

Page 1

®
®
PRINTED IN CHINA
48002917
INSTRUCTION MANUAL
1
*
*
*
*
B
C
D
H
I
K
R
Q
N
M
S
T
U
V
G
F
A
E
J
L
O
P
C
M
Y
CM
MY
CY
CMY
K
Designed and Engineered in Italy
September 2010
Hoover Floorcar
y. Ltd.
Sydney, Australia
ABN: 37 086 345 575
Hoover Customer Helpline
1300 360 845
www
rcare.com.au
Due to a policy of continuous development
and imp r
The words HOOVER and the circular emblem
are registered trademarks.
‘FREESPACE EVO’ is a trademark.
*Some accessories are only available on certain models
PARQUET C ARESSE TFV20 15 (013)
PETS TFV2 020 (013)
™
Page 2
2 3 4 5
6 7 8 9
10 11 12 13
14 15 16 17
18 19 20 21
22 23 24 25
C
M
Y
CM
MY
CY
CMY
K
48001794 Freespace Evo Back Page 1.pdf 1 19/04/2010 08:30:30
Page 3

1
GETTING TO KNOW YOUR CLEANER
A. Cleaner main body
B. On/Off & Variable Power Control Roller.
C. Bag Check Indicator
D. Bag Door Release Buttons
E. Hose Latch
F. Handle
G. Telescopic Tube
H. Telescopic Tube Adjusters
I. Hose
J. Handle Hook
K. Telescopic Tube Parking Hook
L. Hose Release Buttons
M. Carpet & Floor Nozzle
N. Floor Type Selector
O. Crevice Tool
P. Dusting Brush
Q. Nozzle Parking Slot
R. Telescopic Tube Parking Slot
S. Parquet Caresse Nozzle*
T. Pet Hair Remover Mini Turbo Nozzle*
U. Allergen Remover Mini Turbo Nozzle*
V. Grand Turbo Nozzle*
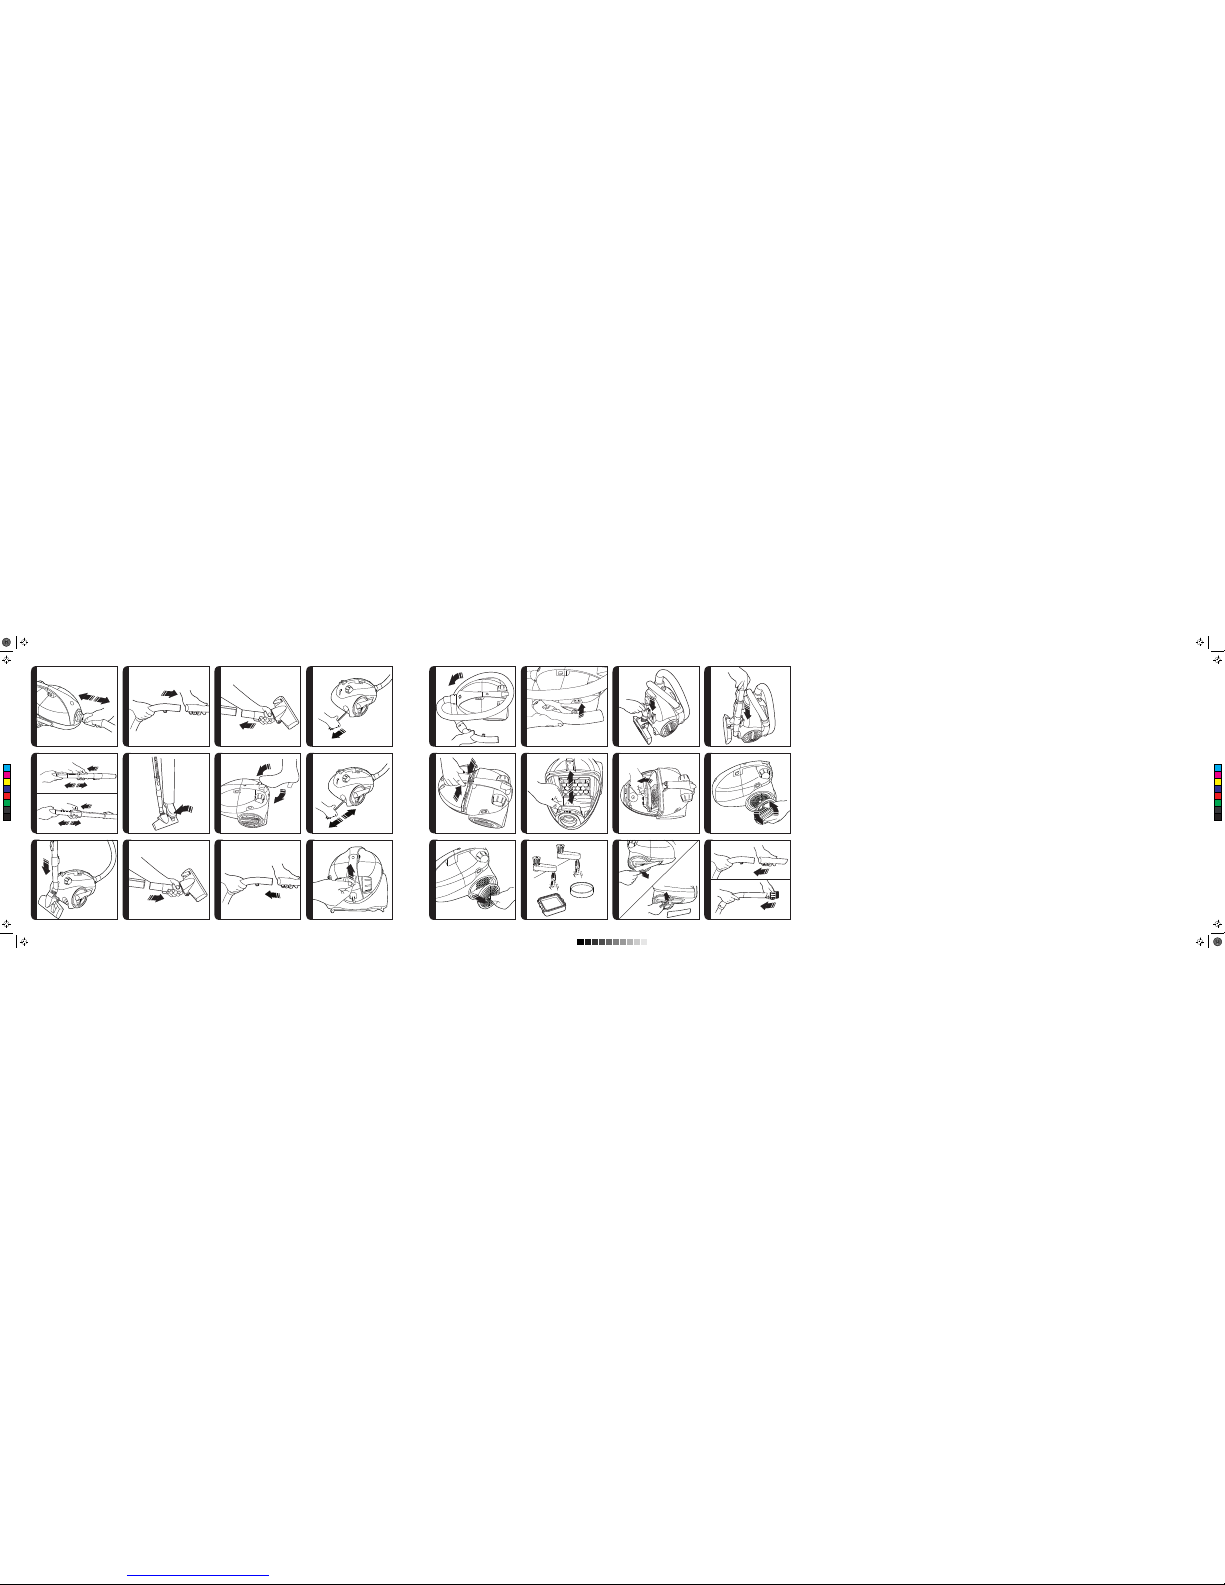
ASSEMBLING YOUR CLEANER
Remove all components from the packaging.
1. .noitisop otni skcol dna spilc ti gnirusne ,ydob niam renaelc eht ot esoh eht tcennoC
To release: simply press the two buttons on the hose end and pull. [2]
2. Connect the handle to the tube upper end [3].
3.
[4]
IMPO RTANT S AFE TY REM IND ERS
IT IS IMP ORTANT THAT YOU DO N OT:
WARNING: Electricity can be extremely dangerous. This appliance is double insulated
and must not be earthed.
STATIC ELECTRICITY: Some carpets can cause a small build up of static electricity.
Any static discharge is not hazardous to health.
AFTER USE: Switch the cleaner off and remove the plug from the electricity supply.
Always switch off and remove the plug before cle
aning the appliance or attempting any
maintenance task.
SAFETY WITH CHILDREN, ELDERLY OR THE INFIRM:
Th is appli ance is not in ten ded fo r use by pe rson s ( inc luding chi ldr en) wi th
re d u c ed p h y sic al, s enso r y or men t a l c apabiliti e s , or la c k of ex p e rie nce a nd
kn ow ledge , u nle ss th ey hav e bee n g iv e n sup erv isi on or in str uc t io n c onc er n in g
us e o f th e ap pliance b y a per s on r es p ons i bl e fo r th e ir saf e ty. Yo u ng c hil d re n
sho ul d be sup er vi se d to e ns ur e th at t he y do n ot p la y wi th t he a pp li an ce .
BE FOR E Y O U B E GIN:
Th is pro duc t m ust be op erate d i n a cco rdanc e w ith these in stru cti ons an d
us ed onl y f or dom est ic cle anin g t o remove DRY dir t and dust fro m
ho useho ld car pet s, flo oring and fab ric s. T h i s clea ner is in ten ded fo r
do mes tic ho use hol d use on ly and i s n ot designed f or t he colle ctio n o f
vi tre ous bu ild ing ma ter ial inc luding p article bo ard cons tru cti on pro duc ts
a
nd si mil ar produ cts su ch as woo d/f ibres , s and , c eme nt, fille rs,
fi bre gl ass et c. T h e pick- up of the se ma terials ma y be harm ful to yo ur
cl eaner an d will vo id the ma nuf act ure r’s war ranty.
Position t he cleaner above you when cleaning the stairs.•
Use y our cleaner out of do ors or on any wet surface or for wet pic k up .•
Pick up hard or sharp objects, match es, hot ashes, cigarette ends o r other •
similar items.
Spr
ay wi th or pick up flammable liq uids, cleaning fluids, aeros ols or their vapours •
as th is may cause risk of fire / e xplosion.
Run o ver the supply cord when using your cleaner or remove the plu g by pu lling •
on th e supply cord.
Sta nd on o r wrap the pow er cord around arms o r legs when us ing t he c le an er .•
Use the appliance to clean people or animals.•
Continue to use your cleaner if i
t appears to be faulty. If the supply cord is damaged •
stop usin g the cl ean er IM MED IATELY. To avoid a safety hazard, an authorised
Hoover service agent must replace the supply cord.
• Do no t d ire ct the appliance to war ds peop le or ani mal s.
*Some accessories are only available on certain models
Page 4

2
USING YOUR CLEANER
1. Extract power cord and plug it into the power supply. [5] Do not pull the cord beyond
the red marker.
2. Adjust the telescopic tube to the desired height by moving the telescopic tube
adjuster up and raise or lower the handle to the most comfortable cleaning position.
[6]
3.
[7] to select the
Hard Floor
Carpet – Brushes are raised for the deepest clean.
4. Switch the cleaner on by rotating the On/Off Variable Power Control Roller clockwise
on the rear of the cleaner main body. [8]
5. Adjust the power level by rotating the On/Off Variable Power Control Roller to the
desired level [8]
6. Switch off at the end of use by rotating the On/Off Variable Power Control Roller
anti-clockwise to the end. [8] Unplug and gently pull the power cord out of the
cleaner and the cord will begin to automatically retract back into the cleaner. [9]
7.
storage while in use [10] or in the Nanopack storage position when not in use:
Retract the telescopic tube to its storage length [6]. Remove the nozzle from the
end of the telescopic tube [11] and remove the hose handle from the telescopic tube
[12]. Lift the hose latch at the rear of the cleaner [13]
around the product [14]. Park the hose handle on the product [15]. Assemble the
nozzle into the parking slot underneath the product [16]. Assemble the telescopic
tube into the remaining parking slot underneath the product [17].
CLEANER MAINTENANCE
Replacing The Dust Bag - (H69)
If the bag check indicator [1C] is red please check and, if necessary, replace the bag.
1. Remove the hose from the cleaner [2].
2. Press the Bag Door Release buttons and remove bag door [18].
3. Pull the bag collar to remove the dust bag [19] and carefully dispose the bag
into a bin.
4. Fit a new bag into the cleaner by inserting the bag collar into the bag holder
[19].
IMPORTANT: The hose must be removed before removing or replacing the dust
bag.
Remember: The
bag check indicator may be red if an obstruction has occurred. In this
case refer to ‘Removing A Blockage From the System’.
Cleaning the Filters
1. Open the bag door and remove the dust bag from the cleaner (see “Replacing
The Dust Bag”)
2.
[20].
1. Unlock the door by rotating the door along arrows indicated [21].
2.
[22].
[23].Remove excess water
Cleaning the permanent dust bag (depending on model) - (H69C)
To maintain optimum performance we recommend that you wash the permanent bag
after every 5 full bags. Empty the contents of the Bag into a bin, wash the Bag under
handwarm water, remove excess water with a dry cloth and leave to dry fully before
replacing.
Removing a Blockage From The System
If the bag check indicator is red:
1. Check if the bag is full. If so refer to ‘Replacin
g The Dust Bag’.
2. If it is not full, then;
B. Check if there is any other blockage in the system - Use a rod or a
C. Check for and clear any blockage in the Nozzle
Warning - The bag check indicator will turn red if the cleaner is used when full, if there is a
the bag check indicator is red, a thermal cut out will switch the cleaner off to prevent overheating. The bag check indicator turn green once the cleaner has switched off to signal
that the thermal cut out has been activated. If this should happen, switch the cleaner off,
unplug and correct the fault. It will take about 45 minutes for the cut out to automatically
reset.
(*Certain Models Only)
Page 5

3
ACCESSORIES
individual models.
Crevice Tool – For corners and hard to reach areas. Remove the Crevice tool from the
accessories holder [24]
[25] or telescopic tube.
Dusting Brush – For bookshelves, frames, keyboards and other delicate areas. Remove
the dusting brush from the accessories holder [24]
hose handle [25] or telescopic tube.
Parquet Caresse Nozzle*
[1S]
Pet Hair Remover Mini Turbo Nozzle* - Use the mini turbo nozzle on stairs or for deep
cleaning on textile surfaces and other hard to clean areas. Particularly suitable for pet
hairs removal.[1T]
Allergen Remover Mini Turbo Nozzle* – Use the mini turbo nozzle on stairs or for
deep cleaning on textile surfaces and other hard to clean areas. Particularly suitable for
allergen removal.[1U]
Grand Turbo Nozzle* –
Use the Grand Turbo Nozzle for deep cleaning on carpets.[1V]
IMPORTANT: Do not use the Grand Turbo Nozzle or Mini Turbo Nozzles on rugs with
long fringes, animal hides and carpet pile deeper than 15mm. Do not keep the nozzle
stationary while the brush is rotating.
USER CHECKLIST
Should you have a problem with the product, complete this simple user checklist
before calling your local Hoover service.
• Is there a working electricit y supply to the cleaner? Please check with anothe
r
electrical appliance.
• Is the Bag over-filled? Please refer to ‘Cleaner Maintenance’.
• Is the filter blocked? Please refer to ‘Cleaner Maintenance’.
• Is the hose or nozzle blocked? Please refer to ‘Removing a blockage from the
system’.
• Has the cleaner overheated? If so, it will take approximately 45 minutes to
automatically reset.
IMPO RTANT I NFO RMATION
Hoover Spares and Consumables - 1300 360 845
Always replace parts with genuine Hoover spares. These are available from your
number.
Hoover Service - 1300 360 845
Should you require service during the life of your vacuum cleaner, please first contact
Hoover Floorcare on 1300 360 845 (Australia) for assistance. Some service issues can
be resolved over the phone with our experienced staff. Separately you may visit our
website, www.hooverfloorcare.com.au for a list of our Hoover Floorcare authorised
service agents.
When ordering parts always quote your model
local Hoover Floorcare dealer or direct from Hoover Floorcare.
The Environment:
By ensuring this product is disposed of correctly you will help prevent potential negative
consequences for the environment and human health, which could otherwise be caused
by inappropriate waste handling of this product.
The symbol on the product indicates that this product may not be treated as houshold
waste. Instead it shall be handed over to the appliance collection point for recycling of
electrical and electronic equipment.
When you have unpacked the unit, do not simply throw the packing into the household
waste take them to an appropriate collecting point for recycling.
For more detailed information about treatment, recovery and recycling of this product,
please contact your local council or the store where you purchased the product.
Subject to change without notice.
*Some accessories are only available on certain models
Page 6

GB
®
Keep this Guarantee with your receipt as proof of purchase should you ever
require service.
Purchase Date........../........../..........
Your new Hoover cleaner, which
has been fully tested, inspected
and adjusted, carries in the case of
domestic users, a 2 year parts and
labour guarantee against defects.
This cleaner is intended for domestic
household use only and is not designed
for the collection of vitreous building
material including particle board
construction products and similar
products such as wood/fibres, sand,
cement, fillers, fibreglass etc.
The pick-up of these materials may be
harmful to your cleaner and will void
the manufacturer’s warranty.
This product is warranted 90 days for
commercial usage.
Brushes and filters, unless actually
defective in manufacture are not
subject to this guarantee since their
length of life depends upon usage and
care given. Any transportation costs
involved in the repair of the appliance
or the replacement of a defective part
shall be borne by the claimant. This
guarantee commences from the date
of purchase of the cleaner.
When properly used and cared for,
your new cleaner will render excellent
service, and therefore, the purchaser
should carefully read the instruction
book, as misuse or failure to follow the
instructions makes this guarantee void.
It also becomes void if the product is
used on an electric voltage other than
that shown on the rating plate.
Hoover is unable to accept responsibility
under this guarantee for damage from
repair work carried out by other than
authorised service retailers or centres,
or from the
use of other than genuine
parts.
This guarantee does not apply to the
cost of replacing any part of the product
due to normal wear and tear, alteration,
improper installation, physical abuse,
misuse or accident.
In the event of service or advice being
needed, please contact your retailer
for your nearest authorised Hoover
service agent. The benefits conferred
by this guarantee are in addition to all
other rights and remedies in respect
of the product which the consumer
has under the Trade Practices Act and
other State and Territory laws.
2 Year
GUARANTEE
This guarantee applies in Australia and New Zealand only.
For the guarantee in another country, please
contact your local retailer/distrubutor.
Hoover Floorcare policy is one of continuous development and accordingly
we reserve the right to change specifications without prior knowledge.
Contents are copyright.
Private Bag 120 Silverwater DC 1811 NSW
HOOVER FLOORCARE ASIA PACIFIC PTY LTD.
(ABN 37 086 345 575)
Genuine HOOVER Spares
Tel: 1300 360 845 (Australia)
Email: www.hooverfloorcare.com.au
Always replace parts with genuine Hoover spares.
When ordering parts always quote your model number.
Hoover Customer Helpline
Should any fault occur with your cleaner contact the
Hoover Customer Helpline on the number below.
Tel: 1300 360 845 (Australia)
Email: sales@hooverfloorcare.com.au
Hoover have a nationwide network of authorised
Hoover Floorcare service agents who will quickly respond
to your call and guarantee your repair.
4
CONSUMABLES CODE
RE-USABLE CLOTH BAG
H69C
PAPER BAG
H69
T102
EXHAUST MICRO FILTER
S107
PRE MOTOR HEPA FILTER
CODE
G98
D118
G90PC
J32
J31
SPARE PARTS
CARPET AND FLOOR NOZZLE
FLEXIBLE HOSE
HARD FLOOR NOZZLE
ALLEGEN REMOVAL MINI TURBO NOZZLE
GRAND TURBO NOZZLE
PLYUSE ON HOOVER S ARES
 Loading...