

Page 1

Page 2
234
Page 3

Page 4

Page 5

important safety reminders
this cleaner should only be used for domestic cleaning as
described in these instructions. please ensure that these are
fully understood before operating this appliance. this product
is double insulated and must not be earthed.
important: the wires in the power cord are coloured in
accordance with the following code:
blue - neutral brown - live
13 amp fused plug on uk versions only.
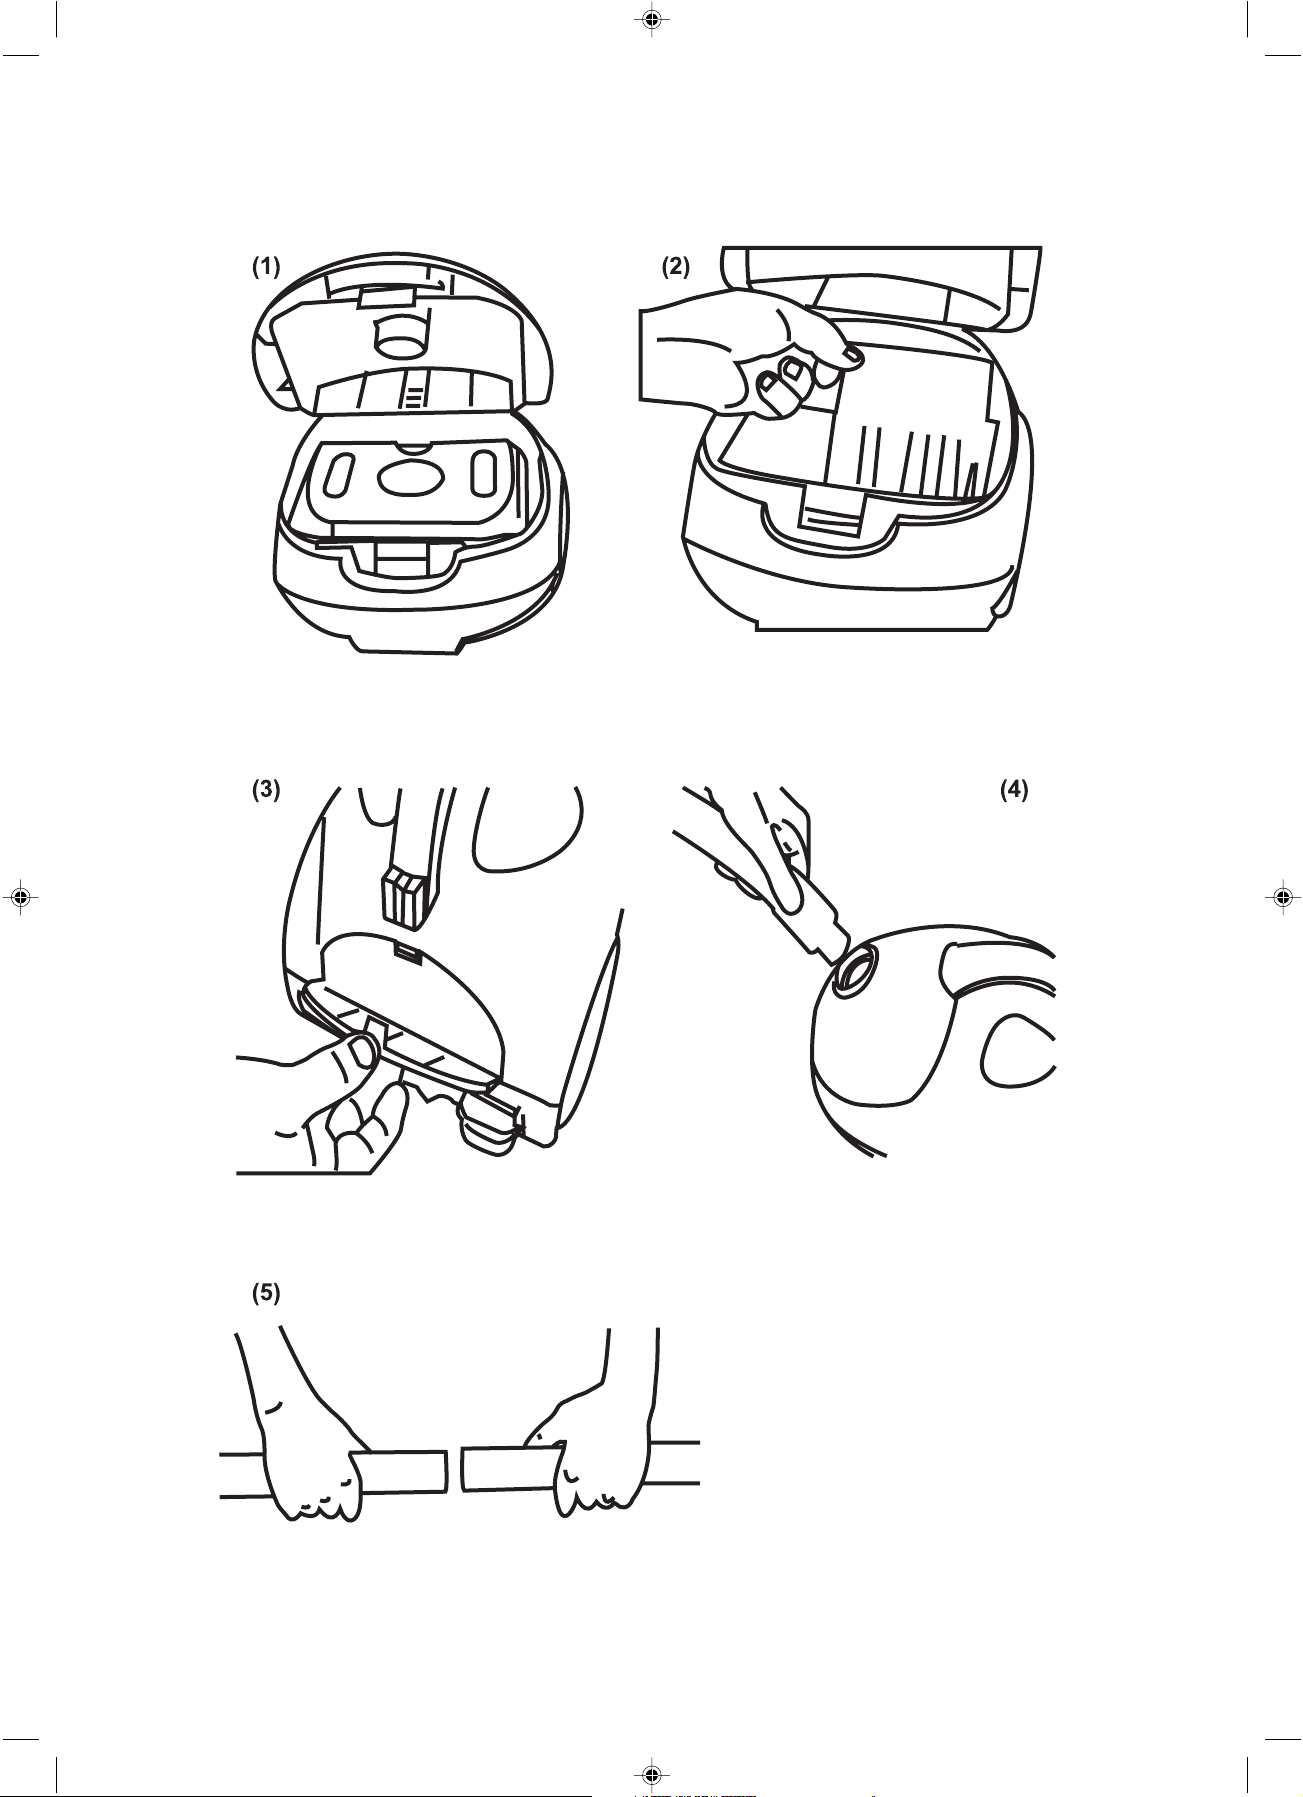
getting started
by following this step-by-step guide your new hoover cleaner
will be ready for use:
remove cleaner and accessories from packaging. Please
dispose of the packaging in a safe and environmentally
conscientious way.
open the top cover (1) ensuring that the bag , pre-motor filter
(2) and exhaust filter (3) are fitted correctly. close the top
cover.
insert the hose end into the top cover, ensuring it clips and
locks into position(4). to release simply press in the two
latches and pull.
fit rigid extension tubes (5), floor nozzle(6), and other
accessories as required for use.
your cleaner is now ready for use. extract the plug and pull
out all of the cord. plug in and switch on.
features
list on/off button (7). once plugged in, press this button to
start the cleaner. press it again to stop the cleaner before
removing the plug after use.
cord rewind button(8).remove the plug from the power supply.
press this button to wind the power cord back into the
cleaner.
bag Check Indicator. (9)
when activated this device warns that the bag requires to be
replaced or emptied. Please refer to chapter, “replacing the
bag / emptying permanent bag”.
if after changing the paper bag or emptying the permanent bag
the bag check indicator is still activated, a blockage has
occurred. please refer to chapter “removing a blockage from
the system”.
fixed power control
by moving the hose handle valve (10): suction will decrease
when opening the valve. Use low suction for delicate fabrics.
variable power control (11) (depending on model). rotate the
control to increase or decrease suction. use low suction for
delicate fabrics.
carpet and floor nozzle (6). press pedal on the nozzle to
lower the brush head when cleaning hard floors. Press the
pedal again to lift the brush head when cleaning carpets.
-depending on model, please see cleaner specification
(depending on model). adjust the suction
dual function tool.
cleaner(12). remove tool and use as:
a) dusting brush for furnishings,bookshelves,frames,keyboards
etc.
b) crevice tool [detach the dusting brush] for corners and
hard to reach areas .
tube parking and atorage (13 & 14). the tubes can be parked at
the rear of the cleaner or stored into the storage slot
underneath of the cleaner.
Tool is stored in the back of the
5
Page 6

replacing the bag/emptying the permanent bag
replacing the bag (depending on model):
when full (see “ bag check indicator” paragraph) please dispose
of the bag immediately.
open the top-cover and grip the bag holder. lift the bag
holder
vertically out of the cleaner (15).
dispose of the full bag into a bin .
fold and fit new bag into the bag holder (16). replace the
bag
holder into the cleaner.
use only genuine hoover bags.
emptying the permanent bag (depending on model):
when full (see “ bag check indicator” paragraph) please empty
the bag immediately.
open the top-cover and grip the bag holder. lift the bag
holder
vertically out of the cleaner (15).
remove the Permanent Bag from the bag holder.
remove the plastic slide at the end of the bag allowing
dirt
collected to fall into the bin
refit the slide back into its original position.
fit the empty permanent bag into the bag holder (16). replace
the bag holder into the cleaner (1).
check filters for excessive build up of dust. if required, clean
or replace. close the top-cover. see diagrams (2 & 3) to access
the
filters.
to maintain best performance we recommend you wash the
filters and the Permanent bag (depending on model) after 5
full bags. please refer to chapter “filters and permanent bag
maintenance”.
filters and permanent bag maintenance
to maintain best performance we recommend that you rinse the
filters and permanent bag under lukewarm water after 5 full
bags
to access the filters please refer to diagrams 2 & 3
do not scrub the filters and permanent bag and do not
use
detergents
remove excess water with a dry cloth and leave to air dry until
fully dry after completing the washing operations, return
the filters and
permanent bag to their original positions in the cleaner.
removing a blockage from the system
the bag check indicator on your cleaner is activated:
1) check if the dust bag is full. If so refer to chapter
“replacing the bag / emptying the permanent bag”.
2) if not full then:
a) did you wash the filters and permanent bag after 5 full
bags? if not please refer to chapter “filters and
permanent bag maintenance”.
b) check if there is any other blockage in the system.
use a rod or pole to remove any blockage from the
tubes and
flexible hose.
it may also be possible to remove an obstruction in the
flexible hose by lightly squeezing or bending it.
clean the underside of the carpet and hard floor
nozzle
frequently by using the crevice tool.
6
Page 7

simple user check list before calling for service
1) is there a working electricity supply to the cleaner? check
with another appliance
2) is a restriction causing the bag check indicator to be
activated in use? if yes:
a) is the dust bag full?please refer to chapter“replacing the
bag/ emptying the permanent bag”.
b) are the filters blocked? please refer to chapter “filters
maintenance”.
c) is the hose or nozzle blocked? please refer to chapter
“removing a blockage from the system”.
please remember that:
1) some carpets can cause a small build up of static
electricity. any static discharge is not hazardous to health or
the product.
2) a service charge will be made if the cleaner is examined and
found in working order, has not been assembled in accordance
with these instructions, or has been misused.
do
call your nearest hoover service centre in the event of
dissatisfaction
ensure that all service and repairs are carried out by an
authorised hoover service engineer
only use genuine Hoover parts
replace the paper bag or empty the permanent bag as soon as
the bag check indicator activates.
always switch off and remove the power plug from the
electricity supply after use and before cleaning the appliance
or attempting user maintenance as described in these
instructions
remember: electricity can be dangerous
do not
position the cleaner above you when cleaning stairs
use your cleaner out of doors, on wet surfaces or for wet pick
up
pick up matches, hot ashes, cigarette ends or anything that may
damage the product
spray with or pick up flammable liquids, cleaning fluids,
aerosols or their vapours as this may cause risk of fire/explosion
run over, stand on, or wrap the power cord around arms or
legs when using your cleaner
continue to use your cleaner if it or the plug/power cord
appears to be faulty or damaged. to avoid safety hazards the
cleaner must only be repaired by an authorised hoover service
engineer
consumable parts: for consumables please quote the
following pack numbers
replacement paper bag pack no. h55
guarantee statement
the guarantee conditions for this appliance are as defined by
our representative in the country in which it is sold. details
regarding these conditions can be obtained from the dealer
from whom the appliance was purchased . The bill of sale or
receipt must be
produced when making any claim under the terms of this
guarantee.
subject to change without notice.
GIAS CUSTOMERS SERVICE 08705 400600
HOOVER SPARES 01204 556111
7
Page 8

GUARANTEE STATEMENT
Your new appliance is fully guaranteed for 12 months against
electrical/mechanical breakdown excluding:
a) Any faults which occur due to incorrect installation or
misuse of the machine or accidental damage.
b) Repair of, or interference with the machine by any person
not authorised by the manufacturer to carry out service.
c) Any parts which are fitted to the machine which are not
original manufacturers parts.
d) Non-domestic use of the machine.
e) Operation at incorrect voltage.
The guarantee applies to Great Britain and Northern Ireland
only. The aforegoing does not affect your statutory rights.
8
Page 9

05655099-1 PRINT IN P.R.C.
9
 Loading...