

Page 1
Cleaning Effectiveness Per Amp Rating
This is not an Amp rating. Amps do not measure dirt removal, only the
amount of electricity used. Cleaning Effectiveness Per Amp is determined
by dividing this model’s Cleaning Effectiveness
*Cleaning Effectiveness is the percent value obtained from dividing:
(a) the geometric mean of the amount of embedded carpet dirt removed in
testing under ASTM Test Method F608-89, by
(b) the value 29 (the geometric mean of the midpoints of the % dirt pickup
scales selected by Hoover as a reference for its rating system).
* by its Amps.
Service
To obtain approved HOOVER service and genuine HOOVER parts,
locate the nearest Hoover Factory Service Center or Authorized
Hoover Warranty Service Dealer (Depot) by:
• checking the Yellow Pages under “Vacuum Cleaners Household” OR -
• checking the list of Factory Service Centers provided
with this cleaner OR -
• calling 1-800-944-9200 for an automated referral of
authorized service outlet locations (U.S. only).
Do not send your cleaner to The Hoover Company in North Canton
for service, this will only result in delay.
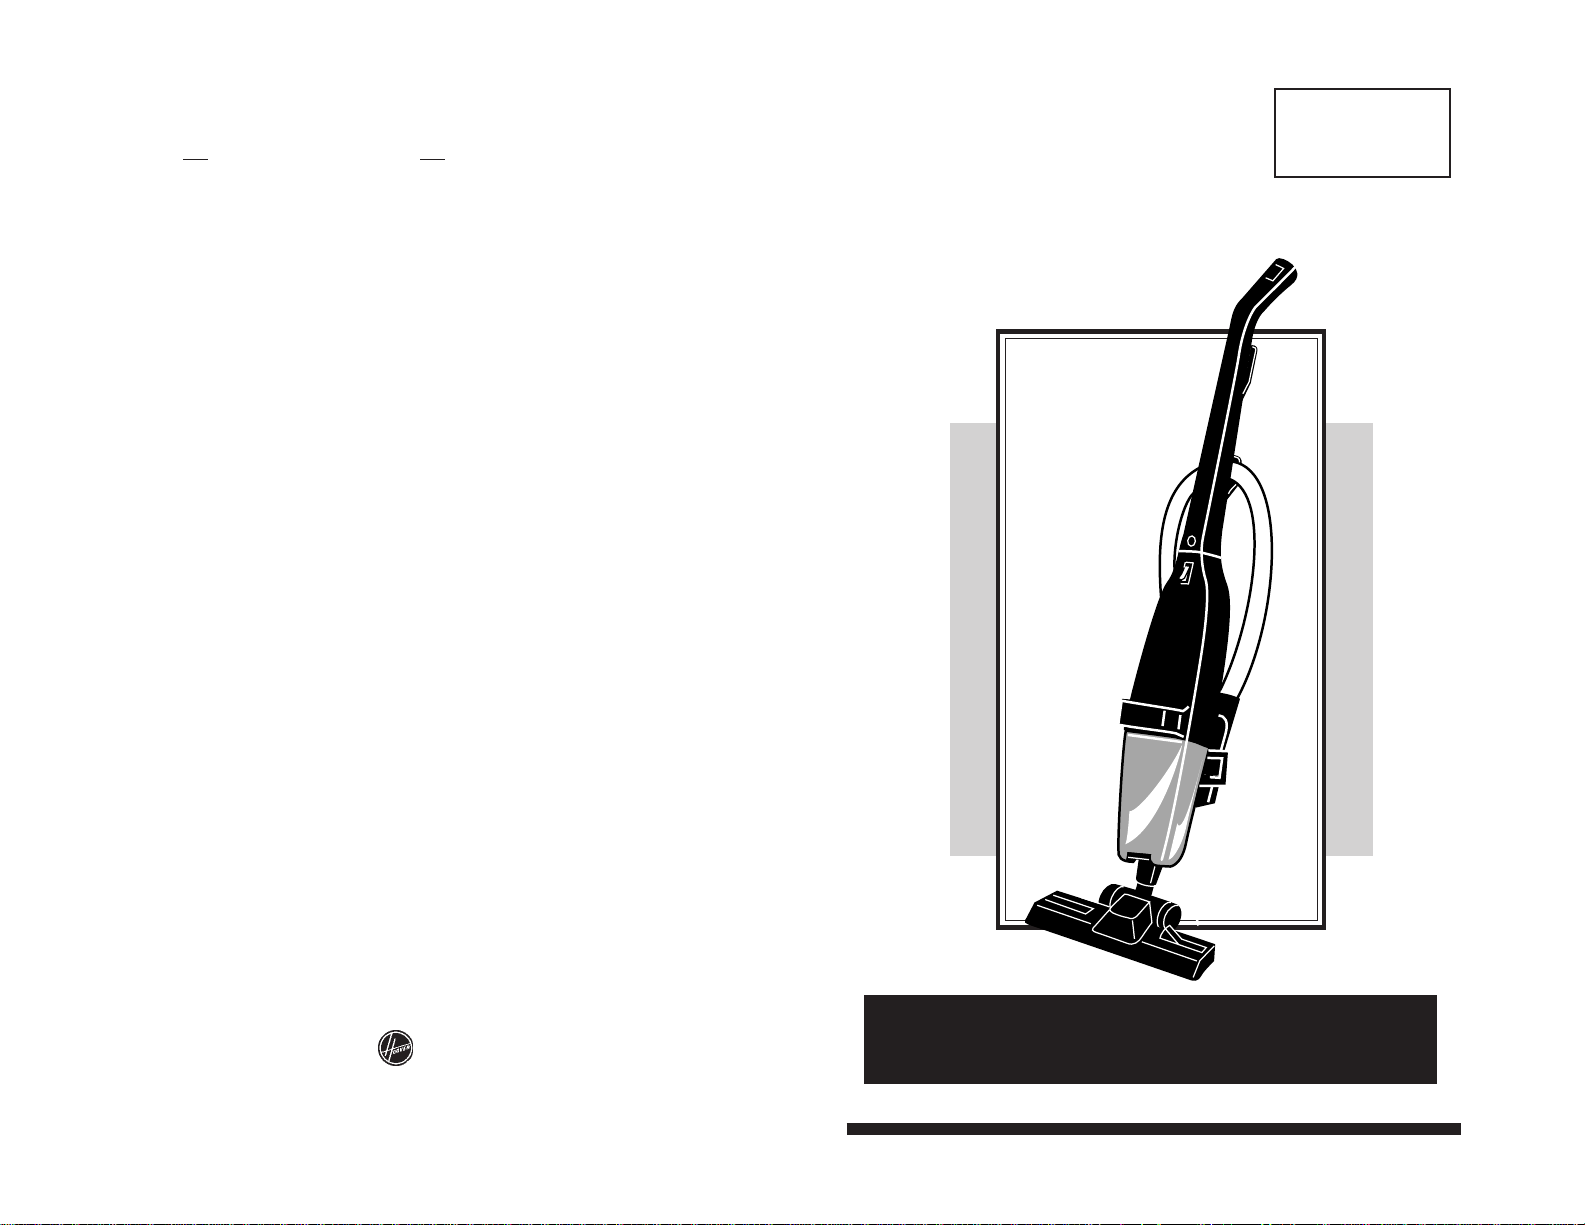
HOOVER®
Stick Cleaner
Owner’s
Manual
If further assistance is needed, contact The Hoover Company
Consumer Response Center, North Canton, Ohio 44720
Phone: 1-330-499-9499.
In Canada, contact Hoover Canada, Burlington, Ontario L7R 4A8,
Phone: 1-800-263-6376.
Always identify your cleaner by the complete model number when
requesting information or ordering parts. (The model number
appears in the middle of the back of the cleaner body.)
HOOVER and are registered trademarks
THE HOOVER COMPANY, NORTH CANTON, OHIO 44720
R5 8-97 S2505/31/41/51/61 Litho USA 56512-167
Review this manual before
operating cleaner
Page 2
Thank you for selecting a HOOVER product.
Important Safeguards!
This cleaner was inspected and packaged carefully before being
shipped from the factory. If you should happen to need assistance during assembly or operation call
1-800-944-9200 for an automated referral of authorized service
outlet locations (U.S. only) or
1-330-499-9499 to speak with a representative in our Consumer
Response Center.
DO NOT RETURN THIS PRODUCT TO THE STORE.
Fill in and retain
The HOOVER vacuum cleaner you have just purchased is a lightweight
cleaner. It may be used for cleaning bare floors and for quick clean up
on carpet and rugs.
The model and serial number are located in the middle of the back of
the cleaner body.
For your personal records, please enter the COMPLETE model and
serial number in the spaces provided and retain this information.
Your cleaner is model___________________________________
and has serial number___________________________________
It is suggested that you attach your sales receipt to this owner’s
manual. Verification of date of purchase may be required for warranty
service of your Hoover product.
Save!
Index
Assembling Cleaner ............................................ 4-5
Cleaner Descriptions .............................................. 3
Cleaning Effectiveness Per Amp Rating............. 11
How To Use
ON-OFF/Speed Selector Switch.................... 6
Rug and Floor Nozzle .................................... 6
Hose and Tool ................................................ 7
Carring handle................................................ 7
If You Have a Problem .......................................... 10
Important Safeguards ............................................. 2
Lubrication............................................................. 10
Maintenance
Dirt Cup ........................................................ 7-8
Rug and Floor Nozzle .................................... 9
Secondary Filter ........................................... 10
Service ................................................................... 11
Storage..................................................................... 8
1
© 1996 The Hoover Company
When using an electrical appliance, always follow
basic precautions, including the following:
READ ALL INSTRUCTIONS BEFORE USING THIS APPLIANCE
Warning: To reduce the risk of fire, electric shock, or
• Do not use outdoors or on wet surfaces.
• Close supervision is necessary when any appliance is used by or
near children. Do not allow vacuum cleaner to be used as a toy or to
run unattended at any time.
• Keep hair, loose clothing, fingers, feet and all parts of body away
from openings and all moving parts.
• Do not pick up anything that is burning or smoking, such as cigarettes, matches, or hot ashes.
• Do not use to pick up flammable or combustible liquids such as
gasoline or use in areas where they may be present.
• Avoid picking up hard, sharp objects with the cleaner. They may
damage the cleaner and the filter.
• Do not use without dirt cup or filters in place. When picking up very
fine materials such as powder, depress bag cap, shake filter bag and
empty dirt cup often.
• Use extra care when cleaning on stairs.
• Do not put any object into openings. Do not use with any opening
blocked; keep free of dust, lint, hair, or anything that may reduce
air flow.
• Do not pull or carry by cord, use cord as a handle, close door on
cord or pull cord around sharp edges or corners. Do not run appliance over cord. Keep cord away from heated surfaces.
• Always disconnect cord from electrical outlet before servicing the
cleaner.
• Unplug cleaner when not in use. Turn off all controls before unplugging.
• Do not unplug by pulling on cord. To unplug, grasp the plug, not the
cord. Never handle plug or appliance with wet hands.
• The use of an extension cord is not recommended.
• Do not use with damaged cord or plug. If appliance is not working as
it should, has been dropped, damaged, left outdoors, or dropped
into water, take it to a Hoover Factory Service Center or Authorized
Hoover Warranty Service Dealer (Depot).
• Use vacuum cleaner only for its intended use as described in the
instructions. Use only attachments recommended by The Hoover
Company; others may cause hazards.
To reduce the risk of fire, electric shock, or
injury:
Save these instructions!
2
Page 3

Unpacking
Unpack cleaner from carton and
identify parts shown.
A. Handle Section
B. Cleaner Body
C. Hose with tool (some models)
D. Nozzle
A
B
C
The assembled cleaner will look
like the drawing below.
Cord hook
Questions or Concerns?
The Hoover Company wants to quickly resolve any concerns about
your cleaner or questions regarding its use. Look on the list pro-
vided with the product for your local Hoover Factory Service
Center or in the Yellow Pages under “Vacuum Cleaners - Household” for the nearest Authorized Hoover Warranty Service Dealer
(Depot) or call:
1-800-944-9200 for an automated referral of
authorized service outlet locations (U.S. only)
OR
1-330-499-9499 to speak with a representative in the
Hoover Consumer Response Center.
D
This cleaner is
intended for household use.
STANDARD
NOZZLE
Cleaner body
Carrying
handle
DELUXE
NOZZLE
Hose hook
(some models)
Hose
(some models)
ON-OFF/Speed
selector switch
Dirt cup
DELUXE
WHEELED
NOZZLE
DO NOT RETURN THIS PRODUCT TO THE STORE OR SEND IT
TO NORTH CANTON FOR SERVICE.
How to assemble
CORD HOOKS
TAB
SLOT
Unpack cleaner and remove all
cardboard. Remove the tape
securing the hose hook and screw
to the handle. A Phillips screwdriver is needed for assembly.
A. Attach handle
1. With cord hooks upward, slide
handle onto cleaner body.
2. For attached hose models, place
hose hook on handle by first
inserting tab into slot.
3. Insert screw and secure handle
Depending on the model you purchased,
ONE of the above Rug/Floor Nozzles is
included with your cleaner.
3
HOSE
MODELS
to cleaner body.
Continued
➜
4
Page 4

B. Attach nozzle
4. Line up raised rib on front of
nozzle with raised rib just above
opening on cleaner. Push nozzle
securely into cleaner.
C. Attach hose
and tool
5. Facing the back of the cleaner,
position hose connector into holder
on right side of cleaner body
making sure latch is inside holder.
(some models)
RIB
HOSE CONNECTOR
HOLDER
HOSE HOOK
LATCH
ON-OFF/Speed selector switch
II = HIGH
0 = OFF
I = LOW
Your cleaner has a one or two
speed motor.
Use the one speed model for
cleaning any type of rug or bare
floor; ON=I, OFF=0
Use the two speed model on
High (II) for cleaning rugs and
carpet, or press switch to Low (l)
for bare floors; OFF=0
Rug and floor nozzle
The combination rug and floor nozzle has been designed to do an efficient
cleaning job on both carpet and hard surface floors.
Some models come with the standard nozzle. Others come with the deluxe
nozzle or with the deluxe wheeled nozzle. All nozzles have constant edge
cleaning for cleaning along baseboards or solid furniture. Both deluxe
nozzles have a BARE FLOOR setting and a RUG setting. To change from
one setting to the other, refer to the directions below for your deluxe nozzle.
6. Loop hose over hose hook and
position tool into holder on other
side of cleaner body.
HOLDER
How to use
Operate cleaner only at voltage specified on data plate located on back
of cleaner motor housing.
To reduce the risk of electric shock, this appliance has a polarized plug
(one blade is wider than the other). This plug will fit in a polarized outlet
only one way. If the plug does not fit fully in the outlet, reverse the plug.
If it still does not fit, contact a qualified electrician to install the proper
outlet. Do not change the plug in any way.
Plug cord into electrical outlet. Your cleaner is now ready to operate.
5
SELECTOR
SELECTOR
Deluxe nozzle
Lock brushes to clean bare floors
by sliding selector toward BARE
FLOOR. Release brushes to clean
rugs or carpet by sliding selector
toward RUG.
Deluxe wheeled
nozzle
Lock brushes to clean bare floors
by depressing selector to BARE
FLOOR. Release brushes to
clean rugs or carpet by depressing selector to RUG.
6
Page 5

Cleaning under low furniture
Your cleaner has been designed to do an effective job cleaning under low
furniture and in hard to reach areas. Lower handle to floor level and
proceed with back and forth motion.
Hose and tool
Turn cleaner OFF before attaching or removing hose.
The hose and tool may be used for cleaning in tight spaces, corners and
along edges in such places as dresser drawers, upholstered furniture,
stairs, and baseboards.
1. Lay cleaner on floor with
backside up. Remove hose
connector and tool from holder.
2. Lift hose door upward.
3. Insert hose connector until it
snaps into position. Suction will
automatically be diverted to the
hose when cleaner is turned on.
To remove hose, press latch on
hose connector and pull outward.
Note: Hose must be removed
from hose door when cleaning
carpet and floors to insure
proper cleaning.
(some models)
HOSE
CONNECTOR
HOSE DOOR
LATCH
Storing cleaner
When cleaner is not in use, wrap
cord around cord hooks and place
hose and tool in holder as shown.
For your convenience, cleaner may
be hung on a hook from opening at
top of handle.
Maintenance
The following sections are concerned with proper maintenance of your
cleaner. Familiarize yourself with these home maintenance tasks and keep
this owner’s manual in a convenient place where you can refer to it when
needed. Proper use and care of your cleaner will ensure continued
cleaning performance.
The dirt cup
The dirt and debris picked up by the cleaner is deposited into the dirt cup.
It is recommended that the dirt cup be emptied after each use.
When empty, the cup can be cleaned with a damp cloth or rinsed with
water. Be sure cup is dry before re-using.
Very fine materials such as face powder, cornstarch and fireplace
ashes, picked up in large quantities can seal the filter and cause a loss
of suction. When using the cleaner for this type of dust, empty cup
often.
4. After using the hose and tool,
place them back in the holder as
for storing.
Carrying handle
For your convenience a carrying
handle is provided to assist in
moving the cleaner and when
cleaning stairs.
7
CARRY
HANDLE
How to empty dirt cup
Disconnect cleaner from electrical outlet.
LATCH
1. Lift latch at bottom of cup to
release cup.
Continued
➜
8
Page 6

➞
2. Grasp cup and pull forward to
remove from cleaner.
DIRT PORT
4. Empty cup, making sure to hold
cup with dirt port facing up, and
shake dust from filter.
3. Remove filter from top of cup.
5. Push filter inside out through filter
frame.
A
B
Secondary filter
How to clean
Disconnect cleaner from
electrical outlet.
The secondary filter protects the
motor from dirt particles and does
SECONDARY
FILTER
NOZZLE
not need to be removed for cleaning.
The filter is located on the inside top
of the cleaner body and can be seen
when the dirt cup and filter are
removed. When the filter becomes
dirty, it can be cleaned by wiping it
off with a damp cloth.
Rug and floor nozzle
To maintain the cleaning effectiveness of your deluxe nozzle or deluxe
wheeled nozzle, the brushes may need to be replaced occasionally.
See your nearest Hoover Factory Service Center or Authorized Warranty
Dealer (Depot) for new brushes.
Lubrication
The motor is equipped with two sleeve bearings. These bearings contain
sufficient lubrication for the life of the motor. Therefore, do not add
lubricant to either motor bearing.
If you have a problem
If a minor problem occurs, it usually can be solved quite easily when the
cause is found by using the check list below.
Problem: Cleaner won’t run
Possible Cause: Possible Solution:
1. Not firmly plugged in.................................. Plug unit in firmly.
2. No voltage in wall plug............................... Check fuse or breaker.
3. Blown fuse/tripped breaker........................ Replace fuse/reset breaker.
6. Brush surface of filter to remove
any clinging litter. (Filter may be
washed in warm water. It must be
completely dry before replacing in
cleaner. Do not use cleaner
without filter in place.)
Push filter back through frame
and pull it right side out.
8. Slide filter into cleaner body and
latch cup into position.
9
7. Place filter on top of cup as
shown and push frame fully into cup.
Some models have a tab (A) on the
frame which fits down into a slot (B)
in the cup.
Problem: Cleaner suction low
Possible Cause: Possible Solution:
1. Dirt cup full ................................................. Empty cup.
2. Filter clogged ............................................. Empty dirt cup and clean
....................................................................... filter.
3. Nozzle clogged .......................................... Remove obstruction.
4. Speed selector (some models) .................. Push selector to high speed
set too low
Problem: Cleaner is difficult to push on carpet
Possible Cause: Possible Solution:
1. Nozzle set for “BARE FLOOR“;
brush is locked............................................ Set nozzle for “RUG”.
10
 Loading...