

Page 1

AACCEENNTTAA
ggeenneerraattiioonn ffuuttuurree
English GB
Italiano IT
Français FR
Deutsch DE
Español ES
∂ППЛУИО¿ GR
Vlaams/Nederlands
BE/NL
ČESKY CZ
Slovenski SL
uusseerr iinnssttrruuccttiioonnss
acenta_ECO_cover2.qxd 5/6/07 11:28 Page 1
Page 2
a) b)
b)
2
b)
3
5*
1
2
a) b)
a)
†
b)
†
c)
†
d) e) f)
i)
ii)
iii)
g) h)*
i)* l)*
4
* Feature varies according to model † Optional accessory
a)
b)
acenta_ECOBOX_v3.qxd 6/7/07 16:38 Page 2
Page 3
6
†
† Optional accessory
acenta_ECOBOX_v3.qxd 6/7/07 16:38 Page 3
Page 4
7
8
9
acenta_ECOBOX_v3.qxd 6/7/07 16:38 Page 4
Page 5
10
acenta_ECOBOX_v3.qxd 6/7/07 16:38 Page 5
Page 6
GB
This product must be assembled and
operated in accordance with these
instructions and used only for domestic
cleaning to remove dry dirt and dust
from household carpets and flooring.
The accessory kit can be used to remove
dirt and dust from furniture and fabrics.
ELECTRICAL
REQUIREMENTS
WARNING! ELECTRICITY CAN BE
EXTREMELY DANGEROUS.
This appliance is double insulated and
must not be earthed.
IMPORTANT: The wires in the mains
lead are coloured in accordance with
the following code:
• Blue – Neutral
• Brown – Live
SAFETY REMINDERS
User´s manual. This cleaner should
only be used for its intended
purpose as described in these
instructions. Ensure that these are fully
understood before operating this
appliance.
Clean the EcoBox™ frequently when
picking up material such as powder or
fine dust or when cleaning new carpets.
Safety with children, elderly or the
infirm: Do not let children play with
the appliance or its controls. Please
supervise the use of the appliance by
older children, the elderly or the infirm.
DO NOT use your cleaner out of doors
or on any wet surface or for wet
pickup.
DO NOT pick up hard or sharp objects,
matches, hot ashes, cigarette ends or
other similar items.
PLEASE READ THESE
INSTRUCTIONS THOROUGHLY
Static electricity. Some carpets
can cause a small build up of static
electricity. Any static discharge is
not hazardous to health.
Only use attachments
recommended or supplied by
Hoover.
DO NOT pick up flammable liquids
such as cleaning fluids, petrol, etc.,
or their vapours.
Aerosol sprays may be
flammable. DO NOT spray near the
cleaner.
Supply cord. DO NOT remove the
plug by pulling on the supply cord.
If the supply cord/plug is damaged,
the cleaner must be repaired by an
authorised HOOVER Service
Engineer to avoid a safety hazard.
Faults. DO NOT continue to use
your cleaner if it appears to be
faulty or the supply cord is
damaged.
After use. Switch the cleaner off
and remove the plug from the
electricity supply. Always switch off
and remove the plug before
cleaning the appliance or
attempting any maintenance work.
Hoover Service. To ensure the
continued safe and efficient
operation of this appliance, we
recommend that any servicing or
repairs are only carried out by an
authorised HOOVER Service
Engineer.
acenta_ECOBOX_v3.qxd 6/7/07 16:38 Page 6
Page 7
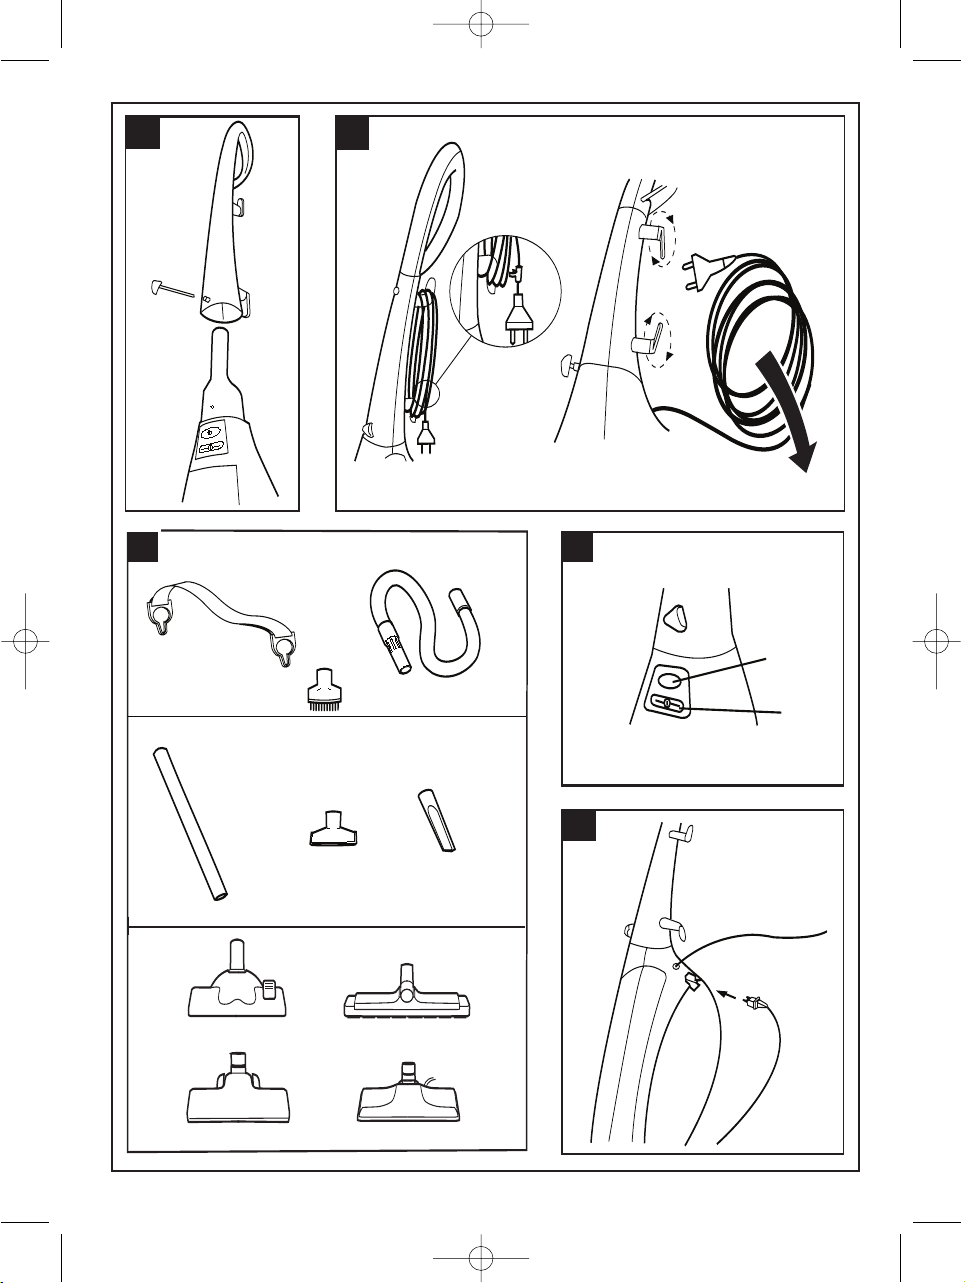
HANDLE ASSEMBLY (1)
The handle must be assembled to the
cleaner before use, unless being used
with the shoulder strap - see (6).
1. Remove hand-screw from handle.
2. Slide handle over top of cleaner.
3. Tighten hand-screw.
CORD STORAGE (2)
a) Wind cord around hooks.
Secure cord with integrated clip.
b) Undo integrated clip.
Turn both hooks inwards as shown
to release cord.
ACCESSORIES (3)
†
a) Shoulder strap
†
b) Flexible hose
†
c) Dusting brush
†
d) Extension tube
e) Furniture nozzle
f) Crevice tool
NOZZLES (3)
g) Carpet & Floor nozzle: press pedal to
bring brushes in contact with hard
floor.
h) Delicate Floor nozzle*: for wooden
floors and all delicate floors.
i) Turbonozzle*: especially for carpets.
l) Electric Power nozzle*: for deep
cleaning of large areas of carpet.
CONTROLS (4)
a) ON / OFF switch
Push to switch on.
Push again to switch off.
b) Power control*
Slide to the right to increase.
Slide to the left to decrease.
POWER NOZZLE (5)
When using Electric Power nozzle*
insert nozzle electric plug into socket on
back of cleaner (behind control panel).
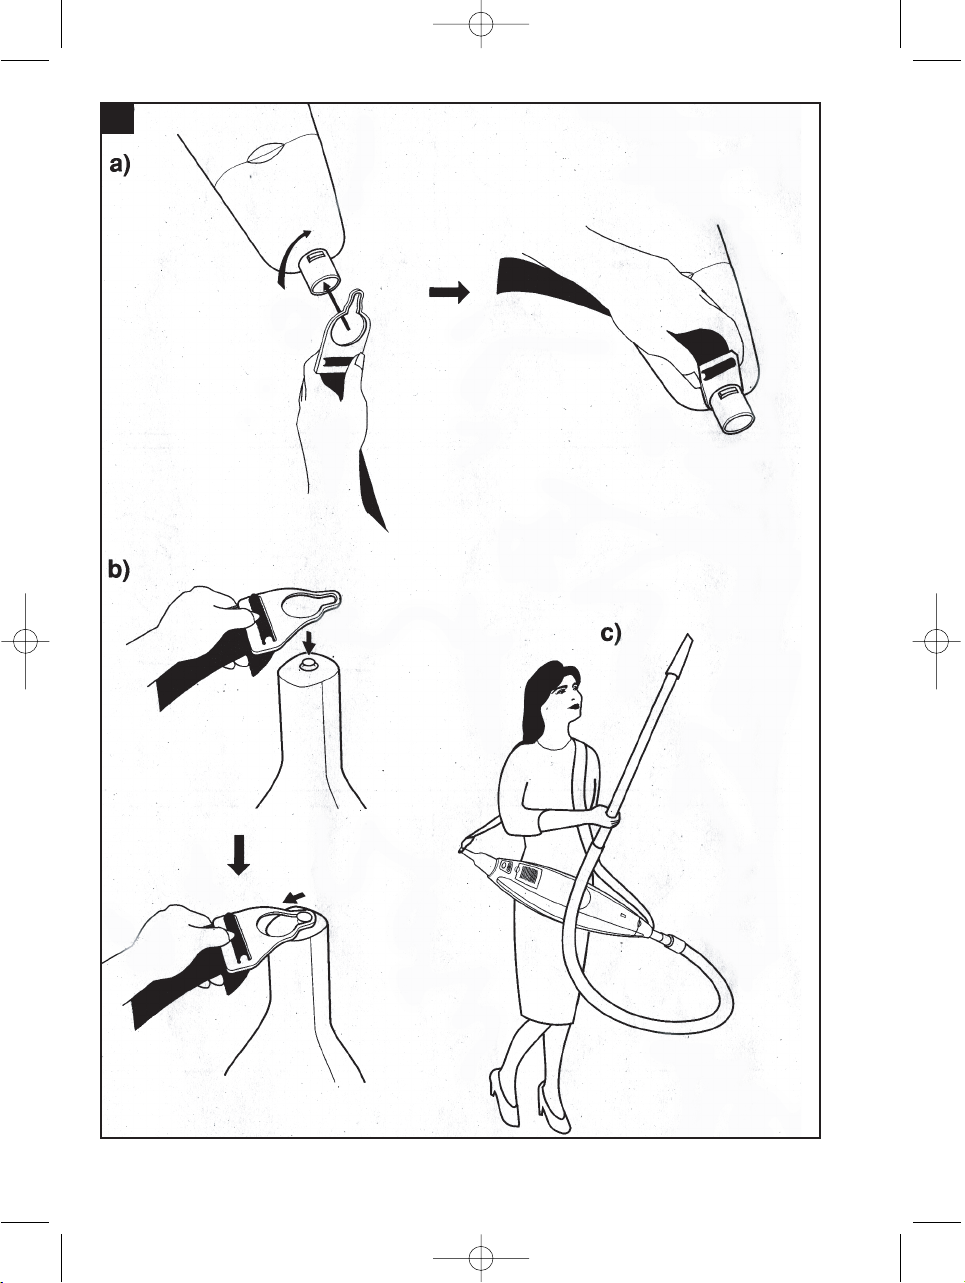
SHOULDER STRAP (6)
†
a) With nozzle removed, slide one end
of shoulder strap over tube at base
of cleaner. Slide the strap end past
the locking tab and rotate as shown.
Refit with accessories depending on
use.
b) With main handle removed - see (1)
clip other end of the shoulder strap
to top of stub handle.
c) Carry the cleaner over the shoulder
as shown.
* Feature varies according to model † Optional accessory.
IMPORTANT: Switch cleaner
off and remove plug from
electricity supply before
emptying the EcoBox™ or
removing any filters.
acenta_ECOBOX_v3.qxd 6/7/07 16:38 Page 7
Page 8

GB
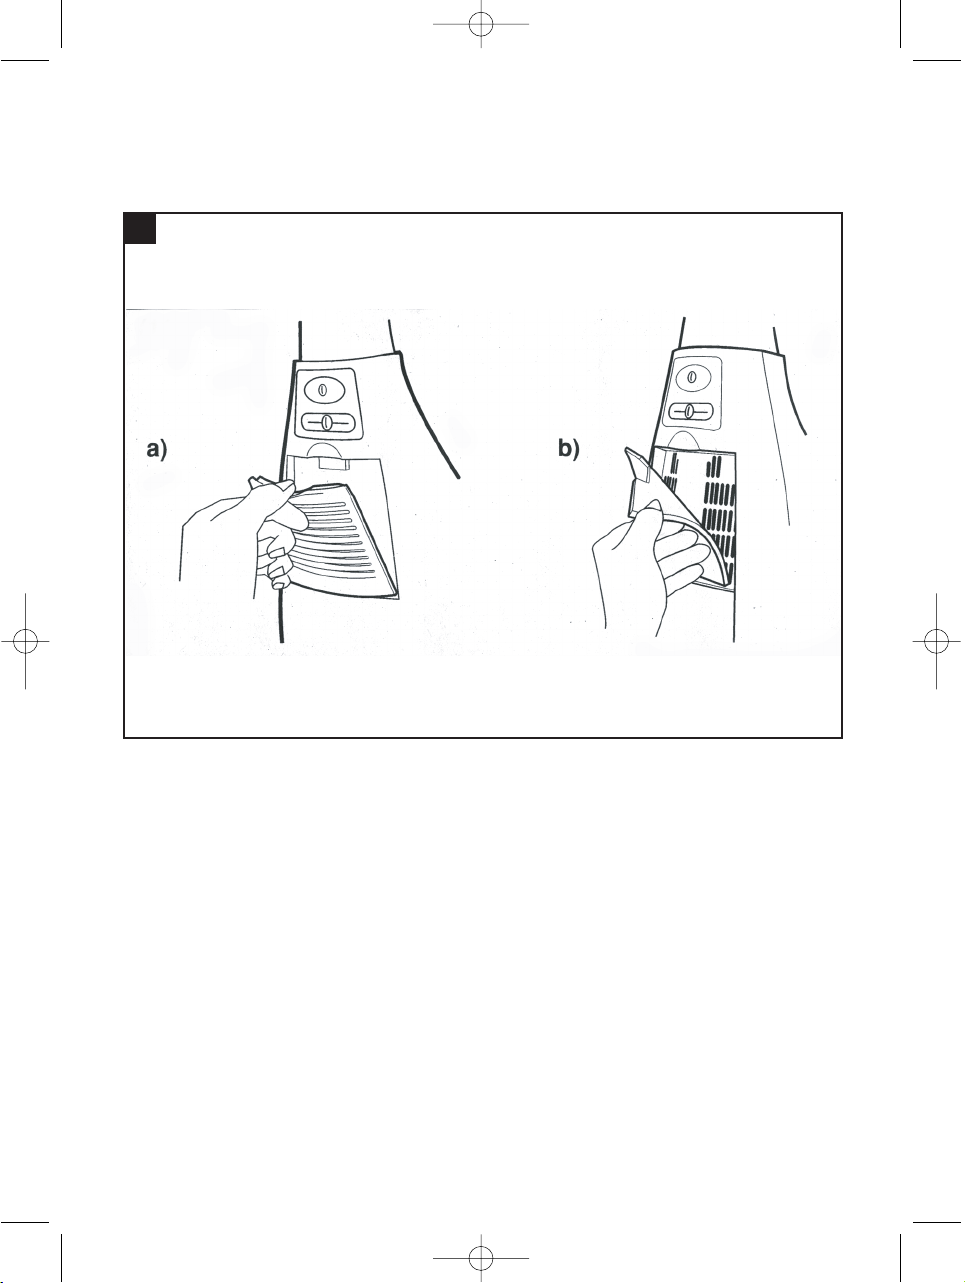
WASHING THE PRE-MOTOR
FILTER (9)
With EcoBox™ removed:
take out the filter from the housing.
Rinse the filter under hand warm
water. Do not scrub the filter.
Remove excess water with a dry
cloth and leave to air dry for 24
hours or until fully dry.
Refit the clean filter and the
EcoBox™.
WASHING THE EXHAUST
FILTER (10)
Lift off filter cover.
Remove filter.
Rinse the filter under hand warm
water. Do not scrub the filter.
Remove excess water with a dry
cloth and leave to air dry for 24
hours or until fully dry.
Refit the clean filter and the cover.
DO NOT use the cleaner without
EcoBox™ in place.
HOOVER RECOMMEND THAT
THE FILTERS ARE WASHED
AFTER FIVE FULL ECOBOX
CONTAINERS.
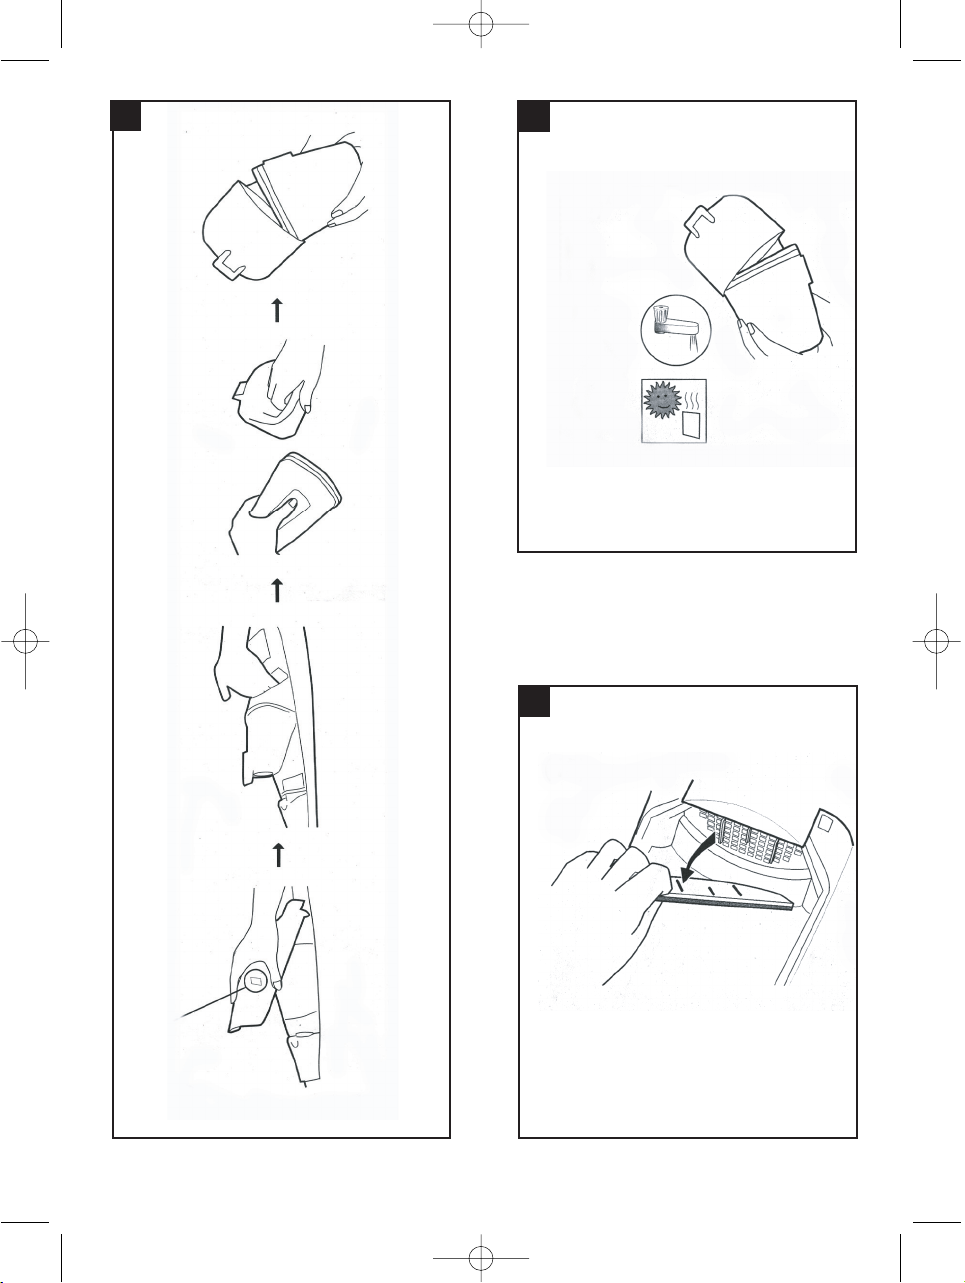
EMPTYING THE EcoBox™ (7
& 8)
The EcoBox™ check indicator will show
red when the EcoBox™ needs emptying.
For true EcoBox™ check indication the
power control must be set to maximum
(fully to the right).
To empty the EcoBox™:
1. Remove front door.
2. Lift EcoBox™ out of cleaner.
3. Open and empty EcoBox™.
4. Re-assemble EcoBox™.
5. Refit assembled EcoBox™ in cleaner
(reverse of 2).
6. Locate tabs on front door. Close front
door.
CALLING FOR SERVICE
A charge will be made if the cleaner is found to be in working order or has not been
assembled in accordance with these instructions or has been used incorrectly.
Before calling a HOOVER Service Engineer run through the following checklist:
1. Is there a working electricity supply to the cleaner? Check with another
appliance.
2. Is the EcoBox™ full?
3. Is the inlet blocked?
4. Are the filters blocked?
If there is any doubt call your local HOOVER Service Office for advice, they may be
able to assist you over the telephone.
acenta_ECOBOX_v3.qxd 6/7/07 16:38 Page 8
Page 9
Consumables and Spare parts*
Use only original Hoover consumables and spare parts.
Guarantee Statement
The guarantee conditions for this appliance are as defined by our
representative in the country in which it is sold. Details regarding
these conditions can be obtained from the dealer from whom the
appliance was purchased.The bill of sale or receipt must be produced
when making any claim under the terms of this guarantee.
Subject to change without notice.
® Registered Trade Mark
HOOVER LTD Pentrebach, Merthyr Tydfil, Mid Glamorgan CF48 4TU
GIAS Customer Sevice 08705 400600
Hoover Spares 01204 556111
* Feature varies according to model
This appliance is marked according to the European directive
2002/96/EC on Waste Electrical and Electronic Equipment (WEEE). By
ensuring this product is disposed of correctly, you will help prevent
potential negative consequences for the environment and human
health, which could otherwise be caused by inappropriate waste
handling of this product. The symbol on the product indicates that
this product may not be treated as household waste. Instead it shall
be handed over to the applicable collection point for the recycling of
electrical and electronic equipment. Disposal must be carried out in
accordance with local environmental regulations for waste disposal. For more
detailed information about treatment, recovery and recycling of this product, please
contact your local city office, your household waste disposal service or the shop where
you purchased the product.
CONSUMABLES & SPARE PARTS CODE
Acenta EcoBox™ pre-motor filter S57 - 03875059
Portable kit (1 shoulder strap + 1 hose + 1
dusting brush)
C48 - 35600191
Carpet & Floor nozzle G28 - 09185554
Parquet caresse nozzle G87PC -35600655
Turbo nozzle J29TN -35600705
acenta_ECOBOX_v3.qxd 6/7/07 16:38 Page 9
Page 10
GB
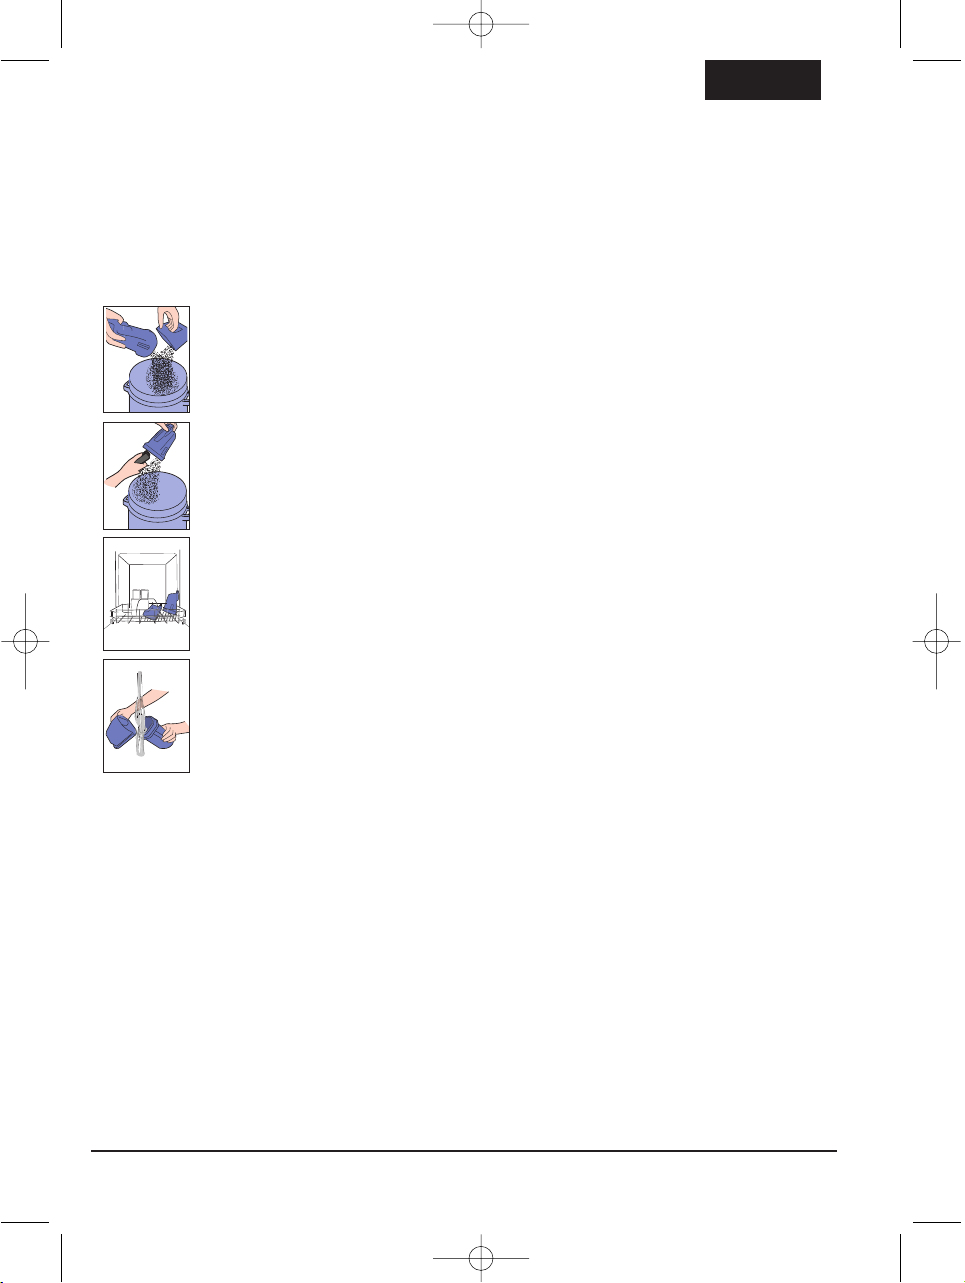
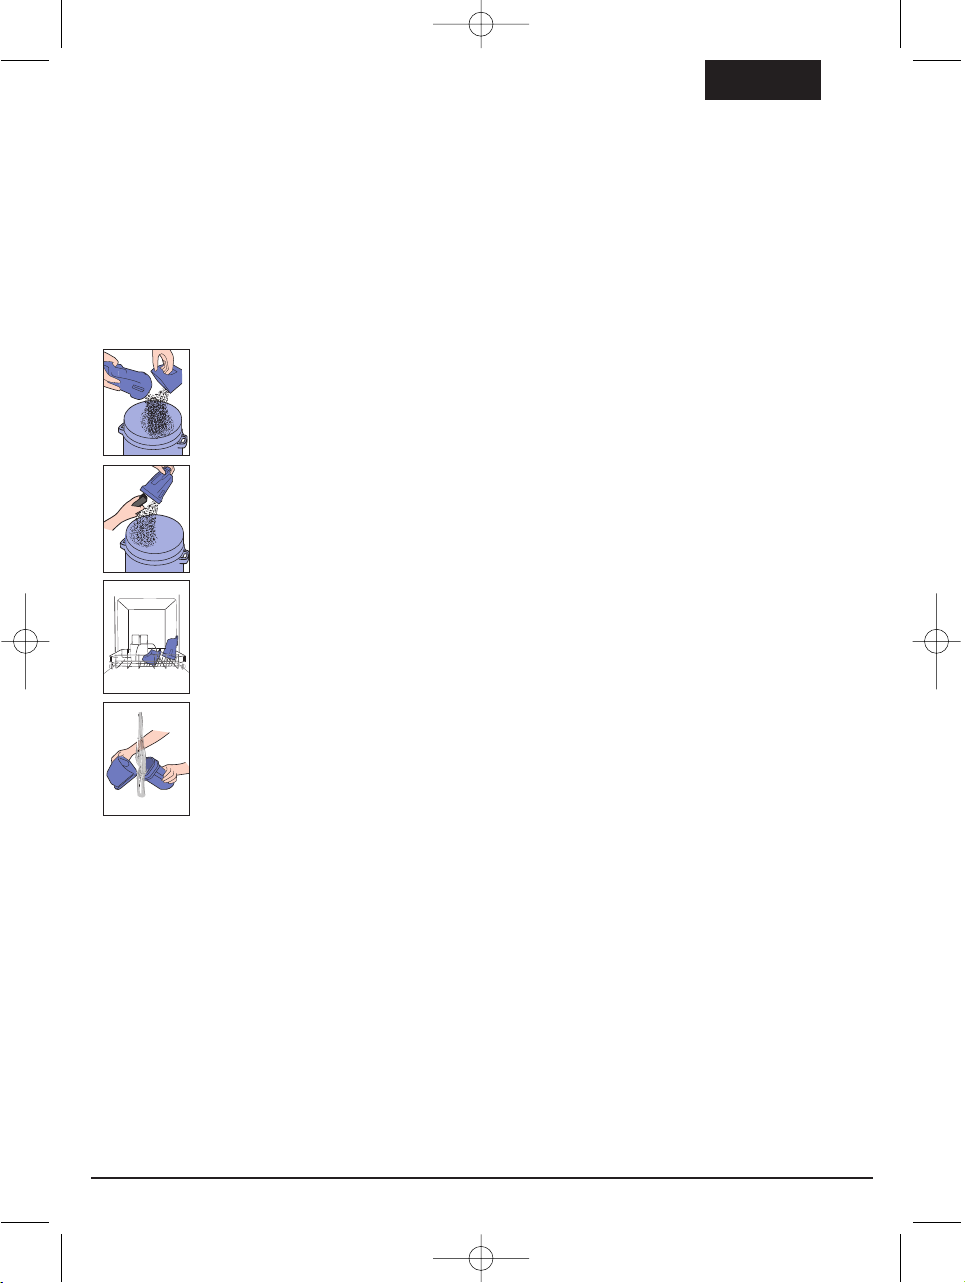
Hoovers unique EcoBox™ is made from a special porous plastic material which allows
air to pass through whilst retaining most of the dirt and fine dust.
To maintain the best performance from the system we would recommend that you
wash the EcoBox™ every five full EcoBox™ containers to remove the fine dust that
your machine has picked up and retained inside the EcoBox™.
To wash and optimise the performance the following simple steps should be taken:
1. Shake out the EcoBox™ to remove large dirt and debris.
2. Brush the inside of EcoBox™ to remove the fine dust that has
formed on the walls of the box.
3. Wash thoroughly the inside and outside of the EcoBox™ using
warm water and washing up liquid. At this point if desired the
EcoBox™ can be placed in a dishwasher and washed on a full wash
and dry cycle at up to 75ºC.
4. If not placed in a dishwasher rinse thoroughly inside and outside
making sure no detergent is left on the EcoBox™.
Remove excess water with a dry cloth and leave to air dry for 24 hours or until fully
dry.
Filter Maintenance
The pre-motor and the exhaust filter should be washed every five full EcoBox™
containers. Please refer to your user manual to find how to access the filters.
To maintain best performance please follow these simple steps:
1. Rinse both filters under hand warm water do not scrub the filters.
2. Remove excess water with a dry cloth and leave to air dry for 24 hours or until
fully dry.
After completing the washing operations, return the EcoBox™ and filters to their
original positions in the cleaner.
ECOBOX™ SYSTEM
acenta_ECOBOX_v3.qxd 6/7/07 16:38 Page 10
Page 11

IT
Questo prodotto deve essere montato
ed utilizzato esclusivamente in ambito
domestico per la pulizia di tappeti,
moquette e pavimenti, secondo le
istruzioni contenute nel presente
libretto. Il set di accessori in dotazione
può inoltre essere utilizzato per la
pulizia di mobili, tappezzerie, ecc.
ALIMENTAZIONE
ELETTRICA
ATTENZIONE! L’ELETTRICITÀ PUÒ
ESSERE ESTREMAMENTE PERICOLOSA.
Questo apparecchio è dotato di doppio
isolamento e non richiede messa a
terra.
IMPORTANTE: I fili del cavo di
alimentazione sono colorati secondo il
seguente codice:
• Blu: Neutro
• Marrone: Fase
AVVERTENZE
Manuale per l’utente. Questo
apparecchio deve essere usato soltanto
per lo scopo a cui è destinato, come
descritto in queste istruzioni. Assicurarsi
di aver ben compreso le istruzioni prima
di utilizzare l’apparecchio.
Pulire la EcoBox™ spesso se si
aspirano materiali quali polvere o
polverine fini quando si effettua la
pulizia di nuovi tappeti/moquettes.
Sicurezza con i bambini, gli anziani
o i disabili: non lasciare che i bambini
giochino con l'apparecchio o con i
relativi comandi. Supervisionare
l'utilizzo dell'apparecchio da parte di
un bambino o di una persona anziana o
disabile.
NON usare l’apparecchio all’aperto, su
superfici bagnate o per aspirare liquidi.
SI PREGA DI LEGGERE
ATTENTAMENTE QUESTE ISTRUZIONI
NON raccogliere oggetti duri o
taglienti, fiammiferi, ceneri calde,
mozziconi di sigarette accesi o altri
oggetti simili.
Elettricità statica. Alcuni tappeti
possono far accumulare una piccola
quantità di elettricità statica, la cui
scarica non è pericolosa.
Usare soltanto gli accessori
raccomandati o forniti dalla Hoover.
NON aspirare liquidi infiammabili quali
fluidi di pulizia, benzina, ecc. o i loro
vapori.
I prodotti spray possono essere
infiammabili. NON vaporizzate i prodotti
spray vicino all’apparecchio.
Cavo elettrico. NON staccare la spina
dalla presa tirando il cavo. Se il cavo
elettrico è danneggiato, la riparazione
deve essere effettuata da un Tecnico
HOOVER Autorizzato per evitare
inconvenienti.
Guasti. NON continuare a usare
l’apparecchio se questo appare
guasto o se il cavo è danneggiato.
Dopo l’uso. Spegnere l’apparecchio e
staccare la spina dalla presa. Spegnere
sempre l’apparecchio e staccare la spina
prima di pulirlo o procedere alla
manutenzione.
Assistenza Hoover. Per assicurare il
funzionamento sicuro ed efficiente di
questo elettrodomestico, si raccomanda
di far eseguire eventuali riparazioni o
interventi di manutezione soltanto da
un Tecnico HOOVER Autorizzato .
acenta_ECOBOX_v3.qxd 6/7/07 16:38 Page 11
Page 12
MONTAGGIO DEL MANICO (1)
Il manico deve essere montato
sull’ apparecchio prima che questo sia
messo in funzione, tranne quando
l’apparecchio viene usato a tracolla (fare
riferimento al punto 6).
1. Rimuovere la vite dal manico.
2. Posizionare il manico sul corpo
motore.
3. Bloccare in posizione tramite la vite.
CAVO DI ALIMENTAZIONE (2)
a) Avvolgere il cavo attorno ai ganci.
Fissare il cavo con l'apposito
fermaglio.
b) Sganciare il cavo dal fermaglio.
Ruotare entrambi i ganci verso
l'interno per sbloccare il cavo, come
mostrato.
ACCESSORI (3)
†
a) Tracolla
†
b) Tubo flessibile
†
c) Spazzola a pennell
†
d) Tubo di prolunga
e) Spazzola per mobili
f) Bocchetta per fessure
SPAZZOLE (3)
g) Spazzola tappeti/pavimenti: premere
il pedale per far toccare le setole con
la superficie dura.
h) Spazzola delicata per pavimenti*: per
il legno e altre superfici delicate.
i) Turbospazzola*: ideale per i tappeti.
l) Spazzola elettrica battitappeto*: per
la pulizia profonda di tappeti di
grandi dimensioni.
COMANDI (4)
a) Interruttore di
accensione/spegnimento
Premere per accendere.
Premere di nuovo per spegnere.
b) Regolatore elettronico della
potenza*
Spostare il cursore verso destra per
aumentare la potenza.
Spostare il cursore verso sinistra per
diminuire la potenza.
PRESA PER SPAZZOLA
ELETTRICA (5)
Prima di utilizzare la spazzola elettrica
battitappeto*, inserire la spina presente
sull’accessorio nella presa ricavata sul retro
del corpo motore (dietro il pannello
comandi).
TRACOLLA (6)
†
a) Rimuovere la spazzola e far scivolare
un’estremità della tracolla sul tubo
alla base dell’apparecchio. Portare la
tracolla oltre il perno presente sul
tubo e ruotare come illustrato.
Installare accessori in base all'uso.
b) Rimuovere il manico principale (far
riferimento al punto 1) e agganciare
l’altra estremità della tracolla al perno
presente sull’impugnatura.
c) Trasportare l’apparecchio a tracolla
come mostrato.
IIMMPPOORRTTAANNTTEE:: ssppeeggnneerree
ll''aassppiirraappoollvveerree ee ssccoolllleeggaarrlloo
ddaallllaa pprreessaa ddii ccoorrrreennttee pprriimmaa
ddii ssvvuuoottaarree llaa EEccooB
Booxx™™ oo ddii
rriimmuuoovveerree ii ffiillttrrii..
* Le caratteristiche cambiano in base al modello † Accessorio opzionale.
acenta_ECOBOX_v3.qxd 6/7/07 16:38 Page 12
Page 13

IT
Si consiglia di lavare il
filtro ogni cinque operazioni
di sostituzione della
EcoBox™.
SVUOTAMENTO DELLA
EcoBox™ (7 & 8)
Quando è richiesto lo svuotamento della
EcoBox™, il relativo indicatore di controllo
si illuminerà (rosso).
Per un'indicazione precisa del controllo
della EcoBox™, il dispositivo di controllo
della potenza deve essere impostato sul
valore massimo (tutto a destra).
Per svuotare la EcoBox™:
1. Rimuovere lo sportello anteriore.
2. Sollevare ed estrarre la EcoBox™
dall'aspirapolvere.
3. Aprire e svuotare la EcoBox™.
4. Riassemblare la EcoBox™.
5. Reinserire nell'aspirapolvere la
EcoBox™ assemblata (eseguendo il
passaggio 2 all'inverso).
6. Individuare le linguette sullo
sportello anteriore. Chiudere lo
sportello anteriore.
lavaggio del filtro premotore (9)
Dopo aver rimosso la EcoBox™:
rimuovere il filtro dal proprio
alloggiamento.
Sciacquare il filtro con acqua tiepida.
Non sfregare il filtro.
Asportare l'acqua in eccesso con un
panno asciutto e lasciare asciugare il
filtro all'aria per 24 ore o finché non sarà
completamente asciutto.
Reinserire il filtro pulito e la EcoBox™.
LAVAGGIO DEL FILTRO DI
USCITA (10)
Sollevare il coperchio del filtro.
Rimuovere il filtro.
Sciacquare il filtro con acqua tiepida.
Non sfregare il filtro.
Asportare l'acqua in eccesso con un
panno asciutto e lasciare asciugare il
filtro all'aria per 24 ore o finché non sarà
completamente asciutto.
reinserire il filtro pulito e il coperchio.
NON utilizzare l'aspirapolvere prima di
aver reinserito la EcoBox™.
ASSISTENZA TECNICA
Se l’apparecchio è perfettamente funzionante o non è stato montato correttamente
secondo le istruzioni fornite oppure è stato utilizzato in maniera errata, l’intervento
verrà addebitato al cliente.
Prima di rivolgersi ad un centro di assistenza tecnico autorizzato HOOVER, si
raccomanda di controllare che:
1. La presa elettrica a cui è collegato l’apparecchio sia funzionante. Verificare
collegando un altro apparecchio a tale presa.
2. La EcoBox™ non sia piena?
3. L'ingresso del tubo flessibile non sia ostruito.
4. I filtri non siano ostruiti.
In caso di dubbi, chiamare il servizio di assistenza tecnica Hoover. Il problema
potrebbe anche essere risolto telefonicamente.
acenta_ECOBOX_v3.qxd 6/7/07 16:38 Page 13
Page 14
PPaarrttii ddii rriiccaammbbiioo ee ddii ccoonnssuummoo**
Utilizzare sempre parti di ricambio e di consumo originali Hoover.
Zerowatt.Hoover S.p.A.
Sede commerciale:
Via Privata E.Fumagalli,
20047 Brugherio (Mi)
Tel: +39 039 208655
servizioclienti@hoover.it
Gias Customer Service (Italia)
039 2086811
Candy Hoover AG
Boesch 21
CH-6331 Huenenberg
Tel: 041-7854040
Gias Customer Service (Svizzera)
0848/780 780 (0,12 CHF / Min.)
PARTI DI RICAMBIO E DI CONSUMO
CODICE
Filtro pre-motore Acenta EcoBox™
Kit portatile (1 cinghia da tracolla + 1 tubo flessibile + 1 spazzola per polvere)
Bocchetta per moquette e pavimento:
Bocchetta Caresse per parquet
Turbospazzola
S57 - 03875059
C48 35600191
G28 - 09185554
G87PC -35600655
J29TN -35600705
* Disponibile a seconda dei modelli.
REGOLAMENTO PER LA
GARANZIA
Le condizioni di garanzia di questo prodotto seguono le norme previste per
il Paese nel quale è stato venduto. I dettagli delle suddette condizioni
possono essere richiesti al distributore presso il quale il prodotto è stato
acquistato. Per ogni contestazione nei termini della garanzia è necessaria
l’esibizione della fattura o di documento equipollente.
® Marchio Registrato
Questo elettrodomestico è marcato conformemente alla Direttiva
Europea 2002/96/CE sui rifiuti da apparecchiature elettriche ed
elettroniche (WEEE). Assicurandovi che questo prodotto sia smaltito
correttamente, aiuterete ad evitare possibili conseguenze negative
all'ambiente e alla salute delle persone, che potrebbero verificarsi a
causa d'un errato trattamento di questo prodotto giunto a fine vita.
Il simbolo sul prodotto indica che questo apparecchio non può essere
trattato come un normale rifiuto domestico; dovrà invece essere
consegnato al punto più vicino di raccolta per il riciclo delle
apparecchiature elettriche ed elettroniche. Lo smaltimento deve essere effettuato in
accordo con le regole ambientali vigenti per lo smaltimento dei rifiuti. Per
informazioni più dettagliate sul trattamento, recupero e riciclo di questo prodotto,
per favore contattare l'ufficio pubblico di competenza (del dipartimento ecologia e
ambiente), o il vostro servizio di raccolta rifiuti a domicilio, o il negozio dove avete
acquistato il prodotto.
acenta_ECOBOX_v3.qxd 6/7/07 16:38 Page 14
Page 15
IT
L’esclusivo sistema EcoBox™ di Hoover, realizzato in uno speciale materiale plastico
poroso, consente il passaggio dell’aria trattenendo nel contempo gran parte dello
sporco e della polvere fine.
A garanzia delle migliori prestazioni del sistema, si consiglia di lavare l’EcoBox™ ogni
quinta volta che viene svuotata per rimuovere la polvere fine raccolta
dall’apparecchio e trattenuta all’interno dell’EcoBox™.
Per lavare l’EcoBox™ e ottimizzarne le prestazioni, procedere nel modo di seguito
indicato:
1. Vuotare l’EcoBox™ scuotendolo in modo tale da rimuovere lo
sporco e i residui più voluminosi.
2. Pulire con una spazzola la parte interna dell’EcoBox™ per
rimuovere la polvere fine depositata sulle pareti del contenitore.
3. Lavare accuratamente la parte interna e quella esterna
dell’EcoBox™ con acqua calda e detersivo liquido per stoviglie. A
questo punto si può impostare un ciclo completo di lavaggio e
asciugatura in lavatrice fino a 75ºC.
4. Se non si lava l’EcoBox™ nella lavastoviglie, risciacquare con cura
la parte interna e quella esterna prestando attenzione a che non
rimangano residui di detergente.
Rimuovere l’acqua in eccesso con un panno asciutto e lasciare asciugare l’EcoBox™
all’aria per 24 ore o finché non sarà completamente asciutto.
Manutenzione dei filtri
Lavare il filtro pre motore e il filtro uscita ogni quinta volta che la che la EcoBox™
viene svuotata. Nel manuale d’uso viene illustrato come accedere ai filtri.
A garanzia delle migliori prestazioni, procedere nel modo di seguito indicato:
1. Risciacquare entrambi i filtri con acqua calda senza strofinare.
2. Rimuovere l’acqua in eccesso con un panno asciutto e lasciare asciugare i filtri
all’aria per 24 ore o finché non si saranno completamente asciugati.
Una volta ultimate le operazioni di lavaggio, riposizionare l’EcoBox™ e i filtri nell’
apparecchio.
ECOBOX™ SYSTEM
acenta_ECOBOX_v3.qxd 6/7/07 16:38 Page 15
Page 16

FR
Ce produit doit être assemblé et
employé conformément à ces
instructions et il doit être utilisé
uniquement pour le nettoyage
ménager, c’est-à-dire le nettoyage de la
salissure et de la poussière sèche des
planchers et moquettes d’habitations
particulières.
Le kit d’acessoires peut être utilisé pour
nettoyer la salissure et la poussière
des-meubles et tissus d’ameublement.
ALIMENTATION ÉLECTRIQUE
AVERTISSEMENT!
L’ELECTRICITE PEUT ETRE
EXTREMEMENT DANGEREUSE. Cet
appareil est à double isolation et il ne
doit pas être relié à la terre.
IMPORTANT: Les fils du cordon de
raccordement secteur sont colorés selon
le code suivant:
• Bleu – Neutre
• Marron – Phase
CONSIGNES DE SÉCURITÉ
Mode d’emploi. Cet aspirateur doit
uniquement être utilisé pour les tâches
pour lesquelles il est prévu et de la
manière décrite dans ces instructions.
S’assurer que l’on a bien compris les
instructions avant d’utiliser cet appareil.
Nettoyer la cuve EcoBox™ fréquemment
lors de l’aspiration de mati_res telles que
des poudres ou des poussi_res fines ou
lors du nettoyage de moquettes neuves
Sécurité concernant les enfants, les
personnes âgées ou infirmes : Ne pas
laisser les enfants jouer avec l’appareil ou
ses commandes. Prière de superviser
l’utilisation de l’appareil par des grands
enfants, des personnes âgées ou infirmes.
NE PAS utiliser l’aspirateur à l’extérieur,
sur des surfaces mouillées, ou pour
aspirer des matières mouillées.
NE PAS aspirer d’objets durs ou
PRIERE DE LIRE ATTENTIVEMENT
CES INSTRUCTIONS
tranchants, d’allumettes, de cendres
chaudes, de mégots de cigarettes, de farine,
de plâtre, de ciment, d’enduit, de sciure de
bois, ou autres articles du même genre.
NE PAS aspirer de liquides inflammables tels
que détachant, essence, etc., ou les vapeurs
de tels liquides.
Les produits aérosols peuvent être
inflammables.
Electricité statique.
Certaines moquettes peuvent causer de
petites accumulations d’électricité statique.
Les décharges d’électricité statique de ce
type ne sont pas dangereuses pour la santé.
Utiliser uniquement les accessoires
recommandés ou fournis par Hoover.
NE PAS vaporiser de tels produits à proximité
de l’aspirateur.
Cordon de raccordement. NE PAS retirer la
prise en tirant sur le cordon de
raccordement. Si le cordon/la prise de
raccordement est endommagé, l’aspirateur
doit obligatoirement être réparé par un
réparateur agréé du réseau de service
HOOVER pour garantir la sécurité.
Défauts de fonctionnement. NE PAS
continuer d’utiliser l’aspirateur si un défaut
de fonctionnement est suspecté ou si le
cordon de raccordement est endommagé.
Après l’utilisation. Arrêter l’aspirateur et
débrancher la prise de l’alimentation
électrique. Toujours arrêter l’aspirateur et
débrancher la prise de l’alimentation
électrique avant de nettoyer l’appareil ou
d’entreprendre tout travail d’entretien.
Service Hoover. Pour assurer le
fonctionnement sûr et efficace de cet
appareil, nous recommandons que son
entretien et sa réparation soient confiés
exclusivement à un technicien agréé du
réseau de service HOOVER.
acenta_ECOBOX_v3.qxd 6/7/07 16:38 Page 16
Page 17

ASSEMBLAGE DE LA
POIGNÉE (1)
La poignée doit être assemblée sur
l’aspirateur avant l’utilisation, à moins
que l’aspirateur ne soit utilisé avec la
bandoulière - voir (6).
1. Retirer la vis de maintien de la
poignée.
2. Glisser la poignée sur le haut de
l’aspirateur.
3. Serrer la vis de maintien.
RANGEMENT DU CORDON (2)
a) Enrouler le cordon autour des
crochets.
Immobiliser le cordon avec le clip
intégré.
b) Défaire le clip.
Tourner les deux crochets vers
l’intérieur comme illustré pour libérer
le cordon.
ACCESSOIRES (3)
†
a) Bandoulière
†
b) Tuyau flexible
†
c) Brosse ronde
†
d) Tube de prolongement
e) Brosse à meubles
f) Suceur long
g) Suceur pour sol/moquette: presser la
pédale pour mettre les brosses en
contact avec les sols durs.
h) Brosse pour sols délicats*: pour les
parquets et tous les sols délicats.
i) Turbo brosse*: conçue spécialement
pour les moquettes et tapis.
l) Electrobrosse*: pour le nettoyage en
profondeur des grandes surfaces de
moquette.
CONTRÔLES (4)
a) Interrupteur ON / OFF
(MARCHE / ARRET)
Appuyer pour mettre en route.
Appuyer de nouveau pour arrêter.
b) Variateur de puissance*
Pousser vers la droite pour augmenter.
Pousser vers la gauche pour réduire.
PRISE POUR
ELECTROBROSSE (5)
Raccorder la prise de l’électrobrosse à la
prise prévue à l’arrière de l’aspirateur
(derrière le panneau de commande).
BANDOULIÈRE (6)
†
a) Retirer l’accessoire utilisé, passer une
extrémité de la bandoulière
par-dessus le tube à la base de
l’aspirateur. Glisser l’extrémité de la
bandoulière au-delà du taquet de
verrouillage et tourner comme
illustré. Remontez avec les
accessoires correspondant à
l'utilisation.
b) Retirer la poignée principale – voir
(1), raccorder l’autre extrémité de la
bandoulière en haut de la poignée
courte avec le clip.
c) Porter l’aspirateur sur l’épaule
comme illustré.
IIMMPPOORRTTAANNTT :: EEtteeiinnddrree
ll’’aassppiirraatteeuurr eett ddéébbrraanncchheerr l
laa
pprriissee ddee ll’’aalliimmeennttaattiioonn sseecctteeuurr
aavvaanntt ddee vviiddeerr llaa ccuuvvee
EEccooBBooxx™™ oouu ddee rreettiirreerr lleess
ffiillttrreess..
* Les caractéristiques varient en fonction du modèle † Accessoire en option.
acenta_ECOBOX_v3.qxd 6/7/07 16:38 Page 17
Page 18

FR
HOOVER RECOMMANDE DE
NETTOYER LES FILTRES
TOUS LES CINQ VIDAGES
DE CUVE ECOBOX PLEINE.
VIDAGE DE LA CUVE
EcoBox™ (7 & 8)
L’indicateur de remplissage de la cuve
EcoBox™ est rouge lorsque la cuve
EcoBox™ doit être vidée.
Pour une indication correcte du
remplissage de la cuve EcoBox™, la
commande de puissance doit être réglée
sur la position maximum (complètement
à droite).
Pour vider la cuve EcoBox™ :
1. Retirer la porte avant.
2. Sortir la cuve EcoBox™ de
l’aspirateur en la soulevant.
3. Ouvrir et vider la cuve EcoBox™.
4. Réassembler la cuve EcoBox™.
5. Remettre en place la cuve EcoBox™
assemblée dans l’aspirateur (inverse
de 2)
6. Adapter les pattes sur la porte
avant. Fermer la porte avant.
NETTOYAGE DU FILTRE
PRÉ-MOTEUR (9)
La cuve EcoBox™ étant retirée :
Sortir le filtre du compartiment.
Rincez le filtre à l’eau tiède. Ne le
brossez pas.
Épongez-le avec un chiffon sec et
laissez-le sécher à l’air libre pendant 24
heures jusqu’à ce qu’il soit
complètement sec.
Remettez le filtre propre et la cuve
EcoBox™ en place.
NETTOYAGE DU FILTRE DE
SORTIE (10)
Soulevez le couvercle du filtre.
Retirez le filtre.
Rincez le filtre à l’eau tiède.
Ne le brossez pas.
Épongez-le avec un chiffon sec et
laissez-le sécher à l’air libre pendant 24
heures jusqu’à ce qu’il soit
complètement sec.
Remettez le filtre propre et le
couvercle en place.
NE PAS utiliser l’aspirateur sans la cuve
EcoBox™ en place.
RECOURS AU SERVICE DE DÉPANNAGE
Des frais seront facturés si l’aspirateur est trouvé en bon état de marche ou s’il n’a pas
été assemblé conformément à ces instructions ou s’il a été utilisé de façon incorrecte.
Avant de faire appel à un technicien du réseau HOOVER, procéder aux vérifications suivantes:
1. L’aspirateur est-il raccordé à une alimentation électrique sous tension? Vérifier la
prise électrique avec un autre appareil.
2. La cuve EcoBox™ est-elle pleine ?
3. L'orifice d'admission est-il bouché?
4. Les filtres sont-ils colmatés?
En cas de doute, appeler le centre de service Hoover local qui peut être à même de
fournir des conseils au téléphone.
acenta_ECOBOX_v3.qxd 6/7/07 16:38 Page 18
Page 19

Pièces d’usure et de rechange*
N’utiliser que des pièces d’usure et de rechange de la marque Hoover.
Groupe Candy. Hoover
13, rue Auger
93697 Pantin Cedex
Tel. : 01-49159200
Ligne Service Consommateurs
(France) 0892 35 00 89
Candy Hoover Belgium
Haaschtsesteenweg 162B
1820 Melsbroek
Tel. : 02-752 94 11
Gias Customer Service (Belgique)
0903/99109 (1.12 € / min.)
Candy Hoover AG
Boesch 21
CH-6331 Huenenberg
Tél. : 041-7854040
Gias Customer Service (Suisse)
0848/780 780 (0,12 CHF / Min.)
CODE DES PIECES D’USURES ET DE RECHANGE
CODICE
Filtre pré-moteur Acenta EcoBox™
Kit portatif (1 bandoulière + 1 flexible + 1 brosse ronde)
Suceur pour moquette et sol
Suceur Caresse pour parquet
Turbobrosse
S57 - 03875059
C48 - 35600191
G28 - 35600191
G87PC -35600655
J29TN -35600705
* Les caractéristiques varient selon les modèles
GARANTIE
Les conditions de garantie de cet appareil sont définies par notre
représentant dans le pays où il est vendu et peuvent être obtenues auprès de
votre revendeur. La facture d’achat ou le reçu doit être présenté pour toutes
réclamations relevant directement des conditions de cette garantie. Ces
conditions peuvent être modifiées sans préavis.
® Marque Déposée
Cet appareil porte des marques conformes à la directive européenne
2002/96/CE sur les équipements électriques et électroniques mis au
rebut (WEEE). La mise au rebut de ce produit convenablement
contribue à éviter des conséquences néfastes potentielles pour
l'environnement et pour la santé. Le symbole figurant sur le produit
indique qu'il ne peut pas être mis à la poubelle avec les ordures
ménagères. Il doit donc être amené à un centre de recyclage des
déchets électriques et électroniques. La mise au rebut doit être
effectuée conformément à la réglementation locale en vigueur en
matière de déchets. Pour des compléments d'information sur le traitement, la
récupération et le recyclage de ce produit, merci de contacter la municipalité, le
service local des ordures ménagères ou le lieu d'achat du produit.
acenta_ECOBOX_v3.qxd 6/7/07 16:38 Page 19
Page 20

FR
EcoBox™ est un produit Hoover unique en son genre. Il est fabriqué dans un
matériau plastique poreux spécial qui laisse passer l’air tout en retenant les débris
et la poussière.
Pour conserver toute la performance du système, nous vous recommandons de
nettoyer la cuve EcoBox™ tous les cinq vidages de cuve pleine afin d’éliminer la
poussière fine aspirée qui reste collée aux parois intérieures de la cuve.
Pour laver l’EcoBox™ et conserver sa performance, suivez cette procédure:
1. Videz l’Ecobox en le secouant pour supprimer les débris et la
poussière.
2. Brossez l’intérieur de l’EcoBox™ pour supprimer la poussière fine
collée aux parois.
3. Lavez soigneusement l’intérieur et l’extérieur de l’EcoBox™ à l’eau
tiède avec du liquide vaisselle. Si vous le désirez, vous pouvez alors
mettre l’EcoBox™ dans un lave-vaisselle pour un cycle complet de
lavage et de séchage jusqu’à 75ºC.
4. Si vous ne mettez pas l’EcoBox™ dans un lave-vaisselle, rincez-le
soigneusement à l’intérieur et à l’extérieur en éliminant toutes les
traces de détergent.
Séchez-le rapidement avec un chiffon sec et laissez sécher à l’air libre pendant 24
heures ou jusqu’à ce qu’il soit complètement sec.
Maintenance des filtres
Le pré-moteur et le filtre de sortie doivent être nettoyés tous les cinq vidages de
cuve EcoBox™ pleine. Votre manuel d’utilisation explique comment accéder aux
filtres.
Pour maintenir la performance de votre aspirateur, suivez cette procédure:
1. Rincez les deux filtres à l’eau tiède. Ne les brossez pas.
2. Séchez-les rapidement avec un chiffon sec et laissez-les sécher à l’air libre
pendant 24 heures ou jusqu’à ce qu’íls soient totalement secs.
Après le lavage, remettez l’EcoBox™ et les filtres à leur position d’origine dans
l’aspirateur.
ECOBOX™ SYSTEM
acenta_ECOBOX_v3.qxd 6/7/07 16:38 Page 20
Page 21

DE
Dieses Gerät muss gemäß der
Gebrauchsanleitung zusammengesetzt
werden und ist nur für die Trockenreinigung von Teppichen und Glattböden
im Haushalt geeignet.
Die Zubehörteile können zum
Entfernen von trockenem Schmutz und
Staub von Möbeln und Stoffen benutzt
werden.
ELEKTROANSCHLUSS
WARNUNG!
STROM KANN SEHR GEFÄHRLICH SEIN.
DIESES GERÄT IST DOPPELT ISOLIERT
UND DARF NICHT GEERDET WERDEN.
WICHTIG: Die Farben der Drähte im
Netzkabel sind im Einklang mit
folgendem Code:
• Blau – Neutral
• Braun – Spannungsführend
SICHERHEITSHINWEISE
Gebrauchsanleitung. Dieses Gerät
darf nur für die vorgesehenen Zwecke
und im Einklang mit der Anleitung
verwendet. Gebrauchsanleitung
sorgfältig durchlesen, bevor Sie das
Gerät einschalten.
Werden neue Teppiche gereinigt oder
wird Pulver bzw. feiner Staub
aufgesaugt, muss die EcoBox™ häufiger
gereinigt werden.
Sicherheit in Bezug auf Kinder sowie
ältere oder kranke Menschen: Lassen Sie
Kinder nicht Sie mit dem Gerät oder
seinen Bedienvorrichtungen spielen. Die
Benutzung des Geräts durch größere
Kinder sowie ältere oder kranke
Menschen sollte nur unter Aufsicht eines
Erwachsenen erfolgen.
Gerät NICHT außerhalb der Wohnung
auf nassen Oberflächen oder zum
Nasssaugen verwenden.
GEBRAUCHSANLEITUNG BITTE
SORGFÄLTIG DURCHLESEN
KEINE harten oder scharfen
Gegenstände, Streichhölzer, heiße Asche,
Zigarettenstummel oder ähnliches
aufsaugen.
Statische Elektrizität. Es gibt Teppiche,
die zu elektrostatischer Aufladung
neigen, die jedoch sehr gering und bei
Entladung nicht gesundheitsschädlich ist.
Nur von Hoover empfohlene und
gelieferte Ersatzteile und Zubehörteile
verwenden.
KEINE entflammbaren Flüssigkeiten wie
Reinigungsmittel, Benzin, usw. oder
deren Dämpfe aufsaugen.
Raumsprays/Sprühdosen können
entflammbar sein. NICHT in der Nähe des
Staubsaugers vesprühen.
Netzkabel. Nicht am Kabel ziehen, um
den Stecker aus der Steckdose zu
entfernen. Wenn das Kabel/der Stecker
beschädigt ist, muss der Straubsauger
von einem zugelassenen HOOVERKundendiensttechniker repariert
werden, da ein defektes Gerät eine
Gefahr darstellen kann.
Störungen. Den Staubsaugert bitte
nicht mehr benutzen, wenn das Gerät
defekt erscheint oder das Netzkabel
beschädigt ist.
Nach Gebrauch. Gerät ausschalten und
Stecker aus der Steckdose ziehen. Den
Staubsauger stets ausschalten und den
Stecker herausziehen, bevor Sie das
Gerät reinigen oder versuchen,
Wartungsarbeiten vorzunehmen.
Hoover-Service. Um sicheren und
wirksamen Betrieb dieses Gerätes zu
gewährleisten, empfiehlt es sich,
Wartungs und Reparaturarbeiten nur
von einem zugelassenen HOOVER
Kundendiensttechniker durchführen zu
lassen.
acenta_ECOBOX_v3.qxd 6/7/07 16:38 Page 21
Page 22

ZUSAMMENBAU DES
GRIFFS (1)
Vor Gebrauch muss der Griff am
Staubsauger angebracht werden, es sei
denn, es wird der Schulterriemen
verwendet - siehe (6).
1. Handschraube vom Griff entfernen.
2. Griff über das Endstück des
Staubsaugers schieben.
3. Handschraube fest anziehen.
KABELAUFWICKLUNG (2)
a) Kabel um die Haken wickeln und mit
der integrierten Klammer sichern.
b) Integrierte Klammer lösen.
Zur Freigabe des Kabels beide Haken
so, wie gezeigt, nach innen drehen.
ZUBEHÖR (3)
†
a) Schulterriemen
†
b) Flexibler Saugschlauch
†
c) Möbelpinsel
†
d) Verlängerungsrohr
e) Polsterdüse
f) Fugendüse
DÜSEN (3)
g) Teppich & Bodendüse: Fußhebel
drücken, um Bürsten mit hartem
Boden in Kontakt zu bringen.
h) hartbodendüse*: für Holz und alle
empfindlichen Böden.
i) Turbodüse*: besonders geeignet für
Teppiche.
l) Elektrosaugbürste*: für fasertiefe
Reinigung großer Teppichflächen.
STEUERUNGEN (4)
a) EIN-/AUS-SCHALTER
Drücken, um einzuschalten.
Nochmals drücken, um auszuschalten.
b) Saugkraftregulierung*
Zur Vertärkung nach rechts schieben.
Zur Verringerung nach links
schieben.
ELEKTROSAUGBÜRSTE (5)
Bei Verwendung der Elektrosaugbürste* muss der Stecker in die
Buchse auf der Rückseite des
Staubsaugers (hinter der Schaltblende)
eingesteckt werden.
SCHULTERRIEMEN (6)
†
a) Den Saugschlauch entfernen. Das
eine Ende des Schulterriemens über
den Rohrstutzen am unteren Ende
des Staubsaugers, an der
Arretierzunge vorbei, auschieben.
Wie gezeigt drehen und
Saugschlauch wieder anbringen. Mit
den entsprechenden Zubehörteilen
wieder anbringen.
b) Nach Entfernen des langen
Hauptgriffs - siehe (1) - das andere
Ende des Schulterriemens am oberen
Griffstutzen einklicken.
c) Staubsauger wie gezeigt tragen.
WWIICCHHTTIIGG :: VVoorr ddeemm LLeeeerreenn
ddeerr EEccooBBooxx™™ ooddeerr ddeemm
EEnnttffeerrn
neenn eeiinneess FFiilltteerrss
ddeenn SSttaauubbssaauuggeerr
aauusssscchhaalltteenn uunndd ddeenn
SStteecckkeerr aauuss ddeerr
SStteecckkddoossee zziieehheenn..
* Variiert je nach Modell † Optionales Zubehör.
acenta_ECOBOX_v3.qxd 6/7/07 16:38 Page 22
Page 23

DE
HOOVER empfiehlt, nach
jedem fünften Leeren des
Ecobox-Staubbehälters die
Filter auszuwaschen.
LEEREN DER EcoBox™ (7 & 8)
Die EcoBox™-Prüfanzeige leuchtet rot auf,
wenn die EcoBox™ geleert werden muss.
Für eine korrekte Anzeige der EcoBox™
muss der Leistungsregler auf Maximum
eingestellt sein (ganz nach rechts).
So leeren Sie die EcoBox™:
1. Die vordere Tür entfernen.
2. Die EcoBox™ aus dem Staubsauger
herausheben.
3. Die EcoBox™ öffenen und leeren.
4. Die EcoBox™ wieder
zusammensetzen.
5. Die EcoBox™ wieder in den
Staubsauger einsetzen (Gegenteil von
2).
6. Die Zungen an der vorderen Tür
ausfindig machen. Die vordere Tür
schließen.
Waschen des Motorschutzfilters (9).
Die EcoBox™ herausnehmen und daraufhin:
den Filter aus dem Gehäuse nehmen.
Den Filter unter lauwarmem Wasser
abspülen. Filter nicht abschrubben.
Mit einem trockenen Tuch abtrocknen
und 24 Stunden lang, oder bis er
vollständig trocken ist, an der Luft
trocknen.
Den sauberen Filter wieder anbringen
und die EcoBox™ wieder einsetzen.
Waschen des Abluftfilters
(10)
Den Filterdeckel abheben.
Den Filter herausnehmen.
Den Filter unter lauwarmem Wasser
abspülen. Filter nicht abschrubben.
Mit einem trockenen Tuch abtrocknen
und 24 Stunden lang, oder bis er
vollständig trocken ist, an der Luft
trocknen.
Den sauberen Filter wieder anbringen
und den Deckel wieder anbringen.
Den Staubsauger NICHT benutzen, wenn
die EcoBox™ nicht eingesetzt ist.
KUNDENDIENST
Eine Gebühr wird erhoben, wenn sich das Gerät als funktionstüchtig herausstellt oder
nicht gemäß dieser Anleitung zusammengesetzt oder fehlerhaft benutzt wurde.
Bevor Sie Ihren HOOVER - Kundendiensttechniker anrufen, haken Sie die folgende
Checkliste ab.
1. Ist die Stromversorgung in Ordnung? Mit anderem elektrischen Gerät überprüfen.
2. Ist die EcoBox™ voll?
3. Ist der Einlass blockiert?
4. Sind die Filter blockiert?
Wenden Sie sich im Zweifelsfalle an Ihren Hoover-Kundendienst, der Sie vielleicht
telefonisch beraten kann.
acenta_ECOBOX_v3.qxd 6/7/07 16:38 Page 23
Page 24

Verbrauchsgüter und Ersatzteile*
Benutzen Sie nur Originalverbrauchsgüter und -ersatzteile von Hoover.
Garantieerklärung
Die Garantiebestimmungen für Geräte entsprechen den Richtlinien des
Landes, in dem Sie das Gerät erworben haben. Detailinformationen erhalten
Sie von dem Händler, bei dem Sie das Gerät erworben haben. Bitte bewahren
Sie den Kaufbeleg sorgfältig auf, denn er wird dringend für eventuell
auftretende Garantieansprüche benötigt.
Deutschland
Candy-Hoover GmbH
Kaiserswerther Str. 83
D-40878 Ratingen
www.candy-hoover.de
Kundendienst Deutschland
(GIAS Customer Service)
01805 62 55 62 (0,12 € / min.)
Schweiz
Candy Hoover AG
Bösch 21
CH-6331 Huenenberg
www.candy-hoover.ch
Kundendienst Schweiz
(GIAS Customer Service)
0848/780 780 (0,12 CHF / Min.)
Österreich
Candy Hoover Austria GmbH
Dominikanerbastei 4
A-1011 Wien
www.candy-hoover.at
Kundendienst Österreich
(GIAS Customer Service)
0820 / 220 224 (0,15 € / min)
VERBRAUCHSGÜTER & ERSATZTEILE
CODE
Acenta EcoBox™ Motorschutzfilter
Tragekit (1 Schultergurt + 1 Schlauch + 1 Möbelpinsel)
Teppich- und Fußbodendüse
Caresse-Parkettdüse
Turbodüse
S57 - 03875059
C48 - 35600191
G28 - 09185554
G87PC -35600655
J29TN -35600705
* Ist je nach Modell verschieden
Dieses Gerät ist entsprechend der europäischen Richtlinie 2002/96/EG
des europäischen Parlaments und Rates über Elektro- und ElektronikAltgeräte (WEEE-Richtlinie) gekennzeichnet. Durch die sichere und
umweltgerechte Entsorgung dieses Produkts tragen Sie dazu bei,
mögliche negative Auswirkungen auf die Umwelt und die Gesundheit
des Menschen zu verhindern. Das am Produkt angebrachte Symbol
gibt an, dass dieses Produkt nicht als Hausmüll behandelt werden
darf, sondern in einem entsprechenden Recyclingzentrum für
elektrische und elektronische Geräte zu entsorgen ist. Die Entsorgung
ist in Übereinstimmung mit allen geltenden Vorschriften für die umweltgerechte
Abfallentsorgung vorzunehmen. Für ausführlichere Informationen über die
Müllbehandlung und das Recycling dieses Produkts wenden Sie sich bitte an Ihre
zuständige Umweltbehörde, die Müllentsorgung oder an die Verkaufsstelle, von der
Sie das Produkt erworben haben.
acenta_ECOBOX_v3.qxd 6/7/07 16:38 Page 24
Page 25

DE
Hoovers einzigartige EcoBox™ ist aus einem speziellen, porösen Kunststoff
hergestellt, der luftdurchlässig ist, doch zugleich Schmutz und feinen Staub
zurückhält.
Damit Sie mit Ihrem Gerät optimale Ergebnisse erzielen, empfehlen wir Ihnen, die
EcoBox™ nach jedem fünften Leeren des EcoBox™-Behälters zu reinigen und dabei
den im Staubbehälter aufgenommenen feinen Staub zu entfernen.
So waschen Sie die EcoBox™ und optimieren damit die Leistung Ihres Geräts:
1. Schütteln Sie den groben Schmutz aus der EcoBox™ heraus.
2. Bürsten Sie die Innenseite der EcoBox™ aus, um den feinen
Staub, der sich an den Wänden abgesetzt hat, zu entfernen.
3. Waschen Sie die Innen- und Außenseite der EcoBox™ mit warmem
Wasser und Geschirrspülmittel gründlich sauber. Anschließend kann
die EcoBox™ im Geschirrspüler in einem kompletten Wasch- und
Trockenzyklus bei bis zu 75ºC gereinigt werden.
4. Wird kein Geschirrspüler verwendet, so spülen Sie die EcoBox™
innen und außen gründlich ab, damit kein Spülmittel an der
EcoBox™ zurückbleibt.
Trocknen Sie die EcoBox™ mit einem trockenen Tuch ab und lassen Sie diese 24
Stunden lang, oder bis sie vollständig trocken ist, an der Luft trocknen.
WARTUNG DER FILTER
Der Motorschutz- und Abluftfilter sollten nach jedem fünften Leeren des
EcoBox™-Staubbehälters ausgewaschen werden. Bitten lesen Sie diesbezüglich im
Handbuch nach, wie Sie die Filter ein- bzw. ausbauen.
Zur Aufrechterhaltung der optimalen Leistung Ihres Geräts befolgen Sie bitte diese
einfachen Schritte:
1. Spülen Sie beide Filter unter handwarmem Wasser ab. Verwenden Sie zur
Reinigung der Filter keine Bürste.
2. Trocknen Sie die Filter mit einem trockenen Tuch ab und lassen Sie diese 24
Stunden lang, oder bis sie vollständig trocken sind, an der Luft trocknen.
Setzen Sie die EcoBox™ und die beiden Filter nach ihrer Reinigung wieder korrekt
in den Staubsauger ein.
ECOBOX™ SYSTEM
acenta_ECOBOX_v3.qxd 6/7/07 16:38 Page 25
Page 26

ES
Este producto debe montarse y
utilizarse siguiendo estas instrucciones,
y sólo debe utilizarse para la limpieza
doméstica, con el fin de quitar la
suciedad y el polvo seco de las moquetas
y el suelo de la casa.
El juego de accessorios puede utilizarse
para quitar la suciedad y el polvo de
muebles y tapicerias.
REQUISITOS ELÉCTRICOS
ADVERTENCIA!
LA ELECTRICIDAD PUEDE RESULTAR
EXTREMADAMENTE PELIGROSA.
Este aparato tiene aislamiento doble y
no debe conectarse a tierra.
IMPORTANTE: Los cables que componen
el cable de toma de corriente siguen el
siguiente código de color:
• Azul: - Neutral
• Marrón: - Con Corriente
ADVERTENCIAS DE
SEGURIDAD
Manual del usuario. Esta aspiradora
debe utilizarse únicamente para el fin
indicado, tal y como se describe en estas
instrucciones. Cerciórese de que las
entiende perfectamente antes de poner
en funcionamiento el aparato.
Limpio el EcoBox™ con frecuencia para
aspirar materiales como polvo fino o
limpiar alfombras nuevas.
Seguridad con relación a niños,
ancianos o enfermos: No permita que
los niños jueguen con el aparato ni con
sus mandos. Supervise a niños mayores,
ancianos o enfermos cuando utilicen el
aparato.
LEA ATENTAMENTE ESTAS
INSTRUCCIONES
NO utilice la aspiradora en la calle, ni en
cualquier superficie húmeda, ni para
aspirar residuos mojados.
NO aspire objetos duros o afilados,
cerillas, ceniza caliente, colillas de
cigarrillo ni objetos similares.
Electricidad estática. Algunas
moquetas pueden producir una pequeña
acumulación de electricidad estática. Las
descargas estáticas no son peligrosas para
la salud.
Utilice únicamente accesorios
recomendados o distribuidos por Hoover.
No aspire líquidos inflamables tales como
productos de limpieza, gasolina, etc. ni los
vapores que emanan.
Los aerosoles pueden ser inflamables. NO
los utilice cerca del aspirador.
Cable de alimentación. NO tire del
cable del enchufe para desenchufarlo de
la toma. Si el cable de alimentación está
dañado, la aspiradora debe ser reparada
por un Técnico del Servicio HOOVER para
evitar riesgos de seguridad.
Fallos. NO continúe utilizando la
aspiradora si parece estar averiada o el
cable de alimentación está dañado.
Depués de utilizarla. Apague la
aspiradora y desenchúfela de la toma de
alimentación. Apague y desenchufe siempre
la aspiradora antes de limpiarla o
emprender cualquier labor de
mantenimiento.
Servicio Hoover. Para garantizar el
funcionamiento seguro, eficaz y duradero
de la aspiradora, recomendamos que
cualquier labor de mantenimiento o
reparación sea realizada por un Técnico
autorizado del Servicio Hoover.
acenta_ECOBOX_v3.qxd 6/7/07 16:38 Page 26
Page 27

MONTAJE DEL MANGO (1)
El mango debe instalarse en el aspirador
antes de utilizarlo, a menos que se utilice
con la correa bandolera - ver (6).
1. Retire el tornillo del mango.
2. Deslice el mango sobre la parte
superior del aspirador.
3. Apriete el tornillo.
PORTA CABLES (2)
a) Recoja el cable enrollándolo en los
ganchos.
Sujete el cable con la pinza
incorporada.
b) Abra la pinza incorporada.
Gire ambos ganchos hacia dentro
como muestra la ilustración para soltar
el cable.
ACCESORIOS (3)
†
a) Correa bandolera
†
b) Tubo flexible
†
c) Cepillo para polvo
†
d) Tubo de extensión
e) Boquilla para muebles
f) Boquilla rinconera
TOBERAS (3)
g) Tobera de alfombras y suelo: pulse el
pedal para que el cepillo haga
contacto con el suelo duro.
h) Tobera para suelos delicados*: para
suelos de madera y demás suelos
delicados.
i) Tobera Turbo*: especialmente para
moquetas
l) Tobera eléctrica*: para la limpieza a
fondo de áreas amplias de moqueta.
MANDOS (4)
a) Interruptor ON/OFF (Encendido
Apagado)
Pulse el interruptor para encender.
Pulse el interruptor de nuevo para
apagar.
b) Regulador de potencia*
Deslice hacia la derecha para
aumentar la potencia.
Deslice hacia la izquierda para
disminuir la potencia.
TOMA DE FUERZA (5)
Para utilizar la tobera eléctrica* conecte la
clavija de la boquilla al enchufe de la parte
posterior de la aspiradora (detrás del panel
de control).
CORREA BANDOLERA (6)
†
a) Una vez retirada la tobera, deslice un
extremo de la correa bandolera por el
tubo situado en la base de la
aspiradora. Deslice el extremo de la
correa por la lengueta de bloqueo y
gírelo como se indica. Instale el
accesorio que necesite para la
aplicación que desee.
b) Después de quitar el mango principal -
ver (1), sujete el otro extremo de la
correa bandolera a la parte superior
del mango.
c) Coloque el aspirador como se indica
para llevarlo sobre el hombro.
IIMMPPOORRTTAANNTTEE:: AAppaagguuee eell
aassppiirraaddoorr yy ssaaqquuee eell
eenncchhuuffee ddee llaa ttoommaa ddee
ccoorrrriieennttee aanntteess ddee vvaacciiaarr
eell EEccooBBoox
x™™ oo qquuiittaarr
ccuuaallqquuiieerr ffiillttrroo..
* Las características varían en función del modelo † Accesorio opcional.
acenta_ECOBOX_v3.qxd 6/7/07 16:38 Page 27
Page 28

ES
HOOVER RECOMIENDA QUE
SE LAVEN LOS FILTROS
CADA TRAS HABER VACIADO
EL RECIPIENTE ECOBOX
CINCO VECES.
VACIADO DEL EcoBox™ (7 y
8)
El indicador de comprobación del EcoBox™
se iluminará en rojo cuando sea preciso
vaciar el EcoBox™.
Para que el indicador de comprobación
refleje el estado real del EcoBox™ es preciso
que el regulador de potencia esté al
máximo nivel (a la derecha del todo).
Para vaciar el EcoBox™:
1. Extraiga la portezuela delantera.
2. Levante el EcoBox™ para sacarlo del
aspirador.
3. Abra y vacíe el EcoBox™.
4. Vuelva a montar el EcoBox™.
5. Una vez montado, instale de nuevo el
EcoBox™ en el aspirador
(procedimiento contrario al punto 2).
6. Sitúe las lengüetas de la portezuela
delantera. Cierre la portezuela
delantera.
LAVADO DEL FILTRO
premotor (9)
Tras haber extraído el EcoBox™:
Extraiga el filtro de su alojamiento.
Enjuague el filtro con agua tibia. No
frote el filtro.
Elimine el agua que sobre con un paño
seco y déjelo secar al aire durante 24
horas o hasta que esté completamente
seco.
Coloque de nuevo el filtro limpio y el
EcoBox™.
LAVADO DEL FILTRO DE
SALIDA DE AIRE (10)
Saque la cubierta del filtro.
Extraiga el filtro.
Enjuague el filtro con agua tibia. No
frote el filtro.
Elimine el agua que sobre con un
paño seco y déjelo secar al aire
durante 24 horas o hasta que esté
completamente seco.
Coloque de nuevo el filtro limpio y la
tapa.
NO utilice el aspirador sin estar instalado el
EcoBox™.
PARA SOLICITAR SERVICIOS
Se cobrará el servicio si la aspiradora funciona correctamente o no se ha montado de
acuerdo a estas instrucciones o se ha utilizado incorrectamente.
Antes de llamar a un Técnico del Servicio HOOVER, compruebe lo siguiente:
1. ¿Funciona la alimentación eléctrica a la que está conectada la aspiradora? Pruebe
con otro aparato.
2. ¿Está lleno el EcoBox™?
3. ¿Está obstruida la entrada de aire?
4. ¿Están obstruidos los filtros?
Si tiene alguna duda, llame a su Centro de Asistencia Técnica Hoover local para recibir
asesoramiento. Quizá puedan ayudarle por teléfono.
acenta_ECOBOX_v3.qxd 6/7/07 16:38 Page 28
Page 29

PIEZAS DE REPUESTO Y CONSUMIBLES*
Utilice solamente piezas de repuesto y consumibles originales de Hoover.
Declaración de garantía
Las condiciones de garantía para este aparato están definidas en el
país que se ha comprado. Para poder beneficiarse de esta garantía
puede ser obtenida por el vendedor donde se ha realizado la compra.
La factura de compra o el recibo debe ser mostrada cuando se hace
alguna reclamacíón bajo términos de garantía.
CANDY HOOVER ELECTRODOMESTICOS S. A
Ahumategui Bide s/n
20570 Bergara (Guipùzcoa)
GIAS Customer Service (Servicio De Asistencia Técnica) 902 100 150
PIEZAS DE REPUESTO Y CONSUMIBLES CÓDIGO
Filtro premotor de Acenta Ecobox™ S57 - 03875059
Conjunto portátil (1 correa bandolera + 1
manguera + 1 cepillo para el polvo)
C48 - 35600191
Tobera para alfombras y suelos G28 - 09185554
Tobera caresse para parqué G87PC -35600655
Tobera turbo J29TN -35600705
Este aparato está marcado de acuerdo con la Directiva Europea
2002/96/CE sobre residuos de aparatos eléctricos y electrónicos
(RAEE). Al cerciorarse de que este producto se elimine correctamente,
usted ayudará a prevenir las posibles consecuencias perjudiciales para
el medio ambiente y la salud humana que, de otro modo, podrían
producirse en caso de manejo inadecuado de los residuos de este
producto. El símbolo que puede verse en el producto indica que este
producto no puede tratarse como un residuo doméstico. En vez de
esto debe entregarse en un punto de recogida apropiado para el
reciclaje de equipos eléctricos y electrónicos. La eliminación debe llevarse a cabo
según los reglamentos medioambientales locales sobre eliminación de residuos. Para
información más detallada sobre el tratamiento, la recuperación y el reciclaje de este
producto, póngase en contacto con su Ayuntamiento, su servicio de recogida de
residuos domésticos o con el establecimiento donde haya comprado el producto.
acenta_ECOBOX_v3.qxd 6/7/07 16:38 Page 29
Page 30

ES
El sistema EcoBox™ exclusivo de HOOVER está hecho de un material especial de
plástico poroso que permite que el aire lo traspase sin dificultad mientras retiene la
mayor parte de la suciedad y el polvo más fino.
Para mantener el rendimiento óptimo del sistema, recomendamos que se lave el
EcoBox™ cada vez que se vacíe el EcoBox™ cinco veces, a fin de eliminar el polvo fino
que el aparato pueda haber aspirado y que haya podido quedar dentro del EcoBox™.
Para limpiarlo y conseguir un rendimiento óptimo deben seguirse los sencillos pasos
que se indican a continuación:
1. Sacuda el EcoBox™ para que salga la suciedad y los residuos de mayor
tamaño.
2. Pase un cepillo por el interior del EcoBox™ para extraer el polvo fino
que se haya acumulado en las paredes del recipiente.
3. Limpie en profundidad el interior y el exterior del EcoBox™
utilizando agua templada y detergente lavavajillas. A
continuación, si lo desea, puede introducir el EcoBox™ en el
lavavajillas y lavarlo en un ciclo completo de lavabo y secado de hasta
75ºC.
4. En caso de que no lo lave en el lavavajillas, enjuáguelo bien por
dentro y por fuera para asegurarse de que no quede nada de
detergente en el EcoBox™.
Elimine el agua sobrante con un paño seco y déjelo secar al aire durante 24 horas o
hasta que esté completamente seco.
Mantenimiento de los filtros
Tanto el filtro premotor como el de salida de aire deben lavarse cada vez que se vacíe
el recipiente EcoBox™ cinco veces. Consulte el manual del usuario para averiguar
cómo se accede a los filtros.
Para mantener un rendimiento óptimo debe seguir los sencillos pasos que se indican
a continuación:
1. Enjuague ambos filtros en agua templada, no los frote con estropajo.
2. Elimine el agua sobrante con un paño seco y déjelos secar al aire durante 24 horas
o hasta que estén completamente secos.
Tras realizar las operaciones de lavado, vuelva a colocar el EcoBox™ y los filtros en sus
posiciones originales en el aspirador.
ECOBOX™ SYSTEM
acenta_ECOBOX_v3.qxd 6/7/07 16:38 Page 30
Page 31

GR
Àԉ›ÍÂȘ ·ÛÊ·Ï›·˜
∏ ЫОФ‡· Ъ¤ВИ У· ¯ЪЛЫИМФФИВ›Щ·И
Ы‡МКˆУ· МВ ЩИ˜ Ф‰ЛБ›В˜. μВ‚·ИˆıВ›ЩВ
fiЩИ ¤¯ВЩВ О·Щ·УФ‹ЫВИ fiПВ˜ ЩИ˜
ПВЩФМ¤ЪВИВ˜ ЪИУ У· ЩЛУ
¯ЪЛЫИМФФИ‹ЫВЩВ.
∫·ı·Ъ›˙ВЩВ Ы˘¯У¿ ЩФУ О¿‰Ф EcoBoxì
fiÙ·Ó Ì·˙‡ÂÙ ˘ÏÈο fiˆ˜ ÛÎfiÓ˜ ‹
ÏÂÙ‹ ÛÎfiÓË ‹ fiÙ·Ó Î·ı·Ú›˙ÂÙÂ
ηÈÓÔ‡ÚÁÈ· ¯·ÏÈ¿.
∞ЫК¿ПВИ· БИ· ·И‰И¿, ЛПИОИˆМ¤УФ˘˜ ‹
·‰‡Ó·Ì· ¿ÙÔÌ·: ªËÓ ·Ê‹ÓÂÙ ٷ ·È‰È¿
У· ·›˙Ф˘У МВ ЩЛ Ы˘ЫОВ˘‹ ‹ МВ Щ·
¯ВИЪИЫЩ‹ЪИ¿ ЩЛ˜. ¶·Ъ·О·ПВ›ЫЩВ У·
ВИ‚П¤ВЩВ ЩЛ Ы˘ЫОВ˘‹ fiЩ·У
¯ЪЛЫИМФФИВ›Щ·И ·fi МВБ·П‡ЩВЪ· ·И‰И¿,
ЛПИОИˆМ¤УФ˘˜ ‹ ·‰‡У·М· ¿ЩФМ·.
ªËÓ ¯ЪЛЫИМФФИВ›ЩВ ЩЛ ЫОФ‡· ВОЩfi˜
ЫИЩИФ‡ ‹ ЫВ ‚ЪВБМ¤УВ˜ ВИК¿УВИВ˜ ‹
БИ· У· М·˙¤„ВЩВ ˘БЪ¿.
ªËÓ М·˙В‡ВЩВ ЫОПЛЪ¿ ‹ ·И¯МЛЪ¿
·УЩИОВ›МВУ·, Ы›ЪЩ·, ЩЫИБ¿Ъ· ‹
·ЪfiМФИ· ·УЩИОВ›МВУ·.
™Щ·ЩИОfi˜ ЛПВОЩЪИЫМfi˜. ªВЪИО¿ ¯·ПИ¿
МФЪВ› У· ‰ЛМИФ˘ЪБ‹ЫФ˘У ЫЩ·ЩИОfi
ЛПВОЩЪИЫМfi.
√ФИ·‰‹ФЩВ ЫЩ·ЩИО‹ ·ФКfiЪЩИЫЛ ‰ВУ
В›У·И ВИО›У‰˘УЛ БИ· ЩЛУ ˘БВ›·.
ГЪЛЫИМФФИВ›ЩВ МfiУФУ ÂÍ·ÚÙ‹Ì·Ù·
HOOVER.
ªËÓ М·˙В‡ВЩВ В‡КПВОЩ· ˘ПИО¿, fiˆ˜
О·ı·ЪИЫЩИО¿, ВЩЪ¤П·И· О.П.
Δ· ЫЪ¤˘ МФЪВ› У· В›У·И В‡КПВОЩ·.
ªËÓ „Âο˙ÂÙ ‰›Ï· ÛÙË ÛÎÔ‡·.
ªËÓ ‚Á¿˙ÂÙ ÙËÓ Ú›˙· ÙÚ·‚ÒÓÙ·˜ ÙÔ
ηÏÒ‰ÈÔ, ÁÈ·Ù› Â¿Ó Î·Ù·ÛÙÚ·Ê›, Ë
ÛÎÔ‡· ı· Ú¤ÂÈ Ó· ÂÈÛ΢·ÛÙ› ·fi
ÙÔ ÂÍÔ˘ÛÈÔ‰ÔÙË̤ÓÔ Û¤Ú‚È˜ Ù˘
HOOVER.
ªËÓ Ы˘УВ¯›˙ВЩВ У· ¯ЪЛЫИМФФИВ›ЩВ ЩЛ
ЫОФ‡·, ·У ‰В›¯УВИ fiЩИ ¤¯ВИ ‚П¿‚Л ‹
fiЩ·У ЩФ О·ПТ‰ИФ ·ЪФ˘ЫИ¿˙ВИ КıФЪ¿.
ªÂÙ¿ ·fi ÙË ¯Ú‹ÛË ОПВ›УВЩВ ¿УЩ· ЩФ
‰И·ОfiЩЛ ПВИЩФ˘ЪБ›·˜ О·И ‚Б¿˙ВЩВ ЩФ
О·ПТ‰ИФ ·fi ЩЛУ Ъ›˙·. ΔФ ›‰ИФ О¿УВЩВ
ЪИУ ·fi ЩФ О·ı¿ЪИЫМ· ‹ fiЩ·У ı¤ПВЩВ
У· О¿УВЩВ ФФИ·‰‹ФЩВ ¿ППЛ ВЪБ·Ы›·
ЫЩЛ ЫОФ‡·.
°И· ЩЛУ ·ЫК·П‹ О·И ЫˆЫЩ‹ ПВИЩФ˘ЪБ›·
ЩЛ˜ Ы˘ЫОВ˘‹˜ ÙÔ Û¤Ú‚È˜ ηÈ
ÔÔÈ·‰‹ÔÙ ¿ÏÏË ÂȉÈfiÚıˆÛË Ú¤ÂÈ
Ó· Á›ÓÂÙ·È ÌfiÓÔ ·fi
ÂÍÔ˘ÛÈÔ‰ÔÙË̤ÓÔ˘˜ Ù¯ÓÈÎÔ‡˜ Ù˘
HOOVER.
¶∞ƒ∞∫∞§√Àª∂ ¡∞ ¢π∞μ∞™∂Δ∂ ¶ƒ√™∂∫Δπ∫∞ Δπ™ √¢∏°π∂™ Ã∏™∏™
∏ Ы˘ЫОВ˘‹ Ъ¤ВИ У· Ы˘У·ЪМФПФБВ›Щ·И БИ· У· ПВИЩФ˘ЪБВ› Ы‡МКˆУ· МВ ·˘Щ¤˜
ЩИ˜ Ф‰ЛБ›В˜. ∂У‰В›ОУ˘Щ·И БИ· ФИОИ·О‹ ¯Ъ‹ЫЛ О·И МfiУФ БИ· У· О·ı·Ъ›˙ВИ ЫЩВБУ‹
‚ÚˆÌÈ¿ Î·È ÛÎfiÓË ·fi ¯·ÏÈ¿ Î·È ‰¿Â‰·.
ΔФ ЪfiЫıВЩФ ЫВЩ ВЪБ·ПВ›ˆУ МФЪВ› У· ¯ЪЛЫИМФФИЛıВ› БИ· ЩЛУ ·К·›ЪВЫЛ
ЫЩВБУ‹˜ ‚ЪˆМИ¿˜ О·И ЫОfiУЛ˜ ·fi ¤ИП· О·И ˘К¿ЫМ·Щ·.
acenta_ECOBOX_v3.qxd 6/7/07 16:38 Page 31
Page 32

∏ Û˘Û΢‹ ·˘Ù‹ ¤¯ÂÈ ‰ÈÏ‹ ÌfiÓˆÛË Î·È ‰ÂÓ ··ÈÙ› Á›ˆÛË.
™∏ª∞¡Δπ∫√: Δ· Ы‡ЪМ·Щ· ЫЩФ О·ПТ‰ИФ ЩЪФКФ‰ФЫ›·˜ ¤¯Ф˘У ¯ЪˆМ·ЩИЫМФ‡˜ Ф˘
·УЩИЫЩФИ¯Ф‡У МВ ЩИ˜ ·ОfiПФ˘ıВ˜ Оˆ‰ИОФФИ‹ЫВИ˜:
ªПВ – √À¢∂Δ∂ƒ√ ∫·Ê¤ – ∂¡∂ƒ°√
¶ƒ√∂π¢√¶√π∏™∏!
Δ√ ∏§∂∫Δƒπ∫√ ƒ∂Àª∞ ª¶√ƒ∂π ¡∞ ∂π¡∞π
∂•∞πƒ∂Δπ∫∞ ∂¶π∫π¡¢À¡√.
∏ПВОЩЪИО¤˜ ··ИЩ‹ЫВИ˜
™˘У·ЪМФПfiБЛЫЛ ¯ВИЪФП·‚‹˜ (1)
∏ ¯ВИЪФП·‚‹ Ъ¤ВИ У· Ы˘У·ЪМФПФБВ›Щ·И ЫЩЛ
ЫОФ‡· ЪИУ ·fi ЩЛ ¯Ъ‹ЫЛ, ВОЩfi˜ О·И ·У
¯ЪЛЫИМФФИВ›Щ·И М·˙› МВ ЩФУ ИМ¿УЩ· ТМФ˘ ‚П¤В (6).
1. ∞К·ИЪ¤ЫЩВ ЩЛ ‚›‰· ·fi ЩЛ ¯ВИЪФП·‚‹.
2. ¶ВЪ¿ЫЩВ ЩЛ ¯ВИЪФП·‚‹ ЫЩФ ¿Уˆ М¤ЪФ˜
ЩЛ˜ ЫОФ‡·˜.
3. μȉÒÛÙ ÙË ‚›‰·.
∞Ôı‹Î¢ÛË Î·Ïˆ‰›Ô˘ (2)
a) Δ˘Ï›ÍÙ ÙÔ Î·ÏÒ‰ÈÔ Á‡Úˆ ·fi Ù·
¿БОИЫЩЪ·.
™ЩВЪВТЫЩВ ЩФ О·ПТ‰ИФ МВ ЩЛУ
ВУЫˆМ·ЩˆМ¤УЛ ·ЫК¿ПВИ·.
b) ∞ÓÔ›ÍÙ ÙËÓ ÂÓۈ̷و̤ÓË ·ÛÊ¿ÏÂÈ·.
™ЩЪ¤„ЩВ О·И Щ· ‰‡Ф ¿БОИЫЩЪ· ЪФ˜ Щ·
М¤Ы·, fiˆ˜ К·›УВЩ·И ЫЩЛУ ВИОfiУ·, БИ· У·
ВПВ˘ıВЪТЫВЩВ ЩФ О·ПТ‰ИФ.
∂Í·ÚÙ‹Ì·Ù· (3)
†
a) πÌ¿ÓÙ·˜ ÒÌÔ˘
†
b) ∂
‡
ηÌÙÔ˜ ۈϋӷ˜
†
c) μФ‡ЪЩЫ· НВЫОФУ›ЫМ·ЩФ˜
†
d) ™ˆÏ‹Ó·˜ ÚÔ¤ÎÙ·Û˘
e) ∂Í¿ÚÙËÌ· ÁÈ· ¤ÈÏ·
f) ∂Í¿ÚÙËÌ· ÁÈ· ÁˆÓ›Â˜
∞ÎÚÔʇÛÈ· (3)
g) ¶¤ÏÌ·: ȤÛÙ ÙÔ ÂÓÙ¿Ï ÁÈ· Ó· ʤÚÂÙÂ
ЩИ˜ ‚Ф‡ЪЩЫВ˜ ЫВ В·К‹ МВ ЩФ ЫОПЛЪfi
‰¿В‰Ф.
h) ∂Í¿ÚÙËÌ· ÁÈ· ¢·›ÛıËÙ· ‰¿Â‰·*: ÁÈ·
͇ÏÔ Î·È fiÏ· Ù· ¢·›ÛıËÙ· ‰¿Â‰·.
i) ∂Н¿ЪЩЛМ· turbo*: ВИ‰ИОfi БИ· ¯·ПИ¿.
l) ∂Н¿ЪЩЛМ· ЛПВОЩЪИО‹˜ ‚Ф‡ЪЩЫ·˜*: БИ·
‚·ı‡ ηı·ÚÈÛÌfi ¯·ÏÈÒÓ Ì ÌÂÁ¿ÏÔ
ÂÌ‚·‰fiÓ.
ГВИЪИЫМfi˜ (4)
a) ¢È·ÎfiÙ˘ O¡/OFF
¶И¤ЫЩВ БИ· У· ВУВЪБФФИ‹ЫВЩВ.
¶И¤ЫЩВ Н·У¿ БИ· У·
·ВУВЪБФФИ‹ЫВЩВ.
b) ƒ˘ıÌÈÛÙ‹˜ ÈÛ¯‡Ô˜*
™‡ÚÂÙ ÚÔ˜ Ù· ‰ÂÍÈ¿ ÁÈ· Ó·
·˘Н‹ЫВЩВ ЩЛУ ИЫ¯‡.
™‡ЪВЩВ ЪФ˜ Щ· ·ЪИЫЩВЪ¿ БИ·
У· МВИТЫВЩВ ЩЛУ ИЫ¯‡.
∞‡ÍËÛË ÈÛ¯‡Ô˜ (5)
°И· ЩЛ ¯Ъ‹ЫЛ ЩФ˘ ВН·ЪЩ‹М·ЩФ˜
ЛПВОЩЪИО‹˜ ‚Ф‡ЪЩЫ·˜ ВИЫ¿БВЩВ ЩФ КИ˜
ЩЛ˜ ‚Ф‡ЪЩЫ·˜ ЫЩЛУ ˘Ф‰Ф¯‹ ЫЩФ ›Ыˆ
М¤ЪФ˜ ЩЛ˜ ЫОФ‡·˜ (›Ыˆ ·fi ЩФУ ›У·О·
ВП¤Б¯Ф˘).
πÌ¿ÓÙ·˜ ÒÌÔ˘ (6)
†
a)
∞КФ‡ ·К·ИЪ¤ЫВЩВ ЩФУ В‡О·МЩФ ЫˆП‹У· ‹
О¿ФИФ ВН¿ЪЩЛМ· ВЪ¿ЫЩВ ЩФ ¤У· ¿ОЪФ ЩФ˘
ИМ¿УЩ· ТМФ˘ ЫЩФ ЫˆП‹У· ЫЩЛ ‚¿ЫЛ ЩЛ˜
ЫОФ‡·˜. ¶ВЪИЫЩЪ¤„ЩВ ЩФ ¿ОЪФ ЩФ˘ ИМ¿УЩ·
М¤¯ЪИ У· ·ЫК·П›ЫВИ ЫЩЛУ ВИ‰ИО‹ ЪФВНФ¯‹,
fiˆ˜ ·ВИОФУ›˙ВЩ·И.
∂БО·Щ·ЫЩ‹ЫЩВ Щ· О·Щ¿ППЛП·
ВН·ЪЩ‹М·Щ·, ·У¿ПФБ· МВ ЩЛ ¯Ъ‹ЫЛ.
b) ªВ ЩЛУ ОВУЩЪИО‹ П·‚‹ ·ФЫ˘У‰В‰ВМ¤УЛ
–
‚П¤В (1), ЫЩВЪВТЫЩВ ЩФ ¿ППФ ¿ОЪФ ЩФ˘
ИМ¿УЩ· ТМФ˘ ЫЩФ ¿Уˆ М¤ЪФ˜ ЩЛ˜
¯ВИЪФП·‚‹˜.
c) ¶ÂÚ¿ÛÙ ÙË ÛÎÔ‡· ¿Óˆ ·fi ÙÔÓ ÒÌÔ,
fiˆ˜ ·ВИОФУ›˙ВЩ·И.
*Δ· ¯·Ъ·ОЩЛЪИЫЩИО¿ ‰И·К¤ЪФ˘У ·У¿ПФБ· МВ
ЩФ МФУЩ¤ПФ † ¶ЪФ·ИЪВЩИОfi ВН¿ЪЩЛМ·.
™∏ª∞¡Δπ∫√: ¶ÚÈÓ ·fi ÙÔ ¿‰ÂÈ·ÛÌ·
ÙÔ˘ ο‰Ô˘ EcoBoxì ‹ ÙËÓ ·Ê·›ÚÂÛË
ЩˆУ К›ПЩЪˆУ, У· ·К·ИЪВ›ЩВ ¿УЩ· ЩФ
КИ˜ ·fi ЩЛУ ·ЪФ¯‹ ЩФ˘ ЛПВОЩЪИОФ‡
Ú‡̷ÙÔ˜.
acenta_ECOBOX_v3.qxd 6/7/07 16:38 Page 32
Page 33

GR
∏ HOOVER ™À¡π™Δ∞ ¡∞ ¶§∂¡∂Δ∂ Δ∞
ºπ§Δƒ∞ ª∂Δ∞ ∞¶√ ¶∂¡Δ∂ °∂ªπ™ª∞Δ∞
Δ√À ∫∞¢√À ECOBOX.
∞¢∂π∞™ª∞ Δ√À ºπ§Δƒ√À ∫∞¢√À
ECOBOXì (7 & 8)
√ ‰В›ОЩЛ˜ ВП¤Б¯Ф˘ EcoBoxм Б›УВЩ·И
ОfiООИУФ˜ fiЩ·У ··ИЩВ›Щ·И ¿‰ВИ·ЫМ· ЩФ˘
О¿‰Ф˘ EcoBoxм. °И· У· П·М‚¿УВЩВ ЩЛУ
·ОЪИ‚‹ ¤У‰ВИНЛ Ы¯ВЩИО¿ МВ ЩЛУ О·Щ¿ЫЩ·ЫЛ
ЩФ˘ О¿‰Ф˘ EcoBoxм, Ф Ъ˘ıМИЫЩ‹˜ ИЫ¯‡Ф˜
ı· Ъ¤ВИ У· ¤¯ВИ Ъ˘ıМИЫЩВ› ЫЩЛ М¤БИЫЩЛ
ЩИМ‹ (Щ¤ЪМ· ‰ВНИ¿).
°È· Ó· ·‰ÂÈ¿ÛÂÙ ÙÔÓ Î¿‰Ô EcoBoxì:
1. ∞К·ИЪ¤ЫЩВ ЩЛУ МЪФЫЩИУ‹ fiЪЩ·.
2. ∞К·ИЪ¤ЫЩВ ЩФУ О¿‰Ф EcoBoxм ·fi ЩЛ
ЫОФ‡· ·У·ЫЛОТУФУЩ¿˜ ЩФУ.
3. ∞ÓÔ›ÍÙÂ Î·È ·‰ÂÈ¿ÛÙ ÙÔÓ Î¿‰Ô
EcoBoxì.
4. ™˘У·ЪМФПФБ‹ЫЩВ Н·У¿ ЩФУ О¿‰Ф
EcoBoxм.
5. ∂·У·ЩФФıВЩ‹ЫЩВ ЩФУ
Ы˘У·ЪМФПФБЛМ¤УФ О¿‰Ф EcoBoxм ЫЩЛ
ЫОФ‡· (·ОФПФ˘ıТУЩ·˜ ЩФ ‚‹М· 2
·УЩИЫЩЪfiКˆ˜).
6. ∂УЩФ›ЫЩВ ЩИ˜ БПˆЩЩ›‰В˜ ЫЩЛУ
МЪФЫЩИУ‹ fiЪЩ·. ∫ПВ›ЫЩВ ЩЛУ
МЪФЫЩИУ‹ fiЪЩ·.
∫∞£∞ƒπ™ª√™ Δ√À ºπ§Δƒ√À ¶PIN TO
MOTEP (9)
∞ÊÔ‡ ·Ê·ÈÚ¤ÛÂÙ ÙÔÓ Î¿‰Ô EcoBoxì:
μÁ¿ÏÙ ÙÔ Ê›ÏÙÚÔ ·fi ÙÔ ÂÚ›‚ÏËÌ·.
•ÂχÓÂÙ ÙÔ Ê›ÏÙÚÔ Î¿Ùˆ ·fi
¯ÏÈ·Úfi ÓÂÚfi. ªËÓ ÙÚ›‚ÂÙ ÙÔ Ê›ÏÙÚÔ.
∞ÔÌ·ÎÚ‡ÓÂÙÂ ÙËÓ ÂÚ›ÛÛÂÈ· ÓÂÚÔ‡
МВ ¤У· ЫЩВБУfi ·У› О·И ·К‹ЫЩВ ЩФ У·
ЫЩВБУТЫВИ В› 24 ТЪВ˜ ‹ ¤ˆ˜ fiЩФ˘
ЫЩВБУТЫВИ ВУЩВПТ˜.
∂·Ó·ÙÔÔıÂÙ‹ÛÙ ÙÔ Î·ı·Úfi Ê›ÏÙÚÔ
Î·È ÙÔÓ Î¿‰Ô EcoBoxì.
∫∞£∞ƒπ™ª√™ Δ√À ºπ§Δƒ√À ∂•√¢√À
(10)
∞У·ЫЛОТЫЩВ О·И ·К·ИЪ¤ЫЩВ ЩФ
Î¿Ï˘ÌÌ· ÙÔ˘ Ê›ÏÙÚÔ˘.
∞Ê·ÈÚ¤ÛÙ ÙÔ Ê›ÏÙÚÔ.
•ÂχÓÂÙ ÙÔ Ê›ÏÙÚÔ Î¿Ùˆ ·fi
¯ÏÈ·Úfi ÓÂÚfi. ªËÓ ÙÚ›‚ÂÙ ÙÔ Ê›ÏÙÚÔ.
∞ÔÌ·ÎÚ‡ÓÂÙÂ ÙËÓ ÂÚ›ÛÛÂÈ· ÓÂÚÔ‡
МВ ¤У· ЫЩВБУfi ·У› О·И ·К‹ЫЩВ ЩФ У·
ЫЩВБУТЫВИ В› 24 ТЪВ˜ ‹ ¤ˆ˜ fiЩФ˘
ЫЩВБУТЫВИ ВУЩВПТ˜.
∂·Ó·ÙÔÔıÂÙ‹ÛÙ ÙÔ Î·ı·Úfi Ê›ÏÙÚÔ
Î·È ÙÔ Î¿Ï˘ÌÌ·.
ª∏¡ ¯ЪЛЫИМФФИ‹ЫВЩВ ЩЛ ЫОФ‡· ¯ˆЪ›˜
У· ¤¯ВЩВ ЩФФıВЩ‹ЫВИ ЩФУ О¿‰Ф
EcoBoxм.
∫·ÏÒÓÙ·˜ ÙÔ Û¤Ú‚È˜
£· ˘¿ЪНВИ ВИ‚¿Ъ˘УЫЛ ЫВ ВЪ›ЩˆЫЛ Ф˘ Л ЫОФ‡· ‚ЪВıВ› fiЩИ ПВИЩФ˘ЪБВ› О·УФУИО¿
‹ fiЩИ ‰ВУ ¤¯ВИ Ы˘У·ЪМФПФБЛıВ› Ы‡МКˆУ· МВ ЩИ˜ ·ЪФ‡ЫВ˜ Ф‰ЛБ›В˜ ‹ fiЩИ ¤¯ВИ Б›УВИ
·УЩИО·УФУИО‹ ¯Ъ‹ЫЛ ЩЛ˜.
¶ÚÈÓ Ó· ηϤÛÂÙ ¤Ó· Ù¯ÓÈÎÔ ÙÔ˘ ™¤Ú‚Ș Ù˘ HOOVER ‰ÈÂÍ¿ÁÂÙ ÙÔ˘˜ ÂϤÁ¯Ô˘˜
Ù˘ ·ÎfiÏÔ˘ı˘ Ï›ÛÙ·˜:
1.
°›ÓÂÙ·È ·ÚÔ¯‹ Ú‡̷ÙÔ˜ ÛÙË ÛÎÔ‡·; ∂ϤÁÍÙ ÙÔ Ì ÌÈ· ¿ÏÏË Û˘Û΢‹.
2. °¤ÌÈÛÂ Ô Î¿‰Ô˜ EcoBoxì;
3. ∂›Ó·È ÊÚ·Á̤ÓÔ ÙÔ ÛÙfiÌÈÔ;
4. ∂›Ó·È ÊÚ·Á̤ӷ Ù· Ê›ÏÙÚ·;
™Â ÂÚ›ÙˆÛË Ô˘ ¤¯ÂÙ ÔÔÈ·‰‹ÔÙ ·ÌÊÈ‚ÔÏ›· ηϤÛÙ ÁÈ· Û˘Ì‚Ô˘Ï¤˜ ÙÔ ÙÔÈÎfi
™¤Ú‚Ș Ù˘ Hoover - ÂӉ¯Ô̤ӈ˜ Ó· ÌÔÚÔ‡Ó Ó· Û·˜ ‚ÔËı‹ÛÔ˘Ó ·fi ÙÔ
ÙËϤʈÓÔ.
acenta_ECOBOX_v3.qxd 6/7/07 16:38 Page 33
Page 34

∞У·ПТЫИМ· О·И ·УЩ·ПП·ОЩИО¿*
¡· ¯ЪЛЫИМФФИВ›ЩВ ·ФОПВИЫЩИО¿ Щ· ·У·ПТЫИМ· О·И Щ· БУ‹ЫИ· ·УЩ·ПП·ОЩИО¿
ЩЛ˜ Hoover.
BERSON
∞º√π ∫. ™∞ƒ∞ºπ¢∏ ∞.∂.μ.∂
∞£∏¡∞
∞Б·М¤МУФУФ˜ 47, 176 75 ∫·ППИı¤·
ΔËÏ: 210-9478700 º·Í: 210-9428541
Service: 210-9478773
∞vt/ο: 210-9478775
¶·УВИЫЩЛМ›Ф˘ 41 - ™ЩФ¿ ¡ИОФПФ‡‰Л
ΔЛП: 210-3222705 º·Н: 2103225770
£∂™™∞§√¡π∫∏
∞Ï. ¶··Ó·ÛÙ·Û›Ô˘ 53-55, 54 453
£ÂÛ/Ó›ÎË
ΔËÏ: 2310-923761 º·Í: 2310928972
∞¡∞§ø™πª∞ ∫∞π ∞¡Δ∞§§∞∫Δπ∫∞
∫ø¢π∫√™
º›ÏÙÚÔ Acenta EcoBoxì ÚÈÓ ÙÔ ÌÔÙ¤Ú
∫ИЩ КФЪЛЩ‹˜ ¯Ъ‹ЫЛ˜ (1 ИМ¿УЩ·˜ ТМФ˘ + 1 В‡О·МЩФ˜ ЫˆП‹У·˜ + 1 ‚Ф‡ЪЩЫ· НВЫОФУ›ЫМ·ЩФ˜)
∞ÎÚÔʇÛÈÔ ¯·ÏÈÒÓ Î·È ‰·¤‰Ô˘
∞ÎÚÔʇÛÈÔ caresse ÁÈ· ·ÚΤ:
∞ÎÚÔʇÛÈÔ turbo
S57 - 03875059
C48 -35600191
G28 - 09185554
G87PC -35600655
J29TN -35600705
*Δ· ¯·Ъ·ОЩЛЪИЫЩИО¿ ‰И·К¤ЪФ˘У ·У¿ПФБ· МВ ЩФ МФУЩ¤ПФ
®
∂°°À∏™∏
¶·Ъ·¯ˆЪФ‡МВ ‰‡Ф (2) ¯ЪfiУИ· ВББ‡ЛЫЛ, ЫЩФ ЪФ˚fiУ, НВОИУТУЩ·˜ ·fi ЩЛУ
ЛМВЪФМЛУ›· ·БФЪ¿˜.
ª¤Ы· ЫЩЛУ ВЪ›Ф‰Ф ВББ‡ЛЫЛ˜ О·П‡ЩФ˘МВ, ¯ˆЪ›˜ ¯Ъ¤ˆЫЛ, ФФИФ‰‹ФЩВ
ВП¿ЩЩˆМ· ЪФВЪ¯fiМВУФ ·fi О·О‹ О·Щ·ЫОВ˘‹ ‹ О·О‹˜ ФИfiЩЛЩФ˜ ˘ПИОfi, В›ЩВ
ВИЫОВ˘¿˙ФУЩ·˜ В›ЩВ ·УЩИО·ıИЫЩТУЩ·˜ ФПfiОПЛЪЛ ЩЛ Ы˘ЫОВ˘‹ Ы‡МКˆУ· МВ ЩЛУ
ОЪ›ЫЛ М·˜.
∏ ВББ‡ЛЫЛ ‰ВУ О·П‡ЩВИ: К˘ЫИФПФБИО‹ КıФЪ¿ ‹ ВП·ЩЩТМ·Щ· ПfiБˆ ·М¤ПВИ·˜ ЩФ˘
¯Ъ‹ЫЩЛ, О·ıТ˜ В›ЫЛ˜ О·И ·У·ПТЫИМ· ·УЩ·ПП·ОЩИО¿ fiˆ˜ Ы·ОФ‡ПВ˜, ‚Ф‡ЪЩЫВ˜,
К›ПЩЪ·, ИМ¿УЩВ˜, П˘¯У›В˜ О.П.. ∏ ВББ‡ЛЫЛ ·О˘ЪТУВЩ·И ·У ¤¯Ф˘У Б›УВИ ВИЫОВ˘¤˜
·fi МЛ ВНФ˘ЫИФ‰ФЩЛМ¤У· ¿ЩФМ· ‹ ‰ВУ ¤¯Ф˘У ¯ЪЛЫИМФФИЛıВ› БУ‹ЫИ·
·ÓÙ·ÏÏ·ÎÙÈο Hoover.°È· ÂÈÛ΢‹ ¯ˆÚ›˜ ¯Ú¤ˆÛË Ì¤Û· ÛÙËÓ ÂÚ›Ô‰Ô Ù˘
ÂÁÁ‡ËÛ˘, ·Ú·‰ÒÛÙ ‹ ÛÙ›ÏÙ ÙËÓ Û˘Û΢‹ Ì ÙËÓ ·fi‰ÂÈÍË ·ÁÔÚ¿˜ Û ¤Ó·
ÂÍÔ˘ÛÈÔ‰ÔÙË̤ÓÔ Î·Ù¿ÛÙËÌ· ۤڂȘ Ù˘ Hoover.
∞˘Щ‹ Л Ы˘ЫОВ˘‹ К¤ЪВИ ЩЛ Ы‹М·УЫЛ Ф˘ ВИ‚¿ППВИ Л ∂˘Ъˆ·˚О‹ √‰ЛБ›·
2002/96/E∫ ВЪ› ∞Ф‚П‹ЩˆУ ∏ПВОЩЪИОФ‡ О·И ∏ПВОЩЪФУИОФ‡ ∂НФПИЫМФ‡ (∞∏∏∂).
∏ ЫˆЫЩ‹ ·fiЪЪИ„Л ЩФ˘ ЪФ˚fiУЩФ˜ ı· ·ФЩЪ¤„ВИ ЩИ˜ Иı·У¤˜ ·ЪУЛЩИО¤˜
ВИЩТЫВИ˜ ЫЩФ ВЪИ‚¿ППФУ О·И ЩЛУ ·УıЪТИУЛ ˘БВ›·, ФИ ФФ›В˜ Иı·УfiУ У·
ЪФО‡„Ф˘У ·fi ЩЛУ ·О·Щ¿ППЛПЛ ‰И·¯В›ЪИЫЛ ЩФ˘ ЪФ˚fiУЩФ˜. ∏ Ы‹М·УЫЛ ЩФ˘
ЪФ˚fiУЩФ˜ ВИЫЛМ·›УВИ fiЩИ ЩФ Ы˘БОВОЪИМ¤УФ ЪФ˚fiУ ‰ВУ Ъ¤ВИ У· ·ФЪЪ›ЩВЩ·И
М·˙› МВ Щ· ФИОИ·О¿ ·ФЪЪ›ММ·Щ·. ∞УЩИı¤Щˆ˜, ı· Ъ¤ВИ У· ·Ъ·‰›‰ВЩ·И ЫЩФ
ВО¿ЫЩФЩВ ЫЛМВ›Ф Ы˘ППФБ‹˜ ЛПВОЩЪИОФ‡ О·И ЛПВОЩЪФУИОФ‡ ВНФПИЫМФ‡ БИ·
·У·О‡ОПˆЫЛ. ∏ ·fiЪЪИ„Л ЩФ˘ ЪФ˚fiУЩФ˜ ı· Ъ¤ВИ У· Ъ·БМ·ЩФФИЛıВ›
Ы‡МКˆУ· МВ ЩФ˘˜ О·Щ¿ ЩfiФ˘˜ ВЪИ‚·ППФУЩИОФ‡˜ О·УФУИЫМФ‡˜ БИ· ЩЛУ ·fiЪЪИ„Л ·Ф‚П‹ЩˆУ. °И·
ВЪИЫЫfiЩВЪВ˜ ПЛЪФКФЪ›В˜ Ы¯ВЩИО¿ МВ ЩЛ ‰И·¯В›ЪИЫЛ, ЩЛУ ·У¿ОЩЛЫЛ О·И ЩЛУ ·У·О‡ОПˆЫЛ ·˘ЩФ‡ ЩФ˘
ЪФ˚fiУЩФ˜, ВИОФИУˆУ‹ЫЩВ МВ ЩЛ ‰ЛМФЩИО‹ ˘ЛЪВЫ›· ЩЛ˜ ВЪИФ¯‹˜ Ы·˜, ЩЛУ ˘ЛЪВЫ›· ·fiЪЪИ„Л˜
ФИОИ·ОТУ ·ФЪЪИММ¿ЩˆУ ‹ ЩФ О·Щ¿ЫЩЛМ· ·fi ЩФ ФФ›Ф ·БФЪ¿Ы·ЩВ ЩФ ЪФ˚fiУ.
acenta_ECOBOX_v3.qxd 6/7/07 16:38 Page 34
Page 35

GR
Δ√ ª√¡∞¢π∫√ EcoBox™ Δ∏™ HOOVER ∂π¡∞π ∫∞Δ∞™∫∂À∞™ª∂¡√ ∞¶√ ∂π¢π∫√ ¶√ƒø¢∂™
¶§∞™Δπ∫√ À§π∫√ ¶√À ∂¶πΔƒ∂¶∂π Δ∏ ¢π∂§∂À™∏ Δ√À ∞∂ƒ∞ ∂¡ø ™À°∫ƒ∞Δ∂I Δ√
ª∂°∞§ÀΔ∂ƒ√ ª∂ƒ√™ Δ∏™ μƒøªπ∞™ ∫∞π Δ∏™ §∂¶Δ∏™ ™∫√¡∏™.
°И· У· ‰И·ЩЛЪЛıВ› Л ‚¤ПЩИЫЩЛ ·fi‰ФЫЛ ЩФ˘ Ы˘ЫЩ‹М·ЩФ˜, Ы˘УИЫЩФ‡МВ У· П¤УВЩВ ЩФУ О¿‰Ф
EcoBoxм МВЩ¿ ·fi ¤УЩВ БВМ›ЫМ·Щ· ЩФ˘ О¿‰Ф˘ EcoBoxм, БИ· У· ·К·ИЪ¤ЫВЩВ ЩФ ЫЩЪТМ· ПВЩ‹˜
ЫОfiУЛ˜ Ф˘ ·У·ЪЪfiКЛЫВ Л МЛ¯·У‹ О·И ·Ъ¤МВИУВ М¤Ы· ЫЩФУ О¿‰Ф EcoBoxм.
°π∞ ¡∞ ¶§À¡∂Δ∂ Δ√ EcoBox™ ∫∞π ¡∞ ∞À•∏™∂Δ∂ ™Δ√ ª∂°π™Δ√ Δ∏¡ ∞¶√¢√™∏ Δ∏™
™À™∫∂À∏™, £∞ ¶ƒ∂¶∂π ¡∞ ∞∫√§√À£∏™∂Δ∂ Δ∞ ¶∞ƒ∞∫∞Δø μ∏ª∞Δ∞.
1. ∞¡∞∫π¡∏™Δ∂ Δ√ EcoBox™ °π∞ ¡∞ ∞º∞πƒ∂™∂Δ∂ ª∂°∞§∞ ™øª∞Δπ¢π∞
μƒøªπ∞™ ∫∞π ™∫√À¶π¢π∞.
2. μ√ÀƒΔ™π™Δ∂ Δ√ ∂™øΔ∂ƒπ∫√ Δ√À EcoBox™ °π∞ ¡∞ ∞º∞πƒ∂™∂Δ∂ Δ√
™Δƒøª∞ §∂¶Δ∏™ ™∫√¡∏™ ¶√À ∂Ã∂π ™Ã∏ª∞Δπ™Δ∂π ™Δ∞ Δ√πÃøª∞Δ∞ Δ√À.
3. ¶§À¡∂Δ∂ ™Ã√§∞™Δπ∫∞ Δ∏¡ ∂™øΔ∂ƒπ∫∏ ∫∞π Δ∏¡ ∂•øΔ∂ƒπ∫∏ ∂¶πº∞¡∂π∞
Δ√À EcoBox™ Ã∏™πª√¶√πø¡Δ∞™ ∫∞£∞ƒπ™Δπ∫√ À°ƒ√ ∫∞π ∑∂™Δ√ ¡∂ƒ√.
ª¶√ƒ∂πΔ∂, ∂∞¡ £∂§∂Δ∂, ¡∞ Δ√¶√£∂Δ∏™∂Δ∂ Δ√ EcoBox™ ™Δ√
¶§À¡Δ∏ƒπ√ ¶π∞Δø¡ ™Δ√ ¶ƒ√°ƒ∞ªª∞ ¶§∏ƒ√À™ ¶§À™∏™ ∫∞π
∞¶√™Δƒ∞°°π™∏™ ™Δ√À™ 75Cº ∫∞Δ’ ∞¡øΔ∞Δ√ √ƒπ√.
4. ∂∞¡ ¢∂¡ Δ√ ¶§À¡∂Δ∂ ™∂ ¶§À¡Δ∏ƒπ√ ¶π∞Δø¡, •∂¶§À¡∂Δ∂ ¶ƒ√™∂∫Δπ∫∞
Δ∏¡ ∂™øΔ∂ƒπ∫∏ ∫∞π Δ∏¡ ∂•øΔ∂ƒπ∫∏ Δ√À ∂¶πº∞¡∂π∞ ∫∞π μ∂μ∞πø£∂πΔ∂
√Δπ ¢∂¡ ∂Ã√À¡ ª∂π¡∂π À¶√§∂πªª∞Δ∞ ∫∞£∞ƒπ™Δπ∫√À.
∞¶√ª∞∫ƒÀ¡∂Δ∂ Δ√ ∂¶π¶§∂√¡ ¡∂ƒ√ ª∂ ∂¡∞ ™Δ∂°¡√ ¶∞¡π ∫∞π ∞º∏™Δ∂ Δ∞ ¡∞
™Δ∂°¡ø™√À¡ ª√¡∞ Δ√À™ °π∞ 24 øƒ∂™ ◊ ∂ø™ √Δ√À ™Δ∂°¡ø™√À¡ ∂¡Δ∂§ø™.
™À¡Δ∏ƒ∏™∏ Δø¡ ºπ§Δƒø¡
¶Ú¤ÂÈ Ó· ϤÓÂÙ ÙÔ Ê›ÏÙÚÔ ÚÈÓ ÙÔ ÌÔÙ¤Ú Î·È ÙÔ Ê›ÏÙÚÔ ÂÍfi‰Ô˘ ÌÂÙ¿ ·fi ¤ÓÙÂ
ÁÂÌ›ÛÌ·Ù· ÙÔ˘ ο‰Ô˘ EcoBoxì. ∞Ó·ÙÚ¤ÍÙ ÛÙÔ ÂÁ¯ÂÈÚ›‰ÈÔ ¯Ú‹Û˘ ÁÈ· Ó· Ì¿ıÂÙ Ҙ
Ó· ÚÔÛÂÏ¿ÛÂÙ ٷ Ê›ÏÙÚ·.
°π∞ ¡∞ ¢π∞Δ∏ƒ∏™∂Δ∂ Δ∏ μ∂§Δπ™Δ∏ ∞¶√¢√™∏, ∞∫√§√À£∏™Δ∂ Δ∞ ¶∞ƒ∞∫∞Δø ∞¶§∞
μ∏ª∞Δ∞.
1. •∂¶§À¡∂Δ∂ ∫∞π Δ∞ ¢À√ ºπ§Δƒ∞ ª∂ çπ∞ƒ√ ¡∂ƒ√, Ãøƒπ™ ¡∞ Δ∞ Δƒπμ∂Δ∂.
2. ∞¶√ª∞∫ƒÀ¡∂Δ∂ Δ√ ∂¶π¶§∂√¡ ¡∂ƒ√ ª∂ ∂¡∞ ™Δ∂°¡√ ¶∞¡π ∫∞π ∞º∏™Δ∂ Δ∞ ¡∞
™Δ∂°¡ø™√À¡ ª√¡∞ Δ√À™ °π∞ 24 øƒ∂™ ◊ ∂ø™ √Δ√À ™Δ∂°¡ø™√À¡ ∂¡Δ∂§ø™.
∞º√À √§√∫§∏ƒø™∂Δ∂ Δ∏ ¢π∞¢π∫∞™π∞ ¶§À™πª∞Δ√™, Δ√¶√£∂Δ∏™Δ∂ Δ∞ ºπ§Δƒ∞ ∫∞π Δ√
EcoBox™ •∞¡∞ ™Δ∏¡ ∞ƒÃπ∫∏ Δ√À™ £∂™∏ ª∂™∞ ™Δ∏ ™∫√À¶∞.
ECOBOX™ SYSTEM
acenta_ECOBOX_v3.qxd 6/7/07 16:38 Page 35
Page 36

BE/NL
LEES DEZE INSTRUCTIES
GOED DOOR
Dit product moet worden gemonteerd
overeenkomstig deze instructies. Dit
product dient uitsluitend voor
huishoudelijk gebruik, ter
verwijdering van vuil en stof van
huishoudelijke vloerbedekking en
vloeren.
De accessoires kunnen worden gebruikt
voor het verwijderen van vuil en stof
van meubilair en bekleding.
ELEKTRISCHE VEREISTEN
WAARSCHUWING!
ELEKTRICITEIT KAN BIJZONDER
GEVAARLIJK ZIJN. Dit apparaat is
dubbel geïsoleerd en moet niet worden
geaard.
BELANGRIJK: De individuele draden in
het hoofdsnoer zijn gekleurd in
overeenstemming met de volgende
code:
• Blauw: – Neutraal
• Bruin: – Spanningvoerend
VEILIGHEIDSINSTRUCTIES
Handleiding. Deze stofzuiger mag alleen
worden gebruikt voor de werkzaamheden
waarvoor deze is bedoeld, zoals
beschreven in deze instructies. Overtuig u
ervan dat u deze goed hebt begrepen,
alvorens het apparaat te gebruiken.
Maak de EcoBox™ regelmatig schoon
wanneer u materiaal zoals poeder of fijn
stof opzuigt of als u een nieuw tapijt
reinigt.
Veiligheid voor kinderen, ouderen of
minder begaafden: Laat kinderen niet
spelen met het apparaat of de
bedieningsonderdelen. Zorg voor toezicht
bij gebruik van het apparaat door oudere
kinderen, ouderen of minder begaafden.
NOOIT de stofzuiger in de buitenlucht
gebruiken of op een nat oppervlak, of
voor het opzuigen van nat materiaal.
NOOIT scherpe of harde
voorwerpen, lucifers, hete as,
sigarettenpeuken e.d. opzuigen.
Statische electriciteit. In sommige soorten
vloerbedekking kan een kleine
hoeveelheid statische elektriciteit worden
gevormd. Een ontlading van deze
statische elektriciteit is niet gevaarlijk voor
de gezondheid.
Gebruik uitsluitend de hulpstukken die
door Hoover zijn aanbevolen of geleverd.
NOOIT brandbare vloeistoffen opzuigen
zoals reinigingsvloeistoffen, benzine, enz.,
noch de daardoor geproduceerde
dampen.
Spuitbussen. De inhoud hiervan kan
ontvlambaar zijn. Spuit NOOIT in buurt
van de stofzuiger.
Het snoer. De stekker NIET uit het
stopcontact verwijderen door aan het
snoer te trekken. Als het snoer of de
stekker beschadigd zijn, moet de
stofzuiger worden hersteld door een
officiële HOOVER onderhoudsmonteur,
om risico’s te vermijden.
Storingen / defecten. Uw stofzuiger
NIET blijven gebruiken als die kennelijk
defect is of als het electrisch snoer
beschadigd is.
Na het gebruik. De stofzuiger afzetten
en de stekker uit het stopcontact
verwijderen. De stofzuiger altijd afzetten
en de stekker uit het stopcontact
verwijderen voordat reiniging of
onderhoud van het apparaat
plaats vindt.
Hoover Service. Tenslotte: Om de
voortdurende veilige en efficiënte
werking van het apparaat te kunnen
garanderen, wordt aanbevolen dat
reparaties en onderhoud uitsluitend
worden uitgevoerd door een officiële
HOOVER onderhoudsmonteur.
acenta_ECOBOX_v3.qxd 6/7/07 16:38 Page 36
Page 37

HANDVAT MONTEREN (1)
Tenzij het apparaat wordt gebruik met
de schouderband (zie (6)), dient altijd
vóór gebruik het handvat op de
stofzuiger te worden gemonteerd.
1. Verwijder de handschroef van het
handvat.
2. Schuif het handvat over de
stofzuiger.
3. Draai de handschroef vast.
DE KABEL OPBERGEN (2)
a) Wind het snoer om de haken.
Zet het snoer vast met de snoerklem.
b) Maak de snoerklem los.
Draai beide haken naar binnen om
het snoer af te wikkelen (zie
afbeelding).
ACCESSORIES (3)
†
a) Schouderband
†
b) Flexibele slang
†
c) Stofborstel
†
d) Verlengbuis
e) Zuigmond voor meubilair
f) Spleetzuigmond
MONDSTUKKEN (3)
g) Zuigmond voor vloerbedekking/vloeren:
druk op het pedaal, zodat de borstels de
harde vloer raken.
h) Zuigmond kwetsbare vloeren*: voor
hout en alle kwetsbare vloeren.
i) Turbozuigmond*: speciaal voor
vloerbedekking.
l) Krachtzuigmond*: voor diep reinigen
van vloerbedekking met een groot
oppervlak.
BEDIENINGSKNOPPEN (4)
a) AAN/UIT schakelaar
Indrukken om de machine in te
schakelen.
Nogmaals indrukken om de machine
uit te schakelen.
b) Zuigkrachtinstelling*
Naar rechts schuiven voor hogere
zuigkracht.
Naar links schuiven voor lagere
zuigkracht.
KRACHTZUIGER (5)
Bij gebruik van de krachtzuigmond, dient
de «krachtzuigstekker» te worden
aangesloten op het contact aan de
achterkant van de stofzuiger (achter het
bedieningspaneel).
SCHOUDERBAND (6)
†
a) Verwijder de zuigmond en schuif
een uiteinde van de schouderband
over de buis aan de onderkant van
de stofzuiger. Schuif de band tot
voorbij het grendellipje en draai de
band zoals getoond. Aanbrengen
met het hulpstuk voor het gewenste
gebruik.
b) Verwijder het grootste handvat – zie (1).
Bevestig het andere uiteinde van de
schouderband met de clip aan de
bovenkant van de stomp van dit
handvat.
c) Draag de stofzuiger over de
schouder, zoals getoond.
BBEELLAANNGGRRIIJJKK:: SScchhaakkeell ddee
ssttooffzzuuiiggeerr uuiitt eenn ttrreekk ddee
sstteekkkkeerr uuiitt hheett
ssttooppccoonnttaacctt vvoooorrddaatt uu ddee
EEccooBBooxx™™ lle
eeeggtt ooff eeeenn
ffiilltteerr vveerrwwiijjddeerrtt..
* Kenmerken zijn per model verschillend † Verkrijgbaar accessoire.
acenta_ECOBOX_v3.qxd 6/7/07 16:38 Page 37
Page 38

BE/NL
DE MOTORFILTER
UITSPOELEN (9)
Als de EcoBox™ is verwijderd:
neem de filter uit de behuizing.
Spoel de filter schoon met lauw water.
U mag de filter niet schoonschuren.
Verwijder overtollig water met een
droge doek en laat de filters 24 uur
lang volledig drogen.
Plaats de schone filter en de EcoBox™
terug.
DE UITBLAASFILTER
REINIGEN (10)
Open de filterklep.
Verwijder de filter.
Spoel de filter schoon met lauw water.
U mag de filter niet schoonschuren.
Verwijder overtollig water met een
droge doek en laat de filters 24 uur
lang volledig drogen.
Plaats de schone filter en de
stofzuigerklep terug.
Gebruik de stofzuiger NIET zonder dat er
een EcoBox™ is geplaatst.
HOOVER RAADT U AAN OM DE
FILTERS TE REINIGEN NADAT
U HET VIJFDE VOLLE ECOBOX
RESERVOIR HEEFT GELEEGD.
DE EcoBox™ LEGEN (7 & 8)
De EcoBox™ indicator is rood wanneer de
EcoBox™ moet worden geleegd.
Voor een betrouwbare EcoBox™ indicatie
dient de vermogensregeling op het
maximum ingesteld te worden (helemaal
naar rechts).
De EcoBox™ legen:
1. Verwijder de voorste klep.
2. Til de EcoBox™ uit de stofzuiger.
3. Open de EcoBox™en leeg deze.
4. Zet de EcoBox™ weer in elkaar.
5. Plaats de in elkaar gezette EcoBox™
terug in de stofzuiger (stap 2
omgekeerd).
6. Kijk waar de lipjes aan de voorste
klep zitten. Sluit de voorste klep.
SERVICEOPROEP
Er zal een tarief in rekening worden gebracht wanneer blijkt dat de stofzuiger in
goede conditie verkeert, of niet gemonteerd is in overeenstemming met deze
instructies, of incorrect gebruikt is.
Controleer de volgende lijst voordat u een HOOVER onderhoudsmonteur belt:
1. Controleer of de netstroom naar stofzuiger is aangesloten en werkt. Controleer
het stopcontact met een ander elektrisch apparaat.
2. Is de EcoBox™ vol?
3. Is de aansluiting verstopt?
4. Zijn de filters verstopt?
Bel in geval van twijfel de serviceafdeling van HOOVER voor telefonisch advies.
acenta_ECOBOX_v3.qxd 6/7/07 16:38 Page 38
Page 39

® Gedeponeerd Merk
Toebehoren en reserveonderdelen*
Gebruik uitsluitend originele Hoover toebehoren en onderdelen.
Candy Hoover Belgium NV
Haachtsesteenweg 162B
1820 Melsbroek
Tel : 02-752 94 11
Gias Customer Service (België)
0903/99109 (1.12 € / min.)
Candy Nederland BV
Argonweg 7-11
3812 RB AMERSFOORT
Tel : 033-4224000
Gias Customer Service (Nederland)
0900/9999109 (0.10 € / min.)
CODES VAN TOEBEHOREN EN RESERVEONDERDELEN
CODE
Acenta EcoBox™ motorfilter
Portable kit (1 schouderriem + 1 slang + 1 stofborstel)
Zuigmond voor tapijt & vloer
Zuigmond voor parket - Caresse
Turbomondstuk
S57 - 03875059
C48 -35600191
G28 - 09185554
G87PC -35600655
J29TN -35600705
* Eigenschappen kunnen per model verschillen
Uw garantie
De garantievoorwaarden voor dit toestel worden bepaald door uw
vertegenwoordiger in het land waarin het toestel verkocht wordt. Bijzonderheden
omtrent deze voorwaarden kunnen verkregen worden bij de dealer bij wie het
toestel werd gekocht. Het bewijs van verkoop of ontvangst moet getoond worden
bij elke claim onder de voorwaarden van deze garantie. Onderworpen aan
verandering zonder kennisgeving.
Dit toestel is voorzien van een markering volgens de Europese
richtlijn 2002/96/EG betreffende afgedankte elektrische en
elektronische apparatuur (AEEA). Door dit product aan het einde van
de levensduur op verantwoorde wijze weg te gooien, voorkomt u
mogelijk negatieve gevolgen voor het milieu en de gezondheid, die
zouden kunnen ontstaan door een onverantwoorde afvalverwerking
van dit product. Het symbool op dit product geeft aan dat het niet
mag worden beschouwd als huishoudelijk afval. In plaats hiervan
moet u het inleveren bij een inzamelpunt voor het recyclen van
elektrische en elektronische apparatuur. U moet het toestel weggooien in
overeenstemming met de lokale voorschriften voor afvalverwerking. Voor meer
informatie over verwerking, hergebruik en recycling van dit product, kunt u contact
opnemen met uw lokale overheid, uw afvalverwerkingsbedrijf of de winkel waar u
het product heeft gekocht.
acenta_ECOBOX_v3.qxd 6/7/07 16:38 Page 39
Page 40

BE/NL
Verwijder het teveel aan water met een droge doek en laat de EcoBox™ drogen
gedurende 24 uur of tot hij volledig droog is.
De unieke EcoBox™ van Hoover is vervaardigd uit een speciaal poreus plastic dat wel
lucht doorlaat maar het meeste vuil en fijn stof tegenhoudt.
Voor de beste prestaties van het systeem raden we u aan om de EcoBox™ om de vijf
volle EcoBox™ reservoirs schoon te spoelen, zodat het fijne stof wordt verwijderd dat
uw stofzuiger heeft opgezogen en dat zich nog in de EcoBox™ bevindt.
Om de EcoBox™ schoon te maken en zo de prestaties ervan te optimaliseren, volgt u
de volgende eenvoudige stappen:
1. Schud de grote stukken vuil en afval uit de EcoBox™.
2. Verwijder met een borstel het fijne stof dat zich op de
binnenwanden van de EcoBox™ heeft vastgezet.
3. Was de binnen- en buitenkant van de EcoBox™ grondig uit met
warm water en afwasmiddel. U kunt de EcoBox™ nu ook in de
vaatwasmachine schoonmaken met een volledige was- en
droogcyclus op maximaal 75ºC.
4. Als u de EcoBox™ niet in een vaatwasser stopt, moet u zowel de
binnen- als buitenkant ervan grondig spoelen. Zorg ervoor dat u
alle zeepresten wegspoelt.
Onderhoud van de filters
Het motorfilter en uitblaasfilter moeten om de vijf volle EcoBox™ reservoirs worden
schoongespoeld. Zie uw gebruikershandleiding voor informatie over het verwijderen
van de filters.
Om de goede werking van de filters te verzekeren, volgt u deze eenvoudige stappen:
1. Spoel beide filters uit onder lauwwarm water maar schrob ze niet.
2. Verwijder het teveel aan water met een droge doek en laat ze drogen gedurende
24 uur of tot ze volledig droog zijn.
Nadat u ze volledig schoongemaakt heeft, bevestigt u de EcoBox™ en de filters
opnieuw op hun oorspronkelijke plaats in de stofzuiger.
ECOBOX™ SYSTEM
acenta_ECOBOX_v3.qxd 6/7/07 16:38 Page 40
Page 41

CZ
Tento produkt se smí sestavit a používat
výhradně v souladu s pokyny uvedenými
v tomto návodu. Je určen pouze pro
odstraňování suchých nečistot a prachu
z koberců a podlah v domácnosti. Sadu
příslušenství lze použít k odstraňování
prachu z nábytku a tkanin.
POŽADAVKY NA NAPÁJENÍ
POZOR!
Elektřina může být velmi nebezpečná.
Tento vysavač má dvojitou izolaci a
nesmí být uzemněn.
UPOZORNĚNÍ: Vodiče v přívodní
šňůře mají toto barevné značení:
• Modrý – nulák
• Hnědý – fáze.
BEZPEČNOSTNÍ UPOZORNĚNÍ
Návod k použití. Tento vysavač se smí
používat pouze k účelům, pro které byl
vyroben, jak je uvedeno v tomto návodu.
Před použitím vysavače se s instrukcemi
důkladně seznamte.
EcoBox™ se používá pro častý sběr
materiálu prachového typu nebo jemného
prachu při čištění nových koberců.
Bezpečnost dětí, starších nebo
nemohoucích lidí: Nedovolte, aby si s
přístrojem nebo jeho ovládáním hrály
děti. Dohlížejte na používání přístroje
staršími dětmi, staršími nebo
nemohoucími lidmi.
PEČLIVĚ SI, PROSÍM, PŘEČTĚTE TENTO
NÁVOD
Vysavač NEPOUŽÍVEJTE na venkovní
úklid, na vlhké povrchy nebo na vysávání
vody.
NEVYSÁVEJTE tvrdé nebo ostré
předměty, zápalky, žhavý popel,
cigaretové nedopalky a podobně.
Statická elektřina. Při čištění
některých koberců dochází ke vzniku
statické elektřiny. Výboje statické
elektřiny neohrožují zdraví.
Používejte pouze příslušenství dodané
nebo doporučené firmou Hoover.
NEVYSÁVEJTE hořlavé kapaliny, jako
například čisticí roztoky, benzín apod.,
ani jejich výpary.
Aerosolové spreje mohou být hořlavé.
Nestříkejte jimi v blízkosti vysavače.
Napájecí kabel. Při odpojování vysavače
od napájení netahejte za napájecí kabel.
Opravu poškozeného napájecího kabelu
smí z bezpečnostních důvodů provádět
pouze autorizovaný servisní technik
značky HOOVER.
Závady. Je-li vysavač nebo přívodní
šňůra poškozna, přístro nepoužívejte.
Po použití. Vypněte vysavač a přívodní
šňůru vytáhněte ze zásuvky. Před
čištěním nebo prováděním údržby
vysavač vždy vypněte a odpojte od sítě.
Servis Hoover. Abyste zaručili trvale
bezpečnou a efektivní funkci vysavače,
nechte jej vždy opravovat pouze u
autorizovaného servisního technika firmy
Hoover.
acenta_ECOBOX_v3.qxd 6/7/07 16:38 Page 41
Page 42

MONTÁŽ RUKOJETI (1)
Nepoužíváte-li vysavač s ramenním
popruhem, je třeba před použitím
namontovat rukojeť - viz obr. (6).
1. Rukou vyšroubujte šroub rukojeti.
2. Rukojeť nasaďte shora na vysavač.
3. Utáhněte šroub.
ULOŽENÍ NAPÁJECÍHO KABELU (2)
A) Naviňte kabel na háky.
Zajistěte kabel propojenou svorkou.
B) Uvolněte připojenou svorku.
Otočte oba háky dovnitř podle
obrázku, abyste uvolnili kabel.
PŘÍSLUŠENSTVÍ (3)
†
A) Ramenní popruh
†
B) Pružná hadice
†
C) Prachový kartáč
†
D) Prodlužovací trubice
E) Hubice na nábytek
F) Štěrbinový nástavec
HUBICE (3)
G) Hubice na koberce a podlahy:
sešlápnutím pedálu se vysunou
kartáče - pro čištění hladkých podlah.
H) Šetrná hubice na podlahy*: vhodná
k čištění dřevěných a choulostivých
podlah.
I) Hubice Turbonozzle*: speciální hubice
na koberce.
L) Elektrická aktivní hubice*: pro důkladné
čištění velkých ploch koberce.
OVLÁDACÍ PRVKY (4)
A) Hlavní vypínač
Stisknutím vysavač zapněte.
Opětovným stisknutím jej vypněte.
B) Ovládání sacího výkonu*
Posunutím doprava se zvýší sací
výkon.
Posunutím doleva se sníží sací výkon.
NAPÁJENÍ EXTERNÍCH
ZAŘÍZENÍ (5)
Používáte-li elektrickou aktivní hubici, připojte
její napájecí kabel do zdířky na zadní straně
vysavače (za ovládacím panelem).
RAMENNÍ POPRUH (6)
†
A) Odstraňte hubici. Jeden konec popruhu
přetáhněte přes trubici na dně
vysavače. Popruh protáhněte přezkou
a otočte, jak je znázorněno na obrázku.
Vybavte doplňky podle účelu použití.
B) Odstraňte dlouhou rukojeť - Viz obr.
(1). Druhý konec ramenního popruhu
upevněte pomocí přezky na vrchní
straně rukojeti k přenášení vysavače.
C) Popruh si nasaďte přes rameno, jak je
znázorněno na obrázku.
DůLEžITÉ: Předtím, než vysypete
EcoBox™ nebo vyměníte filtry,
vysavač vypněte a odpojte
zástrčku ze sítě.
* Tato funkce závisí na modelu † Volitelné příslušenství.
acenta_ECOBOX_v3.qxd 6/7/07 16:38 Page 42
Page 43

CZ
HOOVER DOPORUôUJE
OPLÁCHNOUT FILTRY, JAKMILE
PĚTKRÁT NAPLNÍTE NÁDRŽ
ECOBOX.
VYSYPÁNÍ ECOBOX™ (7 A 8)
Pokud bude třeba EcoBox™ vysypat,
rozsvítí se červená kontrolka EcoBox™.
Pokud se chcete řídit kontrolkou
EcoBox™, ovládání výkonu přístroje
musíte nastavit na maximum (zcela
vpravo).
Pokud chcete EcoBox™ vysypat:
1. Odejměte přední dvířka.
2. Zdvihněte EcoBox™ z přístroje.
3. Otevřete a vysypte EcoBox™.
4. EcoBox™ znovu smontujte.
5. Namontujte sestavenou nádrž
EcoBox™ do vysavače (opačný postup
než v bodě 2).
6. Umístěte úchytky na přední dvířka.
Zavřete přední dvířka.
OPLÁCHNĚTE FILTR (9) PŘED
MOTOREM
Po demontáži nádrže EcoBox™:
Vyjměte filtr z tělesa.
Opláchněte ho teplou (nikoli horkou)
vodou. Filtr nečistěte kartáčem.
Setřete vodu suchým hadříkem a
nechejte filtr schnout 24 hodin, popř.
vyčkejte, dokud úplně neuschne.
Namontujte čistý filtr a nádrž EcoBox™.
ôI‚TĚNÍ VÝSTUPNÍHO FILTRU (10)
Odklopte kryt filtru.
Vyjměte filtr.
Opláchněte ho teplou (nikoli horkou)
vodou. Filtr nečistěte kartáčem.
Setřete vodu suchým hadříkem a
nechejte filtr schnout 24 hodin, popř.
vyčkejte, dokud úplně neuschne.
Namontujte čistý filtr a sklopte kryt.
Nepoužívejte vysavač bez nádrže
EcoBox™.
SERVIS
Za servisní práci bude účtován poplatek, pokud byl vysavač prohlédnut a nebyla na něm
shledána závada, pokud nebyl vysavač sestaven podle tohoto návodu nebo pokud byl
používán k jinému účelu, než ke kterému je určen.
Než zavoláte servisního technika firmy HOOVER, zkontrolujte následující:
1) Jde do vysavače elektřina? Zkontrolujte zásuvku pomocí jiného spotřebiče.
2. Je EcoBox™ plný?
3) Není ucpaný sací otvor?
4) Nejsou ucpané filtry?
Máte-li jakékoliv pochybnosti, zavolejte nejbližší servisní pobočku firmy HOOVER.
Možná se vám problém podaří odstranit po telefonu.
acenta_ECOBOX_v3.qxd 6/7/07 16:38 Page 43
Page 44

Spotřební materiál a náhradní díly*
Používejte pouze originální spotřební materiál a náhradní díly.
Záruka
Záruční podmínky pro tento spotřebič jsou takové, jaké stanoví náš
zástupce v zemi, kde se spotřebič prodává. Podrobné údaje ohledně
těchto podmínek lze obdržet od prodejce, u kterého byl spotřebič
zakoupen. Při reklamacích podle těchto záručních podmínek musí být
předložena účtenka nebo doklad o nákupu. Podléhá změně bez
oznámení.
CANDY CR s.r.o.
Karmelitská 18
118 00 Praha 1
Tel: 257 530 418
* Prvky a příslušenství se liší v závislosti na modelu.
KÓDY SPOTŘEBNÍHO MATERIÁLU A
NÁHRADNÍCH
DÍLŮ
Filtr před motorem Acenta EcoBox™ S57 - 03875059
Přenosná sada (1 pás přes rameno + 1
hadice + prachový kartáč)
C48 - 35600191
Hubice na koberec a podlahu G28 - 09185554
Hubice na hladké parkety G87PC -35600655
Turbo hubice J29TN -35600705
Pfiístroj je oznaãen v souladu se Smûrnicí Evropského spoleãenství ã.
2002/96/EC o odpadech z elektrick˘ch a elektronick˘ch zafiízení. Pokud
zajistíte správnou likvidaci tohoto v˘robku, napomÛÏete zamezit
moÏn˘m neÏádoucím dÛsledkÛm na Ïivotní prostfiedí a lidské zdraví,
ke kter˘m by jinak do‰lo v pfiípadû nevhodné manipulace s
odpadem z tohoto v˘robku. Tento symbol na v˘robku znamená, Ïe s
tímto v˘robkem není moÏno nakládat jako s domovním odpadem.
Místo toho jej pfiedejte na sbûrné místo oprávnûné k recyklaci
elektrick˘ch a elektronick˘ch zafiízení. Likvidaci je nutno provést v
souladu s místními pfiedpisy o ekologickém nakládání s odpady. Více informací o
zacházení, údrÏbû a recyklaci tohoto v˘robku vám poskytne místní mûstsk˘ úfiad, firma
povûfiena likvidací domovního odpadu nebo obchod, ve kterém jste v˘robek
zakoupili.
acenta_ECOBOX_v3.qxd 6/7/07 16:38 Page 44
Page 45

CZ
Jedinečné prachové nádrže EcoBox™ značky Hoover se vyrábějí ze zvláštního porézního
materiálu, který propouští vzduch, avšak zadržuje většinu nečistot a jemného prachu.
Pokud chcete zajistit trvale vysoký výkon systému, doporučujeme vypláchnout nádrž
EcoBox™, jakmile ji pětkrát naplníte, abyste odstranili jemný prach, který se při vysávání
zachytil uvnitř nádrže.
Při umývání a optimalizaci funkce vysavače postupujte, prosím, podle následujících
dnoduchých pokynů:
1. Vyklepejte z nádrže EcoBox™ velké nečistoty a úlomky.
2. Jemný prach z vnitřních stěn nádrže EcoBox™ odstraňte pomocí
kartáče.
3. Teplou vodou a v případě potřeby i prostředkem na mytí nádobí
pečlivě umyjte vnější a vnitřní stěny nádrže EcoBox™. Nádrž
EcoBox™ lze umýt též v myčce nádobí v nastavení na úplný mycí a
sušicí cyklus při teplotě 75 °C.
4. Pokud nádrž EcoBox™ neumýváte v myčce nádobí, pečlivě
opláchněte její vnitřní a vnější stěny, aby na nich nezůstal saponát.
Nádrž otřete suchým hadříkem a nechte ji 24 hodin schnout, dokud nebude
zcela suchá.
ÚDRŽBA FILTRŮ
Filtr před motorem a výstupní filtr je třeba vždy opláchnout, jakmile pětkrát naplníte
nádrž EcoBox™. Při vyjmutí filtrů laskavě postupujte podle návodu k obsluze.
Chcete-li zaručit optimální funkci vysavače, postupujte, prosím, podle následujících
jednoduchých pokynů:
1. Oba filtry propláchněte teplou vodou. Nečistěte je kartáčem apod.
2. Vodu jemně otřete suchým hadříkem a filtry nechte schnout 24 hodin nebo dokud
nebudou zcela suché.
Umyté filtry a nádrž EcoBox™ vraťte do vysavače na jejich původní místo.
ECOBOX™ SYSTEM
acenta_ECOBOX_v3.qxd 6/7/07 16:38 Page 45
Page 46

SL
PROSIMO, DA POZORNO
PREBERETE SLEDEČA NAVODILA
Izdelek morate sestaviti in z njim upravljati
skladno s temi navodili. Uporabljate ga
lahko izključno za čiščenje v
gospodinjstvih, za vsesavanje nečistoče
in prahu iz preprog in tal.
Priloženi nastavki omogočajo čiščenje
oblazinjenega in drugega pohištva.
PRIKLJUČITEV NA ELEKTRIČNO
OMREŽJE
POZOR, ELEKTRIKA JE LAHKO ZELO
NEVARNA!
Ta aparat ima dvojno izolacijo in ne sme
biti ozemljen.
OPOZORILO: Žice v priključnem kablu so
obarvane na naslednji način:
• Modra – Nula
• Rjava – Faza
VARNOSTNA OPOZORILA
Navodila za uporabo. Sesalnik
uporabljajte le v dovoljene namene, kot je
to opisano v tej knjižici. Pred uporabo
pozorno preberite navodila in jih vedno
upoštevajte.
Redno čistite posodo EcoBox(tm), ko
sesate materiale, kot so drobni prašni
delci, ali po čiščenju novih preprog.
Varnost otrok, ostarelih ali slabotnih:
Otrokom ne dovolite, da se igrajo z
napravo ali njenimi regulatorji. Če napravo
uporabljajo starejši otroci, ostareli ali
slabotni, bodite v bližini.
NE sesajte trdih ali ostrih predmetov,
vžigalic, vročega pepela, cigaretnih
ogorkov ali drugih podobnih predmetov.
Statična elektrika. Nekatere preproge
ustvarjajo statično elektriko, katere
sproščanje ni nevarno za zdravje.
Uporabljajte samo nastavke, ki so
priloženi sesalniku in jih priporoča
znamka Hoover.
NE sesajte vnetljivih tekočin kot na
primer tekočih čistil, bencina ipd. ali
njihovih hlapov.
Razpršila v dozah so lahko vnetljiva.
Ne pršite jih v bližini sesalnika.
Električni kabel. Ko želite potegniti
vtikač iz vtičnice NE vlecite za kabel.
Če se priključni kabel poškoduje, ga
mora popraviti za to usposobljeni
strokovnjak pooblaščenega servisa.
Nestrokovno popravilo pomeni
tveganje za varnost uporabnikov.
Napake. NE nadaljujte z uporabo
aparata, če opazite nepravilnosti v
delovanju ali če je poškodovan
priključni kabel.
Po uporabi potegnite vtikač iz
vtičnice in izključite sesalnik iz
električnega omrežja. Enako storite
tudi pred vsemi vzdrževalnimi deli ali
čiščenjem aparata.
Hoover pooblaščeni servis. Za
varno in učinkovito delovanje
vašega sesalnika vam priporočamo,
da se za morebitna vzdrževalna dela
in popravila obrnete na najbližji
pooblaščeni servis znamke
HOOVER.
acenta_ECOBOX_v3.qxd 6/7/07 16:38 Page 46
Page 47

SKLOP ROČAJA (1)
Pred uporabo sesalnika namestite ročaj
na sesalnik, razen če sesalnik uporabljate
z ramenskim jermenom* (slika 6).
1. Ročno odvijte vijak z ročaja.
2. Namestite ročaj na vrh sesalnika.
3. Ročno zategnite vijak.
SHRANJEVANJE KABLA (2)
a) Ovijte kabel okoli držal.
Kabel zavarujte s sponko.
b) Odmaknite sponko.
Če želite sprostiti kabel, obrnite držala
navznoter kot kaže slika.
DODATKI (3)
†
a) Ramenski jermen
†
b) Gibljiva cev
†
c) Nastavek za prah
†
d) Podaljšek cevi
e) Nastavek za pohištvo
f) Nastavek za špranje
NASTAVKI (3)
g) Nastavek za preproge in tla: za
čiščenje trdih tal pritisnite pedal in
krtača se bo pomaknila navzven.
h) Nastavek za občutljiva tla*: za
čiščenje lesenih ali občutljivih podov.
i) Krtača Turbo*: namenjena je zlasti za
čiščenje preprog.
l) Električna krtača*: namenjena je
globinskemu čiščenju večjih preprog.
STIKALA (4)
a) Stikalo za VKLOP/IZKLOP
Enkrat pritisnite za vklop.
Ponovno pritisnite za izklop.
b) Nastavljanje moči*
Potisnite drsno stikalo v desno, da bi
povečali sesalno moč.
Potisnite drsno stikalo v levo, da bi
zmanjšali sesalno moč.
ELEKTRIČNA KRTAČA (5)
Če uporabljate električno krtačo, potisnite
vtikač električnega nastavka v vtičnico na
zadnji strani sesalnika (za stikalno
ploščo).
RAMENSKI JERMEN (6)
†
a) Ko je nastavek snet, namestite en
konec jermena čez cev na dnu
sesalnika.
Nato potisnite konec jermena mimo
zapornega zatiča in ga zavrtite, kot je
to prikazano na sliki. Znova namestite
gibljivo cev, podaljšek cevi, nastavek
za špranje, nastavek za oblazinjeno
pohištvo ali krtačo za prah, odvisno
od namena uporabe.
b) Ko je snet dolgi ročaj (slika 1), drugi
konec jermena pripnite na mesto,
namenjeno pritrjevanju ročaja.
c) Zdaj si lahko sesalnik namestite čez
ramo, kot je to prikazano na sliki.
POZOR: PRED ZAMENJAVO VREČKE
ZA PRAH, PRAZNENJEM POSODE
ECOBOX™ ALI ODSTRANJEVANJEM
FILTROV SESALNIK IZKLOPITE IN GA
IZKLJUČITE IZ ELEKTRIČNEGA
OMREŽJA.
* Funkcije se razlikujejo glede na model † Dodatki po izbiri.
acenta_ECOBOX_v3.qxd 6/7/07 16:38 Page 47
Page 48

SL
Filter izperite pod mlačno vodo. Filtra ne
ščetkajte.
S suho krpo odstranite odvečno vodo in
pustite, da se 24 ur suši na zraku ali dokler
se povsem ne posuši.
Nazaj namestite čist filter in posodo
EcoBox™.
ČIŠČENJE IZPUSTNEGA FILTRA
(10)
Dvignite pokrov filtra.
Odstranite filter:
Filter izperite pod mlačno vodo. Filtra
ne ščetkajte.
S suho krpo odstranite odvečno vodo
in pustite, da se 24 ur suši na zraku
ali dokler se povsem ne posuši.
Nazaj namestite čist filter in pokrov.
Sesalnika NE uporabljajte brez posode
EcoBox™.
HOOVER PRIPOROČA, DA FILTRE
OPERETE PO PETKRAT
NAPOLNJENI POSODI ECOBOX.
PRAZNJENJE POSODE EcoBox™ (7 in
8)
Ko je treba izprazniti posodo EcoBox™,
indikator napolnjenosti EcoBox™ zasveti
rdeče. Dejansko stanje napolnjenosti
posode EcoBox™ preverite tako, da
nastavite največjo sesalno moč (drsno
stikalo potisnite povsem v desno).
Praznjenje posode EcoBox™:
1. Odstranite sprednja vrata.
2. Vzemite posodo EcoBox™ iz
sesalnika.
3. Odprite in izpraznite posodo
EcoBox™.
4. Zaprite posodo EcoBox™.
5. Zaprto posodo EcoBox™ namestite
nazaj v sesalnik (obratno kot v 2.
koraku).
6 Namestite jezičke na sprednja vrata.
Zaprite sprednja vrata.
ČIŠČENJE FILTRA PRED
MOTORJEM (9)
Ko odstranite posodo EcoBox™:
Iz ohišja odstranite filter.
POOBLAŠČENI SERVIS
Če pri pooblaščenem servisu ugotovijo, da aparat normalno deluje, ni bil sestavljen v
skladu s temi navodili ali, da ste ga nepravilno uporabljali, vam bodo zaračunali stroške.
Preden se obrnete na pooblaščeni servis se prepričajte o naslednjem:
1. Ali je aparat pod napetostjo? Preverite s kakšnim drugim gospodinjskim aparatom.
2. Ali je posoda EcoBox™ polna?
3. Je zamašen dovod?
4. Ali so zamašeni filtri?
Če niste prepričani, pokličite pooblaščeni servis znamke HOOVER in morda vam bodo
lahko pomagali preko telefona.
acenta_ECOBOX_v3.qxd 6/7/07 16:38 Page 48
Page 49

Ta naprava je označena v skladu z evropsko direktivo 2002/96/ES o
odpadni električni in elektronski opremi (WEEE). S pravilnim
odstranjevanjem izdelka boste pripomogli k preprečevanju morebitnih
negativnih vplivov na okolje in človeško zdravje, do česar bi utegnilo priti
ob neprimerni odstranitvi tega izdelka. Simbol na izdelku pomeni, da
izdelka ne smete odstraniti kot gospodinjski odpadek. Oddati ga morate
na primernem zbirnem mestu za recikliranje električne in elektronske
opreme. Odstranitev morate izvesti v skladu s krajevnimi okoljskimi
predpisi glede odstranjevanja odpadkov. Za podrobnejše informacije o
ravnanju z izdelkom, obnovi in recikliranju izdelka se obrnite na krajevni urad, komunalno
podjetje za odvoz gospodinjskih odpadkov ali trgovino, kjer ste izdelek kupili.
GARANCIJSKA IZJAVA
Garancijske pogoje določi predstavnik države, ki prodaja izdelek.
Dodatna pojasnila o teh pogojih lahko dobite pri trgovcu pri katerem ste
kupili izdelek. Pod pogoji te garancije morate na pooblaščenem servisu
pokazati potrdilo o nakupu ali račun. Pogoji se lahko spremenijo brez
predhodnega opozorila.
® Zaščitena blagovna znamka
POTROŠNI MATERIAL IN NADOMESTNI DELI
KODA
Filter Acenta EcoBox™ pred motorjem
Prenosna oprema (1 ramenski pas + 1 cev + 1 krtača za prah)
Šoba za sesanje preprog in tal
Šoba za čiščenje parketa
Turbo nastavek
S57 - 03875059
C48 - 35600191
G28 - 09185554
G87PC -35600655
J29TN -35600705
Candy Hoover d.o.o.
Letališ ka 35
1000 Ljubljana
Tel: +386 1 520 75 50
Faks:+386 1 520 75 58
* Lastnosti, oz. nastavki, ki jih ne vsebujejo vsi modeli in so odvisni od tipa sesalnika.
Potrošni material in nadomestni deli*
Uporabljajte le originalni Hooverjev potrošni material in nadomestne dele.
acenta_ECOBOX_v3.qxd 6/7/07 16:38 Page 49
Page 50

Edinstvena posoda za prah EcoBox™ znamke Hoover je izdelana iz posebne porozne
plastike, ki omogoča prehajanje zraka, vsa nečistoča in fini prah pa ostanejo v posodi.
Za popolno delovanje sistema priporočamo, da po petkrat napolnjeni posodi EcoBox™ leto operete, da odstranite drobne prašne delce, ki ste jih posesali in se nahajajo v posodi
EcoBox™.
Pranje in s tem zagotavljanje optimalnega delovanja je zelo enostavno:
1. Najprej iz posode EcoBox™ stresite smeti in drugo nečistočo.
2. Notranjost posode EcoBox™ skrtačite, da odstranite prah, ki se je
nabral na steni posode.
3. Temeljito operite posodo od znotraj in od zunaj s toplo vodo in
tekočino za pomivanje posode. Nato lahko EcoBox™ pomijete v
pomivalnem stroju na običajnem programu za pomivanje in sušenje
posode; Najvišja dovoljena temperatura je 75 stopinj.
4. Če posode EcoBox™ ne želite pomivati v stroju, jo temeljito izperite z
notranje in zunanje strani s čisto vodo in pazite, da na njej ne
ostanejo sledi čistila.
Posodo EcoBox™ obrišite s suho krpo in pustite na zraku 24 ur oziroma dokler
se povsem ne posuši.
VZDRŽEVANJE FILTROV
Filter pred motorjem in izpustni filter morate oprati po petkrat napolnjeni posodi
EcoBox™. Za dostop do filtrov si oglejte uporabniški priročnik.
Da bi zagotovili optimalno delovanje, sledite naslednjim preprostim navodilom:
1. Oba filtra izperite z mlačno vodo. Filtrov ne drgnite, npr. s ščetko.
2. Filter obrišite s suho krpo in pustite na zraku 24 ur oziroma dokler se povsem ne
posuši.
Po čiščenju namestite filtre in posodo EcoBox™ v pravilni položaj nazaj v sesalnik.
SISTEM ECOBOX™
SL
acenta_ECOBOX_v3.qxd 6/7/07 16:38 Page 50
Page 51

EENNGGLLIISSHH IITTAALLIIAANNOO FFRRAANNÇÇAAIISS
DDEEUUTTSSCCHH EESSPPAAÑÑOOLL
∂§§∏¡π∫∞
VVLLAAAAMMSS//NNEEDDEERRLLAANNDDSS
ČESKY SLOVENSKI
©
22000077 PPrriinntteedd iinn PP..RR..CC..
00556655 552266 44
acenta_ECOBOX_v3.qxd 6/7/07 16:38 Page 51
 Loading...