

Page 1

Central Va c u u m
S y s t e m s
Power Canisters
Thank you for selecting a
HOOVER® product.
This cleaner was inspected and packaged carefully before being shipped from the
factory. If you should happen to need
assistance during assembly or operation, call
1-800-944-9200 for automated referral of
authorized service outlet locations
(U.S. only) OR
1-330-499-9499 to speak with a representative in our Consumer Response Center OR
Visit us on-line at www.hoover.comto find
the service outlet nearest you (click on
the “Service” button).
Owner’s Manual
English ➜ pp. 1-7
Français ➜ p. 8-11
PLEASE DO N OT RETURN T H I S
P RODUCT TO THE STO R E.
Review this manual before
operating cleaner.
Page 2

Fill in and retain
The HOOVER Central Vacuum System Power unit will be permanently mounted.
For your records, please enter model and serial numbers in the spaces provided
below and retain in a safe place.
Power Unit Model No. _______________ Serial No. _______________________
(See side of power unit)
Attach your sales receipt to this owner’s manual. Verification of purchase date
may be required for warranty service.
Important Safeguards!
When using an electrical appliance, always follow basic precautions, including
the following:
READ ALL INSTRUCTIONS BEFORE USING THIS APPLIANCE
Index
Canister description....................3
Grounding instructions...............3
How to use....................................4
Important safeguards..................2
Maintenance.................................5
If you have a problem..............5
Where and how to install
the power unit.........................4
©2001 The Hoover Company
www.hoover.com
Warning:To reduce the risk of fire, electric shock, or injury:
• Do not use on wet surfaces.
• Connect to a properly grounded outlet only. See “Grounding Instructions.”
• Close supervision is necessary when any appliance is used by or near children.
Do not allow cleaning system to be used as a toy or to run unattended at any
time.
• Do not allow any objects to be put into wall inlets.
• Do not pick up anything that is burning or smoking, such as cigarettes,
matches, or hot ashes.
• Do not use to pick up flammable or combustible liquids such as gasoline or fine
wood sandings or use in areas where they may be present.
• Do not use without filter in place. Empty dust container and clean filter
frequently when picking up very fine materials such as powder.
• Use extra care when cleaning stairs.
• Do not put any objects into openings. Do not use with any openings blocked:
keep free of dust,lint, hair, and anything that may reduce air flow.
• Do not pull or carry by cord, use cord as a handle, close a door on cord or pull
cord around sharp edges or corners. Do not run appliance over cord. Keep
cord away from heated surfaces.
• Always disconnect cord from electrical outlet before servicing the power unit.
• Do not unplug by pulling on cord. To unplug, grasp the plug, not the cord.
Never handle plug or appliance with wet hands.
• Unplug cleaner when not in use. Turn off all controls before unplugging.
• Do not use with damaged cord or plug. If appliance is not working as it should,
has been dropped, damaged, left outdoors, or dropped into water, take it to a
Hoover Factory Service Center or Authorized Hoover Warranty Service Dealer
(Depot).
• Use vacuum cleaner only for its intended use as described in this owner’s
manual. Use only attachments recommended byThe Hoover Company; others
may cause hazards.
When using accessory kits, note these additional
Safeguards:
• Do not use powered nozzle outdoors.
• Keep hair, loose clothing, fingers, feet and all parts of body away from openings, rotating agitator and any other moving parts. Do not operate nozzle in
bare feet or when wearing open toe shoes or sandals.
• Disconnect hose from wall inlet and cord from electrical outlet when not in use
and before servicing motorized nozzle.
•The hose contains electrical wires. Do not use if damaged, cut, or punctured.
Avoid picking up sharp objects.
• Always disconnect cord from electrical outlet before connecting or
disconnecting hose or motorized nozzle.
Save these instructions!
2
Page 3
1. Assembly
Operate cleaning system only at
voltage specified on power unit.
This system is intended for
household use.
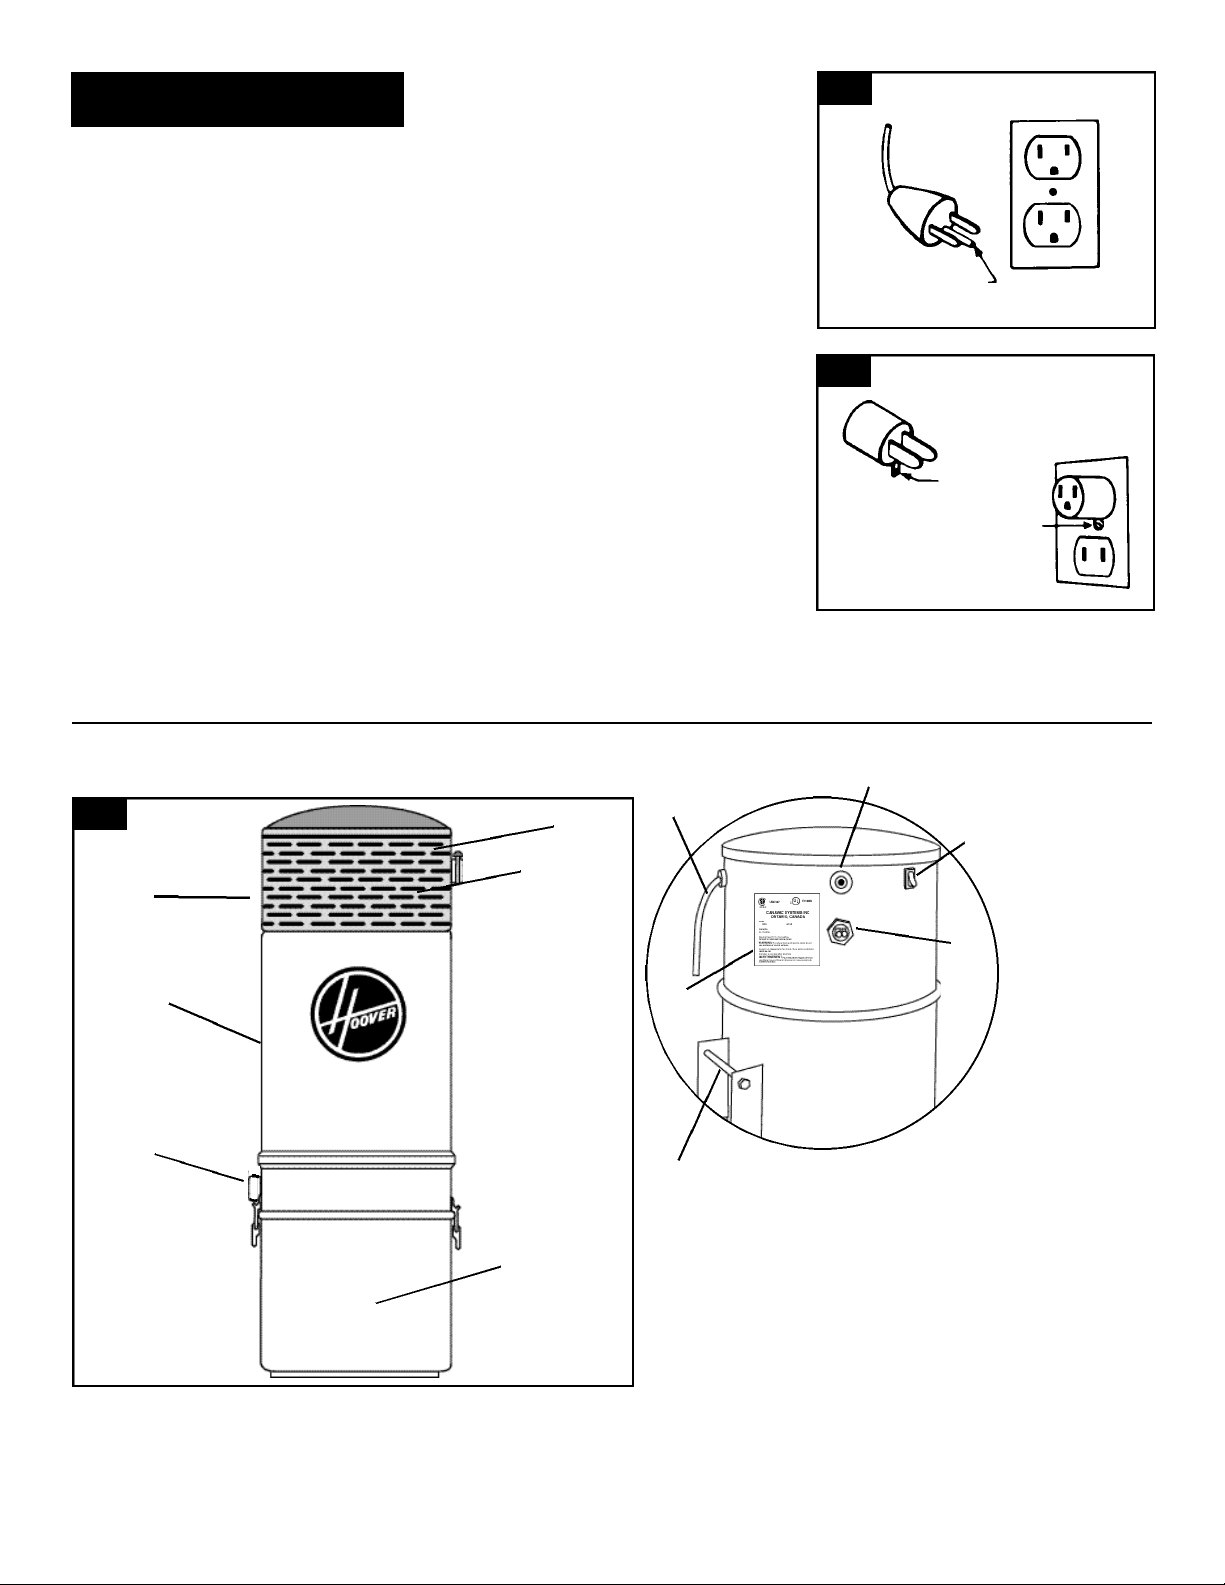
Grounding
Instructions
This appliance must be grounded. If it
should malfunction or breakdown,
grounding provides a path of least
resistance for electrical current to
reduce the risk of electric shock. This
appliance is equipped with a cord having an equipment-grounding conductor
(A) and grounding plug (B). The plug
must be plugged into an appropriate
outlet (C) that is properly installed and
grounded in accordance with all local
codes and ordinances.
DANGER-
Improper connection of the equipment-
grounding conductor can result in the
risk of electric shock. Check with a
qualified electrician or service person if
you are in doubt as to whether the outlet
is properly grounded. Do not modify
the plug provided with the appliance if it will not fit the outlet, have a proper
outlet installed by a qualified electrician.
This appliance is for use on a nominal
120 volt circuit and has a grounding
plug that looks like the plug illustrated in
Fig. 1-1.
A Temporary adapter (D) may be used
to connect this plug to a 2-pole recepta-
cle (E) if a properly grounded outlet is
not available. The Temporary adapter
should be used only until a properly
grounded outlet (C) can be installed by
a qualified electrician. The green col-
ored rigid ear (F), lug, or the like extend-
ing from the adapter must be connected
to a permanent ground such as a properly grounded outlet box cover.
Whenever the adapter is used, it must
be held in place by a metal screw (G).
1-1
B
A
C
1-2
D
F
G
E
NOTE: In Canada, the use of a tempo-
rary adapter is Not Permitted by the
Canadian Electrical Code.
Description
1-3
7
6
3
9
11
1
8
2
10
12
4
1. Motor module
2. Motor exhaust
3. Pipe inlet
5
4. Mounting bar
5. Dust container (contains Mounting
bracket - Fig. 2-1)
6. Filtration module
7. Controls (see 8-10)
8. ON-OFF switch
9. Over load protector
10. Low voltage receptacle (24 volt)
11. Power cord
12. Data label
3
Page 4

2. Installation
Location for power
canister
The Power Canister can be mounted in
the basement, utility room, garage or
any other remote area, except where
exposed to weather, and convenient to
an electrical outlet. The unit requires
ventilation. DO NOT install in a heat producing or confined area such as the
attic, furnace room, etc. If desired, the
Power Canister can be exhausted to the
outside.
The top of the Canister should be no
less than 12” (30.5 cm) from the ceiling
to allow proper cooling to the motor. For
ease of removing the dust container, the
bottom of the unit should be at least 6”
(16 cm) above the floor.
Central Vacuum Power Canisters require
a separate/dedicated, 120 Volt, 60Hz.,
20 Amp, 3 wire grounded power circuit,
protected by a 120 Volt, 60 Hz., AC, 20
Amp time delay fuse or circuit breaker
and a 120 Volt, 60 Hz., 20 Amp grounded receptacle.
If a 120 volt, 60 Hz., 20 Amp grounded
receptacle is not available, have a qualified electrician install one for you. The
receptacle should be no more than 5
feet (152 cm) from the Power Canister.
UNDER NO CIRCUMSTANCES
SHOULD AN EXTENSION CORD BE
USED WITH THIS CANISTER.
Mounting the power
canister
1) Determine if the wall you will be
mounting the Canister to is block,
concrete, or plaster/drywall.
2) Block or Concrete Wall
You will need (2) 1-1/2” (3.8 cm) x
1/4” (.64 cm) lead plugs and (2) 11/2” (3.8 cm) x 1/4” (.64 cm) lag
bolts. Drill a 1/2” (1.3 cm) dia. x 13/4” (4.4 cm) deep hole with a
masonry drill bit. Insert a lead plug
into the hole.
Mount the bracket (Fig. 2-1) from a
top hole with a lag bolt. Mark the
other upper hole of the bracket.
Make sure that the bracket is
straight. Slide the bracket away
from the mark and drill a hole directly over the mark.
Insert a lead plug into the hole.
Align the bracket over the hole and
tightly fasten with a lag bolt.
Continue to 4).
2-1
3) Drywall or Plaster Wall
You will need(2) 1-1/2” (3.8 cm) x
1/4” (.64 cm) wood screws. Locate
a stud and drill a 1/8” (.32 cm) dia.
x 1-3/4” (4.4 cm) pilot hole. Mount
the bracket from a top hole with a
wood screw. Make sure that the
bracket is straight. Drill a second
pilot hole using a lower hole on the
bracket and fasten tightly with the
other wood screw.
4) Mount the Power Canister on the
bracket making sure the bar on the
back of the machine is settled to the
bottom of the slots on the mounting
bracket. The wall mounting bracket
must fit between the two brackets
on the back of the central vacuum.
TOP
MOUNTING
BRACKET
5) Route the intake tubing to the
Canister.
6) Insert the tubing into the Canister
inlet.
7) Tighten the inlet connection with the
3” (7.6 cm) gear clamp. (Do not
cement pipe to plastic inlet port.)
8) Connect tubing to the exhaust (right
hand side near top of unit) and vent
outside (not necessary if unit is in
garage). Tighten the exhaust connection with the clamp. (Do not
cement pipe to plastic exhaust
port.)
9) Connect the 24 Volt wires coming
from the wall valves into the 24 Volt
receptacle on the machine.
10) Plug the power cord in.
11) Assuming that the wall inlet valves
are connected, the system is now
ready.
3. How to use
To start your Power Canister, simply plug
your hose end into any wall inlet valve.
Both types of wall valves (Standard (A) Corded Hose; Electrified (B) - Cordless
Hose) are shown in Fig 3-1.
3-1
A
B
If you have a hose without switches, the
Power Canister will start as soon as the
hose is inserted into the wall valve.
If you have a hose with a switch, then
the Power Canister can be turned ON or
OFF with the switch.
The Power Canister can also be turned
ON and OFF with the switch found on
the upper section of the motor module.
Check the System
Check each connection for proper seal
and that no air leaks occur. If one is present, you may hear a “hissing” sound.
Correct if present.
Check each inlet valve for air leaks.
Start the system by plugging the hose
into each valve to make sure it functions
properly.
Your Central Vacuum Cleaning System is
now ready for your use.
4
Page 5

4. Maintenance
Disconnect cord from electrical outlet
before cleaning filter.
The only maintenance your Power
Canister requires is emptying the dust
container as required and periodically
cleaning the filter.
To clean the filter:
1) Remove the dirt container by unlatching the latches located on each side of
the dirt container.
2) Place a plastic grocery bag over the
dacron/cloth filter and around the
cyclonic deflector that surrounds the filter.
3) Using the plastic bag as hand protection from dirt particles, shake the
filter to cause any particles adhering to
the filter to fall into the bag. (Fig. 4-1)
4) Replace the dirt container and
secure latches.
4-1
5) If the cloth filter needs to be removed, grasp the tab and pull towards
the middle of the unit in order to remove.
4-2
6) To replace the cloth filter, you must
decrease the circumference of the filter
by pulling one side of the filter towards
the center of the filter to create a “V” or
“U” shape (see Fig. 4-2).
7) Place the filter back into the unit and
let the filter snap outward into the
groove.
IMPORTANT
Make sure the cloth filter is fitting
properly into the groove so it will not
come out when the machine is turned
on. Failure to do so could void your
warranty.
If you have a
problem
If a minor problem develops, it usually
can be remedied quite easily when the
cause is found by using the check list
below.
Problem: Cleaner won’t run
Possible cause
Possible solution
• Not firmly plugged in
• Plug in firmly
• No voltage in wall plug
• Check fuse or breaker
• Blown fuse/tripped breaker*
• Replace fuse/reset breaker
* If your unit does not start after resetting the breaker, check the telephone
book for a HOOVER COMPANY listing;
or consult the Yellow Pages of your
Telephone Directory for the nearest
location where approved service and
genuine HOOVER replacement parts
may be obtained. For service under
warranty, follow the instructions in the
warranty provided with this product.
Always identify your cleaner by model
number when requesting information or
ordering replacement parts.
• Low voltage circuit incorrectly
installed
• Short low voltage terminals at
power unit, if unit starts, there is a
problem with the low volt circuit.
• Defective wall valve
• Insert the hose into another inlet
valve. If unit turns on, the inlet
valve may be defective. Replace
inlet valve.
• Problem with low voltage circuit
• Turn on central vacuum with ON/
OFF switch located on the unit.
If the unit starts, the problem is in
the wiring to the inlet valve, the 24
Volt transformer or the relay.
Contact your local Hoover Factory
Service Center.
Problem: Suction low
Possible cause
Possible solution
• Filter dirty
• Clean filter
• Obstruction in hose, piping or
cleaning tools
• Determine if the blockage is in the
hose or piping by inserting hose
in an inlet valve. Check to see if
there is any suction at another
inlet valve by opening the cover. If
there is, plug the hose into the
second wall valve and feel the
end of the hose to see if there is
regular suction.
If the blockage is in the hose,
insert a long blunt item, such as a
broom handle, to clear the blockage.
If the blockage is in the pipe,
insert hose into wall valve and
place hand over end of hose to
cut off air flow. Place your hand
on and off the end of hose rapidly several times. If this does not
clear the blockage, contact your
local Hoover Factory Service
Center.
Check tools, wands, etc. for
blockages.
• System tubing and/or wall
valves incorrectly installed
• Check to make sure all inlet
valves are properly closed.
• Dirt container full or mispositioned
• Check to see if the dirt container
needs to be emptied.
Check to see if the dirt bucket is
properly positioned and securely
clamped shut.
5
 Loading...