

Page 1
Owner's
)peroting
ond
Servicing
Manual
I nstructions
www.hoover.com
Hoover
Elite
Cyclonic
Conister
Please
review
02008
this
Healthy
Gain lnvestments,
manual
before
operating
Ltd. All
rights reserved.
your
Hoover@
#59135305
appliance.
Rt.B/Oe
Page 2
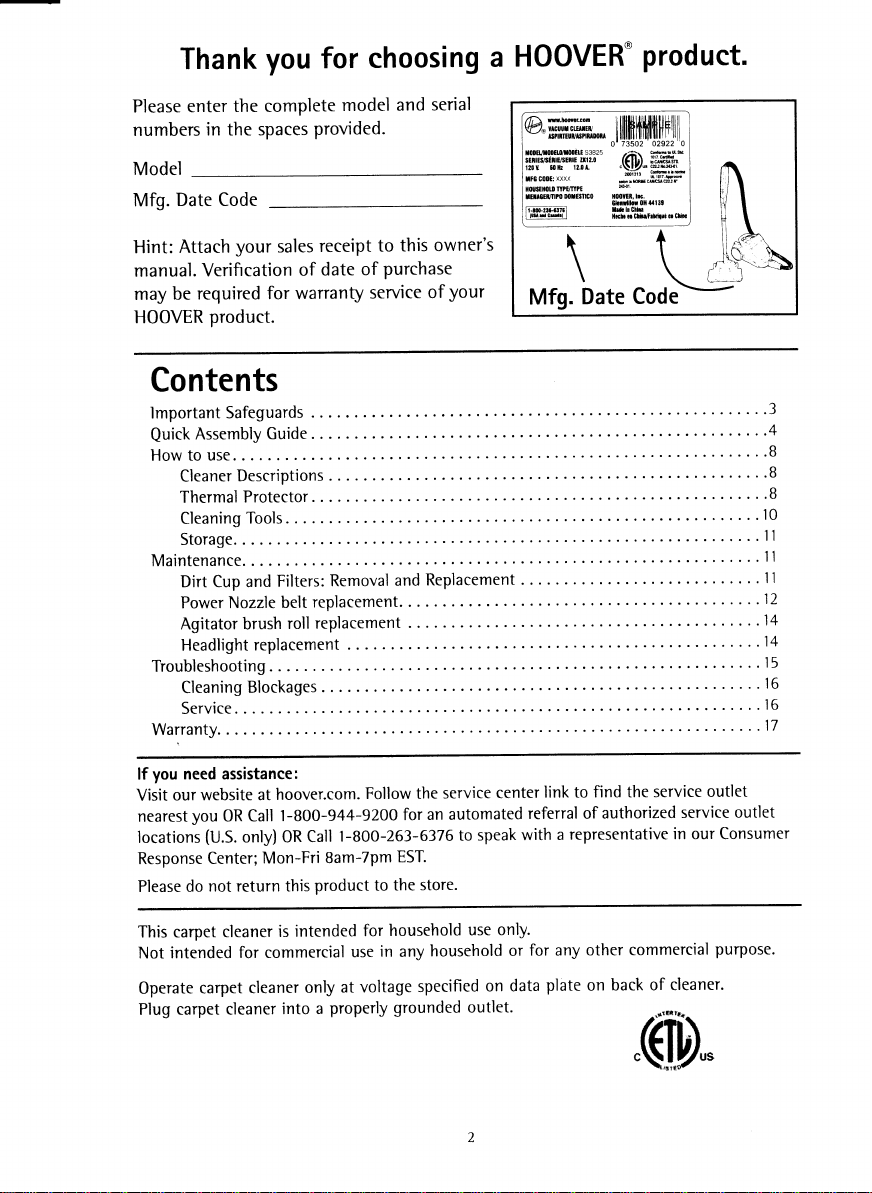
Thank
enter
Please
numbers
you
the complete
in the spaces
Model
Date Code
Mfg.
your
Attach
Hint:
manual.
may
Veriflcation
required
be
HOOVER
product.
sales
for warranty
Contents
lmportantSafeguards
Assembly
Quick
How to use
Cleaner
Thermal
Cleaning
Storage
Maintenance.
Dirt Cup and
Power
Agitator brush
Headlight
Troubleshooting.
Cleaning
Guide
Descriptions
Protector
Tools
Filters:
belt
Nozzle
roll
replacement
. .
Blockages
choosing
for
model
provided.
receipt
of date
of
service
....
.
Removal
replacement.
replacement
. .
serial
and
owner's
this
to
purchase
of
Replacement
and
.
. .
your
HOOVER'
a
/,\ rwJtootcr.con
(f9^
ncuurcurrru
-
ts?rtTEUUlEPtmDom
s3825
toDEuroDEoflolau
u!2.0
stnltvsEllgsEnl:
12.0 L
60 llr
120 t
XXXX
TFG CODE:
TYPSTY?T
HOUSETOU
D0rEsllco
rttl0Eul|m
fr-roG2$-srrtl
I
llg$dcrr.l
\
Date
Mfg.
.
. . .
product.
llilffiltiilillili{iirllll
0'73502 02922
rfi",t ffiffifl*
c\fl,/w
tdoil
[00YEn, hc.
olcrdllil
Irlc ln Gti$
cDh2s.
moiif
trfiT:#"tr
tl$* CAIICS CZU
$13S
oil
Code
.| Clinc
0
r
.....3
.....4
. .. ..8
..8
.. .
. .. . .B
. . .10
.
....11
....11
....11
....12
....14
. . . .'t4
. . . .15
. . .16
.
. . . .16
....17
you
lf
need assistance:
Visit our website
at hoover.com.
nearestyou OR Call
(U.S.
locations
Response Center;
Please do not
This carpet
intended
Not
Operate
carpet cleaner
Plug
only) OR Call
Mon-Fri
return this
cleaner
for commercial
cleaner
carpet
Follow
1-800-944-g2OO
1-800-263-6376
EST.
the store.
to
household
for
in
use
at voltage
grounded outlet.
product
intended
is
only
into a
8am-7pm
properly
the service
an automated
for
to
household
any
specified
center
speak with
only.
use
or
on data
find the service
link to
referral ofauthorized
a representative
other
for any
plate
on
back of
in out
commercial
cleaner.
'(lh
outlet
service
Consumer
purpose.
outlet
Page 3
I mportant
When using an electrical appliance, always follow basic
Safety
I nstructions
precautions,
including the following:
READ ALL INSTRUCTIONS BEFORE USING THIS APPLIANCE
WAR N I N
r
Only use the vacuum cleaner
.
Do not use
r
Close supewision is necessary when any appliance
vacuum
o
Do not
r
Keep hair,
and other moving
sandals.
.
Do not
r
Do not
or
use
r
The hose contains
o
Avoid
o
Afways
powered
o
Do not use
such as
.
Use extra
o
Do not
lint, hair, or anything that may reduce air flow.
e
Do not
edges or comers. Do not run appliance over cord. Keep cord away from heated surfacts.
o
Always
o
Alwa)s
.
Do not unplug
Never handle
o
If
cleaner
prwent
.
The use of
r
Do not
dropped, damaged, left outdoon,
Center or Authorized Hoover Wananty Sewict Dealer
.
Use vacuum cleaner on! for its intended use as described in the instructions. Use only
attachments recommended by The Hoover Company; others may cause hazards.
o
This
reproductive toxicity. Wash hands after handling.
outdoors
cleaner to be used as a toy.
run unattended at any time.
loose clothing, fingen, feet and all
parts.
pick
up anything that
pick
use to
in
areas where they may be
picking
fum off this appliance before connecting or dismnnecting
hand
powder.
care when cleaning on stain.
put
pull
disconnect cord from elecffical outlet before seMcing the cleaner.
unplug cleaner when not in use. Tum offall controls before unplugging.
has
cord from whipping.
use with damaged cord or
product
up flammable or combustible
electrical
up hard, sharp objects with the cleaner.
tool.
filten in
without
arry object
or carry by cord,
pulling
by
plug
or appliance with wet
a mrd reel, hold on to the
an extension cord
contains chemicals
: ," reduce the risk or nre, etectric shock, or injury:
G
indoors
or on wet surfacts.
Do not
operate cleaner
is
buming or smoking, such
present.
wires. Do not use if damaged, cut or
plact.
Clean filten frequently when
into openings. Do not use with arry opening blocked; keep free ofdust,
use
cord
on cord.
is not recommended.
plug.
or
known
surfacts.
on dry
is
by
used
parts
ofbody away
in bare feet or when wearing
liquids
Thqr may
as a handle, close door on cord or
To unplug,
dropped into water, take it to a Hoover Factory
gnsp
hands.
plug
lf applianct is not
to the
the
while cord
(Depot).
state of Califomia
near
or
fiom
as
cigarettes,
gasoline
such as
punctured.
damage the cleaner.
hose,
picking
plug,
not the
is
rewound
being
working
to cause cancrr and
children.
as it
Do not
openings,
matchel
mrd.
rotating
open toe
or
or fine wood sandings
motorized nozzle or
up very fine materials
pull
cord
to
has
should,
allow
shoes
hot
ashes.
around
been
Sewict
agitator
or
sharp
Save these
instructions
!
Page 4
Guia
Guide
FOLLOW ASSEMBLY
LOS PASOS
SIGA
SUIVEZ LES ETAPES D'ASSEMBLAGE DANS L'ORDRE INAAIJE
COMPLEIE ASSEMBLY
IAS //VSIRUCCI?NES
/NSIR
tFS
'l
UCTI}NS
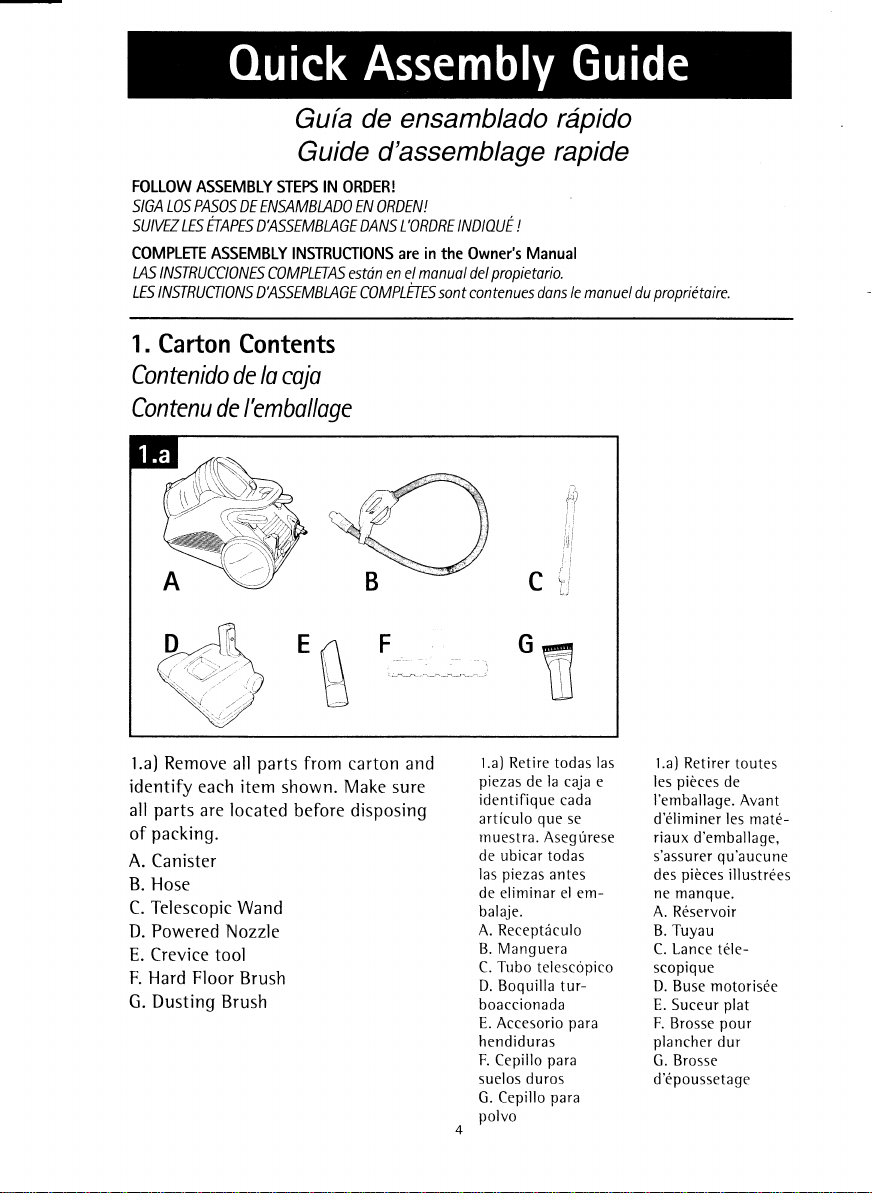
.
Carton
Contenido de lo
STEPS
DE ENSAMBIADO EN
INSTRUCIIONS are
C)MPLETASestrin en el
D'ASSEMBIAGE
Contents
cojo
de ensamblado
d'assemblage
IN
ORDER!
ORDEN!
in
the Owner's
monuol
del
COUptEfS sont
contenues dons
propietario.
Contenu de l'embolloge
!
Manual
C r,'l
\-il
rapido
rapide
le
monuel du
A)
l1
lr
ti
l,il
lrii
ii
!'l
tJ
proprietoire.
1.a) Remove
identify
all
of
A.
B.
C.
D. Powered
E.
each item
parts
are located
packing.
Canister
Hose
Telescopic
Nozzle
Crevice tool
F. Hard Floor
Dusting Brush
G.
EU
parts
all
Wand
Brush
from
shown. Make sure
before disposing
F
carton and
1.a) Retire
piezas
identifique
articulo
rnuestra.
de ubicar todas
las
de eliminar el embalaje.
A. Receptaculo
B. Manguera
C.
D.
boaccionada
E. Accesorio
hendiduras
F.
suelos duros
G. Cepillo
polvo
todas
la
de
caja e
cada
que
se
Asegurese
piezas
antes
Tubo
telescopico
Boquilla tur-
para
para
Cepillo
para
las
l.a) Retirer
les
I'emballage.
d'eliminer les materiaux
s'assurer
des
ne manque.
A. Reservoir
B. Tuyau
C. Lance
scopique
D. Buse motorisee
E.
F. Brosse
plancher
G. Brosse
d'epoussetage
toutes
pieces
de
d'emballage,
qu'aucune
pieces
illustrees
tele-
plat
Suceur
pour
dur
Avant
Page 5
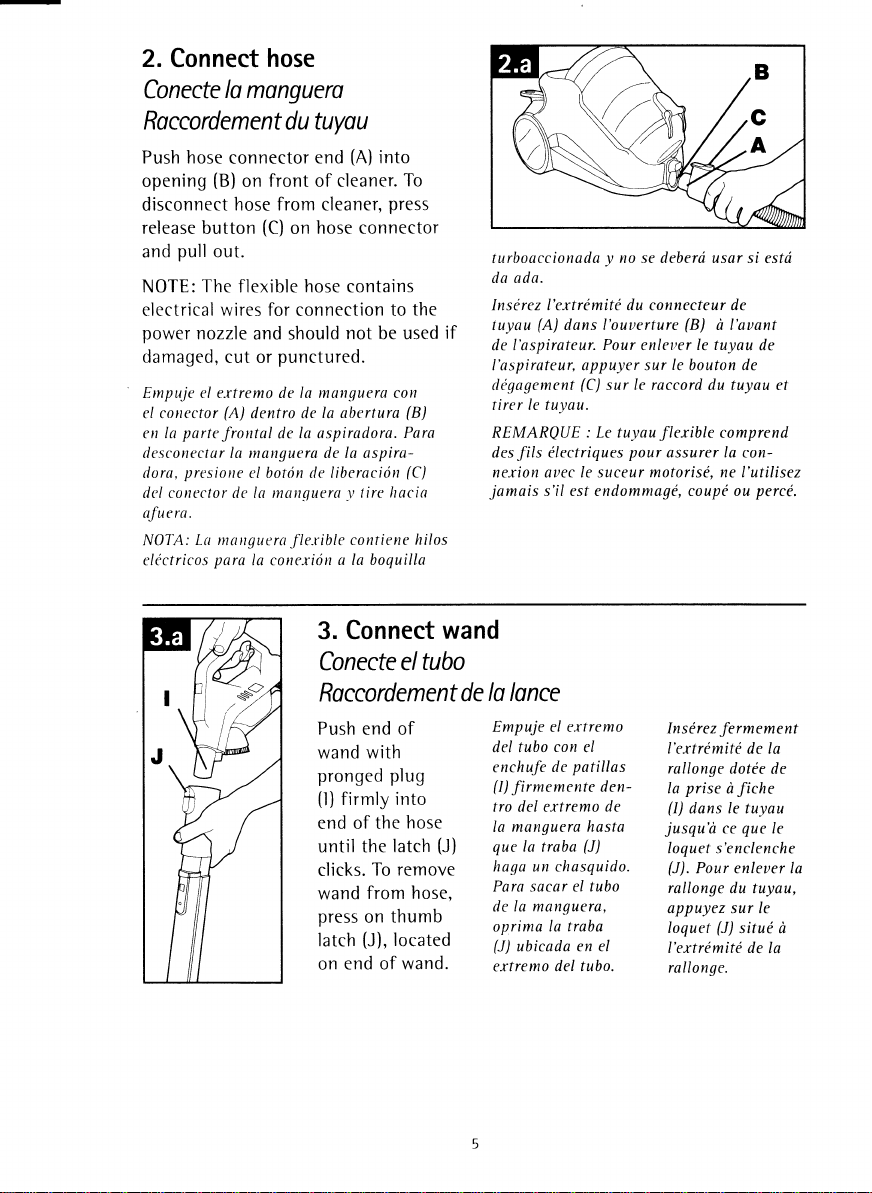
2.
Connect
Conecte
Rocco rdement
Push hose
opening
disconnect
release
button
pull
and
The
NOTE:
electrical wires for connection
power
nozzle
damaged,
Empuje el extremo de la monquera
el conector
parte
en Io
desconectur la manguero de la aspira-
presione
dora,
del coneclor de la monquera
afuera.
Lo ntottguero
NOTA:
electricos
hose
lo monguero
tuyou
du
(A)
connector
(B)
on
hose from cleaner,
out.
flexible hose contains
cut or
(A)
dentro de
frontal
el boton de Iiberacion
para
la conexion
end
front
of
(C)
hose connector
on
and should
punctured.
Ia abe
Ia aspirodora.
de
fle.rible
cleaner.
not be used
y
contiene
a Ia boquilla
into
To
press
to
con
(B)
rtura
Para
(C)
tire hacia
the
hilos
y
turboaccionada
da ada.
Inserez I'extrdmite du connecteur de
(A)
tuyau
if
de l'aspirateur.
l'aspirateur, appuyer sur
deqagement
f irer le tuyau.
REMARQUE : Le tuyau
electriques
des
fils
nexion auec Ie suceur
jamais
s'i/ esf endommage, coup( ou
no se debera usar si
dans I'ouuerture
Pour
(C)
Ie raccord
sur
pour
(B)
le tuyau
enleuer
Ie
bouton de
du tuyau et
flexible
assurer la con-
motorise,
B
c
A
esta
a l'auant
de
comprend
I'utilisez
ne
perce.
3. Connect
Conecfe el
rdement de
Rocco
wand
tubo
Push end of
with
wand
pronged
(l)
end of
until
clicks.
wand
press
latch
plug
firmly into
hose
the
latch
the
remove
To
from hose,
on thumb
(J),
located
(J)
on end of wand.
lo lonce
Empuje el extremo
del tubo
enchufe
(l)
tro del ertremo de
la manguera
que
haga
Para sacar
de Ia manguera,
oprima la
(J)
extremo del tubo.
con
el
patillas
de
firmemente
chasquido.
un
eI tubo
traba
en el
(J)
la traba
ubicada
hasta
den-
Inserez
fermement
I'extremite de la
rallonge
Ia
(l)
jusqu'a
loquet s'enclenche
(J).
rallonge
appuyez sur le
Ioquef
I'extrdmite de
rallonge.
dotee de
prise
a
fiche
dans Ie tuyau
que
ce
Pour enleuer Ia
du tuyau,
(J)
situe a
Ie
la
Page 6
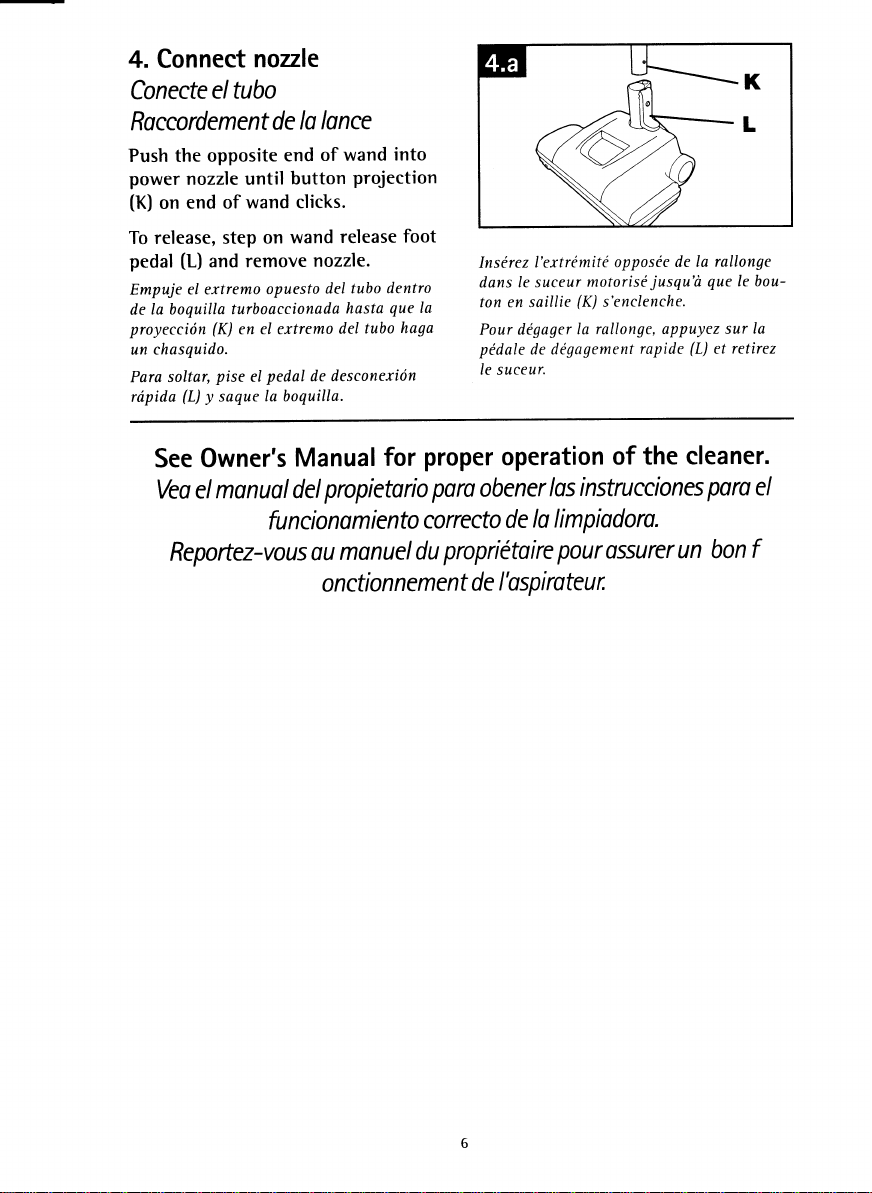
4. Connect
Conecfe
rdement
Rocco
Push the
power
nozzle until
(K)
end of
on
To release,
(L)
pedal
el extremo
Empuje
boquilla
de la
proyeccion
un chasquido.
Para soltar,
(L)
rdpida
nozzle
e/ tubo
opposite
wand
step on
and remove
turboaccionada
(K)
en
pise
eI
y
soque
lo
de
of
end
button
clicks.
wand
nozzle.
opuesto
el ertremo
pedal
de desconerion
la boquilla.
lonce
wand
projection
release
tubo
del
hasta
tubo
del
into
foot
dentro
que
haga
Insirez
dans Ie
ton en saillie
la
Pour degager
pedale de degagement
Ie suceur.
l'ertr(mite
motorise
suceur
(K)
Ia
de Ia
oppos(e
jusqu'a
que
s'enclenche.
rallonge, appuyez
rapide
(L)
rallonge
le bou-
Ia
sur
retirez
et
Owner's
See
Vea
el
monuol del
Manual
funcionomiento
Reportez-vous
for
propietorio
monuel
0u
onction
du
nement
proper
poro
correcto
operation
obener
lo limpiodors.
de
proprietoire
l'
ospi
de
of the
instrucc,ones
los
pour
ossurer
r
roteu
cleaner.
poro
el
f
bon
un
Page 7

Helpful
Reminders
you
notice
lf
rvo uno
obse
5i
remorquez
vous
Si
Unplug
any
Desenc
hocer
D eb
d'effectu
.
motor
become
the cleaner
the
of
hufe
lo siguiente.
ro n
ch ez
e
the
Check
filter;
dirty
r /es foch
think!
Verifique
y
el
llenorse
que
Verifier
situe
se
ne
.
Check
it
Replace
el contenedor
previo
filtro
y
ensuciorse
pienso
!
le vide-pous-siere
0v0nt
pensez!
le
plus
remplir
the
be broken
may
with
AH20000.
Verifique
lo correo
motorizodo;
estirodo.
HOOVER
Verifiez
suceur
ou
ovec
Pido el
AH2OOOO.
|dtot
motorise.
detendue.
courroie
une
AH20000.
a decrease
in
disminucion
borsse
une
before
following.
lo ospirodoro
r ovo
u
rote
l'
ospi
ivo
su
es
container
dirt
fill
it may
quicker
than
poro
motor;
ol
mos
motettr,
le
cor
rapidement
power
podrio
nozzle
stretched.
or
poro
belt
boquillo
HOOVER
estar
numero
lo courroie
de
peut
Elle
Remplocez
H)}VER
Recordotorios
Conseils
cleaner's
the
lo copocidod
de
puisslnce d'ospiration
de
doing
de
ontes
nt
nfes.
pre
and
and
uP
You
polvo
ipuede
de
ropido
fittre
/e
et
peuvent
ils
que
vous
belt;
number
o
roto
correo
de
du
cossee
€tre
courroie
lo
numdro
utiles
ability
de
lo
See
instructions.
Veo el
Reportez-vous
proprietoire
i n stru
de
utiles
pick
to
ospirocion.-.
Before
to the
We
assistance.
24hours
questions,
automated
Hoover
a
to
Representative.
8:00am
obten
uP'..
l'opporeil
de
you
store
if
help
can
o
Log on
day!
a
email
-800-9
.
1
Call
referral
and
Sales
o
1-800-263-6376
Call
Consumer
Hoover
-
7:00pm,
owner's
monuol
i nstru
r I os
e
pour
ns
co
o
cti
to
manual
...
product
your
return
first!
any
need
answers
experts
44-9200
your
to
Center.
ResPonse
ay-Frid
EST)
us
to
and
for an
nearest
to
aY
Contact
you
http://hoover.com
Get
our
Service
(M
ond
for comPlete
propietorio
del
cciones
monuel
ou
obtenir
pl
m
com
du
des
etes.
Your
more!
speak
Poro
plefos.
Page 8

nl
. How
This
cleaner was
should happen
-800-944-92O0
1
(U.S.
1-800-263-6376
Mon-Fri
Visit
us online
Cleaner
at www.hoover.cum
Description
to
use
inspected
to need
only)
OR
8AM-7PM
packaged
and
assistance
during assembly
for
an automated
to speak with
EST. OR
to find
carefully
before
or operation,
referral
a representative
the service outlet
being shipped from
call
of authorized
in
nearest
service
our Consumer
(click
you
4
5
6
7
B
9
l0
the factory,
outlet locations
Response
"Service"
on the
If
Center
button).
you
Operate
cleaner
only
specified
of
This
household
Not intended
in
commercial purpose.
cleaner.
cleaner
any
household
on
data
is intended
use
plate
only.
for
commercial
or for
at voltage
on
for
any
IMPORTANT:
Thermal
An internal
your
in
if
a large
nozzle
extremely
removed,
and
lf
this happens,
disconnect
Protector
thermal protector
cleaner
item
or if
the
dirty.
the
cleaner
will
cleaner
prevent
to
gets
or
clog
pre-motor
When
thermal protector
stop running.
turn
cleaner
from
bottom
use
other
is
installed
overheating
caught in
filter
the blockage
becomes
will
OFF and
electrical
outlet.
1. Hose
2.
Dirt
inlet
container
3. Cyclone
4. Dirt
container
5. Dirt
cup release
6.
Carry handle
7.
Auto
cord rewind pedal
B.
On/off
Plug
9.
l0.Exhaust
1 l.Wheel
the
is
not
trip
(Front
separator
handle
pedal
filter
cover
Then
disconnect
struction.
protector
and
cleaning
lf
cleaner
tional
time
Note:
The
plugged
period.
of canister)
button
n
Within
30
will
cool
may
does
not
for
thermal protector
canister
during
the
Accessories
I
13.
14.
1
16.
1
ozzle
and remove
minutes
and
automatically
resume.
operate,
must
remain
30 minute
2.
Hose
Telescopic
Powered
5.
Crevice
Hard
floor
7.
Dusting
the
thermal
allow
addi-
to reset.
un-
cooling
wand
Nozzle
tool
brush
brush
ob-
reset
Page 9

Polarized Plug
To
reduce the risk
than the other). This
fully in the outlet,
install the
proper
of electric
reverse the
outlet.
shock, this appliance
plug
will
Do
fit in
plug.
not
change
polarized
a
it
lf
still does
the
polarized plug
has a
outlet only one way.
not fit, contact a
plug
in
any way.
(one
blade is wider
plug
lf
the
qualified
does not fit
electrician to
Release
Cord
Fully unwind
power
yellow
power
the
indicates
recommended
length.
exceed the cord
length
red
mark.
Carpet
Attach the Power
Nozzle
of the telescopic
wand tube. For
large carpeted
the
cord. A
mark
on
cord
the
Do not
beyond
Cleaning
to the
end
areas.
cord
the
On/off
1. lnsert the
into
outlet.
2. Press the on/
off
on the top of the
vacuum cleaner, to
turn on the vacuum
cleaner and
the
turn
cleaner
Pedal
plug
the electrical
pedal
located
press
pedal
again
vacuum
the
off.
to
Hard Floor
For
floor
hard
ing
use the
floor tool
uming hardwood,
laminate coverings,
and ceramic
N0TE:
Power Nozzle
the
clean hard floors,
turn the agitator
"OFF'
the brushroll
OFF" button on
hand
in
Fig.
clean-
hard
for
vacu-
floors.
When using
pushing
by
"0N/
grip
as
shown
1.6.
to
the
Cleaning
ON
5f
E]FF
Suction
To
clean delicate
fabrics,
over
suction and
fabrics and
faces.
to
slide
lower
Control
valve
the
protect
sur-
Valve
Page 10

Edge
Guide side of nozzle
parallel
carpet or
as shown.
Cleaning
to edge
of
furniture
Rewind
Cord
rewind
To
er cord,
rewind
cord
located
of the vacuum
cleaner, and
power
the
hand. This
one
prevent
from
whipping
which could cause
damage or
pow-
the
press
the
pedal,
on the top
guide
cord with
will
the cord
injury.
Carry
Use the carry
handle located
the
vacuum cleaner
move
room.
Handle
rear
end of the
from room
at
to
to
Cleaning Tools
The
cleaning
are conveniently
stored underneath
hand
the
The
have many
Select the tool
suited for
ing
task
following
tions.
tools
grip.
cleaning tools
uses.
best
the
clean-
from
the
descrip-
H
g
Select
H.
Crevice
in such
baseboards.
l. Dusting Brush
table tops, books,
shutters
draperies, tapestries,
J. Hard floor tool
floors
proper
the
tool may be used in
p'laces
as dresser drawers, upholstered furniture,
with swivel
lamps, lighting fixtures,
registers.
and
may
such as brick
and
I
ffi
tool
tight spaces, corners, and
neck may
May also be used for
mattresses
be used
slate.
and clothing.
for
walls and
n-t-ut rrFtt
along edges
stairs and
be used for carved furniture,
venetian blinds, baseboards,
upholstered
very
furniture,
irregular hard
surface
Page 11

Attaching
Tools may
attached
hand
the
the wand.
push
tool into
grip
hand
Twist tool slightly
to tighten or loosen
connection.
be
directly to
grip
or to
Firmly
the
or
wand.
Tools
Storage
IMPORTANT: Always
cord as directed
N0TE: Always
unplug the vacuum
before storing.
store the vacuum cleaner
2. Maintenance
Familiarize
tenance
your
effectiveness.
To
ates at
that
tasks as
cleaner
assure
peak
you
yourself
that
use only
with these
proper
will ensure continued
your
performance,
use and care of
HOOVER cleaner oper-
genuine
home
cleaning
it is imperative
HOOVER
cleaner from
base
down.
main-
parts.
How
to Clean Stairs
Clean stairs from
bottom to top.
NOTE: Take
care when vacuum-
ing stairs. Do not
store canister in ver-
tical
the
Dirt
Removal
IMPORTANT: lt is recommend
the
emptied
your
of
IMPORTANT:
cleaner from
removing
IMPORTANT: Do NOT use
er
without
extra
position.
electrical
outlet and
Container tt
Replacement
ft
filters
everytime the dirt
for
consistent
machine.
Always unplug
the electrical outlet before
the dirt container.
ALL
of the
rewind
Filters:
cleaning
the vacuum clean-
filters
power
the
you
that
container
performance
the vacuum
place.
in
clean
is
Emptying
I
Step
Press
button
handle
located
the dirt
pull
lid
and
container
the
on
on
container
dirt
out.
the
Dirt
Container
ll
Step
Hold
the dirt container over trash
can and
quick
ton
empty the container. When all
the dirt has fallen,
close
tainer flap, a
will be heard
closed. Then
replace the dirt
container.
press
the
release
the
but-
dirt con-
click
when
as directed to
Page 12

Cleaning the Cyclone
Step I
Twist lid
unlock
pull
tainer bin off the
cyclonic separator.
the
to
position
the dirt con-
and
Step
The separator
should
with a soft brush
and wiped
damp cloth.
dirt container
may be wiped
clean.
Separator
ll
be cleaned
with a
The
bin
to
lll
Step
Leave the
to
before
IMPORTANT:
cyclonic
should
merged
Step
Replace the
container
ed,
to
tion.
separator
dry completely
replacing.
separator
not be
in
water
lV
dirt
as direct-
by twisting
locked
the
The
sub-
lid
pos-
Cleaning
NOTE: This is located
Step
Release the
motor filter
lifting
by
Lift
tab.
filter
cover to
access to the
Remove the filter
pulling
by
towards
I
off the
you.
pre-
cover
up the
filter.
the
the
gain
tab
the dirt
ll
foam
the
Each
can to
Filter
fab-
Pre-Motor
underneath
Step
Separate the
from
filter
ric cassette.
filter can be tapped
against the side
of a trash
remove the excess
dirt and dust.
container bin.
Step
pre-motor
The
filter may be
rinsed in warm
water.
for 24 hours
dry
before
lll
Allow to air
replacing.
NOTE: Do not
any
detergents or
boiling
wash the
For
best
mance, the foam
filter
should
cleaned each
the dirt container is
emptied.
Step
0nce completely
dry, return
pre-motor
and cassette to the
vacuum cleaner.
Replace
motor filter
before
the vacuum cleaner.
water to
filters.
perfor-
be
time
lV
the
filter
pre-
the
cover
restarting
use
Page 13

Cleaning
NOTE:This
the Exhaust Filter
is located
Step I
Release
the exhaust
filter
cover
the
by
and
cover as
the
pulling
you.
remove
shown. Remove
filter
tab towards
on the
the
rear
of the
vacuum cleaner.
ll
Step
pleated
Tap
the
filter
of a trash can
remove
and
WARNING: Do not
apply water to
pleated
on the
excess dust
dirt.
filter.
inside
to
N
OTE : Repla
filter if
any sign
damage.
lll
Step
Once
c'leaned
return
the exhaust
filter
to the
vacuum
cleaner.
Replace
the
filter
cover
restarting
um
cleaner.
ce
of
exhaust
before
the vacu-
What
to
purchasing
When
new
HEPA
Filter,
ask
HOOVER
AH400to.
buy
Exhaust
for
part
a
no.
Power
The
agitator. lt has
for
effective operation.
What
There are
are similar in
designed for
Such belts
rectly
How
Step
Disconnect
from
outlet and
nect
from
wand.
To remove
turn nozzle
and
7 recessed
head
belt in
in
use
this
to buy
other
and may
replace
to
I
e'lectrical
power
extension
unscrew
screws.
Nozzle
your
power
been designed
cleaner
belts manufactured
shape
the HOOVER
do not
create stress
cleaner
discon-
nozzle
hood,
over
the
Phillips
belt replacement
nozzle
drives the
specifically
is important
and
and size, but are not
power
operate
the agitator cor-
which could
for
that
nozzle.
your power
damage
genuine
HOOVER
when
When
The
time
check, remove
tion). Replace
or broken.
Step
Return nozzle
to original
tion. Lower
Disconnect
depressing down
the
pedal
the
replacement
a belt
replace
to
belt should
to be sure
ll
posi-
Quick
by
handle
release
and lift
hood.
off
nozzle.
part
Belt
is necessary.
be
checked from
good
it
is in
(see
hood
the
the belt if it is
Use
only a
no.
AH20000
time
condition.
following
stretched,
to
To
sec-
cut,
Page 14

lll
Step
lf
is not
belt
is
but
cut,
motor
Lift up end of
agitator brush
Remove old belt
from agitator
(E)
ley
Step
Hold opposite
agitator brush
of
roll in
belt end
rotating
(F)
until
into
agitator,
ing sure
freely.
stretched or
pull
it
off
pulley
and replace
lV
place.
forward,
end
it
slides
place.
Turn
mak-
it
rotates
broken
(D).
Push
plate
the
roll.
pul-
end
new belt.
with
Lettering
must
Stretch belt
and attach to
pulley.
on belt
be visible.
back
motor
V
Step
Position hood on
nozzle base.
top of
Turn nozzle over.
Replace
Philips head screws.
the
7
Agitator
When to
Disconnect
from
electrical outlet.
When agitator brush
roll
brushes are worn,
brush roll
the
replaced.
be
To
check condition
brushes,
a card across bottom
plate
while turning brush
cleaning effectiveness,
brushes do not touch card.
brush
replace
cleaner
should
move
edge of
roll replacement
of
roll.
To maintain
replace
brush
Headlight replacement
The headlight, located on top of the
the cleaner
when
How to
Disconnect
nozzle from
1. Remove
2. Pull old bulb from
Replace hood.
3.
is
turned on. Use only
replacing
headlight.
the
replace
cleaner from electrical outlet
extension wand.
the hood
as shown
socket.
HOOVER
in Fig. 2.10.
new
Push
roll if
power
nozzle,
part
and disconnect
into socket.
bulb
What
to buy
purchasing
When
for HOOVER
ask
How to
Disconnect
1.
Remove
in Figs. 2.9 Io 2.11.
shown
2. Discard old brush
Replace
3.
in
Figs. 2.12 and
operates
no.
59135317,
power
a
part
replace
cleaner
hood,
belt
new
brush
2.13.
when
new agitator
no.
59135316.
from
electrical
and
brush
roll.
roll
and belt as shown
brush
outlet.
roll
as
roll,
Page 15

Troubleshooti
3.
problem
minor
lf a
the check list below.
using
PROBLEM POSSIBLE
"ON"
run.
Not
Not firmly
No voltage
Blown
Motor
tripped.
Dirt container
Dirt
Blockage
or wands.
Filters dirty or
Suction
Hose
Cleaner
won't
Low suction.
Power
it usually
occurs,
CAUSE
at cleaner.
plugged
in wall
fuse or tripped
Thermal
container
in nozzle connector,
control
power
cord
nozzle
agitator
brushroll
won't
Nozzle
won't
up
Broken or worn
Brushroll
run
Thermo Protector
Low cleaner
pick
Blockage
Agitator brushroll
switch
suction.
in nozzle connector.
Agitator brushroll
ng
can
in.
plug.
breaker.
Protector
full or blocked.
not
clogged.
valve
not firmly
belt.
set to
has
installed
open.
plugged
"OFF".
Activated.
not running.
worn.
brushes
be solved
properly.
hose
in.
quite
easily when
POSSIBLE SOLUTION
'ON"
Turn
Plug
unit
fuse or breaker.
Check
Replace fuse or
off
Switch
cleaner.
switchinq
Empty dirt
dirt container
Review
Remove
or replace
Clean
suction
Close
Plug firmly
base.
Replace belt.
Brushroll switch
Set
OFF
Switch
cleaner.
switchinq
section
See
the cause
at cleaner.
firmly.
in
reset breaker.
and unplug the vacuum
for
Leave
blockage.
Leave
30
vacuum cleaner
the
container.
filters.
control
receptacle on cleaner
into
and unplug the
for 30
vacuum back on.
the
"Cleaner
Remove blockage.
See section
"Agitator
Replace brushes.
is found
minutes
valve
to
suction
before
back
replacement.
hand
on
"ON".
vacuum
minutes
before
low".
brushroll won't
by
on.
grip/
run"
ing
Clean
Low suction or
may be
up
a blockage
system.
following
for
check
continuing with
each step until the
blockage
Blockages
pick
due to
in
the
Refer
to the
steps to
blockages,
is found:
I
Step
Turn the
cleaner off
unplug
electrical
vacuum
from the
and
outlet.
ll
Step
The
can be disconnected
from the
cleaner
the
on hose connector and
shown.
blockages
then
hose securely.
hose
flexible
vacuum
pressing
by
release button
pull
out as
Remove
found
reconnect the
any
Page 16

Cleaning
lll
Step
Plug
cleaner in,
turn on, and
hose
end for
tion.
Remove
obstructions.
Blockages
check
suc-
anv
Service
To
obtain approved
and Service
r
Checking
o
Checking
r
Calling l-800-944-9200
(U.5.
only)
Do not send
lf
further assistance
-8OO -263 -
1
ln
Canada, contact
Phone: l-800-263-6376
Always identify
ordering
parts.
HOOVER
Center
or Authorized Hoover
the Service
the Yellow Pages
your
cleaner to Hoover in Glenwillow,
is needed,
637
6 Mon-Fri
Hoover
your
cleaner by the
(The
model number
(continued)
Step Vl
power
Remove
nozzle from
and
to hose.
suction
any
service and
Section ofHoover
for
8am-7pm EST.
Canada, Carson Building, t00
Mon-Fri
wand
attach wand
Check for
remove
and
blockages.
genuine
HOOVER
Warranty Sewice Dealer
on-line at hoover.com
"Vacuum
under
Cleaners
an automated referral of
contact the Hoover
8am-7nm EST.
complete model number
appears on
the bottom of the cleaner.)
Step V
Make
nozzle is
nected
Then
blockage
connector
Ohio for
Consumer Response
power
sure
discon-
from
wand.
for
check
in nozzle
(A).
parts,
locate
(Depot)
authorized
OR
Household"
0R
sewice outlet locations
service; this will
Center, Phone:
Carson St., Etobicoke,
when requesting
Step
Make
nozzle
nected from
Turn
nozzle
and
check for
ages.
the nearest
by:
only result in
Ontario
information
lV
power
sure
is
discon-
wand.
over
Hoover
delay.
MBW
or
block-
Sales
3R9,
Page 17

Li mited
Two
(Domestic
Year
Warcanty
Use)
THIS
WHAT
When used and
Manual,
manship for a full two
Warranty
defect
HOW
lf
this
and
purchase.
1-800-944-92OO 0R
information
the
Canada,
3R9,
WHAT
This
janitorial
due
owner's acts or omissions,
chased
up,
Sales and Service
This warranty does
its territories
OTHER
This Warranty is
erned
extended
TH]S
ALL OTHER
MERCHANTABILITY
NO EVENT
CONSENQUENTIAL
CLAIMING
OR STRICT PRODUCTS
states
not
vary from state to
WARRANTY
maintained
your
HOOVER@
Period, Hoover
products
in
TO
MAKE A WARRANTY
product
Service Center
For an automated
concerning
Hoover
Consumer
contact
Phone: l-800-263-6376,
THIS
WARRANTY
Warranty
to misuse,
delivery, transportation
WARRANTY
apply to
does
and equipment
and resales of the
and
IMPORTANT
and
construed
by any replacement
WARRANTIES,
WILL
THROUGH OWNER,
do not
allow
you.
product
years
will
purchased
not as warranted,
is
Hoover
or
visit
this
Response Center,
Hoover Canada,
not cover:
God,
of
acts
Center
not apply to
possessions),
TERMS
not
transferable
under
THE EXCLUSIVE
IS
OR
HOOVER
DAMAGES
LIABLILI-Y
the exclusion
This warranty
state.
COVERS
in normal
provide
in
Hoover online
Warranty
DOES
rental services),
nature, vandalism
use
product
or
for warranty
the
FITNESS
BE
household use
is warranted
from date
labor and
United
the
CLAIM
take
Authorized Warranty
referral to
or the
Phone
Carson
Bam-7pm
Mon-Fri
NOT COVER
the
use of
the
outside
by the
house cal'ls.
service,
products
Military
U.S.
may
and
laws
the state
of
performed
repair
or
WARRANTY
EXPRESSED
FOR
LTABLE
ANY KIND OR
OF
WHETHER
ARISING
OR
consequential
of
gives you
in accordance
and
original
against
purchase
of
parts,
States,
send the
or
authorized
at www.hoover.com.
availability
1-800-263-6376,
Building,
product
improper maintenance
or other acts
country
original owner.
However,
cost of
purchased
Exchange and
not be assigned.
of Ohio.
IMPLIED,
OR
PARTICULAR
FOR ANY SPECIAL,
BASED
FROM
specific
"Warranty
(the
no cost to
at
Military Exchanges
U.S.
product
Service
outlets
service
of warranty
100 Carson
EST.
in a commercial
beyond the
in which the
This warranty
you
mail
if
shipping
outside
Canada.
The Warranty
this
under
AND REMEDY
INCLUDING WARRANTIES
PURPOSE, ARE
NATURE
IN CONTRACI
ANY CAUSE WHATSOEVER.
damages,
you
rights;
with the Owner's
in material and work-
defects
Period").
you,
to correct any
and Canada.
either a
to
Dealer along
For additional
Mon-Fri Bam-7pm
St., Etobicoke,
operation
of the
product
your product
will be
the: United
This
Warranty
Warranty.
PROVIDED
INDIRECI
TO OWNER
so the above
may also
with
in the U.S.A.,
outlets,
service
product,
control of
was
does
paid
one
States
Period will
DISCLAIMED.
INCIDENTIAL 0R
OR
NEGLIGENCE,
have others that
During the
such
Hoover Sales
proof
phone:
assistance or
phone
EST. ln
MBW
Ontario
(such
maid,
as
damage
Hoover,
pur-
initially
not
shall be
exclusion
pick
cover
Hoover
to a
way.
(including
gov-
not
BY HOOVER.
ANY PARTY
TORT
SOMC
may
of
be
OF
IN
 Loading...