

Page 1

DIE SAUBERE LÖSUNG
Robert Hoover
Metall- und Elektrowerke GmbH & Co. KG
Postfach 18 20, 57279 Neunkirchen
Hellerstraße 6, 57290 Neunkirchen
Telefon +49 - 27 35 - 7 88 - 0
Telefax +49 - 2735 - 788 - 519
e-mail: info@robert-hoover.de
www.robert-hoover.de
GERMANY
Techn. Änderungen vorbehalten
GA 05/03
Teile-Nr. 188 045
Page 2

Page 3

Contents Page
Illustration of appliance/identification of parts 3/6
Assembly diagrams 4/5
Safety points 6
Assembling the appliance 7
Dry vacuuming 7
Wet vacuuming 8
If unexpected difficulties arise 8
Customer service 8
GB
Índice Página
Ilustraciones del aparato / Identificación de piezas
Ilustraciones de montaje 4/5
Advertencias de seguridad 18
Montaje 19
Aspiración seca 19
Aspiración húmeda 20
Ayuda en caso de posibles fallos 20
Servicio Postventa 20
E
3/18
Table des matières Page
Schéma de l’appareil/identification des pièces 3/9
Schémas pour le montage 4/5
Consignes de sécurité 9
Montage 10
Aspiration à sec 10
Aspiration humide 11
En cas de difficultés imprévues 11
Service après vente 11
Inhalt Seite
Geräteabbildung/Teileidentifizierung 3/12
Montageabbildungen 4/5
Sicherheitshinweise 12
Montage 13
Trockensaugen 13
Naßsaugen 14
Hilfe bei eventuellen Störungen 14
Kundendienst 14
Indice Pagina
Illustrazioni dell’apparecchio /
identificazione dei componenti 3/15
Illustrazioni di montaggio 4/5
Indicazioni di sicurezza 15
Montaggio dell’apparecchio 16
Aspirazione a secco 16
Aspirazione umida 17
In caso di guasto 17
Assistenza clienti 17
F
D
I
Índice Página
Ilustração do aparelho / Identificação de peças
Apresentação da montagem
Instruções de segurança 21
Montagem do aparelho 22
Aspiração de sólidos 22
Aspiração de líquidos 23
Ajuda em caso de avarias 23
Serviço de assistência a clientes 23
Inhoudsopgave Pagina
Overzichtstekening/onderdelenlijst 3/24
Montagetekeningen 4/5
Veiligheidsaanwijzingen 24
Montage 25
Droog zuigen 25
Nat zuigen 26
Tips voor eventuele storingen 26
After Sales Service 26
Obsah Strana
Obrázek spotřebiče/
Identifikace součástek 3/27
Znázornění montáže 4/5
Bezpečnostní upozornění 27
Montáž spotřebiče 28
Suché vysávání 28
Mokré vysávání 29
Objeví-li se nečekané potíže 29
Zákaznický servis 29
P
3/21
4/5
NL
CZ
2
Page 4
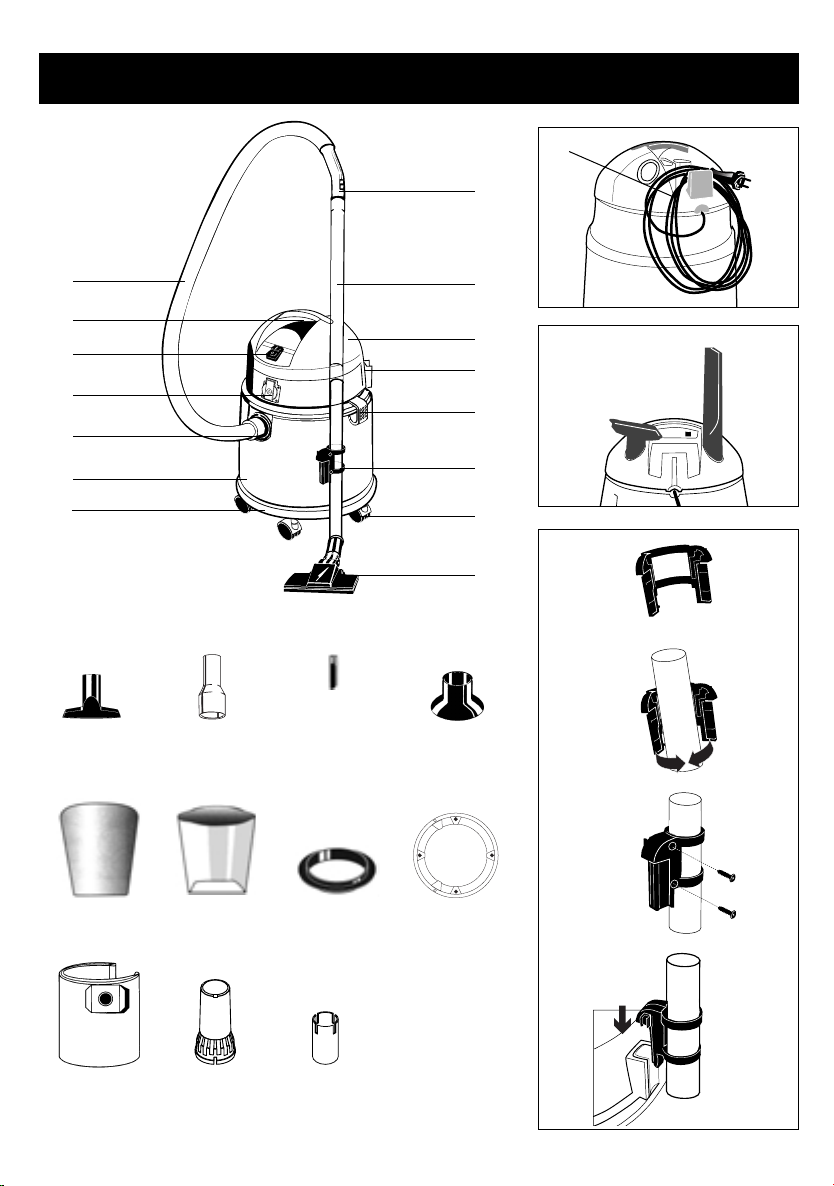
Appliance diagram · Schéma de l’appareil · Geräteabbildung · Illustrazioni dell’apparecchio · Ilustraciones del
aparato · Ilustração do aparelho · Onderdelen variëren al naar gelang het model · Obrázek spotřebiče
10
11*
12*
9
5
6*
8
1
23
15 15a* 17* 18*
13*
26*
25*
16*
2
3
15
17*
4
25*
1.
2.
20 21 22 23
24 27 28
* Feature varies according to model
* Les équipements varient selon les modéles
3.
3
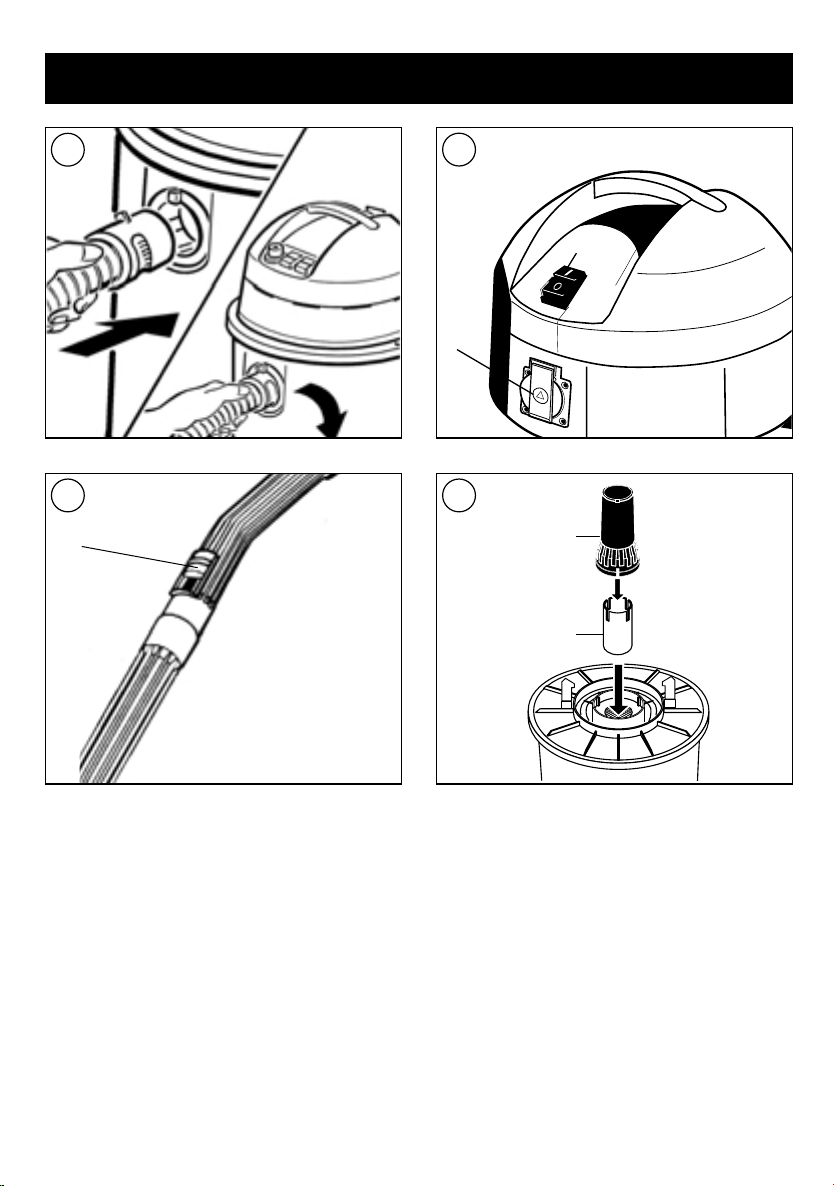
Page 5

Assembling the Appliance · Illustrations pour le montage · Montageabbildungen · Illustrazioni di montaggio ·
Ilustraciones de montaje · Montaj · Onderdelen variëren al naar gelang het model · Montáž spotřebiče
A B
C* D
3
23
3.
pp
2.
p
1.
p
E F
4
*Feature varies according to model
*Les équipements varient selon les modéles
Page 6
Assembling the Appliance · Illustrations pour le montage · Montageabbildungen · Illustrazioni di montaggio
· Ilustraciones de montaje · Montaj · Onderdelen variëren al naar gelang het model · Montáž spotřebiče
G
J
11*
H
5
6*
K*
27
28
* Feature varies according to model
* Les équipements varient selon les modéles
5
Page 7

Before operating
appliance for the first time
Please read through all of the information
below carefully. The information provides
important points for the safe use and the
maintenance of the appliance. Please
keep these operating instructions in a safe
place and provide them to the next
owner.
Part identification
1 = Collecting bin
2 = Motor block
3 = Snap fasteners
4 = Castor wheels
5 = On/Off switch
6*= Power Tool Socket
8 = Hose connection
9 = Carrying handle
10 = Mains cable
11* = Suction control
12* = Flexible hose
13* = Suction tubes
15 = Upholstery nozzle
15a*= Reduction piece
16* =
Carpet + floor nozzle
17* = Crevice Tool
18* = Drain Clearing nozzle
20 = Foam premotor filter
21 = Paper premotor filter
22 = Clamping ring
23 = Footring
24 = Dust paper bag
25* = Parking hook
26* = Suction tube – park position
* Feature varies according to model
Safety points
• HOOVER WET & DRY is intended for household use
by adults.
• This product is double insulated and must not be
earthed.
IMPORTANT: The wires in the power cord are
coloured in accordance with the following code:
Blue-Neutral Red-Live
13 AMP FUSED PLUG ON UK MODELS ONLY.
• Do not allow nozzles and tubes (when the appliance
is switched on) to come within the proximity of the
head – danger for eyes and ears, for example.
• Do not vacuum noxious substances or corrosive or
solvent liquids.
• Never operate the appliance in rooms where
inflammable materials are stored or where gases
have formed.
• Materials such as petrol, paint thinner and heating
oil can form explosive gases or mixtures by being
subjected to centrifugal air from the appliance.
• Never vacuum hot ash or glowing objects.
• Check before every use to be sure that you have
correctly fitted the filters required for the specific
application.
• Do not vacuum toner dust! Toners such as those
used in printers and copiers, can be electric
conductors! Furthermore, it is possible that the
appliance’s filter system will not completely filter out
toner dust, and in this way it can enter the air
supply of the room.
• Acetone, acids and solvents can attack the materials
used in this appliance.
• Extreme care is required when vacuuming stair
carpets with your appliance. Ensure that the
vacuum cleaner stands firmly on the step and take
care that the flexible hose is not stretched beyond its
actual length. When using the vacuum cleaner on
stairs, always ensure that you hold the appliance
steady with one hand.
• Do not leave the appliance unattended whilst it is
switched on and ensure that children do not play
around with the appliance.
• Always pull out the plug
– if the appliance malfunctions during operation
– before cleaning and maintenance
– after use
– when changing the filter.
• Never unplug the appliance by pulling at the cable,
but only by removing the plug directly from the
socket.
• Ensure that the main cable is not exposed to either
heat or chemical substances, nor that it is pulled
across sharp edges or surfaces.
• Avoid using extension cables in wet rooms.
• Never repair damage to the appliance, to the
6GB30
Page 8

Page 9

accessories or to the cable (special cable required);
have repairs done only by an authorised customer
service station, because modifications to the
appliance can pose a risk to your health.
Ensure that only original spare parts and accessories
are used.
• Do not expose the appliance to the elements,
humidity or heating sources.
• After wet vacuuming, empty the collecting bin
immediately.
Unpacking the Unit
• Unpack the unit and inspect it for signs of shipping
damage. Check that all items that should be
included are present. Immediately notify your
dealer or out customer-service department if you
find any damage or if any items are missing.
• Save the original packing carton, since you can use
it for storing the unit and might need it to return the
unit to your dealer or a HOOVER Customer-Service
Center for servicing.
Dry vacuuming
After wet vacuuming, the appliance must be
absolutely dry; dry off the flexible hose or tubes
if necessary beforehand.
Never dry vacuum without filters or
with damaged filters.
D Assemble the foam premotor filter, premotor
paper filter and clamping ring and fasten them
with the locking clips.
E Press the filter bag on the suction connection
firmly and lay it against the wall of the collecting
bin.
F Place the motor block on top and secure it by
means of snap-on fasteners.
G Connecting the flexible hose. Remove the hose by
turning the hose connecting piece and
withdrawing the hose.
Assemble the accessories you require.
Connect the mains cable.
Disposing of the Unit
Dispose of the appliance according to local regulations
and pull out and cut off the mains cable beforehand.
Assembly
A Undo the snap-on fasteners and lift the motor
block.
B Place footring with the 4 holes to match with the
holes on the underside of tank and fix it by
plugging in the fixing elements.
Push the castor wheels and the pegs into the
footring until they snap into place.
C* Press snap catch (19) in the side of the motor
head and unlock.
K* Assembly float and float holder.
H Turn the appliance on with the On/Off switch (5).
Suction control (11, figure J) allows you to vary
the suction power.
– Sliding air trap closed = full suction power
– Sliding air trap open = reduced suction power
Dependant on equipment:
Appliance with plug box.
Electric tools with a rating in accordance with the
rating printed on the plug box can be connecting up to
the appliance plug box (6).
This plug box is ready for service as soon as the
vacuum cleaner has been connected to the main
voltage.
* Feature varies according to model
7
Page 10

Wet vacuuming
Always remove the filter assembly (figure
D+E) before commencing wet vacuuming,
since otherwise the filter assembly will be
ruined. Do not forget to unplug the power
cord before removing the motor housing (2)
from the tank.
When vacuuming out containers in which the
liquid level is higher than the top of the collecting
bin and which have a larger volume than the
capacity of the collecting bin, liquid can continue
to be vacuumed beyond the capacity of the
collecting bin if the float valve is closed.
In such cases, vacuum only in partial amounts and
intermittently empty the collecting bin.
Lift the tube and flexible hose out of the liquid first and
then turn off the appliance afterwards, in order to
prevent an overflow of liquid.
Keep the float valve (27, fig. K) clean and
accessible at all times. It automatically interrupts
vacuuming when the collecting bin is full.
After completion of wet vacuuming, please clean
and dry the appliance and the accessories used.
Sudden reduction in suction power
- Has the float stopped the flow of air? This can
happen if the appliance is standing at a slant or if
the appliance falls over. Turn off the vacuum
cleaner – the float will fall back into place – the
appliance is ready for use again.
The motor does not function:
- Is there damage to the mains cable, plug or socket?
- Pull out the plug before checking.
- Never open the motor yourself!
Customer Service:
To obtain approved HOOVER service and genuine
HOOVER parts, please call: Gias Customer Service
08705400600 or your nearest Hoover Service Centre.
Ensure that all service and repairs are carried out by
an authorised Hoover Service Engineer.
Use only genuine Hoover spare parts. Always identify
your cleaner by the complete model number when
requesting information or ordering parts. (The model
number appears on the back of the cleaner body.)
If unexpected difficulties arise
If your appliance does not operate to your satisfaction,
you do not have to contact customer service straight
away. Please check first as to whether the fault is due
one of the following minor causes:
Dust escaping from suction sockets:
- Has the filter system been fitted in accordance with
the instructions?
- Has an original HOOVER filter been used?
Gradual reduction in suction power:
- Are the pores of the paper filter bag clogged up by
dust or soot?
- Is the collecting bin full?
- Is there a blockage in the nozzle, extension tube or
flexible hose?/Stretch the flexible hose while the
appliance is switched on – this will loosen the
obstruction.
Water is coming out of the air expulsion
openings of the appliance during
vacuuming:
- Is the float (figure K) blocked when vacuuming liquid
and unable to operate?
8
HOOVER LTD Pentrebach,
Merthyr Tydfil,
Mid-Glamorgan
CF48 4TU
Gias Customer service 08705 400600
Hoover Spares 01204 556111
Guarantee
Your new appliance is fully guaranteed for 12
months against electrical/mechanical breakdown
excluding:
a) Any faults which occur due to incorrect
installation or misuse of the machine or
accidental damage.
b) Repair of, or interference with the machine by
any person not authorised by the
manufacturer to carry out service.
c) Any parts which are fitted to the machine
which are not original manufacturers parts.
d) Non-domestic use of the machine.
e) Operation at incorrect voltage.
The guarantee applies to Great Britain and
Northern Ireland only. The aforegoing does not
affect your statutory rights.
Page 11

Avant d’utiliser l’appareil
F
pour la première fois
Veuillez lire attentivement toutes les
informations fournies ci-dessous. Les
informations concernent des points
importants pour l’utilisation et l’entretien
en toute sécurité de l’appareil. Veuillez
conserver ces instructions en lieu sûr et
les remettre au propriétaire suivant.
Identification des pièces
1 = Cuve de récupération
2 = Bloc moteur
3 = Fermoirs
4 = Roulettes
5 = Interrupteur Marche/Arrêt
6* = Prise pour outils électriques
8 = Embout de flexible
9 = Poignée de déplacement
10 = Câble d’alimentation secteur
11* = Commande de réglage d’aspiration
12* = Flexible
13* = Tubes d’aspiration
15 = Suceur pour tissus d’ameublement
15a* = Réduction
16* = Suceur moquette + sol
17* = Suceur biseau
18* = Accessoire de nettoyage d’écoulements
20 = Filtre pré-moteur en mousse
21 = Filtre pré-moteur en papier
22 = Anneau de blocage
23 = Socle
24 = Sac de poussière en papier
25* = Crochet de rangement
26* = Tube d’aspiration - rangement
* Varie selon le modèle
Consignes de sécurité
• L’aspirateur HOOVER HUMIDE ET SEC est prévu
pour l'utilisation domestique par des adultes.
• Cet appareil a une double isolation et ne doit pas
être relié à la terre.
IMPORTANT : Les fils du câble d’alimentation
secteur sont colorés selon le code suivant :
Bleu = Neutre Rouge = Phase
PRISE DE 13 A AVEC FUSIBLE UNIQUEMENT
POUR LES MODELES DU ROYAUME-UNI
• Tenez les suceurs et tubes (lorsque l’appareil est
allumé) à l’écart de votre tête – il y a risque de
danger pour les yeux et les oreilles par exemple.
• N'aspirez pas de substances nocives ou corrosives
ou liquides solvants.
• N’utilisez jamais l'appareil dans des pièces dans
lesquelles des matériaux inflammables sont stockés
ou dans lesquelles il y a eu une formation de gaz.
• Les matières telles que l’essence, les diluants de
peinture et le mazout peuvent former des gaz
ou mélanges explosifs s’ils sont exposés à l’air
centrifuge de l’appareil.
• N’aspirez jamais de cendres chaudes ou matières
incandescentes.
• Vérifiez avant utilisation que vous avez correctement
posé les filtres requis pour l’application spécifique.
• N’aspirez pas la poussière de toner ! Les toners
(encres) pour imprimantes et photocopieurs peuvent
être conducteurs d’électricité ! Qui plus est, il est
possible que le système de filtration de l’appareil
ne filtre pas complètement la poussière de toner,
qui peut donc ainsi pénétrer dans l’alimentation
d’air de la pièce.
• L'acétone, les acides et les solvants peuvent attaquer
les
matériaux entrant dans la construction de cet
appareil.
• Procédez avec extrême prudence lorsque vous
aspirez la moquette d'escalier avec votre appareil.
Veillez à ce que l’aspirateur repose fermement sur
la marche et veillez à ne pas étirer le flexible
au-delà de sa longueur réelle. Lors de l’utilisation de
l’aspirateur sur des escaliers, veillez toujours à le
maintenir stable avec une main.
• Ne laissez pas l’aspirateur sans surveillance lorsqu’il
est allumé et assurez-vous que les enfants ne jouent
pas à proximité de l’appareil.
• Débranchez toujours l’appareil
– s’il ne fonctionne pas correctement pendant l’utilisation
– avant son nettoyage et entretien
– après utilisation
– lors du changement du filtre
• Ne débranchez jamais l’appareil en tirant sur le câble,
mais uniquement en le débranchant directement au
niveau de la prise d’alimentation secteur.
• Prenez garde de ne pas exposer le câble
d’alimentation secteur à la chaleur ou à des
9
Page 12

substances chimiques, ou à ne pas le tirer sur des
arêtes vives ou surfaces tranchantes.
• Evitez d’utilisez des rallonges de câble dans les
pièces mouillées.
• Ne réparez jamais les dégâts occasionnés à
l'appareil, accessoires ou câble (un câble spécial est
requis). Ne confiez les réparations qu’à un service
après-vente agréé, toute modification à l’appareil
présentant un risque pour votre santé. Veillez à
utiliser des pièces de rechange et accessoires
d’origine.
• N’exposez pas l’appareil aux éléments, sources
d’humidité ou de chaleur.
• Après une aspiration humide, videz immédiatement
le bac de récupération.
Déballage de l’appareil
• Déballez l’appareil et inspectez-le pour détecter
les signes de dégâts susceptibles d’avoir été
occasionnés lors du transport. Vérifiez que toutes
les pièces qui devraient être incluses sont bien
présentes. Informez immédiatement votre revendeur
ou service après-vente si vous constatez des dégâts
ou si des pièces sont manquantes.
• Conservez le carton d’emballage, vous pouvez
l’utiliser pour ranger l'appareil ou si vous devez
renvoyer l’appareil au revendeur ou à un centre
de service après-vente HOOVER pour réparation.
Aspiration à sec
Après une aspiration à sec, l'appareil doit être
parfaitement sec. Séchez le flexible ou les tubes
si nécessaires au préalable.
N'aspirez jamais sans les filtres
ou avec des filtres endommagés.
D Montez le filtre
pré-moteur en
serrez-les avec les clips de blocage.
E Enfoncez fermement le sac de protection de filtre
sur l’embout d’aspiration et faites-le reposer
contre la paroi du bac de récupération.
F Placez le bloc moteur au-dessus et immobilisez-le
avec les fermoirs.
G Raccordement du flexible. Retirez le flexible en
tournant l’embout de flexible et en tirant sur le
flexible.
Montez les accessoires de votre choix.
Branchez le câble d’alimentation secteur.
H Allumez l’appareil avec l’interrupteur de
Marche/Arrêt (5).
La commande de réglage d’aspiration (11, figure J)
vous permet de régler la puissance d’aspiration.
– Glissière fermée = puissance d’aspiration
maximum
– Glissière ouverte = puissance d’aspiration
réduite
pré-moteur en
papier et l’anneau de blocage et
mousse, le filtre
Mise au rebut de l’appareil
• Mettez l’appareil au rebut conformément à la
réglementation locale en vigueur, tirez et coupez le
câble d’alimentation secteur au préalable.
Montage
A Libérez les fermoirs et soulevez le bloc moteur.
B Placez le socle en faisant correspondre les 4 trous
avec les trous sur le dessous de la cuve et fixez-le
en insérant les éléments de fixation.
Enfoncez les roulettes et les chevilles dans le socle
jusqu’à ce qu’elles produisent un déclic.
C* Appuyez sur le verrou (19) sur le côté de la tête
du moteur pour déverrouiller.
K* Montez le flotteur et le porte-flotteur.
10
Selon l’équipement :
Appareil avec prise de courant.
Les outils électriques d’une puissance nominale
conforme à la puissance indiquée sur la prise peuvent
être raccordés à la prise de courant de l’appareil (6).
Cette prise est prête pour le service dès que
l'aspirateur est raccordé à la tension secteur.
* Varie selon le modèle
Page 13

Aspiration humide
Retirez toujours l’ensemble filtres (figure
D+E) avant toute aspiration humide,
l’ensemble filtres sera irrémédiablement
endommagé dans le cas contraire. N’oubliez
pas de débrancher le câble d’alimentation
secteur avant de déposer le bloc moteur (2)
du bac.
Lors de l’aspiration de récipients dont le niveau
de liquide est supérieur au haut du bac de
récupération et d’un volume supérieur à la
capacité du bac de récupération, le liquide
peut continuer d’être aspiré au-delà de la
capacité du bac de récupération si la soupape
à flotteur est fermée.
Dans ce cas, n’aspirez qu'en quantités partielles et
videz le bac de récupération par intermittence.
Sortez tout d’abord le tube et le flexible du liquide et
éteignez ensuite l’appareil afin d’éviter un
débordement du liquide.
Gardez la soupape à flotteur (27, fig. K) propre
et accessible à tout moment. Celle-ci interrompt
automatiquement l’aspiration lorsque le bac de
récupération est plein.
Une fois l’aspiration humide terminée, veuillez
nettoyer et sécher l’appareil et les accessoires
utilisés.
En cas de difficultés imprévues
Si votre appareil ne fonctionne pas à votre satisfaction,
vous n’avez pas à contacter immédiatement le service
après-vente. Veuillez d’abord vérifier si le problème est
dû à l'une des causes mineures suivantes :
Echappement de poussière au niveau
des embouts d’aspiration :
• Le système de filtres a-t-il été posé conformément
aux instructions ?
• Un filtre d’origine HOOVER a-t-il été utilisé ?
Diminution progressive de la puissance
d’aspiration :
• Les pores du sac de protection de filtre papier
sont-ils colmatés par de la poussière ou de la suie ?
Le bac de récupération est-il plein ?
Y a-t-il un blocage dans le suceur, tube de rallonge
ou flexible ? Etirez le flexible lorsque l’appareil est
allumé, ceci éliminera le blocage.
De l’eau s’échappe des orifices d’expulsion
d’air de l’appareil pendant l’aspiration :
• Le flotteur (figure K) est-il bloqué lors de l’aspiration
de liquide et incapable de fonctionner ?
Diminution soudaine de la puissance
d’aspiration
• Le flotteur a-t-il stoppé le débit d’air ? Ceci peut
se produire si l’appareil se trouve sur une surface
inclinée ou s'il tombe. Eteignez l’aspirateur - le
flotteur se remettra en place - l'appareil est de
nouveau prêt à être utilisé.
Le moteur ne fonctionne pas :
• Le câble d’alimentation secteur, la fiche ou la prise
sont-ils endommagés ?
• Débranchez le câble avant de vérifier.
• N’ouvrez jamais le moteur vous-même !
Service après-vente :
Pour un service après-vente agréé par HOOVER et les
pièces d’origine HOOVER, appelez le service aprèsvente Gias au 02.48.55.69.67 ou votre service aprèsvente le plus proche. Ne confiez l’entretien et les
réparations qu’à un technicien de service après-vente
agréé par HOOVER.
N’utilisez que des pièces d’origine Hoover. Identifiez
toujours votre aspirateur en précisant le numéro
complet du modèle lors de toute demande de
renseignements ou de la commande de pièces de
rechange. (Le numéro du modèle figure à l’arrière
de la carrosserie de l’aspirateur).
GROUPE ROSIERES SAS
13, RUE AUGER
93697 PANTIN CEDEX
TEL.: 01-49159200
CANDY HOOVER BELGIUM
HAASCHTSESTEENWEG 1628
1820 MELSBROEK
TEL.: 02-752 94 11
CANDY HOOVER AG
BOESCH 21
CH-6331 HUENENBERG
TEL.: 041-7854040
LIGNE SERVICE CONSOMMATEUR (FRANCE)
02.48.55.69.67
GIAS CUSTOMER SERVICE (BELGIQUE) 0903/ 99109
GIAS CUSTOMER SERVICE (SUISSE) 0848/ 780 780
Garantie
LES CONDITIONS DE GARANTIE DE CET
APPAREIL SONT DEFINIES PAR NOTRE
REPRESENTANT DANS LES PAYS OU IL EST
VENDU ET PEUVENT ETRE OBTENUES AUPRES
DE VOTRE REVENDEUR. LA FACTURE D'ACHAT
OU LE REÇU DOIT ETRE PRESENTE POUR
TOUTES RECLAMATION DIRECTMENT DES
CONDITIONS DE CETTE GARANTIE. CES
CONDITIONS PEUVENT ETRE MODIFIEES SANS
PREAVIS.
11
Page 14

Vor der ersten Achtung!
Inbetriebnahme
Bitte lesen Sie alle im Folgenden
aufgeführten Informationen aufmerksam
durch. Sie geben wichtige Hinweise für die
Sicherheit, den Gebrauch und die Wartung
des Gerätes. Bewahren Sie die
Gebrauchsanweisung sorgfältig auf und
geben Sie diese an Nachbesitzer weiter.
Teileidentifizierung
1 = Behälter
2 = Motorkopf
3 = Verschlußschnapper
4 = Lenkrollen
5 = EIN/AUS-Schalter
6* = Gerätesteckdose
8 = Ansaugstutzen
9 = Tragegriff
10 = Netzanschlußleitung
11* = Saugkraftregulierung
12* = Saugschlauch
13* = Saugrohre
15 = Polsterdüse
15a*= Rohrreduzierstück
16* = Teppichdüse
17* = Fugendüse
18* = Abflussdüse
20 = Schaumstoffilter
21 = Papierschutzfilter
22 = Spannring
23 = Fußring
24 = Staubbeutel
25* = Saugrohrhalterung
26* = Parkstellung Saugrohr
27 = Schwimmer
28 = Schwimmerführung
12
D
Sicherheitshinweise
• HOOVER WET & DRY dient ausschließlich der
Nutzung im Haushalt durch Erwachsene.
• Das Gerät auf keinen Fall in Betrieb nehmen, wenn:
– die Netzanschlußleitung beschädigt ist,
– es sichtbare Schäden aufweist,
– es einmal heruntergefallen sein sollte.
• Die Spannungsangabe auf dem Typenschild muss
mit der Versorgungsspannung übereinstimmen.
• Düsen und Rohre dürfen bei eingeschaltetem Gerät
nicht in Kopfnähe gelangen, da sonst Verletzungsgefahr insbesondere für Augen und Ohren besteht.
• Das Gerät ist nicht zum Absaugen gesundheitsgefährdender, ätzender und lösungsmittelhaltiger
Stoffe geeignet.
• Das Gerät darf nicht in Räumen betrieben werden,
in denen feuergefährliche Stoffe lagern oder sich
Gase gebildet haben.
• Stoffe wie Benzin, Farbverdünner und Heizöl
können durch Verwirbelung mit der Saugluft
explosive Dämpfe oder Gemische bilden.
• Niemals heiße Asche oder glühende Gegenstände
aufsaugen.
• Überprüfen Sie vor jedem Gebrauch, ob die jeweils
benötigten Filter richtig eingesetzt sind.
• Saugen Sie keinen Tonerstaub auf! Toner, der zum
Beispiel bei Druckern oder Kopiergeräten
verwendet wird, kann elektrisch leitfähig sein!
Außerdem wird der Toner vom Filtersystem des
Staubsaugers evtl. nicht vollständig ausgefiltert und
kann so über das Sauggebläse wieder in die
Raumluft gelangen.
• Azeton, Säuren und Lösungsmittel können die am
Gerät verwendeten Materialien angreifen.
• Äußerste Umsicht ist beim Reinigen von Treppen
geboten. Sorgen Sie für eine ausreichende
Standsicherheit des Gerätes. Der Schlauch darf nicht
über seine Ursprungslänge hinaus gedehnt werden.
Halten Sie das Gerät stets mit einer Hand fest.
• Lassen Sie das Gerät im eingeschalteten Zustand nie
unbeaufsichtigt und achten Sie darauf, dass Kinder
nicht am Gerät spielen.
• Der Netzstecker ist zu ziehen:
➝
bei Störungen während des Betriebes,
➝
vor jeder Reinigung und Pflege,
➝
nach dem Gebrauch,
➝
bei jedem Filterwechsel.
• Niemals den Stecker am Kabel aus der Steckdose
ziehen, sondern ausschließlich am Stecker.
• Sorgen Sie dafür, daß die Anschlußleitung weder
Hitze und chemischen Flüssigkeiten ausgesetzt ist,
noch über scharfe Kanten oder Oberflächen
gezogen wird.
Page 15

• Die Verwendung von Verlängerungskabeln in
Naßräumen ist zu vermeiden.
• Schäden am Gerät, am Zubehör, oder an der
Netzanschlußleitung (Sonderleitung erforderlich)
niemals selbst reparieren, sondern nur durch eine
autorisierte Kundendienststation instand setzen
lassen, denn Veränderungen am Gerät können Ihre
Gesundheit gefährden. Sorgen Sie dafür, daß nur
Original-Ersatzteile und Zubehör verwendet wird.
• Das Gerät keinen Witterungseinflüssen, keiner
Feuchtigkeit und keinen Hitzequellen aussetzen.
• Entleeren und reinigen Sie den Behälter nach dem
Naßsaugen sofort.
Verpackung
• Nach dem Auspacken das Gerät auf Transportschäden und den Lieferumfang auf Vollständigkeit
prüfen! Bei Schäden oder unvollständiger
Lieferung bitte an Ihren Fachhändler oder an den
HOOVER Kundendienst wenden!
• Originalkarton nicht wegwerfen! Kann zum
Aufbewahren des Geräts bei Außerbetriebnahme
und zur Rücksendung an Ihren Fachhändler oder
den HOOVER Kundendienst benötigt werden.
Entsorgung
• Entsorgen Sie das Gerät nach den örtlichen
Vorschriften und schneiden Sie vorher den
gezogenen Netzstecker ab.
Montage
Trockensaugen
Nach vorherigem Nasssaugen muss das Gerät
absolut trocken sein; auch Schlauch oder Rohre
gegebenenfalls vorher trocknen.
Nie ohne oder mit beschädigten Filtern
trockensaugen.
D Schaumstofffilter, Papierschutzfilter und Spannring
montieren und mit Drehklammern sichern.
E Filtersack fest auf den Ansaugstutzen drücken und
an die Behälterwand anlegen.
F Motorkopf aufsetzen und Verschlussschnapper
schließen.
G Saugschlauch anschließen. Zum Abnehmen den
Sauganschluß zur Seite drehen und herausziehen.
Montieren Sie das gewünschte Zubehör.
Netzstecker anschließen.
H Gerät mit EIN/AUS-Schalter (5) einschalten.
Mit der Saugkraftregulierung (11, Abb. J ) lässt
sich die Saugkraft verändern.
– Nebenluftschieber geschlossen
= volle Saugkraft
– Nebenluftschieber geöffnet
= verringerte Saugkraft
Ausstattungsabhängig:
Gerät mit Steckdose
An die Gerätesteckdose (6) können Elektrowerkzeuge
mit einer Leistungsaufnahme gemäß Steckdosenaufdruck angeschlossen werden.
Steckdose ist betriebsbereit, sobald Gerätestecker des
Saugers an die Netzspannung angeschlossen ist.
A Verschlussschnapper öffnen und Motorkopf
abnehmen.
B Drücken Sie den Fußring in die vorgesehenen
Löcher am Tonnenboden ein.
Lenkrollen und Bolzen fest in den Fußring
eindrücken.
C Geräteabhängig:
Verschlußschnapper (3) seitlich in Motorkopf
eindrücken und einrasten lassen.
K Geräteabhängig: Schwimmer und
Schwimmerführung montieren.
13
Page 16

Naßsaugen
Vor dem Naßsaugen immer die eingesetzte
Filtereinheit (Abb. D und E) entnehmen, da
diese sonst gebrauchsunfähig wird (vor
Abnahme des Motorkopfs (2) unbedingt den
Netzstecker aus der Steckdose ziehen)!
Beim Absaugen aus Behältern, deren
Flüssigkeitsspiegel höher liegt als die Oberkante
des Saugbehälters und deren Füllinhalt größer ist
als das Fassungsvermögen des Saugbehälters,
kann bei geschlossenem Schwimmerventil weiter
Flüssigkeit nachfließen.
In solchen Fällen nur Teilmengen absaugen und
Saugbehälter zwischendurch entleeren.
Zuerst Saugrohr und -schlauch aus der Flüssigkeit
heben und danach das Gerät ausschalten, um ein
Nachlaufen von Flüssigkeit zu verhindern.
Schwimmerventil (27, Abb. K ) stets sauber und
gangbar halten. Es unterbricht automatisch das
Ansaugen, wenn der Saugbehälter voll ist.
Nach Beendigung des Nasssaugens das Gerät
und verwendete Zubehörteile reinigen und
trocknen.
Hilfe bei eventuellen Störungen
Falls Ihr Gerät wider Erwarten einmal nicht zufriedenstellend funktioniert, brauchen Sie nicht gleich den Kundendienst einzuschalten. Bitte prüfen Sie zunächst, ob
die Störung nur kleine Ursachen hat:
Wenn beim Saugen Staub austritt:
• Ist das Filtersystem richtig befestigt und ohne
Defekt?
• Wurde ein Original HOOVER-Filter verwendet?
Wenn die Saugkraft allmählich nachläßt:
• Sind die Filterporen durch Feinstaub verstopft?
• Ist der Papierfiltersack voll?
• Sind Düse, Verlängerungsrohr oder Saugschlauch
durch Schmutz verstopft? (Saugschlauch bei
eingeschaltetem Gerät auseinanderziehen –
Dehnung lockert Verstopftes).
Wenn beim Saugen Wasser aus den
Ausblasöffnungen des Gerätes tritt:
• Ist der Schwimmer (Bild K) beim Saugen von
Flüssigkeiten blockiert und kann nicht ansprechen?
Wenn die Saugkraft plötzlich nachläßt:
• Hat das Schwimmerventil die Saugluft gestoppt? Das
kann passieren bei extremer Schrägstellung oder
beim Umkippen des Gerätes. Sauger ausschalten –
14
der Schwimmer fällt nach unten – das Gerät ist
wieder betriebsbereit.
Wenn der Motor nicht läuft:
• Sind Kabel, Stecker und Steckdose intakt?
• Vor Prüfung Stecker ziehen.
• Niemals selbst den Motor öffnen!
Kundendienst
Wenden Sie sich an Ihren Fachhändler, der Ihnen im
Bedarfsfall auch gerne die Adresse oder Telefonnummer des für Sie zuständigen HOOVER-Kundendienstes
miteilt.
Bitte geben Sie dabei stets die Angaben auf dem Typenschild Ihres Saugers an.
Zur Aufrechterhaltung der Sicherheit des Gerätes
sollten Sie Reparaturen insbesondere an stromführenden Teilen nur durch Elektro-Fachkräfte
durchführen lassen. Im Störungsfall sollten sie sich
daher an Ihren Fachhändler oder direkt an den
HOOVER Kundendienst wenden.
CANDY-HOOVER GmbH,
Kaiserswerther Str. 83, D-40878 Ratingen,
Hoover Kundendienst Hotline: 01805-62 55 62,
www.candy-hoover.de
Candy Hoover AG
Boesch 21, CH-6331 Hünenberg
Tel: 041-7854040
GIAS CUSTOMER SERVICE (KUNDENDIENST)
SCHWEIZ 0848/ 780 780
Candy Hoover Austria GmBH
Mariahilferstrasse 172 A-1150 Wien
Tel: 01- 897 33 00, Fax: 01- 897 33 00 99
KUNDENDIENST: 0820- 220 224 (0.15 Euro/ Min)
E-mail: VERKAUF@CANDY.AT
WWW.HOOVER.AT
Garantieerklärung
Die Garantiebestimmungen für Geräte entsprechen
den Richtlinien des Landes, in dem Sie das Gerät
erworben haben. Detailinformationen erhalten Sie von
dem Händler, bei dem Sie das Gerät erworben haben.
Bitte bewahren Sie den Kaufbeleg sorgfältig auf, denn
er wird dringend für eventuell auftretende
Garantieansprüche benötigt.
Page 17

Prima di procedere alla messa
I
in funzione dell’apparecchio
Leggere attentamente il presente libretto
d’istruzioni che contiene importanti
indicazioni di sicurezza ed istruzioni
per la manutenzione dell’apparecchio.
Conservare il presente libretto d’istruzioni
in un luogo sicuro e consegnarlo al
successivo proprietario dell’apparecchio.
Identificazione dei componenti
1 = Recipiente di raccolta
2 = Blocco motore
3 = Dispositivi di fissaggio automatici
4 = Ruote orientabili
5 = Interruttore acceso/spento
6* = Presa accessori
8 = Attacco tubo flessibile
9 = Impugnatura di trasporto
10 = Cavo di alimentazione
11* = Dispositivo di controllo aspirazione
12* = Tubo flessibile
13* = Tubi di aspirazione
15 = Spazzola per tappezzeria
15a* = Riduttore
16* = Spazzola per tappeti e pavimenti
17* = Bocchetta per fessure
18* = Accessorio per liberare gli scarichi
20 = Filtro premotore in spugna
21 = Filtro premotore in carta
22 = Anello di serraggio
23 = Anello di fondo
24 = Sacco carta
25* = Gancio di parcheggio
26* = Posizione di parcheggio tubo di aspirazione
* La dotazione varia in funzione del modello
Indicazioni di sicurezza
• HOOVER WET & DRY è destinato all’uso domestico
da parte di persone adulte.
• Questo apparecchio è dotato di doppio isolamento
e non richiede la messa a terra.
IMPORTANTE: I fili contenuti nel cavo di alimentazione sono colorati secondo il seguente codice:
Blu-Neutro Rosso-Fase
SPINA CON FUSIBILI DA 13 AMP SOLO NELLE
VERSIONI INGLESI.
• Quando l’apparecchio è acceso non avvicinare le
spazzole o i tubi alla testa: possibili danni ad occhi
ed orecchie.
• Non aspirare sostanze nocive o liquidi solventi o
corrosivi.
• Non azionare mai l’apparecchio in locali in cui sono
depositate sostanze infiammabili oppure dove si
sono formati dei gas.
• Materiali come la benzina, il diluente per vernici e
olio combustibile per riscaldamento possono formare
gas o miscele esplosive per effetto dell’esposizione
all’aria centrifuga prodotta dall’apparecchio.
• Non aspirare mai ceneri calde od oggetti
incandescenti.
• Prima di ogni utilizzo, verificare il corretto
montaggio dei filtri necessari per l’applicazione
specifica.
• Non aspirare polvere di toner! I toner usati nelle
stampanti e nelle fotocopiatrici possono essere
conduttori elettrici! Inoltre, è possibile che il sistema
filtrante dell’apparecchio non filtri completamente
la polvere di toner che potrebbe così entrare
nell’alimentazione dell’aria del locale.
• Acetone, acidi e solventi possono attaccare i
materiali utilizzati nell’apparecchio.
• Prestare molta attenzione quando si puliscono
le superfici tessili delle scale con il presente
apparecchio. Controllare che l’aspirapolvere sia
posizionato saldamente sul gradino e che il tubo
flessibile non venga allungato eccessivamente.
Quando si usa l’aspirapolvere sulle scale, accertarsi
sempre di tenere saldo l’apparecchio con una mano.
• Non lasciare l’apparecchio incustodito quando è
acceso e verificare che i bambini non giochino con
l’apparecchio.
– Estrarre sempre la spina
– se l’apparecchio non funziona bene
– prima di interventi di pulizia e manutenzione
– dopo l’uso
– quando si sostituisce il filtro.
• Non scollegare mai l’apparecchio dalla rete
elettrica tirando il cavo, ma esclusivamente
estraendo la spina direttamente dalla presa.
• Accertarsi che il cavo di alimentazione non sia
esposto a calore o sostanze chimiche, né che sia
fatto passare su bordi o superfici affilate.
15
Page 18

• Evitare di usare tubi di prolunga in locali bagnati.
• Non riparare mai danni all’apparecchio, agli
accessori o al cavo (è necessario un cavo speciale);
fare eseguire le riparazioni esclusivamente da un
tecnico autorizzato, in quanto possibili modifiche
all’apparecchio possono causare rischi per la salute.
Accertarsi che vengano utilizzati esclusivamente
pezzi di ricambio ed accessori originali.
• Non esporre l’apparecchio agli agenti atmosferici,
all’umidità e a fonti di calore.
• Al termine dell’aspirazione umida, svuotare
immediatamente il recipiente di raccolta.
Come disimballare l’apparecchio
Aspirazione a secco
Al termine dell’aspirazione umida, l’apparecchio
deve essere assolutamente asciutto; se necessario,
asciugare in primo luogo i tubi o il flessibile di
aspirazione.
Non aspirare mai a secco senza i filtri
oppure con i filtri danneggiati.
D Montare il filtro premotore in spugna, il filtro
premotore in carta e l’anello di serraggio e fissarli
con le clip di fissaggio.
E Premere saldamente il sacco carta sul raccordo di
aspirazione e posizionarlo sulla parete del
recipiente di raccolta.
• Disimballare l’apparecchio ed ispezionarlo per
individuare eventuali danni dovuti al trasporto.
Controllare che siano presenti tutti i componenti che
devono essere inclusi. Contattare immediatamente il
rivenditore o l’assistenza clienti se si riscontra la
presenza di danni o la mancanza di componenti.
• Conservare il cartone d’imballo originale per poi
riutilizzarlo per riporvi l’apparecchio oppure per
rispedirlo al rivenditore o al centro di assistenza
clienti HOOVER per l’assistenza.
Come smaltire l’apparecchio
Smaltire l’apparecchio in conformità alle disposizioni
locali; in primo luogo, staccare e isolare il cavo di
alimentazione.
Montaggio
A Sbloccare i dispositivi di fissaggio automatici e
sollevare il blocco motore.
B Posizionare l’anello di fondo con i 4 fori in
corrispondenza dei fori presenti sul lato inferiore
del serbatoio e fissarlo inserendo gli appositi
elementi.
Inserire le ruote orientabili e le spine nell’anello di
fondo fino a farle scattare in posizione.
F Applicare il blocco motore e fissarlo per mezzo
di dispositivi di fissaggio a scatto.
G Collegare il tubo flessibile. Rimuovere il flessibile
ruotando il connettore ed estraendo il tubo.
Montare gli accessori necessari.
Collegare il cavo di alimentazione.
H Accendere l’apparecchio tramite l’interruttore
acceso/spento (5).
Il dispositivo di controllo dell’aspirazione (11,
figura J) consente di variare la potenza aspirante.
– bocchetta scorrevole dell’aria chiusa = piena
potenza aspirante
– bocchetta scorrevole dell’aria aperta =
potenza aspirante ridotta
In base all’equipaggiamento:
apparecchio dotato di presa
Gli accessori elettrici con una potenza nominale
conforme ai valori riportati sulla presa possono essere
collegati alla presa dell’apparecchio (6).
La presa è pronta per il funzionamento non appena
l’aspirapolvere viene collegato alla tensione di rete.
* La dotazione varia in funzione del modello
C* Premere l’attacco a scatto (19) sul lato della testa
del motore e sbloccare.
K* Montare il galleggiante e il relativo supporto.
16
Page 19

Aspirazione umida
Rimuovere sempre il gruppo filtro (figura
D+E) prima di iniziare l’aspirazione umida,
per evitare che esso si danneggi. Non
dimenticare di staccare il cavo di
alimentazione prima di togliere il corpo
motore (2) dal serbatoio.
Quando si aspira da contenitori con un livello di
liquido più alto rispetto allo spigolo superiore del
recipiente di raccolta e con un volume superiore
alla capacità del recipiente di raccolta, è possibile
continuare ad aspirare il liquido oltre la capacità
del recipiente di raccolta, se la valvola a
galleggiante è chiusa.
In questi casi, aspirare soltanto quantità parziali e
svuotare il recipiente di raccolta tra un’aspirazione e
l’altra.
In primo luogo sollevare il tubo e il flessibile dal liquido
e poi spegnere l’apparecchio per impedire una
tracimazione del liquido.
Tenere sempre pulita ed accessibile la valvola a
galleggiante (27, Fig. K) che interrompe
automaticamente l’aspirazione quando il
recipiente di raccolta è pieno.
Al termine dell’aspirazione umida, pulire ed
asciugare l’apparecchio e gli accessori utilizzati.
In caso di guasto
Se l’apparecchio non funziona in modo soddisfacente,
non è necessario contattare immediatamente il servizio
di assistenza clienti. Prima è consigliabile controllare se il
guasto è dovuto ad una delle cause secondarie seguenti:
Fuoriuscita di polvere dalle prese di
aspirazione:
- Il sistema filtrante è stato montato in conformità
alle presenti istruzioni?
- È stato utilizzato un filtro HOOVER originale?
Riduzione graduale della potenza
aspirante:
- I pori del sacco del filtro sono intasati da polvere
o fuliggine?
- Il recipiente di raccolta è pieno?
- È presente un’ostruzione nella bocchetta, nel tubo
di prolunga o nel tubo flessibile? (Allungare il tubo
flessibile quando l’apparecchio è acceso; in questo
modo si allenta l’ostruzione.)
Esce dell’acqua dalle aperture di
espulsione dell’aria dell’apparecchio
durante l’aspirazione: :
- Il galleggiante (figura K) è bloccato durante
l’aspirazione del liquido e non può intervenire?
Improvvisa riduzione della potenza
aspirante:
- Il galleggiante ha interrotto il flusso d’aria? Ciò può
accadere se l’apparecchio si trova in una posizione
estremamente inclinata oppure si rovescia. Spegnere
l’aspirapolvere, il galleggiante ritornerà in posizione,
e l’apparecchio sarà di nuovo pronto per l’uso.
Il motore non funziona:
- Sono presenti danni al cavo di alimentazione, alla
spina o alla presa?
- Staccare la spina prima di controllare.
- Non aprire mai il motore da soli!
Assistenza ai clienti
Per ottenere assistenza HOOVER autorizzata e pezzi
di ricambio HOOVER originali, contattare: Gias
Customer Service 199.123.123 oppure il centro
assistenza Hoover più vicino. Assicurarsi che gli
interventi di assistenza e riparazione siano eseguiti
da tecnici Hoover autorizzati.
Utilizzare esclusivamente pezzi di ricambio Hoover
originali. Identificare sempre l’apparecchio con il
numero di modello completo quando si chiedono
informazioni o si ordinano dei pezzi. (Il numero di
modello è riportato sul retro del corpo
dell’apparecchio).
ZEROWATT.HOOVER SPA
SEDE COMMERCIALE:
VIA PRIVATA E. FUMAGALLI
20047 BRUGHERIO (MI)
TEL.: +39 039 208655
servizioclienti@hoover.it
GIAS CUSTOMER SERVICE (ITALIA) 199.123.123
CANDY HOOVER AG
BOESCH 21
CH-6331 HUENENBERG
TEL.: 041-7854040
GIAS CUSTOMER SERVICE (SVIZZERA) 0848/ 780 780
Garanzia:
LE CONDIZIONI DI GARANZIA DI QUESTO
PRODOTTO SEGUONO LE NORME PREVISTE
PER IL PAESE NEL QUALE È STATO VENDUTO.
I DETTAGLI DELLE SUDDETTE CONDIZIONI
POSSONO ESSERE RICHIESTI AL DISTRIBUTORE
PRESSO IL QUALE IL PRODOTTO È STATO
ACQUISTATO. PER OGNI CONTESTAZIONE NEI
TERMINI DELLA GARANZIA È NECESSARIA
L'ESIBIZIONE DELLA FATTURA O DI
DOCUMENTO EQUIPOLLENTE.
17
Page 20

Antes de poner en
funcionamiento el
aparato por primera vez
Por favor lea atentamente toda la
información que aparece a continuación.
La información proporciona importantes
advertencias para el uso seguro y el
mantenimiento del aparato. Conserve
estas instrucciones de funcionamiento
en un lugar seguro y transfiéralas al
siguiente propietario.
Identificación de piezas
1= Contenedor de recogida
2= Bloque del motor
3= Abrazaderas de presión
4= Ruedas giratorias
5= Botón On/Off
6*= Toma de Accesorio Eléctrico
8= Conexión de Manguera
9= Asa de transporte
10= Cable de red
11*= Control de aspiración
12*= Manguera flexible
13*= Tubos de aspiración
15= Tobera para tapicerías
15*= Pieza de reducción
16*= Tobera para suelos + alfombras
17*= Accesorio para Grietas
18*= Accesorio para Limpieza de Desagües
20= Filtro premotor de espuma
21= Filtro premotor de papel
22= Anillo de sujeción
23= Anillo de base
24= Bolsa de papel recogepolvo
25*= Gancho de fijación
26*= Tubo de aspiración – posición de fijación
* La descripción puede variar según el modelo
18
E
Advertencias de seguridad
• HOOVER WET & DRY está destinado para el uso
doméstico por parte de adultos.
• Este producto cuenta con un doble aislamiento y no
debe ser conectado a tierra.
IMPORTANTE: Los hilos del cable conductor de
corriente tienen un color según el código siguiente:
Azul – Neutro Rojo – Cargado
ENCHUFE CON FUSIBLE DE 13 AMP SOLAMENTE
EN LOS MODELOS DEL REINO UNIDO.
• No permita que las toberas y los tubos (cuando el
aparato esté conectado) se aproximen a la cabeza
– esto representaría un peligro para ojos y oídos,
por ejemplo.
• No aspire sustancias nocivas o corrosivas ni líquidos
disolventes.
• No haga funcionar nunca el aparato en
habitaciones en las que se almacenen materiales
inflamables o donde se hayan formado gases.
• Materiales como la gasolina, el disolvente de
pintura y el aceite para calefacción pueden formar
mezclas o gases explosivos estando sujetos al aire
centrífugo del aparato.
• No aspire nunca cenizas calientes u objetos
incandescentes.
• Realice una comprobación antes de cada uso para
asegurarse de haber colocado correctamente los
filtros requeridos para la aplicación específica.
• ¡No aspire polvo de toner! ¡Los toners como los que
se utilizan en impresoras y copiadoras pueden ser
conductores eléctricos! Además, es posible que el
sistema de filtro del aparato no filtre
completamente el polvo de toner, y de esta forma
puede introducirse en el suministro de aire de la
habitación.
• La acetona, los ácidos y los disolventes pueden
atacar a los materiales utilizados en este aparato.
• Se requiere un especial cuidado al aspirar
alfombras en escaleras con su aparato. Asegúrese
de que el aspirador esté firmemente apoyado sobre
un escalón y tenga cuidado para que la manguera
flexible no se extienda más allá de su longitud real.
Al utilizar el aspirador en escaleras, asegúrese
siempre de que sujeta el aparato firmemente con
una mano.
• No deje el aparato desatendido mientras está
conectado y asegúrese de que los niños no juegan
con el mismo.
• Saque siempre el enchufe
– si el aparato funciona mal
– antes de llevar a cabo la limpieza y el
mantenimiento
– después del uso
– al cambiar el filtro.
• Nunca desenchufe el aparato tirando del cable, sino
sacando el enchufe directamente de la toma.
Page 21

• Asegúrese de que el cable principal no esté
expuesto al calor o a sustancias químicas, y que no
se haga pasar por superficies o bordes afilados.
• Evite la utilización de extensiones de cable en
habitaciones mojadas.
• Nunca repare los daños que se hayan producido
en el aparato, en los accesorios o en el cable por si
mismo; haga que las reparaciones se lleven a cabo
solamente por parte de un punto de servicio
postventa autorizado, porque las modificaciones
llevadas a cabo en el aparato pueden suponer un
riesgo para su salud. Asegúrese de que solamente
se utilicen accesorios y piezas de repuesto
originales.
• No exponga el aparato a inclemencias, humedad o
fuentes de calor.
• Tras una aspiración húmeda, vacíe el contenedor
de recogida inmediatamente.
Desembalaje de la Unidad
• Desembale la unidad e inspeccione si hay signos de
daños como consecuencia del transporte.
Compruebe que todos los artículos que deban estar
incluidos estén presentes. Comunique
inmediatamente a su vendedor o a nuestro
departamento de servicio postventa si encuentra
algún daño o si falta algún elemento.
• Guarde la caja de cartón del embalaje original,
dado que puede utilizarla para almacenar la
unidad y podría necesitarla para devolver la
unidad a su vendedor o al Centro de Servicio
Postventa de HOOVER.
Deshacerse de la Unidad
• Deshágase del aparato según las normativas
locales y antes tire del cable eléctrico y arránquelo.
Aspiración seca
! Tras la aspiración húmeda, el aparato debe
secarse completamente; seque la manguera
flexible o los tubos antes si es necesario.
No seque nunca el aspirador sin filtros o con los
filtros dañados.
D Monte el filtro premotor de espuma, el filtro de
papel y el anillo de sujeción y apriételos con los
clips de bloqueo.
E Presione la bolsa de filtro en la conexión de
aspiración firmemente y colóquela contra la
pared del contenedor de recogida.
F Coloque el bloque del motor encima y fíjelo
mediante las abrazaderas de presión.
G Conexión de la manguera flexible. Extraiga la
manguera haciendo girar la pieza de conexión
de manguera y separándola.
Monte los accesorios que necesite.
Conecte el cable eléctrico.
H Conecte el aparato con el botón On / Off (5).
El control de aspiración (11, figura J) permite
variar la potencia de aspiración.
– Válvula de aire deslizante cerrada = potencia
de aspiración completa
– Válvula de aire deslizante abierta = potencia
de aspiración reducida
Según el equipo:
Aparato con toma de enchufe.
Los accesorios eléctricos con un valor nominal de
acuerdo con el indicado en la toma de enchufe pueden
conectarse a la toma de enchufe del aparato (6).
Esta toma de enchufe está lista para el servicio tan
pronto como se haya conectado el aspirador a la red
principal.
Montaje
A Separe las abrazaderas de presión y levante el
bloque del motor.
B Coloque el anillo de base con los 4 orificios que
se correspondan con los orificios de la parte
inferior del depósito y fíjelo acoplando los
elementos de fijación. Acople las ruedas
giratorias y las clavijas en el anillo de base hasta
que estén acopladas en su lugar.
C* Presione el seguro de presión (19) del lado de la
parte delantera del motor y desbloquéelo.
K* Flotador de unidad y soporte de flotador
* La descripción puede variar según el modelo.
19
Page 22

Aspiración húmeda
Extraiga siempre la unidad de filtro (figura
D + E) antes de iniciar la aspiración húmeda,
ya que de lo contrario, la unidad de filtro
se estropeará. No se olvide de desenchufar
el cable conductor de corriente antes de
extraer la caja del motor (2) del depósito.
Al aspirar contenedores en los cuales el nivel
de líquido esté por encima de la parte superior
del contenedor de recogida y que tengan un
volumen mayor que la capacidad del contenedor
de recogida, el líquido puede seguir aspirándose
más allá de la capacidad del contenedor de
recogida si la válvula de flotador está cerrada.
En dichos casos, aspire sólo en cantidades parciales y
vacíe intermitentemente el contenedor de recogida.
Separe el tubo y la manguera flexible del líquido
primero y a continuación desconecte el aparato, para
impedir que se produzca un rebose de líquido.
Mantenga la válvula de flotador (27, fig. K)
limpia y accesible en todo momento. Se
interrumpe automáticamente la aspiración
cuando el contenedor de recogida está lleno.
Tras finalizar la aspiración húmeda, limpie y
seque el aparato y los accesorios utilizados.
Ayuda en caso de posibles fallos
Si su aparato no funciona de forma satisfactoria para
usted, antes de ponerse en contacto directamente con
el servicio postventa compruebe en primer lugar si la
avería se debe a alguna de las siguientes causas
menores:
Sale polvo ¡ de las tomas de aspiración:
• ¿Se ha colocado el sistema de filtro de acuerdo
con las instrucciones?
• ¿Se ha utilizado un filtro HOOVER original?
Reducción gradual de la potencia de
aspiración:
• ¿Están los poros de la bolsa de filtro de papel
obstruidos por polvo u hollín?
• ¿Está el contenedor de recogida lleno?
• ¿Hay un bloqueo en la tobera, el tubo de extensión
o la manguera flexible? / Extienda la manguera
flexible mientras el aparato esté conectado – esto
eliminará la obstrucción.
Reducción repentina de la potencia de
aspiración.
• ¿El flotador ha detenido el flujo de aire? Esto puede
ocurrir si el aparato está sobre una pendiente
o si el aparato se cae. Desconecte el aspirador –
el flotador volverá a su lugar – el aparato vuelve
a estar listo para el uso.
El motor no funciona:
• ¿Se han producido daños en el enchufe, la toma
o el cable eléctrico?
• Extraiga el enchufe antes de realizar la
comprobación.
• ¡No abra nunca el motor usted mismo!
Servicio Postventa:
Para obtener servicio HOOVER autorizado y piezas
originales HOOVER, contacte con: Servicio Postventa
Gias 902 100 150 o a su Centro de Servicio Hoover
más próximo. Asegúrese de que todos los servicios y
las reparaciones las lleve a cabo un Técnico de
Servicio Hoover.
Use solamente piezas de repuesto originales Hoover.
Identifique siempre su aspirador mediante el número
de modelo completo al solicitar información o solicitar
piezas. (El número de modelo aparece en la parte de
atrás de la estructura central del aspirador.)
Candy Hoover Electrodomésticos, S.A
Ahumategi Bide, s/n
20570 Bergara (Guipúzcoa)
Servicio Postventa Gias 902 100 150
Declaración de garantía
Las condiciones de garantía para este aparato
están definidas en el país que se ha comprado.
Para poder beneficiarse de esta garantía, puede
ser obtenida por el vendedor donde se ha
realizado la compra. La factura de compra o el
recibo debe ser mostrada cuando se hace alguna
reclamación bajo términos de garantía.
Gias Customer Service (Servicio de Asistencia
Técnica) 902 100 150
Sale agua de las aperturas de expulsión
de aire del aparato durante la aspiración:
• ¿Está el flotador (figura K) bloqueado al aspirar
líquido y no puede funcionar?
20
Page 23

Antes de utilizar o
P
aparelho pela primeira vez
Leia atentamente todas as informações
indicadas em baixo, uma vez que referem
aspectos importantes para a utilização
segura e manutenção do aparelho.
Mantenha estas instruções de
funcionamento num local seguro e
entregue-as juntamente com o aspirador
ao ser futuro dono.
Identificação de peças
1 = Depósito de recolha de lixo
2 = Bloco do motor
3 = Fechos de segurança
4 = Rodízios
5 = Interruptor Ligar/Desligar
6*= Tomada do aparelho
8 = Ligação para a mangueira
9 = Pega de transporte
10 = Cabo de alimentação
11* = Controlo da sucção
12* = Mangueira flexível
13* = Tubos de aspiração
15 = Escova para estofos
15a* = Peça de redução
16* = Escova para estofos + pavimentos
17* = Bico
18* = Escova de limpeza
20 = Filtro pr
21 = Filtro pré-motor
22 = Anel de aperto
23 = Anel para os pés
24 = Saco de papel
25* = Gancho de estacionamento
26*= Tubo de aspiração – posição de estacionamento
* Opção variável de acordo com o modelo
é-motor de espuma
Instruções de segurança
• O HOOVER WET & DRY foi concebido para uso
doméstico por adultos.
• Este produto tem isolamento duplo e não precisa de
ser ligado à terra.
IMPORTANTE: Os fios do cabo de alimentação são
coloridos de acordo com o código seguinte:
Azul – Neutro Vermelho – Com tensão
Ficha protegida por fusível de 13 Amp, apenas nas
versões para o Reino Unido.
• Evite aproximar as escovas e tubos (quando o
aparelho estiver ligado) da sua cabeça – risco para
os olhos e para os ouvidos, por exemplo.
• Não aspire substâncias nocivas, corrosivas ou
líquidos solventes.
• Nunca utilize o aparelho em locais de
armazenamento de materiais inflamáveis ou locais
de concentração de gases.
• Os materiais como a gasolina, diluente e óleo de
aquecimento podem provocar a acumulação de
gases explosivos ou misturas ao ficarem sujeitos ao
ar centrífugo provocado pelo aparelho.
• Nunca aspire cinzas quentes ou objectos
incandescentes.
• Faça uma verificação antes de cada utilização para
confirmar se colocou correctamente os filtros
necessários para a aplicação específica.
• Não aspire o pó dos toners! Os toners, como os
utilizados em impressoras e fotocopiadoras, podem
ser condutores de electricidade! Além disso, é
provável que o sistema de filtragem do aparelho
não consiga filtrar totalmente o pó dos toners,
podendo desta forma contaminar o ar da divisão
que está a aspirar.
• A acetona, ácidos e solventes podem atacar os
materiais utilizados neste aparelho.
• É necessário ter muito cuidado ao aspirar carpetes
em escadas. Verifique se o aspirador está
devidamente colocado e apoiado num degrau
e tenha cuidado para não esticar a mangueira
flexível para além do seu comprimento normal.
Sempre que utilizar o aspirador em escadas, não se
esqueça de o segurar firmemente com uma das mãos.
• Não deixe o aspirador ligado e sem vigilância, e
assegure-se de que nenhuma criança brinca perto dele.
• Desligue sempre a ficha da corrente:
– se o aparelho estiver a funcionar mal
– antes de efectuar a limpeza ou manutenção
– depois da utilização
– ao substituir o filtro
• Nunca desligue o aparelho puxando o cabo;
remova a ficha directamente da tomada.
• Tenho cuidado para que o cabo de alimentação
não fique exposto ao calor ou a substâncias
químicas; também deve evitar friccionar o cabo
em arestas afiadas ou superfícies rugosas.
21
Page 24

• Evite utilizar extensões em divisões molhadas.
• Não tente reparar as avarias no seu aparelho, nos
acessórios ou cabo (é necessário um cabo especial);
solicite a sua reparação junto do serviço de
assistência a clientes autorizado, uma vez que
quaisquer modificações no aparelho podem pôr em
risco a sua saúde.
Certifique-se de que apenas são utilizadas peças
sobressalentes e acessórios originais da HOOVER.
• Evite expor o aparelho a condições atmosféricas
adversas, à humidade ou fontes de calor.
• Depois da aspiração de líquidos, esvazie de
imediato o depósito de recolha de resíduos.
Aspiração de sólidos
Depois da aspiração de líquidos, o aparelho
deve ser seco por completo; seque previamente
a mangueira flexível ou tubos, se necessário.
Nunca aspire sólidos sem os filtros
colocados ou com filtros danificados.
D Monte o filtro
motor
grampos de fixação.
E Encaixe bem o saco do filtro na ligação para
sucção e encoste-o à parede do depósito de
recolha de lixo.
pré-motor de
e o anel de aperto e prenda-os com os
espuma, o filtro
pré-
Desembalar a Unidade
• Retire a unidade da embalagem e verifique a
existência de danos provocados pelo transporte.
Confirme se foram expedidos todos os itens
necessários. Avise de imediato o seu revendedor ou
departamento de serviço ao cliente caso detecte
algum dano ou se faltarem peças.
• Conserve a embalagem original de cartão, uma vez
que a pode usar para guardar a unidade e pode
ser necessário para devolver a unidade ao seu
revendedor ou a um Centro de Serviço ao Cliente
da HOOVER para assistência.
Eliminação da Unidade
Elimine o aparelho de acordo com os regulamentos
locais e, antes de o fazer, puxe o cabo de alimentação
e corte-o.
Montagem do aparelho
A Abra os fechos de segurança e retire o bloco do
motor.
B Alinhe os 4 orifícios do anel para os pés com os
orifícios na parte inferior do tanque e fixe-os
encaixando os elementos de fixação.
Introduza os rodízios e as cavilhas no anel para
os pés até encaixarem devidamente.
F Coloque o bloco do motor por cima e prenda-o
com os fechos de segurança.
G Ligação da mangueira flexível. Remova a
mangueira rodando a peça de ligação da
mangueira e retirando a mangueira.
Monte os acessórios se necessário.
Ligue o cabo de alimentação.
H Ligue o aparelho através do interruptor
Ligar/Desligar (5).
O controlo da sucção (11, fig. J) permite-lhe
variar a potência de sucção.
– Válvula fechada = potência de sucção máxima
– Válvula aberta = potência de sucção reduzida
Dependendo do equipamento:
Aparelho com tomada.
As ferramentas eléctricas com um regime de serviço
de acordo com o regime indicado na tomada podem
ser ligadas à tomada do aparelho (6).
Esta tomada está pronta para ser utilizada assim que
o aspirador é ligado à corrente.
* Opção variável de acordo com o modelo
C* Prima os trincos (19) do lado da cabeça do motor
e abra-os.
K* Monte o flutuador e o suporte do flutuador.
22
Page 25

Aspiração de líquidos
Não se esqueça de remover o conjunto
do filtro (figura D+E) antes de iniciar a
aspiração de líquidos, uma vez que
poderá danificar o conjunto do filtro.
Não se esqueça de desligar a cabo de
alimentação entes de retirar o conjunto
do motor (2) do tanque.
Ao aspirar líquidos de contentores em que o
nível de líquido é superior ao nível máximo do
depósito de recolha de lixo (e nos casos em que
o próprio contentor tem uma maior capacidade
que o depósito), pode continuar a aspirar o
líquido para além da capacidade do depósito
se a válvula do flutuador estiver fechada.
Nestes casos, aspire apenas pequenas quantidades e
vá esvaziando periodicamente o depósito.
Primeiro afaste o tubo e a mangueira flexível do líquido e depois desligue o aparelho, por forma a evitar
um excesso de líquido.
Mantenha a válvula do flutuador (27, fig. K)
limpa e acessível em todas as circunstâncias. Esta
permite interromper automaticamente a
aspiração quando o depósito está cheio.
Após a conclusão da aspiração de líquidos, limpe
e seque o aparelho e acessórios utilizados.
Ajuda em caso de avarias
Se o seu aparelho não funcionar conforme previsto,
não precisa de contactar de imediato o serviço de
assistência ao cliente. Primeiro deve verificar se essa
falha se deve a qualquer uma das seguintes causas:
Redução súbita da potência de sucção:
• O flutuador suspendeu o fluxo de ar? Isto pode
acontecer se o aparelho estiver num local inclinado
ou se o aparelho cair. Desligue o aspirador, o
flutuador regressa à sua posição e o aparelho fica
pronto a seu utilizado.
O motor não funciona:
• Existe alguma deficiência no cabo de alimentação,
na ficha ou na tomada?
• Puxe a ficha antes da verificação.
• Nunca abra o motor sozinho!
Serviço de Assistência a Clientes:
Para aceder ao serviço autorizado da HOOVER e
obter peças originais da HOOVER, contacte: Serviços
de Assistência Gias 21 318 97 00 ou o seu Centro de
Assistência local da Hoover. Certifique-se de que
todos os serviços a reparações são efectuados por um
Técnico da Hoover devidamente autorizado.
Utilize apenas peças sobressalentes originais da
Hoover. Identifique sempre o seu aspirador pelo
número completo do modelo ao solicitar informações
ou ao encomendar peças. (O número do modelo está
indicado na parte de trás do aspirador).
Candy Hoover Portugal, LDA
Rua D. Estefânia 90A
1049-050 Lisboa
Tel.: 021 318 97 00
O pó é expelido pelas tomadas de sucção:
• O sistema de filtragem foi instalado de acordo com
as instruções?
• Utilizou um filtro original da HOOVER?
Redução gradual na potência de sucção:
• Os poros do saco do filtro de papel estão
obstruídos por poeira ou fuligem?
• O depósito de recolha está cheio?
• Existe alguma obstrução na escova, tubo extensível
ou mangueira flexível? (Estique a mangueira flexível
com o aparelho ligado, isto irá libertar qualquer
obstrução).
Durante a aspiração, sai água pelas
aberturas de expulsão de ar do aparelho:
• O flutuador (figura K) fica bloqueado durante
a aspiração de líquidos e não funciona?
DECLARAÇÃO DE GARANTIA
AS CONDIÇÕES DE CONCESSÃO DE
GARANTIA RELATIVAMENTE A ESTE APARELHO
SÃO AS QUE TIVEREM SIDO DEFINIDAS PELO
NOSSO REPRESENTANTE NO PAÍS EM QUE O
ASPIRADOR TIVER SIDO VENDIDO. PARA OBTER
INFORMAÇÕES MAIS DETALHADAS SOBRE
ESTAS CONDIÇÕES DEVERÁ DIRIGIR-SE AO
AGENTE DA ESPECIALIDADE A QUEM
ADQUIRIU O SEU ASPIRADOR. SEMPRE QUE
PRETENDER APRESENTAR QUALQUER
RECLAMAÇÃO OU SOLICITAR QUALQUER
ASSISTÊNCIA AO SERVIÇO AO ABRIGO DA
GARANTIA CONCEDIDA A ESTE APARELHO,
DEVERÁ MOSTRAR A FACTURA OU O RECIBO
DE COMPRA DO APARELHO, PELO QUE A (O)
DEVERÁ GUARDAR DURANTE O PERIODO DE
VIGÊNCIA DA GARANTIA. O FABRICANTE
RESERVA O DIREITO DE INTRODUZIR
ALTERAÇÕES NOS SEUS PRODUTOS SEM
QUALQUER AVISO PRÉVIO.
23
Page 26

Voordat u het toestel
NL
voor het eerst gebruikt
Lees alle informatie hieronder zorgvuldig
door. Deze informatie is belangrijk voor
een veilig gebruik en onderhoud van het
toestel. Bewaar deze gebruiksaanwijzing
op een veilige plaats en geef hem door
aan een eventuele volgende eigenaar.
Benaming onderdelen
1 = Reservoir
2 = Motorblok
3 = Snelsluiters
4 = Zwenkwielen
5 = Aan/Uit-schakelaar
6* = Stekkerdoos voor elektrisch gereedschap
8 = Slangaansluitstuk
9 = Draaghandvat
10 = Netsnoer
11* = Zuigkrachtregeling
12* = Zuigslang
13* = Zuigbuizen
15 = Meubelzuigmond
15a*= Reduceerstuk
16* = Tapijt- + vloerzuigmond
17* = Kierenzuigmond
18* = Afvoerzuigmond
20 = Schuimstoffilter
21 = Papierfilter
22 = Klemring
23 = Voetring
24 = Papieren stofzak
25* = Parkeerhaak
26* = Zuigbuis – parkeerstand
* Onderdeel varieert al naargelang het model
Veiligheidsaanwijzingen
• De HOOVER WET & DRY is bestemd voor
huishoudelijk gebruik door volwassenen.
• Dit product is dubbel geïsoleerd en hoeft niet te
worden geaard.
BELANGRIJK: De draden in het netsnoer zijn
gekleurd volgens de volgende code:
Blauw - Neutraal Rood - Spanning
STEKKER MET 13 AMP. ZEKERING ALLEEN VOOR
BRITSE MODELLEN.
• Houd de zuigmonden of zuigbuizen niet bij uw
hoofd wanneer het toestel aanstaat, want dit kan
gevaarlijk zijn (vooral voor uw ogen en oren).
• Zuig geen schadelijke of corrosieve stoffen of
oplosmiddelen op.
• Gebruik het toestel nooit in vertrekken waar
brandbare materialen zijn opgeslagen of waar zich
gassen hebben gevormd.
• Bij sommige stoffen, zoals benzine, verfverdunner of
stookolie, kunnen explosieve gassen of mengsels
ontstaan wanneer ze worden blootgesteld aan de
centrifugale luchtcirculatie van het toestel.
• Zuig nooit hete as of gloeiende voorwerpen op.
• Controleer telkens voordat u het toestel gebruikt of
u de filters voor de gewenste toepassing correct
heeft aangebracht.
• Zuig geen tonerstof op! Toner, zoals gebruikt in
printers en kopieermachines, kan elektrisch
geleidend zijn! Bovendien is het mogelijk dat het
filtersysteem van de stofzuiger niet alle tonerstof
tegenhoudt, zodat een deel weer wordt uitgeblazen
in de lucht in het vertrek.
• Aceton, zuren en oplosmiddelen kunnen de
materialen aantasten die in dit toestel zijn gebruikt.
• Wees altijd zeer voorzichtig wanneer u een trap
zuigt. Zorg ervoor dat de stofzuiger stevig op een
trede staat en let erop dat u de zuigslang niet
verder uitrekt dan zijn feitelijke lengte. Wanneer u
de stofzuiger op een trap gebruikt, houd het toestel
dan altijd met één hand stevig vast.
• Laat het toestel niet onbewaakt achter als het
aanstaat en laat kinderen niet met het toestel
spelen.
• Trek de stekker uit het stopcontact:
– wanneer de stofzuiger slecht functioneert tijdens
het zuigen
– voordat u de stofzuiger gaat reinigen of
onderhouden
– na gebruik van de stofzuiger
– wanneer u een filter vervangt.
• Trek nooit aan het snoer om de stekker uit het
stopcontact te verwijderen, maar alleen aan de
stekker zelf.
24
Page 27

• Zorg ervoor dat het netsnoer niet wordt
blootgesteld aan grote warmte of chemische stoffen
en trek het nooit over scherpe randen of
voorwerpen.
• Gebruik geen verlengkabels in natte vertrekken.
• Probeer nooit zelf beschadigingen te repareren aan
het toestel, de hulpstukken of de kabel (speciale
kabel vereist). Laat reparaties uitsluitend uitvoeren
door een erkende After Sales Service, omdat
wijzigingen aan het toestel uw gezondheid in
gevaar kunnen brengen. Zorg ervoor dat er
uitsluitend originele reserveonderdelen en
hulpstukken worden gebruikt.
• Stel het toestel niet bloot aan weersinvloeden, vocht
of warmtebronnen.
• Nadat u water heeft opgezogen, moet u het
reservoir onmiddellijk legen.
Het toestel uitpakken
• Neem het toestel uit de verpakking en controleer
het op beschadiging. Controleer ook of de inhoud
compleet is. Breng uw dealer of onze After Sales
Service onmiddellijk op de hoogte in geval van
beschadiging of ontbrekende voorwerpen.
• Bewaar de originele doos, zodat u deze kunt
gebruiken om het toestel in op te bergen of om het
terug te sturen naar uw dealer of de After Sales
Service van HOOVER mocht dit nodig zijn.
Droog zuigen
Als u droog wilt zuigen dan moet het toestel
absoluut droog zijn. Indien nodig moet u dus
eerst de zuigslang of zuigbuizen droogwrijven.
Droog zuigen mag nooit zonder filters
of met beschadigde filters.
D Monteer de schuimstoffilter, de papierfilter en de
klemring en bevestig deze door middel van de
borgclips.
E Druk de filterzak stevig op de zuigaansluiting en
leg de zak tegen de wand van het reservoir.
F Plaats het motorblok op het reservoir en
vergrendel het door middel van de snelsluiters.
G Sluit de zuigslang aan. U kunt de slang weer
verwijderen door het verbindingsstuk rechtsom te
draaien en de slang eruit te trekken.
Monteer het gewenste hulpstuk.
Steek de stekker van het netsnoer in het stopcontact.
H Zet de stofzuiger aan met de Aan/Uit-schakelaar
(5).
Met de zuigkrachtregeling (figuur J, 11) kunt u de
zuigkracht variëren.
– Luchtschuif dicht = maximale zuigkracht
– Luchtschuif open = gereduceerde zuigkracht
Het toestel weggooien
Gooi het toestel weg volgens lokale voorschriften en
vergeet niet het netsnoer uit te rollen en af te snijden.
Montage
A Open de snelsluiters en til het motorblok omhoog.
B Plaats voetring aan de onderzijde van het
reservoir zodat de vier gaten in de ring
overeenkomen met de gaten in het reservoir.
Bevestig vervolgens de ring door de
bevestigingselementen vast te drukken.
Duw de zwenkwielen met pinnen in de voetring
totdat ze vastklikken.
C* Druk op de snelsluiter (19) aan de zijkant van het
motorblok om dit los te maken.
K* Monteer de vlotter en vlotterhouder.
Afhankelijk van het model:
Toestel met stekkerdoos.
Aan de stekkerdoos (6) van het toestel kunt u elektrisch
gereedschap aansluiten met hetzelfde vermogen als
vermeld op de stekkerdoos.
De stekkerdoos is klaar voor gebruik zodra u de
stekker van de stofzuiger in het stopcontact heeft
gestoken.
* Onderdeel varieert al naargelang het model
25
Page 28

Nat zuigen
Verwijder altijd de filters (figuur D + E)
voordat u gaat nat zuigen, want anders
gaan ze stuk. Vergeet niet de stekker van
het netsnoer uit het stopcontact te trekken,
voordat u het motorblok (2) van het
reservoir neemt.
Wanneer u een reservoir wilt leegzuigen waarin het
vloeistofniveau hoger staat dan het
maximumniveau van het stofzuigerreservoir en dat
een groter volume heeft dan het stofzuigerreservoir
en de vlotterklep is dicht, dan zou u toch door
kunnen gaan met het opzuigen van vloeistof.
In dergelijke gevallen kunt u het reservoir het beste in
delen leegzuigen en het stofzuigerreservoir tussendoor
legen.
Om het overstromen van vloeistof te voorkomen, tilt u
eerst de zuigbuis en zuigslang uit de vloeistof en zet
dan het toestel uit.
Houd het vlotterventiel (figuur K, 27) altijd
schoon en open. Het vlotterventiel zorgt ervoor
dat het zuigen automatisch stopt wanneer het
reservoir vol is.
Als u klaar bent met nat zuigen, reinig dan het
toestel en de gebruikte hulpstukken en droog ze af.
Tips voor eventuele storingen
Als uw stofzuiger niet naar tevredenheid functioneert,
raadpleeg dan niet meteen de After Sales Service,
maar controleer eerst of één van de volgende
oorzaken van toepassing is:
Er ontsnapt stof uit de zuigaansluitingen:
- Is het filtersysteem volgens de instructies
gemonteerd?
- Heeft u een originele HOOVER-filter gebruikt?
Geleidelijke afname van de zuigkracht:
- Zijn de poriën van de papieren filterzak verstopt
door stof of roet?
- Is het reservoir vol?
- Is de zuigmond, zuigbuis of zuigslang verstopt? Rek
de zuigslang uit terwijl het toestel aan staat –
hierdoor komt de verstopping los.
Tijdens het zuigen komt er water uit de
luchtopeningen van het toestel:
- Is tijdens het opzuigen van vloeistof de vlotter
(figuur K) geblokkeerd, zodat hij niet functioneert?
Plotselinge afname van de zuigkracht
-
Heeft de vlotter de luchtstroming stopgezet? Dit kan
gebeuren als het toestel schuin staat of is omgevallen.
Zet de stofzuiger uit. Nu keert de vlotter terug naar de
uitgangspositie en is het toestel weer klaar voor gebruik.
De motor doet het niet:
- Is het netsnoer, de stekker of het stopcontact
beschadigd?
- Trek de stekker uit het stopcontact voordat u dit
controleert.
- Open de motor nooit zelf!
After Sales Service:
Voor door HOOVER erkend onderhoud en voor originele HOOVER-onderdelen kunt u bellen met: Gias
Service 0900/9999109 (NL) /0903-99 109 (BE) of uw
dichtstbijzijnde Hoover-dealer. Zorg ervoor dat al het
onderhoud en alle reparaties worden uitgevoerd door
een onderhoudsmonteur die is erkend door Hoover.
Gebruik alleen originele reserveonderdelen van
Hoover. Wanneer u informatie vraagt of onderdelen
wilt bestellen, vermeld dan altijd het complete modelnummer van uw stofzuiger. (Het modelnummer staat
op de achterkant van de stofzuiger.)
Candy Nederland BV
Argonweg 7-11
3812 RB AMERSFOORT
Tel: 033-4224000
Gias Customer Service (Nederland) 0900/9999109
www.hoover.nl
Candy Hoover Belgium
Haaschtsesteenweg 162B
1820 Melsbroek
Tel. : 02-752 94 11
Gias Customer Service 0903/99109
www.hoover.be
Garantie
U heeft gedurende 12 maanden vanaf de
aankoopdatum volledige garantie op uw nieuwe
toestel tegen elektrische/mechanische defecten. Deze
garantie geldt niet in geval van:
a) Defecten die zijn veroorzaakt door onjuiste installatie,
verkeerd gebruik of beschadiging van het toestel.
b) Reparatie of onderhoud van het toestel door een
persoon die van de fabrikant geen bevoegdheid
heeft ontvangen om onderhoudswerkzaamheden uit
te voeren.
c) Het aanbrengen van onderdelen op het toestel die
geen originele fabrieksonderdelen zijn.
d) Niet-huishoudelijk gebruik van het toestel.
e) Gebruik bij een onjuist voltage.
Het voorgaande doet geen inbreuk op uw wettelijke
rechten.
U dient de verkoopnota of kwitantie te overleggen
wanneer u aanspraak wilt maken op deze garantie.
26
Page 29

Než přístroj
CZ
poprvé spustíte
Pečlivě si prostudujte níže uvedené
informace. Informace obsahují důležitá
bezpečnostní upozornění vztahující se k
bezpečnému provozu a údržbě spotřebiče.
Uložte si tento návod k použití na
bezpečném místě a předejte jej příštímu
majiteli.
Identifikace součástek
1 = Sběrná nádoba
2 = Blok motoru
3 = Západky
4 = Kolečka
5 = Spínač
6* = Odporová skříň
8 = Koncovka hadice
9 = Úchyt pro přenášení spotřebiče
10 = Přívodní šňůra
11* = Regulace sání
12* = Ohebná hadice
13* = Sací nástavce
15 = Hubice na čalounění
15a* = Redukce
16* = Hubice na koberec a podlahu
17* = Štěrbinovka hubice
18* = Nástavec na odsávání kapalin
20 = Pěnový pryžový filtr
21 = Papírový předmotorovy filtr
22 = Pojistný kroužek
23 = Spodní kruh
24 = Papírový prachovy sáček
25* = Parkovací úchyt
26* = Sací nástavec – parkovací poloha
* Funkce se liší v závislosti na modelu
Bezpečnostní upozornění
• HOOVER WET & DRY je určen pro domácí
použití dospělými osobami.
• Tento produkt je vybaven dvojitou izolací a
nesmí být uzemněn.
DŮLEŽITÉ: Vodiče v přívodní šňůře mají toto
barevné značení:
Modrý – neutrál Červený – fáze
Zástrčka s 13A pojistkou pouze na modelech pro
GB.
• Je-li spotřebič v chodu, nepřibližujte hadice a
hubice k hlavě – nebezpečí např. pro oči, uši.
• Nevysávejte škodlivé látky ani korozívní
tekutiny a či rozpouštědla.
• Nikdy nepoužívejte spotřebič v místnostech,
kde jsou skladovány hořlavé materiály nebo
kde se vytvářejí plyny.
• Z materiálů, jako je benzín, ředidla a topné
oleje, se mohou vlivem odstředivého vzduchu
produkovaného spotřebičem uvolňovat
výbušné plyny či směsi.
• Nikdy nevysávejte žhavé uhlíky či rozžhavené
předměty.
• Před každým použitím se ujistěte, že filtry
potřebné pro konkrétní použití jsou správně
uchyceny.
• Nevysávejte prach z tonerů! Tonery
používané např. v tiskárnách a kopírkách
mohou působit jako elektrické vodiče! Také
se může stát, že filtry spotřebiče nezachytí
stoprocentně prach z toneru, a ten se tak
může dostat do vzduchu cirkulujícího v
místnosti.
• Aceton, kyseliny a ředidla mohou poškodit
materiály použité v tomto spotřebiči.
• Při vysávání koberců na schodech tímto
spotřebičem je třeba dbát zvýšené opatrnosti.
Zajistěte, aby vysavač stál na schodu stabilně
a aby hadice nebyla natahována více, než je
její skutečná délka. Používáte-li vysavač na
schodech, vždy jej pevně přidržujte jednou
rukou.
• Je-li spotřebič v provozu, neponechávejte jej
bez dozoru a zajistěte, aby si v jeho blízkosti
nehrály děti.
• Přívodní šňůru vytáhněte ze zásuvky vždy:
– když spuštěný přístroj přestane správně
fungovat
– před čištěním a prováděním údržby
– po použití
– při výměně filtru.
– Nikdy nevytahujte šňůru ze zásuvky tak, že
za ni zatáhnete. Vždy uvolněte přímo
zástrčku ze zásuvky.
– Zajistěte, aby přívodní šňůra nebyla
vystavena teplu či působení chemikálií a
27
Page 30

aby nebyla odírána o ostré rohy či povrchy.
– Ve vlhkých místnostech nepoužívejte
prodlužovací šňůry.
– Poškozený spotřebič, příslušenství či šňůru
nikdy neopravujte (je zapotřebí speciální
šňůra), veškeré opravy zadávejte pouze
autorizovanému zákaznickému servisu,
neboť modifikace provedené na spotřebiči
vás mohou ohrozit na zdraví.
– Používejte pouze originální náhradní díly a
příslušenství.
– Nevystavujte spotřebič působení přírodních
sil, vlhkosti či zdrojům vytápění.
– Po mokrém vysávání okamžitě vyprázdněte
sběrnou nádobu.
Vybalení spotřebiče
• Vybalte spotřebič a zkontrolujte, zda nebyl
při přepravě poškozen. Zkontrolujte, zda jsou
přiloženy veškeré prvky, které mají být jeho
součástí. Pokud zjistíte poškození či chybějící
příslušenství, neprodleně se obraťte na svého
prodejce či zákaznický servis.
• Krabici, v níž byl spotřebič uložen, uschovejte
– můžete ji použít pro ukládání spotřebiče a
pro případ, že spotřebič budete muset vrátit
svému prodejci nebo servisnímu středisku
HOOVER, vyvstane-li potřeba zajistit servis.
Likvidace spotřebiče
Spotřebič znehodnoťte v souladu s místně
platnými předpisy; nejprve vytáhněte a
odstřihněte přívodní šňůru.
Montáž
A Uvolněte západky a zdvihněte blok motoru.
Suché vysávání
Po mokrém vysávání musí být spotřebič
zcela vysušen; je-li třeba, před použitím
vysušte ohebnou hadici nebo nástavce.
Nikdy nevysávejte bez filtrů nebo s
poškozenými filtry.
D Nasaďte pěnový pryžový filtr,
předmotorovy filtr
pomocí svorek je přichyťte.
E Papírový sáček pevně přitiskněte ke
koncovce hadice tak, aby přiléhal ke stěně
sběrné nádoby.
F Blok motoru umístěte nad něj a zajistěte
západkami.
G Připojení ohebné hadice. Hadici odpojíte
pootočením spojky hadice a následným
vytažením hadice.
Nasaďte potřebné příslušenství.
Zapojte přívodní šňůru.
H Spotřebič zapněte pomocí spínače On/Off (5).
Regulace sání (11, obr. J) vám umožní
regulovat sací výkon.
– Posuvná dvířka zděře zavřena
= plný sací výkon.
– Posuvná dvířka zděře otevřena
= snížený sací výkon.
V závislosti na modelu:
Spotřebič vybavený odporovou skříní.
K odporové skříni spotřebiče (6) lze připojit
elektrické přístroje s jmenovitými hodnotami
odpovídajícími údajům uvedeným na odporové
skříni.
Tato odporová skříň je připravena k použití,
jakmile je vysavač připojen k hlavnímu přívodu
elektřiny.
a pojistný kroužek a
papírový
B Nastavte si spodní kruh tak, aby zapadl do
4 otvorů ve dně spotřebiče, a upevněte jej
pomocí příchytek.
Do kruhu zatlačte kolečka s kolíky tak, aby
zapadly na místo.
C* Stiskněte pojistnou záchytku (19) po straně
hlavy motoru a uvolněte ji.
K* Namontujte plovák a jeho úchyt.
28
* Funkce se liší v závislosti na modelu
Page 31

Mokré vysávání
Před zahájením mokrého vysávání vždy
odstraňte systém filtrů (obr. D + E),
abyste předešli jeho poškození. Než
z přístroje vyjmete skříň motoru (2),
nezapomeňte odpojit přívodní šňůru
ze zásuvky.
Pokud vysáváte nádoby, v nichž hladina
kapaliny převyšuje vršek sběrné nádoby a
jejichž objem je větší než objem sběrné
nádoby, může nasávání kapaliny
pokračovat i po zaplnění objemu sběrné
nádoby, pokud je plovákový ventil uzavřen.
V těchto případech vysajte pouze část objemu a
průběžně vyprazdňujte sběrnou nádobu.
Nejprve z kapaliny vyjměte ohebnou hadici a
nástavce a potom vypněte spotřebič, abyste
zabránili přetékání.
Plovákový ventil (27, obr. K) udržujte v
čistotě a zajistěte, aby byl kdykoliv
přístupný. Tento ventil automaticky přeruší
vysávání, když se sběrná nádoba naplní.
Po ukončení mokrého vysávání spotřebič a
použité příslušenství vyčistěte a vysušte.
Objeví-li se nečekané potíže
Náhlé snížení sacího výkonu:
- Zastavil plovák přívod vzduchu? K tomu
může dojít, pokud je spotřebič nakloněn nebo
pokud se převrátí. Vypněte vysavač – plovák
zapadne do původní polohy – spotřebič je
opět připraven k použití.
Motor nefunguje:
- Nedošlo k poškození přívodní šňůry, zástrčky
nebo zásuvky?
- Před kontrolou vytáhněte zástrčku.
- Nikdy sami neotevírejte motor!
Zákaznický servis:
Autorizované servisni střediska HOOVER jsou
uvedena v přiloze záručn
Používejte pouze originální náhradní díly
Hoover. Pokud si vyžádáte informace či
objednáváte součástky, vždy uvádějte celé číslo
modelu (číslo modelu je uvedeno na zadní
straně těla vysavače).
ího listu.
Pokud váš spotřebič nefunguje k vaší
spokojenosti, nemusíte ihned volat zákaznický
servis. Nejprve zvažte, zda závada nevznikla z
následujících nezávažných příčin:
Ze sacích objímek uniká prach:
- Byl systém filtrů připevněn podle návodu?
- Používáte originální filtr HOOVER?
Postupné snižování sacího výkonu:
- Nejsou póry papírového sáčku ucpané
prachem nebo sazemi?
- Není sběrná nádoba plná?
- Není hubice, nástavec anebo ohebná hadice
ucpaná? (Natáhněte ohebnou hadici, když je
přístroj v chodu - tak se překážka uvolní).
Ze vzduchových vývodů spotřebiče uniká
při provozu voda:
- Není při vysávání kapalin zablokován plovák
(obr. K), který je tudíž nefunkční?
Záruka
Záruční podmínky pro tento spotřebič jsou
takové, jaké stanoví náš zástupce v zemi,
kde se spotřebič prodává. Podrobné údaje
ohledn
ě těchto
prodejce, u kterého byl spotřebič zakoupen.
Při reklamacích podle
podmínek musí být předložena účtenka
nebo doklad o nákupu. Podléhá zm
oznámen
podmínek lze obdržet od
těchto z
í.
áručních
ěně bez
29
 Loading...