

Page 1
Page 2
+
*
Fill in and retain!
The HOOVER vacuum cleaner you have just purchased is designed for
carpet and floor cleaning and has cleaning tools for above the floor
cleaning.
Yourcleanerisa model no.
and hasaserialnumber
For your personal records, please enter the model number and serial
number in the spaces provided above and retain in a safe place.
The model number and serial number are located on the bottom of the
cleaner.
Save!
Index
BlowerFeature............................~
Cleaner Description.
Cleaning Tools.
Edge Cleaning Feature.
How to Assemble.
How to Use Rug and Floor Nozzle.
How to Use Suction Regulator.
IfYouHaveaProblem
Important Safeguards.
Lubrication
Maintenance
TheBag.................................ll
Secondary Filter
Replacing Brush on Rug and Floor Nozzle.
Storage..................................1
ToCleanStairs..
..............................
.....................
.........................
..................... .8
.......................
..........
..............
.....................
.....................
.........................
...........................
.8,4
$10
.5,8
.7,8
....
.8
-18
.2
.I4
.I2
I2
0
0
.
@
1974The Hoover Company
Page 3

1
Important Safeguards!
0
Read all instructions.
0
Warning: Electric shock could occur if used outdoors or on wet surfaces.
0
Close supervision is necessary when any appliance is used by or near
children. Do not allow vacuum cleaner to be used as a toy or to run
unattended at any time.
0
Do not use cleaner to pick up matches, or live ashes and cigarette
butts.
0
Avoid picking up hard, sharp objects with the cleaner. They may
damage the cleaner and the bag.
0
Unplug cleaner when not in use. Turn machine off at switch before
unplugging.
0
Always disconnect cord from electrical outlet before servicing the
cleaner.
0
Empty bag frequently when picking up very fine materials such as
powder.
0
Grasp the plug to disconnect from wall outlet to avoid damage to
cord, plug, prongs, or receptacle.
l
The use of an extension cord is not recommended.
e
If cleaner is in disrepair, do not attempt to operate.
0
Have repairs made by the qualified personnel at Hoover Factory Setv-
ice Centers or Authorized Hoover Warranty Service Dealers.
0
Use vacuum cleaner only for its intended use as described in the in-
structions. The use of attachments not recommended by the ap-
pliance manufacturer may cause hazards.
Save
these
instructions!
P%z%s
En-ll~ae
Participation
I
e
DOUBLE INSULATED:
When servicing use only identical replacement parts.
This cleaner has the safety equivalent of a grounded wiring system
plus the convenience of a
This cleaner meets Occupational Safety and Health Act (OSHA-29
CFR 1910 Subpart S) requirements providing safer working condi-
tions as a result of mandated safety regulations and equipment
safeguards.
two
wire system.
.
2
Page 4
’
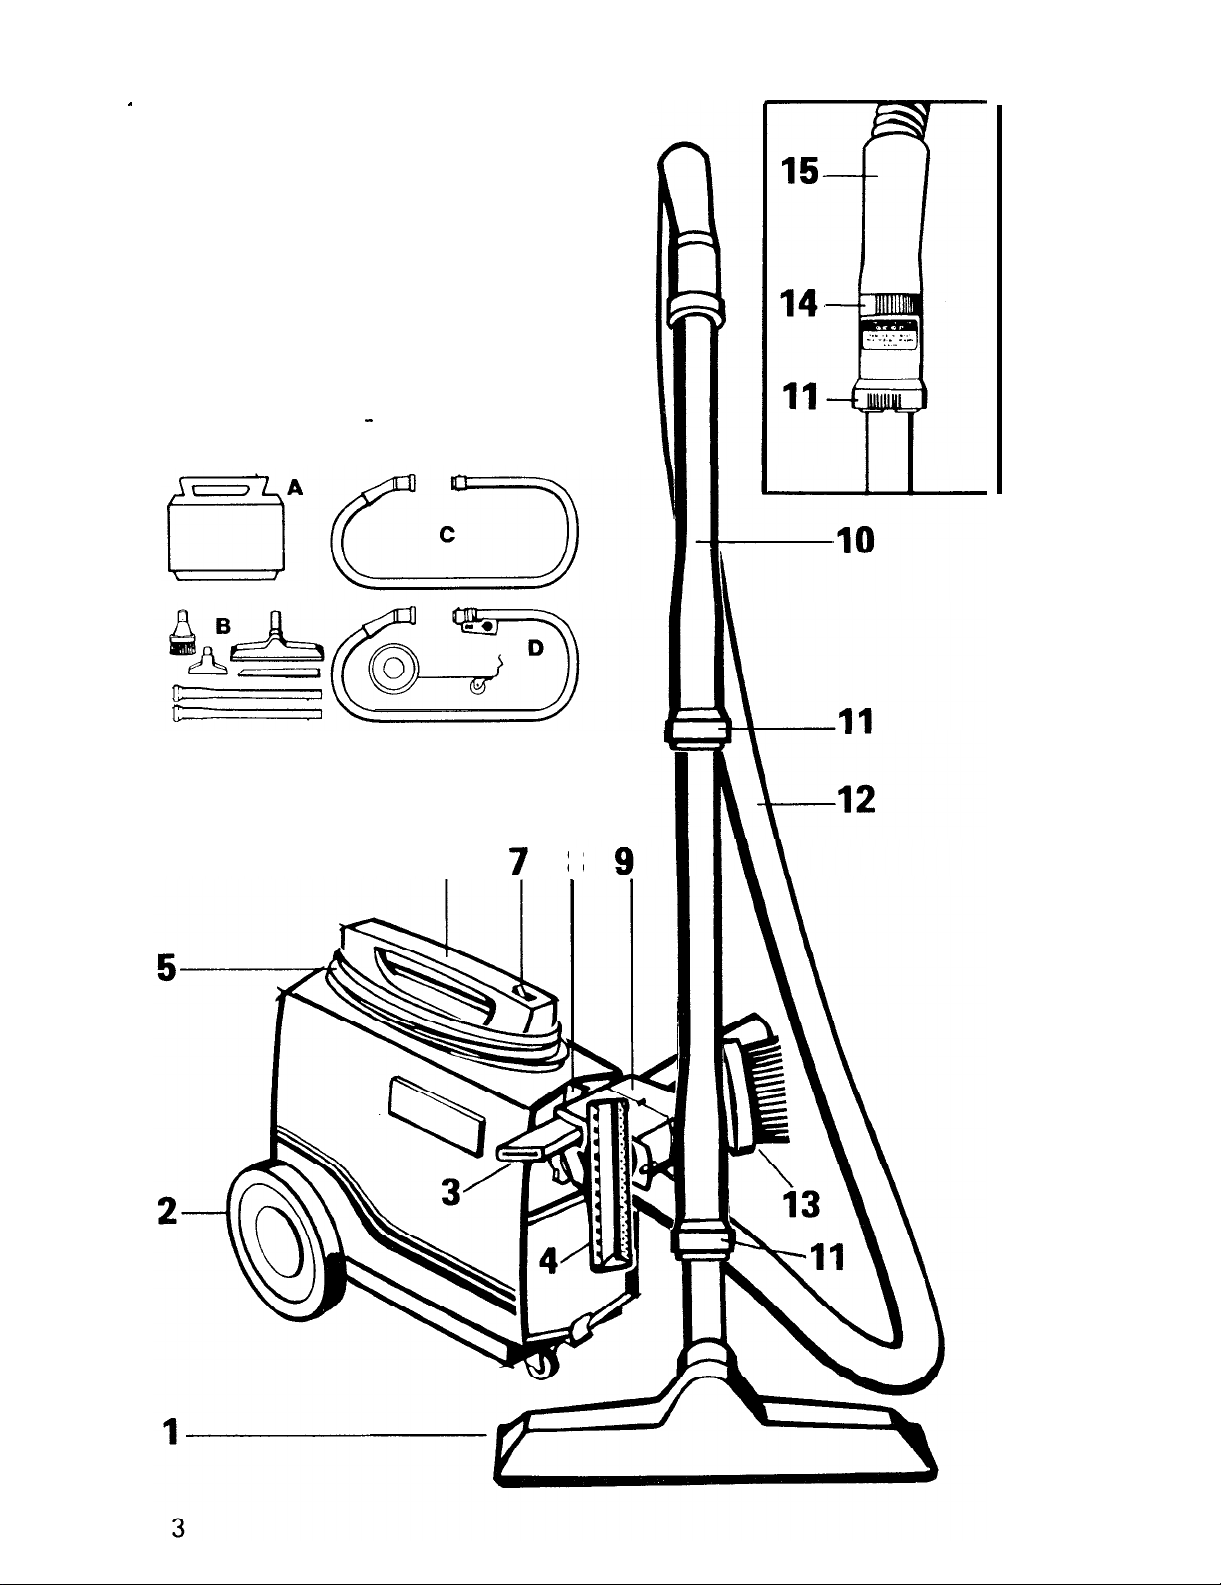
Unpacking
Unpack the cleaner from the
carton and identify the parts
shown. Remove and dispose of
the cardboard packing.
A. Cleaner
B. Tools and extension wands
C. Hose
OR
D. Wheeled carrier and hose
with tool holder - deluxe model
only
The cleaner assembled will look
like the drawing below.
6
7
8
Page 5

Operate cleaner only at voltage specified on data plate on bottom
of cleaner.
1. Combination rug and floor nozzle
2. Wheeled carrier
provides easy towing; pull cleaner using hose to guide
the cleaner easily over carpet, area rugs and door sills. (Removable) Included with deluxe model only.
3.
Crevice tool
4. Furniture nozzle
5. Cord
6. Carrying handle
7. On-off switch
8.
Bag door lock
9. Tool holder
provides tool storage for crevice tool, dusting brush and
furniture nozzle. Included with deluxe model only.
10.
Extension wands
are used with the rug and floor nozzle. If added
length is desired when using cleaning tools, one or both wands may be
used.
11. Plastic latch ring
is located on extension wands and hose grip; rotates
to connect wands and cleaning tools.
12. Flexible hose
13. Dusting brush
14. Suction regulator
for use ease in using cleaning tools.
is set for MINIMUM, MEDIUM, or MAXIMUM suc-
tion by rotating the plastic ring so that the raised plastic indicator is
directly below the desired setting.
15. Hose grip
Page 6

How to assemble
1.
Connect hose
Insert hose connector into opening
in bag door by fitting prongs on
end of hose connector into cor-
responding slots in opening. Turn
hose connector in either direction
until it locks into position. Turn in
opposite direction to remove from
cleaner.
2. Attach extension
wands, cleaning tools and
nozzle
a. To attach extension wand to the
hose, rotate the plastic latch ring
on the hose grip to accept the button projection on the end of the ex-
tension wand. Turn the latch ring
to lock in place. To remove,
reverse the above procedure.
b. Cleaning tools may be attached
directly to the hose grip by following the above directions.
Attach the second wand when using the rug and floor nozzle or for
added length when using cleaning
tools.
To attach the second wand and the
rug and floor nozzle, follow the
same procedure as when attaching
wand or tools to hose grip.
Page 7

Deluxe model only
3. Attach wheeled carrier
The removable wheeled carrier can
be used for transporting your
cleaner from room to room or for
use as you are cleaning.
To attach wheeled carrier, first,
open louvered door at the back of
the cleaner. Then position large
wheeled end of carrier into notch
as shown. Close door.
Push front of cleaner down to snap
into place.
To remove wheeled carrier,
depress metal clip at small wheel
end while lifting up cleaner.
4. Position tools
Position tools in tool holder as
shown in the illustration.
6
Page 8

1
How to use
CAUTION: POTENTIAL SHOCK HAZARD This vacuum cleaner is
not intended to be used where water may be present. Carpet will
retain moisture long after it has been wet. This vacuum cleaner
should not be used on wet or moist carpet.
Rug and floor nozzle
Use the combination rug and floor nozzle to clean both carpet and hard surface floors. To connect rug and floor nozzle to the wands and hose, rotate
the plastic latch ring on the wand to accept the button projection on the end
of the rug and floor nozzle. Turn the latch ring to lock in place. To remove,
reverse the procedure.
Hard surface floors
Put the brush in the floor position
by moving the brush lock lever to
the “FLOOR” position on the nozzle.
Rugs
Put the brush in floating position by
moving the brush lock lever either
to the left or right to the “RUG”
position. You will find it convenient
to use only one hand when operating the cleaner on rugs and
carpet.
Page 9

On certain types of dense carpet, it
may be advantageous to keep the
brush in a position where it does
not come in contact with the
carpet. To lock brush into the nozzle, adjust lever to “RUG” position
then press the brush all the way in-
to the nozzle with your finger.
While still holding the brush, adjust
the lever to the “FLOOR” position
and the brush will be locked into
place. To release brush; move the
brush lock lever either to the left or
right to the “RUG” position.
Note: Before using the nozzle on
hard surface floors, make certain
the brush is not locked into the
nozzle; then adjust the lever to the
“FLOOR” position.
For most efficient cleaning,
place the nozzle flat on rugs
and hard surface floors.
Edge cleaning feature
This feature provides for improved
cleaning of carpet edges near
baseboards and solid furniture.
Passages have been added to the
side of the nozzle to increase air
flow carrying dust from the carpet
edge to the nozzle.
Adjusting suction
The suction regulator is located on
the hose grip and may be used for
adjusting the amount of suction
when cleaning carpet and rugs or
when using the attachments.
Set the suction regulator to MINI-
MUM, MEDIUM, or MAXIMUM
suction by rotating the plastic ring
until the raised plastic indicator on
the dial is directly under the desired
setting.
8
Page 10

Cleaning tools
The cleaning tools allow you to
do above the floor cleaning and
to clean hard to reach areas.
1. Furniture nozzle
stered furniture, draperies, tapestries, mattresses, clothing, and
automobile interiors.
2. Dusting brush
furniture, table tops, books,
lamps, lighting fixtures, Venetian
blinds, baseboard, shutters and
registers.
3.
Crevice tool
dresser drawers, edges of wall-
to-wall carpet, spaces between
kitchen equipment.
4. Wall/floor brush*
and very irregular hard surface
floors such as brick and slate.
*Available at additional cost.
for uphol-
for carved
for radiators,
for walls
.
1
A
Attaching tools
Tools may be attached 3 places
depending on your cleaning
needs:
To hose grip,to end of one
wand or to end of two wands
by rotating plastic latch ring.
To clean tools
To clean the hose, wipe off dirt
with a cloth dampened with a liquid detergent. Cleaning tools
can be washed in warm water
with a detergent. Rinse and let
dry before using.
’
Page 11

To clean stairs
Place cleaner on stair as shown.
Clean stairs from bottom to top.
D.eluxe
$rirs
model may be used on
with wheeled carrier attach-
.
Blower feature
To use as a blower, remove hose
from bag door. (See “How to assemble” section) Open louvered
door, at back of cleaner, by pull-
ing up from bottom. Insert hose
connector into corresponding
slots in opening. Turn hose con-
nector in either direction until it
locks into place. Use to blow dirt
out of areas where it is impossible
for suction to reach and to aerate
musty closets and chests.
How to store
Remove hose and wrap cord
around cleaner handle for storage.
Deluxe model only
When cleaning is completed, the
tool holder and hose may be hung
by the convenient hook located at
the top of the holder.
Position hose over holder.
10
Page 12

Maintenance
The following sections are concerned with proper maintenance of the
cleaner. Familiarize yourself with these home maintenance tasks and keep
this owner’s manual in a convenient place where you can refer to it when
needed. Proper use and care of your cleaner will assure continued cleaning
effectiveness.
Disconnect cleaner from electrical outlet before attempting to service it in any manner.
The bag
Check bag from time to time and empty when necessary. Very fine materials
in large quantities, such as face powder, corn starch, fireplace ashes or furnace soot, will seal the pores of the bag. If the cleaner is used to remove
materials of this type, empty the bag frequently.
without the bag.
To empty bag
The bag is located behind the bag
door. Remove hose and set
cleaner back on end opposite bag
door to assure that the dirt settles
to the rear of the bag. Open bag
door by turning latch clockwise
and swinging door upward. Re-
move bag by grasping tab on
front of bag ring and pulling bag
from cleaner. Hold bag ring firmly
on a paper and shake bag vigor-
ously until it is clean. The bag
may also be turned inside out for
a thorough cleaning. Replace
bag. Use the Crevice Tool or
similar object to push bag into
proper position. Bag ring should
be seated against ridges in hous-
ing.
Never operate cleaner
11
Page 13

Secondary filter
1
The secondary filter protects the
motor from dirt particles. It is
located at the front of the bag com-
partment. When bag is removed,
check filter, which is not removable. If filter is dirty, remove dirt
with a small brush.
Rug/f loor nozzle
Replacing brush
Replace the brush on the rug and
floor nozzle when it becomes worn
and
is not doing a satisfactory job
of cleaning. Brush Lock Lever
must be in “RUG” position to
remove brush.
1. Remove one of the metal clips
holding brush in position by placing
a screwdriver under the raised edge
and lifting upward. Note position
of old brush and springs, then
remove them.
2. Screw springs onto projections
of new brush. Center new brush in
nozzle. Make sure that the bristles
are facing up and the projection
side is turned toward tube. Replace
the clip and clamp into position by
pressing down with the flat side of
a screwdriver.
12
Page 14

,I -
*
Lubrication
The motor is equipped with two bearings that contain sufficient lubrication
for the life of the motor. The addition of lubricant could cause damage.
Therefore, do not add lubricant to either motor bearing.
14
Page 15

VACUUM CLEANER MANUFACTURERS ASSOCIATION
VCMA
This
information has been compiled by the Vacuum Cleaner
ation
from Government and Private Sources concerned
basic guIdelInes are for your
TO AVOID ELECTRIC SHOCK
Never vacuum damp or wet surfaces or Irquids.
Do not store machine outdoors.
Replace worn or frayed power cord immediately.
TO AVOID ACCIDENTS
Never vacuum live ashes or cigarette butts.
Never run machine over or place sharp objects on the power cord.
Never let children use machine as a toy.
Use extra caution when cleaning on stairs.
Keep machine on f!oor - not on chairs, tables, etc.
(HOOVER -AN ASSOCIATION
protectton
and convenience.
MEMf3ERI
Matjufacturers ASSOCI
with
product safety.
These
When machine is turned on, never allow fingers, eyes, hair, garments, etc. to come
near intake suction ports or revolving brushes.
Never leave machine running or cord plugged in when unattended.
Turn machine off at switch before unplugging from wall outlet.
When unplugging machine, grasp plug - not cord; guide cord and plug
wrapping or cord reel rewinding.
The use of an extension cord is not recommended.
Never vacuum in the presence of flammable or combustible liquids or fumes.
Always unplug power cord from wall outlet before servicrng machine or attaching
accessories.
Store machine promptly after each use to prevent accidents from
cord or machme.
Use machine and accessories only in manner intended by manufacturers
FOR BEST PERFORMANCE
Keep your machine and all accessories clean and in good operating condition.
Change or clean bags and/or filters as recommended by manufacturer to maintain
optimum cleaning efficiency, after unplugging the power cord.
Periodically check revolving brush for build-up of lint, hair or other foreign matenal
and remove as necessary, after unplugging the power cord.
Adjust or replace cleaning brushes when worn, after unplugging the power cord
Have machine checked periodically by manufacturer’s authorized service center
Use only manufacturer’s authorized service center for parts or service.
Store machine carefully in a dry area.
For optimum cleaning performance and safety, study and follow your Owner’s
Manual
--~
keep it in a handy and safe place for future reference.
tripplng
dunny
over power
THE HOOVER COMPANY, NORTH CANTON, OHIO 44720
s 1029-075
R58-83
s1049/55
s1049-032
LithoUSA
565 12-065
 Loading...