

Page 1

1
TABLE OF CONTENTS
What’s in the Box...............................................................4
Getting to Know Rogue
™
..........................................................5
Technology.............................................................7
The Hoover Home App ...........................................................8
SmartWall
™
Technology.....................................................10
Scheduling............................................................11
Operating Rogue
™
.............................................................13
Charging .............................................................13
Cleaning .............................................................15
Maintaining Rogue
™
............................................................16
Emptying the Dirt Cup .....................................................16
Brush Roll and Side Brush Maintenance ...........................................17
Cleaning the Sensors and Wheels ..............................................18
Troubleshooting...............................................................19
Factory Reset . . . . . . . . . . . . . . . . . . . . . . . . . . . . . . . . . . . . . . . . . . . . . . . . . . . . . . . . . . 20
Important Safety Instructions .....................................................21
Page 2

2
WHAT’S IN THE BOX
I’m Rogue™, of course I come with accessories.
Rogue™ Robot Vacuum
My Base (Docking Station) 2 Side Brushes* Cleaning Tool
*Accessories vary per model.
Page 3
3
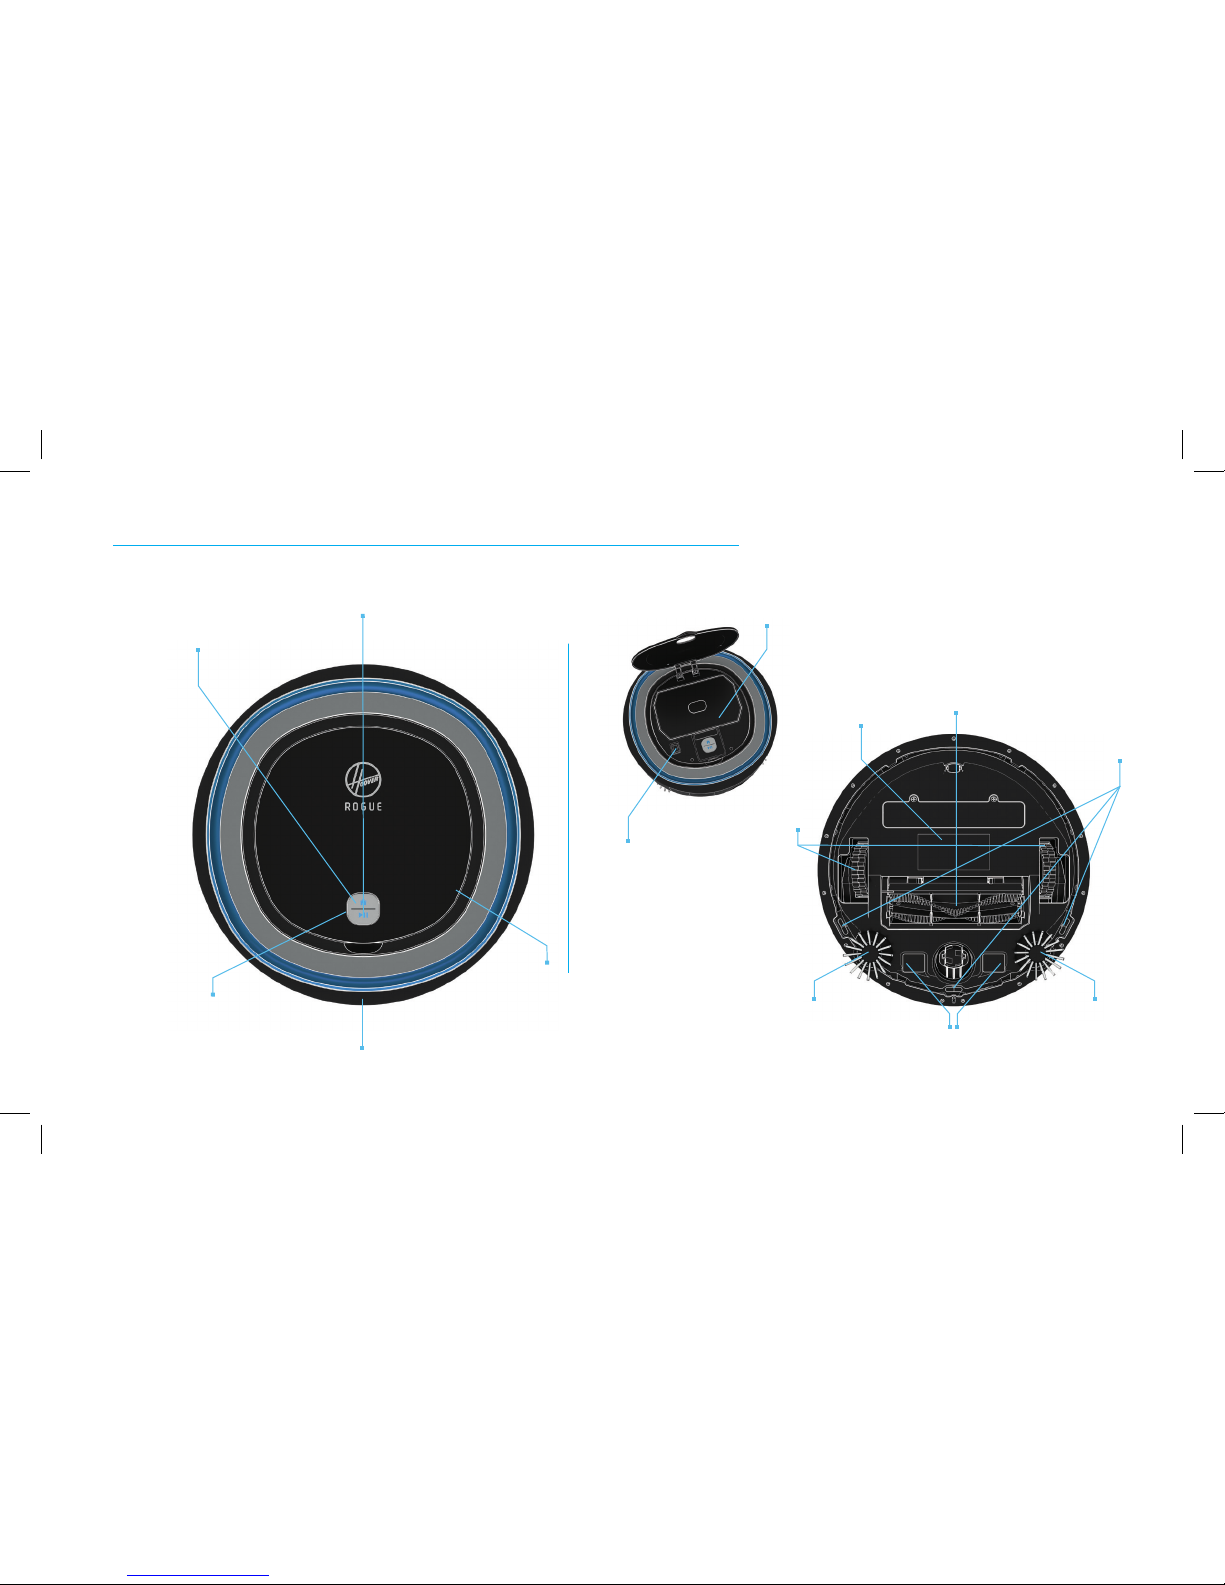
GETTING TO KNOW ROGUE
™
Dirt Cup and Filter
Send Rogue
™
Back to Base (Dock)
ON/OFF Switch
Rogue's Cover
Rogue
™
Control Center
Robart
®
Technology Navigation Sensors
Charging Sensors
Wheels
Side Brush
Side Brush
Start/Stop Cleaning
Top View Top Open View
Bottom View
Cliff Sensors
Brush Roll
Battery
Page 4
4
GETTING TO KNOW ROGUE
™
Rogue™ Control Center
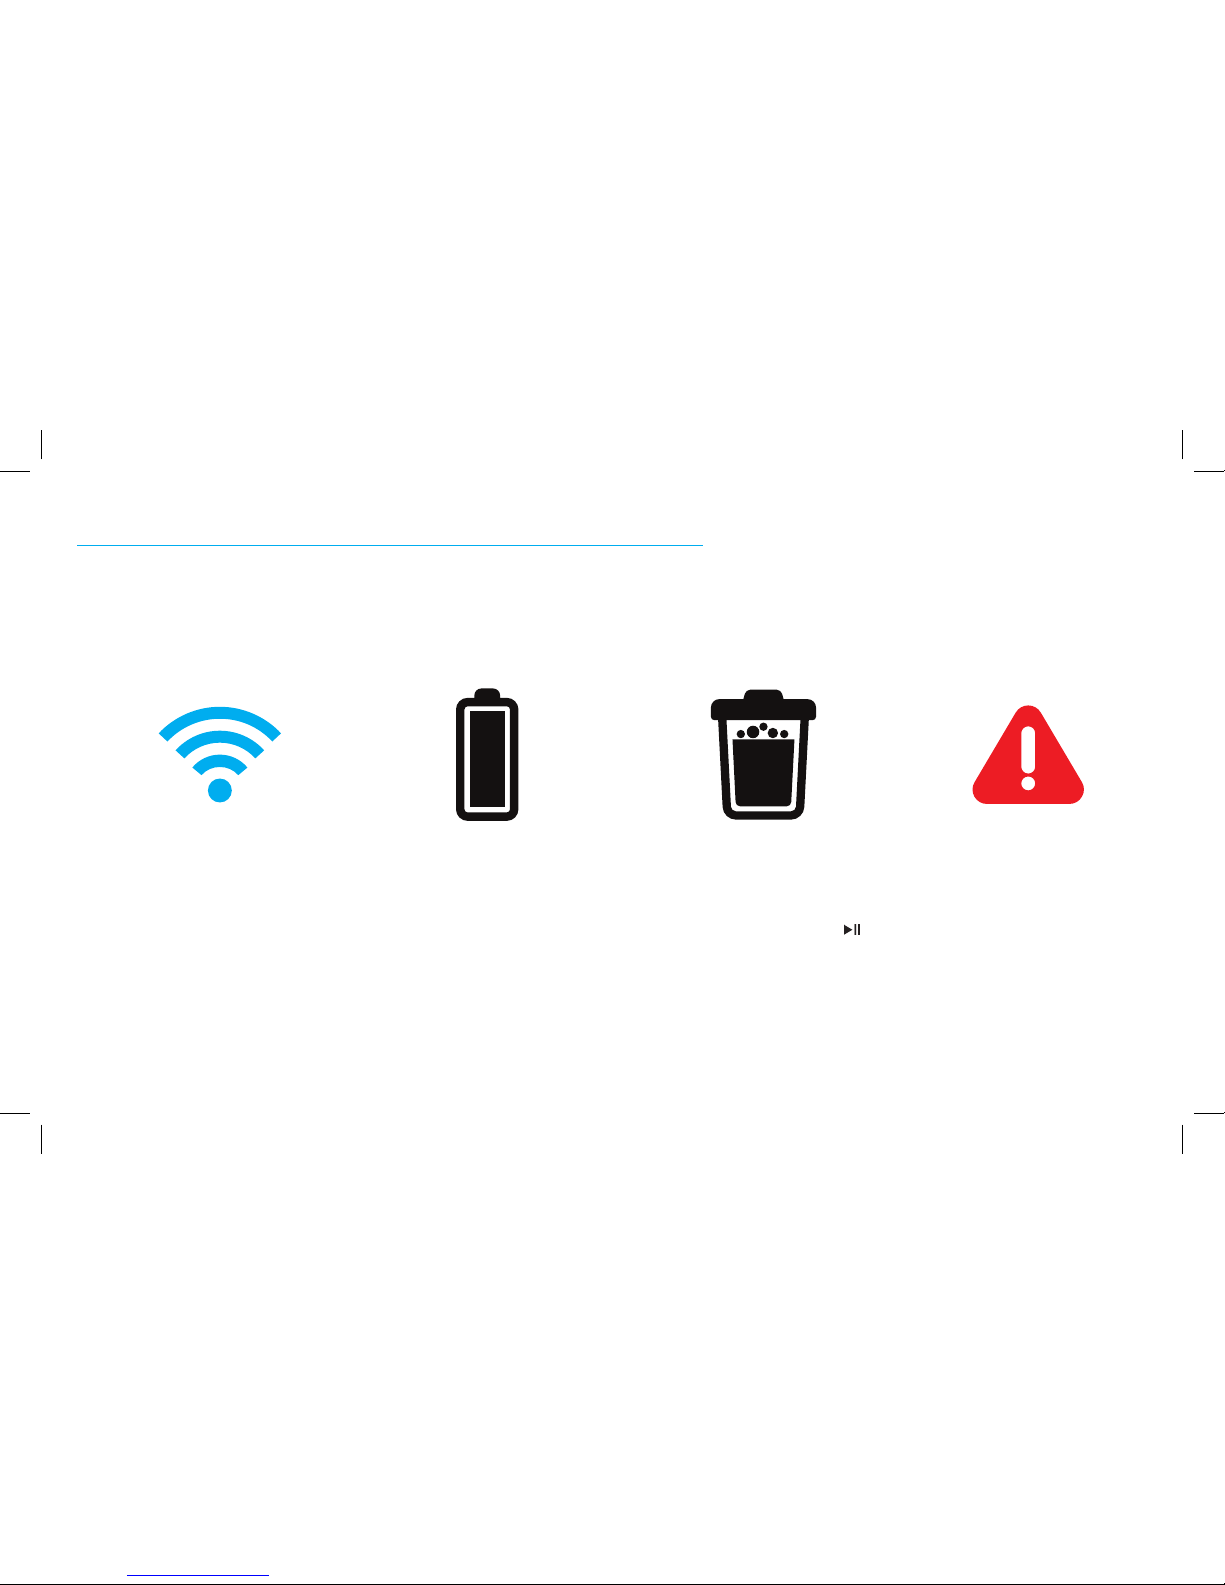
These icons are located on my lid and will light up when active.
This blue Wi-Fi symbol will light up
when you are connected to Wi-Fi
through the Hoover Home App. If it’s
not lit, I’m not connected.
To set up a connection, turn to
page 8.
This battery symbol lets you know my
battery status. If you don’t see it lit
up, I have enough battery life. When
it starts blinking, I’m going to head
back to my base to recharge.
When you see this symbol, it means
my dirt cup is full. Please make sure
to empty it so I can continue cleaning.
The light will disappear once you
empty the dirt cup and press the .
When you see this symbol flashing,
I’m in trouble. It might be as simple
as something stuck in my brush roll
or it could be an internal error.
Turn to page 19 for some common
errors I might encounter and how you
can help me.
Wi-Fi Connectivity Battery Dirt Cup Full Error
Page 5
5
GETTING TO KNOW ROGUE
™
Voice Control
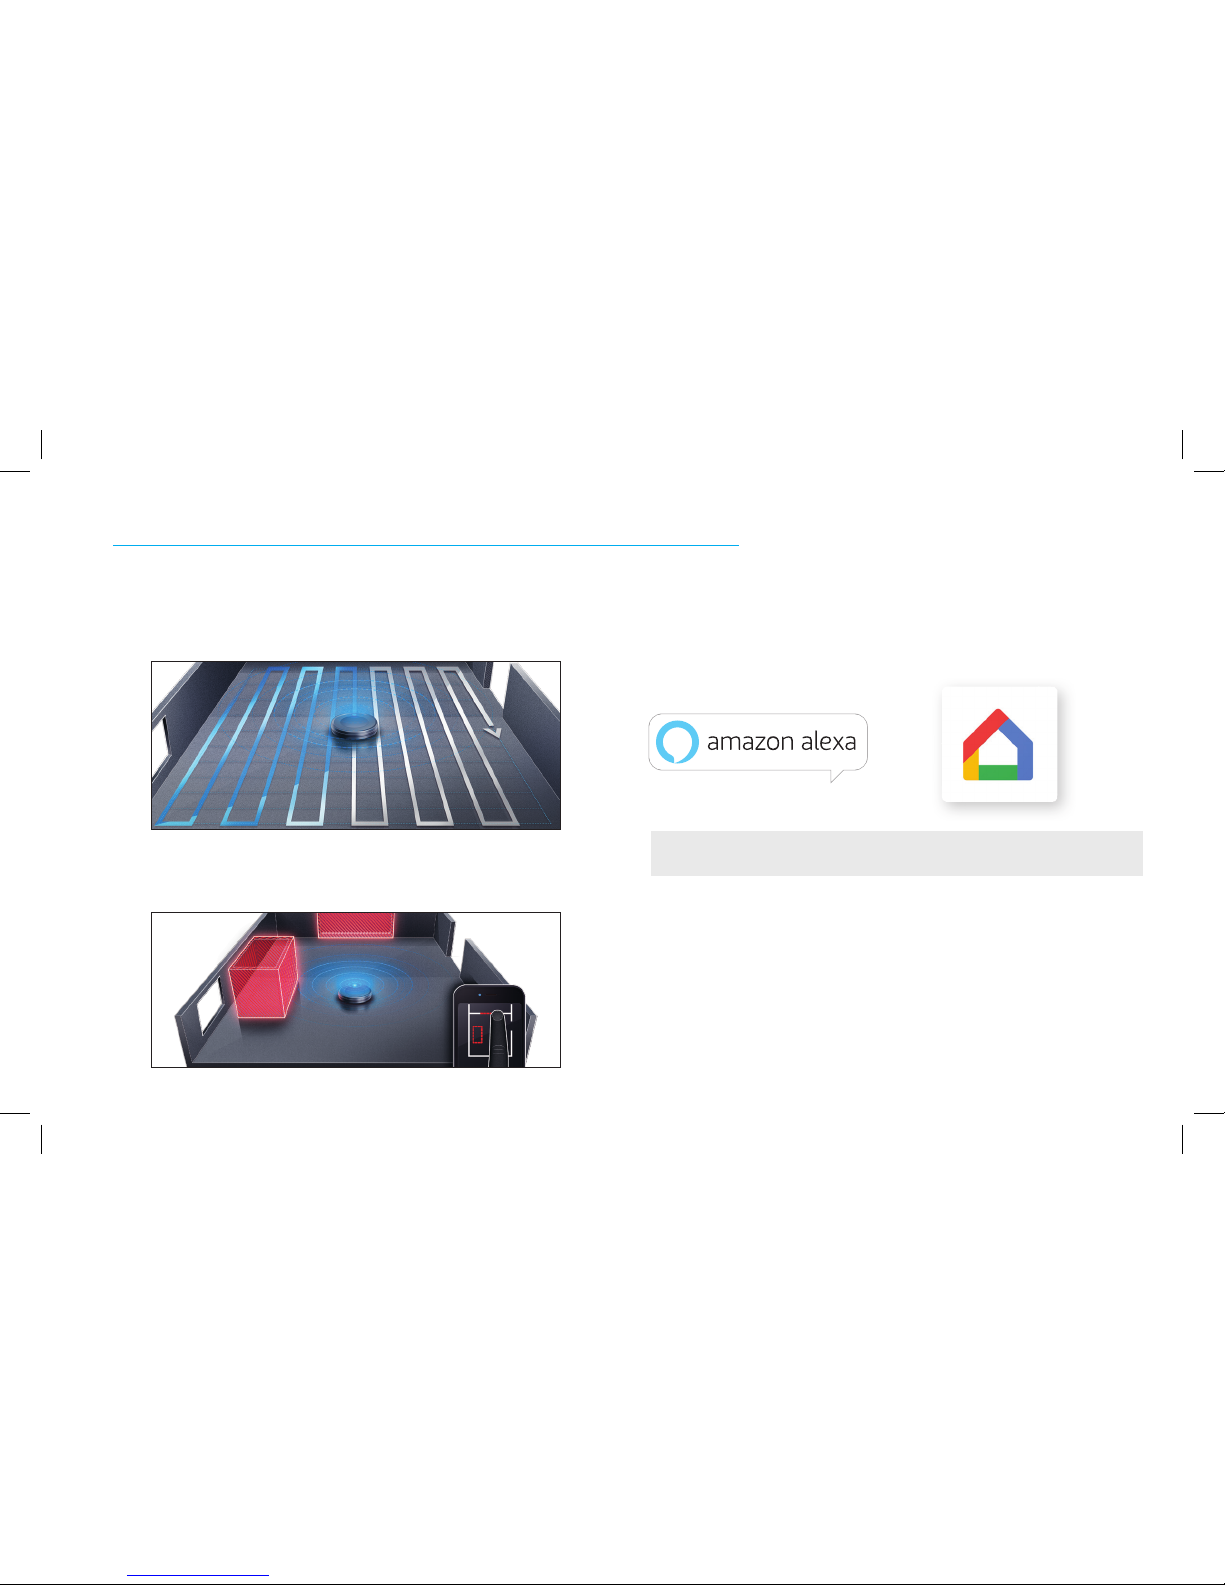
I’ve got a pretty good relationship with Amazon Alexa* and Google Home Assistant*.
If you own an Amazon Alexa product or a Google Home Assistant, you can use them
to communicate with me. Download the skill set in the Amazon Alexa or Google Home
App.
Robart® Technology with Memory Navigation
I utilize a high-tech laser to map and navigate your home because I'm
highly intelligent. I will also remember your home's floor plan so you can
customize how I clean (See SmartWall™ Technology on page 10).
SmartWall™ Technology
Through the Hoover Home App, you can designate rooms and areas as off
limits but I don’t know why you would want to.
*Amazon Alexa and Google Home Assistant sold separately.
NOTE: The Hoover Home App is required to interact with Amazon Alexa and Google Home
Assistant. Be on the look out for new skills/commands coming soon.
Amazo n, Alexa and a ll relat ed logos are t rademar ks of Amazo n.com, Inc . or its af liates.
Google Home is a trademark of Google Inc.
The ROB ART logo i s a regist ered tra demark of R obart Gmb H.
Page 6
6
• Utilize SmartWall™ Technology to create barriers and boundaries
• Connect to your Amazon Alexa* or Google Home Assistant* products
• View your floor plan and see where I’ve cleaned
• Allow you to easily create a schedule by day, time and room
THE HOOVER HOME APP
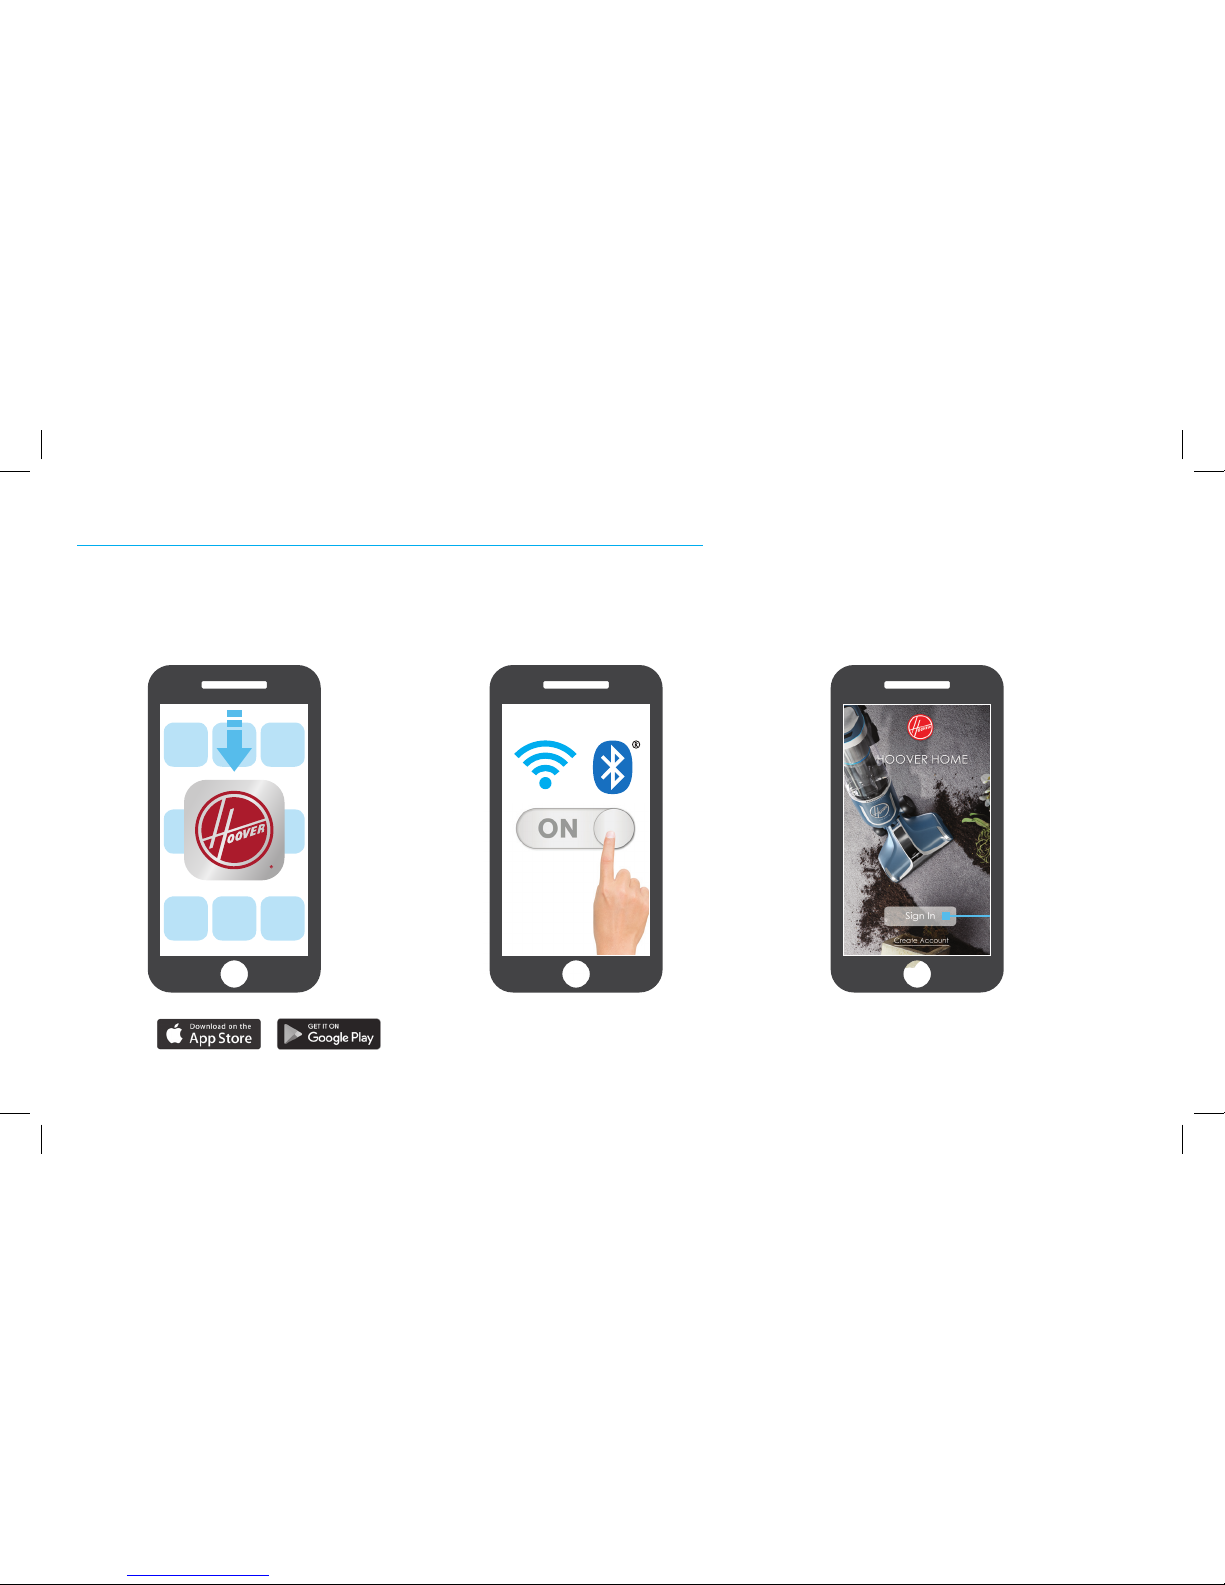
Why download my App?
Make sure your device’s Wi-Fi and
Bluetooth are ON.
NOTE: I only work on 2.4GHz networks so make sure you aren’t on a 5GHz.
Most routers will broadcast both so just switch on over to the 2.4GHz.
21
Open the Hoover Home App and
create an account.
3
Apple, the Apple logo, and iPhone are trademarks
of Apple In c., regi stered in t he U.S. and o ther
countri es. App St ore is a ser vice mar k of Apple I nc.,
regist ered in the U .S. and oth er countr ies.
Google Play and Google Play logo are trademarks
of Google Inc.
Download the Hoover Home App
• Start, stop and control me right from your device
• Receive push notifications directly from me, so I can keep you updated on all missions
• Access support materials if I’m in trouble
• Stay up-to-date on the latest firmware to ensure I’m operating at my best
The Bluetooth® word mark and logos are registered trademarks owned by Bluetooth SIG, Inc. and any use of such marks by
TTI Floorcare NA is under license. Other trademarks and trade names are those of their respective owners.”
Page 7
7
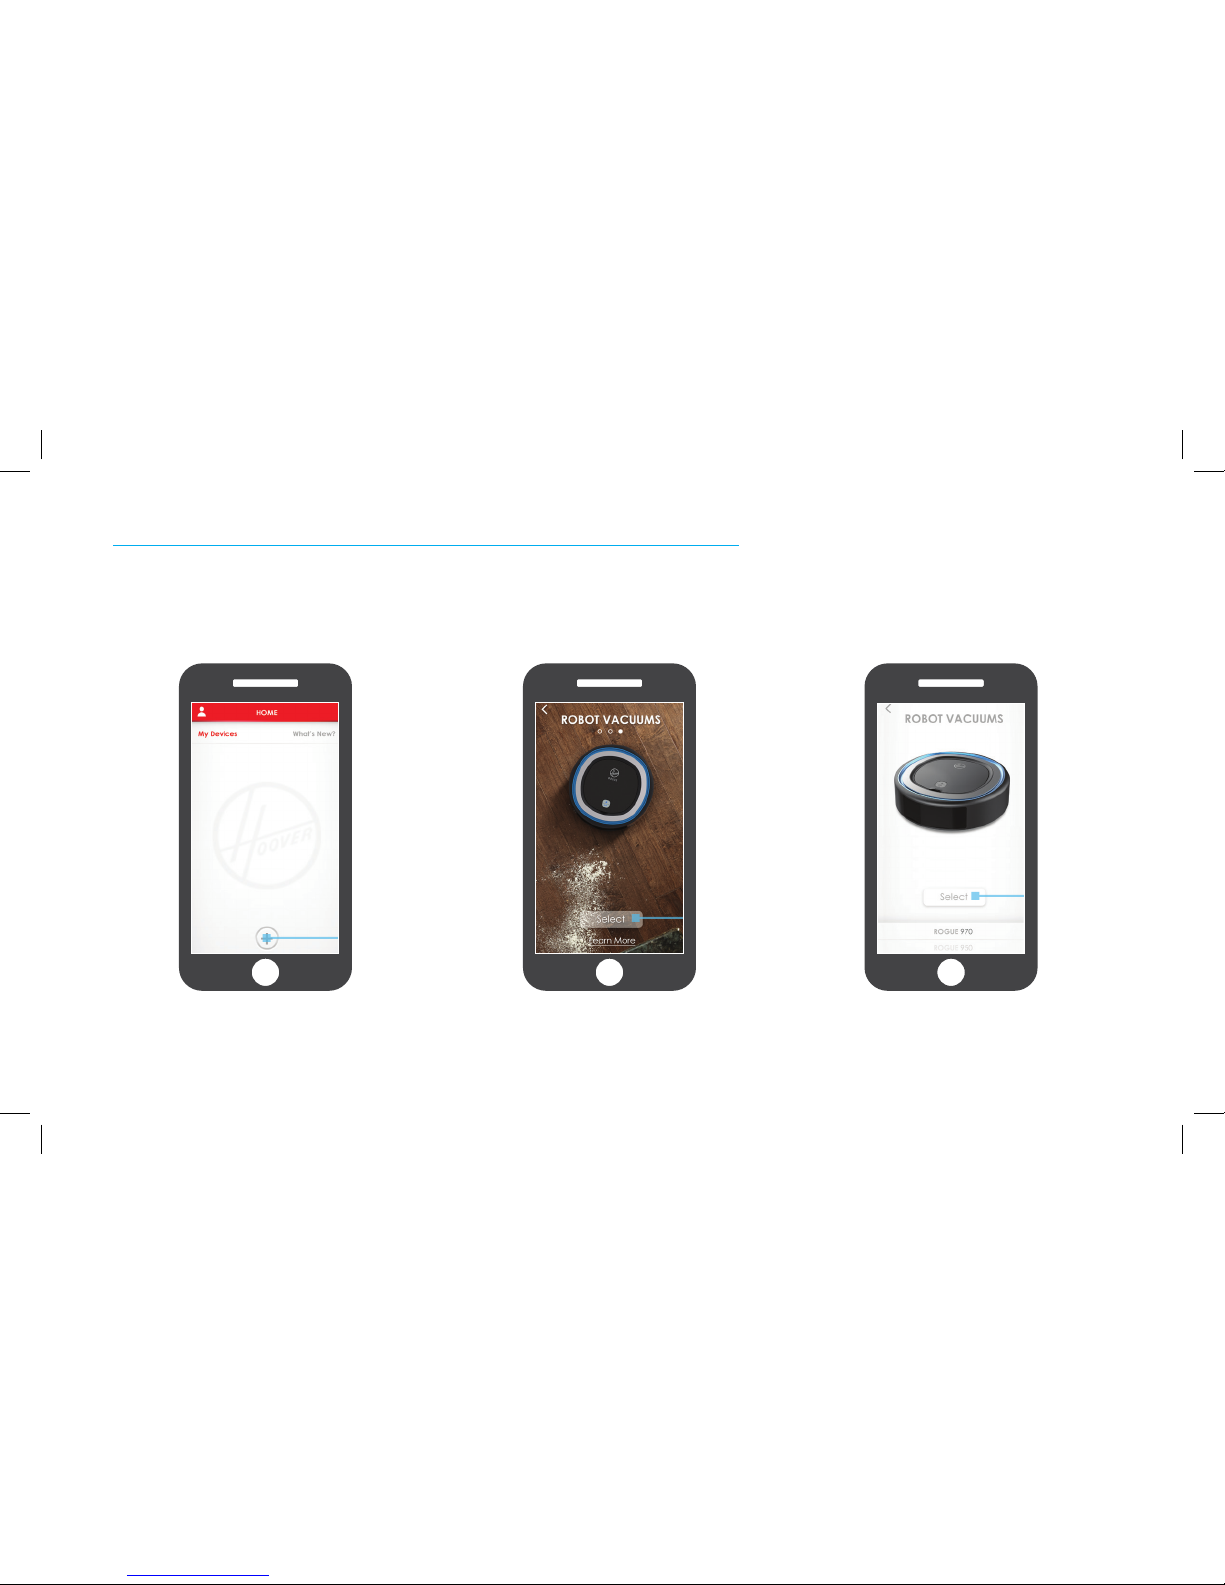
THE HOOVER HOME APP
After you create your account,
press “Add Device”.
Swipe until you reach ROBOT
VACUUMS, then press “Select”.
Scroll until you find your model
and then follow the guided on
screen set up.
4 5 6
Page 8
8
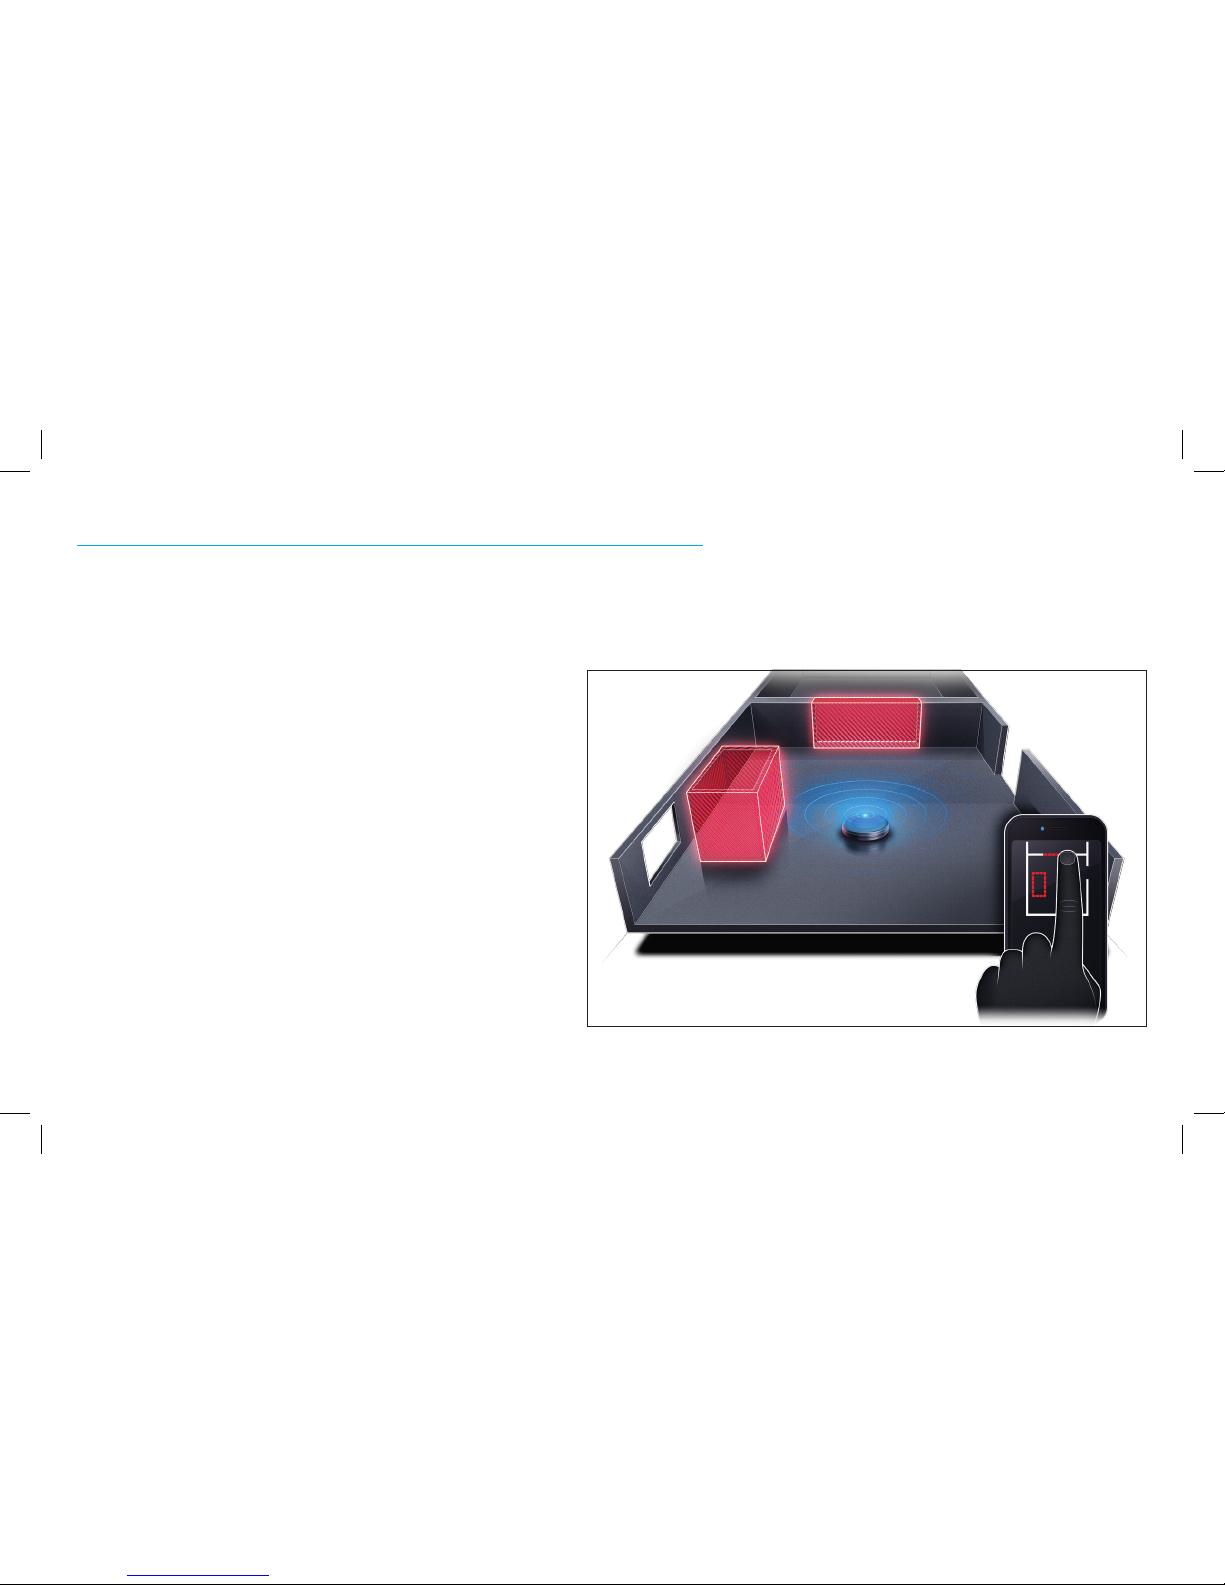
THE HOOVER HOME APP: SMARTWALL™ TECHNOLOGY
I understand you might not want me in certain areas or rooms, so use SmartWall™ Technology in the Hoover Home App to create
boundaries and barriers that I won’t cross.
If you have not downloaded the Hoover Home App, please go to page 8 for instructions on how to get connected. Before attempting to use SmartWall™ Technology,
please allow Rogue™ to complete the Recon Mode to explore its surroundings and map your floor plan.
• Mark entire rooms as off-limits.
• Mark areas within rooms as off-limits (I want to avoid the dog bowl
just as much as you do).
Why use SmartWall™ Technology?
Visit Hoover.com for a SmartWall™ Technology tutorial.
Page 9
9
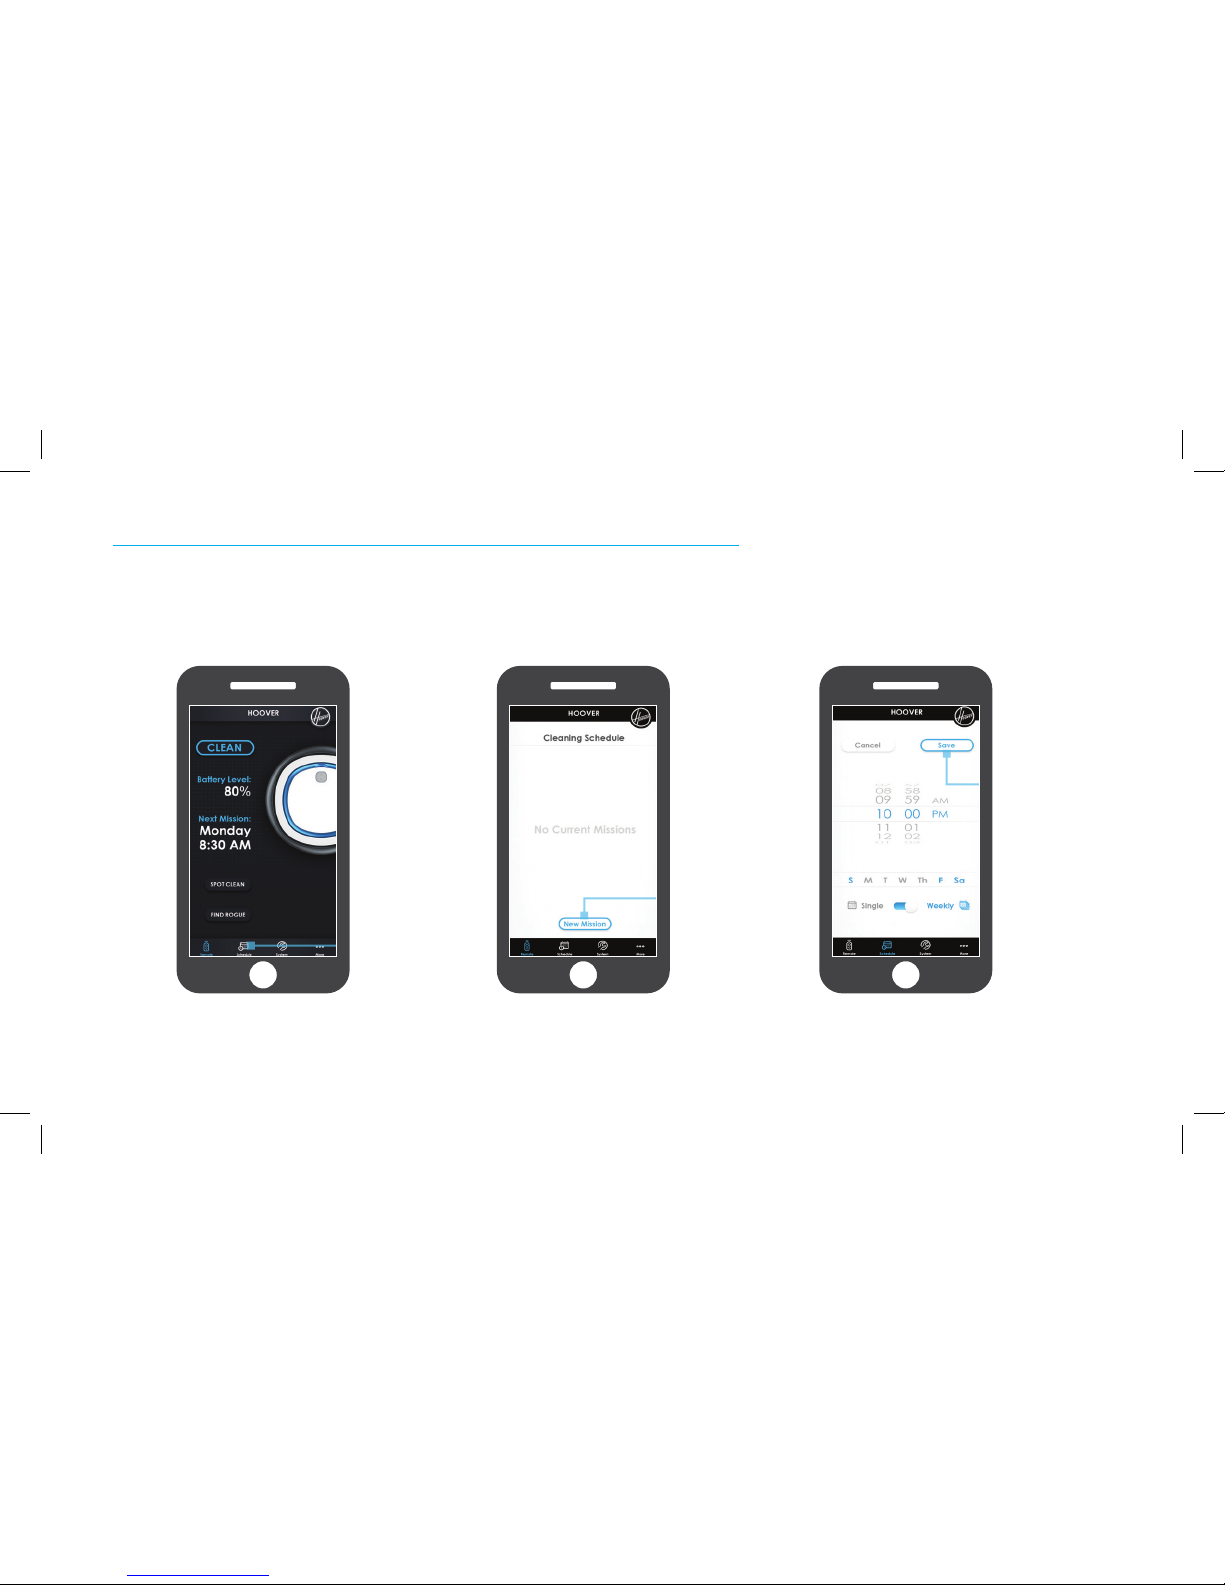
THE HOOVER HOME APP: SCHEDULING
Want to plan my cleaning missions ahead of time? You can schedule me by day, time and room in the Hoover Home App.
If you have not downloaded the Hoover Home App, please go to page 8 for instructions on how to get connected. In order to schedule by room, you must have a floor plan
established and zones created. Please let Rogue™ run its Recon Mode to map your floor plan before attempting to schedule by room.
Select the time and day and press
SAVE. If you would like to repeat
scheduled cleaning, toggle from
SINGLE to WEEKLY and press SAVE.
To create a schedule, press the
ADD button.
Open the Hoover Home App and
select the schedule icon.
1 2 3
Page 10
10
THE HOOVER HOME APP: SCHEDULING
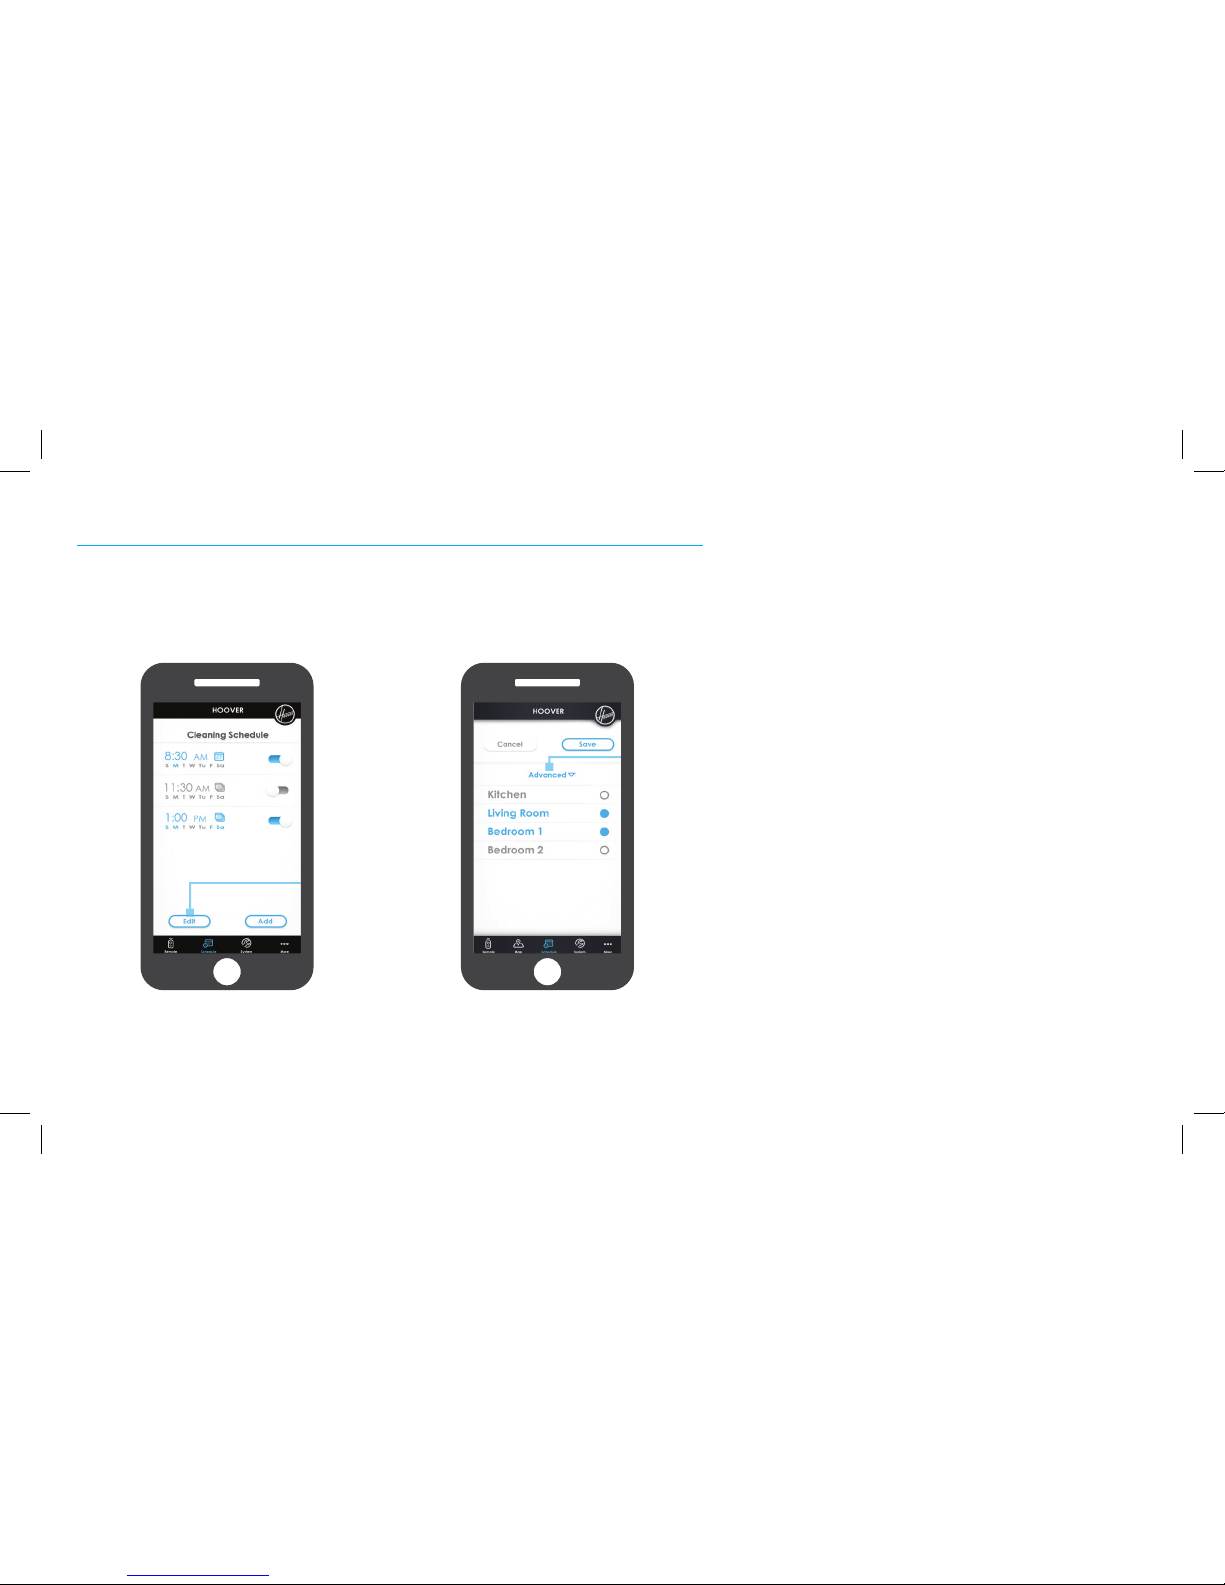
To edit or delete a scheduled
cleaning, press the EDIT button.
To schedule by room, press the
Advanced schedule option and follow
the instructions on the screen.
4 5
Page 11
11
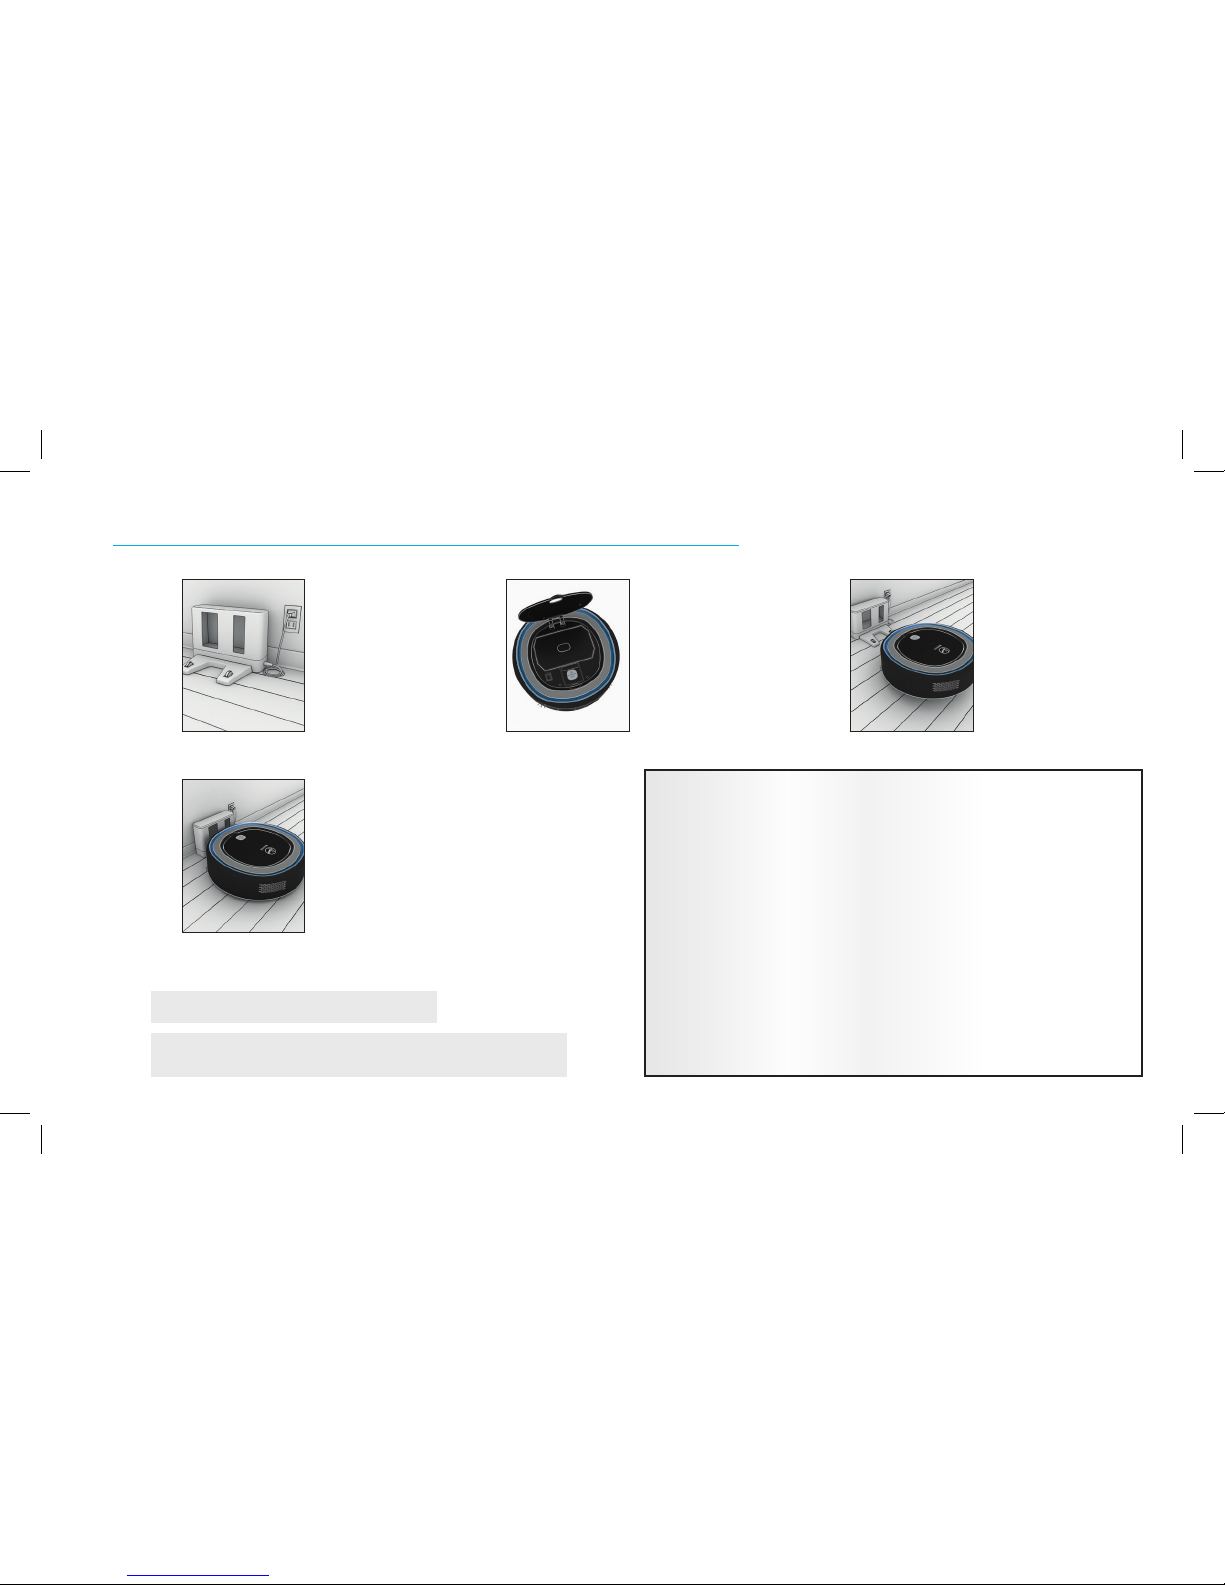
OPERATING ROGUE™: CHARGING
To power me ON, open my lid
and flip the power switch.
I only need about 3 hours to fully
charge (impressive, right?). When
I’m ready to go, my charging light
will stop flashing.
Find a good spot for my
base. I would prefer to
have 4 ft. on each side.
Plug in the AC adaptor to
the side of the dock and
into a wall outlet.
1 2
4
To make sure I’m charged
and ready to clean, manually
place me on my base. I’ll
flash my charging light and
give a beep to let you know
I’m aligned correctly.
3
NOTE: I arrive with limited battery life (traveling can be exhausting). To get the
most out of my first clean, I recommend charging me for approximately 3 hours.
TIP: I perform best if my base is set up on hard floor.
Follow all charging instructions and do not charge the battery pack or appliance
outside of the temperature range specified in the instructions. Charging
improperly or at temperatures outside of the specified range may damage the
battery and increase the risk of fire.
Have servicing performed by a qualified repair person using only identical
replacement parts. This will ensure that the safety of the product is maintained.
Do not modify or attempt to repair the appliance or the battery pack (as
applicable) except as indicated in the instructions for use and care.
If the device is not in use for an extended period, charge the battery fully and store it
in a cool and dry place to protect the battery from any potential damage.
Do not use outdoors or on wet surfaces.
! IMPORTANT !
Page 12
12
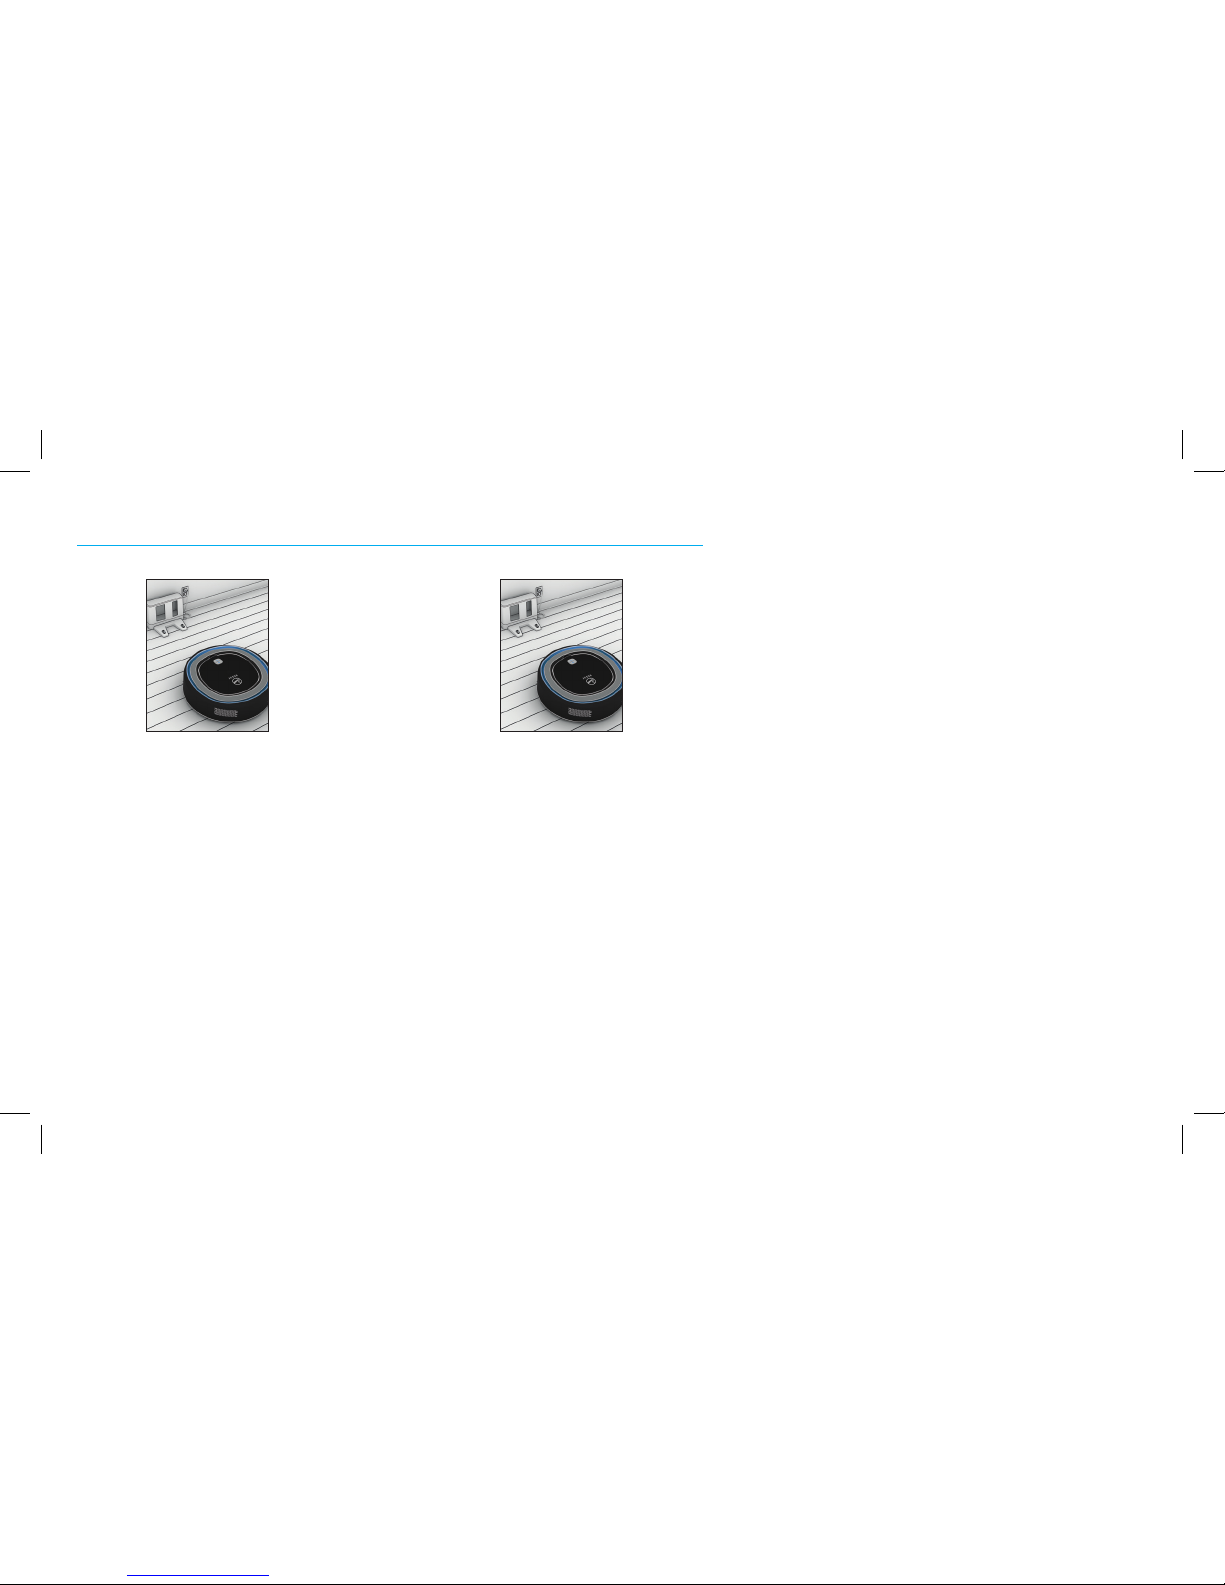
OPERATING ROGUE™: CHARGING
If I didn’t complete my
cleaning mission before my
battery ran out, no worries!
Once I am charged, I will
automatically go back out
to where I left off to finish
cleaning.
After I complete cleaning
missions, I will automatically
make my way back to the
base to recharge.
5 6
Page 13

13
OPERATING ROGUE™: CLEANING
When you’re ready to send me on a
cleaning mission, press the button.
I’ll beep and start up to let you know I’ve
accepted the mission.
If you want me to take a break or pause
mid-cleaning, press the button again.
If you want me to terminate the cleaning
mission completely, press my button and
I’ll start traveling back to my base.
NOTE: For hands-free control, download the Hoover Home App to control Rogue™ from anywhere.
FIRST CLEANING MISSION
During my first mission, I will go into Recon Mode and explore my new surroundings. Once I’m done with my Recon and mapping, I’ll head back to my
base. Download the Hoover Home App to see your floor plan or press to send me out on a mission to clean your mapped home.
Page 14
14
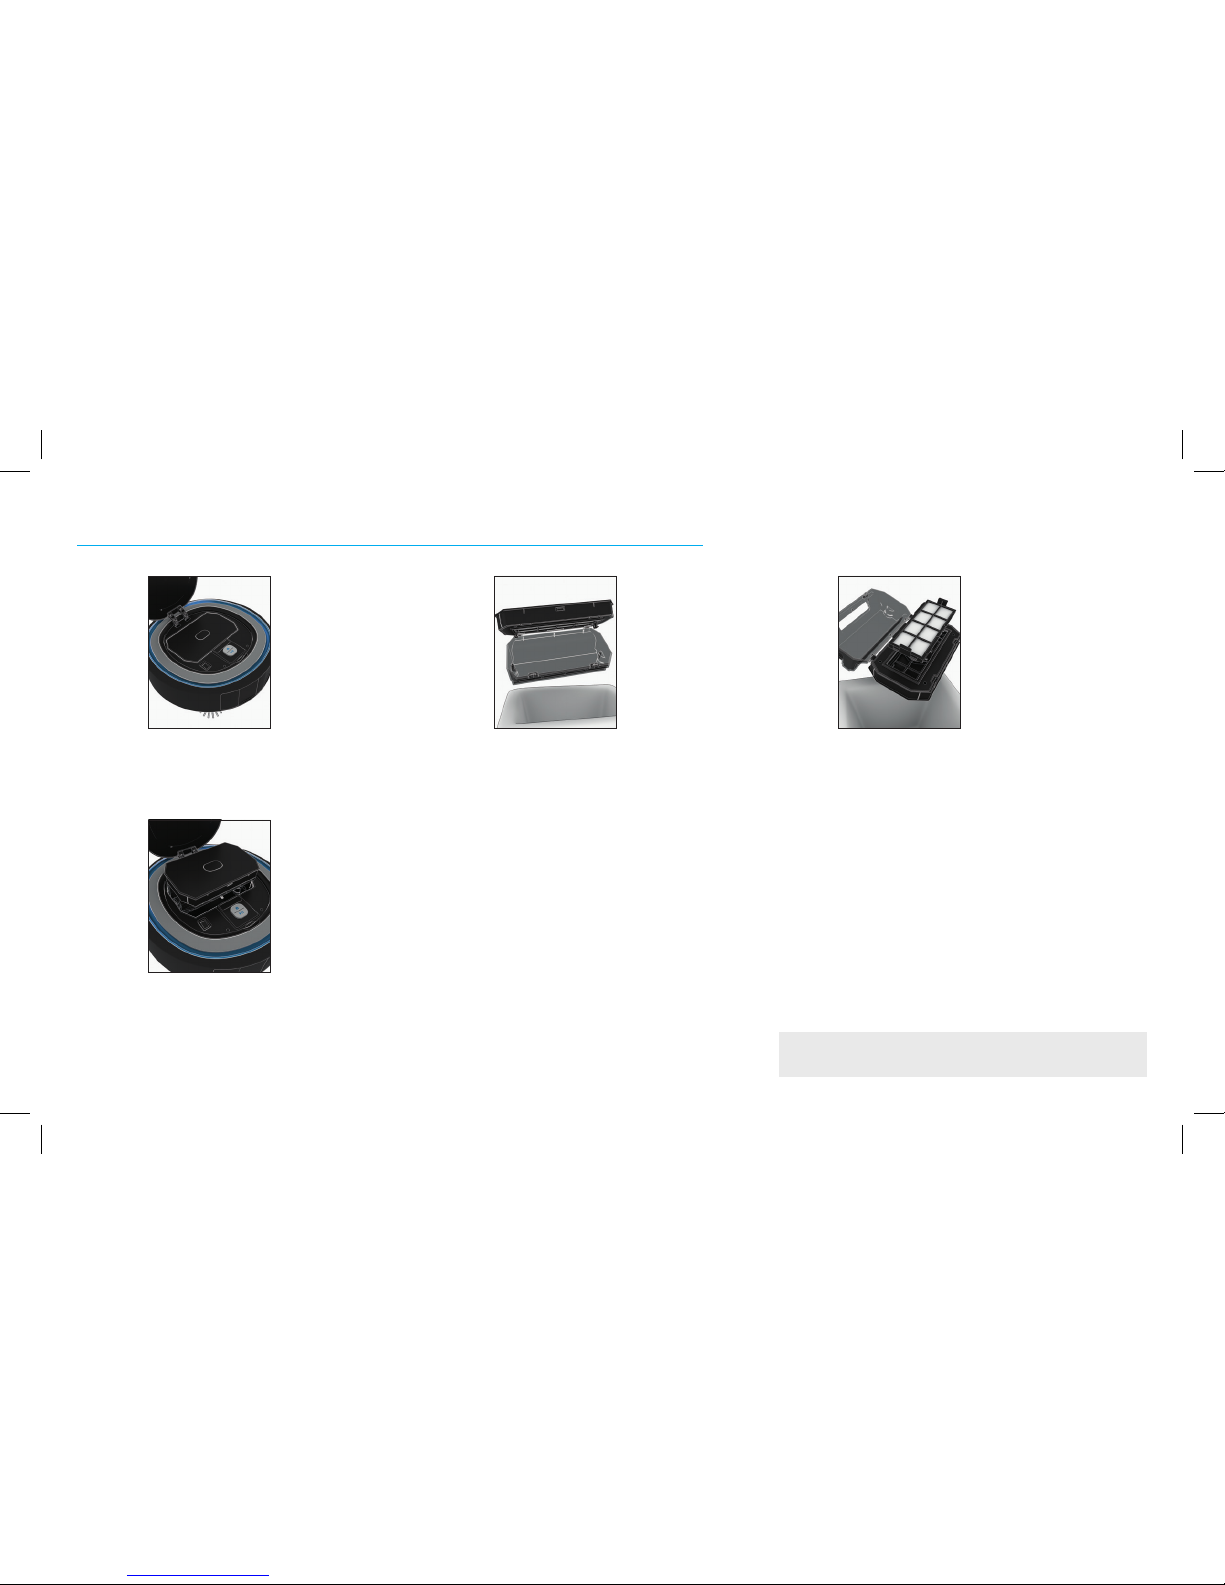
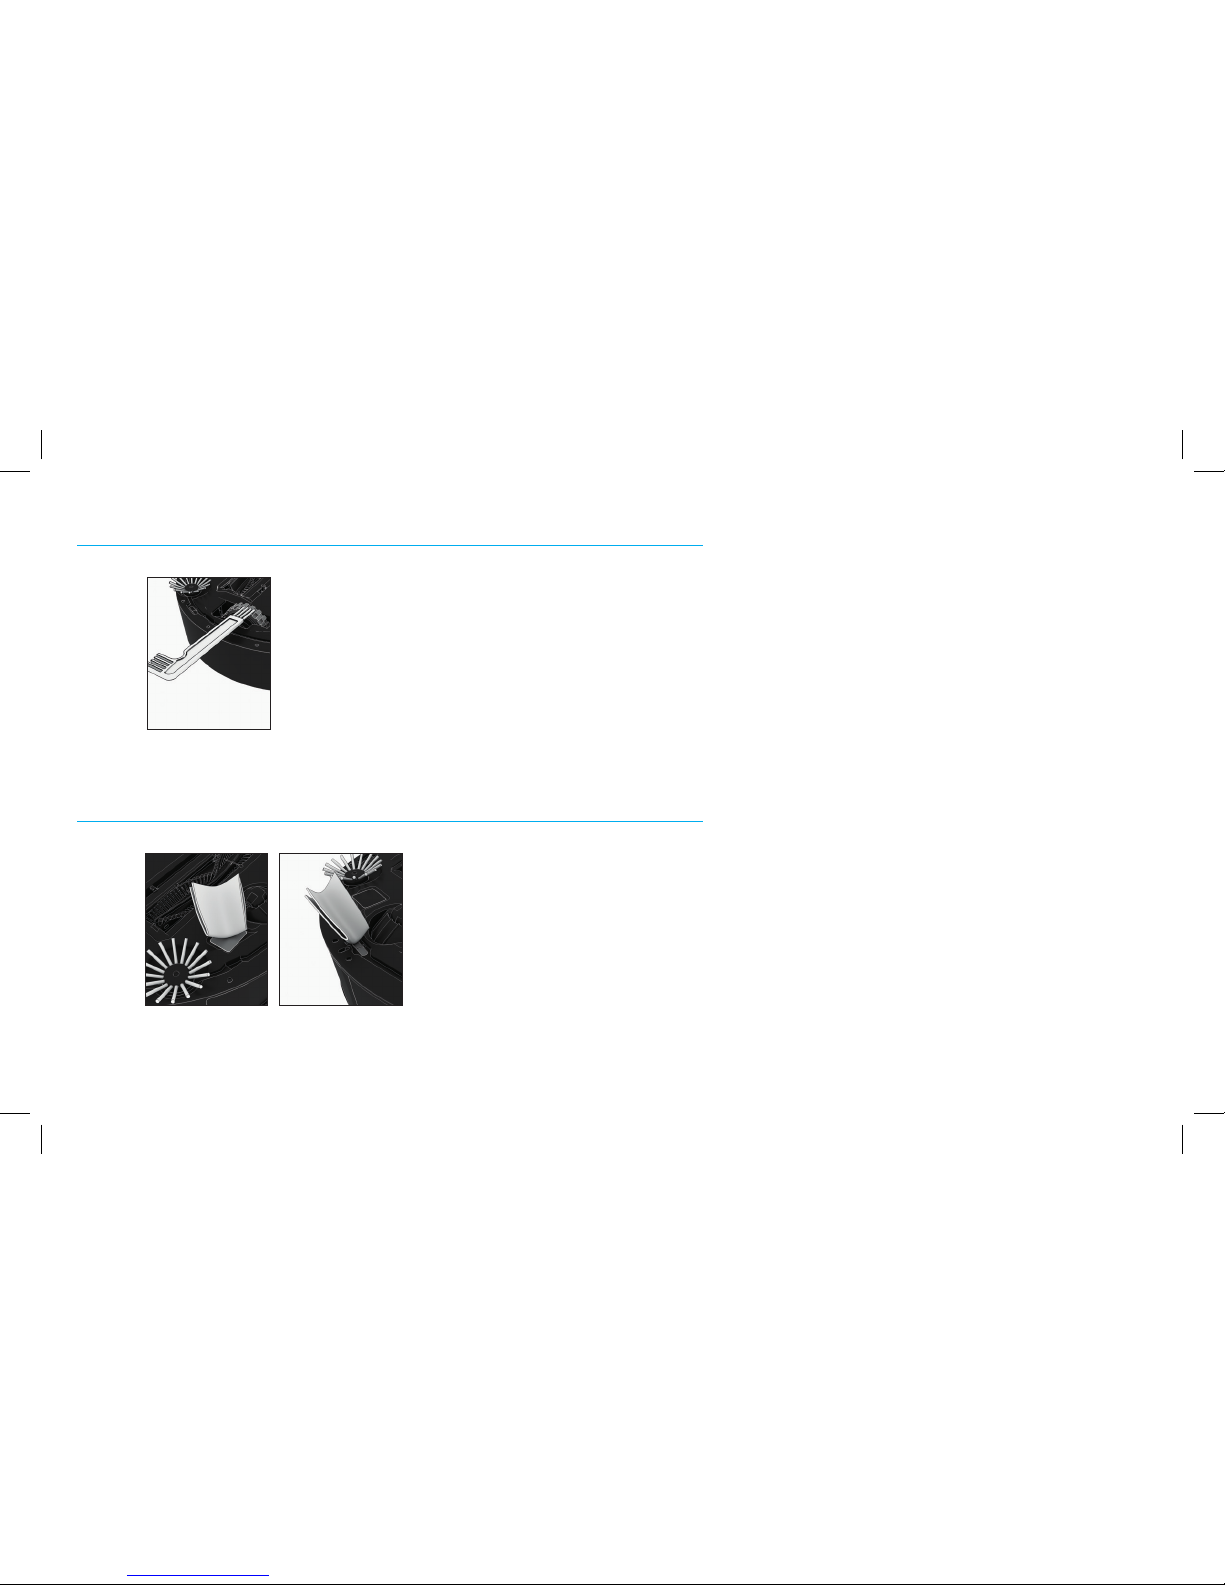
MAINTAINING ROGUE™: EMPTYING THE DIRT CUP
Lift the lid upwards and
remove all the dirt inside.
I would prefer you did this
after every cleaning mission.
After you've emptied the dirt
cup and cleaned the filter,
reinsert into Rogue™ and
firmly snap into place.
Lift my lid and push the
button in the center to
access my dirt cup (the dirt
cup is that square container
filled with all the dirt, dust
and pet hair I just picked up
for you).
1 2
4
My filter is attached to the
inside of the dirt cup, this
should be cleaned too. You can
pull the tabs on the side of the
filter to remove - the filter is
rinsable to ensure extended
filter life.
NOTE: Please ensure the filter
is completely dry before
reinserting into Rogue™.
3
To purchase additional filters, visit Hoover.com or Hoover.ca
Page 15
15
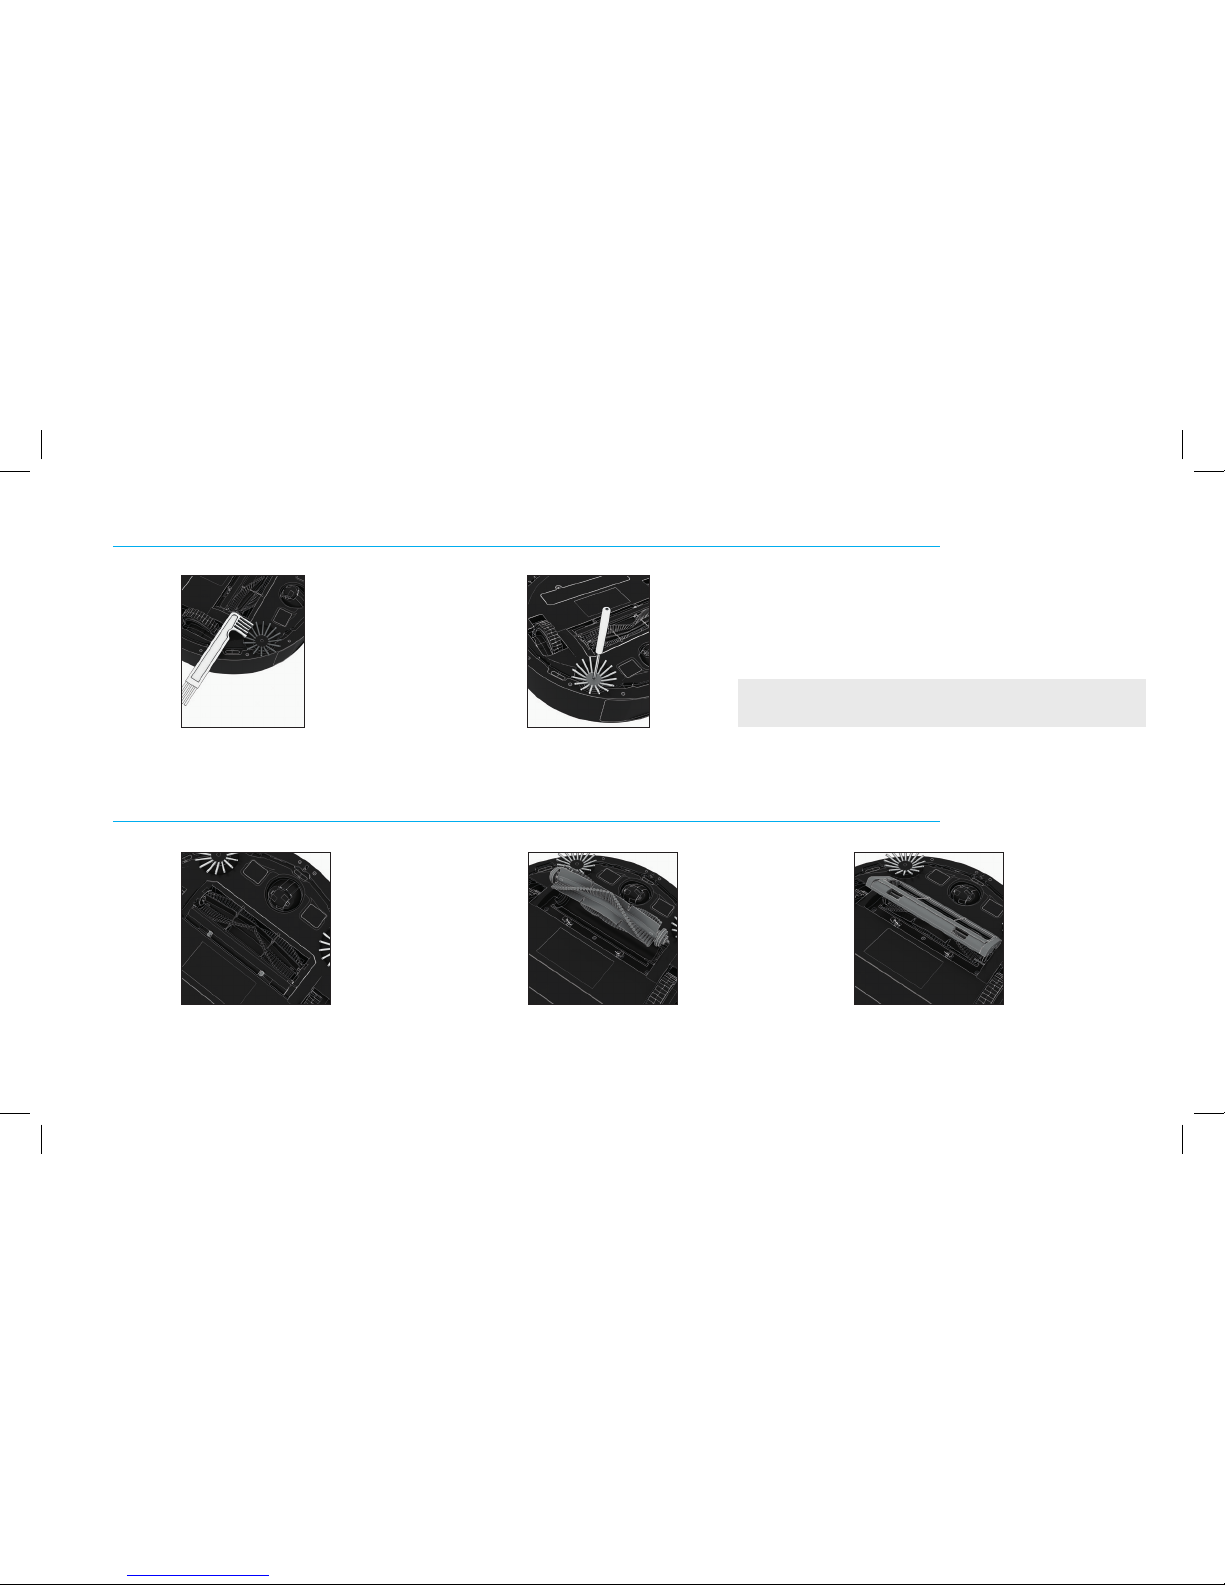
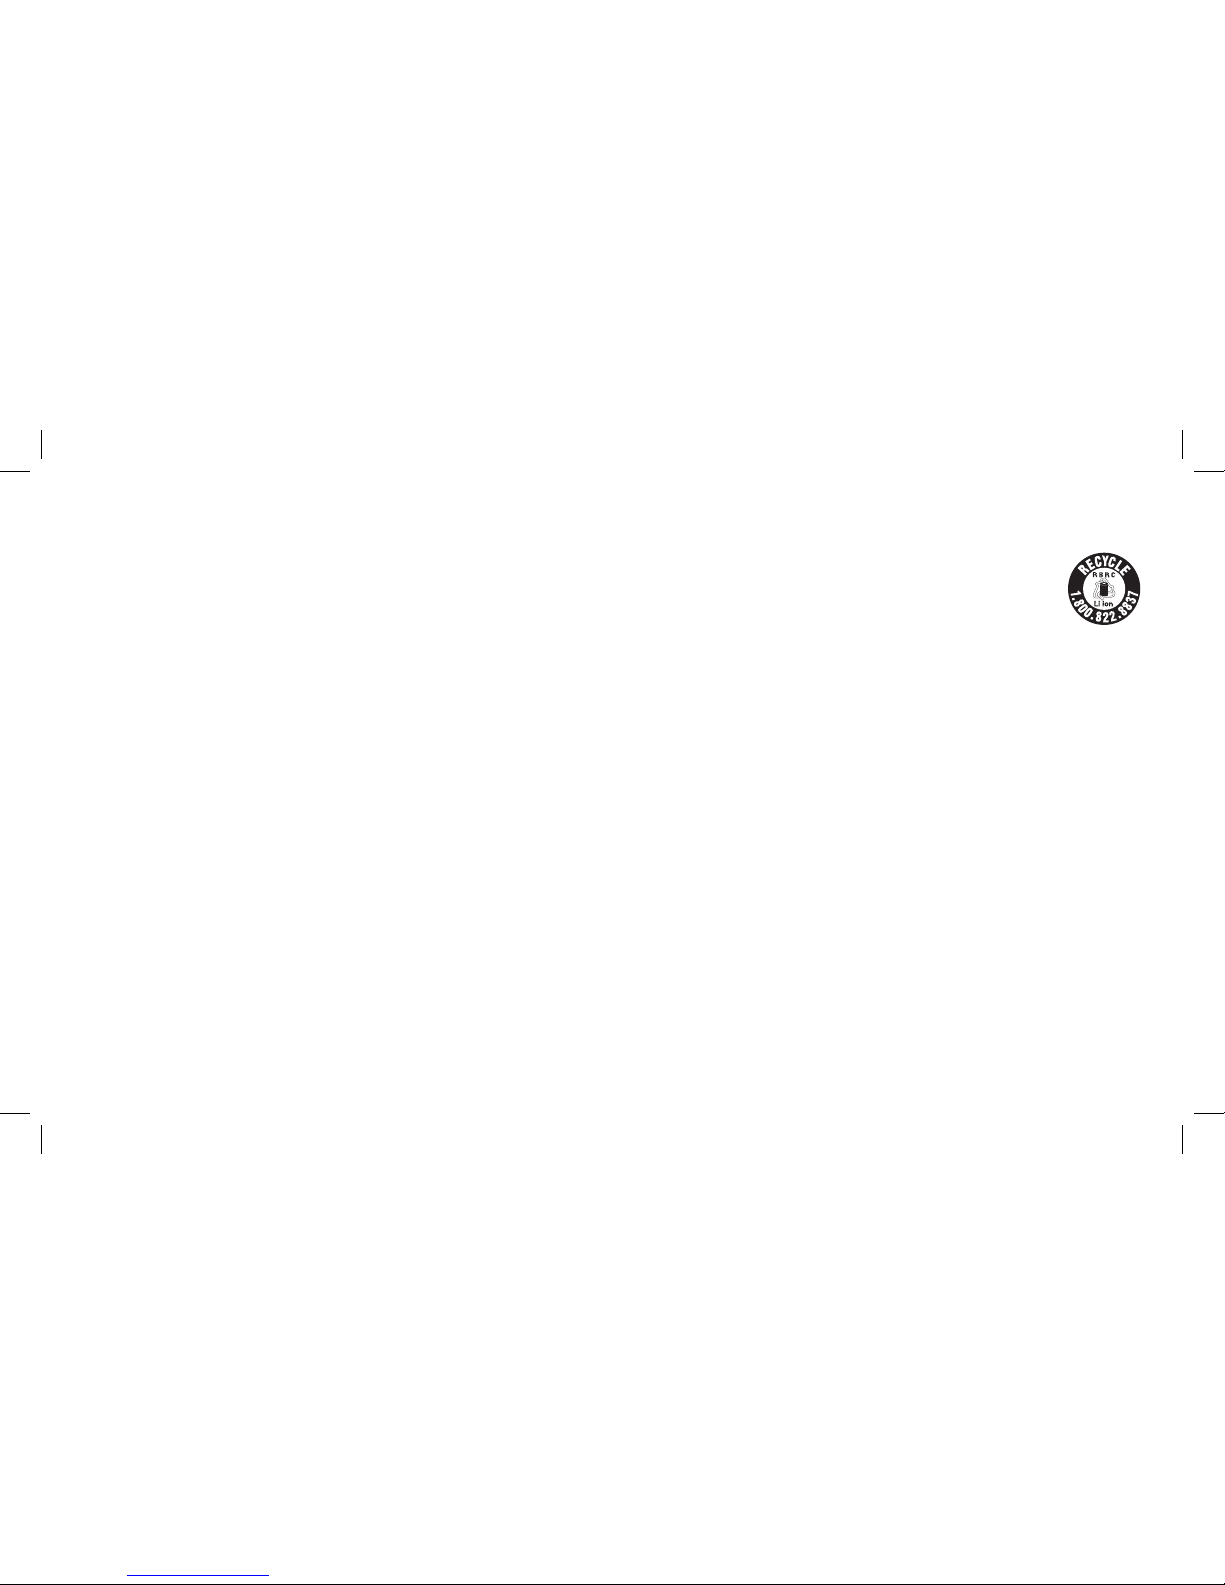
MAINTAINING ROGUE™: CLEANING/CHANGING THE SIDE BRUSHES
MAINTAINING ROGUE
™
: CLEANING/CHANGING THE BRUSH ROLL
To change my side brushes,
use a Philips head screwdriver
to unscrew the screw in the
middle of my side brush. Be
careful it’s small and easy
to lose.
Remove any dirt, dust
and pet hair from my side
brush with the cleaning
tool provided.
21
Press the two blue tabs to
remove my brush roll cover.
Lift out my brush roll to
clean it or replace it.
1 2
Replace the cover by
snapping it back into
place.
3
To purchase additional side brushes, visit Hoover.com or Hoover.ca
Page 16
16
MAINTAINING ROGUE™: CLEANING THE WHEELS
MAINTAINING ROGUE
™
: CLEANING THE SENSORS
Clean my wheels regularly
to remove any dirt, dust and
pet hair by using the cleaning
tool I came with. Please do
this so I can move effectively
on my cleaning missions.
1
Use a clean, dry cloth to clean
my sensors. This ensures I
continue to run smoothly by
being able to see.
1
Page 17

17
The Problem The Cause The Action
Erro r - Cliff S ensor
Cliff sensor is covered with dirt.
Rogue
™
is stuck at a drop-off.
See page 18 for instructions on cleaning the sensors.
Move Rogue™ to another location.
Erro r - Main brush
Brush roll is stuck or not spinning properly. Clean the brush roll of any dirt, lint or hair. See page 14 for instruc tions.
Erro r - Suction m otor
There is something blocking the suction path. Remove brush roll and dirt cup (see pages 13 & 14 for instruct ions) and remove any obstr uctions.
Erro r - Critic ally low ba tter y
Battery is too low and unable to return to dock ing station to recharge. Manually place Rogue
™
on the docking station to char ge. See page 10 f or instructions.
Erro r - Wheel st uck
Wheel is stuck or not spinning properly. Clean the wheels of any dirt, lint or hair. See page 18 for instructions.
Erro r - No Dust bin
Dirt cup is not installed or is installed incorrectly. See page 16 for instructions.
Erro r - Unit picke d up
Rogue
™
is lifted off the ground or the wheel is elevated excessively.
Place unit back on the ground properly.
Erro r - Side brush s tuck
Side brush is stuck or not spinning properly. Clean the side brush off of any dirt, lint or hair. See page 14 for instr uctions.
Error - Electrical disconnection
Internal software connection was lost. Factory reset. See page 20 for instructions.
Erro r - Firmwar e update f ailure
Connection was lost. Ensure stable Wi-F i connec tion and r edownload the rmwar e from the Hoover Home App.
Erro r - Wi-Fi chip f ailure
Can’t establish a connection. Ensure Wi-Fi router is broadcasting 2.4Ghz (not 5Ghz).
Erro r - Robot st uck error
Rogue
™
is stuck. Manually move Rogue™.
Erro r - Bumper err or
Something is obstructing the bumper. Remove any obstruction in the bumper.
TROUBLESHOOTING
Am I causing trouble?
Visit Hoover.com for FAQs and additional troubleshooting.
Page 18

18
FACTORY RESET
Sometimes I might just need a hard reset. If nothing on the last page works to solve my issues, follow these instructions
to reset. Be warned, this is a factory reset so it will erase everything!
• Press button and hold for 10 seconds.
• All indicator lights will shut off for 1-2 seconds.
• Rogue™ will then reboot and all indicator lights will illuminate.
Page 19

19
IMPORTANT SAFETY INSTRUCTIONS
SAVE THESE INSTRUCTIONS
When using an electrical appliance, basic precautions should always be followed,
including the following:
READ ALL INSTRUCTIONS BEFORE USING THIS APPLIANCE. THIS PRODUCT IS INTENDED FOR
HOUSEHOLD USE ONLY. IF USED COMMERCIALLY WARRANTY IS VOID.
WARNING: TO REDUCE THE RISK OF FIRE,
ELECTRIC SHOCK, DAMAGE OR INJURY:
• Use appliances only with specifically designated battery packs.
• Use of any other battery packs may create a risk of injury and fire.
• When battery pack is not in use, keep it away from other metal objects,
like paper clips, coins, keys, nails, screws or other small metal objects,
that can make a connection from one terminal to another. Shorting the
• battery terminals together may cause burns or a fire.
• Do not expose a battery pack or appliance to fire or excessive temperature.
Exposure to fire or temperature above 130°C may cause explosion. The
temperature of 130°C can be replaced by the temperature of 265°F.
• Follow all charging instructions and do not charge the battery pack or
appliance outside of the temperature range specified in the instructions.
• Charging improperly or at temperatures outside of the specified range may
damage the battery and increase the risk of fire.
• Have servicing performed by a qualified repair person using only identical
replacement parts. This will ensure that the safety of the product is
maintained.
• Do not modify or attempt to repair the appliance or the battery pack (as
applicable) except as indicated in the instructions for use and care.
• Fully assemble before operating.
• The charger is for indoor use only.
• Do not allow to be used as a toy. Not intended for use by children age 12
and under. Close supervision is necessary when used near children. To
avoid injury or damage, keep children away from product, and do not allow
children to place fingers or other objects into any openings.
• Use only as described in this manual. Use only Hoover
®
recommended
attachments and products.
• Do not use charger with damaged cord or plug. If appliance or charger is not
working as it should, has been dropped, damaged, left outdoors, or dropped
into water, take it to a service center prior to continuing use.
• Do not pull or carry charger by cord, use cord as a handle, close a door on
cord, or pull cord around sharp edges or corners. Do not place product on
cord. Do not run appliance over cord. Keep cord away from heated surfaces.
• Do not unplug charger by pulling on cord. To unplug charger, grasp the plug,
not the cord.
Page 20

20
• Do not handle charger including charger plug and charger terminals, or
appliance with wet hands.
• Do not put any object into openings. Do not use with any opening blocked; keep
free of dust, lint, hair, and anything that may reduce air flow.
• Keep hair, loose clothing, fingers, and all parts of body away from openings
and moving parts.
• Do not place cleaner on stairs or furniture, as it may result in injury
or damage.
• Do not use to pick up flammable or combustible liquids, such as gasoline, or
fine wood shavings, or use in areas where they may be present.
• Do not pick up anything that is burning or smoking, such as cigarettes,
matches, or hot ashes.
• Do not use without Dirt Cup and Filters in place.
• Turn power switch off before removing or installing brush roll.
• Do not incinerate the charger, battery, or appliance even if it is severely
damaged. The batteries can explode in a fire.
• This product includes rechargeable Lithium Ion batteries. Do not expose
batteries to high temperatures, as they may catch fire and/or explode. Do not
dispose of battery in a fire or trash compactor. See battery disposal section for
directions.
• Do not attempt to disassemble battery.
• Leaks from battery cells can occur under extreme conditions. If any liquid gets
on the skin wash quickly with soap and water. If any liquid gets into the eyes,
do not rub eyes, immediately flush them with clean water continuously for a
minimum of 15 minutes. Seek medical attention immediately.
• Use only the charger (part #440011974) supplied by Hoover
®
to recharge.
• Do not touch or insert objects into battery pack or charger terminals.
• Do not attempt to short circuit the battery or charger terminals.
• Place the cords from other appliances out of the area to be cleaned.
• Do not operate the vacuum in a room where an infant or child is sleeping.
• Do not operate the vacuum in an area where there are lit candles or fragile
objects on the floor to be cleaned.
• Do not operate the vacuum in a room that has lit candles on furniture that the
vacuum may accidentally hit or bump into.
• Do not allow children to sit on vacuum.
WARNING: TO REDUCE THE RISK OF ELECTRIC SHOCK, THE
CHARGER HAS A POLARIZED PLUG (ONE BLADE IS WIDER THAN THE
OTHER). THIS PLUG WILL FIT IN A POLARIZED OUTLET ONLY ONE
WAY. IF THE PLUG DOES NOT FULLY FIT IN THE OUTLET, REVERSE
THE PLUG. IF IT STILL DOES NOT FIT, CONTACT A QUALIFIED
ELECTRICIAN TO INSTALL THE PROPER OUTLET. DO NOT CHANGE THE
PLUG IN ANY WAY.
WARNING: This product contains chemicals known to the State
of California to cause cancer, birth defects or reproductive harm. WASH
HANDS AFTER HANDLING.
Page 21
21
• Avoid picking up hard, sharp objects with this product, as they may cause damage.
• Store appropriately indoors in a dry place. Do not expose machine to freezing
temperatures. This product includes rechargeable Lithium Ion Batteries. Do not expose
batteries to high temperatures, as they may catch re and/or explode.
• With brush roll on, do not allow cleaner to sit in one location for an extended period of
time, as damage to oor can result.
BEFORE USE
WARNING:
Ensure that no children or pets are in the room or have access to
the room to be cleaned to avoid risk of injury.
CAUTION: To avoid risk of damage, put away fragile objects, loose cords and
small objects that could topple over.
• To avoid damage to the oor, put away any pointed or sharp objects that could get
under the robot and scratch the oor surface.
• Your robot is designed to take up small quantities of dirt and does not replace an
upright vacuum cleaner. Use Rogue
™
regularly to help reduce your weekly vacuuming
time.
• Rogue
™
cleans hard oor and low pile carpet. It is not recommended for use on high
pile carpet.
• Dark colored carpets or objects may trigger Rogue’s
™
sensors, so it may not vacuum
on or around them.
ROBOT BATTERY DISPOSAL
• To preserve natural resources please recycle or dispose of
expired battery pack properly. This product contains Lithium Ion
Battery must be disposed of properly. Local, state, or federal law
may prohibit disposal of Lithium Ion batteries in ordinary trash.
• Consult your local waste authority for information regarding
available recycling and/or disposal options. For disposal information,
call The Rechargeable Recycling Corporation at 1-800-3-BATTERY.
WARNING: Upon removal of cover battery pack terminals with heavy
duty adhesive tape. Do not attempt to destroy or disassemble battery pack or
remove any of it’s components. Lithium Ion Batteries must be recycled or disposed
of properly. Also, never touch both terminals with metal objects or vacuum parts
as short circuit may result. Keep vacuum parts away from children. Failure to
comply with these warnings could result in re and/or serious injury.
Page 22

22
SERVICE & WARRANTY
BATTERY SERVICE INFORMATION
ANY SERVICING SHOULD BE DONE BY A N AUTHORIZED SERVICE REPRESENTATIVE
Call 1-877-897-2050 USA & Canada
In the event that further assistance is required, visit an authorized service center. Find one nearest you by
visiting our website at www.hoover.com. Costs of any transportation to and from any place of repair are
to be paid by the owner. Always identify your product by the model number and manufacturing code when
requesting information or ordering replacement parts. (The model number and manufacturing code for the
vacuum appears on the bottom and/or back of the product, and on the back of the battery and charger.)
LIMITED ONE YEAR WARRANTY (DOMESTIC USE)
WHAT T HIS WARRANTY COVERS: When used and maintained in normal household use and in accordance
with the Owner’s Guide, your Hoover
®
product and battery are warranted against original defects in
material and workmanship for a full year. During the Warranty Period, Hoover
®
will provide labor and
parts, at no cost to you, to correct any such defect in your products.
HOW TO M AKE A WARR ANTY CLAIM: If this product is not as warranted, take or send the product to a
Hoover
®
Authorized Warranty Service Dealer along with proof of purchase. If the batteries are not as
warranted, either take or send the batteries along with proof of purchase to a Hoover
®
authorized dealer
or contact Hoover
®
Services at 1-877-897-2050.
For an automated referral to authorized service outlets in the U.S.A., phone 1-877-897-2050 or visit
Hoover
®
online at www.hoover.com.
WHAT T HIS WARRANTY DOES NOT CO VER: This warranty does not cover belts, lters and brush rolls, use of
the product in a commercial operation (such as maid, janitorial and equipment rental services), improper
maintenance of the product, damage due to misuse, acts of God, nature, vandalism or other acts beyond
the control of Hoover
®
, owner’s acts or omissions, use outside the country in which the product was
initially purchase and resales of the product by the original owner. This warranty does not cover pick up,
delivery, transportation or house calls. However, if you mail your product to a Hoover
®
Sale s and Service
Center for warranty service, cost of shipping will be paid one way. Please call Hoover
®
Services, 1-877897-2050, on how to ship this product. This warranty does not apply to products purchased outside the
United States, including its territories and possessions, a U.S. Military Exchange and Canada.
OTHER IMPORTANT TERMS: This warranty is not transferable and may not be assigned. This warranty shall
be governed and construed under the laws of the state of Ohio. The Warranty Period will not be extended
by any replacement of batteries or parts or repair performed under this warranty.
THIS WARRAN TY IS THE EXCLUSIVE WARRANTY AND REMEDY ALL OTHER WARRANTIES, EXPRESSED
OR IMPLIED, INCLUDING WARRANTIES OF MERCHANTABIL ITY OR FITNESS FOR PARTICULAR PURPOSE,
ARE DISCLAIMED IN NO E VENT WIL L HOOVER BE LIABLE FOR ANY SPECIA L, INDIRECT, INCIDENTAL OR
CONSEQUENTIAL DAMAGES OF ANY KIND OR NATURE TO OWNER OR ANY PARTY CLAIMING THROUGH OWNER,
WHETHER BASED IN CONTRACT, NEGLIGENCE, TORT OR STRICT PRODUCTS LIABILITY OR ARISING FROM ANY
CAUSE WHATSOEVER.
Some states do not allow the exclusion of consequential damages, so the above exclusion may not apply
to you. This war rant y gives you specic right s; you may also have o thers that var y from st ate to st ate.
Page 23

23
DECLARATION OF CONFORMITY
This device c omplies with Par t 15 of the FCC Rules / Industr y Canada license-exempt RSS standard(s).
Operation is subject to the following two conditions: (1) this device may not cause harmful inteference,
and (2) this device must accept any interference received, including interference that may cause
undesired operation.
Under Industry Canada regulations, this radio transmitter may only operate using an antenna of a
type and maximum (or lesser) gain approved for the transmitter by industry Canada. To reduce
potential radio interference to other users, the antenna type and its gain should be chosen that
the equivalent isotropically radiated power (e.i.r.p.) is not more than that necessary for successful
communication.
MPE REMINDING
To satisfy FCC / IC RF exposure requirements, a separation distance of 20 cm or more should be
maintained between the antenna of this device and persons during device operation.
To ensure compliance, operations at closer than this distance is not recommended.
Changes or modi cati ons not ex pressly approved by the party responsible for compliance could
void the user’s authority to operate the equipment.
This equipment has been tested and found to comply with the limits for a Class B digital device, pursuant
to part 15 of the FCC Rules. These limits are designed to provide reasonable protection against harmful
interference in a residential installation. This equipment generated uses and can radiate radio frequency
energy and, if not installed and used in accordance with the instructions, may cause harmful interference
to radio communications. However, there is no guarantee that interference will not occur in a particular
installation. If this equipment does cause harmful interference to radio or television reception, which
can be determined by turning the equipment off and on, the user is encouraged to try to correct the
interference by one or more of the following measures:
• Reorient or relocated the receiving antenna.
• Increase the separation between the equipment and receiver.
• Connect the equipment into an outlet on a circuit different from that to which the receiver is connected.
• Consult the dealer or an experienced radio/TV technician for help.
Page 24

24
C'EST GARANTI!
Nettoyez en toute confiance pendant un (1) an grâce à la garantie limitée de HooverMD.
Enregistrez votre appareil RogueMC sur ::
Bonjour!
Je me nomme RogueMC.
Composez le 1-877-897-2050Visitez le Hoover.com ou Hoover.ca
Téléchargez l’application Hoover Home
Page 25

25
Table des matières
Contenu de la boîte ............................................................28
Au sujet de votre appareil Rogue
MC
..................................................29
Technologie ...........................................................31
L’application Hoover Home .......................................................32
Technologie SmartWall
MC
...................................................34
Horaire ..............................................................35
Fonctionnement de votre appareil Rogue
MC
............................................37
Recharge ............................................................37
Nettoyage ............................................................39
Entretien de votre appareil Rogue
MC
.................................................40
Vider le vide-poussière.....................................................40
Entretien du cylindre brosseur et de brosse latérale ....................................41
Nettoyage des capteurs et des roues.............................................42
Dépannage ..................................................................43
Réinitialisation aux paramètres d’usine ...........................................44
Consignes de sécurité importantes .................................................45
Page 26

26
Contenu de la boîte
Je suis un RogueMC et je suis équipé d'accessoires.
Aspirateur-robot Rogue
MC
Ma base (station d'accueil) Brosses latérales* Outil de nettoyage
*Les accessoires varient selon le modèle.
Page 27

27
Au sujet de votre appareil Rogue
MC
Vide-poussière et filtre
Retour de l'appareil Rogue
MC
à la base (station)
Bouton
MARCHE/ARRÊT
Couvercle de
l’appareil Rogue
MC
Centre de commandes
Rogue
MC
Technologie de capteurs de navigation Robart
MD
Captuer de chargement
Roues
Brosse latéral Brosse latéral
Commencer/arrêter le nettoyage
Vue du dessus Vue du dessus
Vue du dessous
Capteurs
d'escarpement
Rouleau-brosse
Batterie
Page 28

28
Au sujet de votre appareil Rogue
MC
Centre de commandes Rogue
MC
Ces icônes sont situées sur mon couvercle et s’allumeront dès que la fonction est activée.
Le symbole bleu du Wi-Fi s’allumera
dès que vous serez connecté à
l’application Hoover Home. Vous
n’êtes pas connecté si mon témoin
ne s’allume pas.
Pour configurer votre connexion,
consultez la page 32.
Le symbole blanc de la pile vous
permet de voir l’état du niveau de
charge de ma pile. Le niveau de
charge de la pile est suffisant si mon
témoin ne s’allume pas. Lorsqu’il
commence à clignoter, je retournerai
à ma base pour me charger.
Mon vide-poussière est plein lorsque
vous voyez ce symbole. Assurez-vous
de vider mon vide-poussière pour que
je puisse continuer à nettoyer. Le
témoin s’éteindra dès que vous aurez
vidé mon vide-poussière et appuyé
sur le bouton de .
J’ai un problème si vous voyez
clignoter ce symbole. Mon rouleaubrosse est peut-être simplement coincé
sur quelque chose ou il y a une erreur
interne.
Consultez la page 43 pour connaître les
erreurs les plus usuelles que je peux
rencontrer et savoir comment m’aider.
Connectivité Wi-Fi Batterie Le vide-poussière est plein. Erreur
Page 29

29
Au sujet de votre appareil Rogue
MC
Service d’intégration vocale
J'ai une bonne relation avec les applications Amazon Alexa* et Google Home
Assistant*. Vous pourrez communiquer avec moi avec un produit Amazon Alexa ou
l’assistant Google Home. Téléchargez les phrases-clés pour l’appareil sur le site
d’Amazon Alexa ou de l’application Google Home.
Technologie RobartMD avec navigation en mémoire
Parce que je suis intelligent, j'utilise un laser haute technologie pour
cartographier et naviguer dans votre maison. Je me souviens aussi du
plan de votre maison pour que vous puissiez personnaliser votre nettoyage
(consultez le chapitre « Technologie SmartWallMC » à la page 34.)
Technologie SmartWall
MC
Grâce à l’application Hoover Home, vous pourrez assigner les pièces et les
zones hors limites et vous n’aurez pas à me dire pourquoi.
*Amazon Alexa et Google Home Assistant vendus séparément.
REMARQUE: L'application Hoover Home App est requise pour interagir avec Amazon Alexa et Google
Home Assistant. Soyez à l'affût des nouvelles phrases-clés et des commandes offertes bientôt.
Amazo n, Alexa et t ous les logo s connexe s sont des mar ques dépos ées d'Amaz on.com, In c. ou de ses soc iétés af liées.
Google Home est une marque déposée de Google Inc.
Le logo ROBART est une marque déposée de Robart GmbH.
Page 30

30
• Utilisez la fonction SmartWallMC pour créer des limites et des frontières.
• Appariez vos produits avec Amazon Alexa* ou l’assistant Google Home*.
• Visualisez votre plan d’étage et voyez où je suis passé.
• Établissez facilement votre horaire selon le jour et l'heure
L'application Hoover Home
Pourquoi télécharger cette application?
Assurez-vous que le réseau Wi-Fi et
BluetoothMD de vos dispositifs sont activés.
REMARQUE: Je fonctionne uniquement sur des réseaux de 2,4 GHz, alors assurez-vous que vous n'êtes pas sur un
réseau de 5 GHz. La plupart des routeurs diffusent sur les deux bandes, alors passez sur la bande de 2,4 GHz.
21
Ouvrez l'application Hoover Home
et créer un compte.
3
Apple et le logo Apple sont des marques d'Apple
Inc., déposées aux États-Unis et dans d'autres pays.
App Store est une marque de service d'Apple Inc.
Google Pl ay et le log o de Google P lay sont de s
marques de commerce de Google Inc.
Téléchargez l’application Hoover Home
• Faites-moi commencer, arrêter ou contrôlez-moi à partir de votre dispositif.
• Recevez des notifications poussées que je vous envoie directement afin que vous
puissiez mettre toutes mes missions à jour.
• Accédez à une banque de solutions si je suis en difficulté.
• Restez informé au sujet des dernières versions du logiciel pour vous assurer que je
fonctionne au maximum de mes capacités.
La marque verbales et les logos Bluetooth
MD
sont des marques enregistrées détenues par Bluetooth
MD
SIG,In c. et leur u tilisa tion par T TI Floor care NA se f ait sous l icence.
Page 31

31
L'application Hoover Home
Après avoir créer votre compte,
appuyez sur « Ajouter un
dispositif ».
Glissez jusqu'à la page
ASPIRATEURS-ROBOTS puis
appuyez sur « Sélectionner ».
Déroulez le menu jusqu'à ce que vous
trouviez votre modèle et suivez les
fenêtres d'étapes pour effectuer votre
configuration.
4 5 6
Page 32

32
L'application Hoover Home : TECHNOLOGIE SMARTWALL
™
Je comprends que vous ne vouliez pas que je me retrouve dans certaines zones ou pièces, alors utilisez la fonction Technologie
SmartWall
MC
de l’application Hoover Home pour créer des limites et des frontières que je ne traverserai pas.
Consultez la page 32 pour connaître les instructions et savoir comment vous connectez si vous n’avez pas encore téléchargé l’application Hoover Home. Avant
d’activer la fonction Technologie SmartWallMC, laissez votre appareil Rogue
MC
terminer son mode de reconnaissance qui lui permettra d’explorer son nouvel
environnement et d’effectuer la cartographie de votre plan d’étage.
• Pour marquer et interdire l’accès à des pièces entières.
• Pour marquer et interdire l’accès à des zones d’une pièce (comme éviter le bol .
du chien, tout comme vous).
Pourquoi utiliser la fonction Technologie SmartWallMC?
Visitez le site Hoover.com pour lire le tutoriel de la
fonction Technologie SmartWall
MC
.
Page 33

33
L'application Hoover Home : Horaire
Vous voulez planifier des missions de nettoyage à l'avance? Vous pouvez planifier mes missions selon le jour et l'heure avec
votre application Hoover Home.
Sélectionnez l'heure et le jour et appuyez sur «
ENREGISTRER ». Si vous voulez répéter l'horaire
de nettoyage, basculez de « UNIQUE » vers «
HEBDOMADAIRE » et appuyez sur « ENREGISTRER ».
Pour créer un horaire, appuyez sur
le bouton « Ajouter ».
Ouvrez l'application Hoover Home
et sélectionnez l'icône « Horaire ».
1 2 3
Consultez la page 32 pour connaître les instructions et savoir comment vous connectez si vous n’avez pas encore téléchargé l’application Hoover Home. Avant d’activer
la fonction Technologie SmartWallMC, laissez votre appareil RogueMC terminer son mode de reconnaissance qui lui permettra d’explorer son nouvel environnement et
d’effectuer la cartographie de votre plan d’étage.
Page 34

34
L'application Hoover Home : Horaire
Pour modifier ou supprimer un
horaire de nettoyage, appuyez sur
le bouton « MODIFIER ».
Pour établir un horaire à une pièce,
appuyez sur l’option d’horaire « avancé »
et suivez les instructions à l’écran.
4 5
Page 35

35
Fonctionnement de votre appareil RogueMC : Recharge
Pour me mettre sous tension,
ouvrez mon couvercle et
appuyez sur l’interrupteur.
Je n’ai besoin que d’environ
3 heures pour me charger
complètement (impressionnant,
n’est-ce pas?). Lorsque je suis
prêt pour ma mission, mon témoin
cessera de clignoter.
Trouvez un emplacement
idéal pour ma base.
J'aimerais être avoir un
espace de 122 cm tout
autour de moi. Branchez
l'adaptateur CA sur le côté
de la station et dans une
prise de courant.
1 2
4
Déposez-moi sur ma base
pour vous assurer que
ma pile est chargée pour
que je puisse commencer
à nettoyer. Mon témoin
de charge clignotera et
émettra un signal sonore
pour vous indiquer que je
suis bien en place.
3
REMARQUE: La durée de vie de ma pile est limitée lorsque j'arrive (voyager
peut être épuisant). Je vous recommande de me charger pendant environ 3
heures afin que je puisse vous offrir un premier nettoyage efficace.
ENTRETIEN : du cylindre brosseur et de brosse latérale
Suivez toutes les instructions de charge et ne chargez pas le bloc-piles ou l'appareil à l'extérieur
lorsque la température ne se trouve pas dans l'échelle inscrite aux instructions. Une charge mal
effectuée ou à des températures hors de l'échelle inscrite risque d'endommager la pile et augmenter le
risque d'incendie.
Lorsqu’un entretien est nécessaire, confiez votre appareil à un réparateur qualifié qui n’utilisera que des
pièces de rechange identiques aux pièces d’origine. Vous vous assurerez ainsi de préserver la sécurité
de l’appareil.
N'essayez pas de modifier ou tenter de réparer l'appareil ou le bloc-piles (le cas échéant) sauf si cela
est indiqué aux instructions de fonctionnement et d'entretien.
Si vous projetez de ne pas utiliser l’appareil pendant une longue période, rechargez la pile et entreposez
l’appareil dans un endroit frais et sec an de protéger la pile des risques de dégradation.
N’utilisez pas l’appareil à l’extérieur ni sur des surfaces humides.
! IMPORTANT !
Page 36

36
Fonctionnement de votre appareil RogueMC : Recharge
Ne vous inquiétez pas si ma
pile est épuisée avant que
j’aie terminé ma mission
de nettoyage. Dès que ma
pile est complètement
chargée, je retournerai
automatiquement à l’endroit
où je n’ai pas pu terminer
mon nettoyage.
Lorsque j’ai terminé mes
missions de nettoyage, je
retourne automatiquement
vers ma base pour me
charger.
5 6
Page 37

37
Fonctionnement de votre appareil RogueMC : Nettoyage
Appuyez sur le bouton dès que vous
êtes prêt à m’envoyer en mission de
nettoyage. Je clignoterai et vous laisserez
savoir que j’ai accepté la mission en
commençant à nettoyer.
Si vous souhaitez que j’arrête ou que
j’effectue une pause de nettoyage,
appuyez à nouveau sur le bouton .
Si vous souhaitez que j’arrête complètement
ma mission de nettoyage, appuyez sur le
bouton pour que je puisse retourner à ma
base.
REMARQUE: Pour pouvoir effectuer des commandes mains libres, téléchargez l'application Hoover Home pour me contrôler departout.
Première mission de nettoyage
Lors de ma première mission, je passerai en mode de reconnaissance et explorerez mon nouvel environnement. Dès que
j’aurai terminé ma mission de reconnaissance et de cartographie, je retournerai à ma base. Téléchargez l’application
Hoover Home pour voir votre plan schématique ou appuyez sur le bouton pour m’envoyer en mission de nettoyage en
me servant de la fonction.
Page 38

38
Entretien de votre appareil RogueMC : Vider le vide-poussière
Soulevez le couvercle à la
verticale et videz toute la
poussière à l’intérieur du
contenant. Je préférerais
que vous fassiez ceci
après chaque mission de
nettoyage.
Après avoir vidé le videpoussière et nettoyé le
filtre, réinstallez-les
dans l’appareil RogueMC et
enclenchez-les fermement
en place.
Soulevez mon couvercle et
appuyez sur le bouton situé
au centre pour accéder à
mon vide-poussière (le videpoussière est un contenant
carré rempli de toute la
saleté, la poussière et les
poils d’animaux que j’ai
aspiré pour vous).
1 2
4
Mon filtre se trouve à
l’intérieur du vide-poussière
et devrait être aussi nettoyé.
Vous pouvez presser les
languettes sur le côté du
filtre et tirez le filtre pour
l’enlever - ce filtre se rince
afin de lui assurer une durée
de vie plus longue.
REMARQUE: Assurezvous que le filtre est
complètement sec avant de
le réinstaller dans l’appareil
RogueMC.
3
Pour acheter des filtres de rechange, visitez le site Hoover.com ou Hoover.ca
Page 39

39
Entretien de votre appareil RogueMC : Nettoyage et changement des brosses latérales
Entretien de votre appareil Rogue
MC
: Nettoyage et changement du rouleau-brosse
Pour changer mes brosses
latérales, utilisez un
tournevis à tête cruciforme
pour dévisser la vis à micourse de ma brosse latérale.
Prenez grand soin de ne pas
perdre ma petite vis.
Retirez toute la saleté,
la poussière et les poils
d’animaux de ma brosse
latérale en utilisant l’outil
de nettoyage fourni.
1 2
Appuyez sur les deux
languettes bleu pour
retirer le couvercle du
rouleau-brosse.
Soulevez et retirez mon
rouleau-brosse pour le
nettoyer et réinstallez-le.
1 2
Rabaissez le couvercle
en l’enclenchant en
place.
3
Pour acheter des filtres de rechange, visitez le site
Hoover.com ou Hoover.ca
Page 40

40
Entretien de votre appareil RogueMC : Nettoyage des roues
Entretien de votre appareil Rogue
MC
: Nettoyage des capteurs
Nettoyez périodiquement mes
roues en retirant toute la
saleté, la poussière et les poils
d’animaux en utilisant l’outil de
nettoyage qui vous a été offert
avec moi. Veuillez effectuer
cet entretien afin que je puisse
réaliser efficacement mes
missions de nettoyage.
1
Utilisez un linge propre
et sec pour nettoyer mes
capteurs. Ceci me permettra
de voir mieux et de travailler
efficacement.
1
Page 41

41
The Problem The Cause The Action
Erreur - Capteurs d'escarpemen t
Le capteur d'escarpement est couvert de saleté.
L'appareil RogueMC est coincé dans une zone escarpée.
Lisez les instruc tions de nettoyage des capteurs à la page 42.
Déplacez l'appareil RogueMC à un autre endroit.
Erre ur - Le roule au-bros se principa l
Le rouleau-brosse est coincé ou ne tourne plus.
Nettoyez le rouleau-brosse pour le débarrasser de toute saleté, peluche ou cheveux.
Consultez les inst ructions à la page 41.
Erreur - Moteur d'aspiration
Un objet bloque la trajectoire d'aspiration.
Retirez le rouleau-brosse et le vide-pou ssière (consult ez les ins tructi ons à la page 4 0,41) et
retirez toutes le s obstruction s
Erre ur - Niveau de p ile très f aible
La pile est trop faible et incapable de retourner à la station
d'accueil pour se charger.
Déposer l'appareil Rogue
MC
sur la station d'accueil pour qu'il se charge. Consultez les
instructions à la page 37.
Erre ur - Roue coinc ée
La roue est coincée ou ne tourne pas correctement. Nettoyez e t éliminez toute saleté, p eluches e t cheveux. Consultez les inst ructions à la page 42.
Erruer-Vide-poussière sans sac
Le vide-poussière n’est pas installé ou est mal installé. Consultez les inst ructions à la page 4 0.
Erre ur - Appare il soulevé
L'appareil Rogue
MC
ne touche plus au sol ou la hauteur des roues
est beaucoup trop hau te.
Redéposer l'appareil correctement au sol.
Erre ur - Brosse l atéra le coincée
La brosse latérale est coincée ou ne tourne pas correctement. Nettoyez e t éliminez toute saleté, p eluche et c heveux . Consult ez les ins tructi ons à la page 41.
Erre ur - Hors ten sion
La connexion du logiciel est perdue. Réinitialisez aux paramètres d'usine. Consultez les instructions à la page 44 .
Erre ur - Échec de mis e à jour du logic iel
Connexion perdue.
Assurez-vous que la connex ion au réseau Wi-Fi est stable et téléchargez à nou veau le
logiciel avec l'application Hoover Home.
Erre ur- Échec de co nnexion au r éseau Wi- Fi
Impossible d'établir la communication. Assurez-vous que le routeur Wi-Fi diffuse sur la bande 2,4 GHz (non 5 GHz).
Erreur - Robot coincé
L'appareil Rogue
MC
est coincé. Déplacez vous-même l'appareil RogueMC.
Erreur - Erreur du pare-chocst
Un objet est coincé sur le pare-chocs. Retirez toute obstruction du pare-chocs (haut et bas du pare-chocs).
Dépannage
Avez-vous des problèmes? Visitez la FAQ du site Hoover.com pour obtenir plus de solutions de dépannage.
Page 42

42
Réinitialisation aux paramètres d’usine
Je dois parfois avoir besoin d'un redémarrage à froid. Si aucune solution fournie de la dernière page ne résout
le problème, suivez ces instructions de redémarrage. Cette réinitialisation aux paramètres d'usine effacera
toutefois toutes vos données enregistrées.
• Appuyez et maintenez le bouton enfoncé pendant 10 secondes.
• Tous les témoins s’éteindront après 1 à 2 secondes.
• L’aspirateur RogueMC se réinitialisera et tous les témoins s’allumeront.
Page 43

43
CONSIGNES DE SÉCURITÉ IMPORTANTES
CONSERVEZ CES INSTRUCTIONS
Lorsque vous utilisez des appareils électriques, veuillez toujours respecter entre autres les
consignes de sécurité de base suivantes:
VEUILLEZ LIRE TOUTES LES INSTRUCTIONS AVANT D’UTILISER CET APPAREIL. CE PRODUIT EST CONÇU
POUR UN USAGE DOMESTIQUE SEULEMENT. UNE UTILISATION À DES FINS COMMERCIALES ANNULERA
LA GARANTIE.
AVERTISSEMENT: POUR RÉDUIRE LES RISQUES
D'INCENDIE, D'ÉLECTROCUTION, DE DOMMAGES ET DE BLESSURES :
• Utilisez l’appareil uniquement avec les bloc-piles spécialement conçus pour votre
appareil.
• L’utilisation de tout autre bloc-piles représente un risque de blessure et d’incendie.
• Si vous n'utilisez pas le bloc-piles, gardez le éloigné des objets métalliques comme
des trombones, des pièces de monnaie, des clés, des clous, des vis et autres petits
objets métalliques pouvant établir une liaison électrique entre les bornes. Un courtcircuit des bornes de la pile représente un risque de brûlures et d'incendie.
• N’exposez pas le bloc-piles ou l’appareil au feu ou à une température excessive.
L’exposition au feu ou à une température supérieure à 130°C représente un risque
d’explosion. Les température de 130°C est l'équivalent de 265°F.
• Respectez toutes les instructions de charge et ne chargez pas un bloc-piles ou un
appareil hors de l'échelle de température indiquée aux instructions.
• Une charge mal effectuée ou hors de l'échelle de températures indiquée risque
d'endommager la pile et d'augmenter le risque d'incendie.
• Lorsqu’un entretien est nécessaire, conez votre appareil à un réparateur
qualié qui n’utilisera que des pièces de rechange identiques aux pièces
d’origine. Ceci assurera et maintiendra la sécurité du produit.
• Ne modiez pas ou ne tentez pas de réparer l'appareil ou le bloc-piles (le cas
échéant) sauf si indiqué aux instructions de fonctionnement et d'entretien.
• Assemblez entièrement l’appareil avant de l’utiliser.
• Le chargeur est conçu pour être utilisé à l’intérieur seulement.
• Ne permettez pas aux enfants de jouer avec l’appareil. Cet appareil ne doit
pas être utilisé par des enfants de 12 ans et moins. Exercez une surveillance
étroite lorsque l’appareil est utilisé à proximité d’enfants. Pour éviter les
blessures et les ou bris, tenez les enfants éloignés du produit et ne leur
permettez pas d'introduire leurs doigts ou d'autres objets dans aucune
ouverture pour éviter les blessures et les bris de l'appareil.
• Utilisez l’appareil uniquement aux ns décrites dans le présent guide. Utilisez
seulement les accessoires et produits recommandés par Hoover
MD
.
• N’utilisez pas le chargeur si la che ou le cordon est endommagé. Si votre
appareil ou le chargeur ne fonctionne pas comme il se doit, s’il a été échappé,
est endommagé, a été laissé à l’extérieur ou est tombé dans l’eau, apportez-le.
Page 44

44
• au centre de réparations pour le faire inspecter avant de continuer à l’utiliser.
• Ne tirez ou ne transportez pas le chargeur par le cordon, n'utilisez pas le
cordon comme une poignée, ne fermez pas une porte sur le cordon et ne tirez
pas le cordon contre des arêtes tranchantes ou des coins. Ne placez pas
l’appareil sur le cordon. Ne faites pas rouler l’appareil sur le cordon.
• Tenez le cordon éloigné des surfaces chaudes.
• Ne débranchez pas le chargeur en tirant sur le cordon. Débranchez le chargeur
en tenant la fiche et non en tirant sur le cordon.
• Ne manipulez pas le chargeur, y compris la fiche, les bornes du chargeur et
l'appareil si vous avez les mains mouillées.
• N’insérez aucun objet dans les ouvertures. N’utilisez pas l’appareil si les
ouvertures sont obstruées. Assurez-vous qu’elles sont exemptesde poussière,
de peluche, de cheveux ou de tout ce qui pourrait réduire le débit d’air. Gardez
les cheveux, les vêtements amples, les doigts et toutes autres parties du corps
à l’écart des ouvertureset des pièces mobiles.
• Ne placez pas l’appareil sur les marches d’un escalier ou sur un meuble pour
éviter les blessures et les bris.
• N’utilisez pas l’appareil pour aspirer des liquides inflammables ou
combustibles comme de l'essence ou des copeaux de bois fins et d'utiliser
l'appareil dans des pièces où des articles peuvent s'y trouver.
• N’utilisez pas l’appareil pour aspirer quoi que ce soit qui brûle ou dégage de la
fumée comme des cigarettes, des allumettes ou des cendres chaudes.
• N’utilisez pas l’appareil si le vide-poussière ou les filtres ne sont pas installés.
• Éteignez l'appareil avec l'interrupteur avant de retirer ou installer le rouleau-brosse.
• N’incinérez pas le chargeur, la pile ou l’appareil même s’ils sont gravement
endommagés. La pile peut exploser au feu.
• Ce produit contient des piles au lithium-ion rechargeables. N’exposez pas les
piles à des températures élevées, car elle pourrait s’enflammer et exploser.
N’exposez pas la pile au feu ou dans un compresseur à déchets. Consultez le
chapitre de mise au rebut de la pile pour connaître les directives.
• Ne tentez pas de démonter la pile.
• La batterie peut fuir si elle est soumise à des conditions extrêmes. Si du
liquide entre en contact avec la peau, lavez immédiatement la peau avec de
l'eau et du savon. Si du liquide entre en contact avec les yeux, ne frottez pas
les yeux et rincez-les immédiatement et continuellement avec de l'eau propre
pendant au moins 15 minutes. et consultez un médecin sans attendre.
• Pour recharger l’appareil, utilisez uniquement le chargeur (pièce n°440011974)
fourni par Hoovevr
MD
.
• Ne touchez pas aux bornes du chargeur et du bloc-piles et n’y insérez pas
d’objets.
• Ne tentez pas de court-circuiter la pile ou les bornes du chargeur.
• Placez les cordons d'autres appareils hors de la zone à nettoyer.
• N'utilisez pas l'aspirateur dans une pièce où un nourrisson ou un enfant dort.
• Ne faites pas fonctionner l'aspirateur dans une zone où se trouve des
chandelles allumées ou des objets fragiles sur le sol à nettoyer.
• Ne faites pas fonctionner l'aspirateur dans une zone où se trouve des chandelles
allumées sur des meubles où l'aspirateur pourrait les frapper accidentellement.
• Ne laissez pas les enfants s'asseoir sur l'aspirateur.
Page 45

45
AVERTISSEMENT: POUR RÉDUIRE LE RISQUE D’INCENDIE,
DE DÉCHARGE ÉLECTRIQUE. LE CHARGEUR EST ÉQUIPÉ D'UNE
FICHE POLARISÉE (UNE LAME PLUS LARGE QUE L'AUTRE). CETTE
FICHE DOIT ÊTRE BRANCHÉE DANS UNE PRISE POLARISÉE ET DANS
UN SEUL SENS. SI LA FICHE NE S'INSÈRE PAS COMPLÈTEMENT
DANS LA PRISE, RETOURNEZ LA FICHE. SI ELLE REFUSE TOUJOURS
DE S'INSÉRER, APPELEZ UN ÉLECTRICIEN QUALIFIÉ POUR FAIRE
INSTALLER UNE PRISE ADÉQUATE. NE MODIFIEZ PAS LAFICHE
D'AUCUNE MANIÈRE.
•Évitez d’utiliser l’appareil pour ramasser des objets durs ou aux arêtes
tranchantes, car ils pourraient endommager l’appareil.
•Rangez l’appareil adéquatement à l’intérieur et dans un endroit sec. N'exposez
pas l'appareil au gel. Ce produit contient des piles au lithium-ion rechargeables.
N’exposez pas les piles à des températures élevées, car elle pourrait s’enammer et
exploser.
•Après avoir activé le rouleau-brosse, évitez l'immobilisation de l'appareil à un seul
endroit pendant un long moment pour éviter d'endommager le plancher.
AVANT D'UTILISER AVERTISSEMENT:
Assurez-vous qu'aucun enfant ou animal n'est présent dans la pièce ou ne
pénètre dans la pièce à nettoyer an d'éviter les risques de blessures.
MISE EN GARDE: Pour éviter le risque de bris, éloignez tous les
objets fragiles, les cordons pendants et les petits objets qui pourraient tomber.
•Pour éviter d'endommager le plancher, éloignez tous les objets pointus ou
acérés pouvant se retrouver sous le robot et causer des éraures sur la
surface du plancher.
•Votre robot est conçu pour aspirer de petites quantités de poussière et ne doit
pas être utilisé pour remplacer un aspirateur-balai. Utilisez votre appareil
Rogue
MC
régulièrement pour réduire la durée hebdomadaire pendant laquelle
vous passez l'aspirateur.
•Votre appareil RogueMC nettoiera les planchers durs et les tapis à poils courts.
Son utilisation n'est pas recommandée pour les tapis à poils longs.
•Les tapis foncés et décolorés ou des objets peuvent activer les capteurs de
l'appareil Rogue
MC
et il pourrait ne pas aspirer la poussière sur ou autour de
ces derniers.
MISE AU REBUT DE LA PILE DU ROBOT
•An de préserver les ressources naturelles, veuillez recycler les piles périmées
ou les jeter de manière appropriée. Ce produit contient une pile au lithium-ion
qui doit être mise correctement au rebut. Une loi locale, fédérale ou provinciale.
AVERTISSEMENT: Ce produit contient des produits
chimiques reconnus par l'État de la Californie comme étant
cancérigène, causant des anomalies infantiles ou congénitales.
LAVAGE LES MAINS APRÈS CHAQUE MANIPULATION.
Page 46

46
peut interdire la mise au rebut de piles au nickel-métal-hydrure dans les ordures
ménagères.
•Consultez les règlements de mise au rebut de votre région
concernant les options de recyclage et de mise au rebut
offertes. Pour obtenir des renseignements concernant
la mise au rebut, appelez la Rechargeable Recycling
Corporation au 1 800 3-BATTERY.
AVERTISSEMENT: Après avoir retiré la pile, couvrez ses bornes de
ruban adhésif résistant. N’essayez pas de détruire ni de démonter le bloc-piles,
et ne retirez aucun de ses composants. Les piles au lithium-ion doivent être
recyclées ou éliminées adéquatement. De plus, ne mettez jamais les deux bornes
simultanément en contact avec un objet métallique ou une partie de votre corps,
car cela pourrait entraîner un court-circuit. Gardez les pièces de l'aspirateur
éloignées des enfants. Le non respect de ces avertissements représente un
risque d'incendie et de blessures graves.
Page 47

47
ENTRETIEN & GARANTIE
RENSEIGNEMENT CONCERNANT LA RÉPARATION DE PILE
TOUTES AUTRES RÉPARATIONS DOIV ENT ÊTRE CONFIÉES À UN REPRÉSENTANT DE SERVICE AUTORISÉ.
Appelez au 1 888 897-2050 aux É .-U. et au Canada
Si vous avez besoin d’aide supplémentaire, visitez un centre de service autorisé. Trouvez le représentant
le plus près de chez vous en visitant notre site Internet au www.oreck.com. Les frais de toute expédition
d'un endroit ou en provenance d'un endroit de r éparations seront payés par le pr oprié taire. Identiez
toujours votre produit avec le numéro de modèle et le code de fabrication lorsque vous demandez des
renseignements ou que vous commandez des pièces de rechange. (Le numéro de modèle et le code de
fabrication de l’aspirateur se trouvent au bas ou à l’arrière de l’appareil ainsi qu’à l’arrière de la batterie et
du chargeur.)
GARANTIE LIMITÉE D'UN AN (UTILISATION DOMESTIQUE)
COUV ERTURE DE L A GARANTIE: Lorsqu'utilisé et maintenu dans des conditions domestiques normales et
conformément au manuel d'utilisation, le produit et la pile Hoover
MD
sont garantis contre les défauts de
fabrication et la main d'œuvre pendant une année entière. Au cours de cette période de garantie, Hoover
MD
vous f ournir a la ma in d'œuvre et les pi èces san s frais a n de corr iger un tel défaut sur l'un de ces produit s.
RÉCL AMATION AU TITRE DE LA GARANTIE: Si votre produit n'est pas conforme à la garantie, apportez-le
ou envoyez-le chez un réparateur autorisé au titre de la garantie Hoover
MD
et accompagné d'une preuve
d'achat. Si les piles ne sont pas conformes à la garantie, appor tez-les ou envoyez-les avec une preuve
d'achat chez un détaillant autorisé de Hoover
MD
ou appelez les Services HooverMD au 1 877-897-2050.
Pour obtenir des renseignements automatisés concernant les ateliers de réparations autorisés aux É.-U.,
téléphonez au 1 888 1 877 897-2050 ou visitez le site Internet de Hoover
MD
au www.hoover.com.
ÉLÉMENTS NON COUVERTS PAR LA GARANTIE: Ce tte gar antie ne couvre pas les courroies, ltr es, rouleauxbrosses, l'u tilis ation du produit à des ns commerciales (comme par une fem me de chamb re, un concierge
ou une entreprise de location d'équipement), un entretien du produit mal effectuée, des dommages causés
par une mauvaise utilisation, des cas fortuits, la nature, le vandalisme et autres act ions hors du contrôle
de Hoover
MD
, les agissements ou omissions de son propriétaire, l'utilisation à l'extérieur d'un pays où
le produit à été acheté une première fois et les reventes du produit par le premier acheteur. La
présente garantie ne couvr e pasla cueillette, la livraison, le transport et les visites à domicile.
Cependant, si vous postez vo tre produit au Centre de ventes et de service Hoover
MD
pour une
réparation au titre de la garantie, les frais d'expédition ne seront payés qu'à l'envoi ou à l'expédition.
Appelez les Services Hoover
MD
au 1 877 897-2050 pour savoir comment nous envoyer votre produit.
Cet te garantie ne couvre pas les produits achetés à l'extérieur des États-Unis, y compris ses
territoires et possessions, aux boutiques d'échange militaires américaines et canadiennes.
AUTRES CONDITIONS IMPORTANTES: La présente garantie n’es t pas transférable et ne peut pas être
cédée. Cette garan tie doit êt re régie et interprétée selon le s lois de l'État de l'Ohio. La période de
garantie ne sera pas prolongée par aucun changement de piles ou de pièces ou de réparations
exécutées au titre de la présente garantie.
CET TE GARA NTIE EST UNE GARA NTIE EXC LUSIVE E T REMPLACE TOUTES AUTRES GARANTIES, EX PRESSES
OU IMPLICITES, Y COMPRIS LES GARANTIES DE QUALITÉ MARCHANDE OU D'ADAPTATION À UN USAGE
PARTICULIER, QUI SERONT RE JETÉE S ET HOOVE R NE SERA AUC UNEMENT R ESPONSABLE DES DOMMAGE S
SPÉCIAUX, INDIRECTS, ACCIDENTELS OU ACCESSOIRES DE TOUTE S SORTES OU NATURES ENVERS LE
PROP RIÉTAIRE OU TOUTES AUTRES PARTIES DEMANDERESSES POUR LE PROPRIÉTAIRE, QU'ELLE RELÈVE
DU DROIT DES CONTRATS, DE LA NÉGLIGENCE, DE LA RESPONSABILITÉ CIVILE DÉLICTUELLE OU DE LA
RESPONSABILITÉ S TRICTE DU FAIT DES PRODUITS, OU DE TOUTE AUTRE CAUSE S'Y RÉFÉRANT.
Certains États ne permettent pas l’exclusion des dommages consécutifs. Par conséquent, l’exclusion
précédente pourrait ne pas s'adresser à vous. La présente garantie vous donne des droits précis.
Vous pouvez également avoir d'autres droits, lesquels varient d'une province à l'autre.
Page 48

48
ÉNONCÉ DE CONFORMITÉ
Cet ap pareil e st conf orme à la partie15 des règlements de la FCC et des normes d’ex emption RSS
d’Industr ie Canada. Son utilisat ion est as sujet tie aux deux condit ions sui vante s: (1) ce dispositif peut
produit des interférences nuisibles et (2) ce dispositif doit accepter toutes interférences reçues, y compris
les interférences pouvant causer un fonctionnement indésirable.
Selon les règlements d'Industrie Canada, cet émetteur radioélectrique peuvent fonctionner uniquement
avec une antenne d'une certaine catégorie et un gain maximum (ou moindre) approuvé pour l'émetteur par
Industrie Canada. Pour réduire le risque potentiel de brouillage radioélectrique aux autres usagers, ce
type d'antenne et son gain doivent être choisis de manière à ce que l'équivalent de sa puissance isotrope
rayonnée équivalente (p.i.r.e.) ne soit pas supérieure à la puissance nécessaire à une bonne communication.
RAPPEL MPE
An de répondre aux exigences d'exposi tion aux r adiofréquences de la FCC et d'IC, une séparation d'une
distance de 20 cm ou plus doit être maintenue entre l'antenne de ce dispositif et les personnes pendant le
fonctionnement du dispositif.
Pour assurer la conformité, toute opération à une distance moindre n’est pas recommandée.
Les changements ou modications non approuvées expr essément par la partie r esponsable de la
conformité pourrait annuler le droit l'autorité d'utilisation et de fonctionnement de cet équipement par son
propriétaire.
Cet équipement a été éprouvé et trouvé conforme aux limites d'un dispositif numérique de Classe B, selon
le chapitre 15 des règlements de la FCC. Ces limites sont conçues pour offrir une protection raisonnable
contre le brouillage nuisible dans une bâtisse résidentielle. Cet équipement génère, utilise et peut émettre
de de faibles niveaux d'énergie radioélectrique et peut, s'il n'est pas installé et utilisé conformément aux
instructions, causer un brouillage nuisible aux communications radio. Toutefois, rien ne garantit l'absence
d'interférences dans une installation particulière. Si cet équipement cause un brouillage nuisible à la
réception d'une radio ou d'un téléviseur, ce qui peut être déterminé en allumant et en éteignant l'appareil,
l'utilisateur peut tenter de corriger ce brouillage en effectuant l'une des solutions suivantes :
• Réorienter ou repositionner l'antenne de réception;
• Augmenter l'espacement entre l'équipement et le récepteur;
• Brancher l’appareil dans une prise de courant sur un circuit différent du récepteur;
• Consulter le vendeur ou un technicien radiotélévision expérimenté pour obtenir de l’aide.
Page 49

49
ESTÁ GARANTIZADA.
Limpie con confianza durante 1 año completo, gracias a la garantía limitada de Hoover.
Registre a Rogue™:
HOLA.
ME LLAMO ROGUE™.
llame al 1-877-897-2050Visite Hoover.com o Hoover.ca Descarge el Hoover Home App
Page 50

50
ÍNDICE
¿Qué hay en la caja? ...........................................................53
Conocer a Rogue
™
.............................................................54
Tecnología ............................................................56
La aplicación Hoover Home.......................................................57
Technología SmartWall
™
....................................................59
Programación ..........................................................60
Operación de Rogue
™
...........................................................62
Carga...............................................................62
Limpieza .............................................................64
Mantenimiento de Rogue
™
........................................................65
Vaciado de la copa de recolección de residuos .......................................65
Mantenimiento de cepillo giratorio y cepillo lateral ....................................66
Limpieza de sensores y ruedas ................................................67
Resolución de problemas ........................................................68
Restablecimiento a valores de fábrica ............................................69
Instrucciones de seguridad importantes .............................................70
Page 51

51
¿QUÉ HAY EN LA CAJA?
Soy Rogue™, claro que vengo con accesorios.
Rogue™ Robot Vacuum Mi Base (Estación de Carga) Cepillos laterales* Herramienta de limpieza
*Los accesorios varían por modelo.
Page 52

52
CONOCER A ROGUE
™
Copa de recolección de residuos y filtro
Envíe a Rogue™ de regreso
a la base (Cargador)
Botón de encendido /
apagado
Cubierta dte
Rogue
™
Centro de control Rogue
™
Sensores de navegación de Tecnología Robart
®
Sensores de carga
Ruedas
Cepillo lateral Cepillo lateral
Copa de recolección de residuos y filtro
Visualización Superior Vista superior abierta
Inferior
Sensores
Acantillados
Cepillo Giratorio
Bateria
Page 53

53
CONOCER A ROGUE
™
Centro de control Rogue
™
Estos iconos se ubican en la tapa y se iluminan cuando la unidad está activa.
Este símbolo azul de Wi-Fi se ilumina
cuando está conectado a Wi-Fi
a través de la aplicación Hoover
Home. Si no está iluminado, no está
conectado.
Para configurar una conexión, vaya a
la página. 57.
Este símbolo blanco de la batería
le permite saber el estado de la
batería. Si no lo observa encendido,
la batería aún tiene suficiente carga.
Cuando comience a parpadear, deberá
recurrir a la base para recargarla.
Cuando vea este símbolo, la copa de
recolección de residuos está llena.
Asegúrese de vaciarla para poder
seguir limpiando. La luz desaparecerá
una vez que vacíe la copa de
recolección de residuos y presione el
botón de .
Cuando vea este símbolo
parpadeando, es porque hay
problemas. Puede que sea tan simple
como un algún objeto atascado en el
cepillo giratorio o podría ser un error
interno.
Vaya a la página. 68 para ver algunos
errores comunes que puede encontrar
y la forma de obtener ayuda.
Conectividad Wi-Fi Batería La copa de recolección de
residuos está llena
Error
Page 54

54
CONOCER A ROGUE
™
Integración del servicio de voz
Tengo una excelente relación con Amazon Alexa* y Google Home Assistant*. Si usted
posee algún producto de Amazon Alexa o un Google Home Assistant, puede utilizarlos para
comunicarse conmigo. Descargue el conjunto de habilidades de la en la aplicación de
Amazon Alexa o Google Home.
Tecnología Robart® con memoria de navegación
Utilizo un láser de alta tecnología para mapear y navegar por su hogar
gracias a mi capacidad inteligente. También recordaré el plano de los
pisos de su hogar para que pueda personalizar la forma en la que limpio
(consulte Tecnología SmartWall™ en la página 59).
Tecnología SmartWall
™
Mediante la aplicación Hoover Home, puede designar habitaciones y áreas
como límites, pero desconozco por qué desearía hacerlo.
*Amazon Alexa y Google Home Assistant se venden por separado.
NOTA: La aplicación Hoover se requiere para interactuar con Amazon Alexa y Google Home Assistant.
Esté pendiente de nuevas habilidades/comandos próximamente.
Amazo n, Alexa y tod os los logo tipos rel acionado s son marca s comerci ales de Amaz on.com, I nc. o sus ali ados.
Google Home es una marca comercial de Google Inc.
El logotipo de ROBART es una marca comercial registrada de Robart GmbH.
Page 55

55
• Utilice Tecnología SmartWall™ para crear barreras y límites
• Conéctese a sus productos de Amazon Alexa* o Google Home Assistant*
• Vea su plan de piso y observe dónde he limpiado
• Le permitirá crear un horario por día y hora fácilmente
LA APLICACIÓN HOOVER HOME
Pourquoi télécharger cette application?
Asegúrese que la conexión Wi-Fi y
Bluetooth® estén ENCENDIDOS.
NOTA: Solo funciona en redes de 2,4 GHz, por lo que debe asegurarse de no estar conectado en 5 GHz.
Muchos enrutadores emitirán ambas señales, así que simplemente cambie su conexión a 2,4 GHz.
21
Abra la aplicación Hoover Home y
crea una cuenta.
3
Apple, the Apple logo, and iPhone are
trademarks of Apple Inc., registered in
the U.S. a nd other co untrie s. App Sto re is
a serv ice mark of A pple Inc ., regis tered
in the U.S. and other countries.
Google P lay and Goo gle Play l ogo are
trademarks of Google Inc.
Descargue la aplicación Hoover Home
• Inícieme, deténgame y contróleme desde su dispositivo
• Reciba notificaciones emergentes directamente desde esta unidad, de manera que
pueda mantenerse actualizado sobre todas mis misiones
• Acceda a materiales de asistencia cuando haya problemas
• Manténgase actualizado con el firmware más reciente para asegurarse de que me está
aprovechando al máximo
La marca denominativa y los logotipos de Bluetooth® son marcas comerciales registradas propiedad de Bluetooth SIG, Inc. y cualquier uso de dichas marcas por parte de TTI Floorcare NA está bajo licencia.
Otras marcas comerciales y nombres comerciales son propiedad de sus respectivos dueños.
Page 56

56
LA APLICACIÓN HOOVER HOME
Luego de crear su cuenta,
presione "Agregar Dispositivo".
Deslice hasta llegar a ROBOT
VACUUMS, luego presione en
"Seleccionar".
Deslice hasta encontrar su
modelo y luego siga las
instrucciones de guía para la
instalación en pantalla.
4 5 6
Page 57

57
LA APLICACIÓN HOOVER HOME: TECNOLOGÍA SMARTWALL
™
Comprendo que es posible que no desee que ingrese en ciertas áreas o habitaciones; para eso, puede usar Tecnología SmartWall™
en la aplicación Hoover Home para crear límites y barreras que no cruzaré.
Si aún no descargó la aplicación Hoover Home, vaya a la página 57 para ver las instrucciones sobre cómo conectarse. Antes de intentar usar Tecnología SmartWall™,
permita que Rogue™ complete el modo de reconocimiento para explorar su entorno y mapear el plan de piso.
• Marque habitaciones enteras como límites de ingreso.
• Marque áreas dentro de habitaciones como límites de ingreso (quiero evitar el
tazón del perro tanto como usted).
¿Por qué usar Tecnología SmartWall™?
Visite Hoover.com para ver un tutorial de
Tecnología SmartWall
™
.
Page 58

58
LA APLICACIÓN HOOVER HOME: PROGRAMACIÓN
¿Quiere programar mis misiones de limpieza de antemano? Puede programarme por día y por hora en la Aplicación Hoover Home.
Seleccione la hora y el día y
presione GUARDAR. Si quisiera
repetir la limpieza programada,
alterne entre INDIVIDUAL a
SEMANAL y presione GUARDAR.
Para crear un horario, presione el
botón AÑADIR.
Abra la Aplicación Hoover Home y
seleccione el icono de horario.
1 2 3
Si aún no descargó la aplicación Hoover Home, vaya a la página 57 para ver las instrucciones sobre cómo conectarse. Antes de intentar usar Tecnología SmartWall™,
permita que Rogue™ complete el modo de reconocimiento para explorar su entorno y mapear el plan de piso.
Page 59

59
LA APLICACIÓN HOOVER HOME: PROGRAMACIÓN
Para editar o eliminar una limpieza
programada, presione el botón EDITAR.
Para programar por habitación,
presione la opción de programación
Avanzada y siga las instrucciones en
la pantalla.
4 5
Page 60

60
OPERACIÓN DE ROGUE™: CARGA
Para encenderme, abra la
tapa y gire el interruptor de
encendido.
Solo necesito aproximadamente
3 horas para cargarme
completamente (impresionante,
¿no?). Cuando la carga esté
lista, la luz de carga dejará de
parpadear.
Busque un buen lugar para
la base. Preferiría tener un
espacio de 1,2 metros (4
pies) a cada lado. Conecte
el adaptador CA a la parte
lateral de la estación y a un
tomacorriente de pared.
1 2
4
Para asegurarse de que
haya carga y esté lista
para limpiar, colóqueme
en la base manualmente.
La luz de carga parpadeará
y emitiré un pitido para
informarle que estoy
correctamente alineada.
3
NOTA: Llegué con una vida de batería limitada (el viajar suele ser agotador).
Para obtener el mejor resultado de mi primera limpieza, recomiendo que me
cargue por aproximadamente 3 horas.
SUGERENCIA: Funciono mejor si mi base está colocada en un piso duro.
Siga todas las instrucciones para la carga y no cargue la batería o electrodoméstico fuera del rango
de temperatura detallado en las instrucciones. La carga inadecuada o a temperaturas fuera del rango
detallado podría dañar la batería y aumentar el riesgo de incendios.
Solo una persona calificada debe realizar el mantenimiento de la unidad, y deben utilizarse
únicamente piezas de repuesto idénticas. Esto garantizará que se mantenga la seguridad del producto.
No modifique o trate de reparar el electrodoméstico o la batería (según se aplique) excepto por lo
indicado en las instrucciones de uso y mantenimiento.
Si el dispositivo no está en uso por un período prolongado, cargue la batería por completo y guarde el
dispositivo en un lugar fresco y seco para proteger la batería de cualquier daño potencial.
No utilice la aspiradora en exteriores o en supercies mojadas.
! IMPORTANTE !
Page 61

61
OPERACIÓN DE ROGUE™: CARGA
Si no pude completar mi
misión de limpieza antes
de que se agote la batería,
¡no se preocupe! Una vez
que esté cargada, volveré
automáticamente donde dejé
para terminar de limpiar.
Una vez que complete mis
misiones de limpieza, volveré
automáticamente a la base
para recargar.
5 6
Page 62

62
OPERACIÓN DE ROGUE™: LIMPIEZA
Cuando esté listo para enviarme a una
misión de limpieza, presione el botón
un pitido y arrancaré para hacerle saber
que acepté la misión.
Si desea que me tome un descanso u que
realice una pausa durante la limpieza,
presione el botón nuevamente.
Si desea que termine la misión de limpieza
por completo, presione el botón y
comenzaré a volver hacia la base.
NOTA: Para el control libre de manos, descargue la Aplicación Hoover Home para controlar a Rogue™ desde cualquier lugar.
PRIMERA MISIÓN DE LIMPIEZA
Durante mi primera misión, me colocaré el modo de reconocimiento y exploraré mi nuevo entorno. Una vez que finalice el reconocimiento y
el mapeo, volveré a la base. Descargue la aplicación Hoover Home para ver su plan de piso o presione para enviarme en una misión de
limpieza de su hogar reconocido.
Page 63

63
MANTENIMIENTO DE ROGUE™: VACIADO DE LA COPA DE RECOLECCIÓN DE RESIDUOS
Eleve la tapa y retire toda la
suciedad interior. Preferiría
que haga esto después de
cada misión de limpieza.
Una vez que vacíe la copa
de recolección de residuos
y limpie el filtro, vuelva
a colocarlos en Rogue™ y
encástrelos con firmeza en
su lugar.
Levante la tapa y presione
el botón del centro para
acceder a la copa de
recolección de residuos
(la copa de recolección de
residuos es un contenedor
cuadrado lleno con
suciedad, polvo y pelos
de animales que acabo de
recolectar por usted).
1 2
4
El filtro está unido al interior
de la copa de recolección
de residuos, y también debe
limpiarse. Puede tirar de
las lengüetas en las partes
laterales del filtro para
extraerlo, el filtro puede
enjuagarse para extender su
vida útil.
NOTA: Asegúrese de que el
filtro esté completamente
seco antes de volver a
colocarlo en Rogue™.
3
Para adquirir filtros adicionales, visite Hoover.com o Hoover.ca
Page 64

64
MANTENIMIENTO DE ROGUE™: LIMPIEZA/CAMBIO DE LOS CEPILLOS LATERALES
MANTENIMIENTO DE ROGUE
™
: LIMPIEZA/CAMBIO DEL CEPILLO GIRATORIO
Para cambiar los cepillos
laterales, utilice un
destornillador Philips para
quitar el tornillo del centro
del cepillo lateral. Tenga
cuidado. Es pequeño y se
puede perder.
Retire la suciedad, el polvo
y el pelo de animales
del cepillo lateral con la
herramienta de limpieza
provista.
1 2
Presione las 2 lengüetas
azules para extraer la
cubierta del cepillo
giratorio.
Extraiga el cepillo
giratorio para limpiarlo o
reemplazarlo.
1 2
Vuelva a colocar la
cubierta encastrándola
en su lugar.
3
Para adquirir filtros adicionales, visite Hoover.com o Hoover.ca
Page 65

65
MANTENIMIENTO DE ROGUE™: LIMPIEZA DE LAS RUEDAS
MANTENIMIENTO DE ROGUE™: LIMPIEZA DE LOS SENSORES
Limpie las ruedas con
frecuencia para retirar
cualquier suciedad, polvo o
pelos de animales usando la
herramienta de limpieza que
viene con la unidad. Hágalo
para poder moverme en forma
efectiva durante mis misiones
de limpieza.
1
Use un paño limpio y seco
para limpiar los sensores. Esto
garantizará que pueda continuar
funcionando suavemente y pueda
ver sin obstáculos.
1
Page 66

66
El Problema La Causa La Acción
Erro r - El Sensor A cantil ado
El sensor acantilado está cubierto de polvo.
Rogue
™
está trabado en la caída.
Ver página 67 para instrucciones para limpiar los sensores.
Mueva a Rogue™ a otra ubicación.
Erro r - El cepill o principa l
El cepillo giratorio está trabado o no gira adecuadamente.
Limpie el cepillo giratorio de cualquier residuo, pelusa o cabello. Vea la página 66 para instrucciones.
Erro r - Motor de su cción
Hay algo bloqueando las vías de succión. Remueva el cepillo giratorio y la copa de recolección de residu os (ver página 65 y 66 para instruc-
ciones) y remueva cualquier obstrucción.
Erro r - Baterí a está crí ticamen te baja
La batería está muy baja y no puede regresar a la es tación de carga
para recargarse.
Ubique a Rogue
™
manualmente a la estación de carga para cargarlo. Vea la página 62 para
instrucciones.
Erro r - La rueda es tá trab ada
La rueda está trabada o no gira adecuadamente. Limpie las ruedas de cualquier residuo, pelusa o cabello. Vea la página 67 para instrucciones.
Erro r - No tiene co ntenedor d e residuos
La copa de recolección de residuos no está instalada o está instalada
incorrectamente.
Consulte la página 65 para ver las instrucciones
.
Erro r - Unidad se le vantó
Rogue
™
se levanto del piso o la rueda ha sido elevada excesivamente. Ubique la unidad de regreso al piso apropiadamente.
Erro r - El cepill o later al
El cepillo lateral está trabado o no está girando adecuadament. Limpie el cepillo lateral de cualquier residuo, pelusa o cabello. Vea la página 66 para instruc-
ciones.
Error - Desconexión eléctrica
Se desconecto el software interno. Haga un reinicio de fabrica. Ver página 69 para instrucciones.
Erro r - Actual ización de F irmwar e
Se desconecto.
Aseg úrese de mantener una conexión Wi- Fi vuelva a desca rgar el r mware de la Aplic ación
Hoover Home Assistant.
Erro r- Falla en e l chip Wi-Fi
No puede establecer conexión. Asegúrese que el enru tador Wi-Fi esté transmitiendo en 2.4 GHz (no 5 GHz).
Erro r - El robot e stá tra bado
Rogue
™
está trabado. Mueva a Rogue™ manualmente.
Erro r - Error en l a defensa
Algo e stá obstruyendo la defensa. Remueva cualquier obstrucción en la defensa (la defensa superior e inferior).
RESOLUCIÓN DE PROBLEMAS
¿Estoy causando problemas? Visite Hoover.com para ver preguntas frecuentes y resolución de problemas adicionales.
Page 67

67
RESTABLECIMIENTO A VALORES DE FÁBRICA
En ocasiones, es posible que necesite un restablecimiento por hardware. Si ninguna de las opciones de la última página
resuelve mis problemas, siga estas instrucciones para el restablecimiento. ¡Tenga cuidado, este restablecimiento a
valores de fábrica borrará todo!
• Presione el botón
y manténgalo presionado durante 10 segundos.
• Todos los indicadores se apagarán después de 1 a 2 segundos.
• Luego, Rogue™ se reiniciará y todas las luces indicadoras se iluminarán.
Page 68

68
INSTRUCCIONES DE SEGURIDAD IMPORTANTES
GUARDE ESTAS INSTRUCCIONES.
Cuando se utilizan aparatos eléctricos, siempre deben seguirse precauciones básicas, incluida
las siguientes:
LEA TODAS LAS INSTRUCCIONES ANTES DE UTILIZAR ESTE APARATO. ESTE PRODUCTO ESTÁ DISEÑADO
PARA USO DOMESTICO ÚNICAMENTE. SI SE LO UTILIZA CON FINES COMERCIALES, LA GARANTÍA QUEDARÁ
ANULADA.
ADVERTENCIA: PARA DISMINUIR EL RIESGO DE INCENDIO,
DESCARGA ELÉCTRICA, DAÑO O LESIÓN:
• Use aparatos solo con los paquetes de baterías diseñados especícamente.
• El uso de un paquete de baterías distinto puede crear un riesgo de lesiones e
incendios.
• Cuando el paquete de batería no esté en uso, manténgalo alejado de otros objetos
metales, como clips, monedas, llaves, clavos, tornillos y otros objetos pequeños
de metal, que puedan crear una conexión de una terminal a otra. Al crear un corto
en las terminales de la batería podría causar quemaduras o un incendio.
• No exponga el paquete de baterías o el aparato al fuego o a temperaturas
excesivas.
• La exposición al fuego o a temperaturas sobre los 130 °C (265 °F) puede causar
una explosión. La temperatura de 130°C puede remplazarse por la temperatura de
265°F.
• Siga todas las instrucciones de carga y no cargue el paquete de batería o
electrodoméstico fuera del rango de temperatura detallado en las instrucciones.
• La carga inadecuada o en temperaturas fuera del rango detallado podría dañar la
batería y aumentar el riesgo de incendios.
• Solo una persona calicada debe realizar el mantenimiento de la unidad, y
deben utilizarse únicamente piezas de repuesto idénticas. Esto permitirá que se
mantenga la seguridad del producto.
• No modique o trate de reparar el aparto o el paquete de batería (según se
aplique) excepto a lo indicado en las instrucciones de uso y cuido.
• Arme la aspiradora por completo antes de ponerla en funcionamiento.
• El cargador es para uso en interiores solamente.
• Evite utilizarlo como un juguete. La unidad no tiene como n el uso por parte de
niños menores de 12 años. Cuando se la utilice cerca de niños, será necesario
hacerlo bajo una estricta supervisión. Para evitar lesiones o daños, mantenga a
los niños lejos del producto y no permita que coloquen los dedos u otros objetos
en las aperturas.
• Utilícelo únicamente según el uso descrito en este manual. Utilice únicamente
piezas y productos Hoover® recomendados.
• No utilice el cargador si el cable o el enchufe se encuentran dañados. Si el aparato o
cargador no está funcionando como debe ser, se ha caído, dañado, dejado afuera, o
si se ha sumergido en agua, llévelo a un Centro técnico antes de continuar usándolo.
Page 69

69
• No hale o alce el cargador por el cable, no use el cable como mana, no cierre la
puerta sobre el cable, no tienda el cable alrededor de bordes o esquinas losos.
No apoye el producto sobre el cable.
• No pase el aparato por encima del cable. Mantenga el cable lejos de las
supercies calientes.
• No desenchufe el cargador tirando del cable. Para desenchufar el cargador, sujete
el enchufe,no el cable.
• No manipule el cargador (incluido el enchufe y las terminales de carga) o los
electrodomésticos con las manos mojadas.
• No coloque ningún objeto en las aberturas. No lo utilice la unidad si alguna de sus
aberturas se encuentra bloqueada.
• Manténgalas libres de polvo, pelusas, cabello y cualquier otro elemento que pueda
disminuir el ujo de aire.
• Evite que el cabello, la ropa suelta, los dedos y cualquier otra parte del cuerpo
entren en contacto con las aberturas y las piezas móviles.
• No coloque la aspiradora sobre las escaleras ni sobre un mueble, ya que pueden
generarse lesiones o daños.
• No utilice la unidad en áreas donde pueden haber líquidos inamables o
combustibles, o pedazos nos de madera, ni lo utilice en áreas en donde estos
estén presente.
• No aspire nada que se encuentre en combustión o emita humo, como cigarrillos,
fósforos o cenizas calientes.
• No utilice la unidad si esta no tiene colocados la copa de recolección de residuos
o los ltros.
• Apague el interruptor de alimentación antes de extraer o instalar el cepillo
giratorio.
• No incinere el cargador, la batería ni el aparato, aún si estuvieran muy
• dañados. Las baterías pueden explotar y provocar un incendio.
• Este producto incluye baterías recargables de iones de litio. No exponga las
baterías a altas temperaturas, ya que pueden prenderse fuego o explotar. No
deseche la batería en un incinerador ni en un compactador de desechos. Vea
la sección para desechar la batería para instrucciones.
• No intente desarmar la batería.
• En condiciones extremas, pueden producirse pérdidas en las celdas de la
batería. Si se lo vierte liquido en su piel lávese rápidamente con agua y
jabón. Si se lo vierte líquido en los ojos, no se frote los ojos, lávelos
rápidamente con agua limpia y de manera continua por un mínimo de 15
minutos. Consulte a un médico de inmediato.
• Para recargar la unidad, utilice únicamente el cargador
(N.° de pieza #440011974) provisto por Hoover®.
• No toque el bloque de batería ni los terminales del cargador, ni inserte
objetos en ellos.
• No intente cortocircuitar la batería ni los terminales del cargador.
• Quite los cables de otros aparatos del área de limpieza.
• No opere la aspiradora en una habitación donde se encuentre un infante o
niño durmiendo.
Page 70

70
• No opere la aspiradora en un área en donde se encuentren velas encendidas u
objetos frágiles en el piso que se va a limpiar.
• No opere esta aspiradora en una habitación que tenga velas prendidas en
muebles que la aspiradora puede accidentalmente golpear o se pueda tropezar
sobre los mismos.
• No permita que los niños se sienten sobre la aspiradora
ADVERTENCIA: PARA REDUCIR EL RIESGO DE SHOCK
ELÉCTRICO, EL CARGADOR CUENTA CON UN ENCHUFE POLARIZADO
(UNA HOJA ES MÁS ANCHA QUE LA OTRA). EL ENCHUFE SE PODRÁ
UTILIZAR ÚNICAMENTE EN UN TOMACORRIENTE POLARIZADO DE
UNA MANERA. SI EL ENCHUFE NO CABE EN EL TOMACORRIENTE,
GIRE EL ENCHUFE. SI AÚN NO CABE, COMUNÍQUESE CON UN
ELECTRICISTA CALIFICADO PARA INSTALAR UN TOMACORRIENTE
ADECUADO. NO CAMBIE EL ENCHUFE.
AVERTISSEMENT: Este producto contiene químicos que pueden
causar cáncer, defectos de nacimiento o daños a la reproducción según el
conocimiento del estado de California LAVAR LAS MANOS DESPUÉS
DE MANIPULARLO.
•Evite aspirar objetos duros y filosos con este producto, ya que pueden dañarlo.
•Almacénelo apropiadamente en interiores, en un lugar seco. No exponga
la máquina a temperaturas congeladas. Este producto incluye baterías
recargables de iones de litio. No exponga las baterías a altas temperaturas, ya
que pueden prenderse fuego o explotar.
•Cuando el cepillo giratorio esté encendido, no permita que la aspiradora se
asiente en una ubicación durante un extenso período de tiempo, ya que puede
dañarse el piso.
ANTES DE USAR ADVERTENCIA:
Asegúrese que no haya niños ni mascotas en la habitación o que tengan acceso
a la habitación que se va a limpiar para evitar el riesgo de lesiones.
PRECAUCIÓN: P Para evitar el riesgo de daños, guarde objetos
frágiles, cables sueltos y objetos pequeños que puedan volcarse.
•Para evitar el daño a los pisos, guarde cualquier objeto filoso o con puntas que
puedan introducirse por debajo del robot y rayar la superficie del piso.
•Su robot está diseñado para recoger pequeñas cantidades de polvo y no debe
remplazar una aspiradora vertical. Use a Rogue™ regularmente para ayudarle a
reducir el tiempo que le toma aspirar semanalmente.
•Rogue™ limpia pisos de toda superficie y de alfombra delgada. No se
recomienda su uso en alfombra gruesa.
•Las alfombras de colores oscuros u objetos pueden activar los sensores de
Rogue™, por lo que pueda que no aspire sobre o alrededor de estos.
ELIMINACIÓN DE LA BATERÍA DEL ROBOT
•A fin de preservar los recursos naturales, recicle o deseche el paquete vencido
en la forma correspondiente. Este producto contiene una batería de iones de
litio que debe desecharse debidamente. Las leyes locales, estatales o federales
pueden prohibir la eliminación de las baterías de litio en la basura ordinaria.
Page 71

71
•Consulte con su autoridad de manejo de desperdicios para información
sobre opciones de reciclaje o deshecho disponibles. Para información sobre
desechar, llame a The Rechargeable Recycling
Corporation al 1-800-3-BATTERY.
ADVERTENCIA: Al remover la cubierta
de las terminales del empaque de baterías con una
cinta adhesiva resistente. No intente destruir ni desarmar el paquete de batería,
ni extraer alguno de sus componentes. Las baterías de iones de litio deben ser
recicladas o desechadas en la forma correspondiente. Además, nunca debe tocar
ambos terminales con objetos de metal o con partes del cuerpo, dado que puede
producirse un cortocircuito. Mantenga las piezas de la aspiradora lejos del
alcance de los niños. El no cumplir con estas advertencias podría resultar en un
incendio / o daños serios.
Page 72

72
MANTENIMIENTO Y GARANTÍA
INFORMACIÓN DE MANTENIMIENTO DE LA BATERÍA
CUALQUIER OTRO SERVICIO DE MANTENIMIENTO DEBER Á REALIZARLO UN PERSONAL TÉCNICO AUTORIZ ADO
Llame al 888 1-877-897-2050 EE.UU. y Canadá
En caso de necesitar más ayuda, diríjase a un Centro Técnico autorizado. Para encontrar a uno más
cercanovisite nuestro sitio web en www.hoover.com. El costo de cualquier transportación hacia o desde
cual quier lugar de repa ración deberá se r pagado por el dueño. Siempre identique su producto por el
número de modelo y código del fabricante al solicitar información o al ordenar partes de remplazo. (El
número de modelo o código del fabricante para la aspiradora se encuentra en la parte inferior o en la parte
de atrás del producto, y en la batería y cargador.)
GARANTÍA LIMITADA DE UN AÑO (USO DOMESTICO)
COBERTURA DE LA GARANTÍA INCLUYE: El uso y mantenimiento normal en una vivienda y según la Guía
de Usuario, su producto Hoover
®
y batería son garantizados contra defectos originales de fabrica en
materialesy mano de obra por un año completo. Durante el periodo de garantía, Hoover
®
proveerá mano de
obra y piezas, de forma gratuita, para corregir dichos defectos en sus productos.
CÓMO REALIZAR UN RECLAMO POR LA GARANTÍA: Si este producto no está funcionando según lo
garantizado, lleve o envíe el producto a un Centro de Servicio de Garantía Autorizado de Hoover
®
junto con
su comprobante de compra. Si la batería no está funcionando según lo garantizado, lleve o envíelas junto
con el comprobante de compra a un centro de servicio autorizado de Hoover
®
o comuníquese conHoover®
al 1-877-897-2050. Para un referido automatizado a un centro de servicio autorizado en los Estados Unidos,
llame al 888 1-877-897-2050 o visite Hoover
®
en línea a www.hoover.com.
NO CUBIERTO POR LA PRESENTE G ARANTÍA: Esta garantía no cubre cor reas, ltros y rollos de cepillo s, el
uso de este producto en la operación comercial (tal y como los servicios de limpieza, portería, y alquiler de
equipos), el mantenimiento inadecuado del producto, daños a causa del mal uso, caso fortuito, naturaleza,
vandalismo, y otros casos ma s allá del control de Hoover
®
, omisiones o hechos del dueño, uso fuera del
país en el que se compró el producto originalmente y reventa del producto por el dueño original.
y las reventas del producto por el propietario original. La presente garantía no cubre la
recolección,ent rega, transpor te o visit as a la casa. Sin embargo, si us ted envía su producto al centro de
Ventas y Servicio para el ser vicio de garantía, el costo del envío de una vía será cubierto. Llame a Serv icios
de Hoover
®
al 1-877-897-2050, para información sobre cómo enviar este producto. Esta garantía no se
aplica a productos comprados fuera de los Estados Unidos, incluyendo sus territorios y posesiones, un
Intercambio Militar estadounidense y Canadá.
OTROS TÉRMINOS IMPORTANTES: Esta garantía no es transferible y no podrá ser cedida. Esta garantía
deberá ser gobernada e interpretada según las leyes del estado de Ohio. El Periodo de Garantía no será
extendido para ningún remplazo de baterías o piezas o reparaciones hechas bajo esta garantía.
ESTA GARANTÍA ES LA GARANTÍA EXCLUSIVA Y REMEDIARÁ T ODA OTRA GARANTÍA, EXPRESA O IMPLÍCITA,
INCLUSO LAS GARANTÍAS DE COMERC IALIZACIÓN O APTITUD PA RA UN PROPÓSITO PARTICULAR, SE LAS
RENUNCIAN Y EN NINGÚN EVENTO SERÁ HOOVER RESPONSABLE POR CUALQUIER DAÑO ESPEC IAL, INDIRECTO,
INCIDENTAL O CONSECUENCIAL DE CUALQUIER TIPO O NATUR ALEZA AL DUEÑO O A CUALQUIER PARTE
HACIENDO UN RECLAMO POR PARTE DEL DUE ÑO, YA SEA BASADO EN UN CONTRATO, POR NEGLIGENCIA, HECHO
ILÍCITO CIVIL O RESPONSABILIDAD OBJETIVA, NI POR NINGUNA OTRA CAUSA ALGUNA.
En algunos estados, la exclusión de los daños mediatos no está permitida, de modo que la exclusión
prec edente puede no serle aplicable. Esta gar antía l e otorga derechos espec ícos . También pue de tener
otros derechos, que varían según el estado.
Page 73

73
DECLARACIÓN DE CONFORMIDAD
Este dispositivo cumple con la Par te 15 de las reglas de FCC / los estándares RSS para la exención
de licencia de la Industria de Canadá. La operación está sujeta a las dos siguientes condiciones: (1)
este dispositivo no debe causar interferencia dañina, y (2) este dispositivo deberá aceptar cualquier
interferencia recibida, incluso la interferencia que pueda ser causada por la operación no deseada. Bajo las
regulaciones de la Industria de Canadá, este transmisor de radio solo debe operar por medio de una antena
de un tipo y un alcance máximo (o menor) aprobado por el transmisor por la industria de Canadá. Para
reducir el potencial de interferencia por radio a otros usuarios, el tipo de antena y su alcance deberá ser
seleccionado para que la energía equivalente radiada isotrópicamente (e.i.r.p., por sus siglas en inglés) no
sea mayor de lo necesario para una comunicación exitosa.
RECORDATORIO DE MPE
Para cumplir con los requisitos de exposición de FCC / IC RF, se deberá mantener una distancia de 20 cm o
más entre la antena de este dispositivo y las personas durante la operación del mismo.
Para cumplir con este requisito, no se recomienda la operación a una distancia menor a esta.
Los cambios o modicac iones no ap robada s expre samente por la par te respon sable para su cump limien to
podría anular la autoridad del usuario para operar el equipo.
El equipo ha sido probado y se encuentra en cumplimiento con los límites para un dispositivo
digital clase B, según la parte 15 de las Normas FCC. Estos limites son diseñados para pr oveer
una protección razonable contra la interferencia dañina en una instalación residencial. El equipo
generado usa y puede radiar energía de radiofrecuencia y si no se instala y se usa según las
instrucciones, podría causar una interferencia dañina a las radiocomunicaciones. Sin embargo,
no hay garantía que la interferencia no ocurrirá en una instalación en particular. Si este equipo
llega a causar una interferencia dañina a la recepción de radio o televisión, lo cual puede ser
determinado al encender o apagar el equipo, se le exhorta al usuario a tratar de corregir la
interferencia por una o más de las siguientes medidas:
• Reoriente o reubique la antena receptora.
• Aumente la separación entre el equipo y el recibidor.
• Conecte el equipo a un tomacorriente distinto del que se encuentra el recibidor conectado.
Page 74

74
 Loading...