

Page 1

Instruction Manual IMPORTANT: Read carefully before assembly and use.
©2017 Techtronic Fl oor Care Techn ology Limi ted. All Rig hts Reser ved. Distr ibuted by Ho over, Inc., Gle nwillow, Oh 44139 #961151146 ID112321-R1
Page 2

Welcome to
Hoover
®
ownership.
Page 3

Your Rewind Guide:
Safety Instructions
1
Getting Started
Using your Rewind
Keep your
Rewind Running Properly
Need Help?
Warranty
3
4
9
17
18
Page 4

IMPORTANT SAFETY INSTRUCTIONS
When using an electrical appliance, basic precautions should
always be followed, including the following:
READ ALL INSTRUCTIONS BEFORE USING THIS APPLIANCE.
WARNING:
ELECTRIC SHOCK, DAMAGE OR INJURY:
•
Fully assemble before operating.
•
Operate cleaner only at voltage specified on data
TO REDUCE THE RISK OF FIRE,
label on bottom of cleaner.
•
Do not leave appliance when plugged in. Unplug from
outlet when not in use and before cleaning or servicing.
•
Do not use outdoors or on wet surfaces.
•
Do not allow to be used as a toy. Not intended for
use by children age 12 and under. Close supervision
is necessary when used near children. To avoid injury
or damage, keep children away from product,
and do not allow children to place fingers or other
objects into any openings.
•
Use only as described in this manual. Use only
manufacturer’s recommended attachments and products.
•
Do not use with damaged cord or plug. If appliance is
1
not working as it should, has been dropped, damaged,
left outdoors, or dropped into water, take it to a service
center prior to continuing use.
•
Do not pull or carry by cord, use cord as a handle, close a door on
cord, or pull cord around sharp edges or corners.
•
Do not place product on cord. Do not run appliance over
cord. Keep cord away from heated surfaces.
•
Do not unplug by pulling on cord. To unplug, grasp
the plug, not the cord.
•
Do not handle plug or appliance with wet hands.
•
Do not put any object into openings. Do not use with any
opening blocked; keep free of dust, lint, hair, and anything
that may reduce air flow.
•
Keep hair, loose clothing, fingers, and all parts of body
away from openings and moving parts. Brushroll
continues to rotate when in the upright position.
•
Turn off all controls before unplugging.
•
Use extra care when cleaning on stairs. To avoid
personal injury or damage, and to prevent the cleaner
from falling, always place cleaner at bottom of stairs on
Page 5

floor. Do not place cleaner on stairs or furniture, as it may
result in injury or damage.
•
Do not use to pick up flammable or combustible liquids,
such as gasoline, or fine wood sandings, or use in areas
where they may be present.
•
Hold plug when rewinding onto cord reel. Do not allow plug to
whip when rewinding.
•
Unplug before connecting Turbo Tool.
•
Do not pick up anything that is burning or smoking,
such as cigarettes, matches, or hot ashes.
•
Do not use without dirt cup and/or filters in place.
•
WARNING: This product contains
chemicals known to the State of California to cause
cancer, birth defects or reproductive harm.
WASH HANDS AFTER HANDLING.
CAUTION:
•
Avoid picking up hard, sharp objects with this product,
TO REDUCE THE RISK OF DAMAGE:
as they may cause damage.
•
Store appropriately indoors in a dry place.
Do not expose machine to freezing temperatures.
•
Brushroll continues to turn while product is turned on and
handle is in upright position. To avoid damage to carpet,
rugs, furniture and flooring, avoid tipping cleaner or
setting it on furniture, fringed area rugs, or carpeted
stairs during tool use.
•
Do not use sharp objects to clean out hose as they
can cause damage.
•
With brushroll on, do not allow cleaner to sit in one
location for an extended period of time, as damage
to the floor can result.
SAVE THESE INSTRUCTIONS
:
WARNING
ELECTRIC SHOCK, THIS APPLIANCE HAS A POLARIZED PLUG (ONE
BLADE IS WIDER THAN THE OTHER). THIS PLUG WILL FIT IN A
POLARIZED OUTLET ONLY ONE WAY. IF THE PLUG DOES NOT FIT
FULLY IN THE OUTLET, REVERSE THE PLUG. IF IT STILL DOES NOT
FIT, CONTACT A QUALIFIED ELECTRICAN TO INSTALL THE PROPER
OUTLET. DO NOT CHANGE THE PLUG IN ANY WAY.
THIS PRODUCT IS INTENDED FOR HOUSEHOLD USE ONLY.
IF USED COMMERCIALLY WARRANTY IS VOID.
TO REDUCE THE RISK OF
2
Page 6
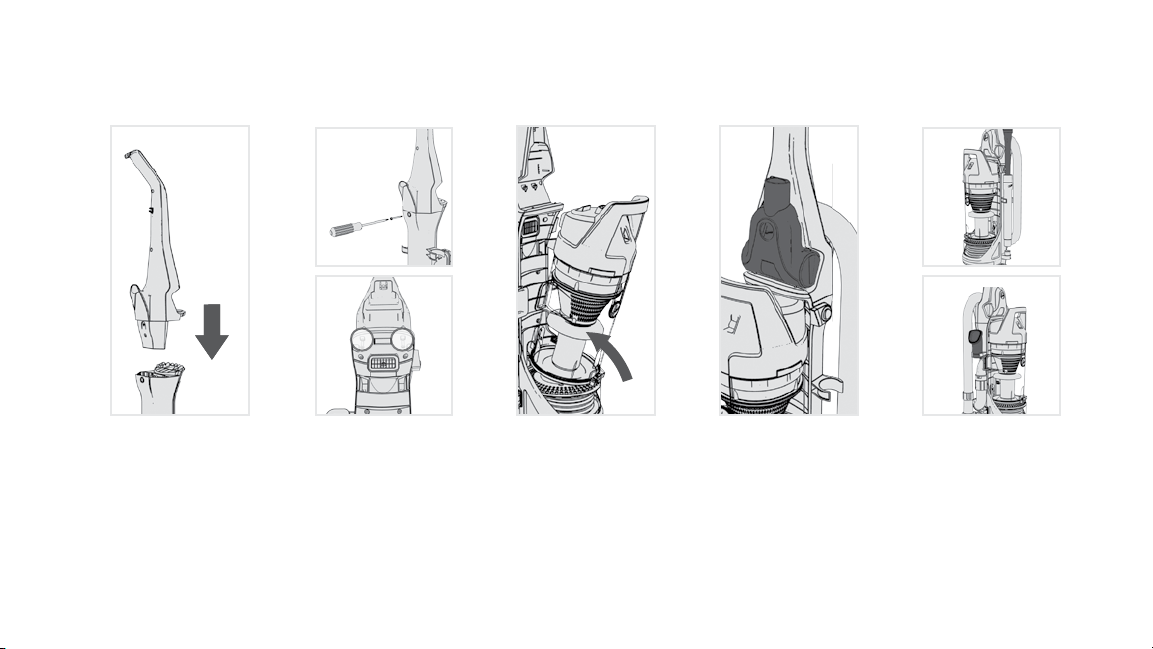
Getting Started with your Rewind
Remove handle screw
and insert handle.
1
3
Insert handle screw
and tighten with a
Phillips screwdriver.
Then tighten
2 small screws
in the front
lower handle.
32
Place bottom
of dirt cup in
first and pivot
into place.
It’ll click.
4
Secure Turbo
tool here.
Place Crevice Tool
into wand then slide
5
into storage
area. Place
the Dusting
Brush on the
other side.
NOTE: Act ual model ma y vary from im ages shown .
Page 7
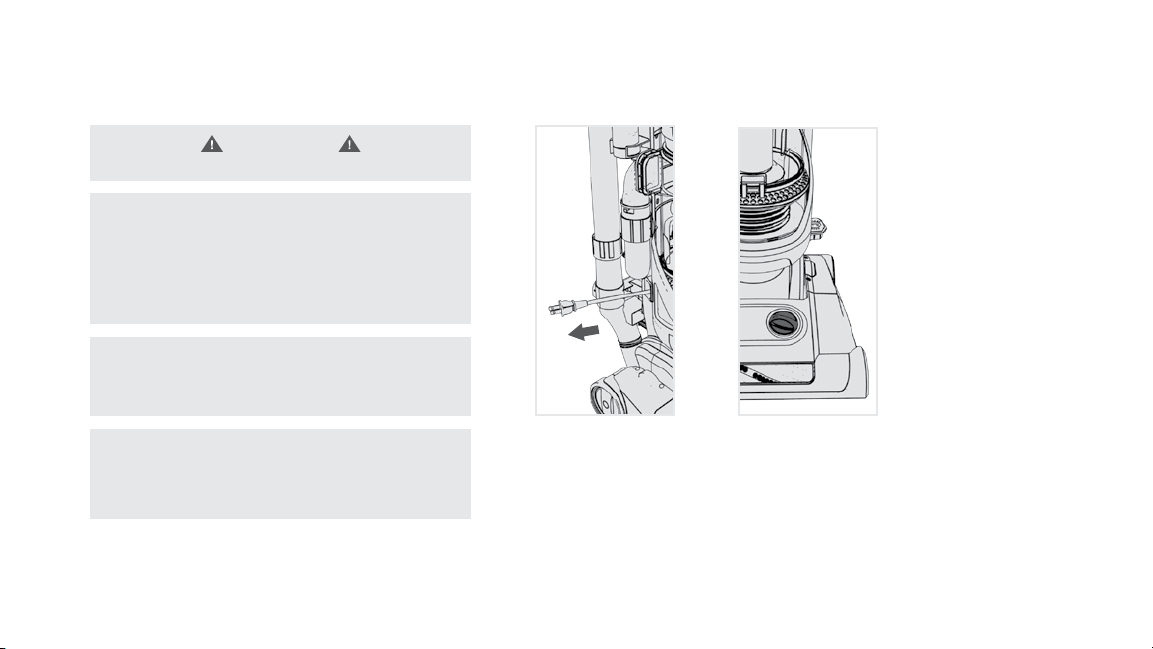
Using your Rewind
CAUTION
Not to be used for grooming a pet.
IMPORTANT
When pulling on the cord, yellow tape will identify when the
cord is almost fully extended. When red tape is visible on the
cord, the cord has reached its full length. (Do not pull the cord
past the red tape.)
IMPORTANT
If the vacuum is diffi cult to push, push down
and turn knob to the next higher setting.
For maximum cleaning performance, set to LOW
for all types of carpet. For very deep pile and soft
carpet, set to HIGH Carpet.
For bare floors turn dial to HARD FLOOR.
Grasp the end of the
plug and pull
1
to release cord from
cord reel.
Push down and turn
height adjustment*
2
knob to a desired
setting.
*Numb er of height s ettings va ry per mode l.
4
Page 8

Using your Rewind
WARNING
Very fine materials, such as face powder
or corn starch, may seal the filter and cause
a reduction in performance. When using the
vacuum for this type of dust, empty the cup
and clean the filters often.
Plug into an
electrical outlet. Press
3
power switch on side
of vacuum.
5
Step here and
pull handle back
4
to recline.
Page 9
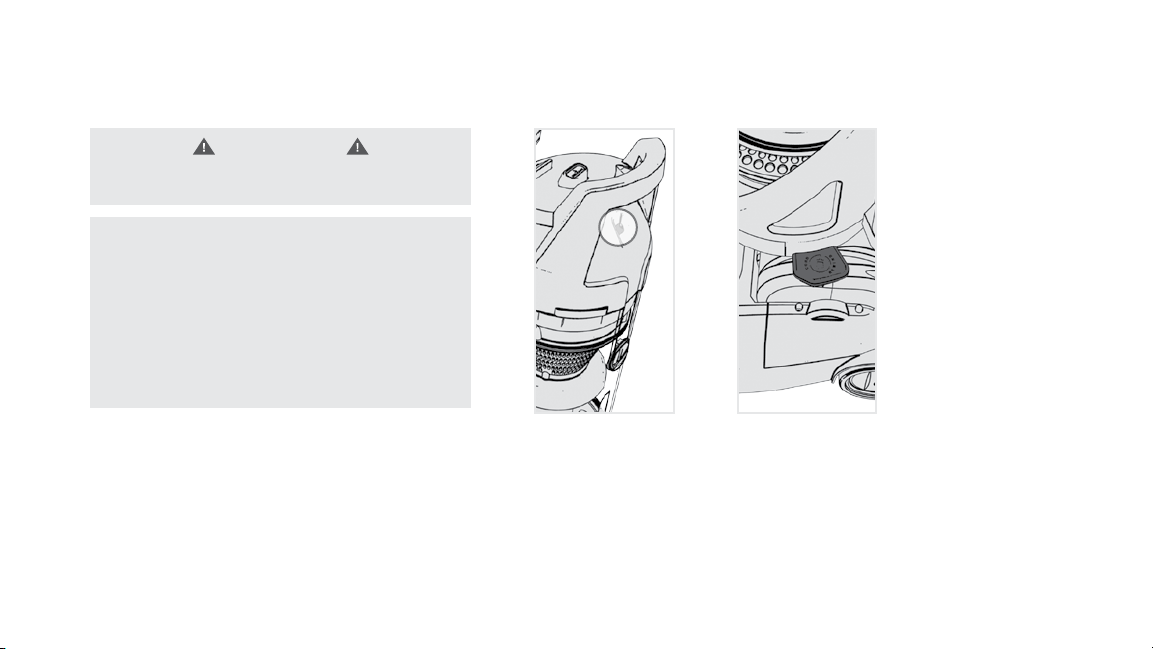
Using your Rewind
WARNING
Hold plug when retracting onto cord reel.
Do not allow plug to whip when retracting.
IMPORTANT
If system check indicator is red:
1. Clean rinsable filter (refer to page 10) and/or filter made
with HEPA media (refer to page 12).
2. Empty dirt cup (refer to page 9).
3. Check hose for clogging (refer to page 14).
4. Check brushroll for clogging (refer to page 13).
When red, the
system check
5
indicator aler ts
to possible system
performance issues.
To rewind the
cord, unplug from
6
electrical outlet. Hold
plug and press down
on the cord rewind
pedal on side of cord
reel.
6
Page 10
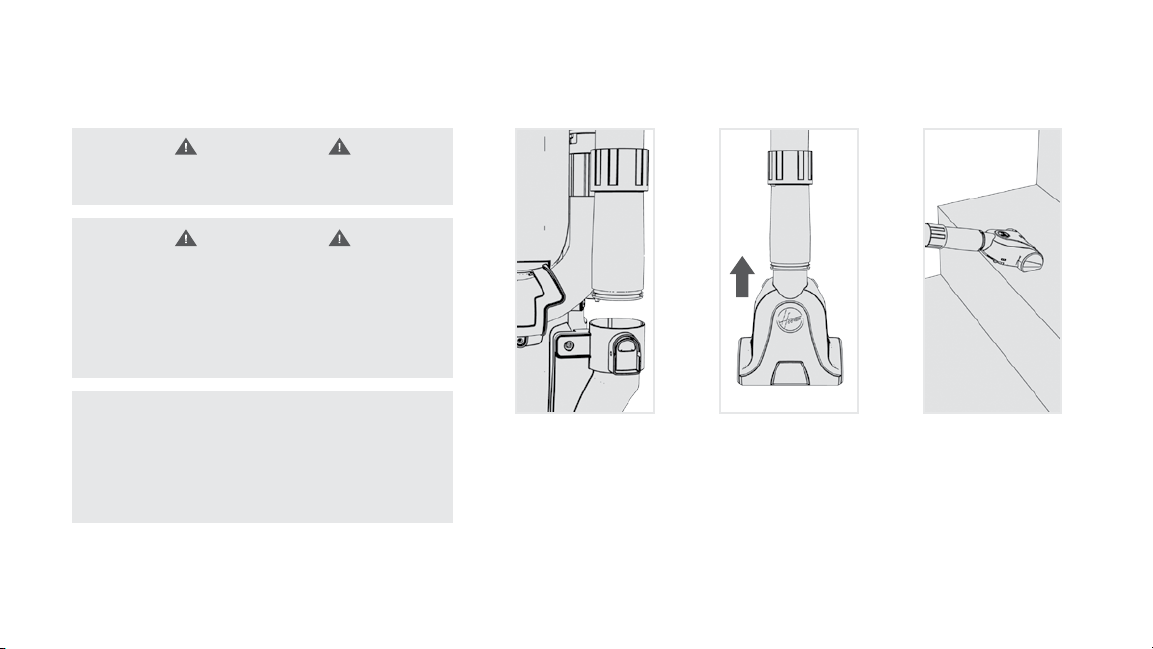
Using your Rewind: Tools and Hose
WARNING
Always turn off before connecting
or disconnecting wand or tools.
CAUTION
Use extra care when cleaning on stairs. To avoid personal inju-
ry or damage, and to prevent the cleaner from falling, always
place cleaner at bottom of stairs
or on floor. Do not place cleaner on stairs or furniture,
as it may result in injury or damage. When using
tools, always insure handle is in upright position.
IMPORTANT
Brushroll continues to turn while product is turned
on and handle is in upright position. To avoid
damage to carpet, rugs, furniture and flooring,
avoid tipping cleaner or setting it on furniture,
fringed area rugs, or carpeted stairs during tool use.
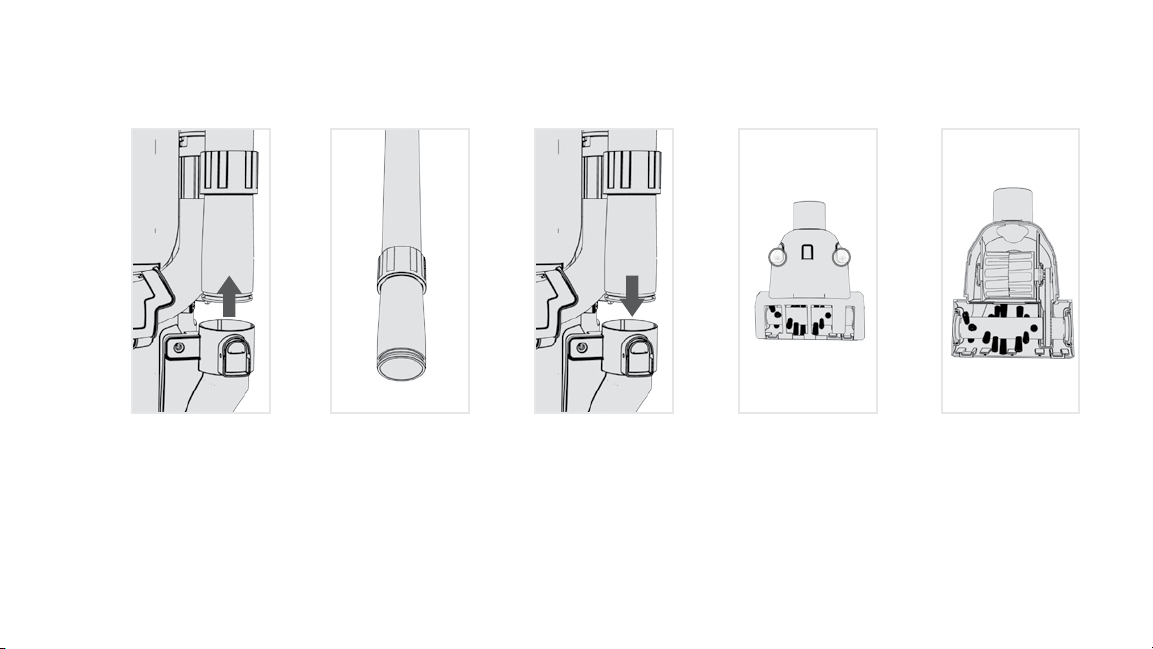
Press the hose release
button and pull hose
1
end out for tool use. To
lock back into place,
reinser t into hose tube
until it clicks.
Attach tool or wand
by pushing fi rmly into
2
place.
Use the Turbo Tool
to clean stairs and
3
upholstery.
7
(Tools va ry per mod el)
Page 11
Using your Rewind: Tools and Hose
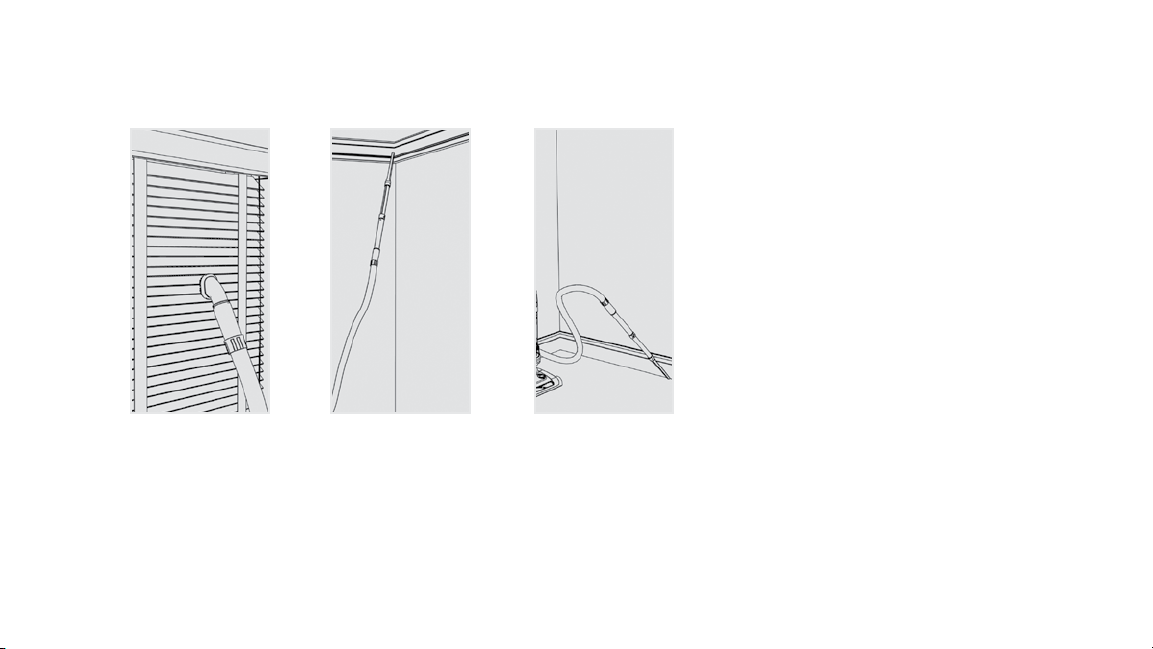
Use the dusting brush
on vents, blinds and
furniture.
The Wand
gives you extra reach
54
with any attached
tool.
Use the Crevice
Tool in tight
6
spaces, corners and
along edges.
8
Page 12
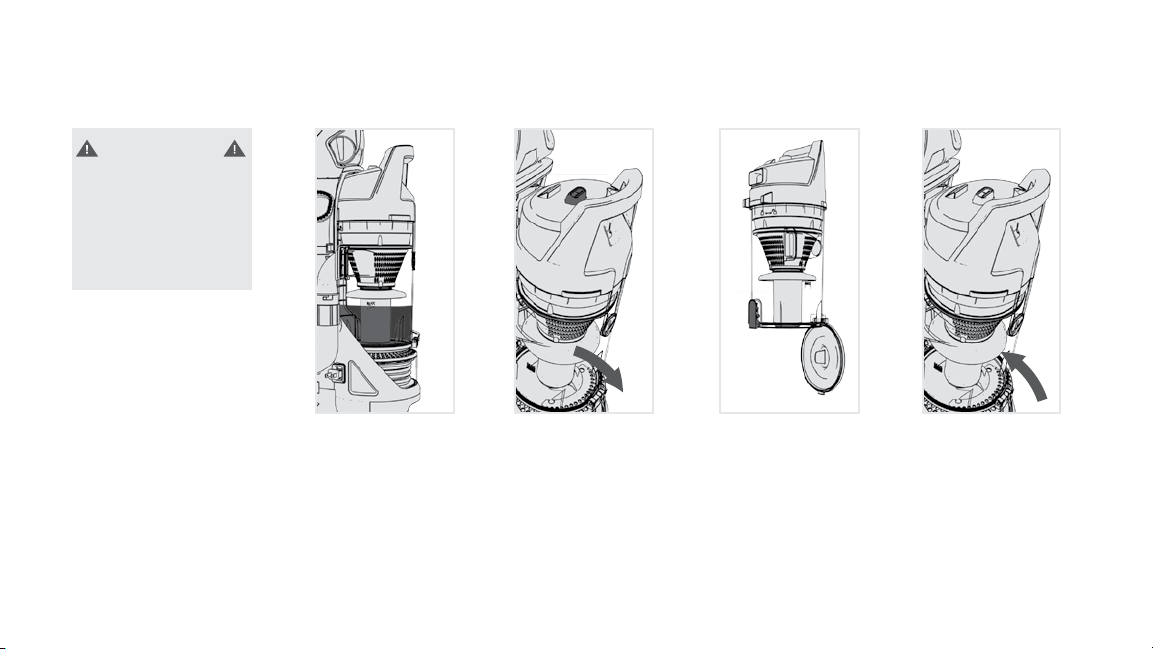
Keep your Rewind Running Properly: Emptying Dirt Cup
WARNING
To reduce the risk
of personal injury -
Unplug before cleaning
or servicing. Do not use
vacuum without dir t cup or
filters in place.
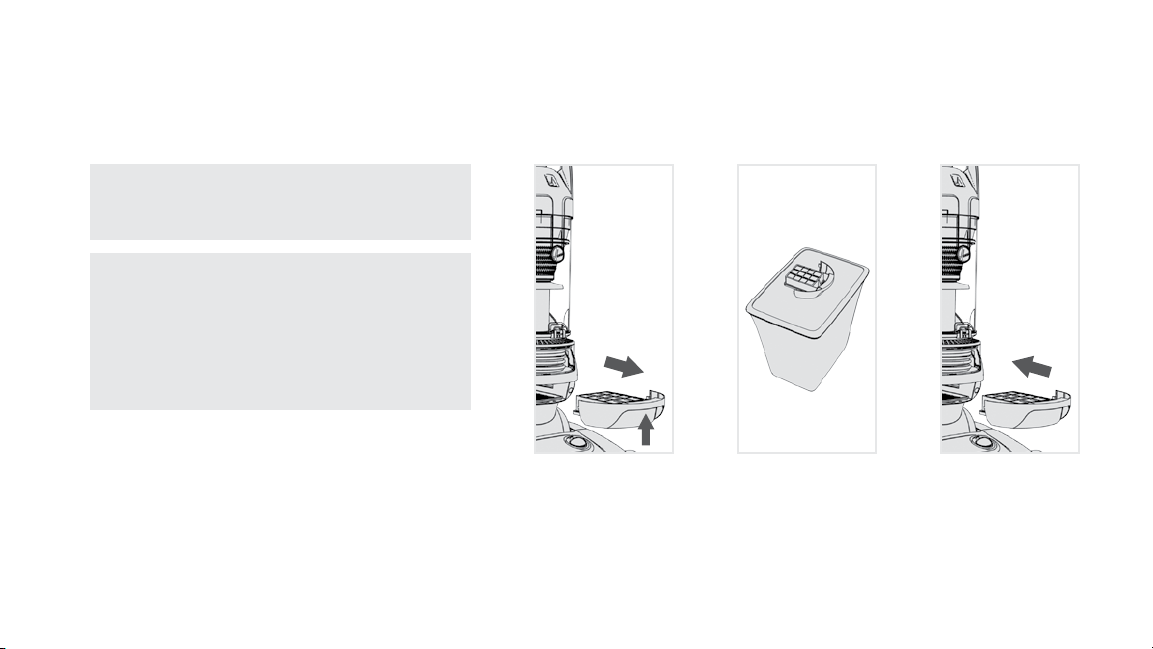
2
Press this tab
and pivot the
dirt cup out.
Empty the dirt cup
when it reaches
1
the max fill line,
or when filter check
indicator is red.
9
Press lower button to
empty. Snap the dirt
3
cup closed.
Place the cup back in,
bottom first,
4
and pivot into place.
It'll click.
Page 13
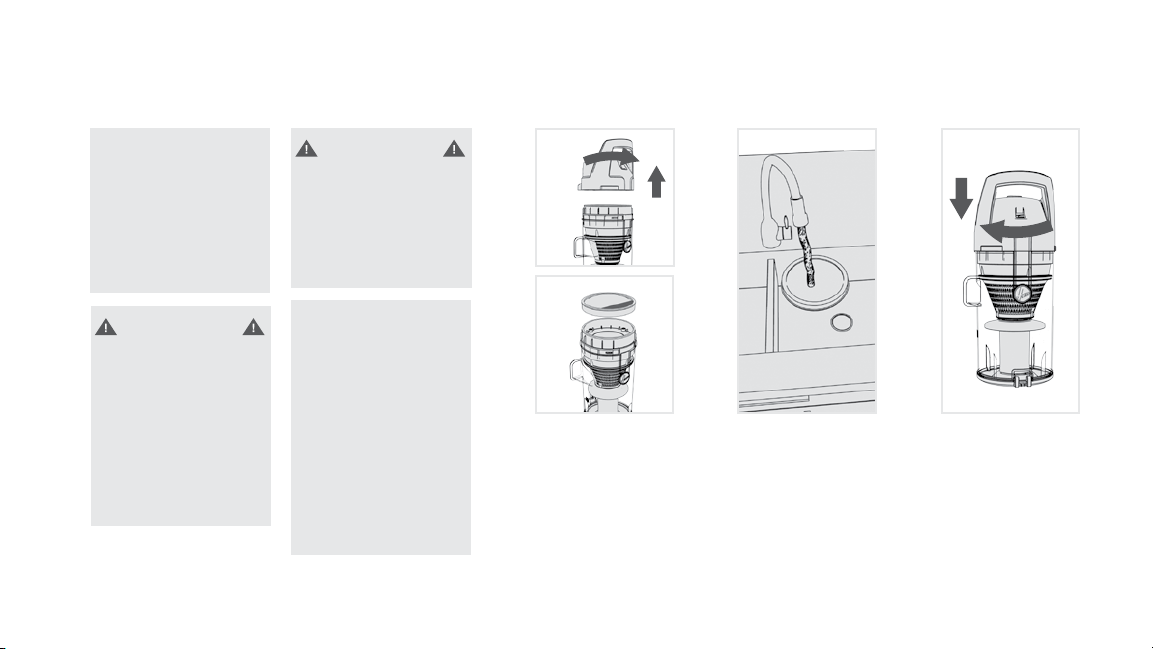
Keep your Rewind Running Properly: Cleaning Rinsable Filter
IMPORTANT
Allow filter to dry
completely before
replacing. Dry filter on edge
so air circulates
on both sides of the
filter. This will take
at least 24 hours.
WARNING
Very fine materials,
such as face powder
or cornstarch, may seal the
filter and cause a reduction
in performance. When using
the vacuum for this type of
dust,
empty the cup and
clean the filters often.
WARNING
To reduce the risk of personal
injury - Unplug before
cleaning or
servicing. Do not use vacuum
without dirt
cup or filters in place.
What to Buy:
Rinsable Filter
When used and
maintained properly,
your Rinsable Filter
should not need
replacement within
the warranty period.
If desired, additional
filter is available at Hoover.
com or call 1-800 -944-
9200. Ask for Hoover
No. 304087001
®
Part
Remove the dirt cup.
Twist the lid open. Pull
1
tab to remove the filter.
Rinse for 2 minutes
in clear warm water;
2
dry for
a minimum of
24 hours.
Replace the filter, tab
side out.
3
Twist lid securely until
it clicks.
10
Page 14
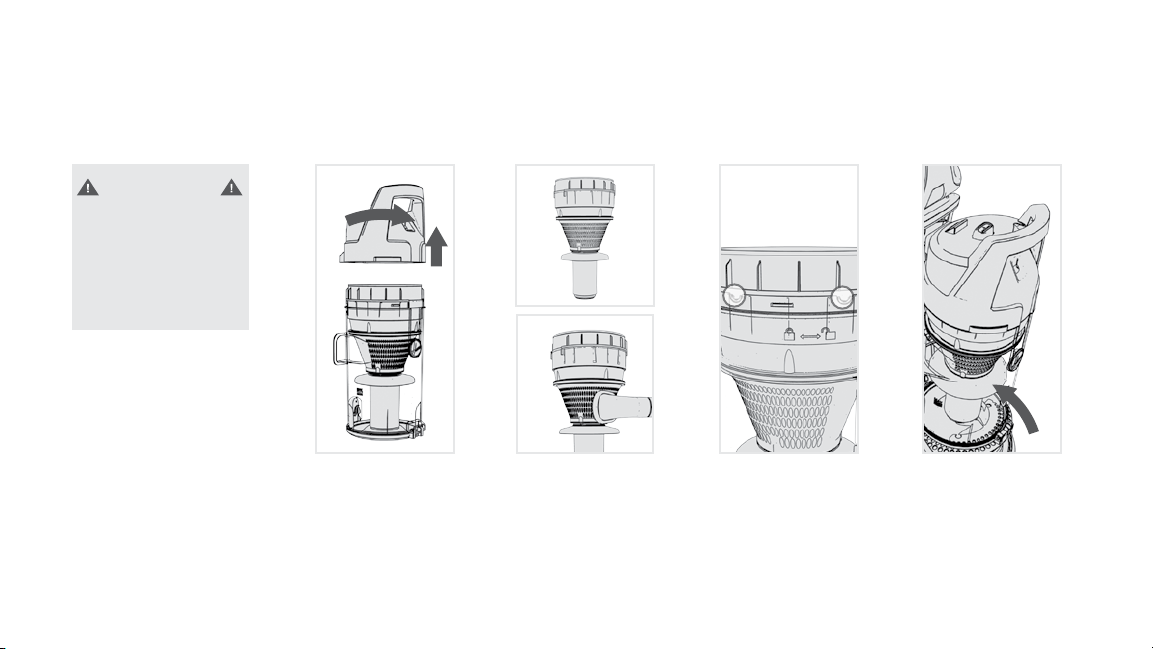
Keep your Rewind Running Properly:
Cleaning Cyclonic Filter Assembly
WARNING
To reduce the risk
of personal injury - Unplug
before cleaning or servicing.
Do not use vacuum without
dirt cup or filters in place.
11
Remove the dirt cup.
Twist the lid open.
1
Pull the cyclone
assembly out.
2
Use the Dusting Brush
to clean off assembly
debris.
Replace the cyclone
assembly making
3
sure the tabs align.
Then twist to lock dirt
cup lid.
Place the cup back in,
bottom first,
4
and pivot into place.
It'll click.
Page 15
Keep your Rewind Running Properly:
Cleaning Filter made with HEPA media
IMPORTANT
Do not rinse or wash the filter
made with HEPA media.
What to Buy:
Filter Made With HEPA Media
When used and maintained properly, your Filter
should not need replacement within the warrant y
period. If desired, additional filter is available
at Hoover.com or call 1-800-944-9200.
Ask for Hoover® Part No. 411018001.
With fingers in slot,
pull filter frame
1
straight out.
Hold filter over
a trash can and tap
out debris.
Slide filter frame back
into position.
32
12
Page 16

Keep your Rewind Running Properly: Cleaning Brushroll
CAUTION
To reduce risk of injury from
moving parts -
Unplug before ser vicing.
13
Turn off brushroll.
Lower the handle. Flip
1
vacuum over.
Remove (6) screws on
bottom plate with a
2
Phillips screwdriver.
Pivot to remove
bottom plate.
Remove any
debris or hair
3
from brushroll.
Visit Hoover.com for
more info.
Replace bottom plate
and reinsert screws.
4
Page 17
Keep your Rewind Running Properly: Cleaning Hose and Tools
Press the hose release
button and pull hose
1
end out.
Clear away debris or
obstructions
2
using a blunt
object. Do not
use sharp objects.
To lock back into
place, push hose into
3
hose tube
until it clicks.
Clean the Turbo Tool
by removing screws
4
on
either side.
5
Remove the
bottom plate.
14
Page 18

Keep your Rewind Running Properly: Cleaning Hose and Tools
CAUTION
To reduce the risk
of injury from moving parts
- Unplug
before servicing.
LUBRICATION
NOT REQUIRED.
The motor and brushroll are
equipped with bearings
which contain sufficient
lubrication
for their lifetime. The
addition of lubricant could
cause damage.
Do not add lubricant
to motor or brushroll.
15
NOTICE
A Thermal Protector has been designed into
your cleaner to protect it from overheating.
When the thermal protector activates the
cleaner will stop running.
If this happens proceed as follows:
1. Turn cleaner OFF and unplug it from
the electrical outlet.
2. Empty dirt cup.
3. Inspect the nozzle inlet, hose connector, hose,
dirt cup inlet, cyclonic filter, rinsable filter,
and HEPA filter. Clear obstructions if present.
4. When cleaner is unplugged and motor cools
for 30 minutes, the thermal protector will
deactivate and cleaning may continue.
If the thermal protector continues to activate
after following the above steps, your cleaner
needs servicing.
Clean out any
debris or hair from the
brushroll.
Replace bottom plate
and
76
replace screws
on either side.
Page 19

Keep your Rewind Running Properly: Replacing Belt
The bel t is locate d under the cov er of the vacuu m and should b e checked of ten. Repla ce belt if it st retched, c ut or broken.
Lower handle and
vacuum flip over.
1
CAUTION
To reduce the risk
of injury from moving parts
- Unplug
before servicing.
Any oth er servic ing should be do ne by an authori zed servi ce represen tative. If a ppliance is no t working as it sh ould,
has bee n dropped, dam aged, lef t outdoors, o r dropped into wa ter, take it to a ser vice cente r prior to cont inuing use.
Remove (6) screws on
bottom plate with a
2
Phillips screwdriver.
Pivot off the
bottom plate.
Remove worn belt
and slide new belt
3
with lettering on the
outside over the motor
shaft.
If desired, additional belts can be purchased at Hoover.com or 1-800 -944-9200.
When purchasing a new belt for models ask for Hoover® Belt part No. 38528058
Push other end of new
belt around brushroll
4
area without bristles.
What to buy: Belt
Replace bottom plate
and reinsert screws.
5
16
Page 20

Need Help?
WARNING
To reduce the risk of personal injury - Unplug before cleaning or servicing.
My Rewind won’t run.
Always be sure to plug it in firmly. A Thermal Protector may have been activated—
unplug and let vacuum cool for 30 min. If this doesn’t work, there may be no
voltage in the wall plug. Check fuse or breaker in home. If there is a blown fuse
or tripped breaker, replace fuse or reset breaker in home.
If the System Check Indicator is red…
The Rinsable Filter, filter made with HEPA media or Filter Assembly may be dirty.
Also be sure to empty the dirt cup if full. (See page 6)
If your Rewind turns off
A Thermal Protector may have been activated. First, turn off and
unplug. Empty Dirt Cup then inspect hose, filters for obstructions.
Thermal Protector should deactivate in 30 minutes. (See page 14)
My Rewind isn’t picking up well.
Be sure to empty if the dirt cup is full. You may have a clogged
filter. Lift the filter assembly out of the dirt cup and remove the
filter. Rinse with clear warm water for two minutes.
Let it dry for 24 hours before reinstalling. (See page 10)
If your filter was dirty…
17
You may also have a clog in the system. Unhook the hose to search
for a clog. If found, remove the clog. (See page 14)
My Rewind is hard to push
Be sure to set the carpet height adjustment to the appropriate setting. (See page
4)
If your Turbo Tool brushroll won’t turn.
Be sure not to apply to much pressure to the tool. If that doesn’t
work you may have blockage—remove any hair or debris from
the tool brushroll. (See page 14)
Any other servicing should be done by an authorized service
representative. If appliance is not working as it should, has been dropped,
damaged, left outdoors, or dropped into water,
take it to a service center prior to continuing use.
QUESTIONS OR CONCERNS?
Contact Us:
(800) 944 -9200
For a Complete Troub leshooting Guide, see:
Twitter: @HooverUSA
Facebook: facebook.com/hoover
Do not return to store. See ba ck of product fo r model number.
Page 21

SERVICE & WARRANTY
SERVICE INFORMATION
ANY SERVICING SHOULD BE DONE BY AN AUTHORIZED SERVIC E
REPRES ENTATIVE Call (800) 944- 9200 USA & Canada
In the event tha t fur ther assista nce is required, visi t an authorized servi ce center. Find one
nearest you by visiting our website at www.ho over.com. Costs of any trans portatio n to and
from any plac e of repair are to be paid by the owner. Always ident ify your product by the
model num ber and manufact uring code
when requ esting information or ordering replace ment parts.( The model
number an d manuf acturing cod e for the vac uum appears on the bot tom
of charge r and side of battery.)
LIMITED ONE YEAR WARRANTY (DOMESTIC USE)
WHAT THIS WARRANTY COVERS
When use d and main tained in normal household use and in accordance with
the Owner’s Manual, your Ho over
and workm anship for a full one year from date of purchase
(the “Warra nty Period”). During the Warranty Peri od, Hoover® will provid e
labor and pa rts, at no cost to you, to correc t any such de fect in products
purcha sed in the United Stat es, U.S. Militar y Exchanges and Ca nada.
HOW TO MAKE A WARRANTY CLAIM
If this product is not as warranted, take or send the product to either
®
Authorized Warranty Ser vice Dealer along with proo f of purch ase.
a Hoover
For an automa ted referral to authorized serv ice outlets in the U.S .A., phone: 1- 800-944 9200 OR visi t Hoover® online at ww w.hoover.com. For addi tional assistance or informat ion
concerning thi s Warrant y or the availability of
warranty ser vice outlets, phone the Ho over® Consumer Response Center,
Phone 1-800 -944-9200, Mon -Fri 8am-7pm EST.
®
product is war ranted against origina l defe cts in material
WHAT THIS WARRANTY DOES NOT COVER
This Warranty does not cover: use of the pro duct in a commercial op eration (such as maid,
janito rial and equipment rental servic es), brushroll, bel t, improper maintenan ce of the pro duct, dama ge due to misuse, acts of God, na ture, vandalism or ot her acts beyond the control of
®
, owner’s acts or omissions, use outsi de the country in whi ch the product was initially
Hoover
purcha sed and resales of the product by the ori ginal owner. This warranty does not cover
pick up, deli very, transpor tation or house calls. However, if you mail you r product to a Hoover®
Authorized Warra nty Service Dealer, cost of shipping will be paid one way.
This warranty does not apply to pro ducts purchas ed out side the United Sta tes, includin g its
territories and posse ssions, outside a U.S. Military Exchang e and outside of Canada. This
warranty does not cover produc ts purchased fro m a part y that is not an authorized retailer,
dealer, or distribu tor of Hoover
®
products.
OTHER IMPORTANT TERMS
This Warranty is not transferab le and may not be assigned. This Warrant y shall be governed
and const rued under the laws of th e stat e of Ohio. Th e Warrant y Period will not be extended
by any replacement or repair performed under this Warra nty.
THIS WARR ANTY IS THE EXCLUSIVE WARRA NTY AND REMEDY PROVID ED BY HOOVER
ALL OTHER WARR ANTIES, EXPRESSED OR IMP LIED, INCLUDING WARRAN TIES OF
MERCHANTABILITY OR FIT NESS FOR PARTICUL AR PURPOSE, ARE DISCLAIMED. IN
NO EVEN T WILL HO OVER BE LIABLE FOR ANY SPECIAL, INDIRECT, INC IDENTAL OR
CONSEQ UENTIAL DAMAG ES OF ANY KIND OR NATURE TO OWNER OR AN Y PARTY
CLA IMING THROUGH OWN ER, WHETHE R BASED IN CONTRACT, NEGLIG ENCE,
TORT OR STRIC T PRODUCTS LIA BILITY OR ARIS ING FROM ANY CAUSE WHATSOE VER.
Some sta tes do not allow the exclusion of consequential damage s, so the above exclusion
may not appl y to you. This warranty gives you speci fic rights; you may also have others that
vary fro m state to state.
18
®
.
Page 22

Guide de votre aspirateur
Rewind :
Consignes de sécurité
Premiers pas
20
23
Utilisation de votre aspirateur Rewind
Gardez votre aspirateur Rewind en bon état de marche
Besoin d'aide?
Garantie
23
26
33
34
FRANÇAIS
Guide d’utilisation IMPORTANT : Lisez attentivement le présent guide d’utilisation avant d’assembler et d’utiliser l’appareil.
Page 23

CONSIGNES DE SÉCURITÉ IMPORTANTES
Lorsque vous utilisez des appareils électriques, veuillez toujours
respecter entre autres les consignes de sécurité élémentaires
suivantes :
INSTRUCTIONS AVANT D’UTILISER CET APPAREIL.
AVERTISSEMENT :
LE RISQUE D’INCENDIE, DE DÉCHARGE ÉLECTRIQUE, DE
DOMMAGE OU DE BLESSURE :
•
Assemblez entièrement l’appareil avant de l’utiliser.
•
Faites seulement fonctionner l’appareil à la tension
VEUILLEZ LIRE TOUTES LES
POUR RÉDUIRE
indiquée sur la plaque signalétique située sous l’aspirateur.
•
Ne laissez pas l'appareil en marche sans surveillance. Débranchez
la fiche de la prise de courant dès la fin de l'utilisation et avant le
nettoyage ou l'entretien.
•
Ne pas utiliser à l’extérieur ni sur des surfaces humides.
•
Ne permettez pas aux enfants de jouer avec l’appareil. Cet
appareil ne doit pas être utilisé par des enfants de moins de 12 ans.
Exercez une surveillance étroite lorsque l’appareil est utilisé à proximité d’enfants. Gardez l’appareil hors de la portée des enfants et
ne laissez pas ces derniers introduire leurs doigts ou d’autres objets
dans aucune ouverture afin d’éviter les blessures ou les bris.
•
Utilisez uniquement l’appareil aux fins décrites dans ce manuel.
Utilisez uniquement les accessoires et produits recommandés par
le fabricant.
•
N’utilisez pas l'appareil lorsque le cordon ou la fiche est endommagé. Cessez d’utiliser l’appareil s’il ne fonctionne pas comme
prévu, s’il a été échappé sur le sol ou dans l’eau, s’il est endommagé ou s’il a été laissé à l’extérieur
et apportez-le au centre de réparations.
•
Ne tirez pas et ne transportez l'appareil par son cordon, n’utilisez
pas le cordon comme une poignée, ne coincez pas le cordon dans
l’embrasure d’une porte et ne le tirez pas contre des arêtes ou des
cornières tranchantes. Ne placez pas l’appareil sur le cordon. Ne
faites pas rouler l’appareil sur le cordon. Tenez le cordon éloigné des
surfaces chaudes.
•
Ne débranchez pas l'appareil en tirant le cordon. Débranchez
l'appareil en tenant la fiche et non le cordon.
•
Ne manipulez pas la fiche ou l'appareil avec des
mains mouillées.
•
N’insérez aucun objet dans les ouvertures. N’utilisez pas l’appareil
si les ouvertures sont obstruées. Assurez-vous qu’elles sont exempt-
20
Page 24

es de poussière, de mousse, de
cheveux ou de tout ce qui pourrait réduire le débit d’air.
•
Gardez les cheveux, les vêtements amples, les doigts et toute autre
partie du corps à l’écart des ouvertures et des pièces en mouvement. Le rouleau-brosse continue
de tourner lorsque l’appareil est en position verticale.
•
Éteignez toutes les commandes avant de
débrancher l'appareil.
•
Redoublez de prudence lorsque vous utilisez l’appareil sur des
escaliers. Pour éviter tout dommage ou blessure
et empêcher l’appareil de tomber, placez toujours ce
dernier au bas des escaliers, sur le plancher. Ne placez
pas l’appareil sur les marches d’un escalier ou sur un
meuble, car cela peut entraîner des dommages ou
des blessures.
•
N’utilisez pas l’appareil pour aspirer des liquides
inflammables ou combustibles, comme de l’essence,
ni de la sciure de bois, ni dans des endroits où de telles
substances peuvent être présentes.
•
Tenez la fiche lorsque vous rembobinez le cordon,
de sorte qu’elle ne s’agite pas dans tous les sens.
•
Débranchez l’appareil avant de brancher
21
l’accessoire Turbo.
•
N’utilisez pas l’appareil pour aspirer quoi que ce soit qui brûle ou
dégage de la fumée comme des cigarettes,
des allumettes ou des cendres chaudes.
•
N’utilisez pas l’appareil si le vide-poussière et/ou les
filtres ne sont pas installés.
•
AVERTISSEMENT : Ce produit
contient des produits chimiques reconnus par l’État de
la Californie comme pouvant causer le cancer, des
anomalies congénitales ou des dysfonctions du système
reproducteur.
MANIPULATION.
MISE EN GARDE :
LES RISQUES DE DOMMAGE :
•
Évitez d’utiliser l’appareil pour ramasser des objets durs ou aux
BIEN SE LAVER LES MAINS APRÈS LA
POUR RÉDUIRE
arêtes tranchantes, car ils pourraient endommager l’appareil.
•
Rangez l’appareil adéquatement à l’intérieur et dans un endroit
Page 25

sec. N’exposez pas l’appareil à des conditions
de gel.
•
Le rouleau-brosse continue de tourner lorsque l’appareil est
en marche et que la poignée est redressée. Afin d’éviter tout
dommage aux tapis, carpettes et revêtements de plancher, évitez
d’incliner l’appareil ou de l’utiliser sur des meubles, des carpettes à
franges ou des escaliers
recouverts de tapis durant son utilisation.
•
N’utilisez pas d’objet aux arêtes tranchantes pour nettoyer le tuyau,
car cela risquerait de l’endommager.
•
Lorsque le rouleau-brosse est en marche, ne laissez
pas l’appareil trop longtemps au même endroit, car
vous risqueriez d’endommager le plancher.
GARDEZ CES
INSTRUCTIONS
D’UTILISATION
ÉQUIPÉ D’UNE FICHE POLARISÉE (UNE LAME PLUS LARGE QUE
L’AUTRE) POUR DIMINUER LE RISQUE DE DÉCHARGE ÉLECTRIQUE.
CETTE FICHE NE PEUT ÊTRE BRANCHÉE QUE DANS UN SEUL SENS À
UNE PRISE POLARISÉE. SI LA
FICHE NE S’INSÈRE PAS ENTIÈREMENT DANS LA PRISE,
RETOURNEZ-LA. SI VOUS NE POUVEZ TOUJOURS PAS
L’INSÉRER, COMMUNIQUEZ AVEC UN ÉLECTRICIEN
QUALIFIÉ POUR FAIRE INSTALLER UNE PRISE DE COURANT APPRO
PRIÉE. NE MODIFIEZ LA FICHE EN AUCUN CAS.
CE PRODUIT EST DESTINÉ À UN USAGE DOMESTIQUE SEULEMENT.
LA GARANTIE EST NULLE SI L’APPAREIL EST
UTILISÉ À DES FINS COMMERCIALES.
-
AVERTISSEMENT :
CET APPAREIL EST
22
Page 26

Premiers pas avec votre aspirateur Rewind
Retirez la vis de la
poignée et insérez-y
1
la poignée.
Insérez la vis de la
poignée et serrez
avec un tournevis
cruciforme. Ensuite,
serrez deux petites
vis dans la poignée
avant inférieure.
Introduisez d’abord
le vide-poussière
et faites-le pivoter
en place. Vous
entendrez un clic.
REMARQUE : Le s images mon trées peuv ent diffé rer du modèl e acheté.
Utilisation de votre aspirateur Rewind
Saisissez l’extrémité
du cordon et tirez-le
1
pour l’extraire
du système de
rembobinage.
23
Enfoncez et tournez
le bouton de
2
réglage * à la hauteur
souhaitée.
IMPORTANT
Si l’aspirateur est dif ficile
à pousser, appuyez et
tournez le bouton au réglage
supérieur suivant.
MISE EN
GARDE
N’utilisez pas l’aspirateur
pour toiletter un animal.
Fixez l’accessoire
Turbo du traineau ici.
432
Fixez le suceur plat
au tube -rallonge puis
5
faites-le glisser dans
la zone de rangement.
Fixez la brosse à
épousseter de l'autre
côté.
IMPORTANT
Lorsque vous tirez le cordon, un ruban jaune indique que le
cordon est presque entièrement déroulé. Lorsque le ruban
rouge est visible sur le cordon, ceci signifie que le cordon a
atteint sa longueur maximale. (Veillez à ne jamais dépasser la
marque du ruban rouge.)
Si vous voulez obtenir une performance maximale,
réglez le bouton sur BAS pour
tous les types de tapis. Réglez le bouton
sur HAUT pour des surfaces spongieuses
et des tapis très moelleux. Pour des
planchers lisses, tournez le bouton
sur la position PLANCHER DUR.
*Le nom bre de réglag es possibl e varie selo n le modèle.
Page 27

Utilisation de votre aspirateur Rewind
AVERTISSEMENT
Des matières très fines, comme de la poudre pour le visage ou de la fécule
de maïs, peuvent obstruer le filtre et causer une diminution de la performance.
Lorsque vous utilisez l’aspirateur pour nettoyer ce type de poussière, videz
le vide-poussière et nettoyez les filtres plus souvent.
IMPORTANT
Si le voyant de l’indicateur d’état du système est rouge :
1. Nettoyez le filtre lavable (consultez la page 27) et/ou le filtre fabriqué selon les normes
HEPA (consultez la page 29).
2. Videz le vide-poussière (consultez la page 26).
3. Vérifiez si le tuyau est obstrué (consultez la page 30).
4. Vérifiez si le rouleau-brosse est obstrué (consultez la page 30).
AVERTISSEMENT
Tenez la fiche lorsque vous rembobinez le cordon, de sorte
qu’elle ne s’agite pas dans tous les sens.
Branchez dans une
prise de courant.
3
Appuyez sur
l’interrupteur sur le
côté de l’aspirateur.
Si le voyant est
rouge, l’indicateur
5
d’état du système
indique d’éventuels
problèmes de
performance.
Posez votre pied
ici et tirez la poignée
4
vers l’arrière pour
l’incliner.
Débranchez de la
prise de courant
6
avant de rembobiner
le cordon. Tenez la
fiche et appuyez sur
la pédale de côté du
rembobinage
du cordon.
24
Page 28

Utilisation de votre aspirateur Rewind : Accessoires et tuyau
AVERTISSEMENT
Éteignez toujours l’appareil avant d’installer ou de retirer le
tube-rallonge ou les accessoires.
MISE EN GARDE
Redoublez de prudence lorsque vous utilisez l’appareil
sur des escaliers. Pour éviter tout dommage ou blessure et
empêcher l’appareil de tomber, placez toujours ce dernier au
bas des escaliers, sur le plancher. Ne placez pas l’appareil
sur les marches d’un escalier ou sur un meuble, car cela peut
entraîner des dommages ou des blessures. Lorsque vous
utilisez des accessoires, assurez-vous que la poignée est
toujours redressée.
IMPORTANT
Le rouleau-brosse continue de tourner lorsque l’appareil est
en marche et que la poignée est redressée. Afin d’éviter tout
dommage aux tapis, carpettes et revêtements de plancher,
évitez d’incliner l’appareil ou de l’utiliser sur des meubles,
des carpettes à franges ou des escaliers recouverts de tapis
durant son utilisation.
25
Appuyez sur le bouton
de déverrouillage
1
du tuyau et tirez sur
l’extrémité du tuyau
pour l’utiliser. Pour
le remettre en place,
réinsérez-le dans le
tube jusqu’à ce que
vous entendiez un clic.
Utilisez la brosse
à épousseter sur
les ventilateurs, les
stores et
les meubles.
Fixez l’accessoire ou
le tube en le poussant
2
fermement
en place.
Le tube vous
offre une portée
54
supplémentaire en y
attachant n’importe
quel outil.
Utilisez l’accessoire
Turbo pour nettoyer
3
des escaliers et
des revêtements
en tissu.
Utilisez le suceur
plat dans les petits
6
espaces, les coins et
le long des rebords.
(Les ac cessoire s varient se lon le modèl e).
Page 29

Gardez votre aspirateur Rewind en bon état de marche : Videz le
vide-poussière
AVERTISSEMENT
Débranchez l'appareil avant de le nettoyer ou de faire l'entretien afin de réduire le risque de blessures.
N'utilisez pas l'aspirateur sans avoir installé le vide-poussière ou les filtres.
Videz le videpoussière lorsqu’il
1
atteint la ligne de
remplissage maximum
ou lorsque le voyant
de l’indicateur d’état
du filtre
est rouge.
Appuyez sur cette
languette et faites
2
pivoter le videpoussière.
Videz en appuyant
sur le bouton inférieur.
3
Fermez le videpoussière.
Repositionnez le videpoussière en insérant
4
d’abord le fond et en
le faisant pivoter
r en place. Vous
entendrez un clic.
26
Page 30

Gardez votre aspirateur Rewind en bon état de marche : Nettoyage
du filtre lavable
Laissez le filtre sécher complètement avant de
IMPORTANT
le remettre en place. Faites sécher le filtre sur son rebord pour
que l’air puisse circuler des deux côtés
du filtre. Il faudra au moins 24 heures.
AVERTISSEMENT
Débranchez l'appareil avant de le nettoyer ou
de faire l'entretien afin de réduire le risque
de blessures. N'utilisez pas l'aspirateur sans
avoir installé le vide-poussière ou les filtres.
AVERTISSEMENT
Des matières très fines, comme de la poudre
pour le visage ou de la fécule de maïs peuvent obstruer le filtre
et causer une diminution de la performance. Lorsque vous
utilisez l’aspirateur
pour nettoyer ce type de poussière, videz le
vide-poussière et nettoyez les filtres plus souvent.
27
Enlevez le videpoussière. Ouvrez le
1
couvercle. Tirez sur la
languette pour retirer
le filtre.
Quoi acheter :
Filtre lavable Votre filtre
lavable ne devrait pas être
remplacé durant la période
de garantie s’il est utilisé
et entretenu correctement.
Si vous le souhaitez, des
filtres supplémentaires sont
disponibles sur Hoover.com
ou si vous appelez au 1-800-
944-9200. Demandez le
No de pièce Hoover
304087001
MD
Rincez le filtre
pendant 2 minutes
2
dans l’eau tiède et
propre. Laissez- le
sécher pendant
minimum 24 heures.
Remplacez le filtre en
mettant la languette
3
vers l’extérieur.
Replacez le couvercle
en tournant, jusqu’à
ce vous entendiez
un clic.
Page 31

Gardez votre aspirateur Rewind en bon état de marche :
Nettoyage de l’assemblage du filtre cyclonique
AVERTISSEMENT
Débranchez l'appareil avant de le nettoyer ou de faire l'entretien afin de réduire le risque de blessures.
N'utilisez pas l'aspirateur sans avoir installé le vide-poussière ou les filtres.
Enlevez le videpoussière. Ouvrez le
1
couvercle.
Sortez l’assemblage
cyclonique.
Utilisez la brosse
à épousseter pour
nettoyer des débris.
Replacez l’assemblage
cyclonique en vous
32
assurant que les
languettes s’alignent.
Puis tournez le
vide-poussière
pour le verrouiller.
Repositionnez le videpoussière en insérant
4
d’a bor d
le fond et en le faisant
pivoter
r en place. Vous
entendrez un clic.
28
Page 32

Gardez votre aspirateur Rewind en bon état de marche :
Nettoyage du filtre conçu avec la technologie HEPA.
IMPORTANT
Ne pas rincer ou nettoyer le filtre conçu avec la technologie
HEPA.
Quoi acheter :
Filtre conçu avec la technologie HEPA Votre
filtre ne devrait pas être remplacé durant la période
de garantie s’il est utilisé et entretenu correctement.
Si vous le souhaitez, des filtres supplémentaires
sont disponibles sur Hoover.com ou si vous
appelez au 1-800 -944-9200. Demandez le
No de pièce HooverMD411018001.
29
Retirez le porte -filtre
en insérant les doigts
1
dans la fente prévue à
cet effet.
Tenez le filtre
au-dessus d’une
poubelle et secouez
les débris.
Glissez le porte- filtre
dans sa position
32
initiale.
Page 33

Gardez votre aspirateur Rewind en bon état de marche :
Nettoyage du rouleau-brosse
MISE EN
GARDE
Pour réduire le risque de
blessures présenté par
les pièces en mouvement,
débranchez l’appareil avant
d’en effectuer l’entretien.
Éteignez le rouleaubrosse. Abaissez la
1
poignée. Retournez
l’aspirateur.
Retirez (6) les vis
de la base avec un
2
tournevis cruciforme.
Faites-la pivoter pour
l’enlever.
Retirez les débris
ou les cheveux du
3
rouleau-brosse.
Visitez Hoover.
com pour plus
d’informations.
Replacez la base
et réinsérez les vis.
4
Gardez votre aspirateur Rewind en bon état de marche : Nettoyage
des tuyaux et des accessoires
de déverrouillage
1
du tuyau et tirez sur
l’extrémité de celui -ci.
Retirez les débris
ou les boules de
2
poussière à l’aide
d’un objet émoussé.
Ne pas utiliser
d’objets tranchants.
Pour le remettre en
place, réinsérez-le
3
dans le tube jusqu’à
ce que vous entendiez
un clic.
Nettoyez les
accessoires Turbo du
4
traineau en retirant
les vis de chaque
côté.
Enlevez la base. Appuyez sur le bouton
5
30
Page 34

Gardez votre aspirateur Rewind en bon état de marche : Nettoyage
des tuyaux et des accessoires
MISE EN GARDE
Pour réduire le risque de blessures présenté par les pièces en mouvement, débranchez
l’appareil avant d’en effectuer l’entretien.
AVERTISSEMENT
Votre appareil est équipé d’un rupteur thermique interne afin de le protéger contre la
surchauffe. L'appareil cessera de fonctionner si ce rupteur thermique s'active.
Voici ce qu'il faut faire lorsque ceci survient :
1. ÉTEIGNEZ l’appareil et débranchez-le de la prise de courant.
2. Videz le vide-poussière.
3. Inspectez l’orifice de la buse, le connecteur, le tuyau, l’orifice du
vide-poussière, le filtre cyclonique, le filtre lavable et le filtre HEPA.
Dégagez toutes les obstructions visibles.
4. Le rupteur thermique se réinitialisera après le débranchement de l’appareil et que le
moteur ait refroidi pendant 30 minutes et vous pourrez à ce moment reprendre le travail.
Votre appareil devra être réparé si le rupteur thermique ne se réinitialise pas après avoir
respecté les étapes ci-dessus.
31
AUCUNE LUBRIFICATION REQUISE.
Le moteur et le rouleau-brosse sont équipés de roulements qui
contiennent suffisamment de lubrifiant pour toute leur durée
de vie. L’ajout de lubrifiant pourrait causer des dommages.
N’ajoutez pas de lubrifiant au moteur ni au rouleau de brosses.
Retirez tous les débris
ou les cheveux du
rouleau-brosse.
Replacez la base et
remettez les vis de
76
chaque côté.
Page 35

Gardez votre aspirateur Rewind en bon état de marche :
Remplacement de la courroie
La cour roie est sit uée sous le co uvercle de l’as pirateur et d oit être rég ulièremen t vérifiée . Remplacez l a courroie si e lle est étir ée, coupée ou c assée.
Abaissez la poignée
et retournez
1
l’aspirateur.
Retirez (6) les vis
de la base avec un
tournevis cruciforme.
Faites pivoter la base
pour la faire sortir.
MISE EN GARDE
Pour réduire le risque
de blessures présenté
par les pièces en mouvement,
débranchez l’appareil avant
d’en effectuer l’entretien.
Toute aut re tâche d’entr etien doit êt re confiée à un re présenta nt de servi ce autorisé . Cessez d’util iser l’appare il s’il ne fonct ionne pas com me
prévu, s’i l a été échappé s ur le sol ou dans l’eau , s’il est endom magé ou s’il a été la issé à l’extéri eur et appor tez-le au ce ntre de répara tions.
Si vous le souhaitez, des courroies supplémentaires
peuvent être achetées sur Hoover.com ou si vous appelez
au 1-800-944-9200. Lorsque vous achetez une nouvelle
courroie pour les modèles demandez le No de courroie
Quoi acheter : Courroie
HooverMD38528058.
Retirez la courroie
usée et faites glisser
32
la nouvelle courroie
en place à l’aide
des lettres placées à
l’extérieur de l’arbre
du moteur.
Poussez l’autre
extrémité de la
4
nouvelle courroie
autour de la partie du
rouleau -brosse sans
poils.
Replacez la base et
5
réinsérez les vis.
32
Page 36

Besoin d'aide?
AVERTISSEMENT
Débranchez l'appareil avant de le nettoyer ou de faire l'entretien afin de réduire le
risque de blessures.
Mon aspirateur Rewind ne fonctionne pas.
Veillez à toujours le brancher fermement et correcte ment. Le rupteur thermique s’est peut- être
activé ; débranchez et lais sez refroidir l’appareil penda nt 30 min. Si cela ne fonct ionne pas, il
se peut que la pris e de courant murale soit défect ueuse. Vérifiez les fus ibles ou les disjonc teurs
du domicile. Si un fusibl e est brûlé ou un disjoncteur s’est déclen ché, remplacez le fusible ou
réenclenchez le disjoncteur du domic ile.
Si le voyant de l’indicateur d’état du système est rouge...
Un nettoyage du filtr e lavab le, du filtre fabri qué selon les normes HE PA ou de l’assemblage des
filtres est peut -être néces saire. Veillez égale ment à vider le
vide -poussiè re s’il est plein (consul tez la page 24).
L'aspirateur Rewind cessera de fonctionner
si le rupteu r ther mique s’est activé. Éteignez d’abord l’app areil et débranchez-le. Videz le
vide -poussiè re, puis vér ifiez que le tuyau et les filtres ne sont pas obst rués. Le rupteur thermiq ue
devrai t se désactiver après 30 minute s (consultez la page 30).
Mon aspirateur Rewind n'aspire pas correctement.
Veillez égal ement à vider le vide-pous sière s’il est plein. Le fil tre de votre aspirateur est peut -être
obstr ué. Sortez l’assemblage de fil tres du vide-poussière et retirez le filtre. Rincez-l e à l’eau
tiède pro pre pendant 2 minutes et laissez- le sécher pendant 24 heures avant de l’ installer de
nouvea u (consultez la page 27).
33
Si votre filtre est encrassé, voir ci-dessous.
Il est égale ment possible que le sys tème soit obstru é. Décrochez le tuyau et vérifiez qu’il n’est
pas encrassé. Si c’est le cas, reti rez l’encrassem ent (consultez la page 30).
Mon aspirateur Rewind n'avance pas bien.
Assurez-vous de bien définir le réglage de la hauteur de tapis . (consul tez la page 23).
Si le rouleau-brosse Turbo ne veut pas tourner,
assurez-vous de ne pas trop appuyer sur l’appareil. Si cel a ne fonctionne pas, l’apparei l peut
être obst rué — retirez tous les poils ou les débris du rouleau- brosse de l’apparei l (consultez la
page 30).
Toute autre tâche d’entretien doit être confié e à un représe ntant de servic e autorisé. Ces sez
d’utilis er l’appa reil s’il ne fonctionn e pas comm e prévu, s’il a été éch appé sur le sol ou dans
l’eau, s’il est end ommagé ou s’il a été laissé à l’extérieu r et appor tez-le au centre de répara tions.
DES QUESTIONS OU DES PRÉOCCUPATIONS?
Commun iquez avec nous : (80 0) 944 -9200
Pour obte nir le guide complet de dépannage, rend ez-vous au :
Twitte r : @HooverUSA
Facebook : facebook.com/hoover
Ne retournez pas le produit en magasin. L e numéro de modèle du produit
est indiqué à l’arr ière de l’appareil.
Page 37

ENTRETIEN & GARANTIE
RENSEIGNEMENTS RELATIFS À L’ENTRETIEN
TOUTE TÂCHE D’ ENTRETIE N DOIT ÊTRE CON FIÉE À UN REPRÉS ENTANT DE SERVI CE
AUTORIS É. Appelez au (80 0) 944 -9200 pour le s É.-U. et le Can ada.
Si vous avez b esoin d’aide sup plémentai re, visitez un cen tre de servic e autorisé. Trou vez le
centr e le plus près de chez vou s en visitant no tre site Web à www.h oover.com. Les fra is de
trans port à destin ation et en prove nance de l’empla cement de répa ration sont pa yés par le
propr iétaire. Ide ntifiez touj ours votre produ it par le numéro de mo dèle et le code de f abricatio n
lorsq ue vous demandez d es informat ions ou que vous comm andez des pièc es de rechange . (Le
numéro d e mod èle et le code de fab rication de l ’aspi rateur se trou vent sur le fond du ch argeur et
sur le côt é de la batter ie.)
GARANTIE LIMITÉE DE UN AN (USAGE DOMESTIQUE) COUVERTURE DE LA
GARANTIE
Lorsq u’ils sont util isés et entre tenus dans des co nditions nor males d’utilis ation et d’entr etien
domes tiques, com me il est stipul é dans le guide de l’uti lisateur, votr e prod uit Hoover
garant i contre les déf auts de fabri cation et de mai n-d’œuvr e pen dant une pério de de un an à
part ir de la date d’acha t (ci-aprè s la « Période de gara ntie »). Pendant la Pér iode de garant ie,
HooverMD fourni ra la main-d ’œuv re et les pièces gr atuitemen t afin de corri ger une telle
défec tuosité pou r les produits ac hetés aux Éta ts-Uni s, dans les bout iques d’éc hanges milit aires
améri caines et au Can ada.
RÉCLAMATION AU TITRE DE LA GARANTIE
Si le prod uit n’est p as dans l’éta t prévu par la garan tie, apport ez ou envoyez le produi t chez un
fourn isseur autor isé de serv ice sous garant ie HooverMD avec u ne preuve d’achat . Pour obtenir
la liste d es points de ser vice autor isés aux É.- U., composez le nu méro du servi ce automati sé au
1-80 0-944-9 200 OU visitez Ho over
ou d’autre s renseignem ents au sujet de la g arantie ou pour c onnaître le s boutiques of frant les
répara tions au titre d e la garantie, ap pelez le Centre d e réponses à la cli entèle Hoove rMDau
numéro 1 80 0 944 -9200, du lund i au ven dredi, de 8 h à 19 h, EST.
ÉLÉMENTS NON COUVERTS PAR LA GARANTIE
Cett e garantie ne cou vre pas : l’utilis ation du produi t à des fins commer ciales (comme p ar les
femme s de chambre, les c oncierges et l es service s de location d ’équipem ent), le rouleau -brosse ,
la cour roie, un entreti en inadéqua t du produit, les br is causés par la m auvaise util isation, les c as
fort uits, les cat astrophes n aturelles , le vandalisme e t aut res actes hors d u con trôle de Hoover
les agis sements ou om issions du prop riétaire, l ’util isation à l’exté rieur du pays d’ach at et de
revent es d’origine du prod uit par le premie r acheteur. La pré sente garant ie ne couvre pas l e
MD
en ligne au w ww.hoover.co m. Pour obtenir du s outien
MD
est
MD
ramas sage, la livrai son, le transp ort, ni les répa rations à domic ile. Cepend ant, si vous envoyez
le produ it chez un fourni sseur autor isé de servi ce sous garanti e Hoover
ne sera pr is en charge qu’une seu le fois.
Cett e garantie ne s’appli que pas aux produi ts achetés en d ehors des État s-Unis , y compris
ses ter ritoires et po ssession s, en dehors d’une bo utique d’é changes mili taires amér icaine et à
l’extér ieur du Canada . Cet te garantie n e couvre pas les pr oduits ache tés à une parti e n’ét ant
pas un dét aillant, un con cessionna ire ou un distri buteur autor isé des produi ts Hoover
AUTRES CONDITIONS IMPORTANTES
La prése nte garanti e n’est pas tr ansférabl e et ne peut pas être cé dée. La présen te garantie
sera rég ie et interpré tée selon les lo is de l’État de l’O hio. La périod e de garantie ne se ra pas
prolon gée après tout re mplacemen t ou toute répara tion au titre de l a présente gara ntie.
CET TE GARANTI E EST VOTRE UNIQUE R ECOURS ET VOIE DE D ROIT FOURNIS PAR
MD
HOOVER
GARA NTIES DE QUALIT É MARCHAND E OU D'ADAPTATION À UN USAG E PARTI CULIER,
SONT DÉ CLINÉES. HO OVER NE POURR A EN AUCUN CAS ÊT RE TENUE RESP ONSABLE
DE DOMMAG ES-IN TÉRÊTS SPÉC IAUX OU DOMMAGES I NDIRECTS , ACCESSOIRES OU
CONSÉ CUTIFS DE QUELQ UE NATURE QUE CE SO IT, SUBIS PAR LE PROPRI ÉTAIRE DU
PRODU IT OU PAR TOUTE PARTIE RÉC LAMANT PAR L’I NTERMÉDI AIRE DU PROPRI ÉTAIRE,
QU’ILS RELÈVENT DU DROIT DES CONTRATS, DE LA NÉGLIGENCE, DE LA RESPONSABILITÉ
CIVI LE DÉLICTU ELLE OU DE LA RES PONSABIL ITÉ STRICTE D U FAIT DE S PRODUITS, OU
QU’I LS DÉCOULEN T DE QU ELQUE CAUSE QUE C E SOIT.
Cert ains États ne pe rmetten t pas l’exclusion de s dommages con sécutifs . Par conséquen t,
l’exclusi on précédent e pourrait ne pa s être applica ble dans votre cas . La présente g arantie vous
donne de s droits préci s. Vous pouvez égal ement avoir d’aut res droits, le squels varie nt d’un État
à l’autre.
. TOUTES AUTR ES GARANTIE S, EXPRESSES O U TACIT ES, INCLUANT LE S
MD
, le coût de l ’expéd ition
,
MD
.
34
Page 38

Guía para su aspiradora
Rewind:
Instrucciones de seguridad
Cómo comenzar
36
39
Uso de la aspiradora Rewind
Mantenimiento correcto
¿Necesita ayuda?
Garantía
de la aspiradora Rewind
39
42
49
50
ESPAÑOL
Manual de instrucciones IMPORTANTE: Lea la guía con atención antes de ensamblar y usar este aparato.
Page 39

INSTRUCCIONES DE SEGURIDAD IMPORTANTES
Cuando se utilizan aparatos eléctricos, siempre deben seguirse
precauciones básicas, incluidas las siguientes:
INSTRUCCIONES ANTES DE UTILIZAR ESTE APARATO.
ADVERTENCIA:
DE INCENDIO, DESCARGA ELÉCTRICA, DAÑOS O LESIONES, RESPETE LAS SIGUIENTES MEDIDAS:
•
Arme la aspiradora por completo antes de ponerla
PARA DISMINUIR EL RIESGO
LEA TODAS LAS
en funcionamiento.
•
Hágala funcionar únicamente con el voltaje especificado en la
etiqueta de datos que se encuentra en la base de la aspiradora.
•
No descuide el aparato cuando esté enchufado.
Desenchúfelo del tomacorriente cuando no esté en
uso y antes de su limpieza o servicio de mantenimiento.
•
No la utilice en exteriores o en superficies mojadas.
•
Evite que se la utilice como un juguete. La unidad no tiene como fin
el uso por parte de niños de 12 años o menos. Cuando se la utilice
cerca de niños, será necesario
hacerlo bajo una estricta supervisión. Para evitar lesiones
o daños, mantenga a los niños alejados del producto y
no permita que introduzcan sus dedos ni objetos en
ninguna de las aberturas del producto.
•
Utilícela únicamente según el uso descripto en este manual. Utilice
solamente los accesorios y productos recomendados por el
fabricante.
•
No la utilice si el cable o el enchufe se encuentran dañados. Si el
aparato no funciona como debe, si se ha caído, dañado o dejado
a la intemperie, o si se ha sumergido en agua, llévelo a un Centro
técnico antes
de continuar usándolo.
•
No tire del aparato ni lo transporte tomándolo por el
cable, no use el cable como una manija, no cierre una
puerta sobre el cable ni lo enrosque alrededor de bordes
o esquinas filosas. No apoye el producto sobre el cable.
No pase el aparato por encima del cable. Mantenga
el cable lejos de las superficies calientes.
•
No lo desenchufe tirando del cable. Para desenchufarlo, agarre el
enchufe, no el cable.
•
No manipule el enchufe ni el aparato con
las manos mojadas.
36
Page 40

•
No coloque ningún objeto en las aberturas. No utilice la unidad si
alguna de sus aberturas se encuentra
bloqueada. Manténgala libre de polvo, pelusas, cabello
y cualquier otro elemento que pueda disminuir el flujo
de aire.
•
Evite que el cabello, la ropa suelta, los dedos y cualquier otra par-
te de su cuerpo entren en contacto con las aberturas y las piezas
móviles de la unidad. El cepillo giratorio permanecerá girando
mientras la unidad esté en posición vertical.
•
Apague todos los controles antes de desenchufar
el aparato.
•
Extreme las precauciones cuando utilice la aspiradora para
limpiar escaleras. Para evitar lesiones o daños físicos, y a fines de
evitar que la aspiradora se caiga, siempre colóquela al pie de
las escaleras, sobre el suelo. No coloque la aspiradora sobre las
escaleras ni sobre un mueble, ya que pueden generarse lesiones
o daños.
•
No utilice la unidad para aspirar líquidos combustibles o inflam-
ables, tales como gasolina o restos de madera lijada, ni la utilice
en áreas en las que dichas sustancias puedan estar presentes.
•
Sostenga el enchufe cuando lo enrosque en el carretel portaca-
ble. Evite golpear el enchufe cuando enrosque
37
el cable.
•
Desconecte la unidad antes de conectar la
herramienta turbo.
•
No aspire nada que se encuentre en combustión o emita humo,
como cigarrillos, fósforos o cenizas calientes.
•
No utilice la unidad si esta no tiene colocados la copa
de recolección de residuos o los filtros.
•
ADVERTENCIA: Este producto
contiene químicos reconocidos por el estado de
California como causantes de cáncer, defectos de
nacimiento u otros daños reproductivos.
LÁVESE LAS MANOS LUEGO DE MANIPULARLO.
Page 41

PRECAUCIÓN:
DE DAÑOS:
•
Evite aspirar objetos duros y filosos con este producto,
PARA DISMINUIR EL RIESGO
ya que pueden dañarlo.
•
Almacénelo apropiadamente en interiores, en un lugar seco. No
exponga la máquina a temperaturas muy frías.
•
El cepillo giratorio sigue girando mientras el producto está en-
cendido y la manija se encuentra en posición vertical. Para evitar
daños en alfombrados, alfombras, muebles y pisos, evite inclinar la
aspiradora o colocarla sobre
muebles, flecos de alfombras o escaleras alfombradas
durante el uso de dicha herramienta.
•
No utilice objetos filosos para limpiar la manguera, ya que pueden
dañar la unidad.
•
Cuando el cepillo giratorio esté funcionando, evite dejar la aspira-
dora apoyada en un lugar por mucho tiempo. Esto puede dañar el
suelo.
CONSERVAR ESTAS
INSTRUCCIONES
ADVERTENCIA:
DE DESCARGA ELÉCTRICA, ESTE APARATO TIENE UN ENCHUFE
POLARIZADO (UNA CLAVIJA ES MÁS ANCHA QUE LA OTRA). ESTE
ENCHUFE CABE EN UN TOMACORRIENTE POLARIZADO DE UNA
SOLA MANERA. SI NO ENCAJA
POR COMPLETO EN EL TOMACORRIENTE, INVIERTA EL
ENCHUFE. SI AÚN NO ENCAJA, CONTACTE A UN
ELECTRICISTA CUALIFICADO PARA QUE INSTALE EL
TOMACORRIENTE CORRESPONDIENTE. NO REALICE NINGÚN
TIPO DE MODIFICACIÓN EN EL ENCHUFE.
ESTE PRODUCTO TIENE COMO FIN SU USO DOMÉSTICO
SOLAMENTE. SI SE LO UTILIZA CON FINES COMERCIALES,
LA GARANTÍA QUEDARÁ ANULADA.
PARA REDUCIR EL RIESGO
38
Page 42

Cómo comenzar con la aspiradora Rewind
Extraiga el tornillo de
la manija e inserte la
1
manija.
Inserte el tornillo de
la manija y ajústelo
con un destornillador
Phillips. Luego, ajuste
2 tornillos pequeños
en la manija inferior
del frente.
Coloque primero
la base de la copa
32
de recolección de
residuos y gírela
para que encaje.
Escuchará un sonido
de clic.
Uso de la aspiradora Rewind
Tome el extremo del
enchufe y tire para
1
soltar el cable de
liberación del carretel
portacable.
39
Empuje hacia abajo
y gire la perilla de
2
*ajuste de altura al
ajuste deseado.
PRECAUCIÓN
La aspiradora no debe
utilizarse para limpiar
mascotas.
IMPORTANTE
Si se le dificulta empujar la
aspiradora, empuje hacia
abajo y gire la perilla al ajuste
superior siguiente.
*La can tidad de ajus tes de altu ra varía segú n el modelo de a spiradora .
Asegure aquí la
herramienta turbo.
4
NOTA: El mode lo real pued e
difer ir de las imág enes que
se mues tran.
Coloque la herramienta para
limpieza en
5
rincones en el tubo
de extensión. Luego,
deslícela en el área
de almacenamiento. Coloque
el cepillo quitapolvo en
el otro lateral.
IMPORTANTE
Cuando extienda el cable, la cinta amarilla le indicará cuando
haya llegado a casi el total de su extensión. Cuando vea la parte
con la cinta roja del cable, significa que el cable ha alcanzado su
longitud máxima. No extienda el cable más allá de dicha cinta
roja.
Para obtener un rendimiento máximo de limpieza,
ajuste a LOW (BAJO) para todos
los tipos de alfombras. Para alfombras suaves
y de uso comercial, ajuste a HIGH (ALTO) para
alfombras. Para pisos sin alfombrar, coloque la
perilla en HARD
FLOOR (PISOS DE MADERA DURA).
Page 43

Uso de la aspiradora Rewind
ADVERTENCIA
Los materiales muy finos, como el maquillaje facial en polvo o el almidón de maíz, pueden sellar
el filtro y causar un menor rendimiento. Cuando utilice la unidad para aspirar este tipo de polvos,
vacíe la copa y limpie los filtros con frecuencia.
IMPORTANTE
Si el indicador de verificación del sistema está en rojo:
1. Limpie el filtro enjuagable (remitirse a la página 43) o el filtro hecho con materiales
HEPA (remitirse a la página 45).
2. Vacíe la copa de recolección de residuos (remitirse a la página 42).
3. Verifique que la manguera no esté obstruida (remitirse a la página 46).
4. Verifique que el cepillo giratorio no tenga ningún elemento obstructivo (remitirse a la
página 46).
ADVERTENCIA
Sostenga el enchufe cuando lo enrosque en el carretel portacable.
Evite golpear el enchufe cuando enrosque el cable.
Enchúfela en un
tomacorriente.
3
Presione el interruptor
de alimentación
en el lateral de la
aspiradora.
Cuando está en
rojo, el indicador
5
de verifi cación del
sistema alerta sobre
posibles problemas
de rendimiento del
sistema.
Párese aquí y tire del
mango hacia atrás
4
para reclinarla.
Para enroscar el
cable, desenchúfelo
6
del tomacorriente.
Sostenga el enchufe
y presione hacia
abajo el pedal para
enroscar el cable, en
el lateral del carretel
portacable.
40
Page 44

Uso de la aspiradora Rewind: herramientas y manguera
ADVERTENCIA
Siempre apague este aparato antes de conectar o
desconectar el tubo de extensión o las herramientas.
PRECAUCIÓN
Extreme las precauciones cuando utilice
la aspiradora para limpiar escaleras. Para evitar
lesiones o daños físicos, y a fin de evitar que
la aspiradora se caiga, siempre colóquela al pie
de las escaleras o sobre el suelo. No coloque
la aspiradora sobre las escaleras ni sobre un mueble,
ya que pueden generarse lesiones o daños.
Cuando utilice las herramientas, siempre asegúrese de
que la manija se encuentre en posición vertical.
IMPORTANTE
El cepillo giratorio sigue girando mientras el producto está
encendido y la manija se encuentra en posición vertical. Para
evitar daños en alfombrados, alfombras, muebles y pisos, evite
inclinar la aspiradora o colocarla sobre muebles, flecos de
alfombras o escaleras alfombradas durante el uso de dicha
herramienta.
41
Presione el botón
de liberación de la
1
manguera y tire del
extremo de esta hacia
afuera para usar la
herramienta. Para
volver a bloquearla
en su lugar, vuelva a
insertar el tubo de la
manguera hasta que
escuche un clic.
Utilice el cepillo
quitapolvo en rejillas
de ventilación,
persianas y muebles.
Sujete la herramienta
o el tubo de extensión,
2
presionándolos con
firmeza en su lugar.
El tubo de extensión
le brinda un mayor
54
alcance con cualquier
herramienta sujeta a
la aspiradora.
Utilice la herramienta
turbo para limpiar
3
escaleras y
tapizados.
Utilice la herramienta
para limpieza en
6
rincones en espacios
reducidos, esquinas y
bordes.
(Las he rramienta s varían segú n el modelo de a spiradora).
Page 45

Mantenimiento correcto de la aspiradora Rewind: vaciado de la
copa de recolección de residuos
ADVERTENCIA
Para disminuir el riesgo de lesiones físicas, desenchufe la unidad antes de limpiarla o realizarle un servicio de mantenimiento.
No utilice la unidad si esta no tiene colocados la copa de recolección de residuos o los filtros.
Vacíe la copa de
recolección de
1
residuos cuando
alcance la línea de
llenado máximo o
cuando el indicador
de verifi cación del
filtro esté en rojo.
Presione esta
lengüeta y gire
2
hacia afuera la copa
de recolección de
residuos.
Presione el botón
inferior para vaciarla.
3
Cierre a presión la
copa de recolección
de residuos.
Vuelva a colocar
la copa (primero
4
la base) y luego,
gírela en su lugar.
Escuchará un sonido
de clic.
42
Page 46

Mantenimiento correcto de la aspiradora Rewind: limpieza del filtro
enjuagable
Deje que el filtro se seque por completo antes
IMPORTANTE
de volver a colocarlo. Seque el filtro en los
bordes, para que el aire circule por sus dos
lados. Esto tomará, al menos, 24 horas.
ADVERTENCIA
Para disminuir el riesgo de lesiones físicas,
desenchufe la unidad antes de limpiarla o
realizarle un ser vicio de mantenimiento. No
utilice la unidad si esta no tiene colocados
la copa de recolección de residuos o los filtros.
ADVERTENCIA
Los materiales muy finos, como el maquillaje facial en polvo
o el almidón de maíz pueden sellar el filtro y causar un menor
rendimiento. Cuando utilice la unidad para aspirar este tipo
de polvos, vacíe la copa y limpie los filtros con frecuencia.
43
Extraiga la copa
de recolección de
1
residuos. Gire la tapa
para abrirla. Tire
de la lengüeta para
extraer el filtro.
Elementos que
debe adquirir:
Filtro enjuagable:
Si se usa y mantiene
en forma correcta, no
deberá reemplazar el filtro
enjuagable dentro del
periodo de garantía. Si lo
desea, puede adquirir un
filtro adicional, disponible
a través de Hoover.com o
llamando al 1-800-944-
9200. Consulte por la pieza
N.º 304087001 Hoove
Enjuáguelo durante 2
minutos en agua tibia
2
limpia. Deje secar
durante 24 horas
como mínimo.
r
®
Reemplace el filtro,
con el lado de las
3
lengüetas hacia
afuera. Gire con
firmeza la tapa hasta
que haga un sonido
de clic.
Page 47

Mantenimiento correcto de la aspiradora Rewind:
limpieza de la unidad del filtro ciclónico
ADVERTENCIA
Para disminuir el riesgo de lesiones físicas, desenchufe la unidad antes de limpiarla o realizarle un servicio de mantenimiento. No
utilice la unidad si esta no tiene colocados la copa de recolección de residuos o los filtros.
Extraiga la copa
de recolección de
1
residuos. Gire la tapa
para abrirla.
Tire hacia afuera de
la unidad del filtro
ciclónico.
Utilice el cepillo
quitapolvo para
limpiar los residuos
en la unidad.
Vuelva a colocar
el filtro ciclónico,
32
asegurándose de que
las lengüetas queden
alineadas. Luego
gire para bloquear
la tapa de la copa
de recolección de
residuos.
Vuelva a colocar
la copa (primero la
4
base) y luego, gírela
en su lugar. Escuchará
un sonido de clic.
44
Page 48

Mantenimiento correcto de la aspiradora Rewind:
limpieza del filtro hecho con materiales HEPA
IMPORTANTE
No enjuague ni lave el filtro hecho
con materiales HEPA.
Elementos que debe adquirir:
Filtro hecho con materiales HEPA: Si lo usa y mantiene
en forma correcta, no deberá reemplazar este filtro dentro
del periodo de garantía. Si lo desea, puede adquirir un filtro
adicional, disponible a través de Hoover.com o llamando al
1-800-944-9200.
Solicite la pieza N.º 411018001 de Hoover®.
45
Con los dedos
colocados en
1
la ranura, tire
directamente hacia
afuera del marco del
filtro.
Sostenga el filtro
sobre un cesto de
basura y palméelo
para eliminar los
residuos.
Deslice nuevamente
en posición el marco
32
del filtro.
Page 49

Mantenimiento correcto de la aspiradora Rewind: limpieza del
cepillo giratorio
PRECAUCIÓN
Para reducir el riesgo de
lesión derivado de las piezas
móviles, desconecte el
aparato antes de
realizarle el ser vicio
de mantenimiento.
Apague el cepillo
giratorio. Descienda
1
la manija. Dé vuelta la
aspiradora.
Extraiga los (6)
tornillos de la
2
placa base con un
destornillador Phillips.
Gire para extraer la
placa base.
Extraiga los residuos
o cabellos del cepillo
3
giratorio. Visite el
sitio Hoover.com
para obtener más
información.
Vuelva a colocar
la placa base y
4
reinser te los tornillos.
Mantenimiento correcto de la aspiradora Rewind: limpieza de la
manguera y las herramientas
Presione el botón
de liberación de la
1
manguera y tire del
extremo de esta hacia
afuera.
Elimine los residuos
o elementos
2
obstructivos con un
elemento desafilado.
No utilice elementos
afilados.
Para volver a
bloquearlos en
3
su lugar, empuje
la herramienta
en el tubo para la
manguera hasta que
haga un sonido de
clic.
Limpie la herramienta
turbo para pelos de
4
animales, extrayendo
los tornillos a ambos
lados.
Extraiga la placa
base.
5
46
Page 50

Mantenimiento correcto de la aspiradora Rewind: limpieza de la
manguera y las herramientas
PRECAUCIÓN
Para reducir el riesgo de lesión derivado de las piezas móviles, desconecte el aparato antes de
realizarle el ser vicio de mantenimiento.
AVISO
Se ha colocado un protector térmico en su aspiradora para protegerla
contra el sobrecalentamiento. Cuando dicho protector se active,
la aspiradora dejará de funcionar.
De ser así, proceda como se indica a continuación:
1. APAGUE la aspiradora y desenchúfela del tomacorriente.
2. Vacíe la copa de recolección de residuos.
3. Revise la entrada de la boquilla, el conector de la manguera, la manguera, la entrada de la
copa de recolección de residuos, el filtro ciclónico, el filtro enjuagable y el filtro HEPA. Limpie
cualquier obstrucción presente.
4. Una vez que la aspiradora esté desenchufada y el motor se haya enfriado durante 30 minutos,
el protector térmico se desactivará y usted podrá retomar la limpieza.
Si el protector térmico continúa activándose luego de haber seguido los pasos anteriores,
signifi ca que su aspiradora requiere de un servicio de mantenimiento.
47
NO SE REQUIERE LUBRICACIÓN.
El motor y el cepillo giratorio vienen equipados con cojinetes
de suficiente lubricación para toda su vida útil. La adición de
lubricante podría dañarlos. No agregue lubricante al motor ni
al cepillo giratorio.
Elimine los residuos o
cabellos que haya en
el cepillo giratorio.
Vuelva a colocar
la placa base y
76
reinser te los tornillos
en ambos laterales.
Page 51

Mantenimiento correcto de la aspiradora Rewind: reemplazo de
la correa
La corr ea se ubica de bajo de la cub ierta de la a spiradora y d ebe ser revis ada con frec uencia. Re emplace la c orrea toda vez q ue se encuen tre estira da, corta da o rota.
Descienda la manija
y dé vuelva la
1
aspiradora.
Extraiga los (6)
tornillos de la
placa base con un
destornillador Phillips.
Gire hacia afuera la
placa base.
PRECAUCIÓN
Para reducir el riesgo de
lesión derivado de las piezas
móviles, desconecte el
aparato antes de
realizarle el ser vicio
de mantenimiento.
Todo otro se rvicio de m antenimie nto deberá se r realizado p or personal t écnico auto rizado. Si el a parato no fun ciona como de be, si se ha caído, da ñado o dejado a la
intem perie, o si se ha su mergido en agu a, llévelo a un Cen tro técnico a ntes de conti nuar usándo lo.
Elementos que debe adquirir: Correa
Si lo desea, puede adquirir correas adicionales,
disponibles a través de Hoover.com o llamando al 1-800 -
944-9200. Cuando compre una correa nueva para los
modelos de aspiradoras, solicite la correa N.º 38528058
Hoover®.
Extraiga la correa
desgastada y deslice
32
la nueva con las
letras en el exterior
por encima del eje
del motor.
Empuje el otro
extremo de la correa
4
nueva alrededor
del área del cepillo
giratorio que no tiene
cerdas.
Vuelva a colocar la
5
placa base y reinserte
los tornillos.
48
Page 52

¿Necesita ayuda?
ADVERTENCIA
Para disminuir el riesgo de lesiones físicas, desenchufe la unidad antes de limpiarla o
realizarle un servicio de mantenimiento.
Mi aspiradora Rewind no funciona.
Siempre asegúre se de enchufarla con firmez a. Es posible que se haya act ivado un protector
térmico. Desen chúfela y déjela enf riar durante 30 minuto s. Si ello no funciona, es posible
que no haya volta je en el tomac orriente. Revise el fusibl e o el disyunt or del hog ar. Si hubiera
un fusibl e quemado o un disyunto r acti vado, reemplace el fusible o reinicie el disyun tor en el
hog ar.
Si el indicador de verificación del sistema está en rojo…
Es posibl e que el filt ro enjua gable, el filtro hecho con mater iales HEPA o la unidad del filtro
estén sucias. As egúrese, también, de vaciar la copa de recolecc ión de residuos, si estu viera
llena. (Consultar la página 40).
Si la aspiradora Rewind se apaga…
Es posibl e que se haya act ivado el protecto r térmico. Primero, apague y desenchufe la
unidad . Vacíe la copa de reco lección de residuos. Luego revise la mangue ra y los filtros para
corrob orar que no estén obstruidos. El protecto r térmico deber ía desactivarse en 30 minuto s.
(Consul tar la página 46).
Mi aspiradora Rewind no aspira correctamente.
Asegúrese de vaciar la copa de recole cción de residuos, si estuvie ra llen a. El filtro puede estar
tapado. Levante la unid ad del fil tro hacia afuera de la copa de rec olección de residuos y
extraiga el filtro. Enjuágue lo con agu a tibia y limpia durante dos minutos. Déjelo secar por 24
horas ante s de volver a colo carlo. (Consult a la págin a 43).
49
Si el filtro estuviera sucio...
Puede que el sis tema esté obstru ido. Desenganc he la mang uera para encontra r la obstr ucción.
Si la encuentra, elimínela. (Consultar la página 46).
Es difícil empujar la aspiradora Rewind.
Asegúrese de confi gurar el ajuste de altura para alfombras en el ajuste apropiado. (Consultar
la página 39).
Si el cepillo giratorio de la herramienta turbo no funciona…
Asegúrese de no estar presionando demasiado la her ramienta. Si ello no funciona, es posible
que esté tap ado: extraiga el cabello o los residuos del cepillo.
(Consul tar la página 46).
Todo otro ser vicio de mantenim iento deberá ser real izado por persona l técnico autor izado. Si
el aparat o no funci ona como debe, si se ha caído, dañado o dejado a la intempe rie, o si se ha
sumerg ido en agua, llévelo a un Centro técnico antes de continua r usánd olo.
¿PREGUNTAS O DUDAS?
Contáctenos: (800) 944-9200
Para consultar la Guía completa de resolu ción de problemas, visite el siguien te
siti o:
Twitter: @HooverUSA
Facebook: facebook.com/hoover
No devuelva la unidad a la tienda. Con sulte el revers o del producto para
ver el número de mod elo.
Page 53

MANTENIMIENTO Y GARANTÍA
INFORMACIÓN SOBRE EL MANTENIMIENTO
TODO TIPO DE M ANTENIMI ENTO DEBERÁ ESTAR A CA RGO DE PERSONAL TÉC NICO
AUTORIZ ADO. Llame al (800) 944 -9200 en los EE. UU. y Cana dá.
En caso de nec esitar más ayud a, diríjase a un Cent ro Técni co autorizad o. Enc uentre el más cerca no
a su domicil io visitando nue stro sitio web ww w.hoover.com. Los ga stos derivad os del transpor te
desde y hac ia el lugar de reparac ión deberán ser abo nados por el propie tario del produ cto.
Siemp re identifiq ue su producto de acue rdo al número del mode lo y el códi go de fábrica cuan do
solic ite informac ión o realice el pedid o de las pie zas de repuesto. (El nú mero de modelo y el códig o
de fábri ca de la aspiradora ap arecen en la base del car gador y en el lateral de la ba tería).
GARANTÍA LIMITADA POR UN AÑO (PARA USO DOMÉSTICO) COBERTURA DE
LA GARANTÍA
En casos de uso y man tenimient o domé sticos en condi ciones norma les y conforme al Manu al del
propie tario, el produc to Hoover
por mano de obr a por un per iodo complet o de un año des de la fecha de compra (en ad elante, el
“Plaz o de la gara ntía”). Durante el Pla zo de la garantía, Hoove r® le proporc ionará la mano de obra
y los repues tos, sin ningún cos to, a los fin es de reparar cualq uier falla de produc tos adquirid os en los
Estad os Unidos, Tien das de intercamb ios militares de los EE . UU., y Cana dá.
CÓMO REALIZAR UN RECLAMO POR LA GARANTÍA
Si este pro ducto no present ara las caracte rísticas gara ntizadas, ll évelo o envíelo a un Distr ibuidor
Técnico O ficial autor izado de Hoover
forma au tomática a un Cent ro de servicio s auto rizado en los EE. UU., ll ame al: 1-800 -944-9200 o
visit e el sit io en línea de Hoover® en www.ho over.com. Para obten er más ayuda o inform ación sobre
esta Gar antía o la disponib ilidad de los Centr os de ser vicios cont emplados en la gara ntía, llame al
Centr o de resp uesta al consumi dor de Hoover® al 1-800 -944-920 0, de lunes a viernes de 8 a. m. a
7 p. m., hora del Este .
NO CUBIERTO POR LA PRESENTE GARANTÍA
La prese nte Garantía no cub re los sig uientes supu estos: el uso del produ cto en operacio nes
comerc iales (tales com o servicio s de limp ieza y de alquiler de equi pamiento), el cep illo giratori o, la
corre a, el mantenimie nto incorrec to del producto, los da ños derivados de su ma l uso, cas os fortuito s
o hechos de la na turaleza, vanda lismo u otros actos fu era del control de Hoo ver
tampo co cubre los actos u omisi ones del propiet ario, su uso fuera del pa ís donde se compró el
produc to originalm ente y las reventas del pr oducto que reali zare el propieta rio original . Est a
®
tiene gara ntía contra fall as de fábrica en los mat eriales y falla s
®
junto con el com probante de comp ra. Para ser redirig ido en
®
. La garantí a
garant ía no cubre la recolec ción, la entrega , el tran sporte ni el ser vicio a domicil io del producto.
No obsta nte, si envía su produc to por correo posta l a un Dist ribuidor Técnic o Ofi cial autori zado
®
, el costo de envío se rá de ida solament e.
Hoover
Esta gar antía no se aplica a los prod uctos adquiri dos fuera de los Esta dos Unidos, inclu idos
sus terr itorios y poses iones, fuera de Ti endas de interca mbios militar es de los EE. UU. y fuera
de Canad á. Esta garantía no cu bre los productos ad quiridos a un terce ro no aut orizado como
minor ista, conces ionario o distr ibuidor de produc tos Hoover
®
.
OTROS TÉRMINOS IMPORTANTES
Esta gar antía no es transfe rible y no podrá ser cedi da. Esta garant ía se regirá e interpr etará de
confo rmidad con las leye s del Est ado de Ohio. El Plazo de la gar antía no se prolonga rá por ningún
reemp lazo o reparación re alizados conf orme a la garantía.
ESTA GARA NTÍA REPRESE NTA LA GAR ANTÍA Y EL RECURS O LEGA L EXC LUSIVOS,
PROPORCIONADOS POR HOOVER
IMPLÍ CITAS, SERÁN RE CHAZADA S, INCLUIDAS L AS GARANTÍAS DE AP TITUD PARA L A VEN TA
O ADECUACI ÓN A FINES ESPECÍF ICOS. EN NINGÚN C ASO HOOVER SERÁ RE SPONSABLE
POR LOS DAÑOS ESP ECIALES, IND IRECTOS, INC IDENTALES O EMERG ENTES DE NINGU NA
CLA SE, QUE SUFRA EL PROP IETARIO O CUALQUI ER PART E QUE REC LAME POR IN TERMEDIO
DE ESTE, YA SEA EN VIR TUD DE UN CONTRATO, POR NEG LIGENCI A, HECHO ILÍC ITO CIVIL O
RESPO NSABILIDA D OBJ ETIVA NI POR NINGU NA OTRA CAUSA.
En alguno s est ados, la exclusió n de los dañ os mediatos no está pe rmitida, de mod o que la excl usión
prece dente puede no ser le aplicable . Est a gara ntía le otorga derec hos específi cos. También pue de
tener ot ros derechos, qu e varía n seg ún el estado.
®
. TODAS LAS DEM ÁS GARANTÍA S, EXPRESAS O
50
Page 54

Notes:
Page 55

Notes:
Page 56

Hoover.com
Find us on:
youtube.com/hoover
facebook.com/hoover
twitter.com/hooverusa
 Loading...