

Page 1
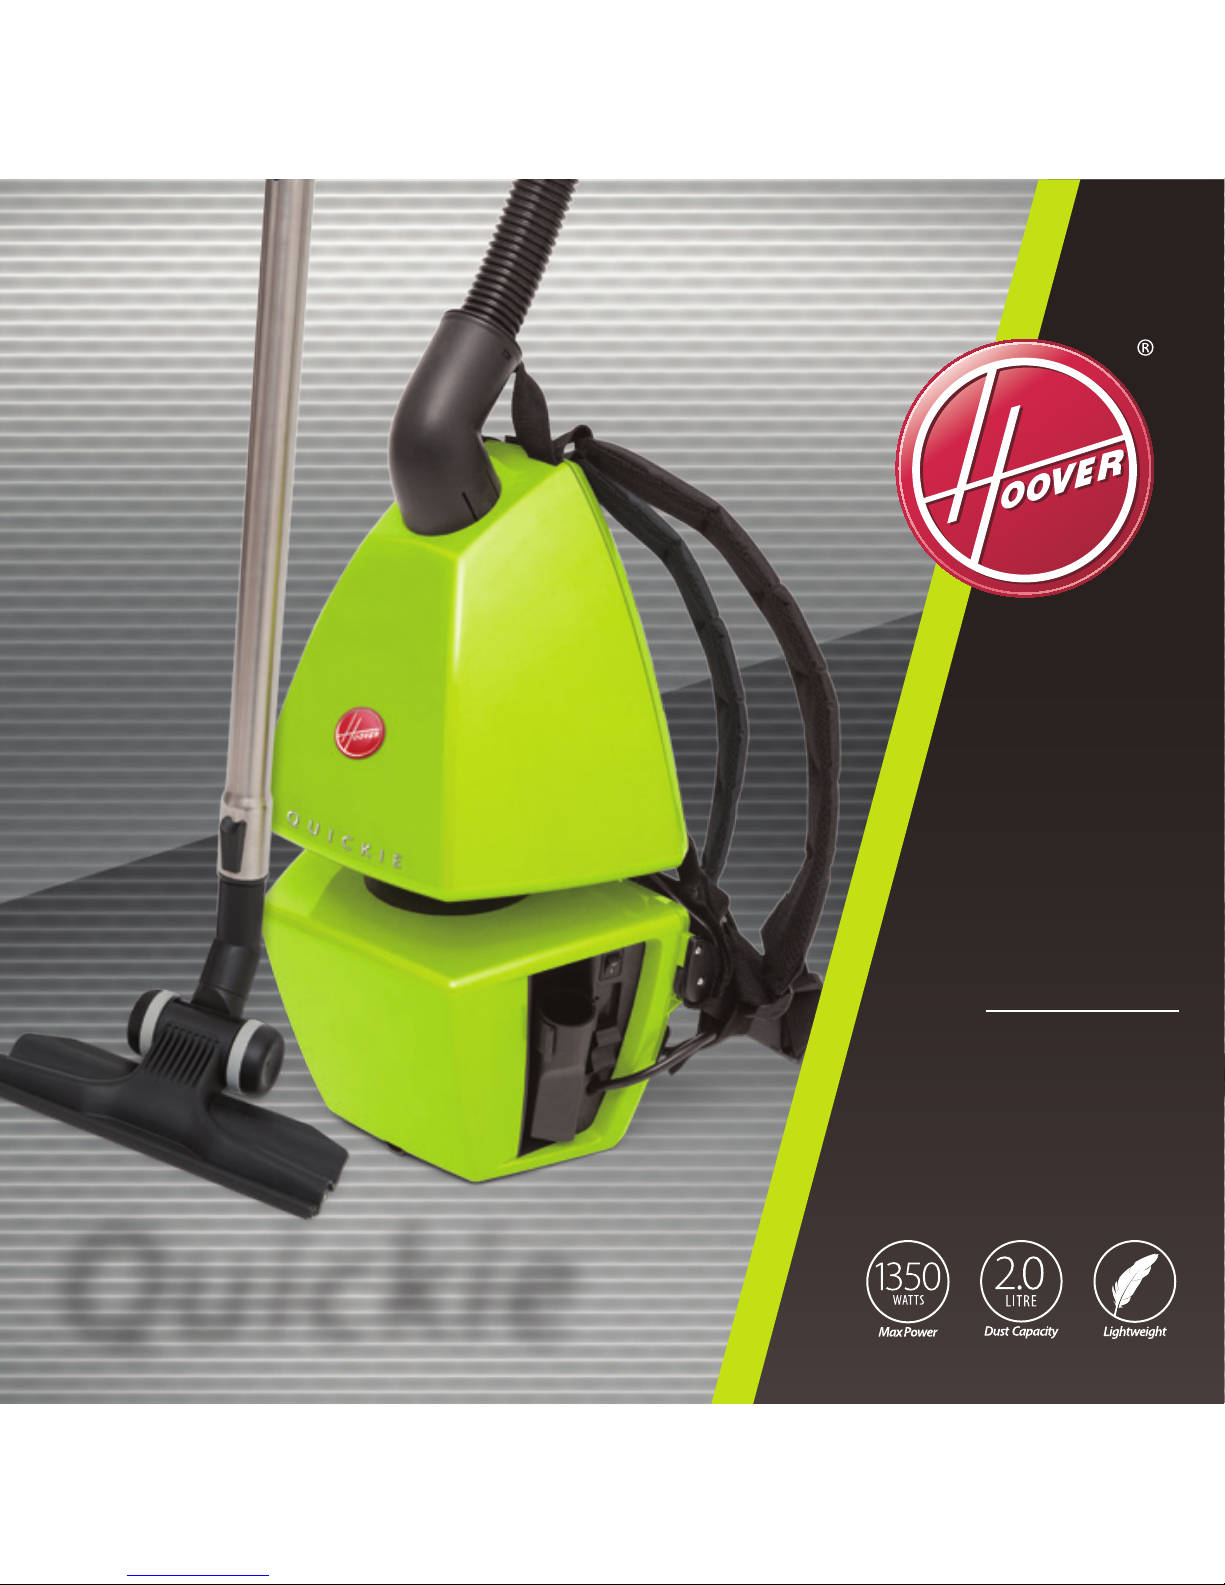
Compact & Ergonomically
designed to reduce user fatigue
HEPA Filtration
Variable Speed Control
Vacuum Cleaner
Quickie
QUICKIE
BACKPACK
Page 2
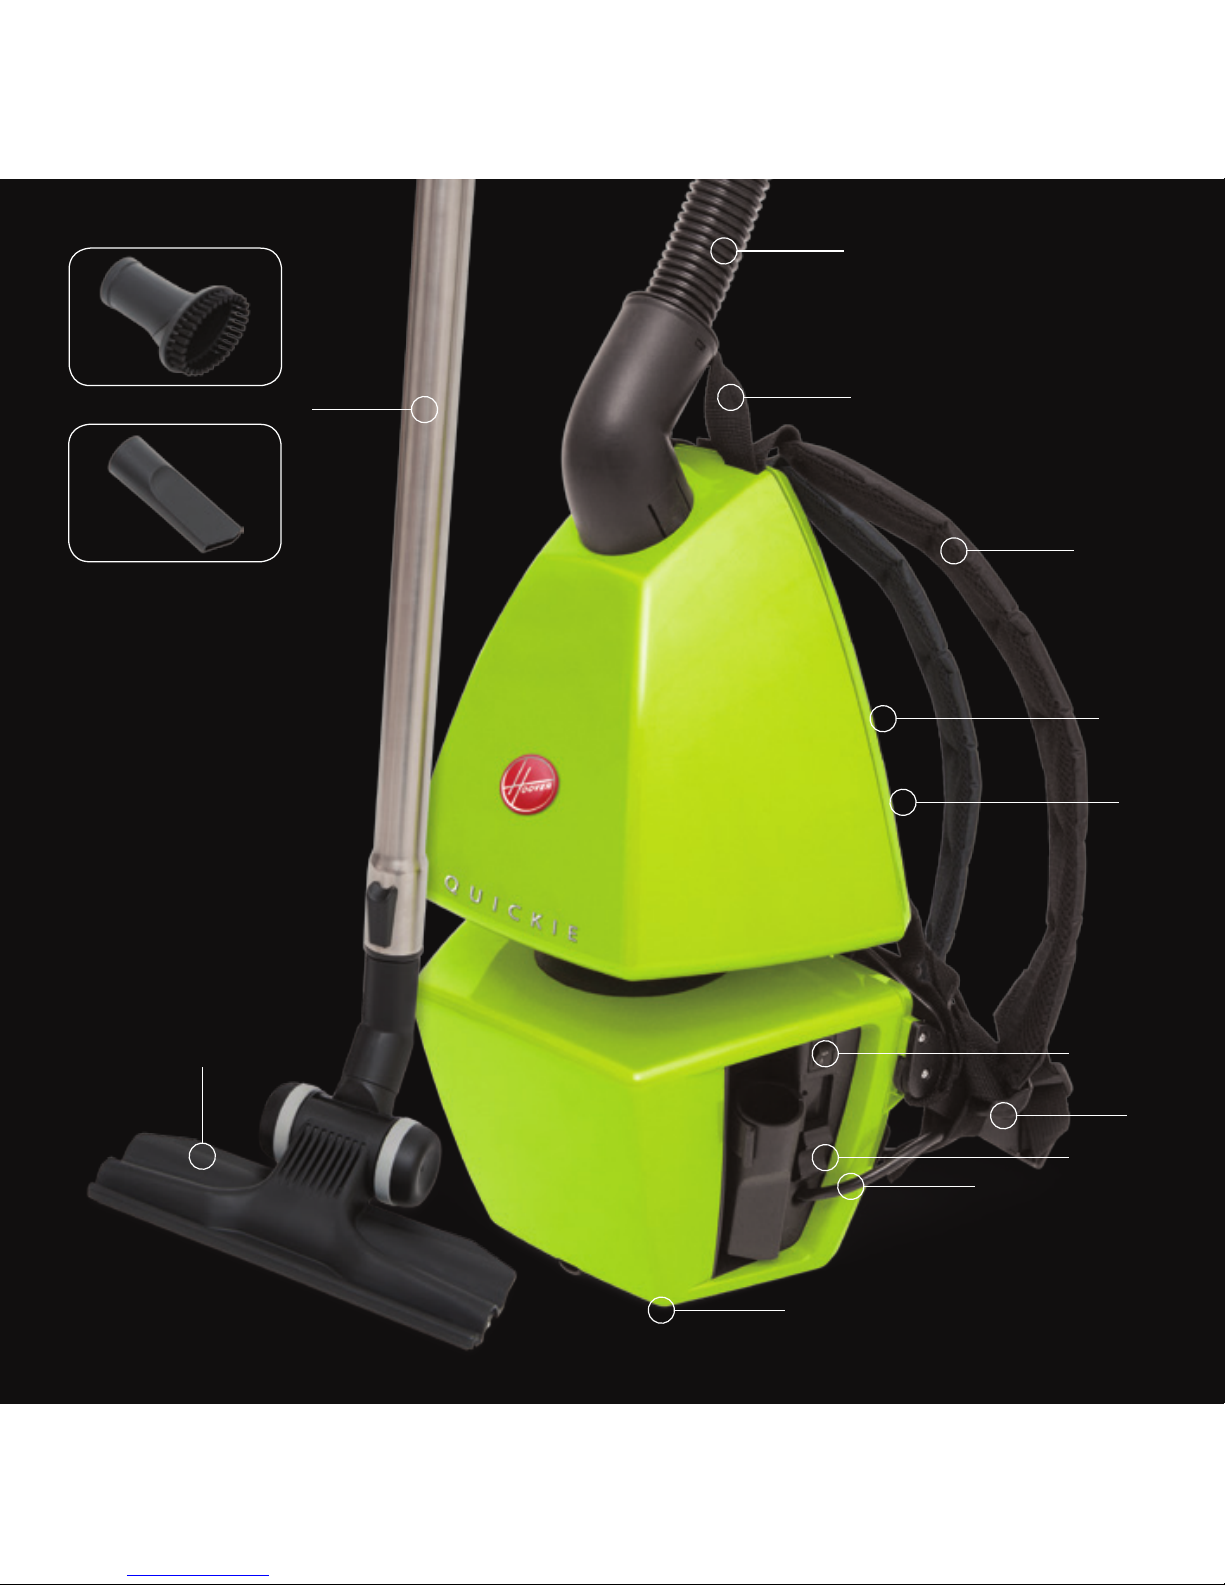
8
1
2
3
4
11
5
9
7
6
10
12
14
13
Page 3

Quickie
Congratulations on your purchase of your new HOOVER backpack vacuum cleaner. There are many
useful features built into your cleaner and we recommend that you carefully read this instruction book
so that you may take best advantage of them.
Features:
1. On/o switch
2. Variable speed control
3. Cable restraint
4. Power cable
5. Flexible hose
6. Back pad (not shown)
7. Shoulder straps
8. Telescopic wand
9. Carry handle
10. Dust bag compartment
(dust bag not shown)
11. HEPA lter (not shown)
Features
Specications:
Max Power: 1350W
Dust Capacity: 2.0L
Telescopic Tube: 960mm
Power Cable Length: 8m
Hose Length: 1.15m
Net Weight: 5.7kg
Accessories:
12. Gulper Floor Tool
13. Dusting Brush
14. Crevice Tool
Please contact Hoovers Customer Care 1300 360 845 to nd
your local spare parts provider.
Page 4

Before you Begin
Before you start using your new backpack vacuum cleaner you should read this instruction leaet carefully
and make sure that you have understood its contents. If not, please contact the store where you bought
your backpack vacuum cleaner and get answers to any questions before you start using it.
Congratulations on your purchase of this new and innovative backpack vacuum cleaner. This backpack
vacuum cleaner has been developed from the point of view of user ergonomics. It makes vacuum cleaning
quicker and easier as the backpack follows the user’s movements; it becomes “part of the user”.
Unlike traditional vacuum cleaners, this backpack does not need to be lugged about, potentially scratching
furniture and other inventory.
Page 5

Before you Begin
Precautionary measures:
If the opening that sucks in the air, the hose or the telescopic wand are blocked, you should
switch o the vacuum cleaner at once. First clear the blocked substance before you attempt
to start the vacuum cleaner again.
1. Do not operate the vacuum cleaner too close to heaters, radiators,
cigarette butts etc.
2. Before you insert the plug into the mains power supply, make sure your
hand is dry.
3. Before you start using the vacuum cleaner, please remove large or sharp
objects from the oor in order to prevent the paper lter being damaged.
4. When you want to pull the plug from the mains power supply, please do
this at the plug itself and not by the electrical cable.
This backpack is equipped with a cord restraint, plug and cable.
In the event that either of these parts get damaged, it must be
repaired by a qualied technician.
Page 6

Warning
To reduce the risk of re, electric
shock, or injury:
1. Do not leave the appliance connected to the
mains power supply when not in use. Disconnect
from any power supply before performing any
maintenance duties.
2. To reduce the risk of electric shock, do not use
outdoors or on wet surfaces.
3. This appliance must not be used as a toy. Do not
allow children to use the appliance unattended.
4. This appliance is not intended for use by persons
(including children) with reduced physical, sensory
or mental capabilities, or lack of experience
and knowledge, unless they have been given
supervision or instruction concerning use of the
appliance by a person responsible for their safety.
Children should be supervised to ensure they do
not play with the appliance.
5. Use only as described in this instruction manual.
Do not use for any other purpose except those
outlined in this instruction manual.
6. If the vacuum cleaner is not working correctly, has
been dropped, damaged, left outdoors, dropped
into water or if the power cable or plug appears
damaged, do not use. Return to a Hoover Service
agent or contact Hoover Customer Care:
1300 360 845/sales@hooveroorcare.com.au/
www.hooveroorcare.com.au.
7. If the power cord is damaged, it must be replaced
by the manufacturer, its service agent or similarly
qualied persons in order to avoid a hazard.
8. Do not pull or carry the appliance by the power cable,
use the power cable as a handle, or pull the power
cable around sharp edges or corners.
9. Keep the appliance away from heated surfaces.
10. Unplug the appliance by lightly grasping and pulling
the plug from the wall. Do not unplug the machine
by pulling on the power cable.
11. Do not handle the appliance and/or power cable
with wet hands.
12. Always ensure that all openings and entry points on
the appliance are clear from objects or any blockages
before commencing use. Removal of dust, lint, hair
and dirt from all openings and entry points will help
improve airow on the appliance.
13. Keep hair, loose clothing, ngers and all body
parts away from openings and entry points on
the appliance.
14. Ensure the appliance is switched o before
unplugging.
15. Use extra care when cleaning on stairs.
16. Do not use the appliance to pick up ammable
items or combustible liquids (i.e. petrol, hot
ashes, cigarettes, matches or anything burning) or
use in areas where such substances and items may
be present.
17. Ensure the appliance is disconnected from the mains
power supply before connecting the hose to the unit.
18. Do not use the appliance without dust bag and/or
lter in place.
19. Do not immerse the vacuum cleaner or accessories
into water or other liquids.
Page 7

Assembly
Always remove the plug from the mains power supply before tting or
removing accessories
Connecting the hose
1.
To t the hose, insert into the hose inlet at the top of the backpack.
Push the tabs on the side of the hose end until it clicks into position.
2. To remove the hose, squeeze the tabs on the side of the hose end
and gently pull from the inlet.
Fitting the telescopic wand and oor tool
1.
To t the telescopic wand to the handle, gently insert the
end of the handle into the top of the telescopic wand.
2. To t the oor tool to the telescopic wand, gently
insert the telescopic wand into the top if the oor
tool as shown.
Assembly
Page 8

Fitting the dusting brush and crevice tool
To t the accessories to the telescopic wand, gently insert the telescopic wand into the top if the dusting
brush or crevice tool.
Dusting Brush – ideal for cleaning furniture, curtains and upholstery
Crevice Tool – ideal for cleaning in tight spaces
The Gulper oor tool is ideal for
cleaning on carpets and hard oors.
Carpet Hard Floors
Assembly (continued)
Page 9

Instructions for Use
Fitting unit to the Operator’s Back
The backpack comes with straps fastened for ease of packing. Before tting the unit become familiar with
the various straps and pads for safe and comfortable operation.
Shoulder strap adjustments
1. To loosen the shoulder pads tilt up strap lock and allow webbing
to slide. To tighten pull down on the bottom straps.
2. Shoulder pads can pivot side to side for comfort around the neck.
Chest strap adjustment
1. To fasten the clip, click the male and female halves together.
2. To unlock the clip press on the clip tabs.
Instructions for Use
Page 10

3. To loosen the chest strap tilt up strap lock and allow webbing to
slide. To tighten the chest strap pull on the strap.
1. Lift the vacuum onto a table or countertop for ease of tting.
2. Loosen the shoulder straps and unclip the chest strap. Slide
arms under the shoulder straps so that the padding is over
the shoulders. Make sure the straps do not twist.
3. Adjust the shoulder straps and chest strap accordingly.
Now that adjustments are understood, proceed to t the unit for operation.
IMPORTANT! – the unit is ergonomically correct when the weight is
distributed over the hips and not on the shoulders.
Instructions for Use (continued)
Page 11

Instructions for Use
CAUTION! Secure Cable
An extension cable is required with this vacuum cleaner, an extension cable allows for ease of
replacement when damaged. Please make sure you follow the instructions to properly t the
cable through the cable restraint.
IMPORTANT! The cable restraint improves the cable control when in use
and serves as an important safety device.
Cable Restraint and Power Cable
Make sure you bend the cable approximately 10cm
from the xed end into a “U” shape (See Diagram 1).
Slide the cable “U” shape through the elongated slot
on the cable restraint and loop over the hook part of
the cable restraint.
Once the cable is tted, pull rmly on the cable side
shown to locate securely. (See Diagram 2).
1.
2.
Cable
restraint
Page 12

Operating the Backpack
Please follow the cable restraint instructions to properly t the cable through the cable restraint device on
the backpack. Release ties from the extension cable and ensure that the cable is not coiled when in use.
1. Put the cable plug into mains power supply.
2. Fit the unit onto your back (as per tting instructions).
3. To switch on the backpack, reach back with your right hand
to the lower side of the unit and ick the on/o switch.
4. Stand upright as much as possible when
vacuuming. Grip the handle on the vacuum rmly
and ensure that your arm is positioned straight as
this will help angle the oor tool to the oor making
it easier to push.
Instructions for Use (continued)
Page 13

Instructions for Use
Adjustable Power Control
The power of the backpack vacuum cleaner is adjustable enabling you
to carry out many dierent vacuuming tasks. Below is a list of vacuuming
tasks categorised according to the power recommended – 1 as the lowest
and 5 being the most powerful.
1. Curtains, plants, lampshades
2. Books, TV’s, electronic equipment
3. Photo frames, window sills, furniture
4. Hard Floors, soft oors, rugs
5. Carpets
1
2
3
4
5
Removal of the vacuum
1. To switch the backpack o, ick the on/o switch
(lower right hand side of the unit).
2. Unclip chest strap.
Page 14

3. Loosen shoulder straps slightly. Slide pad o one
shoulder and then o the other shoulder – grabbing
the carry handle on the top of the unit.
4. Turn o and pull out plug at mains power supply.
5. Unplug cable and wind the cable for storage.
Do not wrap the cable around the machine.
Instructions for Use (continued)
Page 15

Maintenance
Maintenance
Always operate the cleaner with the dust bag and lter correctly installed. This will prevent any damage to
the cleaner and help maximise performance.
Changing the dust bag
When the eciency of the backpack vacuum cleaner is noticeably reduced, the dust bag should be changed.
1. To t a new dust bag, remove the hose, then press the button
located at the top of the machine to open the dust
bag compartment.
2. Remove the dust bag by sliding the bag collar out of
the holder.
3. Fit the new dust bag by sliding the bag collar into
the holder. The arrow on the bag collar, is the
direction in which to t the bag. Close the bag
compartment lid. Replace the hose.
Page 16

Changing the lters
Ensure that the backpack vacuum cleaner is not connected to the mains power when performing
any maintenance duties.
This backpack is tted with a HEPA (high eciency particulate air) exhaust lter which removes harmful
particles from the air.
1. To change the HEPA lter, remove the exhaust grill from the base
of the machine.
2. Remove the used HEPA lter (by pulling on the tab on the lter) and
replace with a new one.
When replacing the HEPA lter ensure it is lifted correctly. The tab on
the lter needs to be facing towards the front.
3. Replace the exhaust grill once completed.
Maintenance (continued)
Page 17

Maintenance
Changing the lters (continued)
The backpack is also tted with a inlet foam lter which is located in the dust bag compartment.
1. Press the button located at the top of the machine to open the dust
bag compartment.
2. Remove the dust bag.
3. Open the inlet grill and remove the used foam lter.
Replace with new foam lter and close the grill.
4. Replace the dust bag and close the compartment door.
Page 18

Fault Treatment
The backpack vacuum cleaner
will not turn on.
Check that the power cable is inserted securely; remove the
power plug and then reinsert into the mains power supply.
Check that the on/o switch is in the ‘ON’ position.
The backpack vacuum
performance is deteriorating.
Check the backpack to ensure there are no blockages.
Please clear any blockages that may be found.
Check the inlet foam lter or HEPA exhaust lter to see if
they need replacement.
The cleaner makes an abnormal
sound when switched on.
Check the backpack to ensure there are no blockages.
Please clear any blockages that may be found.
Troubleshooting
Problems and solution
If you come across a problem, please use the checklist of troubleshooting tips before ringing
Hoover Customer Care
Page 19

Troubleshooting
Customer Care
Part Part Number
Paper Dust Bags 5pk 32440316
Filter Set
(HEPA Exhaust & Inlet Foam)
32200827
Gulper Floor Tool 32mm 31110189
Telescopic Wand 32mm 31300558
Hose Assembly with BEP 31220449
Please contact Hoover Customer Care: 1300 360 845 to nd your local spare parts provider.
Page 20

Call Hoover Floorcare
with any product queries
Australia 1300 360 845
To nd out more about our range,
visit: www.hoover.com.au
www.hoover.co.nz
email: sales@hooveroorcare.com.au
Conditions of warranty
Your Hoover cleaner, in the case of domestic use, has a one
year parts and labour warranty against product defects
and failures when the product is used in accordance with
the terms and conditions of this warranty statement.
In the case of commercial use, your cleaner has a three
month parts and labour warranty against product defects
and failures when the product is used in accordance with
the terms and conditions of this warranty statement.
This warranty commences from the original date of
purchase and is not transferable; please retain your
original proof of purchase for any warranty claims. This
warranty is valid only in the country where the cleaner
is purchased.
The cleaner must be operated in accordance with
these instructions and used for general cleaning to
remove DRY dirt and dust from carpets, ooring and
fabrics. This cleaner is not designed for the collection
of vitreous building material including particle board,
construction products and similar products such as
wood/bres, cement, llers, bre glass etc or excessive
or frequent sand. The infrequent pick-up of these
materials in these circumstances may be harmful to
your cleaner and may void the manufacturer’s warranty.
Accessories and consumables including dust bags
and lters, unless defective in manufacture, are not
subject to this warranty. In order to prolong the life
of accessories and consumables, regular care and
maintenance is recommended.
When properly used and cared for, your cleaner will
render excellent service; refer to the instruction manual
for further details, as misuse or failure to follow the
instructions makes this warranty void.
In the event of service or advice being needed, please contact
Hoover Floorcare Asia Pacic Pty Ltd, Level 1, Building 2 Brandon
Business Park, 530 Springvale Road, Glen Waverley Victoria 3150,
or on 1300 360 845, Monday-Friday 9am-5pm EST. The decision
to repair or replace the cleaner is at the sole discretion of Hoover
Floorcare. If Hoover Floorcare decide to repair or replace the
cleaner, it will do so at its own cost.
Hoover Floorcare is unable to accept responsibility under this
warranty for any repair work not carried out by an authorised
Hoover Service Agent or from the use of non-genuine parts.
If any part is no longer available or manufactured, Hoover
Floorcare will replace it with a genuine functional replacement
part. This warranty does not apply to the cost of replacing any
parts of the product due to normal wear and tear, alterations,
impro per installation, physical abuse, misuse or accidental
damage. Any transportation costs involved in the repair of
defective parts shall be borne by the claimant.
If proof of purchase cannot be provided at the time of a
warranty claim or service, any work carried out on the
cleaner is chargeable.
The repair or replacement of the cleaner under
this warranty does not extend the original period
of warranty.
The benets conferred by this warranty are in
addition to all other rights and remedies in
respect of the product as outlined under the
Competition and Consumer Act and other State
and Territory laws.
“Our goods come with guarantees that cannot
be excluded in the Australian Consumer Law.
You are entitled to a replacement or refund
for a major failure and for compensation for
any other reasonably foreseeable loss or
damage. You are also entitled to have the
goods repaired or replaced if the goods fail
to be of acceptable quality and the failure
does not amount to a major failure.”
V2 05/13
 Loading...