

Page 1
Instruction Manual IMPORTANT: Read carefully before assembly and use.
©2016 Techtronic F loor Care Tech nology Lim ited. All Ri ghts Reser ved. Dist ributed by Roy al Applian ce Mfg. Co. Gle nwillow, Oh 44139 #961152030 ID118201
BH71000 S eries
Page 2

Welcome to
Hoover
®
ownership.
It’s Guaranteed.
H oo ve r w il l rep lac e y ou r b at ter ies un de r o ur 1 y ea r w ar ra nt y.
See Warranty for complete details.
http://hoover.com/. (8 88) 679- 2121
Make it official.
Page 3

Safety Instructions
Getting started with your Quest
TM
1000
Getting to know your Quest
TM
1000
Setting up your docking station
Charging your Quest
TM
1000
Using your Quest
TM
1000
Emptying the Dirt cup
Dirt cup assembly
Trouble shooting
Warranty
Declaration of Conformity
1
6
7
8
9
10
11
13
14
18
19
Your Guide:
This O wner’s Manual a pplies to th e following Q uest™ Robot ic Vacuum mode ls:
BH71000 S eries
Page 4

IMPORTANT SAFETY INSTRUCTIONS
SAVE THESE INSTRUCTIONS
When using an electrical appliance, basic precautions should always
be followed, including the following:
READ ALL INSTRUCTIONS BEFORE USING THIS APPLIANCE.
THIS PRODUCT IS INTENDED FOR HOUSEHOLD USE ONLY.
IF USED COMMERCIALLY WARRANTY IS VOID.
WARNING: TO REDUCE THE RISK OF FIRE,
ELECTRIC SHOCK, DAMAGE OR INJURY:
•Fully assemble before operating.
• Do not use the unit, store or charge batter y outdoors or on wet surfaces. Do
not allow to get wet.
• The charger is for indoor use only.
• Do not allow to be used as a toy. Not intended for use by children age
12 and under. Close supervision is necessary when used near children.
To avoid injury or damage, keep children away from product, and do not
allow children to place fingers or other objects into any openings.
• Use only as described in this manual. Use only Hoover
®
recommended
attachments and products.
• Do not use charger with damaged cord or plug. If appliance or charger
is not working as it should, has been dropped, damaged, left outdoors,
or dropped into water, take it to a service center prior to continuing use.
• Do not pull or carry charger by cord, use cord as a handle, close a door
on cord, or pull cord around sharp edges or corners. Do not place product on
cord. Do not run appliance over cord. Keep cord away from heated surfaces.
• Do not unplug charger by pulling on cord. To unplug charger, grasp the plug,
not the cord.
• Do not handle charger including charger plug and charger terminals, or
appliance with wet hands.
• Do not put any object into openings. Do not use with any opening blocked;
keep free of dust, lint, hair, and anything that may reduce air flow.
• Keep hair, loose clothing, fingers, and all parts of body away from openings
and moving parts.
•Use extra care when cleaning on stairs. Do not place cleaner on stairs or
furniture, as it may result in injury or damage.
• Do not use to pick up flammable or combustible liquids, such as gasoline, or
fine wood shavings, or use in areas where they may be present.
• Do not pick up anything that is burning or smoking, such as cigarettes,
matches, or hot ashes.
•Do not use without Dirt Cup and/or Filters in place.
• Turn power switch off and remove battery before removing or installing brush
roll.
• Do not incinerate the charger, battery, or appliance even if it is severely
damaged. The batteries can explode in a fire.
1
Page 5

• This product includes rechargeable lithium-ion batteries. Do not expose
batteries to high temperatures, as they may catch fire and/or explode.
• Do not dispose of battery in a fire or trash compactor. See battery disposal
section for directions.
•Do not attempt to disassemble battery.
• Unplug the charger from the outlet before any routine cleaning or
maintenance.
• Leaks from battery cells can occur under extreme conditions. If any liquid
gets on the skin wash quickly with soap and water. If any liquid gets into the
eyes, do not rub eyes, immediately flush them with clean water continuously
for a minimum of 15 minutes. Seek medical attention immediately.
• Do not touch or insert objects into battery pack or charger terminals.
•Do not attempt to short circuit the battery or charger terminals.
•Place the cords from other appliances out of the area to be cleaned.
•Do not operate the vacuum in a room where an infant or child is sleeping.
•Do not operate the vacuum in an area where there are lit candles or fragile
objects on the floor to be cleaned.
•Do not operate the vacuum in a room that has lit candles or fragile objects on
furniture that the vacuum may accidentally hit or bump into.
•Do not allow children to sit on vacuum.
•For use only with Hoover Docking station (Part 440009836)& Charger (Part
440009836).
WARNING: TO REDUCE THE RISK OF ELECTRIC
SHOCK, THE CHARGER HAS A POLARIZED PLUG (ONE
BLADE IS WIDER THAN THE OTHER). THIS PLUG WILL FIT
IN A POLARIZED OUTLET ONLY ONE WAY. IF THE PLUG
DOES NOT FIT FULLY IN THE OUTLET, REVERSE THE PLUG.
IF IT STILL DOES NOT FIT, CONTACT A QUALIFIED ELECTRICIAN TO INSTALL THE PROPER OUTLET. DO NOT CHANGE
THE PLUG IN ANY WAY.
CAUTION: TO REDUCE THE RISK OF DAMAGE:
• With brush roll on, do not allow cleaner to sit in one location for an
extended period of time, as damage to floor can result.
• Avoid picking up hard sharp objects with this product, as they may cause
damage.
• Store appropriately indoors in a dry place. Do not expose machine to
freezing temperatures. This product includes rechargeable lithium-ion
batteries. Do not expose batteries to high temperatures,as they may catch
fire and/or explode.
2
Page 6

3
BEFORE USE
WARNING: Ensure that no children or pets are in the room
or have access to the room to be cleaned to avoid risk of injury.
CAUTION: To avoid risk of damage, put away fragile
objects, loose cords and small objects that could topple over.
•To avoid damage to the floor, put away any pointed or sharp objects that
could get under the robot and scratch the floor surface.
•Your robot is designed to take up small quantity of dirt and does not replace a
classic vacuum cleaner. Use your Quest regularly to help reduce your weekly
vacuuming time.
•Quest cleans hard floor and low pile carpet up to 1 cm. It is not recommend
for use on longer pile carpet.
•Dark colored carpets or objects may contribute to Quest's cliff sensors so it
may not vacuum on or around them.
WARNING: This product may contain chemicals known to
the State of California to cause cancer, birth defects or reproductive harm.
WASH HANDS AFTER HANDLING.
CAUTION: The battery used in this device may present a risk
of fire or chemical burn if mistreated. Do not disassemble, heat above
manufacturer’s maximum temperature limit (60°C/ 140°F), or incinerate.
Dispose of battery promptly. Keep away from children. Do not disassemble
and do not dispose of in a fire. Do not attempt to disassemble the battery or
remove any component projecting from the battery terminals. The battery
and charger have no user serviceable parts. Fire or injury may result. Prior
to disposal, protect exposed terminals with heavy insulating tape to prevent
shorting.
BATTERY DISPOSAL
WARNING:
RISK OF EXPLOSION
OR EXPSURE TO TOXIC MATERIAL 1-800-822-8337
LITHIUM-ION BATTERIES
The battery must be collected, recycled or disposed of in an
environmentally sound manner. The EPA certified RBRC Battery Recycling
Seal on the lithium-ion (Li-ion) battery indicated Techtronic Industries,
a corporate affiliate of Hoover, Inc., is voluntarily participating in an
industry program to collect and recycle these batteries at the end of their
useful life, when taken out of service in the United States or Canada.
The RBRC program provides a convenient alternative to placing used
Li-ion batteries into the trash or the municipal waste stream, which may
be illegal in your area. Please visit www.rbrc.org/call2recycle/ for
information on Li-ion battery recycling and disposal bans/restrictions
in your area. Hoover, Inc., involvement in this program is part of
our commitment to preserving our environment and conserving our
natural resources.
Page 7
4
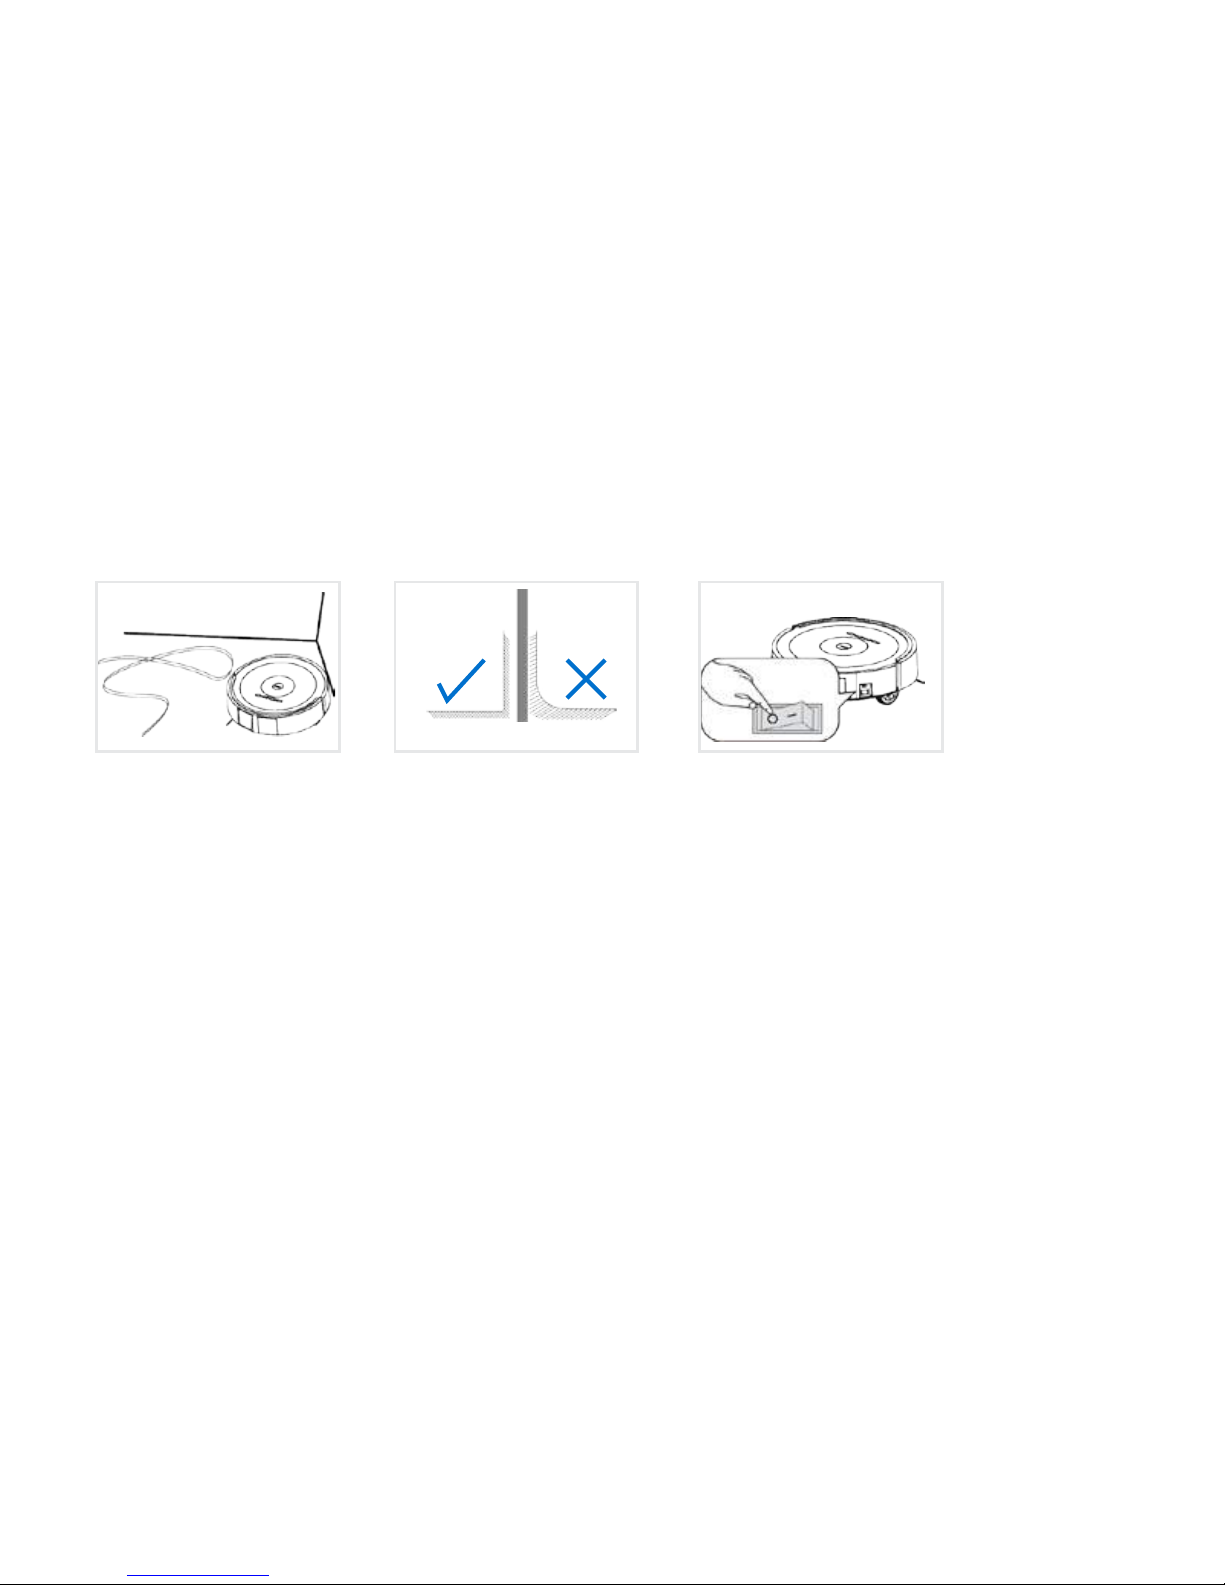
Before using this device, remove
obstacles on the floor such as
power cords, clothes and any
fragile objects. If the device
passes over a cord, it may drag
the object along and cause it to
tumble.
The docking station should be
positioned against the wall and at
least 4 ft away from other objects
around it to allow the robot to find
its docking station easily.
When the device is not in use,
power OFF the machine. This will
protect your device battery.
IMPORTANT INSTRUCTIONS BEFORE FIRST USE
Page 8
5
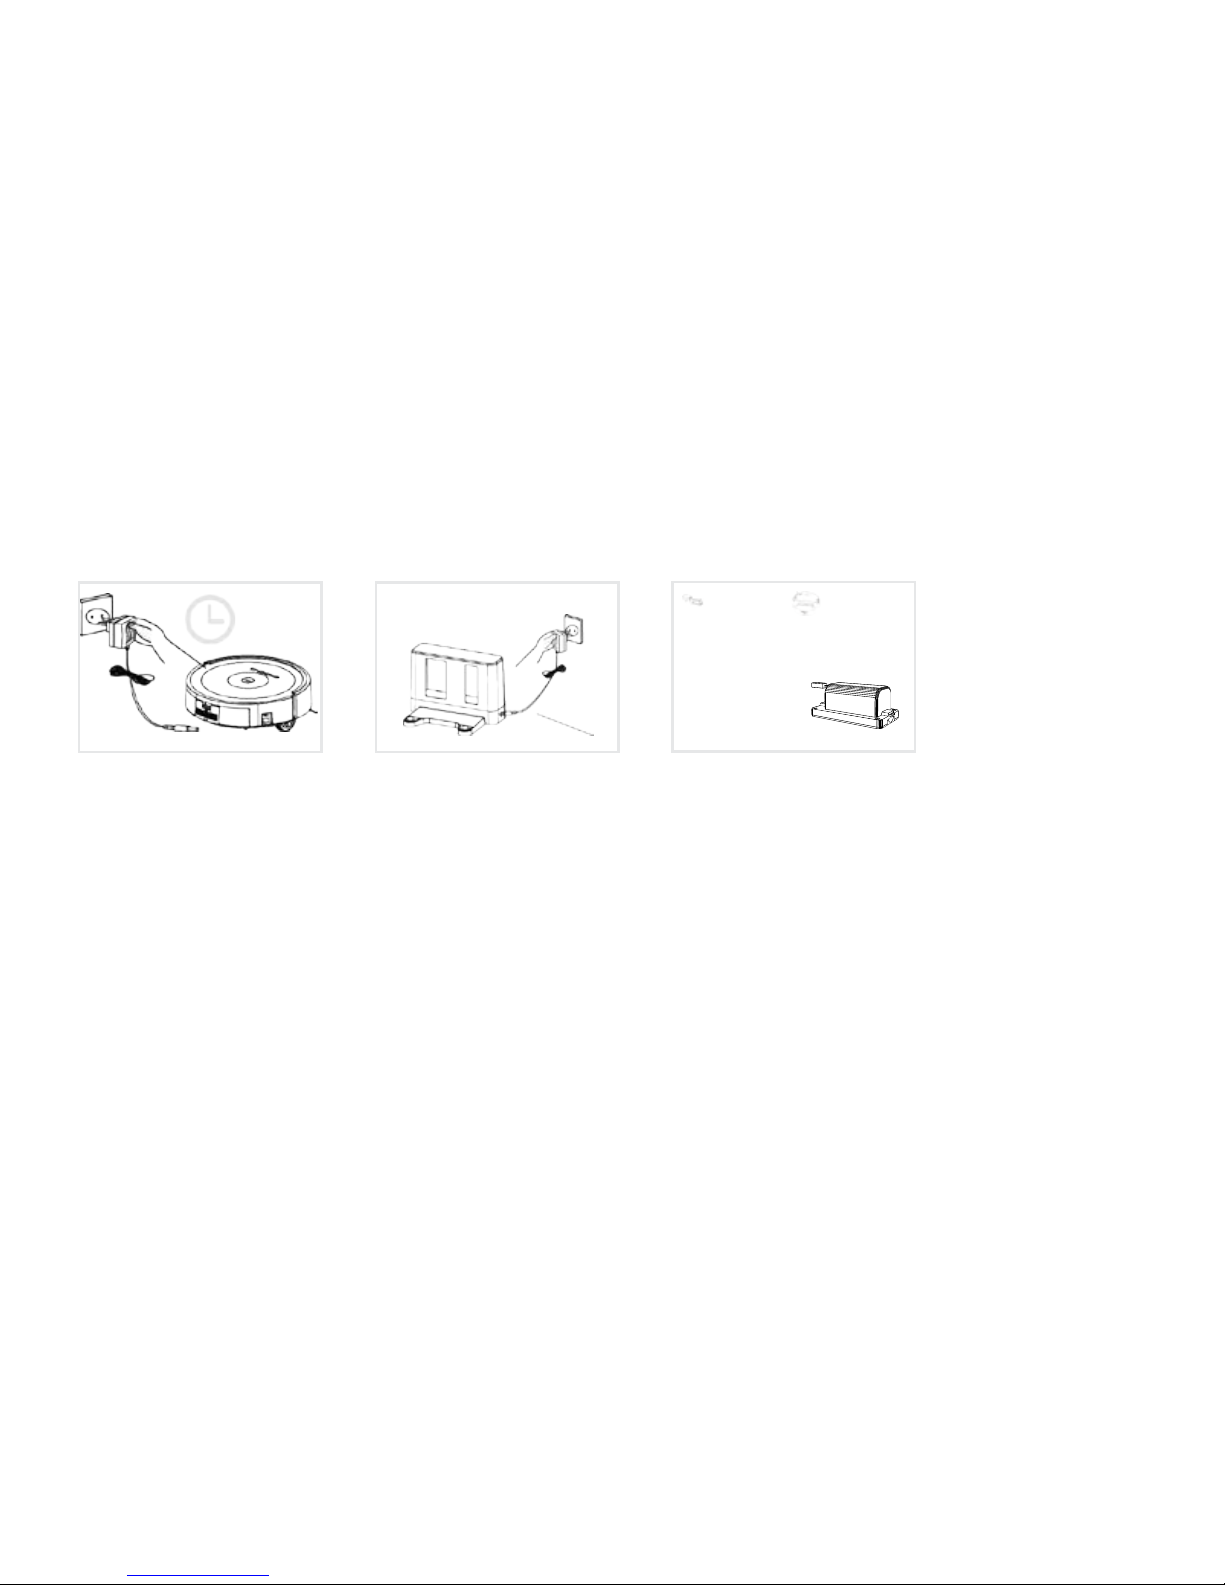
If the device is not in use for
extended period, charge the
battery fully and store it in a cool
& dry place to protect battery
from any potential damage.
Before first use or using it after a
long period, charge the battery
for about 18-24 hours to refresh
the battery.
When not in use for a long period,
unplug the docking station to
avoid unwanted electric hazard.
IMPORTANT SAFETY INSTRUCTIONS BEFORE FIRST USE
Page 9
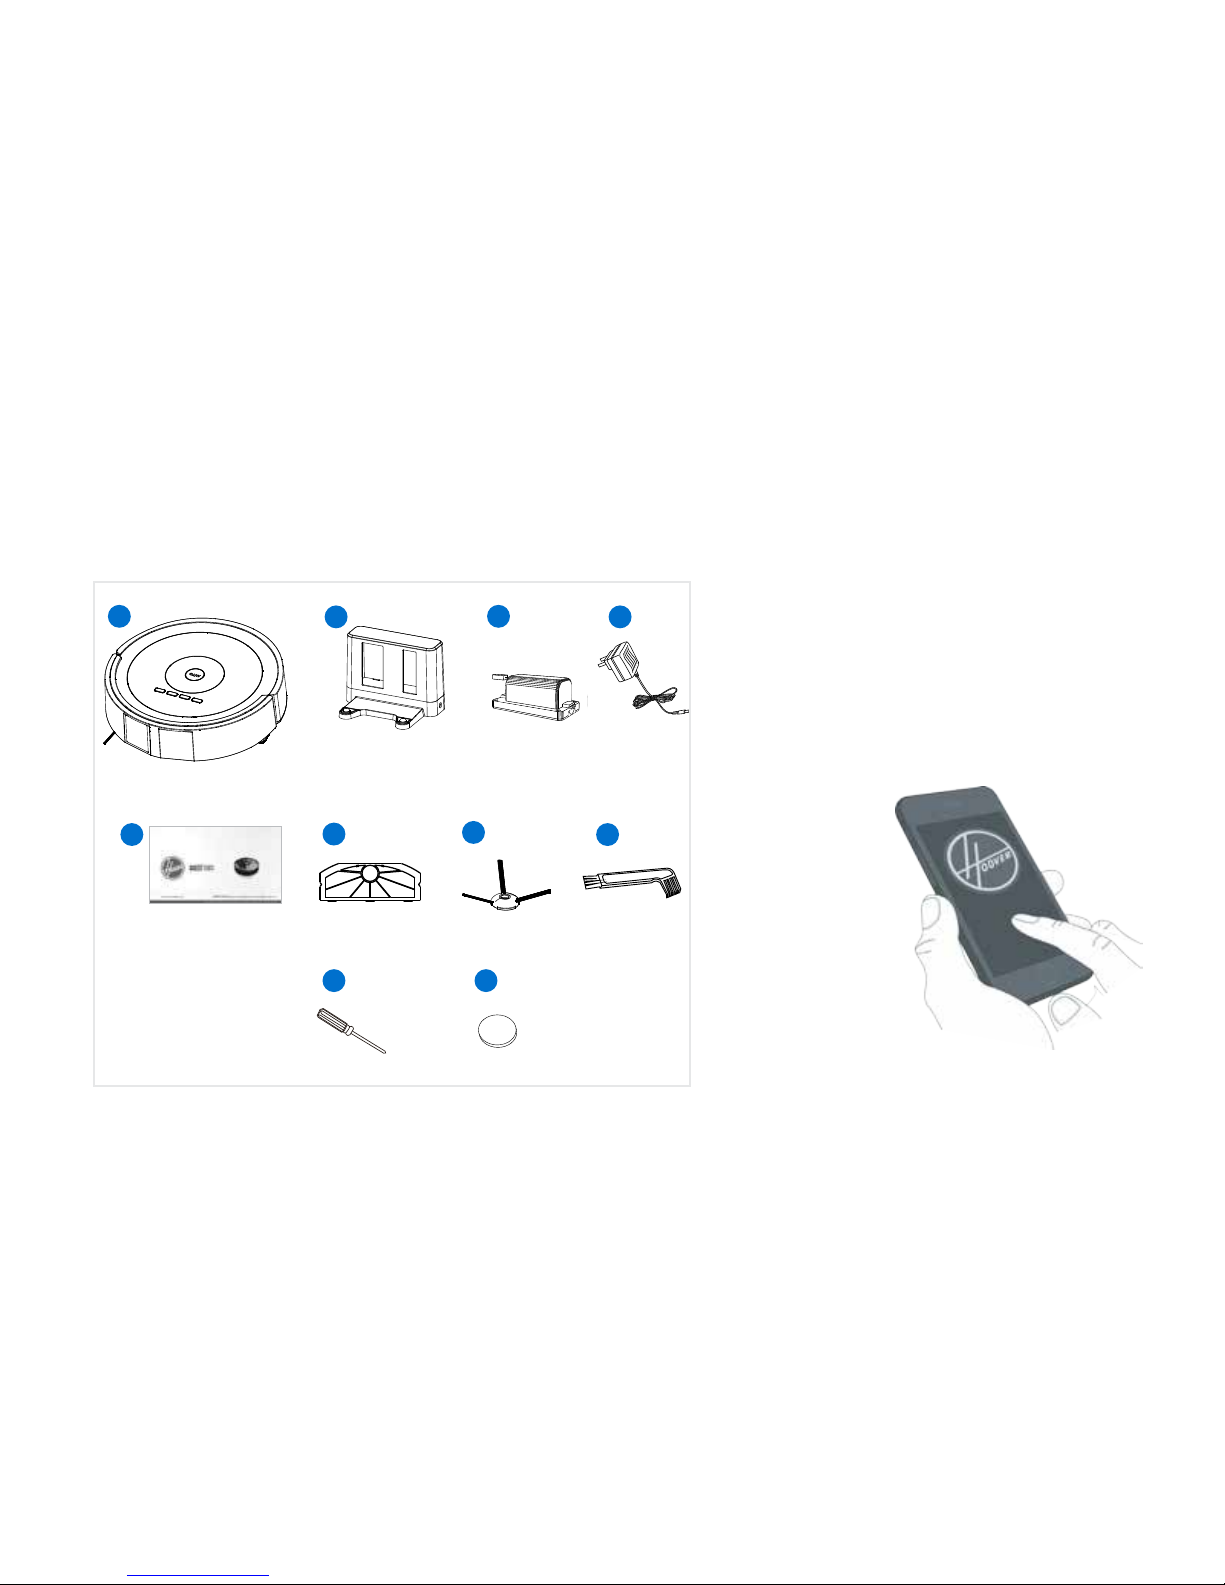
Getting started with your Quest
TM
1000 Robotic Vaccum
1. Quest™ 1000 Robotic
Vacuum
2. Docking Station
3. Battery
4. Adapter
5. Use manual
1
9
10
7
2
3
4
5
6
8
NOTE: B attery and filter come installed inside your robot.
6. Filter
7. Side Brush(2)
8. Dust Brush
9. Screwdriver
10. Adhesive pads
6
NOTE: Download Hoover Mobile App from iTunes
store or Google play.
Page 10
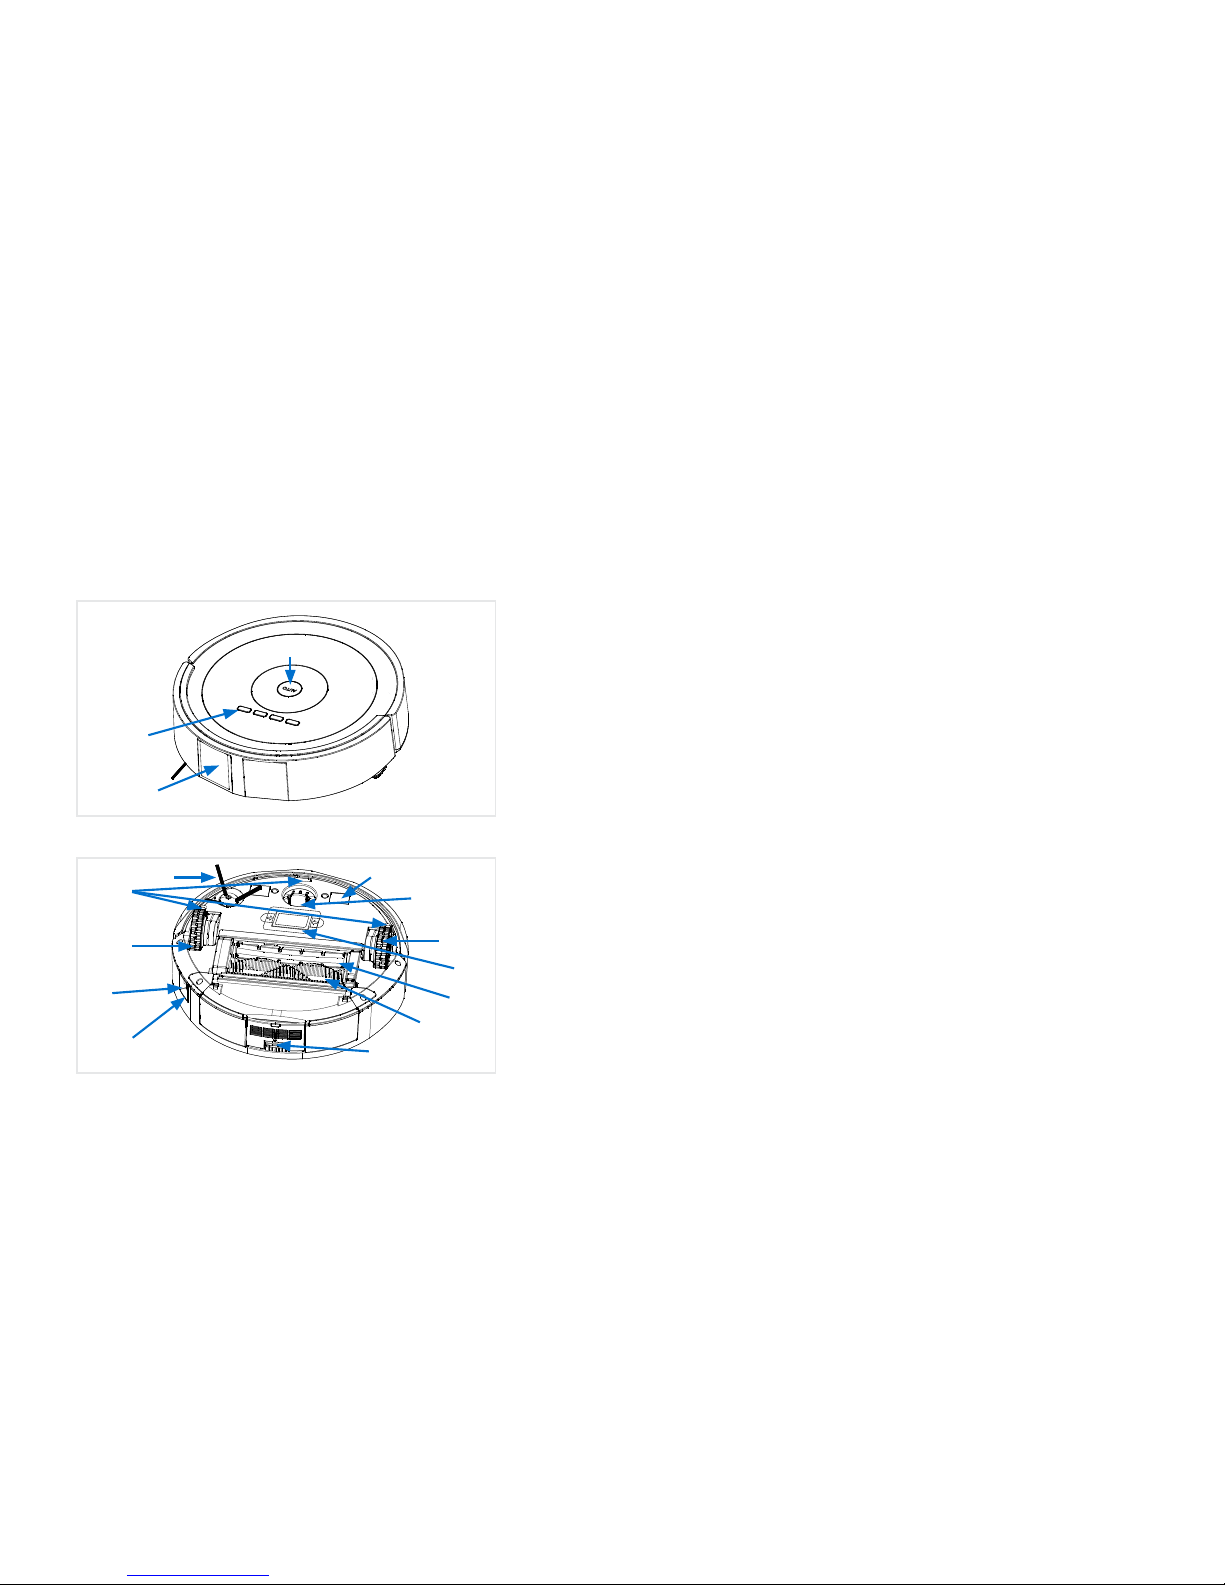
Getting to know your QuestTM 1000
1. Control Buttons
2. Sensor windows
3. Start button
1. Side Brush
2.Ground Detection Sensors
3.Right wheel
4.Power switch
5. Charging port
6.Dir t cup assembly
7. Charging contacts
8.Front wheel
9.Battery Compartment
10.Left wheel
11. Support brush
12. Main brush
7
Front View
Bottom View
1
2
1
2
3
4
5
6
12
11
10
9
8
7
3
Page 11
8
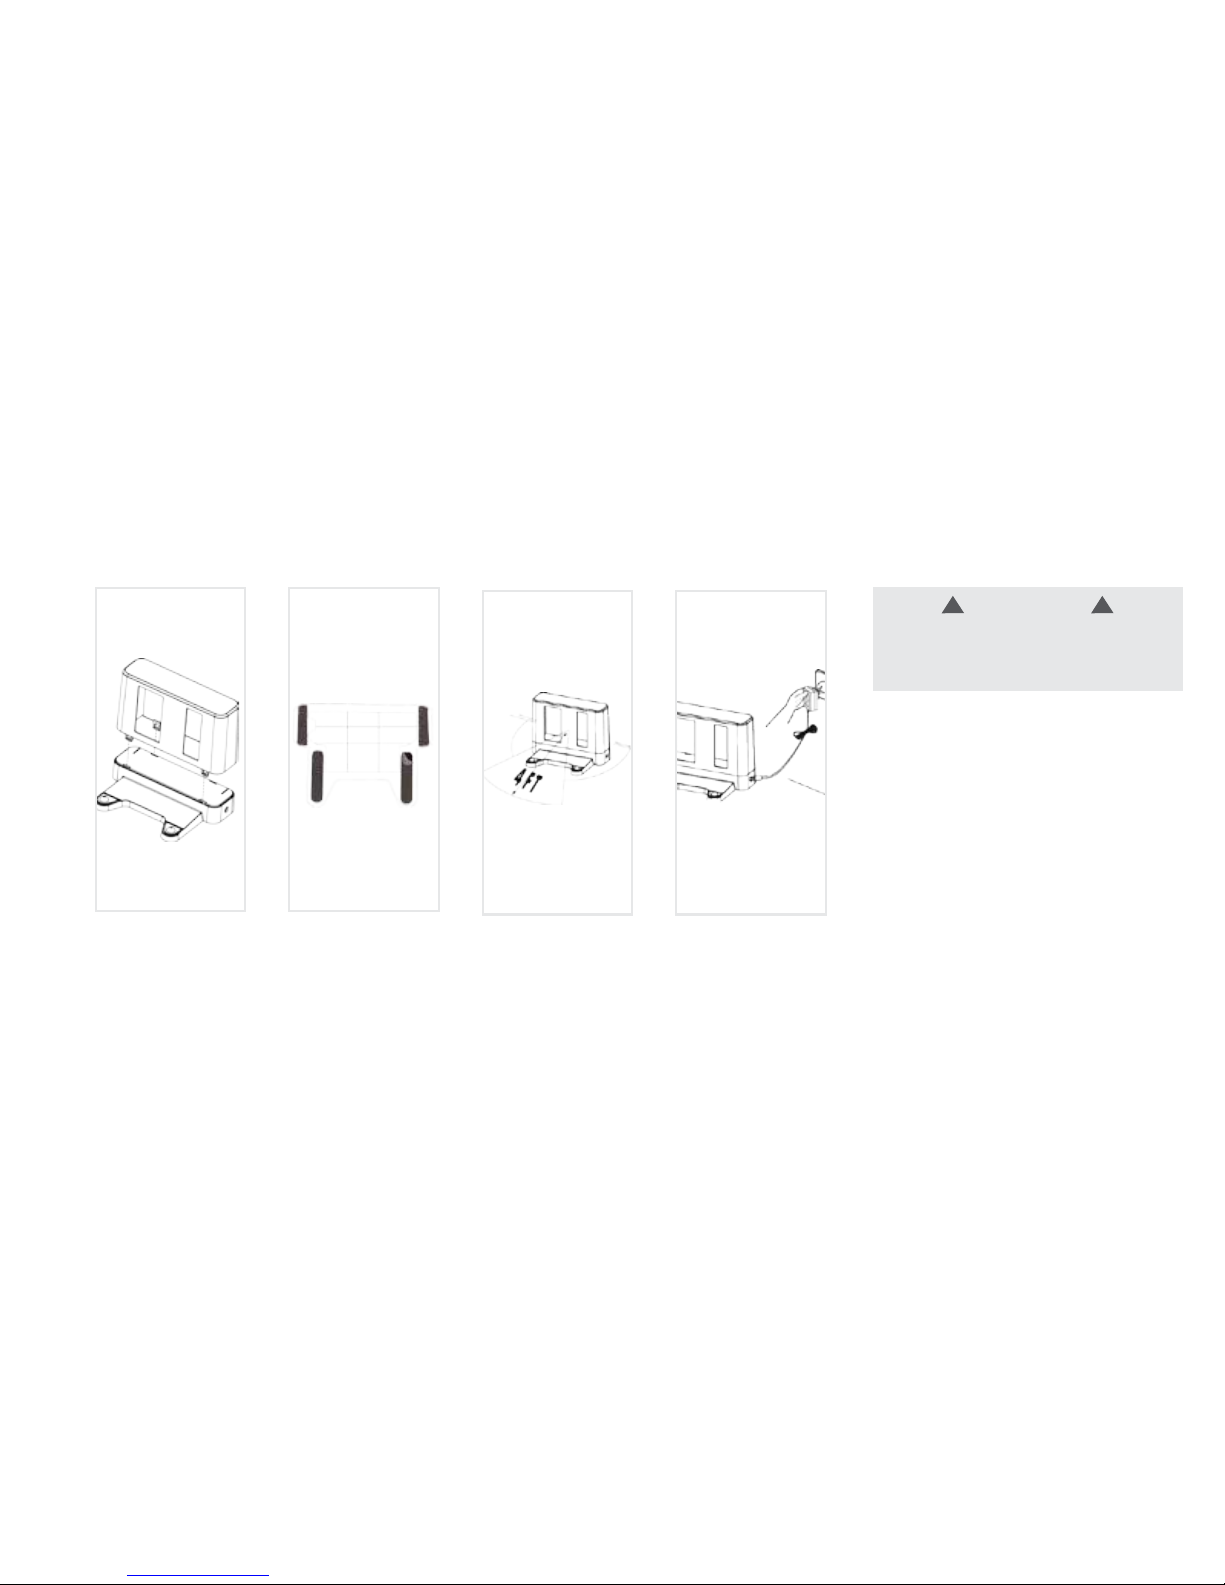
Setting up docking station
Top Cover, Base
Assemble the docking
station by inserting
the top and the base
together.
Tear the clear film off.
Position the docking
station against the
wall and at least 4 ft
away from any objects
around it.
Plug in the adapter.
WARNING
Do not move the docking station while
Quest is cleaning. Otherwise, it might not
return to its docking station.
!!
Page 12
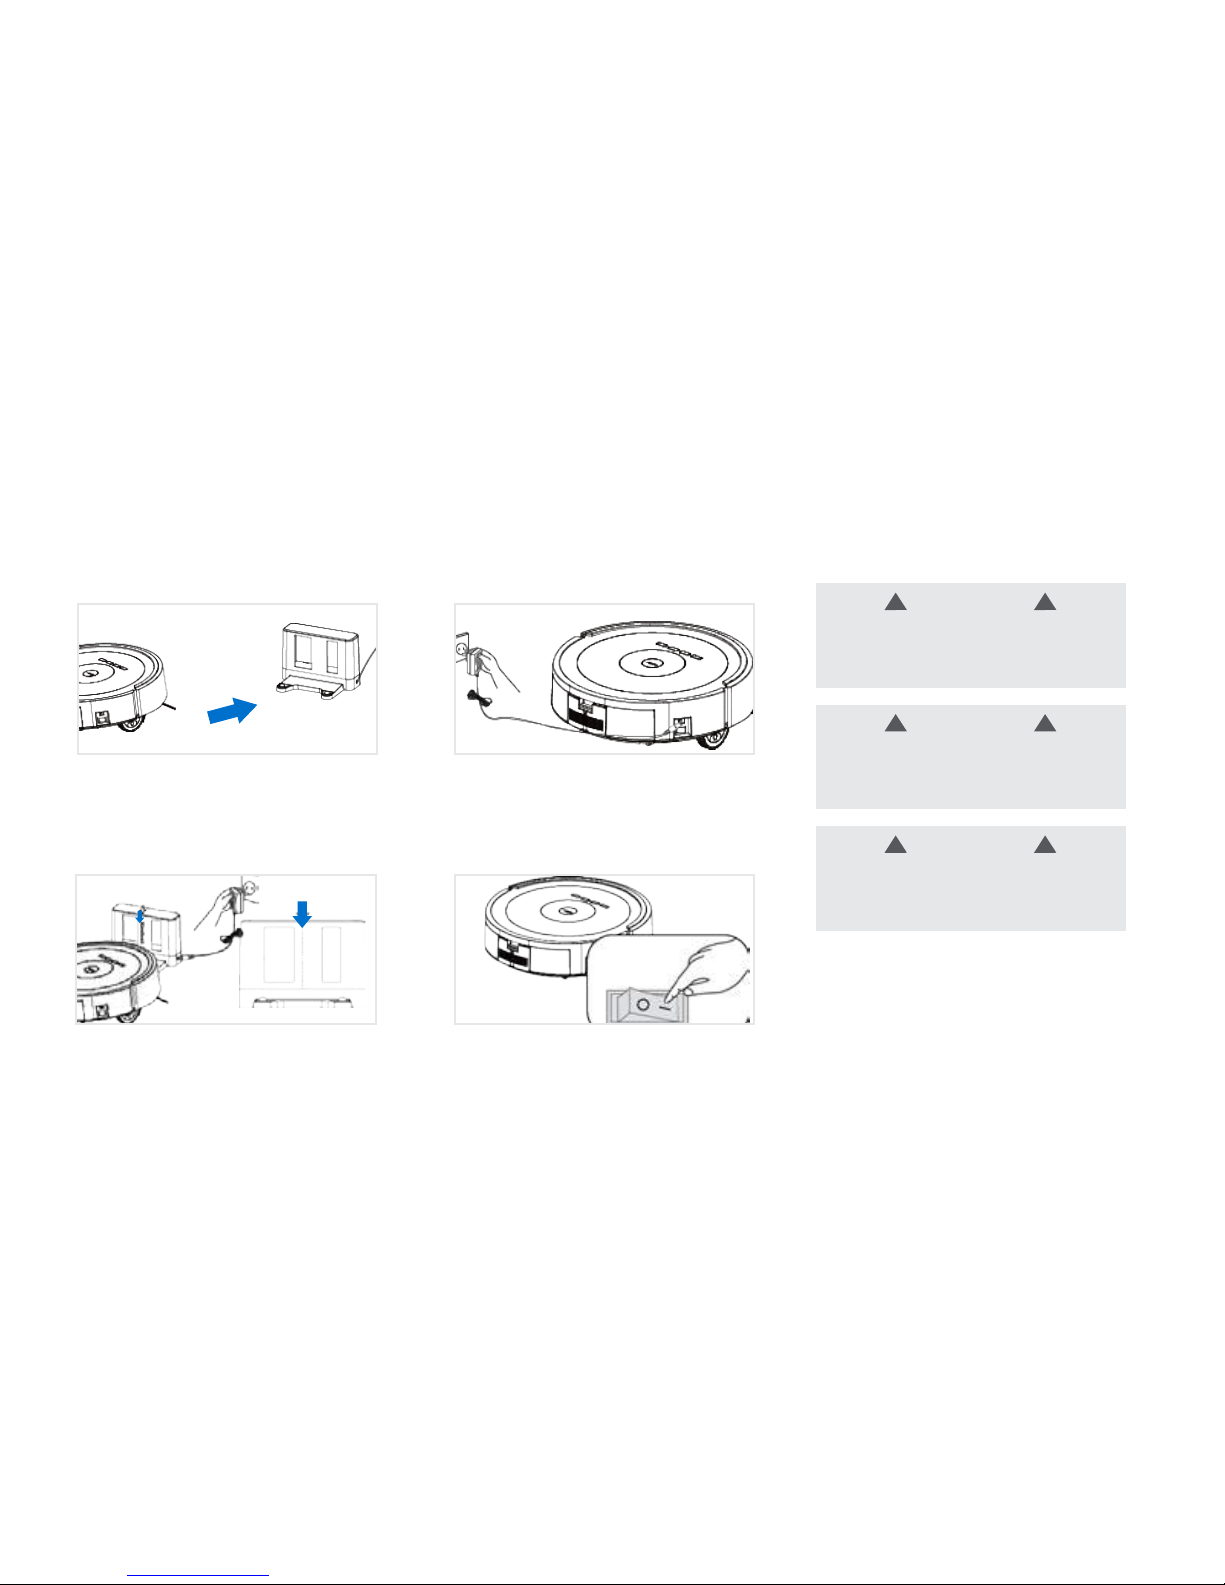
Turn the power switch ON on the side
of the robot. Once your Quest is ready,
press the "dock" button. Robot will find
the docking station and dock itself for
charging.
You may also manually position Quest
™
on the docking station along the center
line until it clicks into position.
IMPORTANT: Make sure the power
switch on the side of the robot is ON before
charging. Otherwise, it will not charge.
(Step 1) Plug the AC adapter connector
into Quest's DC terminal.
(Step 2) Plug the Adapter into an electric
outlet
Charging Quest
TM
1000
9
WARNING
When the device is not in use, power off
the machine. This will protect your device
batter y.
WARNING
If the device is not in use for extended
period, charge the batter y fully and store it
in a cool & dr y place to protect battery from
any potential damage.
WARNING
Before first use or using it after long period,
charge the battery for about 18-24 hours
to refresh the battery.
!
!
!
!
!
!
Charging Method 1 Charging Method 2
1
2
Page 13
10
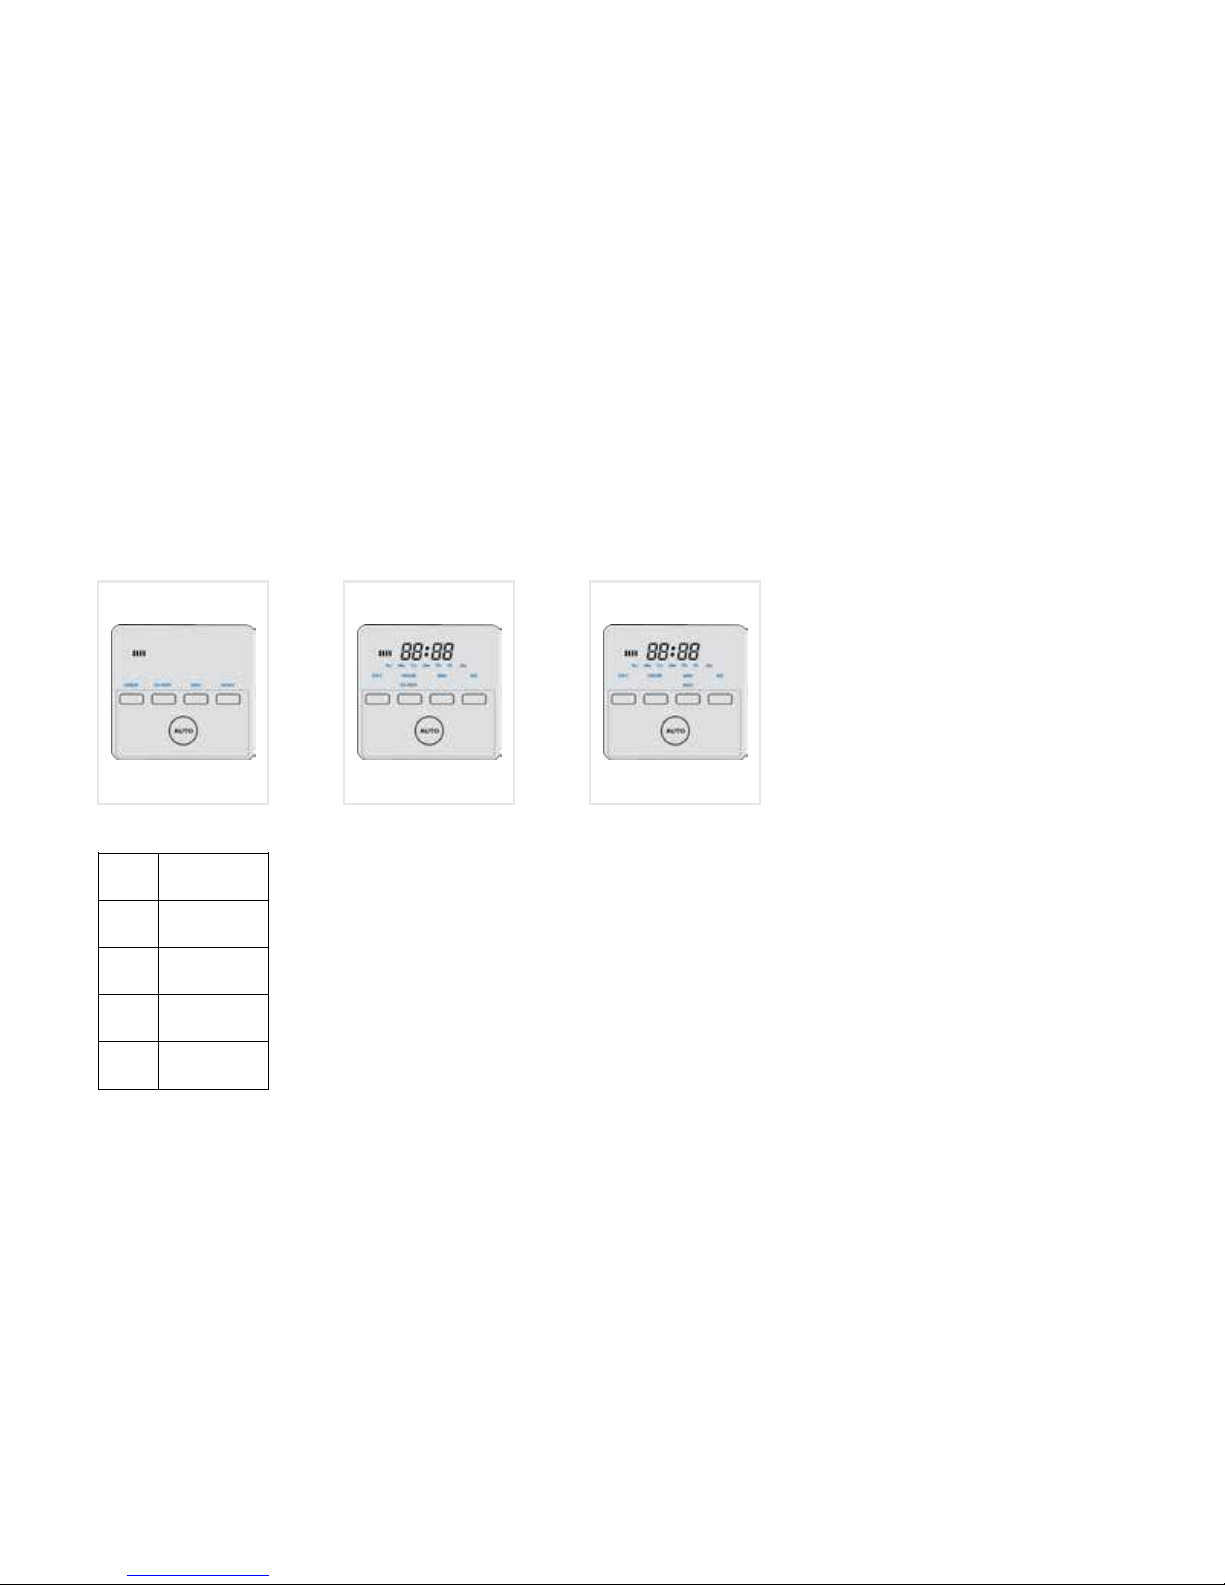
Using your QuestTM 1000
Clock Settings
Press the CLOCK
button
Use the DAY, HOUR,
MIN buttons to set the
Clock.
Press OK when done
Press AUTO to cancel
Scheduling (SCH)
Set Quest
™
on the daily or
weekly schedule.
Press the SCH button
Use the DAY, HOUR, MIN
buttons to set the schedule.
Press OK when done
Press AUTO to cancel
Press & Hold DAY button
to view or delete previous
day's schedule.
AUTO
Starts/Stops Auto
Clean
Spot Cleaning
Clock Settings
Returns to the
docking station
and charges
Schedule Quest's
weekly cleaning
times
DOCK
CLOCK
SCH
SPOT
Main Controls
Page 14
11
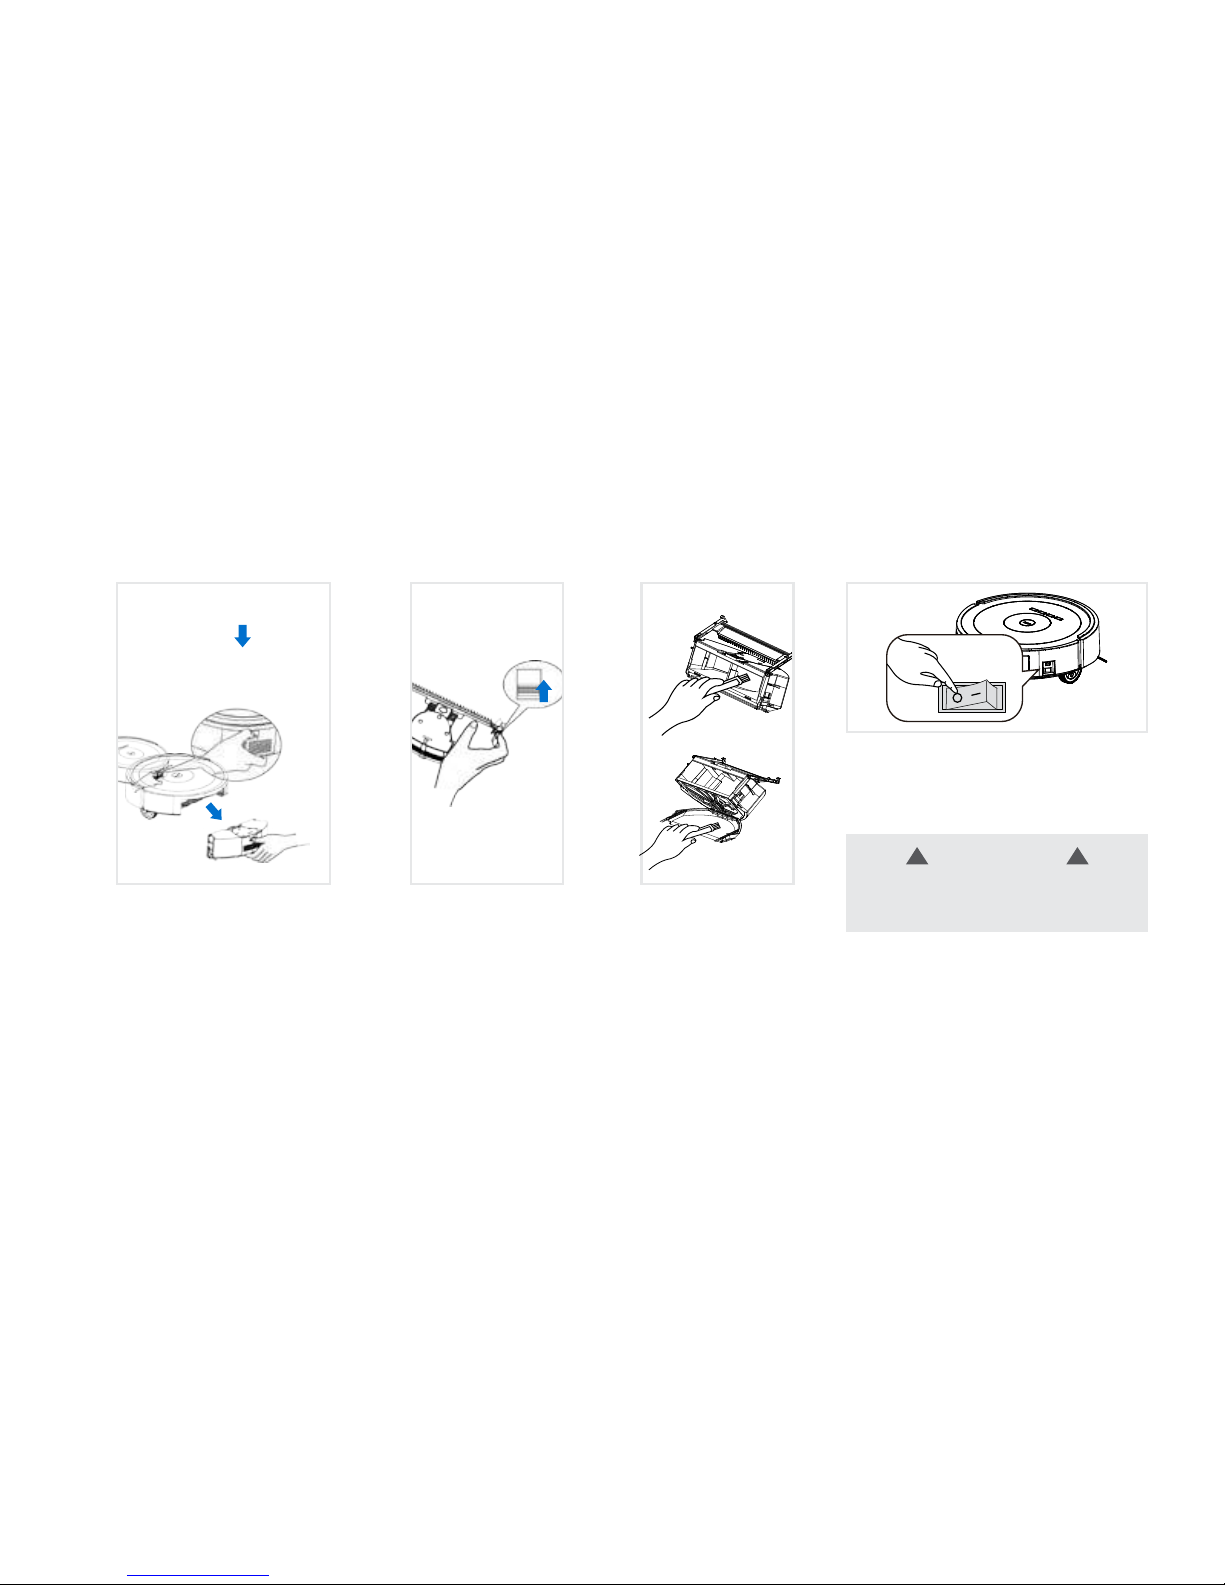
Emptying the Dirt cup
Press button and pull
to remove the Dirt cup
assembly.
Slide up the red
buttons on the sides
to open the lid.
Empty the dirt cup
and clean it with
dust brush.
1 2 3
IMPORTANT: Turn the power switch
OFF before removing dirt cup.
WARNING
To reduce the risk of personal
i n j u r y - Tu r n p o w e r s w i tc h O FF b e f or e
cleaning or servicing.
! !
Page 15
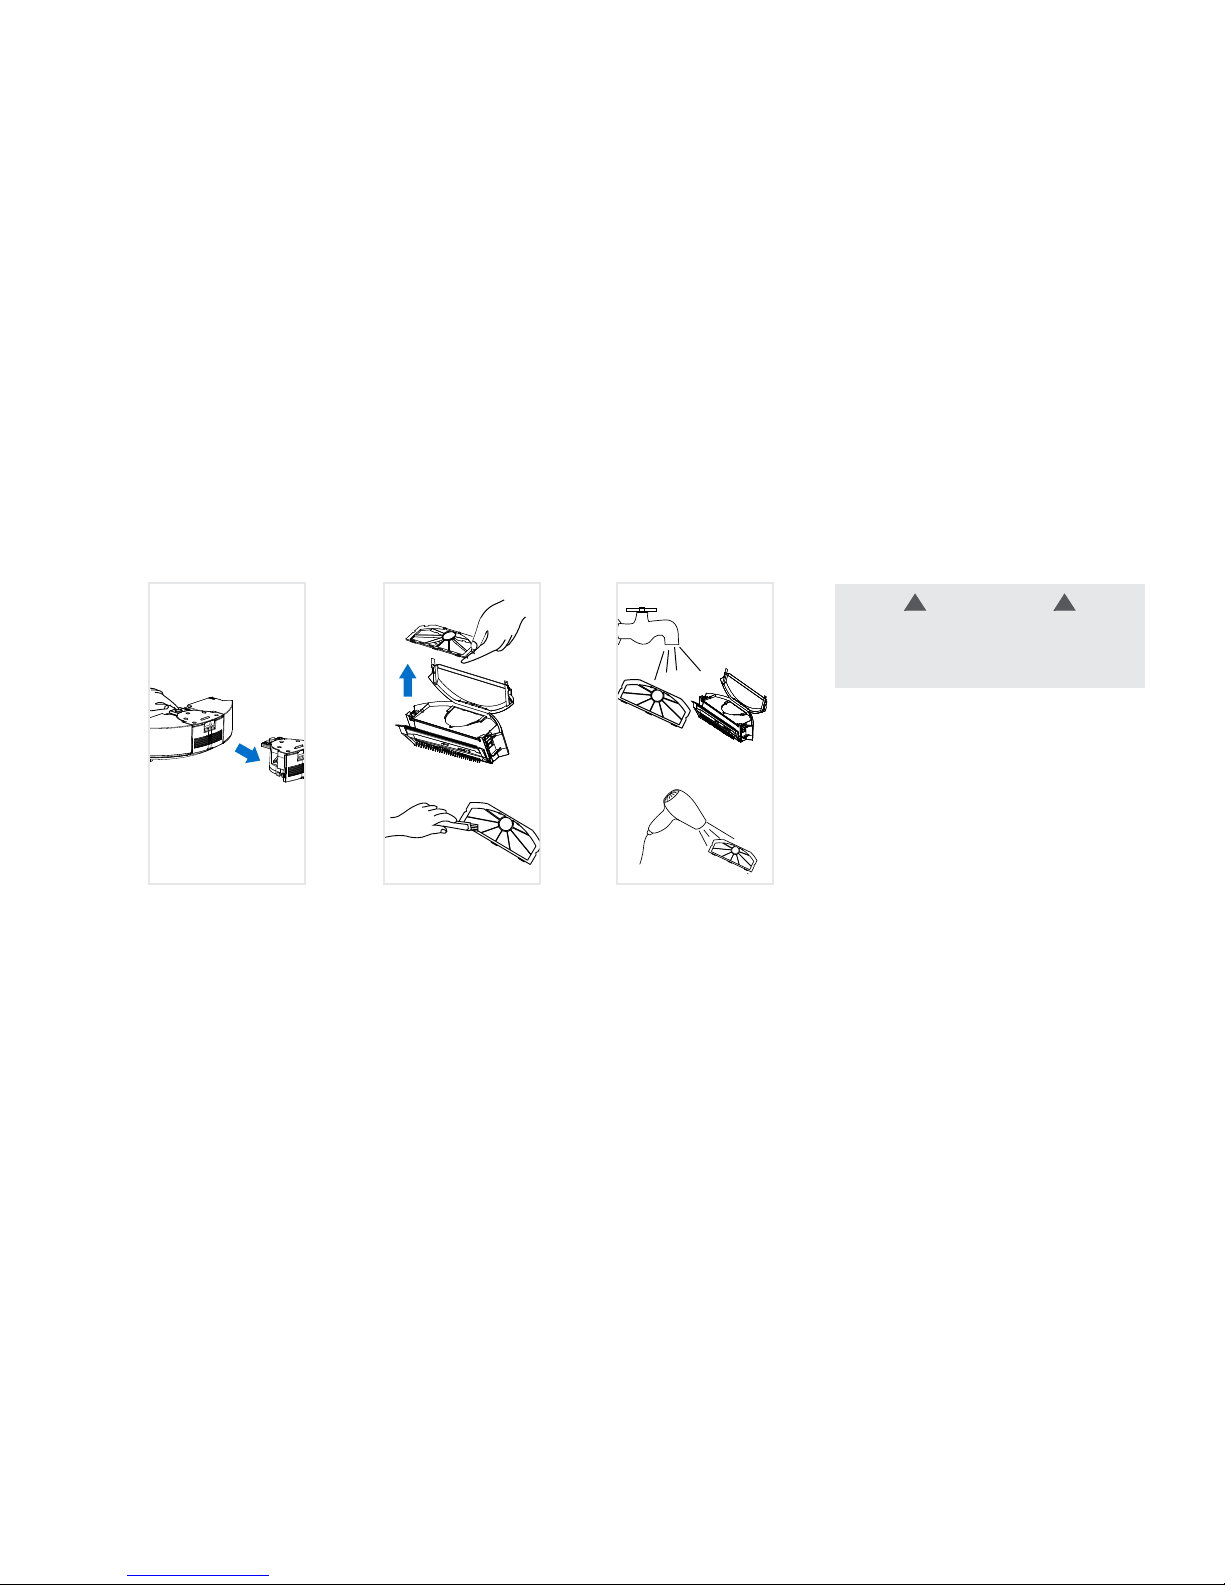
Push the round
button on top of Dirt
cup and pull out the
Motor Fan assembly.
With motor and fan
assembly removed
rinse the filter and
Dirt cup under cold
or warm water and
dry thoroughly for
24 hours.
Remove the filter
and clean it.
12
4 65
WARNING
Do not w et t he Motor Fan a ssembly
( refer to step 4)
!!
Page 16
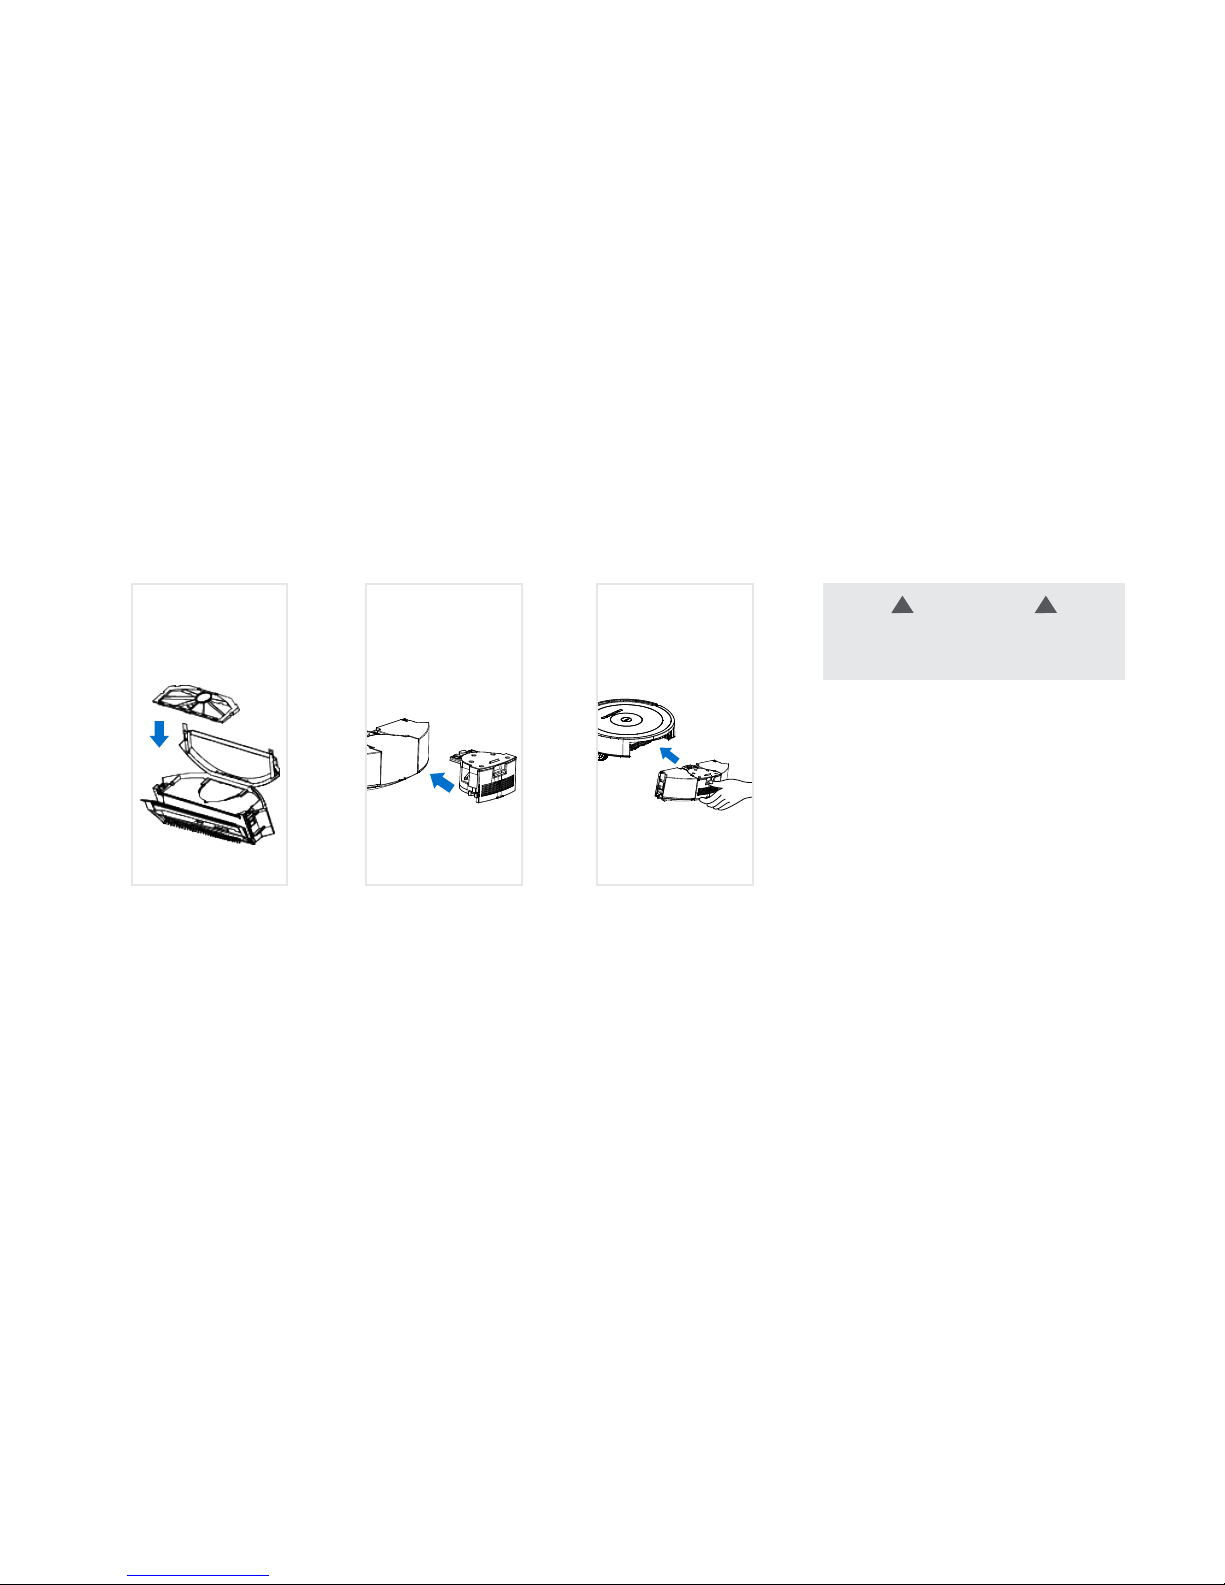
Dirt cup assembly
13
Insert the filter into
dirt cup. Make sure
the filter is locked
into position on
either sides.
Install the Dirt Cup.Attach the fan
assembly.
1 32
CAUTION
To reduce the risk of personal
i n j u r y - Tu r n p o w e r s w i tc h O FF b e f or e
cleaning or servicing.
! !
Page 17

14
CauseIssue Action
E001 : Ground Detection Failure
E002 : Brush Roll Error
E003 : Battery Low Error
E004 : Right Wheel Error
E005 : Dirt Cup Install Error
E006 : Off the Ground
E007 : Side Brush Error
Quest1000 halts after a shot period
Quest1000 keeps returning to its base
station during cleaning cycles
Quest1000 doesn’t turn ON
Quest1000 doesn’t return to
charging base
Ground sensor is covered with dirt.
Wipe the Ground dection sensor clean with a dry microfiber cloth. See page 7 to locate ground
detection sensor.
Quest is stuck at a stairway.
Brush roll is stuck or not spinning properly.
Battery is too low and unable to return to docking station for
auto recharge.
Right wheel is stuck or not spinning properly.
Dirt cup is not installed or installed incorrectly.
Quest is lifted off the ground or front wheel is elevated
excessively.
Side brush is stuck or not spinning properly.
Battery is too low and unable to return to docking station for
auto recharge.
May indicate Quest is working in a high glare environment or
dark floors or ground detection sensor is covered with dirt
Power Button on the side of the robot is OFF.
Docking station is not plugged in.
Battery is completely drained.
Quest is unable to detect its docking station due to unclear path.
Move Quest to a different location.
Clean the brush roll off of any dirt, lint or hair. See page 15 for instructions.
Manually place Quest on docking station and charge. See page 9 for instructions.
Turn OFF Quest before cleaning the right wheel off of any dirt, lint or hair. See page 17 for instructions.
Turn OFF Quest and install Dirt cup. Follow instructions on page 13 for correct installation steps.
Place unit back on the ground properly.
Turn the Power Button ON.
Plug docking station. See page 8 for instructions.
Charge Quest. See page 9 for instructions.
Remove any obstacles in its path or manually dock Quest. See page 8 for proper installation of
docking station.
Clean the side brush off of any dirt, lint or hair. See page 16 for instructions.
Manually place Quest on docking station and charge. See page 8 for instructions.
Move Quest to a different location and wipe Ground detection sensor with a clean dry microfibre cloth.
See page 7 to locate Ground Detection Sensor.
QUESTIONS OR CONCERNS?
Contac t Us: (888) 679-2121 For a Complete Tro ubleshoo ting Guide, s ee: Hooverh elp.com/Que st™ Twitter : @HooverU SA Facebook : faceboo k.com/hoov er
Do not return to store. Se e back of prod uct for mode l number.
Any othe r servic ing should b e done by an auth orized ser vice repr esentati ve. If appli ance is not wor king as it sho uld, has been d ropped int o water, take it to a s ervice ce nter prior t o continui ng use.
WARNING
To reduce the risk of personal injury-Turn power switch OFF before cleaning or servicing.
! !
Page 18

Troubleshooting
Slide the tab
next to brush
roll to unlock the
module
Remove hair, lint
and dirt from
brush rolls.
Clean the brush
rolls using cleaning
tool provided.
Remove the brushes.
1 3
2 4
15
Cleaning brush roll module
CAUTION
To reduce the risk of personal
i n j u r y - Tu r n p o w e r s w i tc h O FF b e f or e
cleaning or servicing.
! !
Page 19

Clean any hair ,
lint and dirt off
the side brush
and the post.
Remove the screw. Replace it.
1 3
2
16
Cleaning the side brush
CAUTION
To reduce the risk of personal
i n j u r y - Tu r n p o w e r s w i tc h O FF b e f or e
cleaning or servicing.
! !
Page 20

17
Troubleshooting
Clean the front, left
and right wheels
using the cleaning
brush tool. Perform
this task regularly to
ensure your Quest
moves easily.
Use the clean, dry
microfiber or cotton
cloth to clean the
sensors.
Cleaning the wheels Cleaning sensors
CAUTION
To reduce the risk of personal
i n j u r y - Tu r n p o w e r s w i tc h O FF b e f or e
cleaning or servicing.
! !
Page 21

ANY SERVICING SHOULD BE D ONE BY AN AUTHORIZED SERVICE
REPRES ENTATIVE Call (888) 679-2121 USA & Canada
In the event that further assistance is required, visit an authori zed service center. Find
one nearest you by vis iting our website at ww w.hoover.com. Cost s of any transportation
to and from any place of repair are to be paid by the owner. Always identify your
produc t by the model number and manufacturing code when requesting information
or ordering replacement parts. ( The model number and manufactur ing code for the
vacuum appears on t he bottom and/or back of the product, and on t he back of the
battery and c harger.)
LIMITED ONE YEAR WARRANTY (DOMESTIC USE)
WHAT THIS WARRANTY COVERS
When used and maintained in normal household use and in accordance with the
Owner’s Guide, your Hoover
®
produc t and batter y are warranted against original
defec ts in material and workmanship for a full year. During the Warranty Period,
Hoover® will provide labor and part s, at no cost to you, to correct any such defect in your
products.
HOW TO MAKE A WARRANTY CLAIM
If this product is not as warranted, take or send the product to a Hoover
®
Authorized
Warrant y Service D ealer along with proof of purchase. If the bat teries are not as
warranted, either take or send the bat teries along with proof of purchase to a Hoover®
authorized dealer or contact Hoover® Services at (888) 679-2121. For an automated
referral to authorized service outlets in the U.S. A., phone (888) 679-2121 or visit
Hoover® online at www.hoover.com.
WHAT THIS WARRANTY DOES NOT COVER
This war ranty does not cover belts, filters and brush rolls, use of the product in a
commercial operation (such as maid, janitorial and equipment rental services), improper
maintenance of the product, damage due to misuse, acts of God, nature, vandalism
or other acts beyond the control of Hoover®, owner’s acts or omissions, use outside the
country in which the product was initially purc hase and resal es of the produc t by the
original owner. This warrant y does not cover pick up, delivery, trans portation or house
calls. However, if you mail your product to a Hoover® Sales and Serv ice Center for
warranty ser vice, cost of shipping will be paid one way. Please call the Hoover® Services,
(888) 679-2121, on how to ship this product. This warranty does not apply to products
purchased outside the United States, including its territories and possessions, a U.S.
Military Exchange and Canada.
OTHER IMPORTANT TERMS
This war ranty is not transferable and may not be assigned. This warranty shall be
governed and construed under the laws of the state of Ohio. The Warranty Period
will not be extended by any replacement of batteries or par ts or repair performed
under this warranty.
THIS WARR ANTY IS THE EXCLUSIVE WARRANTY AND REMEDY ALL OTHER
WARRANTIES, EX PRESSED OR IMPLIED, INCLUDING WARR ANTIES OF
MERCHANTABILITY OR FITNESS FOR PARTICULAR PURPOSE, ARE DISCLAIMED IN
NO EVE NT WILL HOOVER BE LIABLE FOR ANY SPECIAL, INDIREC T, INCIDENTAL
OR CONSEQUENTIAL DAMAGES OF ANY KIND OR NATURE TO OWNER OR
ANY PART Y CLAIMING THROUGH OWNER, WHETHER BASED IN CONTRACT,
NEGLIGENCE, TORT OR STRIC T PRODUCTS LIABILIT Y OR ARISING FROM ANY
CAUSE WHATSOEVER.
Some states do not allow the exclusion of consequential damages, so the above
exclusion may not apply to you. This warrant y gives you specific rights; you may
also have others that vary f rom state to state.
SERVICE & WARRANTY FOR HOOVER® QUESTTM PRODUCT & BATTERY
SERVICE INFORMATION
18
Page 22

DECLARATION OF CONFORMITY
This dev ice complies w ith Part 15 of the FCC Rules / Industry Canada licens e-exempt
RSS standard(s). Operation is subject to the following two conditions: (1) t his device
may not cause harmful interference, and (2) this device must accept any interference
received, including interference that may cause undesired operation.
Under Industr y Canada regulations, this radio transmit ter may only operate using an
antenna of a type and maximum (or lesser) gain approved for the transmit ter by Industry
Canada. To reduce potential radio inter ference to other users, the antenna type and its
gain should be so chosen that the equivalent isot ropically radiated power (e.i.r.p.) is not
more than that necessar y for success ful communication.
MPE REMINDING
To satisfy FCC / IC RF exposure requirements, a separation dis tance of 20 cm or more
should be maintained bet ween the antenna of this device and persons during device
operation.
To ensure compliance, operations at clos er than this dis tance is not recommended.
Changes or modifi cations not expressl y approved by the party responsible for
compliance could void the user's authority to operate the equipment.
This equipment has been tested and found to comply with the limits for a Class B digital
device, pursuant to part 15 of the FCC Rules. These limits are designed to provide
reasonable protection against harmful interference in a residential installation. This
equipment generates uses and can radiate radio f requency energy and, if not installed
and used in accordance with the instructions, may cause harmful interference to radio
communications. However, there is no guarantee that interf erence will not occur in a
part icular installation. If this equipment does cause harmful interference to radio or
television reception, which can be determined by turning the equipment off and on, the
user is encouraged to try to correct the interference by one or more of the following
measures:
•Reorient or relocate the receiving antenna.
•Increase the separation between the equipment and receiver.
•Connect the equipment into an outlet on a circuit different from that to which the receiver
is connected.
•Consult the de aler or an experienced radio/TV technician for help.
19
Page 23

Devenez officiellement propriétaire.
• Visitez le Hoover.com
• Composez le 888 679-2121
C’est garanti.
Hoover
MD
remplacera vos batteries conformément à sa garantie limitée
d'un an. Consultez la garantie pour obtenir plus de détails.
Consignes de sécurité
Prise en main de votre aspirateur robotique Quest 1000
MC
Apprendre à connaître votre1000
MC
Installation de la station d'accueil
Recharge du Quest 1000
MC
Utilisation du Quest 1000
MC
Vidange du réservoir à poussière
Montage du réservoir à poussière
Dépannage
Garantie
Declaración de Conformidad
20
25
25
26
26
27
28
28
29
31
32
Votre guide:
Guide d’utilisation IMPORTANT : Lire ces instructions attentivement avant d’assembler et d’utiliser l’appareil.
FRANÇAIS
Ce guid e de l’utilisa teur s’appliqu e aux modèles d e QuestMC: BH71000 s érie.
Page 24

CONSIGNES DE SÉCURITÉ IMPORTANTES
CONSERVEZ CES INSTRUCTIONS
Lorsque vous utilisez des appareils électriques, veuillez toujours respecter
entre autres les consignes de sécurité élémentaires suivantes :
VEUILLEZ L IRE TOUT ES LES INSTRU CTIO NS AVANT D’UTILISER CET
APPAREIL. C E PRODUIT EST DESTINÉ À U N USAGE DOMESTIQUE
SEULEME NT. LA GAR ANTIE EST NULLE SI L’APPAREIL EST UTI LISÉ
À DES FINS COMMERCIALES.
AVERTISSEMENT : POUR RÉDUIRE LE RISQUE
D’INCENDIE, DE DÉCHARGE ÉLECTRIQUE, DE DOMMAGE OU
DE BLESSURE :
• Assemblez entièrement l’appareil avant de l’utiliser.
• Ne pas utiliser la batterie unité , magasin ou de la charge à l'extérieur ou sur des
surfaces humides . Ne pas laisser se mouiller.
• Le chargeur est conçu pour être utilisé à l’intérieur seulement.
• Ne permet tez pas aux enfants de jouer avec l’appareil. Non destiné à être utilisé par
les enfants âgés de12 ans et moins. Exercez une surveillance étroite lorsque l’appareil est
utilisé à proximité d’enfants.
•Pour éviter les blessures ou les dommages, garder les enfants loin de l'appareil et ne pas
permettre aux enfants de placer leurs doigts ou d'autres objets dans les ouvertures.
• Utilisez l’appareil uniquement aux fins décrites dans le présent guide. N’utilisez que des
accessoires et des produits recommandés par Hoover
MD
.
• N’utilisez pas le chargeur si la fiche ou le cordon est endommagé. Si l'appareil ou le
chargeur ne fonctionne pas de la manière prévue, s’il a chuté sur le sol ou dans l’eau, s’il
a été endommagé ou s’il a été laissé à l’extérieur et apportez-le au centre de réparations
pour le faire inspecter avant de continuer à l’utiliser.
• Ne tirez ou ne transportez pas le chargeur par le cordon, n'utilisez pas le cordon comme
une poignée, ne fermez pas une por te
sur le cordon et ne tirez pas le cordon contre des arêtes tranchantes ou des coins. Ne
placez pas l’appareil sur le cordon. Ne faites pas rouler l’appareil sur le cordon. Tenez le
cordon éloigné des surfaces chaudes.
• Ne débranchez pas le chargeur en tirant sur le cordon. Pour débrancher le chargeur,
tirez sur la fiche.
• Ne manipulez pas le chargeur, y compris la fiche et les bornes, ni l’appareil si vous avez
les mains mouillées.
• N’insérez aucun objet dans les ouvertures. N’utilisez pas l’appareil si les ouvertures sont
obstruées. Assurez-vous qu’elles sont exemptes de poussière, de mousse, de cheveux ou
de tout ce qui pourrait réduire le débit d’air.
• Gardez les cheveux, les vêtements amples, les doigts et toute autre partie du corps à
l’écart des ouvertures et des pièces en mouvement
• Redoublez de prudence lorsque vous utilisez l’appareil dans des escaliers. Ne
placez pas l’appareil sur les marches d’un escalier ou sur un meuble, car cela peut
entraîner des dommages ou des blessures.
• N’utilisez pas l’appareil pour aspirer des liquides inflammables ou combustibles,
comme de l’essence, ou de copeaux de bois, ni dans des endroits où de telles
substances peuvent être présentes.
• N’utilisez pas l’appareil pour nettoyer quoi que ce soit qui brûle ou dégage de la
fumée, comme des cigarettes, des allumettes ou des cendres chaudes.
21
Page 25

22
• N’utilisez pas l’appareil si le vide-poussière ou les filtres ne sont pas installés.
• Éteignez l’appareil et retirez la batterie avant d’enlever ou d’installer le rouleaubrosse.
• Toujours éteindre l’appareil avant de connecter ou déconnecter l’accessoire turbo
motorisé ou les autres accessoires.
• N’incinérez pas le chargeur, la batterie ou l’appareil mêmes s’ils sont gravement
endommagés. La batterie peut exploser au feu.
• Ce produit contient une pile au au nickel -métal-hydrure rechargeable. N’exposez
pas la pile à des températures élevées, car elle pourrait s’enflammer et exploser.
• Ne jetez pas la pile au feu ou dans un compresseur à déchets. Consultez la section
sur l’élimination de la batterie pour obtenir des instructions.
• Ne tentez pas de démonter la batterie.
• Débranchez le chargeur de la prise avant de procéder à tout nettoyage ou
entretien de routine.
• La pile peut fuir si elle est soumise à des conditions extrêmes. Si l’électrolyte entre
en contact avec votre peau, lavez aussitôt les parties touchées avec de l’eau et du
savon. En cas de contact avec les yeux, ne frottez pas. Rincez immédiatement vos
yeux à l’eau propre pendant au moins 15 minutes et consultez un médecin sans
attendre.
• Ne touchez pas aux bornes du chargeur et du bloc-piles et n’y insérez pas d’objets.
• Ne tentez pas de court-circuiter la bat terie ou les bornes du chargeur.
• Placez les cordons d'autres appareils hors de la zone à nettoyer.
• N'utilisez pas l'aspirateur dans une pièce où un nourrisson ou un enfant dort.
• N'utilisez pas l'aspirateur dans une pièce à net toyer où se trouvent des bougies
allumées ou des objets fragiles sur le sol.
• N'utilisez pas l'aspirateur dans une pièce dans laquelle se trouvent des bougies
allumées sur un meuble que l'aspirateur pourrait accidentellement heurter ou avec
lequel il pourrait entrer en contact.
• Ne laissez pas les enfants s'asseoir sur l'aspirateur.
•Exclusivement conçu pour la station d'accueil (pièce 440009836) et l'adaptateur
de l'aspirateur (pièce 440009836).
AVERTISSEMENT : POUR RÉDUIRE LE
RISQUE DE DÉCHARGE ÉLECTRIQUE, LE CHARGEUR EST
MUNI D’UNE FICHE POLARISÉE (L’UNE DES BROCHES EST
PLUS LARGE QUE L’AUTRE). CETTE FICHE NE PEUT ÊTRE
BRANCHÉE SUR UNE PRISE POLARISÉE QUE DANS UN SEUL
SENS. SI LA FICHE NE S’INSÈRE PAS ENTIÈREMENT DANS LA
PRISE, RETOURNEZ-LA. SI VOUS NE POUVEZ TOUJOURS
PAS L’INSÉRER, COMMUNIQUEZ AVEC UN ÉLECTRICIEN
QUALIFIÉ POUR FAIRE INSTALLER UNE PRISE APPROPRIÉE.
NE MODIFIEZ LA FICHE EN AUCUN CAS.
MISE EN GARDE: POUR RÉDUIRE LES
RISQUES DE DOMMAGE:
• Évitez d’utiliser l’appareil pour ramasser des objets durs ou aux arêtes tranchantes,
car ceux-ci pourraient l’endommager.
• Rangez l’appareil adéquatement à l’intérieur et dans un endroit sec. N’exposez
pas l’appareil à des conditions de gel. Ce produit contient une pile au lithium-ion.
N’exposez pas la batterie à des températures élevées, car elle pourrait s’enflammer
et exploser.
• Lorsque le rouleau-brosse est en marche, ne laissez pas l’appareil trop longtemps
au même endroit, car vous risqueriez d’endommager le plancher.avant utilisation.
Page 26

AVANT UTILISATION
AVERTISSEMENT :
Ce produit contient des produits
chimiques reconnus par l’État de la Californie comme pouvant causer le cancer,
des anomalies congénitales ou d’autres dommages au système reproductif. LAVEZ-
VOUS LES MAINS APRÈS AVOIR MANIPULÉ L’APPAREIL.
AVERTISSEMENT: Veillez à ce qu'aucun enfant ou animal
domestique ne se trouve dans ou puisse avoir accès à la pièce à nettoyer
pour éviter tout
risque de blessure.
MISE EN GARDE: Pour éviter tout risque
d'endommagement, éloignez les objets fragiles, cordons lâches et les petits
objets qui pourraient basculer et chuter.
• Pour éviter d'endommager le plancher, rangez tous les objets pointus ou
tranchants qui pourraient passer sous l'aspirateur et rayer la surface du sol.
• Votre aspirateur est conçu pour ramasser de petites quantités de saleté et
ne remplace pas un aspirateur classique. Utilisez votre Quest régulièrement
pour aider à réduire la durée hebdomadaire pendant laquelle vous passez
l'aspirateur.
• Quest nettoie les sols durs et les moquettes à poil ras allant jusqu'à 1 cm
d'épaisseur. Il n'est pas recommandé d'utiliser l'aspirateur sur des moquettes plus
épaisses.
• Les moquettes de couleur foncée ou les objets peuvent activer les détecteurs
de proximité de l'aspirateur et donc empêcher leur aspiration ou l'aspiration aux
alentours.
MISE EN GARDE: La batterie utilisée dans cet
appareil peut présenter un risqué d'incendie ou de brûlure chimique si elles sont
maltraitées. Ne pas démonter, chauffer au-dessus température maximale limite
du fabricant (60 °C /140 °F) , ou incinérer. Éliminer la batterie rapidement.
Garder loin des enfants. Ne démontez pas et ne jetez pas dans un feu. Ne tentez
pas de démonter la batterie ou supprimer tout composant faisant saillie à partir
des bornes de la batterie. La batterie et le chargeur ne comportent aucune pièce
réparable par l'utilisateur. Incendie ou des blessures peuvent en résulter. Avant
l'élimination, protégez les bornes exposées avec du ruban isolant épais pour
éviter un court-circuit.
ÉLIMINATION DE LA
BATTERIE AVERTISSEMENT:
RISQUE D’EXPLOSION OU D’EXPOSITION À DES
MATIÈRES TOXIQUES 1-800-822-8831
23
BATTERIE AU LITHIUM-ION
La batterie doit être recueillie, recyclée ou éliminée dans le respect
de l’environnement. Le sceau de recyclage des batteries au
lithium-ion de la RBRC certifié par l’EPA indique que Techtronic Industries,
société affiliée à Hoover, Inc., participe volontairement à un programme de
collecte et de recyclage des batteries usagées au Canada et aux États-Unis.
Le programme de recyclage de la RBRC offre une solution de rechange
pratique qui permet d’éviter que les batteries soient jetées à la poubelle
ou dans les ordures ménagères municipales, ce qui pourrait être illégal
dans votre région. Visitez le www.rbrc.org/call2recycle/ pour obtenir
de plus amples renseignements sur le recyclage des batteries au lithiumion ainsi que sur les interdictions et les restrictions relatives à l’élimination
de ces batteries dans votre région. La participation de Hoover, Inc. à ce
programme témoigne de son engagement à protéger l’environnement et les
ressources naturelles.
Page 27

CONSIGNES DE SÉCURITÉ IMPORTANTES AVANT LA PREMIÈRE
UTILISATION
Avant d'utiliser cet appareil, retirez
tous les obstacles sur le plancher,
notamment les câbles d'alimentation,
les tissus et les objets fragiles. Si
l'appareil vient à passer par-dessus
un câble d'alimentation, il risque
d'entraîner l'objet à sa suite et le faire
chuter.
La station d'accueil doit être placée
contre le mur et au moins 4 pieds de
distance des autres objets autour afin
de permettre au robot aspirateur de
détecter facilement la station d'accueil.
Éteignez l'appareil lorsque vous ne
l'utilisez pas. Vous protégerez ainsi
la durée de vie de la batterie de
l'appareil.
Avant la première utilisation et après
une longue période d'inutilisation,
rechargez la batterie durant 18-24
heures pour régénérer la batterie.
Lors d'une longue période d'inutilisation,
débranchez la station d'accueil pour
éviter les risques d'électrocution.
Si vous projetez de ne pas utiliser
l'appareil pendant une longue période,
rechargez la batterie et entreposez
l'appareil dans un endroit frais et sec
afin de protéger la batterie des risques
de dégradation.
24
Page 28

Apprendre à connaître votre Quest 1000
MC
Prise en main de votre Quest 1000
MC
6. Filtre
7. Brosse latérale (2)
8. Brosse à époussetage
9. Tournevis
10. Tampons adhésifs
1. Brosse latérale
2. Capteurs de détection
optique au sol
3. Roue droite
4. Bouton d'alimentation
5. Chargeur
6. Réservoir à poussière
7. Broches de chargement
8. Roue avant
9. Compartiment à batterie
10. Roue gauche
11. Brosse de support
12. Brosse principale
1. Aspirateur robot Quest
MC
1000
2. Station d'accueil
3. Batterie
4. Adaptateur
5. Manuel d'utilisation
1. Boutons de commande
2. Fenêtres des capteurs
infrarouges
3. Touche de démarrage
25
REMARQUE: Batterie
et filt re viennent installés à
l'intérieur de votre robot .
Vue avant Vue de dessous
Page 29

26
Installation de la station d'accueil
Assemblez la station d'accueil en
insérant la partie supérieure dans
la partie inférieure.
Retirez la pellicule protectrice. Positionnez la station d'accueil
contre le mur et à au moins 4
pieds de distance des objets les
plus près.
Branchez l'adaptateur.
Mettez l'appareil ON sur le côté du
robot . Une fois que votre quête est prêt,
appuyez sur le " dock " bouton. Robot se
trouve la station d'accueil et se quai pour
le chargement.
Vous pouvez également positionner par
vous-même le Quest
MC
sur la station d'accueil.
(Étape 1) Branchez l'adaptateur
CA dans la prise DC du Quest
MC
.
(Étape 2) Branchez l'adaptateur
dans une prise électrique
Recharge du Quest 1000
MC
Partie supérieure, partie
inférieure
Méthode de chargement 1 Méthode de chargement 2
IMPORTANT : A ssurez-vous que l'interrupteur
d'alim entation s ur le côté du robo t est sur "ON" ava nt la
charg e. Sinon, il ne se ch argera pas .
AVERTISSEMENT
Ne déplacez pas la station d'accueil pendant que le Quest procède
au nettoyage puis qu'il pourrait ne pas être en mesure de retourner à la
station d'accueil.
AVERTISSEMENT
Si vous projetez de ne pas utiliser l'appareil
pendant une longue période, rechargez la
batterie et entreposez l'appareil dans un endroit
frais et sec afin de protéger la batterie des
risques de dégradation.
AVERTISSEMENT
Avant la première utilisation et après une longue
période d'inut ilisation, rechargez la batterie
durant 18-24 heures pour régénérer la batterie.
AVERTISSEMENT
Éteignez l'appareil lorsque vous ne l'ut ilisez
pas. Vous protégerez ainsi la durée de vie de la
batterie de l'appareil.
!
!
!
!
!!
!
!
Page 30

Utilisation du Quest 1000
M
Commandes principales Réglage de l'heure Programmation (SCH)
AUTO (nettoyage automatique)
DOCK (station)
CLOCK (horloge)
SCH (programmation)
SPOT (nettoyage localisé)
Débute/arrête le nettoyage
automatique
L'appareil retourne sur la station
d'accueil et se recharge
Réglage de l'heure
Programmation du nettoyage
hebdomadaire du Quest
MC
Nettoyage localisé
27
Appuyez sur la touche CLOCK
Utilisez les touches DAY, HOUR,
MIN pour régler l'heure.
Appuyez sur la touche OK lorsque
vous avez terminé
Appuyez sur la touche AUTO pour
annuler
Programmez les horaires journalier ou
hebdomadaire du Quest
MC
.
Appuyez sur la touche SCH
Utilisez les touches DAY, HOUR, MIN pour régler
la programmation.
Appuyez sur la touche OK lorsque vous avez
terminé
Appuyez sur la touche AUTO pour annuler
Appuyez et maintenez la touche DAY enfoncée
pour visualiser ou supprimer la programmation
de la journée précédente.
Page 31

28
Appuyez sur le
bouton et retirez
le réservoir à
poussière en tirant
vers vous.
Faites glisser les
boutons rouges
sur les côtés
afin d'ouvrir le
couvercle.
Videz le réservoir
à poussière et
nettoyez-le à l'aide
de la brosse à
époussetage.
Lorsque le groupe
motoventilateur est retiré,
rincez le filtre et le réservoir
à poussière à l'eau chaude
ou froide et laissez sécher
soigneusement durant 24
heures.
Appuyez sur le
bouton rond sur le
dessus du réservoir
à poussière et
retirez le groupe
motoventilateur.
Retirez le filtre pour
le nettoyer.
Vidange du réservoir à poussière
Montaje de la copa de recolección de residuos
1 2 3 4
5 6
Insérez le filtre dans le
réservoir à poussière.
Veillez vous assurer que
le filtre est verrouillé en
position des deux côtés.
Fixez
l'ensemble de
ventilation.
Installez le
réservoir à
poussière.
1 2 3
AVERTISSEMENT
Pour réduire le risque de blessures personnelles- Éteignez
l'appareil avant de le nettoyer ou de l'entretenir.
AVERTISSEMENT
Veillez à garder le groupe motoventilateur au sec (veuillez
consulter l'étape 4)
!
!
!
!
IMPORTANT : É teignez l'appareil
en appu yant sur la touc he OFF avant
de reti rer le réser voir à poussiè re.
Page 32

CauseIssue Action
E001 : Erreur du capteur de détection
optique au sol
E002 : Erreur du rouleau-brosse
E003 : Erreur batterie faible
E004 : Erreur de la roue droite
E005 : Erreur de mise en place du
réservoir à poussière
E006 : Perte de contact avec le sol
E007 : Erreur de brosse latérale
Le Quest1000 arrête de fonctionner
après une courte période de temps
Le Quest1000 ne cesse de retourner à
la station d'accueil durant les cycles de
nettoyage
Le Quest1000 ne s'allume pas
Le Quest1000 ne retourne pas à la
station d'accueil pour la recharge.
Le capteur de détection optique au sol est couvert de
poussière.
Nettoyez le capteur de détection optique au sol avec un chiffon sec en microfibres. Voir la
page 7 pour situer le capteur de détection optique au sol.
Le Quest est coincé dans un escalier.
Le rouleau-brosse est coincé ou ne fonctionne pas correctement.
La batterie est trop faible et le robot aspirateur ne peut retourner
à la station d'accueil pour la recharge automatique.
La roue droite est coincée ou ne fonctionne pas correctement.
Le réservoir à poussière n'est pas en place ou n'est pas installé
adéquatement.
Le Quest doit être repositionné ou la roue avant est trop élevée.
La brosse latérale est coincée ou ne fonctionne pas
correctement.
La batterie est trop faible et le robot aspirateur ne peut retourner
à la station d'accueil pour la recharge automatique.
Indique que le Quest se trouve dans un endroit où les reflets du
plancher sont trop éblouissants pour l'appareil, que les planchers sont trop foncés ou que le capteur de détection optique au
sol est couvert de poussière.
Le bouton d'alimentation sur le côté du robot est à la position OFF.
La station d'accueil n'est pas branchée.
La batterie est vide.
Le Quest n'est pas en mesure de détecter la station d'accueil en
raison des obstacles.
Déplacez le Quest à un autre endroit.
Retirez les corps étrangers du rouleau-brosse. Voir page 30 pour les instructions.
Positionnez le Quest sur la station d'accueil pour la recharge automatique. Voir page 26 pour
les instructions.
Éteignez votre Robot Quest avant de nettoyer la roue droite hors de toute saleté, de peluches ou de
poils. Voir page 30 pour les instructions.
Éteignez le Quest et installez le réservoir à poussière. Suivez les instructions à la page 28 pour vous
assurer qu'il soit convenablement installé.
Replacez convenablement l'appareil au sol.
Appuyer sur le bouton d'alimentation à ON.
Branchez la station d'accueil. Voir page 26 pour les instructions.
Rechargez le Quest. Voir page 26 pour les instructions.
Retirez tout obstacle qui se trouve sur le parcours de l'appareil ou positionnez le Quest par vous-même
sur la station d'accueil. Voir les instructions à la page 26 pour l'installation de la station d'accueil.
Retirez les corps étrangers de la brosse latérale. Voir page 30 pour les instructions.
Positionnez le Quest sur la station d'accueil pour la recharge automatique. Voir page 26 pour les
instructions.
Déplacez le Quest à un autre endroit et nettoyez le capteur de détection optique au sol avec un
chiffon en microfibres propre et sec. Voir page 7 pour situer le capteur de détection optique au sol.
DES QUESTIONS OU DES PRÉOCCUPATIONS?
Commun iquez avec nou s : (888) 679-2121 Pour un gu ide de dépan nage compl et, voir : Hoove rhelp.com /QuestMC Twit ter : @Hoove rUSA Facebo ok : facebo ok.com/hoo ver
Ne retournez pas le produit en magasin. Le n uméro de mod èle du produi t est indiqu é à l’arrière de l ’appareil.
Toute aut re tâche d’ent retien doi t être confi ée à un représe ntant de ser vice auto risé. Si l'a ppareil ne fo nctionne p as comme il le d evrait ou s'il e st tombé dan s l'eau, appor tez-le à u n centre de se rvice ava nt de l'utili ser à nouvea u.
Dépannage
AVERTISSEMENT
Pour réduire le risque de blessures personnelles- Éteignez l'appareil avant de le nettoyer ou de l'entretenir.
! !
29
Page 33

30
Dépannage
Nettoyage du module du rouleau-brosse
Nettoyage de la brosse latérale
Nettoyage des roues Capteurs de nettoyage
Nettoyez les
rouleaux-brosses à
l'aide de l'outil de
nettoyage.
Nettoyez les roues avant, gauche et droite en
utilisant la brosse de nettoyage. En effectuant ce
nettoyage régulièrement, vous vous assurez que
le Quest
MC
se déplace plus facilement.
Utilisez un chiffon en
microfibres ou en coton
propre et sec pour nettoyer les
capteurs.
Retirez la vis.
Faites glisser les
languettes près
du rouleau-brosse
pour déverrouiller
le module.
Retirez les corps
étrangers de la
brosse latérale et
de la tige.
Retirez les brosses
Remplacez-la.
Retirez les corps
étrangers des
rouleaux-brosses.
1
1
2
2
3
3
4
MISE EN GARDE
Pour réduire le risque de blessures person-
nelles-Éteignez l'appareil avant de le nettoyer
ou de l'entretenir.
! !
Page 34

TOUTE TÂCHE D’ENTRETIEN DOIT ÊTRE CONFIÉE À UN REPRÉSENTANT DE SERVICE
AUTORISÉ . Appelez au 888 679-2121 (É.-U. et Canada).
Si vous a vez besoin de p lus d’aide, vis itez un centr e de servic e autorisé . Trouvez le cent re le plus
près de c hez vous en vis itant notre s ite Web à www.h oover.com. Le s frais de tran sport à des tinatio n
et en prov enance de l’em placemen t de réparati on sont payé s par le propr iétaire. In diquez toujo urs
le numé ro de modèle e t le code de fab rication d e votre produ it lorsque vo us demandez d es
rense ignement s ou que vous comm andez des pi èces de rech ange. (Le mod èle et le numé ro de série de
l’aspir ateur se trou vent en dess ous et/ou au dos du pro duit, et au dos d e la batte rie et du charg eur.)
GARANTIE LIMITÉE D'UN AN (UTILISATION DOMESTIQUE)
COUVERTURE DE LA GARANTIE
Lorsq u’ils sont u tilisés et e ntretenus d ans des cond itions norm ales d’util isation dom estique, c omme il
est st ipulé dans le g uide du propr iétaire, vo tre apparei l Hoover
MD
et la ba tterie so nt garantis c ontre
les dé fauts de fab rication e t de main- d’œuvre pend ant une péri ode de un ans co mplètes. Pe ndant la
péri ode de garant ie, Hoover
MD
fourn ira la main -d’œuvre et l es pièces gra tuiteme nt afin de cor riger de
tels dé fauts pour v os produits .
RÉCLAMATION AU TITRE DE LA GARANTIE
Si le pro duit n’est pas dan s l’état pr évu par la gara ntie, appo rtez ou envoyez l e produit ch ez un
fourn isseur aut orisé de ser vice sou s garantie Ho over
MD
avec un e preuve d’acha t. Si les bat teries
ne sont p as dans l’é tat prévu pa r la garantie , apportez -les ou envoy ez-les, a vec une preuve d ’achat,
chez un f ournisse ur de servi ces autori sé Hoover
MD
ou comm uniquez avec l es servi ces HooverMD
au 888 679-2121. Pour accéder à u n servic e d’aide automa tique prés entant la li ste des cent res de
ser vice autor isés aux Éta ts-Uni s, composez l e 888 679-2121 ou visi tez le site Web de H oover
MD
à www.hoover.com.
ÉLÉMENTS NON COUVERTS PAR LA GARANTIE
La prés ente garan tie ne couvre p as les cour roies, les fi ltres et les r ouleaux- brosses, t oute utili sation
du prod uit dans des co nditions c ommercial es (par exempl e dans le cadr e de servic es ménager s, de
conci ergerie et d e location d ’équipe ment), l’entr etien inad équat du prod uit, les dom mages liés à un e
mauva ise utilis ation, à des c as fortuit s ou à des cata strophes n aturelle s, au vandali sme, à tout aut re
acte h ors du contrô le de Hoover
MD
, ou à tout a cte ou négli gence de la pa rt du propr iétaire, to ute
utili sation dan s un pays autr e que celui où le p roduit a été ac heté init ialement et t out produi t revendu
par son p ropriéta ire origin al. La présen te garanti e ne couvre pa s le ramassa ge, la livrai son, le
trans port, ni les r éparatio ns à domicile . Toutefois, s i vous envoyez vot re produit pa r courrier à u n point
de vent e ou à un centre de s ervice s Hoover
MD
pour un e réparatio n sous garan tie, les frai s de livrais on
de reto ur seront pa yés. Veuillez c ommunique r avec les ser vices Hoov er
MD
au 888 679-2121 pour
savoi r comment exp édier ce pro duit. Seuls l es produit s achetés aux É tats- Unis (y compr is ses terr itoires
et ses p ossessio ns), au Canada o u en vertu du P rogramme d’ échange s militaire s américai n sont visés
par cet te garant ie.
AUTRES CONDITIONS IMPORTANTES
La prés ente garan tie n’est pas tran sférable e t ne peut pas êt re cédée. La p résente ga rantie sera r égie
et inte rprétée se lon les lois d e l’État de l ’Ohio. La Péri ode de garant ie ne peut pas ê tre prolon gée
par une r éparatio n ou un remplac ement des ba tterie s ou des pièce s exécutés en ve rtu de la pré sente
garan tie, quels qu’ ils soient .
LA PR ÉSENTE GAR ANTIE CONS TITUE L’UNI QUE GARAN TIE ET RECO URS. L’ENTRE PRISE
DÉCL INE TOUTE RESP ONSABIL ITÉ QUANT À TOUT ES LES AUTRES GAR ANTIES E XPRESSES
OU IMPL ICITES, Y COM PRIS LES GAR ANTIES LIÉ ES À LA QUALI TÉ MARCHA NDE OU À LA
COMPATIB ILITÉ DU PROD UIT POUR UN U SAGE PARTICUL IER. HOOV ER NE POURR A EN AUCUN
CAS ÊT RE TENUE RES PONSABL E DE DOMMAGES -INTÉ RÊTS SPÉC IAUX OU DOMMAGE S
INDI RECTS, ACCE SSOIRES OU CO NSÉCUTI FS DE QUELQUE NAT URE QUE CE SO IT, SUBIS
PAR LE PROP RIÉTAIRE D U PRODUIT OU PAR TO UTE PARTIE RÉC LAMAN T PAR L’INTERMÉ DIAIRE
DU PROP RIÉTAIRE, Q U’ILS REL ÈVENT DU DR OIT DES CONT RATS, DE LA N ÉGLIGENC E, DE
LA RES PONSABI LITÉ CIVI LE DÉLICT UELLE OU DE L A RESPONS ABILITÉ ST RICTE DU FAIT D ES
PRODU ITS, OU QU’I LS DÉCOUL ENT DE QUELQU E CAUSE QUE CE S OIT.
Cert ains État s ne permet tent pas l’excl usion des dom mages cons écutifs . Par conséqu ent, l’exclusi on
précé dente pour rait ne pas êt re applicab le dans votre c as. La prés ente garant ie vous donne d es droits
préci s. Vous pouvez ég alement av oir d’autres dr oits, lesq uels varien t d’un État à l’aut re.
ENTRETIEN ET GARANTIE DE QuestMC HOOVERMD ET DE LA BATTERIE
RENSEIGNEMENTS RELATIFS À L’ENTRETIEN
31
Page 35

32
DECLARACIÓN DE CONFORMIDAD
Le présent appareil est conforme aux CNR d'Industrie Canada applicables aux
appareils radio exempts de licence. L'exploitation est autorisée aux deux conditions
suivantes : (1) l'appareil ne doit pas produire de brouillage, et (2) l'utilisateur de
l'appareil doit accepter tout brouillage radio électrique subi, même si le brouillage est
susceptible d'en compromettre le fonctionnement.
Conformément à la réglementation d'Industrie Canada, le présent émet teur radio peut
fonct ionner avec une antenne d'un type et d'un gain maximal (ou inférieur) approuvé
pour l'émetteur par Industrie Canada. Dans le but de réduire les risques de
brouillage radio électrique à l'intention des autres utilisateurs, il faut choisir le t ype
d'antenne et son gain de sorte que la puissance isotrope rayonnée équivalente
(p.i.r.e.) ne dépasse pas l'intensité nécessaire à l'établissement d'une communication
satisfaisante.
EL RECORDAR MPE
Les antennes installées doivent être situées de facon à ce que la population ne puisse
y être exposée à une distance de moin de 20 cm. Installer les antennes de facon à ce
que le personnel ne puisse approcher à 20 c m ou moins de la position centrale de l’
antenne.
La FCC de s éltats -unis sti pule que cet ap pareil doi t être en tout t emps éloign é d’au moins 20 cm de s
personnes pendant son functionnement.
Page 36

Para siempre.
• Visite
Hoover.com
• Llame al 1-888-679-2121
Podemos garantizarlo.
Hoover reemplazará las baterías durante nuestra garantía de 1 año.
Consulte la Garantía para conocer los detalles completos.
Guía del usuario IMPORTANTE: Lea atentamente antes de ensamblar y usar.
ESPAÑOL
Este m anual del usu ario aplic a a los siguien tes modelo s de QuestTM: BH71000
Instrucciones de seguridad
Introducción a su dispositivo Quest 1000
TM
Familiarización con su dispositivo Quest 1000
TM
Configuración de su estación de acoplamiento
Carga de su dispositivo Quest 1000
TM
Uso de su dispositivo Quest 1000
TM
Vaciado de la copa de recolección de residuos
Montaje de la copa de recolección de residuos
Resolución de problemas
Garantia
Declaración de Conformidad
34
38
38
39
39
40
41
41
42
44
45
Su guía:
Page 37

INSTRUCCIONES DE SEGURIDAD IMPORTANTES
CONSERVE ESTAS INSTRUCCIONES
Cuando se utilizan aparatos eléctricos, siempre deben seguirse
precauciones básicas, incluidas las siguientes:
LEA TODAS LAS INSTRUCCIONES ANTES DE UTILIZAR ESTE
APARATO. ESTE PRODUCTO TIENE COMO FIN SU USO
DOMÉSTICO SOLAMENTE. SI SE LO UTILIZA CON FINES
COMERCIALES, LA GARANTÍA QUEDARÁ ANULADA.
ADVERTENCIA: PARA DISMINUIR EL RIESGO
DE INCENDIO, DESCARGA ELÉCTRICA, DAÑOS O LESIONES,
RESPETE LAS SIGUIENTES MEDIDAS:
•Antes de poner en funcionamiento la aspiradora, ármela por completo.
• No utilice la batería de la unidad , tienda o carga a la intemperie ni sobre
super ficies mojadas . No permita que se moje.
• El cargador es para uso dentro solamente.
• Evite que se la utilice como un juguete. La unidad no tiene como fi n el uso por
parte de niños de 12 años o menos. Cuando se la utilice cerca de niños, será
necesario hacerlo bajo una estricta supervisión. Para evitar lesiones o daños,
mantenga a los niños alejados del producto y no permita que introduzcan sus
dedos u otros objetos en cualquiera de las aberturas del producto.
• Utilícelo únicamente según el uso descripto en este manual. Utilice únicamente
los accesorios y productos Hoover
®
recomendados.
• No utilice el cargador si el cable o el enchufe se encuentran dañados. Si el
aparato o el cargador no funcionan como deben; si se han caído, han sido
dañados, dejados a la intemperie o sumergidos en agua, llévelos a un Centro
Técnico antes de continuar usándolos.
• No extraiga ni transporte el cargador tomándolo por el cable; no tire del cable,
no cierre una puerta con él ni lo enrosque alrededor de bordes o esquinas filosas.
No apoye el producto sobre el cable. No pase el aparato por encima del cable.
Mantenga el cable lejos de las superficies calientes.
• No desenchufe el cargador tirando del cable. Para desenchufarlo, agarre el
enchufe, no el cable.
• No manipule el cargador (incluido el enchufe y los terminales) ni el aparato con
las manos mojadas.
• No coloque ningún objeto en las aberturas. No utilice la unidad si alguna de sus
aberturas se encuentra bloqueada. Manténgala libre de polvo, pelusas, cabello
y cualquier otro elemento que pueda disminuir el flujo de aire.
• Evite que el cabello, la ropa suelta, los dedos y cualquier otra parte de su cuerpo
entren en contacto con las aberturas y las piezas móviles de la unidad.
• Extreme las precauciones cuando utilice la aspiradora para limpiar escaleras.
No coloque la aspiradora sobre las escaleras ni sobre un mueble, ya que
pueden generarse lesiones o daños.
• No utilice la unidad para aspirar líquidos combustibles o inflamables, tales
como gasolina o birutas de madera lijada, ni la utilice en áreas en las que
dichas sustancias puedan estar presentes.
• No aspire nada que se encuentre en combustión o emitiendo humo, como
cigarrillos, fósforos o cenizas calientes.
• No utilice la unidad si esta no tiene colocados la copa de recolección de
residuos o los filtros.
34
Page 38

• Apague el interruptor de alimentación y extraiga la batería antes de extraer
o colocar el cepillo giratorio.
• Siempre apaga este aparato previa a conectar o desconectar el accesorio
motorizado “Turbo” u otro accesorio.
• No incinere el cargador, la batería ni el aparato, aun si estuvieran muy
dañados. Las baterías pueden explotar y provocar un incendio.
•Este producto incluye baterías de hidruro metálico de níquel recargables. No
exponga las baterías a altas temperaturas, ya que pueden prenderse fuego o
explotar.
•No deseche la batería en un incinerador ni en un compactador de desechos.
Consulte la sección sobre desecho de la batería para obtener instrucciones.
• No intente desarmar la batería.
•Desenchufe el cargador del tomacorriente antes de llevar a cabo una rutina de
limpieza o mantenimiento en la unidad.
•En condiciones extremas, pueden producirse pérdidas en las celdas de la batería.
Si la piel entrara en contacto con el líquido, lávese rápidamente con jabón y agua.
Si el líquido le entrara en los ojos, no se los frote. Enjuáguelos de inmediato con
agua limpia, en forma continua durante 15 minutos como mínimo. Consulte a un
médico de inmediato.
•No toque el paquete de baterías ni los terminales del cargador, ni inserte objetos
en ellos.
• No intente cortocircuitar la batería ni los terminales del cargador.
• Coloque los cables de otros aparatos lejos del área que se va a limpiar.
•No haga funcionar la aspiradora en una habitación donde haya niñosdurmiendo.
•No haga funcionar la aspiradora en áreas donde haya velas encendidas u
objetos frágiles en el piso que se va a limpiar.
•No haga funcionar la aspiradora en una habitación donde haya velas
encendidas sobre muebles que la aspiradora puede golpear por accidente.
•No permita que los niños se sienten sobre la aspiradora.
•Para usar solo con la base de acoplamiento Hoover (N.° de pieza 440009842)
y cargador Hoover (N.° de pieza 440009842).
ADVERTENCIA: PARA REDUCIR EL RIESGO DE
DESCARGA ELÉCTRICA, EL CARGADOR TIENE UN ENCHUFE
POLARIZADO (UNA CLAVIJA ES MÁS ANCHA QUE LA
OTRA). ESTE ENCHUFE CABE EN UN TOMACORRIENTE
POLARIZADO DE UNA SOLA VÍA SOLAMENTE. SI NO
ENCAJA POR COMPLETO EN EL TOMACORRIENTE,
INVIERTA EL ENCHUFE. SI AÚN NO ENCAJA, CONTACTE
A UN ELECTRICISTA CUALIFICADO PARA QUE INSTALE
EL TOMACORRIENTE CORRESPONDIENTE. NO REALICE
NINGÚN TIPO DE MODIFICACIÓN EN EL ENCHUFE.
PRECAUCIÓN: PARA DISMINUIR EL RIESGO DE
DAÑOS:
• Evite aspirar objetos duros y filosos con este producto, ya que pueden dañarlo.
• Almacénelo adecuadamente en interiores, en un lugar seco. No exponga la máquina
a temperaturas muy frías. Este producto incluye baterías de lithium-ion recargables. No
exponga las baterías a altas temperaturas, ya que pueden prenderse fuego o explotar.
• Cuando el cepillo giratorio esté encendido, no permita que la aspiradora se asiente
en una ubicación durante un extenso período de tiempo, ya que puede dañarse el piso.
35
Page 39

36
ANTES DE USO
ADVERTENCIA:
Asegúrese de que los niños o las
mascotas no tengan acceso a la habitación que se va a limpiar para evitar
riesgo de lesiones.
PRECAUCIÓN: : Para evitar riesgo de daños, mantenga
alejados objetos frágiles, cables flojos, y objetos pequeños que se pueden caer.
•Para evitar que el piso se dañe, aleje todos los objetos puntiagudos o filosos que
puedan caer debajo del robot y rayar la superficie del piso.
•Su robot está diseñado para levantar una pequeña cantidad de basura y no
reemplaza a una aspiradora clásica. Use su Quest regularmente para ayudar a
reducir su tiempo de aspirado semanalmente.
•Quest limpia pisos duros y alfombras de pelo corto de hasta 1 cm. No se
recomienda para el uso en alfombras de pelo más largo.
•Las alfombras u objetos de colores oscuros pueden afectar a los sensores de
Quest por lo que puede no aspirarlos ni aspirar cerca de ellos.
ADVERTENCIA: This product may contain chemicals
known to the State of California to cause cancer, birth defects or reproductive
harm.
WASH HANDS AFTER HANDLING.
PRECAUCIÓN: La batería utilizada en este dispositivo
puede presentar un riesgo de incendio o quemaduras químicas . No desmonte
, caliente por encima límite del fabricante máxima temperatura ( 60 ° C / 140
° F) , o incinerar . Deseche las baterías con prontitud . Aléjate de los niños.
No desmonte ni la arroje al fuego . No intente desarmar la batería o eliminar
cualquier componente que sobresalen de las terminales de la batería . La
batería y el cargador no tienen piezas reparadas por el usuario . Fuego o causar
lesiones. Antes de tirarla, proteja los terminales expuestos con cinta aislante
gruesa para evitar el cortocircuito .
DESECHO DE LA BATERÍA
ADVERTENCIA:
RIESGO DE
EXPLOSIÓN O EXPOSICIÓN A MATERIAL TÓXICO
1-800-822-8837
BATERÍAS DE IONES DE LITIO
La batería debe ser recolectada, reciclada o desechada en forma
favorable al medio ambiente. El Sello de reciclado de la batería RBRC
certificado por EPA (Agencia de Protección Ambiental) en la batería
de iones de litio (Li-ion) indica que Techtronic Industries, una afiliada
corporativa de Hoover, Inc. se encuentra participando voluntariamente
en un programa industrial para recolectar y reciclar estas baterías al
final de sus vidas útiles, cuando son retiradas de ser vicio en los Estados
Unidos o Canadá. El programa RBRC proporciona una conveniente
alternativa a la colocación de las baterías de iones de litio usadas en
la basura o en el flujo de desechos municipales, lo que puede ser ilegal
en su área. Visite el sitio www.rbrc.org/call2recycle/ para obtener
información sobre el reciclaje de las baterías de iones de litio y las
restricciones/prohibiciones sobre desechos en su área. La participación
de Hoover, Inc. en este programa forma parte de nuestro compromiso
por preservar el medio ambiente y conser var los recursos naturales.
Page 40

37
INSTRUCCIONES DE SEGURIDAD IMPORTANTES PARA EL PRIMER USO
Antes de usar este dispositivo, quite los
obstáculos del piso, como ser cables de
alimentación, ropa y cualquier objeto
frágil. Si el dispositivo pasa por encima
de un cable, puede arrastrar el objeto y
hacer que se caiga.
La estación de acoplamiento debe
ubicarse contra la pared y debe estar a
por lo menos 4 pies de otros objetos a
su alrededor para permitir que el robot
encuentre la estación de acoplamiento
con facilidad.
Cuando el dispositivo no esté en uso,
apague la máquina. Esto protegerá la
batería de su dispositivo.
Antes del primer uso o al usarlo luego
de un largo período, cargue la batería
durante aproximadamente 18 a 24
horas para refrescar la batería.
Cuando no está en uso por un largo
período, desenchufe la estación de
acoplamiento para evitar riesgos
eléctricos no deseados.
Si el dispositivo no está en uso por
un período prolongado, cargue la
batería por completo y almacene el
dispositivo en un lugar fresco y seco
para proteger la batería de cualquier
daño potencial.
Page 41

38
Familiarización con su dispositivo Quest 1000
MC
Introducción a su dispositivo Quest 1000
MC
6. Filtro
7. Cepillo lateral (2)
8. Cepillo quitapolvo
9. Destornillador
10. Almohadillas adhesivas
1. Cepillo lateral
2. Sensores de detección de
suelo
3. Rueda derecha
4. Interruptor de alimentación
5. Puerto de carga
6. Montaje de la copa de
recolección de residuos
7. Contactos de carga
8. Rueda delantera
9. Compartimento de la batería
10. Rueda izquierda
11. Cepillo de apoyo
12. Cepillo principal
1. Aspiradora robótica Quest
™
1000
2. Estación de acoplamiento
3. Batería
4. Adaptador
5. Manual de uso
1. Botones de control
2. Ventanas con sensor IR
3. Botón de inicio
NOTA: la batería y el filtro vienen
instalados en el interior de su robot.
Vista frontal Vista inferior
Page 42

39
Configuración de su estación de acoplamiento
Monte la estación de
acoplamiento insertando la parte
superior y la base juntas.
Arranque la lámina transparente. Coloque la estación de
acoplamiento contra la pared y a
por lo menos 4 pies de cualquier
objeto a su alrededor.
Enchufe el adaptador.
Girar el interruptor de corriente en el lado del
robot . Una vez que su dispositivo Quest
™
este
listo , presione el botón de "acoplamiento".
El dispositivo encontrará la estación de
acoplamiento y el se montara si mismo para
cargarse.
También puede posicionar manualmente
el dispositivo Quest
™
en la estación de
acoplamiento delante de la línea central hasta
que se encaje en su posición.
(Paso 1) Enchufe el conector del adaptador de
CA en la terminal de CC del dispositivo Quest
™
.
(Paso 2) Enchufe el adaptador en un
tomacorriente eléctrico.
Carga de su dispositivo Quest 1000
MC
Cubierta superior, base
Método de carga 1 Método de carga 2
IMPORTANTE : Asegúre se de que el inte rruptor de
alime ntación en el l ado del robot es tá en ON antes de la
carga . De l o contrario , no s e cargará .
ADVERTENCIA
No mueva la estación de acoplamiento mientras el dispositivo Quest
está limpiando. De lo contrario, podría no volver a su estación de
acoplamiento.
ADVERTENCIA
Si el dispositivo no está en uso por un período
prolongado, cargue la batería por completo
y almacene el dispositivo en un lugar fresco y
seco para proteger la batería de cualquier daño
potencial.
ADVERTENCIA
Antes del primer uso o al usarlo luego de un
largo período, cargue la batería durant e
aproximadamente 18 a 24 horas para ref rescar
la batería.
ADVERTENCIA
Cuando el dispositivo no esté en uso, apague
la máquina. Esto protegerá la batería de su
dispositivo.
!
!
!
!
!!
!
!
Page 43

40
Uso de su dispositivo Quest 1000
MC
Commandes principales Réglage de l'heure Programmation (SCH)
AUTO (nettoyage automatique)
DOCK (station)
CLOCK (horloge)
SCH (programmation)
SPOT (nettoyage localisé)
Appuyez sur la touche CLOCK
Utilisez les touches DAY, HOUR,
MIN pour régler l'heure.
Appuyez sur la touche OK lorsque
vous avez terminé
Appuyez sur la touche AUTO pour
annuler
Programmez les horaires journalier ou
hebdomadaire du Quest
™
.
Appuyez sur la touche SCH
Utilisez les touches DAY, HOUR, MIN pour régler
la programmation.
Appuyez sur la touche OK lorsque vous avez
terminé
Appuyez sur la touche AUTO pour annuler
Appuyez et maintenez la touche DAY enfoncée
pour visualiser ou supprimer la programmation
de la journée précédente.
Inicio/Detención de la limpieza
automática
Regreso a la estación de
acoplamiento y carga
Configuración del reloj
Programación del horario de
limpieza semanal de Quest
™
Limpieza de manchas
Page 44

41
Presione el botón y
tire para quitar el
montaje de la copa
de recolección de
residuos.
Deslice hacia
arriba los botones
rojos de los
costados para
abrir la tapa.
Vacíe la copa de
recolección de
residuos y límpiela
con el cepillo
quitapolvo.
Una vez que haya extraído
el montaje del ventilador y
el motor, enjuague el filtro
y la copa de recolección
de residuos con agua fría
o tibia y séquelos bien
durante 24 horas.
Empuje el botón redondo
en la parte superior de
la copa de recolección
de residuos y extraiga el
montaje del ventilador
del motor.
Quite el filtro y
límpielo.
Vaciado de la copa de recolección de residuos
Montaje de la copa de recolección de residuos
1 2 3 4
5 6
Inserte el filtro en la
copa de recolección de
residuos. Asegúrese de
que el filtro se bloquee en
su posición a ambos lados.
Fije el montaje
del ventilador.
Instale la copa
de recolección
de residuos.
1 2 3
PRECAUCIÓN
¡Peligro de lesiones! Puede dejar que su robot funcione sin
super visión; sin embargo, sea siempre cuidadoso de no pisarlo ya que
podría hacerlo caer.
ADVERTENCIA
No moje el montaje del ventilador del motor (consulte el
paso 4).
!
!
!
!
IMPORTANTE : Apague el i nterrupt or
de alim entación an tes de quitar l a copa de
recolección de residuos.
Page 45

42
CauseIssue Action
E001: Falla de detección de suelo
E002: Error del cepillo giratorio
E003 : Error de bateria baja
E004: Error de la rueda derecha
E005 : Error de instalación de copa de
recoleccion.
E006: Fuera del piso
E007: Error del cepillo lateral
El dispositivo Quest1000 se detiene
luego de un período corto
El dispositivo Quest1000 regresa continuamente a su estación base durante los
ciclos de limpieza
El dispositivo Quest1000 no se
enciende
El dispositivo Quest1000 no regresa
a la base de carga
El sensor del suelo está cubierto de suciedad.
Limpie el sensor de detección de suelo con un paño de microfibra limpio y seco. Consulte la
página 7 para localizar el sensor de detección de suelo.
El dispositivo Quest está atascado en la escalera.
El cepillo giratorio está atascado o no gira correctamente.
El nivel de batería es demasiado bajo y el dispositivo no puede regresar a la estación de acoplamiento para recargarse automáticamente.
La rueda derecha está atascada o no gira correctamente.
La copa de recolección de residuos no está instalada o está
instalada incorrectamente.
El dispositivo Quest está levantado del suelo o la rueda
delantera está elevada excesivamente.
El cepillo lateral está atascado o no gira correctamente.
El nivel de batería es demasiado bajo y el dispositivo no puede
regresar a la estación de acoplamiento para recargarse
automáticamente.
Esto puede indicar que el dispositivo Quest está trabajando en
un ambiente de alto resplandor o en pisos oscuros, o bien que el
sensor de detección de suelo está cubierto con suciedad.
El botón de encendido al costado del robot está apagado.
La estación de acoplamiento no está enchufada.
La batería está completamente agotada.
El dispositivo Quest no puede detectar su estación de acoplamiento debido a una ruta no clara.
Mueva el dispositivo Quest a una ubicación diferente.
Limpie el cepillo giratorio y quite cualquier suciedad, pelusa o cabello. Consulte la página 43 para
ver las instrucciones.
Coloque manualmente el dispositivo Quest en la estación de acoplamiento y cárguelo. Consulte
la página 39 para ver las instrucciones.
Apague el dispositivo Quest antes de limpiar la rueda justo al lado de la suciedad, pelusas o
pelos. Consulte la página 43 para obtener instrucciones .
Apague el dispositivo Quest e instale la copa de recolección de residuos. Lea las instrucciones en la
página 41para seguir los pasos correctos de instalación.
Vuelva a colocar la unidad en el suelo en la forma correspondiente.
Encienda el botón de encendido.
Enchufe la estación de acoplamiento. Consulte la página 39 para ver las instrucciones.
Cargue el dispositivo Quest. Consulte la página 39 para ver las instrucciones.
Quite cualquier obstáculo en la ruta o acople manualmente el dispositivo Quest. Consulte la
página 39 para ver la instalación correcta de la estación de acoplamiento.
Limpie el cepillo lateral y quite cualquier suciedad, pelusa o cabello. Consulte la página 43 para ver
las instrucciones.
Coloque manualmente el dispositivo Quest en la estación de acoplamiento y cárguelo.
Consulte la página 39 para ver las instrucciones.
Mueva el dispositivo Quest a una ubicación diferente y limpie el sensor de detección de suelo con
un paño de microfibra limpio y seco. Consulte la página 7 para localizar el sensor de detección de
suelo.
Resolución de problemas
AVERTISSEMENT
Para disminuir el riesgo de lesiones físicas, apague el interruptor de encendido/apagado de
la unidad antes de limpiar o realizar un servicio de mantenimiento en la unidad.
! !
¿TIENE PREGUNTAS O INQUIETUDES?
Contác tenos: (888) 679- 2121 Para obten er una guía comp leta de res olución de pr oblemas, c onsulte: Ho overhelp.c om/Quest™ Twit ter: @Ho overUSA Face book: fac ebook.com /hoover
No devuelva la unidad a la tienda. Vea la part e posterio r del produc to para consu ltar el núme ro de modelo.
Cualqu ier otro mant enimient o lo debe reali zar un repres entante de s ervici o autorizad o. Si el apara to no funcio na como debe, s i se ha sumerg ido en agua, ll évelo a un Cent ro técnico an tes de cont inuar usánd olo.
Page 46

43
Resolución de problemas
Limpieza del módulo del cepillo giratorio
Limpieza del cepillo lateral
Limpieza de las ruedas Limpieza de sensores
Limpie los cepillos
giratorios con la
herramienta de
limpieza provista.
Limpie las ruedas delantera, izquierda y derecha
usando la herramienta de cepillo de limpieza.
Realice esta tarea regularmente para garantizar
que su dispositivo Quest
TM
se mueva con facilidad.
Use un paño de microfibra o
algodón limpio y seco para
limpiar los sensores.
Retire el tornillo.
Deslice la lengüeta
junto al cepillo
giratorio para
desbloquear el
módulo.
Limpie cualquier
cabello, pelusa
o suciedad del
cepillo lateral y del
poste.
Extraiga los
cepillos.
Vuélvalo a colocar.
Quite el cabello,
las pelusas y la
suciedad de los
cepillos giratorios.
1
1
2
2
3
3
4
PRECAUCIÓN
¡Peligro de lesiones! Puede dejar que su robot
funcione sin supervisión; sin embargo, sea siempre
cuidadoso de no pisarlo ya que podría hacerlo caer.
! !
Page 47

44
TODO TIPO DE MANTENIMIENTO DEBERÁ SER REALIZADO P OR PERSONAL
TÉCNICO AUTORIZADO. Llame al (888) 679-2121 en los EE. UU. y Canadá.
En caso de nec esitar más ay uda, diríjas e a un Cent ro Técnico autor izado. Encu entre el más cerca no a su
domic ilio visita ndo nuestro sit io web www.hoo ver.com. Los gast os derivados de l tra nsporte de sde y hacia
el lugar de re paración deb erán ser abona dos por el propiet ario del produ cto. Siempre id entifiqu e su
produ cto de acuerdo al núm ero del modelo y el cód igo de fábrica cu ando solicit e informac ión o realice
el pedid o de las piezas de repue sto. (El número de mod elo y el código de mauf actura para la as piradora
apare ce en el inferior y/o columna de l producto y en el resp aldo de la bacter ia y del cargador.)
GARANTÍA LIMITADA POR UN AÑO (PARA USO DOMÉSTICO)
COBERTURA DE LA GARANTÍA
En casos de us o y mant enimiento do mésticos en co ndicione s nor males y confor me a la Guía de l propietar io,
el produ cto y la batería Hoov er
®
tienen ga rantía cont ra fallas de fábri ca en los materia les y fallas por man o
de obra por un pe riodo de un año compl eto. Durant e el Pla zo de la garantía, Hoo ver
®
proporcionará la
mano de obr a y los repu estos, sin ning ún co sto, a los fines de repa rar cualquie r fal la del producto . Y (b.)
propo rcionará una ba tería de repues to gratis para rep arar las falla s de la bat ería Lithium Life
™
que vino
inclu ida con su product o adquirido en lo s Est ados Unidos, T iendas de inter cambios mili tares de los EE. UU.,
y Canadá .
CÓMO REALIZAR UN RECLAMO POR LA GARANTÍA
Si este pro ducto no prese ntara las carac terístic as garantiz adas, llével o o envíe lo a un Dis tribuido r Técni co
Ofic ial autoriz ado de Hoover
®
junto con el co mprobante de co mpra. Si las bate rías no present aran las
carac terístic as garantiz adas, llével as o enví elas junto con el com probante de com pra a un Distribu idor
autor izado de Hoover
®
o contac te al Servici o de Ate nción al Clien te de Hoover® al (888) 679-2121. Para ser
redir igido en forma au tomática a un Cen tro de Servic ios autoriz ado en los EE. UU., llam e al (888) 679-2121
o visite el si tio en línea de Hoove r
®
, www.hoover.com.
NO CUBIERTO POR LA PRESENTE GARANTÍA
La prese nte garantía no cu bre las correas , los filtros y los cepi llos girator ios, el uso del produ cto en
opera ciones come rciales (tal es como servi cios de contra tación de equip amiento y limp ieza), el
mante nimiento inc orrecto de l prod ucto, los daños de rivados de su mal uso, ca sos fortui tos o hechos de la
natu raleza, vandal ismo u otros actos f uera del contro l de Hoo ver
®
. La garant ía tampoco cubr e los ac tos u
omisi ones del propie tario, su uso fue ra del país de compra or iginal y las revent as del producto po r parte
del prop ietario. Es ta garantía no cub re la recolecci ón, la entrega, el tr ansport e ni el ser vicio a domic ilio del
produ cto. No obstant e, si envía el produc to por correo post al al Centro Técnic o y de Ventas de Ho over
®
para
obten er el servic io de la garantía, el env ío tendrá un costo de id a sol amente. Con tacte al Centro Téc nico de
Hoover
®
al (888) 679-2121 para info rmarse sob re las formas de envío de e ste producto . Est a gar antía no se
aplic a a los prod uctos adqui ridos fuera de los Es tados Unidos , incluidos sus te rritori os y pos esiones, Ti endas
de inter cambios mili tares de los EE. UU., y Can adá.
OTROS TÉRMINOS IMPORTANTES
Esta ga rantía no es transf erible y no podrá se r cedida. Dich a garantía se regi rá e int erpretará de
confo rmidad con las le yes del Estado de Oh io. El Plazo de la garant ía no se prolongar á por el re emplazo
de las bate rías o piezas, ni por cu alquier repa ración reali zada confor me a aqu ella.
ESTA GARANTÍA REPRESENTA LA GARANTÍA Y EL RECURSO LEGAL EXCLUSIVOS .
TODAS LAS DEM ÁS GARANTÍAS, EXPRESAS O IMPLÍCITAS, CON INC LUSIÓN DE LAS
GARANTÍAS SOBRE APTITUD PARA LA VENTA O ADECUACIÓN A FINES ESPECÍFICOS,
SERÁN RECHAZADAS. EN NINGÚN SUPUESTO HOOVER SERÁ RESPONSABLE
POR LOS DAÑOS ESPECIALES, IN DIRECTOS, INCIDENTALES O MEDIATOS DE
NINGUNA CLASE, QUE SEAN RECLAMADOS POR EL PROPIETARIO O CUALQUIER
PARTE POR INTERMEDIO DE ESTE, YA SEA CON FUNCIÓN EN UN CONTRATO, POR
NEGLIGENCIA, HECHO ILÍCITO CIVIL O RESP ONSABILIDAD OBJETIVA, NI POR
CUALQUIER OTRA CAUSA.
En algun os estados, la exc lusión de los daños me diatos no está pe rmitida, de mo do que la exclusión
prece dente puede no se rle aplicab le. Esta garan tía le otorga dere chos especí ficos. Tambié n pue de tener
otros de rechos, que var ían según el esta do.
MANTENIMIENTO Y GARANTÍA DE LA ASPIRADORA QuestTM HOOVER
®
INFORMACIÓN SOBRE EL MANTENIMIENTO
Page 48

DECLARACIÓN DE CONFORMIDAD
Este dispositivo cumple con la Parte 15 de las normas de la FCC / Indust ria Canadiense
exento de licencia e stándar ( s ) de RSS. La operac ión está sujet a a las dos condiciones
siguientes : ( 1 ) este dispositivo no puede causar interferencias perjudiciales y ( 2 ) este
dispositivo debe aceptar cualquier interferencia recibida , incluidas las inter ferencias
que puedan provocar un funcionamiento no deseado .
Bajo los reglamentos Industry Canad , este transmisor de radio sólo puede funcionar
con una antena de un tipo y el máximo ( o menor ) de g anancia aprobado para el
transmisor de la industria de Canadá . Para reducir el potencial de interferencia de
radio a ot ros usuarios , el t ipo de antena y su ganancia deben elegirse de manera que
la potencia isótropa radiada equivalente ( e.i.r.p. ) no es mayor que el necesario para
una comunicación exitosa .
EL RECORDAR MPE
Para satisfacer los requisi tos de exposición a RF de la FCC / IC , una distancia de
separación de 20 cm o más se debe mantener entre la antena de este dispositivo y
personas durante el funcionamiento del dispositivo.
Para garantizar el cumplimiento , no se recomienda operaciones en una distancia
menor.
45
Page 49

Notes
46
Page 50

Page 51

Page 52

http://Hoover.com/
Find us on:
youtube.com/hoover
facebook.com/hoover
twitter.com/hooverusa
 Loading...