

Page 1
USER MANUAL (GB) ..............................P 01
MANUEL D’UTILISATION (FR) ...............P 04
MANUALE ISTRUZIONI (IT) ...................P 07
MANUAL DE INSTRUÇÕES (PT) ............P 10
MANUAL DE INSTRUCCIONES (ES) .....P 13
*Certain Models Only **Nozzle design may vary according to models
®
®
PRINTED IN P.R.C.
48010616
X1*
X2*
X3*
Y*
Z*
AA*
C
A
B
D
J
G
H
I
F
E
M*
N*
Q
S1
S2
P**
R
T
S3
W1
U
V
W2
O
L
K
Page 2
1 2 3
4
5 6 7
*
8
**
9
10
11
12
20
23 24
17
18
19
16
13
14
15
21 22
*Certain Models Only **Nozzle design may vary according to models *Certain Models Only **Nozzle design may vary according to models
A
B
A
B
Page 3
1
INSTRUCTIONS FOR SAFE USE
This appliance should only be used for domestic cleaning, as
described in this user guide. Please ensure that this guide is
fully understood before operating the appliance.
Do not leave the appliance plugged in. Always switch off and
remove the plug from the socket after use, or before cleaning
the appliance or any maintenance task.
This appliance can be used by children aged from 8 years and
above and persons with reduced physical, sensory or mental
capabilities or lack of experience and knowledge if they have
been given supervision or instruction concerning use of the
appliance in a safe way and understand the hazards involved.
Children shall not play with the appliance. Cleaning and user
maintenance shall not be made by children without supervision.
If the power cord is damaged stop using the appliance immediately.
To avoid a safety hazard, an authorised Hoover service engineer
must replace the power cord.
Keep hands, feet, loose clothing and hair away from rotating brushes.
Use only attachments, consumables or spares recommended
or supplied by Hoover.
Static electricity: Some carpets can cause a small build up of
static electricity. Any static discharge is not hazardous to health.
Do not use your appliance out of doors or on any wet surface
or for wet pick up.
Do not pick up hard or sharp objects, matches, hot ashes,
cigarette ends or other similar items.
Do not spray with or pick up ammable liquids, cleaning uids,
aerosols or their vapours.
Do not run over the power cord when using your appliance
or
remove the plug by pulling on the power cord.
Do not continue to use your appliance if it appears faulty.
Hoover service: To ensure the continued safe and efcient
operation of this appliance we recommend that any servicing
or repairs are only carried out by an authorised Hoover service
engineer.
Do not stand on or wrap the cord around arms or legs when
using your appliance.
Do not use the appliance to clean animals or people.
Do not position the appliance above you when cleaning the
stairs.
Do not pick up large quantities of powdery materials such as
laundry detergent, our or similar.
Do not operate without water in the water container.
Always position the appliance horizontally during use to keep
the water inside the container.
Always empty the water container when nished using the
appliance.
Do not touch the plug or appliance with wet hands.
The Environment
The symbol on this appliance indicates that this appliance may not be treated
as household waste. Instead it must be handed over to the applicable collection
point for the recycling of electrical and electronic equipment. Disposal must be
carried out in accordance with local environmental regulations for waste disposal.
For more detailed information about treatment, recovery and recycling of this
appliance, please contact your local city ofce, your household and waste disposal service
or the shop where you purchased the appliance.
This appliance complies with the European Directives 2006/95/EC, 2004/108/EC
and 2011/65/EU.
HOOVER Limited, Pentrebach, Merthyr Tydl, Mid Glamorgan, CF48 4TU, UK
GB
Page 4

2
*Certain Models Only **Nozzle design may vary according to models
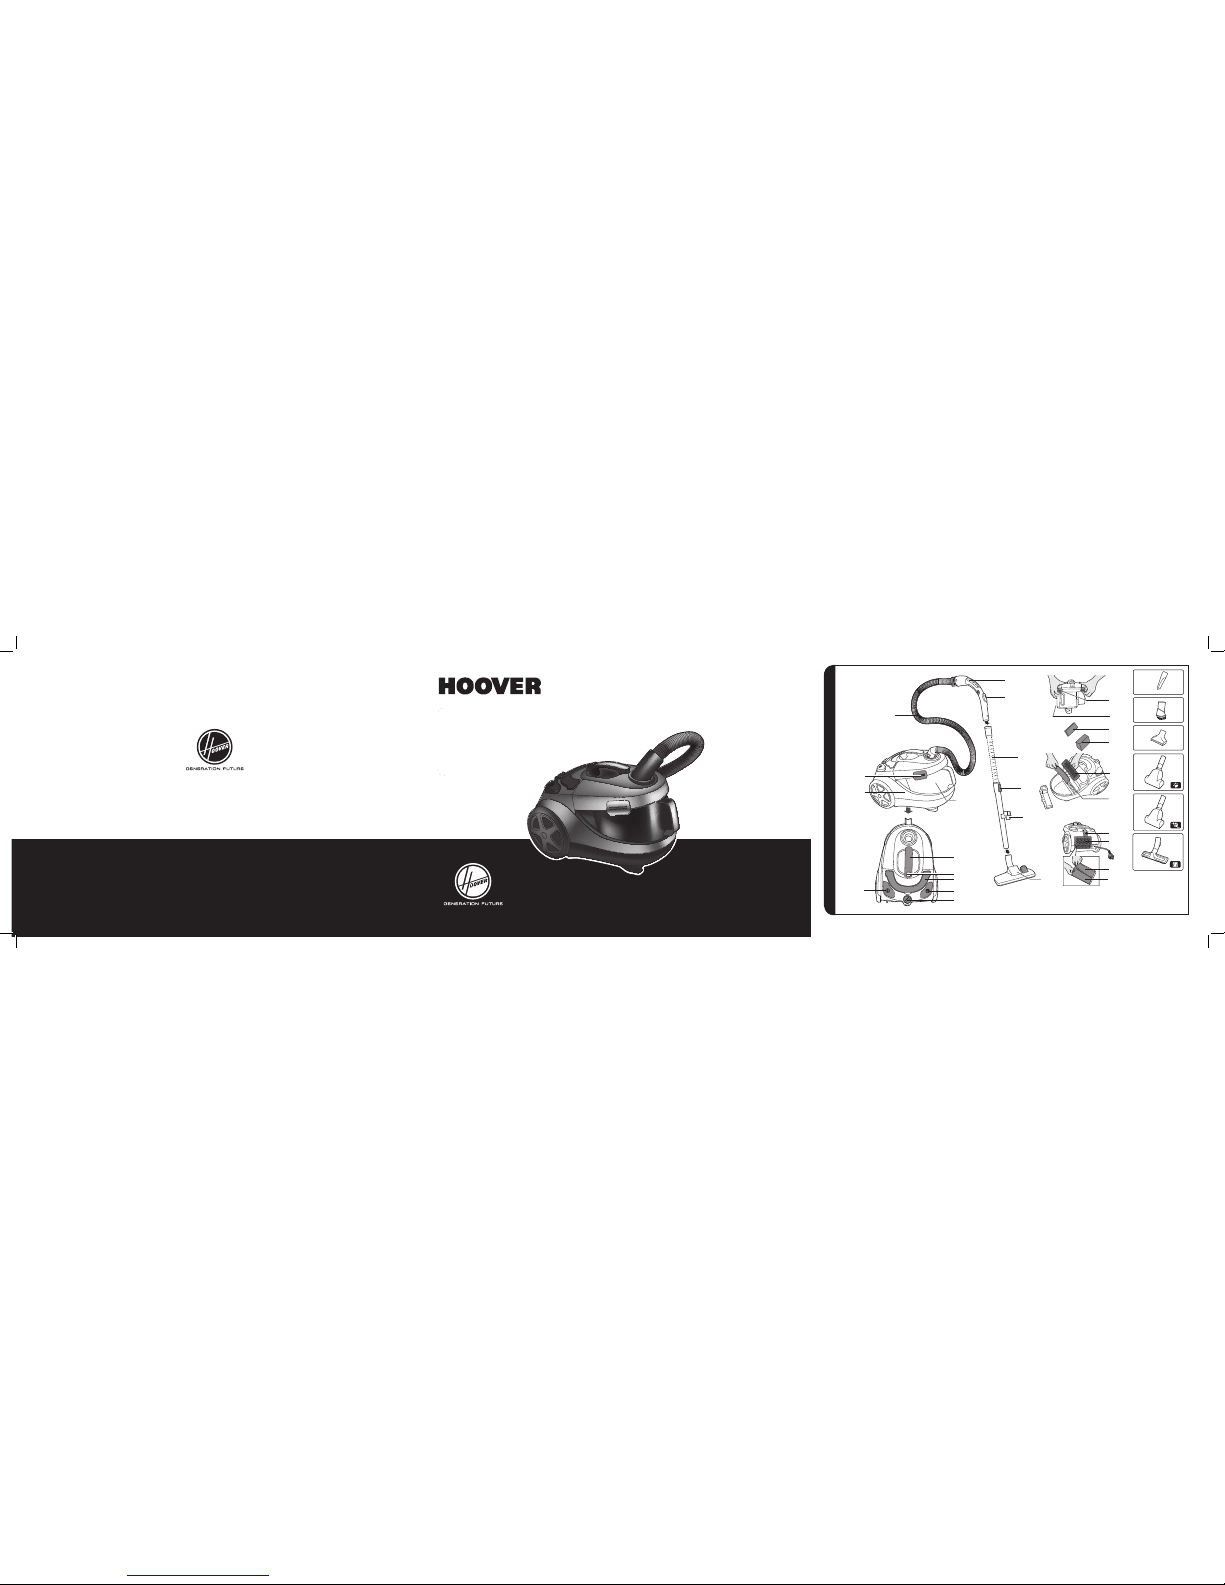
GETTING TO KNOW YOUR CLEANER
GB
A. Main Cleaner
B. Bin Lid Latch Left/Right
C. Hose
D. Water Tank
E. Bin Handle
F. Bin Release Button
G. Carry Handle
H. Cord Reel Pedal
I. Variable Power Control Knob
J. On/Off Pedal
K. Hose Handle
L. Suction Regulator
M. Telescopic Tube*
N. Telescopic Tube Adjuster*
O. Tool holder
P. Carpet and Floor Nozzle**
Q. Dust Container Latch
R. Empty Latch
S1. Pre-motor Filter Foam A
S2. Pre-motor Filter Foam B
S3. Pre-motor Filter Foam C
T. Pre-motor HEPA Filter
U. Parking Slot
V. Exhaust Filter Cover
W1. Exhaust Filter A
W2. Exhaust Filter B
X1. Crevice Tool*
X2. Dusting Brush*
X3. Furniture Nozzle*
Y. Pet Hair Remover Mini Turbo Nozzle*
Z. Allergy Remover Mini Turbo Nozzle*
AA. Hard Floor Nozzle*
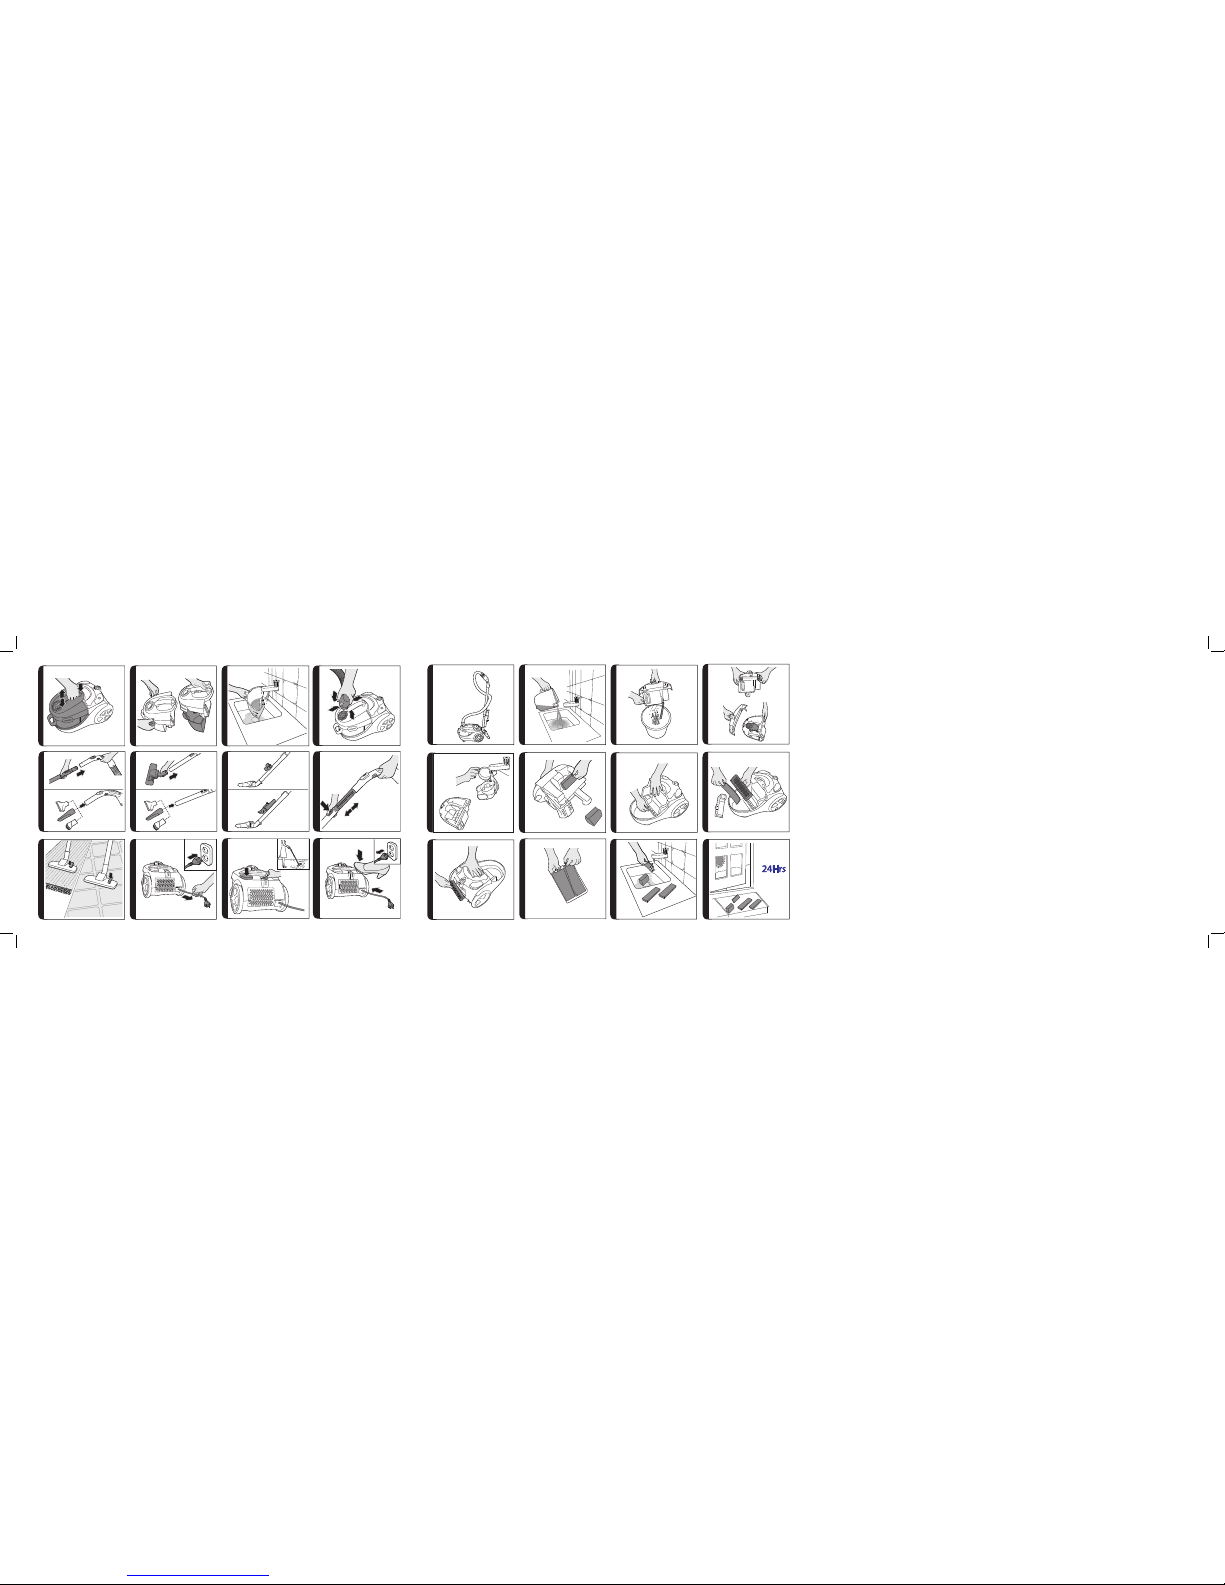
ASSEMBLING YOUR CLEANER
Remove all components from the packaging.
1. Press the bin release button and remove the bin assembly from the cleaner,
by holding
the bin handle.
[1]
2. Open the bin lid latch left/right and remove the bin lid from the bin assembly.
[2]
3. Fill the water tank with ordinary tap water between MIN and MAX. Do not overll above
the MAX level.
[3]
4. Re-assemble the bin lid onto the water tank, locking both left and right latches. [2]
5. Ret the bin assembly onto the product ensuring it is rmly locked. [1]
6. Connect the hose to the cleaner main body, ensure it clips and locks. [4]
To release the
hose: simply press the two latches on the hose end and pull.
[4]
7. Connect the hose handle to the tube upper end, ensure it clips and locks.
[5A]
8. Connect the tube lower end to carpet and oor nozzle**.
[6A]
9. Clip the tool holder on the tube and the tools [X1, X2, X3]
can be stored.
[7]
The tools
can be tted to the end of hose handle and tube when used. [5B, 6B]
USING YOUR CLEANER
ENSURE THE WATER TANK IS FILLED WITH WATER BETWEEN MIN AND MAX
BEFORE USING CLEANER. IF THE WATER TANK IS EMPTY, PLEASE REFER TO
“ASSEMBLING YOUR CLEANER ” FROM STEP 1 TO STEP 5.
1. Extract power cord and plug it into the power supply. Do not pull the cord beyond the
red mark. [10]
2. Adjust the telescopic tube* to the desired height by moving the telescopic tube adjuster*
to the most comfortable cleaning position. [8]
3. Carpet & Floor Nozzle**. Press the oor type selector on the nozzle [9] to select the
ideal cleaning mode for the oor type.
Hard Floor – Brushes are lowered to protect the oor.
Carpet – Brushes are raised for the deepest clean.
4. Switch the cleaner on by pressing the on/off Pedal on the cleaner main body. [11]
5. Adjust the variable power control knob to increase or decrease the power. [11]
6. Adjust the suction regulator to the desired level.
7. Switch off at the end of use by pressing the on/off Pedal. Unplug and press the cord
reel pedal to wind the power cord back into the cleaner. [12]
NOTE: After every use, ensure the water tank is emptied and cleaned. This product
is for dry vacuum only and MUST NOT be used for wet pick or on wet surfaces.
PARKING AND STORAGE SECTION
The tube can be parked on the back of the cleaner for storage or temporary storage while
in use. [13]
CLEANER MAINTENANCE
EMPTYING AND CLEANING THE WATER TANK, BIN CYCLONE AND DUST CONTAINER
1. Turn off the cleaner by pressing the on/Off pedal [11] and unplug the power cable. [10]
2. Press the bin release button and remove the bin assembly from the cleaner, by
holding the bin handle. [1]
3. Open the bin lid latches left and right and remove the water tank from the bin
assembly.
[2]
4. Empty the dirty water from water tank and clean the water tank.
[14]
5. Pull the empty latch and empty the dust container.
[15]
6. Close the dust container bin ap.
7. Open the dust container latches and remove the bin lid [16], remove the cyclonic
unit and clean it. [17]
8. Ret the cyclonic unit to the bin lid, ret to the bin assembly and lock the dust container
latches. [16]
9. Ret the bin lid assembly to the water tank and lock the bin lid latches left and right. [2]
10. Ret the bin assembly to the cleaner and ensure it clips and locks.
[1]
Cleaning the Filter
To maintain optimum performance of your cleaner, wash the pre-motor HEPA lter, foam
lters and exhaust lter after every use.
Page 5

3
*Certain Models Only **Nozzle design may vary according to models
GB
USER CHECKLIST
Should you have a problem with the product, complete this simple user checklist before
calling your local HOOVER service.
• Is there a working electricity supply to the cleaner? Please check with another electrical
appliance.
• Is the water tank or bin lled? Please refer to ‘Cleaner Maintenance’.
• Is the Filter blocked? Please refer to ‘Cleaning the lter’.
• Is the hose or nozzle blocked? Please refer to ‘Removing a blockage from the system’.
IMPORTANT INFORMATION
HOOVER spares and Consumables
Always replace parts with genuine HOOVER spares. These are available from your local
HOOVER dealer or direct from Hoover. When ordering parts always quote your model
number.
Consumables:
• Filter Kit (Pre-Motor and Exhaust): U72 35601577
Spares:
• Carpet & Floor Nozzle: G150 35601579
• Hard Floor Caresse Nozzle: G151 35601580
• Pet Mini Turbo Nozzle: J51 35601163
• Complete Flexible Hose: D148 35601578
Quality
HOOVER’s factories have been independently assessed for quality. Our products are
made using a quality system which meets the requirements of ISO 9001.
Your Guarantee
The guarantee conditions for this appliance are as dened by our representative in the
country in which it is sold. Details regarding these conditions can be obtained from the
dealer from whom the appliance was purchased. The bill of sale or receipt must be
produced when making any claim under the terms of this guarantee.
Subject to change without notice.
Cleaning the pre-motor lter:
1. Press the bin release button and remove the bin assembly from the cleaner, by
holding the bin handle. [1]
2. Open the bin lid latch left/right and remove the water tank from bin assembly. [2]
3. Remove the pre-motor lter foam A and B. [18]
4. Wash it in hand warm water [23] and allow it to dry thoroughly before replacing to the
cleaner. [24]
5. Take out the pre-motor HEPA lter and remove the pre-motor lter foam. [19, 20]
6. Wash HEPA lter and lter foam [23] and allow it to dry thoroughly before replacing
to the cleaner. [24]
Cleaning the exhaust lter:
1. To remove the exhaust lter, unclip the exhaust lter cover and remove the exhaust
lter from the exhaust lter cover. [21]
2. Wash the lter in hand warm water [22, 23] and allow it to dry thoroughly before
replacing to the cleaner. [24]
NOTE: Do n
ot use hot water or detergents.
In the unlikely event of the lters becoming
damaged, t a Genuine Hoover replacement. Do not try and use the product without lters
tted.
Removing a Blockage From the System
If the suction of the cleaner decreases:
1. Check if the water tank and bin are full. If so refer to ‘EMPTYING AND CLEANING
THE WATER TANK AND BIN CYCLONE AND BIN’.
2. If the water tank and bin are not full, then;
A. Do the lters need cleaning? If so refer to ‘Cleaning the Filter’.
B. Check if there is any other blockage in the system - Use a rod or a pole to remove
any blockage from Telescopic tube or exible hose.
ACCESSORIES AND NOZZLES
The crevice tool, furniture nozzle and dusting brush can be stored on the tube.
Crevice Tool
* – For corners and hard to reach areas. [X1]
Dusting Brush* – For bookshelves, frames, keyboards and other delicate areas.
[X2]
Furniture Nozzle – For soft furnishings and fabrics. [X3]
Carpet and Floor Nozzle**- For carpet and oors. [P]
Hard Floor Nozzle* – For parquet oors and other delicate oors. [AA]
Pet Hair Remover Mini Turbo Nozzle*– Use the mini turbo nozzle on stairs or for deep
cleaning on textile surfaces and other hard to clean areas.[Y]
Allergen Remover Mini Turbo Nozzle* – Use the mini turbo nozzle on stairs or for deep
cleaning on textile surfaces and other hard to clean areas. [Z]
IMPORTANT: Do not use mini turbo nozzles on rugs with long fringes, animal hides and
carpet pile deeper than 15mm. Do not keep the nozzle stationary while the brush is
rotating.
Page 6

4
INSTRUCTIONS DE SÉCURITÉ D’UTILISATION
Cet appareil ne doit être utilisé que pour un nettoyage
domestique, conformément à ce guide d’utilisation. Veuillez
vous assurer que ces instructions sont parfaitement comprises
avant d’utiliser l’appareil.
Ne laissez pas l’appareil branché. Eteignez et débranchez
toujours l’appareil après l’avoir utilisé, ou avant de le nettoyer
ou de procéder à son entretien.
Cet appareil peut être utilisé par des enfants âgés d’au moins
8 ans et par des personnes ayant des capacités physiques,
sensorielles ou mentales réduites, ou n’ayant pas d’expérience
ou de connaissances en la matière. Ces dernières doivent
recevoir des instructions sur l’utilisation de l’appareil en toute
sécurité et comprendre les risques impliqués. Les enfants ne
doivent pas jouer avec l’appareil. Le nettoyage et l’entretien ne
devraient pas être effectués par des enfants sans supervision.
Si le cordon d’alimentation est endommagé, arrêtez immédiatement
d’utiliser l’appareil. Pour éviter les risques d’accident, un réparateur
Hoover agréé doit remplacer le cordon d’alimentation.
Maintenez les mains, pieds, vêtements lâches et cheveux à
distance des brosses rotatives.
N’utilisez que les accessoires, les consommables et les pièces
de rechange recommandés ou fournis par Hoover.
Electricité statique : certains tapis peuvent entraîner une petite
accumulation d’électricité statique. Les décharges d’électricité
statique ne sont pas dangereuses pour la santé.
N’utilisez pas votre appareil à l’extérieur, sur une surface humide
ou pour un ramassage humide.
N’aspirez pas d’objets durs ou tranchants, d’allumettes, de
cendres chaudes, de mégots de cigarettes ou d’autres objets
similaires.
Ne pulvérisez ou n’aspirez pas des liquides inammables,
des
produits d’entretien liquides, des aérosols ou leurs vapeurs.
Ne marchez pas sur le cordon d’alimentation lorsque vous
utilisez votre appareil et ne débranchez pas la che en tirant sur
le cordon d’alimentation.
Ne continuez pas à utiliser votre appareil s’il semble défectueux.
Service Hoover: Pour assurer l’utilisation sûre et efcace de
cet appareil, nous recommandons de n’en coner l’entretien et
les réparations qu’à un réparateur Hoover agréé.
Ne marchez pas sur le cordon d’alimentation ou ne l’enroulez
pas sur vos bras ou vos jambes quand vous utilisez l’appareil.
N’utilisez pas l’appareil sur des personnes ou des animaux.
Lors du nettoyage des escaliers, ne placez pas l’appareil dans
une position plus haute que la vôtre.
N’aspirez pas de grandes quantités de matériaux poudreux
comme des détergents à lessive, la farine ou des objets
similaires.
N’utilisez pas l’appareil sans eau dans le récipient à eau.
Positionnez toujours l’appareil de manière horizontale pendant
l’utilisation an de garder l’eau à l’intérieur du récipient.
Videz toujours l’eau du récipient à eau lorsque vous terminez
d’utiliser l’appareil.
Ne touchez pas la prise ou l’appareil avec les mains mouillées.
Environnement
Le symbole gurant sur cet appareil indique qu’il ne peut pas être mis au rebut
avec les ordures ménagères. Vous devez le déposer dans un centre de recyclage
des déchets électriques et électroniques. La mise au rebut doit être effectuée
conformément à la réglementation locale en matière de déchets. Pour obtenir des
compléments d’information sur le traitement, la récupération et le recyclage de
cet appareil, veuillez contacter votre municipalité, le service local d’élimination des ordures
ménagères ou le revendeur de l’appareil.
Cet appareil est conforme aux Directives européennes 2006/95/CE, 2004/108/CE et
2011/65/UE.
HOOVER Limited, Pentrebach, Merthyr Tydl, Mid Glamorgan, CF48 4TU, UK
FR
Page 7

5
*Sur certains modèles uniquement
**La conception de la brosse peut varier en fonction du modèle
CONNAITRE VOTRE ASPIRATEUR
FR
A. Corps de l’aspirateur
B. Loquet de couvercle du bac gauche/
droite
C. Tuyau
D. Réservoir d’eau
E. Poignée du bac
F. Bouton de déverrouillage de la cuve
G. Poignée de transport
H. Pédale d’enroulement du cordon
I. Variateur de puissance
J. Pédale de marche/arrêt
K. Poignée de exible
L. Variateur d’aspiration
M. Tube télescopique*
N. Bouton de réglage du
tube télescopique*
O. Porte-outil
P. Brosse pour moquette et sol dur**
Q. Loquet du bac à poussière
R. Loquet de vidage
S1. Mousse A du ltre pré-moteur
S2. Mousse B du ltre pré-moteur
S3. Mousse C du ltre pré-moteur
T. Filtre HEPA pré-moteur
U. Fente de rangement
V. Couvercle du ltre d’évacuation
W1. Filtre d’évacuation A
W2. Filtre d’évacuation B
X1. Suceur plat*
X2. Brosse meuble*
X3. Petit suceur*
Y. Mini turbobrosse pour élimination des
poils d’animaux domestiques*
Z. Mini turbobrosse pour élimination des
allergènes*
AA. Suceur pour sol dur*
MONTAGE DU NETTOYEUR
Sortez tous les composants de l’emballage.
1. Faites glisser le bouton de déverrouillage du bac à poussière vers le bas
et retirez-le de
l’appareil, en tenant la poignée du bac.
[1]
2. Ouvrez le loquet de couvercle du bac gauche/droit et retirez le couvercle de bac de
l’ensemble.
[2]
3. Remplissez le réservoir avec de l’eau ordinaire du robinet entre les niveaux MIN et MAX. Ne
remplissez pas au-delà du niveau MAX.
[3]
4. Remontez le couvercle de bac sur le réservoir d’eau, tout en verrouillant les deux loquets
gauche et droit. [2]
5. Remettez l’ensemble de bac sur le produit tout en vous assurant qu’il est fermément bloqué. [1]
6. Raccordez le exible au corps principal du nettoyeur, en veillant à ce qu’il se xe bien et se
verrouille correctement. [4]
Pour détacher le tuyau : il suft d’appuyer sur les deux loquets
du tuyau et de tirer.
[4]
7. Raccordez la poignée du exible à l’extrémité supérieure du tube en veillant à ce qu’elle se xe
bien et se verrouille correctement.
[5A]
8. Raccordez l’extrémité inférieure du tube à la brosse moquette et sol dur**.
[6A]
9. Fixez le porte-outil sur le tube et les outils [X1, X2, X3]
peuvent être rangés.
[7]
Les outils
peuvent être montés à l’extrémité de la poignée du tuyau ou sur le tube lorsqu’il est
utilisé. [5B, 6B]
UTILISATION DE L’APPAREIL
ASSUREZ-VOUS QUE LE RÉSERVOIR D’EAU EST REMPLI D’EAU JUSQU’AU NIVEAUX
MIN ET MAX AVANT D’UTILISER L’APPAREIL. SI LE RÉSERVOIR EST VIDE, VEUILLEZ
VOUS RÉFÉRER À « MONTAGE DU NETTOYEUR » DE L’ÉTAPE 1 À L’ÉTAPE 5.
1. Sortez le cordon d’alimentation et branchez-le sur la prise d’alimentation. Ne tirez pas le
cordon au-delà du repère rouge. [10]
2. Réglez le tube télescopique* à la hauteur voulue en déplaçant son dispositif de réglage*
à la position de nettoyage la plus confortable. [8]
3. Brosse moquette et sol dur**. Appuyez sur le sélecteur de type de sol de la brosse [9]
pour sélectionner le mode d’aspiration idéal pour le type de sol.
Sol dur – Les brosses sont baissées pour protéger le sol.
Moquette – Les brosses sont relevées pour un nettoyage en grande profondeur.
4. Allumez l’aspirateur en appuyant sur la pédale de marche/arrêt placé sur le corps
principal de l’aspirateur. [11]
5. Réglez le bouton du variateur de puissance pour augmenter ou diminuer la puissance
d’aspiration. [11]
6. Réglez le variateur d’aspiration au niveau désiré.
7. Eteignez l’aspirateur après utilisation en appuyant sur la pédale de marche/arrêt.
Débranchez l’aspirateur et enroulez le cordon d’alimentation dans l’aspirateur en
appuyant sur la pédale d’enroulement du cordon. [12]
REMARQUE: Après chaque utilisation, assurez-vous que le réservoir d’eau est vidé
et nettoyé. Cet appareil n’est destiné qu’à l’aspiration d’objets secs et Ne doit pas être
utilisé pour un ramassage humide ou sur des surfaces humides.
SECTION PARKING ET RANGEMENT
Le tube peut être mis en position « parking » pour rangement ou rangement temporaire
pendant l’utilisation. [13]
ENTRETIEN DE L’ASPIRATEUR
VIDAGE ET NETTOYAGE DU RÉSERVOIR D’EAU, DU CYCLONE DE BAC ET DU BAC
À POUSSIÈRE
1. Éteignez l’appareil en appuyant sur la pédale de marche/arrêt [11] et débranchez le
câble d’alimentation. [10]
2. Faites glisser le bouton de déverrouillage du bac à poussière vers le bas et retirez-le de
l’appareil, en tenant la poignée du bac. [1]
3. Ouvrez les loquets de couvercle du bac gauche et droit et retirez le réservoir d’eau de
l’ensemble de bac. [2]
4. Videz l’eau sale du réservoir d’eau et nettoyez le réservoir d’eau. [14]
5. Tirez le loquet de vidage et videz le bac à poussière. [15]
6. Fermez le volet du bac à poussière.
7. Ouvrez les loquets du bac à poussière et enlevez le couvercle du bac [16], retirez
l’unité cyclonique et nettoyez-la. [17]
8. Remettez l’unité cyclonique sur le couvercle du bac, replacez-la sur l’ensemble de bac et
verrouillez les loquets du bac à poussière. [16]
9. Remontez l’ensemble de couvercle de bac sur le réservoir d’eau, et verrouillez les
loquets gauche et droit du couvercle de bac. [2]
10. Remettez l’ensemble de bac sur l’appareil et veillez à ce qu’il se xe bien et se verrouille
correctement. [1]
Page 8

6
*Sur certains modèles uniquement
**La conception de la brosse peut varier en fonction du modèle
FR
LISTE DE CONTRÔLE UTILISATEUR
En cas de problèmes avec l’appareil, effectuez les vérications de la liste de vérications
avant d’appeler le service après-vente HOOVER local.
• L’aspirateur est-il alimenté en électricité ? Veuillez vérier la prise utilisée avec un
autre appareil électrique.
• Le réservoir d’eau ou le bac sont-ils remplis ? Veuillez vous reporter à « Entretien de
l’aspirateur ».
• Le ltre est-il encrassé ? Si c’est le cas, référez-vous à « Pour nettoyer le ltre ».
• Le tube ou le exible est-il bouché ? Veuillez vous reporter à « Pour éliminer une
obstruction ».
INFORMATIONS IMPORTANTES
Pièces détachées et consommables HOOVER
Remplacez toujours les pièces par des pièces détachées originales de la marque
HOOVER. Celles-ci sont disponibles auprès de votre revendeur HOOVER ou directement
auprès de Hoover. Lors de la commande de pièces, veuillez toujours préciser le numéro
de votre modèle.
Consommables:
• Kit de ltre (pré-moteur et évacuation) : U72 35601577
Pièces détachées :
• Brosse moquette et sol : G150 35601579
• Brosse Caresse pour sol dur : G151 35601580
• Mini turbobrosse pour élimination des poils d’animaux domestiques : J51 35601163
• Tuyau exible complet : D148 35601578
Qualité
Le contrôle qualité des usines Hoover a été effectué par un organisme indépendant. Nos
produits sont fabriqués selon un système de qualité conforme à la norme ISO 9001.
Votre garantie
Les conditions de garantie de cet appareil sont dénies par notre représentant dans le
pays où il est vendu et peuvent être obtenues auprès de votre revendeur. Les détails
concernant ces conditions peuvent être obtenues auprès du revendeur auprès duquel
l’appareil a été acheté. La facture d’achat ou le reçu doivent être présentés pour toutes
réclamations relevant des conditions de cette garantie.
Ces conditions peuvent être modiées sans préavis.
Pour nettoyer le ltre
Pour maintenir votre aspirateur en état de marche optimal, veuillez laver le ltre pré-moteur
HEPA, les ltres en mousse et le ltre d’évacuation après chaque utilisation.
Nettoyage du ltre pré-moteur :
1. Faites glisser le bouton de déverrouillage du bac à poussière vers le bas et retirez-le de
l’appareil, en tenant la poignée du bac. [1]
2. Ouvrez le loquet de couvercle du bac gauche/droit et retirez le réservoir d’eau de
l’ensemble de bac. [2]
3. Retirez les mousses A et B du ltre pré-moteur. [18]
4. Lavez-le à la main à l’eau tiède, [23] et laissez-le sécher complètement avant de le
remettre sur l’aspirateur. [24]
5. Enlevez le ltre HEPA pré-moteur et retirez la mousse du ltre pré-moteur. [19, 20]
6. Lavez le ltre HEPA et la mousse du ltre [23] et laissez-les sécher complètement avant
de les remettre sur l’aspirateur. [24]
Nettoyage du ltre d’évacuation sortie moteur :
1. Pour retirer le ltre d’évacuation, déclipsez le couvercle du ltre d’évacuation et retirez le
ltre d’évacuation de son couvercle. [21]
2. Lavez le ltre à la main à l’eau tiède [22, 23] et laissez-le sécher complètement avant de
le remettre sur l’aspirateur. [24]
REMARQUE : N’ut
ilisez pas d’eau chaude ou de détergents.
Dans le cas peu probable où les
ltres seraient endommagés, remplacez-les par des ltres de la marque Hoover. N’utilisez pas
l’aspirateur quand les ltres ne sont pas montés.
Pour éliminer un blocage dans le système
Si l’aspiration de l’appareil diminue :
1. Vériez si le réservoir d’eau et le bac sont pleins. Si c’est le cas, référez-vous à «
VIDAGE ET NETTOYAGE DU RÉSERVOIR D’EAU, DU CYCLONE DE BAC ET DU
BAC À POUSSIÈRE ».
2. Si le réservoir d’eau et le bac ne sont pas pleins, alors :
A. Les ltres ont-ils besoin d’être nettoyés ? Si c’est le cas, voir « Pour nettoyer le ltre ».
B. Vériez qu’il n’y ait pas de blocage à un autre endroit du système. - Éliminez toute
obstruction dans le tube télescopique ou dans le exible à l’aide d’une tige ou d’un manche.
ACCESSOIRES ET BROSSES
Le suceur plat, la brosse à meubles et la brosse à dépoussiérer peuvent être rangés sur le tube.
Suceur plat* – Pour coins et endroits difciles d’accès. [X1]
Brosse meuble* – Pour étagères, cadres, claviers et autres surfaces délicates. [X2]
Petit suceur – Pour meubles et tissus d’ameublement. [X3]
Brosse pour moquette et sol dur**- Pour les tapis et sols. [P]
Suceur pour sol dur* – Pour parquets et autres sols délicats. [AA]
Mini turbobrosse pour élimination des poils d’animaux domestiques*– Mini turbo
brosse pour escaliers ou nettoyage en profondeur des surfaces textiles et autres surfaces
difciles à aspirer.[Y]
Mini turbobrosse pour élimination des poils d’animaux domestiques, limitant la
prolifération des bactéries* – Mini turbo brosse pour escaliers ou nettoyage en profondeur
des surfaces textiles et autres surfaces difciles à aspirer. [Z]
IMPORTANT : N’utilisez pas les suceurs mini turbo sur les tapis à franges longues, les peaux
d’animaux ou les moquettes à poils de plus de 15 mm de longueur. Ne pas laisser la brosse
tourner sur place.
Page 9

7
ISTRUZIONI PER UN USO SICURO
Questo apparecchio deve essere utilizzato esclusivamente in
ambito domestico per interventi di pulizia, secondo le istruzioni
riportate nel presente documento. Accertarsi di aver compreso
le istruzioni prima di mettere in funzione l’apparecchio.
Non lasciare l’apparecchio collegato alla corrente. Prima di
procedere alla pulizia dell’apparecchiatura o di effettuare
qualsiasi operazione di manutenzione, spegnere sempre
l’apparecchio e scollegare la spina.
Questo elettrodomestico non è destinato a essere utilizzato
da persone dalle ridotte capacità siche, sensoriali o mentali
(bambini inclusi), senza una adeguata assistenza o controllo da
parte di una persona adulta responsabile della loro sicurezza.
Controllare che i bambini non giochino con l’apparecchio. Pulizia
e manutenzione non possono essere eseguite da bambini
senza sorveglianza da parte di una persona responsabile.
Se il cavo di alimentazione è danneggiato, interrompere
immediatamente l’utilizzo dell’apparecchio. Per evitare pericoli,
il cavo di alimentazione dovrà essere sostituito da un tecnico
del servizio assistenza autorizzato Hoover.
Tenere le mani, i piedi, i capi di abbigliamento non attillati e i
capelli lontani dalle spazzole rotanti.
Utilizzare solo accessori o parti di consumo e di ricambio
consigliati o forniti da HOOVER.
Elettricità statica: Alcuni tappeti possono produrre un piccolo
accumulo di elettricità statica. Le cariche di elettricità statica non
sono pericolose per la salute.
Non utilizzare l’apparecchio all’aperto, su superci bagnate o per
aspirare liquidi.
Non aspirare oggetti solidi o appuntiti, ammiferi, ceneri calde,
mozziconi di sigaretta o similari.
Non vaporizzare o aspirare liquidi inammabili, detergenti,
aerosol o i loro vapori.
Non calpestare il cavo di alimentazione durante l’utilizzo
dell’apparecchio o scollegare la spina dalla presa tirando il cavo
di alimentazione.
Non continuare a utilizzare l’apparecchio in caso di presunto
guasto.
Assistenza Hoover: per garantire un funzionamento sempre
sicuro ed efciente dell’apparecchiatura, si consiglia di fare
eseguire eventuali interventi di assistenza o di riparazione dai
tecnici del servizio assistenza autorizzato Hoover.
Non calpestare il cavo di alimentazione o avvolgerlo intorno
alle braccia o alle gambe mentre si usa l’apparecchio.
Non utilizzare l’apparecchio per l’igiene della persona o degli
animali.
Non collocare l’apparecchio in una posizione più bassa
rispetto alla propria quando si puliscono delle scale.
Non aspirare eccessive quantità di sostanze polverose come
detersivo per lavatrici, farina o simili.
Non utilizzare l’apparecchio se non c’è acqua nel serbatoio.
Durante l’utilizzo, tenere sempre l’apparecchio in posizione
orizzontale per mantenere l’acqua all’interno del serbatoio.
Svuotare sempre il serbatoio dell’acqua dopo ogni utilizzo.
Non maneggiare la spina o l’apparecchio con le mani bagnate.
Ambiente:
Il simbolo apposto sul prodotto indica che lo stesso non può essere smaltito
come i normali riuti domestici, bensì deve essere portato al punto di raccolta o al
centro di riciclaggio delle apparecchiature elettriche ed elettroniche più vicino. Lo
smaltimento deve essere eseguito in conformità alle normative locali vigenti per
la salvaguardia dell’ambiente e lo smaltimento dei riuti. Per ulteriori informazioni
sul trattamento, il recupero e il riciclaggio di questo prodotto, contattare l’unità territoriale
competente per il servizio di smaltimento o il negozio in cui il prodotto è stato acquistato.
Questo prodotto è conforme alle Direttive Europee 2006/95/EC, 2004/108/EC e
2011/65/EC.
HOOVER Limited, Pentrebach, Merthyr Tydl, Mid Glamorgan, CF48 4TU, UK
IT
Page 10

8
*Solo su alcuni modelli
**Il design delle spazzole può variare secondo il modello
DESCRIZIONE DELL’APPARECCHIO
IT
A. Corpo principale dell’apparecchio
B. Levette Sinistra/Destra del coperchio
contenitore
C. Tubo essibile
D. Serbatoio acqua
E. Maniglia contenitore
F. Pulsante di sblocco del contenitore
G. Maniglia per il trasporto
H. Pedale di riavvolgimento del cavo
I. Manopola controllo potenza variabile
J. Pulsante a pedale Accensione/
Spegnimento
K. Impugnatura tubo
L. Regolatore forza aspirante
M. Tubo telescopico*
N. Dispositivo di controllo del tubo
telescopico*
O. Porta-accessori
P. Spazzola per tappeti e pavimenti**
Q. Levetta sblocco contenitore
raccoglipolvere
R. Levetta svuotamento
S1. Spugna A del Filtro Pre-Motore
S2. Spugna B del Filtro Pre-Motore
S3. Spugna C del Filtro Pre-Motore
T. Filtro pre-motore HEPA
U. Stazionamento
V. Coperchio del ltro in uscita
W1. Filtro in uscita A
W2. Filtro in uscita B
X1. Bocchetta per fessure*
X2. Spazzola a pennello*
X3. Bocchetta tutti gli usi*
Y. Mini turbospazzola per rimuovere i peli
di animali domestici*
Z. Mini turbospazzola per rimuovere gli
allergeni*
AA. Spazzola per pavimenti duri*
MONTAGGIO DELL’APPARECCHIO
Disimballare tutti i componenti.
1. Premere il pulsante di sblocco contenitore e rimuovere il gruppo contenitore
dall’apparecchio afferrando la maniglia del contenitore stesso. [1]
2. Sboccare le levette sinistra/destra del coperchio contenitore per estrarlo dal gruppo
contenitore. [2]
3. Riempire il serbatoio dell’acqua tra il livello minimo e massimo con acqua corrente. Non
riempire oltre il livello massimo. [3]
4. Rimettere il coperchio contenitore sul serbatoio dell’acqua e bloccare entrambe le
levette a sinistra e a destra. [2]
5. Reinserire il gruppo serbatoio nell’apparecchio assicurandosi che sia correttamente
bloccato. [1]
6. Collegare il tubo essibile al corpo principale dell’apparecchio, assicurandosi che si
agganci e si blocchi in posizione. [4] Per disinserire il tubo, è sufciente premere le due
levette all’estremità del tubo essibile e tirare. [4]
7. Collegare l’impugnatura del tubo essibile all’estremità superiore del tubo assicurandosi
che si agganci e si blocchi in posizione. [5A]
8. Collegare la spazzola** per tappeti e pavimenti all’estremità inferiore del tubo. [6A]
9. Agganciare il porta-accessori al tubo per inserirvi gli accessori [X1, X2, X3]. [7] Tutti gli
accessori possono essere inseriti all’estremità dell’impugnatura del tubo essibile o nel
tubo quando utilizzato. [5B, 6B]
UTILIZZO DELL’APPARECCHIO
PRIMA DELL’UTILIZZO DELL’APPARECCHIO, ASSICURARSI CHE IL SERBATOIO
DELL’ACQUA SIA PIENO TRA IL LIVELLO MINIMO E MASSIMO. SE IL SERBATOIO
DELL’ACQUA È VUOTO, VEDERE IL PARAGRAFO “MONTAGGIO DELL’APPARECCHIO”
DALLA FASE 1 ALLA 5.
1. Estrarre il cavo di alimentazione e inserirlo in una presa di corrente. Non tirare il cavo
oltre il segno rosso. [10]
2. Regolare il tubo telescopico* all’altezza desiderata muovendo il dispositivo di controllo* del
tubo stesso no a trovare la posizione ottimale per la pulizia. [8]
3. Spazzola per tappeti e pavimenti**. Premere il selettore tipo pavimento sulla spazzola
[9] per selezionare la modalità di pulizia ideale per il tipo di supercie da pulire.
Pavimento – Le setole si abbassano per proteggere il pavimento.
Tappeto/moquette – Le setole si sollevano per garantire una pulizia più in profondità.
4. Accendere l’apparecchio premendo il pulsante a pedale di accensione/spegnimento sul
corpo principale dell’aspirapolvere. [11]
5. Far scorrere il dispositivo di controllo di potenza variabile per aumentare o diminuire il
livello di aspirazione. [11]
6. Regolare il regolatore di forza apirante sul livello desiderato.
7. Dopo l’uso, spegnere l’apparecchio premendo il pulsante a pedale di accensione/
spegnimento. Staccare la spina e premere il pedale di riavvolgimento del cavo per
riavvolgere il cavo di alimentazione nell’aspirapolvere. [12]
NOTA: Dopo ogni utilizzo, assicurarsi che il serbatoio dell’acqua sia vuoto e pulito.
L’apparecchio è adatto esclusivamente per l’aspirazione a secco e NON DEVE essere
utilizzato per aspirare liquidi o su superci bagnate.
STAZIONAMENTO E PARCHEGGIO
Il tubo può essere parcheggiato sul retro dell’apparecchio per essere riposto o per uno
stazionamento temporaneo durante l’uso. [13]
MANUTENZIONE DELL’APPARECCHIO
SVUOTAMENTO E PULIZIA DEL SERBATOIO ACQUA, DEL CONTENITORE CICLONICO
E DEL CONTENITORE RACCOGLIPOLVERE
1. Spegnere l’apparecchio premendo il pulsante a pedale di accensione/spegnimento [11] e
scollegare il cavo di alimentazione. [10]
2. Premere il pulsante di sblocco contenitore e rimuovere il gruppo contenitore
dall’apparecchio afferrando la maniglia del contenitore stesso. [1]
3. Sboccare le levette a sinistra e a destra del coperchio contenitore ed estrarre il
serbatoio acqua dal gruppo contenitore.
[2]
4. Svuotare l’acqua sporca dal serbatoio acqua e pulirlo.
[14]
5. Tirare la levetta svuotamento e svuotare il contenitore raccoglipolvere.
[15]
6. Chiudere lo sportello del contenitore raccoglipolvere.
7. Sboccare le levette del contenitore raccoglipolvere e togliere il coperchio contenitore
[16], estrarre l’unità ciclonica e pulirla. [17]
8. Rimontare l’unità ciclonica con il coperchio contenitore, rimontare il gruppo contenitore
a bloccare le levette del contenitore raccoglipolvere. [16]
9. Rimontare il gruppo coperchio contenitore con il serbatoio acqua e boccare le levette a
sinistra e a destra del coperchio contenitore. [2]
10. Rimontare il gruppo contenitore all’apparecchio assicurandosi che si agganci e si
blocchi in posizione. [1]
Page 11

9
*Solo su alcuni modelli
**Il design delle spazzole può variare secondo il modello
IT
CHECKLIST UTENTE
In caso di problemi con l’apparecchio, completare questa semplice checklist utente prima
di chiamare il Centro per l’Assistenza Clienti HOOVER:
• La presa elettrica a cui è collegato l’apparecchio è funzionante? Controllare collegando
un altro elettrodomestico.
• Il serbatoio acqua o il contenitore sono pieni? Vedere “Manutenzione dell’apparecchio”.
• Il ltro è ostruito? Vedere la sezione “Pulizia del ltro”.
• Il tubo essibile o la bocchetta sono ostruiti? Vedere “Rimozione di un’ostruzione dal
sistema”.
INFORMAZIONI IMPORTANTI
Parti di ricambio e materiali di consumo HOOVER
Utilizzare sempre parti di ricambio originali HOOVER, che è possibile acquistare dal
distributore locale HOOVER o direttamente dalla Hoover. Quando si ordinano delle parti
di ricambio, ricordarsi sempre di fornire il numero di modello dell’apparecchio utilizzato.
Materiali di consumo:
• Kit ltro (pre-motore e ltro in uscita): U72 35601577
Pezzi di ricambio:
• Spazzola tappeti e pavimenti: G150 35601579
• Spazzola caresse per pavimenti duri G151 35601580
• Mini turbospazzola per rimuovere i peli di animali domestici: J51 35601163
• Tubo essibile completo: D148 35601578
Qualità
Il controllo qualità Hoover è stato effettuato da enti indipendenti. I nostri prodotti vengono
realizzati mediante un sistema di qualità che soddisfa i requisiti ISO 9001.
Regolamento per la garanzia
Le condizioni di garanzia relative a questo apparecchio sono denite dal rappresentate
Hoover nel Paese di vendita. Per conoscere in dettaglio le condizioni, rivolgersi al
distributore Hoover presso il quale l’apparecchio è stato acquistato. Per ogni contestazione
ai sensi dei termini della garanzia, è necessario mostrare la fattura o un documento di
acquisto equipollente.
Queste condizioni potrebbero venire modicate senza obbligo di preavviso.
Pulizia del ltro
Per mantenere sempre ottime prestazioni dell’apparecchio, lavare il ltro pre-motore HEPA,
i ltri in spugna e il ltro in uscita dopo ogni utilizzo.
Pulitura del ltro pre-motore:
1. Premere il pulsante di sblocco contenitore e rimuovere il gruppo contenitore
dall’apparecchio afferrando la maniglia del contenitore stesso. [1]
2. Sboccare le levette a sinistra e a destra del coperchio contenitore ed estrarre il serbatoio
acqua dal gruppo contenitore. [2]
3. Rimuovere le spugne A e B del ltro pre-motore [18]
4. Lavarlo in acqua tiepida [23] e lasciare che si asciughi completamente prima di
reinserirlo nell’apparecchio. [24]
5. Estrarre il ltro pre-motore HEPA e rimuovere la spugna del ltro pre-motore. [19, 20]
6. Lavare il ltro HEPA e la spugna del ltro [23] e lasciare che si asciughino completamente
prima di reinserirli nell’apparecchio. [24]
Pulitura del ltro in uscita:
1.
Per rimuovere il ltro in uscita, sbloccarlo dal suo coperchio ed estrarlo da quest’ultimo. [21]
2. Lavare il ltro in acqua tiepida [22, 23] e lasciare che si asciughi completamente prima
di reinserirlo nell’apparecchio. [24]
NOTA: Non utilizzare acqua bollente o detergenti. Se i ltri vengono danneggiati, sostituirli
con ricambi originali Hoover. Non provare ad utilizzare l’apparecchio senza aver montato i ltri.
Rimozione di un’ostruzione dal sistema
Se l’aspirazione dell’apparecchio dovesse diminuire:
1. Controllare se il serbatoio dell’acqua e il contenitore sono pieni. Nel caso, vedere la
sezione “SVUOTAMENTO E PULIZIA DEL SERBATOIO ACQUA, DEL CONTENITORE
CICLONICO E DEL CONTENITORE RACCOGLIPOLVERE”.
2. Se il serbatoio dell’acqua e il contenitore non sono pieni:
A. Potrebbe essere necessario pulire i ltri. In questo caso, vedere la sezione “Pulizia
del ltro”.
B. Controllare che non vi siano altre ostruzioni nel sistema. - Utilizzare un’asticella o un
bastoncino per rimuovere eventuali ostruzioni dal tubo telescopico o dal tubo essibile.
ACCESSORI E SPAZZOLE
La bocchetta per fessure, la bocchetta tutti gli usi e la spazzola a pennello possono essere
riposte sul tubo.
Bocchetta per fessure* – Per angoli e punti difcili da raggiungere. [X1]
Spazzola a pennello* – Per librerie, cornici, tastiere e altre superci delicate. [X2]
Bocchetta tutti gli usi – Per imbottiti e tessuti. [X3]
Spazzola per tappeti e pavimenti**- Per tappeti e pavimenti. [P]
Spazzola per pavimenti duri* – Per parquet e pavimenti delicati. [AA]
Mini turbospazzola per rimuovere i peli di animali domestici*– utilizzare la mini
turbospazzola per la pulizia profonda di superci tessili e imbottiti e per altre aree difcili.[Y]
Mini turbospazzola per rimuovere gli allergeni* – utilizzare la mini turbospazzola per la
pulizia profonda di superci tessili e imbottiti e per altre aree difcili. [Z]
IMPORTANTE: Non utilizzare le mini turbo spazzole su tappeti a frange, pellicce o moquette
con pelo di oltre 15 mm. Non tenere ferma la spazzola sul tappeto con il rullo in rotazione.
Page 12

10
INSTRUÇÕES PARA UMA UTILIZAÇÃO SEGURA
Este aparelho só deve ser utilizado para limpeza doméstica,
conforme descrito neste guia do utilizador. Certique-se de
que este manual é totalmente compreendido antes de utilizar
o aparelho.
Não deixe o aparelho ligado. Desligue sempre o aparelho
e retire a cha da tomada após a utilização ou antes de o
limpar ou executar qualquer tarefa de manutenção.
Este aparelho pode ser utilizado por crianças com idade
igual ou superior a 8 anos e por pessoas com capacidades
mentais, sensoriais e físicas reduzidas ou sem experiência
e conhecimento caso lhes sejam fornecidas instruções e
supervisão relativas à utilização do aparelho de modo seguro
e caso compreendam os perigos envolvidos. As crianças não
devem brincar com o aparelho. A limpeza e a manutenção
não devem ser efectuada por crianças sem supervisão.
Se o cabo de alimentação estiver danicado deixe de utilizar
o aparelho imediatamente. Para evitar um risco de segurança,
o cabo de alimentação deve ser substituído por um técnico de
assistência autorizado da Hoover.
Mantenha as mãos, os pés, as roupas largas e o cabelo longe das
escovas rotativas.
Utilize apenas acessórios, consumíveis ou peças
sobressalentes recomendadas ou fornecidas pela Hoover.
Electricidade estática: Algumas alcatifas podem provocar uma
pequena acumulação de electricidade estática. A descarga
de electricidade estática não constitui qualquer perigo para a
saúde.
Não utilize o aparelho no exterior, em superfícies húmidas ou
para aspirar líquidos.
Não aspire objectos duros ou aados, fósforos, cinzas
quentes, pontas de cigarro ou outros itens semelhantes.
Não pulverize nem aspire líquidos inamáveis, líquidos de
limpeza, aerossóis ou respectivos vapores.
Não passe por cima do cabo de alimentação ao utilizar
o a
spirador nem retire a cha puxando pelo cabo de
alimentação.
Não continue a utilizar o aparelho se este parecer defeituoso.
Assistência da Hoover: Para assegurar o funcionamento
seguro e eciente deste aparelho, recomendamos que
todas as intervenções de assistência ou reparação sejam
efectuadas apenas por um técnico de assistência autorizado
da Hoover.
Não permaneça em cima do cabo de alimentação nem o
enrole à volta das pernas ou braços ao utilizar o aparelho.
Não utilize o aparelho para limpar pessoas ou animais.
Não posicione o aparelho num nível superior aquele em
que se encontra ao limpar escadas.
Não recolha grandes quantidades de materiais em pó, tais
como detergente da roupa, farinha ou semelhante.
Não opere sem água no recipiente de água.
Coloque sempre o aparelho na horizontal durante a
utilização para manter a água dentro do recipiente.
Esvazie sempre o recipiente quando terminar de utilizar o
aparelho.
Não toque na cha nem no aparelho com as mãos molhadas.
Ambiente
O símbolo no aparelho indica que este não pode ser tratado como resíduo
doméstico. Pelo contrário, deve ser encaminhado para o ponto de recolha
aplicável para reciclagem de equipamento eléctrico e electrónico. A eliminação
deve ser realizada em conformidade com as leis ambientais locais relativas
à eliminação de resíduos. Para obter informações mais detalhadas sobre o
tratamento, recuperação e reciclagem deste produto, contacte as autoridades
locais, o serviço de eliminação de resíduos domésticos ou a loja onde adquiriu o produto.
Este aparelho encontra-se em conformidade com as Directivas Europeias
2006/95/CE, 2004/108/CE e 2011/65/UE.
HOOVER Limited, Pentrebach, Merthyr Tydl, Mid Glamorgan, CF48 4TU, UK
PT
Page 13

11
*Apenas em alguns modelos
**O design do bocal pode variar de acordo com os modelos
APRESENTAÇÃO DO ASPIRADOR
PT
A. Aspirador
B. Patilha esquerda/direita da tampa do
contentor
C. Tubo exível
D. Depósito de água
E. Manípulo do contentor
F. Botão de Libertação do Contentor
G. Manípulo
H. Pedal de recolha do cabo
I. Botão de Controlo de Potência
J. Pedal Ligar/Desligar
K. Pega do tubo exível
L. Regulador de Sucção
M. Tubo Telescópico*
N. Adaptador do tubo telescópico*
O. Suporte de ferramentas
P. Escova para Pisos e Alcatifas**
Q. Patilha do depósito de pó
R. Patilha de esvaziamento
S1. Filtro de espuma A do pré-motor
S2. Filtro de espuma B do pré-motor
S3. Filtro de espuma C do pré-motor
T. Filtro HEPA do pré-motor
U. Ranhura de Arrumação
V. Tampa do Filtro de Exaustão
W1. Filtro de exaustão A
W2. Filtro de exaustão B
X1. Acessório para fendas*
X2. Escova para pó*
X3. Escova para móveis*
Y. Escova para remover pêlos de
animais*
Z. Mini escova turbo para remoção de
alergéneos*
AA. Escova para pavimentos duros*
MONTAGEM DO ASPIRADOR
Retire todos os componentes da embalagem.
1. Prima o botão de libertação do contentor e remova o conjunto do contentor do aspirador,
segurando no manípulo do contentor. [1]
2. Abra a patilha esquerda/direita da tampa do contentor e remova a tampa do contentor
do conjunto do contentor. [2]
3. Encha o depósito de água com água da torneira entre MIN e MAX. Não encha após o nível
MAX. [3]
4. Volte a colocar a tampa do contentor no depósito de água, bloqueando as patilhas da
esquerda e direita. [2]
5. Volte a colocar o conjunto do contentor no produto, garantindo que está bem encaixado. [1]
6. Ligue o tubo exível ao corpo principal do aspirador, certicando-se de que encaixa e
xa. [4] Para retirar a mangueira:basta premir as duas patilhas na extremidade do tubo
exível e puxar. [4]
7. Ligue o manípulo do tubo exível à extremidade superior do tubo, certicando-se de que
encaixa e xa. [5A]
8. Ligue a extremidade inferior do tubo à escova para pavimentos e alcatifas**. [6A]
9. Encaixe o suporte de ferramentas no tubo e pode armazenar as ferramentas [X1, X2,
X3]. [7] As ferramentas podem ser encaixadas na extremidade do manípulo do tubo
exível e tubo quando utilizadas. [5B, 6B]
UTILIZAR O SEU ASPIRADOR
CERTIFIQUE-SE DE QUE O DEPÓSITO DE ÁGUA ESTÁ CHEIO COM ÁGUA ENTRE
OS NÍVEIS MIN E MAX ANTES DE UTILIZAR O ASPIRADOR. SE O DEPÓSITO DE
ÁGUA ESTIVER VAZIO, CONSULTE “MONTAR O ASPIRADOR” DO PASSO 1 A 5.
1. Extraia o cabo de alimentação e ligue-o na fonte de alimentação. Não puxe o o além
da marca vermelha. [10]
2. Ajuste o tubo telescópico* à altura pretendida movendo o ajustador do tubo telescópico*
até à posição de limpeza mais confortável. [8]
3. Escova para pavimentos e alcatifas**. Prima o selector do tipo de pavimento na escova
[9] para seleccionar o modo de limpeza ideal para o tipo de pavimento.
Pavimentos duros – Baixar as escovas para proteger o soalho.
Alcatifas – Levantar as escovas para uma limpeza em profundidade.
4. Ligue o aspirador premindo o pedal ligar/desligar no corpo principal do aspirador. [11]
5. Ajuste o botão de controlo da energia variável para aumentar ou diminuir a potência. [11]
6. Ajuste o regulador de sucção para o nível pretendido.
7. Desligue no nal da utilização pressionando o pedal ligar/desligar. Desligue e prima o
pedal de recolha do cabo para enrolar o cabo de alimentação no aspirador. [12]
NOTA: Após cada utilização, certique-se de que o depósito de água é esvaziado e
limpo. Este produto destina-se apenas à aspiração a seco e NÃO DEVE ser utilizado
para recolha de líquidos ou limpeza de superfícies molhadas.
SECÇÃO DE DESCANSO E ARRUMAÇÃO
O tubo pode ser xado na parte de trás do aspirador para armazenamento ou armazenamento
temporário durante a utilização. [13]
MANUTENÇÃO DO ASPIRADOR
ESVAZIAR E LIMPAR O DEPÓSITO DE ÁGUA, CICLONE DO CONTENTOR E
DEPÓSITO DE PÓ
1. Desligue o aspirador premindo o pedal ligar/desligar [11] e desconecte o cabo de
alimentação. [10]
2. Prima o botão de libertação do contentor e remova o conjunto do contentor do aspirador,
segurando no manípulo do contentor. [1]
3. Abra as patilhas esquerda e direita da tampa do contentor e remova o depósito de água
do conjunto do contentor. [2]
4. Esvazie a água suja do depósito de água e limpe o mesmo. [14]
5. Puxe a patilha de esvaziamento e esvazie o depósito de pó. [15]
6. Feche a aba do contentor do depósito de pó.
7. Abra as patilhas do depósito de pó e remova a tampa do contentor [16], remova a
unidade ciclónica e limpe-a. [17]
8. Volte a colocar a unidade ciclónica na tampa do contentor, volte a montar o conjunto do
contentor e bloqueie as patilhas do depósito de pó. [16]
9. Volte a colocar o conjunto da tampa do contentor no depósito de água e bloqueie as
patilhas esquerda e direita da tampa do contentor. [2]
10. Volte a colocar o conjunto do contentor no aspirador, certicando-se de que encaixa e
xa. [1]
Page 14

12
*Apenas em alguns modelos
**O design do bocal pode variar de acordo com os modelos
PT
LISTA DE VERIFICAÇÃO DO UTILIZADOR
Se tiver algum problema com o aparelho, preencha esta simples lista de vericação do
utilizador antes de chamar o serviço de assistência Hoover local.
• O aspirador tem alimentação de corrente? Verique com outro aparelho eléctrico.
• O depósito de água ou o contentor está cheio? Consulte “Manutenção do Aspirador”.
• O Filtro está sujo? Consulte “Limpeza do ltro”.
• O tubo exível ou o bocal estão entupidos? Consulte “Remover uma obstrução do
sistema”.
INFORMAÇÕES IMPORTANTES
Peças sobressalentes e consumíveis HOOVER
Substitua sempre as peças por peças sobressalentes HOOVER genuínas. Pode obtê-
las junto do seu representante local ou directamente da HOOVER. Quando encomendar
peças, mencione sempre o número do seu modelo.
Consumíveis:
• Kit do ltro (pré-motor e exaustão): U72 35601577
Peças sobressalentes:
• Escova para pavimentos e alcatifas: G150 35601579
• Escova Caress para pavimento duro: G151 35601580
• Mini escova turbo para remover pêlos de animais: J51 35601163
• Tubo exível completo: D148 35601578
Qualidade
As fábricas da HOOVER foram independentemente avaliadas em termos de qualidade.
Os nossos produtos são fabricados de acordo com um sistema de qualidade que satisfaz
os requisitos da norma ISO 9001
Garantia
As condições de garantia para este aparelho são as denidas pelo nosso representante
no país onde foi vendido. Pode obter detalhes sobre estas condições junto do agente a
quem adquiriu o aparelho. A factura de venda ou o recibo deverão ser entregues quando
apresentar uma reclamação ao abrigo dos termos da garantia.
Sujeito a alteração sem aviso prévio.
Limpeza do ltro
Para manter o desempenho ideal do seu aspirador, lave o ltro HEPA do pré-motor, ltros
de espuma e o ltro de exaustão após cada utilização.
Limpeza o ltro pré-motor:
1. Prima o botão de libertação do contentor e remova o conjunto do contentor do aspirador,
segurando no manípulo do contentor. [1]
2. Abra a patilha esquerda/direita da tampa do contentor e remova o depósito de água do
conjunto do contentor. [2]
3. Remova os ltros de espuma A e B do pré-motor. [18]
4. Lave-os à mão em água morna [23] e deixe-os secar por completo antes de os voltar a
colocar no aspirador. [24]
5. Retire o ltro HEPA e o ltro de espuma do pré-motor. [19, 20]
6. Lave o ltro HEPA e o ltro de espuma [23] deixe-os secar por completo antes de os
voltar a colocar no aspirador. [24]
Limpeza o ltro de exaustão:
1. Para remover o ltro de exaustão, solte a tampa do ltro de exaustão e remova o ltro
de exaustão da tampa do mesmo. [21]
2. Lave o ltro à mão em água morna [22, 23] e deixe-o secar por completo antes de o
voltar a colocar no aspirador. [24]
NOTA: Não utilize água quente nem detergentes. Na eventualidade de os ltros carem
danicados, substitua-os apenas por peças originais Hoover. Não tente nem utilize o
produto sem os ltros instalados.
Remoção de uma obstrução do sistema
Se a sucção do aspirador diminuir:
1. Verique se o depósito de água e o contentor estão cheios. Em caso armativo, consulte
“Esvaziar e limpar o depósito de água, ciclone do contentor e contentor”.
2. Se o depósito de água e contentor não estiverem cheios, então:
A. Os ltros necessitam de limpeza? Em caso armativo, consulte “Limpeza do ltro”.
B. Caso esteja, consulte a secção “Esvaziar o depósito de pó”. - Utilize uma vareta ou
pau para remover qualquer obstrução do tubo telescópico ou do tubo exível.
ACESSÓRIOS E ESCOVAS
O acessório para fendas, escova para móveis e a escova para pó podem ser armazenados
no tubo.
Acessório para fendas* – Para cantos e áreas difíceis de alcançar. [X1]
Escova para pó* – Para estantes de livros, molduras, teclados e outras áreas delicadas. [X2]
Escova para móveis – Para sofás e tecidos. [X3]
Escova para Pisos e Alcatifas**- Para alcatifas e pisos. [P]
Escova para pavimentos duros* – Para pavimentos de parquet e outros pavimentos
delicados. [AA]
Escova para remover pêlos de animais*– Utilize a mini escova turbo em escadas ou para
uma limpeza em profundidade de tecidos e outras áreas mais difíceis.[Y]
Mini escova turbo para remoção de alergéneos* – Utilize a mini escova turbo em
escadas ou para uma limpeza em profundidade de tecidos e outras áreas mais difíceis. [Z]
IMPORTANTE: Não utilize mini escovas turbo em tapetes com franjas, animais e alcatifas
com um pêlo com mais de 15 mm de altura. Não mantenha a escova parado enquanto está
em rotação.
Page 15

13
INSTRUCCIONES PARA UN USO SEGURO
Este aparato sólo debe utilizarse para la limpieza doméstica
habitual, como se describe en esta guía de usuario. Asegúrese
de haber comprendido todo el contenido de este manual antes
de poner en funcionamiento el aparato.
No deje enchufado el aparato. Apague y desenchufe siempre
el aparato antes de limpiarlo o de realizar cualquier labor de
mantenimiento.
Este aparato puede ser usado por niños de 8 años en adelante
y personas con capacidades físicas, sensoriales o mentales
reducidas o falta de experiencia y conocimiento bajo supervisión
y con una explicación de las instrucciones con respecto al uso
del aparato de manera segura y que comprendan los riesgos
implicados. Los niños no deben jugar con el aparato. Los niños
no deben limpiar ni dar mantenimiento sin supervisión.
Si el cable de alimentación está dañado, deje de utilizar el
aparato inmediatamente. Para evitar riesgos de seguridad,
el cable de alimentación sólo puede ser cambiado por un
especialista del servicio técnico de Hoover.
Mantener lejos de los cepillos rotatorios pies, manos, ropa
suelta y cabellos.
Utilice únicamente accesorios, consumibles o repuestos
recomendados o distribuidos por Hoover.
Electricidad estática: Algunas alfombras pueden provocar una
pequeña acumulación de electricidad estática. Las descargas
estáticas no son peligrosas para la salud.
No utilice el aparato al aire libre, en supercies húmedas o
para recoger líquidos.
No aspire objetos duros o alados, cerillas, ceniza candente,
colillas de cigarrillo u objetos similares.
No rocíe ni aspire líquidos inamables, aerosoles para limpiar
o sus vapores.
No pase por encima del cable de alimentación cuando utili
ce el
aparato ni lo desenchufe tirando del cable.
No siga utilizando su aparato si parece tener algún defecto.
Servicio Técnico de Hoover: Para garantizar el funcionamiento
seguro, ecaz y duradero del aspirador, recomendamos que
las tareas de mantenimiento sean realizadas exclusivamente
por técnicos autorizados del servicio Técnico de Hoover.
No pise el cable ni lo enrolle en los brazos ni en las piernas al
utilizar el aparato.
No utilice el aparato en personas ni animales.
No sitúe el aparato por encima de usted cuando esté limpiando
las escaleras.
No recoja grandes cantidades de material en polvo como
detergente para lavadoras, harina o productos similares.
No utilice el aparato sin agua en el interior del depósito de agua.
Coloque siempre el aparato en posición horizontal durante el
uso para mantener el agua en el interior del contenedor.
Vacíe siempre el contenedor del agua cuando haya terminado
de utilizar el electrodoméstico.
No toque el enchufe o el electrodoméstico con las manos
mojadas.
El Medio Ambiente:
El símbolo que puede verse en el producto indica que éste no puede tratarse
como residuo doméstico. En su lugar, se debe entregar en un punto de recogida
de electrodomésticos para el reciclaje de equipos eléctricos y electrónicos.
La eliminación debe llevarse a cabo según los reglamentos medioambientales
locales sobre eliminación de residuos. Para información más detallada sobre el
tratamiento, la recuperación y el reciclaje de este aparato, póngase en contacto con
su Ayuntamiento, su servicio de recogida de residuos domésticos o con el establecimiento
donde haya comprado el producto.
Esta aparato cumple con las Directivas europeas 2006/95/EC, 2004/108/EC y
2011/65/EU.
HOOVER Limited, Pentrebach, Merthyr Tydl, Mid Glamorgan, CF48 4TU, UK
ES
Page 16

14
*Sólo para algunos modelos
**El diseño de la tobera puede variar según el modelo
INFORMACIÓN SOBRE EL ASPIRADOR
ES
A. Estructura central del aspirador
B. Pestaña izquierda/derecha de la tapa
del contenedor
C. Manguera
D. Depósito de agua
E. Asa del contenedor
F. Botón de desbloqueo del contenedor
G. Asa de transporte
H. Pedal recogecable
I. Mando de Control de
Potencia Variable
J. Pedal de encendido/apagado
K. Empuñadura del tubo
L. Regulador de succión
M. Tubo telescópico*
N. Regulador del tubo telescópico*
O. Accesorio Portaherramientas
P. Cepillo para alfombras y suelos**
Q. Pestaña del contenedor del polvo
R. Pestaña de vaciado
S1. Filtro pre-motor de espuma A
S2. Filtro pre-motor de espuma B
S3. Filtro pre-motor de espuma C
T. Filtro pre-motor HEPA
U. Slot Parking
V. Tapa del ltro de salida
W1. Filtro de salida A
W2. Filtro de salida B
X1. Accesorio rincones*
X2. Cepillo para polvo*
X3. Cepillo para limpieza de muebles*
Y. Mini Tobera Tubo Eliminación Pelo de
Mascotas*
Z. Tobera Mini Turbo elimina alérgenos*
AA. Tobera para suelo duro*
MONTAJE DEL ASPIRADOR
Saque todas las piezas del embalaje.
1. Presione el botón de desbloqueo del contenedor y extraiga el contenedor de
l aspirador,
sosteniendo el asa del contenedor.
[1]
2. Abra la pestaña izquierda y la pestaña derecha de la tapa del contenedor y extraiga dicha
tapa del conjunto del contenedor.
[2]
3. Llene el depósito de agua con agua corriente de grifo entre el nivel MIN. y MAX. No
sobrepase el nivel MÁX de llenado.
[3]
4. Vuelva a montar la tapa del contenedor en el depósito de agua bloqueando la pestaña
derecha y la pestaña izquierda. [2]
5. Vuelva a colocar el conjunto del contenedor en el electrodoméstico asegurándose de que
esté bloqueado rmemente. [1]
6. Conecte la empuñadura del tubo en el cuerpo principal del aspirador, asegúrese de que
encaje en su lugar. [4]
Para liberar la manguera: simplemente presionar las dos pestañas
en el extremo de la manguera y tirar.
[4]
7. Conecte el mango de la manguera en el extremo superior del tubo asegurándose de que encaje
en su lugar.
[5A]
8. Conecte el extremo inferior del tubo en la tobera** para alfombras y suelos.
[6A]
9. Enganche el accesorio portaherramientas en el tubo y puede gua
rdar las herramientas
[X1, X2, X3].Cuando se utilicen las herramientas
[7]
, pueden colocarse en el extremo
del mango de la manguera y el tubo. [5B, 6B]
USO DEL ASPIRADOR
ANTES DE UTILIZAR EL ASPIRADOR, ASEGÚRESE DE QUE EL DEPÓSITO DEL
AGUA ESTÉ LLENO DE AGUA ENTRE EL NIVEL MÍNIMO Y MÁXIMO. SI EL DEPÓSITO
DEL AGUA ESTÁ VACÍO, VÉASE EL “APARTADO MONTAJE DEL ASPIRADOR” DEL
PASO 1 AL PASO 5.
1. Extraiga el cable de alimentación y enchúfelo a la toma de corriente. No tire el cable
más allá de la marca roja. [10]
2. Ajuste el tubo telescópico* a la altura deseada desplazando el regulador*del tubo
telescópico a la posición de limpieza más cómoda. [8]
3. Tobera para alfombras y suelos**. Pulse el selector de tipo de suelo en la tobera [9]
para seleccionar el modo de limpieza ideal para el tipo de suelo.
Suelos duros – Los cepillos bajan para proteger el suelo.
Alfombra – Los cepillos se elevan para una limpieza a fondo.
4. Encienda el aspirador pulsando el pedal de encendido/apagado en el cuerpo principal
del aspirador. [11]
5. Regule el mando de control de potencia variable para aumentar o reducir la potencia. [11]
6. Denir el regulador de aspiración al nivel deseado.
7. Apague el aparato tras su uso pulsando el pedal de encendido/apagado. Desenchufe y
accione el pedal para enrollar el cable de alimentación en el aspirador. [12]
NOTA: Después de cada uso, asegúrese de que el depósito del agua esté vacío y
limpio. Este electrodoméstico debe utilizarse únicamente para aspirar elementos
secos y NO SE PUEDE utilizar para recoger líquidos o aspirar supercies mojadas.
SECCIÓN DE ESTACIONAMIENTO Y ALMACENAMIENTO
El tubo puede colocarse en la parte posterior del aspirador para guardarlo o apoyarlo
temporalmente durante el uso. [13]
MANTENIMIENTO DEL ASPIRADOR
VACIADO Y LIMPIEZA DEL DEPÓSITO DEL AGUA, CONTENEDOR DEL CICLÓN Y
CONTENEDOR DEL POLVO
1. Apague el aspirador presionando el pedal de encendido/apagado [11] y desenchufe el
cable de alimentación. [10]
2. Presione el botón de desbloqueo del contenedor y extraiga el contenedor del aspirador,
sosteniendo el asa del contenedor. [1]
3. Abra la pestaña izquierda y la pestaña derecha de la tapa del contenedor y
extraiga el depósito del agua del conjunto del contenedor.
[2]
4. Vacíe el depósito del agua, eliminando el agua sucia y límpielo.
[14]
5. Mueva la pestaña de vaciado y vacíe el contenedor del polvo.
[15]
6. Cierre la tapa del recipiente contenedor del polvo.
7. Abra las pestañas del contenedor de polvo y quite la tapa del contenedor
[16],
extraiga la unidad ciclónica y límpiela. [17]
8. Vuelva a colocar la unidad ciclónica en la tapa del contenedor, coloque nuevamente el
conjunto del contenedor y bloquee las pestañas del contenedor de polvo. [16]
9. Vuelva a colocar el conjunto del contenedor en el depósito del agua y bloquee la pestaña
izquierda y la pestaña derecha de la tapa del contenedor. [2]
10. Vuelva a colocar el conjunto del contenedor en el aspirador y asegúrese de que encaje en
su lugar.
[1]
Page 17

15
*Sólo para algunos modelos
**El diseño de la tobera puede variar según el modelo
ES
LISTA DE COMPROBACIÓN PARA EL USUARIO
Si surgiera algún problema con el producto, lleve a cabo las sencillas comprobaciones
que se enumeran a continuación antes de llamar al servicio técnico de Hoover.
• ¿Hay suministro de corriente para el aspirador? Pruebe con otro aparato eléctrico.
• ¿El contenedor o el depósito de agua está lleno? Remítase al capítulo “Mantenimiento
del Aspirador”.
• ¿El ltro está bloqueado? Véase el apartado “Limpieza del ltro”.
• ¿Está obstruida la manguera o la tobera? Consulte “Eliminación de una obstrucción en
el sistema”.
INFORMACIÓN IMPORTANTE
Piezas de recambio y consumibles HOOVER
Utilice siempre piezas de repuesto originales de Hoover. Puede adquirirlas a través de los
distribuidores de HOOVER. Cuando realice pedidos de piezas, indique siempre el número
de modelo que posee.
Consumibles:
• Juego de ltros (pre-motor y salida): U72 35601577
Piezas de repuesto:
• Tobera para alfombras y suelos: G150 35601579
• Tobera Caresse para suelo duro: G151 35601580
• Tobera Mini Turbo para el pelo de animales: J51 35601163
• Manguera exible completa: D148 35601578
Calidad
Las fábricas de HOOVER han sido sometidas a inspecciones de calidad independientes.
Nuestros productos se fabrican de conformidad con el sistema de calidad que cumple los
requisitos de la norma ISO 9001.
Su garantía
Las condiciones de garantía para este aparato vienen denidas por nuestro representante
en el país de venta. Puede obtener los detalles acerca de estas condiciones en el
establecimiento donde haya comprado este aparato. Debe mostrarse la factura de
compra o el recibo al hacer alguna reclamación en virtud de las condiciones de garantía.
Sujeto a cambios sin previo aviso.
Limpieza del ltro
Para mantener las prestaciones perfectas de su aspirador, lave el ltro pre-motor HEPA,
ltros de espuma y el ltro de salida después de cada uso.
Limpieza del ltro pre-motor:
1. Presione el botón de desbloqueo del contenedor y extraiga el contenedor del aspirador,
sosteniendo el asa del contenedor. [1]
2. Abra la pestaña izquierda y la pestaña derecha de la tapa del contenedor y extraiga el
depósito de agua del conjunto del contenedor. [2]
3. Quite la espuma del ltro pre-motor A y B. [18]
4. Lávelo con agua tibia [23] y déjelo secar totalmente antes de colocarlo de nuevo en el
aspirador. [24]
5. Extraiga el ltro pre-motor HEPA y quite la espuma del ltro pre-motor. [19, 20]
6. Lave el ltro HEPA y la espuma del ltro [23], déjelo secar totalmente antes de colocarlo
de nuevo en el aspirador. [24]
Limpieza del ltro de salida:
1. Para quitar el ltro de salida, desenganche la cubierta del ltro de salida y extráigalo de
dicha cubierta. [21]
2. Lave el ltro en agua tibia [22, 23] y déjelo secar por completo antes de volver a
colocarlo en el aspirador. [24]
NOTA: No u
sar agua hirviendo o detergentes.
En caso improbable de dañarse los ltros,
coloque un repuesto Hoover original. No intente utilizar el electrodoméstico sin haber montado
los ltros.
Eliminación de una obstrucción del sistema
Si la succión del aspirador se reduce:
1. Controle si el contenedor y el depósito del agua están llenos. De ser así, véase
“VACIADO Y LIMPIEZA DEL DEPÓSITO DEL AGUA, CONTENEDOR DEL CICLÓN Y
CONTENEDOR”.
2. Si el depósito del agua y el contenedor no están llenos:
A. ¿Cabe la posibilidad de que sea preciso limpiar los ltros? Si es así, remitirse al
capítulo “Limpieza del Filtro”.
B. Compruebe si existe alguna otra obstrucción en el sistema - Utilice una varilla o una
barra para eliminar cualquier obstrucción del tubo telescópico o la manguera exible.
ACCESORIOS Y CEPILLOS
El accesorio rincones, cepillo para muebles y cepillo para polvo se pueden guardar en el tubo.
Accesorio rincones
* – Para rincones y zonas de difícil acceso. [X1]
Cepillo para polvo* – Para estanterías, marcos, teclados y demás áreas delicadas.
[X2]
Cepillo para limpieza de muebles – Para cortinas y muebles con tejidos blandos. [X3]
Cepillo para alfombras y suelos**- Para suelos y alfombras. [P]
Tobera para suelo duro* – Para suelos de parqué y demás suelos delicados. [AA]
Mini Tobera Tubo Eliminación Pelo de Mascotas*– Emplee la mini tobera turbo para la
limpieza de escaleras o para la limpieza a fondo de tejidos y demás áreas difíciles de limpiar.[Y]
Tobera Mini Turbo eliminación alérgenos* – Emplee la mini tobera turbo para la limpieza de
escaleras o para la limpieza a fondo de tejidos y demás áreas difíciles de limpiar. [Z]
IMPORTANTE: No utilice las toberas mini turbo para alfombras que tengan ecos largos, estén
hechas de piel animal, ni sean de pelo de un espesor superior a 15 mm. No mantenga la tobera
inmóvil mientras el cepillo esté girando.
 Loading...