

Page 1
Istruzioni per l’uso
Bedienungsanleitung
Gebruiksaanwijzing
User instructions
PT
IT
DE
NL
EN
Instruções de Utilização
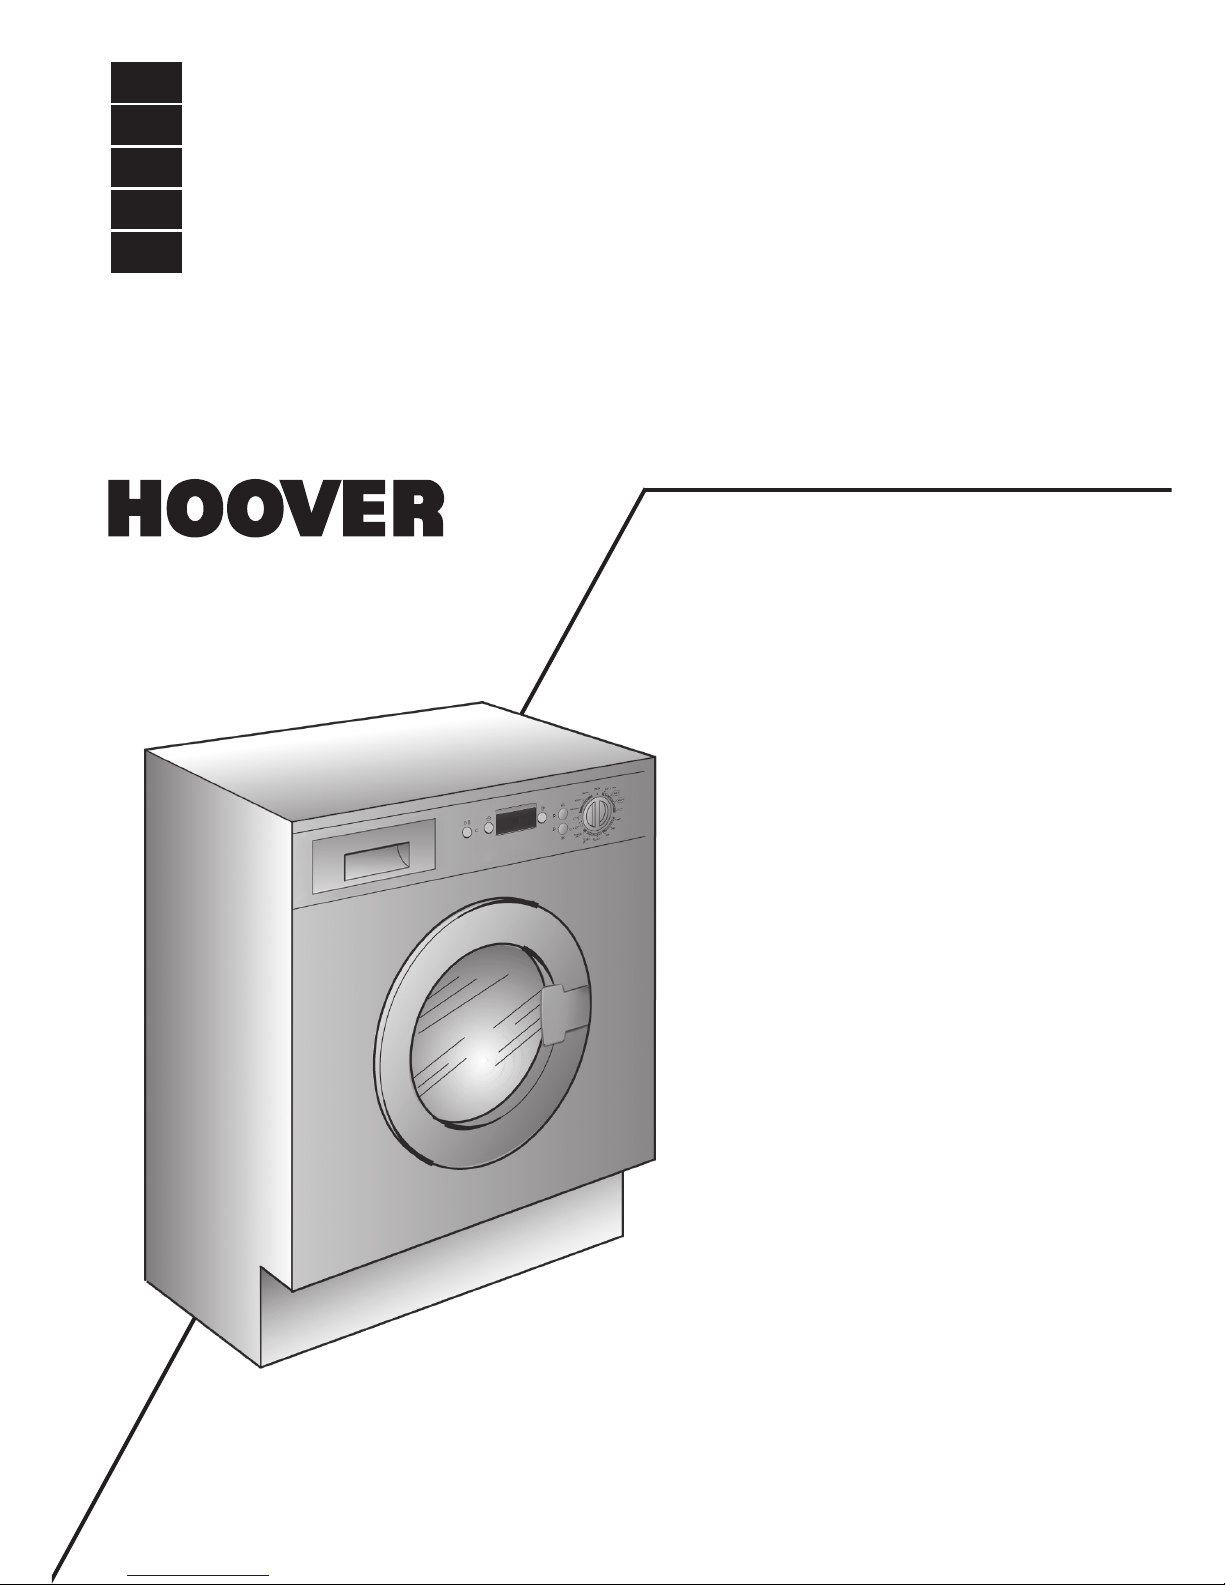
HWB 2DN
Page 2
2
FR IT
TOUS NOS
COMPLIMENTS
En achetant cet appareil ménager
Hoover, vous avez démontré que
vous n’acceptez aucun
compromis: vous voulez toujours
ce qu’il y a de mieux.
Hoover a le plaisir de vous
proposer cette nouvelle machine
à laver qui est le résultat d’années
de recherches et d’études des
besoins du consommateur. Vous
avez fait le choix de la qualité,de
la fiabilité et de l’efficacité.
Hoover vous propose une large
gamme d’appareils
électroménagers: machines à
laver la vaisselle,machines à laver
et sécher le linge, cuisinières, fours
à micro-ondes, fours et tables de
cuisson, hottes, réfrigerateurs et
congélateurs.
Demandez à votre Revendeur le
catalogue complet des produits
Hoover.
Cet appareil a pour vocation
d’être utilisé au sein du foyer,ou
dans ces différentes situations:
- zones réservées au personnel
dans les magasins, bureaux et
autres environnements de travail;
- exploitation agricoles;
- par les clients dans les hôtels,
motels et autres environnements
résidentiels;
- environnement de type bed and
breakfast.
Une utilisation autre que
domestique, comme par exemple
une démonstration commerciale
ou une session de formation,est à
exclure également dans les lieux
cités ci-dessus. Une utilisation
détournée de l’appareil est
proscrite.
Si l’appareil doit être utilise de
manière incompatible comme
défini ci-dessus, la durée de vie de
l’appareil pourrait être réduite et la
garantie du fabricant serait
annulée.
Tout dommage causé à l'appareil,
résultant d’une mauvaise utilisation
de l’appareil (même si l’utilisation
en est faite au sein du foyer), ne
permettra pas de recours auprès
du fabriquant, comme il est établi
par la loi.
Nous vous prions de lire
attentivement les conseils
contenus dans ce livret. Il contient
d’importantes indications
concernant les procédures
d’installation, d’emploi, d’entretien
et quelques suggestions utiles en
vue d’améliorer l’utilisation de la
machine à laver.
Conservez avec soin ce livret: vous
pourrez le consulter bien souvent.
Quand vous communiquez avec
Hoover, ou avec ses centres
d’assistance, veuillez citer le
Modèle, le n° et le numéro G
(éventuellement).
COMPLIMENTI
Con l’acquisto di questo
elettrodomestico Hoover;
Lei ha dimostrato di non
accettare compromessi:
Lei vuole il meglio.
Hoover é lieta di proporLe questa
nuova lavatrice frutto di anni di
ricerche e di esperienze
maturate sul mercato,a contatto
diretto con i Consumatori. Lei ha
scelto la qualità, la durata e le
elevate prestazioni che questa
lavatrice Le offre.
Hoover Le propone inoltre una
vasta gamma di
elettrodomestici: lavatrici,
lavastoviglie,lavasciuga,cucine,
forni a microonde,forni e piani di
cottura, frigoriferi e congelatori.
Chieda al Suo Rivenditore
il catalogo completo dei prodotti
Hoover
Questo apparecchio è
destinato ad un uso in ambienti
domestici e simili come per
esempio:
- nelle aree ristoro di negozi, uffici
e altri ambienti di lavoro;
- negli agriturismo;
- dai clienti negli hotels, motels e
altre aree residenziali simili;
- nei bed & breakfast.
Un utilizzo diverso da quello tipico
dell’ambiente domestico, come
l’uso professionale da parte di
esperti o di persone addestrate,
è escluso anche negli ambienti
sopra descritti.
Un utilizzo non coerente con
quello riportato, può ridurre la
vita del prodotto e può
invalidare la garanzia del
costruttore. Qualsiasi danno
all’apparecchio o ad altro,
derivante da un uso diverso da
quello domestico (anche
quando l’apparecchio è
installato in un ambiente
domestico), non sarà ammesso
dal costruttore in sede legale.
La preghiamo di leggere
attentamente le avvertenze
contenute nel presente libretto in
quanto forniscono importanti
indicazioni riguardanti la
sicurezza di installazione, d’uso, di
manutenzione e alcuni utili
consigli per il migliore utilizzo
della lavatrice.
Conservi con cura questo libretto
per ogni ulteriore consultazione.
Quando comunica con la
Hoover o con i suoi centri di
assistenza citi sempre il Modello, il
n° e il numero G (se c’è).
Praticamente tutto ciò che é
citato nel riquadro.
PT
PARABÉNS!
Ao adquirir este electrodoméstico
Hoover, demonstrou não estar disposta
a contentar-se com qualquer coisa:
você quer o melhor!
A Hoover alegra-se de lhe poder
oferecer esta nova máquina de lavar
roupa, resultado de anos de
investigação e de experiência de
mercado, em contacto directo com os
nossos clientes. Ao escolher esta
máquina, está a escolher a qualidade,
a durabilidade e as características
excepcionais que ela tem para
oferecer.
Mas a Hoover orgulha-se ainda da
vasta gama de electrodomésticos que
coloca à disposição dos seus clientes:
máquinas de lavar roupa,máquinas de
lavar loiça,máquinas de lavar e de
secar,fogões,micro-ondas, fornos e
placas de fogão,frigoríficos e
congeladores.
Peça ao seu agente da especialidade
que lhe dê o catálogo dos
electrodomésticos Hoover.
Este aparelho destina-se a ser utilizado
apenas em contexto doméstico ou
semelhnate, tais como:
- Áreas de cozinha de lojas, escritórios e
outros ambientes de trabalho, que
sejam reservadas aos funcionários;
- Casas de férias, de praia ou de
campo;
- Por clientes de hotéis,motéis e outros
ambientes do tipo residencial;
- Em quartos e alojamento do género
de “cama e pequeno almoço”.
A utilização deste aparelho em
ambientes diferentes do ambiente
familiar e doméstico,como o uso
comercial por especialistas, está
absolutamente excluída e não se
integra nas recomendações dadas
anteriormente.
Se o aparelho for utilizado de maneira
não conforme às recomendações, livro
de instruções ou for utilizado para outros
fins que não os indicados, isso pode
reduzir a vida útil do aparelho e pode
anular a garantia do fabricante.
Qualquer avaria ou dano provocado
ao aparelho resultante de qualquer uso
que não seja o próprio e o
recomendado, ou resultante de
utilização que não seja do âmbito
doméstico, não serão aceites pelo
fabricante, mesmo estando o
electrodoméstico dentro da garantia
máxima prevista por lei.
Leia este livro de instruções
atentamente. Ele contém não só
informações importantes sobre a
instalação, a utilização e a
manutenção seguras da sua máquina,
mas também conselhos úteis sobre
como tirar o melhor proveito da sua
máquina.
Preserve este livro cuidadosamente,
mantendo-o à mão para futuras
consultas.
Quando contactar o seu agente
Hoover ou os Serviços de Assistência
Técnica refira sempre o modelo e o
número da sua máquina, bem como o
número G (se aplicável).Todas estas
referências se encontram na
placadedecaracterísticas da sua
máquina.
Page 3
3
DE
HERZLICHEN
GLÜCKWUNSCH!
Mit dem Kauf dieses Hoover
Elektrogerätes haben Sie bewiesen,
daß Sie stets nur das Beste wählen ohne Kompromisse.
Hoover freut sich,Ihnen diese neue
Waschmaschine anbieten zu
können. Sie ist das Ergebnis
jahrelanger Forschung und einer
Markterfahrung, die im ständigen
direkten Kontakt mit dem
Verbraucher gereift ist. Sie haben mit
diesem Gerät Qualität, lange
Lebensdauer und einen hohen
Leistungsstandard gewählt.
Hoover bietet Ihnen darüber hinaus
eine breite Palette weiterer
elektrischer Haushaltsgeräte:
Waschmaschinen,Geschirrspüler,
Wäschetrockner, Elektroherde,
Mikrowellenherde,Backöfen und
Kochfelder, Kühl - und
Gefrierschränke.
Fragen Sie Ihren Fachhändler nach
dem kompletten Hoover Katalog.
Dieses Gerät ist ausschließlich für
den Haushaltsgebrauch konzipiert
bzw. für den haushaltsnahen
Gebrauch, wie z.B:
- Teeküchen für das Personal von
Büros, Geschäften oder ähnlichen
Arbeitsbereichen;
- Ferienhäuser;
- Gäste von Hotels, Motels und
anderen Wohneinrichtungen;
- Gäste von
Apartments/Ferienwohnungen, Bed
and Breakfast Einrichtungen.
Eine andere Nutzung als die normale
Haushaltsnutzung, wie z.B.
gewerbliche oder professionelle
Nutzung durch Fachpersonal, ist
auch im Falle der oben erwähnten
Einrichtungen ausgeschlossen.
Sollte das Gerät entgegen diesen
Vorschriften betrieben werden,kann
dies die Lebensdauer des Gerätes
beeinträchtigen und den
Garantieanspruch gegenüber dem
Hersteller verwirken.
Eventuelle Schäden am Gerät oder
andere Schäden oder Verluste, die
durch eine nicht haushaltsnahe
Nutzung hervorgerufen werden
sollten (selbst wenn sie in einem
Haushalt erfolgen),werden, so weit
vom Gesetz ermöglicht, vom
Hersteller nicht anerkannt.
Lesen Sie bitte aufmerksam die
Anweisungen, die Sie in diesem Heft
finden.Sie finden dort wichtige
Hinweise zur sicheren Installation, zur
Bedienung, zur Pflege und zur
optimalen Verwendung der
Waschmaschine.
Bewahren Sie das Heft für eine
spätere Nutzung gut auf.
Geben Sie bitte in allen Mitteilungen
an Hoover oder an Ihre zuständige
Kundendienststelle stets das Modell,
die Nummer und die G-Nummer
(falls vorhanden),- also praktisch alle
Angaben des Typenschildes -,an.
EN
OUR COMPLIMENTS
With the purchase of this Hoover
household appliance, you have
shown that you will not accept
compromises: you want only the
best.
Hoover is happy to present their
new washing machine,the result of
years of research and market
experience through direct contact
with Consumers. You have chosen
the quality, durability and high
performance that this washing
machine offers.
Hoover is also able to offer a vast
range of other household
appliances: washing machines,
dishwashers, washer-dryers,
cookers, microwave ovens.
Traditional ovens and hobs,
refrigerators and freezers.
Ask your local retailer for the
complete catalogue of Hoover
products.
This appliances is intended to be
used in household and similar
applications such as:
- staff kitchen areas in shops,
offices and other working
environments;
- farm houses;
- by clients in hotels, motels and
other residential type
environments;
- bed and breakfast type
environments.
A different use of this appliance
from household environment or
from typical housekeeping
functions, as commercial use by
expert or trained users, is excluded
even in the above applications.
If the appliance is used in a
manner inconsistent with this it
may reduce the life of the
appliance and may void the
manufacturer’s warranty.
Any damage to the appliance or
other damage or loss arising
through use that is not consistent
with domestic or household use
(even if located in a domestic or
household environment) shall not
be accepted by the manufacturer
to the fullest extent permitted by
law.
Please read this booklet carefully
as it provides important guide lines
for safe installation,use and
maintenance and some useful
advise for best results when using
your washing machine.
Keep this booklet in a safe place
for further consultation.
When contacting Hoover
or a Customer Services Centre
always refer to the Model,No., and
G number (if applicable of the
appliance see panel).
NL
ONZE COMPLIMENTEN
Met de aankoop van dit Hoover
huishoudelijk apparaat hebt u laten
zien dat u geen genoegen neemt
met tussenoplossingen en dat u
alleen het allerbeste wilt.
Het is voor Hoover een ge-noegen u
een nieuwe
wasautomaat aan te bieden die het
resultaat is van jarenlang onderzoek
en ervaring opgedaan door een
direct contact met de gebruiker.U
hebt gekozen voor de kwaliteit,de
duurzaamheid en de
uitstekende prestatie die deze
wasmachine levert.
Hoover kan u ook een uitgebreid
assortiment van ander huishoudelijke
apparaten en stofzuigers bieden. Kijk
hiervoor op de lokale website van
Hoover.
Een uitgebreide catalogus van
Hoover apparaten kunt u bij uw
winkelier krijgen.
Dit apparaat is bedoeld om te
worden gebruikt voor huishoudelijke
en soortgelijke toepassingen, zoals:
- kantines op kantoren, winkels en
andere werkomgevingen;
- boerderijen;
- door klanten in hotels, motels en
andere soorten residentiële
omgevingen;
- bed and breakfast.
Een ander gebruik van dit toestel
dan huishoudelijke omgeving of van
de typische huishoudelijke functies,
zoals commercieel gebruik door de
deskundige of opgeleide gebruikers,
is uitgesloten, zelfs in de
bovenstaande toepassingen.
Als het apparaat wordt gebruikt op
een wijze die hier niet mee
overeenkomt kan de levensduur van
het apparaat beïnvloeden en de
garantie van de fabrikant komt te
vervallen.
Eventuele schade aan het apparaat
of andere schade of verlies ontstaan
door gebruik dat niet in
overeenstemming is met
huishoudelijk gebruik (ook als ze
gelokaliseerd is in een huiselijke
omgeving) worden niet aanvaard
door de fabrikant voor zover
toegestaan door de wet.
Wij verzoeken u dit boekje
aandachtig door te lezen, want het
geeft u belangrijke richtlijnen
omtrent het veilig installeren, het
gebruik en het onderhoud en
bruikbare tips om met uw
wasautomaat de beste resultaten te
verkrijgen.
Bewaar dit boekje op een goede
plaats zodat u het kunt raadplegen.
Vermeld altijd het type, nummer en
G-nummer (indien van toepassing)
van het apparaat (staat op het
paneel) als u contact
opneemt met Hoover of de
Klantenservice.
Page 4

FR
IT
INDEX
Avant-propos
Notes générales à la
livraison
Garantie
Mesures de sécurité
Données techniques
Mise en place, installation
Description des commandes
Tableau des programmes
Sélection
Tiroir à lessive
Le produit
Lavage
Nettoyage et entretien
Recherche des pannes
INDICE
Prefazione
Note generali alla consegna
Garanzia
Prescrizioni di sicurezza
Dati tecnici
Messa in opera, installazione
Descrizione comandi
Tabella programmi
Selezione
Cassetto detersivo
Il prodotto
Lavaggio
Pulizia e manutenzione
ordinaria
Ricerca guasti
CHAPITRE
CAPITOLO
KAPITEL
HOOFDSTUK
CHAPTER
1
2
3
4
5
6
7
8
9
10
11
12
13
4
PT
INDICE
Introdução
Verificações a efectuar
quando a máquina lhe for
entregue
Garantia
Instruções de segurança
Dados técnicos
Instalação
Descrição dos comandos
Tabela de programas de
lavagem
Selecção dos programas
Colocação do detergente
Separação das peças de
roupa
Lavagem
Limpeza e manutenção da
máquina
Eliminação de avarias
CAPÍTULO
Page 5
5
DE
INHALT
Einleitung
Allgemeine Hinweise zur
Lieferung
Garantie
Sicherheitsvorschriften
Technische Daten
Inbetriebnahme, Installation
Bedienungsanleitung
Programmtabelle
Programm/Temperaturwahl
Waschmittelbehälter
Das Produkt
Waschen
Reinigung und allgemeine
Wartung
Fehlersuche
EN
INDEX
Introduction
General points on delivery
Guarantee
Safety Measures
Technical Data
Setting up and Installation
Control Description
Table of Programmes
Selection
Detergent drawer
The Product
Washing
Cleaning and routine
maintenance
Faults Search
NL
INHOUDSOPGAVE
Inleiding
Algemene aanwijzingen bij
levering
Garantie
Veiligheidsmaatregelen
Technische gegevens
In elkaar zetten en
installeren
Bedieningspaneel
Overzicht van programma’s
Kiezen van het programma
Wasmiddelbakje
De weefsels
Het wassen
Schoonmaken en normaal
onderhoud
Storingzoeker
Page 6
6
FR
IT
CHAPITRE 1
NOTES GENERALES
A LA LIVRAISON
A la livraison veuillez,
contrôler que le matériel
suivant accompagne la
machine:
A) LIVRET
D’INSTRUCTIONS
B) ADRESSES DE SERVICE
APRES VENTE
C) CERTIFICAT DE
GARANTIE
D) BOUCHONS
E) COUDES POUR LE TUBE
DE VIDANGE
F) BAC POUR LES
PRODUITS LESSIVIELS
LIQUIDES OU POUR LES
PRODUITS
BLANCHISSANTS
LIQUIDES
LES CONSERVER
et contrôler que ce matériel
soit en bon état; si tel n’est
pas le cas appelez le centre
Hoover le plus proche.
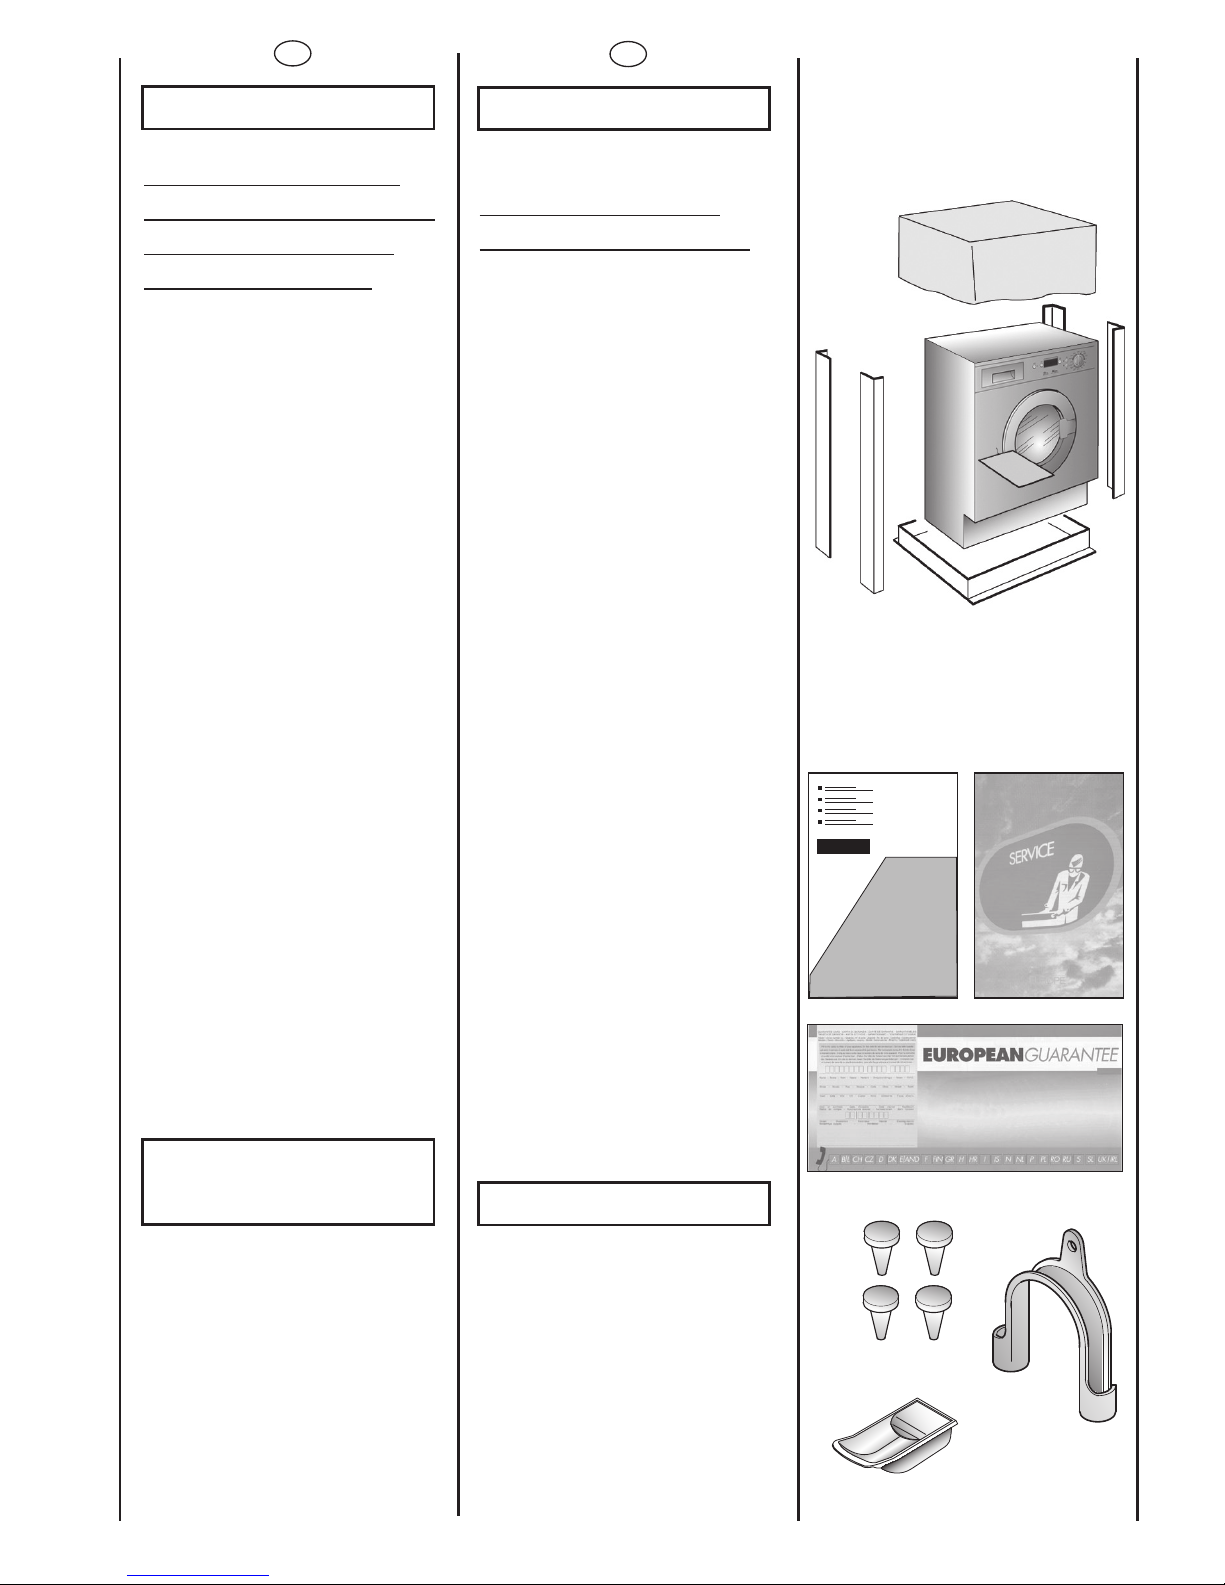
CAPITOLO 1
NOTE GENERALI
ALLA CONSEGNA
Alla consegna controlli che
con la macchina ci siano:
A) MANUALE
D’ISTRUZIONE
B) INDIRIZZI DI ASSISTENZA
C) CERTIFICATI DI
GARANZIA
D) TAPPI
E) CURVA PER TUBO
SCARICO
F) BACINELLA DETERSIVO
LIQUIDO O
CANDEGGIANTE
CONSERVATELI
e controlli che non abbia
subito danni durante il
trasporto, in caso contrario
chiami il centro Hoover più
vicino.
E
AB
C
F
D
PT
CAPÍTULO 1
VERIFICAÇÕES
A
EFECTUAR QUANDO
A MAQUINA LHE
FOR ENTREGUE
Ao receber a máquina,
verifique se os seguintes
componentes, que deverá
manter num local seguro e
à mão, lhe foram entregues
juntamente com a máquina:
A) MANUAL DE
INSTRUÇÕES
C) CERTIFICADO DE
GARANTIA
D) TAMPÖES
E) CURVA PARA O TUBO
DE ESGOTO
F) COMPARTIMENTO DE
DETERGENTE LÍQUIDO
OU BRANQUEADOR
LÍQUIDO
GUARDE ESTES
COMPONENTES BEM.
Verifique igualmente se a
máquina não sofreu
quaisquer danos durante o
transporte. Caso a máquina
esteja danificada entre
imediatamente em
contacto com o Centro de
Assistência Técnica mais
próximo.
Page 7
7
DE
KAPITEL 1
ALLGEMEINE
HINWEISE ZUR
LIEFERUNG
Kontrollieren Sie bei
Anlieferung des Gerätes, ob
das folgende Zubehör
mitgeliefert wurde:
A) BEDIENUNGSANLEI-
TUNG
B) VERZEICHNIS DER
KUNDENDIENSTSTELLEN
C)GARANTIESCHEIN
D) STÖPSEL
E) ROHRBOGEN FÜR
ABLAUFSCHLAUCH
F) EINSATZ FÜR
FLÜSSIGWASCHMITTEL
BZW. BLEICHMITTEL
BITTE GUT AUFBEWAHREN
Gerät bei Lieferung auf
eventuelle
Transportschäden
untersuchen und
gegebenenfalls beim
Händler reklamieren.
EN
CHAPTER 1
GENERAL POINTS
ON DELIVERY
On delivery, check that the
following are included with
the machine:
A) INSTRUCTION MANUAL
B) CUSTOMER SERVICE
ADDRESSES
C) GUARANTEE
CERTIFICATES
D) CAPS
E) BEND FOR OUTLET TUBE
F) LIQUID DETERGENT OR
LIQUID BLEACH
COMPARTMENT
(CONTAINER)
KEEP THEM IN A SAFE
PLACE
Check that the machine has
not incurred damage during
transport. If this is the case,
contact your nearest Hoover
Centre.
NL
HOOFDSTUK 1
ALGEMENE
AANWIJZINGEN BIJ
DE LEVERING
Controleer bij de levering of
met de machine het
volgende is bijgeleverd:
A) HANDLEIDING
B) ADRESSEN KLANTEN-
SERVICE
C) GARANTIEBEWIJZEN
D) KAPJES
E) AFVOERSLANGGELEI-
DER
F) WASMIDDELENBAKJE
BEWAAR DEZE GOED
Controleer ook of de
machine gedurende het
transport niet beschadigd is.
Mocht dat wel het geval
zijn, neemt u dan contact
met uw Hoover leverancier
Page 8
8
FR
CHAPITRE 2
GARANTIE
L’appareil est accompagné
par un certificat de
gàrantie.
0900-9999109
IT
CAPITOLO 2
Servizio Assistenza Clienti
CERTIFICATO DI GARANZIA CONVENZIONALE: cosa fare?
Il Suo prodotto è garantito, alle condizioni e nei termini riportati sul certificato inserito nel
prodotto ed in base alle previsioni del decreto legislativo 24/02, nonché del decreto
legislativo 6 settembre 2005, n. 206, per un periodo di 24 mesi decorrenti dalla data di
consegna del bene.
Così come riportato nei testi dei Decreti Legislativi citati, il certificato di garanzia dovrà
essere da Lei conservato, debitamente compilato, per essere mostrato al Servizio
Assistenza Tecnica Autorizzato, in caso di necessità, unitamente ad un documento
fiscalmente valido rilasciato dal rivenditore al momento dell’acquisto (bolla di consegna,
fattura, scontrino fiscale, altro) sul quale siano indicati il nominativo del rivenditore, la
data di consegna, gli estremi identificativi del prodotto ed il prezzo di cessione.
Resta pure inteso che, salvo prova contraria, poiché si presume che i difetti di
conformità che si manifestano entro sei mesi dalla consegna del bene esistessero già a
tale data, a meno che tale ipotesi sia incompatibile con la natura del bene o con la
natura del difetto di conformità, il Servizio di Assistenza Tecnica Autorizzato Gias,
verificato il diritto all’intervento, lo effettuerà senza addebitare il diritto fisso di intervento
a domicilio, la manodopera ed i ricambi. Per contro, nel successivo periodo di diciotto
mesi di vigenza della garanzia, sarà invece onere del consumatore che intenda fruire
dei rimedi accordati dalla garanzia stessa provare l’esistenza del difetto di conformità
del bene sin dal momento della consegna; nel caso in cui il consumatore non fosse in
grado di fornire detta prova, non potranno essere applicate le condizioni di garanzia
previste e pertanto il Servizio di Assistenza Tecnica Autorizzato Gias effettuerà
l’intervento addebitando al consumatore tutti i costi relativi.
ESTENSIONE DELLA GARANZIA FINO A 5 ANNI: come?
Le ricordiamo inoltre che sullo stesso certificato di garanzia convenzionale Lei troverà le
informazioni ed i documenti necessari per prolungare la garanzia dell’apparecchio sino
a 5 anni e così, in caso di guasto, non pagare il diritto fisso di intervento a domicilio, la
manodopera ed i ricambi.
Per qualsiasi informazione necessitasse, La preghiamo rivolgersi al numero telefonico
del Servizio Clienti
199 12 13 14.
ANOMALIE E MALFUNZIONAMENTI: a chi rivolgersi ?
Per qualsiasi necessità il centro assistenza autorizzato è a Sua completa disposizione
per fornirLe i chiarimenti necessari; comunque qualora il Suo prodotto presenti
anomalie o mal funzionamenti, prima di rivolgersi al Servizio Assistenza Autorizzato,
consigliamo vivamente di effettuare i controlli indicati nel capitolo "Ricerca guasti".
UN SOLO NUMERO TELEFONICO PER OTTENERE ASSISTENZA.
Qualora il problema dovesse persistere, componendo il “Numero Utile” sotto indicato,
sarà messo in contatto direttamente con il Servizio Assistenza Tecnica Autorizzato che
opera nella Sua zona di residenza.
Attenzione:
la chiamata è a pagamento; il costo verrà comunicato, tramite messaggio vocale, dal
Servizio clienti dell’operatore telefonico utilizzato. Dettagli sono presenti sul sito internet
www.hoover.it.
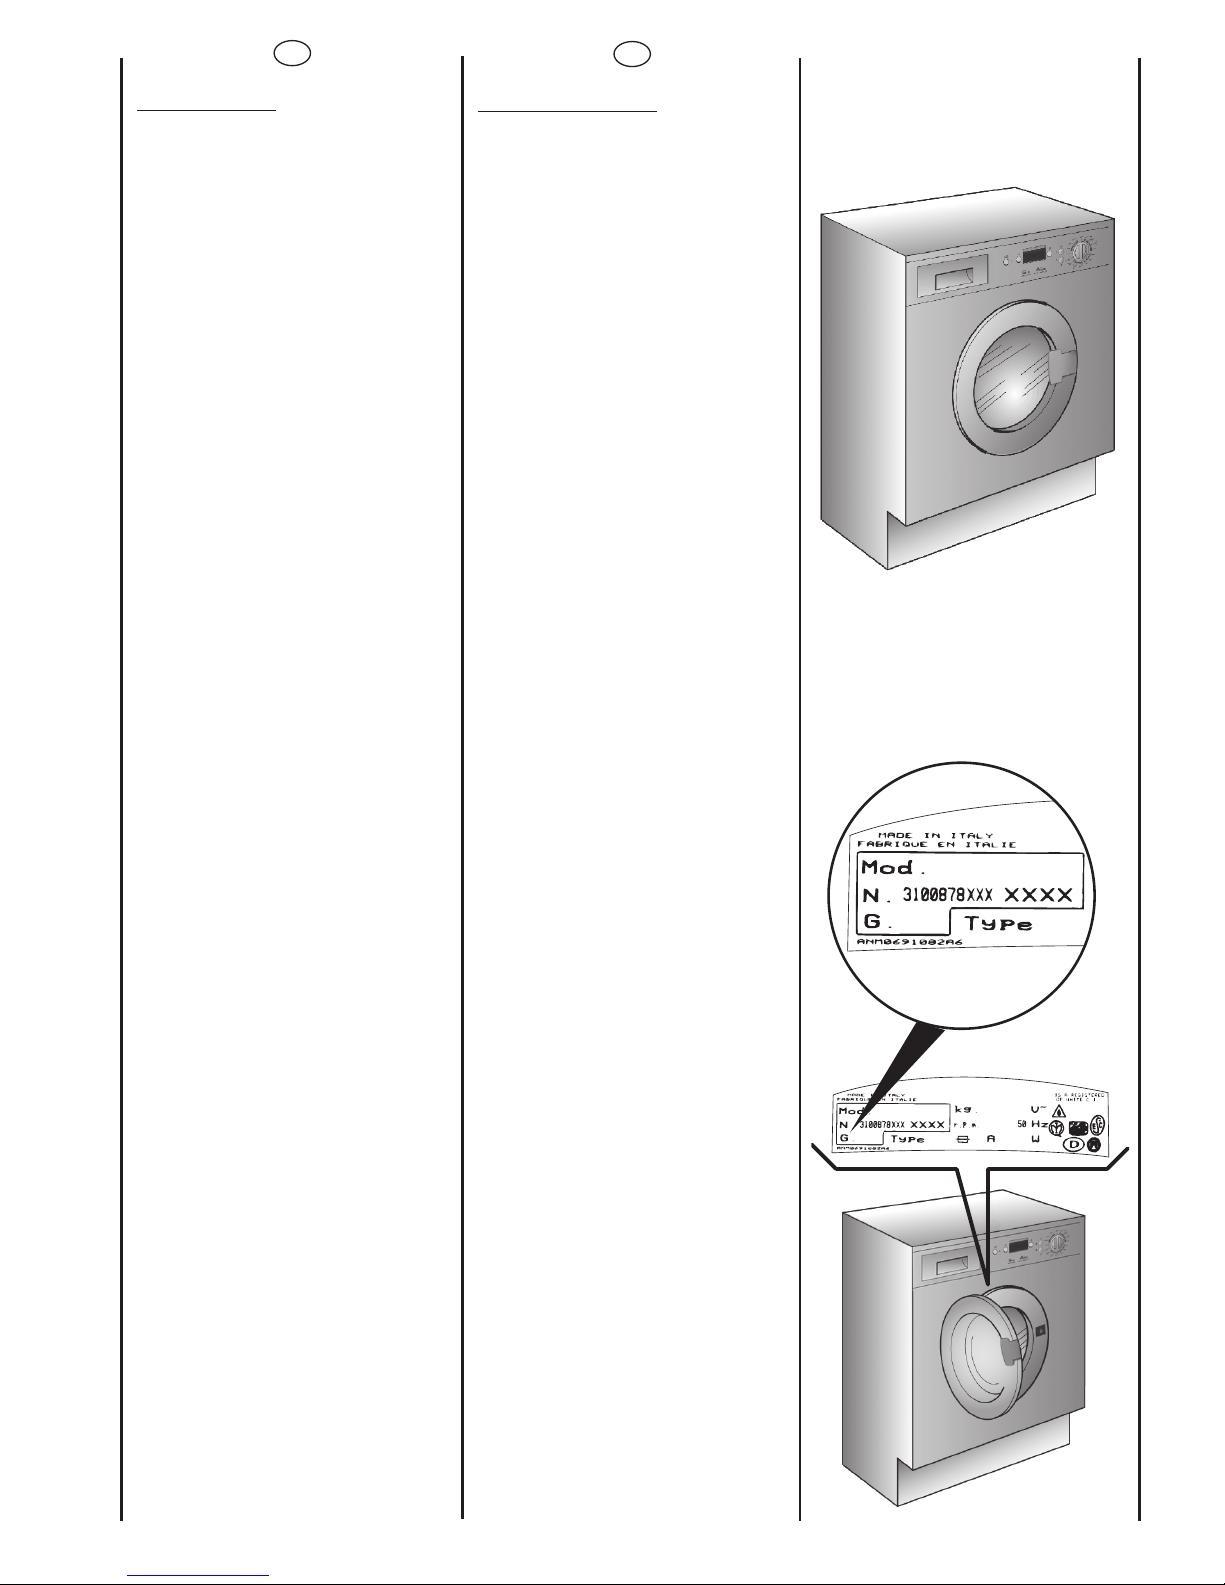
MATRICOLA DEL PRODOTTO. Dove si trova?
E’ indispensabile che comunichi al Servizio Assistenza Tecnica Autorizzato la sigla del
prodotto ed il numero di matricola (16 caratteri che iniziano con la cifra 3) che troverà
sul certificato di garanzia oppure sulla targa matricola posta sul frontale della
lavabiancheria (zona oblò). In questo modo Lei potrà contribuire ad evitare trasferte
inutili del tecnico, risparmiando oltretutto i relativi costi.
PT
CAPÍTULO 2
GARANTIA
CONDIÇÕES DE
GARANTIA
Este electrodoméstico está
abrangido por uma Garantia.
Para beneficiar desta garantia
deverá apresentar o certificado
de “Garantia Internacional” ,
devidamente preenchido com o
nome e morada do consumidor
final,modelo e número de série
do aparelho e data de compra,
além de devidamente
autenticado pelo lojista. Este
documento ficará sempre na
posse do consumidor.
Durante o período de Garantia
os Serviços de Assistência
Técnica efectuarão a reparação
de qualquer deficiência no
funcionamento do aparelho
resultante de defeito de fabrico.
A Garantia não inclui
deslocações a casa do cliente,
que serão debitadas de acordo
com a taxa de deslocação em
vigor a cada momento.
Exceptua-se a 1a deslocação se
se efectuar no primeiro mês de
vigência da Garantia, que será
gratuita.
A Garantia não inclui:
– Anomalias ocasionadas por
mau trato,negligência ou
manipulação contrária às
instruções contidas no manual,
modificação ou incorporação
de peças de procedência
diferente da do aparelho,
aplicadas por serviços técnicos
não autorizados.
– Defeitos provocados por curto-
-circuito ou injúria mecânica.
– Qualquer serviço de instalação
ou explicação do
funcionamento do aparelho em
casa do cliente.
– Indemnizações por danos
pessoais ou materiais causados
directa ou indirectamente.
– Troca do aparelho.
Serviço Pós-Venda
Com o objectivo de satisfazer
cada vez mais o consumidor
final,colocamos à vossa
disposição a nossa Rede
Nacional de Assistência Técnica,
com pessoal técnico
devidamente especializado.
Page 9
9
EN
CHAPTER 2
GUARANTEE
The appliance is supplied
with a guarantee certificate
which allows free use of the
Technical Assistance Service.
DE
KAPITEL 2
GARANTIE
Die Vorlage der OriginalKaufrechnung ist
Voraussetzung für die
Inanspruchnahme einer
Garantieleistung durch
den Werkskundendienst.
Die detaillierten
Garantiebedingungen
entnehmen Sie bitte den
beigefügten Unterlagen
"European Guarantee".
Bewahren Sie die
Kaufrechnung gut auf Und
zeigen Sie diese im
Servicefall dem
Kundendiensttechniker, um
Ihren
Garantieanspruch
nachzuweisen.
SERVICENUMMER FÜR DEN
KUNDENDIENST
Im Servicefall wenden Sie
sich bitte an unseren
autorisierten
Werkskundendienst.Bitte
schauen Sie in den
mitgelieferten
Garantieunterlagen nach.
WO KANN ICH DIE
MATRIKELNUMMER DES
GERÄTES FINDEN?
Um eine schnelle und
effektive Hilfe zu leisten,
braucht der Kundendienst
das Gerätemodell und die
Matrikelnummer laut
Typenschild.Das ist eine 16stellige Zahl, die mit 3
anfängt und sich im
Bullaugenbereich befindet.
Teilen Sie diese Nummer
stets dem Kundendienst
mit, wenn Sie ihn
benötigen.
GIAS SERVICE
0820.220.224
0848.780.780
☎
A
CH
DE
01805.625.562
NL
HOOFDSTUK 2
GARANTIE
De machine staat onder
garantie,waardoor u tijdens
de garantieperiode gratis
gebruik kunt maken van de
Gias Service, behalve de
prijs van het telefoontje.
Vergeet niet om binnen 10
dagen na de
aankoopdatum het
garantiecertificaat op te
sturen.
Bewaar het ontvangstbewijs
van de winkelier waar u de
machine gekocht heeft om
dit aan de reparateur te
tonen, mocht hij het bewijs
nodig hebben.
Als uw machine defect is of
niet juist functioneert, dan
raden wij u aan om eerst
het hoofdstuk ‘Problemen’
door te lezen, voordat u
contact op neemt met Gias
Service.
Als het probleem zich na
alle aanbevolen controles
nog steeds voordoet,dan
kunt u bellen met Gias
Service.
U betaalt voor het
telefoontje en u wordt direct
verbonden met Gias
Service. Het is belangrijk dat
u de adviseur het
modelnummer en het
serienummer van uw
machine doorgeeft,die u
op de kenplaat aan de
voorkant van de
wasmachine (bij de deur)
kunt vinden (16 tekens,
beginnend met het nummer
3). Hierdoor kunnen wij u
beter van dienst zijn.
0900-9999109
Page 10

10
FR
IT
CAPITOLO 3
PRESCRIZIONI DI
SICUREZZA
ATTENZIONE:
PER QUALSIASI
INTERVENTO DI PULIZIA
E MANUTENZIONE
DELLA LAVATRICE
●
Tolga la spina.
●
Chiuda il rubinetto
dell’acqua.
●
La Hoover correda tutte le
sue macchine di messa a
terra.
Si assicuri che l’impianto
elettrico sia provvisto di
messa a terra in caso
contrario richieda
l’intervento di personale
qualificato.
Apparecchio
conforme alle Direttive
Europee 73/23/CEE e
89/336/CEE , sostituite
rispettivamente da
2006/95/CE e 2004/108/CE ,
e successive modifiche.
●
Non tocchi l’apparecchio
con mani, piedi bagnati o
umidi.
●
Non usi l’apparecchio a
piedi nudi.
●
Non usi, se non con
particolare cautela,
prolunghe in locali adibiti a
bagno o doccia.
ATTENZIONE:
DURANTE IL LAVAGGIO
L’ACQUA PUO’ ANDARE
A 90°C.
●
Prima di aprire l’oblò si
assicuri che non vi sia
acqua nel cestello.
CHAPITRE 3
MESURES DE
SECURITE
ATTENTION:
EN CAS
D’INTERVENTION DE
NETTOYAGE ET
D’ENTRETIEN
● Débrancher la prise de
courant.
● Fermer le robinet
d’alimentation d’eau.
● Toutes les machines
Hoover sont pourvues de
mise à la terre.
Vérifier que l’installation
électrique soit alimentée par
une prise de terre, en cas
contraire demander
l’intervention du personnel
qualifié.
Produit compatible
avec les Directives
Européennes 73/23/EEC et
89/336/EEC, remplacé par
2006/95/EC et 2004/108/EC,
et les amendements
successifs.
● Ne pas toucher l’appareil
pieds nus.
● Autant que possible éviter
l’usage de rallonges dans les
salles de bains ou les
douches.
ATTENTION:
PENDANT LE LAVAGE
L’EAU PEUT ATTEINDRE
90°C.
● Avant d’ouvrir le hublot
vérifier que le tambour soit
sans eau.
PT
CAPÍTULO 3
INSTRUÇÕES DE
SEGURANÇA
IMPORTANTE:
ESTAS INSTRUÇÕES
SÃO EXTREMAMENTE
IMPORTANTES PARA
TODAS AS OPERAÇÕES
DE LIMPEZA E DE
MANUTENÇÃO.
● Deslige o aparelho da
corrente, retirando a ficha do
respectivo cabo de
alimentação da tomada.
● Feche a torneira de
alimentação de água.
● Todos os electrodomésticos
Hoover têm ligação à terra.
Assegure-se de que a instalação
eléctrica a que a máquina está
ligada se encontra devidamente
ligada à terra.Se tiver dúvidas ou
a instalação eléctrica não
estiver devidamente ligada à
terra, peça a um electricista
qualificado que proceda à
verificação e eventualmente à
ligação da instalação à terra.
Este aparelho está em
conformidade com as Directivas
Europeias 73/23/EEC e
89/336/EEC, substituídas pelas
2006/95/EC e 2004/108/EC, e
respectivas alterações
posteriores.
● Nunca toque no equipamento
com as mãos ou os pés
molhados ou húmidos.
● Não utilize os seus
electrodomésticos quando
estiver descalça.
● Evite usar cabos de extensão
em compartimentos com
banheira ou chuveiro; se,
eventualmente,tiver de optar
por essa solução, faça-o com o
maior cuidado.
ATENÇÃO:
DURANTE O CICLO
DE LAVAGEM A ÁGUA
PODE ATINGIR UMA
TEMPERATURA DE 90°C.
● Antes de abrir a porta da
máquina de lavar roupa
certifique-se de que o tambor já
não tem água.
10
Page 11
11
KAPITEL 3
SICHERHEITSVORSCHRIFTEN
ZUR BEACHTUNG:
BEI REINIGUNG UND
WARTUNG DES
GERÄTES
● Netzstecker ziehen.
● Wasserzufuhr sperren.
● Alle Hoover Geräte sind
geerdet.
Versichern Sie sich, daß Ihr
Stromnetz geerdet ist.Sollte
dies nicht der Fall sein, rufen
Sie einen Fachmann.
Das Gerät entspricht
den Europäischen Richtlinien
73/23/CEE und 89/336/CEE,
ersetzt durch 2006/95/CE
bzw. 2004/108/CE , und deren
nachträglichen
Veränderungen.
● Benutzen Sie nach
Mögkichkeit keine
Verlängerungskabel in
Feuchträumen.
ACHTUNG:
JE NACH
WASCHPROGRAMM
KANN SICH DAS
WASSER BIS AUF 90° C
AUFHEIZEN.
● Vor dem Öffnen des
Bullauges sicherstellen, daß
kein Wasser mehr in der
Trommel steht.
DE
EN
CHAPTER 3
SAFETY MEASURES
IMPORTANT:
FOR ALL CLEANING
AND MAINTENANCE
WORK
● Remove the plug
● Turn off the water inlet tap.
● All Hoover appliances are
earthed. Ensure that the
main electricity circuit is
earthed. Contact a qualified
electrician if this is not the
case.
Appliance complies
with European Directives
73/23/EEC and 89/336/EEC,
replaced by 2006/95/EC and
2004/108/EC, and
subsequent amendments.
● Do not touch the
appliance with wet or damp
hands or feet.
● Do not use the appliance
when bare-footed.
● Extreme care should be
taken if extension leads are
used in bathrooms or shower
rooms. Avoid this where
possible.
WARNING: DURING THE
WASHING CYCLE, THE
WATER CAN REACH A
TEMPERATURE OF 90°C.
● Before opening the
washing machine door,
ensure that there is no water
in the drum.
NL
HOOFDSTUK 3
VEILIGHEIDSMAATREGELEN
BELANGRIJK:
VOOR HET
SCHOONMAKEN EN
ONDERHOUD
●
Haal de stekker uit het
stopcontact.
●
Draai de
watertoevoerkraan dicht.
●
Alle Hoover apparaten zijn
geaard. Controleer of het
hoofdnet wel geaard is.Als
dat niet het geval is dient u
contact op te nemen met
een erkend elektricien.
Dit apparaat voldoet
aan de Europese Richtlijnen
73/23/EEC en 89/336/EEC,
vervangen door 2006/95/EC
and 2004/108/EC en
eventuele wijzigingen
●
Raak het apparaat niet
aan met natte of vochtige
handen of voeten.
●
Gebruik het apparaat niet
blootsvoets.
●
Als er verlengsnoeren in
de badkamer of
doucheruimte worden
gebruikt moet u extra
voorzichtig zijn.Vermijd dat,
als dat mogelijk is.
WAARSCHUWING:
TIJDENS HET
WASPROGRAMMA
KAN DE TEMPERATUUR
VAN HET WATER
OPLOPEN TOT 90° C.
●
Controleer voordat u de
deur van de wasautomaat
openmaakt of er geen water
in de trommel zit.
Page 12
12
FR
IT
● Ne pas utiliser
d’adaptateurs ou de prises
multiples.
● Cet appareil n’est pas
destiné à être utilisé par des
personnes (notamment les
enfants) incapables,
irresponsables ou sans
connaissance sur l’utilisation
du produit, à moins qu’elles ne
soient surveillées, ou instruites
sur l’utilisation de l’appareil,
par une personne responsable
de leur sécurité.
Surveillez les enfants pour être
sûr qu’ils ne jouent pas avec
l’appareil.
● Pour débrancher la prise, ne
pas tirer sur le câble.
● Ne pas laisser la machine
exposée aux agents
atmosphériques (pluie, soleil,
etc...).
● En cas de déménagement
ne jamais soulever la machine
par les boutons ou par le tiroir
des produits lessiviels.
● Pendant le transport ne pas
appuyer le hublot sur le
chariot.
Important!
Les ouvertures à la base de
l’appareil ne doivent en
aucun cas être obstruées par
des tapis, moquette ou autres
objets.
● 2 personnes pour soulever la
machine (voir dessin).
● En cas de panne et/ou de
mauvais fonctionnement
éteindre la machine, fermer le
robinet d’alimentation d’eau
et ne pas toucher à la
machine. Pour toute
réparation adressez-vous
exclusivement à un centre
d’assistance technique Hoover
en demandant des pièces de
rechange certifiées
constructeur.Le fait de ne pas
respecter les indications
susmentionnées peut
compromettre la sécurité de
l’appareil.
● Si le remplacement du
câble d’alimentation s’avère
nécessaire, il devra être
remplacé par un câble
special fourni par le service
après-vente.
●
Non usi adattatori o spine
multiple
●
Questo apparecchio non è
destinato ad essere usato da
bambini e persone incapaci o
inesperte all'uso del prodotto, a
meno che non vengano
sorvegliate o istruite riguardo
all'uso dell'apparecchio da
una persona responsabile
della loro sicurezza.
Sorvegliare i bambini in modo
tale da assicurarsi che non
giochino con l'apparecchio.
●
Non tiri il cavo di
alimentazione, o
l’apparecchio stesso, per
staccare la spina dalla presa
di corrente.
●
Non lasci esposto
l’apparecchio ad agenti
atmosferici (pioggia, sole,
ecc...).
●
In caso di trasloco non la
sollevi mai dalle manopole o
dal cassetto del detersivo.
●
Durante il trasporto non
appoggi mai l’oblò al
carrello.
Importante!
Nel caso si installi
l’apparecchio su un
pavimento ricoperto da
tappeti o con moquette, si
deve fare attenzione che le
aperture di ventilazione alla
base dell’apparecchio non
vengano ostruite.
●
Sollevarla in due persone
come illustrato in figura.
●
In caso di guasto e/o di
cattivo funzionamento
dell’apparecchio, lo spenga,
chiuda il rubinetto
dell’acqua e non
manometta
l’elettrodomestico. Per
l’eventuale riparazione si
rivolga solamente a un
centro di Assistenza Tecnica
Hoover e richieda l’utilizzo di
ricambi originali.
Il mancato rispetto di quanto
sopra può compromettere la
sicurezza dell’apparecchio.
●
Se il cavo di alimentazione
risultasse danneggiato, dovrà
essere sostituito da un cavo
speciale disponibile presso il
servizio di Assistenza Tecnica.
PT
● Não utilize adaptadores ou
fichas múltiplas.
● Este aparelho não está
indicado para ser utilizado
por crianças e por pessoas
incapazes ou inexperientes
no que toca à utilização do
produto, excepto se forem
devidamente supervisionadas
ou instruídas sobre a
utilização do aparelho por
uma pessoa responsável pela
sua segurança.
As crianças devem ser
vigiadas de modo a
assegurar que não brinquem
com o aparelho.
● Nunca puxe pelo cabo ou
pelo próprio
electrodoméstico para retirar
a ficha do electrodoméstico
da tomada.
● Proteja o seu
electrodoméstico dos
elementos (chuva,sol, etc.).
● Se tiver de deslocar a sua
máquina ou de a mudar de
lugar, nunca pegue nela
pelos botões ou pela gaveta
para detergente.
● Durante o transporte nunca
deite a máquina sobre o lado
da porta.
Atenção: Se o
electrodoméstico for
instalado num local
alcatifado,deverá assegurarse de que as aberturas de
ventilação inferiores não
fiquem tapadas ou
obstruídas.
● Tal como a figura ilustra,a
máquina deverá ser sempre
erguida por duas (2) pessoas.
● Se a sua máquina se
avariar ou deixar de trabalhar
correctamente, desligue-a,
feche a alimentação de
água e não tente repará-la.
Qualquer trabalho de
reparação deverá ser sempre
feito por um técnico
autorizado Hoover, devendo
sempre ser instaladas peças
sobressalentes originais.
O incumprimento desta
norma poderá acarretar
sérias consequências para a
segurança dos equipamentos.
● Se o cabo de alimentação
de energia, a ser ligado à
rede, estiver danificado,
deverá ser substituido por um
cabo específico, que poderá
adquirir directamente aos
serviços de Assistência
Técnica Hoover.
Page 13

13
DE
● Gerät nicht an Adapter oder
Mehrfachsteckdosen anschließen.
● Kinder oder Personen mit
eingeschränkten körperlichen
oder geistigen Fähigkeiten oder
mit ungenügenden Kenntnissen
und Erfahrung dürfen nur dann
das Gerät benutzen, wenn sie
beaufsichtigt werden oder
hinreichend Anweisungen zur
sicheren Behandlung des Gerätes
durch eine für ihre Sicherheit
verantwortliche Person erhalten
haben.
Kinder sind zu beaufsichtigen, um
sicher zu stellen, dass sie nicht mit
dem Gerät spielen.
● Ziehen Sie den Stecker immer
am Stecker selbst aus der
Steckdose.
● Setzen Sie das Gerät keinen
Witterungseinflüssen (Regen,
Sonne usw.) aus.
● Das Gerät niemals an den
Schaltknöpfen oder am
Waschmittelbehälter anheben.
● Während des Transportes mit
einer Sackkarre das Gerät nicht
auf das Bullauge lehnen.
Wichtig!
Falls Sie das Gerät auf einen
Teppich oder Teppichboden
aufstellen, achten Sie darauf,daß
die Lufteinlässe am Boden des
Gerätes nicht verstopft werden.
● Stets, wie auf der Zeichnung
dargestellt, zu zweit anheben.
● Bei eventuellen Defekten und
Fehlfunktionen das Gerät
abschalten, die Wasserzufuhr
unterbrechen und die
Waschmaschine nicht gewaltsam
öffnen.Bei anfallenden
Reparaturen wenden Sie sich bitte
ausschließlich an die
Kundendienststelle der Firma
Hoover und bestehen Sie auf die
Verwendung von
Originalersatzteilen. Die
Nichtbeachtung der o.a.
Vorschriften kann zur
Beeinträchtigung der Gerätesicherheit führen.
● Wenn das Gerät einmal
ausgedient hat, entsorgen Sie es
bitte ordnungsgemäß über Ihren
Fachhändler oder die
kommunalen
Entsorgungseinrichtungen.
● Sollte das Netzkabel
beschädigt sein, muß dieses mit
dem speziellen Netzkabel ersetzt
werden,das vom
Gias-Kundendienst zur Verfügung
gestellt werden kann.
EN
● Do not use adaptors or
multiple plugs.
● This appliance is not
intended for use by persons
(including children) with
reduced physical,sensory or
mental capabilities, or lack of
experience and knowledge,
unless they have been given
supervision or instruction
concerning use of the
appliance by a person
responsible for their safety.
Children should be supervised
to ensure that they do not
play with the appliance.
● Do not pull the mains lead
or the appliance itself to
remove the plug from the
socket.
● Do not leave the appliance
exposed to atmospheric
agents (rain, sun etc.)
● In the case of removal,
never lift the appliance by
the knobs or detersive drawer.
● During transportation
do not lean the door against
the trolley.
Important!
When the appliance location
is on carpet floors, attention
must be paid so as to ensure
that there is no obstruction to
the bottom vents.
● Lift the appliance in pairs as
illustrated in the diagram.
● In the case of failure
and/or incorrect operation,
turn the washing machine off,
close the water inlet tap and
do not tamper with the
appliance. Contact a Hoover
Technical Assistance Centre
for any repairs and ask for
original Hoover spare parts.
Avoidance of these norms
may compromise the safety
of the appliance.
● Should the supply cord
(mains cable) be demaged,
this is to be replaced by a
specific cable available from
the after sales service centre.
NL
●
Gebruik geen
verdeelstekkers of
meervoudige contactdozen.
●
Het gebruik van dit
apparaat is niet bedoeld voor
personen (inclusief kinderen)
met verminderde lichamelijke,
zintuiglijke of geestelijke
capaciteiten of tekort van
ervaring en kennis, tenzij er
toezicht of instructie is van een
persoon die verantwoordelijk is
voor hun veiligheid.
Kinderen moeten in de gaten
worden gehouden worden,
om er zeker van te zijn dat ze
niet met het apparaat gaan
spelen.
●
Trek niet aan de
elektriciteitsdraad of aan het
apparaat zelf om de stekker
uit het stopcontact te halen.
●
Stel het apparaat niet bloot
aan atmosferische invloeden
(regen, zon, etc.)
●
Als u het apparaat wilt
verplaatsen til het dan nooit
op aan de knoppen of aan de
wasmiddellade.
●
Laat tijdens het verplaatsen
de vuldeur niet tegen de
steekwagen steunen.
●
Als u het apparaat op een
ondergrond met een hoog
polig tapijt zet, controleer dan
of de opening aan de
onderkant vrij blijft.
●
Til het apparaat op zoals in
de schets is aangegeven.
●
Ingeval van storing en/of
niet goed functioneren: zet de
wasautomaat uit,draai de
watertoevoerkraan dicht en
kom verder niet aan het
apparaat. U hoeft alleen maar
contact op te nemen met een
Gias Service Center voor
eventuele reparaties en vraag
om originele Hoover
onderdelen.Als deze regels
niet worden opgevolgd zou
de veiligheid van het
apparaat in gevaar gebracht
kunnen worden.
● Als de (hoofd) aanvoerslang
beschadigd is, moet deze
worden vervangen door een
speciale kabel die verkrijgbaar
is bij de after sales afdeling
van Hoover (Gias Service).
Page 14
14
FR
IT
CAPITOLO 4
CAPACITA’DI BIANCHERIA
ASCIUTTA
POTENZA
ASSORBITA
AMPERE DEL
FUSIBILE DELLA RETE
GIRI DI
CENTRIFUGA (giri/min.)
PRESSIONE NELL’IMPIANTO
IDRAULICO
TENSIONE
DATI TECNICI
kg
1500
10
min. 0,05
max. 0,8
220-240
W
A
VEDERE TARGHETTA DATI
SIEHE MATRIKELSCHILD
RAADPLEEG DE KENPLAAT
SEE RATING PLATE
MPa
V
678
VERIFIQUE A PLACA DE IDENTIFIÇÃO
PT
CAPÍTULO 4
CARGA MÁXIMA
(ROPA SECA)
POTÊNCIA ABSORVIDA
FUSÍVEL
VELOCIDADE
DE ROTAÇÃO (r.p.m.)
PRESSÃO DO SISTEMA
HIDRÃULICO
TENSÃO
DADOS TÉCNICOS
82 cm
60 cm
54 cm
Page 15
EN
CHAPTER 4
15
WASSERDRUCK
DE
KAPITEL 4
FASSUNGSVERMÖGEN
TROCKENWÄSCHE
GESAMTANSCHLUßWERT
ABSICHERUNG
SCHLEUDERDREHZAHL
(U/min.)
SPANNUNG
TECHNISCHE DATEN
MAXIMUM WASH
LOAD DRY
POWER INPUT
POWER CURRENT FUSE
AMP
SPIN
r.p.m.
WATER PRESSURE
SUPPLY VOLTAGE
TECHNICAL DATA
NL
HOOFDSTUK 4
CAPACITEIT DROOG
WASGOED
AANSLUITWAARDE
STROOMSTERKTE VAN DE
ZEKERING
CENTRIFUGE
(t/min.)
DRUK HYDRAULISCHE POMP
NETSPANNING
TECHNISCHE GEGEVENS
Page 16
16
FR
IT
CAPITOLO 5
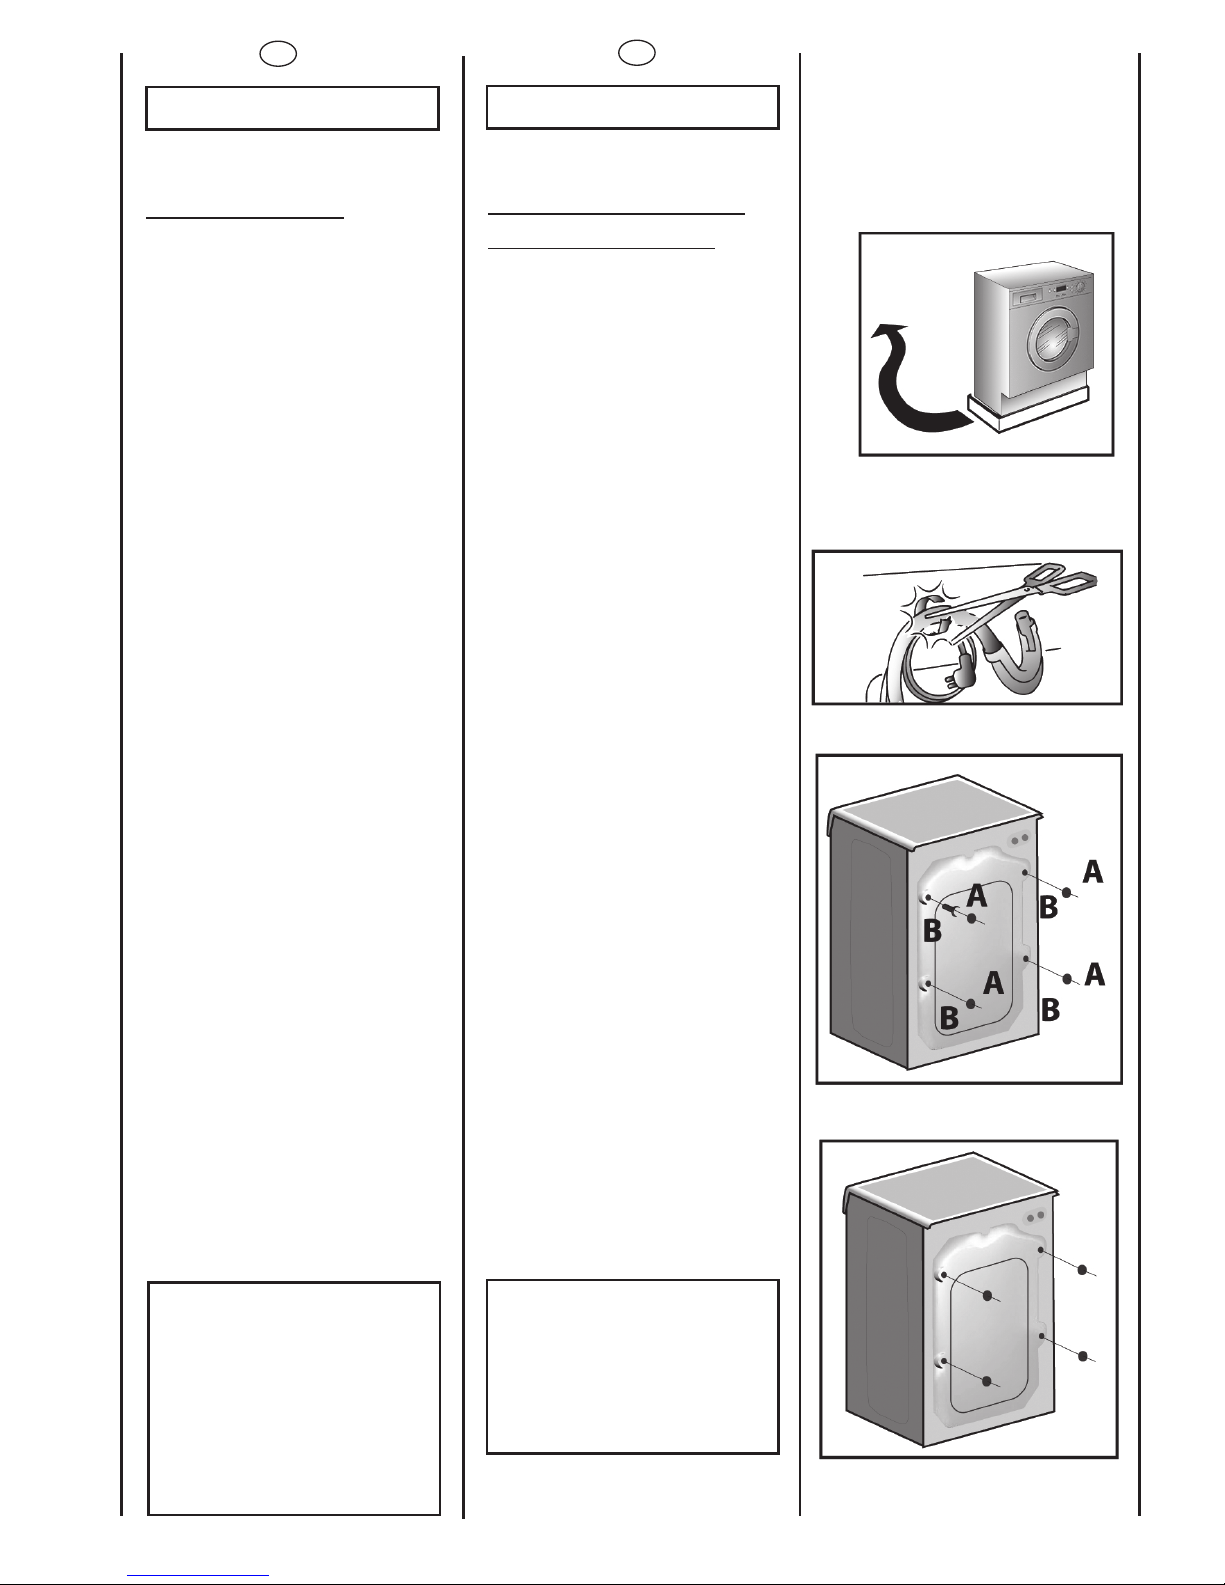
MESSA IN OPERA
INSTALLAZIONE
Porti la macchina vicino al
luogo di utilizzo senza il
basamento dell’imballo.
Tagliare le fascette
fermatubo, prestando
attenzione di non
danneggiare il tubo e il
cavo elettrico
Svitare le 4 viti (A) sul lato
posteriore e rimuovere i 4
distanziali (B).
Richiudere i 4 fori utilizzando
i tappi contenuti nella busta
istruzione.
ATTENZIONE:
NON LASCI ALLA
PORTATA DI BAMBINI
GLI ELEMENTI
DELL’IMBALLAGGIO IN
QUANTO POTENZIALI
FONTI DI PERICOLO.
CHAPITRE 5
MISE EN PLACE
INSTALLATION
Placer la machine près du
lieu d’utilisation sans la base
d’emballage.
Couper avec précaution le
cordon qui maintient le
tuyeau d’évacuation et le
cable d’alimentation
Enlever les 4 vis de fixation
indiquées en (A) et enlever
les espaces indiqués en (B)
Couvrir les quatre trous en
utilisant les capuchons
prévus à cet effet dans le
sachet où se trouve la
notice
ATTENTION:
NE PAS LAISSER À LA
PORTÉE DES ENFANTS
DES ELEMENTS
D’EMBALLAGE QUI
PEUVENT CAUSER DES
RISQUES.
PT
CAPÍTULO 5
INSTALAÇÃO
Coloque a máquina, sem a
base da embalagem, perto
do local onde vai ficar
permanentemente
instalada.
Corte cuidadosamente a
correia de segurança que
segura o fio principal e o
tubo da mangueira.
Remova os 4 parafusos
fixadores assinalados e as 4
porcas assinaladas.
Para alguns modelos 1 ou
mais espaços cairão dentro
da máquina;
Inclinando a máquina,
poderão ser removidos os
espaços.
Tape os 4 buracos utilizando
as tampas que vêm no
pack do manual de
instruções.
ATENÇÃO:
NÃO DEIXE A
EMBALAGEM DA
MÁQUINA OU OS SEUS
COMPONENTES AO
ALCANCE DE
CRIANÇAS: ELA É UMA
POTENCIAL FONTE DE
PERIGO.
IT
CAPITOLO 5
MESSA IN OPERA
INSTALLAZIONE
Porti la macchina vicino al
luogo di utilizzo senza il
basamento dell’imballo.
Tagliare le fascette
fermatubo, prestando
attenzione di non
danneggiare il tubo e il
cavo elettrico
Svitare le 4 viti (A) sul lato
posteriore e rimuovere i 4
distanziali (B).
In alcuni modelli 1 o più
distanziali cadranno
all'interno della
macchina; Inclinare in
avanti l'apparecchio per
rimuovere i distanziali.
Richiudere i 4 fori utilizzando
i tappi contenuti nella busta
istruzione.
ATTENZIONE:
NON LASCI ALLA
PORTATA DI BAMBINI
GLI ELEMENTI
DELL’IMBALLAGGIO IN
QUANTO POTENZIALI
FONTI DI PERICOLO.
Page 17
17
DE
KAPITEL 5
INBETRIEBNAHME
INSTALLA
TION
Gerät ohne
Verpackungsunterteil in die
Nähe des Aufstellungsortes
bringen.
Schneiden Sie das
Kunststoffband der
Schlauchbefestigung durch.
Achten Sie darauf, den
Schlauch und das Kabel
nicht zu beschädigen.
Schrauben Sie die 4
Schrauben (A) auf der
Rückseite ab und entfernen
Sie die 4 Distanzstücke (B).
Schließen Sie die 4
Öffnungen mit den im
Beipack mitgelieferten
Stöpseln.
ACHTUNG:
DIE VERPACKUNG IST IN
DEN HÄNDEN VON
KINDERN EINE
GEFAHRENQUELLE. BITTE
ENTSORGEN SIE DAS
VERPACKUNGS-
MATERIAL
ORDNUNGSGEMÄß.
EN
CHAPTER 5
SETTING UP
INSTALLA
TION
Move the machine near its
permanent position without
the packaging base.
Carefully cut the securing
strap that holds the main
cord and the drain hose.
Remove the 4 fixing screws
marked (A) and remove the
4 spacers marked (B)
Cover the 4 holes using the
caps provided in the
instruction booklet pack.
WARNING:
DO NOT LEAVE THE
PACKAGING IN THE
REACH OF CHILDREN
AS IT IS A POTENTIAL
SOURCE OF DANGER.
NL
HOOFDSTUK 5
INSTALLATIE
Breng de machine (zonder
de onderkant van de
verpakking) dicht bij de
plaats waar hij komt te
staan.
Knip voorzichtig de
beveiligingslus van het snoer
en de afvoerslang door.
Verwijder de 4 schroeven zie
(A) en verwijder de 4
pluggen zie (B)
Vul de 4 gaatjes op met de
dopjes die in de verpakking
bij de gebruiksaanwijzing
zitten.
WAARSCHUWING:
ZORG ERVOOR DAT HET
VERPAKKINGSMATERI-
AAL BUITEN HET BEREIK
VAN KINDEREN BLIJFT
OMDAT DAT GEVAAR
KAN OPLEVEREN.
DE
KAPITEL 5
INBETRIEBNAHME
INSTALLA
TION
Gerät ohne
Verpackungsunterteil in die
Nähe des Aufstellungsortes
bringen.
Schneiden Sie das
Kunststoffband der
Schlauchbefestigung durch.
Achten Sie darauf, den
Schlauch und das Kabel
nicht zu beschädigen.
Schrauben Sie die 4
Schrauben (A) auf der
Rückseite ab und entfernen
Sie die 4 Distanzstücke (B).
Bei einigen Modellen fallen
die Abstandhalter in
Gerätegehäuse hinein.
Lehnen Sie das Gerät nach
vorne, um die Abstandshalter
zu entfernen.
Schließen Sie die 4
Öffnungen mit den im
Beipack mitgelieferten
Stöpseln.
ACHTUNG:
DIE VERPACKUNG IST IN
DEN HÄNDEN VON
KINDERN EINE
GEFAHRENQUELLE. BITTE
ENTSORGEN SIE DAS
VERPACKUNGSMATERIAL
ORDNUNGSGEMÄß.
NL
HOOFDSTUK 5
INSTALLATIE
Breng de machine (zonder
de onderkant van de
verpakking) dicht bij de
plaats waar hij komt te
staan.
Knip voorzichtig de
beveiligingslus van het snoer
en de afvoerslang door.
Verwijder de 4 schroeven zie
(A) en verwijder de 4
pluggen zie (B)
Bij sommige modellen vallen
de 1 of meerdere
afstandsbouten in de
machine.
Door de machine te
kantelen kunnen deze
verwijderd worden.
Vul de 4 gaatjes op met de
dopjes die in de verpakking
bij de gebruiksaanwijzing
zitten.
WAARSCHUWING:
ZORG ERVOOR DAT HET
VERPAKKINGSMATERIAAL BUITEN HET BEREIK
VAN KINDEREN BLIJFT
OMDAT DAT GEVAAR
KAN OPLEVEREN.
EN
CHAPTER 5
SETTING UP
INSTALLA
TION
Move the machine near its
permanent position without
the packaging base.
Carefully cut the securing
strap that holds the main
cord and the drain hose.
Remove the 4 fixing screws
marked (A) and remove the
4 spacers marked (B)
For some models 1 or more
spacers will fall inside the
machine;
By tilting the machine,
remove the mentioned
spacers.
Cover the 4 holes using the
caps provided in the
instruction booklet pack.
WARNING:
DO NOT LEAVE THE
PACKAGING IN THE
REACH OF CHILDREN
AS IT IS A POTENTIAL
SOURCE OF DANGER.
Page 18

18
min 50 cm
max 85 cm
+2,6 mt max
max 100 cm
min 4 cm
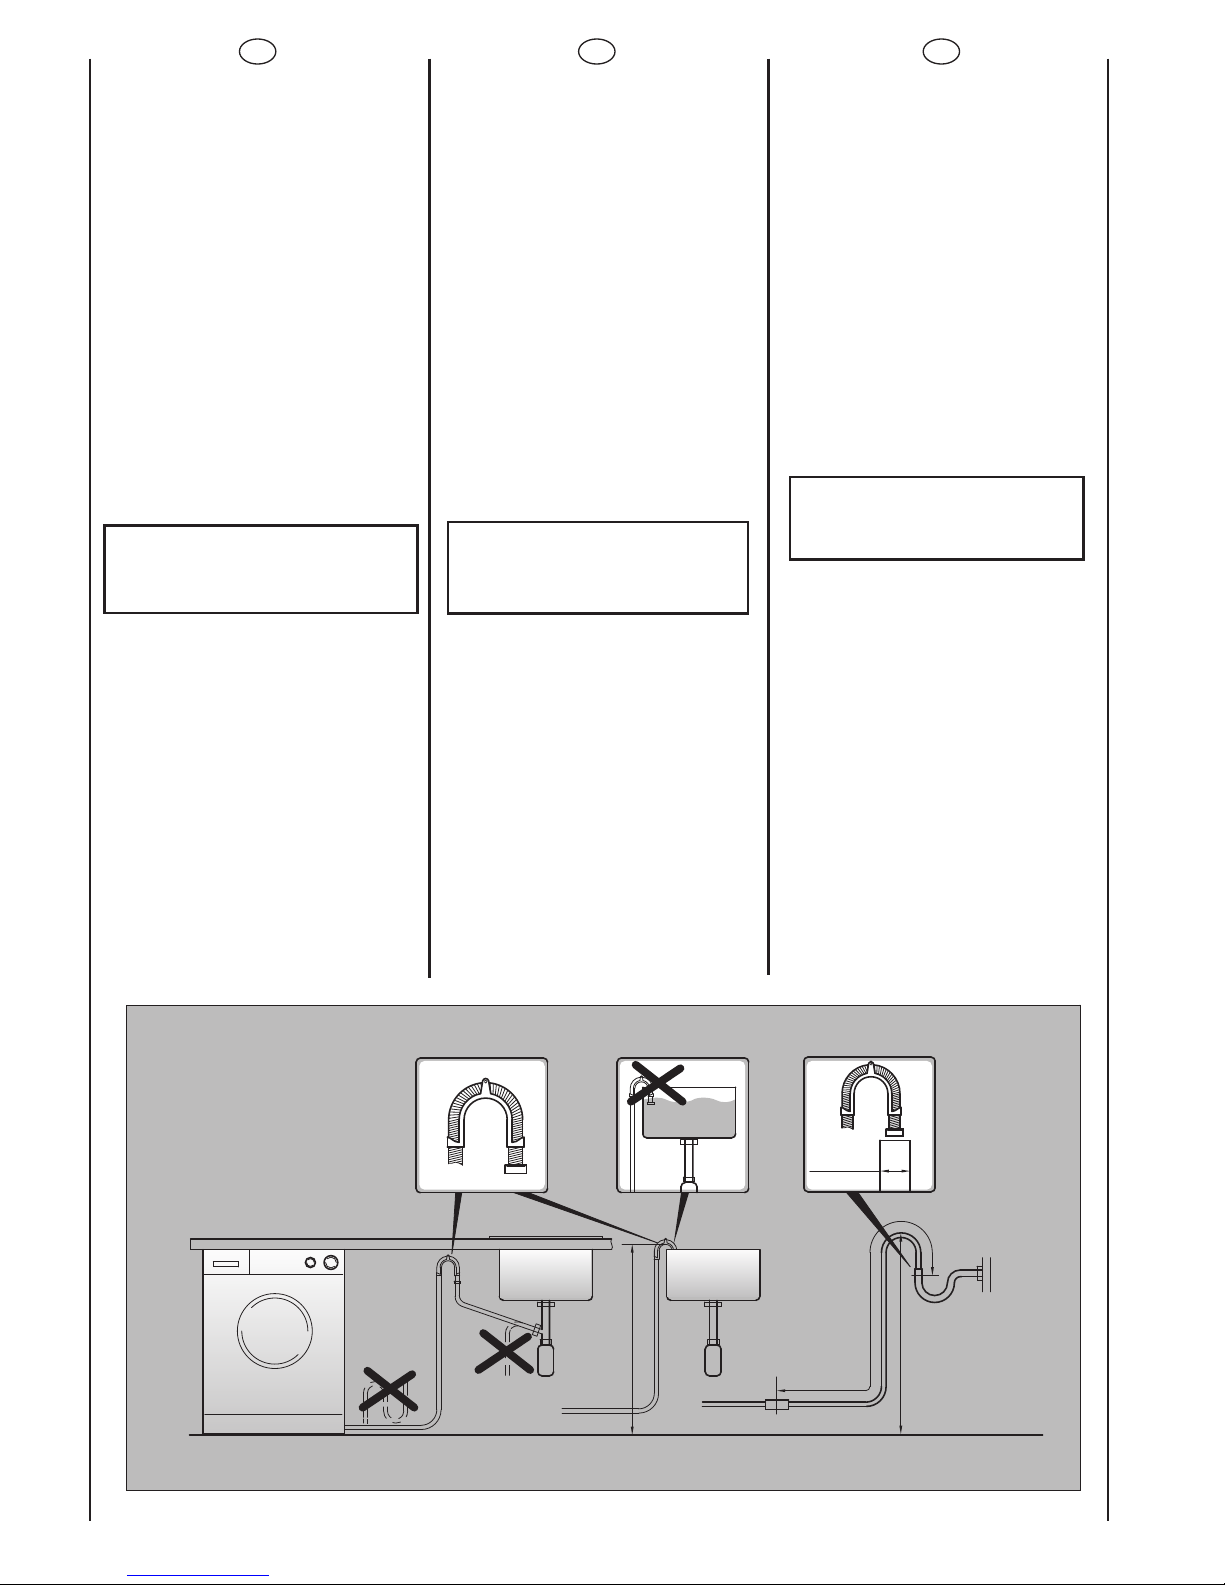
Appliquer la feuille
supplémentaire sur le fond
comme dans la figure.
Raccorder le tuyau d’arrivée
d’eau au robinet.
L'appareil doit être relié à
l'arrivée d'eau exlusivement
avec les tuyaux fournis .
Ne pas réutiliser les anciens
tuyaux.
ATTENTION:
NE PAS OUVRIR LE ROBINET
Approcher la machine contre
le mur en faisant attention à
ce que le tuyau n’ait ni
coudes ni étranglements.
Raccorder le tuyau de
vidange au rebord de la
baignoire ou, mieux encore, à
un dispositif fixe d’évacuation,
hauteur mini. 50 cm, et de
diamètre supérieur au tuyau
de la machine à laver.
En cas de besoin, utiliser le
coude rigide livré avec la
machine.
FR IT
Applichi il foglio di polionda
sul fondo come mostrato in
figura.
Allacci il tubo dell’acqua al
rubinetto.
L’apparecchio deve essere
connesso alla rete idrica
solo con i nuovi tubi di
carico forniti in dotazione. I
vecchi tubi di carico non
devono essere riutilizzati.
ATTENZIONE:
NON APRA IL RUBINETTO
Accosti la lavatrice al muro
facendo attenzione che
non vi siano curve o
strozzature, allacci il tubo di
scarico al bordo della
vasca.
o meglio a uno scarico fisso;
altezza minima 50 cm, di
diametro superiore al tubo
della lavatrice.
In caso di necessità utilizzare
la curva rigida in dotazione.
PT
Fixe a placa de material
ondulado no fundo da
mãquina, da forma indicada
na figura.
Ligue a mangueira de
admissão de água à torneira
de alimentação.
Os acessórios devem estar
ligados à torneira da água,
usando mangueiras novas.
As mangueiras não devem
ser reutilizadas.
ATENÇÃO:
NÃO ABRA A TORNEIRA!
Encoste a máquina à parede.
Prenda o fim da mangueira
de esgoto por cima da borda
da bacia ou do tubo de
descarga,assegurando-se de
que não esteja torcida ou
dobrada.
Sempre que possível, utilize um
tubo de esgoto fixo com um
diâmetro superior ao da
mangueira de esgoto da
máquina de lavar, a fim de
permitir a saída do ar.
O topo da mangueira de
esgoto deverá estar a uma
altura mínima de 50 cm.
Se necessário use a curva
rígida fornecida juntamente
com a máquina.
Type 1
Type 2
Page 19
min 50 cm
max 85 cm
+2,6 mt max
max 100 cm
min 4 cm
19
EN
Fix the sheet of corrugated
material on the bottom as
shown in picture.
Connect the fill hose
to the tap.
The appliance must be
connected to the water
mains using new hose-sets.
The old hose-sets should not
be reused.
IMPORTANT:
DO NOT TURN THE TAP
ON AT THIS TIME.
Position the washing
machine next to the wall.
Hook the outlet tube to the
edge of the bath tub,
paying attention that there
are no bends or
contractions along the tube.
It is better to connect the
discharge hose to a fixed
outlet of a diameter greater
than that of the outlet tube
and at a height of min. 50
cm. If is necessary to use the
plastic sleeve supplied.
DE
Befestigen Sie die gewellte
Bodenplatte wie in der
Abbildung dargestellt.
Den Zulaufschlauch an den
Wasserhahn anschließen.
Beim Anschließen des
Zulaufschlauchs ist die
Benutzung einer Rohrzange zu
vermeiden. Handfestes Ziehen
reicht völlig aus.
Das Gerät muß an die
Wasserversorgung mit neuen
Schläuchen angeschlossen
werden.
Alte Schläuche dürfen nicht
wiederverwendet werden.
ACHTUNG:
WASSERHAHN NOCH NICHT
ÖFFNEN.
Die Waschmaschine an die
Wand rücken, darauf achten,
daß dabei der Schlauch nicht
verkrümmt oder eingeengt
wird.
Ablaufschlauch am
Wannenrand
befestigen,oder an einem
festen Abfluß von mindestens
50 cm Höhe anbringen, dessen
Durchmesser größer ist als der
des
Waschmaschinenschlauchs.
Falls erforderlich den
mitgelieferten starren
Rohrbogen benutzen.
NL
Bevestig de dempplaat op
de bodem, (zie tekening).
Verbind de
watertoevoerslang met de
waterkraan.
Het apparaat moet
aangesloten worden aan
de waterkraan met behulp
van de watertoevoerslang.
Maak gebruik van de
nieuwe watertoevoerslang,
gebruik niet de oude!
BELANGRIJK:
DRAAI DE WATERKRAAN
NIET OPEN
Zet de wasmachine dicht
tegen de muur aan.
Let er op dat er geen
bochten of vernauwingen in
de buis zitten.
Het is het beste om de
afvoerslang aan te sluiten
op een vaste afvoer met
een doorsnee die groter is
dan die van de afvoerslang
en op een hoogte van
minstens 50 cm.
Gebruik zonodig de
bligeleverde slanggeleider.
Page 20
20
FR
IT
Mettre la machine à niveau
en reglant les 4 pieds:
a) Tourner dans le sens des
aiguilles d’une montre
l’écrou de façon à
dévérouiller la vis du pied.
b) Tourner le pied et le faire
monter ou descendre
jusqu’à obtenir une parfaite
adhérence au sol.
c) Enfin bloquer le pied en
revissant l’écrou dans le sens
inverse des aiguilles d’une
montre et le faire adhérer au
fond de la machine.
Vérifier que la manette soit
sur la position “OFF” et que le
hublot soit fermé.
Brancher la prise.
ATTENTION:
Au cas où il serait nécessaire
de remplacer le cable
d’alimentation, assurez vous
de respecter les codes-
couleur suivants dans le
branchement de chacun
des fils:
BLEU - NEUTRE (N)
MARRON - PHASE (L)
VERT-JAUNE - TERRE ( )
Une fois l'appareil installé, la
prise électrique doit rester
accessible.
Livelli la macchina con i 4
piedini:
a) Girare in senso orario il
dado per sbloccare la vite
del piedino.
b) Ruotare il piedino e farlo
scendere o salire fino ad
ottenere la perfetta
aderenza al suolo.
c) Bloccare infine il piedino
riavvitando il dado in senso
antiorario, fino a farlo aderire
al fondo della lavatrice.
Si assicuri che la manopola
sia in posizione “OFF” e l’oblò
sia chiuso.
Inserisca la spina.
ATTENZIONE:
nel caso si renda necessario
sostituire il cavo di
alimentazione, assicurarsi di
rispettare il seguente
codice-colore durante il
collegamento dei singoli fili:
BLU - NEUTRO (N)
MARRONE - FASE (L)
GIALLO-VERDE - TERRA ( )
L’apparecchio deve essere
posto in modo che la spina
sia accessibile ad
installazione avvenuta.
A
B
C
Assegure-se que o botão está
em posição de desligado
(OFF) e a porta está fechada
Ligue a máquina à corrente,
inserindo a ficha do
respectivo cabo de
alimentação na tomada.
ATENÇÃO:
Se for necessário proceder à
substituição do cabo de
alimentação de energia, ao
efectuar a ligação dos fios
individuais, deve sempre
certificar-se de que respeita o
seguinte código de cores:
AZUL - NEUTRO (N)
CASTANHO - FASE (L)
AMARELO-VERDE - TERRA ( )
Depois da instalação, os
acessórios devem estar
posicionados, pelo que a
tomada deve estar num local
acessível.
PT
Use os 4 pés para nivelar a
máquina com o chão:
a) Rode a porca no sentido
dos ponteiros do relógio para
soltar a rosca de fixação do
pé.
b) Rode a pé para o erguer
ou baixar até estar
firmemente assente no chão.
c) Fixe o pé nessa posição
rodando a porca no sentido
contrário co dos ponteiros do
relógio até embater no fundo
da máquina.
Page 21

21
DE
Richten Sie das Gerät mit
den 4 Verstellfüßen
waagerecht aus:
a) Kontermuttern im
Uhrzeigersinn lösen.
b) Standfuß einregulieren, bis
das Gerät genau
ausgerichtet ist (möglichst
mit der Wasserwaage
justieren!).
c) Kontermuttern (gegen
den Uhrzeigersinn) festziehen.
Wichtig: Sollte das Gerät auf
einen Sockel aufgestellt
werden,ist es durch eine
Sockelbefestigung zu sichern.
Erkundigen Sie sich bitte
hierfür im Fachhandel.
Der Hersteller haftet nicht für
unsachgemäße Aufstellung
und Installation.
Sicherstellen, daß der
Schalter auf “OFF” steht,und
das Bullauge geschlossen ist.
Stecker einstecken.
ACHTUNG:
Falls das Netzkabel
ausgetauscht werden sollte,
achten Sie beim Anschluss
der einzelnen Kabel
unbedingt auf die folgende
Farbenbelegung:
BLAU - NULLLEITER (N)
BRAUN - PHASE (L)
GELB-GRÜN - ERDE ( )
Nach der Installation muß der
Anschluß zugänglich sein.
EN
Use the 4 feet to level the
machine with the floor:
a) Turn the nut clockwise to
release the screw adjuster of
the foot.
b) Rotate foot to raise or
lower it until it stands firmly on
the ground.
c) Lock the foot in position
by turning the nut anticlockwise until it comes up
against the bottom of the
machine.
Ensure that the knob is on the
“OFF” position and the load
door is closed
Insert the plug.
ATTENTION:
should it be necessary to
replace the supply cord,
connect the wire in
accordance with the
following colours/codes:
BLUE - NEUTRAL (N)
BROWN - LIVE (L)
YELLOW-GREEN - EARTH ( )
After installation, the
appliance must be
positioned so that the plug is
accessible.
NL
Gebruik de 4 pootje om de
machine waterpas te zetten:
a) Kontra moer losdraaien
b) Apparaat waterpas zetten
m.b.v. verstelbare voeten
(maak eventueel gebruik
van een waterpas)
c) Kontra moer weer
vastdraaien.
Controleer of alle knoppen
op “OFF” staan en of de
vuldeur gesloten is.
Steek de stekker in het
stopcontact.
LET OP:
Mocht het nodig zijn dat het
aansluitsnoer vervangen
moet worden,verbind de
draden dan volgens
onderstaande kleur/codes
(wij raden aan dit door een
erkende installateur te laten
doen):
BLAUW - NEUTRAAL (N)
BRUIN - FASE (L)
GEEL-GROEN -AARDE ( )
Na installatie, plaatst u het
apparaat zo, het
stopcontact makkelijk
toegangbaar is.
Page 22
CAPITOLO 6
22
IT
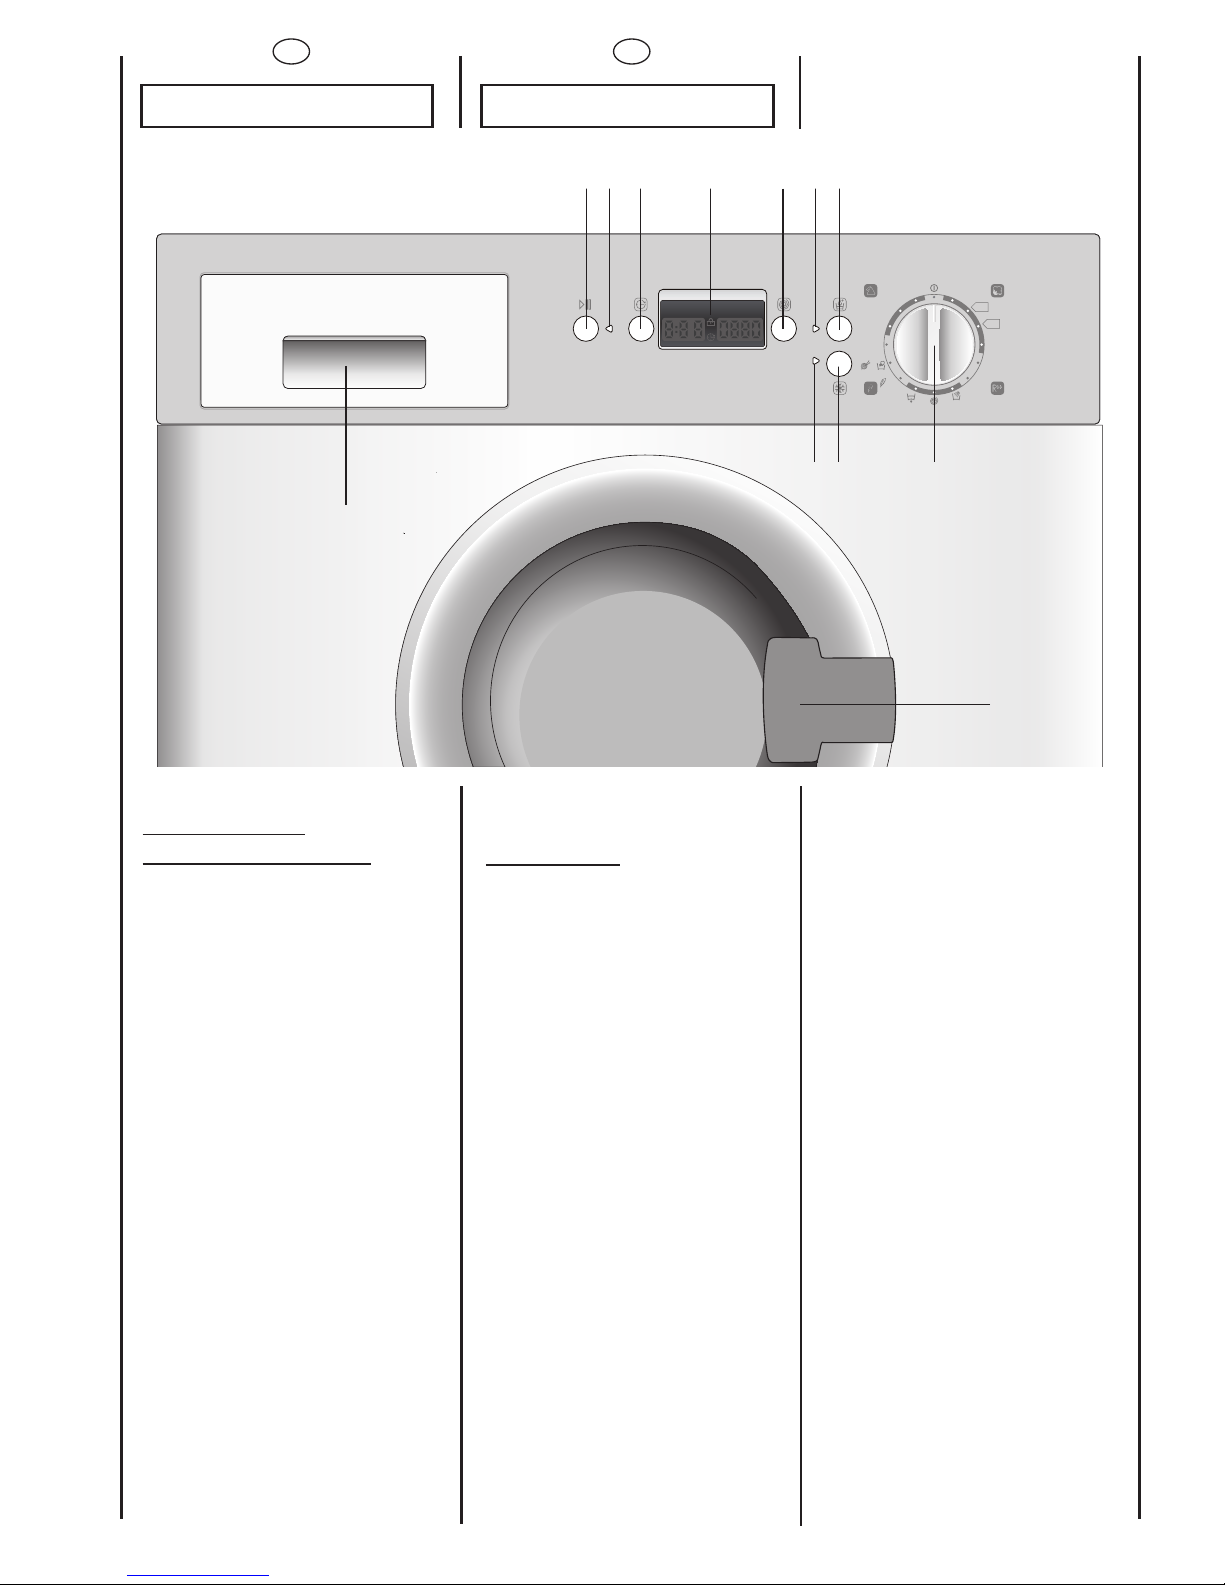
COMANDI
Maniglia apertura oblò
Spia inizio programma
Tasto Avvio/pausa
Tasto Stop Allergia
Tasto Lavaggio Freddo
Tasto Partenza Differita
Tasto Selezione Centrifuga
Display Digit
Spie tasti
Manopola programmi di
lavaggio con OFF
Cassetto detersivo
A
B
C
D
E
F
G
H
M
N
P
COMANDI
A
P
C
FH
GMD N
EM
B
BEDIENUNGSELEMENTE
6kg
800 rpm
CWB 0862 DN1
90° + Pre
40°
50°
30°
30°
30°
30°
14 Min
30 Min
59 Min
60°C
40°C
&
EcoMix
20°
OFF
P
I
A
D
R
E
X
D
I
M
A
C
T
I
E
L
E
S
D
T
T
O
O
N
C
P
EM
A
N
G
DMHFBC
44’
30’
ActivEco
20°
&
30°
30°
50° + Pre
40°
30°
90° + Pre
40°C
60°C
PT
CAPÍTULO 6
DESCRIÇÃO
DOS COMANDOS
Manipulo para abrir a porta
Indicador luminoso de
arranque do programa
Botão início (START)
Tecla Aquaplus
Tecla de lavagem a frio
Botão de início de
funcionamento retardado
Tecla velocidade de
centrifugação
Visor “Digital”
Luzes das teclas
Botão de selecção do programa
de lavagem com a posição OFF
Gaveta para detergente
P
EM
A
N
G
DMHFBC
Page 23
23
DE
KAPITEL 6
EN
CHAPTER 6
NL
HOOFDSTUK 6
BEDIENUNGSELEMENTE
Türöffnungsgriff
Anzeige programmstart
Start/Pause Taste
Taste “Aquaplus”
Kaltwasch Taste
Taste Startzeitvorwahl
Taste “Schleuderdrehzahl”
Display Digit
Tastenanzeige
Waschprogrammwahlschalter mit OFF
Waschmittelbehälter
CONTROLS
Door handle
Programme start light
Start button
Aquaplus button
Cold wash button
Start Delay button
Spin Speed button
Digital Display
Buttons indicator light
Timer knob for wash
programmes with OFF position
Detergent drawer
BEDIENINGSP
ANEEL
Deurgreep
Programma Start Lampje
Knop Start/Pauze
"Aquaplus" –knop
Knop Koud Water
Knop voor Uitgestelde Start
Knop regeling
centrifugesnelheid
“Digitaal” Display
Indicatielampjes bij de
knoppen
Programmaknop wassen
Met OFF
Wasmiddelbakje
Page 24
FR
IT
DESCRIPTION DES
COMMANDES
POIGNEE D’OUVERTURE DU
HUBLOT
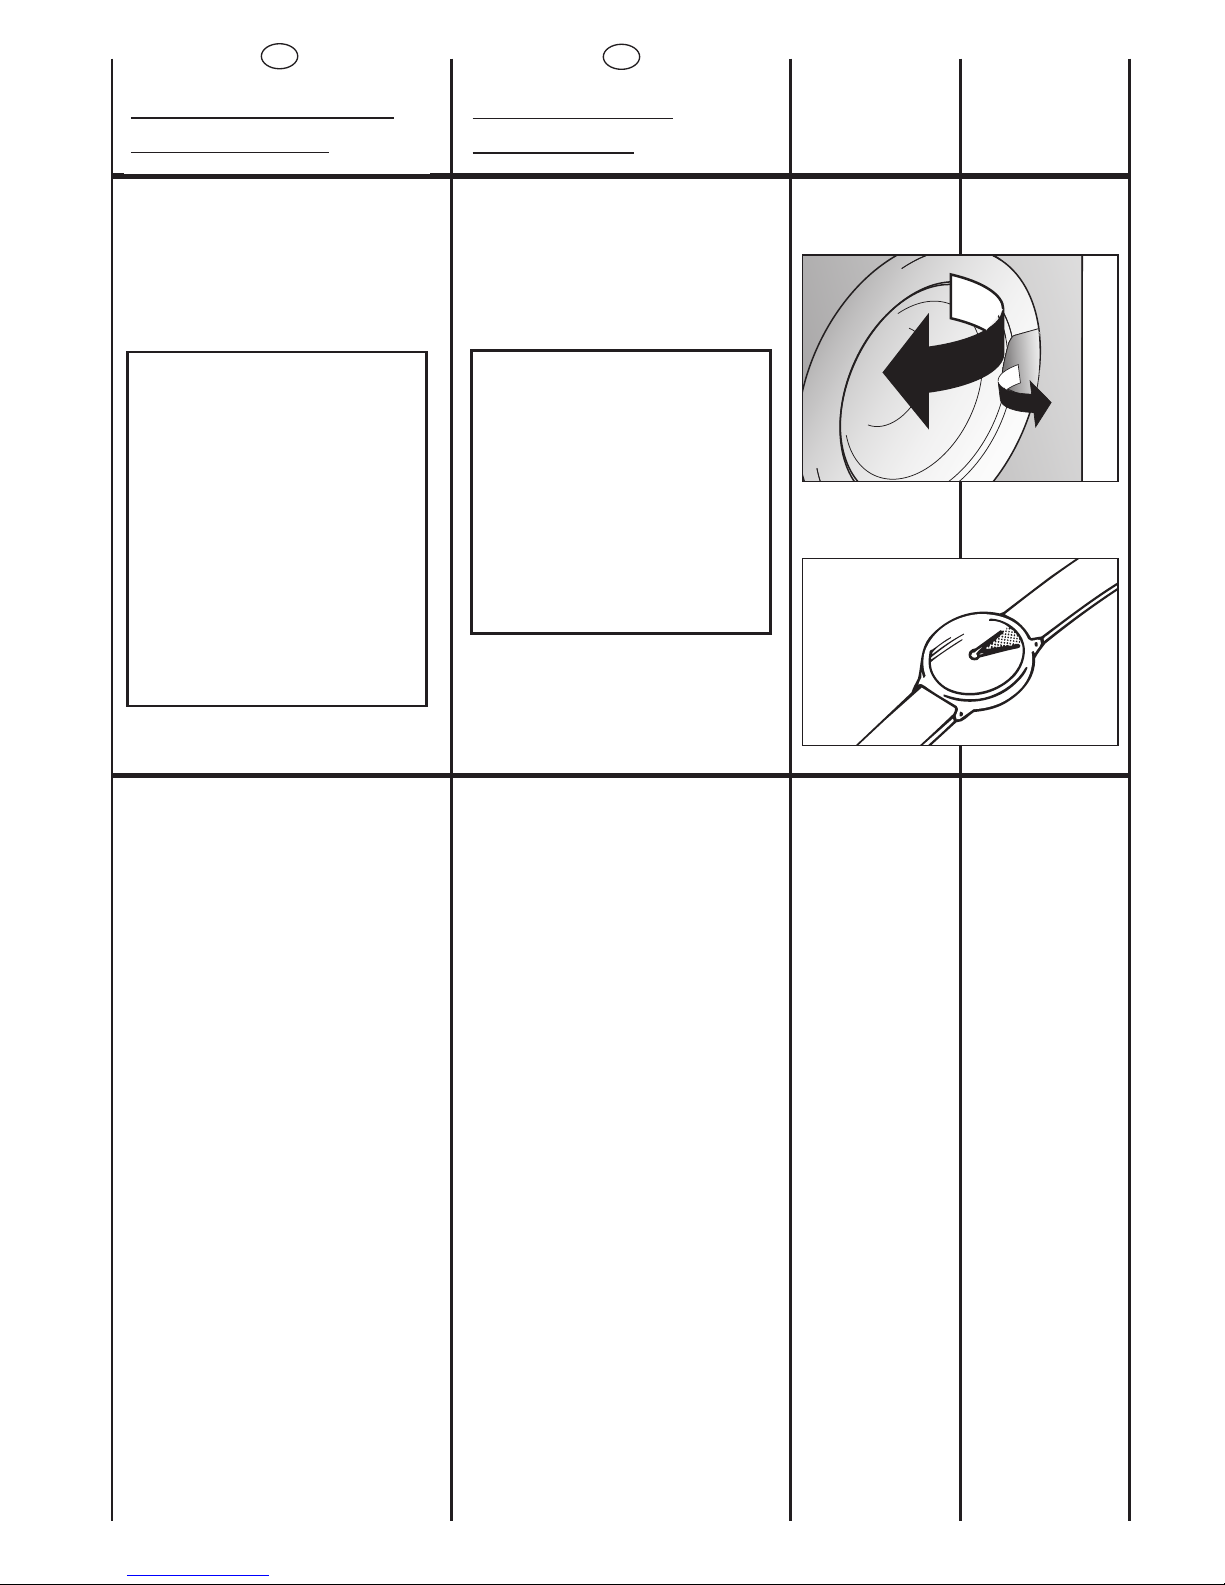
Pour ouvrir le hublot,
actionner la poignée en
faisant levier comme
indiqué dans la figure.
ATTENTION:
UN DISPOSITIF SPECIAL
DE SECURITE EMPECHE
L’OUVERTURE
IMMEDIATE DU HUBLOT
A LA FIN DU LAVAGE.
APRES LA PHASE
D’ESSORAGE, ATTENDRE
2 MINUTES AVANT
D’OUVRIR LE HUBLOT.
DESCRIZIONE
COMANDI
MANIGLIA APERTURA OBLÒ
Per aprire l’oblò agire sulla
maniglia facendo leva
come indicato in figura.
ATTENZIONE:
UNO SPECIALE
DISPOSITIVO DI
SICUREZZA IMPEDISCE
L’IMMEDIATA APERTURA
DELL’OBLO” ALLA FINE
DEL LAVAGGIO. AL
TERMINE DELLA FASE DI
CENTRIFUGA ATTENDA 2
MINUTI PRIMA DI
APRIRE L’OBLÒ.
24
2 min.
TEMOIN DE PROGRAMME EN
COURS
Ce témoin s’allume dès que
la touche START est pressée.
SPIA INIZIO PROGRAMMA
Si illumina dopo avere premuto
il tasto START.
B
POIGNEE D’OUVERTURE DU
HUBLOT
Pour ouvrir le hublot,
actionner la poignée en
faisant levier comme
indiqué dans la figure.
ATTENTION:
UN DISPOSITIF SPECIAL
DE SECURITE EMPECHE
L’OUVERTURE
IMMEDIATE DU HUBLOT
A LA FIN DU LAVAGE.
APRES LA PHASE
D’ESSORAGE, ATTENDRE
2 MINUTES AVANT
D’OUVRIR LE HUBLOT.
MANIGLIA APERTURA OBLÒ
Per aprire l’oblò agire sulla
maniglia facendo leva
come indicato in figura.
ATTENZIONE:
UNO SPECIALE
DISPOSITIVO DI
SICUREZZA IMPEDISCE
L’IMMEDIATA APERTURA
DELL’OBLO” ALLA FINE
DEL LAVAGGIO. AL
TERMINE DELLA FASE DI
CENTRIFUGA ATTENDA 2
MINUTI PRIMA DI
APRIRE L’OBLÒ.
2 min.
TEMOIN DE PROGRAMME EN
COURS
Ce témoin s’allume dès que
la touche START est pressée.
SPIA INIZIO PROGRAMMA
Si illumina dopo avere premuto
il tasto START.
B
INDICADOR LUMINOSO DE
ARRANQUE DO PROGRAMA
Este indicador luminoso iluminase depois de o botão”START”
(arranque) ter sido premido.
ABRIR A PORTA
Para abrir a porta rodar o
manipulo como ilustrado na
fig.
ATENÇÃO:
UM DISPOSITIVO
DE SEGURANÇA
ESPECIAL IMPEDE
A ABERTURA
DA PORTA NO FIM DO
CICLO DE LAVAGEM.
UMA VEZ CONCLUÍDO
O CICLO DE
CENTRIFUGAÇÃO
DEVERÁ ESPERAR
2 MINUTOS PARA
PODER ABRIR
A PORTA.
PT
DESCRIÇÃO DOS
COMANDOS
Page 25
25
DE
BESCHREIBUNG DER
BEDIENELEMENTE
TÜRÖFFNUNGSGRIFF
Um das Bullauge zu öffnen,
drücken Sie den Hebel im
Türgriff.
ACHTUNG:
DIE SICHERHEITSTÜRVERRIEGELUNG VERHINDERT
DAS SOFORTIGE ÖFFNEN
DES BULLAUGES NACH
BEENDIGUNG DES WASCHPROGRAMMS. WARTEN SIE
DAHER NACH DEM LETZTEN
SCHLEUDERN CA. ZWEI
MINUTEN, BEVOR SIE DIE TÜR
ÖFFNEN.
ANZEIGE PROGRAMMSTART
Sie leuchtet auf,sobald die
Taste START gedrückt wurde.
DESCRIPTION OF
CONTROL
DOOR HANDLE
Press the finger-bar inside
the door handle to open the
door
IMPORTANT:
A SPECIAL SAFETY
DEVICE PREVENTS THE
DOOR FROM OPENING
AT THE END OF THE
WASH/SPIN CYCLE. AT
THE END OF THE SPIN
PHASE WAIT UP TO 2
MINUTES BEFORE
OPENING THE DOOR.
PROGRAMME START LIGHT
This lights up when the START
button has been pressed.
ENNL
BEDIENINGSPANEEL
DEURGREEP
Gebruik de knop binnenin
de deurgreep om de deur
te openen.
BELANGRIJK:
EEN SPECIALE
VEILIGHEIDSVERGRENDELING ZORGT ERVOOR
DAT DE VULDEUR NA
AFLOOP VAN HET
WASPROGRAMMA NIET
OPEN KAN. WACHT NA
HET CENTRIFUGEREN
NOG 2 MINUTEN VOOR U
DE VULDEUR OPENT.
PROGRAMMA START LAMPJE
Dit lampje gaat branden als
het programma is gestart.
ANZEIGE PROGRAMMSTART
Sie leuchtet auf,sobald die
Taste START gedrückt wurde.
PROGRAMME START LIGHT
This lights up when the START
button has been pressed.
PROGRAMMA START LAMPJE
Dit lampje gaat branden als
het programma is gestart.
GRIFF TÜRÖFFNUNG
Um die Tür zu öffnen,
drücken Sie auf dem Griff,
wie in der Zeichnung
abgebildet.
DEURGREEP
Om de vuldeur te openen
handel zoals bijgaande
tehening aangeeft.
OTEVÍRÁNÍ DVÍÜEK
PROGRAMME START LIGHT
This lights up when the START
button has been pressed.
HANDLE DOOR
To open the door turn the
handle in the manner
illustrated in fig.
IMPORTANT:
A SPECIAL SAFETY
DEVICE PREVENTS THE
DOOR FROM OPENING
AT THE END OF THE
WASH/SPIN CYCLE. AT
THE END OF THE SPIN
PHASE WAIT UP TO 2
MINUTES BEFORE
OPENING THE DOOR.
Page 26

FR IT
TOUCHE MARCHE/PAUSE
Appuyez sur la touche pour
commencer le cycle.
ATTENTION:
LORSQUE LA TOUCHE
START A ETE
ENCLENCHEE L’APPAREIL
NE COMMENCERA LE
CYCLE QU’APRES
QUELQUES SECONDES.
CHANGER LA
PROGRAMMATION APRES LE
DEMARRAGE DE LA MACHINE
(PAUSE)
Maintenez la pression sur le
bouton “START/PAUSE” durant
2 secondes, les témoins des
boutons d’options
clignoteront et l’indicateur
du temps restant indiquera
que la machine est en
pause. Modifiez et pressez le
bouton “START/PAUSE” pour
relancer le programme.
Le voyant lumineux " Témoin
de verrouillage de porte "
reste allumé pendant environ
2 minutes. Il est possible
d’ouvrir la porte une fois le
voyant lumineux éteint.
Pour relancer le programme,
appuyez une nouvelle fois
sur le bouton "MARCHE".
ANNULATION D’UN
PROGRAMME SELECTIONNÉ
Afin d’annuler un
programme,positionnez le
sélecteur sur OFF
Sélectionnez un programme
différent
Repositionnez le sélecteur sur
OFF.
TASTO AVVIO/PAUSA
Premere per avviare il ciclo
impostato con la manopola
programmi.
NOTA: DOPO AVERE
AVVIATO LA
LAVABIANCHERIA CON IL
TASTO START SI DOVRÀ
ATTENDERE ALCUNI
SECONDI AFFINCHÉ LA
MACCHINA INIZI IL
PROGRAMMA.
MODIFICARE IMPOSTAZIONI
DOPO AVVIO DEL
PROGRAMMA (PAUSA)
Dopo l’avvio del programma
possono essere modificate solo
le regolazioni e le opzioni
tramite i tasti opzione.Tenere il
tasto “AVVIO/PAUSA”premuto
per circa 2 secondi, il
lampeggio delle spie dei tasti
opzione e del tempo residuo
indica che la macchina è in
pausa, modifichi quanto
desiderato e prema
nuovamente il tasto
“AVVIO/PAUSA”annullando
l’intermittenza.
Se si desidera aggiungere o
togliere capi durante il
lavaggio,attendere DUE minuti
affinché il dispositivo di
sicurezza liberi il blocco
dell’oblò e ne permetta
l’apertura.
Effettuata la manovra,dopo
aver richiuso l’oblò e premuto
il tasto AVVIO/PAUSA, la
macchina ripartirà dal punto
in cui era stata fermata.
CANCELLAZIONE PROGRAMMA
IMPOSTATO
Per annullare il programma,
portare il selettore in posizione
OFF.
Selezionare un programma
diverso.
Riportare il selettore
programmi in posizione OFF.
26
C
PT
BOTÃO INÍCIO (START)
Depois de seleccionar o
programa espere que o
indicador luminoso da
velocidade de
centrifugação se acenda
antes de pressionar o botão
START (INICIO).
Pressione para iniciar o ciclo
seleccionado (de acordo
com o ciclo seleccionado o
indicador luminoso de uma
fase de lavagem acende-se).
NOTA: DEPOIS DE
ACCIONAR O BOTÃO
DE INÍCIO, ESTE,
DEMORARÁ ALGUNS
SEGUNDOS PARA
COMEÇAR A
TRABALHAR.
Alterar a programação após
o início do programa
(PAUSA)
O programa pode estar em
pausa em qualquer
momento durante o ciclo de
lavagem pressionando o
botão “START/PAUSE”
(INICIO/PAUSA) durante 4
segundos.
Quando a máquina está no
estado “PAUSA”, os
indicadores luminosos da
“fase de lavagem” e os
botões de opção irão piscar.
Para reiniciar o programa
pressione novamente o
botão START (INíCIO).
Se desejar alargar ou anular
a duração de lavagem,
espere 2 minutos até abrir a
porta em segurança.
Após ter feito essa escolha,
feche a porta, pressione o
botão de Início, e este
continuará a funcionar até
ao fim.
CANCELANDO O PROGRAMA
Para cancelar o programa tem
de rodar o botão de selecção
de programas para a posição
“OFF”(desligada).
Isto feito,seleccione então um
programa diferente.
Volte a rodar o botão de
selecção de programas para a
posição “OFF” (desligada).
Page 27
27
DE
START/PAUSE TASTE
Drücken Sie diese Taste, um das
Programm zu starten,die mit
dem Programmwahlschalter
gewählt wurde.
ANMERKUNG: NACH DER
BETÄTIGUNG DER STARTTASTE DAUERT ES EINIGE
SEKUNDEN, BIS DAS
GERÄT ANFÄNGT ZU
ARBEITEN.
EINSTELLUNGEN NACH DEM
PROGRAMMSTART ÄNDERN
(PAUSE)
Nachdem das Programm
gestartet wurde, können nur die
Programmoptionen und die
Zusatzfunktionen mit den
Funktionstasten verändert
werden.
Drücken Sie die Taste
“START/PAUSE” ca. 2 Sekunden
lang. Die Lampen der
Optionstasten und der
Restzeitanzeigen blinken, um
anzuzeigen, dass das Gerät sich
in einer Betriebspause befindet.
Verändern Sie nun die
gewünschten Einstellungen und
drücken Sie dann erneut die
Taste “START/PAUSE”, damit das
Blinken aufhört.
Wenn Sie während des
Programmablaufs Wäsche
entnehmen bzw. hinzufügen
wollen,warten Sie ZWEI Minuten,
damit der
Türverriegelungsmechanismus
die Tür entriegelt.
Nachdem Sie die Wäsche
entnommen bzw. hinzugefügt
haben, schließen Sie die Tür und
drücken Sie die START-Taste. Das
Gerät fängt wieder dort an zu
arbeiten,wo es aufgehört hatte.
EINGESTELLTES PROGRAMM
LÖSCHEN
Um das Programm zu löschen,
drehen Sie den
Programmwahlschalter auf OFF.
Wählen Sie nun ein anderes
Programm.
Drehen sie dann den
Programmwahlschalter wieder
auf OFF.
START BUTTON
Press to start the selected
cycle.
NOTE: WHEN THE START
BUTTON HAS BEEN
PRESSED, THE APPLIANCE
CAN TAKE FEW SECONDS
BEFORE STARTS
WORKING.
CHANGING THE SETTINGS
AFTER THE PROGRAMMES
HAS STARTED (PAUSE)
Press and hold the
“START/PAUSE” button for
about 2 seconds, the
flashing lights on the options
buttons and time remaining
indicator will show that the
machine has been paused,
adjust as required and press
the “START/PAUSE” button
again to cancel the flashing
lights.
If you wish to add or remove
items during washing, wait 2
minutes until the safety
device unlocks the door.
When you have carried out
the manoeuvre, close the
door, press START button and
the appliance will continue
working where it left off.
CANCELLING THE
PROGRAMME
To cancel the programme,
set the selector to the OFF
position.
Select a different
programme.
Re-set the programme
selector to the OFF position.
EN
NL
START/PAUZE KNOP
Druk op start voor het
selecteren van een
wascyclus.
LET OP: WANNEER DE
START KNOP IS
INGEDRUKT, DUURT HET
ENIGE SECONDE
VOORDAT HET
PROGRAMMA WORDT
GESTART.
Instellingen veranderen nadat
een programma is gestart
(PAUZE).
Houd de Start/Pauze knop
gedurende 2 sec.ingedrukt,
de knipperende lampjes op
de keuze toets en de resttijd
indicator geven aan dat de
machine gepauzeerd is. Nu
uw aanpassing invoeren.
Druk weer op de
“start/pauze” toets en de
lampjes stoppen met
knipperen.
Indien u kledingstukken toe
wil voegen of wil verwijderen
uit de trommel tijdens het
wassen: wacht twee minuten
totdat het veiligheidsslot van
de deur is.
Wanneer de handeling is
uitgevoerd,sluit de deur,druk
op de START knop en de
wasautomaat gaat verder
met het programma.
HET WASPROGRAMMA
VOORTIJDIG BEËINDIGEN
Om het programma te
annuleren, zet u de
programma keuze op de UIT
positie.
Selecteer een ander
programma
En zet de programma keuze
weer op de UIT positie.
Page 28

28
D
FR IT
Les options doivent être
sélectionnées AVANT
d’appuyer sur la touche
“MARCHE”.
TOUCHE "AQUAPLUS"
Grâce au nouveau Sensor
System, il est possible, en
activant la touche Aquaplus,
d’effectuer un cycle de
lavage spécifique pour les
tissus résistants et mixtes.Le
lavage ainsi effectué permet
d’éliminer tout résidu lessiviel
et donc de prendre soin des
peaux délicates qui seront
en contact avec ces fibres.
L’ajout d’une plus grande
quantité d’eau au lavage
ainsi que l’action renforcée
de 5 rinçages avec
essorages intermédiaires
permettent d’obtenir un
linge propre parfaitement
rincé. Afin d’obtenir un
résultat optimal de lavage,la
quantité d’eau est accrue
pendant cette phase du
cycle garantissant une
parfaite dilution de la lessive.
La quantité d’eau est
également accrue au
moment du rinçage de
manière à éliminer toute
trace de lessive des fibres.
Cette fonction a été
spécialement étudiée pour
les PEAUX DELICATES ET
SENSIBLES pour lesquelles
même un minimum de résidu
de lessive peut causer
irritations ou allergies.
Il est aussi conseillé d’utiliser
cette fonction pour le LINGE
DES ENFANTS, pour le LINGE
DELICAT en général ainsi que
pour le lavage des TISSUS
EPONGE dont les fibres
tendent à retenir la lessive.
Pour assurer une meilleure
prestation de lavage,cette
fonction est toujours active
pendant les programmes
Délicat et Laine/lavage a la
main.
I tasti opzione devono
essere selezionati prima di
premere il tasto AVVIO.
TASTO “STOP ALLERGIA”
Grazie al nuovo Sensor
System, agendo sul tasto è
possibile effettuare un nuovo
speciale ciclo di lavaggio
applicabile nei programmi
per tessuti resistenti e misti
che si prende cura delle fibre
e della pelle delicata di chi le
indossa.
L’aggiunta di molta più
acqua e la nuova azione
combinata di cicli di
rotazione del cesto con
carico e scarico d’acqua,
permette di ottenere capi
perfettamente puliti e
risciacquati.Viene aumentata
l’acqua in lavaggio per
ottenere la perfetta
dissoluzione del detersivo,
garantendo un’efficace
azione pulente.Viene
aumentata l’acqua anche al
momento dei risciacqui in
modo da eliminare ogni
traccia di detersivo dalle
fibre.
Questa funzione è stata
studiata appositamente per
le persone con pelle delicata
e sensibile, per le quali anche
un minimo residuo di detersivo
può causare irritazioni o
allergie.
Si consiglia di utilizzare questa
funzione anche per i capi dei
bambini e per i delicati in
generale, oppure nel
lavaggio di capi di spugna le
cui fibre tendono
maggiormente a trattenere il
detersivo.
Per assicurare le migliori
prestazioni di lavaggio questa
funzione è sempre attiva nei
programmi Delicati e
Lana/lavaggio a mano.
TECLA “AQUAPLUS”
Pressionando esta tecla
poderá activar um novo
ciclo de lavagem especial
nos programas de Cores e
Tecidos Mistos,graças ao
novo Sistema Sensor.Esta
opção cuida
delicadamente das fibras
das roupas e da delicada
pele daqueles que as usam.
A roupa é lavada numa
maior quantidade de água
e isso, em conjunto com a
nova combinação de
acção de ciclos de rotação
do tambor, dar-lhe-à roupa
que foi lavada e enxaguada
na perfeição.A quantidade
de água na lavagem foi
aumentada de forma a que
o detergente fosse
completamente dissolvido,
assegurando uma lavagem
eficiente.A quantidade de
água também foi
aumentada no ciclo de
enxaguamento permitindo
que todas as partículas de
detergente sejam removidas
das fibras.
Esta função foi
especificamente concebida
para pessoas com peles
delicadas e sensíveis, para
quem mesmo uma
pequena quantidade de
detergente pode causar
alergias ou irritações na
pele.
Esta função também é
recomendada para a
lavagem de roupa de
criança ou tecidos
delicados em geral,ou para
quando lava tecidos turcos,
uma vez que as fibras
tendem a absorver uma
elevada quantidade de
detergente.
Para assegurar a melhor
performance das suas
lavagens, esta função é
sempre activada nos
programas de Tecidos
Delicados e Lãs/lavagem à
mão
.
PT
A opção do botão deverá
ser seleccionada antes de
pressionar o botão “START”.
Page 29

EN
The option buttons should
be selected before pressing
the START button
“AQUAPLUS” BUTTON
By pressing this button you
can activate a special new
wash cycle in the Colourfast
and Mixed Fabrics
programs, thanks to the new
Sensor System.This option
treats with care the fibres of
garments and the delicate
skin of those who wear
them.
The load is washed in a
much larger quantity of
water and this, together with
the new combined action
of the drum rotation cycles,
where water is filled and
emptied, will give you
garments which have been
cleaned and rinsed to
perfection.The amount of
water in the wash is
increased so that the
detergent dissolves
perfectly, ensuring an
efficient cleaning action. The
amount of water is also
increased during the rinse
procedure so as to remove
all traces of detergent from
the fibres.
This function has been
specifically designed for
people with delicate and
sensitive skin, for whom even
a very small amount of
detergent can cause
irritation or allergy.
You are advised to also use
this function for children’s
clothing and for delicate
fabrics in general, or when
washing garments made of
towelling,where the fibres
tend to absorb a greater
quantity of detergent.
To ensure the best
performance for your wash,
this function is always
activated on the Delicates
and Woollens/Handwash
programs.
29
DE
Die Optionstasten müssen
VOR der Betätigung der
START-Taste gedrückt
werden.
TASTE “AQUAPLUS”
Dank des neuen „Sensor
Systems“ kann durch
Drücken dieser Taste ein
neues, spezielles
Waschprogramm für Kochund Buntwäsche
durchgeführt werden,das
nicht nur Ihre Wäsche
besonders gut pflegt,
sondern auch besonders
schonend für empfindliche
Haut ist.
Durch die Hinzunahme von
bedeutend mehr Wasser
und die Kombination von
Trommeldrehungen
während der Wasserzu- und
-ablaufphasen wird Ihre
Wäsche porentief gereinigt
und rückstandsfrei gespült.
Um die vollständige
Auflösung des Waschmittels
zu garantieren,wird mehr
Wasser für die Waschlauge
hinzugefügt, so dass
perfekte Waschergebnisse
erreicht werden.Auch für
die Spülgänge wird die
Wassermenge erhöht,so
dass jegliche
Waschmittelrückstände von
den Fasern restlos entfernt
werden.
Diese Funktion wurde
speziell für Menschen mit
empfindlicher Haut
konzipiert, für die auch die
kleinsten
Waschmittelrückstände zu
Hautreaktionen oder
Allergien führen können.
Wir empfehlen, diese
Funktion auch zum Waschen
von Kinderwäsche und für
Feinwäsche im Allgemeinen
zu wählen, oder zum
Waschen von besonders
saugfähigem Gewebe,wie
Frottee o.Ä., dessen Fasern
die Waschlauge stärker
aufnehmen. Damit die
besten Waschergebnisse
gewährleistet werden,ist
diese Funktion in den
Programmen für Feinwäsche
und Wolle/Handwäsche
immer aktiviert.
NL
U moet de optieknoppen
gebruiken voordat u op de
START-knop drukt
"AQUAPLUS" –KNOP
Door deze knop in te drukken
activeert u een nieuw
speciaal wasprogramma in
het kleurvast en gemengde
weefsel programma, dankzij
het nieuwe Sensor Sijsteem.
Dit programma behandeld
de vezels van uw kleding met
de grootste zorg.
De lading zal gewassen
worden in een grotere
hoeveelheid water en te
samen met de nieuwe
gecombineerde werking van
de trommel en wascyclus,
door een continue wisselend
waterniveau,Dit zal er voor
zorgen dat uw kleding
perfect gereinigd en
gespoeld word.
De hoeveelheid water word
verhoogd waardoor het
wasmiddel perfect kan
oplossen voor een perfect
wasresultaat.De hoeveelheid
water tijdens het spoelen is
ook verhoogd om te zorgen
dat al het wasmiddel uit de
vezels va de kleding word
verwijderd.
Deze functie is speciaal
ontwikkeld voor mensen met
een gevoelige huid,en die
ook maar van de kleinste
hoeveelheid wasmiddel,
irritatie of een allergische
reactie krijgen.
Ook adviseren wij dit
programma te gebruiken
voor kinderkleding en
delicate stoffen in het
algemeen, en voor het
wassen van badstof
producten welke een groter
wasmiddel absorptie
vermorgen hebben.
Om zeker te zijn van het
beste wasresultaat is deze
functie altijd geactiveerd in
het delicaat en
wolwasprogramma/handwas
.
Page 30

30
E
FR IT
LAVAGE EN EAU FROIDE
En appuyant sur la touche
correspondante on peut faire
exécuter tous les cycles de
lavage sans le chauffage de
l’eau,tandis que toutes les
autres caractéristiques restent
inchangées (niveau d’eau,
temps, rythmes de lavage,
etc.).
Les programmes en eau froide
sont conseillés pour le lavage
de tous les tissus de couleur qui
ne supportent pas la
température,et pour le lavage
de rideaux, fibres synthétiques
particulièrement délicates,
petits tapis, ou tissus peu sales.
TOUCHE DEPART DIFFERE
Cette option permet de
programmer le départ du
cycle de lavage jusqu’à 24
heures.
Afin d’utiliser cette fonction,
suivez la procédure ci-dessous
:
Choisissez le programme
Pressez le bouton départ
différé pour l’activer (h00
apparais sur l’écran) puis
pressez le à nouveau pour
choisir un départ différé
d’1 heure (h01 apparaît sur
l’écran) ; à chaque pression le
départ différé augmentera d’1
heure jusqu’à ce que 24h
apparaisse sur l’écran, une
pression supplémentaire
réinitialisera le départ différé.
Confirmez en appuyant sur
"START/PAUSE" (la lumière sur
l’écran clignotera).Le compte
à rebours commencera et à
son terme le programme
débutera automatiquement.
Il est possible d’annuler le
départ différé selon la
procédure suivante :
Maintenez le bouton appuyé
durant 5 secondes jusqu’à ce
que l’écran montre les
réglages du programme
choisi.
A cette étape il est possible
soit de lancer le programme
en appuyant sur "START/PAUSE"
soit d’annuler le départ différé
en positionnant le
programmateur sur OFF puis
en sélectionnant un autre
programme.
LAVAGGIO A FREDDO
Inserendo questa funzione si
possono eseguire tutti i cicli di
lavaggio senza il
riscaldamento dell’acqua,
mentre rimangono invariate
tutte le altre caratteristiche
(livello d’acqua, tempi, ritmi di
lavaggio ecc.).
I programmi a freddo sono
indicati per il lavaggio di tutti i
capi di biancheria i cui colori
non sono resistenti e per il
lavaggio di tende,copriletti,
fibre sintetiche
particolarmente delicate,
piccoli tappeti o tessuti poco
sporchi.
TASTO “PARTENZA DIFFERITA”
Questo tasto permette di
programmare l’avvio del ciclo
di lavaggio con un ritardo
massimo di 24h.
Per impostare la partenza
ritardata procedere nel
seguente modo:
Impostare il programma
desiderato.
Premere il pulsante una prima
volta per attivarlo (sul display
viene visualizzato h00) e
premere nuovamente per
impostare un ritardo di 1 ora
(sul display viene visualizzato
h01), ad ogni pressione
successiva il ritardo impostato
aumenta di 1 ora fino a h24
mentre con un ulteriore
pressione si azzera la partenza
ritardata.
Confermare premendo il tasto
“AVVIO/PAUSA”(La spia nel
display inizia a lampeggiare)
per iniziare il conteggio alla fine
del quale il programma inizierà
automaticamente.
E’ possibile annullare la
partenza ritardata agendo
come segue:
Tenere premuto il tasto per 5
secondi fino a quando sul
display non vengono visualizzati
i parametri del programma
scelto.
A questo punto è possibile
iniziare il programma scelto in
precedenza premendo il tasto
“AVVIO/PAUSA”o annullare
l’operazione portando il
selettore in posizione di OFF e
successivamente selezionare
un’ altro programma.
F
BOTÃO “ARRANQUE
RETARDADO”
Este botão permite-lhe programar
previamente o ciclo de lavagem e
retardar o seu arranque até um
máximo de 24 horas.
Se quiser retardar o arranque da
máquina, proceda da seguinte
forma: Regule o programa de
lavagem pretendido.
Prima o botão uma vez para o
activar (no visor fica visível a
indicação “h00”); em seguida, volte
a premir o botão para regular um
retardamento de 1 hora (no visor
fica visível a indicação “h01”); de
cada vez que premir este botão
estará a retardar o arranque do
programa em mais uma hora, até no
visor ser apresentada a indicação
“h24” (retardamento máximo de 24
horas); se, estando esta indicação
visível no visor (ou seja, se tiver sido
programado um retardamento de
24 horas), voltar a premir o botão, o
retardamento é reposto a zeros.
Prima o botão “START/PAUSE”
(arranque/pausa) para confirmar o
retardamento regulado (o indicador
luminoso no visor começa a piscar).
A contagem decrescente inicia-se e,
quando chegar ao fim,o programa
seleccionado inicia-se
automaticamente.
Se quiser, pode cancelar o
retardamento do arranque,para o
que terá de executar as seguintes
operações: Prima o botão e
mantenha-o premido durante 5
segundos, até no visor ver as
definições relativas ao programa
seleccionado. Nesta altura pode
premir o botão “START/PAUSE”
(arranque/pausa) para
desencadear o arranque imediato
do programa previamente regulado,
ou, em alternativa, pode cancelar o
processo, rodando o botão de
selecção de programas para a
posição “OFF” (desligada) e, se for
esse o caso, seleccionando um outro
programa.
PT
TECLA DE LAVAGEM A FRIO
Com esta função podem-se
executar todos os ciclos de
lavagem sem acquecimento da
água, ficando inalteradas todas as
outras caracteristicas da lavagem,
(nível de água, tempos e ritmos de
lavagem etc.).
Os programas de lavagem a frio
são indicados para a lavagem de
todas as peças de roupa cujas
cores não sejam resistentes á
temperaturas elevadas e para a
lavagem de cortinas, fibras
sintéticas particularmente
delicadas, pequenos tapetes ou
tecidos pouco sujos.
Page 31

COLD WASH BUTTON
By pressing this button it is
possible to transform every
programme into a cold
washing one,without
modifying other
characteristics (water level,
times, rythmes, etc...).
Curtains, small carpets, man
made delicate fabrics, non
coulor fast garments can be
safely washed thanks to this
new device.
“DELAY START” BUTTON
This button allows you to preprogramme the wash cycle
to delay the start of the
cycle for up to 24 hours.
To delay the start use the
following procedure:
Set the required programme.
Press the button once to
activate it (h00 appears on
the display) and then press it
again to set a 1 hour delay
(h01 appears on the display);
the pre-set delay increases
by 1 hour each time the
button is pressed, until h24
appears on the display, at
which point pressing the
button again will reset the
delay start to zero.
Confirm by pressing the
“START/PAUSE” button (the
light on the display starts to
flash). The countdown will
begin and when it has
finished the programme will
start automatically.
It is possible to cancel the
delay start by taking the
following action:
Press and hold the button for
5 seconds until the display
will show the settings for the
programme selected.
At this stage it is possible to
start the programme
previously selected by
pressing the “START/PAUSE”
button or to cancel the
process by setting the
selector to the OFF position
and then selecting another
programme.
EN
31
DE
KALTWASCH-TASTE
Durch das Drücken dieser Taste
wird in allen
Waschprogrammen das
Aufheizen der Waschlauge
verhindert, während alle
übrigen Programmerkmale
(Wasserstand,Waschzeit,
Trommelrhythmus etc.)
unverändert bleiben. Das
Kaltwaschen eignet sich für
Gardinen, Bettvorleger,
empfindliche Synthetik und alle
ausfärbenden Textilien.
TASTE STARTZEITVORWAHL
Diese Taste ermöglicht die
Programmierung einer
Startzeitvorwahl von bis zu 24
Stunden. Um die
Startverzögerung einzustellen,
gehen Sie wie folgt vor:
Wählen Sie das gewünschte
Programm.
Drücken Sie die Taste einmal,
damit die Funktion aktiviert ist.
Das Display zeigt h00. Drücken
Sie die Taste erneut, um eine
Startverzögerung von einer
Stunde einzustellen (das Display
zeigt nun h01). Bei jedem
weiteren Drücken der Taste wird
die Startverzögerung bis h24um
je eine Stunde erhöht. Durch ein
weiteres Drücken wird die
Verzögerungszeit annulliert.
Bestätigen Sie Ihre Einstellung
mit der Taste “START/PAUSE”.Die
Leuchtanzeige im Display fängt
an zu blinken und die Zeit
beginnt abzulaufen. Ist die Zeit
abgelaufen, startet das
Programm automatisch.
Sie können die Startzeitvorwahl
wie folgt löschen:
Halten Sie die Taste 5 Sekunden
lang gedrückt, bis das Display
die Voreinstellungen des
gewählten Programms wieder
anzeigt.
Nun können Sie entweder das
Programm durch Drücken der
Taste “START/PAUSE” manuell
starten oder das Programm
durch Drehen des
Programmwahlschalters auf OFF
löschen und ein neues
Programm einstellen.
NL
KOUD WATER TOETS
Door de knop in te drukken
is het mogelijk om jeder
programma om te zetten in
een programma met koud
water, zonder de andere
eigenschappen te
veranderen (water niveau,
tijdskduur, ritme, etc.)
Gordijnen, kleine kleden,
handgemaakte fijne
materialen en nietkleurvaste kledingstukken
kunnen veilig gewassen
worden dankzij dit nieuwe
mechanisme.
“UITGESTELDE START” TOETS
Deze knop geeft u de
mogelijkheid om de start en
eindtijd van uw
wasprogramma voor te
programmeren.(tot 24 uur)
Om de start uit te stellen
handelt u als volgt:
Stel het programma in.
Druk eenmaal op de toets
om hem te activeren (h00
verschijnt in het display) druk
nogmaals om 1 uur in te
stellen (h01 verschijnt in het
display) elke keer als u op
de toets druk verhoogt u de
tijd met 1 uur tot een
maximum van 24 uur.Als u
dan nog een keer druk
begint hij weer bij 0 uur.
Bevestig door de
“START/PAUZE” toets in te
drukken (het lampje op het
display zal gaan knipperen).
Het aftellen zal beginnen en
als deze voorbij is zal het
programma automatisch
starten.
Het is mogelijk om de
uitgestelde start te
annuleren:
Druk de toets in en hou deze
5 sec. vast totdat het display
de instellingen weergeeft.
Tijdens deze fase is het
mogelijk het al
geselecteerde programma
te starten door op de
“START/PAUZE” toets te
drukken. U kunt het
programma annuleren door
de selectie op de UIT positie
zetten.
Page 32

32
FR IT
TOUCHE "ESSORAGE"
La phase d'essorage est très
importante pour la
préparation à un bon
séchage et votre modèle est
doté d'une grande flexibilité
pour satisfaire chaque
exigence.
En agissant sur cette touche
vous pouvez réduire la vitesse
maximale possible pour le
programme sélectionnée,
jusqu'à une complète
élimination de l'essorage.
Pour réactiver l'essorage, il est
suffisant de presser la touche
de nouveau,jusqu'à atteindre
la vitesse choisie.
Pour la sauvegarde des tissus,
il n'est pas possible
d'augmenter la vitesse
d'essorage, au-delà de celle
qui est indiquée
automatiquement au moment
de la sélection du
programme.
Il est toujours possible de
modifier la vitesse d'essorage,
sans mettre la machine en
PAUSE.
NOTE:
LA MACHINE EST DOTEE
D’UN DISPOSITIF
ELECTRONIQUE QUI
EMPECHE LE DÉPART DE
L’ESSORAGE SI LES
CHARGES SONT MAL
REPARTIES ET LIMITE LES
VIBRATIONS ET LE BRUIT
DURANT LE LAVAGE.
TASTO SELEZIONE
CENTRIFUGA
La fase di centrifuga è molto
importante per la
preparazione ad una buona
asciugatura ed il vostro
modello è dotato della
massima flessibilità per ogni
vostra esigenza.
Premendo questo tasto, si
può ridurre la massima
velocità di centrifuga
possibile per il programma
selezionato, fino alla sua
completa esclusione.
Per riattivare la centrifuga,è
sufficiente premere
nuovamente il tasto,fino al
raggiungimento della
velocità scelta.
Per la salvaguardia dei
tessuti, non è possibile
aumentare la velocità oltre
quella automaticamente
indicata al momento della
selezione del programma.
E' possibile modificare la
velocità della centrifuga in
qualsiasi momento, anche
senza portare la macchina in
PAUSA.
NOTA:
IL MODELLO È DOTATO DI
UN PARTICOLARE
DISPOSITIVO ELETTRONICO
CHE IMPEDISCE LA
PARTENZA DELLA
CENTRIFUGA CON CARICHI
PARTICOLARMENTE
SBILANCIATI. QUESTO SERVE
A MIGLIORARE LE
VIBRAZIONI, LA
SILENZIOSITÀ E LA DURATA
DELLA LAVABIANCHERIA.
G
PT
TECLA VELOCIDADE DE
CENTRIFUGAÇÃO
O ciclo de centrifugação é
muito importante para remover
a maior quantidade de água
possível da roupa,sem danificar
os tecidos. Poderá ajustar a
velocidade de centrifugação
de acordo com as suas
necessidades.
Pressionando esta tecla, é
possível reduzir a velocidade de
centrifugação máxima, e se
desejar, cancelar o ciclo de
centrifugação.
Para reactivar o ciclo de
centrifugação basta pressionar
a tecla até encontrar a
velocidade de centrifugação
desejada.
Para não danificar os tecidos,
não é possível aumentar a
velocidade de centrifugação
além da velocidade
estabelecida automaticamente
na selecção do programa.
É possível modificar a
velocidade de centrifugação a
qualquer momento, mesmo
sem colocar a máquina em
pausa.
NOTA:
O MODELO ESTÁ EQUIPADO
COM UM DISPOSITIVO
ELECTRÓNICO ESPECIAL QUE
IMPEDE O CÍCLO DE
CENTRIFUGAÇÃO CASO AS
CARGAS FOREM
DESEQUILIBRADAS.TAL CONDUZ A
UMA REDUÇÃO DE RUIDOS E DE
VIBRAÇÕES, CONTRIBUINDO
PARA UM MAIOR SILÊNCIO E UMA
MAIOR DURAÇÃO DA MÁQUINA
DE LAVAR.
Page 33

EN
SPIN SPEED BUTTON
The spin cycle is very
important to remove as
much water as possible from
the laundry without
damaging the fabrics.You
can adjust the spin speed of
the machine to suit your
needs.
By pressing this button, it is
possible to reduce the
maximum speed,and if you
wish, the spin cycle can be
cancelled.
To reactivate the spin cycle
is enough to press the
button until you reach the
spin speed you would like to
set.
For not damage the fabrics,
it is not possible to increase
the speed over that
automatically suitable
during the selection of the
program.
It is possible to modify the
spin speed in any moment,
also without to pause the
machine.
NOTE:
THE MACHINE IS FITTED
WITH A SPECIAL
ELECTRONIC DEVICE,
WHICH PREVENTS THE
SPIN CYCLE SHOULD THE
LOAD BE UNBALANCED.
THIS REDUCES THE NOISE
AND VIBRATION IN THE
MACHINE AND SO
PROLONGS THE LIFE OF
YOUR MACHINE.
33
DE
TASTE SCHLEUDERDREHZAHL
Die Schleuderphase ist sehr
wichtig für eine gute Trocknung
der Wäsche.Auch hier kann Ihr
Gerät sich sehr flexibel an Ihre
Bedürfnisse anpassen.
Durch Betätigen der Taste
Schleuderdrehzahl können Sie
die für das jeweilige Programm
höchstmögliche Tourenzahl
reduzieren oder die
Schleuderung ganz
ausschließen.
Um den Schleudergang
wieder zu aktivieren,brauchen
Sie nur die Taste erneut zu
drücken,bis die gewünschte
Tourenzahl angezeigt wird.
Um die Gewebe zu schonen, ist
es nicht möglich, eine höhere
Schleuderdrehzahl einzustellen,
als die, die bei der
Programmwahl automatisch
angezeigt wird.
Die Schleuderdrehzahl kann zu
jedem Zeitpunkt des
Programms eingestellt werden.
Dabei brauchen Sie die Taste
PAUSE nicht zu betätigen.
ANMERKUNG:
DAS MODELL IST MIT EINER
ELEKTRONISCHEN
VORRICHTUNG AUSGESTATTET,
DIE VERHINDERT, DAß DER
SCHLEUDERGANG MIT
FÜLLMENGEN, DEREN GEWICHT
UNGLEICHMÄßIG VERTEILT SIND,
STARTET. DIES TRÄGT ZU EINER
REDUZIERUNG DER
VIBRATIONEN, DER
GERÄUSCHENTWICKLUNG UND
ZU EINER VERLÄNGERUNG DER
LEBENSDAUER DER
WASCHMASCHINE BEI.
NL
KNOP REGELING
CENTRIFUGESNELHEID
De centrifuge snelheid is erg
belangrijk voor het zoveel
mogelijk water verwijderen
uit de kleding. U kunt de
snelheid naar eigen wens
instellen.
Door deze knop in te drukken
is het mogelijk om het
toerental te verminderen en
als u wilt zelfs uitzetten.
Om de centrifugesnelheid
terug te zetten moet u de
knop indrukken totdat u bij
de gewenste snelheid bent.
Het is mogelijk de snelheid
ten aller tijde aan te passen
zonder de machine stop te
zetten.
OPMERKING: DIT MODEL
HEEFT EEN ELEKTRONISCHE
SENSOR DIE VOELT OF DE
LADING GOED
UITGEBALANCEERD IS. ALS DE
LADING ENIGSZINS
ONEVENWICHTIG IS, ZAL DE
MACHINE DE WAS
AUTOMATISCH BALANCEREN
EN DAN NORMAAL
CENTRIFUGEREN.
ALS ER, NA EEN AANTAL
KEREN PROBEREN, GEEN
EVENWICHT WORDT BEREIKT,
WORDT EEN LAGERE
CENTRIFUGESNELHEID
GEBRUIKT.
ALS DE LADING ERG
ONEVENWICHTIG IS, WORDT
DE CENTRIFUGEFASE
GEANNULEERD.
HIERDOOR WORDT DE
TRILLING VERMINDERD, HET
LAWAAI MINDER EN WORDT
DE BETROUWBAARHEID EN
DE LEVENSDUUR VAN DE
WASMACHINE VERGROOT.
Page 34

34
H
FR IT
31
4
2
h
mm
ECRAN DIGITAL
Cet écran électronique
permet une information
constante envers l’utilisateur:
1) VITESSE D’ESORAGE
Lors de la sélection du
programme un voyant
indiquera la vitesse
d’essorage maximum.
Chaque pression du bouton
entrainera une réduction de
100 tours/minute jusqu’à à la
vitesse minium de 400
tours/minutes ou jusqu’à
une complète élimination de
l’essorage.
2) TEMOIN DEPART DIFFERE
Ce témoin clignote lorsque
le départ différé à été activé
3)TEMOIN DE VERROUILLAGE
DE PORTE
Le voyant lumineux s’allume
lorsque la porte est
totalement fermée et que la
machine est en marche.
Lorsque la touche "MARCHE"
est enfoncée sur la machine
et que la porte est fermée,
l’indicateur clignote
temporairement puis
s’allume.
Si la porte n’est pas
fermée, le voyant lumineux
continue de clignoter.
Un dispositif de sécurité
spécial vous empêche
d’ouvrir la porte
immédiatement après la fin
du cycle.Attendez
2 minutes après la fin du
cycle de lavage et assurez-
vous que le témoin est éteint
avant d’ouvrir la porte. Par
mesure de sécurité, vérifiez
qu’il n’y a plus d’eau dans le
tambour. A la fin du cycle,
tournez le sélecteur de
programmes à la position
OFF.
DISPLAY DIGIT
Il sistema di segnalazione del
display consente di essere
costantemente informati sul
funzionamento dell’
apparecchio:
1) GIRI CENTRIFUGA
Una volta selezionato il
programma,sul display
apparirà la massima velocità
consentita di centrifuga per
quel programma.Premendo
ripetutamente il pulsante di
centrifuga, la velocità
diminuirà ogni volta di 100
g/m. La velocità minima
consentita è di 400 g/m,
oppure è possibile escludere
la centrifuga premendo
ripetutamente il pulsante di
selezione della centrifuga.
2) SPIA PARTENZA RITARDATA
Lampeggia quando è
impostata la partenza
ritardata.
3) SPIA PORTA BLOCCATA
La spia è illuminata quando
l’oblò è chiuso correttamente
e la macchina è accesa.
Dopo aver premuto il tasto
AVVIO/PAUSA inizialmente la
spia lampeggia per poi
diventare fissa sino alla fine
del lavaggio.
Nel caso in cui l’oblò non sia
chiuso correttamente la spia
continuerà a lampeggiare.
Uno speciale dispositivo di
sicurezza impedisce che
l’oblò possa venire aperto
immediatamente dopo la
fine di un ciclo di lavaggio,
attendere 2 minuti che la spia
si spenga e quindi spegnere
la macchina portando la
manopola programmi in
posizione di OFF.
1
2
3
4
PT
VISOR “DIGITAL”
O sistema de transmissão de
informações do visor permite-lhe
manter-se constantemente
informado sobre o estado da
máquina:
1) VELOCIDADE DE
CENTRIFUGAÇÃO
Depois de o programa ter sido
seleccionado,é apresentada no
visor a velocidade de
centrifugação máxima admitida
para esse programa. Cada
pressão no botão de selecção
da velocidade de
centrifugação reduz a
velocidade de centrifugação
em 100 rpm. A velocidade de
centrifugação mínima admitida
é de 400 rpm, sendo que, em
alternativa,também é possível
suprimir a centrifugação final,
para o que basta premir
repetidamente o botão de
selecção da velocidade de
centrifugação.
2) INDICADOR LUMINOSO DE
ARRANQUE RETARDADO
Este indicador luminoso fica a
picar sempre que tiver sido
programado um arranque
retardado do programa.
3)
INDICADOR DE FECHO DE
PORTA
O indicador luminoso de
“fecho de porta” acende
quando a porta está
totalmente fechada e a
máquina está pronta para
começar.
Quando o botão de “INÍCIO”
é pressionado com a porta
da máquina fechada, o
indicador luminoso piscará
momentâneamente e depois
ficará ligado.
Se a porta não estiver
fechada, o indicador
luminoso continuará a piscar.
Um dispositivo especial de
segurança previne que a
porta abra de imediato ao
fim do ciclo de lavagem.
Espere 2 minutos depois do
ciclo de lavagem ter
terminado, e a luz de fecho
de porta desligar-se-á antes
da porta se abrir. No fim do
ciclo de lavagem,rode o
selector de programas para a
posição “OFF”.
Page 35

35
EN
DE
“DIGITAL” DISPLAY
The display’s indicator
system allows you to be
constantly informed about
the status of the machine:
1) SPIN SPEED
Once the programme has
been selected, the
maximum spin speed
allowed for that programme
appears on the display.
Pressing the spin button will
reduce the speed by 100
rpm each time the button is
pressed. The minimum
speed allowed is 400 rpm, or
it is possible to omit the spin
by pressing the spin button
repeatedly.
2) DELAY START LIGHT
This flashes when delay start
has been set.
3) DOOR LOCKED
INDICATOR
The “Door Locked” indicator
light is illuminated when the
door is fully closed and the
machine is ON.
When START is pressed on
the machine with the door
closed the indicator will flash
momentarily and then
illuminate.
If the door is not closed the
indicator will continue to
flash.
A special safety device
prevents the door from
being opened immediately
after the end of the cycle.
Wait for 2 minutes after the
wash cycle has finished and
the Door Locked light has
gone out before opening
the door. At the end of cycle
turn the programme
selector to OFF .
DISPLAY “DIGIT”
Die Anzeigen im Display
geben Ihnen ständig Auskunft
über die gerade
durchgeführten Funktionen
des Gerätes.
1) SCHLEUDERDREHZAHL
Sobald das Programm
gewählt wurde,erscheint auf
dem Display die
höchstmögliche Tourenzahl
für dieses Programm.Durch
wiederholtes Drücken der
Taste wird die
Schleuderdrehzahl jeweils um
100 U/Min herabgesenkt. Die
Mindestdrehzahl beträgt 400
U/Min, es ist jedoch auch
möglich, den Schleudergang
ganz zu unterdrücken,wenn
man die Taste
Schleuderdrehzahl wiederholt
drückt.
2) ANZEIGE
STARTZEITVORWAHL
Sie blinkt, wenn eine
Startzeitvorwahl eingestellt ist.
3) LEUCHTANZEIGE TÜR
GESCHLOSSEN
Die Anzeige leuchtet,wenn die
Tür korrekt geschlossen ist und
das Gerät eingeschaltet ist.
Nach Drücken der Taste
START/PAUSE blinkt die Taste
zuerst, dann leuchtet sie
permanent bis zum
Programmende.
Wenn das Bullauge nicht
korrekt geschlossen wurde,
blinkt die Leuchtanzeige weiter.
Eine spezielle
Sicherheitsvorrichtung
verhindert,dass das Bullauge
unmittelbar nach dem
Programmende geöffnet
werden kann.Warten Sie ca.2
Minuten,bis die Leuchtanzeige
ausgeht und schalten Sie dann
das Gerät durch Drehen des
Programmwahlschalters auf die
Position AUS ab.
NL
“DIGITAAL” DISPLAY
Het display indicatie sijsteem
geeft u de mogelijkheid
continue op de hoogte te
blijven van de status van de
machine.
1) CENTRIFUGE TOERENTAL
Als het programma is
geselecteerd, zal het
maximale aantal toeren
toegestaan voor het
programma worden
weergegeven. Elke keer als u
de centrifuge knop indrukt zal
het toerental met 100 rpm
afnemen. Het minimum is 400
rpm, het is mogelijk de
centrifuge uit te schakelen
door de centrifuge toets
meerdere malen in te
drukken.
2) UITGESTELDE START LAMPJE
Deze knippert als de
uitgestelde start is ingesteld.
3) DEURVERGRENDELINGINDICATIE
Het indicatielampje voor de
“deurvergrendeling” licht op
als de deur goed dichtzit en
wanneer de wasmachine
AAN staat.
Wanneer u op START drukt als
de deur dicht is, zal het
indicatielampje eventjes
knipperen en vervolgens
blijven branden.
Als de deur niet dicht is, zal
het indicatielampje blijven
knipperen.
Een speciale beveiliging zorgt
ervoor dat u de deur niet
meteen kunt openen na
afloop van een wascyclus.
Wacht na afloop van de
wascyclus 2 minuten tot het
lampje van de
deurvergrendeling is gedoofd
voordat u de deur probeert te
openen. Zet na afloop van de
wascyclus de
programmaknop op UIT (OFF).
Page 36

36
H
FR
IT
4) TEMPS RESTANT
Lors de la sélection d’un
programme,l’écran
indiquera automatiquement
la durée du cycle de lavage
cette dernière peut varier
selon les options choisies.
La machine calcule la durée
du programme sélectionné
sur la base d’une charge
standard; pendant le cycle,
la machine rectifie cette
durée selon la taille et la
composition de la
charge.
4) DURATA CICLO
Al momento della selezione di
un programma,verrà
automaticamente indicata la
durata del ciclo che potrà
variare a seconda delle
opzioni che verranno
selezionate.
Dopo l’ avvio del programma
vi terrà costantemente
informati sul tempo restante
alla fine del lavaggio.
L’apparecchio calcola tale
tempo in base a un carico
standard, ma durante il ciclo
la macchina corregge il
tempo a seconda del volume
e della composizione del
carico.
31
4
2
h
mm
1
2
3
4
PT
4) DURAÇÃO DO CICLO
Sempre que um programa é
seleccionado é
automaticamente apresentada
no visor a duração do ciclo,que
pode variar em função das
opções seleccionadas.
Depois de o programa se iniciar,
o utilizador é constantemente
mantido ao corrente do tempo
que falta até ao fim da
lavagem.
A máquina calcula o tempo na
base de um carregamento
standard,no entanto no
decorrer do ciclo a máquina
corrigirá o tempo segundo o
volume e a composição do
carregamento.
Page 37

37
EN
4) CYCLE DURATION
When a programme is
selected the display
automatically shows the
cycle duration,which can
vary, depending on the
options selected.
Once the programme has
started you will be kept
informed constantly of the
time remaining to the end of
the wash.
The appliance calculates
the time to the end of the
selected programme based
upon a standard loading,
during the cycle, the
appliance corrects the time
to that applicable to the
size and composition of the
load.
DE
4) PROGRAMMDAUER
Sobald das Programm
eingestellt ist, wird die
Programmdauer automatisch
angezeigt. Diese kann je nach
den eventuell zusätzlich
gewählten Optionen
variieren.
Nach dem Programmstart
gibt Ihnen die Anzeige
ständig Auskunft über die
Restzeit zum Programmende.
Die Waschmaschine
berechnet die Zeitdauer bis
zum Ende des ausgewählten
Programms mit der Annahme,
dass es sich um eine
Standardwäschefüllung
handelt.Während des
Waschvorgangs berichtigt die
Waschmaschine die
Zeitdauer je nach Menge und
Art der Wäschestücke in der
Waschmaschine.
NL
4)WASTIJD
Als er een programma is
geselecteerd zal het display
automatisch aangeven
hoelang het programma
duurt, dit is afhankelijk van
geselecteerd opties.
Tijdens het programma zal u
constant op de hoogte
worden gehouden van de
restrende wastijd.
De machine berekent de tijd
tot aan het einde van het
gekozen programma,
op basis van een
standaardlading.Tijdens de
cyclus corrigeert de machine
de tijd op basis van de
afmeting en de samenstelling
van de lading.
Page 38

38
M
FR
IT
LES VOYANTS DES TOUCHES
Ces témoins s’allument
lorsque qu’une option est
choisie
Si une option est
incompatible avec le
programme,le témoin de
l’option clignotera puis
s’éteindra.
MANETTE DES PROGRAMMES
DE LAVAGE AVEC OFF
LORSQUE LE SELECTEUR EST
POSITIONNE SUR UN
PROGRAMME, L’ECRAN
MONTRE LES DETAILS DU
CYCLE CHOISI. EN FIN DE
CYCLE OU LORSQUE LA
MACHINE EST RESTEE
INACTIVE, LA LUMINOSITE DE
L’ECRAN DIMINUE
PROGRESSIVEMENT DANS UN
SOUCI D’ECONOMIES
D’ENERGIE.
N.B. AFIN D’ETEINDRE
COMPLETEMENT LA
MACHINE, PLACER LE
SELECTEUR SUR " OFF "
Appuyez sur la touche
"MARCHE/PAUSE" pour
commencer le cycle.
Le cycle de lavage se
réalisera avec la manette
des programmes arrêtée sur
le programme sélectionné
jusqu'à la fin de celui-ci.
A la fin du lavage, mettez la
machine à l' arrêt en
tournant la manette
programmes sur la position
"OFF"
NOTE: LORS DE LA MISE EN
MARCHE DU CYCLE DE
LAVAGE SUIVANT, LE
SELECTEUR DE
PROGRAMME DOIT ETRE
REMIS EN POSITION OFF
AVANT DE SELECTIONNER
ET DE LANCER LE
PROGRAMME SUIVANT.
SPIE TASTI
Si accendono quando i
rispettivi tasti vengono
premuti.
Nel caso in cui sia stata
selezionata un’ opzione non
compatibile con il
programma scelto la luce sul
pulsante prima lampeggia e
dopo si spegne.
MANOPOLA PROGRAMMI
CON OFF
RUOTANDO LA MANOPOLA
IL DISPLAY SI ILLUMINA
VISUALIZZANDO I
PARAMETRI DEL
PROGRAMMA SCELTO.
A FINE CICLO O DOPO UN
PERIODO DI INATTIVITÀ, LA
LUMINOSITÀ DEL DISPLAY
DIMINUISCE PER UN
RISPARMIO ENERGETICO.
N.B. PER SPEGNERE LA
MACCHINA RUOTARE LA
MANOPOLA PROGRAMMI
SULLA POSIZIONE “OFF”.
Premere il tasto "Avvio/Pausa"
per iniziare il ciclo di lavaggio
Il ciclo di lavaggio avverrà
con la manopola programmi
ferma sul programma
selezionato sino alla fine del
lavaggio.
A fine ciclo spegnere la
lavabiancheria portando la
manopola programmi in
posizione "OFF".
NOTA:
LA MANOPOLA
PROGRAMMI DEVE
ESSERE SEMPRE PORTATA
IN POSIZIONE DI OFF
ALLA FINE DI UN
LAVAGGIO E PRIMA DI
SELEZIONARNE UNO
NUOVO.
N
PROGRAMA SELECTOR COM A
POSIÇÃO "OFF".
ROTAÇÃO EM AMBAS AS
DIRECÇÕES.
QUANDO O SELECTOR
DE PROGRAMAS ESTÁ
NA POSIÇÃO DE UM
PROGRAMA O
INDICADOR LUMINOSO
DA VELOCIDADE DE
CENTRIFUGAÇÃO IRÁ
ACENDER.
N.B. PARA DESLIGAR A
MÁQUINA , COLOQUE O
SELECTOR DE
PROGRAMAS NA
POSIÇÃO OFF
(DESLIGAR).
Pressione a tecla
“Start/Pause” para iniciar o
ciclo seleccionado.
O botão mantém-se intacto,
mesmo quando o programa
está a decorrer.
No fim do programa desligue
a máquina de lavar rodando
o selector para a posição
“OFF”.
NOTA:
O SELECTOR DE
PROGRAMAS DEVERÁ SER
DODADO ATÉ À POSIÇÃO
“OFF” NO FIM DE CADA
CICLO DE LAVAGEM OU
QUANDO RECOMEÇAR
UM OUTRO CICLO, OU
OUTRO PROGRAMA.
PT
LUZES DAS TECLAS
Estes indicadores luminosos
acendem-se sempre que os
botões a que estão associados
são premidos.
Se for seleccionada uma opção
que não é compatível com o
programa seleccionado,o
indicador luminoso do botão da
opção em causa pisca e depois
apaga-se.
Page 39

EN
BUTTONS INDICATOR LIGHT
These light up when the
relevant buttons are
pressed.
If an option is selected that
is not compatible with the
selected programme then
the light on the button first
flashes and then goes off.
PROGRAMME SELECTOR WITH
OFF POSITION
WHEN THE PROGRAMME
SELECTOR IS TURNED THE
DISPLAY LIGHTS UP TO
SHOW THE SETTINGS FOR
THE PROGRAMME
SELECTED. FOR ENERGY
SAVING, AT THE END OF THE
CYCLE OR WITH AN
INACTIVITY PERIOD,THE
DISPLAY LEVEL CONTRAST
WILL DECREASE.
N.B. TO SWITCH THE
MACHINE OFF, TURN THE
PROGRAMME SELECTOR TO
THE “OFF” POSITION.
Press the "Start/Pause"
button to start the selected
cycle.
The programme carries out
with the programme
selector stationary on the
selected programme till
cycle ends.
Switch off the washing
machine by turning the
selector to OFF.
NO
TE:
THE PROGRAMME
SELECTOR MUST BE
RETURN TO THE OFF
POSITION AT THE END
OF EACH CYCLE OR
WHEN STARTING A
SUBSEQUENT WASH
CYCLE PRIOR TO THE
NEXT PROGRAMME
BEING SELECTED AND
STARTED.
39
DE
TASTENANZEIGE
Sie leuchten auf,sobald die
entsprechenden Tasten
gedrückt werden.
Falls eine Option gewählt
wird, die mit dem
eingestellten Programm nicht
kompatibel ist, blinkt die
Anzeige auf der Taste zuerst,
dann erlischt sie.
PROGRAMMWAHLSCHALTER MIT
OFF
DURCH DREHEN AM
WAHLSCHALTER LEUCHTET
DAS DISPLAY AUF UND ZEIGT
DIE VOREINSTELLUNGEN DES
GEWÄHLTEN PROGRAMMS.
AM ENDE DES PROGRAMMS
ODER NACH EINER
LÄNGEREN BETRIEBSPAUSE
WIRD DIE LEUCHTKRAFT DES
DISPLAYS HERUNTERGESETZT,
UM ENERGIE ZU SPAREN.
HINWEIS: UM DAS GERÄT
AUSZUSCHALTEN,
PROGRAMMWAHLSCHALTER
AUF OFF STELLEN.
Drücken Sie die START-Taste,
um das Programm zu starten.
Während des Waschgangs
bleibt der
Programmwahlschalter bis
zum Ende des Programmes
auf dem gewählten
Programm stehen.
Am Ende des
Waschprogrammes schalten
Sie das Gerät ab durch
Drehen des Wahlschalters auf
die Position OFF.
HINWEIS:
DREHEN SIE IMMER NACH
BEENDIGUNG DES
PROGRAMMS, UND
BEVOR SIE EIN NEUES
PROGRAMM EINSTELLEN,
DEN
PROGRAMMWAHLSCHALT
ER AUF DIE POSITION AUS.
NL
INDICATIELAMPJES BIJ DE
KNOPPEN
Deze lampjes gaan branden
als de toets wordt ingedrukt.
Als er een keuze wordt
gemaakt welke niet kan
worden ingeschakeld,gaat
het lampje knipperen en
vervolgens weer uit.
PROGRAMMAKNOP WASSEN
MET OFF
WANNEER ER AAN DE
PROGRAMMAKEUZE KNOP
WORDT GEDRAAID ZAL HET
DISPLAY GAAN BRANDEN OM
DE INSTELLINGEN VAN HET
GEKOZEN PROGRAMMA TE
LATEN ZIEN.VOOR
ENERGIEBESPARING, AAN HET
EINDE VAN HET PROGRAMMA
OF TIJDENS INACTIVITEIT, ZAL
HET DISPLAY CONTAST
VERMINDEREN
OM DE MACHINE UIT TE
SCHAKELEN DRAAID U DE
PROGRAMMAKEUZEKNOP
NAAR DE “UIT”POSITIE.
Druk op de "Start/Pauze"-knop
om het geselecteerde
programma te starten.
Het programma draait met
de programmaknop
gepositioneerd op het
gekozen programma totdat
het programma eindigt.
Schakel de machine bij het
einde van het programma uit
door de knop in de “OFF”
positie te draaien.
LET
OP:
ZET NA AFLOOP VAN EEN
WASCYCLUS DE
PROGRAMMAKNOP
ALTIJD EERST WEER OP UIT
(OFF) VOORDAT U EEN
VERVOLG-PROGRAMMA
OF EEN NIEUW
PROGRAMMA INSTELT EN
START.
Page 40

40
90°
60°
40°
30°
30°
40°
-
-
-
30°
30°
20°
30°
40°
50°
21
7
7
7
7
2
3
-
-
-
2
1
7
3,5
3,5
3,5
6
6
6
6
2
3
-
-
-
2
1
6
3
3
3
**
**
8
8
8
8
2,5
3,5
-
-
-
2,5
2
8
4
4
4
CAPÍTULO 7
PT
TABELA DE PROGRAMAS DE LAVAGEM
TEMPE-
RATURA
°C
Tecidos resistentes
Algodão, linho
Algodão,
tecidos mistos
TECIDOS
MUITO DELICADOS
Làs Sintéticos
(dralon, acrílìco, trevira)
Tecidos mistos e
sintéticos
Sintéticos (nylon, perlon)
mistos de algodão
COLOCAÇÃO DO
DETERGENTE NA GAVETA
SELECTOR DE
PROGRAMAS:
PROGRAMA PARA
Brancos com pré
lavagem
Tecidos coloridos
Tecidos coloridos
Tecidos normais
Tecidos mistos e
resistentes
Tecidos mistos e
resistentes
Enxaguamentos
Centrifugação
Despejo simples
da água
Tecidos
delicados
Lavagem
à mão &
Lãs "laváveis à
máquina"
Tecidos mistos e
resistentes
Camisas
Tecidos normais
Tecidos coloridos
com pré lavagem
QUANTIDA-DE
MÁXIMA DE
ROUPA
kg
*
Especiais
Camisas
II I
Page 41

41
Em todos os programas,é possível regular a velocidade da centrifugação de acordo com as
recomendações de lavagem indicadas na roupa.Se a etiqueta não trouxer qualquer indicação,
pode usar-se a centrifugação à velocidade máxima prevista pelo programa.
** PROGRAMAS DE ALGODÕES STANDARD EM CONFORMIDADE COM (EU) Nº 1015/2010 E
Nº 1061/2010
PROGRAMA DE ALGODÃO COM TEMPERATURA A 60ºC
PROGRAMA DE ALGODÃO COM TEMPERATURA A 40ºC
Estes programas são adequados para lavar roupas em algodão com sujidade normal, são os
programas mais eficientes em termos de consumos de energia e água para a lavagem de
roupas em algodão.
Estes programas foram desenvolvidos para serem compatíveis com a temperatura na
etiqueta de lavagem de roupas,e a temperatura da água pode diferir ligeiramente da
temperatura declarada do ciclo.
Observações importantes
*)
Capacitade máxima de roupa seca, de acordo com o modelo usado (verifique a
placa de identificação
44’
30’
ActivEco
20°
&
30°
30°
50° + Pre
40°
30°
90° + Pre
40°C
60°C
Quando só um limitado número de peças de roupa têm nódoas que requerem um
tratamento especial com branqueadores líquidos, a remoção preliminar das nódoas
pode ser efectuada na máquina de lavar roupa.
Coloque o branqueador no dispensador de branqueador líquido, inserido no
compartimento com a marca “2” na gaveta do detergente, e seleccione o programa
especial “ENXAGUAMENTO”.
Quando terminado o ciclo, rode o selector de programas até à posição “OFF”,
coloque a restante roupa e continue com uma lavagem normal no programa
desejado.
“II”
Page 42

CAPITOLO 7
IT
90°
60°
40°
30°
30°
40°
-
-
-
30°
30°
20°
30°
40°
50°
21
6
6
6
6
2
3
-
-
-
2
1
6
3
3
3
**
**
7
7
7
7
2
3
-
-
-
2
1
7
3,5
3,5
3,5
TEMP.
°C
TABELLA PROGRAMMI
CARICO DETERSIVO
PROGRAMMA PER:
CARICO
MAX
kg
*
SELEZIONE
PUNTATORE
MANOPOLA
PROGRAMMI SU:
Tessuti resistenti
Cotone, lino, canapa
Cotone, misti
Rapidi
Tessuti delicati
Biancheria in lana
Sintetici (Dralon,Acrylico,
Trevira)
Tessuti misti e sintetici
Sintetici (Nylon Perlon)
misti di cotone
Bianchi
con prelavaggio
Colorati resistenti
Colorati resistenti
Colorati delicati
Tes suti
resistenti/misti
Tes suti
resistenti/misti
Tes suti
resistenti/misti
Risciacqui
Centrifuga forte
Solo scarico
Delicati
Lavaggio a mano &
Lana "lavabile in
lavatrice”
Camicie
Colorati delicati
Colorati resistenti
con prelavaggio
Speciali
8
8
8
8
2,5
3,5
-
-
-
2,5
2
8
4
4
4
42
II I
Page 43

43
Note da considerare
* La massima capacità di carico di biancheria asciutta differisce a seconda del modello
(vedere targhetta dati).
** PROGRAMMI COTONE DI PROVA SECONDO (EU) No 1015/2010 e No 1061/2010.
PROGRAMMA COTONE con temperatura di 60°C
PROGRAMMA COTONE con temperatura di 40°C
Questi programmi sono indicati per lavare capi di cotone normalmente sporchi e sono i
più efficienti in termine di consumo combinato di acqua e energia per lavaggi di
biancheria in cotone.
Questi programmi sono stati sviluppati per essere conformi con le temperature di
lavaggio delle etichette degli indumenti e la temperatura effettiva dell’ acqua potrebbe
differire leggermente da quella dichiarata dal ciclo.
In tutti i programmi è possibile regolare la velocità della centrifuga secondo il consiglio
del fabbricante del tessuto.
Se l’etichetta non riporta alcuna indicazione è possibile centrifugare alla massima
velocità prevista dal programma.
Quando solo alcuni capi presentano macchie che richiedono un trattamento con
prodotti candeggianti liquidi, si può procedere ad una smacchiatura preliminare in
lavatrice.
Introdurre nello scomparto "2" del cassetto detersivo l'apposita vaschetta in
dotazione nella quale versare il candeggiante ed impostare il programma
"RISCIACQUI" ( ).
Finito questo trattamento, riportare la manopola programmi in posizione "OFF",
aggiungere ai capi candeggiati il resto della biancheria e procedere al bucato
normale con il programma più adatto.
44’
30’
ActivEco
20°
&
30°
30°
50° + Pre
40°
30°
90° + Pre
40°C
60°C
“II”
Page 44

44
21
Kochwäsche
mit Vorwäsche
Widerstandsfähige
Buntwäsche
Widerstandsfähige
Buntwäsche
Pflegeleichte
Buntwäsche
Widerstandsfähige
Gewebe/
Mischgewebe
Widerstandsfähige
Gewebe/
Mischgewebe
Spülen
Intensivschleudern
Abpumpen
Feinw
äsche
Handwäsche &
Waschmaschinenge
-eignete Wolle
Widerstandsfähige
Gewebe/
Mischgewebe
Oberhemden
Pflegeleichte
Buntwäsche
Widerstandsfähige
Buntwäsche
mit Vorwäsche
TEMP.
°C
90°
60°
40°
30°
30°
40°
-
-
-
30°
30°
20°
30°
40°
50°
KAPITEL 7
DE
MAX
BELADUNG
kg*
PROGRAMMTABELLE
WASCHMITTEL
EINFÜLLEN
PROGRAMM-
WAHL-
SCHALTER
EINSTELLEN
AUF
PROGRAMM FÜR / GEWEBEART
Koch-/Buntwäsche
Baumwolle Leinen Jute
Baumwolle
Mischgewebe
Spezial
Feinwäsche
Wolle
Synthetik (Dralon, Acryl,
Trevira)
Synthetik
Synthetik (Nylon, Perlon)
Baumwolle
Mischgewebe
**
**
7
7
7
7
2
3
-
-
-
2
1
7
3,5
3,5
3,5
6
6
6
6
2
3
-
-
-
2
1
6
3
3
3
8
8
8
8
2,5
3,5
-
-
-
2,5
2
8
4
4
4
II I
Page 45

45
Hinweise:
* Die maximale Fassungsvermögen für Trockenwäsche ist je nach Modell unterschiedlich (siehe
Matrikelschild).
** VERGLEICHSPROGRAMME FÜR BAUMWOLLE LT. (EU) Nr. 1015/2010 und Nr.
1061/2010.
PROGRAMM BAUMWOLLE mit Waschtemperatur 60°C
PROGRAMM BAUMWOLLE mit Waschtemperatur 40°C
Diese Programme sind geeignet zum Waschen von normal verschmutzten Wäschestücken
aus Baumwolle und sind hierfür die sparsamsten Programme, was den Strom- und
Wasserverbrauch betrifft. Sie weisen unter Umständen eine längere Programmlaufzeit auf.
Die Programme wurden speziell auf die Angaben der Wäschepflegeetiketten in den Textilien
hin optimiert. Die tatsächliche Wassertemperatur kann leicht von der im Programm
deklarierten Temperatur abweichen.
In allen Programmen können Sie die Schleuderdrehzahl entsprechend dem Pflegeetikett
des Wäschestücks herunterregulieren. Wenn Sie keine Angabe im Wäscheetikett
vorfinden, können sie die höchstmögliche Schleuderdrehzahl des Programms
anwenden.
Wenn nur einige Wäschestücke Verschmutzungen aufweisen, die mit einem flüssigen Bleichmittel behandelt werden müssen, können Sie eine Vorbehandlung mit
Bleichmittel in der Waschmaschine vornehmen.
Legen Sie in die Waschmittelkammer “2“ den hierfür vorgesehenen Einsatz für Flüssigmittel und füllen Sie das Bleichmittel ein. Stellen Sie das Programm „Spülen“
( ) ein.
Nach der Behandlung mit Bleichmittel stellen Sie den Programmwahlschalter wieder
auf OFF, fügen Sie die anderen Wäschestücke in die Trommel hinzu und waschen
normal mit dem Waschprogramm Ihrer Wahl.
44’
30’
ActivEco
20°
&
30°
30°
50° + Pre
40°
30°
90° + Pre
40°C
60°C
“II”
Page 46

90°
60°
40°
30°
30°
40°
-
-
-
30°
30°
20°
30°
40°
50°
21
6
6
6
6
2
3
-
-
-
-
-
-
-
-
-
2
1
6
3
3
3
8
8
8
8
2,5
3,5
2,5
2
8
4
4
4
7
7
7
7
2
3
2
1
7
3,5
3,5
3,5
**
**
PROGRAMMATABEL
HOOFDSTUK 7
NL
STERKE
WEEFSELS
Katoen, linnen, jute
Katoen
Gemengde weefsels
WASMIDDELBAKJE
PROGRAMMA-
KNOP OP:
PROGRAMMA VOOR:
Speciaal
WITTE WAS
MET VOORWAS
BONTE WAS
BONTE WAS
BONTE WAS
KLEURECHT
KREUKHERSTELLEND OF
BONTE WAS
KREUKHERSTELLEND OF
BONTE WAS
KREUKHERSTELLEND OF
BONTE WAS
SPOELEN
CENTRIFUGEREN
AFPOMPEN
HANDWAS /
WOLWAS
DELICAAT
OVERHEMDEN
BONTE WAS
KLEURECHT
BONTE WAS
MET VOORWAS
MAXIMALE
BELADING
kg
*
TEMPE-
RATUUR
KEUZE
°C
Zeer gevoelige
weefsels
Wol
Synthetische w
eefsels
(dr
alon, acryl)
GEMENGDE/
SYNTHETISCHE
WEEFSELS
Synthetisch (nylon),
Gemengde weefsels
46
II I
Page 47

** Standaard katoen Programma volgens (EU) nr. 1015/2010 en niet
1061/2010
KATOEN PROGRAMMA met een temperatuur van 60 °C
KATOEN PROGRAMMA met een temperatuur van 40 °C
Deze programma's zijn geschikt voor normaal bevuild wasgoed en ze zijn de
meest efficiënte programma's op het gebied van de combinatie, energie en
water verbruik, voor het wassen van katoen.
Deze programma's zijn ontwikkeld om te voldoen aan de temperatuur op het
waslabel in de kleding de werkelijke water temperatuur kan enigszins
afwijken van de opgegeven temperatuur van de cyclus.
Voor fijne was en weefsels die een speciale behandeling nodig hebben kan de centrifuge
snelheid worden verminderd door het aantal toeren per minuut te verlagen.
Wanneer er slecht een beperkt aantal kledingstukken dusdanig vervuild zijn dat
bleken gewenst is, kan er voor deze kledingstukken een voorwas worden gekozen.
Doe het bleekmiddel in het bleekbakje van de zeeplade (2) en kies het programma
SPOELEN . Wanneer dit is beeindigd,draai de programmaknop op UIT en voeg
vervolgens de overige kledingstukken toe waarna de normale was met het gewenste
programma gestart kan worden.
Enkele belangrijke opmerkingen:
* Raadpleeg de kenplaat vor het maximale (droge) laadgewicht
47
44’
30’
ActivEco
20°
&
30°
30°
50° + Pre
40°
30°
90° + Pre
40°C
60°C
(II)
Page 48

21
Whites
with Prewash
Fast coloureds
Fast coloureds
Non fast coloureds
Resistant or Mixed
fabrics
Resistant or Mixed
fabrics
Rinse
Fast spin
Drain only
Delicates
Hand wash &
“MACHINE
WASHABLE”
woollens
Resistant or Mixed
fabrics
Shirts
Non fast coloureds
Fast coloureds
with Prewash
90°
60°
40°
30°
30°
40°
-
-
-
30°
30°
20°
30°
40°
50°
**
**
TEMP.
°C
CHAPTER 7
EN
WEIGHT
MAX
kg
*
TABLE OF PROGRAMMES
Resistant fabrics
Cotton, linen
Cotton, mixed
Very delicate fabrics
Mixed fabrics
and synthetics
Synthetics (nylon,
perlon), mixed cotton
CHARGE DETERGENT
PROGRAMME
SELECTOR
ON:
PROGRAM FOR:
Specials
7
7
7
7
2
3
-
-
-
2
1
7
3,5
3,5
3,5
6
6
6
6
2
3
-
-
-
2
1
6
3
3
3
8
8
8
8
2,5
3,5
-
-
-
2,5
2
8
4
4
4
44
Shirts
II I
Page 49

Please read these notes
* Maximum load capacity of dry clothes, according to the model used (see rating
plate).
** STANDARD COTTON PROGRAMMES ACCORDING TO (EU) No 1015/2010 and
No 1061/2010
COTTON PROGRAMME with a temperature of 60°C
COTTON PROGRAMME with a temperature of 40°C
These programmes are suitable to clean normally soiled cotton laundry and they are the most
efficient programmes in terms of combined energy and water consumptions for washing
cotton laundry.
These programmes have been developed to be compliant with the temperature on the wash
label on the garments and the actual water temperature may slightly differ from the declared
temperature of the cycle.
The spin speed may also be reduced, to match any guidelines suggested on the
fabric label, or for very delicate fabrics cancel the spin completely this option is
available with a spin speed button.
When only a limited number of articles have stains which require treatment with liquid
bleaching agents, preliminary removal of stain can be carried out in the washing
machine.
Pour the bleach into the liquid bleach container, inserted into the compartment
marked "2" in the detergent drawer, and set the special programme "RINSE" .
When this phase has terminated, turn the programme selector on the "OFF" position,
add the rest of the fabrics and proceed with a normal wash on the most suitable
programme.
49
44’
30’
ActivEco
20°
&
30°
30°
50° + Pre
40°
30°
90° + Pre
40°C
60°C
“II”
Page 50

50
FR
CHAPITRE 8
SELECTION
L’appareil dispose de groupes de
programmes différents pour laver
tous types de tissus et selon
différents degrés de salissure en
attribuant au type de lavage, la
température et la durée (voir
tableau des programmes de
lavage).
TISSUS RÉSISTANTS
Ces programmes sont destinés à
accomplir des lavages et des
rinçages avec le maximum
d’efficacité.Ils sont entrecoupés
de cycles d’essorages qui offrent
des résultats parfaits sur le
rinçage. L’essorage final retire le
maximum d’eau contenue dans
les tissus.
EXPRESS 40°C - RAPIDE 30’
Un cycle complet de
lavage(lavage,rinçage et
essorage), capable de laver en
environ 30 minutes:
- une charge maximu de 2/2,5 kg
- des textiles légèrement sales
(coton et textiles mixtes)
Nous recommandons avec ce
programme de mettre 20% de
produit lessiviel (par rapport à
un dosage normal), afin d’éviter
de gaspiller du produit lessiviel
EXPRESS 40°C – RAPIDE 44’
Un cycle complet de
lavage(lavage,rinçage et
essorage), capable de laver en
environ 44 minutes:
- une charge maximum
de 3/3.5 kg
- des textiles légèrement sales
(coton et textiles mixtes)
Nous recommandons avec ce
programme de mettre 30% de
produit lessiviel (par rapport à
un dosage normal), afin d’éviter
de gaspiller du produit lessiviel.
IT
CAPITOLO 8
SELEZIONE
PROGRAMMI
Per trattare i vari tipi di tessuto e
le varie gradazioni di sporco,la
lavatrice ha fasce di programmi
diversi per tipo di tessuto,
temperatura e durata (vedere
tabella programmi di lavaggio).
TESSUTI RESISTENTI
I programmi sono realizzati per
sviluppare il massimo grado di
lavaggio e i risciacqui, intervallati
da fasi di centrifuga,assicurano
un perfetto risciacquo.
La centrifuga finale alla massima
velocità assicura un’ottima
strizzatura.
LAVAGGIO GIORNALIERO 40°C
- CICLO RAPIDO 30’
Ciclo di lavaggio completo
(lavaggio,risciacquo e
centrifuga) in grado di lavare
in circa 30 minuti:
- carichi massimi fino a 2/2,5 kg;
- tessuti poco sporchi (cotone
e misti)
Con questo programma si
raccomanda di usare solo il
20% del detersivo
normalmente usato per
evitare sprechi inutili.
LAVAGGIO GIORNALIERO 40°C
- CICLO RAPIDO 44’
Ciclo di lavaggio completo
(lavaggio,risciacquo e
centrifuga) in grado di lavare
in circa 44 minuti:
- carichi massimi fino a 3/3,5 kg;
- tessuti poco sporchi (cotone
e misti)
Con questo programma si
raccomanda di usare solo il
30% del detersivo
normalmente usato per
evitare sprechi inutili.
PT
CAPÍTULO 8
SELECÇÃO DOS
PROGRAMAS
A máquina dispõe de grupos
de programas diferentes
baseados nos diversos tipos de
tecidos a lavar, nos vários graus
de sujidade, na temperatura a
na duração do programa de
lavagem (vide a tabela de
programas).
TECIDOS RESISTENTES
Os programas deste grupo
foram desenvolvidos de modo a
garantirem os melhores
resultados de lavagem,e os
enxaguamentos com
centrifugação intercalar
garantem um enxaguamento
perfeito da roupa.A
centrifugação final assegura que
as peças de roupa fiquem bem
torcidas.
LAVAGEM DIÁRIA 40ºC – RÁPIDA
30’ (minutos)
Um ciclo de lavagem completo
(lavagem,enxaguamento e
centrifugação), disponível para
uma lavagem de
aproximadamente 30’ (minutos):
- uma carga máxima de 2/2,5 kg;
- tecidos mais sujos (algodões e
mistos).
Recomendado para este
programa,mais 20% de carga
em detergente (comparando
com a lavagem normal),para
evitar desperdícios de
detergente.
LAVAGEM DIÁRIA 40ºC – RÁPIDA
44’ (minutos)
Um ciclo de lavagem completo
(lavagem,enxaguamento e
centrifugação), disponível para
uma lavagem de
aproximadamente 44’(minutos):
- uma carga máxima de 3/3,5 kg;
- tecidos mais sujos (algodões e
mistos).
Recomendado para este
programa,mais 30% de carga
em detergente (comparando
com a lavagem normal),para
evitar desperdícios de
detergente.
Page 51

51
DE
KAPITEL 8
PROGRAMM/
TEMPERATURWAHL
Um unterschiedliche Textilien und
Verschmutzungsgrade optimal
behandeln zu können,bietet Ihnen
diese Waschmaschine
Programmtypen für
unterschiedliche Gewebearten,
Temperaturen und
Programmdauer (siehe
Programmtabelle) an .
UNEMPFINDLICHE STOFFE
Die Programme bieten eine
maximale Reinigung und jeweils
von Schleuderphasen
unterbrochene Spülgänge, die
die optimale Spülung der
Wäsche garantieren.
Der abschließende
Schleudergang sichert die
bestmögliche Trocknung.
TÄGLICHER WASCHGANG 40°C
– SCHNELLPROGRAMM
30MINUTEN
Es handelt sich um einen
kompletten Waschgang
(Waschen,Spülen, Schleudern),
der nur ca. 30 Minuten dauert
und besonders empfohlen wird
für:
- maximale Wäscheladungen
von 2/2,5 kg
- leicht verschmutzte
Wäschestücke (Beumwolle und
Mischgewebe)
Um eine Verschwendung des
Waschmittels zu vermeiden,
empfehlen wir, nur 20% der
normalerweise benutzten
Waschmitteldosis zu nehmen.
TÄGLICHER WASCHGANG 40°C
– SCHNELLPROGRAMM 44
MINUTEN
Es handelt sich um einen
kompletten Waschgang
(Waschen,Spülen,Schleudern),
der nur ca.44 Minuten dauert und
besonders empfohlen wird für:
- maximale Wäscheladungen
von 3/3,5 kg
- leicht verschmutzte
Wäschestücke (Beumwolle und
Mischgewebe)
Um eine Verschwendung des
Waschmittels zu vermeiden,
empfehlen wir, nur 30% der
normalerweise benutzten
Waschmitteldosis zu nehmen.
EN
CHAPTER 8
SELECTION
For the various types of fabrics
and various degrees of dirt the
washing machine has different
programme bands according
to: wash cycle,temperature
and lenght of cycle (see table
of washing cycle
programmes).
RESISTANTS FABRICS
The programmes have been
designed for a maximum wash
and the rinses, with spin
intervals, ensure perfect rinsing.
The final spin gives more
efficient removal of water.
DAILY WASH 40°C – FAST 30’
A complete washing cycle
(wash,rinse and spin), able to
wash in approximately 30
minutes:
- a maximum load of 2/2,5 kg;
- lightly soiled fabrics (cotton
and mixed fabrics)
We recommend,with this
programme,a 20% detergent
loading dose (compared to
the normal one), in order to
avoid detergent waste.
DAILY WASH 40°C – FAST 44’
A complete washing cycle
(wash,rinse and spin), able to
wash in approximately 44
minutes:
- a maximum load of 3/3,5 kg;
- lightly soiled fabrics (cotton
and mixed fabrics)
We recommend,with this
programme,a 30% detergent
loading dose (compared to
the normal one), in order to
avoid detergent waste.
NL
HOOFDSTUK 8
KIEZEN VAN HET
PROGRAMMA
Voor de verschillende soorten
weefsels en afhankelijk van de
graad van vervuiling van het
wasgoed heeft de
wasautomaat verschillende
hoofdgroepen: (zie het
overzicht van de
wasprogramma’s).
STERKE WEEFSELS
Deze programma’s zijn
bestemd om grondig te
wassen.De verschillende
spoelgangen, die tussendoor
gecentrifugeerd worden,
zorgen dat er perfect
gespoeld wordt.Bij de laatste
centrifugegang wordt het
water optimaal verwijderd.
DAGELIJKSE WAS 40° C – SNEL
30 MINUTEN
Een compleet wasprogramma
(wassen,spoelen en
centrifugeren), voor het in
ongeveer 30 minuten wassen
van:
- een maximale belading van
2/2,5 kg
- licht vervuilde weefsels
(katoen en synthetisch)
Wij adviseren bij dit
programma het gebruik van
20% van de normale
hoeveelheid wasmiddel, om
verspilling van wasmiddel te
voorkomen.
DAGELIJKSE WAS 40° C – SNEL
44 MINUTEN
Een compleet wasprogramma
(wassen,spoelen en
centrifugeren), voor het in
ongeveer 44 minuten wassen
van:
- een maximale belading van
3/3,5 kg
- licht vervuilde weefsels
(katoen en synthetisch)
Wij adviseren bij dit
programma het gebruik van
30% van de normale
hoeveelheid wasmiddel, om
verspilling van wasmiddel te
voorkomen.
Page 52

52
FR
PROGRAMME SPÉCIAL
“RINÇAGE”
Ce programme effectue trois
rinçages et un essorage
intermédiaire (qui peut être
réduit ou supprimé en
agissant sur la touche
appropriée). Il peut être utilisé
pour rincer tous types de
tissus, par exemple après un
lavage à la main.
Ce programme peut être en
outre utilisé comme cycle de
BLANCHISSAGE (voir le
tableau des programmes).
PROGRAMME SPÉCIAL
“ESSORAGE ENERGIQUE”
Ce programme effectue un
essorage à la vitesse
maximale (qui peut être
réduit en agissant sur la
touche appropriée).
UNIQUEMENT VIDANGE
Ce programme vous permet
d’effectuer la vidange de
l’eau.
TISSUS TRÈS DÉLICATS
Il s’agit d’un nouveau
concept de lavage qui
alterne des moments de
brassage et de trempage du
linge; ce processus est
particulièrement indiqué pour
le lavage de tissus
extrêmement délicats
comme la Pure Laine Vierge.
Le lavage et le rinçage sont
effectués à pleine eau afin
d’obtenir les meilleures
prestations.
LAVAGE A LA MAIN
Cette machine à laver est
également équipée d’un
programme de Lavage à la
main.
Ce programme vous permet
d’effectuer un cycle de
lavage complet pour les
vêtements qui exigent d’être
lavés à la main.
Le programme a une
température de 30°C et se
termine par 3 rinçages et un
essorage rapide.
IT
PROGRAMMA SPECIALE
“RISCIACQUI”
Questo programma effettua
3 risciacqui della biancheria
con centrifuga intermedia
(eventualmente riducibile o
annullabile tramite
l’apposito tasto).
E’ utilizzabile per
risciacquare qualsiasi tipo di
tessuto, ad esempio dopo
un lavaggio effettuato a
mano.
Questo programma può
essere inoltre utilizzato come
ciclo di CANDEGGIO (vedi
tabella programmi).
PROGRAMMA SPECIALE
“CENTRIFUGA FORTE”
Questo programma effettua
una centrifuga alla massima
velocità (eventualmente
riducibile tramite l’apposito
tasto).
SOLO SCARICO
Questo programma effettua
lo scarico dell’acqua.
TESSUTI DELICATISSIMI
E’ un nuovo concetto di
lavaggio in quanto alterna
momenti di lavoro a
momenti di pausa,
particolarmente indicato
per il lavaggio di tessuti
molto delicati come la lana.
Il lavaggio ed i risciacqui
sono eseguiti con alto livello
di acqua per assicurare le
migliori prestazioni.
PROGRAMMA SPECIALE
“LAVAGGIO A MANO“
La macchina presenta
anche un ciclo di lavaggio
delicato chiamato Lavaggio
a mano.
Il programma consente un
ciclo di lavaggio completo
per i capi da lavare
esclusivamente a mano.Il
programma raggiunge una
temperatura massima di
30°C e termina con 3
risciacqui e una centrifuga
delicata.
30°
&
gp
com um nível elevado de
água.
LAVAGEM À MÃO 30°
Esta máquina de lavar também
tem um programa de ciclo de
lavagem à mão.Este programa
tem um ciclo completo de
lavagem para roupas,
denominado como "Só
Lavagem à Mão".O programa
tem uma temperatura de 30º C
e é concluído com 3
enxaguamentos e uma lenta
PROGRAMA DE LAVAGEM
MANUAL E LÃS
Este programa permite um
ciclo de lavagem completo
para lãs especificadas como
"laváveis à máquina" e roupas
especificadas como "lavar só
à mão" na etiqueta dos
tecidos.
O programa tem uma
temperatura máxima de 30ºC
e termina com 3
enxaguamentos, um
amaciador e uma
centrifugação suave.
TECIDOS MUITO DELICADOS
Este programa representa um
novo conceito de lavagem
que alterna fases de rotação
e de impregnação, sendo
particularmente adequado
para tecidos muito delicados,
por exemplo, pura lã virgem.
Para que os resultados de
lavagem sejam os melhores,
tanto a lavagem,como o
TECIDOS MUITO DELICADOS
Este programa representa um
novo conceito de lavagem
que alterna fases de rotação
e de impregnação, sendo
particularmente adequado
para tecidos muito delicados.
Para que os resultados de
lavagem sejam os melhores,
tanto a lavagem,como o
enxaguamento, se processam
com um nível elevado de
água.
pode ser reduzida utilizando a
tecla correcta).
ESCOAR
O programa escoar é
indicado para escoar a água.
g
ciclo de branqueamento (veja
tabela de programas).
PROGRAMA ESPECIAL
“CENTRIFUGAÇÃO RÁPIDA”
O programa “CENTRIFUGAÇÃO
RÁPIDA” proporciona a
PROGRAMA ESPECIAL
“CENTRIFUGAÇÃO RÁPIDA”
O programa “CENTRIFUGAÇÃO
RÁPIDA” proporciona a
máxima centrifugação (a qual
pode ser reduzida utilizando a
tecla correcta).
PT
PROGRAMA ESPECIAL
“ENXAGUAMENTO”
Este programa é constituído
por três enxaguamento com
uma centrifugação intermédia
(que pode ser reduzida ou
excluída usando a tecla
correcta). Pode ser utilizado
para enxaguar qualquer tipo
de tecido, ou por exemplo
para utilizar após a lavagem
de roupa à mão.
Este programa pode ser
igualmente usado como um
ciclo de branqueamento
(veja tabela de programas).
sono eseguiti con alto livello
di acqua per assicurare le
migliori prestazioni.
PROGRAMMA SPECIALE
“LAVAGGIO A MANO“
La macchina presenta anche
un ciclo di lavaggio delicato
chiamato Lavaggio a mano.
Il programma consente un
PROGRAMMA LANA & MANO
Questo programma effettua
un ciclo di lavaggio dedicato
ai tessuti in “Lana lavabile in
lavatrice” o per i capi da
lavare esclusivamente a
mano.
Il programma raggiunge una
temperatura di 30°C e
termina con 3 risciacqui e una
centrifuga delicata.
Page 53

53
EN
SPECIAL “RINSE”
PROGRAMME
This programme carries out
three rinses with a
intermediate spin (which
can be reduced or
excluded by using the
correct button). It can be
used for rinsing any type of
fabric, eg. use after handwashing.
This program can be also
used as cycle of Bleaching
(see table of washing cycle
programmes).
SPECIAL “FAST SPIN”
PROGRAMME
Programme “FAST SPIN”
carries out a maximum spin
(which can be reduced by
using the correct button).
DRAIN ONLY
This programme drains out
the water.
SPECIAL DELICATE FIBRES
This is a new wash cycle
which alternates washing
and soaking and is
particularly recommended
for very delicate fabrics
such as Pure Machine
Washable Wool. The wash
cycle and rinses are carried
out with high water levels to
ensure best results.
SPECIAL “HAND WASH”
This washing machine also
has a gentle Hand Wash
programme cycle.This
programme allows a
complete washing cycle for
garments specified as
“Hand Wash only”on the
fabric care label. The
programme has a
temperature of 30°C and
concludes with 3 rinses and
a slow spin.
DE
SPEZIALPROGRAMM
“SPÜLEN”
Das Programm Spülen führt
drei Spülgänge aus mit
letztem Schleudergang,der
evtl. reduziert oder ganz
ausgeschlossen werden
kann (drücken Sie die
entsprechende Taste).
Geeignet zum Spülen
jedweder Gewebeart,z.B.
nach dem Waschen per
Hand.
Dieses Programm kann auch
als BLEICHPROGRAMM
benutzt werden
(s.Programmtabelle).
SPEZIALPROGRAMM
“INTENSIVSCHLEUDERN”
Dieses Spezialprogramm
führt einen
Intensivschleudergang (die
Schleuderdrehzahl kann
evtl. durch Drücken der
entsprechenden Taste
reduziert werden).
ABPUMPEN
Das Programm pumpt das
Wasser nur ab.
HOCHEMPFINDLICHE STOFFE
Dieses neue Waschkonzept
mit abwechselnden Wasch-
und Einweichphasen ist
besonders geeignet für die
Wäsche feinster Textilien, wie
z.B. reiner Wolle. Wasch-und
Spülgänge werden mit
hohem Wasserstand
durchgeführt, um eine
schonende Behandlung und
beste Ergebnisse zu sichern.
SPEZIALPROGRAMM
“HANDWÄSCHE”
Das Gerät verfügt auch
über ein besonders sanftes
Waschprogramm, das
Handwäsche-Programm.Es
handelt sich um einen
kompletten Waschzyklus für
Wäschestücke,die nur mit
der Hand gewaschen
werden können.Das
Programm erreicht eine
Höchsttemperatur von 30°C
und endet mit 3 Spülgängen
und einem
Schonschleudergang.
NL
SPECIAAL
“SPOELPROGRAMMA”
Dit programma spoelt drie
keer met tussendoor
centrifugeren. (dit kan worden
aangepast ) Dit programma
kan worden gebruikt voor het
spoelen van ieder type
wasgoed.Bijv. na de handwas.
Dit programma kan ook
worden gebruikt als een bleek
programma (zie
programmatabel).
SPECIAAL “SNEL CENTRIFUGE”
PROGRAMMA
Het programma "snelle
centrifuge" centrifugeert op
het maximale toerental (deze
kan worden aangepast door
de juiste knop te drukken).
ALLEEN AFPOMPEN
Het programma pompt
alleen water af.
BIJZONDER GEVOELIGE
WEEFSELS
Dit is een nieuw
wasprogramma waarbij om
beurten wordt gewassen en
geweekt en is in het bijzonder
geschikt voor zeer gevoelige
weefsels zoals zuiver
scheerwol.Het wassen en
spoelen worden uitgevoerd
met een hoog waterniveau
om tot het beste resultaat te
komen.
SPECIAAL “HANDWAS”
Deze wasmachine heeft ook
een handwascyclus.Het
programma geeft de
mogelijkheid om een complete
wasscyclus voor speciale
kledingstukken als “Handwas”
te behandelen. Het
programma heeft een
temperatuur van 30°C en sluit
af met 3 keer spoelen en
langzaam centrifugeren.
durchgeführt,um eine
schonende Behandlung und
beste Ergebnisse zu sichern.
SPEZIALPROGRAMM
“HANDWÄSCHE”
Das Gerät verfügt auch über
ein besonders sanftes
Waschprogramm, das
Handwäsche-Programm.Es
handelt sich um einen
kompletten Waschzyklus für
Wäschestücke,die nur mit der
Hand gewaschen werden
können. Das Programm erreicht
eine Höchsttemperatur von
30°C und endet mit 3
Spülgängen und einem
Schonschleudergang.
PROGRAMM WOLLE &
HANDWÄSCHE
Mit diesem Programm kann
speziell dafür gekennzeichnete,
maschinenwaschbare Wolle
(s. Wäschezeichen) oder
Textilien,die nur zur
Handwäsche empfohlen
werden (s.Wäschezeichen),
mit der Maschine gewaschen
werden und man spart sich so
die aufwendige Handwäsche.
Die max.Waschtemperatur
liegt bei 30°C. Das Programm
arbeitet mit geringen, sanften
Trommelbewegungen
während des Waschvorgangs
und endet mit drei
Spülgängen sowie einem
sanften Schleudergang bei
niedriger Drehzahl.
HOCHEMPFINDLICHE STOFFE
Dieses neue Waschkonzept
mit abwechselnden Waschund Einweichphasen ist
besonders geeignet für die
Wäsche feinster Textilien, wie
z.B. reiner Wolle. Wasch-und
Spülgänge werden mit
hohem Wasserstand
durchgeführt, um eine
schonende Behandlung und
beste Ergebnisse zu sichern.
WOL & HANDWAS
PROGRAMMA
Dit programma geeft de
mogelijkheid van een
compleet wasprogramma
voor wollen kleding
omschreven als "machine
wasbaar" en wasgoed met
"alleen handwas" op het
label.
Het programma heeft een
maximale temperatuur van
30 °C en sluit af met 3
spoelingen, een
wasverzachter en een
langzame centrifugecyclus.
SPECIAL “HAND WASH”
This washing machine also has
a gentle Hand Wash
programme cycle.This
programme allows a
complete washing cycle for
garments specified as “Hand
Wash only”on the fabric care
label. The programme has a
temperature of 30°C and
WOOL & HAND WASH
PROGRAMME
This programme allows a
complete washing cycle for
garments specified as
“Machine-Washable”Wool
fabrics and laundry items
specified as “Hand Wash
only” on the fabric label. The
programme has a maximum
temperature of 30°C and
concludes with 3 rinses, one
for fabric conditioner, and a
slow spin.
Page 54

54
IT
SPORTSWEAR
Hoover ha dedicato ai capi
sportivi un programma di
lavaggio speciale.
La macchina presenta un
programma esclusivo
Sportswear.
Si tratta di un programma
speciale per il lavaggio di
capi sportivi misti che non
possono essere lavati con i
programmi che prevedono
elevate temperature.
Il programma lava i capi a
30°C, li risciacqua e
centrifuga delicatamente
per garantire la massima
cura dei capi delicati ma
sporchi.
TESSUTI MISTI E SINTETICI
Il lavaggio ed il risciacquo
sono ottimizzati nei ritmi di
rotazione del cesto e nei
livelli di acqua.
La centrifuga ad azione
delicata, assicura una ridotta
formazione di pieghe sui
tessuti.
SPORT
Grâce à Hoover,les
vêtements de sport ont
désormais leur propre
programme d’entretien.
La machine à laver est
équipée d’un programme
Vêtements de sport.
Elle est spécialement conçue
pour laver des vêtements de
sport de fibres mixtes qui ne
peuvent pas être lavés à
haute température et elle est
conçue pour éliminer les
saletés et les taches résultant
des activités sportives.
Ce programme lave à 30°C,
rince et essore lentement
pour l’entretien optimal de
vos vêtements délicats et très
sales.
TISSUS MIXTES ET
SYNTHÉTIQUES
La combinaison d’un système
de lavage efficace, une
rotation optimum du tambour
et l’autogestion du niveau
d’eau assurent des résultats
de lavage excellents,
pendant qu’un rinçage
délicat évite les faux plis.
FR
ROUPAS DESPORTIVAS
A hoover delineou às peças
de roupa de desporto um
programa de lavagem
especial.
A máquina dispõe de um
programa exclusivo para
roupa desportiva.
Trata-se de uma
programação especial para
a lavagem de artigos de
roupa desportiva mistos que
não possam ser lavados em
programas de muito altas
temperaturas.
PT
PROGRAMA “ActivEco”
Este programa inovador
permite lavar tipos de tecidos
e cores diferentes misturados,
tais como algodões, sintéticos
ou tecidos e fibras mistas,
apenas a 20° garantindo,
desta forma,excelentes
resultados de lavagem.O
consumo energético deste
programa é cerca de 40%
menor do que um programa
convencional de lavagem de
algodões a 40°.
IT
SPORTSWEAR
Hoover ha dedicato ai capi
sportivi un programma di
lavaggio speciale.
La macchina presenta un
programma esclusivo
Sportswear.
Si tratta di un programma
speciale per il lavaggio di
capi sportivi misti che non
possono essere lavati con i
programmi che prevedono
Questo innovativo
programma consente di
lavare insieme capi di diversi
colori e tessuti quali cotone,
misti e sintetici alla
temperatura di 20°C,con
prestazioni ottimali.
Il consumo di questo
programma risulta essere
circa il 40% di quello di un
normale Cotone 40°C.
PROGRAMMA “ActivEco“
suavemente para guarant
um máximo cuidado com
as peças de roupa
delicadas mas desportiva
s
TECIDOS MISTOS E
SINTÉTICOS
A lavagem e o
enxaguamento estão
TECIDOS MISTOS E
SINTÉTICOS
A lavagem e o
enxaguamento estão
optimizados através dos
ritmos de rotação do
tambor e dos níveis de
água.
A centrifugação suave
assegura uma formação
reduzida de pregas e de
rugas nos tecidos.
Page 55

55
EN
SPORTS
Hoover has given sports
items their own wash care
programme.
The washing machine has a
unique Sportswear
programme.It is specially
designed to wash mixed
sportswear fabrics that
cannot be washed on
hotter programmes and is
designed to remove the soil
and staining created by
participation in sports
activities. This programme
washes at a cool 30°C,rinses
and spins slowly for the best
care of your heavily soiled,
delicate garments.
MIXED AND SYNTHETIC
FABRICS
The main wash and the rinse
gives best results thanks to
the rotation rhythms of the
drum and to the water
levels.
A gentle spin will mean that
the fabrics become less
creased.
DE
SPORTBEKLEIDUNG
Hoover hat für
Sportbekleidung ein eigenes
Waschprogramm entwickelt.
Diese Waschmaschine verfügt
über ein einzigartiges
Sportbekleidungsprogramm.
Mit diesem Programm kann
Sportbekleidung, die nicht mit
Programmen mit höheren
Temperaturen gewaschen
werden darf, gewaschen
werden.
Die Wäsche wird bei nur 30°C
gewaschen,ausgespült und
zum Schluss mit niedriger
Drehzahl geschleudert, um Ihre
stark verschmutzten und
empfindlichen Wäschestücke
zu schonen.
MISCHGEWEBE UND
KUNSTFASERN
Das Waschen und Spülen
dieser Gewebearten ist durch
die optimale Drehzahl der
Trommel und durch das
perfekt abgestimmte
Wasserniveau besonders
wirksam.
Das Schonschleudern
verhindert außerdem die
Bildung von Falten in der
Wäsche.
NL
Sport programma
Hoover heeft sportkleding
een eigen wasprogramma
gegeven.
De Wasmachine heeft een
uniek sportkleding
programma.Het is speciaal
ontworpen voor gemixte
sportkleding stoffen welke
niet op een hogere
temperatuur gewassen
kunnen worden en om vuil
en vlekken welke door het
sporten zijn ontstaan te
verwijderen.
Dit programma wast op
40°C, spoelt en centrifugeert
langzaam voor de beste
zorg van uw zwaar vervuilde
delicate stoffen.
GEMENGDE EN
SYNTHETISCHE WEEFSELS
Dankzij een speciale
trommelbeweging en het
hogere waterniveau wordt er
tijdens de hoofdwas en de
spoeling de beste resultaten
behaald.Er wordt met een
laag toerental
gecentrifugeerd om kreuken
te voorkomen.
DE
SPORTBEKLEIDUNG
Hoover hat für
Sportbekleidung ein eigenes
Waschprogramm entwickelt.
Diese Waschmaschine verfüg
t
über ein einzigartiges
Sportbekleidungsprogramm.
Mit diesem Programm kann
Sportbekleidung, die nicht mit
Programmen mit höheren
Temperaturen gewaschen
werden darf, gewaschen
werden.
Die Wäsche wird bei nur 40°C
“ActivEco”-PROGRAMM
Mit diesem
Waschprogramm können
Sie gleichzeitig farbechte
Textilien aus Baumwolle,
Mischgeweben und
Kunstfasern bei einer
Temperatur von nur 20°C
waschen.Der
Energieverbrauch liegt
dabei rund 40% unter dem
eines herkömmlichen 40°C
Baumwollwaschprogramms.
"ActivEco" PROGRAMMA
Met dit innovatieve
programma kunt u
verschillende stoffen, zoals
katoen, synthetische en
gemengde weefsels, en
kleuren bij elkaar wassen op
slechts 20°C met een
uitstekend reinigende
werking.
Met dit programma verbruikt
u lechts 40% ten opzichte
van een standaard
katoenwascyclus op 40°C.
EN
SPORTS
Hoover has given sports
items their own wash care
programme.
The washing machine has a
unique Sportswear
programme.It is specially
designed to wash mixed
sportswear fabrics that
cannot be washed on
hotter programmes and is
designed to remove the soil
and stainin
g
created b
y
"ActivEco" PROGRAMME
This innovative programme,
allows you to wash different
fabrics and colours
together, such as cottons,
synthetics and mixed fabrics
at only 20°C and provides
an excellent cleaning
performance.Consumption
on this program is about 40%
of a conventional 40°C.
cottons wash.
Page 56

✿
✿
✿
✿
✿
✿
56
FR
CHAPITRE 9
TIROIR A LESSIVE
Le tiroir à lessive est divisé en
3 petits bacs:
– le bac marquée du
symbole “1” sert pour la
lessive destinée au
prélavage;
– le bac marquée du
symbole “✿
✿
” sert pour
des additifs spéciaux:
adoucisseurs, parfums,
amidon, produits pour
l’azurage, etc;
– le bac marquée du
symbole “2” sert pour la
lessive destinée au
lavage.
Si vous souhaitez utiliser une
lessive liquide, un récipient
spécial peut être inséré
dans la section “2” du tiroir à
lessive. Grâce à ce système,
la lessive s’écoulera dans le
tambour seulement au bon
moment.
Ce bac doit être introduit
dans la section "2" du tiroir à
lessive, également lorsque
l’on désire utiliser le
programme "RINÇAGE"
comme cycle de
BLANCHISSAGE.
ATTENTION :
NOUS RAPPELONS QUE
CERTAINS PRODUITS
ONT DES DIFFICULTÉS A
ÊTRE ÉVACUÉS; DANS
CE CAS NOUS VOUS
CONSEILLONS D’UTILISER
LE DOSEUR QUI VA
DIRECTEMENT DANS LE
TAMBOUR.
ATTENTION :
DANS LE BAC
MARQUÉE DU SYMBOLE
“
✿
✿
” N’INTRODUIRE
QUE DES PRODUITS
LIQUIDES. LA MACHINE
EST PROGRAMMÉE DE
MANIÈRE À
AUTOMATIQUEMENT
ABSORBER LES
PRODUITS
COMPLÉMENTAIRES
PENDANT LE DERNIER
RINÇAGE DE TOUS LES
CYCLES DE LAVAGE.
IT
CAPITOLO 9
CASSETTO DETERSIVO
Il cassetto detersivo è
suddiviso in 3 vaschette:
– la vaschetta
contrassegnata con “1”
serve per il
detersivo del prelavaggio;
– la vaschetta
contrassegnata con“
✿
✿
”,
serve per additivi speciali,
ammorbidenti, profumi
inamidanti, azzurranti, ecc.
– la vaschetta
contrassegnata con “2”
serve per il detersivo di
lavaggio.
Se si desidera adoperare
detersivi liquidi, va introdotta
l’apposita vaschetta in
dotazione nello scomparto
contrassegnato con “2” del
cassetto detersivo.
Questo assicura che il sapone
liquido vada nel cesto solo al
momento in cui è necessario.
Se si desidera Candeggiare
occorre utilizzare il
programma Risciacqui ed
inserire la sopracitata
vaschetta sempre nello
scomparto “2”.
ATTENZIONE: SI RICORDI
CHE ALCUNI DETERSIVI
SONO DI DIFFICILE
ASPORTAZIONE. IN
QUESTO CASO LE
CONSIGLIAMO L’USO DI
UN APPOSITO
CONTENITORE DA PORRE
NEL CESTELLO.
ATTENZIONE: NELLA
VASCHETTA
CONTRASSEGNATA
CON “
✿
✿
” METTERE
SOLO PRODOTTI LIQUIDI.
LA MACCHINA È
PREDISPOSTA AL
PRELIEVO AUTOMATICO
DEGLI ADDITIVI
DURANTE I’ULTIMO
RISCIACQUO IN TUTTI I
CICLI DI LAVAGGIO.
✿
✿
✿
✿
✿
ATENÇÃO:
LEMBRE-SE DE QUE
ALGUNS DETERGENTES
SÃO DIFÍCEIS DE
REMOVER.
RECOMENDAMOS QUE,
NESSE CASO, UTILIZE O
RECIPIENTE ESPECIAL
PARA O DETERGENTE,
QUE DEVERÁ SER
DIRECTAMENTE
COLOCADO NO TAMBOR.
NO COMPARTIMENTO “
✿
✿
”
USAR APENAS PRODUTOS
LÍQUIDOS. A MÁQUINA
ESTÁ DIRECCIONADA À
PRÉ LAVAGEM
AUTOMÁTICA DOS
ADITIVOS DURANTE O
ÚLTIMO
REENXAGUAMENTO
TODOS OS CICLOS DE
LAVAGEM.
PT
CAPÍTULO 9
COLOCAÇÃO DO
DETERGENTE
GAVET
A PARA
DETERGENTE
A gaveta para detergente
está dividida em 3
compartimentos:
- O compartimiento,
indicado com “1”,
destina-se ao detergente
da pré-lavagem.
- O compartimento
✿
✿
destina-se a aditivoss
especiais, amaciadores,
perfumes, gomas,
branqueadores, etc.
- O compartimiento
indicado com “2”, é para
o detergente da lavagem
principal.
No caso dos detergentes
líquidos, utilize o recipiente
próprio, semelhante ao
representado na figura,e que
deverá ser introduzido no
tambor, sobre a roupa.
Este especial dispensador
deverá ser inserido no
compartimento “2” na gaveta
do detergente, ou também
quando deseja utilizar o
programa “ENXAGUAMENTO”
como ciclo BRANQUEADOR.
Page 57

57
DE
KAPITEL 9
WASCHMITTELBEHÄLTER
Der Waschmittelbehälter ist in
3 Fächer unterteilt:
– Das Fach mit "1" ist für die
Vorwäsche.
– Das Fach “✿
✿
”, ist für
spezielle Zusätze wie
Weichspüler, Duftstoffe,
Stärke usw.
– Das Fach mit "2" ist für das
Hauptwaschmittel.
Für Flüssigwaschmittel
benutzen Sie bitte den
beiliegenden Einsatz, der wie
abgebildet in die
Waschmittelkammer “2” der
Waschmittelschublade
einzusetzen ist.
Der Einsatz für Flüssigmittel ist
ebenfalls in die
Waschmittelkammer "2"
einzusetzen, wenn Sie das
Programm “SPÜLEN“ als
BLEICHPROGRAMM nutzen
wollen.
ACHTUNG:
BEKANNTLICH LASSEN
SICH EINIGE
WASCHMITTEL SCHWER
EINSPÜLEN, IN SOLCHEN
FÄLLEN BENUTZEN SIE
BITTE DIE SPEZIELLEN
BEHÄLTER FÜR DIE
VERWENDUNG DIREKT
IN DER TROMMEL.
ACHTUNG:
IN DAS FACH “
✿
✿
” NUR
FLÜSSIGE MITTEL
EINFÜLLEN. DAS GERÄT
SPÜLT DIE ZUSATZMITTEL
AUTOMATISCH
WÄHREND DES LETZTEN
SPÜLGANGS IN ALLEN
WASCHPROGRAMMEN
EIN.
EN
CHAPTER 9
DETERGENT
DRAWER
The detergent draw is split
into 3 compartments:
- the compartment labelled
"1" is for prewash
detergent;
- the compartment
labelled “
✿
✿
” is for special
additives, fabric softeners,
fragrances, starch,
brighteners etc;
- the compartment labelled
"2" is for main wash
detergent.
If liquid detergents are used,
please insert the special
container supplied into the
compartment marked “2”in
the detergent drawer. This
ensures that the liquid
detergent enters the drum
at the right stage of the
wash cycle.
This special container must
be inserted into the
compartment marked "2" in
the detergent drawer, also
when you wish to use the
"RINSE" programme as
BLEACHING cycle.
NOTE: SOME
DETERGENTS ARE
DIFFICULT TO REMOVE.
FOR THESE, WE
RECOMMEND YOU USE
THE SPECIAL DISPENSER
WHICH IS PLACED IN
THE DRUM.
NOTE: ONLY PUT
LIQUID PRODUCTS IN
THE COMPARTMENT
LABELLED “
✿
✿
”. THE
MACHINE IS
PROGRAMMED TO
AUTOMATICALLY TAKE
UP ADDITIVES DURING
THE FINAL RINSE
STAGE FOR ALL WASH
CYCLES.
HOOFDSTUK 9
WASMIDDELBAKJE
De wasmiddelbakje bestaat uit
3 afzonderlijke vakjes:
– het vakje met een “1” is voor
de zeep die voor de Voorwas
of de Snelle Was wordt
gebruikt.
– Het vakje “✿
✿
” is voor
speciale toevoegingen,
verzachters, geurmiddelen,
stijfsel, bleekwater, enz.
– het vakje met een “2” is voor
de zeep die voor de
hoofdwas wordt gebruikt.
Vloeibaar wasmiddel kunt u
gieten in het het het
wasmiddelenbakje met het
teken “2”.
Dit zorgt ervoor dat het
vloeibare wasmiddel op het
juiste tijdstip tijdens de
wascyclus aan de was wordt
toegevoegd.
Dit speciale bakje doet u in de
zeep lade met het teken “2” dit
bakje gebruikt u ook bij het
spoel- en bleek programma.
BELANGRIJK:
U DIENT ER REKENING MEE
TE HOUDEN DAT SOMMIGE
WASMIDDELEN MOEILIJK
TE VERWIJDEREN ZIJN.
IN DAT GEVAL RADEN WIJ
U AAN OM EEN
WASBOLLETJE IN DE
TROMMEL TE GEBRUIKEN.
BELANGRIJK:
HET VAKJE “
✿
✿
” IS ALLEEN
BESTEMD VOOR VLOEIBARE
STOFFEN.
DE MACHINE IS
GEPROGRAMMEERD OM
AUTOMATISCH DE EXTRA
MIDDELEN TIJDENS DE
LAATSTE SPOELING VAN
ALLE WASPROGRAMMA’S
TE GEBRUIKEN.
NL
Page 58

FR
IT
58
CHAPITRE 10
LE PRODUIT
ATTENTION:
si vous devez laver des tapis,
des couvre-lits ou d’autres
pièces lourdes, nous
conseillons de ne pas
essorer.
Pour laver à la machine des
vêtements et de la lingerie
se reporter à l’étiquette qui
doit mentionner “pure laine
vierge” et l’indication “ne se
feutre pas” ou “peut être
lavé en machine”.
ATTENTION:
Au cours de la phase
de sélection vérifier
que:
- aucun objet
métallique ne se
trouve dans le linge à
laver (boucles,
épingles de nourrice,
épingles, monnaie,
etc.);
- les taies d’oreiller
soient boutonnées, les
fermetures à glissière,
les crochets, les oeillets
soient fermés, les
ceintures et les rubans
des robes de chambre
soient noués;
- les anneaux soient
enlevés des rideaux;
- n’oublier pas de lire
attentivement
l’étiquette sur les tissus;
- Si, au cours de la
sélection, vous trouvez
des taches résistantes,
les enlever à l’aide
d’un nettoyant
spécial.
CAPITOLO 10
IL PRODOTTO
ATTENZIONE:
se deve lavare tappetoni,
copriletti o altri indumenti
pesanti é bene non
centrifugare.
Indumenti e biancheria di
lana, per poter essere lavati
in lavatrice, devono essere
contrassegnati con il
simbolo “Pura Lana Vergine”
e avere inoltre l’indicazione
“Non infeltrisce” oppure
“Lavabile in lavatrice”.
ATTENZIONE:
Durante la selezione si
assicuri che:
- nella biancheria da
lavare non vi siano
oggetti metallici (ad
esempio fermagli, spille
di sicurezza, spilli,
monete, ecc.);
- abbottoni federe,
chiuda le cerniere
lampo, gancetti a
occhielli, annodi cinghie
sciolte e lunghi nastri di
vestaglie;
- asporti dalle tendine
anche i rulli di
scorrimento;
- osservi attentamente le
etichette sui tessuti;
- se durante la selezione
vede delle macchie
resistenti, le asporti con
del detersivo speciale o
con un’apposita pasta
di lavaggio.
ATENÇÃO:
Recomendamos que,
sempre que lavar tapetes
pesados, colchas e outras
peças de roupa igualmente
pesadas, suprima a
centrifugação.
Antes de colocar uma peça
de lã na máquina, verifique
a respectiva etiqueta,para
se assegurar de que a peça
em questão é um artigo de
“Pura Lã Virgem” e também
“Lavável à Máquina” e
“Não feltrante”.Só estas
peças de lã poderão ser
lavadas na máquina.
IMPORTANTE:
Quando separar as
peças de roupa a
lavar certifique-se de
que:
- não deixou objectos
metálicos nas peças
de roupa, por
exemplo, alfinetes,
alfinetes de ama,
moedas, etc.;
- apertou os botões das
almofadas, os fechos,
os colchetes e os
cintos e que amarrou
as tiras de tecido
compridas;
- retirou as argolas das
cortinas;
- o programa de
lavagem
seleccionado está de
acordo com as
indicações de
lavagem fornecidas
pelos fabricantes das
peças de roupa
(símbolos inscritos nas
respectivas etiquetas).
- Além disso, antes de
colocar qualquer
peça de roupa muito
suja na máquina,
remova as nódoas
mais difíceis com um
detergente especial
ou tira-nódoas.
PT
CAPÍTULO 10
SEPARAÇÃO DAS
PEÇAS DE ROUPA
Page 59

EN
59
CHAPTER 10
THE PRODUCT
IMPORTANT:
When washing heavy rugs,
bed spreads and other
heavy articles, it is advisable
not to spin.
To be machine-washed,
woollen garments and other
articles in wool must bear
the “Machine Washable
Label”.
IMPORTANT:
When sorting articles
ensure that:
- there are no metal
objects in the washing
(e.g. brooches, safety
pins, pins, coins etc.).
- cushion covers are
buttoned, zips and
hooks are closed, loose
belts and long tapes on
dressing gowns are
knotted.
- runners from curtains are
removed.
- attention is paid to
garment labels.
- when sorting, any tough
stains should be
removed prior to
washing using stain
removers only
recommended on
label.
DE
KAPITEL 10
DAS PRODUKT
ACHTUNG:
Wenn Sie Kleinere Läufer,
Tagesdecken oder ähnliche,
schwere Textilien waschen,
sollten Sie auf das
Schleudern verzichten.
Das Symbol “reine Wolle”
kennzeichnet Kleidung und
Textilien aus Wolle, die für die
Maschinenwäsche geeignet
sind. Darüber hinaus sollten
solche Textilien den Hinweis
“nicht filzend”oder
“waschmaschinenecht”
tragen.
ACHTUNG:
Achten Sie beim
Sortieren der Wäsche
auf folgende Details:
- keine Metallteile (z.B.
Schnallen,
Sicherheitsnadeln,
Anstecknadeln,
Münzen) an oder in der
Wäsche;
- Kissenbezüge
zuknöpfen,
Reißverschlüsse und
Druckknöpfe schließen,
lose Gürtel und Bänder
von Morgenröcken
zuknöpfen;
- Rollen von den
Gardinen entfernen;
- Hinweise auf den
Wäscheetiketten
genauestens
beachten;
- beim Sortieren
auffallende,
hartnäckige Flecken
mit Spezialreiniger oder
geeigneter
Waschpaste
vorbehandeln.
NL
HOOFDSTUK 10
DE WEEFSELS
BELANGRIJK:
Als er zware kleden,
bedspreien of andere zware
artikelen worden gewassen
is het aan te bevelen om
niet te centrifugeren.
Om wollen kledingstukken
en andere wollen artikelen
met de machine te kunnen
wassen moeten zij een
“Zuiver Scheerwol”etiket
dragen met de vermelding
“Krimpvrij” of “wasbaar in de
machine”
BELANGRIJK:
Bij het uitzoeken van
het wasgoed moet u er
op letten:
- dat er geen metalen
voorwerpen aan of in
het wasgoed zitten
(zoals broches,
veiligheidsspelden,
pennen, munten, etc.);
- dat kussenovertrekken
zijn dichtgeknoopt,
ritssluitingen en haken
dicht zijn, losse ceintuurs
en lange koorden aan
bad-of ochtendjassen
zijn vastgeknoopt;
- dat haken uit de
gordijnen zijn verwijderd;
- wat er op het etiket van
het kledingstuk staat;
- dat bij het sorteren van
het wasgoed
hardnekkige vlekken
verwijderd moeten
worden met een
speciaal
reinigingsmiddel of met
zeep voordat het
wasgoed wordt
ingeladen.
Page 60

60
FR
CHAPITRE 11
CONSEILS UTILES
POUR L’UTILISATEUR
SUGGESTION POUR L’UTILISATION DE
VOTRE LAVE-LINGE
Dans le souci du respect de
l’environnement et avec le
maximum d’économie d’énergie,
charger au maximum votre lave-
linge pour éliminer les éventuels
gaspillages d’énergie et d’eau.Nous
recommandons d’utiliser la capacité
maximale de chargement de votre
lave-linge.
Vous pouvez ainsi économiser
jusqu’à 50% d’énergie si vous
pratiquez le chargement maximal.
Effectuez un lavage unique à
l’opposé de 2 lavages en 1/2
charge.
QUAND LE PRE-LAVAGE EST-IL
VRAIMENT NÉCESSAIRE ?
Seulement dans le cas d’un linge
particulièrement sale. Dans le cas
d’un linge normalement sale, ne
sélectionnez pas l’option
" prélavage ",ceci vous permettra
une économie d’énergie de 5 à
15%.
QUELLE TEMPÉRATURE DE LAVAGE
SÉLECTIONNER ?
L’utilisation des détachants avant le
lavage en machine ne rend pas
nécessaire le lavage au-delà de
60°C. L’utilisation de la température
de 60°C permet de diminuer la
consommation d’énergie de 50%.
IT
CAPITOLO 11
CONSIGLI UTILI
PER GLI UTENTI
Brevi suggerimenti per un
utilizzo del proprio
elettrodomestico nel rispetto
dell’ambiente e con il massimo
risparmio
CARICARE AL MASSIMO LA
PROPRIA LAVABIANCHERIA
Per eliminare eventuali sprechi
di energia, acqua o detersivo si
raccomanda di utilizzare la
massima capacità di carico
della propria lavabiancheria. E’
possibile infatti risparmiare fino
al 50% di energia con un
carico pieno effettuato con un
unico lavaggio rispetto a due
lavaggi a mezzo carico.
QUANDO SERVE VERAMENTE IL
PRELAVAGGIO?
Solamente per carichi
particolarmente sporchi!
Si risparmia dal 5 al 15% di
energia evitando di
selezionare l’opzione
prelavaggio per biancheria
normalmente sporca.
QUALE TEMPERATURA DI
LAVAGGIO SELEZIONARE?
L’utilizzo di smacchiatori prima
del lavaggio in lavabiancheria
riduce la necessità di lavare a
temperature superiori a 60°C.
E’ possibile risparmiare fino al
50% utilizzando la temperatura
di lavaggio di 60°C.
PT
CAPÍTULO 11
CONSCIENCIALIZAÇÃO DO CLIENTE
Um guia para uma
utilização mais ecológica e
económica da sua
máquina de lavar roupa.
MAXIMIZE A QUANTIDADE DE
ROUPA A LAVAR
Assegure a melhor utilização
possivel da energia,da
água, do detergente e do
tempo, lavando na
máquina de lavar roupa a
quantidade máxima de
roupa recomendada.
Poupe até 50% de energia
lavando uma carga
completa em vez de lavar 2
meías cargas.
TEM DE FAZER UMA PRÉLAVAGEM?
Só se a roupa estiver muito
suja!
Se, no caso de a roupa estar
pouco ou normalmente
suja, NÃO seleccionar a
função de pré-lavagem,
estará a POUPAR
detergente, tempo e água
e ainda entre 5 a 15% de
consumo de energia.
TEM REALMENTE DE LAVAR A
ROUPA COM ÁGUA QUENTE?
Trate as nódoas com um
produto especial para
remover as nódoas ou
amoleça as nódoas já
secas em água antes de
lavar a roupa na máquina:
deixará assim de ter tanta
necessidade de lavar a
roupa com um programa
de lavagem a quente.
Poupe até 50% de energia
utilizando programas de
lavagem a 60°C.
Page 61

EN
CHAPTER 11
CUSTOMER
AW
ARENESS
A guide environmentally
friendly and economic use of
your appliance.
MAXIMISE THE LOAD SIZE
Achieve the best use of
energy, water,detergent and
time by using the
recommended maximum
load size.
Save up to 50% energy by
washing a full load instead of
2 half loads.
DO YOU NEED TO PRE-WASH?
For heavily soiled laundry
only!
SAVE detergent, time, water
and between 5 to 15%
energy consumption by NOT
selecting Prewash for slight to
normally soiled laundry.
IS A HOT WASH REQUIRED?
Pretreat stains with stain
remover or soak dried in
stains in water before
washing to reduce the
necessity of a hot wash
programme.
Save up to 50% energy by
using a 60°C wash
programme.
61
DE
KAPITEL 11
EINIGE NÜTZLICHE
HINWEISE
Wir möchten Ihnen im folgenden
einige Hinweise für die richtige
Nutzung Ihres Haushaltsgerätes,
damit Sie es umweltschonend
und mit der höchstmöglichen
Ersparnis betreiben können.
STETS MAXIMALE FÜLLUNG
BELADEN
Um Strom,Wasser und
Waschmittel nicht zu
verschwenden,empfehlen wir,
Ihre Waschmaschine stets mit der
maximalen Wäschefüllung zu
beladen. Das Waschen einer
vollen Wäscheladung emöglicht
eine Erspamis von bis zu 50%
Strom gegenüber zwei
Wäscheladungen mit halber
Menge.
WANN IST EINE VORWÄSCHE
WIRKLICH NOTWENDIG?
In der Regel nur für stark
verschmutzte Wäsche!
Wenn Sie normal oder wenig
verschmutzte Wäsche waschen,
sparen Sie zwischen 5% und 15%
Strom,wenn Sie keine Vorwäsche
wählen.
WELCHE WASCHTEMPERATUR?
Durch die Vorbehandlung der
Wäsche mit geeigneten
Fleckentfernern ist eine
Waschtemperatur von über 60°C
in den meisten Fällen nicht mehr
nötig. Sie können bis zu 50%
sparen, wenn Sie die
Waschtemperatur auf 60°C
begrenzen.
NL
HOOFDSTUK 11
TIPS V
OOR
GEBRUIK
Tips voor economisch en
milieuvriendelijk gebruik van
uw wasmachine.
MAXIMALISEREN VAN DE
LADING
Door de machine te vullen
met de geadviseerde
maximale lading,maakt u
optimaal gebruik van energie,
water, wasmiddel en tijd.
Door één keer een volle lading
te wassen,in plaats van twee
keer een halve lading,
bespaart u 50% energie.
IS VOORWASSEN ECHT NODIG?
U kunt uw kleding voorwassen
wanneer hier grote,moeilijke
vlekken inzitten.
Door kleding met normale
vlekken te wassen zonder
gebruik te maken van het
voorwasprogramma,kunt u
wasmiddel,tijd, water en 5 tot
15% energie besparen.
IS WASSEN OP EEN HOGE
TEMPERATUUR NOODZAKELIJK?
Bespaar 50% energie door
vlekken voor te behandelen
met een vlekkenverwijderaar
of uw was voor te laten
weken. Hierdoor kan het
gebruik van warm water
worden verminderd.
Page 62

✿✿
✿
FR IT
LAVAGGIO
CAPACITÁ VARIABILE
Questa lavatrice é in grado di
adattare automaticamente il
livello dell’acqua al tipo e alla
quantità di biancheria.
E’ così possibile ottenere
un bucato “personalizzato”
anche dal punto di vista
energetico.
Questo sistema porta ad una
diminuzione dei consumi
d’energia e ad una riduzione
sensibile dei tempi di
lavaggio.
ESEMPIO DI USO:
Per tessuti molto delicati é
consigliabile l’utilizzo di un
sacchetto di rete.
Supponiamo che il bucato da
lavare sia di COTONE MOLTO
SPORCO (se ha delle
macchie particolarmente
resistenti le asporti con
l’apposita pasta).
Le consigliamo di non fare un
carico di soli capi in tessuto di
spugna che, assorbendo
molta acqua, diventano
troppo pesanti.
●
Apra il cassetto detersivo
(P).
●
Metta nella vaschetta di
lavaggio 2 120 g di detersivo
●
Metta 50 ml dell’additivo
che desidera nella vaschetta
additivo
✿
✿
.
●
Chiuda il cassetto detersivo
(P).
LAVAGE
CAPACITÉ VARIABLE
AUTOMATIQUE
Cette machine peut adapter
automatiquement le niveau
d’eau au type et à la
quantité de linge.Vous
pouvez ainsi obtenir un
lavage “personnalisé”, même
du point de vue énergétique.
Ce système permet de
diminuer la consommation
d’énergie et réduit nettement
les temps de lavage.
EXEMPLE:
Pour les tissus extrêmement
délicats nous conseillons
d’utiliser un filet.
Supposons que le linge à
laver soit en COTON
EXTREMEMENT SALE (s’il a des
taches particulièrement
résistantes les enlever avec
un detachant).
Nous vous conseillons de ne
pas faire un lavage
exclusivement de serviettes-
éponge qui, absorbant
beaucoup d’eau, deviennent
trop lourdes.
● Ouvrir le tiroir à produits
lessiviels (P).
● Remplir le bac de lavage 2
avec 120 g de produit.
● En cas de besoin, remplir le
bac des additifs avec 50 ml
de produit
✿✿
.
● Fermer le tiroir (P).
62
✿✿
●
Deitar 50 cc do aditivo
pretendido no
compartimento para aditivos
✿
✿
.
●
Feche a gaveta para
detergente (P).
●
Abra a gaveta para
detergente (P).
●
Deitar 120 g de detergente
no compartimento da gaveta
para detergente 2.
PT
LAVAGEM
CAPACIDADE VARIÁVEL
Esta máquina ajusta
automaticamente o nível de
água ao tipo e quantidade
de água ao tipo e
quantidade de roupa a lavar.
Torna-se assim possível obter
uma lavagem
“personalizada”, inclusive do
ponto de vista da poupança
de energia.
O sistema proporciona uma
redução do consumo de
energia e uma redução
sensível da duração da
lavagem.
EXEMPLO:
Sempre que lavar peças de
roupa extre-mamente
delicadas, meta-as dentro de
um saco de rede.
Suponhamos que a carga de
roupa a lavar é composta por
ROUPA DE ALGODÃO MUITO
SUJA (as nódoas mais difíceis
deverão ser removidas com o
detergente especial).
Recomendamos que nunca
carregue a máquina só com
atoalhados, pois estes tecidos
absorvem muita água,
ficando muito pesados.
Page 63

63
DE
WASCHEN
UNTERSCHIEDLICHE
WÄSCHEMENGEN
Die Waschmaschine gleicht die
Wassermenge automatisch an
Art und Menge der Wäsche an.
So ist, auch im Hinblick auf den
Energieverbrauch, eine sehr
“individuelle” Form des
Waschens möglich.
Dieses System ermöglicht eine
spürbare Reduzierung sowohl
des.Wasserverbrauches als
auch der Waschzeiten.
BEISPIEL:
Für die Wäsche extrem
empfindlicher Teile empfiehlt
sich die Verwendung eines
Waschnetzes.
Angenommen, Sie waschen
z.B. STARK VERSCHMUTZTE
BAUMWOLLE (auf die
hartnäckigen Flecken vorher
eine geeignete Waschpaste
auftragen).Waschen Sie
nach Möglichkeit niemals
ausschließlich sehr
saugfähige Wäschestücke,
die, bedingt durch die
extreme Wasseraufnahme,
sehr schwer werden.
●
Waschmittelbehälter (P)
öffnen.
●
in das Fach mit 2
(Hauptwäsche) ca 120 g
Waschmittel geben.
●
auf Wunsch ca.50 ml
Zusatzmittel in den Behälter
✿
✿
für Zusatzmittel geben.
●
Waschmittelbehälter (P)
schließen.
EN
WASHING
VARIABLE CAPACITY
This washing machine
automatically adapts the level
of the water to the type and
quantity of washing.In this way
it is also possible to obtain a
“personalized” wash from an
energy saving point of view.
This system gives a decrease in
energy consumption and a
sensible reduction in washing
times.
EXAMPLE:
A net bag should be used
for particularly delicate
fabrics.
Let us suppose that the
washing consists of HEAVILY
SOILED COTTON (tough
stains should be removed
with suitable stain removal).
It is advisable not to wash a
load made up entirely of
articles in towelling fabric
which absorb a lot of water
and become too heavy.
● Open the detergent
drawer (P).
● Put 120 g in the main wash
compartment marked 2.
● Put 50 ml of the desired
additive in the additives
compartment
✿
✿
.
● Close the detergent
drawer (P).
NL
HET WASSEN
VARIABELE CAPACITEIT
Deze wasautomaat regelt
automatisch het
waterniveau afhankelijk van
het soort en de hoeveelheid
wasgoed.Vanuit het
oogpunt van
energiebesparing is het op
deze manier mogelijk om
‘persoonlijk’ te wassen.
Dit systeem geeft een
vermindering van het
energieverbruik en een
merkbare vermindering van
de wastijd.
VOORBEELD:
Doe uitzonderlijk gevoelige
weefsels in een net.
Stel dat het wasgoed
bestaat uit ZWAAR VERVUILD
KATOEN (hardnekkige
vlekken dienen verwijderd te
worden met een speciaal
middel).
Het is aan te bevelen om
het wasgoed niet geheel te
laten bestaan uit badstoffen
of andere stoffen die veel
water opnemen en te zwaar
worden.
● Trek de wasmiddellade
open.
● Doe 120 gram in het bakje
met een 2.
● Doe 50 ml van het
gewenste
✿
✿
toevoegmiddel in het
toevoegvakje.
● Sluit de wasmiddellade
(P).
Page 64

64
FR IT
● Vérifier que le robinet d’eau
soit ouvert.
● Vérifier que la vidange soit
placée correctement.
SÉLECTION DU PROGRAMME
Sélectionnez le programme en
tournant le sélecteur de
programmes et en alignant le
nom du programme sur
l’indicateur.
L’écran affichera les réglages
du programme sélectionné.
Pressez les boutons d’options si
besoin
Appuyez sur le bouton " START "
et quelques secondes plus
tard, le programme se lance.
Le cycle de lavage se réalisera
avec la manette des
programmes arrêtée sur le
programme sélectionné jusqu'à
la fin de celui-ci.
Attention: En cas de coupure
de courant pendant un
programme de lavage, une
mémoire spéciale restaure le
programme sélectionné et,
lorsque le courant est rétabli,
reprend le cycle là où il s’est
arrêté.
● A la fin du programme, le
mot “End” apparaitra sur
l’écran.
● Lorsque le programme est
terminé:
● Attendez que le verrou de
porte se désactive. Le voyant
lumineux "" Témoin de
verrouillage de porte " s’éteint
après environ 2 minutes;
● Mettez la machine à l’arrêt
en tournant le sélecteur de
programme à la position OFF.
● Ouvrez la porte.
● Enlevez le linge.
● Fermer le robinet d’eau.
POUR TOUS LES TYPES DE
LAVAGE CONSULTER
TOUJOURS LE TABLEAU
DES PROGRAMMES ET
SUIVRE LA SEQUENCE
DES OPERATIONS
INDIQUEE.
●
Si assicuri che il rubinetto
dell’acqua sia aperto.
●
Che lo scarico sia in
posizione regolare.
SELEZIONE PROGRAMMA
Fate riferimento alla tabella dei
programmi o alla legenda dei
programmi sulla macchina,per
scegliere il programma più
adatto.
Il programma viene scelto
ruotando la manopola
programmi e facendo
coincidere il numero del
programma con l’indice.
Sul display verranno visualizzati i
parametri del programma
scelto.
Premere i tasti opzione (se
desiderati)
Premete il tasto AVVIO/PAUSA.
Il programma ha inizio.
Il ciclo di lavaggio avverrà con
la manopola programmi ferma
sul programma selezionato sino
alla fine del lavaggio.
Attenzione: Se dovesse
mancare la corrente durante il
funzionamento della
lavabiancheria, una speciale
memoria conserverà
l’impostazione effettuata e, al
ritorno della corrente, la
macchina ripartirà dal punto in
cui si era fermata.
●
Alla fine del programma sul
display viene visualizzata la
scritta “End”
●
Attendete lo spegnimento
della spia oblò bloccato (2
minuti dalla fine del
programma).
●
Spegnere la lavabiancheria
portando la manopola
programma in posizione OFF.
●
Apra l’oblò e tolga i tessuti.
●
Chiuda il rubinetto dell’
acqua.
PER QUALSIASI TIPO DI
LAVAGGIO CONSULTI
SEMPRE LA TABELLA DEI
PROGRAMMI E SEGUA
LA SEQUENZA DELLE
OPERAZIONI COME
INDICATO.
SELECÇÃO DE PROGRAMA.
Utilize o guia de programas para
seleccionar o programa mais
adequado.Rode o selector
requerendo o programa que
está activado.Aguarde que o
indicador luminoso de
centrifugação se acenda.
Depois pressione o botão de
“INÍCIO”.Quando o botão de
“INÍCIO”for pressionado,a
máquina apresentará a
sequência do programa.
O botão mantém-se intacto,
mesmo quando o programa
está a decorrer.
Aviso: Se houver quebra de
corrente eléctrica enquanto
a máquina estiver a
funcionar, o programa
seleccionado fica registado
numa memória especial e,
quando a energia eléctrica
for restaurada o programa
continuará a partir do sítio
onde tinha ficado.
●
No final do programa os
indicadores luminosos de
toda a fase de lavagem
iluminam-se.
●
Espere que a porta que
está fechada abra (cerca de
2 minutos, depois do
programa ter terminado).
●
Desligue a máquina,
rodando o selector para a
posição “OFF”.
●
Abra a porta e retire a
roupa.
A TABELA DE
PROGRAMAS CONTÉM
INFORMAÇÕES SOBRE
TODOS OS TIPOS DE
LAVAGEM. CONSULTE-A
PARA ESCOLHER O
PROGRAMA ADEQUADO
À ROUPA QUE VAI
LAVAR, E SIGA AS
OPERAÇõES PELA
ORDEM AQUI
APRESENTADA.
PT
●
Certifique-se de que a
torneira de alimentação de
água esteja aberta.
●
Certifique-se também de
que o tubo de descarga
esteja bem colocado.
Page 65

65
EN
● Ensure that the water inlet
tap is turned on.
● And that the discharge
tube is in place.
PROGRAMME SELECTION
Refer to the programme guide
to select the most suitable
programme.
Turning the selector knob
required programme is
activate.
The display will show the
settings for the programme
selected.
Press the option buttons (if
required)
Then press the START button.
When the START button is
pressed the machine sets the
working sequence in motion.
The programme carries out
with the programme selector
stationary on the selected
programme till cycle ends.
Warning: If there is any break
in the power supply while the
machine is operating,a
special memory stores the
selected programme
and,when the power is
restored, it continues where it
left off.
● When the programme has
ended the word “End” will
appear on the display
● Wait for the door lock to be
released (about 2 minutes
after the programme has
finished).
● Switch off the machine by
turning the programme
selector to the “OFF” position.
● Open the door and remove
the laundry.
● Turn off the water supply
after every use.
FOR ALL TYPES OF
WASH CONSULT THE
PROGRAMME TABLE
AND FOLLOW THE
OPERATIONS IN THE
ORDER INDICATED.
DE
● überzeugen Sie sich, daß die
Wasserzufuhr geöffnet ist.
● daß der Ablaufschlauch
richtig angebracht ist.
PROGRAMM WÄHLEN
Die Programmtabelle oder die
Programmübersicht am Gerät
hilft Ihnen, das geeignete
Programm für Ihre Wäsche zu
finden.
Drehen Sie den
Programmwahlschalter auf das
gewünschte Programm,bis die
Programmnummer mit der
Anzeigemarke übereinstimmt
Das Display zeigt sodann die
Voreinstellungen des gewählten
Programms.
Optionstasten (sofern
gewünscht) drücken.
Drücken Sie die Taste
START/PAUSE.
Das Programm startet.
Während des Waschgangs
bleibt der
Programmwahlschalter bis zum
Ende des Programmes auf dem
gewählten Programm stehen.
ACHTUNG: Bei einem
eventuellen Stromausfall
während des Betriebs der
Waschmaschine werden die
gewählten Einstellungen in
einem speziellen Speicher
abgespeichert, so daß das
Gerät wieder dort anfängt zu
arbeiten, wo es aufgehört hatte,
wenn der Strom wieder da ist.
● Am Ende des Programms
erscheint im Display die Anzeige
“End”
● Warten Sie,bis die
Türverriegelungsanzeige
ausgeht (2 Minuten nach
Programmende).
● Schalten Sie die ab und
Waschmaschine stellen Sie den
Programmwahlschalter auf die
Position OFF
● Das Bullage öffnen und die
Wäsche entnehmen.
● Schließen Sie den
Wasserhahn.
BENUTZEN SIE FÜR JEDE
WÄSCHE DIE
PROGRAMMTABELLE UND
BEACHTEN SIE DIE O.A.
REIHENFOLGE.
NL
●
Controleer of de
watertoevoerkraan open
staat.
●
En of de afvoerslang goed
is aangesloten.
PROGRAMMA SELECTEREN
Raadpleeg het programmaoverzicht voor het meest
geschikte programma.
Draai de programmaknop
naar het gewenste
programma.
Het display geeft de
instellingen van het gekozen
programma weer.
Druk op de keuze toetsen
(als dat nodig is)
Druk vervolgens op de STARTknop. Het indrukken van de
START-knop stelt de
wasmachine in werking.
Het programma draait met
de programmaknop
gepositioneerd op het
gekozen programma totdat
het programma eindigt.
Waarschuwing: Indien er een
onderbreking van stroom is,
teriwjld e amchine aan staat,
wordt het geselecteerde
programma opgeslagen in
een speciaal geheugen.
Wanneer de stroom is
hersteld, zal de machine
verder gaan met het
wasprogramma.
●
Als het programma is
beëindigd zal het woord
“End” in het display
verschijnen.
●
Wacht tot de
deurvergrendeling ontgrendelt
(circa 2 minuten na afloop van
het wasprogramma).
●
Draai de programmaknop
naar de UIT-stand (OFF) om
de machine uit te schakelen.
●
Open de deur en haal uw
wasgoed uit de machine.
●
Draai na het gebruik de
watertoevoer dicht .
VOOR ALLE SOORTEN
WASPROGRAMMA’S
RAADPLEEG HET
OVERZICHT EN VOER DE
HANDELINGEN UIT IN
DE AANGEGEVEN
VOLGORDE
Page 66

FR
IT
CAPITOLO 12
PULIZIA E
MANUTENZIONE
ORDINARIA
Per la Sua lavatrice
all’esterno non usi abrasivi,
alcool e/o diluenti, basta
solo una passata con un
panno umido.
La lavatrice ha bisogno di
pochissime manutenzioni:
●
Pulizia vaschette.
●
Pulizia filtro.
●
Traslochi o lunghi periodi
di fermo macchina.
PULIZIA VASCHETTE
Anche se non strettamente
necessario é bene pulire
saltuariamente le vaschette
del detersivo, del
candeggiante e additivi.
Per questa operazione
basta estrarre il cassetto con
una leggera forza.
Pulisca tutto il contenuto
sotto un getto d’acqua.
Reinserisca il tutto nella
propria sede.
CHAPITRE 12
NETTO
YAGE ET
ENTRETIEN
ORDINAIRE
Ne jamais utiliser de produits
abrasifs, d’alcool et/ou de
diluant, pour laver l’extérieur
de votre machine; il suffit de
passer un chiffon humide.
La machine n’a besoin que
de peu d’entretien:
● Nettoyage des bacs.
● Nettoyage filtre.
● Déménagements ou
longues périodes d’arrêt de
la machine.
NETTOYAGE DES BACS
Même si cette opération
n’est pas strictement
nécessaire, il vaut mieux
nettoyer de temps en temps
les bacs à produits lessiviels.
Il suffit de tirer légèrement
sur le tiroir pour l’extraire.
Nettoyer le tiroir sous un jet
d’eau.
Remettre le tiroir dans sa
niche.
66
PT
CAPÍTULO 12
LIMPEZA E
MANUTENÇÃO DA
MAQUINA
Não utilize produtos
abrasivos, com álcool,
soluções alcoólicas e/ou
diluentes para limpar as
paredes externas da
máquina: basta passar um
pano húmido para a limpar.
Esta máquina exige muito
pouca manutenção:
●
Limpeza da gaveta para
detergentes.
●
Limpeza do filtro.
●
Adopção de medidas
especiais quando a
máquina vai ser mudada de
sítio (mudança de casa, por
exemplo) ou quando a
máquina estiver muito
tempo sem funcionar.
LIMPEZA DA GAVETA PARA
DETERGENTE
Embora não seja
estritamente necessário, é
recomendável limpar
ocasionalmente os resíduos
de detergente, de
branqueador e de aditivos
da gaveta para detergente.
Para tal,deverá puxar
suavemente a gaveta toda
para fora.
Lave cuidadosamente
cada um dos
compartimentos sob um
jacto de água, e volte a
colocar a gaveta na
máquina.
Page 67

67
DE
KAPITEL 12
REINIGUNG UND
ALLGEMEINE
WARTUNG
Benutzen Sie für die äußere
Reinigung niemals
Scheuermittel, Alkohol oder
Verdünnungsmittel. Es genügt,
wenn Sie die Maschine mit
einem feuchten Lappen
abwischen.
Das Gerät braucht nur sehr
wenig Pflege:
● Reinigung des
Waschmittelbehälters
● Reinigen des Flusensiebs
● Umzug oder längerer
Stillstand der Maschine.
REINIGUNG DES
WASCHMITTELBEHÄLTERS
Obwohl nicht unbedingt
notwendig, empfiehlt es sich,
den Behälter gelegenlich von
Waschmittel-und
Weichspülerrückständen zu
reinigen.
Hierzu den Behälter mit wenig
Kraft herausziehen.
Die Rückstände unter
fließendem Wasser abspülen.
Den Behälter wieder
einschieben.
EN
CHAPTER 12
CLEANING AND
ROUTINE
MAINTENANCE
Do not use abrasives, spirits
and/or diluents on the
exterior of the appliance. It is
sufficient to use a damp
cloth.
The washing machine
requires very little
maintenance:
● Cleaning of drawer
compartments.
● Filter cleaning
● Removals or long periods
when the machine is left
standing.
CLEANING OF DRAWER
COMPARTMENTS
Although not strictly
necessary, it is advisable to
clean the detergent, bleach
and additives
compartments occasionally.
Remove the compartments
by pulling gently.
Clean with water.
Put the compartments back
into place
NL
HOOFDSTUK 12
SCHOONMAKEN
EN NORMAAL
ONDERHOUD
Gebruik geen
schuurmiddelen, alcoholoplossingen en/of
oplosmiddelen aan de
buitenkant van de wasautomaat of droger. Een
vochtige doek is voldoende.
De wasautomaat behoeft
zeer weinig onderhoud:
● Schoonmaken van de
vakjes voor wasmiddelen.
● Het reinigen van het filter.
● Bij verplaatsingen of
wanneer de machine voor
langere tijd niet gebruikt
wordt.
HET SCHOONMAKEN VAN DE
VAKJES VOOR WASMIDDELEN
Alhoewel het niet strikt
noodzakelijk is raden wij aan
af en toe de vakjes voor de
was-en bleekmiddelen en
de toevoegingen schoon te
maken.
Haal de vakjes er uit door er
voorzichtig aan te trekken.
Schoonmaken met water
De vakjes opnieuw naar
binnen schuiven.
Page 68

FR IT
NETTOYAGE FILTRE
La machine à laver est
équipée d’un filtre spécial
qui peut retenir les résidus les
plus gros qui pourraient
bloquer le tuyau
d’évacuation (pièces de
monnaie, boutons, etc.).Ce
dispositif permet de les
récupérer facilement.Pour
nettoyer le filtre, suivre les
indications ci-dessous:
● Ouvrez le capot
● Disponible sur certains
modèles uniquement :
Sortez le tuyau, ôtez le
bouchon et videz l’eau
dans un récipient.
● Avant de retirer le filtre,
placez un tissue absorbant
en dessous de ce dernier
afin de récupérer le résidu
d’eau contenu dans la
pompe
● Tourner le filtre dans le
sens contraire des aiguilles
d’une montre jusqu’à l’arrêt,
en position verticale.
● Enlever et nettoyer.
● Apres avoir nettoyé,
utilisez l’entaille et remontez
le filtre en faisant toutes les
opérations précédentes
dans le sens inverse.
DEMENAGEMENTS OU
LONGUES PERIODES D’ARRET
DE LA MACHINE
En cas de déménagement,
ou de longues périodes
d’arrêt de la machine dans
des endroits non chauffés, il
faut vidanger
soigneusement tous ses
tuyaux.
Débrancher le courant et se
servir d’un seau.
Enlever la bague sur le tuyau
et le plier vers le bas, dans le
seau, jusqu’à ce qu’il ne
sorte plus d’eau.
Après cette opération, la
répéter en sens inverse.
PULIZIA FILTRO
La lavatrice è dotata di uno
speciale filtro in grado di
trattenere i residui più grossi
che potrebbero bloccare lo
scarico (monete, bottoni,
ecc.) che possono così essere
facilmente recuperati.
Quando lo deve pulire si
comporti così:
● Abbassi lo sportellino.
● Solo su alcuni modelli:
Estragga il tubicino,tolga il
tappo e raccolga l’acqua
in un contenitore.
● Prima di svitare il filtro si
raccomanda di collocare
un panno assorbente sotto
di esso al fine di raccogliere
l’acqua residua che ne
fuoriesce.
● Ruoti il filtro in senso
antiorario fino all’arresto,in
posizione verticale.
● Lo estragga e lo pulisca.
● Dopo averlo pulito osservi
la tacca e lo rimonti
seguendo in senso contrario
tutte le operazioni
precedentemente descritte.
TRASLOCHI O LUNGHI PERIODI
DI FERMO MACCHINA
Per eventuali traslochi o
qualora la macchina restasse
ferma a lungo in luoghi non
riscaldati, é necessario
svuotare completamente da
ogni residuo di acqua tutti i
tubi.
A corrente disinserita, stacchi il
tubo dalla fascetta e lo porti,
verso il basso,in un catino,fino
alla completa fuoriuscita
dell’acqua.
Al termine dell’operazione
fissare il tubo di scarico
all’apposita fascetta.
68
PT
LIMPEZA DO FILTRO
A máquina dispõe de um filtro
especial, concebido para
recolher objectos grandes que
poderiam impedir a descarga de
água (moeds, botões, etc.),
possibilitando, desta forma,uma
fácil recuperação desses
objectos.
Este filtro,que se encontra atrás
do rodapé, deverá ser limpo a
intervalos regulares.
Para maior segurança, siga
atentamente estas instruções:
●
Desligue a ficha do cabo de
alimentação de corrente da
tomada, e esvazie a máquina de
toda a água.
●
Abra a tampa
●
Apenas disponível em alguns
modelos:
Puxe a mangueira ondulada,
retire o bujão e despeje a água
para um recipiente.
●
Antes de remover o filtro,
coloque uma toalha absorvente
por baixo do compartimento do
filtro de forma a recolher uma
eventual pequena quantidade
de água que possa existir no
interior da bomba.
●
Rode a tampa do filtro no
sentido contrário ao dos
ponteiros do relógio até atingir o
batente (posição vertical).
●
Retire o filtro e limpe-o.
●
Depois de limpo, volte a
colocar o filtro,assegurando-se
de que a saliência esteja
perfeitamente alinhada com o
respectivo recorte, e rode o filtro
no sentido dos ponteiros do
relógio. Siga as instruções acima
referidas pela sua ordem inversa
para voltar a colocar a tampa do
filtro,o rodapé, etc.
O QUE FAZER SE MUDAR A
MÁQUINA DE SÍTIO OU SE A
MÁQUINA ESTIVER MUITO TEMPO
SEM FUNCIONAR
Caso tenha de transportar a
máquina, ou sempre que esta
estiver sem trabalhar por um
período de tempo prolongado
num local não aquecido, deverá
escoar totalmente a água de
todas as mangueiras.
Para tal,deverá desligar
previamente a máquina da
corrente, retirando a respectiva
ficha da tomada.Irá necessitar
de um recipiente para recolher a
água.
Solte o tubo de alimentação de
água do respectivo suporte,
puxe-o para baixo e esvazie toda
a água para un recipiente depois
da água ter sido esvaziada volte
a colocar o tubo no respectivo
suporte.
Repita esta operação para o
tubo de esgoto da água.
Page 69

69
DE
REINIGEN DER
KLAMMERNFALLE
Das Gerät besitzt eine
Klammernfalle zur Aufnahme
größerer Gegenstände
(Münzen, Knöpfe),die das
Abpumpen des Waschwassers
behindern könnten. Die
Klammernfalle kann
problemlos wie folgt gereinigt
werden:
●
Klappe herunter klappen
●
Nur bei einigen Modellen:
Schlauch herausziehen,
Stöpsel entfernen und
Restwasser in einem Behälter
auffangen.
●
Bevor Sie den Filter
herausnehmen, empfiehlt es
sich, einen saugfähigen
Aufnehmer darunter zu
legen, um das daraus
fließende Restwasser
aufzufangen.
●
Drehen Sie die
Klammernfalle gegen den
Uhrzeigersinn bis zum
Anschlag in vertikaler
Stellung.
●
Entnehmen Sie und
reinigen Sie die
Klammernfalle.
●
Beim Einsetzen nach der
Reinigung achten Sie bitte
auf die Einkerbung, und
verfahren Sie in umgekehrter
Reihenfolge wie zuvor
beschrieben.
UMZUG ODER LÄNGERER
STILLSTAND DER MASCHINE
Bei einem Umzug, oder wenn
die Maschine längere Zeit in
ungeheizter Umgebung
stillstehen wird,müssen alle
Schläuche vollständig entleert
werden.
Strom abschalten und eine
Waschschüssel bereitstellen.
Schlauch von der Klemme
nehmen und bis zur völligen
Entleerung in die Schüssel
halten.
EN
FILTER CLEANING
The washing-machine is
equipped with a special filter
to retain large foreign matter
which could clog up the
drain, such as coins, buttons,
etc.These can, therefore,
easily be recovered.The
procedures for cleaning the
filter are as follows:
● Open the flap
● Only available on certain
models:
Pull out the corrugated hose,
remove the stopper and
drain the water into a
container.
● Before removing the filter,
place an absorbent towel
below the filter
cap to collect the small
amount of water likely to be
inside the pump
● Turn the filter anticlockwise
till it stops in vertical position.
● Remove and clean.
● After cleaning, replace by
turning the notch on the end
of the filter clockwise.Then
follow all procedures
described above in reverse
order.
REMOVALS OR LONG PERIODS
WHEN THE MACHINE IS LEFT
STANDING
For eventual removals or
when the machine is left
standing for long periods in
unheated rooms, the drain
hose should be emptied of
all remaining water.
The appliance must be
switched off and unplugged.
A bowl is needed. Detach
the drainage hose from the
clamp and lower it over the
bowl until all the water is
removed.
Repeat the same operation
with the water inlet hose.
NL
HET REINIGEN VAN HET FILTER
De wasmachine is uitgerust
met een speciale filter die
materialen zoals knopen en
munten tegenhoud,die de
afvoerslang kunnen blokkeren.
De procedure voor het reinigen
van het filter is als volgt.
● Open het klepje
● Alleen op bepaalde
modellen:
Haal de kleine slang eruit, en
haal het dopje eraf om het
achtergebleven water te
verwijderen
● Voordat u het filter
verwijderd,kunt u het beste
even een handdoek onder
hij het filter leggen om de
kleine hoeveelheid water
dat nog in de pomp zit op te
vangen.
● Draai de dop tegen de
klok in open in verticale
richting.
● Verwijder het filter en
maak het schoon.
● Als het filter schoon is kan
het met de klok mee weer in
de opening gedraaid
worden,vastgeschroefd
worden en kan het klepje
weer dicht gedaan worden,
zoals boven in omgekeerde
volgorde werd aangegeven.
BIJ VERPLAATSINGEN OF
WANNER DE MACHINE VOOR
LANGERE TIJD NIET GEBRUIKT
WORDT
Bij eventuele verplaatsingen of
wanneer de machine voor
langere tijd in een
onverwarmde ruimte stil staat
moet het resterende water uit
alle slangen worden
verwijderd.
Haal de stekker uit het
stopcontact.U hebt een bak
nodig.Haal de slang van de
klem en laat die laag over de
bak hangen tot al het water
weggelopen is.
Herhaal deze handelingen aan
de andere kant.
Page 70

70
NOTA:
O MODELO ESTÁ EQUIPADO COM UM DISPOSITIVO ELECTRÓNICO ESPECIAL QUE IMPEDE O CÍCLO DE
CENTRIFUGAÇÃO CASO AS CARGAS FOREM DESEQUILIBRADAS. TAL CONDUZ A UMA REDUÇÃO DE RUIDOS E DE
VIBRAÇÕES, CONTRIBUINDO PARA UM MAIOR SILÊNCIO E UMA MAIOR DURAÇÃO DA MÁQUINA DE LAVAR.
CAPÍTULO 13
AVARIA
1. O programa não
funciona
2. A máquina não
mete água
3. A máquina não
despeja a água
4. Agua no chão ao pé
da máquina
5. A máquina não faz a
centrifugação
6. Excesso de vibrações
durante a
centrifugação
7.No visor é apresentado
o seguinte código de
erro: 0,1,5,7,8,9
8.No visor é apresentado
o código de erro 2
9.No visor é apresentado
o código de erro 3
10.No visor é apresentado
o código de erro 4
A máquina não está ligada à corrente
A tecla de ligar/desligar não
foi premida
Falha da alimentação de corrente
Fusível disparado
A porta não está bem fechada
Vide ponto (1)
Torneira de água fechada
Selecção incorrecta de programa
Mangueira de esgoto dobrada
ou torcida
Presença de um corpo estranho no filtro
Falta de vedação entre a torneira e a
mangueira
A água ainda não foi despejada
Tecla “eliminação da centrifugação”
premida (alguns modelos)
Fixações de transporte não foram
removidas
A máquina está mal nivelada
A roupa está mal distribuída
-
A máquina não meteu água.
A máquina não despeja a água.
A máquina meteu uma quantidade
excessiva de água.
Ligue a máquina à corrente
Pressione a tecla
Verifique
Verifique e, se necessário, substitua
Feche bem a porta
Verifique
Abra a torneira
Volte a seleccionar o programa
Endireite a mangueira
Verifique o filtro
Substitua o vedante e aparafuse bem
a mangueira
Espere alguns minutos
Solte a tecla
Remova-as
Nivele a máquina com os pés
ajustáveis
Distribua a roupa de modo
mais uniforme
Por favor entre em contacto com a
Assistência Técnica.
Verifique se a torneira de alimentação
de água à máquina está aberta.
Certifique-se de que a mangueira de
descarga não está dobrada,torcida
ou esmagada.
Feche a alimentação de água à
máquina. Por favor entre em contacto
com a Assistência Técnica.
CAUSA PROVÁVEL
ACÇÃO NECESSÁRIA
PT
Page 71

71
Se a máquina continuar a não funcionar entre em contacto com um Serviço de
Assistência Técnica Candy. Para que o serviço seja prestado com maior rapidez será
recomendável indicar o modelo da máquina, tal como consta da placa de
características ou no certificado de garantia.
Atenção:
1 A utilização de um detergente ecológico “sem fosfatos” poderá provocar os
seguintes efeitos secundários:
durante o ciclo de enxaguamento a água pode apresentar-se turva devido à
presença de zeólitos em suspensão, o que não altera a eficácia do enxaguamento;
presença de uma película de pó branco (zeólitos) na roupa no fim da lavagem. Esta
película não fica incorporada nos tecidos e não altera a sua cor;
presença de espuma durante o último enxaguamento, o que não é necessariamente
um sinal de um enxaguamento ineficaz;
os agentes tensio-activos não iónicos presentes na composição dos detergentes para
máquinas de lavar são frequentemente difíceis de remover da própria roupa e,
mesmo que em pequenas quantidades, podem produzir sinais visíveis da formação
de espuma;
este fenómeno não é eliminado através de enxaguamentos posteriores sucessivos.
2 Se a sua máquina se avariar, antes de chamar um técnico para prestar assistência à
sua máquina, proceda às verificações anteriormente referidas.
Salvaguardam-se erros e alterações!
Recomendações para o uso dos detergentes a várias temperaturas
Ao lavar os brancos muito sujos, recomendamos o uso de programas de algodões a 60°C ou mais e um
detergente em pó normal (forte) que contenha agentes de branqueamento, que em temperatura média/
alta proporcionam excelentes resultados. Para lavagens entre os 40°C e 60°C, o tipo de detergente
utilizado deve ser apropriado para o tipo de tecido a lavar e respectivo nível de sujidade. Pós comuns,
regulares são adequados para roupas claras ou tecidos coloridos com elevada sujidade, enquanto
detergentes líquidos ou “protectores” das cores, mesmo que em pó, são adequadas para tecidos muito
coloridos, mais sensíveis e com menores níveis de sujidade. Para a lavagem a temperaturas abaixo
de 40°C recomenda-se a utilização de detergentes líquidos ou detergentes especiÀ camente concebidos
como sendo adequados para a lavagem a baixas temperaturas. Para a lavagem de lãs ou sedas, use
apenas detergentes formulados especiÀ camente para estes tecidos. Para saber as quantidades de
detergente a utilizar, por favor siga as instruções de dosagem nos rótulos das embalagens de detergente.
Page 72

NOTA:
IL MODELLO È DOTATO DI UN PARTICOLARE DISPOSITIVO ELETTRONICO CHE IMPEDISCE LA
PARTENZA DELLA CENTRIFUGA CON CARICHI PARTICOLARMENTE SBILANCIATI. QUESTO SERVE A
MIGLIORARE LE VIBRAZIONI, LA SILENZIOSITÀ E LA DURATA DELLA LAVABIANCHERIA.
CAPITOLO 13
IT
ANOMALIA
1. Non funziona con
qualsiasi
programma
2. Non carica acqua
3. Non scarica
acqua
4. Presenza di acqua
sul pavimento
attorno alla
lavabiancheria
5. Non centrifuga
6. Forti vibrazioni
durante la
centrifuga
7. Sul display appare
errore n. 0, 1,5, 7, 8, 9
8. Sul dislay appare
errore n.2
9. Sul display appare
errore n.3
10.Sul display appare
errore n.4
Spina corrente elettrica
non inserita nella presa
Tasto interruttore generale
non inserito
Manca energia elettrica
Valvole impianto elettrico guaste
Sportello aperto
Vedi cause 1
Rubinetto acqua chiuso
Timer non correttamente posizionato
Tubo di scarico piegato
Presenza corpi estranei nel filtro
Perdita della guarnizione posta
tra rubinetto e tubo carico
La lavabiancheria non ha ancora
scaricato l’acqua
“Esclusione centrifuga” inserita
(solo per alcuni modelli)
Lavabiancheria non perfettamente
in piano
Staffe di trasporto
non ancora asportate
Carico biancheria
non uniformemente distribuito
_
La macchina non carica acqua
La macchina non scarica
La macchina è troppo piena d’acqua
Inserire la spina
Inserire tasto.
Interruttore generale
Controllare
Controllare
Chiudere sportello
Controllare
Aprire il rubinetto acqua
Posizionare timer correttamente
Raddrizzare tubo di scarico
Ispezionare filtro
Sostituire guarnizione e
stringere bene tubo e rubinetto
Attendere alcuni minuti, la macchina
scaricherà
Disinserire tasto
“esclusione centrifuga”
Regolare gli appositi piedini regolabili.
Asportare staffe di trasporto
Distribuire in modo uniforme
la biancheria
Rivolgersi al servizio assistenza
Verificare che il rubinetto dell’acqua sia
aperto
Verificare che lo scarico sia libero
Verificare che il tubo di scarico non sia
piegato
Chiudere il rubinetto dell’acqua.
Rivolgersi al servizio assistenza.
CAUSA
RIMEDIO
72
Page 73

Se il malfunzionamento dovesse persistere si rivolga al Centro di Assistenza Tecnica
Hoover comunicando il modello di lavabiancheria, riportato sulla targhetta posta sul
mobile all’interno dell’oblò o sul foglio di garanzia.
Fornendo tali informazioni otterrete un intervento più tempestivo ed efficace.
Attenzione:
1L’utilizzo di detersivi ecologici senza fosfati può produrre i seguenti effetti:
- l’acqua di scarico dei risciacqui risulta più torbida per la presenza di zeoliti in
sospensione senza che l’efficacia del risciacquo ne risulti pregiudicata
- presenza di polvere bianca (zeoliti) sulla biancheria al termine del lavaggio che
non si ingloba nei tessuti e non ne altera il colore.
- La presenza di schiuma nell’acqua dell’ultimo risciacquo non é necessariamente
indice di una cattiva sciacquatura.
- I tensioattivi anionici presenti nelle formulazioni dei detersivi per lavabiancheria,
risultano spesso difficilmente allontanabili dalla biancheria stessa e, anche in
minima quantità, possono produrre vistosi fenomeni di formazione di schiuma.
- L’esecuzione di ulteriori cicli di risciacquo, in casi come questi, non comporta alcun
beneficio.
2Se la Sua lavabiancheria non funzionasse, prima di chiamare il Centro di Assistenza
Tecnica Hoover eseguire i controlli sopradescritti.
73
Raccomandazioni sull’uso del detersivo alle varie temperature
Per lavaggi con programmi cotone a temperature > = a 60°C su capi bianchi resistenti molto sporchi si
consiglia l’utilizzo di un detersivo in polvere normale (heavy-duty) in quanto contenente agenti sbiancanti
che alle temperature medio alte fornisce ottime prestazioni. Per lavaggi con programmi a temperature
fra 60°C e 40°C la scelta del tipo di detersivo deve essere fatta in funzione del tessuto, colori e grado
di sporco. In linea generale per bucati di bianchi resistenti con un elevato grado di sporco il detersivo
consigliato è la polvere normale, in presenza di colorati e in assenza di macchie diffi cili è consigliabile
l’utilizzo di detersivi liquidi o polveri indicati per la protezione dei colori. Per lavaggi a basse temperature
<40°C è consigliabile l’utilizzo di detersivi liquidi o polveri specifi camente indicate per le basse temperature.
Per il lavaggio di lana e sete utilizzare esclusivamente detersivi specifi ci per lana. Per un corretto uso e
dosaggio del detersivo si consiglia di seguire le istruzioni riportate sulle confezioni di detergente.
Page 74

ANMERKUNG:
DAS MODELL IST MIT EINER ELEKTRONISCHEN VORRICHTUNG AUSGESTATTET, DIE VERHINDERT, DAß DER
SCHLEUDERGANG MIT FÜLLMENGEN, DEREN GEWICHT UNGLEICHMÄßIG VERTEILT SIND, STARTET. DIES TRÄGT ZU
EINER REDUZIERUNG DER VIBRATIONEN, DER GERÄUSCHENTWICKLUNG UND ZU EINER VERLÄNGERUNG DER
LEBENSDAUER DER WASCHMASCHINE BEI.
KAPITEL 13
FEHLVERHALTEN
1. Programme
funktionieren nicht
2. Kein Wasserzulauf
3. Kein Wasserablauf
4. Wasser auf dem
Boden rund um
das Gerät
5. Keine
Schleuderfunktion
6. Starke Vibrationen
während des
Schleuderns
7.
Folgende
Fehlermeldung auf
dem Display:
0,1,5,7,8,9
8.
Fehlermeldung 2
auf dem Display
9.
Fehlermeldung 3
auf dem Display
10.
Fehlermeldung 4
auf dem Display
Stecker nicht in der Steckdose
Hauptschalter nicht eingedrückt
Stromausfall
Sicherungen defekt
Bullauge nicht geschlossen
Siehe Gründe zu 1
Wasserhahn geschlossen
Programmwahlschalter nicht richtig
eingestellt
Ablaufschlauch gekrümmt
Fremdkörper in der Klammernfalle
Dichtung vom Wasserzulaufschlauch
defekt
Die Waschmaschine hat das Wasser
noch nicht abgepumpt
Taste “Schleuderstop” eingestellt (nur bei
einigen Modellen)
Waschmaschine nicht richtig justiert
Transportstange noch nicht entfernt
Wäsche nicht gleichmäßig in der
Trommel verteilt
–
Waschmaschine füllt sich nicht mit
Wasser.
Wasser wird nicht abgepumpt.
Zu viel Wasser in Waschmaschine.
Stecker einstecken
Strom einschalten
Kontrollieren
Kontrollieren
Bullauge schließen
Kontrollieren
Wasserhahn öffnen
Programmwahlschalter richtig einstellen
Ablaufschlauch begradigen
Klammernfalle reinigen
Dichtung ersetzen und Zulaufschlauch
am Wasserhahn befestigen
Einige Minuten warten, bis das Wasser
abgepumpt ist
Taste “Schleuderstop” herausdrücken
Über die entsprechenden einstellbaren
Füße justieren
Transportstange entfernen
Wäsche gleichmäßig verteilen
Kundendienst anrufen.
Überprüfen, ob der Wasserhahn
aufgedreht ist.
Überprüfen, ob der Ablaufschlauch
verstopft ist.
Überprüfen, ob der Schlauch geknickt ist.
Wasserhahn für Waschmaschine
zudrehen.
Kundendienst anrufen.
GRUND
ABHILFE
DE
74
Page 75

Läßt sich der Fehler nicht beheben, wenden Sie sich bitte an den Technischen
Kundendienst der Firma Hoover.
Geben Sie dabei das Maschinenmodell laut Typenschild * oder Garantieschein an, um
eine schnelle effektive Hilfe zu ermöglichen.
* (welches sich im Bullauge befindet)
Achtung:
1 Die Verwendung von umweltfreundlichen Waschmitteln kann folgende Effekte
auslösen:
-Die schwebenden Minerale führen zu einer Trübung des Spülwassers, die aber
weder die Wirkung der Spülungen noch das Waschergebnis beeinflussen.
-Nach erfolgter Wäsche können sich auf der Wäsche Spuren weißen Pulvers
(Minerale) befinden, die sich aber weder in der Wäsche festsetzen noch die Farben
beeinträchtigen.
-Schaumbildung auf dem letzten Spülwasser bedeutet nicht unbedingt
unzureichende Spülresultate.
-Die in den Waschmitteln enthaltenen waschaktiven anionischen Tenside sind häufig
sehr schwer ausspülbar, und erzeugen auch in nur geringer Dosierung auffällige
Schaummengen.
-Zusätzliche Spülgange sind in solchen Fällen nicht sehr effektiv.
2 Bitte wenden Sie sich bei Defekten an der Maschine erst dann an den Kundendienst,
wenn Sie anhand der obigen Liste selbst versucht haben, eventuelle Fehler zu
beheben.
75
Empfehlungen zur Verwendung des richtigen Waschmittels bei unterschiedlichen
Waschtemperaturen
Für Waschprogramme für Baumwolle bei Waschtemperatur über 60°C, z.B. für weiße Kochwäsche,
empfehlen wir ein normales Waschmittel in Pulverform (Vollwaschmittel), da die darin enthaltenen
Bleichmittel die beste Wirkung bei mittleren und hohen Temperaturen entfalten. Zum Waschen bei
niedrigeren Temperaturen zwischen 40°C und 60°C wählen Sie das richtige Waschmittel je nach
Gewebeart, Farbe und Verschmutzungsgrad. Generell empfi ehlt sich für weiße, widerstandsfähige
Wäsche mit hohem Verschmutzungsgrad ein Vollwaschmittel in Pulverform, während für Buntwäsche
oder für nicht besonders verschmutzte Wäsche ein Flüssigwaschmittel oder ein Colorwaschmittel
in Pulverform am besten geeignet sind. Für die Wäsche bei weniger als 40°C empfi ehlt sich ein
Flüssigwaschmittel oder ein speziell für niedrige Waschtemperaturen geeignetes Pulverwaschmittel.
Zum Waschen von Wolle und Seide verwenden Sie nur spezielle Feinwaschmittel für Wolle. Zur korrekten
Dosierung und Verwendung des Waschmittels befolgen Sie die Anweisungen des Herstellers auf der
Waschmittelpackung.
Page 76

76
OPMERKING: DIT MODEL HEEFT EEN ELEKTRONISCHE SENSOR DIE VOELT OF DE LADING GOED
UITGEBALANCEERD IS. ALS DE LADING ENIGSZINS ONEVENWICHTIG IS, ZAL DE MACHINE DE WAS
AUTOMATISCH BALANCEREN EN DAN NORMAAL CENTRIFUGEREN.
ALS ER, NA EEN AANTAL KEREN PROBEREN, GEEN EVENWICHT WORDT BEREIKT, WORDT EEN LAGERE
CENTRIFUGESNELHEID GEBRUIKT.
ALS DE LADING ERG ONEVENWICHTIG IS, WORDT DE CENTRIFUGEFASE GEANNULEERD.
HIERDOOR WORDT DE TRILLING VERMINDERD, HET LAWAAI MINDER EN WORDT DE BETROUWBAARHEID
EN DE LEVENSDUUR VAN DE WASMACHINE VERGROOT.
HOOFDSTUK 13
NL
PROBLEEM
1. Geen enkel
programma
functioneert
2. Er wordt geen water
ingevoerd
3. Pompt het water niet
weg
4. Water op de vloer
bij de machine
5. Centrifugeert niet
6. Sterke trillingen
gedurende het
centrifugeren
7. Op het display
staat de volgende
fout: 0,1, 5,7, 8, 9
8. Op het display
staat fout 2
9. Op het display
staat fout 3
10.Op het display
staat fout 4
Stekker zit niet in het stopcontact
Hoofdschakelaar is niet aan
Stroomonderbreking
Elektrische zekeringen doorgebrand
Vuldeur is open
Zie oorzaak 1
De watertoevoerkraan staat niet open
De tijdschakelaar is niet juist ingesteld
Er zit een knik in de afvoerslang
Materiaal blokkeert het filter
Een lek bij de ring tussen de kraan en de
inlaatslang
De wasautomaat heeft het water niet
weggepompt
Ingesteld op “niet centrifugeren” (alleen
bij enkele machines)
De wasautomaat staat niet recht
De transportklemmen zijn niet
verwijderd
Het wasgoed is niet gelijkmatig
verdeeld
–
Er wordt geen water opgenomen.
Er wordt geen water afgevoerd.
De machine zit te vol met water.
Doe de stekker in het stopcontact
Zet de hoofdschakelaar aan
Controleer
Controleer
Sluit de vuldeur
Controleer
Zet de watertoevoerkraan open
Stel de tijdschakelaar in
Trek de afvoerslang recht
Controleer het filter
Vervang de sluitring en draai de slang
goed aan bij de kraan
Wacht een paar minuten tot de
machine het water heeft weggepompt
Maak de “niet centrifugeren” instelling
ongedaan
Stel de speciale voetjes bij
Verwijder de transportklemmen
Schut het wasgoed los en verdeel het
geljkmatig
Bel de reparatiedienst.
Controleer of de waterkraan open is.
Controleer of de afvoer niet verstopt is.
Controleer of de afvoerslang niet
geknikt is.
Zet de watertoevoer naar de machine
uit. Bel de reparatiedienst.
OORZAAK
OPLOSSING
Page 77

Als de storing niet verholpen kan worden neem dan contact op met een Gias Service
Center van Hoover. Voor snelle service geeft u het soort automaat op dat op het etiket
aan de binnenkant van de deur of op het garantiebewijs is vermeld.
Belangrijk
1Het gebruik van fosfaatvrije milieuvriendelijke wasmiddelen kunnen het volgende
effect geven:
- Het afgevoerde spoelwater kan troebel zijn vanwege de aanwezigheid van in het
water zwevende zeoliet. Dit betekent niet dat de spoelgangen niet effectief genoeg
waren.
- De aanwezigheid van wit poeder (zeoliet) op het eind van het programma. Dit blijft
niet in het wasgoed zitten en geeft geen kleurverandering.
- De aanwezigheid van schuim in het laatste spoelwater. Dit is niet noodzakelijkerwijs
een teken dat er niet goed gespoeld is.
- De niet-ionische middelen die in de samenstelling van wasmiddelen zitten zijn vaak
moeilijk uit het wasgoed te verwijderen en zelfs als het gaat om kleine
hoeveelheden kan er zichtbare sopvorming zijn. In dergelijke gevallen is het niet
nodig om nog een spoelgang te laten uitvoeren.
2Als uw wasmachine niet meer functioneert zoals het moet wilt u dan a.u.b. eerst de
bovenstaande controles uitvoeren voordat u contact opneemt met de Gias Service
Center van Hoover
77
Aanbevelingen voor het gebruik van wasmiddel bij verschillende temperaturen
Bij het wassen van zeer vuile witte was, raden wij u aan katoen programma’s van 60°C of hoger te
gebruiken en een normaal wasmiddel (zwaar) dat bleekmiddel bevat dat op medium / hoge temperaturen
uitstekende resultaten oplevert. Voor wassen tussen 40°C en 60°C moet het detergent geschikt zijn
voor het type was en de mate van vervuiling. Normaal poeders zijn geschikt voor de “witte” of kleurvaste
stoffen met een hoge vervuiling, terwijl de vloeibare wasmiddelen of “kleur te beschermen” poeders zijn
geschikt voor gekleurde stoffen met een lichte mate van vervuiling. Voor het wassen bij temperaturen
onder 40°C raden wij het gebruik van vloeibare reinigingsmiddelen of reinigingsmiddelen die specifi ek
worden gemarkeerd als zijnde geschikt voor lage temperatuur. Voor het wassen van wol of zijde, alleen
gebruik maken van reinigingsmiddelen speciaal ontwikkeld voor deze stoffen. Voor doseringshoeveelheden
volgt u de instructies op de verpakking van het wasmiddel.
Page 78

NOTE:
THE MACHINE IS FITTED WITH A SPECIAL ELECTRONIC DEVICE, WHICH PREVENTS THE SPIN CYCLE
SHOULD THE LOAD BE UNBALANCED.
THIS REDUCES THE NOISE AND VIBRATION IN THE MACHINE AND SO PROLONGS THE LIFE OF YOUR
MACHINE.
CHAPTER 13
EN
FAULT
1. Does not function
on any
programme
2. Does not load
water
3. Does not
discharge water
4. Water on floor
around washing
machine
5. Does not spin
6. Strong vibrations
during spin
7. Display reads error
0, 1, 5, 7, 8, 9
8. Display reads
error 2
9. Display reads
error 3
10.Display reads
error 4
Mains plug not plugged in
Mains switch not on
No power
Electric circuit fuses failure
Load door open
See cause 1
Inlet tap turned off
Timer not set correctly
Discharge tube bent
Odd material blocking filter
Leak from the washer between the tap
and inlet tube
The washing machine has not
discharged water
“No spin” setting (some models only)
Washing machine not perfectly level
Transport bracket not removed
Washing load not evenly distributed
–
No water fill.
No pump out.
Machine overfilled with water.
Insert plug
Turn on mains switch
Check
Check
Close load door
Check
Turn on water inlet tap
Set timer on correct position
Straighten discharge tube
Check filter
Replace washer and tighten the tube
on the tap
Wait a few minutes until the machine
discharges water
Turn the programme dial onto spin
setting
Adjust special feet
Remove transport bracket
Distribute the washing evenly
Call service.
Check water supplies are on.
Check drain is clear.
Check drain hose is not kinked.
Turn off water supply to machine.
Call service.
CAUSE
REMEDY
78
Page 79

If the fault should persist, contact a Hoover Technical Assistance Centre. For prompt
servicing, give the model of the washing machine, to be found on the label placed on
the cabinet inside of the porthole or on the guarantee certificate.
Important
1The use of environment friendly detersives without phosphates may produce the
following effects:
- The discharge rinse water may result cloudier due to the presence of zeolites in
suspension. This does not compromise the efficiency of the rinses.
- The presence of white powder (zeolites) on the washing at the end of the washing
cycle. This does not remain incorporated in the fabric and does not alter the colour.
- The presence of foam in the last rinse water which is not necessarily a sign of
inadequate rinsing.
- The non-ionic surface-active agents present in the composition of washing
machine detersives are often difficult to remove from the washing itself and, even in
small quantities, may produce visible signs of the formation of foam.
- Carrying out further rinses, in cases such as this, is not useful.
2If your washing machine fails to function, carry out the above-mentioned checks
before calling the Hoover Technical Assistance Service.
79
Recommendations on the use of detergent at various temperatures
When washing heavily soiled whites, we recommend using cotton programs of 60°C or above and a
normal washing powder (heavy duty) that contains bleaching agents that at medium/high temperatures
provide excellent results. For washes between 40°C and 60°C the type of detergent used needs to be
appropriate for the type of fabric and level of soiling. Normal powders are suitable for “white” or colour fast
fabrics with high soiling, while liquid detergents or “colour protecting” powders are suitable for coloured
fabrics with light levels of soiling. For washing at temperatures below 40°C we recommend the use of
liquid detergents or detergents specifi cally labeled as suitable for low temperature washing. For washing
wool or silk, only use detergents specifi cally formulated for these fabrics. For dosage amounts please
follow the instructions on the detergent package label.
Page 80

IT
ISTRUZIONI
MONTAGGIO
PORT
A
Forare la porta
utilizzando la dima in
cartone come
indicato in figura per
applicare le cerniere
e la calamita di
chiusura, in posizione
dx o sx secondo vs.
esigenza. La posizione
delle cerniere é
riferita al bordo
superiore.
Applicare le cerniere
mediante le 4 viti (A).
Applicare la calamita
(B) mediante vite (C).
Montare sulla
lavatrice in posizione
dx o sx secondo le vs.
esigenze la piastr
ina
(D) interponendo le
guarnizioni in gomma
(E) ed avvitando le
viti (G). Montare a
scatto il tappo (H)
nella posizione
inferiore.
Solo per
alcuni modelli
Disponible sur certains
modèles uniquement
Sólo algunos modelos
Alleen op bepaalde
modellen
Only available on certain
models
Nur bei einigen Modellen
Apenas disponível em
alguns modelos
4x
1x
2x
A
C
G
4x
L
07.10 - 9258998.5.D - Printed in Italy - Imprimé en Italie
Page 81

FR
ES
NL
INSTRUCTION POUR
LE MONTAGE DE
LA PORTE
Percer la porte en
utilisant le gabarit en
carton suivant les
indication fig.1 pour
monter les charnières et
l’aimant de fermeture à
droite, ou à gauche,
suivant votre exigence.
La position des
charnières est référée au
bord supérieur.
Monter les charnières à
l’aide des 4 vis (A).
Monter l’aimant (B) par
les vis (C).
Monter sur la machine à
laver, à droite ou à
gauche suivant vos
exigences, la plaque (D)
en interposant les
joints
en caoutchouc (E) et
vissant la vis (G). Monter
par enclenchement le
bouchon (H) sur la
position ìnférieure.
INSTRUCCIONES DE
MONTAJE DE LA
PUERT
A
Perfore la puerta
utilizando la plantilla de
cartón tal como viene
indicado en la fig.1 para
colocar las bisagras y el
imán de cierre, en
posición dcha. o izqda.
según sus necesidades.
La posición de las
bisagras se muestra en el
borde superior.
Fije las bisagras mediante
los 4 tornillos (A).
Coloque el imán (B)
mediante el tornillo (C).
Coloque la placa (D)
sobre la lavadora en
posición dcha. o izqda.
según sus necesidades,
interponiendo las
guarn
iciones de goma
(E) y enroscando el
tornillo (G). Coloque a
presión el tapón (H) en la
posición inferior.
AANWIJZINGEN
VOOR HET
MONTEREN
VAN DE DEUR
Boor gaten in de deur
Gebruike hiervoor de kar
tonnen sjabloon zoals
aangegeven in Fig.1 om
de magneetsluiter
desgewenst rechts of
links aan te brengen. De
plaats van de
scharnieren verwijst naar
de bovenkant.
Schroef de scharnieren
op de plaats met de 4
schroeven (A). Schroef
de magneet (B) op met
schroef (C).
Breng de plaat (D)
naargelang uw behoefte
rechts-of linksdraaiend
aan. Zet de rubberen
ringen onder de plaat en
schroef ze aan met
schroef (G). Druk het
kapje (H) in de laagste
stand.
Page 82

GB
DE
PT
INSTRUCTIONS FOR
MOUNTING DOOR
Drill holes in the door
using the cardboard
template as indicated in
Fig. 1 to mount the hinges
and closure magnet in
the right or left-hand
position according to
your requirements.The
position of the hinges
refers to the upper edge.
Screw the hinges in place
with the 4 screws (A).
Screw on the magnet (B)
with screw (C).
Mount the plate (D) in the
right or left-hand position,
according to your
requirements. Place the
rubber washers under the
plate and screw in place
with screw (G).
Snapmount cap (H) in the
lower position.
ANLEITUNG ZUR
TÜRMONTAGE
Türbohrungen unter
Zuhillfenahme der
Pappschablone
vornehmen wie in
Zeichnung 1 gezeigt, um
die Scharniere und den
Verschlußmagneten
nach Ihren Wünschen in
Position dx oder sx (mit
Rechts-oder
Linksanschlag)
anzubringen. Die Position
der Scharniere ist an der
Oberkante angezeigt.
Die Scharniere mit den 4
Schrauben (A)
befestigen.
Den Magneten (B) mit
Schraube (C) befestigen.
Nach Wunsch das
Blechstück (D) an der
rechten (dx) oder linken
(sx) Seite der Maschine
anbringen, dabei die
Gummidichtungen (E)
einlegen und m
it der
Schraube (G) befestigen.
Unten am
Schnappverschluß den
Zapfen (H) anbringen.
INSTRUÇÕES DE
MONTAGEM DA
PORT
A
Regendo-se pela figura 1
e utilizando o escantilhão
de cartão fornecido
juntamente com a
máquina, perfure os
orifícios na porta para
montar as dobradicas e o
imã de fecho, do lado
direito ou do lado
esquerdo, dependendo
do lado escolhido para a
abertura da porta.
A posição das
dobradicas reporta-se à
borda superior.
Aparafuse as dobradiças
na posição com os 4
parafusos (A).
Aparafuse o imã (B) com
o parafusó (C).
Monte a placa (D) na
máquina, do lado direito
ou do lado esquerdo,
dependendo do lado
escolhido para a
abertura da porta,
intercalando as
guarnições de borracha
(E) e aparafusando-as
com o parafuso (G).
Monte o tampão (H) na
posição inferior.
EN
Page 83

IT
Montare la porta
corredata di cerniere
avvitando le viti (L) sul
frontale della
lavabiancheria.
Nota: È consigliabile
montare la porta con il
senso di apertura verso sx
come è l’apertura
dell’oblò per dare
migliore spazio al
caricamento dei panni.
Incassare la
lavabiancheria nel vano
di dimensioni opportune.
Lo zoccolo inferiore può
essere applicato nel
modo da voi preferito
entro le dimensioni
previste.
I 4 piedini regolabili
consentono di variare
l’altezza della
lavabiancheria da 820
mm (togliendo i dadi in
dotazione e sostituendoli
con dadi altezza 5 mm)
a 840 mm max, alzando i
piedini ricordarsi di
bloccare il controdado
al fondo della lamiera.
Page 84

FR
ES
NL
Monter la porte et ses
charnières en vissant les
vis (L) sur le devant de la
machine à laver.
Remarque: Nous
conseillons de monter la
porte s’ouvrant vers la
gauche, comme
l’ouverture du hublot,
pour laìsser plus
d’espace au
chargement du linge.
Emboîter la machine
dans la niche prévue. Le
socle inférieur peut être
appliqué selon vos
exigences en respectant
les dimensions prévues.
Le 4 pattes réglables
permettent de varier la
hauteur de la machine à
laver en passant de
820 mm (enlever les
écrous et les remplacer
par des écrous de 5 mm)
à 840 mm maxi. En
haussant les pattes ne
pas oublier de bloquer
les contreécrous sur le
fond en tô
le
Coloque la puerta
provista de bisagras
roscando los tornillos (L)
en la parte delantera de
la lavadora.
Nota: Se aconseja
montar la puerta en el
sentido de apertura
hacia la izqda.igual a la
apertura del ojo de buey
para disponer de más
espacio al cargar la
ropa.
Encajar la lavadora en
un hueco de
dimensiones justas.
El zócalo inferior puede
fijarse del modo que
usted prefiera sin que
sobrepase las
dimensiones previstas.
Las 4 patas regulables
permiten variar la altura
de la lavadora de
820 mm (quitando las
tuercas adjuntas y
sustituyéndolas por
tuercas de 5 mm de
altura) a 840 mm máx.,al
levantar las patas no
olvide fijar la
contratuerca por detrás
de la plancha.
Breng de deur met
scharnieren op de
voorkant van de
wasautomaat aan door
die met de schroeven (L)
aan te schroeven.
N.B.: Om meer
laadruimte te krijgen
adviseren wij u de deur
zodanig aan te brengen
dat deze naar links
opent, in dezelfde
richting als de vuldeur
van de wasautomaat.
Schuif de wasautomaat
in een opening die ruim
genoeg is.
De onderste afdekplaat
kan aangebracht
worden als er voldoende
ruimte voor is.
Met de vier verstelbare
voetjes kan de hoogte
van de wasautomaat
worden ingesteld van
820 mm (door de
bijgeleverde moeren er
af te halen en te
verwisselen met de 5 mm
moeren) tot een
maximum hoogte van
840 mm door de voetjes
uit te trekken en de
contramoer vast te
zetten tot aan de
onderkant van de plaat.
Page 85

GB
DE
PT
Mount the door with
hinges by screwing with
screws (L) to the front of
the washing machine.
NOTE: You are advised to
mount the door so that it
opens towards the left, in
the same direction as the
washing machine load
door for more loading
space.
Slide the washing
machine into an opening
of adequate size.
The lower skirting may be
applied as preferred but
within the size provided
for.
The four adjustable feet
allow the height of the
washing machine to be
adjusted from 820 mm
(by removing the nuts
supplied and substituting
with 5 mm nuts) to a
max. 840 mm by raising
the feet and blocking the
lock nut to the base of
the plate.
Die Tür mit den
Scharnieren an das
Vorderteil der
Waschmachine
montieren, die Schrauben
(L) anziehen.
Achtung: Die Tür sollte, wie
das Bullauge, nach links zu
öffnen sein, um das
Einfüllen der Wäsche zu
erleichtern.
Die Waschmaschine in die
passende Öffnung
einsetzen. Innerhalb der
vorgesehenen Maße kann
der Sockel Ihren
Wünschen entsprechend
angepaßt werden.
Mittels der vier
regulierbaren Füße kann
die Höhe der
Waschmaschine von 820
mm auf max. 840 mm
geändert werden (dazu
die zur Ausstattung
gehörenden
Schraubenmuttern
entfernen und durch die 5
mm hohen
Schraubenmuttern
ersetzen). Nach dem
Ausrichten die
Kontermuttern an der
Geräteunterseite
anziehen.
Monte a porta com as
dobradiças
aparafusando-a à parte
da frente da máquina
de lavar roupa com os
parafusos (L).
ATENÇÃO:
Recomendamos que a
porta seja montada de
modo a abrir para a
esquerda, tal como a
porta da máquina de
lavar, a fim de dispor de
mais espaço para
carregar a máquina.
Introduza a máquina de
lavar no espaço previsto
para o encastre, cujas
dimensões deverão ser
as adequadas. O rodapé
pode ser montado da
forma que melhor lhe
convenha,mas dentro
das dimensões definidas.
Os quatro pés reguláveis
permitem ajustar a altura
da máquina entre
820 mm (para o que
deverá remover as
porcas fornecidas com a
máquina e substituí-las
por porcas de 5 mm) e
840 mm (altura máxima),
para o que deverá
regular a altura dos pés e
fixá-los em posição com
a respectiva
contraporca de aperto,
aparafusando-a contra
o fundo de chapa.
EN
Page 86

gdld hgjd hjfgòhgf
Page 87

La Ditta costruttrice declina ogni responsabilità per eventuali errori di stampa contenuti
nel presente libretto. Si riserva inoltre il diritto di apportare le modifiche che si
renderanno utili ai propri prodotti senza compromettere le caratteristiche essenziali.
Wir schileßen die Haftung für alle evtl. Druckfehler aus. Kleinere Änderungen und
technische Weiterentwicklungen im Detail vorbehalten.
Wij stellen ons niet aansprakelijk voor eventuele drukfouten. Kleine veranderingen en
technische ontwikkelingen zijn voorbehouden.
The manufacturer declines all responsibility in the event of any printing mistakes in
this booklet. The manufacturer also reserves the right to make appropriate
modifications to its products without changing the essential characteristics.
O modelo e caracteristicas indicados nesta folha podem ser alterados sem
qualquer aviso.
Page 88

Dieses Elektrohaushaltsgerät ist entsprechend der EU-Richtlinie 2002/96/CE über Elektro- und Elektronik-Altgeräte
(WEEE) gekennzeichnet. Bitte sorgen Sie dafür, dass das Gerät ordnungsgemäß entsorgt wird, damit mögliche
negative Auswirkungen auf Umwelt und Gesundheit vermieden werden, die bei einer unsachgemäßen Entsorgung
des Altgerätes entstehen könnten.
Das Symbol auf dem Produkt bedeutet, dass dieses Gerät nicht in den normalen Hausmüll gehört, sondern den
jeweiligen kommunalen Rücknahmesystemen für Elektro- und Elektronik-Altgeräte übergeben werden muss. Die
Entsorgung muss im Einklang mit den geltenden Umweltrichtlinien für die Abfallentsorgung erfolgen.
Für nähere Informationen über Entsorgung und Recycling dieses Produktes wenden Sie sich bitte an Ihre
kommunalen Einrichtungen (Umweltamt) oder an die Abfallentsorgungsgesellschaft Ihrer Stadt bzw. an Ihren
Händler.
Dit apparaat voldoet aan de Europese richtlijnen 2002/96/EC voor elektrische en elektronische afval.
Door dit apparaat correct te verwijderen, helpt u het potentiële negatieve gevolg voor de omgeving en menselijke
gezondheid te voorkomen., welke anders door onjuiste verwijdering zou kunnen worden veroorzaakt.
Het symbool op het product duidt aan dat dit product niet behandeld zal worden als huishuidelijk afval. In plaats
daarvan zal het apparaat naar het verzamelpunt voor de recycling van elektrische en elektronische uitrusting gaan.
De verwijdering moet in overeenstemming met plaatselijke milieuvoorschriften voor afvalverwerking uitgevoerd
worden
Voor meer gedetailleerde informatie over de verwijderingvan dit product, neemt u contact op met uw gemeenlijke
reinigingsdienst of de dealer waar u het apparaat heeft gekocht.
This appliance is marked according to the European directive 2002/96/EC on Waste Electrical and Electronic
Equipment (WEEE).
By ensuring this product is disposed of correctly, you will help prevent potential negative consequences for the
environment and human health, which could otherwise be caused by inappropriate waste handling of this product.
The symbol on the product indicates that this product may not be treated as household waste. Instead it shall be
handed over to the applicable collection point for the recycling of electrical and electronic equipment
Disposal must be carried out in accordance with local environmental regulations for waste disposal.
For more detailed information about treatment, recovery and recycling of this product, please contact your local city
office, your household waste disposal service or the shop where you purchased the product.
Questo elettrodomestico è marcato conformemente alla Direttiva Europea 2002/96/CE sui rifiuti da apparecchiature
elettriche ed elettroniche (WEEE).
Assicurandovi che questo prodotto sia smaltito correttamente, aiuterete ad evitare possibili conseguenze negative
all’ambiente e alla salute delle persone, che potrebbero verificarsi a causa d’un errato trattamento di questo
prodotto giunto a fine vita.
Il simbolo sul prodotto indica che questo apparecchio non può essere trattato come un normale rifiuto domestico;
dovrà invece essere consegnato al punto più vicino di raccolta per il riciclo delle apparecchiature elettriche ed
elettroniche.
Lo smaltimento deve essere effettuato in accordo con le regole ambientali vigenti per lo smaltimento dei rifiuti.
Per informazioni più dettagliate sul trattamento, recupero e riciclo di questo prodotto, per favore contattare l’ufficio
pubblico di competenza (del dipartimento ecologia e ambiente), o il vostro servizio di raccolta rifiuti a domicilio, o il
negozio dove avete acquistato il prodotto.
IT
DE
NL
EN
Este electrodoméstico está marcado de acordo com o disposto na directiva europeia 2002/96/CE relativa
aos resíduos de equipamentos eléctricos e electrónicos (REEE).
Ao assegurar que este produto seja correctamente eliminado, estará a prevenir eventuais consequências
negativas para o ambiente e para a saúde, que, de outra forma, poderiam resultar de um tratamento
incorrecto deste produto, quando eliminado.
O símbolo patente neste produto indica que ele não pode ser tratado como lixo doméstico. Em vez disso,
deve ser entregue no centro de recolha apropriado, para reciclagem do equipamento eléctrico e
electrónico.
A elim
inação deste produto deve ser levada a cabo de acordo com os regulamentos localmente
aplicáveis à eliminação e ao tratamento de lixo e resíduos.
Para obter informações mais detalhadas sobre o tratamento, a recuperação e a reciclagem deste
produto, agradecemos que entre em contacto com a entidade municipal competente, com o serviço de
eliminação de lixos e resíduos ou com o estabelecimento comercial onde adquiriu o produto.
PT
13.10 - 41040027 - Canon Italia - Business Services Channel - Printed in Italy - Imprimé en Italie
 Loading...