

Hoover HSV-AC2IN1 Instruction Manual
Instruction Manual IMPORTANT: Read carefully before assembly and use.
©2015 Techtronic F loor Care Tech nology Lim ited. All Ri ghts Reser ved.

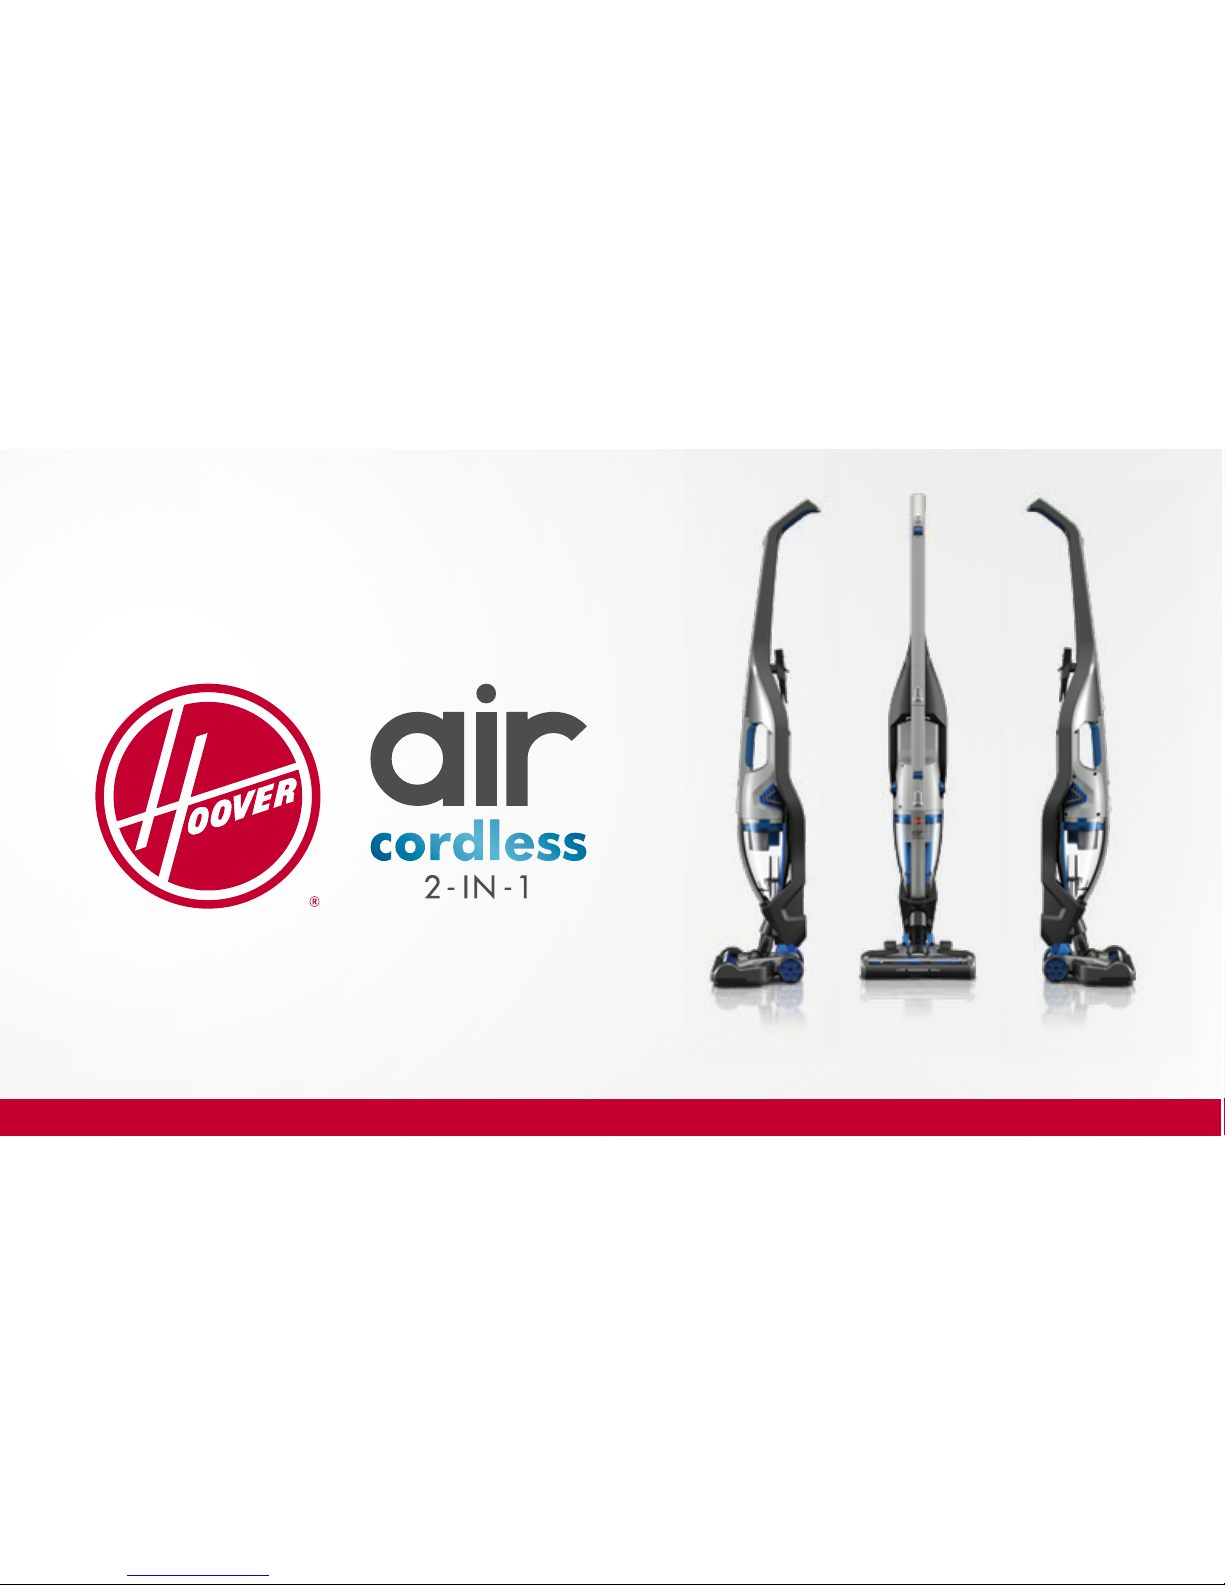
Welcome to
Hoover
®
ownership.

Your Guide:
Important Safety Instructions 1
Getting started with your LithiumLife or LithiumLife
Extended Runtime battery 3
Using your Air Cordless 2-in-1 Hand Vac 4
Keep Your Air Cordless Hand Vac Running Properly 5
Getting started with your Air Cordless 2-in-1 8
Using your Air Cordless 2-in-1 9
Keep Your Air Cordless 2-in-1 Running Properly 10
Need Help? 11

1
IMPORTANT SAFETY INSTRUCTIONS
SAVE THESE INSTRUCTIONS
This vacuum cleaner is intended for
household use only and NOT for
commercial or industrial use.
It is a battery-operated appliance,
the battery being charged outside the
appliance.
y Only use the vacuum cleaner
indoors and keep the area you’re
cleaning well lit.
y Keep fingers, hair and loose
clothing from moving parts and
openings whilst using the vacuum
cleaner.
y This vacuum cleaner can be
used by children aged from 8
years and above and persons
with reduced physical, sensory
or mental capabilities or lack of
experience and knowledge if they
have been given supervision or
instruction concerning use of the
vacuum cleaner in a safe way and
understand the hazards involved.
Children should not play with the
vacuum cleaner. Cleaning and user
children without supervision.
y Only Hoover recommend tools and
accessories should be used with
this vacuum cleaner.
y Keep the charger and batteries in
a dry place, and use them indoors
only.
y If the charger cord is damaged,
it must be replaced by the
manufacturer, a service agent or
similarly qualified persons in order
to avoid hazard.
Basic safety precautions
Always make sure the filter and
dirt container are fitted correctly
before using your vacuum
cleaner.
Always turn off and remove the
battery from the vacuum cleaner
or change before carrying out
any maintenance.
Turn off all controls on the vacuum
cleaner before disconnecting or
connecting the battery.
Take extra care when cleaning on
the stairs.
Use only the charger [Hoover Part
#BH03200K, BH03200HK &
BH03200C] supplied by Hoover
to recharge.
Always protect the charger cord
from heated surfaces or near
open flames.
Use only extension cords, non-
approved extension cords may
overheat. Care should be taken
to arrange the extension cord as
it can be a trip hazard.
Always carry the vacuum
cleaner by the handle.
Store your vacuum cleaner,
charger and battery in a cool,
dry area.
Do’s

2
Don’ts
Don’t use this vacuum cleaner if
it has been dropped, damaged,
immersed in water or left outdoors.
Don’t handle the charger plug or
use the vacuum cleaner with wet
hands.
Don’t run over the charger cord
or use the vacuum cleaner if the
charger cord or plug is damaged.
Please contact our authorized
distributor.
Don’t attempt to remove blockages
with sharp objects as this may
cause damage to your vacuum
cleaner.
Don’t use the vacuum cleaner or
charger with incorrect voltage
as this may result in damage or
injury to the user. The correct
voltage is listed on the ratings
label.
Don’t vacuum up hot coals,
cigarette butts, matches or
smoking hot burning items or use
in an area where there may be
harmful fluids (chlorine, bleach,
and ammonia drain cleaner).
Don’t try to short the terminals of
the battery and the charger.
Please keep instructions
for further use.
WARNING: For best performance terminals on battery, battery
charger and vacuum cleaner must be clean and free from dust and
dirt. Do not attempt to recharge nonrechargeable batteries.
CAUTION: The battery used in this device may present a risk of fire
or chemical burn if mistreated.
Do not disassemble or heat above manufacturer’s maximum
temperature limit (60°C/140°F) or incinerate. Replace battery with
Hoover battery only. Use of another battery may present a risk of
fire or explosion. Dispose of used battery promptly. Keep away from
children.
Do not disassemble and do not dispose of in fire. Do not attempt to
disassemble the battery or remove any component projecting from
the battery terminals.
The battery and charger have no user serviceable parts. Fire or injury
may result.
Prior to disposal, protect exposed terminals with heavy insulating
tape to prevent shorting.
3
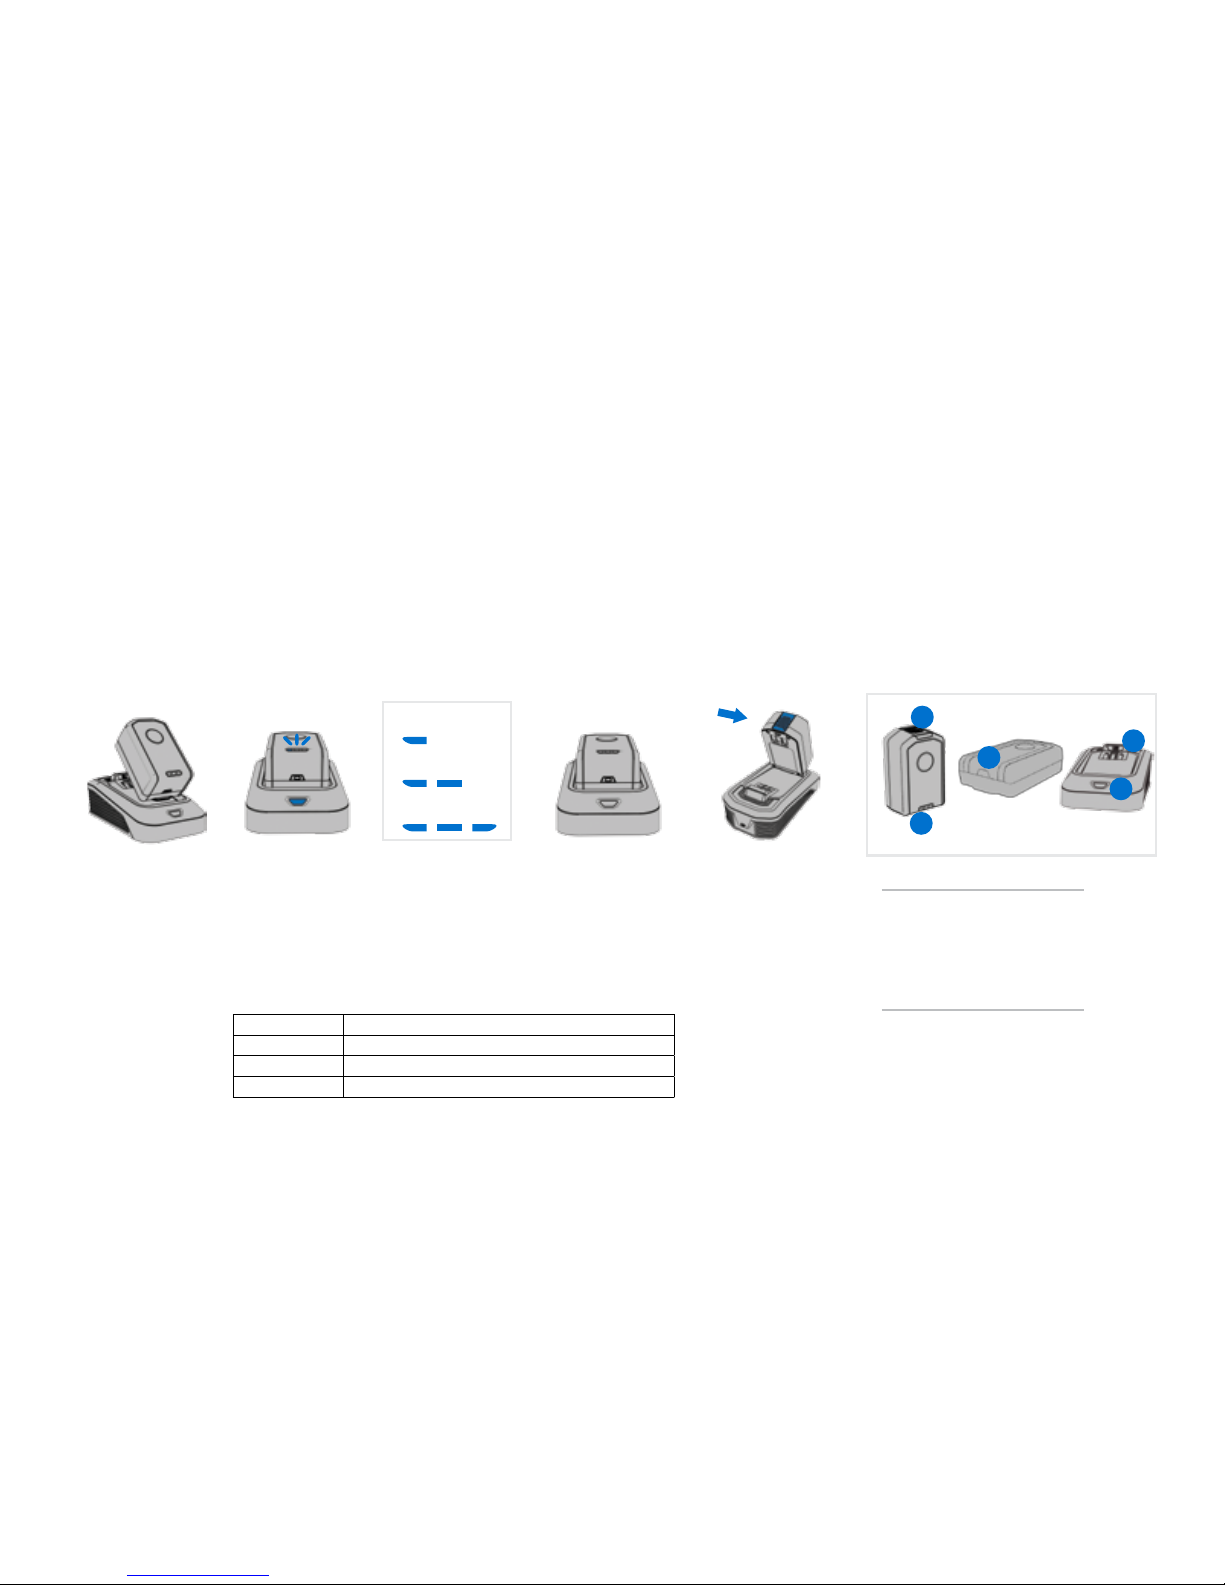
Getting started with your LithiumLife or LithiumLife Extended Runtime battery
To bring the battery
to full life, place the
battery onto the
cha rger.
LithiumLife bat tery
does not come fully
charged.
When charging, the
charger light will turn
solid blue and the blue
LEDs on the battery
will light up to inidcate
charging progress.
The charger light will
turn off when fully
charged.
If the charger LED
flashes red, an error
has occurred.
Remove and replace.
To remove the b attery,
press the blue releas e
button and lift the
battery while holding
down on the charger
base.
Charging the battery Removing the battery
Battery
1. Blue Release Button
2. LED Charge Level Indicator
3. Charge Level Check Button
Charger
4. Battery Cavity
5. LED Indicator
25% Charge d
50% Charged
75% Charged
It’s ready when you are.
You can lea ve your batt ery on the c harger– even
aft er it’s charge d.
It cleans powerf ully at any charge level.
Whet her it’s 25% charg ed or 100% full , get fadefree po wer until the e nd of the cha rge.
It’s versati le.
This ba ttery a nd charger ar e compatib le with the
rest of o ur Lithium Life famil y.
Runtime.
Runti me will vary b ased on the p articula r
combi nation of Li thiumLif e batter y model and
FloorM ate Cordle ss or Air Cord less clea ner
produ cts. If usin g a LithiumL ife batt ery model
diff erent than t he batte ry that cam e with your Ai r
Cordl ess produc t, runtime d ifferenc es will occu r.
To check the charge
level of your bat tery,
press the Charge
Level Check Button.
What does it mean when cha rger light is...
*Images may differ from
actual product.
NOTE: All LithiumLife batteries are
compatible with FloorMate Cordless and the
entire Air Cordless family of products.
1
4
2
5
3
Solid B lue Bat tery Charg ing Progress : 1-3 LEDs
Off Fully Ch arged
Flash ing Blue Leave B atter y o n Charger. It' s t oo hot or cold to cha rge.
Flash ing Red Call our a uthorize d H oover serv ice center
4
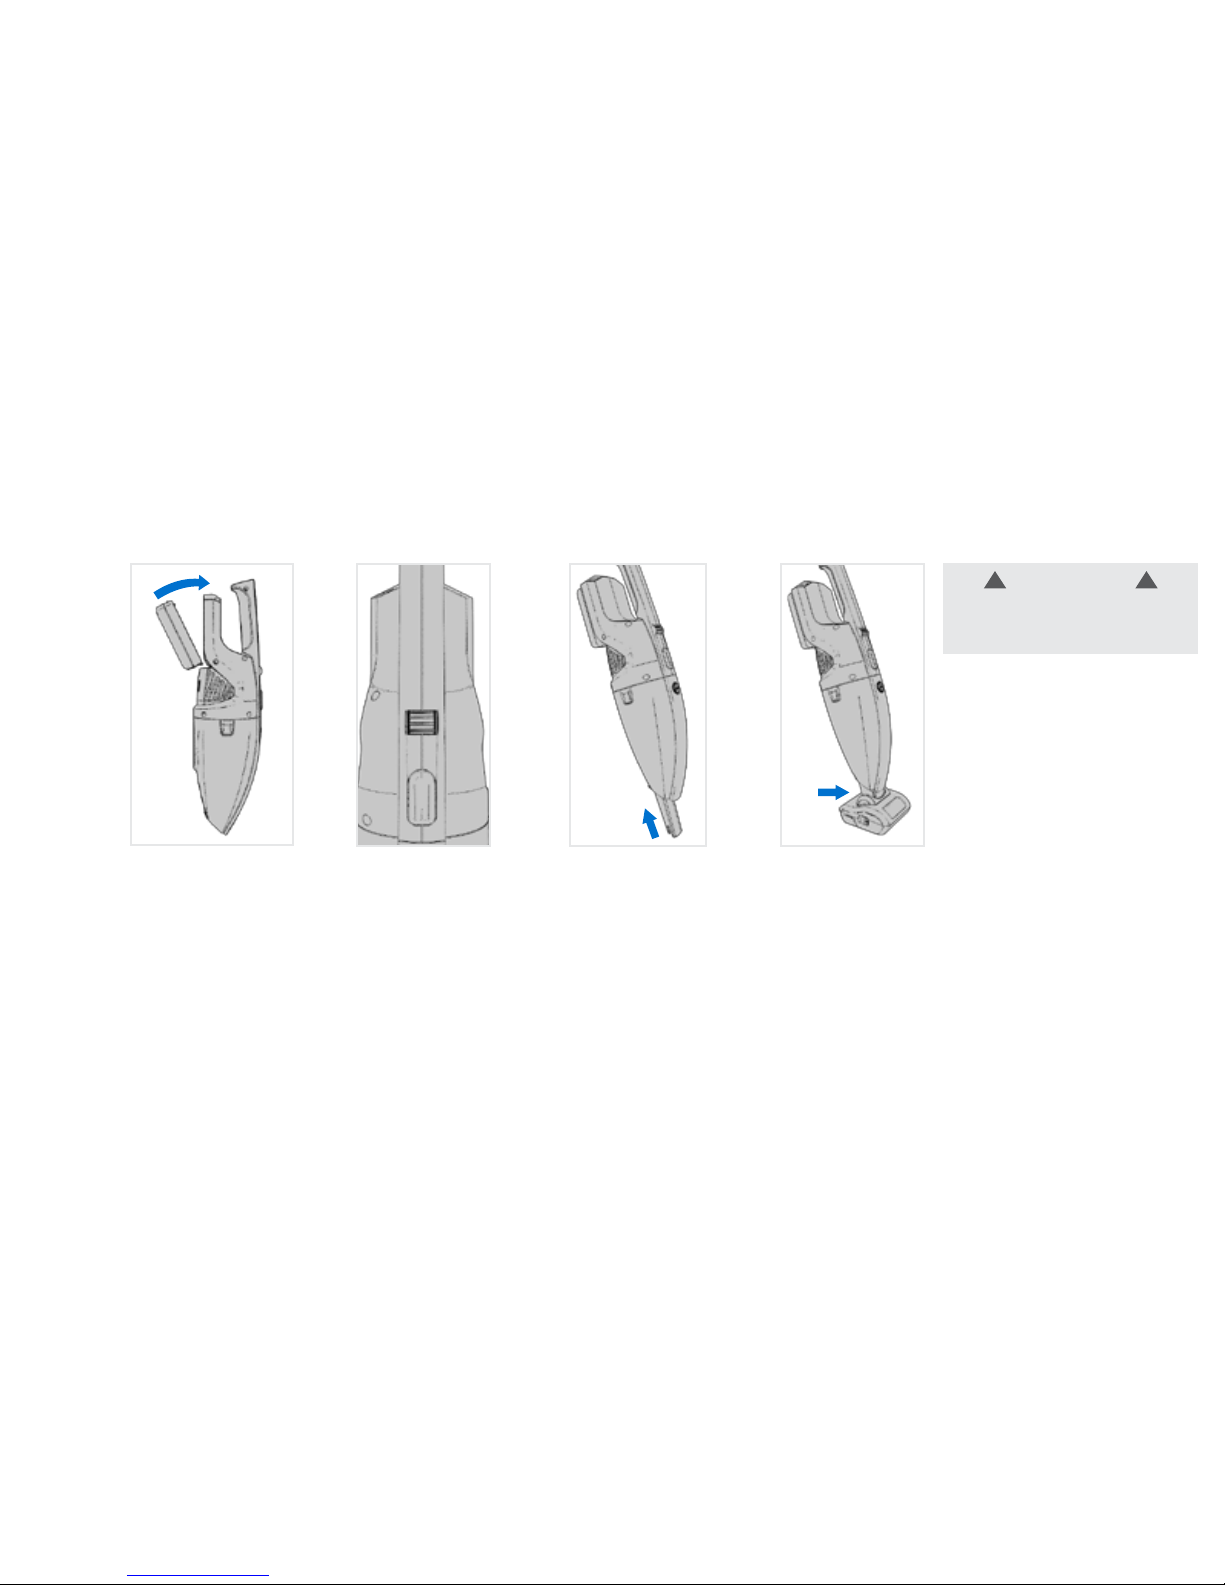
Using your Air Cordless 2-in-1 Hand Vac
Roll the power
switch to turn on.
For detailed
cleaning, attach
the Crevice Tool.
Attach the Motorized
Turbo Tool to clean stairs
and upholstery. Align the
pins and insert here until
it’s securely in place.
2
1
3
4
!
WARNING
!
Always turn off this appliance before
connecting or disconnecting the
Motorized Turbo Tool or tools.
Pivot battery in the
Hand Vac and click it
into place.
Battery does not
come fully charged.
5
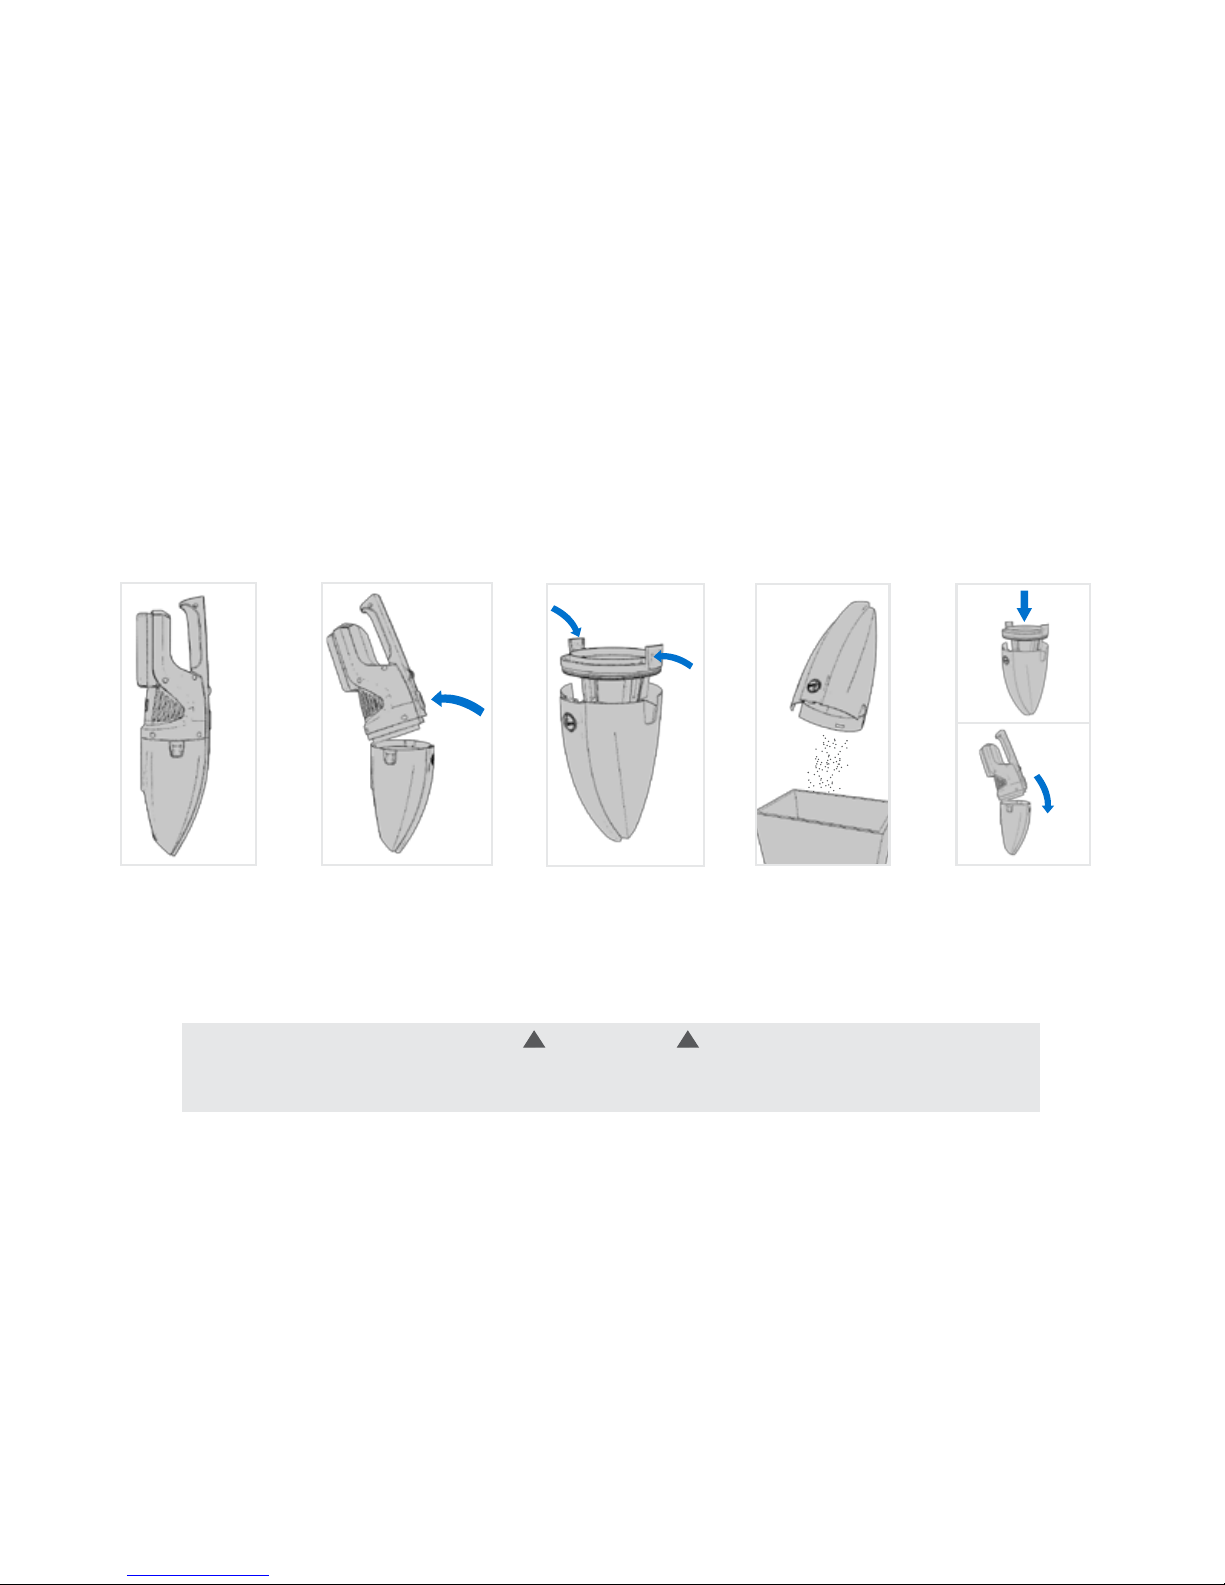
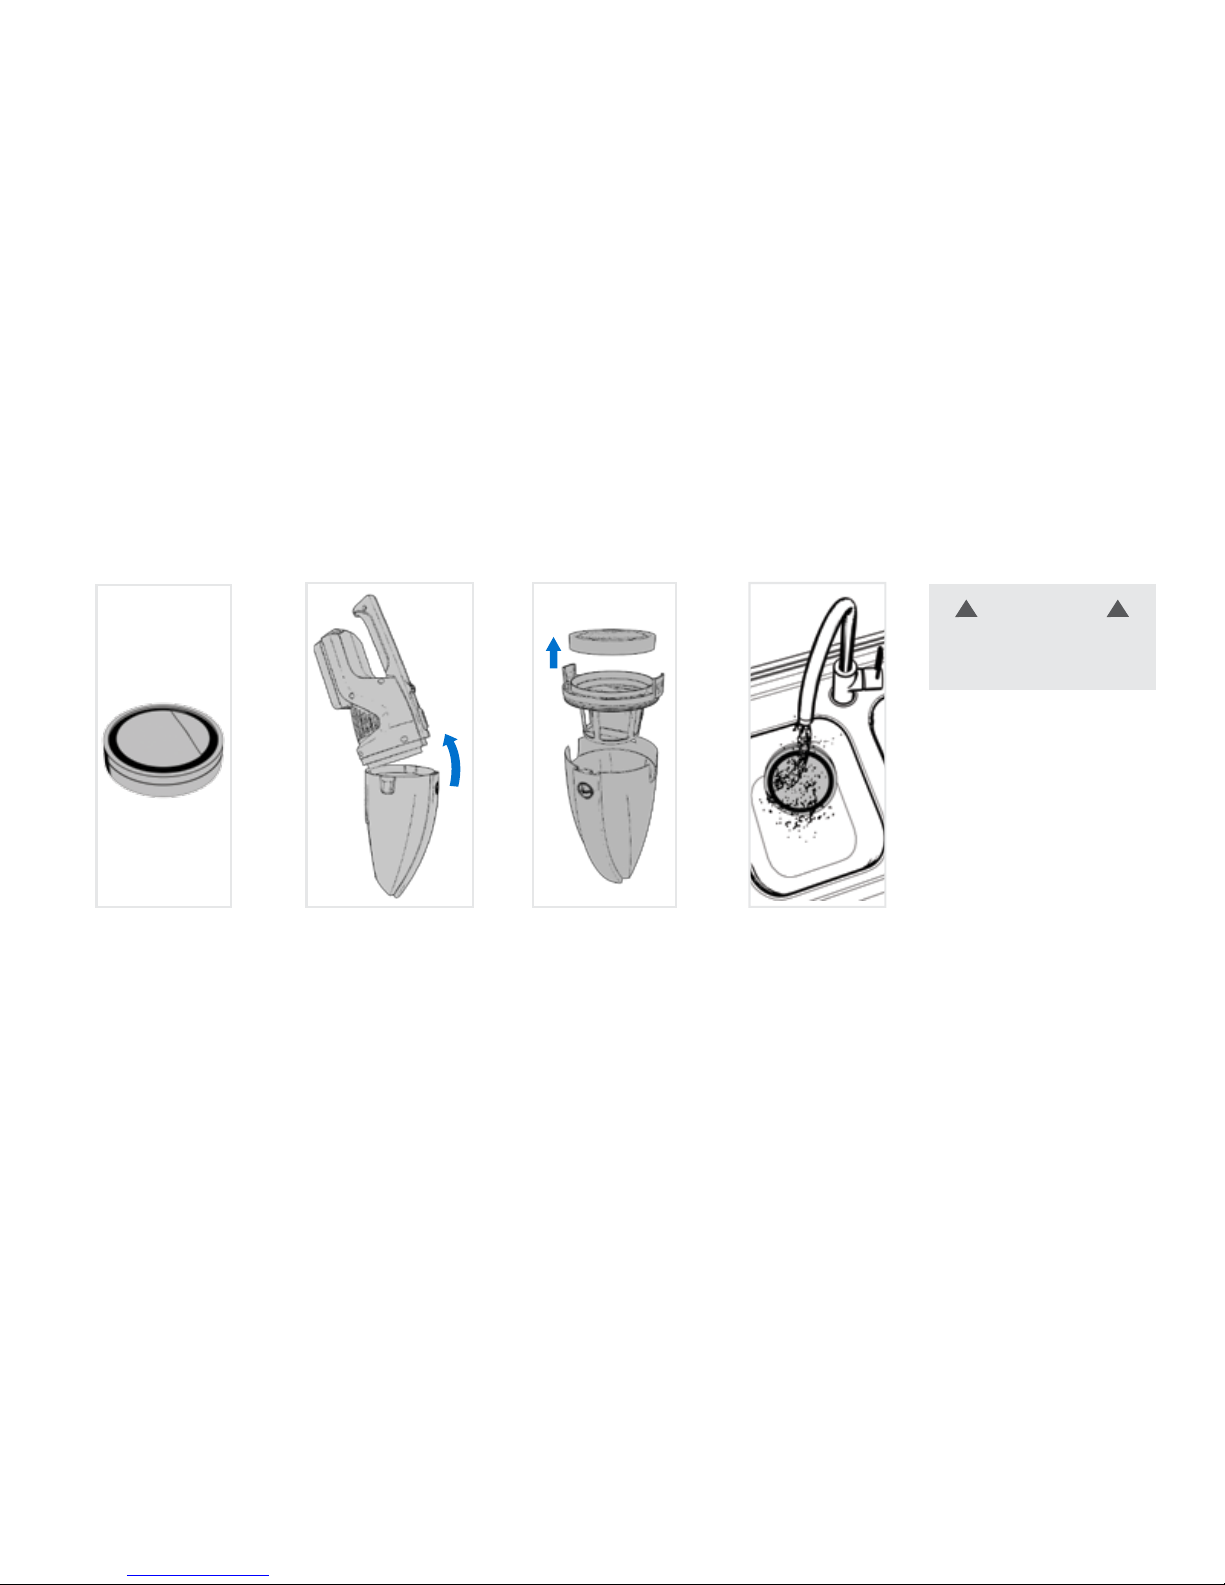
Keep your Air Cordless 2-in-1 Hand Vac running properly: Dirt Cup
Keep Your Air Cordless Hand Vac Running Properly
Empty the dirt cup
when it is full or
sooner.
Grip these tabs
and lift out dirt
cup separator.
Empty the dirt.
Replace the dirt
cup separator and
snap the Hand Vac
back together.
Press this button to
open the dirt cup.
1
2 3 4
5
!
WARNING
!
To reduce the risk of personal injury, remove battery before cleaning or servicing. Do not use vacuum without dirt cup or filters
in place. Very fine materials, such as face powder or cornstarch may seal the filter and cause a reduction in performance. When
using the vacuum for this type of dust, empty the cup and clean the filters often.
6
Keep your Air Cordless 2-in-1 running properly: Filters
Clean this filter
every 4-6 uses, or
as needed.
Pull tab to remove
the filter from the
dirt cup seperator.
Rinse for 2 minutes in
clear warm water; dry
for 24 hours.
Open the dirt cup.
1 2 3
!
WARNING
!
To reduce the risk of personal
injury, remove battery before
cleaning or ser vicing.
7
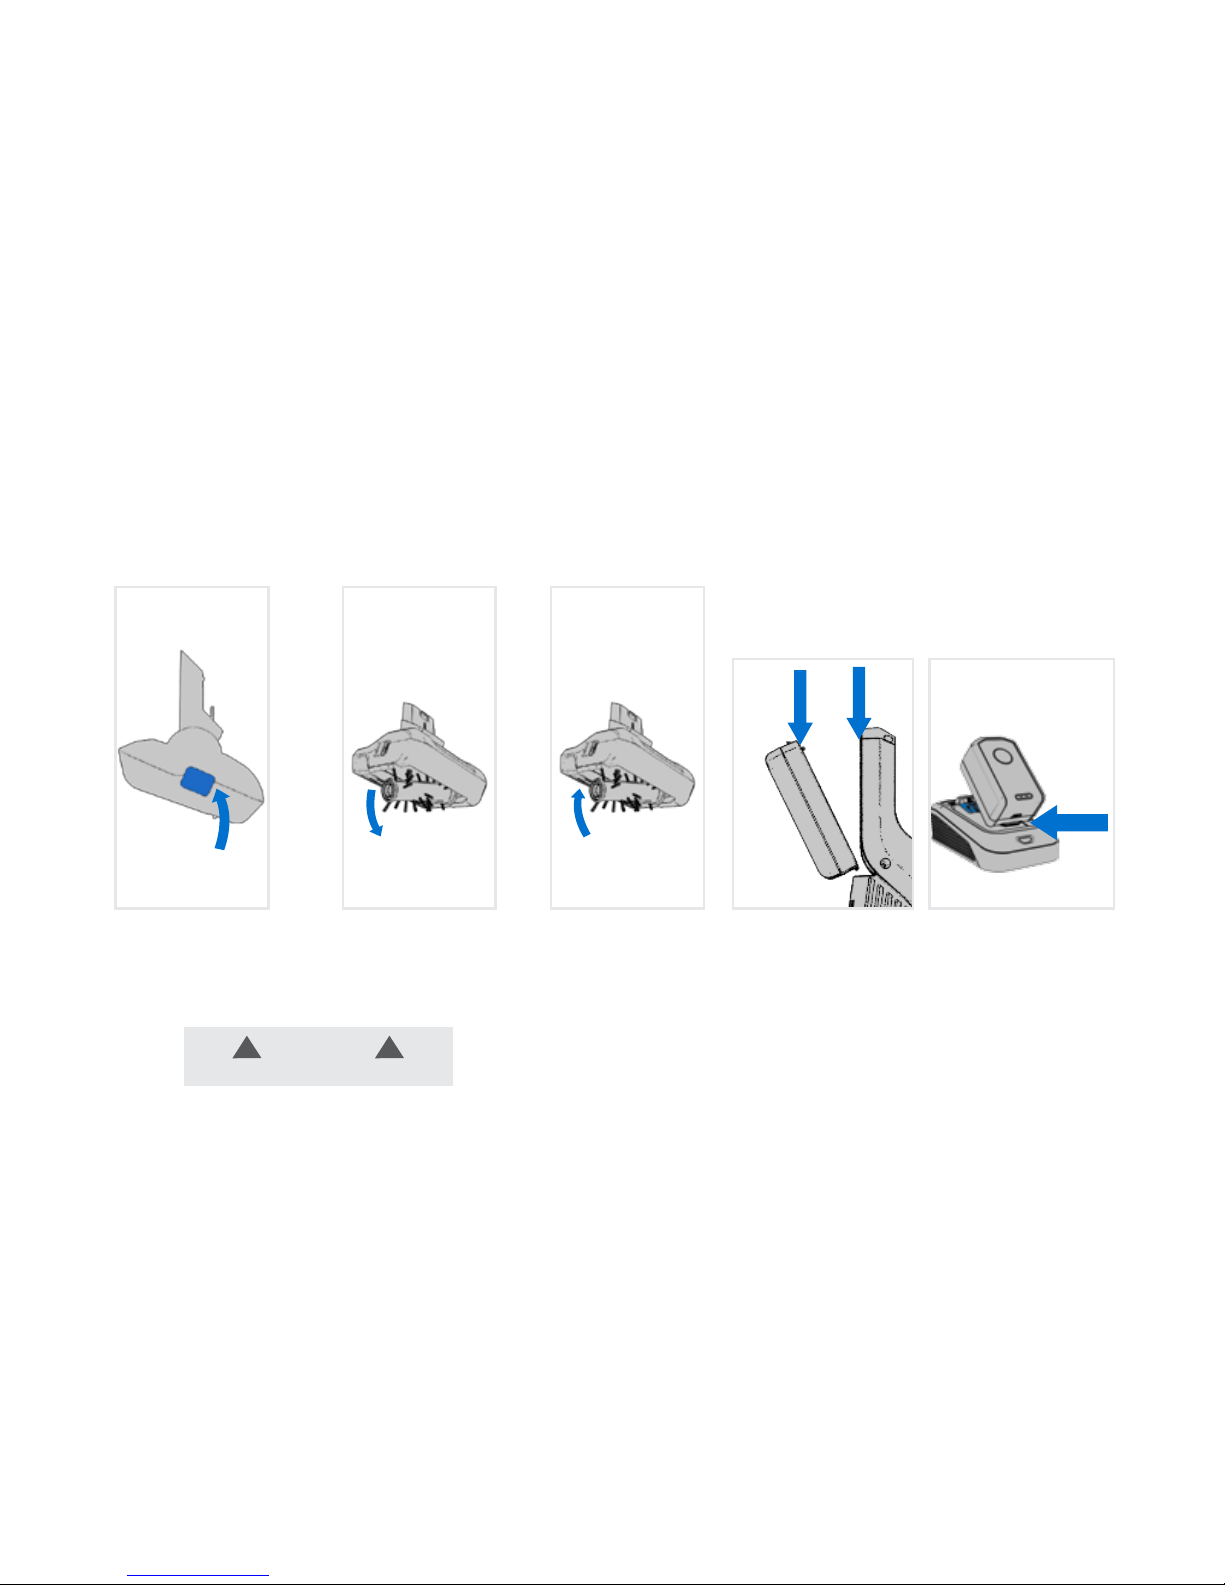
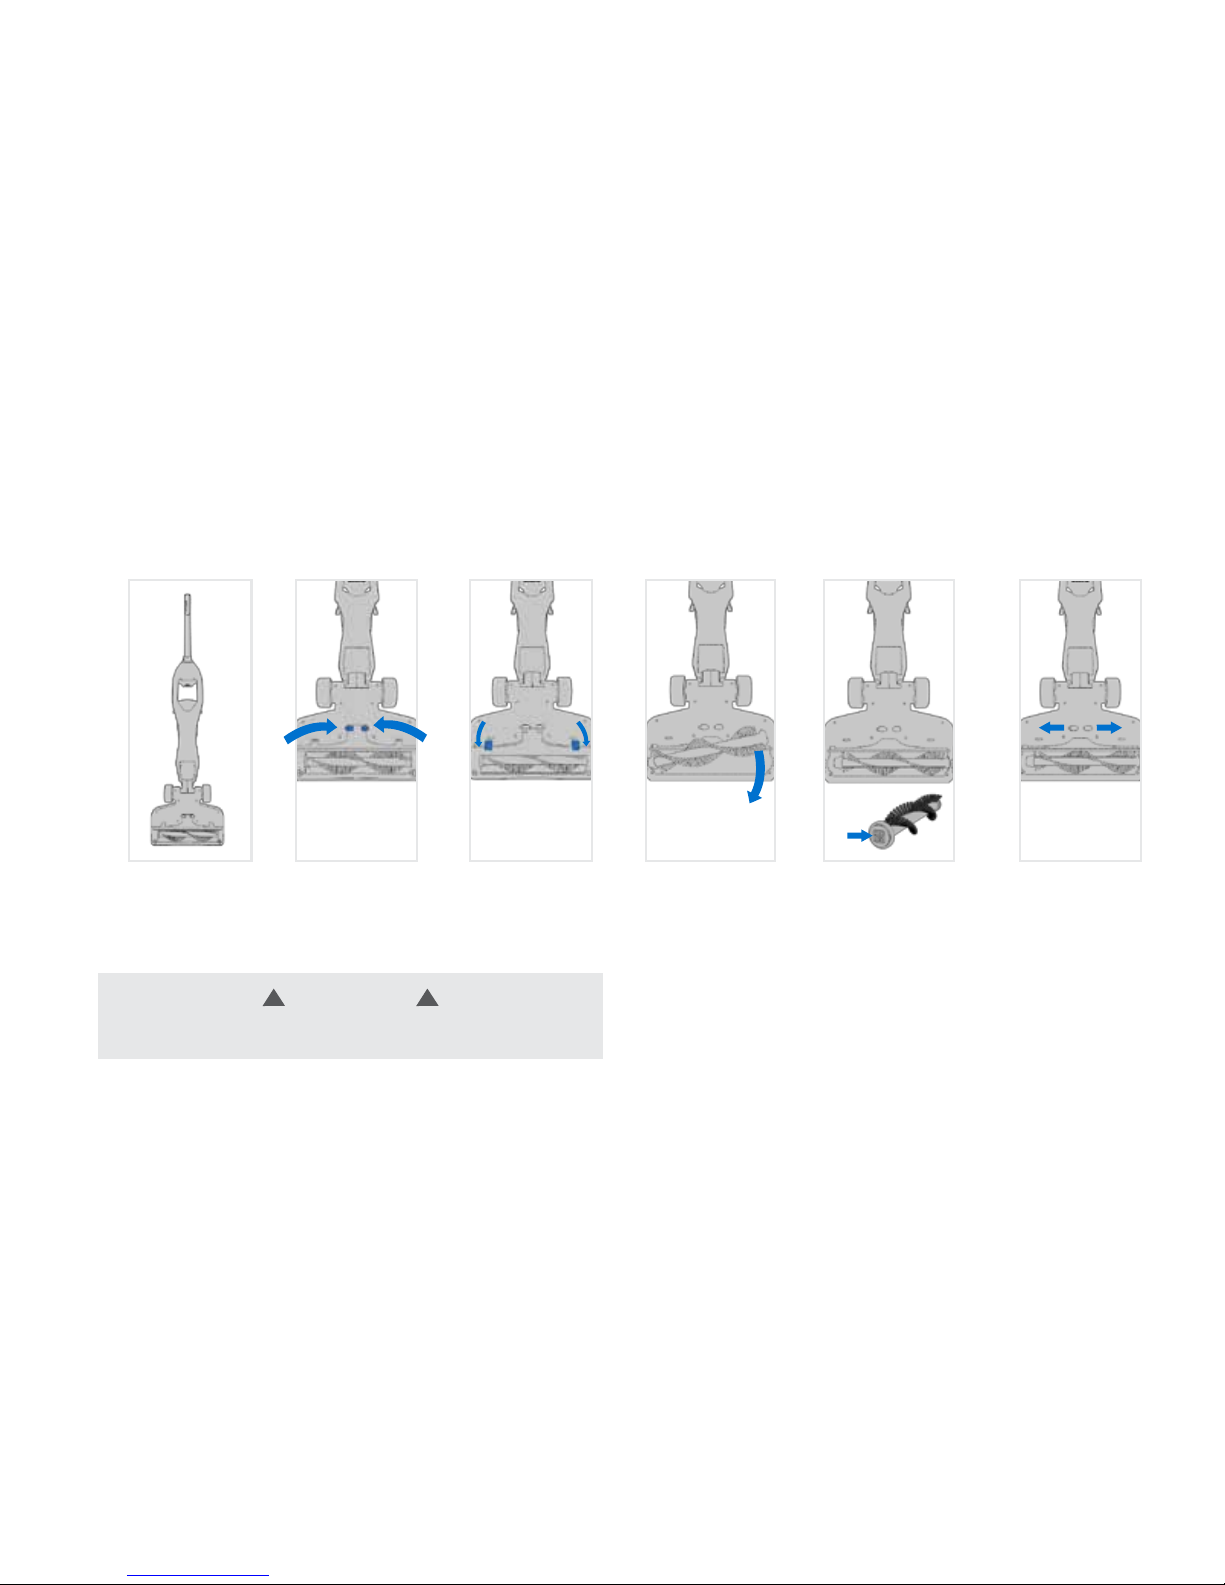
Keep your Air Cordless 2-in-1 running properly: Motorized Turbo Tool & Battery
Pull out brush
roll and remove
debris.
Replace the clean
brush roll and snap
the tool shut.
Squeeze here to open
the motorized turbo
tool.
1 2
3
!
CAUTION
!
Not to be used for grooming a pet.
Using a dry cloth or soft dusting brush remove any
dust/debris from terminals on battery charger, battery
and vacuum cleaner.
Cleaning terminals
8
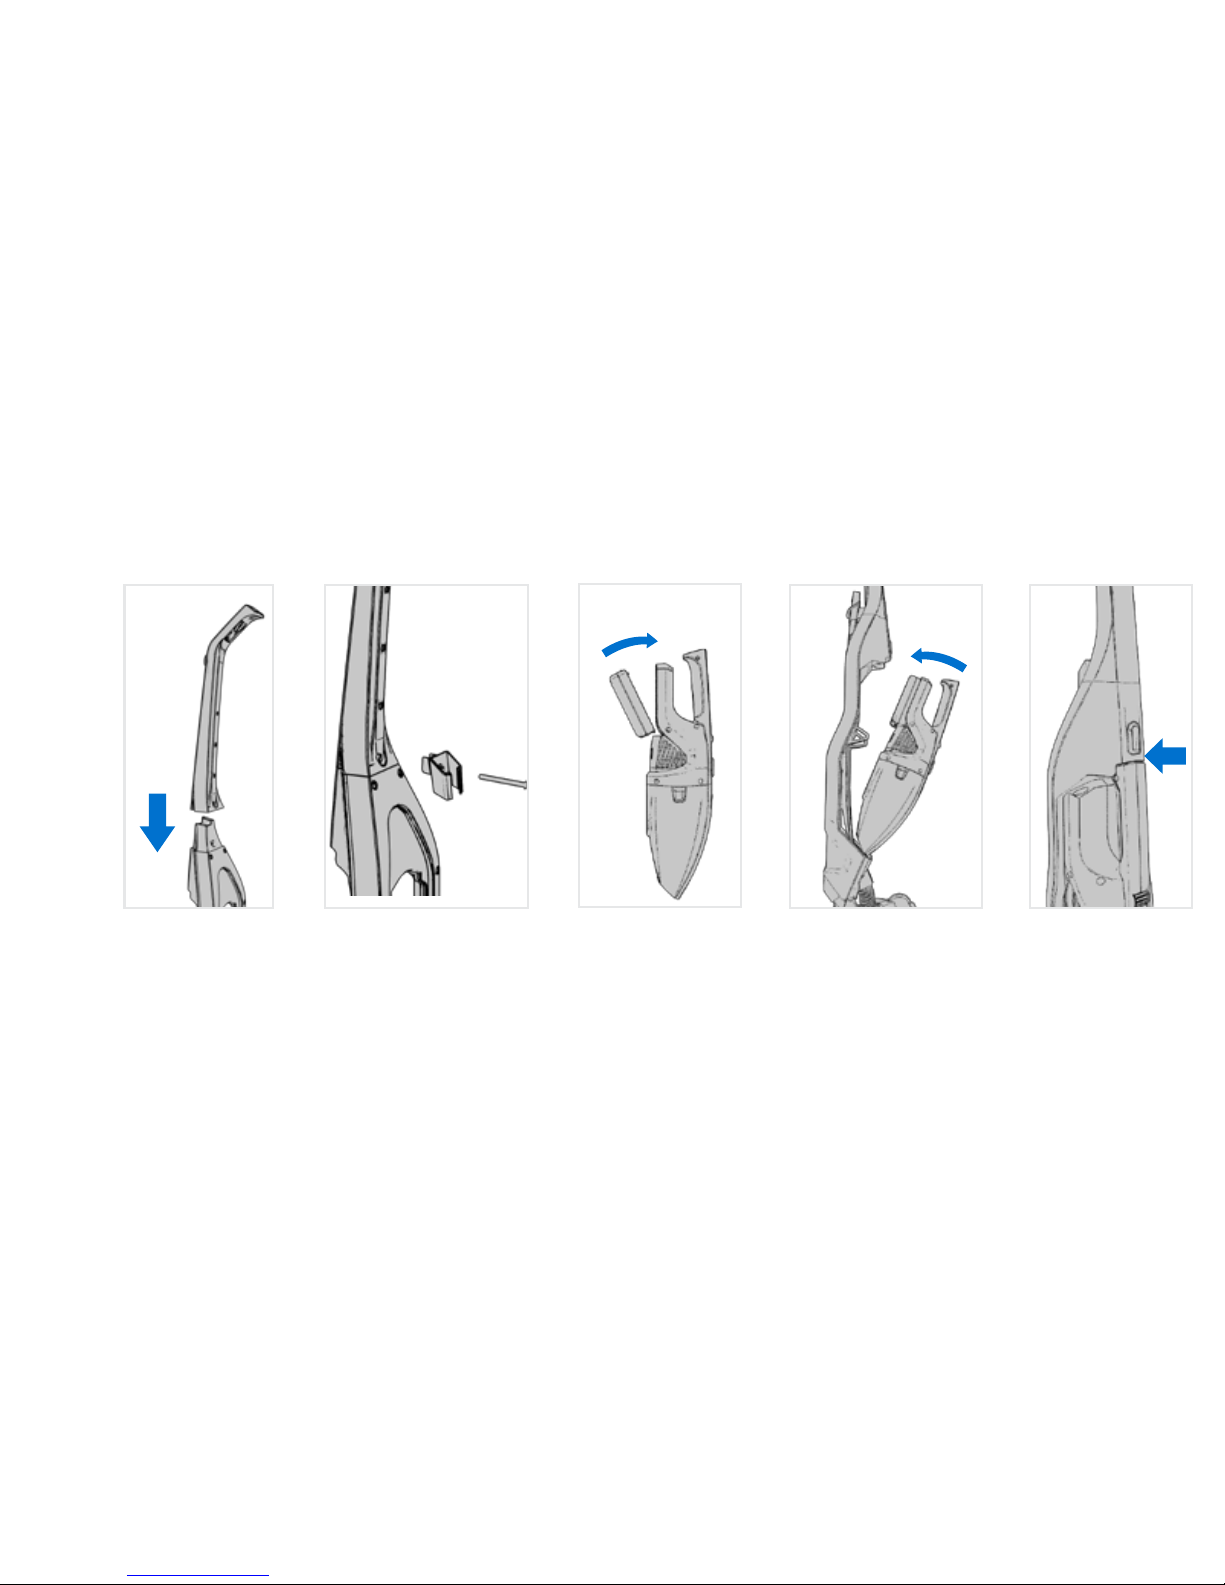
Place the Crevice Tool
Holder here and secure
with the screw. Insert
the Crevice Tool into the
holder.
Pivot battery in the
Hand Vac and click
it into place.
Battery does not
come fully charged.
Set the Hand Vac nozzle
here and pivot into
place.
It will click.
Press this button
and pivot hand vac
forward to remove.
Insert the handle
until it locks into
place.
1 2
3
4 5
Getting started with your Air Cordless 2-in-1
NOTE: Bat tery will be a ccessibl e from the back o f the Stick Vac whe n
the Han d Va c is in place. To chec k your charge le vel while cle aning, pres s
the blu e button on the b ottom of the b attery.
9
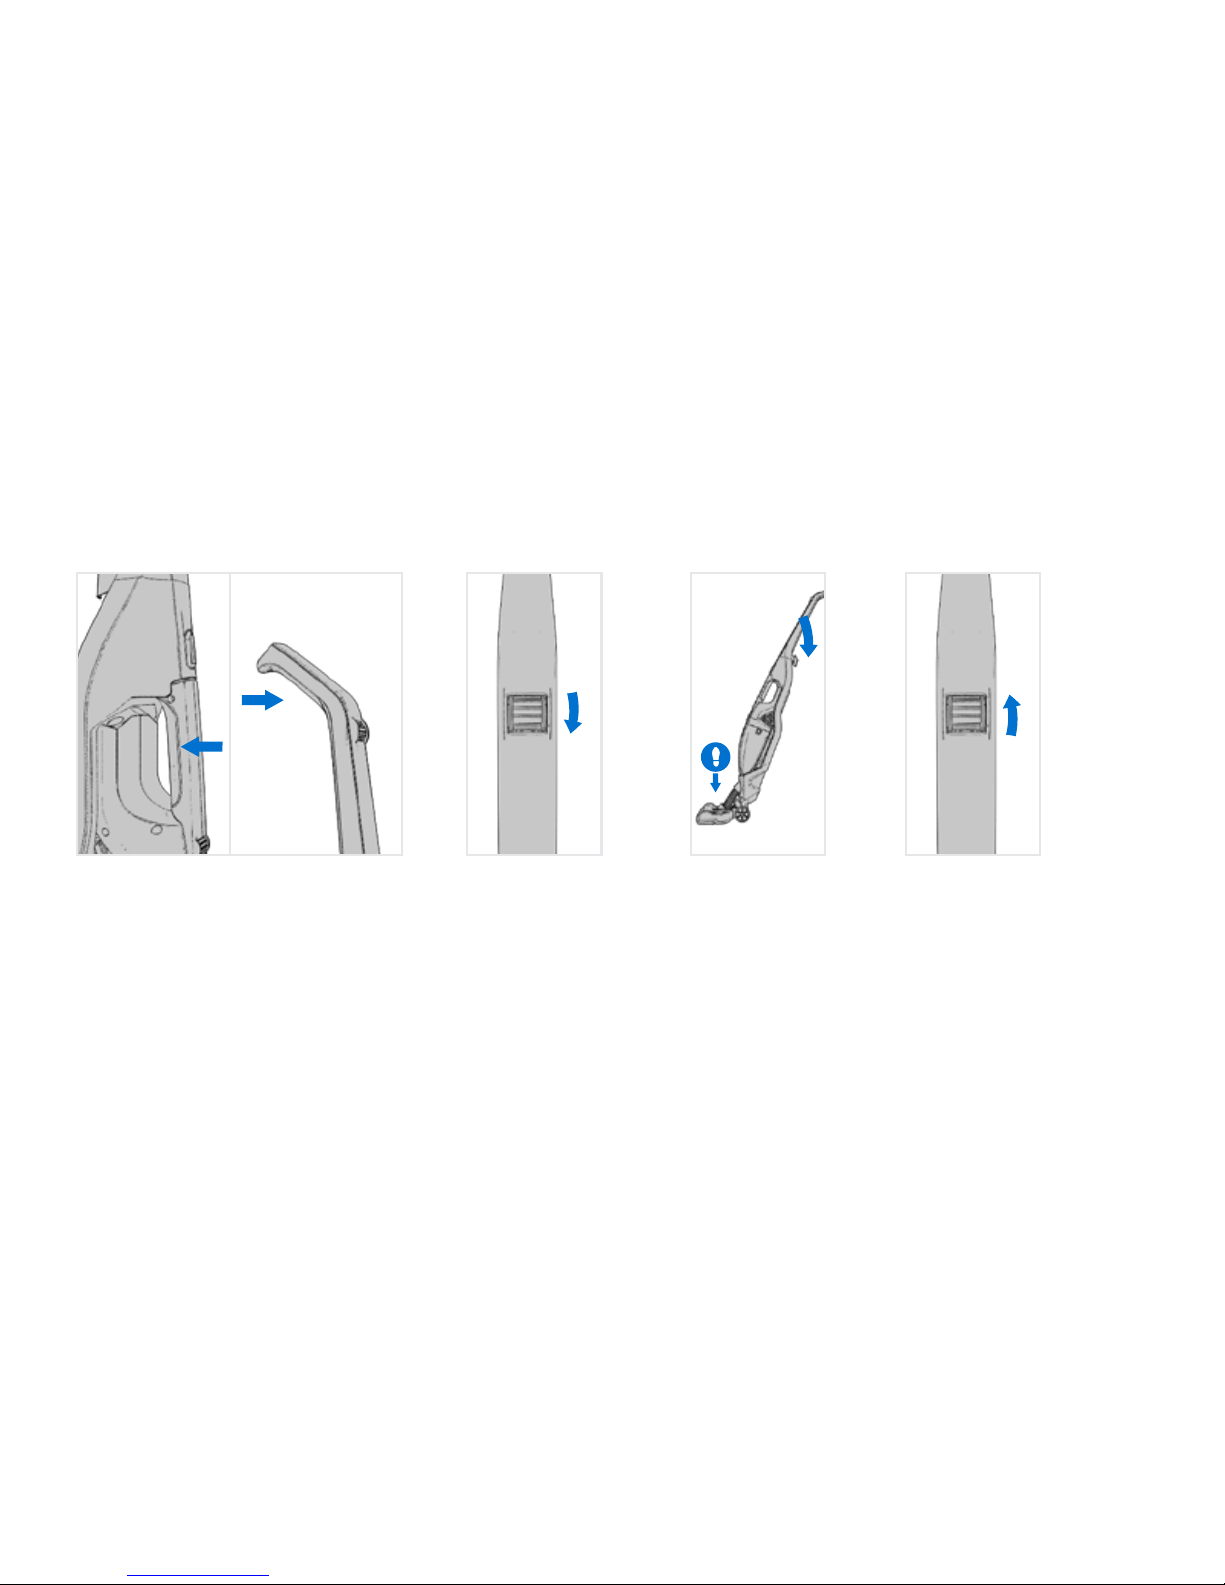
Using your Air Cordless 2-in-1
It’s easiest to carry here or here. Step here and
pull the handle
back to recline.
For optimal cleaning, keep
the brush roll rotating for
all surfaces. For delicate,
highly polished floors, roll
the power switch back to
turn the brush roll off for
Hard Floor Mode.
Roll the power
switch once for
Hard Floor Mode.
Roll it again to
activate the brush
roll for Carpet
Mode.
1
2 3
10
Keep Your Air Cordless 2-in-1 Running Properly: Brush Roll
Keep Your Air Cordless 2-in-1 Running Properly
Lower the
handle and flip
over.
Push tabs
towards the
brush roll and
lift up.
Pull the brush
roll out from this
end.
Push plate locks
towards each
other.
Replace clean
brush roll into belt.
Ensure brush roll
ends are aligned in
their slots.
Reinsert the plate
then push the
plate locks back
out.
1 2 3 4 5 6
!
WARNING
!
Risk of personal injury: brush roll may suddenly restart if battery is in place.
Turn power switch off and remove battery before cleaning or ser vicing.
LUBRICATION
The motor and brush roll are equipped with bearings which contain sufficient
lubrication for their lifetime. The addition of lubricant could cause damage. Do
not add lubricate to motor or brush roll.

11
What to do if it goes wrong
Need Help?
Why does my
vacuum cleaner
have no power?
My brushbar
isn’t turning?
Why won’t the
vacuum cleaner
pick up?
y Check the battery is inserted correctly into
the vacuum cleaner. Go to "Getting started
with your LithiumLife or LithiumLife Extended
Runtime battery".
y Check the handheld has been correctly fitted
into the main body. Go to "Using your Air
Cordless Hand Vac".
y The battery may not be charged, remove and
charge battery.
y Check terminals on battery and vacuum
cleaner are clean. Go to "Keep Your Air
Cordless Hand Vac Running Properly:
Motorized Turbo Tool & Battery".
y Battery might be too hot, remove and allow to
cool for 30 minutes.Replace battery.
y The Motor Protection Sensor may have been
activated. If this has happened,switch off the
vacuum cleaner. Remove and empt y the dirt
container and check for blockages. Clean the
filters and allow the vacuum cleaner to cool
for approximately 1 hour (if you have washed
Problem Solution
!
WARNING
!
To reduce the risk of personal injury, unplug the vacuum cleaner before performing maintenance/troubleshooting checks.
y Empty the dirt container and clean filters. Go
to "Keep your Air Cordless 2-in-1 running
properly: Filter & Dirt cup ".
y There may be a blockage in the vacuum
cleaner. Check the brushbar, the nozzle of
handheld, separator, shroud and tool for
blockages.
y The separator has not been fitted correctly.
Go to "Keep Your Air Cordless Hand Vac
Running Properly: Dirt Cup".
y The brushbar may not be turning. Go to
"Keep Your Air Cordless Hand Vac Running
Properly: Brush Roll" below.
y The brushbar may not be switched on. Check
the On/Off control brush bar roll has been
turned to carpet mode. Go to "Using your Air
Cordless 2-in-1".
y The brushbar may be obstructed. Go to
"Keep Your Air Cordless Hand Vac Running
Properly: Brush Roll".
the filters you will need to wait 24 hours for the
filters to fully dry before putting them back into
the vacuum cleaner).

12
!
WARNING
!
To reduce the risk of personal injury, unplug the vacuum cleaner before performing maintenance/troubleshooting checks.
Need Help?
What to do if it goes wrong
Problem Solution
Why does my
battery have a
short run time?
Why is the
battery charger
light cotinually
flashing?
Why isn’t the
battery charger
light lit when
the battery is
charging?
y Check the battery charger is plugged in.
y Check the battery is inserted correctly into the
charger.
y Check terminals on battery and vacuum cleaner
are clean. Go to "Keep Your Air Cordless Hand
Vac Running Properly: Motorized Turbo Tool &
Ba ttery".
y The battery may not be connecting with the
charger. Remove battery and unplug charger,
wait 10 seconds then retry.
y The battery is fully charged and the charger light
has turned off.
y The battery has not been fully charged. Go
to "Getting started with your LithiumLife or
LithiumLife Extended Runtime battery".
y Check the battery is inserted correctly into the
charger.
y The battery or charger has an error. Remove the
battery and unplug charger, wait 10 seconds
then plug charger into the mains and re-insert the
batter y.
y Check terminals on battery and vacuum cleaner
are clean. Go to "Keep Your Air Cordless Hand
Vac Running Properly: Motorized Turbo Tool &
Ba ttery".

Hoover is a trademark of group

使用手冊 重要說明:在安裝及使用前請仔細閱讀本手冊。
©2015 Techtronic Floor Care Technology Limited.保留所有權利。

感謝您選購 Hoover® 產品!

使用指南:
安全操作說明 1
開始使用 LithiumLife 電池或 LithiumLife Extended Runtime 電池 3
使用 Air Cordless 二合一無線真空手提吸塵機 4
妥善使用 Air Cordless 無線真空手提吸塵機 5
開始使用 Air Cordless 二合一無線真空吸塵機 8
使用 Air Cordless 二合一無線真空吸塵機 9
妥善使用 Air Cordless 二合一無線真空吸塵機 10
需要幫助嗎? 11

1
安全操作說明
請保留此手冊以供日後參考
此吸塵機僅供家居使用,不得用於
商業或工業用途。
此吸塵機為電池供電型家用電器,
電池在吸塵機外充電。
y 僅在室內使用吸塵機並確保清
潔範圍內照明良好。
y 使用吸塵機時,請勿讓手指、
頭髮或寬鬆衣服接近可轉動的
部件和吸塵機吸口。
y 8 歲或以上的兒童以及體力、
感官或精神上有障礙者,也可
以使用本吸塵機,但必須有他
人在場監督或指導安全使用的
方式,並了解當中的危險。請
小心監督兒童,確保他們不會
把本裝置當作玩具。不可在無
監督情況下讓兒童清潔或操作
吸塵機。
y 僅可將 Hoover 推薦的工具和配
件用於本吸塵機之上。
y 將充電器和電池存放在乾燥環
境中並限定在室內使用。
y 若充電器電線有損壞,必須由
製造商或服務代理商或同等專
業人員更換,以免造成危險。
基本安全預防措施
確保使用吸塵機之前,已正確
安裝過濾網和集塵筒。
在進行任何維修工作前必須關
掉吸塵機及從吸塵機或充電器
移除電池。
在拔除或接駁電池前須關上吸
塵機上的所有開關。
清潔樓梯時要格外小心。
只可使用 Hoover 提供的
充電器 [Hoover 部件編
號 BH03200K, BH03200HK &
BH03200C] 充電。
充電器電線須遠離明火或受熱
表面。
只可使用符合規格的拖板,
否則可能導致過熱。延長線
有絆倒的危機,使用時請特
別注意。
搬動吸塵機時請使用手柄。
將吸塵機、充電器及電池存
放在陰涼乾燥環境中。
參照用法
 Loading...