

Hoover HSV87-LX1-ID User Manual

OWNER’S MANUAL /
使用手冊
Operating and Servicing Instructions /
操作及維修手冊
www.hoover.com.hk
IMPORTANT: READ CAREFULLY BEFORE ASSEMBLY AND USE.
重要提示:在裝配及使用前請仔細閱讀本手冊。
THIS PRODUCT IS INTENDED FOR HOUSEHOLD USE ONLY.
IF USED COMMERCIALLY WARRANTY IS VOID.
本產品只適用於家庭使用。如果用於商業用途保用無效。
©2014 Techtronic Floor Care Technology Limited. All Rights Reserved.

2
CONTENTS
Important Safety Instructions.......................................................................................3
Battery Disposal ............................................................................................................4
Vacuum Assembly .........................................................................................................5
Carton Contents ..........................................................................................................5
Attach Main Body .......................................................................................................5
Attach Handle .............................................................................................................5
Change Battery ...........................................................................................................5
How To Use ....................................................................................................................6
Vacuum Description ....................................................................................................6
On-Off Switch ..............................................................................................................6
Battery Charge Indicator .............................................................................................7
Charger: LED Operations ...........................................................................................7
Maintenance ...................................................................................................................8
Emptying and Cleaning Dirt Container .......................................................................8
Advanced Cleaning .....................................................................................................8
Cleaning the Filter .......................................................................................................8
Removing Blockages ..................................................................................................9
Troubleshooting ..........................................................................................................10
Other Information ........................................................................................................11
Warranty .......................................................................................................................11
Service ..........................................................................................................................22

3
IMPORTANT SAFETY INSTRUCTIONS
SAVE THESE INSTRUCTIONS
When using the cordless upright vacuum cleaner, basic safety
precautions should always be observed, including the following:
READ ALL INSTRUCTIONS BEFORE USING THIS APPLIANCE.
WARNING: TO REDUCE THE RISK OF FIRE,
ELECTRIC SHOCK OR INJURY:
• Do not charge the unit outdoors.
• Turn off the vacuum cleaner control before removing or replacing the battery.
• Children should be supervised to ensure that they do not play with the appliance.
• This appliance is not intended for use by persons (including children) with reduced
physical, sensory or mental capabilities, or lack of experience and knowledge,
unless they have been given supervision or instruction concerning use of the
appliance by person responsible for their safety.
• Use only as described in this manual.
• Do not use with damaged cord or plug. If the appliance is not working, as it should,
has been dropped, damaged, left outdoors, or dropped into water, return it to a
Hoover
tm
Authorised Service Agent or suitably qualified person for examination, repair
or adjustment.
• Do not abuse the charger cord. Keep the charger cord away from heated surface.
Do not pull the charger cord around sharp edges or corners. Do not close the charger cord in a door.
• Do not handle the plug or appliance with wet hands.
• This product uses a rechargeable Lithium-Ion battery. Do not throw the battery into
fire or expose to high temperatures, as it may burst.
• Do not use with any opening blocked; keep free of dust, lint, hair, and anything that
may reduce airflow.
• Keep hair, loose clothing, fingers and all parts of the body away from openings and
moving parts.
• Do not pick up hot coals, cigarette butts, matches or anything hot, smoking or burning objects.
• Do not pick up flammable or combustible materials (lighter fluid, petrol, kerosene,
etc) or use in the presence of explosive liquids or vapour.
• Do not vacuum up harmful or toxic material (chlorine bleach, ammonia, drain
cleaner, etc).
• Do not use without the filter in place.
• Do not vacuum up hard or sharp objects such as glass, nails, screws, coins, etc.
• Turn off all controls before unplugging.
• Take extra care when cleaning on stairs
• Store the appliance indoors in a cool, dry area.
• Use only the charge supplied by the manufacturer to recharge.
• Do not continuously leave the charger connected to the mains when not in use.
! !
IMPORTANT
For dry debris use only.
4
! !
IMPORTANT
Always switch off and remove the battery from the vacuum before assembling,
opening or emptying the dirt container.
BATTERY RECYCLING:
• Please check with your local authority for recycling advice.
BATTERY DISPOSAL
• CAUTION: The battery used in this device may present a risk of fire or
chemical burn if mistreated. Do not disassemble, heat, or incinerate. Replace
battery with HOOVER
®
battery Part # BH50000 only. Use of another battery may
present a risk of fire or explosion.
• Dispose of used battery promptly. Keep away from children.
• Do not disassemble and do not dispose of in fire.
• Do not attempt to disassemble the battery or remove any component projecting from the
battery terminals. The battery and charger have no user serviceable parts. Fire or injury
may result. Prior to disposal, protect exposed terminals with heavy insulating tape to
prevent shorting.
WARNING: RISK OF EXPLOSION OR
EXPOSURE TO TOXIC MATERIAL
SAVE THESE INSTRUCTIONS
BATTERY RECYCLING
Your cleaner uses a Lithium-Ion battery. When
these batteries no longer recharge, they must be
removed from the cleaner and recycled.
Please check with your local authority for
recycling advice.
The battery is to be disposed of in one piece.
Do not attempt to take apart.
IMPORTANT
5
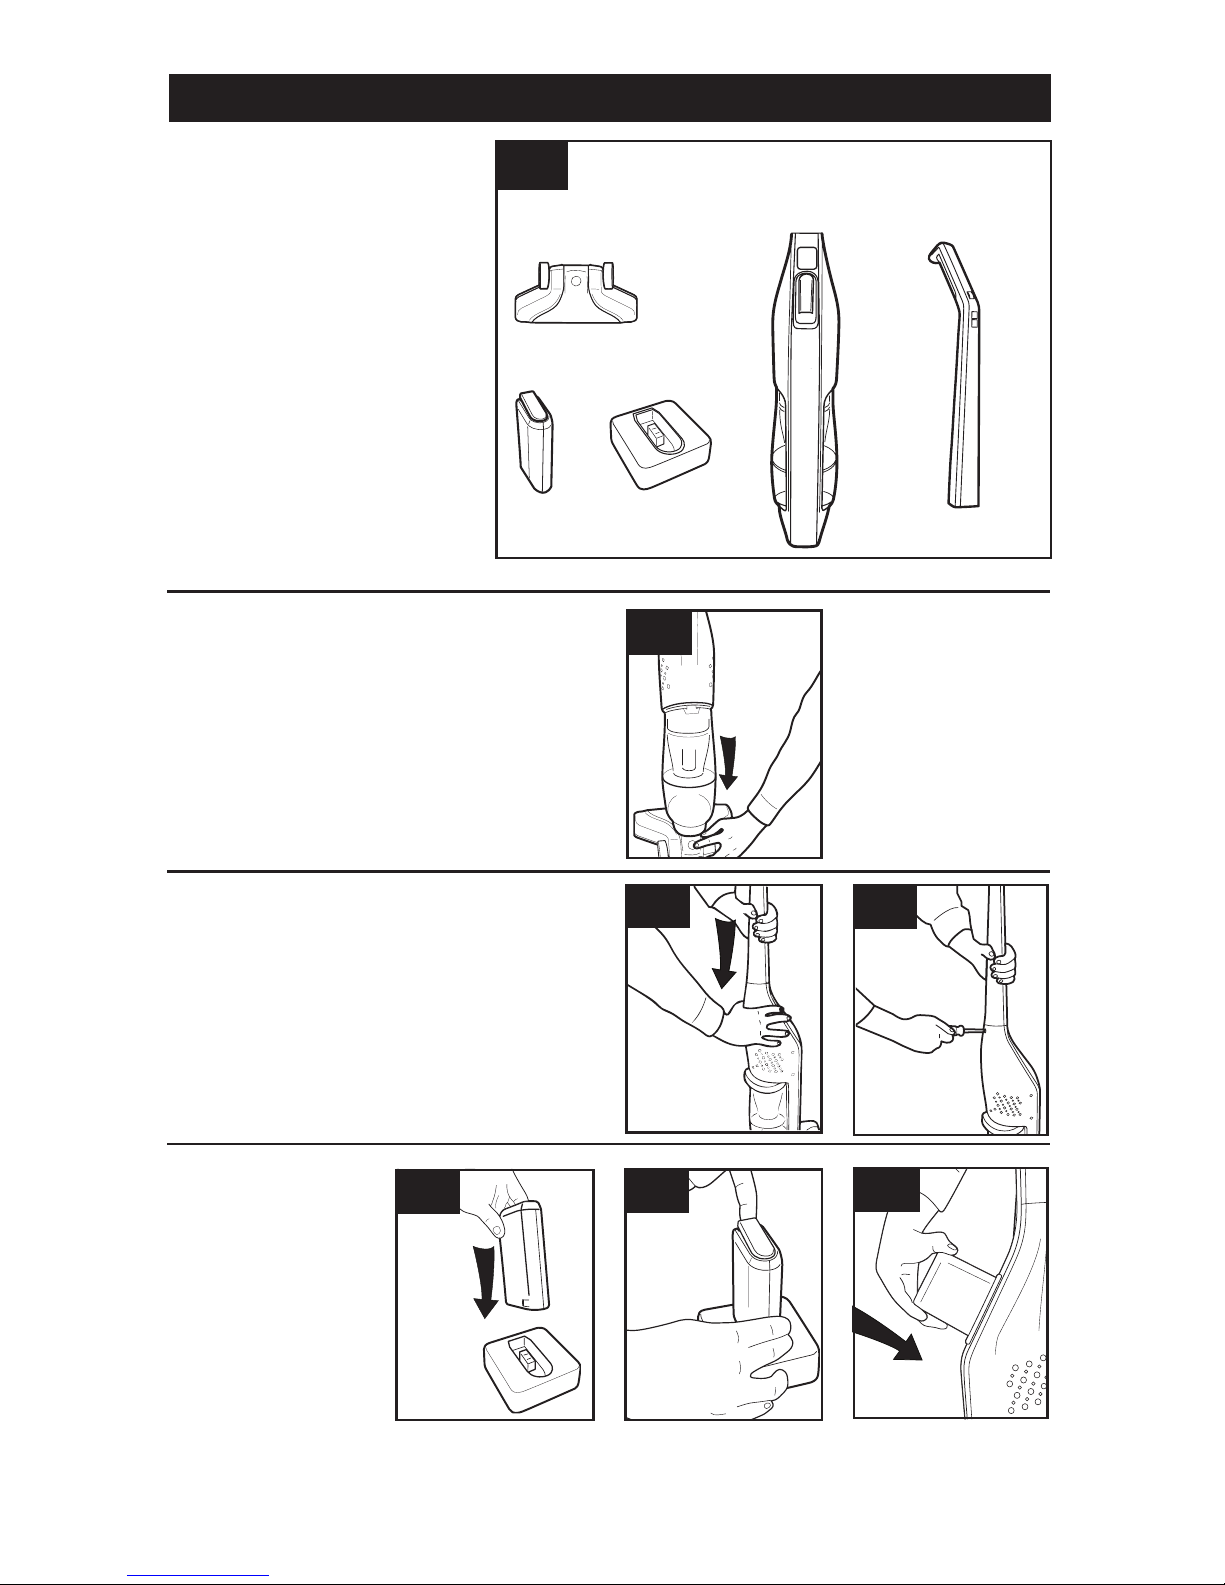
1. VACUUM ASSEMBLY
A B
1.2
1.3
1.6
1.7
1.4
1.1
ATTACH MAIN BODY
CHARGE BATTERY
A. Floorhead
B. Main Body
C. Handle
D. Lithium-Ion Battery
E. Battery Charger
Remove all parts from carton and
identify each item shown.
Make sure all parts are located before
disposing of packing materials.
1.2 Line up floor head with main body and
firmly push together until floor head locks
into place.
ATTACH HANDLE
1.3 Insert handle section into main body.
1.4 Secure with screw.
NOTE: Do not overtighten screw.
NOTE: Fully charge
battery before first use.
1.5 Plug charger into
the mains. Push down
firmly. LED indicator will
light within 2 seconds
if inserted properly.
Ensure the initial charge
is 3 hours.
Remove the battery
from charger after fully
charged.
CARTON CONTENTS
C
D E
1.5
1.6 To remove battery,
pull up release flap while
holding the charger.
1.7 NOTE: Make sure
on/off switch on machine
is set to off.
NOTE: Use only
manufacturer’s supplied
or recommended battery
and charger.

6
On
Off
2.1
2. HOW TO USE
VACUUM DESCRIPTION
2.2 On/off switch:
O Off
I Hard floors
II Carpets
2.2
2.3 2.4
Handle
On/off switch
Brushbar on/off indicator
Battery charge indicator
Battery slot
Dirt container
Floor head
Dirt container release button
Filter cap
Filter
Separator
Quick release button
Floor head removal button
Filter
Battery
Charger
1.
2.
3.
4.
5.
6.
7.
8.
9.
10.
11.
12.
13.
14.
15.
16.
ON-OFF SWITCH
IMPORTANT
Do not use brushbar on hard floors
as it may cause damage.
1
2
3
4
5
6
7
8
13
9
10
11
12
1514 16
7
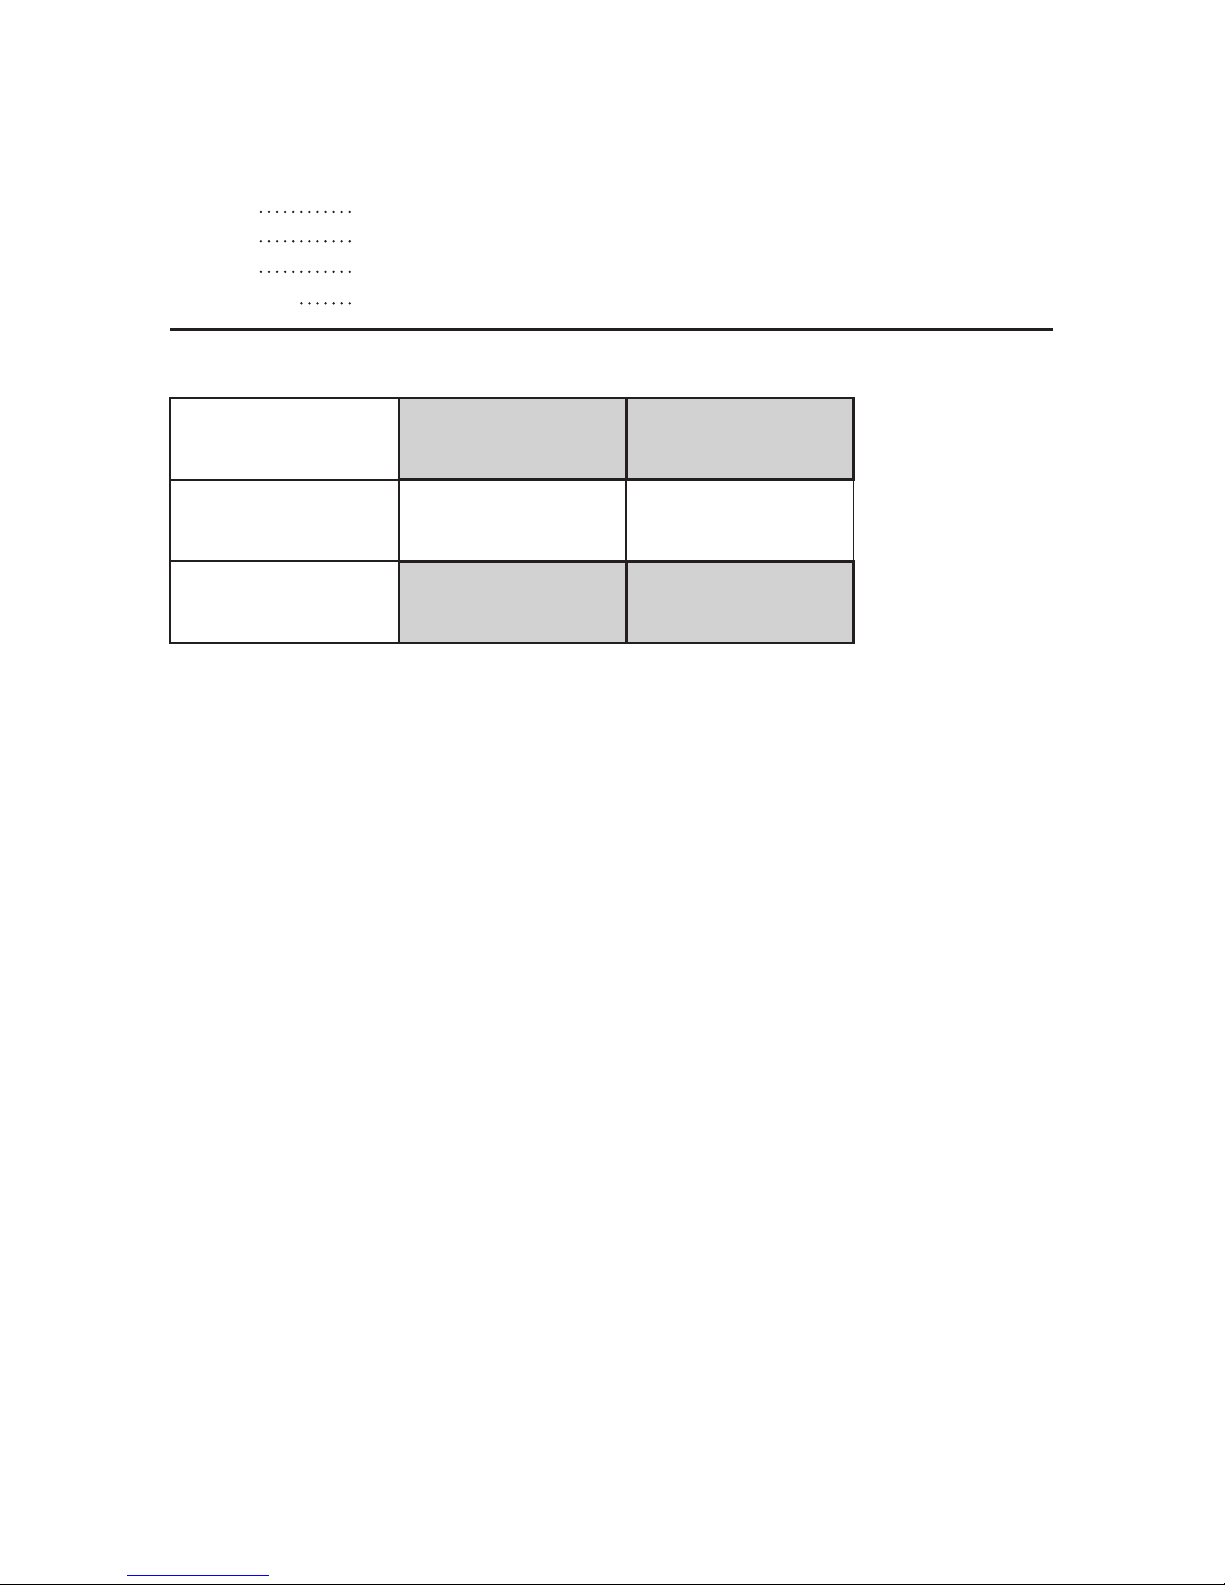
BATTERY CHARGE INDICATOR
CHARGER: LED OPERATIONS
All three LEDs will light momentarily when the power switch is turned on. The battery charge
indicator will then indicate remaining capacity as below:
3 LEDs lit Remaining capacity is more than 75%
2 LEDs lit Remaining capacity is more than 50%
1 LED lit Remaining capacity is more than 25%
1 LED blinking Remaining capacity is less than 25%
LED lit, battery not
in charger
No charging is taking
place
Normal condition
LED lit continuously
Battery is charging Leave battery in charger
LED pulses (gradually
dimming & brightening)
Battery is fully charged Remove battery from
charger
 Loading...