

Page 1

• HOE3161IN
• HOT3161BI
• HOT3161WI
USER INSTRUCTIONS
OVENS
MANUALE D’ISTRUZIONI
FORNO
KULLANIM KILAVUZU
FIRINLAR
POKYNY PRO UŽIVATELE
TROUBY
CANDY HOOVER GROUP S.R.L. • Via Privata Eden Fumagalli • 20047 Brugherio Milano Italy
EN
IT
TR
CZ
02
15
28
43
Page 2

Safety Indications
• WARNING:the appliance and accessible parts become hot during use.
Be carefulnot to touch anyhot parts.
•WARNING: the accessible parts can become hot when the oven is in
use. Childrenmust be keptat a safedistance.
•WARNING: ensure that the appliance is switched off before replacing
the bulb, toavoid the possibility of electricshocks.
•WARNING:beforeinitiating the automatic cleaningcycle:
- Clean theovendoor;
- Removelarge or coarse foodresidues from the inside of the ovenusing
a damp sponge.Do notuse detergents;
- Removeall accessories and the sliding rackkit (where present);
- Do notplacetea towels
• In ovens with meat probe it is necessary, before making the cleaning
cycle, close the hole with the nut provided. Always close the hole with
the nut whenthemeat probe is not used.
•Children under 8 must be kept at a safe distance from the appliance if
not continuouslysupervised.
•Children must not play with the appliance. The appliance can be used
by those aged 8 or over and by those with limited physical, sensorial or
mental capacities, without experience or knowledge of the product,
only if supervised or provided with instructionas tothe operation of the
appliance, in asafe waywith awarenessof thepossible risks.
•Cleaning and maintenance should not be carried out by unsupervised
children.
•Do not use rough or abrasive materials or sharp metal scrapers to
clean the oven door glasses, as they can scratch the surface and cause
the glass toshatter.
•The oven must be switched off before removing the removable parts
and, aftercleaning,reassemble them according theinstructions.
•Only use themeatprobe recommendedforthis oven.
•Do not useasteam cleaner forcleaningoperations.
• Connect a plug to the supply cable that is able to bear the voltage,
current and load indicated on the tag and having the earth contact. The
socket must be suitable for the load indicated on the tag and must be
EN 02
Page 3

having the earth contact connected and in operation. The earth
conductor is yellow-green in colour. This operation should be carried
out by a suitably qualified professional. In case of incompatibility
between the socketand theappliance plug, aska qualifiedelectrician to
substitute the socket with another suitable type. The plug and the
socket must be conformed to the current norms of the installation
country. Connection to the power source can also be made by placing
an omnipolar breaker between the appliance and the power source
that can bear the maximum connected load and that is in line with
current legislation. The yellow-green earth cable should not be
interrupted by the breaker. The socket or omnipolar breaker used for
the connection should be easily accessible when the appliance is
installed.
•The disconnection maybe achievedby having the plug accessible or by
incorporating a switch in the fixed wiring in accordance with the wiring
rules.
•If the power cable is damaged, it must be substituted with a cable or
special bundle available from the manufacturer or by contacting the
customerservicedepartment.
•The type ofpowercable must be H05V2V2-F.
•Failure to comply with the above can compromise the safety of the
appliance and invalidatethe guarantee.
•Anyexcess of spilled materialshould be removedbeforecleaning.
•During the pyrolytic cleaning process, surfaces can heat up more than
usual, childrenmust thereforebe keptat a safedistance.
•The appliance must not be installed behind a decorative door in order
toavoidoverheating.
•When you place the shelf inside, make sure that the stop is directed
upwardsand in the back of the cavity.
The shelf mustbe inserted completelyinto the cavity
• WARNING: Do not linethe oven walls with aluminum foil or single-use
protectionavailable from stores.Aluminum foil or any other protection,
in direct contact with the hot enamel, riskmelting anddeteriorating the
enamel of theinsides.
• WARNING:Never removethe ovendoorseal.
EN 03
Page 4

Summary
General Instructions
5
Product Description
7
Use of the Oven
8
Oven Cleaning and Maintenance
11
1.1 Safety indications
1.2 Electrical safety
1.3 Recommendations
1.4 Installation
1.5 Waste management
1.6 Declaration of compliance
2.1 Overview
2.2 Accessories
2.3 First use
3.1 Display description
3.2 Cooking modes
4.1 General notes on cleaning
4.2 Hydro easy clean function
4.3 Maintenance
• Removal and cleaning of the side
racks
• Removal of the oven window
• Removal and cleaning of the glass
door
• Changing the bulb
Troubleshooting
14
5.1 F.A.Q.
EN 04
Page 5

1. General Instructions
We thank you for choosing one of ourproducts. Forthe
best results with your oven, you should read this
manual carefully and retain it for future reference.
Before installing the oven, take note of the serial
number so that you can give it to customer service staff
if any repairs are required. Having removed the oven
from itspackaging, check that it has not been damaged
during transportation. If you have doubts, do not use
the oven and refer to a qualified technician for advice.
Keep all of the packaging material (plastic bags,
polystyrene, nails) out of the reach of children. When
the oven is switched on for the first time, strong
smelling smoke can develop, which is caused by the glue on the insulation panelssurrounding the oven
heating for the first time. This is absolutely normal and, if it occurs, you should wait for the smoke to
dissipate before putting food in the oven. The manufacturer accepts no responsibility in cases where
the instructions containedin this documentarenot observed.
NOTE: the oven functions, properties and accessories cited in this manual will vary, depending on the
model you havepurchased.
1.1 Safety Indications
Only use the oven for its intended purpose, that is only for the cooking of foods; any other use, for
example as a heat source, is considered improper and therefore dangerous. The manufacturer cannot
be held responsiblefor anydamage resultingfromimproper,incorrector unreasonable usage.
The use ofanyelectricalappliance impliesthe observanceof some fundamental rules:
- do notpullon thepower cabletodisconnect the plugfromthe socket;
- do nottouchthe appliance withwetor damp handsor feet;
- in general the useofadaptors,multiple sockets and extensioncablesis not recommended;
- in caseof malfunctionand/or poor operation,switch off theappliance anddo not tamperwithit.
1.2 Electrical Safety
ENSURE THAT AN ELECTRICIAN ORQUALIFIED TECHNICIAN MAKESTHE ELECTRICAL CONNECTIONS.
The powersupply towhich the oven is connected must conform withthe laws in forcein the country of
installation.The manufacturer accepts noresponsibilityforany damage causedby thefailureto observe
these instructions. The oven must be connected to anelectrical supply with an earthed wall outlet or a
disconnector with multiple poles, depending on the laws in force in the country of installation. The
electrical supply should be protected with suitable fuses and the cables used must have a transverse
section that can ensure correctsupply to the oven.
CONNECTION
The ovenis suppliedwith a power cablethat shouldonly be connected toan electricalsupply with 220240 Vac 50 Hz power between the phases or between the phase and neutral. Before the oven is
connectedto the electricalsupply,it is importantto check:
- power voltageindicatedon the gauge;
- the settingof thedisconnector.
The groundingwire connected to theoven's earthterminal mustbe connectedto theearth terminal of
the power supply.
WARNING
Beforeconnectingthe oven to thepowersupply,aska qualifiedelectricianto check thecontinuity of the
power supply's earth terminal. The manufacturer accepts no responsibility for any accidents or other
problems caused byfailureto connect the ovento theearth terminal orby anearth connection thathas
defectivecontinuity.
EN 05
Page 6

NOTE: as theoven couldrequiremaintenance work, itis advisableto keep another wallsocketavailable
so that the oven can be connected to this if it is removed from the space in which it is installed. The
power cable must only be substituted by technical service staff or by technicians with equivalent
qualifications.
1.3 Recommendations
Aftereach useof theoven, a minimumofcleaning willhelp keepthe ovenperfectlyclean.
Do not linethe oven walls withaluminium foil orsingle-use protectionavailablefrom stores. Aluminium
foil or any other protection, in direct contact with the hot enamel, risks melting and deteriorating the
enamel of the insides. In order to prevent excessive dirtying of your oven and the resulting strong
smokey smells, we recommend not using the oven at very high temperature. It is better to extend the
cooking time and lower the temperature a little. In addition to the accessories supplied with the oven,
we advise you only usedishesand baking mouldsresistantto veryhigh temperatures.
1.4 Installation
The manufacturers have noobligationto carry thisout. Ifthe assistance ofthe manufacturer is required
to rectify faults arising from incorrect installation, this assistance is not covered by the guarantee. The
installation instructions for professionally qualified personnel must be followed. Incorrect installation
may cause harm or injury to people, animals or belongings. The manufacturer cannot be held
responsiblefor such harmor injury.
The oven can be located high in a column or under a worktop. Before fixing, you must ensure good
ventilation in the oven space to allow proper circulation of the fresh air required for cooling and
protectingthe internal parts.Make theopenings specifiedon last pageaccordingtothe type offitting.
1.5 Waste management and environmental protection
This appliance is labelled in accordance with European Directive 2012/19/EU regarding
electric and electronic appliances (WEEE). The WEEE contain both polluting substances
(that can have a negative effect on the environment) and base elements (that can be
reused). It isimportant that theWEEE undergo specifictreatments tocorrectlyremove and
dispose of the pollutants and recover all the materials. Individuals can play an important
role in ensuring that the WEEE do not become an environmental problem;it is essential to
followa few basicrules:
- the WEEEshouldnot be treatedas domesticwaste;
- the WEEE should be taken to dedicated collection areas managed by the town council ora registered
company.
In many countries, domestic collections may be available for large WEEEs. When you buy a new
appliance, the old one canbe returned to the vendorwho must accept it freeof charge as a one-off,as
long as theapplianceis of anequivalenttype and hasthesame functionsas thepurchased appliance.
SAVINGAND RESPECTINGTHE ENVIRONMENT
Where possible,avoid pre-heating the oven andalways try to fillit. Openthe ovendoor asinfrequently
as possible, because heat from the cavity disperses every time it is opened. For a significant energy
saving, switch off theoven between5 and 10 minutes before theplanned endof the cooking time, and
use the residualheat thatthe oven continuesto generate. Keep theseals cleanand in order, toavoidany
heat dispersal outside of the cavity. If you have an electric contract with an hourly tariff, the "delayed
cooking" programme makes energy saving more simple, moving the cooking process to start at the
reducedtariff time slot.
1.6 Declaration of compliance
The parts ofthis appliance thatmay comeintocontactwith foodstuffscomplywith the provisionsofEEC
Directive89/109.
By placing the mark on thisproduct,we are confirmingcompliance toall relevant European safety,
health and environmentalrequirementswhichare applicable inlegislationforthis product.
EN 06
Page 7
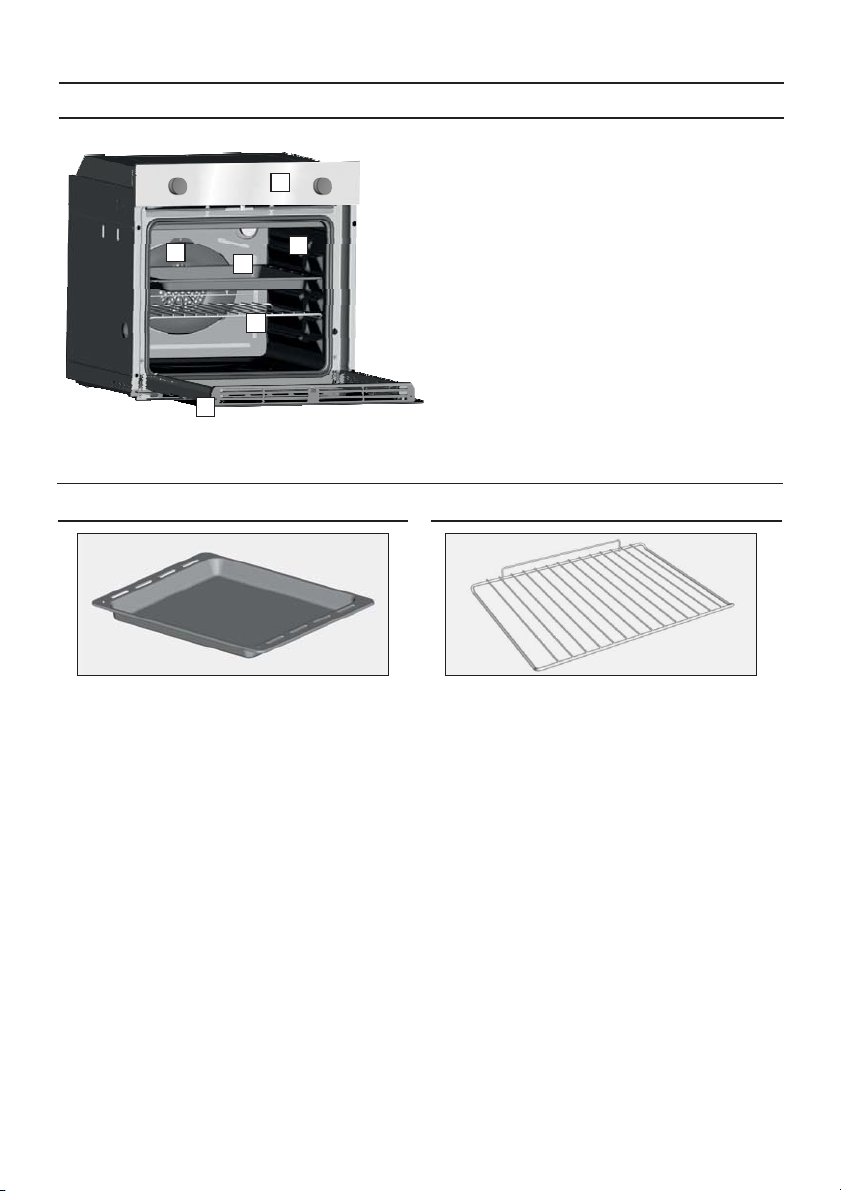
2. Product Description
2.1 Overview
1
5
6
2.2 Accessories
2
4
3
1. Control panel
2. Shelf positions
(lateral wire grid if included)
3. Metal grill
4. Drip pan
5. Fan (behind the steel plate)
6. Oven door
Drip pan
1
Collects the residuesthat dripduring the cooking
of foods on thegrills.
Metal grill
2
Holds baking trays and plates.
EN 07
Page 8

2.3 First Use
PRELIMINARYCLEANING
Clean theoven before using forthe first time. Wipeover external surfaces witha dampsoft cloth.Wash
all accessories and wipe inside the oven with a solution of hot water and washing up liquid. Set the
empty ovento themaximum temperature andleave onfor about1 hour, this will remove any lingering
smells of newness.
3. Use of the Oven
3.1 Display description
1. Minute minder
2. Clock setting
3. Cooking time
4. End of cooking
5. Temperature or clock display
6. LCD display adjustment controls
7. Thermostat selector knob
8. Function selector knob
MENU
WARNING: the first operationto carryout afterthe
oven has been installed or following the
interruption of power supply (this is recognizable
the display pulsating and showing ) is setting12:00
the correct time.This isachieved as follows.
•Pushthe centralbutton.
•Set time with"-" "+" buttons.
•Releaseall buttons.
ATTENTION: The ovenwill only operate providing the
clock is set.
8
EN 08
Page 9

FUNCTION HOW TO DEACTIVATE WHAT IT DOES WHY IT IS NEEDEDHOW TO USE
•Child Lock function is
activatedby touchingSet
(+) for a minimum of 5
KEY LOCK
MINUTE
MINDER
seconds. From this
moment on all other
function are locked and
the display will flash
STOP and preset time
intermittently.
•Push the central button
1 times
•Press the buttons "-"
"+"
to set the required time
•Release all the buttons
•Child Lock function is
deactivated by touching
touchpad Set(+) again for
a minimum of 5 seconds.
From this moment on all
functions are selectable
again.
•When the set time as
elapsed an audible
alarm is activated (this
alarm will stop on its
own, however it can be
stoppedimmediately by
pressing the button)
SELECT.
•Sounds an alarm at the
end of the set time.
•During the process, the
display shows the
remaining time.
•Allows to use the oven as
alarm clock (could be
activated either with
operating the oven or with
out operatingthe oven)
COOKING
TIME
END OF
COOKING
• Pushthe central button
2 times
• Pressthe buttons"-" or
"+"to set the lenght of
cookingrequired
• Release all buttons
•Setthecooking
function with the oven
function selector
•Push the central button
3 times •Press the
buttons "-" "+" to setthe
time at which you wish
the oven to switch off
•Releasethe buttons
•Set the cooking
function with the oven
function selector.
•Push any button to
stop thesignal. Push the
central button to return
to the clock
function.
•Atthetimeset,the
oven will switch off. To
switch off manually,
turn the oven function
selectorto position O.
• It allows to preset the
cooking time required for
the recipe chosen.
• To checkhow longis left
to run press the SELECT
button2 Times.
• To alter/change the
preset time press SELECT
and "-" "+" buttons.
•Enables you to set the
end of cooking time
•To check the preset
time push the central
button3 times
•To modify the preset
time press buttons
SELECT+ "-" "+"
•When the time is elapsed
the oven will switch off
automatically.
Should you wish to stop
cooking earlier either turn
the functionselector to0, or
set time to 0:00
(SELECTand "-" "+" buttons)
•This function is typically
used with “cooking time”
function.
For example if the dish has
to be cooked for 45 minutes
and needs to be ready by
12:30, simply select the
required function, set the
cooking time to 45 minutes
and the end of cooking time
to12:30.
•At the end of the cooking
set time, the oven will
switch off automatically and
an audible alarmwill ring.
•Cooking will start
automatically at 11:45
(12:30 minus 45 mins) and
will continue until the preset end-of-cooking-time,
when the oven will switch
itself off automatically.
WARNING.
If the END of cooking is
selected without setting the
length of cooking time, the
oven will start cooking
immediately and it will stop
at the END of cooking time
set.
EN 09
Page 10

3.2 Cooking Modes
Function
Dial
*
*
*Tested in accordance with the CENELEC EN 60350-1 used for definition of energy class.
T °C
default
40
180
210
220 50 ÷ 280
210
190 50 ÷ 230
L3
220 50 ÷ 230
T °C
range
40 ÷ 40
50 ÷ 240
50 ÷ 240
50 ÷ 230
L1 ÷ L5
Function (Depends on the oven model)
LAMP: Turns on the oven light.
DEFROST: When the dial is set to this position. The fan circulates air at room
temperature around the frozen food so that it defrosts in a few minutes
without the proteincontentof the foodbeing changed or altered.
FAN COOKING: We recommend you use this method for poultry, pastries, fish
and vegetables. Heat penetrates into thefoodbetter and boththe cookingand
preheating times are reduced. You can cook different foods at the same time
with or without the same preparation in one or more positions. This cooking
method gives even heat distribution and thesmells arenotmixed.
Allow about ten minutes extrawhen cooking foodsat the sametime.
CONVENTIONAL COOKING: Both top and bottom heating elements areused.
Preheat theoven for about ten minutes.This method isideal for all traditional
roastingand baking. For seizing redmeats, roastbeef,leg oflamb, game,bread,
foilwrapped food (papillotes), flakypastry. Placethe foodand its dishona shelf
in mid position.
FAN + LOWER ELEMENT: The bottom heating element is used with the fan
circulatingthe airinsidethe oven.This method is idealforjuicy fruitflans, tarts,
quiches and pâté.
It prevents food from drying and encourages rising in cakes, bread dough and
other bottom-cookedfood.
Place the shelfin thebottomposition.
The " " functionallows youto cook in a healthierway, byreducing theamount ofECO
fat or oil required. Thanks to the useof the grill and fan combined with a pulsating
cycle of air, it will retain the moisture content of the food, grilling the surface and
using a shortercooking time,without compromisingontaste.
It is particularly suitable for cooking meat, roasted vegetables and omelettes. The
cycle of pulsed air keeps the humidity inside the oven and the moisture content of
the food, preserving the nutritional values and ensuring a rapid uniform cooking
process.
Try all your recipes and reduce the amount of dressing you usually use and
experiencethe lightness ofthis newfunction!
GRILL: use thegrill withthedoor closed.
The top heating element is used alone and you can adjust the temperature. Five
minutes preheating is required to get the elements red-hot. Success is guaranteed
forgrills, kebabsand gratin dishes. Whitemeats shouldbe putat adistancefrom the
grill; the cooking time is longer, but the meat will be tastier. You can put red meats
and fish fillets on the shelf with the drip tray underneath. The oven has two grill
positions:
Grill: 2140 W Barbecue: 3340 W
PIZZA: Withthis function hotair circulated inthe oven to ensureperfectresult
fordishes such aspizza orcake.
EN 10
Page 11

4. Oven cleaning and maintenance
4.1 General notes on cleaning
The lifecycle ofthe appliance canbe extended through regular cleaning.Waitforthe oventocool before
carrying outmanual cleaningoperations. Never use abrasive detergents, steel woolor sharp objects for
cleaning, so as to not irreparably damage the enamelled parts. Use only water, soap or bleach-based
detergents(ammonia).
GLASS PARTS
It is advisable to clean the glass window with absorbent kitchen towel after every use of the oven. To
remove more obstinate stains, you can use a detergent-soaked sponge, well wrung out, and then rinse
with water.
OVENWINDOW SEAL
If dirty,the seal canbe cleanedwith a slightlydampsponge.
ACCESSORIES
Clean accessories with a wet, soapy sponge before rinsing and drying them: avoid using abrasive
detergents.
DRIP PAN
After using the grill, removethe pan fromthe oven. Pour thehot fat into acontainerand washthe pan in
hot water,using asponge andwashing-upliquid.
If greasy residuesremain, immersethe pan in water and detergent.Alternatively, youcan washthe pan
in the dishwasheror usea commercial oven detergent.Never put adirtypan backinto theoven.
4.2 Hydro Easy Clean Function
The HYDRO EASY CLEAN procedure uses steam to help remove remaining fat and food particles from
the oven.
1. Pour 300 ml of water into the HYDRO EASY CLEAN container at the bottom of the oven.
2. Set the oven function to Static ( ) or Bottom ( )heater
3. Set the temperature to the HYDRO EASY CLEAN icon
4. Allow the program to operate for 30 minutes.
5. After 30 minutes switch off the program and allow the oven to cool down.
6. When the appliance is cool, clean the inner surfaces of the oven with a cloth.
Warning
Make sure that the appliance is cool before you touch it.
Care must be taken with all hot surfaces as there is a risk of burns.
Use distilled or drinkable water.
MENU MENU
300 ml
EN 11
Page 12

4.3 Maintenance
REMOVALAND CLEANINGOF THE SIDERACKS
1. Unscrew thebolt inan anti-clockwise direction.
2. Remove the sideracksbypulling themtowards you.
3. Clean thesideracksin adishwasher orwith a wetsponge andthen dry themimmediately.
4. Having cleaned the side racks, put them back in and reinsert the bolts, ensuring that they are fully
tightened.
A
REMOVALOF THEOVEN WINDOW
1. Open thefrontwindow.
2. Openthe clampsof the hinge housing on the right andleft sideof the front windowby pushingthem
downwards.
3. Replace thewindow bycarryingout theprocedure inreverse.
EN 12
Page 13

LOW-E
REMOVALAND CLEANINGOF THE GLASSDOOR
1. Open theovendoor.
2.3.4. Lock thehinges,removethe screwsand removethe upper metalcoverbypulling itupwards.
5.6. Remove the glass, carefully extracting it from the oven door (NB: in pyrolytic ovens, also remove
the second andthird glass(if present)).
7. At the endof cleaning orsubstitution,reassemblethe parts inreverseorder.
On all glass, the indication "Low-E"must be legible and positioned on the left side of the door, close to
the left-hand lateralhinge. In thisway,the printed label ofthe first glass willbeinside thedoor.
1.
2.
3.
5.
6.
1
2
3
7.
4.
EN 13
Page 14
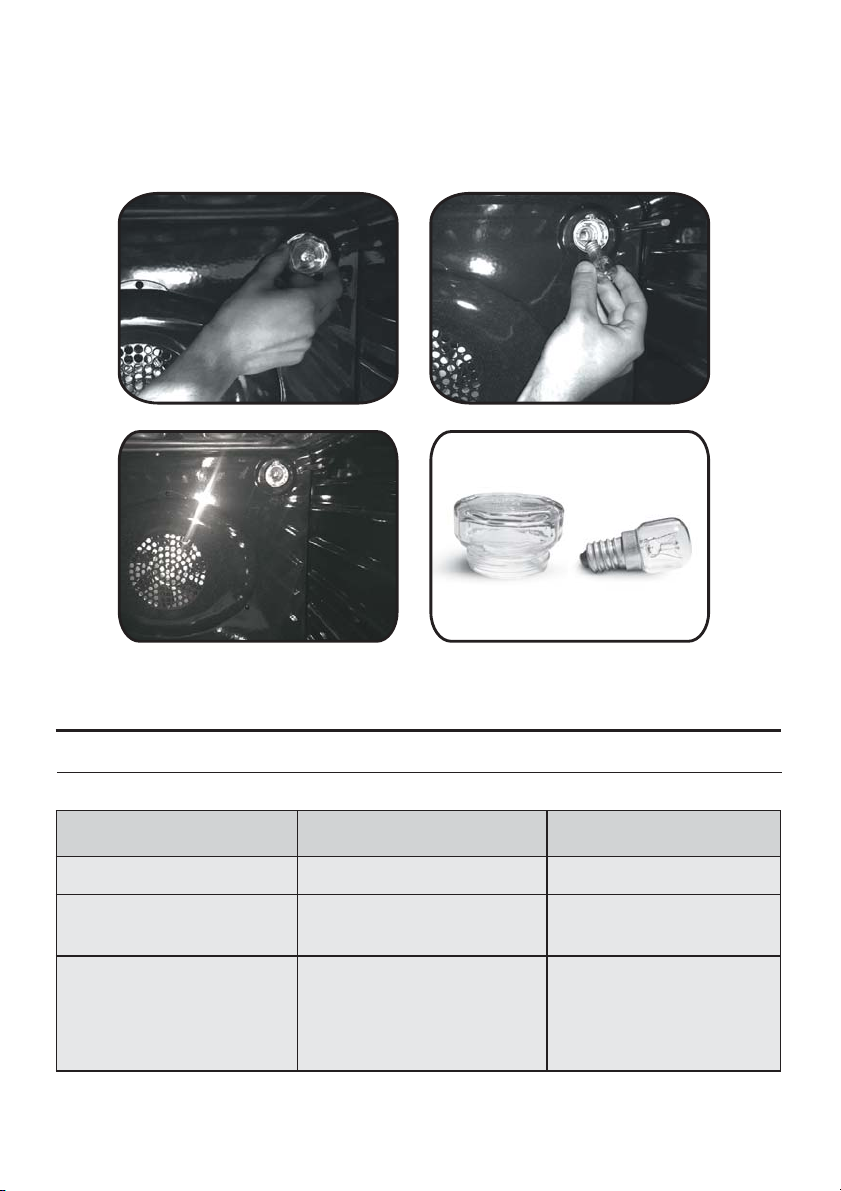
CHANGING THE BULB
1. Disconnect theoven fromthemains supply.
2. Undo theglasscover,unscrew the bulbandreplace it withanew bulbof thesame type.
3. Once thedefectivebulb isreplaced, replace theglass cover.
5. Troubleshooting
5.1 FAQ
PROBLEM POSSIBLE CAUSE SOLUTION
The oven does not heat up
The oven does not heat up
No reaction of the touch
user interface
The clock is not set Set the clock
A cooking function and
temperature has not been set
Steam and condensation on
the user interface panel
Ensure that the necessary
settings are correct
Clean with a microfiber
cloth the user interface
panel to remove the
condensation layer
EN 14
Page 15

INSTALLATION
INSTALLAZIONE
560 mm
EN
IT
Opening/ Açıklık/Apertura/
Otvor 460 mm x 15 mm
KURULUM
INSTALACE
TR
CZ
550 mm
560 mm
590 mm
500 mm x 10 mm
560 mm x 45 mm
GB
If the oven does not have a cooling fan, create an
opening 460 mm x 15 mm
IT
Se il forno non dispone di una ventola di
raffreddamento, lasciare uno spazio 460 mm x 15 mm
TR
Soğutma fanı yoksa bir açıklık oluşturun
460 mm x 15 mm
CZ
Pokud nemá trouba chladicí ventilátor, vytvořte otvor.
460 mm x 15 mm
580 mm
545 mm
22 mm
GB
If the furniture is equpped with a covarage at the back
part, provide an opening for the power supply cable.
IT
Se il mobile ha un fondo posteriore, praticare un foro per
il passaggio del cavo di alimentazione.
TR
Mobilyanın arka tarafında bir kaplama bulunuyorsa güç
kaynağı kablosu için bir delik açın.
CZ
Je-li nábytek v zadní části vybaven krytem, vytvořte otvor
pro napájecí kabel.
mm
600
560
595 mm
mm
560
mm
595 mm
Opening/ Açıklık/Apertura/
Otvor 560 mm x 45 mm
Opening/Apertura/Açıklık/
Otvor 560 mm x 45 mm
EN
The manufacturerwillnotbe responsibleforanyinaccuracyresulting fromprinting or transcripterrorscontained inthis brochure.We
reserve theright to carryout modifications toproducts as required,including theinterests of consumption, withoutprejudice to the
characteristicsrelating tosafetyor function.
IT
Il produttore declina ogniresponsabilità per inesattezze contenutenel documentostampato per errori di trascrizionecontenuti ino
questa brochure. Inoltre, si riserva il diritto di apportare modifiche al prodotto, nell'interesse dei consumatori, senza alcun
pregiudizioper la suasicurezza funzionalità.o
TR
Üretici bu kullanma kılavuzunda bulunan basım veya kopyalama hatalarından kaynaklanan herhangi bir yanlışlıktan sorumlu
olmayacaktır. Güvenlik veya işlevle ilgili özelliklere zarar vermeden tüketim istekleri dahil olmak üzere ürünlerde gerektiğinde
değişiklik yapma hakkımız mahfuzdur.
CZ
Výrobceneodpovídáza tiskovéchybyvnávodu.Vyhrazujemesi právona změny spotřebiče podlepotřeby,včetně údajů spotřeby, bez
vlivu nabezpečnost nebofunkci.
07.2017 • REV.0 • 42824275
Page 16

HOBS
USER INSTRUCTIONS
TABLES DE CUISSON
NOTICE D’EMPLOI
VARNÉ DESKY
NÁVOD POUŽITĺ
UND BEDIENUNGSANLEITUNG
INSTALLATIONS
ENCIMERAS
INSTRUCCIONES DE USO
INSTRUKCJE
UŻYCIA I MONTAŻU
ANKASTRE OCAK
KULLANIM KLAVUZU
ВАРОЧНЫЕ ПОВЕРХНОСТИ
ИНСТРУКЦИЯ ПОЛЬЗОВАТЕЛЯ
GB - IE
FR
CZ
DE
ES
PL
TR
RU
NAVODILA ZA UPORABO
VGRADNJO IN PRIKLJUČITEV
PIANI COTTURA
ISTRUZIONI PER L’USO
PLACAS
INSTRUÇÕES DE UTILIZAÇÃO
TŰZHELYLAPOK
HASZNÁLATI UTASÍTÁS
PLITE
MANUAL DE UTILIZARE
SL
IT
PT
HU
RO
CANDY HOOVER GROUP S.R.L. • Via Privata Eden Fumagalli • 20047 Brugherio Milano Italy
Page 17

CONTENT
GB - IE
CONTENU
FR
Safety Instuructions
1. Instructions For The Installer
1.1. Bulding In
1.2. Suitable Location
2. Electrical Connection (For U.K. Only)
2.1. Electrical Connection
2.2. Gas Connection (For U.K. Only)
2.3. Adapting The Hob To Different Types Of Gas
2.4. Regulating The Minimum Flame
3. Use Of Hob - User Instructions
3.1. Using The Gas Burner
3.2. Use Of Cooktop Electrical Plates
4. Maintenance and Cleaning
5. Aftercare
6. Protection Of The Environment
...................................................................................08
....................................................................05
..................................................06
................................................................................06
....................................................................06
....................................06
..............................................................06
..............................................06
..............................................07
...............................................07
.............................................................07
............................................07
......................................................08
..............................................08
OBSAH
Bezpečnostní Pokyny
1. Pokyny pro instalatéra
1.1 Vestavba
1.2 Vhodné místo instalace
2.1. Připojení k elektrické síti
2.2. Připojení plynu
2.3. Změna varné desky na jiný druh plynu
2.4. Nastavení minimálního plamene
3. Použití varné desky
3.1. Použití plynového hořáku
3.2. Použití Elektrických Ploten
4. Údržba a čištění
5. Servis
6. Ochrana životního prostředí
...................................................................................14
.........................................................................................16
..................................................................13
............................................................14
............................................................14
........................................................14
.........................................................................14
...................................15
.............................................15
.................................................................15
........................................................15
......................................................15
.......................................................................16
...................................................16
.........................07
CZ
Conseils De Sécurité
1. Installation
1.1 Encastrement
1.2. Caracteristiques Requises
2.1. Raccordement Electrique
2.2. Raccordement Gaz
2.3. Adapter La Table A Differents Types De Gaz
2.4. Reguler La Flamme Au Minimum
3. Utilisation De La Table
3.1. Using The Gas Burner
3.2. Manuel D'utilisation Des Pl Au Es Chauffantes Electriques
Sur Comptoirs
4. Maintenance Et Entretien
5. Assistance Technique
6. Protection De L'environnement
................................................................................10
................................................................................11
...................................................................09
..........................................................................10
......................................................10
........................................................10
.................................................................10
..........................11
...........................................11
.............................................................11
.............................................................11
........................................................12
..............................................................12
.............................................12
INHALT
Sicherheitsvorschriften
1. Installationsanweisung
1.1 Einbau
1.2. Geeigneter Standort
2.1. Elektrischer Anschluss
2.2. Gasanschluss
2.3. Umstellung Auf Eine Andere Gasar
2.4. Einstellen Der Gasmindestzufuhrt
3. Bedienungsanleitung
3.1. Inbetriebnahme Der Brenner
3.2. Benutzung Der Elektrischen Kochlatten
4. Wartung Und Reinigung
5. Technischer Kundendienst
6. Umweltgerechte Entsorgung
......................................................................................18
.........................................................................18
............................................................17
..........................................................18
...............................................................18
.............................................................18
........................................19
..........................................19
...............................................................19
..................................................19
......................................19
..........................................................20
.....................................................20
..................................................20
DE
CONTENIDO
Instrucciones Para Un Uso Seguro
1. Instrucciones Para El Instalador
1.1 Integración
1.2 Ubicación Ideal
2.1 Conexión Eléctrica
2.2 Conexión Del Gas
2.3 Adaptación De La Placa A Distintos Tipos De Gas
2.4 Regulación De La Llama Mínima
3. Utilización De La Placa Instrucciones Para El Usuario
3.1 Utilización Del Quemador De Gas
3.2. Uso De La Cocina De Las Placas Eléctricas
4. Mantenimiento Y Limpieza
5. Servicio Técnico
6. Protección Del Medioambiente
...............................................................................22
.........................................................................22
...................................................................22
...................................................................22
......................................................................24
............................................21
...........................................22
.................23
.............................................23
...........................................23
..........................23
.....................................................24
...............................................24
İÇİNDEKİLER
Güvenlik Uyarıları
1. Kurulum Talimatları
1.1. Ankastre Montaj
1.2. Uygun Yer Tespiti
2.1. Elektrik Bağlantısı
2.2. Gaz Bağlantısı
2.3. Ocağın Farklı Gaz Türlerine Uyarlanması
2.4. Minimum Alevin Ayarlanması
3. Ocak Kullanımı Kullanım Talimatları
3.1. Gazlı Ocak Gözlerinin Kullanımı
3.2. Elektrikli Isıtıcının Kullanımı
4. Bakim Ve Temizlik
5. Satış Sonrası Servis
6. Çevrenin Korunması
Garanti Belgesi
.....................................................................29
................................................................30
......................................................................30
....................................................................30
...................................................................30
.........................................................................30
..............................30
.................................................31
.....................................31
............................................31
.....................................................31
.................................................................32
...............................................................32
..............................................................32
............................................................................33
ES
........23
TR
SPIS TREŚCI
Instrukcje Bezpıieczeństwa
1. Instrukcje Dla Instalatora
1.1 Zabudowa
1.2 Odpowiednie Pomieszczenie
2.1 Podłączenie Do Sieci Elektrycznej
2.2 Podłączenie Do Gazu
2.3 Przystosowanie Płyty Do Różnych Rodzajów Gazu
2.4 Regulacja Płomienia Minimalnego
3. Użytkowanie Płyty - Instrukcje Dla Użytkownika
3.1 Używanie Palników Gazowych
3.2. Eksploatacja Kuchenek Z Płytami Elektrycznymi
4. Czyszczenie I Konserwacja
5. Obsługa Serwisowa
6. Ochrona Środowiska
................................................................................26
......................................................25
........................................................26
...................................................26
..........................................26
..............................................................26
...........................................27
..................27
................................................27
...................27
.....................................................28
.................................................................28
...............................................................28
СОДЕРЖАНИЕ
Правила Техники Безопасности
1. Инструкции по выполнению установки
1.1. Встраиваемые варочные поверхности
1.2. Выбор места для установки варочной поверхности
2. Подключение к электросети (только для Великобритании)
2.1. Подключение к электросети
2.2. Подключение к линии газоснабжения (только для Великобритании)
2.3. Адаптация варочной поверхности на другие типы газа
2.4. Регулировка минимального пламени
3. Инструкции по эксплуатации варочной поверхности
3.1 использование газовой конфорки
3.2. Руководство По Использованию Электрических Плит
4. Обслуживание и чистка
5. Послепродажное обслуживание
6. Защита окружающей среды
....................................................34
.....................................35
.........................................35
........................35
.........................................................35
...................36
............................................36
...................36
..................................................36
.........................36
..............................................................37
.................................................37
........................................................37
PL
...............27
RU
.........35
36
Page 18

C
A B
Bracket
Seal
accessible space
Min 10 mm
60 cm
Figure 2Figure 1
2
2
240 cm
Figure 3
Figure 5Figure 4
120 cm
180 cm
Sp.da 25 a 45 mm
2
2
INJECTOR
1/2 GAS
CONICAL
CYLINDRICAL
CONICAL
Figure 6
Figure 7
Figure 8
YES
Figure 10 Figure 11
04
Page 19

SAFETY INSTURUCTIONS
WARNING: The appliance and its accessible parts become hot during use. Care should be taken to avoid
touching heating elements.
• Children under 8 Year of age must be kept away from the appliance unless they are continuously
supervised.
• This appliance can be used by children aged from 8 years and above and persons with reduced
physical, sensory or mental capabilities or lack of experience and knowledge if they have been given
supervision or instruction concerning use of the appliance in a safe way and understand the hazards
involved.
• Children must not play with the appliance.
• Cleaning and user maintenance shall not be made by children without supervision
WARNING: Unattended cooking on a hob with fat or oil can be dangerous and may result in fire.
• NEVER try to extinguish a fire with water, but switch off the appliance and then cover flame e.g. with a lid
or a fire blanket.
WARNING: Danger of fire: do not store items on the cooking surfaces.
WARNING: If the surface is cracked, switch off the appliance to avoid the possibility of electric shock.
• Do not use a steam cleaner for cleaning operations.
• Any spillage should be removed from the lid before opening.
• The hob surface must be allowed to cool down before closing the lid.
• This appliance is not intended to be operated by means of an external timer or separate remote-control
system.
• The means for disconnection must be incorporated in the fixed wiring in accordance with the wiring
rules.
• The instructions state the type of cord to be used, taking into account the temperature of the rear surface
of the appliance.
• If the supply cord is damaged, it must be replaced by a special cord or assembly available from the
manufacturer or its service agent.
CAUTION: In order to avoid a hazard due to inadvertent resetting of the thermal cutout, this appliance
must not be supplied through an external switching device, such as a timer, or connected to a circuit that
is regularly switched on and off by the utility.
• This appliance must be installed in accordance with the regulations in force and only used in a well
ventilated space. Read the instructions before installing or using this appliance.
• "These instructions are only valid if the country symbol appears on the appliance. If the symbol does not
appear on the appliance, it is necessary to refer to the technical instructions which will provide the
necessary instructions concerning modification of the appliance to the conditions of use of the country".
• "Prior to installation, ensure that the local distribution conditions (nature of the gas and gas pressure)
and the adjustment of the appliance are compatible";
• "The adjustment conditions for this appliance are stated on the label (or data plate)";
• "This appliance is not connected to a combustion products evacuation device. It shall be installed and
connected in accordance with current installation regulations. Particular attention shall be given to the
relevant requirements regarding ventilation".
• The use of a gas cooking appliance results in the production of heat and moisture in the room in which it
is installed. Ensure that the kitchen is well ventilated: keep natural ventilation holes open or install a
mechanical ventilation device (mechanical extractor hood). Prolonged intensive use of the appliance
may call for additional ventilation, for example opening of a window, or more effective ventilation, for
example increasing the level of mechanical ventilation where present.
05 GB
Page 20

1. INSTRUCTIONS FOR THE INSTALLER
INSTALLING A DOMESTIC APPLIANCE CAN BE A COMPLICATED OPERATION WHICH IF NOT CARRIED OUT CORRECTLY, CAN SERIOUSLY
AFFECT CONSUMER SAFETY. IT IS FOR THIS REASON THAT THE TASK SHOULD BE UNDERTAKEN BY A PROFESSIONALLY QUALIFIED
PERSON WHO WILL CARRY IT OUT IN ACCORDANCE WITH THE TECHNICAL REGULATIONS IN FORCE. IN THE EVENT THAT THIS ADVICE IS
IGNORED AND THE INSTALLATION IS CARRIED OUT BY AN UNQUALIFIED PERSON, THE MANUFACTURER DECLINES ALL RESPONSIBILITY
FOR ANY TECHNICAL FAILURE OF THE PRODUCT WHETHER OR NOT IT RESULTS IN DAMAGE TO GOODS OR INJURY TO INDIVIDUALS.
1.1 BUILDING IN
The hob may be installed in any worktop which is heat resistant to a
temperature of 100°C, and has a thickness of 25-45 mm. The
dimensions of the insert to be cut out of the worktop are in shown in
Figure 2.
If the Hob is fitted next to a cabinet on either side, the distance
between the Hob and the cabinet must be at least 15 cm (see Figure
4); while the distance between the hob and the rear wall must be at
least 5,5 cm.
The distance between the hob and any other unit or appliance above it
(e.g. An extractor hood) must be no less than 70 cm (Figure 4).
When there is an accessible space between the built-in hob and the
cavity below, a dividing wall made of insulating material should be
inserted (wood or a similar material) (Figure 3).
Important - The diagram in figure 1 shows how the sealant should
be applied.
The Hob unit is fitted by attaching the Fixing Clamps supplied, using
the holes at the base of the unit.
If a hob of 60 cm is fitted above an oven which is not equipped with fan
cooling system it is recommended that openings are created within
the built in furniture to ensure correct air circulation.
The size of these openings must be at least 300 cm2 and placed as
shown in Figure 5.
When a 75 cm hob is fitted over a built in oven, the latter must be fan
cooled.
This appliance is not intended to be operated by means of an external
timer or separate remote-control system.
Brown Wire Live Connection
Note: We do not advocate the use of earth leakage devices with
electric cooking appliances installed to spur points because of the
«nuisance tripping» which may occur. You are again reminded that
the appliance must be correctly earthed, the manufacturer declines
any responsibility for any event occurring as a result of incorrect
electrical installation.
2.1. ELECTRICAL CONNECTION
Check the data on the rating plate, located on the outside of the unit, to
ensure that the supply and input voltage are suitable.
Before connection, check the earthing system.
By Law, this appliance must be earthed. If this regulation is not
complied with, the Manufacturer will not be responsible for any
damage caused to persons or property. If a plug is not already
attached, fit a plug appropriate to the load indicated on the rating plate.
The earth wire is coloured yellow/green. The plug should always be
accessible.
Where the Hob is connected direct to the electricity supply, a circuit
breaker must be fitted.
If the power supply cord is damaged this is to be replaced by a
qualified engineer so as to prevent any potential risk.
The earth wire ( green and yellow coloured ) must be at least 10 mm
longer than the live and neutral wires.
The section of the cable used must be of the correct size in relation to
the absorbed power of the hob.
Please check rating plate for the power details and ensure that the
power supply cord is of the type 3x0.75 mm² H05RR-F.
1.2. SUITABLE LOCATION
This appliance must be installed in accordance with the regulations in
force and only used in a well ventilated space. Read the instructions
before installing or using this appliance.
A gas-powered cooking appliance produces heat and humidity in the
area in which it is installed. For this reason you should ensure good
ventilation either by keeping all natural air passages open or by
installing an extractor hood with an exhaust flue. Intensive and
prolonged use of the appliance may require extra ventilation, such as
the opening of a window or an increase in speed of the electric fan, if
you have one.
If a hood can not be installed, an electric fan should be fitted to an
outside wall or window to ensure that there is adequate ventilation.
The electric fan should be able to carry out a complete change of air in
the kitchen 3-5 times every hour. The installer should follow the
relevant national standards.
2. ELECTRICAL CONNECTION (FOR U.K. ONLY)
Warning - this appliance must be earthed
This appliance is designed for domestic use only. Connection to the
main supply must be made by a competant electrician, ensuring that
all current regulations concerning such installations are observed.
The appliance must only be connected to a suitably rated spur point, a
3 pin 13 amp plug/socket is not suitable. A double pole switch must be
provided and the circuit must have appropriate fuse protection.
Further details of the power requirement of the individual product will
be found in the users’ instruction and on the appliance rating plate. In
the case of built-in product you are advised, should you wish to use a
longer cable than the one supplied, that a suitably rated heat resistant
type must be used.
The wiring must be connected to the mains supply as follows:
CONNECT TO SPUR TERMINAL
Green & Yellow Wire Earth Connection
Blue Wire Neutral Connection
LIVE
Mains Supply
If an appliance is not fitted with a supply cord and a plug, or with other
means for disconnection from the supply mains having a contact
separation in all poles that provide full disconnection under
overvoltage category III conditions, the instructions shall state that
means for disconnection must be incorporated in the fixed wiring in
accordance with the wiring rules.
EARTH
NEUTRALLN
Brown Wire
Green/Yellow Wire
Blue Wire
Power Cable
2.2. GAS CONNECTION
These instructions are for qualified personnel, installation of
equipment must be in line with the relevant national standard. (For
U.K. only: by law the gas installation\commissioning must be
carried out by a "Gas Safe" installer)
All work must be carried out with the electricity supply disconnected.
The rating plate on the hob shows the type of gas with which it is
designed to be used. Connection to the mains gas supply or gas
cylinder should be carried out after having checked that it is regulated
for the type of gas with which it will be supplied. If it is not correctly
regulated see the instructions in the following paragraphs to change
gas setting.
For liquid gas (cylinder gas) use pressure regulators which comply
with the relevant national standards.
Use only pipes,washers and sealing washers which comply with the
relevant national standards.
For some models a conic link is furnished to outfit for the installation in
the countries where this type of link is obligatory; in picture 8 it is
pointed out how to recognize the different types of links (CY =
cylindrical, CO = conic). In every case the cylindrical part of the link
has to be connected to the hob.
When connecting the hob to the gas supply via use offlexible hoses
please ensure that the maximum distance covered by the hose does
not exceed 2 metres.
06 GB
Page 21

The flexible tube shall be fitted in such a way that it cannot come into
contact with a moveable part of the housing unit (e.g. a drawer) and
does not pass through any space where it may become crushed/
kinked or damaged in any way.
To prevent any potential damage to the hob please carry out the
installation following this sequence (picture 6):
1)As illustrated, assemble parts in sequence:
A: 1/2 Male Adaptor Cylindirical
B: 1/2 Seal
C: 1/2 Female Gas Adaptor Conical-Cylindirical or
Cylindirical-Cylindirical
2)Tighten the joints with the spanner, remembering to twist the
pipes into position.
3)Attach fitting C to mains gas supply using rigid copper pipe or
flexible steel pipe.
IMPORTANT: carry out a final check for leaks on the pipe
connections using a soapy solution. NEVER USE A FLAME. Also,
make sure that the flexible pipe cannot come into contact with a
moving part of the cabinet (eg.adrawer) and that it is not situated
where it could be damaged.
Warning: If gas can be smelt in the vicinity of this appliance turn off the
gas supply to the appliance and call the engineer directly. Do not
search for a leak with a naked flame.
For models fitted with a safety tap (which cuts-off the flow of gas if the
flame is accidentally extinguished) the burners are ignited and
described above, but care must be taken.
Prior to switching on the gas hob ensure that the burners and burner
caps are correctly placed within their position.
GENERAL ADVISE
For best results, use cooking vessels with a flat surface. The size of
the surface should match the gas burner side as follows. Table A.
Burner Type
AUX
Auxiliary Burner
SR
Semi Rapid Burner
R
Rapid Burner
Ø pan / pot
(cm)
12 - 18
18 - 24
24 - 26
Power
(kW)
1
1,7
2,7
G20/20 mbar
(Methane)
95 I/h
162 I/h
257 I/h
G30/28-30 mbar
(LPG)
73 g/h
124 g/h
196 g/h
Table A
For smaller containers the gas burner should be regulated so that the
flame does not overlap the base of the pan. Vessels with a concave or
convex base should not be used.
WARNING: If a flame is accidentally extinguished, turn the knob
to the off position and do not attempt to re-ignite if for at least 1
minute.
If over the years the gas taps become stiff to turn it is necessary to
lubricate them.
Such operation must be carried out only by qualified Service
Engineers.
2.3. ADAPTING THE HOB TO DIFFERENT
TYPES OF GAS
To adapt the Hob for use with different types of gas, carry out the
following instructions:
•remove the grids and burners
•insert on hexagonal spanner (7 mm) into the burner support (Figure
7)
•Unscrew the injector and replace it with one suitable for the gas to be
used (see gas type table)
2.4. REGULATING THE MINIMUM FLAME
After lighting the burners, turn the control knob to the minimum setting
and then remove the knob (this can easily be removed by applying
gentle pressure).
Using a small «Terminal» type screwdriver the regulating screw can
be adjusted as in Figure 9. Turning the screw clockwise reduces the
gas flow, whilst turning it anticlockwise increases the flow – Use this
adjustment to obtain a flame of approximately 3 to 4 mm in length and
then replace the control knob.
When the gas supply available is LPG - the screw to set the idle flame
must be turned (clockwise) to the end stop.
When you have carried out the new gas regulation, replace the old gas
rating plate on your appliance with one (supplied with hob) suitable for
the type of gas for which it has been regulated.
3. USE OF HOB - USER INSTRUCTIONS
This appliance must only be used for the purpose for which it is
intended, domestic cooking, and any other use will be considered
improper and could therefore be dangerous. The Manufacturer will
not be responsible for any damage or loss resulting from improper
use.
3.1. USING THE GAS BURNER
To ignite the burners, place a lighted taper close to the burner, press in
and turn the control knob anti-clockwise.
If the burners have not been used for a couple of days, wait for a few
seconds before lighting the burner, this will allow any air present in the
pipes to escape.
For appliances fitted with electronic ignition carry out the following:
• push in and turn the knob anticlockwise to the ignition symbol.
• ignite the burner by pressing the sparker button.
For hobs fitted with automatic ignition simply push in and turn the knob
to the ignition symbol.
The ignition system will continue to generate sparks as long as the
control knob is being pressed.
If the burner has not ignited within 5 seconds, turn the knob to the 0
position and repeat the operation.
3.2. USE OF COOKTOP ELECTRICAL PLATES
Turn the knob to the position for the required temperature of the hot plate.
The indicator light of the hot plate will come on and the hot plate will start to
heat.
When cooking is completed, turn the knob to the “ O” position. (Figure 10).
Do not leave the hot plate turned on without a pan on it. The diameter and
the base of the pan you use is critical. The maximum diameter of the pan
base is 14 cm and the base should be flat.
Leave the hot plate to heat up for 5 minutes before placing a pan on it the
first time you use it. This will allow the heat resistant coating of the plate to
harden due to burning.
Use a wet cloth and detergent for cleaning the hot plates. Do not remove
food residues from the hot plates with a knife or any other hard, sharp
object.
Turn on the hot plate for a few moments to dry it after cleaning. However, it
must never be left on for more than a few moments without a pan on top.
Power (Watt)
0
135 W
220 W
300 W
850 W
1150 W
1500 W
0
1
2
3
4
5
6
Power (Watt)
0
100 W
180 W
250 W
500 W
750 W
1000 W
Position
Suitability of Cooking Pans (Figure 11)
Keep in mind that larger pans have larger heating surfaces.
This will help them to cook the food faster than pans with smaller heating
surfaces.
Always use pan sizes proportionate to the amount of the food to be
cooked. In order to prevent splashing, do not use very small pans,
especially for foods with excess liquid. If you use excessively large pans
for quick cooked foods, sausages and liquids will stick and residues will
remain attached to the pan after being emptied.
Closed pans and baking trays or moulds are suggested for cooking
sweets. Splashed sugar and juices from an open pan may stick to the
cooker surface and will be difficult to remove.
This is especially important for pans used for roasting or pressurized
cooking at high temperature.
Do not leave burners unattended without a pan or with an empty pan on
top.
Check the suitability of cooking pans with respect to the following criteria;
They should be heavy.
They should completely cover the burner surface; they may be a little
bigger but no smaller.
Base surfaces should be completely flat and fit well on the cooking
surface.
•For the best use of the electric hotplates and to minimize energy
consumption, only pans with smooth flat bases should be used. The size of
the pan should be as close as possible to the diameter of the hotplate, and
never smaller. The base of the pan should be dry and spillage should be
avoided. Empty pans must not be left on the plates, and the plates should
not be left switched on without a pan.
07 GB
Explanation
Off
Heating
Cooking at low temperature
Cooking at low temperature
Cooking, Roasting, Boiling
Cooking, Roasting, Boiling
Cooking, Roasting, Boiling
Page 22

4. MAINTENANCE AND CLEANING
6. PROTECTION OF THE ENVIRONMENT
Before cleaning the hob, ensure the appliance has cooled down.
Remove the plug from the socket or (if connected directly) switch off
the electricity supply.
Cleaning and user maintenance shall not be made by children without
supervision.
Never use abrasives, corrosive detergents, bleaching agents or
acids. Avoid any acid or alkaline substances (lemon, juice, vinegar
etc.) on the enamelled, varnished or stainless steel sections.
When cleaning the enamelled, varnished or chrome sections, use
warm soapy water or a non caustic detergent. For stainless steel use
an appropriate cleaning solution.
The burners can be cleaned with soapy water. To restore their original
shine, use a household stainless steel cleaner. After cleaning, dry the
burners and replace.
It is important the Burners are replaced correctly.
Chromed grids and burners
Chromed grids and burners have a tendency to discolour with use.
This does not jeopardize the functionality of the hob.
Our After Sales Service Centre can provide spare parts if required.
5. AFTERCARE
Before calling out a Service Engineer please check the following:
• that the plug is correctly inserted and fused;
• that the gas supply is not faulty.
If the fault cannot be detected:
Switch off the appliance and call the After Service Centre. DO NOT
TAMPER WITH THE APPLIANCE.
This appliance is marked according to the European
directive 2012/19/EU on Waste Electrical and
Electronic Equipment (WEEE). WEEE contains both
polluting substances (which can cause negative
consequences for the environment) and basic
components (which can be re-used). It is important to
have WEEE subjected to specific treatments, in order
to remove and dispose properly all pollutants, and
recover and recycle all materials.
Individuals can play an important role in ensuring that WEEE does not
become an environmental issue; it is essential to follow some basic
rules:
• WEEE shall not be treated as household waste.
• WEEE shall be handed over to the relevant collection points
managed by the municipality or by registered companies. In many
countries, for large WEEE, home collection could be present.
• When you buy a new appliance, the old one may be returned to the
retailer who has to collect it free of charge on a one-to-one basis, as
long as the equipment is of equivalent type and has the same
functions as the supplied equipment.
Declaration of compliance: This equipment, in the parts intended to
come into contact with food, complies with the regulations laid down in
EEC directives 89/109.
Appliance complies with European Directives 2006/95/EC,
2004/108/EC and 2009/142/EC, and subsequent
amendments.
The Manufacturer will not be responsible for any inaccuracy resulting from
printing or transcript errors contained in this brochure. We reserve the right
to carry out modifications to products as required, including the interests of
consumption, without prejiudice to the characteristics relating to safety or
function.
BUILT IN HOBS
1
Burner
Type / reference
Flame failure device
Auxiliary burner ( AUX Ø 50 mm)
Electric Plate
Semirapid burner ( SR Ø 75 mm)
Rapid burner ( R Ø 100 mm)
Installed Gas Type / Power:
Gas Power
G 20/20 mbar (methane)
G 30/28-30 mbar (LPG)
Installation Class
Voltage / Frequency V / Hz
Electrical input power
Electric ignition
Product dimension
This appliance has been designed for non-professional, i.e. domestic, use.
4 gas
R /2SR / AUX
S60 / HBGS
YES
1
2
1
7.1 kW
676 l/h
516 g/h
3
220-240 V / 50-60 Hz
15 W
YES
585 x 510
Table 1
2
3 gas
R / SR / AUX / E
S60 / HBGS
YES
1
1
1
1
5.4 kW
514 l/h
393 g/h
3
220-240 V / 50-60 Hz
1500 W
YES
585 x 510
08 GB
Page 23
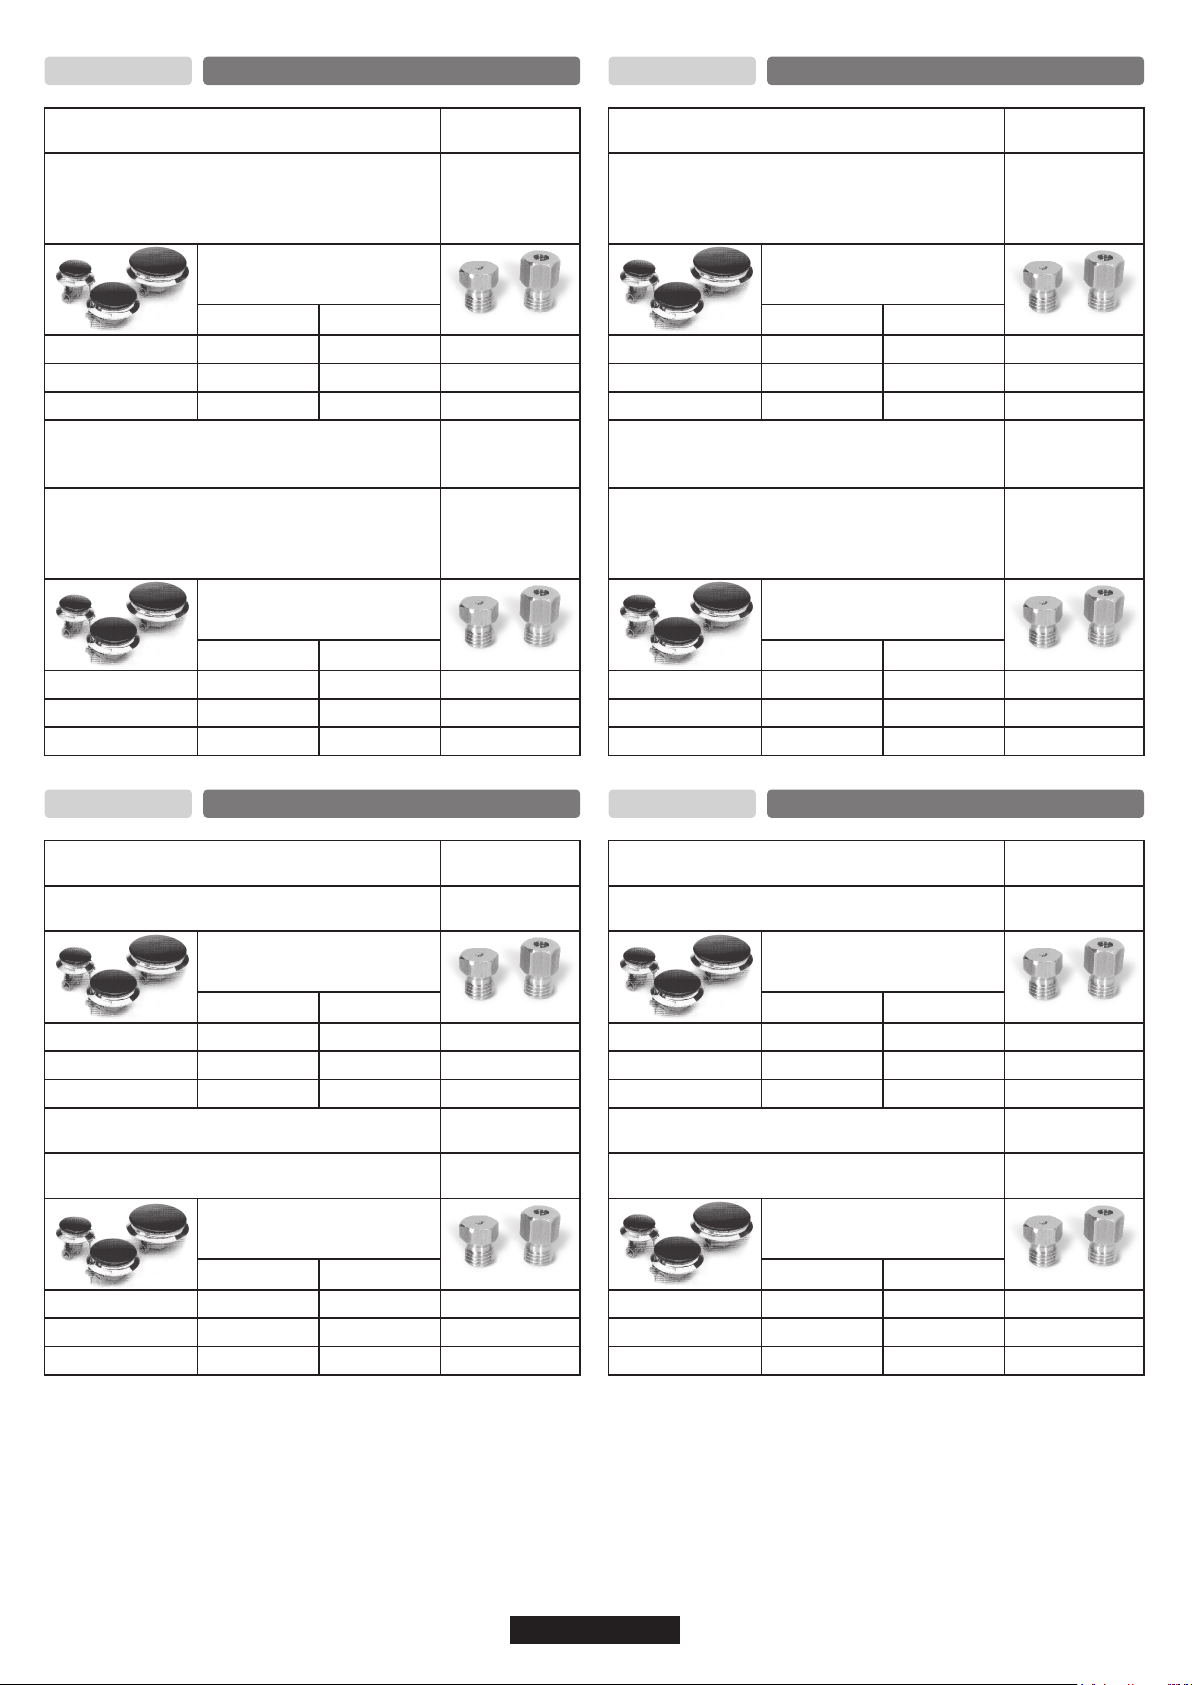
II 2H3+
CY, CZ, GB, GR, IE, IT, PT, SI, ES, CH,TR
II 2H3B/P
BG, HR, DK, EE, FI, LV, LT, NO, RO, SK, SE
Tipo di gas/Gas type/Gassoort/Gasart/Type de gaz
Tipo de gás/Tύттоς αερіоυ/Gaz type/Gaz Tipi
Pressione gas/Gas pressure/Pression gaz/
Gasdruck/Presion gas/Πίεση του αερίου/
Pressão gás/Tlak plina/Ciśnienie gazu/
Gáz nyomása/Gaz Basıncı
P (Kw)
Max (kW)
A
SR
R
Tipo di gas/Gas type/Gassoort/Gasart/Type de gaz/
Tipo de gás/Tύттоς αερіоυ/Tipo de gás/Gaz type/
Vrsta plina/Pritisk plina/Typ gazu/Rodzaj gazu
Pressione gas/Gas pressure/Pression gaz/
Gasdruck/Presion gas/Πίεση του αερίου/
Pressão gás/Tlak gasa/Tlak plina/Ciśnienie gazu/
1.00
1.70
2.70
Gáz nyomása
Min (kW)
0.60
0.85
1.20
P (Kw)
A
SR
R
Max (kW)
1.00
1.70
2.70
Min (kW)
0.60
0.85
1.20
G20
20 mbar
Tipo di gas/Gas type/Gassoort/Gasart/
Type de gaz/Tipo de gás/Tύттоς αερіоυ/Gaz type
Pressione gas/Gas pressure/Pression gaz/
Gasdruck/Presion gas/Πίεση του αερίου/
Pressão gás/Tlak gasa/Tlak plina/Ciśnienie gazu/
Gáz nyomása
P (Kw)
0.83
1.00
1.20
G30 / G31
28-30/37 mbar
Max (kW)
A
SR
R
Tipo di gas/Gas type/Gassoort/Gasart/Type de gaz/
Tipo de gás/Tύттоς αερіоυ/Tipo de gás/Gaz type/
Vrsta plina/Pritisk plina/Typ gazu/Rodzaj gazu
Pressione gas/Gas pressure/Pression gaz/
Gasdruck/Presion gas/Πίεση του αερίου/
Pressão gás/Tlak gasa/Tlak plina/Ciśnienie gazu/
1.00
1.70
2.70
Gáz nyomása
Min (kW)
0.60
0.85
1.20
P (Kw)
Ø mm Ø mm
0.50
0.65
0.85
A
SR
R
Max (kW)
1.00
1.70
2.70
Min (kW)
0.60
0.85
1.20
G20
20 mbar
Ø mmØ mm
0.83
1.00
1.20
G30 / G31
30/30 mbar
0.50
0.65
0.85
II 2L 3B/P
Tipo di gas/Gas type/Gassoort/Gasart/Type de gaz
Pressione gas/Gas pressure/Pression gaz/
Gasdruck/Presion gas
NL
P (Kw)
Max (kW)
A
SR
R
Tipo di gas/Gas type/Gassoort/Gasart/Type de gaz
Pressione gas/Gas pressure/Pression gaz/
Gasdruck/Presion gas
1.00
1.70
2.70
Min (kW)
0.60
0.85
1.20
P (Kw)
A
SR
R
Max (kW)
1.00
1.70
2.70
Min (kW)
0.60
0.85
1.20
G25
25 mbar
Ø mm
0.83
1.00
1.20
G30 / G31
30/30 mbar
0.50
0.65
0.85
II 2E 3B/P
Tipo di gas/Gas type/Gassoort/Gasart/Type de gaz
Pressione gas/Gas pressure/Pression gaz/
Gasdruck/Presion gas
DE
P (Kw)
Max (kW)
A
SR
R
Tipo di gas/Gas type/Gassoort/Gasart/Type de gaz
Pressione gas/Gas pressure/Pression gaz/
Gasdruck/Presion gas
1.00
1.70
2.70
Min (kW)
0.60
0.85
1.20
P (Kw)
A
SR
R
Max (kW)
1.00
1.70
2.70
Min (kW)
0.60
0.85
1.20
G20
20 mbar
Ø mm
0.83
1.00
1.20
G30 / G31
50/50 mbar
Ø mmØ mm
0.45
0.60
0.70
Wichtig: Österreich, Deutschland und der Schweiz - AT, DE, CH G30/31 - 50
mbar (3B/P) Beim Gastyp G30/31 - 50 mbar (3B/P) dagegen müssen die
Gasdüsen Art.-Nr. 35000230 benutzt werden. Bitte bestellen Sie die
entsprechenden Gasdüsensätze bei unserem autorisierten Werkskundendienst.
60
Page 24

II 2E+3+
FR, BE
II2H 3B/P
AT, CH
Tipo di gas/Gas type/Gassoort/Gasart/
Type de gaz/Tipo de gás/Tύттоς αερіоυ/Gaz type
Pressione gas/Gas pressure/Pression gaz/
Gasdruck/Presion gas/Πίεση του αερίου/
Pressão gás/Tlak gasa/Tlak plina/Ciśnienie gazu/
Gáz nyomása
P (Kw)
Max (kW)
A
SR
R
Tipo di gas/Gas type/Gassoort/Gasart/
Type de gaz/Tipo de gás/Tύттоς αερіоυ/Gaz type
Pressione gas/Gas pressure/Pression gaz/
Gasdruck/Presion gas/Πίεση του αερίου/
Pressão gás/Tlak gasa/Tlak plina/Ciśnienie gazu/
1.00
1.70
2.70
Gáz nyomása
Min (kW)
0.60
0.85
1.20
P (Kw)
Max (kW)
A
SR
R
Tipo di gas/Gas type/Gassoort/Gasart/Type de gaz/
Tipo de gás/Tύттоς αερіоυ/Tipo de gás/Gaz type/
Vrsta plina/Pritisk plina/Typ gazu/Rodzaj gazu
Pressione gas/Gas pressure/Pression gaz/
Gasdruck/Presion gas/Πίεση του αερίου/
Pressão gás/Tlak gasa/Tlak plina/Ciśnienie gazu/
1.00
1.70
2.70
Gáz nyomása
Min (kW)
0.60
0.85
1.20
G20
20 mbar
Ø mm
0.83
1.00
1.20
G25
25 mbar
Ø mm
0.83
1.00
1.20
G30 / G31
28-30/37 mbar
Tipo di gas/Gas type/Gassoort/Gasart/Type de gaz
Pressione gas/Gas pressure/Pression gaz/
Gasdruck/Presion gas
G20
20 mbar
P (Kw)
Max (kW)
A
SR
R
Tipo di gas/Gas type/Gassoort/Gasart/Type de gaz
Pressione gas/Gas pressure/Pression gaz/
Gasdruck/Presion gas
1.00
1.70
2.70
Min (kW)
0.60
0.85
1.20
Ø mm
0.83
1.00
1.20
G30 / G31
50/50 mbar
P (Kw)
Max (kW)
A
SR
R
Wichtig: Österreich, Deutschland und der Schweiz - AT, DE, CH G30/31 - 50
mbar (3B/P) Beim Gastyp G30/31 - 50 mbar (3B/P) dagegen müssen die
Gasdüsen Art.-Nr. 35000230 benutzt werden. Bitte bestellen Sie die
entsprechenden Gasdüsensätze bei unserem autorisierten Werkskundendienst.
Remarque: Autriche, Allemagne et Suisse - AT, DE, CH G30/31 - 50 mbar (3B/P)
Si le gaz utilisé est de type G30/31 - 50 mbar (3B/P), vous pouvez utiliser le jeu
d’injecteurs 35000230. Merci de vous rapprocher du service approprié pour
obtenir le jeu d’injecteurs.
Nota: Austria, Germania, Svizzera - AT, DE, CHG30/31 - 50 mbar(3B/P) Se
dovete installare il gas G30/31 - 50 mbar (3B/P), va utilizzato il il set di iniettori di
cui al codice 35000230. Prego richiedere il set di iniettori al servizio assistenza
autorizzato.
1.00
1.70
2.70
Min (kW)
0.60
0.85
1.20
Ø mm
0.45
0.60
0.70
A
SR
R
Max (kW)
1.00
1.70
2.70
P (Kw)
Min (kW)
0.60
0.85
1.20
Ø mm
0.50
0.65
0.85
61
Page 25

GB - IE
The manufacturer will not be responsible for any inaccuracy resulting from printing or transcript errors contained in this brochure. We reserve the right
to carry out modifications to products as required, including the interests of con sumption, without prejudice to the characteri stics relating to safety or
function.
FR
Le constructeur décline toute responsabilité concernant d'éventuelles inexacitudes imputables à des erreurs d'impression ou de transcription contenue dans
cette notice. Le constructeur se réserve le droit de modifier les produits en cas de nécessité, même dans l'intérêt de l'utilisation, sans causer de préjudices
aux caractéristiques de fonctionnement de sécurité des appareils.
CZ
Výrobce nezodpovídá za nepřesnosti obsažené v této příručce vzniklé při tisku nebo překladu. Vyhrazujeme se právo provádět úpravy výrobku podle
potřeby, aniž by byly dotčeny charakteristiky vztahující se k bezpečnosti nebo provozu.
DE
Der Hersteller übernimmt keine Haftung für eventuelle Druck- oder Übersetzungsfehler dieser Bedienungsanleitung. Der Hersteller behält sich vor
technische Änderungen zurVerbesserung der Produktqualität im Interesse des Endverbrauchers vorzunehmen.
ES
La empresa constructora declina toda responsabilidad derivada de eventuales errores de impresión contenidos en el presente libro. Se reserva además el
derecho de realizar las modificaciones que se consideren útiles a los productos sin comprometer las características esencial es.
PL
Producent nie będzie ponosić odpowiedzialności za jakiekolwiek niedokładności wynikające z druku lub błędЧw tłumaczenia występujące w niniejszej
broszurze. Zastrzegamy sobie prawo do wprowadzania modyfikacji produktu zgodnie z potrzebami, w tym w interesie konsumenta, bez szkЧd dla
charakterystyk dotyczących bezpieczeństwa lub działania.
TR
Üretici, bu klavuzda meydana gelecek baskı hatalarından sorumlu değildir. Üretici gerekli olması durumunda ürünün emniyet ve işlevine ilişkin olmamak
kaydıyla üründe değişiklik yapma hakkını saklı tutar.
RU
Производитель не несет ответственности за опечатки и неточности, которые могут встретиться в данной инструкции. Мы оставляем за собой право
вносить изменения в конструкцию выпускаемых нами изделий с целью улучшения качества выпускаемой продукции. При этом основные функции
изделия и его безопасность будут оставаться неизменными.
SL
Proizvajalec ni odgovoren za napake v tej knjižici, ki bi nastale ob tisku ali prepisu. Pridržujemo si pravico izvajanja potrebnih sprememb na izdelku, tudi tistih,
ki se nanašajo na porabo, brez škode za varnost in funkcionalnost naprave.
IT
La Ditta costruttrice declina ogni responsabilità per eventuali errori di stampa contenuti nel presente libretto. Si riserva inoltre il diritto di apportare le modifiche
che si renderanno utili ai propri prodotti senza compromettere le caratteristiche essenziali.
PT
O fabricante não será responsável por quaisquer imprecisões resultantes de impressão ou transcrição de erros contidos na presente brochura.
Reservamo-nos ao direito de efectuar alterações aos produtos, conforme necessário, incluindo as taxas de consumo, sem prejuízo das características
relacionadas com a segurança ou funcionamento.
HU
A gyártó nem vállal felelősséget az ebben a kiadványban előforduló nyomtatási és elírási hibákból eredő pontatlanságokért. A biztonsággal vagy a
működéssel kapcsolatos jellemzők sérelme nélkül fenntartjuk a jogot a termékek szükség szerinti változtatására.
RO
Producătorul nu se face responsabil pentru erorile de printare din acest manual. Ne rezervăm dreptul de a realiza modificări asupra produselor fără a afecta
caracteristicile privind siguranţa sau funcţionarea. Versiunea în limba engleză este de referinţă.
04.2015 • REV:B • 42810851
 Loading...