

Page 1
IMPORTANT Safety Reminders
Contents
User Guide
Please read carefully before use
Your Hoover Guarantee
Hoover Candy Group
Pentrebach : Merthyr Tydfil : Mid Glamorgan CF48 4TU 0565-5222
This cleaner should only be used for domestic cleaning as described in this User Guide.
Please ensure that this guide is fully understood before operating the appliance.
WARNING: Electricity can be extremely dangerous. This appliance is double insulated, and must
not be earthed. The plug is fitted with a 13 Amp fuse.
IMPORTANT: The wires in the mains lead are coloured in accordance with the following code:
BLUE – Neutral; BROWN – Live
STATIC ELECTRICITY: some carpets can cause a small build up of static electricity. Any static
discharge is not hazardous to health.
REMEMBER:
• When using cleaning tools ensure that the cleaner is kept in the upright (parked) position.
This will avoid possible damage to the carpet, floor or floor covering
• Keep hands, feet, loose clothing and hair away from rotating brushes
• After use, switch the cleaner off and remove the plug from the electricity supply. Always switch
off and remove the plug before cleaning the appliance or attempting any maintenance task
DO NOT:
• Position the cleaner above you when cleaning stairs
• Use your cleaner out of doors, on wet surfaces or for wet pick-up
• Pick up matches, hot ash, cigarette ends, hard or sharp objects or anything that may damage the cleaner
• Spray with, or pick up, flammable liquids, cleaning fluids, aerosols, or their vapours, as this may cause risk
of fire/explosion
• Run over the supply cord when using your cleaner or remove the plug by pulling on the cord
• Stand on, or wrap the power cord around arms or legs when using your cleaner
• Continue to use your cleaner if it appears to be faulty. If the supply cord is damaged stop using
the cleaner IMMEDIATELY. The supply cord must be replaced by an authorized Hoover
service engineer to avoid a safety hazard
To avoid safety hazards the cleaner must only be repaired by an authorised Hoover Ser vice Engineer.
OPEN OUT THIS PAGE TO VIEW MAIN FUNCTIONAL PARTS
2
IMPORTANT Safety Reminders P 2
Getting to know your cleaner P 3
Parts Checklist P 4
Assembling your cleaner P 5
Using your cleaner P 6
Maintaining performance P 7
Before calling Hoover checklist P11
Important information P12
Your guarantee P14
www.hoover.co.uk
Your Hoover Guarantee
During year 1 HOOVER engineers will replace or repair
all defective parts free of charge, except for parts subject
to fair wear and tear such as belts, brushes and filters.
To qualify for benefits under guarantee, you must be able
to provide proof of purchase and the appliance
must have been supplied, maintained
and used in accordance with HOOVER instructions.
Exclusions
Consequential losses and accidental damage
to the product. Any faults which occur due to bad
installation or misuse.
Repair of or interference with the appliance
by any person not authorised by Hoover.
Any parts which are fitted to the appliance which
are not original manufacturer's parts.
Non-domestic use of the appliance.
Operation at incorrect voltage.
If you have any trouble with your Hoover product simply
telephone your nearest HOOVER Service Office by
telephoning 08705 400600.
The guarantee does not affect your statutory rights
or common law rights. Hoover Ltd cannot be responsible
for the results of using this machine for any
purpose other than those described
in the instruction book.
www.hoover.co.uk
Page 2
Congratulations
Parts Checklist
Getting to know your cleaner
3
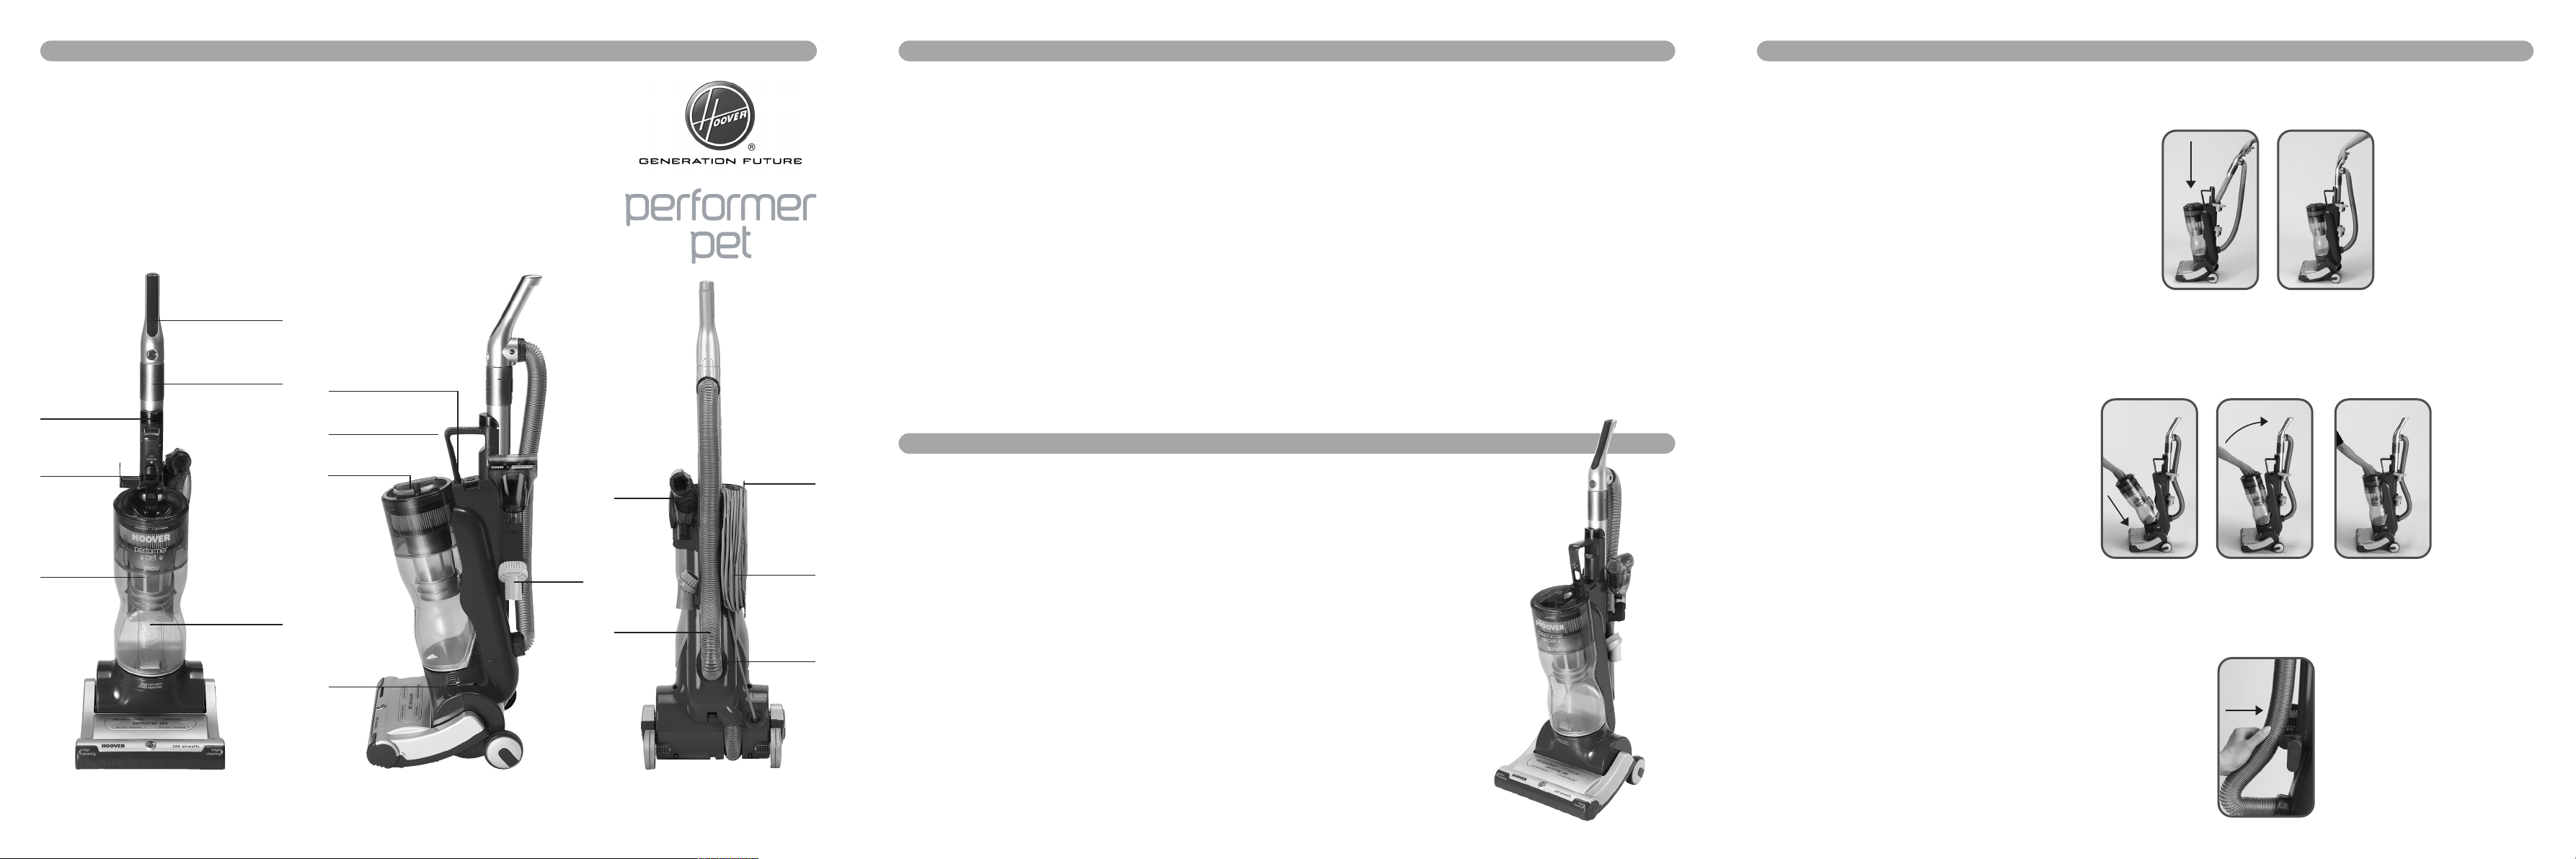
Fold out this page when reading the User Guide
to help you easily identify the main functional
product parts of PERFORMER PET.
Before assembling, please check and identify the following components
as you unpack the cleaner:
• User Guide (this booklet)
• PERFORMER PET vacuum cleaner body
• PERFORMER PET handle and flexible hose
• PERFORMER PET dust container
“Congratulations on your purchase of your new Hoover PERFORMER PET.
This highly advanced machine makes cleaning easier and more efficient.
To benefit fully from the features of PERFORMER PET, please ensure you read this
User Guide carefully.”
In the unlike event of you finding a part missing, or if you have any concerns regarding this
product,
DO NOT TAKE THE PRODUCT BACK TO THE RETAILER.
Please call the Hoover Helpline (Open 7 days a week) on
4
08705 400 600
Assembling your cleaner
5
1 Stand PERFORMER PET on the floor and push the handle firmly into the top of the
cleaner making sure it clicks into place.
2 Place the dust container onto the ribbed moulding and push into main body until
it clicks into place.
3 Push hose into the two hose clips.
www.hoover.co.ukwww.hoover.co.uk
QUICK
RELEASE CORD
STORAGE HOOK
PET HAIR
REMOVER
EXHAUST
FILTER
HANDLE
ZOOM CLEANING
TOOL
ON/OFF
SWITCH
CARRYING
HANDLE
DUST LEVEL
MAXIMUM MARK
BIN
RELEASE BUTTON
DUST
CONTAINER
STAIR CLEANING
RELEASE
BUTTON
FLEXIBLE
HOSE
POWER CORD
HOSE CLIPS
DUSTING
BRUSH
PRE MOTOR
FILTER COVER
Page 3

Maintaining performance
Using your cleaner
Using your cleaner
EMPTYING THE DUST CONTAINER
For peak performance we recommend the dust container is emptied on a regular basis.
Filling must not exceed the maximum level indicated on the dust level viewing window.
REMEMBER – Always switch off and unplug the machine from the electricity supply
before maintaining your cleaner.
12 Dust container release
Holding the pre-motor filter cover, press the dust container release button and lift the dust
container from the cleaner.
13 Dust container emptying
The 2-stage opening system minimises the escape of dust when emptying. To release fine dust
first, firmly hold the dust container and push down the hand grip at the back of the container
with your palm (13a).
Rotate hand grip with your fingers to open fully the dust container and release the remaining
debris (13b). Reverse operation to close the dust container.
7
FLOOR CLEANING
Make sure handle is fully clicked into place.
1 Self adjusting head
Is ideal to clean carpeted areas.
2 Release power cord
Rotate the quick release cord storage hook to release the cord.
Plug the cleaner into a power socket.
3 Power cord location
For safe operation always ensure cord is located into the 2 cord retaining clips.
4 Working mode
Place foot on cleaner base and pull the handle back to put the cleaner in working mode.
5 Switching your cleaner on
Press the on/off switch as shown.
6
USING THE CLEANING TOOLS
8 Tools mode
Press the stair cleaning release button and lift the handle from the cleaner body.
There are 3 cleaning tools included:
9 Zoom Cleaning Tool with integrated crevice tool
The Zoom Cleaning Tool can be extended for extra reach by pushing the collar
and the handle away from each other. To retract the Zoom Cleaning Tool pull
the collar towards the handle.
10 Pet Hair Remover
The turbo nozzle is stored on the hose support and fits on the crevice tool.
It is ideal for upholstery, stair cleaning and many other uses.
11 Dusting brush
The dusting brush is stored on the cleaner body and fits on the crevice tool.
It is ideal for gentle dusting on all surfaces.
REMEMBER - Make sure handle is fully clicked into place after use.
STAIR CLEANING
REMEMBER – Always work with the cleaner below you. The exceptional suction may
cause the cleaning tool to become locked to a surface, restricting airflow. In such cases,
simply lift the tool away from the surface. Make sure the handle is fully clicked into place
after use.
6 Stair cleaning mode
To use the cleaning tools, press the stair cleaning release button and lift the handle from
the cleaner body.
Release the flexible hose from clips.
The flexible hose fitted with the extended Zoom Cleaning Tool with integrated crevice tool
will reach up a full flight of 13 stairs.
7 Positioning the cleaner for maximum safety
Your cleaner incorporates an Anti-Tip Design. Ensure the cleaner is positioned up against
the bottom step.
www.hoover.co.ukwww.hoover.co.uk
1
2
3
4
5 11
6
7
www.hoover.co.uk
8
9a
9b
10
12
13a
13b
Page 4

Maintaining performanceMaintaining performance
9
FILTER SYSTEM
There are 3 filters and a dust screen. The pre-motor filter and the Antibacterial foam filter
are located beneath the pre-motor filter cover above the dust container. The exhaust filter is
located below the dust container. The dust screen is within the dust container.
REMEMBER – Always switch off and unplug the machine from the electricity supply before
maintaining your cleaner.
14 Pre-motor filter and Antibacterial foam filter maintenance
Rotate the pre-motor filter cover anticlockwise (14a). The pre-motor filter and the
Antibacterial foam filter are attached under the filter cover (14b). Using the tab provided
remove the foam filter and wash under hand warm water.
Remove pre-motor filter from the cover and rinse the inner side of the filter under hand
warm water (14c). Do not scrub and do not use detergents. Allow to air dry thoroughly
before refitting. Refit pre-motor filter ensuring the thicker seal end is pressed into filter
cover.
REMEMBER – Clean these filters after every 5 dust container empties, or if there is a drop in
performance.
15 Pre-motor screen maintenance
Remove the pre-motor filter cover with filters attached as above. Lift out the pre-motor
screen using the integral handle (15a). Use the dusting brush to remove any dust from the
screen (15b). Refit the screen. We recommend cleaning the screen after every 5 bin empties,
or if there is a drop in performance.
16 Hepa Anti Odour filter
Hoover PERFORMER PET is fitted with a HEPA Anti Odour exhaust filter to retain finest dust
particles and unpleasant odours. After 12 months you may wish to replace the exhaust filter
with a new one. This part can be ordered through the GIAS Service Division at 01204 - 556111
or purchased on www.hoover.co.uk at Hoover Accessory Shop (Part no. 04365127 T84).
The HEPA Anti Odour filter requires little or no maintenance and should only need checking
if there is a drop in performance.
To access the HEPA Anti Odour filter, remove the dust container from the cleaner (16a).
Press the filter release button to release the exhaust filter (16b and 16c).
Shake the filter to remove fine dust particles. Do not wash or scrub the filter.
8
CLEARING BLOCKAGES
REMEMBER – Always switch off and unplug the machine from the electricity supply before
maintaining your cleaner.
17 Clearing a blockage in the flexible hose
Twist the hose end connectors to remove hose from both the base of the cleaner and the
handle.
Check hose and handle for blockages. Use a blunt rod to remove any obstruction.
After clearing any blockage in the hose, refit both hose connectors ensuring the hose
supports are located on the inner side of the hose.
18 Clearing a blockage at the cleaner base
Remove the flexible hose as previously described. Unclip the cover at the base of the machine
(18a). Check the lower hose for any blockages (18b). The lower hose can be easily removed for
inspection. Refit hose and hose cover.
www.hoover.co.ukwww.hoover.co.uk
14a
14b
14c
15a
15b
16a
16b
16c
www.hoover.co.uk
17
18a
18b
Page 5

Before calling HooverMaintaining performance
11
19 CHECKING BELT AND BRUSHES/ REPLACING THE BELT
REMEMBER – Always switch off and unplug the machine from the electricity supply before
checking the brushes, belt or removing the hood.
Remove the flexible hose from the cleaner – twist hose end connectors to remove hose
at both ends as shown in section 17.
Lie cleaner flat. Using a crosshead screwdriver remove 4 hood screws as shown (19a).
Turn cleaner over and lift off hood (19b).
Remove agitator brush and belt assembly by pulling upwards out of the cleaner
base (19c).
Replace belt, if worn or broken, by looping the new belt over the metal
motor spindle (19d).
Refit agitator brush assembly by holding the brush and stretching the belt.
Align and insert both agitator end caps into slots in the base as shown (19e).
When located, rotate the agitator brush to ensure free movement of the belt.
Push down front of hood to fit in the cleaner base (19f).
Lie cleaner flat and secure hood using the 4 screws (19a).
Refit flexible hose.
User checklist
If your cleaner has stopped working completely, run through the following check list:
NOTE: It will take about 30 minutes for the thermal cut out to automatically reset.
If your cleaner is not working properly, run through the following checklist:
REMEMBER – Always switch off and unplug the machine from the electricity supply before
maintaining your cleaner.
REMEMBER - If there is any doubt, call the Hoover Advice Helpline (open 7 days a week)
on 08705 400600. They may be able to assist you over the telephone.
10
i)
ii)
iii)
iv)
v)
vi)
vii)
viii)
ix)
x)
Is there a working electricity supply to the cleaner?
Check with another electrical product.
A thermal cut out switches off the cleaner automatically to prevent overheating if the
cleaner is used when the dust container is over full, or the filters require cleaning,
or there is a blockage. If this should happen switch off and unplug the machine from
the electricity supply. To correct the fault please refer to sections 12-18.
i)
ii)
Is the dust container overfilled? (refer to sections 12 and 13)
Is the hose blocked? (refer to section 17)
Is there a blockage in the cleaner base? (refer to section 18)
Are the filters blocked? (refer to sections 14, 15 and 16)
Are the brushes rotating? (refer to section 19)
i)
ii)
iii)
iv)
v)
www.hoover.co.ukwww.hoover.co.uk
19a
19b
19c
19d
19e
19f
www.hoover.co.uk
Page 6

NotesImportant information
13
12
www.hoover.co.uk www.hoover.co.uk
Genuine Hoover Spares
Always replace parts with Genuine Hoover Spares. These are available from your local
Hoover dealer or direct from Hoover. When ordering parts, always quote your model
number.
Hoover Service
Should you require service at any time, please call your local Hoover Service Office. Hoover
have a computerised nationwide service network of over 500 engineers who will respond
quickly to your call and guarantee your repair for 12 months.
Safety and the Environment
As the owner of a new Hoover product, we would like to tell you more about the high
standards we have set in safety and the environment.
Safety
Although safety certification of electrical appliances is not required by law in the UK,
Hoover believe that independent approval is the best way of demonstrating safety in design
and manufacture. The British Electrotechnical Approvals Board (BEAB), the independent UK
national authority for the safety of domestic electrical appliances, ensure that European
Safety Standards are met and maintained throughout the production life of an appliance.
All appliances which pass these tests are permitted to carry the BEAB mark of safety.
The Environment - WEEE Directive
This appliance is marked according to the European directive 2002/96/EC on
the Waste of Electrical and Electronic Equipment (WEEE).
By ensuring this product is disposed of correctly, you will help prevent
potential negative consequences for the environment and human health,
which could otherwise be caused by inappropriate waste handling of this
product.
The symbol on the product indicates that this product may not be treated as
household waste. Instead it shall be handed over to the applicable collection
point for the recycling of electrical and electronic equipment.
Disposal must be carried out in accordance with local environmental regulations for waste
disposal.
For more detailed information about treatment, recovery and recycling of this product, please
contact your local city office, your household waste disposal service or the shop where you
purchased the product.
 Loading...