

Page 1

GB USER INSTRUCTIONS AND INSTALLA TION INFORMATION
FOR THE BUILT-IN OVEN
~~~
HPO 858
41012605
1
Page 2

CONTENTS
• USER INSTRUCTIONS
SAFETY RECOMMENDA TIONS..................................................................... 3
CONTROL PANEL DESCRIPTION ................................................................. 4
THE DISPLAY ................................................................................................. 4
BEFORE USING FOR THE FIRST TIME
. Initial cleaning ............................................................................................... 5
. What you should know.................................................................................. 5
. Setting the clock programmer ....................................................................... 5
. Language choice........................................................................................... 6
USING THE OVEN
. Oven modes
AUTOMA TIC mode ............................................................................. 7/8
MANUAL mode ............................................................................... 9/10/11
KEEP WARM - DEFROST mode........................................................ 11
. Oven programming
The timer............................................................................................. 12
Programming the timer ....................................................................... 12
Programming the end of cooking time.............................................. 12/13
Child safety ......................................................................................... 13
OVEN EQUIPMENT
Accessories......................................................................................... 14
CLEANING THE OVEN
Pyrolytic cleaning ..............................................................................15/16
General cleaning................................................................................. 17
• INST ALLA TION
INSTALLATION
Electrical connection........................................................................... 18
Fitting the oven .................................................................................19/20
DATA SHEET.................................................................................................. 21
2
Page 3

SAFETY RECOMMENDA TIONS
• Please read the instructions carefully. We recommend that you keep the instructions safe
for future reference. Before installing the oven make a note of the serial number just in case
you need assistance from the after sales service organisation.
Identification plate
(located on the side
of the oven)
The company will not be liable if the instructions provided in this document are not complied
with.
The installation of your appliance and its electrical connection must be carried out by a
qualified fitter or technician.
• Under no circumstances should any modifications be made to the appliance.
• While the oven is operating and during the pyrolytic cycle, the oven door becomes hot, keep
children away from it.
• Before operating the pyrolytic cycle, it is very important that large grease deposits are removed
from the oven interior as they could catch fire during the intense heat generated during the
pyrolytic cycle.
• Never use a steam or a high pressure spray to clean the oven.
• If your oven shows any defects whatever, disconnect it from the power supply and immediately
contact an approved HOOVER service agent.
• Do not store flammable products in the oven ; they can catch fire if the oven is switched on
accidentally.
• Do not allow children sit on the oven door.
• Use oven gloves, when removing or placing a dish in the oven.
• After each use minimal cleaning will help keep the oven in perfect order.
• Do not line the oven walls with aluminium foil or single-use protection sheets available from
high street stores. Aluminium foil or any other protection wrapper that comes into direct contact
with the hot enamel, risks melting and deteriorating the enamel interior.
• In order to prevent excessive oven soiling and the resulting smoke, we recommend not using
the oven at too high a temperature. It is better to extend the cooking time and lower the
temperature a little.
• In addition to the accessories supplied with the oven, we advise that you only use dishes and
baking trays that are resistant to very high temperatures (i.e. earthenware dishes).
3
Page 4
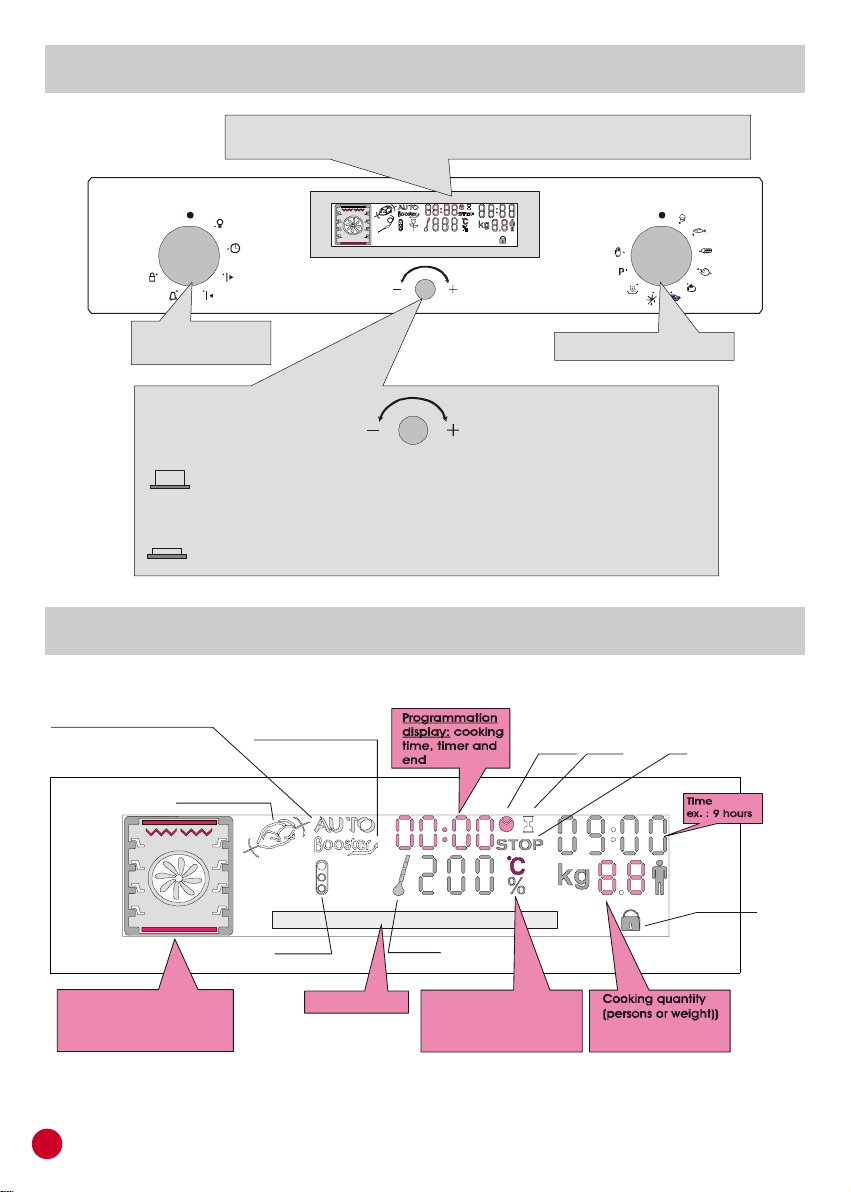
CONTROL PANEL DESCRIPTION
quantity/weight, temperature, programming cooking
Regulated by turning the button towards “-” or “+”
Display panel: time, programming of cooking mode, indicator lights,
cooking temperature function and shelf positioning
Function selector
knob
Button for regulation and confirmation
Selected cooking mode:
Auto: illuminated display,
Automatic mode
Auto off: manual mode
Rotisserie
SETTINGS:
and end of c ooking time.
TO CONFIRM SETTINGS:
press the button.
DESCRIPTION OF THE DISPLAY
Booster d isplay :
pre-he ating
Indicato r light :
child safety device
Indicato r light :
rising temperature
Programme symbol display: cooking
time, timer a nd end
Oven selector knob
Indicato r light :
oven door
Oven functioning display
and recommended
livel position
Textual zone
4
Cooking temperature
ex. : 200°C
or % of grilling functio ning
Page 5

ADVICE BEFORE USING THE OVEN FOR THE FIRST TIME
• PRELIMINARY CLEANING - clean the oven before using for the first time:
. wipe over external surfaces with a damp soft cloth.
. Wash all accessories and wipe inside the oven with a solution of hot water and washing up
liquid.
. Set the empty oven to the maximum temperature and leave on for about 1 hour, this will
remove any lingering smells of newness. Ensure that the room is well ventilated while this is
being done.
• THINGS TO REMEMBER
Confirmation of operation: all modification must be confirmed by pressing the central button.
Stopping the oven: this may be necessary if you have input an incorrect instruction. To stop
the oven .... turn back the function selector knob to the Stop Position.
Child safety device: To lock the oven controls or the oven door, select the child safety device.
Refer to the section entitled "Programming - The child safety device" page 13.
The cooling fan: this protects the control panel and electronics from heat damage.
It begins and then stops automatically even when the oven is switched off.
Oven lighting: By turning to the light symbol, you can switch on the oven light when it is not
in use.
When the oven is in use, with the exception of the pyrolytic cycle, the light stays on during
all of the oven functions and when the door is opened.
• CLOCK SETTING
When the oven is connected to the electricity supply or after a power cut, the clock must be
re-set.
. To set the clock :
1- Turn the control knob to the "Clock" symbol :
2- When the minutes flash, set the central button by turning to the "-" or "+" symbol.
Confirm by pressing the central button.
3- The hours will then flash, set with the central button by turning to the "-" or "+",
confirm by pressing the central button.
4- Turn back the control to the STOP position, the new hour is set.
5
Page 6
• LANGUAGE CHOICE
6 types of the dish are recorded.
Each menu suggests different recipes with
pre-programmed data (quantity, temperature
function modes, 9 choices are offered with a
The pre-set language setting on the display panel is in French, but it can be changed to Italian
or English.
To change the language display, carry out the following procedure :
1- Turn the programme selector knob to "Light" symbol.
2- Press the central button in and hold for 3 seconds. The display panel will show
FRANCAIS. Turn the button until the required language appears and confirm by
pressing the same button.
The display will disappear.
3- Y our selection is now confirmed. T urn the programme selector knob back to the STOP
position.
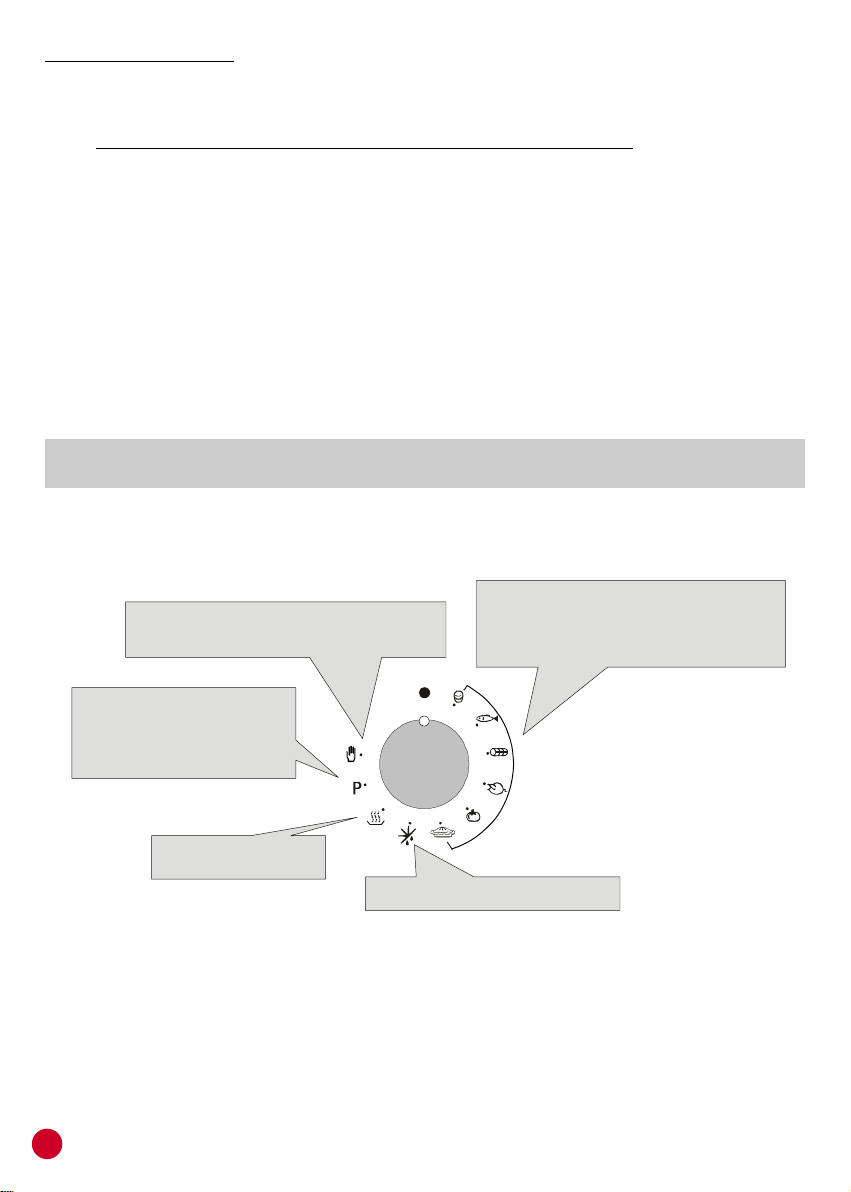
HOW TO USE THE OVEN ?
• OVEN MODES
MANUAL MODE
pre-programmed temperature range.
PYROCLEAN MODE
complete oven interior cleaning.
Three programmes:
ECO, NORMAL, SUPER
PYROCLEAN
KEEP WARM MODE:
keeping dishes hot
6
: direct access to “cooking”
:
for
DEFR O S T M O D E :
food before a cooking
AUTO MODE:
and cooking time).
for defrosting the
- FUNCTION SELECTOR CONTROL KNOB -
Page 7

AUTOMA TIC MODE
When the oven is on standby - only the time of day appears on the display.
1- Select the type of dish you want to cook by turning the function selector knob to the
appropriate position.
... Pastry Fish Meat Rotisserie Legumes Desserts ...
2- Turn the central button to the correct position for the chosen recipe.
Confirm your selection by pressing the same button.
3- According to the recipe selected, the following will be displayed:
• t he heating elements in operation for the particular programme, as well
as the suggested shelf position for the food to be cooked.
... Place the food in the recommended position (eg. on the
2nd shelf).
• a pre-programmed (fixed setting - not variable)
... the temperature display is static.
• The weight of the food to be cooked or the number of servings/portions (variable
setting, flashing display), can be chosen by turning the central button. Select the
most appropriate setting and confirm by pressing the same button.
... the display indicating the weight of the food or the number of servings
becomes static.
The oven begins cooking in Automatic mode (the Auto sign starts flashing on the
display) and the oven starts to heat up.
The indicator light flashes until the selected temperature has been
reached. An audible signal sounds at the end of this operation.
4- Each recipe is recorded with a cooking time.
The cooking time indicator light and the End of cooking time indicator
light appear on the display.
These settings can be adjusted by turning the programme selector knob to "cooking
time" or "end of cooking".
The "cooking time" or "end of cooking" display will start flashing. Using the central button,
modify the settings as required and then confirm them.
When you have finished, do not forget to turn the programme selector knob back to
STOP,
to confirm a new programme.
For more details about programming, refer to the chapter entitled PROGRAMMING..
5- When the cooking time is up, the oven switches itself off automatically. An audible
signal sounds for 15 seconds to tell you the cycle has ended and the "cooking time"
and STOP symbols flash.
. Turn the function selector knob to STOP. If you do not do this the "cooking time" and
STOP symbols will continue flashing.
The cooling fan will continue operating for a while and will only stop when the oven
has cooled down sufficiently.
NB: please note that all AUTO cooking programmes are done without preheating. This means
that the food must be placed in the oven right at beginning of the programme.
7
Page 8
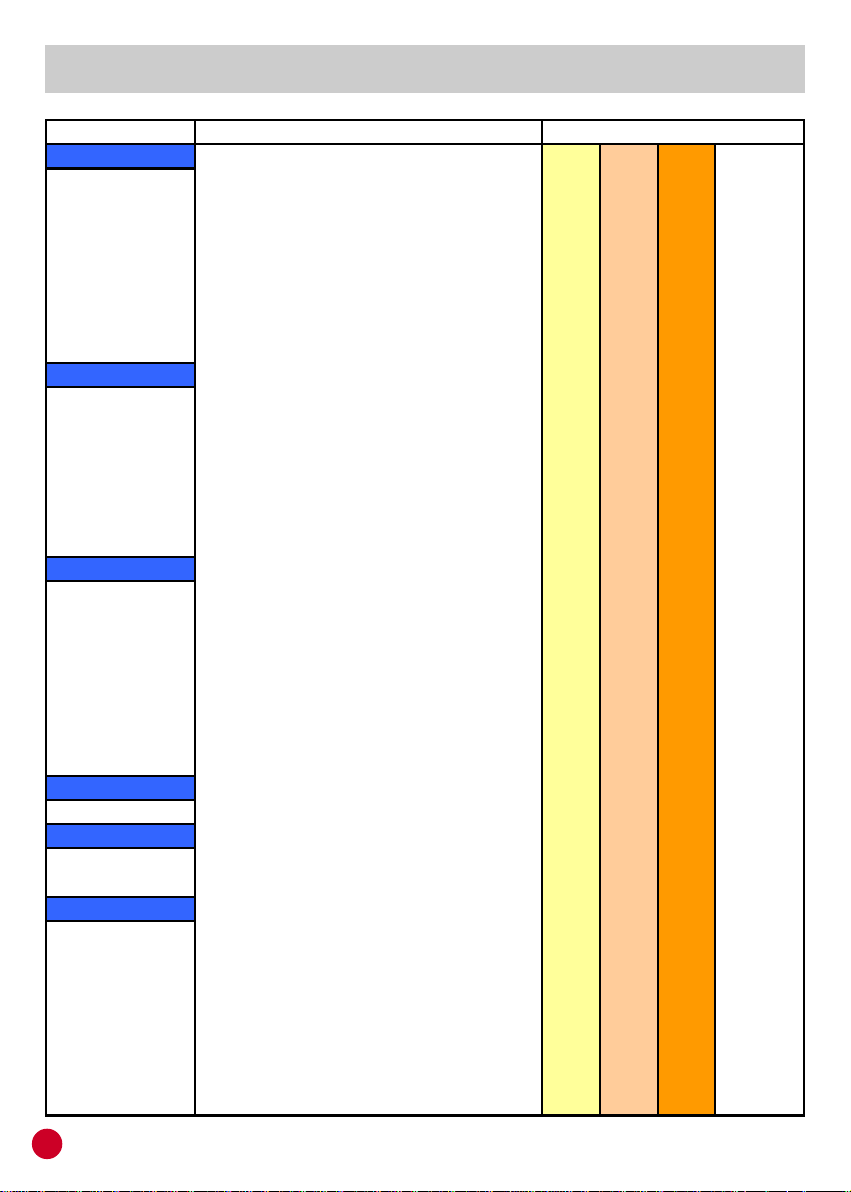
PRE-PROGRAMMED RECIPE SELECTION
Category
PASTRY QUI CHE LORRAI NE 4 6 8 Pers.
FISH BAKED SALMON 4 6
MEAT ROAST BEEF 0.511.5 Kg
ROTISSERIE ME DI UM SI Z E 1 1,5
LEGU ME S STUFFED TOMATO 4 6 Pers.
DESSERTS APPLE PI E 4 6 8 Pers.
Recipes Quantity
F I LO TARTLETS 4 6 8 Pers.
SAUSAGE ROLLS 4 6 8 Pers.
VEG CRUMBLE 4 6 Pers.
RAI SED GAME PI E 4 6 8 Pers.
SMOKED FI SH PI E 4 8 Pers.
F OCACCI A BREAD 4 6 8 Pers.
LASAGNE 4 6 8 Pers.
HAM PI ZZA 6 8 Pers.
Pers.
ROASTED COD 4 6 Pers.
RED MULLET BAKE 2 4 6 Pers.
MONKF I S H 6 8 Pers.
BRAI SED TUNA 4 6 Pers.
SEABASS I N SALT 0,5 1 Kg
SOLE FI LLETS 2 4 6 Pers.
SEABREAM FI LLET 4 6 Pers.
ROAST LEG LAMB 1 1.5 2 Kg
BEEF WELL I NGT ON 1,5 2 2,5 Kg
ROAST HAM 1 1.5 2 Kg
ROAST TURKEY 4 5 Kg
ROAST DUCK 2 2,5 Kg
ROAST QUAI LS 4 6 Pers.
LEMON CHI CKEN 1,5 2 Kg
PHEASANT 0.5 1 2 Kg
Kg
LARGE SI ZE 2 2,5 Kg
ROASTED VEG 6 8 Pers.
POTATO GRATI N 4 6 8 Pers.
MERI NGUE GATEAU 4 6 8 Pers.
CREME CARAMEL 4 6 8 Pers.
FRUI T TART 6 8 Pers.
CARROT CAKE 6 8 Pers.
SPONGE CAKE 6 8 Pers.
SOUFFLE 4 6 8 Pers.
COOKIES 6 8 Pers.
WALNUT TORTE 6 8 Pers.
8
Page 9

THE MANUAL MODE
TEMPERATURE
*
The cooking methods suggested in manual mode are set out in the table below. A
temperature is also suggested for each cooking method. This can be modified within a
pre-determined range.
OVEN
FUNCTIONS
M
A
N
U
A
L
COOKING METHOD
NATURAL CONVECTION 220°C 50 to 280°C
FAN ASSISTED COOK ING 210°C 50 to 240°C
BOTTOM HEAT 160°C 50 to 240°C BOOSTER*
BOTTOM HE AT + FAN 210°C 50 to 240°C BOOSTER*
FAN COOKING 180°C 50 to 240°C
GRILL 50% 25 to 75%
GRILL + FAN 210°C 180 to 230°C BOOSTER*
TURNSPIT 240°C 180 to 240°C BOOSTER*
TURNSPIT + FAN 240°C 180 to 240°C BOOSTER*
PRE-SET
RANGE
ADJUSTMENT
BOOSTER
FUNCTION
* Booster: fast rising in temperature
In this mode the oven is on standby, only the time of day appears on the display.
1- Turn the function selector knob to the "Manual" position.
2- Turn the central button in the appropriate direction for the required cooking method.
See the table above.
Confirm your selection by pressing the central button.
... The cooking method is now set.
The heating elements in operation for the selected cooking method are displayed.
3- The appropriate temperature according to the cooking method selected is displayed. It
can be modified within a pre-determined range - see the table above.
To modify the temperature setting, turn the central button and confirm the setting by
pressing the same button.
... the temperature display is fixed but can be modified during the cooking cycle.
The oven will start cooking in "Manual" mode and will start to heat up.
4- A cooking time and an end of cooking time can be programmed by turning the
programme selector knob to "cooking time" or "end of cooking time".
The "cooking time" or "end of cooking time" display starts flashing. Using the central
button, modify the settings as required and confirm.
When you have done this, do not forget to turn the programme selector knob back to
STOP to confirm the new setting.
For more details about programming, refer to the chapter entitled PROGRAMMING.
5- At the end of the cooking cycle, turn the function selector knob back to STOP.
The indicator light flashes until the selected temperature has been reached.
An audible signal sounds at the end of this operation.
9
Page 10

- ALL COOKING SHOULD BE CARRIED OUT WITH THE DOOR CLOSED -
• NATURAL CONVECTION - Both top and bottom heating elements are in use. This method is
ideal for all traditional roasting and baking. When cooking red meat, roast beef, leg of lamb, game,
bread or foil wrapped foods.
• FAN ASSISTED COOKING - Both top and bottom heating elements are used in conjunction
with the fan, which circulates hot air throughout the oven. We recommend this method for
poultry, p astries, fish and veget ables. By using this method better heat penetration is achieved and
cooking and preheating times are also reduced. The fan cooking option allows you to cook
different foods together at different positions in the oven all at the same time, providing even
heat distribution but without the risk of mingling tastes and smells. When cooking different
foods at the same time allow a further 10 minutes.
• BOTTOM HEAT - Using the lower element. Ideal for cooking all pastry based dishes. Use this for
flans, quiches, tarts, pâté and any cooking that needs more heat and radiation from below.
• BOTTOM HEAT + FAN - The combination of the bottom heating element and fan is ideal for fruit
flans, tarts, quiches and pastries. It prevents food from becoming too dry and encourages bread
dough to rise. Place the shelf in the bottom position in the oven.
• FAN COOKING - Both top and bottom heating elements are used in conjunction with the circular
heating element, which circulates hot air throughout the oven. Its definition is the same as that of the
Fan Cooking method.
• GRILL : using the top heating element. Success is guaranteed for mixed grills, kebabs and
gratin dishes. The grill should be pre-heated to a high temperature for 5 minutes. White meats
should always be placed at some distance from the grill element, the cooking time is slightly longer
but the meat will be more succulent. Red meat and fish fillets can be placed directly onto the shelf
with the drip tray placed beneath on lower shelf position.
• GRILL + FAN : The top heating element is used in conjunction with the fan which circulates the
hot air around the oven. Pre heating is recommended for red meats but is not necessary for white
meats. Grilling is ideal for cooking thicker food items such as pork or poultry. Food to be grilled
should be placed directly at the centre of the middle shelf. By sliding the driptray underneath the
shelf it will ensure that any juices are collected. For best results always make sure that the food is
not too close to the grill element and turn the food over half way through the cooking time.
• TURNSPIT : During this phase both the top oven element and rotisserie are in use. The rotisserie
is best for medium sized pieces of meat. To cook larger joints of meat turn the oven to the turbo
grill position. The rotisserie is programmed to continue rotating for approximately five minutes
after cooking, making full use of the residual oven heat. No pre-heating is required for rotisserie
cooking.
• TURNSPIT + FAN : the advantage of using the top oven element at the same time as the fan and
rotisserie is that the food is evenly cooked, preventing it from becoming dry and tasteless.
10
Page 11

COOKING TIPS
It is advisable not to salt meat before cooking, as salt only encourages the production of fat
which quickly spreads throughout the oven and causes unnecessary smoke.
GRILLING :
Remove the meat from the refrigerator a few hours before grilling. We advise placing it on
several layers of absorbent paper : this will remove excess water and will concentrate the
flavour. Add pepper and herbs to the meat before grilling, but any salt should be added later.
This way it will retain its juices.
Never pierce the food during cooking even when you turn it, as this allows the juices out and it
can make it dry.
Meat should be turned halfway through cooking, except when using the rotisserie which
automatically rotates the food.
Caution :
If your oven produces a lot of smoke, you are cooking at too high a temperature: correct this by
resetting to a lower temperature.
Never use the drip tray as a roasting dish.
BAKING : Avoid using shiny tins, they reflect the heat and can spoil your cakes. If your cakes
brown too quickly, cover them with greaseproof paper or aluminium foil.
Caution : the correct way to use foil is with the shiny side in towards the cake (dull side out). If
not, the heat is reflected from the shiny surface and will not penetrate the food.
Avoid opening the door during the first 20 to 25 minutes of cooking : sponges cakes, soufflés
and brioche will tend to drop.
You can check if cakes are done by pricking the centre with a knife blade or metal screwer. If it
comes out nice and dry, your cake is ready, and you can stop cooking. If the blade come out
moist or with bits of cake stuck to it, continue baking but lower the temperature slighlty so that
it finishes cooking without burning.
KEEP WARM MODE - DEFROST MODE
The access for these two functions is direct.
• KEEP WARM : the top and bottom elements are used intermittently with the fan circulating the
hot air inside the oven. Ideal for keeping dishes hot without over cooking, suitable for
meringues and plate warming.
.... the temperature is pre-set to a const ant 60 degrees C (no adjustment is available).
• DEFROST : the top and bottom elements are used intermittently with the fan circulating the
hot air inside the oven. Wrap the food to be defrosted in aluminium foil, shiny side out.
.... the temperature is pre-set to constant 40 degrees C (no adjustment is available).
These two functions can be pre-programmed. To do this, turn the programme selector knob to
"Cooking time" or "End of cooking time". The cooking time or the end of cooking time will start
flashing. Using the central button, adjust the time as you desire and confirm. When you have
done this, do not forget to turn the programme selector knob back to STOP in order to confirm
the new programme.
For more details about programming, refer to the chapter entitled PROGRAMMING.
11
Page 12

PROGRAMMING
Timer in operation
DISPLAY SYMBOLS :
Cooking time programming
End of cooking time programming
Child safety device operational
Programmation control knob
THE TIMER :
The timer works independently of the oven and has no effect on the heating elements. It is
simply a reminder.
. Turn the knob to the Timer position. The Timer symbol will appear. The digits 00:00 will
appear on the display.
. The minutes will then flash, turn the central button to the required number of minutes and
confirm by pressing the same button.
. The hours will flash, turn the central button to the required number of hours and confirm by
pressing the same button.
. Turn the knob back to the STOP position.
When the time is up, the cooking time will disappear. An audible signal will sound for 15
seconds and the Timer display will flash (to stop it before the 15 seconds are up, just press the
central button).
PROGRAMMING THE COOKING TIME :
various recipes are pre-programmed with a cooking time. In Manual mode, Defrosting or
Steaming can be pre-set, if required.
. Turn the knob to the Cooking time position. The Cooking time symbol will appear. A pre-
programmed cooking time for the various recipes will appear, or 00:00 for other functions
of the oven.
. With the minutes flashing, turn the central button to the required number of minutes and
confirm by pressing the same button.
. With the hours flashing, turn the central button to the required number of hours and confirm
by pressing the same button.
. Turn the programme selector knob back to the STOP position to confirm the new
cooking time.
When the time is up, the cooking time will disappear from the display. An audible signal will
sound for 15 seconds and the Cooking time and STOP symbols will flash.
. Turn the programme selector knob back to STOP. If you do not do this, the Cooking time
and STOP symbols will continue flashing.
Oven door locking
PROGRAMMING THE END OF COOKING TIME :
various recipes are pre-programmed with a cooking time and therefore with an end of cooking
time. In Manual Mode, Defrosting or Steaming can be pre-set, if required.
. Turn the knob to the End of cooking position. The STOP symbol will appear. A pre-
programmed end of cooking time for the various recipes will appear, or 00:00 for other oven
functions or the time of day will be shown.
12
Page 13

. Turn the programme selector knob to confirm the end time.
. The minutes will flash. Turn the central button to indicate the required number of minutes,
and confirm your choice by pressing the same button.
. The hours will then flash. Turn the central button to indicate the required number of hours,
and confirm your choice by pressing the same button.
NB : with a delayed start, the end of programme time will appear on the display with the
"Cooking time" and "STOP" symbols, and only the function mode of the oven remains.
. The oven automatically calculates the start time (end time minus cooking time).
At the end of the cycle the oven switches itself off automatically. For 15 seconds, an audible
signal lets you know that the cycle has ended and the "Cooking time" and STOP symbols will
flash.
. Turn the function selector knob to STOP. Unless you do this, the symbols will continue
flashing.
CHILD SAFETY :
This function is essential, especially when children are around. It prevents children from
switching the oven on or altering the pre-set programmes.
This safety system locks the oven control panel while it is operating (pyrolytic or cooking
modes).
There are two levels of safety :
LIVEL 1 : Locking the controls
. To activate : turn the programme selector knob to child safety
. Action : the cooking mode selector and the central button are inactive*.
. To deactivate : turn the programme selector knob to 0.
LIVEL 2 : Locking the controls and the oven door
(be warned that this cycle is relatively long: locking 1 minute, unlocking between 4 and 7
minutes, according to the temperature).
. To activate : turn the programme selector knob to child safety and keep the central
button pressed in for 3 seconds.
. Action : the controls are inactive* and the oven door is locked.
. To deactivate : the same procedure as for activating. Turn the programme selector
knob to child safety and keep the central button pressed in for 3
seconds.
*Nota : in all cases, for reasons of safety, even when the controls are locked, the oven can
be switched off by turning the selector knob to zero.
13
Page 14

OVEN EQUIPMENT
Standard shelf for supporting various dishes and baking
trays.
The drip tray shelf, especially good for grilling, use in
conjunction with the drip tray.
The drip tray collects meat and juices during roasting or
grilling. It can be put directly onto the shelf, or under it. Unless
used with the gill, the drip tray must not be stored in the oven
while in use.
The shelves have been specially designed so that they do not
tilt even when pulled out to their maximum extent, so avoiding
the risk of spillage.
The pastry tray. Ideal for small pastries, like choux, biscuits,
meringues etc.
The grill pan can be combined with the drip tray for all types
of grilling. A handle is supplied for removing grill pan from the
oven without the risk of burning yourself. Never leave the
handle inside the oven.
The rotisserie consists of one skewer, two forks and a holding
frame. When the rotisserie is engaged in the drive device it
automatically rotates the food.
TO USE :
. Remove all of the accessories from the oven,
. Place the deep tray at the base,
. Place the food on the skewer, centred between the two
forks,
. Place the skewer on the holder,
. Slide the holder and skewer into the second shelf position
from the bottom.
The end of the rotisserie should be opposite the drive device.
Position the rotisserie in the drive device.
Before switching the oven on you should remove any unnecessary accessories.
14
Fitting the rotisserie
Page 15

CLEANING - PYROLYTIC PROGRAMME
The oven is equipped with a Pyrolytic cleaning system, which eliminates food deposits at high
temperatures. The operation is carried out automatically and odours are rendered "clean" by
passing over a Pyrolyser which starts as soon as cooking begins. As very high temperatures are
required by the Pyrolyser, the oven door is fitted with a safety lock which prevents the door from
being opened.
The Pyrolytic cycle can be stopped at any time. The door cannot be opened until the key indicator
is illuminated.
NB : if a hob is fitted above the oven, never use the hob during a Pyrolytic cycle, otherwise there
is a danger of overheating the oven control panel.
THREE PYROLYTIC CYCLES :
. ECO PYROCLEAN : for moderate staining.
Operates at a temperature of 475°C for a period of 90 minutes.
. NORMAL PYROCLEAN : for normal staining.
Operates at a temperature of 475°C for a period of 105 minutes.
. SUPER PYROCLEAN : for heavy staining.
Operates at a temperature of 475°C for a period of 120 minutes.
Never use commercially available cleaning products before carrying out a pyrolytic cycle !
Tip : carrying out Pyrolytic cleaning immediately after cooking allows you to take advantage of
residual heat, thus saving energy.
Before carrying out a Pyrolytic programme
- Remove all accessories from the oven : they cannot withstand the high temperatures
and would be damaged by Pyrolytic temperatures.
- Remove any large spillages or stains before beginning the Pyrolytic cycle as excessively
large amounts of grease could ignite when subjected to the very high temperatures of the
Pyrolytic cycle.
- Close the oven door.
Starting the Pyrolytic cycle
1- Turn the function selector knob to position "P" (Pyrolytic).
2- Turn the central button in the appropriate direction according to the degree of soiling:
... ECO PYROCLEAN ... NORM PYROCLEAN ... SUPER PYROCLEAN ...
Confirm your choice by pressing the central button.
... The oven will start the Pyrolytic cycle.
The end of cycle time appears on the display and the symbols "cooking time" and
"Stop" also appear.
The thermometer begins the rising of the temperature. The corresponding indicator
light flashes until the temperature has been reached.
15
Page 16

During the Pyrolytic cycle, a padlock symbol appears on the display panel to indicate
that the oven door is locked and the cooling fan is operating.
* the beginning of the Pyrolytic programme can be delayed by selecting an end time
for the cycle.
Turn the programme selector knob to the end of cycle position and set the required
end of cycle time.
When the time is up, the oven switches itself off automatically.
A 15 second, audible signal lets you know that the cycle has ended and the "Cooking time"
and STOP symbols flash.
. Turn the function selector knob to STOP. Unless you do this, the symbols will continue
flashing.
As long as the padlock symbol is shown, the door cannot be opened, for safety reasons,
as the temperature is too high.
The cooling fan will not stop operating until the temperature of the electrical components
is sufficiently cool.
After the pyrolytic cycle has finished, there will be a whitish deposit on the oven walls.
Wait for the oven to cool down, before wiping with a damp sponge.
THE OVEN INFORMS THE USER WHEN A PYROLYTIC CYCLE SHOULD BE
CARRIED OUT ....
The oven records all the set programmes, such as the function modes, temperatures,
cooking times, etc... it then assesses the degree of soiling in the oven and, according to
various criteria, suggests that the user should start a Pyrolytic cycle. In order to do this,
follow the instructions described previsouly.
At the end of the pyrolytic cycle, the oven automatically resets its timer to zero.
16
Page 17

CLEANING - GENERAL MAINTENANCE
GENERAL MAINTENANCE
• Wait for the oven to cool down before doing any manual cleaning.
• Never clean with abrasive cleaners, wire wool or sharp objects, as it may irreparably
damage the enamel.
• Only use soapy water or bleach (ammonia) cleaners.
• Never line the oven wall with aluminium foil.
• GLASS PARTS
Glass oven door : w e recommend that you wipe clean the glass door with absorbent kitchen
paper every time you use the oven. If spattering is heavy, you can clean with a sponge and
detergent. Never use abrasive cleaners or sharp objects.
Control panel : the simplest and easiest method is to use a soft dry cloth, or absorbent paper.
• ACCESSORIES - Clean the accessories with a sponge dipped in soapy water. Rinse with clean
water and dry off. Avoid abrasive cleaners.
• DRIP TRAY After grilling, remove the drip tray from the oven. Take care when disposing of warm fat.Wash
and rinse the drip tray in hot water with a sponge soaked in washing up liquid. If burnt on residues
remain, soak them off with water and a detergent solution.
The drip tray can also go in to a dishwasher or be cleaned with a commercial oven cleaner.
Never place a soiled drip tray in the oven.
• OVEN LIGHTING -
The bulb and its cover are made from high temperature resistant materials. To change a
defective bulb, just unscrew the glass cover, remove the bulb and replace it with the same type.
Screw back the protective glass cover.
You can obtain a bulb that withstands high temperatures from many high street retailers.
Disconnect the power supply before cleaning or replacing the bulb.
17
Page 18

INST ALLA TION "ELECTRICAL CONNECTION"
IMPORTANT : INFORMATION FOR QUALIFIED INSTALLERS.
The electric installation for the oven should comply with the norms in force in the country of
installation.
Connection to the network must be by mean of an earthed outlet equipped with a multi-pole
circuit-breaker having a distance between contacts of at least 3 mm.
The installation must be protected by suitable fuses, and have wires with a large enough
cross-section to take the load required by the oven.
The oven is fitted with a power level lead for connecting exclusively to a voltage of 230 V AC
across the phases or across phase and neutral.
Connection must be carried out in compliance with the diagram having first checked the supply
voltage indicated on the meter, the circuit breaker setting.
The Earth wire (green/yellow) must be connected to the earth of both power supply and appliance
terminals.
Do not forget that the oven may require after-sales service. To allow easy servicing, position the
electrical outlet so that the oven can be removed from its space while still connected.
Caution :
Check the continuity of the earth installation before connecting.
The manufacturer will not be liable for any incident or the possible consequences that may
arise from the use of the oven which has not been earthed, or connected to an earth with
defective continuity.
Power supply cable : if the power supply cable must be changed, please have this done by our
after-sales technicians or by a qualified engineer.
18
Oven isolation
switch
Connection
box
230-V AC Mains house meter
across Phases or
across Phase and Neutral
Consumer unit
Circuit breaker
minimum rating 25 Amp
Fuse 20 Amp
Earth
Appliance connection point
Page 19

INST ALLATION OF THE OVEN
The oven should be installed by an approved contractor or technician with similar qualifications.
The oven can be located high in a column or under a worktop.
The kitchen unit in which the oven is to be fitted must be made of material resistant to high
temperatures.
• Before fixing, you must ensure good ventilation in the oven space to allow proper circulation
of the fresh air required for cooling and protecting the internal parts. Make the openings as
specified hereunder according to the type of fitting.
• For fixing, inside the oven is a bag with fixing screws. The corresponding holes are located on
each side of the side uprights.
1. OVEN IN COLUMN
19
Page 20

2. Oven fitted under worktop
20
Page 21

DA T A SHEET
All data is given for information only. In order to improve the quality of its products, HOOVER
may modify its appliances with technological developments which adhere to the conditions
set out in the Consumer Code.
Appliances comply with Directives 89/336/CEE and 73/23/CEE.
rerutcafunaM REVOOH
ledoM
MRON
40305NE
emulovelbasUsertil84
rewopixaMW0063
E
)setunim08(
ssalcycneiciffeygrenE
)tneiciffessel(Got)tneiciffeerom(A
noitcnufgnitaeHlanoitnevnoC
noitnevnoc-noitpmusnocygrenEhWk97,0
la
noitcevnocriadecrof-noitpmusnocygrenEhWK89,0
ehtfoezis(ecnailppafoepyTmuidememuloV
)nevo
daoldradnatsnodesabemitgnikooCnim54
aerateehsgnikabtsegraL²mc0521
tcennoclacirtcelE+~V032esahponoM
noi
elcyccitylorypehtgnirudnoitpmusnocyticirtcel
858OPH
A
A61esuF-htraE
hWk2,3
21
Page 22

222324
Page 23

Page 24

 Loading...