

Page 1

• HOZ7173 WIFI
USER INSTRUCTIONS
OVENS
NOTICE D'EMPLOI ET D'INSTALLATION
DES FOURS ENCASTRABLES
MANUALE D’ISTRUZIONI
FORNO
INSTRUCCIONES DE USO
HORNOS EMPOTRABLES
BEDIENUNGSANLEITUNG
BACKOFEN
KULLANIM KILAVUZU
FIRINLAR
POKYNY PRO UŽIVATELE
TROUBY
EN
FR
IT
ES
DE
TR
CZ
02
17
33
48
64
79
95
CANDY HOOVER GROUP S.R.L. • Via Privata Eden Fumagalli • 20047 Brugherio Milano Italy
Page 2

Safety Indications
• WARNING: the appliance and accessible parts become hot during use.
Be careful not to touch any hot parts.
•WARNING: the accessible parts can become hot when the grill is in
use. Children should be kept at a safe distance.
•WARNING: ensure that the appliance is switched off before replacing
the bulb, to avoid the possibility of electric shocks.
•WARNING: in order to avoid any danger caused by the accidental
resetting of the thermal interruption device, the appliance should not
be powered by an external switching device, such as a timer, or be
connected to a circuit that is regularly switched on and off.
•WARNING: before initiating the automatic cleaning cycle:
- clean the oven door;
- remove large or coarse food residues from the inside of the oven using
a damp sponge. Do not use detergents;
- remove all accessories and the sliding rack kit (where present);
- do not place tea towels
• In ovens with meat probe it is necessary, before making the cleaning
cycle, close the hole with the nut provided. Always close the hole with
the nut when the meat probe is not used.
•Children under 8 should be kept at a safe distance from the appliance
if not continuously supervised.
•Children should not play with the appliance. The appliance can be
used by those aged 8 or over and by those with limited physical,
sensorial or mental capacities, without experience or knowledge of the
product, only if supervised or provided with instruction as to the
operation of the appliance, in a safe way with awareness of the possible
risks.
•Cleaning and maintenance should not be carried out by unsupervised
children.
•Do not use rough or abrasive materials or sharp metal scrapers to
clean the oven door glasses, as they can scratch the surface and cause
the glass to shatter.
•The oven must be switched off before removing the removable parts
and, after cleaning, reassemble them according the instructions.
EN 02
Page 3

•Only use the meat probe recommended for this oven.
•Do not use a steam cleaner.
•Put the plug into a socket equipped with a third contact which
corresponds to the earth and which must be connected and in
operation. For models without a plug, attach a standard plug to the
cable that is able to bear the load indicated on the tag. The earth
conductor is yellow-green in colour. This operation should be carried
out by a suitably qualified professional. In case of incompatibility
between the socket and the appliance plug, ask a qualified electrician to
substitute the socket with another suitable type. Connection to the
power source can also be made by placing an omnipolar breaker
between the appliance and the power source that can bear the
maximum connected load and that is in line with current legislation. The
yellow-green earth cable should not be interrupted by the breaker. The
socket or omnipolar breaker used for the connection should be easily
accessible when the appliance is installed.
•If the power cable is damaged, it should be substituted with a cable or
special bundle available from the manufacturer or by contacting the
customer service department.
If the cable is damaged, replace it promptly in accordance with the
following instructions:
- open the cover of the terminal block;
- remove the power cable and substitute it with a similar cable which is
compatible with the appliance (type H05VV-F, H05V2V2-F).
•This operation should be carried out by a suitably qualified
professional. The earth conductor (yellow-green) must be
approximately 10 mm longer than the other conductors. For any
repairs, refer only to the Customer Care Department and request the
use of original spare parts.
•Failure to comply with the above can compromise the safety of the
appliance and invalidate the guarantee.
•Any excess of spilled material should be removed before cleaning.
•During the pyrolytic cleaning process, surfaces can heat up more than
usual, children should therefore be kept at a safe distance.
EN 03
Page 4

Summary
General Instructions
5
Product Description
7
Use of the Oven
8
Oven Cleaning and Maintenance
13
1.1 Safety indications
1.2 Electrical safety
1.3 Recommendations
1.4 Installation
1.5 Waste management
1.6 Conformity declaration
2.1 Overview
2.2 Accessories
2.3 First use
3.1 Display description
3.2 Cooking modes
4.1 General notes on cleaning
4.2 Steam cleaning
4.3 Maintenance
• Removal and cleaning of grills
• Removal of the oven window
• Removal and cleaning of the glass
door
• Changing the bulb
Troubleshooting
16
5.1 F.A.Q.
EN 04
Page 5

1. General Instructions
We thank you for choosing one of our products. For the
best results with your oven, you should read this
manual carefully and retain it for future reference.
Before installing the oven, take note of the serial
number so that you can give it to customer service staff
if any repairs are required. Having removed the oven
from its packaging, check that it has not been damaged
during transportation. If you have doubts, do not use
the oven and refer to a qualified technician for advice.
Keep all of the packaging material (plastic bags,
polystyrene, nails) out of the reach of children. When
the oven is switched on for the first time, strong
smelling smoke can develop, which is caused by the glue on the insulation panels surrounding the oven
heating for the first time. This is absolutely normal and, if it occurs, you should wait for the smoke to
dissipate before putting food in the oven. The manufacturer accepts no responsibility in cases where
the instructions contained in this document are not observed.
NOTE: the oven functions, properties and accessories cited in this manual will vary, depending on the
model you have purchased.
1.1 Safety Indications
Only use the oven for its intended purpose, that is only for the cooking of foods; any other use, for
example as a heat source, is considered improper and therefore dangerous. The manufacturer cannot
be held responsible for any damage resulting from improper, incorrect or unreasonable usage.
The use of any electrical appliance implies the observance of some fundamental rules:
- do not pull on the power cable to disconnect the plug from the socket;
- do not touch the appliance with wet or damp hands or feet;
- in general the use of adaptors, multiple sockets and extension cables is not recommended;
- in case of malfunction and/or poor operation, switch off the appliance and do not tamper with it.
1.2 Electrical Safety
ENSURE THAT AN ELECTRICIAN OR QUALIFIED TECHNICIAN MAKES THE ELECTRICAL CONNECTIONS.
The power supply to which the oven is connected must conform with the laws in force in the country of
installation. The manufacturer accepts no responsibility for any damage caused by the failure to observe
these instructions. The oven must be connected to an electrical supply with an earthed wall outlet or a
disconnector with multiple poles, depending on the laws in force in the country of installation. The
electrical supply should be protected with suitable fuses and the cables used must have a transverse
section that can ensure correct supply to the oven.
CONNECTION
The oven is supplied with a power cable that should only be connected to an electrical supply with 220240 Vac 50 Hz power between the phases or between the phase and neutral. Before the oven is
connected to the electrical supply, it is important to check:
- power voltage indicated on the gauge;
- the setting of the disconnector.
The grounding wire connected to the oven's earth terminal must be connected to the earth terminal of
the power supply.
WARNING
Before connecting the oven to the power supply, ask a qualified electrician to check the continuity of the
power supply's earth terminal. The manufacturer accepts no responsibility for any accidents or other
problems caused by failure to connect the oven to the earth terminal or by an earth connection that has
defective continuity.
EN 05
Page 6

NOTE: as the oven could require maintenance work, it is advisable to keep another wall socket available
so that the oven can be connected to this if it is removed from the space in which it is installed. The
power cable must only be substituted by technical service staff or by technicians with equivalent
qualifications.
1.3 Recommendations
After each use of the oven, a minimum of cleaning will help keep the oven perfectly clean.
Do not line the oven walls with aluminium foil or single-use protection available from stores. Aluminium
foil or any other protection, in direct contact with the hot enamel, risks melting and deteriorating the
enamel of the insides. In order to prevent excessive dirtying of your oven and the resulting strong
smokey smells, we recommend not using the oven at very high temperature. It is better to extend the
cooking time and lower the temperature a little. In addition to the accessories supplied with the oven,
we advise you only use dishes and baking moulds resistant to very high temperatures.
1.4 Installation
The manufacturers have no obligation to carry this out. If the assistance of the manufacturer is required
to rectify faults arising from incorrect installation, this assistance is not covered by the guarantee. The
installation instructions for professionally qualified personnel must be followed. Incorrect installation
may cause harm or injury to people, animals or belongings. The manufacturer cannot be held
responsible for such harm or injury.
The oven can be located high in a column or under a worktop. Before fixing, you must ensure good
ventilation in the oven space to allow proper circulation of the fresh air required for cooling and
protecting the internal parts. Make the openings specified on last page according to the type of fitting.
1.5 Waste management and environmental protection
This appliance is labelled in accordance with European Directive 2012/19/EU regarding
electric and electronic appliances (WEEE). The WEEE contain both polluting substances
(that can have a negative effect on the environment) and base elements (that can be
reused). It is important that the WEEE undergo specific treatments to correctly remove and
dispose of the pollutants and recover all the materials. Individuals can play an important
role in ensuring that the WEEE do not become an environmental problem; it is essential to
follow a few basic rules:
- the WEEE should not be treated as domestic waste;
- the WEEE should be taken to dedicated collection areas managed by the town council or a registered
company.
In many countries, domestic collections may be available for large WEEEs. When you buy a new
appliance, the old one can be returned to the vendor who must accept it free of charge as a one-off, as
long as the appliance is of an equivalent type and has the same functions as the purchased appliance.
SAVING AND RESPECTING THE ENVIRONMENT
Where possible, avoid pre-heating the oven and always try to fill it. Open the oven door as infrequently
as possible, because heat from the cavity disperses every time it is opened. For a significant energy
saving, switch off the oven between 5 and 10 minutes before the planned end of the cooking time, and
use the residual heat that the oven continues to generate. Keep the seals clean and in order, to avoid any
heat dispersal outside of the cavity. If you have an electric contract with an hourly tariff, the "delayed
cooking" programme makes energy saving more simple, moving the cooking process to start at the
reduced tariff time slot.
1.6 Declaration of compliance
The parts of this appliance that may come into contact with foodstuffs comply with the provisions of EEC
Directive 89/109.
By placing the mark on this product, we are confirming compliance to all relevant European safety,
health and environmental requirements which are applicable in legislation for this product.
EN 06
Page 7

2. Product Description
2.1 Overview
1
3
5
4
6
2
2.2 Accessories
Drip pan
1
Collects the residues that drip during the cooking
of foods on the grills.
Led vision
3
1. Control panel
2. Shelf positions
(lateral wire grid if included)
3. Metal grill
4. Drip pan
5. Fan (behind the steel plate)
6. Oven door
Metal grill
2
Holds baking trays and plates.
Chef Panel
4
Is an illumination system which replaces the
traditional « light bulb ». 14 LED (for non-pyrolitic
versions) or 10 High Power LED (for pyrolitic
versions) lights are integrated within the door.
These produce white high quality illumination
which enables to view the inside of the oven with
clarity without any shadows on all the shelves.
Advantages :
This system, besides providing excellent illumination
inside the oven, lasts longer than the traditional light
bulb its easier and to maintain and most of all saves
energy.
-Optimum view
-Long life illumination
-Very low energy consumption, -95% in comparison
with the traditional illumination.
EN 07
All ovens with this technology boast a function
typical of professional models, the fruit of
innovative technologies and the vast experience
acquired by the Candy Hoover Group in this
sector. The Chef Panel is an air conveyor that
increases air circulation inside the oven. This
allo w s for a n i n crea s e in oven coo k i ng
performance, more standard cooking of food at
all temperatures, shorter cooking times and,
lastly, a uniform temperature distribution inside
the oven.
Page 8

Meat-probe (depends on the oven model)
5
Measures the internal temperature of food during
cooking. Insert the meat-probe into the hole on the top
of the cavity.
– Prepare the food and properly insert the meat probe
into the food. Do not preheat or start cooking before
properly inserting the meat probe. Probe should be
inserted into the food and receptacle while the oven is
still cool.
– Do not insert the meat probe in the frozen food.
– Do not leave the meat probe inside the oven when it's not used: it could damage.
2.3 First Use
PRELIMINARY CLEANING
Clean the oven before using for the first time. Wipe over external surfaces with a damp soft cloth. Wash
all accessories and wipe inside the oven with a solution of hot water and washing up liquid. Set the
empty oven to the maximum temperature and leave on for about 1 hour, this will remove any lingering
smells of newness.
3. Use of the Oven
3.1 Display description
ON / OFF
EXTRA
Cooking
duration
Clock
set
The oven is switched on and off with this button.
Cooking
end Timer
If the oven is switched off, the display shows the clock. When
the oven is inactive, all the functions are available except the
cooking duration and end of cooking.
If the clock is not set, the oven does not work: the display
flashes, showing "12:00" and the only functioning key is
Extra. From the Extra key, the following functions can be set:
Child
lock
WiFi
EN 08
Page 9

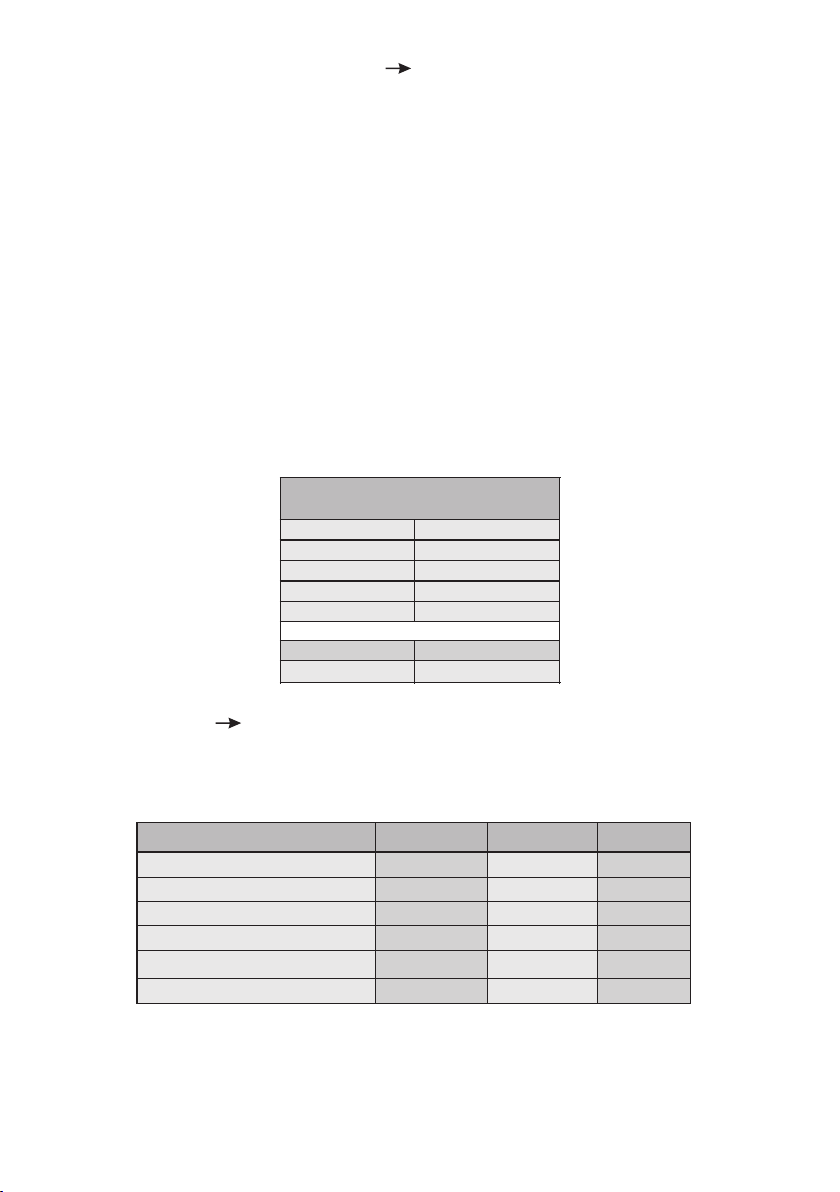
FUNCTION HOW TO DEACTIVATE WHAT IT DOES WHY IT IS NEEDED
COOKING
DURATION
END OF
COOKING
TIMER
SETTING
THE CLOCK
CHILD
SAFETY
HOW TO USE
NB: can only be set with an
active cooking programme.
Press EXTRA twice and set
the time using the “+” and
“-” keys , confi rmin g by
pressing "SELECT".
The display shows “00:00”
if no cooking duration has
been inserted, otherwise
the display shows the time
remaining.
NB: can only be set with an
active cooking programme.
Press EXTRA enough times
to illuminate the icon, set
the end of cooking time
using the “<” and “>” keys
and confirm by pressing
"SELECT".
Press EXTRA enough times
to illuminate the icon, set
the end of cooking time
using the “<” and “>” keys
and confirm by pressing
"SELECT".
The cooking duration is
automatically calculated.
• Th e d i s p la y s ho ws
“00:00” if no time has been
in se rt ed or th e ti me
re ma in in g i f t hi s h as
already been set.
Press EXTRA enough times
to illuminate the icon and
use the “<” and “>” keys to
set the time, confirming by
pressing SELECT.
•Switched on for the first
t i m e , t h e d i s p l a y
il lum ina tes and sho ws
"12:00".
•To modify the time, press
EXTRA enough times to
illuminate the icon and use
the “<” and “>” keys to set
the time, confirming it by
pressing SELECT.
•P res s t he EX TRA key
enough times to illuminate
the icon and then either
th e “ <” or “> ” ke y to
activate this function: the
display will show ON; to
confirm press SELECT.
•To modify cooking before
the set time, press EXTRA
twice a nd regu late th e
cooking time as required
using the “<” and “>” keys,
before pressing "SELECT"
once more.
•To cancel the cooking
duration, reset the display
to “00:00”.
To modif y t he end of
coo king before the s et
time, press EXTRA enough
times to illumin ate the
icon, regulate the end of
cooking time as required
using the “<” and “>” keys
and confirm by pressing
"SELECT".
To canc e l t he e nd o f
cooking time, reset the
display to “00:00”.
•To modify the timer, press
EXTRA enough t imes to
i ll u mi n at e th e ic on ,
regulate the cooking time
as required using the “<”
and “>” keys and confirm
by pressing "SELECT".
•P ress th e E XTRA key
enough times to illuminate
the icon and then either
th e “ <” or “>” key to
deactivate this function:
the display will show OFF;
to confirm press SELECT.
When a cooking programme
t e rm in at es , t he ov en
sw it ches of f w hile the
display shows "END" (the
cooking programme icon
remains on) until the On/Off
button, the only functioning
key, is pressed. When a
c o ok i n g p r o gr a mm e
terminates, an alarm will
sound.
W h e n a c o o k i n g
programm e ter mi nate s,
the oven switches off while
the display shows "END"
(the cooking programme
icon remains on) until the
On/Off button, the only
functioning key, is pressed.
W h e n a c o o k i n g
programme terminates, an
alarm will sound.
•This function activates an
alarm that sounds for a few
seconds when the set time
expires (this function does
not switch the oven off).
You ca n sele ct a time
between 00:00 and 23:59.
•It allows you to set the
time that appears on the
display.
•If the function is active
only the "Extra" button, to
deactivate the function,
and "On/Off" button can
be used.
When the cooking time has
f i n i s h e d , t h e o v e n
automatically switches off and
the alarm sounds for a few
seconds.
•This function is also used for
cooking that can be scheduled
in advance.
•If a cooking programme is set,
it will be lost if the "F" key is
pressed.
•If delayed cooking is set, the
ove n switches o ff and t he
display shows the current time
while the cooking programme,
cooking duration and end of
cooking icons are illuminated.
•If a cooking programme is set,
by pressing the “<” and “>”
keys you can see and modify
the temperature set: at the first
t o u c h , t h e o p e r at i n g
temperature is shown while
another touch will allow you to
modify said temperature.
• Th e ti m er f u nc t io ns
regardless of whethe r the
oven is switched on.
• Th e a l a r m f u nc t io ns
regardless of whether the
oven is switched on.
•This f unction i s usefu l
when there are children in
the house.
EN 09
Page 10

WiFi (depends on the oven model)
Pressing "Extra" on the timer display allows you to select the WiFi menu. In the Wi-Fi menu if you press the "< >" buttons you can select:
- Off: Wi-Fi is off; the oven is not controllable via the app.
- On: Wi-fi is on and the oven is only controllable via the app. It means that it is not possible to select cooking
functions, recipes and temperature from the display. Only the Wi-Fi menu is available by pressing "Extra". You
can switch the oven off using the On/Off button, but you cannot switch it back on again via the display, it can
only be switched on via the app.
- Reset: This setting should be used to enrol the oven the first time it connects to your Wi-Fi network and to
reset the current Wi-Fi connection to allow a new enrolment. Once selected, the appliance gives you 5
minutes to complete the enrolment process. During this process the cooking functions, recipes and
temperature setting are not accessible from the display. Only the Wi-Fi menu is available by pressing "Extra".
You can switch the oven off using the On/Off button, but you cannot switch it back on again via the display, it
can only be switched on via the app. To exit the enrolment/reset procedure via the display, press "Extra" and
then use "< >" buttons to select "Off". After five minutes, the appliance will exit the enrolment/reset
procedure automatically.
- Read: the oven sends its status to the app but it cannot be controlled remotely. The oven must be enrolled
before this is possible.
If Wi-Fi is not configured it is only possible to choose between off and reset.
When the oven is connected to Wi-Fi, the default cooking time duration is 5 hours, but this can be modified by
the user.
Wi-Fi Enrolment:
To enroll the appliance for Wi-Fi, press "Extra" on the display until the Wi-Fi icon lights, then select "Reset" by
pressing "< >". The procedure on the app should then be followed. Once selected, the appliance gives you 5
minutes to complete the enrolment process.
Wi-Fi icon
- icon not lit: Wi-Fi is off.
- Icon blinks 1 second on an 1 second off: the oven is accessible to your Wi-Fi network and ready to be enrolled.
If the enrolment has not been successful, the Wi-Fi icon will switch off after 5 minutes.
- Icon is permanently lit: the oven is connected to your Wi-Fi router.
- The icon blinks 3 seconds on and 1 second off: the oven is trying to connect to your Wi-Fi router.
- The icon blinks 1 second on and 3 seconds off: the oven is in read only mode.
HOOVER :
For detailed information on HOW TO CONNECT your OneFi appliance and HOW
TO USE IT effectively, go to http://wizardservice.candy-hoover.com/
LANGUAGE SETTING The language can be set when
the oven is switched off by pressing the Extra and Select
buttons simultaneously and for 3". The current language is
Pyro
shown on the display and can be changed by pressing the
“<” or “>” keys, confirming it by pressing SELECT. Available
languages are: Italian, English, French and German.
Defost
SELECT Any selection must be confirmed. If not
confirmed within 15 seconds, the selection is cancelled.
Oven box
Turnspit
Circular
heating element
Bottom heating element
Grill
Fan
By changing menu, any unconfirmed selection is lost.
“HOT” ICON When a cooking programme finishes or when the oven switches off, if the oven is still
hot, the display shows the current time alternating with the message “HOT” at 3" intervals.
EN 10
Page 11
MEAT PROBE (depends on the oven model) If the meat probe is identified, the display shows
"PROBE"; if the meat probe is inserted once a cooking programme is underway, the programme stops.
When a cooking programme is selected, the display shows the default temperature but is never higher
than 200°C: the selectable temperature is also limited to 200°C.
When the temperature is confirmed, by pressing "Select", the display shows “Ϙ 40°”: it is now possible
to select the meat probe target temperature, between 30°C and 90°C at 1°C intervals. When the meat
probe temperature is confirmed, press the "Select" key and the display shows “Ϙ” followed by the
actual temperature taken by the meat probe (1 degree intervals). As soon as the meat probe reaches
the set temperature, the cooking programme terminates. If a cooking programme is set with the meat
probe, by pressing the “-” and “+” keys you can see and modify the temperature of the meat probe: at
the first touch of one of the two keys, the display shows the meat probe target temperature, while at the
next touch you can change the selected temperature of the probe.
If the user changes the cooking programme, the meat probe temperature setting is reset. Repeat the
setting sequence to select a new target temperature. The meat probe cannot be used with pre-set
cooking or with the separating plate (if present) inside the oven: in this case the display shows“Ϙ NO”
and will not execute any command until the meat probe is removed. Defrost, grill, any program with
turnspit, pyrolysis and any programmed cooking are not allowed with the meat probe (they are not
shown on the menu).
MEAT PROBE
RECOMMENDED TEMPERATURES
Meat
Rare
Medium rare
Medium
Well done
56
58
60
62
Salmon
Chicken
35
min 68
PRE-SETTED RECIPES When a recipe is selected the display shows “R” followed by the number of
the recipe and shows the correspondent way of cooking.
The available recipes are the following:
RECIPE
R1- Lasagne
R2- Roast/Oven cooked chicken
R3- Crusted bream
R4- Baked potatoes
R5- Omelette
R6- Apple pie
COOKING
METHOD
Static + fan
Static + fan
Static + fan
Static + fan
Static
Static + fan
TEMPERATURE
150°
180°
180°
180°
160°
180°
COOKING
DURATION
45’
40’
40’
45’
25’
45’
NB: It is not possible to change neither the temperature nor the cooking duration.
EN 11
Page 12

3.2 Cooking Modes
Function
Dial
T °C
default
T °C
range
Function (Depends on the oven model)
LAMP: Turns on the oven light.
40
40 ÷ 40
180
50 ÷ 240
210
50 ÷ 240
*
220 50 ÷ 280
210 50 ÷ 230
210
50 ÷ 230
200
150 ÷ 220
L1 ÷ L5
L3
220 50 ÷ 230
*
*Tested in accordance with the CENELEC EN 60350-1 used for definition of energy class.
190 50 ÷ 230
DEFROST: When the dial is set to this position. The fan circulates air at room
temperature around the frozen food so that it defrosts in a few minutes
without the protein content of the food being changed or altered.
FAN COOKING: We recommend you use this method for poultry, pastries, fish
and vegetables. Heat penetrates into the food better and both the cooking and
preheating times are reduced. You can cook different foods at the same time
with or without the same preparation in one or more positions. This cooking
method gives even heat distribution and the smells are not mixed.
Allow about ten minutes extra when cooking foods at the same time.
CONVENTIONAL COOKING: Both top and bottom heating elements are used.
Preheat the oven for about ten minutes. This method is ideal for all traditional
roasting and baking. For seizing red meats, roast beef, leg of lamb, game, bread,
foil wrapped food (papillotes), flaky pastry. Place the food and its dish on a shelf
in mid position.
BOTTOM: Using the lower element. Ideal for cooking all pastry based dishes.
Use this for flans, quiches, tarts, pate and any cooking that needs more heat
from below.
FAN + LOWER ELEMENT: The bottom heating element is used with the fan
circulating the air inside the oven. This method is ideal for juicy fruit flans, tarts,
quiches and pâté.
It prevents food from drying and encourages rising in cakes, bread dough and
other bottom-cooked food.
Place the shelf in the bottom position.
FAN ASSISTED GRILL : use the turbo-grill with the door closed.
The top heating element is used with the fan circulating the air inside the oven.
Preheating is necessary for red meats but not for white meats. Ideal for cooking
thick food items, whole pieces such as roast pork, poultry, etc. Place the food to be
grilled directly on the shelf centrally, at the middle level. Slide the drip tray under the
shelf to collect the juices. Make sure that the food is not too close to the grill. Turn
the food over halfway through cooking.
GRILL: use the grill with the door closed.
The top heating element is used alone and you can adjust the temperature. Five
minutes preheating is required to get the elements red-hot. Success is guaranteed
for grills, kebabs and gratin dishes. White meats should be put at a distance from the
grill; the cooking time is longer, but the meat will be tastier. You can put red meats
and fish fillets on the shelf with the drip tray underneath. The oven has two grill
positions:
Grill: 2140 W Barbecue: 3340 W
PIZZA - With this function hot air circulated in the oven to ensure perfect result
for dishes such as pizza or cake.
The "ECO" function allows you to cook in a healthier way, by reducing the amount of
fat or oil required. Thanks to the use of the grill and fan combined with a pulsating
cycle of air, it will retain the moisture content of the food, grilling the surface and
using a shorter cooking time, without compromising on taste.
It is particularly suitable for cooking meat, roasted vegetables and omelettes. The
cycle of pulsed air keeps the humidity inside the oven and the moisture content of
the food, preserving the nutritional values and ensuring a rapid uniform cooking
process.
Try all your recipes and reduce the amount of dressing you usually use and
experience the lightness of this new function!
EN 12
Page 13

4. Oven cleaning and maintenance
4.1 General notes on cleaning
The lifecycle of the appliance can be extended through regular cleaning. Wait for the oven to cool before
carrying out manual cleaning operations. Never use abrasive detergents, steel wool or sharp objects for
cleaning, so as to not irreparably damage the enamelled parts. Use only water, soap or bleach-based
detergents (ammonia).
GLASS PARTS
It is advisable to clean the glass window with absorbent kitchen towel after every use of the oven. To
remove more obstinate stains, you can use a detergent-soaked sponge, well wrung out, and then rinse
with water.
OVEN WINDOW SEAL
If dirty, the seal can be cleaned with a slightly damp sponge.
ACCESSORIES
Clean accessories with a wet, soapy sponge before rinsing and drying them: avoid using abrasive
detergents.
DRIP PAN
After using the grill, remove the pan from the oven. Pour the hot fat into a container and wash the pan in
hot water, using a sponge and washing-up liquid.
If greasy residues remain, immerse the pan in water and detergent. Alternatively, you can wash the pan
in the dishwasher or use a commercial oven detergent. Never put a dirty pan back into the oven.
4.2 Steam Cleaning
This procedure uses steam to help remove remaining fat and food particles from the oven.
1. Pour 300 ml of water into the bottom of the oven.
2. Set the oven function to Static ( )or Bottom heater ( ).
3. Set the temperature at 90°C.
4. Allow the program to operate for 30 minutes.
5. After 30 minutes switch off the program and allow the oven to cool down.
6. When the appliance is cool, clean the inner surfaces of the oven with a cloth.
Warning: Make sure that the appliance is cool before you touch it.
Care must be taken with all hot surfaces as there is a risk of burns. Use distilled or drinkable water.
300 ml
EN 13
Page 14

4.3 Maintenance
REMOVAL AND CLEANING OF THE SIDE RACKS
1. Unscrew the bolt in an anti-clockwise direction.
2. Remove the side racks by pulling them towards you.
3. Clean the side racks in a dishwasher or with a wet sponge and then dry them immediately.
4. Having cleaned the side racks, put them back in and reinsert the bolts, ensuring that they are fully
tightened.
A
REMOVAL OF THE OVEN WINDOW
1. Open the front window.
2. Open the clamps of the hinge housing on the right and left side of the front window by pushing them
downwards.
3. Replace the window by carrying out the procedure in reverse.
EN 14
Page 15

LOW-E
REMOVAL AND CLEANING OF THE GLASS DOOR
1. Open the oven door.
2.3.4. Lock the hinges, remove the screws and remove the upper metal cover by pulling it upwards.
5.6. Remove the glass, carefully extracting it from the oven door (NB: in pyrolytic ovens, also remove
the second and third glass (if present)).
7. At the end of cleaning or substitution, reassemble the parts in reverse order.
On all glass, the indication "Pyro" must be legible and positioned on the left side of the door, close to the
left-hand lateral hinge. In this way, the printed label of the first glass will be inside the door.
1.
2.
3.
5.
6.
1
2
3
7.
4.
EN 15
Page 16

CHANGING THE BULB
1. Disconnect the oven from the mains supply.
2. Undo the glass cover, unscrew the bulb and replace it with a new bulb of the same type.
3. Once the defective bulb is replaced, replace the glass cover.
5. Troubleshooting
5.1 FAQ
PROBLEM POSSIBLE CAUSE SOLUTION
The oven does not heat up
The oven does not heat up
The oven does not heat up
No reaction of the touch
user interface
The clock is not set Set the clock
The child lock is on
A cooking function and
temperature has not been set
Steam and condensation on
the user interface panel
Deactivate the child lock
Ensure that the necessary
settings are correct
Clean with a microfiber
cloth the user interface
panel to remove the
condensation layer
EN 16
Page 17

Conseils De Securite
• ATTENTION: l'appareil et les parties accessibles deviennent chauds
pendant l'utilisation. Veillez à ne pas toucher les élements chauffants.
• MISE EN GARDE: les parties accessibles peuvent devenir chaudes
lorsque le gril est en cours d'utilisation. Les enfants doivent être
maintenus à une distance de sécurité.
• ATTENTION: le four doit éteint avant de changer l'ampoule, de être
manière à éviter tout risque de .choc électrique
•ATTENTION: pour éviter tout danger dû à une réinitialisation
accidentelle, cet appareil ne doit pas être alimenté par un dispositif de
commutation externe, comme une minuterie, ou connecté à un circuit
qui est régulièrement allumé et éteint par .l'utilisateur
• ATTENTION: avant d’activer la fonction de nettoyage automatique :
- nettoyer la porte du four
- enlever avec une éponge humide les résidus les plus gros. Ne pas
utiliser de détergents;
- sortir tous les accessoires ainsi que le kit éventuel de glissières
coulissantes ;
- ne pas placer de torchons ou de maniques sur la poignée du four.
• Dans les fours avec sonde à viande, il est nécessaire, avant d'effectuer
le cycle de nettoyage de refermer l'embout avec l'écrou fourni.
Refermer toujours le trou avec l'écrou lorsque la sonde de viande n'est
pas utilisé .
• Les enfants de moins de 8 ans doivent être tenus à l'écart à moins
d'être surveillés continuellement.
• Les enfants ne doivent pas jouer avec l'appareil. Cet appareil n'est pas
destiné à être utilisé par des personnes (y compris les enfants) dont les
capacités physiques, sensorielles ou mentales sont réduites, ou ayant
un manque d'expérience et de connaissances, à moins qu'elles n'aient
été formées à l'utilisation de l'appareil, par une personne responsable
de leur sécurité.
• Le nettoyage et entretien ne doivent pas être effectués par des
enfants sans surveillance.
• Ne pas utiliser de matériaux rêches, abrasifs, ou de racloirs
métalliques tranchants pour nettoyer les portes en verre du four car ils
peuvent rayer la surface entrainant des risques d'exposions.
FR 17
Page 18

•Le four doit être éteint avant le démontage des accessoires. Après
nettoyage, remonter les accessoires en suivant les instructions.
• Utilisez uniquement la sonde thermique recommandée pour ce four.
• Ne pas utiliser un nettoyeur à vapeur.
• Brancher la fiche dans une prise de courant équipée d’un troisième
contact correspondant à la prise de terre. Monter sur le fil une prise
normalisée capable de supporter la charge indiquée sur la plaquette. Le
fil conducteur de masse à la terre est identifié par les couleurs jaune et
vert. Veiller à ce que votre installation soit capable de supporter toute la
puissance absorbée par le four. Si votre installation électrique n’est pas
conforme faites la modifier par un électricien afin de prévenir tous
risques. On peut également effectuer le branchement au réseau en
interposant entre l’appareil et le réseau un interrupteur omnipolaire
dimensionnée en fonction de la charge et conforme aux normes en
vigueur. Le fil de terre jaune et vert ne doit pas être interrompu par
l’interrupteur. La prise et l’interrupteur omnipolaire utilisés doivent
être facilement accessibles une fois l’appareil électroménager installé.
• Si le cordon d'alimentation est endommagé, il doit être remplacé par
un cordon spécial disponible auprès du fabricant ou de stations de
dépannage agrées.
Si le câble est endommagé, remplacez-le rapidement en conformité
avec les indications suivantes:
- Ouvrir le couvercle de la boîte à bornes;
- Retirer le câble d'alimentation et le remplacer par un câble similaire
adaptée à l'appareil (type , H05V2V2-F).H05VV-F
• Cette opération doit être effectuée par du personnel qualifié. Le
conducteur de terre (jaune-vert) doit être environ 10 mm plus long que
les conducteurs de ligne. Pour toute réparation, reportez-vous
seulement à un centre de service technique agréé et demander
l'utilisation de pièces de rechange d'origine.
• Le non respect de ce qui précède peut compromettre la sécurité de
l'appareil.
• Tout excédent de produit déversé doit être enlevé avant de le
nettoyer.
• Pendant la pyrolyse, les surfaces peuvent chauffer plus que
d'habitude: les enfants doivent donc être maintenus à une distance de
sécurité.
FR 18
Page 19

SOMMAIRE
Instructions Générales
20
Description du produit
22
Utilisation du Four
24
Nettoyage du four et
maintenance
29
1.1 Indications de sécurité
1.2 Sécurité électrique
1.3 Recommandations
1.4 Installation
1.5 La gestion des déchets et la
protection de l'environnement
1.6 Déclaration de conformité
2.1 Vue d'ensemble
2.2 Accessoires
2.3 Première utilisation
3.1 Description de l'affichage
3.2 Mode de cuisson
4.1 Remarques générales concernant
le nettoyage
4.2 Nettoyage à la vapeur
4.3 Entretien
• Retrait et nettoyage des grilles
• Retrait de la porte du four
• Retrait et nettoyage des vitres
• Remplacement de l'ampoule
Dépannage
32
5.1 F.A.Q.
FR 19
Page 20

1. Instructions générales
Nous vous remercions d'avoir choisi un de nos produits.
Pour obtenir les meilleurs résultats avec votre four, vous
devez lire attentivement ce manuel et le conserver pour
toute consultation ultérieure. Avant d'installer le four,
notez le numéro de série, il vous sera demandé par le
support technique si des réparations sont nécessaires.
Après avoir enlevé le four de son emballage, vérifiez
qu'il n'a pas été endommagé pendant le transport. Si
vous avez des doutes, ne pas utiliser le four et se référer
à un technicien qualifié pour obtenir des conseils.
Conservez tous les matériaux d'emballage (sacs en
plastique, polystyrène, clous) hors de la portée des
enfants.Lors de la première utilisation du four, il peut se produire un dégagement de fumée âcre
provoqué par le premier échauffement de la colle des panneaux d’isolation enveloppant le four. Ce
phénomène est normal. Attendez que la fumée cesse avant de cuire des aliments. Le fabricant décline
toute responsabilité dans les cas où les instructions contenues dans le présent document ne sont pas
respectées.
REMARQUE: les fonctions du four, les propriétés et les accessoires cités dans ce manuel peuvent varier
selon les modèles.
1.1 Indications de sécurité
Utilisez uniquement le four à sa destination, qui est seulement pour la cuisson des aliments; toute autre
utilisation, par exemple comme une source de chaleur, est considérée comme impropre et donc
dangereuse. Le fabricant ne peut être tenu responsable de tout dommage lié à une mauvaise utilisation
ou a des modifications techniques du produit.
L'utilisation de tout appareil électrique implique le respect de certaines règles fondamentales:
- Ne pas tirer sur le fil électrique pour débrancher la prise.
- Ne pas toucher l'appareil avec les mains ou les pieds mouillés ou humides;
- En général l'utilisation d'adaptateurs, de prises multiples et de rallonges est déconseillé;
- En cas de dysfonctionnement et / ou de mauvais fonctionnement, éteindre l'appareil et ne pas y
toucher.
1.2 Sécurité électrique
LE BRANCHEMENT ELECTRIQUE DOIT ÊTRE REALISE PAR UN INSTALLATEUR AGREE OU UN
TECHNICIEN DE E.QUALIFICATION SIMILAIR
L'alimentation électrique à laquelle le four est connecté doit être conforme aux lois en vigueur dans le
pays d'installation. Le fabricant décline toute responsabilité pour tout dommage causé par le non
respect de ces instructions. Le four doit être raccordé à l'alimentation électrique avec une prise murale
reliée à la terre ou par l'intermédiaire d'un dispositif à coupure omnipolaire, selon les lois en vigueur
dans le pays d'installation. L'alimentation électrique doit être protégée par des fusibles appropriés et les
câbles utilisés doivent avoir une section transversale qui peut assurer une alimentation normale du four.
CONNEXION
Le four est livré avec un câble d’alimentation permettant le raccordement sous une tension électrique
de 230 V entre les phases ou entre phase et neutre. Le raccordement devra être effectué après avoir
vérifié:
- La tension d'alimentation indiquée sur le compteur;
- Le réglage du disjoncteur.
Le fil de protection du cordon (vert/jaune) relié à la Borne Terre de l’appareil doit être relié à la Borne
Terre de l’installation.
FR 20
Page 21

ATTENTION
Faire vérifier la continuité de la terre de l’installation avant de procéder au raccordement. Le fabricant
décline toute responsabilité en cas d'accidents ou d'autres problèmes qui pourraient survenir à l'usage
d'un appareil non relié à la terre, ou relié à une terre dont la continuité serait défectueuse.
REMARQUE: Le four peut nécessiter une opération de S.A.V. Aussi, placez la prise de courant de façon à
pouvoir brancher le four une fois sorti de sa niche. Câble d'alimentation: si le changement du câble
d'alimentation s'avère nécessaire, nous vous demandons de faire réaliser cette opération par le service
après-vente ou une personne de qualification similaire.
1.3 Recommandations
Après chaque utilisation du four, réaliser un petit entretien qui favorisera le nettoyage parfait du four.
Ne pas tapisser les parois du four avec des feuilles en aluminium ou des protections jetables du
commerce. La feuille d'aluminium ou toute autre protection, en contact direct avec l'émail chauffé,
risque de fondre et de détériorer l'émail du moufle. Avant installation de l'appareil, il faut relever le
numéro de série et le noter ci-dessous en cas d'éventuelle demande d'intervention.
Afin d'éviter les salissures excessives de votre four ainsi que les fortes odeurs de fumée pouvant en
résulter, nous recommandons de ne pas utiliser le four à trop forte température. Il est préférable de
rallonger le temps de cuisson et de baisser la température. Nous vous conseillons de n'utiliser que des
plats, des moules à pâtisserie résistants à de très hautes températures.
1.4 Installation
La mise en service de l’appareil est à la charge de l’acheteur, le constructeur est dégagé de ce service.
Les pannes liées à une mauvaise installation ne seront pas couvertes par la garantie. Une mauvaise
installation peut provoquer des dommages aux personnes, aux animaux domestiques; dans ce cas la
responsabilité du constructeur ne peut être engagée. L'installation du four doit être réalisée par un
installateur agréé ou un technicien de qualification similaire. Le four peut être placé en hauteur dans
une colonne ou enchâssé sous un plan de travail. Avant sa fixation: il est indispensable d'assurer une
bonne aération dans la niche d'encastrement afin de permettre la bonne circulation de l'air frais
nécessaire au refroidissement et à la protection des organes intérieurs. Pour cela, réaliser les
ouvertures spécifiées selon le type d'encastrement (dernière page).
1.5 La gestion des déchets et la protection de l'environnement
Le présent appareil est marqué conformément à la directive 2012/19/UE relative aux
déchets d'équipements électriques et électroniques
(DEEE). Les DEEE contiennent à la fois des substances polluantes (qui peuvent avoir des
conséquences négatives sur l'environnement) et des éléments de base (réutilisables). Il est
important de soumettre les DEEE à des traitements spécifiques, en vue d'extraire et
d'éliminer de façon appropriée toutes les substances polluantes, puis de récupérer et
recycler tous les matériaux.
Chacun peut jouer un rôle important quant à la protection de l'environnement contre les DEEE. Pour
atteindre cet objectif, il est impératif de suivre quelques règles élémentaires :
• Les DEEE ne doivent pas être traités comme des déchets ménagers.
• Ils doivent être remis aux points de collecte appropriés gérés par la municipalité ou par des sociétés
immatriculées. Dans plusieurs pays, il est possible de collecter à domicile les DEEE volumineux.
• Lorsque vous achetez un nouvel appareil, vous devez retourner l'ancien au vendeur qui le récupère
gratuitement, au cas par cas, à condition que l'équipement soit de type équivalent et possède les
mêmes fonctions que celui fourni.
FR 21
Page 22

ÉCONOMIE ET R ESPECT DE L'ENVIRONNEMENT
Lorsque cela est possible, éviter le préchauffage du four et éviter de le faire tourner à vide. N'ouvrez la
porte du four que lorsque cela est nécessaire, car il y a des déperditions de chaleur à chaque fois qu'il est
ouvert. Pour une économie d'énergie significative, éteindre le four entre 5 et 10 minutes avant la fin de
cuisson prévue, et utiliser la chaleur que le four continue de générer. Gardez les joints propres et en bon
état, pour éviter toute déperdition d'énergie. Si vous avez un contrat électrique avec un tarif heure
creuse, le programme "cuisson différée" peut vous faire réaliser des économies d'énergie en déplaçant
le début du programme à un intervalle de temps à tarif réduit.
1.6 Declaration De Conformité
Les parties de cet appareil pouvant être en contact avec des substances alimentaires sont conformes à
la prescription de la Dir. CEE 89/109.
En utilisant le symbol sur ce produit, nous déclarons sur notre propre responsabilité que ce produit
est conforme à toutes les normes Européennes relatives à la sécurité, la santé et à l’environnement.
2. Description du produit
2.1. Vue d'ensemble
1
3
2
5
4
1. Panneau de commande
2. Positions des gradins
(gradins fils si inclus)
3. Grille métalique
4. Léchefrite
5. Ventilateur
(derrière la plaque d'acier)
6. Porte du four
6
FR 22
Page 23

2.2. Accessories
1
Léchefrite
Grille métalique
3
Recueille le jus des grillades. Le lèche frite ne doit
pas être utilisé pour les cuissons autres que Grill
et grill pulsé (Il va provoquer un écran de
température entre le bas et le haut de la cavité).
Rien ne doit être posé sur la sole du four (risque de
déformation de l’émail). En cas de non respect de
ces conseils, nous ne pourrons être tenu pour
responsable.
Led vision
2
Ce système d'éclairage remplace les « ampoules »
traditionnelles. 14 LED (pour les versions nonpyrolyse) ou 10 LED haute puissance (pour les
versions pyrolyse) sont intégrées dans la contre
porte du four. Celles-ci illuminent la cavité avec
une lumière diffuse permettant une vision de la
cuisson sans ombres, sur plusieurs niveaux.
Les avantages :
-Visibilité optimales des plats
-Durée de vie prolongée
-Consommation énergétique extrêmement basse
'' -95'' par rapport au système traditionnel
d'éclairage du four
« les appareils dotés de LED blanches de classe 1M
selon la norme IEC 60825 1 : 1993 + A1 :1997 + A2
: 2001 (équivalent a la norme EN 60825-1 :1994 +
A1 :2002 + A2 : 2001 ) la puissance maximale
lumineuse émise est 459nm < 150uW. Donnée
non observée directement avec des instruments
optiques ».
La grille métalique sert de support aux plats.
Sonde à viande (selon )modèle
4
Me s u re de l a t e mpérat u re i nterne de la
nourriture en cours de cuisson. Insérez la sonde à
viande dans l'embout prévu à cet effet.
– Préparez l'aliment et ajoutez proprement la
sonde de via nde dan s l'ali ment . Ne pas
préchauffer ou commencer à cuire avant d'insérer
proprement la sonde de viande. La sonde doit
être insérée dans l'aliment et réceptacle lorsque
le four est encore froid.
– Ne pas insérer la sonde de viande dans l'aliment
congelé.
– Ne pas laisser la sonde de viande dans le four
lorsqu'elle n'est pas utilisée:elle peut endommager.
FR 23
Page 24

Parois Chef
5
Les fours Rosières dotés de ces parois offrent un
résultat de cuisson de type professionnel. Ces parois
sont le fruit d'années de recherche et développement
dans le domaine de la cuisson, avec les plus grands
chefs. Ces parois optimisent la circulation de l'air à
l'intérieur de la cavité, augmentant le rendement de la
cuisson : une cuisson qui garde tous les bienfaits
nutritionnels, des temps de cuisson plus courts, et une
cuisson 100% homogène.
Des viandes plus juteuses, et des pâtisseries plus moelleuses: le développement de parois exclusives
brevetées vous offre des résulats de cuisson professionnels à la maison.
2.3 Première Utilisation
UN PREMIER NETTOYAGE doit être réalisé avant la première utilisation passer un chiffon doux et
humide sur les surfaces extérieures de l'appareil. Nettoyer avec une éponge additionnée de produit
lessiviel, les accessoires et l'intérieur du four. Rincer et sécher. Faire chauffer le four à vide une bonne
heure à la température maximale pour faire disparaître l'odeur du neuf. Pendant cette opération, bien
aérer la pièce.
3. Utilisation du Four
3.1 Description de l'affichage
ON / OFF
EXTRA
Le four s'allume et s'éteint avec ce bouton.
DUREE DE
CUISSON
REGLAGE
DE L'HEURE
FIN DE
CUISSSON
SECURITE
ENFANT
MINUTEUR
WiFi
Si le four s'éteint, l'écran affiche l'heure. Quand le
four est inactif, toutes les fonctions s'affichent sur
l'écran à l'exception de la fonction de durée de
cuisson et de fin de cuisson. Si l'heure n'est pas
réglée, le four ne fonctionne pas et l'heure 12:00
se met à clignoter sur l'écran. A cet instant, la
seule fonction qui marche est la fonction EXTRA.
Le symbole EXTRA, permet le réglage de plusieurs
fonctions (Voir le tableau à la page suivante).
FR 24
Page 25

FONCTION
DUREE DE
CUISSON
FIN DE
CUISSSON
MINUTEUR
REGLAGE
DE L'HEURE
SECURITE
ENFANT
COMMENT L'UTILISER
NB : ce disp os it if es t
fonctionnel une fois que le
programme de cuisson est
activé.
Appuyez deux fois de suite
sur le b outon EXTR A et
détermin ez le temps de
cuisson en vous aidant des
touches "+" et "-". Une fois
que le temps souhaité est
atte int , ap puy ez s ur la
to uch e SEL ECT. L'éc ran
affiche "00:00" si la durée
de cui sso n n' a pas été
i ns é ré e . D a ns l e c as
échéant, l'écran affiche le
temps restant.
NB : c e d ispositif e st
fonctionnel une fois que le
programme de cuisson est
activé.
Appu yez sur le bou to n
E XT RA su ff is a mm en t
longtemps pour que l'icone
s'allume. Determinez la fin
du temps de cuisson en
utilisant les boutons "<" et
" >" e t c o nf i r me z l a
sélection en appuyant sur
le bo uton "S ELECT". La
d ur ée de cu i so n es t
a u t o m a t i q u e m e n t
calculée.
Si aucu n temps n'a été
in séré ou si le temp s
restan t de cui sso n est
éc oulé l' écr an aff iche
00:00
Quand on met en marche
ce tte fon cti on pour la
pre mi ère fois, l'écran
s'allume et indique 12:00.
Po ur mo difier l 'heure
a p p uy e r s u r E X TR A
suffisamment longtemps
jusqu’à ce que le voyant
s'allume puis t iliser les
touches "<" et ">".
Appuyez sur le bouton
E XT RA s uf fi sa mm en t
longtemps po ur qu e le
vo ya nt s 'allume. P uis
appuyer sur la touche "<"
ou ">" pour activer cette
fonction. L'écran affichera
"ON", pour confirmer la
sélection il suffit d'appuyer
sur le bouton "SELECT".
COMMENT LE
DESACTIVER
Pour modifier le temps de
cuisson, appuyez deux fois
sur le bouton EXTRA et
ch oi ssise z l e nouv eau
temps de cuisson en vous
aidant des touches "<" et
">", appuyez sur le bouton
"SELECT" pour confirmer le
nouveau temps choisi.
Pour annuler le temps de
cuisson restant, il suffit de
réinitialiser l'écran à 00:00
Pour modifier le temps de
fin de cuisson, appuyez
suffisamment longtemps
su r l e b outo n E XTRA ,
jusqu'a ce que le voyant
s ' a l l um e . E n s u it e ,
ch oisi ssez le nouv eau
temps de cuisson restant
en vous aidant des touches
"<" et ">", appuyez sur le
bo uton " SEL ECT" pou r
co nfir mer le nouv eau
temps choisi.
Pou r annule r la fi n de
c ui ss on , i l s uf f it d e
réinitialiser l'écran à 00:00
Pour modifier le minuteur,
ap puy er sur la touc he
EXTRA a ssez lo ngtemps
jusqu’à ce qu'elle s'allume.
Une f oi s allumé e, vo us
pouvez régler la durée de
cuisson en appuyant sur les
boutons "<" et ">". Une fois
le temps recherché obtenu,
appuyer sur "SELECT" pour
confirmer votre sélection.
Appuyez s ur le b outo n
E XT RA s uf fi s am me nt
longt emps po ur qu e le
vo ya nt s 'a llum e . P u is
appuyer sur la touche "<"
ou "> " pou r dés acti ver
cette fonct ion. L'é cran
af fi chera "O FF ", p our
confirmer votre sélection il
su ff it d 'appu ye r su r le
bouton "SELECT".
FR 25
FONCTION PRINCIPALE
Quand le programmme de
cuisson prend fin, le four
s'éteint et l'écran affiche
" E N D " ( l ' i c o n e d u
pr ogr amm e de cuiss on
r e st e a ll um ée ). P ou r
l'éteindre il faut appuyer sur
le bouto n On/ Off. Une
alarme retentit pour vous
prévenir que le programme
de cuisson est terminé.
Quand le programmme de
cuisson prend fin, le four
s'éteint et l'écran affiche
" E N D " ( l ' i c o n e d u
programm e de cuis son
re st e al lu mé e ). Po u r
l'éteindre il faut appuyer
sur le bouton On/Off.
Une alarme retentit pour
vo us pr év en ir qu e l e
programme de cuisson est
terminé.
Cette fo nc ti on se rt à
activer une alarme qui se
déclenchera une fois que le
temps de cuisson prendra
fin. Attenti o n : ce tte
fonc tion n'éteint pas le
four. Vous pouvez choisir
une période de temps qui
varie de 00:00 à 23:53
Cette fonction permet de
sélectionner le temps qui
apparaîtra sur votre écran.
Si la fonction est activée ,
seul la touche EXTRA et
On/ Off pe ut al ors être
utilisé.
POURQUOI QUELS
BESOINS ?
Lors que le temps de cuisson
est écoulé, le four s'éteint
au tom ati que ment et une
alarme se déclenche et dure
quelques secondes.
Cette fonction peut aussi être
utilisée pour les cuissons qui
peuvent être programmées en
avance.
Si un programme de cuisson est
sélectionné, n'appuyez pas sur
le bo uton " F", s ino n v os
données seront perdues.
S i l e d ép ar t d iffé ré es t
programmé, le four s'éteint et
l'écran affiche l'heure pendant
que les fonctions de cuisson,
temps de cuisson et fin de
cuisson sont allumés.
Si un programme de cuisson est
sélectionné en cliquant sur les
to uc hes "< " e t " >", vo us
pourrez voir la température en
appuyant une première fois, et
la modifier en appuyant de
nouveau.
Le minu teur s'en chlench e
même si le four n'est pas
allumé.
L'alarme s'enchlenche même
si le four n'est pas allumé.
Cette fonc ti on es t uti le
lorsque les enfants sont à la
maison.
Page 26

WiFi (selon du four)modèle
La touche "EXTRA" qui se trouve sur l'écran d'affichage permet de
sélectionner le menu WIFI. Si vous appuyer sur les boutons"<>" vous pouvez sélectionner les fonctions
suivantes :
- Off ( Wi-fi non connecté ) : Le four ne peut pas être contrôlé par l'application
- On ( Wi-fi connecté) : le WIFI est activé et uniquement l'application contrôle le four, ce qui signifie qu'il
est impossible de sélectionner les fonctions : cuisson, recette et température sur l'écran d'affichage.
Le menu WIFI s'affiche uniquement lorsque vous appuyez sur la touche "EXTRA". Vous pouvez éteindre
le four en utilisant les boutons Marche/Arrêt mais vous ne pouvez pas le rallumer à partir de l'écran
d'affichage. Vous ne pouvez allumer le four qu'à partir de l'application.
- Reset (Réinitialisation) : Cette fonction doit être utilisée lors de la première connection du four au
réseau WI-FI ou lorsqu'il faut réinitialiser le réseau WIFI si l'on veut que le four se connecte
automatiquement à un autre réseau. Une fois le réseau WIFI choisi, vous avez 5 minutes pour
compléter le processus d'enregistrement. Lors de ce processus, les fonctions: cuisson,recette et
température ne sont pas accessibles à partir de l'écran d'affichage. Seul le menu WIFI est disponible, si
l'on appuie sur la touche "EXTRA". Vous pouvez éteindre le four en utilisant les boutons Marche/Arrêt
mais vous ne pouvez pas le rallumer à partir de l'écran d'affichage. Vous ne pouvez allumer le four qu'à
partir de l'application. Pour sortir du processus d'inscription ou réinitialiser la procédure à travers
l'écran d'affichage, il faut appuyer sur le bouton "EXTRA" et utiliser les boutons "<>"pour sélectionner
la fonction "Off". Après 5 minutes, le dispositif quitte la procédure d'inscription/la procédure de
réinitalisaton automatiquement.
- Read (Lecture) : Le four envoi ses statuts à l'application mais il ne peut etre contrôlé à distance. La
procédure d'inscription doit être faite en amont.
Si le réseau WIFI n'est pas configuré, seules les fonctions Off et Réinitialisation peuvent être utilisées.
Quand le four est connecté au réseau WIFI, le temps de cuisson par défaut est de 5 heures, mais il peut
être modifié par l'utilisateur.
Inscription au réseau WI-FI :
Pour s'inscrire au réseau WI-FI, il faut appuyer sur la touche "EXTRA" présente sur l'écran d'affichage
jusqu'à ce que l'icone WI-FI s'allume,il faut ensuite sélectionner la touche "RESET" en s'aidant des
touches "<>". Sur l'application, la procédure se met jour. Une fois sélectionné, vous avez 5 minutes
pour compléter le processus d'inscription depuis l'application.
L'icône de la WI-FI
- L'icône n'est pas illuminée : Le WI-FI est désactivé
- L'icône s'allume pendant 1 seconde et s'éteint la seconde qui suit : Le four détecte un accés à votre
réseau WI-FI et est prêt à s'enregistrer. Si l'enregristrement échoue, l'icône s'éteindra après 5 minutes.
-L'icône est en permenance illuminée : Le four est connecté à votre routeur WI-FI.
-L'icône s'illumine pendant 3 secondes et s'éteint pendant une seconde : le four tente de se connecter à
votre routeurWI-FI.
-L'icône s'illumine pendant une seconde et s'éteint pendant 3 secondes : Le four est en mode lecture.
HOOVER :
Pour obtenir des informations détaillées concernant le mode de
fonctionnement de OneFi et pour savoir comment cette application s'utilise,
il suffit d'aller sur le site http://wizardservice.candy-hoover.com/
FR 26
Page 27

CHOIX DE LA LANGUE Une fois que le four
est éteint , il est possible de définir la langue de
vo tre cho i x. Il fau t a ppuye r d e m anière
simultanée sur le bouton EXTRA, SELECT
pendant 3 secondes. La langue actuelle s'affiche
sur l'écran, et il est possible de la changer en
appuyant sur les touches "<" et ">". Une fois que
la nouvelle langue est choisie, il suffit d'appuyer
sur la touche SELECT pour valider son choix. Les
langues disponibles sont : Italien, Anglais,
Cavité
Tournebroche
Résistance
circulaire
Grill
Sole
Pyro
Décongélation
Ventilateur
Francais, et Allemand.
SELECT Toutes les choix doivent être validés. Si vous ne validez pas votre sélection dans les 15 secondes, la
sélection s'annule. Si vous changez de menu, toutes les sélections non validées seront perdues.
ICONE "HOT" Si le four est encore chaud à la fin d'une cuisson ou lorsque le four est éteint, l'écran indique
l'heure et alterne avec un message stipulant "CHAUD" à intervales de 3 sec.
SONDE A VIANDE (selon ) Si la sonde à viande est insérée dans l'emplacement prévu à cet effet, modèle
l'écran affiche le mot "SONDE". Si vous insérez la sonde a viande une fois que le programme de cuisson est
commencé, le programme s'arrête automatiquement. Lorsqu'une fonction de cuisson est sélectionnée,
l'écran affiche une température par défaut qui ne peut être supérieure à 200°C. La sélection du degré de
température ne peut dépasser 200°C. Pour confirmer une degré de température, en appuyant sur le bouton
"SELECT", l'écran afficge "Q 40°". Il est alors possible de sélectionner la température souhaitée de la sonde à
viande,variable de 30 à 90°C, avec un intervalle de 1°C. Pour confirmer la température de la sonde à viande
choisie, il suffit d'appuyer sur la touche "SELECT". L'écran affiche alors "Q" suivie de la température réelle à
coeur de la sonde à viande. Une fois que la sonde atteint la température selectionnée, le programme de
cuisson prend fin automatiquement. Si un programme de cuisson est sélectionné avec utilisation de la sonde,
en appuyant sur les touches "-" et "+", vous pouvez a tout moment vérifier ou modifier la température de la
sonde à viande.
Par une simple pression d'une des deux touches, le display indique la température finale que la sonde à viande
devra atteindre. Si vous pressez de nouveau l'une de des deux touches, vous pouvez modifier la température
finale de la sonde à viande.
Si l'utilisateur change de programme de cuisson, la température de la sonde à viande se réinitalise. Il faut
recommencer la manipulation avec la température voulue. La sonde à viande ne peut pas être utilisée avec un
programme de cuisson pré-programmé ou avec un séparateur de cavité (selon modèle). Dans le cas échéant,
l'écran affiche "Q NO" et aucune fonction ne pourra être sélectionnée avant que la sonde à viande soit retirée.
Les fonctions décongélation, grill , tournebroche, pyrolyse, et tous les programmes de cuisson préprogrammés ne peuvent pas être effectués avec une sonde à viande. (elles ne s'affichent pas sur le menu).
TEMPÉRATURES CONSEİLLÉES POUR
LA CUİSSON AVEC SONDE
Viande rouge
Bleu
Saignant
Mi-saignant
A point
Bien Cuit
Saumon
Poulet
50
56
58
60
62
35
min 68
RECETTES PREREGLÉES Quand une recette est sélectionnée,
l'écran affiche "R" suivi du numéro de la recette et gére
automatiquement la cuisson.
Les recettes disponibles sont les suivantes:
RECETTE
R1- Lasagne
R2 - Poulet Rôti
R3 - Filet de lieu
R4 - Tomates farcies
R5 - Quiche lorraine
R6- Apple pie
MODE DE
CUISSON
Chaleur+tournante
Chaleur+tournante
Chaleur+tournante
Chaleur+tournante
Static
Chaleur+tournante
TEMPÉRATURE
150°
180°
180°
180°
160°
180°
TEMPS DE
CUISSON
45’
40’
40’
45’
25’
45’
REMARQUE: Il est impossible de modifier ni la température, ni la
durée de cuisson.
FR 27
Page 28

3.2 Mode de cuisson
Bouton de
sélection
*
**
*
* Programme testé selon le CENELEC, norme européenne EN 60350-1 qui définit la classe énergétique.
T °C
par défaut
40
180
50 ÷ 240
200
50 ÷ 240
220
50 ÷ 280
210 50 ÷ 230
210
50 ÷ 230
200
150 ÷ 220
L3
220 50 ÷ 230
190 50 ÷ 230
T °C
range
40 ÷ 40
L1 ÷ L5
Fonction (selon modèle)
L'ampoule: Allumage de l’éclairage du four
Décongélation: fonctionnement de la turbine de cuisson qui brasse l'air dans
l'enceinte du four. Idéale pour réaliser une décongélation avant une cuisson.
Chaleur brassée: fonction recommandée pour les volailles, les pâtisseries, les
poissons, les légumes... La chaleur pénètre mieux à l'intérieur du mets à cuire
et réduit le temps de cuisson, ainsi que le temps de préchauffage. Vous pouvez
réaliser des cuissons combinées avec préparations identiques ou non sur un ou
deux gradins. Ce mode de cuisson assure en effet une répartition homogène de
la chaleur et ne mélange pas les odeurs.
Prévoir une dizaine de minutes de plus, pour la cuisson combinée.
Convection naturelle: utilisation simultanée de la résistance de sole et de
voûte.
Préchauffer le four une dizaine de minutes. Idéale pour toutes les cuissons à
l'ancienne, pour saisir les viandes rouges, les rosbifs, gigots, gibiers, le pain, les
papillotes, les feuilletages. Placer le mets à cuire à un niveau de gradin moyen.
Sole: Utilisation de la resistance de sole. Ideale pour la cuisson de tartes, de
creme caramel, flans, terrine, toutes preparations qui necessitent une cuisson
par le dessous (cocottes : poulet, boeuf)
Sole brassée: idéale pour les tartes à fruits juteux, les tourtes, les quiches, les
pâtés. Elle évite le dessèchement des aliments et favorise la levée pour les
cuissons de cakes, pâte à pain et autres cuissons par le dessous. Placer la grille
sur le gradin inférieur. Avec ce mode de cuisson, un préchauffage est
nécessaire en Chaleur Brassée pendant une dizaine de minutes.
Turbo-Gril: l'utilisation de la position turbo-gril se fait porte fermée. Un
préchauffage est nécessaire pour les viandes rouges et inutile pour les viandes
blanches. Idéal pour les cuissons de volume épais, des pièces entières telles
que rôti de porc, volailles etc... Placer le mets à cuire directement sur la grille au
centre du four, à un niveau moyen. Glisser le récolte-sauce sous la grille de
façon à récupérer les graisses. S'assurer que le mets ne soit pas trop près du
grilloir. Retourner la pièce à cuire à mi-cuisson.
Gril: l'utilisation du grilloir se fait porte fermée. Un préchauffage de 5 mins est
nécessaire pour le rougissement de la résistance. Succès assuré pour les
grillades, les brochettes et les gratins. Les viandes blanches doivent être écartées
du grilloir ; le temps de cuisson sera alors plus long, mais la viande sera plus
savoureuse. Les viandes rouges et filets de poissons peuvent être placés sur
la grille avec le plat récolte sauce glissé dessous.
Le four a deux positions de gril :
Gril: 2140 W Barbecue: 3340 W
SOLE - Utilisation de la résistance de sole. Idéale pour la cuisson de tartes, de
crème caramel, flans, terrine, toutes préparations qui nécessitent une cuisson
par le dessous (cocottes : poulet, boeuf)
La fonction "COOK LIGHT" vous permet de cuire d'une façon saine, en réduisant
la quantité de graisse ou d'huile nécessaire à la cuisson. Grâce à l'utilisation
combinée du gril, du ventilateur et d'un brassage de l'air, elle permet de
conserver la teneur en humidité des aliments, en cuisant plus rapidement sans
perte de saveurs. Le brassage de l'air d'air maintient l'humidité à l'intérieur du
four et conserve les valeurs nutritionnelles des aliments en assurant un
processus de cuisson rapide et uniforme.
Cette fonction est particulièrement adaptée pour la cuisson des viandes et des
légumes grillés.
Essayer "COOK LIGHT " sur toutes vos recettes et laissez- vous tenter par la
légèreté de cette nouvelle fonction!
FR 28
Page 29

4. Nettoyage du four et maintenance
4.1 Remarques générales sur le nettoyage
Le cycle de vie de l'appareil peut être étendu grâce à un nettoyage régulier. Attendez le refroidissement
du four avant de procéder à des opérations de nettoyage manuel. Ne jamais utiliser de détergents
abrasifs, de laine d'acier ou d'objets pointus pour le nettoyage, l'émail serait irrémédiablement abîmé.
Utilisez uniquement de l'eau, du savon ou des détergents à base d'eau de Javel (ammoniac).
PARTIE VITREE
Il est conseillé de nettoyer la vitre avec du papier absorbant après chaque utilisation du four. Pour
enlever les taches plus tenaces, vous pouvez utiliser une éponge imbibée de détergent, puis rincer à
l'eau.
JOINT DE LA PORTE
Si elle est sale, le joint peut être nettoyé avec une éponge légèrement humide.
ACCESSOIRES
Nettoyer les accessoires avec une éponge et de l'eau savonneuse puis rincer. Eviter d'utiliser des
détergents abrasifs.
LECHEFRITE
Après l'utilisation de la grille, retirez le du four. Prendre soin de reverser les graisses (tièdes) lêchefrite
dans l’évier. Laver et rincer le plat récolte-sauce dans de l’eau chaude, avec une éponge imbibée de
produit lessiviel. Si les résidus restent collés, le faire tremper dans de l’eau et un produit détergent. Il
peut aussi être nettoyé dans un lave-vaisselle ou avec un produit du commerce.
Ne jamais replacer le plat récolte-sauce encrassé dans un four.
4.2 Nettoyage à la vapeur
Le système utilise la vapeur pour éliminer les graisses et les restes de nourritures incrustées sur les
parois du four.
1. Verser 300 ml d’eau au centre de la cavité.
2. Mettre le programme convection naturelle ( ) ou sole seule ( ).
3. Mettre la température sur 90°C.
4. Laisser agir 30 minutes.
5. Une fois les 30 minutes écoulées, éteindre le programme et attendre que le four refroidisse.
6. Une fois que le four est refroidi passer un linge propre pour éliminer les résidus.
Attention: Ne pas toucher les parois tant qu’elles n’ont pas refroidies (risque de brûlures). N’utiliser
que de l’eau potable ou distillée.
300 ml
FR 29
Page 30

4.3 Entretien
RETRAIT ET NETTOYAGE DES GRADINS FILS
1. Dévissez les écrous moletés dans le sens inverse des aiguilles d'une montre.
2. Retirez les en les tirant vers vous.gradins fils
3. Nettoyez les dans le lave-vaisselle ou avec une éponge humide, puis séchez-les gradins fils
immédiatement.
4. Après avoir nettoyé les , les remettre dans le four et revisser les écrous moletés.gradins fils
A
RETRAIT DE LA PORTE DU FOUR
1. Ouvrez la porte.
2. Ouvrez les pinces du boîtier de charnière sur le côté droit et gauche de la fenêtre avant en les
poussant vers le bas.
3. Replacez la porte en procédant en sens inverse.
FR 30
Page 31

RETRAIT ET NETTOYAGE DES VITRES
LOW-E
1. Ouvrez la porte du four.
2.3.4. Bloquer les charnières, enlever les vis et retirez le couvercle métallique supérieur en le tirant vers
le haut.
5.6. Retirez le verre, soigneusement de la porte du four (NB: dans les fours de pyrolyse, retirez l'extraire
également les deuxième et troisième verre (le cas échéant)).
7. A la fin du nettoyage Remonter les pièces dans l'ordre inverse.
Sur toutes les vitres, l'indication "Pyro" doit être lisible et positionné sur le côté gauche de la porte, à
proximité de la charnière latérale gauche. De cette manière, l'étiquette imprimée du premier verre sera
à l'intérieur de la porte.
1.
5.
2.
3.
4.
6.
1
2
3
7.
FR 31
Page 32

REMPLACEMENT DE L'AMPOULE
1. Débranchez le four de la prise.
2. Défaire le couvercle en verre, dévisser l'ampoule et la remplacer par une ampoule du même modèle.
3. Une fois l'ampoule remplacée, remettre le couvercle en verre.
5. Dépannage
5.1 FAQ
PROBLEMES CAUSE POSSIBLE SOLUTION
Le four ne chauffe pas
Le four ne chauffe pas
Le four ne chauffe pas
Aucume rèaction de
l'ècran tactile
L'horloge n'est pas réglée
La sécurité enfant est
activée
Les réglages nécessaires
ne sont pas imposés
Vapeur et de la
condensation sur l'ècran
tactile
FR 32
Réglez l'horloge
Désactiver la sécurité enfant
Assurez-vous que les
paramètres nécessaires
sont corrects
Nettoyer avec un chiffan en
microfibres l'ècran tactile
pour enlever la couche de
condensation
Page 33

Indicazioni di Sicurezza
•ATTENZIONE: l’apparecchio e le parti accessibili diventano calde
durante l’uso. Prestare attenzione a non toccare le parti calde.
•ATTENZIONE: le parti accessibili possono diventare calde quando il
grill è in uso. I bambini dovrebbero essere tenuti a distanza.
•ATTENZIONE: assicurarsi che l’apparecchio sia spento prima di
sostituire la lampada per evitare la possibilità di scosse elettriche.
•ATTENZIONE: al fine di evitare ogni pericolo dovuto al riarmo
accidentale del dispositivo termico di interruzione, il presente
apparecchio non deve essere alimentato con un dispositivo di manovra
esterno, quale un temporizzatore, oppure essere connesso a un circuito
che viene regolarmente alimentato o disalimentato dal servizio.
• ATTENZIONE: prima di attivare la funzione di pulizia automatica:
- pulire la porta del forno
- con una spugna umida togliere dall’interno del forno i residui più
consistenti. Non usare detergenti;
- estrarre tutti gli accessori e il kit guide scorrevoli (se presente);
- non lasciare strofinacci o presine sulla maniglia.
•I bambini al di sotto di 8 anni dovrebbero essere tenuti a distanza se
non continuamente supervisionati.
•I bambini non dovrebbero giocare con l’apparecchio. L’apparecchio
può essere usato da bambini dagli 8 anni in su e da persone con ridotte
capacità fisiche, sensoriali o mentali, senza esperienza e conoscenza del
prodotto, solo se supervisionate o dando loro istruzioni riguardo al
funzionamento dell’apparecchio in maniera sicura e cosciente del
rischio possibile.
•La pulizia e la manutenzione non dovrebbero essere fatte da bambini
senza supervisione.
•Non usare materiali ruvidi, abrasivi o raschietti metallici affilati per
pulire le porte di vetro del forno dato che possono graffiare la
superficie e causare la frantumazione del vetro.
•Spegnere il forno prima di rimuovere le parti rimovibili e, dopo la
pulizia, rimontarle secondo le istruzioni.
•Usare solo la sonda termica raccomandata per questo forno.
•Non utilizzare un pulitore a vapore.
IT 33
Page 34

•Inserire la spina in una presa di corrente munita di un terzo contatto
corrispondente alla presa di terra, che deve essere collegata in modo
efficiente. Per i modelli sprovvisti di spina, montare sul cavo una spina
normalizzata che sia in grado di sopportare il carico indicato in targa. Il
conduttore di messa a terra è contraddistinto dai colori giallo-verde.
Tale operazione dovrà essere eseguita da personale professionalmente
qualificato. In caso di incompatibilità tra la presa e la spina
dell’apparecchio, fare sostituire la presa con altra di tipo adatto da
personale professionalmente qualificato. Si può effettuare anche
l’allacciamento alla rete interponendo, tra l’apparecchio e la rete, un
interruttore omnipolare dimensionato al carico e rispondente alle
norme in vigore. Il cavo di terra giallo-verde non deve essere interrotto
dall’interruttore. La presa o l’interruttore omnipolare usati per
l’allacciamento devono essere facilmente accessibili ad elettro-
domestico installato.
•Se il cavo di alimentazione è danneggiato, esso deve essere sostituito
da un cavo o un assieme speciali disponibili presso il costruttore o il suo
servizio assistenza tecnica.
In caso di danneggiamento del cavo, provvedere tempestivamente alla
sua sostituzione secondo le seguenti indicazioni:
- aprire il coperchio morsettiera;
- togliere il cavo di alimentazione e sostituirlo con uno corrispondente e
adeguato all’apparecchio (tipo ).H05VV-F , HO5V2V2-F
•Tal e o pe r a z i on e d o v r à es s e r e e s e g u i ta da p e rs o n a l e
professionalmente qualificato. Il conduttore di terra (giallo-verde),
deve obbligatoriamente essere più lungo di circa 10 mm rispetto ai
conduttori di linea. Per l’eventuale riparazione rivolgersi solamente ad
un centro di assistenza tecnica autorizzato e richiedere l’utilizzo di
ricambi originali.
•Il mancato rispetto di quanto detto sopra può compromettere la
sicurezza dell’apparecchio.
•Gli eccessi di materiale tracimato devono essere tolti prima della
pulizia.
•Durante la Pirolisi le superfici possono scaldarsi più del solito: pertanto
è consigliato tenere i bambini a distanza.
IT 34
Page 35

Riassunto
Avvertenze Generali
36
Descrizione del Prodotto
38
Utilizzo del Forno
39
Pulizia e Manutenzione del Forno
44
1.1 Suggerimenti sulla sicurezza
1.2 Sicurezza elettrica
1.3 Raccomandazioni
1.4 Installazione
1.5 Gestione dei rifiuti
1.6 Dichiarazione di conformità
2.1 Panoramica
2.2 Accessori
2.3 Primo utilizzo
3.1 Descrizione del display
3.2 Modalità di cottura
4.1.Note generiche di pulizia
4.2 Pulizia con Vapore
4.3 Manutenzione
• Rimozione e pulizia delle griglie
• Rimozione dello sportello del forno
• Rimozione e pulizia della porta in
vetro
• Sostituzione della lampadina
Risoluzione dei problemi
47
5.1 F.A.Q.
IT 35
Page 36

1. liIndicazioni generali
Vi ringraziamo per aver scelto uno dei nostri prodotti.
Per utilizzare il forno in modo ottimale è consigliabile
leggere con attenzione questo manuale e conservarlo
con cura per ogni ulteriore consultazione. Prima di
installare il forno, prendere nota del numero di serie in
modo da poterlo comunicare al personale del servizio di
assistenza in caso di richiesta di intervento. Dopo aver
rimosso il forno dall’imballaggio, verificare che non
abbia subito danni durante il trasporto. In caso di
dubbi, non utilizzare il forno e richiedere l’assistenza di
un tecnico qualificato. Tenere tutto il materiale da
imballaggio (sacchetti di plastica, polistirolo, chiodi)
fuori dalla portata dei bambini. Alla prima accensione del forno può svilupparsi fumo di odore acre,
causato dal primo riscaldamento del collante dei pannelli d’isolamento avvolgenti il forno: si tratta di un
fenomeno assolutamente normale e, in caso si verificasse, occorre attendere la cessazione del fumo
prima di introdurre le vivande. Il produttore declina ogni responsabilità in caso di mancata osservanza
delle istruzioni contenute in questo documento.
NOTA: le funzioni, le proprietà e gli accessori dei forni citati in questo manuale possono variare a
seconda dei modelli.
1.1 SicurezzaAvvertenze di
Utilizzare il forno solo per lo scopo per cui è stato progettato, ossia solo per la cottura di alimenti;
qualsiasi altro utilizzo, ad esempio come fonte di riscaldamento, è considerato improprio e quindi
pericoloso. Il costruttore non può essere considerato responsabile per eventuali danni derivanti da usi
impropri, erronei ed irragionevoli.
L’uso di un qualsiasi apparecchio elettrico comporta l’osservanza di alcune regole fondamentali:
- non tirare il cavo di alimentazione per staccare la spina della presa di corrente;
- non toccare l’apparecchio con mani o piedi bagnati o umidi;
- in generale è sconsigliabile l’uso di adattatori, prese multiple e prolunghe;
- in caso di guasto e/o cattivo funzionamento dell’apparecchio, spegnerlo e non manometterlo.
1.2 Sicurezza Elettrica
ACCERTARSI CHE I COLLEGAMENTI ELETTRICI SIANO EFFETTUATI DA UN ELETTRICISTA O DA UN
TECNICO QUALIFICATO.
La rete di alimentazione alla quale si collega il forno deve rispettare le leggi in vigore nello stato in cui
viene installato. Il produttore non si assume responsabilità per danni causati dal mancato rispetto di
queste istruzioni. Il forno deve essere collegato ad una rete di alimentazione elettrica, con un'uscita a
parete con messa a terra oppure un interruttore automatico multipolare, a seconda delle leggi in vigore
nello stato in cui viene installato. L'alimentazione elettrica deve essere protetta tramite appositi fusibili;
i cavi utilizzati devono avere una sezione trasversale in grado di garantire un'alimentazione corretta al
forno.
COLLEGAMENTO
Il forno è alimentato da un cavo che deve essere collegato unicamente ad una rete di alimentazione
elettrica da 220-240 Vac, 50 Hz tra le fasi o tra fase e neutro. Prima di collegare il forno alla rete di
alimentazione elettrica, è importante controllare quanto segue:
- tensione di alimentazione riportata sull'indicatore;
- impostazione dell'interruttore automatico. Il cavo di messa a terra collegato al morsetto di terra del
forno deve essere a sua volta collegato al morsetto di terra della rete di alimentazione.
ATTENZIONE
Prima di collegare il forno alla rete di alimentazione, chiedere ad un tecnico qualificato di controllare la
continuità del morsetto di terra della rete di alimentazione. Il produttore non si assume responsabilità
per incidenti o altri problemi causati dal mancato collegamento del forno al morsetto di terra o da un
IT 36
Page 37

collegamento di terra con continuità difettosa.
NOTA: considerando che il forno potrebbe richiedere attività di manutenzione, si consiglia di tenere a
disposizione un'altra presa a parete in modo da potere collegare a questa il forno se viene tolto dallo
spazio nel quale è montato. Il cavo di alimentazione deve essere sostituito unicamente da personale di
assistenza tecnico o da tecnici con qualifiche equivalenti.
1.3 Consigli
Dopo ogni utilizzo del forno, si consiglia di effettuare una rapida pulizia per mantenerlo sempre in
condizioni ottimali. Non rivestire le pareti del forno con pellicola di alluminio o protezione monouso
disponibili nei supermercati. La pellicola di alluminio o le eventuali altre protezioni, trovandosi a diretto
contatto con lo smalto caldo, rischiano di fondersi e di danneggiare lo smalto che si trova all'interno del
forno. Per evitare di sporcare eccessivamente il forno e causare odore di fumo acre, si consiglia di non
utilizzare il forno a temperature molto elevate. È meglio prolungare il tempo di cottura e abbassare
leggermente la temperatura. Oltre agli accessori forniti con il forno, si consiglia di utilizzare solo piatti e
stampi di cottura resistenti alle temperature elevate.
1.4 Installazione
Il produttore non è obbligato ad effettuarla. Se è necessaria l'assistenza del produttore per correggere
errori dovuti ad un'installazione non corretta, questo intervento in assistenza non è coperto da
garanzia. Le istruzioni di installazione destinate al personale professionalmente qualificato devono
essere rispettate. Un'installazione non corretta può causare lesioni o danni alle persone, agli animali o
alle cose. Il produttore non si assume la responsabilità per tali lesioni o danni.
Il forno può essere posizionato in alto all'interno di una colonna o sotto un piano di lavoro. Prima del
fissaggio, è necessario garantire una corretta ventilazione nella zona del forno per permettere la
corretta circolazione dell'aria fresca necessaria per raffreddare e proteggere i componenti interni.
Praticare le aperture specificate all'ultima pagina a seconda del tipo di inserimento.
1.5 Gestione dei rifiuti e rispetto dell’ambiente
Questo elettrodomestico dispone di contrassegno ai sensi della direttiva europea
2012/19/CE in materia di apparecchi elettrici ed elettronici (RAEE). I RAEE contengono sia
sostanze inquinanti (che possono avere un effetto negativo sull'ambiente) sia elementi base
(che possono essere riutilizzati). È importante che i RAEE siano sottoposti a trattamenti
specifici in modo da togliere e smaltire in modo corretto gli inquinanti e recuperare tutti i
materiali. Spetta ai singoli individui garantire che i RAEE non diventi un problema a livello
ambientale. Esistono alcune regole specifiche da rispettare:
- i RAEE non devono essere trattati come rifiuti domestici;
- i RAEE devono essere portati nelle aree di smaltimento specifiche, gestite dai comuni o da società autorizzate.
In molti stati, nel caso di RAEE di grandi dimensioni sono disponibili servizi di prelievo a domicilio.
Durante l'acquisto di un nuovo elettrodomestico, quello vecchio può essere restituito al venditore che
lo deve accettare gratuitamente in un'unica soluzione, a condizione che l'elettrodomestico sia di tipo
simile ed abbia le stesse funzioni di quello acquistato.
SALVATAGGIO E RISPETTO DELL'AMBIENTE
Cercare per quanto possibile di evitare il preriscaldamento e cercare di riempire sempre il forno. Aprire
la porta del forno il meno possibile, in quanto il calore del vano di cottura si disperde ogni volta che la
porta viene aperta. Per un buon risparmio di energia, spegnere il forno 5 e 10 minuti prima del tempo
previsto di cottura; utilizzare il calore residuo che il forno continua a generare. Mantenere pulite e in
buone condizioni le guarnizioni, per evitare di disperdere il calore all'esterno del vano di cottura. Se si
dispone di un contratto di fornitura di elettricità con tariffa oraria, il programma "cottura ritardata"
semplifica il risparmio energetico, facendo iniziare il processo di cottura nel periodo a tariffa ridotta.
1.6 Dichiarazione di conformità
I componenti di questo elettrodomestico che possono entrare in contatto con sostanze alimentari
devono rispettare le disposizioni della direttiva CEE 89/109.
Apponendo il marchio su questo prodotto, confermiamo la conformità a tutti i requisiti di legge
europei in materia di sicurezza, salute e tutela ambientale applicabili per legge a questo prodotto.
IT 37
Page 38

2. Descrizione del Prodotto
2.1 Panoramica
1
2. Posizioni ripiani
3
5
4
2
(griglia laterale a rete se in dotazione)
3. Griglia metallica
4. Vaschetta raccogligocce
5. Ventola (dietro alla piastra in acciaio)
6. Separatore
6
2.2 Accessori )(a seconda del modello
Griglia metallica
1
Supporta vassoi e piastre di cottura.
Led vision
3
Vaschetta raccogligocce
2
Raccoglie i residui che gocciolano durante la cottura
del cibo sulle griglie.
4
1. Pannello comandi
Porta forno7.
Chef Panel
Questo sistema di illuminazione sostituisce le “lampadine”
tradizionali. I 14 LED (sui modelli non pirolitici) o i 10 LED ad
alta potenza (sui modelli pirolitici) sono integrati
direttamente nello sportello. Questi LED producono una
luce bianca di alta qualità che consente di vedere bene
tutti i ripiani all'interno del forno senza ombre.
Vantaggi :
Oltre a garantire una buona visibilità all'interno del
forno, questo sistema è più resistente rispetto alla
lampadi n e t radiz i o n ali, r ichied e u na m inore
manutenzione e consuma meno dei sistemi tradizionali.
- Ottima visibilità
- Illuminazione di lunga durata
-Consumi ultra-ridotti, Consuma il 95% in meno rispetto
ai sistemi tradizionali.
IT 38
Tutti i forni con questa tecnologia presentano una
funzione tipica dei modelli professionali, frutto delle
tecnologie innovative e della vasta esperienza
acquisita da Candy Hoover Group in questo settore.
Lo Chef Panel è un convogliatore d’aria che
incrementa la circolazione della stessa all’interno
de l la cav i tà. Ciò pe r mett e d i a umentare le
performance di cottura del forno, di avere una
co ttura d el ci b o p iù omoge n ea a t utte le
temperature, di accorciare i tempi di cottura delle
pietanze ed infine, di avere una distribuzione di
temperatura uniforme all’interno della cavità.
Page 39

Sonda Carne
5
Misura la temperatura interna del cibo durante la
cottura.
Inserire la sonda carne nell'apposito foro nella parte
superiore della cavità.
– Preparare il cibo e inserire correttamente la sonda
carne nel cibo. Non preriscaldare o iniziare a cucinare
prima di inserire correttamente la sonda carne. La
sonda va inserita nel cibo mentre il forno è ancora
fresco.
– Non inserire la sonda carne nel cibo surgelato.
– Non lasciare la sonda carne all'interno del forno se non si utilizza: potrebbe danneggiarsi.
2.3 Primo utilizzo
PULIZIA PRELIMINARE
Prima del primo utilizzo, pulire il forno. Ripulire le superfici esterne con un panno morbido e umido.
Lavare tutti gli accessori e ripulire l'interno del forno con una soluzione di acqua calda e liquido
detergente. Impostare il forno (vuoto) alla temperatura massima e lasciarlo in questa posizione per
circa 1 ora, per togliere qualsiasi odore pungente di prodotto nuovo.
3. Utilizzo del Forno
3.1 Descrizione del display
ACCESO / SPENTO
EXTRA
Durata di
cottura
Regolazione
dell’ora
Fine
cottura
Blocco
bambini
Questo pulsante permette di accendere e spegnere il forno
Contaminuti
Se il forno è spento, viene visualizzato l'orologio. Quando il
forno non è attivo, sono disponibili tutte le funzioni ad
eccezione di durata cottura e fine cottura.
Se l'orologio non è regolato, il forno non funziona: il display
lampeggia, indicando "12:00" e l'unico tasto che funziona è
Wi-Fi
quello di EXTRA. Tramite il tasto EXTRA, si possono impostare
le seguenti funzioni:
IT 39
Page 40

FUNZIONE COME DISATTIVARE
DURATA
COTTURA
FINE
COTTURA
CONTAMINUTI
REGOLA-
ZIONE
DELL'ORA
BLOCCO DI
SICUREZZA
BAMBINI
COME ATTIVARE
No ta: l'i mpo stazio ne è
poss i bil e so lo co n u n
pr og ram ma di cottu ra
attivo. Premere due volte
EX TRA ed i mpo sta re il
tempo utilizzando i tasti "+"
e " -" , c o n fe r m a nd o
premendo "SELECT".
Il display visualizza "00:00"
se non è stata inserita la
durata di cottura, altrimenti
visualizza il tempo restante.
No ta: l'i mpost azion e è
possibile s o lo con u n
pr ogra mma di cot tura
attivo. Premere EXTRA a
s uf f ic i en za p er fa re
a c c e nd e r e l ' ic o n a ,
impostare la fine del tempo
di cottura utilizzando i tasti
"<" e ">" e conferm are
premendo "SELECT".
P r e m e r e E X T R A a
s uf f ic i en za p er fa re
a c c e nd e r e l ' ic o n a ,
impostare la fine del tempo
di cottura utilizzando i tasti
"<" e ">" e conferm are
premendo "SELECT".
La durata di cottura viene
c a l c o l a t a
automaticamente.
• I l dis play vis uali zza
"00 :00" se non è stato
inserito il tempo oppure il
tempo rimanente se era
già stato impostato.
P r e m e r e E X T R A a
s uf f i ci en za pe r fa r e
a c ce nd er e l 'i co na , e
utilizzare i tasti "< " e ">"
per impostare il tempo,
q u i nd i c o nf e r m a r e
premendo "SELECT"
• Quando viene attivato
per la prima volta, i l
di s pl ay s i a cc en de e
visualizza "12:00".
• Per modificare l'ora,
p r e m e r e E X T R A a
s uf fi c ie nz a pe r f ar e
ac ce nd er e l 'i co na, e
utilizzare i tasti "<" e ">"
per impostare l'ora, quindi
co nf erm are pr emend o
"SELECT".
• Premere il tasto EXTRA a
s uf f ic i e nz a p e r fa r e
accendere l'icona, e quindi
il ta sto "< " o ">" per
attivare questa funzione; il
display visualizza ON, per
co nf er ma re p re me re
"SELECT".
• Per modificare la cottura
p r i m a d e l t e m p o
impostato, premere due
volte EXTRA e regolare il
tempo di co ttura come
richiesto utilizzando i tasti
"<" e ">", prima di premere
nuovamente "SELECT".
• Per cancellare la durata di
cottura, azzerare il display
a "00:00".
Per modificare la fine della
co ttura , i n modo che
avvenga prima del tempo
i mp o st at o , pr em e re
EXTRA a sufficienza per
fare a ccen de re l' icona,
regolare la fine del tempo
di cottura a seconda delle
necessità utilizzando i tasti
"<" e ">" e confermare
premendo "SELECT".
Per cancellare il tempo di
fine cottura, azzerare il
display a "00:00".
• P er m o di f ic a re i l
co nt aminuti, premere
EXTRA a sufficienza per fare
accendere l'icona, regolare
il tempo di cottura come
richiesto utilizzando i tasti
"<" e ">" e conferma re
premendo "SELECT".
• Premere il tasto EXTRA a
s uf f ic i en z a p e r fa r e
accendere l'icona, e quindi
il ta sto "< " o ">" p er
d i s a tt i v a r e q u e s t a
f un zi on e; i l d i s pl a y
v i su a li z za O F F, p e r
co nf er ma re pr em er e
"SELECT".
IT 40
COME FUNZIONA COSA SERVE
Quando un programma di
cottura termina, il forno si
spegne e il display visualizza
" E N D " ( l ' i c o n a d e l
prog ra mm a d i c ot tu ra
rim an e a cc es a) fi no a
quando non viene premuto
il pulsante Acceso/Spento,
l'unico ancora funzionante.
Quando un programma di
cottura termina, si attiva un
allarme.
Quando un programma di
cottura termina, il forno si
spegne e il display visualizza
" E N D " ( l ' i c o n a d e l
pr og ram ma di c ott ura
ri ma ne a ccesa ) f in o a
quando non viene premuto
il pulsante Acceso/Spento,
l'unico ancora funzionante.
Quando un programma di
cottura termina, si attiva un
allarme.
• Questa funzione attiva un
alla rme che suo na per
al cuni seco ndi qua ndo
scade il tempo impostato
(questa funzione non fa
spegnere il forno).
Si pu ò sele ziona re un
tempo compreso tra 00:00
e 23:59
• Si può impostare l'ora che
sarà visualizzata sul display.
• Se la funzione è attiva si
possono utilizzare solo il
pu lsa nte "EXT RA" pe r
disattivare la funzione ed il
pulsante
«Acceso/ Spento".
Quando il tempo di cottura è
terminato, il forno si spegne
automaticamente e l'allarme si
attiva per alcuni secondi.
• Questa funzione è utilizzata
anche per la cottura che può
e ss er e p ro gr am m at a in
anticipo.
•Se è impostato un programma
di cottura, se si preme il tasto
"F" il programma va perso.
• Se è impostata la cottura
ritardata, il forno si spegne e il
display visualizza l'ora attuale,
m e n t r e l e i c o n e d e l
programma, della durata di
cottura e della fine cottura
sono accese.
• S e è i m p o s t a t o u n
p ro g ra mm a d i c ot t ur a ,
premendo i tasti "<" e ">" si può
controllare e modifi care la
te mp er at ur a im pos ta t a;
toccando l a prim a volta, si
visualizza la temperatura di
fu nzio name nto, toc cand o
un 'alt ra volta è p oss ibil e
modificare tale temperatura.
• Il contaminuti funziona
indipendentemente dal fatto
che il forno sia acceso.
• L ' a l l ar m e f u n zi o n a
indipendentemente dal fatto
che il forno sia acceso.
• Questa funzione è utile
quando ci sono dei bambini
all'interno della casa.
Page 41

Wi-Fi (a seconda del modello)
Premendo il tasto "Extra" sul display del timer è possibile selezionare
il menu Wi-Fi. Nel menu Wi-Fi se si premono i tasti "< >" è possibile selezionare:
- Off: Wi-Fi è spento; il forno non è controllabile tramite l'applicazione.
- On: Wi-Fi è attivo e il forno è controllabile solo attraverso l'applicazione. Ciò significa che non è possibile
selezionare funzioni di cottura, ricette e temperatura da display. Solo il menu Wi-Fi è disponibile premendo il
tasto "Extra". È possibile spegnere il forno con il pulsante di accensione / spegnimento, ma non è possibile
riaccendere nuovamente tramite il display, può essere acceso solo tramite l'applicazione.
- Reset: Questa impostazione deve essere utilizzata per arruolare il forno la prima volta che si collega alla rete
Wi-Fi o per resettare la connessione Wi-Fi e consentire una nuova iscrizione. Una volta selezionato,
l'apparecchio impiega 5 minuti per completare il processo di registrazione. Durante questo processo le
funzioni di cottura, le ricette e la regolazione della temperatura non sono accessibili dal display. Solo il menu
Wi-Fi è disponibile premendo il tasto "Extra". È possibile spegnere il forno con il pulsante di accensione /
spegnimento, ma non è possibile riaccendere nuovamente tramite il display, può essere acceso solo tramite
l'applicazione. Per uscire dalla procedura di arruolamento/reset tramite il display, premere "Extra" e quindi
usare "< >" per selezionare "Off". Dopo cinque minuti, l'apparecchio esce automaticamente dalla procedura
di arruolamento/reset.
- Read: il forno invia il suo stato all'applicazione, ma non può essere controllato da remoto. Il forno deve essere
arruolato prima che questo sia possibile.
Se il Wi-Fi non è configurato è solo possibile scegliere tra off e reset.
Quando il forno è collegato al Wi-Fi, la durata predefinita tempo di cottura è di 5 ore, ma può essere modificato
dall'utente.
Arruolamento Wi-Fi
Per arruolare l'apparecchio al Wi-Fi, premere "Extra" sul display fino a quando l'icona Wi-Fi lampeggia, quindi
selezionare "Reset" premendo "< >". La procedura in applicazione dovrebbe quindi essere seguita. Una volta
selezionato, l'apparecchio si dà 5 minuti per completare il processo di registrazione.
Icona Wi-Fi
- Icona non illuminata: Wi-Fi è spento.
- L'icona lampeggia 1 secondo e un 1 secondo si spegne: il forno è accessibile alla rete Wi-Fi e pronto per
essere arruolato. Se l'arruolamento non ha avuto successo, l'icona Wi-Fi si spegne dopo 5 minuti.
- Icona è sempre accesa: il forno è collegato al router Wi-Fi.
- L'icona lampeggia 3 secondi e 1 secondo si spegne: il forno sta tentando di connettersi al router Wi-Fi.
- L'icona lampeggia 1 secondo e 3 secondi rimane spenta: il forno è in modalità di sola lettura.
HOOVER : Per maggiori informazioni su COME CONNETTERE il tuo
elettrodomestico OneFi e COME USARLO, vai sul sito
http://wizardservice.candy-hoover.com/
IMPOSTAZIONE DELLE LINGUE La lingua può essere
im p o stata q u a n do i l forno è s pento prem e n do
contemporaneamente i pulsanti EXTRA e SELECT, per
circa 3". La lingua corrente è visualizzata sul display e può
Piro
essere modificata premendo i tasti "<" o ">" e confermata
premendo SELECT. Le lingue disponibili sono: italiano,
inglese, francese e tedesco.
Scongelamento
SELECT Ogni selezione deve essere confermata. Se
non viene confermata entro 15 secondi, la selezione si
cancella. Cambiando il menu, qualsiasi selezione non
Cavità
Girarrosto
Elemento circolare
Elemento inferiore
Grill
Ventola
confermata va persa.
ICONA "HOT" Quando un programma di cottura termina o quando il forno si spegne, se il forno è
ancora caldo il display visualizza l'ora attuale alternata con il messaggio "HOT” (CALDO).
IT 41
Page 42

SONDA CARNE (a seconda del modello) Se la sonda carne è identificata, il display mostra
"SONDA". Se la sonda carne viene inserita mentre un programma di cottura è in corso, il programma si
arresta. Quando viene selezionato un programma di cottura, il display visualizza la temperatura di
default, ma non è mai superiore a 200 ° C: la temperatura selezionabile è limitata a 200 ° C.
Quando viene confermata la temperatura, premendo il tasto "Select", il display mostra "Ϙ 40 °": è ora
possibile selezionare la temperatura target della sonda, tra 30 ° C e 90 ° C ad intervalli di 1 ° C. Quando
viene confermata la temperatura della sonda carne, premere il tasto "Select" e il display mostra "Ϙ"
seguito dalla temperatura effettiva rilevata dalla sonda carne (intervalli di 1 grado). Quando la sonda
raggiunge la temperatura impostata, il programma di cottura termina. Se un programma di cottura
viene impostato con la sonda carne, premendo i tasti "-" e "+" è possibile visualizzare e modificare la
temperatura della sonda carne:
al primo tocco di uno dei due tasti, il display visualizza la temperatura target della sonda, mentre con
un'ulteriore tocco potrai modificare la temperatura selezionata della sonda.
Se l'utente cambia il programma di cottura, l'impostazione della temperatura della sonda carne viene
azzerato. Ripetere la sequenza di impostazione per selezionare una nuova temperatura target. La sonda
carne non può essere utilizzata con cotture pre settate o con la placca di separazione (se presente)
all'interno del forno: in questo caso il display mostra "Ϙ NO" e non verrà eseguito nessun comando
finché la sonda carne non verrà rimossa. Scongelamento, grill, grill con girarrosto, pirolisi e ogni cottura
programmata non può essere eseguita con la sonda carne (non sono indicati sul menu).
Temperature Suggerite
Carne
Al sangue
Mediamente al sangue
Media
Ben Cotta
56
58
60
62
Salmone
Pollo
35
min 68
RICETTE PRE IMPOSTAT Quando una ricetta è selezionata il display mostra "R" seguito dal numero
della ricetta e mostra il corrispondente metodo di cottura.
Le ricette disponibili sono le seguenti:
RICETTA
R1- Lasagne
R2 - Pollo arrosto
R3 - Orata in crosta
R4- Patate
R5- Frittata
R6- Torta di mele
FUNZIONE DI
COTTURA
Statico + ventola
Statico + ventola
Statico + ventola
Statico + ventola
Statico
Statico + ventola
TEMPERATURA
150°
180°
180°
180°
160°
180°
DURATA DI
COTTURA
45’
40’
40’
45’
25’
45’
NB: non è possibile modificare la temperatura o la durata di cottura.
IT 42
Page 43

3.2 Modalità di cottura
Manopola
commuta-
tore
T° preim-
postata
Intervallo
di T°
Funzione (a seconda del modello)
LAMPADA: accende la luce interna.
40
40 ÷ 40
180
50 ÷ 240
210
50 ÷ 240
*
220 50 ÷ 280
210 50 ÷ 230
210
50 ÷ 230
200
150 ÷ 220
L1 ÷ L5
L3
SCONGELAMENTO: questa posizione permette di far circolare l’aria a
temperatura ambiente intorno al cibo surgelato facendolo così scongelare in
pochi minuti senza modificare od alterare il contenuto proteico.
FORNO VENTILATO: l’aria calda viene ripartita sui diversi ripiani. E’ ideale per
cuocere contemporaneamente diversi tipi di cibo (carne, pesce), senza
miscelare sapori e odori. Cottura delicata - indicata per pan di spagna, torte
Margherita, pasta sfoglia, ecc...
CONVEZIONE NATURALE: sono in funzione le resistenze superiore e inferiore.
È la cottura tradizionale, ottima per arrostire cosciotti, selvaggina, ideale per
biscotti, mele al forno e per rendere i cibi molto croccanti.
ELEMENTO RISCALDANTE INFERIORE: Ideale per la cottura di tutti i piatti a
base di pasta. Utilizzare questa funzione per crostate, torte salate, torte, paté e
qualsiasi cottura che ha bisogno di più calore e radiazioni dal basso.
SUOLA VENTİLATA: adatta per cotture delicate (torte-soufflè).
GRILL + VENTOLA: l'utilizzo del turbo-grill richiede la porta chiusa. Utilizzando
la ventilazione e la resistenza grill contemporaneamente, si cuociono
perfettamente grandi porzioni di cibo, come arrosti, pollame, ecc.
Mettere la griglia a metà del forno e posizionare la leccarda sotto di essa per
raccogliere i grassi. Assicuratevi che il cibo non sia troppo vicino al grill. Girare la
carne a metà cottura.
GRILL: Grigliatura tradizionale a porta chiusa: con questa funzione viene
inserita la resistenza del grill. Ottima nella cottura di carni di medio e piccolo
spessore (salsicce, costine, bacon).
220 50 ÷ 230
*
* Programma di prova secondo CENELEC EN 60350-1 utilizzato per la definizione della classe energetica.
190 50 ÷ 230
PIZZA: Il calore avvolgente in questa funzione ricrea un ambiente simile a
quello dei forni a legna di pizzeria.
La funzione “ECO” consente di cucinare in modo leggero riducendo l'utilizzo dei
grassi. Grazie ad una combinazione del grill e della ventola, associate ad un ciclo di
pulsazione dell'aria, è possibile conservare l'umidità dei cibi, grigliare la superficie e
garantire una cottura rapida delle pietanze utilizzando pochi condimenti, senza
rinunciare al sapore.
È particolarmente indicata per verdure, frittate e carni. Il ciclo di aria pulsata
mantiene l'umidità dei cibi, ne conserva le proprietà nutritive e garantisce una
cottura rapida e omogenea.
Provate tutte le vostre ricette riducendo la quantità di condimento che di solito
utilizzate e provate la leggerezza di questa nuova funzione!
IT 43
Page 44

4. Pulizia e manutenzione del forno
4.1 Note generiche di pulizia
La vita di servizio dell’apparecchio si allunga se questo viene pulito ad intervalli regolari. Attendere che il
forno si raffreddi prima di effettuare le operazioni di pulizia manuali. Non utilizzare mai detergenti
abrasivi, pagliette di ferro o oggetti appuntiti per lapulizia, per non danneggiare in modo irreparabile le
parti smaltate.Utilizzare solo acqua, sapone o detergenti a base di candeggina (ammoniaca).
PARTI IN VETRO
E’ consigliabile pulire lo sportello in vetro con carta assorbente da cucina dopo ogni utilizzo del forno.
Per rimuovere le macchie più ostinate, è possibile anche utilizzare una spugna imbevuta di detergente
ben strizzata e sciacquare con acqua.
GUARNIZIONE DELLO SPORTELLO DEL FORNO
Se sporca, la guarnizione può essere pulita con una spugna leggermente inumidita.
ACCESSORI
Pulire gli accessori con una spugna imbevuta con acqua e sapone, sciacquarli e asciugarli : evitare di
usare detergenti abrasivi.
VASCHETTA DI GOCCIOLAMENTO
Dopo l’uso del grill, rimuovere la vaschetta dal forno. Versare il grasso caldo in un contenitore e lavare la
vaschetta in acqua calda, utilizzando una spugna e del detergente per piatti.
Se rimangono dei residui di grasso, immergere la vaschetta in acqua e detergente. In alternativa, è
possibile anche lavare la vaschetta nella lavastoviglie oppure utilizzare un detergente per forni di tipo
commerciale. Non reinserire mai una vaschetta sporca nel forno.
4.2 Pulizia con Vapore
Questa procedura di pulizia utilizza il vapore per facilitare la rimozione dal forno di grasso e di pezzi di
cibo rimasti.
1. Inserire 300 ml di acqua distillata o potabile sul fondo del forno.
2. Impostare la funzione del forno su Statico ( ) o su Riscaldamento dal basso ( ).
3. Impostare la temperatura del forno a 90°C.
4. Impostare il tempo di cottura a 30 minuti.
5. Disattivare la macchina e lasciare che si raffreddi.
6. Una volta che il forno si è raffreddato, pulire la superficie interna del forno con uno straccio.
Attenzione: Assicurarsi che il forno sia freddo prima di toccarlo: c'è il rischio di scottarsi. Utilizzare acqua
distillata o potabile.
300 ml
IT 44
Page 45

4.3 Manutenzione
RIMOZIONE E PULIZIA DELLE GRIGLIE
1. Svitare in senso antiorario i dadi zigrinati.
2. Rimuovere le griglie tirandole verso se stessi.
3. Pulire le griglie lavandole in lavastoviglie o con una spugna bagnata e asciugandole subito dopo.
4. Dopo aver pulito le griglie, installarle nuovamente, fissando i dadi zigrinati.
A
RIMOZIONE DELLO SPORTELLO DEL FORNO
1. Aprire lo sportello anteriore.
2. Aprire i morsetti dell’alloggiamento della cerniera sul lato destro e sinistro dello sportello anteriore,
premendoli verso il basso.
3. Installare nuovamente lo sportello eseguendo la procedura all’inverso.
IT 45
Page 46

RIMOZIONE E PULIZIA DELLA PORTA IN VETRO
LOW-E
1. Aprile la porta del forno.
2.3.4. Bloccare le cerniere, rimuovere le viti e rimuovere la copertura metallica superiore tirandola
verso l’alto.
5.6. Rimuovere il vetro, estraendolo con molta cura, dalla controporta del forno (NB: nei forni pirolitici,
rimuovere anche il secondo e terzo vetro (se presente)).
7. Al termine della pulizia o sostituzione riassemblare le parti nell’ordine opposto alla rimozione.
Su tutti i vetri, l’indicazione ”Low-E” deve essere correttamente leggibile e posizionata sul lato sinistro
della porta, vicino alla cerniera laterale sinistra. In questo modo, l’etichetta stampata del primo vetro
rimarrà interna alla porta.
1.
5.
2.
3.
4.
6.
1
2
3
7.
IT 46
Page 47

SOSTITUZIONE DELLA LAMPADINA
1. Scollegare il forno alla rete.
2. Allentare la copertura in vetro, svitare la lampadina e sostituirla con una nuova dello stesso modello.
3. Una volta sostituita la lampadina difettosa, riavvitare la copertura in vetro.
5. Risoluzione dei Problemi
5.1 FAQ
PROBLEMA POSSIBILE CAUSA SOLUZIONE
Il forno non si scalda
Il forno non si scalda
Il forno non si scalda
N e s s u n a r e a z i o n e
quando si usa l'interfaccia
utente di tipo touch
L’orologio non è impostato
Il blocco bambini è attivo
Le regolazioni necessarie
non sono impostate
Vapore e conde n s a sul
pannello interfaccia utente
IT 47
Impostare l’orologio
Disattivare il blocco bambini
Assicurarsi che le impostazioni
necessarie siano corrette
Pu l ir e co n u n p an no i n
m i c ro fi br a i l p an ne ll o
interfaccia utente per togliere
lo strato di condensa.
Page 48

Indicaciones de seguridad
•ATENCIÓN: el aparato y las piezas accesibles se calientan durante el
uso. Tenga cuidado de no tocar las piezas calientes.
•ATENCIÓN: las piezas accesibles pueden calentarse cuando la
resistencia está en uso. Mantenga el aparato fuera del alcance de los
niños.
•ATENCIÓN: asegúrese de que el aparato esté apagado antes de
sustituir la lámpara para evitar la posibilidad de descargas eléctricas.
•ATENCIÓN: con el fin de evitar cualquier peligro debido a un rearme
accidental del dispositivo térmico de interrupción, este aparato no
debe alimentarse con dispositivos de maniobra externos como
temporizadores, ni conectarse a un circuito regularmente alimentado o
interrumpido por el servicio.
• ATENCIÓN: antes de activar la función de limpieza automática:
- limpie la puerta del horno
- con una esponja húmeda quite los residuos más consistentes del
interior del horno. No utilice detergentes;
- quite todos los accesorios y el kit guías deslizables (si existe);
- no deje paños de cocina o manoplas en la manija.
•Mantenga el aparato fuera del alcance de los niños menores de ocho
años si no están constantemente supervisados.
•No permita que los niños jueguen con el aparato. Los niños mayores
de ocho años y las personas con capacidades físicas, sensoriales o
mentales reducidas, así como aquellas sin experiencia ni conocimientos
del aparato pueden usarlo únicamente bajo supervisión o siguiendo de
forma segura y consciente del posible riesgo las instrucciones de
funcionamiento del aparato.
•La limpieza y el mantenimiento no deben ser responsabilidad de niños
sin supervisión.
•No use materiales rugosos o abrasivos ni rasquetas metálicas afiladas
para limpiar las puertas de vidrio del horno, ya que pueden arañar la
superficie y agrietar el vidrio.
•Apague el horno antes de extraer la pantalla de protección y, después
de la limpieza, vuelva a montarla conforme a las instrucciones.
•Use solo la sonda térmica recomendada para este horno.
ES 48
Page 49

•No utilice limpiadores de vapor.
•Enchufe el conector a una toma de corriente provista de toma de
tierra, que debe estar correctamente conectada. Para los modelos que
no dispongan de conector, montar en el cable uno normalizado capaz
de soportar la carga indicada en la ficha técnica. El conductor de toma
de tierra se caracteriza por los colores amarillo y verde. Esta operación
deberá confiarse a un profesional cualificado. En caso de
incompatibilidad entre la toma de corriente y el conector del aparato,
hacer que un profesional cualificado sustituya la toma por otra del tipo
adecuado. Se puede efectuar también la conexión a la red
interponiendo, entre el aparato y la red, un interruptor omnipolar
dimensionado a la carga y conforme con la normativa vigente. El cable
de tierra amarillo y verde no debe interrumpirse con el interruptor. La
toma o el interruptor omnipolar usados para la conexión deben ser
fácilmente accesibles para el electrodoméstico instalado.
•Si el cable de alimentación está dañado, debe sustituirse por un cable
o un conjunto especialmente disponible en el fabricante o en su servicio
de asistencia técnica.
En caso de que el cable esté dañado, proceder puntualmente a su
sustitución conforme a las indicaciones siguientes:
- abra la cubierta del terminal;
- extraer el cable de alimentación y sustituirlo por uno análogo y
adecuado al aparato (tipo ).H05VV-F , HO5V2V2-F
•Esta operación deberá confiarse a un profesional cualificado. El
conductor de toma de tierra (amarillo y verde), debe necesariamente
ser aproximadamente 10 mm más largo que los conductores de línea.
Para la eventual reparación, diríjase únicamente a un centro de
asistencia técnica autorizado y solicite que se empleen recambios
originales.
•No respetar las indicaciones anteriores puede comprometer la
seguridad del aparato.
•Los excesos de material deben retirarse antes de limpiar.
•Durante la pirólisis las superficies pueden calentarse más de lo
habitual: por ello es aconsejable mantener el aparato fuera del alcance
de los niños.
ES 49
Page 50

Resumen
Advertencias generales
51
Descripción del producto
53
Utilización del horno
55
Limpieza y mantenimiento
del horno
60
1.1 Recomendaciones de seguridad
1.2 Seguridad eléctrica
1.3 Recomendaciones
1.4 Instalación
1.5 Gestión de residuos
1.6 Declaración de conformidad
2.1 Descripción general
2.2 Accesorios
2.3 Primer uso
3.1 Descripción de la pantalla
3.2 Modalidades de cocción
4.1 Notas genéricas de limpieza
4.2 Limpieza a Vapor
4.3 Mantenimiento
• Extracción y limpieza de las
resistencias
• Extracción de la puerta del horno
• Extracción y limpieza de la puerta
de vidrio
• Sustitución de la bombilla
Solución de problemas
63
5.1 Preguntas más frecuentes
ES 50
Page 51

1. Advertencias Generales
Le agradecemos que haya elegido uno de nuestros
productos. Para utilizar el horno de forma óptima es
ac onsejable leer con ate n ción este manua l y
conservarlo para poder consultarlo en el futuro. Antes
de instalar el horno, anote el número de serie para
poder facilitárselo al personal del servicio de asistencia
técnica en caso de solicitar su intervención. Después de
extraer el horno del embalaje, compruebe que no haya
sufrido daño alguno durante el transporte. En caso de
duda, no utilice el horno y solicite la asistencia de un
técnico cualificado. Conserve todo el material de
embalaje (bolsitas de plástico, poliestireno, clavos)
fuera del alcance de los niños. La primera vez que se enciende el horno puede producirse un humo de
olor acre, causado por el primer calentamiento del adhesivo de los paneles de aislamiento que recubren
el horno: se trata de un fenómeno absolutamente normal y, en caso de que se produzca, será preciso
esperar a que cese el humo antes de introducir los alimentos. El fabricante declina toda responsabilidad
en caso de no observar las instrucciones contenidas en este documento.
NOTA: las funciones, las propiedades y los accesorios de los hornos citados en este manual pueden
variar según los modelos.
1.1 Recomendaciones de seguridad
Utilice el horno solo con el fin para el que se ha diseñado, es decir: únicamente para cocer alimentos;
cualquier otro uso, por ejemplo como fuente de calefacción, se considera impropio y por lo tanto
peligroso. El fabricante no puede ser considerado responsable de eventuales daños derivados de usos
impropios, erróneos o irracionales.
El uso de cualquier aparato eléctrico comporta la observación de una serie de reglas fundamentales:
- no tirar del cable de alimentación para desenchufar el conector de la toma de corriente;
- no tocar el aparato con las manos ni los pies mojados o húmedos;
- en general no es aconsejable usar adaptadores, regletas ni alargadores;
- en caso de avería o mal funcionamiento del aparato, apáguelo y no lo manipule.
1.2 Seguridad eléctrica
CONFÍE LA CONEXIÓN ELÉCTRICA A UN ELECTRICISTA O A UN TÉCNICO CUALIFICADO.
La red de alimentación a la que se conecte el horno debe cumplir la normativa vigente en el país de
instalación. El fabricante declina toda responsabilidad por eventuales daños derivados de no observar
dicha normativa. El horno debe conectarse a la red eléctrica mediante un enchufe de pared con toma de
tierra o mediante un seccionador con varios polos, según la normativa vigente en el país de instalación.
La red eléctrica debe estar protegida mediante fusibles adecuados y deben utilizarse cables con una
sección transversal idónea que garantice una correcta alimentación del horno.
CONEXIÓN
El horno se suministra con un cable de alimentación que debe conectarse únicamente a una red
eléctrica con una tensión de 230 V de CA entre fases o entre la fase y el neutro. Antes de conectar el
horno a la red eléctrica es imprescindible comprobar:
- la tensión de alimentación indicada por el medidor;
- la configuración del seccionador.
El hilo de toma de tierra conectado al terminal de tierra del horno debe estar conectado al terminal de
tierra de la red eléctrica.
ATENCIÓN
Antes de conectar el horno a la red eléctrica, confíe la comprobación de la continuidad de la toma de
tierra de la red eléctrica a un electricista cualificado. El fabricante no se hace responsable de eventuales
accidentes u otros problemas derivados de no conectar el horno a tierra o de conectarlo a una toma de
tierra con una continuidad defectuosa.
ES 51
Page 52

NOTA: puesto que el horno podría requerir la intervención del servicio de asistencia, es aconsejable
prever la disponibilidad de otro enchufe de pared al que conectar el horno después de extraerlo del
espacio donde se ha instalado. El cable de alimentación debe sustituirse únicamente por personal de
asistencia técnica o por técnicos con una cualificación análoga.
1.3 Recomendaciones
Una limpieza mínima después de utilizar el horno ayudará a mantenerlo limpio durante más tiempo. No
forrar las paredes del horno con aluminio u otras protecciones disponibles en tiendas. El aluminio o los
protectores, en contacto directo con el esmalte caliente puede derretirse y deteriorar el esmalte del
interior. Para evitar un exceso de suciedad en el horno y que pueden derivar en olores y humo en
exceso, recomendamos no utilizar el horno a temperaturas muy elevadas. Es mejor ampliar el tiempo
de cocción y bajar un poco la temperatura.
1.4 Instalación
No es obligación del fabricante instalar el horno. Si se requiere la ayuda del fabricante para subsanar
fallos derivados de una instalación incorrecta, dicha asistencia no la cubrirá la garantía.
Han de seguirse a rajatabla las instrucciones de instalación para personal cualificado. Una instalación
incorrecta puede provocar daños personales, materiales o en animales. El fabricante no se hace
responsable de esos posibles daños.
El horno se puede colocar encima, en una columna, o debajo de una encimera. Antes de fijar el horno
hay que asegurar una buena ventilación en el hueco donde se vaya a colocar y que el aire necesario para
enfriar y proteger las piezas internas circula sin problema. Realizar las aperturas especificadas en la
última página según el tipo de altura.
1.5 Gestión de residuos y respeto por el medio ambiente
Este aparato está certificado conforme a la directiva europea 2012/19/EU sobre aparatos
eléctricos y electrónicos (WEEE). Los dispositivos WEEE contienen sustancias
contaminantes (que pueden provocar consecuencias negativas en el medio ambiente) o
componentes básicos (que pueden reutilizarse). Es importante que dichos dispositivos
estén sujetos a tratamientos específicos para eliminar y desechar correctamente todos los
contaminantes y recuperar todos los materiales. Cada individuo puede desempeñar un
papel importante a la hora de asegurar que los dispositivos WEEE no se conviertan en un
problema medioambiental; es esencial seguir algunas reglas básicas:
- los dispositivos WEEE no deben tratarse como residuos domésticos;
- los dispositivos WEEE deben llevarse a los puntos de recogida específicos gestionados por el municipio
o por una sociedad registrada.
En muchos países, para los WEEE de grandes dimensiones, puede haber disponible un servicio de
recogida a domicilio. Cuando se compra un nuevo aparato, el viejo puede entregarse al vendedor, que
debe adquirirlo gratuitamente siempre que el aparato sea de tipo equivalente y tenga las mismas
funciones que el que se ha adquirido.
AHORRAR Y RESPETAR EL MEDIO AMBIENTE
Siempre que sea posible, evite precalentar el horno e intente utilizarlo siempre lleno. Abra la puerta del
horno lo menos posible, ya que se producen dispersiones de calor cada vez que se lleva a cabo esta
operación. Para ahorrar mucha energía basta apagar el horno de 5 a 10 minutos antes del fin del tiempo
de cocción planificado y servirse del calor que el horno continúa generando. Mantener las juntas
limpias y en buen estado para evitar posibles dispersiones de energía. Si se dispone de un contrato de
energía eléctrica por tarifa horaria, el programa de cocción retardada permitirá ahorrar más fácilmente
retrasando el encendido del horno hasta el horario de tarifa reducida.
ES 52
Page 53

1.6 Consejos De Cumplimiento
En este equipo, las piezas que se prevé que puedan estar en contacto con los alimentos, cumplen las
regulaciones de la CEE indicadas en la directiva 89/109.
Al mostrar el logo marcado en este producto, declaramos, bajo nuestra propia responsabilidad,
el cumplimiento de todos los requisitos europeos en términos de seguridad, salud y medio ambiente,
establecidos en la legislación de este producto.
2. Descripción del producto
2.1 Descripción general
1
3
5
4
6
2
1. Panel de control
2. Posiciones de las bandejas
(y del soporte elevado si corresponde)
3. Rejilla metálica
4. Bandeja
5. Ventilador (detrás de la placa de acero)
6. Puerta del horno
2.2 Accesorios (depende del modelo de horno)
1 Rejilla metálica
Sostiene fuentes y platos.
2 Bandeja
Recoge los residuos que gotean durante la
cocción de alimentos con las resistencias.
ES 53
Page 54

Visi n Ledó
3
Sonda para carnes
5
Es un sistema de iluminación que sustituye el
tradicional sistema “de bombilla”. En la puerta del
horno se integran 14 luces LED (en versiones no
piroliticas) o 10 luces LED de Potencia Superior (en
modelos piroliticos). Las luces LED crean una
iluminacion blanca de calidad que permite ver
dentro del horno con claridad todas las bandejas
sin sombras.
Los LEDS permanecen apagados durante la
apertura de la puerta (solo para hornos piroliticos).
Ventajas:
Este sistema, ademas de proporcionar una
iluminacion excelente dentro del horno, dura mas
que la bombilla tradicional, tiene un mantenimiento
mas sencillo y, sobre todo, ahorra energia.
-Vision optima
-Iluminacion duradera
consumo energetico muy bajo, reduccion del 95%
en comparacion con la iluminacion tradicional.
Panel chef
4
Mide la temperatura interior de la comida
durante la cocción. Introduzca la sonda para
carnes en el orificio superior de la cavidad.
– Prepare el alimento e inserte correctamente la
sonda de carne en el alimento. No precaliente ni
empiece a cocinar antes de insertar correctamente
la sonda de carne. La sonda debe insertarse en el
alimento y el recipiente mientras el horno está
todavía frío.
– No inserte la sonda de carne en los alimentos
congelados.
– No deje la sonda de carne dentro del horno
cuando no se utilice: podría dañarse.
Todos los hornos con esta tecnología tienen una
función típica de los modelos profesionales, fruto de
tecnologías innovadoras y de la vasta experiencia
adquirida por el Grupo Candy Hoover en este sector.
El Panel Chef es un transportador de aire, que
aumenta la circulación del aire en el interior del
horno. Eso permite aumentar el rendimiento de
cocción en el horno, proporcionando una cocción
más homogénea de los alimentos a todas las
temperaturas, tiempos de cocción más cortos y, por
último, una distribución uniforme de la temperatura
dentro del horno.
ES 54
Page 55

2.3 Primer uso
LIMPIEZA PRELIMINAR
Limpie el horno antes de utilizarlo por primera vez. Limpie las superficies externas con un paño suave
levemente humedecido.
Lave todos los accesorios y limpie el interior del horno con detergente lavavajillas y agua caliente.
Compruebe que el horno esté vacío, seleccione la temperatura máxima y déjelo encendido durante un
mínimo de una hora para eliminar todos los olores que suele haber presentes en los hornos nuevos.
3. Uso del horno
3.1 Descripción de la pantalla
ENCENDIDO / APAGADO
EXTRA
Tiempo de
cocción
Configuración
del reloj
Fin de
la cocción
Bloqueo
para niños
El horno se enciende y se apaga usando este botón.
Temporizador
Cuando el horno está apagado, en la pantalla aparece el reloj.
Cuando el horno no está activo, todas las funciones están
disponibles, excepto la del tiempo de cocción y la de fin de la
cocción.
Si el reloj no está configurado, el horno no funciona: la
pantalla parpadea mostrando "12:00" y el único botón que
funciona es el Extra. Utilizando el botón Extra se pueden
WiFi
configurar las siguientes funciones:
ES 55
Page 56

FUNCIóN CóMO SE ACTIVA CóMO SE DESACTIVA QUÉ HACE PARA QUÉ SIRVE
TIEMPO
DE
COCCIóN
FIN DE LA
COCCIóN
TEMPORIZA
CONFIGUR
ACIóN DEL
RELOJ
BLOQUEO
INFANTIL
Nota: sólo se puede
configurar con un programa
de cocción activo. Pulse dos
veces el botón EXTRA y
configure el tiempo
utilizando los botones “+” y
“-”, acepte la configuración
pulsando "SELECT"
(Seleccionar).
Si no se introdujo ningún
tiempo de cocción, la
pantalla muestra “00:00”; de
lo contrario, la pantalla
muestra el tiempo restante.
Nota: sólo se puede
configurar con un programa
de cocción activo. Pulse el
botón EXTRA las veces
necesarias para que se
encienda el icono, configure
el tiempo de fin de la
cocción utilizando los
botones “<” y “>” y acepte
pulsando "SELECT".
Pulse el botón EXTRA las
veces necesarias para que
se encienda el icono,
configure el tiempo de fin de
la cocción utilizando los
botones “<” y “>” y acepte
pulsando "SELECT".
El tiempo de cocción se
calcula automáticamente.
•
La pantalla muestra
“00:00” cuando no hay
DOR
ningún tiempo programado,
o muestra el tiempo
restante cuando el tiempo
ya está configurado.
Pulse el botón EXTRA las
veces necesarias para que
se encienda el icono y use
los botones “<” y “>” para
configurar el tiempo, acepte
pulsando "SELECT".
•Cuando se enciende por
primera vez, la pantalla se
activa y muestra "12:00".
•Para modificar la hora,
pulse el botón EXTRA las
veces necesarias para que
se encienda el icono y use
los botones “<” y “>” para
configurar la hora, acepte
pulsando "SELECT".
•Pulse el botón EXTRA las
veces necesarias para que
se encienda el icono, y use
el botón “<” o el botón “>”
para activar esta función:
en la pantalla aparece la
palabra ON; acepte
pulsando SELECT.
•Para modificar la cocción
antes del tiempo
configurado, pulse dos
veces el botón EXTRA y
ajuste el tiempo de cocción
según sus necesidades
utilizando los botones “<” y
“>”, luego pulse
nuevamente "SELECT".
•Para borrar el tiempo de
cocción, lleve otra vez la
pantalla a “00:00”.
Para modificar el fin de la
cocción antes del tiempo
configurado, pulse el botón
EXTRA las veces
necesarias para que se
encienda el icono, ajuste el
tiempo de fin de la cocción
según sus necesidades
utilizando los botones “<” y
“>”, y acepte pulsando
"SELECT".
Para borrar el tiempo de fin
de la cocción, lleve otra vez
la pantalla a “00:00”.
•Para modificar el
temporizador, pulse el
botón EXTRA las veces
necesarias para que se
encienda el icono, ajuste el
tiempo de cocción según
sus necesidades utilizando
los botones “<” y “>”, y
acepte pulsando "SELECT".
•Le permite configurar la
•Pulse el botón EXTRA las
veces necesarias para que
se encienda el icono, y use
el botón “<” o el botón “>”
para desactivar esta
función: en la pantalla
aparece la palabra OFF;
acepte pulsando SELECT.
Cuando finaliza el programa
de cocción, el horno se
apaga y en la pantalla
aparece la palabra "END"
(Fin) (el icono del programa
de cocción queda encendido)
hasta que se pulsa el botón
de encendido/apagado, el
único botón activo. Cuando
finaliza un programa de
cocción, se genera un sonido
de alarma.
Cuando finaliza el programa
de cocción, el horno se
apaga y en la pantalla
aparece la palabra "END"
(Fin) (el icono del programa
de cocción queda
encendido) hasta que se
pulsa el botón de
encendido/apagado, el
único botón activo. Cuando
finaliza un programa de
cocción, se genera un
sonido de alarma.
•Esta función activa una
alarma que suena durante
algunos segundos cuando
se cumple el tiempo
programado (esta función
no apaga el horno).
Puede seleccionar un
tiempo de 00:00 a 23:59.
hora que aparece en la
pantalla.
•Si la función está activa,
sólo se pueden usar el
botón "Extra", para
desactivar la función y el
botón "On/Off".
Cuando se cumple el tiempo de
cocción, el horno se apaga
automáticamente y suena una
alarma durante algunos
segundos.
•Esta función también se usa
para las cocciones que se
pueden programar
anticipadamente.
•Si hay un programa de cocción
configurado, éste se elimina
cuando se pulsa el botón "F".
•Si se configura una cocción
diferida, el horno se apaga y la
pantalla muestra la hora actual,
mientras que los iconos del
programa de cocción, de tiempo
de cocción y fin de la cocción
quedan encendidos.
•Si hay un programa de cocción
configurado, pulsando los
botones “<” y “>” puede ver y
modificar la configuración de la
temperatura: tocando una
primera vez, aparece la
temperatura de funcionamiento,
mientras que tocando una
segunda vez podrá modificar
esa temperatura.
El temporizador funciona
•
independientemente de si el
horno está encendido.
La alarma funciona
•
independientemente de si el
horno está encendido.
•Esta función es útil en las
casas donde hay niños
pequeños.
ES 56
Page 57

WiFi (depende del modelo de horno) Pulsando el botón "Extra" en la pantalla del temporizador,
puede seleccionar el menú Wi-Fi. En el menú Wi-Fi, utilizando los botones "< >" puede seleccionar:
- Off: el Wi-Fi está desactivado; el horno no se puede controlar a través de la aplicación.
- On: el Wi-Fi está activado; el horno sólo se puede controlar a través de la aplicación. Eso significa que no es
posible seleccionar funciones de cocción, recetas ni temperatura utilizando la pantalla. Pulsando el botón
"Extra" está disponible sólo el menú Wi-Fi. Puede apagar el horno utilizando el botón On/Off, pero no
puede encenderlo otra vez desde la pantalla; sólo puede encenderlo usando la aplicación.
- Reset: Esta configuración se puede utilizar para registrar el horno la primera vez que lo conecta a su red
Wi-Fi y para restablecer la conexión Wi-Fi actual, para permitir un nuevo registro. Cuando lo selecciona, el
aparato le da 5 minutos para completar el proceso de registro. Durante este proceso, desde la pantalla no se
puede acceder a las funciones de cocción, a las recetas ni a la configuración de la temperatura. Pulsando el
botón "Extra" está disponible sólo el menú Wi-Fi. Puede apagar el horno utilizando el botón On/Off, pero no
puede encenderlo otra vez desde la pantalla; sólo puede encenderlo usando la aplicación. Para salir del
procedimiento de registro/reset usando la pantalla, pulse el botón "Extra" y luego use los botones "< >"
para seleccionar "Off". Después de cinco minutos, el aparato sale automáticamente del proceso de
registro/reset.
- Nota: el horno envía su estado a la aplicación, pero no se puede controlar a distancia. Para que eso sea
posible, el horno debe estar ya registrado.
Si la Wi-Fi no está configurada, sólo es posible seleccionar off y reset.
Cuando el horno está conectado a la Wi-Fi, el tiempo configurado para la cocción es de 5 horas, pero puede
ser modificado por el usuario.
Registro Wi-Fi:
Para registrar el aparato para la red Wi-Fi, pulse el botón "Extra" en la pantalla hasta que se encienda el
icono Wi-Fi, luego, seleccione "Reset" pulsando "< >". A continuación se debe seguir el procedimiento
presente en la aplicación. Cuando lo selecciona, el aparato le da 5 minutos para completar el proceso de
registro.
Icono Wi-Fi:
- el icono no se enciende: la Wi-Fi no está activa.
- El icono parpadea 1 segundo encendido y 1 segundo apagado: se puede acceder al horno desde la red WiFi y está preparado para el registro. Si el registro no se completa correctamente, el icono Wi-Fi se apaga
después de 5 minutos.
- Icono encendido de forma permanente: el horno está conectado a su enrutador Wi-Fi.
- El icono parpadea 3 segundos encendido y 1 segundo apagado: el horno está intentando conectarse a su
enrutador Wi-Fi.
- El icono parpadea 1 segundo encendido y 3 segundos apagado: el horno está en el modo de sólo lectura.
HOOVER : Para una información detallada sobre CÓMO CONECTAR
su aparato OneFi y CÓMO USARLO correctamente, visite la página
http://wizardservice.candy-hoover.com/
Cavidad del horno
Rustepollos
Elemento
calentador circular
Grill
Elemento calentador
inferior
Piro
Descongelación
Ventilador
CONFIGURACIÓN DEL IDIOMA El idioma se Puede
configurar cuando el horno se apaga pulsando los
botones Extra y Select simultáneamente durante 3". El
idioma actual aparece en la pantalla y se puede modificar
pulsando el botón “<” o el botón “>”, y aceptando con el
botón SELECT. Los idiomas disponibles son: Italiano,
Inglés, Francés y Alemán.
BOTÓN SELECT (Seleccionar) Todas las selecciones
se deben aceptar con este botón. Si no se aceptan en 15
segundos, la selección se elimina. Si se cambia de menú, se pierden todas las selecciones no aceptadas.
ICONO “HOT” (Caliente) Cuando finaliza un programa de cocción, o cuando se apaga el horno, si todavía
está caliente, la pantalla muestra la hora actual que se alterna con el mensaje “HOT” a intervalos de 3".
ES 57
Page 58

SONDA PARA CARNES (depende del modelo de horno) Si la sonda para carnes es reconocida por
el horno, la pantalla muestra la palabra "PROBE" (Sonda); si la sonda para carnes se introduce cuando
hay un programa de cocción en ejecución, el programa se detiene. Cuando se selecciona un programa
de cocción, la pantalla muestra la temperatura predeterminada, que nunca es superior a los 200°C: la
temperatura que se puede seleccionar también se limita a 200°C.
Cuando se acepta la temperatura pulsando el botón "Select", la pantalla muestra “Ϙ 40°”: ahora es
posible seleccionar la temperatura deseada de la sonda para carnes, entre 30°C y 90°C a intervalos de
1°C. Cuando se acepta la temperatura de la sonda para carnes pulsando el botón "Select", en la pantalla
aparece la letra “Ϙ” seguida de la temperatura concretamente captada por la sonda para carnes (a
intervalos de 1 grado). Apenas la sonda para carnes alcanza la temperatura programada, finaliza el
programa de cocción. Si un programa de cocción está configurado con la sonda para carnes, pulsando
los botones “-” y “+” puede ver y modificar la temperatura de la sonda: tocando una primera vez uno de
los dos botones, la pantalla muestra la temperatura deseada de la sonda para carnes, mientras que
tocando una segunda vez puede modificar la temperatura seleccionada para la sonda.
Si el usuario modifica el programa de cocción, la configuración de la temperatura de la sonda para
carnes se pone a cero. Repita la secuencia de configuración para seleccionar una nueva temperatura
deseada. La sonda para carnes no se puede utilizar con la cocción preconfigurada ni con la placa de
separación (si está presente) dentro del horno:
en ese caso, la pantalla muestra “Ϙ NO” y no se ejecutará ningún mando hasta que se retire la sonda.
Con la sonda para carnes no están admitidas las funciones de descongelación, grill, ningún programa
con rustepollos, la pirólisis ni cualquier cocción programada (no aparecen en el menú).
SONDA PARA CARNES
TEMPERATURAS RECOMENDADAS
Carne
Medio cruda
Término medio
En su punto
Muy hecha
56
58
60
62
Salmón
Pollo
35
min 68
RECETAS PRECONFIGURADAS Cuando se selecciona una receta, la pantalla muestra la letra “R”
seguida del número de la receta, y también muestra el correspondiente modo de cocción.
Las recetas disponibles son las siguientes:
RECETA
R1- Lasañas
R2- Pollo al horno/asado
R3- Mojarra con costra
R4- Patatas al horno
R5- Tortilla
R6- Pastel de manzana
MÉTODO DE
COCCIÓN
Estático+ventilador
Estático+ventilador
Estático+ventilador
Estático+ventilador
Estático
Estático+ventilador
TEMPERATURA
150°
180°
180°
180°
160°
180°
TIEMPO DE
COCCIÓN
45’
40’
40’
45’
25’
45’
Nota: No es posible modificar la temperatura ni el tiempo de cocción.
ES 58
Page 59

3.2 Modalidades de cocción
Mando
selector
T°C
establecida
40
180
210
*
220 50 ÷ 280
210 50 ÷ 230
210
200
L3
220 50 ÷ 230
*
* Programa de prueba según CENELEC EN 60350-1 utilizado para la definición de la clase energética.
190 50 ÷ 230
Rango
de T°C
40 ÷ 40
50 ÷ 240
50 ÷ 240
50 ÷ 230
150 ÷ 220
L1 ÷ L5
FUNCIÓN ( )dependiendo del modelo
LAMPARA: Conecta la luz interior
DESCONGELACIÓN: Funcionamiento de la turbina de cocción que hace
circular el aire dentro del espacio del horno. Ideal para realizar una
descongelación previa a una cocción.
CALOR CIRCULANTE: Utilización simultánea de la resistencia inferior, superior
y de la turbina que hace circular el aire dentro del espacio del horno. Función
recomendada para las aves, la repostería, los pescados, las verduras... El calor
penetra mejor dentro del alimento a cocer reduciendo el tiempo de cocción,
así como el tiempo de precalentamiento. Se pueden realizar cocciones
combinadas con preparaciones idénticas o distintas en uno o dos niveles. Este
modo de cocción garantiza una distribución homogénea del calor y no mezcla
los olores. Para una cocción combinada se deben prever unos diez minutos
más.
CONVECCİÓN NATURAL: Funcionan la resistencia inferior y la resistencia
superior del horno. Es la cocción tradicional, ideal para cocinar asados, caza,
galletas, manzanas al horno y para conseguir alimentos crujientes.
BASE: Utilizar el elemento inferior. Ideal para todo tipo de reposteria. Utilizar
para flanes, quiches, tartas, pastas y procesos que requieran mas calor desde
abajo.
RESISTENCIA INFERIOR CIRCULANTE: Utilización de la resistencia inferior más
la turbina que hace circular el aire dentro del espacio del horno. Ideal para
hacer tartas de frutas jugosas, tortadas, quiches, pasteles. Evita que se sequen
los alimentos y favorece la subida de bizcochos, masa de pan y otras cocciones
realizadas por debajo. Coloque la rejilla en la ranura inferior.
TURBOGRILL : La función turbogrill debe utilizarse con la puerta cerrada.
Utilización de la resistencia superior más la turbina que hace circular el aire
dentro del espacio del horno. Se requiere un precalentamiento para las carnes
rojas pero no para las carnes blancas. Ideal para las cocciones de volumen
grueso, piezas enteras como cerdo asado, las aves, etc. Coloque el plato que
quiera cocer directamente en la rejilla en el centro del horno, a un nivel medio.
Coloque la grasera debajo de la rejilla para que las grasas caigan dentro.
Asegúrese de que la comida no quede demasiado cerca del grill. En la mitad de
la cocción, gire la pieza que esté cociendo.
GRILL: El grill debe utilizarse con la puerta cerrada. Utilización de la resistencia
superior con posibilidad de ajustar la temperatura. Es necesario un
precalentamiento de 5 minutos para que la resistencia se ponga al rojo. Éxito
seguro con las parrilladas, las brochetas y los gratinados. Las carnes blancas
deben alejarse del grill, porque aunque así se alargará el tiempo de cocción, la
carne quedará más sabrosa. Las carnes rojas y los filetes de pescado se pueden
colocar encima de la rejilla colocando debajo la grasera.
PIZZA: El calor envolvente en esta modalidad genera un ambiente similar al de
los hornos de leña de las pizzerías.
La función "ECO" permite cocinar de manera más saludable, reduciendo la
cantidad de grasa o aceite necesaria. Gracias a la combinación del grill y el
ventilador, conjuntamente con un flujo de aire variable, se conservará el nivel
de humedad de los alimentos, dorando la superficie y reduciendo el tiempo de
cocción, sin alterar su sabor. Especialmente, es adecuado para la cocción de
carnes, verduras asadas y tortillas. El flujo variable de aire mantiene tanto la
humedad en el interior del horno como en los alimentos, conservando los
valores nutricionales y garantizando un proceso de cocción uniforme rápido.
¡Pruebe todas sus recetas y reduzca la cantidad de condimentos que se
emplean y experimente la ligereza de esta nueva función!
ES 59
Page 60

4. Limpieza y mantenimiento del horno
4.1 Notas genéricas de limpieza
La vida útil del aparato se prolonga si se limpia a intervalos regulares. Espere a que el horno se enfríe
antes de llevar a cabo las operaciones de limpieza manuales. No utilice nunca detergentes abrasivos,
estropajos metálicos ni objetos puntiagudos para la limpieza con el fin de no dañar de forma irreparable
las piezas esmaltadas. Utilice únicamente agua, jabón o detergentes a base de amoniaco.
PIEZAS DE VIDRIO
Es aconsejable limpiar la puerta de vidrio con papel absorbente de cocina después de cada uso del
horno. Para eliminar las manchas más persistentes, se puede utilizar también una esponja empapada
en detergente bien escurrida y aclarar con agua.
JUNTA DE LA PUERTA DEL HORNO
Si se ensucia, la junta se puede limpiar con una esponja ligeramente húmeda.
ACCESORIOS
Limpie los accesorios con una esponja empapada en agua y jabón, escúrralos y séquelos: no utilice
detergentes abrasivos.
FUENTE DE GOTEO
Después de usar las resistencias, extraiga la fuente del horno. Vierta la grasa caliente en un recipiente y
lave la fuente con agua caliente utilizando una esponja y detergente lavavajillas.
Si quedan residuos grasos, sumerja la fuente en agua y detergente. También se puede lavar la fuente en
el lavavajillas o bien utilizar un detergente comercial para hornos. Nunca vuelva a introducir la fuente
sucia en el horno.
4.2 Limpieza a Vapor
El procedimiento utiliza el vapor para facilitar la eliminación de grasa y restos de alimentos del horno.
1. Introduzca 300 ml de agua destilada o potable en el fondo del horno.
2. Configure la función del horno en Estática ( ) o Calentamiento desde abajo ( ).
3. Configure la temperatura a 90°C.
4. Deje el electrodoméstico en funcionamiento durante 30 minutos.
5. Desactive el aparato y deje que se enfríe. Una vez que el horno se haya enfriado.
6. Limpie la superficie interna del horno con un paño.
Atención: Asegúrese de que el horno esté frío antes de tocarlo: corre el riesgo de escaldarse.
300 ml
ES 60
Page 61

4.4 Mantenimiento
EXTRACCIÓN Y LIMPIEZA DE LAS REJILLAS
1. Desenrosque en sentido antihorario las tuercas estriadas.
2. Extraiga las rejillas tirando de ellas hacia fuera.
3. Límpielas lavándolas en el lavavajillas o con una esponja húmeda y séquelas inmediatamente
después.
4. Una vez limpias, vuelva a instalar las rejillas fijando las tuercas estriadas.
A
EXTRACCIÓN DE LA PUERTA DEL HORNO
1. Abra la puerta anterior.
2. Abra las pestañas de alojamiento de la bisagra por el lado derecho e izquierdo de la puerta anterior
presionándolas hacia abajo.
3. Vuelva a instalar la puerta llevando a cabo el procedimiento a la inversa.
ES 61
Page 62

EXTRACCIÓN Y LIMPIEZA DE LA PUERTA DE VIDRIO
LOW-E
1. Abra la puerta del horno.
2.3.4. Bloquee las bisagras, desenrosque los tornillos y extraiga la cubierta metálica superior tirando
hacia arriba.
5.6. Extraiga el vidrio con mucho cuidado de la contrapuerta del horno (N. B.: si se trata de un horno
pirolítico, extraiga también el segundo y el tercer vidrio si los hubiera).
7. Al término de la limpieza o sustitución, vuelva a ensamblar las piezas en el orden opuesto a la
extracción.
En todos los vidrios, la indicación ”Low-E” debe ser correctamente legible y estar ubicada a la izquierda
de la puerta, cerca de la bisagra lateral izquierda. De este modo, la etiqueta estampada en el primer
vidrio quedará por el interior de la puerta.
1.
5.
2.
3.
4.
6.
1
2
3
7.
ES 62
Page 63

SUSTITUCIÓN DE LA BOMBILLA
1. Desenchufe el horno de la red eléctrica.
2. Suelte la cubierta de vidrio, desenrosque la bombilla y sustitúyala por una nueva del mismo modelo.
3. Una vez sustituida la bombilla defectuosa, vuelva a atornillar la cubierta de vidrio.
5. Solución de problemas
5.1 Preguntas más frecuentes
PROBLEMA CAUSA POSIBLE SOLUCIÓN
El horno no se calienta
El horno no se calienta
El horno no se calienta
No hay reacción cuando
se toca la pantalla
El reloj no está en hora Configure el reloj
El bloqueo infantil está
activado
Los ajustes necesarios no
están configurados
Vapor y condensa en la
pantalla
Desactive el bloqueo infantil
Asegúrese de que los ajustes
necesarios sean correctos
Limpiar con un paño de
microfibra la pantalla para
quitar la capa condensación
ES 63
Page 64

Sicherheitshinweise
• WARNUNG: Das Gerät und zugängliche Teile können während des
Betriebs heiß werden. Darauf achten, dass keine heißen Bestandteile
berührt werden.
•WARNUNG: Der Grill und zugängliche Teile können während des
Betriebs heiß werden. Kinder nicht in die Nähe des Geräts gelangen
lassen.
•WARNUNG: Vor dem Austauschen der Glühbirne prüfen, ob das Gerät
ausgeschaltet ist, um die Gefahr von Stromschlägen zu vermeiden.
•WARNUNG: Um Gefahren durch das versehentliche Zurücksetzen der
thermischen Schutzeinrichtung zu verhindern, sollte das Gerät nicht
über eine externe Schaltquelle wie einen Timer betrieben oder an
einen Stromkreislauf angeschlossen werden, der regelmäßig ein- und
ausgeschaltet wird.
•WARNUNG: Vor dem Start des automatischen Reinigungszyklus:
- Backofentür reinigen.
- Große oder grobe Speisereste mit einem feuchten Schwamm aus dem
Inneren des Backofens entfernen. Keine Reinigungsmittel verwenden.
- Alle Zubehörteile und Gleitschienen (falls vorhanden) herausnehmen.
- Keine Geschirrtücher in den Ofen legen.
• Bei Backöfen mit Kerntemperaturfühler, das Anschlussloch vor dem
Reinigungszyklus mit der beigefügten Nuss verschließen. Wird der
Kerntemperaturfühler nicht verwendet, sollte das Anschlussloch
immer mit der Nuss verschlossen werden.
•Kinder unter acht Jahren nur unter Aufsicht an das Gerät lassen.
•Kinder sollten nicht mit dem Gerät spielen. Dieses Gerät darf nicht von
körperlich oder geistig behinderten bzw. in ihrer Sinneswahrnehmung
beeinträchtigten Personen (einschließlich Kindern) oder von Personen
mit unzureichender Produktkenntnis benutzt werden, es sei denn, sie
werden von einer für ihre Sicherheit verantwortlichen Person
überwacht und eingewiesen.
•Reinigung und Wartung sollten nicht durch unbeaufsichtigte Kinder
erfolgen.
•Für die Reinigung der Glasbestandteile der Backofentür keine
Scheuermaterialien oder scharfkantigen Metallschaber verwenden, da
diese die Oberfläche zerkratzen und das Glas zerspringen kann.
DE 64
Page 65

•Ofen vor dem Herausnehmen der Zubehörteile ausschalten und diese
nach der Reinigung entsprechend der Anweisung wieder einsetzen.
•Nur den für diesen Ofen empfohlenen Kerntemperaturfühler
verwenden.
•Keinen Dampfreiniger verwenden.
•Den Stecker in eine geerdete, betriebsfähige Steckdose stecken. Bei
Geräten ohne Stecker, einen Standardstecker am Kabel befestigen, der
für die auf dem Siegel angegebene Ladung geeignet ist. Der Erdleiter
hat eine gelb-grüne Farbe. Dieser Vorgang darf nur durch einen
geschulten Elektriker ausgeführt werden. Passen Steckdose und Stecker
nicht zueinander, muss die Steckdose durch einen qualifizierten
Elektriker gegen eine geeignete ausgetauscht werden. Der Anschluss an
die Stromversorgung kann auch mittels eines allpoligen Schalters
zwischen Gerät und Stromquelle erfolgen, der die gesetzlich
zugelassenen maximalen Anschlusswerte tragen kann. Das gelb-grüne
Erdungskabel sollte nicht vom Schalter unterbrochen werden. Bei der
Installation des Geräts darauf achten, dass die für den Anschluss
verwendete Steckdose oder der allpolige Schalter gut zugänglich sind.
•Ist das Stromkabel beschädigt, sollte es durch ein vom Hersteller
erhältliches vom Kundendienst ersetzt werden.
Ist das Kabel beschädigt, gemäß der folgenden Anweisung austauschen:
- Abdeckung der Klemmleiste öffnen;
- Stromkabel entfernen und durch ein ähnliches ersetzen, das zum
Gerät passt (Typ H05VV-F, H05V2V2-F).
•Dieser Vorgang darf nur durch einen geschulten Elektriker ausgeführt
werden. Der Erdleiter (gelb-grün) muss etwa 10 mm länger sein als die
anderen Leiter. Wenden Sie sich für alle Reparaturen an den
Kundendienst und veranlassen Sie die Verwendung originaler
Ersatzteile.
•Die Nichteinhaltung der oben genannten Anweisungen kann die
Sicherheit des Geräts beeinträchtigen und zum Erlöschen der Garantie
führen.
•Eventuelle Materialreste sollten vor der Reinigung entfernt werden.
•Während der pyrolytischen Selbstreinigung des Herdes können sich
Oberflächen mehr als gewöhnlich erhitzen. Kinder sollten daher einen
ausreichenden Sicherheitsabstand einhalten.
DE 65
Page 66

Zusammenfassung
Allgemeine Anweisungen
67
Produktbeschreibung
69
Betrieb des Backofens
70
Reinigung und Wartung des
Backofens
75
1.1 Sicherheitshinweise
1.2 Elektrische Sicherheit
1.3 Empfehlungen
1.4 Installation
1.5 Abfallentsorgung
1.6 Konformitätserklärung
2.1 Übersicht
2.2 Zubehör
2.3 Inbetriebnahme
3.1 Beschreibung der Anzeige
3.2 Funktionen zum Garen
4.1 Allgemeine Reinigungshinweise
4.2 Dampfreinigung
4.3 Wartung
Entfernen und Reinigen der
•
Führungsschienen
•
Entfernen des Backofenfensters
Entfernen und Reinigen der Glastür
•
•
Wechseln der Glühbirne
Fehlerbehebung
78
DE 66
5.1 Häufig gestellte Fragen
Page 67

1. Allgemeine Anweisungen
Vielen Dank, dass Sie sich für eins unserer Produkte
entschieden haben. Damit Sie lange Freude mit Ihrem
Backofen haben, sollten Sie diese Bedienungsanleitung
sorgfältig durchlesen und zum Nachschlagen in der
Zukunft aufbewahren. Notieren Sie sich vor dem
Anschließen des Backofens die Seriennummer, sodass Sie
diese im Reparaturfall an den Kundendienst weitergeben
können. Den Backofen nach dem Auspacken auf mögliche
Transportschäden überprüfen. Im Zweifelsfall den Ofen
nicht in Betrieb nehmen und einen qualifizierten
Servicetechniker konsultieren. Verpackungsmaterial
(Plastiktüten, Styropor, Nägel usw.) außerhalb der
Reichweite von Kindern aufbewahren. Beim ersten
Einschalten des Backofens kann ein streng riechender Rauch entstehen.
Dieser kann beim ersten Erhitzen durch den Kleber auf den Dämmplatten hervorgerufen werden. Dies ist
bei der ersten Inbetriebnahme ein normaler Vorgang; es sollte jedoch abgewartet werden, bis der Rauch
sich verzogen hat, bis Lebensmittel in den Ofen geschoben werden. Der Hersteller übernimmt keine
Verantwortung in Fällen, wo die in diesem Dokument enthaltenen Anweisungen nicht beachtet werden.
HINWEIS: Die in diesem Handbuch erwähnten Funktionen, Eigenschaften und Zubehörteile können je nach
gekauftem Modell variieren.
1.1 Sicherheitshinweise
Den Backofen nur zum vorbestimmten Zweck, das heiß
anderen Verwendungsmöglichkeiten wie beispielsweise als Heizungsquelle gelten als unsachgemäß und
sind daher gefährlich. Der Hersteller übernimmt keine Haftung für Schäden, die aus einer falschen,
unsachgemäßen oder unverständlichen Verwendung her
Der Betrieb elektrischer Geräte erfordert die Einhaltung
- Das Gerät nicht am Stromkabel aus der Steckdose ziehen.
- Gerät nicht mit nassen oder feuchten Händen oder Füßen
- Die Verwendung von Adaptern, Mehrfachsteckern und
- Bei einer Fehlfunktion beziehungsweise bei unzulänglichem
t, für das Garen von Lebensmitteln einsetzen. Alle
vorgehen.
einiger Grundregeln:
berühren.
Verlängerungskabeln wird nicht empfohlen.
Betrieb Gerät ausschalten und nicht öffnen.
1.2 Elektrische Sicherheit
DER ANSCHLUSS AN DIE STROMQUELLE DARF NUR DURCH EINEN ELEKTRIKER ODER QUALIFIZIERTEN
TECHNIKER ERFOLGEN.
Die Stromquelle, an die der Backofen angeschlossen wird, muss den gesetzlichen Voraussetzungen des
Landes entsprechen. Der Hersteller übernimmt keine Haftung für Schäden, die aus der Nichtbefolgung
dieser Anweisungen entstehen. Der Backofen muss entsprechend der geltenden Gesetzgebung des Landes
an eine geerdete Wandsteckdose oder an einen allpoligen Trennschalter angeschlossen werden. Die
Stromquelle sollte durch entsprechende Sicherungen geschützt sein und die verwendeten Kabel müssen
einen Querschnitt aufweisen, der eine ordnungsgemäße Stromversorgung des Backofens gewährleistet.
ANSCHLUSS
Der Backofen wird mit einem Stromkabel geliefert, das an eine Stromquelle mit 220- 240 Vac 50 Hz
angeschlossen werden kann. Bevor der Backofen an die Stromquelle angeschlossen wird, muss Folgendes
überprüft werden:
- Spannung des Stromnetzes mit dem Messgerät;
- Beschaffenheit und Umfeld des Trennschalters.
Die mit der Erdungsklemme des Backofens verbundene Schutzleitung muss mit der Erdungsklemme der
Stromquelle verbunden werden.
WARNUNG
Vor dem Anschließen des Backofens an die Stromquelle einen qualifizierten Elektriker darum bitten, die
Kontinuität der Erdungsklemme an der Stromquelle zu überprüfen. Der Hersteller übernimmt keine
Verantwortung für Unfälle oder sonstige Probleme, die aus einem nicht sachgemäßen Anschluss des
Backofens an die Erdungsklemme oder an einen geerdeten Anschluss mit defekter Kontinuität entstehen
können.
DE 67
Page 68

HINWEIS: Für eine eventuelle Wartung des Ofens ist die Zugänglichkeit einer zweiten Wandsteckdose von
Vorteil, sodass er an diese angeschlossen werden kann, wenn er ausgebaut werden muss. Das Stromkabel
darf nur von qualifizierten Kundendiensttechnikern oder Elektrikern ausgetauscht werden.
1.3 Empfehlungen
Es empfiehlt sich, den Backofen nach jeder Verwendung grob zu reinigen.
Die Ofenwände nicht mit Aluminiumfolie oder sonstiger im Handel erhältlicher Einmalschutzfolie
auskleiden.
Gerät die Aluminiumfolie oder sonstige Schutzfolie mit der heißen Emaille in Berührung, so kann sie
schmelzen und die Qualität der Backofenbeschichtung beeinträchtigen. Es wird empfohlen, den Backofen
nicht bei sehr hohen Temperaturen zu betreiben, um eine übermäßige Verschmutzung und unangenehme
Rauch- und Geruchsentwicklung zu vermeiden. Es ist besser, bei niedrigerer Temperatur die Garzeit zu
erhöhen. Zusätzlich zum mitgelieferten Zubehör sollten nur temperatur- und hitzebeständige Backformen
und ofenfestes Geschirr verwendet werden.
1.4 Einbau und Installation
Der Hersteller ist nicht zur Installation verpflichtet. Wird das Eingreifen des Hersteller erforderlich, um
Fehler zu beheben, die aus einer falschen Installation hervorgehen, so erfolgt dieses nicht im Rahmen der
Gewährleistungsgarantie. Die Installationsanweisungen für qualifiziertes Fachpersonal müssen befolgt
werden. Eine falsche Installation kann Personen- oder Sachschäden hervorrufen. Für derartige Schäden
oder Verletzungen übernimmt der Hersteller keine Haftung.
Der Backofen kann oben in einem Einbauschrank oder unter der Arbeitsfläche eingebaut werden. Vor dem
Fixieren muss gewährleistet sein, dass im Backofenraum genügend Fischluft zirkulieren kann, um die
Kühlung und den Schutz der innenliegenden Teile zu gewährleisten. Je nach Einbauart die auf der letzten
Seite angegebenen Öffnungen vornehmen.
1.5 Entsorgung und Umweltschutz
Dieses Elektrohaushaltsgerät ist in Einklang mit der EU-Richtlinie 2012/19/EU über Elektround Elektronik-Altgeräte (WEEE) gekennzeichnet. Elektro- und Elektronik-Altgeräte enthalten
umweltschädigende Substanzen, aber auch Grundkomponenten, die wiederverwendet
werden können. Daher ist es wichtig, Elektro- und Elektronik-Altgeräte spezifisch zu entsorgen,
um alle schädlichen Substanzen zu entfernen und wiederverwendbare Teile zu recyceln.
Verbraucher leisten einen wichtigen Beitrag zur Gewährleistung, dass Elektro- und ElektronikAltgeräte nicht zu einem Umweltproblem werden. Halten Sie sich daher bitte an die folgenden
Grundregeln:
- Elektro- und Elektronik-Altgeräte dürfen nicht mit dem normalen Hausmüll entsorgt werden.
- Elektro- und Elektronik-Altgeräte müssen bei zugelassenen Sammelstellen abgegeben werden, die von
der Stadtverwaltung oder anderen zuständigen Stellen verwaltet werden.
In vielen Ländern wird für die Entsorgung großer Elektro- und Elektronik-Altgeräte ein Abholservice
angeboten. Beim Kauf eines neuen Geräts wird das alte möglicherweise vom Händler zurückgenommen,
der es kostenfrei entsorgt, sofern das neue Gerät von einem ähnlichen Typ ist und die gleiche Funktion
erfüllt wie das Altgerät.
MASSNAHMEN ZUM STROMSPAREN UND UMWELTSCHUTZ
Sofern möglich, das Vorheizen des Backofens vermeiden und seine Kapazität voll ausnutzen. Die
Backofentür so selten wie möglich öffnen, weil die Hitze aus dem Innenraum bei jedem Öffnen verloren
geht.
Für eine deutliche Energieersparnis den Backofen 5-10 Minuten vor dem Ende der Garzeit ausschalten und
mit der Restwärme zu Ende garen. Die Dichtungen sollten sauber und unversehrt bleiben, damit keine Hitze
aus dem Inneren verloren geht. Falls Sie einen Stromversorgungsvertrag mit wechselndem Stundentarif
haben, erleichtert das Programm der „verzögerten Startzeit“ das Stromsparen, indem der Anfang des
Garvorgangs in die Zeit verschoben wird, wo der günstigere Stromtarif gilt.
1.6 Konformitätserklärung
Die Teile dieses Geräts, die mit Lebensmitteln in Berührung kommen können, entsprechen der EURichtlinie 89/109.
Durch das Zeichen auf diesem Produkt wird seine Einhaltung aller geltenden Sicherheits-,
Gesundheits- und Umweltanforderungen bestätigt, die gesetzlich für dieses Produkt vorgeschrieben sind.
DE 68
Page 69

2. Produktbeschreibung
2.1 Übersicht
1
3
5
4
6
2
2.2 Zubehör
Fettpfanne/Backblech
1
Fängt die beim Backen aus den Lebensmitteln
austretende Flüssigkeit auf.
Led vision
3
1. Bedienfeld
2. Führungsschienen
(seitlicher Metallrost, falls enthalten)
3. Backrost
4. Fettpfanne/Backblech
5. Lüfter (hinter der Stahlabdeckung)
6. Backofentür
Backrost
2
Hält Auflauf- und Backformen.
Heißluftventilator
4
Das ist ein Beleuchtungssystem, das s di e
traditionelle Gluhbirne ersetzt. 14 LED-Leuchten
sind in der Backofentur integriert. Das erzeugte Licht
ist sehr hell und ermoglicht eine fast schattenfreie
Sicht auf allen Ebenen im Backofeninneren.
LED schaltet sich wahrend der Turoffnung aus (nur
fur Pyrolyseofen).
Die Vorteile:
Neben der herausragenden Qualitat und Intensitat
der Beleuchtung, bietet das System U-See auch eine
langere Lebensdauer im Vergleich zu herkommlichen
Backofenlampen, ist auserdem leicht zu reinigen und
vor allem sehr sparsam im Enerigeverbrauch.
- optimale Ubersicht auf allen Backofenebenen
- zuverlassige Funktion und lange Lebensdauer
- hohe Helligkeit bei sehr niedrigen Energieverbrauch, bis
zu 95% weniger als herkommliche Backofenbeleuchtung
leicht zu reinigen.
DE 69
Alle Backofen mit dieser Technologie verfügen
über eine typische Funktion, die das Ergebnis
innovativer Technologien ist, und der großen
Erfahrung der Candy Hoover Group auf diesem
Sektor zu verdanken ist.
Der Heißluftventilator fördert die Zirkulation der
Luft im Ofen. Dadurch wird die Garleistung des
Backofens verbessert, eine standardmäßige
Garung bei allen Temperaturen erzielt, Garzeiten
we rd en ve r kü r zt un d s c hli eß li c h e in e
gleichmäßige Temperaturverteilung im Ofen
gewährleistet.
Page 70

Kerntemperaturfühler (je nach Backofenmodell)
5
Misst die Innentemperatur während des Garvorgangs.
Den Kerntemperaturfühler in das Anschlussloch
oben im Backofen stecken.
–Bereiten Sie das Essen vor und stecken Sie die
Fleischsonde r ichtig in das Bratgut. Vor dem
ordnungsgemäßen Einsetzen der Fleischsonde nicht
vorheizen oder mit dem Kochvorgang beginnen. Die
Sonde sollte in das Bratgut bzw. die Steckdose gesteckt
– Stecken Sie die Fleischsonde nicht in tiefgekühlte Nahrungsmittel.
– Lassen Sie die Fleischsonde nicht in der Nahrung, wenn es nicht genutzt wird; es könnte beschädigt
werden.
werden, während der Backofen noch kühl ist.
2.3 Erste Inbetriebnahme
ERSTE REINIGUNG
Den Backofen vor der ersten Inbetriebnahme reinigen. Die Außenflächen mit einem feuchten, weichen
Tuch abwischen. Alle Zubehörteile spülen und den Backofen innen mit warmem Spülwasser
auswischen. Den leeren Backofen auf die Höchsttemperatur einstellen und etwa eine Stunde lang
anlassen, damit der neue Geruch verfliegt.
3. Betrieb des Backofens
3.1 Beschreibung der Anzeige
ON / OFF
EXTRA
Garzeit
Uhrzeit
Über diese Schaltflächen wir der Backofen ein-/ausgeschaltet.
Garzeitende
Kindersich
erung
Timer
Ist der Backofen ausgeschaltet, zeigt das Display die Uhrzeit
an. Ist der Backofen inaktiv, können außer der Garzeit und
dem Garzeitende alle Funktionen ausgewählt werden.
Wenn die Uhrzeit nicht eingestellt ist, funktioniert der
Backofen nicht: Das Display blinkt und zeigt „12:00“ an.
Die einzige funktionierende Taste ist „EXTRA“. Über die Taste
„EXTRA“ können folgende Funktionen eingestellt werden:
WLAN
DE 70
Page 71

FUNKTION
GARZEIT
ENDE DER
GARZEIT
TIMER
UHR
EINSTELLEN
KINDERSICH
ERUNG
VERWENDUNG
Hinweis: Kann nur
zusammen mit einem
aktiven Garprogramm
eingestellt werden. Drücken
Sie zweimal EXTRA und
stellen Sie die Zeit über die
Tasten „+“ und „-“ ein.
Bestätigen Sie dann mit
„SELECT“. Das Display
zeigt „00:00“ an, wenn keine
Garzeit eingegeben wurde;
anderenfalls zeigt es die
verbleibende Garzeit an.
Hinweis: Kann nur
zusammen mit einem
aktiven Garprogramm
eingestellt werden. Drücken
Sie so lange EXTRA, bis
das Symbol leuchtet.
Stellen Sie das Ende der
Garzeit über die Tasten „<“
und „>“ ein, bevor Sie zum
Bestätigen auf SELECT
drücken.
Drücken Sie so lange
EXTRA, bis das Symbol
leuchtet. Stellen Sie das
Ende der Garzeit über die
Tasten „<“ und „>“ ein,
bevor Sie zum Bestätigen
auf SELECT drücken.
Die Garzeit wird
automatisch berechnet.
•
Wurde keine Zeit
eingestellt, zeigt das
Display „00:00“ an,
ansonsten gibt es die
verbleibende Garzeit an.
Drücken Sie so lange
EXTRA, bis das Symbol
leuchtet. Stellen Sie die Zeit
über die Tasten „<“ und „>“
ein, bevor Sie zum
Bestätigen auf SELECT
drücken.
•Beim erstmaligen
Einschalten leuchtet das
Display auf und zeigt
„12:00“ an.
Drücken Sie zum Ändern der
Uhrzeit so lange EXTRA, bis
das Symbol leuchtet. Stellen
Sie die Zeit dann über die
Tasten „<“ und „>“ ein, bevor
Sie zum Bestätigen auf
SELECT drücken.
•Drücken Sie so lange
EXTRA, bis das Symbol
leuchtet. Aktivieren Sie
dann über die Taste „<“
oder „>“ die Funktion:
Das Display zeigt ON.
Drücken Sie zum
Bestätigen auf SELECT.
DEAKTIVIEREN FUNKTIONSWEISE
•Um die Garzeit vor dem
eingestellten Ende zu ändern,
drücken Sie zweimal EXTRA
und stellen Sie die Zeit über
die Tasten „<“ und „>“ ein,
bevor Sie noch einmal auf
SELECT drücken.
•Um die Garzeit abzubrechen,
setzen Sie die Anzeige auf
„00:00“ zurück.
Um das Ende der Garzeit vor
der eingestellten Zeit zu
ändern, drücken Sie so oft
EXTRA, bis das Symbol
leuchtet. Stellen Sie das Ende
der Garzeit über die Tasten
„<“ und „>“ ein, bevor Sie mit
SELECT bestätigen.
•Um das Ende der Garzeit
abzubrechen, setzen Sie die
Anzeige auf „00:00“ zurück.
•Um den Timer umzustellen,
drücken Sie so oft EXTRA, bis
das Symbol leuchtet. Stellen
Sie die Garzeit über die Tasten
„<“ und „>“ ein, bevor Sie mit
SELECT bestätigen.
•Drücken Sie so lange
EXTRA, bis das Symbol
leuchtet. Deaktivieren Sie
dann über die Taste „<“
oder „>“ die Funktion:
Das Display zeigt OFF.
Drücken Sie zum
Bestätigen auf SELECT.
Erreicht ein Garprogramm
das Ende, schaltet sich der
Backofen aus und das
Display zeigt so lange END
(das Symbol für das
Garprogramm bleibt
weiterhin an), bis die einzige
funktionierende Taste
„On/Off“ gedrückt wird.
Erreicht ein Garprogramm
das Ende, ertönt ein
Alarmsignal.
Erreicht ein Garprogramm
das Ende, schaltet sich der
Backofen aus und das
Display zeigt so lange END
(das Symbol für das
Garprogramm bleibt
weiterhin an), bis die einzige
funktionierende Taste
„On/Off“ gedrückt wird.
Erreicht ein Garprogramm
das Ende, ertönt ein
Alarmsignal.
•Diese Funktion schaltet ein
Alarmsignal ein, das einige
Sekunden lang läutet, wenn
die eingestellte Zeit abläuft
(der Ofen wird durch diese
Funktion nicht
ausgeschaltet).
Sie können eine Zeit
zwischen 00:00 und 23:59
einstellen.•
•Darüber können Sie die
Uhrzeit einstellen, die im
Display angezeigt wird.
•Ist die Funktion aktiv, lässt
sich nur die Taste EXTRA
zum Deaktivieren und die
Taste ON/OFF bedienen.
DE 71
VERWENDUNGSZWECK
Erreicht die Garzeit das Ende,
wird der Backofen automatisch
ausgeschaltet und das
Alarmsignal ertönt für einige
Sekunden.
•Diese Funktion kann auch zum
Programmieren der Garzeit
verwendet werden.
•Eingestellte Garprogramme
gehen verloren, wenn „F“
gedrückt wird.
•Wird eine verzögerte Garzeit
eingestellt, schaltet sich der
Backofen aus und das Display
zeigt die aktuelle Uhrzeit an.
Dabei sind die Symbole für das
Garprogramm, die Garzeit und
das Ende der Garzeit
beleuchtet.
•Beim Einstellen des
Garprogramms können Sie über
die Tasten „<“ und „>“ die
ausgewählte Temperatur
anzeigen und ändern: Beim
ersten Berühren wird die
Temperatur angezeigt, beim
zweiten kann sie geändert
werden.
De r Tim er fun ktion iert
au ch dan n, w enn der
Ba ckofen aus gesc haltet
ist.
• D i e A l a r m fu n k ti o n
f un k ti o ni er t au ch be i
ausgeschaltetem Ofen.
•Diese Funktion ist vor allem
für Haushalte mit kleinen
Kindern zu empfehlen.
Page 72

WLAN (je nach Backofenmodell) Wenn Sie im Timer-Display auf EXTRA drücken, können Sie das WLANMenü auswählen. Im WLAN-Menü können Sie über die Tasten „< >“ Folgendes auswählen:
- Off: Das WLAN wird ausgeschaltet, der Backofen kann nicht über die App bedient werden.
- On: Das WLAN wird eingeschaltet, der Backofen kann nur über die App bedient werden. Dies bedeutet, dass
keine Garprogramme, Rezepte oder Temperaturen im Display zur Auswahl stehen. Es steht lediglich das WLANMenü zur Verfügung, indem die Taste EXTRA gedrückt wird. Sie können den Backofen über die ON/OFF-Taste
zwar ausschalten, aber nicht über das Display wieder einschalten. Dies geht nur über die App.
- Reset: Mit dieser Einstellung sollte der Backofen sich bei seiner ersten Verbindung mit Ihrem WLAN-Netz
anmelden. Außerdem kann über diese Funktion die aktuelle WLAN-Verbindung für eine erneute Anmeldung
zurückgesetzt werden. Ist die Funktion ausgewählt, gibt Ihnen das Gerät fünf Minuten Zeit, um die Anmeldung
abzuschließen. Während dieses Vorgangs lassen sich Garfunktionen, Rezepte und Temperaturen nicht über das
Display einstellen. Es steht lediglich das WLAN-Menü zur Verfügung, indem die Taste EXTRA gedrückt wird. Sie
können den Backofen über die ON/OFF-Taste zwar ausschalten, aber nicht über das Display wieder einschalten.
Dies geht nur über die App. Um das Anmelden/Zurücksetzen über das Display zu beenden, drücken Sie EXTRA
und wählen Sie dann über die Tasten „< >“ OFF aus. Nach fünf Minuten beendet das Gerät automatisch das
Anmelden/Zurücksetzen.
- Read: Der Backofen sendet zwar seinen Status an die App, lässt sich aber nicht über das Handy bedienen. Zu
diesem Zweck muss der Backofen erst angemeldet werden.
Ist kein WLAN konfiguriert, stehen nur die Optionen OFF und RESET zur Auswahl.
Wird der Backofen mit dem WLAN verbunden, beträgt die standardmäßige Garzeit fünf Stunden und kann vom
Benutzer geändert werden.
WLAN-Anmeldung:
Um das Gerät am WLAN anzumelden, drücken Sie so lange EXTRA, bis das WLAN-Symbol leuchtet. Wählen Sie
dann über die Tasten „< >“ „Reset“ aus. Folgen Sie dann den Anweisungen in der App. Ist die Funktion
ausgewählt, gibt Ihnen das Gerät fünf Minuten Zeit, um die Anmeldung abzuschließen.
WLAN-Symbol
- Symbol nicht beleuchtet: WLAN ist ausgeschaltet.
- Symbol blinkt, eine Sekunde an, eine Sekunde aus: Sie können über Ihr WLAN-Netzwerk auf den Backofen
zugreifen und diesen anmelden. Schlägt die Anmeldung fehl, wird das WLAN-Symbol nach fünf Minuten
ausgeschaltet.
- Das Symbol leuchtet dauerhaft: Der Backofen ist mit Ihrem WLAN-Router verbunden.
- Symbol blinkt, drei Sekunden an, eine Sekunde aus: Der Backofen versucht, sich mit Ihrem WLAN-Router zu
verbinden.
- Symbol blinkt, eine Sekunde an, drei Sekunden aus: Der Backofen befindet sich im Lesemodus.
HOOVER :
Detaillierte Informationen ZUM VERBINDEN Ihres Geräts von ONEFI und zu seiner
effektiven NUTZUNG finden Sie unter. http://wizardservice.candy-hoover.com/
Ofen Innenraum
Bratspieß
Umluft
Heizelement
Heizelement Boden
Grill
Pyro
Auftauen
Ventilator
SPRACHEINSTELLUNG Die Sprache kann eingestellt
werden, nachdem der Backofen ausgeschaltet wurde.
Dazu die
Tasten EXTRA und SELECT 3 Sekunden lang gleichzeitig
drücken. Die aktuelle Spracheinstellung wird im Display
angezeigt und kann geändert werden, indem die Taste „<“
oder „>“ gedrückt und durch SELECT bestätigt wird.
Verfügbare Sprachen:
Italienisch, Englisch, Französisch und Deutsch.
nicht innerhalb von 15 Sekunden bestätigt, wird die Auswahl verworfen. Bei einem Menüwechsel geht die
SELECT Jede Auswahl muss bestätigt werden. Wird sie
unbestätigte Auswahl verloren.
SYMBOL „HOT“ Wenn ein Garprogramm endet oder sich der Backofen ausschaltet, zeigt das Display an,
dass
der Ofen noch heiß ist. Dabei variieren die Anzeige „HOT“ und die aktuelle Uhrzeit in 3-Sekunden-Abständen.
DE 72
Page 73

KERNTEMPERATURFÜHLER (je nach Backofenmodell) Wurde die Kerntemperatur ermittelt, zeigt
das Display „PROBE“. Wird der Kerntemperaturfühler eingeführt, während ein Garprogramm läuft, so
wird das Programm angehalten. Wird ein Garprogramm ausgewählt, so zeigt das Display die
Standardtemperatur an, die 200°C nie überschreitet. Die auswählbare Temperatur ist ebenfalls auf
200°C begrenzt.
Wird die Temperatur über SELECT bestätigt, zeigt das Display „Ϙ 40°“ an: Jetzt kann die gewünschte
Kerntemperatur zwischen 30°C und 90°C mit 1°C-Abständen ausgewählt werden. Wenn die
Kerntemperatur bestätigt wurde, drücken Sie die Taste SELECT und das Display zeigt „Ϙ“, gefolgt von der
aktuell gemessenen Kerntemperatur (in 1-Grad-Abständen). Sobald die eingestellte Kerntemperatur
erreicht ist, schaltet sich das Garprogramm ab. Wird ein Garprogramm mit Kerntemperaturfühler
eingestellt, lässt sich die Temperatur über die Tasten „-“ und „+“ anzeigen und ändern. Beim ersten
Berühren einer der beiden Tasten zeigt das Display die gewählte Kerntemperatur an, bei der nächsten
Berührung kann diese geändert werden.
Ändert der Benutzer das Garprogramm, so wird die Kerntemperatureinstellung zurückgesetzt.
Wiede r h o len S i e d i e Ei n s t e l lung , um e i ne n e ue Zi e l t e mperatu r auszu w ä h l en. D e r
Kerntemperaturfühler kann nicht verwendet werden, wenn ein Garprogramm eingestellt ist oder sich
eine Trennplatte (falls vorhanden) im Backofen befindet. In diesem Fall zeigt das Display „Ϙ NO“ und
führt keine weiteren Befehle aus, bis der Kerntemperaturfühler entfernt wird. Die Funktion zum
Auftauen, der Grill, alle Programme mit Drehspieß, die Pyrolyse und alle Garprogramme können nicht
zusammen mit dem Kerntemperaturfühler verwendet werden (und sind im Menü auch nicht
angezeigt).
KERNTEMPERATURFÜHLER
EMPFOHLENE TEMPERATUREN
Fleisch
Roh
Medium roh
Medium
Gut durch
56
58
60
62
Lachs
Huhn
35
min 68
VOREINGESTELLTE REZEPTE Wird ein Rezept ausgewählt, zeigt das Display „R“ und die
Rezeptnummer sowie die entsprechende Garmethode an.
Folgende Rezepte sind verfügbar:
REZEPT
R1- Lasagne
R2- Braten/Brathähnchen
R3- Fisch in Salzkruste
R4- Backofenkartoffeln
R5- Eierkuchen
R6- Gedeckter Apfelkuchen
GARMETHODE
Ober-/Unterhitze + Umluft
Ober-/Unterhitze + Umluft
Ober-/Unterhitze + Umluft
Ober-/Unterhitze + Umluft
Ober-/Unterhitze
Ober-/Unterhitze + Umluft
TEMPERATUR
150°
180°
180°
180°
160°
180°
GARZEIT
45’
40’
40’
45’
25’
45’
Anmerkung: Es kann weder die Temperatur, noch die Garzeit geändert werden.
DE 73
Page 74

3.2 Funktionen zum Garen
Funktion
*
T °C
standard
40
180
210
220 50 ÷ 280
T °C
Bereich
40 ÷ 40
50 ÷ 240
50 ÷ 240
LAMPE: Schaltet das Licht im Backofen an.
AUFTAUEN: Wenn die Auswahl auf diese Funktion eingestellt wird. Der Ventilator
wälzt die Luft bei Raumtemperatur um, sodass das Tiefkühlprodukt innerhalb
weniger Minuten aufgetaut wird, ohne dass sein Eiweißgehalt sich ändert.
UMLUFT: Diese Garmethode ist für die Zubereitung von Geflügel, Backwaren, Fisch
und Gemüse zu empfehlen. Die Hitze gelangt besser in das Lebensmittel und die
Dauer zum Garen und Vorheizen wird reduziert. Es lassen sich unterschiedliche
Lebensmittel und Rezepte gleichzeitig und auf mehreren Garebenen zubereiten.
Diese Garmethode sorgt für eine gleichmäßige Hitzeverteilung und Gerüche
werden nicht vermischt.
Wenn mehrere Gerichte gleichzeitig zubereitet werden, ist eine zusätzliche
Gardauer von 10 Minuten erforderlich.
OBER-/UNTERHITZE: Es kommt das obere und untere Heizelement zum Einsatz.
Den Backofen etwa zehn Minuten lang vorheizen. Diese Methode eignet sich für
alle herkömmlichen Brat- und Backrezepte. Für rotes Fleisch, Roastbeef,
Lammkeulen, Wild, Folienrezepte, Blätterteig. Lebensmittel in feuerfestem
Geschirr auf mittlerer Schiene garen.
Funktion (je nach Backofenmodell)
210 50 ÷ 230
UNTERHITZE: Bei dieser Funktion wird die groste Hitze im unteren Bereich des
Ofens erreicht. Unterhitze eignet sich besonders fur Geback und Kuchen.
UMLUFT + UNTERHITZE: Das untere Heizelement wird zusammen mit dem
Ventilator gebraucht, der die Luft im Ofen umwälzt. Diese Garmethode ist ideal
für saftige Obstkuchen, Quiche und Pasteten.
210
50 ÷ 230
Das Essen trocknet nicht aus, Kuchen, Brotteige und sonstige Rezepte mit
Unterhitze gehen gut auf. Auf unterster Schiene backen.
UMLUFT + GRILL: Turbogrill mit geschlossener Tür verwenden.
Das obere Heizelement wird zusammen mit dem Ventilator gebraucht, der die
Luft im Ofen umwälzt. Für rotes Fleisch ist Vorheizen erforderlich, für weißes
Fleisch nicht. Ideal zum Garen dicker Leben smittel am Stück wie Schweinebraten,
200
150 ÷ 220
L1 ÷ L5
L3
220 50 ÷ 230
*
*Nach CENELEC EN 60350-1 zur Definition der Energieklasse geprüft.
190 50 ÷ 230
Geflügel usw. Grillgut in der Mitte des Ofens auf mittlerer Schiene garen.
Bratensaft mit der Fettpfanne auffangen. Darauf achten, dass sich der Braten
nicht zu nahe am Grill befindet. Nach der Hälfte der Garzeit wenden.
GRILL: Grill mit geschlossener Tür verwenden. Es wird nur das obere Heizelement
verwendet und die Temperatur kann eingestellt werden. Damit die Heizelemente
rot glühen ist eine Vorheizdauer von fünf Minuten erforderlich. Grillgerichte,
Kebab und Gratin gelingen garantiert. Weißes Fleisch sollte mit Abstand zum Grill
gegart werden; die Garzeit ist dann zwar länger, aber das Fleisch bleibt schön
saftig. Rotes Fleisch und Fischfilet kann auf dem Rost mit der Fettpfanne darunter
gegart werden. Der Backofen verfügt über zwei Grillstufen:
Grill: 2140 W Barbecue: 3340 W
PIZZA: Die umfassende Hitze dieser Funktion reproduziert im Backofen
ahnliche Bedingungen wie im Holzofen einer Pizzeria.
Die "ECO" Funktion ermöglicht es Ihnen auf einer gesunden Art und Weise zu
kochen, indem die benötigte Menge Fett oder Öl reduziert wird. Dank der
Verwendung des Grills und des Ventilators in Kombination mit einem pulsierenden
Luftkreislauf, wird die Feuchtigkeit in den Nahrungsmitteln beibehalten, die
Oberfläche gebrate n bzw. gegril lt und so eine kürzere Ko chzeit, oh ne
Auswirkungen auf den Geschmack erzielt.
Dies ist besonders zum Garen von Fleisch, Braten von Gemüse und Omeletts
geeignet. Der pulsierende Luftkreislauf hält die Feuchtigkeit im Inneren des Ofens
und den Feuchtigkeitsgehalt der Lebensmittel, erhält die Nährwerte und erzielt
einen gleichmäßigen raschen Garvorgang.
Probieren Sie alle Ihre Rezepte aus, reduzieren Sie die Menge an Zutaten, die
Sie gewöhnlich nutzen und erleben Sie die Leichtigkeit dieser neuen Funktion!
DE 74
Page 75

4. Reinigung und Wartung des Backofens
4.1 Allgemeine Reinigungshinweise
Die Lebensdauer des Geräts lässt sich durch eine regelmäßige Reinigung verlängern. Den Ofen vor der
Reinigung abkühlen lassen. Keine Scheuermittel, Stahlwolle oder scharfkantige Gegenstände für die
Reinigung verwenden, um die Emaillebeschichtung nicht zu beschädigen. Nur Wasser, Spülmittel oder
Reinigungsmittel mit Bleiche (Ammoniak) verwenden.
BESTANDTEILE AUS GLAS
Es empfiehlt sich, die Glastür nach jeder Verwendung des Backofens mit einem saugfähigen
Küchentuch zu reinigen.
Hartnäckige Flecken können mit einem in Reinigungsmittel getränkten Schwamm gesäubert und mit
klarem Wasser abgewaschen werden.
DICHTUNG OFENTÜR
Schmutzige Dichtungen mit einem leicht angefeuchteten Schwamm reinigen.
ZUBEHÖR
Zubehörteile mit einem feuchten Reinigungsschwamm säubern, abwaschen und abtrocknen. Keine
Scheuermittel verwenden.
FETTPFANNE
Fettpfanne nach der Verwendung des Grills aus dem Ofen nehmen. Das heiße Fett abschütten (nicht in
den Abfluss) und Fettpfanne mit heißem Wasser und Spülmittel reinigen.
Hartnäckige Fettreste durch Einweichen in Spülwasser reinigen. Alternativ lässt sich die Fettpfanne
auch in der Spülmaschine oder mit einem herkömmlichen Backofenreiniger säubern. Schmutzige
Fettpfanne nicht wieder zurück in den Backofen schieben.
4.2 Dampfreinigung
Dieses Verfahren verwendet Dampf, um zu helfen, restliches Fett und Nahrungsmittelteilchen vom
Ofen zu entfernen.
1. 300 ml Wasser in den Backofenboden füllen.
2. Die Ofenfunktion auf Ober-/Unterhitze ( )oder auf unteres Heizelement ( ) stellen.
3. Die Temperatur auf 90°C einstellen.
4. Das Programm 30 Minuten lang laufen lassen.
5. Programm nach 30 Minuten ausschalten und Backofen abkühlen lassen.
6. Wenn das Gerät abgekühlt ist, die Innenflächen mit einem Tuch reinigen.
Warnung: Gerät nur berühren, wenn es sicher abgekühlt ist.
Vorsicht, bei allen heißen Oberflächen besteht ein Verbrennungsrisiko. Destilliertes oder Trinkwasser
verwenden.
300 ml
DE 75
Page 76

4.3 Wartung
ENTFERNEN UND REINIGEN DER SEITLICHEN FÜHRUNGSSCHIENEN
1. Schraube entgegen dem Uhrzeigersinn abschrauben.
2. Die seitlichen Führungsschienen herausziehen und aus dem Ofen nehmen.
3. In der Spülmaschine oder mit einem feuchten Schwamm säubern und sofort abtrocknen.
4. Die gereinigten Führungsschienen wieder einsetzen und mit den Schrauben sichern.
A
ENTFERNEN DES BACKOFENFENSTERS
1. Die Backofentür öffnen.
2. Die Klemmen am Scharniergehäuse rechts und links an der Scheibe nach unten drücken und öffnen.
3. Glasscheibe austauschen, indem die Schritte in umgekehrter Reihenfolge ausgeführt werden.
DE 76
Page 77

LOW-E
ENTFERNEN UND REINIGEN DER GLASTÜR
1. Die Backofentür öffnen.
2.3.4. Scharniere sperren, Schrauben entfernen und die obere Metallkappe nach oben abziehen.
5.6. Die Glasscheibe vorsichtig aus der Ofentür ziehen (Hinweis: Bei Backöfen mit PyrolyseReinigungsfunktion auch die zweite (falls vorhanden) und dritte Scheibe herausnehmen).
7. Nach der Reinigung oder dem Austausch der Scheibe, Einzelteile in umgekehrter Reihenfolge wieder
einbauen.
Bei allen Glasscheiben muss die Aufschrift „PYRO“ in der oberen linken Ecke, in der Nähe des linken
Scharniers, gut lesbar sein. Auf diese Weise wird sichergestellt, dass sich die Aufschrift auf der
Innenseite der ersten Scheibe befindet.
1.
2.
3.
5.
6.
1
2
3
7.
4.
DE 77
Page 78

WECHSELN DER GLÜHBIRNE
1. Den Backofen von der Stromversorgung trennen.
2. Glasabdeckung abnehmen, Glühbirne herausschrauben und durch eine neue vom selben Typ
ersetzen.
3. Nach dem Austausch der kaputten Glühbirne die Glasabdeckung wieder aufsetzen.
5. Fehlerbehebung
5.1 HÄUFIG GESTELLTE FRAGEN
STÖRUNG MÖGLICHE URSACHE LÖSUNG
Der Backofen wird nicht heiß.
Der Backofen wird nicht heiß.
Der Backofen wird nicht heiß.
Das Touch-Display reagiert
nicht.
Die Uhr ist nicht eingestellt.
Die Kindersicherung ist
eingeschaltet.
Garfunktion und Temperatur
wurden nicht eingestellt.
Dampf und Kondenstropfen
auf dem Touch-Display.
Uhr einstellen.
Kindersicherung deaktivieren.
Prüfen, ob die nötigen
Einstellungen richtig sind.
Touch-Dis play mit einem
Mikrofasertuch abtrocknen.
DE 78
Page 79

Güvenlik uyarıları
• UYARI: bu cihaz ve erişilebilir parçaları kullanım sırasında ısınır. Isınmış
parçalara dokunmaktan kaçınınız.
UYARI: ızgara kullanılırken erişilebilir yüzeyler çok sıcak olabilir.
Çocukların güvenli bir mesafede tutulması gereklidir.
• UYARI: elektrik çarpması ihtimalini önlemek için ampulü
değiştirmeden önce cihazın kapalı olduğundan emin olun.
• UYARI: termik şalterin istem dışı sıfırlanması nedeniyle ortaya
çıkabilecek tehlikeleri önlemek amacıyla, bu cihazın, zaman rölesi gibi
harici bir anahtarlama cihazı ya da şebeke tarafından düzenli aralıklarla
açılan ve kapatılan bir devre üzerinden beslenmemesi gereklidir.
• UYARI: otomatik temizleme programını başlatmadan önce:
-fırın kapağını temizleyin;
- ıslak bir sünger kullanarak fırının içindeki büyük ve kaba gıda
kalıntılarını temizleyin. Deterjan kullanmayın;
- tüm aksesuarları ve (eğer varsa) kayar kızak setini çıkarın;
- kurulama bezini fırının içinde bırakmayın
• Sıcaklık probu bulunan fırınlarda, temizlik programını çalıştırılmadan
önce, birlikte verilen somunu kullanılarak deliğin kapatılması gereklidir.
Sıcaklık probu kullanılmadığı zamanlarda bu deliği her zaman somunla
kapatın.
• Sürekli gözetim altında bulunmamaları halinde 8 yaşından küçük
çocukların cihazdan güvenli bir mesafede tutulmaları gereklidir.
• Çocuklar bu cihazla oynamamalıdır. Bu cihaz, kendi güvenliklerinden
sorumlu kişilerin gözetimi altında olmamaları veya cihazın güvenli bir
şekilde ve olası risklerin bilincinde kullanımı açısından yeterli bilgi veya
deneyime sahip olmamaları durumunda, 8 yaşından büyük çocuklar
veya fiziksel, algısal ya da zihinsel yetenekleri kısıtlı kişiler ile deneyimi
ve bilgisi olmayan kişilerin kullanımı için uygun değildir.
• Temizlik ve bakım işlemi gözetim altında olmadan çocuklar tarafından
yapılamaz.
• Fırın kapağındaki camın kırılmasına neden olabilecek şekilde yüzeyi
çizebileceği için fırın kapağını temizlemek için sert aşındırıcı
temizleyicileri ya da metal kazıyıcıları kullanmayın.
• Çıkarılabilir parçalar sökülmeden önce fırının açma/kapatma
anahtarından kapatılması ve temizlik işleminden sonra, bu parçaların
açıklamalara göre yeniden takılması gereklidir.
TR 79
Page 80

• Sadece bu fırın için önerilen sıcaklık probunu kullanın.
• Buharlı temizleyici kullanmayın.
• Fişi toprak bağlantısına sahip olan ve kullanım sırasında topraklama
bağlantısını sağlayan üçüncü bir ucu bulunan bir prize takın. Fişi
olmayan modeller için, kabloya etikette belirtilen yükü taşımaya yeterli
kapasitede standart bir fiş takın. Toprak iletkeni sarı-yeşil renklidir. Bu
işlem uygun niteliklere sahip bir personel tarafından yapılmalıdır. Priz ile
cihazın fişi uyumsuz ise prizi uygun başka bir prizle değiştirmesi için
kalifiye bir elektrikçiye başvurun. Elektrik beslemesi bağlantısı, cihaz ile
elektrik beslemesi arasına maksimum yükü taşımaya yeterli kapasitede
ve mevcut yönetmeliklere uygun, tüm kutupları ayıran bir devre kesici
kullanılarak da yapılabilir. Sarı-yeşil topraklama kablosunun devre kesici
ile üzerinden geçmemesi gereklidir. Bağlantı için kullanılan priz ve devre
kesici, cihazın montajından sonra kolaylıkla ulaşılabilir bir yerde
olmalıdır.
• Elektrik kablosunun hasar görmesi halinde, imalatçı tarafından
sağlanan bir kablo veya özel bir kablo demeti ile değiştirilmeli ya da
müşteri hizmetleri departmanına başvuru yapılmalıdır.
Kablonun hasar görmesi halinde, derhal aşağıdaki açıklamalara uygun
biçimde değiştirin:
- klemens blokunun kapağını açın;
- elektrik kablosunu çıkarın ve cihaza uygun benzer bir kablo ile
değiştirin (tip H05VV-F, H05V2V2-F).
• Bu işlem uygun niteliklere sahip bir personel tarafından yapılmalıdır.
Toprak iletkeninin (sarı-yeşil) diğer iletkenlerden yaklaşık 10 mm daha
uzun olması gereklidir. Her türlü onarım için sadece Müşteri Hizmetleri
Departmanına başvurun ve orijinal yedek parçalar kullanılmasını tavsiye
edin.
• Yukarıda belirtilen açıklamalara uyulmaması cihazın güvenliğini
olumsuz etkileyebilir ve garantiyi geçersiz kılabilir.
• Dökülen kalıntıların temizlik yapılmadan önce giderilmesi gerekir.
• Pirolitik temizlik işlemi sırasında, yüzeyler normalden sıcak olabilir, bu
yüzden çocukların güvenli bir mesafede tutulması gereklidir.
TR 80
Page 81

Özet
Genel Açıklamalar
82
Ürün Açıklaması
84
Fırının Temizlenmesi ve Bakımı
86
Fırının Temizlenmesi ve Bakımı
91
1.1 Güvenlik ipuçları
1.2 Elektriksel güvenlik
1.3 Tavsiyeler
1.4 Kurulum
1.5 Atık yönetimi
1.6 Uygunluk beyanı
2.1 Genel bakış
2.2 Aksesuarlar
2.3 İlk kullanım
3.1 Gösterge açıklamaları
3.2 Pişirme modları
4.1 Temizleme hakkında genel notlar
4.2 Buharla Temizleme
4.3 Bakım
• Izgaraların sökülmesi ve temizlenmesi
• Fırın kapağının sökülmesi
• Camın sökülmesi ve temizlenmesi
• Ampulün değiştirilmesi
Sorun Giderme
94
TR 81
5.1 Sorun giderme
Page 82

1. Genel Açıklamalar
Ürünlerimizden birini tercih ettiğiniz için teşekkür
ederiz. Fırınınızdan en iyi sonuçları almak için bu
kılavuzu
dikkatle okuyun ve daha sonra başvurmak için saklayın.
Fırının montajından önce, herhangi bir onarım
gerekmesi halinde müşteri hizmetleri personeline
vermek üzere seri n umara sını not edi n. Fırını
ambalajından çıkardıktan sonra nakliye sırasında hasar
almamış olduğunu kontrol edin. Eğer tereddüdünüz
varsa fırını kullanmayın ve tavsiye almak için kalifiye bir
teknisyene başvurun.
Tüm ambalaj malzemelerini (plastik torbalar, polistiren,
vidalar) çocukların erişemeyeceği yerlerde tutun. Fırın ilk kez çalıştırıldığında güçlü bir duman kokusu
oluşabilir, bunun nedeni fırın ilk kez ısındığında yalıtım panelleri üzerinde bulunan yapışkan maddenin
yanmasıdır. Bu kesinlikle normal bir durumdur ve oluştuğu zaman dumanın yayılması beklendikten
sonra yiyeceklerin fırının içine konulması gereklidir. Bu dokümanda verilen açıklamalara uyulmaması
halinde ortaya çıkabilecek durumlar için imalatçı herhangi bir sorumluluk kabul etmez.
NOT: Bu kılavuzda belirtilen fırın işlevleri, özellikleri ve aksesuarları satın almış olduğunuz modele bağlı
olarak farklılık gösterecektir.
1.1 Güvenlik İpuçları
Fırın sadece kullanım amacına uygun biçimde kullanılmalıdır, kullanım amacı yiyeceklerin pişirilmesidir;
başka bir amaç için, örneğin bir ısı kaynağı olarak kullanılması uygunsuz ve bu nedenle tehlikeli kullanım
olarak değerlendirilir. Uygunsuz, hatalı veya makul olmayan kullanım sonucunda ortaya çıkabilecek her
türlü zarardan imalatçı sorumlu tutulamaz.
Herhangi bir elektrikli cihazın kullanımı sırasında bazı asli kurallara uyulması gereklidir:
- elektrik fişini prizden çıkarmak için asla kablodan tutarak çekmeyin;
- elleriniz ya da ayaklarınız ıslak veya nemli iken cihaza dokunmayın;
- genellikle adaptörlerin, çoklu prizlerin ve uzatma kablolarının kullanılması tavsiye edilmez;
- arızalanması ve/veya düzgün çalışmaması durumunda cihazı kapatın ve kurcalamayın.
1.2 Elektriksel Güvenlik
ELEKTRİK BAĞLANTILARINI BİR ELEKTRİKÇİNİN YA DA KALİFİYE BİR TEKNİSYENİN YAPMASINI
SAĞLAYIN
Fırının bağlanmış olduğu elektrik beslemesinin montajın yapıldığı ülkede yürürlükte bulunan yasalara
uygun olması gereklidir. Bu açıklamalara uyulmaması durumunda ortaya çıkabilecek zararlar için
imalatçı herhangi bir sorumluluk kabul etmemektedir. Montajın yapıldığı ülkede yürürlükte bulunan
yasalara bağlı olarak fırının topraklı bir priz ya da bütün kutupları ayıran bir devre kesici kullanılarak
elektrik beslemesine bağlanması gereklidir. Elektrik beslemesinin uygun sigortalarla korunması ve
kullanılan kabloların fırının doğru bir şekilde beslenebilmesine yeterli kapasitede olması gereklidir.
BAĞLANTI
Fırın, faz arası veya faz nötr arası 220-240 VAC 50 Hz olan bir elektrik beslemesine bağlanması gereken
bir elektrik kablosu ile sağlanmıştır. Fırın elektrik beslemesine bağlanmadan önce aşağıdakilerin kontrol
edilmesi gereklidir:
- etikette belirtilen gerilim değeri;
- devre kesicinin ayarı.
Fırının topraklama klemensine bağlanmış olan topraklama kablosunun elektrik beslemesinin
topraklama klemensine bağlanması gereklidir.
UYARI
Fırını elektrik beslemesine bağlamadan önce, elektrik beslemesinin topraklama klemensinin
sürekliliğini kontrol etmesi için kalifiye bir elektrikçiye başvurun. Fırının topraklama klemensine
bağlanmaması veya topraklama bağlantısının sürekliliğinde bir sorun olması sonucunda ortaya
TR 82
Page 83

çıkabilecek her türlü kaza veya zararda imalatçı herhangi bir sorumluluk kabul etmemektedir.
NOT: fırında bazı bakım işlemleri yapılması gerektiğinden, montajın yapılmış olduğu alandan çıkarılması
halinde fırının bağlanabileceği başka bir prizin yakınlarda bulunması tavsiye edilir. Elektrik kablosunun
sadece teknik servis personeli ya da eşdeğer niteliklere sahip teknisyenler tarafından değiştirilmesi
gereklidir.
1.3 Tavsiyeler
Fırını her kullandıktan sonra yapılacak kısa süreli temizlik işlemi fırının her zaman mükemmel temizlikte
kalmasını sağlayacaktır. Fırının yan duvarlarını alüminyum folyo veya mağazalardan satın alınabilecek
tek kullanımlık koruma malzemeleri ile kaplamayın. Sıcak emaye ile temas eden alüminyum folyo veya
başka herhangi bir koruma malzemesi erime riskine sahiptir ve emaye iç yüzeylerin bozulmasına neden
olabilir. Fırınınızın aşırı kirlenmesini ve bunun sonucunda duman kokusu oluşmaması için fırını çok
yüksek sıcaklıklarda kullanmamanızı tavsiye ederiz. Pişirme süresini uzun tutmak ve sıcaklığı biraz
düşürmek daha iyidir. Fırın ile birlikte verilen aksesuarlara ek olarak, sadece çok yüksek sıcaklıklara
dayanıklı tabaklar ve pişirme kapları kullanmanızı tavsiye ederiz.
1.4 Kurulum
Ürünün kurulumu firmanın yetkilendirilmiş servis/yetkilendirilmiş kişi tarafından yapılmalıdır. Yetkisiz
kişi ve kuruluşlar tarafından yapılan kurulumlardan doğan tüm ürün, kişi, mahal hasarları firmanın
sorumluluğunda değildir. Kurulum yapılacak mahalin ürünün çalışma ve teknik koşullara kullanma
kılavuzunda belirlenen kurallara uygun şekilde olması/sağlanması tüketicinin sorumluluğundadır. Eğer
tüketici tarafından yapılan kurulum nedeniyle ortaya çıkan hataların düzeltilmesi için imalatçının desteği
gerekirse, bu destek garanti kapsamında sağlanmaz. Kurulum açıklamaları profesyonel kalifiye personel
içindir ve kurulum sırasında uyulması gereklidir. Hatalı kurulum insanların ve evcil hayvanların
yaralanmasına ve eşyaların zarar görmesine neden olabilir. Böylesi bir yaralanma veya zarar için imalatçı
sorumlu tutulamaz.
Fırın yüksek bir mutfak dolabına ya da tezgah altına yerleştirilebilir. Sabitlemeden önce, iç parçaların
soğutulması ve korunması için gerekli temiz havanın uygun biçimde dolaşımının sağlanması amacıyla
fırının etrafında iyi bir havalandırma sağlandığından emin olun. Sabitleme şekline göre son sayfada
belirtilen hava alma açıklıklarını açın. Bu cihaz ev standartlarında kullanımına uygun olarak tasarlanmış
ve üretilmiş olup
ticari ve profesyonel amaçla kullanımlara uygun değildir. Ticari kullanımlarda (ev harici) ürün teslim
tarihinden itibaren 1 (bir) ay sure ile üretim hatalarına karşı garanti kapsamındadır. Ticari kullanımlarda
cihazın ömrü kısalabilir ve kullanım beklentilerini karşılamayabilir. Ev ve benzeri kullanım amacıyla
örtüşmeyen (ev veya ev tipi bir mekanda bile olsa) kullanım dolayısıyla cihazda meydana gelebilecek
herhangi bir arıza ve/veya hasar üretici / satıcı tarafından kabul edilmeyecektir. Ticari amaç ile kullanılan
ürünlerde, Malın ayıplı olduğu teslim sırasında açıkça belli ise alıcı 2 (iki) gün içinde durumu satıcıya
ihbar etmelidir. Açıkça belli değilse alıcı malı teslim aldıktan sonra 8 (sekiz) gün içinde incelemek veya
incelettirmekle ve bu inceleme sonucunda malın ayıplı olduğu ortaya çıkarsa, haklarını korumak için
durumu bu süre içinde satıcıya ihbarla yükümlüdür.
Bu cihaz ev standartlarında kullanılmak üzere üretilmiştir. Profesyonel kullanım veya
ticare kullanım için kurulmuş olması durumunda, ilgili ticari hususta uygulanan
standartlar dikkate alınmalıdır.
1.5 Atık yönetimi ve çevrenin korunması
Bu cihaz, 2012/19/EU Atık Elektrikli ve Elektronik Cihazlar (WEEE) hakkında Avrupa
Yönergesine göre etiketlenmiştir. WEEE hem kirletici maddeleri (çevreye olumsuz bir etkisi
olabilecek), hem de baz elemanları (yeniden kullanılabilir olan) içermektedir. Kirletici
maddelerin bertaraf edilmesi ve tüm malzemelerin geri dönüştürülebilmesi için
WEEE'lerin doğru bir şekilde tasnif edilmesi önemlidir. WEEE'lerin çevre açısından bir
son derece önemlidir:
- WEEE evsel atık olarak işlem görmemelidir;
- WEEE belediyeler veya tescilli bir firma tarafından yönetilen belirlenmiş toplama alanlarına
götürülmelidir.
sorun oluşturmaması için bireyler önemli bir rol oynayabilir; birkaç temel kurala uyulması
TR 83
Page 84

Birçok ülkede, büyük WEEE'ler için şehir içinde toplama noktaları bulunmaktadır. Yeni bir cihaz satın
aldığınızda, eski cihazın satın alınan cihazla aynı tipte olması ve aynı işlevlere sahip olması
durumunda eski cihazı ücretsiz olarak bire bir kabul etmesi gereken satıcıya iade edebilirsiniz.
ENERJİ TASARRUFU VE ÇEVREYE SAYGI
Mümkün olduğunda, fırını önceden ısıtmaktan kaçının ve her zaman doldurmaya çalışın. Fırın
kapağını olabildiğince az açın çünkü her açılışında ısı kaybı oluşur. Önemli oranda enerji tasarrufu
için, fırını planlanan pişirme süresinden 5 ile 10 dakika daha önce kapatın ve fırının üretmeye devam
edeceği artakalan ısıyı kullanın. Isının hazne dışına kaçmaması için contaları temiz ve düzgün tutun.
Eğer saatlik bir tarife ile ücretlendirilen bir elektrik sözleşmeniz varsa, pişirmeye başlama saatini
indirimli fiyat tarifesinin saatine taşıyan "gecikmeli pişirme" programı ile daha basit bir şekilde enerji
tasarrufu yapılabilir.
1.6 Uygunluk beyanı
Bu cihazın gıdalarla temas edebilecek parçaları 89/109 EEC Yönetmeliği hükümlerine uygundur.
Bu ürüne işaretinin yerleştirilmesi ile cihazın bu ürün için yürürlükte olan tüm ilgili Avrupa
güvenlik, sağlık ve çevre standartlarına uygun olduğunu doğruluyoruz.
2. Ürün Açıklaması
2.1 Genel bakış
1
3
5
4
6
2
2.2 Aksesuarlar
Tepsi
1
Yiyeceklerin ızgara üzerinde pişirilmesi sırasında
damlayan sularını toplar.
1.Kontrol paneli
2. Raf konumları
(eğer varsa yan tel raflar)
3. Metal ızgara
4. Tepsi
5. Fan (çelik plakanın arkasında)
6. Fırın kapağı
Metal ızgara
2
Pişirme tepsilerini ve tabaklarını tutar.
TR 84
Page 85

Led vision
3
Sıcaklık probu (fırın modeline bağlıdır)
5
Klasik “elektrik ampulunün” yerine geçen bir
aydınlatma sistemidir. 14 adet LED (pirolitik
olmayan modeller için) veya 10 adet Yüksek Güçlü
LED (pirolitik modeller icin) lamba, kapıya
entegredir. Bu lambalar, fırının içini, hiçbir raf
üzerine gölge düşme d e n, n et b i r ş e kilde
görmenizi sağlayan yüksek kalitede beyaz ışık
vermektedir.
Avantajları:
Bu sistem, fırın içinde mükemmel aydınlatma
sağlamanın yanı sıra, klasik ampullerden daha
uzun süre dayanır, kullanımı ve bakımı daha
kolaydır ve her şeyden önemlisi, enerji tasarrufu
sağlar.
-Optimum görüş
-Uzun ömürlu aydınlatma
-Ç ok düşük e nerji tüket imi; kla sik yüksek
aydınlatma sistemlerine kıyasla %95 daha düşük.
Şef Panel
4
Pişirme süresince yiyeceğin iç sıcaklığını ölçer.
Sıcaklık probunu pişirici haznenin üstünde
bulunan deliğe geçirin.
– Yiyeceği hazırlayın ve et termometresini
yiyeceğin içine düzgün bir şekilde sokun. Et
termometresini yiyeceğe düzgün bir şekilde
sokmadan önce ön ısıtma uygulamayın veya
pişirme işle mine ba şlamayın. Ter mometre
yiyeceğe ve kaba fırın soğukken sokulmalıdır.
– Et termometresini dondurulmuş yiyeceklere
sokmayın.
– Kullanılmadığı durumda et termometresini fırının
içinde bırakmayın: zarar verebilir.
Bu teknolojiye sahip tüm fırınlar, bu sektörde
Candy Hoover Grup olarak kazandığımız engin
deneyimler ve geniş bir yelpazede yenilikçi
teknolojiler sonucunda profesyonel modellerin
tipik bir işlevine sahiptirler. Şef Panel, fırının içinde
hava dolaşımını arttıran bir hava taşıma sistemidir.
Böylelikle fırının pişirme performansı artar, tüm
sıcaklıklarda yiyecekler daha standart bir şekilde
daha kısa pişirme sürelerinde pişirilir ve son olarak
fırının içinde ısı dağılımı eşit düzeyde olur.
TR 85
Page 86

2.3 İlk Kullanım
İLK TEMİZLEME
İlk kez kullanmadan önce fırını temizleyin. Dış yüzeyleri yumuşak bir ıslak bezle silin. Tüm aksesuarları
yıkayın ve fırının içini sabunlu su ve sıvı bulaşık deterjanı karışımına batırılmış bir bezle silin. Boş fırını
maksimum sıcaklık değerine ayarlayın ve yaklaşık 1 saat çalıştırın, bu şekilde fırının yeni olmasından
kaynaklı tüm kokular giderilecektir.
3. Fırının Kullanımı
3.1 Gösterge açıklamaları
AÇMA/KAPATMA
EXTRA
Pişirme
süresi
Saat
ayarı
Pişirme
sonu
Çocuk
kilidi
Fırın bu tuş ile açılır ve kapatılır.
Zaman
ayarı
WiFi
Fırın kapatıldığı zaman göstergede saat görünür. Fırın aktif
olmadığı zaman, pişirme süresi ve pişirme sonu dışında tüm
işlevler kullanılabilir.
Eğer saat ayarlanmamışsa fırın çalışmaz: gösterge "12:00"
göstererek yanıp söner ve sadece Ekstra tuşu işlev yapar.
Ekstra tuşundan aşağıdaki işlevler ayarlanabilir:
TR 86
Page 87

İŞLEV
PİŞİRME
SÜRESİ
PİŞİRME
SONU
ZAMAN
AYARI
SAATİN
AYARLAN-
MASI
NASIL KULLANILIR
No t: sa dec e a kt if b i r
p iş ir me p ro gr am ı i l e
ayarlanabilir. EXTRA üzerine
iki kez basın ve "+" ile "-"
tuşl arını kullanarak saati
ayarlayın, "SELECT" üzerine
bas ara k ayarı onay lay ın.
E ğe r pi ş ir me s ür e si
gir ilmemişse göstergede
"0 0: 00 " g ör ün tü le ni r,
girildiğinde ise kalan süre
gösterilir.
No t: sa de ce ak ti f bi r
p iş ir me pr og ra mı il e
ay ar la na bi li r. S im gey i
yakmaya yetecek kadar ardı
ardına EXTRA tuşuna basın,
" <" i l e " >" t uş la r ın ı
kullanarak pişirme süresini
ay arlay ın ve "SELECT"
üze ri ne ba sa rak a yarı
onaylayın.
Simgeyi yakmaya yetecek
kadar ardı ardına EXTRA
tuşuna basın, "< " ile ">"
tuşlarını kullanarak pişirme
s ü re si ni ay a rl ay ın v e
"SELECT" üzerine basarak
ayarı onaylayın.
Piş irme süre si otoma tik
olarak hesaplanır.
• E ğe r z a m an a y a r ı
yapılmamışsa göstergede
"00:00" gösterilir, zaman
ayarı yapıldığınza ise kalan
süre görüntülenir. Simgeyi
yak maya yetecek kadar
ardı ardına EXTRA tuşuna
basın, "<" ile ">" tuşlarını
kullanarak süreyi ayarlayın
ve "S E LE CT " ü ze ri ne
basarak ayarı onaylayın.
• İlk kez aç ıld ığı zaman
gösterge yanar ve "12:00"
görüntülenir.
• Saati değiştirmek için,
simgeyi yakmaya yetecek
kadar ardı ardına EXTRA
tuşuna basın, "<" ile ">"
tuşlarını kullanarak saati
ay arl ayın ve "SELE CT"
üz er ine b asar ak a yarı
onaylayın.
NASIL DEVRE DIŞI
BIRAKILIR
• Ayarlanan süre dolmadan
ön ce pi şirme sü resini
deği şt ir mek içi n EXTRA
tuşuna iki kez basın ve "<"
ile ">" tuşlarını kullanarak
pişirme süresini gerektiği
gib i ayar lay ın, "SEL ECT"
üze ri ne b asara k a yarı
onaylayın.
• Pişirme sü resin i iptal
et me k i çin göste rgeyi
"00:00" değerine ayarlayın.
Ayarlanan süre dolmadan
ön ce p işi rm e s üre si ni
değiştirmek için, simgeyi
yakmaya yetece k kada r
ardı ardına EXTRA tuşuna
basın, "<" ile ">" tuşlarını
kullanarak pişirme süresini
gerektiği gibi ayarlayın ve
"SELECT" üzerine basarak
ayarı onaylayın.
Pişirme süresi sonunu iptal
et mek için gö ste rge yi
" 0 0 : 0 0 " d e ğ e r i n e
ayarlayın.
• A y ar l a na n s ü re y i
değiştirmek için, simgeyi
yakmaya yetecek kadar ardı
ardına EXTRA tuşuna basın,
" <" i l e " >" t uş la rı n ı
kullanarak pişirme süresini
gerektiği gibi ayarlayın ve
"SELECT" üzerine basarak
ayarı onaylayın.
NE YAPAR
Bir piş irme p rogr amının
sonuna gelindiğinde f ırın
kapanır ve işlev yapan tek
tuş ola n Aç ma /Kap atma
tuş una bası lıncaya kadar
g ö s t e r g e d e " E N D "
gö rü nt ül en ir (p i şi rm e
programının simgesi yanık
kalır). Pişirme programının
so nuna g elind iğind e bi r
alarm sesi duyulacaktır.
Bir pişirme programının
sonuna gelindiğinde fırın
kapanır ve işlev yapan tek
tuş olan Aç ma/Kapatma
tuşuna basılıncaya kadar
g ö s t e r g e d e " E N D "
gör ünt ül e ni r ( pi şi rm e
programının simgesi yanık
k a l ı r ) . B i r p i ş i r m e
p ro g ra m ın ın s o nu na
gelindiğinde bir alarm sesi
duyulacaktır.
• Bu işlev, ayarlanan süre
do lduğu zaman bi rka ç
saniye boyunca duyulan bir
alarmı aktif eder (bu işlev
fırını kapatmaz). 00:00 ile
23: 59 arası nda bir süre
seçebilirsiniz.
• Göstergede görüntülenen
saati ayarlamanıza olanak
sağlar.
NEDEN GEREKLİDİR
Pişirme süresi dolduğu zaman
fırın otomatik olarak kapanır ve
birkaç saniye boy unca bir
alarm sesi duyulur.
• Bu işlev, önceden programlı
pişirme için de kullanılabilir.
• Eğer bir pişirme programı
ay ar la nm ış sa "F " t uş un a
b a s ı l d ı ğ ı n d a b u a y a r
silinecektir.
• Eğ er ge cik me li pi şirm e
ayarlanmışsa fırın kapanır ve
g ös te rg ed e o a nk i s aa t
gösterilir, pişirme programı,
pişirme süresi ve pişirme sonu
simgeleri yanık kalır. • Eğer bir
pişirme programı ayarlanmışsa
"<" ile ">" tuşlarına basarak
a y a r l a n a n s ı c a k l ı ğ ı
d e ği ş t ir e b i li rs i ni z : i lk
dokunuşta çalışma sıca klığı
gö ster ili rken b ir k ez dah a
dokunulduğunda bu sıcaklık
değiştirilebilir.
• Zaman ayarı fırının açık olup
olmadığından bağımsız bir
şekilde çalışır.
•A larm fı rın ın a çık ol up
olmadığından bağımsız bir
şekilde çalışır.
ÇOCUK
KİLİDİ
• Simgeyi yakmaya yetecek
kadar ardı ardına EXTRA
tuşuna basın, "<" ile ">"
tuşlarından birine basarak
b u i ş le vi ak t if e di n:
g ö s t e r g e d e " O N "
g ö rü n tü l en e c e k t ir ;
onaylamak için "SELECT"
üzerine basın.
• Simgeyi yakmaya yetecek
kadar ardı ardına EXTRA
tuşuna basın, "<" ile ">"
tuşlarından birine basarak
bu işlevi devre dışı bırakın:
g ö s t e r g e d e " O F F "
g ö rü n tü l e ne c e k t i r;
onaylamak için "SELECT"
üzerine basın.
TR 87
• Eğer işlev sadece "Extra"
tuş u ile aktif oluyorsa,
işlevi devre dışı bırakmak
için "Açma/Kapatma" tuşu
kullanılabilir.
• Bu işlev evde çocukları
olduğu zaman kullanışlıdır.
Page 88

WiFi (fırın modeline bağlıdır) Zaman ayarı gösteriminde "Extra" üzerine basıldığında Wi-Fi
menüsü seçilir. Wi-Fi menüsünde "< >" tuşlarına basarak seçim yapabilirsiniz
-Off: Wi-Fi kapalıdır; fırın uygulama aracılığıyla kontrol edilemez.
-On: Wi-Fi açıktır; fırın sadece uygulama aracılığıyla kontrol edilebilir. Bu durumda pişirme fonksiyonları,
tarifler ve sıcaklık göstergeden seçilemez. "Extra" üzerine basıldığında sadece Wi-Fi menüsü
kullanılabilir. Açma/Kapatma tuşunu kullanarak fırını kapatabilirsiniz, ancak göstergeden yeniden
açamazsınız, sadece uygulama üzerinden açılabilir.
-Reset: Bu ayar, Wi-Fi ağınıza ilk kez bağlandığında fırını kaydetmek ve yeni bir kayıt yapmak üzere
mevcut Wi-Fi bağlantısını sıfırlamak için kullanılır. Seçildiğinde, kayıt işlemini tamamlamanız için cihaz
size 5 dakika zaman verir. Bu işlem sırasında pişirme işlevleri, tarifler ve sıcaklık ayarına göstergeden
erişilemez. "Ekstra" üzerine basıldığında sadece Wi-Fi menüsü kullanılabilir. Açma/Kapatma tuşunu
kullanarak fırını kapatabilirsiniz, ancak göstergeden yeniden açamazsınız, sadece uygulama üzerinden
açılabilir. Gösterge aracılığıyla kayıt/sıfırlama işleminden çıkmak için "Extra" üzerine basın ve ardından
"< >" tuşlarını kullanarak "Off" seçimini yapın. Beş dakika sonra, cihaz kayıt/sıfırlama işleminden
otomatik olarak çıkacaktır.
- Read: fırın kendi durumunu uygulamaya gönderir, ancak uzaktan kontrol edilemez. Bunun
yapılabilmesi için fırının kaydedilmiş olması gereklidir.
Eğer Wi-Fi konfigürasyonu yapılmamışsa, sadece Off ve Reset arasında seçim yapılabilir.
Fırının Wi-Fi bağlantısı yapıldığında, varsayılan pişirme süresi 5 saat olarak ayarlanır, ancak bu süre
kullanıcı tarafından değiştirilebilir.
Wi-Fi Kaydı:
Cihazın Wi-Fi kaydını yapmak için Wi-Fi simgesi yanıncaya kadar göstergede "Extra" üzerine basın,
ardından "< >" tuşlarına basarak "Reset" seçimini yapın. Daha sonra uygulama üzerindeki prosedürün
takip edilmesi gerekir. Seçildiğinde, kayıt işlemini tamamlamanız için cihaz size 5 dakika zaman verir.
Wi-Fi simgesi
- simge yanmıyor: Wi-Fi kapalıdır.
- Simge 1 saniye yanık ve 1 saniye sönük kalıyor: fırın Wi-Fi ağınıza erişim sağlamaktadır ve kaydedilmesi
gereklidir. Eğer kaydetme işlemi başarılı olmazsa, 5 dakika geçtikten sonra Wi-Fi simgesi sönecektir.
- Simge sürekli yanıyor: fırın Wi-Fi yönlendiricinize bağlanmıştır.
- Simge 3 saniye yanık ve 1 saniye sönük kalıyor: fırın Wi-Fi yönlendiricinize bağlanmaya çalışmaktadır.
- Simge 1 saniye yanık ve 3 saniye sönük kalıyor: fırın sadece okuma modundadır.
HOOVER :
OneFi cihazınıza NASIL BAĞLANILACAĞI ve etkin bir biçimde NASIL KULLANILACAĞI hakkında
detaylı bilgiler için http://wizardservice.candy-hoover.com/ adresini ziyaret edin.
Fırın kutusu
Piliç
çevirme şişi
Turbo
ısıtıcı eleman
Izgara
Alt ısıtıcı eleman
Fan
DİL AYARI Dil ayarı fırın kapalı olduğunda
Extra ve Select tuşlarına aynı anda 3 saniye boyunca basılı
tutularak yapılabilir. Mevcut dil göstergede gösterilir ve
Piro
"<" ya da ">" tuşlarına basılarak değiştirilebilir, SELECT
Buz
üzerine basılarak seçim onaylanır. Kullanılabilir diller:
çözme
İtalyanca, İngilizce, Fransızca, Almanca.
SELECT Tüm seçimlerin onaylanması gereklidir. Eğer
15 saniye içinde onaylanmazsa, seçim iptal edilir. Menü
değiştirildiğinde, onaylanmamış tüm seçimler silinir.
"HOT/SICAK" SİMGESİ Bir pişirme programı sona erdiğinde veya fırın kapandığında, göstergede o
anki saat ile "HOT/SICAK" mesajı 3 saniye aralıklarla dönüşümlü olarak gösterilir.
TR 88
Page 89

SICAKLIK PROBU (fırın modeline bağlıdır) Eğer sıcaklık probu tanımlanmışsa göstergede
"PROBE" gösterilir; eğer bir pişirme programı devam ederken sıcaklık probu takılırsa program durur. Bir
pişirme programı seçildiğinde göstergede en fazla 200°C olmak üzere varsayılan sıcaklık değer gösterilir:
seçilebilir sıcaklık değeri de 200°C ile sınırlandırılmıştır.
"Select" üzerine basılarak sıcaklık doğrulandığı zaman, göstergede " Ϙ 40°" gösterilir: şimdi artık sıcaklık
probunun hedef sıcaklık değerini 30°C ile 90°C arasında 1°C artışlarla seçebilmek mümkündür. Sıcaklık
probunun sıcaklığı onaylandığı zaman "Seç" tuşuna basın, göstergede " Ϙ " ve ardından sıcaklık
probundan alınan anlık sıcaklık değeri (1 derece aralıklarla) gösterilir. Sıcaklık probu ayar sıcaklığına
ulaştığında pişirme programı sona erer. Eğer bir pişirme programı sıcaklık probu ile ayarlanmışsa "-" ve
"+" tuşlarına basarak sıcaklık probunun sıcaklığını görebilir ve değiştirebilirsiniz: bu iki tuştan birine ilk
kez basıldığında göstergede sıcaklık probunun hedef sıcaklığı gösterilirken, bir sonraki basışta probun
seçilen sıcaklığı değiştirilebilir.
Eğer kullanıcı pişirme programını değiştirirse sıcaklık probunun ayarı sıfırlanır. Yeni bir hedef sıcaklık
seçmek için ayar işlemlerini tekrarlayın. Sıcaklık probu ön ayarlı pişirme veya fırının içinde ayırıcı plaka
(eğer varsa) ile birlikte kullanılamaz: bu durumda göstergede " Ϙ NO" gösterilir ve sıcaklık probu
çıkarılıncaya kadar hiçbir komut çalıştırılmaz. Sıcaklık probu ile buz çözme, ızgara, çevirme şişi ile
herhangi bir program, piroliz ve her türlü programlanmış pişirmeye izin verilmez (menüde
görüntülenmezler).
SICAKLIK PROBU İÇİN TAVSİYE EDİLEN
SICAKLIK DEĞERLERİ
Et
Az pişmiş
Orta az pişmiş
Orta
İyi pişmiş
Somon balığı
Tavuk
56
58
60
62
35
min 68
ÖN AYARLI TARİFLER Bir tarif seçildiği zaman, göstergede "R" ve ardından tarifin numarası ile
ilgili pişirme yöntemi gösterilir.
Kullanılabilir tarifler aşağıda verilmiştir:
TARİF
R1- Lazanya
R2- Kızartma/Fırında tavuk
R3- Kabuklu deniz ürünü
R4- Fırında patates
R5- Omelet
R6- Elmalı pasta
PİŞİRME
YÖNTEMİ
Statik + fan
Statik + fan
Statik + fan
Statik + fan
Statik
Statik + fan
SICAKLIK
150°
180°
180°
180°
160°
180°
PİŞİRME
SÜRELERİ
45’
40’
40’
45’
25’
45’
NOT: Ne sıcaklık ne de pişirme süresi değiştiremez.
TR 89
Page 90

3.2 Pişirme Modları
Fonksiyon
*
*
*CENELEC EN 60350-1 uyumlu olarak test edilmiştir enerji sınıfının tanımlanması için kullanılmıştır.
ikonu
Varsayılan
sıcaklık °C
40
180
210
220 50 ÷ 280
210 50 ÷ 230
210
200
220 50 ÷ 230
190 50 ÷ 230
L3
Sıcaklık
aralığı °C
40 ÷ 40
50 ÷ 240
50 ÷ 240
50 ÷ 230
150 ÷ 220
L1 ÷ L5
Fonksiyon (Fırın modeline bağlıdır)
LAMBA: Fırın lambasını yakar.
BUZ ÇÖZME: Düğme bu konuma alındığı zaman fan oda sıcaklığında havayı
donmuş gıdanın etrafında dolaştırır, böylece gıdanın protein içeriği
değişmeden birkaç dakika içinde buzu çözülür.
FANLI PİŞİRME: Bu yöntemi kümes hayvanları, çörekler, balık ve sebzeler için
kullanmanızı tavsiye ederiz. Isı gıdanın içine daha iyi işler ve hem pişirme, hem
de ısıtma süreleri azalır. Değişik gıdaları aynı veya farklı soslarla bir veya daha
fazla konumda pişirebilirsiniz. Bu pişirme yöntemi ısı yayılımının eşit olmasını
sağlar ve kokular birbirine karışmaz. Aynı anda farklı gıdalar pişirdiğiniz zaman
fazladan yaklaşık on dakika daha bekleyin.
STATİK/GELENEKSEL PİŞİRME: Hem üst, hem de alt ısıtıcı elemanlar kullanılır.
Fırını yaklaşık on dakika önceden ısıtın. Bu yöntem her türlü geleneksel
kızartma ve fırında pişirme için idealdir. Kırmızı etler, rosto, kuzu butu, ekmek,
folyoya sarılmış yiyecekler (papillote), katmer içindir. Gıdayı bir tabağın içinde
orta rafın üzerine yerleştirin.
ALT: Alt ısıtma elemanını kullanır. Tüm hamur işlerinin pişirilmesi icin idealdir.
Bu ısıtma yöntemini, alt taraftan daha fazla ısı ve ışınım gerektiren pasta, tart,
ezme ve diğer bu turlu yiyecekler için kullanın.
FAN + ALT ISITICI: Alt ısıtıcı eleman kullanılır, fan fırının içindeki havanın
sirkülasyonunu sağlar. Bu yöntem sulu meyveler, meyveli pastalar, turtalar,
kişler ve etli börekler için idealdir.
Gıdaların kurumasını önler ve keklerin, ekmeklerin ve alttan pişirilen diğer
gıdaların kabarmasını fazlalaştırır.
Rafı alt konuma yerleştirin.
FAN DESTEKLİ IZGARA: fırın kapağı kapalı iken bu fonksiyonu kullanın. Üst ısıtıcı
eleman kullanılır, fan fırının içindeki havanın sirkülasyonunu sağlar. Kırmızı etler
için ön ısıtma gereklidir, ancak beyaz etler için gerekmez. Kızarmış domuz,
kümes hayvanları, vb gibi kalın parçalar ile bütün parçaların pişirilmesi için
idealdir. Pişirilecek gıdayı doğrudan orta konumda bulunan rafın ortasına
yerleştirin. Suları toplamak için rafın altına damlama tepsisini koyun. Gıdanın
ızgaraya çok yakın olmadığından emin olun. Pişirme süresinin yarısında gıdayı
çevirin.
IZGARA: fırın kapağı kapalı iken bu fonksiyonu kullanın.
Üst ısıtıcı eleman tek başına kullanılır ve sıcaklık ayarı yapılabilir. Elemanların
ısınması için beş dakikalık ön ısıtma gereklidir. Izgaralar, kebaplar ve üstü
örtülen yemeklerin pişirilmesinde başarı garanti edilir. Beyaz etlerin ızgaradan
biraz açıkta tutulması gereklidir; pişirme süresi daha uzundur, ancak et daha
lezzetli olacaktır. Kırmızı etleri ve balık filetolarını altında damlama tepsisi ile
rafın üzerine yerleştirin. Fırın iki ızgara konumuna sahiptir:
Izgara: 2140W Barbekü: 3340 W
PİZZA: Bu seçenekte sıcak hava sirkülasyonuyla pizza ve kek gibi yiyecekler
mükemmel bir şekilde pişirilir.
"ECO" fonksiyonu kullandığınız yağ miktarını azaltarak, daha sağlıklı bir şekilde
pişirmenizi sağlar. Fanlı ve ızgara kullanımı sayesinde, yiyeceklerin nemini
kaybetmesini önleyerek, yüzeyini kızartarak ve en kısa pişirme zamanını
kullanarak yiyecekleri tadından ödün vermeden pişirir.
Et, kavrulmuş sebze ve omletler için özellikle uygundur.
Fan sayesinde darbeli hava döngüsü, fırındaki yiyeceklerin nemini ve besin
değerlerini korur ve bu sayede hızlı ve homojen bir pişirme gerçekleşir.
Bu yeni fonksiyon ile tüm tarifleri deneyin ve yiyeceklerde kullandığınız sos
miktarını azaltarak hafif pişirilmiş yiyeceklerin zevkine varın!
TR 90
Page 91

4. Fırının Temizlenmesi ve Bakımı
4.1 Temizleme hakkında genel notlar
Düzenli temizlik ile cihazın kullanım ömrü uzatılabilir. Elle temizlik işlemlerini yapmadan önce fırının
soğumasını bekleyin. Temizlik için asla aşındırıcı deterjanlar, çelik tel veya keskin nesneler kullanmayın,
aksi takdirde emaye parçalarda onarılamaz hasarlar oluşabilir. Sadece su, sabun veya ağartıcı bazlı
deterjanlar (amonyak) kullanın.
CAM PARÇALAR
Fırın her kullanıldıktan sonda pencerenin camının emici bir mutfak bezi ile temizlenmesi tavsiye edilir.
İnatçı lekeleri temizlemek için deterjana batırılmış ve iyice sıkılmış bir sünger kullanın ve sonra su ile
durulayın.
FIRIN KAPAK CONTASI
Kirlendiği zaman hafifçe ıslatılmış bir süngerle temizlenebilir.
AKSESUARLAR
Aksesuarları sabunlu su ile ıslatılmış bir süngerle temizleyin, ardından durulayın ve kurutun: aşındırıcı
deterjanlar kullanmaktan kaçının.
DAMLAMA TEPSİSİ
Izgarayı kullandıktan sonra tepsiyi fırından çıkarın. Sıcak yağı bir kaba dökün ve bir sünger ve sıvı bulaşık
deterjanı kullanarak tepsiyi sıcak su ile yıkayın.
Eğer yap artıkları kalırsa, tepsiyi deterjanlı suya batırın. Alternatif olarak, tepsiyi bulaşık makinesinde
yıkayabilir veya piyasada bulunan fırın deterjanlarını kullanabilirsiniz. Kirli tepsiyi asla fırına geri
koymayın.
4.2 Buharla Temizleme
Bu işlem su buharı kullanarak fırın içerisindeki yağ ve yemek artıklarının temizlenmesine yardımcı olur.
1. 300 ml suyu fırının tabanına dökün.
2. Statik ( ) ya da Alt Isıtıcı ( ) fonksiyonunu seçin.
3. Sıcaklığı 90°C ye ayarlayın.
4. 30 dakika bu programda çalıştırın.
5. 30 dakika sonunda programı sonlandırın ve fırını soğumaya bırakın.
6. Cihaz soğuduğunda biz bezle fırının iç yüzeyini temizleyin.
Uyarı: Cihaza dokunmadan önce tamamen soğuduğuna emin olun. Tüm sıcak yüzeyler yanık riski
oluşturabileceğinden dikkat edilmesi gerekir. Damıtılmış ya da içme suyu kullanınız.
300 ml
TR 91
Page 92

4.3 Bakım
YAN RAFLARIN ÇIKARILMASI VE TEMİZLENMESİ
1. Saat yönünün tersine çevirerek vidayı sökün.
2. Kendinize doğru çekerek yan rafları çıkarın.
3. Yan rafları bir bulaşık makinesinde veya ıslak bir sünger kullanarak temizleyin ve hemen kurutun.
4. Yan rafları temizledikten sonra yerlerine takın ve vidalarını sonuna kadar sıkın.
A
FIRIN KAPAĞININ SÖKÜLMESİ
1. Kapağı açın.
2. Aşağı doğru iterek fırın kapağının sağ ve sol tarafında bulunan menteşe yuvalarının kıskaçlarını
açın.
3. Bu işlemin tersini uygulayarak kapağı yerine takın.
TR 92
Page 93

LOW-E
CAMIN SÖKÜLMESİ VE TEMİZLENMESİ
1. Fırının kapağını açın.
2.3.4. Menteşeleri kilitleyin, vidaları çıkarın ve yukarı doğru çekerek üst metal kapağı çıkarın.
5.6. Camı dikkatli bir şekilde fırın kapağından çekerek çıkarın (Not: pirolitik fırınlarda ikinci ve üçüncü
camı (eğer varsa) da çıkarın).
7. Temizleme veye değişim işleminin sonunda parçaları sökme işleminin ters sıralaması ile toplayın.
Tüm camların üzerinde "PYRO" kelimesinin okunabilmesi ve kapağın sol tarafında bulunması
gereklidir, soldaki yatay menteşeyi kapatın. Bu şekilde birinci camın baskılı yüzeyi kapağın içinde
kalacaktır.
1.
5.
2.
3.
4.
6.
1
2
3
7.
TR 93
Page 94

AMPULÜN DEĞİŞTİRİLMESİ
1. Fırını elektrik beslemesinden ayırın.
2. Cam kapağı sökün, ampulü sökün ve aynı türde yeni bir ampul ile değiştirin.
3. Arızalı ampul değiştirildikten sonra cam kapağı yerine takın.
5. Sorun Giderme
5.1 Sorun giderme
SORUN
Fırın ısınmıyor
Fırın ısınmıyor
Fırın ısınmıyor
Dokunmatik kullanıcı paneli
tepki vermiyor
OLASI NEDENİ
Saat ayarlanmamış
Çocuk kilidi devrede
Bir pişirme işlevi ya da sıcaklık
ayarlanmamış
Kullanıcı panelinde buhar
veya yoğuşma var
TR 94
ÇÖZÜMÜ
Saati ayarlayın
Çocuk kilidini devre dışı bırakın
Gerekli ayarların doğru
olduğunu kontrol edin
Yoğuşma tabakasını
temizlemek için kullanıcı
panelini mikrofiber bir
bezle silin
Page 95

TÜKETİCİ HİZMETLERİ
Yetkili servislerimizden hizmet talebiniz olduğunda veya ürünlerimizle ilgili genel öneri ve talepleriniz için
aşağıdaki numaradan ulaşabilirsiniz.
TÜKETİCİ HATTI: 444 03 98
Sabit telefonlardan veya cep telefonlarından alan kodu çevirmeden arayınız.
Ürününüzü kullanmadan önce montaj ve kullanma kılavuzunu mutlaka okuyunuz. Ürünün montaj ve
kullanım kılavuzunda yer alan hususlara aykırı kullanılması, kullanım hataları ve cihazın standart kullanım
şartları / amaçları haricinde kullanılması halinde ürün garanti kapsamı dışında kalacaktır.
Ürünün standart ve sorunsuz çalışma koşullarının sağlanması için gerekli / zorunlu olan montaj ve
kullanım kılavuzunda belirtilen teknik özelliklerinin (su basıncı, voltaj değeri, gaz besleme basıncı, sigorta
değeri, topraklama, yakıt cinsi, yakıt kalitesi vb.) uygun olmaması, sabit olmaması ve/veya değişken
olması halinde, cihazda meydana gelebilecek arızalar ve sorunlar garanti kapsamı dışında kalacaktır.
Candy Hoover Euroasia tarafından sağlanan garanti şartları aşağıdaki koşullarda geçersiz olacaktır.
• Ürüne, yetkili servis dışındaki kişiler tarafından müdahale edilmesi, elektrik-su kesintisi ve üründen
kaynaklanmayan kaçaklar garanti kapsamı dışındadır.
• Kullanım hatalarından dolayı oluşan arıza ve hasarlar, elektrik-gaz -su tesisatı ve / veya tesisat
ekipmanları nedeniyle meydana gelebilecek arızalar garanti kapsamı dışındadır.
•Ürünün, müşteriye ulaştırılması sonrası yapılan taşıma işlemine bağlı arıza ve hasarlar, tüketici
tarafından yapılan yanlış depolama ve ortam koşulları nedeniyle cihazda meydana gelen hasarlar ve
arızalar garanti kapsamı dışındadır.
• Hatalı elektrik tesisatı, ürünün üzerinde belirtilen voltajdan farklı voltajda kullanılması veya şebeke
voltajındaki dalgalanmalar sonucu oluşan arıza ve hasarlar, doğal afetler, üründen kaynaklanmayan
harici/fiziki dış etkenler, mevsimsel hava şartları ve çevresel etkenler (deprem, yangın, sel, su basması,
şiddetli rüzgar, yıldırım düşmesi, kireç, nem, rutubet, toz, nakliye, taşıma, ürünün dona maruz kalması,
susuz çalışma vb.) nedeniyle oluşan arızalar garanti kapması dışında kalacaktır.
• Kullanım kılavuzunda belirtilen hususlara aykırı kullanılmasından kaynaklanan arızalar ve hasarlar.
Yukarıda belirtilen arızaların giderilmesi ücret karşılığı yapılır.
Ürünün kullanım ömrü 10 (on) yıldır. Bu ürünün tanımlandığı şekilde çalışabilmesi için gerekli yedek
parçaları bulundurma süresidir.
Üretim yeri Türkiye 'dir.
İTHALATCI FİRMA:
CANDY HOOVER EUROASIA EV GEREÇLERİ SAN. VE TİC. A.Ş.
İçerenköy Mh. Hal Yolu Cd. Çayır Yolu Sk. No: 11
Sayar İş Merkezi Kat: 7 34752 Ataşehir / İSTANBUL/ TÜRKİYE
Tel: 0216 466 42 42 • Fax: 0216 466 15 45
www.hoover.com.tr • servis@hoover.com.tr
ÜRETİCİ FİRMA:
CANDY HOOVER GROUP
Via Privata E. Fumagalli 20861 Brugherio (MB) - ITALY
Tel: 039.2086.1 • Fax: 039.2086.403
www.candy-group.com
TR 95
Page 96

GARANTİ BELGESİ
ANKASTRE FIRIN
Ankastre fırın kullanma kılavuzunda gösterildiği şekilde kullanılması ve yetkili kıldığımız servis elemanları dışındaki
şahıslar tarafından bakımı, onarımı veya başka bir nedenle müdahale edilmemiş olması şartıyla bütün parçaları dahil
olmak üzere tamamı malzeme, işçilik ve üretim hatalarına karşı ürünün teslim tarihinden itibaren 3 ( ÜÇ ) YIL SÜRE
İLE CANDY HOOVER EUROASIA A.Ş. TARAFINDAN GARANTİ EDİLMİŞTİR.
Malın bütün parçaları dahil olmak üzere tamamı garanti kapsamındadır.
Malın ayıplı olduğunun anlaşılması durumunda tüketici, 6502 sayılı Tüketicinin Korunması Hakkında Kanunun 11
inci maddesinde yer alan;
a) Satılanı geri vermeye hazır olduğunu bildirerek sözleşmeden dönme,
b) Satılanı alıkoyup ayıp oranında satış bedelinde indirim isteme,
c) Aşırı bir masraf gerektirmediği takdirde, bütün masrafları satıcıya ait olmak üzere satılanın ücretsiz onarılmasını
istem,
ç) İmkan varsa, satılanın ayıpsız bir misli ile değiştirilmesini isteme, seçimlik haklarından birini kullanabilir.
Tüketicinin, Kanunun 11. maddesinde yer alan seçimlik haklarından ücretsiz onarım hakkını seçmesi durumunda
satıcı; işçilik masrafı, değiştirilen parça bedeli ya da başka herhangi bir ad altında hiçbir ücret talep etmeksizin malın
onırımını yapmak veya yaptırmakla yükümlüdür. Tüketici ücretsiz onarım hakkını üretici veya ithalatçıya karşı da
kullanılabilir. Satıcı, üretici ve ithalatçı tüketicinin bu hakkını kullanmasından müteselsilen sorumludur.
Tüketicinin, ücretsiz onarım hakkını kullanması halinde malın;
• Garanti süresi içinde tekrar arızalanması,
• Tamiri için gereken azami sürenin aşılması,
• Tamirinin mümkün olmadığının, yetkili servis istasyonu, satıcı, üretici veya ithalatçı tarafından bir raporla
belirlenmesi durumlarında;
tüketici malın bedel iadesini alıp, ayıp oranında beden indirimini veya imkan varsa malın ayıpsız misli ile
değiştirilmesini satıcıdan talep edebilir. Satıcı, tüketicinin talebini reddetmez. Bu talebin yerine getirilmemesi
durumunda satıcı, üretici ve ithalatçı müteselsilen sorumludur.
Garanti uygulaması sırasında değiştirilen malın garanti süresi, satın alınan malın kalan garanti süresi ile
sınırlıdır.
Malın tamir süresi 20 iş gününü geçemez. Bu süre, garanti süresi içerisinde mala ilişkin arızanın yetkili servis
istasyonuna veya satıcıya bildirimi tarihinde, garanti süresi dışında ise malın yetkili servis istasyonuna teslim
tarihinden itibaren başlar. Malın arızasının 10 iş günü içerisinde giderilememesi halinde, üretici veya ithalatçı; malın
tüketicinin kullanımına tahsis etmek zorundadır. Malın garanti süresi içerisinde arızalanması durumunda, tamirde
geçen süre garanti süresine eklenir.
Malın kullanma kılavuzunda yer alan hususlara uykırı kullanılmasından kaynaklanın arızalar garanti kapsamı
dışındadır.
Tüketici, garantiden doğan haklarının kullanılması ile ilgili olarak çıkabilecek uyuşmazlıklarda yerleşim yerinin
bulunduğu veya tüketici işleminin yapıldığı yerdeki Tüketici Hakem Heyetine veya Tüketici Mahkemesine
başvurabilir.
Garanti belgesinin tekemmül ettirilerek tüketiciye verilmesi ve bu yükümlülüğün yerine getirildiğinin ispatı
satıcıya aittir.
Satılan mala ilişkin olarak düzenlenen faturalar garanti belgesi yerine geçmez.
Satıcı tarafından bu Garanti Belgesinin verilmemesi durumunda, tüketici Gümrük ve Ticaret Bakanlığı Tüketicinin
Korunması ve Piyasa Gözetimi Genel Müdürlüğüne başvurabilir.
CANDY-HOOVER-EUROASIA EV GEREÇLERİ SAN VE TİC. A.Ş.
Genel Müdür:
Model:..............................
Bandrol ve Seri No:...........
Teslim Tarihi Yeri: ..............
Bu bölümü, ürünü aldığınız Yetkili Satıcı imzalayacak ve kaşeleyecektir.
Bu garanti belgesi ile kesilen fatura garanti süresi boyunca garanti belgesi ile muhafaza edilmesi önerilir.
Fatura Tarihi No: .................
Satıcı Firma Ünvanı: ............
Adres:
Tel - Fax:
Satıcı Firma (Kaşe ve İmza):
TR 96
Page 97

Bezpečnostní pokyny
• VAROVÁNÍ: spotřebič a přístupné díly jsou během používání horké.
Buďte opatrní a nedotýkejte se horkých součástí.
•VAROVÁNÍ: pokud se používá gril, přístupné díly jsou horké. Nenechte
děti přiblížit se ke spotřebiči.
•VAROVÁNÍ: aby nedošlo k úrazu elektrickým proudem, před výměnou
žárovky zkontrolujte, že je spotřebič vypnutý.
•VAROVÁNÍ: aby se zabránilo jakémukoliv nebezpečí vyplývajícího z
náhodného resetování tepelné pojistky, spotřebič nesmí být napájen
přes externí vypínací zařízení, jako je časovač nebo být připojen na
obvod napájení, který je pravidelně zapínán a vypínán.
•VAROVÁNÍ: před spuštění cyklu automatického čištění:
- očistěte dveře trouby;
- vlhkou houbou odstraňte velké nebo hrubé zbytky jídla z vnitřku
trouby.
Nepoužívejte čisticí prostředky;
- vyjměte všechna příslušenství a výsuvný rošt (jsou-li uvnitř);
- nepoužívejte utěrky
• U trub se sondou do masa zavřete před prováděním čištění otvor
pomocí dodané matice. Otvor mějte uzavřený vždy, když sondu do masa
nepoužíváte.
•Děti mladší než 8 let by se měly zdržovat v bezpečné vzdálenosti od
spotřebiče, pokud nejsou pod nepřetržitým dohledem.
•Děti si nesmí se spotřebičem hrát. Osoby ve věku 8 a více let a osoby s
omezenými fyzickými, smyslovými nebo duševními schopnostmi, bez
zkušeností a znalostí produktu, smějí spotřebič používat pouze pod
dohledem nebo s poučením ohledně provozu spotřebiče, bezpečným
způsobem a s vědomím možných rizik.
•Čištění a údržba by neměly být prováděny dětmi bez dozoru.
•K čištění skel dvířek trouby nepoužívejte drsné nebo abrazivní
materiály ani ostré kovové škrabky, protože mohou poškrábat povrch a
způsobit prasknutí skla.
•Před odstraněním odnímatelných částí musí být trouba vypnuta a po
vyčištění zkompletována podle návodu.
CZ 97
Page 98

•Používejte pouze takovou sondu do masa, která je doporučena pro
tuto troubu.
•Nepoužívejte parní čistič.
•Zasuňte zástrčku do zásuvky opatřené třetím kontaktem, který
odpovídá uzemnění a který musí být zapojený a funkční. U modelů bez
zástrčky připojte na kabel standardní zástrčku, která je schopná
pracovat se zatížením uvedeným na štítku. Zemnicí vodič má
žlutozelenou barvu. Tuto operaci by měl provádět příslušně
kvalifikovaný odborník. V případě nekompatibility mezi zásuvkou a
zástrčkou spotřebiče požádejte kvalifikovaného elektrikáře o nahrazení
zásuvky jiným vhodným typem.
Připojení ke zdroji energie je možné také umístěním omnipolárního
jističe mezi spotřebič a zdroj energie, který je schopen pracovat s
maximálním připojeným zatížením a je v souladu s platnou legislativou.
Žlutozelený zemnicí kabel by neměl být jističem přerušen. Zásuvka a
omnipolární jistič používané pro připojení by měly být snadno přístupné
při instalaci spotřebiče.
•Pokud je napájecí kabel poškozen, měl by být nahrazen kabelem nebo
speciálním svazkem dostupným od výrobce nebo servisního oddělení.
Pokud je kabel poškozen, vyměňte jej bezodkladně následujícím
postupem:
- otevřete kryt svorkovnice;
- demontujte napájecí kabel a nahraďte jej podobným kabelem, který je
kompatibilní se spotřebičem (typ H05VV-F, H05V2V2-F).
•Tuto operaci by měl provádět příslušně kvalifikovaný odborník.
Zemnicí vodič (žlutozelený) musí být přibližně o 10 mm delší než ostatní
vodiče.
V případě jakýchkoli oprav kontaktujte pouze oddělení péče o zákazníky
a požadujte použití originálních náhradních dílů.
•Nedodržení výše uvedených pokynů může narušit bezpečnost
spotřebiče a způsobit ztrátu záruky.
•Před čištěním odstraňte jakýkoli nadbytečný rozlitý materiál.
•Během pyrolytického čisticího procesu se mohou povrchy zahřát více
než obvykle, a proto je nutné držet děti v bezpečné vzdálenosti.
CZ 98
Page 99

Shrnutí
Obecné pokyny
100
Popis výrobku
102
Použití trouby
103
Čištění a údržba trouby
108
1.1 Bezpečnostní pokyny
1.2 Elektrická bezpečnost
1.3 Doporučení
1.4 Instalace
1.5 Odpadové hospodářství
1.6 Prohlášení o shodě
2.1 Přehled
2.2 Příslušenství
2.3 První použití
3.1 Popis displeje
3.2 Režimy vaření
4.1 Obecné poznámky k čištění
4.2 Pyrolýza
4.3 Údržba
• Demontáž a čištění roštů
• Demontáž okna trouby
• Demontáž a čištění skleněných dvířek
• Výměna žárovky
Řešení potíží
111
5.1 Často kladené otázky
CZ 99
Page 100

1. Obecné pokyny
Děkujeme Vám, že jste si zvolili jeden z našich výrobků.
Pro dosažení nejlepších výsledků s troubou byste si měli
pečlivě přečíst tento návod a uschovat jej pro budoucí
použití. Před instalací trouby si poznamenejte výrobní
číslo, abyste jej mohli poskytnout pracovníkům
zákaznických služeb v případě nutnosti opravy. Po
vyjmutí trouby z obalu zkontrolujte, zda nedošlo během
přepravy k jejímu poškození. Máte-li pochybnosti,
troubu nepoužívejte a požádejte kvalifikovaného
technika o radu. Uchovávejte všechen obalový materiál
(plastové sáčky, polystyrén, hřebíky) mimo dosah dětí.
Při prvním zapnutí trouby se může linout silný
páchnoucí kouř, který je způsoben prvním ohřevem lepidla na izolačních deskách v troubě. To je
naprosto normální, a pokud k tomu dojde, je třeba počkat, než se kouř rozptýlí, a teprve poté vložit do
trouby pokrmy. Výrobce neponese žádnou odpovědnost v případech, kdy nebudou dodrženy pokyny
obsažené v tomto dokumentu.
POZNÁMKA: funkce, vlastnosti a doplňky trouby uváděné v tomto návodu se budou lišit v závislosti na
modelu, který jste zakoupili.
1.1 Bezpečnostní pokyny
Používejte troubu pouze ke stanovenému účelu, kterým je pečení potravin; jakékoliv jiné použití,
například jako zdroj tepla, je považováno za nevhodné a proto nebezpečné. Výrobce nemůže nést
odpovědnost za případné škody vzniklé nesprávným či nevhodným používáním.
Použití jakéhokoliv elektrického spotřebiče předpokládá dodržování některých základních pravidel:
- neodpojujte napájecí kabel ze zásuvky taháním;
- nedotýkejte se spotřebiče mokrýma nebo vlhkýma rukama či nohama;
- použití adaptérů, rozdvojek a prodlužovacích kabelů není zásadně doporučeno;
- v případě selhání nebo a/nebo špatné funkce vypněte spotřebič a nemanipulujte s ním.
1.2 Elektrická bezpečnost
ZAJISTĚTE, ABY ELEKTRICKÁ ZAPOJENÍ PROVÁDĚL ELEKTRIKÁŘ NEBO KVALIFIKOVANÝ TECHNIK.
Napájecí zdroj, ke kterému je trouba připojena, musí být v souladu s právními předpisy platnými v zemi
instalace.
Výrobce nenese žádnou zodpovědnost za případné škody způsobené nedodržením těchto pokynů.
Trouba musí být připojena k elektrické síti prostřednictvím uzemněné zásuvky nebo odpojovače s více
póly, v závislosti na právních
předpisech platných v zemi instalace. Elektrické napájení je třeba chránit vhodnými pojistkami a použité
kabely musístit správné napájení trouby.
ZAPOJENÍ
Trouba je dodávána s napájecím kabelem, který by měl být připojen pouze k elektrickému zdroji s
220–240 V AC 50 Hz mezi fázemi nebo mezi fází a nulovým vodičem. Pře připojením trouby k elektrické
síti je důležité zkontrolovat:
- napájecí napětí uvedené na voltmetru;
- nastavení odpojovače.
Uzemňovací vodič připojený k zemnicí svorce trouby musí být připojen k zemnící svorce napájecího
zdroje.
VAROVÁNÍ
Před připojením trouby k elektrické síti požádejte kvalifikovaného elektrikáře o kontrolu spojitosti
zemnicí svorky elektrického napájení. Výrobce nenese žádnou odpovědnost za nehody nebo jiné
problémy způsobené nepřipojením trouby k zemnící svorce nebo uzemněním, které má vadnou
spojitost.
CZ 100
 Loading...