

Page 1
FORNI DA INCASSO
ISTRUZIONI PER L’USO
IT
OVENS
USER INSTRUCTIONS
HORNOS EMPOTRABLES
INSTRUCCIONES DE USO
OVEN
GEBRUIKSAANWIJZING
EINBAUBACKÖFEN
BEDIENUNGSANLEITUNG
FORNOS
MANUAL DE INSTRUÇÕES DE UTILIZAÇÃO
GB
ES
NL
DE
PT
HOOVER - Via Privata Eden Fumagalli - 20047 Brugherio (Milano) - Italy
Page 2
AVVERTENZE GENERALI
Leggere attentamente le istruzioni incluse in questo libretto. Vi danno importanti indicazioni sulla sicurezza d'installazione e d'impiego,
per la manutenzione e la pulizia, ed anche qualche consiglio per un ottimo utilizzo del forno. Conservare con cura questo documento
per ogni consultazione ulteriore ed annotare qui sotto, prima dell'installazione il numero di serie del forno, nel caso di richiesta d'intervento
del servizio di assistenza.
Dopo aver sballato il forno assicurarsi che non sia danneggiato,
in caso di dubbi contattare personale qualificato.
Tenere i materiali utilizzati per l’imballo (buste di plastica, polistirolo,
chiodi o graffette) fuori dalla portata dei bambini.
Il produttore declina ogni responsabilità nel caso di
non rispetto delle istruzioni spiegate nel presente libretto
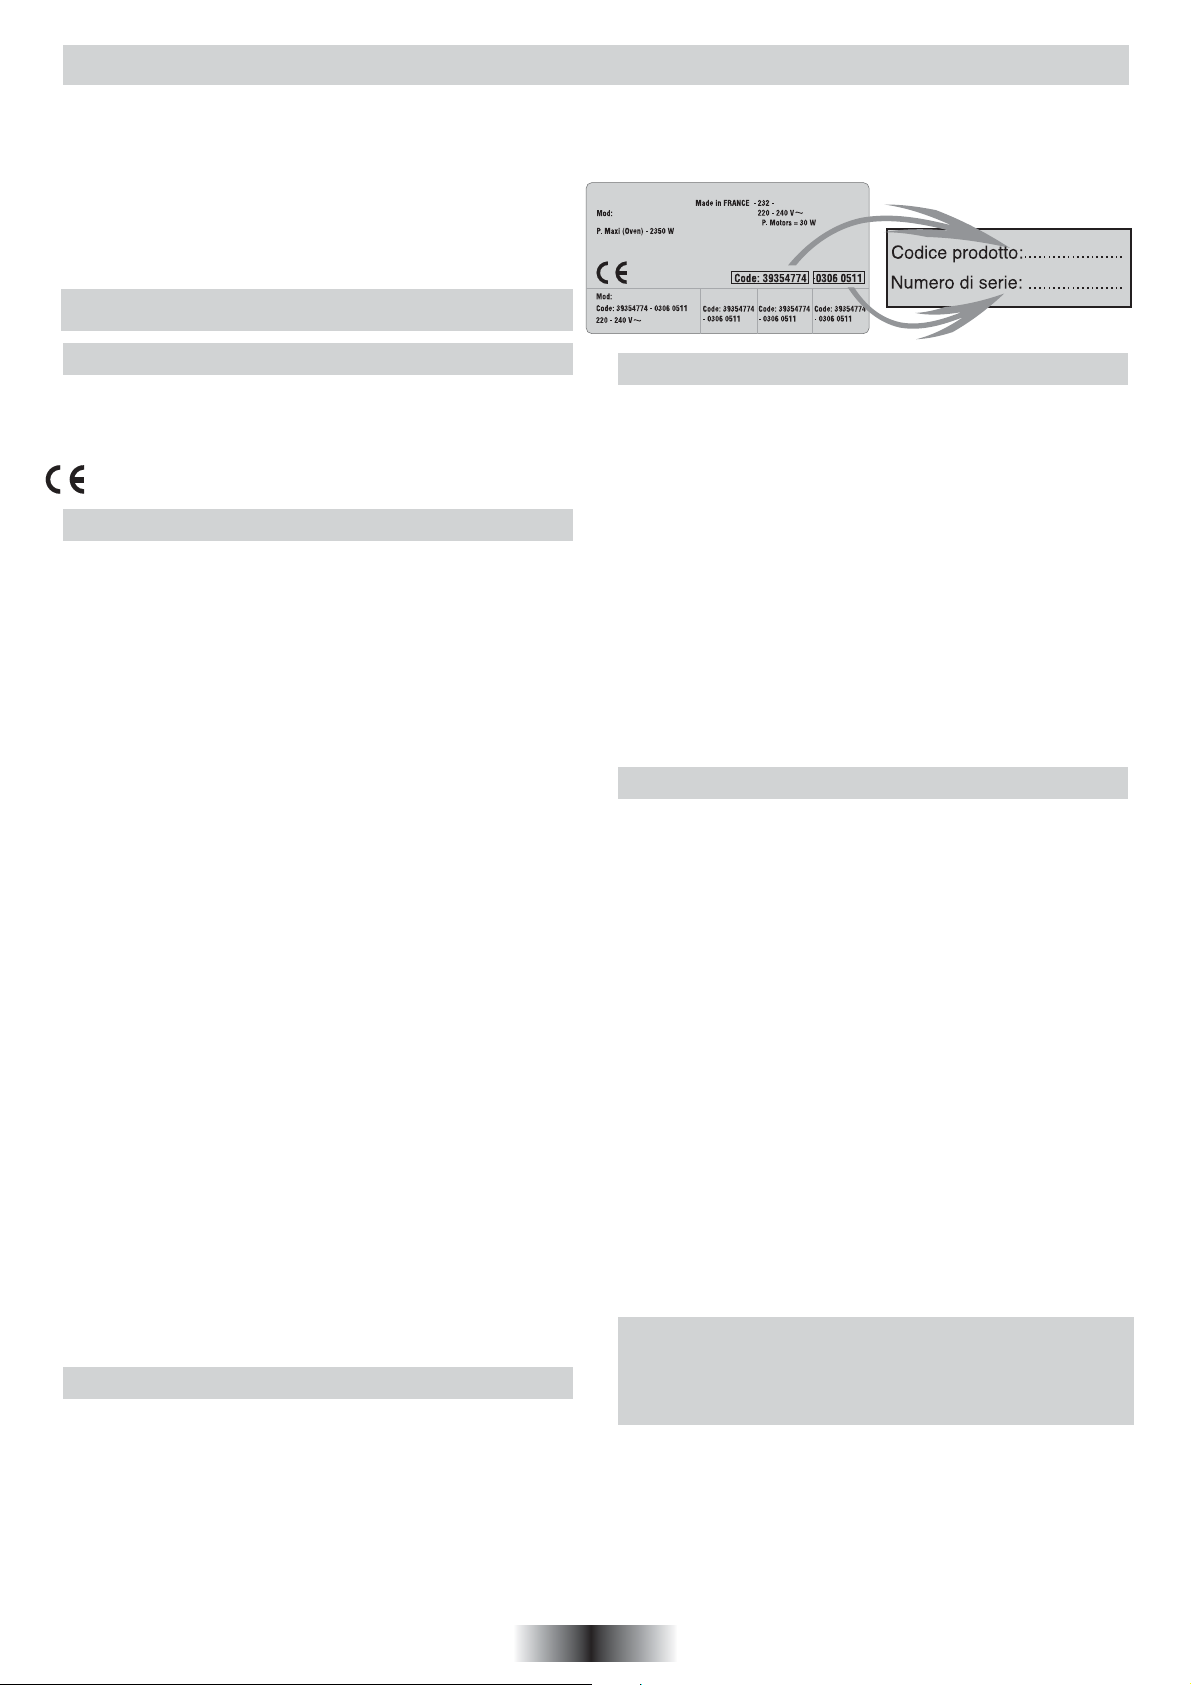
Placca segnaletica (situata sul lato
dell’ apparecchio)
DICHIARAZIONE DI CONFORMITA
• Questa apparecchiatura nelle parti destinate a venire a contatto con sostanze alimentari, è conforme alla prescrizione
della dir. CEE 89/109 e al D.L. di attuazione N° 108 del
25/01/92.
Apparecchio conforme alle Direttive Europee 89/336/CEE,
73/23/CEE e successive modifiche
INFORMAZIONI SULLA SICUREZZA
• Questo apparecchio dovrà essere destinato solo all’uso per
il quale è stato espressamente concepito, e cioè per la cottura
di alimenti.
Ogni altro uso (ad esempio riscaldamento ambiente) è da
considerarsi improprio e quindi pericoloso. Il costruttore non
può essere considerato responsabile per eventuali danni
derivanti da usi impropri, erronei ed irragionevoli.
• L’uso di un qualsiasi apparecchio elettrico comporta
l’osservanza di alcune regole fondamentali. In particolare:
- non tirare il cavo di alimentazione per staccare la spina dalla
presa di corrente
- non toccare l’apparecchio con mani o piedi bagnati o umidi
- non usare l’apparecchio a piedi nudi
- non permettere che l’apparecchio sia usato dai bambini
o da incapaci, senza sorveglianza
- in generale è sconsigliabile l’uso di adattatori, prese multiple
e prolunghe.
- In caso di guasto e/o di cattivo funzionamento dell’apparecchio,
spegnerlo e non manometterlo.
• In caso di danneggiamento del cavo, provvedere tempestivamente alla sua sostituzione secondo le seguendi indicazioni:
aprire il coperchio morsettiera, togliere il cavo di alimentazione
e sostituirlo con uno corrispondente,
H05V2V2-F)
Tale operazione dovrà essere eseguita da personale professionalmente qualificato. Il conduttore di terra (giallo-verde), deve
obbligatoriamente essere più lungo di circa 10 mm. rispetto
ai conduttori di linea.
Per l’eventuale riparazione rivolgersi solamente ad un centro
di assistenza tecnica autorizzato e richiedere l’utilizzo di ricambi originali.
Il mancato rispetto di quanto sopra può compromettere la
sicurezza dell’apparecchio.
• Il forno possiede delle caratteristiche tecniche ben definite e
perció non potrete apportare modifiche.
• Non utilizzate mai macchine a vapore o ad alta pressione per
la pulizia del forno.
• Non mettete alcun prodotto infiammabile nel forno. Potrebbe
incendiarsi se il forno venissa acceso accidentalmente.
• Non appogiatevi e non fate sedere i bambini sulla porta del
forno.
• Usate gli appositi guanti da forno per introdurre ed estrarre
dal forno recipienti, cibi ed accessori.
e adeguato alla portata dell’apparecchio.
(tipo H05RR-F, H05VV-F,
RACCOMANDAZIONI
• Dopo ogni utilizzo, eseguire la manutenzione favorirà una
perfetta pulizia con la pirolisi.
• Non rivestire mai le pareti del forno con alluminio o con altri
materiali simili. Si rischia di bruciare il foglio d'alluminio e di
danneggiare le pareti del forno.
• É consigliato di non utilizzare il forno alle alte temperature per
non rischiare di provocare fumo e odori. É dunque meglio
allungare il tempo di cottura e abbassare leggermente la
temperatura.
• Vi consigliamo di utilizzare solo dei piatti che resistano alle
alte temperature.
INSTALLAZIONE
L’installazione è a carico dell’acquirente e la Casa Costruttrice
è esonerata da questo servizio, gli eventuali interventi richiesti
alla Casa Costruttrice che dipendono da una errata installazione
non sono compresi nella garanzia.
L’installazione deve essere effettuata secondo le istruzioni da
personale professionalmente qualificato. Una errata installazione
può causare danni a persone, animali o cose, nei confronti dei
quali il costruttore non può essere considerato responsabile.
Il mobile nel quale il forno deve essere incassato deve essere
realizzato con materiali resistenti al calore.
Il forno puó essere incassato sia sotto un piano di cottura
sia in colonna.
Prima del fissaggio : é indispensabile assicurare una buona
aerazione del vano di incasso al fine di permettere una buona
circolazione dell'aria necessaria al raffreddamento ed alla
protezione dei meccanismi interni. Bisogna quindi praticare aperture
(vedere ultima pagina).
COLLEGAMENTO ELETTRICO
L'INSTALLAZIONE DEL FORNO DEVE ESSERE EFFETTUATA
DA UN INSTALLATORE AUTORIZZATO O DA UN TECNICO
QUALIFICATO.
L'installazione di questo apparecchio deve essere effettuata in
conformità delle Norme vigenti.
La casa costruttrice, declina ogni responsabilità in caso di mancato
rispetto delle suddette norme.
Importante: la casa costruttrice resta sollevata da ogni responsabilità
per eventuali danni a persone o cose, derivanti dal mancato
allacciamento della linea di terra.
Il forno è conforme ai requisiti di sicurezza previsti dalle norme
e deve essere munito di spina tripolare con polo di terra che
assicura la completa messa a terra.
L'efficacia della sicurezza è comunque subordinata anche alla
corretta messa a terra del vostro impianto. Pertanto, prima di
alimentare elettricamente il forno accertarsi che la
presa abbia un corretto collegamento di messa a terra e che la
portata amperometrica del contatore elettrico risulti idonea per
l'assorbimento indicato dai dati di targa del forno.
Nota: non dimenticate che l'apparecchio potrebbe aver bisogno
di manutenzione da parte dell'assistenza tecnica. Ponete quindi
la presa di corrente in una posizione facilmente accessibile.
Questo apparecchio é venduto provvisto di cordone di alimentazione
con presa di corrente e deve essere utilizzato esclusivamente
con una tensione di 230 Volts.
Attenzione: nel caso si desideri realizzare una connessione
fissa alla rete, si dovrà interporre tra l'apparecchio e la rete, un
dispositivo omnipolare di interruzione con distanza dei contatti
di almeno 3 mm. Il cavo di terra non deve essere interrotto
dall'interruttore.
FAR VERIFICARE L'EFFICIENZA DELL'IMPIANTO DI MESSA
A TERRA.
La sostituzione del cordone di alimentazione deve essere effettuata
dal servizio di assistenza tecnica o da personale altamente
qualificato, in conformità alle caratteristiche d'origine.
Prima di effettuare qualsiasi operazione di smontaggio, si deve
staccare la spina dalla presa di corrente o togliere corrente a
mezzo dell'interruttore generale dell'impianto elettrico.
1 IT
Page 3
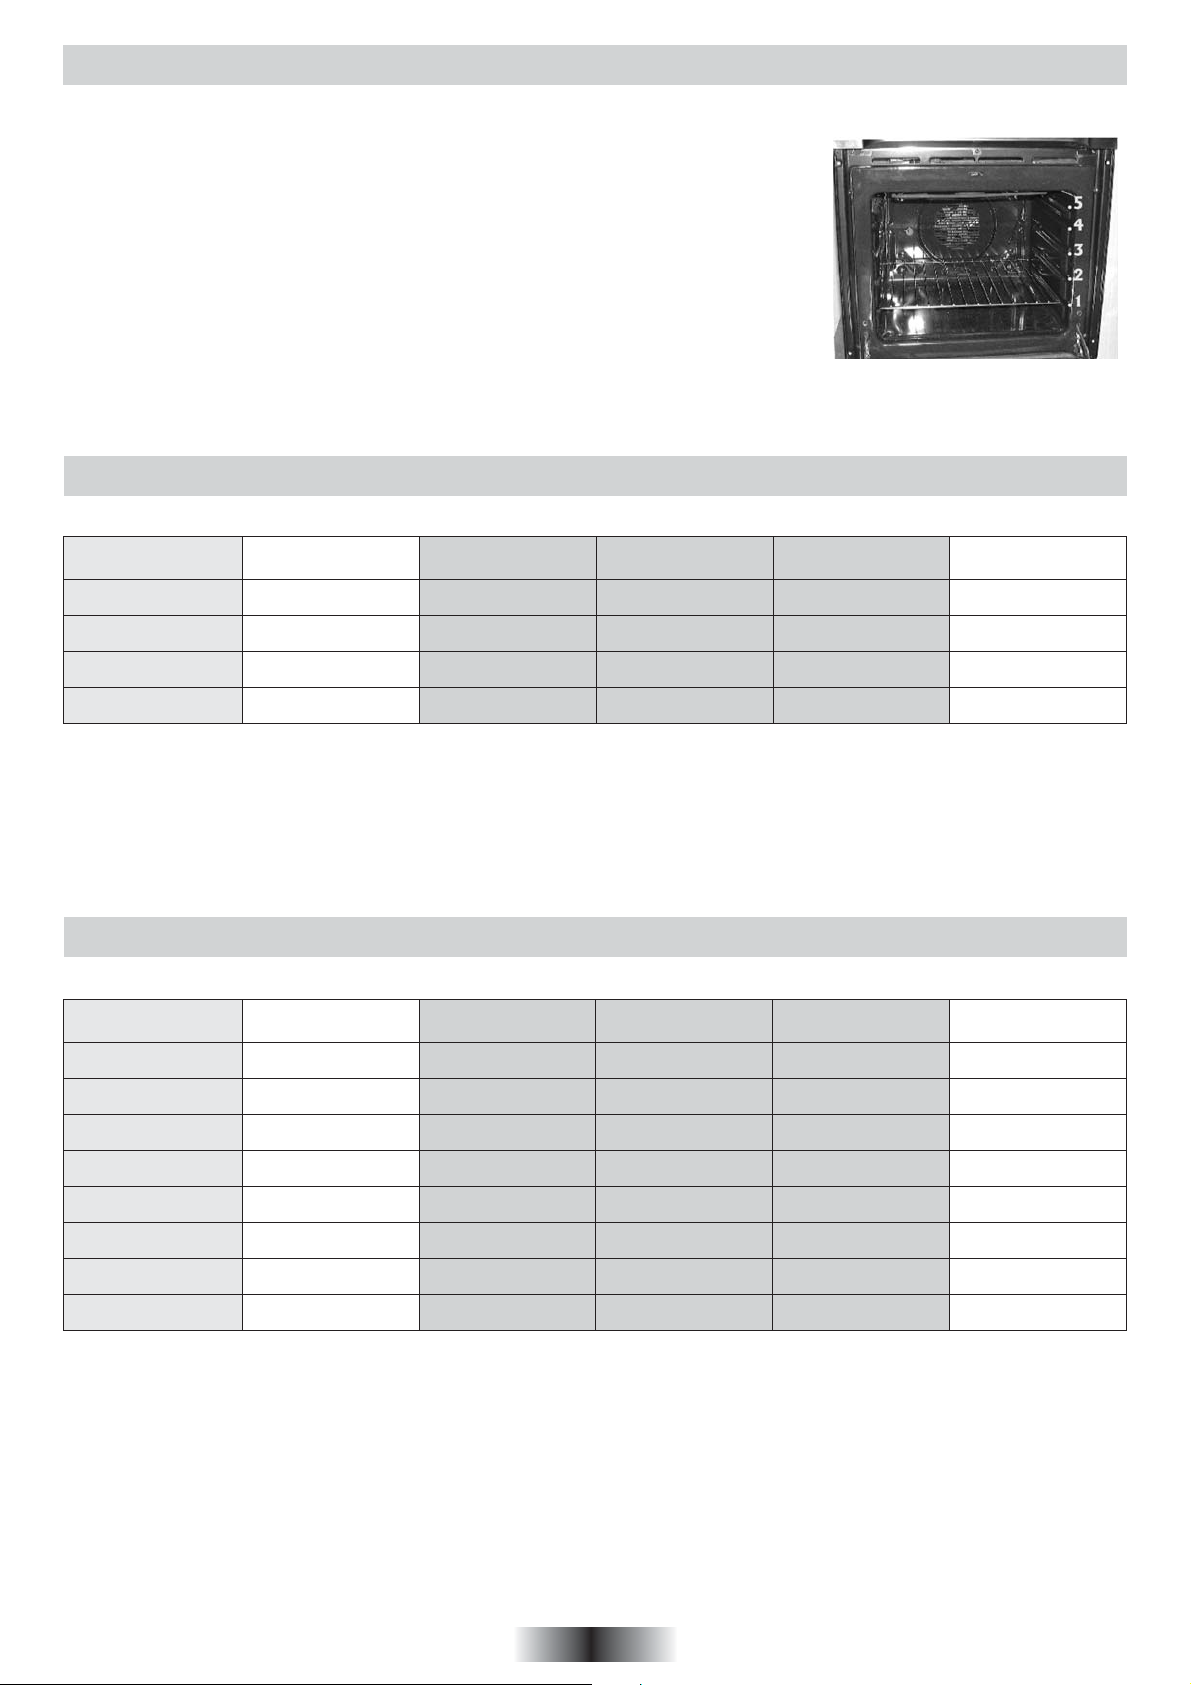
DOTAZIONE DEL FORNO
Prima di utilizzare gli accessori del forno per la prima volta
è necessario pulirli. Per questa operazione si consiglia di
utilizzare una spugna. Successivamente risciacquare ed
asciugare gli accessori.
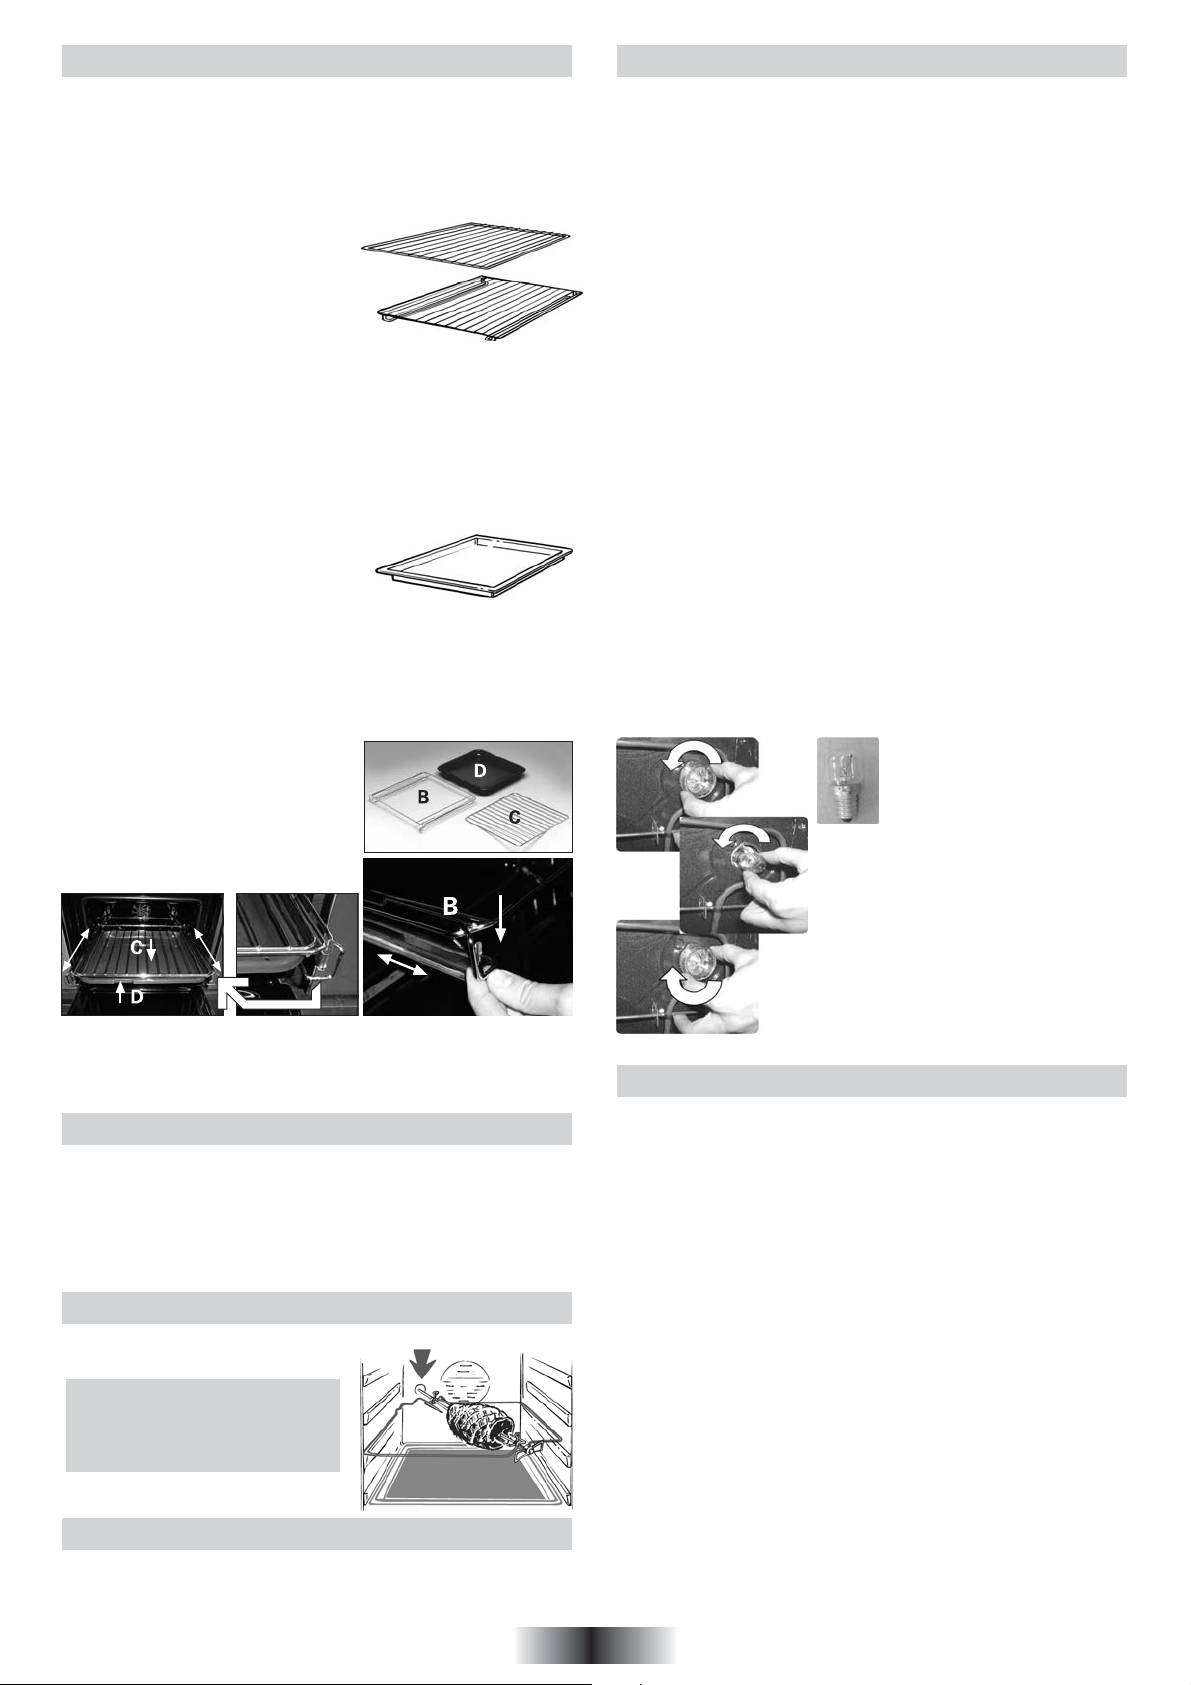
La griglia semplice serve da supporto
per teglie, pirofile, stampi per i dolci.
La griglia porta-piatto serve in
particolare per le grigliate di carne
poiché sostiene anche la leccarda che
raccoglie i grassi che colano.
Grazie ai loro profili speciali, le griglie
restano sempre in orizzontale, anche
quando vengono estratte verso
l'esterno. Non c'é nessun rischio quindi
che i tegami scivolino o si ribaltino.
La leccarda serve a raccogliere i
grassi che colano durante la cottura
con il grill. Puo essere appoggiata sotto
la griglia, inserita nelle apposite guide
della griglia o ancora, posta sul fondo
del forno. Deve essere utilizzata solamente con il grill, il girarrosto o il turbo
girarrosto.
Attenzione: in tutti gli altri modi di
cottura, la leccarda deve essere tolta
dal forno.
Non usare mai la leccarda per cuocere
gli arrosti perché ne risulterebbe un
eccessivo sviluppo di fumo e vapori e
il forno si sporcherebbe inultimente.
MANUTENZIONE DEL FORNO
• Prima di effettuare la pulizia attendere che l'apparecchio si
raffreddi.
• Non usare mai prodotti abrasivi, pagliette metalliche o
oggetti taglienti che potrebbero danneggiare lo smalto e
l'acciaio.
• Usare semplicemente acqua saponata o prodotti a base di
ammoniaca.
LE PARTI IN VETRO
Alla fine di ogni utilizzo del forno, asciugate con carta assorbente.
Se gli schizzi sono troppo grandi, pulite con una spugna ed un
detergente. Sciacquate ed asciugate. Non usare mai prodotti
abrasivi o oggetti taglienti.
LA GUARNIZIONE PORTA FORNO
Pulire con una spugna e del detergente.
GLI ACCESSORI
Pulire con una spugna imbevuta d'acqua saponata. Risciacquare
e asciugare. Non usare prodotti abrasivi.
LA LECCARDA
Dopo aver grigliato, estrarre la leccarda dal forno. Abbiate cura
di svuotarla in un recipiente a parte, lavare e risciaquare con
dell'acqua calda e una spugna imbevuta di detersivo.
Lasciarla a riposo con uno strato d'acqua e detergente per
ammorbidire le incrostazioni.
Puo anche essere lavata, in lavastoviglie o con prodotti reperibili
in commercio.
Non lasciare mai la leccarda sporca all'interno del forno.
LUCE FORNO
Staccare la spina di alimentazione prima di ogni operazione di
pulizia o di sostituzione della lampadina.
La lampadina e il bulbo protettivo sono realizzati con un materiale
resistente alle alte temperature.
GUIDA TELESCOPICA
Estrarre i bracci telescopici e posizionare la griglia porta leccarda B dietro
al fermo griglia nella parte frontale.
Completare con l’inserimento della
griglia piana C e della leccarda D
Gli accessori devono essere tolti dal forno se non vengono
utilizzati.
LA COTTURA AL GRILL
Questo tipo di cottura consente la doratura rapida dei cibi.
A questo scopo consigliamo di inserire la griglia generalmente nel
3° o 4° ripiano, secondo le dimensioni dei cibi (Fig. pag. 6).
Quasi tutte le carni possono essere cotte al grill, fanno eccezione
alcune carni magre di selvaggina ed i polpettoni.
La carne ed il pesce da cucinare al grill vanno leggermente unti
con olio.
IL GIRARROSTO
Non si effettua preriscaldamento per le cotture al girarrosto.
Le cotture al girarrosto si effettuano a porta chiusa.
TEMPI DI COTTURA
Alle pagine 6-7 riportiamo una tabella indicativa dove sono indicati
tempi e temperature consigliati per le prime cotture. Ad esperienza
acquisita potrete variare a vostro piacimento i valori riportati nella
tabella stessa.
Caratteristiche della lampadina:
230 V~ - 25 W - Base E 14 Temperatura 300°C.
Per la sostituzione della lampadina
difettosa, è sufficiente smontare il
bulbo in vetro,
- togliere la lampadina,
- sostituirla con una lampadina identica e,
- riavvitare il bulbo in vetro che serve come
protezione.
FORNO AUTOPULENTE CATALITICO
Speciali pannelli autopulenti ricoperti da uno smalto a struttura
microporosa, offerti come accessori opzionali per tutti i modelli,
eliminano la pulizia manuale del forno.
I grassi proiettati sulle pareti durante la cottura, vengono decomposti
dallo smalto, mediante un processo catalitico di ossidazione e
trasformati in prodotti gassosi.
Schizzi eccessivi di grasso possono ostruire i pori e quindi impedire
l’autopulizia. Tale caratteristica può essere ripristinata mediante
un riscaldamento per circa 10-20 minuti del forno vuoto impostando
la manopola forno in corrispondenza della massima temperatura.
Non usare prodotti abrasivi, pagliette metalliche, oggetti appuntiti,
panni ruvidi, prodotti chimici o detersivi che possono danneggiare
irrimediabilmente lo smalto.
Si consiglia inoltre di utilizzare pentole a bordi alti nel caso di
cotture di vivande particolarmente grasse (arrosti, ecc.) e di usare
la leccarda quando si esegue la cottura al grill.Qualora, per
particolari condizioni di sporco, non fosse sufficiente l’azione
precedente, si consiglia di intervenire asportando i grassi con un
panno morbido od una spugna inumiditi con acqua calda.
La porosità dello smalto è fondamentale per garantire l’azione
autopulente.
N.B.: Tutti i pannelli autopulenti in commercio hanno un’efficacia
di rendimento di circa 300 ore di funzionamento forno. Dopo tale
limite i pannelli dovrebbero essere sostituiti.
2 IT
Page 4
PULIZIA DEL FORNO: LA PIROLISI
La pirolisi è un sistema di pulizia che sfrutta le alte temperature
per rimuovere lo sporco.
I fumi risultanti dal processo vengono puliti tramite il passaggio
nel filtro catalizzatore.
poiché durante il processo di pirolisi la temperatura è estremamente
alta, la porta del forno è munita di un blocco di sicurezza per
impedirne l'apertura.
Durante la pirolisi è possibile che un leggero odore si propaghi
nella stanza; sarà più o meno percettibile a seconda dell'aerazione
della stessa.
IMPORTANTE :
- Prima della pirolisi:
• Togliete tutti gli accessori dal forno perché potrebbero danneggiarsi
con l'alta temperatura della pirolisi.
• É importante togliere ogni accumulo di grasso. Residui grassi
in quantità elevata potrebbero infiammarsi sotto l'azione del
calore intenso che si sprigiona durante la pirolisi.
• Chiudere la porta del forno
• Nel caso di installazione di un piano di cottura sopra il forno,
non
utilizzare mai i bruciatori o le piastre elettriche durante l'operazione
di pirolisi allo scopo di evitare un eccessivo riscaldamento del
cruscotto del forno.
• É altamente sconsigliato l'utilizzo dei prodotti detergenti o altri
prodotti per la pulizia dei forni.
La pirolisi lascia sulle pareti del forno un deposito di qualche
residuo biancastro.
Attendere il raffreddamento del forno poi pulire l'interno del forno
con una spugna umida.
Nota:
• una pulizia dopo una cottura permette di beneficiare del calore
già immagazzinato nel forno e quindi economia di energia.
Il forno pirolisi é dotato di una turbina di raffreddamento per
proteggere dal calore i componenti del forno. La turbina di
raffreddamento parte automaticamente quando il centro forno
raggiunge temperature elevate e continua a funzionare per qualche
minuto dopo la fine della pirolisi.
PER ATTIVARE LA PIROLISI:
Vengono proposti due cicli di Pirolisi:
ECO 1:30 Raccomandato per un forno normalmente sporco.
Durata: 90 minuti *.
SUP 2:00 Raccomandato per un forno molto sporco. Durata: 120
minuti *.
* tempi non modificabili.
- Ruotare il selettore finzioni su P. La sigla P si accende e
lampeggia la scritta ECO.
- Con i tasti di regolazione " + " e " - scegliere il ciclo di pirolisi in
funzione del grado di sporco del forno. Le scritte ECO e SUP
lampeggiano.
- La convalida è automatica dopo tre secondi. La scritta (ECO o
SUP) del ciclo scelto diventa fissa e la sigla P lampeggia. Il forno
si avvia la salita in temperatura. Quando la temperatura arriva
a livelli elevati, la porta viene bloccata e si accende il simbolo
.
La partenza della ciclo Pirolisi può essere differita modificando
l'ora di fine di ciclo (ad esempio per utilizzare una tariffa serale
economica o per realizzare il ciclo di pirolisi fuori dalla presenza
dei bambini). Vedere capitolo ' USO DEL PROGRAMMATORE
ELETTRONICO’
Al termine del ciclo di Pirolisi:
- Il forno si ferma automaticamente. Lampeggiano i simboli e
- Riportare il selettore funzioni sulla posizione " 0 ". L'ora del giorno
appare.
- La temperatura scende. Quando la porta viene sbloccata il
simbolo si spegne.
- La turbina di raffreddamento continua a girare e si ferma solo
quando gli organi interni del forno si saranno raffreddati
sufficientemente.
SERVIZIO ASSISTENZA CLIENTI
CERTIFICATO DI GARANZIA CONVENZIONALE: cosa fare?
Il Suo prodotto è garantito, alle condizioni e nei termini riportati
sul certificato inserito nel prodotto ed in base alle previsioni del
decreto legislativo 24/02, nonché del decreto legislativo 6 settembre
2005, n. 206, per un periodo di 24 mesi decorrenti dalla data di
consegna del bene.
Così come riportato nei testi dei Decreti Legislativi citati, il certificato
di garanzia dovrà essere da Lei conservato, debitamente compilato,
per essere mostrato al Servizio Assistenza Tecnica Autorizzato,
in caso di necessità, unitamente ad un documento fiscalmente
valido rilasciato dal rivenditore al momento dell’acquisto (bolla di
consegna, fattura, scontrino fiscale, altro) sul quale siano indicati
il nominativo del rivenditore, la data di consegna, gli estremi
identificativi del prodotto ed il prezzo di cessione
Resta pure inteso che, salvo prova contraria, poiché si presume
che i difetti di conformità che si manifestano entro sei mesi dalla
consegna del bene esistessero già a tale data, a meno che tale
ipotesi sia incompatibile con la natura del bene o con la natura
del difetto di conformità, il Servizio di Assistenza Tecnica Autorizzato
Gias, verificato il diritto all’intervento, lo effettuerà senza addebitare
il diritto fisso di intervento a domicilio, la manodopera ed i ricambi.
Per contro, nel successivo periodo di diciotto mesi di vigenza della
garanzia, sarà invece onere del consumatore che intenda fruire
dei rimedi accordati dalla garanzia stessa provare l’esistenza del
difetto di conformità del bene sin dal momento della consegna;
nel caso in cui il consumatore non fosse in grado di fornire detta
prova, non potranno essere applicate le condizioni di garanzia
previste e pertanto il Servizio di Assistenza Tecnica Autorizzato
Gias effettuerà l’intervento addebitando al consumatore tutti i costi
relativi.
ESTENSIONE DELLA GARANZIA FINO A 5 ANNI : come?
Le ricordiamo inoltre che sullo stesso certificato di garanzia
convenzionale Lei troverà le informazioni ed i documenti necessari
per prolungare la garanzia dell’apparecchio sino a 5 anni e così,
in caso di guasto, non pagare il diritto fisso di intervento a domicilio,
la manodopera ed i ricambi.
Per qualsiasi informazione necessitasse, La preghiamo rivolgersi
al numero telefonico del Servizio Clienti 0392086811.
ANOMALIE E MALFUNZIONAMENTI: a chi rivolgersi ?
Per qualsiasi necessità il centro assistenza autorizzato è a Sua
completa disposizione per fornirLe i chiarimenti necessari;
comunque qualora il Suo prodotto presenti anomalie o mal
funzionamenti, prima di rivolgersi al Servizio Assistenza Autorizzato,
consigliamo vivamente di effettuare i controlli indicati sopra.
UN SOLO NUMERO TELEFONICO PER OTTENERE ASSISTENZA.
Qualora il problema dovesse persistere, componendo il “Numero
Utile” sotto indicato, sarà messo in contatto direttamente con il
Servizio Assistenza Tecnica Autorizzato
che opera nella Sua zona di residenza.
Attenzione, la chiamata è a pagamento;
il costo verrà comunicato, tramite
messaggio vocale, dal Servizio clienti
dell’operatore telefonico utilizzato. Dettagli sono presenti sul sito
internet www.hoover.it
MATRICOLA DEL PRODOTTO. Dove si trova?
E’ indispensabile che comunichi al Servizio Assistenza Tecnica
Autorizzato la sigla del prodotto ed il numero di matricola (16
caratteri che iniziano con la cifra 3) che troverà sul certificato di
garanzia oppure sulla targa matricola del prodotto (figura in ultima
pagina). In questo modo Lei potrà contribuire ad evitare trasferte
inutili del tecnico, risparmiando oltretutto i relativi costi.
Questo elettrodomestico è marcato conformemente alla Direttiva Europea 2002/96/CE sui
rifiuti da apparecchiature elettriche ed elettroniche
(WEEE).
Assicurandovi che questo prodotto sia smaltito
correttamente, aiuterete ad evitare possibili
conseguenze negative all’ambiente e alla salute
delle persone, che potrebbero verificarsi a causa
d’un errato trattamento di questo prodotto giunto
a fine vita.
Il simbolo sul prodotto indica che questo apparecchio non può
essere trattato come un normale rifiuto domestico; dovrà invece
essere consegnato al punto più vicino di raccolta per il riciclo
delle apparecchiature elettriche ed elettroniche.
Lo smaltimento deve essere effettuato in accordo con le regole
ambientali vigenti per lo smaltimento dei rifiuti.
Per informazioni più dettagliate sul trattamento, recupero e riciclo
di questo prodotto, per favore contattare l’ufficio pubblico di
competenza (del dipartimento ecologia e ambiente), o il vostro
servizio di raccolta rifiuti a domicilio, o il negozio dove avete
acquistato il prodotto.
3 IT
Page 5

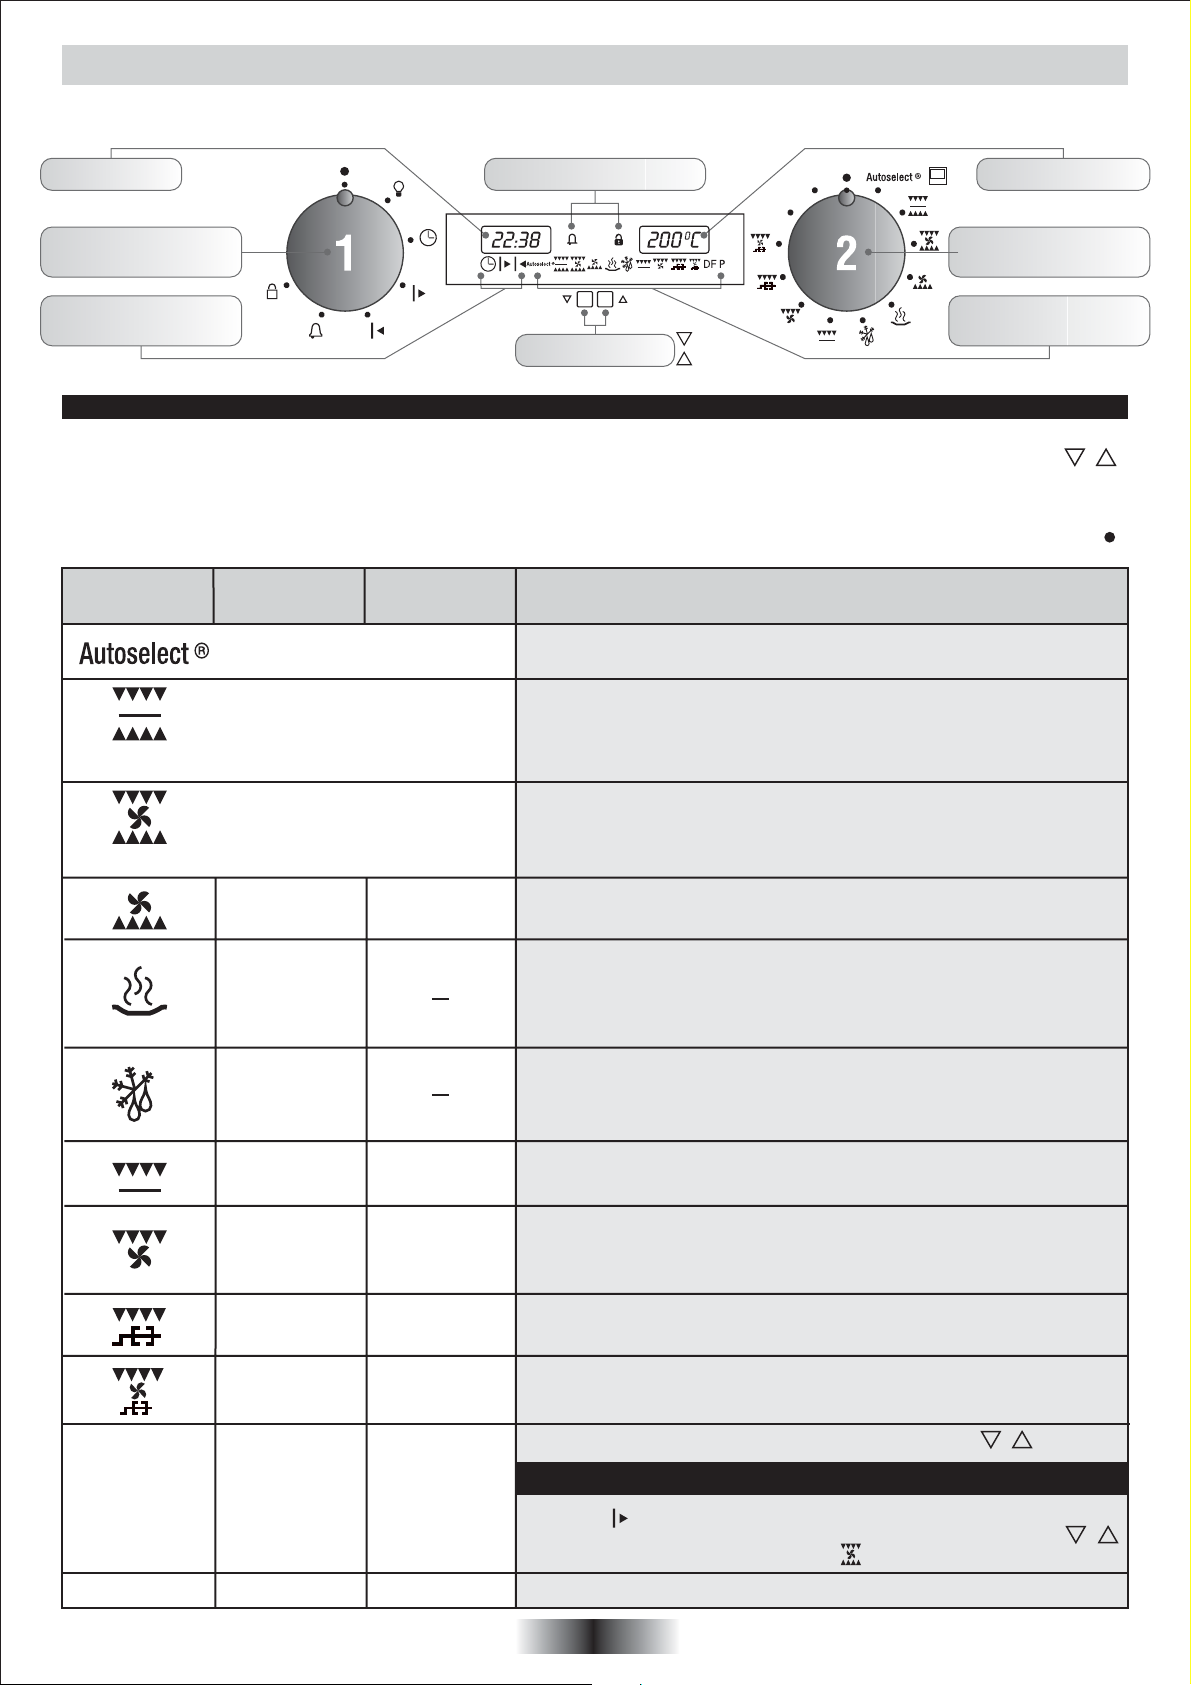
USO DEL PROGRAMMATORE ELETTRONICO
FUNZIONE COME SI ATTIVA COME SI SPEGNE COSA FA A COSA SERVE
LAMPADA
FORNO
OROLOGIO
SUONERIA
SICUREZZA
BAMBINI
DURATA
COTTURA
Da utilizzare anche
per il ciclo di pirolisi
FINE
COTTURA
Da utilizzare anche
per il ciclo di pirolisi
• Spostando la manopola
(1) sul simbolo viene
accesa la lampada
• Posizionare il selettore 1
sul simbolo
• Regolare l’ora con i tasti
e (durante la regolazione i numeri sul display
lampeggiano)
• Posizionare il selettore 1
sul simbolo
• Regolare la durata con i
tasti e (durante la
regolazione i numeri sul
display lampeggiano)
• Posizionare il selettore 1
sul simbolo la spia
lampeggia
• Premere insieme i tasti
e per 3 secondi
• Confermato smette di lampeggiare
• Selezionare una funzione
di cottura (selettore 2)
• Posizionare il selettore 1
sul simbolo
• Regolare la durata con i
tasti e (durante la regolazione i numeri sul
display lampeggiano)
• Selezionare una funzione
di cottura (selettore 2)
• Posizionare il selettore 1
sul simbolo
• Regolare l’ora di fine cottura
con i tasti e (durante
la regolazione i numeri sul
display lampeggiano)
IL PROGRAMMATORE
Display orologio Visualizzazione sicurezza
• Posizionare il selettore sul
simbolo
• Dopo il tempo impostato
la funzione si spegne da
sola; se deve essere
fermata prima è necessario
portare il tempo impostato
a 0 (selettore 1 su e
utilizzati i tasti e )
• Premere insieme i tasti
e per 3 secondi
• La spia lampeggia
• Al termine della durata
impostata la funzione si
spegne da sola; se deve
essere fermata prima è
necessario fermare il forno
oppure portare a 00:00 la
durata cottura (selettore 1
su simbolo ed utilizzare
i tasti e )
• All’ora impostata la funzione
si spegne da sola; se deve
essere fermata prima è
necessario fermare il forno
posizionando il selettore 2
sul simbolo
• Permettedi regolare l’ora
indicata dall’orologio del
forno
• Permette di avere un
segnale sonoro (per alcuni
secondi) al termine del
tempo impostato
• Non permette di cambiare
le impostazioni del forno
(neanche girando accidentalmente i selettori)
• Permette di memorizzare
l’ora di fine cottura
• Al termine dell’imposta-
zione posizionare il selettore 1 sul simbolo per
visualizzare l’ora corrente
• Per visualizzare il tempo
programmato posizionare
il selettore 1 sul simbolo
• Permette di memorizzare
l’ora di fine cottura
• Al termine dell’impostazione
posizionare il selettore 1
sul simbolo per visualizzare l’ora corrente
• Per visualizzare il tempo
programmato posizionare
il selettore 1 sul simbolo
• Questa funzione è utile per
ispezionare il forno quando
spento
• Regolare l’ora utilizzando
i tasti e durante la regolazione i numeri sul
display lampeggiano
• Viene utilizzato come
promemoria
• Il funzionamento della
funzione è indipendente
dal forno (può essere
utilizzato anche a forno
spento)
• Attivata a forno spento non
permette l’accensione
del forno stesso
• Attivata a forno funzionante
non permette di cambiare
le impostazioni del forno
(spostamento accidentale
dei selettori)
Attenzione: il forno può
essere ancora spento
girando il selettore 2
sulla posizione 0
• Al termine della durata di
cottura impostata ferma
automaticamente il forno
ed avvisa, per alcuni
secondi, con segnale
sonoro
• Tipicamente si utilizza questa funzione con la funzione ‘durata cottura’ - ad
esempio il cibo desidrato
deve cuocere per 45 minuti
e desidero sia pronto per
le ore 12:30; in tal caso
selezionare la funzione di
cottura desiderata
impostare la durata cottura
a 45 minuti impostare la
fine cottura alle 12:30
la cottura avrà automaticamente inizio alle ore
11:45 (12:30 meno 45 minuti), all’ora impostata
come fine cottura il forno
si spegne automaticamente
Attenzione: impostando
solo la fine cottura e non
la durata della cottura la
cottura inizierà subito e
terminerà all’ora di fine
cottura impostata
Visualizzazione funzioni
programmatore
Il programma esegue alcuni controlli ad ogni impostazione e in
conseguenza può essere percepito un piccolo ritardo sulla partenza
Tasti regolazione
ATTENZIONE:
la prima operazione da eseguire dopo installazione o interruzione di corrente (tali situazioni
si riconoscono perché sul display lampeggia
l’ora 12:00) é la regolazione dell’orologio,
altrimenti il forno non funziona.
4 IT
Page 6
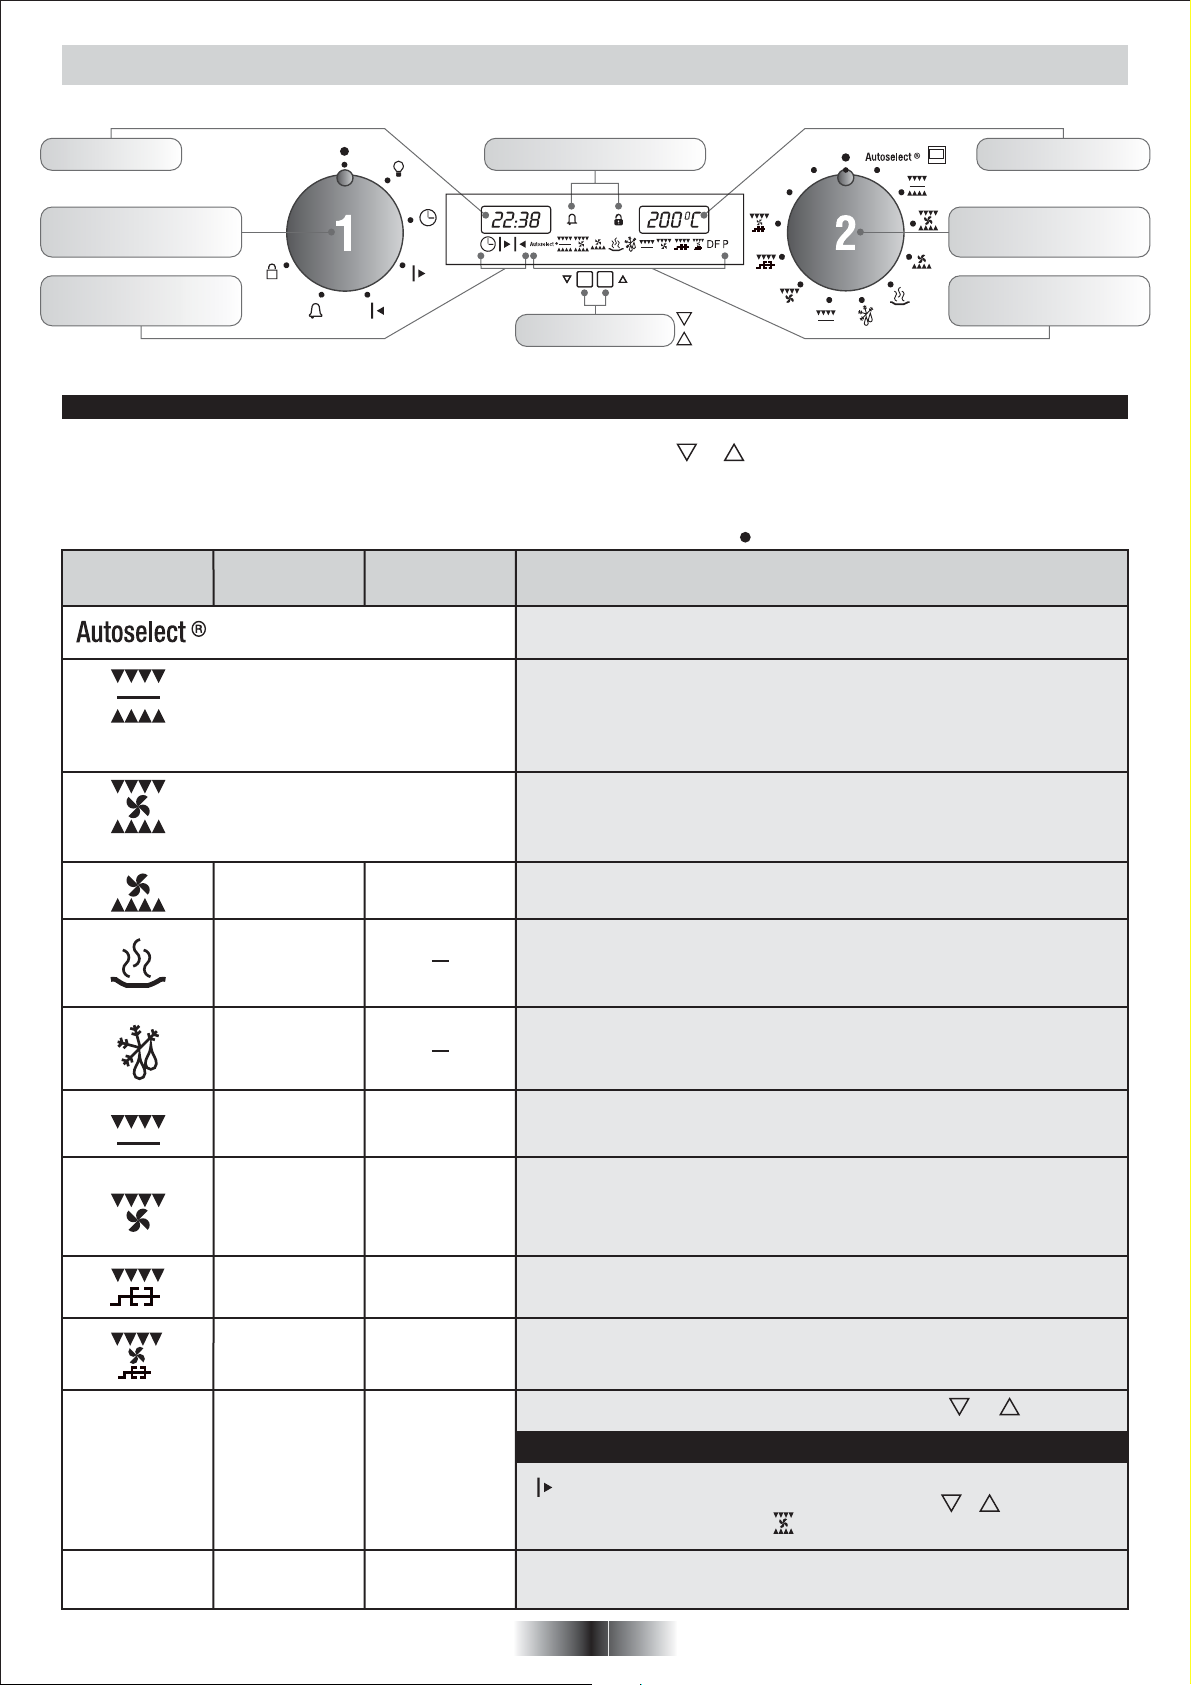
ISTRUZIONI PER L’USO
Visualizzazione sicurezza Display temperatureDisplay orologio
Impostazioni funzioni
programmatore
Visualizzazione funzioni
programmatore
Tasti regolazione
• Se l’orologio non viene impostato il forno non funziona e sul display lampeggia l’ora 12:00.
Per avviare la cottura è necessario selezionare una funzione con la manopola (2), sul display si illuminerà il simbolo corrispondente
e la temperatura automaticamente pre-definita lampeggerà, se si desidera modificare tale temperatura, agire sui tasti o .
Dopo qualche secondo il forno entrerà in funzione, ma è possibile regolare il programmatore per l’avvio differito all’ora desiderata
(si veda il capitolo “Il programmatore”). Il simbolo della funzione cottura lampeggerà fino a che il forno non avrà raggiunto la temperatura
indicata sul display, raggiunta smetterà di lampeggiare e un suono avviserà l’utente.
Nota bene: È possibile interrompere il funzionamento del forno in qualsiasi momento riportando la manopola (2) sullo “ ”.
Simbolo
Temperatura
predefinita
Programma di prova secondo CENELEC EN 50304 utilizzato
per la definizione della classe energetica.
210° C
Programma di prova secondo CENELEC EN 50304.
Possibile
regolazione
50°-280° C220° C
50°-240° C
In funzione della temperatura impostata il forno sceglie automaticamente la funzione
di cottura ottimale.
Convezione naturale
Sono in funzione la resistenza suola e la resistenza cielo forno.
È la cottura tradizionale, ottima per arrostire cosciotti, selvaggina, ideale per biscotti,
mele al forno e per rendere i cibi molto croccanti. Si ottengono buoni risultati per
cotture su un ripiano.
Forno ventilato
Sono in funzione la resistenza di suola e di cielo con l’ausilio della ventola interna
al forno. Questa funzione è indicata per la cottura di pollame, pesce, pane, ecc.
Questo sistema di cottura assicura anche una buona distribuzione del calore e quindi
è possibile cuocere su ampia superficie qualsiasi pietanza.
P
DF
Impostazioni funzioni
forno (cottura)
Visualizzazione modi
cottura
Funzione
DF
210° C
60° C
40° C
210° C
210° C
50°-240° C
180°-240° C
180°-230° C
180°-240° C240° C
180°-240° C240° C
Suola ventilata
Adatta per cotture delicate (torte-soufflè).
Mantenimento in caldo
Utilizzo intermittente della resistenza di suola e di cielo con l’ausilio della ventola.
La temperatura è pre-regolata a 60°C costanti (per questa funzione non è possibile
modificare la temperatura di funzionamento). Ideale per tenere in caldo i cibi appena
cotti senza rischio di sovracottura, è molto pratico anche per riscaldare le stoviglie
che devono essere servite calde.
Scongelamento
Utilizzo intermittente della resistenza di suola e di cielo con l’ausilio della ventola.
La temperatura è pre-regolata a 40°C costanti (per questa funzione non è possibile
modificare la temperatura di funzionamento). Questa funzione permette di scongelare
rapidamente prima della cottura.
Grigliatura tradizionale a porta chiusa
In questa posizione viene inserita la resistenza del grill a raggi infrarossi. Ottima nella
cottura di carni di medie e piccolo spessore (salsicce, costine, bacon).
Grill ventilato a porta chiusa
L’aria, riscaldata dalla resistenza grill, viene aspirata dal ventilatore che la riversa
sulle vivande alla temperatura desiderata tra 180 e 230°C. Il grill ventilato sostituisce
egregiamente il girarrosto e garantisce ottimi risultati con pollame, salsicce e carni
rosse, anche in quantità rilevante.
Grill più girarrosto
Inserimento resistenza grill e motorino girarrosto.
Serve per effettuare cotture allo spiedo.
Turbo Girarrosto.
Si utilizza a porta chiusa. Uso della resistenza superiore, della turbina e del girarrosto
che permette la rotazione degli alimenti da cuocere. Questa funzione, con l’utilizzo
della turbina, evita il seccarsi del cibo.
Sono disponibili due doppie funzioni, selezionabili con i tasti e , la funzione
scelta appare sul display e viene confermata dopo 3 secondi.
DF1: scongelamento a 40°C (30 minuti) + forno ventilato a 200°C (45 minuti)
DF2: forno ventilato a 200°C (45 minuti) + mantenimento in caldo a 60°C (60 minuti)
La durata di cottura con forno ventilato può essere modificata mettendo il selettore
funzioni su . I tempi dello scongelamento e del mantenimento in caldo non sono
modificabili. La temperatura di cottura con forno ventilato è modificabile (tasti o )
solo quando questa parte è attiva (simbolo acceso sul display).
P
Pirolisi, vedere capitolo relativo
5 IT
Page 7
CONSIGLI PER LA COTTURA
Le temperature ed i tempi di cottura vengono forniti a titolo indicativo per facilitare l'uso del
forno. L'esperienza personale dovrebbe permettere di adattare le ricette ad i gusti ed alle
abitudini personali.
Ricordate che la cottura a temperature elevate puó causare schizzi di liquidi ed il forno
sporcandosi puó produrre fumo. Vi consigliamo di ridurre la temperatura di cottura, anche
se ció significa allungarne la durata.
PESCE
Le pareti del forno sono dotate di
supporti per le griglie a differenti livelli.
Piatto
Spigola o Orata
Coda di rospo
Filetto di sogliola 160° C115-20 minuti6 pezzi
Pesce alla griglia
Convezione Naturale
Convezione Naturale
Modo
cottura
Convezione Forzata
Grill
Quantità
1kg intero 220° C130 minuti
1kg brasato 220° C130 minuti
6 filetti 275° C42x5 minuti
°C
cottura
Tempo
di cottura
VERDURE - ALTRI PIATTI
Piatto
Cavolo al forno
Paté in crosta
Paté in crosta 200-220° C 1 ora/kg
Cicoria con
emmental
Soufflé
salatini/dolci
Pomodori al forno
Convezione Naturale
Convezione Naturale
Modo
cottura
Convezione Forzata
Convezione Forzata
Convezione Forzata
Quantità
per 6 200-220° C
per 6
per 6
6-8 pezzi 200-220° C
°C
cottura
180-200° C
180-200° C 50-60 min
Tempo
di cottura
1 ora
25-30 min
40-45 min
Posizione
griglia
Consigli
Ø 22
Flan di pere
“Quiche Lorraine” 6 pers. 45-50 min
“Gratin dauphinois”
Tutte le cotture si fanno con la griglia al livello ‘1’, eccetto quelle indicate con ‘*’ che richiedono il posizionamento della griglia al livello
centrale
Suola ventilata
Suola ventilata
Turbogrill
per 6
220° C 35-40 min
220° C
200° C6 porzioni Piatto ovale45 min
6 IT
Page 8
CARNE
É consigliabile salare la carne solo a fine cottura, poiché il sale favorisce la fuoriscita dei grassi, il forno si sporca più facilmente e
produce più fumo. Gli arrosti di carne bianca, vitello, agnello e pesce possono essere messi nel forno freddo.
La cottura risulterà più lunga ma il cibo verrà cotto uniformemente anche nel suo interno.
Per la carne rossa, un buon preriscaldamento del forno è alla base di una cottura migliore.
PER GRIGLIARE
• Prima d'infornare: tirate fuori la carne dal congelatore qualche ora prima di grigliarla. Poggiatela su fogli di carta da cucina per migliorare
il gusto ed impedire che la carne rimanga fredda al suo interno. Aggiungete pepe e spezie prima di grigliare ma ricordatevi di salare
solamente a fine cottura. Cosí la carne resterà morbida e saporita. Ungete tutta la carne da cuocere con un po' d'olio, possibilmente con
un pennello da cucina. Aggiungete ancora un po' di aromi e di pepe. Mettete il piatto nel forno. Girate la carne a metà cottura senza bucarla.
• Durante la cottura: non bucate mai il cibo mentre cuoce, o mentre lo si gira: i grassi e l'acqua della carne escono ed il cibo diventa asciutto.
Piatto
Anatra
Tacchino 5/6 kg 2 ore 30 - 3 ore
Oca 160-180° C 2 - 2 ore 30 min.3/4 kg
Cosciotto agnello 200-220° C 15 min. per 1/2 kg
Pollo arrosto
Roast beef
Coniglio arrosto 800-1 kg 50-60 min
Manzo
Agnello / Montone 1 kg 20-25 min
Kebab 275° C 2x8 min
Costolette di maiale
Ogni ricetta va cucinata con la griglia posizionata sul livello "1".
Convezione Naturale
Convezione Naturale
Convezione Naturale
Convezione Naturale
Convezione Naturale
Convezione Naturale
Modo
cottura
Convezione Forzata
Girarrosto
Girarrosto
Grill
Grill
Quantità
1,5 kg 200-220° C 1 ora 30 min.
1/1,5 kg 220° C
1kg 275° C 15-20 min
6 pezzi
6 pezzi 275° C 2x8 min
°C
cottura
160-180° C
240° C 15 min per 1/2 kg
200-220° C
275° C
Tempo
di cottura
circa 1 ora
Consigli
senza preriscaldam.
senza preriscaldam.
Girare a metà
cottura
Girare a metà
cottura
DOLCI
Evitate di utilizzare degli stampi lucidi perché questi riflettono il calore e possono bruciare l'esterno del dolce. Se la doratura del dolce
fosse troppo rapida, ricoprirlo con un foglio di carta da forno o di alluminio. Attenzione : usate il foglio d'alluminio dalla parte giusta: la
parte lucida deve essere rivolta verso il dolce. In caso contrario il calore sarà riflesso e non penetrerà all'interno dell'alimento.
Evitate di aprire la porta del forno durante i primi 20-25 minuti di cottura altrimenti tutti dolci che richiedono une lievitazione durante la
cottura come soufflés, brioches, etc. si sgonfieranno immediatamente. Per controllare la cottura, pungete il centro del dolce con la punta
di una lama di coltello. Se una volta estratta sarà pulita, allora il dolce è cotto ed è possibile fermare la cottura.
Nel caso in cui la punta della lama rimanga umida, o con dei residui di pasta, continuate la cottura abbassando leggermente la temperatura
per evitare che il dolce si bruci esternamente.
Piatto
Brioche 200° C 40-45 min
Pan di spagna
Bigné 40 pezzi 35 min
Base per torta 20-30 min
Meringhe
* con la ventilazione e la resistenza suola, raccomandiamo il preriscaldamento per risparmiare tempo.
Modo
di cottura
Convezione Forzata
Convezione Forzata
Convezione Forzata
Convezione Forzata
Convezione Forzata
Suola ventilata
Quantità
800 grs 1
per 6 Ø 271
6 pezzi
1 teglia 80-85° C 4 h 30 1
°C
di cottura
180-200° C 30-35 min
190° C
180-200° C
200° C 15-20 min
Tempo
di cottura
Livello
griglia
1
1Pasta sfoglia
Consigli
Ø 27
2 teglie*1 / 3
7 IT
Page 9

GENERAL WARNINGS
• Read the instructions carefully to make the most of your oven. We recommend you keep the instructions for installation and use for
later reference, and before installing the oven, note its serial number below in case you need to get help from the after-sales service.
When you have unpacked the oven, make sure that it has not
been damaged in any way. If you have any doubts at all, do
not use it: contact a professionally qualified person.
Keep packing materials such as plastic bags, polystyrene, or
nails out of the reach of children because they are dangerous
for children.
The company shall not be liable if the instructions
provided in this document are not complied with.
DECLARATION OF COMPLIANCE
• The parts of this appliance that may come into contact with
foodstuffs comply with the provisions of EEC Directive 89/109.
This appliances complies with Directives 89/336/EEC,
73/23/EEC and following changes.
SAFETY HINTS
• The oven must be used only for the purpose for which it was
designed: it must only be used for cooking food.
Any other use, e.g. as a form of heating, is an improper use
of the oven and is therefore dangerous.
• The manufacturers cannot be held responsible for any damage
caused by improper, incorrect or unreasonable use.
When using any electrical appliance you must follow a
few basic rules.
- Do not pull on the power cable to remove the plug from the
socket.
- Do not touch the oven with wet or damp hands or feet.
- Do not use the oven unless you are wearing something on
your feet.
- Do not allow children or irresponsible people to use the
oven unless they are carefully supervised.
- It is not generally a good idea to use adapters, multiple sockets
for several plugs or cable extensions.
- If the oven breaks down or develops a fault switch it off at the
mains and do not touch it.
• If the cable is damaged it must be replaced promptly.
When replacing the cable, follow these instructions.
Remove the power cable and replace it with one of the HO5RRF, H05VV-F, H05V2V2-F type. The cable must be able to bear
the electrical current required by the oven. Cable replacement
must be carried out by properly qualified technicians.
The earthing cable (yellow-green) must be 10 mm longer than
the power cable.
Use only an approved service centre for repairs and ensure
that only original parts are used. If the above instructions are
not adhered to the manufacturers cannot guarantee the safety
of the oven.
• The oven you have just acquired has the described technical
characteristics and you must not make any modifications to it.
• Never use a steam or high-pressure spray to clean the oven.
• Do not store flammable products in the oven; they can catch
fire if the oven comes on accidentally.
• Do not press on and do not let children sit on the oven door.
• Use kitchen oven gloves, when putting into or removing a dish
from the oven.
RECOMMENDATIONS
• After each use of the oven, a minimum of cleaning will help
keep the oven perfectly clean.
• Do not line the oven walls with aluminium foil or single-use
protection available from stores. Aluminium foil or any other
protection, in direct contact with the hot enamel, risks melting
and deteriorating the enamel of the insides.
• In order to prevent excessive dirtying of your oven and the
resulting strong smoky smells, we recommend not using the
oven at too high a temperature. It is better to extend the cooking
time and lower the temperature a little.
• In addition to the accessories supplied with the oven, we advise
you only use dishes and baking moulds resistant to very high
temperatures.
• Identification plate (located on the side of the oven)
INSTALLATION
Installation is the customer’s responsibility. The manufacturers
have no obligation to carry this out. If the assistance of the
manufacturer is required to rectify faults arising from incorrect
installation, this assistance is not covered by the guarantee.
The installation instructions for professionally qualified personnel
must be followed. Incorrect installation may cause harm or injury
to people, animals or belongings. The manufacturer cannot be
held responsible for such harm or injury.
The kitchen unit in which the oven is to be fitted must be made
of material resistant to temperatures of at least 70°C.
The oven can be located high in a column or under a worktop.
Before fixing: you must ensure good ventilation in the oven space
to allow proper circulation of the fresh air required for cooling and
protecting the internal parts. Make the openings specified on last
page according to the type of fitting.
ELECTRICAL CONNECTION
THE ELECTRICAL CONNECTION SHOULD BE CARRIED OUT
BY AN APPROVED CONTRACTOR OR TECHNICIAN WITH
SIMILAR QUALIFICATIONS.
The installation receiving the appliance must comply with the
standard in force in the installation country.
The manufacturer does not accept any responsibility if this provision
is not complied with.
Connection to the network must be by earthed socket outlet, or
by means of a multipole circuit-breaker having a distance between
contacts of at least 3 mm.
The installation must be protected by suitable fuses, and have
wires with a large enough cross-section to supply the oven normally.
CONNECTION:
The oven is fitted with a power lead for connecting exclusively to
a voltage of 230 V AC across the phases or across phase and
neutral.
Connection must be carried out having first checked:
. the supply voltage indicated on the meter,
. the circuit-breaker setting.
The lead protection wire (green/yellow) connected to the earth
terminal of the oven must be connected to the earth terminal of
the installation.
Caution:
. Have the earth continuity of the installation checked by an
electrician before making the connection.
. The manufacturer will not be liable for any incident, or the
possible consequences that may arise from the use of the
oven not earthed, or connected to an earth with defective
continuity.
NB:
Do not forget that the oven may require after-sales service.
Also, locate the socket outlet so that the oven can be connected
once it is removed from its space.
Power supply cable
please have this done by the after-sales service or by someone
with similar qualifications.
8 GB
:
if the power supply cable has to be changed,
Page 10

OVEN EQUIPMENT
The simple shelf can take moulds
and dishes.
The tray holder shelf is especially
good for grilling things. Use it with the
drip tray.
The special profile of the shelves
means they stay horizontal even when
pulled right out. There is no risk of a
dish sliding or spilling.
The drip tray catches the juices from
grilled foods. It can be put on a shelf,
or slid under the rails. It is only used
with the Grill, Rotisserie, or Fan
Assisted Grill; remove it from the oven
for other cooking methods.
Never use the drip tray as a roasting
tray as this creates smoke and fat will
spatter your oven making it dirty.
TELESCOPIC SHELF KIT
Slide out the runners and position the
shelf support B behind the shelf stop
located at the front side of the kit.
Complete assembly by inserting plain
shelf C and drip tray D
CLEANING THE OVEN
. Wait for the oven to cool down before doing any cleaning
by hand.
. Never clean your oven with abrasive cleaners, wire wool or
sharp objects, or the enamel may be damaged beyond repair.
. Only use soapy water or bleach (ammonia) cleaners.
GLASS PARTS
We recommend you wipe clean the glass door with absorbent
kitchen paper every time you use the oven. If the spattering is
heavy, then you can clean with a well squeezed sponge and
detergent, and rinse. Never use abrasive cleaners or sharp objects.
OVEN DOOR SEAL
If this gets dirty, clean the oven seal with a slightly damp sponge.
ACCESSORIES
Clean them with a sponge soaked in soapy water. Rinse with
clean water and dry off. Avoid abrasive cleaners.
DRIP TRAY
After grilling, remove the drip tray from the oven. Take care to
pour the warm grease into a container. Wash and rinse the drip
tray in hot water with a sponge soaked in washing up liquid.
If residues remain attached, soak them off in water and detergent.
It can also go in a dish washer or be cleaned with a commercial
oven cleaner.
Never placer a soiled drip tray in the oven.
Never leave the drip tray in during pyrolysis.
OVEN LIGHTING
Disconnect the power supply from the oven before cleaning
or replacing the lamp.
The bulb and its cover are made of material resistant to high
temperatures.
When the oven is in use, any unused accessories should be
removed from the oven.
THE TURNSPIT
No preheating is required for
Rotisserie cooking.
Rotisserie cooking is done
with the door closed.
GRILLING
Grilling makes it possible to give food a rich brown colour quickly.
For browning we recommend that you insert the grill onto the
fourth level, depending on the proportions of the food (see fig.
page 13).
Almost all food can be cooked under the grill except for very lean
game and meat rolls.
Meat and fish that are going to be grilled should first be lightly
doused with oil.
COOKING TIME
For recommended cooking times and temperatures the first time
you use the oven, refer to the tables on pages 13 - 14. You may
then wish to vary these times and settings in the light of your own
experience.
Bulb characteristics:
230 V AC - 25 W - E 14 base Temperature 300°C
To change a defective bulb, just
. unscrew the glass cover,
. unscrew the bulb,
. replace it with the same type: see
characteristics above,
. after replacing the defective bulb, screw back
the protective glass cover.
SELF-CLEANING OVEN WITH CATALYTIC
Special self-cleaning panels covered in a micro-porous coating
are available as optional extras for all models. If they are fitted,
the oven no longer needs to be cleaned by hand.
The fat that is splattered onto the sides of the oven during roasting
is eliminated by the microporous coating which breaks the fat
down by catalysis and transforms it into gas.
Excessive splattering may nevertheless block the pores and
therefore hinder self-cleaning. The self-cleaning capacity may be
restored by switching on the empty oven to maximum for about
10-20 minutes.
Do not use abrasive products, metal cleaning wads, sharp objects,
rough cloths, or chemical products and detergents that may
permanently damage the catalytic lining.
It is a good idea to use deep roasting trays to roast fatty foods
such as joints of meat etc. and to put a tray underneath the grill
to catch surplus fat.
If the walls of the oven are so thickly coated in grease that the
catalytic lining is no longer effective remove surplus grease with
a soft cloth or sponge soaked in hot water.
The lining must be porous for self-cleaning to be effective.
N.B.: All catalytic linings currently on the market have a working
life of about 300 hours. They should therefore be replaced after
about 300 hours.
9 GB
Page 11

CLEANING THE OVEN : PYROLYSIS
Pyrolysis is a cleaning method that uses high temperatures to
destroy dirt.
The resulting smoke is cleaned by the passage of a catalyser.
The oven door is provided with a safety lock that prevents it being
opened during pyrolysis due to the necessity of high temperatures.
The pyrolysis cycle may result in a slight odour in the kitchen
which will be more or less noticeable depending on the latter’s
aeration.
IMPORTANT:
Before carrying out pyrolysis:
• Take all accessories out of the oven as they will be damaged
in the high pyrolysis temperatures;
• Clean away all excess food spills or large scraps of food
which would take too long to be destroyed. Effectively, large
amounts of grease may catch fire under the intense heat
emitted by pyrolysis.
• Close the oven door.
. If you have an hob top installed above the oven, never use
the gas burners or the electric plates during pyrolysis to
avoid excessive heating of the oven’s control panel.
. It is strongly advised not to use detergents or any other
recommended product for cleaning ovens.
• Open the oven door.
Pyrolysis leaves a white residue on the oven walls.
Wait for the oven to cool completely then clean the inside of the
oven with a damp sponge to wipe off the residue.
Remarks:
•
you will save energy by cleaning directly after cooking thus
making use of the residual heat in the oven.
The cooling fan operates from the start of the pyrolysis.
•
•
The cooling fan only stops when the oven parts are sufficiently
cooled.
SERVICE CENTRE
Before calling the Service Centre
If the oven is not working, we recommend that:
• you check that the oven is properly plugged into the power
supply.
If the cause of the fault cannot be detected:
disconnect the oven from the mains, do not touch the oven and
call the after sales service.
Before calling the Service Centre remember to make a note
of the serial number on the serial number specifications plate.
The oven is supplied with a guarantee certificate that ensures that
it will be repaired free of charge by the Service Centre whilst
under guarantee.
This appliance is marked according to the
European directive 2002/96/EC on Waste
Electrical and Electronic Equipment (WEEE).
By ensuring this product is disposed of correctly,
you will help prevent potential negative
consequences for the environment and human
health, which could otherwise be caused by
inappropriate waste handling of this product.
The symbol on the product indicates that this
product may not be treated as household waste.
Instead it shall be handed over to the applicable collection point
for the recycling of electrical and electronic equipment
Disposal must be carried out in accordance with local
environmental regulations for waste disposal.
For more detailed information about treatment, recovery and
recycling of this product, please contact your local city office,
your household waste disposal service or the shop where you
purchased the product.
ACTIVATING THE PYROLYSIS CYCLE:
Two cycles are proposed:
ECO 1:30 Oven normally dirty. 90 minutes *.
SUP 2:00 Oven very dirty. 120 minutes *.
* times cannot be changed.
- Rotate the function selector to the position P. Symbol P if lighted
and word ECO blinks on the display.
- Chose the pyrolysis cycle using " + " and " –“ buttons. Words
ECO or SUP blinks on the display.
- Selection is automatically confirmed after 3 seconds. Word Eco
(or SUP) is fixe and symbol P blinks. The oven starts raising in
temperature. Once the temperature reaches high level the door
is locked; symbol is lighted.
A delayed start can be setted. See chapter ‘USE OF THE
PROGRAMMER’
At the end of pyrolysis cycle:
- The oven will automatically switch off. Symbols and blinks.
- Rotate the function selector to the position ‘0’
- The oven temperature will decrease. Once the door is unlocked
the symbol is switched off.
- The coolong fan only stops when the oven parts are sufficiently
cooled.
10 GB
Page 12

USE OF THE PROGRAMMER
FUNCTION HOW TO ACTIVATE ITHOW TO SWITCH IT OFF WHAT IT DOES WAT IT IS FOR
OVEN
LIGH
CLOCK
ALARM
CHILD
SAFETY
COOKING
TIME
(To be used even for
the pyrolysis cycle)
END OF
COOKING
(To be used even for
the pyrolysis cycle)
• When knob (1) is turned
to the symbol, the light
comes on
• Turn the selector knob (1)
to the symbol.
• Using the and buttons,
set the time of day (while
setting, the numbers on
the display will flash)
• Turn selector knob 1 to the
symbol.
• Set the cooking time using
the and buttons (while
setting, the numbers on
the display will flash)
• Turn the selector knob 1
to the symbol. The
indicator light will flash.
• Press the and buttons
at the same time, for three
seconds.
• The setting is confirmed
when the light stops
flashing.
• To select a cooking fun-
ction use (selector knob 2)
• Turn selector knob 1 to the
symbol
• Set the cooking time using
the and buttons (while
setting, the numbers on
the display will flash)
• Select a cooking function (selector knob 2)
• Turn the selector knob to
the symbol.
• Set the end of cooking time
using the and buttons
(while setting, the numbers
on the display will flash)
THE PROGRAMMER
• Turn the selector knob to
the position
• When the set cooking time
is up, the oven will automatically switch itself off. If
you need to stop it before
then, you must turn the set
time to 0 (selector knob 1
on and then use the
and buttons)
• Press buttons and
together for three seconds.
The light flashes.
• When the cooking time is
up, the oven will switch it
self off.
If you need to stop it before
then, the oven must be
switched off, or the cooking
time must be turned to 00:00.
(selector 1 to symbol ,
and use the and
buttons)
• At the pre-set time the oven
automatically switches
itself off. If you need to stop
it before then, switch the
oven off by turning the
selector knob 2 to the
symbol.
• Allows you to regulate the
time shown on the oven
clock
• Provides an audible alarm
signal (for a few seconds)
at the end of cooking time.
• The oven settings cannot
be altered (even when the
knobs are accidentally
adjusted)
• Allows the end of cooking
time to be stored in the
memory.
• When the cooking time
has been set, turn selector
knob 1 to the symbol
to display the time of day.
• To display the programmed
time turn selector knob 1
to the symbol.
• Allows the end of cooking
time to be stored in the
memory.
• When the cooking time has
been set, turn selector
knob 1 to the symbol to
display the time of day.
• To display the programmed
time turn selector knob 1
to the symbol.
• This function is useful for
checking that the oven is
fully operational.
• Using the and buttons,
set the time of day (while
setting, the numbers on the
display will flash)
NB: Set the clock immediately after installing the
appliance or after an interruption to the power supply (this is shown by 12:00
flashing on the display).
• Useful as a reminder
• This function works
independently of the
oven (it can be used
even when the oven is
not working)
• Operates even when the
oven is not on preventing
it from being inadvertently
switched on.
• Is operational when the
oven is on and prevents
any alterations to the
settings (through accidental turning of the knobs)
NB: the oven can still be
switched off by turning selector knob 2 to position 0.
• When the set cooking time
is up the oven switches
itself off automatically and
for a few seconds an alarm
sounds.
• This function is used typically used with ‘cooking
time’ function. For example
if the dish has to be
cooked for 45 minutes and
needs to be ready by
12:30, simply select the
required function, set the
cooking time to 45 minutes
and the end of cooking
time to 12:30.
Cooking will start automatically at 11:45 (12:30
minus 45 mins) and
will continue until the preset end-of-cooking-time,
when the oven will switch
itself off automatically.
Clock display Safety display
Programmer function
display
Control buttons
WARNING
The first operation to carry out after the oven has been
installed or following the interruption of power supply
(this is recognizable the display pulsating and showing
12:00) is setting the correct time.
A slight delay will occour when setting a programme, while the
oven carries out internal diagnostics.
11 GB
Page 13
OPERATING INSTRUCTIONS
Safety display Temperature displayClock display
Programme function
selector knob
Programmer function
display
Regulator buttons
• If the clock is not set the oven will not work and 12:00 will flash on the display.
To start cooking a function must be selected using knob (2). The corresponding symbol will appear on the display and the automatically
pre-set temperature will flash. If you wish to alter that temperature, press the or buttons.
After a few seconds the oven will start working, but the programme selector can be regulated so that the start is delayed until the required
time (see chapter “The Programmer”). The cooking function symbol will flash until the oven reaches the temperature shown on the
display. When that temperature is reached it will stop flashing and an audible signal sounds.
The oven can be switched off at any stage by simply turning the selector knob (2) to “ ”.
Symbol
Pre-set
temperature
220° C
Tested in accordance with the CENELEC EN 50304
used for definition of energy class.
210° C
Tested in accordance with the CENELEC EN 50304.
Temperature
range setting
50°-280° C
50°-240° C
Setting the temperature the oven automatically chooses the optimal cooking function.
Natural convection
Both upper and lower elements are working.
Traditional cooking, best for roasting a leg of lamb or game.
Ideal for biscuits and baked apples, and for crisping foods.
Best results are obtained by placing on a shelf .
Fan oven
Both the upper and lower elements are working, assisted by the internal oven fan.
This function is recommended for cooking poultry, fish, bread etc. This system ensures
an even distribution of heat, making it possible to cook any dish on a large tray.
P
DF
Oven function selector
knob (cooking)
Cooking function
display
Function
DF
210° C
50°-240° C
60° C
40° C
210° C
210° C
240° C
180°-240° C
180°-230° C
180°-240° C
240° C 180°-240° C
Lower element & fan
Recommended for delicate cooking (soufflés)
Keeping food warm
The upper and lower elements work intermittently with fan assistance. The temperature
is pre-set at a constant 60°C (this function does not allow the working temperature
to be regulated). Ideal for keeping food hot that has just been cooked, without
overcooking it. It is also useful for warming dishes.
Defrosting
The upper and lower elements work intermittently with fan assistance. The temperature
is pre-set at a constant 40°C (this function does not allow the operating temperature
to be regulated). This function allows rapid defrosting prior to cooking.
Traditional grilling with closed door
In this position, the infrared grill element comes on. Excellent for cooking thin or
medium slices of meat (sausages, chops, bacon)
Fan grilling with closed door
Hot air from the grill element is circulated around the food by the fan at the required
temperature, between 180 and 230°C. The fan is an excellent substitute for the
rotisserie and ensures excellent results with poultry, sausages and red meats, also
in large quantities.
Grill/spit element.
This is used for roasting on the spit.
Fan-assisted Rotisserie.
Use the turbogrill with the door closed. The grilling heating element is used with the
fan and the turnspit. This function prevents the food drying out.
Two double functions are available, to choose use buttons and , the selected
function is displayed and confirmed after 3 seconds.
DF1: defrost at 40°C (30 minutes) + fan oven at 200°C (45 minutes)
DF2: fan oven at 200°C (45 minutes) + warming at 60°C (60 minutes)
The cooking length of the fan oven can be changed turning the function selector to
. Defrost and warming times cannot be changed.
Fan oven cooking temperature can be changed (buttons or ) only when this
cooking function is active (symbol lighted on display).
P
Pyrolysis, see relative chapter.
12 GB
Page 14
COOKING TIPS
Temperatures and cooking times are given for information only to facilitate using the oven.
Personal experience should then let you adapt these settings to your taste and habits.
Remember that cooking at higher temperatures causes more spattering, and the oven can
become dirty and smokey. It is better to slightly reduce the cooking temperature, even if it
means increasing the cooking time.
FISH
Recipes
Tilefish or bream
Cooking
method
Conv cooking
Quantity
1kg whole 220° C130 min
Cooking
°C
The sides of the oven are equipped
with different positions numbered
from the bottom.
Cooking
time
Shelf level
Monk fish or Salmon
Fillet of sole 160° C115-20 min6 pieces
Grilled fish
Conv cooking
Fan cooking
Grill
1kg braised 220° C130 min
6 fillets 275° C42x5 min
VEGETABLES - OTHERS
Recipes
Braised cabbage
Pâté en croûte 200-220° C 1 hour/kg
Chicory with gruyere for 6 25-30 min
Potatoes in their
jackets
Soufflé
savoury/sweet
Stuffed tomatoes
Cooking
method
Conv cooking
Conv cooking
Fan cooking
Fan cooking
Fan cooking
Fan cooking
Quantity
for 6 200-220° C
for 6
6-8 pieces 200-220° C
Cooking
°C
180-200° C
200-220° about 1 hourfor 6
180-200° C 50-60 min
Cooking
time
1 hour
40-45 min
Tips
Ø 22
Leek flan
Quiche Lorraine for 6 45-50 min
Toast with crottin*
All the cooking was done at shelf position "1" except cooking marked thus "*", which requires cooking at a middle position.
Fan + lower element
Fan + lower element
Turbo grill
for 6
6 pieces 210° C
220° C 35-40 min
220° C
3 min to toast one
side + 4 min/crottin
Flat steak pan
13 GB
Page 15

MEAT
It is better not to salt meats until after cooking as salt encourages the meat to spatter fat. This will dirty the oven and make a lot of smoke.
Joints of white meat, pork, veal, lamb and fish can be put into the oven cold. The cooking time is longer than in a preheated oven, but
it cooks through to the centre better as the heat has more time to penetrate the joint.
Correct preheating is the basis of successful red meat cookery.
GRILLS
• Before loading the grill: remove the meat from the refrigerator a few hours before grilling. Lay it on several layers of kitchen paper:
this improves seizing, making it tastier and avoids it staying cold at the centre.
Add pepper and spices to the meat before grilling, but add any salt after cooking. This way it will seize better and stay juicy. Baste all
the food to be cooked with a little oil. This is best done with a wide flat basting brush. Then sprinkle with more pepper and herbs (thyme,
etc.).
• During cooking: never pierce the food during cooking even when you turn it. This lets the juice out and it becomes dry.
Recipes
Beef with carrots
Duck
Turkey 5/6 kg 2 - 3 hours
Goose 160-180° C 2 - 2 hours3/4 kg
Leg of lamb 200-220° C 15 min/pound
Roast chicken
Roast beef
Roast rabbit 800-1 kg 50-60 mins
Beef
Lamb / Mutton 1 kg 20-25 min
Kebabs 275° C 2x8 min
Pork chop
Cooking
method
Conv cooking
Conv cooking
Conv cooking
Conv cooking
Conv cooking
Conv cooking
Conv cooking
Fan cooking
Rotisserie
Rotisserie
Grill
Grill
Quantity
for 6 200-220° C
1,5 kg 200-220° C 1 hours
1/1,5 kg 220° C
1kg 275° C 15-20 min
6 pieces
6 pieces 275° C 2x8 min
Cooking
°C
160-180° C
240° C 15 min/pound
200-220° C
275° C
Cooking
time
about 1 hours
about 1 hour
* All cooking was done at shelf position "1".
Tips
No preheat
No preheat
Turn over in mid
cooking
Turn over in mid
cooking
BAKING
Avoid using shiny tins, they reflect the heat and can spoil your cakes. If your cakes brown too quickly, cover them with grease-proof
paper or aluminium foil. Caution: the correct way to use foil is with the shiny side in towards the cake. If not the heat is reflected by the
shiny surface and does not penetrate the food. Avoid opening the door during the first 20 to 25 minutes of cooking: soufflés, brioches,
sponge cakes, etc. will tend to fall. You can check if cakes are done by pricking the centre with a knife blade or metal knitting needle.
If the blade comes out nice and dry, your cake is ready and you can stop cooking. If the blade comes out moist or with bits of cake
attached, continue baking but slightly lower the thermostat so that it is finished off without burning.
Recipes
Brioche 200° C 40-40 min
Cooking
method
Fan cooking
Quantity
800 grs 1
Fan cooking
Pastry base 20-30 min
Meringues
Fruit tart
St Honoré
Fan cooking
Fan cooking
Fan+Lower element*
Fan+Lower element*
Fan+Lower element*
for 6 Ø 271
6 pieces
1 tray 80-85° C
for 6 220° C 35-40 min
6 pieces 30-35 min
Cooking
°C
190° CChoux pastry 40 pieces 35 min
180-200° C
200° C 15-20 min
190° C
Cooking
time
4 hours
TipsShelf level
2 trays1 / 3
1Puff pastry
1
1
1
1
e.g.
Bouchée
Ø profiteroles
* with fan and lower element, we recommend preheating with fan cooking to save time.
14 GB
Page 16

INSTRUCCIONES GENERALES
• Lea atentamente el presente manual para poder sacar el mejor partido de su horno. Le aconsejamos que conserve el manual de uso
y de instalación para poder consultarlo más adelante y para anotar, antes de la instalación del horno, el número de serie del aparato
para una posible intervención del servicio posventa.
Si el horno presenta cualquier fallo, no lo enchufe o desenchúfelo
de la alimentación general y llame directamente a un servicio
técnico homologado.
El fabricante no asume ninguna responsabilidad en caso de
incumplimiento de las instrucciones contenidas en el
presente manual.
DECLARACIÓN DE CONFORMIDAD
• Este aparato, en las partes destinadas a estar en contacto
con los alimentos cumple la Directiva CEE 89/109.
Este aparato cumple las Directivas Europeas 89/336/CEE,
73/23/CEE y sucesivas modificationes.
INFORMACIÓN SOBRE SEGURIDAD
• Este aparato deberá destinarse únicamente al uso para el
cual ha sido especialmente concebido, es decir, para la cocción
de alimentos.
Cualquier otro uso (por ejemplo, calentamiento a temperatura
ambiente) debe considerarse impropio, y por lo tanto peligroso.
• El fabricante declina toda responsabilidad por los posibles
daños causados por el uso impropio, erróneo e irracional del
aparato.
• El uso de cualquier aparato eléctrico comporta la observación
de algunas reglas fundamentales. En particular:
— No tire del cable de alimentación para desenchufar el aparato.
— No toque el aparato con las manos o los pies húmedos o
mojados.
— No utilice el aparato si no lleva calzado.
— No deje que los niños o las personas incapacitadas usen el
aparato sin vigilancia.
— No utilice adaptadores, ladrones ni alargadores.
— En caso de avería o de mal funcionamiento del aparato,
apáguelo y no lo manipule.
En caso de deterioro del cable, sustitúyalo inmediatamente
con arreglo a las siguientes indicaciones:
— saque el cable de alimentación y sustitúyalo por uno (tipo
HO5RR-F, H05VV-F, H05V2V2-F) y adecuado a la potencia
del aparato.
— esta operación deberá realizarla un técnico especializado. El
hilo de tierra (amarillo-verde) debe ser obligatoriamente
10 mm más largo que los conductores de línea.
En caso de que el aparato precise ser reparado, diríjase
únicamente a un centro de asistencia técnica autorizado y
exija piezas de recambio originales.
No observar todo lo mencionado puede comprometer la
seguridad del aparato.
• El horno que acaba de adquirir posee unas características
técnicas definidas que en ningún caso podrán ser modificadas.
• No utilice nunca un limpiador a vapor o de alta presión para
limpiar el horno.
• No guarde productos inflamables dentro del horno; podrían
prender si alguien pusiera en marcha involuntariamente el
horno.
• No se apoye ni deje sentarse a los niños encima de la puerta
del horno.
• Utilice guantes térmicos de cocina para introducir o retirar un
plato del horno.
RECOMENDACIONES
• Después de cada utilización, limpie el horno superficialmente.
Ello le permitirá obtener unos resultados perfectos cuando lo
limpie a fondo.
• No cubra las paredes del horno con papel de aluminio o con
protecciones desechables que se venden en las tiendas.
El papel de aluminio o cualquier otra protección en contacto
directo con el esmalte caliente podría fundirse y deteriorar el
esmalte de la mufla.
• Para evitar que su horno se ensucie demasiado y que
desprenda fuertes olores de humos, recomendamos no utilizarlo
a una temperatura demasiado elevada. Es preferible alargar
el tiempo de cocción y bajar un poco la temperatura.
• Aparte de los accesorios suministrados con el horno, le
aconsejamos que utilice solamente fuentes y moldes de
repostería resistentes a temperaturas muy elevadas.
Placa de señalización (situada en el lateral del horno).
INSTALACIÓN
La instalación corre a cargo del comprador y el Fabricante queda
exento de este servicio; eventuales intervenciones requeridas a
la Casa Constructora que dependan de una instalación incorrenta
no están incluidas en la Garantia.
La instalación debe ser efectuada según las instrucciones por
personal profesionalmente cualificado. Una instalación errónea
puede causar daños a personas, animales o cosas, de los cuales
el fabricante no puede ser considerado responsable.
El mueble donde se debe empotrar el horno debe estar fabricado
de un material resistente a una temperatura de 70°C como mínimo.
Se pued puede e colocar el horno en un lugar alto dentro de
una columna o empotrarlo debajo de una superficie de trabajo.
Antes de fijarlo: es imprescindible garantizar una buena ventilación
del hueco donde quede empotrado para permitir una buena
circulación del aire fresco necesario para la refrigeración y para
la protección de los órganos interiores. Para ello, realice las
oberturas especificadas en la última página según el tipo de
empotramiento.
CONEXIÓN ELÉCTRICA
LA CONEXIÓN ELÉCTRICA DEBE SER REALIZADA POR UN
INSTALADOR HOMOLOGADO O POR UN TÉCNICO DE
CALIFICACIÓN SIMILAR.
La instalación del aparato debe cumplir la normativa en vigor del
país de instalación. El fabricante declina cualquier responsabilidad
en caso de incumplimiento de esta exigencia.
La conexión a la red debe efectuarse a través de una toma de
corriente con toma de tierra, o mediante un dispositivo con corte
omnipolar que tenga una distancia de obertura de los contactos
de al menos 3 mm.
Es obligatorio que la instalación quede protegida con los fusibles
adecuados, debiendo incluir unos cables con sección suficiente
para alimentar el aparato con toda normalidad.
CONEXIÓN:
Este aparato está equipado con un cable de alimentación que
permite su conexión exclusivamente con una tensión de 230 V~
entre fases o entre fase y neutro.
La conexión se deberá realizar después de haber comprobado:
• la tensión de alimentación indicada en el contador,
• el ajuste del disyuntor.
El hilo de protección del cable (verde/amarillo) conectado al
terminal de tierra del aparato debe estar conectado al terminal
de tierra de la instalación.
Atención:
. Un profesional deberá comprobar la continuidad de la tierra
de la instalación antes de proceder a la conexión.
. Declinamos toda responsabilidad ante cualquier incidente
y sus posibles consecuencias que pudieran producirse
debido a la utilización de un aparato no conectado a tierra,
o conectado a una tierra cuya continuidad sea defectuosa.
NOTA:
Recuerde que la toma de corriente debe quedar colocada
de manera que pueda enchufar el horno cuando lo haya sacado
del hueco donde está empotrado, por ejemplo en caso de tener
que sacarlo ante una posible intervención del servicio de asistencia
técnica.
Cable de alimentación:
cambiarlo, le aconsejamos que recurra al servicio de asistencia
técnica o a una persona de calificación similar para realizar
dicha operación.
En el caso de que sea necesario
15 ES
Page 17

EQUIPAMIENTO DEL HORNO
La rejilla simple sirve de soporte para
los moldes y las fuentes.
La rejilla para sostener las fuentes
sirve más especialmente para colocar
las parrilladas. Debe utilizarse junto
con la bandeja que recoge el jugo
decocción (grasera).
Gracias a su perfil especial, las rejillas
permanecen en horizontal hasta el
tope. No hay ningún riesgo de
deslizamiento o de desbordamiento
de la fuente.
La grasera sirve para recoger el jugo
de las parrilladas. Se coloca en la
rejilla, o se desliza bajo las guías. Sólo
se debe utilizar en modo Grill, Asador
o Turbogrill. Para los otros modos de
cocción, retírela del horno.
nunca la grasera como fuente para
asar. Ello provocaría emanación de
humos, salpicaduras de grasa y un
ensuciamiento rápido
No utilice
LA JUNTA UNTA DE LA PUERTA DEL HORNO
Si la junta del horno está muy sucia, límpiela con una esponja
ligeramente humedecida.
LOS ACCESORIOS
Límpielos con una esponja empapada con agua jabonosa.
Enjuáguelos con agua limpia y séquelos. Evite los productos
abrasivos.
LA GRASERA
Después de una parrillada, saque del horno la grasera. Tenga la
precaución de reservar las grasas en un recipiente. Limpie y
enjuague la grasera con agua caliente y utilice una
esponja empapada con producto detergente. Si los residuos
permanecen pegados, déjela en remojo con agua y añádale un
producto detergente.
También se puede lavar en el lavaplatos o con otros productos
que encontrará en las tiendas.
No vuelva a colocar nunca la grasera sucia en el horno.
No efectúe nunca una pirólisis con la grasera en el interior del
horno.
ILUMINACIÓN DEL HORNO
Antes de cualquier operación de limpieza o de reemplazo,
desenchufe el aparato de la alimentación.
La bombilla, así como su protector, están fabricados en un
material resistente a las altas temperaturas.
Deslice las guías hacia delante y
posicione el soporte de la bandeja B
detrás del tope de las bandejas situada
en la parte frontal del kit.
Se queda perfectamente montado insertando la bandeja plana C y la rejilla D
Durante la utilización del horno, los accesorios que no utilice
deben ser retirados del mismo.
LA COCCIÓN AL GRILL
Este tipo de cocción permite el dorado rápido de los alimentos.
Con este fin, le aconsejamos introducir la rejilla generalmente en
el 3° o 4° estante, según las dimensiones de los alimentos.
(pág. 20) Casi todas las carnes pueden ser cocidas al grill, excepto
algunas carnes tiernas de caza y albóndigas.
La carne y el pescado para cocinar al grill deben ser ligeramente
untados con aceite.
EL ASADOR
No es necesario precalentar el
horno para las cocciones con
el asador.
Durante las cocciones con el
asador la puerta debe estar
cerrada
TIEMPOS DE COCCIÓN
En las págs. 20 - 21 mostramos una tabla indicativa de los tiempos
y temperaturas aconsejados para las primeras cocciones. Con la
experiencia podrá variar a su gusto los valores mostrados en la
tabla.
MANTENIMIENTO DEL HORNO
• Espere a que el horno se haya enfriado antes de realizar
una operación de limpieza manual.
• No utilice nunca productos abrasivos, esponjas metálicas
u objetos cortantes para limpiar su horno, porque el esmalte
resultaría irremediablemente dañado.
• Utilice solamente agua jabonosa o productos líquidos con
amoniaco.
LAS PARTES ACRISTALADAS
Después de cada utilización del horno, le aconsejamos que seque
el cristal de la puerta del horno con un papel absorbente. Si las
salpicaduras son demasiado importantes, puede limpiarlas después
con una esponja bien escurrida y un producto detergente,
enjuagando a continuación. No utilice nunca productos abrasivos
u objetos cortante.
Características de la bombilla:
230 V~ - 25 W - Casquillo E 14
Temperatura 300°C
Para cambiar una bombilla defectuosa,
bastará con:
. desmontar el protector de cristal
destornillándolo
. desenroscar la bombilla,
. cambiarla por un modelo idéntico
(véanse sus características
más arriba).
. Después de haber cambiado la bombil-
la defectuosa, vuelva a montar el pro-
tector atornillándolo de nuevo
HORNO AUTOLIMPIANTE CATALÍTICO
Los paneles especiales autolimpiantes recubiertos por un esmalte
con estructura microporosa (ofrecidos como accesorios opcionales
en unos modelos o de serie en otros) eliminan la limpieza manual
del horno.
Las grasas proyectadas sobre las paredes durante la cocción,
son descompuestas por el esmalte, mediante un proceso catalítico
de oxidación y son transformados en productos gasos.
Salpicaduras excesivas de grasa pueden obstruir los poros y por
consiguiente impedir la autolimpieza. tal característica puedé ser
restablecidá mediante un calentamiento de unos 10-20 minutos
del horno vacío programándo el horno a la máxima temperatura.
no usar productos abrasivos, barillas metálicas, objetos de punta,
paños rugosos, productos químicos o jabones que puedieran
dañar irremediablemente el esmalte.Se aconseja además utilizar
fuertes con bordes altos en el caso de cocciones de alimentos
particularmente grasos (asados, etc) y utilizar la grasera al realizar
la cocción al grill.
Para el caso que, por condiciones particulares de suciedad, no
fuera suficiente la acción precedente, se aconseja apartar las
grasas con un paño mullido o una esponja humedecidos con agua
caliente. La porosidad del esmalte es fundamental para garantizar
la acción autolimpiante.
N.B. Todos los paneles autolimpiantes comercializados en el
mercado tienen una eficacia de rendimiento de aproximadamente
300 horas de funcionamiento del horno. Pasado dicho límite los
paneles deberían ser sustituidos.
16 ES
Page 18

LIMPIEZA DEL HORNO: PIRÓLISIS
ASISTENCIA TÉCNICA
La pirólisis es un método de limpieza que utiliza temperaturas
elevadas para eliminar la suciedad.
El humo resultante se limpia con el paso de un catalizador. La
puerta del horno está provista de un cierre de seguridad que
previene su apertura durante la pirólisis, puesto que es necesario
alcanzar una temperatura elevada. El ciclo de pirólisis podría
impregnar la cocina de un olor desagradable que podrá ser más
o menos notable dependiendo de la ventilación posterior.
IMPORTANTE:
Antes de comenzar la pirólisis:
• Saque todos los accesorios fuera del horno ya que podrían
sufrir algún daño al estar expuestos a las altas temperaturas de
pirólisis.
• Elimine todo tipo de salpicaduras o grandes residuos de
alimentos puesto que el proceso de eliminación sería demasiado
largo. Las cantidades grandes de grasa podrían prender a
causa del intenso calor producido por la pirólisis.
• Cierre la puerta del horno.
• Si su cocina está instalada sobre el horno, nunca utilice los
quemadores de gas o las placas eléctricas durante la pirólisis
para evitar el calentamiento excesivo del panel de control
del horno.
• Se recomienda enérgicamente no utilizar detergentes o
cualquier otro producto de limpieza de hornos recomendado.
La pirólisis deja un residuo blanco sobre las paredes del horno.
Espere a que el horno se haya enfriado completamente y limpie
a continuación el interior del horno con una esponja húmeda para
retirar los residuos.
Observaciones:
• Ahorrará energía si limpia directamente después de cocinar ya
que así hace uso del calor residual del interior del horno.
• El ventilador de refrigeración funciona desde el comienzo de la
pirólisis.
• El ventilador de refrigeración se detiene sólo cuando todos los
componentes del horno están suficientemente fríos.
En caso de incorrecto funcionamiento del horno le aconsejamos:
— verificar la buena conexión del enchufe en la toma de corriente.
En caso de que no se determine la causa del mal funcionamiento:
apagar el aparato sin manipularlo y llamar al Servicio de
Asistencia Técnica. Antes de llamar al Centro de Asistencia
recuerde tomar nota del número de matrícula situado en la
tarjeta matrícula del producto (Fig. última página).
El aparato está dotado de un certificado de garantía que le permite
disponer del Servicio Asistencia Técnica.
Este electrodomestico está marcado conforme
a la directiva Europea 2002/96/CE sobre los
residuos de aparatos eléctricos y electrónicos
(WEEE).
Asegurándose que este producto ha sido
eliminado correctamente, ayudará a evitar
posibles consecuencias negativas en el ambiente
y la salud de las personas, que pudiera verificarse
por causa de un anómalo tratamiento de este
producto
El simbolo sobre el producto indica que este aparato no puede
ser tratado como un residuo doméstico normal, en su ligar deberá
ser entregado al centro de recogidas para reciclaje de aparatos
eléctricos y electrónicos.
La eliminación debe ser efectuada de acuerdo con las reglas
medioambientales vigentes para el tratamiento de los residuos.
Para informacion más detallada sobre el tratamiento, recuperación
y reciclaje de este producto, por favor contacte con la oficina
compentente (del departamento de ecología y mediomabiente),
o su servicio de recogida a domicilio si lo hubiera o el punto de
venta donde compró el producto.
PARA ACTIVAR LA PIROLISIS:
se proponen dos ciclos de pirolisis:
ECO 1:30: recomendado para un horno con suciedad normal.
Duración 90 minutos*
SUP 2:00 :recomendado para un horno muy sucio. Duración: 120
minutos*
* tiempos no modificables.
- Girar el selector de funciones hacia “Pirolisis”. La letra P se enciende
e intermitentemente aparece la lectura ECO
- Con las opciones de regulación “+” y “-“ seleccionar el ciclo de
pirolisis en función del grado se suciedad del horno. Las palabras
ECO y SUP inician su intermitencia.
- El inicio de la función es automático. El horno inicia a elevar la
temperatura. Cuando la misma llega a un nivel elevado, la puerta
se bloquea y se enciende el simbolo
El inicio del ciclo Pirolisis puede ser diferido modificando la hora de
fin de ciclo (por ejemplo para utilizar una tarifa nocturna económica
o para realizar el ciclo pirolisis fuera de la presencia de niños). Ver
capitulo “USO DEL PROGRAMADOR ELECTRÓNICO”.
Al finalizar el ciclo de Pirolisis:
- El horno se apaga automáticamente. En intermitencia y
- Llevar el selector de funciones a la posición “0”. La hora en curso
aparecerá.
- La temperatura desciende. Cuando la puerta se desbloquea, el
simbolo se apaga.
- La turbina de enfriamiento continúa a girar y se para solamente
cuando los componentes internos del horno se han enfriado
suficientemente.
17 ES
Page 19

USO DEL PROGRAMADOR ELECTRÓNICO
FUNCIÓN CÓMO SE ACTIVA CÓMO SE APAGA QUÉ HACE A QUÉ SIRVE
LÁMPARA
DEL HORNO
RELOJ
TIMBRE
SEGURO PARA
NIÑOS
DURACIÓN
DE COCCIÓN
Para ser usada
siempre en el ciclo
de pirolisis
FINAL DE
COCCIÓN
Para ser usada
siempre en el ciclo
de pirolisis
• Posicionando el mando (1)
en el símbolo se
enciende la lámpara.
• Posicione el selector 1 en
el símbolo .
• Ajuste la hora con los
botones y (durante
el ajuste, los números en
el visualizador parpadean).
• Posicione el selector 1 en
el símbolo .
• Seleccione la duración de
cocción con los botones
y (durante la selección,
los números en el visualizador parpadean).
• Posicione el selector 1 en
el símbolo , el indicador
empieza a parpadear.
• Pulse simultáneamente los
botones y durante
tres segundos.
• El botón “Confirmado” deja
de parpadear.
• Seleccione una modalidad
de cocción (selector 2).
• Posicione el selector 1 en
el símbolo .
• Seleccione la duración de
cocción con los botones
y (durante la selección,
los números en el visualizador
parpadean).
• Seleccione una modalidad
de cocción (selector 2).
• Posicione el selector 1 en
el símbolo .
• Seleccione la hora de final
de cocción con los botones y (durante la
selección, los números en
el visualizador parpadean).
• Posicione el selector en el
símbolo .
• Transcurrido el tiempo
seleccionado, esta función
seapaga automáticamente; si debe interrumpirse
antes, e necesario poner
el tiempo a 00:00 (selector
1 en el símbolo y pulsando los botones y ).
• Pulse conjuntamente los
botones y durante
tres segundos.
• El indicador empieza a
parpadear.
• Transcurrido el tiempo
seleccionado, esta función
seapaga automáticamente; si debe interrumpirse antes de transcurrir
este tiempo es necesario
detener el horno o poner
a 00:00 la duración de
cocción (selector 1 en el
símbolo y pulsando los
botones y ).
• A la hora programada, esta
función se apaga automáticamente; si debe interrumpirse antes de esta
hora es necesario detener
el horno posicionando el
selector 2 en el símbolo
.
PROGRAMADOR
Visualizador del
reloj
Visualización de las fun-
ciones del programador
l programa sigue algunos procedimientos con cada programación,
y en consecuencia puede ser percibido un pequeño retraso en el
inicio.
Visualización del seguro
Botones de ajuste
• Permite ajustar la hora del
reloj del horno.
• Permite oír una señal
sonora (durante unos
segundos) al final del
tiempo programado.
• No permite cambiar la
configuración del horno
(incluso girando accidentalmente los selectores).
• Permite memorizar la hora
de final de cocción.
• Permite visualizar la hora
actual al final de la selección, posicionando el selector 1 en el símbolo .
• Permite visualizar el tiempo
de cocción programado,
posicionando el selector
1 en el símbolo .
• Permite memorizar la hora
de final de cocción.
• Permite visualizar la hora
actual al final de la selección, posicionando el
selec-
tor 1 en el símbolo .
• Permite visualizar el tiempo
de cocción programado,
posicionando el selector 1
en el símbolo .
ATENCIÓN
La primera operación que
hay que efectuar después de
la instalación o después de
una interrupción de la
corriente (este tipo de situaciones se reconocen al
observar que en la pantalla
de visualización parpadea la
hora 12:00 ) es el ajuste de
la hora.
18 ES
• Esta función es útil para
comprobar el estado del
horno cuando está apagado.
• Ajustar la hora mediante
los botones y .
Durante el ajuste, los
n˙meros en el visualizador
parpadean.
Atención: esta es la
primera operación que
debe efectuarse tras su
instalación o un corte de
corriente (estas situaciones se reconocen por el
parpadeo de la hora 12:00
en el visualizador).
• Se utiliza como recordatorio.
• El funcionamiento de
esta función es independiente del funcionamiento del horno (puede
utilizarse también con el
horno apagado).
• Activado con el horno
apagado no permite su
encendido.
• Activado con el horno en
funcionamiento no permite
cambiar la programación
del horno (posicionamiento
accidental de los selectores).
Atención: siempre puede
apagarse el horno en cualquier momento girando el
selector 2 en la posición 0.
• Detiene el horno al final
del tiempo de cocción
programado y avisa de
ello activando una señal
sonora durante unos
segundos.
• Esta función suele utilizarse junto con la función de
“duración de cocción”. Por
ejemplo, el alimento deseado debe cocerse durante 45 minutos y estar
listo para las 12:30 horas;
en este caso, seleccione
la modalidad de cocción
deseada, programe la
duración de cocción en 45
minutos y programe el
final de cocción a las 12:30
horas. La cocción empe-
zará automáticamente a
las 11:45 horas (12:30
horas menos 45 minutos)
y se detiene automáticamente a la hora de final
de cocción programada.
Atención: de programar
solamente el final de
cocción sin su duración,
la cocción empezará
enseguida y terminará a
la hora de final de cocción programada.
Page 20

ISTRUCCIONES DE USO
Visualizador del reloj
Selección de las funcio-
nes del programador
Visualización de las funciones del programador
Visualización del seguro
P
DF
Visualizador de temperatura
Selección de las funcio-
DF
P
nes del horno (cocción)
Visualización de las modali-
dades de cocción
Botones de ajuste
• De no fijarse la hora en el reloj, el horno no funcionará y en el visualizador parpadeará la hora 12:00.
Para que se inicie la cocción, es necesario seleccionar una modalidad con el mando (2), en el visualizador se iluminará el correspondiente
símbolo y empieza a parpadear la temperatura preestablecida automáticamente. Si se desea modificar la temperatura, pulse los botones
y . El horno empieza a funcionar pasados unos segundos, aunque puede programarse el programador para el inicio retardado,
a la hora deseada (véase el capítulo “Programador”). El símbolo de la modalidad de cocción parpadeará hasta que el horno haya
alcanzado la temperatura indicada en el visualizador. Al alcanzar esta temperatura dejará de parpadear y se oirá un sonido que avisa
de ello al usuario.
Nota: Puede detenerse el funcionamiento del horno en cualquier momento posicionando el mando (2) en el “ ”.
Simbolo
Temperatura
predeterminada
220° C
Programa de prueba segun CENELEC EN 50304 utilizado para
la definición de la clase energética
210° C
Programa de prueba segun CENELEC EN 50304
Posible
regolazione
50°-280° C
50°-240° C
Modalidad
En función de la temperatura introducida, el horno elige automáticamente la función
de cocción óptima
Convección natural
Utilización simultánea de la resistencia de la base y del techo del horno. Esta
modalidad equivale a la cocción tradicional, excelente para asar piernas, caza. Ideal
para cocer galletas, manzanas al horno y preparar platos muy crujientes. Se consiguen
unos buenos resultados poniendo los alimentos en un solo estante .
Horno ventilado
Utilización de la resistencia de la base y del techo, además del ventilador interno
del horno. Esta función es ideal para cocer aves, pescado, pan, etc. Asimismo, esta
modalidad de cocción asegura una buena distribución del calor por lo que puede
cocinarse cualquier plato sobre una superficie amplia.
DF
210° C
60° C
40° C
210° C
210° C
50°-240° C
180°-240° C
180°-230° C
180°-240° C240° C
180°-240° C240° C
Base ventilada
Ideal para cocciones delicadas (tartas, souflés).
Mantenimiento en caliente
Utilización intermitente de la resistencia de la base y del techo, además del ventilador.
La temperatura está predeterminada a 80°C constantes (para esta función no puede
modificarse la temperatura de funcionamiento). Ideal para mantener los alimentos
calientes sin riesgo de sobrecocción. También es muy útil para calentar la vajilla que
debe mantenerse caliente.
Descongelación
Utilización intermitente de la resistencia de la base y del techo, además del ventilador.
La temperatura está predeterminada a 40°C constantes (para esta función no puede
modificarse la temperatura de funcionamiento). Esta función permite descongelar
rápidamente los alimentos antes de su cocción.
Asador tradicional con puerta cerrada
En esta posición se conecta la resistencia del asador de rayos infrarrojos. Ideal para
cocer carne de mediano y pequeño grosor (salchichas, chuletas, bacon).
Asador ventilado con puerta cerrada
El aire calentada por la resistencia del asador, es aspirada por el ventilador que la
vierte sobre los alimentos a la temperatura deseada, comprendida entre 180 y 230°C.
El asador ventilado sustituye estupendamente al asador giratorio y asegura unos
resultados óptimos con aves, salchichas y carnes rojas, incluso en cantidades
relevantes.
Grill asador rotativo
Pesistencia grill y motor asador.
Sirve para realizar asados.
Turbo Asador. Debe utilizarse con la puerta cerrada. Utilizacìon de la resistencia
superior junto con el asador mas la turbina. Este modo de coccion es idéntico a la
del asador giratorio, excepto en que aprovecha mejor el funcionamiento de la turbina
en el fondo del horno, evitando que se sequen los alimentos.
Están disponibles dos dobles funciones, seleccionables con las teclas. y , la
función seleccionada aparece en el display y se confirma automáticamente después
de 3 segundos.
DF1: Descongelación a 40ºC (30 minutos)+ horno ventilado a 200ºC (45 minutos)
DF2: Horno ventilado a 200ºC (45 minutos) + mantenimiento del calor a 60ºC
(60 minutos)
La duración de la cocción con horno ventilado puede ser modificada posicionando
el selector de funciones en (simbolo de duración cocción). Los tiempos de
descongelación y del mantenimiento del calor no son modificables.
La temperatura de cocción con horno ventilado es modificable (tecla o ) sólo
cuando esta parte está activa (simbolo encendido en el display)
P
Pirolisis, ver el capítulo correspondiente.
19 ES
Page 21

CONSEJOS DE COCCIÓN
Las temperaturas, así como los tiempos de cocción, se dan a título indicativo para facilitar
el buen manejo del aparato. La experiencia personal permitirá más adelante adaptar estos
parámetros a los gustos y a las costumbres de cada uno.
Cabe señalar que como más alta es la temperatura de una cocción, más riesgo hay de
que se produzcan salpicaduras importantes, favoreciendo así que el horno se ensucie y
genere humos. Por ello, a menudo es preferible moderar ligeramente la temperatura de
cocción, aunque ello suponga un tiempo de cocción más largo.
PESCADOS
Recetas
Lubina o Dorada
Modo de cocción
Conv natural
Cantidad
1kg entero 220° C130 minutos
°C cocción Tiempo de cocción
Las paredes del horno están equipadas
con diferentes niveles numerados
empezando desde abajo.
Nivel empezando
por abajo
Rape o Salmón
Filete lenguado 160° C115-20 min.6 piezas
Pescado asado
Conv natural
Calor circulante
Grill
1kg asado 220° C130 minutos
6 filetes 275° C42x5 min.
VERDURAS - VARIOS
Recetas
Coles asadas
Empanada 200-220° C 1 hora/kg
Endivias con gruyere 6 pers. 25-30 min.
Soufflé
salado/dulce
Tomates rellenos
Tarta de puerros
Quiche Lorraine 6 pers. 45-50 min.
Patatas al gratén
con crema de leche
Todas las cocciones se han realizado en el nivel «1» excepto las cocciones marcadas con el símbolo «*» que requieren una cocción
a nivel medio.
Modo de cocción
Conv natural
Conv natural
Calor circulante
Calor circulante
Calor circulante
Resistencia inf.
circulante
Resistencia inf.
circulante
Turbogrill
Cantidad
6 pers. 200-220° C
6 pers.
6-8 pièces 200-220° C
6 pers.
°C cocción Tiempo de cocción
1 h
180-200° C
180-200° C 50-60 min.
40-45 min.
220° C 35-40 min.
220° C
200° C6 portions Plato tierra45 min.
Consejos
Ø 22
20 ES
Page 22

CARNES
Es preferible salar las carnes sólo al final de la cocción, porque la sal favorece las salpicaduras de grasa y, con ello, un ensuciamiento
rápido del horno y una generación de humo importante. Los asados de carne blanca, cerdo, ternera, cordero y los pescados pueden
colocarse en el horno frío. De este modo, la cocción será más larga que con el horno calentado previamente,
pero el alimento a cocinar quedará mejor cocido por dentro, porque el calor tendrá más tiempo para propagarse hacia el interior del
alimento.
Un buen precalentamiento es siempre garantía de éxito en la cocción de la carne roja.
PARA LAS PARRILLADAS
• Antes de meter en el horno la parrillada: saque la carne de la nevera algunas horas antes de asarla. Colóquela encima de varias capas
de papel absorbente: de esta manera quedará mejor soasada, más sabrosa y no habrá riesgo de que quede fría por dentro.
Sazone la carne con pimienta y con especias antes de asarla, pero sálela solamente cuando esté cocida. Así quedará mejor soasada
y más jugosa. Cubra con un poco de aceite todas las piezas que quiera cocer. Lo mejor es utilizar un pincel largo y plano. Sazónelas
después con pimienta y algunas hierbas (romero, etc.).
Meta la parrillada en el horno.
• Durante la cocción: no pinche nunca los alimentos durante su cocción, ni cuando les dé la vuelta: perderían sujugo y la parrillada
quedaría seca.
Recetas
Pato
Pavo 5/6 kg 2 h 30 - 3 h
Oca 160-180° C 2 - 2 h 30 min.3/4 kg
Pierna de cordero 200-220° C 15 min./libra
Pollo asado
Asado de buey
Conejo asado 800-1 kg 50-60 min.
Buey
Cordero 1 kg 20-25 min.
Cerdo 275° C 45-50 min.1 kg
Costilla de cerdo
Modo de cocción
Conv natural
Conv natural
Conv natural
Conv natural
Conv natural
Conv natural
Calor circulante
Asador
Asador
Asador
Grill
Cantidad
1,5 kg 200-220° C 1 h 30 min.
1/1,5 kg 220° C
1kg 275° C 15-20 min.
6 piezas 275° C 2x8 min.
°C cocción Tiempo de cocción
160-180° C
1 h aprox.
240° C 15 min./ libra
200-220° C
275° C
Todas las cocciones se han realizado en el nivel «1».
REPOSTERÍA
Consejos
Sin precalentam.
Sin precalentam.
Sin precalentam.
Dar la vuelta a mitad
cocción
Evite utilizar moldes brillantes. Reflejan el calor y pueden ser perjudiciales para la cocción de los pasteles. Si los pasteles que prepara
se doran demasiado rápido, recúbralos con una hoja de papel sulfurizado o con una hoja de papel de aluminio. ¡Atención! Utilice la
hoja de aluminio en el sentido correcto: el lado brillante debe estar de cara al pastel. En el caso contrario, el calor se reflejará en la
cara brillante y no penetrará dentro de la comida.
Evite abrir la puerta del horno durante los 20 – 25 primeros minutos de cocción: los soufflés, bollos, bizcochos de Saboya, etc., volverían
a bajar enseguida. Para controlar la cocción de sus pasteles, pínchelos en el centro con un cuchillo o con
una aguja de hacer punto. Si al sacarla está seca, significa que el pastel está bien cocido. Puede parar la cocción. Si sale húmeda o
con partículas de pastel pegadas, continúe la cocción pero bajando ligeramente el termostato para que el pastel termine de cocerse
sin quemarse.
Recetas
Bollo 200° C 40-40 min.
Pastel de Saboya
Genovesa
Base de tarta 20-30 min.
Merengues
Pastel St Honoré
Modo de cocción
Calor circulante
Calor circulante
Calor circulante
Calor circulante
Calor circulante
Resistencia inf.
circulante*
Resistencia inf.
circulante*
Cantidad
800 grs 1
6 pers. Ø 271
6 piezas
1 placa 80-85° C 4 h 30 1 Ø profiteroles
°C cocción Tiempio
180-200° C 35-40 min.
180-200° C 30-35 min.
180-200° C
200° C 15-20 min.
190° C6 piezas 30-35 min.
Nivel piso
1
1
1Hojaldre
11
Consejos
molde Ø 27
molde Ø 27
ex: volavánt
* con resistencia inferior circulante, recomendamos un precalentamiento con calor circulante para ganar tiempo.
21 ES
Page 23

ALGEMENE AANWIJZINGEN
De handleiding aandachtig lezen zodat u de oven optimaal kan gebruiken. Wij raden u aan de installatie- en gebruikshandleiding voor
een latere raadpleging te bewaren en er, vóór de installatie van de oven, het serienummer van het toestel op te noteren voor de
aanvraag van een eventuele interventietussenkomst door de dienst-na-verkoop.
Wanneer uw oven een defect vertoont, mag u deze niet aansluiten
of moet u deze van het stroomnet halen en onmiddellijk een
beroep doen op een door erkende technische dienst.
Onze aansprakelijkheid of verantwoordelijkheid geldt niet
wanneer u de richtlijnen in deze handleiding niet naleeft.
LEES DEZE HANDLEIDING AANDACHTIG
• De onderdelen, die in contact komen met voedsel voldoen
aan de EEC richtlijn 89/109.
Dit apparaat voldoet aan de EEC richtlijn 89/336, 73/23
eneventuele wijzigingen.
Verzeker u ervan dat de oven niet is beschadigd. Indien u
hieraan twijfelt, dient u de oven niet te gebruiken en direct
contact op te nemen met de leverancier. Houdt u het
verpakkingsmateriaal van de oven (plastic zakjes, piepschuim
en karton) uit de buurt van kinderen. Dit materiaal kan een
gevaar opleveren voor kinderen.
VEILIGHEIDSVOORSCHRIFTEN
• Het apparaat dient uitsluitend gebruikt te worden voor het doel,
waarvoor het is ontworpen, d.w.z. het bereiden van voedsel.
Elk ander doel, bijvoorbeeld als verwarming, is onjuist gebruik
van de oven en gevaarlijk.
De fabrikant is niet verantwoordelijk voor mogelijke schade ten
gevolge van een onjuist, verkeerd of onverstanding gebruik van
de oven.
• Bij het gebruik van elk elektrische apparaat dienen
verschillende regels in acht genomen te worden:
- Trek niet aan de kabel om de stekker uit het stopcontact te
halen;
- Raak het apparaat niet met vochtige of natte handen of voeten aan;
- Gebruik het apparaat niet indien u geen schoeisel draagt;
- Zorg ervoor dat kinderen en/of onbevoegde personen het
apparaat niet zonder toezicht gebruiken;
- Gebruik geen adapters, tussenverbindingen en/of
verlengsnoeren;
- Zet het apparaat bij hapering of siechte werking af en ga er niet
aan sieutelen.
De kabel dient bij beschadiging direct vervangen te worden en
wel op de volgende wijze:
- Haal de stekker uit het stopcontact of schakel de gehele
elektrische installatie uit;
- Verwijder de kabel en vervang hem door een even lange nieuwe,
(van het type H05RR-F, H05VV-F, H05V2V2-F). Deze kabel
moet geschikt zijn voor het vermogen van het apparaat;
- Dit dient door een technische specialist uitgevoerd te worden;
- De aarde-draad (geel/groen) moet 10 mm langer zijn dan de
andere draden.
Voor reparaties aan het apparaat dient u zich uitsluitend tot een
officiële technische service te wenden, alwaar u originele onderdelen
kunt bestellen. Indien al hetgeen hierboven niet in acht wordt
genomen, kan de veiligheid van het apparaat niet gegarandeerd
worden.
• De oven die u net aanschafte, bezit bepaalde technische
kenmerken en u mag onder geen enkel beding wijzigingen aan
dit toestel aanbrengen.
• U mag nooit een stoomreiniger of hogedrukreiniger gebruiken
om de oven schoon te maken.
• Geen brandbare producten in de oven bewaren; ze kunnen
ontvlammen bij het onvrijwillig aanzetten van de oven.
• U mag niet op de ovendeur leunen en u mag er ook geen
kinderen op laten zitten.
• U moet hittebestendige ovenwanten gebruiken om een schotel
in de oven te plaatsen of eruit te halen.
AANBEVELINGEN
• Na elk gebruik voert u een klein onderhoud uit zodat het
schoonmaken van de oven gemakkelijker verloopt.
• De ovenwanden niet bekleden met aluminiumfolie of
wegwerpverpakkingen die in de handel verkrijgbaar zijn. De
aluminiumfolie of eender welke andere bescherming die
rechtstreeks in contact komt met de verwarmde lak, kan smelten
en de lak van de moffel beschadigen.
• Om een buitensporige vervuiling van uw oven evenals sterke
rookgeuren te vermijden, raden wij u aan de oven op een niet
al te hoge temperatuur te gebruiken. Het is verkieslijk om de
baktijd te verlengen en de temperatuur iets lager in te stellen.
• Naast de bij de oven geleverde accessoires raden wij u aan
INSTALLATIE
De installatie valt onder de verantwoording van de koper zelf. De
fabrikant is voor de installatie niet verantwoordelijk. Eventuele
bijstand van de fabrikant bij onjuiste installatie valt niet onder de
garantie. De oven dient door een technisch bevoegd persoon
geïnstalleerd te worden volgens de installatie instructies. De
fabrikant is niet verantwoordelijk voor eventuele persoonlijke of
materiële schade ten gevolge van een onjuiste installatie.Het
meubel waarin de oven in te bouwen is, moet vervaardigd zijn in
materialen die bestand zijn tegen een minimale temperatuur van
70°C.
of ingebouwd worden onder het werkvlak.
Vóór de plaatsing plaatsing: u moet voor een goede verluchting
van de inbouwniche zorgen zodat de voor de afkoeling en bescherming van de interne organen noodzakelijke luchtcirculatie
gewaarborgd is. Hiervoor moet u de op laatste pagina verduidelijkte
openingen aanbrengen volgens het inbouwtype.
ELEKTRISCHE AANSLUITING
DE ELEKTRISCHE AANSLUITING MOET DOOR EEN ERKENDE
INSTALLATEUR OF EEN TECHNICUS MET EEN
GELIJKAARDIGE KNOWHOW UITGEVOERD WORDEN.
De installatie waarin het toestel te plaatsen is, moet conform de
geldende norm in het land van installatie zijn. Wijst elke
aansprakelijkheid of verantwoordelijkheid af bij het niet naleven
van deze vereiste.
De aansluiting op het net dient te gebeuren aan de hand van een
geaard stopcontact of via een voorziening voor omnipolaire
stroomonderbreking met een openingsafstand tussen de contacten
van minstens 3 mm.
De installatie moet met gepaste zekeringen beschermd worden
en een bedrading van een voldoende doorsnede krijgen voor een
normale voeding van het toestel.
AANSLUITING:
Dit toestel is uitgerust met een snoer waarbij er enkel een aansluiting
kan gebeuren met een spanning van 230 V~ tussen fases of
tussen fase en neutraal.
De aansluiting moet in overeenstemming gebeuren nadat u het
volgende controleerde:
• de voedingsspanning op de teller,
• de regeling van de hoofdschakelaar.
De beveiligingsdraad van het snoer (groen/geel) die op de Aardklem
van het toestel aangesloten is, moet ook op de Aardklem van de
installatie aangesloten zijn.
Opgepast:
• U moet een professional gebruiken om na te gaan of de
• Onze aansprakelijkheid en verantwoordelijkheid is niet van
OPMERKING:
van de DNV kan vereisen. U moet er ook op letten dat het
stopcontact zo geplaatst wordt dat u het snoer kan uittrekken
wanneer de oven uit de niche gehaald is.
snoer te vervangen is, raden wij u aan dit door de dienst-naverkoop of een persoon met een gelijkaardige knowhow te laten
uitvoeren.
22 NL
Identificatieplaatje (aan de zijkant van de oven)
enkel schotels en bakvormen te gebruiken die tegen zeer hoge
temperaturen bestand zijn.
De oven kan in de hoogte geplaatst worden in een kolom
aarding van de installatie overloopt voordat u met de
aansluiting verder gaat.
toepassing voor eender welke incidenten of de eventuele
gevolgen ervan die kunnen optreden door het gebruik van
een toestel dat niet op een aarding aangesloten is of dat
op een aarding met een defecte overloop aangesloten werd.
U mag niet vergeten dat het toestel een tussenkomst
Snoer:
wanneer het
Page 24

UITRUSTING VAN DE OVEN
Het eenvoudige rooster dient als steun voor vormen en schotels.
Het schotelrooster dient meer
bepaald voor het grillen. Dit wordt
meestal samen met de lekbak gebruikt.
Dankzij hun speciaal profiel blijven ze
steeds horizontaal, zelfs wanneer ze
maximaal uitgetrokken zijn. Er bestaat
geen enkel risico op het schuiven of
overlappen van de gerechten.
De lekbak is bestemd voor het
opvangen van de jus bij het grillen. Hij
staat op het rooster of schuift in de
rails. Deze wordt slechts gebruikt in
de modus Grillen, Draaispit of
Turbogrill. Voor alle andere bakwijzen
moet u deze uit de oven halen. De
lekbak nooit als bakschaal gebruiken,
er kan zich rookontwikkeling,
vetverspreiding en een snelle vervuiling
van de oven voordoen
TELESCOPISCH GELEIDE SYSTEEM
Schuif de geleiders uit en plaats de
houder B achter de beveiliging aan de
voorzijde van de geleiders.
Voltooi de installatie door de bakplaat
C en de uitlekschaal D te plaatsen.
Wanneer u de oven gebruikt, moet u alle niet benutte
accessoires uit de oven verwijderen.
.
GRILLEREN
Grilleren maakt het mogelijk het voedsel snel een diepe bruine
kleur te geven. Afhankelijk van de grootte van uw gerecht raden
wij u aan dit op het vierde niveau te zetten.
Bijna elk voedsel kan worden bereid onder de grill afgezien van
erg mager vlees of.een rollade. Vlees en vis dat u gaat grillen,
dient u eerst licht tebestrijken met olie.
ONDERHOUD VAN DE OVEN.
• De oven laten afkoelen voordat u deze manueel
schoonmaakt.
• Nooit schuurmiddelen, metalen sponsjes of snijdende
voorwerpen gebruiken om de oven schoon te maken. Zo
beschadigt u namelijk onherroepelijk de lak.
• Enkel zeepwater of vloeibare middelen met ammoniak
gebruiken.
DE GLAZEN ONDERDELEN
Wij bevelen u aan om na elk gebruik het glas van de ovendeur
schoon te maken d.m.v. absorberend papier. Indien er teveel
vetspatten op zitten kan u deze nadien met een uitgewrongen
spons en een schoonmaakmiddel reinigen en daarna spoelen.
Nooit schuurmiddelen of snijdende voorwerpen gebruiken.
DE DICHTING VAN DE OVENDEUR
Bij grote vervuiling moet u de dichting van de ovendeur met een
lichtjes vochtige spons schoonmaken.
DE ACCESSOIRES
Deze moet u met een spons en wat zeepwater schoonmaken.
Spoelen met helder water en afdrogen. Schuurmiddelen zijn steeds
te vermijden.
DE LEKBAK
Na het grillen de lekbak uit de oven halen. De vetten in een
recipiënt gieten. De lekbak wassen en spoelen in warm water met
een spons doordrenkt van detergent. Indien de resten blijven
kleven de lekbak in water met een schoonmaakmiddel laten
weken. Deze kan natuurlijk ook in de vaatwasser of met een
product dat in de handel verkrijgbaar is, schoongemaakt worden.
Een vuile lekbak nooit opnieuw in de oven plaatsen.
Een lekbak nooit een pyrolysecyclus laten doorlopen.
OVENVERLICHTING Het toestel van de stroomtoevoer halen
voor u de verlichting schoonmaakt of de lamp vervangt.
De lamp en zijn bescherming zijn vervaardigd uit materialen die
zeer warmtebestendig zijn.
Kenmerken van de lamp:
230 V~ - 25 W - Huls E 14 -
Temperatuur 300°C
Voor het vervangen van de lamp volstaat het:
. de glazen bescherming te verwijderen,
. de lamp weg te nemen,
. deze te vervangen door een identiek
model: zie bovenstaande kenmerken,
. na vervanging van de defecte lamp,
de glazen bescherming terug te
plaatsen.
HET DRAAISPIT
Bij het draaispit moet er niet
voorverwarmd worden.
Het bakken met het draaispit
gebeurt met een gesloten deur
KOOKTIJDEN
Op pagina 27 - 28 vindt u de aanbevolen kooktijden en
temperaturen. Houdt u deze gegevens aan als u de eerste keer
een gerecht gaat bereiden in uw oven. U kunt deze tijden en
temperaturen echter aanpassen aan uw eigen ervaringen.
Wij raden u aan uw oven eerst een half uur op vol vermogen aan
te zetten om onprettige luchtjes uit de oven te verwijderen
ZELFREINIGENDE OVENWANDEN
Als extra optie zijn voor alle modellen speciale zelfreinigende
ovenwanden met een micro-poreuse beschermlaag verkrijgbaar.
Met deze ovenwanden hoeft u uw oven niet meer met de hand
schoon te maken. Het vet dat tijdens het bereiden van uw voedsel
tegen de wanden aan komt, wordt door de micro-poreuse
beschermlaag afgebroken en de katalytische wanden zetten het
om in gas. Bovenmatig spatten kan desondanks de poriën
verstoppen en daardoor de zelfreiniging hinderen. Dit kan worden
hersteld door de lege oven ongeveer 10-20 minuten op de maximum
temperatuur aan te zetten.
Gebruik geen bijtende middelen, metalen sponsjes, scherpe
voorwerpen, ruwe doeken of chemische schoonmaakmiddelen,
deze kunnen permanente schade toebrengen aan de katalytische
wanden.
Wij raden u aan om diepe bakplaten te gebruiken of een vangschaal
onder de grill te plaatsen, wanneer u vettig voedsel bereid.
Indien de wanden zodanig met vet zijn bedekt, dat de katalytische
reining niet langer effectief is, dient u dit vet met een zachte doek
of spons doordrenkt in heet water schoon te maken.
De wanden moet poreus gehouden worden voor een doelmatige
reiniging.
N.B.: Alle zelfreinigende ovenwanden, die momenteel verkrijgbaar
zijn hebben een levensduur van ongeveer 300 uur. U dient deze
dus na ongeveer 300 uur te vervangen.
23 NL
Page 25

HET SCHOONMAKEN VAN DE OVEN :
PYROLYSE
De Pyrolyse schoonmaak methode is een methode
welke d.m.v. hoge temperaturen vuil verwijderd.
De rook welke ontstaat wordt door de doorgang van
een katalysator gereinigd.
De oven deur is beveiligd zodat deze niet kan worden
geopend tijdens de pyrolyse. De pyrolyse kan een
lichte geur veroorzaken in de keuken afhankelijk van
de ventilatie..
BELANGRIJK:
Voordat u de pyrolyse methode gaat gebruiken:
• verwijder alle accessoires uit de oven; deze zullen als u ze niet
verwijderd beschadigen tijdens het gebruik van de pyrolyse
methode
• Verwijder alle losse en grote delen etensresten, deze kunnen
namelijk vlamvatten door de hitte van de pyrolyse methode
• Sluit de oven deur.
• Als uw kookplaat boven de oven is geïnstalleerd, gebruik dan
NOOIT de gaspitten of elektrische kookzones tijdens de pyrolyse
schoonmaak methode.
• Wij adviseren u om geen schoonmaak middelen te gebruiken
bij het reinigen van de oven.
• De pyrolyse methode laat een witte laag op de oven wand
achter, wacht tot de oven is afgekoeld, daarna kunt u de
laag verwijderen met een vochtige spons.
Opmerking:
• U bespaart energie door de oven direct na gebruik
schoon te maken. U maakt dan gebruik van de
overgebleven hitte van de oven.
.
SERVICE DIENST
Alvorens u de Service Dienst belt
Indien de oven niet werkt, raden wij u aan:
— na te gaan of het apparaat goed is aangesloten.
Indien u de oorzaak niet kunt ontdekken:
— haal de stekker uit het stopcontact of sluit de elektriciteit van
de oven af middels de hoofdschakelaar
— gebruik de oven niet meer en ga er niet zelf aan sleutelen
— bel de Service Dienst
Noteert u, voordat u de Service Dienst belt, het typenummer van
uw oven (zie binnenzijde van de ovendeur) Bij de oven zit een
garantiecertificaat, welke u recht geeft op één jaar garantie vanaf
de datum van aankoop.
Dit apparaat voldoet aan de Europese richtlijnen
2002/96/EC voor elektrische en elektronische
afval.
Door dit apparaat correct te verwijderen, helpt
u het potentiële negatieve gevolg voor de
omgeving en menselijke gezondheid te
voorkomen., welke anders door onjuiste
verwijdering zou kunnen worden veroorzaakt.
Het symbool op het product duidt aan dat dit
product niet behandeld zal worden als huishuidelijk afval. In
plaats daarvan zal het apparaat naar het verzamelpunt voor de
recycling van elektrische en elektronische uitrusting gaan.
De verwijdering moet in overeenstemming met plaatselijke
milieuvoorschriften voor afvalverwerking uitgevoerd worden
Voor meer gedetailleerde informatie over de verwijderingvan dit
product, neemt u contact op met uw gemeenlijke reinigingsdienst
of de dealer waar u het apparaat heeft gekocht.
• De ventilator werkt vanaf het begin van de pyrolyse
methode.
• De ventilator stopt alleen als de accessoires voldoende
zijn afgekoeld.
ACTIVEREN VAN DE PYROLYSE METHODE:
Twee mogelijkheden:
ECO 1:30 Oven normal vuil, 90 minuten*
SUP 2:00 Oven heel erg vuil, 120 minuten*
* Deze tijden kunnen niet veranderd worden.
- Draai de programmaknop naar de P, symbool P licht geeft en
het word ECO knippert op het display
- Kies de Pyrolyse methode met “ + “ en “- “ toetsen, het woord
ECO of SUP knippert op het display.
- De keuze wordt automatisch na 3 sec. vastgelegd. Het word
ECO of SUP knippert niet meer en P knippert. De oventemperatuur
zal stijgen. Als de temperatuur hoog is zal de deur beveiligd
worden, het symbool zal gaan branden.
U kunt de starttijd uitstellen, zie hoofdstuk “ELEKTRONISCHE
PROGRAMMA'S GEBRUIKEN”
Einde van het programma:
- De oven gaat automatisch uit, De zymbolen en gaan
branden
- Draai de programmaknop naar “0”
- De Temperatuur zal afnemen. Als de deur ontgrendeld is gaat
het lampje uit.
- De Ventilator stopt als de oven voldoende is afgekoeld.
24 NL
Page 26

ELEKTRONISCHE PROGRAMMA'S GEBRUIKEN
FUNCTIE HOE TE ACTIVEREN HOE UIT TE SCHAKELEN WERKING DOEL
OVENLAMP
KLOK
ALARM
KINDVEILIG
BAKTIJD
Kan gebruikt worden
• Als de schakelaar (1) op
gedraaid wordt, gaat het
lampje aan
• Draai de schakelaar (1)
op .
• Gebruik de en knoppen (u ziet hierbij de getallen op het display aanspringen)
• Draai de schakelaar 1 op
het symbool.
• Stel het einde van de baktijd in met de en
knoppen (u ziet hierbij de
getallen op het display
aanspringen)
• Draai schakelaar 1 op het
symbool. Het lichtje
springt aan.
• Druk de en knoppen
tegelijkertijd voor drie
seconden in.
• Als het licht uitspringt is
de oven goed ingesteld.
• Kies een bakfunctie met
behulp van schakelaar 2
• Draai schakelaar 1 op het
symbool
• Stel de baktijd in met de
en knoppen (u ziet
hierbij de getallen op het
display aanspringen)
voor de pyrolyse
methode
EINDE
BAKTIJD
Kan gebruikt worden
voor de pyrolyse
methode
• Kies een bakfunctie met
schakelaar 2
• Draai de schakelaar 1 op
het symbool .
• Stel het einde van de
baktijd in met de en
knoppen (u ziet hierbij de
getallen op het display
aanspringen)
PROGRAMMERING
Klokdisplay Veiligheidsdisplay
• Draai de schakelaar op •Om de tijd op de ovenklok
• Als de baktijd voorbij is,
springt de oven vanzelf uit.
Mocht u de oven voor het
aflopen van de ingestelde
baktijd uit willen schakelen,
zet u de ingestelde tijd op
0 (schakelaar 1 op en
gebruik daarna de en
knoppen).
• Druk de en knoppen
tegelijkertijd voor drie
seconden in.
• Het licht springt aan.
• Als de baktijd voorbij is,
springt de oven vanzelf uit.
Mocht u de oven voor het
aflopen van de ingestelde
baktijd uit willen schakelen,
moet u de oven zelf
uitschakelen. U kunt ook de
baktijd op 00:00 instellen.
(draai schakelaar 1 op het
symbool , en gebruik
de en knoppen)
• De oven schakelt automatisch op de ingestelde
tijd uit. Als u voor deze
ingestelde tijd de oven uit
wilt schakelen, draait
u schakelaar 2 tot het
symbool.
in te stellen
• U hoort een alarmgeluid
(voor een paar seconden)
aan het eind van de baktijd.
• De oveninstellingen kunnen
niet veranderd worden (ook
niet als er per ongeluk aan
de schakelaars gedraaid
wordt)
• Zorgt ervoor dat het eind
van de baktijd in het geheugen van de oven wordt
opgeslagen.
• Als de baktijd is ingesteld,
draai schakelaar 1 op het
symbool zodat de
ingestelde tijd van de klok
weer zichtbaar is.
• Zorgt ervoor dat het eind
van de baktijd in het geheugen van de oven wordt
opgeslagen.
• Als de baktijd is ingesteld,
draai schakelaar 1 op het
symbool zodat de ingestelde tijd van de klok weer
zichtbaar is.
• Met deze functie kunt u
controleren of de oven
werkt.
• Gebruik de en knoppen, stel de tijd in (u ziet
hierbij de getallen op het
display aanspringen)
NB: Stel de klok onmiddellijk na het installeren
van het apparaat in. Doe
dit ook wanneer de
stroom is uitgevallen (als
de tijd van 12.00 op het
display knippert weet u
dat de stroom is uitgevallen).
• Handig, want deze functie
kunt u ook gebruiken als
de oven niet in gebruik is.
• Deze functie werkt zelfs
als de oven niet in gebruik
is, zodat voorkomen kan
worden dat de oven per
ongeluk aangezet wordt.
• Deze functie is werkzaam
als de oven aan is en voorkomt dat de instellingen
veranderd worden (bijvoorbeeld als er per ongeluk
aan de schakelaars
gedraaid wordt)
NB: de oven kan altijd uitgezet worden door schakelaar 2 op 0 te zetten.
• Als de ingestelde baktijd
verstreken is, wordt de
oven automatisch uitgeschakeld en hoort u enige
seconden een alarm.
• Deze functie werkt zelfs
als de oven niet in gebruik
is, zodat voorkomen kan
worden dat de oven per
ongeluk aangezet wordt.
• Deze functie is werkzaam
als de oven aan is en
voorkomt dat de instellingen veranderd worden
(bijvoorbeeld als er per
ongeluk aan de schakelaars gedraaid wordt)
NB: de oven kan altijd
uitgezet worden door
schakelaar 2 op 0 te zetten.
Programmeerbare
functiedisplay
Een kleine vertraging zal optreden wanneer het programma wordt
ingesteld, omdat de oven een interne controle uitvoert.
regelaar knoppen
WAARSCHUWING
Na installatie van de oven en na het
onderbreken van de voeding (dit is te
herkennen aan de knipperende cijfers 12:00
op het scherm) dient u eerst de juiste tijd in te
stellen.
25 NL
Page 27

INSTRUCTIES VOOR HET GEBRUIK VAN DE OVEN
Veiligheidsdisplay TemperatuurdisplayKlokdisplay
Programma
Functieschakelaar
Programmeerbare
functiedisplay
regelaar knoppen
• Als de klok niet is geïnstalleerd, dan werkt de oven niet en op het display knippert 12:00.
Voordat u met het bereiden van eten kunt beginnen, moet er met behulp van schakelaar 2 een bakfunctie zijn gekozen. Het bijbehorende
symbool is te zien op het display en de automatisch ingestelde temperatuur springt aan. Als u de temperatuur wilt veranderen, dan kunt
u dit doen aan de hand van de of knoppen. Na een paar seconden treedt de oven in werking. Het functieprogramma kan echter
op zo’n manier worden ingesteld dat het opstarten tot het gewenste moment kan worden uitgesteld (zie verder hoofdstuk “Programmering”).
Het symbool van de bakfunctie springt aan wanneer de oven de gewenste temperatuur bereikt. Deze temperatuur is op het display is
te zien. Als de temperatuur is bereikt, stopt het knipperen en is er een alarmgeluid te horen.
De oven kan te allen tijde uitgeschakeld worden door schakelaar 2 op “ ” te draaien.
Symbool
Instel-
temperatuur
220° C
Testprogramma volgens norm CENELEC EN 50304 ter bepaling
van de energie efficiency klasse.
210° C
Testprogramma volgens norm CENELEC EN 50304
210° C
Temperatuur-
regulering
50°-280° C
50°-240° C
50°-240° C
Automatische keuze. Instellen van de temperatuur, de oven kiest automatisch de
optimale kook functie.
Natuurlijke convectie
De boven- en onderelementen worden hierbij geactiveerd. Traditioneel bakken, het
meest geschikt voor het grillen van lamsbout of wild. Ideaal voor koekjes en stoofappels
en knapperige spijzen. U krijgt het beste resultaat wanneer u het gerecht op een
bakplaat plaatst
Ventilatoroven
De boven- en onderelementen worden hierbij geactiveerd en werken met behulp van
de interne ovenventilator. Deze functie is te gebruiken voor het bereiden van gevogelte,
vis, brood etc. Dit systeem zorgt ervoor dat de hete lucht gelijkmatig verdeeld wordt.
Deze functie is uitermate geschikt voor het bereiden van allerlei soort gerechten in
grote hoeveelheden.
Onderelement & ventilator
Speciaal voor delicate gerechten (soufflés)
P
DF
Ovenfunctie
functieknop (bakken)
Ovenfunctie
display
Functie
DF
P
60° C
40° C
210° C
210° C
180°-240° C
180°-230° C
180°-240° C240° C
180°-240° C240° C
Het eten warm houden
De boven- en onderelementen werken afwisselend en met behulp van de ventilators.
Stel de oven in op constant 60°C (met deze functie kan de temperatuur waarmee
u op dat moment werkt niet gereguleerd worden). Ideaal voor het warm houden van
eten dat net klaargemaakt is zonder dat het aanbrandt. Deze functie is ook te
gebruiken om eten op te warmen.
Ontdooien
De boven- en onderelementen werken afwisselend en met behulp van de ventilators.
Stel de oven in op constant 40°C (met deze functie kan de temperatuur waarmee
u op dat moment werkt niet gereguleerd worden). Deze functie zorgt ervoor dat u
razendsnel kunt ontdooien.
Traditioneel grillen met gesloten deur
Met deze functie worden de infrarode elementen geactiveerd. Uitstekend voor het
grillen van dunne of normale plakjes vlees (worst, koteletten, bacon).
Ventilator grillen met gesloten deur
Hete lucht van het grillelement stroomt langs het eten door de ventilator op gewenste
temperatuur tussen de 180 en 230°C. De ventilator is een uitstekende vervanger
voor het roosterspit en is ook uitermate geschikt voor het bereiden van gevogelte,
worst en rood vlees, ook in grote hoeveelheden.
Plateau positie
Inwerkingstelling van de grill/draaimotor van het spit.
Voor gerechten aan het spit of roosteren.
Draaispit met Ventilatie. Gebruik de turbogrill functie met de deur gesloten.
Het grillelement wordt dan samen gebruikt met de ventilator en de draaispit. Deze
functie voorkomt dat etenswaren uitdrogen.
Er zijn twee dubbelfuncties beschikbaar, om deze te selecteren gebruikt u de knoppen
en , De gekozen functie verschijnt in het display en wordt bevestigd na 3
seconden.
DF1: Ontdooien bij 40°C (30 minuten) + hetelucht oven bij 200°C (45 minuten)
DF2: Hetelucht oven bij 200°C (45 minuten) + verwarmen bij 60°C (60 minuten)
De kooktijd van het hetelucht programma kan worden aangepast door de
functiekeuzeknop te draaien naar .De duur van het ontdooien en verwarmen kan
niet worden aangepast. De temperatuur kan alleen worden aangepast (knoppen
of ) wanneer deze kookfunctie is geactiveerd ( symbool is verlicht op het
display).
Pyrolyse, zie bijbehorende hoofdstuk.
26 NL
Page 28

RAADGEVINGEN BIJ HET BAKKEN
De baktemperaturen en -tijden zijn louter informatief om de werking van het toestel te
vergemakkelijken. De persoonlijke ervaring laat dan toe deze instellingen naar eigen smaak
en gewoonte af te stellen.
Wij merken echter op dat hoe hoger de baktemperatuur is, hoe groter de kans op aanzienlijke
spatten en hoe groter de vervuiling van de oven en de mogelijkheid op rookvorming zalzijn.
Het is dus vaak verkieslijk om de baktemperatuur te matigen, zelfs wanneer dit een langere
baktijd inhoudt.
VIS
Recepten
Bakwijze
Hoeveelheid
Bak°C
De ovenwanden zijn voorzien van
verschillende niveaus die van beneden
naar boven genummerd zijn.
Baktijd de
cuisson
Schapniveau van
onderuit
Baars of brasem
Zeeduivel of zalm
Tongfilet 160° C115-20 min6 stukken
Gegrilde vis
Naturrl. conv.
Naturrl. conv.
Hete lucht
Grill
1kg volledig 220° C130 minuten
1kg gestoofd 220° C130 minuten
6 filets 275° C42x5 min
GROENTEN - DIVERS
Recepten
Gestoomde kolen
Bladerdeegpastei 200-220° C 1 uur/kg
Witloof in kaas 6 pers. 25-30 min
Zout/zoete soufflé
Gevulde tomaten
Flamiche
met prei
Quiche Lorraine 6 pers. 45-50 min
Bakwijze
Natuurl. conv.
Natuurl. conv.
Hete lucht
Hete lucht
Hete lucht
Vloer/hete lucht
Vloer/hete lucht
Hoeveelheid Bak°C Baktijd Tips
6 pers. 200-220° C
180-200° C
6 pers.
6-8 stukken 200-220° C
6 pers.
180-200° C 50-60 min
220° C 35-40 min
220° C
1 u
40-45 min
Ø 22
Gratin dauphinois 200° C6 portie Oval schotel45 min.
Al het bakken gebeurde op schapniveau «1» uitgezonderd het bakken dat gemarkeerd werd met het symbool «*», wat u in het midden
moet bakken.
Turbogrill
27 NL
Page 29

VLEES
Wij raden aan het vlees pas te zouten op het einde van het bakken omdat zout het vet activeert en dus zorgt voor een snellere vervuiling
van de oven en aanzienlijke rookontwikkeling. De gebraden van wit vlees, varken, kalf, lam en vis kunnen in een koude oven geplaatst
worden. Het bakken gaat hier iets trager dan bij een reeds voorverwarmde oven, maar gebeurt beter in het midden van het te bakken
stuk aangezien de warmte meer tijd heeft om tot het midden van de eetwaren door te dringen.
Goed voorverwarmen ligt steeds aan de basis van een goed gebraden stuk rood vlees.
OM TE GRILLEN
• Voordat u het grillstuk in de oven stopt:
Het vlees enkele uren voor het grillen uit de koelkast nemen. Wij raden u aan dit op laagjes absorberend papier te leggen : het bruint
makkelijker, blijft sappiger en blijft niet koud aan de binnenzijde.
Het vlees kruiden voor u het op de grill legt, maar het zout slechts gebruiken na het bakken, want anders zal het vlees slecht bruinen
en minder sappig zijn. Alle te bakken stukken met een beetje olie insmeren. Het best gebruikt u een lang en vlak penseel. Vervolgens
met peper en enkele kruiden (tijm, …) besprenkelen.
Het grillstuk in de oven stoppen.
• Tijdens het bakken:
Nooit in de eetwaren prikken tijdens het bakken , ook niet wanneer u ze omdraait: het sap loopt eruit en het vlees wordt droog.
Recepten
Eend
Kalkoen 5/6 kg 2 u 30 - 3 u
Gans 160-180° C 2 - 2u 30 min.3/4 kg
Schapenbout 200-220° C 15 min./pond
Gebraden kip
Rundgebraad
Gebraden konijn 800-1 kg 50-60 min.
Rund
Lamp / schaap 1 kg 20-25 min.
Spiesen 275° C 2x8 min.
Varkensrib
Al het bakken gebeurde op schapniveau “1”.
Bakwijze
Natuurl. conv.
Natuurl. conv.
Natuurl. conv.
Natuurl. conv.
Natuurl. conv.
Natuurl. conv.
Hete lucht
Draaispit
Draaispit
Grill
Grill
Hoeveelheild Bak°C Baktijd Tips
1,5 kg 200-220° C 1 u 30 min.
160-180° C
1/1,5 kg 220° C
240° C 15 min/pound
200-220° C
1kg 275° C 15-20 min.
275° C
6 stukken
6 stukken 275° C 2x8 min.
ongeveer 1 u
Zonder
voorverwarming
Zonder
voorverwarming
Halverwege draaien
Halverwege draaien
GEBAK
U moet steeds vermijden om glanzende vormen te gebruiken, aangezien deze de warmte weerkaatsen en het bakken van de taart
nadelig kunnen beïnvloeden. Wanneer uw taarten te vlug goudbruin bakken, moet u ze met een vel perkament- of aluminiumpapier
bedekken. Opgepast: u moet het aluminiumpapier wel langs de juiste zijde gebruiken: de glanzende zijde moet naar de taart gericht
zijn. Is dit niet het geval, dan zal de warmte op het glanzende oppervlak weerkaatsen en niet tot de kern van het gerecht doordringen.
U moet ook vermijden de ovendeur tijdens de eerste 20 tot 25 minuten te openen: de soufflés, taarten, koekjes, gebakjes kunnen
invallen. Om het bakken van uw gebak te controleren, moet u in de kern met een mes of een breinaald prikken. Wanneer deze er droog
uitkomt, is uw taart klaar. U kan de oven dan stoppen. Wanneer het mes er vochtig of met enkele taartdeeltjes uitkomt, moet u blijven
bakken maar met een lichtjes lagere temperatuur zodat de taart blijft bakken zonder aan te branden.
Recepten
Cake
Vruchtenclafoutis
Quadre - quarts 1,5 kg 45-50 min.
Versierde taart 200-220° C 40-45 min. for 6
Brioche 200° C 40-40 min.
Savoie - taart
Génoise
Crèmevulling 40 stukken 35 min.
Tartbodem 20-30 min.
Schuimgebakje
Vruchtentaart
St Honoré
* Bij de combinatie vloer/hete lucht raden wij aan met hete lucht voor te verwarmen zodat u tijd wint.
Bakwijze
Natuurl. conv.
Natuurl. conv.
Natuurl. conv.
Natuurl. conv.
Hete lucht
Hete lucht
Hete lucht
Hete lucht
Hete lucht
Hete lucht
Vloer / hete lucht*
Vloer / hete lucht*
Vloer / hete lucht*
Hoeveelheid
1,5 kg 180-200° C
6 pers. 200-220° C 40-50 min.
800 grs 1
6 pers. Ø 271
6 stukken
1 plaat 80-85° C
6 pers. 220° C 35-40 min.
6 stukken 30-35 min.
Bak°C Baktijd
50+60 min.
200-220° C
180-200° C
180-200° C 30-35 min.
190° C
180-200° C
200° C 15-20 min.
190° C
35-40 min.
4 u 30
28 NL
Schapniveau
1
1 Ø 27
1
1Bladerdeeg
1
1
11
Tips
Ø 271
vorm Ø 271
Vorm Ø 271
2 platen1 / 3
vb: Hapjes
profiterolen
Page 30

ALLGEMEINE HINWEISE
• Lesen Sie die in diesem Handbuch enthaltene Bedienungsanleitung ausführlich durch. Sie liefert wichtige Hinweise für die Installation,
die Bedienung und die Pflege sowie einige Tipps zum optimalen Gebrauch Ihres Ofens. Bewahren Sie diese Unterlagen an sicherer
Stelle auf, damit Ihnen diese Informationen auch zukünftig jederzeit zur Verfügung stehen.
Wir können keine Haftung für eventuelle Schäder
übernehmen, die durch Mißachtung der folgenden
Anweisungen entstehen sollten
KONFORMITÄTSERKLÄRUNG:
• Dieses Gerät entspricht der EU-Vorschrift 89/109 für die
Bereiche, die mit Lebensmitteln in Berührung kommen.
.
Das Gerät entspricht den EU-Normen 89/336/EEG, 73/23/EEG
und deren nachträglichen Änderungen.
SICHERHEITSHINWEISE
• Dieses Gerät darf ausschließlich für den Zweck eingesetzt
werden, für den es hergestellt wurde, nämlich die Zubereitung
von Speisen.
Jede andere Anwendung (beispielsweise das Heizen von
Räumen) ist deshalb als zweckentfremdet zu betrachten und
demzufolge gefährlich. Der Hersteller kann für eventuelle
Schäden, die auf einen ungeeigneten, fehlerhaften und
unvernünftigen Einsatz zurückzuführen sind, nicht verantwortlich
gemacht werden.
Die Verwendung jedes elektrischen Gerätes erfordert die
Beachtung einiger grundsätzlichen Regeln. Das sind
insbesondere:
- Das Gerät nicht mit nassen oder feuchten Händen oder Füßen
berühren.
- Das Gerät nicht barfuß bedienen.
- Verhindern Sie, dass Kinder oder unfähige Personen
unbeaufsichtigt am Gerät hantieren.
- Bei Ausfällen und/oder Funktionsstörungen ist das Gerät
abzuschalten. Versuchen Sie nicht, den Fehler auf eigene
Faust zu beheben.
- Bei Beschädigung des Zuleitungskabels ist dieses so schnell
wie möglich auszutauschen. Dies ist ausschließlich durch
qualifiziertes Fachpersonal durchzuführen, unter Beachtung
folgender Hinweise: Blechschutzdeckel abnehmen, Kabel
abschrauben und durch ein anderes (Typ HO5RR-F, H05VVF, H05V2V2-F) ersetzen. Das Kabel muss der Leistung des
Gerätes entsprechen. Der Erdleiter (gelb-grün) muss
vorschriftsgemäß 10 mm länger sein als die Hauptleiter.
Bei einer erforderlichen Reparatur wenden Sie sich bitte an
Ihren zuständigen Werkskundendienst und verlangen Sie die
Verwendung von Original-Ersatzteilen.
Die Missachtung der vorgenannten Hinweise kann die Sicherheit
des Gerätes beeinträchtigen.
- Der Ofen, den Sie erworben haben, zeichnet sich durch
bestimmte technische Eigenschaften aus; auf keinen Fall
dürfen Änderungen an der Ausstattung vorgenommen werden.
- Benutzen Sie niemals Dampf- oder Hochdruckvorrichtungen
zum Reinigen des Ofens!
- Lagern Sie keine entflammbaren Gegenstände im Ofen; sie
könnten verbrennen, wenn der Ofen unbeabsichtigt eingeschaltet wird!
- Stützen Sie sich nicht an der Ofentür ab und stellen Sie sicher,
dass keine Kinder sich darauf setzen!
- Benutzen Sie Küchenhandschuhe, wenn Sie Gerichte in den
Ofen stellen oder daraus herausnehmen!
EMPFEHLUNGEN
• Den Ofen nach jeder Benutzung reinigen - dies begünstigt die
vollständige Reinigung der Pyrolyse.
• Um eine übermäßige Verschmutzung des Ofens sowie den
daraus resultierenden starken Rauchdunst zu vermeiden,
empfehlen wir Ihnen, den Ofen nicht bei zu hohen
Temperaturen zu nutzen. Es ist günstiger, die Garzeit zu
verlängern und die Temperatur ein wenig zu senken.
• Wir empfehlen Ihnen, außer den mitgelieferten Zubehörteilen
nur Bleche und Backformen zu verwenden, die sehr hohen
Temperaturen widerstehen.
• Niemals die Backofenwände mit Aluminiumpapier ausschlagen.
Das in direktem Kontakt mit den erhitzten Teilen stehende
Aluminiumpapier könnte schmelzen und das Email des Muffels
zerstören.
INSTALLATION
Der Einbau erfolgt auf Kosten des Endverbrauchers. Der Hersteller
ist von diesem Dienst entbunden. Eventuell an den Hersteller
herangetragene Ansprüche, die auf einen falschen Einbau
zurückgehen, sind von jeder Garantieleistung ausgeschlossen.
Der Einbau muss entsprechend der Anleitung und durch qualifiziertes
Fachpersonal erfolgen. Durch einen falschen Einbau können
Schäden an Personen, Tieren oder Sachen verursacht werden,
für die der Hersteller nicht verantwortlich gemacht werden kann.
Das Möbelstück, welches den Ofen aufnehmen soll, muss gegen
Temperaturen von mindestens 70° C beständig sein.
Der Ofen kann in einen säulenförmigen Hohlraum oder unter
eine Arbeitsfläche eingebaut werden.
Vor dem festen Einbau des Ofens: Bei jedem Einbau muss
sichergestellt werden, dass der Ofenraum gut gelüftet wird, damit
die Kaltluftzufuhr zur Kühlung und zum Schutz der
Innenflächen des Ofens gewährleistet werden kann. Bohren Sie
hierfür anhand der Zeichnungen auf Seite 43 je nach Einbauweise
die entsprechenden Öffnungen ein.
ELEKTRISCHER ANSCHLUSS
DER ELEKTRISCHE ANSCHLUSS MUSS VON EINEM
ZUGELASSENEN ELEKTRIKER ODER EINEM ÄHNLICH
QUALIFIZIERTEN TECHNIKER HERGESTELLT WERDEN.
Die Hausinstallation, an die das Gerät angeschlossen wird, muss
entsprechend den geltenden Normen des Landes ausgeführt
werden, wo dieses zum Einsatz kommt.
Der Hersteller lehnt jegliche Verantwortung für Schäden ab, die
auf Missachtung dieser Bestimmung zurückzuführen sind.
Der Anschluss an die Stromversorgung muss über eine geerdete
Wandsteckdose oder mittels eines omnipolaren Ausschalters mit
einem Öffnungsabstand zwischen den Kontakten von
mindestens 3 mm hergestellt werden.
Der elektrische Anschluss muss durch geeignete Sicherungen
geschützt sein; der Kabelquerschnitt muss groß genug sein, um
eine ordnungsgemäße Stromversorgung des Gerätes zu
ermöglichen.
ANSCHLUSS: Der Ofen ist mit einem Versorgungskabel
ausgestattet, das ausschließlich für eine Spannung von 230 V
WS zwischen den Phasen oder zwischen Phase und Nulleiter
geeignet ist.
Der Anschluss muss entsprechend der Skizze auf der nächsten
Seite ausgeführt werden, nachdem
• die auf dem Zähler angezeigten Einspeisespannung
• und die Auslegung des Ausschalters für den Stromkreis
geprüft worden sind.
Der gelb-grüne Erdungskabel, das an einem Ende an den
Erdungskontakt des Gerätes angeschlossen ist, muss am anderen
Ende mit dem Erdungskontakt der Stromquelle verbunden
sein.
Warnung:
• Vor der Inbetriebnahme lassen Sie die Kontinuität der
Erdverbindung von einem Elektriker überprüfen!
• Der Hersteller kann nicht für Unfälle oder Schäden haftbar
gemacht werden, die auf fehlende oder unsachgemäße bzw.
unterbrochene Erdung zurückzuführen sind.
HINWEIS: Bitte beachten Sie, dass der Ofen ggf. auch einmal
instandgesetzt oder gewartet werden muss. Um diese Arbeiten
zu erleichtern, sorgen Sie dafür, dass die Steckdose sich an
einer Stelle befindet, wo es möglich ist, den Ofen zu bewegen,
ohne die Stromversorgung unterbrechen zu müssen.
Stromkabel: Das Stromkabel darf ausschließlich durch unseren
Kundendienst oder durch einen qualifizierten Servicetechniker
ausgewechselt werden.
29 DE
Page 31

OFENAUSSTATTUNG
Der einfache Rost dient als Unterlage für Bleche und Backformen.
Der Grillrost ist vorrangig zum Ablegen
von Grillstücken vorgesehen. Er wird
zusammen mit dem Soßenfänger
verwendet.
Dank ihres speziellen Profils bleiben
die Roste immer waagerecht, auch
wenn sie bis zum Anschlag
herausgezogen werden.
Die Gerichte können nicht
herunterrutschen oder überlaufen
Der Soßenfänger ist zum Auffangen des
Saftes der Grillstücke bestimmt.
Er kann auf den Rost gestellt, unter ihn
geschoben oder auf die Bodenplatte
gestellt werden. Den Soßenfänger
niemals als Unterlage zum Braten
verwenden.
Dies würde Rauchentwicklung und
Fettspritzer und damit eine schnelle
Verschmutzung des Ofens verursachen.
TELESKOPSCHIENE
Ziehen Sie die Schienen heraus und
legen Sie die Backblechhalterung B hinter
dem Stopper, der sich vorne am Rahmen
befindet, auf.
Vervollständigen Sie den Einbau durch
Auflegen von Rost C und Fettpfanne D
DICHTUNG DER OFENTÜR
Wenn es notwendig ist, sie zu reinigen, benutzen Sie dabei einen
feuchten Schwamm, den Sie vorher in heiße Seifenlösung
eingetaucht haben. Spülen Sie die Dichtungen mit klarem Wasser
und trocknen Sie sie
ZUBEHÖR
Benutzen Sie zur Reinigung der Zubehörteile einen Schwamm
und heiße Seifenlösung. Spülen Sie danach die Teile mit klarem
Wasser und trocknen Sie sie. Vermeiden Sie die Verwendung
von korrosiven Reinigungsmitteln. Auffangschale: Entfernen Sie
nach dem Grillen die Auffangschale aus dem Ofen und gießen
Sie das Fett in einen Behälter. Reinigen und spülen Sie die
Auffangschale in sehr heißem Wasser, verwenden Sie dabei einen
Schwamm und Waschpulver. Sollten an der Auffangschale immer
noch hartnäckige angebrannte Speiserückstände haften
bleiben, so tauchen Sie sie in eine Wasser- und Waschmittellauge.
Die Auffangschale ist spülmaschinenfest; sie kann also auch im
Geschirrspüler oder mit einem handelsüblichen Backofenreiniger
gereinigt werden. Bewahren Sie die verschmutzte Auffangschale
nicht im Ofen auf. Die Auffangschale darf nicht mit Pyrolyse
gereinigt werden.
OFENBELEUCHTUNG
Vor dem Reinigen oder dem Erneuern der Lichtquelle muss
die Stromversorgung ausgeschaltet und der Stecker vom
Netz getrennt werden!
Die Lampe und ihr Gehäuse bestehen aus einem extrem
hitzebeständigen Material.
.
Technische Daten der Lampe:
230 V ~ - 25 W - Base E 14
Temperatur 300°C
Während der Nutzung des Ofens müssen die nicht
gebrauchten Teile aus dem Ofen entfernt werden.
GRILLEN
Zum Grillen empfehlen wir, das Grillgut je nach Größe auf den 3.
oder 4. Gitterrost von unten zu schieben (s. Abb. Seite 34). Fast
alle Fleischsorten eignen sich zum Grillen, mit Ausnahme von
sehr magerem Wild. Vor dem Grillen sollte das Grillgut ein wenig
mit Öl oder Fett bestrichen werden.
DER DREHSPIEß
Bei Zubereitungen mit dem
Drehspieß erfolgt kein
Vorheizen.
Die Tür muss bei Gebrauch
des Drehspießes geschlossen blieben.
GARZEITEN
Auf Seite 34 - 35 finden Sie eine Tabelle, in der Richtzeiten und
Temperaturen zum Braten und Backen verschiedener Speisen
angegeben sind. Durch Ihre persönliche Erfahrung werden Sie
diese Angaben entsprechend Ihrem Geschmack und Ihren
Gewohnheiten anpassen können.
REINIGUNG UND WARTUNG
• Lassen Sie vor dem Reinigen den Backofen abkühlen.
• Benutzen Sie zum Reinigen niemals aggressive
Reinigungsmittel, Scheuerkissen, harte Bürsten oder scharfe
Gegenstände, denn diese könnten die Emailoberfläche der
Ofenwände dauerhaft schädigen.
• Verwenden Sie lediglich eine Seifenlösung oder Bleichmittel
(Ammoniak).
• Legen Sie die Ofenwände nie mit Aluminiumfolie aus, da
es dadurch zu einem Hitzestau kommt, der die Emaille
permanent schädigen könnte.
GLASSCHEIBE
Es wird empfohlen, nach jeder Benutzung mit einem
absorbierenden Papiertuch die Glasscheibe innen abzuwischen.
Sind Flecken vorhanden, können Sie die Scheibe nach dem
Abkühlen des Ofens mit einem Schwamm und einem Glasreiniger
säubern. Benutzen Sie keine scheuernden Reinigungsmittel oder
scharfen bzw. spitzen Gegenstände.
Anweisungen zum Auswechseln
einer defekten oder durchgebrannten
Lampe:
• Entfernen Sie einfach das Glasgehäuse.
• Schrauben Sie die defekte Lampe ab.
• Ersetzen Sie sie mit einer neuen gleichen
Typs: siehe die o.a. technischen Daten.
• Schrauben Sie nach dem Auswechseln
den Schutzdeckel wieder an.
KATALYTISCHES SELBSTREINIGUNGSSET
Der Reinigungsset ist als Zubehör für alle Backöfen erhältlich.
Dank der selbstreinigenden Einsätze für die Innenwände des
Backofens wird das mühselige Reinigen von Hand überflüssig.
Die Fett-, Öl-, Fleischsaft- und Soßenspritzer im Backraum werden
durch ein katalytisches Verfahren während des Backens zersetzt
und in gasförmige Verbindungen umgewandelt. Die MikroporenBeschichtung der Einsätze kann durch größere Fettspritzer verstopft
und die selbstreinigende Wirkung dadurch vermindert werden.
Dies lässt sich jedoch sehr einfach beheben, indem der leere
Backofen auf höchste Hitze eingestellt und ca. 10 bis 20 Minuten
lang aufgeheizt wird. Benutzen Sie keine scheuernden oder
ätzenden Mittel, auch keine Stahlwolle, Schaber oder spitzen
Gegenstände. Chemische Reinigungsmittel können die Poren
des Emailüberzugs verstopfen und so die Reinigungswirkung
verhindern.
Zum Braten von besonders großen bzw. fetthaltigen Bratenstücken
ist es ratsam, einen hohen Bräter zu benutzen. Beim Grillen
empfiehlt es sich, die Fettpfanne zum Auffangen der Bratflüssigkeit
zu benutzen.
Entfernen Sie eventuelle Überlaufreste oder Fettrückstände mit
einem feuchten Lappen oder Schwamm.
Die Emailbeschichtung muss immer porös bleiben, damit die
Reinigungswirkung optimal gewährleistet ist.
HINWEIS: Alle handelsüblichen Selbstreinigungssysteme haben
eine begrenzte Leistungsdauer. Nach ca. 300 Betriebsstunden
des Backofens sollte Ihr Reinigungsset ausgetauscht werden
30 DE
Page 32

REINIGUNG DES BACKOFENS: DIE
PYROLYSE
Die Pyrolyse ist ein Reinigungssystem, das mit dem Einsatz sehr
hoher Temperaturen die Schmutzpartikeln im Backofen verdampfen
lässt und somit entfernt.
Die dabei entstehenden Dämpfe werden beim Durchgang durch
den Katalysatorfilter gereinigt.
Da während der Pyrolysereinigung die Temperatur im Backofen
extrem hoch ist, verriegelt ein Sicherheitsmechanismus die Tür,
so dass sie nicht geöffnet werden kann.
Während der Pyrolyse kann ein leichter Geruch im Raum entstehen,
das je nach Durchlüftung des Raumes unterschiedlich stark
wahrnehmbar ist.
WICHTIG :
- Vor der Pyrolyse:
• Entfernen Sie alle Zubehörteile aus dem Backofen, sie würden
die hohen Temperaturen nicht ohne Schaden überstehen.
• Großflächig übergelaufene Speisen oder große Fettflecken
entfernen. Fettrückstände, besonders wenn sie in großer Anzahl
vorhanden sind, können sich unter Einwirkung der starken
Wärme, die von der Pyrolyse ausgeht, leicht entzünden.
• Schließen Sie die Backofentür.
• Wenn über dem Backofen noch ein Kochfeld installiert ist, dürfen
die Kochstellen (Gasbrenner, Elektroplatten oder Ceranflächen)
während der Pyrolyse nicht benutzt werden, damit sich das
Schaltbrett nicht übermäßig erhitzt.
Backofenreinigungsmittel oder andere handelsübliche
Reinigungsmittel dürfen auf keinen Fall verwendet werden.
Die Pyrolyse hinterlässt auf den Backofenwänden einige weißliche
Rückstände. Warten Sie, bis der Backofen vollständig abgekühlt
ist und reinigen Sie dann das Backofeninnere mit einem feuchten
Schwamm.
Anmerkung:
• Wenn Sie die Pyrolysereinigung direkt nach einem Backvorgang
starten, wird die noch vorhandene Wärme für die Pyrolyse
ausgenutzt, und Sie können so Zeit und Strom sparen.
Der Backofen mit Pyrolyse ist mit einem Kühlgebläse ausgestattet,
damit die Backofenkomponenten vor der Hitze geschützt werden
können. Der Kühlventilator tritt automatisch in Funktion, sobald
in der Mitte des Backofens hohe Temperaturen erreicht werden,
und bleibt noch für einige Minuten nach dem Ende der Pyrolyse
eingeschaltet.
PYROLYSE-FUNKTION STARTEN
Es stehen zwei Pyrolyse-Programme zur Verfügung:
ECO 1:30: Empfohlen für einen normal verschmutzten Backofen.
Dauer 90 Minuten*.
Ende des Pyrolyseprogramms
- Der Backofen schaltet sich automatisch ab. Die Symbole
und blinken.
- Drehen Sie den Wahlschalter für die Backfunktion wieder auf
die Position “0”. Die aktuelle Uhrzeit wird eingeblendet.
- Temperatur fängt an zu sinken. Sobald die Tür entriegelt wird,
erlischt das Symbol
- Das Abkühlventilator dreht weiter und schaltet sich erst dann
ab, wenn alle inneren Bauteile des Backofens ausreichend
abgekühlt sind.
TECHNISCHER KUNDENDIENST
Sollte Ihr Backofen einmal nicht richtig funktionieren, prüfen
Sie zuerst, ob die Stromversorgung gewährleistet ist. Ist die
Ursache der Fehlfunktion nicht ausfindig zu machen, wenden Sie
sich bitte an Ihren zuständigen Werkskundendienst unter Angabe
des Modells und der Seriennummer, die auf dem Typenschild
angegeben sind (s. Abb. 4 letzten Seite). Auf Ihr Gerät gewähren
wir eine Garantie von 24 Monaten ab Kaufdatum. Bewahren Sie
Ihre Kaufrechnung sorgfältig auf und legen Sie sie bei Bedarf als
Garantienachweis dem Kundendienst vor. Die
Garantiebedingungen sind im beigefügten Serviceheft angegeben.
Dieses Elektrohaushaltsgerät ist entsprechend
der EU-Richtlinie 2002/96/CE über Elektro- und
Elektronik-Altgeräte (WEEE) gekennzeichnet.
Bitte sorgen Sie dafür, dass das Gerät
ordnungsgemäß entsorgt wird, damit mögliche
negative Auswirkungen auf Umwelt und
Gesundheit vermieden werden, die bei einer
unsachgemäßen Entsorgung des Altgerätes
entstehen könnten.
Das Symbol auf dem Produkt bedeutet, dass dieses Gerät nicht
in den normalen Hausmüll gehört, sondern den jeweiligen
kommunalen Rücknahmesystemen für Elektro- und ElektronikAltgeräte übergeben werden muss. Die Entsorgung muss im
Einklang mit den geltenden Umweltrichtlinien für die
Abfallentsorgung erfolgen.
Für nähere Informationen über Entsorgung und Recycling dieses
Produktes wenden Sie sich bitte an Ihre kommunalen
Einrichtungen (Umweltamt) oder an die
Abfallentsorgungsgesellschaft Ihrer Stadt bzw. an Ihren Händler.
SUP 2:00: Empfohlen bei starker Verschmutzung des
Backofeninneren. Dauer: 120 Minuten*.
* Die Dauer kann nicht verändert werden.
- Drehen Sie den Wahlschalter für die Backfunktion auf “Pyrolyse”.
Der Buchstabe P auf und die Aufschrift ECO blinkt
- Mit den Einstelltasten " + " und " – " wählen Sie das gewünschte
Pyrolyseprogramm je nach Verschmutzungsgrad des Backofens.
Die Aufschriften ECO und SUP blinken.
- Das Programm wird automatisch nach drei Sekunden bestätigt.
Die Aufschrift (ECO bzw. SUP) leuchtet nun permanent und der
Buchstabe P blinkt. Der Backofen fängt an aufzuheizen. Sobald
eine sehr hohe Temperatur erreicht wird, wird die Backofentür
verriegelt, und das Symbol leuchtet auf.
Sie können das Pyrolyseprogramm auch mit einer Startverzögerung
einstellen, indem Sie die Uhrzeit für das Programmende verändern
(z.B. um die günstigeren Stromtarife am Abend auszunutzen oder
um die Pyrolyse dann zu starten, wenn keine Kinder im Haus
sind). Siehe hierzu den Kapitel “ELEKTRONISCHEN
PROGRAMMIERERS”
31 DE
Page 33

GEBRAUCH DES ELEKTRONISCHEN PROGRAMMIERERS
FUNKTION EINSCHALTEN AUSSCHALTEN FUNKTION NÜTZLICH FÜR
BACKOFENBELEUCHTUNG
UHR
MINUTENZÄHLER
KINDERSICHERUNG
BACKDAUER
Einzustellen auch
beim PyrolyseZyklus
BACKZEITENDE
Einzustellen auch
beim PyrolyseZyklus
• Durch drehen des Knopfes
(1) auf das Symbol
schaltet sich das Licht ein
• Wahlschalter 1 auf Symbol
einstellen
• Uhrzeit einstellen mit den
Tasten und (bei der
Einstellung blinken die
Zahlen im Display)
• Wahlschalter 1 auf Symbol
einstellen
• Die Minutendauer mit den
Tasten und einstellen
(während der Einstellung
blinken die Zahlen im
Display)
• Wahlschalter 1 auf Symbol
bringen. Die Anzeige
blinkt
• Die Tasten und
gleichzeitig für 3 Sekunden
drücken
• Nach Bestätigung hört das
Blinken auf
• Funktion wählen
(Wahlschalter 2)
• Wahlschalter 1 auf Symbol
einstellen
• Backdauer mit den Tasten
und einstellen (bei
der Einstellung blinken die
Zahlen im Display)
• Funktion wählen
(Wahlschalter 2)
• Wahlschalter 1 auf Symbol
einstellen
• Backzeitende mit den
Tasten und einstellen
(bei der Einstellung blinken
die Zahlen im Display
ZEITSCHALTUHR
Uhrzeitanzeige Anzeige Kindersicherung
• Wahlschalter auf das
Symbol bringen
• Nach Ablauf der eingestellten Zeit schaltet sich die
Funktion automatisch ab.
Um vorher zu stoppen, bringen Sie die eingestellte Zeit
auf 0 (Wahlschalter 1 auf
Symbol und Tasten
und betätigen)
• Tasten und
gleichzeitig 3 Sekunden
lang drücken
• Die Kontrollanzeige blinkt
• Am Ende der eingestellten
Backdauer schaltet sich
die Funktion automatisch
aus. Um vorher zu stoppen, muß der Backofen
abgeschaltet oder die
Backdauer auf 00:00
eingestellt werden (Wahl
schalter 1 auf Symbol
und Tasten und
betätigen)
• Zu der eingestellten Uhrzeit
schaltet sich die Funktion
automatisch ab. Um vorher
zu stoppen, muß der
Backofen abgeschaltet
werden (Wahlschalter 2
auf Symbol bringen)
• Stellt die Uhrzeit der Uhr
ein
• Es ertönt ein Alarmsignal
nach der eingestellten
Zeitdauer
• Der Backofen ist gesperrt
(keine Einstellung möglich,
auch nicht durch Drehen
der Wahlschalter)
• Speichert das Ende der
Backzeit.
• Nach der Einstellung
Wahlschalter 1 auf Symbol
bringen, um die aktuelle
Uhrzeit zu sehen
• Um die eingestellte Back-
dauer zu sehen, Wahlschalter 1 auf Symbol
stellen
• Speichert das Ende der
Backzeit.
• Nach der Einstellung
Wahlschalter 1 auf Symbol
bringen, um die aktuelle
Uhrzeit zu sehen
• Um die eingestellte Backdauer zu sehen, Wahlschalter 1 auf Symbol
stellen
• Zum Überprüfen des
Backofens, wenn er
ausgeschaltet ist
• Zur Uhrzeiteinstellung
durch die Tasten und
Bei der Einstellung blinken
die Zahlen im Display.
Achtung: immer zuerst
durchzuführen nach der
Erstinstallation bzw. nach
einem Stromausfall (zu
erkennen an der blinkenden Uhrzeitanzeige
12:00)
• Als Minutenzähler sehr
nützlich
• Diese Funktion ist unabhängig vom Betrieb des
Backofens (kann also
auch bei ausgeschaltetem Backofen benutzt
werden)
• Wenn die Funktion bei
ausgeschaltetem Backofen
aktiviert wird, kann der
Backofen nicht eingeschaltet werden
• Bei eingeschaltetem
Backofen können die
Einstellungen nicht verändert werden
Achtung: der Backofen
kann trotzdem ausgeschaltet werden durch
Drehen des Wahlschalters
2 auf die Position 0
• Nach Ende der eingestellten Backdauer schaltet
sich der Backofen automatisch ab und es ertönt
einige Sekunden lang ein
akustisches Signal
• Diese Funktion wird zusammen mit der Backdauer benutzt. Z.B. soll Ihre
Speise 45 Minuten backen
und um 12:30 fertig sein.
Wählen Sie die zuerst die
Backfunktion, dann Backzeitdauer 45 Minuten
einstellen, dann Backzeitende 12:30 eingeben
Der Backofen startet
automatisch um 11:45
(12:30 minus 45 Min.) und
schaltet sich dann zu der
eingestellten Zeit ab
Achtung: wenn Sie nur
das Backzeitende und
nicht auch die Dauer
einstellen, fängt der
Backofen sofort an zu
arbeiten und stoppt zu
der eingestellten Zeit.
Einstellung Funktionen
Zeitschaltuhr
Das Programm führt bei jeder Einstellung einige Kontrollen durch.
Es kann dadurch eine kurze Verzögerung beim Programmstart
erfolgen.
Einstellungstasten
HINWEIS
Das erste, was nach der Installation des Ofens
oder nach der Unterbrechung der
Stromversorgung (die am blinkenden Display
mir der Anzeige 12:00 zu erkennen ist) gemacht
werden muss, ist die Einstellung der korrekten
Uhrzeit.
32 DE
Page 34

BEDIENUNGSANLEITUNG
Uhrzeitanzeige
Einstellung Funktionen
Zeitschaltuhr
Anzeige funktionen
Zeitschaltuhr
Anzeige Kindersicherung
P
DF
DF
P
Temperaturdisplay
Einstellung Funktionen
Backofen
Anzeige
Backofen
Einstellungstasten
• Wenn die Uhr nicht eingestellt wird, kann der Backofen nicht funktionieren und auf dem Display blinkt die Uhrzeit 12:00
Um den Backvorgang zu starten, wählen Sie die gewünschte Backfunktion mit dem Wahlschalter 2. Im Display leuchtet das entsprechende
Symbol auf und die voreingestellte Temperatur erscheint blinkend im Temperaturdisplay. Wenn Sie die Temperatur verändern möchten,
betätigen Sie die Tasten bzw. .Nach einigen Sekunden tritt der Backofen in Funktion, aber es ist möglich, die Zeitschaltuhr für
einen zeitverzögerten Start einzustellen (siehe hierzu den Kapitel “Zeitschaltuhr”).Das Symbol für die Backfunktion blinkt so lange, bis
der Backofen die im Display angezeigte Temperatur erreicht hat. Danach hört es auf zu blinken und es ertönt ein Signalton.
HINWEIS: Es ist möglich, den Backofen durch Drehen des Wahlschalters 2 auf die Position jederzeit abzuschalten.
Symbol
voreingestellte
Temperatur
220° C
Prüfprogramm gemäß CENELEC EN 50304 zur Feststellung
der Energieeffizienzklasse
210° C
Prüfprogramm gemäß CENELEC EN 50304
mögliche
Einstellung
50°-280° C
50°-240° C
Funktion
Je nach eingestellter Temperatur wählt der Backofen automatisch die optimale
Betriebsfunktion
Ober-/Unterhitze
Das obere und das untere Heizelement sind im Betrieb. Für traditionelles Garen,
ausgezeichnet geeignet zum Braten von Keulen, Wildbret, ideal für Plätzchen, Kekse
und Bratäpfel und für alle Speisen, die schön knusprig werden sollen. Gute Ergebnisse
werden beim Braten auf nur einer Schiene bei Einstellung
Umlufthitze
Die obere und die untere Heizung sowie der Ventilator sind im Betrieb. Diese Funktion
eignet sich zum Garen von Geflügel, Fisch, zum Backen von Brot usw. Da sie eine
gute Verteilung der Hitze ermöglicht, können auf einer breiten Fläche Speisen aller
Art zubereitet werden.
DF
P
210° C
60° C
40° C
210° C
210° C
50°-240° C
180°-240° C
180°-230° C
Unterhitze mit Umluft
Sehr geeignet für feine Backwaren (Kuchen, Soufflés)
Warmhalten
Die obere und die untere Heizung sind wechselnd im Betrieb. Der Ventilator läuft.
Die Temperatur ist auf 60°C voreingestellt (für diese Funktion kann man die
Betriebstemperatur nicht verändern). Ideal zum Warmhalten der fertig gegarten
Speisen, ohne sie zu zerkochen. Auch sehr praktisch für das Erwärmen von Geschirr.
Auftauen
Die untere und die obere Heizung und der Ventilator sind wechselnd im Betrieb. Die
Temperatur ist auf 40°C voreingestellt (für diese Funktion kann man die
Betriebstemperatur nicht verändern). Diese Funktion ermöglicht ein schnelles Auftauen
direkt vor dem Garen.
Traditionelles Grillen bei geschlossener Tür
Bei dieser Funktion ist die Infrarot-Grillheizung in Betrieb. Ideal für das Grillen von
Fleischstücken kleiner und mittlerer Größe (Würste, Rippchen, Bacon)
Umluftgrill bei geschlossener Tür
Die von der Grillheizung erwärmte Luft wird durch den Ventilator auf die Speisen
umgewälzt bei einer Temperatur zwischen 180 und 230°C. Der Umluftgrill ersetzt
hervorragend den Drehspieß und ermöglicht beste Ergebnisse bei Geflügel, Würsten
und rotem Fleisch auch in größeren Mengen
Grill mit Drehspieß
Einschaltung der Grillheizung und des Bratspießmotors.
Dient zum Braten am Spieß.
Drehspieß mit Umluft.
Benutzen Sie den Turbogrill bei geschlossener Tür. Die Grillheizung wird zusammen
mit dem Umluftventilator und dem Drehspieß aktiviert. Diese Funktion verhindert das
Austrocknen der Speisen
Es stehen zwei Kombifunktionen zur Verfügung, die mit den Tasten und eingestellt
werden können. Die gewählte Funktion erscheint auf dem Display und wird nach 3
Sekunden bestätigt.
DF1: Auftauen bei 40°C (30 Minuten) + Umlufthitze bei 200°C (45 Minuten)
DF2: Umlufthitze bei 200°C (45 Minuten) + Warmhalten bei 60°C (60 Minuten)
Die Backdauer der Umlufthitze kann verändert werden, indem der Wahlschalter für
die Backfunktion auf (Symbol Backdauer) gebracht wird. Die Dauer für das
Auftauen und das Warmhalten können dagegen nicht verändert werden.
Die Temperatur der Umlufthitze kann nur dann verändert werden (Tasten bzw. ),
wenn diese Funktion aktiv ist (Symbol leuchtet im Display).
Pyrolyse, siehe entsprechendes Kapitel
33 DE
Page 35

TIPPS FÜR DIE ZUBEREITUNG
Folgende Tipps bezüglich Backtemperatur und Backzeit sollen nur als Empfehlung betrachtet
werden und lediglich dazu dienen, Ihnen den Gebrauch des Ofens zu erleichtern. Die
persönliche Erfahrung, sowie Ihr Geschmack und Ihre Gewohnheiten werden Ihnen dazu
verhelfen, die optimalen Werte für Ihre Gerichte herauszufinden.
Bitte beachten Sie, dass je höher die Zubereitungstemperatur ist, desto höher das Risiko
einer Verschmutzung der Innenwände des Backofens ist, wodurch es zu Rauchentwicklung
kommt. Es ist deshalb in den meisten Fällen empfehlenswert, die Zubereitungstemperatur
leicht zu reduzieren, selbst wenn dadurch eine eventuelle Verlängerung der Garzeit
einzukalkulieren ist.
FISCH
Gerichte
Ziegelfisch
oder Brasse
Seeteufel
oder Lachs
Schollenfilet 160° C115-20 Min6 Stück
Betriebsart
Oberhitze/Unterhitze
Oberhitze/Unterhitze
Umluft
Menge
1kg ganz 220° C130 Min
1kg geschmort 220° C130 Min
Zubereitungs-
temperatur in °C
Die Seiten des Ofens sind mit
verschiedenen, von unten an
nummerierten Einschubebenen
versehen.
Zubereitungs-
dauer
Einschubebene
von unten
Grillfisch
Grill
6 Filets MAX 42x5 Min
GEMÜSE UND SONSTIGES
Gerichte
Schichtkohl,
geschmort
Ragout in Teigmantel 200-220° C 1 Stunde/kg
Chicorée mit
Gruyere-Käse
Süßes oder
pikantes Soufflé
Gefüllte
Tomaten
Lauch- oder
Porreekuchen
Quiche Lorraine 6 Pers. 45-50 Min
Bohneneintopf mit
Käse überbacken
Steingutgeschirr
Betriebsart
Oberhitze/Unterhitze
Oberhitze/Unterhitze
Umluft
Umluft
Umluft
Umluft mit hunterhitze
Umluft mit hunterhitze
Turbogrill
Menge
6 Pers. 200-220° C
6 Pers. 25-30 Min
6 Pers.
6-8 Stück 200-220° C
6 Pers.
Zubereitungs-
temperatur in °C
180-200° C
180-200° C 50-60 Min
220° C 35-40 Min
220° C
200° C6 Portionen 45 Min
Zubereitungs-
dauer
1 Stunde
40-45 Min
Tipps
Ø 22
Alle Backvorgänge erfolgen auf der Einschubebene 1, mit Ausnahme der mit ‘*’ angegebenen Gerichte, bei denen der Gitterrost in
die mittlere Einschubleiste eingeschoben werden muss.
34 DE
Page 36

FLEISCH
Die Gerichte sollten erst nach Abschluss des Zubereitungsprozesses gesalzen werden, da Salz die Ausscheidung von Fett aus dem
Fleisch fördert und somit Spritzer und Rauchentwicklung im Ofeninneren verursachen kann.
Für die Zubereitung von Braten aus weißem Fleisch (Schwein, Kalb, Lamm) sowie Fisch sollte der Ofen nicht vorgewärmt werden. Die
Zubereitung dauert dadurch länger als in einem vorgeheizten Ofen, jedoch wird das Fleisch in der Mitte besser durchgegart, da die
Hitze langsamer in das Fleischstück ein- und vordringt.
Ein korrektes Vorheizen ist die Voraussetzung für beste Ergebnisse beim Zubereiten roter Fleischarten.
GRILL:
• Vor dem Grillen: nehmen Sie das Grillgut einige Stunden vor dem Grillen aus dem Kühlschrank. Es ist zu empfehlen, es auf mehrlagiges
Saugpapier zu legen: Dadurch wird überflüssiges Wasser entfernt, der Geschmack kommt besser zur Geltung und das Fleisch wird
gut durchgegart. Bestreuen Sie das Grillgut vor dem Grillen mit Pfeffer und Gewürzen, salzen Sie aber erst nach
der Zubereitung. Somit kann es besser geschnitten werden und saftig bleiben. Bepinseln Sie das Grillgut mit ein wenig Öl. Benutzen
Sie dazu am besten einen breiten Flachpinsel.
Danach würzen Sie das Fleisch mit noch mehr Pfeffer und Kräutern (Thymian usw.).
Sie können jetzt das Grillgut in den Ofen legen.
• Während des Grillens: stechen Sie nie das Grillgut während des Grillens ein, auch nicht, wenn Sie es drehen. Der
Saft würde sonst austreten und das Fleisch somit stärker austrocknen.
Gerichte
Ente
Truthahn 5-6 kg 2 bis 3 Stunden
Gans 160-180° C3-4 kg
Lammkeule 200-220° C 15 Min/Pfund
Grillhähnchen
Roast beef
Kaninchenbraten 50-60 Min
Rindfleisch
Lamm /
Hammelfleisch
Kebab MAX 2x8 Min
Schweinekotelett
Betriebsart
Oberhitze/Unterhitze
Oberhitze/Unterhitze
Oberhitze/Unterhitze
Oberhitze/Unterhitze
Oberhitze/Unterhitze
Oberhitze/Unterhitze
Umluft
Braten mit Drehspieß
Braten mit Drehspieß
Grill
Grill
Menge
1,5 kg 200-220° C 2 Stunden
1-1,5 kg
200 g - 1 kg
1 kg
1 kg
6 Stück
6 Stück
Zubereitungs-
temperatur in °C
160-180° C
220° C ca. 1 Stunde
240° C 15 Min/Pfund
200-220° C
MAX 15-20 Min
MAX
MAX 2x8 Min
Zubereitungs-
dauer
1
2
1
2
1
2 bis 2 Stunden
2
20-25 Min
Tipps
kein Vorheizen
kein Vorheizen
Nach der Hälfte
der Kochzeit wenden
Nach der Hälfte
der Kochzeit wenden
Für die Zubereitung aller o.a. Gerichte soll die Ablage auf Position "1" gelegt werden.
BACKEN (für Kuchen und Pasteten):
Vermeiden Sie die Verwendung von glänzenden Backformen: sie reflektieren nämlich die Hitze und können dadurch das
Backgut verderben. Falls Ihr Kuchen zu schnell bräunt, decken Sie ihn mit einer Lage fettbeständigem Papier oder Aluminiumfolie ab.
Achtung! Verwenden Sie die Aluminiumfolie richtig: Sie ist so auf das Backgut zu legen, dass deren glänzende Seite zum Backgut
hin gerichtet ist (matte Seite nach oben); anderenfalls wird die Hitze von der glänzenden Oberfläche nach außen
reflektiert und kann nicht in das Backgut eindringen. Vermeiden Sie es, die Backofentür in den ersten 20 bis 25 Minuten der Zubereitung
zu öffnen; Biskuitkuchen, Souffles und Brötchen könnten sonst einsinken.
Um zu überprüfen, ob der Kuchen fertig ist, stechen Sie ihn mit einer Messerklinge oder einer metallischen Stricknadel ein: Ist sie beim
Herausziehen sauber und trocken, dann ist der Kuchen durch und Sie können das Backen beenden. Sollte das Messer oder die Nadel
dagegen feucht oder sollte noch Teig daran haften geblieben sein, ist der Garvorgang fortzusetzen, allerdings mit
leicht verminderter Temperatur, so dass das Backgut nicht weiter gebräunt wird.
Gerichte
Hefegebäck 200° C 40-45 Min
Biskuit
Rosinenkuchen
Brandteig 40 Stück 35 Min
Mürbeteig 20-30 Min
Blätterteig
Baiser
Obstkuchen
Betriebsart
Umluft
Umluft
Umluft
Umluft
Umluft
Umluft
Umluft mit hunterhitze*
Umluft mit hunterhitze*
Menge
800 Gramm
6 Stück Ø 271
6 Stück
1 Tablett 80-85° C 4 Stunden
6 Pers. 220° C 35-40 Min
Zubereitungs-
temperatur in °C
180-200° C
180-200° C 30-35 Min
190° C
180-200° C
200° C 15-20 Min
Zubereitungs-
dauer
35-40 Min
1
2
Einschubleiste
von unten
1
1
1
1
1
1
Tipps
Formen Ø 27
2 Ablagen
Ø 27
Windbeutel1 / 3
z.B.
* Betriebsart "Umluft mit Unterhitze"; damit Sie Zeit sparen können, empfehlen wir das Vorwärmen mit Betriebsart "Oberhitze / Unterhitze".
35 DE
Page 37

INDICAÇÕES DE CARÁCTER GERAL
• Ler atentamente este manual, para poder tirar todo o partido do forno. Aconselhamos que este manual seja guardado para posterior
consulta e que nele seja anotado, antes da instalação do aparelho, o respectivo número de série para os casos em que, eventualmente,
seja necessário recorrer à intervenção do Serviço Após Venda..
• Não guardar produtos inflamáveis no forno; podem inflamar-se
por activação involuntária do forno.
• Não se apoie nem deixe que as crianças se sentem na porta
do forno.
• Utilizar luvas térmicas de cozinha, para introduzir ou retirar
qualquer recipiente do forno. Keep packing materials such as
plastic bags, polystyrene, or nails out of the reach of children
because they are dangerous for children.
Declinamos eclinamos toda a responsabilidade em caso de
incumprimento das instruções deste manual.
DECLARAÇÃO DE CONFORMIDADE:
• Os componentes utilizados neste electrodoméstico que podem
entrar em contacto com géneros alimentares satisfazem o
disposto na directiva da CEE 89/109.
Além disso, este electrodoméstico satisfaz o disposto nas
directivas da CEE 89/336/CEE, 73/23/CEE e alterações
subsequentes das mesmas.
Depois de ter retirado o seu forno da embalagem, certifiquese de que ele não apresenta qualquer tipo de danos. Se tiver
qualquer dúvida, não o utilize e entre em contacto com um
técnico qualificado.
Mantenha os materiais utilizados na embalagem, como, por
exemplo, sacos de plástico, poliestireno ou pregos, fora do
alcance das crianças; estes materiais podem constituir fontes
de perigo para as crianças.
INFORMAÇÃO SOBRE SEGURANÇA
O forno só deverá ser utilizado para o fim para que foi concebido,
ou seja, o forno só deverá ser utilizado para cozinhar alimentos.
Todo e qualquer outro tipo de utilização, como, por exemplo,
para aquecer o ambiente, é considerada uma forma imprópria
de utilizar o forno e, consequentemente, é considerada perigosa.
O fabricante declina toda e qualquer responsabilidade por
quaisquer danos provocados por uma utilização imprópria,
incorrecta ou irrazoável do forno.
Sempre que utilizar um aparelho eléctrico, deverá observar
determinadas regras básicas.
Não puxe pelo cabo para desligar a ficha do aparelho da
tomada de alimentação de energia.
Não toque no forno com mãos ou pés molhados ou húmidos.
Nunca utilize o forno quando estiver descalço.
Não permita que crianças ou adultos irresponsáveis utilizem
o forno, salvo sob a supervisão de alguém responsável.
Normalmente nunca é boa ideia utilizar adaptadores, fichas
múltiplas e extensões.
Se o forno se avariar ou ficar defeituoso, desligue-o, retirando
a ficha do respectivo cabo de alimentação de energia da
tomada, e não lhe toque.
Se o cabo de alimentação de energia apresentar qualquer tipo
de dano, ele terá de ser imediatamente substituído. Ao proceder
à substituição do cabo siga estas instruções.
Desmonte o cabo de alimentação de energia danificado e
substitua-o por um HO5RR-F, H05VV-F, H05V2V2-F
apto a suportar a corrente eléctrica de que o forno necessita.
A substituição do cabo deverá ser sempre levada a cabo por
um técnico devidamente qualificado.
O cabo de ligação à terra (amarelo/verde) tem de ter um
comprimento 10 mm superior ao comprimento do cabo de
alimentação de energia.
Sempre que o seu forno necessitar de ser reparado, recorra
exclusivamente a um serviço de assistência técnica aprovado;
certifique-se sempre de que só são utilizadas peças
sobressalentes originais. Se estas instruções não forem
cumpridas, o fabricante não poderá assegurar a segurança
do forno.
• O forno que acaba de adquirir tem características técnicas
bem definidas e, por isso, não pode sofrer quaisquer
modificações.
• A porta do forno integra vários vidros para evitar o risco de
queimadura quando em funcionamento. Todavia, aconselhamos
a manter as crianças afastadas.
Placa de identificação (ao lado do forno)
• Nunca limpar o forno com aparelhos a vapor ou a alta pressão.
• Se o forno apresentar qualquer avaria, não o ligar ou desligá
lo da corrente e contactar directamente os serviços técnicos
acreditados pelo fabricante.
RECOMENDAÇÕES
• Sempre que o forno for utilizado, fazer uma pequena limpeza
para que este se mantenha em perfeitas condições.
• Não forrar as paredes do forno com folha de alumínio ou com
qualquer protecção descartável vulgarmente à venda, pois pode
fundir em contacto directo com o esmalte quente e danificar o
forno.
• Para evitar que o forno se suje excessivamente e também o
fumo e cheiro que daí podem resultar, não o usar a temperaturas
demasiado altas. É preferível demorar mais o tempo e baixar
um pouco o nível térmico.
• Para além dos acessórios fornecidos conjuntamente com o
forno, aconselhamos a utilizar apenas recipientes resistentes
a altas temperaturas
.
INSTALAÇÃO
Compete ao cliente proceder à instalação do forno. O fabricante
não tem qualquer obrigação de proceder à instalação do forno.
Se for necessária assistência técnica do fabricante para repar
avarias ou defeitos resultantes de uma instalação incorrecta do
forno, esta assistência técnica não está coberta pela garantia.
A instalção deve ser efectuada segundo as instruções dos técnicos
qualificados. Uma instalação incorrecta do forno pode causar
danos em pessoas, animais ou objectos. Neste caso, o fabricante
não poderá ser responsabilizado por esses danos.
O móvel em que o forno vai ser encastrado devem ser resistente
a temperaturas de 70°C no mínimo.
O forno pode ser encaixado por baixo de uma bancada ou
colocado em plano superior em coluna adequada.
Antes da fixação fixação: É indispensável certificar-se de que
o nicho de encastramento tem bom arejamento, para circulação
do ar frio necessário à refrigeração e à protecção dos
órgãos internos. Para isso, fazer a uma abertura própria, conforme
indicado na página 43, consoante com o tipo de encastramento.
LIGAÇÃO ELÉCTRICA
A LIGAÇÃO ELÉCTRICA DO FORNO DEVE SER EFECTUADA
POR UM INSTALADOR ACREDITADO OU POR UM TÉCNICO
COM QUALIFICAÇÃO SEMELHANTE.
A instalação eléctrica a que o forno vai ser ligado deve estar de
acordo com as normas vigentes no país de instalação.
O fabricante declina a sua responsabilidade em caso de
incumprimento desta exigência.
A ligação à rede deve ser feita através de tomada de corrente com
ligação à terra ou através de um dispositivo de corte omnipolar,
com uma distância de abertura dos contactos de pelo menos 3mm.
A instalação deve obrigatoriamente ser protegida por fusíveis
apropriados e possuir fios com secção suficiente para a alimentação
normal do aparelho
LIGAÇÃO:
Este aparelho tem um cabo de alimentação que permite apenas
a sua ligação a corrente de 230 V~, entre fases ou entre fase e
neutro.
36 PT
Page 38

A ligação deve ser efectuada de acordo com o esquema da página
seguinte, depois de verificada:
. a tensão de alimentação do contador,
. a regulação do disjuntor.
O fio de protecção do cabo (verde/amarelo), ligado ao borne Terra
do aparelho, deve ser ligado ao borne Terra da instalação.
Atenção:
• Mandar verificar por um profissional a continuidade da
terra da instalação, antes de proceder à ligação.
• Declinamos qualquer responsabilidade por acidentes ou
pelas suas eventuais consequências, em caso de não
ligação à terra do aparelho ou por ligação a terra com
deficiente continuidade.
NOTA: Não esquecer que o aparelho pode necessitar de qualquer
intervenção por parte do Serviço Após Venda. Por isso, mandar
colocar a tomada de corrente de forma a poder ligar-se
o forno, quando fora do nicho.
Cabo de alimentação: Se for necessário, substituir o cabo de
alimentação; essa substituição deve ser efectuada pelo Serviço
Após Venda ou por pessoas com qualificação idêntica.
EQUIPAMENTO DO FORNO
A grelha simples serve de suporte para formas, travessas, etc.
A grelha porta-recipientes serve
mais particularmente para grelhados;
associa-se ao tabuleiro de recolha de
sucos.
Devido ao seu perfil especial, as
grelhas permanecem na horizontal
mesmo quando puxadas ao máximo
para o exterior, pelo que não existe
qualquer risco do recipiente que
contêm escorregar ou transbordar.
O tabuleiro buleiro de recolha de
sucos serve para aparar o suco dos
grelhados. Pode ser colocado por cima
da grelha ou introduzido nas calhas.
Só se utiliza com o Grelhador, o Espeto
ou o Turbogrelhador. Nos outros
modos de cozedura deve ser retirado
do forno. Nunca utilizar este tabuleiro
como recipiente para assar, pois
causaria salpicos de gordura e fumos,
e rapidamente sujaria o forno.
Faça deslizar as calhas para o exterior,
e coloque o suporte da prateleira B
por detrás do travão colocado na parte
frontal do kit.
Complete a montagem inserindo a
prateleira C e o tabuleiro D
Durante a utilização do forno, os acessórios não usados
devem ser retirados do forno.
GRELHAR
O grelhador do forno permite-lhe cozinhar rapidamente os
alimentos, dando-lhes um atraente tom acastanhado.
Para gratinar os alimentos, recomendamos que coloque a prateleira
no quarto nível; este posicionamento da prateleira dependerá
naturalmente da quantidade de alimentos, pelo que recomendamos
que consulte a fig. na página 41.
Quase todos os alimentos podem ser cozinhados com o grelhador,
à excepção de caça muito magra e de rolos de carne.
As carnes e os peixes a serem grelhados deverão ser previamente
ligeiramente untados com óleo ou outra gordura.
ESPETO
Não é preciso pré-aquecer o
forno para utilizar o espeto.
Os cozinhados no espeto
fazem-se com a porta fechada.
TEMPOS DE COZEDURA
Para saber quais os tempos de cozedura recomendados para
cozinhar os alimentos, quando utilizar o forno pela primeira vez,
recomendamos que consulte as tabelas constantes na páginas
41, 42. Quando adquirir mais experiência do modo de
funcionamento do seu forno, poderá querer alterar os tempos
indicados segundo o seu gosto.
LIMPEZA DO FORNO
• Esperar que o forno arrefeça, antes de proceder à sua
limpeza manual.
• Nunca utilizar produtos abrasivos, esfregões de arame ou
objectos cortantes, para limpar o forno, pois danificariam
irremediavelmente o esmalte.
• Utilizar apenas água e sabão ou produtos líquidos
amoniacais.
A PARTE ENVIDRAÇADA
Sempre que o forno for utilizado, aconselhamos a limpar o vidro
da porta com papel absorvente. Se houver demasiados salpicos,
pode limpar depois com uma esponja seca e detergente. Nunca
utilizar produtos abrasivos ou objectos cortantes.
A JUNTA DA PORTA DO FORNO
Se estiver muito suja, limpá-la com uma esponja ligeiramente
húmida.
OS AC ACESSÓRIOS ESSÓRIOS
Limpá-los com uma esponja embebida em água e sabão. Enxaguar
com água limpa e secar. Evitar produtos abrasivos.
O TABULEIRO DE RECOLHA DE SUCOS
Depois de grelhar, retirar do forno este tabuleiro. Ter o cuidado
de deitar a gordura num recipiente. Lavar e enxaguar o tabuleiro
de recolha de sucos com água quente, utilizando
uma esponja com detergente.
Se os resíduos ficarem colados, mergulhá-lo em água com
detergente. Também pode ser limpo na máquina de lavar ou com
um dos produtos habitualmente vendidos para este fim.
Nunca voltar a utilizar, no forno, o tabuleiro de recolha de sucos
sujo. Nunca utilizar o processo de pirólise no tabuleiro de recolha
de sucos.
LUZ DO FORNO
Desligar o aparelho da corrente, antes de fazer qualquer operação
de limpeza ou de substituição.
A lâmpada e a respectiva tampa são de material resistente a
temperaturas bastante altas.
Características da lâmpada:
230 V~ - 25 W - Casquilho E 14
Temperatura 300°C
Para substituir uma lâmpada fundida,
basta:
. desapertar a tampa de vidro,
. desapertar a lâmpada,
. substituí-la por outra idêntica (ver
características acima),
. após substituição da lâmpada, voltar a
apertar a tampa de vidro que serve de
protecção
FORNO AUTO-LIMPANTE COM
REVESTIMENTO CATALÍTICO
Tem à sua disposição, como acessórios extra, painéis especiais,
auto-limpantes, revestidos por uma camada micro-porosa. Estes
painéis existem para todos os modelos. Uma vez instalados estes
painéis, deixa de ser necessário limpar manualmente o interior
do forno.
A gordura que salta para as paredes laterais do forno quando são
assados ou grelhados alimentos é eliminada pela camada microporosa, que decompõe a gordura por meio de catálise e a
transforma em gás.
No entanto, um excesso de salpicos de gordura poderá entupir
os poros e, por isso, impedir a auto-limpeza. Para repor a
capacidade auto-limpante, basta ligar o forno vazio à temperatura
máxima, durante cerca de 10 a 20 minutos.
Nunca utilize produtos abrasivos, esfregões de metal, objectos
afiados, panos rugosos ou produtos químicos ou detergentes que
possam danificar permanentemente o revestimento catalítico do
seu forno.
Quando pretender assar alimentos gordos, o ideal será utilizar
tabuleiros de paredes altas e colocar um tabuleiro por baixo da
grelha, para apanhar a gordura excessiva.
37 PT
Page 39

Se as paredes interiores do forno estiverem coberta por uma
camada de gordura tão espessa que o revestimento catalítico já
não é eficaz, remova o excesso de gordura com um pano macio
ou uma esponja embebido(a) em água quente.
Para que a limpeza automática possa ser levada a cabo com
eficácia é necessário que o revestimento catalítico do interior do
forno esteja poroso.
N.B.: Todos os revestimentos catalíticos actualmente disponíveis
no mercado têm uma vida útil de cerca de 300 horas. Por isso,
deverão ser substituídas de 300 em 300 horas de utilização.
LIMPEZA DO FORNO: PIRÓLISE
A pirólise é um método de limpeza que recorre a temperaturas
elevadas para destruir a sujidade.
O fumo resultante é eliminado através a passagem de um
catalizador. A porta do forno dispõe de um fecho de segurança
que a impede de ser aberta durante a pirólise, tendo em vista as
temperaturas elevadas que são necessárias. A realização do ciclo
de pirólise poderá dar azo à presença de um cheiro ligeiro na
cozinha, que será mais ou menos notório conforme o arejamento
da mesma.
IMPORTANTE:
Antes de levar a cabo a pirólise:
• Remova todos os acessórios do forno, a fim de evitar que
sejam danificados pelas temperaturas elevadas registadas durante
a pirólise.
• Limpe todos os derrames de alimentos de maiores
dimensões ou os restos de alimentos de grandes dimensões
que demorariam demasiado tempo a ser destruídos pela pirólise.
Na verdade, eventuais acumulações de grande quantidade
de gordura poderão incendiar-se devido ao calor intenso
produzido durante a pirólise.
• Feche a porta do forno.
. Se tiver uma placa de cozedura instalada por cima do forno,
nunca utilize os queimadores a gás ou as chapas eléctricas
durante a pirólise para evitar um aquecimento excessivo do
painel de comandos do forno.
. O fabricante recomenda vivamente que nunca utilize
detergente ou quaisquer outros produtos recomendados para
a limpeza de fornos.
•
A pirólise deixa um resíduo branco nas paredes do forno. Espere
que o forno arrefeça completamente e, em seguida, limpe o interior
do forno com uma esponja húmida, para eliminar estes resíduos.
Observações:
•
Poupará energia se limpar o forno imediatamente a seguir a
utilizá-lo, tirando desta forma partido do calor residual acumulado
no interior do forno.
• A ventoinha de refrigeração entra em funcionamento assim que
a pirólise se inicia.
• A ventoinha de refrigeração só deixa de trabalhar quando os
componentes do forno tiverem arrefecido o suficiente.
COMO ACTIVAR O CICLO DE PIRÓLISE:
Tem dois ciclos à sua disposição:
ECO 1:30 Para um forno normalmente sujo. Este ciclo tem uma
duração de 90 minutos*.
SUP 2:00 Para um forno muito sujo. Este ciclo tem uma duração
de 120 minutos*.
* Estas durações não podem ser alteradas.
- Rode o botão de selecção de funções para a posição “P”. O
símbolo “P” acende-se e no visor é apresentada a palavra “ECO”,
que fica a piscar.
- Seleccione o ciclo de pirólise pretendido com as teclas “+" ou
"–“. No visor é apresentada a palavra “ECO” ou “SUP", que fica
a piscar.
- A selecção é automaticamente confirmada depois de passados
3 segundos. A palavra “Eco” (ou a palavra “SUP") fica acesa no
visor, sem piscar, e o símbolo “P” fica a piscar. O forno começa
então a subir a temperatura registada no seu interior. Quando
a temperatura atinge o valor elevado necessário, a porta fica
bloqueada e o símbolo acende-se.
Se quiser, pode optar por seleccionar um arranque retardado.
Para o fazer, consulte o capítulo “UTILIZAÇÃO DO
PROGRAMADOR ELECTRONICO”
Uma vez concluído o ciclo de pirólise:
- O forno desliga-se automaticamente. Os símbolos e ficam
a piscar.
- Rode o botão de selecção de funções para a posição “0”.
- A temperatura registada no interior do forno baixa. Quando a
porta do forno fica desbloqueada, o símbolo apaga-se.
- A ventoinha de refrigeração só deixa de trabalhar depois de os
componentes do forno terem atingido uma temperatura
suficientemente baixa.
ASSISTÊNCIA TÉCNICA
Antes de telefonar para a assistência técnica
Se o forno não estiver a trabalhar, recomendamos que:
- verifique se o forno está devidamente ligado à corrente (ficha
correctamente introduzida na tomada).
Se lhe for impossível detectar a causa da avaria:
desligue o forno da corrente, não o tente reparar e ligue para
os serviços de assistência técnica.
Antes de ligar para os serviços de assistência técnica, porém,
tome nota do número de série do forno, constante da respectiva
placa de características (vide a figura na página 43).
Este electrodoméstico está marcado de acordo
com o disposto na directiva europeia 2002/96/CE
relativa aos resíduos de equipamentos eléctricos
e electrónicos (REEE).
Ao assegurar que este produto seja
correctamente eliminado, estará a prevenir
eventuais consequências negativas para o
ambiente e para a saúde, que, de outra forma,
poderiam resultar de um tratamento incorrecto
deste produto, quando eliminado.
O símbolo patente neste produto indica que ele não pode ser
tratado como lixo doméstico. Em vez disso, deve ser entregue
no centro de recolha apropriado, para reciclagem do equipamento
eléctrico e electrónico.
A eliminação deste produto deve ser levada a cabo de acordo
com os regulamentos localmente aplicáveis à eliminação e ao
tratamento de lixo e resíduos.
Para obter informações mais detalhadas sobre o tratamento, a
recuperação e a reciclagem deste produto, agradecemos que
entre em contacto com a entidade municipal competente, com
o serviço de eliminação de lixos e resíduos ou com o
estabelecimento comercial onde adquiriu o produto.
38 PT
Page 40

UTILIZAÇÃO DO PROGRAMADOR ELECTRÓNICO
FUNÇÃO COMO ACTIVÁ-LA COMO DESACTIVÁ-LA O QUE FAZ PARA QUE SERVE
• Quando o botão de sele-
LUZ
DO FORNO
RELÓGIO
ALARME
BLOQUEIO DE
SEGURANÇA
PARA
CRIANÇAS
TEMPO DE
COZEDURA
Para utilizar inclusive
no ciclo pirolitico.
FIM DA
COZEDURA
cção (1) é rodado de modo
a coincidir com o símbolo
a luz acende-se
• Rode o botão de selecção
(1) de modo a coincidir
com o símbolo
• Premindo as teclas e
acerte a hora do dia (durante o acerto, os números
apresentados no mostrador
ficam a piscar)
• Rode o botão de selecção
1até coincidir com o símbolo
.
• Regule o tempo de cozedura
com as teclas e (durante a regulação os números apresentados no mostrador ficam a piscar)
• Rode o botão de selecção
1 até coincidir com o símbolo
O indicador luminoso fica
a piscar.
• Prima simultaneamente as
teclas e , durante
três segundos.
• A regulação fica confirmada
quando o indicador
luminoso deixa de piscar.
• Seleccione um modo de
cozedura com o (botão
de selecção 2)
• Rode o botão de selecção
1 até coincidir com o símbolo
• Regule o tempo de cozedura
com as teclas e (durante a regulação os números
presentados no mostrador
ficam a piscar)
• Seleccione um modo de
cozedura (botão de selecção 2)
• Rode o botão de selecção
até coincidir com o símbolo
• Regule a hora de fim da
cozedura com as teclas
e (durante a regulação
os números apresentados
no mostrador ficam a piscar)
Para utilizar inclusive
no ciclo pirolitico.
O PROGRAMADOR
• Rode o botão de selecção
para a posição
• Uma vez esgotado o tempo de cozedura assim
regulado, o forno desliga-se
automaticamente. Se precisar
de interromper o seu funcionamento antes disso, terá
de desligar o forno ou terá
de alterar a regulação do
tempo de cozedura para 00:00
(rode o botão de selecção
1 de modo a coincidir com
o símbolo , e, em seguida,
regule a hora com as teclas
e ).
• Prima simultaneamente as
teclas e durante três
segundos.
• O indicador luminoso fica
a piscar.
• Uma vez decorrido o tempo
de cozedura assim regulado, o forno desliga-se
automaticamente. Se precisar de interromper o seu
funcionamento antes disso,
terá de desligar o forno ou
terá de alterar a regulação
do tempo de cozedura
para 00:00 (rode o botão
de selecção 1 de modo a
coincidir com o símbolo
, e, em seguida, regule
a hora com as teclas e ).
• O forno desliga-se automaticamente na hora assim
predefinida. Se precisar de
interromper o seu funcionamento antes disso, terá
de desligar o forno, rodando
o botão de selecção 2 de
modo a ficar a coincidir com
o símbolo .
Indicação de segurançaMostrador do relógio
• Permite-lhe acertar a hora
apresentada no relógio
do forno
• Emite um sinal sonoro de
aviso (durante alguns segundos) uma vez esgotado o
tempo de cozedura regulado.
• As regulações do forno não
podem ser alteradas (mesmo
que a posição dos botões de
selecção seja acidentalmente
alterada)
• Permite a memorização
de um tempo de cozedura
previamente definido.
• Uma vez regulado um
tempo de cozedura, rode
o botão de selecção 1 de
modo a ficar a coincidir
com o símbolo para que
no mostrador sejam apresentadas as horas.
• Para ver o tempo de coze-
dura programado rode o
botão de selecção 1 até
coincidir com o símbolo
• Permite a memorização da
hora de fim da cozedura.
• Uma vez regulada uma
hora de fim de cozedura,
rode o botão de selecção
1 de modo ficar a coincidir
com o símbolo para que
no mostrador sejam apresentadas as horas.
• Para ver a hora de fim da
cozedura programada rode
o botão de selecção 1 até
ao símbolo .
• Trata-se de uma função útil
para verificar se o forno está
perfeitamente operacional.
• Premindo as teclas e
acerte a hora (durante o
acerto, os números apresentados no mostrador ficam
a piscar).
NOTA: Acerte o relógio
ime-diatamente a seguir à
instalação do aparelho ou a
seguir a toda e ualquer
interrupção da alimentação de
energia eléctrica (quando falta
a energia a indicação 12:00
fica a piscar no mostrador).
• É um lembrete muito útil.
• Esta função é indepen-
dente do funcionamento
do forno (podendo ser
utilizada mesmo que o
forno não esteja a ser
utilizado)
• Esta função funciona mesmo
que o forno não esteja a ser
utilizado, impedindo-o de
poder ser acidentalmente
colocado em funcionamento.
• Funciona ainda quando o
forno está a ser utilizado,
evitando que as regulações feitas possam ser
alteradas (através da
deslocação acidental de
um botão de selecção)
NOTA: Mesmo com esta
função activada, o forno
continua a poder ser
desligado, para o que basta
rodar o botão de
selecção 2 para a posição 0.
• Uma vez decorrido o tempo
de cozedura assim regulado,
o forno desliga-se automaticamente, sendo emitido um
sinal sonoro de aviso durante
alguns segundos.
• Normalmente, esta função
é utilizada em conjunto
com a função “tempo de
cozedura”. Por exemplo,
se o prato tiver de ser cozinhado durante 45 minutos e tiver
de estar pronto às 12:30,
basta seleccionar o modo de
cozedura pretendido, regular
um tempo de cozedura com
uma duração de 45 minutos
e regular a hora de fim de
cozedura para as 12:30.
A cozedura inicia-se automaticamente às 11:45 (12:30
menos 45 minutos), prosseguindo até à hora de fim de
cozedura predefinida, altura
em que o forno se desliga
automaticamente.
Mostrador do
programador
Teclas de regulação
Um ligeiro retardamento ocorrerá na programação enquanto o
forno executa os diagnósticos internos.
39 PT
ATENÇÃO
A primeira operação que deve ser levada a
cabo após a instalação do forno ou após um
corte de energia (facilmente detectado no
display onde pisca 12:00 ) é o acertar das
horas.
Page 41

INSTRUÇÕES DE OPERAÇÃO
Mostrador do relógio
Botão da programador
da função
Mostrador
do programador
Indicação de segurança
P
DF
DF
P
do modo de cozedura
Indicação
da temperatura
Botão de selecção
do forno (cozedura)
Indicação do modo
de cozedura
Teclas de regulação
• Se as horas do relógio não tiverem sido acertadas o forno não funciona; nesse caso no mostrador do relógio será
apresentada a indicação 12:00 a piscar.
Para que o forno comece a funcionar é necessário que tenha sido previamente seleccionado um modo de cozedura com o botão de
selecção (2). O símbolo correspondente será apresentado no mostrador e a temperatura automaticamente predefinida fica a piscar.
Para alterar essa temperatura basta premir as teclas ou . Passados poucos segundos o forno começa a trabalhar; no entanto,
o arranque da cozedura poderá ser regulado com o botão de selecção do programa de modo a iniciar-se mais tarde (vide o capítulo
“O programador”). O símbolo correspondente ao modo de cozedura seleccionado será apresentado de modo intermitente no mostrador
até o forno atingir a temperatura apresentada no mostrador. Uma vez atingida esta temperatura, a indicação deixará de piscar, sendo
emitido um sinal sonoro de aviso.
O forno pode ser desligado em qualquer altura, para o que basta rodar o botão de selecção (2) para a posição correspondente a “ ”.
Simbolo
Temperatura
pre-regulada
Programa testado de acordo com o CENELEC EN 50304
utilizado por definição na classe energética.
210° C
Programa testado de acordo com o CENELEC EN 50304
60° C
40° C
210° C
210° C
Tem dois modos duplos à sua disposição; para os seleccionar, utilize os botões e A função seleccionada é visualizada, sendo
confirmada passados 3 segundos.
DF1: descongelação a 40°C (30 minutos) + forno ventilado a 200°C (45 minutos);
DF
DF2: forno ventilado a 200°C (45 minutos) + manutenção dos alimentos quentes a 60°C (60 minutos). A duração do tempo
de cozedura com o forno ventilado pode ser alterada, para o que só tem de rodar o botão de selecção de funções para (símbolo
do tempo de cozedura). Os tempos regulados para a descongelação e para a manutenção dos alimentos quentes não podem
ser alterados. A temperatura do forno ventilado só pode ser alterada (com os botões ou ) quando esta função de cozedura
está activa (nesse caso o símbolo está iluminado no visor).
Intervalo de
temperatura
50°-240° C220° C
50°-240° C
50°-220° C160° C
180°-240° C
180°-230° C
180°-240° C240° C
180°-240° C240° C
Modo
Selecção automática
Uma vez regulada a temperatura pretendida, o forno selecciona automaticamente
a função de cozedura ideal.
Convecção natural
Resistências superior e inferior ligadas. Modo de cozedura tradicional, especialmente
indicado para assar uma perna de borrego ou caça. Ideal para confeccionar biscoitos
e maçãs assadas e para que os alimentos fiquem dourados e estaladiços. Para que
sejam obtidos os melhores resultados os alimentos deverão ser colocados numa
prateleira
Forno ventilado
Tanto a resistência superior como a inferior do forno estão ligadas, sendo assistidas
pela ventoinha interna do mesmo. Trata-se do modo de cozedura recomendado para
cozinhar aves, peixe, pão, etc. Este sistema assegura uma distribuição uniforme do
calor, possibilitando a confecção de qualquer prato num tabuleiro de grandes
dimensões.
Resistência inferior + ventoinha
Modo de cozedura recomendado para a confecção de pratos delicados (soufflés)
Aquecimento dos pratos
As resistências superior e inferior trabalham de modo intermitente, sendo assistidas
pela ventoinha. A temperatura está previamente regulada por forma a manter-se
constante nos 60°C (neste modo de cozedura não é possível alterar a regulação da
temperatura). É o modo ideal para manter quentes os pratos que acabaram de ser
cozinhados, sem se correr o risco de ficarem demasiado passados. Este modo de
cozedura também é útil para aquecer os pratos em que a refeição vai ser servida.
Descongelação
As resistências superior e inferior trabalham de forma intermitente, sendo assistidas
pela ventoinha. A temperatura está previamente regulada por forma a manter-se
constante nos 40°C (neste modo de cozedura não é possível alterar a regulação da
temperatura). Este modo permite descongelar rapidamente os alimentos antes de
os cozinhar.
Grelhador tradicional com a porta do forno fechada
Nesta posição, a resistência por infravermelhos do grelhador está ligada. É o modo
de cozedura perfeito para cozinhar fatias finas ou médias de carne (salsichas, costeletas, entremeada, bacon)
Grelhador ventilado com a porta do forno fechada
O ar quente, emitido pela resistência do grelhador, é circulado à volta dos alimentos
pela ventoinha, à temperatura necessária, entre os 180 e os 230°C. A ventoinha
substitui de forma excelente o espeto rotativo e assegura a obtenção de resultados
excelentes com aves, salsichas e carnes vermelhas, mesmo que cozinhadas em
grandes quantidades.
Grill mais espeto giratório
Grelhador/espeto rotativo.
Esta função é utilizada para assar alimentos com o espeto.
Espeto Rotativo Turbo.
Utilize com a porta fechada. O uso da resistência superior, da turbina e do espeto
rotativo permite a rotação do alimento a cozinhar. Esta função, com a utilização da
turbina evita a secagem dos alimentos.
P
Pirólise, consulte o capítulo dedicado a este tema
40 PT
Page 42

CONSELHOS DE COZEDURA
As temperaturas bem como o tempo de cozedura que a seguir se indicam são dados
apenas com o fim de facilitar o uso inicial do aparelho. A experiência pessoal ditará depois
a adaptação destes tempos ao gosto e aos hábitos de cada um.
Convém notar que quanto mais alta for a temperatura de um cozinhado, mais serão os
salpicos que irão sujar o forno e provocar fumos. É pois preferível baixar ligeiramente a
temperatura, mesmo que para tal seja necessário despender mais tempo.
PEIXES
Pratos
Robalo ou dourada
Pargo ou salmão
Modo de
cozedura
Cozed. comum
Cozed. comum
Quantidade
1kg inteiro 220° C1
1kg assado 220° C130 minutos
°C
cozedura
As paredes do forno tem vários níveis
de patamar numerados a contar de
baixo.
Tempo de
cozedura
30 minutos
Nível de patamar
a contar de baixo
Fillet of sole 160° C115-20 mins6 filtes
Peixe grelahdo
Circ. ar quente
Grelhador
6 filtes 275° C42x5 mins
LEGUMES - DIVERSOS
Pratos
Couves estufadas
Empadões 200-220° C 1 hora/kg
Endivas com gruyère 6 pessoas
Suflés salgados
doces
Tomates recheados
Flamiche de pêras
Modo de
cozedura
Cozed. comum
Cozed. comum
Circ. ar quente
Circ. ar quente
Circ. ar quente
Base ventilada
Quantidade
6 pessoas
6 pessoas
6-8 peças 200-220° C
6 pessoas
°C
cozedura
200-220° C
180-200° C
180-200° C 50-60 minutos
220° C 35-40 minutos
Tempo de
cozedura
1 h
25-30 minutos
40-45 minutos
Conselhos
Ø 22
Quiche Lorraine 6 pessoas 45-50 minutos
Esparguete gratinado
a bolonhesa
Todos os cozinhados foram executados no nível de patamar «1» excepto os pratos marcados com o símbolo «*» que necessitam de cozedura
a nível médio.
Base ventilada
Turbogrelhador
220° C
200° C6 peças Oval earthenware45 minutos
41 PT
Page 43

CARNES
É preferível só salgar as carnes no final da cozedura, porque o sal contribui para os salpicos de gordura com os consequentes fumos,
e assim o forno suja-se rapidamente. Os assados de carne branca, porco, vitela, cabrito e peixes podem ser postos no forno a frio. A
cozedura é mais demorada do que em forno previamente aquecido, mas o interior da peça coze melhor, pois o ar quente tem mais
tempo para se propagar até ao centro do alimento.
Um bom prévio aquecimento está sempre na origem do êxito da cozedura de uma
carne vermelha.
PARA OS GRELHADOS
• Antes de colocar a carne no forno:
Retirar a carne do frigorífico algumas horas antes de a grelhar. Colocá-la sobre várias camadas de papel absorvente; ficará mais tenra,
mais saborosa e não haverá o risco de ficar gelada no interior. Juntar pimenta e especiarias, antes de a grelhar, mas só a salgar depois
de cozinhada, caso contrário ficará menos tenra e gostosa. Pincelar cada peça com um pouco de óleo. É melhor utilizar um pincel largo
e achatado. Juntar seguidamente pimenta e algumas ervas (tomilho, etc.). Meter a carne no forno.
• Durante a cozedura:
Nunca picar os alimentos enquanto estão a ser cozinhados, nem quando os voltar: o suco
escorreria e ficariam secos.
Pratos
Pato
Perú
Ganso
Perna de cabrito
Frango asado
Carne de vaca
assada
Coelho assado
Beef
Vaca 1kg 275° C 15-20 minutos
Lamb / Mutton 1 kg 20-25 min
Cabrito / Borrego 1 kg
Kebabs 275° C 2x8 min
Espetadas 275° C 2x8 minutos
Pork chop
Pork chop 6 peças 275° C 2x8 minutos
Modo de
cozedura
Coz. comum
Coz. comum
Coz. comum
Coz. comum
Coz. comum
Coz. comum
Circ. ar quente
Espeto
Espeto
Grelhador
Grelhador
Quantidade
1,5 kg
5/6 kg
3/4 kg
1/1,5 kg
800-1 kg
1kg 275° C 15-20 min
6 pieces
6 peças
6 pieces 275° C 2x8 min
°C
cozedura
200-220° C
160-180° C
160-180° C
200-220° C
220° C
240° C
200-220° C
275° C
275° C
Tempo de
cozedura
1 h 30
2 h 30 - 3 h
2 - 2 h 30
15 min/libra
cerca de 1 h
15 min/libra
50-60 minutos
20-25 minutos
Conselhos
Sem préaquecimento
Sem préaquecimento
Virar a meio
da cozedura
Virar a meio
da cozedura
* Todos os cozinhados foram executados no nÍvel de patamar "1".
DOCES
Evitar utilizar formas brilhantes, porque reflectem o calor e podem prejudicar a cozedura dos bolos. Se estes alourarem demasiadamente
depressa, cubra-os com papel de alumínio ou papel vegetal.
Atenção: Utilizar o papel de alumínio no sentido correcto, ou seja – com a face brilhante voltada para o bolo. Caso contrário, a face
brilhante reflectiria o calor, não deixando que este penetrasse no interior. Evitar abrir a porta do forno durante os primeiros 20 a 25
minutos: os suflés, bolos... ficariam espalmados. Para verificar se o bolo se encontra devidamente cozido, picá-lo no centro com a
lâmina de uma faca ou com uma agulha de tricô. Se estas saírem secas, o bolo está cozido, mas se saírem húmidas ou com algumas
partículas de bolo agarradas, continuar a cozedura, mas baixar ligeiramente a temperatura para que o bolo acabe de cozer sem queimar.
Receitas
Bolo inglês
Bolo de frutas
Bolo mármore 1,5 kg 45-50 min
Tarte guarnecida 200-220° C 40-45 min
Brioches 200° C 40-40 min
Pão-de-ló
Pudim flã
Biscoitos 40 peças 35 min
Fundo de tarte 20-30 min
Merengues
Tarte de frutos
Queijadas
* Em base ventilada, recomenda-se um pré-aquecimento em modo de circulação de arquente, para ganhar tempo.
Mode de
cozedura
Coz. comum
Coz. comum
Coz. comum
Coz. comum
Circ. ar quente
Circ. ar quente
Circ. ar quente
Circ. ar quente
Circ. ar quente
Circ. ar quente
Base ventilada*
Base ventilada*
Base ventilada*
Quantidade
1,5 kg 180-200° C
6 pessoas 200-220° C 40-50 min
6 pessoas
800 grs 1
for 6 Ø 271
6 peças
1 placa 80-85° C
6 pessoas 220° C 35-40 min
6 peças 30-35 min
15 GB
42 PT
°C
cozedura
200-220° C
180-200° C
180-200° C 30-35 min
190° C
180-200° C
200° C 15-20 min
190° C
Tempo de
cozedura
50+60 min
35-40 min
4 h 30
Nível
patamar
1
1 Ø 27
1
1 / 3
1Massa folhada
1
1
11
Ø profiteroles
Conselhos
Ø 271
forma Ø 271
forma Ø 271
2 placas
Page 44
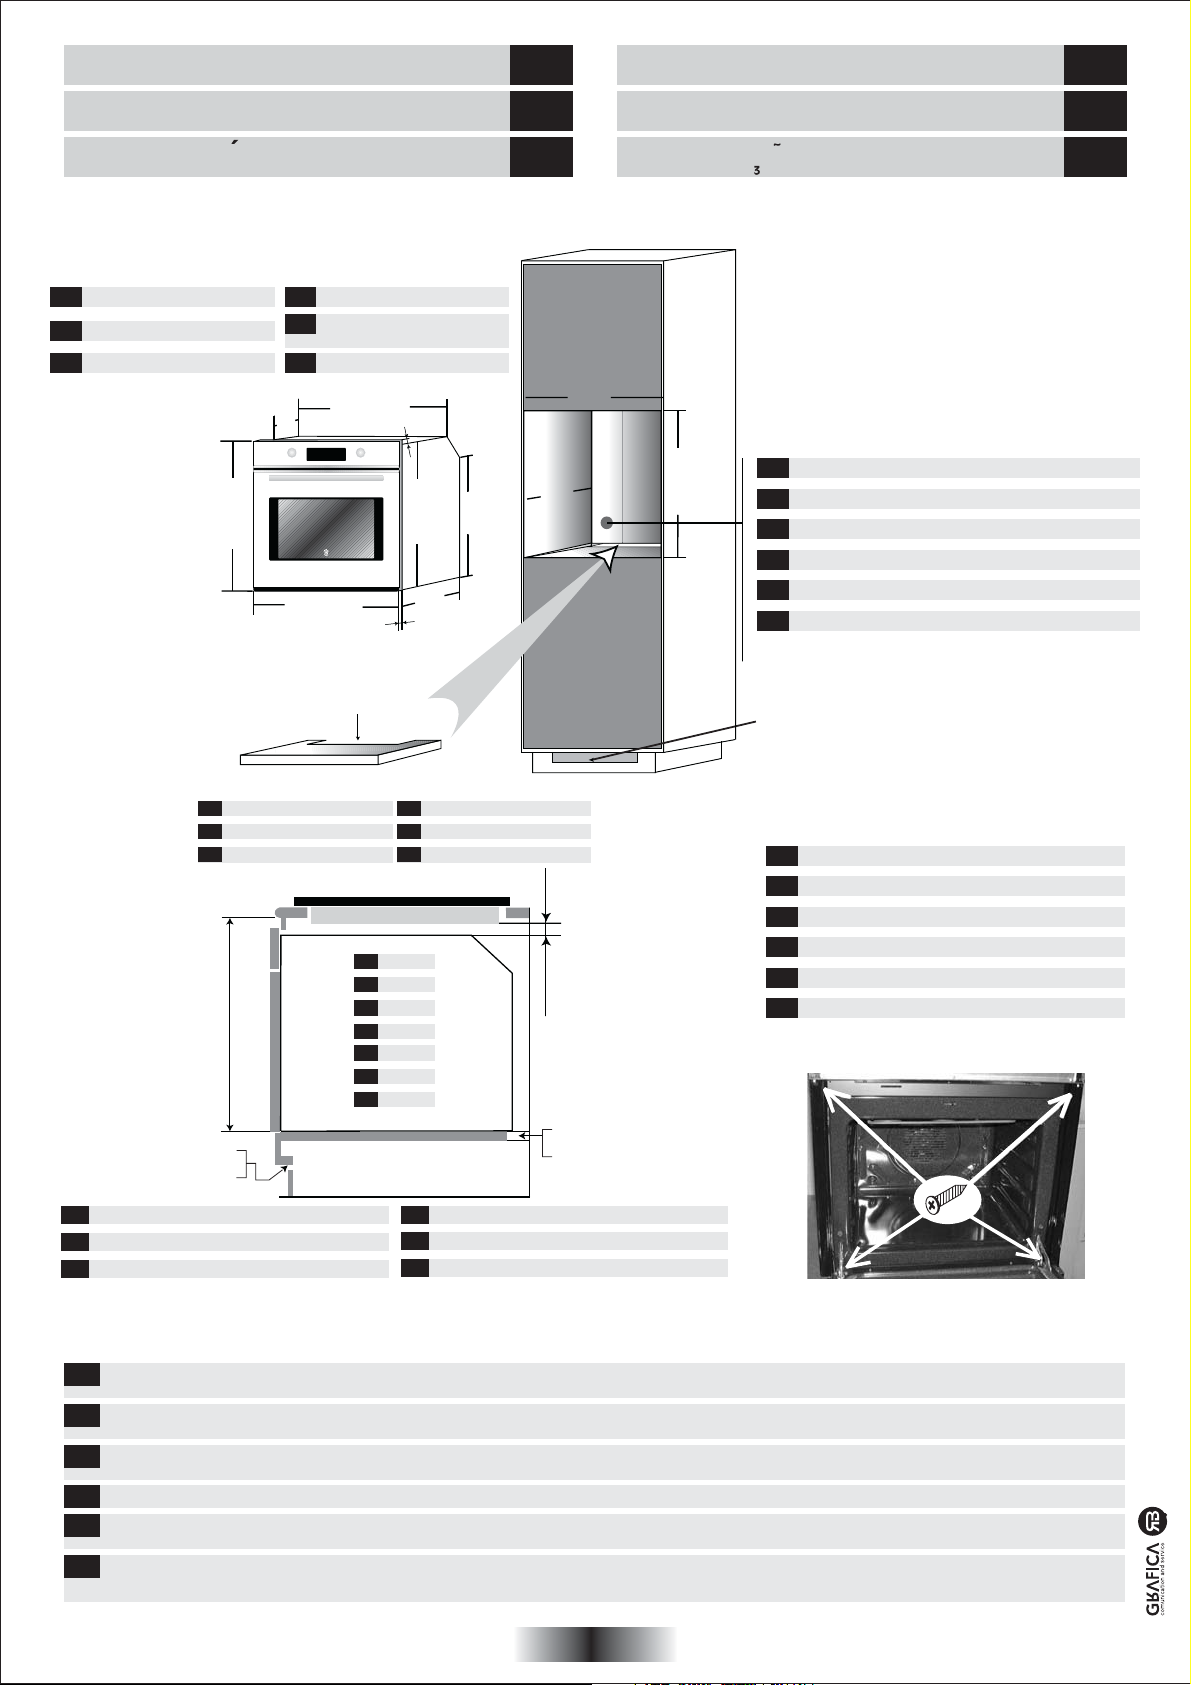
INSTALLAZIONE (dimensioni in mm) IT
INSTALLATION (dimensions mm) GB
INSTALLATIE (afmetingen in mm) NL
INSTALLATION DE
(Die Abmessungen sind in
Millimetern angegeben)
INSTALACION (dimensiones en mm) ES
Forno incassato in colonna
IT
Oven in column
GB
Horno en columna
ES
590
Kolomoven
NL
Einbau des Ofens in einem
DE
säulenförmigen Hohlraum
Forno em coluna
PT
401
557
596
24
500 X 50
15
481
577
540
550
mini
INSTALACAO (dimensões em mm) PT
560
580
Apertura per il passaggio del cavo di alimentazione
IT
Opening for power supply cable
GB
Obertura para pasar el cable de alimentación
ES
Doorgangsopening voor de voedingskabel
NL
Öffnung für das Stromversorgungskabel
DE
Abertura para passagem do cabo de alimentação
PT
500x10
IT
Piano di cottura
GB
Top
ES
Mesa
595 mini
500 X 10
IT
Forno incassato sotto un piano di cottura
GB
Oven fitted under worktop
ES
Horno enpotrado bajo superficie de trabajo
La Ditta costruttrice declina ogni responsabilità per eventuali errori di stampa contenuti nel presente libretto. Si riserva inoltre il diritto di apportare le modifiche che si
IT
renderanno utili ai propri prodotti senza compromettere le caratteristiche essenziali.
The manufacturer will not be responsible for any inaccuracy resulting from printing or transcript errors contained in this brochure. We reserve the right to carry out
GB
modifications to products as required, including the interests of consumption, without prejudice to the characteristics relating to safety or function.
La empresa constructora declina toda responsabilidad derivada de eventuales errores de impresión contenidos en el presente libro. Se reserva además el derecho
ES
de realizar las modificaciones que se consideren útiles a los productos sin comprometer las características esenciales.
De fabrikant stelt zich niet aansprakelijk voor eventuele drukfouten in deze brochure. Kleine veranderingen en technische ontwikkelingen zijn voorbehouden.
NL
Der Hersteller übernimmt keine Hauftung für eventuelle Druck-oder Übersetzungsfehler dieser Bedienungsanleitung. Der Hersteller behält sich vor, technische
DE
Änderungen zur Verbesserung der Produktqualität im Interesse des Endverbrauchers vorzunehmen.
O fabricante declina toda e qualquer responsabilidade por gralhas, erros tipográficos ou de transcrição/tradução contidos neste manual. Reservamo-nos o direito de
PT
introduzir alterações nos nossos produtos, conforme necessário, tendo inclusive em atenção os interesses relativos ao respectivo consumo, sem prejuízo das
características associadas à segurança ou ao funcionamento dos electrodomésticos.
IT
GB
ES
NL
DE
FR
PT
NL
Tafelblad
DE
Koch- bzw. Arbeitsfläche
PT
Mesa
10 mini
Forno
Oven
Horno
Oven
Ofen
Four
Forno
500 X 50
NL
Oven ingebouwd onder het werkblad
DE
Einbau des Ofens unter einer Arbeitsfläche
PT
Forno por baixo de bancada
IT
Fissaggio
GB
Fixing in the location
ES
Fijación en el huecio de empotramiento
NL
Plaatsing in de inbouwniche
DE
Befestigung des Ofens an seinem Sitz
PT
Fixação em nicho de encastramento
01-2007 • Cod. 41016882
43
 Loading...