

Page 1
• HOC3250IN
• HOC3250BI
• HSO8650X
USER INSTRUCTIONS
OVENS
MANUALE D’ISTRUZIONI
FORNO
KULLANIM KILAVUZU
FIRINLAR
CANDY HOOVER GROUP S.R.L. • Via Privata Eden Fumagalli • 20047 Brugherio Milano Italy
EN
IT
TR
02
15
28
Page 2

Safety Indications
• WARNING: the appliance and accessible parts become hot during use.
Be careful not to touch any hot parts.
•WARNING: the accessible parts can become hot when the grill is in
use. Children should be kept at a safe distance.
•WARNING: ensure that the appliance is switched off before replacing
the bulb, to avoid the possibility of electric shocks.
•WARNING: in order to avoid any danger caused by the accidental
resetting of the thermal interruption device, the appliance should not
be powered by an external switching device, such as a timer, or be
connected to a circuit that is regularly switched on and off.
•WARNING: before initiating the automatic cleaning cycle:
- clean the oven door;
- remove large or coarse food residues from the inside of the oven using
a damp sponge. Do not use detergents;
- remove all accessories and the sliding rack kit (where present);
- do not place tea towels
• In ovens with meat probe it is necessary, before making the cleaning
cycle, close the hole with the nut provided. Always close the hole with
the nut when the meat probe is not used.
•Children under 8 should be kept at a safe distance from the appliance
if not continuously supervised.
•Children should not play with the appliance. The appliance can be
used by those aged 8 or over and by those with limited physical,
sensorial or mental capacities, without experience or knowledge of the
product, only if supervised or provided with instruction as to the
operation of the appliance, in a safe way with awareness of the possible
risks.
•Cleaning and maintenance should not be carried out by unsupervised
children.
•Do not use rough or abrasive materials or sharp metal scrapers to
clean the oven door glasses, as they can scratch the surface and cause
the glass to shatter.
•The oven must be switched off before removing the removable parts
and, after cleaning, reassemble them according the instructions.
EN 02
Page 3

•Only use the meat probe recommended for this oven.
•Do not use a steam cleaner.
•Put the plug into a socket equipped with a third contact which
corresponds to the earth and which must be connected and in
operation. For models without a plug, attach a standard plug to the
cable that is able to bear the load indicated on the tag. The earth
conductor is yellow-green in colour. This operation should be carried
out by a suitably qualified professional. In case of incompatibility
between the socket and the appliance plug, ask a qualified electrician to
substitute the socket with another suitable type. Connection to the
power source can also be made by placing an omnipolar breaker
between the appliance and the power source that can bear the
maximum connected load and that is in line with current legislation. The
yellow-green earth cable should not be interrupted by the breaker. The
socket or omnipolar breaker used for the connection should be easily
accessible when the appliance is installed.
•If the power cable is damaged, it should be substituted with a cable or
special bundle available from the manufacturer or by contacting the
customer service department.
If the cable is damaged, replace it promptly in accordance with the
following instructions:
- open the cover of the terminal block;
- remove the power cable and substitute it with a similar cable which is
compatible with the appliance (type H05VV-F, H05V2V2-F).
•This operation should be carried out by a suitably qualified professional.
The earth conductor (yellow-green) must be approximately 10 mm
longer than the other conductors. For any repairs, refer only to the
Customer Care Department and request the use of original spare parts.
•Failure to comply with the above can compromise the safety of the
appliance and invalidate the guarantee.
•Any excess of spilled material should be removed before cleaning.
•During the pyrolytic cleaning process, surfaces can heat up more than
usual, children should therefore be kept at a safe distance.
EN 03
Page 4

Summary
General Instructions
5
Product Description
7
Use of the Oven
8
Oven Cleaning and Maintenance
11
1.1 Safety indications
1.2 Electrical safety
1.3 Recommendations
1.4 Installation
1.5 Waste management
1.6 Declaration of compliance
2.1 Overview
2.2 Accessories
2.3 First use
3.1 Display description
3.2 Cooking modes
4.1 General notes on cleaning
4.2 Hydro easy clean function
4.3 Maintenance
• Removal of the oven window
• Removal and cleaning of the glass
door
• Changing the bulb
Troubleshooting
14
5.1 F.A.Q.
EN 04
Page 5
1. General Instructions
We thank you for choosing one of our products. For the
best results with your oven, you should read this
manual carefully and retain it for future reference.
Before installing the oven, take note of the serial
number so that you can give it to customer service staff
if any repairs are required. Having removed the oven
from its packaging, check that it has not been damaged
during transportation. If you have doubts, do not use
the oven and refer to a qualified technician for advice.
Keep all of the packaging material (plastic bags,
polystyrene, nails) out of the reach of children. When
the oven is switched on for the first time, strong
smelling smoke can develop, which is caused by the glue on the insulation panels surrounding the oven
heating for the first time. This is absolutely normal and, if it occurs, you should wait for the smoke to
dissipate before putting food in the oven. The manufacturer accepts no responsibility in cases where
the instructions contained in this document are not observed.
NOTE: the oven functions, properties and accessories cited in this manual will vary, depending on the
model you have purchased.
1.1 Safety Indications
Only use the oven for its intended purpose, that is only for the cooking of foods; any other use, for
example as a heat source, is considered improper and therefore dangerous. The manufacturer cannot
be held responsible for any damage resulting from improper, incorrect or unreasonable usage.
The use of any electrical appliance implies the observance of some fundamental rules:
- do not pull on the power cable to disconnect the plug from the socket;
- do not touch the appliance with wet or damp hands or feet;
- in general the use of adaptors, multiple sockets and extension cables is not recommended;
- in case of malfunction and/or poor operation, switch off the appliance and do not tamper with it.
1.2 Electrical Safety
ENSURE THAT AN ELECTRICIAN OR QUALIFIED TECHNICIAN MAKES THE ELECTRICAL CONNECTIONS.
The power supply to which the oven is connected must conform with the laws in force in the country of
installation. The manufacturer accepts no responsibility for any damage caused by the failure to observe
these instructions. The oven must be connected to an electrical supply with an earthed wall outlet or a
disconnector with multiple poles, depending on the laws in force in the country of installation. The
electrical supply should be protected with suitable fuses and the cables used must have a transverse
section that can ensure correct supply to the oven.
CONNECTION
The oven is supplied with a power cable that should only be connected to an electrical supply with 220240 Vac 50 Hz power between the phases or between the phase and neutral. Before the oven is
connected to the electrical supply, it is important to check:
- power voltage indicated on the gauge;
- the setting of the disconnector.
The grounding wire connected to the oven's earth terminal must be connected to the earth terminal of
the power supply.
WARNING
Before connecting the oven to the power supply, ask a qualified electrician to check the continuity of the
power supply's earth terminal. The manufacturer accepts no responsibility for any accidents or other
problems caused by failure to connect the oven to the earth terminal or by an earth connection that has
defective continuity.
EN 05
Page 6
NOTE: as the oven could require maintenance work, it is advisable to keep another wall socket available
so that the oven can be connected to this if it is removed from the space in which it is installed. The
power cable must only be substituted by technical service staff or by technicians with equivalent
qualifications.
1.3 Recommendations
After each use of the oven, a minimum of cleaning will help keep the oven perfectly clean.
Do not line the oven walls with aluminium foil or single-use protection available from stores. Aluminium
foil or any other protection, in direct contact with the hot enamel, risks melting and deteriorating the
enamel of the insides. In order to prevent excessive dirtying of your oven and the resulting strong
smokey smells, we recommend not using the oven at very high temperature. It is better to extend the
cooking time and lower the temperature a little. In addition to the accessories supplied with the oven,
we advise you only use dishes and baking moulds resistant to very high temperatures.
1.4 Installation
The manufacturers have no obligation to carry this out. If the assistance of the manufacturer is required
to rectify faults arising from incorrect installation, this assistance is not covered by the guarantee. The
installation instructions for professionally qualified personnel must be followed. Incorrect installation
may cause harm or injury to people, animals or belongings. The manufacturer cannot be held
responsible for such harm or injury.
The oven can be located high in a column or under a worktop. Before fixing, you must ensure good
ventilation in the oven space to allow proper circulation of the fresh air required for cooling and
protecting the internal parts. Make the openings specified on last page according to the type of fitting.
1.5 Waste management and environmental protection
This appliance is labelled in accordance with European Directive 2012/19/EU regarding
electric and electronic appliances (WEEE). The WEEE contain both polluting substances
(that can have a negative effect on the environment) and base elements (that can be
reused). It is important that the WEEE undergo specific treatments to correctly remove and
dispose of the pollutants and recover all the materials. Individuals can play an important
role in ensuring that the WEEE do not become an environmental problem; it is essential to
follow a few basic rules:
- the WEEE should not be treated as domestic waste;
- the WEEE should be taken to dedicated collection areas managed by the town council or a registered
company.
In many countries, domestic collections may be available for large WEEEs. When you buy a new
appliance, the old one can be returned to the vendor who must accept it free of charge as a one-off, as
long as the appliance is of an equivalent type and has the same functions as the purchased appliance.
SAVING AND RESPECTING THE ENVIRONMENT
Where possible, avoid pre-heating the oven and always try to fill it. Open the oven door as infrequently
as possible, because heat from the cavity disperses every time it is opened. For a significant energy
saving, switch off the oven between 5 and 10 minutes before the planned end of the cooking time, and
use the residual heat that the oven continues to generate. Keep the seals clean and in order, to avoid any
heat dispersal outside of the cavity. If you have an electric contract with an hourly tariff, the "delayed
cooking" programme makes energy saving more simple, moving the cooking process to start at the
reduced tariff time slot.
1.6 Declaration of compliance
The parts of this appliance that may come into contact with foodstuffs comply with the provisions of EEC
Directive 89/109.
By placing the mark on this product, we are confirming compliance to all relevant European safety,
health and environmental requirements which are applicable in legislation for this product.
EN 06
Page 7
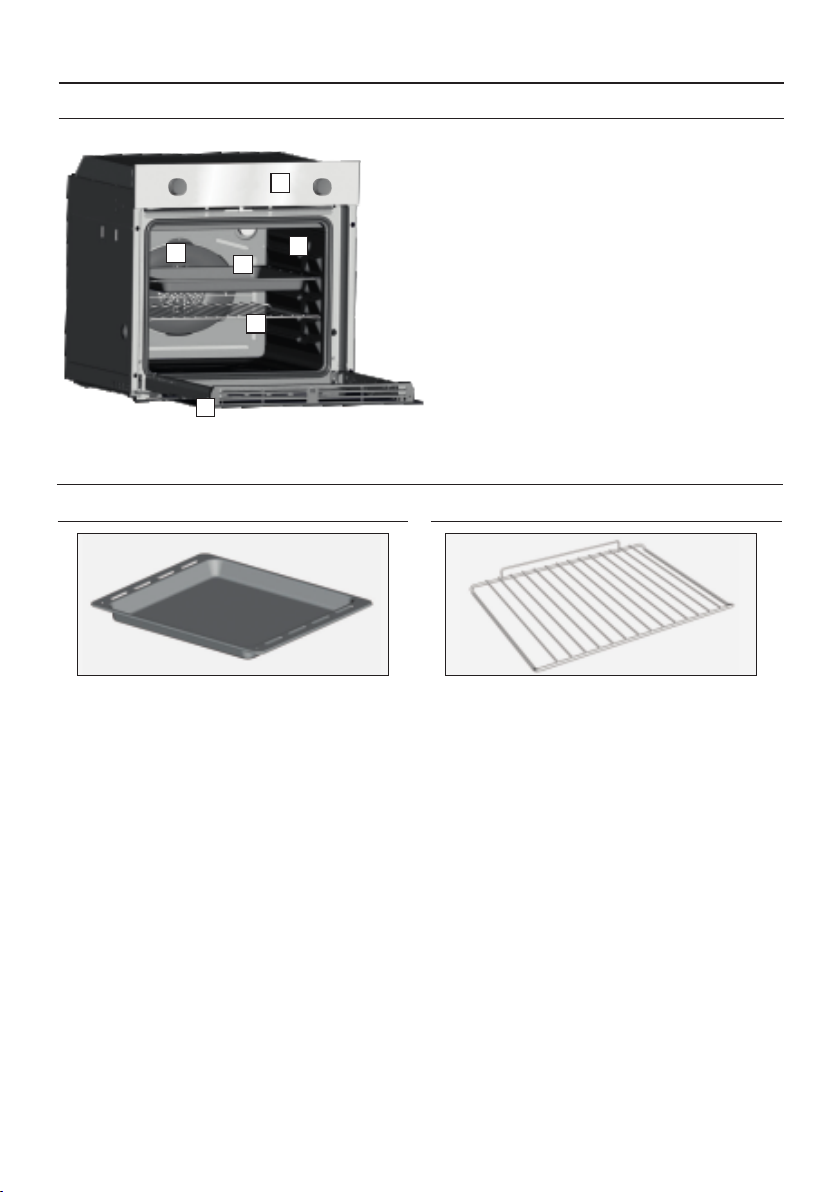
2. Product Description
2.1 Overview
1
5
6
2.2 Accessories
2
4
3
1. Control panel
2. Shelf positions
(lateral wire grid if included)
3. Metal grill
4. Drip pan
5. Fan (behind the steel plate)
6. Oven door
Drip pan
1
Collects the residues that drip during the cooking
of foods on the grills.
Metal grill
2
Holds baking trays and plates.
EN 07
Page 8
2.3 First Use
PRELIMINARY CLEANING
Clean the oven before using for the first time. Wipe over external surfaces with a damp soft cloth. Wash
all accessories and wipe inside the oven with a solution of hot water and washing up liquid. Set the
empty oven to the maximum temperature and leave on for about 1 hour, this will remove any lingering
smells of newness.
3. Use of the Oven
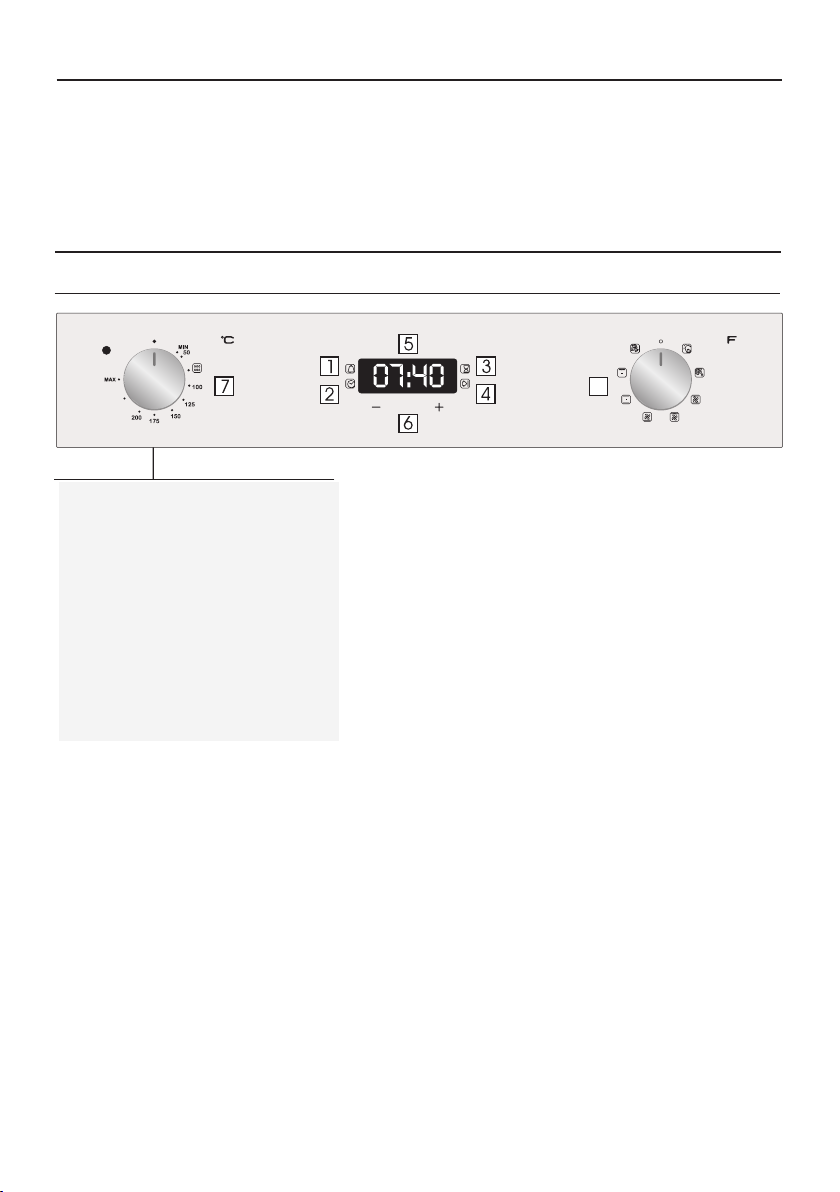
3.1 Display description
1. Minute minder
2. Clock setting
3. Cooking time
4. End of cooking
5. Temperature or clock display
6. LCD display adjustment controls
7. Thermostat selector knob
8. Function selector knob
MENU
WARNING : the first operation to carry out after the
ove n h a s b een insta l led or foll o w ing the
interruption of power supply (this is recognizable
the display pulsating and showing 12:00 ) is setting
the correct time. This is achieved as follows.
•Push the central button.
•Set time with "-" "+" buttons.
•Release all buttons.
ATTENTION: The oven will only operate providing the
clock is set.
8
EN 08
Page 9
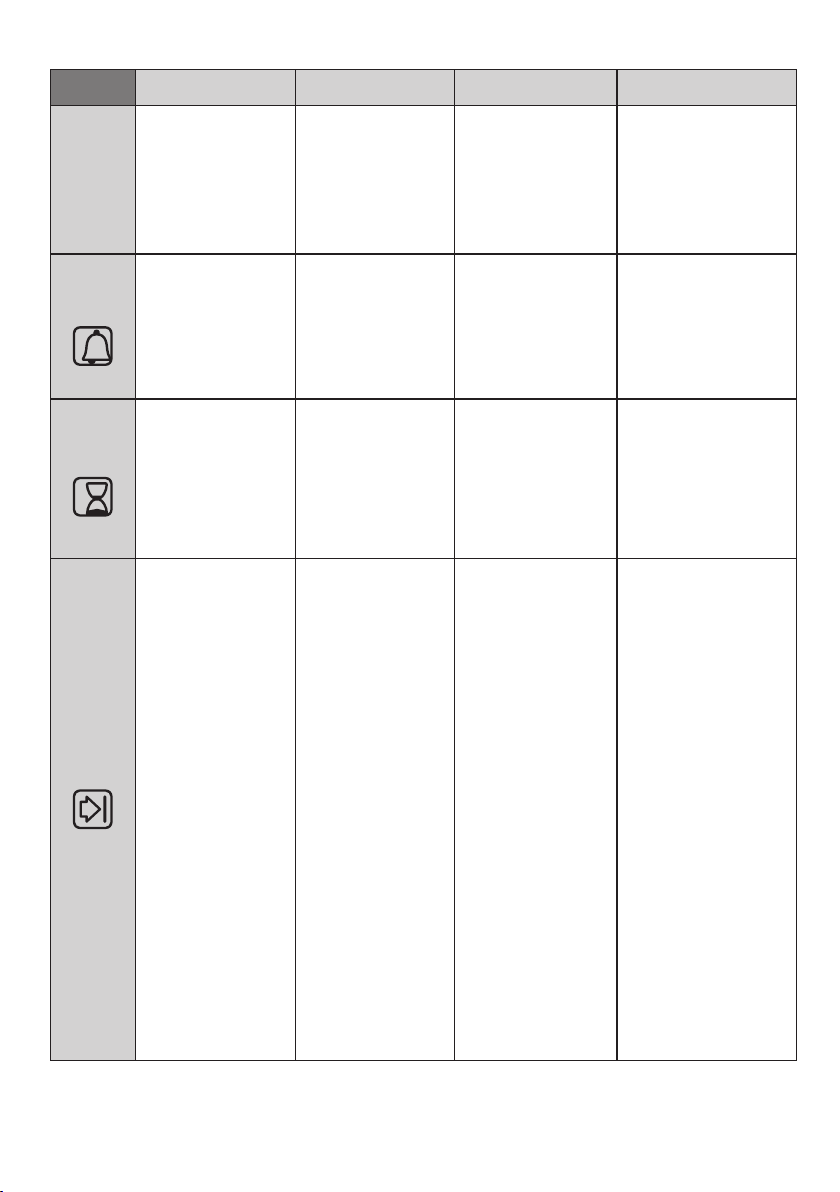
FUNCTION HOW TO DEACTIVATE WHAT IT DOES WHY IT IS NEEDED HOW TO USE
•Child Lock function is
activated by touching Set
(+) for a minimum of 5
KEY LOCK
MINUTE
MINDER
se c o nd s. From t hi s
moment on al l other
function are locked and
th e d isplay wil l f lash
STOP and p reset time
intermittently.
•Push the central button
1 times
•Press the buttons "-"
"+"
to set the required time
•Release all the buttons
•Child Lock function is
deactivated by touching
touchpad Set (+) again for
a minimum of 5 seconds.
From this moment on all
functions are selectable
again.
•When the set time as
elapse d an audible
alarm is activated (this
alarm will stop on its
own, however it can be
stopped immediately by
pressi ng the bu tton )
SELECT.
•Sounds an alarm at the
end of the set time.
•During the process, the
display shows the
remaining time.
•Allows to use the oven as
alarm c lo ck (co ul d b e
a c ti va ted e it her w it h
operating the oven or with
out operating the oven)
COOKING
TIME
END OF
COOKING
• Push the central button
2 times
• Press the buttons "-" or
"+"to set the lenght of
cooking required
• Release all buttons
• S et t h e c oo ki ng
function with the oven
function selector
•Push the central button
3 t im es • P r e s s t he
buttons "-" "+" to set the
time at which you wish
the oven to switch off
•Release the buttons
• S e t t h e c o o k i n g
function with the oven
function selector.
•Pu sh any button to
stop the signal. Push the
central button to return
t o t h e c l o c k
function.
•At the time set, the
oven will switch off. To
sw it ch off manuall y,
turn the oven function
selector to position O.
• It allows to preset the
cooking time required for
the recipe chosen.
• To check how long is left
to run press the SELECT
button 2 Times.
• To alter/c hange t he
preset time press SELECT
and "-" "+" buttons.
•Enables you to set the
en d of coo kin g ti me
•To check the pre set
time push the central
button 3 times
•To modify the preset
time p re ss bu tt on s
SELECT + "-" "+"
•When the time is elapsed
the oven will switch off
automatically.
Should you wish to stop
cooking earlier either turn
the function selector to 0, or
s e t t i m e t o 0 : 0 0
(SELECT and "-" "+" buttons)
•This function is typically
used with “cooking time”
function.
For example if the dish has
to be cooked for 45 minutes
and needs to be ready by
12:30, simp ly selec t t he
required function, set the
cooking time to 45 minutes
and the end of cooking time
to 12:30.
•At the end of the cooking
se t ti me, the o ven wil l
switch off automatically and
an audible alarm will ring.
• C o o k i n g w i l l s t a r t
au toma tica lly at 11:4 5
(12:30 minus 45 mins) and
will continue until the preset e nd-of -cookin g-ti me ,
when the oven will switch
it sel f o ff aut oma ti cal ly.
WARNING.
If the END of cooking is
selected without setting the
length of cooking time, the
ov en w ill sta rt c ook ing
immediately and it will stop
at the END of cooking time
set.
EN 09
Page 10
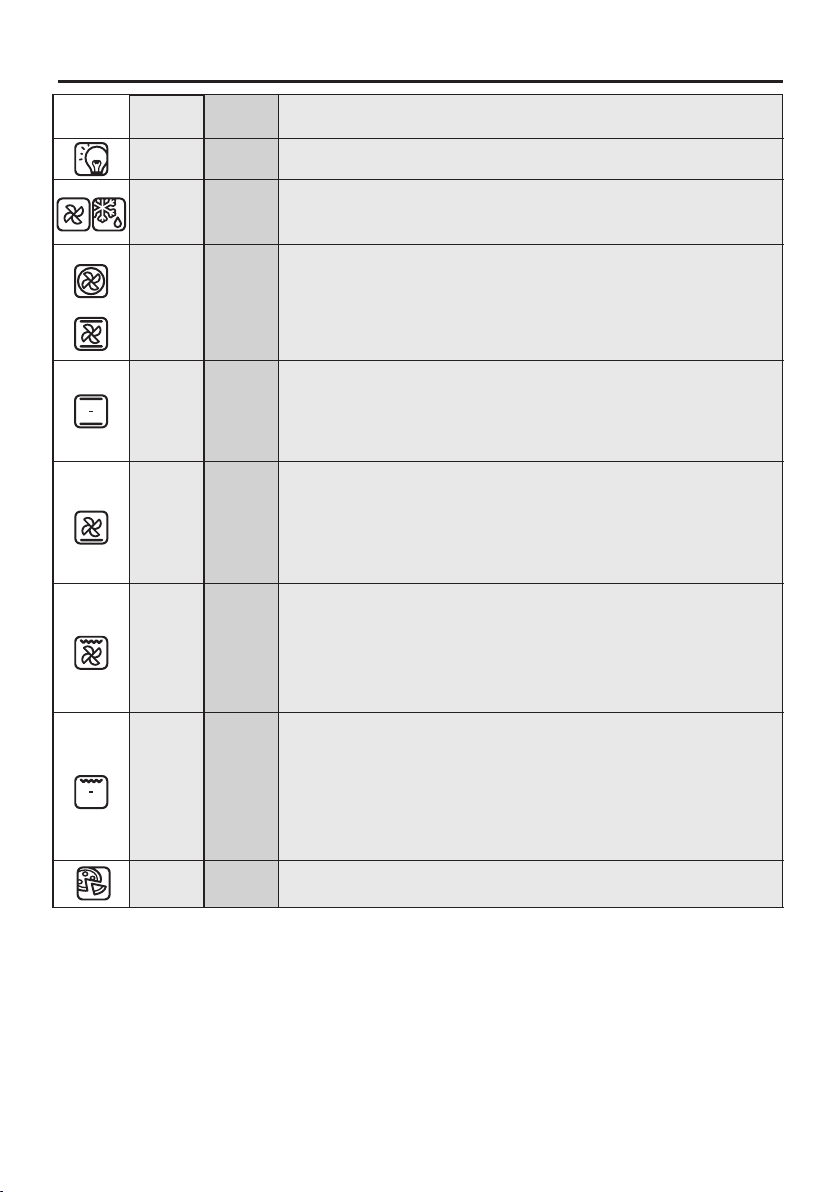
3.2 Cooking Modes
Function
Dial
*
*Tested in accordance with the CENELEC EN 60350-1 used for definition of energy class.
T °C
default
40
180
210
220 50 ÷ 280
210
200
L3
220 50 ÷ 230
T °C
range
40 ÷ 40
50 ÷ 240
50 ÷ 240
50 ÷ 230
150 ÷ 220
L1 ÷ L5
Function (Depends on the oven model)
LAMP: Turns on the oven light.
DEFROST: When the dial is set to this position. The fan circulates air at room
temperature around the frozen food so that it defrosts in a few minutes
without the protein content of the food being changed or altered.
FAN COOKING: We recommend you use this method for poultry, pastries, fish
and vegetables. Heat penetrates into the food better and both the cooking and
preheating times are reduced. You can cook different foods at the same time
with or without the same preparation in one or more positions. This cooking
method gives even heat distribution and the smells are not mixed.
Allow about ten minutes extra when cooking foods at the same time.
CONVENTIONAL COOKING: Both top and bottom heating elements are used.
Preheat the oven for about ten minutes. This method is ideal for all traditional
roasting and baking. For seizing red meats, roast beef, leg of lamb, game, bread,
foil wrapped food (papillotes), flaky pastry. Place the food and its dish on a shelf
in mid position.
FAN + LOWER ELEMENT: The bottom heating element is used with the fan
circulating the air inside the oven. This method is ideal for juicy fruit flans, tarts,
quiches and pâté.
It prevents food from drying and encourages rising in cakes, bread dough and
other bottom-cooked food.
Place the shelf in the bottom position.
FAN ASSISTED GRILL : use the turbo-grill with the door closed.
The top heating element is used with the fan circulating the air inside the oven.
Preheating is necessary for red meats but not for white meats. Ideal for cooking
thick food items, whole pieces such as roast pork, poultry, etc. Place the food to be
grilled directly on the shelf centrally, at the middle level. Slide the drip tray under the
shelf to collect the juices. Make sure that the food is not too close to the grill. Turn
the food over halfway through cooking.
GRILL: use the grill with the door closed.
The top heating element is used alone and you can adjust the temperature. Five
minutes preheating is required to get the elements red-hot. Success is guaranteed
for grills, kebabs and gratin dishes. White meats should be put at a distance from the
grill; the cooking time is longer, but the meat will be tastier. You can put red meats
and fish fillets on the shelf with the drip tray underneath. The oven has two grill
positions:
Grill: 2140 W Barbecue: 3340 W
PIZZA: With this function hot air circulated in the oven to ensure perfect result
for dishes such as pizza or cake.
EN 10
Page 11

4. Oven cleaning and maintenance
4.1 General notes on cleaning
The lifecycle of the appliance can be extended through regular cleaning. Wait for the oven to cool before
carrying out manual cleaning operations. Never use abrasive detergents, steel wool or sharp objects for
cleaning, so as to not irreparably damage the enamelled parts. Use only water, soap or bleach-based
detergents (ammonia).
GLASS PARTS
It is advisable to clean the glass window with absorbent kitchen towel after every use of the oven. To
remove more obstinate stains, you can use a detergent-soaked sponge, well wrung out, and then rinse
with water.
OVEN WINDOW SEAL
If dirty, the seal can be cleaned with a slightly damp sponge.
ACCESSORIES
Clean accessories with a wet, soapy sponge before rinsing and drying them: avoid using abrasive
detergents.
DRIP PAN
After using the grill, remove the pan from the oven. Pour the hot fat into a container and wash the pan in
hot water, using a sponge and washing-up liquid.
If greasy residues remain, immerse the pan in water and detergent. Alternatively, you can wash the pan
in the dishwasher or use a commercial oven detergent. Never put a dirty pan back into the oven.
EN 11
Page 12

4.2 Hydro Easy Clean Function
The HYDRO EASY CLEAN procedure uses steam to help remove remaining fat and food particles from
the oven.
1. Pour 300 ml of water into the HYDRO EASY CLEAN container at the bottom of the oven.
2. Set the oven function to Static ( ) or Bottom ( )heater
3. Set the temperature to the HYDRO EASY CLEAN icon
4. Allow the program to operate for 30 minutes.
5. After 30 minutes switch off the program and allow the oven to cool down.
6. When the appliance is cool, clean the inner surfaces of the oven with a cloth.
Warning
Make sure that the appliance is cool before you touch it.
Care must be taken with all hot surfaces as there is a risk of burns.
Use distilled or drinkable water.
MENU MENU
300 ml
4.3 Maintenance
REMOVAL OF THE OVEN WINDOW
1. Open the front window.
2. Open the clamps of the hinge housing on the right and left side of the front window by pushing them
downwards.
3. Replace the window by carrying out the procedure in reverse.
EN 12
Page 13
LOW-E
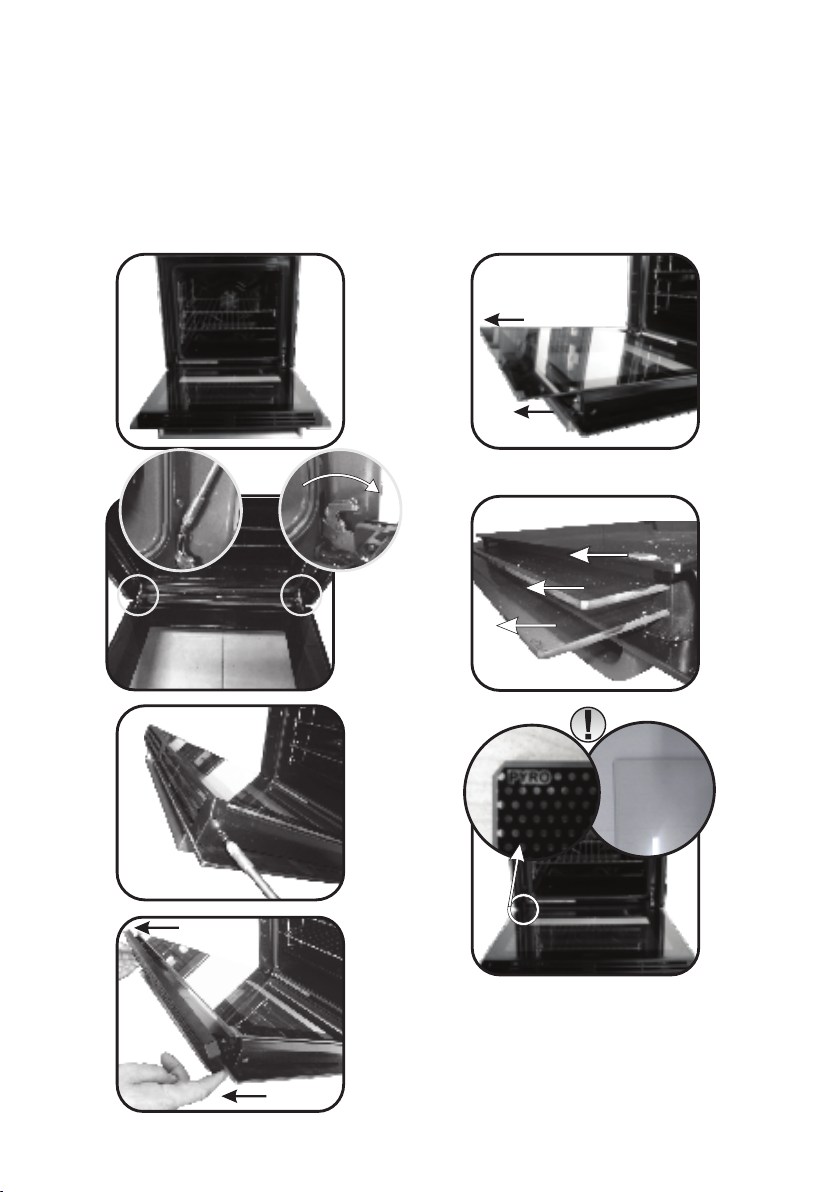
REMOVAL AND CLEANING OF THE GLASS DOOR
1. Open the oven door.
2.3.4. Lock the hinges, remove the screws and remove the upper metal cover by pulling it upwards.
5.6. Remove the glass, carefully extracting it from the oven door (NB: in pyrolytic ovens, also remove
the second and third glass (if present)).
7. At the end of cleaning or substitution, reassemble the parts in reverse order.
On all glass, the indication "Low-E" must be legible and positioned on the left side of the door, close to
the left-hand lateral hinge. In this way, the printed label of the first glass will be inside the door.
1.
2.
3.
5.
6.
1
2
3
7.
4.
EN 13
Page 14
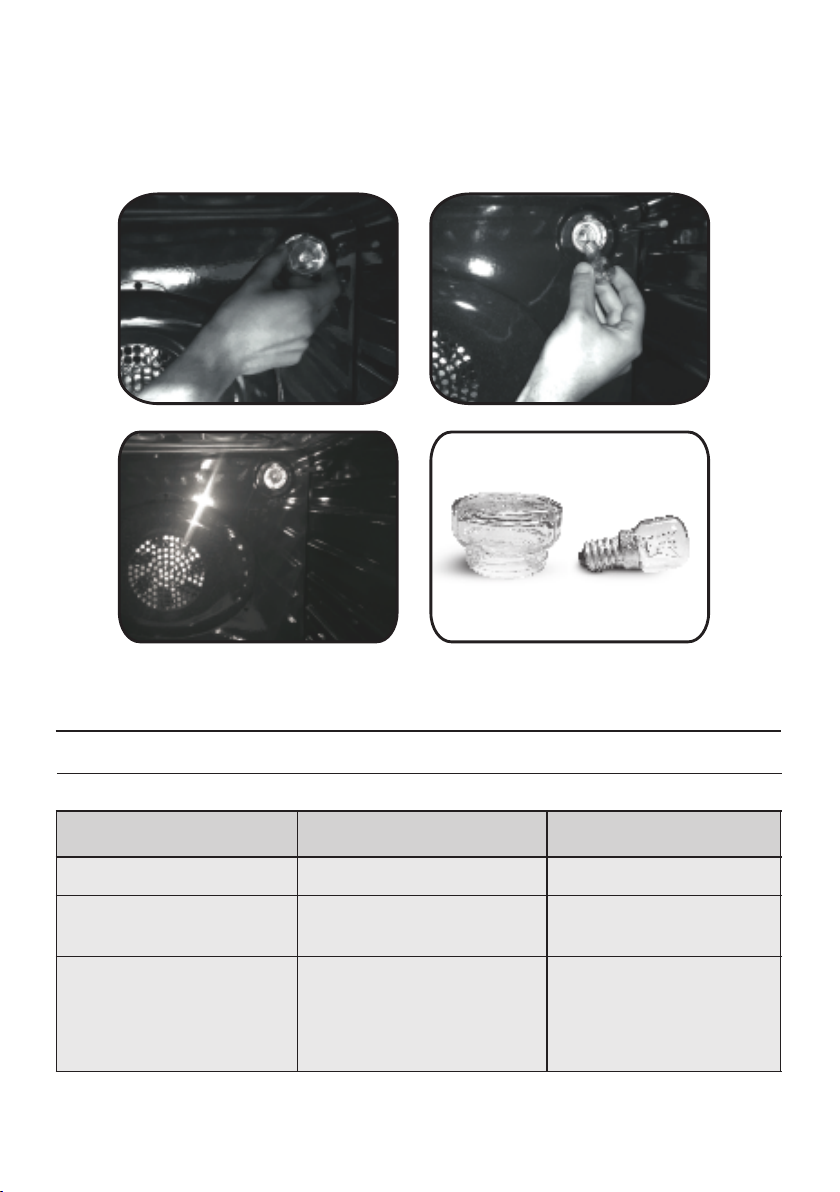
CHANGING THE BULB
1. Disconnect the oven from the mains supply.
2. Undo the glass cover, unscrew the bulb and replace it with a new bulb of the same type.
3. Once the defective bulb is replaced, replace the glass cover.
5. Troubleshooting
5.1 FAQ
PROBLEM POSSIBLE CAUSE SOLUTION
The oven does not heat up
The oven does not heat up
No reaction of the touch
user interface
The clock is not set Set the clock
A cooking function and
temperature has not been set
Steam and condensation on
the user interface panel
Ensure that the necessary
settings are correct
Clean with a microfiber
cloth the user interface
panel to remove the
condensation layer
EN 14
Page 15

Indicazioni di Sicurezza
•ATTENZIONE: l’apparecchio e le parti accessibili diventano calde
durante l’uso. Prestare attenzione a non toccare le parti calde.
•ATTENZIONE: le parti accessibili possono diventare calde quando il
grill è in uso. I bambini dovrebbero essere tenuti a distanza.
•ATTENZIONE: assicurarsi che l’apparecchio sia spento prima di
sostituire la lampada per evitare la possibilità di scosse elettriche.
•ATTENZIONE: al fine di evitare ogni pericolo dovuto al riarmo
accidentale del dispositivo termico di interruzione, il presente
apparecchio non deve essere alimentato con un dispositivo di manovra
esterno, quale un temporizzatore, oppure essere connesso a un circuito
che viene regolarmente alimentato o disalimentato dal servizio.
• ATTENZIONE: prima di attivare la funzione di pulizia automatica:
- pulire la porta del forno
- con una spugna umida togliere dall’interno del forno i residui più
consistenti. Non usare detergenti;
- estrarre tutti gli accessori e il kit guide scorrevoli (se presente);
- non lasciare strofinacci o presine sulla maniglia.
•I bambini al di sotto di 8 anni dovrebbero essere tenuti a distanza se
non continuamente supervisionati.
•I bambini non dovrebbero giocare con l’apparecchio. L’apparecchio
può essere usato da bambini dagli 8 anni in su e da persone con ridotte
capacità fisiche, sensoriali o mentali, senza esperienza e conoscenza del
prodotto, solo se supervisionate o dando loro istruzioni riguardo al
funzionamento dell’apparecchio in maniera sicura e cosciente del
rischio possibile.
•La pulizia e la manutenzione non dovrebbero essere fatte da bambini
senza supervisione.
•Non usare materiali ruvidi, abrasivi o raschietti metallici affilati per
pulire le porte di vetro del forno dato che possono graffiare la superficie
e causare la frantumazione del vetro.
•Spegnere il forno prima di rimuovere le parti rimovibili e, dopo la
pulizia, rimontarle secondo le istruzioni.
•Usare solo la sonda termica raccomandata per questo forno.
•Non utilizzare un pulitore a vapore.
IT 15
Page 16

•Inserire la spina in una presa di corrente munita di un terzo contatto
corrispondente alla presa di terra, che deve essere collegata in modo
efficiente. Per i modelli sprovvisti di spina, montare sul cavo una spina
normalizzata che sia in grado di sopportare il carico indicato in targa. Il
conduttore di messa a terra è contraddistinto dai colori giallo-verde.
Tale operazione dovrà essere eseguita da personale professionalmente
qualificato. In caso di incompatibilità tra la presa e la spina
dell’apparecchio, fare sostituire la presa con altra di tipo adatto da
personale professionalmente qualificato. Si può effettuare anche
l’allacciamento alla rete interponendo, tra l’apparecchio e la rete, un
interruttore omnipolare dimensionato al carico e rispondente alle
norme in vigore. Il cavo di terra giallo-verde non deve essere interrotto
dall’interruttore. La presa o l’interruttore omnipolare usati per
l’allacciamento devono essere facilmente accessibili ad elettro-
domestico installato.
•Se il cavo di alimentazione è danneggiato, esso deve essere sostituito
da un cavo o un assieme speciali disponibili presso il costruttore o il suo
servizio assistenza tecnica.
In caso di danneggiamento del cavo, provvedere tempestivamente alla
sua sostituzione secondo le seguenti indicazioni:
- aprire il coperchio morsettiera;
- togliere il cavo di alimentazione e sostituirlo con uno corrispondente e
adeguato all’apparecchio (tipo ).H05VV-F , HO5V2V2-F
•Tale operazione dovrà essere eseguita da personale professionalmente
qualificato. Il conduttore di terra (giallo-verde), deve obbligatoriamente
essere più lungo di circa 10 mm rispetto ai conduttori di linea. Per
l’eventuale riparazione rivolgersi solamente ad un centro di assistenza
tecnica autorizzato e richiedere l’utilizzo di ricambi originali.
•Il mancato rispetto di quanto detto sopra può compromettere la
sicurezza dell’apparecchio.
•Gli eccessi di materiale tracimato devono essere tolti prima della
pulizia.
•Durante la Pirolisi le superfici possono scaldarsi più del solito: pertanto
è consigliato tenere i bambini a distanza.
IT 16
Page 17

Sommario
Avvertenze Generali
18
Descrizione del Prodotto
20
Utilizzo del Forno
21
Pulizia e Manutenzione del Forno
24
1.1 Suggerimenti sulla sicurezza
1.2 Sicurezza elettrica
1.3 Raccomandazioni
1.4 Installazione
1.5 Gestione dei rifiuti
1.6 Dichiarazione di conformità
2.1 Panoramica
2.2 Accessori
2.3 Primo utilizzo
3.1 Descrizione del display
3.2 Modalità di cottura
4.1.Note generiche di pulizia
4.2 La funzione hydro easy clean
4.3 Manutenzione
• Rimozione dello sportello del forno
• Rimozione e pulizia della porta in
vetro
• Sostituzione della lampadina
Risoluzione dei problemi
27
5.1 F.A.Q.
IT 17
Page 18

1. Avvertenze Generali
Vi ringraziamo per aver scelto uno dei nostri prodotti.
Per utilizzare il forno in modo ottimale è consigliabile
leggere con attenzione questo manuale e conservarlo
con cura per ogni ulteriore consultazione. Prima di
installare il forno, prendere nota del numero di serie in
modo da poterlo comunicare al personale del servizio di
assistenza in caso di richiesta di intervento. Dopo aver
rimosso il forno dall’imballaggio, verificare che non
abbia subito danni durante il trasporto. In caso di
dubbi, non utilizzare il forno e richiedere l’assistenza di
un tecnico qualificato. Tenere tutto il materiale da
imballaggio (sacchetti di plastica, polistirolo, chiodi)
fuori dalla portata dei bambini. Alla prima accensione del forno può svilupparsi fumo di odore acre,
causato dal primo riscaldamento del collante dei pannelli d’isolamento avvolgenti il forno: si tratta di un
fenomeno assolutamente normale e, in caso si verificasse, occorre attendere la cessazione del fumo
prima di introdurre le vivande. Il produttore declina ogni responsabilità in caso di mancata osservanza
delle istruzioni contenute in questo documento.
NOTA: le funzioni, le proprietà e gli accessori dei forni citati in questo manuale possono variare a
seconda dei modelli.
1.1 Suggerimenti sulla Sicurezza
Utilizzare il forno solo per lo scopo per cui è stato progettato, ossia solo per la cottura di alimenti;
qualsiasi altro utilizzo, ad esempio come fonte di riscaldamento, è considerato improprio e quindi
pericoloso. Il costruttore non può essere considerato responsabile per eventuali danni derivanti da usi
impropri, erronei ed irragionevoli.
L’uso di un qualsiasi apparecchio elettrico comporta l’osservanza di alcune regole fondamentali:
- non tirare il cavo di alimentazione per staccare la spina della presa di corrente;
- non toccare l’apparecchio con mani o piedi bagnati o umidi;
- in generale è sconsigliabile l’uso di adattatori, prese multiple e prolunghe;
- in caso di guasto e/o cattivo funzionamento dell’apparecchio, spegnerlo e non manometterlo.
1.2 Sicurezza Elettrica
FARE EFFETTUARE I COLLEGAMENTI ELETTRICI AD UN’ELETTRICISTA O TECNICO QUALIFICATO.
La rete di alimentazione a cui viene collegato il forno deve essere conforme con le normative in vigore
nel paese di installazione. Il produttore declina ogni responsabilità per eventuali danni derivanti dalla
mancata osservanza di tali disposizioni. Il forno deve essere collegato alla rete elettrica tramite una
presa a muro con messa a terra o tramite un sezionatore con più poli, a seconda delle disposizioni in
vigore nel paese di installazione. La rete elettrica deve essere protetta mediante fusibili idonei e devono
essere utilizzati cavi con una sezione trasversale idonea a garantire una corretta alimentazione del
forno.
COLLEGAMENTO
Il forno viene fornito con un cavo di alimentazione che deve essere collegato solo a una rete elettrica con
una tensione di 230 VCA tra le fasi o tra la fase e il neutro. Prima di collegare il forno alla rete elettrica, è
indispensabile controllare:
- la tensione di alimentazione indicata sul misuratore;
- l’impostazione del sezionatore.
Il filo di messa a terra collegato al morsetto di terra del forno deve essere collegato al morsetto di terra
della rete elettrica.
ATTENZIONE
Prima di collegare il forno alla rete elettrica, far controllare la continuità della messa a terra della rete
IT 18
Page 19

elettrica ad un elettricista qualificato. Il produttore declina ogni responsabilità per eventuali incidenti o
altri problemi derivanti dal mancato collegamento a terra del forno o dal suo collegamento ad una
messa a terra con una continuità difettosa.
NOTA: poiché il forno potrebbe richiedere interventi di assistenza, è consigliabile prevedere la
disponibilità di un’ulteriore presa a muro a cui collegare il forno dopo che è stato rimosso dallo spazio in
cui è stato installato. Il cavo di alimentazione deve essere sostituito solo dal personale dell’assistenza
tecnica o da tecnici con qualifiche analoghe.
1.3 Raccomandazioni
Dopo l’uso sono sufficienti alcune semplici operazioni di pulizia per mantenere il forno perfettamente
pulito. Non rivestire le pareti del forno con fogli d’alluminio da cucina o fogli monouso commerciali,
perché potrebbero fondersi a contatto con le superfici in smalto caldo e danneggiare le superfici in
smalto all’interno del forno. Per evitare di sporcare eccessivamente il forno e prevenire la diffusione di
fumo maleodorante, è consigliabile non utilizzare il forno a temperature molto alte. E’ generalmente
preferibile imposta- re un tempo di cottura più lungo e utilizzare una temperatura più bassa. Oltre agli
accessori forniti con il forno, è consigliabile utilizzare piatti e teglie resistenti alle alte temperature.
1.4 Installazione
Il produttore non è obbligato ad occuparsi dell’installazione. Gli eventuali interventi di assistenza,
necessari per correggere problemi dovuti ad un’errata installazione, non sono coperti da garanzia.
L’installazione deve essere effettuata da un tecnico qualificato e in conformità con queste istruzio- ni.
Un’installazione impropria potrebbe causare infortuni alle persone, agli animali domestici o danni alle
attrezzature. Il produttore declina ogni responsabilità per eventuali lesioni o danni dovuti ad un’errata
installazione.
Il forno può essere installato sopra una colonna o sotto a un piano di lavoro. Prima di fissare in posizione
il forno, verificare che lo spazio attorno allo stesso sia sufficiente a garantire la circolazione del flusso di
aria fresco necessario a garantire il raffreddamento del forno e la sicurezza dei componenti interni.
Realizzare le aperture indicate nell’ultima pagina del manuale, a seconda del tipo di installazione.
1.5 Gestione dei rifiuti e rispetto dell’ambiente
Questo apparecchio è contrassegnato in conformità alla Direttiva europea 2012/19/EU
sulle apparecchiature elettriche ed elettroniche (WEEE). I WEEE contengono sia sostanze
inquinanti (che possono provocare conseguenze negative sull’ambiente) che componenti
di base (che possono essere riutilizzati). E’ importante che i WEEE siano soggetti a
trattamenti specifici per rimuovere e smaltire correttamente tutti gli inquinanti e
recuperare tutti i materiali. I singoli possono giocare un ruolo importante nell’assicurare
base:
- i WEEE non devono essere trattati come rifiuti domestici;
- i WEEE devono essere portati ai punti di raccolta appositi gestiti dal comune o da società registrate.
In molti paesi, per i WEEE di grandi dimensioni, potrebbe essere presente la raccolta domestica.
Quando si acquista un nuovo apparecchio, quello vecchio potrebbe essere restituito al rivenditore che
deve acquisirlo gratuitamente su base singola, sempre che l’apparecchio sia del tipo equivalente e abbia
le stesse funzioni di quello acquistato.
che i WEEE non diventino un problema ambientale; è essenziale seguire alcune regole di
RISPARMIARE E RISPETTARE L’AMBIENTE
Ove possibile, evitare di pre-riscaldare il forno e cercare sempre di riempirlo. Aprire la porta del forno
quanto necessario, perché vi sono dispersioni di calore ogni volta che viene aperta. Per risparmiare
molta energia sarà sufficiente spegnere il forno dai 5 ai 10 minuti prima della fine del tempo di cottura
pianificato, e servirsi del calore che il forno continua a generare. Tenere le guarnizioni pulite e in ordine,
per evitare eventuali dispersioni di energia. Se si dispone di un contratto di energia elettrica a tariffa
oraria, il programma “cottura ritardata” renderà più semplice il risparmio spostando l’avvio del
programma negli orari a tariffa ridotta.
IT 19
Page 20

1.6 Dichiarazione di conformità
Tutti i componenti di questo elettrodomestico destinati a venire a contatto con gli alimenti sono
conformi con le disposizioni della Direttiva CEE 89/109.
Apponendo la marcatura su questo prodotto, dichiariamo, sotto la nostra responsabilità, di
ottemperare a tutti i requisiti relativi alla tutela di sicurezza, salute e ambiente previsti dalla
legislazione europea in essere per questo prodotto.
2. Descrizione del Prodotto
2.1 Panoramica
1
5
6
2
4
3
2.2 Accessori
1
Leccarda
Raccoglie i residui che gocciolano durante la
cottura di alimenti con i grill.
1. Pannello di controllo
2. Posizioni ripiani (castelletto se previsto)
3. Griglia metallica
4. Leccarda
5. Ventola (dietro alla piastra di acciaio)
6. Porta forno
Griglia metallica
2
Sostiene teglie e piatti.
IT 20
Page 21

2.3 Primo utilizzo
PULIZIA PRELIMINARE
Pulire sempre il forno prima di utilizzarlo per la prima volta. Pulire le superfici esterne con un panno
morbido leggermente inumidito.
Lavare tutti gli accessori e pulire l’interno del forno con del detergente per piatti ed acqua calda.
Verificare che il forno sia vuoto, impostare la temperatura massima e lasciarlo acceso per almeno 1 ora,
così da rimuovere tutti gli odori normalmente presenti nei forni nuovi.
3. Utilizzo del Forno
3.1 Descrizione del display
1- Timer contaminuti
2- Regolazione dell'ora
3- Tempo di cotturaFine cottura
4- Display temperatura e tempo
5- Comandi di regolazione del display LCD
6- Manopola del termostato
7- Manopola del selettore di funzione
MENU
ATTENZIONE: la prima operazione da eseguire dopo
l’installazione o dopo una interruzione di corrente
(tali situazioni si riconoscono perchè sul dispay
lampeggia l’ora 12:00 ) è la regolazione dell’ora,
come di seguito descritto.
•Premere il tasto centrale 4 volte.
•Imposta l'ora con i tasti "- " "+".
•Lasciare i tasti.
ATTENZIONE: Il forno funziona solo se impostato in
modalità manuale o cottura programmata.
8
IT 21
Page 22

FUNZIONE COME SI ATTIVA COME SI SPEGNE COSA FA A COSA SERVE
BLOCCO
BAMBINO
CONTAMINUTI
DURATA
COTTURA
•Tenere premuto per 5
secondi il tasto (+), Da
qu est o mom ent o lo
s c h e r m o v i s u a l i z z a
a l t e r n a t i v a m e n t e
“ S TO P ” e il t e mp o
preimpostato.
• Pr e me r e i l ta st o
c e nt ra le 1 v ol ta .
•Premere i tasti "- " "+"
per regolare la durata
•Lasciare i tasti
• P re mere il t a st o
centrale 2 volte
•Premere i tasti "- "
"+"per rego la re la
durata
•Lasciare i tasti
• S e l e z i o n a r e l a
funzione di cottura con
l a m a n o p o l a
commutatore.
•Tenere premuto per 5
secondi il tasto (+). Da
questo momento tutle
l e f u n zi o n i s o n o
riabilitate.
•Al termine della durata
impostata la funzione si
spegne da sola ed avvisa
con un segnale sonoro
(il segnale son oro si
ferma d a solo ; p er
f e r m a r l o s u b i t o
p re me re i l ta st o )
SELECT.
• Al t er m i ne d el l a
dur ata i mpo sta ta il
forno si spegne da solo;
se deve essere fermato
prima si deve portare la
m a n o p o l a
c o m m u t a t o r e i n
po siz ione O oppure
portare a 0:00 la durata
del la cott ura (ta sti
SELECT e "- " "+")
•Da un segnale sonoro al
termine di un tempo
stabilito
• D u r a n t e i l
funzionamento il display
v i su aliz z a il te m po
rimanente.
•Permette di impostare
la durata della cottura
de l cibo i nse rit o ne l
forno
•Per v is ua lizzare i l
t e m p o r i ma n e n t e
premere il tasto SELECT.
•Per modificare il tempo
riman ente p remere i l
tasto SELECT +"- " "+"
•Permette di utilizzare il
programmatore del forno
come una svegli a ( può
essere usato con for no
funzionante o spento.
• Pe r in te rromp e re il
segnale premere un tasto
qualsiasi. Premere il tasto
centrale per tornare alla
funzione orologio.
FINE
COTTURA
• Pr e me r e i l ta st o
c e n t r a l e 3 v o l t e
•Premere i tasti "- " "+"
per regolare l’ora di fine
cottura
•Lasciare i tasti
•Selezionare la unzione
d i c o tt u r a c on l a
manopola commutatore
•All’ora impostata i l
forno si spegne da solo;
se deve essere fermato
pr ima è nec ess ari o
portare la manopola
c o m m u t a t o r e i n
posizione O.
IT 22
• P e r m e t t e d i
memorizzare l’ora d i
fine cottura
•Per visualizzare l’ora
programmata premere
il tasto centrale 3 volte
•Per modificare l’ora
programmata premere i
tasti SELECT + "- " "+"
•T ip icame nte si uti li zza
qu est a fun zio ne c on l a
f u n z i o n e D U R A T A
COT TURA –ad e sempio il
cibo esiderato deve cuocere
per 45 minuti e desidero che
sia pronto per le ore 12:30;
in tal caso:
•Al termine de lla durata
impostata il forno si spegne
automaticamente ed avvisa
con un segnale sonoro.
Selezionare la funzione di
c o t t u r a d e s i d e r a t a
Impostare la durata cottura
a 4 5 m inu ti ( " - " "+")
Impostare la fine cottura alle
ore 12:30 ( "- " "+" ) La
c o t t u r a a v r à a u t o ma tic am ent e i niz io alle
11: 45 (1 2: 30 m en o 4 5
minuti), all’ora impo stata
come fine cottura il forno si
spegn e automaticamente.
ATTENZIONE: impostando
solo la fine cottura e non la
durata della cottura, il forno
si accen derà subito e s i
sp egnerà a ll’ora di f in e
cottura impostata.
Page 23

3.2 Modalità di cottura
Manopola
commuta-
tore
*
T° preim-
postata
Intervallo
40
40 ÷ 40
180
50 ÷ 240
210
50 ÷ 240
220 50 ÷ 280
210
50 ÷ 230
200
150 ÷ 220
L1 ÷ L5
L3
di T°
LAMPADA: accende la luce interna.
SCONGELAMENTO: questa posizione permette di far circolare l’aria a
temperatura ambiente intorno al cibo surgelato facendolo così scongelare in
pochi minuti senza modificare od alterare il contenuto proteico.
FORNO VENTILATO: l’aria calda viene ripartita sui diversi ripiani. E’ ideale per
cuocere contemporaneamente diversi tipi di cibo (carne, pesce), senza
miscelare sapori e odori. Cottura delicata - indicata per pan di spagna, torte
Margherita, pasta sfoglia, ecc...
CONVEZIONE NATURALE: sono in funzione le resistenze superiore e inferiore.
È la cottura tradizionale, ottima per arrostire cosciotti, selvaggina, ideale per
biscotti, mele al forno e per rendere i cibi molto croccanti.
SUOLA VENTİLATA: adatta per cotture delicate (torte-soufflè).
GRILL + VENTOLA: l'utilizzo del turbo-grill richiede la porta chiusa. Utilizzando
la ventilazione e la resistenza grill contemporaneamente, si cuociono
perfettamente grandi porzioni di cibo, come arrosti, pollame, ecc.
Mettere la griglia a metà del forno e posizionare la leccarda sotto di essa per
raccogliere i grassi. Assicuratevi che il cibo non sia troppo vicino al grill. Girare la
carne a metà cottura.
GRILL: Grigliatura tradizionale a porta chiusa: con questa funzione viene
inserita la resistenza del grill. Ottima nella cottura di carni di medio e piccolo
spessore (salsicce, costine, bacon).
Funzione (a seconda del modello)
220 50 ÷ 230
* Programma di prova secondo CENELEC EN 60350-1 utilizzato per la definizione della classe energetica.
PIZZA: Il calore avvolgente in questa funzione ricrea un ambiente simile a
quello dei forni a legna di pizzeria.
IT 23
Page 24

4. Pulizia e manutenzione del forno
4.1 Note generiche di pulizia
La vita di servizio dell’apparecchio si allunga se questo viene pulito ad intervalli regolari. Attendere che il
forno si raffreddi prima di effettuare le operazioni di pulizia manuali. Non utilizzare mai detergenti
abrasivi, pagliette di ferro o oggetti appuntiti per lapulizia, per non danneggiare in modo irreparabile le
parti smaltate.Utilizzare solo acqua, sapone o detergenti a base di candeggina (ammoniaca).
PARTI IN VETRO
E’ consigliabile pulire lo sportello in vetro con carta assorbente da cucina dopo ogni utilizzo del forno.
Per rimuovere le macchie più ostinate, è possibile anche utilizzare una spugna imbevuta di detergente
ben strizzata e sciacquare con acqua.
GUARNIZIONE DELLO SPORTELLO DEL FORNO
Se sporca, la guarnizione può essere pulita con una spugna leggermente inumidita.
ACCESSORI
Pulire gli accessori con una spugna imbevuta con acqua e sapone, sciacquarli e asciugarli : evitare di
usare detergenti abrasivi.
VASCHETTA DI GOCCIOLAMENTO
Dopo l’uso del grill, rimuovere la vaschetta dal forno. Versare il grasso caldo in un contenitore e lavare la
vaschetta in acqua calda, utilizzando una spugna e del detergente per piatti.
Se rimangono dei residui di grasso, immergere la vaschetta in acqua e detergente. In alternativa, è
possibile anche lavare la vaschetta nella lavastoviglie oppure utilizzare un detergente per forni di tipo
commerciale. Non reinserire mai una vaschetta sporca nel forno.
IT 24
Page 25

4.2 La Funzione Hydro Easy Clean
La procedura “HYDRO EASY CLEAN” utilizza il vapore per facilitare la rimozione dal forno del grasso e dei
pezzi di cibo rimasti.
1. Inserire 300 ml di acqua distillata o potabile nel contenitore dell'HYDRO EASY CLEAN sul fondo del
forno
2. Impostare la funzione del forno su Statico ( ) o su Riscaldamento ( ) dal basso
3. Impostare la temperatura sull'icona HYDRO EASY CLEAN ( )
4. Lasciar funzionare l'elettrodomestico per 30 minuti
5. Disattivare la macchina e lasciare che si raffreddi
Una volta che l'elettrodomestico si è raffreddato, pulire la superfice interna del forno con uno straccio
Attenzione
Assicurarsi che l'elettrodomestico sia freddo prima di toccarlo, c'è il rischio di scottarsi.
Utilizzare acqua distillata o potabile.
MENU MENU
300 ml
4.3 Manutenzione
RIMOZIONE DELLO SPORTELLO DEL FORNO
1. Aprire lo sportello anteriore.
2. Aprire i morsetti dell’alloggiamento della cerniera sul lato destro e sinistro dello sportello anteriore,
premendoli verso il basso.
3. Installare nuovamente lo sportello eseguendo la procedura all’inverso.
IT 25
Page 26

RIMOZIONE E PULIZIA DELLA PORTA IN VETRO
LOW-E
1. Aprile la porta del forno.
2.3.4. Bloccare le cerniere, rimuovere le viti e rimuovere la copertura metallica superiore tirandola
verso l’alto.
5.6. Rimuovere il vetro, estraendolo con molta cura, dalla controporta del forno (NB: nei forni pirolitici,
rimuovere anche il secondo e terzo vetro (se presente)).
7. Al termine della pulizia o sostituzione riassemblare le parti nell’ordine opposto alla rimozione.
Su tutti i vetri, l’indicazione ”Low-E” deve essere correttamente leggibile e posizionata sul lato sinistro
della porta, vicino alla cerniera laterale sinistra. In questo modo, l’etichetta stampata del primo vetro
rimarrà interna alla porta.
1.
5.
2.
3.
4.
6.
1
2
3
7.
IT 26
Page 27

SOSTITUZIONE DELLA LAMPADINA
1. Scollegare il forno alla rete.
2. Allentare la copertura in vetro, svitare la lampadina e sostituirla con una nuova dello stesso modello.
3. Una volta sostituita la lampadina difettosa, riavvitare la copertura in vetro.
5. Risoluzione dei Problemi
5.1 FAQ
PROBLEMA POSSIBILE CAUSA SOLUZIONE
Il forno non si scalda
Il forno non si scalda
Nessuna reazione
quando si usa l'interfaccia
utente di tipo touch
L’orologio non è impostato
Le regolazioni necessarie
non sono impostate
Vapore e condensa sul
pannello interfaccia utente
IT 27
Impostare l’orologio
Assicurarsi che le impostazioni
necessarie siano corrette
Pulire con un panno in
microfibra il pannello interfaccia
utente per togliere lo strato di
condensa.
Page 28

Güvenlik uyarıları
• UYARI: bu cihaz ve erişilebilir parçaları kullanım sırasında ısınır. Isınmış
parçalara dokunmaktan kaçınınız.
UYARI: ızgara kullanılırken erişilebilir yüzeyler çok sıcak olabilir.
Çocukların güvenli bir mesafede tutulması gereklidir.
• UYARI: elektrik çarpması ihtimalini önlemek için ampulü değiştirmeden
önce cihazın kapalı olduğundan emin olun.
• UYARI: termik şalterin istem dışı sıfırlanması nedeniyle ortaya çıkabilecek
tehlikeleri önlemek amacıyla, bu cihazın, zaman rölesi gibi harici bir
anahtarlama cihazı ya da şebeke tarafından düzenli aralıklarla açılan ve
kapatılan bir devre üzerinden beslenmemesi gereklidir.
• UYARI: otomatik temizleme programını başlatmadan önce:
-fırın kapağını temizleyin;
- ıslak bir sünger kullanarak fırının içindeki büyük ve kaba gıda kalıntılarını
temizleyin. Deterjan kullanmayın;
- tüm aksesuarları ve (eğer varsa) kayar kızak setini çıkarın;
- kurulama bezini fırının içinde bırakmayın
• Sıcaklık probu bulunan fırınlarda, temizlik programını çalıştırılmadan
önce, birlikte verilen somunu kullanılarak deliğin kapatılması gereklidir.
Sıcaklık probu kullanılmadığı zamanlarda bu deliği her zaman somunla
kapatın.
• Sürekli gözetim altında bulunmamaları halinde 8 yaşından küçük çocukların
cihazdan güvenli bir mesafede tutulmaları gereklidir.
• Çocuklar bu cihazla oynamamalıdır. Bu cihaz, kendi güvenliklerinden
sorumlu kişilerin gözetimi altında olmamaları veya cihazın güvenli bir
şekilde ve olası risklerin bilincinde kullanımı açısından yeterli bilgi veya
deneyime sahip olmamaları durumunda, 8 yaşından büyük çocuklar
veya fiziksel, algısal ya da zihinsel yetenekleri kısıtlı kişiler ile deneyimi
ve bilgisi olmayan kişilerin kullanımı için uygun değildir.
• Temizlik ve bakım işlemi gözetim altında olmadan çocuklar tarafından
yapılamaz.
• Fırın kapağındaki camın kırılmasına neden olabilecek şekilde yüzeyi
çizebileceği için fırın kapağını temizlemek için sert aşındırıcı
temizleyicileri ya da metal kazıyıcıları kullanmayın.
• Çıkarılabilir parçalar sökülmeden önce fırının açma/kapatma
anahtarından kapatılması ve temizlik işleminden sonra, bu parçaların
açıklamalara göre yeniden takılması gereklidir.
TR 28
Page 29

• Sadece bu fırın için önerilen sıcaklık probunu kullanın.
• Buharlı temizleyici kullanmayın.
• Fişi toprak bağlantısına sahip olan ve kullanım sırasında topraklama
bağlantısını sağlayan üçüncü bir ucu bulunan bir prize takın. Fişi
olmayan modeller için, kabloya etikette belirtilen yükü taşımaya yeterli
kapasitede standart bir fiş takın. Toprak iletkeni sarı-yeşil renklidir. Bu
işlem uygun niteliklere sahip bir personel tarafından yapılmalıdır. Priz ile
cihazın fişi uyumsuz ise prizi uygun başka bir prizle değiştirmesi için
kalifiye bir elektrikçiye başvurun. Elektrik beslemesi bağlantısı, cihaz ile
elektrik beslemesi arasına maksimum yükü taşımaya yeterli kapasitede
ve mevcut yönetmeliklere uygun, tüm kutupları ayıran bir devre kesici
kullanılarak da yapılabilir. Sarı-yeşil topraklama kablosunun devre kesici
ile üzerinden geçmemesi gereklidir. Bağlantı için kullanılan priz ve devre
kesici, cihazın montajından sonra kolaylıkla ulaşılabilir bir yerde
olmalıdır.
• Elektrik kablosunun hasar görmesi halinde, imalatçı tarafından sağlanan
bir kablo veya özel bir kablo demeti ile değiştirilmeli ya da müşteri
hizmetleri departmanına başvuru yapılmalıdır.
Kablonun hasar görmesi halinde, derhal aşağıdaki açıklamalara uygun
biçimde değiştirin:
- klemens blokunun kapağını açın;
- elektrik kablosunu çıkarın ve cihaza uygun benzer bir kablo ile değiştirin
(tip H05VV-F, H05V2V2-F).
• Bu işlem uygun niteliklere sahip bir personel tarafından yapılmalıdır.
Toprak iletkeninin (sarı-yeşil) diğer iletkenlerden yaklaşık 10 mm daha
uzun olması gereklidir. Her türlü onarım için sadece Müşteri Hizmetleri
Departmanına başvurun ve orijinal yedek parçalar kullanılmasını tavsiye
edin.
• Yukarıda belirtilen açıklamalara uyulmaması cihazın güvenliğini olumsuz
etkileyebilir ve garantiyi geçersiz kılabilir.
• Dökülen kalıntıların temizlik yapılmadan önce giderilmesi gerekir.
• Pirolitik temizlik işlemi sırasında, yüzeyler normalden sıcak olabilir, bu
yüzden çocukların güvenli bir mesafede tutulması gereklidir.
TR 29
Page 30

Özet
Genel Açıklamalar
31
Ürün Açıklaması
33
Fırının Kullanımı
34
Fırının Temizlenmesi ve Bakımı
37
1.1 Güvenlik ipuçları
1.2 Elektriksel güvenlik
1.3 Tavsiyeler
1.4 Kurulum
1.5 Atık yönetimi
1.6 Uygunluk beyanı
2.1 Genel bakış
2.2 Aksesuarlar
2.3 İlk kullanım
3.1 Gösterge açıklamaları
3.2 Pişirme modları
4.1 Temizleme hakkında genel notlar
4.2 Kolay Temizlenme Fonksiyonu
4.3 Bakım
• Fırın kapağının sökülmesi
• Camın sökülmesi ve temizlenmesi
• Ampulün değiştirilmesi
Sorun Giderme
40
TR 30
5.1 Sorun giderme
• Tüketici hizmetleri
• Garanti belgesi
Page 31

1. Genel Açıklamalar
Ürünlerimizden birini tercih ettiğiniz için teşekkür ederiz.
Fırınınızdan en iyi sonuçları almak için bu kılavuzu
dikkatle okuyun ve daha sonra başvurmak için saklayın.
Fırının montajından önce, herhangi bir onarım gerekmesi
halinde müşteri hizmetleri personeline vermek üzere seri
numarasını not edin. Fırını ambalajından çıkardıktan
sonra nakliye sırasında hasar almamış olduğunu kontrol
edin. Eğer tereddüdünüz varsa fırını kullanmayın ve
tavsiye almak için kalifiye bir teknisyene başvurun.
Tüm ambalaj malzemelerini (plastik torbalar, polistiren,
vidalar) çocukların erişemeyeceği yerlerde tutun. Fırın
ilk kez çalıştırıldığında güçlü bir duman kokusu oluşabilir,
bunun nedeni fırın ilk kez ısındığında yalıtım panelleri üzerinde bulunan yapışkan maddenin yanmasıdır.
Bu kesinlikle normal bir durumdur ve oluştuğu zaman dumanın yayılması beklendikten sonra
yiyeceklerin fırının içine konulması gereklidir. Bu dokümanda verilen açıklamalara uyulmaması halinde
ortaya çıkabilecek durumlar için imalatçı herhangi bir sorumluluk kabul etmez.
NOT: Bu kılavuzda belirtilen fırın işlevleri, özellikleri ve aksesuarları satın almış olduğunuz modele bağlı
olarak farklılık gösterecektir.
1.1 Güvenlik İpuçları
Fırın sadece kullanım amacına uygun biçimde kullanılmalıdır, kullanım amacı yiyeceklerin pişirilmesidir;
başka bir amaç için, örneğin bir ısı kaynağı olarak kullanılması uygunsuz ve bu nedenle tehlikeli kullanım
olarak değerlendirilir. Uygunsuz, hatalı veya makul olmayan kullanım sonucunda ortaya çıkabilecek her
türlü zarardan imalatçı sorumlu tutulamaz.
Herhangi bir elektrikli cihazın kullanımı sırasında bazı asli kurallara uyulması gereklidir:
- elektrik fişini prizden çıkarmak için asla kablodan tutarak çekmeyin;
- elleriniz ya da ayaklarınız ıslak veya nemli iken cihaza dokunmayın;
- genellikle adaptörlerin, çoklu prizlerin ve uzatma kablolarının kullanılması tavsiye edilmez;
- arızalanması ve/veya düzgün çalışmaması durumunda cihazı kapatın ve kurcalamayın.
1.2 Elektriksel Güvenlik
ELEKTRİK BAĞLANTILARINI BİR ELEKTRİKÇİNİN YA DA KALİFİYE BİR TEKNİSYENİN YAPMASINI
SAĞLAYIN
Fırının bağlanmış olduğu elektrik beslemesinin montajın yapıldığı ülkede yürürlükte bulunan yasalara
uygun olması gereklidir. Bu açıklamalara uyulmaması durumunda ortaya çıkabilecek zararlar için
imalatçı herhangi bir sorumluluk kabul etmemektedir. Montajın yapıldığı ülkede yürürlükte bulunan
yasalara bağlı olarak fırının topraklı bir priz ya da bütün kutupları ayıran bir devre kesici kullanılarak
elektrik beslemesine bağlanması gereklidir. Elektrik beslemesinin uygun sigortalarla korunması ve
kullanılan kabloların fırının doğru bir şekilde beslenebilmesine yeterli kapasitede olması gereklidir.
BAĞLANTI
Fırın, faz arası veya faz nötr arası 220-240 VAC 50 Hz olan bir elektrik beslemesine bağlanması gereken
bir elektrik kablosu ile sağlanmıştır. Fırın elektrik beslemesine bağlanmadan önce aşağıdakilerin kontrol
edilmesi gereklidir:
- etikette belirtilen gerilim değeri;
- devre kesicinin ayarı.
Fırının topraklama klemensine bağlanmış olan topraklama kablosunun elektrik beslemesinin
topraklama klemensine bağlanması gereklidir.
UYARI
Fırını elektrik beslemesine bağlamadan önce, elektrik beslemesinin topraklama klemensinin
sürekliliğini kontrol etmesi için kalifiye bir elektrikçiye başvurun. Fırının topraklama klemensine
bağlanmaması veya topraklama bağlantısının sürekliliğinde bir sorun olması sonucunda ortaya
TR 31
Page 32

çıkabilecek her türlü kaza veya zararda imalatçı herhangi bir sorumluluk kabul etmemektedir.
NOT: fırında bazı bakım işlemleri yapılması gerektiğinden, montajın yapılmış olduğu alandan çıkarılması
halinde fırının bağlanabileceği başka bir prizin yakınlarda bulunması tavsiye edilir. Elektrik kablosunun
sadece teknik servis personeli ya da eşdeğer niteliklere sahip teknisyenler tarafından değiştirilmesi
gereklidir.
1.3 Tavsiyeler
Fırını her kullandıktan sonra yapılacak kısa süreli temizlik işlemi fırının her zaman mükemmel temizlikte
kalmasını sağlayacaktır. Fırının yan duvarlarını alüminyum folyo veya mağazalardan satın alınabilecek
tek kullanımlık koruma malzemeleri ile kaplamayın. Sıcak emaye ile temas eden alüminyum folyo veya
başka herhangi bir koruma malzemesi erime riskine sahiptir ve emaye iç yüzeylerin bozulmasına neden
olabilir. Fırınınızın aşırı kirlenmesini ve bunun sonucunda duman kokusu oluşmaması için fırını çok
yüksek sıcaklıklarda kullanmamanızı tavsiye ederiz. Pişirme süresini uzun tutmak ve sıcaklığı biraz
düşürmek daha iyidir. Fırın ile birlikte verilen aksesuarlara ek olarak, sadece çok yüksek sıcaklıklara
dayanıklı tabaklar ve pişirme kapları kullanmanızı tavsiye ederiz.
1.4 Kurulum
Ürünün kurulumu firmanın yetkilendirilmiş servis/yetkilendirilmiş kişi tarafından yapılmalıdır. Yetkisiz
kişi ve kuruluşlar tarafından yapılan kurulumlardan doğan tüm ürün, kişi, mahal hasarları firmanın
sorumluluğunda değildir. Kurulum yapılacak mahalin ürünün çalışma ve teknik koşullara kullanma
kılavuzunda belirlenen kurallara uygun şekilde olması/sağlanması tüketicinin sorumluluğundadır. Eğer
tüketici tarafından yapılan kurulum nedeniyle ortaya çıkan hataların düzeltilmesi için imalatçının desteği
gerekirse, bu destek garanti kapsamında sağlanmaz. Kurulum açıklamaları profesyonel kalifiye personel
içindir ve kurulum sırasında uyulması gereklidir. Hatalı kurulum insanların ve evcil hayvanların
yaralanmasına ve eşyaların zarar görmesine neden olabilir. Böylesi bir yaralanma veya zarar için imalatçı
sorumlu tutulamaz.
Fırın yüksek bir mutfak dolabına ya da tezgah altına yerleştirilebilir. Sabitlemeden önce, iç parçaların
soğutulması ve korunması için gerekli temiz havanın uygun biçimde dolaşımının sağlanması amacıyla
fırının etrafında iyi bir havalandırma sağlandığından emin olun. Sabitleme şekline göre son sayfada
belirtilen hava alma açıklıklarını açın. Bu cihaz ev standartlarında kullanımına uygun olarak tasarlanmış
ve üretilmiş olup ticari ve profesyonel amaçla kullanımlara uygun değildir. Ticari kullanımlarda (ev harici)
ürün teslim tarihinden itibaren 1 (bir) ay sure ile üretim hatalarına karşı garanti kapsamındadır. Ticari
kullanımlarda cihazın ömrü kısalabilir ve kullanım beklentilerini karşılamayabilir. Ev ve benzeri kullanım
amacıyla örtüşmeyen (ev veya ev tipi bir mekanda bile olsa) kullanım dolayısıyla cihazda meydana
gelebilecek herhangi bir arıza ve/veya hasar üretici / satıcı tarafından kabul edilmeyecektir. Ticari amaç
ile kullanılan ürünlerde, Malın ayıplı olduğu teslim sırasında açıkça belli ise alıcı 2 (iki) gün içinde durumu
satıcıya ihbar etmelidir. Açıkça belli değilse alıcı malı teslim aldıktan sonra 8 (sekiz) gün içinde incelemek
veya incelettirmekle ve bu inceleme sonucunda malın ayıplı olduğu ortaya çıkarsa, haklarını korumak
için durumu bu süre içinde satıcıya ihbarla yükümlüdür.
Bu cihaz ev standartlarında kullanılmak üzere üretilmiştir. Profesyonel kullanım veya
ticare kullanım için kurulmuş olması durumunda, ilgili ticari hususta uygulanan
standartlar dikkate alınmalıdır.
1.5 Atık yönetimi ve çevrenin korunması
Bu cihaz, 2012/19/EU Atık Elektrikli ve Elektronik Cihazlar (WEEE) hakkında Avrupa
Yönergesine göre etiketlenmiştir. WEEE hem kirletici maddeleri (çevreye olumsuz bir etkisi
olabilecek), hem de baz elemanları (yeniden kullanılabilir olan) içermektedir. Kirletici
maddelerin bertaraf edilmesi ve tüm malzemelerin geri dönüştürülebilmesi için WEEE'lerin
doğru bir şekilde tasnif edilmesi önemlidir. WEEE'lerin çevre açısından bir sorun
derece önemlidir:
- WEEE evsel atık olarak işlem görmemelidir;
- WEEE belediyeler veya tescilli bir firma tarafından yönetilen belirlenmiş toplama alanlarına götürülmelidir.
oluşturmaması için bireyler önemli bir rol oynayabilir; birkaç temel kurala uyulması son
TR 32
Page 33

Birçok ülkede, büyük WEEE'ler için şehir içinde toplama noktaları bulunmaktadır. Yeni bir cihaz satın
aldığınızda, eski cihazın satın alınan cihazla aynı tipte olması ve aynı işlevlere sahip olması durumunda
eski cihazı ücretsiz olarak bire bir kabul etmesi gereken satıcıya iade edebilirsiniz.
ENERJİ TASARRUFU VE ÇEVREYE SAYGI
Mümkün olduğunda, fırını önceden ısıtmaktan kaçının ve her zaman doldurmaya çalışın. Fırın kapağını
olabildiğince az açın çünkü her açılışında ısı kaybı oluşur. Önemli oranda enerji tasarrufu için, fırını
planlanan pişirme süresinden 5 ile 10 dakika daha önce kapatın ve fırının üretmeye devam edeceği
artakalan ısıyı kullanın. Isının hazne dışına kaçmaması için contaları temiz ve düzgün tutun. Eğer saatlik
bir tarife ile ücretlendirilen bir elektrik sözleşmeniz varsa, pişirmeye başlama saatini indirimli fiyat
tarifesinin saatine taşıyan "gecikmeli pişirme" programı ile daha basit bir şekilde enerji tasarrufu
yapılabilir.
1.6 Uygunluk beyanı
Bu cihazın gıdalarla temas edebilecek parçaları 89/109 EEC Yönetmeliği hükümlerine uygundur.
Bu ürüne işaretinin yerleştirilmesi ile cihazın bu ürün için yürürlükte olan tüm ilgili Avrupa güvenlik,
sağlık ve çevre standartlarına uygun olduğunu doğruluyoruz.
2. Ürün Açıklaması
2.1 Genel bakış
1
5
6
2
4
3
2.2 Aksesuarlar
Tepsi
1
Yiyeceklerin ızgara üzerinde pişirilmesi sırasında
damlayan sularını toplar.
1. Kontrol paneli
2. Raf konumları
(eğer varsa yan tel raflar)
3. Metal ızgara
4. Tepsi
5. Fan (çelik plakanın arkasında)
6. Fırın kapağı
Metal ızgara
2
Pişirme tepsilerini ve tabaklarını tutar.
TR 33
Page 34

2.3 İlk Kullanım
İLK TEMİZLEME
İlk kez kullanmadan önce fırını temizleyin. Dış yüzeyleri yumuşak bir ıslak bezle silin. Tüm aksesuarları
yıkayın ve fırının içini sabunlu su ve sıvı bulaşık deterjanı karışımına batırılmış bir bezle silin. Boş fırını
maksimum sıcaklık değerine ayarlayın ve yaklaşık 1 saat çalıştırın, bu şekilde fırının yeni olmasından
kaynaklı tüm kokular giderilecektir.
3. Fırının Kullanımı
3.1 Gösterge açıklamaları
1- Dakika hatırlatıcı
2- Saat ayarı
3- Pişirme süresi
4- Pişirme sonu
5- Sıcaklık veya saat ekranı
6- LCD ekran ayar kontrolleri
7- Sıcaklık seçici düğme
8- Fonksiyon seçici düğme
MENU
UYARI: Fırın yerine monte edilip elektrik bağlantısı
yapıldığında veya elektrik beslemesi kesilip tekrar geri
geldiğinde, gösterge yanıp sönmeye başlar. Bu
aşamada saatin ( 12:00 ) ayarlanması gerekir. Saat
aşağıdaki gibi ayarlanır:
•Orta düğmeye 1 kez basınız.
• "-" "+" Butonlarıyla zamanı ayarlayınız.
•Bütün düğmelere basmaya son verin.
UYARI: Fırın ancak saat ayarlandıysa çalışmaya başlar.
8
TR 34
Page 35

PROGRAM DEVREYE SOKULMASI
• Çocuk kilidi fonksiyonu
dokunmatik ekrandaki
(+) sembolüne en az 5
saniye dokunarak aktif
ÇOCUK
KİLİDİ
ZAMAN
SAYACI
PİŞİRME
SÜRESİ
PROGRAMI
hale getirilir. Bu andan
itib ar e n di ğe r t üm
fonksiyonlar kilitlenir.
Ekran ya “Stop” ya da
zam a n a y a rl ay ıc ıyı
gösterir. İkisini de aynı
anda göstermez.
•Orta düğmeye 1 kez
basınız
•Arzu ettiğiniz süreyi
ayarlamak için "-" "+"
düğ me leri ne b asın .
•B ü t ün dü ğmele r e
basmaya son verin.
•Orta düğmeye 2 kez
basınız
•Arzu ettiğiniz pişirme
süresini ayarlamak için
"-" "+" düğmelerine
basın.
•B ü tü n dü ğ me le re
bas may a s on ver in.
•Fırın fonksiyon düğmesi
ile pişirme fonksiyonunu
seçin.
DEVREDEN
ÇIKARILMASI
• Ç o c u k k i l i d i
f o n ks i y o nu t e k ra r
dokunmatik ekrandaki
(+) sembolüne en az 5
saniye dokunarak iptal
edilir. Bu andan itibaren
tüm fonksiyonlar tekrar
seçilebilir hale gelir.
•Ayarlanmış olan süre
sona erdiğinde, sesli bir
alarm verilir (bu alarm
kendiliğ in de n du ru r)
a nc ak , d ü ğm e s in e
ba s ıl ar ak i s t e nd iğ i
ta kdi rde da ha önc e
de durdurulabilir.
•Ayarlanmış olan süre
sona erdiği nde, fırın
otomatik olarak kapanır.
Pişirme işlemini daha
ö n c e d ur d u rm a k
istemeniz durumunda,
i şl ev s eç ic is in i 0
konumuna getirin veya
süreyi 0 :0 0 o la ra k
ayarlayın SELECT ve "-"
"+" düğmeleri.
İŞLEVİ
• A ya r la n m ış o l an
sürenin sonunda alarmı
çaldırır.
•İşlem sırasında kalan
süreyi gösterir.
•Seçilmiş olan tarif için
ge rekl i o lan piş irme
süresini ayarlayabilmenize
olanak sağlar.
•Ne kadar çalışma süresi
kaldığ ın ı gö rmek i çi n
SELECT düğmesine basın.
•Program la nmış olan
süreyi değiştirmek için
SEL ECT v e " -" "+ "
düğmelerine basın.
NE İÇİN KULLANILDIĞI
•F ırını bir ala rm lı s aat
olara k kullanabil me nize
o la na k s a ğ l a r ( f ır ın
çalışırken de çalışmıyorken
de kullanılabilir)
•Sinyali durd urmak için
her hang i b i r düğ meye
basın. Saat fonksiyonuna
ge ri d önm ek i çin or ta
düğmeye basın.
PİŞİRME
SONU
PROGRAMI
•Orta düğmeye 3 kez
basınız.
•Arzu ettiğiniz pişirmenin
s o na e rm e s aa tin i
ayarlamak için "-" "+"
düğmelerine basın.
•B ü tü n d ü ğ me le re
basmaya son verin.
•Fırın fonksiyon düğmesi
ile pişirme fonksiyonunu
seçin.
•Ayarlanmış olan süre
sona erdiğinde, fırın
otomatik olarak kapanır.
Pişirme işlemini kendiniz
m üd a ha le ed ere k
durdu rmak için f ırın
fonksiyon düğmesini O
konumuna getirin.
TR 35
•Pişirme sonu saatini
ay ar la y ab i l me n iz e
olanak sağlar.
•Ayarlanmış olan saati
kontrol etmek için orta
düğmeye 3 kez basınız
•Programlanmış olan
saati değiştirmek için
SELE CT ve "- " " +"
düğmelerine basın.
• Bu i ş l ev ge ne l li kl e
“pişirme süresi” işlevi ile
birlikte kullanılır. Örneğin
yiyeceğin pişme süresi 45
dakikaysa ve saat 12:30'da
hazır olması gerekiyorsa,
sadece pişirme süresini 45
dakikaya ve pişirme sonu
s a a t i n i d e 1 2 : 3 0 ' a
ayarlamanız yeterlidir.
•Programlanm ı ş o la n
pişirme süresinin sonunda
fır ı n o to ma ti k o la ra k
kapanır ve bir sesli alarm
verilir.
•P iş ir me saa t 1 1: 45'de
(1 2:3 0 ek si 4 5 dak ik a)
otomatik olarak başlar ve
p ro g ra m la n mı ş ol a n
pişirme süresi (45 dakika)
kadar sürdükten sonra fırın
otomatik olarak kapanır.
UYARI:Pişirme sonu(END)
programı pişirme sü resi
se çil med en a ya rla nmı ş
olması durumunda, fırın
hemen çalışmaya başlar ve
p ro g ra m la n mı ş o l an
pişirme sonu saatine kadar
çalı şı p otom at ik o la rak
durur.
Page 36

3.2 Pişirme Modları
Fonksiyon
ikonu
*
L3
Sıcaklık
aralığı °C
40 ÷ 40
50 ÷ 240
50 ÷ 240
50 ÷ 230
150 ÷ 220
L1 ÷ L5
Varsayılan
sıcaklık °C
40
180
210
220 50 ÷ 280
210
200
220 50 ÷ 230
Fonksiyon (Fırın modeline bağlıdır)
LAMBA: Fırın lambasını yakar.
BUZ ÇÖZME: Düğme bu konuma alındığı zaman fan oda sıcaklığında havayı
donmuş gıdanın etrafında dolaştırır, böylece gıdanın protein içeriği
değişmeden birkaç dakika içinde buzu çözülür.
FANLI PİŞİRME: Bu yöntemi kümes hayvanları, çörekler, balık ve sebzeler için
kullanmanızı tavsiye ederiz. Isı gıdanın içine daha iyi işler ve hem pişirme, hem
de ısıtma süreleri azalır. Değişik gıdaları aynı veya farklı soslarla bir veya daha
fazla konumda pişirebilirsiniz. Bu pişirme yöntemi ısı yayılımının eşit olmasını
sağlar ve kokular birbirine karışmaz. Aynı anda farklı gıdalar pişirdiğiniz zaman
fazladan yaklaşık on dakika daha bekleyin.
STATİK/GELENEKSEL PİŞİRME: Hem üst, hem de alt ısıtıcı elemanlar kullanılır.
Fırını yaklaşık on dakika önceden ısıtın. Bu yöntem her türlü geleneksel
kızartma ve fırında pişirme için idealdir. Kırmızı etler, rosto, kuzu butu, ekmek,
folyoya sarılmış yiyecekler (papillote), katmer içindir. Gıdayı bir tabağın içinde
orta rafın üzerine yerleştirin.
FAN + ALT ISITICI: Alt ısıtıcı eleman kullanılır, fan fırının içindeki havanın
sirkülasyonunu sağlar. Bu yöntem sulu meyveler, meyveli pastalar, turtalar,
kişler ve etli börekler için idealdir.
Gıdaların kurumasını önler ve keklerin, ekmeklerin ve alttan pişirilen diğer
gıdaların kabarmasını fazlalaştırır.
Rafı alt konuma yerleştirin.
FAN DESTEKLİ IZGARA: fırın kapağı kapalı iken bu fonksiyonu kullanın. Üst ısıtıcı
eleman kullanılır, fan fırının içindeki havanın sirkülasyonunu sağlar. Kırmızı etler
için ön ısıtma gereklidir, ancak beyaz etler için gerekmez. Kızarmış domuz,
kümes hayvanları, vb gibi kalın parçalar ile bütün parçaların pişirilmesi için
idealdir. Pişirilecek gıdayı doğrudan orta konumda bulunan rafın ortasına
yerleştirin. Suları toplamak için rafın altına damlama tepsisini koyun. Gıdanın
ızgaraya çok yakın olmadığından emin olun. Pişirme süresinin yarısında gıdayı
çevirin.
IZGARA: fırın kapağı kapalı iken bu fonksiyonu kullanın.
Üst ısıtıcı eleman tek başına kullanılır ve sıcaklık ayarı yapılabilir. Elemanların
ısınması için beş dakikalık ön ısıtma gereklidir. Izgaralar, kebaplar ve üstü
örtülen yemeklerin pişirilmesinde başarı garanti edilir. Beyaz etlerin ızgaradan
biraz açıkta tutulması gereklidir; pişirme süresi daha uzundur, ancak et daha
lezzetli olacaktır. Kırmızı etleri ve balık filetolarını altında damlama tepsisi ile
rafın üzerine yerleştirin. Fırın iki ızgara konumuna sahiptir:
Izgara: 2140W Barbekü: 3340 W
PİZZA: Bu seçenekte sıcak hava sirkülasyonuyla pizza ve kek gibi yiyecekler
mükemmel bir şekilde pişirilir.
*CENELEC EN 60350-1 uyumlu olarak test edilmiştir enerji sınıfının tanımlanması için kullanılmıştır.
TR 36
Page 37

4. Fırının Temizlenmesi ve Bakımı
4.1 Temizleme hakkında genel notlar
Düzenli temizlik ile cihazın kullanım ömrü uzatılabilir. Elle temizlik işlemlerini yapmadan önce fırının
soğumasını bekleyin. Temizlik için asla aşındırıcı deterjanlar, çelik tel veya keskin nesneler kullanmayın,
aksi takdirde emaye parçalarda onarılamaz hasarlar oluşabilir. Sadece su, sabun veya ağartıcı bazlı
deterjanlar (amonyak) kullanın.
CAM PARÇALAR
Fırın her kullanıldıktan sonda pencerenin camının emici bir mutfak bezi ile temizlenmesi tavsiye edilir.
İnatçı lekeleri temizlemek için deterjana batırılmış ve iyice sıkılmış bir sünger kullanın ve sonra su ile
durulayın.
FIRIN KAPAK CONTASI
Kirlendiği zaman hafifçe ıslatılmış bir süngerle temizlenebilir.
AKSESUARLAR
Aksesuarları sabunlu su ile ıslatılmış bir süngerle temizleyin, ardından durulayın ve kurutun: aşındırıcı
deterjanlar kullanmaktan kaçının.
DAMLAMA TEPSİSİ
Izgarayı kullandıktan sonra tepsiyi fırından çıkarın. Sıcak yağı bir kaba dökün ve bir sünger ve sıvı bulaşık
deterjanı kullanarak tepsiyi sıcak su ile yıkayın.
Eğer yap artıkları kalırsa, tepsiyi deterjanlı suya batırın. Alternatif olarak, tepsiyi bulaşık makinesinde
yıkayabilir veya piyasada bulunan fırın deterjanlarını kullanabilirsiniz. Kirli tepsiyi asla fırına geri
koymayın.
TR 37
Page 38

4.2 Kolay Temizlenme Fonksiyonu (Hydro Easy Clean - )
Hydro easy clean buhar yardımı ile fırınınızdaki yağ ve yemek artıklarını temizler.
1. Fırınınızın Hydro Easy Clean – Kolay Temizlenme bölümüne 300 ml su ilave edin.
2. Fırınınızı sabit ( ) ya da taban ( ) sıcaklığına ayarlayın.
3. Isı göstergesini Hyro Easy Clean – Kolay Temizlenme ( ) fonksiyonuna getirin.
4. Programı 30 dakika çalıştırın.
5. Cihaz soğuduğunda fırınınızın iç kısmını temiz bir bezle temizleyin.
Uyarı:
Cihazınıza dokunmadan önce soğuk olduğundan emin olun.
Sıcak yüzeylerin yanık riski taşıdığını unutmayın.
İçme suyu kullanın.
MENU MENU
300 ml
4.3 Bakım
FIRIN KAPAĞININ SÖKÜLMESİ
1. Kapağı açın.
2. Aşağı doğru iterek fırın kapağının sağ ve sol tarafında bulunan menteşe yuvalarının kıskaçlarını açın.
3. Bu işlemin tersini uygulayarak kapağı yerine takın.
TR 38
Page 39

LOW-E
CAMIN SÖKÜLMESİ VE TEMİZLENMESİ
1. Fırının kapağını açın.
2.3.4. Menteşeleri kilitleyin, vidaları çıkarın ve yukarı doğru çekerek üst metal kapağı çıkarın.
5.6. Camı dikkatli bir şekilde fırın kapağından çekerek çıkarın (Not: pirolitik fırınlarda ikinci ve üçüncü
camı (eğer varsa) da çıkarın).
7. Temizleme veye değişim işleminin sonunda parçaları sökme işleminin ters sıralaması ile toplayın.
Tüm camların üzerinde " " kelimesinin okunabilmesi ve kapağın sol tarafında bulunması gereklidir, Low-E
soldaki yatay menteşeyi kapatın. Bu şekilde birinci camın baskılı yüzeyi kapağın içinde kalacaktır.
1.
2.
3.
5.
6.
1
2
3
7.
4.
TR 39
Page 40

AMPULÜN DEĞİŞTİRİLMESİ
1. Fırını elektrik beslemesinden ayırın.
2. Cam kapağı sökün, ampulü sökün ve aynı türde yeni bir ampul ile değiştirin.
3. Arızalı ampul değiştirildikten sonra cam kapağı yerine takın.
5. Sorun Giderme
5.1 Sorun giderme
SORUN
Fırın ısınmıyor
Fırın ısınmıyor
Dokunmatik kullanıcı paneli
tepki vermiyor
OLASI NEDENİ
Saat ayarlanmamış
Bir pişirme işlevi ya da sıcaklık
ayarlanmamış
Kullanıcı panelinde buhar
veya yoğuşma var
TR 40
ÇÖZÜMÜ
Saati ayarlayın
Gerekli ayarların doğru
olduğunu kontrol edin
Yoğuşma tabakasını
temizlemek için kullanıcı
panelini mikrofiber bir
bezle silin
Page 41

TÜKETİCİ HİZMETLERİ
Yetkili servislerimizden hizmet talebiniz olduğunda veya ürünlerimizle ilgili genel öneri ve talepleriniz için
aşağıdaki numaradan ulaşabilirsiniz.
TÜKETİCİ HATTI: 444 03 98
Sabit telefonlardan veya cep telefonlarından alan kodu çevirmeden arayınız.
Ürününüzü kullanmadan önce montaj ve kullanma kılavuzunu mutlaka okuyunuz. Ürünün montaj ve
kullanım kılavuzunda yer alan hususlara aykırı kullanılması, kullanım hataları ve cihazın standart kullanım
şartları / amaçları haricinde kullanılması halinde ürün garanti kapsamı dışında kalacaktır.
Ürünün standart ve sorunsuz çalışma koşullarının sağlanması için gerekli / zorunlu olan montaj ve
kullanım kılavuzunda belirtilen teknik özelliklerinin (su basıncı, voltaj değeri, gaz besleme basıncı, sigorta
değeri, topraklama, yakıt cinsi, yakıt kalitesi vb.) uygun olmaması, sabit olmaması ve/veya değişken
olması halinde, cihazda meydana gelebilecek arızalar ve sorunlar garanti kapsamı dışında kalacaktır.
Candy Hoover Euroasia tarafından sağlanan garanti şartları aşağıdaki koşullarda geçersiz olacaktır.
• Ürüne, yetkili servis dışındaki kişiler tarafından müdahale edilmesi, elektrik-su kesintisi ve üründen
kaynaklanmayan kaçaklar garanti kapsamı dışındadır.
• Kullanım hatalarından dolayı oluşan arıza ve hasarlar, elektrik-gaz -su tesisatı ve / veya tesisat
ekipmanları nedeniyle meydana gelebilecek arızalar garanti kapsamı dışındadır.
•Ürünün, müşteriye ulaştırılması sonrası yapılan taşıma işlemine bağlı arıza ve hasarlar, tüketici
tarafından yapılan yanlış depolama ve ortam koşulları nedeniyle cihazda meydana gelen hasarlar ve
arızalar garanti kapsamı dışındadır.
• Hatalı elektrik tesisatı, ürünün üzerinde belirtilen voltajdan farklı voltajda kullanılması veya şebeke
voltajındaki dalgalanmalar sonucu oluşan arıza ve hasarlar, doğal afetler, üründen kaynaklanmayan
harici/fiziki dış etkenler, mevsimsel hava şartları ve çevresel etkenler (deprem, yangın, sel, su basması,
şiddetli rüzgar, yıldırım düşmesi, kireç, nem, rutubet, toz, nakliye, taşıma, ürünün dona maruz kalması,
susuz çalışma vb.) nedeniyle oluşan arızalar garanti kapması dışında kalacaktır.
• Kullanım kılavuzunda belirtilen hususlara aykırı kullanılmasından kaynaklanan arızalar ve hasarlar.
Yukarıda belirtilen arızaların giderilmesi ücret karşılığı yapılır.
Ürünün kullanım ömrü 10 (on) yıldır. Bu ürünün tanımlandığı şekilde çalışabilmesi için gerekli yedek
parçaları bulundurma süresidir.
Üretim yeri Türkiye 'dir.
İTHALATCI FİRMA:
CANDY HOOVER EUROASIA EV GEREÇLERİ SAN. VE TİC. A.Ş.
İçerenköy Mh. Hal Yolu Cd. Çayır Yolu Sk. No: 11
Sayar İş Merkezi Kat: 7 34752 Ataşehir / İSTANBUL/ TÜRKİYE
Tel: 0216 466 42 42 • Fax: 0216 466 15 45
www.hoover.com.tr • servis@hoover.com.tr
ÜRETİCİ FİRMA:
CANDY HOOVER GROUP
Via Privata E. Fumagalli 20861 Brugherio (MB) - ITALY
Tel: 039.2086.1 • Fax: 039.2086.403
www.candy-group.com
TR 41
Page 42

GARANTİ BELGESİ
ANKASTRE FIRIN
Ankastre fırın kullanma kılavuzunda gösterildiği şekilde kullanılması ve yetkili kıldığımız servis elemanları dışındaki
şahıslar tarafından bakımı, onarımı veya başka bir nedenle müdahale edilmemiş olması şartıyla bütün parçaları dahil
olmak üzere tamamı malzeme, işçilik ve üretim hatalarına karşı ürünün teslim tarihinden itibaren 3 ( ÜÇ ) YIL SÜRE
İLE CANDY HOOVER EUROASIA A.Ş. TARAFINDAN GARANTİ EDİLMİŞTİR.
Malın bütün parçaları dahil olmak üzere tamamı garanti kapsamındadır.
Malın ayıplı olduğunun anlaşılması durumunda tüketici, 6502 sayılı Tüketicinin Korunması Hakkında Kanunun 11
inci maddesinde yer alan;
a) Satılanı geri vermeye hazır olduğunu bildirerek sözleşmeden dönme,
b) Satılanı alıkoyup ayıp oranında satış bedelinde indirim isteme,
c) Aşırı bir masraf gerektirmediği takdirde, bütün masrafları satıcıya ait olmak üzere satılanın ücretsiz onarılmasını
istem,
ç) İmkan varsa, satılanın ayıpsız bir misli ile değiştirilmesini isteme, seçimlik haklarından birini kullanabilir.
Tüketicinin, Kanunun 11. maddesinde yer alan seçimlik haklarından ücretsiz onarım hakkını seçmesi durumunda
satıcı; işçilik masrafı, değiştirilen parça bedeli ya da başka herhangi bir ad altında hiçbir ücret talep etmeksizin malın
onarımını yapmak veya yaptırmakla yükümlüdür. Tüketici ücretsiz onarım hakkını üretici veya ithalatçıya karşı da
kullanılabilir. Satıcı, üretici ve ithalatçı tüketicinin bu hakkını kullanmasından müteselsilen sorumludur.
Tüketicinin, ücretsiz onarım hakkını kullanması halinde malın;
• Garanti süresi içinde tekrar arızalanması,
• Tamiri için gereken azami sürenin aşılması,
• Tamirinin mümkün olmadığının, yetkili servis istasyonu, satıcı, üretici veya ithalatçı tarafından bir raporla belirlenmesi
durumlarında;
tüketici malın bedel iadesini alıp, ayıp oranında beden indirimini veya imkan varsa malın ayıpsız misli ile
değiştirilmesini satıcıdan talep edebilir. Satıcı, tüketicinin talebini reddetmez. Bu talebin yerine getirilmemesi
durumunda satıcı, üretici ve ithalatçı müteselsilen sorumludur.
Garanti uygulaması sırasında değiştirilen malın garanti süresi, satın alınan malın kalan garanti süresi ile
sınırlıdır.
Malın tamir süresi 20 iş gününü geçemez. Bu süre, garanti süresi içerisinde mala ilişkin arızanın yetkili servis
istasyonuna veya satıcıya bildirimi tarihinde, garanti süresi dışında ise malın yetkili servis istasyonuna teslim
tarihinden itibaren başlar. Malın arızasının 10 iş günü içerisinde giderilememesi halinde, üretici veya ithalatçı; malın
tüketicinin kullanımına tahsis etmek zorundadır. Malın garanti süresi içerisinde arızalanması durumunda, tamirde
geçen süre garanti süresine eklenir.
Malın kullanma kılavuzunda yer alan hususlara aykırı kullanılmasından kaynaklanın arızalar garanti kapsamı
dışındadır.
Tüketici, garantiden doğan haklarının kullanılması ile ilgili olarak çıkabilecek uyuşmazlıklarda yerleşim yerinin
bulunduğu veya tüketici işleminin yapıldığı yerdeki Tüketici Hakem Heyetine veya Tüketici Mahkemesine
başvurabilir.
Garanti belgesinin tekemmül ettirilerek tüketiciye verilmesi ve bu yükümlülüğün yerine getirildiğinin ispatı
satıcıya aittir.
Satılan mala ilişkin olarak düzenlenen faturalar garanti belgesi yerine geçmez.
Satıcı tarafından bu Garanti Belgesinin verilmemesi durumunda, tüketici Gümrük ve Ticaret Bakanlığı Tüketicinin
Korunması ve Piyasa Gözetimi Genel Müdürlüğüne başvurabilir.
CANDY-HOOVER-EUROASIA EV GEREÇLERİ SAN. VE TİC. A.Ş.
Genel Müdür:
Model:..............................
Bandrol ve Seri No:...........
Teslim Tarihi Yeri: ..............
Bu bölümü, ürünü aldığınız Yetkili Satıcı imzalayacak ve kaşeleyecektir.
Bu garanti belgesi ile kesilen fatura garanti süresi boyunca garanti belgesi ile muhafaza edilmesi önerilir.
Fatura Tarihi No: .................
Satıcı Firma Ünvanı: ............
Adres:
Tel - Fax:
Satıcı Firma (Kaşe ve İmza):
TR 42
Page 43

Page 44

INSTALLATION
INSTALLAZIONE
EN
IT
KURULUM
TR
590
EN
Opening 500 x 45
Apertura 500 x 45
IT
Açıklık 500 x 45
TR
560
560
EN
Opening 500 x 10
Apertura 500 x 10
IT
Açıklık 500 x 10
TR
560
580
550
595
545
595
22
GB
If the furniture is equpped with a bottom at the back
part, provide an opening for the power supply cable.
IT
Se il mobile è equipaggiato con una copertura
posteriore, provvedere ad una apertura per il passaggio
del cavo di alimentazione.
TR
Mobilyanın arka kısmı kapalıysa, elektrik kablosunun
geçebileceği bir açıklık oluşturun.
550
560
580
595
600
545
EN
The manufacturer will not be responsible for any inaccuracy resulting from printing or transcript errors contained in this brochure. We
reserve the right to carry out modifications to products as required, including the interests of consumption, without prejudice to the
characteristics relating to safety or function.
22
595
IT
Il produttore declina ogni responsabilità per inesattezze contenute nel documento stampato o per errori di trascrizione contenuti in
questa brochure. Inoltre, si riserva il diritto di apportare modifiche al prodotto, nell'interesse dei consumatori, senza alcun
pregiudizio per la sua sicurezza o funzionalità.
TR
Üretici bu kullanma kılavuzunda bulunan basım veya kopyalama hatalarından kaynaklanan herhangi bir yanlışlıktan sorumlu
olmayacaktır. Güvenlik veya işlevle ilgili özelliklere zarar vermeden tüketim istekleri dahil olmak üzere ürünlerde gerektiğinde
değişiklik yapma hakkımız mahfuzdur.
04.2017 • REV.0 • 42822560
 Loading...