

Page 1

OVENS
USER INSTRUCTIONS
GB
CANDY HOOVER GROUP S.R.L. • Via Privata Eden Fumagalli • 20047 Brugherio Milano Italy
HORNOS
INSTRUCCIONES PARA EL USUARIO
ES
PIEKARNIKI
INSTRUKCJA OBSŁUGI
PL
NOTICE D'EMPLOI ET D'INSTALLATION
DES FOURS ENCASTRABLES
FR
EINBAUBACKÖFEN
BEDIENUNGSANLEITUNG
DE
TROUBY
NÁVOD K OBSLUZE
CZ
Page 2

CONTENTS
1. General warnings
1.1 Declaration of compliance
1.2 Safety hints
1.3 Recommendations
1.4 Installation
1.5 Electrical connection
2. Pro/Exp’r technology
2.1 Oven equipment
2.2 Rotisserie
2.3 LED VISION/U.SEE
3. Cleaning the oven
4. Service centre
5. Description of the display
5.1 Before using the oven for the first time
5.2 How to use oven
6. Cooking mode
7. Pyrolytic cycle
8. Cooking tips
GB
...............................................................03
.................................................03
.......................................................................03
..............................................................03
..........................................................................03
.........................................................03
..........................................................04
.................................................................04
...........................................................................04
............................................................04
...............................................................05
.....................................................................05
..................................................05
..............................06
.................................................................06
.....................................................................07
....................................................................08
........................................................................08
CONTENIDO
1. Advertencias generales
1.1 Declaración de cumplimiento
1.2 Consejos de seguridad
1.3 Recomendaciones
1.4 Instalación
1.5 Conexión eléctrica
2. Tecnología Pro/Exp'r
2.1 Equipamiento del horno
2.2 Asador
2.3 LED VISION/U.SEE
3. Limpieza del horno
4. Servicio Técnico
5. Descripción de la pantalla
5.1 Antes de utilizar el horno por primera vez
5.2 Cómo utilizar el horno
6. Modo de cocción
7. Ciclo pirolítico
8. Consejos de cocción
ES
.....................................................09
.............................................09
..........................................................09
..............................................................09
..........................................................................09
.............................................................09
..........................................................10
.....................................................10
.................................................................................10
...........................................................10
............................................................11
................................................................11
................................................11
..........................12
........................................................12
................................................................13
....................................................................14
..........................................................14
SPIS TREŚCI
1. Informacje ogólne
1.1 Deklaracja zgodności
1.2 Wskazówki dotyczące bezpieczeństwa
1.3 Zalecenia
1.4 Instalacja
1.5 Podłączenie elektryczne
2. Technologia Pro/Exp'r
2.1 Wyposażenie piekarnika
2.2 Rożen
2.3 Oświetlenie ledowe/ U.SEE
3. Czyszczenie piekarnika
4. Centrum serwisowe
5. Opis wyświetlacza
5.1 Przed użyciem piekarnika po raz pierwszy
5.2 Obsługa piekarnika
6. Funkcje piekarnika
7. Czyszczenie pirolityczne
8. Wskazówki dotyczące pieczenia
PL
..............................................................15
.........................................................15
.............................15
............................................................................15
............................................................................15
....................................................15
.......................................................16
....................................................16
.................................................................................16
................................................16
......................................................17
...........................................................17
..............................................................17
........................18
.............................................................18
............................................................19
...................................................20
......................................20
02
SOMMAIRE
1. Instructions générales
1.1 Declaration de conformité
1.2 Consignes de sécurité
1.3 Recommandations
1.4 Installation
1.5 Raccordement éléctrique
2. La technologie pro/exp’r
2.1 Equipement du four
2.2 Tournebroche
2.3 LED VISION / U.SEE
3. Entretien général du four
4. Assistance technique
5. Présentation du tableau de bord
5.1 Conseils avant la premiere utilisation
5.2 Comment utiliser le four
6. Modes de cuisson
7. Pyrolyse
8. Quelques conseils de cuisson
FR
.......................................................21
..................................................21
........................................................21
.............................................................21
..........................................................................21
...................................................21
....................................................22
.............................................................22
......................................................................22
...........................................................22
...................................................23
........................................................23
.......................................23
.................................24
.....................................................24
..............................................................25
..............................................................................26
..........................................26
INHALTSVERZEICHNIS
1. Allgemeine Hinweise
1.1 Konformitätserklärung
1.2 Sicherheitshinweise
1.3 Empfehlungen
1.4 Installation
1.5 Elektrischer Anschluss
2. Pro/Exp'r Technologie
2.1 Zubehör (Modellabhängig)
2.2 Grillspieß (Modellabhängig)
2.3 Led Vision
3. Reinigung
4. Technischer Kundendienst
5. Display
5.1 Nützliche Hinweise vor dem ersten Betrieb
5.2 Benutzung des Backofens
6. Backfunktionen
7. Pyrolytische Reinigung
8. Tipps
DE
............................................................27
..........................................................27
..............................................................27
......................................................................27
............................................................................27
..........................................................27
..........................................................28
....................................................28
..................................................28
............................................................................28
.............................................................................29
..................................................29
..................................................................................29
...........................30
....................................................30
....................................................................31
.......................................................32
.....................................................................................32
OBSAH
1. Všeobecná upozornění
1.1 Prohlášení o shodě
1.2 Bezpečnostní tipy
1.3 Doporučení
1.4 Instalace
1.5 Přıpojení k elektrıcké síti
2. Pro/exp'r technologıe
2.1 Vybavení trouby
2.2 Rožeň (podle modelu)
2.3 LED VISION/U.SEE
3. Čištění trouby
4. Servisní středisko
5.
5.1 Před prvním použıtím trouby
5.2 Použití trouby
6. Režim přípravy
7. Pyrolytıcký cyklus (podle modelu)
8. Typy k pečení
Popis displeje
CZ
......................................................33
.............................................................33
................................................................33
.........................................................................33
..............................................................................33
.....................................................33
.........................................................34
..................................................................34
.........................................................34
............................................................34
......................................................................35
...............................................................35
......................................................................35
...............................................36
......................................................................36
....................................................................37
....................................38
......................................................................38
Page 3
The parts of this appliance that may come into contact with foodstuffs
comply with the provisions of EEC Directive 89/109.Appliance
complies with European Directives 2006/95/EC and
2004/108/EC, and subsequent amendments.When you have
unpacked the oven, make sure that it has not been damaged in
any way. If you have any doubts at all, do not use it: contact a
professionally qualified person.
Keep packing materials such as plastic bags, polystyrene, or nails out
of the reach of children because they are dangerous to children.
1. GENERAL WARNINGS
Read the instructions carefully to make the most of your oven. We
recommend you keep the instructions for installation and use for later
reference, and before installing the oven, note its serial number in
case you need to get help from the after-sales service.
When you have unpacked the oven, make sure that it has not been
damaged in any way. If you have any doubts at all, do not to use it.
Contact a professionally qualified person. Keep packing materials
such as plastic bags, polystyrene, or nails out of the reach of children
because they are dangerous to children.
The company shall not be liable if the instructions provided in
this document are not complied with.
! NOTE: Functions, properties and accessories of ovens which
are mentioned in this manual, can be change depending on oven
models.
1.2 SAFETY HINTS
•The oven must be used only for the purpose for which it was designed. It
must only be used for cooking food. Any other use, e.g. as a form of
heating, is an improper use of the oven and is therefore dangerous.
•WARNING: The appliance and its accessible parts become hot during
use. Care should be taken to avoid touching heating elements.
•The manufacturers cannot be held responsible for any damage caused
by improper, incorrect or unreasonable use.
When using any electrical appliance you must follow a few basic rules.
- Do not pull on the power cable to remove the plug from the socket.
- Do not touch the oven with wet or damp hands or feet.
- Do not use the oven unless you are wearing something on your feet.
- It is not generally a good idea to use adapters, multiple sockets for
several plugs or cable extensions.
- If the oven breaks down or develops a fault switch it off at the mains and
do not touch it.
• If the cable is damaged it must be replaced promptly.
When replacing the cable, follow these instructions.
Remove the power cable and replace it with one of the H05VV-F type. The
cable must be able to bear the electrical current required by the
oven.Cable replacement must be carried out by properly qualified
technicians.
The earthing cable (yellow-green) must be 10 mm longer than the power
cable.
Use only an approved service centre for repairs and ensure that only
original parts are used. If the above instructions are not adhered to the
manufacturers cannot guarantee the safety of the oven.
•The oven you have just acquired has the described technical
characteristics and you must not make any modifications to it.
•Never use a steam or high-pressure spray to clean the oven.
•Do not store flammable products in the oven; they can catch fire if the
oven comes on accidentally.
•Do not press on and do not let children sit on the oven door.
•Use kitchen oven gloves, when putting into or removing a dish from the
oven.
•This appliance is not intended for use by people (including children) with
reduced physical, sensory or mental capabilities, or lack of experience and
knowledge, unless they have been given supervision or instruction
concerning use of the appliance by a person responsible for their safety.
•Children should be supervised to ensure that they do not play with the
appliance.
•Children less than 8 years of age shall be kept away unless continuously
supervised.
•This appliance can be used by children aged from 8 years and above and
persons with reduced physical, sensory or mental capabilities or lack of
experience and knowledge if they have been given supervision or
instruction concerning use of the appliance in a safe way and understand
the hazards involved.
•During use the appliance becomes hot. Care should be taken to avoid
touching heating elements inside the oven.
•WARNING: Accessible parts may become hot during use. Young children
should be kept away.
•WARNING: Ensure that the appliance is switched off before replacing the
lamp to avoid the possibility of electric shock.
•CAUTION: Accessible parts may be hot when the grill is in use. Young
children should be kept away.
1.1 DECLARATION OF COMPLIANCE
•In addition to the accessories supplied with the oven, we advise you only
use dishes and baking moulds resistant to very high Temperatures.
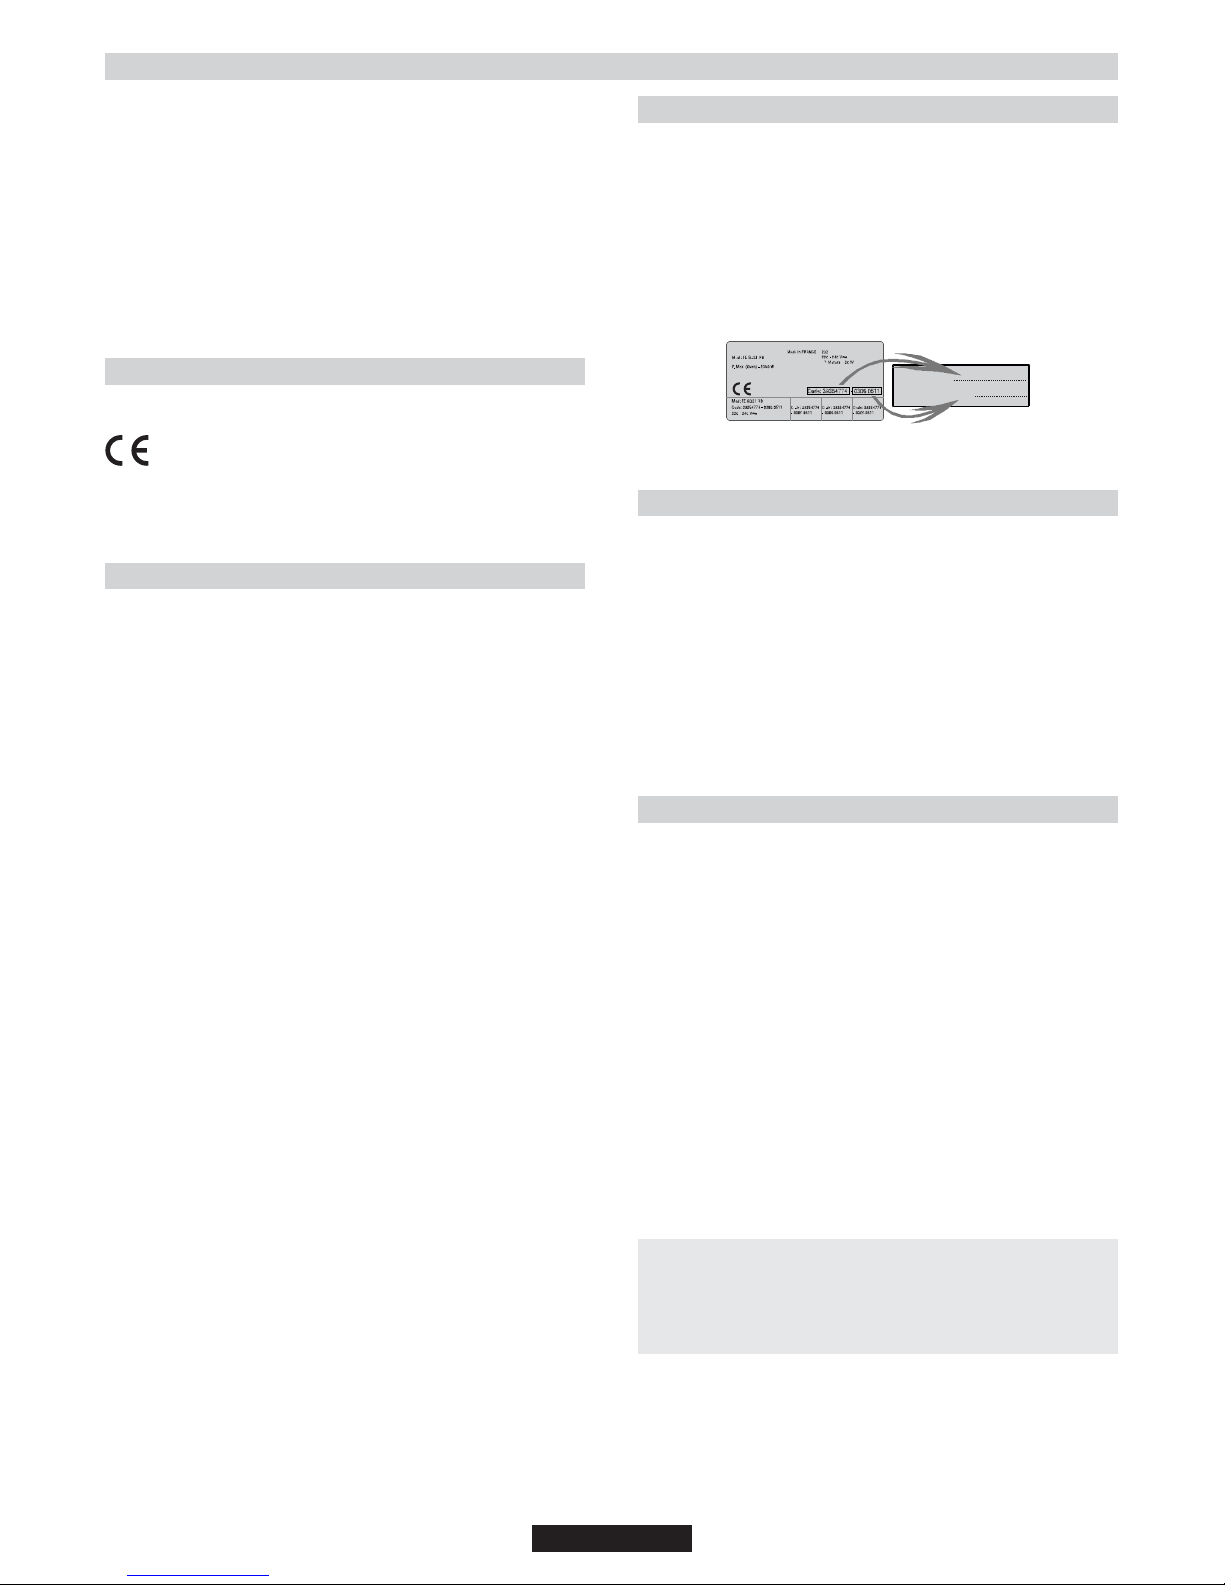
Code produit:
Numéro de série :
1.4 INSTALLATION
The manufacturers have no obligation to carry this out. If the
assistance of the manufacturer is required to rectify faults arising from
incorrect installation, this assistance is not covered by the guarantee.
The installation instructions for professionally qualified personnel
must be followed. Incorrect installation may cause harm or injury to
people, animals or belongings. The manufacturer cannot be held
responsible for such harm or injury.
The kitchen unit in which the oven is to be fitted must be made of
material resistant to temperatures of at least 70°C.
The oven can be located high in a column or under a worktop.
Before fixing, you must ensure good ventilation in the oven space to
allow proper circulation of the fresh air required for cooling and
protecting the internal parts. Make the openings specified on last page
according to the type of fitting.
1.5 ELECTRICAL CONNECTION
THE ELECTRICAL CONNECTION SHOULD BE CARRIED OUT BY
AN APPROVED CONTRACTOR OR TECHNICIAN WITH SIMILAR
QUALIFICATIONS.
The installation receiving the appliance must comply with the standard
in force in the installation country.
The manufacturer does not accept any responsibility if this provision is
not complied with.
Connection to the network must be by earthed socket outlet, or by
means of a multipole circuit-breaker, in compliance with the
installation country.
The installation must be protected by suitable fuses, and have wires
with a large enough cross-section to supply the oven normally.
CONNECTION:
The oven is fitted with a power lead for connecting exclusively to a
voltage of 220-240 V AC across the phases or across phase and
neutral.
Connection must be carried out having first checked:
-the supply voltage indicated on the meter,
The lead protection wire (green/yellow) connected to the earth
terminal of the oven must be connected to the earth terminal of the
installation.
Caution:
•Have the earth continuity of the installation checked by an electrician
before making the connection.
•The manufacturer will not be liable for any incident, or the possible
consequences that may arise from the use of the oven not earthed, or
connected to an earth with defective continuity.
NB: Do not forget that the oven may require after-sales service.
Also, locate the socket outlet so that the oven can be connected once
it is removed from its space.
Power supply cable: If the power supply cable has to be changed,
please have this done by the after-sales service or by someone with
similar qualifications.
1.3 RECOMMENDATIONS
• After each use of the oven, a minimum of cleaning will help keep the
oven perfectly clean.
• Do not line the oven walls with aluminium foil or single-use protection
available from stores. Aluminium foil or any other protection, in direct
contact with the hot enamel, risks melting and deteriorating the
enamel of the insides.
• In order to prevent excessive dirtying of your oven and the resulting
strong smokey smells, we recommend not using the oven at very high
temperature. It is better to extend the cooking time and lower the
temperature a little.
Identification plate
03 GB
Page 4
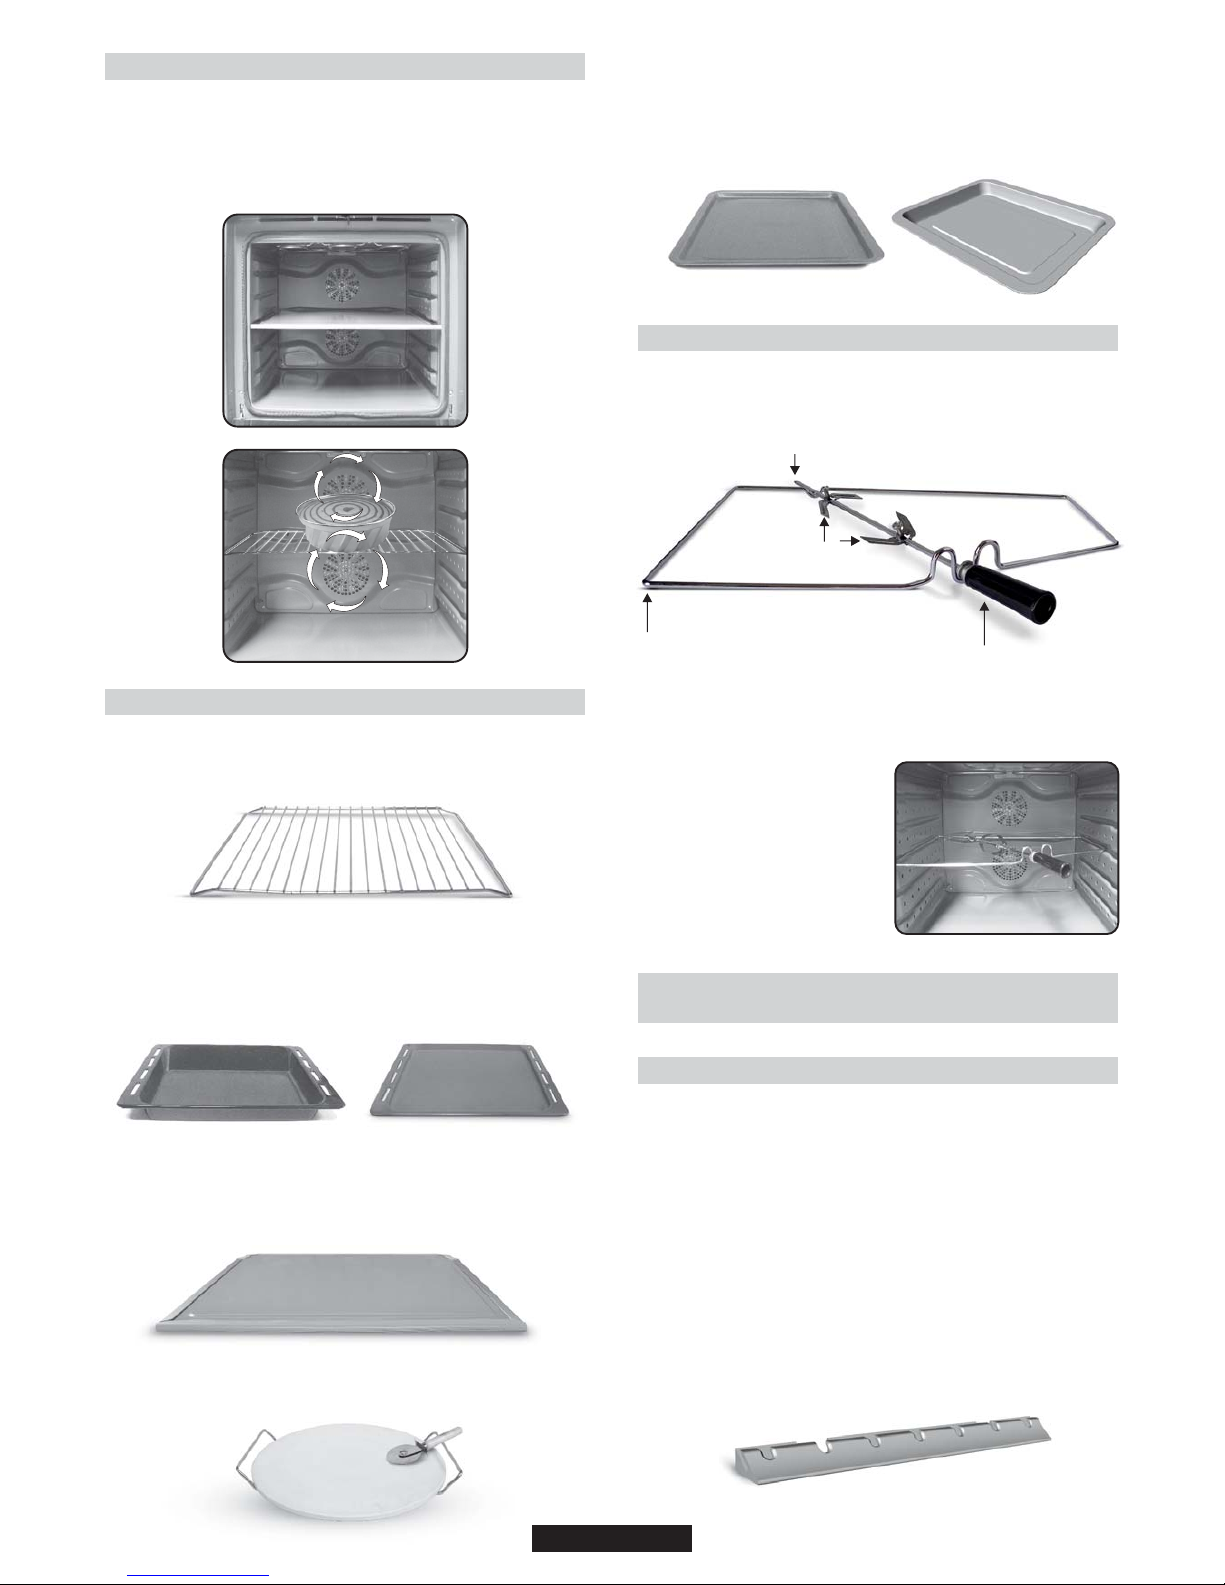
2. PRO/EXP'R TECHNOLOGY
Our technology and experience have brought a feature typical of
professional kitchens into the home. A Multijet lateral ventilation
system emit microflows of hot air directly onto the food, at low speeds,
enveloping it completely.
This enables uniform cooking, reduced loss of food moisture and
simultaneous cooking on different levels.
2.1 OVEN EQUIPMENT
It is necessary to do an initial cleaning of the equipment before the first
use of each of them. Wash them with a sponge. Rinse and dry off.
The shelf can take moulds and dishes.
2.2 ROTISSERIE (According to the model)
No pre-heating is required for rotisserie cooking.
Cooking with the door closed.
The energy consumption is 90-95% less than traditional system.
The pastry tray must be placed on the shelf. It is for cooking small
pastries like choux, biscuits, meringues, etc...
Never place the pastry tray directly on the oven bottom and on
the separator.
When the oven is in use, any unused accessories should be
removed from the oven.
2.3
Is an illumination system which replaces the traditional « light bulb ».
14 LED (for non-pyrolitic versions) or 10 High Power LED (for pyrolitic
versions) lights are integrated within the door. These produce white
high quality illumination which enables to view the inside of the oven
with clarity without any shadows on all the shelves.
Advantages :
This system, besides providing excellent illumination inside the oven,
lasts longer than the traditional light bulb its easier and to maintain and
most of all saves energy.
-Optimum view
-Long life illumination
-Very low energy consumption, -95% in comparison with the
traditional illumination High
LED VISION / U.SEE
The drip tray catches the juices from grilled foods.
Never use he drip tray as a roasting tray as fat deposits can be quickly
spread throughout the oven, which produces excess smoke.
Never place the tray directly on the oven bottom on the
separator.
The seperator divides the oven into two cavities. It seperates upper
and lower cavity when you want to use oven in dual mode. It must be
used in third shelf position.
Never leave the seperator inside the oven when the Pyrolytic
mode is on.
The pizza stone for a crisper pizza equipped according to the model
with its stand and the pizza roller.
HOW TO USE TURNSPIT
1. Unscrew the hooks
2. Put the spit into the meat
3. Fix the meat with the hooks
4. Tighten the screws
5. Insert the spit into the motor hole
6. The handle
04 GB
2
1
3
4
1- Grid
2- Spit
3- Hooks & Screws
4- Handle
Page 5
4. SERVICE CENTRE
Before calling the Service Centre.
If the oven is not working, we recommend that:
•Check that, if the oven is properly plugged into the power supply.
If the cause of the fault cannot be detected:
•Disconnect the oven from the mains, do not touch the oven and call
the after sales service.
Before calling the Service Centre remember to make a note of the
serial number on the serial number specifications plate.
The oven is supplied with a guarantee certificate that ensures that it
will be repaired free of charge by the Service Centre whilst under
guarantee.
This appliance is marked according to the European
directive 2002/96/EC on Waste Electrical and
Electronic Equipment (WEEE).
By ensuring this product is disposed of correctly, you
will help prevent potential negative consequences for
the environment and human health, which could
otherwise be caused by inappropriate waste handling
of this product.
The symbol on the product indicates that this product
may not be treated as household waste.
Instead it shall be handed over to the applicable collection point for the
recycling of electrical and electronic equipment Disposal must be
carried out in accordance with local environmental regulations for
waste disposal.
For more detailed information about treatment, recovery and
recycling of this product, please contact your local city office, your
household waste disposal service or the shop where you purchased
the product.
3. CLEANING THE OVEN
•Wait for the oven to cool down before doing any cleaning by hand.
•Never clean your oven with abrasive cleaners, wire wool or sharp
objects, or the enamel may be damaged beyond repair.
•Only use soapy water or bleach (ammonia) cleaners.
•Never line the oven sides with aluminium foil.
•Do not use a steam cleaner for cleaning operations.
•Cleaning and user maintenance shall not be made by children
without supervision
GLASS PARTS
We recommend you wipe clean the glass door with absorbent kitchen
paper every time you use the oven. If the spattering is heavy, then you
can clean with a well squeezed sponge and detergent, and rinse.
Do not use harsh abrasive cleaners or sharp metal scrapers to clean
the oven door glass since they can scratch the surface, which may
result in shattering of the glass.
OVEN DOOR SEAL
If this gets dirty, clean the oven seal with a slightly damp sponge.
ACCESSORIES
Clean them with a sponge soaked in soapy water. Rinse with clean
water and dry off. Avoid abrasive cleaners.
DRIP TRAY
After grilling, remove the drip tray from the oven. Take care to pour the
warm grease into a container. Wash and rinse the drip tray in hot water
with a sponge soaked in washing up liquid.
If residues remain attached, soak them off in water and detergent.
It can also go in a dishwasher or be cleaned with a commercial oven
cleaner.
Never place a soiled drip tray in the oven.
OVEN LIGHTING
The bulb and its cover are made of material resistant to high
temperatures.
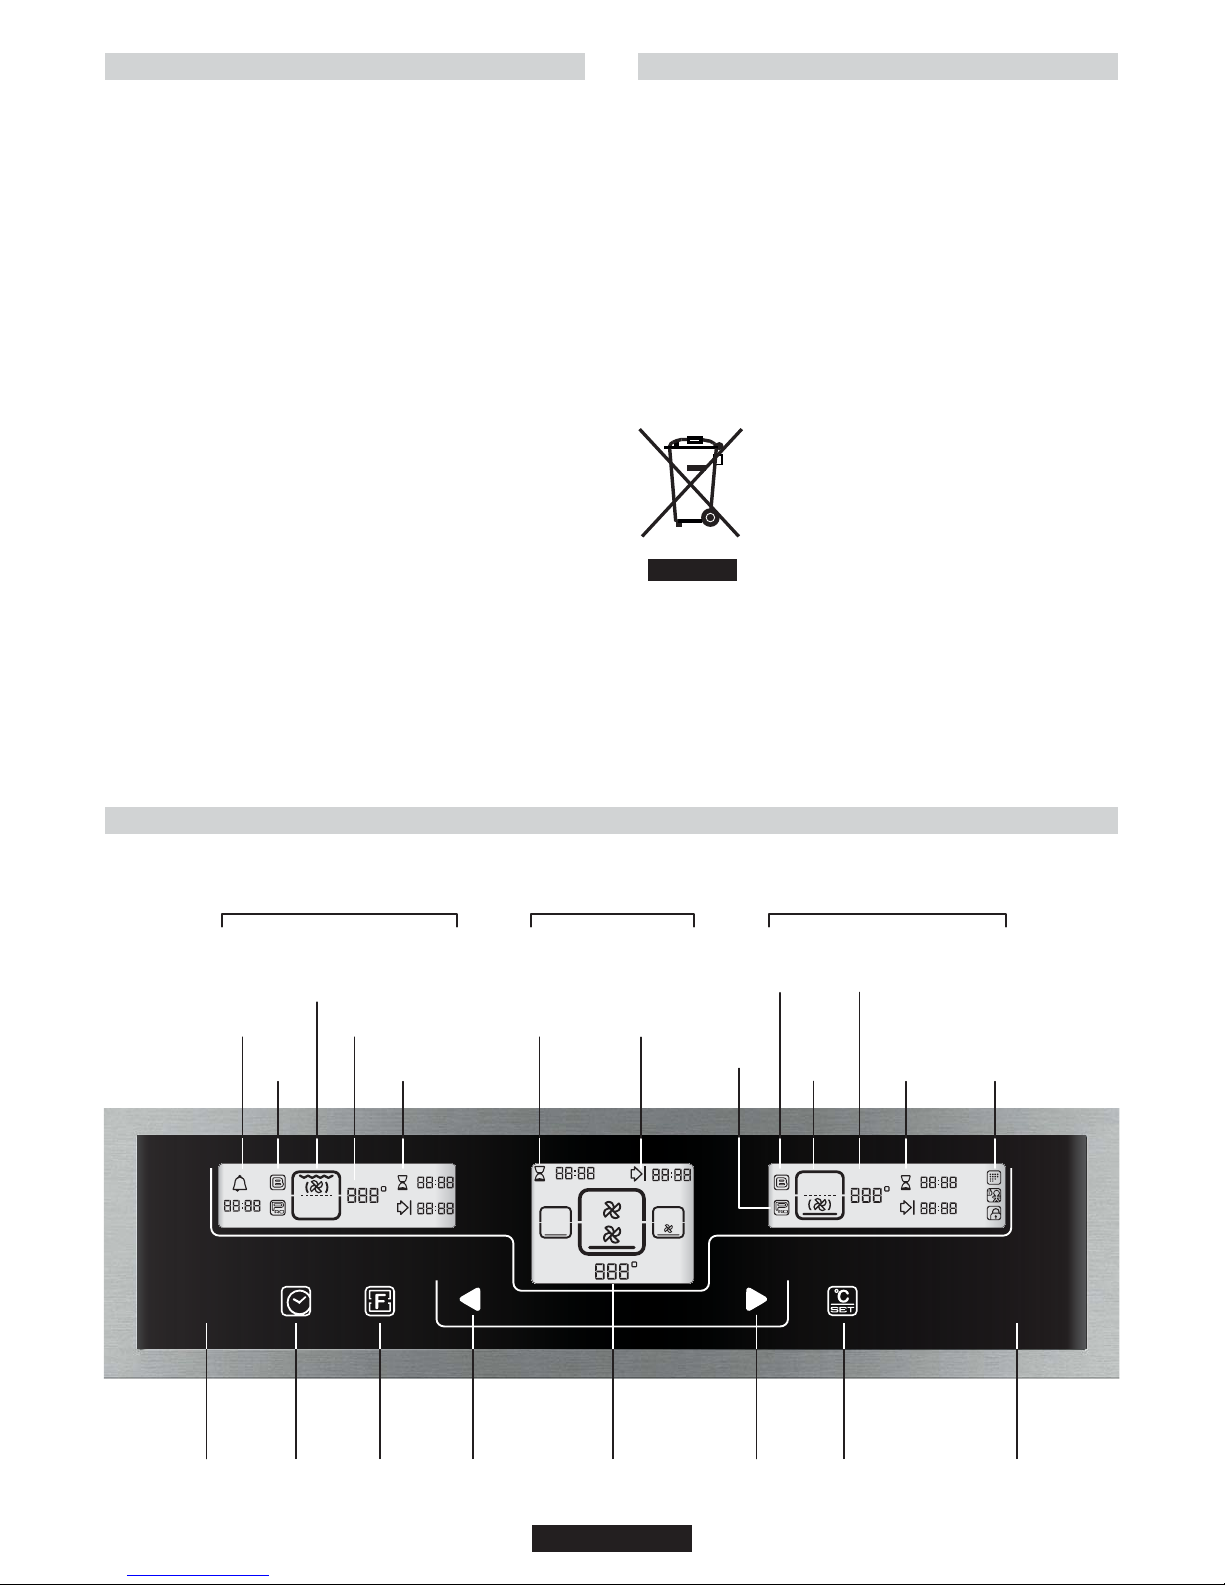
Time Set
Function /
Cavity
Arrow (-) Arrow (+) Temperature / Time Set Start / Stop
On / Off
Pro/Booster
(total cavity)
Booster
Pro
Cooking
function
lower
cavity
Temperature
Cooking duration
End of cooking
Pyrolysis necessary
Child lock
Door lock
Right Display.
Lower Cavity
End of
cooking
(total cavity)
Cooking duration
(total cavity)
Central Display.
Setting Parameters/
Main Cavity
Temperature / Time
Cooking duration
End of cooking
Temperature
Cooking function
upper cavity
Booster
Pro
Timer
Left Display.
Upper Cavity
5. DESCRIPTION OF THE DISPLAY
START
STOP
ON
OFF
05 GB
Page 6
5.1 BEFORE USING THE OVEN FOR THE
FIRST TIME
PRELIMINARY CLEANING
Clean the oven before using for the first time:
•Wipe over external surface with a damp soft cloth.
•Wash all accessories and wipe inside the oven with a solution of hot
water and washing up liquid.
•Set the empty oven to the maximum temperature and leave on for
about 1 hour, this will remove any lingering smells of newness. Ensure
that the room is well ventilated while this is being done.
THINGS TO REMEMBER
Confirmation of operation on timer:
•Modification must be confirmed by pressing “ ” .
Stop the oven:
•This may be necessary if you have input an incorrect instruction. To
stop the oven, press the “ ” .
CLOCK SETTING
When the oven is connected to the electricity supply for the first time of
after a long power cut, the clock must be re-set.
To set the clock:
1.Press the “ ” for few seconds and find the “ ” by using ,
then press the “ ”. The digits on the central display will blink.
2.Set the clock by using then wait a few second or press the
“ ” again to apply your setting.
ADJUSTING THE DISPLAY CONTRAST
1. Press the “ ” for few seconds and find the “ ”by using ,
then press the “ ”. (The contrast of the display brightness is
included between “1” maximum and “5” minimum.)
2. Choose the contrast level by using then wait few seconds or
press the “ ” again to apply your setting.
NOTE: If you want to set the clock or to adjust the display contrast after
the first switching on of the oven, press the “ ” for switch on the
oven, and proceed how described in the points 1 and 2 of the specific
paragraphs.
MINUTE MIND
1.Press the “ ” for switch on the oven.
2.Press the “ ” for few seconds and find the “ ”by using the ,
then press the “ ” .
3.Set the required time by using the , then wait a few seconds or
press the “Temperature/Time SET ” again to apply your setting.
NOTE: This function allows oven to be used as an alarm clock
independently form the working oven.
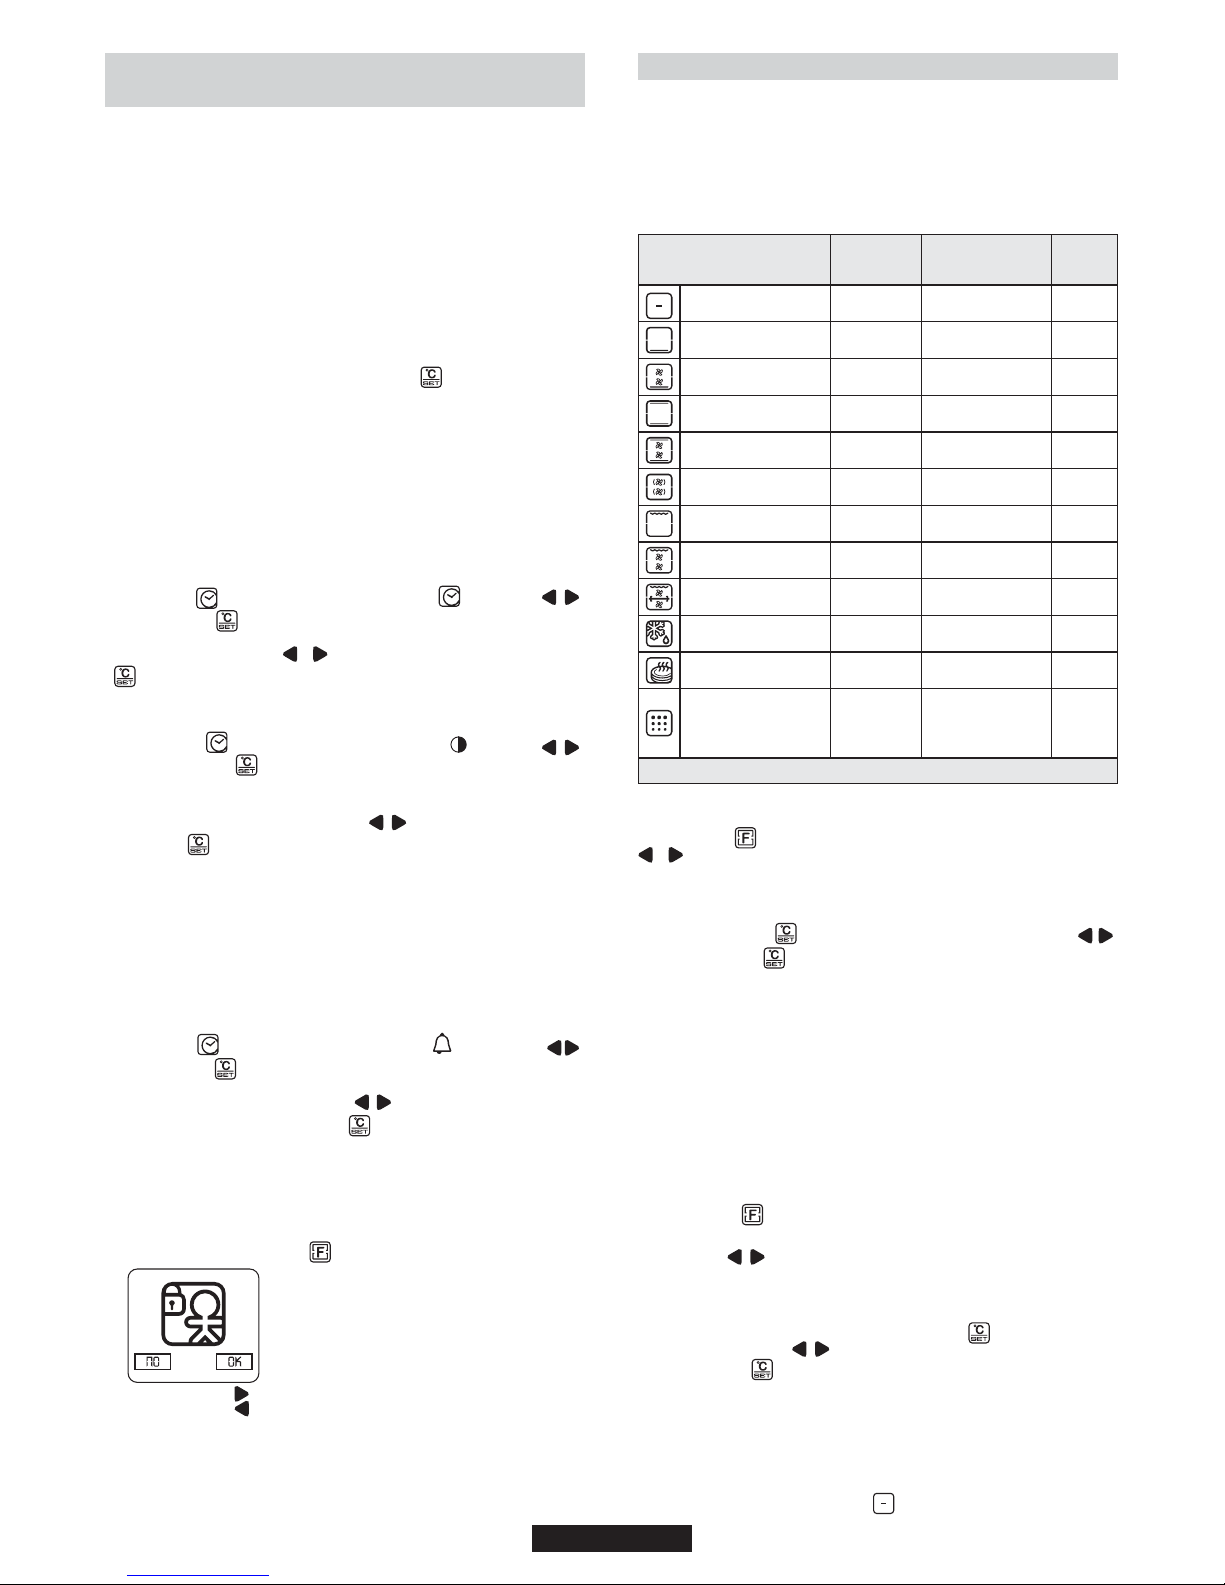
CHILD LOCK
1. To set the child lock press “ ” for few seconds.
2.
To activate press “ ” “OK”
To activate press “ ” “NO”
NOTE: It is possible to activate child lock both when the oven in ON
and OFF
START
STOP
ON
OFF
ON
OFF
5.2 HOW TO USE OVEN
SINGLE MODE
To use the Single Mode, remove the seperator from the oven.
You can choose all the functions below with Single Mode.
The cooking methods suggested are set out in the table below. A
temperature is also suggested for each cooking method. This can be
modified within a pre-determined range.
06 GB
*Booster: rapid temperature raised
-
160
210
220
210
180
L2
210
240
40
60
NORMAL
Off
Bottom
Bottom+Fans
Bottom+Top
Bottom+Top+Fans
Rings+Fans
Grill
Grill+Fans
Grill+Turnspit+Fans
Defrost
Keep Warm
Pyro * **
-
50-240
50-240
50-280
50-240
50-240
L1-L3
180-230
180-240
No
No
ECO:425/65min
NORMAL:425/75min
SUP:425/1h30min
-
-
Booster
-
-
-
-
Booster
Booster
-
-
-
1.Press the “ ” to switch on the oven.
2.Press the “ ”. Choose function required to the cooking by using
.
3.The appropriate temperature or level cooking, according to the
cooking method selected is displayed. It can be modified within a predetermined range - see table above. To modify the temperature
setting, press the “ ” and choose the temperature by using .
Then press the “ ” again to confirm. The temperature display is
fixed but can be modified during the cooking cycle.
4.To start the cooking, press the “ ” . The oven will start
cooking and will start to heat up. The indicator light blinks until the
selection temperature has been reached. An audible sounds at the the
end of this operation and the indicator light becomes fixed.
5.To change the oven function, repeat the steps for 2 to 4.
6.To stop the cooking press the “ ”.
ON
OFF
START/STOP
START
STOP
DUAL MODE
To activate the Dual Mode, put the separator into the third position
shelf of the oven. You can choose the functions below with Dual Mode.
1- Press the “ ” switch on the oven.
2- Press the “ ” select which part of the oven cavity (UPPER or
LOWER) must be used; choose the function required to the cooking
by using the .
3- The appropriate temperature or level cooking, according to the
method selected is displayed.
It can be modified within a pre-determined range-see table below.
To modify the temperature setting, press the “ ” and choose the
temperature by using .
Then press the “ ”again to confirm. The temperature display is fixed
but can be modified during the cooking cycle.
4- To start the cooking, press the “ ” .
The oven will start cooking and will start to heat up. The indicator light
blinks until the selected temperature has been reached; an audible
sounds at the end of this operation and the indicator light becomes
fixed.
5- To stop the cooking, select the “ ”.
ON
OFF
START/STOP
Pre-set
temperature
°C
Function Mode according
to the oven model
Pre-determined
temperature °C
Function
Booster*
Page 7
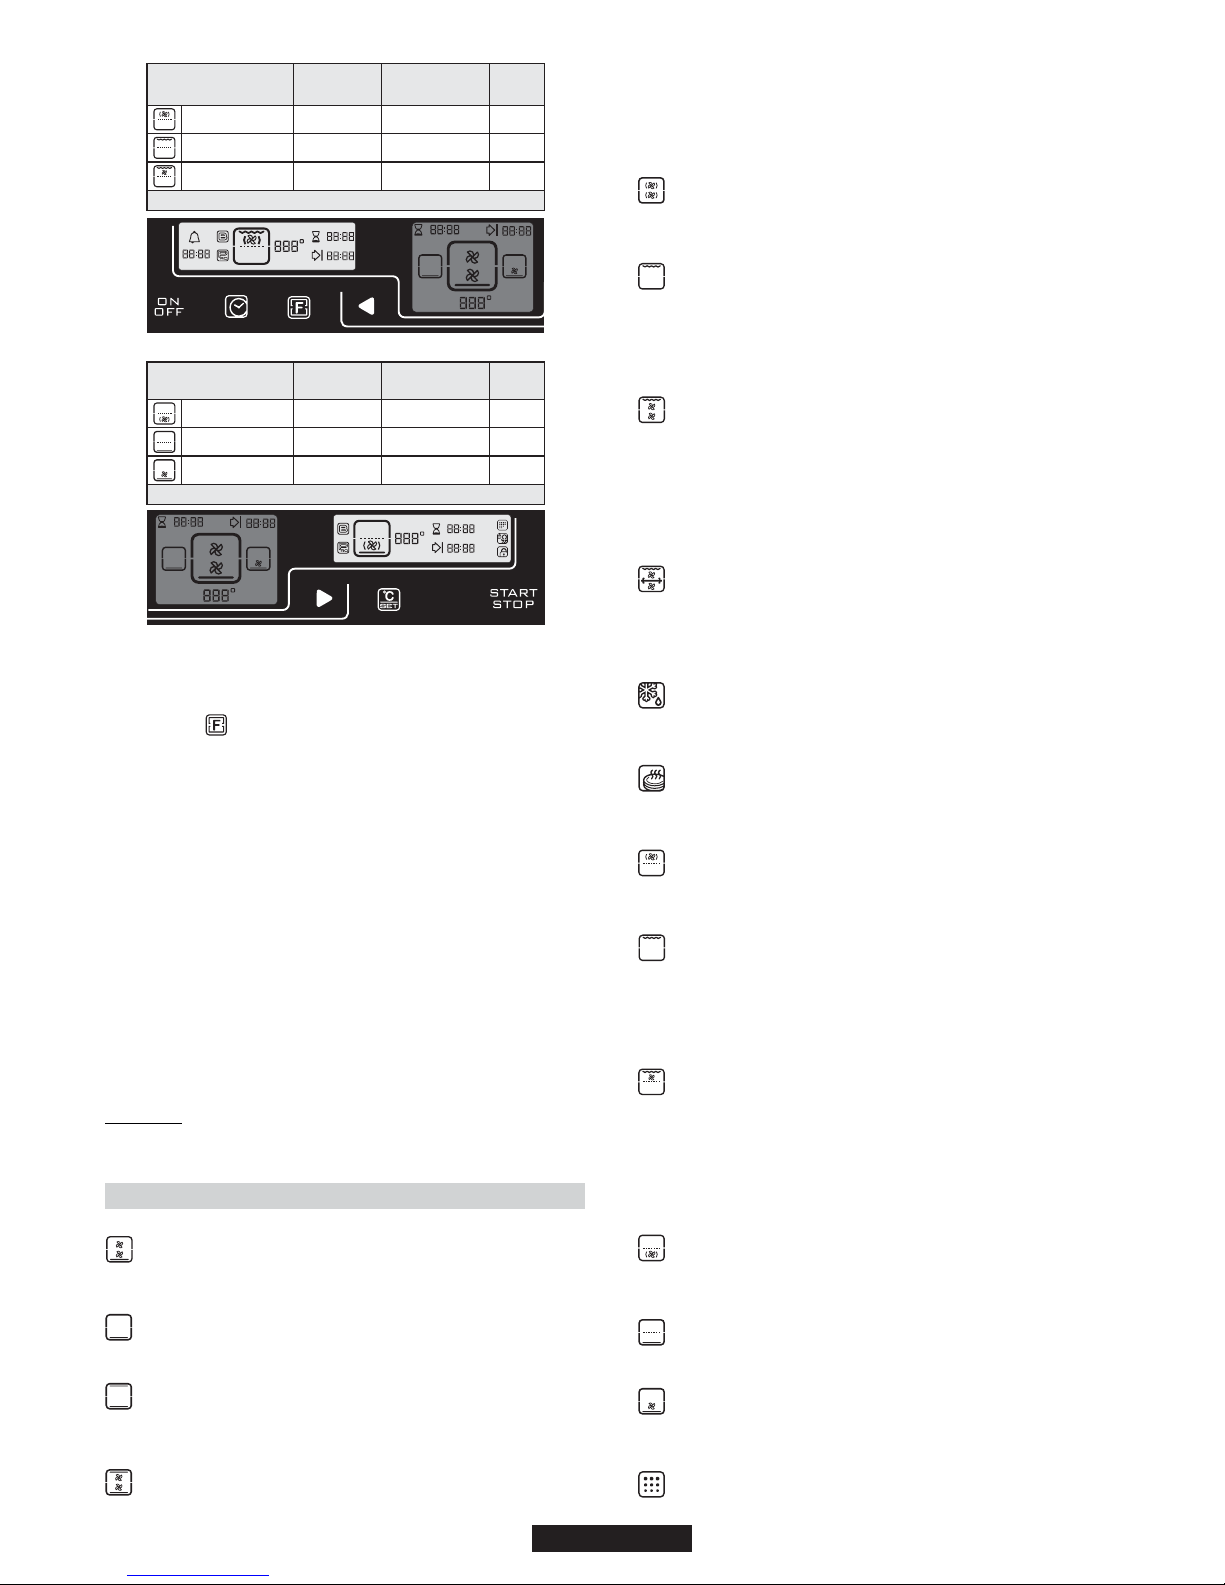
6. COOKING MODE
All cooking should be carried out with the door closed.
BOTTOM + FAN - The combination of the bottom heating
element and fan is ideal for fruit flans, tarts, quiches and pastries. It
prevents food from becoming too dry and encourages bread dough to rise.
Place the shelf in the bottom position in the oven.
BOTTOM - Using the lower element. Ideal for cooking all pastry
based dishes. Use this for flans, quiches, tarts, pâté and any cooking that
needs more heat and radiation from below.
BOTTOM + GRILL - Both top and bottom heating elements are
in use. This method is ideal for all traditional roasting and baking.When
cooking red meat, roast beef, leg of lamb, game, bread or foil wrapped
foods.
BOTTOM + GRILL + FAN - Both top and bottom heating
elements are used in conjunction with the fan, which circulates hot air
throughout the oven.We recommend this method for poultry, pastries, fish
and vegetables. By using this method better heat penetration is achieved
and cooking and preheating times are also reduced. The fan cooking
option allows you to cook different foods together at different positions in
the oven all at the same time, providing even heat distribution but without
the risk of mingling tastes and smells. When cooking different foods at the
same time allow a further 10 minutes.
RING + FAN - Air that has been heated is blown by the fan onto
the different levels. It is ideal for cooking different types of food at the same
time (e.g. meat and fish) without mixing tastes and smell. It cooks very
gently and is ideal for sponge cakes, pasties, etc.
GRILL - Using the top heating element. Success is guaranteed
for mixed grills, kebabs and gratin dishes. The grill should be pre-heated to
a high temperature for 5 minutes. White meats should always beplaced at
some distance from the grill element, the cooking time is slightly longer but
the meat will be more succulent. Red meat and fish fillets can be placed
directly onto the shelf with the drip tray placed beneath on lower shelf
position.
GRILL + FAN - The top heating element is used in conjunction
with the fan which circulates the hot air around the oven. Pre heating is
recommended for red meats but is not necessary for white meats. Grilling
is ideal for cooking thicker food items such as pork or poultry. Food to be
grilled should be placed directly at the centre of the middle shelf. By sliding
the drip tray underneath the shelf it will ensure that any juices are
collected. For best results always make sure that the food is not too close
to the grill element and turn the food over half way through the cooking
time.
GRILL + TURNSPIT + FAN - The advantage of using the top
oven element at the same time as the fan and rotisserie is that the food is
evenly cooked, preventing it from becoming dry and tasteless. The
rotisserie is programmed to continue rotating for approximately five
minutes after cooking, making full use of the residual oven heat.No
preheating is required for rotisserie cooking.
DEFROST - When the dial is set to this position. The fan
circulates hot air around the frozen food so that it defrosts in a few minutes
without the protein content of the food being changed or altered.
The temperature is preset in 40°C constant, no regulation is possible.
KEEP WARM - This is recommended to reheat precooked
foodstuff, positioning the shelf on the second level from top, or to defrost
bread pizza or pastry by positioning the shelf on the lower level.
The temperature is preset in 60°C constant, no regulation is possible.
RING + FAN - Air that has been heated is blown by the fan onto
the different levels. It is ideal for cooking different types of food at the same
time (e.g. meat and fish) without mixing tastes and smell. It cooks very
gently and is ideal for sponge cakes, pasties, etc.
GRILL - Using the top heating element. Success is guaranteed
for mixed grills, kebabs and gratin dishes. The grill should be pre-heated to
a high temperature for 5 minutes. White meats should always beplaced at
some distance from the grill element, the cooking time is slightly longer but
the meat will be more succulent. Red meat and fish fillets can be placed
directly onto the shelf with the drip tray placed beneath on lower shelf
position.
GRILL + FAN - The top heating element is used in conjunction
with the fan which circulates the hot air around the oven. Pre heating is
recommended for red meats but is not necessary for white meats. Grilling
is ideal for cooking thicker food items such as pork or poultry. Food to be
grilled should be placed directly at the centre of the middle shelf. By sliding
the drip tray underneath the shelf it will ensure that any juices are
collected. For best results always make sure that the food is not too close
to the grill element and turn the food over half way through the cooking
time.
RING + FAN - Air that has been heated is blown by the fan onto
the different levels. It is ideal for cooking different types of food at the same
time (e.g. meat and fish) without mixing tastes and smell. It cooks very
gently and is ideal for sponge cakes, pasties, etc.
BOTTOM - Using the lower element. Ideal for cooking all pastry
based dishes. Use this for flans, quiches, tarts, pâté and any cooking that
needs more heat and radiation from below.
BOTTOM + FAN - The combination of the bottom heating
element and fan is ideal for fruit flans, tarts, quiches and pastries. It
prevents food from becoming too dry and encourages bread dough to
rise. Place the shelf in the bottom position in the oven.
PYRO - The oven takes care of the entire inside oven cleaning Three choices are possible ECO, NORMAL, SUPER
07 GB
Upper Cavity
Lower Cavity
*Booster: rapid temperature raised
Pre-set
temperature °C
180
L2
190
Function Mode according
to the oven model
Ring+Fan
Grill
Grill+Fan
Pre-determined
temperature °C
160-240
L1-L3
160-240
Function
Booster*
-
-
-
*Booster: rapid temperature raised
Pre-set
temperature °C
Function Mode according
to the oven model
Pre-determined
temperature °C
Function
Booster*
-
-
-
180
160
160
Ring+Fan
Bottom
Bottom+Fan
160-240
160-240
160-240
USING UPPER AND LOWER CAVITY AT THE SAME TIME
The two cavity (UPPER and LOWER) must be used simultaneously, for
two different type of cooking; for set this modality of cooking,
1- Press the “ ” to select the second cavity to be used and follow the
instruction from “1” to “5” of above paragraph.
COOKING DURATION
1.Press “time set” and find “hourglass” by using “arrows”
2.Press “Temperature/Time Set” and set the cooking duration by using
“arrows”
3.To confirm your setting , press “Temperature/Time Set” again
END OF COOKING
1.Press “time set” and find “hourglass” by using “arrows”
2.Press “Temperature/Time Set” and set the end of cooking time by using
“arrows”
3.To confirm your setting , press “Temperature/Time Set” again.
NOTE: For deleting a time already set, find “barred clock” by using
“arrows” in the time set menu and press “Temperature/Time Set”
to set the
mode of cooking please proceed as follows:
This function is typically used with “cooking duration” function.
For example if the dish has to be cooked for 45 minutes and needs to be
ready by 12:30;
- select the required function
- set the cooking duration time to 45 minutes
- set the end of cooking time to 12:30.
Cooking will start automatically at 11:45 (12:30 minus 45 mins) and will
continue until the pre-set end-of- cooking-time, when the oven will switch
itself off automatically.
If the END of cooking is selected without setting the length of
cooking time, the oven will start cooking immediately and it will stop
at the END of cooking time set.
WARNING.
Page 8

7. PYROLYTIC CYCLE (According to the model)
The oven is equipped with a pyrolyser cleaning system, which
destroys food residues at high temperature.The operation is carried
out automatically by means of the programmer.The resulting fumes
are rendered “clean” by passing over a Pyrolyser wich starts as soon
as cooking begins. As very high temperatures are required by the
Pyrolyser, the oven door is fitted with a safety lock.
The pyrolyser can be stopped at any time. The door cannot be opened
until the safety lock is displayed.
NOTE : If a hob has been fitted above the oven, never use the gas
burners or the electric hot-plates while the Pyrolyser is working, this
will prevent the hob from overheating.
THREE PYROLYTIC CYCLE are pre-set.
•ECO PYROCLEAN : Cleans a moderately stained oven.Operates
for a period of 65 minutes.
•NORMAL PYROCLEAN :
for a period of
•SUPER PYROCLEAN : Cleans a heavily stained oven.Operates for
a period of 90 minutes.
Never use commercially available cleaning products on a
Pyrolytic oven !
Tip : Carrying out Pyrolytic cleaning immediately after cooking allows
you to take advantage of residual heat, thus saving energy.
Before carrying out a Pyrolytic cycle :
•Remove all accessories from the oven (seperator, grids, trays,
etc.) : They cannot withstand the high temperatures and would be
damaged by pyrolytic temperatures.
•Remove any large spillages or stains as it would take too long to
destroy them. Also excessively large amounts of grease could ignite
when subject to the very high temperatures of the Pyrolytic cycle.
•Close the oven door.
•Excess spillage must be removed before cleaning.
Using the pyrolytic cycle :
1- Press the “ ”. Choose the “ ” by using then press the
“ ” to confirm. “ ” will appear on screen. ECO mode flashes.
Remember :
ECO - cycle of 65 minutes - moderately stained oven
NORMAL - cycle of 75 minutes - normaly stained oven
SUP - cycle of 90 minutes - heavily stained oven
2- By using select required Pyrolytic mode, according the
degree of staining: ECO, NORMAL or SUP. Then press the “ ” to
confirm.
• Your choice is confirmed after 3 seconds...
The oven starts the pyrolytic cycle. The pyrolytic mode selected
flashes and the “ ” and the “ ” indicator lights will appear. During
the pyrolytic cycle, the locking oven door symbol appears, this
indicates that the door is locked. The cooling fan will operate.
The indicator light flashes until the temperature required is not
reached and then it becomes fixed.
At the end of the pyrolytic cycle the oven will automatically switch off.
For 15 seconds, an audible signal lets you know that the cycle has
ended and the “ ” and the “ ” indicator lights will flash.
•Press the “ ” to stop. Unless you do this, the symbols will
continue flashing. The symbol “ ” disappears on the Timer, the
pyrolytic mode.
The cooling fan does not switch itself off until the temperature of the
oven components is reasonable.
At the end of the cycle, the indicator flashes again, it will remain also
turned on after having extinguished the oven and it will extinguish
when the inside temperature of the oven is sufficiently low.
Pyrolysis leaves a white residue on the oven walls. Wait for the oven to
cool completely then clean the inside of the oven with a damp sponge
to wipe off the residue.
Cleans a normaly stained oven. Operates
75 minutes
This sentence is incorrect
The oven door will remain locked until the temperature has reduced.
Whist the locking oven door symbol is illuminated the oven door can
not be opened.
START
STOP
18 GB
It is better not to salt meats until after cooking as salt encourages the
meat to spatter fat. This will dirty the oven and make a lot of smoke.
Joints of white meat, pork, veal, lamb and fish can be put into the oven
cold. The cooking time is longer than in a preheated oven, but it cooks
through to the centre better as the heat has more time to penetrate the
joint.
Correct preheating is the basis of successful red meat cookery.
GRILLS
• Before loading the grill:
Remove the meat from the refrigerator a few hours before grilling. Lay
it on several layers of kitchen paper. This improves seizing, making it
tastier and avoids it staying cold at the centre.
Add pepper and spices to the meat before grilling, but add any salt
after cooking. This way it will seize better and stay juicy. Baste all the
food to be cooked with a little oil. This is best done with a wide flat
basting brush.Then sprinkle with more pepper and herbs (thyme,
etc.).
• During cooking:
Never pierce the food during cooking even when you turn it. This lets
the juice out and it becomes dry.
BAKING
Avoid using shiny tins, they reflect the heat and can spoil your cakes. If
your cakes brown too quickly, cover them with greaseproof paper or
aluminium foil.
Caution: The correct way to use foil is with the shiny side in towards
the cake. If not the heat is reflected by the shiny surface and does not
penetrate the food.
Avoid opening the door during the first 20 to 25 minutes of
cooking:
Soufflés, brioches, sponge cakes, etc. will tend to fall.You can check if
cakes are done by pricking the centre with a knife blade or metal
knitting needle. If the blade comes out nice and dry, your cake is ready
and you can stop cooking. If the blade comes out moist or with bits of
cake attached, continue baking but slightly lower the thermostat so
that it is finished off without burning.
8. COOKING TIPS
08 GB
Page 9
595
550
22
546
578
552
17
595
560
440
FR
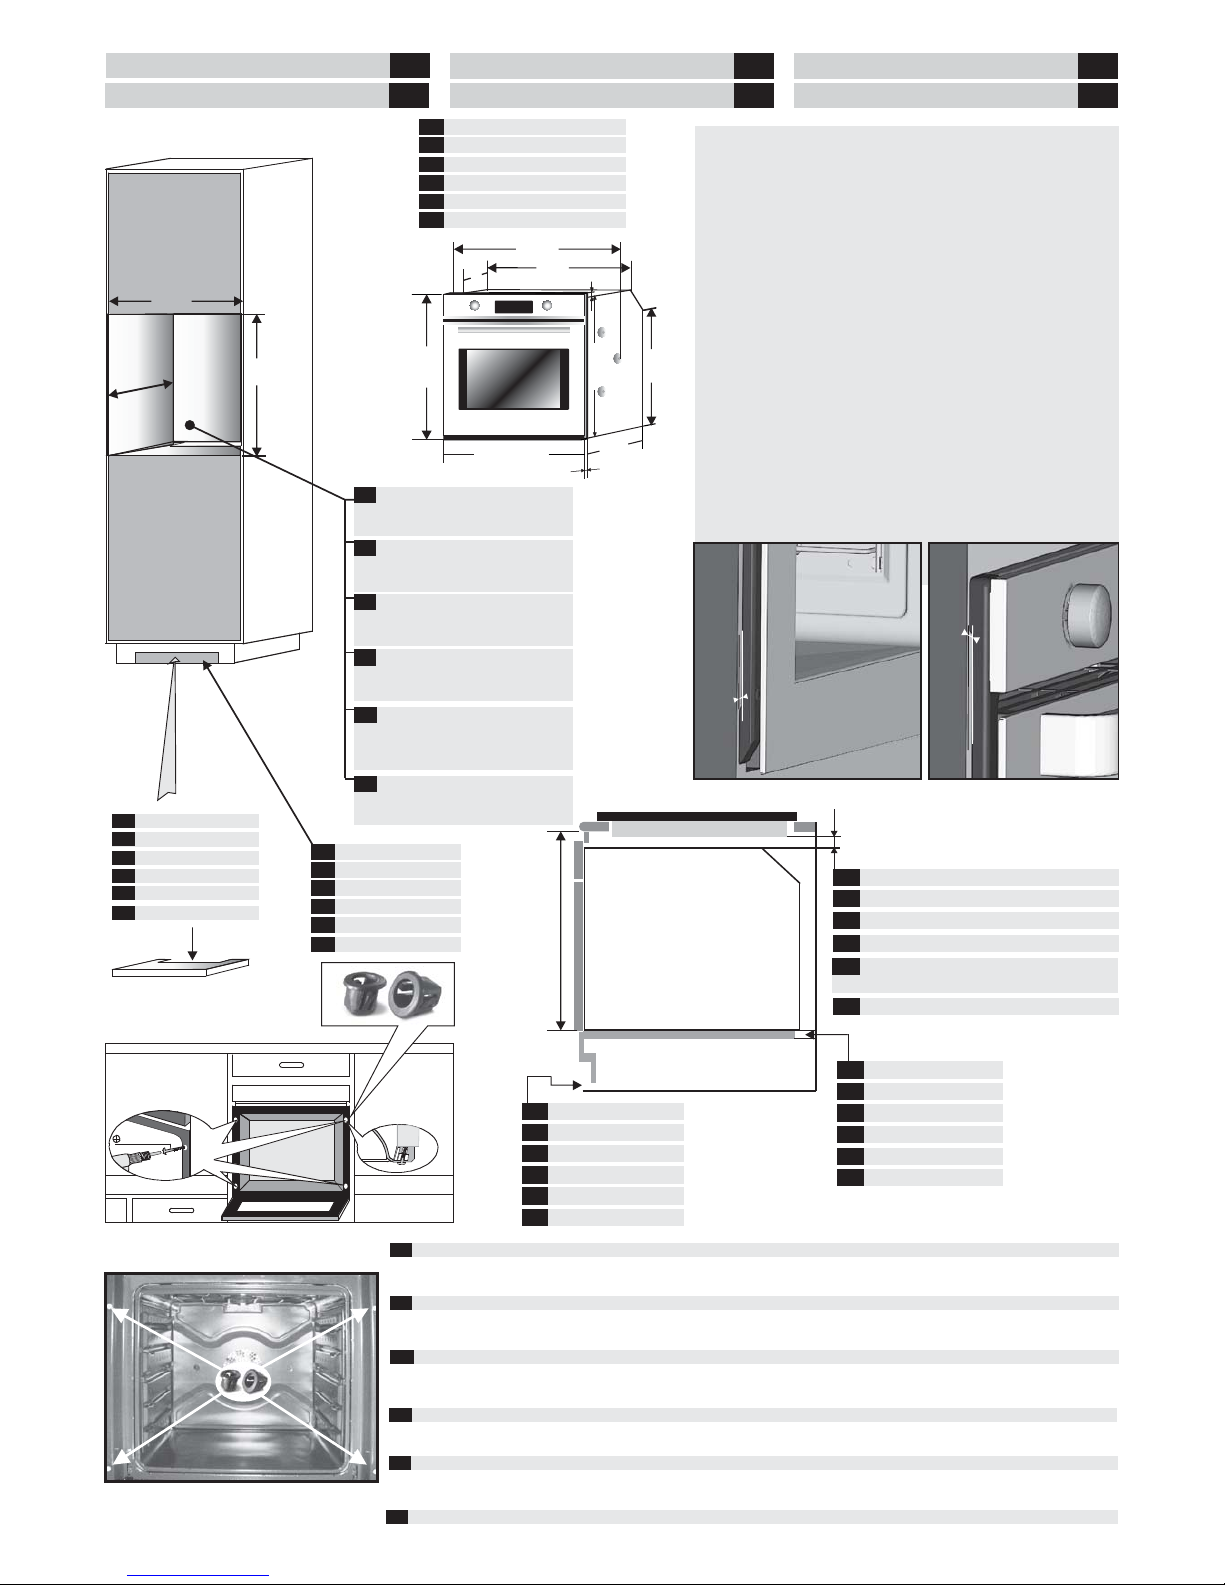
Four en colonne (dimensions en mm)
ES
Horno en columna (dimensiones en mm)
PL
Piekarnik w kolumnie (wymiar w mm)
GB
Oven in column (dimensions mm)
4x4.5x25
Opening 500 x 45
Ouverture 500 x 45
FR
GB
560
min
590
560
Si le meuble est équipé d’un fond à
l’arrière : prévoir une ouverture pour le
passage du câble d'alimentation.
If the furniture is equpped with a
bottom at the back part, provide an
opening for the power supply cable.
GB
FR
Si el mueble tiene fondo en la
parte trasera hacer una apertura
para el cable eléctrico.
ES
Jeśli meble posiadają dno w
tylnej części, należy zadbać o
odpowiedni otwór na kabel zasilający.
PL
2mm
2mm
Apertura 500 x 45
ES
Otwór 500 x 45
PL
INSTALLATION GB
INSTALLATION DU FOUR FR
INSTALACIÓN ES
INSTALACJA
PL
¡ATENCIÓN!
Más presión de la necesaria para fijar los tornillos podría cerrar los canales de
ventilación de ambos lados. Asegurar una apertura de 2 mm de los canales de
ventilación después de instalar el horno en el mueble.
UWAGA!
Należy zwrócić uwagę, aby nie przykręcić śrub zbyt mocno, gdyż może to
spowodować zamknięcie kanałów wentylacyjnych z obu stron. Proszę upewnić
się czy kanały wentylacyjne mają prześwit 2 mm po zamontowaniu
urządzenia.
ATTENZIONE!
Un serrage excessif des vis de fixation peut entraîner une obstruction de la
ventilation sur les deux côtés du produit. Assurez-vous qu'un espace de 2 mm
est toujours présent après installation dans le meuble.
Ouverture 500 x 10
GB
FR
Opening 500 x 10
Apertura 500 x 10
ES
Otwór 500 x 10
PL
ATTENTION !
Applying torque more than needed to fix the screws can close the ventilation
channels on both sides. Please be sure that, these ventilation channels are
2mm open after installation to furniture.
INSTALLATION DE
Öffnung 500 x 45
DE
Wenn der Küchenschrank mit einer
Hinterwand ausgestattet ist, dann ist eine
Öffnung notwendig damit das Stromkabel
angeschlossen werden kann.
DE
FR
Fixation dans la niche d'encastrement
Vous trouverez dans un sachet à l'intérieur du four les vis de fixation. Pour la fixation: lorsque la porte du four est ouverte, les trous sont accessibles,
ils sont situés de chaque côté des montants latéraux. Utiliser les vis fournies pour fixer le four.
ES
Fijación del horno
Dentro del horno hay una bolsa con tornillos fijadores. Fijación:Con la puerta abierta se accede a los agujeros y se encuentran a los lados. Para fijar el horno
utilizar los tornillos que se proporcionan con el mismo.
PL
Fixing in the location
Inside the oven there is a bag with four fixing screws. Fixing: When the oven door is open, holes are accessible, they are located on each side. Use the screws
provided to fix the oven.
GB
Fixing in the location
Inside the oven there is a bag with four fixing screws. Fixing: When the oven door is open, holes are accessible, they are located on each side. Use the screws
provided to fix the oven.
DE
Montage (Fixierung der Schrauben)
Im Inneren des Backofens befindet sich ein Plastikbeutel mit insgesamt 4 Befestigungsschrauben. Fixierung: Wenn Sie den Backofen öffnen, sehen Sie
auf der linken und rechten Seite 2 Löcher die für die Fixierung vorgesehen sind. Verwenden Sie für die Fixierung die mitgelieferten Schrauben.
Achtung!
Vergewissern Sie sich, dass Sie beim Einbau des Backofens einen 2 mm Spalt zu
den Küchenschränken einhalten. Dieser Spalt muss für die Lüftungskanäle
sichergestellt werden.
Öffnung 500 x 10
DE
DE
Fabmessungen (mm)
INSTALACE
CZ
CZ
Trouba ve vysoké skříni (rozměry v mm)
Pokud je nábytek vybavený stěnou v
zadní části, udělejte otvor pro přívodní
kabel.
CZ
Otvor 500 x 45
CZ
Otvor 500 x 10
CZ
FOUR / OVEN
600 min
10 min
TABLE / TOP
FR
Ouverture 500 x 10
GB
Opening 500 x 10
ES
Apertura 500 x 10
PL
Otwór 500 x 10
Oven fitted under worktop (dimensions mm)
GB
Four enchâssé sous plan de travail
FR
Horno colocado debajo de la encimera
ES
Piekarnik umieszczony pod blatem.
PL
FR
Ouverture 560 x 45
GB
Opening 560 x 45
ES
Apertura 560 x 45
PL
Otwór 560 x 45
DE
Opening 500 x 10
DE
Opening 560 x 45
Backofen unter der Arbeitsplatte montiert
(Abmessungen mm)
DE
Trouba pod pracovní deskou
CZ
CZ
Otvor 560 x 45
CZ
Otvor 500 x 10
Upevnění v pozici
Uvnitř trouby je sáček se čtyřma upevňovacími šrouby. Upevnění: Po otevření dvířek zpřístupníte upevňovací otvory, jsou v rozích. Použijte dodané šrouby k
upevnění.
Upozornění!
Použitím většího než potřebného tahu při utažení šroubů můžete uzavřít
ventilační kanály po stranách. Ujistěte se, zda jsou ventilační kanály otevřené
2 mm po instalaci do nábytku.
CZ
Page 10

01.2012 • REV:0 • 42806943
FR
GB
Le constructeur décline toute responsabilité concernant d’éventuelles inexacitudes imputables à des erreurs d’impression ou de transcription
contenue dans cette notice. Le constructeur se réserve le droit de modifier les produits en cas de nécessité, même dans l’intérêt de l’utilisation, sans
causer de préjudices aux caractéristiques de fonctionnement de sécurité des appareils.
The manufacturer will not be responsible for any inaccuracy resulting from printing or transcript errors contained in this brochure. We reserve the
right to carry out modifications to products as required, including the interests of consumption, without prejudice to the characteristics relating to
safety or function.
ES
El fabricante no se responsabiliza de las inexactitudes debidas a fallos de impresión o transcripción contenidos en este folleto. Nos reservamos el
derecho a modificar los productos como sea necesario, incluidos los intereses de consumo, sin perjuicio de las características relacionadas con la
seguridad o su funcionamiento.
PL
Producent nie odpowiada za jakiekolwiek błędy drukarskie. Zastrzegamy sobie prawo do wprowadzania zmian i modyfikacji naszych
produktów zgodnie z potrzebami wynikającymi z zainteresowania konsumentów, bez jakiejkolwiek szkody dla właściwości bezpieczeństwa lub
funkcji
DE
Der Hersteller übernimmt keine Haftung für eventuelle Druck- oder Übersetzungsfehler dieser Bedienungsanleitung. Der Hersteller behält sich vor
technische Änderungen zurVerbesserung der Produktqualität im Interesse des Endverbrauchers vorzunehmen.
CZ
Výrobce neodpovídá za tiskové chyby v návodu. Vyhrazujeme si právo na změny spotřebiče podle potřeby, včetně údajů spotřeby, bez vlivu na bezpečnost
nebo funkci.
 Loading...