

Page 1

OVENS
USER INSTRUCTIONS
AUS
CANDY HOOVER GROUP S.R.L. • Via Privata Eden Fumagalli • 20047 Brugherio Milano Italy
HOA2VX AUS
Page 2

CONTENTS
Safety Instructıons
1. General warnings
1.1 Declaration of compliance
1.2 Safety hints
1.3 Recommendations
1.4 Installation
1.5 Electrical connection
2. Accessories
2.1 Oven equipment
2.2 Rotisserie
2.3 LED VISION
2.4 Removing and cleaning wire racks
3. Cleaning the oven
4. Service centre
5. Description of the display
5.1 Setting The Correct Time
5.2 Use Of Touch Control Clock Programmer
6. Operating Instructions
7. Child safety
AUS
........................................................................03
......................................................................04
........................................................04
...............................................................................04
....................................................................04
.................................................................................04
.................................................................04
...............................................................................05
.......................................................................05
..................................................................................05
..............................................................................05
............................................05
.....................................................................05
...........................................................................06
.......................................................07
.........................................................08
................................08
.............................................................09
................................................................................10
This appliance is not intended for use by persons (including children) with reduced physical, sensory or mental capabilities, or lack of experience and
knowledge, unless they have been given suppervision or instruction concerning use of the appliance by a person responsible for their safety. Children
should be supervised to ensure that they do not play with the appliance. WARNING - Accessible parts may become hot during use. To avoid burns young
children should be kept away.
Page 3

• This oven is compliant with the standard AS60335.1:2011 +A1+A2+A3 and AS60335.2.6:2014 +A1.
WARNING: The appliance and its accessible parts become hot during use. Care should be taken to avoid
touching heating elements.
• Children under 8 Year of age must be kept away from the appliance unless they are continuously
supervised.
• This appliance can be used by children aged from 8 years and above and persons with reduced
physical, sensory or mental capabilities or lack of experience and knowledge if they have been given
supervision or instruction concerning use of the appliance in a safe way and understand the hazards
involved.
• Children must not play with the appliance.
• Cleaning and user maintenance shall not be made by children without supervision.
• During use the appliance becomes hot. Care should be taken to avoid touching heating elements inside
the oven.
WARNING: Accessible parts may become hot during use. Young children must be kept away.
• Do not use harsh abrasive cleaners or sharp metal scrapers to clean the oven door glass since they can
scratch the surface, which may result in shattering of the glass.
• The oven must be switched off before removing the guard, after cleaning, the guard must be replaced in
accordance with the instructions.
• Only use the temperature probe recommended for this oven.
• Do not use a steam cleaner for cleaning operations.
• WARNING: Avoid possibility of electric shock - ensure the appliance is switched off before replacing the
lamp.
• The means for disconnection must be incorporated in the fixed wiring in accordance with the wiring
rules.
• The instructions state the type of cord to be used, taking into account the temperature of the rear surface
of the appliance.
• If the supply cord is damaged, it must be replaced by a special cord or assembly available from the
manufacturer or its service agent.
• CAUTION: In order to avoid a hazard due to inadvertent resetting of the thermal cutout, this appliance
must not be supplied through an external switching device, such as a timer, or connected to a circuit that
is regularly switched on and off by the utility.
• CAUTION: Accessible parts may be hot when the grill is in use. Young children must be kept away.
• Excess spillage must be removed before cleaning.
• During self-cleaning pyrolytic operation the surfaces may get hotter than usual and children MUST be
kept away.
03 AUS
SAFETY INSTRUCTIONS
Page 4

1.2 SAFETY HINTS
•The oven must be used only for the purpose for which it was
designed. It must only be used for cooking food. Any other use, e.g. as
a form of heating, is an improper use of the oven and is therefore
dangerous.
•The manufacturers cannot be held responsible for any damage
caused by improper, incorrect or unreasonable use.
When using any electrical appliance you must follow a few basic rules.
- Do not pull on the power cable to remove the plug from the socket.
- Do not touch the oven with wet or damp hands or feet.
- Do not use the oven unless you are wearing something on your feet.
- It is not generally a good idea to use adapters, multiple sockets for
several plugs or cable extensions.
- If the oven breaks down or develops a fault switch it off at the mains
and do not touch it.
• If the cable is damaged it must be replaced promptly.
When replacing the cable, follow these instructions.
Remove the power cable and replace it with one of the H05VV-F type.
The cable must be able to bear the electrical current required by the
oven.Cable replacement must be carried out by properly qualified
technicians.
The earthing cable (yellow-green) must be 10 mm longer than the
power cable.
Use only an approved service centre for repairs and ensure that only
original parts are used. If the above instructions are not adhered to the
manufacturers cannot guarantee the safety of the oven.
•The oven you have just acquired has the described technical
characteristics and you must not make any modifications to it.
•Do not store flammable products in the oven; they can catch fire if the
oven comes on accidentally.
•Do not press on and do not let children sit on the oven door.
•Use kitchen oven gloves, when putting into or removing a dish from
the oven.
1.1 DECLARATION OF COMPLIANCE
Code produit:
Numéro de série :
1.3 RECOMMENDATIONS
• After each use of the oven, a minimum of cleaning will help keep the
oven perfectly clean.
• Do not line the oven walls with aluminium foil or single-use protection
available from stores. Aluminium foil or any other protection, in direct
contact with the hot enamel, risks melting and deteriorating the
enamel of the insides.
• In order to prevent excessive dirtying of your oven and the resulting
strong smokey smells, we recommend not using the oven at very high
temperature. It is better to extend the cooking time and lower the
temperature a little.
Identification plate
04 AUS
The parts of this appliance that may come into contact with foodstuffs
comply with the provisions of EEC Directive 89/109.
By placing the mark on this product, we are confirming
compliance to all relevant European safety, health and environmental
requirements which are applicable in legislation for this product.
When you have unpacked the oven, make sure that it has not been
damaged in any way. If you have any doubts at all, do not use it:
contact a professionally qualified person.
Keep packing materials such as plastic bags, polystyrene, or nails out
of the reach of children because they are dangerous to children.
•In addition to the
accessories supplied with the oven, we advise you only use dishes
and baking moulds resistant to very high Temperatures.
1.4 INSTALLATION
The manufacturers have no obligation to carry this out. If the
assistance of the manufacturer is required to rectify faults arising from
incorrect installation, this assistance is not covered by the guarantee.
The installation instructions for professionally qualified personnel
must be followed. Incorrect installation may cause harm or injury to
people, animals or belongings. The manufacturer cannot be held
responsible for such harm or injury.
The kitchen unit in which the oven is to be fitted must be made of
material resistant to temperatures of at least 70°C.
The oven can be located high in a column or under a worktop.
Before fixing, you must ensure good ventilation in the oven space to
allow proper circulation of the fresh air required for cooling and
protecting the internal parts. Make the openings specified on last page
according to the type of fitting.
1.5 ELECTRICAL CONNECTION
THE ELECTRICAL CONNECTION SHOULD BE CARRIED OUT BY
AN APPROVED CONTRACTOR OR TECHNICIAN WITH SIMILAR
QUALIFICATIONS.
The installation receiving the appliance must comply with the standard
in force in the installation country.
The manufacturer does not accept any responsibility if this provision is
not complied with.
Connection to the network must be by earthed socket outlet, or by
means of a multipole circuit-breaker, in compliance with the
installation country.
The installation must be protected by suitable fuses, and have wires
with a large enough cross-section to supply the oven normally.
CONNECTION:
The oven is fitted with a power lead for connecting exclusively to a
voltage of 220-240 V AC across the phases or across phase and
neutral.
Connection must be carried out having first checked:
-the supply voltage indicated on the meter,
The lead protection wire (green/yellow) connected to the earth
terminal of the oven must be connected to the earth terminal of the
installation.
Caution:
•Have the earth continuity of the installation checked by an electrician
before making the connection.
•The manufacturer will not be liable for any incident, or the possible
consequences that may arise from the use of the oven not earthed, or
connected to an earth with defective continuity.
NB: Do not forget that the oven may require after-sales service.
Also, locate the socket outlet so that the oven can be connected once
it is removed from its space.
Power supply cable: If the power supply cable has to be changed,
please have this done by the after-sales service or by someone with
similar qualifications.
1. GENERAL WARNINGS
Read the instructions carefully to make the most of your oven. We recommend you keep the instructions for installation and use for later reference,
and before installing the oven, note its serial number in case you need to get help from the after-sales service.
When you have unpacked the oven, make sure that it has not been damaged in any way. If you have any doubts at all, do not to use it. Contact a
professionally qualified person. Keep packing materials such as plastic bags, polystyrene, or nails out of the reach of children because they are
dangerous to children.
The company shall not be liable if the instructions provided in this document are not complied with.
! NOTE: Functions, properties and accessories of ovens which are mentioned in this manual, can be change depending on oven models.
The means for disconnection must be incorporated in the fixed wiring
in accordance with the wiring rules.
If the electrical supply is restricted, means of all-pole disconnection
must be accessible and incorporated in the fixed wiring in accordance
with the wiringrules.
Page 5
05 AUS
2
1
3
4
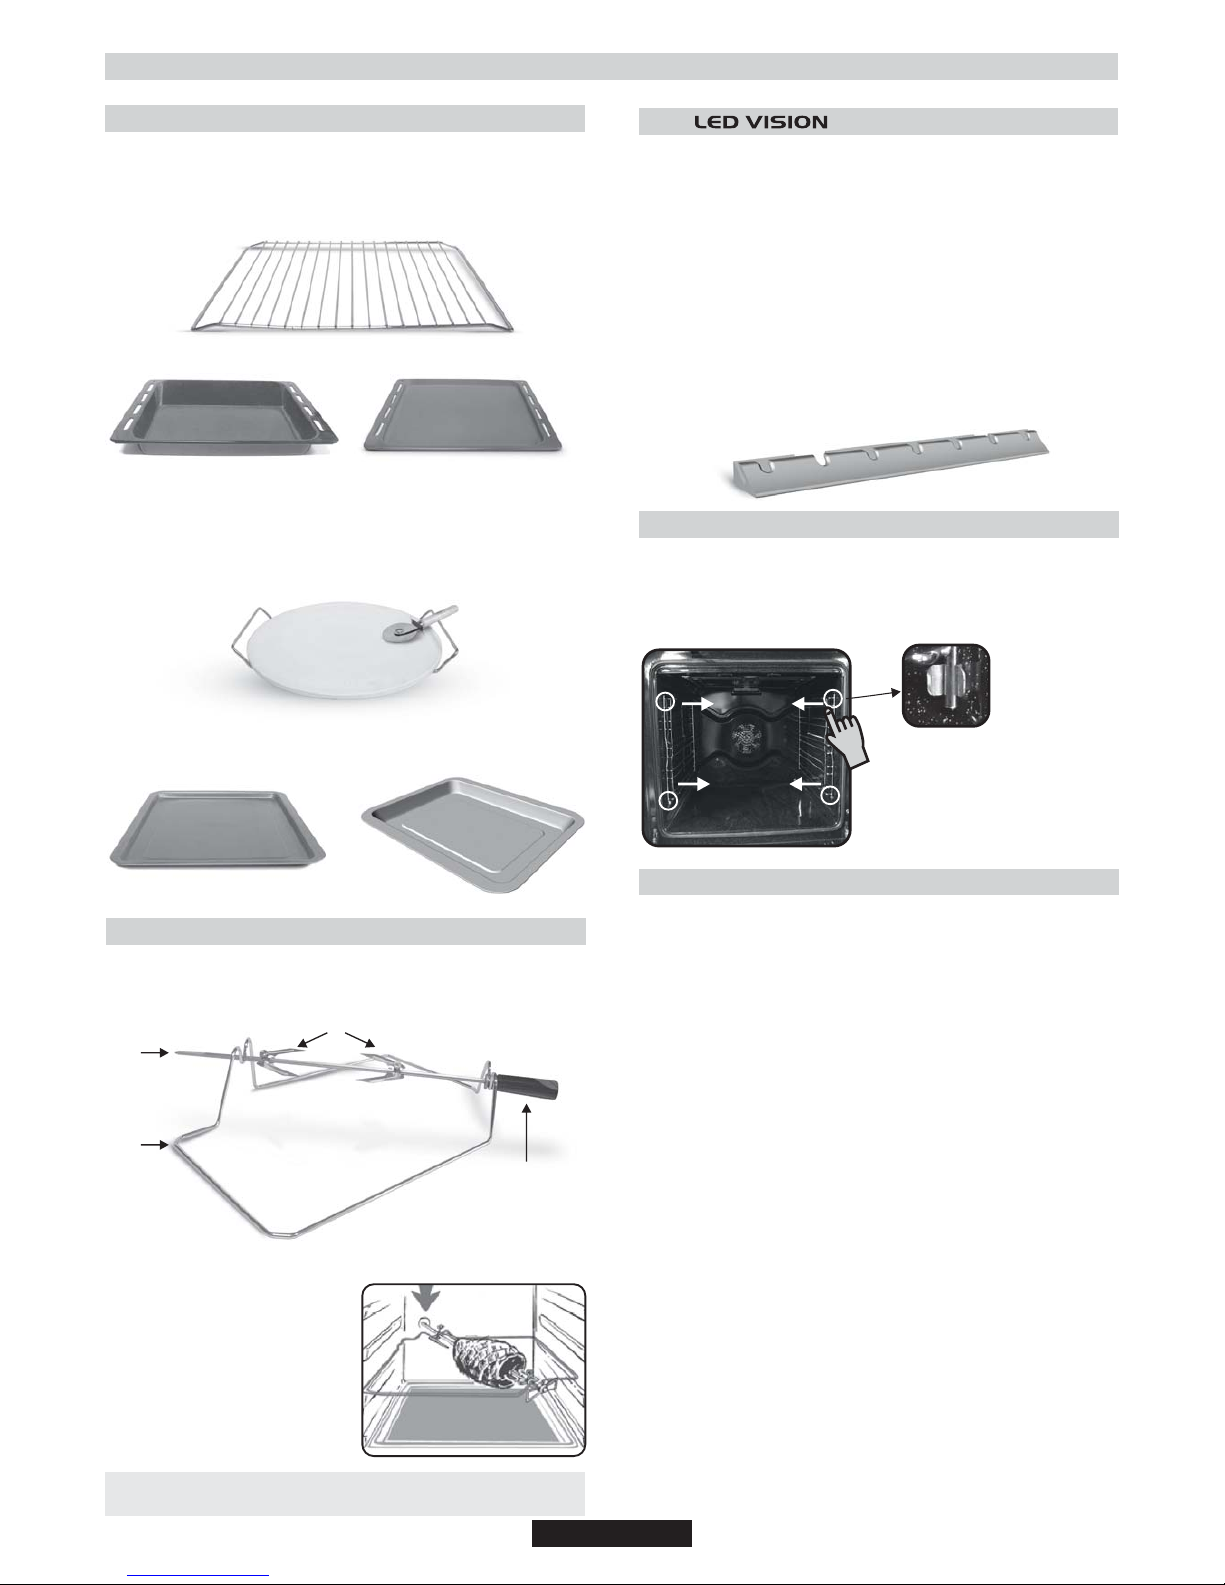
2.1 OVEN EQUIPMENT
It is necessary to do an initial cleaning of the equipment before the first
use of each of them. Wash them with a sponge. Rinse and dry off.
The shelf can take moulds and dishes.
The drip tray catches the juices from grilled foods.
Never use he drip tray as a roasting tray as fat deposits can be quickly
spread throughout the oven, which produces excess smoke.
Never place the drip tray directly on the oven bottom.
The pizza stone for a crisper pizza equipped according to the model
with its stand and the pizza roller.
The pastry tray must be placed on the shelf. It is for cooking small
pastries like choux, biscuits, meringues, etc...
Never place the pastry tray directly on the oven bottom.
2.3
Is an illumination system which replaces the traditional « light bulb ».
14 LED (for non-pyrolitic versions) or 10 High Power LED (for pyrolitic
versions) lights are integrated within the door. These produce white
high quality illumination which enables to view the inside of the oven
with clarity without any shadows on all the shelves.
Advantages :
This system, besides providing excellent illumination inside the oven,
lasts longer than the traditional light bulb its easier and to maintain and
most of all saves energy.
-Optimum view
-Long life illumination
-Very low energy consumption, -95% in comparison with the
traditional illumination High.
When the oven is in use, any unused accessories should be
removed from the oven.
2. ACCESSORIES (According to model)
2.2 ROTISSERIE
No pre-heating is required for rotisserie cooking.
Cooking with the door closed.
The energy consumption is 90-95% less than traditional system.
1- Grid
2- Spit
3- Hooks & Screws
4- Handle
HOW TO USE TURNSPIT
1. Unscrew the hooks
2. Put the spit into the meat
3. Fix the meat with the hooks
4. Tighten the screws
5. Insert the spit into the motor hole
6. The handle
3. CLEANING THE OVEN
•Wait for the oven to cool down before doing any cleaning by hand.
•Never clean your oven with abrasive cleaners, wire wool or sharp objects,
or the enamel may be damaged beyond repair.
•Only use soapy water or bleach (ammonia) cleaners.
•Never line the oven sides with aluminium foil.
GLASS PARTS
We recommend you wipe clean the glass door with absorbent kitchen
paper every time you use the oven. If the spattering is heavy, then you can
clean with a well squeezed sponge and detergent, and rinse.
Do not use harsh abrasive cleaners or sharp metal scrapers to clean the
oven door glass since they can scratch the surface, which may result in
shattering of the glass.
OVEN DOOR SEAL
If this gets dirty, clean the oven seal with a slightly damp sponge.
ACCESSORIES
Clean them with a sponge soaked in soapy water. Rinse with clean water
and dry off. Avoid abrasive cleaners.
DRIP TRAY
After grilling, remove the drip tray from the oven. Take care to pour the
warm grease into a container. Wash and rinse the drip tray in hot water with
a sponge soaked in washing up liquid.
If residues remain attached, soak them off in water and detergent.
It can also go in a dishwasher or be cleaned with a commercial oven
cleaner.
Never place a soiled drip tray in the oven.
OVEN LIGHTING
Disconnect the power supply from the oven before cleaning or replacing
the lamp.
The bulb and its cover are made of material resistant to high temperatures.
2.4 REMOVING AND CLEANING WIRE RACKS
1- Remove the wire racks by pulling them in the direction of the arrows
(see below)
2- To clean the wire racks either put them in the dishwasher or use a
wet sponge, ensuring that they are dried afterwards.
3- After the cleaning process install the wire racks in reverse order.
Page 6
4. SERVICE CENTRE
Before calling the Service Centre.
If the oven is not working, we recommend that:
•Check that, if the oven is properly plugged into the power supply.
If the cause of the fault cannot be detected:
•Disconnect the oven from the mains, do not touch the oven and call
the after sales service.
Before calling the Service Centre remember to make a note of the
serial number on the serial number specifications plate.
The oven is supplied with a guarantee certificate that ensures that it
will be repaired free of charge by the Service Centre whilst under
guarantee.
This appliance is marked according to the European
directive 2012/19/EU on Waste Electrical and
Electronic Equipment (WEEE). WEEE contains both
polluting substances (which can cause negative
consequences for the environment) and basic
components (which can be re-used). It is important to
have WEEE subjected to specific treatments, in order
to remove and dispose properly all pollutants, and
recover and recycle all materials.
Individuals can play an important role in ensuring that
WEEE does not become an environmental issue; it is essential to
follow some basic rules:
• WEEE shall not be treated as household waste.
• WEEE shall be handed over to the relevant collection points
managed by the municipality or by registered companies. In many
countries, for large WEEE, home collection could be present.
• When you buy a new appliance, the old one may be returned to the
retailer who has to collect it free of charge on a one-to-one basis, as
long as the equipment is of equivalent type and has the same
functions as the supplied equipment.
ENERGY SAVING AND RESPECTING THE ENVIRONMENT
Where possible, avoid pre-heating the oven and always try to fill it.
Open the oven door as infrequently as possible, because heat from
the cavity disperses every time it is opened. For a significant energy
saving, switch off the oven between 5 and 10 minutes before the
planned end of the cooking time, and use the residual heat that the
oven continues to generate. Keep the seals clean and in order, to
avoid any heat dispersal outside of the cavity. If you have an electric
contract with an hourly tariff, the "delayed cooking" programme makes
energy saving more simple, moving the cooking process to start at the
reduced tariff time slot.
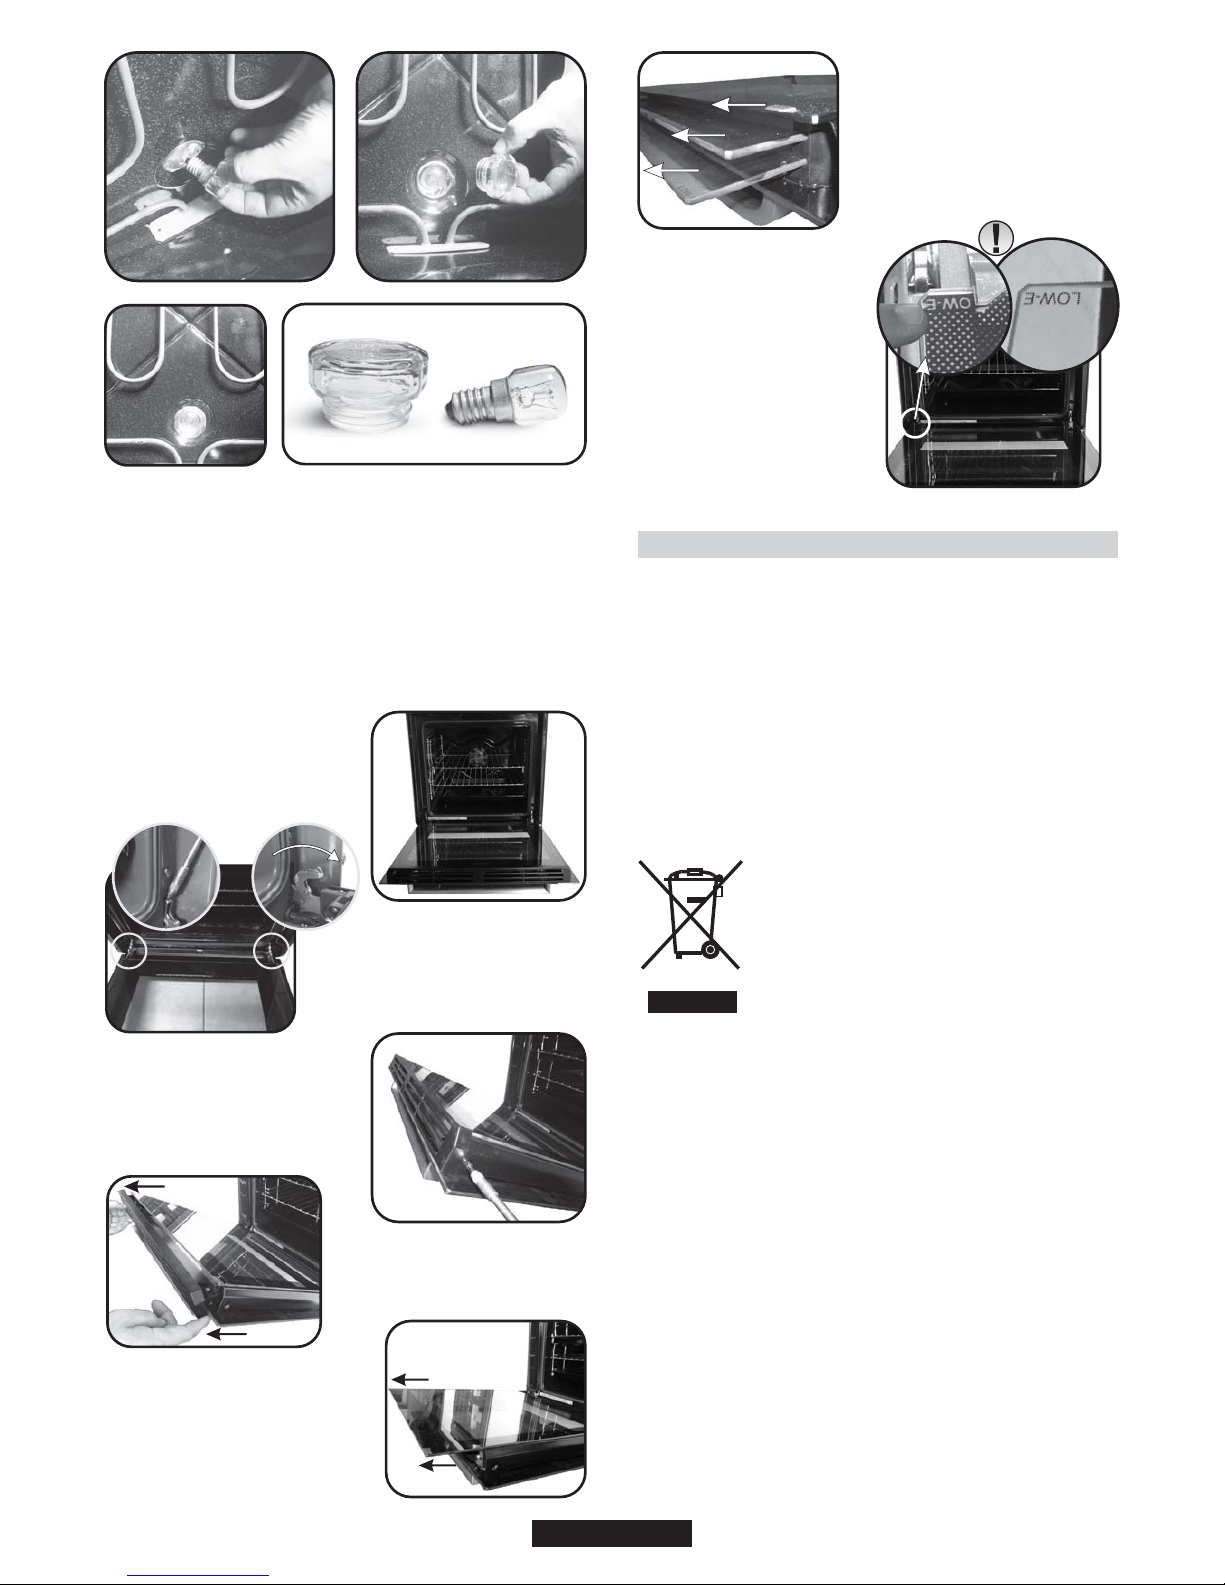
Bulb characteristics:
230 V AC - 25W- E 14 base Temperature 300°C to change a defective
bulb, just :
•Unscrew the glass cover,
•Unscrew the bulb,
•Replace it with the same type: see characteristics above,
•After replacing the defective bulb, screw back the
protective glass cover.
06 AUS
CLEANING THE DOOR GLASS
Internal door glass of this oven can be removed and cleaned.
In order to clean the internal glass follow these instructions;
Picture 1
Picture 3
Picture 4
Picture 5
• Open the door of the oven.
(Picture1)
• Remove the top metallic cover by
pulling it upwards. (Picture 4
• Remove the glass by gently pulling it
out of the door frame (Picture 5)
• Remove the screws as shown in
Picture (Picture 3)
• Lock the hinges as shown in Picture
2 before starting the cleaning
operation.
Unlock the hinges when the cleaning
operation is finished. (Picture 2)
Picture 2
Picture 7
• ON ALL GLASES LOW-E
sign must be properly
readable and must be
positioned on the left corner of
the door, close to the left side
hinge. In this way the printed
st
surface of the 1 glass will
remain INSIDE the door.
•
After cleaning the glass reassemble the parts in the
reverse order of removal.
1
2
3
• *For ovens, please Pyrolytic
nd rd
remove also 2 and 3 glasses .
(
Picture 6)
Picture 6
Page 7
5. DESCRIPTION OF THE DISPLAY
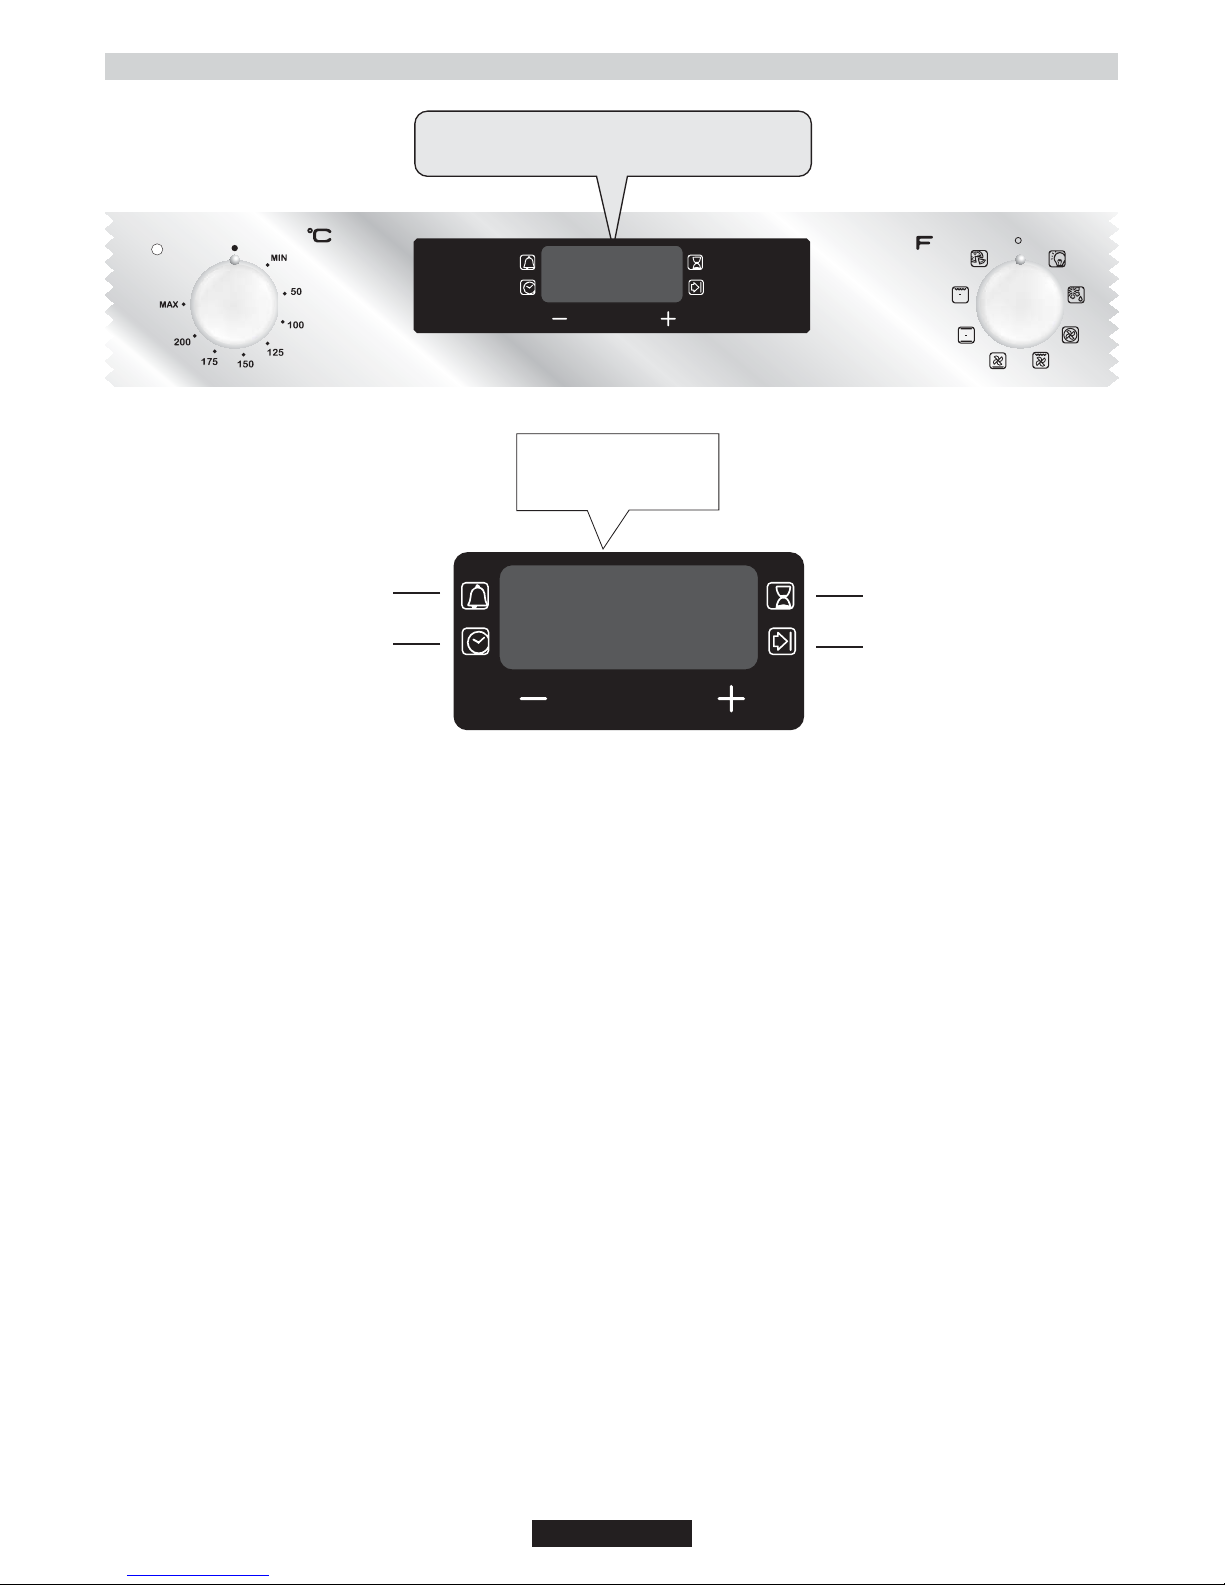
07 AUS
Clock /
Programmation /
Cooking temperature
Display panel : time, programming of cooking mode,
indicator lights, cooking temperature function and
shelf positioning
MENU
00:00
MENU
00:00
MINUTE MINDER
COOKING TIME
END OF COOKING
REGULATION CLOCK
Page 8
08 AUS
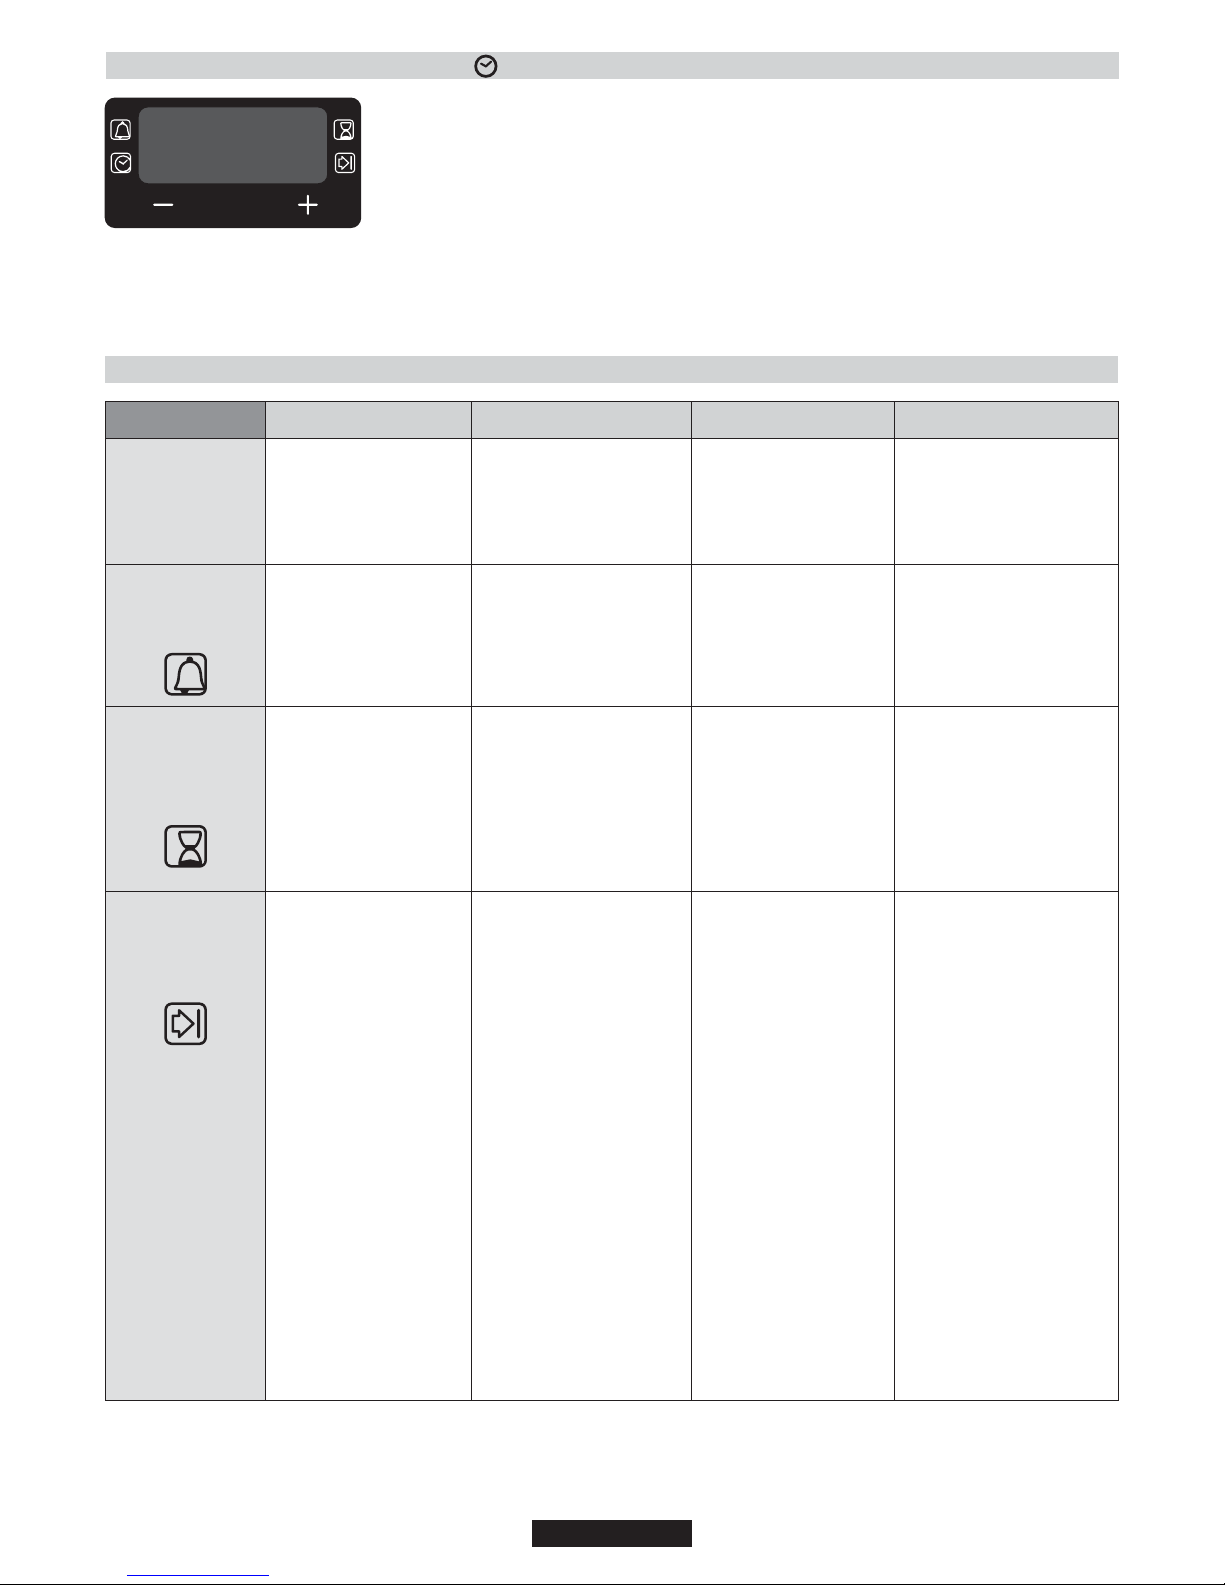
5.2 USE OF TOUCH CONTROL CLOCK PROGRAMMER
FUNCTION
HOW TO ACTIVATE IT
MINUTE
MINDER
COOKING
TIME
END OF
COOKING
HOWTO SWITCH ITOFF WHAT IT DOES WHAT IT IS FOR
•Push the central button
1 times
•Press the buttons "
-" "+"
to set the required time
•Release all the buttons
•When the set time as
elapsed an audible alarm
is activated (this alarm will
stop on its own, however it
can be stopped immediately
by pressing the button)
SELECT.
•Sounds an alarm at the
end of the set time.
•During the process, the
display shows the
remaining time.
•Allows to use the oven as
alarm clock (could be
activated either with
operating the oven or with
out operating the oven)
•Push the central button
2 times
•Press the buttons
"
-" or "+"
to set the lenght of
cooking required
•Release all buttons
•Set the cooking function
with the oven function
selector
•When the time is elapsed
the oven will switch off
automatically. Should you
wish to stop cooking earlier
either turn the function
selector to 0, or set time
to 0:00 (SELECT and
"
-" "+" buttons)
•It allows to preset the
cooking time required
for the recipe chosen
•To check how long is left
to run press the SELECT
button 2 Times.
•To alter/change the
preset time press SELECT
and "
-" "+" buttons
•Push any button to stop
the signal. Push the central
button to return to the clock
function
•Push the central button
3 times
•Press the buttons
"-" "+"
to set the time at which
you wish the oven to
switch off
•Release the buttons
•Set the cooking function
with the oven function
selector
•Push the central button 4 times
•Set time with
"-" "+" buttons.
•Release all buttons.
ATTENTION: The oven will only operate providing the clock is set.
•At the time set, the oven
will switch off. To switch
off manually, turn the oven
function selector to
position O.
•Enables you to set the
end of cooking time
•To check the preset time
push the central button
3 times
•To modify the preset
time press buttons
SELECT + "
-" "+"
WARNING : the first operation to carry out after the oven has been installed or following the
interruption of power supply (this is recognizable the display pulsating and showing
12:00 ) is setting
the correct time. This is achieved as follows
5.1 SETTING THE CORRECT TIME
•This function is typically used
with “cooking time” function.
For example if the dish has to
be cooked for 45 minutes and
needs to be ready by 12:30,
simply select the required
function, set the cooking time
to 45 minutes and the end of
cooking time to 12:30.
•At the end of the cooking set
time, the oven will switch off
automatically and an audible
alarm will ring.
•Cooking will start
automatically at 11:45 (12:30
minus 45 mins) and will
continue until the pre-set endof-cooking-time, when the
oven will switch itself off
automatically.
WARNING.
If the END of cooking is
selected without setting the
length of cooking time, the
oven will start cooking
immediately and it will stop
at the END of cooking time
set.
KEY LOCK
•Child Lock function is
activated by touching Set (+)
for a minimum of 5 seconds.
From this moment on all
other function are locked and
the display will flash STOP
and preset time intermittently.
•Child Lock function is
deactivated by touching
touchpad Set (+) again for a
minimum of 5 seconds. From
this moment on all functions
are selectable again.
MENU
00:00
Page 9
09 AUS
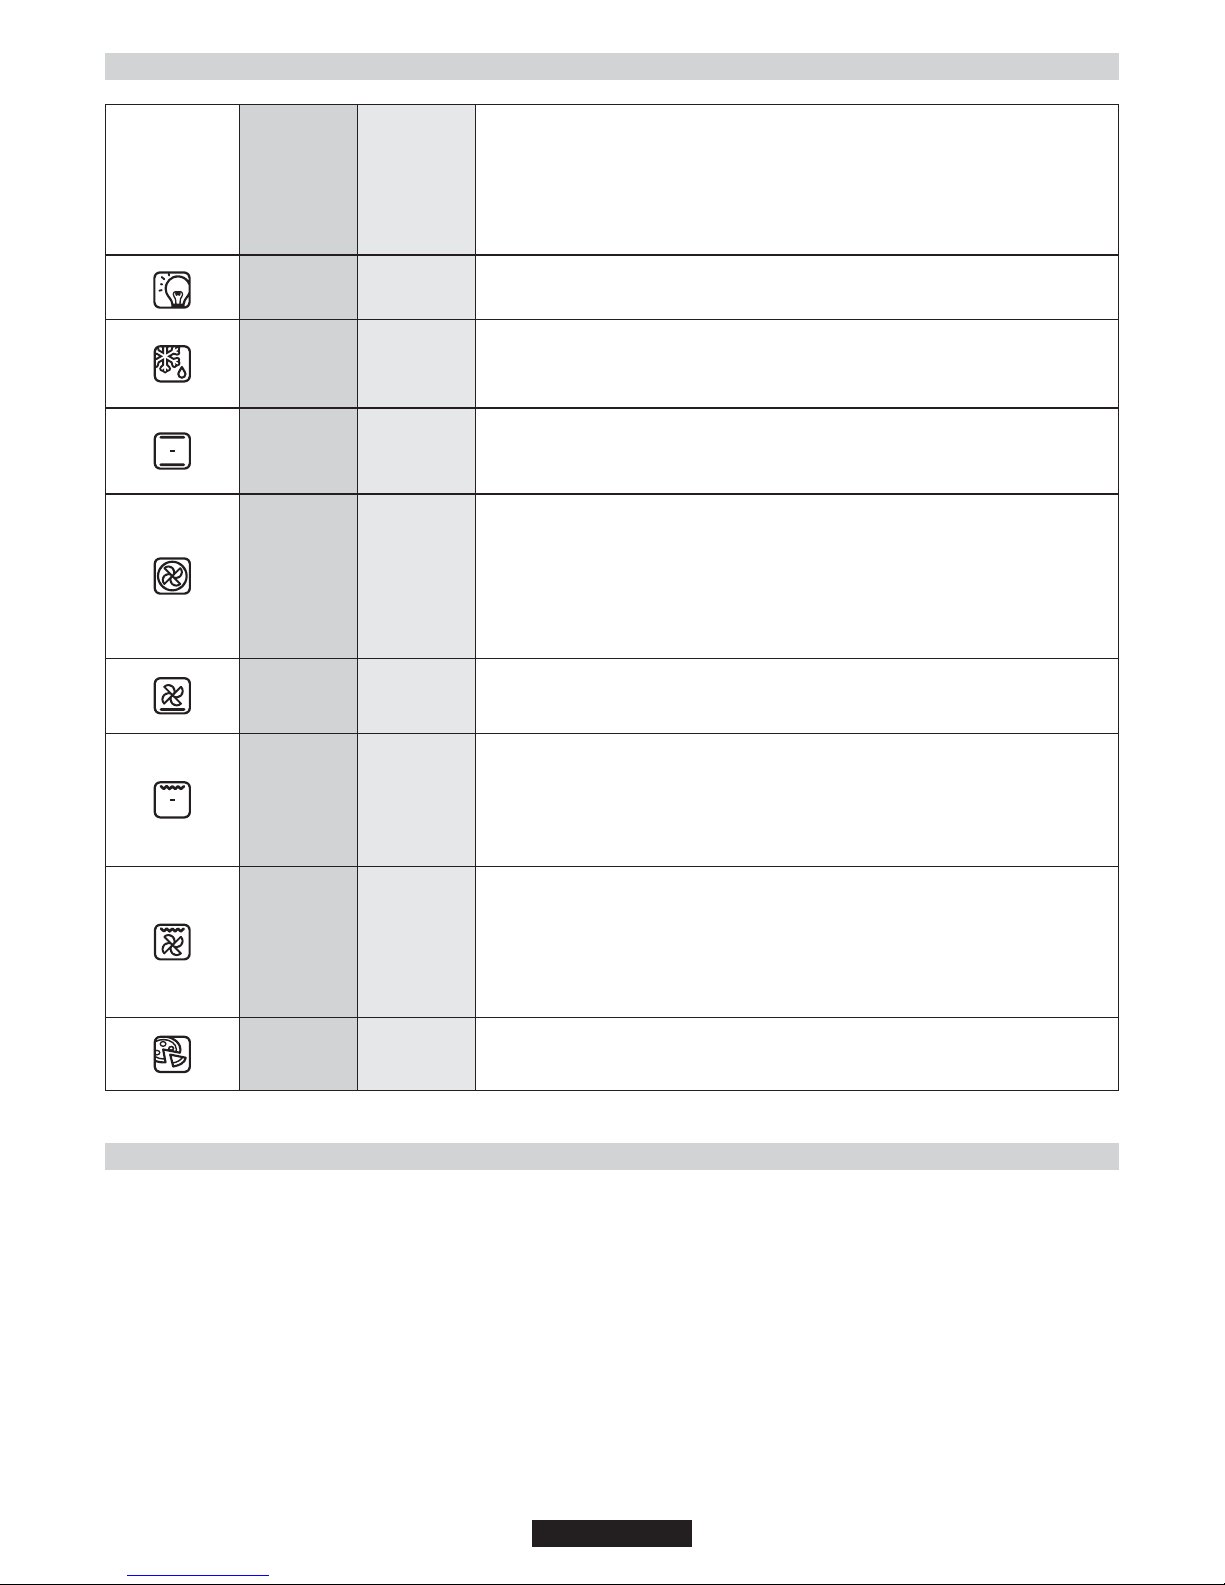
6. OPERATING INSTRUCTIONS
Function
dial
Temperature
pre-set and
setting.
(Model with
electronic
programmer)
(Type A)
Thermostat
dial
Function
Turns on the oven light
This will automatically activate the cooling fan (on fan cooled models only)
Defrosting
When the dial is set to this position. The fan circulates air at room temperature around
the, frozen food so that it defrosts in a few minutes without the protein content of the
food being changed or altered
Natural convection
Bottom and top oven elements are used. This is the traditional form of baking and
roasting. It is ideal for roasting joints of meat and game, baking biscuits and apples and
making the food nice and crunchy.
Fan cooking
Both top and bottom heating elements are used with the fan circulating the air inside
the oven. We recommend you use this method for poultry, pastries, fish and vegetables.
Heat penetrates into the food better and both the cooking and preheating times are
reduced. You can cook different foods at the same time with or without the same
preparation in one or more positions. This cooking method gives even heat distribution
and the smells are not mixed. Allow about ten minutes extra when cooking foods at the
same time.
Fan plus lower element
This function is ideal for delicate dishes (pies-souffle).
GRILL: use the grill with the door closed.
The top heating element is used alone and you can adjust the temperature. Five
minutes preheating is required to get the elements red-hot. Success is guaranteed for
grills, kebabs and gratin dishes. White meats should be put at a distance from the grill;
the cooking time is longer, but the meat will be tastier. You can put red meats and fish
fillets on the shelf with the drip tray underneath.
FAN ASSISTED GRILL (a): use the turbo-grill with the door closed.
The top heating element is used with the fan circulating the air inside the oven.
Preheating is necessary for red meats but not for white meats. Ideal for cooking thick
food items, whole pieces such as roast pork, poultry, etc. Place the food to be grilled
directly on the shelf centrally, at the middle level. Slide the drip tray under the shelf to
collect the juices. Make sure that the food is not too close to the grill. Turn the food over
halfway through cooking.
Function Pizza
This function with hot air circulated in the oven ensure perfect result for
dishes such as pizza or focaccia.
* Tested in accordance with the CENELEC EN 60350-1 used for definition of energy class.
220
50 ÷ 240
50 ÷ MAX
50 ÷ MAX
200
50 ÷ 230
160
50 ÷ 200
50 ÷ MAX
50 ÷ MAX
50 ÷ 200
Level 4
1 ÷ 4
190
180 ÷ 200
50 ÷ MAX
220
7. CHILD SAFETY
This function is essential, especially when children are around. It prevents children from switching the oven on or altering the preset programmes.
This safety system locks the oven control panel while it is operating.
There are two levels of safety :
LEVEL 1 : Locking selector control knob and the central button.
•To activate : Turn the programmation control knob to child safety.
•Action : The control knobs are inactive*.
•To deactivate : Turn the programmation control knob to 0.
LEVEL 2 : Locking function selector knobs
•To activate : Turn the function selector knob to child safety and keep the central button pressed in for 3 seconds.
•Action : All the controls are inactive*.
•To dactivate : the same procedure as for activating. Turn the function selector knob to child safety and keep the central button Pressed in for 3
seconds.
*Note : In all cases, for reasons of safety, even when the controls are locked, the oven can be switched off by turning the selector knob to 0.
*
*
Page 10

Page 11

Page 12
595
550
22
546
578
552
17
595
560
440
4x4.5x25
Opening 500 x 45
AUS
If the furniture is equpped with a
bottom at the back part, provide an
opening for the power supply cable.
AUS
560
min
590
560
2mm
2mm
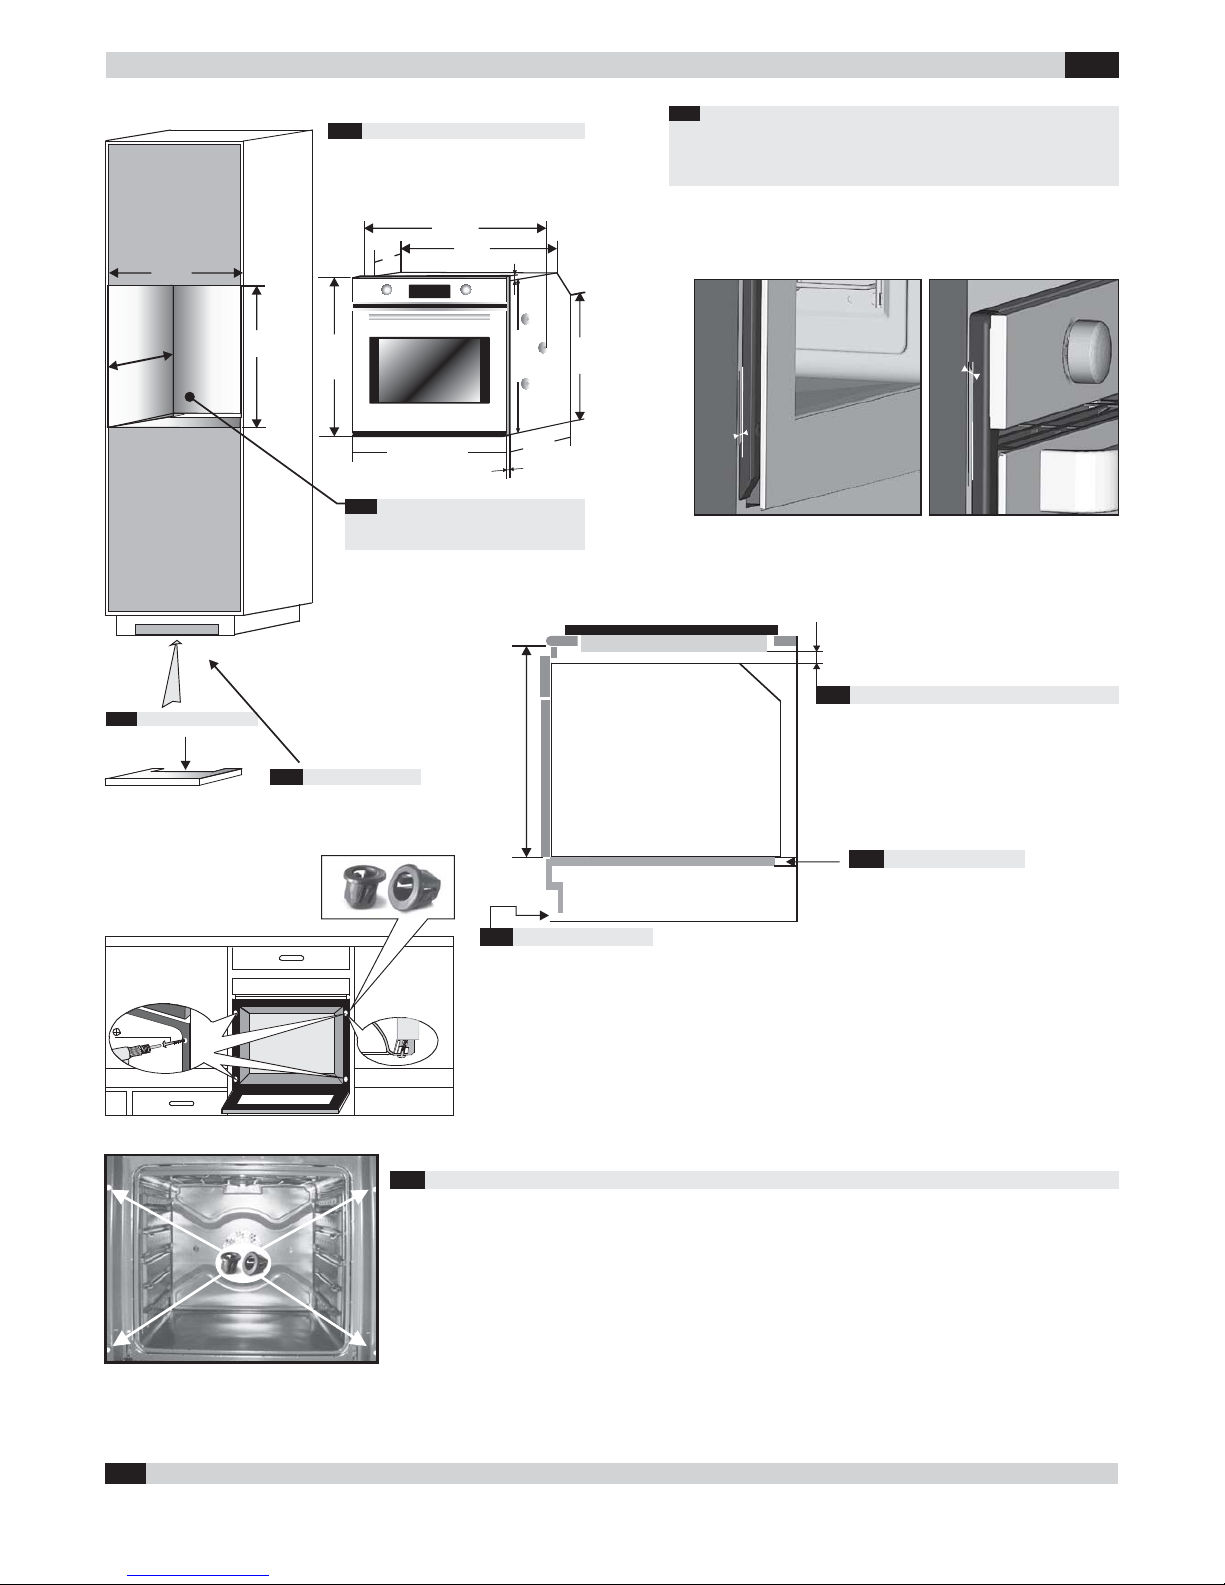
INSTALLATION
AUS
AUS
Fixing in the location
Inside the oven there is a bag with four fixing screws. Fixing: When the oven door is open, holes are accessible,
they are located on each side. Use the screws provided to fix the oven.
Opening 500 x 10
AUS
Oven in column (dimensions mm)
FOUR / OVEN
600 min
10 min
TABLE / TOP
AUS
Opening 500 x 10
Oven fitted under worktop (dimensions mm)
AUS
AUS
Opening 560 x 45
AUS
AUS
Applying torque more than needed to fix the screws can close
the ventilation channels on both sides. Please be sure that, these
ventilation channels are 2mm open after installation to furniture.
ATTENTION!
AUS
The manufacturer will not be responsible for any inaccuracy resulting from printing or transcript errors contained in this brochure. We reserve the right to carry out
modifications to products as required, including the interests of consumption, without prejudice to the characteristics relating to safety or function.
01.2017 • REV:B • 42817348
 Loading...