

Page 1

IT
G B
F R
D E
E S
P T
E L
P L
C Z
N L
F I
N O
S V
D A
COMBINATI TOTAL NO FROST E FROST FREE ...........................................da pag.4 a pag.5
COMBINED TOTAL NO FROST AND FROST FREE ..................................... page 6 to page 7
COMBINÉ S NO FROST ET NO FROST TOTAL
.............................................................page s 8 à 9
K Ü H L-G EFRIERK OMBINATIONEN TOTAL NO FROST U ND FROSTFREE .. Se ite 1 0 b is Se ite 1 1
COMBINAD O TOTAL NO FROST Y FROST FREE .....................................de pá g.1 2 a pá g.1 3
COMBINADO TOTAL NO FROST .................................................................da pág. 14 à pág.15
ΨΥΓΕΙΟΚΑΤΑΨΥΚΤΗΣ Μ Ε ΣΥΣΤΗΜΑ "TOTAL NO FROST" ΚΑΙ Μ Ε ΑΥΤΟΜΑΤΗ ΑΠΟΨΥΞ .. αό σελ. 16 έω σ σελ. 17
LOD Ó W K I K OMBI NO FROST I FROST FREE ..............................................................o d s tr. 1 8 do s tr.1 9
K OMBINACE TOTAL NO FROST A FROST FREE
.................................o d s tran y 2 0 do s tran y 2 1
COMBINATIE TOTAAL G EEN V ORST EN V ORSTV RIJ .............................pag. 22 t/m pag. 23
H U U RTU MATON J Ä Ä K AAP P IP AK ASTINY H D ISTELMÄ ........................................ sivut 24-25
K OMBINERT TOTAL ING EN FROST OG FROSTFRI ..............................fra side 26 til side 27
KOMBINERAD TOTAL INGEN FROST OCH FROSTFRITT ............... från sida 28 till sida 29
K OMBINERET U D EN FROST OG FROSTFRI
........................................................... fra s. 30 til s.31
Page 2

TOTAL NO FROST
I prodotti total No frost sono costituiti da un sistema
di aereazione composto da 2 bocchette regolabili
manualmente.
Si consigli a di tenere le bocchet te par zialmente
e completamente aperte.
The Frost Free Plus system uses the two manually
adjustable vents to circulate cold air evenly around the
fridge.
It is recommended that the vents are kept partially or
completely open.
FROST FREE PLUS
Di e völli g f rostf rei e n Produkte si nd m i t eine r
Lüftungsanlage ausgestattet, die sich aus zwei von
Hand einstellbaren Düsen zusammensetzt.
Es wird empfohlen, die Öffnungen jeweils teilweise und
vollständig geöffnet zu halten.
TOTAL NO FROST
NO FROST TOTAL
Los productos Total No frost estan compuestos por
un sistema de ventilación formado por dos difusores
ajustables manualmente.
Es recomenda ble mantener las aberturas parc ial
o totalmente abiertas.
Produkty z systemem całkowic ie automatyc znego
rozmrażania zawierają system wentylacyjny, w którego
skład wchodzą dwie ręcznie regulowane dysze.
Zaleca się, aby otwory pozostawały częściowo lub
całkowicie otwarte.
CAŁKOW ICIE AUTOMATYCZNE ROZMRAŻANIE
Os equipamentos No Frost são compostos por um
sistema de ventilação que inclui 2 bocais manualmente
ajustáveis.
É recom en dáve l mant er as abertu ras parcial ou
totalmente abertas.
NO FROST TOTAL
TOTAL NO FROST
Les produits total No Frost sont constitués d‘un système
de ventilation qui comprend 2 sorties d’air froid, réglables
manuellement.
Il est reco mma ndé de mai nte nir les ou ver tur es
partiellement et complètement ouvertes.
Τα προϊόντα με πλήρωσ αυτόματη απόψυξη αποτελούνται
από ένα σύστημα αερισμού το οποίο περιλαμβάνει
2 ακροφύσια που ρυθμίζονται χειροκίνητα.
Συνιστάται να διατηρείτε τα ανοίγματα εν μέρει και πλήρωσ
ανοικτά.
ΠΛΗΡΩ Σ ΑΥΤΟΜΑΤΗ ΑΠΟΨΥΞΗ
Výrobky s označením Total No frost jsou vybaveny
systémem větrání, který je tvořen 2 ručně nastavitelnými
větracími otvory.
Doporučujeme nechat tyto otvory částečně a úplně
otevřené.
TOTAL FROST FREE
Page 3

TOTAAL ‚FROST FREE‘
De ‚t o t a a l f r o s t f ree‘ pr o d u c t e n h e b b e n e en
ven tilat iesys teem dat twee handma tig verstel bare
openingen bevat.
Het is aan te bevelen om de openingen gedeeltelijk of
compleet open te houden.
Helt frostfria produkter består av ett ventilationssystem
som består av 2 manuellt justerbara munstycken.
Vi rekommenderar att öppningarna hålls delvis och
helt öppna.
HELT FROSTFRI
Totalt frostfrie produkter består af et ventilationssystem,
som indeholder 2 manuelt justerbare dyser.
Det anbefales at holde åbningerne delvist og fuldstæ ndigt
åbne.
TOTAL FROSTFRI
TOTAL FROST FREE
Total frost free -tuotteissa on ilmanvaihtojärjestelmä,
joka muodostuu kahdesta manuaalisesti säädettävästä
suuttimesta.
Suosittelemme pitämään aukot osittain ja täysin auki.
Total frost free-produktene har et ventilasjonssystem som
består av to manuelt justerbare munnstykker.
Det anbefales å holde åpningene delvis og komplett
åpne.
TOTAL FROST FREE
Page 4

4 IT
1
2
3
4
5
COMBINATI FROST FREE
Q UADRO COMANDI
Per raggiungere il quadro comandi è suffi ciente aprire la porta superiore del frigorifero
M O D E L L O C O N O PZ IO N E S U PE R L a manopola consente di attiv are tutto l’apparecch io e di impostare la temperatura del v ano congelatore e
F rigorifero. L e posiz ioni consigliate sono 2 -3 . S e si ruota sulla posiz ione “0 “ si disattiv a completamente l’apparecch io.
L a spia arancio si accende quando la M anopola termostato è
ruotata in corrispondenz a della posiz ione S U PE R . In questo
caso il compressore funz iona continuamente.
CONGELAZ IONE
(Fig u ra 1 )
L a b uona conserv az ione degli alimenti congelati è garantita in tutti gli scomparti del congelatore.
In alcuni prodotti è presente una sez ione
nella parte superiore, (v edi guida rapida).
M O D E L L O C O N O PZ IO N E S U PE R
D isporre i cib i da congelare nel cassetto
, ruotare in senso orario il termostato fi no a raggiungere la posiz ione di S U PE R , contemporaneamente
si accenderà la relativa spia arancio (v edi fi gura 1 ). T rascorse altre 2 4 ore la congelaz ione è terminata. R iportare quindi il termostato nella posiz ione
2 -3 . L a funz ione S U PE R v iene disattiv ata automaticamente dalla sch eda elettronica dopo 2 6 ore. L a quantità massima di alimenti ch e è possib ile
congelare è indicata nella targh etta matricola, (v edi fi gura 3 ).
M O D E L L O B A S E
D isporre i cib i da congelare nel cassetto
, la congelaz ione è garantita in qualsiasi posiz ione della manopola ( v edi fi gura 2 ).
A ll’iniz io della congelaz ione, per non fare raffreddare eccessiv amente il v ano frigo, potreb b e essere necessario arretrare di circa 1 /2 numero la
manopola del termostato, in funz ione del carico e della temperatura amb iente. A lla fi ne della congelaz ione, riportare la manopola del termostato
sul v alore ab ituale.
N.B. Per u na m iglior c irc olaz ione dell’aria, lasc iare dello spaz io tra gli alim enti ed ev itare di ostru ire le boc h ette dell’ari raff reddam ento.
LO SBRINAMENTO
(Fig u ra 3 )
L a presenz a di un lieve strato di b rina o di gocce d’acqua durante il funz ionamento è da
considerarsi normale
E’ im p o rta n te m a n te n e re s e m p re p u lito il c o n d o tto d i s c a r ic o e d e v ita re d i p o rre i c ib i
a c o n ta tto c o n la p a re te d e lla c e lla
Il v ano freez er non necessita di sb rinamento poich é questo prodotto è dotato di un
sistema automatico ch e impedisce la formaz ione di gh iaccio (frost free)
Importante: In presenza di temperatura ambiente molto calda, l’apparecchio potrebbe funzionare in continuo, con
conseguente formazione anomala di brina sulla parete di fondo della cella frigo. In questi casi è necessario ruotare la
manopola frigo su numeri più bassi (1-2).
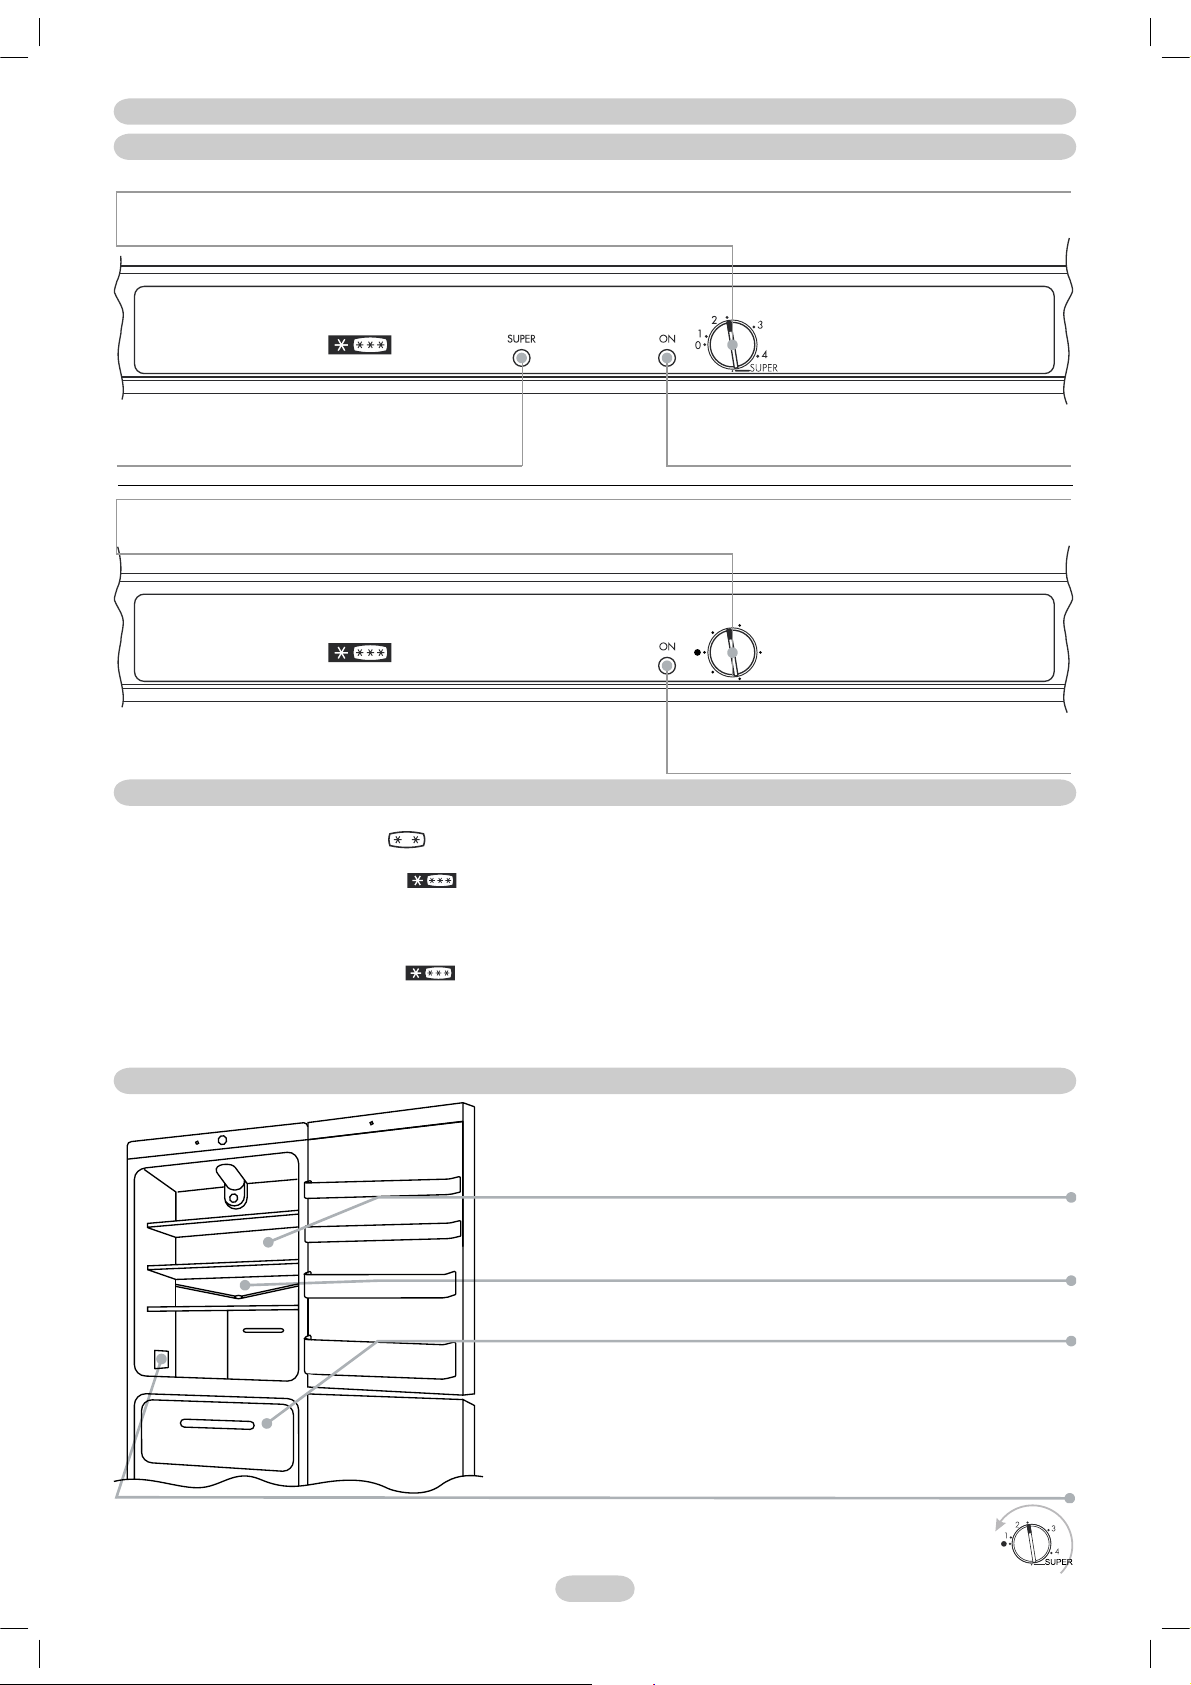
M O D E L L O B A S E L a manopola consente di attiv are tutto l’apparecch io e di impostare la temperatura del v ano congelatore e F rigorifero. L e
posiz ioni consigliate sono 2 -3 . S e si ruota sulla posiz ione “0 “ si disattiv a completamente l’apparecch io.
Im portante: Alc u ni apparec c h i iniz ieranno a fu nz ionare dopo u n tem po di
alm eno 6 m inu ti dal m om ento in c u i si è inserita la spina nella presa della
c orrente e im postata la tem peratu ra.
NB. In q u esta posiz ione è possibile trov are la targa m atric ola, c ontenente i dati da
c om u nic are all’Assistenz a Tec nic a q u alora si v erifi c asse u n gu asto.
L a spia v erde “ O N “ indica ch e l’apparecch io è in funz ione. L a
spia si accende qualunque sia la posiz ione del termostato
ad eccez ione dello 0 .
(Fig u ra 2 )
L a spia v erde “ O N “ indica ch e l’apparecch io è in funz ione. L a
spia si accende qualunque sia la posiz ione del termostato
ad eccez ione dello 0 .
Page 5
5 IT
Per invertire il senso di apertura delle porte seguire le indicazioni in relazione al tipo di testata e di cerniera di cui il vostro prodotto è costituito.
INVERSIONE DEL SENSO DI APERTURA DELLE PORTE
Page 6

6 EN
1
2
3
4
5
COMBINED FROST FREE
CONTROL PANEL
Open the top door of the fridge in order to access the control panel.
MODEL W ITH SUPER OPTION Turn on the k nob to sw itch on the appliance and set the temperature of the freezer compartment and fridge. W e
recommend y ou set the temperature to 2 or 3. Turn the k nob to “0” to turn off the appliance.
The orange light comes on w hen the thermostat k nob is
turned to SUPER. In this case the compressor continues
to function as normal.
FREEZING
(Figure 1)
The preservation of frozen foods is guaranteed in all of the freezer’s compartments.
In some products there is a section
in the top part, (see quick guide).
MODEL W ITH SUPER OPTION
Place the foods to be frozen in the draw er
, turn the thermostat clock w ise to SUPER position, and the orange light w ill come on (see fi gure
1). After 24 hours, freezing is completed. Therefore, reset the thermostat to position 2-3. The SUPER function is automatically disabled
from the circuit board after 26 hours. The rating plate states the max imum quantity of foods that can be frozen, (see fi gure 3).
BASE MODEL
Place the foods to be frozen in the draw er
, freezing is guaranteed in any position of the k nob (see fi gure 2).
At the star t of the freezing process, so as not to mak e the fridge compar tment ex cessively cold, it may be necessary to turn the thermostat k nob
back by approx imately 1/2 numbers, according to the load and room temperature. Once the freezing process is completed, return the thermostat
k nob to the usual value.
N.B. For better air circulation, leave some room in betw een the foods and avoid block ing the cooling air outlets.
DEFROSTING
(Figure 3)
A small amount of frost or drops of w ater on the back of the fridge compartment w hen
the fridge is w ork ing is normal
M ak e sure th e w ater outlet is alw ay s clean. M ak e sure foods do not touch th e back or
sides of th e fridge compartment
The freezer compartment does not require defrosting because this product is equipped
w ith an automatic sy stem that prevents the formation of ice (frost free)
Important: If the room temperature is very warm, the appliance may work continuously and a layer of frost will deposit on
the back of the fridge compartment. In this case, turn the knob to lower settings (1-2).
BASE MODEL Turn on the k nob to sw itch on the appliance and set the temperature of the freezer compartment and fridge. W e recommend y ou
set the temperature to 2 or 3. Turn the k nob to “0” to turn off the appliance.
Important: Some appliances w ill start w ork ing at least 6 minutes after the
plug has been inserted in the pow er outlet and the temperature has been
set.
NB. This is the rating plate. If you need to contact our Service Department in the
event of faults, remember to give them the information on the plate.
The green “ON“ light show s that the unit is w ork ing. This
light is on irrespective of the k nob setting, ex cept for w hen
the k nob is set to 0.
(Figure 2)
The green “ON“ light show s that the unit is w ork ing. This
light is on irrespective of the k nob setting, ex cept for w hen
the k nob is set to 0.
Page 7
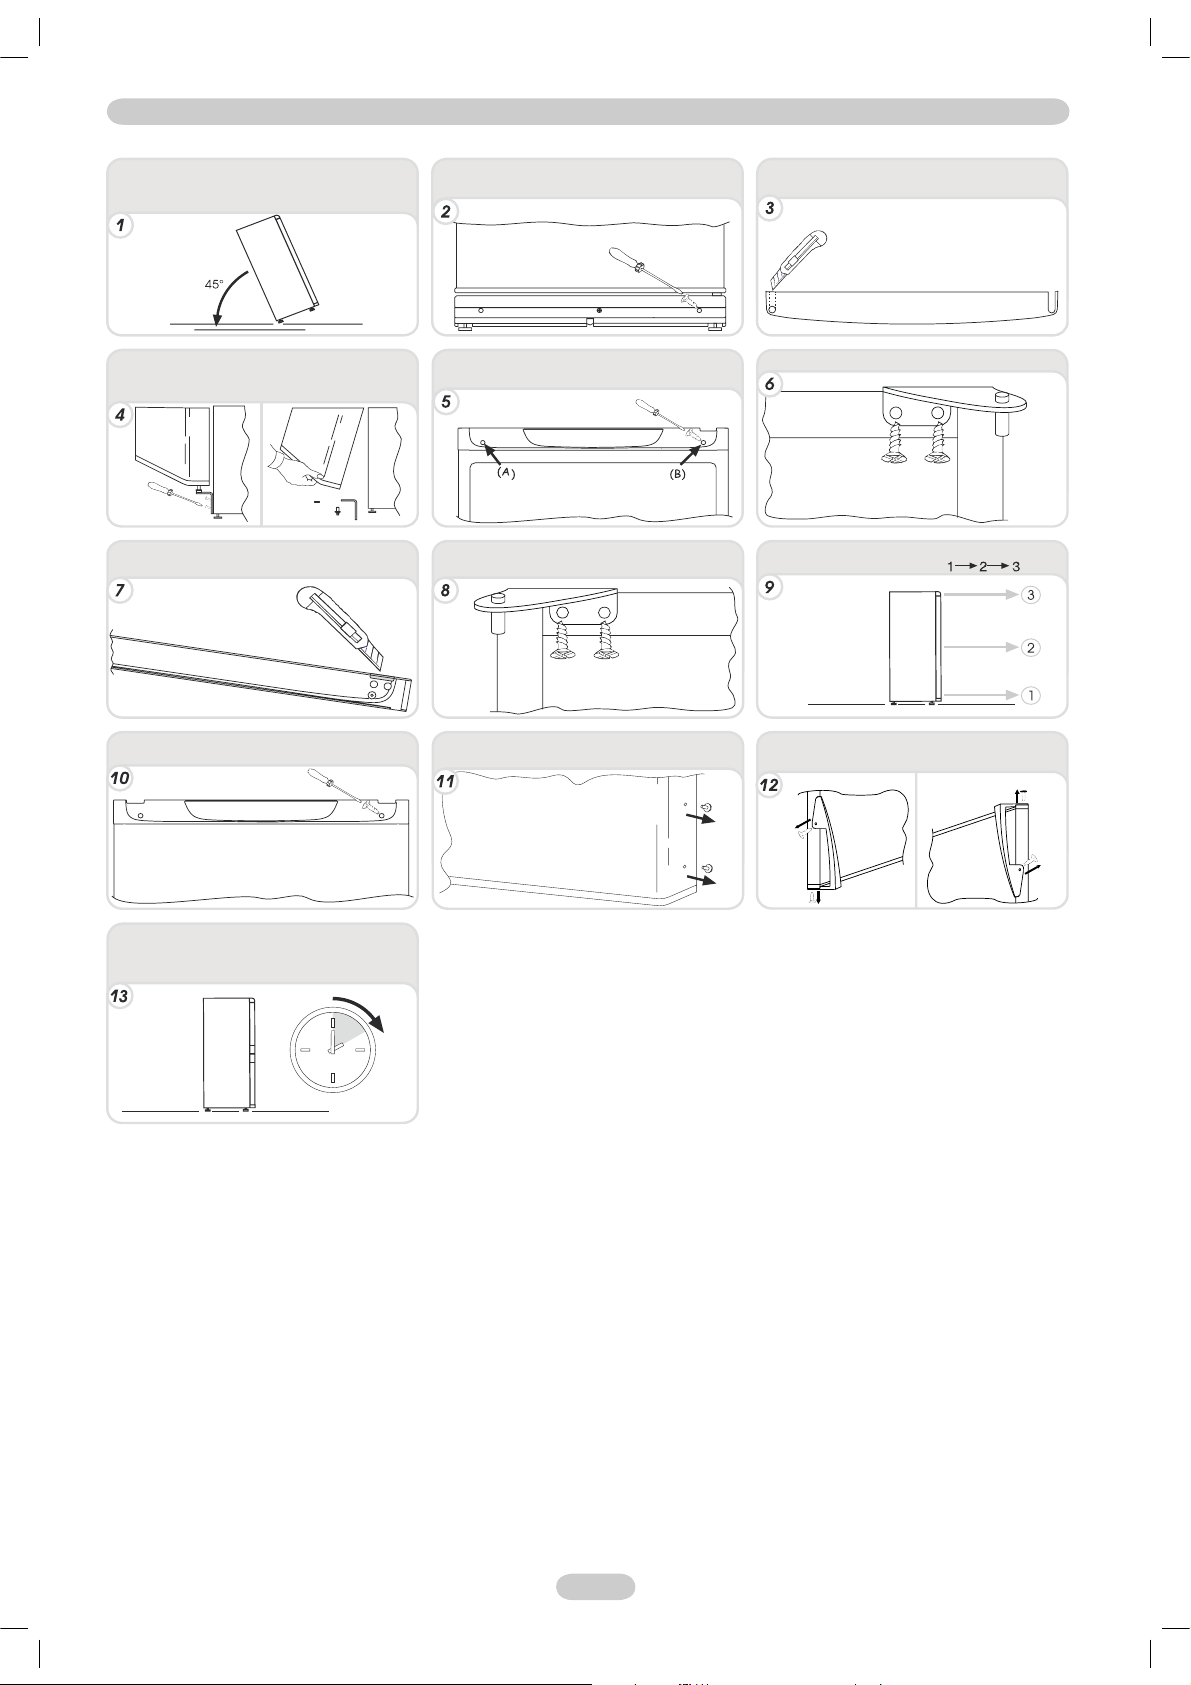
7 EN
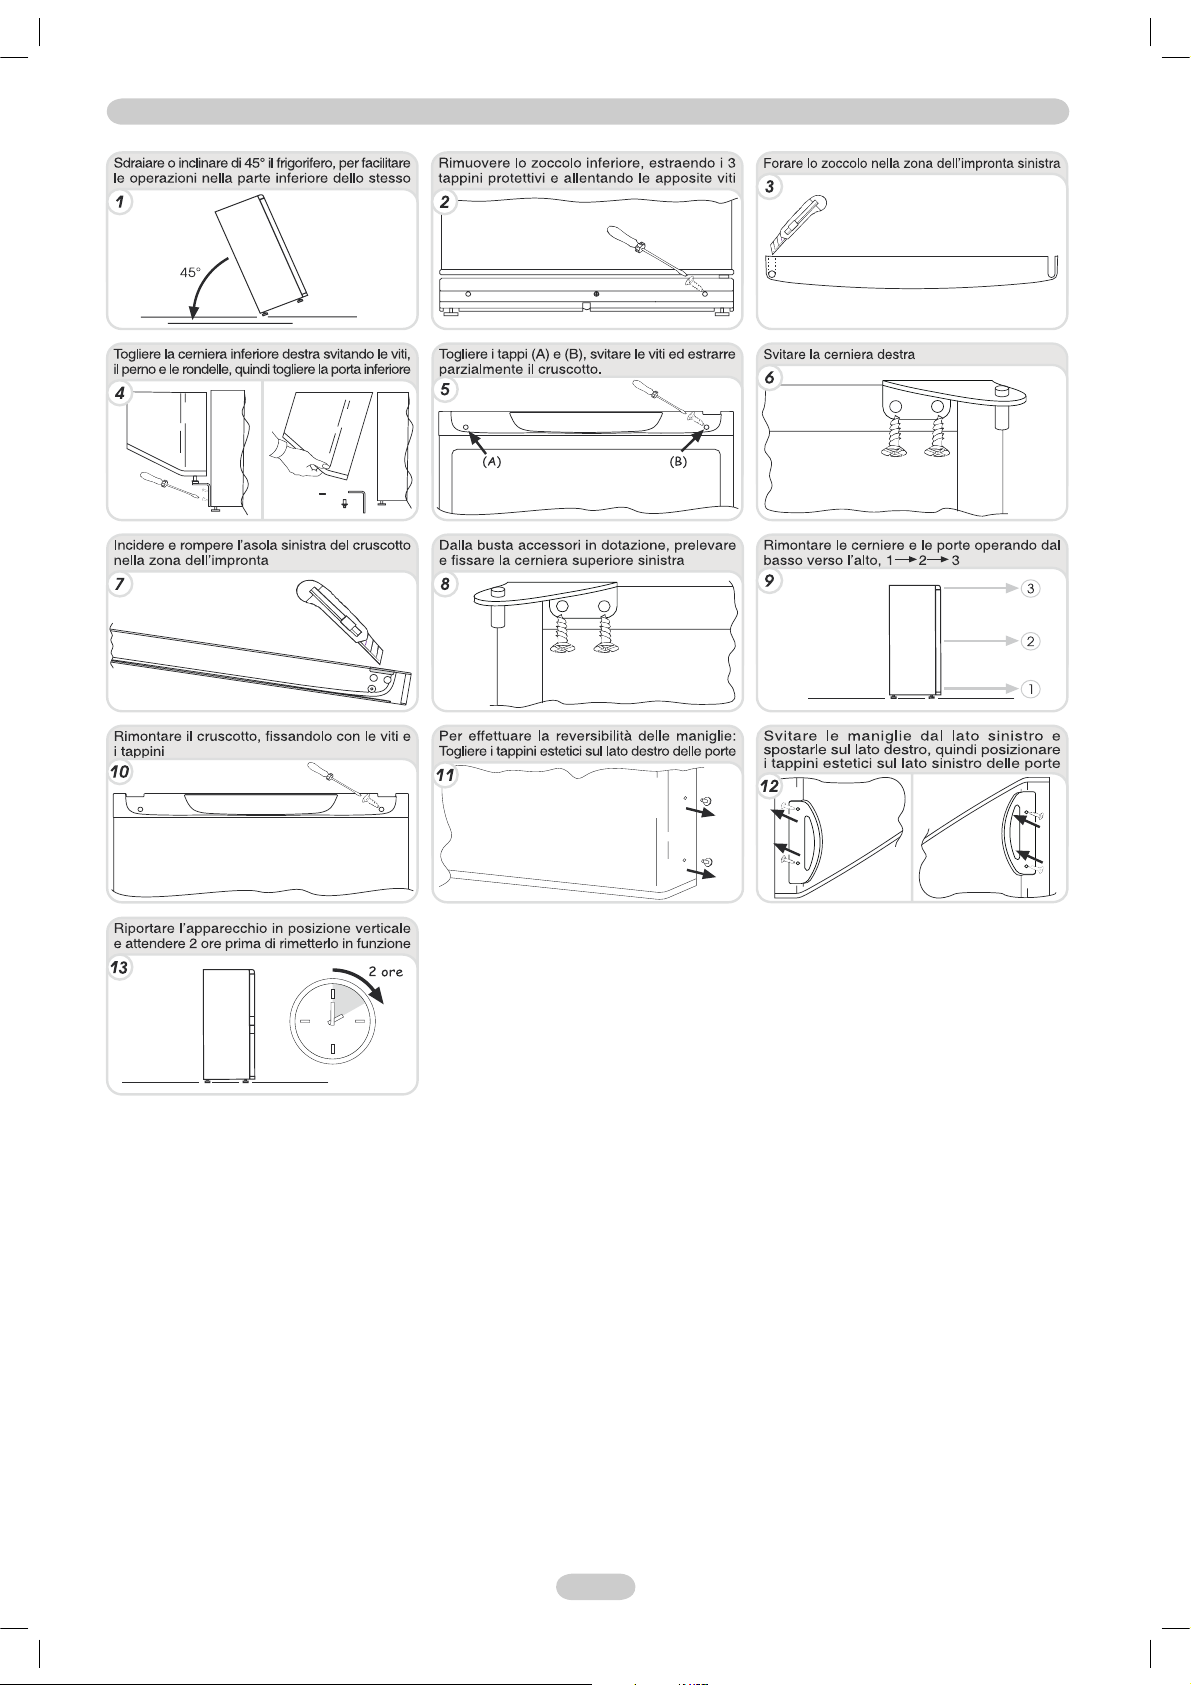
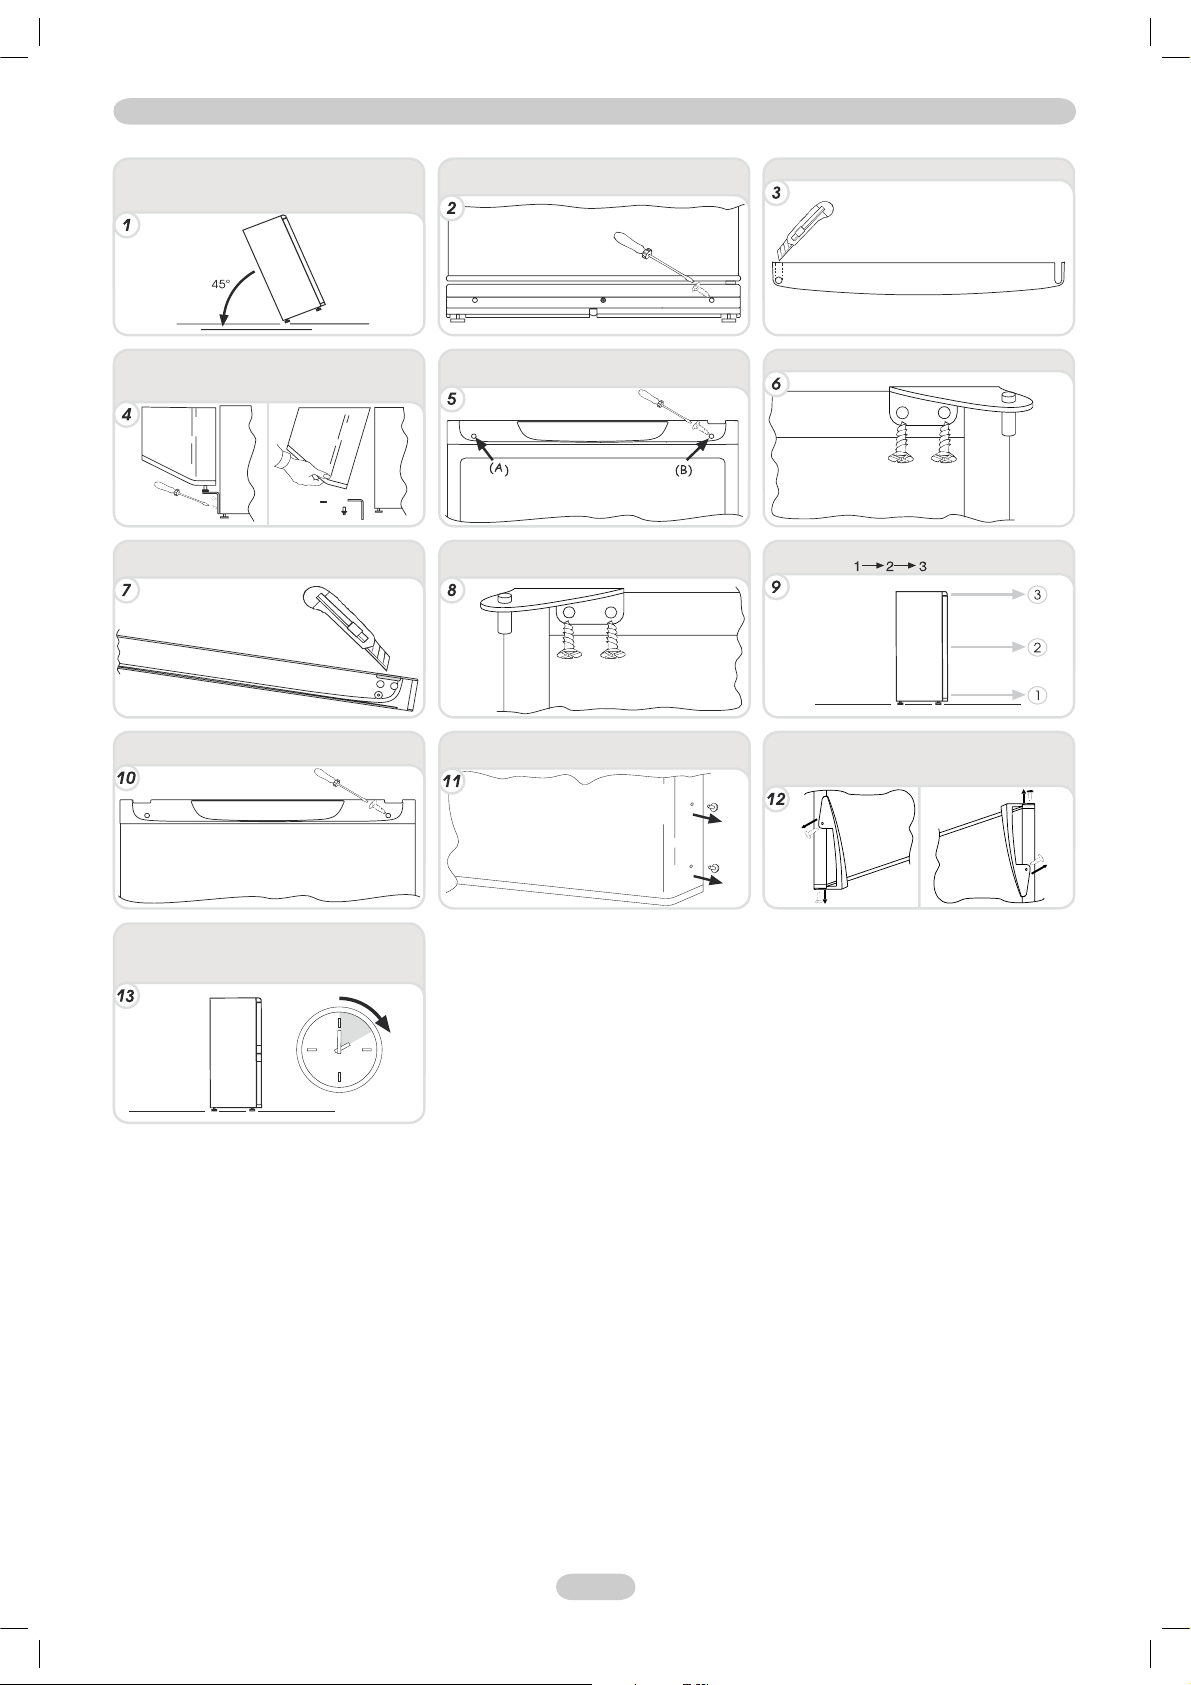
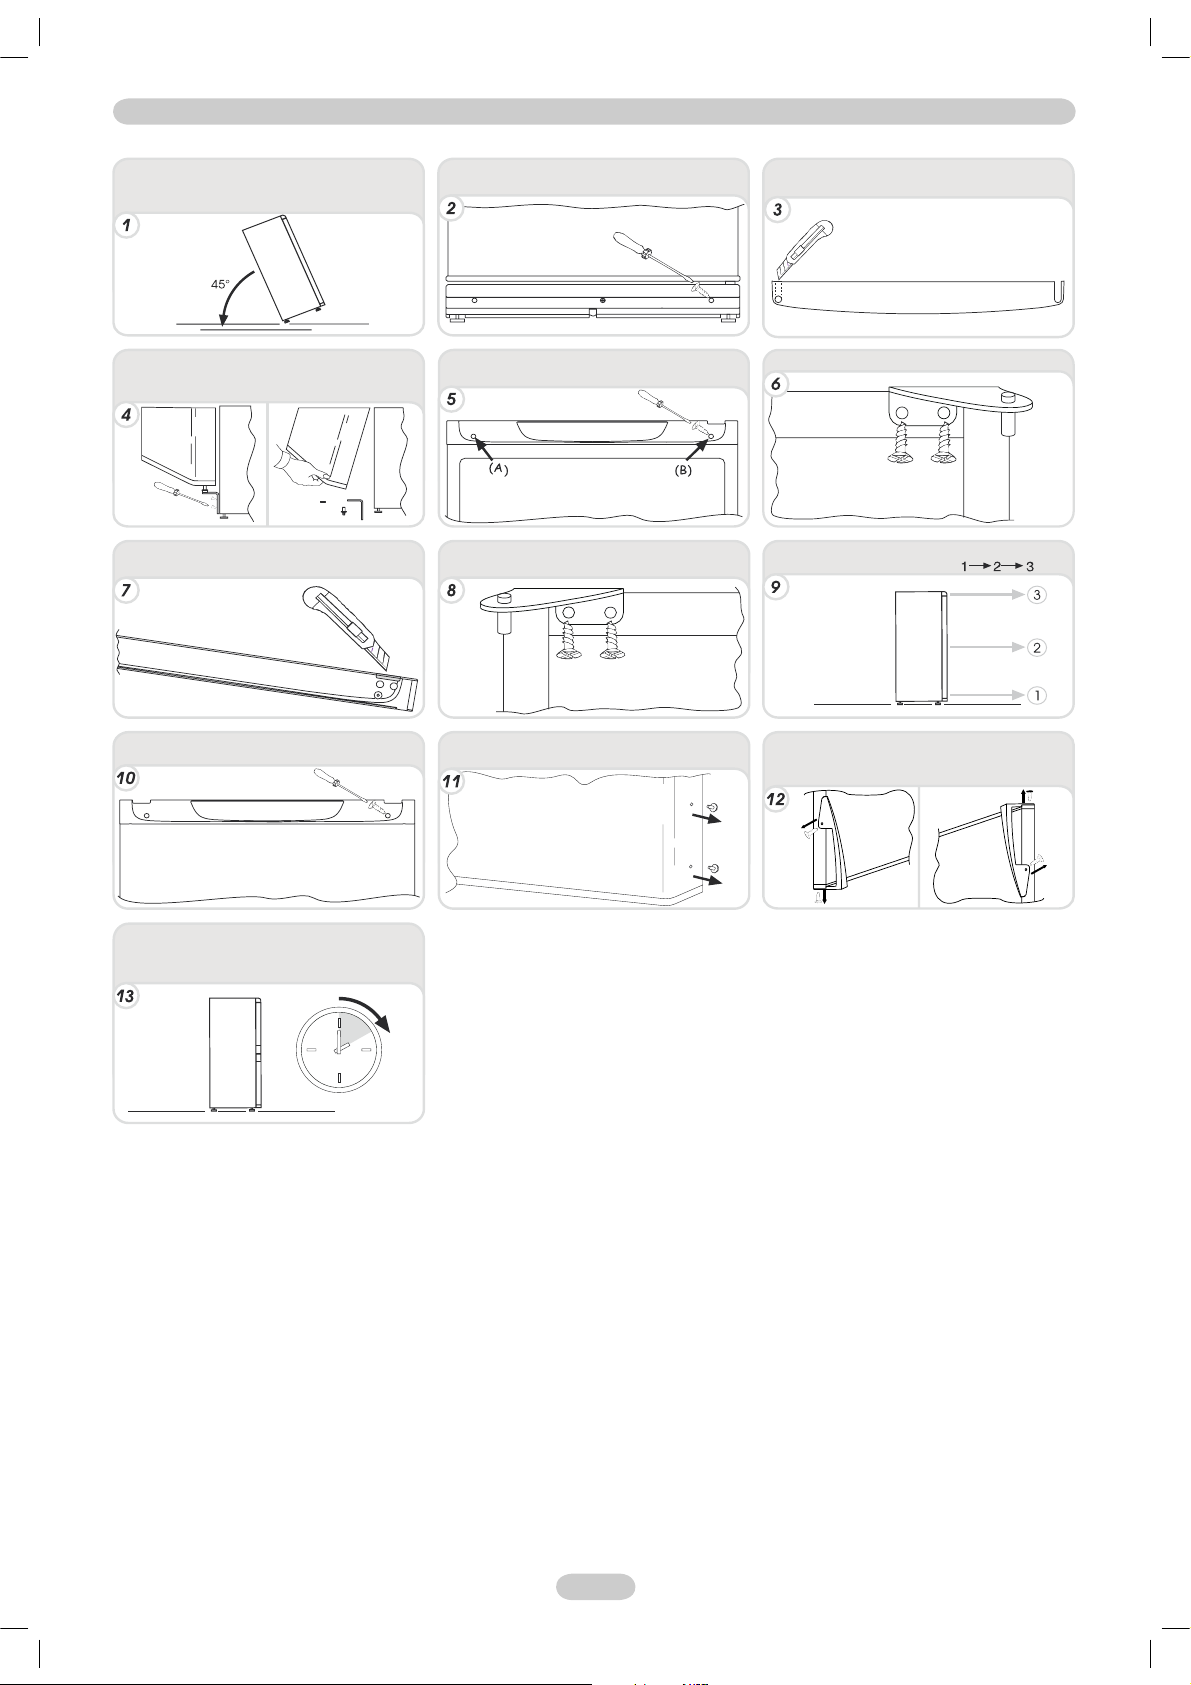
Place the appliance on the floor or at a 45° angle,
since it is necessary to work on the bottom of the
appliance.
Take off the bottom right-hand hinge by removing
the screws, pin and washers, then remove the
lower door.
Mark and break the left-hand slot on the panel, in
the insert area.
Take the top left-hand hinge from the accessories
kit and fasten it.
Fit the panel, and secure with the screws and
caps.
To reverse the handles: remove the outer caps
from the right-hand side of the doors.
Remount the hinges and doors working from
bottom to top,
Unscrew the handles from the left-hand side and
move them to the right-hand side, then position
the outer caps on the left-hand side of the doors.
Remove the lower plinth by pulling out the 3
protective plugs and by loosening the screws.
Remove the caps (A) and (B), loosen the screws
and partially remove the panel.
Unscrew the right hinge.
Drill the plinth on the marked left hand-side area.
Put the appliance in an upright position and wait
two hours before turning it on.
2 Hours
In order to reverse the opening of the doors, follow the indications in relation to the insert and hinge type your product is made up of.
REVERSING THE OPENING OF THE DOORS
Page 8
8 FR
1
2
3
4
5
COMBINE NO FROST
PANNEAU DE COMMANDE
Ouvrez la porte supérieure du réfrigérateur afi n d'accéder au panneau de commande.
MODELE DISPOSANT DE L'OPTION SUPER Tournez le bouton afi n de mettre l'appareil en marche et de régler la température du compartiment
congélateur et du réfrigérateur. Nous vous conseillons de régler la température sur 2 ou 3. Placez le bouton sur “0” pour éteindre l'appareil.
Le voyant orange s'allume quand le bouton du thermostat
est sur la position SUPER. Dans ce cas, le compresseur
fonctionne en continue.
CONGELATION
(Image 1)
La conservation d'aliments surgelés est garantie dans tous les compartiments du congélateur.
Certains modèles disposent d'un espace
dans la partie supérieure, (voir le guide de référence rapide).
MODELE DISPOSANT DE L'OPTION SUPER
Placez les aliments à congeler dans le tiroir
, tournez le thermostat dans le sens des aiguilles d'une montre jusqu'à la position SUPER. Le
voyant orange s'allume. (V oir image 1). La congélation est terminée après 24 heures. Replacez le thermostat en position 2 ou 3. La fonction SUPER
est automatiquement désactivée par la carte électronique au bout de 26h. La plaque signalétique indique la quantité d’aliments maximale pouvant
ê tre congelée. (V oir image 3).
MODELE DE BASE
Placez les aliments à congeler dans le tiroir
, la congélation est assurée, quelle que soit la position du thermostat (voir image 2).
Au démarrage du processus de congélation, pour que la partie réfrigérateur ne devienne pas trop froide, il peut ê tre nécessaire de baisser le
thermostat d'une demie graduation en fonction de la quantité d'aliments présente et de la température de la pièce. Replacez le thermostat dans sa
position habituelle une fois le processus de congélation terminé.
N.B. Pour garantir une meilleure circulation de l'air, espacez les aliments et é vitez d’obstruer les sorties d'air de refroidissement.
DEGIVRAGE
(Image 3)
Il est normal qu'une fi ne péllicule de givre ou de gouttes d'eau se forme au fond du
réfrigérateur quand ce dernier est en marche.
Assurez -vous de toujours maintenir propre la z one d'é vacuation d'eau. Assurez -vous
q ue les aliments ne soient pas en contact avec le fond ou les parois du ré frigé rateur.
Le compartiment congélateur n'a pas besoin d'ê tre dégivré car il est équipé d'un système
automatique empê chant la formation de glace (No Frost).
Important : Si la température de la pièce est trop élevée, il se peut que l'appareil fonctionne en continue et qu'une couche
de givre se forme dans le fond du compartiment réfrigérateur. Dans ce cas, positionnez le bouton sur les réglages les
plus bas. (1-2).
MODELE DE BASE. Tournez le bouton afi n de mettre l'appareil en marche et de régler la température du compartiment congélateur et du
réfrigérateur . Nous vous conseillons de régler la température sur 2 ou 3. Placez le bouton sur “0” pour éteindre l'appareil.
Important : Certains appareils commencent à fonctionner 6 minutes au
moins après que la prise ait é té insé ré e dans la prise de courant et que la
tempé rature ait é té ré glé e.
NB. Ceci est la plaque de signalisation. Si vous devez contacter notre service
après vente en cas de dysfonctionnement, pensez à leur fournir les informations
fi gurant sur la plaque.
Le voyant vert "ON" indique que l'appareil est en marche. Ce
voyant reste allumé peu importe la position du bouton, sauf
si ce dernier est en position 0.
(Image 2)
Le voyant vert "ON" indique que l'appareil est en marche. Ce
voyant reste allumé peu importe la position du bouton, sauf
si ce dernier est en position 0.
Page 9
9 FR
Allongez l'appareil au sol ou à un angle de 45°
car il est nécessaire d'intervenir sur le bas de
l'appareil.
Enlevez la charnière inférieure droite en retirant
les vis, le goujon et les rondelles. Enlevez
ensuite la porte du bas.
Découpez une fente sur le côté gauche du
panneau au niveau de la zone marquée a cet effet.
Fixez la charnière supérieure gauche que vous
trouverez dans le kit d'accessoires.
Installez le panneau et fixez-le à l'aide des vis et
des caches.
Pour inverser les poignées: Retirez les caches
extérieurs sur le côté droit des portes.
Remontez les charnières et les portes en
commençant par celles du bas
Devissez les poignées à gauche et déplacez les
du côté droit, puis positionnez les caches
extérieurs dans les trous du côté gauche.
Retirez la plinthe inférieure en tirant sur les trois
caches protecteurs et en devissant les vis.
Retirez les caches (A) et (B), desserrez les vis et
enlevez partiellement le bandeau.
Devissez la charnière de droite.
Percez la plinthe au niveau du repère situé à
gauche.
Placez l'appareil en position verticale et patientez
deux heures avant de l'allumer.
2 heures
Afi n de pouvoir inverser le sens d'ouverture des por tes, reportez-vous aux instructions relatives au type de charnières et de goujons dont votre appareil est équipé.
INVERSER LE SENS D'OUVERTURE DES PORTES
Page 10

10 DE
1
2
3
4
5
KÜHL-GEFRIERKOMBINATION FROSTFREE
SCHALTBRETT
Öffnen Sie die obere Tür des Kühlschranks, um Zugang zum Schaltbrett zu erhalten.
MODELL MIT OPTION SUPER: Drehen Sie den Drehknopf, um das G erä t einzuschalten, und stellen Sie die Temperatur des G efrierfachs und des
Kühlschranks ein. Wir empfehlen, die Temperatur auf die Stufe 2 oder 3 zu stellen. Drehen Sie den Drehknopf auf “0”, um das G erä t auszuschalten.
Wenn der Thermostatknopf auf SUPER eingestellt ist,
erscheint die Anzeige orange. In diesem Fall arbeitet der
Kompressor im Dauerbetrieb.
EINFRIEREN
(Abbildung 1)
Die Konservierung des G efrierguts ist in allen G efrierfä chern gewä hrleistet.
Bei einigen G erä ten gibt es einen
Bereich im Oberteil (siehe Kurzanleitung).
MODELL MIT OPTION SUPER
Legen Sie die einzufrierenden Nahrungsmittel in das Fach
und drehen Sie das Thermostat im Uhrzeigersinn auf die Einstellung SUPER,
bis das orangefarbene Licht erscheint (siehe Abbildung 1). Nach 24 Stunden ist das Einfrieren abgeschlossen. Stellen Sie deshalb das Thermostat
zurück auf die Position 2-3. Die SUPER Funktion wird automatisch nach 26 Stunden von der Steuerplatine deaktiviert. Das Matrikelschild gibt die
maximale Menge von Nahrungsmitteln an, die eingefroren werden kö nnen (siehe Abbildung 3).
G RUNDMODELL
Legen Sie Nahrungsmittel, die eingefroren werden sollen, in das Fach
, das Einfrieren wird bei jeder Drehknopf-Position gewä hrleistet (siehe
Abbildung 2). Am Anfang des Einfriervorgangs kann es erforderlich sein, den Thermostatknopf je nach Befüllung und Raumtemperatur um ungefä hr
eine halbe Stufe zurückzudrehen, damit der Kühlraum nicht zu kalt ist. Wenn das Einfrieren abgeschlossen ist, drehen Sie den Thermostatknopf
auf den ursprünglichen Wert zurück.
Hinweis: Um eine bessere Luftzirkulation zu gewä hrleisten, sollten Sie zwischen den Nahrungsmitteln etwas Platz lassen und auß erdem
vermeiden, den Kü hlluftauslass zu blockieren.
ABTAUEN
(Abbildung 3)
Beim normalen Betrieb des Kühlschranks entsteht auf der Rückseite des Kühlraums ein
wenig Frost oder ein paar Wassertropfen.
Stellen Sie sicher, dass der W asserablauf immer sauber ist. Vergewissern Sie sich,
dass die Nahrungsmittel nicht die Rü ckseite oder die Seitenwä nde des K ü hlschranks
berü hren.
Das G efrierfach erfordert kein Abtauen, da dieses Produkt mit einem automatischen
System ausgestattet ist, das die Eisbildung verhindert (frostfrei)
Wichtiger Hinweis: Wenn die Raumtemperatur sehr warm ist, wird das Gerät unter Umständen ständig laufen und auf
der Rückseite des Kühlraums wird sich eine Frostschicht ablagern. Stellen Sie den Drehknopf in diesem Fall auf eine
niedrigere Einstellung (1-2).
G RUNDMODELL: Drehen Sie den Drehknopf, um das G erä t einzuschalten und die Temperatur des G efrierfachs und des Kühlschranks einzustellen.
Wir empfehlen, die Temperatur auf die Stufe 2 oder 3 zu stellen. Drehen Sie den Drehknopf auf “0”, um das G erä t auszuschalten.
Wichtiger Hinweis: Einige Gerä te laufen erst dann an, wenn sie fü r
mindestens 6 Minuten an der Steckdose angeschlossen waren und nachdem
die Temperatur eingestellt wurde.
Hinweis: Hier fi nden Sie das Matrikelschild. Wenn Sie bei einer Stö rung den
Kundendienst kontaktieren mü ssen, geben Sie die Informationen auf diesem
Schild an.
Das grüne “ON“ Licht zeigt an, dass das G erä t in Betrieb
ist. Dieses Licht ist unabhä ngig von der Einstellung des
Drehknopfes, auß er für den Fall, dass der Drehknopf auf
"0" steht.
(Abbildung 2)
Das grüne “ON“ Licht zeigt an, dass das G erä t in Betrieb
ist. Dieses Licht ist unabhä ngig von der Einstellung des
Drehknopfes, auß er für den Fall, dass der Drehknopf auf
"0" steht.
Page 11

11 DE
Legen Sie den Kühlschrank auf den Fußboden
oder kippen Sie ihn um 45°, um leichter an der
Unterseite arbeiten zu können.
Entfernen Sie das untere rechte Scharnier, indem
Sie die Schrauben, den Stift und die Unterlegscheiben
abschrauben. Nehmen Sie dann die untere Tür ab.
Ritzen Sie die linke Öse der Stirnwand ein und
stechen Sie diese an der markierten Stelle im
Bereich des Einsatzes durch.
Nehmen Sie aus dem Zubehör das obere linke
Scharnier und befestigen Sie es.
Bringen Sie die Stirnwand wieder an, indem Sie
die Schrauben und Schutzkappen befestigen.
Um die Griffe nach der anderen Richtung
auszurichten: Nehmen Sie die Zierkappen an der
rechten Seite der Türen ab.
Bringen Sie die Scharniere und Türen wieder an,
beginnen Sie dabei von unten:
Schrauben Sie die Griffe von der linken Seite ab
und bringen Sie sie an der rechten Seite an,
befestigen Sie dann erneut die Zierkappen an
der linken Seite der Türen.
Entfernen Sie den unteren Sockel, indem Sie die
3 Schutzstopfen herausziehen und die
Schrauben lösen.
Entfernen Sie die Schutzkappen (A) und (B),
lösen Sie die Schrauben und ziehen Sie die
Stirnwand teilweise heraus.
Schrauben Sie das rechte Scharnier ab.
Bohren Sie an der Markierung der linken Seite
ein Loch in den Sockel.
Stellen Sie das Gerät wieder senkrecht auf und
warten Sie mindestens 2 Stunden, bevor Sie es
wieder in Betrieb nehmen.
2 Stunden
Um die Türanschläge zu wechseln, befolgen Sie die Anweisungen, die sich auf die Stirnwand und die Bauart der Scharniere beziehen, die Ihr Gerät verwendet.
WECHSEL DES TÜRANSCHLAGS
Page 12

12 ES
1
2
3
4
5
COMBINADO TOTAL NO FROST PANEL DE MANDOS
PANEL DE MANDOS
Abra la puerta superior del frigorífi co para acceder a la caja de mandos.
MODELO CON LA SÚ PER OPCIÓ N de Giro de la rueda para encender el aparato y fi jar la temperatura deseada del compartimento del congelador.
Le recomendamos que fi je la temperatura al nivel 2 o 3. Gire la rueda hasta “0” para apagar el aparato.
La luz naranja aparece cuando el interruptor del termostato
se encuentra fi jado en SUPER (al má ximo). En este caso,
el compresor sigue funcionando a la normalidad.
CONGELADOR
(Figura 1)
La conservació n de todas las comidas congeladas queda garantizda en cualquiera de los compartimentos del congelador.
Algunos productos incluyen una secció n
en la parte superior,(véase la guía rá pida).
MODELO CON SÚ PER OPCIÓ N
Coloque los alimentos que desea congelar en el cajó n
, gire el regulador del termostato hasta la posició n SUPER (al má ximo), y la luz
naranja se encenderá (véase fi gura 1). Al cabo de 24 horas, el congelado habrá terminado. A continuació n, reinicie el termostato en la posició n
2-3. La funció n SÚ PER quedará desactivada automá ticamente del panel de circuito al cabo de 26 horas. La placa indicadora muestra la cantidad
má xima de comida que puede ser congelada, (véase fi gura 3).
MODELO DE BASE
Coloque los alimentos que desea congelar en el cajó n
, la congelació n queda asegurada independientemente de la posició n de la rueda
(véase fi gura 2). Al inicio del proceso de congelació n, para evitar que el compartimento del congelador esté excesivamente frío, puede que necesite
girar la rueda del termostato, retrocendiéndola en uno o dos niveles, en funció n de la carga y de la temperatura de la habitació n. Una vez que se
complete el proceso de congelació n, gire la rueda del termostato hasta alcanzar su valor habitual.
NOTA: para mejorar la circulació n del aire, intente dejar siempre un espacio entre las comidas e impida que éstas bloqueen las salidas
de aire del congelador.
DESCONGELACIÓN
(Figura 3)
Un pequeñ o goteo de agua en la parte interna del compartimento del frigorífi co mientras
esté funcionando es totalmente normal.
Asegú rese de mantener siempre limpio el desagüe. Asegú rese de que las comidas no
tocan la parte trasera del compartimento del congelador.
El compartimento del congelador no exige ningú n proceso de descongelació n ya que
el presente producto se encuentra equipado con un sistema automá tico que evita la
formació n de hielo (sin hielo)
Importante: Si la temperatura de la habitación es muy alta, el aparato seguirá funcionando pero una capa de hielo se
formará en la parte trasera del compartimento del frigorífi co. En este caso, gire el interruptor para alcanzar temperaturas
inferiores (1-2).
MODELO DE BASE Gire la rueda para encender el aparato y fi jar la temperatura del compartimento del congelador y del frigorífi co. Le
recomendamos que fi je la temperatura al nivel 2 o 3. Gire la rueda hasta “0” para apagar el aparato.
Importante: Algunos aparatos no empiezan a funcionar hasta 6 minutos
después de ser conectados a la red eléctrica, una vez que han alcanzado
la temperatura.
NOTA: Esta es la placa indicadora Si necesita contactar con nuestro servicio de
atenció n al cliente en caso de fallos o defectos, no olvide indicarle la informació n
contenida en dicha placa.
La luz verde “ON“ (Encendido) indica que la unidad está
funcionando. Esta luz es independiente de la posició n de la
rueda, salvo en el caso de que ésta se encuentre fi jada en
la posició n 0.
(Figura 2)
La luz verde “ON“ (Encendido) indica que la unidad está
funcionando. Esta luz es independiente de la posició n de la
rueda, salvo en el caso de que ésta se encuentre fi jada en
la posició n 0.
Page 13

13 ES
Coloque el aparato en el suelo, respetando un
ángulo de 45°, ya que deberá trabajar sobre la
parte inferior del aparato.
Saque la bisagra del lado inferior derecho
desajustando los tornillos, la clavija y la arandelas.
A continuación, saque la puerta inferior.
Marque y perfore la ranura de la parte izquierda
del panel, situada en la zona de inserción.
Ajuste la bisagra del lado superior izquierdo que
se encuentra en su kit de accesorios.
Ajuste la caja de mandos y refuerce todo el
conjunto con ayuda de los tornillos y las tapas.
Para invertir el sentido de las asas: quite las
tapas exteriores situadas el la parte derecha de
las puertas.
Coloque las puertas y las bisagras instaladas de
arriba a abajo indicadas por los números
Desajuste las asas situadas en la parte izquierda
y colóquelas en la parte derecha. A continuación,
coloque las tapas externas en la parte izquierda
de las puertas.
Saque el plinto inferior, quitando las 3 tapas de
protección y desajustando los tornillos.
Quite las tapas (A) y (B), ajustadas por los
tornillos y saque una parte de la caja de mandos.
Desapriete la bisagra derecha.
Taladre el plinto en el lado izquierdo indicado.
Ponga el aparato en posición vertical y espere
dos horas antes de encenderlo.
2 horas
Para invertir el sentido de apertura de las puertas, siga las siguientes instrucciones en función del tipo de orifi cio y de bisagra que contenga su producto.
INVERTIR EL SENTIDO DE APERTURA DE LAS PUERTAS
Page 14

14 PT
1
2
3
4
5
COMBINADO TOTAL NO FROST
PAINEL DE CONTROLO
Abra a porta superior do frigorífi co para aceder ao painel de controlo.
MODELO COM OPÇ Ã O SUPER Carregue no botã o para ligar o aparelho e programe a temperatura do congelador e do frigorífi co. Recomendamos
que regule a temperatura para 2 ou 3. Rode o botã o para “0” para desligar o aparelho.
A luz laranja acende-se quando o botã o do termóstato está
programado para SUPER. Neste caso, o compressor continua
a funcionar normalmente.
CONGELAÇ Ã O
(Figura 1)
A conservaç ã o dos alimentos congelados é garantida em todos os compartimentos do congelador.
Em alguns produtos, está disponível uma secç ã o
na parte superior (consulte o guia rápido).
MODELO COM OPÇ Ã O SUPER
Coloque os alimentos que pretende congelar na gaveta
, rode o termóstato no sentido dos ponteiros do relógio para a posiç ã o SUPER,
acendendo-se a luz laranja (ver fi gura 1). Após 24 horas, a congelaç ã o está concluída. Em seguida, coloque de novo o termóstato na posiç ã o 2-3.
A funç ã o SUPER é desactivada automaticamente da placa do circuito passadas 26 horas. A placa de identifi caç ã o indica a quantidade máxima de
alimentos que podem ser congelados, (ver fi gura 3).
MODELO DE BASE
Coloque os alimentos a congelar na gaveta
, a congelaç ã o é garantida em qualquer posiç ã o do botã o (ver fi gura 2).
No início do processo de congelaç ã o, para que o compartimento do frigorífi co nã o fi que excessivamente frio, pode ser necessário rodar o botã o do
termóstato para trás aproximadamente 1/2 número, de acordo com a carga e a temperatura ambiente. Q uando o processo de congelaç ã o estiver
concluído, programe o botã o do termóstato para o valor normal.
Obs.: Para uma melhor circulaç ã o do ar, deix e algum espaç o entre os alimentos e evite o bloqueio das saídas do ar de arrefecimento.
DESCONGELAÇ Ã O
(Figura 3)
A presenç a de uma camada fi na de gelo ou de gotas de água na parte posterior do
frigorífi co durante o funcionamento é normal
É importante manter a conduta de á gua sempre limpa. Evite guardar os alimentos
encostados à s partes posterior ou lateral do compartimento do frigorífi co
O compartimento do congelador nã o tem de ser descongelado, porque este produto está
equipado com um sistema automático que impede a formaç ã o de gelo (sem gelo)
Importante: se a temperatura ambiente estiver muito quente, o aparelho pode continuar a funcionar de forma contínua
e irá formar-se uma camada de gelo na parte posterior do frigorífi co. Neste caso, rode o botão para programações mais
baixas (1-2).
MODELO DE BASE Carregue no botã o para ligar o aparelho e programe a temperatura do congelador e do frigorífi co. Recomendamos que
programe a temperatura para 2 ou 3. Rode o botã o para “0” para desligar o aparelho.
Importante: alguns aparelhos começ am a funcionar pelo menos 6 minutos
depois de a fi cha ter sido ligada à tomada de alimentaç ã o e depois de
regulada a temperatura.
Obs.: Esta é a placa de identifi caç ã o. Se necessitar de entrar em contacto com a
Assistê ncia técnica em caso de avaria, deve fornecer-lhes a informaç ã o indicada
na placa.
O indicador luminoso “ON“ (Ligado) verde indica que o aparelho
está a funci ona r. Es te indica dor luminoso está ligado,
independentemente da programaç ã o do botã o, excepto quando
o botã o está programado para 0.
(Figura 2)
O indic ador lum inoso “ON“ (Ligado) ver de indic a que o
aparelho está a funcionar. Este indicador luminoso está ligado,
independentemente da programaç ã o do botã o, excepto quando
o botã o está programado para 0.
Page 15

15 PT
Deite ou incline o frigorífico a 45°, para facilitar
as operaçőes na parte inferior do mesmo.
Para retirar o fecho interior da direita, retire os
parafusos, a cavilha e as anilhas e, em seguida,
remova a porta inferior.
Faça uma incisăo e parta a aba da esquerda do
painel na zona marcada.
No saquinho dos acessórios fornecidos, procure
o fecho superior da esquerda.
Coloque novamente o painel, fixando-o com os
parafusos e coloque as tampas.
Para inverter os puxadores: retire as tampas de
protecçăo do lado direito das portas.
Monte outra vez os fechos e as portas de baixo
para cima,
Desaperte os puxadores do lado esquerdo e
desloque-os para o lado direito e, em seguida,
no lado esquerdo das portas, coloque as tampas
anteriormente retiradas.
Remova o rodapé, puxando as 3 tampas de
protecçăo e desapertando os parafusos.
Retire as tampas (A) e (B), desaperte os
parafusos e remova parcialmente o painel.
Desaparafuse o fecho da direita.
Perfure o rodapé na zona marcada à esquerda.
Coloque o equipamento na vertical, aguarde
duas horas e depois ligue-o.
2 horas
Para inverter a abertura das portas, siga as indicações relacionadas com o tipo de dobradiça e fecho incluídos no seu produto.
INVERTER A ABERTURA DAS PORTAS
Page 16

16 EL
1
2
3
4
5
ΨΥΓΕΙΟΚΑΤΑΨΥΚΤΗΣ ΜΕ ΑΥΤΟΜΑΤΗ ΑΠΟΨΥΞΗ
ΠΙΝΑΚΑΣ ΕΛΕΓΧΟΥ
Για να αποκτήσετε πρόσβαση στον πίνακα ελέγχου ανοίξτε την πάνω πόρτα του ψυγείου.
ΜΟΝΤΕΛΟ ΜΕ ΔΥΝΑΤΟΤΗΤΑ SUPER Γυρίστε το κουμπί για να ενεργοποιήσετε τη συσκευή και να ρυθμίσετε τη θερμοκρασία των χώρων κατάψυξησ
και συντήρησησ. Συνιστούμε να ρυθμίσετε τη θερμοκρασία στη θέση 2 ή 3. Για να απενεργοποιήσετε τη συσκευή γυρίστε το κουμπί στη θέση “0”.
Το πορτοκαλί φωτάκι ανάβει όταν γυρίσετε το κουμπί του
θερμοστάτη στη θέση SUPER (Έντονη ψύξη). Σ' αυτήν την
περίπτωση ο συμπιεστήσ εξακολουθεί να λειτουργεί κανονικά.
ΚΑΤΑΨΥΞΗ
(Εικόνα 1)
Η διατήρηση των κατεψυγμένων τροφίμων είναι εγγυημένη σε όλα τα διαμερίσματα του καταψύκτη.
Σε ορισμένα προϊόντα υπάρχει τμήμα
στο επάνω μέροσ (βλέπε γρήγορο οδηγό).
ΜΟΝΤΕΛΟ ΜΕ ΔΥΝΑΤΟΤΗΤΑ SUPER
Τοποθετήστε τα τρόφιμα που θέλετε να παγώσουν στο συρτάρι
, γυρίστε το θερμοστάτη δεξιόστροφα στη θέση SUPER και θα ανάψει το
πορτοκαλί φωτάκι (δείτε την εικόνα 1). Μετά από 24 ώρεσ, έχει ολοκληρωθεί το πάγωμα. Επομένωσ, τοποθετήστε πάλι το θερμοστάτη στη θέση 2-3.
Η λειτουργία SUPER θα απενεργοποιηθεί αυτόματα από το κύκλωμα ελέγχου μετά από 26 ώρεσ. Η πινακίδα στοιχείων δείχνει τη μέγιστη ποσότητα
τροφίμων που μπορούν να καταψυχθούν (δείτε την εικόνα 3).
ΒΑΣΙΚΟ ΜΟΝΤΕΛΟ
Τοποθετήστε τα τρόφιμα που θέλετε να καταψυχθούν στο συρτάρι
. Η κατάψυξη είναι εγγυημένη για κάθε θέση του κουμπιού (δείτε την εικόνα
2). Στην αρχή τησ διαδικασίασ κατάψυξησ, για να μην κρυώσει υπερβολικά ο χώροσ τησ συντήρησησ, ίσωσ να χρειαστεί να γυρίσετε πίσω το κουμπί
του θερμοστάτη κατά 1/2 αριθμό, ανάλογα με το φορτίο και τη θερμοκρασία του περιβάλλοντοσ χώρου. Όταν η διαδικασία παγώματοσ ολοκληρωθεί,
γυρίστε το κουμπί του θερμοστάτη πάλι στη συνηθισμένη τιμή.
ΣΗΜΕΙΩΣΗ: Για καλύτερη κυκλοφορία του αέρα, αφήστε λίγο χώρο ανάμεσα στα τρόφιμα και αποφεύγετε να φράζετε τισ εξόδουσ του
αέρα ψύξησ.
ΚΑΤΑΨΥΞΗ
(Εικόνα 3)
Μια μικρή ποσότητα πάχνησ ή σταγόνεσ νερού στο πίσω μέροσ του χώ ρου τησ
συντήρησησ είναι κανονικό φαινόμενο όταν λειτουργεί το ψυγείο.
Να βεβαιώνεστε ότι τα τρόφιμα δεν αγγίζουν την πίσω πλευρά ή τα πλαϊνά του χώρου
τησ συντήρησησ
Ο χώροσ κατάψυξησ δεν απαιτεί απόψυξη επειδή το προϊόν αυτό διαθέτει αυτόματο
σύστημα που εμποδίζει το σχηματισμό πάγου (frost free)
Σημαντική παρατήρηση: Εάν η θερμοκρασία του περιβάλλοντοσ χώ ρου είναι πολύ υψηλή, η συσκευή ενδεχομένωσ να
λειτουργεί συνεχώ σ και να σχηματιστεί στοιβάδα πάχνησ στο πίσω μέροσ του χώρου τησ συντήρησησ. Σ' αυτήν την
περίπτωση γυρίστε το κουμπί σε κάποια χαμηλότερη ρύθμιση (1-2).
ΒΑΣΙΚΟ ΜΟΝΤΕΛΟ Γυρίστε το κουμπί για να ενεργοποιήσετε τη συσκευή και να ρυθμίσετε τη θερμοκρασία των χώρων κατάψυξησ και συντήρησησ.
Συνιστούμε να ρυθμίσετε τη θερμοκρασία στη θέση 2 ή 3. Για να απενεργοποιήσετε τη συσκευή γυρίστε το κουμπί στη θέση “0”.
Σημαντική παρατήρηση: Ορισμένεσ συσκευέσ θα αρχίσουν να λειτουργούν
τουλάχιστον 6 λεπτά αφού συνδέστε τη συσκευή στην πρίζα και έχει
ρυθμιστεί η θερμοκρασία.
ΣΗΜΕΙΩΣΗ: Αυτή είναι η πινακίδα στοιχείων. Εάν χρειάζεται να απευθυνθείτε
στο Τμήμα μασ Τεχνικήσ Εξυπηρέτησησ σε περίπτωση κάποιου προβλήματοσ,
θυμηθείτε να αναφέρετε τισ πληροφορίεσ που περιλαμβάνει αυτή η πινακίδα.
Το πράσινο φωτάκι “ON“ δείχνει ότι η μονάδα λειτουργεί. Αυτό το
φωτάκι είναι αναμμένο ανεξάρτητα από τη ρύθμιση, εκτόσ αν το
κουμπί γυριστεί στη θέση "0".
(Εικόνα 2)
Το πράσινο φωτάκι “ON“ δείχνει ότι η μονάδα λειτουργεί. Αυτό το
φωτάκι είναι αναμμένο ανεξάρτητα από τη ρύθμιση του κουμπιού,
εκτόσ αν το κουμπί γυριστεί στη θέση "0".
Page 17

17 EL
Για να αντιστρέψετε τη φορά που ανοίγουν οι πόρτεσ, ακολουθείστε τισ ενδείξεισ σχετικά με τον τύπο ποδιάσ και μεντεσέ που παρέχονται με τη συσκευή.
ΑΝΤΙΣΤΡΟΦΗ ΤΗΣ ΦΟΡΑΣ ΠΟΥ ΑΝΟΙΓΟΥΝ ΟΙ ΠΟΡΤΕΣ
Τοποθετήστε τη συσκευή στο δάπεδο ή σε γωνία 45°,
όπωσ χρειάζεται για να εργαστείτε στο κάτω μέροσ τησ
συσκευήσ.
Αφαιρέστε τον κάτω δεξιό μεντεσέ ξεβιδώνοντασ τισ βίδεσ,
αφαιρέστε τον πείρο και τισ ροδέλεσ και κατόπιν αφαιρέστε
την κάτω πόρτα.
Αφαιρέστε τισ βίδεσ από τον κεντρικό μεντεσέ και κατόπιν
αφαιρέστε την επάνω πόρτα.
Ξεβιδώστε το μεντεσέ από την πόρτα του ψυγείου
και τοποθετήστε στην άλλη πλευρά αυτόν που σασ
έχει παραδοθεί.
Αφαιρέστε τα καπάκια (Α) και (Β), ξεβιδώστε τισ βίδεσ και
αφαιρέστε μερικώσ τον πίνακα.
Ξεβιδώστε το δεξιό μεντεσέ.
Σημειώστε και σπάστε την αριστερή υποδοχή στον
πίνακα, στην περιοχή τησ ποδιάσ.
Από τα παρεχόμενα αξεσουάρ, πάρτε και συνδέστε τον
επάνω αριστερά μεντεσέ.
Προσαρμόστε τον πίνακα, στερεώστε τον με τισ βίδεσ και
τοποθετήστε τα καπάκια τουσ.
Τοποθετήστε πάλι τουσ μεντεσέδεσ και τισ πόρτεσ, από
το κάτω μέροσ προσ το επάνω.
Για να αντιστρέψετε τισ λαβέσ: αφαιρέστε τα
εξωτερικά καπάκια από την δεξιά πλευρά τησ κάθε πόρτασ.
Ξεβιδώστε τισ λαβέσ από την αριστερή πλευρά, τοποθετήστε
τισ στη δεξιά πλευρά, και στη συνέχεια τοποθετήστε τα
καπάκια στην αριστερή πλευρά τησ κάθε πόρτασ.
Τοποθετήστε τη συσκευή σε όρθια θέση και περιμένετε
δύο ώρεσ πριν την ενεργοποιήσετε.
2 ώρεσ
Page 18

18 PL
1
2
3
4
5
LODÓWKI KOMBI NO FROST I FROST FREE
PANEL STEROWANIA
Panel sterowania znajduje się za górnymi drzwiczkami lodówki.
MODEL Z OPCJ Ą SUPER Obracają c pokrętło, włą cz urzą dzenie i ustaw temperaturę zamraż arki i chłodziarki. Zalecamy ustawienie pokrętła
na pozycji 2 lub 3. Aby wyłą czyć urzą dzenie, porkętło należ y obrócić w pozycję 0.
Kiedy pokrętło termostatu jest ustawione w pozycji SUPER,
ś wieci się pomarań czowa kontrolka. Przy takim ustawieniu
spręż arka kontynuuje zwykłą pracę.
ZAMRAŻ ANIE
(rysunek 1)
Produkty mroż one zachowują trwałoś ć po umieszczeniu w dowolnej częś ci zamraż arki.
Dla niektórych produktów przeznaczone jest miejsce oznaczone symbolem
w górnej częś ci zamraż arki (patrz krótka instrukcja).
MODEL Z OPCJ Ą SUPER
W celu zamroż enia produktów umieś ć je w szufl adzie
, a następnie ustaw pokrętło termostatu w pozycji SUPER. Zaś wieci się pomarań czowa
kontrolka (rysunek 1). Produkt jest zamroż ony po 24 godzinach. Ustawić termostat na pozycji 2-3. Funkcja SUPER zostaje automatycznie wyłą czona po
upłynięciu 26 godzin. Na tabliczce znamionowej umieszczono informację o maksymalnej iloś ci produktów, jaką moż na zamrozić (patrz rysunek 3).
MODEL PODSTAWOWY
W celu zamroż enia produktów umieś ć je w szufl adzie . Produkty zostają zamroż one bez wzgledu na pozycję pokrętła (patrz rys. 2).
Na począ tku procesu zamraż ania, w celu uniknięcia nadmiernego obniż enia temperatury w lodówce, moż e być konieczne ustawienie termostatu
o 1/2 pozycji niż ej, odpowiednio do zawartoś ci lodówki i temperatury pokojowej. Po zakoń czeniu procesu zamraż ania moż na ustawić termostat
w zwykłej pozycji.
Uwaga. Dla zapewnienia lepszej cyrkulacji powietrza mię dzy poszczególnymi produktami należ y pozostawić nieco miejsca. Nie należ y
takż e blokować wlotów i wylotów powietrza.
ROZMRAŻ ANIE
(rysunek 3)
Niewielka iloś ć lodu lub wody w tylnej częś ci lodówki podczas jej pracy jest zjawiskiem
normalnym.
Należy dbać o to, aby odpływ wody był zawsze czysty. Produkty nie powinny dotykać
tylnej ani bocznych ścianek lodówki.
Zamraż arka nie wymaga odmraż ania; produkt jest wyposaż ony w automatyczny system
zapobiegają cy formowaniu się lodu.
Ważne: W wysokiej temperaturze otoczenia urządzenie może działać bez przerwy, a w tylnej części zamrażarki może
odkładać się warstwa lodu. W takim przypadku pokrętło należy ustawić na niższą wartość (1-2).
MODEL PODSTAWOWY Obracają c pokrętło, włą cz urzą dzenie i ustaw temperaturę zamraż arki i chłodziarki. Zalecamy ustawienie pokrętła na
pozycji 2 lub 3. Aby wyłą czyć urzą dzenie, porkętło należ y obrócić w pozycję 0.
Waż ne: Niektóre urzą dzenia zaczynają działać dopiero po upłynię ciu
przynajmniej 6 minut od włoż enia wtyczki do gniazda zasilania i ustawienia
temperatury.
Uwaga. Tabliczka znamionowa. W razie problemów, kiedy zachodzi koniecznoś ć
skontaktowania się z serwisem, należ y podać informacje umieszczone na tej
tabliczce.
O tym, ż e urzą dzenie działa, ś wiadczy zielona kontrolka ON.
Kontrolka ta ś wieci się bez względu na ustawienie pokrętła,
za wyją tkiem ustawienia w pozycji 0.
(rysunek 2)
O tym, ż e urzą dzenie działa, ś wiadczy zielona kontrolka ON.
Kontrolka ta ś wieci się bez względu na ustawienie pokrętła,
za wyją tkiem ustawienia w pozycji 0.
Page 19

19 PL
Przechylić urządzenie pod kątem ok. 45°, tak aby
uzyskać dostęp do dolnej części urządzenia.
Zdjąć prawy dolny zawias, odkręcając wkręty,
wyjmując bolec mocujący i zdejmując podkładki.
Następnie zdjąć dolne drzwi.
Naciąć i wyłamać otwór w zaznaczonym miejscu
po lewej stronie.
Z woreczka z akcesoriami wyjąć i zamocować
lewy zawias.
Zamocować listwę, dokręcić wkręty i założyć
zatyczki.
Przekładanie uchwytów: usunąć zatyczki
z prawej strony drzwi.
Ponownie założyć zawiasy i drzwi, idąc od dołu
ku górze:
Odkręcić uchwyty z lewej strony drzwi i przełożyć
je na prawą. Następnie założyć zatyczki z lewej
strony drzwi.
Zdjąć dolny cokół, wyciągając trzy bolce
mocujące i odkręcając wkręty.
Usunąć zatyczki (A) i (B), odkręcić wkręty
i częściowo wyciągnąć listwę.
Odkręcić prawy zawias.
W ywiercić otwór w cokole, w oznaczonym
miejscu po lewej stronie.
Ustaw urządzenie w pozycji pionowej. Przed
włączeniem odczekaj dwie godziny.
2 godziny
W celu odwrócenia kierunku otwierania drzwi należy postępować zgodnie ze wskazówkami odpowiednimi dla danego urządzenia oraz z uwzględnieniem specyfi cznych
zawiasów tego urządzenia.
ODWRACANIE KIERUNKU OTWIERANIA DRZWI
Page 20

20 CZ
1
2
3
4
5
KOMBINOVÁ CHLADNIČKA FROST FREE
OVLÁDACÍ KONTROLNÍ PANEL
Pro přístup k ovládacímu panelu otevřete horní dveře chladničky.
MODEL S FUNKCÍ SUPER. Pro zapnutí spotřebiče otočte ovladačem termostatu a nastavte teplotu mrazničky i chladničky. Doporučujeme, abyste
teplotu nastavili na polohu 2 nebo 3. Pro vypnutí spotřebiče otočte ovladačem termostatu do polohy “0”.
Oranž ové svě tlo se rozsvítí, pokud je ovladač termostatu
přepnut na SUPER. V tomto případě pokračuje kompresor
v normálním provozu.
ZMRAZOVÁNÍ
(Obrázek 1)
Uchovávání zmraž ený ch potravin je zaručeno ve vš ech oddě lení mrazničky.
U ně který ch vý robků je oddě lení v horní části
(viz rychlý prů vodce).
MODEL S FUNKCÍ SUPER
Potraviny pro zmrazení umístě te do zásuvky
, otočte voličem termostatu po smě ru hodinový ch ručiček na polohu SUPER, rozsvítí se oranž ové
svě tlo (viz obrázek 1). Po 24 hodinách je proces zmrazení kompletní. Pokud nastavíte ovladač termostatu do polohy 2-3, funkce SUPER se automaticky
vypne po 26 hodinách. Popisný š títek stanovuje maximální množ ství potravin, které mohou bý t zmrazeny (viz obrázek 3).
ZÁ KLADNÍ MODEL
Potraviny, které chcete zmrazit, vlož te do zásuvky
, zmrazení je zaručeno ve vš ech polohách ovladače termostatu (viz obr. 2).
Abychom mrazící box na začátku mrazení příliš nezchladili, je potřeba otočit ovladač termostatu přibliž ně o 1/2 polohy zpě t, podle obsahu a okolní
teploty. Jakmile je proces zmrazování ukončen, vraťte ovladač termostatu na obvyklou teplotu.
Poznámka: Pro lepš í cirkulaci vzduchu ponechte ně jaký prostor mezi potravinami a vyhně te se zablokování vý stupů chladícího
vzduchu.
ODMRAZOVÁNÍ
(Obrázek 3)
Malé množ ství námrazy nebo kapek vody na zadní stě ně prostoru chladničky je normální,
pokud je chladnička v provozu.
Zajistěte, aby tento odvod vody byl vždy čistý. Ujistěte se, že se potraviny nedotýkají
zadní stěny nebo stran oddělení chladničky.
Mrazící box nevyž aduje odmrazování, protož e tento vý robek je vybaven automatický m
systémem, který zabraň uje vytváření ledu (frost free).
Důležité: Pokud je teplota v místnosti velmi vysoká, může spotřebič pracovat nepřetržitě a vrstva námrazy se bude ukládat
na zadní straně prostoru chladničky. V takovém případě nastavte ovladač na nižší nastavení (1-2).
ZÁ KLADNÍ MODEL. Otočte ovladačem termostatu pro zapnutí spotřebiče a nastavte teplotu mrazničky i chladničky. Doporučujeme, abyste
teplotu nastavili na polohu 2 nebo 3. Pro vypnutí spotřebiče otočte ovladačem termostatu do polohy “0”.
Dů lež ité: Ně které spotřebič e budou uvedeny do chodu minimálně 6 minut po
zapojení zástrč ky do zásuvky napájení elektrické sítě a nastavení teploty.
Poznámka. Toto je popisný š títek. Potřebujete-li kontaktovat servisní středisko
v případě závad, nezapomeň te jim poskytnout informaci z tohoto š títku.
Zelená kontrolka “ON“ svítí, když je spotřebič v provozu. Toto
svě tlo svítí bez ohledu na nastavení ovladače, vý jimkou je
nastavení ovladače do polohy 0.
(Obrázek 2)
Zelená kontrolka “ON“ svítí, když je spotřebič v provozu. Toto
svě tlo svítí bez ohledu na nastavení ovladače termostatu,
vý jimkou je případ, kdy je ovladač nastavený na polohu 0.
Page 21

21 CZ
Spotřebič umístěte na podlahu nebo do úhlu 45°,
protože bude nezbytné pracovat na spodní části
spotřebiče.
Sejměte spodní pravý závěs odstraněním šroubů,
kolíku a podložek, poté sejměte dolní dveře.
Označte a vylomte levý otvor v panelu, v části
výplně.
Přetočte horní levý závěs, který je součástí sady
s příslušenstvím.
Nasaďte desku a zajistěte šrouby a západkami.
Obrácení rukojetí: odstraňte vnější západky
z pravé strany dveří.
Znovu nasaďte závěsy a dveře postupujíc zdola
nahoru,
Odšroubujte rukojeti z levé strany a přesuňte je
na pravou stranu, poté dejte vnější západky na
levou stranu dveří.
Odstraňte spodní lištu, vytáhněte 3 ochranné
západky a uvolněte šrouby.
Odstraňte západky (A) a (B), uvolněte šrouby a
částečně sejměte panel.
Odšroubujte pravý závěs.
Provrtejte lištu ve vyznačené části na levé straně.
Postavte spotřebič do svislé polohy a dvě hodiny
počkejte, než ho zapnete.
2 hodiny
Pro změnu směru otevírání dveří postupujte podle označení v závislosti na typu závěsů a výplně, kterými je vybaven váš výrobek.
ZMĚNA SMĚRU OTEVÍRÁNÍ DVEŘÍ
Page 22

22 NL
1
2
3
4
5
COMBINATIE VORSTVRIJ
BEDIENINGSPANEEL
Open de bovenste deur van de koelkast om toegang tot het bedieningspaneel te krijgen.
MODEL MET SUPEROPTIE Draai aan de knop om het apparaat in te schakelen en de temperatuur van het diepvriescompartiment en de koelkast
in te stellen. Wij adviseren om de temperatuur op 2 of 3 in te stellen. Draai de knop op de stand “0” om het apparaat uit te schakelen.
Het oranje lampje licht op als de thermostaatknop op
SUPER staat ingesteld. In dat geval zal de compressor
doorgaan met de normale werking.
VRIEZEN
(Figuur 1)
Het preserveren van voedingsmiddelen is in alle compartimenten van de diepvriezer gegarandeerd
Bij een aantal producten is er in het bovenste deel een gedeelte
, (zie de Snelstartgids).
MODEL MET SUPEROPTIE
Plaats de in te vriezen voedingsmiddelen in de lade
, draai de thermostaat naar rechts, op de stand SUPER, waarna het oranje lampje oplicht
(zie Figuur 1). Na 24 uur is het diepvriezen voltooid Daarom dient de thermostaat vervolgens op stand 2-3 ingesteld te worden. De SUPER-functie
wordt na 26 uur automatisch door het systeem uitgeschakeld. Het typeplaatje geeft aan welke hoeveelheid voedingsmiddelen maximaal ingevroren
kunnen worden (zie Figuur 3).
BASISMODEL
Plaats de in te vriezen voedingsmiddelen in de lade
, het diepvriezen wordt op elke willekeurige stand gegarandeerd (zie Figuur 2).
Bij het begin van het diepvriesproces en om te voorkomen dat het diepvriescompartiment uiterst koud wordt, kan het noodzakelijk zijn om de
thermostaatknop 1 à 2 standen lager in te stellen. Dit is afhankelijk van de belading en de kamertemperatuur. Zodra het diepvriesproces is voltooid
dient de thermostaatknop op de normale waarde ingesteld te worden.
N.B. Voor een betere luchtcirculatie is het beter om wat ruimte tussen de voedingsmiddelen te bewaren en te voorkomen dat de openingen
voor de luchtkoeling worden geblokkeerd.
ONTDOOIEN
(Figuur 3)
Een klei ne hoeveel heid vor st of drupp els wate r aan de ach te r kant van het
diepvriescompartiment is normaal als de diepvriezer in werking is.l
Controleer of de waterafvoer altijd schoon is. Controleer of de voedingsmiddelen de
achterkant of zijkanten van het diepvriescompartiment niet aanraken.
Het diepvriescompartiment hoeft niet ontdooid te worden omdat het apparaat is voorzien
van een automatisch systeem dat ijsvorming voorkomt (vorstvrij)
Belangrijk: Als de kamertemperatuur relatief hoog is kan het zijn dat het apparaat voortdurend werkt en er ijsafzetting op
de achterkant van het koelkastcompartiment gevormd zal worden.Als dit zo is dient de knop op een lagere stand ingesteld
te worden (1-2).
BASISMODEL Draai aan de knop om het apparaat in te schakelen en de temperatuur van het diepvriescompartiment en de koelkast in te stellen.
Wij adviseren om de temperatuur op 2 of 3 in te stellen. Draai de knop op de stand “0” om het apparaat uit te schakelen.
Een aantal apparaten zullen tenminste 6 minuten nadat de stekker in het
stopcontact is gestoken en de temperatuur werd ingesteld, in werking
worden gesteld.
N.B. Dit is het typeplaatje. Als u in geval van storingen contact van met onze
Serviceafdeling opneemt, dient u de gegevens van het typeplaatje altijd op te
geven.
Het groene lampj e “AAN “ geeft aan dat het apparaat
ingeschakeld is. Dit lampje licht op, ondanks de knopinstelling,
tenzij de knop op 0 is ingesteld.
(Figuur 2)
Het groene lampj e “AAN “ geeft aan dat het apparaat
ingeschakeld is. Dit lampje licht op, ondanks de knopinstelling,
tenzij de knop op 0 is ingesteld.
Page 23

23 NL
Leg het apparaat plat op de grond of houd hem
onder een hoek van 45°, om de handeli ngen aan
de onderkant makkelijker te kunnen uitvoeren.
Verwijder het scharnier rechtsonder door de
schroeven, de pen en de ringen los te draaien en
verwijder vervolgens de onderste deur.
Snij het linkeroog van het paneel bij de
markering door en breek hem.
Bevestig het scharnier linksboven (bevindt zich in
de set met accessoires).
Monteer het paneel door hem vast te zetten met
de schroeven en de dopjes.
Voor het verplaatsen van de handvatten: verwijder
de dopjes aan de rechterkant van de deuren.
Monteer opnieuw de scharnieren en deuren door
van beneden naar boven te werken,
Draai de handvatten aan de linkerkant los,
verplaats ze naar de rechterkant en zet vervolgens
de dopjes op de linkerkant van de deuren.
Verwijder de onderrand door de drie
beschermingsdopjes eruit te wippen en de
bijbehorende schroeven los te draaien.
Verwijder de doppen (A) en (B), draai de
schroeven los en verwijder het paneel
gedeeltelijk.
Draai het rechterscharnier los.
Maak een gat in de onderrand bij de markering
aan de linkerkant.
Zet het apparaat rechtop en wacht twee uur
voordat u het weer inschakelt.
2 uur
Om de deuren op een andere manier te openen, volgt u de instructies die zijn gegeven met betrekking tot het type hang- en sluitwerk waarvan uw product werd gemaakt.
HET WIJZIGEN VAN DE MANIER WAAROP DE DEUREN OPENEN
Page 24

24 FI
1
2
3
4
5
HUURTUMATON YHDISTELMÄ
OHJAUSPANEELI
Avaa jääkaapin yläovi, jotta pääset käsiksi ohjauspaneeliin.
MALLI, JOSSA SUPER-VAIHTOEHTO Käännä valitsinta käynnistääksesi koneen ja asettaaksesi pakastimen ja jääkaapin lämpötilan. Suosittelemme,
että asetat lämpötilaksi 2 tai 3. Käännä nuppi kohtaa “0”, kun haluat sammuttaa laitteen.
Oranssi valo syttyy, kun termostaatin valitsin on käännetty
asentoon SUPER. Kun valitsin on tässä asennossa,
kompressori jatkaa toimintaansa normaalisti.
PAKASTAMINEN
(Kuva 1)
Jäädytettyjen elintarvikkeiden säilyttäminen taataan pakastimen kaikissa osissa.
Joidenkin tuotteiden yläosassa on erityinen osasto
(katso pikaopas).
MALLI, JOSSA SUPER-VAIHTOENTO
Aseta jäädytettävät elintarvikkeet lokeroon
, käännä termostaatti myötäpäivään SUPER-asentoon ja oranssi valo syttyy (katso kuva 1).
24 tunnin jälkeen jäätyminen on valmis. Aseta sitten termostaatti asentoon 2-3. SUPER-toiminto otetaan automaattisesti pois päältä 26 tunnin jälkeen.
Arvokilvessä ilmoitetaan jäädytettävien elintarvikkeiden enimmäismäärä (katso kuva 3).
PERUSMALLI
Laita jäädytettävät ruuat lokeroon
, jäätyminen tapahtuu nupin asennosta riippumatta (katso kuva 2).
Jotta jääkaappiosasta ei tule liian kylmä pakastuksen alkaessa, voi olla tarpeen kääntää termostaattinuppia taaksepäin noin 1/2 numeroa täyttöasteen
ja huoneen lämpötilan mukaan. Kun pakastus on valmis, palauta termostaattinuppi tavalliseen asentoonsa.
Huom! Jotta ilma kiertäisi jääkaapissa paremmin, jätä elintarvikkeiden väliin tilaa ja vältä jäähdytysilma-aukkojen tukkimista.
SULATTAMINEN
(Kuva 3)
Pieni määrä huurretta tai vesipisaroita jääkaapin takaosassa on normaalia silloin, kun
jääkaappi toimii normaalisti
Varmista, että veden poistoletku on aina puhdas. Varmista, että elintarvikkeet eivät
kosketa jääkaapin takaosaa tai sivuja.
Pakastinosaa ei tarvitse sulattaa, koska tuote on varustettu automaattisella järjestelmällä,
joka estää jään muodostumisen (huurtumaton)
Tärkeää: Jos huoneen lämpötila on erittäin lämmin, laite saattaa käydä koko ajan ja jääkaapin takaosaan muodostuu
huurrekerros. Käännä tässä tapauksessa valitsin alhaisempaan asentoon (1-2).
PERUSMALLI Käännä valitsinta käynnistääksesi koneen ja asettaaksesi pakastimen ja jääkaapin lämpötilan. Suosittelemme, että asetat
lämpötilaksi 2 tai 3. Käännä nuppi kohtaa “0”, kun haluat sammuttaa laitteen.
Tärkeää: Jotkut laitteet käynnistyvät vähintään 6 minuuttia sen jälkeen, kun
pistoke on liitetty sähköverkkoon ja lämpötila on asetettu.
Huom! Arvokilpi on kiinnitetty tähän. Jos sinun tarvitsee ottaa yhteyttä huoltoon
vikatilanteessa, muista ilmoittaa kilven tiedot.
Vihreä PÄ Ä LLÄ -merkkivalo osoittaa, että yksikkö toimii. Tämä
merkkivalo palaa valitsimen asetuksesta riippumatta, paitsi
silloin kun valitsin on asennossa 0.
(Kuva 2)
Vihreä PÄ Ä LLÄ -merkkivalo osoittaa, että yksikkö toimii. Tämä
merkkivalo palaa valitsimen asetuksesta riippumatta, paitsi
silloin kun valitsin on asennossa 0.
Page 25

25 FI
Laita jääkaappi lattialle tai kallista sitä 45°, koska
on tarpeen työskennellä laitteen pohjassa.
Irrota oikeanpuoleinen alasarana poistamalla
ruuvit, tappi ja aluslevyt. Poista alaovi.
Lävistä paneelissa oleva vasemmanpuoleinen
lovi merkin kohdalta.
Ota vasen yläsarana laitteen mukana
toimitettavasta välinepakkauksesta ja aseta se
paikalleen.
Asenna paneeli paikalleen ja kiinnitä se ruuveilla
ja tapeilla.
Kahvojen kätisyyden vaihto: poista tapit ovien
oikealta puolelta.
Asenna saranat ja ovet paikoilleen alhaalta
ylöspäin
Ruuvaa kahvat irti vasemmalta ja siirrä ne
oikealle. Aseta sitten tapit ovien vasemmalle
puolelle.
Irrota jalkalista poistamalla kolme suojatulppaa ja
löysäämällä ruuvit.
Poista tulpat (A) ja (B), kierrä ruuvit auki ja poista
paneeli osittain.
Ruuvaa oikea sarana irti.
Tee jalkalistaan reikä vasemmalla olevan merkin
kohdalle.
Laita laite pystyasentoon ja odota kaksi tuntia
ennen kuin käynnistät sen.
2 ennen
Kun haluat vaihtaa ovien kätisyyden, noudata ohjeita oman tuotteesi ja saranatyypin mukaisesti.
OVIEN KÄTISYYDEN VAIHTAMINEN
Page 26

26 NO
1
2
3
4
5
KOMBINERT FROSTFRI
KONTROLLPANEL
Åpne kjøleskapets øvre dør for å få tilgang til kontrollpanelet.
MODELL MED SUPER-OPSJON Vri på knappen for å slå på apparatet, og still inn temperaturen på fryseren og i kjøleskapet. Vi anbefaler å sette
temperaturen til 2 eller 3. Vri bryteren til "0" for å slå av apparatet.
Det oransje lyset begynner å lyse når termostatknappen
står på SUPER. I dette tilfellet fortsetter kompressoren
som normalt.
DYPFRYSING
(Figur 1)
Frossen mat konserveres garantert i alle fryserens seksjoner.
Noen produkter har en
seksjon i den øvre delen, (se hurtigguide).
MODELL MED SUPER-OPSJON
Plasser matvarene som skal fryses ned i skuffen
, vri termostaten med urviseren til SUPER og det oransje lyset vil begynne å lyse (se fi gur 1).
Etter 24 timer er nedfrysingen fullført. Still da termostaten tilbake til 2-3. SUPER funksjon blir da automatisk deaktivert fra kretskortet etter 26 timer.
Merkeskiltet oppgir den maksimale mengden av matvarer som kan fryses ned, (se fi gur 3).
BASIS MODELL
Plasser matvarene som skal fryses ned i skuffen
, innfrysing er garantert uavhengig av posisjon av knappen (se fi gur 2).
Ved starten av fryseprosessen kan det væ re nødvendig, for å unngå at kjøleskapsdelen ikke blir for kald, å skru termostatknappen tilbake ca.
1/2 posisjon, avhengig av belastning og romtemperatur. Når fryseprosessen er ferdig, skru termostatknappen tilbake til vanlig verdi.
N.B. For bedre luftsirkulasjon, ikke stu matvarene for tett sammen og unngå å dekke til kaldlufttilfø rselen.
AVRIMING
(Figur 3)
Det er normalt med litt rim og vanndråper bakerst i kjøleskapet når det er i drift.
Forsikre deg om at avlø pshullet alltid er rent. Pass på at matvarene ikke kommer i kontakt
med veggene til kjø leskapet.
Fryserdelen krever ikke avising fordi dette produktet er utstyrt med et automatisk system
som forhindrer at det dannes is (frost-fri).
Viktig: Dersom romtemperaturen er veldig høy, vil apparatet sannsynligvis fungere uten stans. Dette kan forårsake at
det danner seg unormalt mye rim på den bakre kjøleskapsveggen. I dette tilfellet sett kjøleskapets termostatknapp på et
lavere nummer (1-2).
BASIS MODELL Vri på knappen for å slå på apparatet, og setill inn temperaturen i fryseren og i kjøleskapet. Vi anbefaler å sette temperaturen
til 2 eller 3. Vri bryteren til "0" for å slå av apparatet.
Viktig: Noen apparater vil begynne å virke minst 6 minutter etter at stø pselet
er satt inn i vegguttaket og temperaturen er stilt inn.
N.B. Dette er merkeskiltet. Hvis du blir nø dt til å kontakte vå r serviceavdeling
i tilfelle feil, oppgi dataene på merkeskiltet.
Det grønne “ON“ lyset viser at apparatet fungerer. Dette
lyset er på uavhengig av knappens stilling, unntatt når
knappen står til 0.
(Figur 2)
Det grønne “ON“ lyset viser at apparatet fungerer. Dette
lyset er på uavhengig av knappens stilling, unntatt når
knappen står til 0.
Page 27

27 NO
Skru av skruene, fjern det nederste høyre
hengselet, stiften og mellomleggsskivene og ta
av den nederste døren.
Skjær ut det venstre hullet i dekselet der du ser
merket.
Fest det øverste venstre hengselet som du finner
i utstyrsposen.
Monter hengslene og dørene nedenfra og
oppover.
For å flytte håndtakene til motsatt side: ta av
pyntehettene på den hřyre siden av dørene.
Monter hengslene og dřrene nedenfra og
oppover,
Skru av håndtakene på venstre side og flytt dem
til høyre side, deretter setter du på pyntehettene
på venstre side av dørene.
Fjern de 3 beskyttelseshettene, løsne skruene
og ta av den nederste sokkelen.
Fjern hettene (A) og (B), skru av skruene og
trekk dekselet delvis av.
Skru av høyre hengsel.
Lag hull i sokkelen der du finner det venstre
merket.
For å gjøre det lettere å komme til nederst på
kjøleskapet kan du legge det ned på gulvet eller
bikke det over 45°.
Sett apparatet rett opp og ned og vent to timer
før du slår det på.
2 slår
For å snu døråpningen, følg instruksjonene i relasjon med innsettingen og hengseltypen for ditt produkt.
SNUING AV DØRÅPNINGEN
Page 28

28 SV
1
2
3
4
5
KOMBINERAT FROSTFRITT
KONTROLLPANEL
Öppna den övre dörren av kylskåpet för att komma åt kontrollpanelen.
MODELL MED TILLVALSFUNKTION SUPER Vrid vredet för att slå på apparaten och ställ in temperaturen för frysutrymmet och kylskåpet.
Vi rekommenderar att ställa temperaturen 2 eller 3. Vrid vredet till “0” för att stänga av apparaten.
Den orange lampan tänds när termostatvredet vrids till
SUPER. I det här fallet fortsätter kompressorn att fungera
som vanligt.
INFRYSNING
(Figur 1)
Förvaringen av frusna matvaror är garanterad i frysens alla utrymmen.
På vissa produkter fi nns det en
avdelning i den övre delen, (se snabbmanual).
MODELL MED TILLVALSFUNKTION SUPER
Placera matvarorna som ska frysas in i lådan
, vrid termostatvredet medurs till läge SUPER, och den orange lampan tänds (se fi gur 1). Efter
24 timmar är infrysningen klar. Återställ därför termostatläget till läge 2-3. SUPER funktionen disaktiveras automatiskt från kretskortet efter 26 timmar.
Den maximala mängden matvaror som kan frysas in fi nns angiven på märkplåten, (se fi gur 3).
BASMODEL
Placera matvarorna som ska frysas in i lådan
, infrysningen är garanterad vid vilken inställning av vredet som helst (se fi gur 2).
Vid start av infrysningen, för att inte göra kylskåptsutrymmet överdrivet kallt, kan det bli nödvändigt att vrida tillbaka termostatvredet med cirka ett
halvt nummer, i överensstämmelse med matvaror som har lagts in och rumstemperatur. När en gång infrysningsprocessen har fullbordats, vrid
tillbaka termostatvredet till det vanliga värdet.
OBS! För en bättre luftcirkulation, lämna något mellanrum mellan matvarorna och undvik att blockera luftkylningsutloppen.
AVFROSTNING
(Figur 3)
Det är normalt att en liten mängd frost eller vattendroppar bildas på baksidan av
kylutrymmet när kylskåpet fungerar.
Säkerställ att vattenutloppet är alltid rent. Se till att matvaror inte vidrö r baksidan eller
sidorna i kylutrymmet.
Frysutrymmet behöver ingen avfrostning eftersom denna apparat är försedd med ett
automatiskt system som förhindrar isbildning (frostfritt)
Viktigt: Om rumstemperaturen är mycket hög, kan apparaten fungera kontinuerligt och ett frostlager avsätter sig då på
baksidan av kylutrymmet. I det här fallet, vrid vredet till en lägre inställning (1-2).
BASMODELL Vrid vredet för att slå på apparaten och ställ in temperaturen för frysutrymmet och kylskåpet. Vi rekommenderar att ställa
temperaturen på 2 eller 3. Vrid vredet till “0” för att stänga av apparaten.
Viktigt: Vissa apparater startar att fungera efter minst 6 minuter efter det att
stickkontakten har satts i vägguttaget och temperaturen har ställts in.
OBS!: Detta är märkplåten. Om du behöver kontakta service för eventuella fel,
kom ihåg att ge dem informationen som fi nns på den här plåten.
Den gröna lampan “ON indikerar att enheten fungerar. Denna
lampa är tänd oavsett vredets inställningar, med undantag av
när vredet ställs på 0.
(Figur 2)
Den gröna lampan “ON indikerar att enheten fungerar. Denna
lampa är tänd oavsett vredets inställningar, med undantag av
när vredet ställs på 0.
Page 29

29 SV
Avlägsna det undre högra gångjärnet genom att
avlägsna skruvarna, stiftet och brickorna,
avlägsna sedan den undre dörren.
Markera och bryt den vänstra springan på
panelen, i inpassningsområdet.
Ta det vänstra gångjärnet från tillbehörspåsen
och sätt det på plats.
Fäst panelen på nytt med skruvarna och
täckpluggarna.
För att kasta om handtagen: ta bort de yttre
täckpluggarna frĺn dörrarnas högra sida.
Montera gångjärnen och dörrarna på nytt
nedifrån och upp,
Skruva loss handtagen från den vänstra sidan och
flytta dem till den högra sidan, placera sedan de yttre
täckpluggarna på den vänstra sidan av dörrarna.
Avlägsna den undre sockeln genom att dra ut de
tre 3 täckpluggarna och skruva loss skruvarna.
Avlägsna täckpluggarna (A) och (B), skruva loss
skruvarna och avlägsna delvis panelen.
Skruva loss det högra gångjärnet.
Borra sockeln i det vänstra markerade området.
Placera apparaten på golvet i en 45° vinkel,
eftersom det är nödvändigt att arbeta på botten
av apparaten.
Ställ apparaten i upprätt läge och vänta två
timmar innan du sätter på den.
2 timmar
För att hänga om dörrarna, följ anvisningarna i förhållande till insats och gångjärnstyp med vilka din apparat är tillverkad.
OMHÄNGNING AV DÖRRAR
Page 30

30 DA
1
2
3
4
5
KOMBINERET FROSTFRI
KONTROLPANEL
Åbn den øverste dør på køleskabet for at få adgang til kontrolpanelet.
MODEL MED SUPERINDSTILLING Drej på knappen for at tænde apparatet og indstille temperaturen i fryseboksen og køleskabet. Vi anbefaler,
at du sætter temperaturen til 2 eller 3. Drej knappen til “0” for at slukke for apparatet.
Det orange lys tændes, når termostatknappen er drejet hen
på SUPER. I dette tilfælde fortsætter kompressoren med at
fungere som normalt.
NEDFRYSNING
(Figur 1)
Bevaring af frosne madvarer garanteres i alle fryserens rum.
I nogle produkter er der et
-rum øverst, (se lynvejledning).
MODEL MED SUPERINDSTILLING
Placer madvarer, der skal nedfryses i skuffen
, drej termostaten med uret til positionen SUPER, og det orange lys tændes (se fi gur 1). Efter
24 timer er nedfrysning fuldført. Derfor skal termostaten sættes tilbage til position 2-3. Funktionen SUPER slås automatisk fra printpladen efter
26 timer. 'Typeskiltet angiver maksimal mængde madvarer, der kan nedfryses, (se fi gur 3).
BASISMODEL
Placer madvarer der skal nedfryses i skuffen
, der garanteres nedfrysning ved alle indstillinger af knappen (se fi gur 2).
Ved beg. af nedfrysningsprocessen kan det være nødvendigt at dreje termostatknappen ca. 1/2 tal tilbage for ikke at fryserummet bliver for koldt,
i forhold til mængden af madvarer og rumtemperaturen. Når først nedfrysningsprocessen er gennemført, skal du sætte termostatknappen til dens
normale værdi.
NB. For bedre luftcirkulation skal du sørge for, at der er lidt luft mellem madvarerne og undgå blokering af luftudtagene.
AFRIMNING
(Figur 3)
En lille smule rim eller vanddråber bagerst i køleskabet, når køleskabet kører, er helt
normalt
Sørg for, at vandafl øbet altid er rent. Sørg for, at madvarer ikke rører bagerst eller på
siderne inde i køleskabet
Det er ikke nødvendigt at afrime fryseren, da dette produkt er udstyret med et automatisk
system, der forhindrer isdannelse (frostfri)
Vigtigt: Hvis rumtemperaturen er meget høj, så kan de ske, at apparatet kører hele tiden, og der vil blive dannet et lag rim
bagerst i køleskabet. I sådanne tilfæ lde skal du dreje på knappen til en lavere indstilling (1-2).
BASISMODEL Drej på knappen for at tænde apparatet og indstille temperaturen i fryseboksen og køleskabet. Vi anbefaler, at du sætter
temperaturen til 2 eller 3. Drej knappen til “0” for at slukke for apparatet.
Vigtigt: Nogle apparater starter først 6 minutter efter stikket er sat i
stikkontakten, og temperaturen er sat.
NB. Dette er typeskiltet. Hvis du får brug for at kontakte serviceafdelingen i tilfæ lde
af fejl, så husk at give dem de oplysninger, der er på skiltet.
Den grønne lampe “TÆ NDT” viser, at enheden kører. Dette
lys er tændt, uanset indstillingen af knappen, bortset fra når
knappen er sat til 0.
(Figur 2)
Den grønne lampe “TÆ NDT” viser, at enheden kører. Dette
lys er tændt, uanset indstillingen af knappen, bortset fra når
knappen er sat til 0.
Page 31
31 DA
Fjern bundhængslet til højre ved at fjerne
skruerne, splitten og skiverne, og fjern derefter
den nederste dør.
Marker og bryd rillen på venstre side i
indsætningsområdet.
Slå let på det øverste venstre hćngsel, som
findes i tilbehørs-sćttet.
Juster panelet, og fastgør det med skruerne og
hætterne.
Sådan vendes håndtagene: fjern pyntepropperne
på højre side af dørene.
Sæt hængslerne og dørene på igen ved at
arbejde fra bunden og opefter,
Sådan vendes håndtag ene: fjern
pyntepropperne på højre side af dørene.
Fjern soklen ved at fjerne de
3 beskyttelsespropper og ved at løsne skruerne.
Fjern hætterne (A) og (B), løsn skruerne, og fjern
panelet delvist.
Skru det højre hængsel af.
Sæt apparatet på gulvet i en 45° vinkel, da det er
nødvendigt at kunne arbejde på bunden af
apparatet.
Sæt apparatet i opretstående position igen, og
vent to timer, før du tænder for det.
2 timer
Bor i soklen på det markerede område på
venstre side.
For at spejlvende døråbningen skal du følge anvisningerne for den type ophæng og hængsel, som dit produkt er udstyret med.
VENDING AF DØRÅBNINGERNE
Page 32

Z STUDIO > 10-2006 – 41022855
Page 33

 Loading...