

Page 1
USER
INSTRUCTIONS
®
Globe manual.indd 1 3/28/2012 3:59:38 PM
Page 2

Congratulations on the purchase of your
new Hoover Globe.
This highly advanced machine - with new
Airvolution technology unique to Hoover makes cleaning easier and more efficient.
Please take the time to read this manual
carefully.
You’ll then be ready to make the most of
the special features only the new Hoover
Globe can offer!
This appliance is double-insulated and must not
be earthed.
The plug is fitted with a 13 amp fuse.
IMPORTANT:The wires in the mains lead are
coloured in accordance with the following
code:
Blue - NEUTRAL
Brown - LIVE
IMPORTANT SAFETY REMINDERS
WARNING!
ELECTRICITY CAN BE
EXTREMELY DANGEROUS
- 2 -
In the unlikely event that any item is missing or you experience any problems with the product
DO NOT TAKE IT BACK TO THE SHOP
Please contact the Hoover customer helpline:
Tel: 08444 995 599
Email: [email protected]
Should any faults occur with your cleaner during the first 12 months, contact the Hoover Customer
Helpline on the number above.
If you are having difficulty in obtaining filters or any other accessories for your cleaner, contact the
Hoover Customer helpline or order online at www.hooverspares.com
User manual - This c leaner should o nly be
used for its inten ded purpose as de scribed in
these instru ctions. Ensure th at these are fully
understood before operating this appliance.
Only use attachments recommended or
supplied by Ho over.
When using cleaning tools, ensure that the
cleaner is kept in th e upright (parked)
position. Thi s will avoid possib le damage to
the carpet or f loor coveri ng. When cleanin g
stairs, DO NOT po sition the cle aner above
you.
STATIC ELECTRICITY. Some carpets ca n
cause a small buil d up of static electrici ty. Any
static discha rge is not hazard ous to health.
DO NOT use your clean er out of doors,
on any wet surfac e or for wet pick up.
Keep hands, feet, lo ose clothing an d hair
away from rotatin g brushes.
DO NOT pick up hard o r sharp object s,
matches, hot ashe s, cigarette en ds or other
similar items.
DO NOT pick up fl ammable liquids su ch as
cleaning fl uids, petrol, etc or t heir vapours.
Aerosol sprays m ay be flammable. DO
NOT spray near cleaner.
SUPPLY CORD. DO NOT run over the
supply cord wh en using your clean er or
remove the plug by pulli ng on the supply
cord.
FAULTS. DO NOT continue to use your
cleaner if it app ears to be faulty. If the su pply
cord is damage d stop using the cle aner
IMMEDIATELY. The supply cord must be
replaced by an authorised Hoover service
engineer to avoid a sa fety hazard.
AFTER USE. S witch the clea ner off and
remove the plug fro m the electri city supply.
Always switch of f and remove the plug before
cleaning the appliance or attempting any
maintenance task.
Safety with ch ildren, elder ly or the infirm:
Do not let childre n play with the appli ance or
its control s. Please super vise the use of the
appliance by older children, the elderly or the
infirm.
HOOVER SERVIC E. To ensure the contin ued
safe and eff icient operat ion of this applian ce
we recommend t hat any servic ing or repairs
are only carr ied out by an author ised Hoover
service engineer.
Globe manual.indd 2 3/28/2012 3:59:38 PM
Page 3
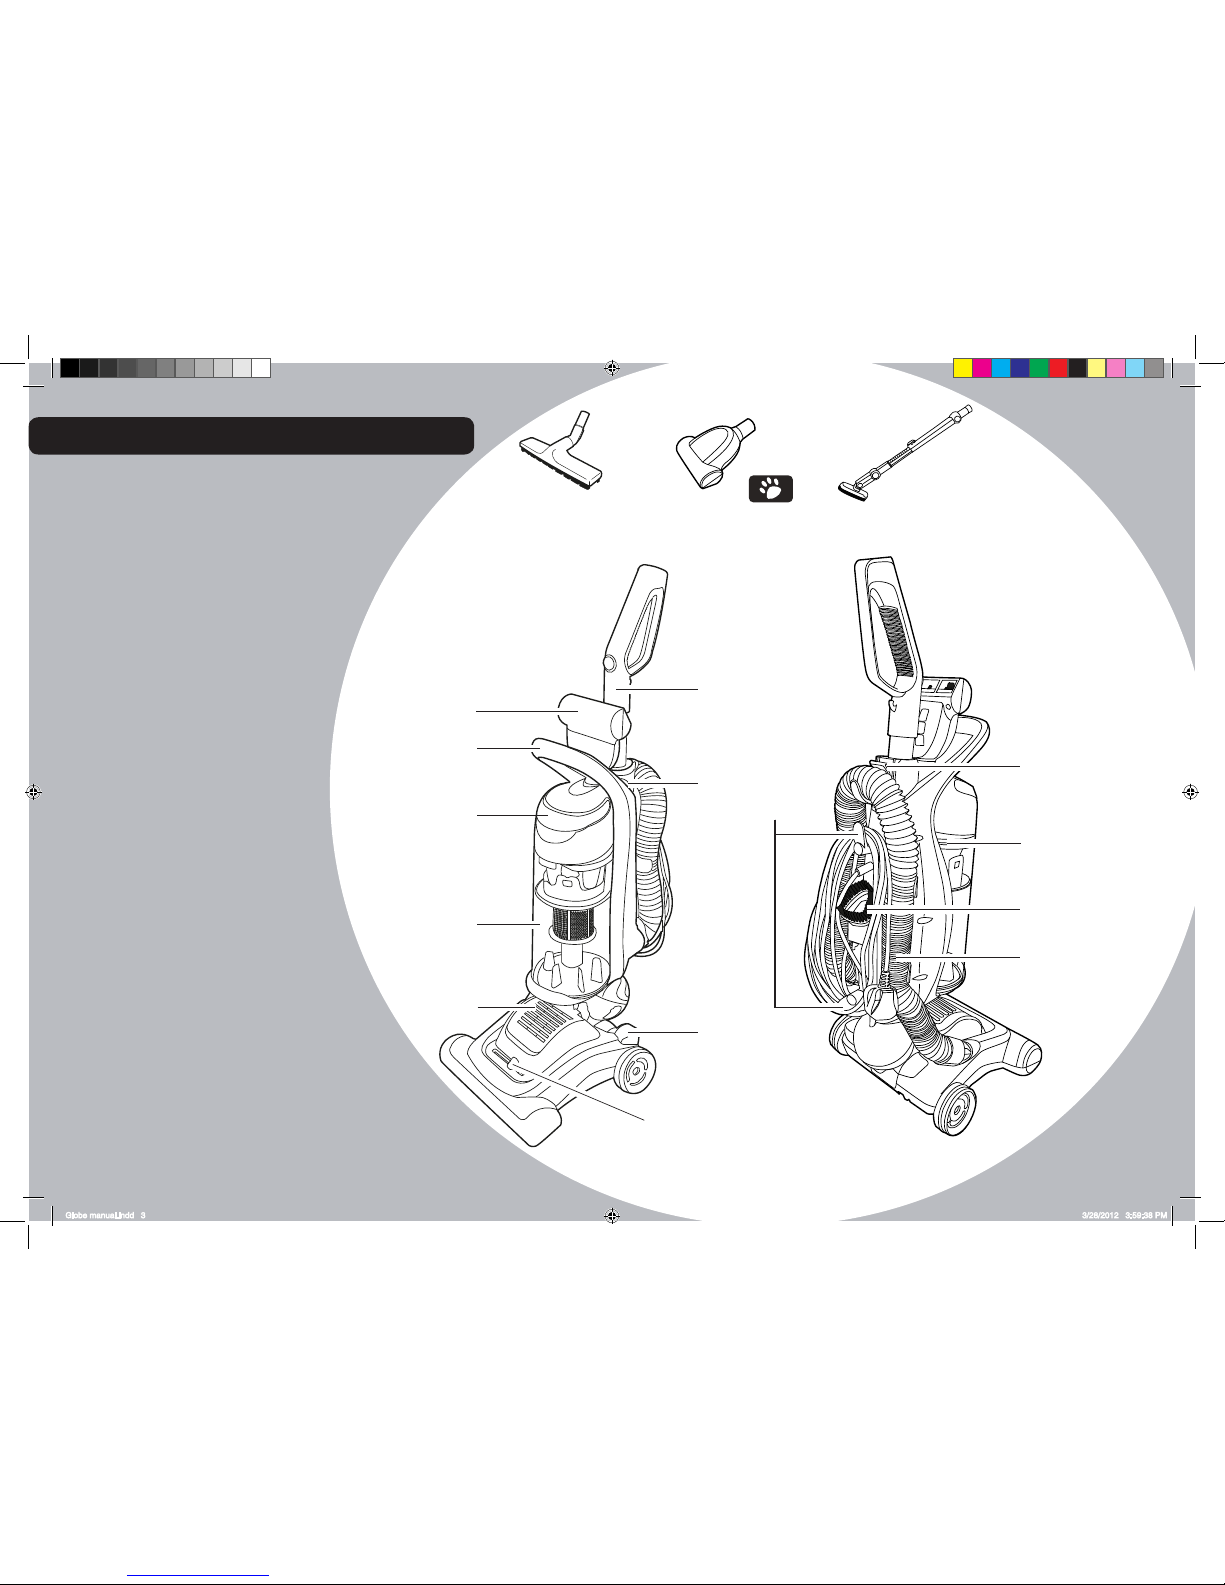
When first unpacking your
cleaner please check all items
are included:
Cleaner body
Cleaner foot
Removable Handle / Crevice tool
Dusting Brush
Hose
Pet Hair Remover Turbo Brush*
Parquet Caresse Nozzle & Tube*
Multi-Function Tool*
(*Certain models only)
If any parts are missing, call the
Hoover helpline on
08444 995 599
GETTING TO KNOW YOUR CLEANER
- 3 -
Globe
The ultra agile
way to clean
all surfaces.
HANDLE RELEASE
BUTTON
PRE MOTOR FILTER
ACCESS BUTTON
FLEXIBLE HOSE
DUSTING BRUSH
PET HAIR REMOVER
TURBO BRUSH*
PARQUET CARESSE
NOZZLE*
(*Certain models only)
MULTI-FUNCTION
TOOL*
TURBO BRUSH
STORED ON BOARD
CARRY HANDLE
EXHAUST
FILTER
BIN
RELEASE
HANDLE
DUST BIN
CARPET CARE
CONTROL SELECTOR
CORD
STORAGE
HOOKS
ON/OFF BUTTON
REMOVABLE HANDLE
/ CREVICE TOOL
UPRIGHT LOCK
RELEASE PEDAL
Globe manual.indd 3 3/28/2012 3:59:38 PM
Page 4
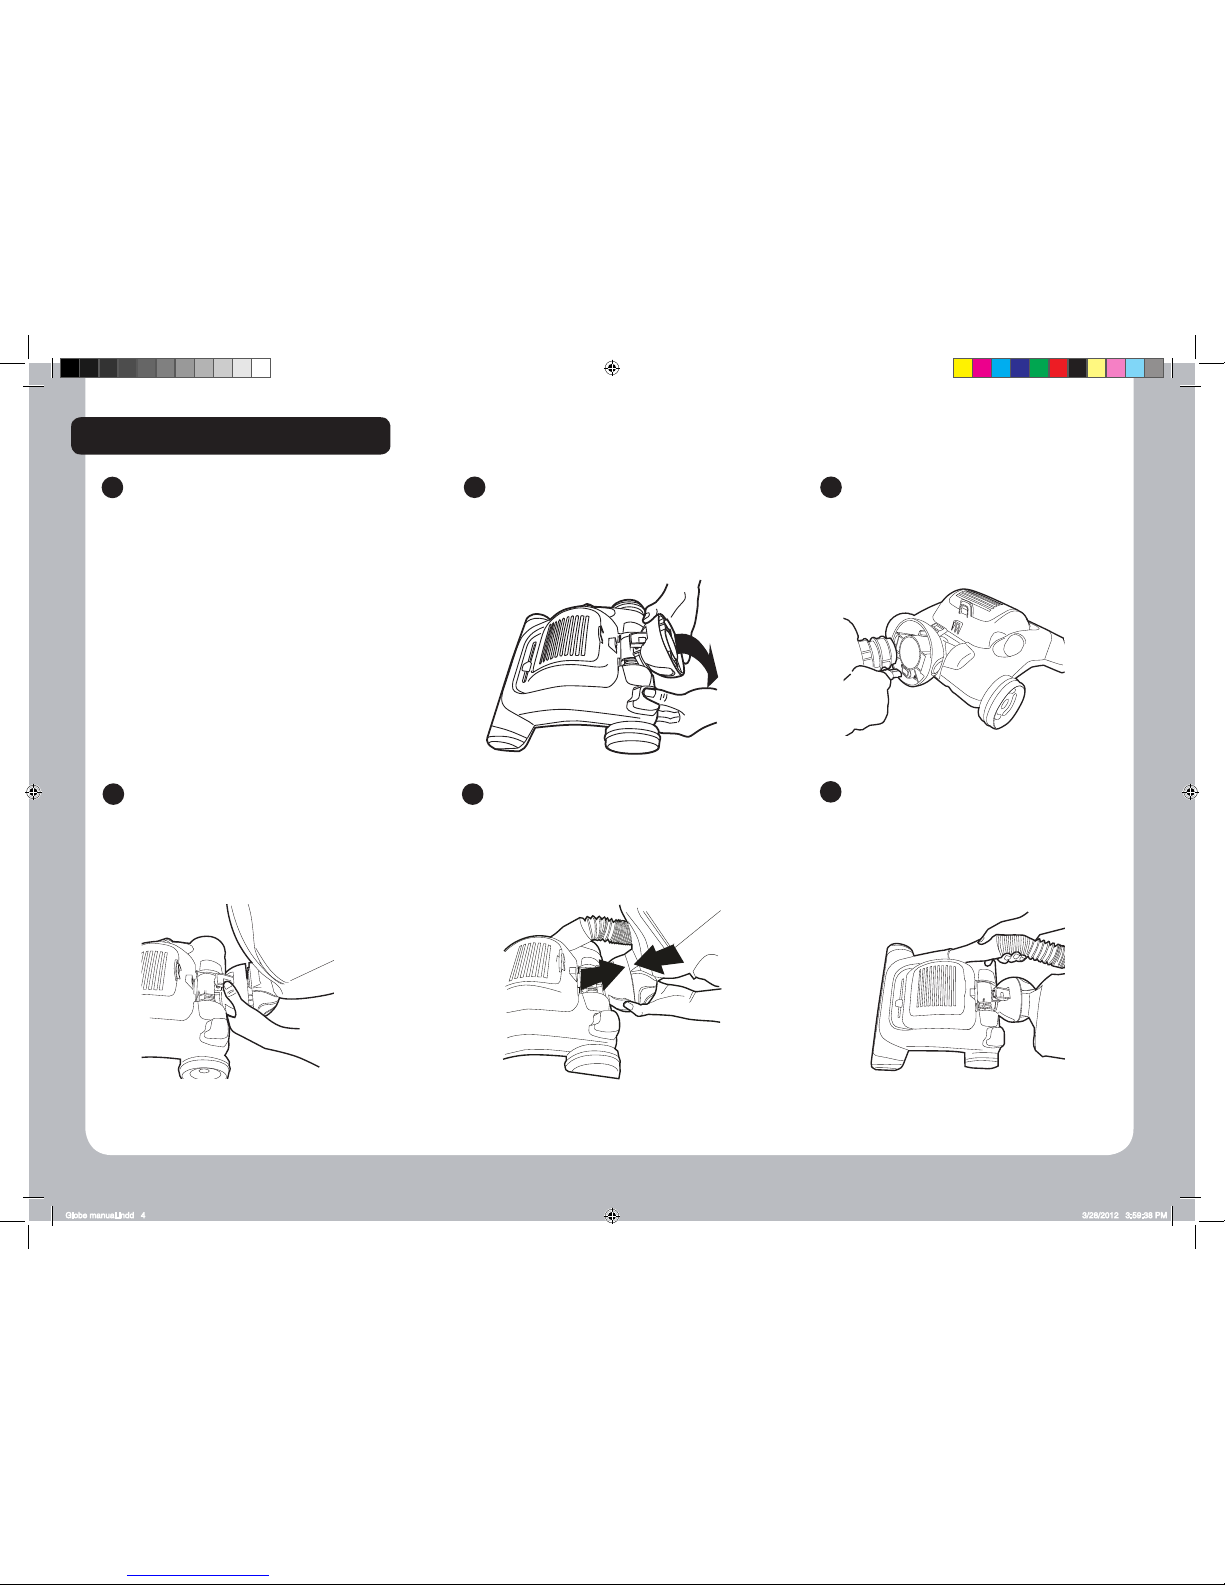
PREPARING YOUR CLEANER
Insert the internal power plug on the main
body into the YELLOW socket located in
the neck of the cleaner.
Take the foot of the cleaner and press
the upright lock release pedal. Lower
the neck to the oor.
Remove the accessories from the
main packaging. You should nd the
following:
Removable Handle / Crevice Tool
Dusting Brush
Hose
Pet Hair Remover Turbo Nozzle*
Parquet Caresse Nozzle & Tube*
Multi-Function Tool*
* Certain Models only
- 4 -
1
Attach the connector hose to the foot of
the cleaner.
Ensure both halves of the neck are
pushed together and the locking clips
are fully engaged.
4
Ensuring the cable is not trapped,
assemble the main body to the foot of
the cleaner.
2
5
3
6
Globe manual.indd 4 3/28/2012 3:59:38 PM
Page 5
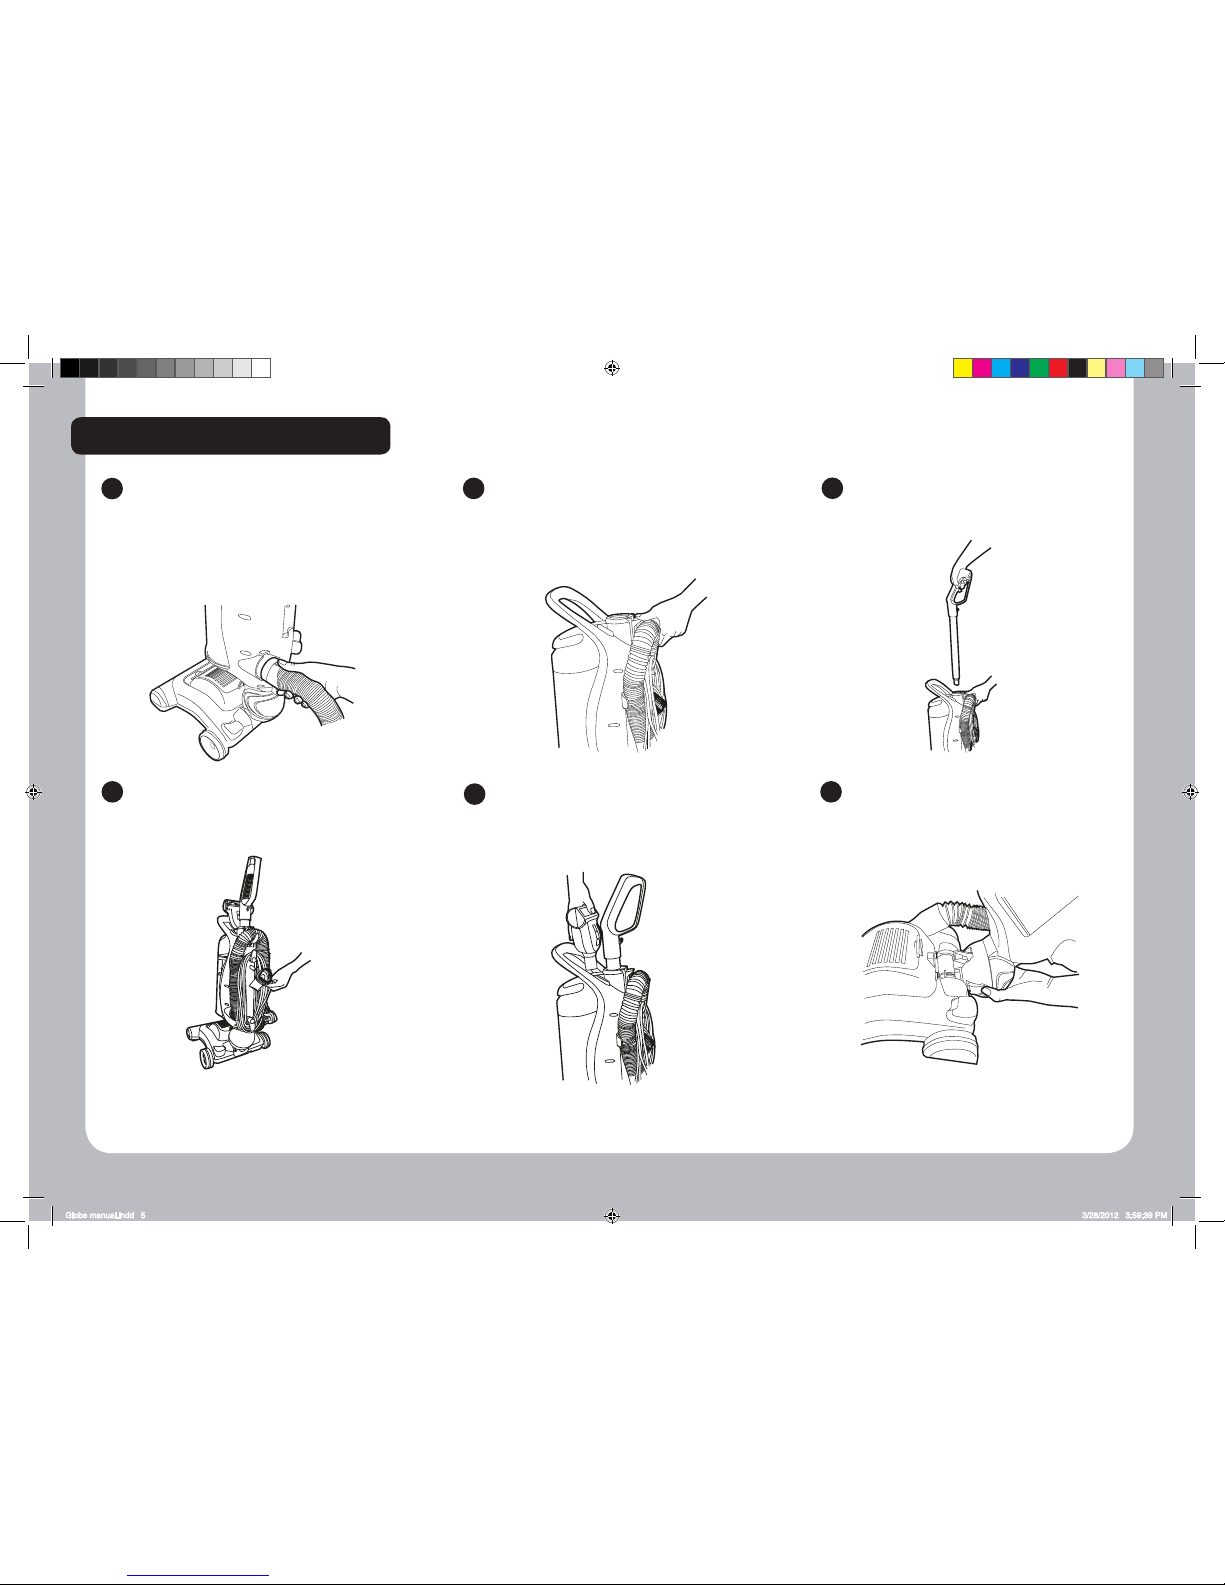
PREPARING YOUR CLEANER
Secure the dusting brush onto the dusting
brush post.
Position the handle at the top of the
main body. Depress the handle release
button and slide the handle down until it
clicks into place.
Position the hose in the hose cradle and
clip it in place.
- 5 -
8
7
IMPORTANT: If you need to access the
internal electric power connector press
the upright lock release pedal and lower
the main body to the oor. Release the
locking clips for access.
11
Secure the turbo brush* onto the
separator lid.
(Certain models only)
9
1210
Position the cleaner in the upright
position. Then attach the other end of
the connector hose to the main body of
the cleaner.
Globe manual.indd 5 3/28/2012 3:59:39 PM
Page 6
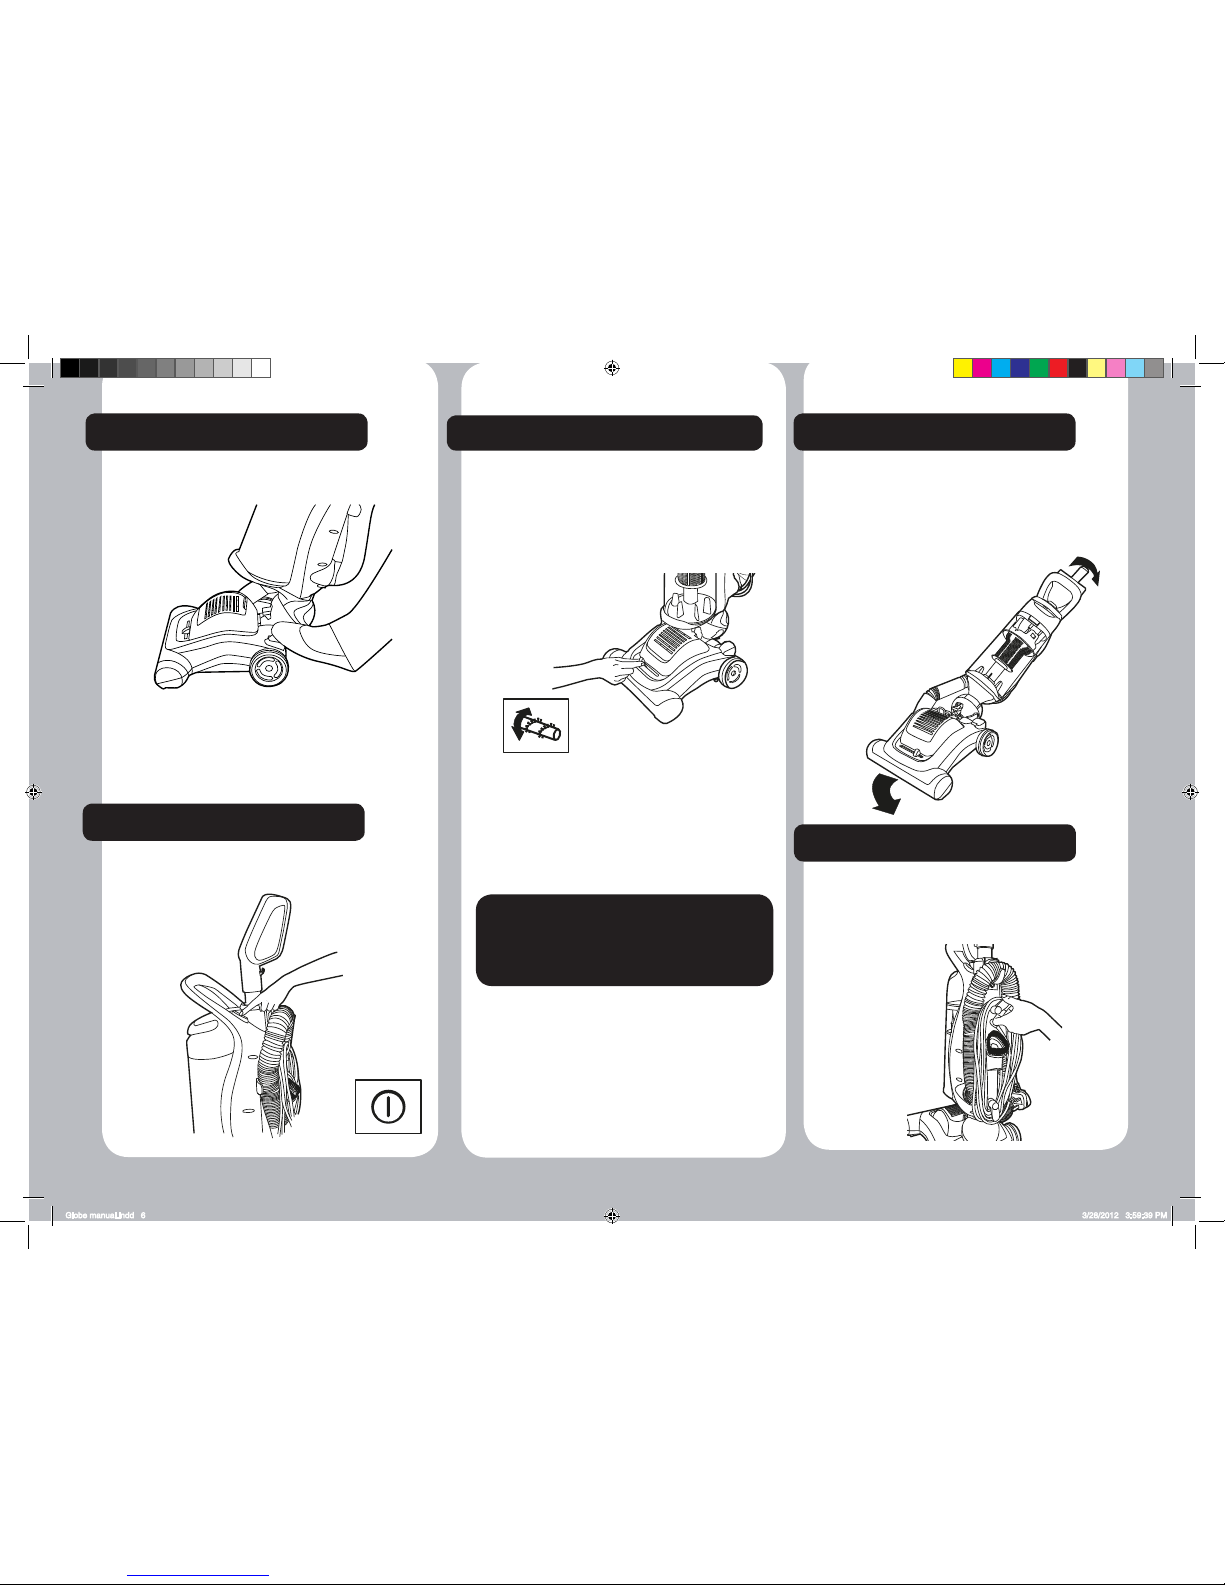
UPRIGHT LOCK RELEASE
Unlock the cleaner by pressing the upright lock pedal
at the rear of the cleaner with your foot.
After use return the cleaner to the upright lock position.
You will hear an audible click once locked in place.
ACTIVE STEERING
The cleaner comes with a unique steering function
that allows you to easily manoeuvre the machine.
Particularly benecial for cleaning in awkward or
conned spaces.
Twist the cleaner in the direction you wish to turn.
POWER SWITCH
To switch the cleaner on or off, press the power switch
on the main body of the cleaner.
- 6 -
CORD STORAGE
Turn the cleaner off and remove the plug. Wind the
cord around the cord storage hooks.
Rotate the storage hooks to quickly release the full
length of the power cord.
CARPET CARE CONTROL SELECTOR
The carpet care control selector raises and lowers the
height of the cleaner.
Ensure that the cleaner is in an upright (parked)
position before selection.
Slide the knob to position best suited to depth of carpet
pile.
Try various settings until you get the best results for
your carpet.
NOTE: Using this cleaner for loop carpets or carpets
with pile greater than 30mm is not recommended.
Please consult the oorcare/carpet manufacturer’s
recommended cleaning instruction before vacuuming.
!
IMPORTANT! When cleaning hard floors
such as vinyl or linoleum, move the selector
knob to the LONG PILE position. Failure to
do so may cause damage to the floor
surface.
!
Globe manual.indd 6 3/28/2012 3:59:39 PM
Page 7
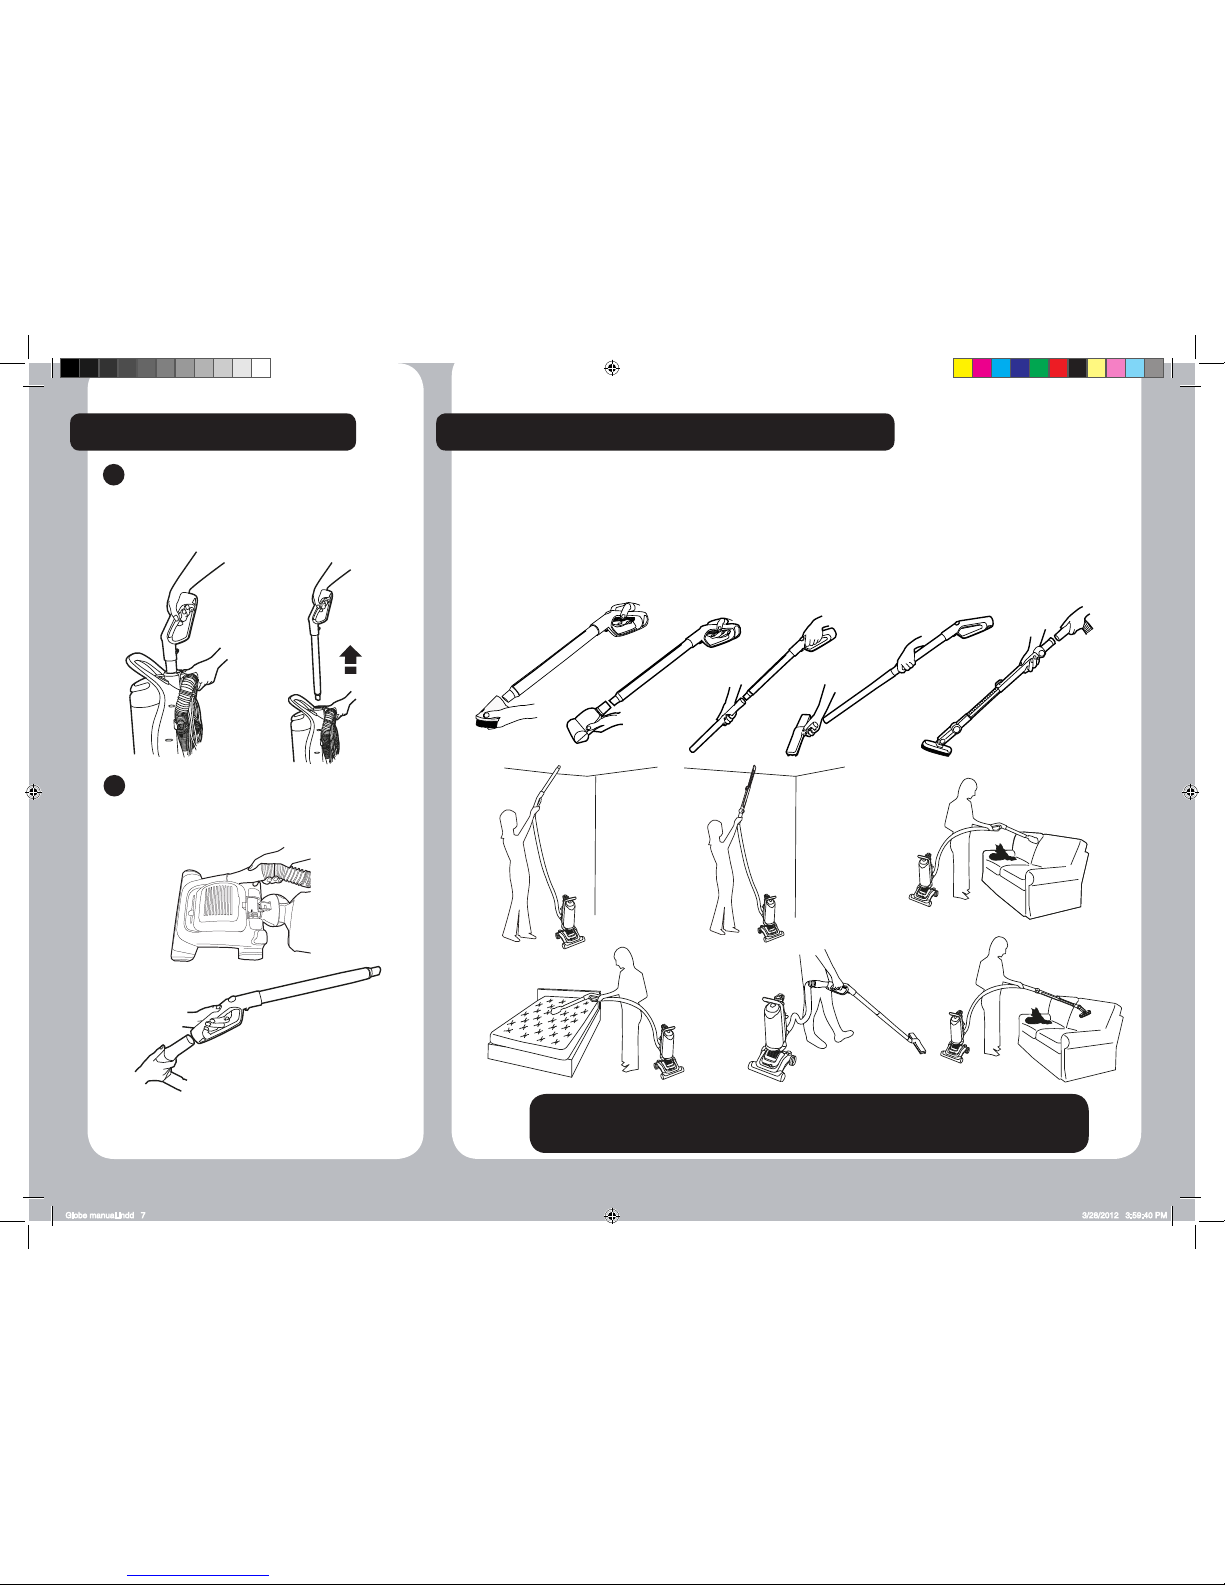
CLEANING TOOLS
!
IMPORTANT! When using cleaning tools, the cleaner must be kept in the upright position,
particularly when cleaning stairs.
!
HANDLE RELEASE
1
2
To clean with accessories, release the handle
from the main body of the cleaner by pressing
the handle release button on the rear of the
cleaner and pull upwards.
.
- 7 -
The following accessories are available with the product:
Dusting Brush
Pet Hair Remover Turbo Brush*
Parquet Caresse Nozzle & Tube*
Multi-Function Tool*
(*certain models only)
All accessories can t directly onto the removable handle / crevice tool or on to the hose. Combine accessories
depending on use.
Remove the hose from the foot of the cleaner
and insert into the removable handle / Crevice
tool.
Globe manual.indd 7 3/28/2012 3:59:40 PM
Page 8
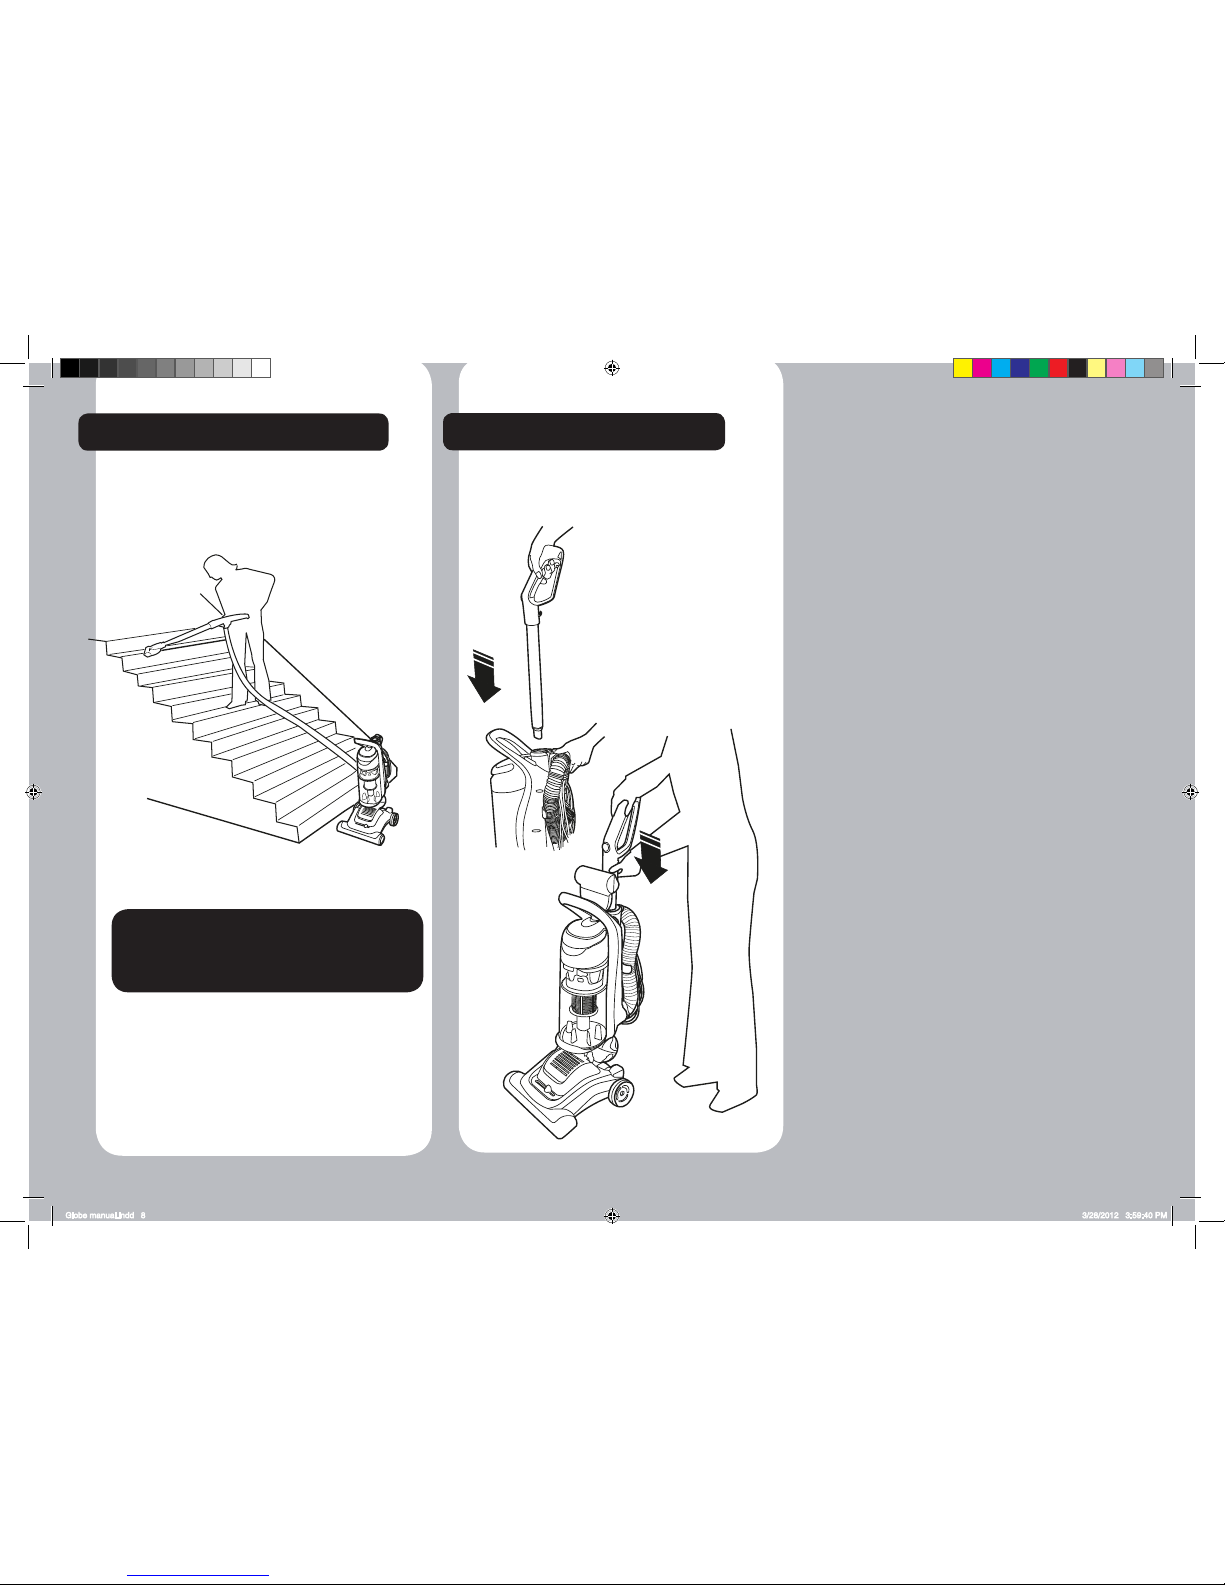
CLEANING THE STAIRS
HANDLE PARK
It is dangerous to place the cleaner above you when
cleaning stairs. Place the cleaner against the bottom
step.
ALWAYS work with the cleaner below you.
For more efcient storage, press the handle
release button on the rear of the product and push
downwards.
- 8 -
!
IMPORTANT! Extra care must be taken when
using the hose on the stairs. If the hose
becomes blocked it can exert a strong pull in
the direction of the cleaner.
!
Globe manual.indd 8 3/28/2012 3:59:40 PM
Page 9
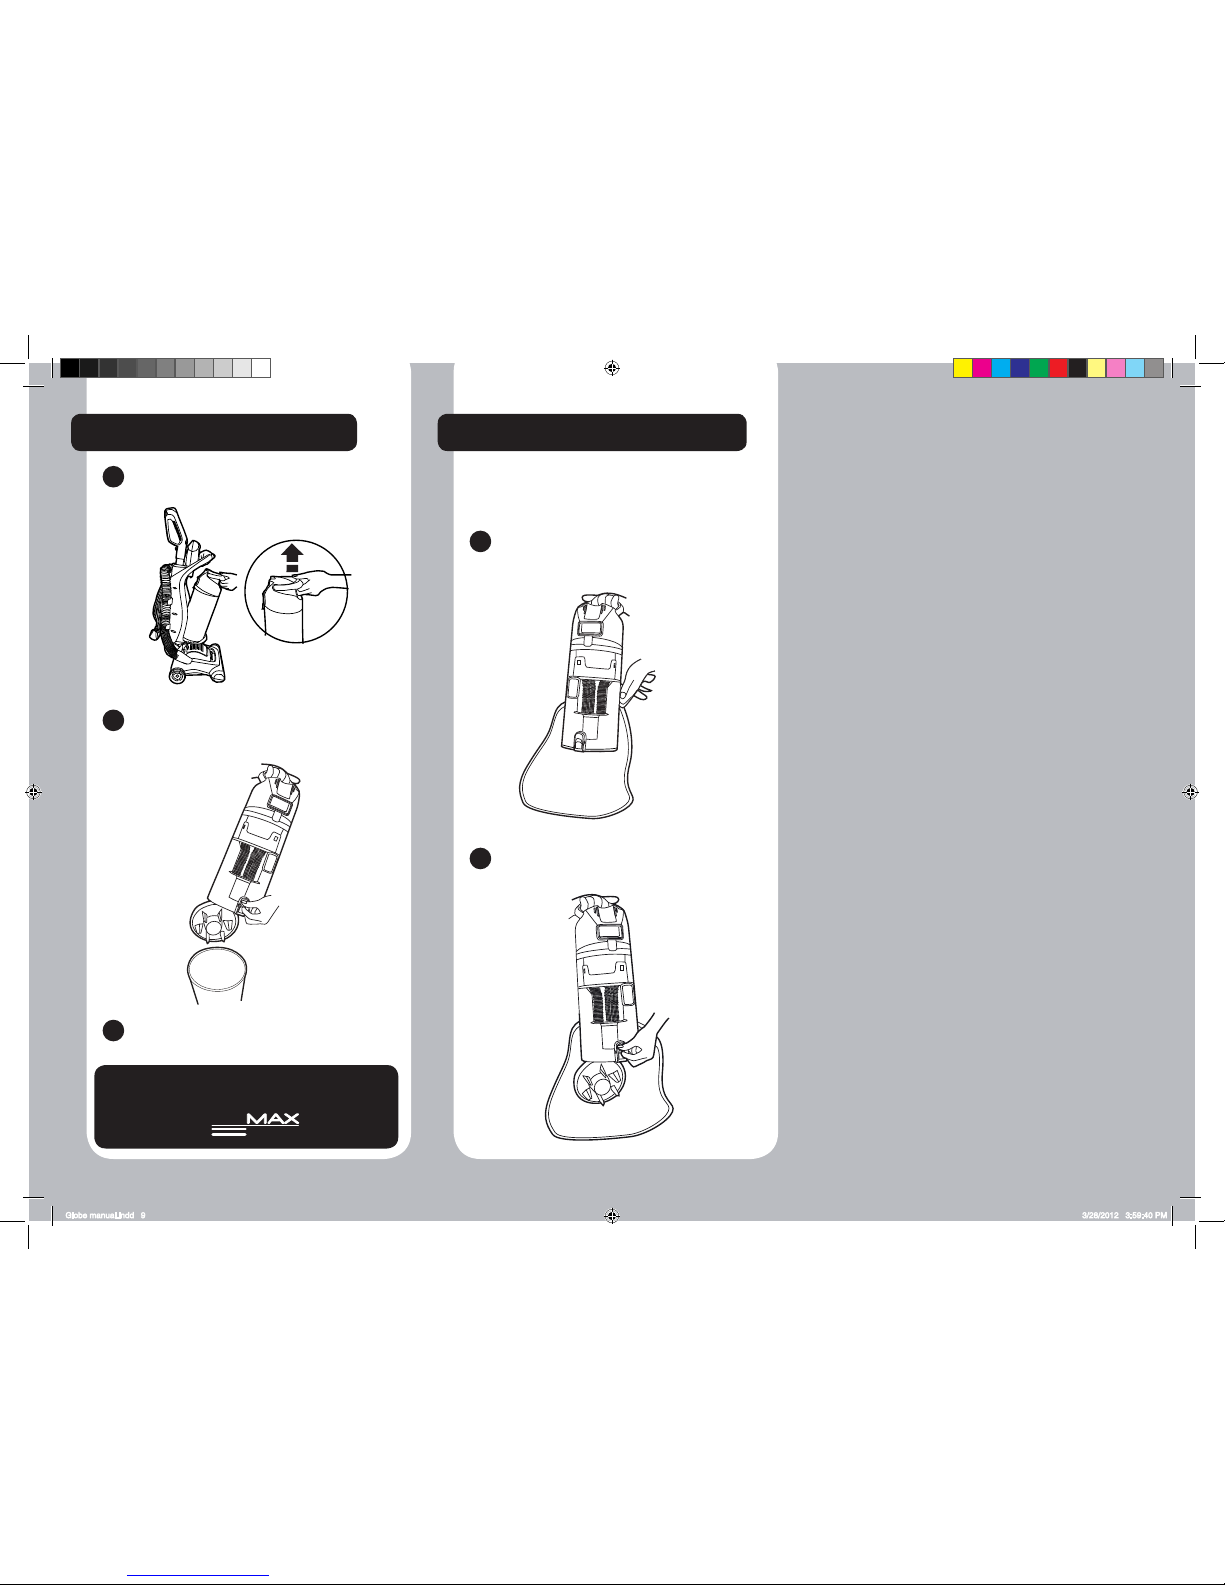
EMPTYING THE DUST BIN
ALLERGY AND ASTHMA SUFFERERS
Hold the container using the carry handle
over the bin and press the bin empty button.
The dust container door will automatically
open.
Wrap the lower bin in a plastic bag and close
the bag tightly around the dust container
before emptying.
Once emptied, gently tap or shake the container
to release any excess dust.
Press the bin empty button to empty the dust
into the plastic bag. Close the bag quickly
and dispose of it immediately.
Lift the bin release latch and remove the dust
bin from the cleaner.
When emptying any vacuum cleaner it is difcult to
avoid exposure to dust. To minimize this risk, please
follow these instructions:
- 9 -
1
1
2
2
3
!
IMPORTANT! Do not ll above the max
level mark shown on the bin.
!
2
Globe manual.indd 9 3/28/2012 3:59:40 PM
Page 10
- 10 -
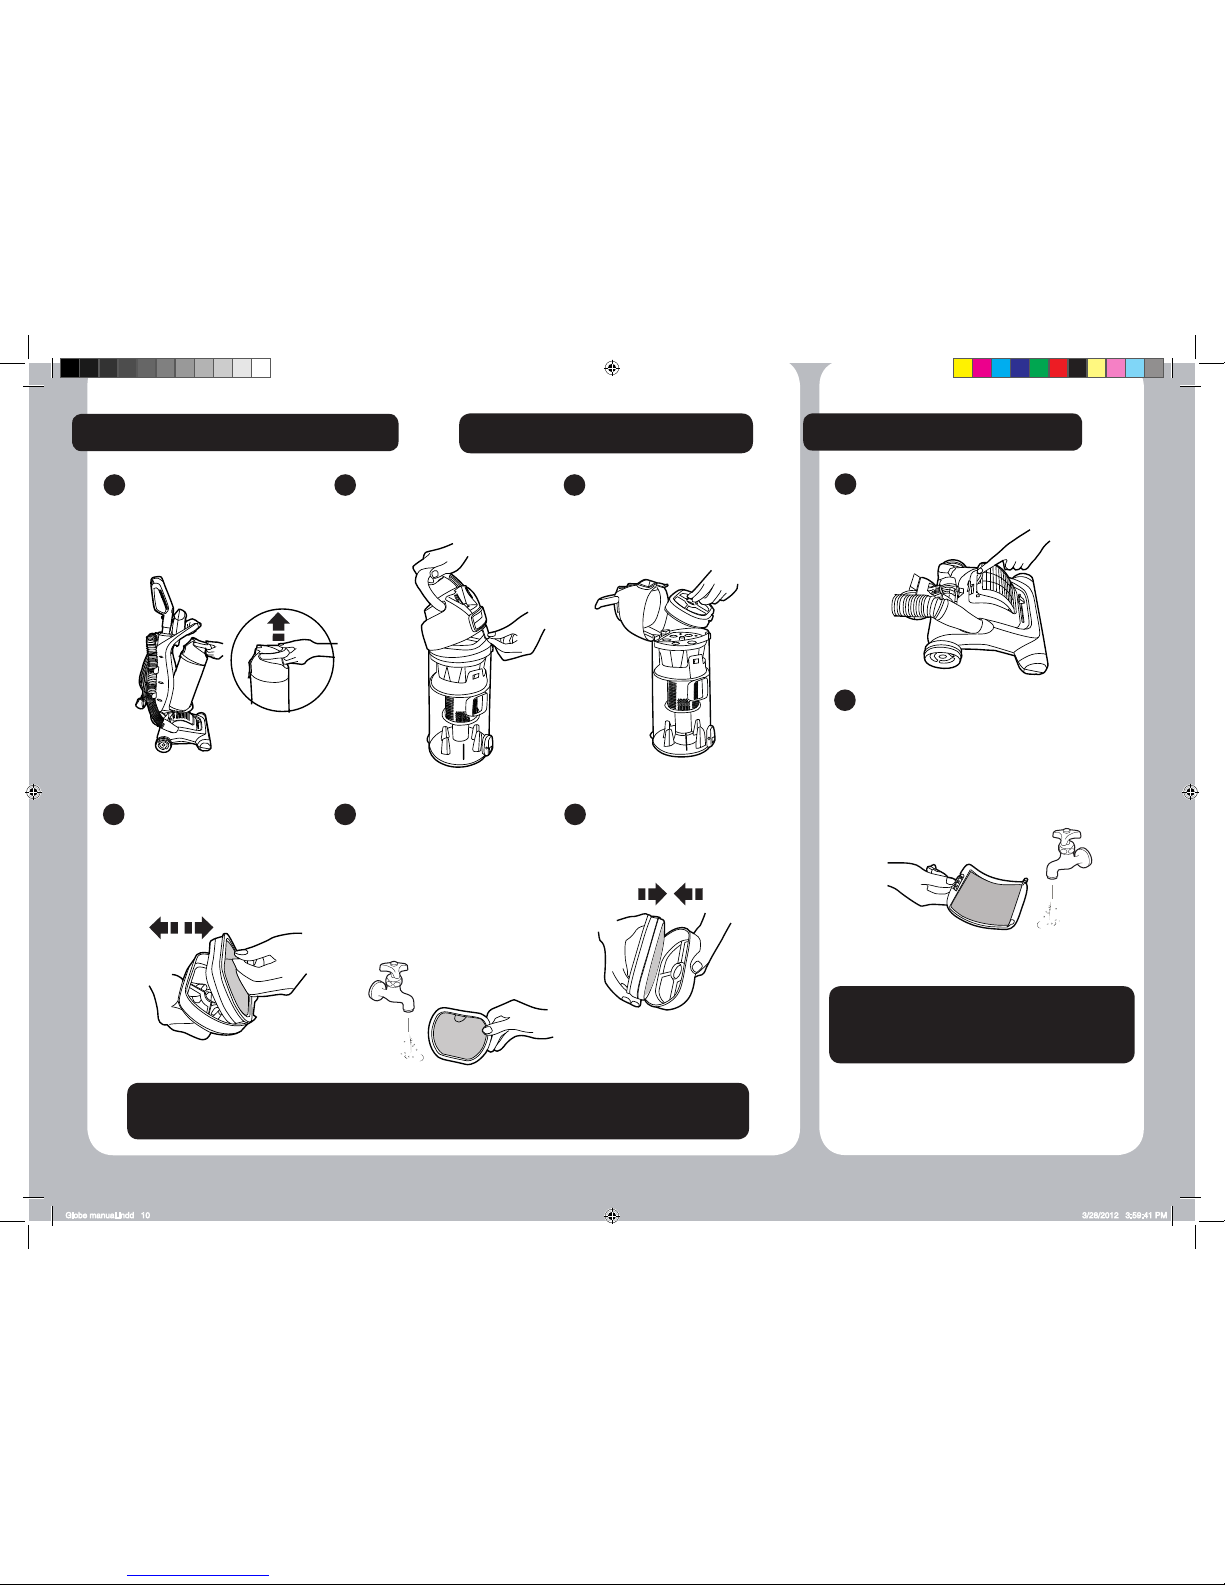
CLEANING THE PRE MOTOR FILTERS
Lift the bin release latch and
remove the dust bin from the
cleaner.
Remove the turbo tool from the
top cover of the cleaner.
1
Place the bin on a at surface
and lift latch to access the lter.
2
Remove the BLUE lter pack
(containing the exible HEPA
lter pad).
3
Separate the exible HEPA
lter pad from the lter frame by
pulling the tab or pushing from
underneath.
Gently tap the exible HEPA
lter pad against the side of a
bin to release excess dust.
Wash the exible HEPA lter pad
thoroughly under hand warm
water, gently squeezing the pad
until the water runs clean.
Remove excess water by
squeezing and leave to dry for
24 hours.
DO NOT USE HOT WATER
OR DETERGENTS.
4
When completely dry
reassemble and refit filters
to cleaner.
65
!
IMPORTANT! For optimum performance,
always keep your lters clean.
!
!
IMPORTANT! For optimum performance, shake off excess dust from the lters regularly.
We recommend that the exible HEPA lter pad is washed every 3 MONTHS.
!
Lift the tab on the exhaust lter cover grille and
remove from the cleaner.
Wash the exhaust lter under hand warm water
until the water runs clean. Remove excess water
by shaking and leave to dry for 24 hours.
Refit filter only when completely dry.
DO NOT USE HOT WATER OR
DETERGENTS.
CLEANING THE EXHAUST FILTER
1
2
!
IMPORTANT! For optimum performance,
always keep your lters clean. We recommend
that the exhaust lter should be washed every
3 MONTHS.
!
Globe manual.indd 10 3/28/2012 3:59:41 PM
Page 11
- 11 -
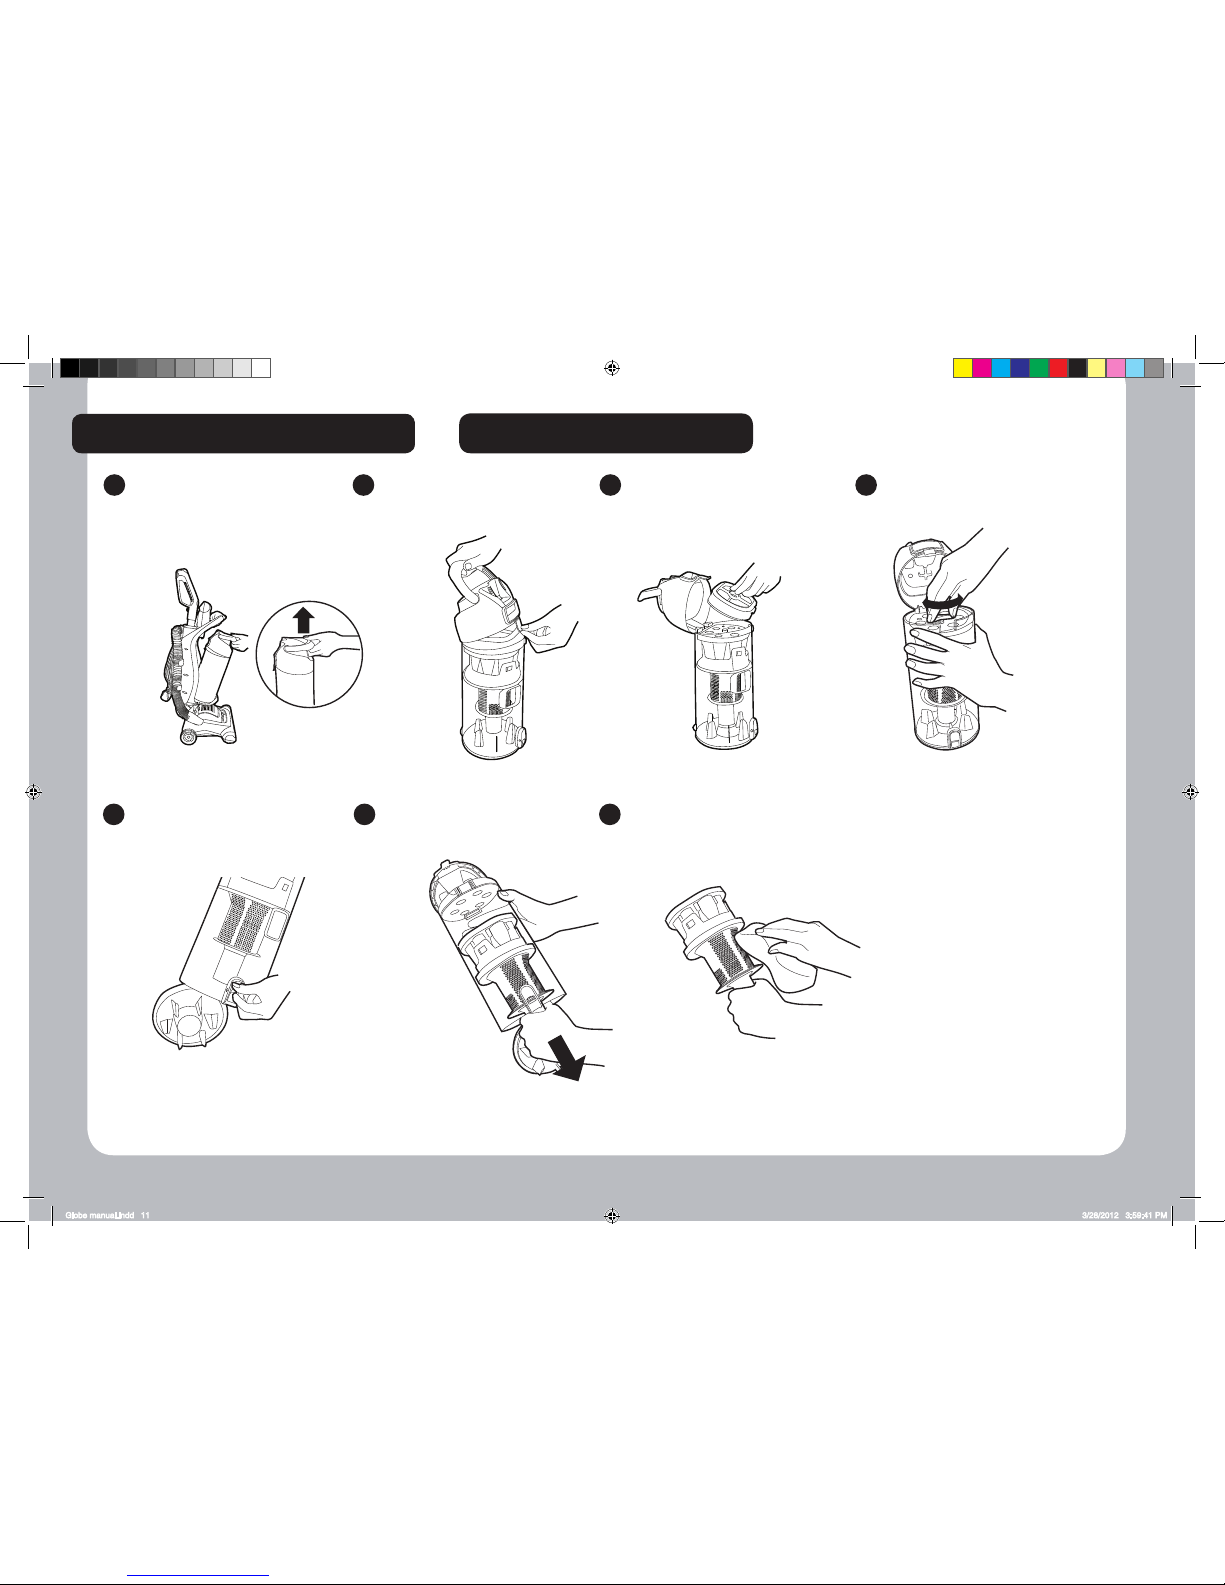
CLEANING THE SEPARATION SYSTEM
Lift the bin release latch and
remove the dust bin from the
cleaner.
Remove the turbo tool from the
top cover of the cleaner.
1
Place the bin on a at surface
and lift latch to access the lter.
2
Remove the BLUE lter pack
(containing the exible HEPA
lter pad).
3
Unscrew the retaining lock to
release the separation system.
3
Press the bin empty button to
open the bin ap.
Pull the separation system out
of the bin.
4
Clean the separation system
with a dry cloth or dusting
brush, Once clean reassemble
and refit to the cleaner
65
!
IMPORTANT! For optimum performance,
always keep your separation system clean.
!
Globe manual.indd 11 3/28/2012 3:59:41 PM
Page 12
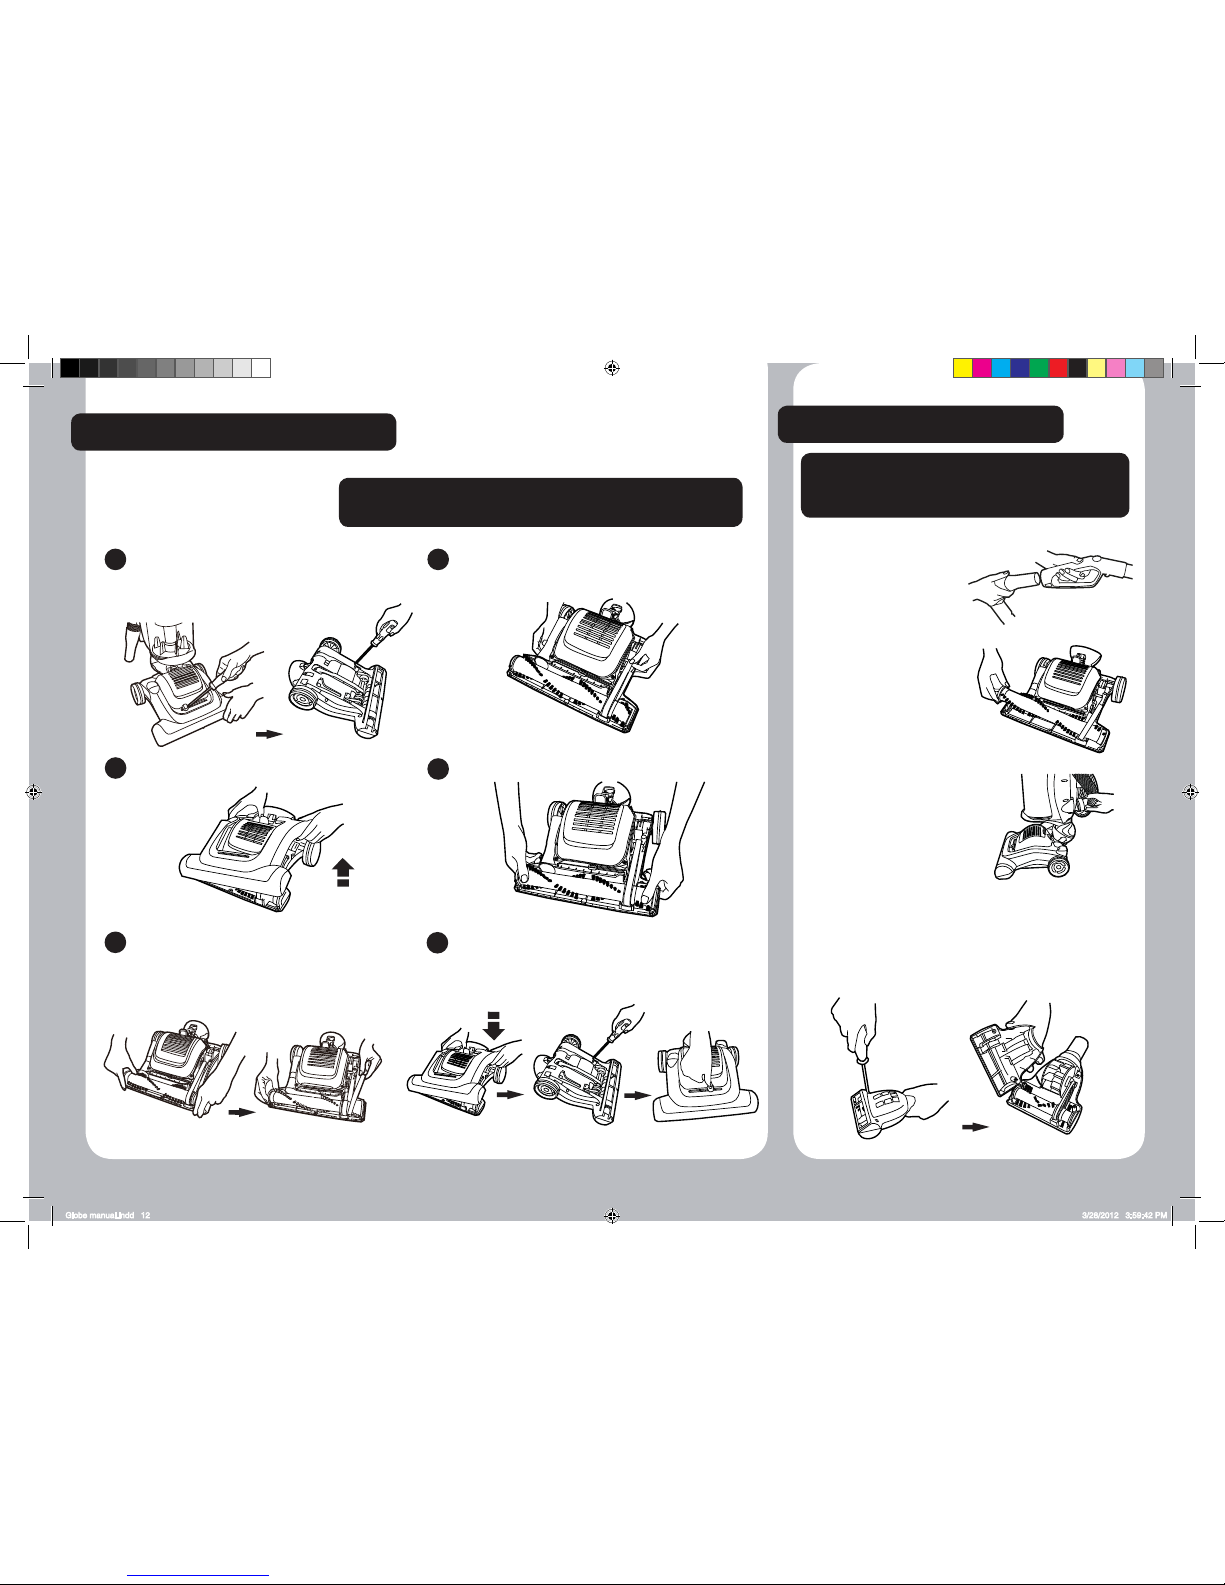
CHANGING THE AGITATOR AND BELT
If your cleaner is not picking up efciently, the belt or brushes (or both) may need replacing, but rst please make
sure you have:
• Emptied the dust container
• Cleaned the lters
• Checked for blockages
CLEARING A BLOCKAGE
IMPORTANT: Switch the cleaner off and remove
the plug from the electricity supply before
dismantling cleaner
!
IMPORTANT: Switch the cleaner off and remove the plug from
the electricity supply before dismantling cleaner
!
Check the hose by
removing it from the
handle, stretching it to full
length.
Turn the cleaner over and
rotate the brushes until
they are free to rotate. If
debris can be seen under
the hood remove the
indicated retaining screws
and clear the debris.
Check for a blockage in
the lower hose socket. To
remove the hose pull the
finger tab and pull the hose
upwards. Use a flexible rod
to remove any obstruction.
Open the pet hair or allergen
remover by removing the
retaining screws.
Lift the cover and remove the
blockage.
- 12 -
Remove the carpet care control knob.
Turn the cleaner over and remove the
retaining screws attaching the brush
guard to the base.
Turn the cleaner over and remove the hood.
Remove brush assembly and check for wear
on the belt. Loop the new belt around the
motor and brush assembly.
Hold the brush assembly and stretch the belt until
the brush can be slotted back into the cleaner
housing.
Rotate the brush to ensure movement of the belt.
Refit the hood ensuring the lugs along the front
are located in the slots on the front edge of the
baseplate. Secure the hood with the retaining
screws. Refit the carpet care control knob.
1
2
3
4
5
6
Globe manual.indd 12 3/28/2012 3:59:42 PM
Page 13
GUARANTEE STATEMENT
The guarantee conditions for this appliance are as defined by our representative
in the country in which it is sold. Details regarding these conditions can be
obtained from the dealer from whom the appliance was purchased. The bill of
sale or receipt must be produced when making any claim under the terms of this
guarantee.
Subject to change without notice.
Environment - WEEE Directive
This appliance is marked according to the European Directive 2002/96/
EC on Waste Electrical and Electronic Equipment (WEEE).
By ensuring this product is disposed of correctly you will help prevent
potential negative consequences for the environment and human health,
which could otherwise be caused by inappropriate waste handling of this
product.
The symbol on the product indicates that this product may not be treated
as household waste. Instead it shall be handed over to the appliance collection point
for recycling of electrical and electronic equipment.
Disposal must be carried out in accordance with the local environmental regulations
for waste disposal.
For more detailed information about treatment, recovery and recycling of this product,
please contact your local city ofce, your household waste disposal service or the
shop where you purchased the product.
Quality
BSI ISO 9001
Hoover’s factories have been independently assessed for quality . Our products are
made using a quality system which meets the requirements of ISO 9001
Quality & the Environment
As the owner of a new Hoover product, we would like to tell you more about the high
standards we have set in Quality and the Environment
USE ONLY HOOVER SPARES
SPARE PARTS CODE
PRE-MOTOR HEPA FILTER PACK S113- 35601263
EXHAUST FILTER T107 - 35601264
BELT V34 - 35601265
AGITATOR Y28 - 35601266
HOSE D134 - 35601267
PET HAIR REMOVER TURBO BRUSH J58 - 35601268
PARQUET CARESSE NOZZLE+CONNECTOR G141PC - 35601269
MULTI-FUNCTION TOOL MFT1 - 35601270
- 13 -
Genuine HOOVER Spares
Tel. 08443 712 758
www.hooverspares.com
Always replace parts with genuine Hoover spares. When ordering parts, always
quote your model number.
Hoover Customer Helpline
Should any faults occur with your cleaner during the first 12 months,
contact the Hoover Customer Helpline on the number below.
Tel: 08444 995 599
Email: [email protected]
Hoover have a computerised nationwide service network of over 500 engineers
who will quickly respond to your call and guarantee your repair for 12 months.
Globe manual.indd 13 3/28/2012 3:59:42 PM
Page 14

User checklist
If your cleaner is not working properly run through the
following checklist.
1. Is there a working electricity supply to the cleaner?
Check with another electrical product.
2. Is the dust bin full or choked with fine dust?
To empty the dust container, see instructions on P9.
3. Is the hose blocked?
To clear a blockage, see instructions on P12.
4. Is there a blockage in the cleaner base?
To clear a blockage, see the instruction on P12.
5. Are the filters blocked?
To clean filters, see the instruction on P10.
6. Are the brushes rotating correctly?
To check the brushes, see the instructions on p12.
7. Has the cleaner overheated?
If so, it will take about 30 minutes to reset.
If there is any doubt call the Hoover Customer Helpline 08444 995 599 for
advice. They may be able to assist you over the telephone.
WARNING
A thermal cut out switches off the cleaner to prevent
overheating if it is used when full or there is a blockage or
dirty filters. If this should happen switch off, unplug and
correct the fault.
It will take approximately 30 minutes for the cut out to
automatically reset.
IMPORTANT
DO NOT RUN OVER THE POWER SUPPLY CORD
AS THIS COULD DAMAGE THE SUPPLY CORD
INSULATION.
DATA
Rated Voltage: 230 - 240 V ~ 50 Hz
CEE Wattage: 900W
Dimensions: 1110 x 308 x 409 mm
- 14 -
Globe manual.indd 14 3/28/2012 3:59:42 PM
Page 15

Hoover Limited
Pentrebach
Merthyr Tydfil
Mid Glamorgan
CF48 4TU
HOOVER CUSTOMER HELPINE
08444 995 599
© 2011 48008014
®
Globe manual.indd 15 3/28/2012 3:59:42 PM
 Loading...