

Page 1

INSTRUCTION MANUAL
®
Page 2
IMPORTANT SAFETY REMINDERS
IT IS IMPORTANT THAT YOU:
- 2 -
This cleaner should only be used for domestic cleaning, as described in this user
guide. Please ensure that this guide is fully understood before operating the
appliance. Use only attachments recommended or supplied by Hoover.
Only use att achm ents recommende d or supplied by H oover.
When us ing c leaning to ols, ensure that th e cle aner is kept in th e upr ight ( parked)
posi tion. This w ill avoid poss ible damage t o the carpet or f loor c overing. When
clea ning stairs, D O NOT position th e cl eane r abo ve you .
IMP ORTANT: The wires in the mains power lead are coloured in accordance with
the following code
: Blue – Neutral Brown – Live
STATIC EL ECTRIC ITY. S ome c arpets c an ca use a smal l buil d up of s tati c
elec tri city. Any st atic disc harge is no t hazardou s to hea lth.
AFT ER USE. Switch the cleaner off and remove the plug from the elec tri cit y
supp ly. A lways sw itch of f and remove t he plug bef ore cleanin g t he appliance or
atte mpti ng any main tenance task.
HOOVER SERVICE. To ensur e the con tinued sa fe an d ef fic ient operation of this
appl iance w e
recommend that a ny se rvici ng or repa irs are only car ried ou t by an
auth orised Hoove r service engineer.
IMPORTANT: This cleaner is fit ted with a bru shbar. Care s houl d b e t aken when
clea ning sta irs. Al ways ensu re t he BACK of t he unit i s pl aced at the bas e of the
stai rs to avoi d th e uni t leaning for ward a ca usin g possible damage to c arpets.
• Us e indoors only.
• Us e only on surf aces moistened by the cleaning process or small spills. Do not
immerse product.
• Always install float before any wet pick up operation.
•
Close supervision is necessary when any appliance is used by or near
children. Do not allow cleaner to be used as a toy or t o run unattended at any
time.
• Keep hair, loose clothing, fingers, feet and all parts of body away from
openings and moving parts .
• Do not pick up anything t hat is burning or smoking, such as cigarettes ,
matches, or hot ashes.
• DO NOT us e aerosol sprays near c leaner. Aerosol sprays may be f lammable.
• Do not pick up or use flammable or combustible materials such as gasoline or
fine wood sandings or use in areas where they may be present.
• Avoid picking up hard, sharp objects with t he cleaner. They may damage t he
machine.
• Do not put any object into openings. Do not u se with any opening blocked;
keep free of dust, lint, hair, and anything that may reduce air flow.
• Do not pull or carry by cord, use cord as a handle, clos
e door on cord or pull
cord around sharp edges or corners. Do not run appliance over cord. Keep
cord away from heat ed surface s.
• Always disconnect cord from electrical outlet before servicing t he cleaner.
• Unplug cleaner when not in use. Turn off all controls before unplugging.
• Do not unplug by pulling on cord. To unplug, grasp the plug, not the cord.
• Never handle plug or appliance wit h wet hands.
• Do not clean over floor electric al outlets.
• Do not use without tanks in plac e.
• Us e extra care when cleaning on stairs. Do not place cleaner on st airs.
• Keep detergents and other cleaners out of children’s reach.
• Do not pick up chlorine bleach, drain cleaner, gasoline or any other toxic
material with t his appliance.
• When using recommended chemicals wit h this machine, be certain area is well
ventilated.
• Do not use a flammable or combustible liquid to c lean
a floor.
• Follow manufacturer’s instructions for all chemicals used with this machine. Do
not exceed rec ommended mixing ratios.
• Store in a dry place. Do not expose machine to freez ing temperatures.
• Do not cont inue to u se yo ur c leaner if it appear s to be fa ulty. If the po wer
cord is dam aged stop usin g th e cl eaner IM MEDI ATELY. To avoid a safet y
hazard, a n auth orised Hoover s ervic e engine er must repl ace the power cor d.
• Us e cleaner only for its int ended use as des cribed in the instructions.
This appliance can be used by persons (including children) with reduced
physical, sensory or mental capabilities or lack of experience and knowledge
if they have been given supervision or instruction concerning use of the
appliance in a safe way and understand the hazards involved. Children shall
not play with the appliance. Cleaning and user maintenance shall not be
made by children.
Page 3
When first unpacking your cleaner
please check all items are included:
Cleaner body
Cloth ad aptor plate*
Cloth*
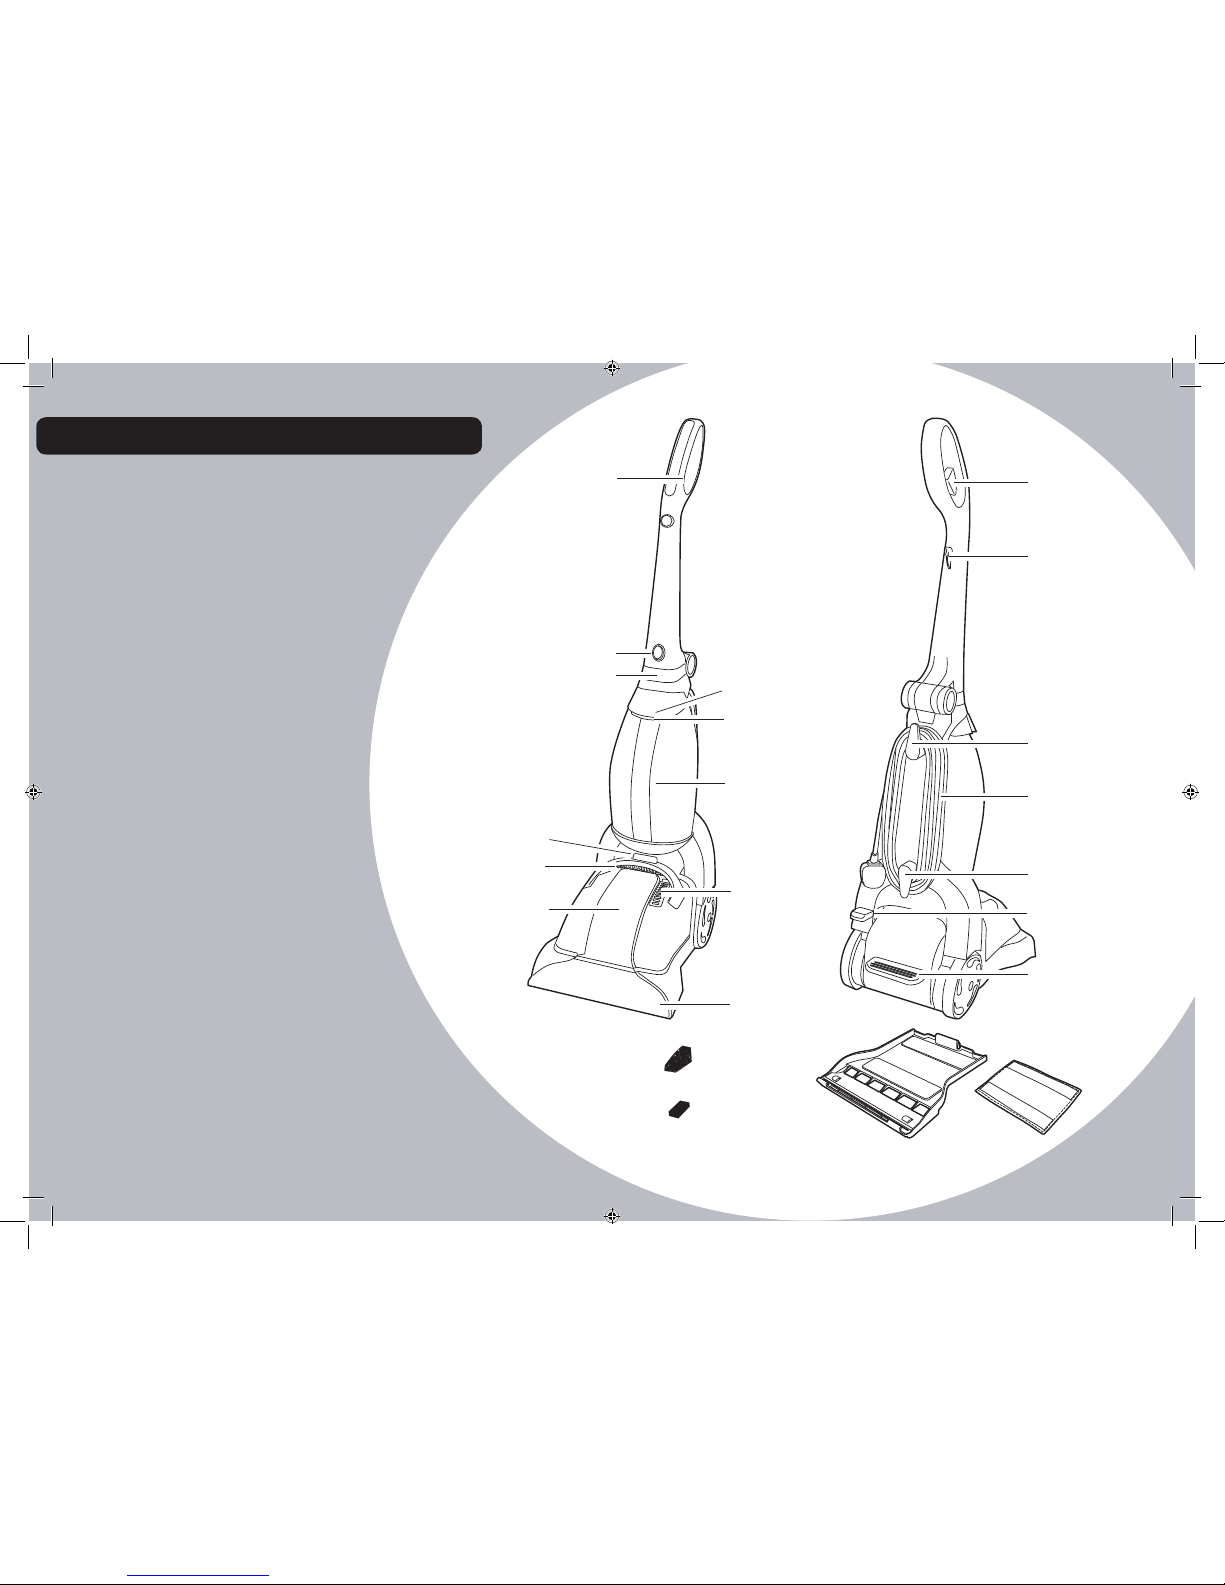
GETTING TO KNOW YOUR CLEANER
- 3 -
cleanjet
LOWER STOR AGE
HOOK
UPPER STOR AGE
HOOK
SOLUTION MIX
TRIGGER
CORD CLIP
POWER CABLE
AND PLUG
CLEANER
RELEASE PEDA L
ON/OFF PEDAL
(*Certain models only)
HANDLE RE LEASE
BUTTON
CARRY HANDLE
EXHAUST
SUCTION NOZZLE
AND BRUSH *
FILTER
CHAMBER
DIRTY WATER TANK
RELEASE L EVER
CLEAN WATER
TANK RELEASE
LEVER
CLEAN WATER
TANK HANDLE
CLEAN WATER
TANK
DIRTY WATER TANK
HANDLE
DIRTY WATER TANK
EXHAUST
FILTER
PRE MO TOR
FILTER
HANDLE
CLOTH*CLOTH ADAPTOR
PLATE*
Congratulations on the purchase of your
new Hoover Cleanjet Carpet Shampooer.
Please take the time to read this
manual carefully.
You’ll then be ready to make the
most of the special features only
the new Hoover Cleanjet can offer!
In the unlik ely event that any item is missing or
you experience any problems wit h the product
Please contact the Hoover customer
helpline:
Tel.: AUS: 1300 360 845 NZ: (09) 263 7573
Email: sales@hooverfloorcare.com.au
Should any faults occur with your cleaner during the first
12 months, contact the Hoover Customer Helpline on t he
number above.
If you are having difficulty in obtaining filters or any other
accessories for your cleaner, conta ct the Hoover Customer
helpline or order online a t
www.hoover.com.au www.hoover.co.nz
Page 4

PREPARING YOUR CLEANER
BEFORE CLEANING CARPET
• Vacuum carpet thoroughly.
Use a vacuum cleaner with a power
head for best results.
• Test for colourfastness
• Move the furniture
Raise the handle to the upright position
until it locks in place.
- 4 -
1
Remove the accessories from the
following:
Cleaner body
Cloth ad aptor plate*
Cloth*
2
Test for colourfastness - Wet a white absorbent
cloth with the solution. In a small, hidden area
of your carpet, gent ly rub the surface with the
dampened cloth.
Wait ten minutes and check for colour removal or
bleed with a white paper t owel.
If your carpet has more than one colour, check
all colours.
When cleaning an ent ire room, move f urniture
out of the area to be cleaned. If the furniture is
too heavy to move, place aluminium foil or wax
paper under legs. This will prevent wood
finishes from s taining your carpet. Pin u p
furniture skirts and curtains.
NOTE: Do not over saturate your carpet.
To fold the handle press the handle
release button and fold to the storage
position.
4
Once the handle has been lowered lift
the carry handle to allow the cleaner to
be carried from room to room.
3
5
!
IMPORTANT: This cleaner
should not be u sed to dry
vacuum the carpet.
!
(*Certain models only)
This appliance should be switched off and
disconnected form the power supply before
preparing the cleaner.
Page 5
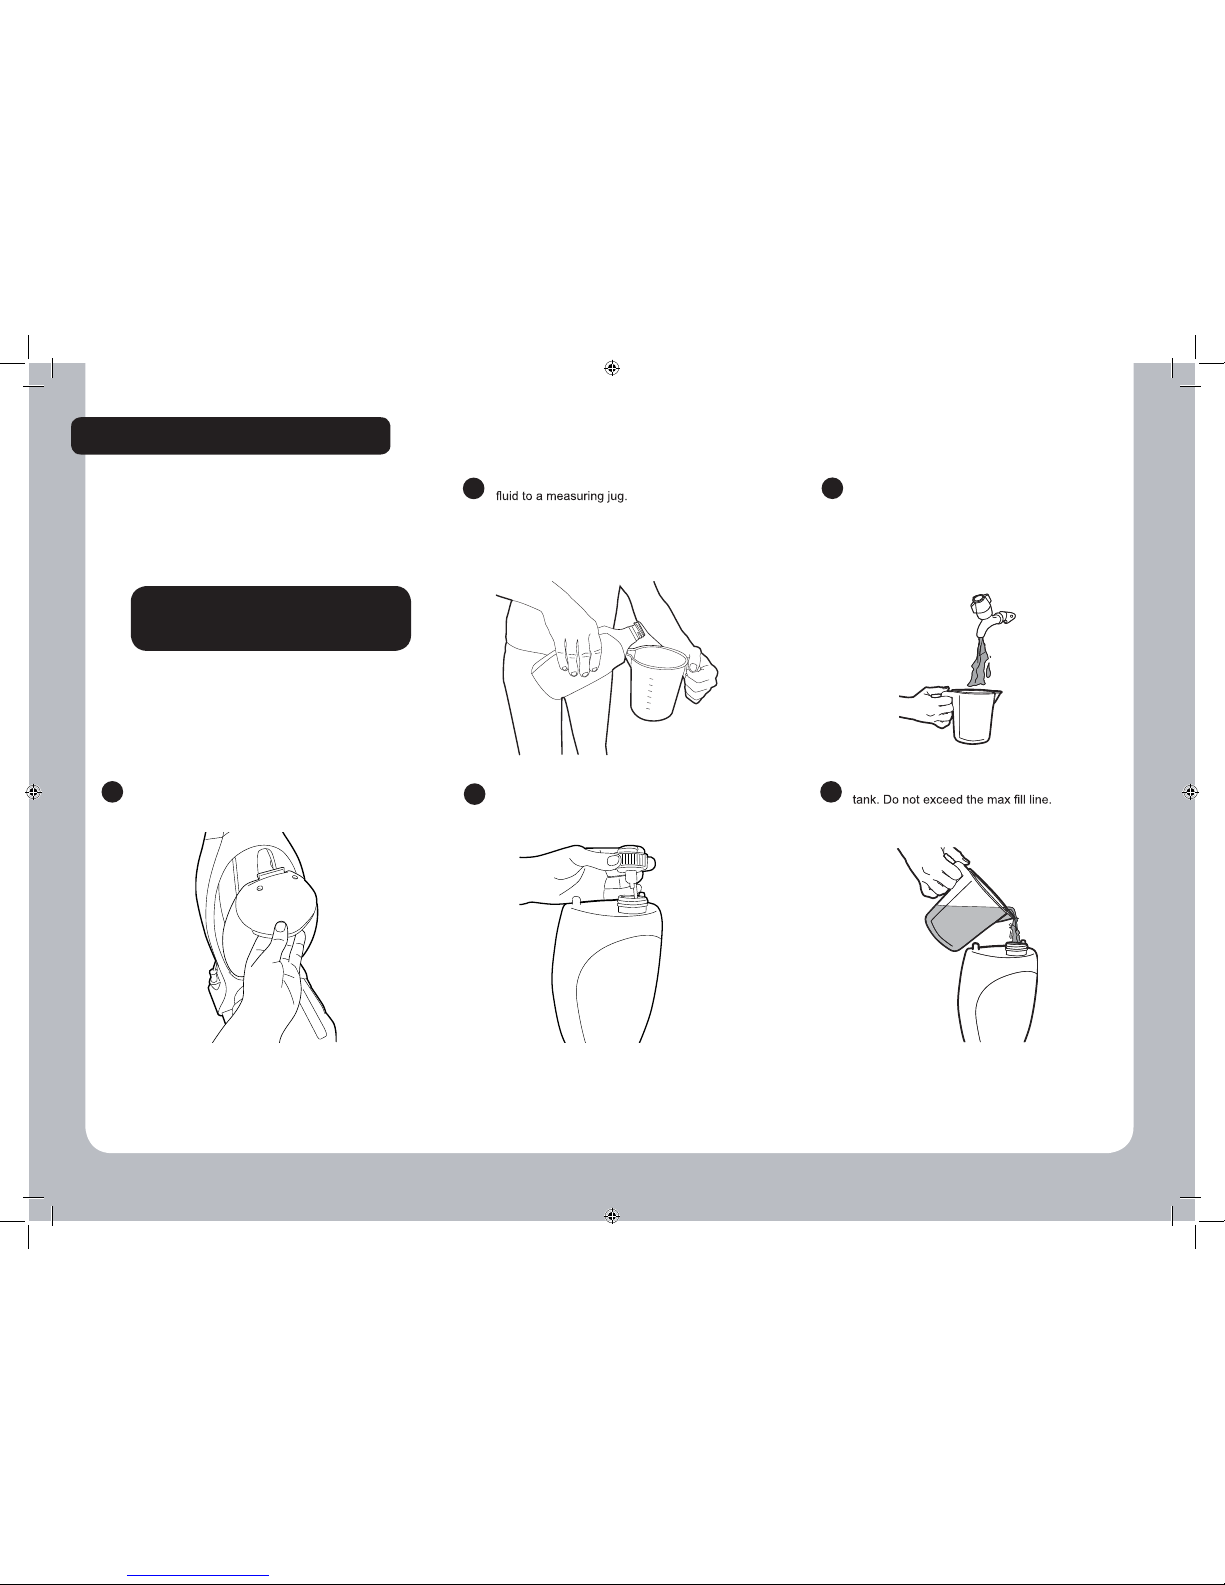
FILLING THE CLEAN WATER TANK
Press the clean water tank release latch
and remove from the cleaner.
Mix the solution with warm water.
(Max. temperature - 40ºC)
Add the required amount of cleaning
(approx. 40ml per 1L of water)
- 5 -
1
Pour the solution into the clean water
Replace the cap and return the clean
water tank to the cleaner.
4
Open the screw cap on the bottom of
the tank.
2
5 3
The clean water tank holds the water and cleaning
solution.
IMPORTANT: Always turn the cleaner off and
disconnect from the electrical outlet before
filling the clean wat er tank.
!
IMPORTANT:When filling
the clean water tank, do not
exceed the max fill line.
!
Do not use any high-foaming solutions as
an excessive amount of foam impairs the
functioning of the shampooer.
Do not use boiling water.
Preferably use distilled water to
prevent calcification.
Page 6

CLEANING CARPETS
Press the cleaner release pedal and
recline the cleaner.
Press the ON/OFF pedal.
Unwrap the power cord and plug the
cleaner into the power supply.
- 6 -
1
For best results apply the solution on the
forward stroke (press trigger) and recover
the solution on the backward stroke (release
trigger).
4
Press the solution mix trigger to release
the solution.
2
5 3
Ensure the c arpet has been checked f or colour fastness.
Never operate without filters as damage to
the appliance could occur.
!
IMPORTANT: This cleaner
should not be u sed to dry
vacuum the carpet.
!
Dry vacuum the carpet thoroughly
before cleaning the carpet. Use a
vacuum cleaner with a powerhead for
best results.
IMPORTANT: Never leave the appliance
unattended with the power on. Turn off when
emptying and filling tanks.
Page 7

CLEANING HARD FLOORS* STORAGE
Use the cleaner as described in ‘Cleaning
Carpets’.
After use remove the cloth from the adapter plate
and wash the cloth pad in a washing machine with
a mild detergent at maximum temperature 30°c.
Do not use a fabric softener.
Before storing the cleaner:
Turn the cleaner off and disconnect from the
electrical socket.
Empty and rinse the dirty water tank. Allow to air dry.
Press the handle release button and lower the
handle for storage.
Do not store the cleaner on a wood surface unless
the cleaner is completely dry.
Attach the Velcro side of the cloth to the
underside of the cloth adaptor plate.
Attached the cloth adapter plate t o the
foot of the cleaner.
- 7 -
1
2
3
!
WARNING: Use only Hoover carpet
cleaning solut ion.
Using other solut ions may affect
your warrant y.
!
* Certain models only
CORD STORAGE
CORD CLIP
Turn the cleaner off and remove the plug from the
electrical socket. Wind the cord around the cord
storage hooks.
Rotate the storage hooks to quickly release the full
length of the power cord.
Do not run over the supply cord.
Clip the supply cord in the cord clip at the back of the
handle to avoid accidentally running the cleaner over
the cord and causing any damage
Prior to storing the machine, empty out any
remaining formula from the formula tank and
rinse out the machine by running a tank of fresh
water from the formula tank.
Page 8

EMPTYING THE DIRTY WATER TANK CLEANING THE EXAUST FILTER
- 8 -
CLEANING THE PRE MOTOR FILTER
located under the dirty
water tank.
Rinse under hand warm
water to remove any debris.
Allow to completely dry
before returning to the
cleaner.
chamber.
Rinse under hand warm
water to remove any
debris. Allow to completely
dry before returning to the
cleaner.
chamber.
Do not wash filters in the
washing machine.
release latch.
!
WARNING: Ensu re both filters are
fitted to the cleaner before use.
IMPORTANT: Clean the filters
after each use.
!
Press the dirty water tank release lever.
1
Turn the tank cap anti-clockwise to
open.
3
Empty the tank. Rinse the tank with
clean water and allow to dry before
storing the cleaner.
2
4
!
!
WARNING: Always switch the cleaner o ff and unplug it from the
electrical sock before emptying the dirty water tank.
WARNING: D O NOT exceed the max fill line on the dirty water tank.
!
!
Remove the dirty water tank from
the cleaner.
Do not wash filters in washing machine.
Page 9

- 9 -
CHANGING THE BRUSHBAR*
Press the dirty water tank release
lever and remove the dirty water
tank. Unscrew 4 retaining screws
on the top surface.
1
Turn the cleaner over. Remove
the brushbar alignment brackets.
2
Unscrew 2 retaining screws
located on the underside of the
detergent nozzle. Remove the
brushbar from the nozzle.
Replace the brush bar and attach to the
nozzle. Attach the alignment brackets and
assemble to the cleaner.
3 4
!
!
IMPORTANT: S witch the cleaner off and
remove the plug from the electricity supply
before dismantling cleaner .
* Certain models only
CLEANING THE BRUSHBAR*
CLEANING THE AGITATOR*
Remove any threads or debris ensuring
the agitat or can rotat e freely.
Turn the cleaner upside down. Remove
any threads or debris from the brush bar.
!
!
!
!
THIS FEATURE VARIES ACCORDING
TO MODE L
Please check your the underside o f
your cleaner and follow the appropriate
instructions.
THIS FEATURE VARIES ACCORDING TO MODEL
Please check your the underside of your cleaner and
follow the appropriate instructions.
Page 10

- 10 -
CHANGING THE AGITATOR / BELT*
Turn cleaner over and remove 7
retaining screws.
1
Remove the belt cover and safety
bar.
2
Slide the agitator assembly out
of the cleaner and check the belt
for wear.
3
Remove the agitator brackets. Replace the agitator by looping the belt
around the agitator making sure it sits
securely in the belt channel.
4
Re-assemble the agita tor assembly to the
cleaner ensuring the agita tor can rota te
freely.
65
!
!
IMPORTANT: Switch the cleaner off and remove the plug from the electricity supply
before dismantling c leaner.
* Certain models only
!
!
THIS FEATURE VARIES ACCORDING TO MODEL
Please check your the underside of your cleaner and
follow the appropriate instructions.
Page 11

- 11-
Genuine HOOVER Spares
Tel. : AUS: 1300 360 845 NZ: (09) 263 7573
www.hoover.com.au www.hoover.co.nz
Always replace parts with genuine Hoover spares. When ordering parts, always
quote your model number.
Hoover Customer Helpline
Should any faults occur with your cleaner during the first 12 months,
contact the Hoover Customer Helpline on the number below.
Tel.: AUS: 1300 360 845 NZ: (09) 263 7573
Email: sales@hooverfloorcare.com.au
Troubleshooting
If your cleaner is not working properly run through the f ollowing checklist.
WARNING: To reduce t he risk of personal injury, unplug the carpet
washer before p erforming maintenan ce/troubleshooting checks.
Why won’t th e carpet washer turn on?
• It may not be plugged into the elect rical outlet correctly: ensure that the plug
is pushed in securely and switched on.
• The power button on the unit hasn’t been f ully depressed.
• If unit cuts out during use, disconnect the unit from t he wall socket, allow to
cool for one hour, clean the f ilter and empty the dirty water tank and check
hose, brushbar for bloc kages.
Why won’t th e cleaner pick up solution/spills?
• The dirty water tank may be full and the aut o shut off engaged. Empty the
dirty water t ank.
• Ensure the dirt y water tank is fitted correctly and the tank cap is
securely
fitted.
• Check the brushbar f or blockages.
Why won’t th e solution/clean water dispense?
• Ensure the clean water tank is fi tted securely.
• The solution/ clean water tank may be empty.
• Ensure dirty water tank is f itted securely.
If there is any doubt call t he Hoover Customer Helpline for
advice. They may be able to a ssist you over the t elephone.
Page 12

- 12 -
GUARANTEE STATEMENT
The guarantee condit ions for this appliance are as defined by our representative
in the country in which it is sold. Details regarding these con ditions can b e
obtained from the dealer f rom whom the appliance was purchased. The bill of
sale or receipt must be produced when making any claim under the terms of this
guarantee.
Subject to change wit hout notice.
Environment - WEEE Directive
This appliance is marked according to the European Directive 20 11/65/
EC on Waste Electrical and Electronic Equipment (WEEE).
By ensuring this product is disposed of correctly you will help prevent
potential negative consequences for the environment and human health,
which could otherwise be caused by inappropriate waste handling of this
product.
The symbol on the product indicates that this product may not be treated as
household waste. Instead it shall be handed over to the appliance collection point for
recycling of electrical and electronic equipment.
Disposal must be carried out in accordance with the local envir onmental regulations
for waste disposal.
For more detailed information about treatment, recovery and recycling of this product,
osal service or the
shop where you purchased the product.
Quality
BSI ISO 9001
Hoover’s factories have been independently assessed for quality . Our products are
made using a quality system which meets the requirements of IS O 9001.
Technical Specification
Model CJ600 CJ800
240V 600W 240V 800W
5.5 6.8
2.5 2.5
335 335
955 955
340 340
Page 13

Keep this Guarantee with your receipt as proof of purchase should you ever require service.
Purchase Date........../........../..........
1 Year
GUARANTEE
This guarantee applies in Australia and New Zealand only.
For the guarantee in another country, please
contact your local retailer/distrubutor.
Hoover Floorcare policy is one of continuous development and accordingly
we reserve the right to change specifications without prior knowledge.
Contents are copyright.
Level 1,Building 2 Brandon Business Park, 530 Springvale Road Glen Waverley Victoria 3150
HOOVER FLOORCARE ASIA PACIFIC PTY LTD.
(ABN 37 086 345 575)
Your Hoover cleaner, in the case of domestic use, has a two year parts and labour warranty against
product defects and failures when the product is used in accordance with the terms and conditions of
this warranty statement.
This warranty commences from the original date of purchase and is not transferable; please retain your
original proof of purchase for any warranty claims. This warranty is valid only in the country where the
cleaner is purchased.
The cleaner must be operated in accordance with these instructions and used only for domestic
household cleaning to remove DRY dirt and dust from household carpets, flooring and fabrics. This
cleaner is not fit to be used as an industrial cleaner, and is not designed for the collection of vitreous
building material including particle poard, construction products and similar products such as
wood/fibres, cement, fillers, fibre glass etc or excessive or frequent sand. The infrequent pick-up of
these materials in these circumstances may be harmful to your cleaner and may void the manufacturer’s
warranty.
Accessories and consumables including dust bags and filters, unless defective in manufacture, are not
subject to this warranty. In order to prolong the life of accessories and consumables, regular care and
maintenance is recommended.
When properly used and cared for, your cleaner will render excellent service; refer to the instruction
manual for further details, as misuse or failure to follow the instruction makes this warranty void.
In the event of service or advice being needed, please contact Hoover Floorcare Asia Pacific Pty Ltd,
Level 1,Building 2 Brandon Business Park,
530 Springvale Road Glen Waverley Victoria 3150,
or on 1300 360 845, Monday- Friday 9am - 5pm EST. The decision to repair or replace the cleaner
is at the discretion of Hoover Floorcare. If Hoover Floorcare decide to repair or replace the cleaner, it
will do so at its own cost.
Hoover Floorcare is unable to accept responsibility under this warranty for any repair work not carried
out by an authorised Hoover Service Agent or from the use of non-genuine parts. If any part is no
longer available or manufactured, Hoover Floorcare will replace it with a genuine functional replacement part. This warranty does not apply to the cost of replacing any parts of the product due to normal
wear and tear, alterations, improper installation, physical abuse, misuse or accidental damage. Any
transportation costs involved in the repair of defective parts shall be borne by the claimant.
If proof of purchase cannot be provided at the time of a warranty claim or service, any work carried
out on the cleaner is chargeable.
The repair or replacement of the cleaner under this warranty does not extend the original period of
warranty.
The benefits conferred by this warranty are in addition to all other rights and remedies in respect of
the product as outlined under the Competition and Consumer Act and other State and Territory laws.
“Our goods come with guarantees that cannot be excluded in the Australian Consumer Law. You are
entitled to a replacement or refund for a major failure and for compensation for any other reasonably
forseeable loss or damage. You are also entitled to have the goods repaired or replaced if the goods
fail to be of acceptable quality and the failure does not amount to a major failure.”
- 12 -
Page 14

®
Hoover Customer Helpline
1300 360 845
NZ: (09) 263 7573
www.hoover.com.au
www.hoover.co.nz
Made in China to our exact
specifications
Designed and Engineering
in Italy
PRINTED IN CHINA.
48007958
V1 05/13
Hoover Floorcare Asia Pacific Pty Ltd
(ACN 086 345 575)
Level 1, Building 2, Brandon Business Park
530 Springvale Road, Glen Waverley
Victoria 3150
Due to a policy of continuous improvement
some specifications may change prior to
notification.
The words HOOVER and the circular
emblem are registered trademarks.
 Loading...