

Page 1

HUSHTONE™
CORDLESS UPRIGHT VACUUM
USER MANUAL
For use with model CH95413.
IMPORTANT:
READ CAREFULLY BEFORE
ASSEMBLY AND USE. THIS PRODUCT IS
INTENDED FOR COMMERCIAL USE ONLY.
Appearance of the product may dif fer slightly from the images depicted.
Page 2

2
Welcome.
Thank you for choosing a Hoover® Commercial product.
IF YOU NEED ASSISTANCE
Please call 1-800-944-9200 US, 1-800-263-6376 CAN
(Mon-Fri 8am-7pm EST) to speak with a customer service representative;
or visit our website at HooverCommercial.com.
Page 3

3
Table of Contents
Safety Instructions 4-5
Product Features 6-7
Tools 8
Attaching The Tools
9
Getting Started 10
M-PWR
™
40V Battery & Charger 10
Using Your HushTone™ Cordless Upright Vacuum
11-13
Maintenance 14
Performance Indicator
14
How To Replace The Filter Bag
15
How To Check For Clogs
16
Filters
17-19
Removing Brushroll & Belt
20-21
Troubleshooting 22
Warranty 23
French 25
Spanish 49
Page 4

4
IMPORTANT SAFETY INSTRUCTIONS
SAVE THESE INSTRUCTIONS!
IMPORTANT: READ CAREFULLY BEFORE ASSEMBLY AND USE. WHEN
USING AN ELECTRICAL APPLIANCE, BASIC PRECAUTIONS SHOULD ALWAYS BE
FOLLOWED, INCLUDING THE FOLLOWING: READ ALL INSTRUCTIONS
BEFORE USING THIS APPLIANCE.
WARNING: TO REDUCE THE RISK OF FIRE, ELECTRIC
SHOCK OR INJURY:
•
Fully assemble before operating.
•
Do not use the unit, store or charge battery outdoors or on wet or damp surfaces. Do not allow charger to get wet.
•
Do not allow to be used as a toy. Not intended for use by children age 12 and under. Close supervision is necessary
when used by or near children. To avoid injury or damage, keep children away from product, and do not allow
children to place fingers or other objects into any openings.
•
Use only as described in this manual. Use only manufacturer’s recommended attachments and products.
•
Do not use charger with damaged cord or plug. If appliance or charger is not working as it should, has been
dropped, damaged, left outdoors, or dropped into water, take it to a service center prior to continuing use.
•
Do not pull or carry charger by cord, use cord as a handle, close a door on cord, or pull cord around sharp edges or
corners. Do not place product on cord. Do not run appliance over cord. Keep cord away from heated surfaces.
•
Do not unplug charger by pulling on cord. To unplug charger, grasp the plug, not the cord.
•
Do not handle charger — including charger plug and charger terminals, or appliance — with wet hands.
•
Do not incinerate the charger, battery, or appliance even if it is severely damaged. The batteries can explode in a fire.
•
Do not put any object into openings. Do not use with any opening blocked; keep free of dust, lint, hair, and anything
that may reduce air flow.
•
Keep hair, loose clothing, fingers, and all parts of body away from openings and moving parts. Brushroll continues
to rotate when in the upright position.
•
Use extra care when cleaning on stairs. To avoid personal injury or damage and to prevent the cleaner from falling,
always place cleaner at bottom of stairs on floor. Do not place cleaner on stairs or furniture as it may result in
injury or damages.
•
This product includes rechargeable lithium-ion batteries. Do not expose batteries to high temperatures, as they
may catch fire and/or explode.
•
Do not expose battery to crushing, incineration or similar actions.
•
Do not dispose of battery in a fire or trash compactor. See battery disposal section for directions.
•
Do not attempt to disassemble battery.
•
Unplug the charger from the outlet before any routine cleaning or maintenance.
•
Leaks from battery cells can occur under extreme conditions. If any liquid gets on the skin wash quickly with soap
and water. If any liquid gets into the eyes, do not rub eyes, immediately flush them with clean water continuously
for a minimum of 15 minutes. Seek medical attention immediately.
•
Use only the charger (
Hoover
Commercial Part #CH90002) supplied by
Hoover
Commercial to recharge.
•
Use only the battery (Hoover Commercial Part #CH90040) supplied by Hoover Commercial. Other batteries may
burst causing serious personal injury or damage.
•
Do not touch or insert objects into battery pack or charger terminals.
•
The charger is for indoor use only. Be sure to always keep the battery and charger in a dry place.
•
Do not attempt to short circuit the battery or charger terminals.
•
Do not use to pick up flammable or combustible liquids, such as gasoline, or fine wood sandings, or use in areas
where they may be present.
•
Do not pick up anything that is burning or smoking, such as cigarettes, matches, or hot ashes.
•
Do not use without Filters and/or Dust Bag in place.
•
Always turn off this appliance before connecting or disconnecting wand or tools.
•
Prevent unintentional starting. Ensure the switch is in the off-position before connecting to battery pack, picking
up or carrying the appliance. Carrying the appliance with your finger on the switch or energizing appliance that
have the switch on invites accidents.
•
Disconnect the battery pack from the appliance before making any adjustments, changing accessories, or storing
appliance. Such preventative safety measures reduce the risk of starting the appliance accidentally.
•
Recharge only with the charger specified by the manufacturer. A charger that is suitable for one type of battery
pack may create a risk of fire when used with another battery pack.
•
Use appliances only with specifically designated battery packs. Use of any other battery packs may create a risk of injury and fire.
Page 5

5
SAFETY INSTRUCTIONS
•
When battery pack is in use, keep it away from other metal objects, like paper clips, coins, keys, nails, screws, or
other small metal objects, that can make a connection from one terminal to another. Shorting the battery terminals
together may cause burns or a fire.
•
Under abusive conditions, liquid may be ejected from the battery; avoid contact. If contact accidentally occurs,
flush with water. If liquid contacts eyes, additionally seek medical help. Liquid ejected from the battery may cause
irritation or burns.
•
Do not use a battery pack or appliance that is damaged or modified. Damaged or modified batteries may exhibit
unpredictable behavior resulting in fire, explosion or risk of injury.
•
Do not expose battery pack or appliance to fire or excessive temperature. Exposure to fire or temperature above
265°F may cause explosion.
•
Follow all charging instructions and do not charge the battery pack or appliance outside of the temperature range
specified in the instructions. Charging improperly or at temperatures outside of the specified range may damage
the battery and increase the risk of fire.
•
Have servicing performed by a qualified repair person using only identical replacement parts. This will ensure that
the safety of the product is maintained.
•
Do not modify or attempt to repair the appliance or the battery pack (as applicable) except as indicated in the
instructions for use and care.
CAUTION: TO REDUCE THE RISK OF DAMAGE:
•
Use on dry floor only.
•
Avoid picking up hard, sharp objects with this product, as they may cause damage.
•
Store appropriately indoors in a dry place. Do not expose machine to freezing temperatures.
•
Brushroll continues to rotate while product is turned on and handle is in the upright position. To avoid damage to carpet,
rugs and flooring, avoid tipping cleaner or setting it on furniture, fringed area rugs or carpeted stairs during tool use.
•
Do not use sharp objects to clean out hose as they can cause damage.
•
With brushroll on, do not allow cleaner to sit in one location for an extended period of time as damage to floor can result.
WARNING:
TO REDUCE THE RISK OF ELECTRIC SHOCK, THE CHARGER HAS A
POLARIZED PLUG (ONE BLADE IS WIDER THAN THE OTHER). THIS PLUG WILL FIT IN A
POLARIZED OUTLET ONLY ONE WAY. IF THE PLUG DOES NOT FIT FULLY IN THE OUTLET,
REVERSE THE PLUG. IF IT STILL DOES NOT FIT, CONTACT A QUALIFIED ELECTRICIAN
TO INSTALL THE PROPER OUTLET. DO NOT CHANGE THE PLUG IN ANY WAY.
WARNING: THIS PRODUCT CONTAINS CHEMICALS, KNOWN TO THE STATE OF
CALIFORNIA TO CAUSE CANCER AND BIRTH DEFECTS OR OTHER REPRODUCTIVE
HARM. WASH HANDS AFTER USING.
BATTERY DISPOSAL WARNING: RISK OF EXPLOSION OR EXPOSURE
TO TOXIC MATERIAL.
CAUTION:
The battery used in this device may present a risk of fire or chemical burn if mistreated. Do not
disassemble, heat above manufacturer’s maximum temperature limit (60°C/140°F), or incinerate. Replace battery with
Hoover Commercial Battery Part #CH90040 only. Use of another battery may present a risk of fire or explosion. Dispose
of used battery promptly. Keep away from children. Do not disassemble and do not dispose of in fire. Do not attempt to
disassemble the battery or remove any component projecting from the battery terminals. The battery and charger have
no user serviceable parts. Fire or injury may result. Prior to disposal, protect exposed terminals with heavy insulating tape
to prevent shorting.
LITHIUM-ION BATTERIES:
The battery must be collected, recycled or disposed of in an environmentally
sound manner. The EPA certified RBRC Battery Recycling Seal on the lithium-ion (Li-ion) battery indicated Techtronic
Industries, a corporate affiliate of Hoover Commercial, is voluntarily participating in an industry program to collect
and recycle these batteries at the end of their useful life, when taken out of service in the United States or Canada.
The RBRC program provides a convenient alternative to placing used Li-ion batteries into the trash or the municipal
waste stream, which may be illegal in your area. Please visit www.rbrc.org/call2recycle/
for information on Li-ion battery recycling and disposal bans/restrictions in your area.
Hoover Commercial involvement in this program is part of our commitment to preserving our
environment and conserving our natural resources.
Page 6

6
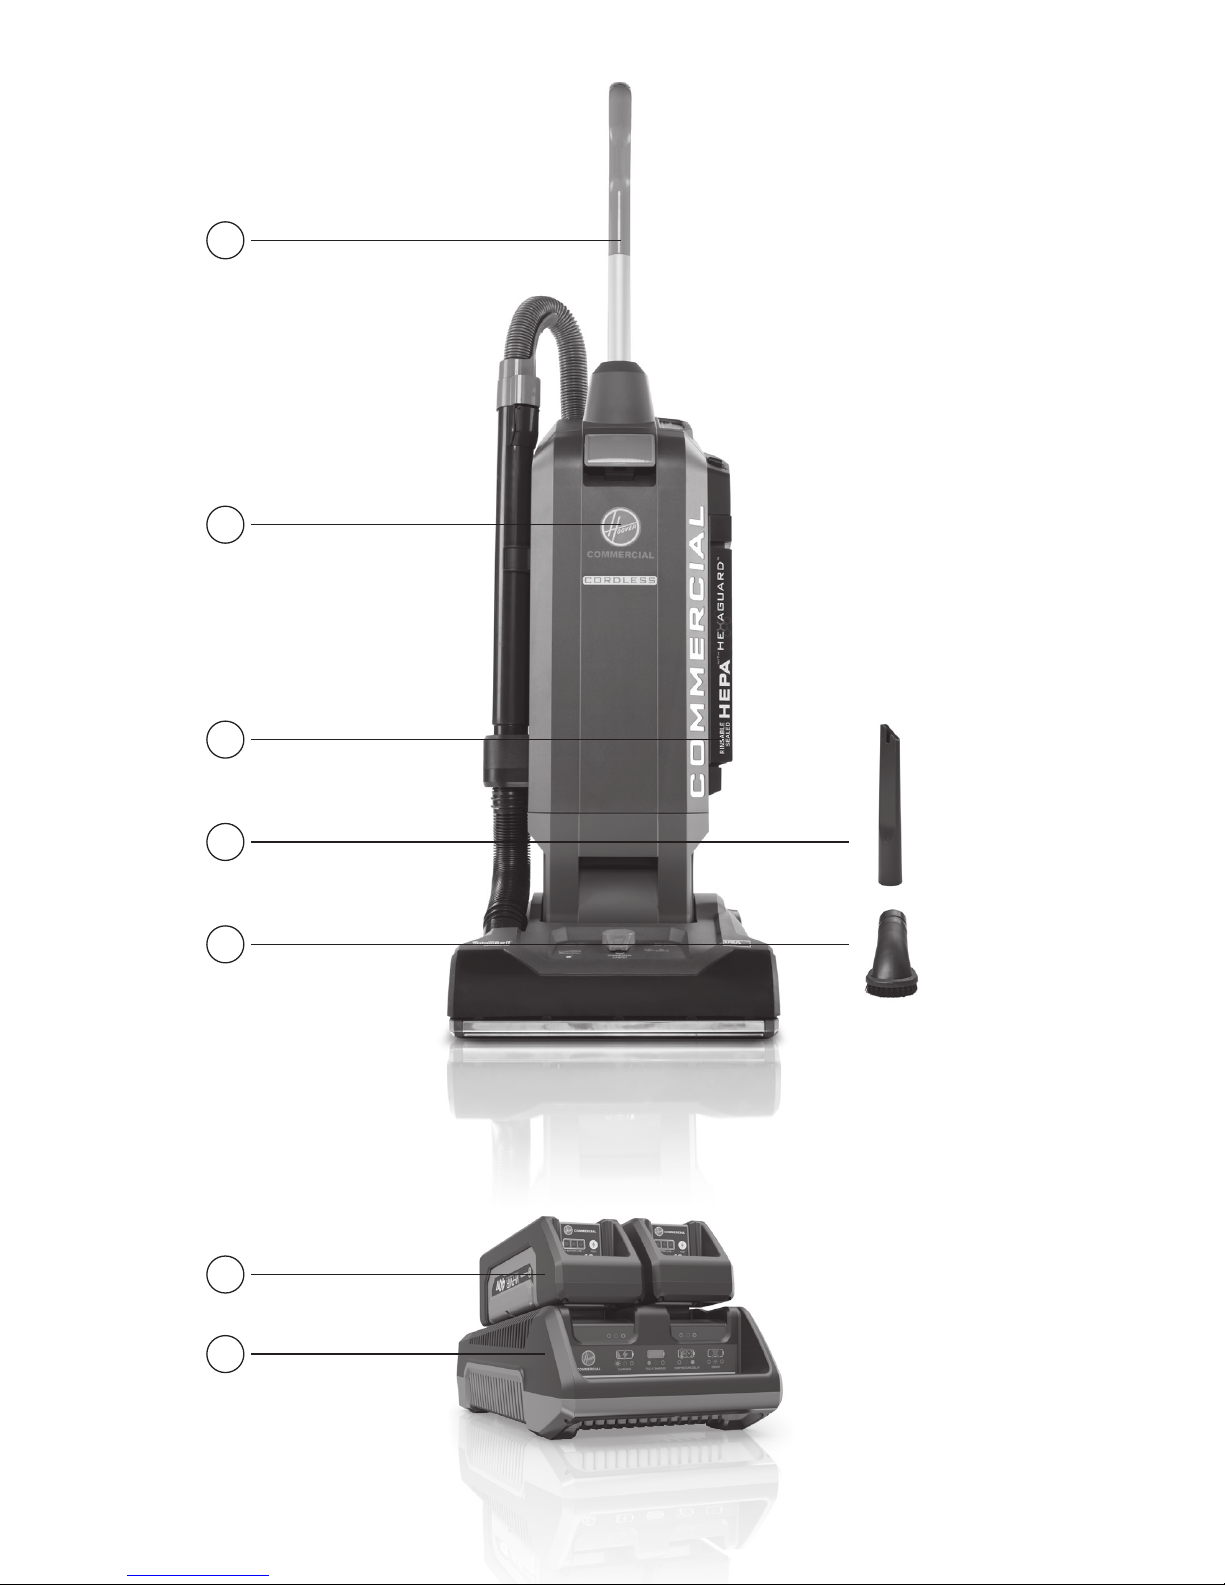
Product Features
Carton Contents
A
Handle
B
Bag Cover Door
C
HEPA Filter
D
Crevice Tool
E
Dusting Brush
+ User Manual
+ Quick Guide
F
M-PWR™40V Li-ion Battery*
G
M-PWR™40V Dual-Bay Charger*
*SOL D SE PARATELY
Page 7
7
PRODUCT FEATURES
A
B
C
D
E
F
G
Page 8
8
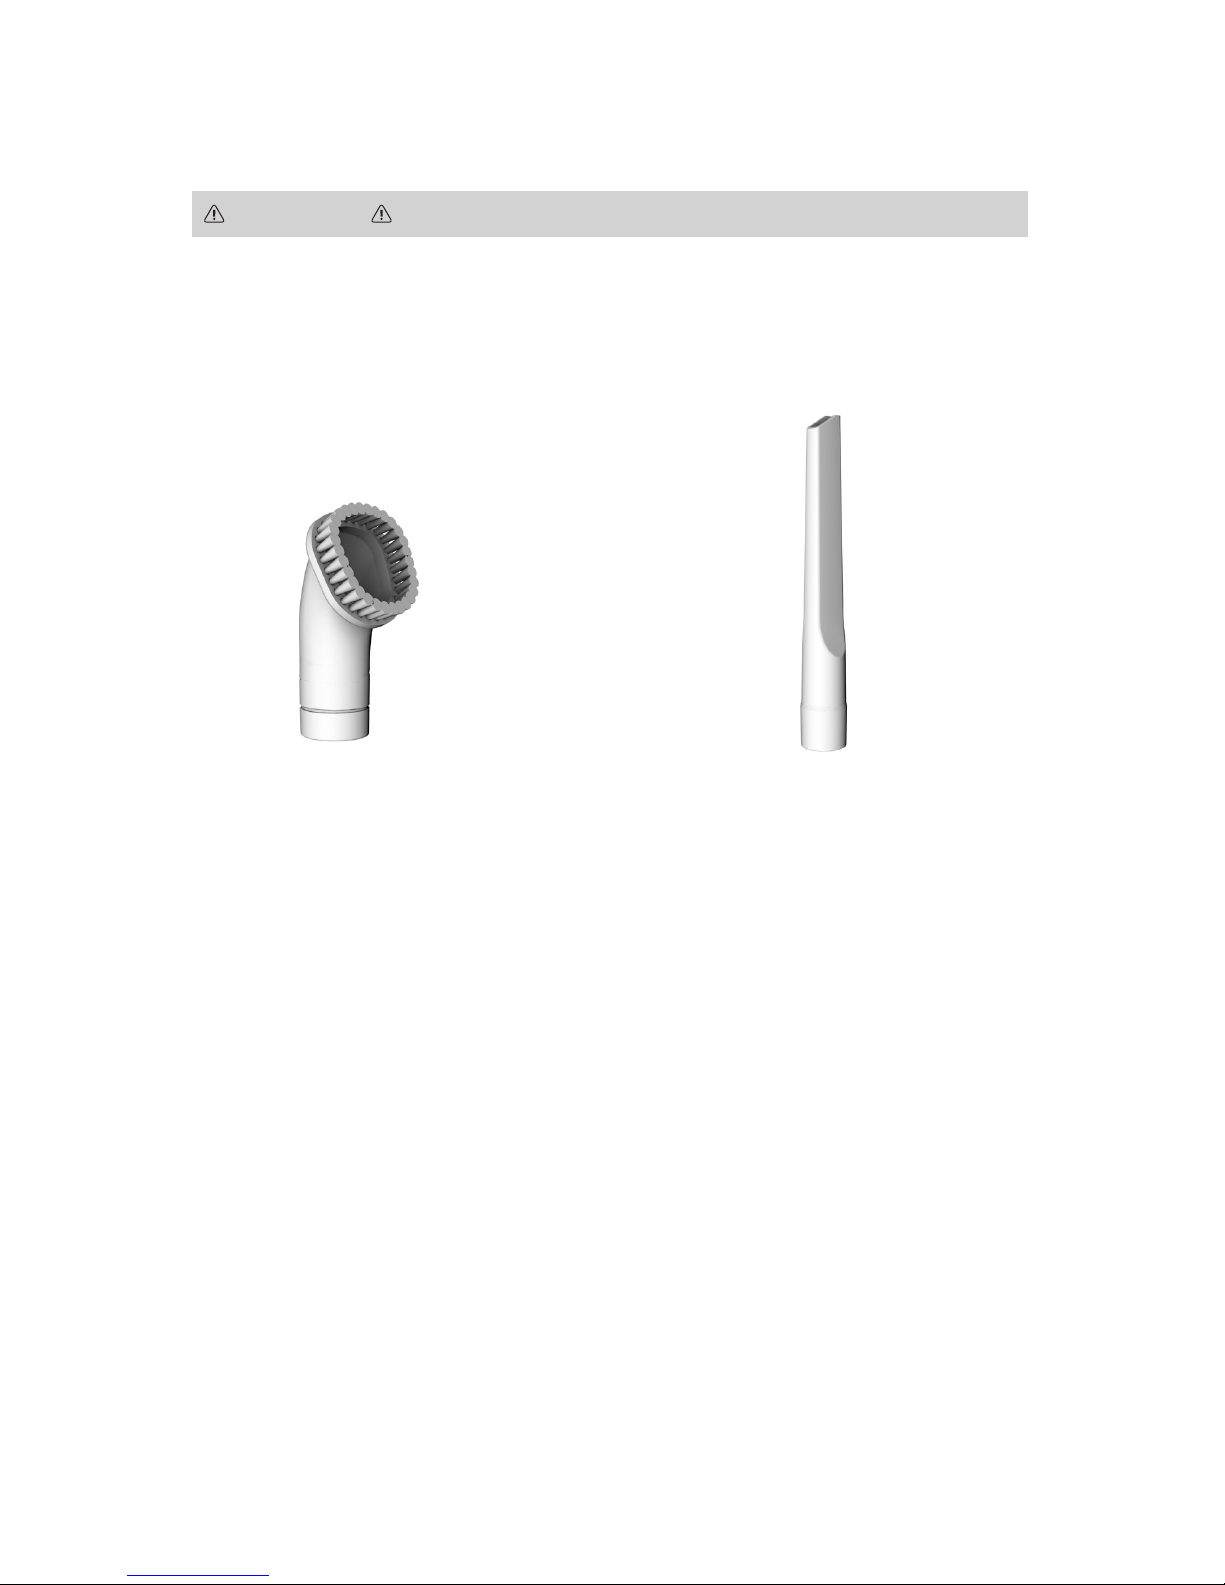
Tools
CAUTION
NOT TO BE USED FOR GROOMING A PET.
NOTE: Accessory tools can be used with the quick clean built-in wand.
Upholstery Tool: For upholstered
furniture, draperies, mattresses,
clothing and carpeted stairs.
Crevice Tool: For extended reach
into tight spaces, corners, and along
edges of dresser drawers, furniture,
stairs and baseboards.
Page 9

9
TOOLS
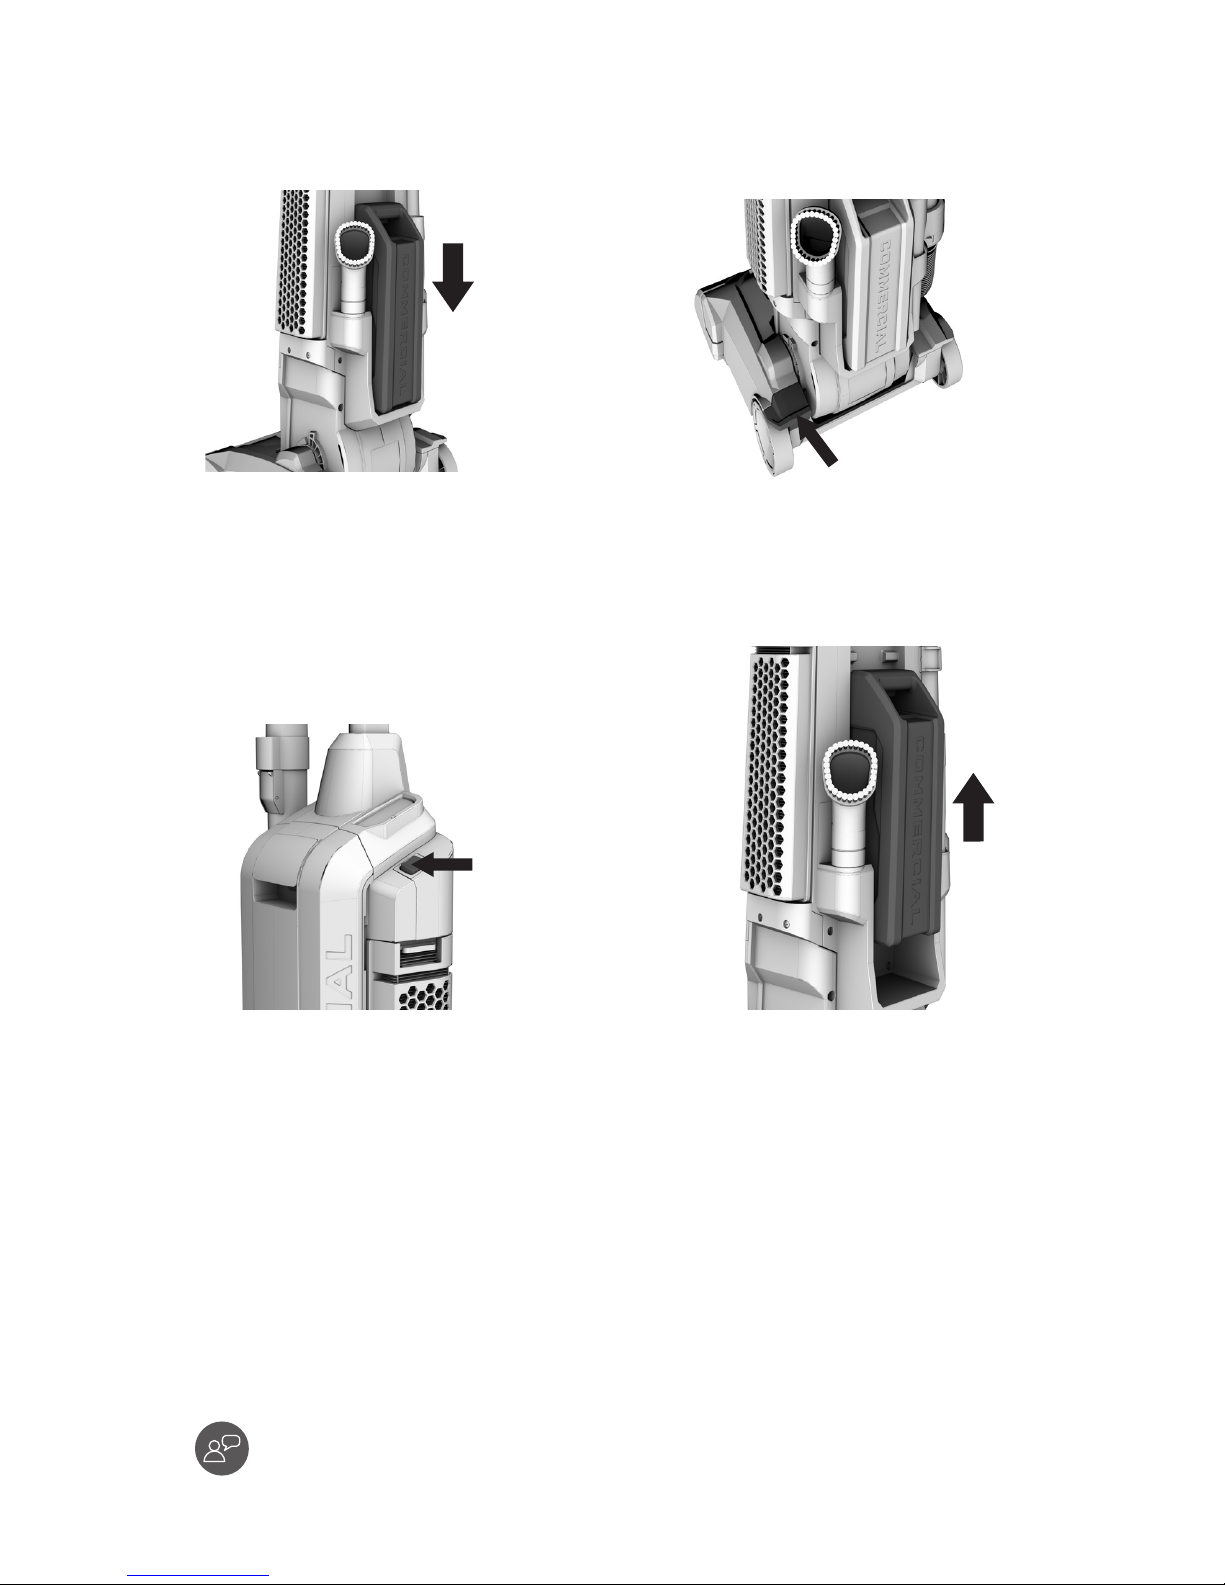
Attaching the Tools
3
To use hose end, press release
tab and pull from wand handle.
CAUTION
BRUSHROLL CONTINUES TO TURN WHILE VACUUM IS TURNED ON AND HANDLE IS IN UPRIGHT
POSITION. TO AVOID DAMAGE TO CARPET, RUGS, FURNITURE, AND FLOORING, AVOID TIPPING VACUUM OR SETTING IT ON FURNITURE,
FRINGED AREA RUGS, OR CARPETED STAIRS DURING USE. USE EXTRA CARE WHEN CLEANING ON STAIRS. TO AVOID PERSONAL INJURY
OR DAMAGE AND TO PREVENT THE CLEANER FROM FALLING, ALWAYS PLACE CLEANER AT BOTTOM OF STAIRS ON FLOOR. DO NOT
PLACE CLEANER ON STAIRS OR FURNITURE AS IT MAY RESULT IN INJURY OR DAMAGES. WHEN USING TOOLS, ALWAYS INSURE HANDLE
IS IN UPRIGHT POSITION.
1
For extended reach, remove wand
from holder by pulling straight up
and out.
2
Push tools firmly into wand end.
When finished, twist and pull to
remove.
WARNING
ALWAYS TURN OFF THIS APPLIANCE BEFORE CONNECTING OR DISCONNECTING WAND OR TOOLS.
Page 10
10
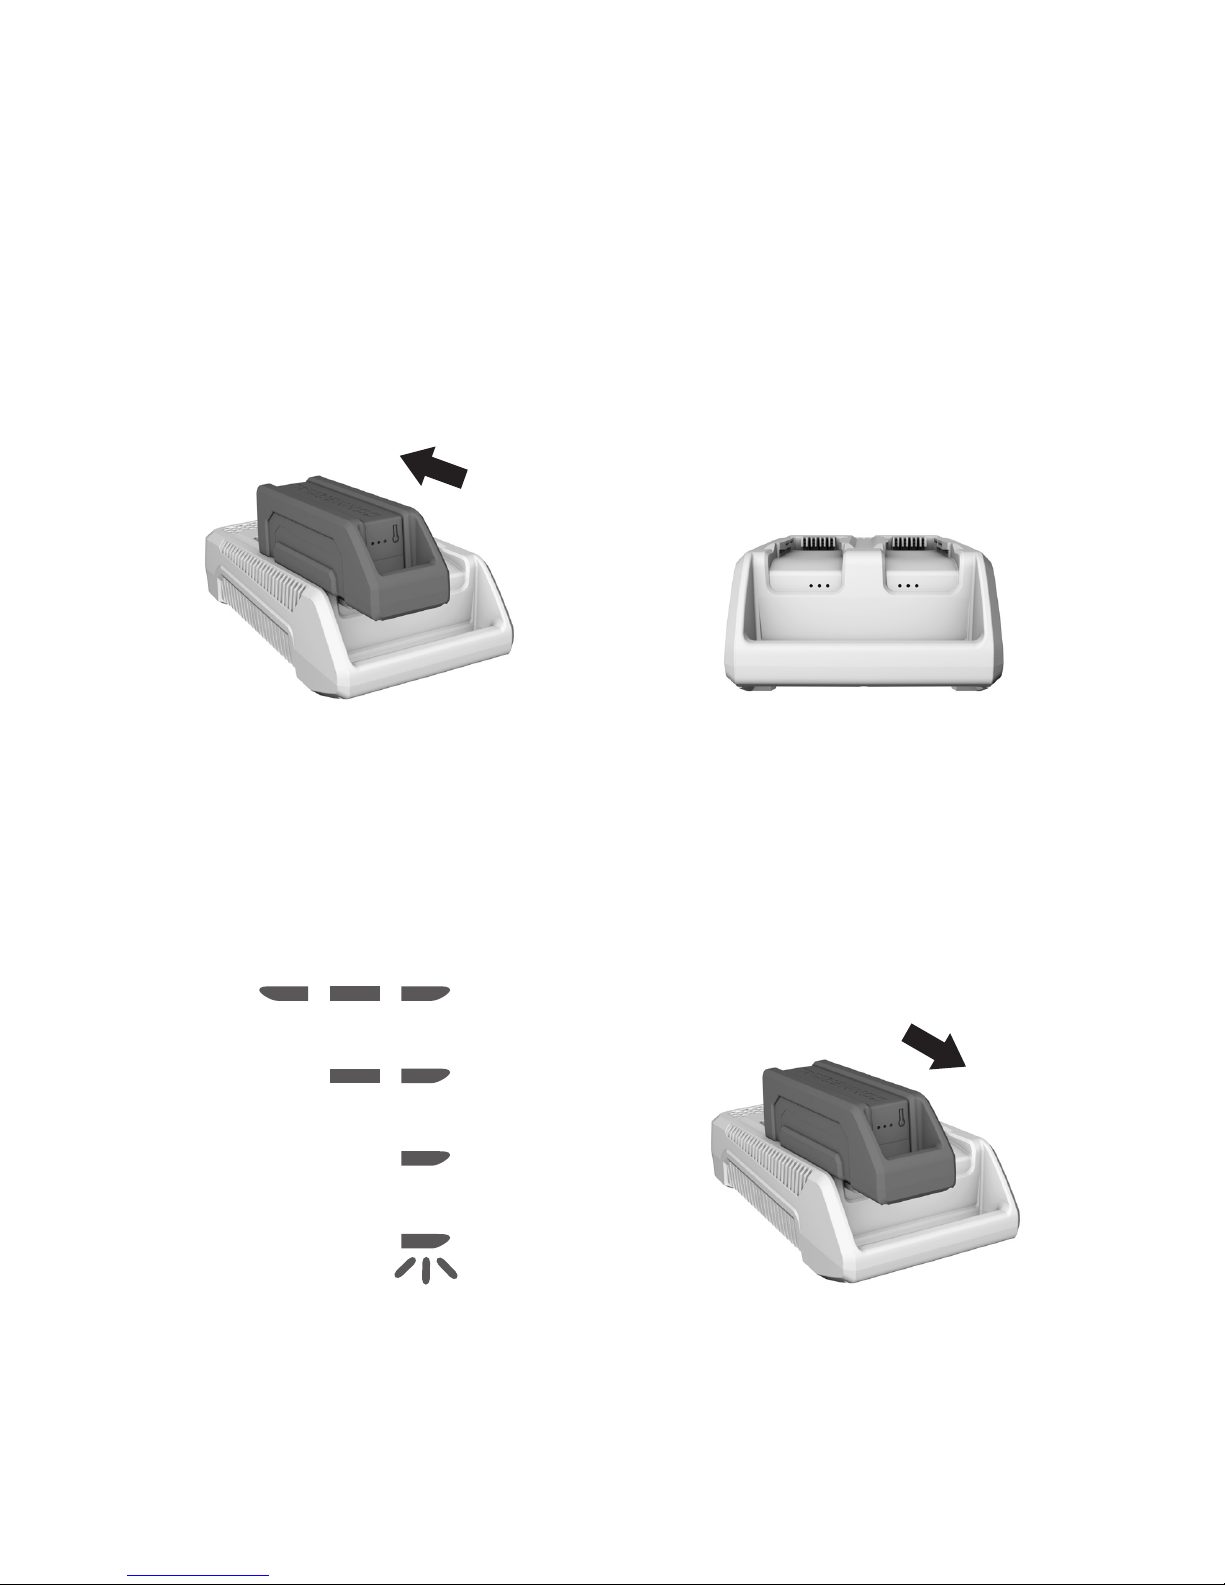
M-PWR™40V Battery & Charger (Sold Separately)
1
To charge the battery, slide battery
into charger. Push backward until
battery clicks into place and LED
Status Indicator is lit.
3
When charging, the fully lit LEDs
on the battery will indicate charge
level.
2
Charger LED Status Indicator will
turn green when battery is fully
charged.
4
To remove battery, press the
release button and slide battery
forward while holding down on
charger base.
NOTE: Batteries are shipped in a low charge condition to prevent possible problems. You should
charge them before first use.
Only one battery is charged at a time. When two batteries are in place, the battery with the most
power remaining will be charged first. This ensures the fastest time to full charge.
CHARGING AMBIENT TEMPERATURE RANGE: 5 °C – 50 °C (41 °F – 122 °F)
10%–33% Charged
0%–10% Charged
33%–66% Charged
66%–100% Charged
Page 11
11
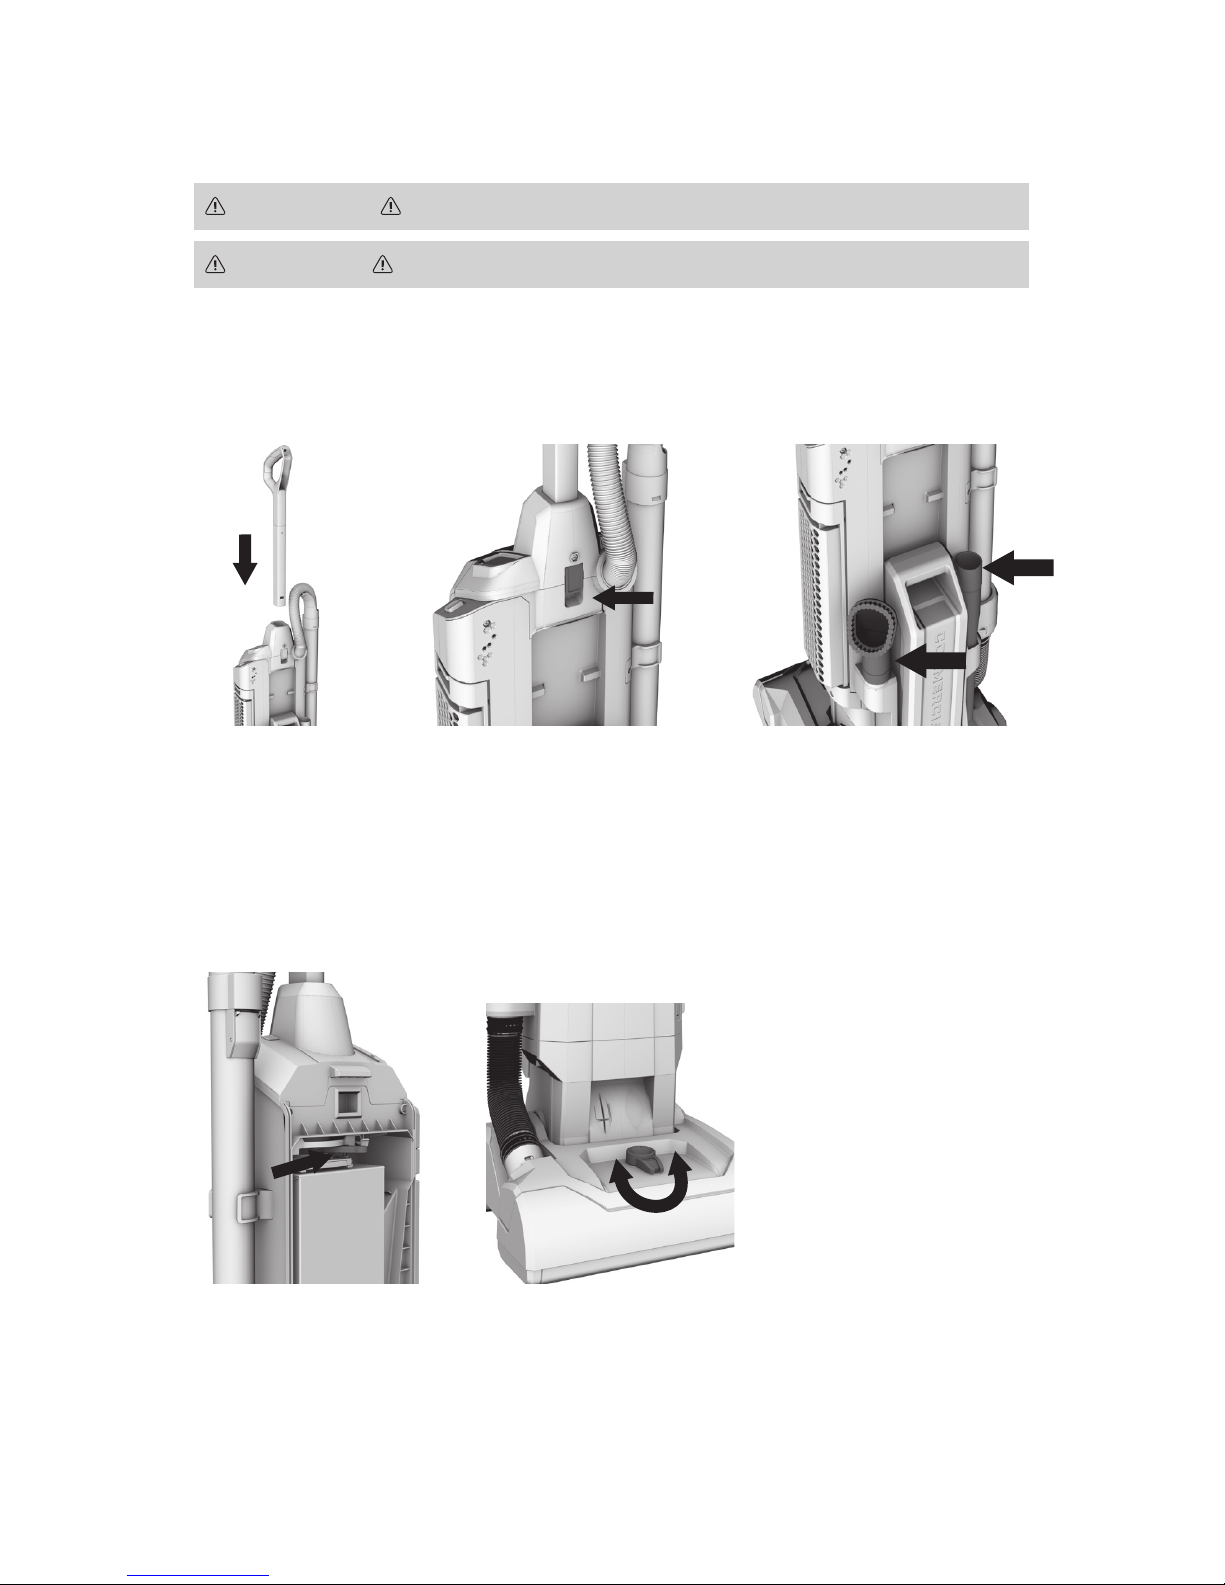
GETTING STARTED
Getting Started
NOTE: Do not use vacuum without both filter bag and HEPA filters in place.
NOTE: Battery should be fully charged before use. Refer to page 10 for charging instruction.
AMBIENT TEMPERATURE RANGE: 0 °C – 40 °C (32 °F – 104 °F)
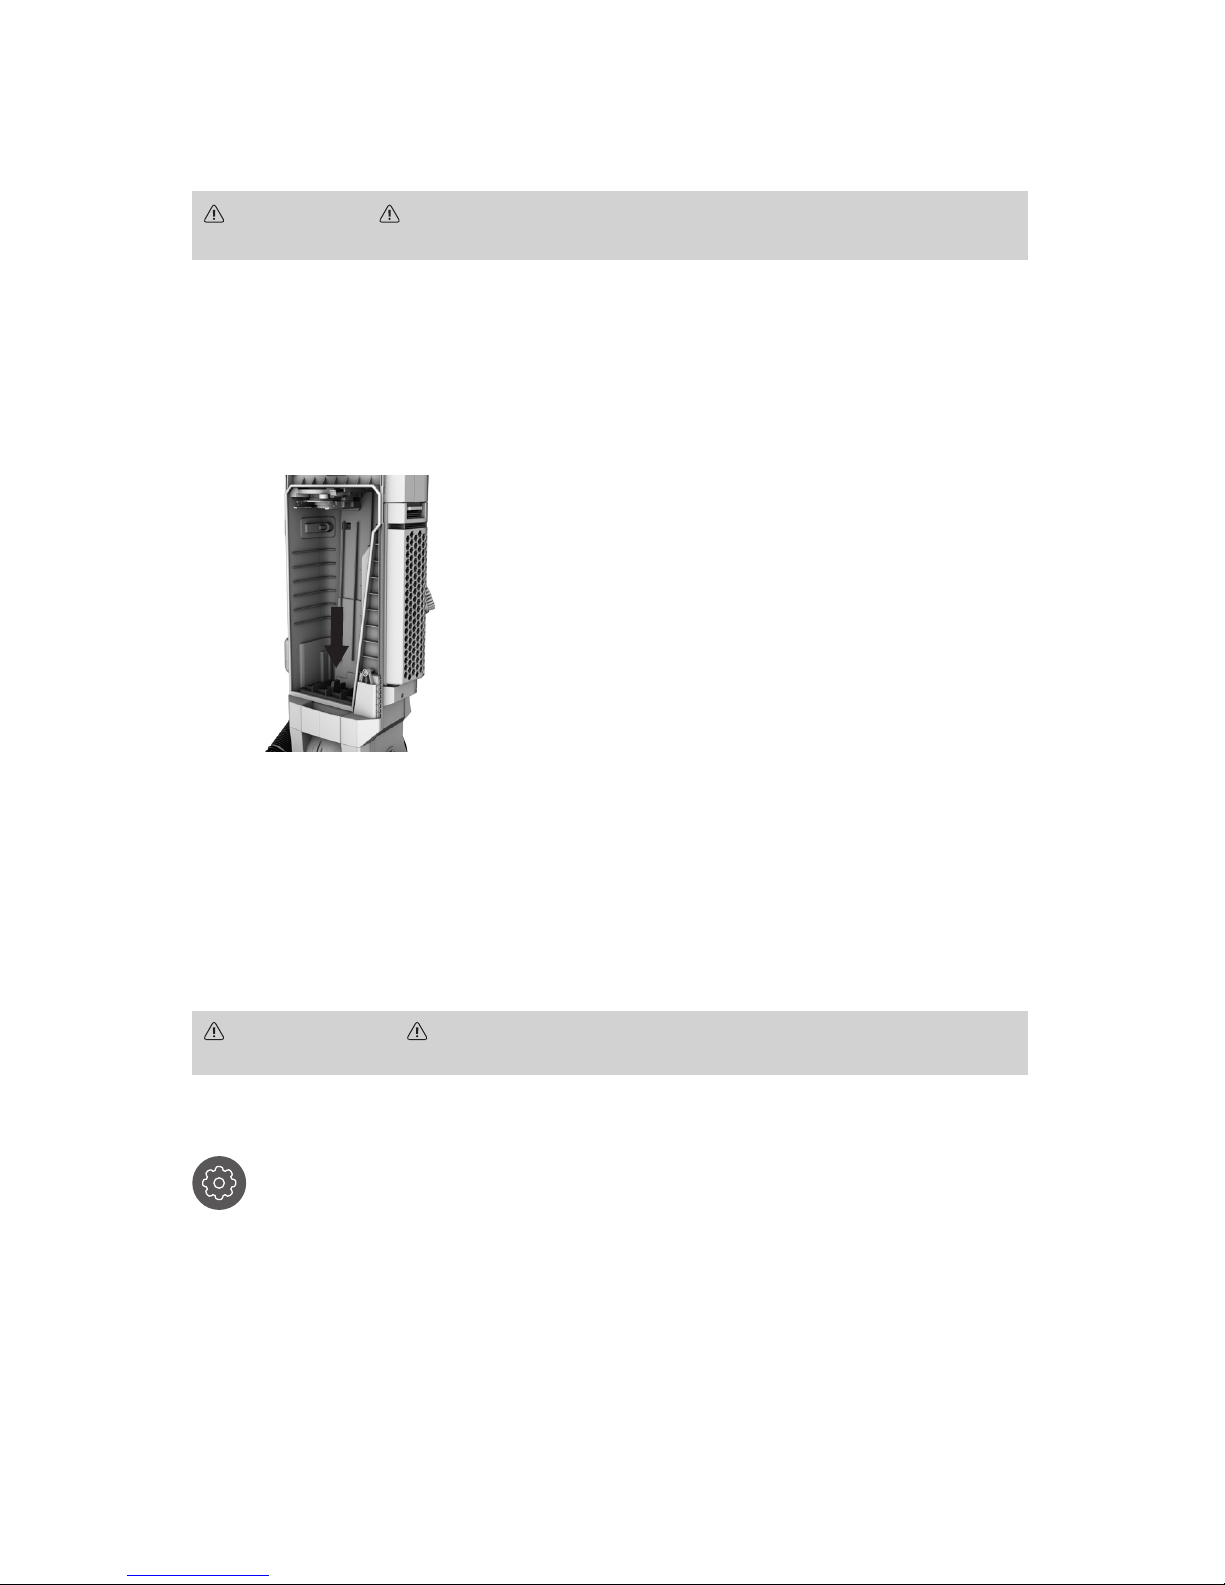
1
Insert handle
firmly into
housing.
WARNING
TO REDUCE THE RISK OF PERSONAL INJURY: REMOVE BATTERY BEFORE CLEANING OR SERVICING.
2
Press latch to lock to
the handle into place.
3
Insert accessory tools
into holders.
4
Rotate lever to
ensure secure
vacuum bag fit.
Note: bag door will
not close if vacuum
bag is not properly
installed.
5
Rotate height adjust
lever to desired level.
If vacuum is difficult
to push, turn knob to
next higher setting.
CAUTION
NOT TO BE USED FOR GROOMING A PET.
Page 12
12
6
Insert battery into housing by
grasping the integrated handle
and pushing firmly in until battery
locks into place.
8
Turn vacuum on by
pressing switch forward
or back to select desired
power level.
Press backward to
the ON position ( I ) for
normal cleaning and less
disruption, with lower
decibel noise levels.
Press forward to the
BOOST position ( II ) when
more power is desired, for
cleaning entry rugs or high
traffic areas.
Turn off by locating switch
in middle position ( O ).
7
Push handle release
pedal with foot and pull
back on handle.
9
To remove battery, grasp the
integrated handle while pressing
the release button. Slide out from
housing by pulling while holding
down release button.
Getting Started
IF YOU NEED ASSISTANCE
Please call 1-800-944-9200 US, 1-800-263-6376 CAN
(Mon-Fri 8am-7pm EST) to speak with a customer service representative;
or visit our website at HooverCommercial.com.
Page 13

13
GETTING STARTED
Page 14
14
Maintenance
Any other servicing should be done by an authorized Hoover Commercial service representative.
If appliance is not working as it should, has been dropped, damaged, left outdoors, or dropped into
water, take it to a service center prior to continuing use.
WARNING
TO REDUCE THE RISK OF PERSONAL INJURY: REMOVE BATTERY BEFORE CLEANING OR SERVICING.
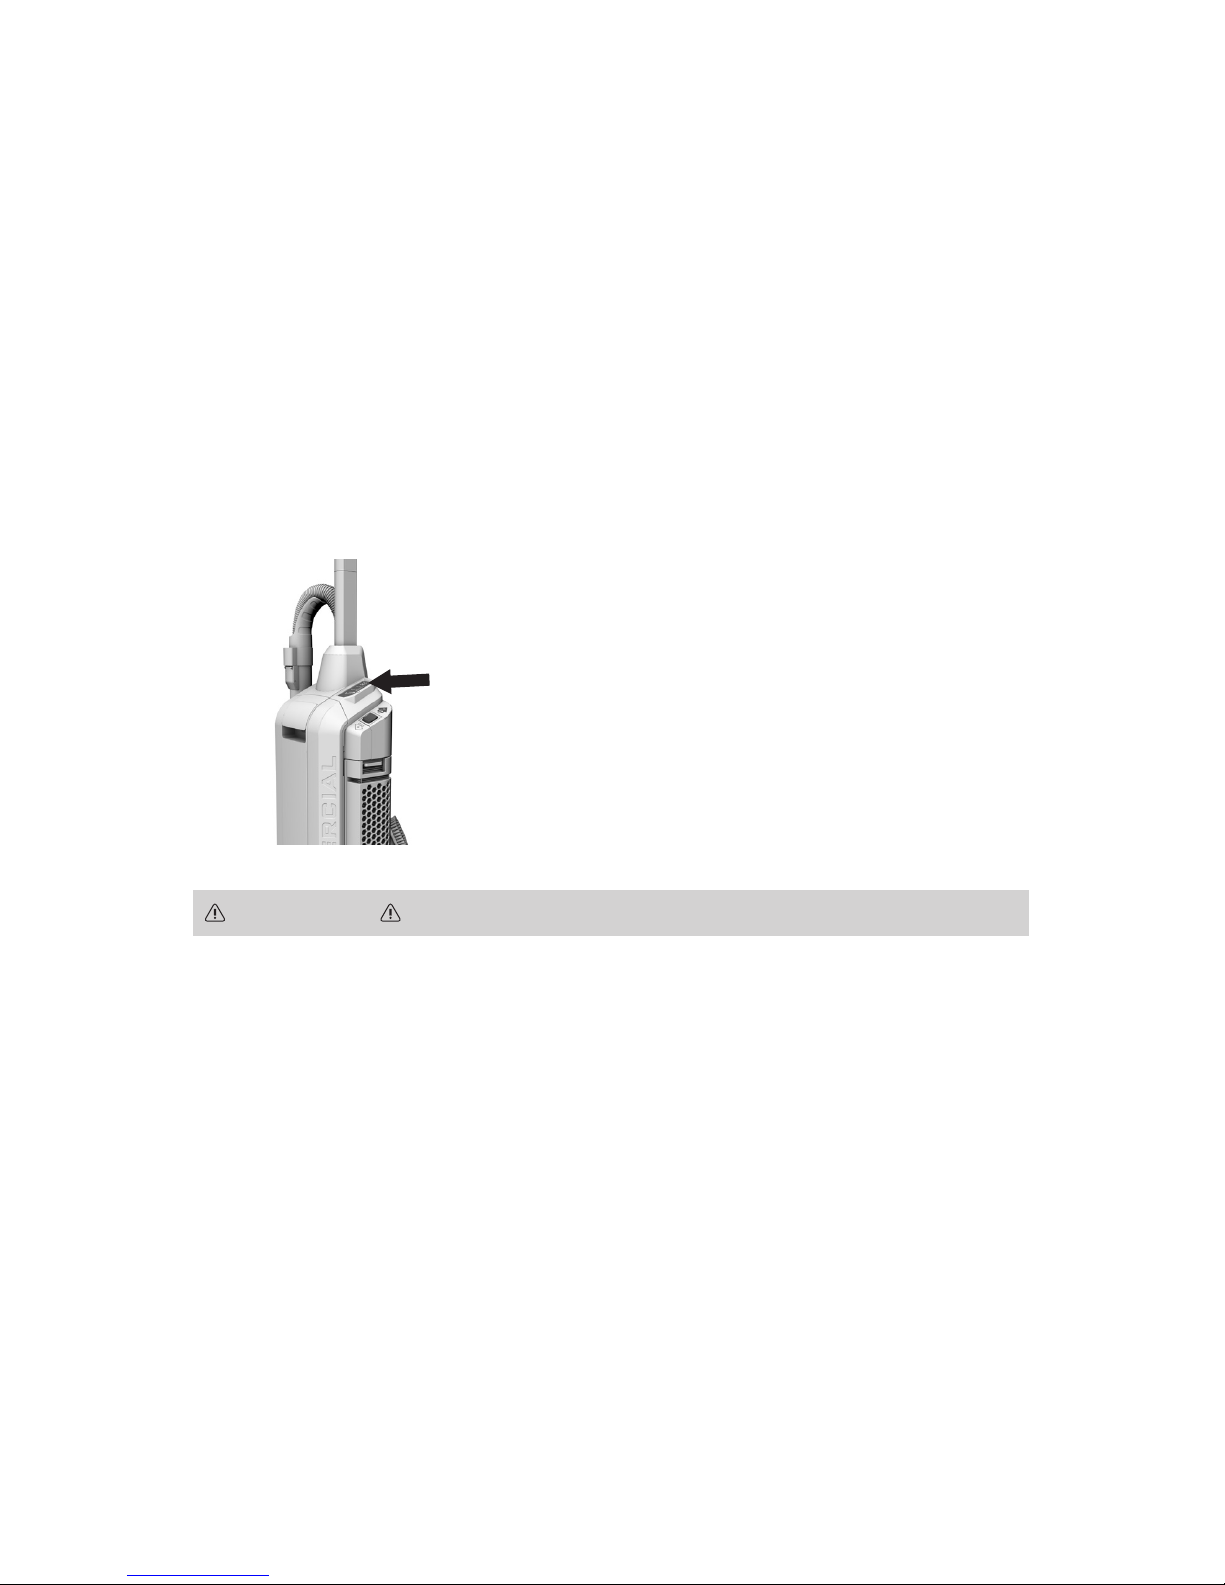
1
Check filter bag. Change, if full.
2
Check for clogs in
nozzle,hose, and bag inlet.
Clear any obstructions.
NOTE: When using the vacuum to pick up very fine dust, such as sawdust or drywall dust, it will be
necessary to replace the bag and clean the filters at more frequent intervals to maintain maximum
pick-up power. Fine dust will clog bag pores and reduce suction, prior to bag becoming full.
Performance Indicator
Alerts the user of a clog or full bag for optimal cleaning.
If color changes from green to red, check the following conditions:
Page 15

15
1
Pull orange release
latch to open bag door.
5
Rotate orange lever
into locking position.
2
Rotate orange bag
release lever to unlock
bag holder.
3
Pull orange tab to
remove bag.
6
Tuck bottom corners of bag
inside lower tabs. Ensure door
latch clicks into place. Make
sure bag does not interfere
with door seal.Note: Door will
not shut unless lever is in the
locking position.
4
Slide bag replacement
into bag holder until
bag is securely in
place.
IMPORTANT DO NOT CLEAN OLD FILTER BAG AND REUSE. DISCARD USED FILTER BAG. DO NOT VACUUM WITHOUT
FILTER BAG IN PLACE.
How To Replace The Filter Bag
WARNING
TO REDUCE THE RISK OF PERSONAL INJURY: REMOVE BATTERY BEFORE CLEANING OR SERVICING.
REPLACEMENT BAGS
Allergen 10 Pack Part No. AH10170
MAINTENANCE & HOW TO REPLACE THE FILTER BAG
Page 16
16
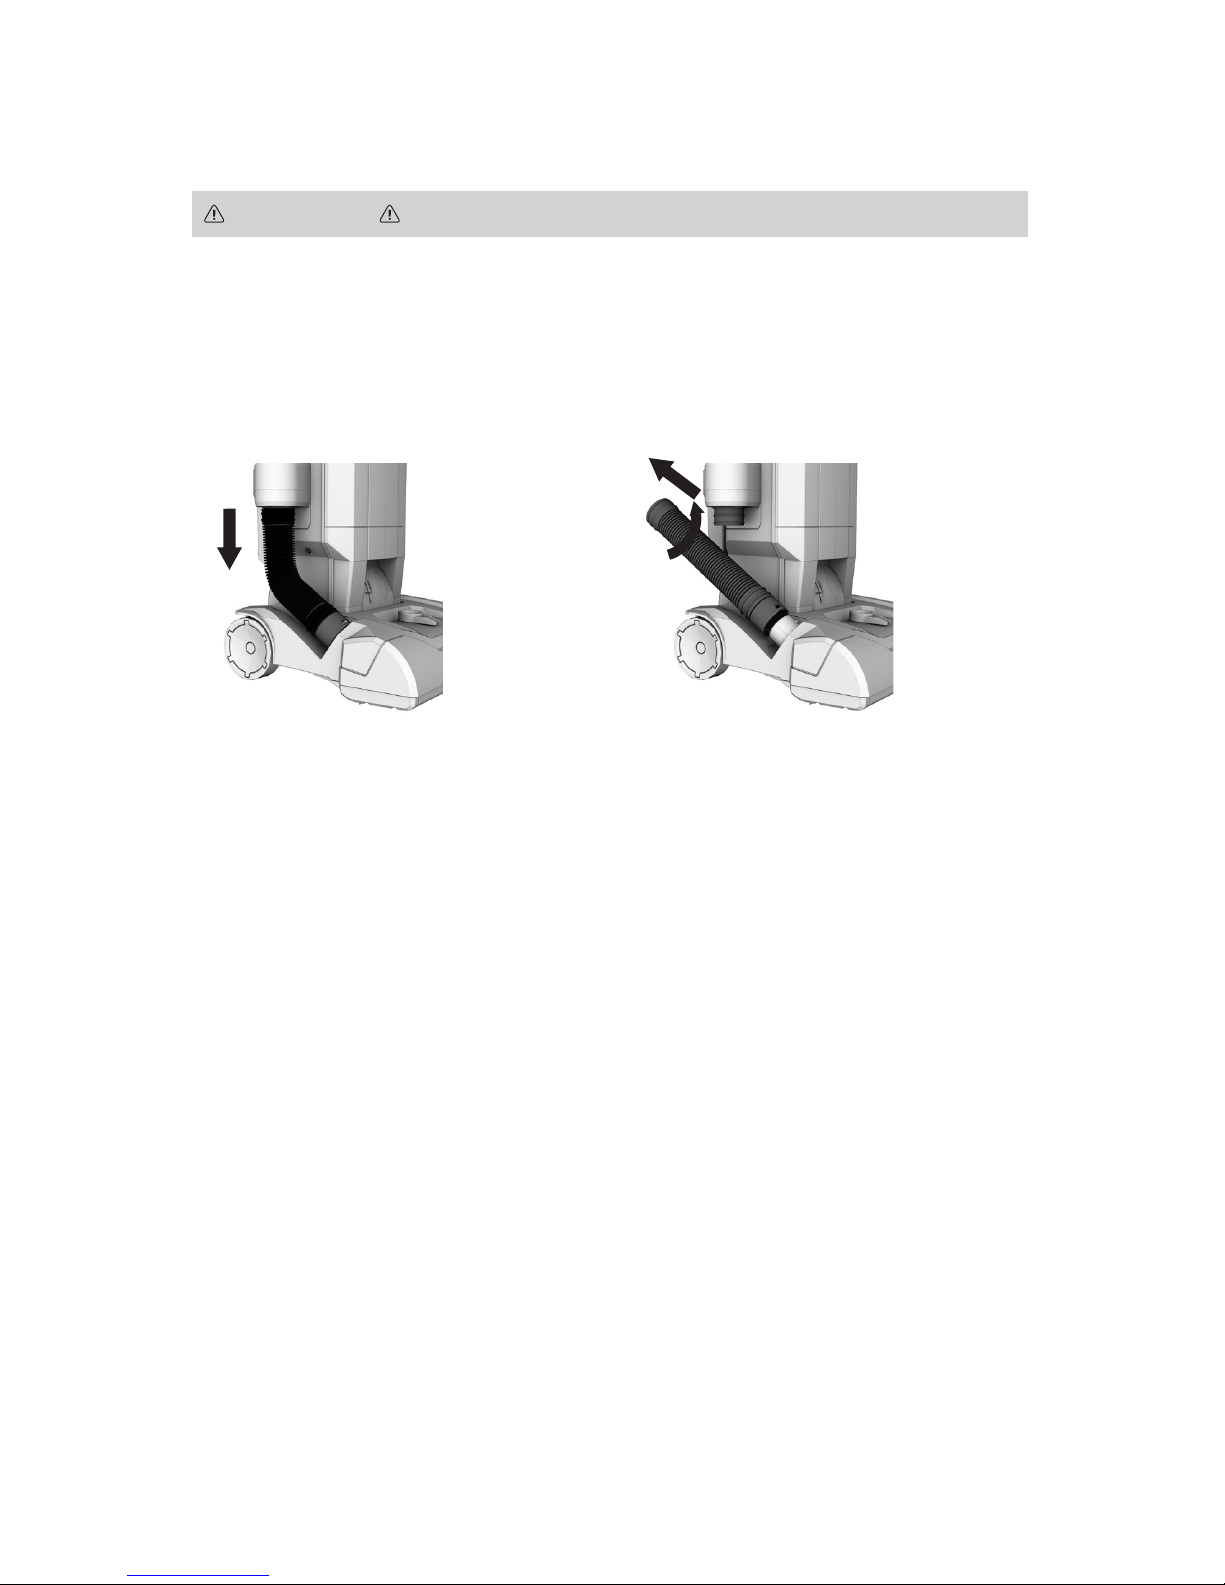
1
Remove flex hose by pressing the
orange release button and pulling
down on the upper hose cuff.
Check hose inlet for obstructions
2
Remove flex hose by twisting
hose counter clockwise and
pulling through lower holder.
Straighten hose and check for
obstructions.
How to Check for Clogs
WARNING
TO REDUCE THE RISK OF PERSONAL INJURY: REMOVE BATTERY BEFORE CLEANING OR SERVICING.
Page 17
17
HOW TO CHECK FOR CLOGS & FILTERS
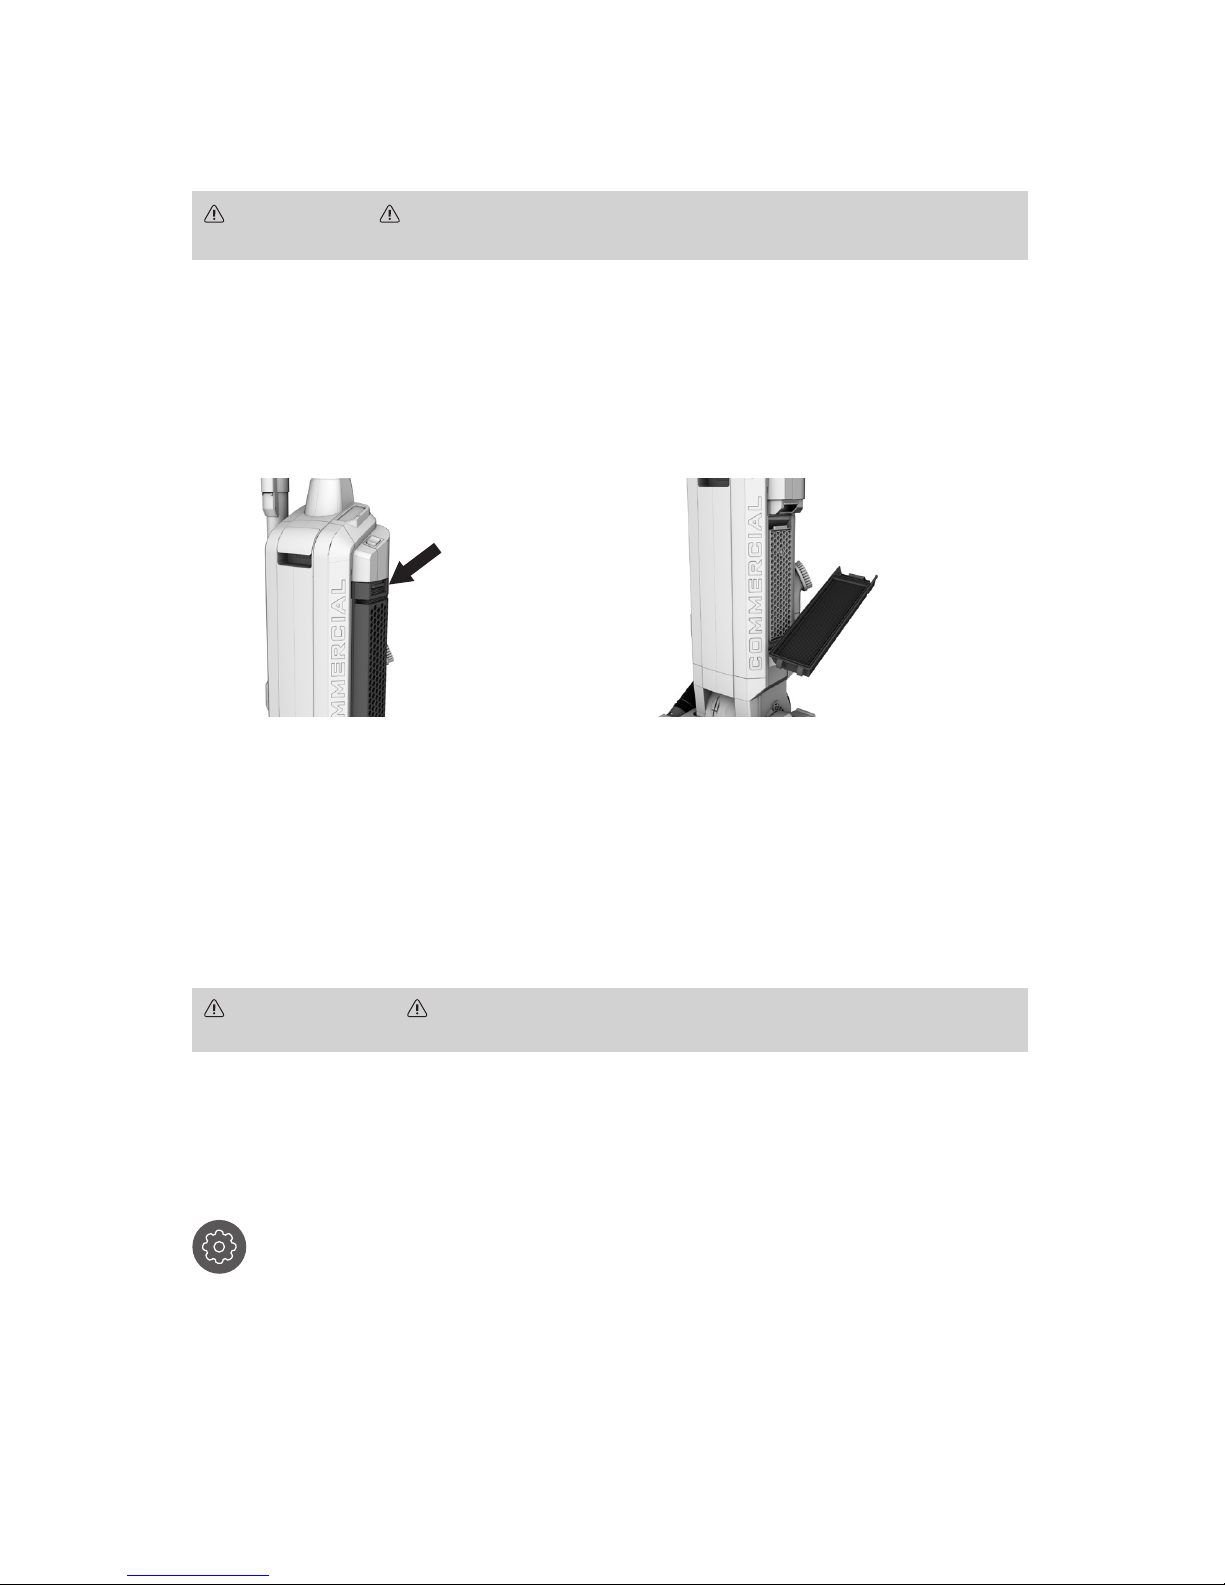
1
To remove, push down on tab
and pull out filter housing
2
Lift out and hand rinse in cold
water under low pressure. Rinse
only with open side facing up.
Allow to dry and reposition into
filter housing, pushing firmly on
tab to snap into place.
IMPORTANT
ALLOW FILTER TO DRY COMPLETELY BEFORE REPLACING. DRY FILTER ON EDGE SO AIR CIRCULATES
ON BOTH SIDES OF FILTER. THIS MAY TAKE UP TO 24 HOURS.
WARNING
TO REDUCE THE RISK OF PERSONAL INJURY – REMOVE BATTERY BEFORE CLEANING OR SERVICING.
DO NOT OPERATE VACUUM WITHOUT BOTH INLET FILTER AND FINAL FILTERS IN PLACE.
Filters
HEPA MEDIA FINAL FILTER
The final filters assist in the filtration process to return cleaner air to the room. This unit has been
equipped with a Service Filter Indicator. When the light flashes, follow procedures for cleaning the
HEPA final filter below.
REPLACEMENT FILTER
Inspect HEPA Media Final Filter every month, rinsing when necessary. Check for
wear of media and replace if pleats are damaged. Change filter regularly to maintain
maximum performance.
HEPA Media Final Filter Part No. 440007773
NOTE: To reset the timer on the Filter indicator, press and hold the reset button until
light stops flashing.
Page 18

18
HEXAGUARD™ ACTIVATED CARBON FILTER
1
To remove from filter
housing, pull from top.
Do not rinse.
2
To replace, align tabs into
correct openings and rotate
toward housing. Be sure to
press firmly into place.
WARNING
TO REDUCE THE RISK OF PERSONAL INJURY – REMOVE BATTERY BEFORE CLEANING OR SERVICING.
DO NOT OPERATE VACUUM WITHOUT BOTH INLET FILTER AND FINAL FILTERS IN PLACE.
Filters
REPLACEMENT FILTE R
Replace HexaGuard™ Filter yearly for optimum performance.
Part No. 440007787
Page 19
19
FILTERS
1
If the filter becomes dirty, pull
off the grill and lift out the filter.
Hand rinse in cold water under
low pressure. Let filter dry for 24
hours. Reposition dry filter and
snap grill into place.
IMPORTANT
ALLOW FILTER TO DRY COMPLETELY BEFORE REPLACING. DRY FILTER ON EDGE SO AIR CIRCULATES
ON BOTH SIDES OF FILTER. THIS MAY TAKE UP TO 24 HOURS.
WARNING
TO REDUCE THE RISK OF PERSONAL INJURY – REMOVE BATTERY BEFORE CLEANING OR SERVICING.
DO NOT OPERATE VACUUM WITHOUT BOTH INLET FILTER AND FINAL FILTERS IN PLACE.
REPLACEMENT FILTE R
Inspect Inlet Filter every 2 weeks to keep vacuum running at peak performance.
Part No. 440010684
INLET FILTER
The Inlet filter protects the motor from damage.
Page 20
20
LUBRICATION
The motor and brushroll are equipped with bearings which contain sufficient lubrication for their
lifetime. The addition of lubricant could cause damage. Do not add lubricant to motor or brushroll.
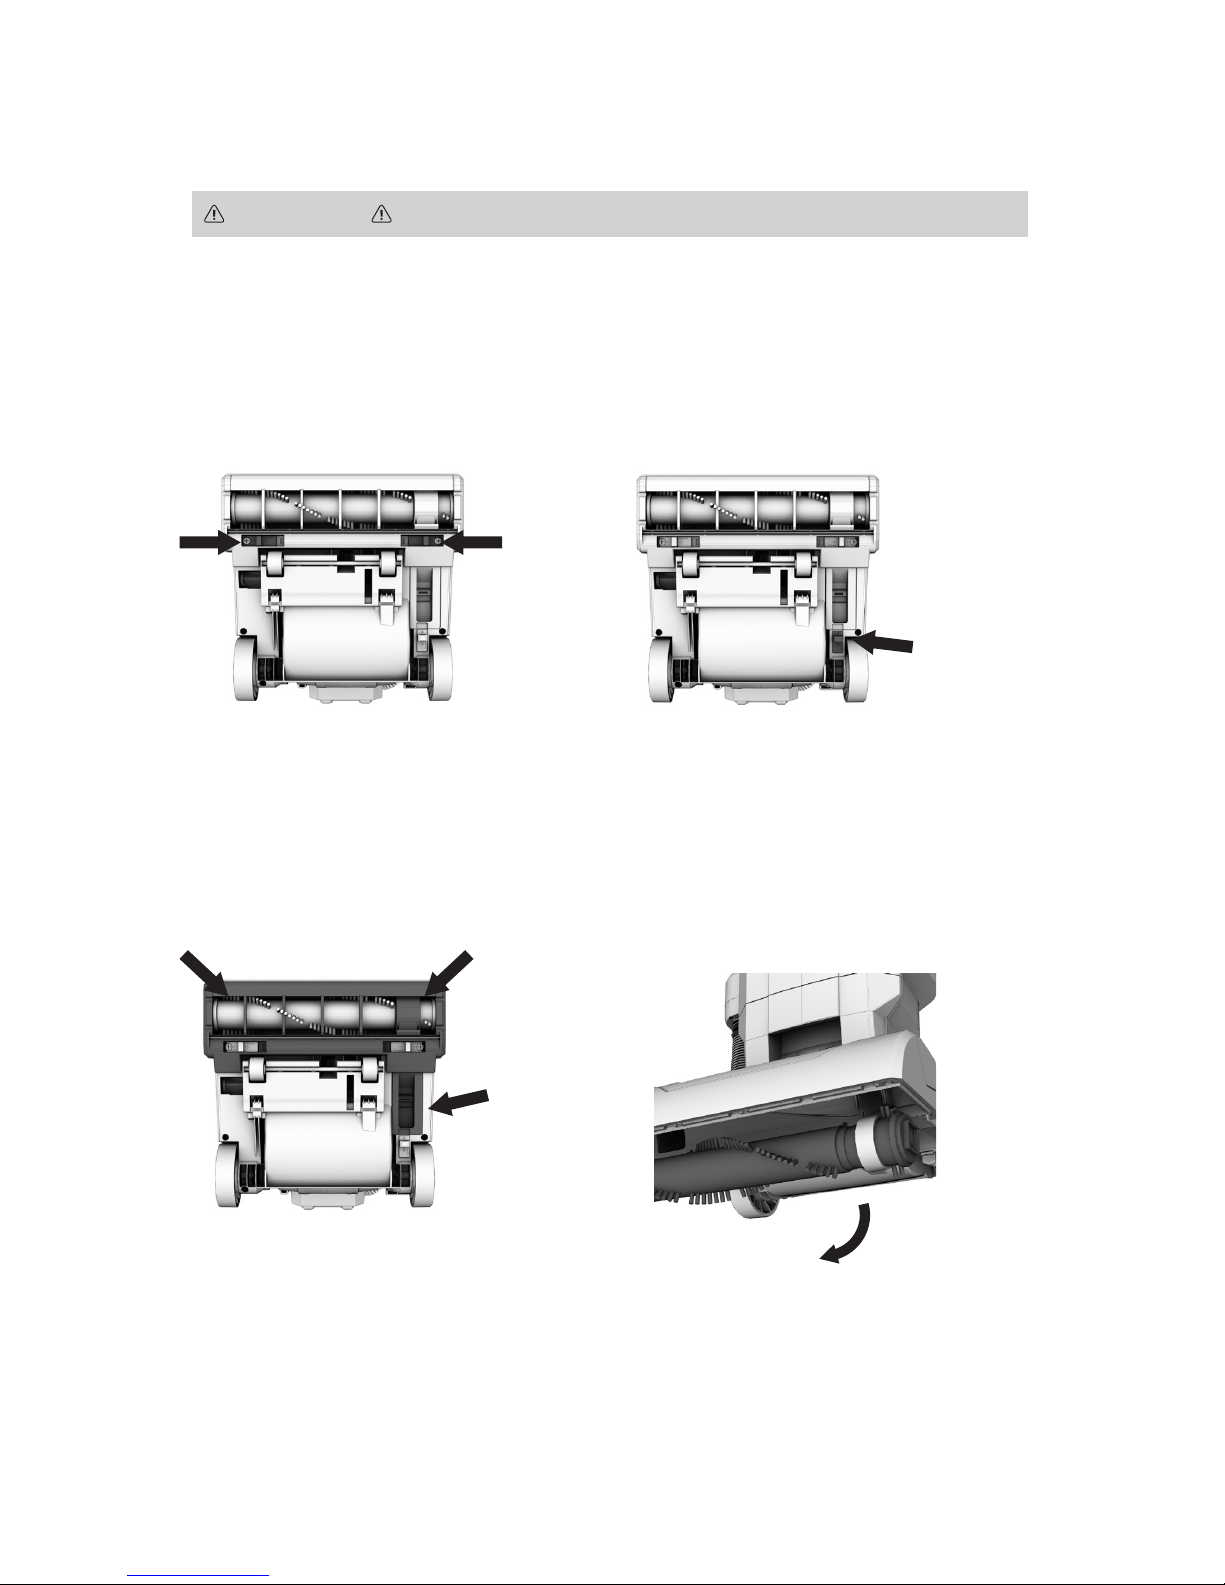
Removing Brushroll
CAUTION
TO REDUCE THE RISK OF INJURY FROM MOVING PARTS: REMOVE BATTERY BEFORE SERVICING.
1
Slide orange tabs toward center.
2
Slide rear tab back, into
unlock position.
3
Remove bottom plate.
4
Pivot Brushroll out then
remove worn or broken belt,
and replace. Make sure belt is
centered on motor shaft and
sits properly within brushroll
grooves before placing back
into unit.
Page 21

21
REMOVING BRUSHROLL & BELT
CAUTION
TO REDUCE THE RISK OF INJURY FROM MOVING PARTS: REMOVE BATTERY BEFORE SERVICING.
5
Check brushroll for wear using
a business card or credit card.
If card does not touch bristles,
replace brushroll.
REPLACEMENT BRUSHROLL
CH95413 (with intelliBelt) Part No. 440007802
Any other servicing should be done by an authorized service representative.
If appliance is not working as it should, has been dropped, damaged, left outdoors,
or dropped into water, take it to a service center prior to continuing use.
Page 22

22
FLASHING
GREEN
SOLID
GREEN
FLASHING
YELLOW
SOLID
YELLOW
FLASHING
RED
Battery
Charging
Fully Charged
Indicates battery is
on sequential standby
waiting to be charged.
Leave Battery on
Charger. It’s too
hot or cold to charge.
Call us at
1-800-944-9200
Troubleshooting
Any other servicing should be done by an authorized service representative.
If appliance is not working as it should, has been dropped, damaged, left outdoors, or dropped into
water, take it to a service center prior to continuing use.
WARNING
TO REDUCE THE RISK OF PERSONAL INJURY: REMOVE BATTERY BEFORE CLEANING OR SERVICING.
Charging a hot
Battery Pack:
When using a vacuum continuously,
the battery may become hot. A hot
battery may be placed directly on the
charger but charging will not begin
until the battery temperature cools
to within an acceptable temperature
range. When a hot battery is placed
on the charger, the Yellow LED will
remain lit until the battery is cool
enough to begin charging.
Charging a cold
Battery Pack:
A cold battery may be placed directly
on the charger but charging will not
begin until the battery temperature
warms to within an acceptable
temperature range. When a cold
battery is placed on the charger, the
Yellow LED will remain lit until the
battery is warm enough to begin
charging.
What does it mean when
Charger light is...
Problem Possible Cause Possible Solution
Vacuum won’t run 1. Your battery may not be
inserted properly.
1. Make sure the battery is fully seated in
battery cavity.
2. Your battery may not be
charged.
2. Check the Charge Level Indicator and
charge the battery if it’s low.
3. Your battery may be too hot. 3. Remove battery and let cool for 30 minutes,
replace battery and retry or replace with
second charged battery.
4. There may be internal
component damage.
4. Call for service: 1-800-944-9200.
Bag Check Indicator
has turned red
OR Vacuum won’t pick
up OR Low suction
1. Filter Bag full and/
or clogged.
1. Empty Filter Bag - Pg. 15
2. Broken or worn belt. 2. Replace belt - Pg. 20
3. Brushroll and/ or Hose
clogged.
3. Check Hose - Pg. 16
Check Brushroll - Pg. 20-21
4. Carpet height setting
is incorrect.
4. Set Carpet Height Adjustment to
appropriate setting for carpet being
cleaned - Pg. 10
Dust escaping
from vacuum
1. Filter Bag full. 1. Empty Filter Bag - Pg. 15
2. Filter Bag not installed
correctly.
2. Review Filter Bag removal &
replacement - Pg. 15
3. Hose not installed correctly. 3. Review Hose installation.
Page 23

23
TROUBLESHOOTING & WARRANTY
2 YEAR LIMITED WARRANTY
WHAT THIS WARRANTY COVERS
When used and maintained in normal Commercial use and in accordance with the User’s Manual, your
Hoover® Commercial product is warranted against original defects in material and workmanship for a full
two years from date of purchase (the “Warranty Period”). During the Warranty Period, as described in this
Warranty, Hoover® Commercial will provide labor and parts, at no cost to you, to correct any such defect in
products purchased in the United States, U.S. Military Exchanges and Canada.
HOW TO MAKE A WARRANTY CLAIM
If this product is not as warranted, take or send the product to a Hoover® Commercial Authorized Warranty
Service Dealer along with proof of purchase. For an automated referral to authorized service outlets, phone:
1-800-944-9200 OR visit Hoover® Commercial online at www.hoovercommercial.com (U.S. Customers) or
www.hoover.ca (Canadian Customers). For additional assistance or information concerning this Warranty
or the availability of warranty service outlets, phone 1-800-944-9200, Mon-Fri 8am-7pm EST. In Canada,
call 1-800-263-6376, Mon-Fri 8am-7pm EST.
WHAT THIS WARRANTY DOES NOT COVER
Certain parts for your
Hoover® Commercial product require replacement in the ordinary course of use due
to normal wear. These items include belts, agitator roll sleeves, agitator bearings, brushes, bags, filters
and bulbs. These parts are not covered by this Warranty. This Warranty also does not cover: improper
maintenance of the product, damage due to misuse, acts of God, nature, vandalism or other acts beyond the
control of
Hoover® Commercial
, owner’s acts or omissions, use outside the country in which the product
was initially purchased, resale of the product by the original owner, defects or damages caused by repair
or alteration by anyone other than an Authorized
Hoover® Commercial
Warranty Service Dealer.
Hoover®
Commercial
reserves the right to inspect any alleged defective product and make final decisions on any
warranty claim. This warranty does not cover pick up, delivery, transportation or house calls. However, if
you mail your product to a
Hoover® Commercial
Authorized Warranty Service Dealer for warranty service,
cost of shipping will be paid one way.
OTHER IMPORTANT TERMS
This Warranty is not transferable and may not be assigned. This Warranty shall be governed and construed
under the laws of the state of Ohio. The Warranty Period will not be extended by any replacement or
repair performed under this Warranty. THIS WARRANTY IS THE EXCLUSIVE WARRANTY AND REMEDY
PROVIDED BY HOOVER® COMMERCIAL. ALL OTHER WARRANTIES, EXPRESSED OR IMPLIED, INCLUDING
WARRANTIES OF MERCHANTABILITY OR FITNESS FOR PARTICULAR PURPOSE, ARE DISCLAIMED. IN
NO EVENT WILL HOOVER® BE LIABLE FOR ANY SPECIAL, INDIRECT, INCIDENTAL OR CONSEQUENTIAL
DAMAGES OF ANY KIND OR NATURE TO OWNER OR ANY PARTY CLAIMING THROUGH OWNER,
WHETHER BASED IN CONTRACT, NEGLIGENCE, TORT OR STRICT PRODUCTS LIABILITY OR ARISING
FROM ANY CAUSE WHATSOEVER. Some states do not allow the exclusion of consequential damages, so
the above exclusion may not apply to you. This warranty gives you specific rights; you may also have others
that vary from state to state.
Vacuum is difficult
to push or won’t
move forward
1. Carpet height setting
is incorrect.
1. Set Carpet Height Adjustment knob to
appropriate setting for carpet being
cleaned - Pg. 12
2. Bottom plate is not
installed correctly.
2. Refer to Pg. 20
Smoky/burning
smell detected
1. Belt broken or stretched. 1. Replace brushroll belt - Pg. 20
2. Brushroll is clogged. 2. Clear/ remove debris from
brushroll - Pg. 20-21
Page 24

Page 25

25
HUSHTONE™
ASPIRATEUR VERTICAL SANS FIL
GUIDE D’UTILISATION
Pour utilisation avec le modèle CH9 5 413 .
IMPORTANT:
LISEZ ATTENTIVEMENT LE
PRÉSENT GUIDE D’UTILISATION AVANT
D’ASSEMBLER ET D’UTILISER L’APPAREIL.
CE PRODUIT EST DESTINÉ À UN USAGE
COMMERCIAL SEULEMENT.
L’apparence du produit peut être légèrement dif férente de celle visible sur les image s.
Page 26

26
Bienvenue
Merci d’avoir choisi un produit commercial Hoover
MC
.
SI VOUS AVEZ BESOIN D’AIDE
Veuillez téléphoner au 1-800-944-9200 (É.-U.) ou au 1-800-263-6376 (Canada)
(Lun-Ven 08h-19h EST) pour communiquer avec un représentant du service client;
ou rendez-vous sur notre site Internet au HooverCommercial.com.
Page 27

27
Table des matières
Consignes de sécurité 28-29
Caractéristiques 30-31
Outils 32
Installation des outils 33
Premiers pas 34
Batterie et chargeur 40V M-PWR
MC
34
Utilisation de votre aspirateur dorsal sans-fil 6Q HUSHTONE
MC
35-37
Entretien 38
Indicateur de performance 38
Comment remplacer le sac-filtre 39
Comment vérifier si l’aspirateur est obstrué 40
Filtres 41-43
Retrait du rouleau-brosse et de la courroie 44-45
Dépannage 46
Garantie 47
Page 28

28
CONSIGNES DE SÉCURITÉ IMPORTANTES
CONSERVEZ CES INSTRUCTIONS!
IMPORTANT : LISEZ ATTENTIVEMENT AVANT L’ASSEMBLAGE ET L’UTILISATION.
LORSQUE VOUS UTILISEZ DES APPAREILS ÉLECTRIQUES, VEUILLEZ TOUJOURS
RESPECTER ENTRE AUTRES LES CONSIGNES DE SÉCURITÉ ÉLÉMENTAIRES SUIVANTES:
VEUILLEZ LIRE TOUTES LES INSTRUCTIONS AVANT D’UTILISER
CET APPAREIL.
AVERTISSEMENT: POUR RÉDUIRE LE RISQUE D’INCENDIE,
DE DÉCHARGE ÉLECTRIQUE, DE DOMMAGE OU DE BLESSURE:
•
Assemblez entièrement l’appareil avant de l’utiliser.
•
Évitez d’utiliser l’appareil, de le ranger ou de charger sa batterie à l’extérieur ou sur des surfaces mouillées ou humides. N’exposez
pas le chargeur à l’eau ou à l’humidité.
•
Ne permettez pas aux enfants de jouer avec l’appareil. Cet appareil ne doit pas être utilisé par des enfants de moins de 12ans.
Exercez une surveillance étroite lorsque l’appareil est utilisé par un enfant ou près de lui. Gardez l’appareil hors de la portée des
enfants et ne laissez pas ces derniers introduire leurs doigts ou d’autres objets dans aucune ouverture afin d’éviter les blessures ou
les bris.
•
Utilisez l’appareil uniquement aux fins décrites dans le présent guide. Utilisez uniquement les accessoires et produits
recommandés par le fabricant.
•
N’utilisez pas le chargeur si la fiche ou le cordon est endommagé. Si l’appareil ou le chargeur ne fonctionnent pas adéquatement,
s’ils sont tombés sur le sol ou dans l’eau, s’ils sont endommagés ou ont été laissés à l’extérieur, apportez-les à un centre de
service pour les faire inspecter avant de continuer à les utiliser.
•
Ne tirez pas ni ne transportez le chargeur par le cordon, n’utilisez pas le cordon comme une poignée, ne coincez pas le cordon dans
l’embrasure d’une porte et ne l’appuyez pas contre des arêtes tranchantes ou des coins. Ne placez pas l’appareil sur le cordon. Ne
faites pas rouler l’appareil sur le cordon. Tenez le cordon éloigné des surfaces chaudes.
•
Ne débranchez pas le chargeur en tirant sur le cordon. Pour débrancher le chargeur, tirez sur la fiche.
•
Ne manipulez pas le chargeur, y compris la fiche et les bornes, ni l’appareil si vous avez les mains mouillées.
•
N’incinérez pas le chargeur, la batterie ou l’appareil mêmes s’ils sont gravement endommagés. La batterie peut exploser au feu.
•
N’insérez aucun objet dans les ouvertures. N’utilisez pas l’appareil si les ouvertures sont obstruées. Assurez-vous qu’elles sont
exemptes de poussière, de mousse, de cheveux ou de tout ce qui pourrait réduire le débit d’air.
•
Gardez les cheveux, les vêtements amples, les doigts et toute autre partie du corps à l’écart des ouvertures et des pièces en
mouvement. Le rouleau-brosse continue de tourner lorsque l’appareil est en position verticale.
•
Redoublez de prudence lorsque vous utilisez l’appareil dans un escalier. Pour éviter tout dommage ou blessure et empêcher
l’aspirateur de tomber, placez toujours ce dernier au bas des escaliers, sur le plancher. Ne placez pas l’aspirateur sur les marches
d’un escalier ou sur un meuble, car cela peut entraîner des dommages ou des blessures.
•
Ce produit contient une batterie au lithium-ion rechargeable. N’exposez pas la batterie à des températures élevées, car elle
pourrait s’enflammer et exploser.
•
Évitez d’écraser et d’incinérer la batterie ou de la soumettre à des actions similaires.
•
Ne jetez pas la batterie au feu ou dans un compresseur à déchets. Consultez la section sur l’élimination de la batterie pour obtenir
des instructions.
•
Ne tentez pas de démonter la batterie.
•
Débranchez le chargeur de la prise avant de procéder à tout nettoyage ou entretien de routine.
•
La batterie peut fuir si elle est soumise à des conditions extrêmes. Si l’électrolyte entre en contact avec votre peau, lavez aussitôt
les parties touchées avec de l’eau et du savon. En cas de contact avec les yeux, ne frottez pas. Rincez immédiatement vos yeux à
l’eau propre pendant au moins 15minutes et consultez un médecin sans attendre.
•
Utilisez seulement le chargeur (
Hoover
Commercial, no de pièce CH90002) fourni avec votre appareil
Hoover
Commercial pour le
recharger la batterie.
•
Utilisez seulement la batterie (Hoover Commercial, no de pièce CH90040) fournie avec votre appareil Hoover Commercial. Un
autre type de batterie pourrait exploser et causer des blessures ou des dommages graves.
•
Ne touchez pas aux bornes du chargeur et du bloc-piles et n’y insérez pas d’objets.
•
Le chargeur est conçu pour être utilisé à l’intérieur seulement. Assurez-vous de toujours conserver la batterie et le chargeur dans
un endroit sec.
•
Ne tentez pas de court-circuiter la batterie ou les bornes du chargeur.
•
N’utilisez pas l’appareil pour aspirer des liquides inflammables ou combustibles, comme de l’essence, ni de la sciure de bois, ni
dans des endroits où de telles substances peuvent être présentes.
•
N’utilisez pas l’appareil pour aspirer quoi que ce soit qui brûle ou dégage de la fumée comme des cigarettes, des allumettes ou
des cendres chaudes.
•
N’utilisez pas l’appareil sans avoir installé le sac à poussière et les filtres.
•
Éteignez toujours l’appareil avant d’installer ou de retirer le tube-rallonge ou des accessoires.
•
Prévenez les mises en marche non intentionnelles. Assurez-vous que l’interrupteur est en position d’arrêt avant de connecter
le bloc-piles, de prendre l’appareil ou de le transporter. Transporter l’appareil en conservant les doigts près de l’interrupteur et
brancher l’appareil sur une source électrique lorsque l’interrupteur est en position de marche sont deux situations qui présentent
Page 29

29
CONSIGNES DE SÉCURITÉ
des risques d’accident.
•
Retirez le bloc-piles de l’appareil avant de faire un ajustement, de changer les accessoires ou d’entreposer l’appareil. Une telle
mesure de précaution permet de réduire le risque que l’appareil entre accidentellement en fonction.
•
Rechargez la batterie uniquement avec le chargeur indiqué par le fabricant. Le chargeur adéquat pour un type de bloc-piles
présente un risque d’incendie s’il est utilisé avec un bloc-piles différent.
•
Utilisez l’appareil uniquement avec un bloc-piles spécialement désigné à cet effet. L’utilisation de tout autre bloc-piles présente
un risque de blessure et d’incendie.
•
Lorsqu’un bloc-piles est en fonction, maintenez-le à distance d’autres objets métalliques (trombones, pièces de monnaie, clés,
clous, vis ou autres menus objets) susceptibles d’établir un contact entre deux bornes. Un tel contact court-circuitant entre deux
bornes de la batterie présente des risques de brûlures ou d’incendie.
•
Dans des conditions extrêmes, un liquide pourrait être expulsé de la batterie. En cas de contact accidentel, rincez les régions
touchées avec de l’eau. En cas de contact avec les yeux, rincez-les avec de l’eau et demandez une assistance médicale. Le liquide
expulsé de la batterie peut être une source d’irritation ou de brûlures.
•
N’utilisez ni un bloc-piles ni un appareil endommagé ou modifié. Le fonctionnement des batteries endommagées ou modifiées
peut être imprévisible et présenter des risques d’incendie, d’explosion ou de blessures.
•
N’exposez pas le bloc-piles ou l’appareil au feu ou à une température excessive. L’exposition au feu ou à une température
supérieure à 130°C (265°F) représente un risque d’explosion.
•
Suivez toutes les instructions portant sur la recharge. Ne rechargez pas le bloc-piles ni l’appareil à des températures autres
que celles indiquées dans ces instructions. Toute recharge à des températures hors de la plage indiquée présente des risques
d’endommager la batterie en plus d’augmenter les risques d’incendie.
•
Lorsqu’un entretien est nécessaire, confiez votre appareil à un réparateur qualifié qui n’utilisera que des pièces de rechange
identiques aux pièces d’origine. Vous vous assurerez ainsi de préser ver la sécurité de l’appareil.
•
Ne modifiez ni l’appareil ni le bloc-piles (le cas échéant), et ne tentez pas de les réparer, sauf dans la mesure indiquée dans les
présentes instructions quant à leur utilisation et aux soins requis.
MISE EN GARDE: POUR RÉDUIRE LES RISQUES DE DOMMAGE:
•
Utilisez seulement sur un plancher sec.
•
Évitez d’utiliser l’appareil pour ramasser des objets durs ou aux arêtes tranchantes, car ils pourraient endommager l’appareil.
•
Rangez l’appareil adéquatement à l’intérieur et dans un endroit sec. N’exposez pas l’appareil à des conditions de gel.
•
Le rouleau-brosse continue de tourner lorsque l’appareil est en marche et que la poignée est à la ver ticale. Afin d’éviter d’endommager
les tapis, les carpettes et les revêtements de plancher, évitez d’incliner l’aspirateur ou de l’utiliser sur des meubles, des carpettes à
franges ou des escaliers recouverts de tapis.
•
N’utilisez pas d’objet aux arêtes tranchantes pour nettoyer le tuyau, car cela risquerait de l’endommager. Lorsque le rouleau-
brosse est en marche, ne laissez pas l’aspirateur trop longtemps au même endroit, car vous risqueriez d’endommager le plancher.
AVERTISSEMENT:
LE CHARGEUR EST MUNI D’UNE FICHE POLARISÉE (L’UNE DES BROCHES EST
PLUS LARGE QUE L’AUTRE) QUI RÉDUIT LE RISQUE DE DÉCHARGE ÉLECTRIQUE. CETTE FICHE NE PEUT ÊTRE
BRANCHÉE QUE DANS UN SEUL SENS À UNE PRISE POLARISÉE. SI LA FICHE NE S’INSÈRE PAS ENTIÈREMENT
DANS LA PRISE, RETOURNEZ-LA. SI VOUS NE POUVEZ TOUJOURS PAS L’INSÉRER, COMMUNIQUEZ AVEC UN
ÉLECTRICIEN QUALIFIÉ POUR FAIRE INSTALLER UNE PRISE APPROPRIÉE. NE MODIFIEZ LA FICHE EN AUCUN CAS.
AVERTISSEMENT : CE PRODUIT CONTIENT DES PRODUITS CHIMIQUES RECONNUS PAR
L’ÉTAT DE LA CALIFORNIE COMME POUVANT CAUSER LE CANCER, DES ANOMALIES CONGÉNITALES OU
D’AUTRES DYSFONCTIONS DU SYSTÈME REPRODUCTEUR. BIEN SE LAVER LES MAINS APRÈS
L’UTILISATION.
AVERTISSEMENT RELATIF À L’ÉLIMINATION DE LA BATTERIE:
RISQUE D’EXPLOSION OU D’EXPOSITION AUX MATIÈRES TOXIQUES :
MISE EN GARDE:
La batterie utilisée dans cet appareil peut présenter un risque d’incendie ou de brûlure chimique si
elle n’est pas manipulée adéquatement. Ne la démontez pas, ne la chauffez pas au-delà de la température maximale établie par le fabricant
(60°C/140°F) et ne l’incinérez pas. Remplacez la batterie uniquement par une bat terie Hoover Commercial, no de pièce CH9 0040. L’utilisation
d’une autre batterie pourrait c auser un incendie ou une explosion. Jetez rapidement tou te batterie usagée. Gardez la batterie hors de la portée
des enfants. Ne démontez pas la batterie et ne la jetez pas au feu. Ne tentez pas de démonter la batterie ou de retirer tout compos ant en saillie
des bornes de la bat terie. Ne tentez pas de remplacer des pièces de la batterie ou du chargeur. Cela pourrait provoquer un incendie ou une
explosion. Avant de jeter la batterie, protégez les bornes exposées à l’aide d’un épais ruban isolant pour éviter les court s-circuits.
BATTERIE AU LITHIUM-ION:
La batterie doit être recueillie, recyclée ou éliminée dans le respect de l’environnement. Le s ceau
de rec yclage des batteries au lithium -ion de la RBRC certifié par l’EPA indique que TechtronicIndustries, société af filiée à Hoover Commercial,
par ticipe volontairement à un progr amme de collecte et de recy clage des batteries usagées au Canada et aux États-Unis. Le programme de
recyclage de la RBRC offre une solution de rechange pr atique qui permet d’éviter que les bat teries soient jetées à la poubelle ou dans les
ordures ménagères municipales, ce qui pour rait être illégal dans votre région. Consultez le site www.rbrc.org/c all2recycle/
pour obtenir de l’information sur le recyclage des batteries au lithium-ion ainsi que sur les interdictions ou les restrictions
touchant leur élimination dans votre région. La participation de Hoover C ommercial à ce programme témoigne de son
engagement à protéger l’environnement et les ressources naturelles.
R
E
C
I
C
L
E
Page 30

30
Caractéristiques du produit
Contenu de l’emballage
A
Poignée
B
Porte du compartiment à sac
C
Filtre HEPA
D
Suceur plat
E
Brosse à épousseter
+ Guide d’utilisation
+ Guide de démarrage rapide
F
Batterie au lithium-ion 40V M-PWR
MC
G
Chargeur double 40V M-PWR
MC
*VENDU SÉPARÉMENT
Page 31

31
CARACTÉRISTIQUES DU PRODUIT
A
B
C
D
E
F
G
Page 32

32
Outils de dépoussiérage
Outil pour revêtements en tissu :
Pour les meubles recouverts de tissu,
les rideaux, les matelas, les vêtements
et les escaliers en tapis.
Suceur plat : Pour atteindre des
espaces restreints, passer dans
des coins et le long des tiroirs, des
meubles, des escaliers et des plinthes.
REMARQUE: Les accessoires peuvent être utilisés avec la baguette intégrée de nettoyage rapide.
MISE EN GARDE
N’UTILISEZ PAS L’ASPIRATEUR POUR TOILETTER UN ANIMAL.
Page 33

33
OUTILS DE DÉPOUSSIÉRAGE
MISE EN GARDE
LE ROULEAU-BROSSE CONTINUE DE TOURNER LORSQUE L’APPAREIL EST EN MARCHE ET
QUE LA POIGNÉE EST REDRESSÉE. AFIN D’ÉVITER TOUT DOMMAGE AUX TAPIS, AUX CARPETTES, AUX MEUBLES ET AUX REVÊTEMENTS
DE PLANCHER, ÉVITEZ D’INCLINER L’APPAREIL OU DE L’UTILISER SUR DES MEUBLES, DES CARPETTES À FRANGES OU DES ESCALIERS
RECOUVERTS DE TAPIS. REDOUBLEZ DE PRUDENCE LORSQUE VOUS NETTOYEZ LES ESCALIERS. POUR ÉVITER TOUT DOMMAGE OU
BLESSURE ET EMPÊCHER L’ASPIRATEUR DE TOMBER, PLACEZ TOUJOURS CE DERNIER AU BAS DES ESCALIERS, SUR LE PLANCHER. NE
PLACEZ PAS L’ASPIRATEUR SUR LES MARCHES D’UN ESCALIER OU SUR UN MEUBLE, CAR CELA PEUT ENTRAÎNER DES DOMMAGES OU
DES BLESSURES. LORSQUE VOUS UTILISEZ DES ACCESSOIRES, ASSUREZ-VOUS QUE LA POIGNÉE EST TOUJOURS REDRESSÉE.
1
Pour étendre votre portée, retirez
le tube-rallonge de son support
en le tirant vers le haut.
3
Pour utiliser l’extrémité du tuyau,
appuyez sur la languette de
dégagement et retirez le tuyau du
tube-rallonge.
2
Insérez fermement les outils
à l’extrémité du tube-rallonge.
Lorsque vous avez terminé,
tournez l’outil et tirez sur ce
dernier pour l’enlever.
Installation des outils
AVERTISSEMENT
ÉTEIGNEZ TOUJOURS L’APPAREIL AVANT D’INSTALLER OU DE RETIRER LE TUBE-RALLONGE OU DES
ACCESSOIRES.
Page 34

34
Batterie et chargeur 40V M-PWR
MC
1
Pour recharger la batterie, faites-la glisser
dans le chargeur. Poussez la batterie vers
le fond jusqu’à ce qu’elle s’enclenche et
que le voyant DEL s’allume.
3
Au moment de la recharge, le voyant
DEL sur la batterie donne une
indication sur le niveau de charge.
2
Le voyant DEL passe au vert lorsque
labatterie est entièrement rechargée.
Retirez la batterie et remettez-la
enplace.
4
Pour retirer la batterie, appuyez sur
le bouton de dégagement et faites
glisser la batterie vers l’avant en
maintenant la base du chargeur.
REMARQUE: Au moment de la livraison, le niveau de charge des batteries est faible afin d’éviter
d’éventuels problèmes. Vous devez les recharger avant de les utiliser une première fois.
Il est possible de recharger une seule batterie à la fois. Lorsque les deux batteries sont en place,
celle qui dispose du plus d’énergie sera rechargée en premier. Cela permet de compter sur un temps
de recharge plusrapide.
TEMPÉRATURE AMBIANTE POUR LA RECHARGE: 5°C à 50°C (41°F à 122°F)
10%–33% Charged
0%–10% Charged
33%–66% Charged
66%–100% Charged
Page 35

35
PREMIERS PAS
Premiers pas
REMARQUE : Ne passez pas l’aspirateur sans avoir installé les deux sacs-filtres et les filtres HEPA.
REMARQUE : Il est recommandé de charger complètement la batterie avant utilisation. Consultez
la page34 pour les instructions relatives au chargement.
AMBIENT TEMPERATURE RANGE: 0 °C – 40 °C (32 °F – 104 °F)
1
Insérez fermement
la poignée dans son
logement.
AVERTISSEMENT
POUR RÉDUIRE LES RISQUES DE BLESSURE : RETIREZ LA BATTERIE AVANT D’EFFECTUER LE
NETTOYAGE OU L’ENTRETIEN DE L’APPAREIL.
2
Appuyez sur le loquet
pour verrouiller la
poignée en place.
3
Insérez les accessoires
dans les endroits prévus à
cet effet.
4
Faites pivoter le levier pour
vous assurer que le sac de
l’aspirateur est en place
de manière sécuritaire.
Remarque: la porte du
compartiment à sac ne se
fermera pas si ce dernier n’est
pas correctement installé.
5
Tournez le levier de
réglage de la hauteur
au niveau désiré. Si
l’aspirateur est difficile
à déplacer, réglez le
levier au prochain
réglage
de hauteur.
MISE EN GARDE
N’UTILISEZ PAS L’ASPIRATEUR POUR TOILETTER UN ANIMAL.
Page 36

36
6
Insérez la batterie dans son
compartiment et fermez-le en
appuyant fermement sur la
poignée intégrée jusqu’à ce que
la batterie soit fixée correctement
en place.
8
Mettez l’aspirateur en
marche en appuyant
sur l’interrupteur vers
l’avant ou l’arrière pour
sélectionner le niveau
de puissance désiré.
Appuyez vers l’arrière
à la position ON ( I
) (marche) pour un
nettoyage normal, moins
d’interruptions et un
niveau de bruit faible.
Appuyez vers l’avant à
la position BOOST ( II)
(puissance maximale)
lorsque vous avez besoin
d’une puissance accrue
( O ) (pour nettoyer les tapis
d’entrée ou les aires très
fréquentées).
Éteignez l’appareil en
déplaçant l’interrupteur
à la position centrale.
7
Appuyez sur la pédale de
dégagement de la poignée
avec votre pied et tirez la
poignée vers l’arrière.
SI VOUS AVEZ BESOIN D’AIDE
Veuillez téléphoner au 1-800-944-9200 (É.-U.) ou au 1-800-263-6376 (Canada)
(Lun-Ven 08h-19h EST) pour communiquer avec un représentant du service
client; ou rendez-vous sur notre site Internet au HooverCommercial.com.
9
Pour retirer la batterie, tirez sur la
poignée intégrée en appuyant sur
le bouton de dégagement. Puis,
toujours en maintenant enfoncé
le bouton de dégagement, faites
glisser la batterie en dehors de
son compartiment.
Premiers pas
Page 37

37
PREMIERS PAS
Page 38

38
Entretien
Toute autre tâche d’entretien doit être confiée à un représentant de service autorisé
Hoover Commercial.
Cessez d’utiliser l’appareil s’il ne fonctionne pas comme prévu, s’il a été échappé sur le sol ou dans
l’eau, s’il est endommagé ou s’il a été laissé à l’extérieur et apportez-le au centre de réparations. .
1
Vérifiez le sac-filtre.
Changez-le s’il est plein.
2
Vérifiez si la buse, le tuyau
et l’entrée du sac sont
obstrués. Dégagez toutes
les obstructions.
Remarque : Si vous utilisez l’aspirateur pour ramasser des poussières très fines, comme de la
sciure ou de la poussière de placoplâtre, il sera nécessaire de remplacer le sac et de nettoyer les
filtres à des intervalles fréquents afin de maintenir une puissance de ramassage maximale. Les
poussières fines bouchent les orifices du sac et réduisent l’aspiration, avant que le sac
ne devienne plein.
Indicateur de performance
Pour que l’utilisateur puisse profiter d’un nettoyage optimal, un témoin l’alerte lorsque le sac est
obstrué ou plein.
Si la couleur passe du vert au rouge, procédez comme suit:
AVERTISSEMENT
POUR RÉDUIRE LES RISQUES DE BLESSURE : RETIREZ LA BATTERIE AVANT D’EFFECTUER LE
NETTOYAGE OU L’ENTRETIEN DE L’APPAREIL.
Page 39

39
AVERTISSEMENT
POUR RÉDUIRE LES RISQUES DE BLESSURE : RETIREZ LA BATTERIE AVANT D’EFFECTUER LE
NETTOYAGE OU L’ENTRETIEN DE L’APPAREIL.
IMPORTANT NE NETTOYEZ PAS L’ANCIEN SAC-FILTRE POUR LE RÉUTILISER. JETEZ LE SAC-FILTRE USÉ. NE PASSEZ
PAS L’ASPIRATEUR SI AUCUN SAC-FILTRE N’EST INSTALLÉ.
Comment remplacer le sac-filtre
SACS DE RECHANGE
Filtration allergène, paquet de10, no de pièceAH10170
ENTRETIEN ET COMMENT REMPLACER LE SAC-FILTRE
1
Ouver le couvercle
supérieur en déclenchant
les 3 languettes.
5
Faites pivoter le levier
orange en position
verrouillée.
2
Faites pivoter le levier
orange de retrait du sac
pour déverrouiller le
support du sac.
3
Tirez sur la languette
orange pour retirer le
sac.
6
Enfoncez les coins inférieurs du
sac à l’intérieur des languettes
inférieures. Assurez-vous que
le loquet de la porte émette
un clic quand il est en place.
Assurez-vous que le sac n’est
pas coincé dans le joint de la
porte. Remarque: la porte ne se
fermera que si le levier est en
position verrouillée.
4
Faites glisser le sac de
rechange dans le support
de sac jusqu’à ce qu’il
soit bien installé.
Page 40

40
Comment vérifier si l’aspirateur est obstrué
AVERTISSEMENT
POUR RÉDUIRE LES RISQUES DE BLESSURE : RETIREZ LA BATTERIE AVANT D’EFFECTUER LE
NETTOYAGE OU L’ENTRETIEN DE L’APPAREIL.
1
Retirez le tuyau flexible en
appuyant sur le bouton de retrait
orange et en tirant vers le bas
le manchon supérieur du tuyau.
Vérifiez si l’entrée du tuyau est
obstruée.
2
Retirez le tuyau flexible en le
tournant dans le sens contraire
des aiguilles d’une montre, puis
en glissant le tuyau dans le
support inférieur. Redressez le
tuyau et vérifiez s’il est obstrué.
Page 41

41
COMMENT VÉRIFIER SI L’ASPIRATEUR EST OBSTRUÉ ET FILTRES
Filtres
FILTRE CONÇU AVEC LA TECHNOLOGIE HEPA
Les filtres finisseurs contribuent au processus de filtration en assainissant l’air rejeté dans la pièce.
Il y a deux filtres HEPA; un filtre de chaque côté du sac à dos. Cet appareil est équipé d’un indicateur
de filtre de service. Lorsque le voyant clignote, suivez les instructions ci-dessous pour nettoyer le
filtre final HEPA.
IMPORTANT
LAISSEZ SÉCHER COMPLÈTEMENT LE FILTRE AVANT DE LE REMETTRE EN PLACE. PLACEZ LE FILTRE DE CÔTÉ POUR
LE FAIRE SÉCHER DE SORTE QUE L’AIR CIRCULE DES DEUX CÔTÉS DU FILTRE. LE TEMPS DE SÉCHAGE PEUT PRENDRE JUSQU’À 24HEURES.
AVERTISSEMENT
POUR RÉDUIRE LES RISQUES DE BLESSURE: RETIREZ LA BATTERIE AVANT D’EFFECTUER LE
NET TOYAGE OU L’ENTRETIEN DE L’APPAREIL. N’UTILISEZ PAS L’ASPIRATEUR SI LE FILTRE D’ENTRÉE ET LES FILTRES D’E XTRÉMITÉ NE SONT PAS INSTALLÉS.
REMPLACEMENT DU FILTRE
Inspectez le filtre finisseur HEPA tous les mois et rincez-le si nécessaire. Vérifiez
si le filtre est usé et remplacez-le si les plis sont endommagés. Changez le filtre
régulièrement pour maintenir une performance optimale.
No de pièce: 440007773
1
Pour le retirer, abaissez la
languette et tirez sur le
boîtier de filtre.
2
Rincez le filtre à l’eau froide,
sous un faible débit d’eau. Rincez
uniquement la face ouverte vers
le haut. Laissez le filtre sécher,
puis repositionnez-le sur le boîtier
de filtre. Poussez fermement sur
la languette pour le fixer en place.
REMARQUE: Pour réinitialiser l’horloge sur l’indicateur de filtre, appuyez et maintenez enfoncé le
bouton jusqu’à ce que le voyant arrête de clignoter.
Page 42

42
Filtre à charbon actif HexaGuard
MC
Filtres
REMPLACEMENT DU FILTRE
Remplacez le filtre HexaGuard™ chaque année pour obtenir une
performance optimale. No de pièce: 440007787
AVERTISSEMENT
POUR RÉDUIRE LES RISQUES DE BLESSURE: RETIREZ LA BATTERIE AVANT D’EFFECTUER LE
NET TOYAGE OU L’ENTRETIEN DE L’APPAREIL. N’UTILISEZ PAS L’ASPIRATEUR SI LE FILTRE D’ENTRÉE ET LES FILTRES D’E XTRÉMITÉ NE SONT PAS INSTALLÉS.
1
Pour retirer le filtre du boîtier,
tirez-le à partir du haut. Ne le
rincez pas.
2
Pour replacer le filtre, alignez les
languettes sur les ouvertures
appropriées et inclinez le filtre
vers le boîtier. Assurez-vous de
bien le fixer en place.
Page 43

43
FILTRES
REMPLACEMENT DU FILTRE
Inspectez le filtre d’entrée tous les deux semaines pour que l’aspirateur offre une
performance optimale. No de pièce: 440010684
AVERTISSEMENT
POUR RÉDUIRE LES RISQUES DE BLESSURE: RETIREZ LA BATTERIE AVANT D’EFFECTUER LE
NET TOYAGE OU L’ENTRETIEN DE L’APPAREIL. N’UTILISEZ PAS L’ASPIRATEUR SI LE FILTRE D’ENTRÉE ET LES FILTRES D’E XTRÉMITÉ NE SONT PAS INSTALLÉS.
IMPORTANT
LAISSEZ SÉCHER COMPLÈTEMENT LE FILTRE AVANT DE LE REMETTRE EN PLACE. PLACEZ LE FILTRE DE CÔTÉ POUR
LE FAIRE SÉCHER DE SORTE QUE L’AIR CIRCULE DES DEUX CÔTÉS DU FILTRE. LE TEMPS DE SÉCHAGE PEUT PRENDRE JUSQU’À 24HEURES.
1
Si le filtre devient sale, retirez
la grille et soulevez le filtre.
Rincez-le à l’eau froide, sous
un faible débit d’eau.
Laissez-le sécher pendant
24heures. Repositionnez le filtre
sec et fixez la grille en place.
Filtre d’entrée
Le filtre d’entrée protège le moteur contre les dommages.
Page 44

44
Retirer le rouleau-brosse
MISE EN GARDE
DÉBRANCHEZ L’APPAREIL AVANT D’EN EFFECTUER L’ENTRETIEN AFIN DE RÉDUIRE LE
RISQUE DE BLESSURES PRÉSENTÉ PAR LES PIÈCES EN MOUVEMENT.
Lubrification
Le moteur et le rouleau-brosse sont équipés de roulements qui contiennent suffisamment de
lubrifiant pour toute leur durée de vie. L’ajout de lubrifiant pourrait causer des dommages. N’ajoutez
pas de lubrifiant au moteur ni au rouleau de brosses.
1
Glissez les languettes orange
vers le centre.
2
Glissez la languette arrière
vers l’arrière, à la position
déverrouillée.
3
Enlevez la base.
4
Retirez le rouleau-brosse, puis
retirez la courroie usée ou brisée
et remplacez-la. Assurez-vous que
la courroie est centrée sur l’arbre
de moteur et se trouve bien à
l’intérieur des rainures du
rouleau-brosse avant de replacer
ce dernier dans l’appareil.
Page 45

45
MISE EN GARDE
DÉBRANCHEZ L’APPAREIL AVANT D’EN EFFECTUER L’ENTRETIEN AFIN DE RÉDUIRE LE
RISQUE DE BLESSURES PRÉSENTÉ PAR LES PIÈCES EN MOUVEMENT.
RETRAIT DU ROULEAU-BROSSE ET DE LA COURROIE
ROULEAU-BROSSE DE RECHANGE
CH95413 (avec intelliBelt), no de pièce440007802
Toute autre tâche d’entretien doit être confiée à un représentant de service autorisé.
Cessez d’utiliser l’appareil s’il ne fonctionne pas comme prévu, s’il a été échappé sur le sol
ou dans l’eau, s’il est endommagé ou s’il a été laissé à l’extérieur et apportez-le au centre de
réparations pour le faire inspecter avant de continuer à l’utiliser.
5
Vérifiez l’usure du rouleau-brosse
à l’aide d’une carte d’affaires
ou d’une carte de crédit. Si la
carte ne touche pas aux poils,
remplacez le rouleau-brosse.
Page 46

46
Dépannage
Problème Cause possible Solution possible
L’aspirateur ne
fonctionne pas
1. La batterie n’est peut-être
pas installée adéquatement.
1. Assurez-vous que la batterie est bien
installée dans son réceptacle.
2. La batterie n’est peut-être
pas chargée.
2. Vérifiez l’indicateur de charge et rechargez
la batterie si le niveau est bas.
3. La batterie est peut-être
trop chaude.
3. Retirez la batterie et laissez-la refroidir
pendant 30minutes, puis remettez-la en
place et essayez de nouveau l’appareil ou
utilisez la deuxième batterie si celle-ci est
chargée.
4. Un composant interne est
peut-être endommagé.
4. Communiquez avec le service technique au
1800944-9200.
L’indicateur de
vérification du sac
est devenu rouge
ou l’aspirateur ne
ramasse pas
la saleté ou il
présente une faible
succion.
1. Le sac-filtre est plein
ou obstrué.
1. Videz le sac-filtre (page39).
2. La courroie est brisée
ou usée.
2. Remplacez la courroie (page44).
3. Le rouleau-brosse ou le
tuyau sont obstrués.
3. Vérifiez le tuyau (page40).
Vérifiez le rouleau-brosse (page44-45).
4. Le réglage de la hauteur sur
tapis est incorrect.
4. Réglez la hauteur sur tapis au réglage
approprié au tapis à nettoyer (page34).
De la poussière
s’échappe
de l’aspirateur.
1. Le sac-filtre est plein. 1. Videz le sac-filtre (page39).
2. Le sac-filtre n’est pas
installé correctement.
2. Consultez la section sur le retrait et le
remplacement du sac-filtre (page39).
3. Le tuyau est mal installé. 3. Vérifiez l’installation du tuyau.
CLIGNOTE
EN VERT
EST
VERTE
JAUNE
CLIGNOTANT
JAUNE
FIXE
CLIGNOTE
EN ROUGE
Batterie
Recharge
Batterie entièrement
rechargée
Indique que la batterie
est en veille prolongée
et en attente d’être
rechargée.
Laissez la batterie sur le
chargeur. Elle est trop
chaude ou trop froide
pourle moment.
Communiquez avec nous
au1800944-9200.
Toute autre tâche d’entretien doit être confiée à un représentant de service autorisé.
Cessez d’utiliser l’appareil s’il ne fonctionne pas comme prévu, s’il a été échappé sur le sol ou dans l’eau, s’il
estendommagé ou s’il a été laissé à l’extérieur et apportez-le au centre de réparations.
AVERTISSEMENT
POUR RÉDUIRE LES RISQUES DE BLESSURE : RETIREZ LA BATTERIE AVANT D’EFFECTUER LE
NETTOYAGE OU L’ENTRETIEN DE L’APPAREIL.
Recharge d’un
bloc-piles chaud:
Lorsque vous utilisez un aspirateur
sans interruption sur une certaine
période, la batterie peut devenir
chaude. Il est possible de placer
une batterie chaude directement
sur le chargeur, mais la recharge
ne commencera pas tant que la
température de la batterie ne sera pas
redescendue à un niveau acceptable.
Lorsqu’une batterie chaude est placée
sur le chargeur, le voyant DEL jaune
demeure allumé jusqu’à ce que la
batterie se soit suffisamment refroidie
pour que la recharge commence.
Recharge d’un
bloc-piles froid:
Il est possible de placer une batterie
froide directement sur le chargeur,
mais la recharge ne commencera pas
tant que la température de la batterie
ne sera pas remontée à un niveau
acceptable. Lorsqu’une batterie froide
est placée sur le chargeur, le voyant
DEL jaune demeure allumé jusqu’à ce
que la batterie se soit suffisamment
réchauffée pour que la recharge
commence.
Quel est le message lorsque
la lumière du chargeur...
Page 47

47
DÉPANNAGE ET GARANTIE
L’aspirateur est
difficile à déplacer
ou à pousser
vers l’avant.
1. Le réglage de la hauteur
sur tapis
est incorrect.
1. Réglez la hauteur sur tapis au réglage
approprié au tapis
à nettoyer (page34).
2. La base n’est pas
installée correctement.
2. Consultez la page 44.
Une odeur de fumée
ou de brûlé est
détectée.
1. La courroie est brisée
ou lâche.
1. Remplacez la courroie du rouleau-brosse
(page44).
2. Le rouleau à brosses
est coincé.
2. Retirez les débris du
rouleau-brosse (page44-45).
GARANTIE LIMITÉE DE 2ANS
COUVERTURE DE LA GARANTIE
Lorsqu’ils sont utilisés et entretenus dans des conditions normales d’utilisation et d’entretien commerciaux, comme il est
stipulé dans le guide d’utilisation, votre appareil HooverMD Commercial est garanti contre les défauts de fabrication et de
main-d’œuvre pendant une période de deuxans à partir de la date d’achat (ci-après la «période de garantie»). Pendant la
période de garantie, telle qu’elle est décrite dans la présente garantieMD, fournira la main-d’œuvre et les pièces gratuitement
afin de corriger une telle défectuosité pour les produits achetés aux États-Unis. dans les boutiques d’échanges militaires
américaines et au Canada.
RÉCLAMATION AU TITRE DE LA GARANTIE
Si le produit n’est pas dans l’état prévu par la garantie, apportez ou envoyez le produit chez un fournisseur autorisédeservice
sous garantie HooverMD avec une preuve d’achat. Pour obtenir la liste des points de service autorisés,composez le numéro du
service automatisé au 1800944-9200 OU visitez HooverMD Commercial en ligne au www.hoovercommercial.com (clients des
É.-U.) États-Unis) ou au www.hoover.ca (clients du Canada). Pour obtenir du soutien ou d’autres renseignements au sujet de
la garantie ou pour connaître les boutiques offrant les réparations au titre de la garantie, composez le 1800944-9200, entre
8h et 19h (HNE) du lundi au vendredi. Au Canada, composez le 1800263-6376, entre 8h et 19h (HNE) du lundi au vendredi.
ÉLÉMENTS NON COUVERTS PAR LA GARANTIE
Certaines pièces de votre produit commercial
HooverMD doivent être remplacées dans le cours normal d’utilisation en raison
d’une usure normale. Ces pièces comprennent les courroies, les manchons du rouleau-brosse, les roulements du rouleaubrosse, les brosses, les sacs, les filtres et les ampoules. Ces pièces ne sont pas couvertes par la présente garantie. De plus, la
présente garantie ne couvre pas: un entretien inadéquat du produit, les bris causés par la mauvaise utilisation, les cas fortuits,
les catastrophes naturelles, le vandalisme et autres actes hors du contrôle de
HooverMDCommercial
, les agissements ou
omissions du propriétaire, l’utilisation à l’extérieur du pays d’achat, la revente du produit par le premier acheteur, les défauts ou
les dommages causés par quiconque autre qu’un fournisseur autorisé de servic e sous garantie
HooverMD Commercial
se réserve
le droit d’inspecter tout produit présumé défectueux et de prendre les décisions définitives à l’égard de toute réclamation au
titre de la garantie. La présente garantie ne couvre pas le ramassage, la livraison, le transport, ni les réparations à domicile.
Toutefois, si vous envoyez votre produit par courrier à un fournisseur autorisé de service sous garantie
HooverMD Commercial
pour une réparation sous garantie, les frais de livraison de retour seront payés.
AUTRES CONDITIONS IMPORTANTES
La présente garantie n’est pas transférable et ne peut pas être cédée. La présente garantie sera régie et interprétée selon les
lois de l’État de l’Ohio. La période de garantie ne sera pas prolongée après tout remplacement ou toute réparation au titre de
la présente garantie. CETTE GARANTIE EST VOTRE UNIQUE RECOURS ET VOIE DE DROIT FOURNIS PAR HOOVERMD. TOUTES
AUTRES GARANTIES, E XPRESSES OU TACITES, INCLUANT LES GARANTIES DE QUALITÉ M ARCHANDE OU D’ADAPTATION
À UN USAGE PARTICULIER, SONT DÉCLINÉES. EN AUCUN TEMPS, HOOVERMD NE POURRA ÊTRE TENUE RESPONSABLE
DE TOUS LES DOMMAGES-INTÉRÊTS SPÉCIAUX, INDIRECTS, ACCIDENTELS OU ACCESSOIRES D’AUCUNE SORTE OU
D’AUCUNE NATURE ENVERS LE PROPRIÉTAIRE OU DE TOUTES PARTIES RÉCLAMANT AU NOM DU PROPRIÉTAIRE, QUE
CE SOIT PAR CONTRAT, NÉGLIGENCE, TORT OU RESPONSABILITÉ STRICTE DES PRODUITS OU SURVENUS PAR QUELQUE
CAUSE QUE CE SOIT. Certains États ne permettent pas l’exclusion des dommages consécutifs. Par conséquent, l’exclusion
précédente pourrait ne pas être applicable dans votre cas. La présente garantie vous donne des droits précis. Vous pouvez
également avoir d’autres droits, lesquels varient d’une province à l’autre.
Page 48

Page 49

49
HUSHTONE™
ASPIRADORA VERTICAL SIN BOLSA
MANUAL DEL USUARIO
Para usar con el modelo CH 95413.
IMPORTANTE:
LEA LA GUÍA CON ATENCIÓN
ANTES DE ENSAMBLAR YUSAR ESTE
APARATO. ESTE PRODUCTO SOLO TIENE
COMO FIN SU USO COMERCIAL.
La apariencia del producto puede diferir levement e de las imágenes que se muestran.
Page 50

50
Bienvenido.
Gracias por elegir un producto Hoover® Commercial.
SI NECESITA AYUDA
Llame al 1-800-944-9200 EE. UU., 1-800-263-6376 CANADÁ
(de lunes a viernes de 8 a. m. - 7 p. m., hora estándar del este) para hablar con un
representante de atención al cliente, o visite nuestro sitio web en HooverCommercial.com.
Page 51

51
Índice
Instrucciones de seguridad 52-53
Características 54-55
Herramientas 56
Conexión de las herramientas 57
Cómo comenzar 58
Batería y cargador M-PWR™ de 40 V 58
Uso de su mochila 6Q HushTone™ inalámbrica 59-61
Mantenimiento 62
Indicador de rendimiento 62
Cómo reemplazar la bolsa de filtro 63
Cómo detectar atascamientos 64
Filtros 65-67
Extracción del cepillo giratorio y la correa 68-69
Resolución de problemas 70
Garantía 71
Page 52

52
INSTRUCCIONES DE SEGURIDAD IMPORTANTES
¡GUARDE ESTAS INSTRUCCIONES!
IMPORTANTE: LEA ESTE MANUAL CON ATENCIÓN ANTES DE ENSAMBLAR Y
USAR ESTE APARATO. CUANDO SE UTILIZAN APARATOS ELÉCTRICOS, SIEMPRE DEBEN
SEGUIRSE PRECAUCIONES BÁSICAS, INCLUIDAS LAS SIGUIENTES: LEA TODAS LAS
INSTRUCCIONES ANTES DE UTILIZAR ESTE APARATO.
ADVERTENCIA: PARA DISMINUIR EL RIESGO DE
INCENDIO, DESCARGA ELÉCTRICA O LESIONES:
•
Arme la aspiradora por completo antes de ponerla en funcionamiento.
•
No utilice la unidad, ni guarde o cargue la batería a la intemperie ni sobre superficies húmedas o mojadas. Evite que el cargador
se moje.
•
Evite que se la utilice como un juguete. La unidad no tiene como fin el uso por parte de niños de 12 años o menos. Cuando la
utilicen niños o se utilice cerca de ellos, será necesario hacerlo bajo una estricta supervisión. Para evitar lesiones o daños,
mantenga a los niños alejados del producto y no permita que introduzcan los dedos ni objetos en ninguna de las aberturas del
producto.
•
Utilícela únicamente según el uso descripto en este manual. Utilice solamente los accesorios y productos recomendados por el
fabricante.
•
No utilice el cargador si el cable o el enchufe se encuentran dañados. Si el aparato o el cargador no funcionan como deben; si
se han caído, han sido dañados, dejados a la intemperie o sumergidos en agua, llévelos a un Centro Técnico antes de continuar
usándolos.
•
No extraiga ni transporte el cargador tomándolo por el cable; no tire del cable, no cierre una puerta con él ni lo enrosque alrededor
de bordes o esquinas filosas. No apoye el producto sobre el cable. No pase el aparato por encima del cable. Mantenga el cable
lejos de las superficies calientes.
•
No desenchufe el cargador tirando del cable. Para desenchufarlo, agarre el enchufe, no el cable.
•
No manipule el cargador (incluido el enchufe y los terminales, ni el aparato) con las manos mojadas.
•
No incinere el cargador, la batería ni el aparato, aun si estuvieran muy dañados. Las baterías pueden explotar y provocar un incendio.
•
No coloque ningún objeto en las aber turas. No utilice la unidad si alguna de sus aberturas se encuentra bloqueada. Manténgala
libre de polvo, pelusas, cabello y cualquier otro elemento que pueda disminuir el flujo de aire.
•
Evite que el cabello, la ropa suelta, los dedos y cualquier otra parte del cuerpo entren en contacto con las aberturas y las piezas
móviles de la unidad. El cepillo giratorio permanecerá girando mientras la unidad esté en posición vertical.
•
E xtreme las precauciones cuando utilice la aspiradora para limpiar escaleras. Para evitar lesiones o daños físicos, y a fin de evitar
que la aspiradora se caiga, siempre colóquela al pie de las escaleras, sobre el suelo. No coloque la aspiradora sobre las escaleras
ni sobre un mueble, ya que pueden generarse lesiones o daños.
•
Este producto incluye baterías recargables de iones de litio. No exponga las baterías a altas temperaturas, ya que pueden
prenderse fuego o explotar.
•
No aplaste ni incinere la batería, ni la someta a acciones similares.
•
No deseche la batería en un incinerador ni en un compactador de desechos. Consulte la sección sobre desecho de la batería para
obtener instrucciones.
•
No intente desarmar la batería.
•
Desenchufe el cargador del tomacorriente antes de llevar a cabo una rutina de limpieza o mantenimiento en la unidad.
•
En condiciones extremas, pueden producirse pérdidas en las celdas de la batería. Si la piel entrara en contacto con el líquido,
lávese rápidamente con jabón y agua. Si el líquido le entrara en los ojos, no los frote. Enjuáguelos de inmediato con agua limpia,
en forma continua durante, al menos, 15minutos. Consulte a un médico de inmediato.
•
Use solo el cargador (N.° de pieza de
Hoover
Commercial CH90002) suministrado por
Hoover
para la recarga.
•
Use solo la batería (N.° de pieza de Hoover Commercial CH90040) suministrada por Hoover Commercial. Otras baterías pueden
explotar y causar lesiones o daños físicos graves.
•
No toque el bloque de batería ni los terminales del cargador, ni inserte objetos en ellos.
•
El cargador es para uso en interiores solamente. Siempre asegúrese de guardar la batería y el cargador en un lugar seco.
•
No intente cortocircuitar la batería ni los terminales del cargador.
•
No utilice la unidad para aspirar líquidos combustibles o inflamables, tales como gasolina o restos de madera lijada, ni la utilice
enáreas en las que dichas sustancias puedan estar presentes.
•
No aspire nada que se encuentre en combustión o emita humo, como cigarrillos, fósforos o cenizas calientes.
•
No utilice el aparato si no tiene colocados los filtros y/o la bolsa de recolección de residuos.
•
Siempre apague el aparato antes de conectar o desconectar el tubo o las herramientas.
•
Evite los arranques no intencionales. Asegúrese de que el interruptor esté en la posición de apagado antes de conectar la unidad
al paquete de baterías, de trasladarla o moverla. Si traslada el aparato con el dedo sobre el interruptor o energiza un aparato que
tiene encendido el interruptor puede provocar accidentes.
•
Desconecte el paquete de baterías del aparato antes de realizar ajustes, cambiar accesorios o almacenar el aparato. Dichas
medidas de seguridad preventivas reducen el riesgo de arrancar el aparato en forma accidental.
•
Recargue la unidad solo con el cargador especificado por el fabricante. Un cargador adaptado para un tipo de paquete de baterías
puede crear un riesgo de incendio cuando se lo utiliza con otro paquete de baterías.
Page 53

53
INSTRUCCIONES DE SEGURIDAD
•
Use aparatos solo con los paquetes de baterías diseñados específicamente. El uso de un paquete de baterías distinto puede crear
un riesgo de lesiones e incendios.
•
Cuando el paquete de baterías está en uso, manténgalo alejado de otros objetos de metal, como sujetadores de papeles,
monedas, llaves, clavos, tornillos u otros objetos metálicos pequeños que puedan realizar una conexión desde una terminal a la
otra. Si se produce un cortocircuito entre las terminales se pueden generar quemaduras o incendios.
•
Bajo condiciones severas, puede eyectarse líquido desde la batería. Evite el contacto. Si sucede un contacto accidental, lávese
con agua. Si el líquido entra en contacto con los ojos, busque asistencia médica adicional. El líquido eyectado desde la batería
puede provocar irritación o quemaduras.
•
No use un paquete de baterías o un aparato que esté dañado o se haya modificado. Las baterías dañadas o modificadas pueden
exhibir un comportamiento impredecible que puede provocar incendios, explosiones o riesgo de lesiones.
•
No exponga el paquete de baterías o el aparato al fuego o a temperaturas excesivas. La exposición al fuego o a temperaturas
sobre los 130 °C (265 °F) puede causar una explosión.
•
Siga todas las instrucciones de carga y no cargue el paquete de baterías ni el aparato fuera del rango de temperaturas
especificado en las instrucciones. La carga incorrecta o a temperaturas que estén fuera del rango especificado puede dañar la
batería y aumentar el riesgo de incendios.
•
Solo una persona calificada debe realizar el mantenimiento de la unidad, y deben utilizarse únicamente piezas de repuesto
idénticas. Esto garantizará que se mantenga la seguridad del producto.
•
No modifique ni intente reparar el aparato o el paquete de baterías (según corresponda), excepto como se indica en las
instrucciones de uso y mantenimiento.
PRECAUCIÓN: PARA DISMINUIR EL RIESGO DE DAÑOS:
•
Utilice la unidad solo en pisos secos.
•
Evite aspirar objetos duros y filosos con este producto, ya que pueden dañarlo.
•
Almacénelo apropiadamente en interiores, en un lugar seco. No exponga la máquina a temperaturas muy frías.
•
El cepillo giratorio sigue girando mientras el producto está encendido y la manija está en posición vertical. Para evitar dañar alfombras
y pisos, no incline la aspiradora sobre muebles, flecos de alfombras o escaleras alfombradas, ni la coloque sobre estos cuando use esta
herramienta.
•
No utilice objetos filosos para limpiar la manguera, ya que pueden dañar la unidad. Con el cepillo giratorio encendido, evite dejar
la aspiradora estacionada en un lugar por mucho tiempo. Esto puede dañar el piso.
ADVERTENCIA:
PARA REDUCIR EL RIESGO DE DESCARGA ELÉCTRICA, EL CARGADOR TIENE
UN ENCHUFE POLARIZADO (UNA CLAVIJA ES MÁS ANCHA QUE LA OTRA). ESTE ENCHUFE CABE
EN UN TOMACORRIENTE POLARIZADO DE UNA SOLA MANERA. SI NO ENCAJA POR COMPLETO EN
EL TOMACORRIENTE, INVIERTA EL ENCHUFE. SI AÚN NO ENCAJA, CONTACTE A UN ELECTRICISTA
CUALIFICADO PARA QUE INSTALE EL TOMACORRIENTE CORRESPONDIENTE. NO REALICE NINGÚN TIPO
DE MODIFICACIÓN EN EL ENCHUFE.
ADVERTENCIA: ESTE PRODUCTO CONTIENE QUÍMICOS RECONOCIDOS POR EL ESTADO
DE CALIFORNIA COMO CAUSANTES DE CÁNCER, DEFECTOS DE NACIMIENTO U OTROS DAÑOS
REPRODUCTIVOS. LÁVESE LAS MANOS LUEGO DE UTILIZARLO.
ADVERTENCIA SOBRE EL DESECHO DE LA BATERÍA: RIESGO DE
EXPLOSIÓN O EXPOSICIÓN A MATERIAL TÓXICO.
PRECAUCIÓN:
La batería utilizada con este disp ositivo puede representar riesgos de incendios o quemaduras químicas si se
la manipula incorrec tamente. No la desarme ni incinere, ni la caliente a temperaturas superiores al límite máximo de temperatura establecido
por el fabricante (6 0°C/140°F ). Reemplace la batería solo con baterías Hoover Commercial N.° de pieza CH9004 0. El uso de otra batería puede
representar riesgos de incendios o explosiones. Deseche la batería usada rápidamente. Manténgala alejada de los niños. No la desarme ni la
deseche prendiéndola fuego. No intente desar mar la batería ni extraer cualquier componente que sobresalga de los terminales de aquella. La
batería y el cargador no contienen piezas a las que el usuario pueda realizarles un ser vicio de mantenimiento. Pueden generarse incendios o
lesiones. Antes de desecharla, proteja los terminales expuestos con cinta aislante gruesa para evitar que se produzcan cortocircuitos.
BATERÍAS DE IONES DE LITIO:
La batería debe recolec tarse, re ciclarse o desecharse en forma que no sea perjudicial al
medio ambiente. El Sello de reciclado de la batería RBRC certificado por EPA (Agencia de Protección Ambiental) en la batería de iones de
litio (Li-ion) indica que Techtronic Industries, una afiliada corpor ativa de Hoover Commer cial, se encuentra participando voluntariamente en
un programa indust rial para recolectar y reciclar estas baterías al final de sus vidas útiles, cuando son retiradas de servicio en los Estados
Unidos o Canadá. El programa RBRC proporciona una conveniente alternativa a la colocación de las baterías de iones de
litio usadas en la basura o en el flujo de desechos municipales, lo que puede ser ilegal en su área. Visite w ww.rbrc.org/
call2recycle/para obtener información sobre el reciclaje de las baterías de iones de litio y las restricciones/prohibiciones
sobre desechos en su área. La participación de Hoover Commercial en este programa forma p arte de nuestro compromiso
por preser var el medio ambiente y conservar los recursos naturales.
A
G
E
Page 54

54
Características del producto
Contenidos de la caja de embalaje
A
Manija
B
Puerta de la cubierta de la bolsa
C
Filtro HEPA
D
Herramienta para limpieza en rincones
E
Cepillo quitapolvo
+ Manual del usuario
+ Guía de inicio rápido
F
Batería de Li-ion M-PWR™ de 40 V
G
Cargador de bahía doble M-PWR™ de 40 V
*SE VE NDE POR SEPARADO
Page 55

55
CARACTERÍSTICAS DEL PRODUCTO
A
B
C
D
E
F
G
Page 56

56
Herramientas
PRECAUCIÓN
LA ASPIRADORA NO DEBE UTILIZARSE PARA LIMPIAR MASCOTAS.
Boquilla para limpieza en
tapizados: Para muebles tapizados,
cortinajes, colchones, prendas y
escaleras con alfombras.
Herramienta para limpieza en
rincones: Para alcance extendido
a espacios confinados, esquinas y
bordes perimetrales de cómodas,
muebles, escaleras y zócalos.
NOTA: Las herramientas accesorias pueden utilizarse con la varilla integrada de limpieza
rápida.
Page 57

57
HERRAMIENTAS
Conexión de las herramientas
PRECAUCIÓN
EL CEPILLO GIRATORIO SIGUE GIRANDO MIENTRAS LA ASPIRADORA ESTÁ ENCENDIDA Y LA
MANIJA SE ENCUENTRA EN POSICIÓN VERTICAL. PARA EVITAR DAÑOS EN ALFOMBRADOS, ALFOMBRAS, MUEBLES Y PISOS, EVITE
INCLINAR LA ASPIRADORA O COLOCARLA SOBRE MUEBLES, FLECOS DE ALFOMBRAS O ESCALERAS ALFOMBRADAS DURANTE EL USO
DE DICHA HERRAMIENTA. EXTREME LAS PRECAUCIONES CUANDO LIMPIE ESCALERAS. PARA EVITAR LESIONES O DAÑOS FÍSICOS, Y A
FIN DE EVITAR QUE LA ASPIRADORA SE CAIGA, SIEMPRE COLÓQUELA AL PIE DE LAS ESCALERAS, SOBRE EL SUELO. NO COLOQUE LA
ASPIRADORA SOBRE LAS ESCALERAS NI SOBRE UN MUEBLE, YA QUE PUEDEN GENERARSE LESIONES O DAÑOS. CUANDO UTILICE LAS
HERRAMIENTAS ACCESORIAS, SIEMPRE ASEGÚRESE DE QUE EL MANGO SE ENCUENTRE EN POSICIÓN VERTICAL.
1
Para un alcance extendido, retire
la varilla del soporte tirando en
forma recta hacia arriba y hacia
afuera.
3
Para utilizar el extremo de la
manguera, presione la lengüeta
de liberación y tire de la manija
de la varilla.
2
Presione las herramientas en
forma firme dentro del extremo
de la varilla. Cuando termine,
gire y tire para retirarlas.
ADVERTENCIA
SIEMPRE APAGUE EL APARATO ANTES DE CONECTAR O DESCONECTAR EL TUBO O LAS
HERRAMIENTAS.
Page 58

58
Batería y cargador M-PWR™ de 40 V
1
Para cargar la batería, deslice la batería
en el cargador. Empuje hacia atrás hasta
que la batería encastre en su lugar y se
encienda el indicador LED de estado.
3
Cuando se realiza la carga, los LED
completamente iluminados de la
batería indicarán el nivel de carga.
2
El indicador LED de estado se
encenderá en color verde cuando la
batería esté completamente cargada.
Retire la batería yreemplácela.
4
Para retirar la batería, presione el
botón de liberación y deslice la batería
hacia adelante mientras sostiene la
base del cargador.
NOTA: Las baterías se envían en condiciones de poca carga para evitar posibles problemas. Debe cargarlas
antes del primer uso.
Solo debe cargar una batería por vez. Cuando hay dos baterías colocadas, primero se cargará la batería con la
mayor cantidad de energía restante. Esto garantiza un tiempo más rápido para la recarga completa.
RANGO DE TEMPERATURA AMBIENTE PARA LA CARGA: 5 °C – 50 °C (41 °F – 122 °F)
10%–33% Charged
0%–10% Charged
33%–66% Charged
66%–100% Charged
Page 59

59
CÓMO COMENZAR
Cómo comenzar
NOTA: No utilice la aspiradora sin la bolsa de filtro y los filtros HEPA.
NOTE: La batería se debe cargar por completo antes de su uso. Consulte las instrucciones de carga
en la página 58.
RANGO DE TEMPERATURA AMBIENTE: 0 °C – 40 °C (32 °F – 104 °F)
1
Inserte
firmemente el
mango en la
carcasa.
ADVERTENCIA
PARA REDUCIR EL RIESGO DE LESIONES PERSONALES: EXTRAIGA LA BATERÍA ANTES DE LIMPIAR LA
UNIDAD O REALIZARLE UN SERVICIO DE MANTENIMIENTO.
2
Presione el pestillo
para fijar el mango en
su lugar.
3
Inserte las herramientas
accesorias en los
soportes.
4
Gire la palanca para
confirmar que la bolsa de
la aspiradora se encajó.
Nota: la puerta de la bolsa
no cerrará si la bolsa de la
aspiradora no se instaló
correctamente.
5
Gire la palanca de ajuste
de altura hasta el nivel
deseado. Si es difícil
empujar la aspiradora,
gire la perilla hasta el
siguiente ajuste
más alto.
PRECAUCIÓN
NO SER USADO PARA CEPILLAR A UN ANIMAL DOMÉSTICO.
Page 60

60
6
Inserte la batería en la carcasa
tomando el mango integrado y
empujándolo firmemente hasta
que trabe la batería en su lugar.
8
Encienda la aspiradora
presionando el
interruptor hacia
adelante o atrás para
seleccionar el nivel de
alimentación deseado.
Presione hacia atrás
hasta la posición de
encendido ( I ) para una
limpieza normal y menos
disruptiva, con menores
niveles de decibeles de
ruido.
Presione hacia adelante
hasta la posición de BOOST
( II ) (Impulsión) si se desea
más potencia, para limpiar
los tapetes de las puertas
de entrada o las áreas de
mayor tráfico.
Apáguela ubicando el
interruptor en la
posición media ( O ).
7
Presione el pedal de
liberación de la manija
con el pie y vuelva a tirar
de la manija.
9
Para retirar la batería, tome
el mango integrado mientras
presiona el botón de liberación.
Deslice hacia afuera de la carcasa
tirando mientras mantiene
presionado el botón de liberación.
SI NECESITA AYUDA
Llame al 1-800-944-9200 EE. UU., 1-800-263-6376 CANADÁ (de lunes a viernes
de 8 a. m. - 7 p. m., hora estándar del este) para hablar con un representante
de atención al cliente, o visite nuestro sitio web en HooverCommercial.com.
Cómo comenzar
Page 61

61
CÓMO COMENZAR
Page 62

62
Mantenimiento
Cualquier otro mantenimiento lo debe realizar un representante de servicio autorizado de
Hoover Commercial.
Si el aparato no funciona como debe, si se ha caído, dañado o dejado a la intemperie, o si se ha
sumergido enagua, llévelo a un Centro técnico antes de continuar usándolo..
ADVERTENCIA
PARA REDUCIR EL RIESGO DE LESIONES PERSONALES: EXTRAIGA LA BATERÍA ANTES DE LIMPIAR LA
UNIDAD O REALIZARLE UN SERVICIO DE MANTENIMIENTO.
Nota: Cuando utilice la aspiradora para recoger polvo muy fino, como el aserrín o el polvo de
mampostería, será necesario reemplazar la bolsa y limpiar los filtros a intervalos más frecuentes
para mantener una máxima potencia de limpieza. El polvo fino atasca los poros de la bolsa y reduce
la aspiración antes de que se llene la bolsa.
Indicador de rendimiento
Alerta al usuario sobre un atascamiento o cuando la bolsa está llena para una limpieza óptima.
Si cambia el color de verde a rojo, verifique las siguientes condiciones:
1
Verifique la bolsa de filtro.
Cámbiela si está llena.
2
Revise que no haya
obstrucciones en la
boquilla, la manguera
y la entrada de la
bolsa. Elimine todo
elemento obstructivo.
Page 63

63
IMPORTANTE NO LIMPIE LA BOLSA DE FILTRO VIEJA PARA VOLVERLA A UTILIZAR. DESECHE LA BOLSA DE
FILTRO VIEJA. NO ASPIRE SIN LA BOLSA DE FILTRO EN SU LUGAR.
Cómo reemplazar la bolsa de filtro
BOLSAS DE REEMPLAZO
Filtración de alérgenos, paquete de 10, N.° de pieza AH10170
MANTENIMIENTO Y CÓMO REEMPLAZAR LA BOLSA DE FILTRO
ADVERTENCIA
PARA REDUCIR EL RIESGO DE LESIONES PERSONALES: EXTRAIGA LA BATERÍA ANTES DE LIMPIAR LA
UNIDAD O REALIZARLE UN SERVICIO DE MANTENIMIENTO.
1
Tire del pasador
de liberación color
naranja para abrir la
puerta de la bolsa.
5
Gire la palanca
naranja hasta la
posición de bloqueo.
2
Gira la palanca
naranja de liberación
de la bolsa para
desbloquear el
soporte de la bolsa.
3
Gire la palanca
naranja hasta la
posición de bloqueo.
6
Encaje las esquinas inferiores de
la bolsa dentro de las lengüetas
inferiores. Asegúrese de que los
pestillos encajen en su sitio (se
oirá un clic). Asegúrese de que la
bolsa no interfiera con el sello de
la puerta Nota: la puerta no se
cerrará a menos que la palanca
esté en la posición de bloqueo.
4
Deslice la bolsa de
repuesto en el soporte
de la bolsa hasta que
la bolsa esté segura
en su lugar.
Page 64

64
Cómo detectar atascamientos
ADVERTENCIA
PARA REDUCIR EL RIESGO DE LESIONES PERSONALES: EXTRAIGA LA BATERÍA ANTES DE LIMPIAR LA
UNIDAD O REALIZARLE UN SERVICIO DE MANTENIMIENTO.
1
Retire la manguera flexible
presionando el botón de
liberación naranja y tirando
del manguito superior de la
manguera hacia abajo. Verifique
la entrada de la manguera en
busca de obstrucciones.
2
Retire la manguera flexible
girando la manguera en el sentido
de las agujas del reloj y tirando
a través del soporte inferior.
Coloque la manguera en forma
recta y compruebe que no haya
obstrucciones.
Page 65
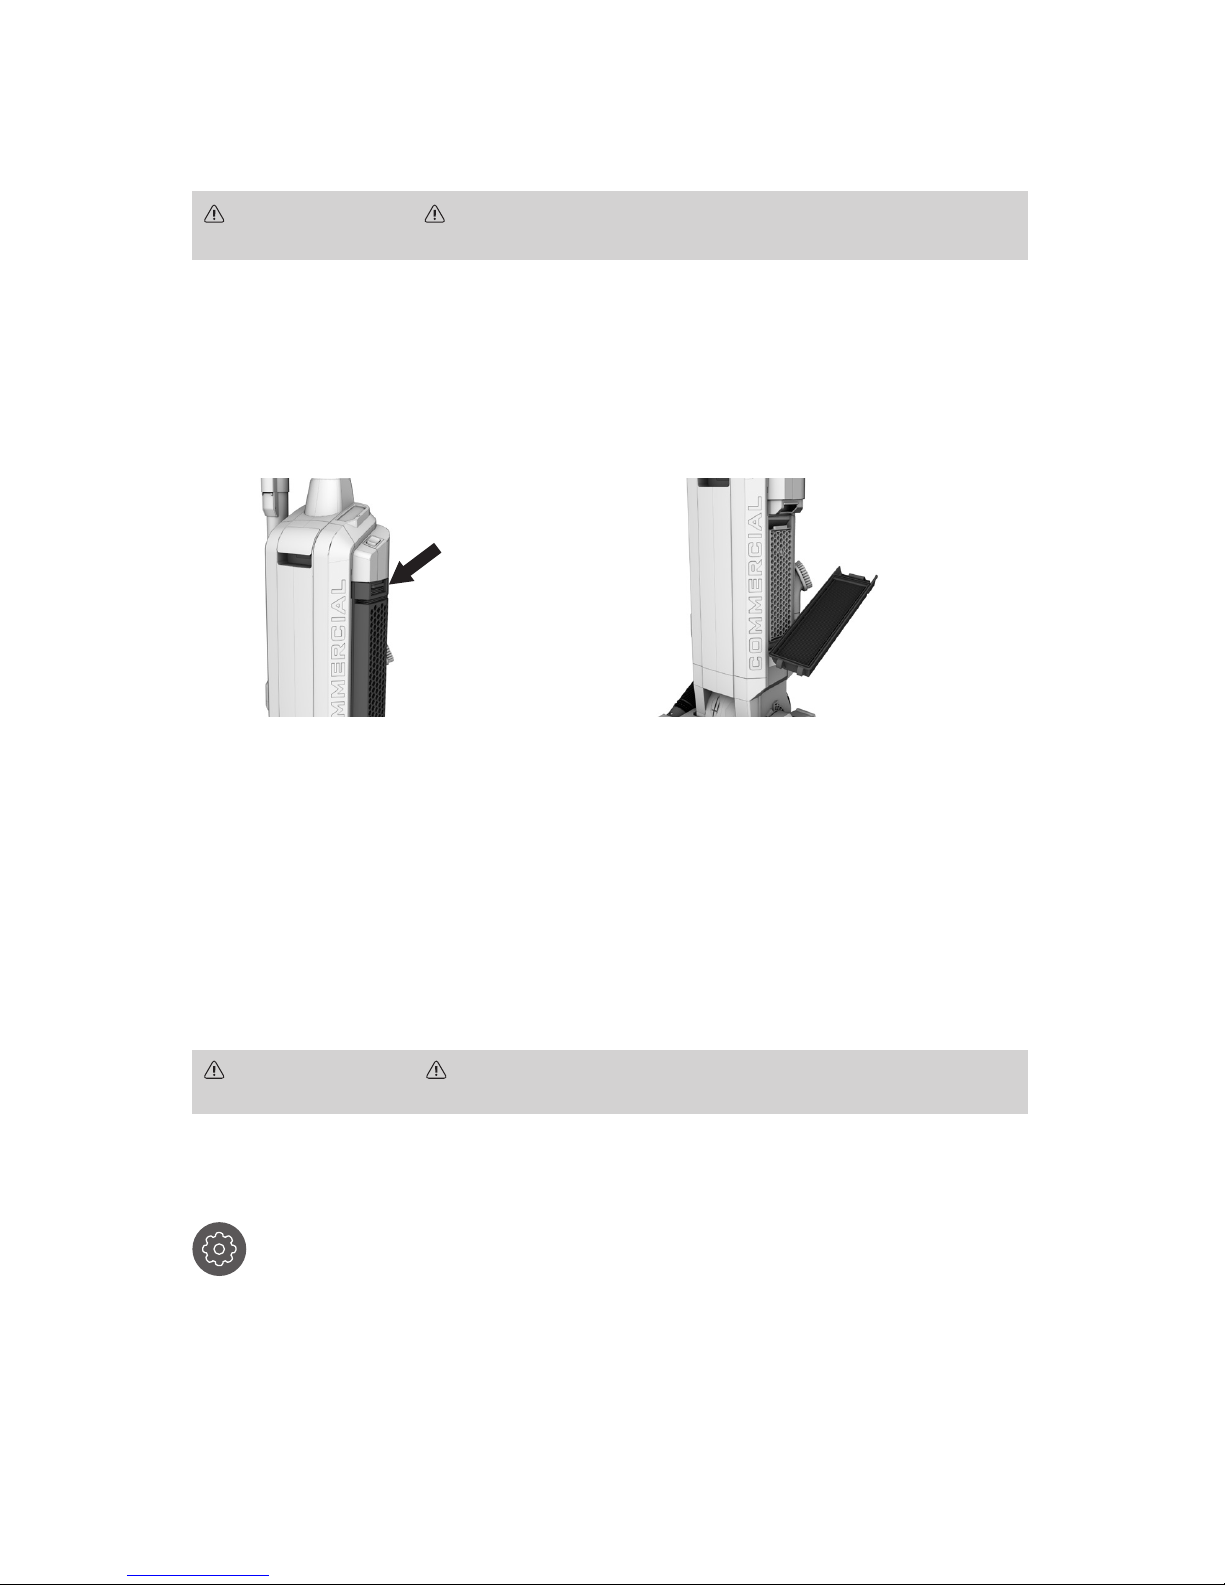
65
CÓMO DETECTAR ATASCAMIENTOS Y FILTROS
IMPORTANTE
PERMITA QUE EL FILTRO SE SEQUE COMPLETAMENTE ANTES DE VOLVER A COLOCARLO. SEQUE
EL FILTRO EN EL BORDE PARA QUE EL AIRE CIRCULE EN AMBOS LADOS DEL FILTRO. ESTO PUEDE DEMORAR HASTA 24 HORAS.
Filtros
FILTRO DE REEMPLAZO
Enjuague el Filtro final de medios HEPA cada 2 meses. Verifique el desgaste del
medio y reemplace los pliegues si están dañados. Cambie el filtro periódicamente
para mantener un máximo rendimiento.
N.° de pieza 440007773
ADVERTENCIA
PARA DISMINUIR EL RIESGO DE LESIONES FÍSICAS, RETIRE LA BATERÍA ANTES DE LIMPIARLA
OREALIZARLE UN SERVICIO DE MANTENIMIENTO. NO HAGA FUNCIONAR LA ASPIRADORA SIN EL FILTRO DE ENTRADA NI LOS FILTROS FINALES.
ADVERTENCIA
PARA DISMINUIR EL RIESGO DE LESIONES FÍSICAS, RETIRE LA BATERÍA ANTES DE LIMPIARLA
OREALIZARLE UN SERVICIO DE MANTENIMIENTO. NO HAGA FUNCIONAR LA ASPIRADORA SIN EL FILTRO DE ENTRADA NI LOS FILTROS FINALES.
Filtro final de medios HEPA
El filtro final ayuda en el proceso de filtración para devolver aire más limpio a la habitación.
Esta unidad está equipada con un Filtro indicador de servicio. Cuando la luz parpadee, siga los
siguientes procedimientos de limpieza para el filtro final de medios HEPA.
1
Para extraerlo, presione la
lengüeta hacia abajo
y tire del alojamiento del filtro.
2
Levántelo y enjuáguelo a mano
con agua fría y presión baja.
Enjuague solo con el lado abierto
hacia arriba. Deje secar y vuelva
a colocarlo en el alojamiento del
filtro, presionando en forma firme
sobre la lengüeta para que encaje
en su lugar.
NOTA: Para restablecer el temporizador del indicador del filtro, mantenga presionado el botón de
restablecimiento hasta que la luz deje de parpadear.
Page 66

66
Filtros
FILTRO DE REEMPLAZO
Reemplace el filtro HexaGuard™ anualmente para un rendimiento óptimo.
Part No. 440007787
ADVERTENCIA
PARA DISMINUIR EL RIESGO DE LESIONES FÍSICAS, RETIRE LA BATERÍA ANTES DE LIMPIARLA
OREALIZARLE UN SERVICIO DE MANTENIMIENTO. NO HAGA FUNCIONAR LA ASPIRADORA SIN EL FILTRO DE ENTRADA NI LOS FILTROS FINALES.
Filtro de carbón activado HexaGuard
™
1
Tire desde arriba para extraerlo
del alojamiento del filtro. No lo
enjuague.
2
Para volver a colocarlo, alinee
las lengüetas con las aberturas
correctas y gire hacia el
alojamiento. Asegúrese de
presionarlo firmemente en
su lugar.
Page 67

67
FILTROS
FILTRO DE REEMPLAZO
Inspeccione el Filtro final de medios HEPA cada mes, y lávelo cuando sea necesario. Verifique el
desgaste del medio y reemplace los pliegues si están dañados. Cambie el filtro periódicamente para
mantener un máximo rendimiento.
N.° de pieza 440010684
ADVERTENCIA
PARA DISMINUIR EL RIESGO DE LESIONES FÍSICAS, RETIRE LA BATERÍA ANTES DE LIMPIARLA
OREALIZARLE UN SERVICIO DE MANTENIMIENTO. NO HAGA FUNCIONAR LA ASPIRADORA SIN EL FILTRO DE ENTRADA NI LOS FILTROS FINALES.
Filtro de entrada
El filtro de entrada protege al motor contra los daños.
1
Si el filtro se ensucia, tire de
la parrilla y extraiga el filtro.
Enjuáguelo a mano con agua
fría y baja presión. Deje secar el
filtro durante 24 horas. Vuelva a
colocar el filtro seco y encaje la
parrilla en su lugar.
IMPORTANTE
PERMITA QUE EL FILTRO SE SEQUE COMPLETAMENTE ANTES DE VOLVER A COLOCARLO. SEQUE
EL FILTRO EN EL BORDE PARA QUE EL AIRE CIRCULE EN AMBOS LADOS DEL FILTRO. ESTO PUEDE DEMORAR HASTA 24 HORAS.
Page 68

68
Extracción del cepillo giratorio
PRECAUCIÓN
PARA REDUCIR EL RIESGO DE LESIONES PERSONALES: EXTRAIGA LA BATERÍA ANTES DE LIMPIAR LA UNIDAD
O REALIZARLE UN SERVICIO DE MANTENIMIENTO.
Lubricación
El motor y el cepillo giratorio vienen equipados con cojinetes de suficiente lubricación para
toda su vida útil. La adición de lubricante podría dañarlos. No agregue lubricante al motor ni al
cepillo giratorio.
1
Deslice las lengüetas naranjas
hacia el centro.
2
Deslice la lengüeta trasera
hacia atrás, a la posición de
desbloqueo.
3
Extraiga la placa inferior.
4
Gire el cepillo giratorio hacia
afuera. Luego, extraiga la correa
rota o desgastada y reemplácela.
Asegúrese de que la correa esté
centrada en el eje del motor y que
se apoye correctamente en las
ranuras del cepillo giratorio, antes de
colocarla nuevamente en la unidad.
Page 69

69
EXTRACCIÓN DEL CEPILLO GIRATORIO Y LA CORREA
CEPILLO GIRATORIO DE REEMPLAZO
CH95413 (con intelliBelt) N.° de pieza 440007802
PRECAUCIÓN
PARA REDUCIR EL RIESGO DE LESIONES PERSONALES: EXTRAIGA LA BATERÍA ANTES DE LIMPIAR LA UNIDAD
O REALIZARLE UN SERVICIO DE MANTENIMIENTO.
5
Revise el cepillo giratorio en
busca de desgaste utilizando
una tarjeta comercial o una
tarjeta de crédito. Si la tarjeta
no toca las cerdas, reemplace
el cepillo giratorio.
Todo otro servicio de mantenimiento deberá ser realizado por personal técnico autorizado.
Si el aparato no funciona como debe, si se ha caído, dañado, dejado a la intemperie
o si se ha sumergido en agua, llévelo a un Centro técnico antes de continuar usándolo.
Page 70

70
Resolución de problemas
Todo otro servicio de mantenimiento deberá ser realizado por personal técnico autorizado.
Si el aparato no funciona como debe, si se ha caído, dañado, dejado a la intemperie
o si se ha sumergido en agua, llévelo a un Centro técnico antes de continuar usándolo.
ADVERTENCIA
PARA DISMINUIR EL RIESGO DE LESIONES FÍSICAS, DESENCHUFE LA UNIDAD ANTES DE
LIMPIARLA O REALIZARLE UN SERVICIO DE MANTENIMIENTO.
Problema Causa posible Solución posible
La aspiradora no
funciona
1. Es posible que la batería no esté
correctamente introducida.
1. Asegúrese de que la batería esté completamente
apoyada en la cavidad de la batería.
2. Es posible que la batería no esté
cargada.
2. Verifique el Indicador de nivel de carga y recargue
la batería si el nivel fuera bajo.
3. Es posible que la batería se
haya recalentado.
3. Extraiga la batería y déjela enfriar durante
30minutos, vuelva a colocar la batería y pruébela
nuevamente o reemplácela por otra batería
cargada.
4. Es posible que existan daños en
los componentes internos.
4. Llame para obtener servicio: 1-800-944-9200.
El indicador de
comprobación
de bolsa está
en color rojoo
la aspiradora no
recoge suciedad
o la aspiración
es baja
1. Bolsa de filtro llena y/
o atascada.
1. Vacíe la bolsa de filtro - Pág. 63
2. Correa rota o desgastada. 2. Reemplace la correa - Pág. 68
3. Cepillo giratorio y/o
manguera atascados.
3. Verifique la manguera - Pág. 64
Verifique el cepillo giratorio - Pág. 68-69
4. El ajuste de altura de la
alfombra es incorrecto.
4. Establezca el ajuste de altura de la alfombra
al valor adecuado para la alfombra que se
limpiará - Pág. 58
Sale polvo de la
aspiradora
1. Bolsa de filtro llena. 1. Vacíe la bolsa de filtro (pág. 63)
2. La bolsa de filtro no está
instaladacorrectamente.
2. Review Filter Bag removal &
replacement - Pg. 63
3. La manguera no está
colocada correctamente.
3. Consulte la sección Colocación de la
manguera(pág. 58).
VERDE
PARPADEANTE
VERDE
FIJO
AMARILLA Y
PARPADEANTE
AMARILLA
Y FIJA
VERDE
PARPADEANTE
Batería
Carga
Carga completa
Indica que la batería
está en el modo de
espera secuencial
para ser cargada.
Deje la batería en
el cargador. Está
demasiado caliente
o fría para cargar.
Llámenos al
1-800-944-9200
Carga de un paquete
debateríascaliente:
Cuando usa una aspiradora en forma
continua, es posible que la batería se
caliente. Una batería caliente puede
colocarse directamente en el cargador,
pero la carga no comenzará hasta que
disminuya la temperatura de la batería
a un rango de temperatura aceptable.
Cuando se coloca una batería caliente en
el cargador, el LED amarillo permanecerá
encendido hasta que la batería se enfríe
lo suficiente como para comenzar la carga.
Carga de un paquete
debateríascaliente:
Una batería fría puede colocarse
directamente en el cargador, pero la
carga no comenzará hasta que aumente
la temperatura de la batería a un rango
detemperatura aceptable. Cuando se
coloca una batería fría en el cargador,
elLED amarillo permanecerá encendido
hasta que la batería se caliente lo
suficiente como para comenzar la carga.
Qué significa cuando
La luz del cargador está…
Page 71

71
RESOLUCIÓN DE PROBLEMAS Y GARANTÍA
GARANTÍA LIMITADA DE 2 AÑOS
COBERTURA DE LA GARANTÍA
En casos de uso y mantenimiento comercial en condiciones normales y conforme al Manual del propietario, su producto
Hoover® Commercial tiene garantía contra defectos originales de fábrica de materiales y mano de obra por dos años
enteros desde la fecha de compra (en adelante, el “Plazo de la garantía”). Durante el Plazo de la garantía, como se
describe en esta Garantía, Hoover® Commercial le proporcionará la mano de obra y los repuestos, sin ningún costo, a los
fines de reparar cualquier defecto en los productos adquiridos en los Estados Unidos, de los EE.UU., y Canadá.
CÓMO REALIZAR UN RECLAMO POR LA GARANTÍA
Si este producto no presentara las características garantizadas, llévelo o envíelo a un Distribuidor Técnico
Oficial Autorizado de Hoover® Commercial junto con el comprobante de compra. Para ser redirigido en forma
automáticaaunCentro de servicios autorizado, llame al: 1-800-944-9200 O visite Hoover® Commercial en línea en
www.hoovercommercial.com (clientes de EE. UU.) o www.hoover.ca (clientes de Canadá). Para obtener asistencia
adicional o información relacionada con esta Garantía o con la disponibilidad de los Centros de servicios autorizados de
garantía, llame el 1-800-944-9200, de lunes a viernes de 8 a. m. a 7 p. m., Hora Estándar del Este. En Canadá, llame al
1-800-263-6376, de lunes a viernes de 8 a. m. a 7 p. m., Hora Estándar del Este.
NO CUBIERTO POR LA PRESENTE GARANTÍA
Algunas piezas de su producto
Hoover® Commercial requieren reemplazo durante el curso habitual del uso, debido al
desgaste normal. Entre ellas se incluyen las correas, las mangas del rodillo del agitador, los cojinetes del agitador, los
cepillos, las bolsas, los filtros y las bombillas. Esta Garantía no cubre estas piezas. La presente Garantía tampoco cubre:
mantenimiento inadecuado del producto, daños debido al uso incorrecto, casos fortuitos o hechos de la naturaleza,
vandalismo u otros actos que estén más allá del control de
Hoover® Commercial
, actos u omisiones del propietario, uso
fuera del país en donde se compró el producto originalmente, reventa del producto por parte del propietario original,
defectos o daños causados por reparaciones o modificaciones que no hayan sido llevadas a cabo por un Distribuidor de
Servicios de Garantía Autorizado de
Hoover® Commercial. Hoover® Commercial
se reserva el derecho de inspeccionar
todos los productos considerados defectuosos y de tomar decisiones finales sobre cualquier reclamo de garantía. Esta
garantía no cubre la recolección, la entrega, el transporte ni el servicio a domicilio del producto. No obstante, si envía el
producto por correo postal al Distribuidor de Servicios de Garantía Autorizado de
Hoover® Commercial
para obtener el
servicio de la garantía, el envío tendrá un costo de ida solamente.
OTROS TÉRMINOS IMPORTANTES
Esta garantía no es transferible y no podrá ser cedida. Esta garantía se regirá e interpretará de conformidad con las leyes
del Estado de Ohio. El Plazo de la garantía no se prolongará por ningún reemplazo o reparación realizados conforme a
la garantía. ESTA GARANTÍA REPRESENTA LA GARANTÍA Y EL RECURSO LEGAL EXCLUSIVOS, PROPORCIONADOS
POR HOOVER® COMMERCIAL. TODAS LAS DEMÁS GARANTÍAS, EXPRESAS O IMPLÍCITAS, SERÁN RECHAZADAS,
INCLUIDAS LAS GARANTÍAS DE APTITUD PARA LA VENTA O ADECUACIÓN A FINES ESPECÍFICOS. EN NINGÚN
SUPUESTO HOOVER® SERÁ RESPONSABLE POR DAÑOS ESPECIALES, INDIRECTOS, INCIDENTALES O EMERGENTES
DE NINGUNA CLASE RECLAMADOS POR EL PROPIETARIO O CUALQUIER PARTE POR INTERMEDIO DE ESTE, YA SEA
EN VIRTUD DE UN CONTRATO, POR NEGLIGENCIA, HECHO ILÍCITO CIVIL O RESPONSABILIDAD OBJETIVA, NI POR
CUALQUIER OTRA CAUSA. En algunos estados, la exclusión de los daños mediatos no está permitida, de modo que la
exclusión precedente puede no serle aplicable. Esta garantía le otorga derechos específicos. También puede tener otros
derechos, que varían según el estado.
Es difícil empujar la
aspiradora o la
aspiradora
no avanza
1. El ajuste de altura de la
alfombra es incorrecto.
1. Establezca la perilla de ajuste de altura de la
alfombra al valor adecuado para la alfombra
que se limpiará - Pág. 58
2. La placa inferior no está
instalada correctamente.
2. Consulte la Pág. 68
Se detecta olor a
humo/quemadura
1. Correa rota o estirada. 1. Reemplace la correa del cepillo
giratorio - Pág. 68
2. El cepillo giratorio
está obstruido.
2. Limpie/retire la suciedad del
cepillo giratorio - Pág. 68-69
Page 72

#961152004
HooverCommercial.com
IMAGES MAY DIFFE R FR OM ACTUA L PRODUCT.
© 2017 TECHTRO NIC FLOOR CARE TECHNOLOGY LI MITED
 Loading...