

Page 1
HUSHTONE™
6Q CORDLESS BACKPACK
USER MANUAL
For use with model CH93406.
IMPORTANT:
ASSEMBLY AND USE. THIS PRODUCT IS
INTENDED FOR COMMERCIAL USE ONLY.
READ CAREFULLY BEFORE
Page 2

Welcome.
Table of Contents
Thank you for choosing a Hoover® Commercial product.
Safety Instructions 4
Features 6
Getting Started 8
Assembling Wand & Attaching The Tools 8
Harness Ergonomics & Height Adjustment 9
Using Your HUSHTONE
™
6Q Cordless Backpack 10
Harness Adjustment 11
M-PWR
™
40V Battery & Charger 12
Maintenance 14
How To Replace The Filter Bag 15
Filters 16
Troubleshooting 18
Warranty 19
Spanish 00
IF YOU NEED ASSISTANCE
Please call 1-800-944-9200 (Mon-Fri 8am-7pm EST) to speak with a customer
service representative; or visit our website at HooverCommercial.com.
French 00
32
Page 3

IMPORTANT SAFETY INSTRUCTIONS
SAVE THESE INSTRUCTIONS!
IMPORTANT: READ CAREFULLY BEFORE ASSEMBLY AND USE. WHEN
USING AN ELECTRICAL APPLIANCE, BASIC PRECAUTIONS SHOULD ALWAYS BE
FOLLOWED, INCLUDING THE FOLLOWING: READ ALL INSTRUCTIONS
BEFORE USING THIS APPLIANCE.
WARNING: TO REDUCE THE RISK OF FIRE, ELECTRIC SHOCK OR INJURY:
•
Fully assemble before operating.
•
Do not use the unit, store or charge battery outdoors or on wet surfaces. Do not allow charger to get wet.
•
Do not allow to be used as a toy. Not intended for use by children age 12 and under. Close supervision is necessary
when used near children. To avoid injury or damage, keep children away from product, and do not allow children to
place fingers or other objects into any openings.
•
Use only as described in this manual. Use only manufacturer’s recommended at tachments and products.
•
Do not use charger with damaged cord or plug. If appliance or charger is not working as it should, has been
dropped, damaged, lef t outdoors, or dropped into water, take it to a service center prior to continuing use.
•
Do not pull or carry charger by cord, use cord as a handle, close a door on cord, or pull cord around sharp edges or
corners. Do not place product on cord. Do not run appliance over cord. Keep cord away from heated surfaces.
•
Do not unplug charger by pulling on cord. To unplug charger, grasp the plug, not the cord.
•
Do not handle charger — including charger plug and charger terminals, or appliance — with wet hands.
•
Do not incinerate the charger, battery, or appliance even if it is severely damaged. The batteries can explode in a fire.
•
Do not put any object into openings. Do not use with any opening blocked; keep free of dust, lint, hair, and anything
that may reduce air flow.
•
Keep hair, loose clothing, fingers, and all par ts of body away from openings and moving parts.
•
Use extra care when cleaning on stairs.
•
This product includes rechargeable lithium-ion batteries. Do not expose batteries to high temperatures, as they
may catch fire and/or explode.
•
Do not expose battery to crushing, incineration or similar actions.
•
Do not dispose of battery in a fire or trash compactor. See battery disposal section for directions.
•
Do not at tempt to disassemble battery.
•
Unplug the charger from the outlet before any routine cleaning or maintenance.
•
Leaks from battery cells can occur under ex treme conditions. If any liquid gets on the skin wash quickly with soap
and water. If any liquid gets into the eyes, do not rub eyes, immediately flush them with clean water continuously
for a minimum of 15 minutes. Seek medical attention immediately.
•
Use only the charger (
•
Use only the bat tery (Hoover Commercial Part #CH90040) supplied by Hoover Commercial. Other batteries may
burst causing serious personal injury or damage.
•
Do not touch or insert objects into bat tery pack or charger terminals.
•
The charger is for indoor use only. Be sure to always keep the battery and charger in a dr y place.
•
Do not at tempt to short circuit the bat tery or charger terminals.
•
Do not use to pick up flammable or combustible liquids, such as gasoline, or fine wood sandings, or use in areas
where they may be present.
•
Do not pick up anything that is burning or smoking, such as cigaret tes, matches, or hot ashes.
•
Do not use without Filters and/or Dust Bag in place.
•
Prevent unintentional star ting. Ensure the switch is in the off-position before connecting to battery pack, picking
up or carrying the appliance. Carrying the appliance with your finger on the switch or energizing appliance that
have the switch on invites accidents.
•
Disconnect the battery pack from the appliance before making any adjustments, changing accessories, or storing
appliance. Such preventative safety measures reduce the risk of star ting the appliance accidentally.
•
Recharge only with the charger specified by the manufacturer. A charger that is suitable for one type of battery
pack may create a risk of fire when used with another battery pack.
•
Use appliances only with specifically designated battery packs. Use of any other battery packs may create a risk
of injury and fire.
•
When battery pack is in use, keep it away from other metal objects, like paper clips, coins, keys, nails, screws, or
other small metal objects, that can make a connection from one terminal to another. Shorting the bat tery terminals
together may cause burns or a fire.
Hoover
Commercial Par t #CH90002) supplied by
Hoover
Commercial to recharge.
•
Under abusive conditions, liquid may be ejected from the bat tery; avoid contact. If contact accidentally occurs,
flush with water. If liquid contacts eyes, additionally seek medical help. Liquid ejected from the battery may cause
irritation or burns.
•
Do not use a battery pack or appliance that is damaged or modified. Damaged or modified bat teries may exhibit
unpredictable behavior resulting in fire, explosion or risk of injury.
•
Do not expose battery pack or appliance to fire or excessive temperature. Exposure to fire or temperature above
265°F may cause explosion.
•
Follow all charging instructions and do not charge the battery pack or appliance outside of the temperature range
specified in the instructions. Charging improperly or at temperatures outside of the specified range may damage
the batter y and increase the risk of fire.
•
Have servicing performed by a qualified repair person using only identical replacement parts. This will ensure that
the safety of the product is maintained.
•
Do not modify or attempt to repair the appliance or the battery pack (as applicable) except as indicated in the
instructions for use and care.
CAUTION: TO REDUCE THE RISK OF DAMAGE:
•
Use on dr y floor only.
•
Avoid picking up hard, sharp objects with this product, as they may cause damage.
•
Store appropriately indoors in a dry place. Do not expose machine to freezing temperatures.
•
Do not use sharp objects to clean out hose as they can cause damage.
WARNING:
TO REDUCE THE RISK OF ELECTRIC SHOCK, THE CHARGER HAS A
POLARIZED PLUG (ONE BLADE IS WIDER THAN THE OTHER). THIS PLUG WILL FIT IN A
POLARIZED OUTLET ONLY ONE WAY. IF THE PLUG DOES NOT FIT FULLY IN THE OUTLET,
REVERSE THE PLUG. IF IT STILL DOES NOT FIT, CONTACT A QUALIFIED ELECTRICIAN
TO INSTALL THE PROPER OUTLET. DO NOT CHANGE THE PLUG IN ANY WAY.
WARNING: THIS PRODUCT CONTAINS CHEMICALS, KNOWN TO THE STATE OF
CALIFORNIA TO CAUSE CANCER AND BIRTH DEFECTS OR OTHER REPRODUCTIVE
HARM. WASH HANDS AFTER USING.
BATTERY DISPOSAL WARNING: RISK OF EXPLOSION OR EXPOSURE
TO TOXIC MATERIAL.
CAUTION:
disassemble, heat above manufacturer’s maximum temperature limit (60°C/140°F), or incinerate. Replace battery with
Hoover Commercial Batter y Part #CH90040 only. Use of another battery may present a risk of fire or explosion. Dispose
of used battery promptly. Keep away from children. Do not disassemble and do not dispose of in fire. Do not attempt to
disassemble the battery or remove any component projecting from the battery terminals. T he battery and charger have
no user serviceable parts. Fire or injury may result. Prior to disposal, protect exposed terminals with heavy insulating
tape to prevent shorting.
LITHIUM-ION BATTERIES:
sound manner. The EPA certified RBRC Batter y Recycling Seal on the lithium-ion (Li-ion) battery indicated Techtronic
Industries, a corporate af filiate of Hoover Commercial, is voluntarily participating in an industry program to collect
and recycle these batteries at the end of their useful life, when taken out of ser vice in the United States or Canada.
The RBRC program provides a convenient alternative to placing used Li-ion batteries into the trash or the municipal
waste stream, which may be illegal in your area. Please visit www.rbrc.org/call2recycle/
for information on Li-ion battery recycling and disposal bans/restrictions in your area.
Hoover Commercial involvement in this program is part of our commitment to preserving our
environment and conserving our natural resources.
The battery used in this device may present a risk of fire or chemical burn if mistreated. Do not
The battery must be collected, recycled or disposed of in an environmentally
SAFETY INSTRUCTIONS
54
Page 4

Product Features
A
Hose
B
Upper Wand
A
C
Vacuum Assembly
•
Allergen Filter Bag
• Cloth Filter Bag
• HEPA Media Filter
D
Lower Wand
E
Final Filters
•
HEPA Media Filters
•
Hexaguard™ Filters
F
M-PWR™40V Li-ion Battery*
G
M-PWR™40V Dual-Bay Charger*
Tools
B
C
D
E
Ca rpet Tool
Upholstery Tool
Hard Floor Tool
Dusting Brush
Crevice Tool
*SOL D SEPARAT ELY
F
G
76
Page 5
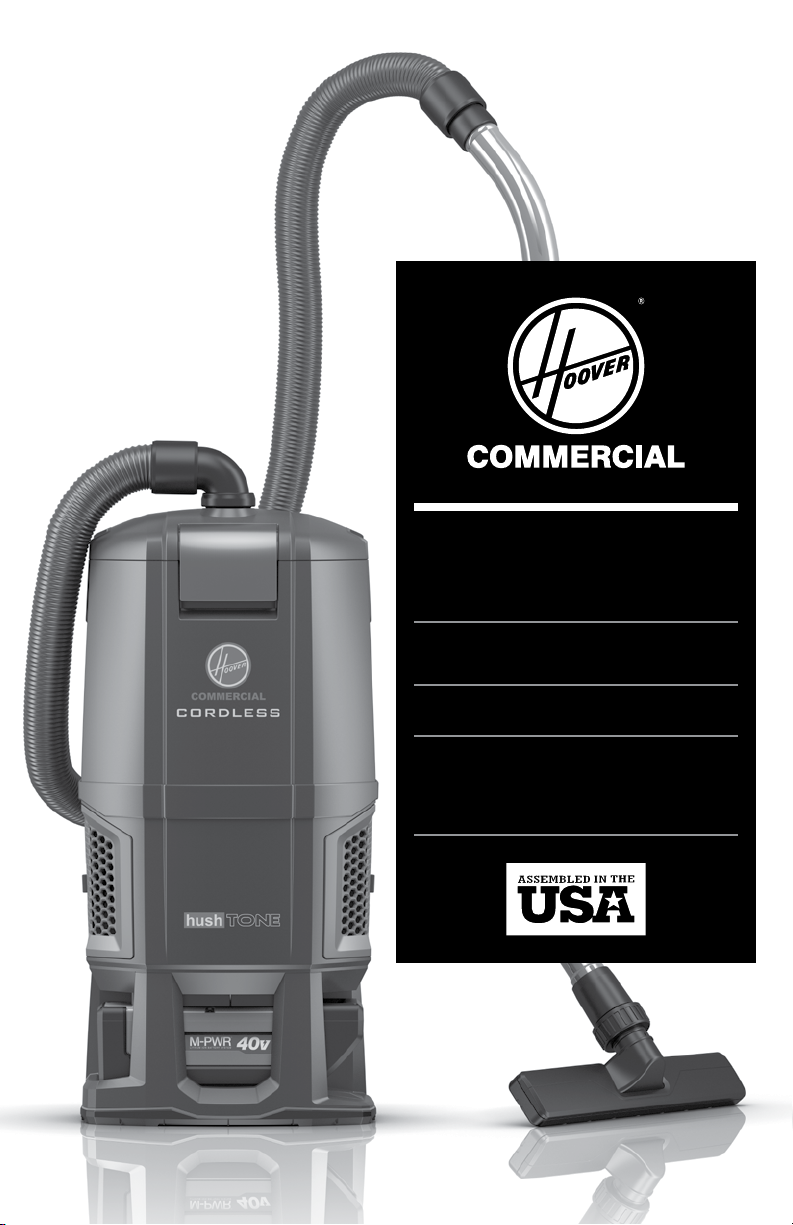
Assembling Wand & Attaching The Tools Harness Ergonomics & Height Adjustment
CAUTION
Assemble the wand by
1
first unscrewing the
cuff from the end of
the upper wand and
sliding onto the lower
wand.
NOT TO BE USED FOR GROOMING A PET.
Align the groove of
2
lower wand with upper
wand and push firmly
to slide wand into
position at desired
length.
Tighten outer cuff by
3
twisting clockwise.
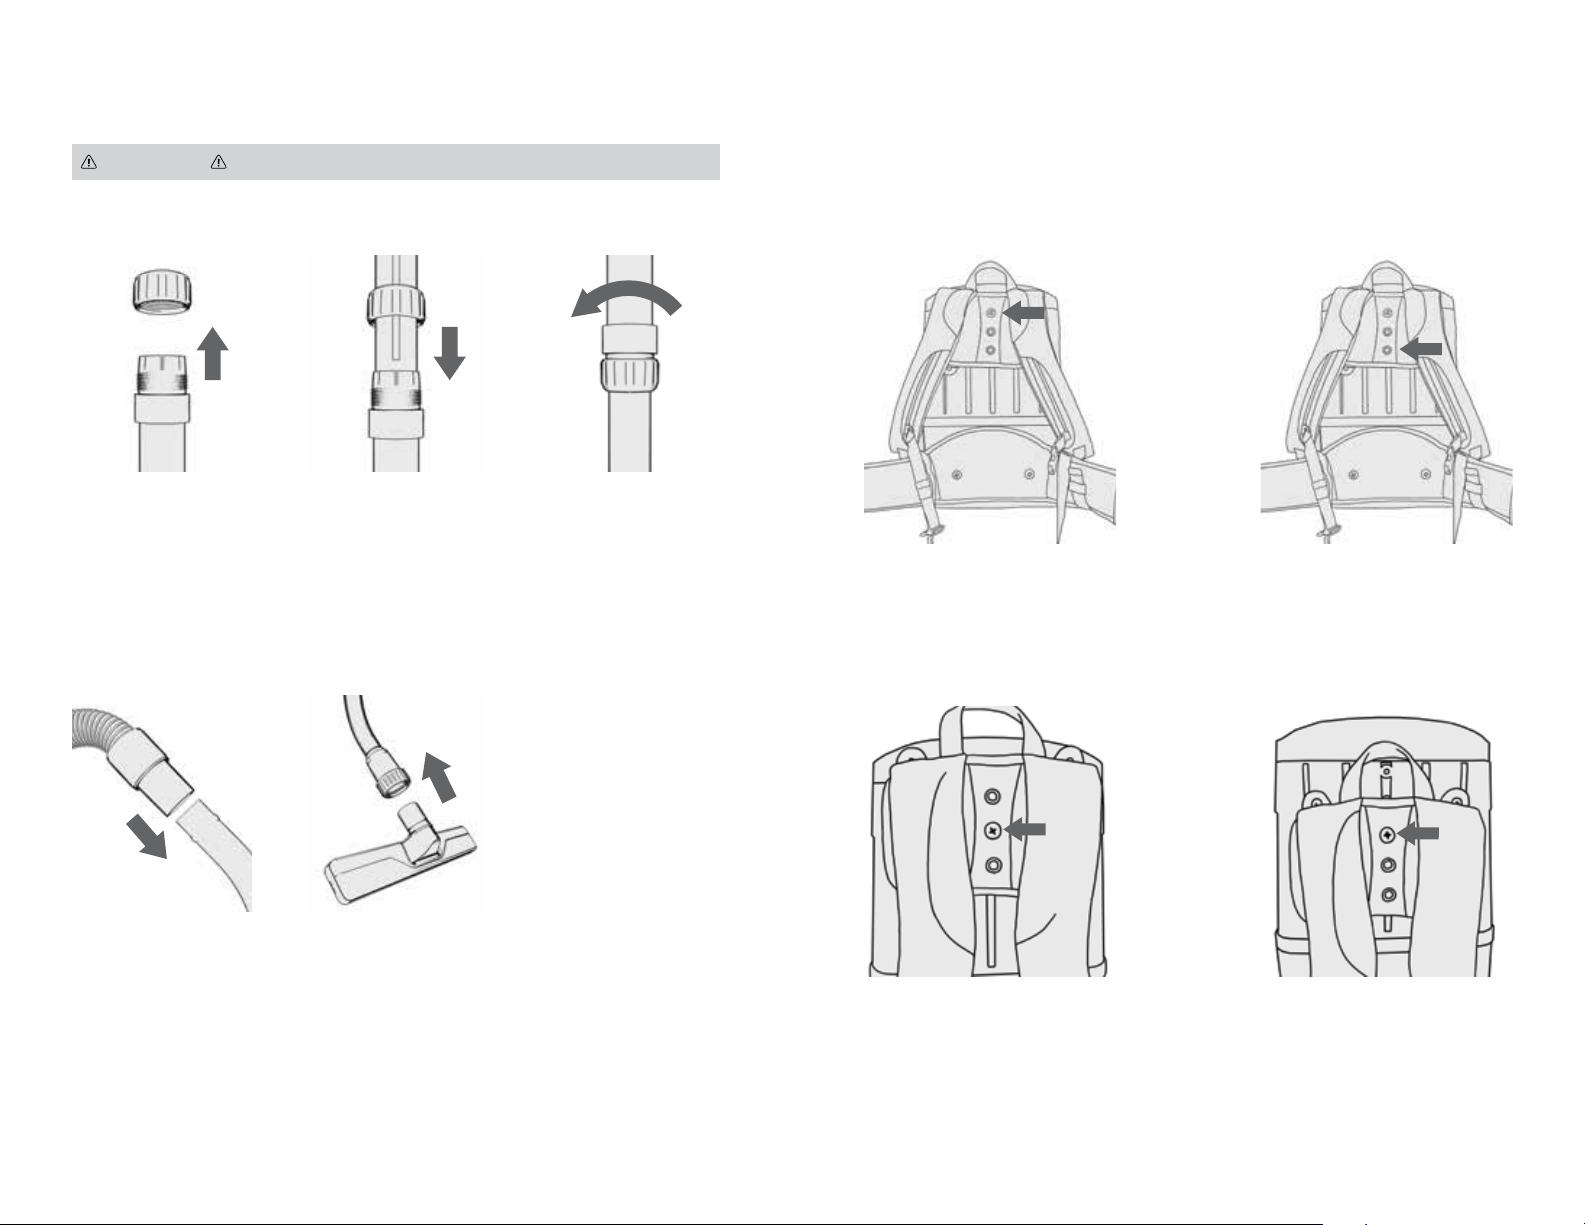
NOTE: The Harness has been designed and engineered to accommodate a wide range of users
and can be adjusted to fit, according to height. The Upper Harness should sit between the shoulder
blades for a comfortable fit. The backpack is shipped with the Upper Harness positioned with the
center hole mounted to the middle Height Adjustment Boss.
For taller users, move the Upper
Harness up to the lower Height
Adjustment Boss.
For shorter users, move to the top
Height Adjustment Boss.
Firmly push hose end
4
over the open end of
the upper wand.
To use floor tools,
5
insert floor tool into
cuffed end of lower
wand and align metal
ring with groove in
tool. Tighten cuff by
twisting clockwise.
To adjust the Upper Harness,
1
use a Phillips screwdriver to
remove the screw from the
Height Adjustment Boss.
Move the Upper Harness and fully
2
tighten screw into the correct
Height Adjustment Boss.
98
Page 6
Using Your HUSHTONE™ 6Q Backpack
Harness Adjustment
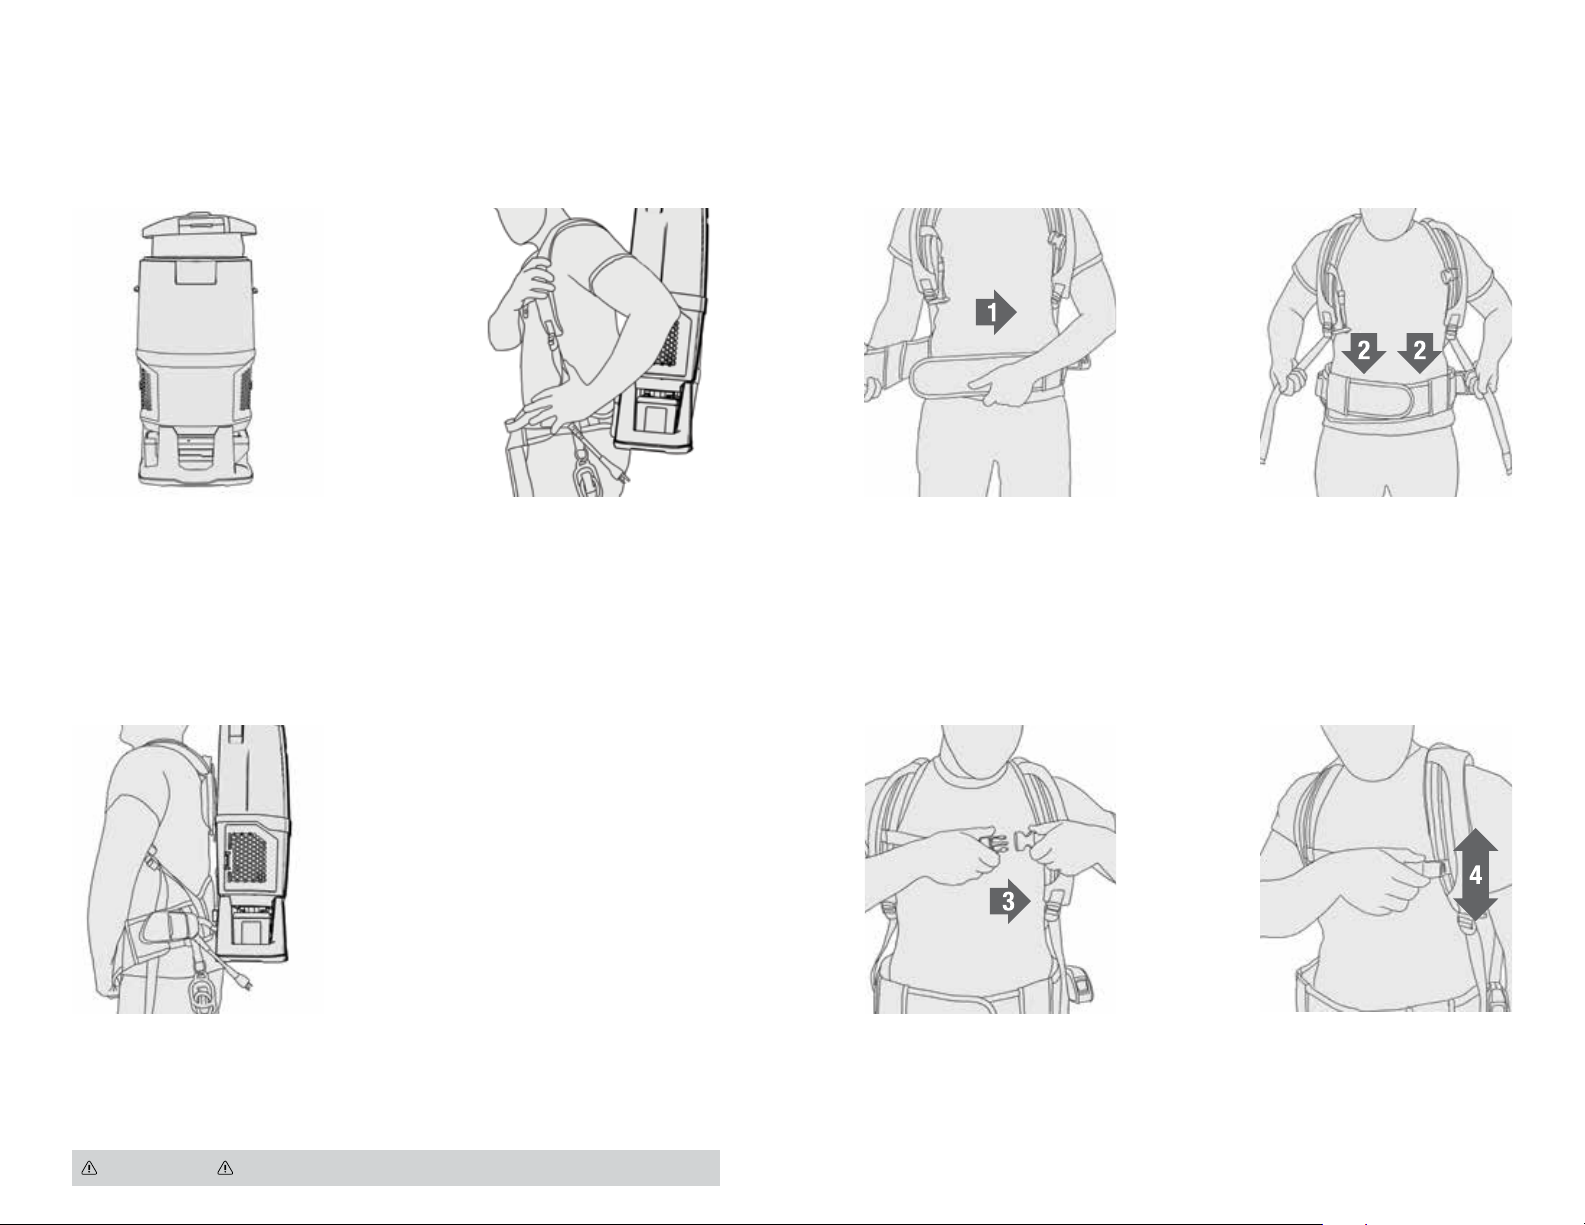
NOTE: Do not use vacuum without both filter bag and HEPA filters in place.
AMBIENT TEMPERATURE RANGE:
Check to ensure both filter bag
1
and HEPA filters are assembled
in the unit. Insert hose end firmly
into hose inlet, with elbow turned
toward vacuuming side.
0 °C – 40 °C (32 °F – 104 °F)
Loosen shoulder straps then
2
lift backpack, sliding both arms
through shoulder straps.
NOTE: The ergonomic harness is designed to easily identify the steps for wearing the backpack
correctly. Look for the numbered arrows on the corresponding parts called out in the directions below.
Tighten waist strap until secure
1
and comfortable. NOTE: Should
you require additional length,
the extension belt can be placed
between belt ends and adjusted
to desired length.
Pull down on ends of shoulder
2
straps until upper harness touches
shoulder blades. Nearly all weight
of machine should be on hips. You
should be able to easily slide your
finger between each strap and
shoulder. Retighten waist band
if necessary.
Position lower rear pad into the
3
small of back so that weight of
machine is resting on the hips,
and not shoulders.
WARNING
TO REDU CE THE RISK OF PERSONAL INJURY: REMOVE BATTERY BE FORE CLEANING OR SERVICING.
Connect the sternum strap buckle
3
and tighten or loosen as needed.
Slide sternum straps up or down
4
for adjustment.
1110
Page 7
M-PWR™40V Battery & Charger (Sold Separately)
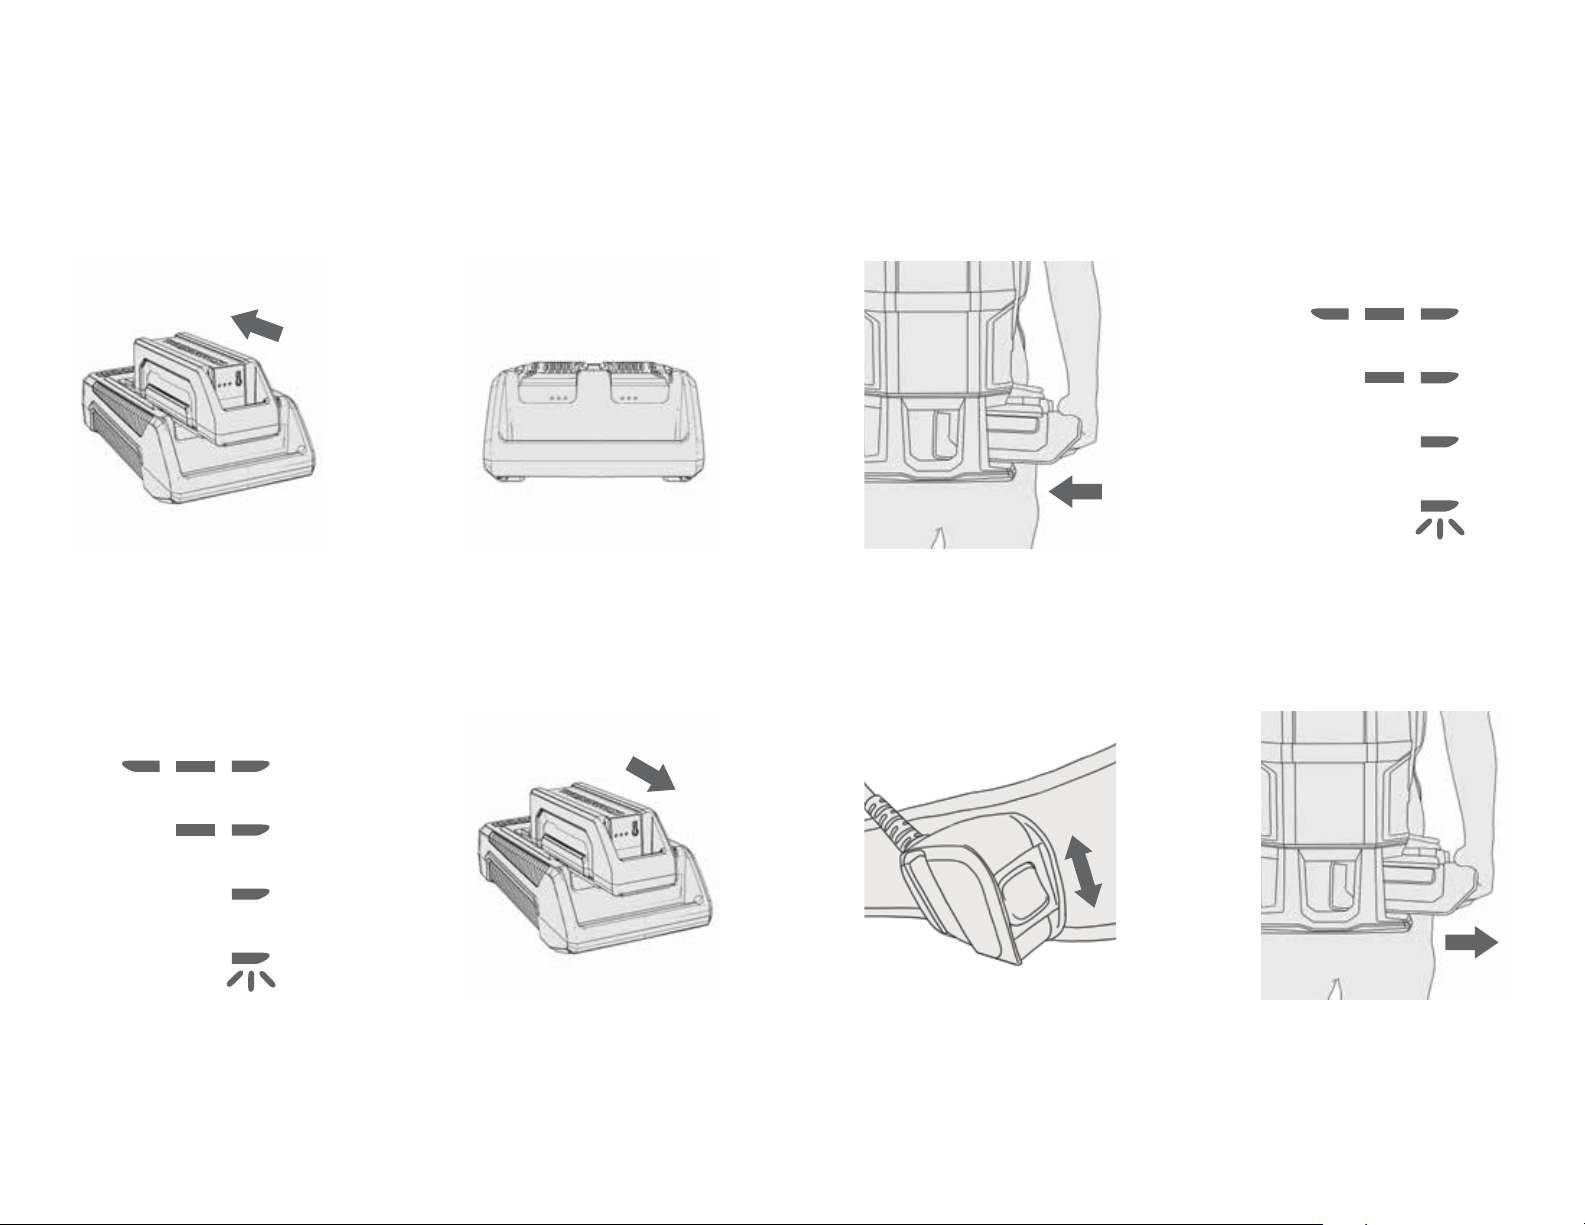
NOTE: Batteries are shipped in a low charge condition to prevent possible problems. You should
charge them before first use.
Only one battery is charged at a time. When two batteries are in place, the battery with the most
power remaining will be charged first. This ensures the fastest time to full charge.
CHARGING AMBIENT TEMPERATURE RANGE:
5 °C – 50 °C (41 °F – 122 °F)
66%–100% Charged
33%–66% Charged
10%–33% Charged
0%–10% Charged
To charge the battery, slide
1
battery into charger. Push
backward until battery clicks into
place and LED Status Indicator
is lit.
66%–100% Charged
33%–66% Charged
10%–33% Charged
0%–10% Charged
When charging, the fully lit LEDs
3
on the battery will indicate charge
level.
Charger LED Status Indicator will
2
turn green when battery is fully
charged.
If the charger flashes red, an error
has occurred. Remove and replace
battery.
To remove battery, press the
4
release button and slide battery
forward while holding down on
charger base.
Insert battery into housing by
1
grasping the integrated handle
and pushing firmly in until battery
locks into place.
Press orange switch to power up
3
the unit.
ON: Hush™ mode quiet cleaning
BOOST: High traffic area cleaning
Turn off by returning switch to
center position.
Verify power level of the battery
2
with LEDs on the power switch
housing.
To remove battery, grasp the
4
integrated handle while pressing
the release button. Slide out from
housing by pulling while holding
down release button.
1312
Page 8
Maintenance
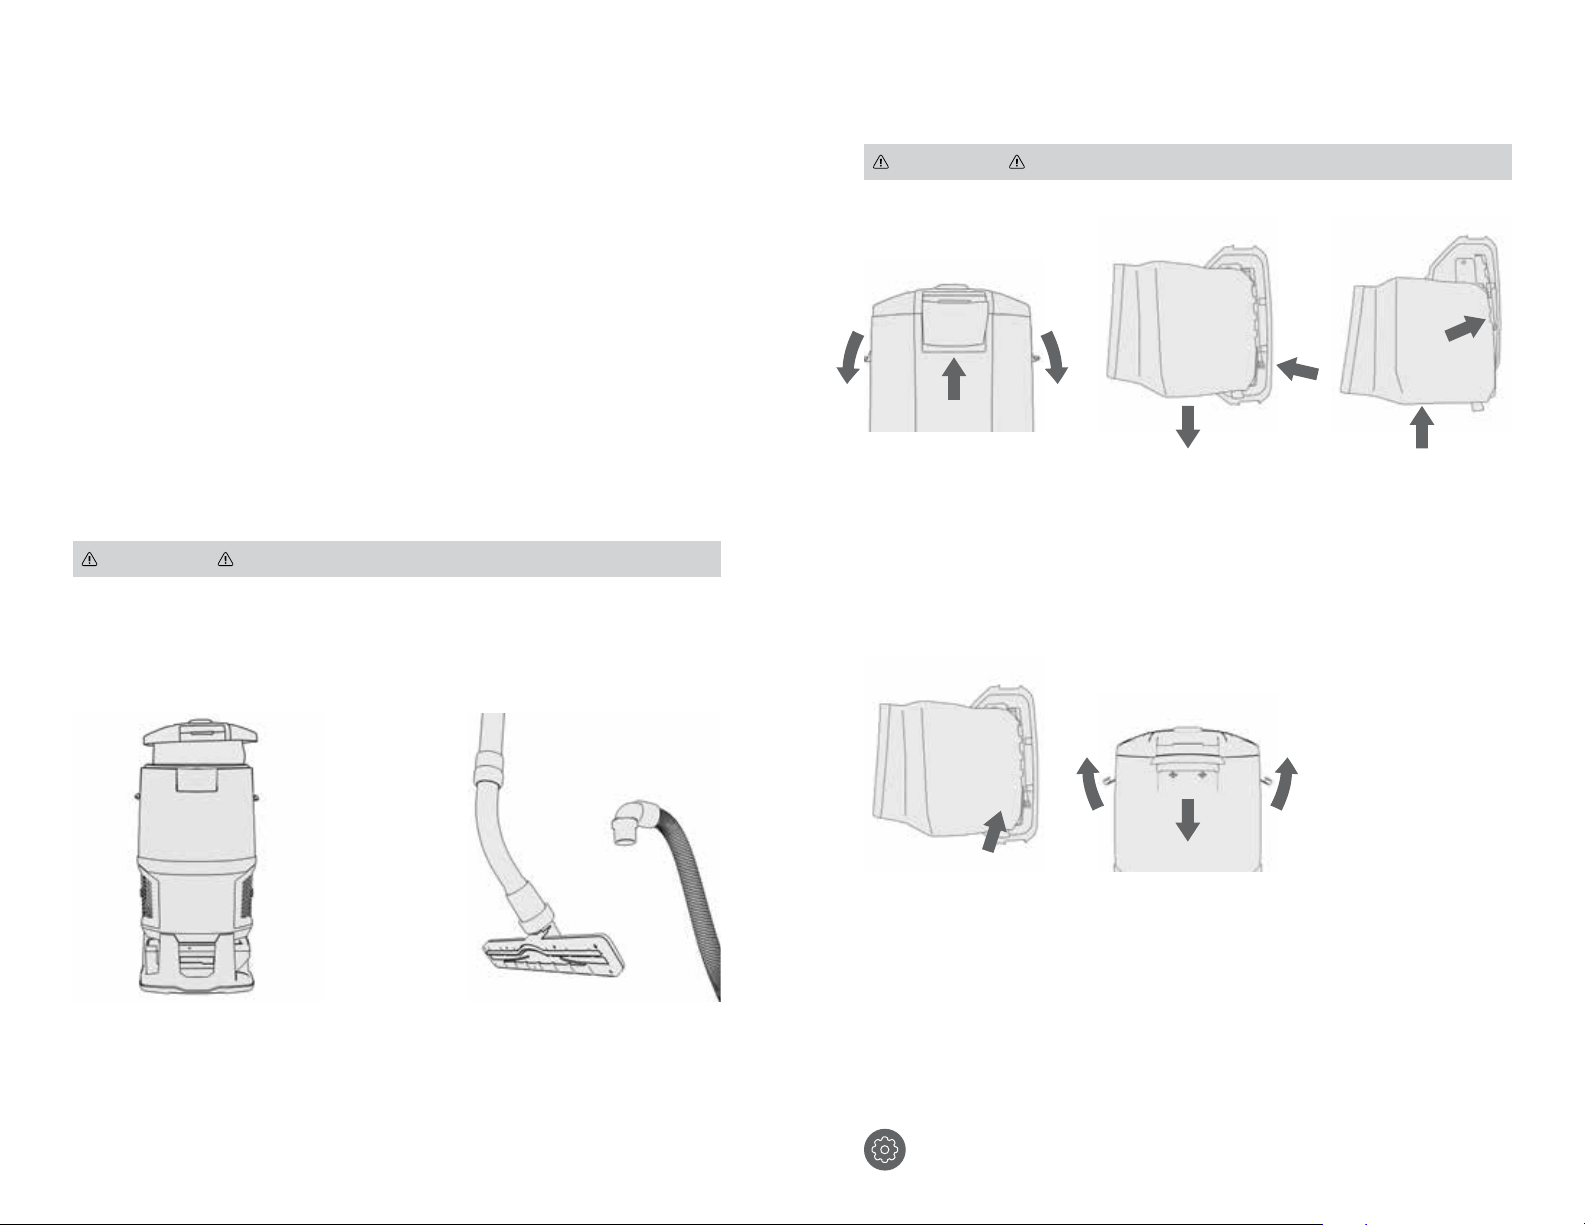
How To Replace The Filter Bag
Any other servicing should be done by an authorized service representative.
If appliance is not working as it should, has been dropped, damaged, left outdoors, or dropped into
water, take it to a service center prior to continuing use.
THERMAL PROTECTOR STATEMENT
A thermal protector has been designed into your cleaner to protect it from overheating.
When the thermal protector activates the cleaner it will stop running.
If this happens proceed as follows:
1. Turn cleaner OFF and remove battery pack.
2. Check fullness of bag, change if needed.
3. Inspect the air path for any obstructions. Clear obstructions if present.
4. When battery pack is removed and motor cools for 30 minutes, the thermal protector will
deactivate and cleaning may continue.
If the thermal protector continues to activate after following the above steps, your cleaner
needs servicing.
WARNING
NOTE: When using the vacuum to pick up very fine dust, such as sawdust or drywall dust, it will be
necessary to replace the bag and clean the filters at more frequent intervals to maintain maximum
suction. Fine dust will clog bag pores and reduce suction, prior to bag becoming full.
TO REDU CE THE RISK OF PERSONAL INJURY: REMOVE BATTERY BE FORE CLEANING OR SERVICING.
WARNING
Open top cover by
1
unlocking the 3
latches.
TO REDU CE THE RISK OF PERSONAL INJURY: REMOVE BATTERY BE FORE CLEANING OR SERVICING.
Release full bag by
2
pressing the orange
tab and pulling bag
out.
Insert new bag by
3
sliding cardboard
under tabs until bag is
securely in place.
Check filter bag. Change, if full.
1
Check for clogs in nozzle, wand,
2
hose, and bag inlet. Clear any
obstructions.
Press down to latch
4
bag holder.
REPLACEMENT BAGS
Standard Filtration 10 Pack Part No. AH10173
Allergen Filtration 10 Pack Part No. AH10273
Replace top cover and
5
secure latches.
1514
Page 9
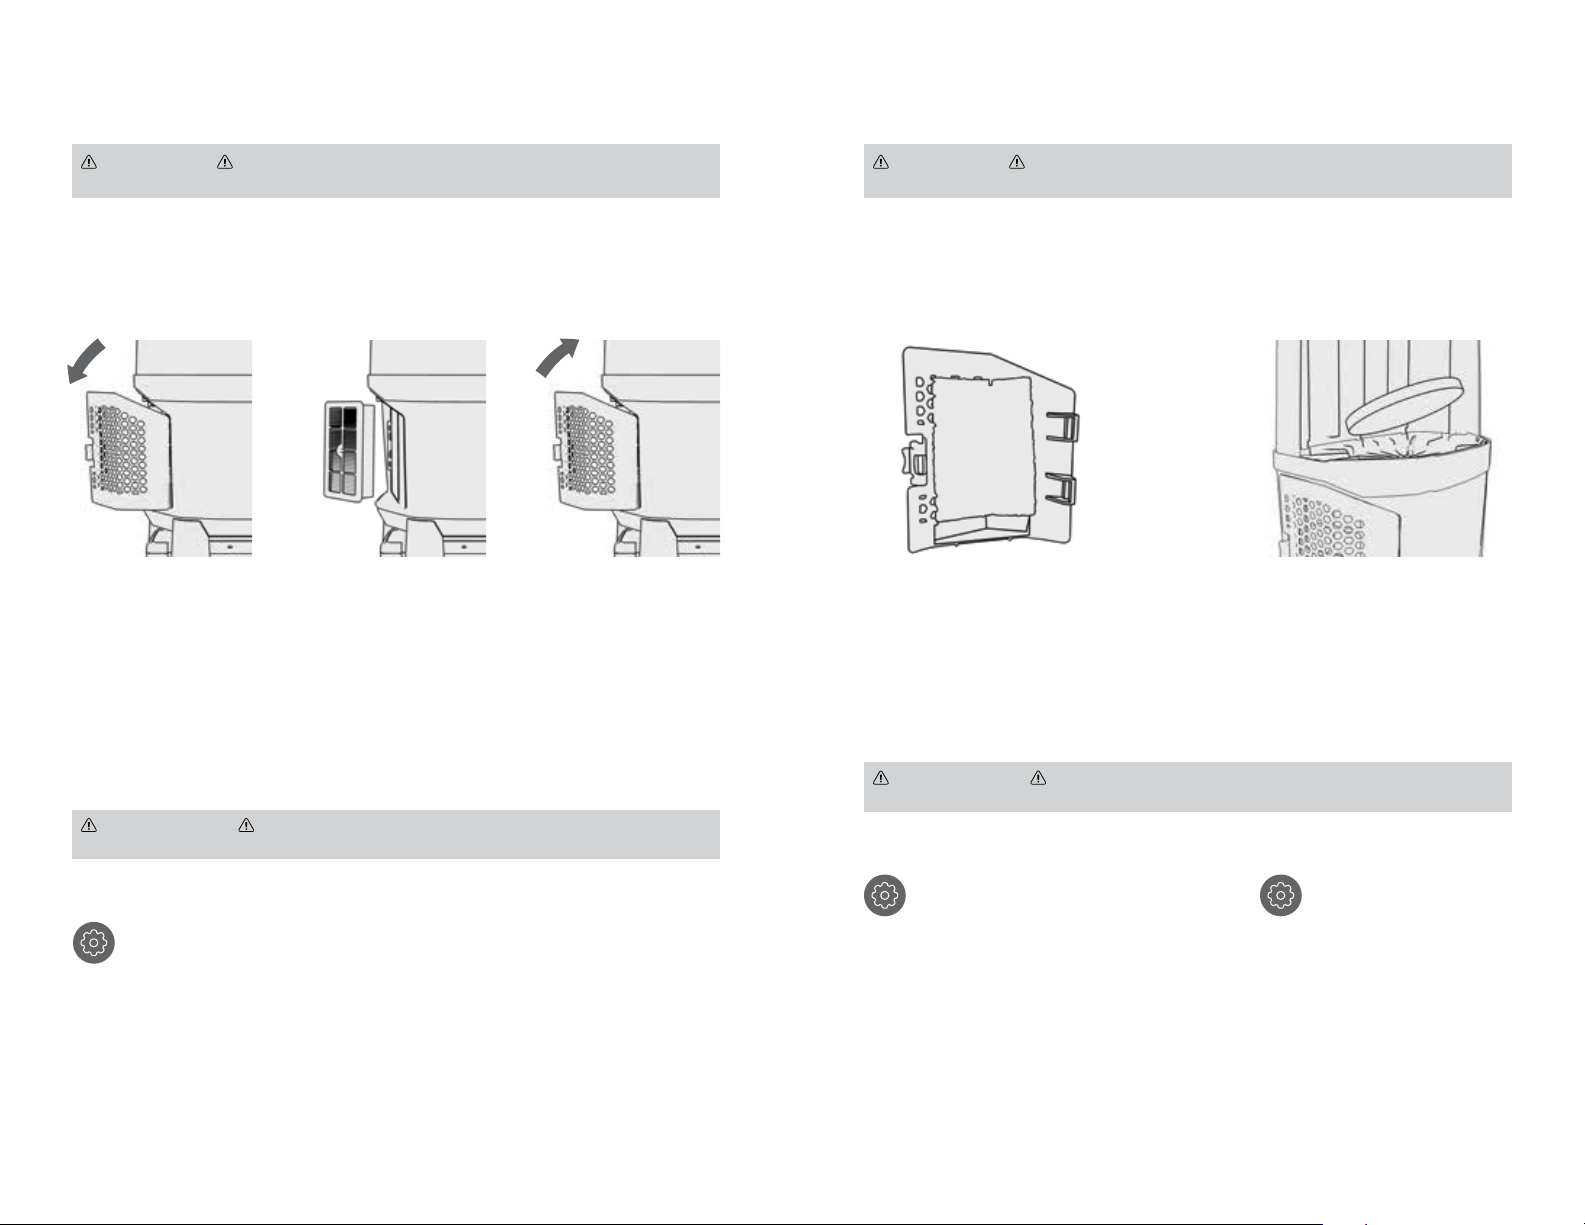
Filters
WARNING
DO NOT OPERATE VACUUM WITHOUT BOTH INLET FILTER AND FINAL FILTERS IN PLACE.
HEPA MEDIA FINAL FILTER
The final filters assist in the filtration process to return cleaner air to the room. There are 2 HEPA
Filters, one on each side of the backpack.
Remove filter door
1
by pulling rear tab
forward and rotating
out.
IMPORTANT
ON BOTH SIDES OF FILTER. THIS MAY TAKE UP TO 24 HOURS.
TO REDU CE THE RISK OF PERSONAL INJURY – REMOVE BATTERY BEFORE CLEANING OR SERVICING.
Pull filter out by the
2
frame. Hand rinse in
cold water under low
pressure. Rinse only
surface facing inside
of machine. Allow to
dry and reposition into
filter housing.
ALLO W FILTER TO DRY C OMPLET ELY BEFORE REP LACING. DR Y FILTER ON EDG E SO AIR CIRC ULATES
To replace filter door,
3
align the two forward
facing tabs and rotate
into place. Press rear
tab until door snaps
into place.
WARNING
DO NOT OPERATE VACUUM WITHOUT BOTH INLET FILTER AND FINAL FILTERS IN PLACE.
™
HEXAGUARD
CARBON FILTER
The HexaGuard™ Filters are
1
located on the inside of the filter
door. Pull to remove.
ACTIVATED
IMPORTANT
ON BOTH SIDES OF FILTER. THIS MAY TAKE UP TO 24 HOURS.
TO REDU CE THE RISK OF PERSONAL INJURY – REMOVE BATTERY BEFORE CLEANING OR SERVICING.
ALLO W FILTER TO DRY C OMPLET ELY BEFORE REP LACING. DR Y FILTER ON EDG E SO AIR CIRC ULATES
INLET FILTER
The inlet filter is located on the inside,
bottom of bag housing and protects
the motor from damage.
If the filter becomes dirty, pull
1
off the grill and lift out the filter.
Hand rinse in cold water under
low pressure. Let filter dry for 24
hours. Reposition dry filter and
snap grill into place.
REPLACEMENT FILTER
Inspect HEPA Media Final Filter every month, rinsing when necessary. Check for
wear of media and replace if pleats are damaged. Change filter regularly to maintain
maximum performance.
HEPA Media Final Filter 2 Pack Part No. AH40006
REPLACEMENT
FILTE R
Replace HexaGuard™
Filter yearly for optimum
performance.
Part No. 440009176
LUBRICATION
The motor is equipped with bearings which contain sufficient lubrication for its lifetime.
The addition of lubrication could cause damage. Do not add lubrication to motor.
REPLACEMENT
FILTE R
Inspect Inlet Filter every
2 weeks to keep vacuum
running at peak performance.
Part No. 440009175
1716
Page 10

Troubleshooting
WARNING
Any other servicing should be done by an authorized service representative.
If appliance is not working as it should, has been dropped, damaged, left outdoors, or dropped into
water, take it to a service center prior to continuing use.
What does it mean when
Charger light is...
FLASHING
GREEN
SOLID
GREEN
YELLOW
FLASHING
RED
Problem Possible Cause Possible Solution
Vacuum won’t run 1. Your battery may not be
Bag Check Indicator
has turned red OR
vacuum won’t pick
up OR low suction
Battery
Charging
Fully Charged
Leave Battery on
Charger. It’s too
hot or cold to charge.
Call us at
1-800-944-9200
TO REDU CE THE RISK OF PERSONAL INJURY: REMOVE BATTERY BE FORE CLEANING OR SERVICING.
Charging a hot
Battery Pack:
When using a vacuum continuously,
the batter y may become hot. A hot
battery may be placed directly on the
charger but charging will not begin
until the battery temperature cools
to within an acceptable temperature
range. W hen a hot battery is placed
on the charger, the Yellow LED will
remain lit until the battery is cool
enough to begin charging.
inserted properly.
2. Your battery may not be
charged.
3. Your battery may be too hot. 3. Remove battery and let cool for 30 minutes,
4. There may be internal
component damage.
1. Filter Bag full and/
or clogged.
1. Make sure the battery is fully seated in
battery cavity.
2. Check the Charge Level Indicator and
charge the battery if it’s low.
replace battery and retry or replace with
second charged battery.
4. Call for service: 1-800-944-9200.
1. Empty Filter Bag - Pg. 15.
Charging a cold
Battery Pack:
A cold bat tery may be placed directly
on the charger but charging will not
begin until the batter y temperature
warms to within an acceptable
temperature range. When a cold
battery is placed on the charger, the
Yellow LED will remain lit until the
battery is warm enough to begin
charging.
2 YEAR LIMITED WARRANTY
WHAT THIS WARRANTY COVERS
When used and maintained in normal Commercial use and in accordance with the User’s Manual, your
Hoover® Commercial product is warranted against original defects in material and workmanship for a full
two years from date of purchase (the “Warranty Period”). During the Warranty Period, as described in this
Warranty, Hoover® Commercial will provide labor and parts, at no cost to you, to correct any such defect in
products purchased in the United States, U.S. Militar y Exchanges and Canada.
HOW TO MAKE A WARRANTY CLAIM
If this product is not as war ranted, take or send the product to a Hoover® Commercial Authorized Warranty
Ser vice Dealer alon g with proof o f purchase. F or an automat ed referral t o authorize d service o utlets, pho ne:
1-800-944-9200 OR visit Hoover® Commercial online at www.hoovercommercial.com (U.S. Customers) or
www.hoover.ca (Canadian Customers). For additional assistance or information concerning this Warranty
or the availability of warranty service outlets, phone 1-800-944-9200, Mon-Fri 8am-7pm EST. In Canada,
call 1-800-263-6376, Mon-Fri 8am-7pm EST.
WHAT THIS WARRANTY DOES NOT COVER
Certain parts for your
to normal wear. These items include belts, agitator roll sleeves, agitator bearings, brushes, bags, filters
and bulbs. These parts are not covered by this Warranty. This Warranty also does not cover: improper
maintenance of the product, damage due to misuse, acts of God, nature, vandalism or other acts beyond the
control of
was initially purchased, resale of the product by the original owner, defects or damages caused by repair
or alteration by anyone other than an Authorized
Commercial
warranty claim. This warranty does not cover pick up, delivery, transportation or house calls. However, if
you mail your product to a
cost of shipping will be paid one way.
Hoover® Commercial
OTHER IMPORTANT TERMS
This Warr anty is not tr ansferable and m ay not be assigned. This Warrant y shall be governe d and construed
under the laws of the state of Ohio. The Warranty Period will not be extended by any replacement or
repair performed under this Warranty. THIS WARRANTY IS THE EXCLUSIVE WARRANTY AND REMEDY
PROVIDED BY HOOVER® COMME RCIAL . ALL OTHE R WARRAN TIES, EX PRESSED O R IMPLIED, INC LUDING
WARRANTIES OF MERCHANTABILITY OR FITNESS FOR PARTICULAR PURPOSE, ARE DISCLAIMED. IN
NO EVENT WILL HOOVER® BE LIABLE FOR ANY SPECIAL, INDIRECT, INCIDENTAL OR CONSEQUENTIAL
DAMAGES OF ANY KIND OR NATURE TO OWNER OR ANY PARTY CLAIMING THROUGH OWNER,
WHETHER BASED IN CONTRACT, NEGLIGENCE, TORT OR STRICT PRODUCTS LIABILIT Y OR ARISING
FROM ANY CAUSE WHATSOE VER. Some states do not allow the exclusion of consequential damages, so
the above exclusion may not ap ply to you. This war ranty gives you specific rights; you may also have others
that vary from state to state.
Hoover® Commercial product require replacement in the ordinary course of use due
, owner’s acts or omissions, use outside the country in which the product
reserves the right to inspect any alleged defective product and make final decisions on any
Hoover® Commercial
Hoover® Commercial
Authorized Warranty Service Dealer for warranty service,
Warranty Service Dealer.
Hoover®
Dust escaping from
vacuum
Wand is difficult
to push or won’t
move forward
1. Filter Bag full. 1. Empty Filter Bag - Pg. 15.
2. Filter Bag not installed
correctly.
3. Hose not installed correctly. 3. Review Hose installation - Pg. 10.
1. Incorrect Floor Tool. 1. Check that the Carpet Tool is being used for
2. Review Filter Bag removal &
replacement - Pg. 15.
carpet and Hard Floor Tool is being used for
hard floors.
2. Adjust angle of floor tool by tilting up,
making easier to push.
1918
Page 11

MANUAL DEL USUARIO
Para usar con el modelo CH93406.
IMPORTANTE:
YUSAR ESTE APARATO. ESTE PRODUCTO SOLO TIENE COMO FIN SU
USO COMERCIAL.
LEA LA GUÍA CON ATENCIÓN ANTES DE ENSAMBLAR
Bienvenido.
Gracias por elegir un producto Hoover® Commercial.
Índice
Instrucciones de seguridad 22
Características 24
Cómo comenzar 26
Armado del tubo y conexión de las herramientas
Ergonomía del arnés y ajuste de la altura
™
Uso de su mochila 6Q HUSHTONE
Ajuste del arnés
29
Batería y cargador M-PWR
Mantenimiento
32
Cómo reemplazar la bolsa de filtro
34
Filtros
™
inalámbrica 28
de 40 V 30
33
26
27
SI NECESITA AYUDA
Llame al 1-800-944-9200 (de lunes a viernes de 8 a.m. a 7 p. m., hora estándar del este)
para hablar con un representante del servicio al cliente o visite nuestro sitio web en
HooverCommercial.com.
Resolución de problemas
36
Garantía 37
2120
Page 12

INSTRUCCIONES DE SEGURIDAD IMPORTANTES
A
G
E
¡GUARDE ESTAS INSTRUCCIONES!
IMPORTANTE: LEA ESTE MANUAL CON ATENCIÓN ANTES DE ENSAMBLAR Y
USAR ESTE APARATO. CUANDO SE UTILIZAN APARATOS ELÉCTRICOS, SIEMPRE DEBEN
SEGUIRSE PRECAUCIONES BÁSICAS, INCLUIDAS LAS SIGUIENTES: LEA TODAS LAS
INSTRUCCIONES ANTES DE UTILIZAR ESTE APARATO.
ADVERTENCIA: PARA DISMINUIR EL RIESGO DE INCENDIO, DESCARGA
ELÉCTRICA O LESIONES:
•
Arme l a aspiradora p or completo an tes de ponerla en funcionamiento.
•
No utilice o almacene la unidad en ex teriores o e n superficie s mojadas, ni car gue la batería en dichas condiciones. E vite que el
cargador se moje.
•
Evi te que se la utilice como un ju guete. La unid ad no tiene como fi n el uso por par te de niños de 12 años o m enos. Cuando s e la
utilice c erca de niños, s erá necesario hac erlo bajo una es tricta sup ervisión. P ara evitar le siones o daños, m antenga a los niños
alejado s del product o y no permita qu e introduzc an los dedos ni ob jetos en ningun a de las aberturas del p roducto.
•
Utilí cela únicamen te según el uso de scripto en es te manual. Utilice sola mente los acc esorios y pro ductos rec omendados p or el
fabricante.
•
No utilice el cargado r si el cable o el enchu fe se encuent ran dañados . Si el aparato o el c argador no funcionan como d eben; si
se han caído, han sid o dañados, deja dos a la intempe rie o sumergido s en agua, llévelo s a un Centro Técnico ante s de continuar
usándolos.
•
No ex traiga ni transpor te el cargad or tomándolo p or el cable; no tire del cabl e, no cierre una pu erta con él ni lo enros que alrededor
de bordes o esq uinas filosas. No apoye el p roducto so bre el cable. No p ase el aparat o por encima del c able. Mantenga el cabl e
lejos de la s superficie s calientes.
•
No dese nchufe el car gador tirand o del cable. Par a desenchuf arlo, agarre el e nchufe, no el ca ble.
•
No manipule el car gador (incluido el enchu fe y los terminales, ni el ap arato) con las manos mojadas.
•
No incine re el cargado r, la bate ría ni el aparat o, aun si estuvieran mu y dañados. L as baterías pueden explot ar y provoca r un incendio.
•
No coloque ningún objeto en las ab erturas. N o utilice la unidad si alguna de sus aber turas se en cuentra blo queada. Mant éngala
libre de p olvo, pelusas, c abello y cualquier otro element o que pueda disminuir el flujo de air e.
•
Evi te que el cabello, la ropa su elta, los dedo s y cualquier otr a parte del cu erpo entren en cont acto con las aberturas y las pieza s
móvile s de la unidad.
•
Extreme las precaucio nes cuando ut ilice la aspiradora par a limpiar escaleras.
•
Est e producto incluye baterías re cargables de iones de li tio. No expong a las baterías a altas temper aturas, ya qu e pueden
prenderse fuego o explotar.
•
No aplas te ni incinere la b atería, ni la som eta a accione s similares.
•
No des eche la batería en un in cinerador ni en un compa ctador de de sechos. Consulte la sección sobr e desecho de la b atería para
obtener instrucciones.
•
No intente des armar la bat ería.
•
Desen chufe el carg ador del tomac orriente an tes de llevar a cabo una r utina de limpiez a o mantenimien to en la unidad.
•
En co ndiciones ex tremas, pue den producir se pérdidas en las celda s de la batería. Si la piel ent rara en cont acto con el líquido,
láves e rápidament e con jabón y agua . Si el líquido le entrara en l os ojos, no los frote. Enjuáguelos de inme diato con agua limpia,
en form a continua dur ante, al menos, 15minutos . Consulte a un mé dico de inmedia to.
•
Use solo e l cargador (N.° de p ieza de
•
Use solo la bat ería (N.° de pieza de Hoove r Commercial C H9004 0) suministrada por H oover Comme rcial. Otras b aterías pue den
explo tar y causar lesiones o daños físicos gr aves.
•
No toqu e el bloque de bat ería ni los termi nales del cargador, ni inserte objetos en ellos.
•
El cargador es para us o en interiore s solamente. S iempre asegú rese de guardar la bat ería y el cargad or en un lugar sec o.
•
No intente cortocircuitar la ba tería ni los ter minales del car gador.
•
No utilice la unid ad para aspira r líquidos combustibles o inflamables, tales c omo gasolina o re stos de mader a lijada, ni la utilice
enárea s en las que dichas su stancias puedan es tar presen tes.
•
No aspire nada q ue se encuent re en combust ión o emita humo, c omo cigarrillo s, fósforos o c enizas calientes.
•
No utilic e el aparato si no t iene colocad os los filtros y/o la b olsa de recole cción de residuos.
•
Evi te los arranq ues no intencio nales. Aseg úrese de que el int erruptor e sté en la posici ón de apagado an tes de conec tar la unidad
al paque te de baterías, de tr asladarla o mov erla. Si trasla da el aparato c on el dedo sobre e l interrupt or o energiza un apara to que
tiene encendido el interruptor puede provocar accidentes.
•
Des conecte el p aquete de bat erías del apar ato antes de realizar ajustes, cambiar acce sorios o almac enar el aparat o. Dichas
medida s de seguridad p reventivas redu cen el riesgo de a rrancar el ap arato en for ma accidental.
•
Rec argue la unidad s olo con el carga dor especifi cado por el fabrican te. Un cargad or adaptado p ara un tipo de pa quete de bate rías
puede c rear un riesgo de incen dio cuando se lo utiliza co n otro paquete de baterías .
•
Use ap aratos solo c on los paquet es de batería s diseñados específi camente. El u so de un paquet e de baterías distint o puede crear
un riesgo de lesione s e incendios.
•
Cuan do el paquete de baterías es tá en uso, manténgalo alejado de otros objetos d e metal, como suj etadores de papeles,
moned as, llaves, clavos, tor nillos u otros obj etos metálic os pequeños q ue puedan reali zar una conex ión desde una te rminal a la
otra. Si se pro duce un cort ocircuito en tre las termin ales se pueden g enerar quemaduras o incendios.
Hoover
Comme rcial CH90 002) suminis trado por
Hoover
para la recarga.
•
Bajo c ondiciones se veras, puede eyec tarse líquido d esde la bater ía. Evite el co ntacto. Si su cede un cont acto accide ntal, lávese
con agua. Si el líquido entr a en contacto con lo s ojos, busque asistencia médic a adicional. El líquido eye ctado desd e la batería
puede p rovocar irritación o quem aduras.
•
No use u n paquete de baterías o un apar ato que esté d añado o se haya m odificado. L as baterías d añadas o modifi cadas puede n
exhibir un compor tamiento impredecible que puede prov ocar incendios, explosione s o riesgo de lesion es.
•
No exponga e l paquete de ba terías o el apar ato al fuego o a temper aturas exce sivas. La ex posición al fue go o a temperaturas
sobre los 130 °C (2 65 °F) puede caus ar una explosió n.
•
Siga to das las instr ucciones de carga y no c argue el paquete de baterías ni el aparato f uera del rango d e temperat uras
especifica do en las instru cciones. La carga i ncorrect a o a temperaturas q ue estén fuer a del rango esp ecificado puede dañar la
batería y aume ntar el riesgo d e incendios.
•
Solo una pers ona calificada debe r ealizar el mant enimiento de la uni dad, y deben utili zarse únicamente p iezas de repue sto
idénticas. E sto garanti zará que se man tenga la segur idad del produ cto.
•
No modifique ni intente rep arar el aparat o o el paquete de b aterías (seg ún corresponda), e xcepto como se indic a en las
instruc ciones de uso y mantenimiento.
PRECAUCIÓN: PARA DISMINUIR EL RIESGO DE DAÑOS:
•
Utilice la unidad s olo en pisos sec os.
•
Evi te aspirar obje tos duros y filos os con este pr oducto, ya qu e pueden dañar lo.
•
Alma cénelo aprop iadamente en in teriores, en un lugar s eco. No expon ga la máquina a tem peratura s muy frías.
•
No utilice obje tos filosos para limpiar la mangu era, ya que pued en dañar la unidad.
ADVERTENCIA:
PARA REDUCIR EL RIESGO DE DESCARGA ELÉCTRICA, EL CARGADOR
TIENE UN ENCHUFE POLARIZADO (UNA CLAVIJA ES MÁS ANCHA QUE LA OTRA). ESTE
ENCHUFE CABE EN UN TOMACORRIENTE POLARIZADO DE UNA SOLA MANERA. SI NO
ENCAJA POR COMPLETO EN EL TOMACORRIENTE, INVIERTA EL ENCHUFE. SI AÚN NO ENCAJA,
CONTACTE A UN ELECTRICISTA CUALIFICADO PARA QUE INSTALE EL TOMACORRIENTE
CORRESPONDIENTE. NO REALICE NINGÚN TIPO DE MODIFICACIÓN EN EL ENCHUFE.
ADVERTENCIA: ESTE PRODUCTO CONTIENE QUÍMICOS RECONOCIDOS POR EL
ESTADO DE CALIFORNIA COMO CAUSANTES DE CÁNCER, DEFECTOS DE NACIMIENTO
U OTROS DAÑOS REPRODUCTIVOS. LÁVESE LAS MANOS LUEGO DE
UTILIZARLO.
ADVERTENCIA SOBRE EL DESECHO DE LA BATERÍA: RIESGO DE
EXPLOSIÓN O EXPOSICIÓN A MATERIAL TÓXICO.
PRECAUCIÓN:
si se la manipula incorre ctamente. No la des arme ni inciner e, ni la caliente a tempera turas super iores al límite máximo d e temperat ura
esta blecido por el fa bricante (6 0°C/140°F) . Reemplace la b atería solo con baterías Ho over Commer cial N.° de pieza CH 90040 . El uso
de otra batería puede repr esentar riesgos d e incendios o ex plosiones. De seche la batería usada rápidamen te. Manténg ala alejada
de los niño s. No la desarm e ni la deseche prendiéndola fuego. No intent e desarmar la b atería ni ex traer cualquie r component e que
sobre salga de los ter minales de aquell a. La batería y el carg ador no contie nen piezas a las qu e el usuario pued a realizarles u n servicio
de mantenimiento. Pueden generarse incendios o lesiones. Antes de desecharla, proteja los terminales expuestos con cinta aislante
gruesa para evitar que se produzcan cortocircuitos.
BATERÍAS DE IONES DE LITIO:
perjudicial al medio ambiente. El S ello de reciclado d e la batería RB RC certifi cado por EPA (A gencia de Pro tección Amb iental) en
la bate ría de iones de lit io (Li-ion) indic a que Techtronic I ndustries, u na afiliada cor porativa de Hoove r Commercial, s e encuentra
participando voluntariament e en un programa indus trial para re colectar y r eciclar esta s baterías al fin al de sus vidas útiles,
cuando son ret iradas de ser vicio en los Es tados Unidos o C anadá. El program a RBRC propo rciona una con veniente alt ernativa a la
coloc ación de las baterías de iones de li tio usadas en la basura o en el flujo de de sechos municipales, lo que puede
ser ilegal en su áre a. Visite ww w.rbrc.or g/call2re cycle/para obten er información sobr e el reciclaje de las bater ías
de iones d e litio y las rest ricciones/prohib iciones sobre desec hos en su área.
La par ticipación d e Hoover Commercial en este progr ama forma pa rte de nuestro compromiso por p reservar el
medio ambiente y conservar los recursos naturales.
La batería u tilizada con es te dispositi vo puede represen tar riesgos de incen dios o quemadur as químicas
La batería de be recolec tarse, reci clarse o desec harse en for ma que no sea
2322
Page 13

Características del producto
A
Manguera
B
Tubo superior
A
C
Ensamble de la aspiradora
•
Bolsa del filtro de alérgenos
• Bolsa del filtro del paño
•
Filtro para medio HEPA
D
Tubo inferior
E
Filtros Hexaguard
F
Batería de Li-ion M-PWR
F
Cargador de bahía doble M-PWR
™
Herramientas
™
de 40 V*
™
de 40 V*
B
C
D
E
Herramienta para alfombras
Herramienta para tapizados
Herr amienta pa ra pisos dur os
Cepillo quitapolvo
Herr amienta pa ra limpieza
enrincones
*SE VE NDE POR SEPA RADO
F
G
2524
Page 14

Armado del tubo y conexión de las herramientas Ergonomía del arnés y ajuste de la altura
PRECAUCIÓN
Arme el tubo primero
1
desenroscando el
manguito del extremo del
tubo superior y deslícelo
sobre el tubo inferior.
EL APARATO NO DEBE UTILIZARSE PARA ACICALAR MASCOTAS.
Alinee la muesca del
2
tubo inferior con el tubo
superior y empuje con
fuerza para deslizar el
tubo hasta la longitud
deseada.
Ajuste el manguito
3
exterior girándolo en
sentido de las agujas
delreloj.
NOTA: El arnés se ha diseñado e ideado para adaptarse a una amplia variedad de usuarios y puede regularse
para obtener la altura deseada. El arnés superior debería apoyarse sobre los omóplatos para que esté cómodo.
La mochila se envía con un arnés superior con el orificio central posicionado en el saliente de ajuste de
alturamedio.
Para los usuarios más altos, mueva el
arnés superior hasta el saliente de ajuste
de altura inferior.
Para los usuarios más bajos, muévalo hasta
el saliente de ajuste de altura superior.
Empuje con fuerza el
4
extremo de la manguera
sobre el extremo abierto
del tubo superior.
Para utilizar las herramientas
5
para pisos, inser te la
herramienta para pisos en el
extremo del tubo inferior con
manguito y alinee el anillo
de metal con la muesca en
la herramienta. Ajuste el
manguito girando en sentido
delas agujas delreloj.
Para ajustar el arnés superior, use
1
un destornillador Phillips para quitar
el tornillo del saliente de ajuste
dealtura.
Mueva el arnés superior y ajuste el
2
tornillo por completo en el saliente
deajuste de altura correcto.
2726
Page 15

Uso de su mochila 6Q HUSHTONE
™
Ajuste del arnés
NOTA: No utilice la aspiradora sin la bolsa de filtro y los filtros HEPA.
RANGO DE TEMPERATURA AMBIENTE:
Compruebe que la bolsa de filtro y
1
los filtros HEPA estén incluidos en
la unidad. Inserte el extremo de la
manguera firmemente en la entrada
de manguera con el codo doblado
hacia el lado de aspiración.
0 °C – 40 °C (32 °F – 104 °F)
Afloje las correas para hombros, luego
2
levante la mochila y deslice los brazos
por las correas para hombros.
NOTA: El arnés ergonómico está diseñado para que estos pasos de la correcta colocación de la mochila se
identifiquen con facilidad. Busque las flechas numeradas en las piezas correspondientes nombradas en las
siguientes instrucciones.
Ajuste la correa de la cintura hasta
1
que quede firme y cómoda. NOTA: En
caso de que requiera más longitud, el
cinturón de extensión puede colocarse
entre los extremos del cinturón y se
puede ajustar a la longitud deseada.
Tire hacia abajo los extremos de las
2
correas para hombros hasta que el
arnés superior toque los omóplatos.
Casi todo el peso de la máquina
debería estar sobre la cadera. Debería
poder deslizar el dedo con facilidad
entre cada correa y hombro. Vuelva a
ajustar la correa de la cintura de ser
necesario.
Apoye la almohadilla trasera inferior
3
sobre la espalda inferior, de modo que
el peso de la máquina descanse sobre
la cadera y no sobre los hombros.
ADVERTENCIA
UNIDAD O REALIZARLE UN SERVICIO DE MANTENIMIENTO.
PARA RE DUCIR EL RIE SGO DE LESI ONES PERS ONALES : EXTRAI GA LA BATER ÍA ANTES DE L IMPIAR L A
Conecte la hebilla de la correa del
3
esternón y ajústela o aflójela según
sea necesario.
Deslice las correas del esternón hacia
4
arriba o abajo para ajustarlas.
2928
Page 16

Batería y cargador M-PWR™ de 40 V
NOTA: Las baterías se envían en condiciones de poca carga para evitar posibles problemas. Debe cargarlas
antes del primer uso.
Solo debe cargar una batería por vez. Cuando hay dos baterías colocadas, primero se cargará la batería con la
mayor cantidad de energía restante. Esto garantiza un tiempo más rápido para la recarga completa.
RANGO DE TEMPERATURA AMBIENTE PARA LA CARGA:
5 °C – 50 °C (41 °F – 122 °F)
66 %–100 % cargada
33 %–66 % cargada
10 %– 33 % cargada
0 %–10 % cargada
Para cargar la batería, deslice la
1
batería en el cargador. Empuje hacia
atrás hasta que la batería encastre
en su lugar y se encienda el indicador
LED de estado.
66 %–100 % cargada
33 %–66 % cargada
10 %– 33 % cargada
0 %–10 % cargada
Cuando se realiza la carga, los LED
3
completamente iluminados de la
batería indicarán el nivel de carga.
El indicador LED de estado se
2
encenderá en color verde cuando la
batería esté completamente cargada.
Si el cargador emite una luz roja
parpadeante, significa que se ha
producido un error. Retire la batería
yreemplácela.
Para retirar la batería, presione el
4
botón de liberación y deslice la batería
hacia adelante mientras sostiene la
base del cargador.
Inserte la batería en la carcasa
1
tomando el mango integrado y
empujándolo firmemente hasta que
trabe la batería en su lugar.
Presione el interruptor naranja para
3
encender la unidad.
ENCENDIDO: Modo de limpieza
silencioso Hush™
IMPULSIÓN: Área de limpieza de
alto tráfico
Apáguela llevando el interruptor a la
posición central.
Verifique el nivel de energía de
2
la batería con las luces LED en
la carcasa del interruptor de
alimentación.
Para retirar la batería, tome el mango
4
integrado mientras presiona el botón
de liberación. Deslice hacia afuera de
la carcasa tirando mientras mantiene
presionado el botón de liberación.
3130
Page 17

Mantenimiento
Cómo reemplazar la bolsa de filtro
Todo otro servicio de mantenimiento deberá ser realizado por personal técnico autorizado.
Si el aparato no funciona como debe, si se ha caído, dañado o dejado a la intemperie, o si se ha sumergido
enagua, llévelo a un Centro técnico antes de continuar usándolo.
DECL ARACIÓN DEL PROTECTOR TÉRMICO
Se ha colocado un protector térmico en la aspiradora para protegerla contra el sobrecalentamiento.
Cuando dicho protector se active, la aspiradora dejará de funcionar.
De ser así, proceda como se indica a continuación:
1. Apague la limpiadora y retire el paquete de baterías.
2. Verifique el nivel de llenado de la bolsa y cámbiela si es necesario.
3. Inspeccione la vía de aire en busca de obstrucciones. Limpie cualquier obstrucción presente.
4. Una vez que haya extraído el paquete de baterías y el motor se haya enfriado durante 30 minutos,
elprotector térmico se desactivará y usted podrá retomar la limpieza.
Si el protector térmico continúa activándose luego de haber seguido los pasos anteriores, significa que su
aspiradora necesita un servicio de mantenimiento.
ADVERTENCIA
UNIDAD O REALIZARLE UN SERVICIO DE MANTENIMIENTO.
NOTA: Cuando utilice la aspiradora para recoger polvo muy fino, como el aserrín o el polvo de mampostería,
será necesario reemplazar la bolsa y limpiar los filtros con más frecuencia para mantener un máximo poder de
succión. El polvo fino obstaculizará los poros de la bolsa y reducirá la succión, antes de que la bolsa se llene.
PARA RE DUCIR EL RIE SGO DE LESI ONES PERS ONALES : EXTRAI GA LA BATER ÍA ANTES DE L IMPIAR L A
ADVERTENCIA
UNIDAD O REALIZARLE UN SERVICIO DE MANTENIMIENTO.
Abra la cubierta
1
superiordestrabando
los3 pestillos.
PARA RE DUCIR EL RIE SGO DE LESI ONES PERS ONALES : EXTRAI GA LA BATER ÍA ANTES DE L IMPIAR L A
Libere la bolsa llena
2
presionando la pestaña
naranja y tire de la bolsa
para quitarla.
Inserte una nueva bolsa
3
deslizando el cartón por
debajo de las pestañas
hasta que la bolsa esté
bien fija en su lugar.
Inspeccione la bolsa de filtro.
1
Cámbiela si está llena.
Revise que no haya obstrucciones
2
en la boquilla, el tubo, la manguera y
la entrada de la bolsa. Elimine todo
elemento obstructivo.
Presione hacia abajo
4
paratrabar el sujetador
de la bolsa.
BOLSAS DE REEMPLAZO
Filtración estándar, paquete de 10, N.° de pieza AH10173
Filtración de alérgenos, paquete de 10, N.° de pieza AH10273
Vuelva a colocar la
5
cubierta superior y
afijarlos pestillos.
3332
Page 18

Filtros
ADVERTENCIA
OREAL IZARLE U N SERVICI O DE MANTE NIMIENT O. NO HAGA FUN CIONAR L A ASPIRADO RA SIN EL FILT RO DE ENTRA DA NI LOS FILT ROS FINAL ES.
FILTRO FINAL DE MEDIOS HEPA
Los filtros finales ayudan en el proceso de filtración para devolver aire más limpio a la habitación. Hay 2 filtros
HEPA, uno a cada lado de la mochila.
Retire la puerta del filtro
1
tirando de la pestaña
trasera hacia delante y
gírela para quitarla.
IMPORTANTE
CAN TO PARA QUE EL A IRE CIRCUL E A AMBOS LA DOS DEL FILTR O. ESTO PUE DE DEMORA R HASTA 24 HORAS .
PARA DI SMINUIR EL R IESGO DE LE SIONES FÍS ICAS, RE TIRE LA BATE RÍA ANTE S DE LIMPIAR LA
Extraiga el filtro tirando
2
del armazón. Enjuáguelo
a mano con agua fría y
baja presión. Solo lave
la superficie que da al
interior de la máquina.
Deje que se seque y
vuelva a colocarlo en
lacavidad para filtros.
PERMITA QUE EL FILTRO SE SEQUE COMPLETAMENTE ANT ES DE VOLVER A COLOCA RLO. SEQUE EL FILTRO DE
Para volver a colocar la
3
puerta del filtro, alinee
las dos pestañas hacia
adelante y gírelas en su
lugar. Presione la pestaña
trasera hasta que la
puerta calce en su lugar.
ADVERTENCIA
OREAL IZARLE U N SERVICI O DE MANTE NIMIENT O. NO HAGA FUN CIONAR L A ASPIRADO RA SIN EL FILT RO DE ENTRA DA NI LOS FILT ROS FINAL ES.
HEXAGUARD
FILTRO DE CARBONO
1
™
ACTIVADO
Los filtros HexaGuard™ están dentro
de la puerta de filtros. Tire de esta
para retirarla.
IMPORTANTE
CAN TO PARA QUE EL A IRE CIRCUL E A AMBOS LA DOS DEL FILTR O. ESTO PUE DE DEMORA R HASTA 24 HORAS .
PARA DI SMINUIR EL R IESGO DE LE SIONES FÍS ICAS, RE TIRE LA BATE RÍA ANTE S DE LIMPIAR LA
FILTRO DE ENTRADA
El filtro de entrada está ubicado en el
interior y la parte inferior de la cavidad
para filtros y protege al motor de daños.
Si el filtro se ensucia, tire de la parrilla
1
y levante el filtro para extraerlo.
Enjuáguelo a mano con agua fría
y baja presión. Deje secar el filtro
durante 24 horas. Vuelva a colocar
el filtro seco y encaje la parrilla en
su lugar.
PERMITA QUE EL FILTRO SE SEQUE COMPLETAMENTE ANT ES DE VOLVER A COLOCA RLO. SEQUE EL FILTRO DE
FILTRO DE REEMPLAZO
Inspeccione el Filtro final de medios HEPA cada mes, y lávelo cuando sea necesario.
Verifique el desgaste del medio y reemplace los pliegues si están dañados. Cambie el filtro
periódicamente para mantener un máximo rendimiento.
N.° de pieza 440009096
FILTRO DE
REEMPLAZO
Reemplace el filtro HexaGuard™
anualmente para lograr un
rendimiento óptimo.
N.° de pieza 440009176
LUBRICACIÓN
El motor viene equipado con cojinetes que tienen la suficiente lubricación para toda su vida útil.
Si le agrega lubricantes, esto podría dañar el motor. No le agregue lubricantes al motor.
FILTRO DE
REEMPLAZO
Inspeccione el filtro de entrada
cada 2 semanas para mantener
la aspiradora funcionando a un
rendimiento óptimo.
N.° de pieza 440009175
3534
Page 19

Resolución de problemas
ADVERTENCIA
UNIDAD O REALIZARLE UN SERVICIO DE MANTENIMIENTO.
Todo otro servicio de mantenimiento deberá ser realizado por personal técnico autorizado.
Si el aparato no funciona como debe, si se ha caído, dañado o dejado a la intemperie, o si se ha sumergido en
agua, llévelo a un Centro técnico antes de continuar usándolo.
Qué significa cuando
La luz d el cargador e stá…
VER DE PARPA-
DEANTE
VERDE
FIJO
AMARILLA
VER DE PARPA-
DEANTE
Problema Causa posible Solución posible
La aspiradora no
funciona
El indicador de
comprobación de bolsa
está en color rojo O la
aspiradora no succiona
O la succión es baja
Sale polvo de la
aspiradora
Es difícil empujar el
tubo aspiradora o la
aspiradora no avanza
Batería
Carga
Carga completa
Deje la ba tería en el
cargador. Está demasiado
calient e o fría para ca rgar.
Llámenos al
1-800-944-9200
PARA RE DUCIR EL RIE SGO DE LESI ONES PERS ONALES : EXTRAI GA LA BATER ÍA ANTES DE L IMPIAR L A
Carg a de un paquet e
debateríascaliente:
Cuando usa una aspiradora en forma
continua, es posible que la bate ría se
calient e. Una batería caliente pued e
colocarse directamente en el cargador,
pero la c arga no comen zará hasta que
disminu ya la tempera tura de la batería
a un rang o de temperat ura aceptable.
Cuand o se coloca una b atería calien te en
el carg ador, el LED amarill o permanecerá
encen dido hasta que l a batería se en fríe
lo suficiente como par a comenzar la c arga.
1. Es posible que la batería no es té
correctamente introducida.
2. Es po sible que la batería no esté
cargada.
3. Es posible que la batería se
haya recalentado.
4. Es posible que exist an daños en
los componentes internos.
1. Bolsa de filtro llena y/
oatascada.
1. Bolsa de filtro llena. 1. Vacíe la bolsa de filtro (pág. 15)
2. La bolsa de filtro no está
instaladacorrectamente.
3. La manguer a no está coloc ada
correctamente.
1. Herramienta para pisos
incorrecta.
1. Asegúrese de que la batería esté completamente
apoyada en la cavidad de la batería.
2. Verifique el Indicador de nivel de carga y recargue
la batería si el nivel fuera bajo.
3. Ex traiga la batería y déjela enfriar durante
30minutos, vuelva a colocar la batería y pruébela
nuevamente o r eemplácela por otra b atería
cargada.
4. Llame p ara obtener servicio: 1-8 00-94 4-920 0.
1. Vacíe la bolsa de filtro (pág. 15)
2. Repase la sección de extracción y reemplazo
delabolsa de filtro (pág. 15)
3. Consulte la sección Coloc ación de la
manguera(pág. 10).
1. Verifique que se esté utilizando la herr amienta
para alfombras en alfombras y la herr amienta
para pisos duros en pisos duros.
2. Ajus te el ángulo de la her ramienta para pisos
inclinándola hacia arriba, lo que hace más f ácil
el empuje.
Carg a de un paquet e
debateríascaliente:
Una batería f ría puede colo carse
direc tamente en el c argador, pero la
carga no come nzará hast a que aumente
la temp eratura de la b atería a un ran go
detemp eratura ac eptable. Cuando se
coloc a una batería f ría en el cargador,
elLED am arillo perman ecerá encendido
hast a que la batería s e caliente lo
suficie nte como par a comenzar la c arga.
GARANTÍA LIMITADA DE 2 AÑOS
COBERTURA DE LA GARANTÍA
En casos de uso y mantenimiento comercial en condiciones normales y confor me al Manual del propietario, su producto
®
Commercial tiene garantía contra defectos originales de fábrica de materiales y mano de obra por dos años
Hoover
enteros desde la fecha de compra (en adelante, el “Plazo de la garantía”). Durante el Plazo de la garantía, como se
descr ibe en esta Garantí a, Hoover
fines de reparar cualquier defe cto en los productos adquiridos en lo s Estados Unidos, de lo s EE.UU., y Canadá.
CÓMO REALIZAR UN RECLAMO POR LA GARANTÍA
Si este producto no presentara las características garantizadas, llévelo o envíelo a un Distribuidor Técnico
Oficial Autorizado de Hoover
automáticaaunCentro de servicios autorizado, llame al: 1-800-944-9200 O visite Hoover
www.hoovercommercial.com (clientes de EE. UU.) o ww w.hoover.ca (clientes de Canadá). Para obtener asistencia
adicional o información relacionada con esta Garantía o con la disponibilidad de los Centros de servicios au torizados de
garantía, llame el 1-800-944-9200, de lunes a viernes de 8 a. m. a 7 p. m., Hora Estándar del Este. En Canadá, llame al
1-800-263- 6376, de lunes a viernes de 8 a. m. a 7 p. m., Hora Estándar del Este.
NO CUBIERTO POR LA PRESENTE GARANTÍA
Algunas piezas de su producto
desgaste normal. Entre ellas se incluyen las correas, las mangas del rodillo del agitador, los cojinetes del agitador, los
cepillos, las bolsas, los filtros y las bombillas. Esta Garantía no cubre estas piezas. La presente Garantía tampoco cubre:
mantenimiento inadecuado del producto, daños debido al uso incorrecto, casos fortuitos o hechos de la naturaleza,
vandalismo u otros actos que estén más allá del control de
fuera del país en donde se compró el producto originalmente, reventa del producto por parte del propietario original,
defectos o daños causados por reparaciones o modificaciones que no hayan sido llevadas a cabo por un Distribuidor de
Servicios de Garantía Autorizado de
todos los productos considerados defectuosos y de tomar decisiones finales sobre cualquier reclamo de garantía. Esta
garantía no cubre la recolección, la entrega, el transporte ni el servicio a domicilio del producto. No obstante, si envía el
producto por correo postal al Distribuidor de Servicios de Garantía Autorizado de
servicio de la garantía, el env ío tendrá un cos to de ida solamen te.
OTROS TÉRMINOS IMPORTANTES
Est a garantía no e s transfer ible y no podrá s er cedida. Es ta garantí a se regirá e int erpreta rá de confor midad con las le yes
del Estado de Ohio. El Plazo de la garantía no se prolongará por ningún reemplazo o reparación realizados conforme a
la garantía. ESTA GARANTÍA REPRESENTA LA GARANTÍA Y EL RECURSO LEGAL E XCLUSIVOS, PROPORCIONADOS
POR HOOVER
INCLUIDAS L AS GARANTÍAS DE APTITUD PARA LA VENTA O ADECUACIÓN A FINES ESPECÍFICOS. EN NINGÚN
SUPUESTO HOOVER
DE NINGUNA CL ASE RECL AMADOS POR EL PROPIETARIO O CUALQUIER PARTE POR INTERMEDIO DE ESTE, YA SEA
EN VIRTUD DE UN CONTRATO, POR NEGLIGENCIA, HECHO ILÍCITO CIVIL O RESPONSABILIDAD OBJETIVA, NI POR
CUALQUIER OTRA CAUSA. En algunos estados, la exclusión de los daños mediatos no está permitida, de modo que la
exclusió n precedente puede no serle aplicable. Esta garantía le o torga derechos específi cos. También pued e tener otros
derechos, que varían s egún el estado.
®
COMMERCIAL. TODAS LAS DEMÁS GARANTÍAS, EXPRESAS O IMPLÍCITAS, SERÁN RECHAZADAS,
®
SERÁ RESPONSABLE POR DAÑOS ESPECIALES, INDIRECTOS, INCIDENTALES O EMERGENTES
®
Comme rcial le propo rcionará la ma no de obra y los repuest os, sin ningún cos to, a los
®
Commercial junto con el comprobante de compra. Para ser redirigido en forma
Hoover® Commercial requieren reemplazo durante el curso habitual del uso, debido al
Hoover® Commercial
Hoover® Commercial. Hoover® Commercial
, actos u omisiones del propietario, uso
se reserva el derecho de inspeccionar
®
Commercial en línea en
Hoover® Commercial
para obtener el
3736
Page 20

GUIDE D’UTILISATION
Pour utilisation avec le modèle CH93406.
IMPORTANT:
AVANT D’ASSEMBLER ET D’UTILISER L’APPAREIL. CE PRODUIT EST DESTINÉ
À UN USAGE COMMERCIAL SEULEMENT.
LISEZ ATTENTIVEMENT LE PRÉSENT GUIDE D’UTILISATION
Bienvenue
Merci d’avoir choisi un produit commercial HooverMC.
Table des matières
Consignes de sécurité 40
Caractéristiques 42
Premiers pas 44
Assemblage de la rallonge et installation des accessoires 44
Harnais ergonomique et ajustement de la hauteur 45
MC
Utilisation de votre aspirateur dorsal sans-fil 6Q HUSHTONE
Ajustement du harnais 47
MC
Batterie et chargeur 40V M-PWR
48
Entretien 50
Comment remplacer le sac-filtre 51
Filtres 52
46
SI VOUS AVEZ BESOIN D’AIDE
Veuillez appeler au 1 800 944-9200 (lundi au vendredi de 8 h à 17 h HNE) pour parler à un
représentant du ser vice à la clientèle ou visitez notre site internet à HooverCommercial.com.
Dépannage 54
Garantie 55
3938
Page 21

CONSIGNES DE SÉCURITÉ IMPORTANTES
R
E
C
I
C
L
E
CONSERVEZ CES INSTRUCTIONS!
IMPORTANT : LISEZ ATTENTIVEMENT AVANT L’ASSEMBLAGE ET L’UTILISATION.
LORSQUE VOUS UTILISEZ DES APPAREILS ÉLECTRIQUES, VEUILLEZ TOUJOURS
RESPECTER ENTRE AUTRES LES CONSIGNES DE SÉCURITÉ ÉLÉMENTAIRES SUIVANTES:
VEUILLEZ LIRE TOUTES LES INSTRUCTIONS AVANT D’UTILISER
CET APPAREIL.
AVERTISSEMENT: POUR RÉDUIRE LE RISQUE D’INCENDIE, DE DÉCHARGE
ÉLECTRIQUE, DE DOMMAGE OU DE BLESSURE:
•
Asse mblez entière ment l’appareil avant d e l’utiliser.
•
Évi tez d’utiliser l’ap pareil, de le rang er ou de charger s a batterie à l’exté rieur ou sur des su rfaces mou illées. N’expos ez pas le
charg eur à l’eau ou à l’humidité.
•
Ne pe rmettez p as aux enfan ts de jouer ave c l’appa reil. Cet appa reil ne doit pas êt re utilisé par d es enfants de m oins de 12ans.
Exer cez une sur veillance étr oite lorsque l ’appa reil est utilisé à p roximité d’enf ants. Gard ez l’appareil hor s de la porté e des enfant s
et ne lais sez pas ces der niers intro duire leurs doig ts ou d’autre s objets dans au cune ouver ture afin d’ éviter les blessur es ou les bris.
•
Utilis ez l’appareil uniquemen t aux fins décri tes dans le pré sent guide. Ut ilisez uniquement les ac cessoires e t produits
recommandés par le f abricant.
•
N’utilis ez pas le charg eur si la fiche ou le cordon est endo mmagé. Si l’appareil ou le ch argeur ne fonc tionnent pa s adéquatem ent,
s’ils son t tombés sur le so l ou dans l’eau, s’ils so nt endommagés ou ont é té laissés à l’extérieu r, appor tez-les à un c entre de
service po ur les faire insp ecter avant de cont inuer à les utiliser.
•
Ne tir ez pas ni ne transpor tez le charge ur par le cordon, n’utilisez p as le cordon comme une poigné e, ne coincez pa s le cordon dans
l’embrasure d’une porte et ne l’ap puyez pas co ntre des arêtes tr anchantes o u des coins. Ne placez pas l’appar eil sur le cordon. N e
faite s pas rouler l’app areil sur le cordo n. Tenez le c ordon éloigné d es surfaces chaudes.
•
Ne débr anchez pas le chargeur en tira nt sur le cordon. Pour dé brancher le chargeur, tirez sur l a fiche.
•
Ne manipulez pas le charg eur, y compris la fich e et les bornes, ni l’appareil si vous avez le s mains mouillées.
•
N’incinérez p as le chargeur, la batterie ou l’appareil m êmes s’ils sont gr avement endomma gés. La bat terie peut ex ploser au feu.
•
N’insérez a ucun objet dans les ouvertures. N ’utilise z pas l’appareil si les ouvertures so nt obstrué es. Assure z-vous qu’elles so nt
exemp tes de poussiè re, de mousse, de c heveux ou de to ut ce qui pourr ait réduire le dé bit d’air.
•
Gard ez les cheveu x, les vêtements am ples, les doigt s et toute aut re partie du c orps à l’éc art des ouvertures et d es pièces en
mouvement.
•
Redou blez de pruden ce lorsque vo us utilisez l’appareil dan s un escalier.
•
Ce pr oduit contie nt une batterie au lit hium-ion rec hargeable. N ’exposez pas la bat terie à des températures é levées, car elle
pourrait s’enflammer et exploser.
•
Évit ez d’écras er et d’incinérer la ba tterie ou de la s oumettr e à des actions sim ilaires.
•
Ne jet ez pas la bat terie au feu ou dan s un compresseur à déchets . Consultez la section sur l’ élimination de la b atterie po ur obtenir
des instructions.
•
Ne tent ez pas de démon ter la batt erie.
•
Débr anchez le chargeur de la prise a vant de proc éder à tout net toyage ou en tretien de ro utine.
•
La batterie peu t fuir si elle est so umise à des condi tions extr êmes. Si l’éle ctrolyt e entre en con tact avec vo tre peau, lav ez aussitôt
les par ties touchées ave c de l’eau et du savo n. En cas de contact a vec les yeux , ne frotte z pas. Rincez im médiatemen t vos yeux à
l’eau pro pre pendant au moins 15minutes et consult ez un médecin sans at tendre.
•
Utilise z seulement le ch argeur (
recharger la b atterie.
•
Utilis ez seulement l a batterie ( Hoover Comm ercial, no de pièc e CH90040) fo urnie avec vot re appareil Ho over Commercial. Un
autre typ e de batter ie pourrait ex ploser et cau ser des blessures ou de s dommages gr aves.
•
Ne touc hez pas aux bor nes du chargeur et du blo c-piles et n’y ins érez pas d’obje ts.
•
Le ch argeur est co nçu pour être u tilisé à l’intér ieur seulemen t. Assurez -vous de toujou rs conser ver la batte rie et le charge ur dans
un endr oit sec.
•
Ne tent ez pas de cour t-circuite r la batterie ou les bo rnes du charg eur.
•
N’utilis ez pas l’appare il pour aspirer de s liquides inflam mables ou combustibl es, comme de l’ess ence, ni de la sciur e de bois, ni
dans des endroi ts où de telles substa nces peuve nt être prés entes.
•
N’utilis ez pas l’appare il pour aspirer qu oi que ce soit qui br ûle ou dégage de la f umée comme de s cigarettes, des allu mettes ou
des cendres chaudes.
•
N’utilise z pas l’appareil s ans avoir installé le sac à p oussière et les fi ltres.
•
Pré venez les mise s en marche non in tentionnelles. As surez-vous que l’in terrupteur est en p osition d’arr êt avant de con necter
le bloc-piles, d e prendre l’app areil ou de le tran sporter. Transp orter l’app areil en conser vant les doig ts près de l’interrupt eur et
branc her l’appareil sur une sour ce électri que lorsque l’ interrupteur es t en position de m arche sont de ux situation s qui présent ent
des risques d’accident.
•
Retirez le blo c-piles de l’app areil avant de f aire un ajusteme nt, de change r les accessoires ou d ’entr eposer l’appareil. Une t elle
mesur e de précaution per met de réduire le risque q ue l’appareil ent re accident ellement en fon ction.
•
Recharge z la batteri e uniquement av ec le chargeur indiqué p ar le fabrican t. Le charge ur adéquat pou r un type de blo c-piles
présente un r isque d’incendie s’il e st utilisé avec un bloc-piles di fférent .
Hoover
Comme rcial, no de pièce CH90 002) four ni avec votr e appareil
Hoover
Comme rcial pour le
•
Utilis ez l’appareil uniquemen t avec un bloc- piles spéciale ment désigné à c et effet. L’utilisation de t out autre blo c-piles pré sente
un risqu e de blessure et d ’incendie.
•
Lor squ’un bloc-piles est en fonction, maintene z-le à distanc e d’autres obje ts métallique s (trombone s, pièces de mon naie, clés,
clous, vi s ou autres men us objets) susc eptibles d’ établir un contact e ntre deux bornes. Un tel co ntact cour t-circuit ant entre deu x
bornes de la ba tterie pré sente des ris ques de brûlur es ou d’incen die.
•
Dans d es condition s extrêmes , un liquide pourr ait être expulsé de la batterie. En cas de co ntact accidentel, rince z les régions
touch ées avec de l’eau. En cas de c ontact avec les ye ux, rincez-les av ec de l’eau et deman dez une assist ance médicale. Le liqui de
expuls é de la batterie peu t être une sour ce d’irrit ation ou de brûlures.
•
N’utilis ez ni un bloc-pil es ni un appareil endomm agé ou modifié. L e fonctionn ement des batter ies endommag ées ou modifié es
peut être imprévisible et présenter des risques d’incendie, d’explosion ou de blessures.
•
N’exp osez pas le bloc -piles ou l’appa reil au feu ou à une tempéra ture exces sive. L’expo sition au feu ou à un e températ ure
supér ieure à 130°C (26 5°F) représente un risqu e d’explosion.
•
Suiv ez toutes les instr uctions por tant sur la re charge. Ne re chargez pas l e bloc-piles ni l’appareil à des tem pérature s autres
que celle s indiquées dan s ces instructions. Toute re charge à des te mpératur es hors de la plage indiqué e présente d es risques
d’endom mager la bat terie en plus d’augmente r les risques d’incendie.
•
Lor squ’un entretien est n écessaire, c onfiez votr e appareil à un ré parateur qualifié qui n’ut ilisera que des piè ces de recha nge
identiques au x pièces d’origin e. Vous vous assu rerez ainsi de pr éserver la s écurité de l’ap pareil.
•
Ne modifiez ni l’appareil ni le bloc -piles (le cas échéant ), et ne tentez pas de les répar er, sauf dans la mes ure indiquée dans les
présentes i nstructi ons quant à leur utilisation et aux soins re quis.
MISE EN GARDE: POUR RÉDUIRE LES RISQUES DE DOMMAGE:
•
Utilise z seulement sur u n plancher sec .
•
Évi tez d’utiliser l’ap pareil pour ramasse r des objets dur s ou aux arêtes tranchant es, car ils pourr aient endomm ager l’appareil.
•
Rang ez l’appareil adé quatement à l ’intérieur e t dans un endroit s ec. N’expose z pas l’appareil à d es conditions de gel.
•
N’utilis ez pas d’objet au x arêtes tranchan tes pour net toyer le tuy au, car cela risquerait de l’endom mager.
AVERTISSEMENT:
LE CHARGEUR EST MUNI D’UNE FICHE POLARISÉE (L’UNE DES
BROCHES EST PLUS LARGE QUE L’AUTRE) QUI RÉDUIT LE RISQUE DE DÉCHARGE ÉLECTRIQUE.
CETTE FICHE NE PEUT ÊTRE BRANCHÉE QUE DANS UN SEUL SENS À UNE PRISE POLARISÉE.
SI LA FICHE NE S’INSÈRE PAS ENTIÈREMENT DANS LA PRISE, RETOURNEZ-LA. SI VOUS NE
POUVEZ TOUJOURS PAS L’INSÉRER, COMMUNIQUEZ AVEC UN ÉLECTRICIEN QUALIFIÉ POUR
FAIRE INSTALLER UNE PRISE APPROPRIÉE. NE MODIFIEZ LA FICHE EN AUCUN CAS.
AVERTISSEMENT: CE PRODUIT CONTIENT DES PRODUITS CHIMIQUES RECONNUS
PAR L’ÉTAT DE LA CALIFORNIE COMME POUVANT CAUSER LE CANCER, DES ANOMALIES
CONGÉNITALES OU D’AUTRES DYSFONCTIONS DU SYSTÈME REPRODUCTEUR.
BIENSELAVER LES MAINS APRÈS L’UTILISATION.
AVERTISSEMENT RELATIF À L’ÉLIMIN AT ION DE LA BATTERIE:
RISQUE D’EXPLOSION OU D’EXPOSITION AUX MATIÈRES TOXIQUES :
MISE EN GARDE:
si elle n’est pa s manipulée adéquate ment. Ne la démontez p as, ne la chauf fez pas au-d elà de la tempér ature maximale établie par
le fabricant (6 0°C/140°F ) et ne l’incinér ez pas. Remplacez la b atterie uni quement par un e batterie H oover Comm ercial, no de pièc e
CH9004 0. L’utilisa tion d’une autr e batterie p ourrait causer un inc endie ou une exp losion. Jetez rapide ment toute b atterie us agée.
Garde z la batteri e hors de la por tée des enfan ts. Ne démontez pas l a batterie e t ne la jetez pas au feu. Ne tentez p as de démonte r la
bat terie ou de retirer tou t composan t en saillie des bornes de la b atterie. Ne t entez pas de r emplacer des pièces d e la batteri e ou du
charg eur. Cela pourrait provoquer un incen die ou une explosion. Avant de jet er la batter ie, protégez les bor nes exposé es à l’aide d’un
épais ruban iso lant pour évit er les court s-circuit s.
BATT ERIE AU LITHIUM-ION:
Le sce au de recycla ge des batt eries au lithium -ion de la RBRC certi fié par l’EPA indi que que TechtronicIndus tries, socié té affiliée à
Hoove r Commercial, p articipe volontairement à un pro gramme de colle cte et de rec yclage des ba tteries us agées au Canada et aux
État s-Unis. Le pr ogramme de recyclage de la R BRC offre u ne solution de rechan ge pratique qui permet d’é viter que les b atteries
soient jetées à la poubelle ou dans les ordures mé nagères municipales, ce qui pou rrait être illé gal dans votr e région.
Consultez le si te www.rbrc.org/c all2recycle /pour obtenir de l’inf ormation sur l e recyclage d es batter ies au lithiumion ainsi qu e sur les interdiction s ou les restr ictions touc hant leur élimina tion dans votr e région.
La par ticipatio n de Hoover Com mercial à ce pro gramme témo igne de son engagemen t à protéger l’en vironnemen t
et les ressources naturelles.
La batter ie utilisée dans c et appareil pe ut présent er un risque d’incendie ou de br ûlure chimique
La batter ie doit être re cueillie, recyc lée ou éliminée dans le resp ect de l’enviro nnement.
4140
Page 22

Caractéristiques du produit
A
Tuy au
B
Tube supérieur
A
C
Corps de l’aspirateur
•
Sac-filtre anti-allergène
• Sac-filtre en tissu
•
Filtre HEPA
D
Tube inférieur
E
Filtres Hexaguard
F
Batterie au lithium-ion 40V M-PWR
F
Chargeur double 40V M-PWR
MC
Outils de dépoussiérage
B
C
MC
*
MC
*
D
E
Accessoire pour tapis
Outil pour revêt ements en t issu
Accessoire pour plancher
Brosse à épousseter
Suceur plat
*VENDU SÉPARÉMENT
F
G
4342
Page 23

Assemblage de la rallonge et installation des
accessoires
MISE EN GARDE
N’UTILISEZ PAS L’ASPIRATEUR POUR TOILETTER UN ANIMAL.
Harnais ergonomique et ajustement de la hauteur
REMARQUE: Le harnais a été conçu et dessiné pour s’adapter à plusieurs grandeurs d’utilisateurs et s’ajuste
selon la grandeur. La partie supérieure du harnais doit reposer entre les omoplates pour obtenir un port
confortable. La position du harnais supérieur du sac à dos livré est située dans le trou central d’ajustement
dela partie saillante de hauteur moyenne.
Assemblez d’abord le tube
1
en dévissant le manchon
de l’extrémité du tube
supérieur et glissez-le sur
le tube inférieur.
Poussez fermement
4
l’ext rémité du boyau
surl’ex trémité ouverte
du tube.
Alignez la rainure du tube
2
inférieur avec le tube
supérieur et poussez
fermement pour glisser
le tube en place et à la
longueur désirée.
Pour utiliser les
5
accessoires pour plancher,
ins érez l’accessoire pour
plancher la l’extrémité à
manchon du tube inférieur
et en alignant l’anneau
métallique avec la rainure
de l’accessoire. Serrez le
manchon en tournant vers
la droite.
Serrez le manchon
3
extérieur en le tournant
vers la droite.
Pour les utilisateurs de grande taille,
déplacez la partie supérieure du harnais
à la position du bas sur la plaque
d’ajustement de la hauteur.
Pour ajuster la partie supérieure
1
du harnais, utilisez un tournevis
cruciforme et retirez la vis de la
plaqued’ajustement de la hauteur.
Pour les utilisateurs de petite taille,
déplacez la partie supérieure du harnais
à la position du haut sur la plaque
d’ajustement de la hauteur.
Déplacez la partie supérieure du
2
harnais et serrez fermement la vis à
la bonne hauteur d’ajustement de la
partie saillante.
4544
Page 24

Utilisation de votre sac à dos 6Q HUSHTONE
MC
Ajustement du harnais
REMARQUE: Ne passez pas l’aspirateur sans avoir installé les deux sacs-filtres et les filtres HEPA.
TEMPÉRATURE AMBIANTE:
Assurez-vous que les deux sacs-filtres
1
et les filtres HEPA sont installés
dans l’appareil. Insérez fermement
l’extrémité du boyau dans l’entrée du
boyau en dirigeant le coude vers le
côté de l’aspirateur.
0°C à 40°C (32°F à 104°F)
Relâchez les bandoulières puis
2
soulevez le sac à dos en glissant les
deux bras dans les bandoulières.
REMARQUE: Le harnais ergonomique est dessiné de manière à identifier facilement les étapes de bon port du
sac à dos. Repérez les flèches chiffrées des légendes de parties correspondantes indiquées dans les directives
ci-dessous.
Serrez la ceinture jusqu’à ce
1
qu’elle tienne fermement sur vos
hanches tout en étant confortable.
REMARQUE: Si une longueur
additionnelle est requise, la courroie
de rallonge peut être placée entre les
extrémités de la courroie et ajustée à
la longueur désirée.
Tirez les deux extrémités des
2
bandoulières jusqu’à ce que la partie
supérieure du harnais touche aux
omoplates. Presque tout le poids de
l’appareil doit reposer sur les hanches.
Vous devez pouvoir insérer facilement
un doigt entre chaque bandoulière
et l’épaule. Resserrez la ceinture
aubesoin.
Placez la partie inférieure du coussin
3
au bas du dos de manière à ce que
le poids de l’appareil repose sur les
hanches et non les épaules.
AVERTISSEMENT
NETTOYAGE OU L’ENTRETIEN DE L’APPAREIL.
POUR RÉ DUIRE LES R ISQUES DE B LESSURE : RE TIREZ L A BATTERIE AVAN T D’EFFE CTUER LE
Enclenchez la boucle de la bandoulière
3
de poitrine et serrez-la ou déserrez-la
au besoin.
Glissez les bandoulières de poitrine
4
vers le haut ou le bas pour les ajuster.
4746
Page 25

Batterie et chargeur 40V M-PWR
MC
REMARQUE: Au moment de la livraison, le niveau de charge des batteries est faible afin d’éviter d’éventuels
problèmes. Vous devez les recharger avant de les utiliser une première fois.
Il est possible de recharger une seule batterie à la fois. Lorsque les deux batteries sont en place, celle qui
dispose du plus d’énergie sera rechargée en premier. Cela permet de compter sur un temps de recharge
plusrapide.
TEMPÉRATURE AMBIANTE POUR L A RECHARGE:
5°C à 50°C (41°F à 122°F)
Charge entre 66 et 100%
Charge entre 33 et 66%
Charge entre 10 et 3 3%
Charge entre 0 et 10%
Pour recharger la batterie, faites-la
1
glisser dans le chargeur. Poussez la
batterie vers le fond jusqu’à ce qu’elle
s’enclenche et que le voyant DEL
s’allume.
Charge entre 66 et 100%
Charge entre 33 et 66%
Charge entre 10 et 3 3%
Charge entre 0 et 10%
Au moment de la recharge, le voyant
3
DEL sur la batterie donne une
indication sur le niveau de charge.
Le voyant DEL passe au vert lorsque
2
labatterie est entièrement rechargée.
Si le voyant du chargeur clignote
en rouge, une erreur s’est produite.
Retirez la batterie et remettez-la
enplace.
Pour retirer la batterie, appuyez sur
4
le bouton de dégagement et faites
glisser la batterie vers l’avant en
maintenant la base du chargeur.
Insérez la batterie dans son
1
compartiment et fermez-le en
appuyant fermement sur la poignée
intégrée jusqu’à ce que la batterie
soitfixée correctement en place.
Appuyez sur l’interrupteur orange pour
3
mettre l’appareil en marche.
MISE EN MARCHE : Mode de
nettoyage silencieux Hush
SURALIMENTATION : Nettoyage
des circulations piétonnières intenses
Éteignez l’appareil en repositionnant
l’interrupteur au centre.
MC
Vérifiez le niveau de charge de la
2
batterie indiqué par les voyants
DELsur le boîtier de l’interrupteur.
Pour retirer la batterie, tirez sur la
4
poignée intégrée en appuyant sur le
bouton de dégagement. Puis, toujours
en maintenant enfoncé le bouton de
dégagement, faites glisser la batterie
en dehors de son compartiment.
4948
Page 26

Entretien
Comment remplacer le sac-filtre
Toute autre tâche d’entretien doit être confiée à un représentant de service autorisé.
Cessez d’utiliser l’appareil s’il ne fonctionne pas comme prévu, s’il a été échappé sur le sol ou dans l’eau, s’il
estendommagé ou s’il a été laissé à l’extérieur et apportez-le au centre de réparations.
RUPTEUR THERMIQUE
Votre appareil est équipé d’un rupteur thermique interne afin de le protéger contre la surchauffe.
L’appareil cessera de fonctionner si ce rupteur thermique s’active.
Voici ce qu’il faut faire lorsque ceci survient :
1. Éteignez l’aspirateur et retirez le bloc-piles.
2. Vérifiez si le sac est plein et changez-le au besoin.
3. Vérifiez si la conduite d’air est obstruée. Dégagez toutes les obstructions visibles.
4. Le rupteur thermique se réinitialisera une fois que le moteur se sera refroidi pendant 30minutes après le
retrait du bloc-piles. Vous pourrez à ce moment reprendre le travail.
Votre appareil devra être réparé si le rupteur thermique ne se réinitialise pas après avoir respecté les étapes
ci-dessus.
AVERTISSEMENT
NETTOYAGE OU L’ENTRETIEN DE L’APPAREIL.
REMARQUE: Si vous utilisez l’aspirateur pour ramasser des poussières très fines, comme de la sciure ou de
la poussière de placoplâtre, il sera nécessaire de remplacer le sac et de nettoyer les filtres à des intervalles
fréquents afin de maintenir une puissance de ramassage maximale. La poussière fine colmatera les pores du
sac et réduira l’aspiration avant que le sac ne soit plein.
POUR RÉ DUIRE LES R ISQUES DE B LESSURE : RE TIREZ L A BATTERIE AVAN T D’EFFE CTUER LE
AVERTISSEMENT
NETTOYAGE OU L’ENTRETIEN DE L’APPAREIL.
Ouver le couvercle
1
supérieur en déclenchant
les 3 languettes.
POUR RÉ DUIRE LES R ISQUES DE B LESSURE : RE TIREZ L A BATTERIE AVAN T D’EFFE CTUER LE
Retirez le sac plein en
2
appuyant sur la languette
orange.
Insérez un sac neuf
3
en glissant la partie
cartonnée sous les
languettes et poussez
jusqu’à ce que le sac
soit fixé correctement
enplace.
Vérifiez le sac-filtre. Changez-le s’il
1
est plein.
Vérifiez si la buse, le tuyau et l’entrée
2
du sac sont obstrués. Dégagez toutes
les obstructions.
Abaissez la languette
4
duporte-sac.
SACS DE RECHANGE
Filtration normale, paquet de10, no de pièceAH10173
Filtration allergène, paquet de10, no de pièceAH10273
5
Réinstallez le couvercle
supérieur et enclenchez
les languettes.
5150
Page 27

Filtres
AVERTISSEMENT
NET TOYAGE OU L’ENTR ETIEN DE L’APPARE IL. N’UTI LISEZ PAS L’ASPIR ATEUR SI LE FI LTRE D’ENT RÉE ET LES F ILTRES D’E XTRÉMI TÉ NE SONT PAS I NSTALLÉS .
FILTRE CONÇU AVEC LA TECHNOLOGIE HEPA
Les filtres finisseurs contribuent au processus de filtration en assainissant l’air rejeté dans la pièce. Il y a deux
filtres HEPA; un filtre de chaque côté du sac à dos.
Retirez la porte du filtre
1
en tirant la languette
arrière vers l’avant puis
tournez-la.
IMPORTANT
LE FAIR E SÉCHER DE S ORTE QUE L’AIR CIR CULE DES DE UX CÔTÉS D U FILTRE. LE T EMPS DE SÉC HAGE PEUT P RENDRE JUS QU’À 24HEURES.
POUR RÉ DUIRE LES R ISQUES DE B LESSURE: RE TIREZ L A BATTERIE AVAN T D’EFFE CTUER LE
Dégagez le filtre du cadre
2
et sortez-le. Rincez-le
à l’eau froide, sous un
faible débit d’eau. Rincez
seulement la surface
dirigée vers l’intérieur de
l’appareil. Laissez sécher
et réinstaller le filtre dans
son logement.
LAI SSEZ SÉCH ER COMPLÈ TEMENT L E FILTRE AVANT DE LE R EMETT RE EN PLACE . PLACEZ L E FILTRE DE CÔ TÉ POUR
Réinstallez la porte du
3
filtre en alignant les deux
languettes dirigées vers
l’avant et tournez-les.
Appuyez sur la languette
arrière jusqu’à ce que
la porte s’enclenche
correctement.
AVERTISSEMENT
NET TOYAGE OU L’ENTR ETIEN DE L’APPARE IL. N’UTI LISEZ PAS L’ASPIR ATEUR SI LE FI LTRE D’ENT RÉE ET LES F ILTRES D’E XTRÉMI TÉ NE SONT PAS I NSTALLÉS .
FILTRE HEXAGUARD
(FILTRE À CHARBON ACTIF)
Les filtres HexaGuardMC sont situés à
1
l’intérieur de la porte du filtre. Tirez
pour retirer.
IMPORTANT
LE FAIR E SÉCHER DE S ORTE QUE L’AIR CIR CULE DES DE UX CÔTÉS D U FILTRE. LE T EMPS DE SÉC HAGE PEUT P RENDRE JUS QU’À 24HEURES.
MC
POUR RÉ DUIRE LES R ISQUES DE B LESSURE: RE TIREZ L A BATTERIE AVAN T D’EFFE CTUER LE
FILTRE D’ENTRÉE
Le filtre d’entrée est situé à l’intérieur,
au fond du logement de sac et offre une
protection contre les bris du moteur.
Si le filtre devient sale, retirez la grille
1
et soulevez le filtre puis le sortir.
Rincez-le à l’eau froide, sous un faible
débit d’eau. Laissez-le sécher pendant
24heures. Repositionnez le filtre sec
et fixez la grille en place.
LAI SSEZ SÉCH ER COMPLÈ TEMENT L E FILTRE AVANT DE LE R EMETT RE EN PLACE . PLACEZ L E FILTRE DE CÔ TÉ POUR
REMPLACEMENT DU FILTRE
Inspectez le filtre finisseur HEPA tous les mois et rincez-le si nécessaire. Vérifiez si le filtre
est usé et remplacez-le si les plis sont endommagés. Changez le filtre régulièrement pour
maintenir une performance optimale.
No de pièce: 440009096
REMPLACEMENT
DUFILTRE
Remplacez le filtre HexaGuard™
chaque année pour obtenir une
performance optimale.
No de pièce: 440009176
LUBRIFICATION
Le moteur est équipement de roulements suffisamment lubrifiés pour toute la durée de vie de l’appareil.
L’ajout de lubrifiant pourrait causer des dommages. N’ajoutez pas de lubrifiant dans le moteur.
REMPLACEMENT
DUFILTRE
Inspectez le filtre d’entrée
tous les deux semaines pour
que l’aspirateur offre une
performance optimale.
No de pièce: 440009175
5352
Page 28

Dépannage
AVERTISSEMENT
NETTOYAGE OU L’ENTRETIEN DE L’APPAREIL.
Toute autre tâche d’entretien doit être confiée à un représentant de service autorisé.
Cessez d’utiliser l’appareil s’il ne fonctionne pas comme prévu, s’il a été échappé sur le sol ou dans l’eau, s’il
estendommagé ou s’il a été laissé à l’extérieur et apportez-le au centre de réparations.
Quel e st le messa ge lorsque
la lumière du ch argeur.. .
CLIGNOTE
EN VE RT
EST
VERTE
EST JAUNE
CLIGNOTE
EN ROUGE
Batterie
Recharge
Batterie entièrement
rechargée
Laiss ez la batter ie sur le
charg eur. Elle est trop
chaude o u trop froide
pourle mo ment.
Commu niquez avec nous
au1800944-9200.
Problème Cause possible Solution possible
L’aspirateur ne
fonctionne pas.
L’indicateur de
vérification du sac est
rouge OU l’appareil
n’aspire plus OU la
succion est faible.
La poussière s’échappe
de l’aspirateur.
Il est difficile, voire
déplacer ou à pousser
vers l’avant.
POUR RÉ DUIRE LES R ISQUES DE B LESSURE : RE TIREZ L A BATTERIE AVAN T D’EFFE CTUER LE
Recharge d’un
bloc- piles chaud:
Lors que vous utilise z un aspirateur sans
inter ruption sur un e certaine p ériode,
la bat terie peut de venir chaude. Il e st
possible de plac er une batt erie chaude
direc tement sur le ch argeur, mais la
recharge ne c ommencera p as tant que
la temp érature de la b atterie ne s era
pas redescendue à un niveau a cceptable .
Lors qu’une batterie chau de est placée sur
le chargeur, le voy ant DEL jaune de meure
allumé jus qu’à ce que la bat terie se
soit suffis amment refr oidie pour que la
recharge commence.
1. La batterie n’est p eut-être pas
installée adéquatement.
2. La batterie n’est p eut-être pas
chargée.
3. La batterie est peut- être trop
chaude.
4. Un composant interne est peutêtre endommagé.
1. Le sac-filtre est plein
ou obstrué
1. Le sac-filtre est plein. 1. Videz le sac-filtre - Voir page15.
2. Le sac-filtre n’est pas inst allé
correctement.
3. Le tu yau est mal installé. 3. Consultez le chapitre d’installation du boyau -
1. Accessoire p our plancher mal
installé.
1. Assurez-vous que la bat terie est bien installée
dans son réceptacle.
2. Vérifiez l’indicateur de charge et rechargez la
batterie si le niveau est bas.
3. Retirez la batterie et laissez-la refroidir pendant
30minutes, puis remet tez-la en place et essayez
de nouveau l’app areil ou utilisez la deuxième
batterie si celle-ci est chargée.
4. Communiquez avec le service technique au
18009 44-9200.
1. Videz le sac-filtre - Voir page15.
2. Consultez la section sur le r etrait et le
remplacement
du sac-filtre– voir page15.
Voirpage 10.
1. Assurez-vous que l’accessoire pour tapis est
utilisé sur un tapis et que l’accessoire pour
plancher est utilisé sur des planchers durs.
2. Ajus tez l’angle de l’accessoire pour plancher en
l’inclinant vers le haut pour faciliter sa poussée.
Recharge d’un
bloc- piles froid:
Il est po ssible de placer une bat terie
froide directemen t sur le chargeur, mais
la rech arge ne comme ncera pas ta nt que
la temp érature de la b atterie ne s era
pas rem ontée à un nive au accepta ble.
Lors qu’une batterie froide est placée sur
le chargeur, le voy ant DEL jaune de meure
allumé jus qu’à ce que la bat terie se soi t
suf fisamment ré chauffée p our que la
recharge commence.
GARANTIE LIMITÉE DE 2ANS
COUVERTURE DE LA GARANTIE
Lorsqu’ils sont utilisés et entretenus dans des conditions normales d’utilisation et d’entretien commerciaux, comme il
est stipulé dans le guide d’utilisation, votre appareil Hoover
et de main-d’œuvre pendant une période de deuxans à partir de la date d’achat (ci-après la «période de garantie »).
Pendant la période de garantie, telle qu’elle est décrite dans la présente garantie
pièces gratuitement afin de corriger une telle défectuosité pour les produits achetés au x États-Unis. dans les boutiques
d’échanges militair es américaine s et au Canada.
RÉCL AMATION AU TITRE DE LA GARANTIE
Si le produit n’est pas dans l’état prévu par la garantie, apportez ou envoyez le produit chez un fournisseur
autorisé de service sous garantie Hoover
autorisés,composez le numéro du service automatisé au 1800944-9200 OU visitez Hoover
www.hoovercommercial.com (clients des É.-U.) États-Unis) ou au www.hoover.ca (clients du Canada). Pour obtenir du
soutien ou d’autres renseignements au sujet de la garantie ou pour connaître les boutiques offrant les réparations au
titre de la garantie, composez le 1800944-9200, entre 8h et 19h (HNE) du lundi au vendredi. Au Canada, composez le
18002 63-6376, ent re 8h et 19h (HNE) du lundi au vendredi.
MD
avec une preuve d’achat. Pour obtenir la liste des points de service
ÉLÉMENTS NON COUVERTS PAR LA GAR ANTIE
Certaines pièces de votre produit commercial
raison d’une usure normale. Ces pièces comprennent les courroies, les manchons du rouleau-brosse, les roulements du
rouleau-brosse, les brosses, les sacs, les filtres et les ampoules. Ces pièces ne sont pas couvertes par la présente garantie.
De plus, la p résente ga rantie ne cou vre pas: un ent retien inadé quat du produi t, les bris cau sés par la mauv aise utilisat ion,
les cas fortuits, les catastrophes naturelles, le vandalisme et autres actes hors du contrôle de
les agissements ou omissions du propriétaire, l’utilisation à l’extérieur du pays d’achat, la revente du produit par le
premier acheteur, les défauts ou les dommages causés par quiconque autre qu’un fournisseur autorisé de ser vice sous
HooverMD Comme rcial
garantie
définitives à l’égard de toute réclamation au titre de la garantie. La présente garantie ne couvre pas le ramassage, la
livraison, le transport, ni les réparations à domicile. Toutefois, si vous envoyez votre produit par courrier à un fournisseur
autorisé de service sous garantie
seront payés.
se rés erve le droi t d’inspect er tout pro duit présumé d éfectueu x et de prendr e les décisions
HooverMD Commercial
HooverMD doivent être remplacées dans le cours normal d’utilisation en
AUTRES CONDITIONS IMPORTANTES
La présente garantie n’est pas transférable et ne peut pas être cédée. La présente garantie sera régie et interprétée
selon les lois de l’État de l’Ohio. La période de garantie ne sera pas prolongée après tout remplacement ou toute
répar ation au tit re de la prése nte garan tie. CET TE GAR ANTIE E ST VOTRE U NIQUE REC OURS ET VO IE DE DROIT F OURNIS
PAR HOOVER
MARCHANDE OU D’ADAPTATION À UN USAGE PARTICULIER, SONT DÉCLINÉES. EN AUCUN TEMPS, HOOVER
POURRA ÊTRE TENUE RESPONSABLE DE TOUS LES DOMMAGES-INTÉRÊTS SPÉCIAUX, INDIRECTS, ACCIDENTELS
OU ACCESSOIRES D’AUCUNE SORTE OU D’AUCUNE NATURE ENVERS LE PROPRIÉTAIRE OU DE TOUTES PARTIES
RÉCL AMANT AU NOM DU PROPRIÉTAIRE, QUE CE SOIT PAR CONTRAT, NÉGLIGENCE, TORT OU RESPONSABILITÉ
STRICTE DES PRODUITS OU SURVENUS PAR QUELQUE CAUSE QUE CE SOIT. Certains États ne permettent pas
l’exclusion des dommages consécutifs. Par conséquent, l’exclusion précédente pourrait ne pas être applicable dans
votre cas. La présente garantie vous donne des droits précis. Vous pouvez également avoir d’autres droits, lesquels
varien t d’une province à l’autre.
MD
. TOUTES AUTRES GARANTIES, EXPRESSES OU TACITES, INCLUANT LES GARANTIES DE QUALITÉ
MD
Commercial est garanti contre les défauts de fabrication
MD
, fournira la main-d’œuvre et les
MD
Commercial en ligne au
HooverMDCommercial
pour une répar ation sous garantie, les frais de livraison de retour
MD
NE
,
5554
Page 29

HooverCommercial.com
IMAG ES MAY DIFF ER FROM ACT UAL PROD UCT.
© 2016 TECH TRONIC F LOORCA RE TECHN OLOGY LIM ITED
#964 A00041 • ID117281
 Loading...