

Page 1
HUSHTONE™
6Q BACKPACK
USER MANUAL
For use with model CH34006.
IMPORTANT:
ASSEMBLY AND USE. THIS PRODUCT IS
INTENDED FOR COMMERCIAL USE ONLY.
READ CAREFULLY BEFORE
Page 2

Welcome.
Table of Contents
Thank you for choosing a Hoover® Commercial product.
Safety Instructions 1
Ground Instructions 6
Extension Cord Guideline 7
Features 8
Getting Started 10
Assembling Wand & Attaching The Tools 10
Harness Ergonomics & Height Adjustment 11
Using Your HUSHTONE
™
6Q Backpack 12
Harness Adjustment 12
Maintenance 14
How To Replace The Filter Bag 15
Filters 16
Troubleshooting 18
Warranty 19
IF YOU NEED ASSISTANCE
Please call 1-800-944-9200 (Mon-Fri 8am-7pm EST) to speak with a customer
service representative; or visit our website at HooverCommercial.com.
Spanish 20
French 38
32
Page 3

IMPORTANT SAFETY INSTRUCTIONS
SAFETY INSTRUCTIONS
SAVE THESE INSTRUCTIONS!
IMPORTANT: READ CAREFULLY BEFORE ASSEMBLY AND USE. WHEN USING
AN ELECTRICAL APPLIANCE, BASIC PRECAUTIONS SHOULD ALWAYS BE FOLLOWED,
INCLUDING THE FOLLOWING: READ ALL INSTRUCTIONS BEFORE
USING THIS APPLIANCE.
WARNING: TO REDUCE THE RISK OF FIRE, ELECTRIC SHOCK OR INJURY:
•
Fully assemble before operating.
•
Operate cleaner only at voltage specified on data plate on back of cleaner.
•
Do not leave appliance when plugged in. Unplug from outlet when not in use and before cleaning or ser vicing.
•
Do not use outdoors or on wet surfaces.
•
Do not allow to be used as a toy. Not intended for use by children age 12 and under. Close supervision is necessary
when used near children. To avoid injur y or damage, keep children away from product, and do not allow children to
place fingers or other objects into any openings.
•
Use only as described in this manual. Use only manufacturer’s recommended attachments and products.
•
Do not use with damaged cord or plug. If appliance is not working as it should, has been dropped, damaged,
left outdoors, or dropped into water, take it to a ser vice center prior to continuing use.
•
Do not pull or carry by cord, use cord as handle, close a door on cord, or pull cord around sharp edges or corners.
Do not run appliance over cord. Keep cord away from heated sur faces.
•
Do not unplug by pulling on cord. To unplug, grasp the plug, not the cord.
•
Do not handle plug or appliance with wet hands.
•
Do not put any objects into openings. Do not use with any opening blocked; keep free of dust, lint, hair, and
anything that may reduce air flow.
•
Keep hair, loose clothing, fingers, and all parts of body away from openings and moving parts.
•
Turn off all controls before unplugging.
•
Use extra care when cleaning on stairs. To avoid personal injury or damage, do not remove the backpack when
on stairs. And to prevent damage to the cleaner, do not place backpack on stairs or furniture, as it may result in
damage or personal injury.
•
Do not use to pick up flammable or combustible liquids, such as gasoline, or fine wood sandings or use in areas
where they may be present.
•
Connect to a properly grounded outlet only. See GROUNDING INSTRUCTIONS on page 6.
•
Do not pick up anything that is burning or smoking, such as cigarettes, matches, or hot ashes.
•
Do not use without Filter Bag and Filters in place.
WARNING: THIS PRODUCT CONTAINS CHEMICALS, KNOWN TO THE STATE OF
CALIFORNIA TO CAUSE CANCER AND BIRTH DEFECTS OR OTHER REPRODUCTIVE
HARM. WASH HANDS AFTER USING.
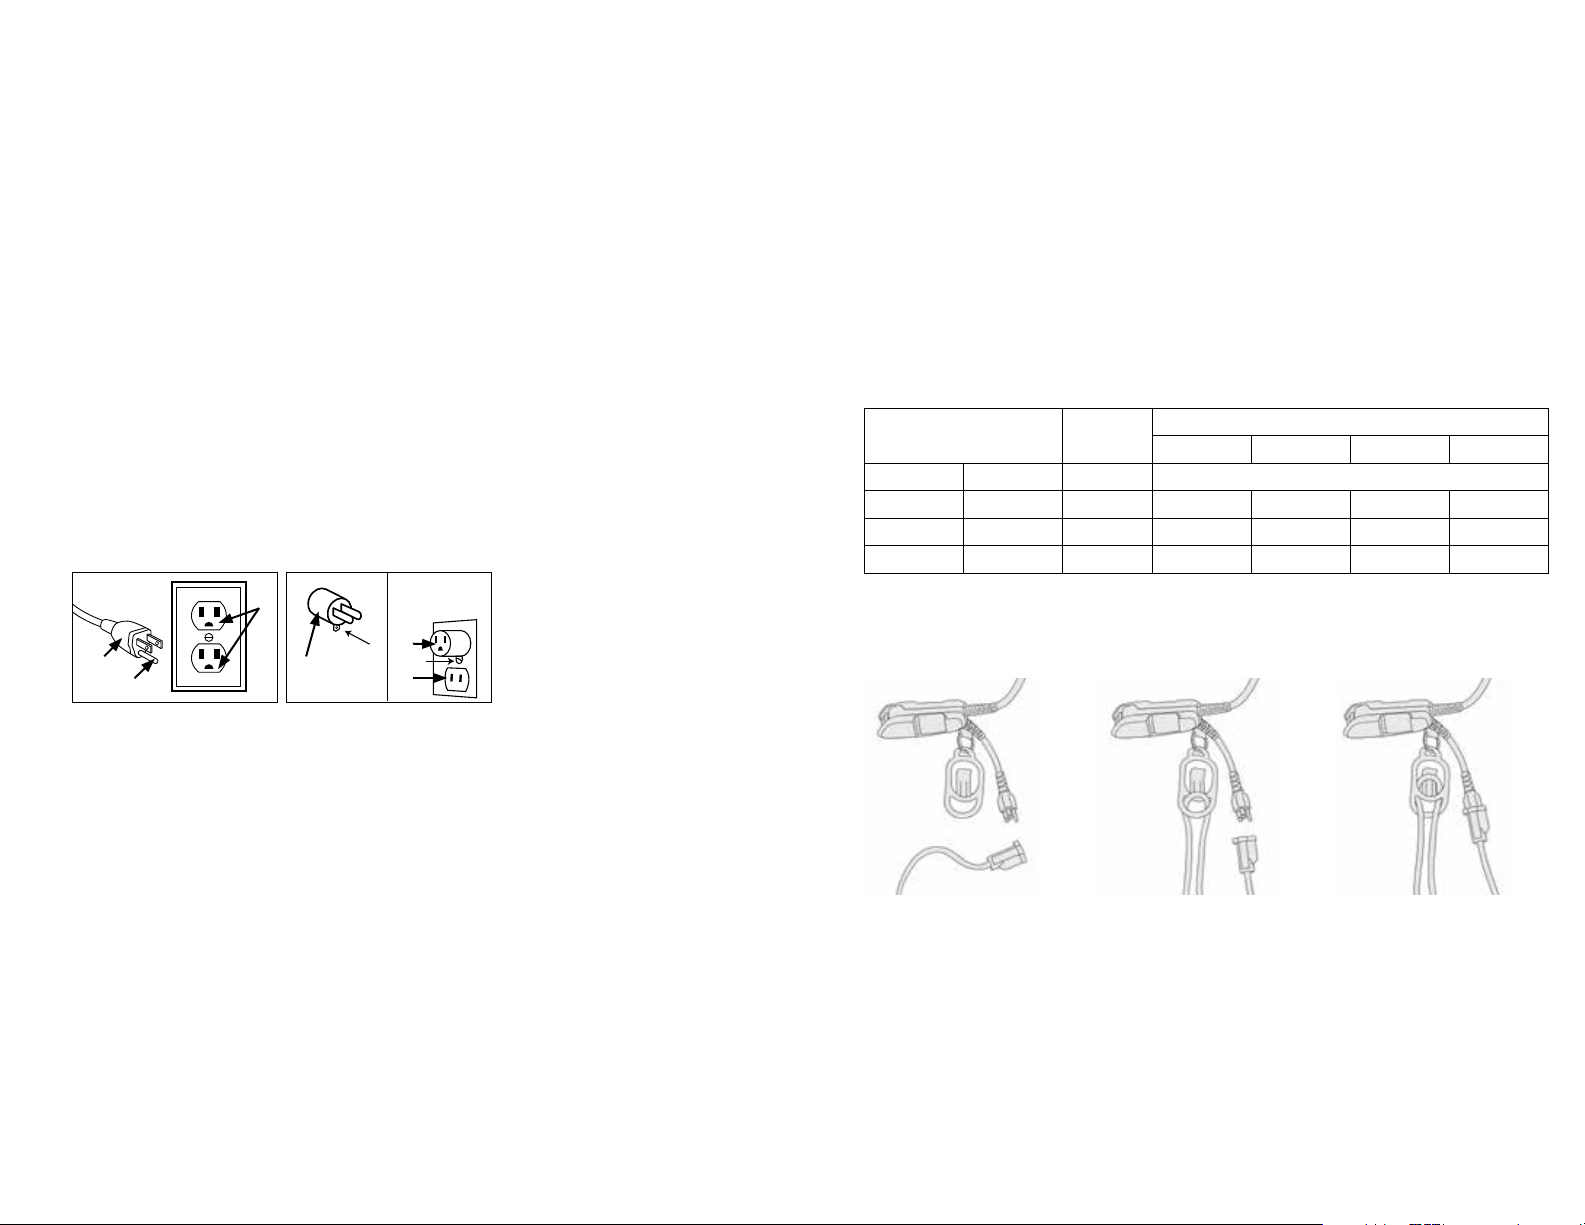
•
Make sure your extension cord is in good condition and is the correct size for your appliance. Table (A) on
page 7 shows the correct size to use depending on cord length and nameplate ampere rating. If in doubt,
use the next heavier gauge. The smaller the gauge number, the heavier the cord. An undersized extension
cord will cause a drop in line voltage resulting in loss of power and overheating.
•
Use only three-wire SJ or SJT-type cords that have three-prong grounding plugs and grounding
receptacles that accept the appliance’s plug.
•
To reduce the risk or personal injur y due to a loose connection between the appliance’s plug and the
extension cord, firmly and fully attach the appliance plug to the extension cord. Periodically check the
connection while operating to ensure it is fully attached. Do not use an ex tension cord that provides a
loose connection. A loose connection may result in overheating, fire and increase the risk of burning.
• To reduce the risk of disconnection of the appliance cord from the extension cord during operation;
secure the extension cord to the appliance plug as shown in the Cord Lock Instructions on Page 7.
•
Maintain Appliance With Care- Inspect extension cords periodically and replace if damaged.
CAUTION: TO REDUCE THE RISK OF DAMAGE:
•
Avoid picking up hard, sharp objects with this product, as they may cause damage.
•
Store appropriately indoors in a dry place. Do not expose machine to freezing temperatures.
•
Do not use sharp objects to clean out hose as they can cause damage.
54
Page 4
Important Safety Instructions
SAFETY INSTRUCTIONS
GROUNDING INSTRUCTIONS
This appliance must be grounded. If it should malfunction or breakdow n, grounding provides a path of least
resistance for electric current to reduce the risk of electric shock. This appliance is equipped with a cord having an
equipment-grounding conductor (B) and grounding plug (A) (Fig.1). The plug must be inserted into an appropriate
outlet (C) that is properly installed and grounded in accordance with all local codes and ordinances (Fig 1).
WARNING: Improper connection of the equipment-grounding conductor can result in the risk of electric
shock. Check with a qualified electrician or service person if you are in doubt as to whether the outlet is properly
grounded. Do not modify the plug provided with the appliance - if it will not fit the outlet, have a proper outlet
installed by a qualified electrician. This appliance is for use on a nominal 120-volt circuit and has a grounding plug
that looks like the plug (A) illustrated in (Fig. 1). A temporar y adapter (D) may be used to connect this plug to a 2-pole
receptacle (E) if a properly grounded outlet is not available (Fig. 2). The temporary adapter should be used only until a
properly grounded outlet (C) can be installed by a qualified electrician (Fig. 1). The green colored rigid ear, lug, or the
like (F) ex tending from the adapter must be connected to a permanent ground (G) such as a properly grounded outlet
box cover (Fig. 2). Whenever the adapter is used, it must be held in place by a metal screw. NOTE: In Canada, the
use of a temporar y adapter is not permitted by the Canadian Electrical Code.
FIGURE 1 FIGURE 2
C
D
F
A
B
D
G
E
EXTENSION CORD GUIDELINE
Do not use appliance with damaged cords or plugs. When servicing, refer to a qualified electrician or service person
only. Use only identical replacement parts.
•
Make sure your extension cord is in good condition and is the correct size for your appliance. Table (A) shows the
correct size to use depending on cord length and nameplate ampere rating. If in doubt, use the next heavier gauge.
The smaller the gauge number, the heavier the cord. An undersized ex tension cord will cause a drop in line voltage
resulting in loss of power and overheating.
TABLE A-MINIMUM GAUGE EXTENSION CORDS
Ampere Rating Volts Total length of cord
25 ft (7.62 m) 50 ft (15.24 m)
More than A Not more than A 120 V
0 6 – 18 (0.82) 16 (1.3) 16 (1.3) 14 (2 .1)
6 10 – 18 (0.82) 16 (1.3) 14 (2 .1) 12 (3.3)
10 12 – 18 (0.82) 16 (1.3) 14 (2.1) 12 (3.3)
100 ft (30.48 m)
AWG (mm2)
150 ft (45.72 m)
CORD LOCK INSTRUCTIONS
Create a loophole with
1
the extension cord
about 6in from the end.
Thread the loophole
2
through the bottom of
the cord lock loop.
Pull the loophole up
3
over the cord lock
clasp. Firmly connect
the extension cord to
the quick-change cord
on the backpack.
76
Page 5
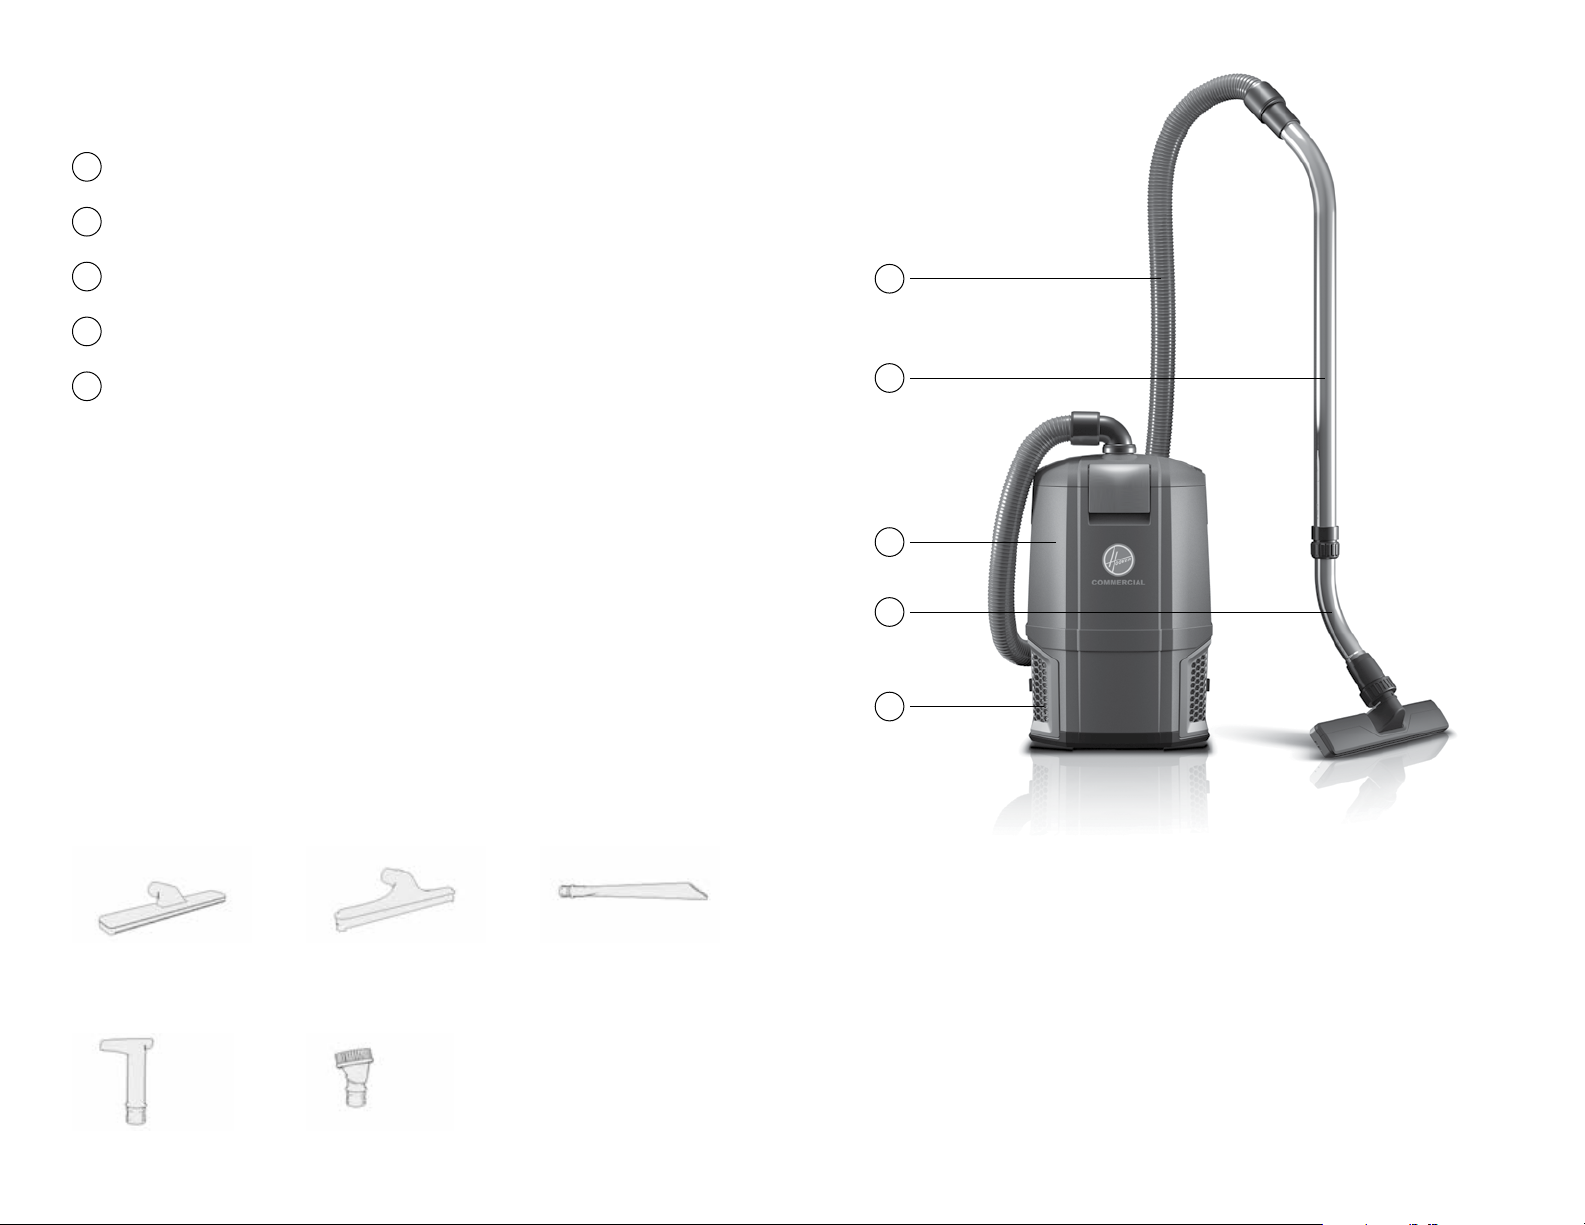
Product Features
A
Hose
B
Upper Wand
C
Vacuum Assembly
D
Lower Wand
PRODUCT FEATURES
A
E
Hexaguard™ Filters
Tools
Ca rpet Tool
Hard Floor Tool
B
C
D
E
Crevice Tool
Upholstery Tool
Dusting Brush
98
Page 6
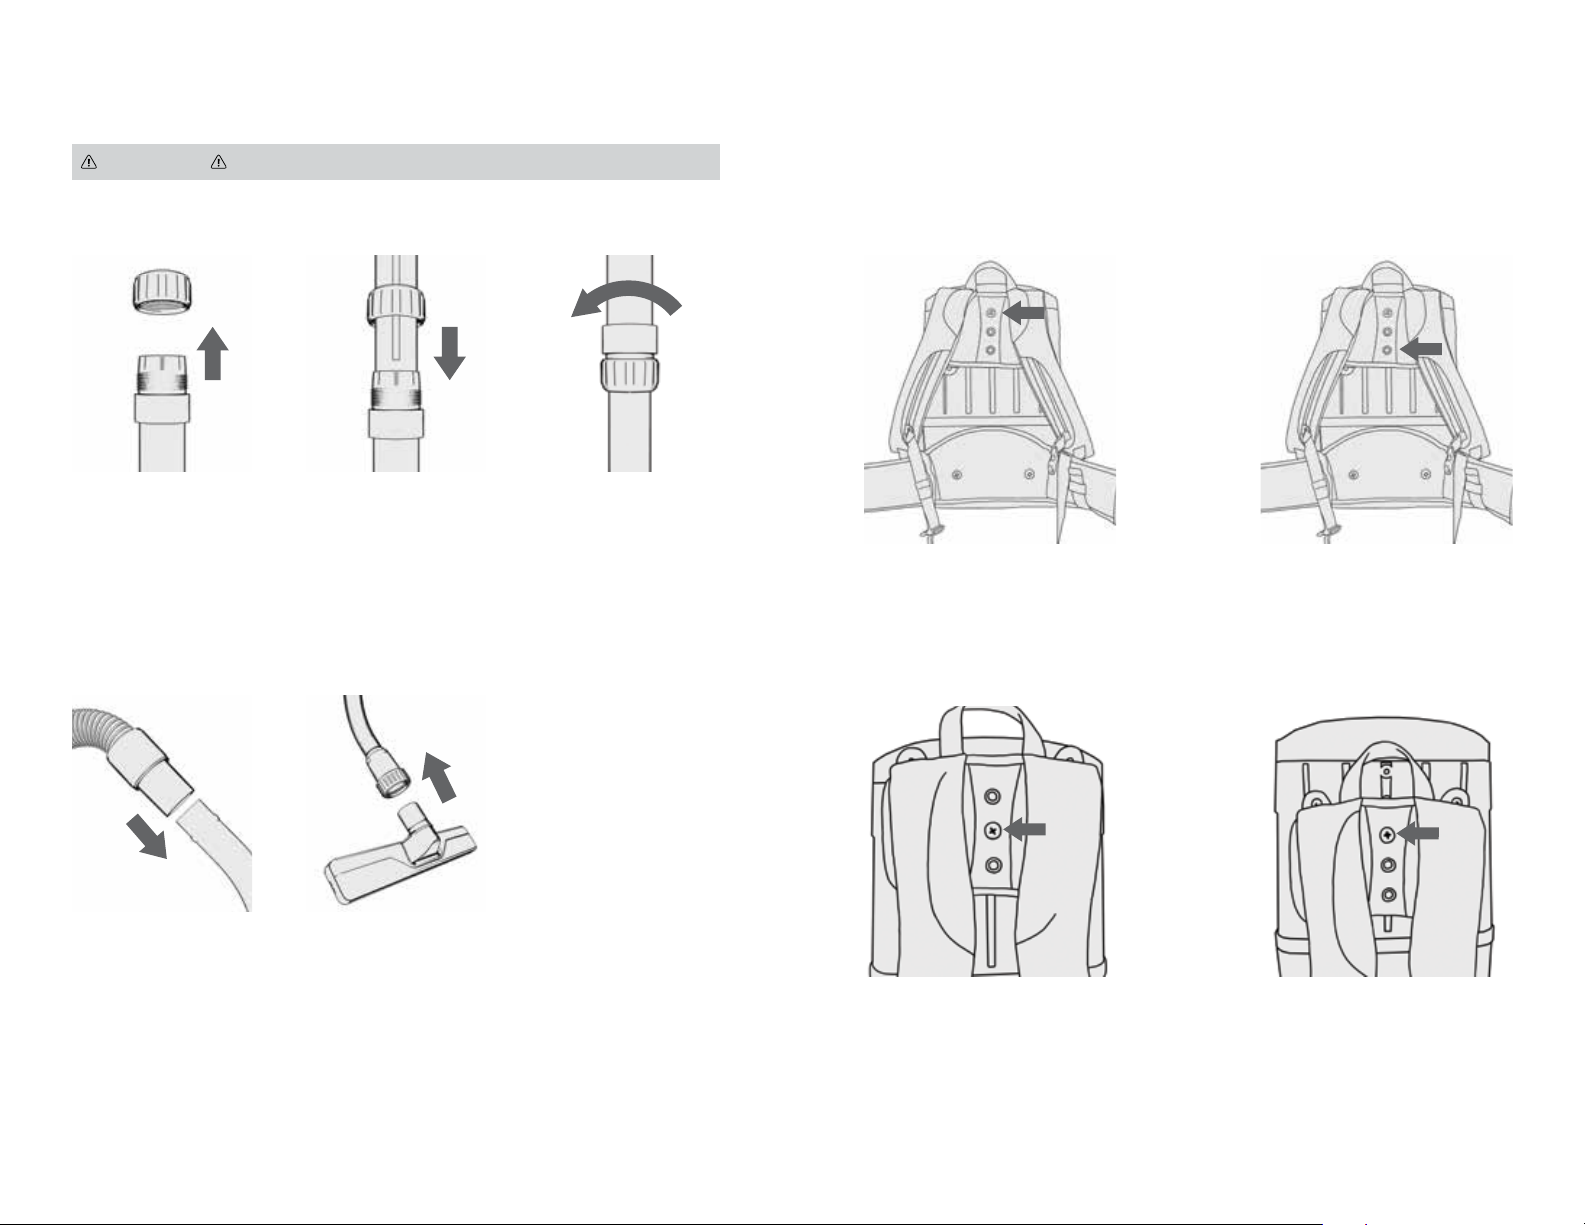
Assembling Wand & Attaching The Tools Harness Ergonomics & Height Adjustment
GETTING STARTED
CAUTION
Assemble the wand by
1
first unscrewing the
cuff from the end of
the upper wand and
sliding onto the lower
wand.
NOT TO BE USED FOR GROOMING A PET.
Align the groove of
2
lower wand with upper
wand and push firmly
to slide wand into
position at desired
length.
Tighten outer cuff by
3
twisting clockwise.
NOTE: The Harness has been designed and engineered to accommodate a wide range of users
and can be adjusted to fit, according to height. The Upper Harness should sit between the shoulder
blades for a comfortable fit. The backpack is shipped with the Upper Harness positioned with the
center hole mounted to the middle Height Adjustment Boss.
For taller users, move the Upper
Harness up to the lower Height
Adjustment Boss.
For shorter users, move to the top
Height Adjustment Boss.
Firmly push hose end
4
over the open end of
the upper wand.
To use floor tools,
5
insert floor tool into
cuffed end of lower
wand and align metal
ring with groove in
tool. Tighten cuff by
twisting clockwise.
To adjust the Upper Harness,
1
use a Phillips screwdriver to
remove the screw from the
Height Adjustment Boss.
Move the Upper Harness and fully
2
tighten screw into the correct
Height Adjustment Boss.
1110
Page 7
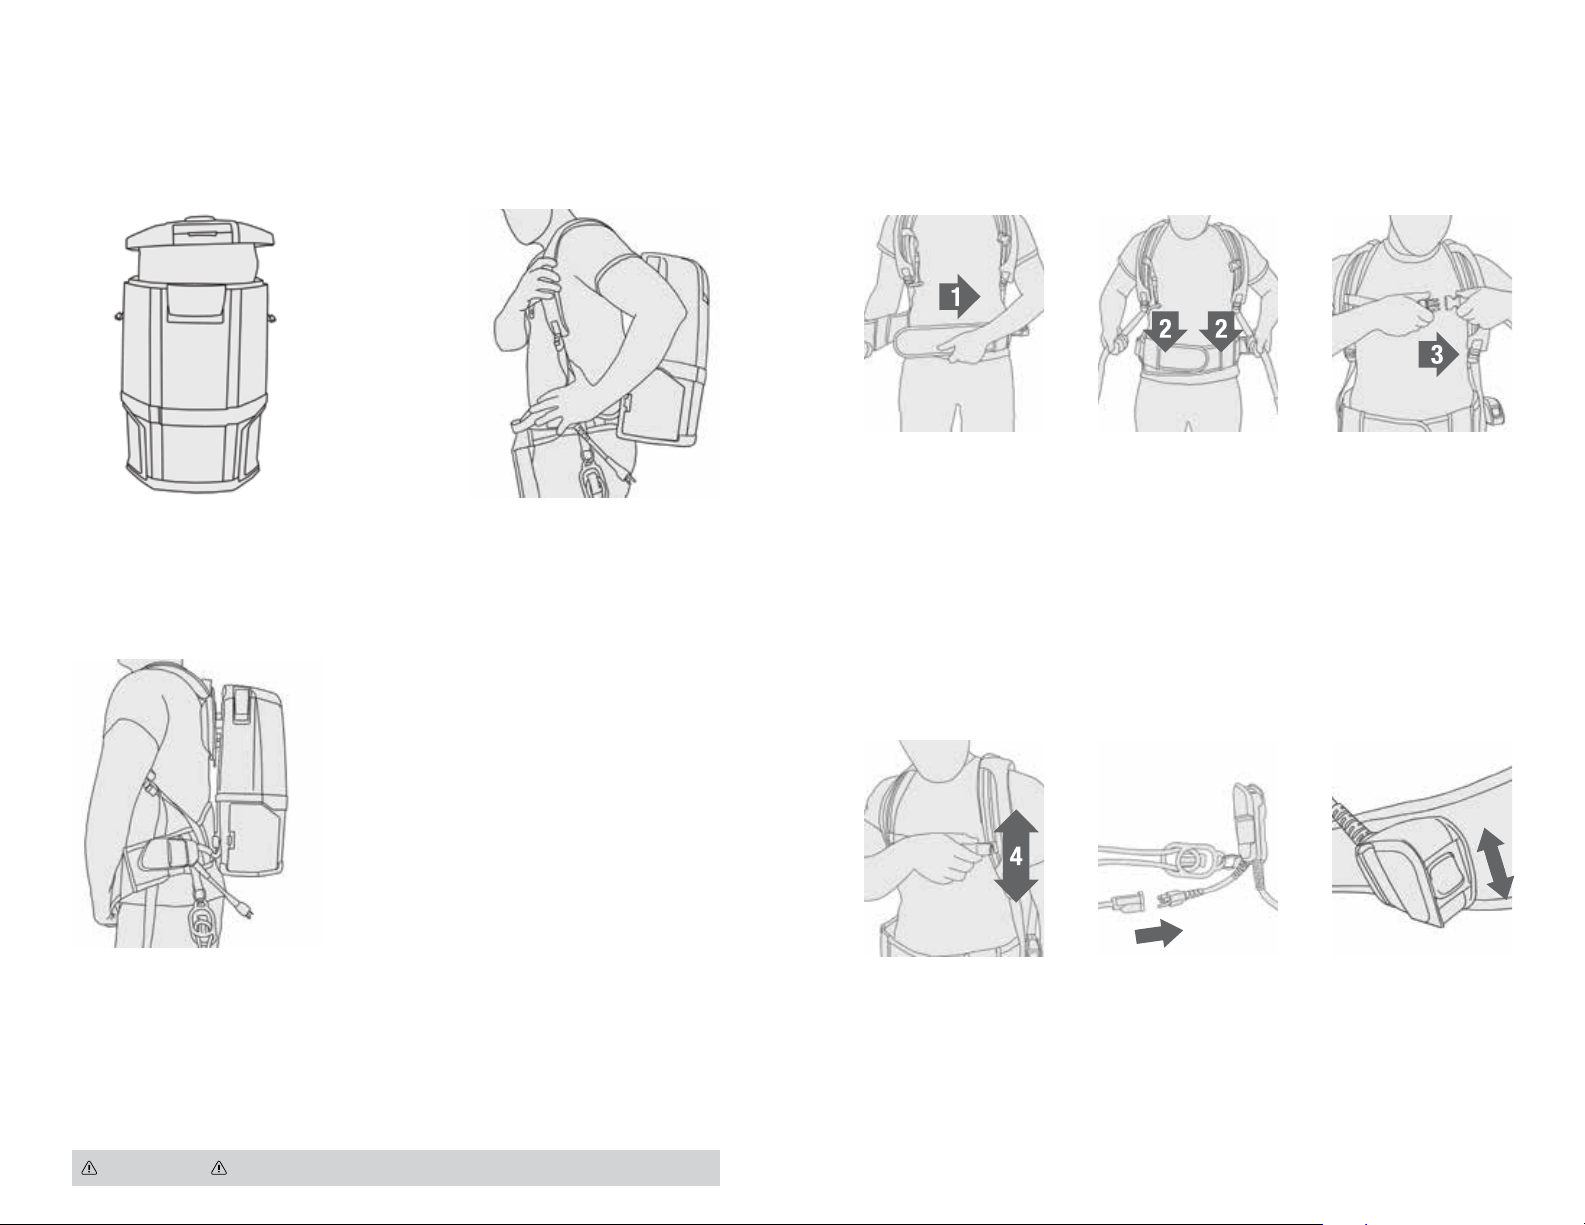
Using Your HUSHTONE™ 6Q Backpack
GETTING STARTED
Harness Adjustment
NOTE: Do not use vacuum without both filter bag and HEPA filters in place.
Check to ensure both filter bag
1
and HEPA filters are assembled
in the unit. Insert hose end firmly
into hose inlet, with elbow turned
toward vacuuming side.
Loosen shoulder straps then
2
lift backpack, sliding both arms
through shoulder straps.
NOTE: The ergonomic harness is designed to easily identify the steps for wearing the backpack
correctly. Look for the numbered arrows on the corresponding parts called out in the directions below.
Tighten waist strap
1
until secure and
comfortable.
NOTE: Should you
require additional
length, the extension
belt can be placed
between belt ends and
adjusted to desired
length.
Pull down on ends of
2
shoulder straps until
upper harness touches
shoulder blades.
Nearly all weight of
machine should be on
hips. You should be
able to easily slide your
finger between each
strap and shoulder.
Retighten waist band
if necessary.
Connect the sternum
3
strap buckle and
tighten or loosen as
needed.
Position lower rear pad into the
3
small of back so that weight of
machine is resting on the hips,
and not shoulders.
CAUTION
TO REDU CE THE RISK OF PERSONAL INJURY: UNGPLUG BEFORE CLE ANING OR SERV ICING.
Slide sternum straps
4
up or down for
adjustment.
Plug in quick-change
5
cord to extension cord
and thread extension
cord through the Cord
Lock on waist belt.
Press orange switch to
power up the unit.
ON: Hush™ mode
quiet cleaning
BOOST: High traffic
area cleaning
Turn off by returning
switch to center position.
1312
Page 8

Maintenance How To Replace The Filter Bag
MAINTENANCE
Any other servicing should be done by an authorized service representative.
If appliance is not working as it should, has been dropped, damaged, left outdoors, or dropped into
water, take it to a service center prior to continuing use.
THERMAL PROTECTOR STATEMENT
A thermal protector has been designed into your cleaner to protect it from overheating.
When the thermal protector activates the cleaner it will stop running.
If this happens proceed as follows:
1. Turn cleaner OFF and unplug it from the electrical outlet.
2. Check fullness of bag, change if needed.
3. Inspect the air path for any obstructions. Clear obstructions if present.
4. When cleaner is unplugged and motor cools for 30 minutes, the thermal protector will deactivate
and cleaning may continue.
If the thermal protector continues to activate after following the above steps, your cleaner
needs servicing.
WARNING
NOTE: When using the vacuum to pick up very fine dust, such as sawdust or drywall dust, it will be
necessary to replace the bag and clean the filters at more frequent intervals to maintain maximum
suction. Fine dust will clog bag pores and reduce suction, prior to bag becoming full.
TO REDU CE THE RISK OF PERSONAL INJURY: UNGPLUG BEFORE CLE ANING OR SERV ICING.
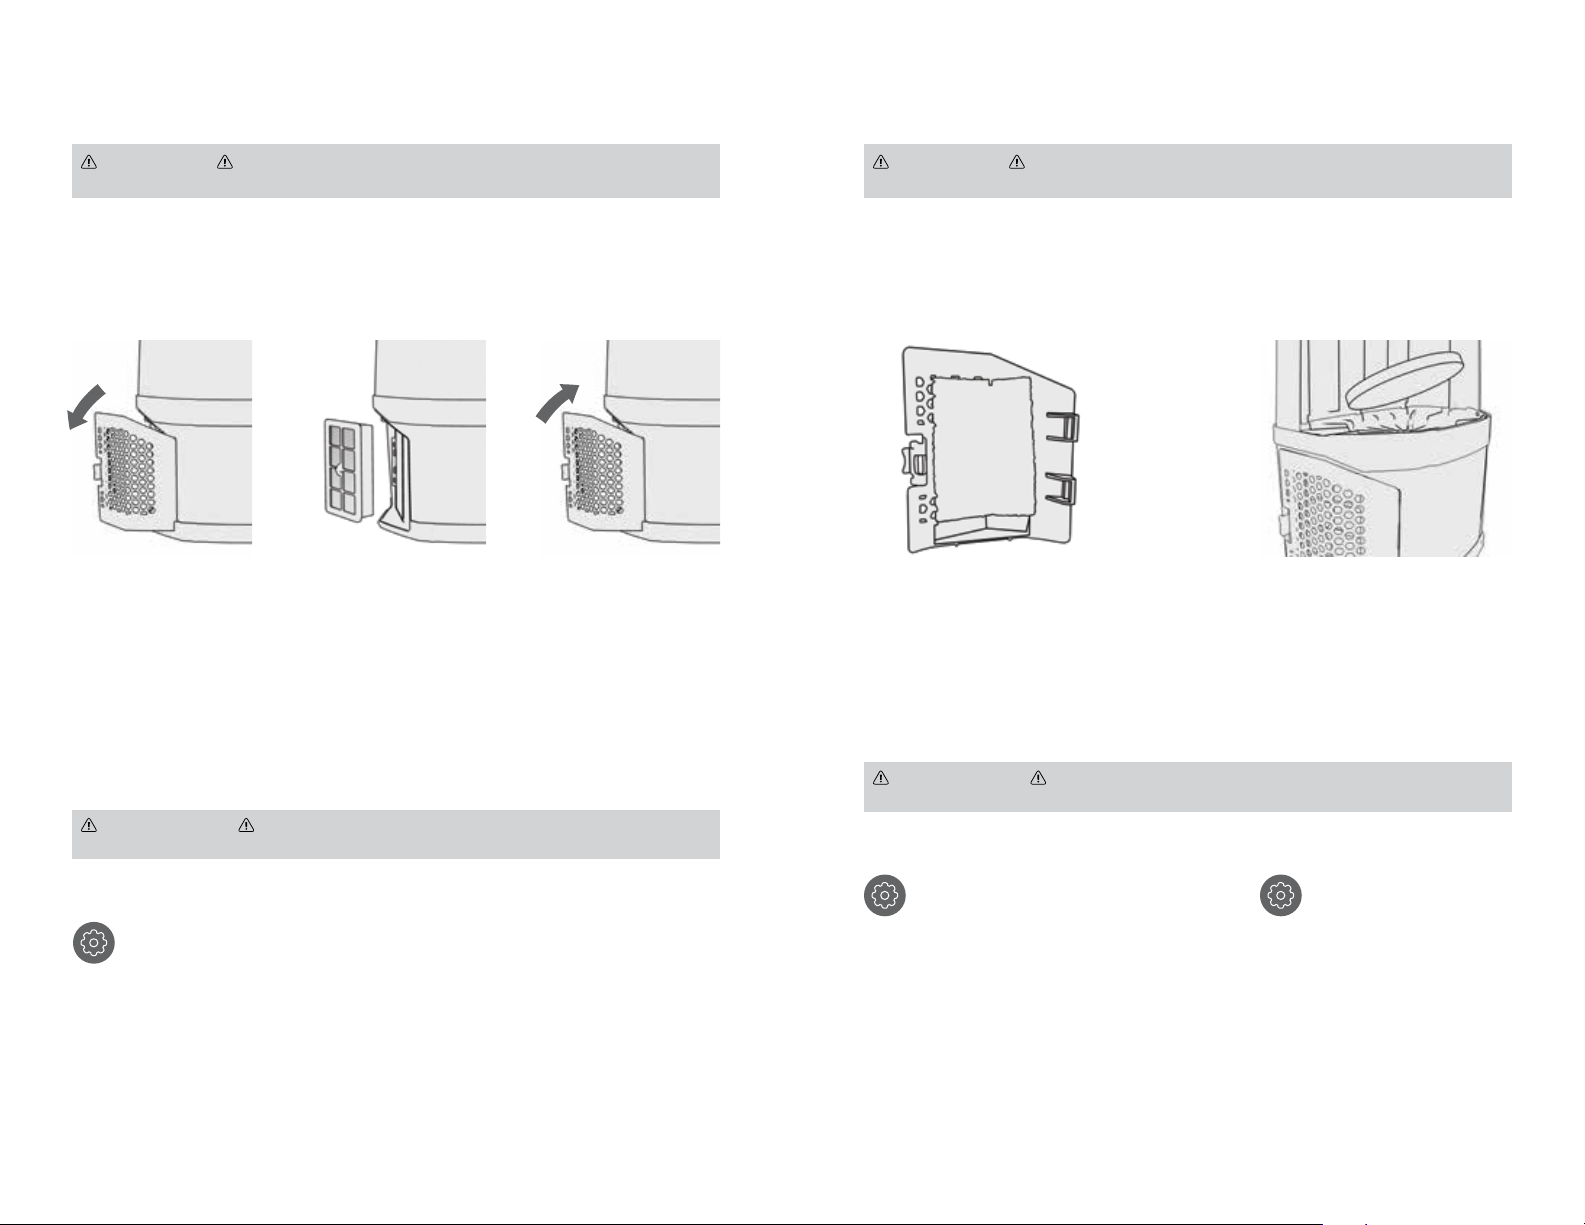
WARNING
Open top cover by
1
unlocking the 3
latches.
TO REDU CE THE RISK OF PERSONAL INJURY: UNGPLUG BEFORE CLE ANING OR SERV ICING.
Release full bag by
2
pressing the orange
tab and pulling bag
out.
Insert new bag by
3
sliding cardboard
under tabs until bag is
securely in place.
Check filter bag. Change, if full.
1
Check for clogs in nozzle, wand,
2
hose, and bag inlet. Clear any
obstructions.
Press down to latch
4
bag holder.
REPLACEMENT BAGS
Standard Filtration 10 Pack Part No. AH10173
Allergen Filtration 10 Pack Part No. AH10273
Replace top cover and
5
secure latches.
1514
Page 9
Filters
FILTERS
WARNING
OPERATE VACUUM WITHOU T BOTH INLET FILTER AND FIN AL FILTERS IN PL ACE.
HEPA MEDIA FINAL FILTER
The final filters assist in the filtration process to return cleaner air to the room. There are 2 HEPA
Filters, one on each side of the backpack.
Remove filter door
1
by pulling rear tab
forward and rotating
out.
IMPORTANT
ON BOTH SIDES OF FILTER. THIS MAY TAKE UP TO 24 HOURS.
TO REDU CE THE RISK OF PERSONAL INJURY – UNPLUG BEFORE CLEANING OR SERVICING. DO NOT
Pull filter out by the
2
frame. Hand rinse in
cold water under low
pressure. Rinse only
surface facing inside
of machine. Allow to
dry and reposition into
filter housing.
ALLO W FILTER TO DRY C OMPLET ELY BEFORE REP LACING. DR Y FILTER ON EDG E SO AIR CIRC ULATES
To replace filter door,
3
align the two forward
facing tabs and rotate
into place. Press rear
tab until door snaps
into place.
WARNING
OPERATE VACUUM WITHOU T BOTH INLET FILTER AND FIN AL FILTERS IN PL ACE.
HEXAGUARD™ ACTIVATED
CARBON FILTER
The HexaGuard™ Filters are
1
located on the inside of the filter
door. Pull to remove.
IMPORTANT
ON BOTH SIDES OF FILTER. THIS MAY TAKE UP TO 24 HOURS.
TO REDU CE THE RISK OF PERSONAL INJURY – UNPLUG BEFORE CLEANING OR SERVICING. DO NOT
ALLO W FILTER TO DRY C OMPLET ELY BEFORE REP LACING. DR Y FILTER ON EDG E SO AIR CIRC ULATES
INLET FILTER
The inlet filter is located on the inside,
bottom of bag housing and protects
the motor from damage.
If the filter becomes dirty, pull
1
off the grill and lift out the filter.
Hand rinse in cold water under
low pressure. Let filter dry for 24
hours. Reposition dry filter and
snap grill into place.
REPLACEMENT FILTER
Inspect HEPA Media Final Filter every month, rinsing when necessary. Check for
wear of media and replace if pleats are damaged. Change filter regularly to maintain
maximum performance.
Part No. 440009096
REPLACEMENT
FILTER
Replace HexaGuard™
Filter yearly for optimum
performance.
Part No. 440009176
LUBRICATION
The motor is equipped with bearings which contain sufficient lubrication for its lifetime.
The addition of lubrication could cause damage. Do not add lubrication to motor.
REPLACEMENT
FILTER
Inspect Inlet Filter every
2 weeks to keep vacuum
running at peak performance.
Part No. 440009175
1716
Page 10

Troubleshooting
WARNING
Any other servicing should be done by an authorized service representative.
TO REDU CE THE RISK OF PERSONAL INJURY: UNGPLUG BEFORE CLE ANING OR SERV ICING.
2 YEAR LIMITED WARRANTY
TROUBLESHOOTING & WARRANTY
WHAT THIS WARRANTY COVERS
When used and maintained in normal Commercial use and in accordance with the User’s Manual, your
Hoover® Commercial product is warranted against original defects in material and workmanship for a full
two years from date of purchase (the “Warranty Period”). During the Warranty Period, as described in this
Warranty, Hoover® Commercial will provide labor and par ts, at no cost to you, to cor rect any such defect in
products purchased in the United States, U.S. Military Exchanges and Canada.
If appliance is not working as it should, has been dropped, damaged, left outdoors, or dropped into
water, take it to a service center prior to continuing use.
Problem Possible Cause Possible Solution
Vacuum won’t run 1. Power Cord not firmly
Bag Check Indicator
has turned red OR
vacuum won’t pick
up OR low suction
Dust escaping from
vacuum
Wand is difficult
to push or won’t
move forward
plugged into outlet.
2. Blown fuse or tripped
breaker.
3. Thermal Protector
activated.
1. Filter Bag full and/
or clogged.
1. Filter Bag full. 1. Empty Filter Bag - Pg. 15.
2. Filter Bag not installed
correctly.
3. Hose not installed correctly. 3. Review Hose installation - Pg. 10.
1. Incorrect Floor Tool. 1. Check that the Carpet Tool is being used for
1. Plug unit in firmly.
2. Check fuse or breaker in building.
Replace fuse/reset breaker in building.
3. Unplug and allow vacuum to cool for 30 min.
(This will reset the Thermal Protector).
1. Empty Filter Bag - Pg. 15.
2. Review Filter Bag removal &
replacement - Pg. 15.
carpet and Hard Floor Tool is being used for
hard floors.
2. Adjust angle of floor tool by tilting up,
making easier to push.
HOW TO MAKE A WARRANTY CLAIM
If this product is not as warranted, take or send the product to a Hoover® Commercial Aut horized Warranty
Ser vice Dealer alon g with proof o f purchase. F or an automat ed referral t o authorize d service o utlets, pho ne:
1-800-944-9200 OR visit Hoover® Commercial online at www.hoovercommercial.com (U.S. Customers) or
www.hoover.ca (Canadian Customers). For additional assistance or information concerning this Warranty
or the availability of warranty service outlets, phone 1-800-944-9200, Mon-Fri 8am-7pm EST. In Canada,
call 1-800-263-6376, Mon-Fri 8am-7pm EST.
WHAT THIS WARRANTY DOES NOT COVER
Certain parts for your
to normal wear. These items include belts, agitator roll sleeves, agitator bearings, brushes, bags, filters
and bulbs. These parts are not covered by this Warranty. This Warranty also does not cover: improper
maintenance of the product, damage due to misuse, acts of God, nature, vandalism or other acts beyond the
control of
was initially purchased, resale of the product by the original owner, defects or damages caused by repair
or alteration by anyone other than an Authorized
Commercial
warranty claim. This warranty does not cover pick up, delivery, transportation or house calls. However, if
you mail your product to a
cost of shipping will be paid one way.
Hoover® Commercial
Hoover® Commercial product require replacement in the ordinary course of use due
, owner’s acts or omissions, use outside the country in which the product
reserves the right to inspect any alleged defective product and make final decisions on any
Hoover® Commercial
Hoover® Commercial
Authorized Warranty Service Dealer for warranty service,
Warranty Service Dealer.
Hoover®
OTHER IMPORTANT TERMS
This Warr anty is not tr ansferable and m ay not be assigned. This Warr anty shall be governed and cons trued
under the laws of the state of Ohio. The Warranty Period will not be extended by any replacement or
repair performed under this Warranty. THIS WARRANTY IS THE EXCLUSIVE WARRANTY AND REMEDY
PROVIDED BY HOOVER® COMME RCIAL . ALL OTHE R WARRAN TIES, EX PRESSED O R IMPLIED, INC LUDING
WARRANTIES OF MERCHANTABILITY OR FITNESS FOR PARTICULAR PURPOSE, ARE DISCLAIMED. IN
NO EVENT WILL HOOVER® BE LIABLE FOR ANY SPECIAL, INDIRECT, INCIDENTAL OR CONSEQUENTIAL
DAMAGES OF ANY KIND OR NATURE TO OWNER OR ANY PART Y CLAIMING THROUGH OWNER,
WHETHER BASED IN CONTRACT, NEGLIGENCE, TORT OR STRICT PRODUCTS LIABILIT Y OR ARISING
FROM ANY CAUSE WHATSOEVER. Some states do not allow the exclusion of consequential damages, so
the above exclusion may not apply to you. This warranty gives you specific rights; you may also have others
that vary from state to state.
IF YOU NEED ASSISTANCE
Please call 1-800-944-9200 (Mon-Fri 8am-7pm EST) to speak with a customer
service representative; or visit our website at HooverCommercial.com.
1918
Page 11

MANUAL DEL USUARIO
Para usar con el modelo CH34006.
IMPORTANTE:
YUSAR ESTE APARATO. ESTE PRODUCTO SOLO TIENE COMO FIN SU
USO COMERCIAL.
LEA LA GUÍA CON ATENCIÓN ANTES DE ENSAMBLAR
Bienvenido.
Gracias por elegir un producto Hoover® Commercial.
Índice
Instrucciones de seguridad 22
Instrucciones de puesta a tierra 24
Guía para el cable de extensión 25
Características 27
Cómo comenzar 28
Armado del tubo y conexión de las herramientas 28
Ergonomía del arnés y ajuste de la altura 29
Uso de su mochila 6Q HUSHTONE
Ajuste del arnés 31
Mantenimiento 32
Cómo reemplazar la bolsa de filtro 33
Filtros 34
™
30
SI NECESITA AYUDA
Llame al 1-800-944-9200 (de lunes a viernes de 8 a.m. a 7 p.m., hora estándar del
este) para hablar con un representante del servicio al cliente o visite nuestro sitio
web en HooverCommercial.com.
Resolución de problemas 36
Garantía 37
2120
Page 12

INSTRUCCIONES DE SEGURIDAD
IMPORTANTES
¡GUARDE ESTAS INSTRUCCIONES!
IMPORTANTE: LEA ESTE MANUAL CON ATENCIÓN ANTES DE ENSAMBLAR
YUSAR ESTE APARATO. CUANDO SE UTILIZAN APARATOS ELÉCTRICOS, SIEMPRE DEBEN
SEGUIRSE PRECAUCIONES BÁSICAS, INCLUIDAS LAS SIGUIENTES: LEA TODAS LAS
INSTRUCCIONES ANTES DE UTILIZAR ESTE APARATO.
ADVERTENCIA: PARA DISMINUIR EL RIESGO DE INCENDIO, DESCARGA
ELÉCTRICA O LESIONES:
•
Arme la aspiradora por completo antes de ponerla en funcionamiento.
•
Opere la aspiradora únicamente con el voltaje especificado en la placa de datos ubicada en su parte trasera.
•
No descuide el aparato cuando esté enchufado. Desenchúfelo del tomacorriente cuando no esté en uso y antes de
su limpieza o servicio de mantenimiento.
•
No utilice la aspiradora en exteriores o en superficies mojadas.
•
Evite que se la utilice como un juguete. La unidad no tiene como fin el uso por parte de niños de 12 años o menos.
Cuando se la utilice cerca de niños, será necesario hacerlo bajo una estricta supervisión. Para evitar lesiones
odaños, mantenga a los niños alejados del producto y no permita que introduzcan los dedos ni objetos en ninguna
de las aber turas del producto.
•
Utilícela únicamente según el uso descripto en este manual. Utilice solamente los accesorios y productos
recomendados por el fabricante.
•
No la utilice si el cable o el enchufe se encuentran dañados. Si el aparato no funciona como debe, si se ha caído,
dañado o dejado a la intemperie, o si se ha sumergido en agua, llévelo a un Centro técnico antes de continuar
usándolo.
•
No tire del aparato ni lo transporte tomándolo por el cable, no use el cable como una manija, no cierre una puerta
sobre el cable ni lo enrosque alrededor de bordes o esquinas filosas. No pase el aparato por encima del cable.
Mantenga el cable lejos de las superficies calientes.
•
No lo desenchufe tirando del cable. Para desenchufarlo, agarre el enchufe, no el cable.
•
No manipule el enchufe ni el aparato con las manos mojadas.
•
No coloque ningún objeto en las aberturas. No utilice la unidad si alguna de sus aberturas se encuentra bloqueada.
Manténgala libre de polvo, pelusas, cabello y cualquier otro elemento que pueda disminuir el flujo de aire.
•
Evite que el cabello, la ropa suelta, los dedos y cualquier otra parte del cuerpo entren en contacto con las
aberturas y las piezas móviles de la unidad.
•
Apague todos los controles antes de desenchufar el aparato.
•
Extreme las precauciones cuando utilice la aspiradora para limpiar escaleras. Para evitar lesiones físicas o daños,
no se quite la mochila si está en una escalera. Y para evitar que se dañe la limpiadora, no coloque la mochila sobre
las escaleras o los muebles, dado que esto puede causar daños o lesiones físicas.
•
No utilice el aparato para aspirar líquidos combustibles o inflamables, tales como gasolina o restos de madera
lijada, ni lo utilice en áreas en las que dichos elementos puedan estar presentes.
•
Conecte la unidad únicamente a un tomacorriente correctamente conectado a tierra. Consulte INSTRUCCIONES
DE PUESTA A TIERRA de la página 6.
•
No aspire nada que se encuentre en combustión o emita humo, como cigarrillos, fósforos o cenizas calientes.
•
No utilice el aparato sin la bolsa de filtro y los filtros.
ADVERTENCIA: ESTE PRODUCTO CONTIENE QUÍMICOS RECONOCIDOS POR EL
ESTADO DE CALIFORNIA COMO CAUSANTES DE CÁNCER, DEFECTOS DE NACIMIENTO
U OTROS DAÑOS REPRODUCTIVOS. LÁVESE LAS MANOS LUEGO DE
UTILIZARLO.
•
Asegúrese de que el cable de extensión esté en buenas condiciones y que tenga el tamaño correcto para
el aparato. La Tabla (A) de la página 7 muestra el tamaño correcto que debe utilizar según la longitud del
cable y la calificación de amperaje de la placa de identificación. Si tiene dudas, utilice el calibre siguiente
más grande. Mientras más pequeño sea el número de calibre, mayor será el cable. Un cable de ex tensión
de tamaño pequeño puede provocar una caída en el voltaje de línea que causará pérdida de alimentación
ysobrecalentamiento.
•
Utilice solo cables de tipo SJ o SJT de tres alambres que posean enchufes y receptáculos de conexión a tierra
de tres dientes que acepten el enchufe del aparato.
•
Para reducir el riesgo de lesiones personales debido a una conexión débil entre el enchufe del aparato y el cable
de extensión, conecte el enchufe del aparato de manera firme y completa al cable de extensión. Verifique la
conexión periódicamente mientras el aparato está en funcionamiento para garantizar que esté completamente
conectado. No utilice un cable de extensión con una conexión floja. Una conexión floja puede provocar
sobrecalentamiento, incendios y aumento del riesgo de quemaduras.
• Para reducir el riesgo de desconexión del cable del aparato del cable de extensión durante el funcionamiento,
fije el cable de extensión al enchufe del aparato como se muestra en Instrucciones de bloqueo del cable en la
pág ina 7.
•
Mantenga el aparato con cuidado: inspeccione los cables de extensión periódicamente y reemplácelos si están
dañados.
PRECAUCIÓN: PARA DISMINUIR EL RIESGO DE DAÑOS:
•
Evite aspirar objetos duros y filosos con este producto, ya que pueden dañarlo.
•
Almacénelo apropiadamente en interiores, en un lugar seco. No exponga la máquina a temperaturas muy frías.
•
No utilice objetos filosos para limpiar la manguera, ya que pueden dañar la unidad.
INSTRUCCIONES DE SEGURIDAD
2322
Page 13

Instrucciones de Seguridad Importantes
INSTRUCCIONES DE SEGURIDAD
INSTRUCCIONES DE PUESTA A TIERRA
Este aparato debe ser conectado a tierra. Su puesta a tierra proporciona una vía de menor resistencia para la
corriente eléctrica a fin de reducir el riesgo de descarga eléctrica en caso de que la unidad funcionara mal o se
rompiera. El aparato viene equipado con un cable que presenta un conductor de puesta a tierra del equipo (B)
yun enchufe de puesta a tierra (A) (Fig. 1). El enchufe debe insertarse en un tomacorriente apropiado (C) que esté
correctamente instalado y puesto a tierra, de conformidad con todos los códigos y las ordenanzas locales (Fig. 1).
ADVERTENCIA: La conexión incorrecta del conductor de puesta a tierra del equipo puede generar
riesgo de descarga eléctrica. Consulte con un electricista o técnico cualificado si tiene dudas sobre la puesta a tierra
correcta del tomacorriente. No modifique el enchufe incluido en el aparato: si no encaja en el tomacorriente, solicite
la instalación de un tomacorriente correspondiente a un electricista cualificado. Este aparato tiene como fin su uso
en un circuito de 120 voltios nominales y cuenta con un enchufe de puesta a tierra que se parece al enchufe (A)
de la (Fig. 1). Para conectar este enchufe a un receptáculo de 2 polos (E), en caso de que no haya un tomacorriente
correctamente puesto a tierra (Fig. 2), puede utilizarse un adaptador temporario (D). Dicho adaptador debe utilizarse
solo hasta que un electricista calificado instale el correspondiente tomacorriente puesta a tierra (C) (Fig. 1). La oreja
rígida de color verde, terminal, o similar (F) que se extiende del adaptador debe conectarse a un conector a tierra
fijo (G), tal como la cubier ta de una caja de conexiones debidamente puesta a tierra (Fig. 2). Toda vez que utilice
el adaptador, deberá ser sostenido en su lugar con un tornillo de metal. NOTA: En Canadá, el Código Eléctrico
Canadiense no permite el uso de un adaptador temporal.
FIGURA 1 FIGURA 2
C
A
B
D
D
F
G
E
GUÍA PARA EL CABLE DE EXTENSIÓN
No utilice el aparato si el cable o el enchufe se encuentran dañados. Cuando realice el mantenimiento, consulte solo
con un electricista calificado o con la persona que realiza el ser vicio. Utilice solo piezas de repuesto idénticas.
•
Asegúrese de que el cable de extensión esté en buenas condiciones y que tenga el tamaño correcto para el
aparato. La Tabla (A) muestra el tamaño correcto que debe utilizar según la longitud del cable y la calificación
de amperaje de la placa de identificación. Si tiene dudas, utilice el calibre siguiente más grande. Mientras más
pequeño sea el número de calibre, mayor será el cable. Un cable de extensión de tamaño pequeño puede provocar
una caída en el voltaje de línea que causará pérdida de alimentación y sobrecalentamiento.
TABLA A-CABLES DE EXTENSIÓN DE CALIBRE MÍNIMO
Calificación de amperaje Voltios Longitud total del cable
7.6 2 m
(25 pies)
Más de A No más de A 120 V
0 6 – 18 (0.82) 16 (1.3) 16 (1.3) 14 (2 .1)
6 10 – 18 (0.82) 16 (1.3) 14 (2 .1) 12 (3.3)
10 12 – 18 (0.82) 16 (1.3) 14 (2.1) 12 (3.3)
15.24 m
(50 pies)
AWG (mm2)
30.48 m
(100 pies)
45.72 m
(150 pies)
INSTRUCCIONES PARA TRABAR EL CABLE
Haga un bucle en el
1
cable de extensión
y deje unos 15 cm
(6pulgadas) del
extremo.
Pase el bucle por la
2
parte inferior del bucle
de traba del cable.
Mueva el bucle hacia
3
arriba y engánchelo
el broche de traba del
cable. Conecte con
firmeza el cable de
extensión al cable de
cambio rápido de la
mochila.
2524
Page 14

Características del producto
A
Manguera
B
Tubo superior
C
Ensamble de la aspiradora
D
Tubo inferior
CARACTERÍSTICAS DEL PRODUCTO
A
E
Filtros Hexaguard
™
Herramientas
Herramienta para alfombras
Herramienta para pisos duros
B
C
D
E
Herramienta para limpieza
en rincones
Herramienta para tapizados
Cepillo quitapolvo
2726
Page 15

Armado del tubo y conexión de las herramientas Ergonomía del arnés y ajuste de la altura
CÓMO COMENZAR
PRECAUCIÓN
Arme el tubo primero
1
desenroscando el
manguito del extremo
del tubo superior y
deslícelo sobre el tubo
inferior.
EL APARATO NO DEBE UTILIZARSE PARA ACICALAR MASCOTAS.
Alinee la muesca
2
del tubo inferior con
el tubo superior y
empuje con fuerza
para deslizar el tubo
hasta la longitud
deseada.
3
Ajuste el manguito
exterior girándolo en
sentido de las agujas
del reloj.
NOTA: El arnés se ha diseñado e ideado para adaptarse a una amplia variedad de usuarios y puede
regularse para obtener la altura deseada. El arnés superior debería apoyarse sobre los omóplatos
para que esté cómodo. La mochila se envía con un arnés superior con el orificio central posicionado
en el saliente de ajuste de altura medio.
Para los usuarios más altos, mueva
el arnés superior hasta el saliente de
ajuste de altura inferior.
Para los usuarios más bajos, muévalo
hasta el saliente de ajuste de altura
superior
Empuje con fuerza
4
el extremo de la
manguera sobre el
extremo abierto del
tubo superior.
Para utilizar las
5
herramientas para pisos,
inserte la herramienta
para pisos en el extremo
del tubo inferior con
manguito y alinee el anillo
de metal con la muesca en
la herramienta. Ajuste el
manguito girando en sentido
de las agujas del reloj.
Para ajustar el arnés superior,
1
utilice un destornillador Phillips
para quitar el tornillo del saliente
de ajuste de altura.
Mueva el arnés superior y ajuste
2
el tornillo por completo en el
saliente de ajuste de altura
correcto.
2928
Page 16

Uso de su mochila 6Q HUSHTONE
™
CÓMO COMENZAR
Ajuste del arnés
NOTA: No utilice la aspiradora sin la bolsa de filtro y los filtros HEPA.
Compruebe que la bolsa de filtro
1
y los filtros HEPA estén incluidos
en la unidad. Inserte el extremo
de la manguera firmemente en
la entrada de manguera con el
codo doblado hacia el lado de
aspiración.
Afloje las correas para hombros,
2
luego levante la mochila y deslice
los brazos por las correas para
hombros.
NOTA: El arnés ergonómico está diseñado para que estos pasos de la correcta colocación de la
mochila se identifiquen con facilidad. Busque las flechas numeradas en las piezas correspondientes
nombradas en las siguientes instrucciones.
Ajuste la correa de
1
la cintura hasta que
quede firme y cómoda.
NOTA: En caso de
que requiera más
longitud, el cinturón
de extensión puede
colocarse entre los
extremos del cinturón
y se puede ajustar a la
longitud deseada.
Tire hacia abajo los
2
extremos de las correas
para hombros hasta
que el arnés superior
toque los omóplatos.
Casi todo el peso de
la máquina debería
estar sobre la cadera.
Debería poder deslizar
el dedo con facilidad
entre cada correa y
hombro. Reajuste la
correa de la cintura de
ser necesario.
Conecte la hebilla de
3
la correa del esternón
y ajústela o aflójela
según sea necesario.
Apoye la almohadilla trasera
3
inferior sobre la espalda inferior,
de modo que el peso de la
máquina descanse sobre la cadera
y no sobre los hombros.
PRECAUCIÓN
LIMPIARLA O REALIZARLE UN SERVICIO DE MANTENIMIENTO.
PARA DISMINUIR EL RIESGO DE LESIONES FÍSICAS: DE SENCHUFE L A MÁQUINA ANTES DE
Deslice las correas del
4
esternón hacia arriba o
abajo para ajustarlas.
Conecte el cable de
5
cambio rápido al cable
de extensión y pase
este último a través de
la traba del cable del
cinturón de la cintura.
Presione el interruptor
naranja para encender la
unidad.
ENCENDIDO: Modo de
limpieza silencioso Hush
IMPULSIÓN: Área de
limpieza de alto tráfico
Apáguela llevando el
interruptor a la posición
central.
™
3130
Page 17

Mantenimiento Cómo reemplazar la bolsa de filtro
MANTENIMIENTO
Todo otro servicio de mantenimiento deberá ser realizado por personal técnico autorizado.
Si el aparato no funciona como debe, si se ha caído, dañado o dejado a la intemperie, o si se ha
sumergido en agua, llévelo a un Centro técnico antes de continuar usándolo.
DECLARACIÓN DEL PROTECTOR TÉRMICO
Se ha colocado un protector térmico en la aspiradora para protegerla contra el sobrecalentamiento.
Cuando dicho protector se active, la aspiradora dejará de funcionar.
De ser así, proceda como se indica a continuación:
1. APAGUE la aspiradora y desenchúfela del tomacorriente.
2. Verifique el nivel de llenado de la bolsa y cámbiela si es necesario.
3. Inspeccione la vía de aire en busca de obstrucciones. Limpie cualquier obstrucción presente.
4. Una vez que la aspiradora esté desenchufada y el motor se haya enfriado durante 30 minutos, el
protector térmico se desactivará y usted podrá retomar la limpieza.
Si el protector térmico continúa activándose luego de haber seguido los pasos anteriores, significa
que su aspiradora necesita un servicio de mantenimiento.
ADVERTENCIA
LIMPIARLA O REALIZARLE UN SERVICIO DE MANTENIMIENTO.
NOTA: Cuando utilice la aspiradora para recoger polvo muy fino, como el aserrín o el polvo de
mampostería, será necesario reemplazar la bolsa y limpiar los filtros con más frecuencia para
mantener un máximo poder de succión. El polvo fino obstaculizará los poros de la bolsa y reducirá la
succión, antes de que la bolsa se llene.
PARA EV ITAR EL RIESGO DE LESIÓN FÍSICA: DESENCHUFE L A MÁQUINA ANTES DE
ADVERTENCIA
LIMPIARLA O REALIZARLE UN SERVICIO DE MANTENIMIENTO.
Abra la cubierta
1
superior destrabando
los 3 pestillos.
PARA EV ITAR EL RIESGO DE LESIÓN FÍSICA: DESENCHUFE L A MÁQUINA ANTES DE
2
Libere la bolsa llena
presionando la pestaña
naranja y tire de la
bolsa para quitarla.
Inserte una nueva
3
bolsa deslizando el
cartón por debajo de
las pestañas hasta que
la bolsa esté bien fija
en su lugar.
Inspeccione la bolsa de filtro.
1
Cámbiela si está llena.
Revise que no haya obstrucciones
2
en la boquilla, el tubo, la
manguera y la entrada de la
bolsa. Elimine todo elemento
obstructivo.
Presione hacia abajo
4
para trabar el sujetador
de la bolsa.
BOLSAS DE REEMPLAZO
Filtración estándar, paquete de 10, n.° de pieza AH10173
Filtración de alérgenos, paquete de 10, n.° de pieza AH10273
Vuelva a colocar la
5
cubierta superior y a
fijar los pestillos.
3332
Page 18

Filtros
FILTROS
ADVERTENCIA
LIMPI ARLA O REAL IZARLE UN SERVICIO DE MANTENIMIENTO. NO HAGA FUNCIONAR LA ASPIRA DORA SIN EL FILTRO DE ENTRADA NI
LOS FILTROS FINALES.
FILTRO FINAL DE MEDIOS HEPA
Los filtros finales ayudan en el proceso de filtración para devolver aire más limpio a la habitación.
Hay 2 filtros HEPA, uno a cada lado de la mochila.
Retire la puerta del
1
filtro tirando de la
pestaña trasera hacia
delante y gírela para
quitarla.
PARA DISMINUIR EL RIESGO DE LESIONES FÍSICAS, DE SENCHUFE L A UNIDAD ANTES DE
Extraiga el filtro
2
tirando del armazón.
Enjuáguelo a mano
con agua fría y baja
presión. Solo lave la
superficie que da al
interior de la máquina.
Deje que se seque y
vuelva a colocarlo en la
cavidad para filtros.
Para volver a colocar la
3
puerta del filtro, alinee
las dos pestañas hacia
adelante y gírelas en
su lugar. Presione la
pestaña trasera hasta
que la puerta calce en
su lugar.
ADVERTENCIA
LIMPI ARLA O REAL IZARLE UN SERVICIO DE MANTENIMIENTO. NO HAGA FUNCIONAR LA ASPIRA DORA SIN EL FILTRO DE ENTRADA NI
LOS FILTROS FINALES.
FILTRO DE CARBÓN ACTIVADO
HEXAGUARD
Los filtros HexaGuard™ están
1
dentro de la puerta de filtros. Tire
de esta para retirarla.
™
IMPORTANTE
EL FILTRO DE CAN TO PARA QUE EL AIRE CIRC ULE A AMBOS LA DOS DEL FILTRO. ESTO PUEDE DE MORAR HASTA 24 HOR AS.
PARA DISMINUIR EL RIESGO DE LESIONES FÍSICAS, DE SENCHUFE L A UNIDAD ANTES DE
FILTRO DE ENTRADA
El filtro de entrada está ubicado en el
interior y la parte inferior de la cavidad
para filtros y protege al motor de daños.
Si el filtro se ensucia, tire de la
1
parrilla y levante el filtro para
extraerlo. Enjuáguelo a mano
con agua fría y baja presión. Deje
secar el filtro durante 24 horas.
Vuelva a colocar el filtro seco
yencaje la parrilla en su lugar.
PERMI TA QUE EL FILTRO SE SEQUE C OMPLETAME NTE ANTE S DE VOLVER A COLOCARL O. SEQUE
IMPORTANTE
EL FILTRO DE CAN TO PARA QUE EL AIRE CIRC ULE A AMBOS LA DOS DEL FILTRO. ESTO PUEDE DE MORAR HASTA 24 HORAS.
PERMI TA QUE EL FILTRO SE SEQUE C OMPLETAME NTE ANTE S DE VOLVER A COLOCARL O. SEQUE
FILTRO DE REEMPLAZO
Inspeccione el Filtro final de medios HEPA cada mes, y lávelo cuando sea
necesario. Verifique el desgaste del medio y reemplace los pliegues si están
dañados. Cambie el filtro periódicamente para mantener un máximo rendimiento.
N.° de pieza 440009096
FILTRO DE
REEMPLAZO
Reemplace el filtro
HexaGuard™ anualmente
para lograr un rendimiento
óptimo.
N.° de pieza 440009176
LUBRICACIÓN
El motor viene equipado con cojinetes que tienen la suficiente lubricación para toda su vida útil. Si
le agrega lubricantes, esto podría dañar el motor. No le agregue lubricantes al motor.
FILTRO DE
REEMPLAZO
Inspeccione el filtro de
entrada cada 2 semanas
para mantener la aspiradora
funcionando a un rendimiento
óptimo.
N.° de pieza 440009175
3534
Page 19

RESOLUCIÓN DE PROBLEMAS
ADVERTENCIA
LIMPIARLA O REALIZARLE UN SERVICIO DE MANTENIMIENTO.
Todo otro servicio de mantenimiento deberá ser realizado por personal técnico autorizado.
Si el aparato no funciona como debe, si se ha caído, dañado o dejado a la intemperie, o si se ha
sumergido en agua, llévelo a un Centro técnico antes de continuar usándolo.
Problema Causa posible Solución posible
La aspiradora no
funciona
PARA EV ITAR EL RIESGO DE LESIÓN FÍSICA: DESENCHUFE L A MÁQUINA ANTES DE
1. El cable de alimentación no
está enchufado con firmeza
en el tomacorriente.
1. Enchúfelo firmemente.
GARANTÍA LIMITADA DE 2 AÑOS
RESOLUCIÓN DE PROBLEMAS Y GARANTÍA
COBERTURA DE LA GARANTÍA
En caso s de uso y mantenimien to comercial en co ndiciones normales y conforme al Manual del propietario,
su producto HOOVER® Commercial tiene garantía contra defectos originales de fábrica de materiales
ymano de obra por dos años enteros desde la fecha de compra (en adelante, el “Plazo de la garantía”).
Durante el Plazo de la garantía, como se describe en esta Garantía, Hoover® Commercial le proporcionará
la mano de obra y los repuestos, sin ningún costo, a los fines de reparar cualquier defecto en los productos
adquiridos en los Estados Unidos, de los EE.UU., y Canadá.
CÓMO REALIZAR UN RECLAMO POR LA GARANTÍA
Si este producto no presentara las características garantizadas, llévelo o envíelo a un Distribuidor Técnico
Oficial Autorizado de Hoover® Comme rcial junto con el c omproban te de compr a. Para ser re dirigido en form a
automática a un Centro de servicios autorizado, llame al: 1-800-944-9200 O visite Hoover® Commercial
en línea en w ww.hoovercommercial.com (clientes de EE. UU.) o w ww.hoover.ca (clientes de Canadá). Para
obtener asistencia adicional o información relacionada con esta Garantía o con la disponibilidad de los
Centros de servicios autorizados de garantía, llame el 1-800-944-9200, de lunes a viernes de 8 a. m. a
7p.m., Hora Est ándar del Este. En Canadá, llame al 1-800-2 63-63 76, de lunes a viernes de 8 a. m. a 7p.m.,
Hora Estándar del Este.
El indicador de
verificación de la
bolsa está en color
rojo O la aspiradora
no recoge suciedad
Otiene poca succión
Sale polvo de la
aspiradora
Es difícil empujar
el tubo o este no se
mueve hacia adelante
2. Fusible quemado o disyuntor
activado.
3. Protector térmico activado. 3. Desenchufe la aspiradora y déjela enfriar
1. Bolsa de filtro llena y/o
atascada.
1. Bolsa de filtro llena. 1. Vacíe la bolsa de filtro (pág. 15).
2. La bolsa de filtro no está
colocada correctamente.
3. La manguera no está
colocada correctamente.
1. Herramienta para pisos
incorrecta.
2. Revise el fusible o el disyuntor del edificio.
Reemplace el fusible/reinicie el disyuntor
del edificio.
durante 30 minutos. (Esto restablecerá el
protector térmico).
1. Vacíe la bolsa de filtro (pág. 15).
2. Consulte la sección Reemplazo y extracción
de la bolsa de filtro (pág. 15).
3. Consulte la sección Colocación de la
manguera (pág. 10).
1. Verifique que se esté utilizando la
herramienta para alfombras en alfombras
y la herramienta para pisos duros en pisos
duros.
2. Ajuste el ángulo de la herramienta para
pisos inclinándola hacia arriba, lo que hace
más fácil el empuje.
NO CUBIERTO POR LA PRESENTE GARANTÍA
Algunas piezas de su producto
uso, debido al desgaste normal. Entre ellas se incluyen las correas, las mangas del rodillo del agitador,
los cojinetes del agitador, los cepillos, las bolsas, los filtros y las bombillas. Esta Garantía no cubre estas
piezas. La presente Garantía tampoco cubre: mantenimiento inadecuado del producto, daños debido al
uso incorrecto, casos fortuitos o hechos de la naturaleza, vandalismo u otros actos que estén más allá
del control de
compró el producto originalmente, reventa del producto por parte del propietario original, defectos o daños
causados por reparaciones o modificaciones que no hayan sido llevadas a cabo por un Distribuidor de
Servicios de Garantía Autorizado de
inspeccionar todos los productos considerados defectuosos y de tomar decisiones finales sobre cualquier
reclamo de garantía. Est a garantía no cubre la recolección, la entrega, el transporte ni el ser vicio a domicilio
del producto. No obstante, si envía el producto por correo postal al Distribuidor de Servicios de Garantía
Autorizado de
solamente.
Hoover® Commercial
Hoover® Commercial
Hoover® Commercial requieren reemplazo durante el curso habitual del
, actos u omisiones del propietario, uso fuera del país en donde se
Hoover® Commercial. Hoover® Commercial
para obtener el servicio de la garantía, el envío tendrá un costo de ida
se reserva el derecho de
OTROS TÉRMINOS IMPORTANTES
Esta g arantía no es tr ansferible y no p odrá ser cedid a. Esta garan tía se regirá e int erpretar á de conformid ad
con las ley es del Estado d e Ohio. El Plazo de la gar antía no se prolongará po r ningún reemplaz o o reparación
realizados conforme a la garantía. ESTA GARANTÍA REPRESENTA LA GARANTÍA Y EL RECURSO LEGAL
EXCLUSIVOS, PROPORCIONADOS POR HOOVER® COMMERCIAL. TODAS LAS DEMÁS GARANTÍAS,
EXPRESAS O IMPLÍCITAS, SERÁN RECHAZADAS, INCLUIDAS LAS GARANTÍAS DE APTITUD PARA LA
VENTA O ADECUACIÓN A FINES ESPECÍFICOS. EN NINGÚN SUPUESTO HOOVER® SERÁ RESPONSABLE
POR DAÑOS ESPECIALES, INDIRECTOS, INCIDENTALES O EMERGENTES DE NINGUNA CLASE
RECLAMADOS POR EL PROPIETARIO O CUALQUIER PARTE POR INTERMEDIO DE ESTE, YA SEA EN
VIRTUD DE UN CONTRATO, POR NEGLIGENCIA, HECHO ILÍCITO CIVIL O RESPONSABILIDAD OBJETIVA,
NI POR CUALQUIER OTRA CAUSA. En algunos estados, la exclusión de los daños mediatos no está
permitida, de modo que la exclusión precedente puede no serle aplicable. Esta garantía le otorga derechos
específicos. También puede tener otros derechos, que varían según el estado.
SI NECESITA AYUDA
Llame al 1-800-944-9200 (de lunes a viernes de 8 a.m. a 7 p.m., hora estándar del
este) para hablar con un representante del servicio al cliente o visite nuestro sitio
web en HooverCommercial.com.
3736
Page 20

GUIDE D’UTILISATION
Pour utilisation avec le modèle CH34006.
IMPORTANT:
AVANT D’ASSEMBLER ET D’UTILISER L’APPAREIL. CE PRODUIT EST DESTINÉ
À UN USAGE COMMERCIAL SEULEMENT.
LISEZ ATTENTIVEMENT LE PRÉSENT GUIDE D’UTILISATION
Bienvenue
Merci d’avoir choisi un produit commercial HOOVERMD.
Table des matières
Consignes de sécurité 40
Instructions de mise à la terre
Directive concernant l’utilisation d’une rallonge
Caractéristiques
Premiers pas
Assemblage de la rallonge et installation des accessoires
Harnais ergonomique et ajustement de la hauteur
Utilisation du sac à dos 6Q HushTone
Ajustement du harnais
Entretien 50
Comment remplacer le sac-filtre
Filtres
52
44
46
42
43
46
47
MC
48
49
51
SI VOUS AVEZ BESOIN D’AIDE
Veuillez appeler au 1 800 944-9200 (lundi au vendredi de 8 h à 17 h HNE) pour parler à un
représentant du service à la clientèle ou visitez notre site internet à HooverCommercial.com.
Dépannage 54
Garantie
55
3938
Page 21

CONSIGNES DE SÉCURITÉ IMPORTANTES
CONSIGNES DE SÉCURITÉ
CONSERVEZ CES INSTRUCTIONS!
IMPORTANT : LISEZ ATTENTIVEMENT AVANT L'ASSEMBLAGE ET L'UTILISATION.
LORSQUE VOUS UTILISEZ DES APPAREILS ÉLECTRIQUES, VEUILLEZ TOUJOURS RESPECTER
ENTRE AUTRES LES CONSIGNES DE SÉCURITÉ ÉLÉMENTAIRES SUIVANTES: VEUILLEZ
LIRE TOUTES LES INSTRUCTIONS AVANT D’UTILISER CET
APPAREIL.
AVERTISSEMENT: POUR RÉDUIRE LE RISQUE D’INCENDIE, DE DÉCHARGE
ÉLECTRIQUE, DE DOMMAGE OU DE BLESSURE:
•
Assemblez entièrement l’appareil avant de l’utiliser.
•
Faites seulement fonctionner l'appareil avec la tension indiquée sur la plaque signalétique située à l'arrière de l'appareil.
•
Ne laissez pas l'appareil en marche sans surveillance. Débranchez la fiche de la prise de courant dès la fin de l'utilisation
et avant le nettoyage ou l'entretien.
•
N’utilisez pas l’appareil à l’extérieur ni sur des sur faces humides.
•
Ne permettez pas aux enfants de jouer avec l’appareil. Cet appareil ne doit p as être utilisé par des enfants de moins de
12ans. Exercez une surveillance étroite lorsque l’appareil est utilisé à proximité d’enfants. Gardez l’appareil hors de la
portée des enfants et ne laissez pas ces derniers introduire leurs doigts ou d’autres objets dans aucune ou verture afin
d’éviter les blessures ou les bris.
•
Utilisez l’appareil uniquement aux fins décrites dans le présent guide. U tilisez uniquement les accessoires et produits
recommandés par le fabricant.
•
N’utilisez pas l'appareil lorsque le cordon ou la fiche est endommagé. Cessez d’utiliser l’appareil s’il ne fonctionne
pas comme prév u, s’il a été échapp é sur le sol ou dans l’eau, s’il est endommagé ou s’il a été laissé à l’extérieur et
apportez-le au centre de réparations.
•
Ne tirez pas et ne transportez pas l’appareil par son cordon, n’utilisez pas le cordon comme une poignée, ne coincez p as
le cordon dans l’embrasure d’une por te et ne le tirez pas contre des arêtes ou des cornières tranchantes. Ne faites pas
rouler l’appareil sur le cordon. Tenez le cordon éloigné des sur faces chaudes.
•
Ne débranchez pas l’appareil en tirant le cordon. Débranchez l’appareil en tenant la fiche et non le cordon.
•
Ne manipulez pas la fiche ou l’appareil avec des mains mouillées.
•
N’insérez aucun objet dans les ouvertures. N’utilisez pas l’appareil si les ouvertures sont obstruées. Assurez-vous
qu’elles sont exemptes de poussière, de mousse, de cheveux ou de tout ce qui pourrait réduire le débit d’air.
•
Gardez les cheveux, les vêtements amples, les doigts et toute autre partie du corps à l’écart des ouvertures et des
pièces en mouvement.
•
Éteignez toutes les commandes avant de débrancher l’appareil.
•
Redoublez de prudence lorsque vous utilisez l’appareil dans un escalier. Ne retirez pas le sac à dos si vous êtes dans
un escalier pour éviter les blessures et les dommages. Ne déposez pas le sac à dos sur les escaliers ou un meuble pour
éviter d’endommager l’appareil et pour éviter les bris et les blessures.
•
N’utilisez pas l’appareil pour aspirer des liquides inflammables ou combustibles comme de l’essence et de la sciure de
bois, ni dans des endroits où de telles substances peuvent être présentes.
•
Branchez l’appareil uniquement dans une prise correctement mise à la terre. Consultez le chapitre INSTRUCTIONS DE
MISE À L A TERRE à la page 6.
•
N’utilisez pas l’appareil pour aspirer quoi que ce soit qui brûle ou dégage de la fumée comme des cigarettes,
desallumettes ou des cendres chaudes.
•
N’utilisez pas l’appareil sans avoir inst allé le sac à poussière et les filtres.
AVERTISSEMENT : CE PRODUIT CONTIENT DES PRODUITS CHIMIQUES
RECONNUS PAR L’ÉTAT DE LA CALIFORNIE COMME POUVANT CAUSER LE
CANCER, DES ANOMALIES CONGÉNITALES OU D’AUTRES DYSFONCTIONS DU
SYSTÈME REPRODUCTEUR. BIEN SE LAVER LES MAINS APRÈS
L'UTILISATION.
•
Assurez-vous que la rallonge est en bon état et que son calibre est approprié à votre appareil. Le tableau (A)
de la page 7 indique le calibre à utiliser selon la longueur de la rallonge et de l’intensité nominale inscrite sur la
plaque signalétique. En cas de doute, utilisez un calibre supérieur. Plus le calibre est petit, plus la rallonge est
de gros diamètre. L’utilisation d’une rallonge de calibre trop faible entraînera une chute de la tension de ligne,
ce qui à son tour provoquer a une perte de puissance et une surchauffe.
•
Utilisez uniquement des cordons à trois fils de t ype SJ ou SJ T dotés d’une fiche moulée à trois broches de mise
àla terre ainsi que d’une prise avec terre qui convient à la fiche de l’appareil.
•
Pour réduire le risque de blessures causées par un mauvais branchement entre la rallonge et la fiche de
l’appareil, assurez-vous qu’elles sont bien branchées. Vérifiez périodiquement le branchement pendant que
vous utilisez l’appareil pour vous assurer que la rallonge est bien fixée. N’utilisez pas une rallonge qui offre un
mauvais branchement . Un mauvais branchement peut provoquer une surchauffe ou un incendie et augmenter
le risque de brûlure.
• Pour éviter que le cordon d’alimentation de l’appareil se débranche de la rallonge pendant que vous passez
l’aspirateur, fixez fermement la rallonge à la prise de l’appareil, comme illustré aux instructions de blocage de
cordon de la page 7.
•
Entretenez l’appareil avec soin. Inspectez périodiquement les rallonges et remplacez-les si elles sont
endommagées.
MISE EN GARDE: POUR RÉDUIRE LES RISQUES DE DOMMAGE:
•
Évitez d’utiliser l’appareil pour ramasser des objets durs ou aux arêtes tranchantes, car ils pourraient
endommager l’appareil.
•
Rangez l’appareil adéquatement à l’intérieur et dans un endroit sec. N’exposez pas l’appareil à des
conditionsdegel.
•
N’utilisez pas d’objet aux arêtes tranchantes pour nettoyer le tuyau, car cela risquerait de l’endommager.
4140
Page 22

Consignes de sécurité importantes
CONSIGNES DE SÉCURITÉ
INSTRUCTIONS DE MISE À LA TERRE
C et appareil doit être mis à la terre. S’il devait mal fonctionner ou être endommagé, la mise à la terre fournira au courant
électrique une résistance moindre afin de réduire le risque de décharge électrique. Cet appareil est muni d’un cordon
d’alimentation équipé d’un conducteur de terre(B) et une fiche mise à la terre(A) (Fig.1). La fiche doit être insérée dans une
prise appropriée(C) qui est bien installée et mise à la terre conformément à tous les codes et règlements locaux (Fig. 1).
AVERTISSEMENT: Le branchement inapproprié du conducteur de protection peut entraîner des risques
de décharge électrique. Consultez un électricien ou un technicien qualifié si vous n’êtes pas certain que la prise est
bien mise à la terre. Ne modifiez pas la fiche fournie avec l’appareil. Si elle ne s’insère pas dans la prise, communiquez
avec un électricien qualifié pour faire installer une prise appropriée. Cet appareil a été conçu pour être utilisé sur un
circuit d’une tension nominale de 120V. Il est équipé d’une fiche de mise à la terre semblable à la fiche (A) illustrée à la
figure1. Un adaptateur temporaire (D) peut être utilisé pour brancher cette fiche à une prise à deux alvéoles (E), si une
prise correc tement mise à la terre n’est pas disponible (figure 2). L’adaptateur temporaire doit uniquement être utilisé en
attendant qu’une prise correctement mise à la terre (C) soit installée par un électricien qualifié (figure1). La languette
rigide verte (F ), ou ce qui lui ressemble, at tachée à l’adaptateur doit être reliée à une mise à la ter re permanente (G), telle
que le couvercle d’une boîte de sor tie correctement mise à la terre (figure 2). Lorsque l’adaptateur est utilisé, il doit être
maintenu en place à l’aide d’une vis à métaux. REMARQUE: Au Canada, l’utilisation d’un adaptateur temporaire n’est
pas autorisée p ar le Code canadien de l’électricité.
FIGURE1 FIGURE2
C
D
F
A
B
D
G
E
DIRECTIVE CONCERNANT L’UTILISATION D’UNE RALLONGE
N’utilisez p as l’appareil lorsque le cordon ou la fiche est endommagé. Pour effectuer l’entretien, consultez un électricien
ouun technicien en entretien qualifié. Utilisez uniquement des pièces de rechange identiques.
•
Assurez-vous que la rallonge est en bon état et que son calibre est approprié à votre appareil. Le tableau (A) indique le
calibre à utiliser en fonction de la longueur de la rallonge et de l’intensité nominale inscrite sur la plaque signalétique.
En cas de doute, utilisez un calibre supérieur. Plus le calibre est petit, plus la rallonge est de gros diamètre. L’utilisation
d’une rallonge de calibre trop faible entraînera une chute de la tension de ligne, ce qui à son tour provoquera une per te
depuissance et une surchauffe.
TABLEAUA-RALLONGES DE CALIBRE MINIMAL
Intensité nominale Volts Longueur totale du cordon
7,2 m (25 pi) 15,24 m (50 pi)
Plus que A Pas plus que A 120V
0 6 – 18 (0,82) 16 (1,3) 16 (1,3) 14 (2,1)
6 10 – 18 (0,82) 16 (1,3) 14 (2,1) 12 (3, 3)
10 12 – 18 (0,82) 16 (1, 3) 14 (2,1) 12 (3,3)
Calibre de fil américain (mm2)
30,4 8 m (100 pi)
45,72 m (150 pi)
INSTRUCTIONS DE BLOCAGE DE CORDON
Pliez la rallonge de
1
manière à former un arc
à environ 15 cm (6 po)
del’extrémité.
Enfilez l’arc dans le bas
2
de la boucle de blocage
du cordon.
Tirez l’arc par-dessus
3
le dispositif de blocage
du cordon. Branchez
fermement la rallonge
dans le dispositif de
branchement rapide
dusac à dos.
4342
Page 23

Caractéristiques du produit
A
Tuy au
B
Tube supérieur
C
Corps de l’aspirateur
D
Tube inférieur
CARACTÉRISTIQUES DU PRODUIT
A
E
Filtres Hexaguard
MC
Outils de dépoussiérage
Accessoire pour tapis
Accessoire pour plancher
Suceur plat
B
C
D
E
Outil pour revêtement s
entissu
Brosse à épousseter
4544
Page 24

Assemblage de la rallonge et installation
des accessoires
MISE EN GARDE
N’UT ILISEZ PAS L’ASPIRATEUR PO UR TOILET TER UN ANIM AL.
PREMIERS PAS
Harnais ergonomique et ajustement de la hauteur
REMARQUE: Le harnais a été conçu et dessiné pour s’adapter à plusieurs grandeurs d’utilisateurs et
s’ajuste selon la grandeur. La partie supérieure du harnais doit reposer entre les omoplates pour obtenir
un port confortable. La position du harnais supérieur du sac à dos livré est située dans le trou central
d’ajustement de la partie saillante de hauteur moyenne.
Assemblez d’abord le
1
tube en dévissant le
manchon de l’extrémité
du tube supérieur et
glissez-le sur le tube
inférieur.
Poussez fermement
4
l’extrémité du boyau
sur l’extrémité ouverte
du tube.
Alignez la rainure du
2
tube inférieur avec
le tube supérieur et
poussez fermement pour
glisser le tube en place
et à la longueur désirée.
Pour utiliser les
5
accessoires pour
plancher, insérez
l’accessoire pour
plancher la l’extrémité
à manchon du tube
inférieur et en alignant
l’anneau métallique avec
la rainure de l’accessoire.
Serrez le manchon en
tournant vers la droite.
Serrez le manchon
3
extérieur en le tournant
vers la droite.
Pour les utilisateurs plus grands,
déplacez la partie supérieure du harnais
à la partie saillante la plus basse.
Pour ajuster la partie supérieure
1
duharnais, utilisez un tournevis
àtête cruciforme pour retirer la vis
de la partie saillante d’ajustement
de hauteur.
Pour les utilisateurs plus petits,
déplacezla partie saillante de hauteur
laplus haute.
Déplacez la partie supérieure du
2
harnais et serrez fermement la vis
àla bonne hauteur d’ajustement
dela partie saillante.
4746
Page 25

Utilisation de votre sac à dos 6Q HUSHTONE
MC
PREMIERS PAS
Ajustement du harnais
REMARQUE: Ne passez pas l’aspirateur sans avoir installé les deux sacs-filtres et les filtres HEPA.
Assurez-vous que les deux
1
sacs-filtres et les filtres HEPA sont
installés dans l’appareil. Insérez
fermement l’extrémité du boyau
dans l’entrée du boyau en dirigeant
le coude vers le côté de l’aspirateur.
Relâchez les bandoulières puis
2
soulevez le sac à dos en glissant les
deux bras dans les bandoulières.
REMARQUE: Le harnais ergonomique est dessiné de manière à identifier facilement les étapes de bon
port du sac à dos. Repérez les flèches chiffrées des légendes de parties correspondantes indiquées dans
les directives ci-dessous.
Serrez la bandoulière
1
de taille jusqu’à ce
qu’elle soit serrée et
confortable.
REMARQUE: Si une
longueur additionnelle
est requise, la courroie
de rallonge peut
être placée entre
les extrémités de la
courroie et ajustée à la
longueur désirée.
Tirez les deux extrémités
2
des bandoulières
jusqu’à ce que la partie
supérieure du harnais
touche aux omoplates.
Presque tout le poids de
l’appareil doit reposer sur
les hanches. Vous devez
pouvoir insérer facilement
un doigt entre chaque
bandoulière et l’épaule.
Réajustez la bandoulière
de taille au besoin.
Enclenchez la boucle
3
de la bandoulière de
poitrine et serrez-la ou
déserrez-la au besoin.
Placez la partie inférieure du coussin
3
au bas du dos de manière àce que
le poids de l’appareil repose sur les
hanches et non les épaules.
MISE EN GARDE
NETTOYER OU FAIRE L’ENTRETIEN.
AFIN DE RÉDUI RE LE RISQUE DE B LESSURE S: DÉBRANCH EZ L’A SPIRATEUR AVANT DE LE
Glissez les bandoulières
4
de poitrine vers le
haut ou le bas pour
lesajuster.
Branchez le raccord
5
rapide de cordon àla
rallonge et enfilez
la rallonge dans le
dispositif de blocage
de cordon de la
bandoulière de taille.
Appuyez sur l’interrupteur
orange pour mettre l’appareil
en marche.
MISE EN MARCHE: Mode
denettoyage silencieux Hush
SURALIMENTATION:
Nettoyage des circulations
piétonnières intenses
Éteignez l’appareil en
repositionnant l’interrupteur
au centre.
MC
4948
Page 26

Entretien Comment remplacer le sac-filtre
ENTRETIEN
Toute autre tâche d’entretien doit être confiée à un représentant de service autorisé.
Cessez d’utiliser l’appareil s’il ne fonctionne pas comme prévu, s’il a été échappé sur le sol ou dans l’eau,
s’il est endommagé ou s’il a été laissé à l’extérieur et apportez-le au centre de réparations.
RUPTEUR THERMIQUE
Votre appareil est équipé d’un rupteur thermique interne afin de le protéger contre la surchauffe.
L’appareil cessera de fonctionner si ce rupteur thermique s’active.
Voici ce qu'il faut faire lorsque ceci survient:
1. ÉTEIGNEZ l’appareil et débranchez-le de la prise de courant.
2. Vérifiez si le sac est plein et changez-le au besoin.
3. Vérifiez si la conduite d’air est obstruée. Dégagez toutes les obstructions visibles.
4. Le rupteur thermique se réinitialisera après le débranchement de l’appareil et que le moteur ait refroidi
pendant 30 minutes et vous pourrez à ce moment reprendre le travail.
Votre appareil devra être réparé si le rupteur thermique ne se réinitialise pas après avoir respecté les
étapes ci-dessus.
AVERTISSEMENT
NETTOYER OU FAIRE L’ENTRETIEN.
REMARQUE: Si vous utilisez l’aspirateur pour ramasser des poussières très fines, comme de la sciure
ou de la poussière de placoplâtre, il sera nécessaire de remplacer le sac et de nettoyer les filtres à
des intervalles fréquents afin de maintenir une puissance de ramassage maximale. La poussière fine
colmatera les pores du sac et réduira l’aspiration avant que le sac ne soit plein.
POUR RÉ DUIRE LES RI SQUES DE BLE SSURE: DÉBR ANCHEZ L’ASPIRATEUR AVANT DE L E
AVERTISSEMENT
NETTOYER OU FAIRE L’ENTRETIEN.
Ouver le couvercle
1
supérieur en déclenchant
les 3languettes.
POUR RÉ DUIRE LES RI SQUES DE BLE SSURE: DÉBR ANCHEZ L’ASPIRATEUR AVANT DE L E
Retirez le sac plein
2
en appuyant sur la
languette orange.
Insérez un sac neuf
3
en glissant la partie
cartonnée sous les
languettes et poussez
jusqu’à ce que le sac
soit fixé correctement
en place.
Vérifiez le sac-filtre. Changez-le s’il
1
est plein.
Vérifiez si la buse, le tuyau et
2
l’entrée du sac sont obstrués.
Dégagez toutes les obstructions.
Abaissez la languette
4
duporte-sac.
SACS DE RECHANGE
Filtration normale, paquet de10, no de pièceAH10173
Filtration allergène, paquet de10, no de pièceAH10273
Réinstallez le couvercle
5
supérieur et enclenchez
les languettes.
5150
Page 27

Filtres
FILTRES
AVERTISSEMENT
RÉDUI RE LE RISQUE DE BLES SURES. N’UTILISEZ PAS L’ASPIR ATEUR SI LE FILT RE D’ENTRÉ E ET LES FILT RES FINISS EURS NE SONT PAS INSTAL LÉS.
FILTRE CONÇU AVEC LA TECHNOLOGIE HEPA
Les filtres finisseurs contribuent au processus de filtration en assainissant l’air rejeté dans la pièce.
Ilyadeux filtres HEPA; un filtre de chaque côté du sac à dos.
Retirez la porte du filtre
1
en tirant la languette
arrière vers l’avant
puistournez-la.
IMPORTANT
CÔTÉ P OUR LE FAIRE S ÉCHER DE S ORTE QUE L’AIR CIR CULE DES DE UX CÔTÉ S DU FILTRE. L E TEMPS DE S ÉCHAGE PE UT PRENDR E JUSQU’À 24HEURE S.
DÉBRANCHEZ L’APPAREIL AVANT D E LE NETTOYER OU D’ EN FAIRE L’ENTR ETIEN AFIN DE
Dégagez le filtre du cadre
2
et sortez-le. Rincez-le
à l’eau froide, sous un
faible débit d’eau. Rincez
seulement la surface
dirigée vers l’intérieur de
l’appareil. Laissez sécher
et réinstaller le filtre
dansson logement.
LAISSEZ SÉCHER COMPLÈTEMENT LE FILTRE AVANT DE LE REMETTRE EN PLACE. PLACEZ LE FILTRE DE
Réinstallez la porte
3
du filtre en alignant
les deux languettes
dirigées vers l’avant et
tournez-les. Appuyez
sur la languette
arrière jusqu’à ce que
la porte s’enclenche
correctement.
AVERTISSEMENT
RÉDUI RE LE RISQUE DE BLES SURES. N’UTILISEZ PAS L’ASPIR ATEUR SI LE FILT RE D’ENTRÉ E ET LES FILT RES FINISS EURS NE SONT PAS INSTAL LÉS.
FILTRE À CHARBON ACTIF
HEXAGUARD
Les filtres HexaGuardMC sont situés
1
à l’intérieur de la porte du filtre.
Tirez pour retirer.
MC
IMPORTANT
CÔTÉ P OUR LE FAIRE S ÉCHER DE S ORTE QUE L’AIR CIR CULE DES DE UX CÔTÉ S DU FILTRE. L E TEMPS DE S ÉCHAGE PE UT PRENDR E JUSQU’À 24HEURE S.
DÉBRANCHEZ L’APPAREIL AVANT D E LE NETTOYER OU D’ EN FAIRE L’ENTR ETIEN AFIN DE
FILTRE D’ENTRÉE
Le filtre d’entrée est situé à l’intérieur,
au fond du logement de sac et offre une
protection contre les bris du moteur.
Si le filtre devient sale, retirez
1
la grille et soulevez le filtre
puis le sortir. Rincez-le à l’eau
froide, sous un faible débit
d’eau. Laissez-le sécher pendant
24heures. Repositionnez le filtre
sec et fixez la grille en place.
LAISSEZ SÉCHER COMPLÈTEMENT LE FILTRE AVANT DE LE REMETTRE EN PLACE. PLACEZ LE FILTRE DE
REMPLACEMENT DU FILTRE
Inspectez le filtre finisseur HEPA tous les mois et rincez-le si nécessaire. Vérifiez si le
filtre est usé et remplacez-le si les plis sont endommagés. Changez le filtre régulièrement
pour maintenir une performance optimale.
No de pièce: 440009096
REMPLACEMENT
DU F I LT RE
Remplacez le filtre
HexaGuard
année pour obtenir une
performance optimale.
No de pièce : 440009176
LUBRIFICATION
Le moteur est équipement de roulements suffisamment lubrifiés pour toute la durée de vie de l’appareil.
L’ajout de lubrifiant pourrait causer des dommages. N’ajoutez pas de lubrifiant dans le moteur.
™
chaque
REMPLACEMENT
DU F I LT RE
Inspectez le filtre d’entrée
tous les deux semaines pour
que l’aspirateur offre une
performance optimale.
No de pièce: 440009175
5352
Page 28

Dépannage
AVERTISSEMENT
NETTOYER OU FAIRE L’ENTRETIEN.
Toute autre tâche d’entretien doit être confiée à un représentant de service autorisé.
POUR RÉ DUIRE LES RI SQUES DE BLE SSURE: DÉBR ANCHEZ L’ASPIRATEUR AVANT DE L E
GARANTIE LIMITÉE DE 2ANS
COUVERTURE DE LA GARANTIE
Lorsqu’ils sont utilisés et entretenus dans des conditions normales d’utilisation et d’entretien commerciaux,
comme il est stipulé dans le guide d’utilisation, votre appareil Commercial Hoover
défauts de fabrication et de main-d’œuvre pendant une période de deuxans à partir de la date d’achat (ci-après
la «période de garantie»). Pendant la période de garantie, telle qu’elle est décrite dans la présente garantie,
Commercial Hoover
pour les produits achetés aux États-Unis. dans les boutiques d’échanges militaires américaines et au Canada.
MD
fournira la main-d’œuvre et les pièces gratuitement afin de corriger une telle défectuosité
MD
est garanti contre les
DÉPANNAGE ET GARANTIE
Cessez d’utiliser l’appareil s’il ne fonctionne pas comme prévu, s’il a été échappé sur le sol ou dans l’eau,
s’il est endommagé ou s’il a été laissé à l’extérieur et apportez-le au centre de réparations.
Problème Cause possible Solution possible
L’aspirateur ne
fonctionne pas.
L’indicateur de
vérification du sac est
rouge OU l’aspirateur
n’aspire plus OU son
débit d’aspiration est
faible.
La poussière
s’échappe de
l’aspirateur.
Le tube est difficile
à pousser ou refuse
de se déplacer vers
l’avant.
1. Le cordon d’alimentation n’est
pas correctement branché sur
la prise.
2. Fusible grillé ou disjoncteur
déclenché.
3. Le rupteur thermique est
activé.
1. Sac-filtre plein et/ou obstrué. 1. Videz le sac-filtre - Voir page15.
1. Le sac-filtre est plein. 1. Videz le sac-filtre - Voir page15.
2. Le filtre est mal installé. 2. Consultez le chapitre de retrait et de
3. Le tuyau est mal installé. 3. Consultez le chapitre d’installation du boyau -
1. Accessoire pour plancher mal
installé.
1. Insérez fermement la fiche dans la prise de
courant.
2. Vérifiez les fusibles ou les disjoncteurs
de l’immeuble. Remplacez le fusible ou
enclenchez le disjoncteur de l’immeuble.
3. Débranchez l’aspirateur et laissez-le refroidir
pendant 30minutes. (Cette action réinitialisera
le rupteur thermique).
remplacement du sac-filtre - Voir page 15.
Voir page 10.
1. Assurez-vous que l’accessoire pour tapis est
utilisé sur un tapis et que l’accessoire pour
plancher est utilisé sur des planchers durs.
2. Ajustez l’angle de l’accessoire pour plancher
en l’inclinant vers le haut pour faciliter sa
poussée.
RÉCLAMATION AU TITRE DE LA GARANTIE
Si le produit n’est pas dans l’état prévu par la garantie, apportez ou envoyez le produit chez un fournisseur
autorisé de service sous garantie Hoover
autorisés, composez le numéro du service automatisé au 1800944-9200 OU visitez Hoover
ligne au www.hoovercommercial.com (clients des É.-U.) États-Unis) ou au www.hoover.ca (clients du Canada).
Pour obtenir du soutien ou d’autres renseignements au sujet de la garantie ou pour connaître les boutiques
offrant les réparations au titre de la garantie, composez le 1800944-9200, entre 8h et 19h (HNE) du lundi au
vendredi. Au Canada, composez le 1800263-6376, entre 8h et 19h (HNE) du lundi au vendredi.
MD
avec une preuve d’achat. Pour obtenir la liste des points de service
MD
Commercial en
ÉLÉMENTS NON COUVERTS PAR LA GARANTIE
Certaines pièces de votre produit commercial
en raison d’une usure normale. Ces pièces comprennent les courroies, les manchons du rouleau-brosse, les
roulements du rouleau-brosse, les brosses, les sacs, les filtres et les ampoules. Ces pièces ne sont pas couvertes
par la présente garantie. De plus, la présente garantie ne couvre pas: un entretien inadéquat du produit, les bris
causés par la mauvaise utilisation, les cas fortuits, les c atastrophes nat urelles, le vandalisme et aut res actes hors
du contrôle de
pays d’achat, la revente du produit par le premier acheteur, les défauts ou les dommages causés par quiconque
autre qu’un fournisseur autorisé de service sous garantie Hoover
le droit d’inspecter tout produit présumé défectueux et de prendre les décisions définitives à l’égard de toute
réclamation au titre de la garantie. La présente garantie ne couvre pas le ramassage, la livraison, le transport,
ni les réparations à domicile. Toutefois, si vous envoyez votre produit par courrier à un fournisseur autorisé de
service sous garantie
seront payés.
HooverMD Commercial
HooverMD Commercial
HooverMD doivent être remplacées dans le cours normal d’utilisation
, les agissements ou omissions du propriétaire, l’utilisation à l’extérieur du
MD
Commercial. Hoover
pour une réparation sous garantie, les frais de livraison de retour
MD
Commercial
se réserve
AUTRES CONDITIONS IMPORTANTES
La présente garantie n’est pas transférable et ne peut pas être cédée. La présente garantie sera régie et
inter prétée se lon les lois de l’É tat de l’Ohio. L a période de g arantie ne s era pas pro longée aprè s tout remp lacement
ou toute réparation au titre de la présente garantie. CETTE GARANTIE EST VOTRE UNIQUE RECOURS ET VOIE
DE DROIT FOURNIS PAR HOOVER
GARANTIES DE QUALITÉ MARCHANDE OU D'ADAPTATION À UN USAGE PARTICULIER, SONT DÉCLINÉES. EN
AUCUN TEMPS, HOOVER
SPÉC IAUX, IND IRECTS, A CCIDENT ELS OU ACCE SSOIRES D’AUC UNE SORT E OU D’AUC UNE NATURE EN VERS LE
PROP RIÉTAIRE OU DE TOUTES PAR TIES RÉCL AMAN T AU NOM DU PROP RIÉTAIRE, QUE CE SO IT PAR CONT RAT,
NÉGLIGENCE, TORT OU RESPONSABILITÉ STRICTE DES PRODUITS OU SURVENUS PAR QUELQUE CAUSE QUE
CE SOIT. Certains États ne permettent pas l’exclusion des dommages consécutifs. Par conséquent, l’exclusion
précédente pourrait ne pas être applicable dans votre cas. La présente garantie vous donne des droits précis.
Vous pouvez également avoir d’autres droits, lesquels varient d’une province à l’autre.
MD
. TOUTES AUTRES GARANTIES, EXPRESSES OU TACITES, INCLUANT LES
MD
NE POURRA ÊTRE TENUE RESPONSABLE DE TOUS LES DOMMAGES-INTÉRÊTS
SI VOUS AVEZ BESOIN D’AIDE
Veuillez appeler au 1 800 944-9200 (lundi au vendredi de 8 h à 17 h HNE) pour parler à un
représentant du service à la clientèle ou visitez notre site internet à HooverCommercial.com.
5554
Page 29

HooverCommercial.com
IMAG ES MAY DIFF ER FROM ACT UAL PROD UCT.
© 2016 TECH TRONIC F LOORCA RE TECHN OLOGY LIM ITED
#964 A0004 0 • ID116666
 Loading...