

Page 1
Owner’s Manual
English ➜ pp. 1-7
Spanish ➜
Central Va c u u m
S y s t e m s
Power Canisters
Thank you for selecting a
HOOVER product.
This cleaner was inspected and packaged
carefully before being shipped from the
factory. If you should happen to need
assistance during assembly or operation, call
1-800-944-9200 for automated referral of
authorized service outlet locations
(U.S. only) or
1-330-499-9499 to speak with a representative in our Consumer Response Center.
DO NOT RETURN THIS PRO D U C T
TO THE STO R E.
French ➜
Review this manual before
operating cleaner.
Page 2
Fill in and retain
The HOOVER Central Vacuum System Power unit will be permanently mounted.
For your records, please enter model and serial numbers in the spaces provided
below and retain in a safe place.
Power Unit Model No. ______________Serial No.
(See side of power unit)
Attach your sales receipt to this owner’s manual. Verification of purchase date
may be required.
Important Safeguards!
When using an electrical appliance, always follow basic precautions, including
the following:
READ ALL INSTRUCTIONS BEFORE USING THIS APPLIANCE
Save!
Index
Canister information.......................3
Grounding instructions ..................4
How and where to install
the power unit...........................5
How to use.....................................6
Important safeguards ....................2
Maintenance..................................7
User check list...............................8
www.hoovercompany.com
Warning:To reduce the risk of fire, electric shock, or injury:
• Do not use on wet surfaces.
• Connect to a properly grounded outlet only. See “Grounding Instructions.”
• Close supervision is necessary when any appliance is used by or near children.
Do not allow cleaning system to be used as a toy or to run unattended at any
time.
• Do not allow any objects to be put into wall inlets.
• Do not pick up anything that is burning or smoking, such as cigarettes,
matches, or hot ashes.
• Do not use to pick up flammable or combustible liquids such as gasoline or use
in areas where they may be present.
• Do not use without filter in place. Empty dust container and clean filter
frequently when picking up very fine materials such as powder.
• Use extra care when cleaning stairs.
• Do not put any objects into openings. Do not use with any openings blocked:
keep free of dust, lint, hair, and anything that may reduce air flow.
• Do not pull or carry by cord, use cord as a handle, close a door on cord or pull
cord around sharp edges or corners. Do not run appliance over cord. Keep
cord away from heated surfaces.
• Always disconnect cord from electrical outlet before servicing the power unit.
• Do not unplug by pulling on cord. To unplug, grasp the plug, not the cord.
Never handle plug or appliance with wet hands.
• Unplug cleaner when not in use. Turn off all controls before unplugging.
• Do not use with damaged cord or plug. If appliance is not working as it should,
has been dropped, damaged, left outdoors, or dropped into water, take it to a
Hoover Factory Service Center or Authorized Hoover Warranty Service Dealer
(Depot).
• Use vacuum cleaner only for its intended use as described in this owner’s
manual. Use only attachments recommended by The Hoover Company; others
may cause hazards.
When using accessory kits, note these additional
Safeguards:
• Do not use powered nozzle outdoors.
• Keep hair, loose clothing, fingers, feet and all parts of body away from openings,
rotating agitator and any other moving parts. Do not operate nozzle in bare feet
or when wearing open toe shoes or sandals.
• Disconnect hose from wall inlet and cord from electrical outlet when not in use
and before servicing motorized nozzle.
• The hose contains electrical wires. Do not use if damaged, cut, or punctured.
Avoid picking up sharp objects.
• Always disconnect cord from electrical outlet before connecting or
disconnecting hose or motorized nozzle.
Save these instructions!
2
Page 3

1. Assembly
Operate cleaning system only at
voltage specified on power unit.
This system is intended for household use.
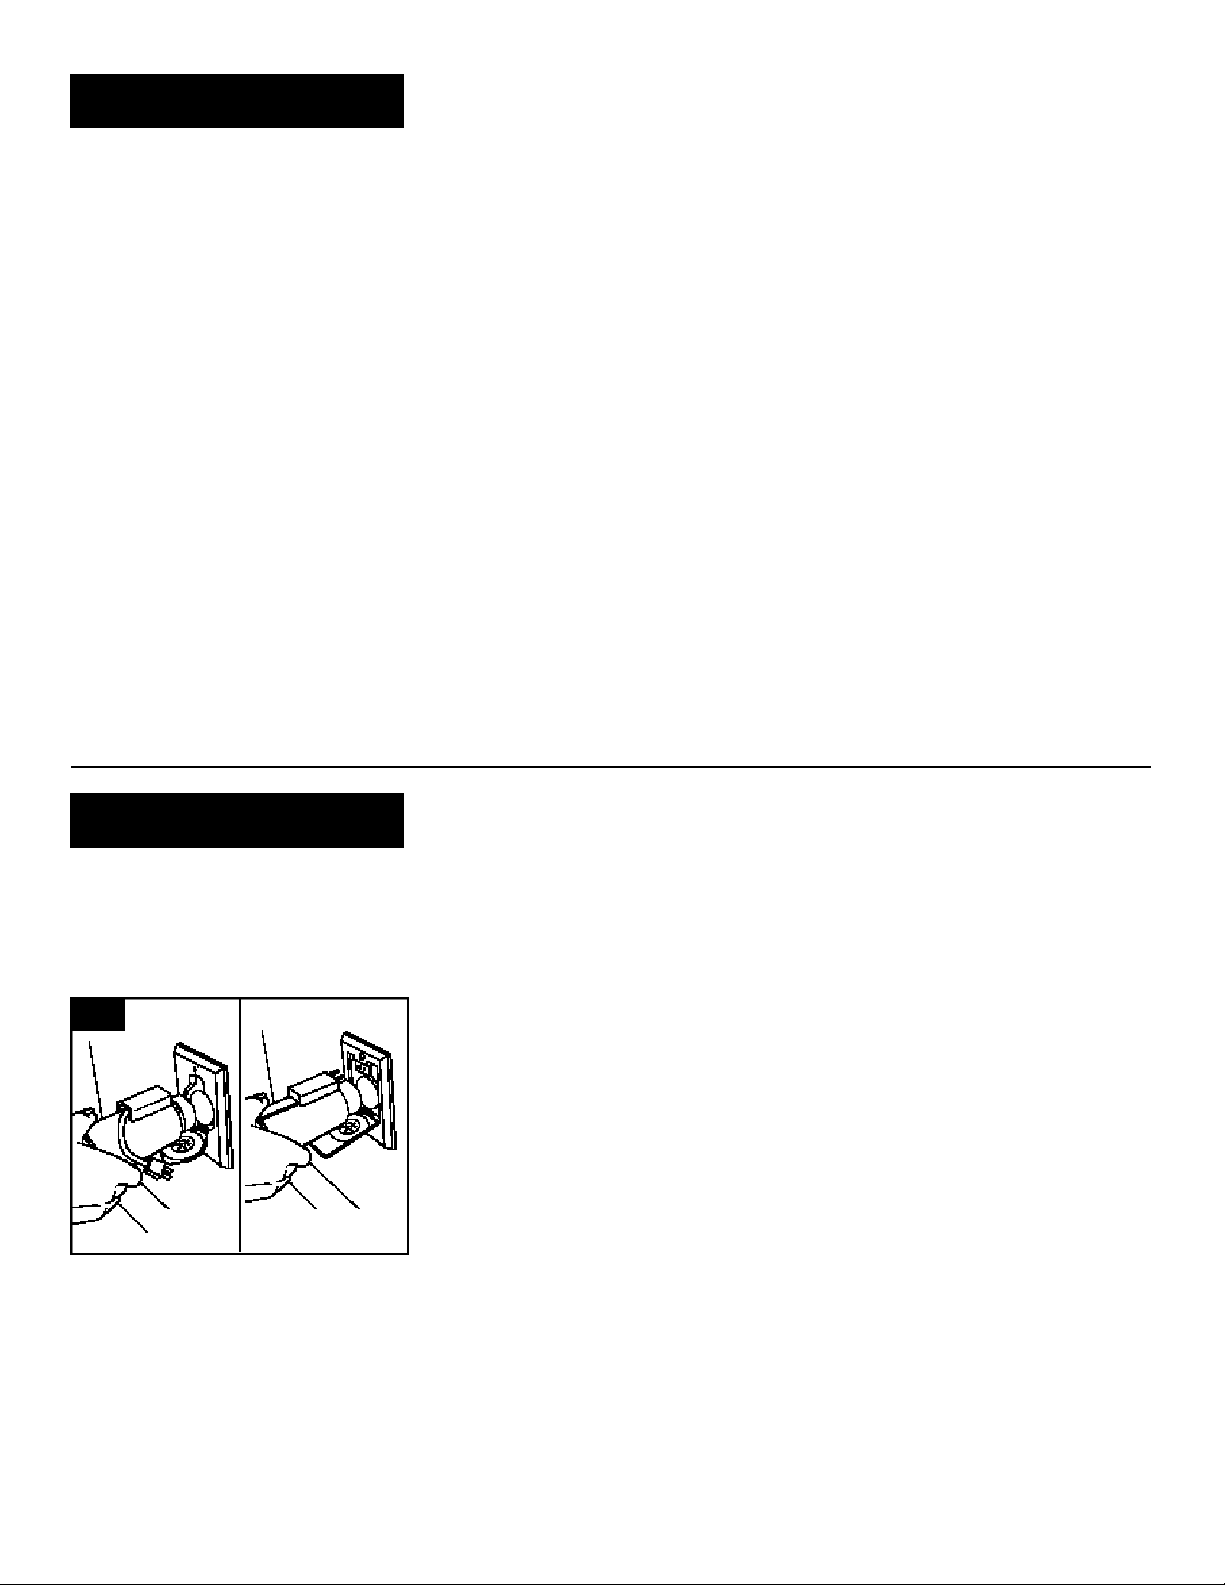
Grounding
Instructions
This appliance must be grounded. If it
should malfunction or breakdown,
grounding provides a path of least
resistance for electrical current to
reduce the risk of electric shock. This
appliance is equipped with a cord having an equipment-grounding conductor
and grounding plug (A). The plug must
be plugged into an appropriate outlet
(B) that is properly installed and
grounded in accordance with all local
codes and ordinances (see page 5).
DANGER-
Improper connection of the equipmentgrounding conductor can result in the
risk of electric shock. Check with a
qualified electrician or service person if
you are in doubt as to whether the outlet
is properly grounded. Do not modify
the plug provided with the appliance if it will not fit the outlet, have a proper
outlet installed by a qualified electrician.
This appliance is for use on a nominal
120 volt circuit and has a grounding
plug that looks like the plug illustrated in
sketch (A).
A Temporary adapter (C) may be used
to connect this plug to a 2-pole receptacle (D) if a properly grounded outlet is
not available. The Temporary adapter
should be used only until a properly
grounded outlet (B) can be installed by
a qualified electrician. The green colored rigid ear, lug, or the like extending
from the adapter must be connected to
a permanent ground such as a properly
grounded outlet box cover. Whenever
the adapter is used, it must be held in
place by a metal screw.
1-1
(A)
Grounding Pin
1-2
(C)
NOTE: In Canada, the use of a temporary adaptor is Not Permitted by the
Canadian Electrical Code.
Adapter
Tab for
Grounding
Screw
Metal Screw
(B)
(D)
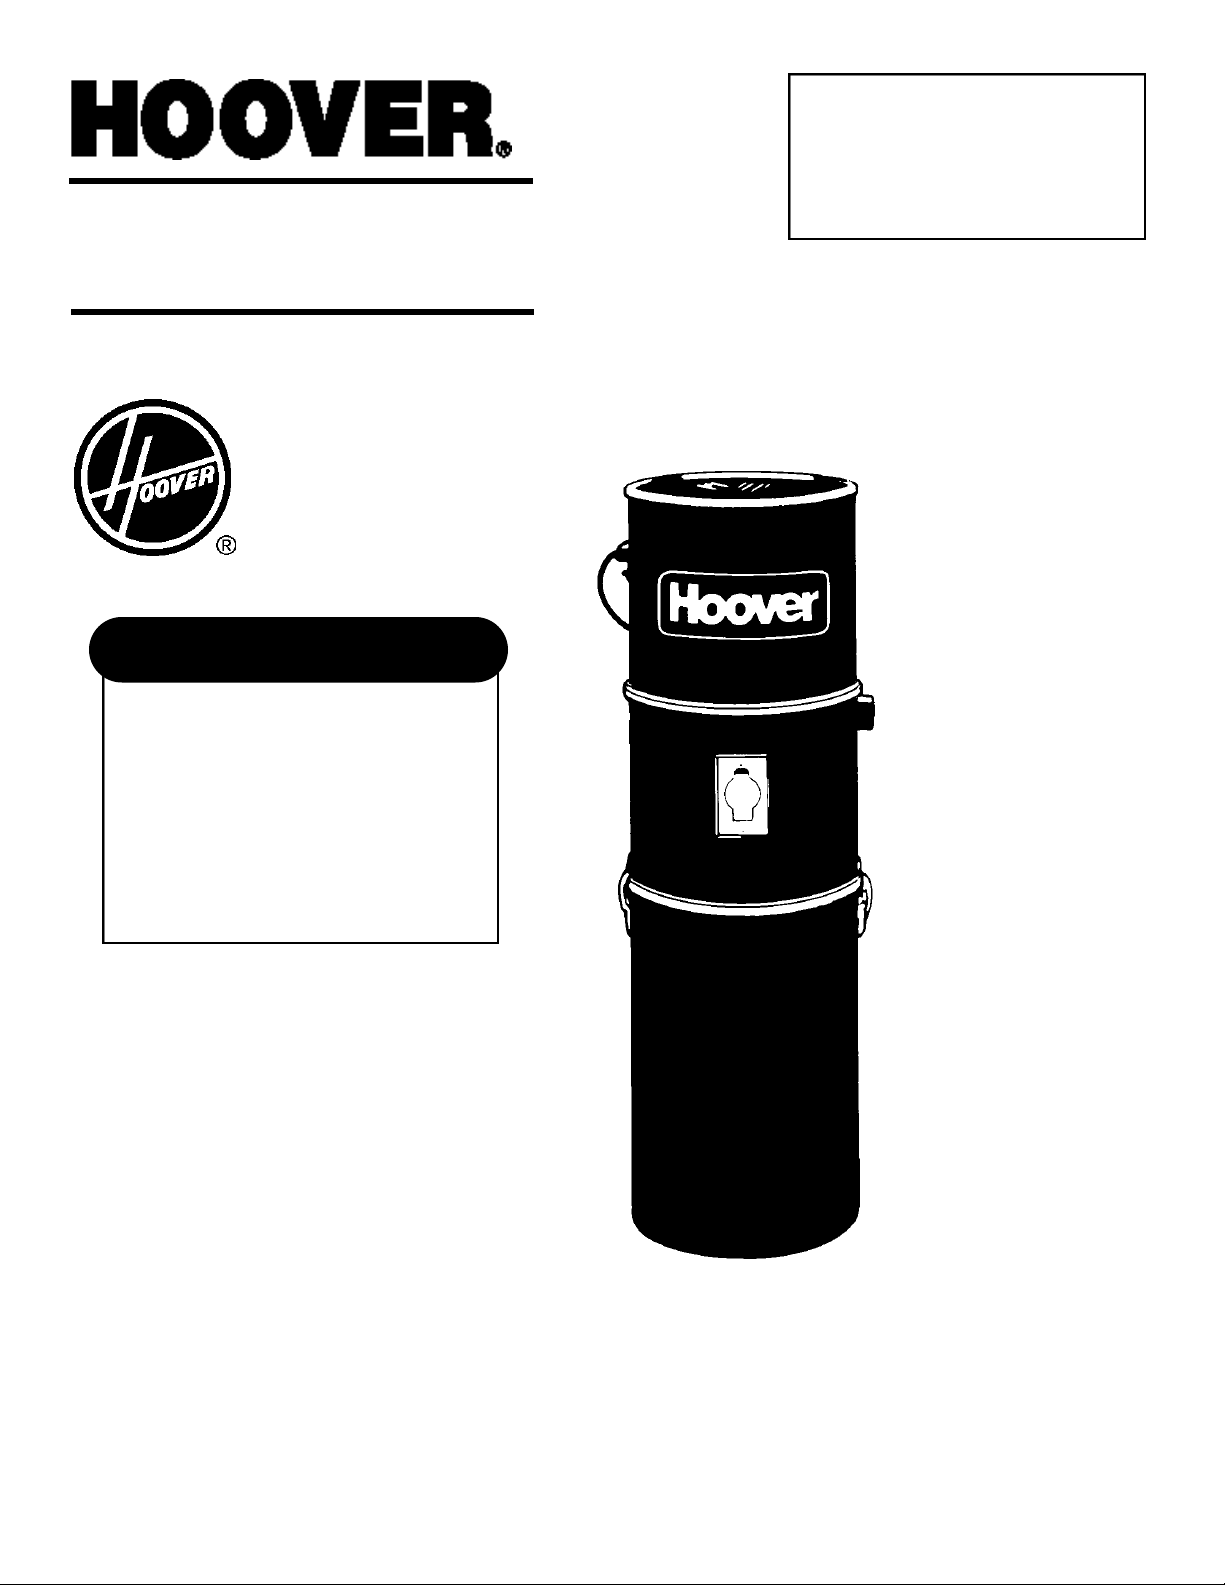
Description
1-3
7. Controls
See right for
details
6.Filtration
Module
1. Motor Module
2. Motor Exhaust
3. Pipe Inlet
4. Utility Inlet
5. Dust Contiainer
Low Voltage
On/Off Switch
Over Load Protector
3
Page 4
2. Installation
POWER CANISTER
Location for Power Canister
The POWER CANISTER can be
mounted in the basement, utility room,
garage or any other remote area, except
where exposed to weather, and convenient to an electrical outlet. The unit
requires ventilation. DO NOT install in a
heat producing or confined area such as
the attic, furnace room, etc. If desired,
the POWER CANISTER can be exhausted to the outside.
The top of the canister should be
no less than 12” (30.5 cm) from the ceiling and no less than 12” (30.5 cm) from
any side wall (excluding the wall on
which model is mounted), to allow proper cooling to the motor. For ease of
removing the dust container, the bottom
of the unit should be at least 18” (46 cm)
above the floor.
Central Vacuum Power Canisters
require a separate/dedicated, 120 Volt,
60Hz., 20 Amp, 3 wire grounded power
circuit, protected by a 120 Volt, 60 Hz.,
AC, 20 Amp time delay fuse or curcuit
breaker and a 120 Volt, 60 Hz., 20 Amp
grounded receptacle.
If a 120 volt, 60 Hz., 20 Amp
grounded receptacle is not available,
have a qualified electrician install one for
you. The receptacle should be no more
than 5 feet (152 cm) from the Power
Canister.
UNDER NO CIRCUMSTANCES SHOULD
AN EXTENSION CORD BE USED WITH
THIS CANISTER.
MOUNTING THE CANISTER
1) Determine if the wall you will be
mounting the canister to is block,
concrete, or plaster/drywall.
2) Block or Concrete Wall
You will need (2) 1-1/2” (3.8 cm) x
1/4” (.64 cm) lead plugs and (2) 1-1/
2” (3.8 cm) x 1/4” (.64 cm) lag bolts.
Drill a 1/2” (1.3 cm) dia. x 1-3/4”
(4.4 cm) deep hole with a masonary
drill bit. Insert a lead plug into the
hole. Mount the bracket from its top
hole with a lag bolt. Mark the lower
hole of the bracket. Make sure that
the bracket is straight. Slide the
bracket away from the mark and drill
a hole directly over the mark.
Insert a lead plug into the hole.
Align the bracket over the hole and
tightly fasten with a lag bolt.
3) Drywall or Plaster Wall
You will need(2) 1-1/2” (3.8 cm) x
1/4” (.64 cm) wood screws. Locate
a stud and drill a 1/8” (.32 cm) dia.
x 1-3/4” (4.4 cm) pilot hole. Mount
the bracket from its top hole with a
wood screw. Make sure that the
bracket is straight. Drill a second
pilot hole and fasten tightly with the
other wood screw.
4) Mount the canister on the bracket.
5) Route the tubing to the canister.
6) Insert the tubing into the canister
inlet no more than 2-1/2” (6.35 cm).
7) Tighten the inlet connection with a
3” (7.6 cm) gear clamp. (Do not
cement pipe to plastic inlet port.)
8) Connect the low voltage wires to the
canister.
9) Plug the unit in.
10) Assuming that the wall inlet valves
are connected, the system is now
ready
3. How to use
To start your Power Canister, simply
plug your hose end into any wall inlet
valve. Both types of wall valves
(Standard and Electrified - Figure 3-1)
are shown below.
3-1
Corded
Hose
Cordless
Hose
If you have a hose without switches, the
Power Canister will start as soon as the
hose is inserted into the wall valve.
If you have a hose with a switch, then
the Power Canister can be turned ON or
OFF with the switch.
HOOVER Power Canisters have built-in
utility valves. This gives you the ability
to vacuum the area around the Power
Canister without the need to install an
additional wall inlet valve to the piping.
To use this feature, insert the hose into
the utility valve. (Note: Power
Canisters made before March 1996 do
not allow Cordless Hoses (Figure B)
to fit the utility valve. Straight Air
Hoses will fit, or the valve can be
replaced with HOOVER Part No.
43526-014, which will allow all
HOOVER hoses to fit.)
The Power Canister can be turned ON
and OFF with the switch found on the
upper section of the motor module.
NOTE: When utility valve is not being
used, the ON/OFF switch should be left
on the OFF position.
for use.
Continued ➜
4
Page 5

4. Maintenance
Disconnect cord from electrical outlet
before cleaning filter.
The only maintenance your power unit
canister requires is emptying of the dust
container as required and periodic
cleaning of the filter.
To clean the filter on models S5671,
S5672, S5673 & S5674:
1) Remove the dirt container.
2) Place a plastic grocery bag over the
dacron/cloth filter and around the
cyclonic deflector that surronds the filter.
3) Using the plastic bag as hand protection from dirt particles, shake the
filter to cause any particles adhering to
the filter to fall into the bag.
4) Replace the dirt container.
To clean the cartridge filter on model
S5675:
1) Remove the dirt container.
2) Unscrew the filter retaining knob,
allowing the filter to slide off its support
bracket.
3) Gently clean the filter with a soft
brush, such as a soft paint brush.
CAUTION: Do not wash. NOTE:
Some discoloration with use is normal.
4) Replace the filter, making sure it is
firmly seated. Replace the retaining
knob and tighten.
5) Replace the dirt container.
If you have a
problem
If a minor problem develops, it usually
can be remedied quite easily when the
cause is found by using the check list
below.
Problem:Cleaner won’t run
Possible cause
Possible solution
• Not firmly plugged in
• Plug in firmly
• No voltage in wall plug
• Check fuse or breaker
• Blown fuse/tripped breaker
• Replace fuse/reset breaker
• Low voltage circuit incorrectly
installed
• Short low voltage terminals at
power unit, if unit starts, there is a
problem with the low volt circuit.
Problem: Suction low
Possible cause
Possible solution
• Filter dirty
• Clean filter
• Obstruction in hose or
cleaning toolls
• Remove obstruction
• System tubing and.or wall
valves incorrectly installed.
• Check for leak and remedy.
* If your unit does not start after resetting
the breaker, check the telephone book
for a HOOVER COMPANY listing; or consult the Yellow Pages of your Telephone
Directory for the nearest location where
approved service and genuine HOOVER
replacement parts may be obtained. For
service under warranty, follow the
instructions in the warranty provided with
this product.
Always identify your cleaner by model
number when requesting information or
ordering replacement parts.
5
Page 6

ATTACHMENT SET - FULLONE YEAR WARRANTY
The power unit of your HOOVER® Central
Vacuum System is warranted in norm a l
household use, in accordance with the
i n s t ructions provided with your power unit,
against original defects in materials and
workmanship for a period of five years fro m
date of purchase. In addition, the suction
motor of the power unit of Model S5673 is
w a rranted for an additional 2 years and the
suction motors of Model S5573 and Model
S5675 are warranted for an additional 5
years against original defects in materials
and workmanship. This warranty applies
when the product is purchased in the United
States including its territories and possessions, or from a U.S. Military Exchange. A
product purchased elsewhere is covered
by a limited warranty which covers the
cost of parts only for the time periods
given above. For Canada, see Canadian
Warranty.
Limited Warranty
(Domestic Use)
Applies in United States Only
POWER UNIT - FIVE YEARS-ALLMODELS
SUCTION MOTOR - FIVE YEARS - MODELS5671
- SEVEN YEARS-Model S5673
- TEN YEARS - Model S5573 & Model S5675
(PACKED WITH ATTACHMENTS)
This warranty does not apply if the
power unit is used in a commercial or
rental application.
This warranty covers all labor and parts
necessary to place the power unit in
correct operating condition during the
warranty period.
Warranty service can only be obtained
by presenting the power unit to a
Hoover Factory Service Center listed on
the back of this warranty. Proof of purchase may be required.
This warranty does not cover pick-up,
delivery or house calls; however, if you
mail your power unit to a Hoover Factory
Service Center for warranty service,
transportation will be paid one way
under this warranty.
This warranty does not cover installation
damages, installation materials, or
damage to the power unit caused by
defective or improper installation of the
Central Vacuum System.
While this warranty gives you specific
legal rights, you may also have other
rights which vary from state to state.
If there are any questions concerning
this warranty, or the availability of warranty service outlets, write or phone the
Consumer Response Center,
The Hoover Company,
101 East Maple Street,
North Canton, Ohio 44720
Phone (330) 499-9499.
HOOVER OWNED SERVICE CENTERS are located in most major cities as listed below. The list is subject to change. Contact Consumer Response
SERVICE
(address and phone number on reverse side) for the latest version. NOTE: DO NOT send products to the main factory in North Canton for repair.
A L A BA M A
The Hoover Company
Plaza at Riverc h a s e
1845 Montgomery Hgwy.
Suite 221
H o o v e r, AL 35244
(205) 942-8661
Fax: (205) 985-7538
P i n e b rook Shpg. Ctr.
3966 Airport Blvd., Suite B
Mobile, AL 36608
(334) 341-0304
Fax: (334) 341-0395
A R I Z O N A
The Hoover Company
3434 West Bell Road
Phoenix, AZ 85023
(602) 439-2751
Fax: (602) 564-0938
4881 E. Speedway Blvd
Tucson, AZ 85712
(520) 795-5612
Fax: (520) 322-6016
C A L I F O R N I A
The Hoover Company
S y c a m o re Plaza
1047 N. State Coll. Blvd.
Anaheim, CA 92806
(714) 635-5710
Fax: (714) 635-8432
Burlingame Plaza Shpg. Ctr.
1803A El Camino Real
Burlingame, CA 94010
(650) 652-7810
Fax: (650)652-7811
S i e rra View Plaza
6487 No. Blackstone Av e .
F resno, CA 93710
(559) 449-8258
Fax: (559) 449-0302
Carson & Orange Plaza
4102 Orange Av e n u e
Unit 108
Long Beach, CA 90807
(562) 424-8623
Fax: (562) 426-9324
1834 Fulton Av e .
Sacramento, CA 95825
(916) 481-4860
Fax: (916) 481-1528
1287 Morena Blvd.
San Diego, CA 92110
(619) 276-9560
Fax: (619) 276-4359
3628 Geary Blvd.
San Francisco, CA 94118
(415) 668-5101
Fax: (415) 668-5976
5126 Stevens Creek Blvd.
San Jose, CA 95129
(408) 243-7060
Fax: (408) 243-2010
Fashion Faire Plaza
15100 Hesperian Blvd.
Suite 112
San Leandro, CA 94578
(510) 278-9880
Fax: (510) 278-0473
C A N A DA
111 West 2nd. Av e .
Va n c o u v e r, B.C. V5Y 1B8
(604) 257-3300
Fax: (604) 257-3303
1589 The Queensway
Unit 5
Etobicoke, ONT M8Z 5W9
(416) 259-3781
Fax: (416) 259-1394
9012 L’Acadie Blvd.
M o n t real, QUE H4N 2Y8
(514) 384-8030
Fax: (514) 384-5940
C O L O R A D O
The Hoover Company
Academy Pl. Shpg. Ctr.
5142 N. Academy Blvd.
Colo. Springs, CO 80918
(719) 260-9988
Fax: (719) 260-8353
Monaco Village, Shpg. Ctr.
2200 S. Monaco Pkwy.
D e n v e r, CO 80222
(303) 757-4904
Fax: (303) 757-2723
F L O R I DA
The Hoover Company
Sunny Isles Sq. Shpg. Ctr.
3067 N.E. 163rd St.
N.Miami Beach, FL 33160
(305) 945-8663
Fax: (305) 948-9025
G reenwood Shpg.Ctr.
1678 S. Congress Av e .
Lake Wo rth, FL 33461
(561) 439-3300
Fax: (561) 439-0265
Home Depot Plaza
10045 US Highway 19
Suite #108
P o rt Richey, FL 34668
(813) 869-3599
Fax: (813) 869-2006
G E O R G I A
The Hoover Company
Doraville Plaza Shpg. Ctr.
5750-B Buford Hwy.
Doraville, GA 30340
(770) 454-8136
Fax: (770) 457-2317
The Hoover Company
11060 Alphare t t a
H i g h w a y
Suite #144
Roswell, GA 30076
(770) 649-0425
Fax (770) 649-0704
H AWA I I
The Hoover Company
1311 Kapiolani Blvd.
Room No. 103
Honolulu, Hl 96814
(808) 591-2428
Fax: (808) 593-8327
I L L I N O I S
The Hoover Company
Winston Plz. Shpg. Ctr.
1372 Winston Plaza
M e l rose Park, IL 60160
(708) 344-3800
Fax: (708) 344-3853
N. Mayfair Commons
5240 N. Pulaski Rd
Suite L
Chicago, IL 60630
(773) 279-0845
Fax: (773) 279-8975
Burbank Square
8531 South Harlem Av e .
Burbank, IL 60459
(708) 430 7440
Fax: (708) 430-4018
I N D I A N A
The Hoover Company
514 W. McKinley Av e .
Mishawaka, IN 46545
(219) 255-7564
Fax: (219) 258-1129
I OWA
The Hoover Company
Walnut Center Shpg. Ctr.
4811 North Brady St.
Suite 4
D a v e n p o rt, IA 52807
(319) 386-3922
Fax: (319) 386-9420
K E N T U C K Y
The Hoover Company
4131 Shelbyville Rd.
Louisville, KY 40207
(502) 895-4775
Fax: (502) 895-9874
L O U I S I A N A
The Hoover Company
3120 Cleary Av e .
Metairie, LA 70002
(504) 888-1851
Fax: (504) 888-0752
M A RY L A N D
The Hoover Company
Belair Beltway Plaza
7632 Belair Road
B a l t i m o re, MD 21236
(410) 668-8100
Fax: (410) 668-9228
The Festival at
Muddy Branch
305 Muddy Branch Rd.
G a i t h e r s b u rg, MD 20878
(301) 948-0864
Fax: (301) 948-0866
M A S S AC H U S E T T S
The Hoover Company
S h e rwood Plaza
1320 Wo rcester Stre e t
Natick, MA 01760
(508) 655-7760
Fax: (508) 655-7303
M I C H I G A N
The Hoover Company
Campbell Cor. Shpg. Ctr.
1423 West 14 Mile Road
Madison Hgts., Ml 48071
(248) 588-3030
Fax: (248) 588-7714
M I N N E S OTA
The Hoover Company
Knollwood Vil. Shpg, Ctr.
8922Highway 7
St. Louis Park, MN 55426
(612) 935-0091
Fax: (612) 935-0462
Bullseye Plz. Shpg, Ctr.
1539 W. Larpenteur Av e .
St. Paul, MN 55113
(612) 644-8684
Fax: (612) 644-6621
M I S S O U R I
The Hoover Company
201 East Gre g o ry
Kansas City, MO 64114
(816) 333-7440
Fax: (816) 333-3184
General Grant Shpg. Ctr.
8430 Watson Road
St. Louis, MO 63119
(314) 849-2444
Fax: (314) 849-2434
N E B R A S K A
The Hoover Company
Plaza ll Shpg. Ctr.
2449 S. 120th Stre e t
Omaha NE 68144
(402) 330-2290
Fax: (402) 330-7675
NEW MEXICO
The Hoover Company
Ross Plaza Shpg. Plaza
4770 Montgomery Blvd.NE
Suite A-102
A l b u q u e rque, NM 87109
(505) 883-0800
Fax: (505) 883-4970
NEW YO R K
The Hoover Company
Sheridan Centre
3336 Sheridan Drive
Amherst, NY 14226
(716) 831-0153
Fax: (716) 833-2423
71-45 Austin Stre e t
F o rest Hills, NY 11375
(718) 544-4240
Fax: (718) 544-4253
Caldor Plaza Shpg. Ctr.
3523 A Hempstead Trn p k .
Levittown, NY 11756
(516) 520-1233
Fax: (516) 520-1293
1577 Ridge Road We s t
R o c h e s t e r, NY 14615
(716) 865-7190
Fax: (716) 865-7214
N o rt h e rn Lights Shpg. Ctr.
320 Nort h e rn Lights Plaza
No. Syracuse, NY 13212
(315) 454-4682
Fax: (315) 454-4782
N O RTH CARO L I N A
The Hoover Company
Four Seasons Plaza
6449 Albemarle Road
Charlotte, NC 28212
(704) 568-0371
Fax: (704) 568-4283
O H I O
The Hoover Company
Mellet Plaza
3812 West Tu s c a r a w a s
Canton, OH 44708
(330) 477-1322
Fax: (330) 477-1034
8068 Hamilton Av e .
Cincinnati, OH 45231
(513) 522-7575
Fax: (513) 522-7580
Morse Center Shpg. Ctr.
4578 Morse Centre Dr.
Columbus, OH 43229
(614) 848-4110
Fax: (614) 848-3857
Alex Bell Plaza
5688 Springboro Road
Dayton, OH 45449
(513) 299-0569
Fax: (513) 299-0576
Springvalley Plaza
6819 Springvalley Dr.
Holland, OH 43528
(419) 865-1227
Fax: (419) 865-6334
Ridge & Day Plaza
6859 Ridge Rd.
P a rma, OH 44129
(440) 884-5111
Fax: (440) 884-5214
B o a rdman Plz. Shpg. Ctr.
229 Boardman-Canfield Rd.
Youngstown, OH 44512
(330) 758-1828
Fax: (330) 758-1332
O K L A H O M A
The Hoover Company
3710 N.W. 50th St.
Oklahoma City,OK 73112
(405) 947-4436
Fax: (405) 947-0886
P E N N S Y LVA N I A
The Hoover Company
G rt. Southern Shpg. Ctr
Washington Pike
S t o re #16
Bridgeville, PA 15017
(412) 221-4568
Fax: (412) 221-0145
Lincoln Ct. Shpg. Cntr.
245 Lancaster Pike
F r a z e r, PA 19355
(610) 651-0570
Fax: (610) 651-0572
5207 Jonestown Road,
S t o re #201
H a rr i s b u rg, PA 17112
(717) 540-8055
Fax: (717) 540-8577
T E N N E S S E E
The Hoover Company
8078 Kingston Pike
Suite 113
Knoxville, TN 37919
(423) 690-0785
Fax: (423) 694-9985
Elysian Fields Shpg. Ctr.
3973 Nolensville Road
Nashville, TN 37211
(615) 331-2192
Fax: (615) 832-1025
T E X A S
The Hoover Company
13536 Preston Rd.
Suite 100
Dallas, TX 75240
(972) 503-9494
Fax: (972) 503-9496
R a n d a l l ’s Center
F o n d ren Road Plaza
7060 Bissonnet
Houston, TX 77074
(713) 334-0199
Fax: (713) 334-1341
N o rth Towne Plaza
Shpg. Ctr.
6900 San Pedro Suite 137
San Antonio, TX 78216
(210) 829-1906
Fax: (210) 805-0612
V I R G I N I A
The Hoover Company
Sassafras Square We s t
9039-5 W. Broad Stre e t
Richmond, VA 23294
(804) 747-8249
Fax: (804) 747-3395
WA S H I N G TO N
The Hoover Company
Parkwood Plz. Shpg. Ctr.
1 5 2 1 4 AA u rora Ave., N
Seattle, WA 98133
(206) 367-4425
Fax: (206) 367-0632
No. 2911 Monro e
Spokane, WA 99205
(509) 328-9514
Fax: (509) 328-9562
WEST V I R G I N I A
The Hoover Company
R i v e rwalk Plz. Shpg, Ctr.
16 Riverwalk Plaza
S. Charleston, WV 25303
(304) 744-4748
Fax:(304) 744-4779
W I S C O N S I N
The Hoover Company
Ashwaubenon Plaza
2791 South Oneida St.
Ashwaubenon, Wl 54304
(920) 494-9441
Fax: (920) 494-5059
The Hoover Company
Midvale Plaza
505 S. Midvale Blvd.
Madison, Wl 53711
(608) 238-3470
Fax: (608) 238-0120
S e n t ry Plaza Shpg. Ctr.
10244 W. National Av e .
West Allis, Wl 53227
(414) 327-7430
Fax: (414) 327-9875
6
Page 7

APPLIES IN CANADA
ONLY
WARRANTY
HOOVER DOMESTIC
FLOORCARE APPLIANCE
THE EXCEPTIONAL
WARRANTY
WITHOUT EXCEPTION*
Afull warranty on all parts and labour in
accordance with the chart on the following
page.
Notwithstanding any other provision in this
warranty or any applicable statutory provi-
sions, neither the Company nor the
Purchaser shall be liable to the other for special or consequential damages or damages
for loss of use arising directly or indirectly
from any breach of this contract, fundamental or otherwise or from any tortious acts or
omissions of their respective employees or
agents. In no event shall the liability of the
Company exceed the unit price of any part
or parts which are defective or are not deliv-
ered.
Subject to any other warranty packed with
the product, this express warranty is the only
warranty applicable to your HOOVER
DOMESTIC FLOORCARE APPLIANCE
and is expressly in lieu of any warranty otherwise implied by law, including, but not
limited to, implied warranties or mer-
chantability or fitness for any particular pur-
pose. The remedies available under this
express warranty shall be the only remedies
available to the purchaser. Hoover Canada
neither assumes, nor authorizes anyone to
assume for it, any other responsibility related
to the sale of HOOVER DOMESTIC
FLOORCARE APPLIANCES.
This warranty is void if repairs are per-
formed by unauthorized persons or if other
than genuine Hoover replacement parts or
accessories are used.
THE EXCEPTIONALWARRANTY WITHOUT EXCEPTION*
HOOVER CENTRAL VACUUM PRODUCTS
CENTRALVACUUM CLEANING ATTACHMENTSETS
1
5
7
1 0
*Normal domestic use only.
Hoover Warranties are honoured at authorized warranty depots across Canada. For in-warranty
or regular service, contact a Hoover authorized service depot nearest you. These dealers are listed in the yellow pages of your telephone directory under the heading of Vacuum Cleaners Household.
AUTHORIZED WARRANTYSERVICE DEALERS are listed in the directory as in the following example:
IFFURTHER ASSISTANCE IS NEEDED IN CANADA, CONTACT:
HOOVER CANADA, 4151 NORTH SERVICE ROAD,
BURLINGTON,ONTARIO L7R 4A8 1-800-263-6376
Full one year warranty covers everything including belts,
brushes and bulbs.
MODELS5671, S5672
CENTRALVACUUM POWER UNIT
Afull five year warranty on all parts and labour.
MODELS5673, S5674
CENTRALVACUUM POWER UNIT
Afull five year warranty on all parts and labour
PLUS AN EXTENDED WARRANTY
FOR TWO YEARS ON THE MOTOR.
MODELS5675 and S5573
CENTRALVACUUM POWER UNIT
Afull five year warranty on all parts and labour
PLUS AN EXTENDED WARRANTY
FOR FIVE YEARS ON THE MOTOR.
HOOVER APPLIANCES
AUTHORIZED WARRANTY
SERVICE CENTER
SMITH VACUUM CLEANER SALES & SERVICE
123 ANYSTREET — 123-4567
* For commercial or rental use, the
warranty is limited to three (3) months
from date of purchase.
“This warranty is not applicable to
Hoover products sold in those Provinces
which have consumer legislation which
specifies mandatory warranty provisions
limiting and defining warranty provisions.”
HOOVER CANADA,
BURLINGTON, ONTARIO
L7R 4A8
1-800-263-6376
7
Page 8

À conserver!
Pour réduire les risques d’incendie, de décharges
électriques et de blessures :
À remplir et à conserver
L’aspirateur central HOOVER unité motrice le montage est permanent.
Pour vos dossiers personnels, veuillez inscrire les numéros de modèle et de
série dans les espaces réservés ci-dessous et conserver ce mode d’emploi
en lieu sûr.
Unité motrice : N° de modèle__________ N° de série
(voir sur le côté de l’unité motrice.)
Veuillez conserver votre reçu de caisse avec ce mode d’emploi. La date
d’achat pourrait être exigée ultérieurement.
CONSEILS DE SÉCURITÉ !
En utilisant un appareil électrique, il faut toujours prendre certaines précautions,
dont les suivantes :
LISEZ TOUT LE MODE D’EMPLOI AVANT D’UTILISER L’APPAREIL
Index
Description de
l’aspirateur central.......................3
Instructions pour la
mise a la terre..............................4
Emplacement et méthode
d’installation de l’aspirateur ........5
Mode d’emploi ............................6
Conseils de sécurité....................2
Entretien ......................................7
Recherche des pannes...............8
Attention:
• N’utilisez pas cet appareil sur une surface humide.
• Branchez-le uniquement à une prise électrique avec mise à la terre. Voir les
“Instructions de mise à la terre”.
• Une surveillance rigoureuse est nécessaire lorsqu’un appareil électrique est utilisé
par des enfants ou près d’eux. Ne les laissez pas jouer avec l’aspirateur et ne
laissez jamais fonctionner l’appareil sans surveillance.
• Ne laisser pénétrer aucun objet dans les prises murales.
• Ne tirez ni ne portez jamais l’appareil par son cordon; n’utilisez pas ce dernier
comme une poignée; ne refermez pas de porte sur lui et ne le tirez pas autour d’un
objet ou d’un coin vif. Ne faites pas rouler l’aspirateur sur le cordon. Gardez le
cordon éloigné de toute surface chaude.
• N’aspirez aucun objet qui brule ou qui fume : cigarette, allumette ou cendres
chaudes.
• N’aspirez aucun liquide inflammable, comme l’essence, et ne faites pas fonctionner
l’aspirateur en présence d’un tel liquide.
• Débranchez l’aspirateur lorsqu’il ne sert pas. Éteignez complètement l’appareil
avant de le débrancher.
• Débranchez toujours la fiche de la prise de courant avant de procéder à l’entretien
de l’aspirateur.
• En débranchant le cordon de la prise de courant, tenez la fiche pour éviter
d’endommager le cordon, la fiche, les broches ou la prise de courant. Ne maniez
jamais un appareil ou une fiche avec des mains mouillées.
• Faites très attention en nettoyant des escaliers.
• Ne pas utiliser si le filtre n’est pas en place. Vider le réservoir et nettoyer le filtre
régulièrement après avoir recueilli des matériaux en fines particules comme de la
poudre.
• Ne placez aucun objet dans les ouvertures et n’utilisez pas l’appareil si certaines
ouvertures sont bouchées. Débarrassez souvent les ouvertures de ce qui pourrait
réduire le débit d’air : poussière, charpie, cheveux.
• N’utilisez pas l’aspirateur en cas de dégâts au cordon ou à la fiche. Si l’aspirateur
ne fonctionne pas correctement, est tombé, endommagé, a été laissé à l’extérieur ou
a été immergé, apportez-le à un centre de service Hoover ou chez un réparateur
agréé par Hoover.
• L’aspirateur ne doit servir que pour ses utilisations prévues, telles que décrites dans
le mode d’emploi. Utilisez seulement les accessoires recommandés par le fabricant.
En utiliser d’autres peut être dangereux.
Lors de l’emploi des accessoires, prière d’observer les mesures de
précaution suivantes :
• Ne pas utiliser la buse motorisée à l’extérieur.
• Gardez vos mains, pieds, vêtements et cheveux éloignés des ouvertures de
l’appareil, de l’agitateur et de toute autre pièce en mouvement. N’utilisez jamais la
buse pieds nus ou en portant des chaussures à ajours ou des sandales.
• Détacher le boyau de sa prise murale et débrancher le cordon électrique lorsque
8
Page 9

• Le boyau contient des fils électriques.
N’utilisez pas l’aspirateur si le boyau
est endommagé, coupé ou percé.
Éviter d’aspirer des objets tranchants.
• Débranchez toujours la fiche de la
prise de courant avant d’assembler ou
de démonter le boyau de la buse
motorisée.
1. Mode d’emploi!
DESCRIPTION DE
L’ A S P I R ATEUR CENTRAL
Commandes
Vior les détails ce-dessous
Boîtier de filtration
Boîtier moteur
Sortie d’air du moteur
Raccord d’entrée du tuyau
Prise d’aspiration utilitaire
Collecteur de poussière
Basse tension
Protection contre les surcharges
Contacteur marche/arrêt
Ne faire fonctionner l’aspirateur que
sous la tension spécifiée sur l’aspirateur central.
Cet aspirateur est prévu pour un
usage ménager.
Instructions pour
la mise a la terre
Il faut relier cet appareil à la terre.
En cas de défaillance ou de panne, la
terre fournit un parcours de plus faible
résistance pour le courant électrique afin
de diminuer la risque de secousses
électriques. L’appareil est équipé d’un
cordon d’alimentation à fil de terre et
d’une fiche comportant une broche de
terre (A). Il faut absolument brancher
l’appareil dans une prise adaptée (B)
convenablement montée et reliée à la
terre conformément à tous les codes et
décrets locaux.
DANGER-
Un branchement incorrect du fil de terre
de l’appareil peut avoir pour conséquence un risque d’électrocution.
S’adresser à un électricien agréé ou à
un employé qualifié du service d’entretien si l’on n’est pas certain que la prise
est conven-ablement mise à la terre. Ne
pas modifier la fiche fournie avec l’appareil: si elle ne rentre pas dans la
prise, faire installer une prise convenable
9
par un électricien qualifié. Cet appareil
doit s’utiliser sur un circuit de tension
nominale 120 V et est muni d’une fiche
qui ressemble à celle représentée dans
le schéma (A).
Il est possible d’utiliser un adaptateur
Provisoire (C) pour brancher cette fiche
à une prise à 2 pôles (D) si on ne dispose pas d’une prise convenablement
mise à la terre. Il ne faut utiliser l’adaptateur Provisoire que jusqu’à l’installation d’une prise convenablement mise à
la terre (B) par un électricien qualifié. Il
faut relier le petit cavalier rigide verte,
l’oeillet ou toute forme semblable dépassant de l’adaptateur à une terre permanente comme le couvercle d’une prise
convenablement mise à la terre. Il faut,
toutes les fois que l’on utilise un adapta-
teur, le maintenir en place par une vis
métallique.
NOTE: Au Canada, l’utilisation d’un
adaptateur temporaire n’est pas
autorisée par le Code Canadien de
l’Électricité.
2. D’INSTALLATION
EMPLACEMENT PRÉCONISÉ
L’ASPIRATEUR peut être monté dans un
sous-sol, une buanderie, un garage ou
tout autre emplacement qui le protège
des intempéries, et à portée commode
d’une prise électrique. Cet appareil
exige une bonne ventilation. NE PAS
installer l’appareil dans un endroit
restreint ou exposé à la chaleur, comme
un grenier, à côté d’un appareil de
chauffage, etc. Au besoin la sortie d’air
du moteur peut être reliée à un évent
extérieur.
Afin de permettre au moteur de refroidir
convenablement, la partie supérieure du
boîtier ne devrait pas se trouver à moins
de 12 po (30,5cm) du plafond ni à moins
de 12 po (30,5 cm) d’un mur (à l’exception du mur sur lequel l’appareil est
installé). Pour que le filtre à poussière
s’enlève aisément, la partie inférieure de
l’appareil ne devrait pas se trouver à
moins de 18 po (45,7cm) du sol.
L’aspirateur central nécessite un circuit
spécial indépendant à 3 fils, relié à la
terre, de 120 volts, 60 hertz et 20
ampéres, protégé par un fusible temporisé de 120 V, 60 Hz et 20 A, ainsi
qu’une prise de 120 V, 60 Hz et 20 A,
reliée à la terre.
Si une prise de courant résidentielle de
120 volts, 60 Hz, 20 ampères conven-
ablement mise à la terre n’existe pas à
proximité de l’appareil, en faire poser
une par un électricien compétent. La
prise murale ne doit pas être à plus de
152 cm (5 pi) du branchement électrique de l’aspirateur.
NE JAMAIS UTILISER DE RALLONGE
ÉLECTRIQUE AVEC CET APPAREIL.
INSTALLATION DE
L’ASPIRATEUR
1) Déterminer si le mur sur lequel l’aspi
rateur doit être monté est construit
en blocs de ciment, en béton ou en
plaques de plâtre.
2) Murs en blocs de ciment ou en béton
Se procurer 2 chevilles en plomb de
3.8 cm (1 1/2 po) x 0.64 cm (1/4
po) et 2 boulons de 3.8 cm (1 1/2 po)
x 0,64 cm (1/4 po). Percer un trou
de 1,3 cm (1/2 po) de diamètre et 4,4
cm (1 3/4 po) de profondeur avec
un foret à maçonnerie. Placer une
cheville en plomb dans le trou.
Monter le support par son trou
supérieur avec un boulon. Repérer
la position du trou inférieur du sup
port et s’assurer que le support est
droit. Dégager le support du repère
tracé sur le mur et percer un trou
directement sur le repère. Placer
une cheville en plomb dans le trou.
Centrer le support sur le trou et fixer
fermement avec un boulon.
3) Mur en plaques de plâtre Se procurer
2 vis à bois de 3.8 cm (1 1/2 po) x
0.64 cm (1/4 po).
Localiser la position d’un montant
dans le mur et percer un tou de 0,32
cm (1/8 po) de diamètre et de 4,4 cm
(1 3/4 po) de profondeur. Monter
le support par son trou supérieur
avec une vis à bois. S’assurer que le
support est droit. Percer un second
trou et fixer fermement avec l’autre
vis à bois.
4) Monter l’aspirateur sur le support.
5) Relier le tuyau à l’aspirateur.
6) Engager le tuyau dans la prise d’entrée de l’aspirateur sans dépasser
6,35 cm (2 1/2 po).
7 ) S e rrer le raccord de la prise d’entrée
avec un collier à vis de 7,6 cm (3 po).
(Ne pas cimenter le tuyau à la fenêtre
de plastique.)
8) Brancher les fils à basse tension à
l’aspirateur.
9) Brancher l’aspirateur dans la prise
murale.
10)En supposant que les prises d’aspiration murales sont convenablement
reliées, l’aspirateur est alors prêt à
fonctionner.
Page 10

3. ENTRETIEN
Débranchez toujours la fiche de la
prise de courant avnat de mettoyer le
filtre.
Le seul entretien requis par votre aspirateur central consiste à vider le collecteur
de poussière lorsque nécessaire et à
nettoyer périodiquement le filtre.
Pour nettoyer le filtre des modèles
S5671, S5672, S5673 et S5674
1. Déposez le collecteur de poussière.
2. Placez un sac en plastique sous le
filtre en tissu et Dacron et autour du
déflecteur cyclonique qui entoure le
filtre.
3. En utilisant le sac en plastique
comme protection contre la chute
des matières accumulées, secouez
le filtre pour faire tomber dans le sac
les matières qui adhèrent au filtre.
4. Reposez le collecteur de poussière.
Pour nettoyer la cartouche filtrant du
modèle S5675
1. Déposez le collecteur de poussière.
2. Dévissez le bouton de fixation du
filtre et laissez descendre le filtre de
son support.
3. Nettoyez soigneusement le filtre avec
une brosse douce, tel un pinceau
à peinture à poils fins. Attention:
Ne pas laver le filtre. Nota: Avec le
temps, la décoloration du filtre est
normale.
4. Replacez le filtre en vous assurant
qu’il est bien placé. Reposez le
bouton de fixation et vissez-le
fermement.
5. Reposez le collecteur de poussière.
RECHERCHE
DES PANNES
L’appareil a été attentivement vérifié et
était en bon état de marche au moment
de son expédition d’usine. En cas de
panne mineure, il est généralement très
facile d’y remédier, lorsque la cause est
identifiée. En conséquence, la liste cidessous a été préparée pour votre commoditié.
Probleme: L’aspirateur ne
fonctionne pas
Cause Po s s i ble
Solutions Possibles
• M a u vais branchement électrique.
• Brancher corre c t m e n t .
• Le tuyau d’aspiration n’est pas
bien branché dans l’appareil.
• Brancher le tuyau convenablement.
• Pas de courant à la prise mu r a l e.
• Vérifier le coup-circuit ou le fusible.
• F u s i ble grillé/coupe circuit
d é cl e n ch é * .
• Remplacer le fusable ou reclencher
le coupe-circ u i t .
• M a u vais branchement du circuit
basse tension.
• Relier ensambles les bornes basse
tension de l’appareil avec un fil
volant. Si l’appareil se met en
m a rche, le circuit basse tension est
en cause.
Probleme: L’aspiration est
insulfisante
Cause Po s s i ble
Solutions Possibles
• Filtre sale.
• Nettoyer le filtre.
• Obstructione dans le tuyau
d’aspiration ou les accessoires
de nettoyage
• Éliminer les obstructions.
• Tubes ou prises d’aspiration
murales mal montés.
• Rechercher les fuites d’air et y
remédier.
* Si l’aspirateur ne fonctionne toujours
pas après voir renclenché le coupe-circuit, communiquer avec le bureau local
de la COMPAGNIE HOOVER ou consulter les Pages Jaunes de l’annuaire téléphonique pour trouver le centre de service approuvé le plus proche pour faire
effectuer les réparations avec des
pièces d’origine HOOVER. Pour toute
réparation sous garantie, respecter les
directives données dans la garantie
livrée avec cet appareil.
Toujours identifier l’aspirateur en indiquant le numéro de modèle, lors de
toute demande de reseignement ou
pour la commande des pièces de
rechange.
10
Page 11

11
Page 12

HOOVER et sont des marques déposées
THE HOOVER COMPANY, NORTH CANTON, OHIO 44720
HOOVER and are registered trademarks
THE HOOVER COMPANY,NORTH CANTON, OHIO 44720
R4 3/99 S5573, S5671/73/75 Imprimé aux E. -U.A. 56513-334
 Loading...