


FCC Compliance Statement
This equipment has been tested and found to comply with the limits for a Class B
digital device, pursuant to part 15 of the FCC Rules. These limits are designed to
provide reasonable protection against harmful interference in a residential installation.
This equipment generates uses and can radiate radio frequency energy and, if not
installed and used in accordance with the instructions, may cause harmful
interference to radio communications. However, there is no guarantee that
interference will not occur in a particular installation. If this equipment does cause
harmful interference to radio or television reception, which can be determined by
turning the equipment off and on, the user is encouraged to try to correct the
interference by one or more of the following measures:
• Reorient or relocate the receiving antenna.
• Increase the separation between the equipment and receiver.
• Connect the equipment into an outlet on a circuit different from that to which the
receiver is connected.
• Consult the dealer or an experienced radio/TV technician for help.
Use of Trademarks, Registered Trademarks, and other Protected Names and Symbols
This manual may make reference to trademarks, registered trademarks, and other
protected names and/or symbols of third-party companies not related in any way to
HooToo.com. Where they occur these references are for illustrative purposes only and
do not represent an endorsement of a product or service by HooToo.com, or an
endorsement of the product(s) to which this manual applies by the third-party
company in question. Regardless of any direct acknowledgement elsewhere in the
body of this document, HooToo.com hereby acknowledges that all trademarks,
registered trademarks, service marks, and other protected names and/or symbols
contained in this manual and related documents are the property of their respective
holders.

Table of Contents
INTRODUCTION ..................................................................................................... 2
PACKAGING CONTENTS ..................................................................................................... 2
SYSTEM REQUIREMENTS ................................................................................................... 2
DIAGRAM .............................................................................................................. 3
FRONT ........................................................................................................................... 3
BACK ........................................................................................... 错误!未定义书签。
INSTALLATION........................................................................................................ 3
REPEATER MODE SETUP: .................................................................................................. 4
ACCESS POINT MODE SETUP: ............................................................................................ 8
ADVANCED CONFIGURATION ............................................................................... 11
WIRELESS ..................................................................................................................... 12
LAN INTERFACE ............................................................................................................ 16
MANAGEMENT ............................................................................................................. 16
SAVE/RELOAD SETTINGS ................................................................................................. 18
REBOOT ....................................................................................................................... 18
SPECIFICATIONS ................................................................................................... 19
TECHNICAL SUPPORT ........................................................................................... 20
WARRANTY INFORMATION .................................................................................. 20
LIMITATION OF LIABILITY ................................................................................................. 20
1

Introduction
The HT-WR01 300Mbps Wireless-N WiFi Access Point and Repeater has two selectable
modes for extending the range of existing wireless networks or adding wireless
capabilities to a non-wireless network. Using a wall plug design, this allows for
convenient or hidden placement anywhere there is an available AC outlet. As a
wireless repeater, the effective range of any 802.11n WiFi network can be increased,
while still providing up to 300Mbps of data bandwidth. This WiFi signal booster can help
eliminate dead spots and provide a stronger signal in areas with obstructions that can
reduce the range of a wireless signal. The WiFi range extender is also backward
compatible with 802.11b/802.11g networks. As a wireless access point (AP), any
non-wireless router can be given wireless-N capabilities. Built in wireless security
(WEP/WPA/WPA2) will help to keep the network private. Backed by a HooToo.com
1-year warranty and free lifetime technical support.
Packaging Contents
• 1x Wireless-N Repeater
• 1x RJ45 Ethernet Cable
• 1x Instruction Manual
System Requirements
• Available AC electrical outlet
Repeater Mode:
• IEEE 802.11B or G or N compliant wireless access point (AP)
Access Point Mode:
• IEEE 802.3i/802.3u (10/100 Mbps) compliant network router
• RJ45 terminated UTP Ethernet cable
2
Diagram
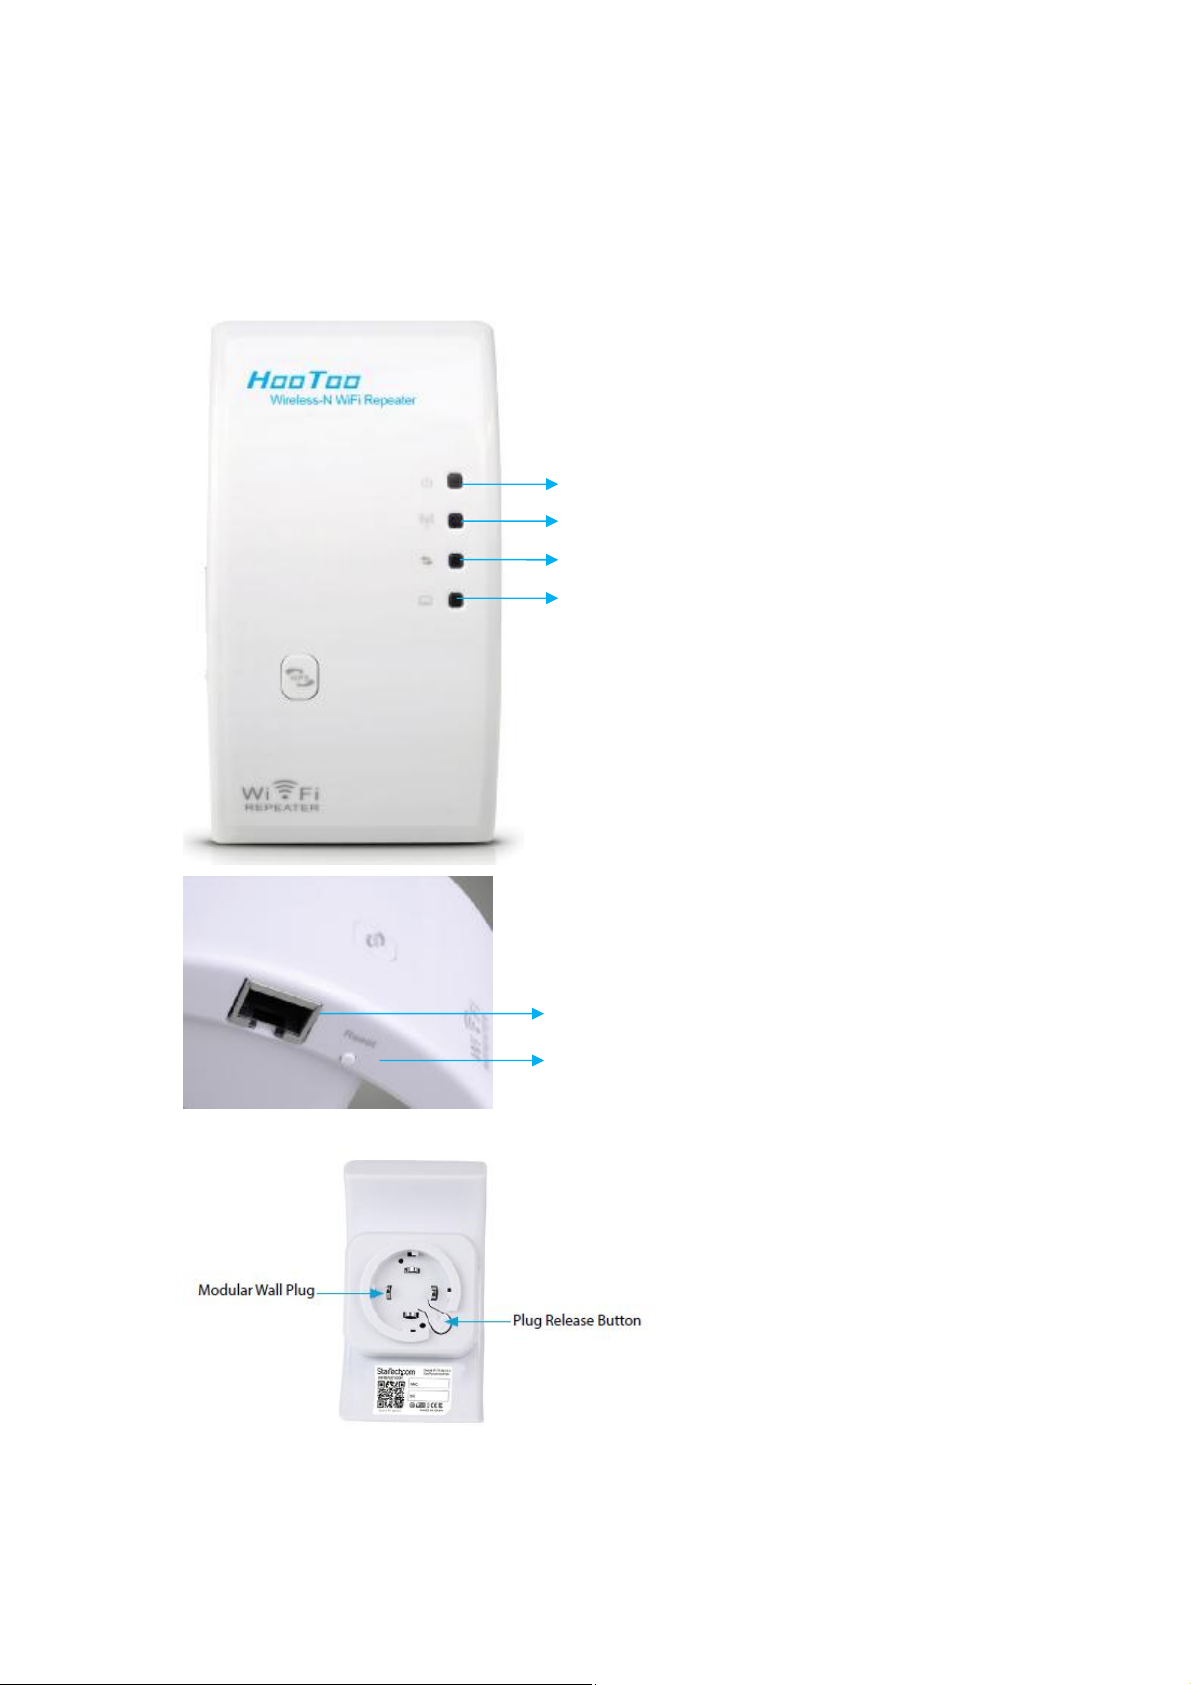
Front
Power
Wireless Link/Activity
WPS
Ethernet Link/Activity
RJ45 Ethernet Port
Reset Button
3

Installation
Repeater Mode Setup:
Step 1. Connect the Repeater to an available AC electrical outlet.
Step 2. Two Options:
a. Wired Setup: Connect an RJ45 Ethernet cable from the Repeater to your computer.
(Then go to step 3)
b. Wireless Setup: Connect to the wireless network ‘WiFi-Repeater’ (then go to step 4).
Step 3. The default IP address on the Repeater is 192.168.10.1; configure your
computer to a matching network address (192.168.10.x, where ‘x’ is between 2~255)
with subnet set to 255.255.255.0 and gateway to 192.168.10.1. See below:
Windows:
1. Open control panel, open the network section.
2. Or you can right click on the windows bar and select Open network and sharing option
3. Click on Change Adapter Setting
4. Select your Ethernet card and then select properties
5. Under Networking tab find "Internet Protocol Version 4" then select properties
6. Enter the following:
IP Address: 192.168.10.X (where ‘x’ is between 2~255)
Subnet mask: 255.255.255.0
Default gateway: 192.168.10.1
Press APPLY then Ok then REBOOT your computer/laptop for the new settings to take effect.
Mac
1. Click the Apple menu located at the top left corner of the screen, then select System
Preferences.
2. On the System Preferences window, click the Network icon.
3. On the Network window, select Automatic and Built-in Ethernet on the Location and Show
drop-down fields, respectively.
4. Select Manually on the Configure IPv4 drop-down field. Enter the following:
IP Address: 192.168.10.X (where ‘x’ is between 2~255)
Subnet mask: 255.255.255.0
Router: 192.168.10.1
5. Click Apply Now to save the changes
Step 4. Open a web browser window and enter 192.168.10.1 into the address bar. This
will bring up the login prompt for the Repeater. The default user name and password
4
are ‘admin’ (without quotes).
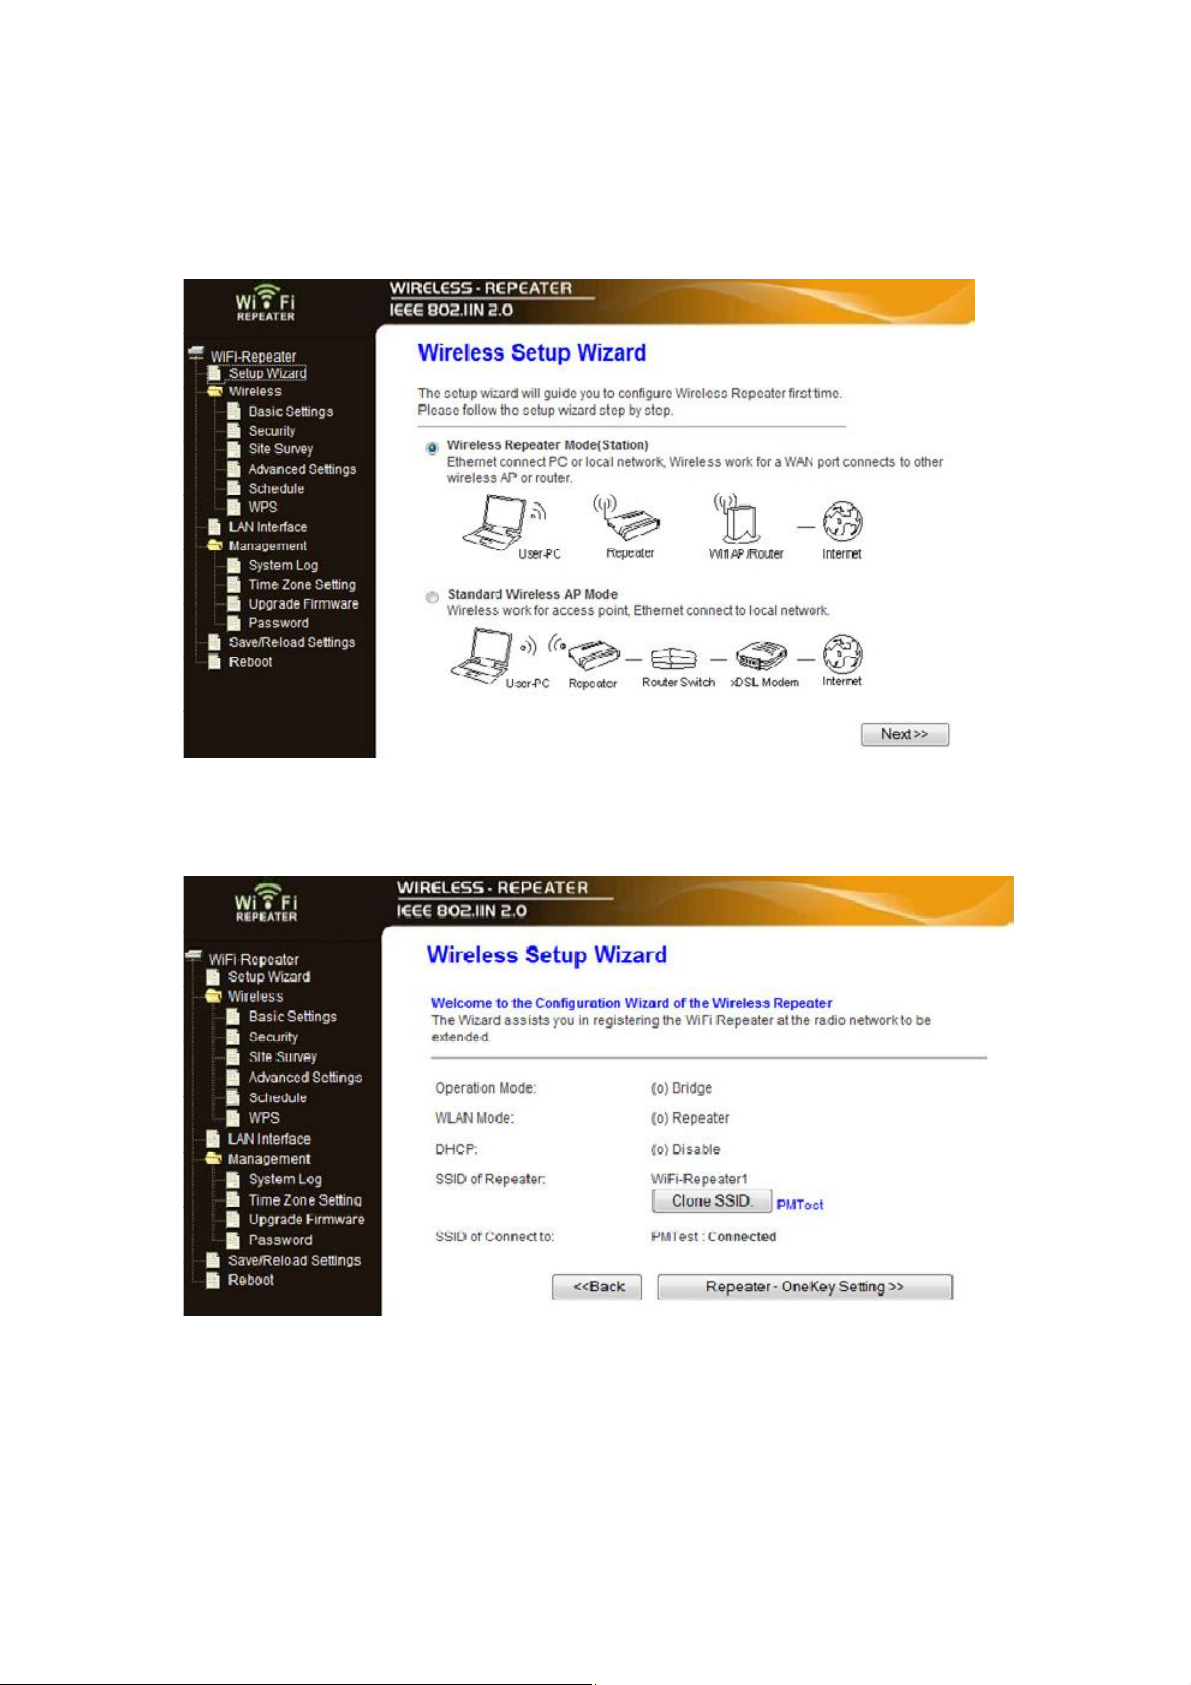
Step 5. From the main menu on the left side of the web interface, click the ‘Setup
Wizard’ link followed by the ‘Wireless Repeater Mode (Station) option. Click ‘Next’ to
continue.
Step 6. The next screen will list some basic configuration information, so click the
‘Repeater –One Key Setting’ button to continue, followed by the ‘Wireless Network
Selection’ button.
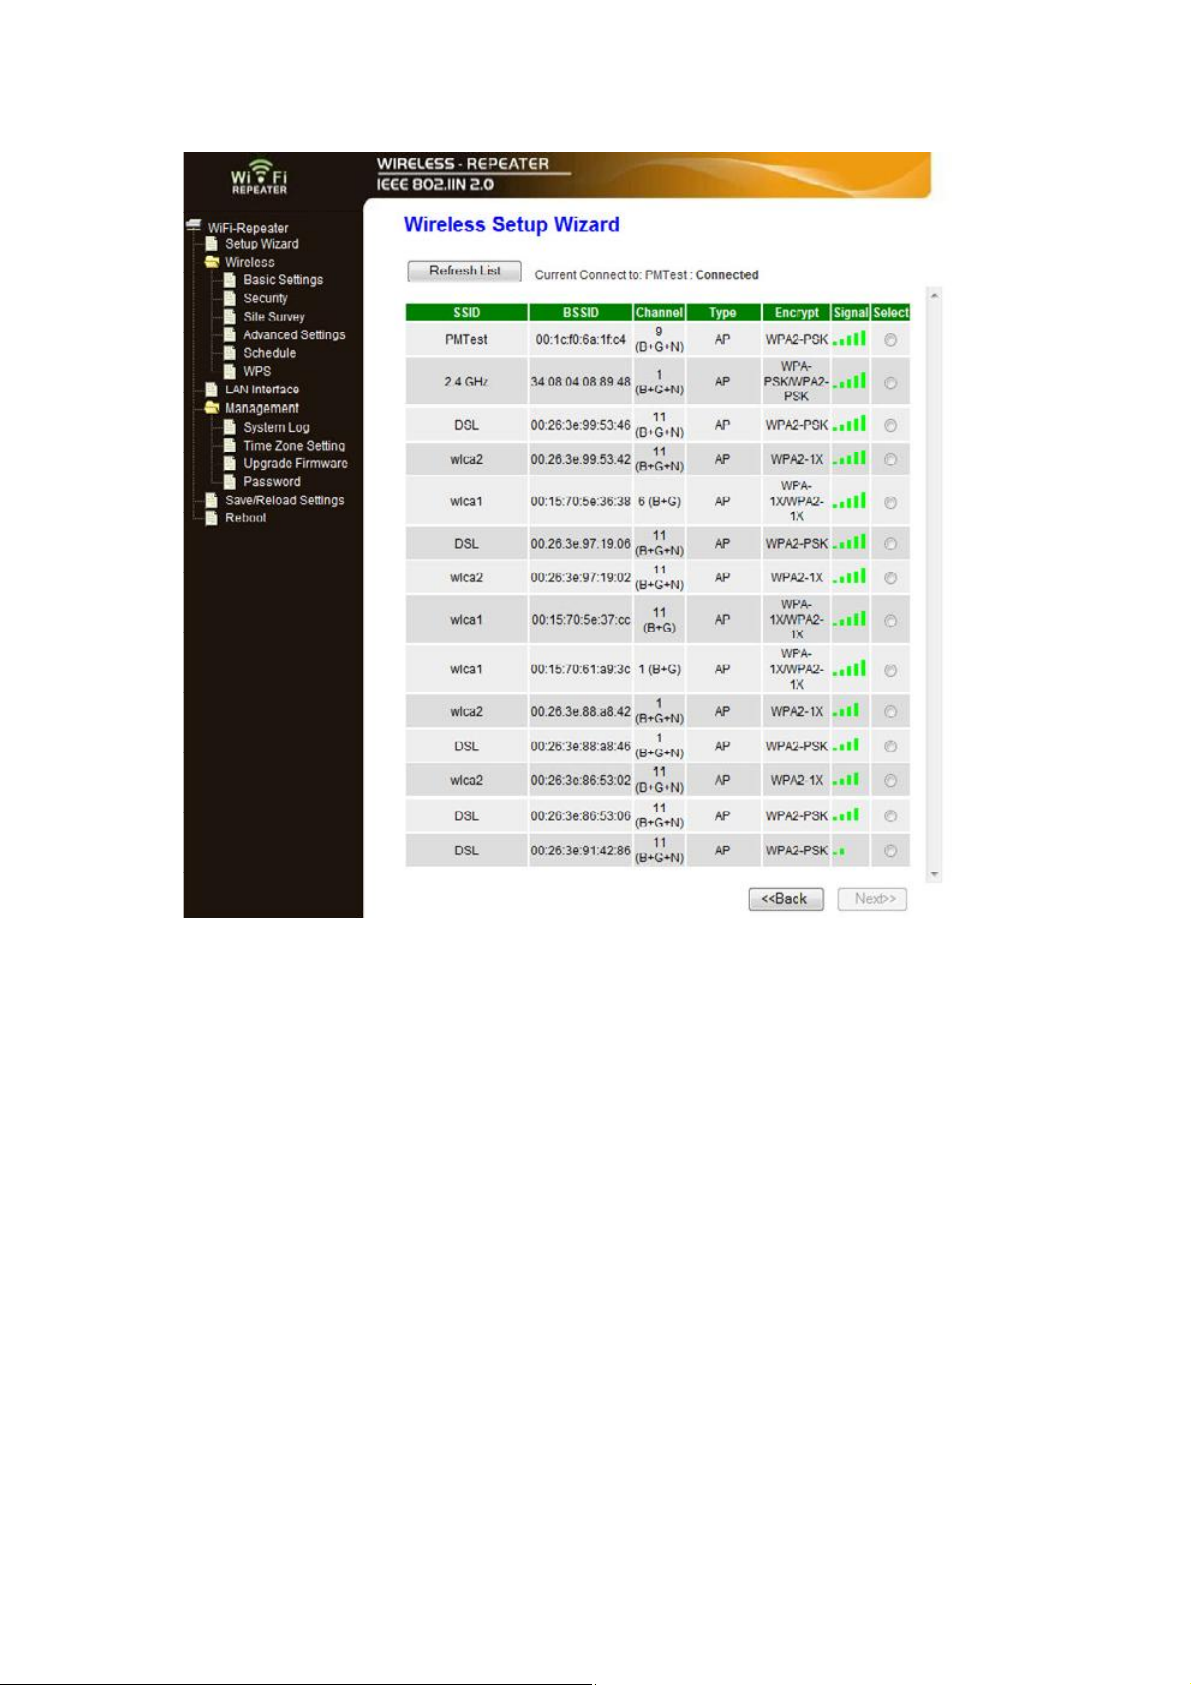
Step 7. The next screen will display a list of detected wireless networks. Click the
‘Refresh List’ button to rescan. Select the desired wireless network and then click the
‘Next’ button.
5
Step 8. Wireless encryption settings will be automatically detected and listed on the
following screen. If the wireless network has a password, then enter this into the
‘Pre-Shared Key’ field. You should not need to change any other settings on this
screen. Click ‘Apply and Reboot’ and you will receive a confirmation prompt. Click
‘OK’ to proceed.
6

Step 9. After the unit has rebooted, the configuration settings/status will be listed.
Confirm that the Mode has been set and the correct network name (SSID) is listed and
connected to.
7

Access Point Mode Setup:
Step 1. Connect the Repeater to an available AC electrical outlet.
Step 2. Two Options:
a. Wired Setup: Connect an RJ45 Ethernet cable from the Repeater to your computer.
(Then go to step 3)
b. Wireless Setup: Connect to the wireless network ‘WiFi-Repeater’ (then go to step 4).
Step 3. The default IP address on the Repeater is 192.168.10.1; configure your
computer to a matching network address (192.168.10.x, where ‘x’ is between 2~255)
with subnet set to 255.255.255.0 and default gateway to 192.168.10.1.
Step 4. Open a web browser window and enter 192.168.10.1 into the address bar. This
will bring up the login prompt for the Repeater. The default user name and password
are ‘admin’ (without quotes).
Step 5. From the main menu of the Repeater configuration utility, click the ‘Setup
Wizard’ link followed by the ‘Standard Wireless AP Mode’ option. Click ‘Next’ to
continue.
Step 6. The next screen will list some basic information. Click the ‘AP – One Key Setting’
button to proceed.
8

9

Step 7. The Repeater will automatically pre-configure itself with default information
and then reboot. If there are multiple wireless networks or a problem occurs with the
automatic setup, Advanced Configuration may be required. Otherwise the setup is
complete.
Note: Further instruction on Advanced Configuration settings for this device are
available on the following pages, if desired.
8. Once the device is configured, close your browser and connect an RJ45 Ethernet
cable from the Repeater unit to your switch/router (disconnect from the computer if
you used the Wired Setup in Step 2).
10

Advanced Configuration
Advanced configuration options for the Repeater can be accessed via the web
interface.
Step 1. Connect an RJ45 Ethernet cable from the Repeater to your computer.
Step 2. The default IP address on the Repeater is 192.168.10.1; configure your
computer to a matching network address (192.168.10.x, where ‘x’ is between 2~255)
with subnet set to 255.255.255.0 and default gateway to 192.168.10.1. (Refer to page
X)
Step 3. Open a web browser window and enter 192.168.10.1 into the address bar. This
will bring up the login prompt for the Repeater. The default user name and password
are ‘admin’ (without quotes).
11

Wireless
Click the link for ‘Wireless’ on the main menu, followed by ‘Basic Settings’. This will
present the basic wireless configuration options for the current mode and also allow
for manually changing the Mode type. Other options are available on the main menu,
such as encryption settings (Security), list of detected WiFi networks (Site Survey), time
of use scheduling (Schedule) and WiFi Protected Setup (WPS).
12

13

14 15


LAN Interface
The ‘LAN Interface’ options allow for configuration of settings for the LAN port (RJ45),
when used in Access Point mode. The Unit’s IP address, DHCP settings and other
related settings can be customized to match your needs.
Management
The ‘Management’ sections contain settings for various administrative functions for the
unit. An important section to note is the ‘Password’ screen. It is recommended that the
default password for the Unit be changed before you finish configuration. To prevent
unauthorized access, please update the user name and password.
16

17

Save/Reload Settings
The current settings for the unit can be saved to a file on your computer and reloaded
onto the Repeater at any time. The Repeater can be reset to factory defaults from this
screen, by clicking the ‘Reset’ button. The Repeater can also be reset to factory
defaults by pressing and holding the ‘Reset’ button, located next to the RJ45 port, for
10 seconds.
Reboot
This provides a remote method of soft restarting the Unit.
18

Specifications
Supported Wireless Standards
Chipset ID
Connectors
LEDs
Antenna Configuration
Antenna Type
Wireless Frequency Range
Wireless Bandwidth
Wireless Encryption Supported
Maximum Wireless Distance
Maximum Data Transfer Rate
Enclosure Material
Operating Temperature
Storage Temperature
Humidity
Dimensions
Weight
IEEE 802.11b/g/n
Realtek RTL8196C
1 x RJ45 Ethernet female
1 x Power
1 x Wireless Link/Activity
1 x Ethernet Link/Activity
2x2:2 (TxR:S)
2dBi (internal)
2.4 GHz ~ 2.485 GHz
20/40MHz
WEP, WPA, WPA2
300m (950ft)
802.11n: 300 Mbps
802.11g: 54 Mbps
802.11b: 11 Mbps
RJ45 Ethernet: 10/100 Mbps
Plastic
0°C ~ 40°C (32°F ~ 104°F)
-40°C ~ 70°C (-40°F ~ 158°F)
10% ~ 90% RH
100.0mm x 60.0mm x 50.0mm
120g
19

Technical Support
HooToo’s lifetime technical support is an integral part of our commitment to provide
industry-leading solutions. If you ever need help with your product, visit
www.hootoo.com/support and access our online tools, documentation, and
downloads.
For inquiries or email services, please contact us via support@hootoo.com.
Warranty Information
This product is backed by a 12-Month warranty. In addition, HooToo.com warrants its
products against defects in materials and workmanship for the periods noted,
following the initial date of purchase. During this period, the products may be returned
for repair, or replacement with equivalent products at our discretion. The warranty
covers parts and labor costs only. HooToo.com does not warrant its products from
defects or damages arising from misuse, abuse, alteration, or normal wear and tear.
Limitation of Liability
In no event shall the liability of HooToo.com (or their officers, directors, employees or
agents) for any damages (whether direct or indirect, special, punitive, incidental,
consequential, or otherwise), loss of profits, loss of business, or any pecuniary loss,
arising out of or related to the use of the product exceed the actual price paid for the
product. Some states do not allow the exclusion or limitation of incidental or
consequential damages. If such laws apply, the limitations or exclusions contained in
this statement may not apply to you.
20
 Loading...