

Hootoo HT-TM05 TripMate User Manual

HooToo
HT-TM0
User Guide

2
Thank you for your purchase of a HooToo HT-TM05 TripMate. To get the
most from your TripMate, please be sure to read all instructions
thoroughly and keep them where they will be read by all who use the
product.
Symbols and Conventions
To make it easier to find the information you need, the following symbols
and conventions are used:
This icon marks notes; information that should be read before using
the TripMate.
This icon marks references to other pages in this manual.
Menu items, options, and messages displayed in the admin setup page
are shown in bold.
TripMate Settings
The explanations in this manual assume that default settings are used.
3
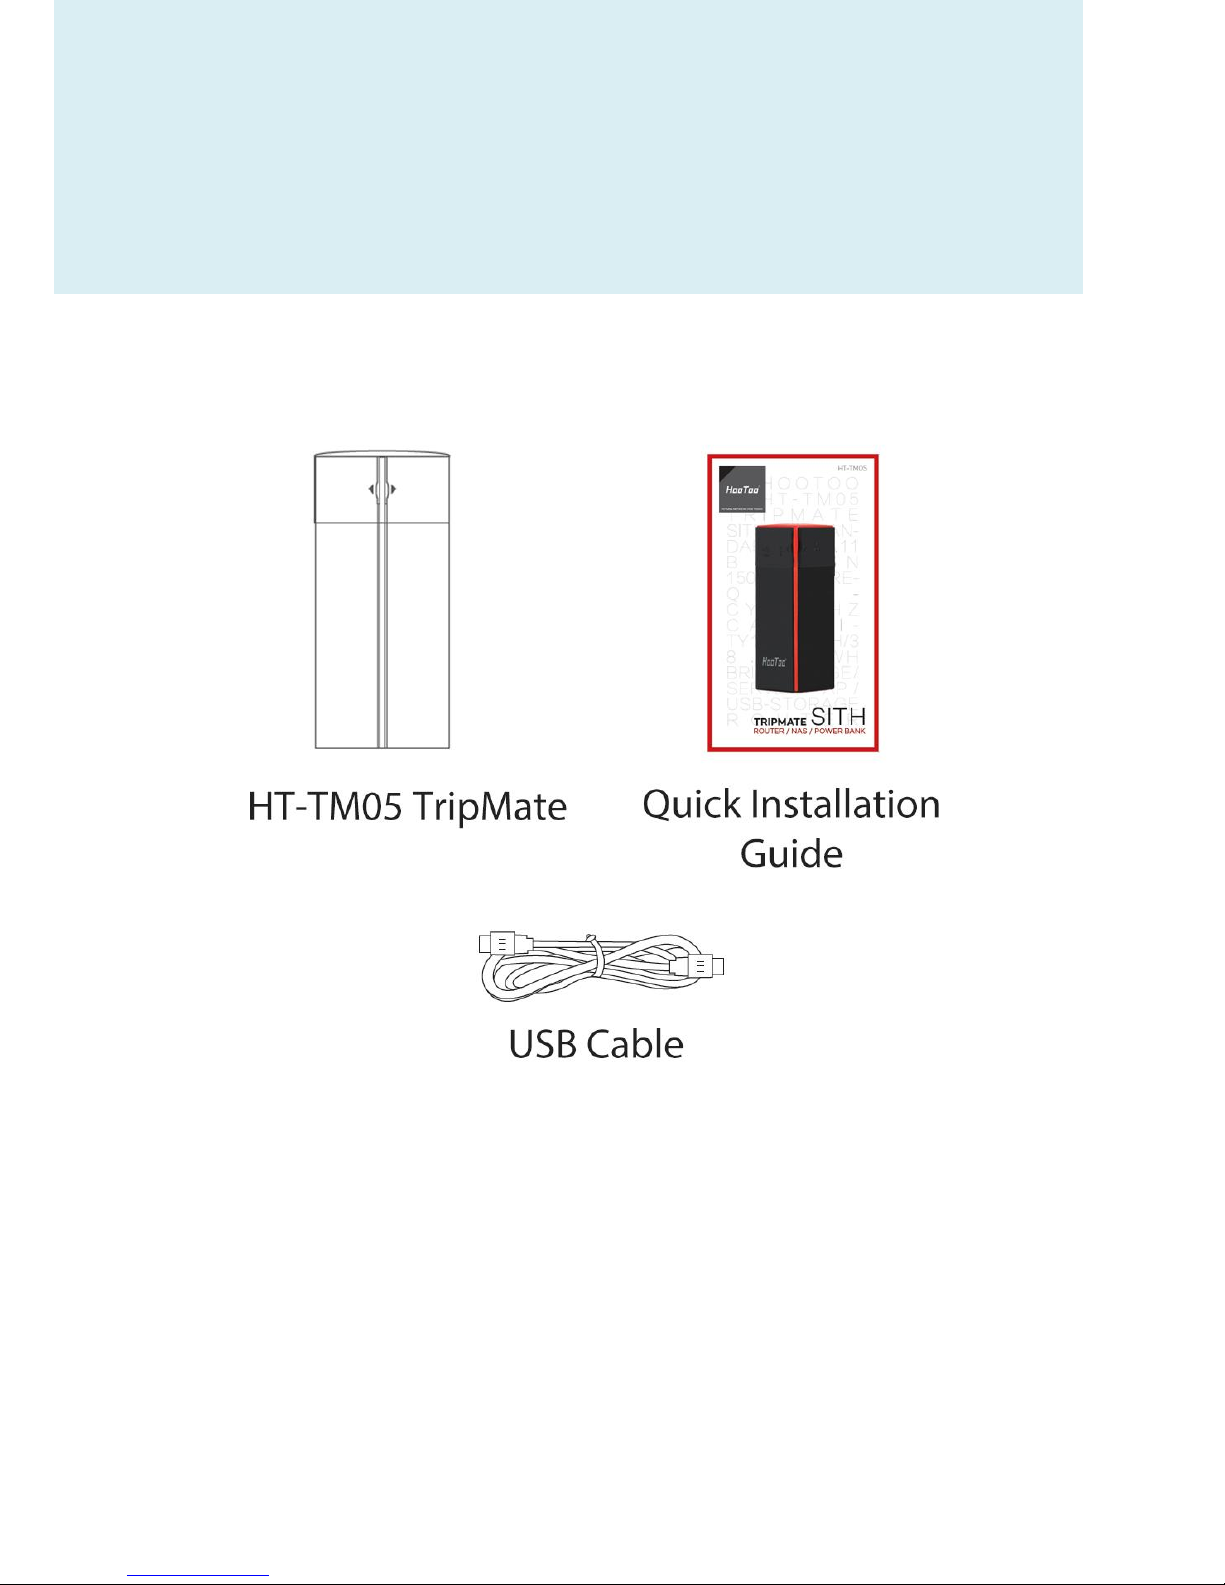
Package Contents
Confirm that the package contains the following items:

4
Contents
Package Contents .............................................................................. 3
Getting to Know the TripMate ........................................................ 7
Features .............................................................................................. 9
Wireless Sharing ............................................................................... 9
Travel Router .................................................................................. 10
External Battery Pack ..................................................................... 10
Configure the TripMate .................................................................. 11
Connection ..................................................................................... 11
More on TripMate ........................................................................... 31
Wireless Sharing ............................................................................ 31
Travel Router ................................................................................. 38
Access Point Mode ..................................................................... 38
Router Mode .............................................................................. 39
Bridge Mode ............................................................................... 50
System Tools .................................................................................... 61
Language......................................................................................... 61
Symbols .......................................................................................... 64
Main Page ....................................................................................... 65

5
Explorer .......................................................................................... 66
Information ..................................................................................... 73
User Settings ................................................................................... 78
Admin ......................................................................................... 79
Guest........................................................................................... 83
Network Settings ............................................................................ 86
Host Name .................................................................................. 87
SSID Settings ............................................................................... 88
Mac Address ............................................................................... 97
Region & Wi-Fi Channel .............................................................. 98
Hide SSID................................................................................... 100
DHCP Settings ........................................................................... 101
Service Settings............................................................................. 104
Samba Service ........................................................................... 105
DLNA Service............................................................................. 106
System Settings ............................................................................ 111
Time Settings ............................................................................ 112
Firmware Upgrade .................................................................... 116
Factory Default ......................................................................... 120

6
Wizard........................................................................................... 122
Battery Backup .............................................................................. 123
Charge TripMate ....................................................................... 123
Charge Devices ......................................................................... 124
Caring for the TripMate................................................................ 125
Storage ...................................................................................... 125
Cleaning .................................................................................... 125
Cautions .......................................................................................... 126
Caring for the Battery ............................................................... 126
Troubleshooting ............................................................................ 127
Error Messages .............................................................................. 128
Hardware Specifications .............................................................. 129
Software Specifications ................................................................ 132
Warranty and Support.................................................................. 136
Contact ............................................................................................ 137
7
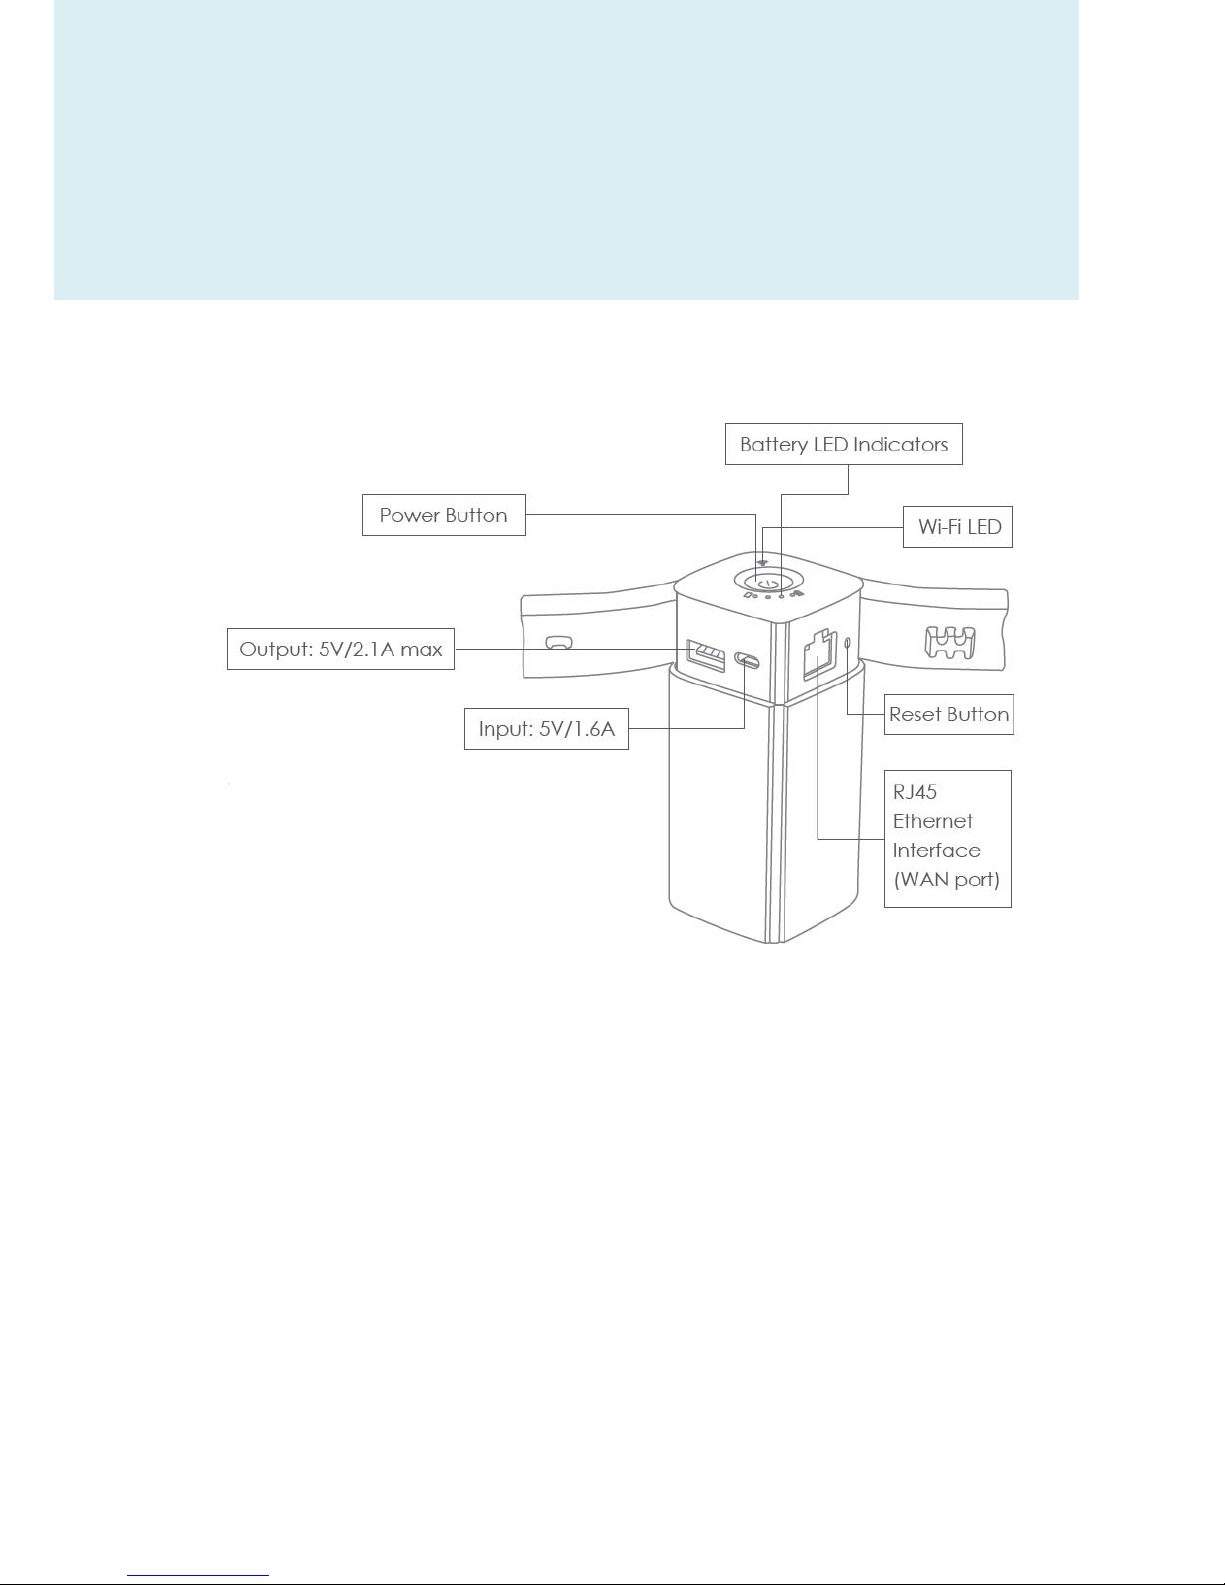
Getting to Know the TripMate
Take a few moments to familiarize yourself with TripMate
Power Button:
Short Press (1 second): Activates battery LED indicators
Long Press (3 seconds): Activates Internet/LAN
Battery LED Indicators:
Indicate how much battery is left.
As below :
LED1: 0~25%
LED2:26~50%
LED3:51~75%

8
LED4:76~100%
If you long press the power button and all lights flash, which means
the battery remaining capacity is not enough to power on. Please
recharge your TripMate ( 124)
Wi-Fi LED:
Flashing Blue: System loading
Solid Blue: System loaded
Flashing Green: Connecting to the Internet
Solid Green: Internet connected
RJ45 Ethernet Port:
Connect to your existing router/modem to set TripMate as
AP/Bridge/Router
USB Port (Output: 5V/2.1A MAX):
To connect to your USB storage and to charge your devices
Micro USB Port (Input: 5V/1.6A):
Charge your TripMate
Reset Button:
Press with a small pin for 10 seconds to reset your TripMate

9
Features
Wireless Sharing
Share Photos/Videos/Documents from your USB storage, smartphone or
tablet with friends and colleagues through TripMate wireless network
Fantastic Four
Not only can you add single USB storage to the TM05, you can add up to
4 USB storage devices by using a USB hub to connect them.
Chromecast Friendly
Unable to get onto a local network? Connect Google Chromecast to your
TM05 and play videos and music on your connected USB storage through
Chromecast to the big screen.
Control Via App
Available for FREE from App Store and Google Play. The brand new
HooToo TripMate Plus App can change network settings, browse content
from USB storage, and move files between devices. Better user-friendly
design means you can start using the TM05 straight away.

10
Travel Router
Take the TripMate HT-TM05 and you have a battery powered travel
router inside your pocket. Provide you with convenient router functions
while you are on the go. It offers 3 router modes to suit today’s popular
network demands:
AP Mode: Connect your smartphone to wired network, let you laptop
uses wired network without carrying a cable
Bridge Mode: Never pay for multiple network connections, use TM05 to
connect and share connections.
Router Mode: Connect your mobile devices directly to cable to DSL
modem
External Battery Pack
The core of TM05 is a 10400mAh external battery charger capable of
charge typical smartphone 3 – 5 times, extending the run time of your
phone or tablet whenever you need.

11
Configure the TripMate
Connection
The TripMate TM05 can create a limited local wireless network (no full
internet access), where the central functions are performed through the
local network. To connect the TripMate TM05 wirelessly, please follow
the steps below:
Example: Android
1. Press the power button for 3 seconds to power on the device. Wait
for the Wi-Fi indicator to be ready

12
2. Click Settings on the phone

13
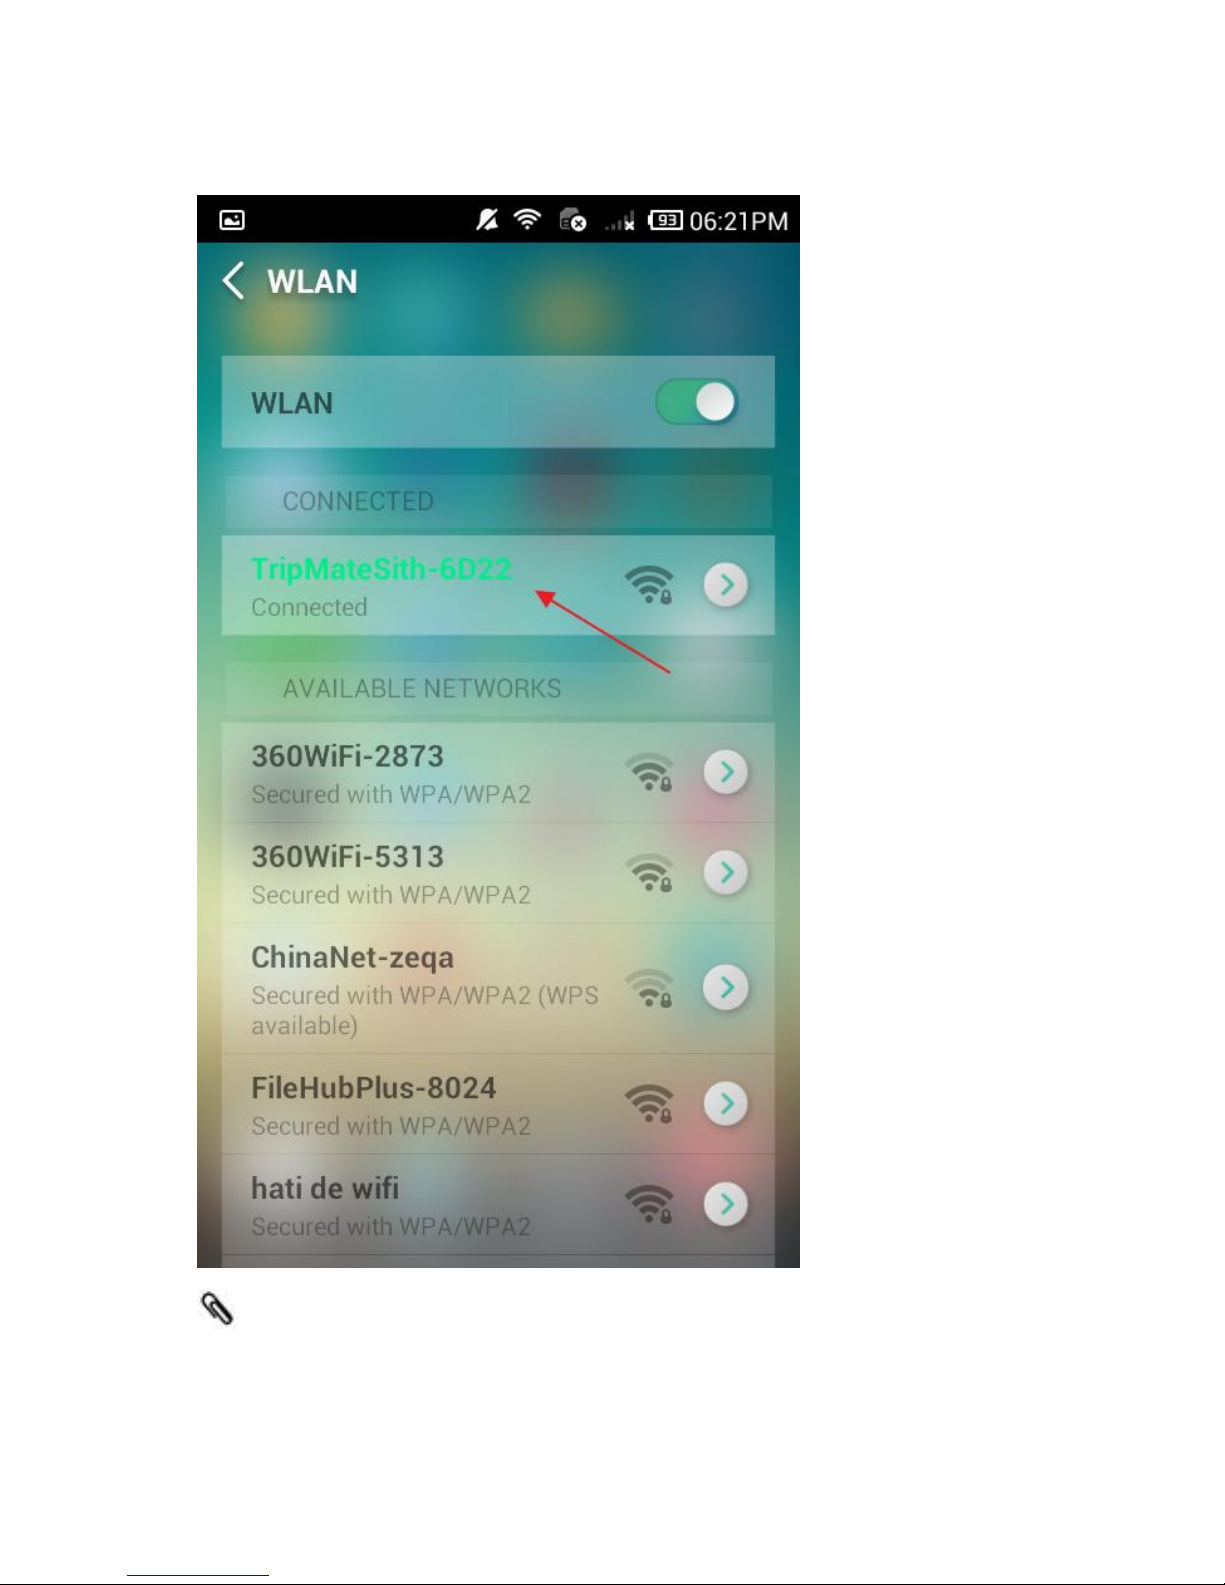
3. Click WLAN

14
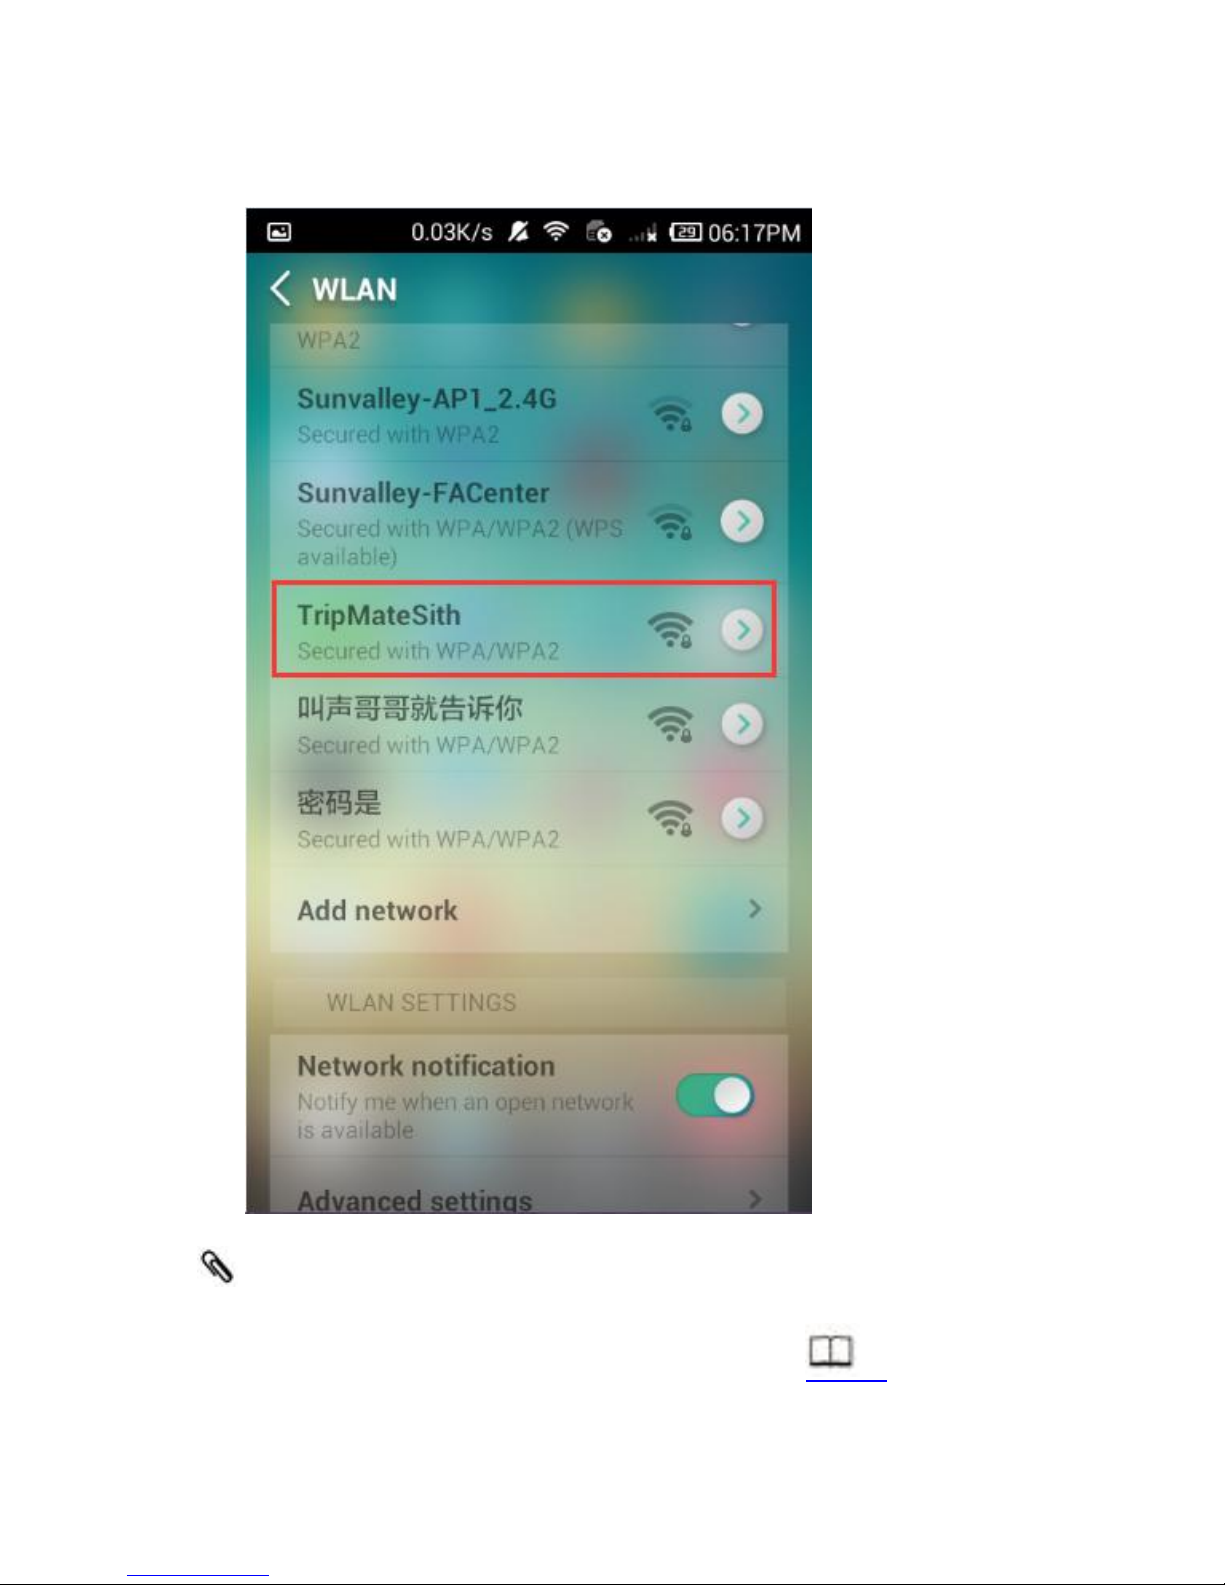
4. Open Wi-Fi, select TripMateSith-XXXX
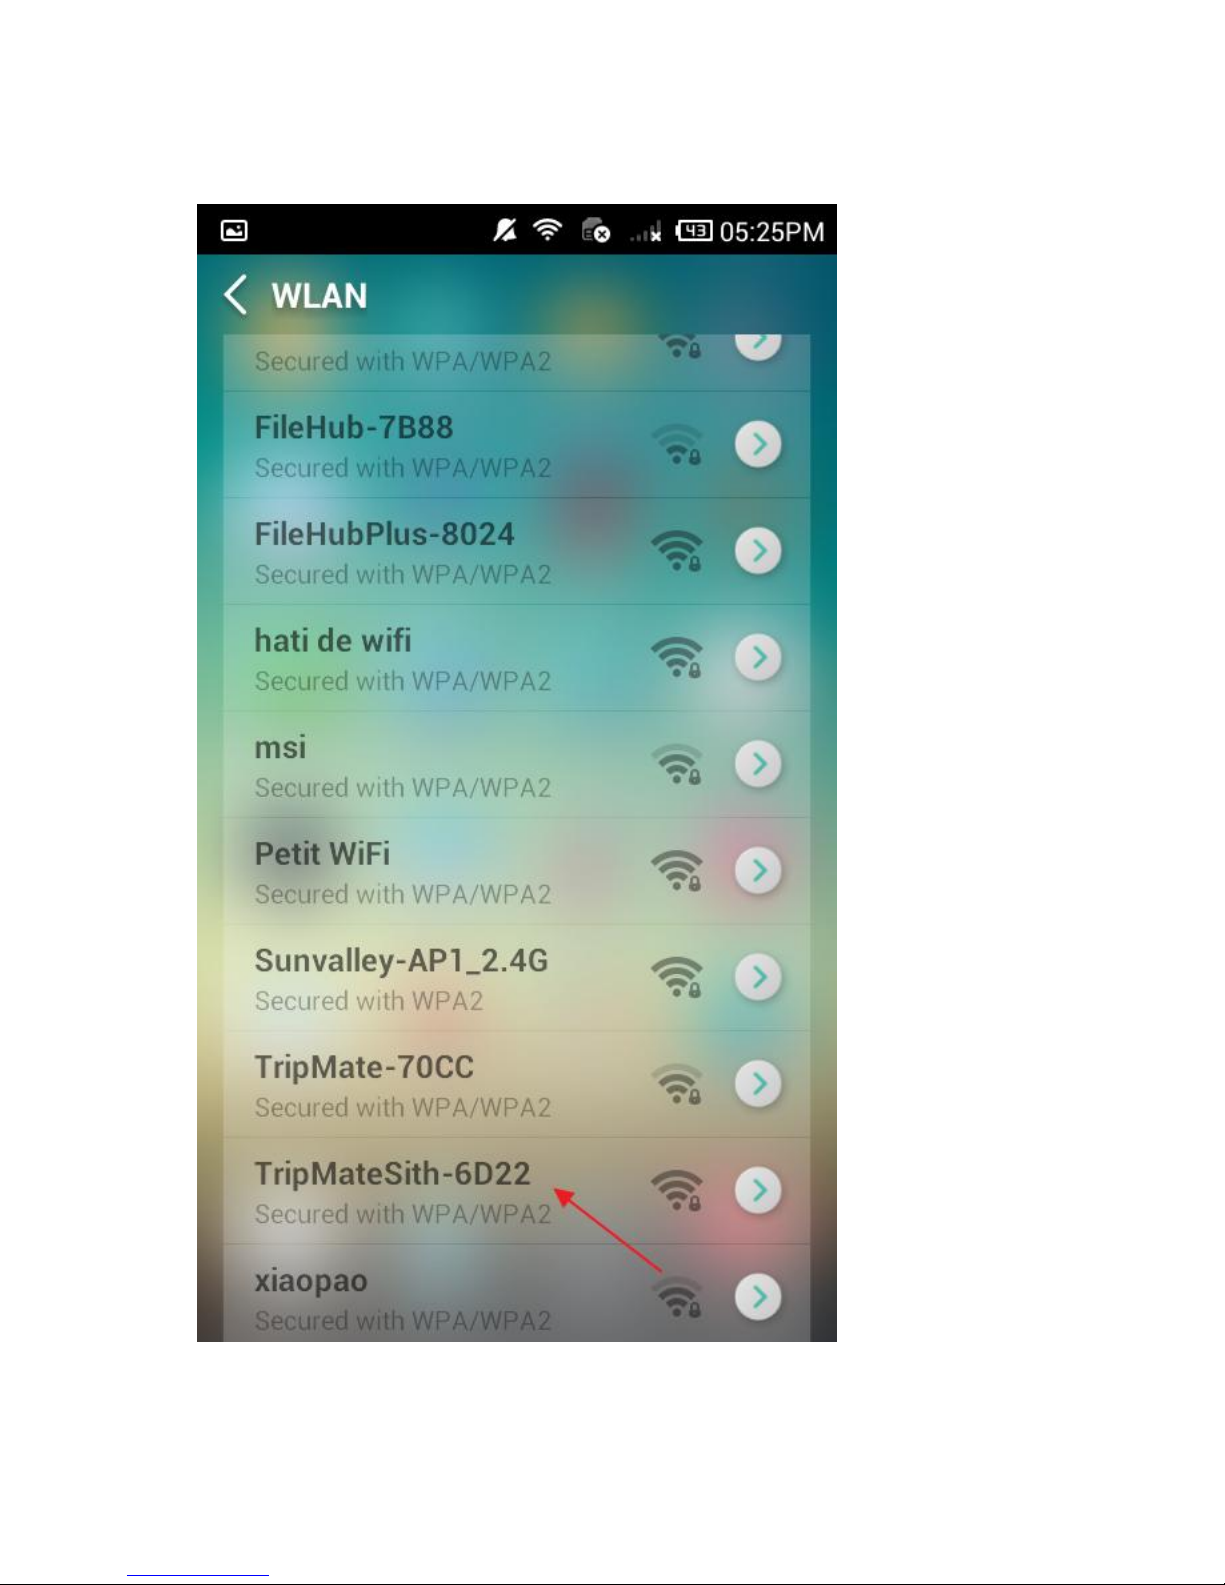
15
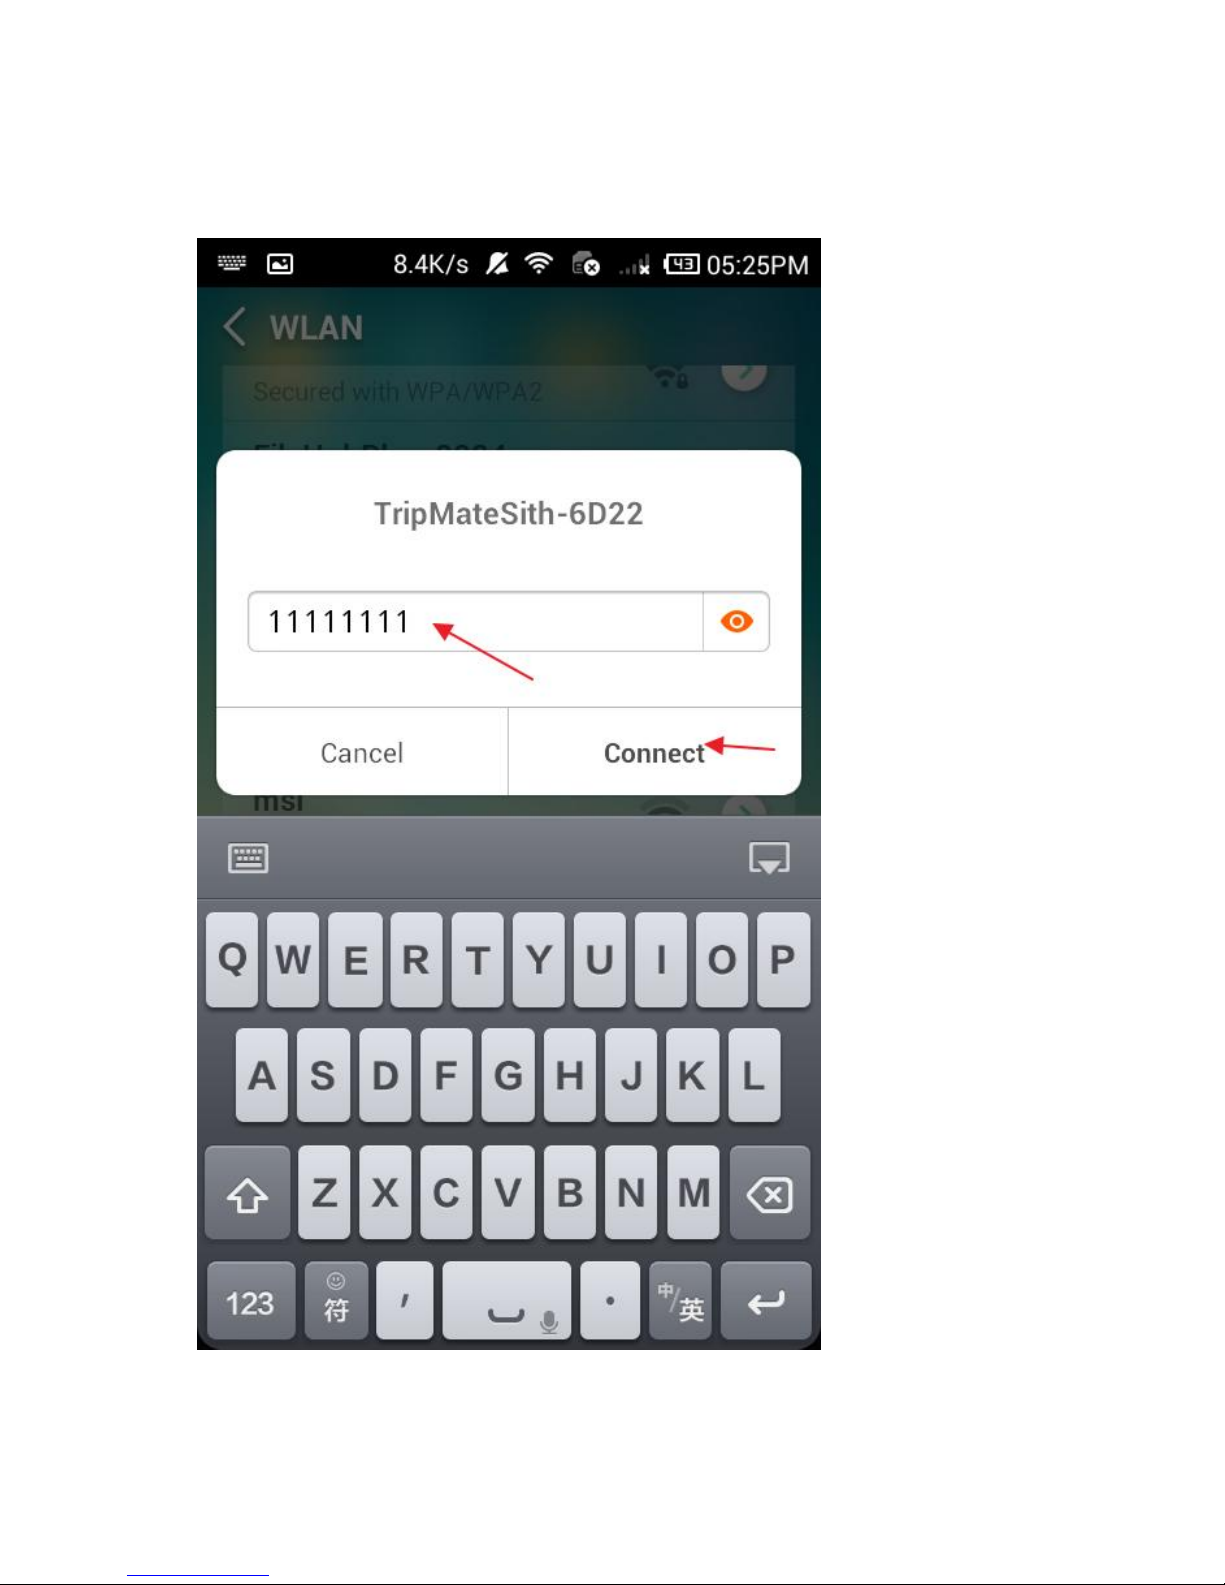
16
5. Enter the default password: 11111111 (8 x 1’s), click Connect
17
The same process applies for iPhone and other Smartphones when
connecting the TripMate to local WiFi.
18
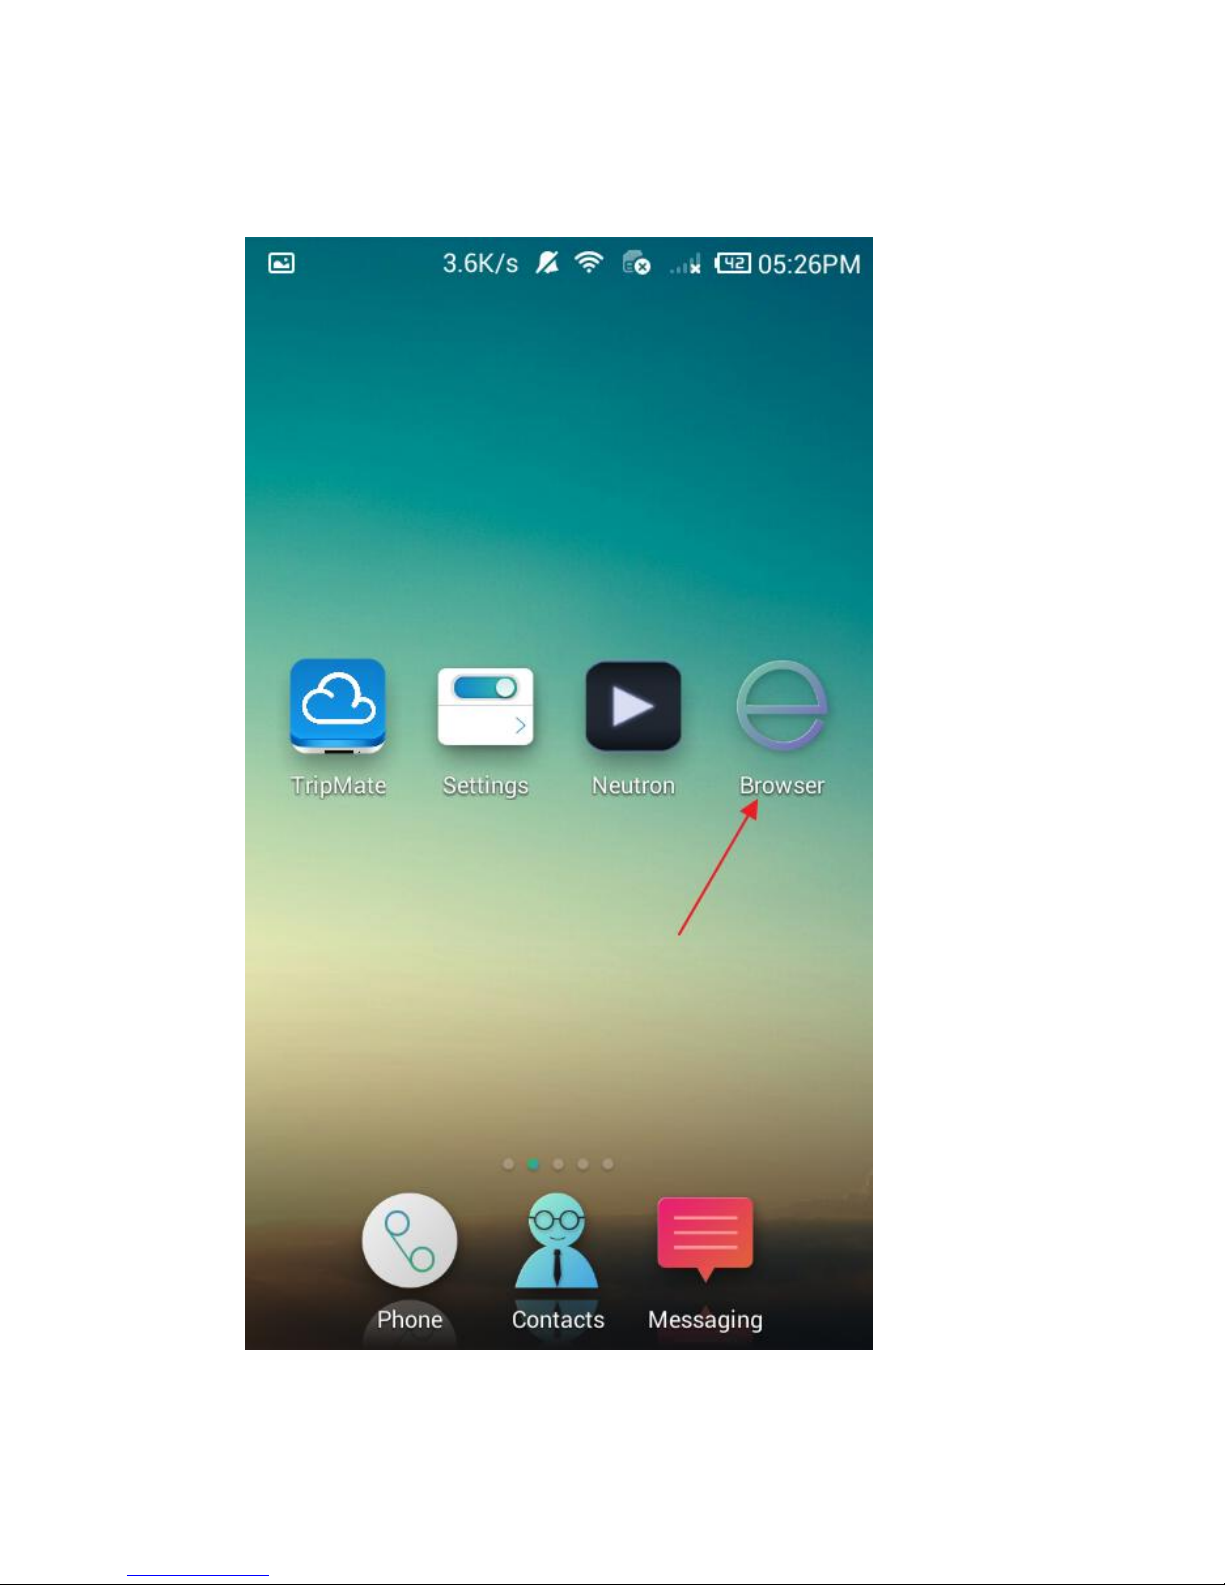
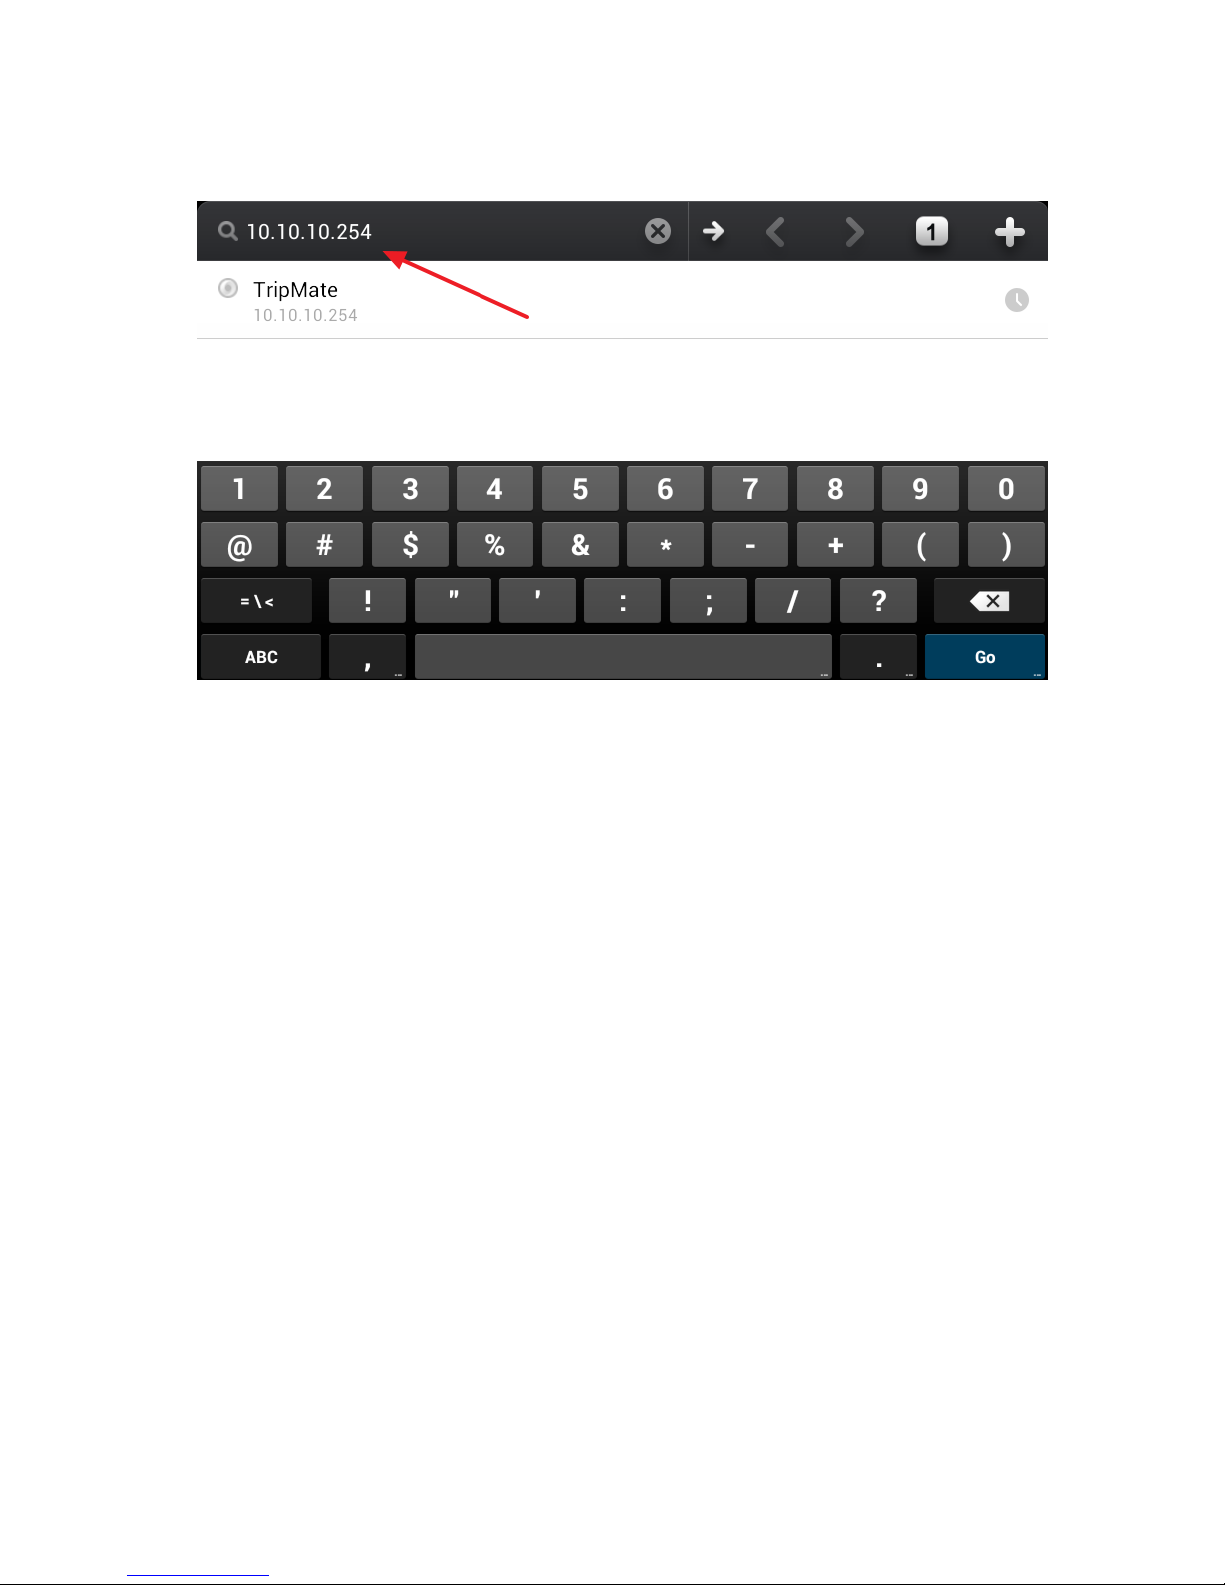
6. Open browser, enter 10.10.10.254 in the url box
19
20
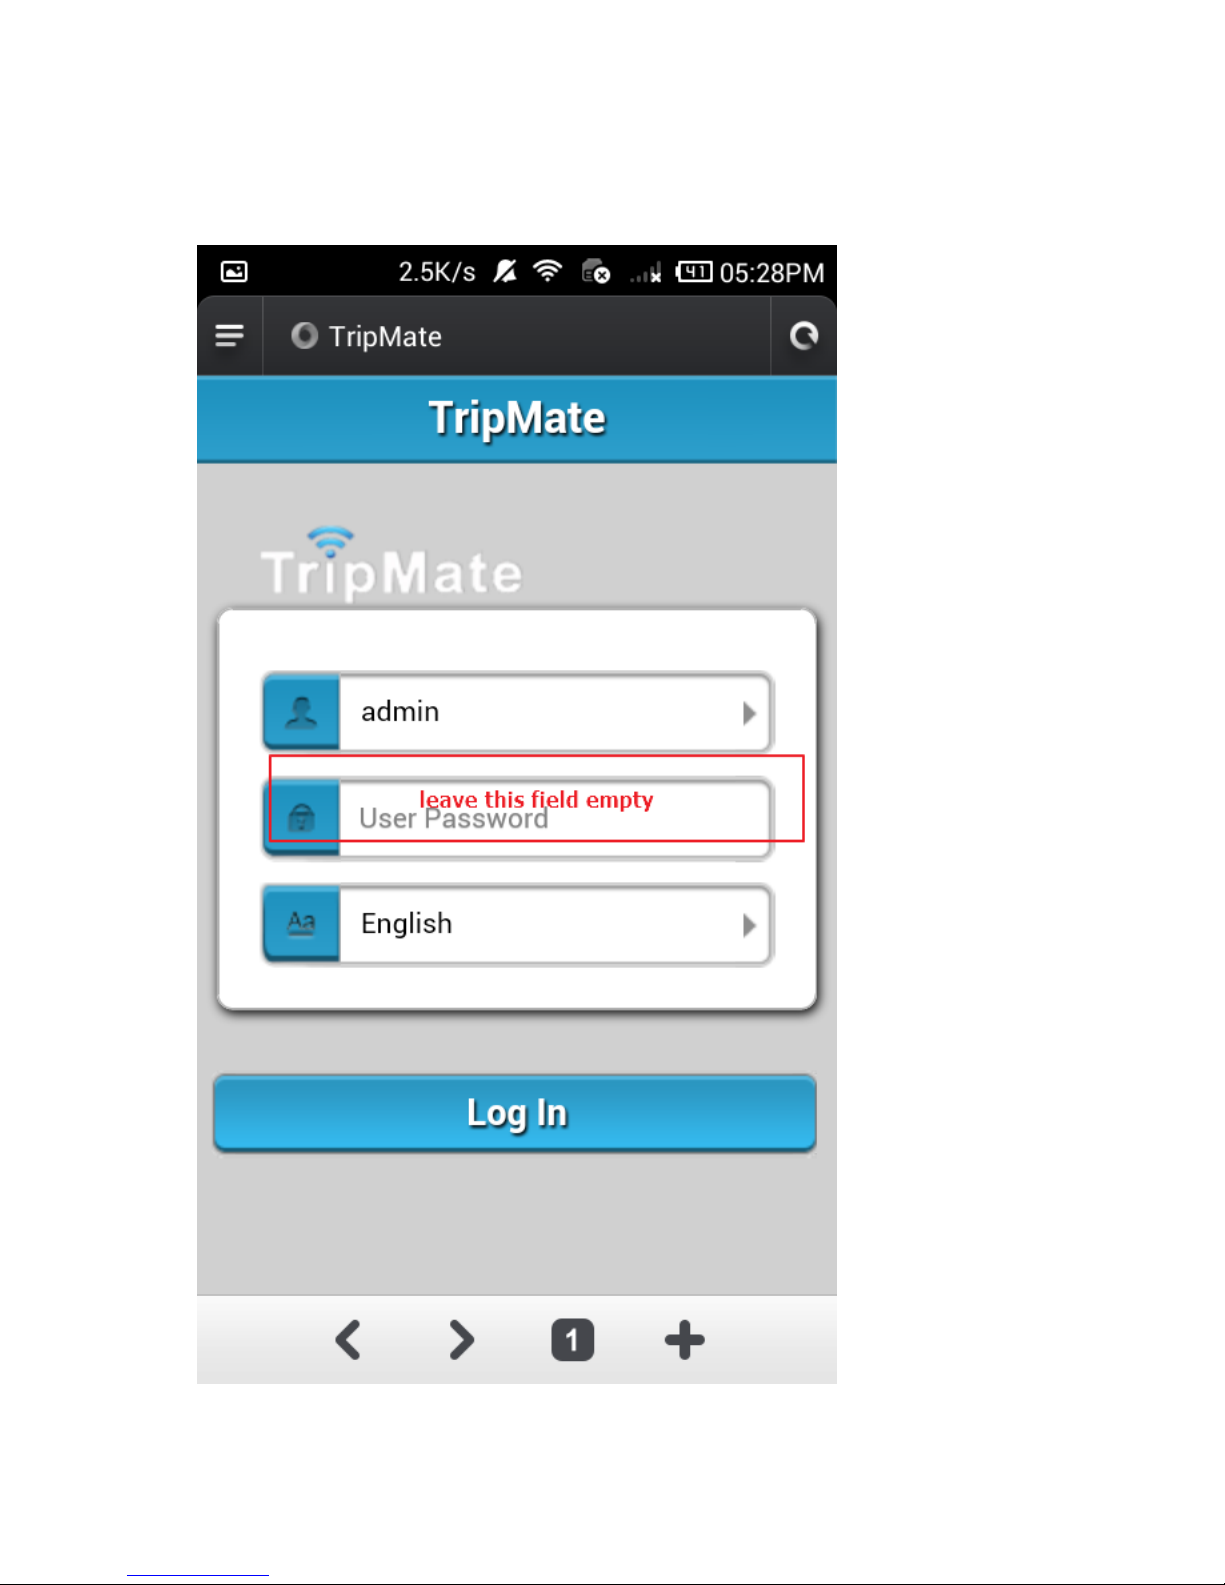
7. Log in with default user name: admin, password: (leave it empty)
21
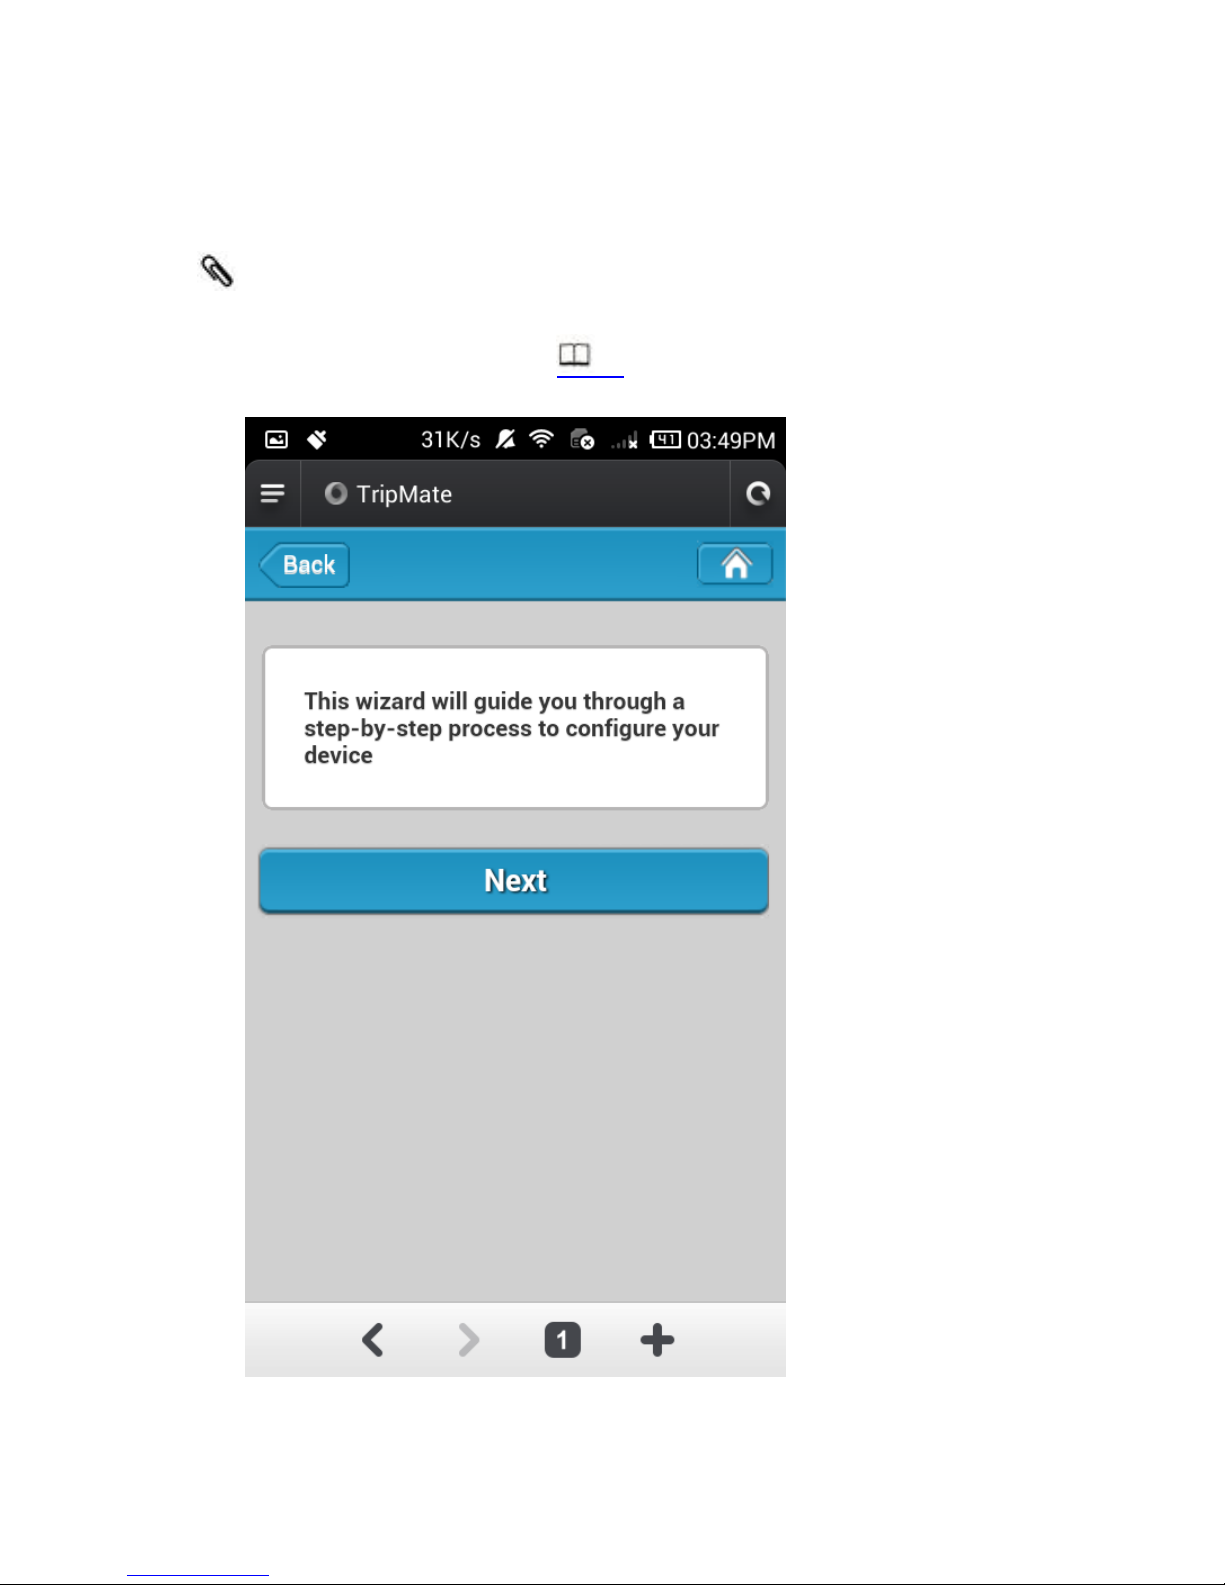
8. Then you will be prompted to the Setup Wizard
The wizard only helps you to connect your TripMate to Internet. To
get more usage, please step to 32 to get full guide.
22
9. Click Next and set up the Internet connection on this page. (Taking
wireless access as an example here, click 38 to get all modes for
wired/wireless access)
23
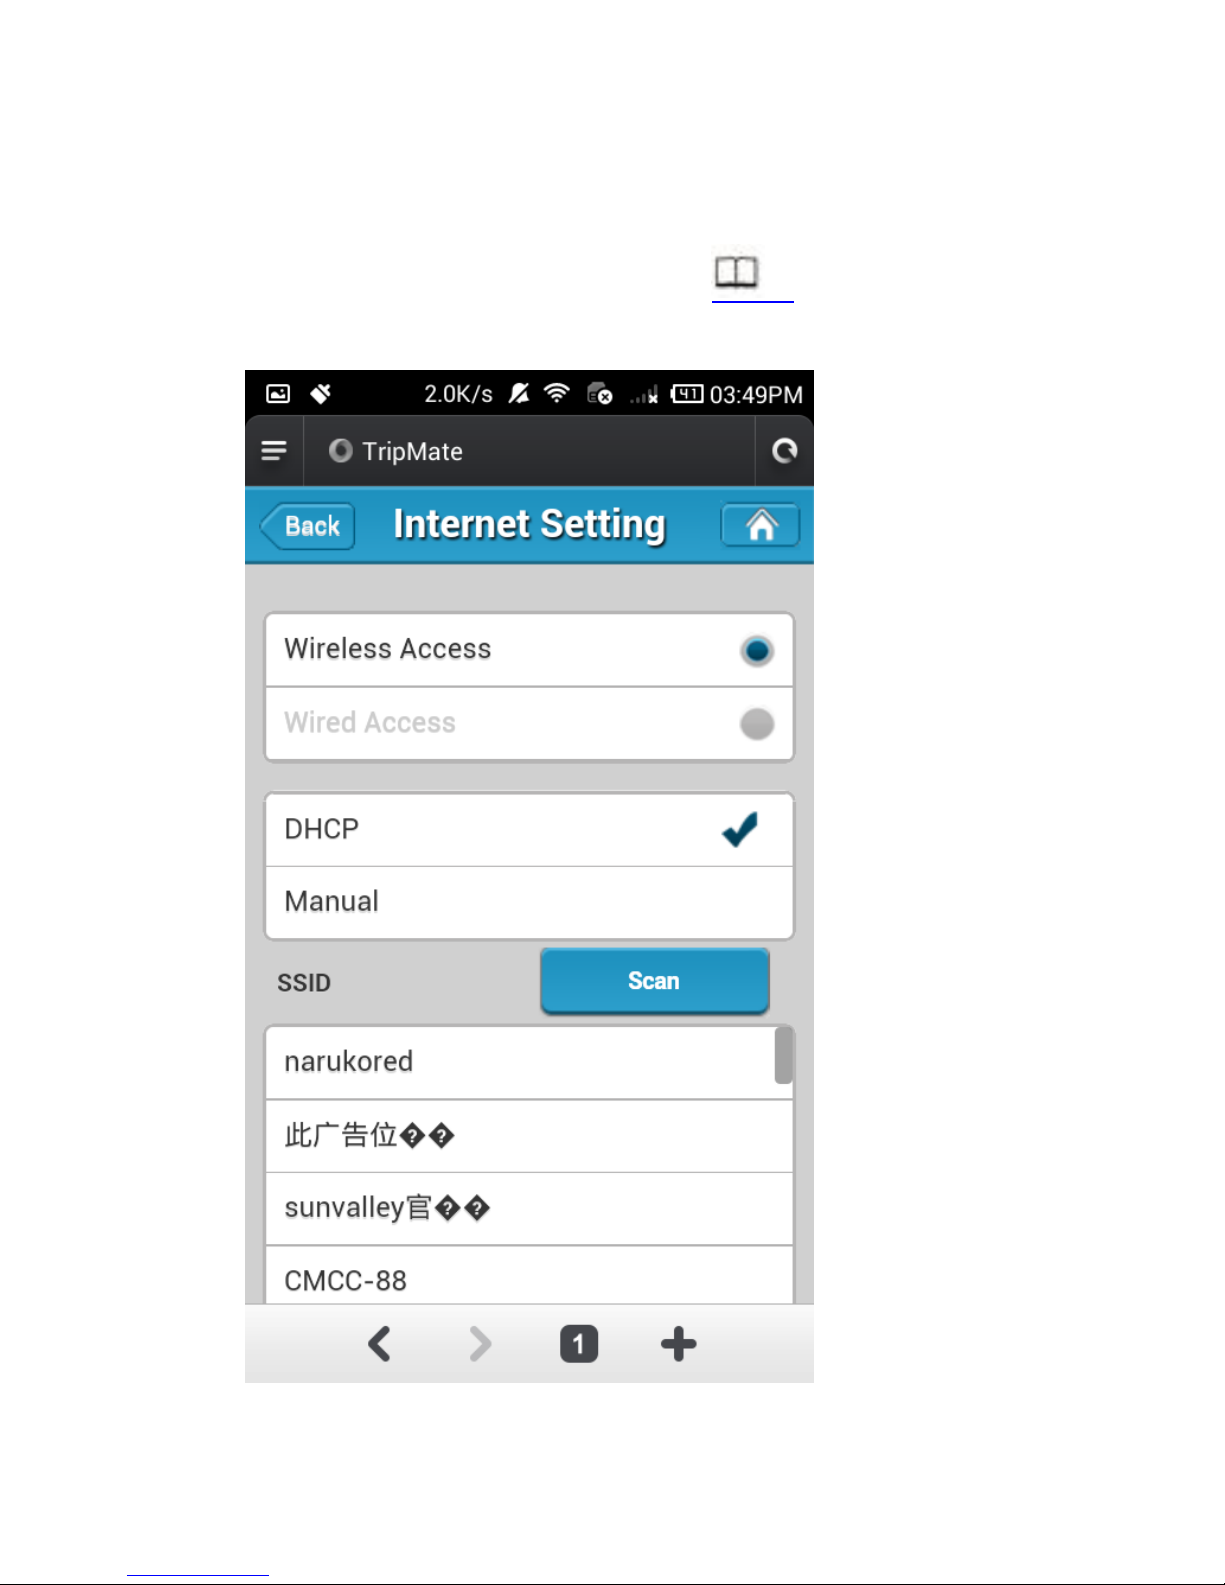
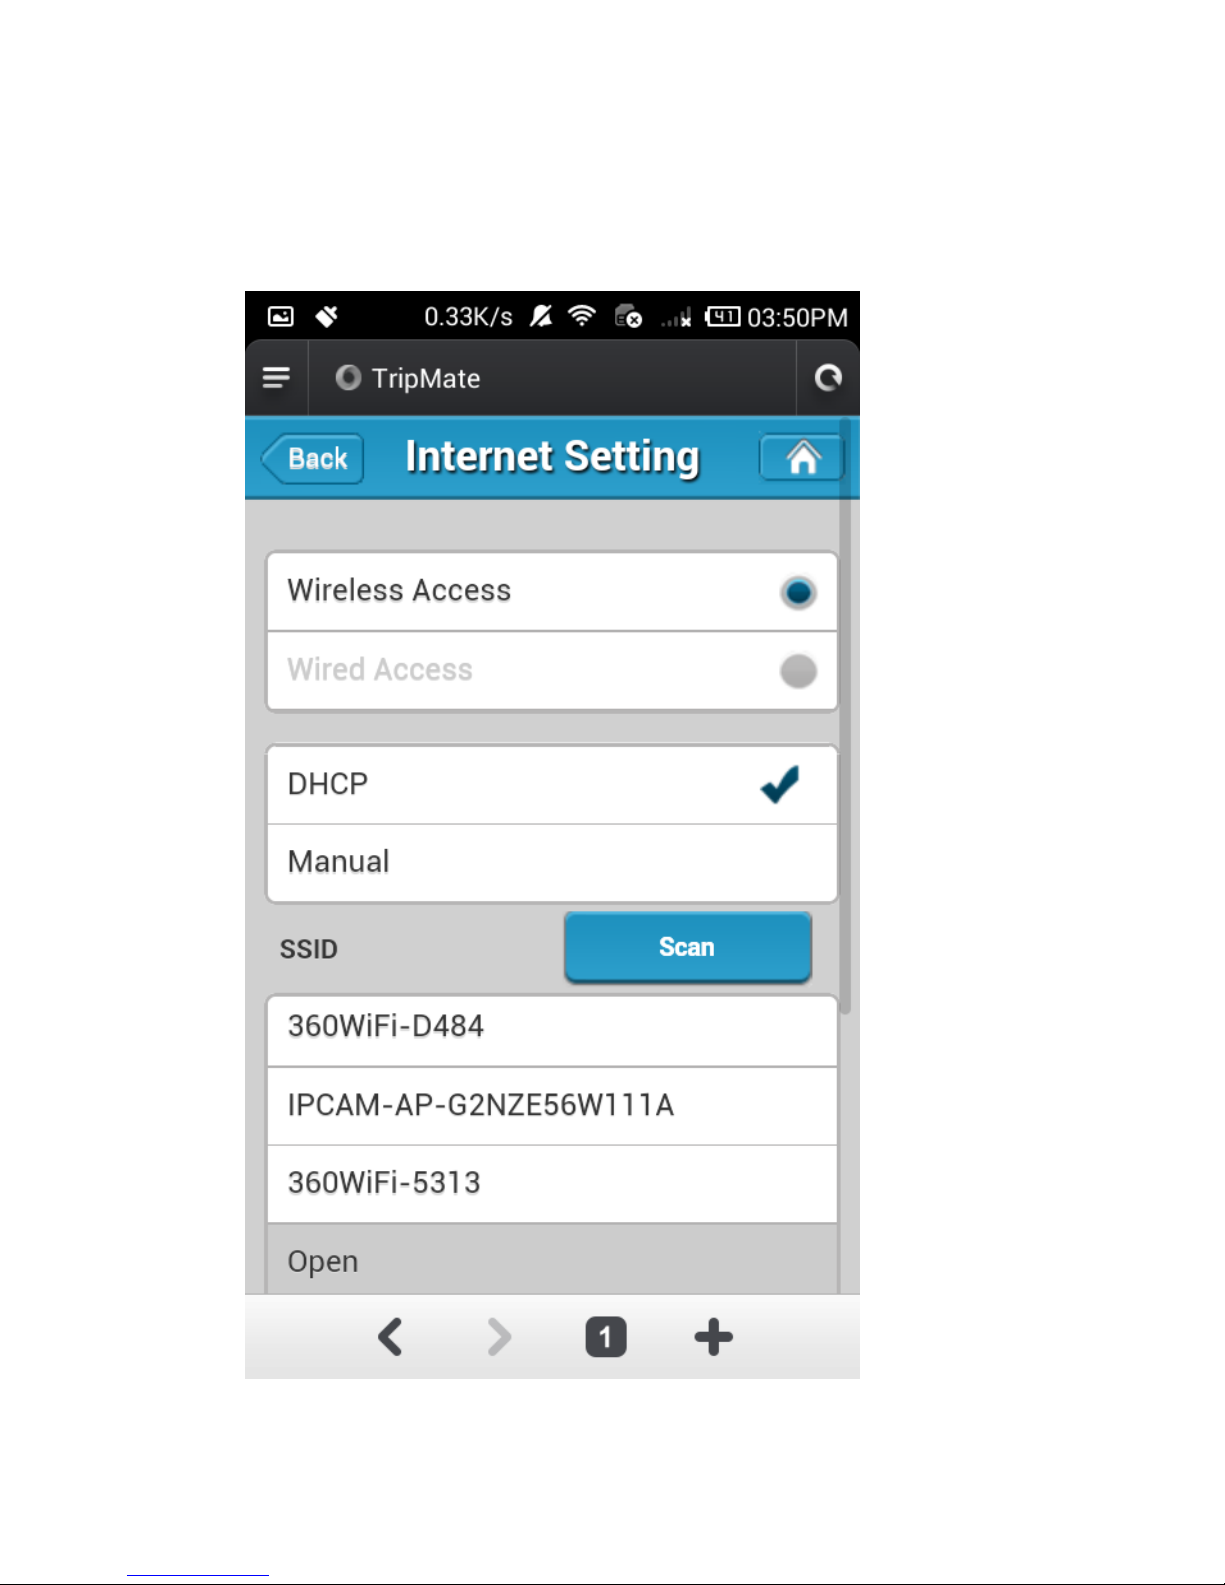
10. Click Scan to search available Wi-Fi. Select your Wi-Fi and enter the
password.
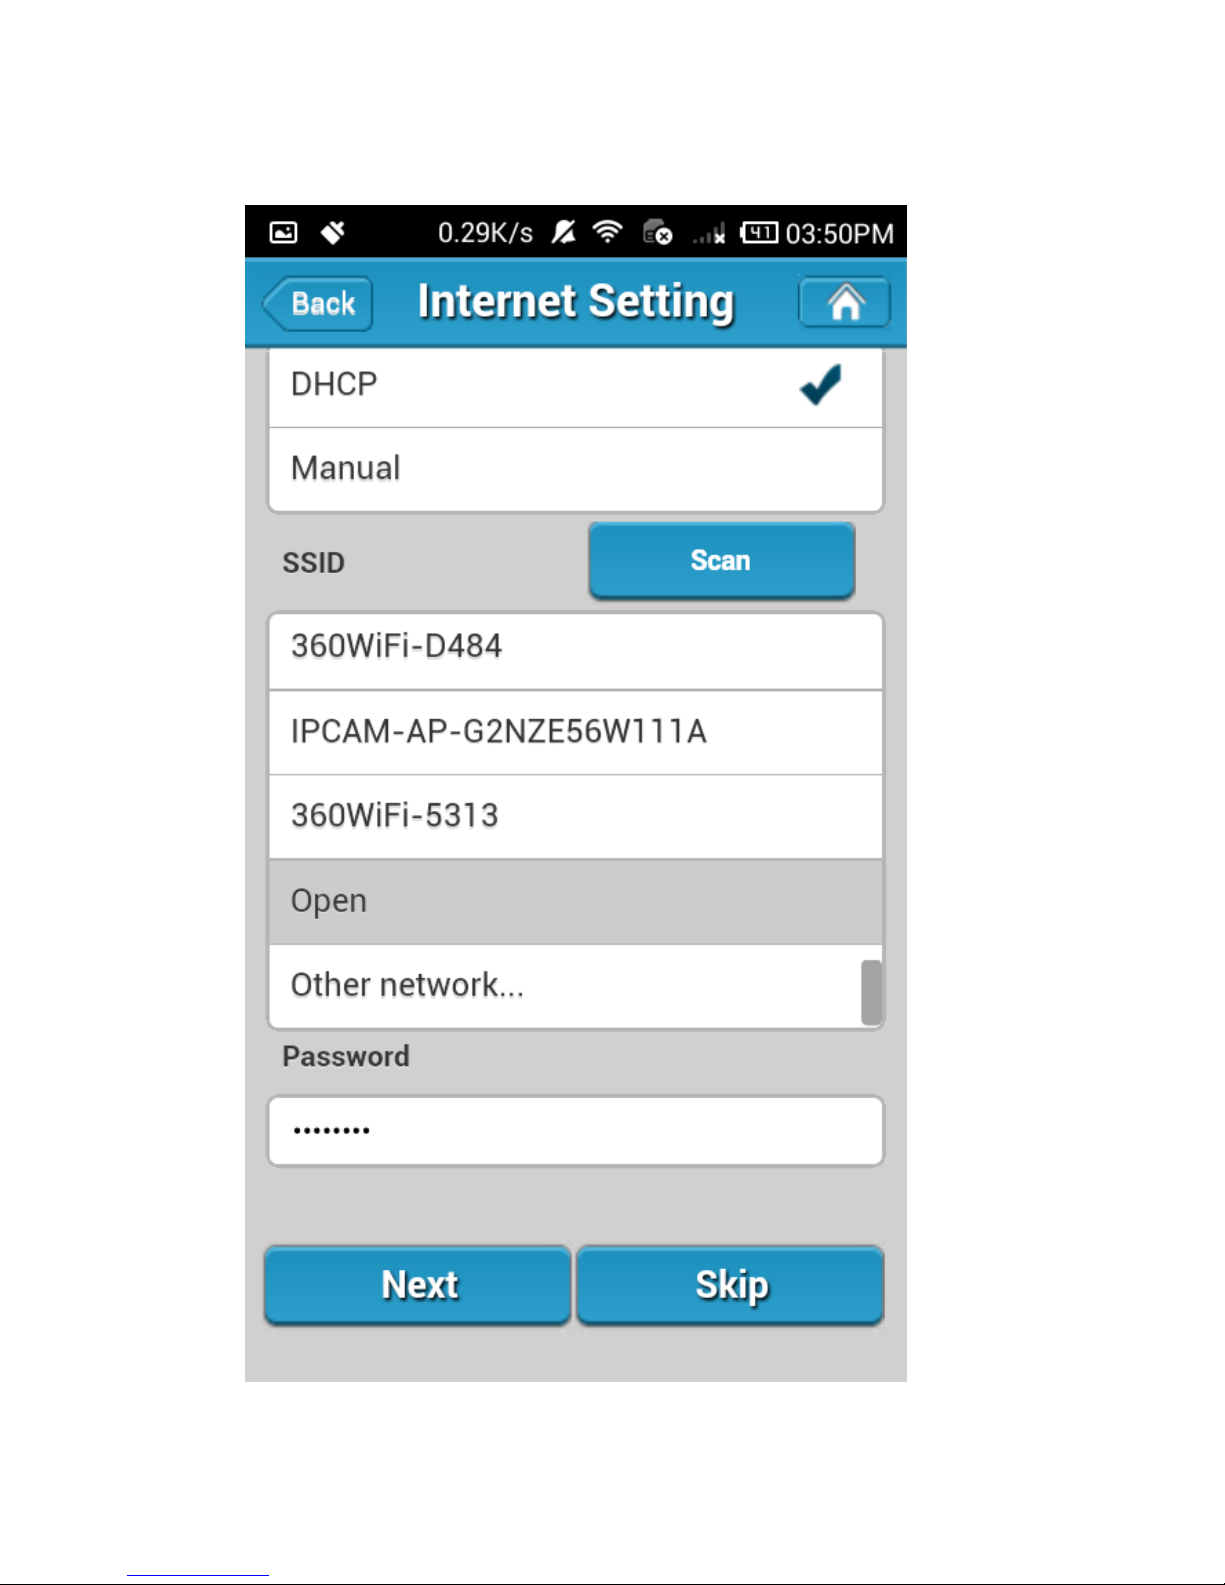
24
25
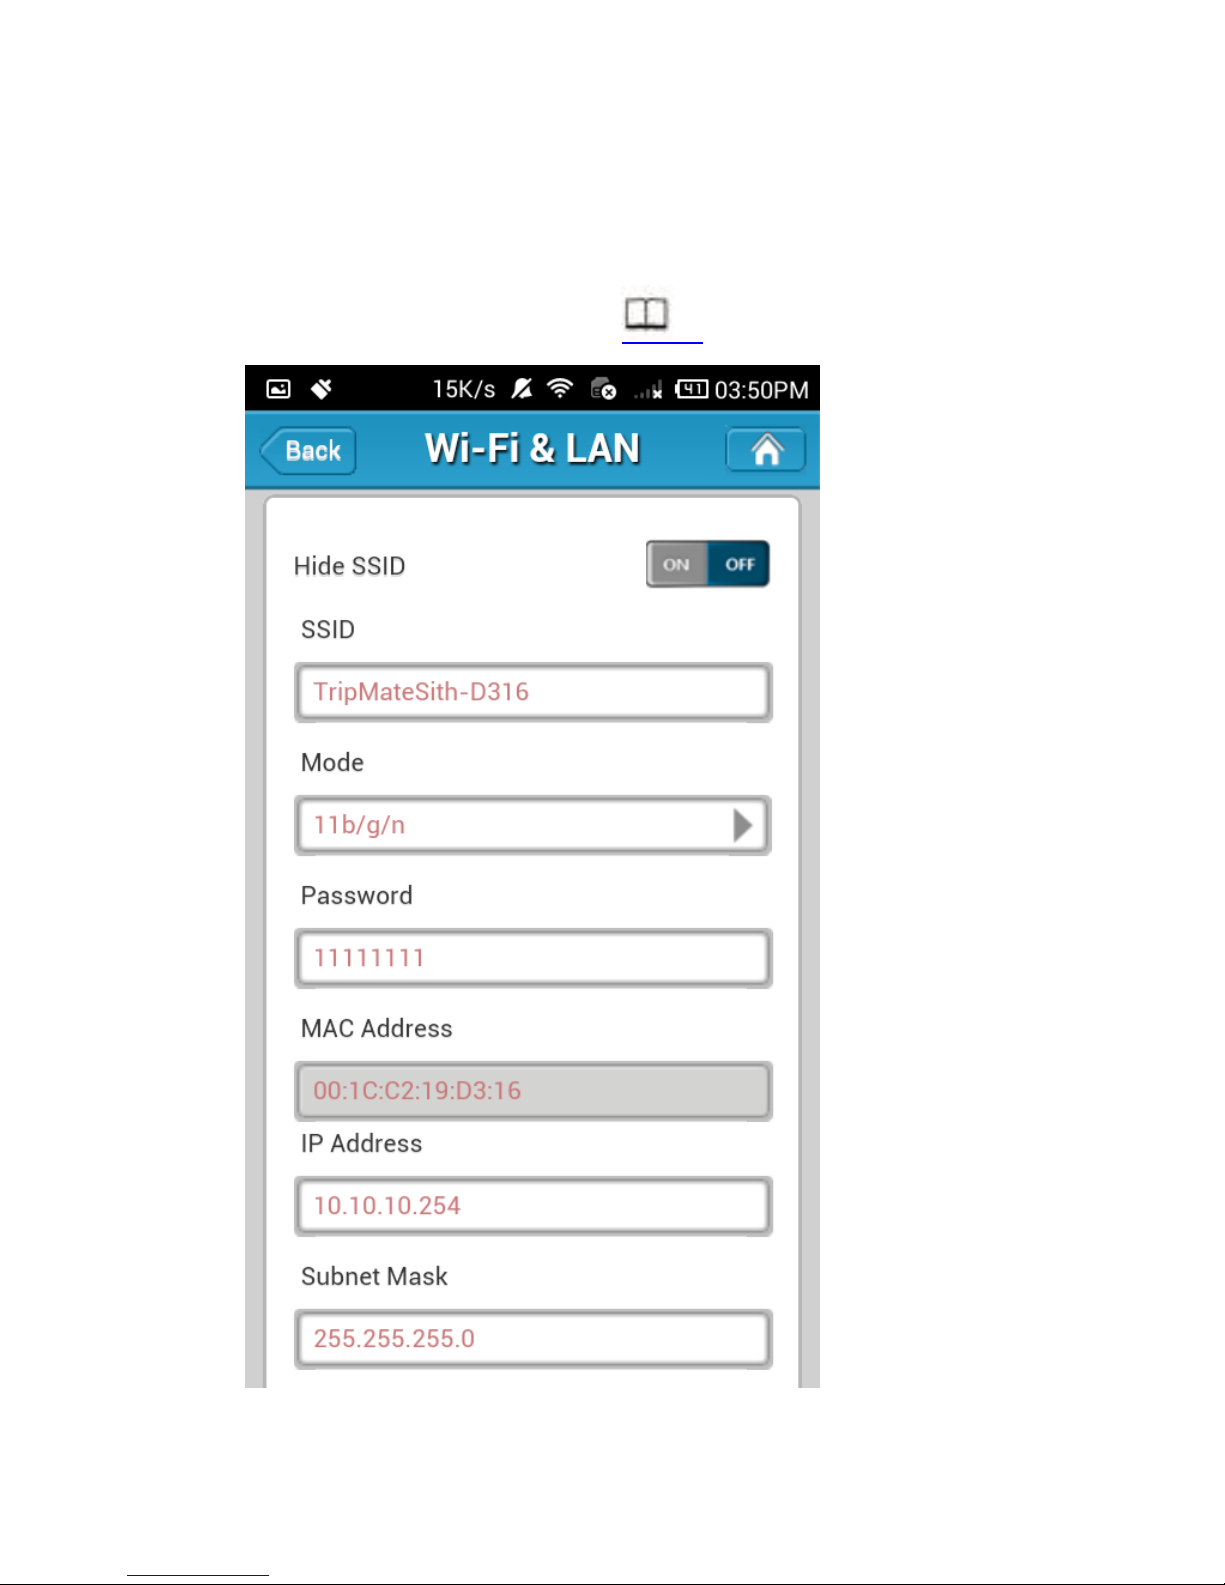
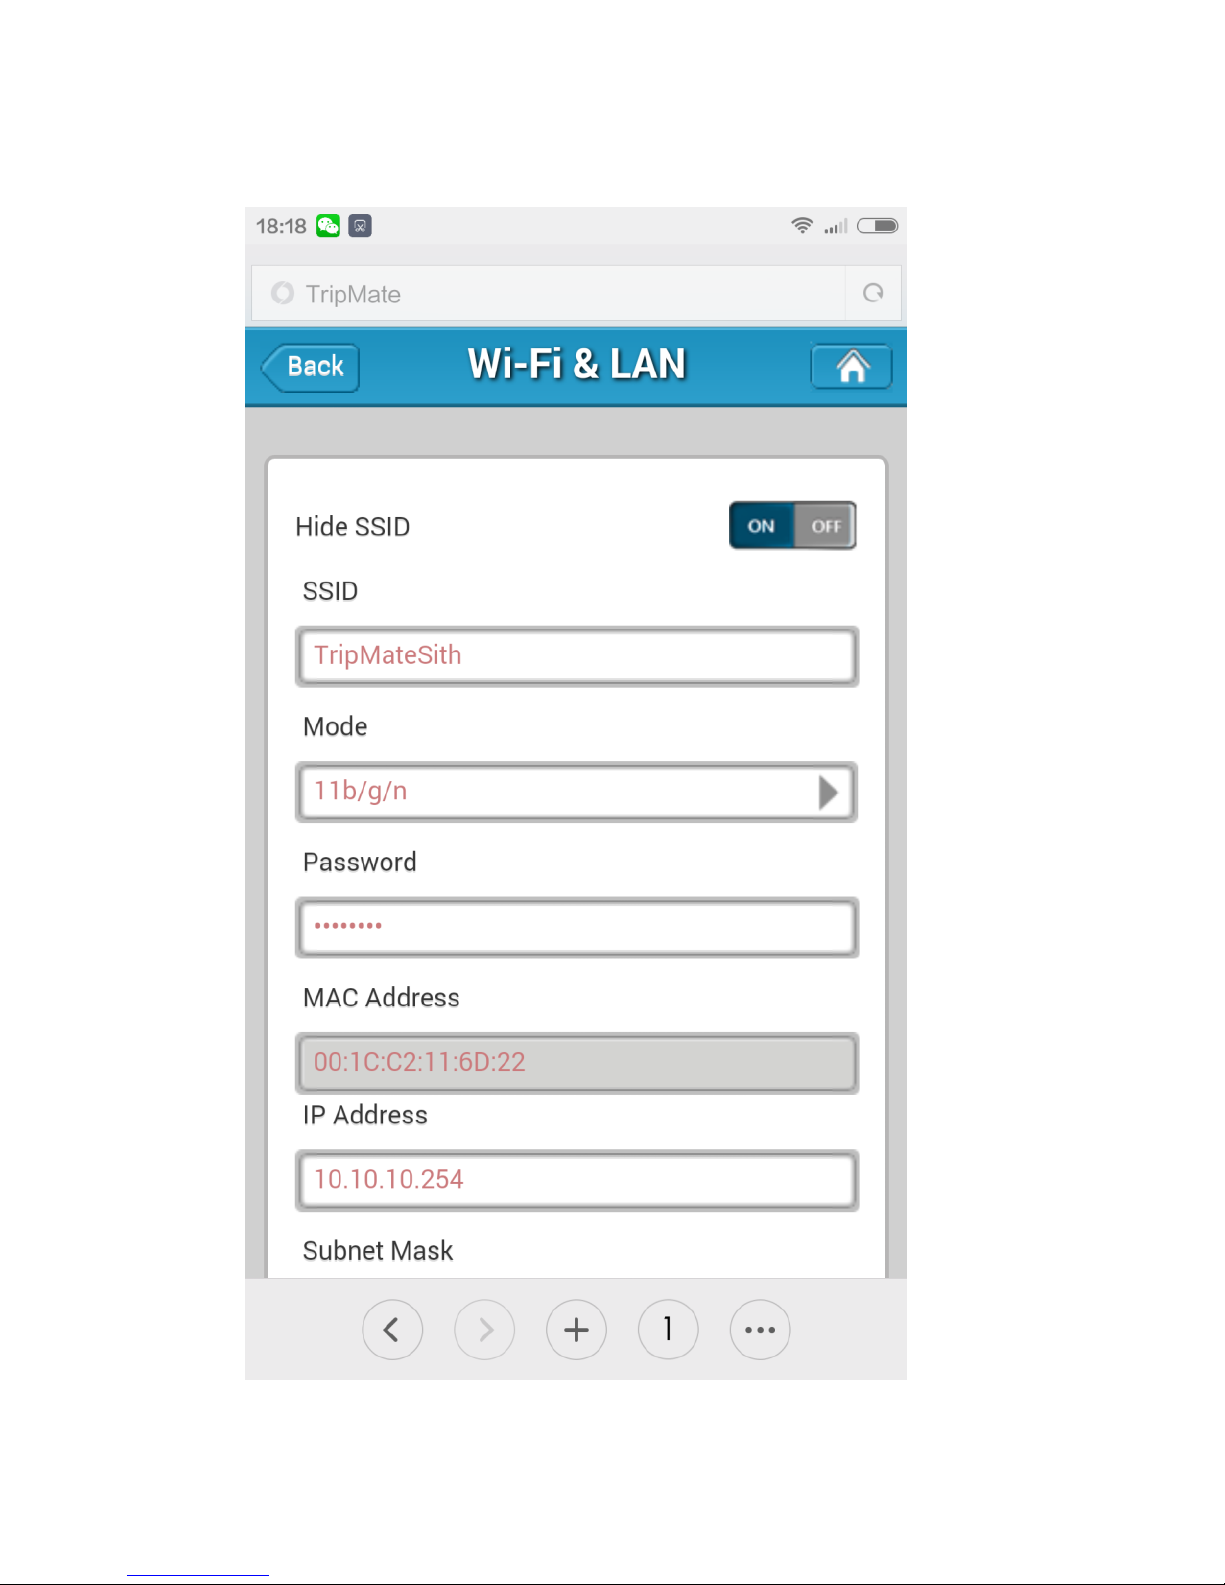
11. Click Next, then you can change the default TripMate Wi-Fi SSID and
password to what you want. (To get more information about the
Wi-Fi & LAN settings, please click 88)
26
27
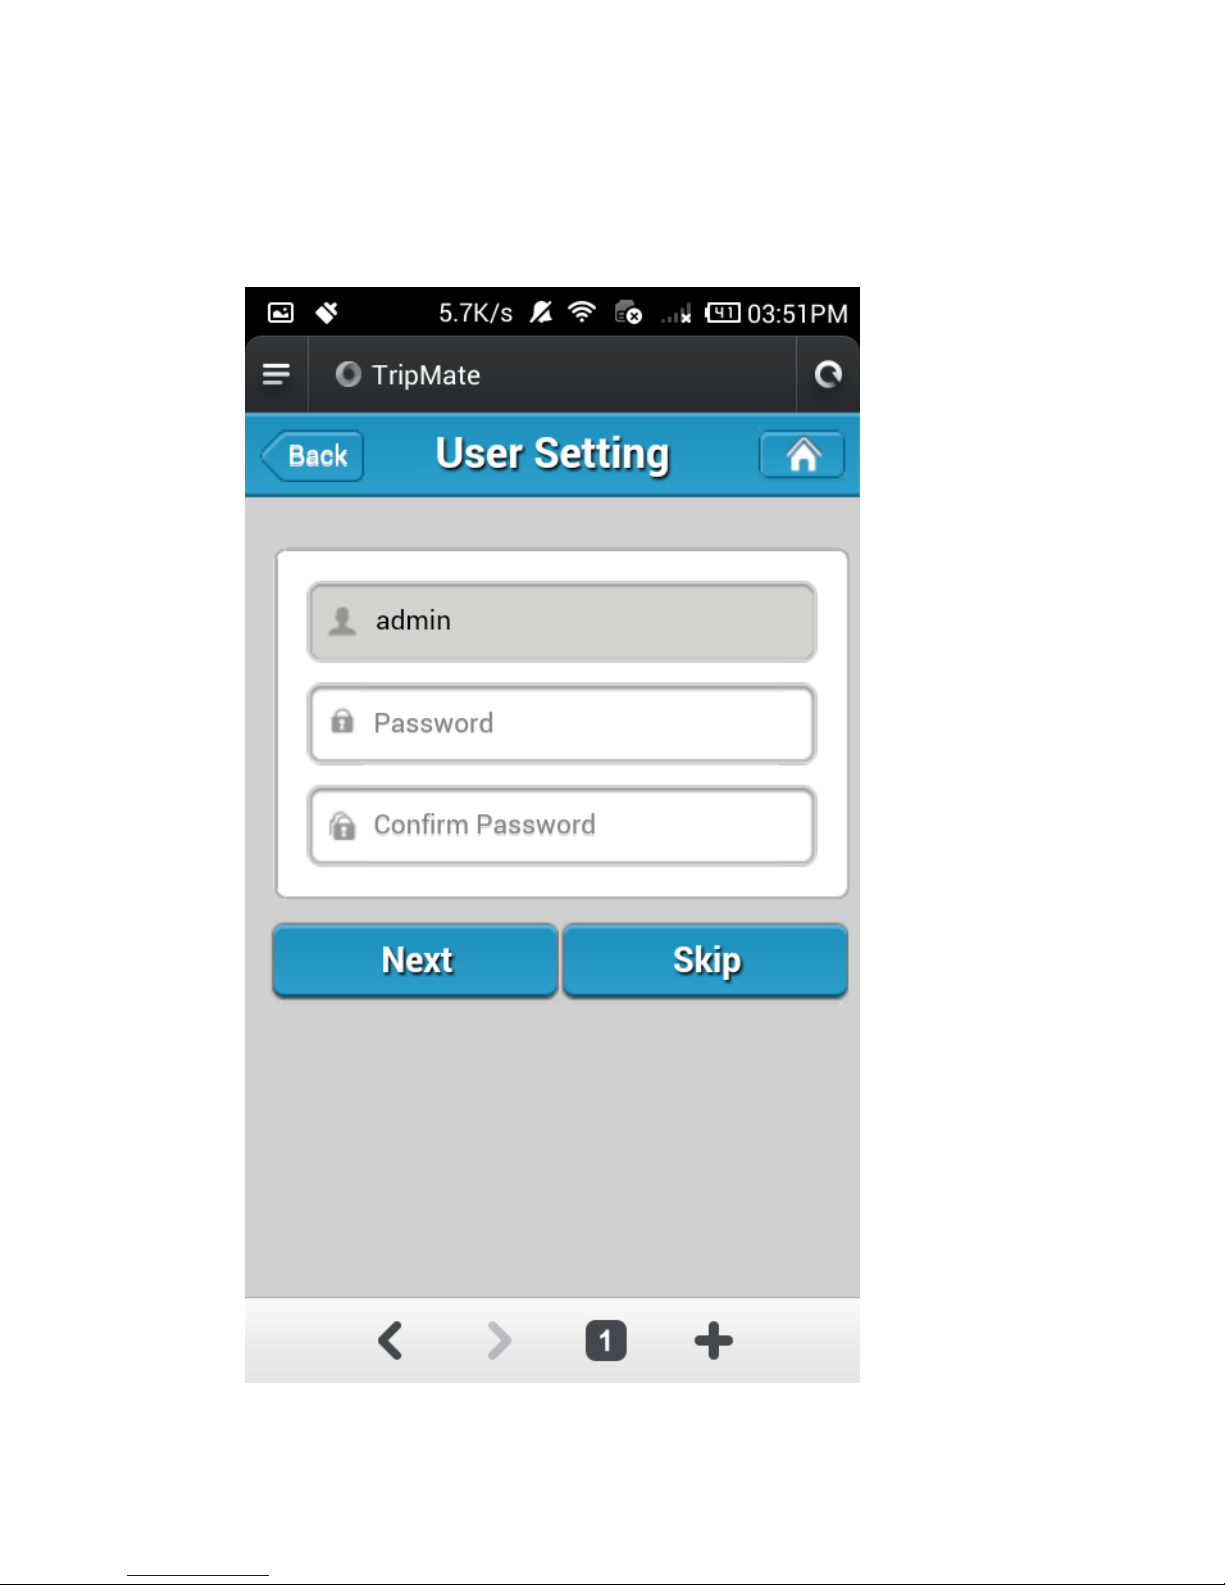
12. Click Next and then you can change the password of the admin
account.

28
13. Click Next then you will be prompted to wait 2 minutes while the
system reboots. After the system has successfully rebooted, please
reconnect to the TripMate wirelessly. Then your TripMate connects
to the Internet. The Wi-Fi LED indicator will turn to green.
29
If you change the SSID and password of TripMate, you may need to
forget the password of TripMate on your phone first. 92

30
e.g. www.cnn.com
 Loading...