

Page 1

User Guide
HT-TM02 TripMate Nano
V 1.0
HooToo®
Page 2

2
Contents
Chapter 1 Introduction ....................................................................................................................................... 4
1.1 Preview ................................................................................................................................................. 4
1.2 Features ................................................................................................................................................ 4
1.2.1 Personal Cloud .............................................................................................................................. 4
1.2.2 Travel Router ................................................................................................................................ 4
1.2.3 Powered by USB for extreme portability ...................................................................................... 4
1.3 Diagram ................................................................................................................................................ 4
Chapter 2 Configure the TripMate Nano ........................................................................................................... 5
2.1 Connect the TripMate Nano ................................................................................................................. 5
2.1.1 Connect the TripMate Nano wirelessly ........................................................................................ 5
2.1.2 Access the Configuration Page ..................................................................................................... 7
2.2 Personal Cloud ..................................................................................................................................... 8
2.3 Travel Router ...................................................................................................................................... 10
2.3.1 Access Point Mode ..................................................................................................................... 11
2.3.2 Router Mode ............................................................................................................................... 12
2.3.3 Bridge Mode ............................................................................................................................... 17
Chapter 3 System Tools .................................................................................................................................... 22
3.1 User Setting ........................................................................................................................................ 22
3.2 Disk Information ................................................................................................................................. 23
3.3 Network Setting ................................................................................................................................. 24
3.3.1 Host Name .................................................................................................................................. 24
3.3.2 SSID Setting ................................................................................................................................. 26
3.3.3 Hide SSID ..................................................................................................................................... 28
3.3.4 DHCP Settings ............................................................................................................................. 29
3.4 Service Setting .................................................................................................................................... 29
3.4.1 Samba Service ............................................................................................................................. 29
3.4.2 DLNA Service ............................................................................................................................... 30
3.5 System Settings .................................................................................................................................. 34
3.5.1 Backup & Restore ....................................................................................................................... 34
Page 3

3
3.5.2 Firmware ..................................................................................................................................... 35
3.5.3 Factory Default ........................................................................................................................... 39
3.6 Wizard ................................................................................................................................................ 40
3.7 Explorer .............................................................................................................................................. 40
Chapter 4 Warranty and Support ..................................................................................................................... 42
Appendix A: Specification ................................................................................................................................. 43
Page 4
4
Chapter 1 Introduction
1.1 Preview
TripMate Nano is a versatile device that may be tiny but is jammed packed with features. The
HooToo TripMate Nano creates a personal hotspot for sharing your existing USB storage device, and
can act as a portable wireless network router by turning a wired connection into a wireless one.
Weighing a tiny 1 ounce, the TripMate Nano saves in size but not in convenience.
1.2 Features
1.2.1 Personal Cloud
Create your own wireless network to transfer and share media with Wi-Fi enabled devices. Stream
your videos and songs from USB storage devices and share with friends!
1.2.2 Travel Router
Turns an existing network into a handy, secure, local hotspot which can be shared by up to 50
different devices!
1.2.3 Powered by USB for extreme portability
The TripMate Nano is USB-powered to ensure convenient internet access anywhere. Because of its
size, you can bring your Nano everywhere you go and never get weighed down. (Please use 5V/1A
power adapter.)
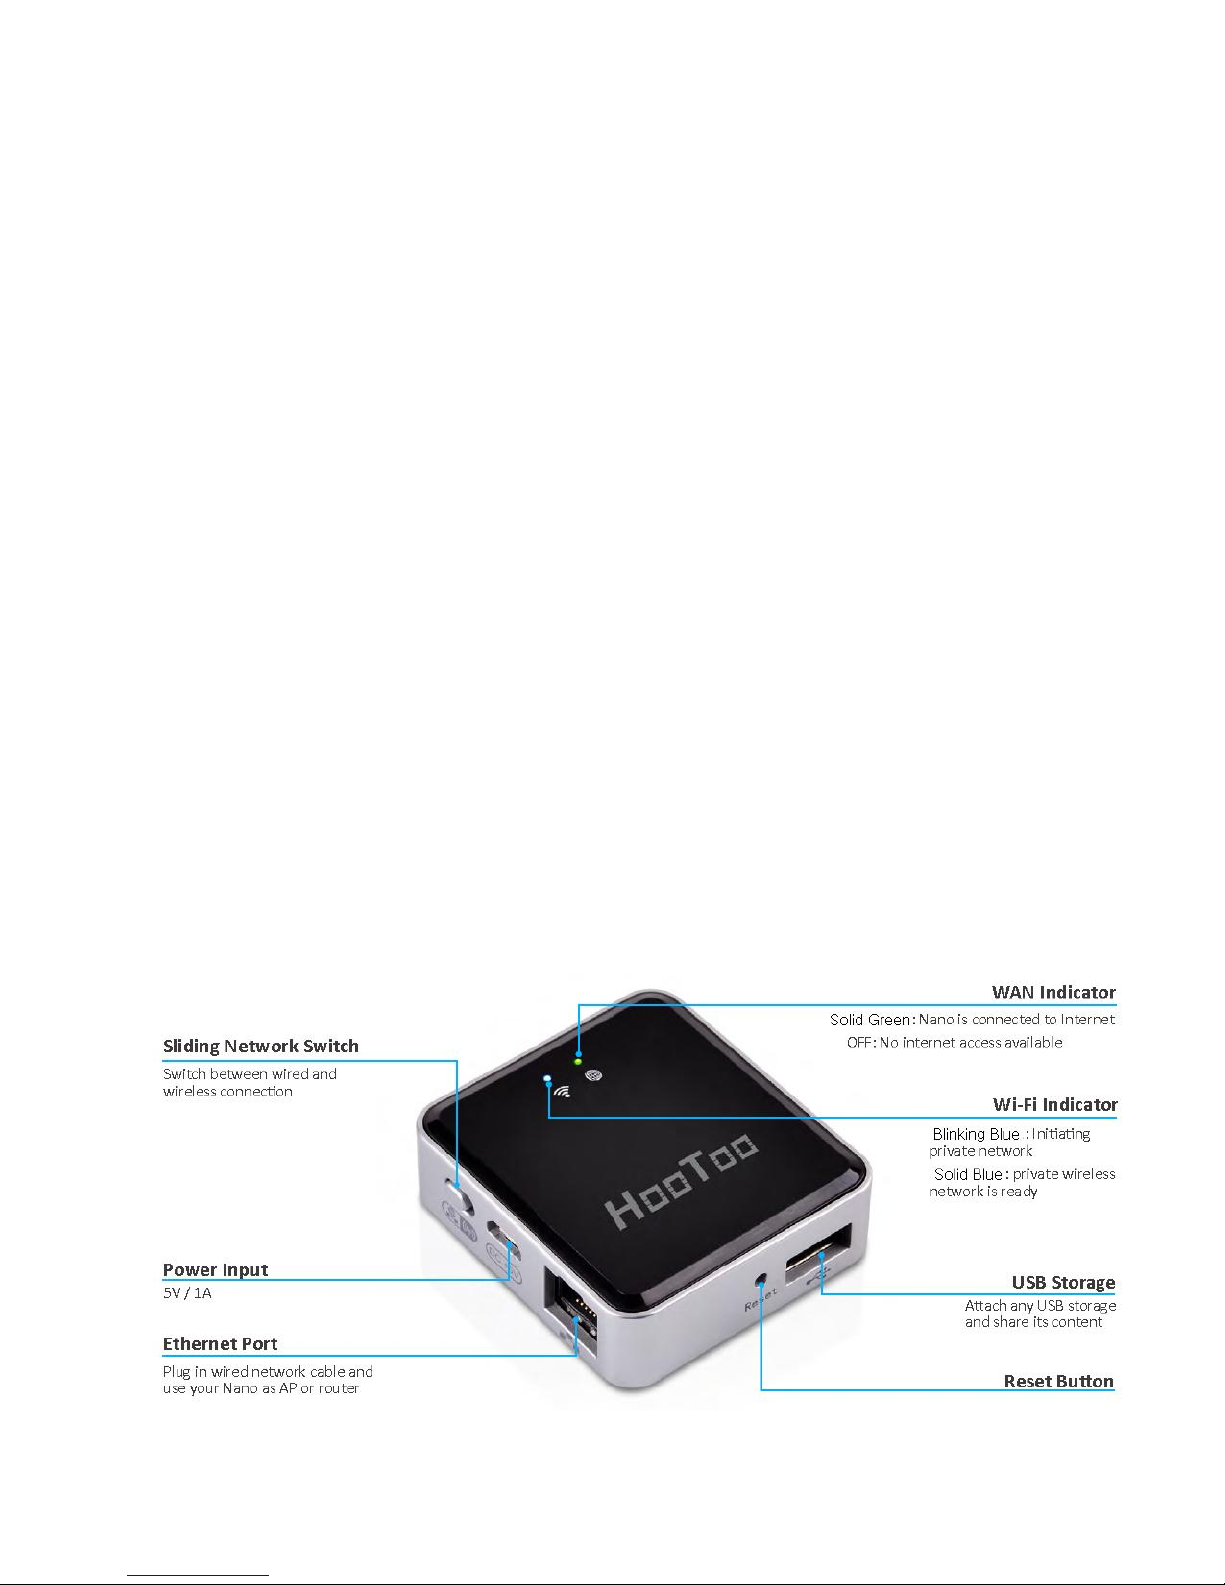
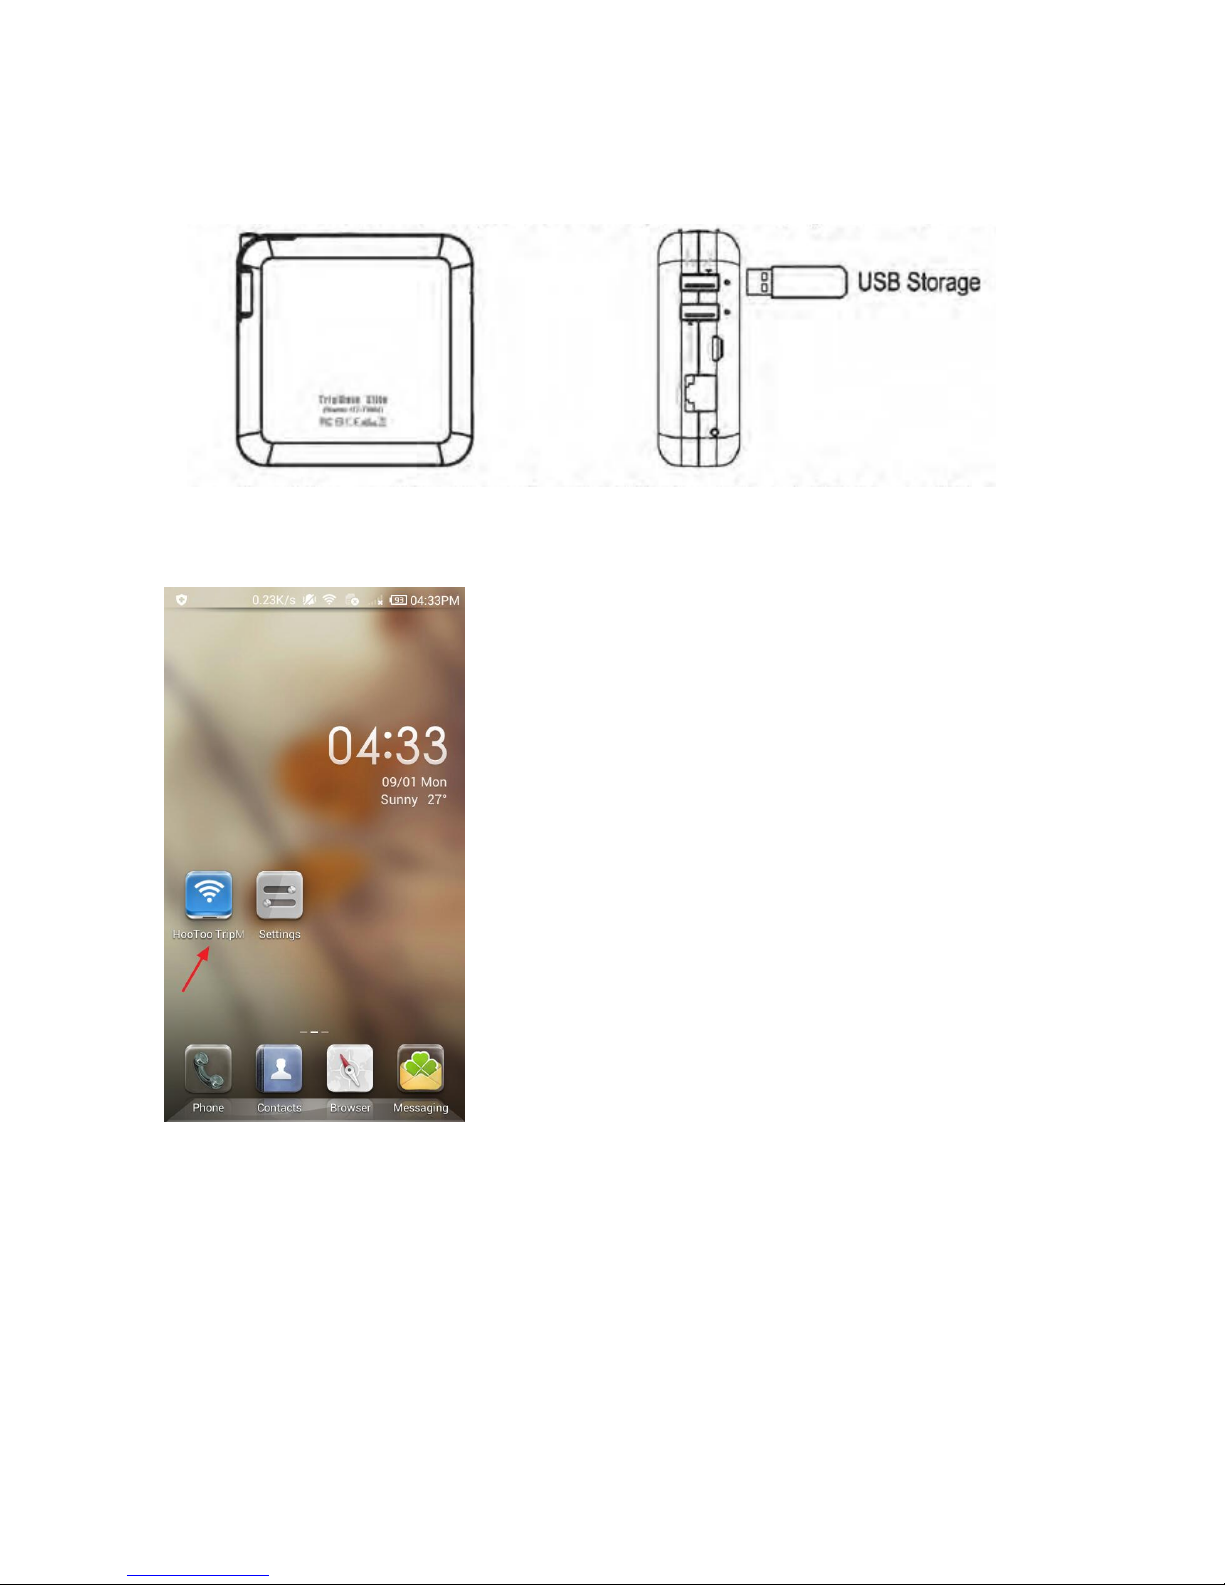
1.3 Diagram
Page 5
5
Chapter 2 Configure the TripMate Nano
2.1 Connect the TripMate Nano
2.1.1 Connect the TripMate Nano wirelessly
TripMate can create a limited local wireless network (no full internet access), where the central
functions are performed through the local network. To connect the TripMate wirelessly, please
follow the steps below:
Example: Android
1. Press the power button for 3 seconds to power on the device. Wait for the Wi-Fi indicator to be
ready
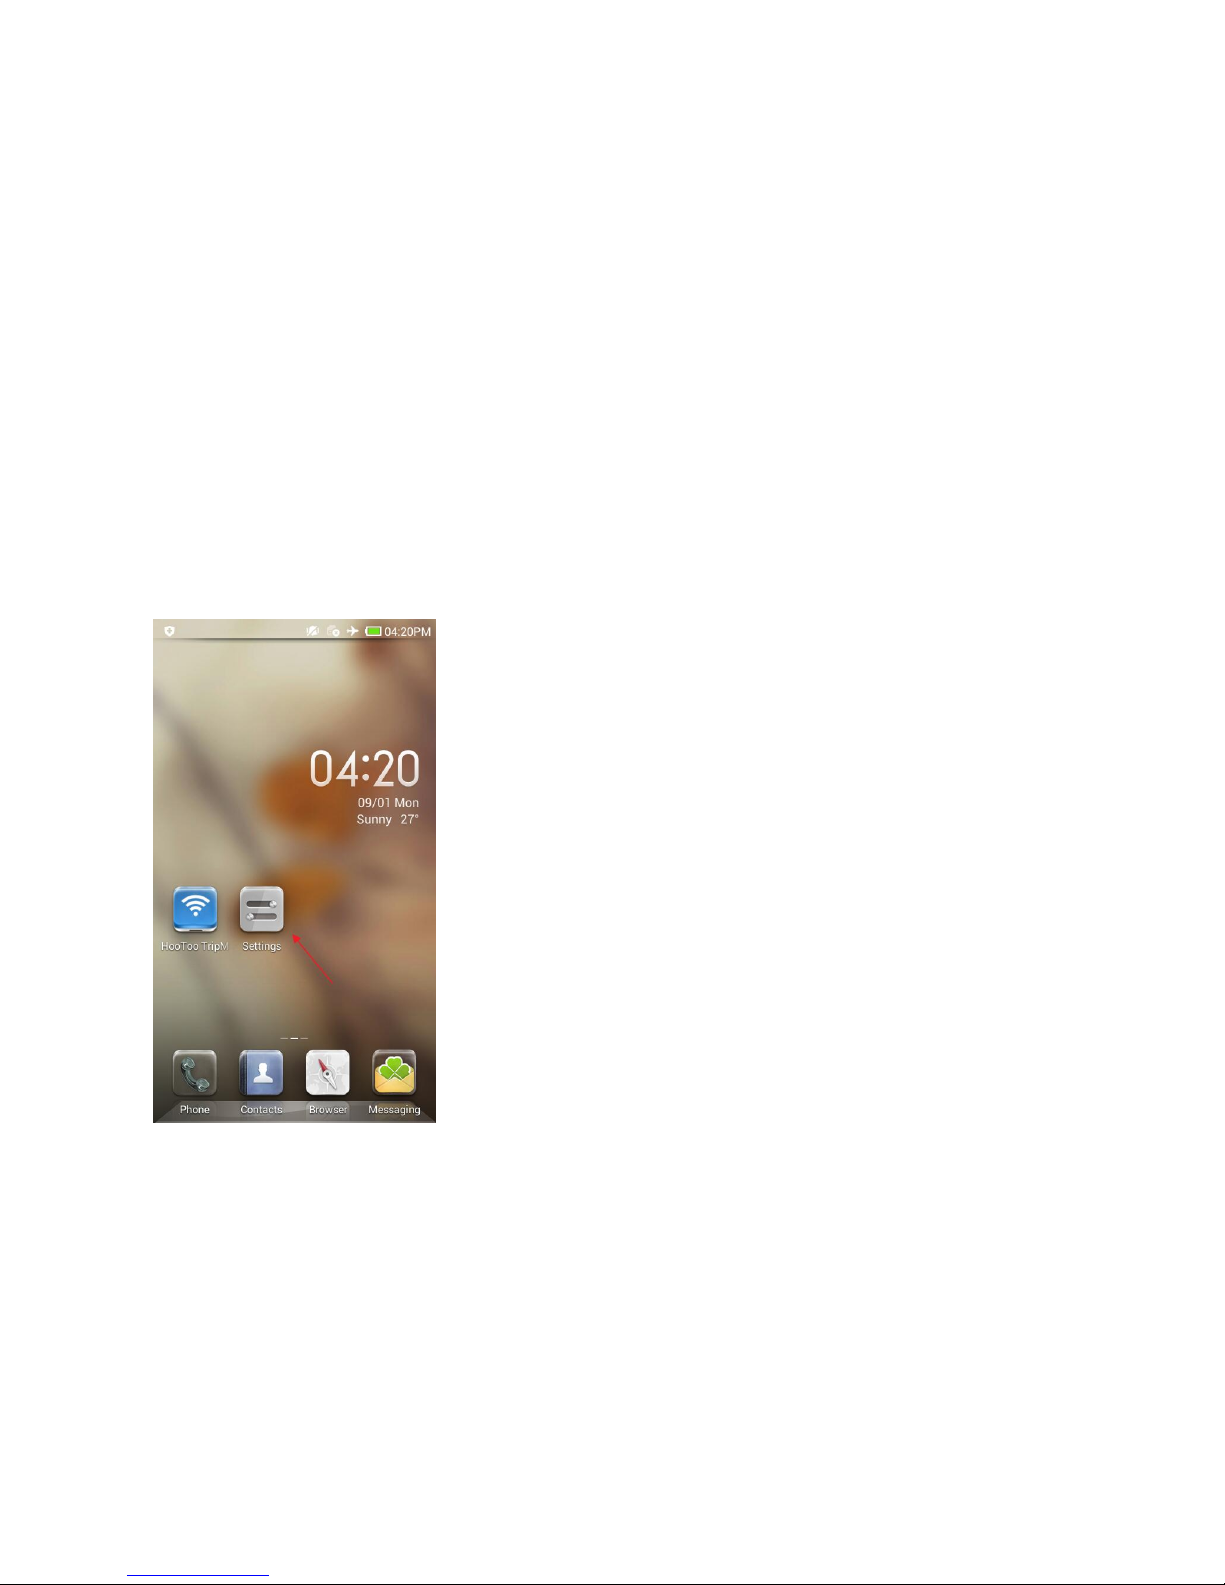
2. Click Setting on phone
Page 6

6
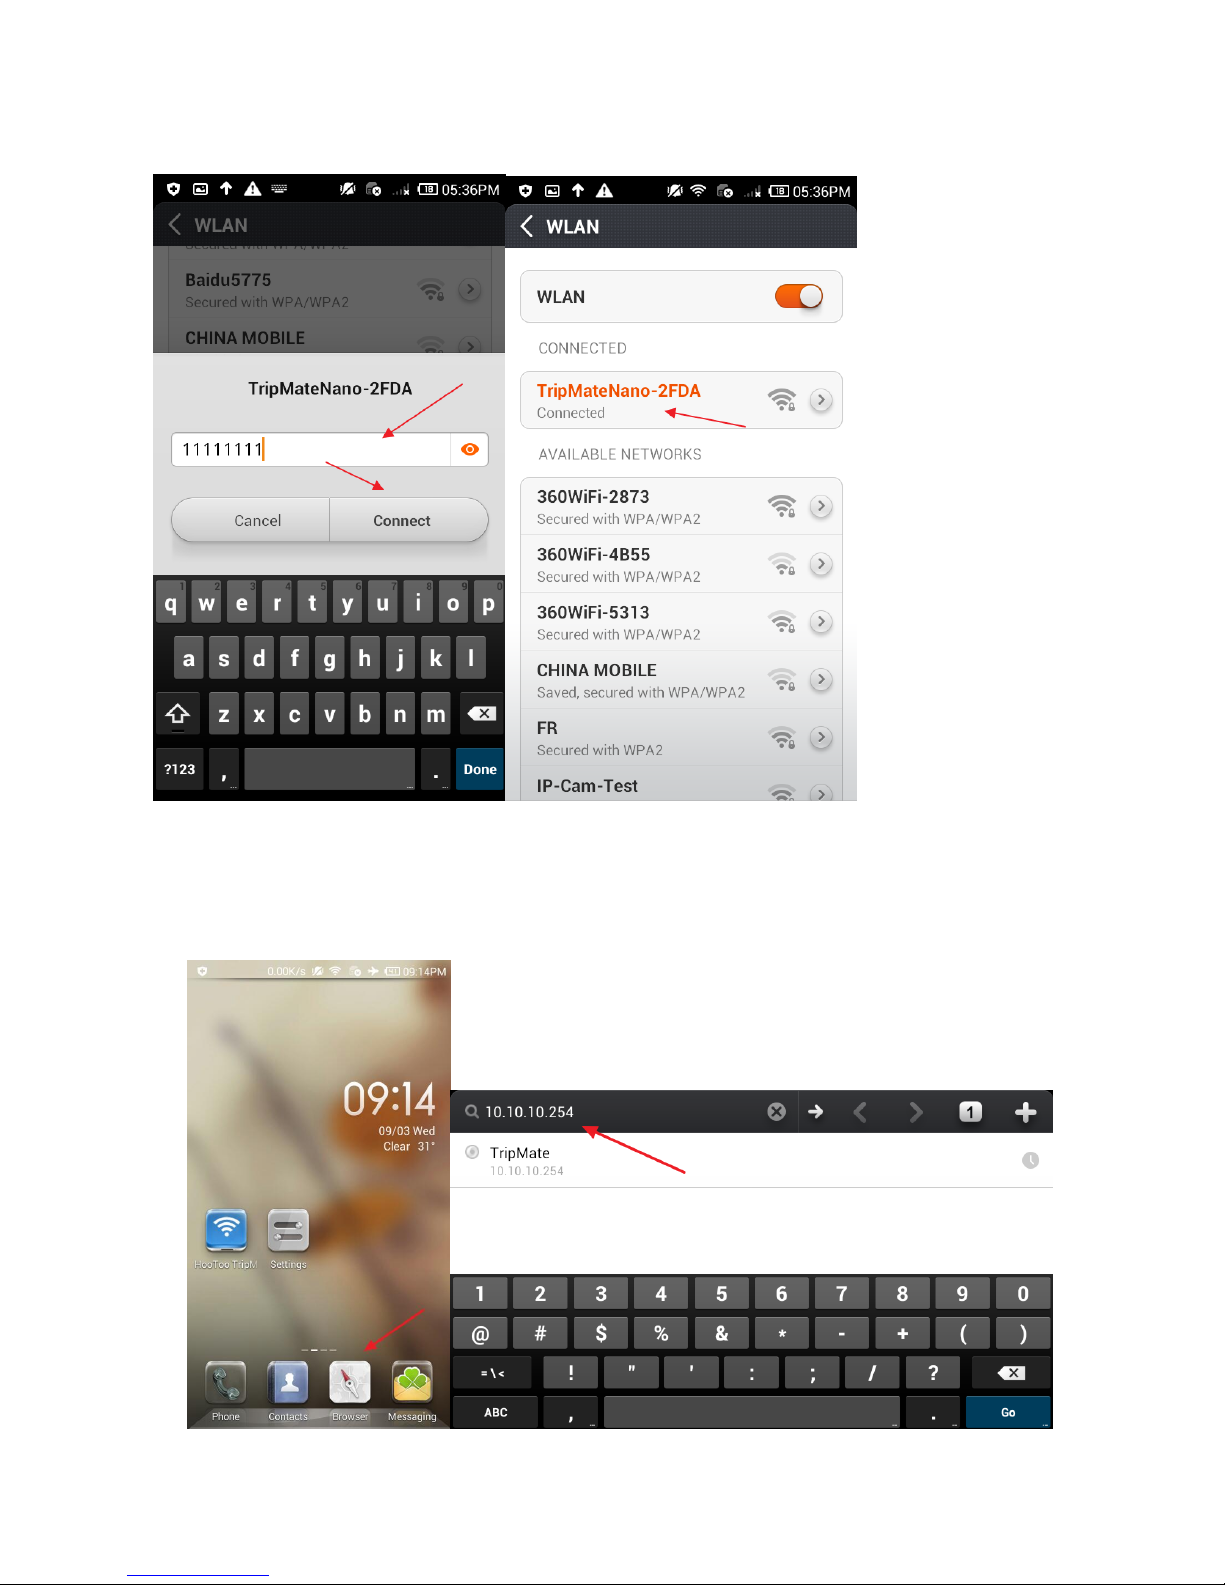
3. Click WLAN
4. Open Wi-Fi, select TripMateNano-XXXX
Page 7
7
5. Enter the default password: 11111111 (8 x 1’s), click Connect
2.1.2 Access the Configuration Page
1. Connect phone to TripMate Nano
2. When it shows the status “Connected”, open browser, enter 10.10.10.254 in the url box
Page 8
8
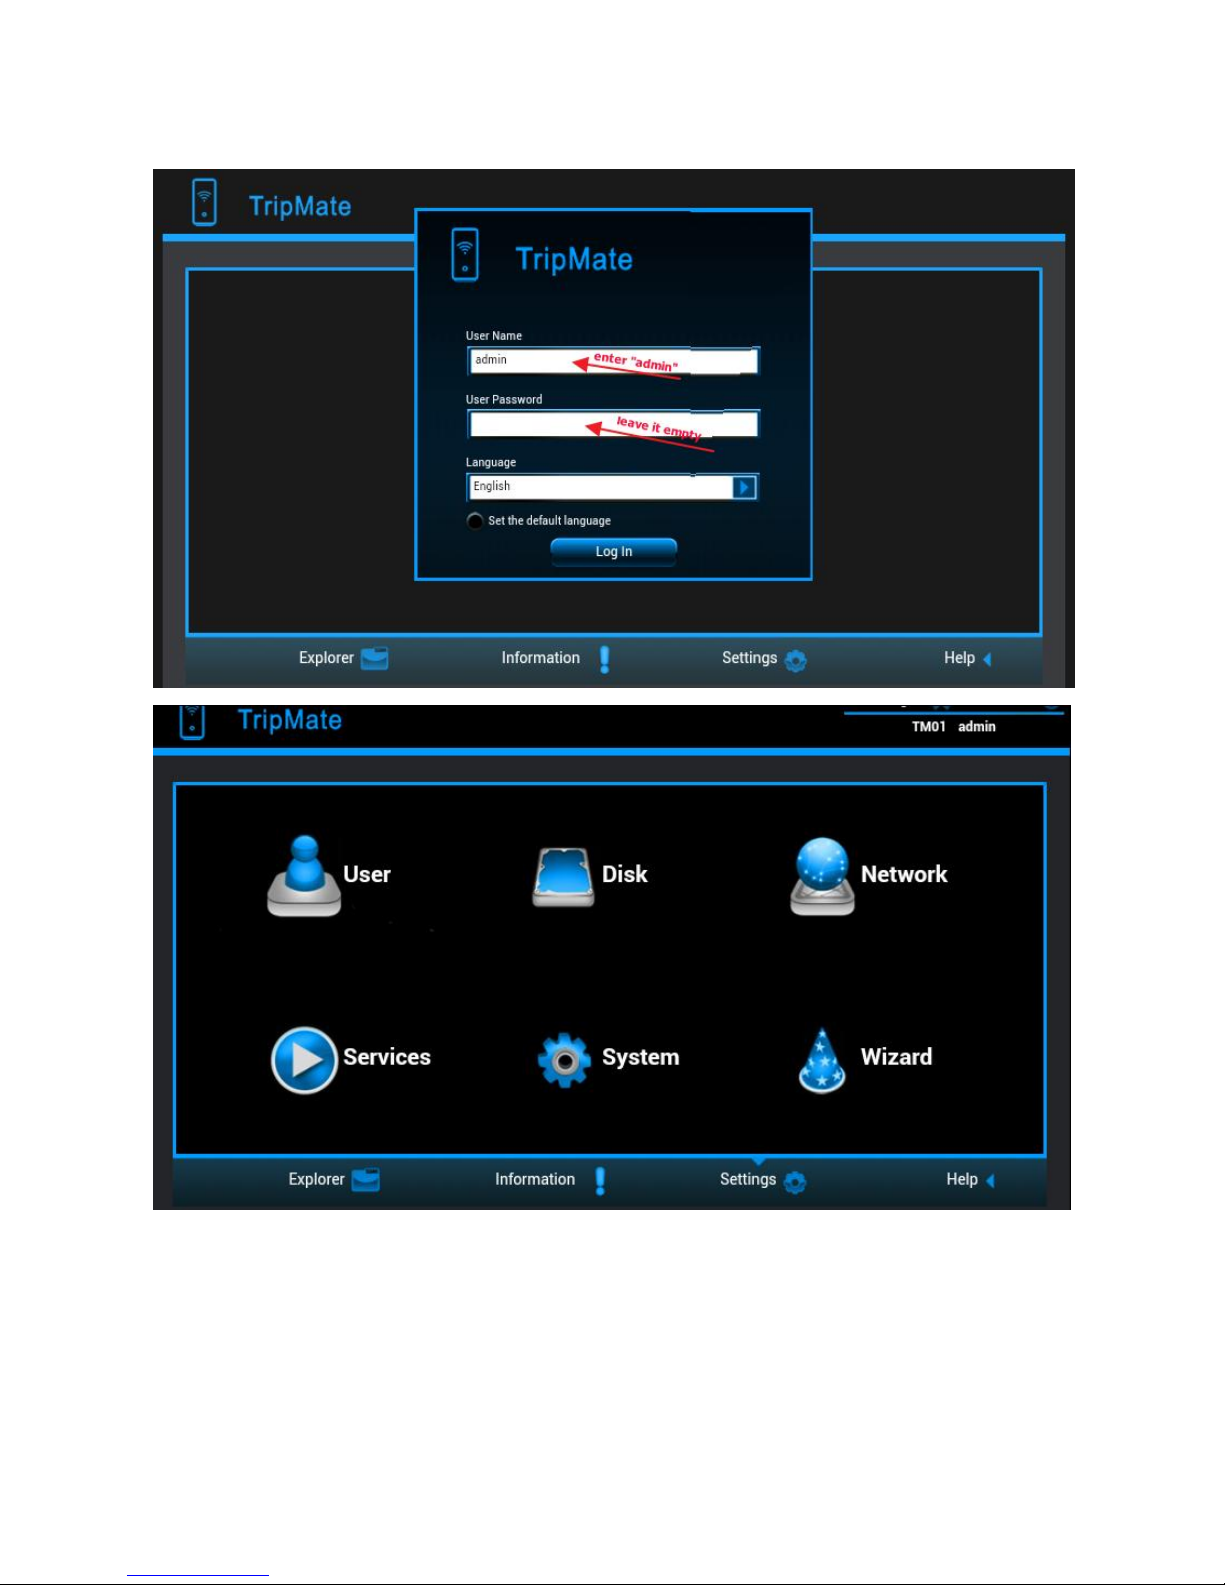
3. Log in with default user name: admin, password: (leave it empty)
2.2 Personal Cloud
You can create your own wireless personal media sharing cloud.
▲Note: Download the "HooToo TripMate" app from App Store or Google Play first
Example: Android
Page 9
9
1. Insert a USB thumb drive, a card reader (up to 64GB), or a USB HHD (supported format:
NTFS/FAT16/FAT32, up to 4TB) into the USB port of the TripMate, then power up the TripMate
2. Download the app HooToo TripMate from Google Play
3. Connect phone to TripMate
4. Run the app HooToo TripMate
Page 10
10
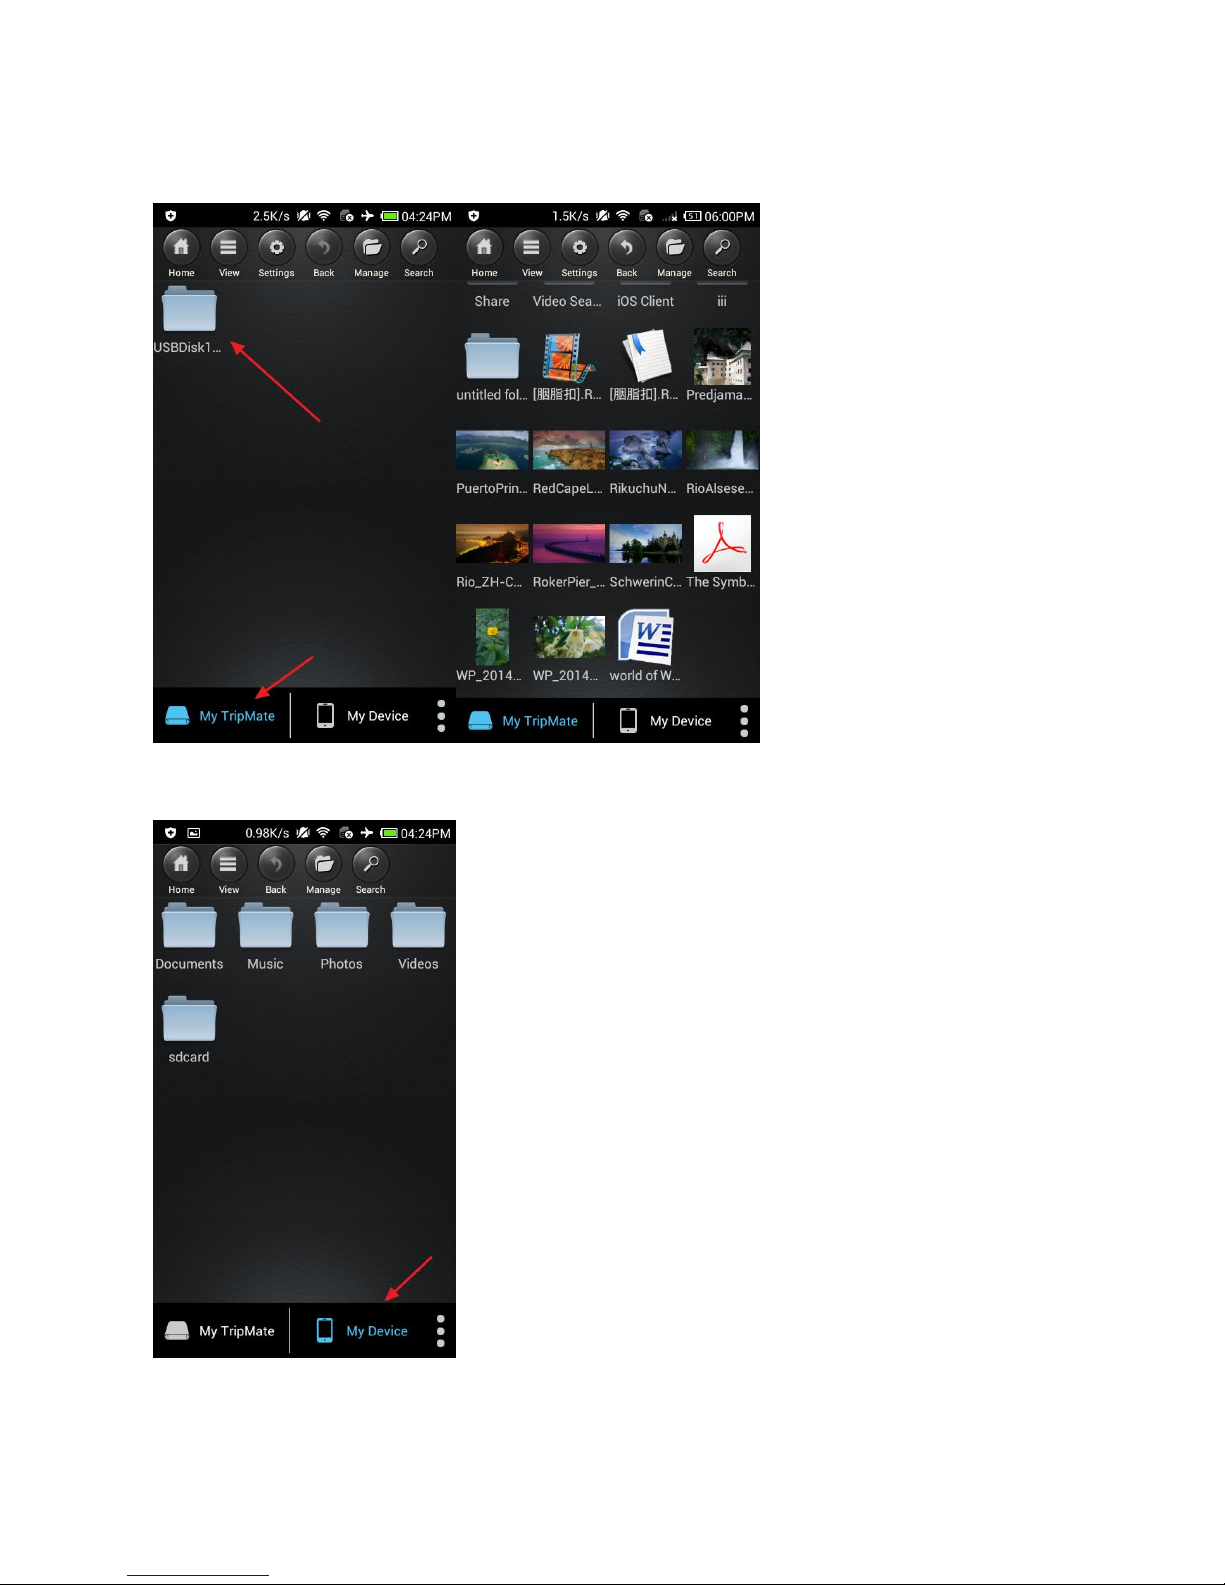
5. Tap on My TripMate. All of the contents can be found under the main folder
"USBDisk1_Volume1”
6. Tap on My Device. All of the contents on the phone can be read.
▲Note: If you need specific instructions for the HooToo TripMate app, please refer to the
Page 11
11
instructions listed on the HooToo website www.hootoo.com
2.3 Travel Router
▲Note: Similar settings can also be performed on any Mac computer, or mobile devices such as
phone, tablet, etc.
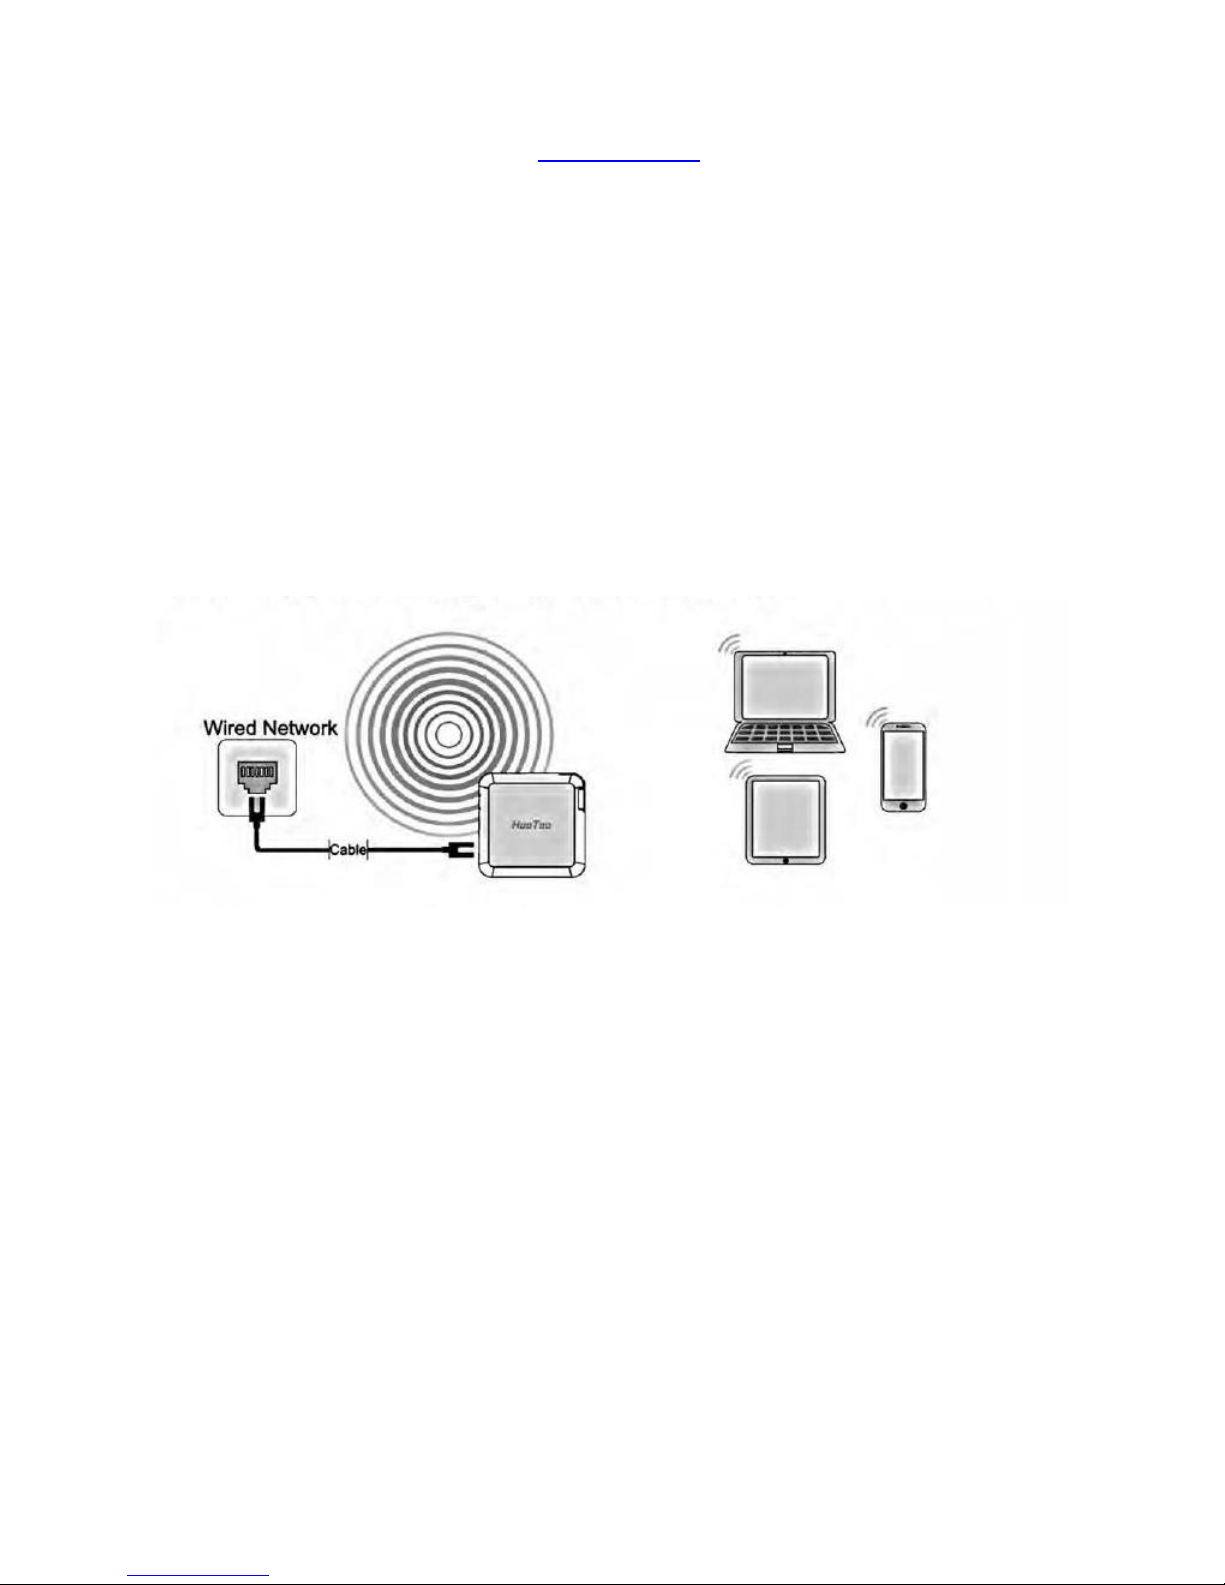
2.3.1 Access Point Mode
Definition: TripMate is connected to a wired network and transforms the wired connection into a
wireless one so that multiple devices can share the Internet.
Application:
1. Office, home, hotel and places where only wired network is available.
2. LAN gaming party, small meeting with file sharing and other situations where a temporary
network is needed.
Configuration:
Example: Android
▲Note: TripMate Nano will automatically become an access point once:
1. Power on the TripMate Nano
2. Plug a network cable from a well-established router to TripMate, wait for the blue Wi-Fi
indicator light to stop flashing and remain steady
3. Switch the network button besides the micro-USB port to wired mode (to the left side)
4. Connect phone to TripMate Nano wirelessly. Wait the green WAN indicator light to be steady
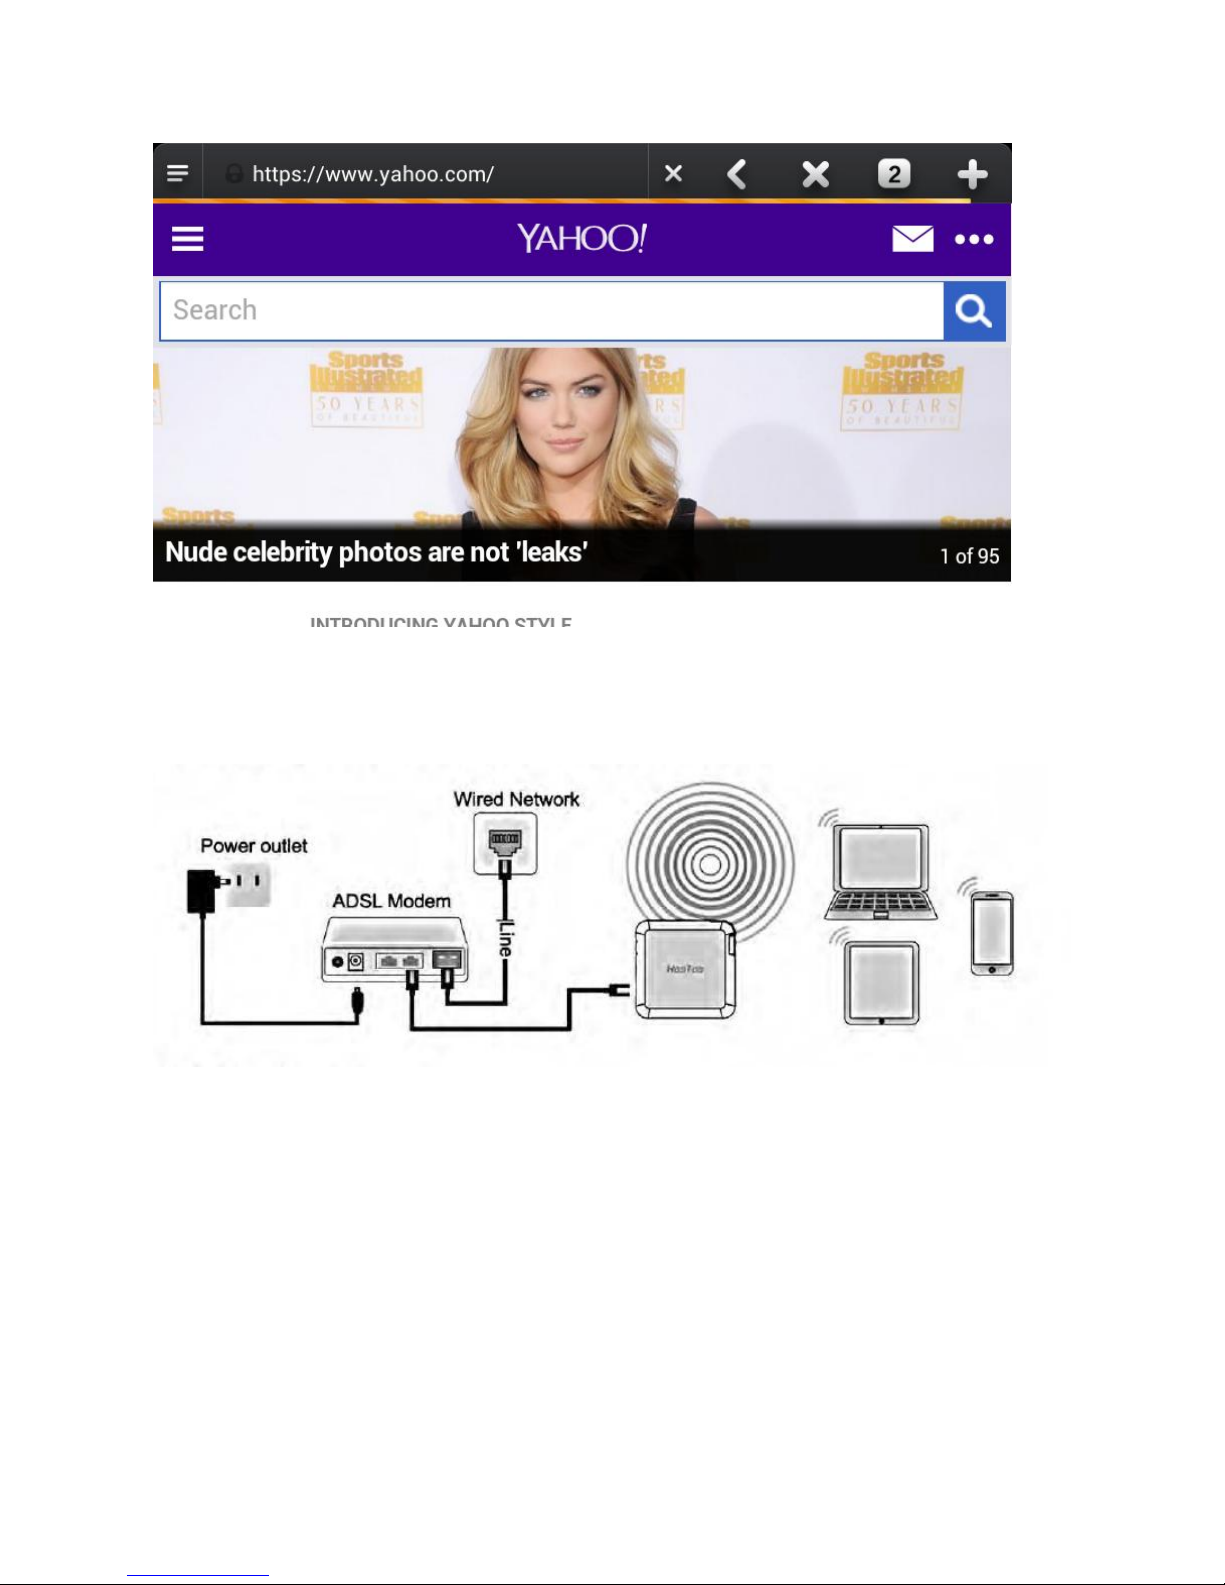
5. TripMate is now connected to the internet (e.g. www.yahoo.com).
▲Note: No need to change any parameters once it becomes an Access Point.
Page 12
12
2.3.2 Router Mode
TripMate connects to a DSL or cable modem and turns it into a regular wireless router.
Configuration:
1. Power on TripMate Nano
2. Plug an Ethernet cable from a well-established modem to TripMate Nano
3. Connect phone to TripMate Nano wirelessly. Make sure the network button is switched to wired
mode.
4. Login 10.10.10.254
5. Click Network
Page 13

13
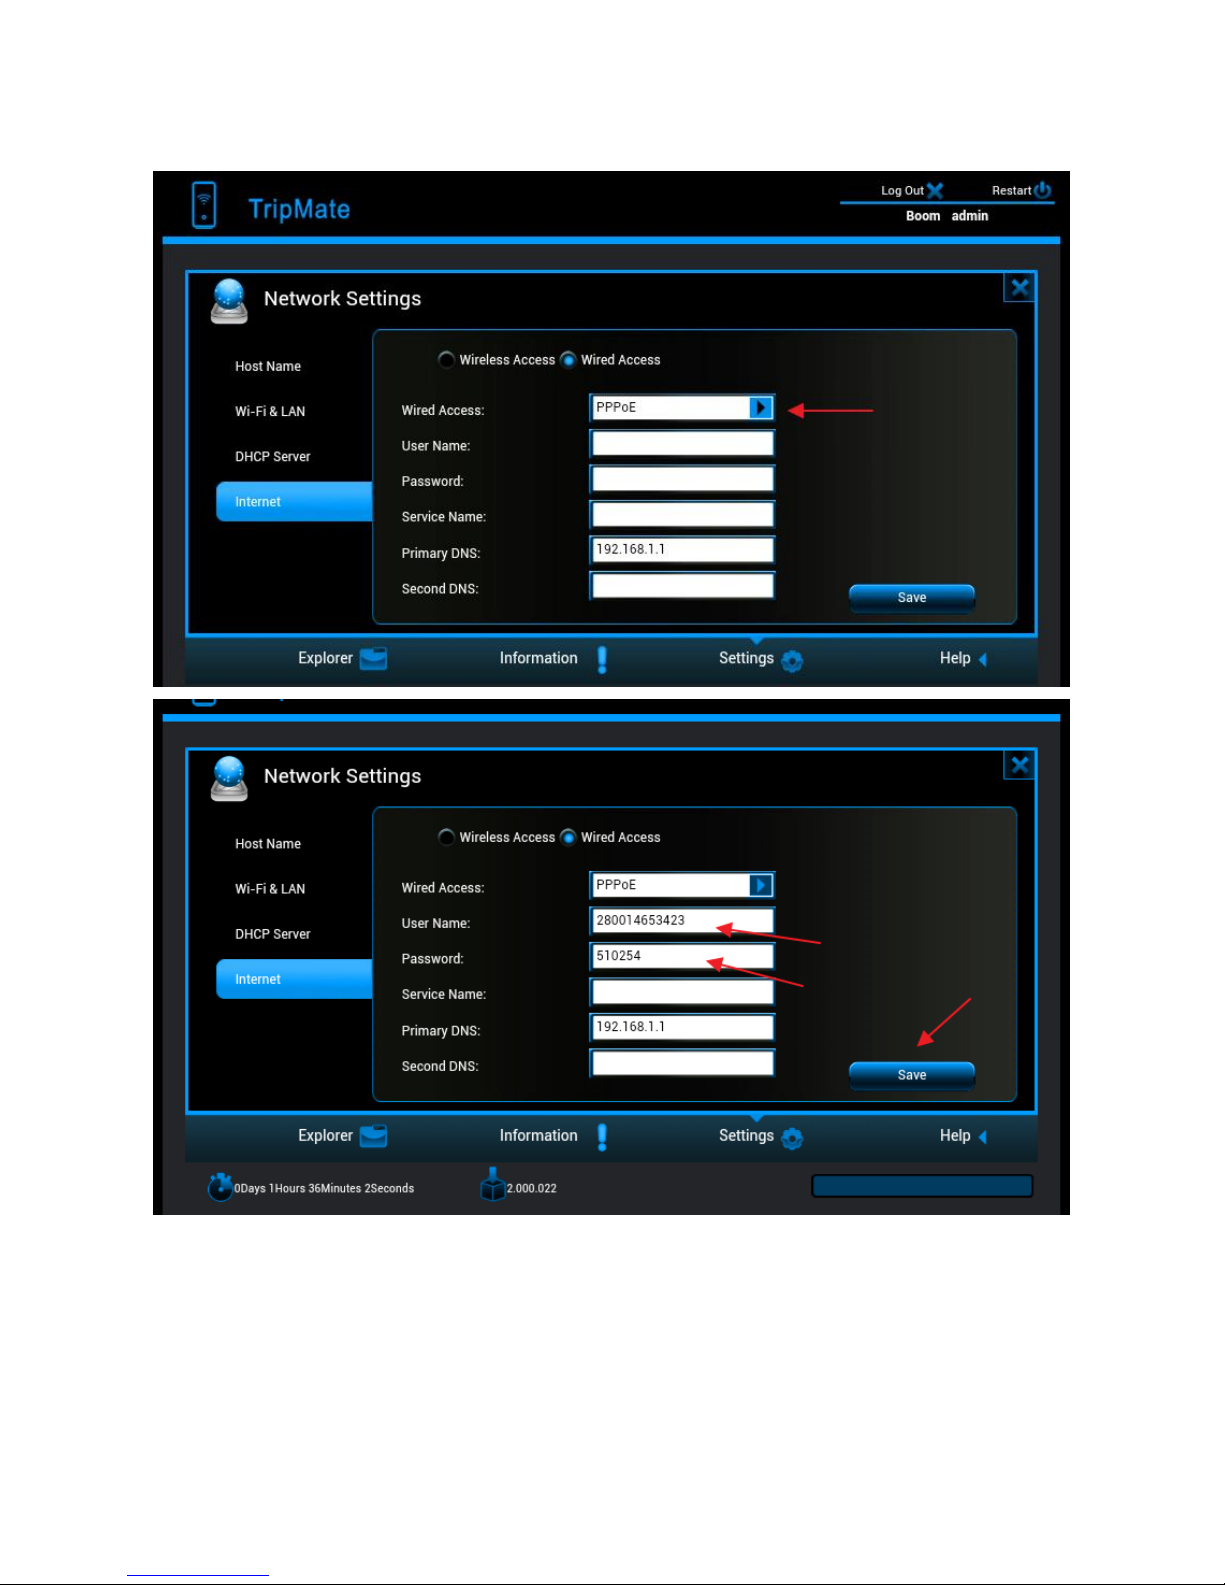
6. Select Internet, choose Wired Access.
▲Note: TripMate provides Dynamic IP, Static IP and PPPoE for router setup. Please consult with the
network administrator or refer to the wired network user documentation for best selection.
If using a DSL Internet, please enter the PPPoE username and password. Click Save
Page 14
14
Example:
TripMate is now connected to the internet
If a static IP address is issued by the network provider (please request network provider), the given
static IP fields (including network mask and gateway) must also be set to the router. Click Save
Page 15

15
TripMate is now connected to the internet
▲Tips:
When connecting devices with network cables, please make sure the cable is connected securely.
Loose cables are one of the most common sources of network setup problems.
If a wired network type cannot be chosen, an alternative method is available to set up the router
mode
1. Connect the computer directly to the wired connection with an Ethernet cable
2. Press win+R on the keyboard (the "win" key is located between the Ctrl and Alt buttons)
3. Enter CMD, a black window pops up; enter ipconfig. Get the IP address, subnet mask and
default gateway assigned by the router/modem.
Page 16

16
4. Connect TripMate Nano to the wired connection with an Ethernet cable. Make sure the network
button is switched to wired mode
5. Login 10.10.10.254
6. Click Network
7. Select Internet , then choose Wired Access, choose Static IP in the drop-down list
8. Enter into the IP field the same IP information assigned by the wired network. Click Save
Page 17

17
TripMate is now connected to the internet
2.3.3 Bridge Mode
Definition: The router borrows an existing wireless Internet and broadcasts it using a different
network name (SSID) and password. This application can create two individual networks for two
groups of users sharing one Internet connection.
Application: Small restaurants, shops, bar, home, office or others where Internet service needs to
be provided for guests without revealing the password of the existing network for hosts.
Configuration:
There are two configuration modes:
1. Wi- Fi is secured, which requires entering password,
2. Wi- Fi is open, but has an authorization page.
Page 18

18
Configuration #1:
Example: Android
1. Power on the TripMate Nano
2. Connect your phone to the TripMate Nano wirelessly. Switch the network button to wireless
mode (right side).
3. Open browser and log in 10.10.10.254
4. Network → Internet, choose Wireless Access
5. Click Scan to search available Wi-Fi
6. Select OpenWifi, enter the corresponding password. Click Save
Page 19

19
TripMate is now connected to the internet
Configuration #2:
1. Get the user name and password of the Wi-Fi, which is needed to click through the
login/authentication page
2. Connect phone to TripMate Nano wirelessly; Open browser and log in 10.10.10.254. Make sure
the network button is switched to wireless mode.
Page 20

20
3. Network → Internet, choose Wireless Access, click Scan to select the Wi-Fi, then leave the
password empty, click Save
4. Open another page of browser, the authorization page pops up, login with the username &
password
▲ Note: if the authorization page doesn’t pop up, please update the firmware. Please download
the firmware from the HooToo website:
http://www.hootoo.com/media/downloads/HooToo-TM02-Auto-jump-button-2.000.018.zip
▲ If you need instructions on how to upgrade the firmware, please refer to page 34.
After upgrading the firmware, please login 10.10.10.254, click Service, and select Auto-jump Service
before selecting off. Click Save
Page 21

21
TripMate is now connected to the internet
▲Note: Please clear the browser cache if the connection failed the first time
Page 22

22
Chapter 3 System Tools
3.1 User Setting
The admin login password can be changed here.
1. Login 10.10.10.254, select User
2. Enter your new password and confirm, click Save
Page 23

23
3.2 Disk Information
The basic information for the USB storage is displayed here.
Log in 10.10.10.254, select Disk
Page 24

24
3.3 Network Setting
Login 10.10.10.254, click Network.
3.3.1 Host Name
TripMate host name can be changed here:
Select Host Name, enter the new host name, click Save
Page 25

25
Now the host name is changed.
Page 26

26
3.3.2 SSID Setting
To change the SSID name and password of TripMate, please follow the steps below:
Select Wi-Fi & LAN
Enter the new SSID name and password. Click Save
Page 27

27
Then reconnect phone to TripMate Nano
▲ Note: On this page the Wi-Fi Channel can also be changed:
Page 28

28
And change the Security type:
3.3.3 Hide SSID
▲Note: If you would like to hide your SSID, please make sure you have set up the network setting
(wired/wireless) previously, otherwise you will lose the connection to TripMate and will need to
reset the TripMate to restore the original settings.
Page 29

29
3.3.4 DHCP Settings
Select DHCP Server, you can disable the DHCP server. Click Disabled → Save
▲Note: If you turn off the DHCP server, TripMate will NOT assign an IP address to your wireless
device therefore making them unable to connect to the TripMate. The IP address from your wireless
device needs to be inputted manually.
3.4 Service Setting
Login 10.10.10.254, click Service
3.4.1 Samba Service
Samba service can be disabled here. The default status is On
Page 30

30
3.4.2 DLNA Service
TripMate Nano also supports DLNA service:
How to use DLNA:
Example: Windows Phone
1. Download an app which supports DLNA service (e.g. My Media Hub) from the Windows app store
2. Plug a USB drive into TripMate Nano
3. Connect phone to TripMate Nano wirelessly
4. Login 10.10.10.254, click Service, select DLNA Service. Change DLNA Name to test; then change
the Directory (select the folder which you would like to access). Click Save
Page 31

31
Page 32

32
Page 33

33
5. Open the app My Media Hub, the server named “test” refers to the TripMate.
6. Entering “test”, the contents of the selected folder of the USB storage device can be read under
the folder Browse Folders
Page 34

34
▲ Note: A wireless device which supports DLNA service is needed
3.5 System Settings
Login 10.10.10.254, click System
3.5.1 Backup & Restore
Select Backup Settings. Here you can save the current configuration of the TripMate as a backup
file or restore the configuration via a backup file.
Click Save to save all configuration settings as a backup file in your local computer.
Page 35

35
To restore the TripMate’s configuration
Click Restore to locate the backup file for the TripMate
3.5.2 Firmware
On the bottom of the interface, you can view the current firmware version.
To upgrade the firmware, please follow the steps below:
1. Download the firmware from the Hootoo website: www.hootoo.com
2. Unzip it
3. Insert a USB storage device into your TripMate (i.e. an external hard drive or a USB flash drive)
4. Connect to TripMate wirelessly
5. Open a browser and enter 10.10.10.254
Login to the page, default user name: admin; password: “leave the password blank field empty”
Page 36

36
6. Click System
7. Click Firmware Upgrade on the left-side tab, Click Upgrade
Page 37

37
8. Browse and select the exact file from step 3
Page 38

38
Click Save
You will be prompted to wait 5 minutes while the system updates. After the system has updated,
you will have successfully updated the firmware.
Page 39

39
3.5.3 Factory Default
There are two ways to reset TripMate Nano:
1. Hard Reset:
Use a needle-like object to press the reset button found next to the USB port; hold for 10 seconds
until the Wi-Fi indicator LED blinks, release it and wait for it to reboot.
2. Restore Factory Setting:
On the computer, click Reset Settings to Restore to factory default settings → Save, wait for it to
reboot.
▲ Note: This will reset all configuration settings to their default values.
The default SSID Name: TripMateNano-XXXX
The default SSID Password: 11111111(8 x 1’s)
The default User Name: admin
The default Password: blank (leave it empty)
All changed settings will be restored to their factory default settings
Page 40

40
3.6 Wizard
Click Wizard, you will be directed to step-by-step basic configuration guide.
3.7 Explorer
Login 10.10.10.254→Explorer, here you can overview the contents of your USB storage when
plugged into the TripMate (the Hootoo TripMate app is needed to read the USB storage device)
Refresh Button – To refresh the display
Upload Button – To upload the files in your PC/Laptop to USB External Storage
Create Folder – To create new folders on you USB External storage devices
Copy Button – To copy files and paste them into another folder
Page 41

41
Cut/Move Button – To move files and paste them into another folder
Download Button – To download files to your PC/Laptop
Delete Button – To delete the files you do not need any more
Rename Button – To rename files or folders
Photo Viewer – To view the photos on one folder with slide
Page 42

42
Chapter 4 Warranty and Support
This HooToo HT-TM02 Tripmate Nano is covered with the HooToo 12 month warranty from the date
of its original purchase. If the HooToo HT-TM02 Tripmate Nano becomes defective during its
warranty period, please contact HooToo or your seller for warranty cover. The following are not
covered by our warranty:
2
nd
hand purchase or purchase from a non-authorized seller/distributor
Damages resulted from abuse, fire, poison and moisture
Damages resulted from natural disaster
Product been dismantled
Note: Successful product registration at www.hootoo.com/productregistration will add an
additional 6 month of warranty cover, making a total of 18 months warranty cover from the date of
original purchase.
▲NOTE:
Please do not return the product without contacting HooToo first
We can only provide warranty cover for products sold by HooToo authorized distributor
Page 43

43
Appendix A: Specification
Hardware Specification
Project name
TripMate Nano
Model name
HT-TM02
CPU
Model
Ralink RT5350
Frequency
MIPS24KEc 360MHZ
Flash
Model
EN25Q64-104WIP
Capacity
8MByte SPI flash
SDRAM
Model
M12L2561616A-6TG (SDRAM)
Capacity
32MB (256Mbit)
WiFi
Standard
802.11 b/g/n
Frequency
2.4GHz
Speed
72Mbps for 20MHz
150Mbps for 40MHz
Interface
WAN LED (Green)
Green: connection is successful
None: connection is failed
WiFi LED (Blue)
WiFi LED shows the system initiating state:
Start flashing: Kernel loading in process
Stop flashing: System initiation completes
Switch button
Switch the connect mode: Wireless /Wired
WAN port
RJ45 100Mbit/s
Reset button
Factory default reset button
USB host interface
USB 2.0:
Support USB flash/HDD
Antenna
Signal strength
2dBi (WiFi component)
14dBm (Main chip)
Environmental
requirements
Operating Temperature: 5°C to 40°C
Non-Operating Temperature: 0°C to 60°C
Operating Humidity: 5% to 90% (Non-condensing)
Non-operating Humidity: 5% ~ 90 % (Non-condensing)
Product dimension
56mm L x51mm W x 1mm H
Emission (EMI), Safety
& Other
Certifications
FCC Class B
CE
Software Specification
Page 44

44
System setting
Language selection
To select your native languages
Firmware upgrade
To upgrade firmware by web browser
Configuration setting
To backup and retrieve system configuration
setting
Factory default setting
restore
To restore default system setting originated
in factory production
File system
NTFS
A) Support Microsoft Windows NTFS file
system
B) Application tools:
Tuxera NTFS tool for mounting file
system
NTFS file system inspection and repair
tool
FAT16/FAT32
A) Support Microsoft Windows
FAT16/FAT32/exFAT file system
B) Application tools:
FAT file system inspection and repair tool
File service
CIFS protocol
Provide shared services to files and printers
for clients on Microsoft Windows Network
Samba service
Provide shared services to files and printers
for clients on Microsoft Windows Network
and Unix-Like Network
HTTP(S) service
OS
A build-in browser which support common
operation system such as Windows, Linux,
Mac® OS and smart terminal for easy
management
WebDAV protocol
Makes the Web a readable and writable
medium which allow users to edit and
manage documents and files stored on
World Wide Web servers
Access control
Password protection
A) WiFi access control:
None
WPA
WPA2
WPA&WPA2
B) WEB access control
Password login
C) Samba access control
Password login
Default security:
A) Authentication needed with password
11111111
B) No authentication
C) No authentication
Page 45

45
Network Management
WiFi setting
A) WiFi login history cache
B) WiFi auto login
A) Available wireless networks display
LAN side setting
A) Camper IP setting
B) Subnet mask setting
C) DHCP server setting
D) Default gateway setting
E) Default DNS setting
Application software
Client
A) Windows XP/2003/Vista/7/8, Linux,
Unix, Mac®
B) Android: tablet, smartphone
C) iOS: iPad®, iPhone®
File Formats
iOS Client
A) Audio: Support formats of MP3
、
AAC
、
m4a、wav、aiff
B) Video: Support formats of MP4
、
MOV
、
m4v、avi
C) Photo: Support formats of jpg
、
tiff
、
bmp,gif(image)
D) Document: Support formats of keynote
、
numbers、page、excel、word、pdf、txt
、
ppt
Android Client
A) Audio: Support formats of MP3 only at
present
B) Video:MP4
C) Photo: Support formats of.jpg
、
.png
D) Document: Support formats of txt
、
word、excel、ppt and pdf
 Loading...