

Hootoo HT-ND006 Online Manual

HooToo 300M Mini Router
ONLINE GUIDE
Model NO.: HT-ND006

Contents
1. Product Overview ...................................................................................... 1
2. Connection ................................................................................................. 4
2.1 Hardware Connection .................................................................... 4
2.2 PC TCP/IP Settings ............................................................................ 5
3. Log Into The Route r .................................................................................... 8
3.1. Log In .................................................................................................. 8
3.2. Webpage Layout ........................................................................... 11
3.3. Commonly Used Webpage Elements ........................................ 12
4. Features & Configuration........................................................................ 10
4.1. Quick Setup ..................................................................................... 10
4.1.1. Router ..................................................................................... 11
4.1.2. WISP ........................................................................................ 12
4.2. System Status................................................................................... 15
4.2.1. System Status ......................................................................... 15
4.2.2. WAN Status ............................................................................ 16
4.2.3. LAN Status .............................................................................. 16
4.2.4. Wireless Status ....................................................................... 17
4.3. Network Settings ............................................................................. 17
4.3.1. WAN Settings ......................................................................... 17
4.3.2. MAC Address Clone ............................................................. 20
4.4. WLAN Settings ................................................................................. 21
4.4.1 Basic Settings ......................................................................... 21
4.4.2 Security Settings
.................................................................... 22
4.4.3 WPS Settings........................................................................... 26
4.4.4 Access Control ...................................................................... 27
4.4.5 Connection Status ................................................................ 27
4.5. LAN Settings ..................................................................................... 25
4.5.1. LAN Settings ........................................................................... 25
4.5.2. DHCP Server .......................................................................... 26
4.5.3. DHCP List & Binding .............................................................. 27
4.6 Expert Settings ................................................................................. 27
4.6.1 URL Filter ................................................................................. 27
4.6.2 Port Range ............................................................................. 28
4.6.3 DMZ Settings .......................................................................... 29
4.6.4 DDNS ....................................................................................... 30
4.6.5 Rem ote WE B .......................................................................... 30

3
4.6.6 WAN Ping ............................................................................... 31
4.7. R outing Settings .............................................................................. 31
4.8. Tr affic Control .................................................................................. 32
4.9. System Tools .................................................................................... 32
4.9.1 Time Settings .......................................................................... 35
4.9.2 Backup/Restore .................................................................... 33
4.9.3 Factory Reset ......................................................................... 36
4.9.4 Firmware Upgrade................................................................ 36
4.9.5 Reboot.................................................................................... 37
4.9.6 Change Password ................................................................ 37
4.9.7 System Log ............................................................................. 38
5. FAQs ........................................................................................................... 38
6. Warranty ................................................................................................. 39
1
1. Product Overview
Thank you for purchasing the HooToo 300M Mini Router. Please read this
manual carefully and keep it in a safe place for future reference. If you
need any further assistance, please contact our custo mer suppo rt team
or email us at support@hootoo.com.
1.1 Product Features
Complies With IEEE802.11b/g/n, IEEE802.3 & 802.3u Standards
2 x 10/100M L A N Po rts, 1 x WAN Port, & Wireless-N AP
Operation Mode: Router / WISP
Connection Type : PPPoE, Static I P, and Dynamic IP Connection
Type
Security Features Such As IP, MAC, and Domain Filtering
With WEP, WPA-PSK, and WPA2-PSK Encryption Security
Web-based Management
5dBi x 2 Omni-Directional Antenna
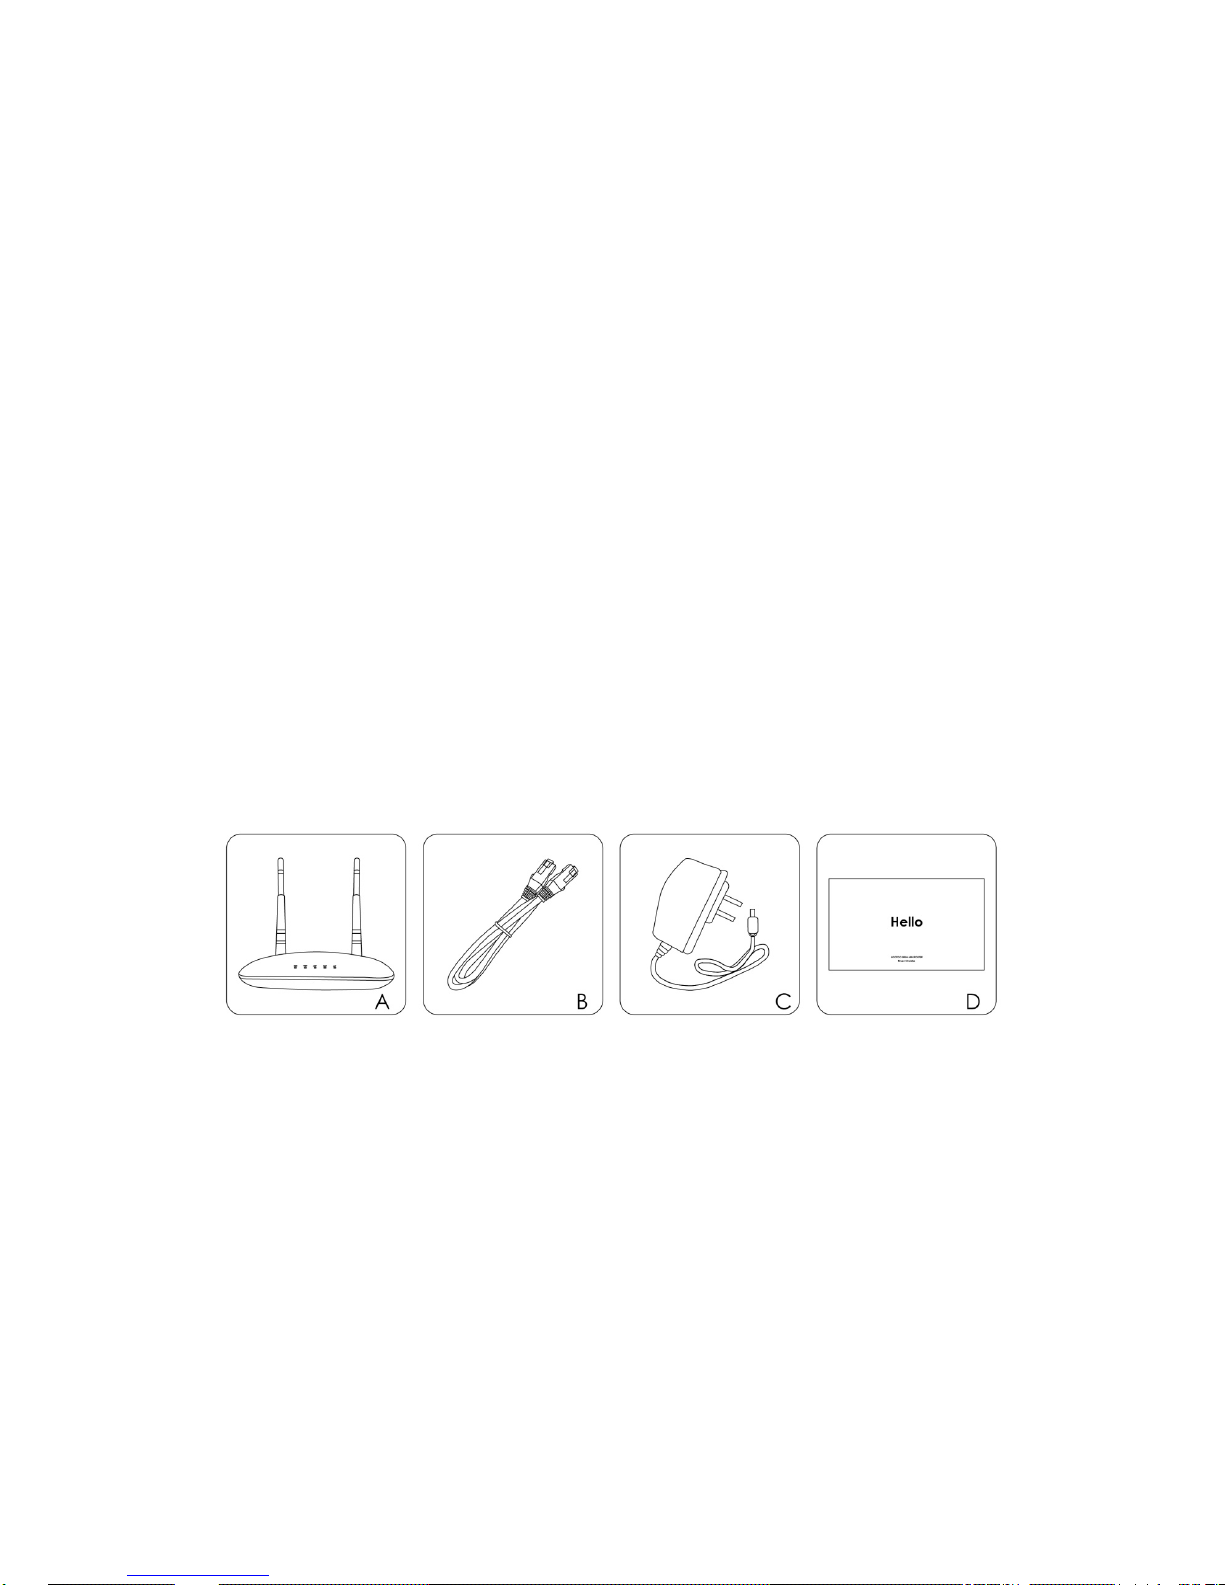
1.2 Package Contents
A. 1 x HooToo 300M Mini Router
B. 1 x Ethernet Cable
C. 1 x Power Adapter
D. 1 x User Guide
2
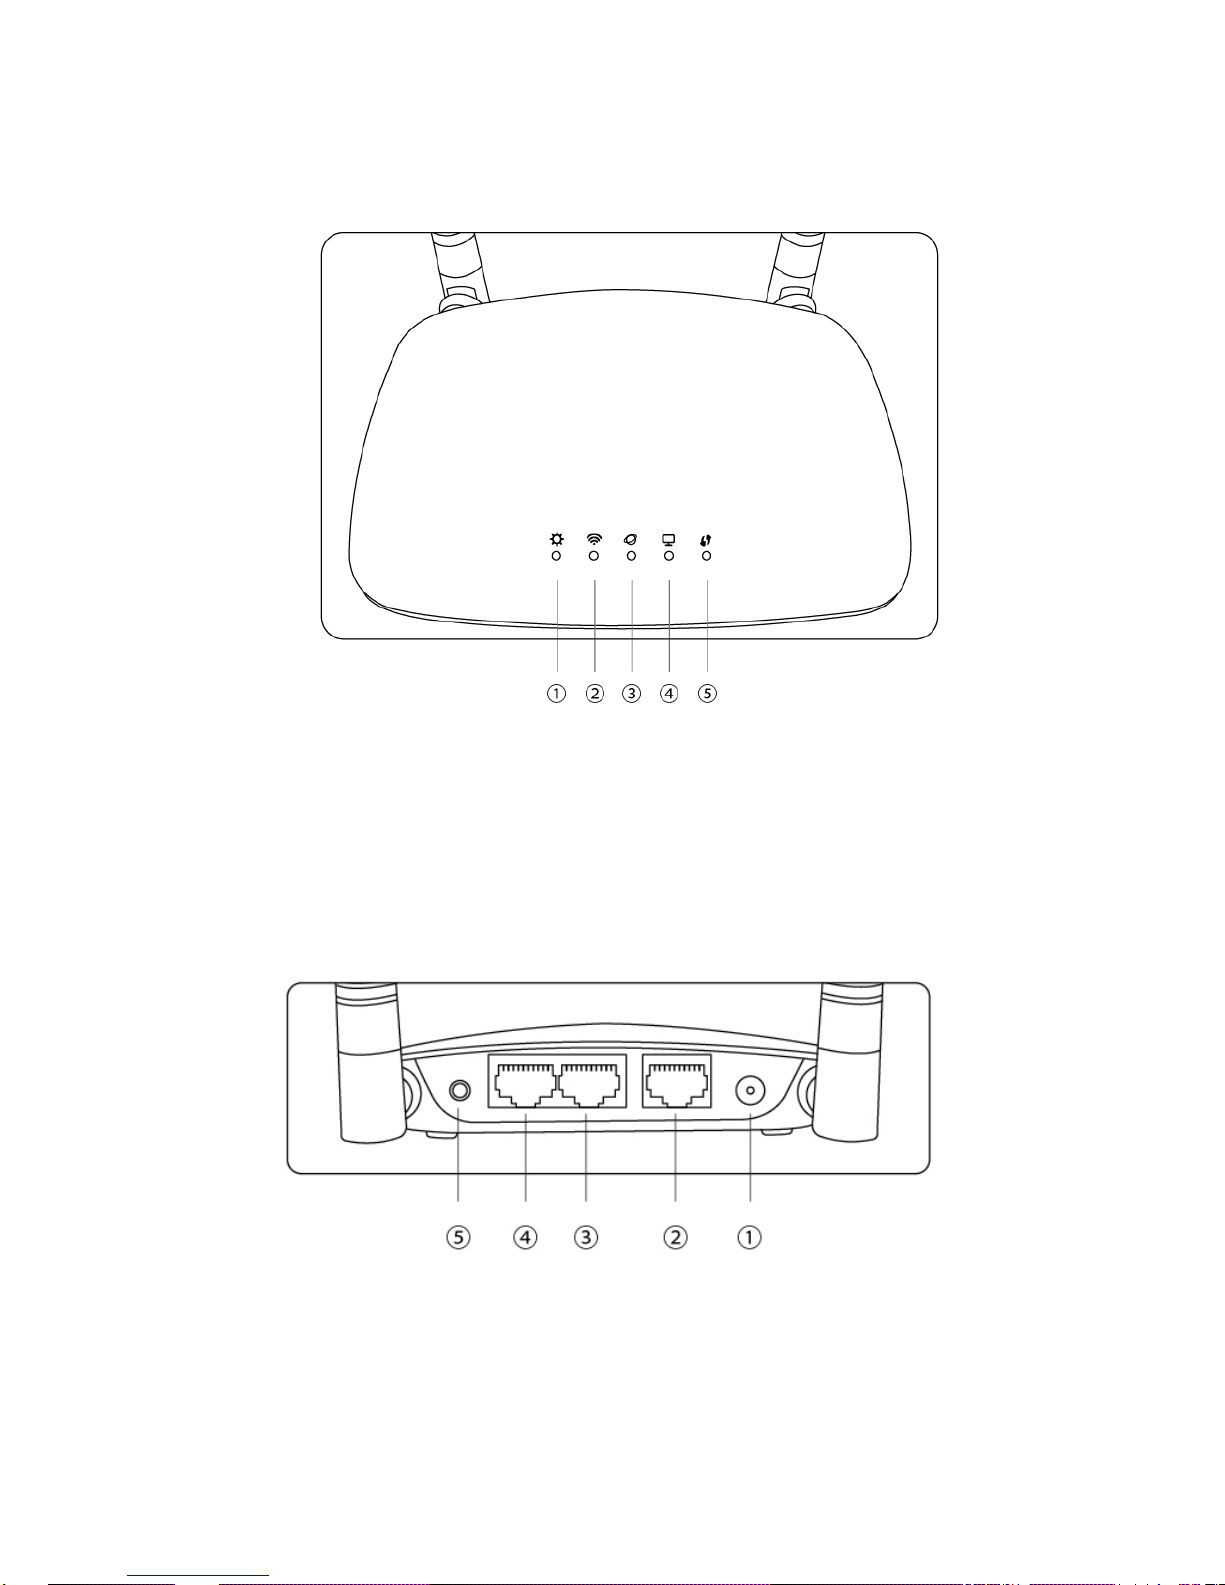
1.3 Product Diagram
1. System LED
2. Wi-Fi LED
3. Internet LED
4. Ethernet LED
5. WPS LED
1. Power
2. WAN
3. LAN-1
4. LAN-2
5. WPS/Reset Button
3
1.4 LED Indicator
The LED indicator displays information about the device status.
1.5 Physical Interface
Port/Button Description
WAN
Internet port connecting to a DSL/Cable modem or
ISP directly.
LAN 1-2 For connection to a computer or router.
RESET/WPS
Pressing this button for 7 seconds restores the device
to factory default settings.
Press WPS button for 2 seconds and release; WPS
LEDs Names Status Indications
System LED
Blinking The router is booting or upgrading.
Solid The router has booted.
Off
Power is off or the router has not
booted.
WiFi LED
Blinking
The wireless function has been
enabled.
Off
The wireless function has been
disabled.
Internet
LED
Solid
Connected to the internet but
inaccessible.
Blinking
Connected to the internet and
accessible.
Off Not connected to the internet.
Ethernet
LED
Off
No device is connected to the
Ethernet (1/2) port.
Blinking
Device(s) connected to the Ethernet
(1/2) port(s).
WPS LED
Blinking
WPS button on the router is pressed
and the router is trying to connect a
wireless device to its network via WPS.
Solid The connection via WPS is successful.
Off The connection via WPS fails.
4
function will start working for 2 minutes.
PWR
Power Adapter.
Don’t use a different power adapter than the
included one.
2.
Connection
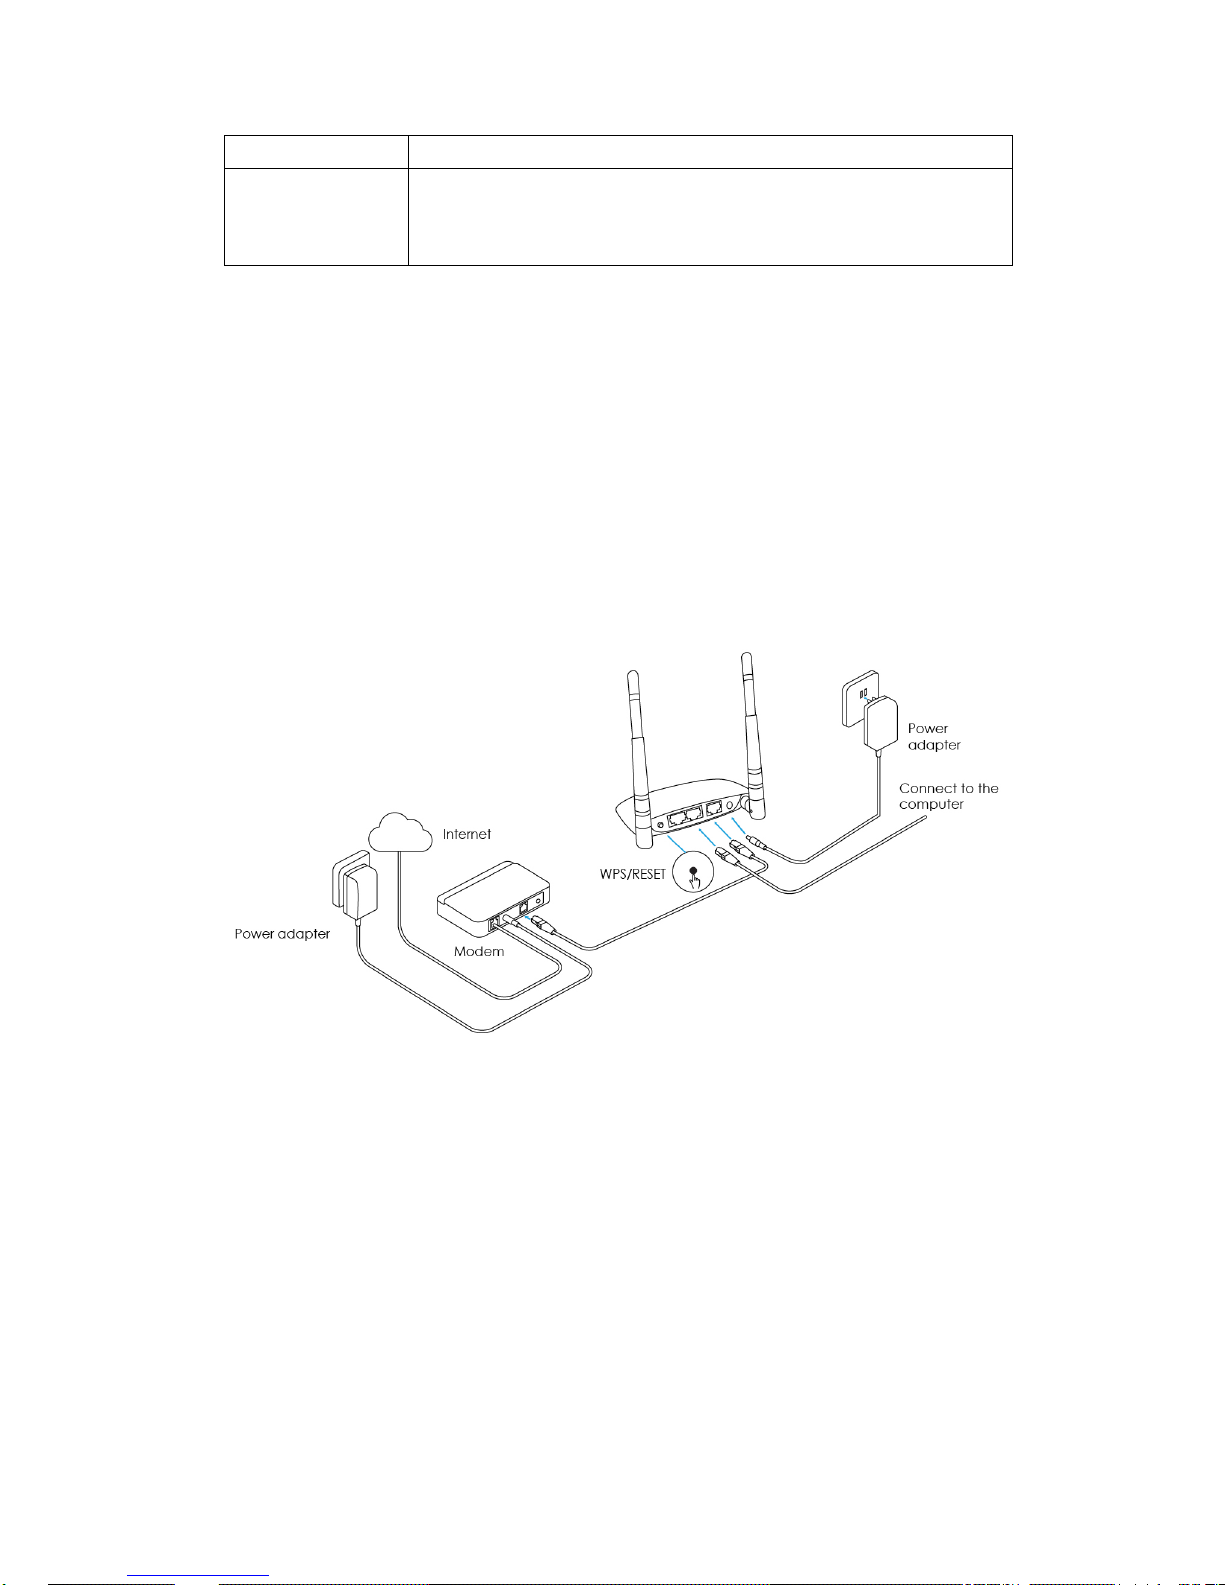
2.1 Hardware Connection
Please follow the following steps to set up the router:
1. Please connect your modem to the router's WAN port via the
Ethernet cable.
2. Use another cable to connect your computer’s Ethernet port with
the router LAN port.
3. Connect the router power adapter.
Note: Before connecting, please make sure that you can surf the
internet on your computer.
5
2.2 PC TCP/IP Settings
Prior to logging into the router, please make sure your computer is set to
"Obtain an IP address automatically" and "Obtain DNS server address
automatically" (from the device).
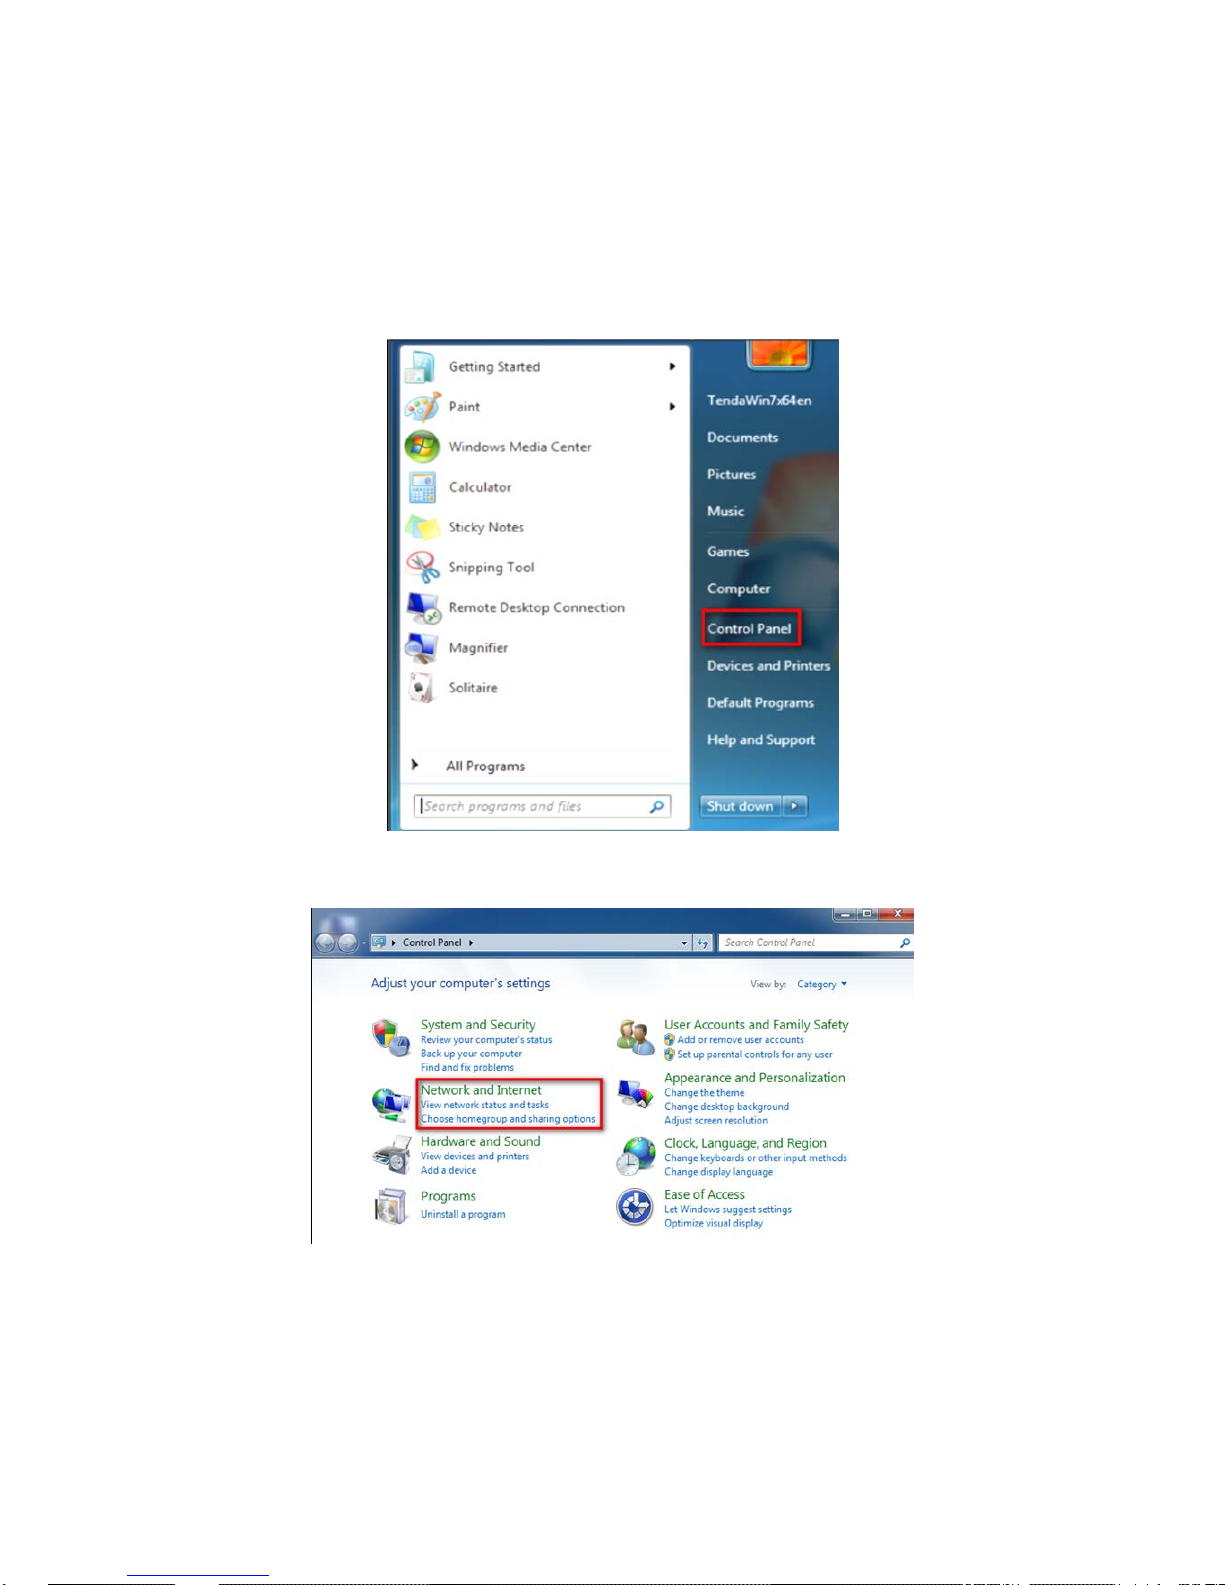
1. Click Start, then select Control Panel.
2. Click Network and Internet.
6
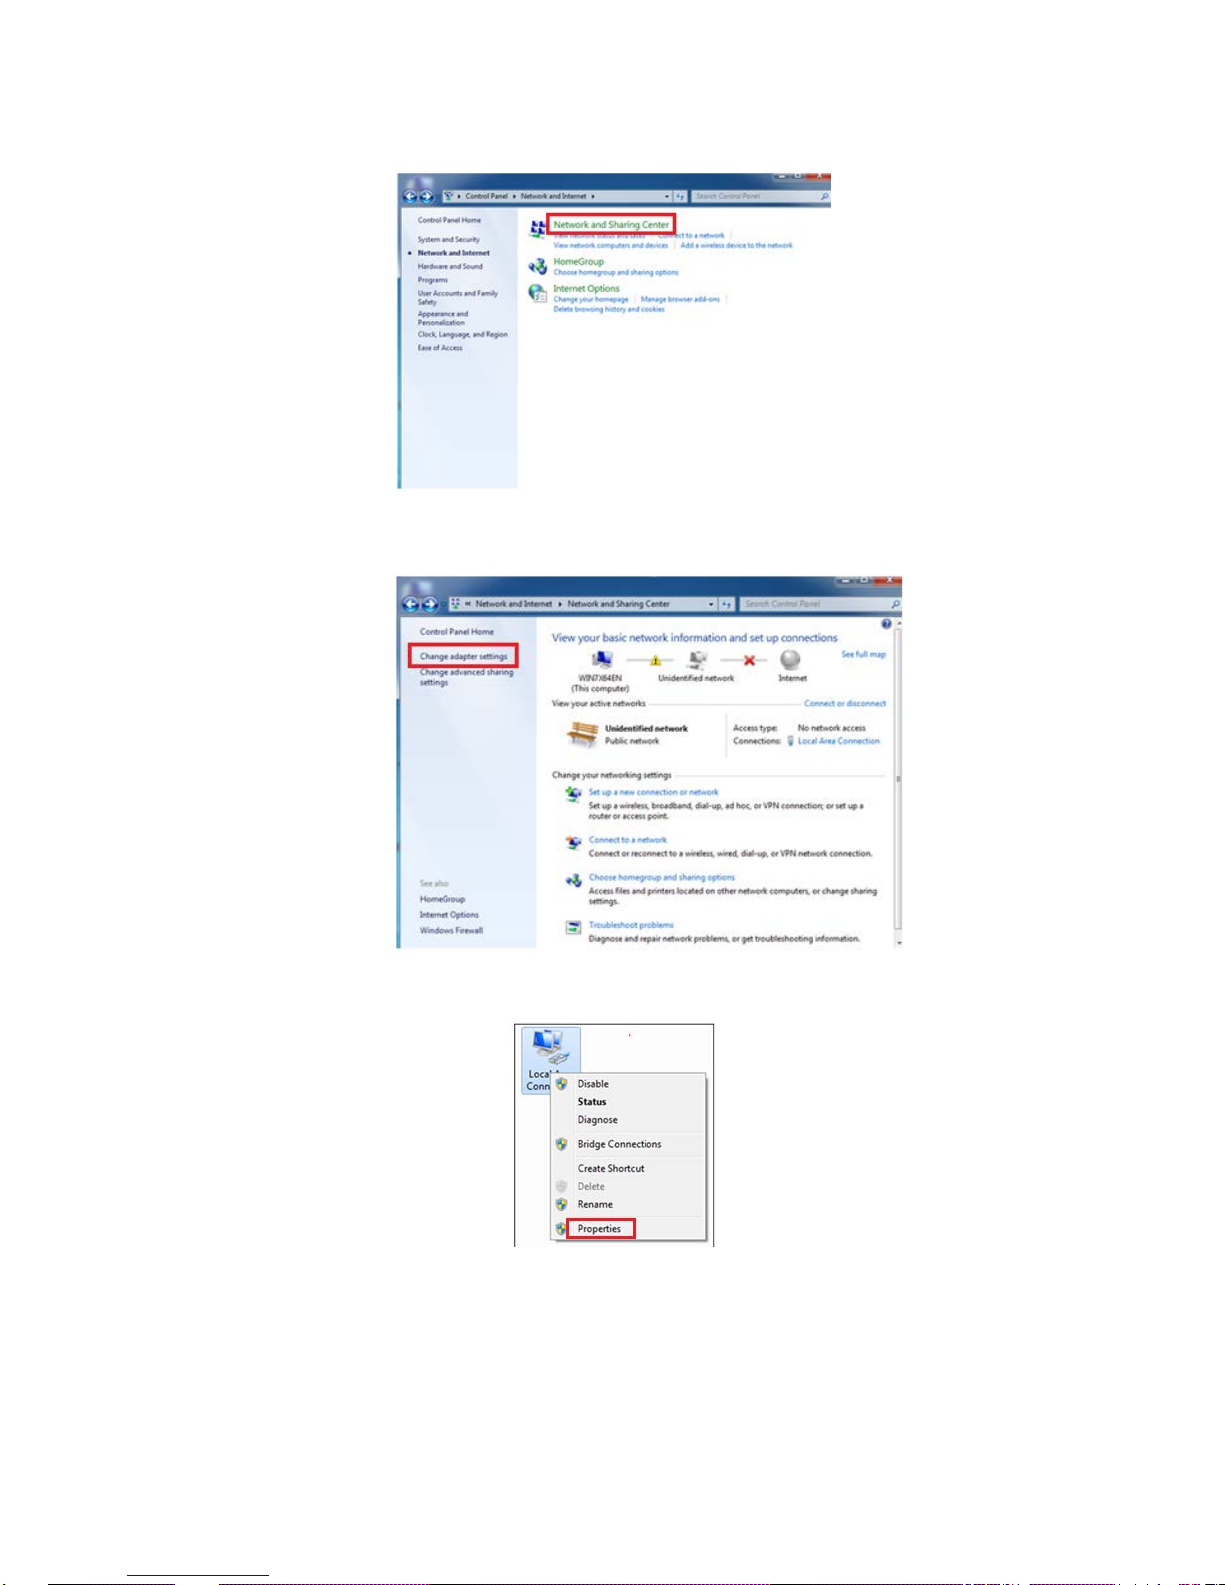
3. Click Network and Sharing Center.
4. Click Change Adapter Settings.
5. Click Local Area Connection and select Properties.

7
6. Select Internet Protocol Version 4 (TCP/IPv4) and click Properties.
7. Select Obtain an IP address automatically and click OK.
8. Click OK on the Local Area Connection Properties window to s ave
your settings.
8
3. Log Into The Router
3.1. Log In
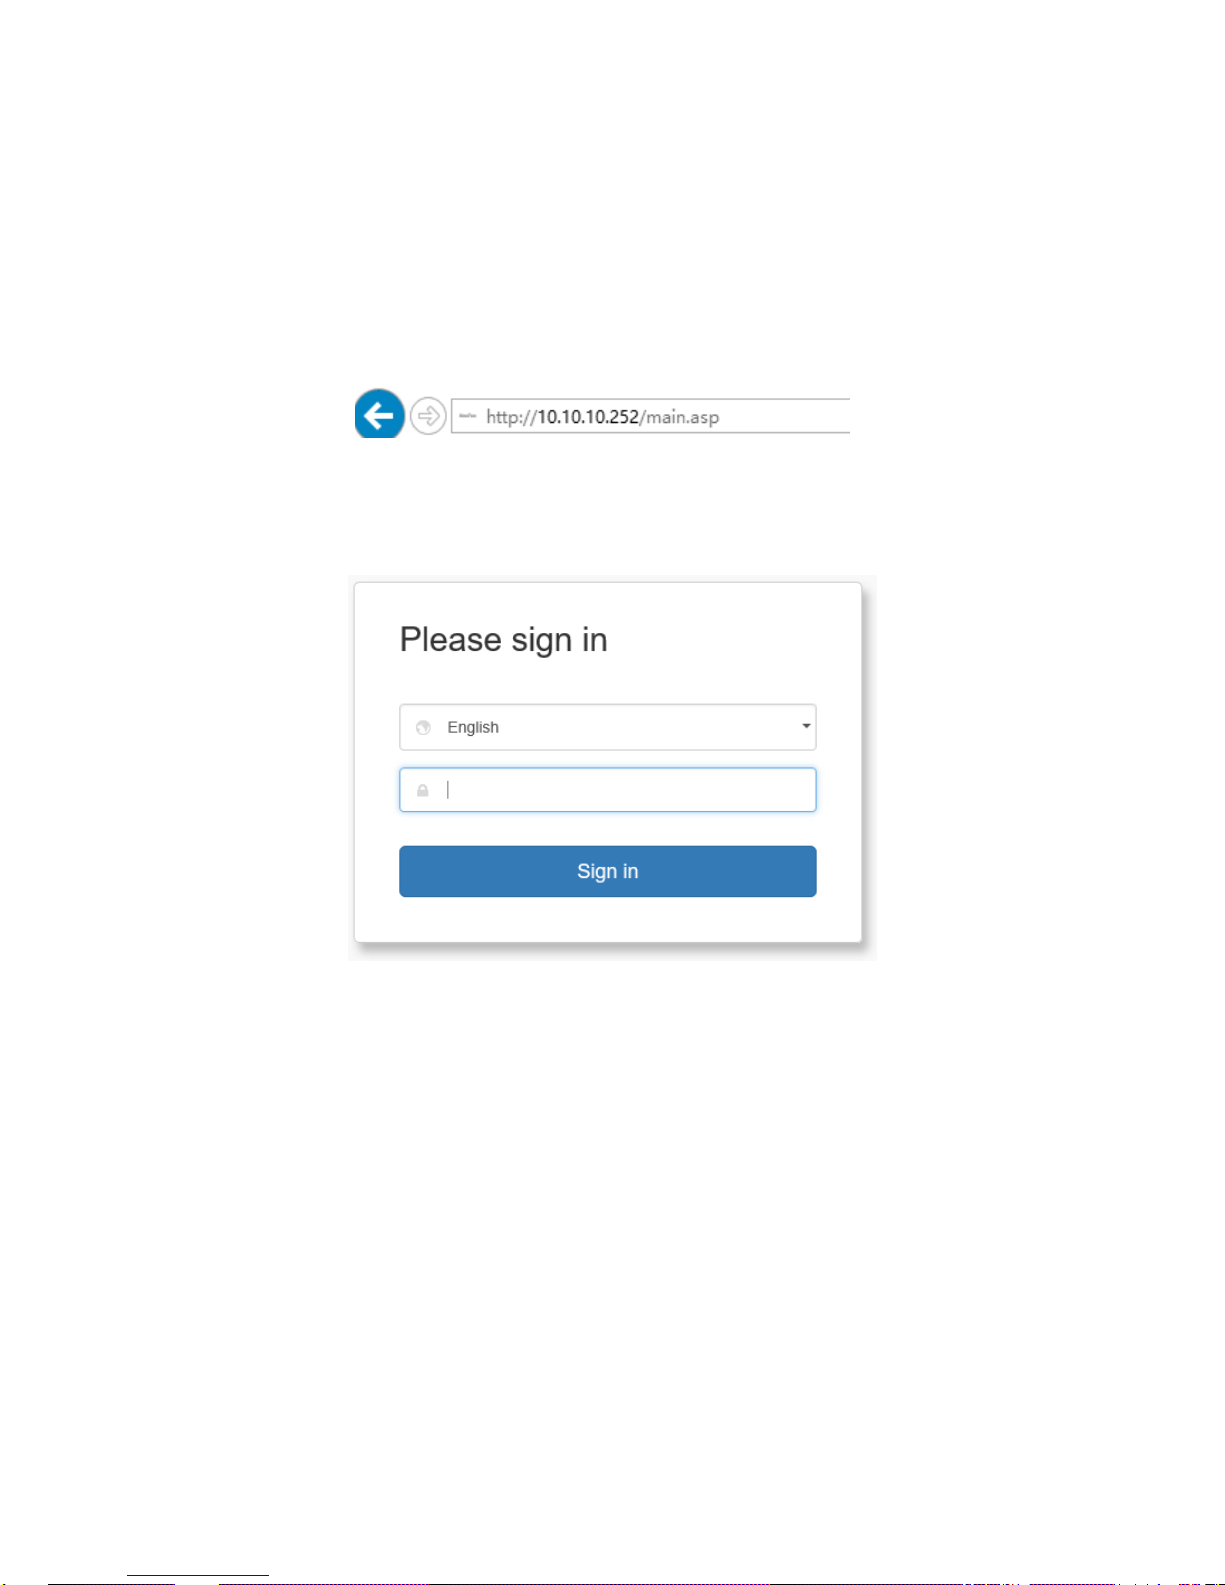
To access the Router’s Web-based Utility, launch a web browser (such
as Internet Explorer or Firefox) and enter http://10.10.10.252 into your
browser address bar. Press “Enter”.
The system will automatically display the login page. Please enter the
correct password (default password is admin) and click the Login
button or press “Enter”.
Note: Password is case sensitive. The default password is admin.
3.2. Webpage Layout
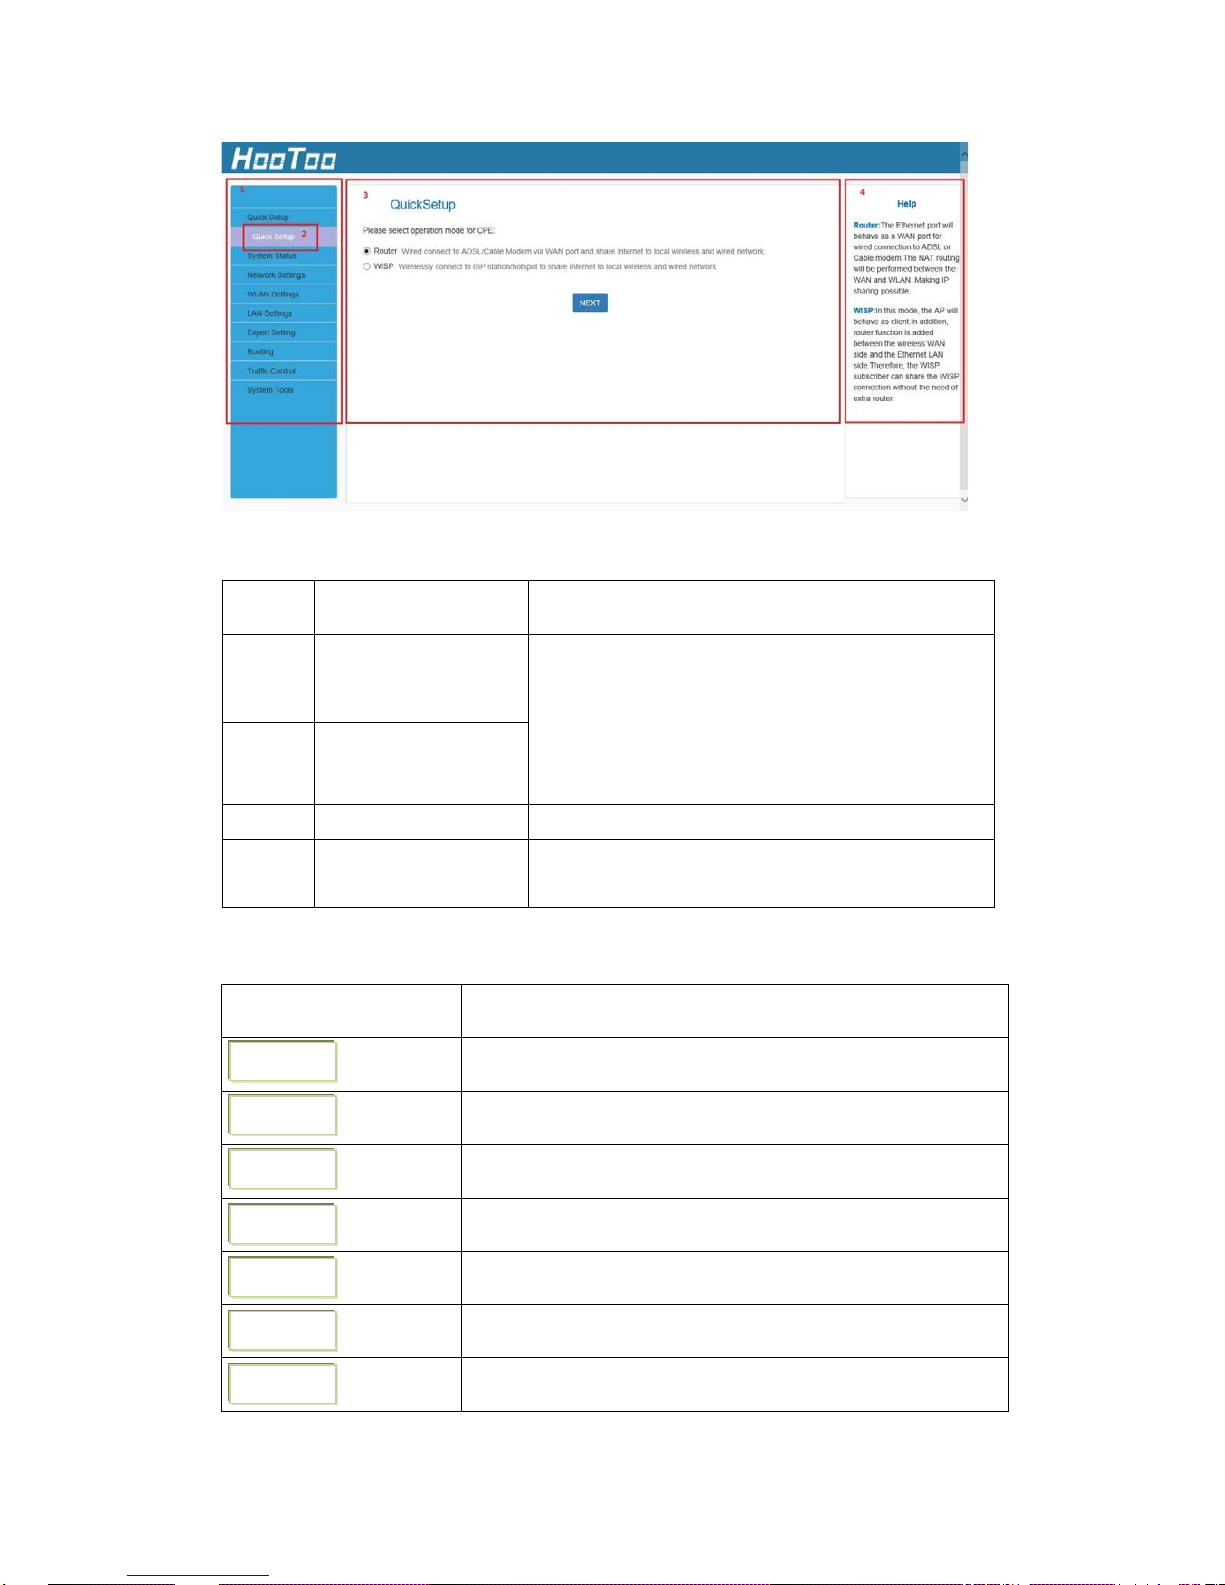
After the first-time login or initial password setup, the system will display
the router web page. Router settings can be viewed and modified here.
The web page is structured into Primary & Secondary Navigation,
Configuration, and Help sections.
9
The four settings:
No. Name Introductions
1
Primary
Navigation
The navigation bar is organized in
multiple tabs. Once a function menu has
been selected from the navigation bar,
the results will be displayed in the
Configuration area.
2
Secondary
Navigation
3 Configuration To configure and view settings.
4 Help
Shows help/information on the current
page.
3.3. Commonly Used Webpage Elements
Common Elements Introductions
To release the WAN IP address information.
To obtain the WAN IP address information again.
To save the current configuration page.
To cancel the current configuration page.
To add settings to the list.
To delete the selected rules.
To refresh the current page.
Release
Renew
Save
Cancel
Add
Delete
Refresh
10
4. Features & Configuration
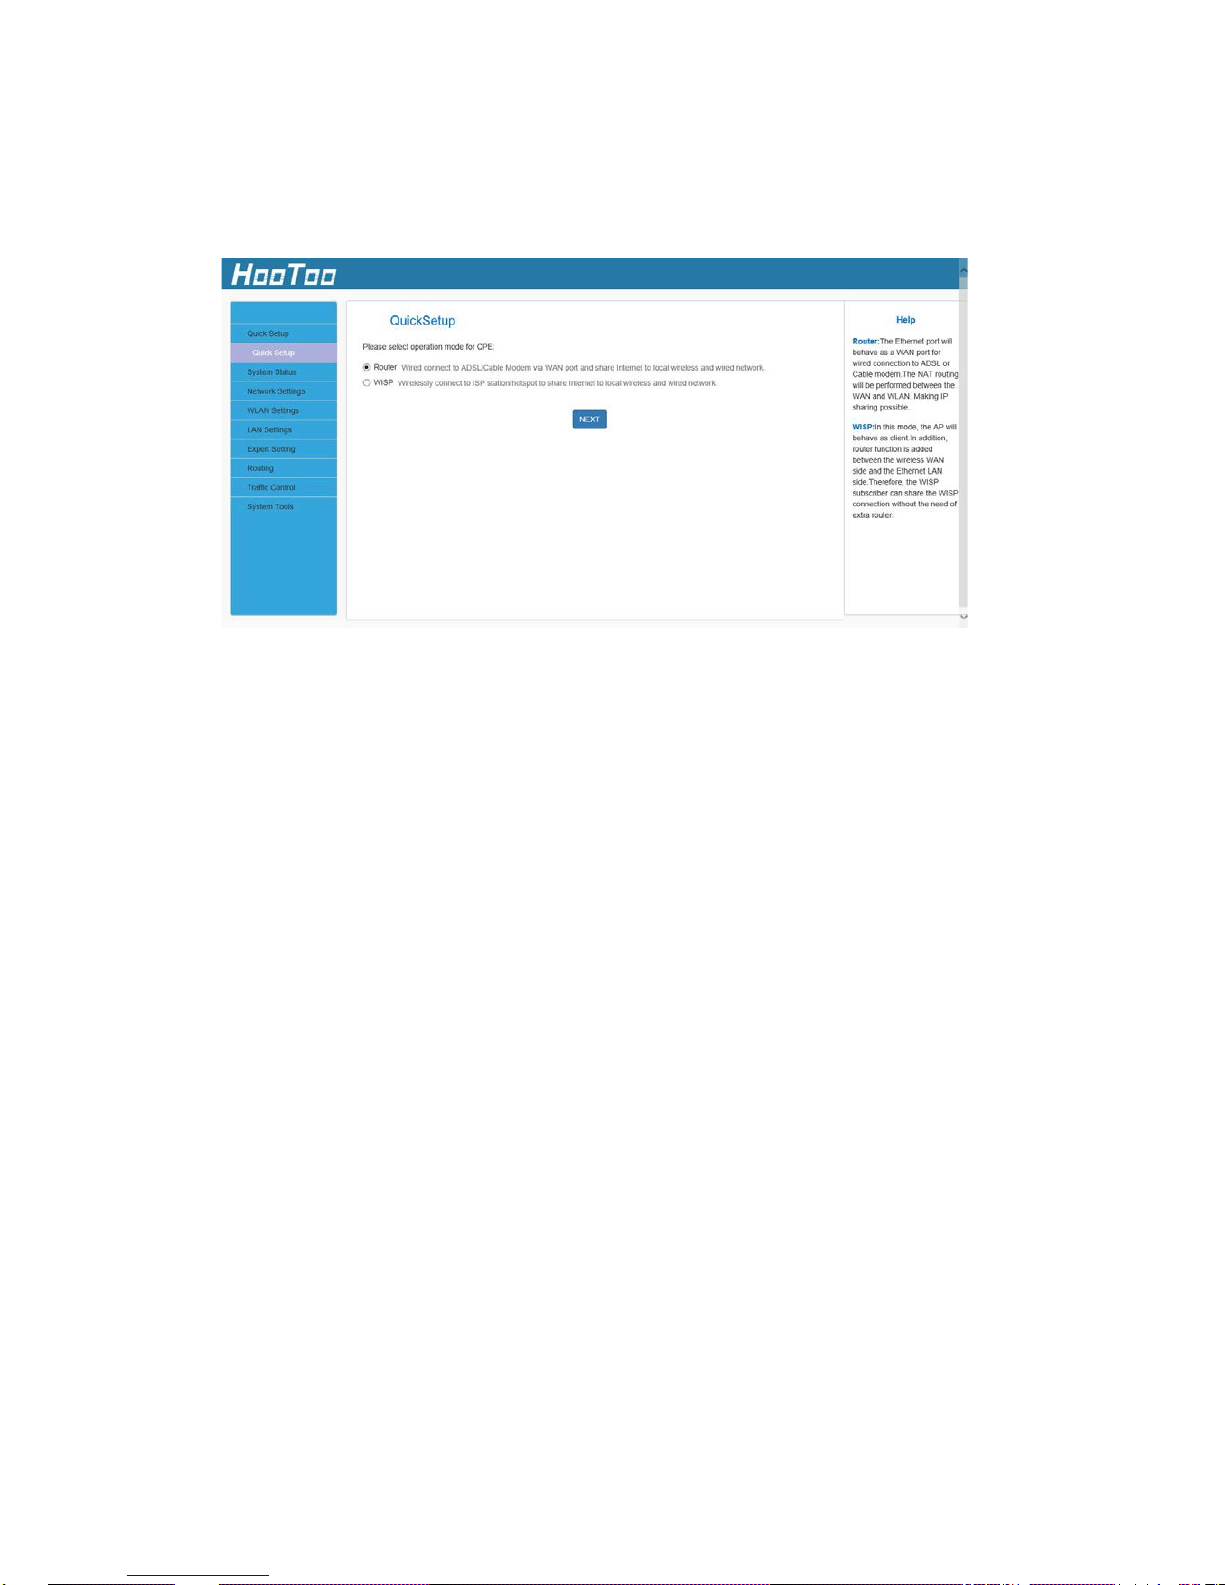
4.1. Quick Setup
Router: The Ethernet port will behave as a WAN port for a wired
connection to an ADSL or Cable modem. The NAT routing will be
performed between the WAN and WLAN to make IP sharing possible.
WISP: In this mode, the AP will behave as a client. The router function wi ll
also be added between the wireless WAN side and the Ethernet LAN
side. Therefore, the WISP subscriber can share the WISP connection
without the need for an extra router.
 Loading...