

Hootoo HT-ND001 Online Manual

1
HooToo Dual Band AC1200 Router
ONLINE GUIDE
Model: HT-ND001

2
Table of Contents
1 Product Overview ......................................................................................................... 4
1.1 Introduction ............................................................................................................... 4
1.2 Package Contents .................................................................................................. 5
1.3 Product Diagram ..................................................................................................... 6
1.4 LED Indicator ............................................................................................................. 7
1.5 Physical Interface..................................................................................................... 8
2 Connecting .................................................................................................................... 8
2.1 Preparation ................................................................................................................ 8
2.2 Hardware Connection ........................................................................................... 9
2.3 PC TCP/IP Settings .................................................................................................. 10
2.4 For Windows ............................................................................................................ 10
2.5 For Mac OS .............................................................................................................. 13
3. Logging into the Router .............................................................................................. 14
3.1 Log in ......................................................................................................................... 14
3.2 Webpage Layout ................................................................................................... 14
3.3 Commonly Used Webpage Elements .............................................................. 16
4. Features & Configuration ........................................................................................... 16
4.1 Quick Setup ................................................................................................................ 16
4.1.1 Router .................................................................................................................. 17
4.1.2 WISP ...................................................................................................................... 18
4.2 System Status ............................................................................................................. 20
4.2.1 System Status ............................................................................................... 20
4.2.2 WAN Status .................................................................................................. 21
4.2.3 LAN Status .................................................................................................... 23
4.2.4 Wireless Status ............................................................................................. 23
4.3 Network Settings ........................................................................................................ 24
4.3.1 LAN Settings ............................................................................................................... 24
4.3.2 WAN Settings ....................................................................................................... 25
4.3.3 MAC Address Clone .......................................................................................... 29
4.4 WLAN Settings ......................................................................................................... 30
4.4.1 Basic Settings ............................................................................................... 30
4.4.2 Security Settings .......................................................................................... 31
4.4.3 Advanced Settings .................................................................................... 32
4.4.4 WPS Settings ................................................................................................. 33
4.4.5 Access Control ............................................................................................ 33
4.4.6 Connection Status ..................................................................................... 34
4.5 USB Settings .............................................................................................................. 35
4.5.1 Device Sharing ............................................................................................ 35
4.5.2 Media Server ............................................................................................... 39
4.5.3 Print Server .................................................................................................... 40
4.5.4 User Account ............................................................................................... 40
4.6 DHCP Server ............................................................................................................ 41

3
4.6.1 DHCP Server ................................................................................................ 41
4.6.2 DHCP List & Binding ................................................................................... 42
4.7 Virtual Server ............................................................................................................ 43
4.7.1 Port Range ................................................................................................... 43
4.7.2 DMZ Settings ................................................................................................ 44
4.7.3 UPnP Settings ............................................................................................... 45
4.8 Security Settings ...................................................................................................... 45
4.8.1 Client Filter .................................................................................................... 45
4.8.2 URL Filter ........................................................................................................ 48
4.8.3 MAC Filter ..................................................................................................... 50
4.8.4 Threat Prevention ....................................................................................... 53
4.8.5 Remote WEB Access ................................................................................. 53
4.8.6 WAN Ping ...................................................................................................... 55
4.9 Routing Settings ...................................................................................................... 56
4.10 Traffic Control .......................................................................................................... 56
4.11 System Tools ............................................................................................................. 57
4.11.1 Time Settings ................................................................................................ 57
4.11.2 DDNS .............................................................................................................. 57
4.11.3 Backup/Restore ........................................................................................ 58
4.11.4 Factory Reset ............................................................................................. 61
4.11.5 Firmware Upgrade ................................................................................... 61
4.11.6 Reboot .......................................................................................................... 63
4.11.7 Change Password ..................................................................................... 63
4.11.8 System Log ................................................................................................. 64
5 FAQs .................................................................................................................................. 64
6.Factory Default Settings ................................................................................................. 65

4
1 Product Overview
Thank you for choosing the HooToo HT-ND001 Dual Band AC1200 Router.
Please read this manual carefully and keep it for future reference.
1.1 Introduction
The HT-ND001 Router supports both 2.4GHz and 5GHz wireless bands for
up to 1200Mbps of total available bandwidth, as well as DHCP, PPPoE,
and static IP Internet modes. Other features include Wireless Password
Setup, USB functionality to save/read data to/from a USB flash drive,
and the following:
Compliance w ith IEEE 802. 11a/ an/ac and 802.11b/g/n
USB 3.0 port for file sharing and use as a print server
WPA/WPA2, WPA-PSK/WPA2-PSK authentication, TKIP/AES
encryption security
Access control
Client filter, MAC filter, URL filter
Remote web management
DDNS, Port forwarding, DMZ host, UPNP
5
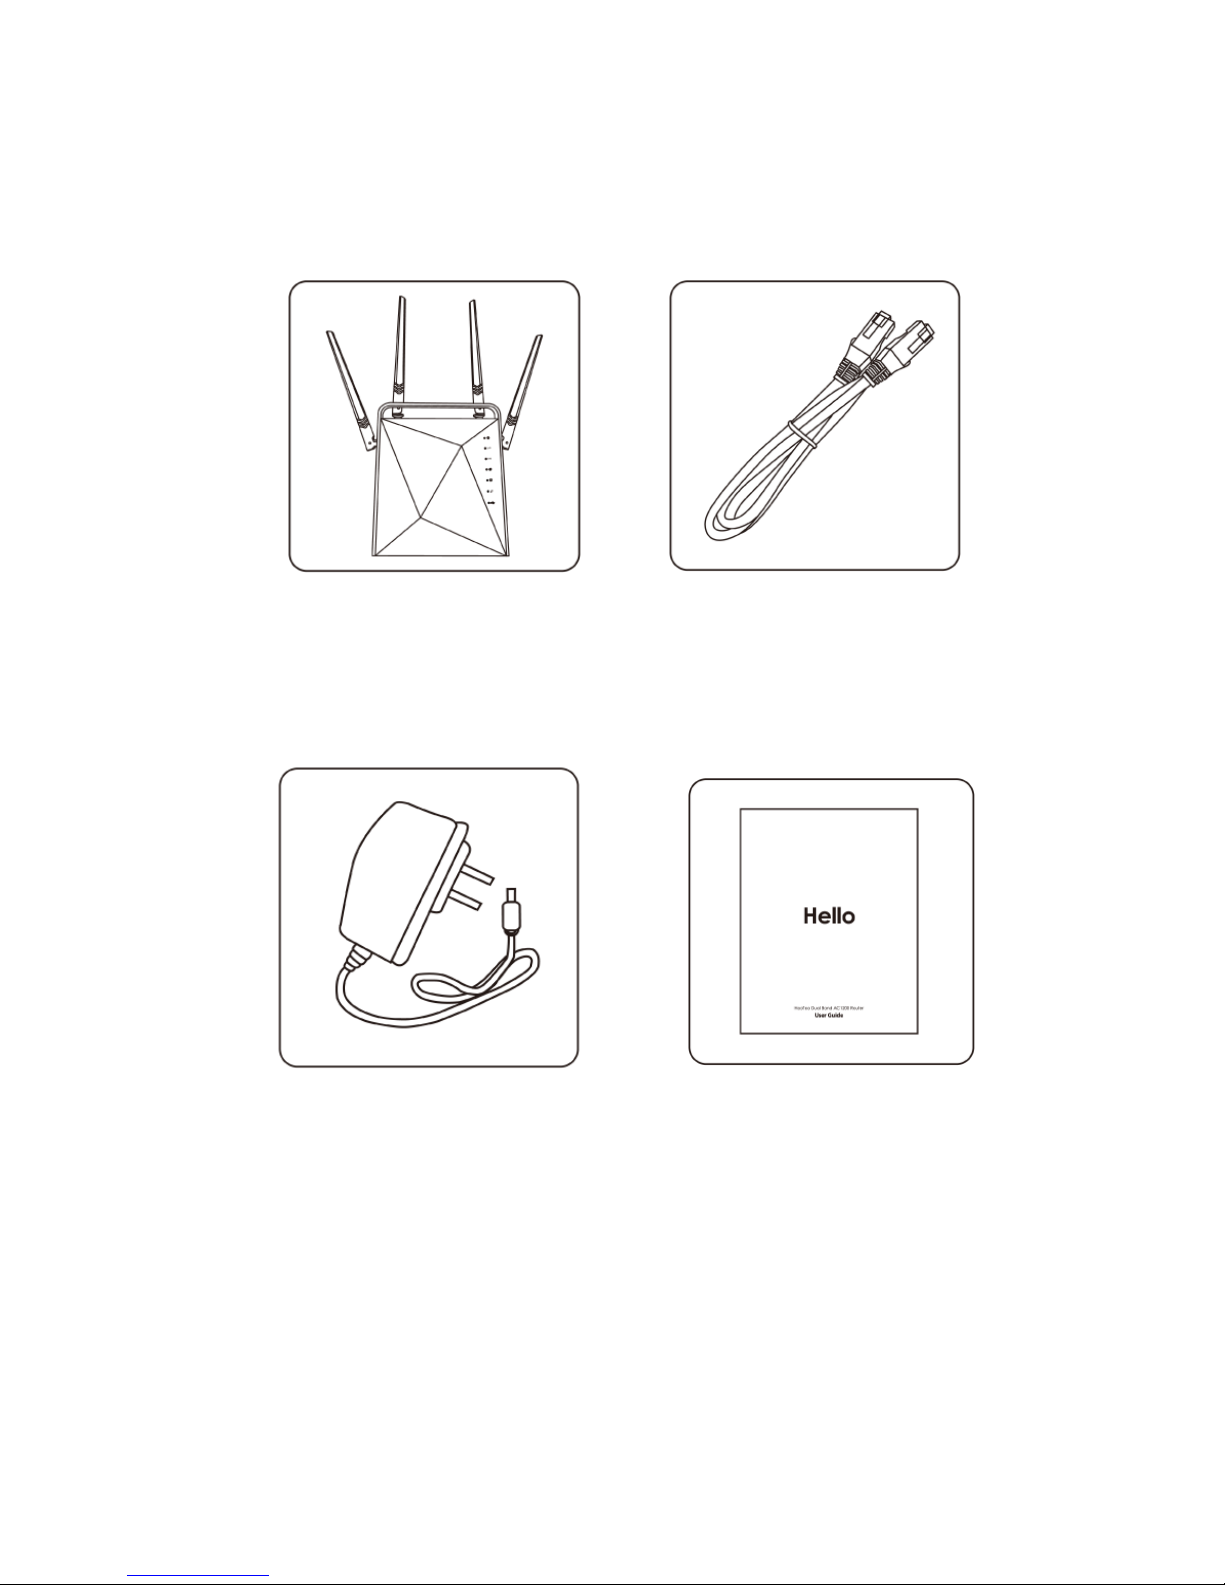
1.2 Package Contents
1 x HooToo Dual Band 1 x Ethernet Cable
AC1200 Router (Model HT-ND001)
1 x Power Adapter 1 x User Guide
6
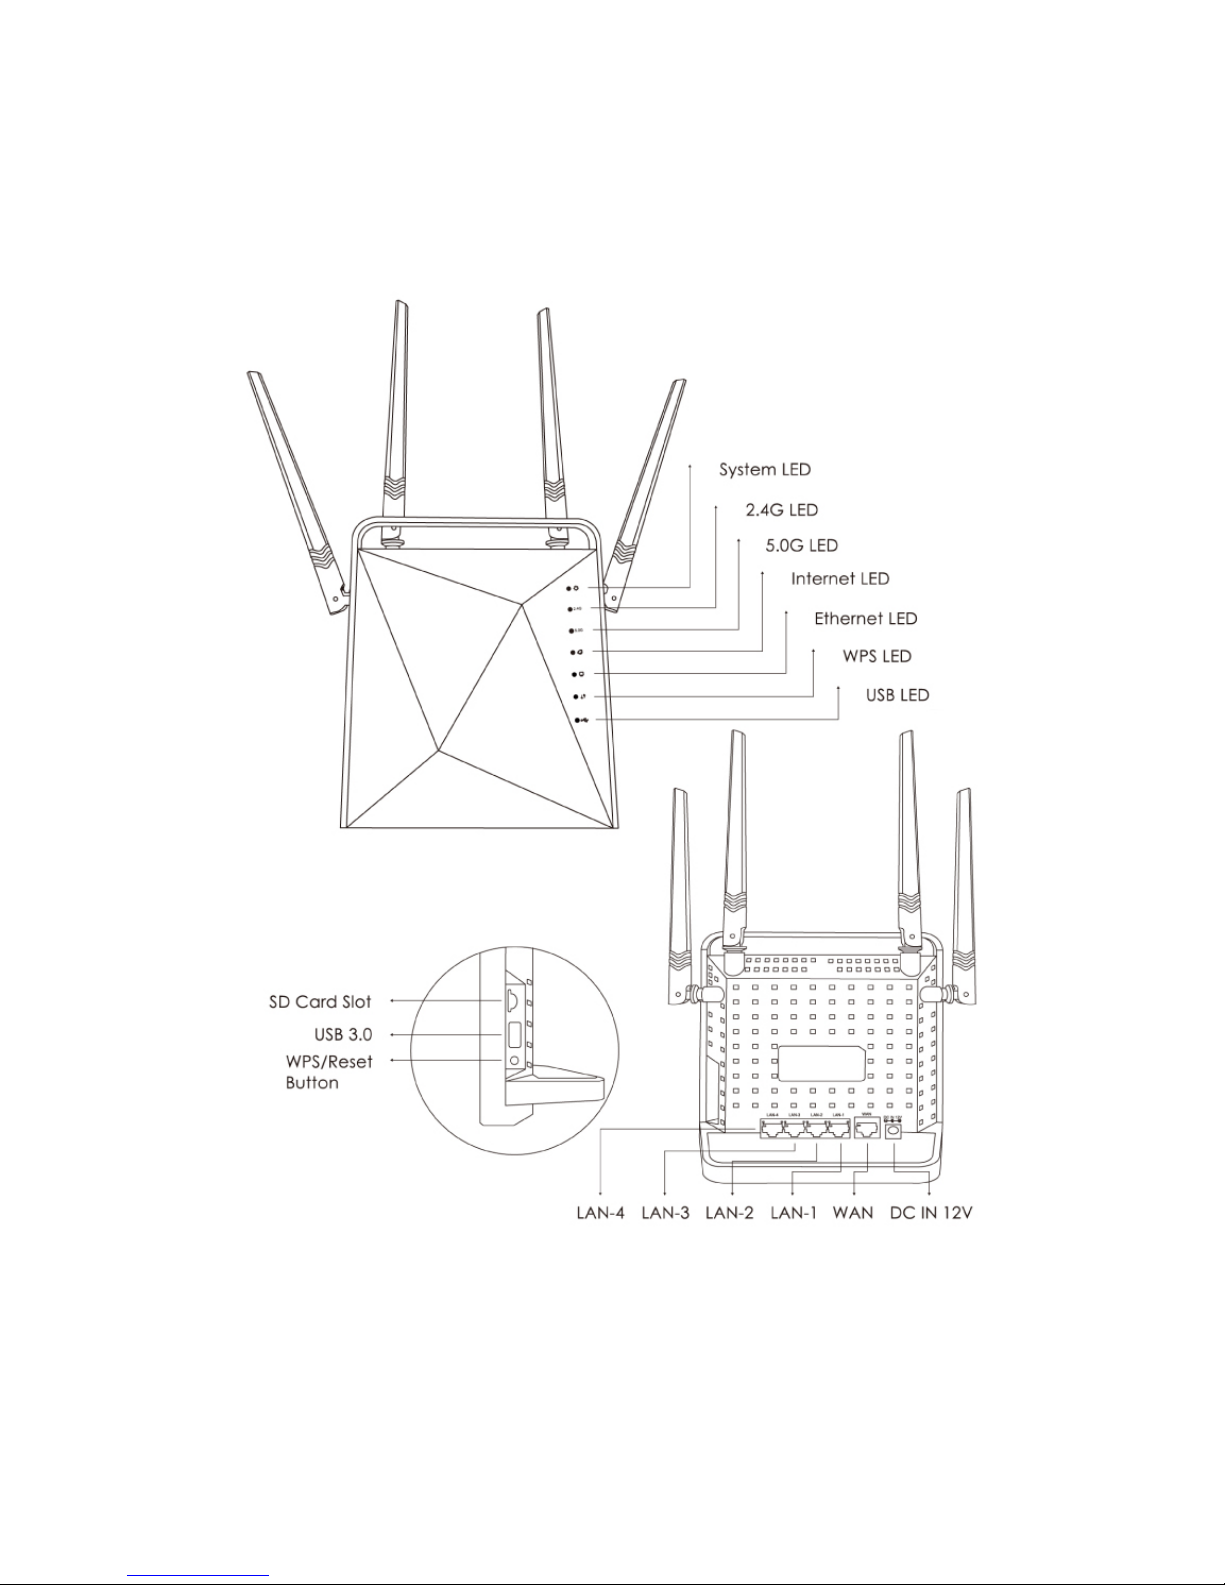
1.3 Product Diagram

7
1.4 LED Indicator
The LED indicator displays information about the device status.
LED Name Status What It Means
System LED
Blinking The router is booting or upgrading.
Solid The router has booted.
Off Power is off or the router is not booted.
2.4G 2.4G LED
Blinking
2.4GHz wireless is on with data being
transferred.
Off 2.4GHz wireless is disabled.
5.0G 5G LED
Blinking
5GHz wireless is on with data being
transferred.
Off 5GHz wireless is disabled.
Internet
LED
Solid
The Internet port is connected but
inaccessible.
Blinking
The Internet port is connected and
accessible.
Off The Internet port is not connected.
Ethernet
LED
Blinking
Device(s) connected to the Ethernet
(1/2/3/4) port(s).
Off
No device is connected to any
Ethernet (1/2/3/4) port.
WPS LED
Blinking
WPS button on the router is pressed
and the router is trying to connect a
wireless device to its network via WPS.
Solid The connection via WPS is successful.
Off The connection via WPS has failed.
USB LED
Off
No device is connected to the USB
port.
Solid Device connected to the USB port.

8
1.5 Physical Interface
2 Connecting
2.1 Preparation
Before you start the installation process, make sure to prepare the following:
Item
Description
Router Included
Power
Adapter
Included
PC Requires Internet Explorer 8 or higher
Item Description
Supply Hub
Connect to a power socket via power adapter (output
12V, 1.5A).
WAN Port Connect to the Internet.
LAN Port Ports (1, 2, 3, 4) to connect a PC/Laptop.
WPS/RST
Button
Press the button to connect to another router via WPS.
Press and hold the button for 10 seconds for a device
factory reset.
USB Port Connect to a USB storage device or a USB printer.

9
ISP
Information
DHCP, PPPoE, or Static IP Internet Connection Type:
1. Ethernet Cable from the incoming Internet side
(provided by your Internet service provider - ISP)
2. ISP Information: Your Internet service provider (ISP)
should have provided you with all of the information
needed to connect to the Internet. If you cannot
locate this information, please contact your ISP.
3. If your ISP uses a PPPoE Internet connection, you will
need the ISP login name and password:
If you use a DHCP Internet connection, no
information is needed
If your ISP gives you a fixed or static IP address for
Internet connection, you will need to gather the
following information:
1) IP Address
2) Subnet Mask
3) Gateway
4) DNS Server
5) Alternate DNS Server (Optional)
WISP Internet Access:
1. Remote AP's SSID, MAC address, security mode,
cipher type, and security key
2. Internet connection information provided by
the remote AP
3. Ethernet Cable (included in the package). You will
need it to connect your PC to the device
2.2 Hardware Connection
Please follow the following steps to set up the router:
1. Use an Ethernet cable and connect the router's WAN port to the internet.
2. Use an Ethernet cable and connect your computer’s Ethernet port
with the router’s LAN port.
3. Connect the router’s power adapter.
Note:
Before connecting, please make sure that your internet is working normally.
10
2.3 PC TCP/IP Settings
Prior to logging onto the router, please make sure your computer is set
to "Obtain an IP address automatically" and "Obta in DNS se r ver addre ss
automatically":
2.4 For Windows
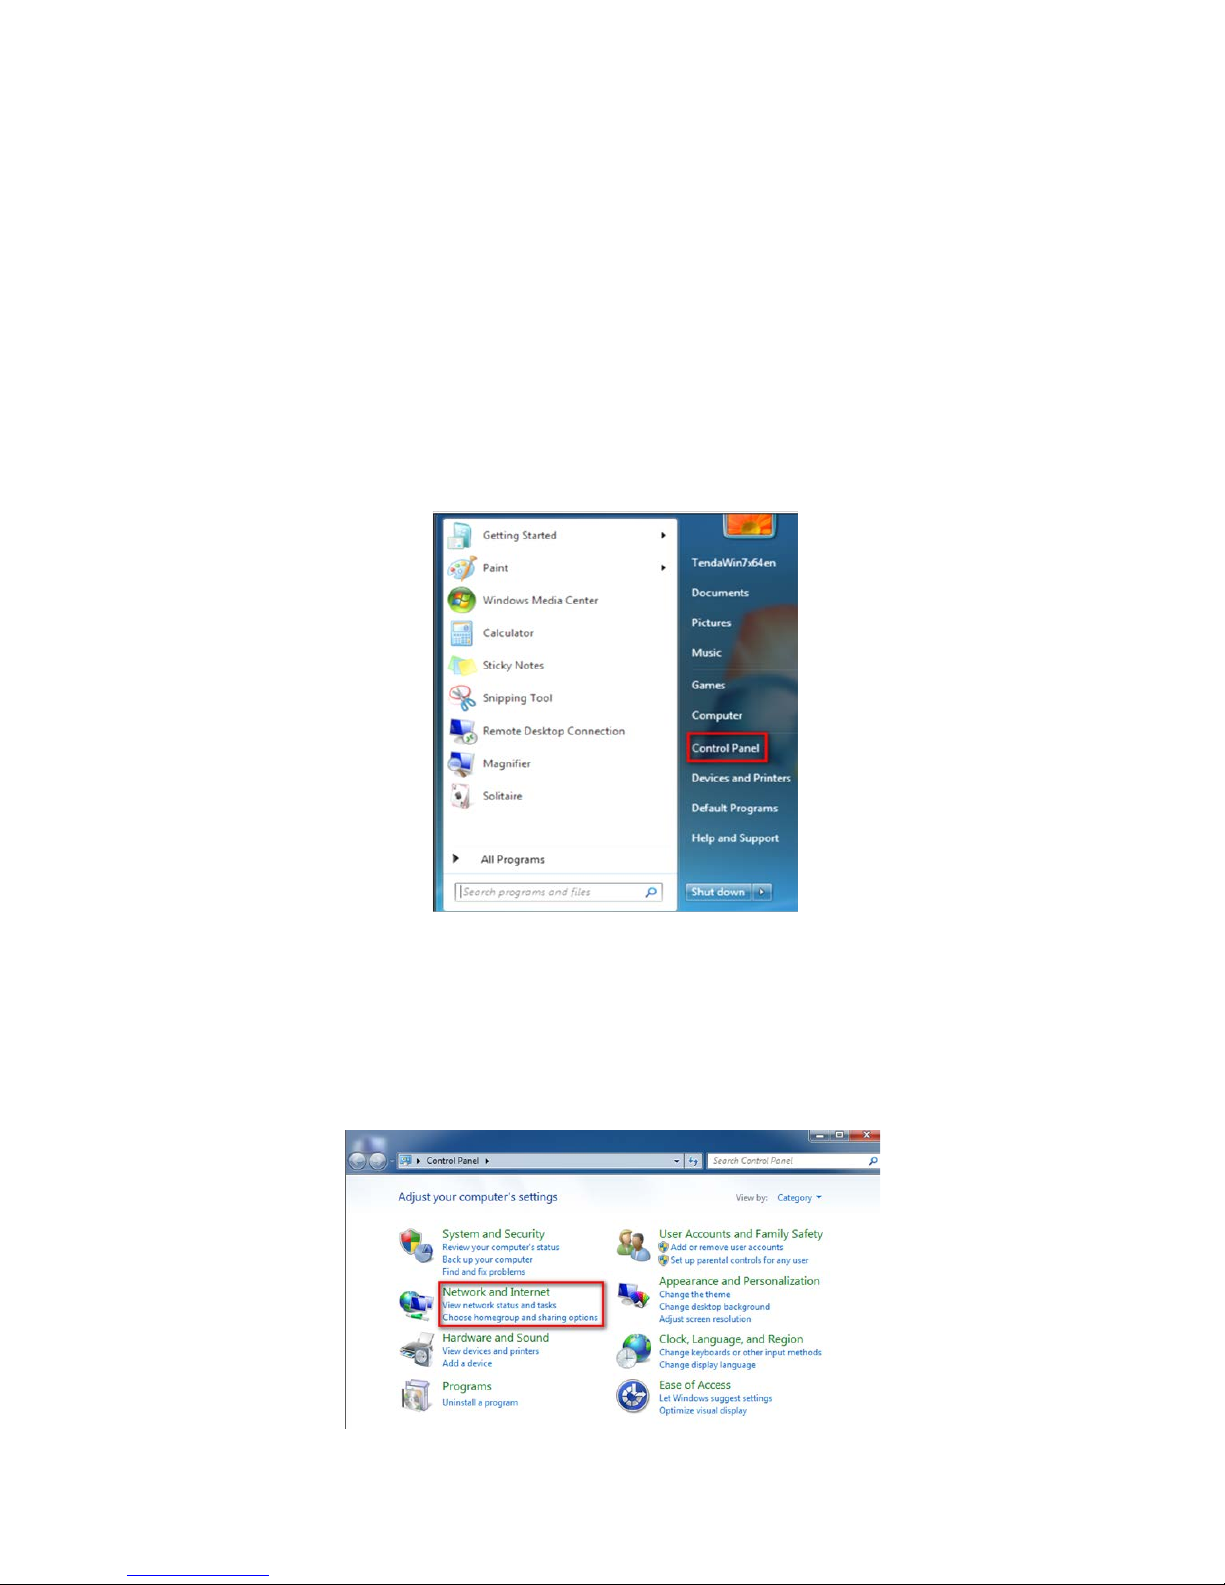
1. Click Start and then select Control Panel.
2. Click Network and Internet.
11
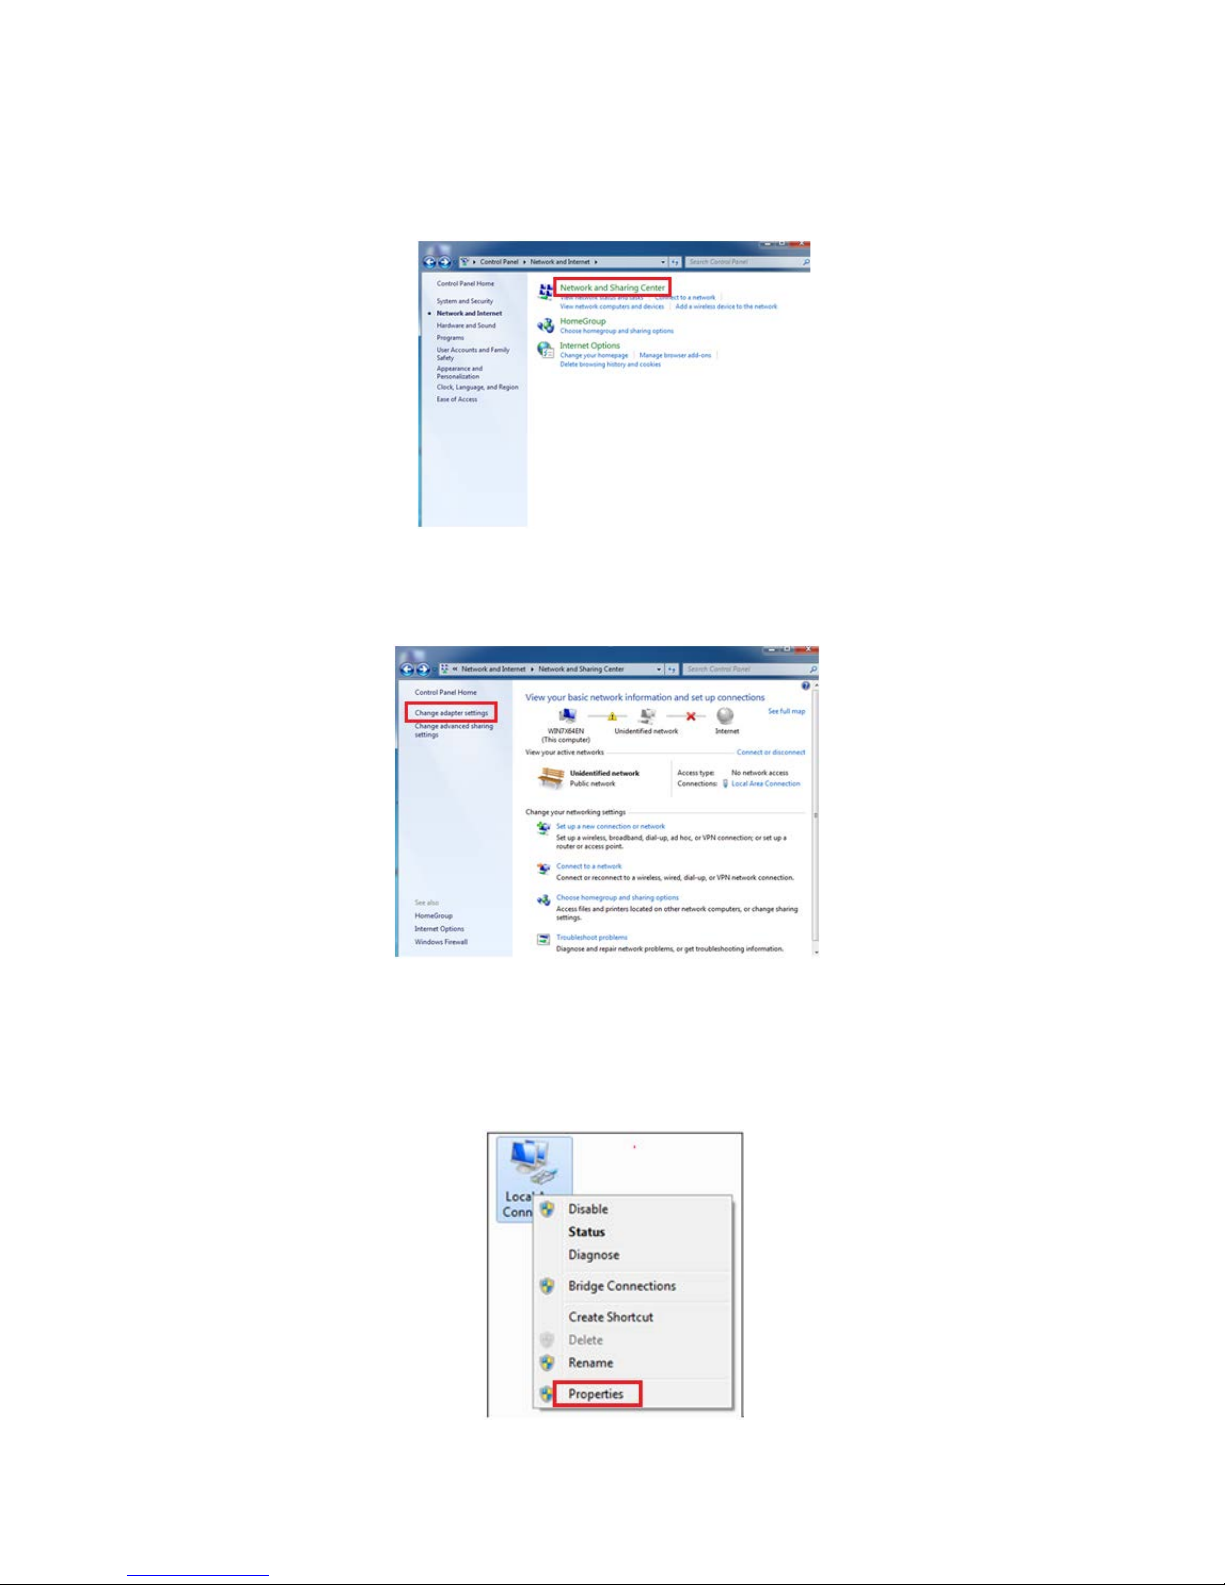
3. Click Network and Sharing Center.
4. Click Change adapter settings.
5. Click Local Area Connection and select Properties.
12
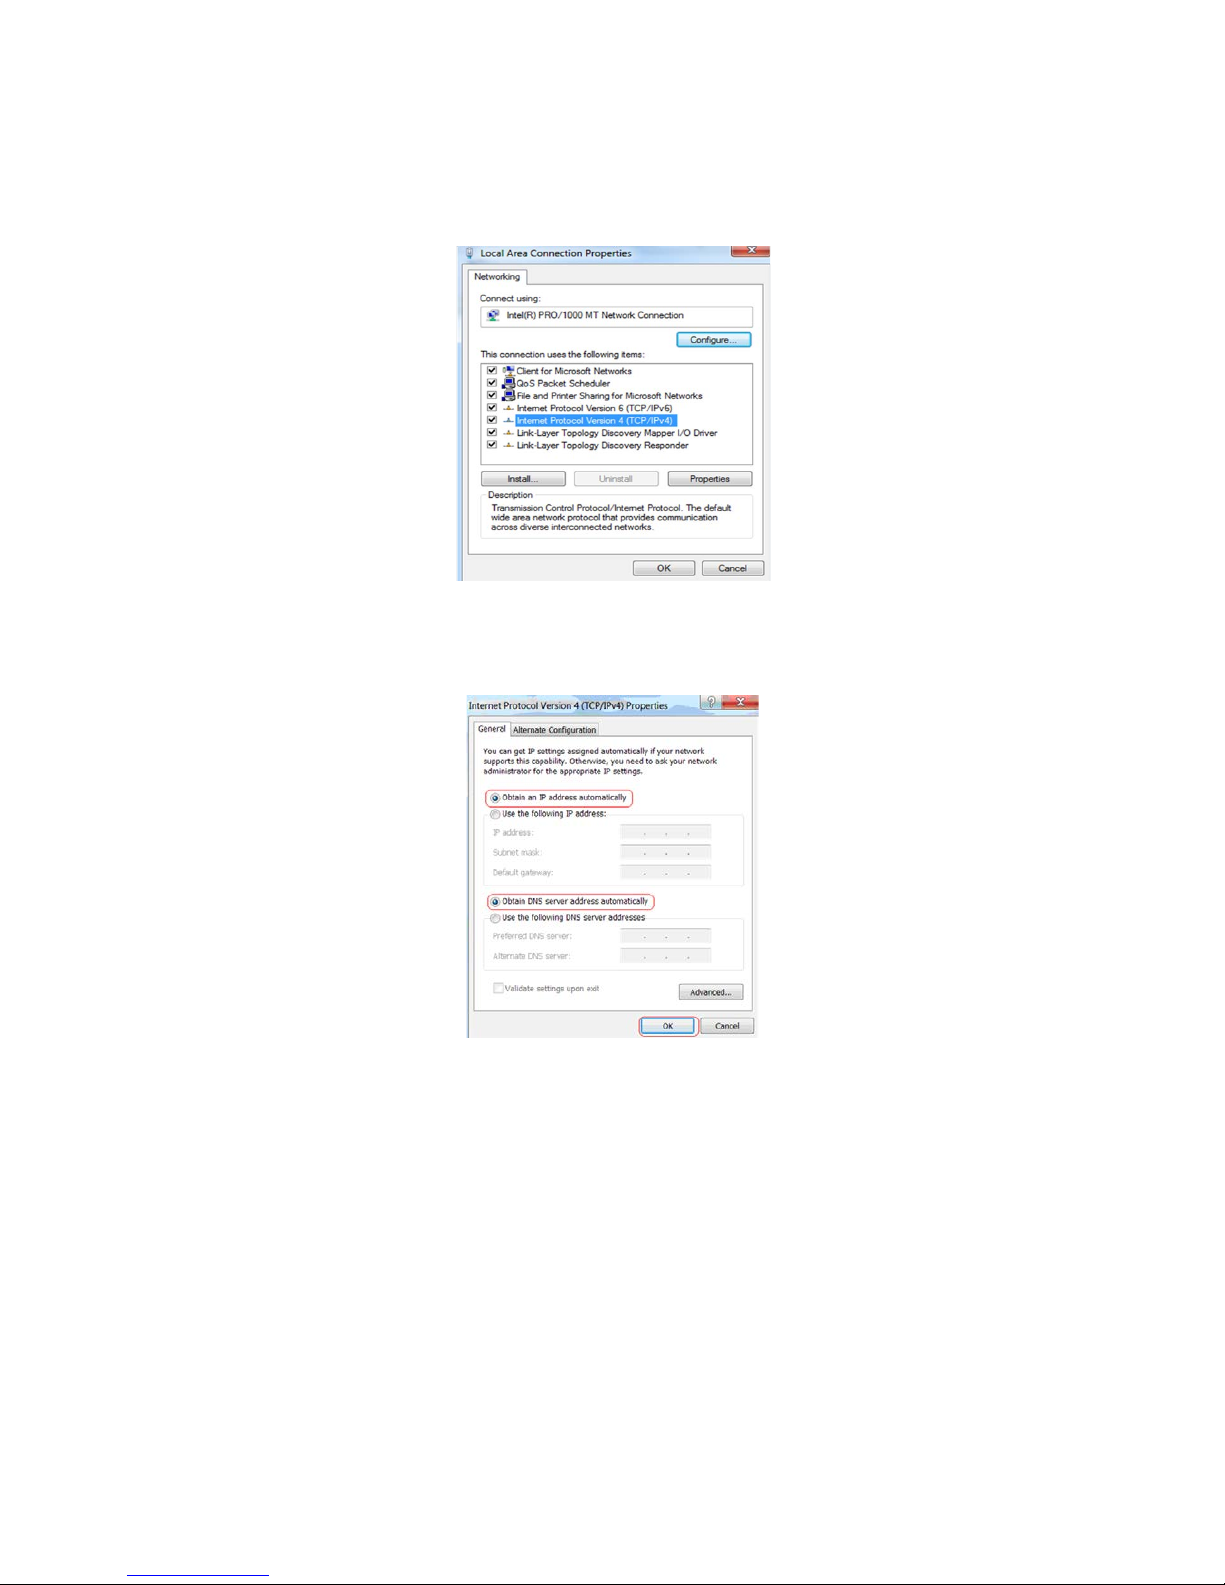
6. Select Internet Protocol Version 4 (TCP/IPv4) and click Properties.
7. Select Obtain an IP address automatically and click OK.
8. Click OK on the Local Area Connection Properties window to save
your settings.
13
2.5 For Mac OS
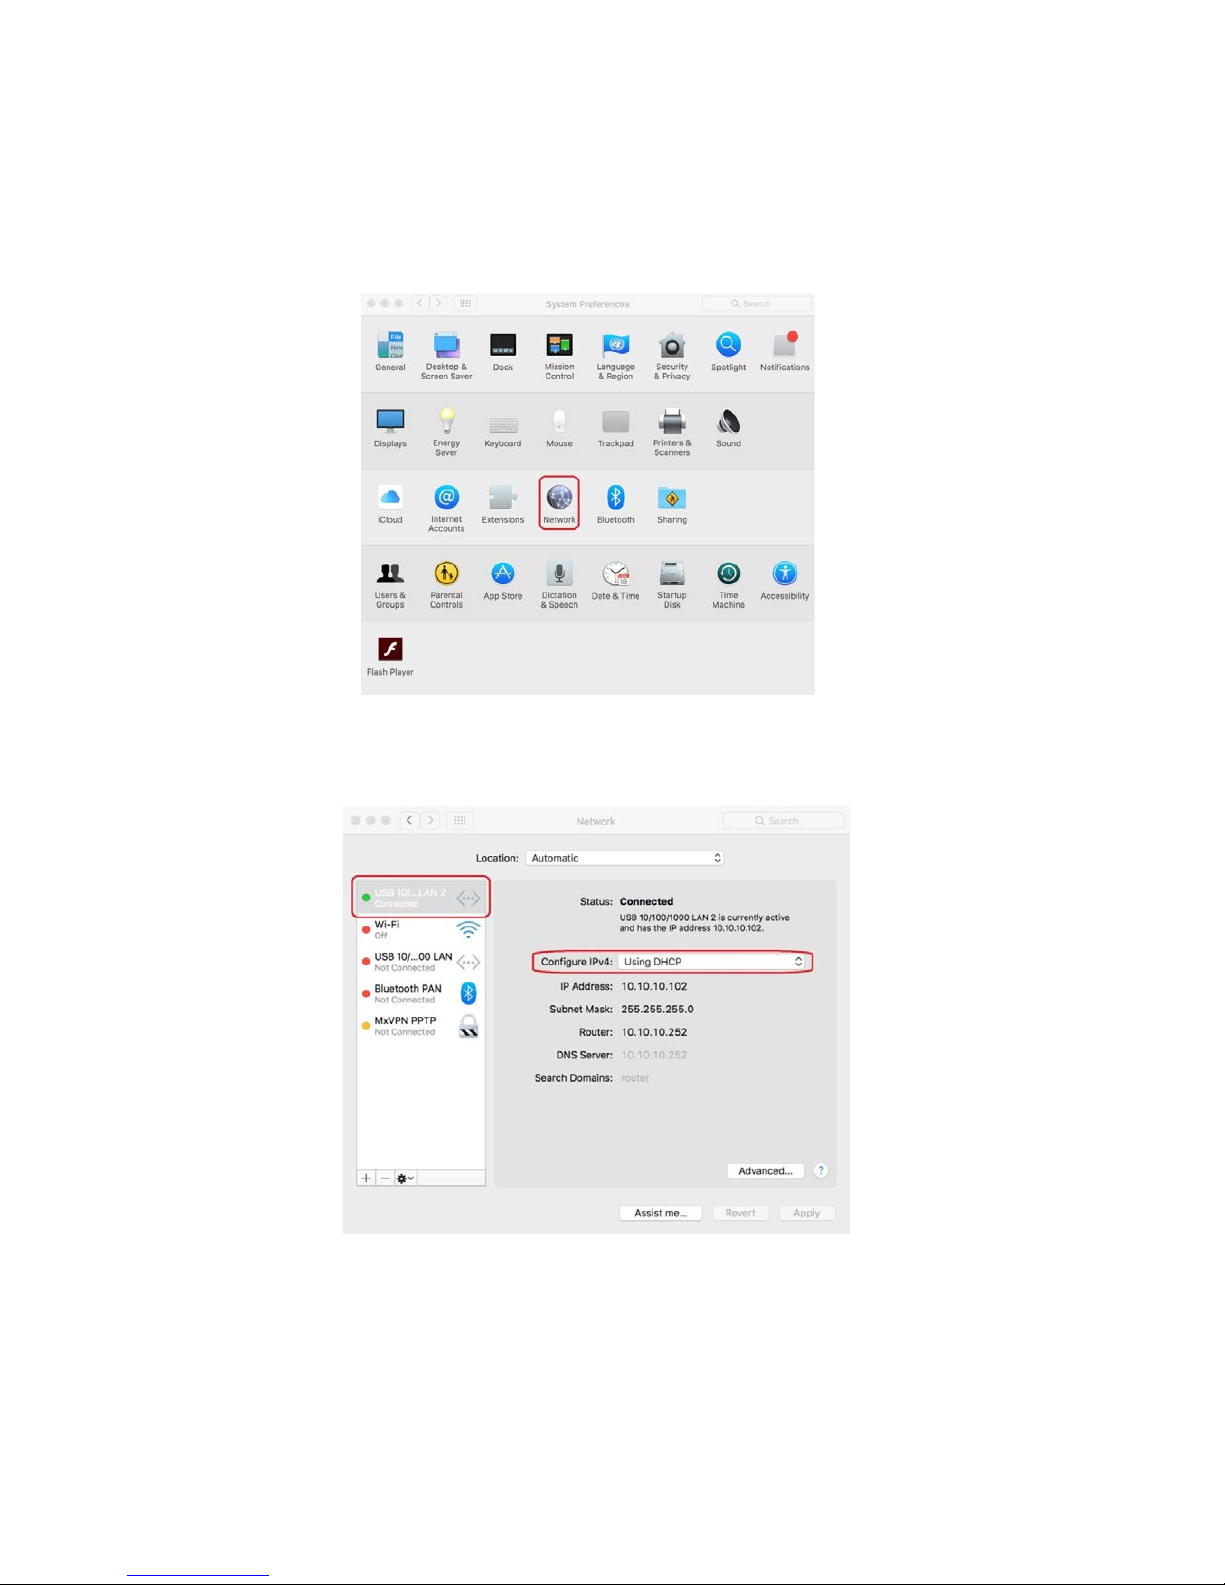
1. Enter the System Preferences page and select Network.
2. Select IPv4 as shown below:
3. Click Apply on the Network window to save your settings.
14
3. Logging into the Router
3.1 Log in
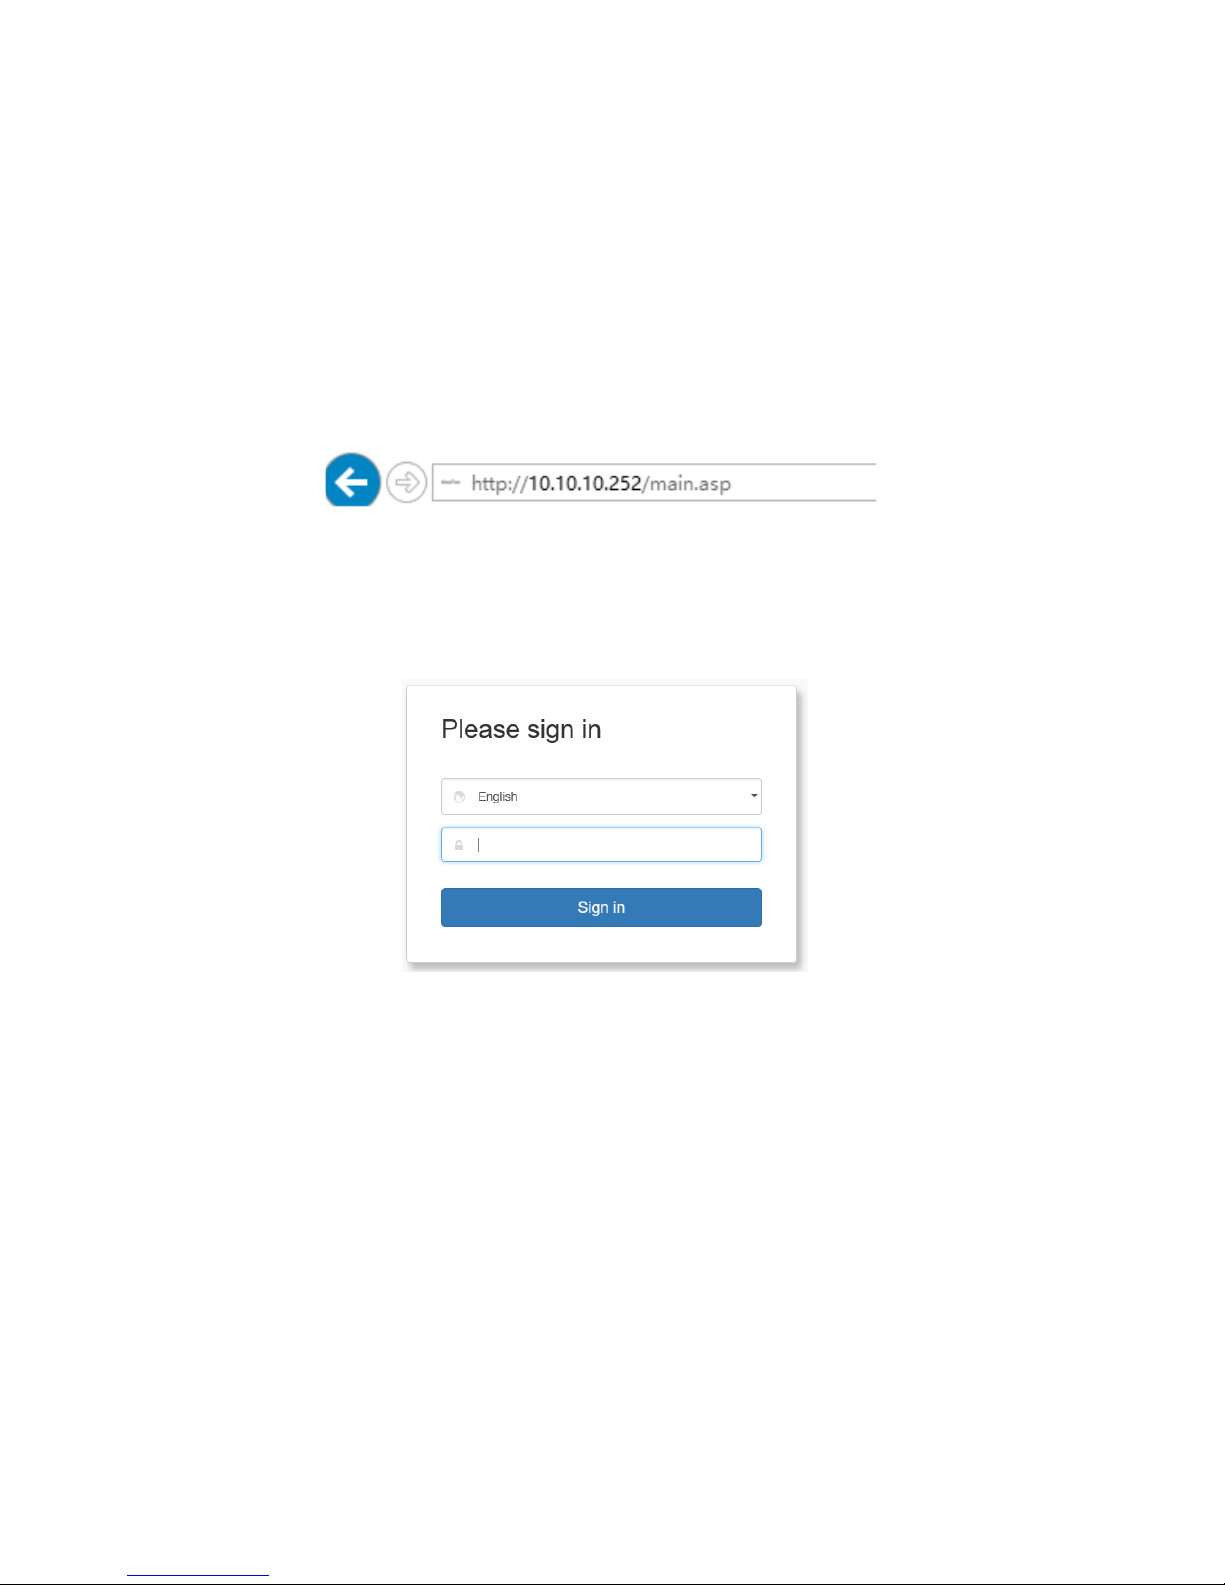
To access the Router’s Web-based Utility, launch a web browser (such
as Internet Explorer or Firefox) and enter http://10.10.10.252 into your
browser address bar. Press “Enter”.
The system will automatically display the login page. Please enter the
correct password (default password is admin) and click the Login
button or press “Enter”.
Note: Password is case sensitive. The default password is admin.
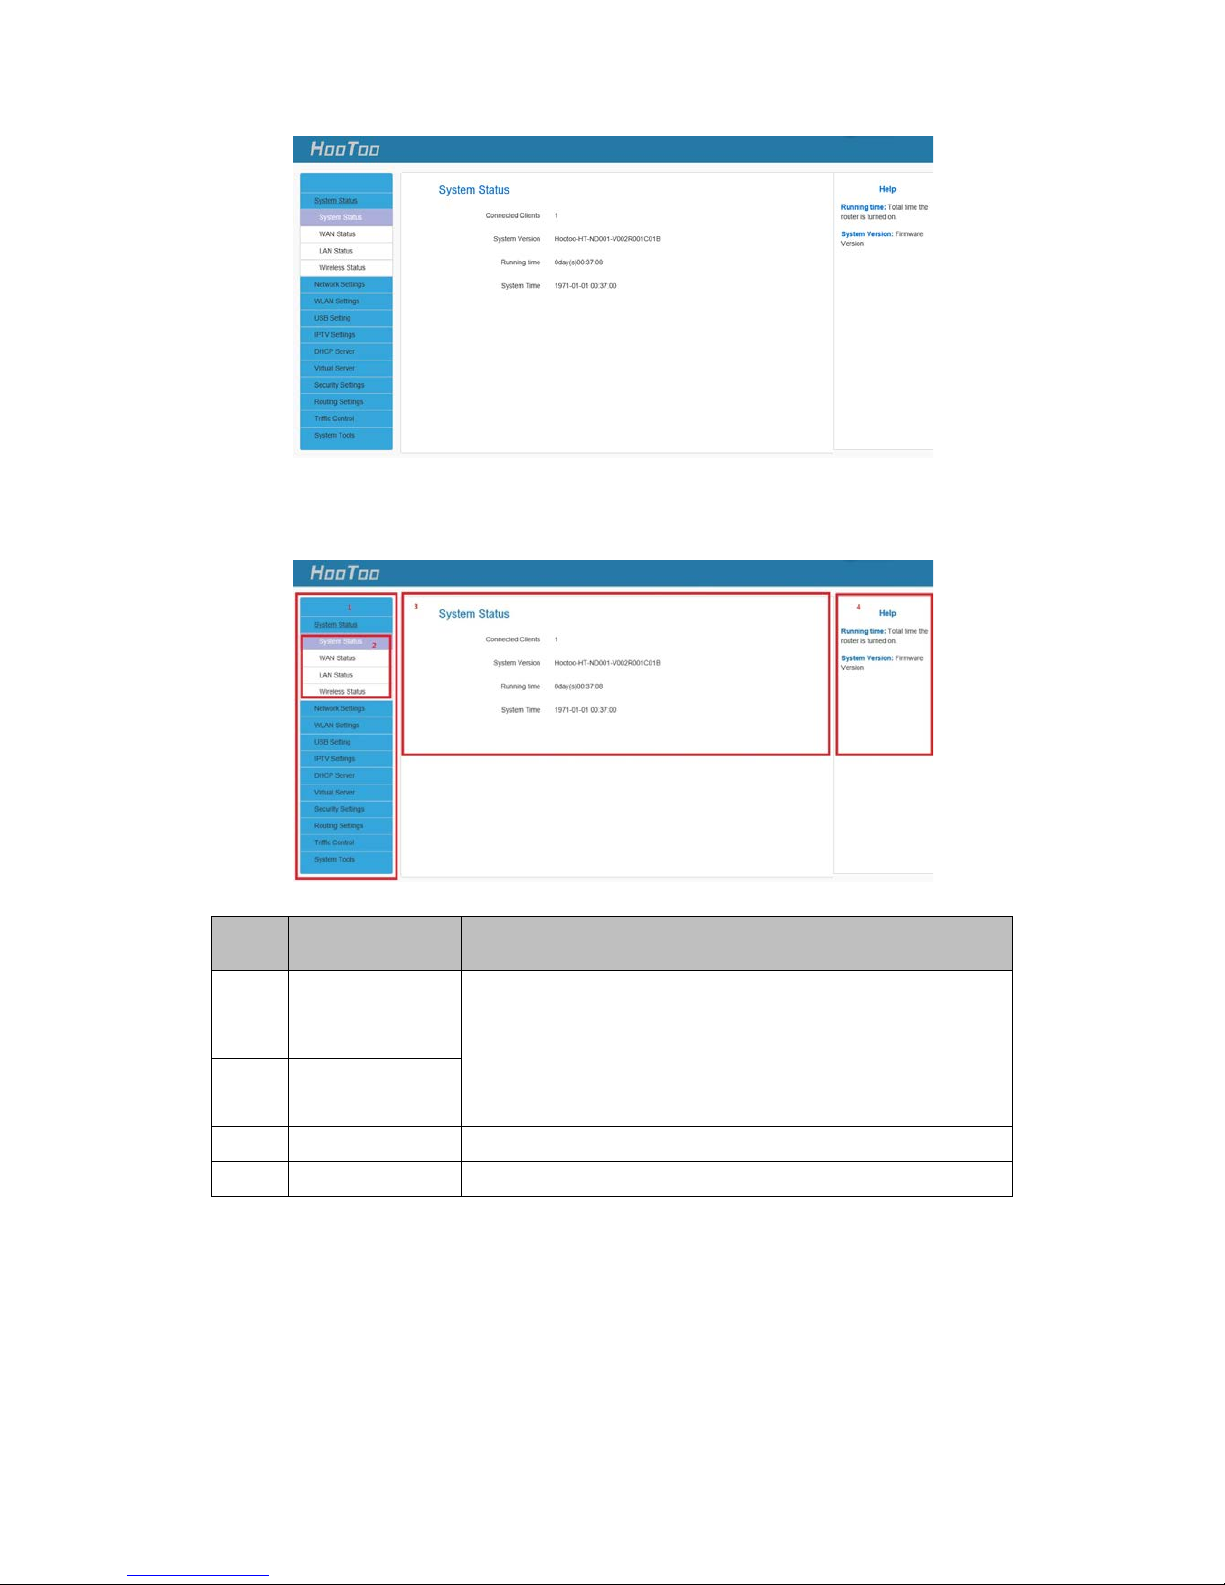
3.2 Webpage Layout
After the first-time login or initial password setup, the system will display
the router web page. Router settings can be viewed and modified here.
The web page is structured into Primary & Secondary Navigation,
Configuration, and Help sections.
15
Four sections categorized as below:
No. Name Introductions
1
Primary
Navigation
The navigation bar is organized in multiple tabs.
Once a function menu has been selected from
the navigation bar, the results will be displayed in
the Configuration area.
2
Secondary
Navigation
3 Configuration To configure and view settings.
4
Help
Shows help/information on the current page.
16
3.3 Commonly Used Webpage Elements
Common
Elements
Introductions
To release the WAN IP address information.
To obtain the WAN IP address information again.
To save the current configuration page.
To cancel the current configuration page.
To add settings to the list
To delete the selected rules.
To refresh the current page.
4. Features & Configuration
4.1 Quick Setup
Router: The Ethernet port will behave as a WAN port for a wired
connection to an ADSL or Cable modem. The NAT routing will be
performed between the WAN and WLAN to make IP sharing possible.
Release
Renew
Save
Cancel
Add
Delete
Refresh
17
WISP: In this mode, the AP will behave as client. The router function will
also be added between the wireless WAN side and the Ethernet LAN
side. Therefore, the WISP subscriber can share the WISP connection
without the need for an extra router.
4.1.1 Router
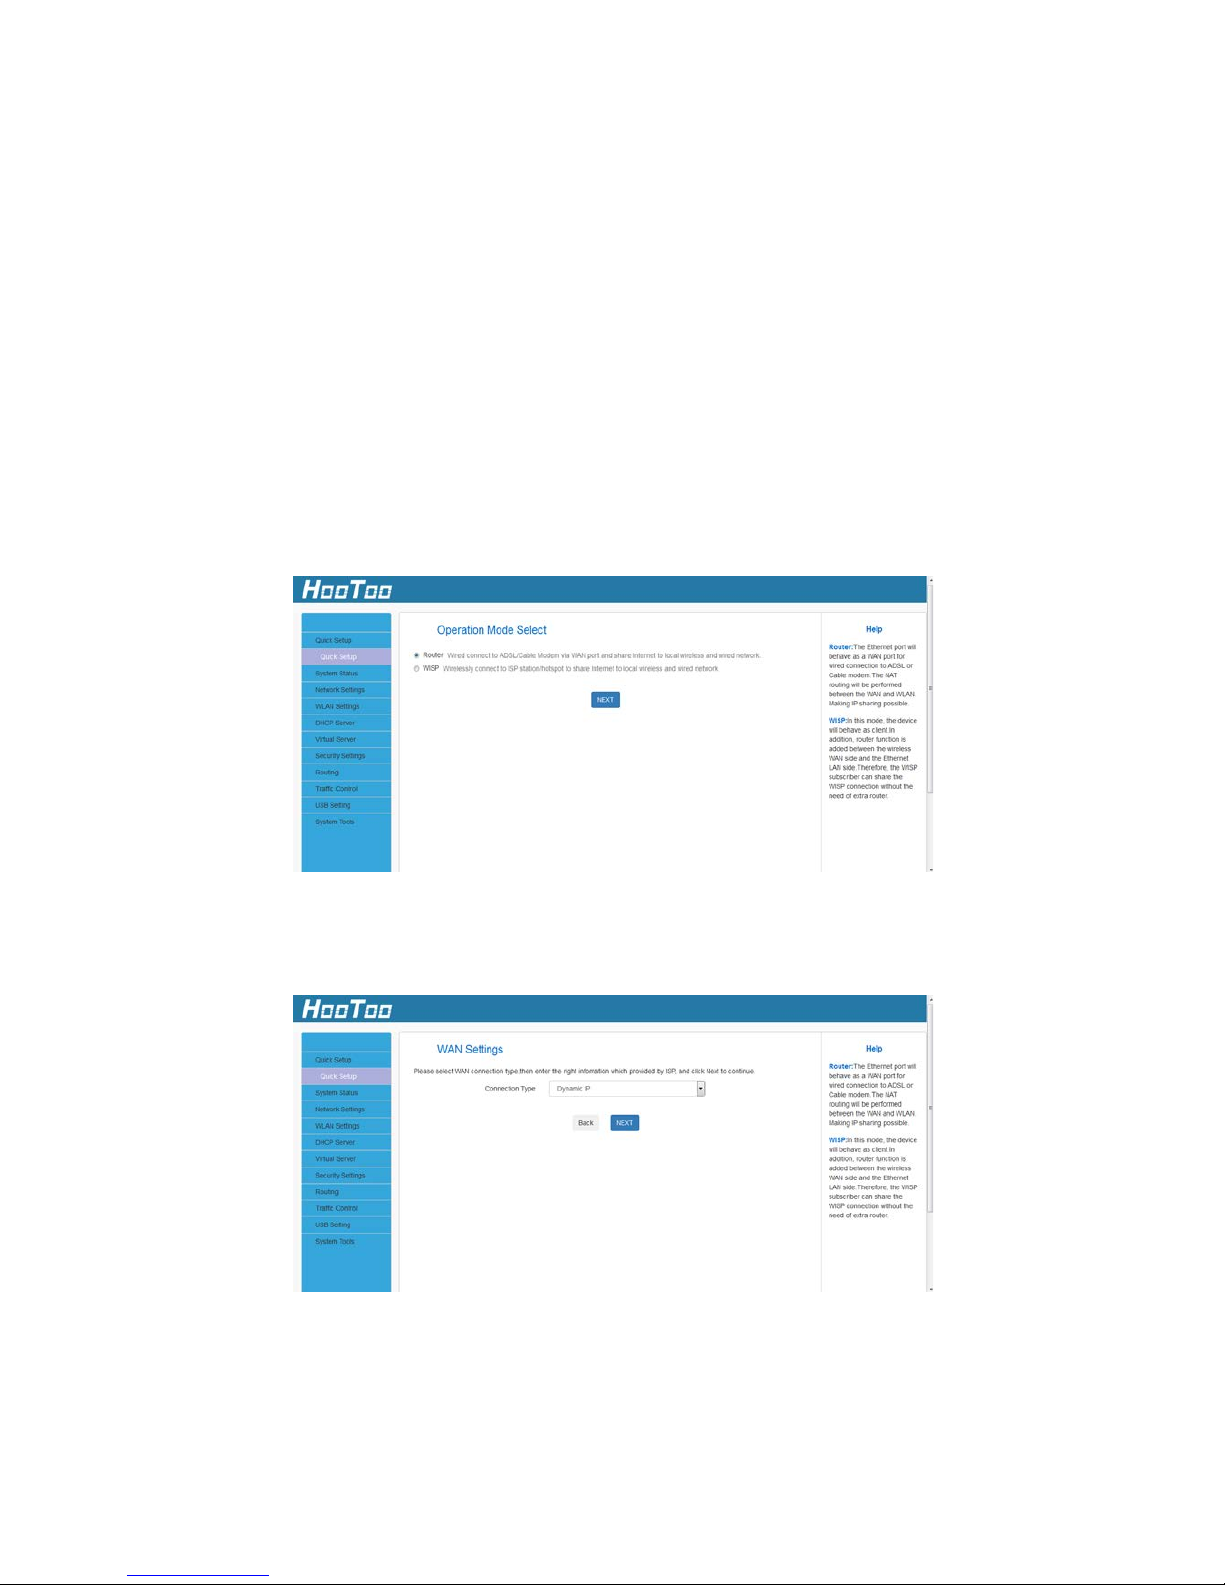
In Router mode, a wired connection can be ma de to an ADSL or Cable
Modem via the WAN port to share the Internet to local wirel ess and wire d
networks.
1. If you want to set the adapter in Router mode, choose Router, and
then click the “NEXT” button.
2. Choose the connection type then click the “NEXT” button.
Static IP: If your broadband ISP provides you a static IP, please select
Static IP mode.
Dynamic IP: If your ISP uses DHCP server, please select DHCP and your ISP
18
will automatically assign these values to you (includes the DNS server).
PPPoE: Inquire with your ISP to make sure you can use PPPoE. Enter your
username and password provided by your ISP.
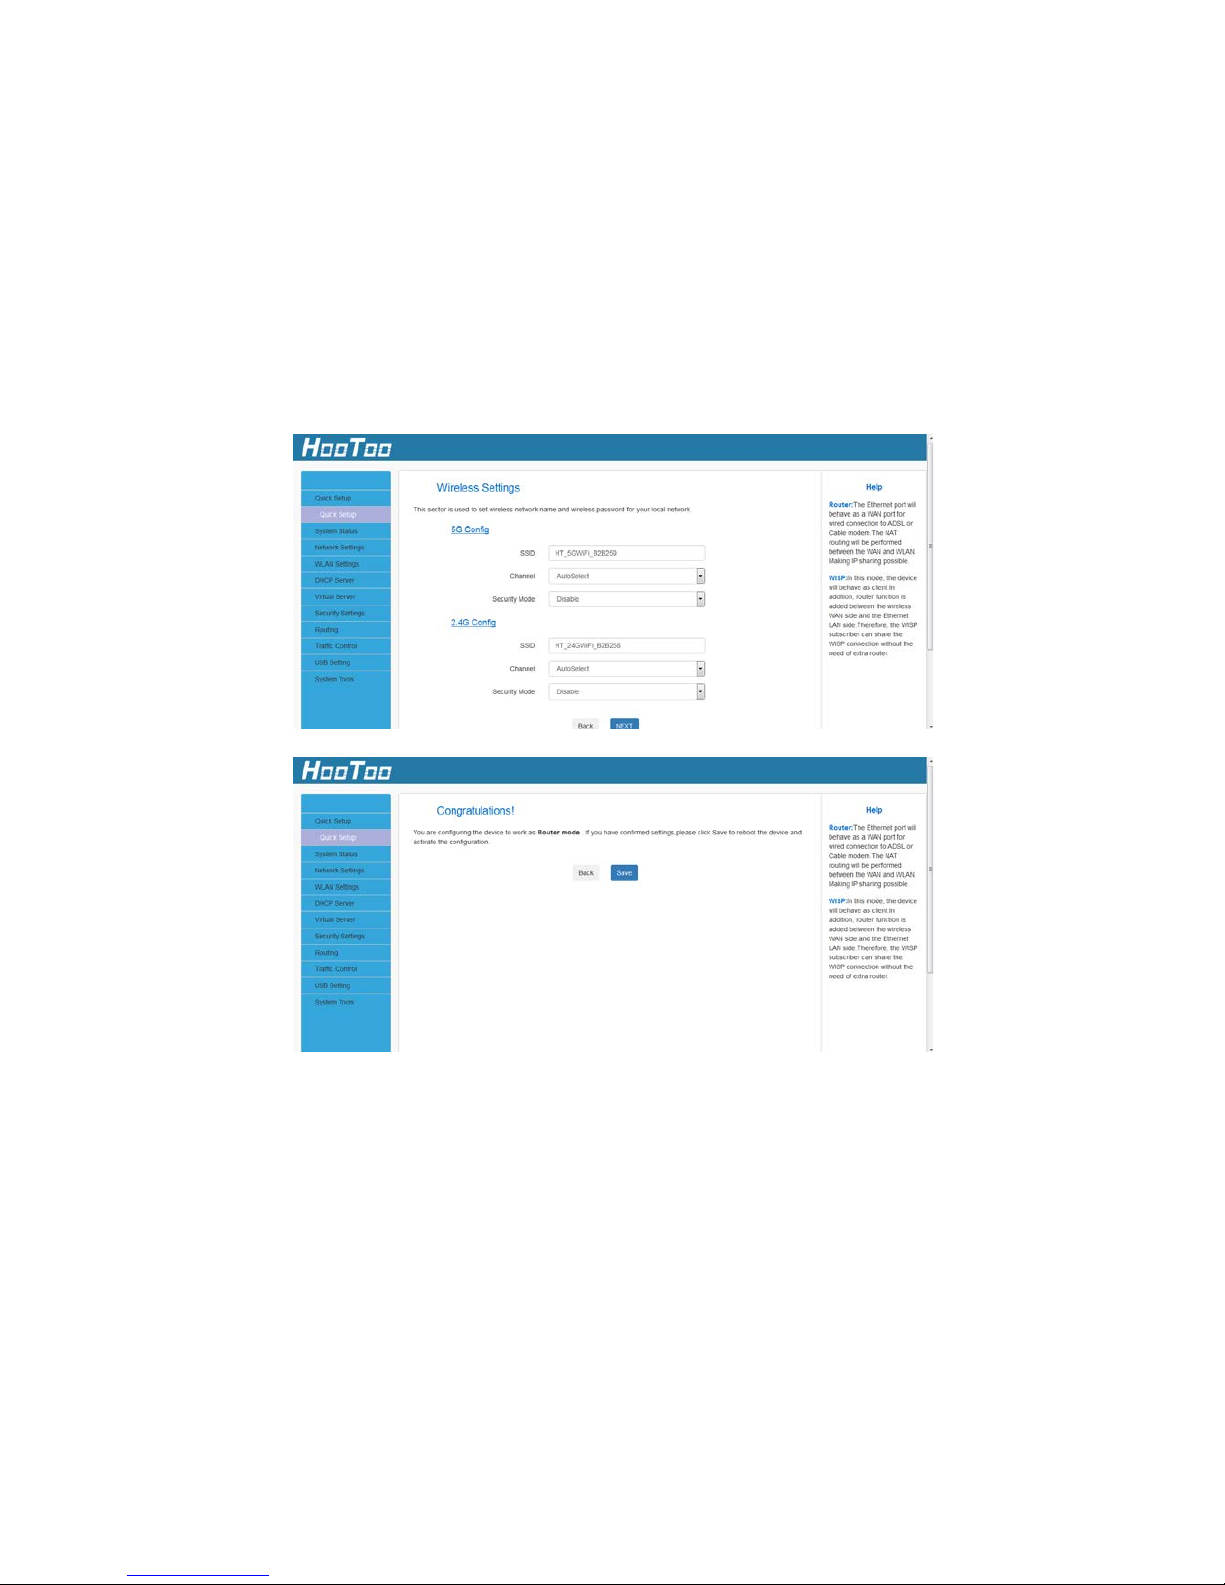
3. In this setting, you can set the wireless name and wireless password for
your local network. Then click the “NEXT” button. You have
configured the adapter to work as a router. Click the “Save” button
to confirm the settings.
4.1.2 WISP
In WISP mode, wirelessly connect to an ISP station/hotspot to share
Internet to local wireless and wired networks.
1. If you want to set the adapter in WISP mode, choose WISP, then
click the “NEXT” button;
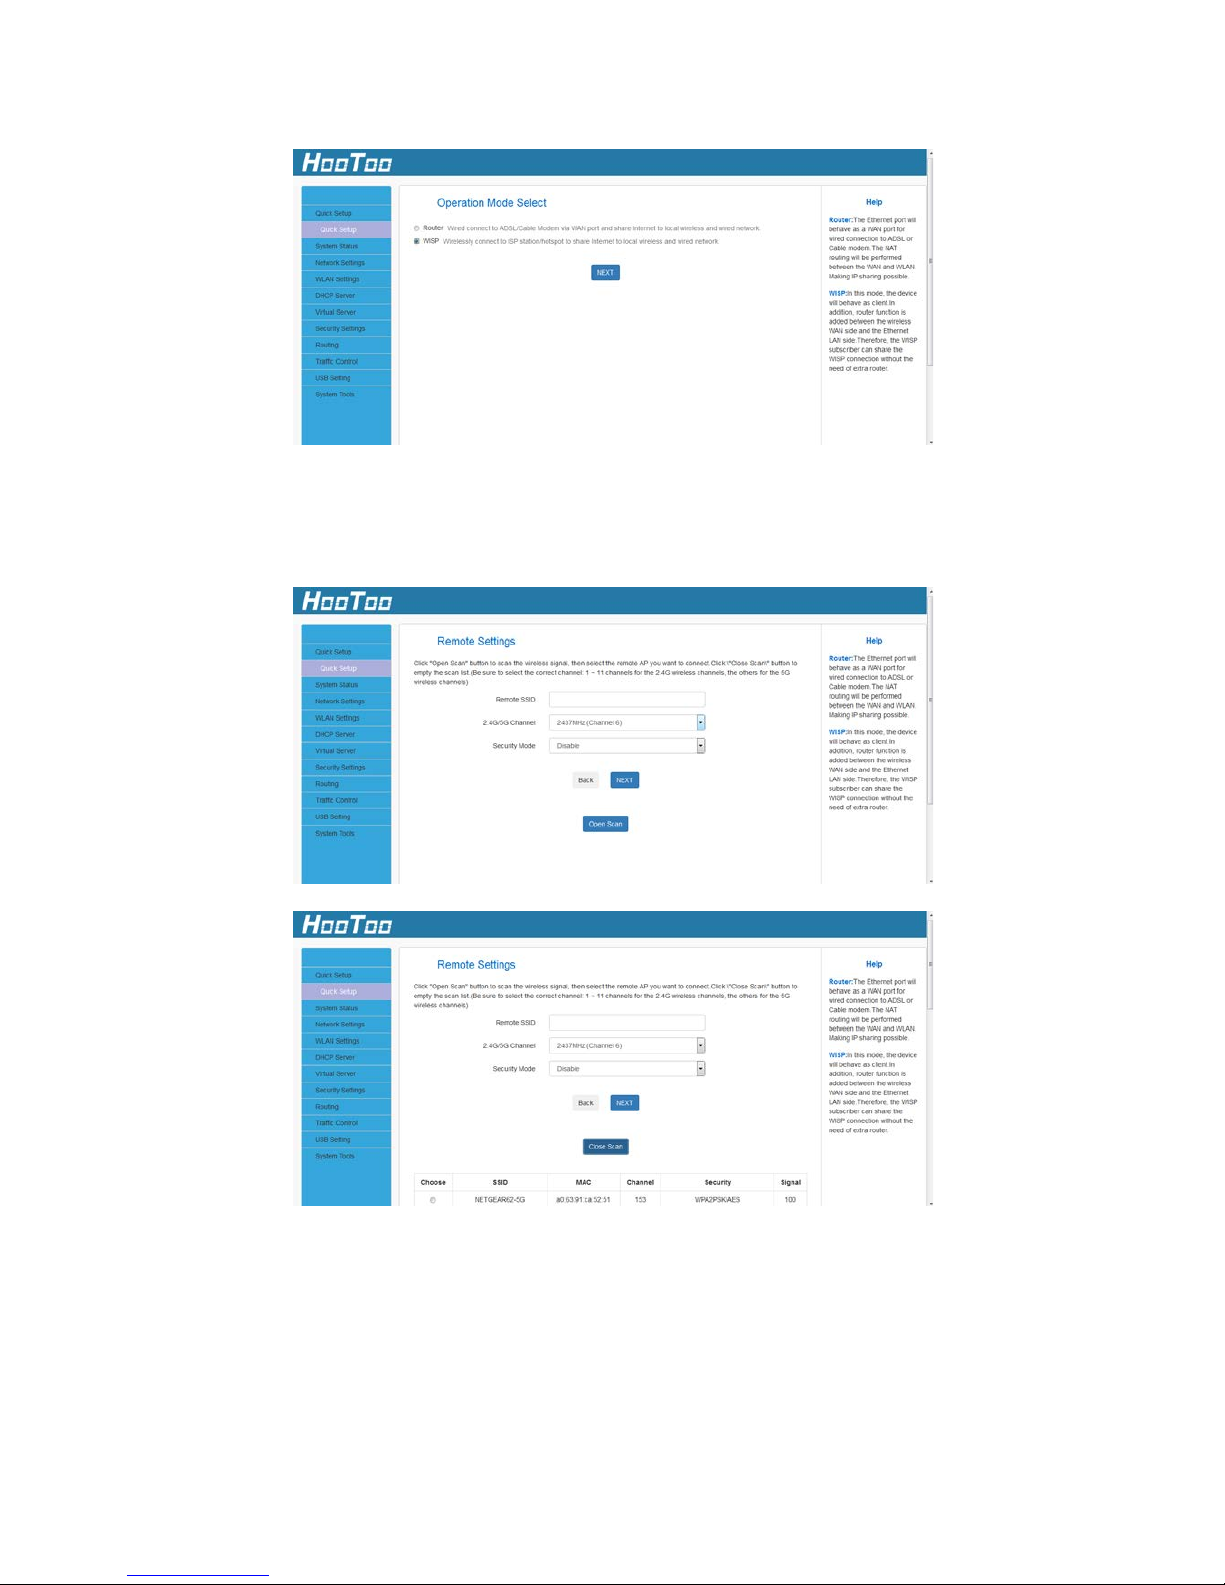
19
2. Click Open Scan to search Wi-Fi signal. Select your Wi-Fi and enter
the password, then click NEXT.
3. Set the pass phrase (password) for the Wi-Fi, then click the
“NEXT” button.
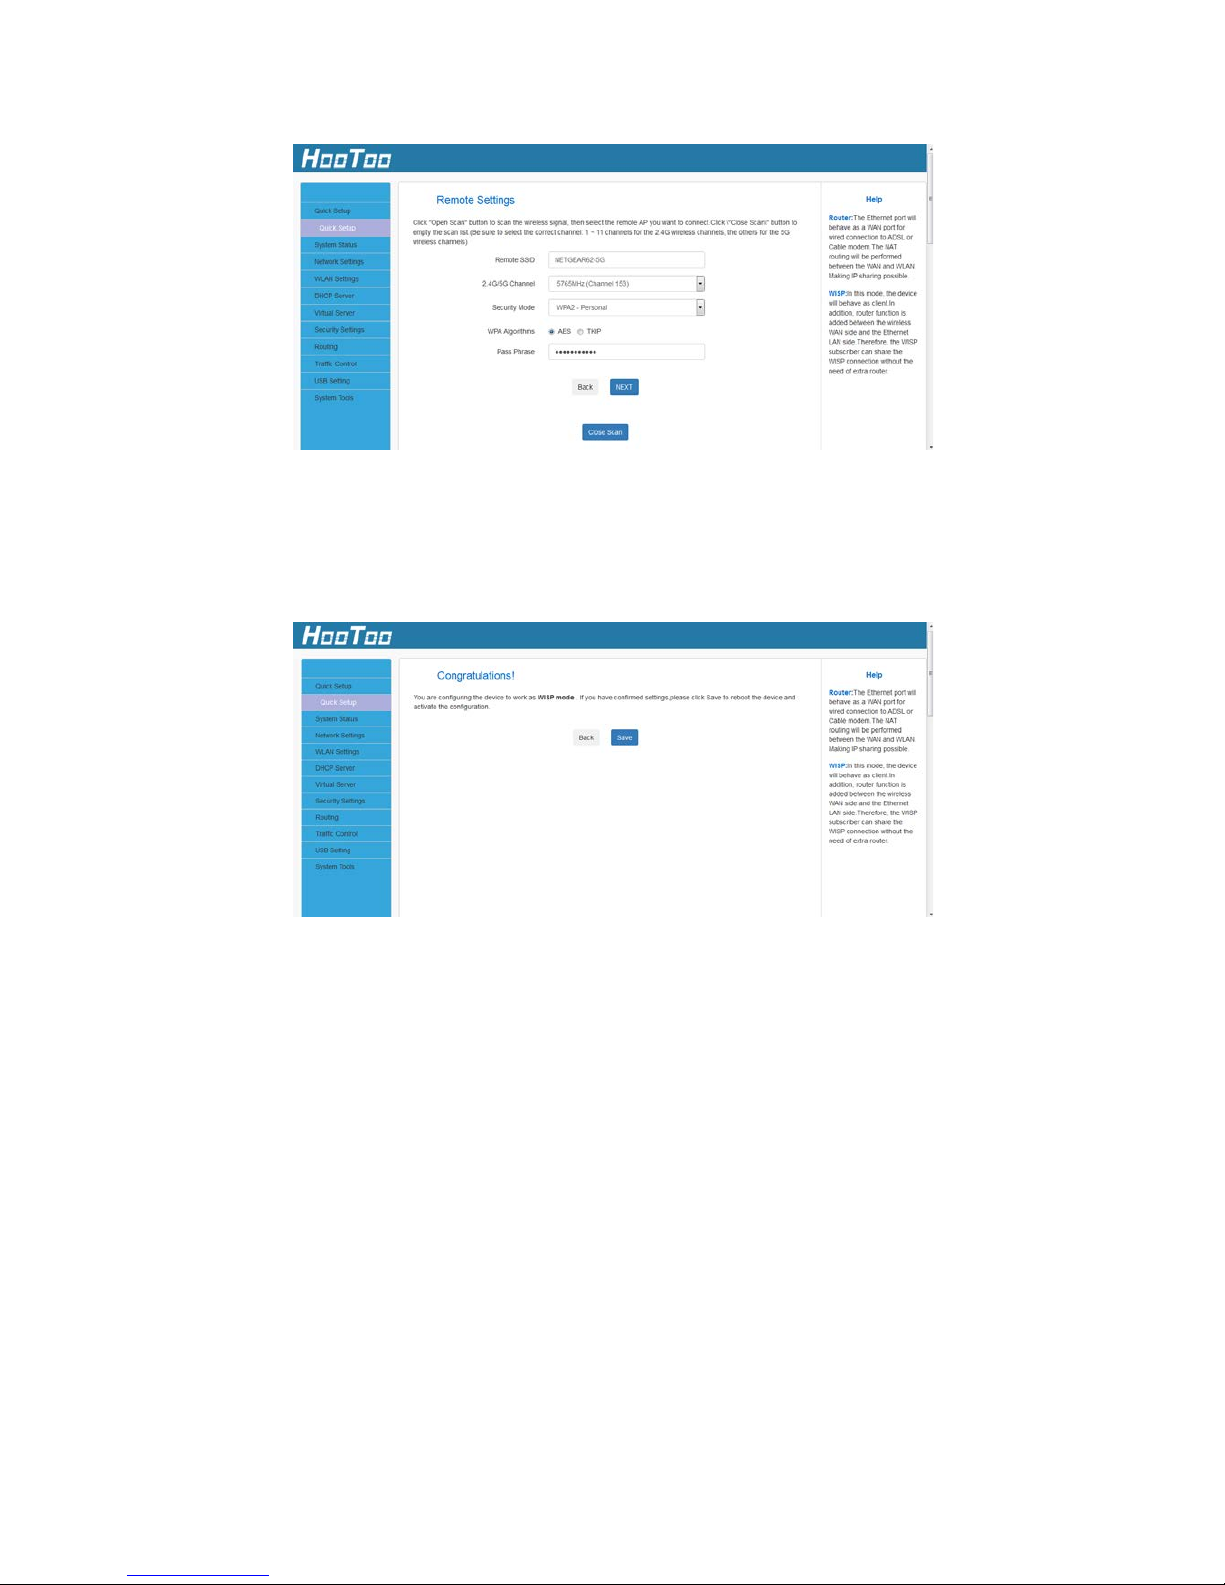
20
4. You are configuring the device to work in WISP mode. If you have
confirmed the settings, please click the “Save” button to reboot the
device and activate the configurations.
4.2 System Status
This section includes the following: System Status, WAN Status, LAN
Status, and Wireless Status. You can c l ick Status to enter the page.
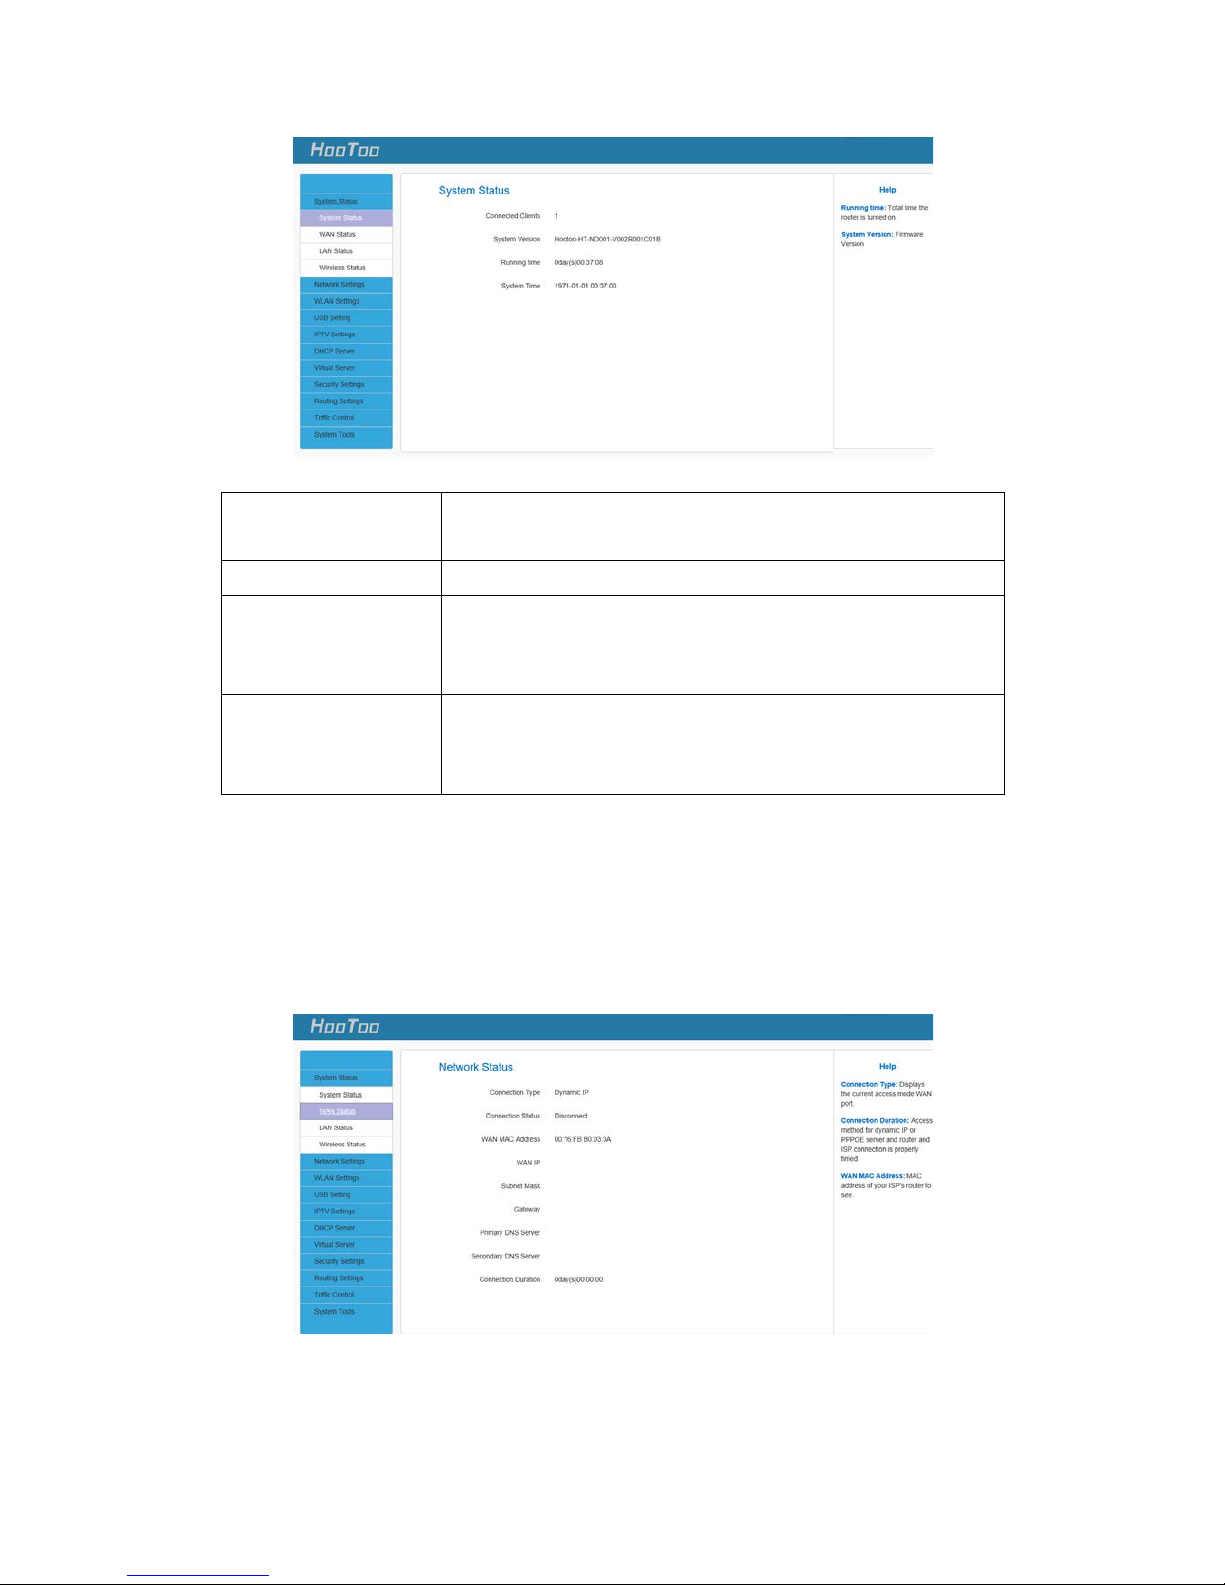
4.2.1 System Status
It displays System Information: System Time, Up Time, Connected Clients,
LAN MAC Address, WAN MAC Address, Firmware Version, and
Hardware Version.
21
Connected
Clients
Number of DHCP clients.
System Version
Router System Version.
Running Time
It indicates how long the router has been working
since startup. Running time is reset when the device
is powered off.
System Time
Current system time on this device. The device
automatically synchronizes the system time with the
Internet server time.
4.2.2 WAN Status
This section displays the WAN basic information.
WAN Status includes Dynamic IP, PPPoE, and Static IP modes.
 Loading...