

Page 1
Website: www.hootoo.com
NORTH AMERICA
E-mail: support.ca@hootoo.com(Canada)
support@hootoo.com (United States)
Tel: 1-888-456-8468 (Monday-Friday: 9:00 – 17:00 PST)
Address: 2228 Junction Ave, San Jose, CA 95131
EUROPEAN UNION
E-mail: support.uk@hootoo.com (United Kingdom)
support.de@hootoo.com (Germany)
support.fr@hootoo.com (France)
support.es@hootoo.com (Spain)
support.it@hootoo.com (Italy)
EU Importer: ZBT International Trading GmbH, Lederstr 21a,
22525 Hamburg, Deutschland
ASIA PACIFIC
E-mail: support.jp@hootoo.com (Japan)
IP CAMERA
Model: HT-IP211HDP
ADVANCED USER MANUAL
For Windows
Page 2

1. Overview - - - - - - - - - - - - - - - - - - - - - - - - - - - - - - - - - - - - - - - - 01
1.1 Key Features- - - - - - - - - - - - - - - - - - - - - - - - - - - - - - - - - - - - 01
1.2 Read Before Use - - - - - - - - - - - - - - - - - - - - - - - - - - - - - - - - - 01
1.3 Package Contents - - - - - - - - - - - - - - - - - - - - - - - - - - - - - - - 01
1.4 Product Diagram - - - - - - - - - - - - - - - - - - - - - - - - - - - - - - - - 02
2. Access the IP Camera - - - - - - - - - - - - - - - - - - - - - - - - - - - - 03
2.1 Access the Camera in LAN- - - - - - - - - - - - - - - - - - - - - - - - - 03
2.1.1 Wired Mode - - - - - - - - - - - - - - - - - - - - - - - - - - - - - - - - 03
2.2 Using the VLC player - - - - - - - - - - - - - - - - - - - - - - - - - - - - - 10
2.3 Wireless mode - - - - - - - - - - - - - - - - - - - - - - - - - - - - - - - - - - 13
3. Surveillance Software GUI - - - - - - - - - - - - - - - - - - - - - - - - - 16
3.1 Home Page- - - - - - - - - - - - - - - - - - - - - - - - - - - - - - - - - - - - - 16
3.1.1 Video Recording - - - - - - - - - - - - - - - - - - - - - - - - - - - - 16
3.1.2 Other adjustment - - - - - - - - - - - - - - - - - - - - - - - - - - - - 18
3.1.3 Presel Position - - - - - - - - - - - - - - - - - - - - - - - - - - - - - - - 18
3.1.4 lmage color adjustment- - - - - - - - - - - - - - - - - - - - - - - 19
3.1.5 Other adjustment - - - - - - - - - - - - - - - - - - - - - - - - - - - - 19
3.2 Parameter Setting Page - - - - - - - - - - - - - - - - - - - - - - - - - - - 20
3.2.1 Camera - - - - - - - - - - - - - - - - - - - - - - - - - - - - - - - - - - - 20
3.2.2 Network - - - - - - - - - - - - - - - - - - - - - - - - - - - - - - - - - - - 21
3.2.3 Event - - - - - - - - - - - - - - - - - - - - - - - - - - - - - - - - - - - - - 30
CONTENTS
3.3 System - - - - - - - - - - - - - - - - - - - - - - - - - - - - - - - - - - - - - - - - 32
3.3.1 User - - - - - - - - - - - - - - - - - - - - - - - - - - - - - - - - - - - - - - 32
3.3.2 Time Setting - - - - - - - - - - - - - - - - - - - - - - - - - - - - - - - - 33
3.3.3 Initialize- - - - - - - - - - - - - - - - - - - - - - - - - - - - - - - - - - - - 34
3.3.4 Device Info- - - - - - - - - - - - - - - - - - - - - - - - - - - - - - - - - 35
3.3.5 System Log - - - - - - - - - - - - - - - - - - - - - - - - - - - - - - - - - 36
4. Remote Viewing on a Windows PC - - - - - - - - - - - - - - - - - 37
5. Frequently Asked Question - - - - - - - - - - - - - - - - - - - - - - - - 38
5.1 How to change Password for the camera?- - - - - - - - - - - - - 38
5.2 How to set up the remote view for the camera?- - - - - - - - - 39
5.3 What you can do if camera could not be searched from
all the software after you connect it to router via network
cable? - - - - - - - - - - - - - - - - - - - - - - - - - - - - - - - - - - - - - - - - 41
5.4 Camera can not connect wireless - - - - - - - - - - - - - - - - - - - 41
6. Specification- - - - - - - - - - - - - - - - - - - - - - - - - - - - - - - - - - - - - 43
7. Warranty and Support- - - - - - - - - - - - - - - - - - - - - - - - - - - - - 44
7.1 HooToo Warranty - - - - - - - - - - - - - - - - - - - - - - - - - - - - - - - - 44
7.2 Support Contact - - - - - - - - - - - - - - - - - - - - - - - - - - - - - - - - - 45
Page 3
01/02
1. Overview
1.1 Key Features
· 1280 x 720 High definition CMOS Lens gives clear and crisp image;
· Easy to set up (WPS: one key setup, AP: PC-free setup, P2P: scan setup );
· Built-in two-way audio communication enables users to not only view,
but listen and talk to the monitor end of camera, thus to increase
monitoring options ;
· Support monitoring from anywhere in the world via internet;
· Extra LED illuminators and light sensor provide clear night vision in dark
area automatically;
· Email alerts/FTP whenever motion is detected.
· Supports IE/Firefox/Chrome/Safari browser or any other standard browsers
· Supports WEP,WPA and WPA2 Encryption
· Wi-Fi compliant with wireless standards IEEE 802.11b/g/n
· Multi-level users management with password protection
· Providing Central Management Software to manage or monitor
multi-cameras
1.2 Read Before Use
Please go through the detailed instructions in the guide to help you setup
the camera correctly. If you need any further assistance, please contact
our customer support team or email us at support@hootoo.com.
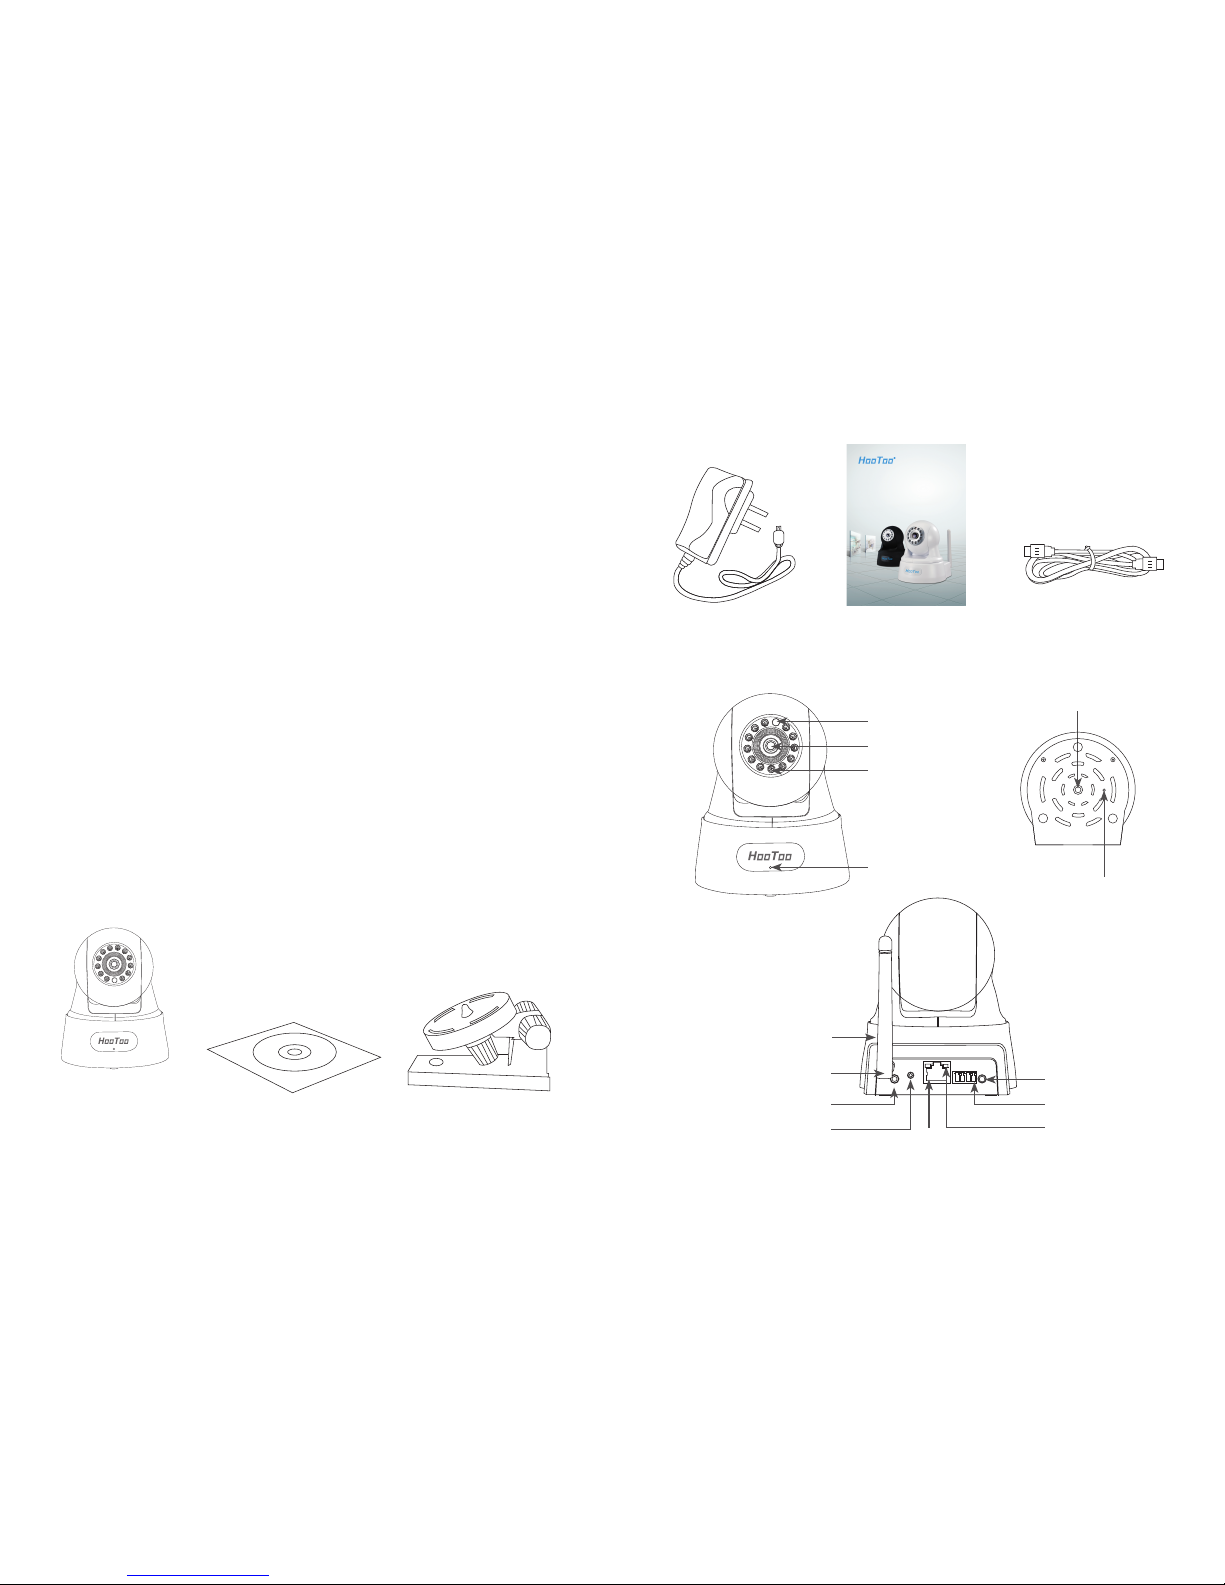
1.3 Package Contents
HT-IP211HDP
IP Camera
Resource CD
tekcarB gnitnuoM
Light Sensor
Lens
Infrared LED
Microphone
Mounting Port
Reset Button
AUDIO
ALARM POWER
WPS
1 2 3 4
LAN
Speaker
Antenna
Network light
Alarm
Power
WPS
Audio
LAN
1.4 Product Diagram
Power Adapter Ethernet Cable
Quick Start Guide
www.hootoo.com
IP CAMERA
Model: HT-IP211HDP
For Windows
ADVANCED USER MANUAL
Page 4
03/04
1.1 Key Features
· 1280 x 720 High definition CMOS Lens gives clear and crisp image;
· Easy to set up (WPS: one key setup, AP: PC-free setup, P2P: scan setup );
· Built-in two-way audio communication enables users to not only view,
but listen and talk to the monitor end of camera, thus to increase
monitoring options ;
· Support monitoring from anywhere in the world via internet;
· Extra LED illuminators and light sensor provide clear night vision in dark
area automatically;
· Email alerts/FTP whenever motion is detected.
· Supports IE/Firefox/Chrome/Safari browser or any other standard browsers
· Supports WEP,WPA and WPA2 Encryption
· Wi-Fi compliant with wireless standards IEEE 802.11b/g/n
· Multi-level users management with password protection
· Providing Central Management Software to manage or monitor
multi-cameras
1.2 Read Before Use
Please go through the detailed instructions in the guide to help you setup
the camera correctly. If you need any further assistance, please contact
our customer support team or email us at support@hootoo.com.
1.3 Package Contents
AUDIO
ALARM POWER
WPS
1 2 3 4
LAN
1
2
3
1.4 Product Diagram
Reset button
Press and hold on the reset button for 30-60 seconds until the camera
starts to rotate. Releasing the reset button and then try to search the
camera from the software, the password will back to the factory default
administrator password. The default administrator user is admin and
password is admin.
QR Code
The QR code shows the UID for your camera which
could be used to view the camera in LAN or WAN
from P2P software such as IPCamClient from
Windows PC and MyCam Pro from your phone.
2. Access the IP Camera
This chapter explains how to access the camera through browser
and RTSP player.
2.1 Access the Camera in LAN
This camera supports HTTP and HTTPS protocols.
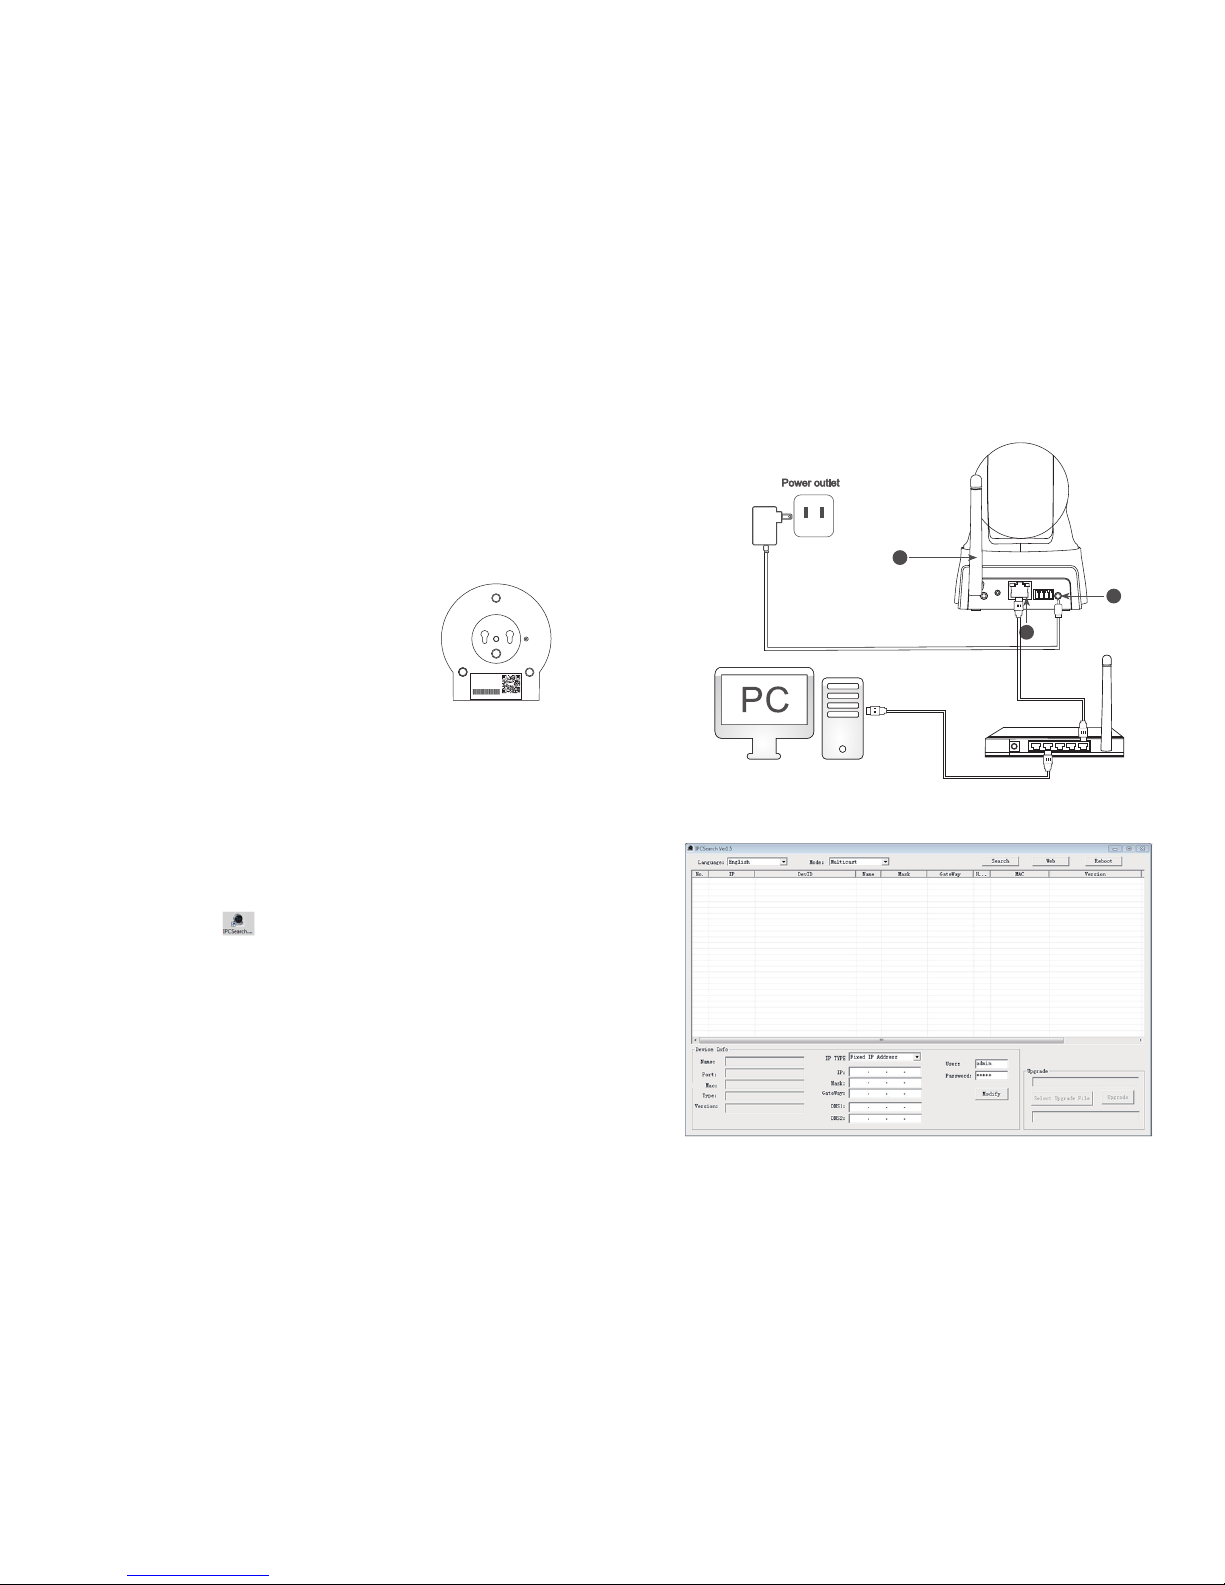
2.1.1 Wired Mode
1) Assemble the camera and its antenna; connect camera to your
router with a network cable (the same router that is being connected
to your windows PC)
2) Find the IPCSearch from the Installation CD, copy and paste
it to your PC.
Note:
· You can download the IPCSearch software from www.hootoo.com
· For FireFox or Chrome browser, in order to view live video, please
download and install “VLC media player” first. Find VLC install file in
camera CD or download here: http://www.videolan.org/vlc/index.html
· For IE browser, in order to view live video, please install “HDIP Camera”.
You can download it on logging page by clicking “download player”.
· We recommend IE browser for more stable performance
3) Double click on IPCSearch to open it. Make sure camera it connected
with your router properly.
MEGAPIXEL IP CAMERA
LENS: 3.6MM LENS
Adapter Power: 5V/2A
IP Address: DHCP Mode
M62SAKKUD6Z2AXAN111A
2014. 12. 10
Page 5
05/06
Reset button
Press and hold on the reset button for 30-60 seconds until the camera
starts to rotate. Releasing the reset button and then try to search the
camera from the software, the password will back to the factory default
administrator password. The default administrator user is admin and
password is admin.
QR Code
The QR code shows the UID for your camera which
could be used to view the camera in LAN or WAN
from P2P software such as IPCamClient from
Windows PC and MyCam Pro from your phone.
2. Access the IP Camera
This chapter explains how to access the camera through browser
and RTSP player.
2.1 Access the Camera in LAN
This camera supports HTTP and HTTPS protocols.
2.1.1 Wired Mode
1) Assemble the camera and its antenna; connect camera to your
router with a network cable (the same router that is being connected
to your windows PC)
2) Find the IPCSearch from the Installation CD, copy and paste
it to your PC.
Note:
· You can download the IPCSearch software from www.hootoo.com
· For FireFox or Chrome browser, in order to view live video, please
download and install “VLC media player” first. Find VLC install file in
camera CD or download here: http://www.videolan.org/vlc/index.html
· For IE browser, in order to view live video, please install “HDIP Camera”.
You can download it on logging page by clicking “download player”.
· We recommend IE browser for more stable performance
3) Double click on IPCSearch to open it. Make sure camera it connected
with your router properly.
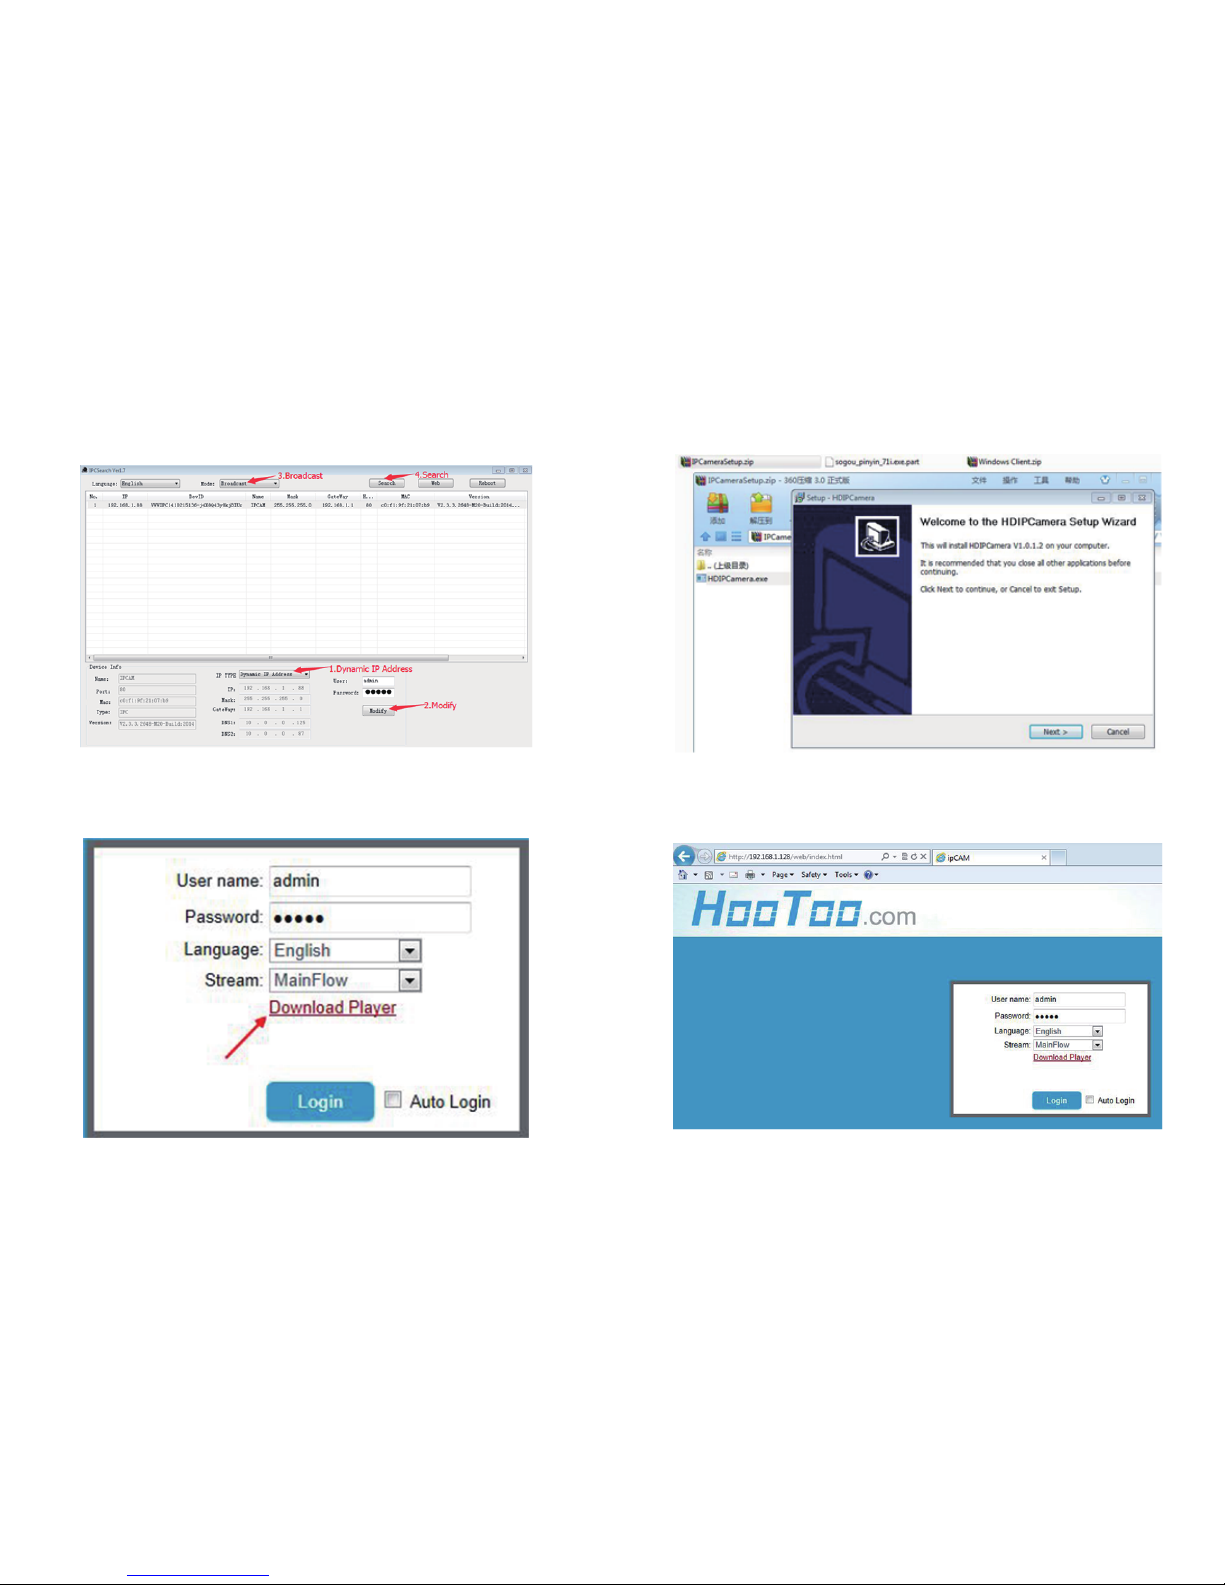
4) Click “Search” to find your camera’s IP address:
5) Select the IP address and double click on it. This will lead you to the
login page of the HT-IP211HDP web setting page. Click “Download
Player” to install camera plug-in for future use:
6) Then login with default username and password.
Username: admin
Password: admin
Page 6
07/08
5) Select the IP address and double click on it. This will lead you to the
login page of the HT-IP211HDP web setting page. Click “Download
Player” to install camera plug-in for future use:
6) Then login with default username and password.
Username: admin
Password: admin
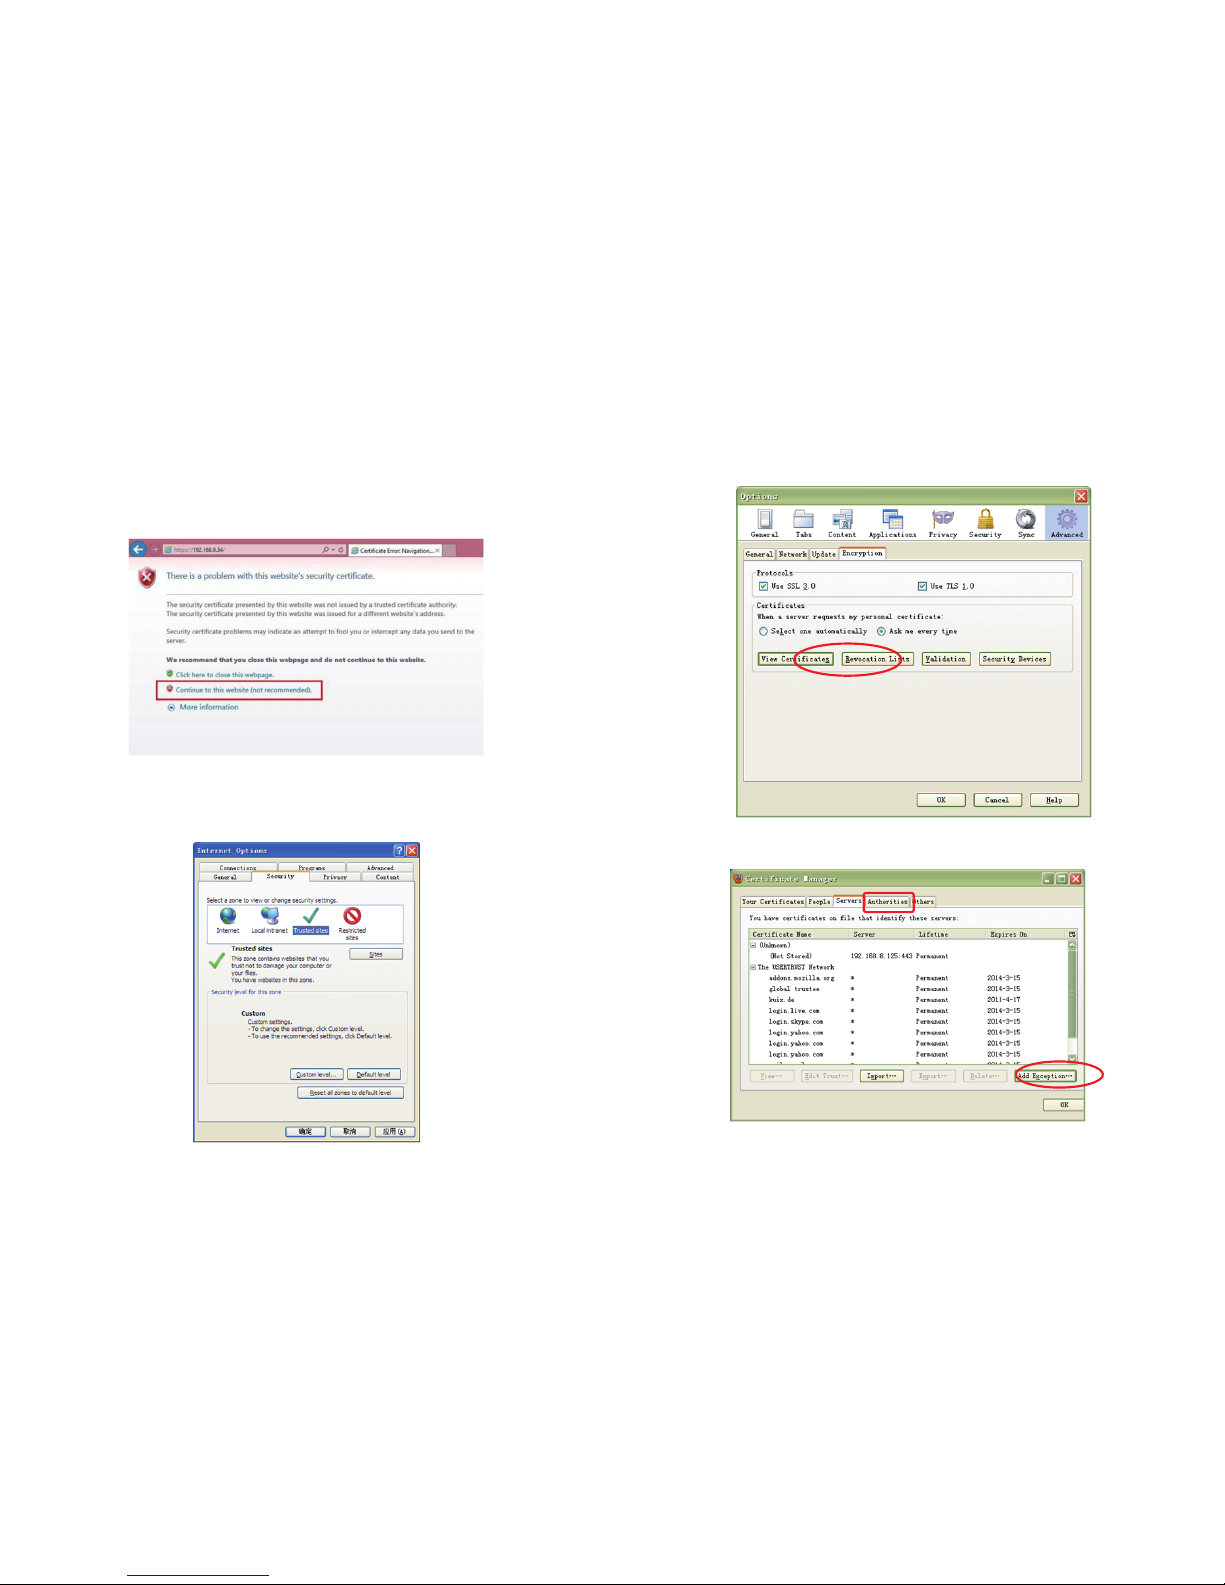
7) HTTPS (Hypertext Transfer Protocol over Secure Socket Layer) is a safe
way to access your camera. The data transferred on the Internet will
be encrypted. Since we cannot apply license for every LAN or DDNS
URL, the webpage may pop up a warning like the following picture,
you just need to click “Continue to this website (not recommended).”
8) Open Internet Explorer if it still could not be opened. Click on Tools and
then click Internet Options.
9) Next, click the Security tab, then click the Trusted sites button.
10) For Firefox, you can add the trusted site as the following way:
Tools --- Options ---- Advanced --- View Certificates --- Servers
Click View Certificates, and go to Servers option.
Figure 2.5
Page 7
09/10
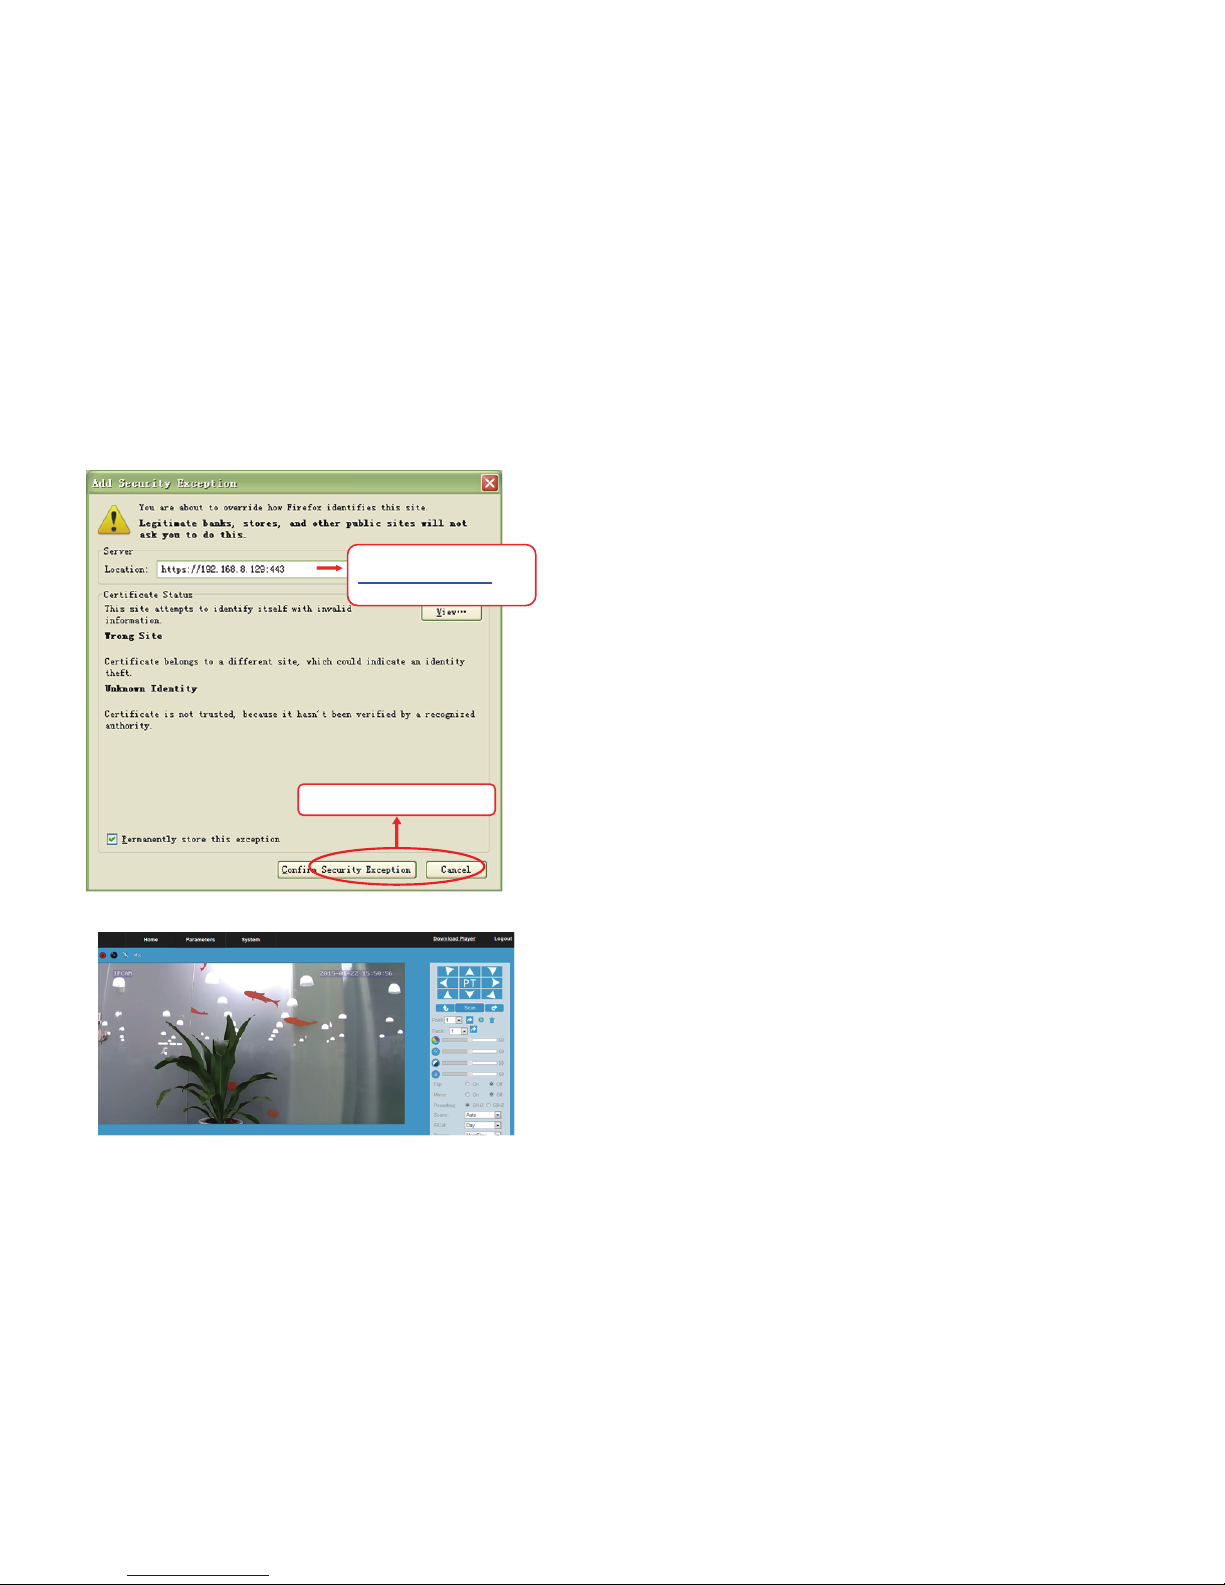
Go to Add Exception panel.
Figure 2.6
Note:
We recommend selecting “Broadcast Mode” when locating your IP
address for more fluent picture
Trouble Shoot
If you fail to find the camera’s IP address or fail to login after clicking the
IP address, try the following steps:
· Check the status of the camera’s Ethernet indicator LEDs. A flashing
yellow LED and a solid green LED means the camera is connected
properly. Otherwise, check the router and Ethernet connection
· Try the camera setup on a different network / router. Sometimes the
camera may not be compatible with your network setup
· Reset the camera to factory setting and try the setup again
· You can connect the camera to PC directly via network cable and try
to fix the problem by changing your PC’s IP address. A detailed
instruction is present in the following video:
https://www.youtube.com/watch?v=zyL1haURYEA&feature=youtu.be
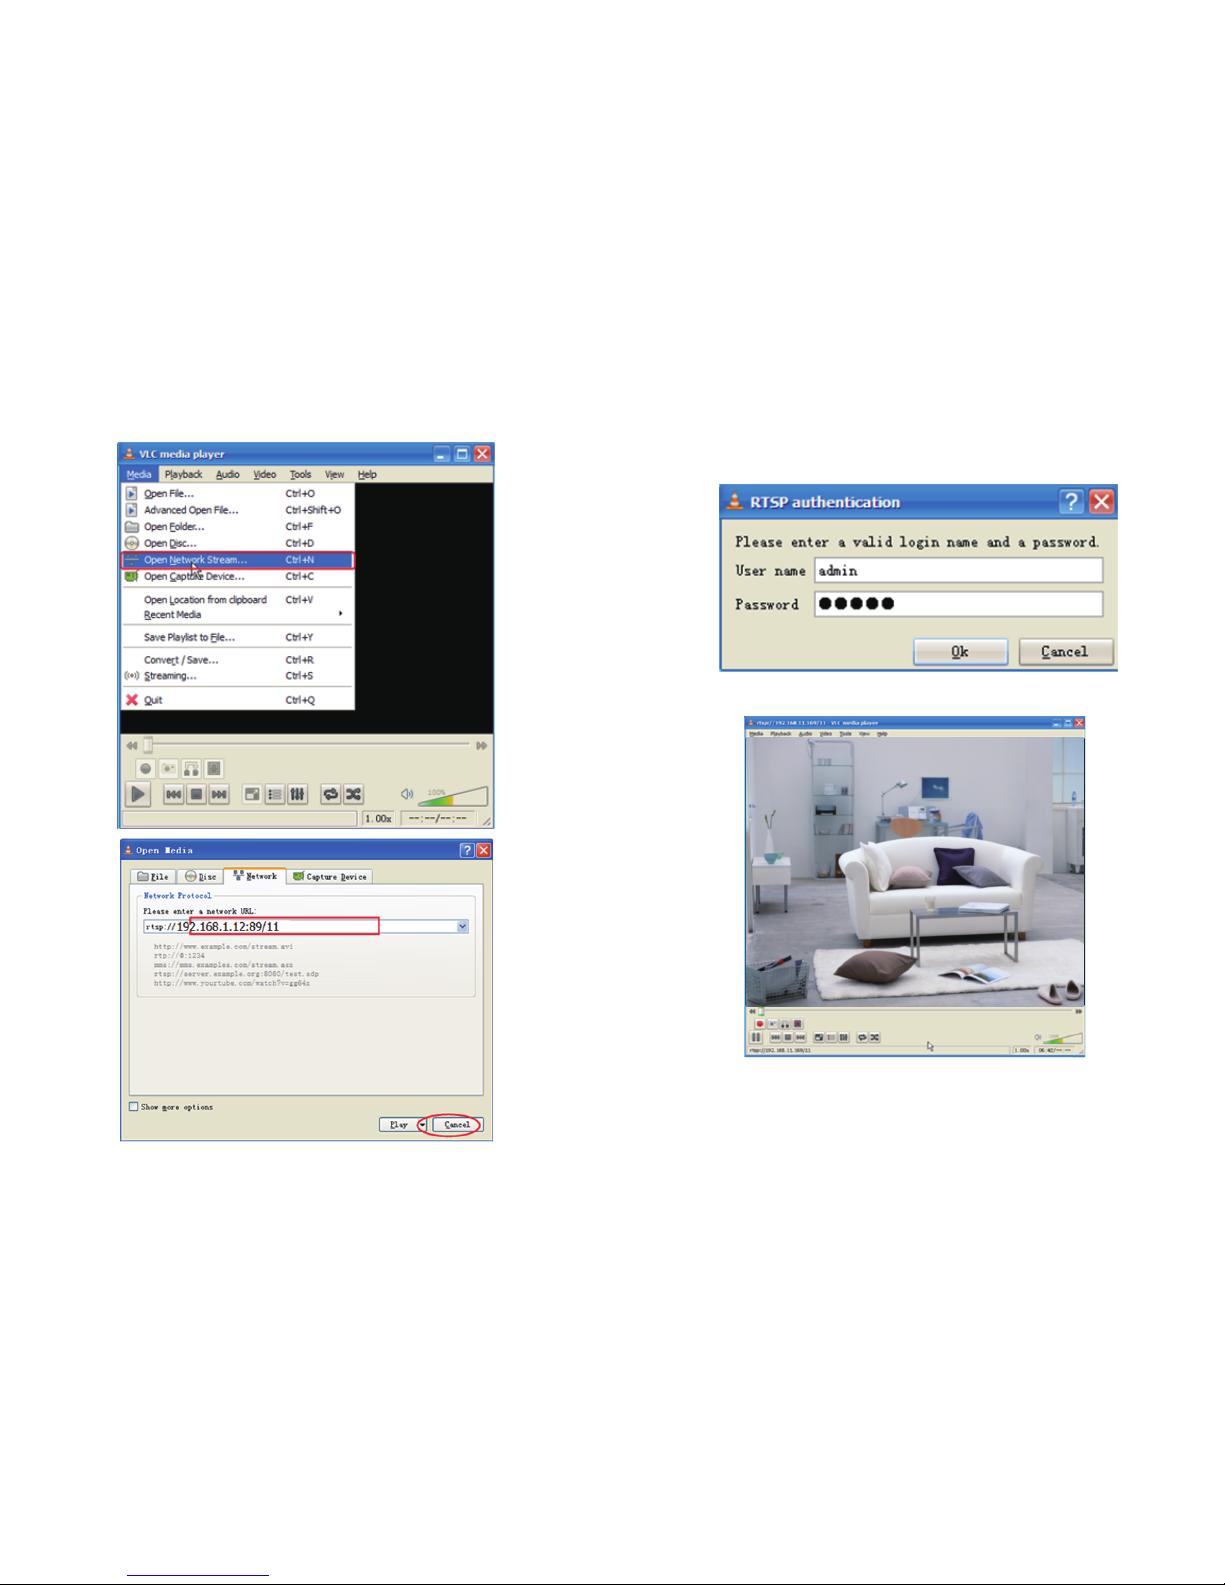
2.2 Using the VLC player
This camera supports RTSP streaming, which enable you to view the
camera using VLC player. The
RTSP stream link is like //192.168.1.128:554/11.
· Replace 192.168.1.128 with your own camera’s IP address
· Replace 554 with your camera’s RTSP port.
· And then try this link from the VLC player to have a try.
For example:
If you camera is setup as:
IP: 192.168.1.12
RTSP Port number: 89
User name: admin
Password: admin
Open the VLC, and go to Media Open Network Stream option, then
enter the following URL into VLC player: rtsp://192.168.1.12:89/11
Enter the camera’s url such as
https://192.168.8.129:443
Click this button to add it
Page 8
11/12
Figure 2.6
Note:
We recommend selecting “Broadcast Mode” when locating your IP
address for more fluent picture
Trouble Shoot
If you fail to find the camera’s IP address or fail to login after clicking the
IP address, try the following steps:
· Check the status of the camera’s Ethernet indicator LEDs. A flashing
yellow LED and a solid green LED means the camera is connected
properly. Otherwise, check the router and Ethernet connection
· Try the camera setup on a different network / router. Sometimes the
camera may not be compatible with your network setup
· Reset the camera to factory setting and try the setup again
· You can connect the camera to PC directly via network cable and try
to fix the problem by changing your PC’s IP address. A detailed
instruction is present in the following video:
https://www.youtube.com/watch?v=zyL1haURYEA&feature=youtu.be
2.2 Using the VLC player
This camera supports RTSP streaming, which enable you to view the
camera using VLC player. The
RTSP stream link is like //192.168.1.128:554/11.
· Replace 192.168.1.128 with your own camera’s IP address
· Replace 554 with your camera’s RTSP port.
· And then try this link from the VLC player to have a try.
For example:
If you camera is setup as:
IP: 192.168.1.12
RTSP Port number: 89
User name: admin
Password: admin
Open the VLC, and go to Media Open Network Stream option, then
enter the following URL into VLC player: rtsp://192.168.1.12:89/11
Sometimes you may need to enter the user name and password again.
Click OK and you can see the real-time preview.
Figure 2.15
NOTE:
If you changed the username or password, you need to restart the
camera, or else the new username and password will not take effect
when you enter the authentication in the VLC.
Page 9

13/14
Figure 2.15
NOTE:
If you changed the username or password, you need to restart the
camera, or else the new username and password will not take effect
when you enter the authentication in the VLC.
2.3 Wireless mode
Note:
Before setting the camera to wireless mode, please make sure you have
followed the previous instruction to set the wired mode.
1) After login the web setting page, click on “Parameters” at the
top of the page
2) Click “Wifi”, then click “Search” to scan nearby wireless network
3) Select the wireless network you wish to connect to. Enter the
password, and then click “Select”
4) Once the page shows “Connected Success!”, click “Apply”
5) Pull out the network cable from the connected camera.
6) Open the IPCSearch software again. Click “Search” to find the camera.
It may take up to 10 seconds for the result to show.
7) Double click on the new IP address. This will lead you to the login page
of the HT-IP211HDP web setting page in your default browser.
8) Use the default username and password “admin” to login
9) If a VVVIPCameraLive Control Module add-in pops up, please allow
the computer to run it:
10) Now you have setup the camera in Wi-Fi mode
Page 10

15/16
followed the previous instruction to set the wired mode.
1) After login the web setting page, click on “Parameters” at the
top of the page
2) Click “Wifi”, then click “Search” to scan nearby wireless network
3) Select the wireless network you wish to connect to. Enter the
password, and then click “Select”
5) Pull out the network cable from the connected camera.
6) Open the IPCSearch software again. Click “Search” to find the camera.
It may take up to 10 seconds for the result to show.
7) Double click on the new IP address. This will lead you to the login page
of the HT-IP211HDP web setting page in your default browser.
8) Use the default username and password “admin” to login
9) If a VVVIPCameraLive Control Module add-in pops up, please allow
the computer to run it:
10) Now you have setup the camera in Wi-Fi mode
Note:
· When you fill in Wi-Fi password, please note that there should be no
special characters ( such as “, #, &, +, ;, \, [, |)
· If you fail to find your own Wi-Fi SSID while other Wi-Fi SSID show normally
after searching, please fill in the SSID manually
· If the camera gets offline once you unplug the network cable,
please open your router’s webpage and make sure the Mac
filter is disabled. And then please set the Wi-Fi encryption mode
to WEP or WPA2. And also make sure the Auth Mode is the same
with your router's Wi-Fi encryption.
3. Surveillance Software GUI
Please setup the camera successfully before moving further.
3.1 Home Page
At home page, you can view camera live video, adjust the viewing area,
make records, take snapshots, and enable two-way audio, etc.
Note:
· For Windows PC users, we recommend using IE browser to view the
video for more functions. Some features may not be available on
FireFox and Chrome browser, such as video recording, snapshot, two
way audio, etc
· To enable those features in FireFox or Chrome, you can install add-on
“IE TAB 2”
· All features mentioned above, such as video recording, snapshot,
two-way audio, etc are not available on Mac.
3.1.1 Video Recording
Click the red record button to start recording. Click it again to stop
recording and select a record saving path to save the file.
Page 11

17/18
Trouble Shooting:
If you are not able to save the recording path, please clear your IE
browser data and reset the IE browser. To clear browser data:
· Tools- Internet Option - Advanced - Reset IE browser
· Tools- Internet Option - General - Clear Browser Data
You also need to run IE as administrator like the below.
3.1.2 Snapshot
To take a snapshot and save it to your PC, please click the snapshot
button (located beside the record button) and then select the file path.
3.1.3 Preset Position
You could setup 8 preset positions for the camera.
Page 12

19/20
Trouble Shooting:
If you are not able to save the recording path, please clear your IE
browser data and reset the IE browser. To clear browser data:
· Tools- Internet Option - Advanced - Reset IE browser
· Tools- Internet Option - General - Clear Browser Data
You also need to run IE as administrator like the below.
To take a snapshot and save it to your PC, please click the snapshot
button (located beside the record button) and then select the file path.
3.1.3 Preset Position
You could setup 8 preset positions for the camera.
Please pick the No. first and then move the camera to the position you
prefer and click Set button. Please set the 8 preset positions through this
method.
Once it is finished, to move the camera to your preferred position, please
pick the specified No. from Track and then click .
3.1.4 Image color adjustment
You can adjust value for Hue, Brightness, Contrast and Saturation.
3.1.5 Other adjustment
· Flip turn the camera image vertically 180 degrees
· Mirrors turn the camera image horizontally 180 degrees
· For the IRCut, there is color and white/back two model.
· To adjust the size for the image, please pick Image.
3.2 Parameter Setting Page
3.2.1 Camera
3.2.1.1 Video
If you are not able to get fluent video, please decrease Resolution, Bit
Rate and Maximum Frame.
3.2.1.2 Audio
In this page, you can adjust camera’s input Gain and output volume and
turn on/off audio function according to your network condition.
Page 13

21/22
method.
Once it is finished, to move the camera to your preferred position, please
pick the specified No. from Track and then click .
3.1.4 Image color adjustment
You can adjust value for Hue, Brightness, Contrast and Saturation.
3.1.5 Other adjustment
· Mirrors turn the camera image horizontally 180 degrees
· For the IRCut, there is color and white/back two model.
· To adjust the size for the image, please pick Image.
3.2 Parameter Setting Page
3.2.1 Camera
3.2.1.1 Video
If you are not able to get fluent video, please decrease Resolution, Bit
Rate and Maximum Frame.
3.2.1.2 Audio
In this page, you can adjust camera’s input Gain and output volume and
turn on/off audio function according to your network condition.
Please decrease Input Gain and Output Volume if it is noisy and also
make sure the camera is not too close to your PC or phone.
3.2.1.3 OSD
Time stamp on/off,
Display camera name in live video, snapshot or record image,
Change camera’s name.
3.2.1.4 PTZ
In this page, you can change image property (flip over or mirror
position), assign different cruise position, adjust camera moving
speed, set track plan, etc.
If you put the camera on the ceiling, please pick Flip and Mirror
Please move the camera’s head manually if it is stuck or it does not pan
or tilt properly.
3.2.2 Network
3.2.2.1 IP settings
In this page, you can select different IP types for camera per your needs.
Fixed IP: to avoid IP conflicts in complex network environment
Dynamic IP: to enable the camera to get an IP address from router
automatically.
HTTP - port: 80. This port number is used for port forwarding setting.
RTSP Port: It is port for you to view the camera from VLC player.
Page 14

23/24
Please decrease Input Gain and Output Volume if it is noisy and also
make sure the camera is not too close to your PC or phone.
3.2.1.3 OSD
Time stamp on/off,
Display camera name in live video, snapshot or record image,
Change camera’s name.
speed, set track plan, etc.
If you put the camera on the ceiling, please pick Flip and Mirror
Please move the camera’s head manually if it is stuck or it does not pan
or tilt properly.
3.2.2 Network
3.2.2.1 IP settings
In this page, you can select different IP types for camera per your needs.
Fixed IP: to avoid IP conflicts in complex network environment
Dynamic IP: to enable the camera to get an IP address from router
automatically.
HTTP - port: 80. This port number is used for port forwarding setting.
RTSP Port: It is port for you to view the camera from VLC player.
If you want to set a static IP for the camera, please keep the camera in
the same subnet of your router or computer.
Changing settings here is the same as using the IPCSearch.
It is recommended that you use the subnet mask, gateway and DNS
server from your locally attached PC. If you don’t know the subnet mask,
gateway and DNS server, you can check your computer’s local area
connection as follows:
Control Panel - Network Connections - Local Area Connections - Choose
Support - Details.
Page 15

25/26
If you don’t know the DNS server, you can use the same settings as the
Default Gateway.
3.2.2.2 DDNS
This feature is used for port forwarding that enables you to view camera
via Internet or external network.
1) Register a private DDNS account from assigned provider. Since
there is no built-in DDNS account for the camera, please go to
the third party DDNS website (such as www.dyndns.org) to
apply a new DDNS account.
2) Go to your router’s configuration page → port forwarding → input your
camera’s IP address and the HTTP port number.
3) Once DDNS connection and port forwarding is finished, you
will be able to view the camera remotely through the URL
http://yourdomain.Dyndns.org:port.
Note:
· If the DDNS connection fails, please double check if you have
input the correct hostname, user name, and password, and try
to redo the settings
· The DDNS default status is off
· Please pick your router’s exact model from the below page and then
check the detailed instruction of port forwarding for your router.
http://portforward.com/english/routers/port_forwarding/routerindex.htm
· We will add no-ip.org option later through new web UI firmware
What is Port forwarding?
Port forwarding allows for outside connections to access a specific
device on your network from anywhere in the world. Every router
automatically blocks any incoming connections for safety purposes.
Using port forwarding, you are telling your router to allow a connection
through a certain port (you can think of it as a gateway) into your router.
You set this port to a specific device, in our case an IP Camera, so it can
be accessed from anywhere in the world.
Click this link to learn more about port forwarding:
http://portforward.com/help/portforwarding.htm
How do we configure Port Forwarding?
For this section, we will be using an example:
Let’s say the camera’s LAN IP address is http://192.168.1.239:82
Step 1: Login to the router, and go to your router’s port forwarding or port
triggering menu. Sometimes this is also under the name of Virtual
Server or NAT.
Using the Netgear Virgin_Media_Super_Hub_2 Router as an
example, we would log into the router, and go to the Advanced
Setting and then pick the Port Forwarding.
Step 2: Create a new column using the LAN IP address & HTTP Port of the
camera within the router as shown below, then Add Rule or
Submit to save your settings:
Page 16

27/28
3.2.2.2 DDNS
This feature is used for port forwarding that enables you to view camera
via Internet or external network.
1) Register a private DDNS account from assigned provider. Since
there is no built-in DDNS account for the camera, please go to
the third party DDNS website (such as www.dyndns.org) to
apply a new DDNS account.
2) Go to your router’s configuration page → port forwarding → input your
camera’s IP address and the HTTP port number.
3) Once DDNS connection and port forwarding is finished, you
will be able to view the camera remotely through the URL
http://yourdomain.Dyndns.org:port.
Note:
· If the DDNS connection fails, please double check if you have
input the correct hostname, user name, and password, and try
to redo the settings
· The DDNS default status is off
· Please pick your router’s exact model from the below page and then
check the detailed instruction of port forwarding for your router.
http://portforward.com/english/routers/port_forwarding/routerindex.htm
· We will add no-ip.org option later through new web UI firmware
device on your network from anywhere in the world. Every router
automatically blocks any incoming connections for safety purposes.
Using port forwarding, you are telling your router to allow a connection
through a certain port (you can think of it as a gateway) into your router.
You set this port to a specific device, in our case an IP Camera, so it can
be accessed from anywhere in the world.
Click this link to learn more about port forwarding:
http://portforward.com/help/portforwarding.htm
How do we configure Port Forwarding?
For this section, we will be using an example:
Let’s say the camera’s LAN IP address is http://192.168.1.239:82
Step 1: Login to the router, and go to your router’s port forwarding or port
triggering menu. Sometimes this is also under the name of Virtual
Server or NAT.
Using the Netgear Virgin_Media_Super_Hub_2 Router as an
example, we would log into the router, and go to the Advanced
Setting and then pick the Port Forwarding.
Step 2: Create a new column using the LAN IP address & HTTP Port of the
camera within the router as shown below, then Add Rule or
Submit to save your settings:
3.2.2.3 Email
You can get email alert triggered by motion detection after you
set the email properly.
Server name: Please refer to the email service provider website or
Google it.
Here is an example of Gmail setting for your reference:
Server name: smtp.gmail.com
Port: 465
SSL: ticked
Authentication: On
User Name: your email account (used for send out alerts)
Password: your email password
Send to: You can have up to 3 receiving email addresses
From As: test the alert send out email account available or not. (Click
“Test” to try)
Note:
· If the email you set failed to test, please try to use some popular email
servers, like Gmail or hotmail
· Please remember to enable motion detection to get email alert.
Trouble Shooting:
Cannot receive any alarm email even though the email test is successful?
· Please click Clear All button on the motion detect screen, along with
Apply and then reboot the camera.
· Then click Select All, Apply from the below screen, and also set the
sensitivity to Very High. Please check whether there is alarm picture
from your email box.
· If it still does not work, please sign in IE as administrator and then clear
your IE browser data and reset the IE browser to have a try from the
below path.
· Tools- Internet Option - Advanced - Reset IE browser
· Tools- Internet Option - General - Clear Browser Data
3.2.2.4 P2P (Enabled by default)
In this page, you can enable or disable camera’s P2P feature.
ID: The code shown here is the camera’s UID code. With this code, you
can add and view camera remotely from internet or external network by
simply entering this UID code when you do “Add Camera” on smart
phone app or on HooToo IPCamClient software in another Windows PC.
Note:
· It is highly recommended to keep P2P feature enabled unless you just
need to view this camera in your local network
· P2P password is used to sign in P2P software such as IPCamClient from
Windows PC or MyCam Pro from your phone
Page 17

29/30
set the email properly.
Server name: Please refer to the email service provider website or
Google it.
Here is an example of Gmail setting for your reference:
Server name: smtp.gmail.com
Port: 465
SSL: ticked
Authentication: On
User Name: your email account (used for send out alerts)
Password: your email password
Send to: You can have up to 3 receiving email addresses
From As: test the alert send out email account available or not. (Click
“Test” to try)
Note:
· If the email you set failed to test, please try to use some popular email
servers, like Gmail or hotmail
· Please remember to enable motion detection to get email alert.
· Please click Clear All button on the motion detect screen, along with
Apply and then reboot the camera.
· Then click Select All, Apply from the below screen, and also set the
sensitivity to Very High. Please check whether there is alarm picture
from your email box.
· If it still does not work, please sign in IE as administrator and then clear
your IE browser data and reset the IE browser to have a try from the
below path.
· Tools- Internet Option - Advanced - Reset IE browser
· Tools- Internet Option - General - Clear Browser Data
3.2.2.4 P2P (Enabled by default)
In this page, you can enable or disable camera’s P2P feature.
ID: The code shown here is the camera’s UID code. With this code, you
can add and view camera remotely from internet or external network by
simply entering this UID code when you do “Add Camera” on smart
phone app or on HooToo IPCamClient software in another Windows PC.
Note:
· It is highly recommended to keep P2P feature enabled unless you just
need to view this camera in your local network
· P2P password is used to sign in P2P software such as IPCamClient from
Windows PC or MyCam Pro from your phone
Trouble Shooting:
The camera works at home but cannot be accessed from anywhere else
outside.
Try the following:
· Disable P2P and then enable it after a while to have a try.
· Set the DNS to 8.8.8.8 as the below snapshot and pick the fixed IP
address or Dynamic IP address to have a try.
3.2.2.5 FTP
FTP server is used to upload camera record clips or snapshots captured
by motion detection. Test after all FTP parameters filled in.
Server: please fill in your own FTP account’s address.
Port: 21
User: your FTP server’s user
Password: your FTP server’s password
Full Strategy: Enable
Path: The exact FTP saving path
3.2.3 Event
3.2.3.1 Motion Detection
Page 18

31/32
Trouble Shooting:
The camera works at home but cannot be accessed from anywhere else
outside.
Try the following:
· Disable P2P and then enable it after a while to have a try.
· Set the DNS to 8.8.8.8 as the below snapshot and pick the fixed IP
address or Dynamic IP address to have a try.
Server: please fill in your own FTP account’s address.
Port: 21
User: your FTP server’s user
Password: your FTP server’s password
Full Strategy: Enable
Path: The exact FTP saving path
3.2.3 Event
3.2.3.1 Motion Detection
To activate motion detection:
1. Click on ‘Enable’
2. Select red grids by clicking or dragging you mouse
3. The motion detection can be only triggered by areas marked by red square.
4. Adjust the sensibility: Very High / High / Normal / Low
3.2.3.2 Occlusion Detection
If you want to detect the specified area from the camera’s image,
please pick the Privacy Mask from the below page first. And you could
enlarge or narrow the mask on your own.
3.3 System
3.3.1 User
In this page, you can create up to 7 guest accounts. With the guest
account, the user can use all functions in the home page of the camera,
and check camera’s device info. However guest account has no authority
to access parameters setting page or change other system settings.
Note:
· The user account is required when you sign in the camera from the
webpage via IPCSearch
· The P2P password is required when you try to view the camera via P2P
software such as IPCamClien from Windows PC or MyCam Pro from phone.
· The username for administrator is fixed as admin.
Page 19

33/34
Note: For the security concern, please change the camera’s password
once you set it up.
3.3.2 Time Setting
This will configure camera’s system time:
Mode: Sync with NTP / Manual / Sync with computer time / Keep current
Server Name: select a time web site for camera to sync time
Interval: enter a number, frequency of time update
Time zone: select a time zone for camera
Auto Update Time: enable to update automatically
Note:
If the time shows on the camera is not correct, please pick the Manual
Mode and then change the Date and Time manually and also make
sure you have picked the correct Time Zone.
If it still does not work, please clear the browser data to have a try.
3.3.3 Initialize
Reboot: click OK to reboot this camera
Factory default: click OK to reset this camera to factory setting
Backup data: click OK to backup current camera’s settings if you want
to save the setting before resetting it to factory setting.
Page 20

35/36
Note: For the security concern, please change the camera’s password
once you set it up.
3.3.2 Time Setting
This will configure camera’s system time:
Mode: Sync with NTP / Manual / Sync with computer time / Keep current
Server Name: select a time web site for camera to sync time
Interval: enter a number, frequency of time update
Time zone: select a time zone for camera
Auto Update Time: enable to update automatically
If the time shows on the camera is not correct, please pick the Manual
Mode and then change the Date and Time manually and also make
sure you have picked the correct Time Zone.
If it still does not work, please clear the browser data to have a try.
3.3.3 Initialize
Reboot: click OK to reboot this camera
Factory default: click OK to reset this camera to factory setting
Backup data: click OK to backup current camera’s settings if you want
to save the setting before resetting it to factory setting.
Note: Please save this config_backup.bin file to a proper path for future use.
Restore: select the backup file and click apply to restore.
Upgrade: select a new firmware to upgrade, and click “Apply” to continue.
Note: Please make sure the power connection is OK while
updating the firmware.
3.3.4 Device Info
In this page, you can check all cameras’ information and status, e.g
camera’s IP address, web UI version, Mac address, etc.
3.3.5 System Log
In this log page, you can search all operation record of this camera.
Page 21

37/38
Upgrade: select a new firmware to upgrade, and click “Apply” to continue.
Note: Please make sure the power connection is OK while
updating the firmware.
3.3.4 Device Info
In this page, you can check all cameras’ information and status, e.g
camera’s IP address, web UI version, Mac address, etc.
4. Remote Viewing on a Windows PC
1) Please download the P2P software “IPCamClient” from CD or
www.hootoo.com and then install it on a windows PC.
2) Open it, click “Add”
3) Enter the UID code of your camera manually, and fill in other blanks,
click “Next” then “Finish”
Device Name could be anything you like.
4) Select your camera, click “Play”, and then you can view the live video.
Note:
You are able to add 9 cameras at most to this software.
For the other setting of the camera, you are suggested to set it up from
the web setting page if possible.
5. Frequently Asked Question
5.1 How to change password for the camera?
There are two kinds of password for the camera. One is for webpage
signin and will be required after you open the camera via IPCSearch.
And you could change the password for through the below page.
Page 22

39/40
www.hootoo.com and then install it on a windows PC.
2) Open it, click “Add”
3) Enter the UID code of your camera manually, and fill in other blanks,
click “Next” then “Finish”
Device Name could be anything you like.
Note:
You are able to add 9 cameras at most to this software.
For the other setting of the camera, you are suggested to set it up from
the web setting page if possible.
5. Frequently Asked Question
5.1 How to change password for the camera?
There are two kinds of password for the camera. One is for webpage
signin and will be required after you open the camera via IPCSearch.
And you could change the password for through the below page.
The other one is used for the P2P software and required when you try to
sign in P2P software such as IPCamClient and MyCam Pro. You can
change this password from the below page.
5.2 How to set up the remote view for the camera?
Since the camera support P2P, you do not need to set up the DDNS
connection and port forwarding like the MJPEG camera. You will be able
to view the camera through the P2P Software such as IPCamClient from
Windows PC and MyCam Pro.
Could view the camera at home and could not make it work when you
are away from home?
If you are able to get the camera's image through the P2P software or
web setting page and could not get it work remotely, please check the
below procedure.
First, please make sure the camera's IP address is Dynamic IP address and
not fixed one. And then please set the DNS to 8.8.8.8 like the below picture.
Second, please disable P2P and then enable it after a while to have a try.
Page 23

41/42
5.3 What you can do if camera could not be searched from
all the software after you connect it to router via network
cable?
Please check the status of the Ethernet indicator LED and inform us
whether one of them is blinking and the other one is solid. If not, please
inform us whether the camera rotate and find another 5V 2A power
adapter to test whether it is the power issue.
And please take the camera to other network to set up since it might not
be compatible with your own network.
Please reset the camera to factory setting manually if it still does not work.
Please find a pin and press the reset button for about 1 minute until the
camera's head rotate and make sure the power adapter is connected
well during resetting.
For the last try, please connect the camera to your PC via network cable
directly and then fix your PC’s IP address like the below video. Once it is
finished, please
https://www.youtube.com/watch?v=zyL1haURYEA&feature=youtu.be
5.4 Camera cannot connect wireless
5.4.1 Could not get any Wi-Fi SSID from the software?
If you could not search any Wi-Fi signal through the software
IPCamClient or MyCam Pro, please try to set up the wireless connection
from the web setting page.
For the wireless connection, you are suggested to download IPCSearch
for your Windows PC and then open the camera via the browser.
http://www.hootoo.com/media/downloads/IPCSearch-Windows PC Search
Software.zip
Then you will be able to search the Wi-Fi SSID from setting page like the
attached picture.
If there is still no Wi-Fi SSID searched, please double check whether the Wi-Fi
antenna is connected well and the camera should be near the router.
By the way, please make sure the camera's IP address is fixed like the
attached picture and the DNS setting could be same as it.
Page 24

43/44
5.3 What you can do if camera could not be searched from
all the software after you connect it to router via network
cable?
Please check the status of the Ethernet indicator LED and inform us
whether one of them is blinking and the other one is solid. If not, please
inform us whether the camera rotate and find another 5V 2A power
adapter to test whether it is the power issue.
And please take the camera to other network to set up since it might not
be compatible with your own network.
Please reset the camera to factory setting manually if it still does not work.
Please find a pin and press the reset button for about 1 minute until the
camera's head rotate and make sure the power adapter is connected
well during resetting.
For the last try, please connect the camera to your PC via network cable
directly and then fix your PC’s IP address like the below video. Once it is
finished, please
https://www.youtube.com/watch?v=zyL1haURYEA&feature=youtu.be
5.4 Camera cannot connect wireless
5.4.1 Could not get any Wi-Fi SSID from the software?
If you could not search any Wi-Fi signal through the software
IPCamClient or MyCam Pro, please try to set up the wireless connection
from the web setting page.
For the wireless connection, you are suggested to download IPCSearch
for your Windows PC and then open the camera via the browser.
http://www.hootoo.com/media/downloads/IPCSearch-Windows PC Search
Software.zip
Then you will be able to search the Wi-Fi SSID from setting page like the
attached picture.
If there is still no Wi-Fi SSID searched, please double check whether the Wi-Fi
antenna is connected well and the camera should be near the router.
By the way, please make sure the camera's IP address is fixed like the
attached picture and the DNS setting could be same as it.
You can reset the camera to factory setting from the web setting page
or manually like the below if it still does not work. Thanks.
Please find a pin and press the reset button for about 1 minute until the
camera's head rotate and make sure the power adapter is connected
well during resetting.
5.4.2 Could not access Wi-Fi after filling in the Wi-Fi password and
unplug the network cable?
First, please make sure that there is no special character from the
Wi-Fi SSID and password.
Second, please open your router's webpage and make sure the
Mac filter is disabled. And then please try to adjust the Wi-Fi
encryption to WEP or WPA2.
By the way, please make sure the Auth Mode is the same with your
router's Wi-Fi encryption.
6. Specification
General
Item HooToo HT-IP211HDP Indoor IP Network Camera
Device Type 1.0 Megapixel CMOS sensor
Size 1/3
Day and Night YES
Min Illumination 0.5lux(IR ON)
Infrared sensitivity Support
Filter IR-CUT
IR-led YES
IR distance 8-10M
LENS
Lens 3.6MM
Focus Fixed Lens
Aperture Fixed Aperture
Viewing Angel Horizontal 355°,Vertical 90°
Video
Compression H.264
Picture Resolution Main Flow: 1280*720@25fps
Minor Flow: 640*360@25fps
Flow Type Dual Stream encoding
Bit Rate 128-8192kbps
Bit Rate Type CBR/VBR
S/N Ratio >50DB
Image enhancement Auto White Balance, Backlight compensation,
Brightness,
Contrast, Saturation adjusted
Subtitles input Support channel name, date/time
Flip Configuration Up/down, Left/right
Audio/ Alarm
Audio Two way audio
equipment Built-in MIC, horn
Audio input/output One channel audio input, one channel audio output
Audio Compression G.711
Alarm way
Motion Detection: Configure motion detection area,
detecting sensitivity is adjustable
Cover alarm: The alarm sensitivity is adjustable
7. Warranty and Support
7.1 HooToo Warranty
This HooToo IP Camera is covered with 12 months limited product
warranty by Hootoo from the date of its original purchase. If it becomes
defective during its warranty period, please contact HooToo or your
seller for warranty cover. The following are not covered by our warranty:
· 2nd hand purchase or purchase from a non-authorized seller/distributor
· Damages resulted from abuse, fire, poison and moisture
· Damages resulted from natural disaster
· Product been dismantled
Page 25

45
or manually like the below if it still does not work. Thanks.
Please find a pin and press the reset button for about 1 minute until the
camera's head rotate and make sure the power adapter is connected
well during resetting.
5.4.2 Could not access Wi-Fi after filling in the Wi-Fi password and
unplug the network cable?
First, please make sure that there is no special character from the
Wi-Fi SSID and password.
Second, please open your router's webpage and make sure the
Mac filter is disabled. And then please try to adjust the Wi-Fi
encryption to WEP or WPA2.
By the way, please make sure the Auth Mode is the same with your
router's Wi-Fi encryption.
6. Specification
General
Item HooToo HT-IP211HDP Indoor IP Network Camera
Device Type 1.0 Megapixel CMOS sensor
Size 1/3
Day and Night YES
Min Illumination 0.5lux(IR ON)
Infrared sensitivity Support
Filter IR-CUT
IR-led YES
IR distance 8-10M
LENS
Lens 3.6MM
Focus Fixed Lens
Aperture Fixed Aperture
Viewing Angel Horizontal 355°,Vertical 90°
Picture Resolution Main Flow: 1280*720@25fps
Minor Flow: 640*360@25fps
Flow Type Dual Stream encoding
Bit Rate 128-8192kbps
Bit Rate Type CBR/VBR
S/N Ratio >50DB
Image enhancement Auto White Balance, Backlight compensation,
Brightness,
Contrast, Saturation adjusted
Subtitles input Support channel name, date/time
Flip Configuration Up/down, Left/right
Audio/ Alarm
Audio Two way audio
equipment Built-in MIC, horn
Audio input/output One channel audio input, one channel audio output
Audio Compression G.711
Alarm way
Motion Detection: Configure motion detection area,
detecting sensitivity is adjustable
Cover alarm: The alarm sensitivity is adjustable
7. Warranty and Support
7.1 HooToo Warranty
This HooToo IP Camera is covered with 12 months limited product
warranty by Hootoo from the date of its original purchase. If it becomes
defective during its warranty period, please contact HooToo or your
seller for warranty cover. The following are not covered by our warranty:
· 2nd hand purchase or purchase from a non-authorized seller/distributor
· Damages resulted from abuse, fire, poison and moisture
· Damages resulted from natural disaster
· Product been dismantled
Note:
· Successful product registration at www.hootoo.com/productregistration
will add an additional 6 month of warranty cover, making a total of 18
months warranty cover from the date of original purchase.
· Please do not return the product without contacting HooToo first
· We can only provide warranty cover for products sold by HooToo
authorized distributor
7.2 Support Contact
For any inquiries or comment concerning our products, please contact
us via below methods. If you have an order number, please include it as
reference. We will try to respond to your inquiry as fast as possible.
 Loading...