

Page 1

User Manual
IP Camera
Page 2
01
CONTENTS
1.Overview - - - - - - - - - - - - - - - - - - - - - - - - - - - - - - - - - - - - - - - - - - - - - - - 1
1.1 Package Includes - - - - - - - - - - - - - - - - - - - - - - - - - - - - - - - - - - - - - - - 1
1.2 Product Diagram - - - - - - - - - - - - - - - - - - - - - - - - - - - - - - - - - - - - - - - - 2
2.For Windows PC - - - - - - - - - - - - - - - - - - - - - - - - - - - - - - - - - - - - - - - - - - 3
2.1Wired mode - - - - - - - - - - - - - - - - - - - - - - - - - - - - - - - - - - - - - - - - - - - - 3
2.2 Wireless mode - - - - - - - - - - - - - - - - - - - - - - - - - - - - - - - - - - - - - - - - - - 6
2.3 Home Page - - - - - - - - - - - - - - - - - - - - - - - - - - - - - - - - - - - - - - - - - - - - 8
2.3.1 PTZ - - - - - - - - - - - - - - - - - - - - - - - - - - - - - - - - - - - - - - - - - - - - - - - - - - 8
2.3.2 Cruise - - - - - - - - - - - - - - - - - - - - - - - - - - - - - - - - - - - - - - - - - - - - - - - 8
2.3.3 OSD - - - - - - - - - - - - - - - - - - - - - - - - - - - - - - - - - - - - - - - - - - - - - - - - - 9
2.3.4 Zoom - - - - - - - - - - - - - - - - - - - - - - - - - - - - - - - - - - - - - - - - - - - - - - - 10
2.3.5 Snapshot - - - - - - - - - - - - - - - - - - - - - - - - - - - - - - - - - - - - - - - - - - - - 10
2.3.6 Video Recording - - - - - - - - - - - - - - - - - - - - - - - - - - - - - - - - - - - - - - 11
2.3.7 Audio - - - - - - - - - - - - - - - - - - - - - - - - - - - - - - - - - - - - - - - - - - - - - - 11
2.3.8 Talk - - - - - - - - - - - - - - - - - - - - - - - - - - - - - - - - - - - - - - - - - - - - - - - - 11
2.3.9 Full Screen - - - - - - - - - - - - - - - - - - - - - - - - - - - - - - - - - - - - - - - - - - - 12
2.4 Settings - - - - - - - - - - - - - - - - - - - - - - - - - - - - - - - - - - - - - - - - - - - - - - 12
2.4.1 Status- - - - - - - - - - - - - - - - - - - - - - - - - - - - - - - - - - - - - - - - - - - - - - - 12
2.4.2 Setup- - - - - - - - - - - - - - - - - - - - - - - - - - - - - - - - - - - - - - - - - - - - - - - 12
2.4.3 Network Settings - - - - - - - - - - - - - - - - - - - - - - - - - - - - - - - - - - - - - - 13
2.4.4 Video info - - - - - - - - - - - - - - - - - - - - - - - - - - - - - - - - - - - - - - - - - - - 15
2.4.5 Motion Detection - - - - - - - - - - - - - - - - - - - - - - - - - - - - - - - - - - - - - 16
2.4.6 Local Settings - - - - - - - - - - - - - - - - - - - - - - - - - - - - - - - - - - - - - - - - 17
2.4.7 System- - - - - - - - - - - - - - - - - - - - - - - - - - - - - - - - - - - - - - - - - - - - - - 17
3. Remote Viewing on Windows PC - - - - - - - - - - - - - - - - - - - - - - - - - - - - 18
4. Specification - - - - - - - - - - - - - - - - - - - - - - - - - - - - - - - - - - - - - - - - - - - 19
5. Warranty and Support - - - - - - - - - - - - - - - - - - - - - - - - - - - - - - - - - - - - 19
5.1 HooToo Warranty - - - - - - - - - - - - - - - - - - - - - - - - - - - - - - - - - - - - - - - 19
5.2 Contact - - - - - - - - - - - - - - - - - - - - - - - - - - - - - - - - - - - - - - - - - - - - - - 19
1. Overview
Thank you for purchasing HooToo IP Camera. Please read this manual carefully and keep it in a
safe place for future reference. If you need any further assistance, please contact our customer
support team or email us at support@hootoo.com.
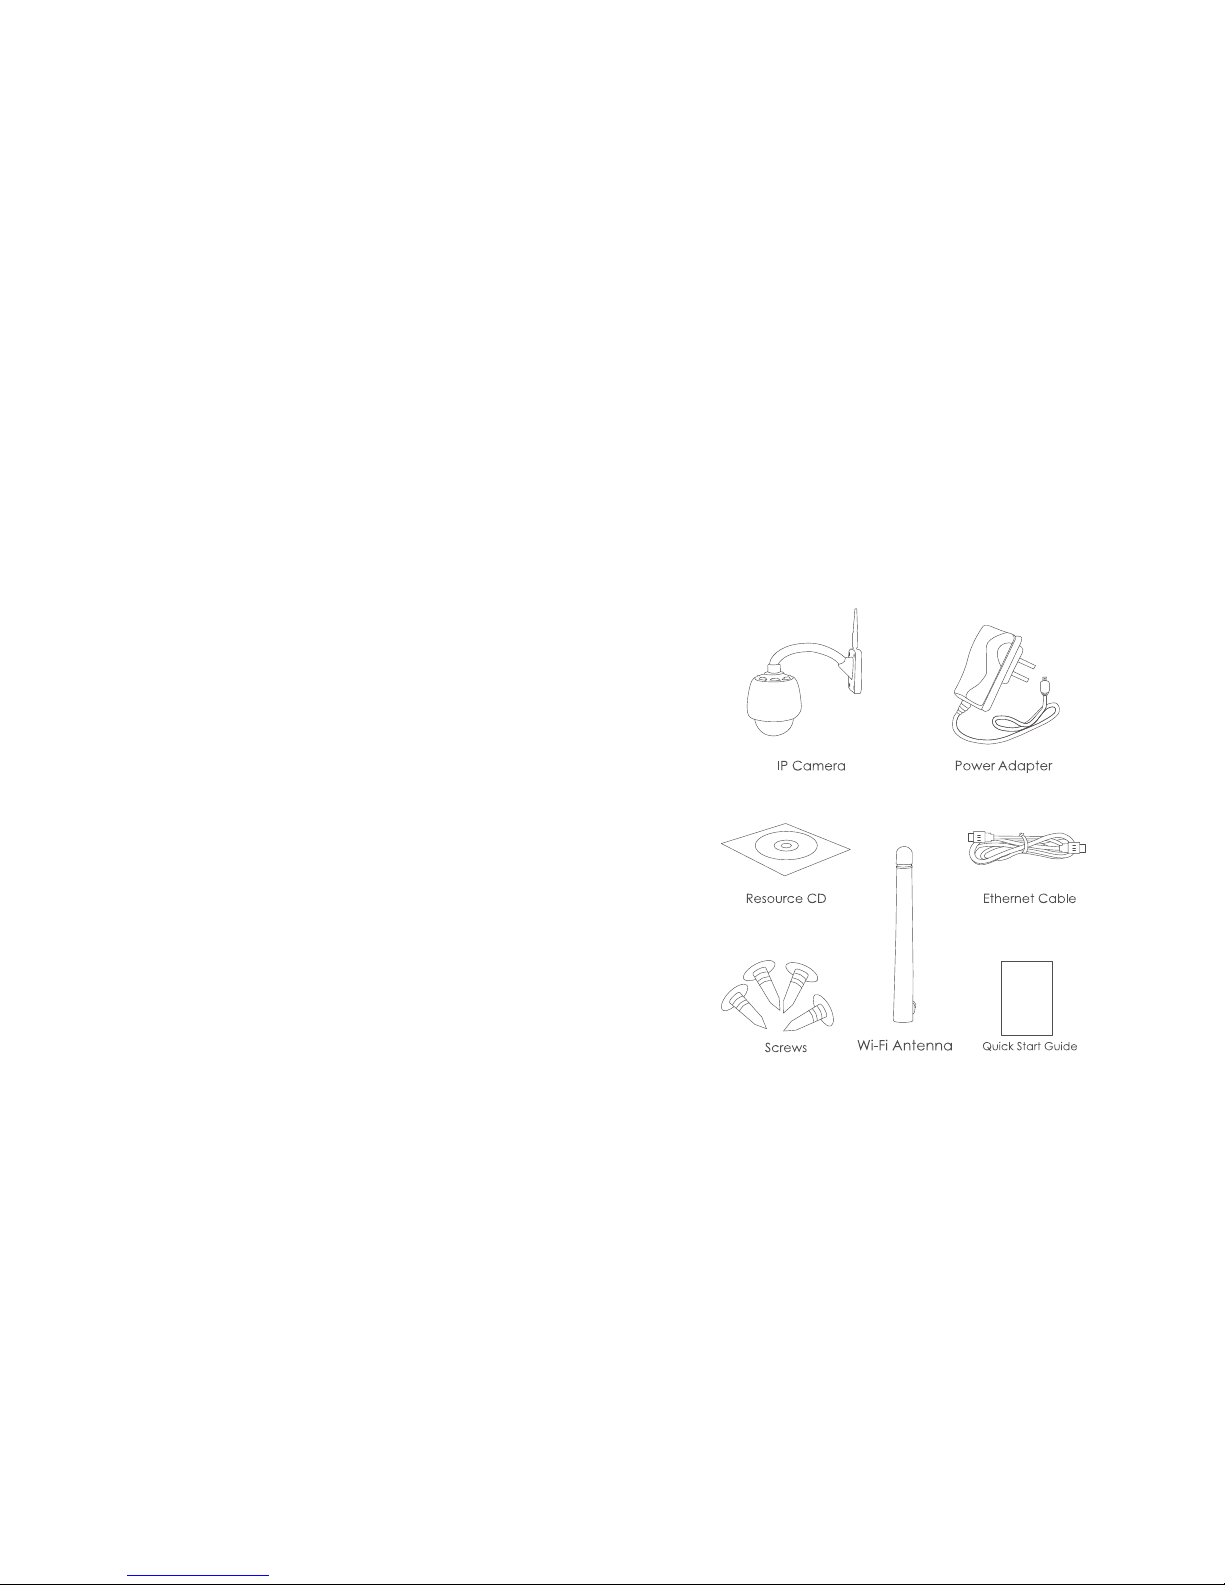
1.1 Package Includes
Hello
User Manual
HooToo IP Camera
Page 3
02/03
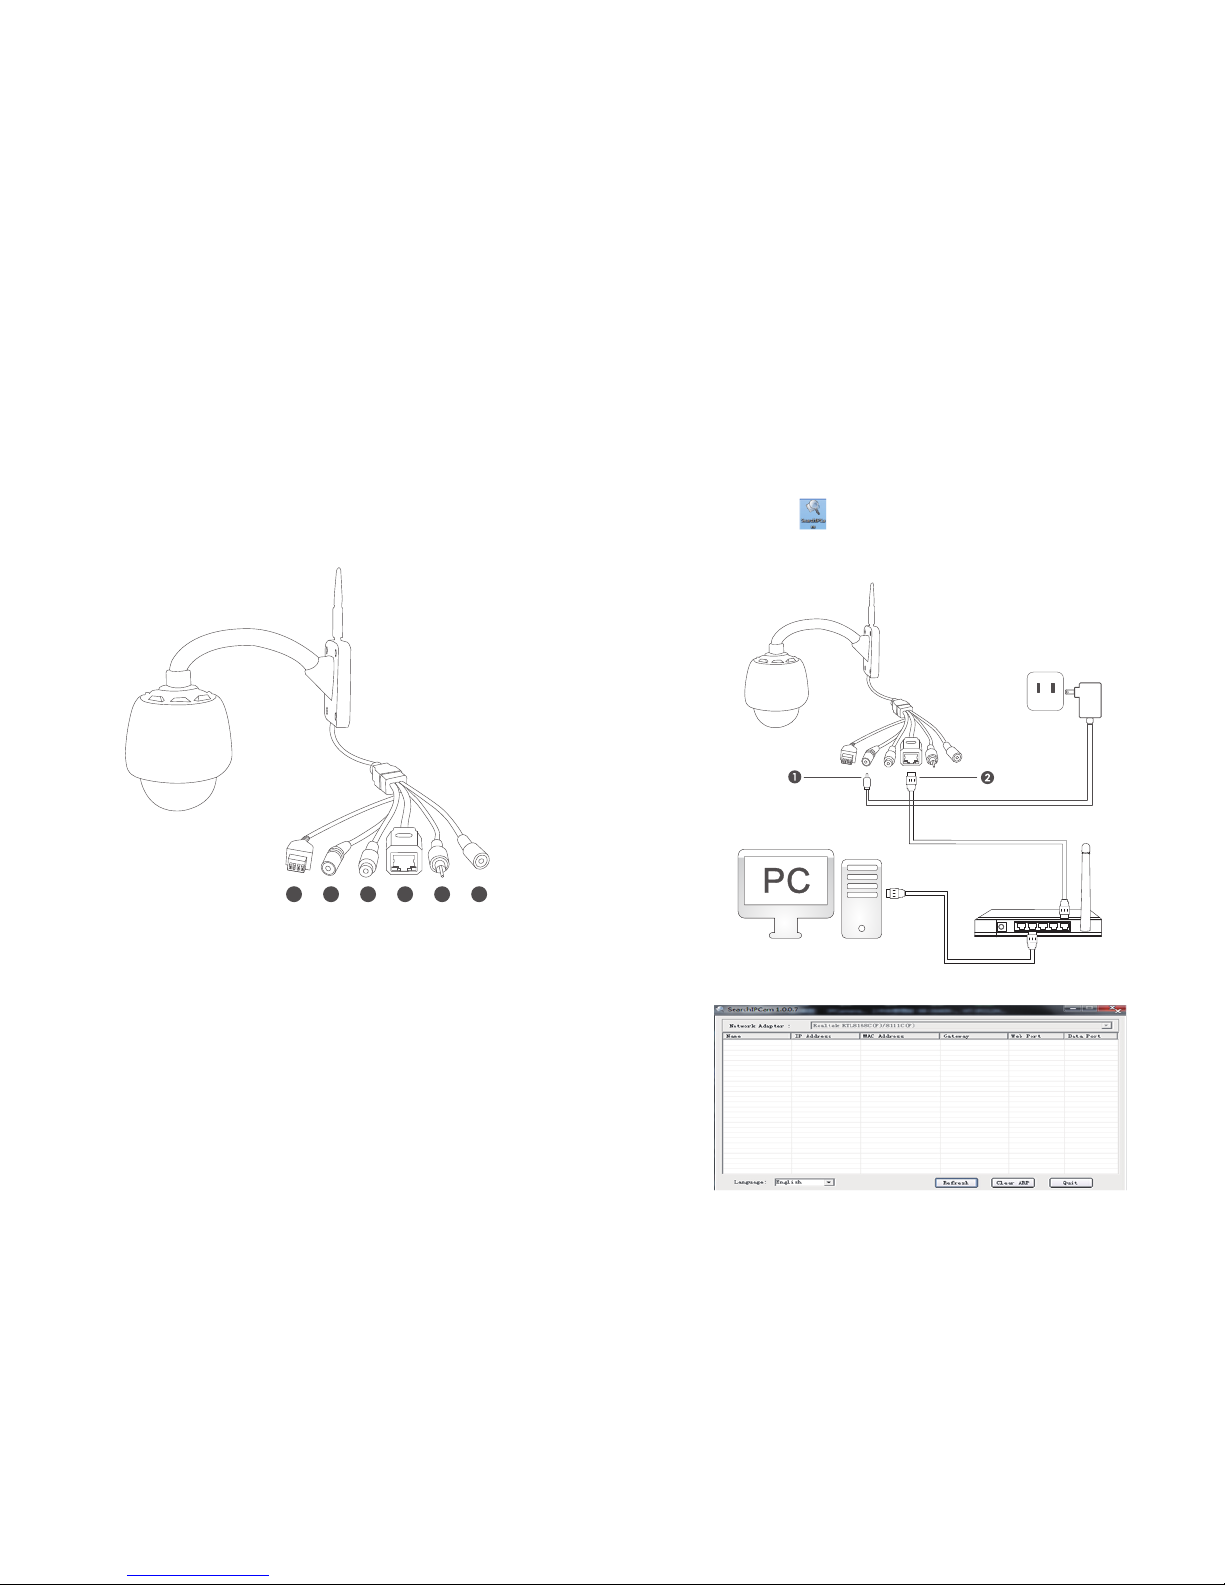
1.2 Product Diagram
2. For Windows PC
2.1Wired mode
1) Assemble the camera and its antenna; connect camera and your router with a network
cable (the same router that connects to your windows PC)
2) Find the SearchIPCam from the Installation CD, copy and paste it to your PC.
Notes:
• You can download the SearchIPCam software from www.hootoo.com
• For IE browser, in order to view live video, please install “Download the ActiveX”. You can
download it on login page by clicking “Download the ActiveX”.
3) Double click on SearchIPCam to open it. Make sure camera has connected with your router.
1. Power
2. LAN
3. Audio Input
4. Audio Output
5. I/O Alarm Pin
6. Reset
1 2
4
5 63
Power outlet
Page 4
04/05
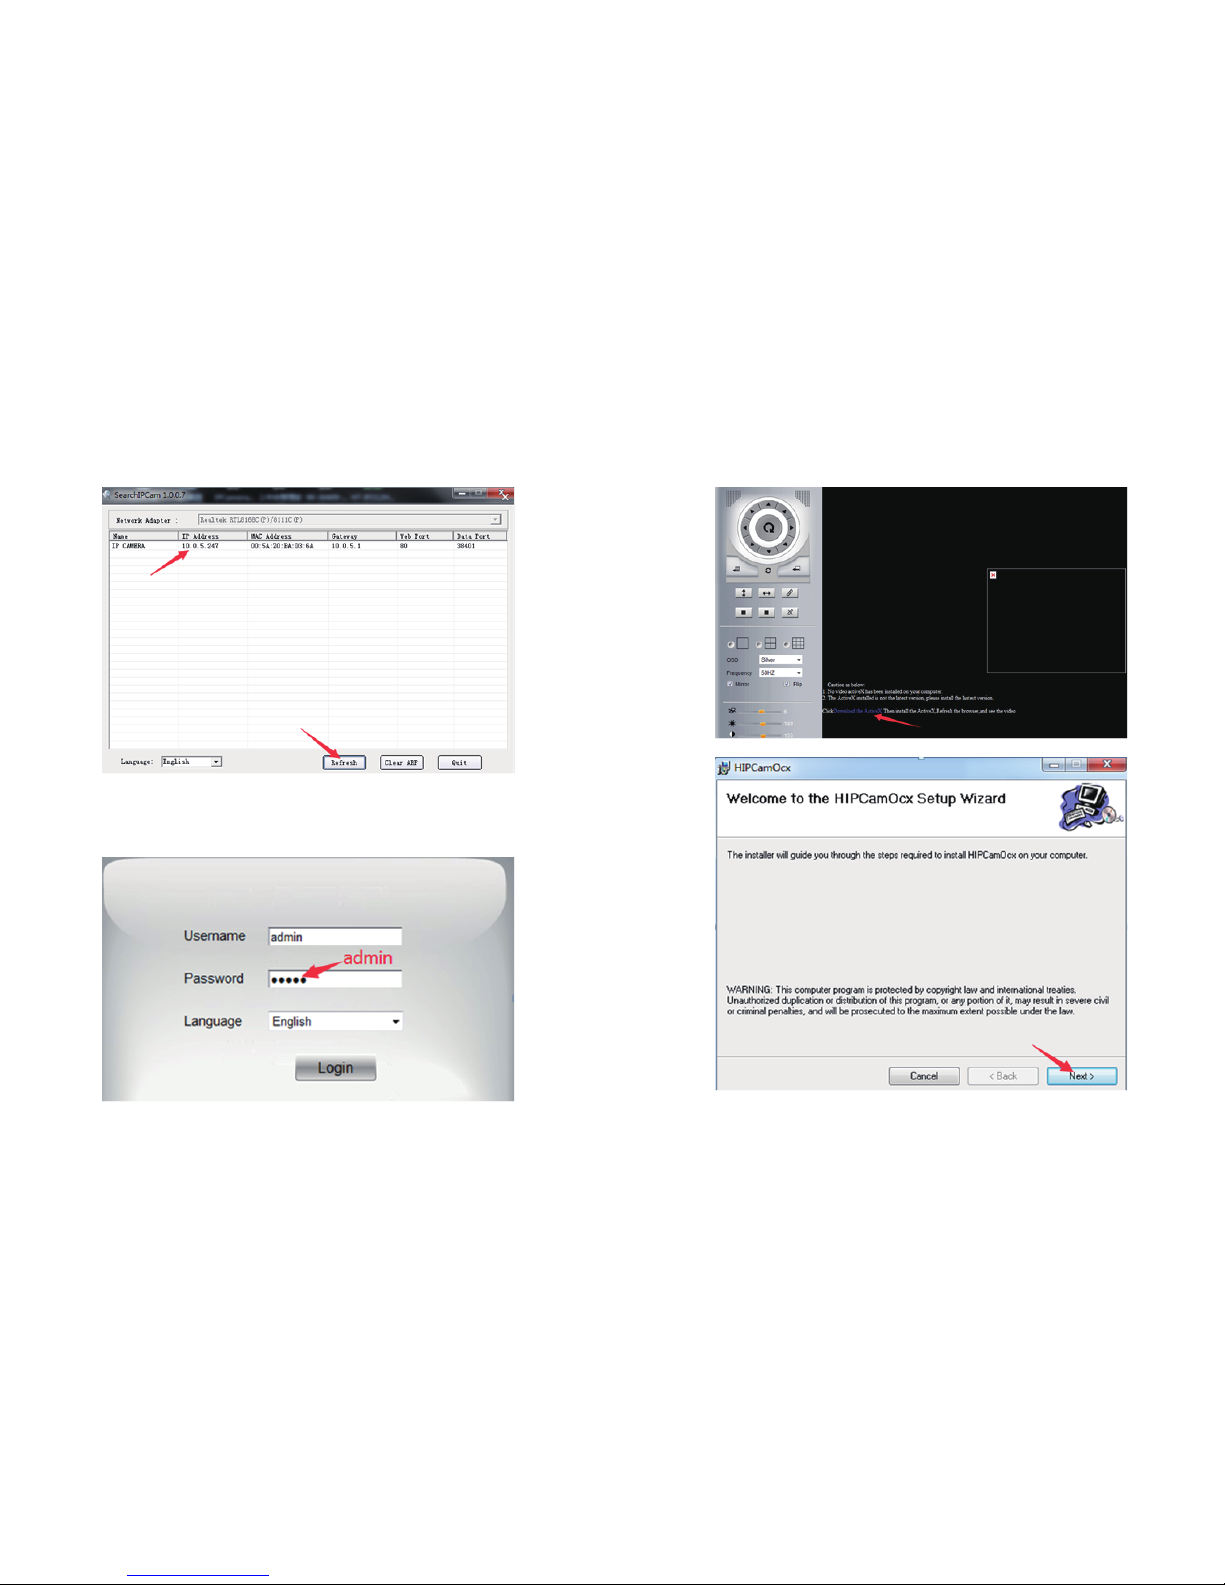
4) Click “Refresh”to find your camera’s IP address:
5) Select the IP address and double click on it. This will lead you to the login page of the
HT-IP009HDP. Then login with default username &password.
Username: admin
Password: admin
6) Click “Download the ActiveX” to install camera plug-in, then save and run it.
Page 5

06/07
7) Double click on the IP address again, login with default username &password,
then you can watch the live video.
▲ Note:
• If you fail to find the camera’s IP address or fail to login after clicking the IP address, please
refer to FAQ on our official website www.hootoo.com
• We recommend IE browser for better performance.
2.2 Wireless mode
▲ Note:
Before setting the camera to wireless mode, please make sure you have followed the previous
instruction to set the wired mode.
1)After login the web setting page, click on “ ” at the top of the page
2)Click “Network Settings”, then click “Wireless Settings”, and then click “Search” to scan nearby
wireless network
3)Select the wireless network you wish to connect to. Enter the password, and then click “Save”
4) After rebooting finish, wait about 60 seconds for the camera to restart. When restarting finished,
pull out the network cable from the connected camera.
5) Open the SearchIPCam software again. Click “Search” to find the camera. It may take up
to 10 seconds for the result to show.
6) Double click on the new IP address. This will lead you to the login page of the HT-IP009HDP
web setting page in your default browser.
7) Use the default username and password “admin” to login
8) If a HIPCamOcx add-in pops up, please allow the computer to run it
9) Now you have setup the camera in Wi-Fi mode
Page 6

08/09
▲ Note:
• When you fill in Wi-Fi password, please note that there should be no special characters
( such as <>“”)
• If you fail to find the camera’s IP address while other IP addresses show normally after searching,
please fill in the SSID manually
• If the camera gets offline once you unplug the network cable, please open your router’s
webpage and then make proper settings. For more details, please check Advanced User
Manual or FAQ in www.hootoo.com
2.3 Home Page
At home page, you can view camera live video, adjust the viewing area, make records,
take snapshots, etc.
Notes:
• For Windows PC users, we recommend using IE browser to view the video for more
functions. Some features are not available on FireFox and Chrome browser, such as video
recording, audio,talk and etc
• All features mentioned above, such as video recording, snapshot are not available for Mac
Computer
2.3.1 PTZ
Use PTZ control to adjust angle and direction of the camera.
2.3.2 Cruise
Set the camera to cruise horizontally or vertically. Press ” ” to stop cruise.
You can set cruise point here. Adjust to the desired camera angle and position, and then
press any number in the “Set Preset”. When you press the same number in “Call Preset”, the
camera will automatically move to the set angle and position. When press the “Cruise”, the
camera will move between your preset positions.
2.3.3 OSD
You can select single or multiple camera views, change the color of date time text in the video,
and set frame refresh rate. If you need to “flip” or “mirror” the image, please tick the appropriate box.
You can adjust Brightness, Hue, Contrast, Saturation, and the turning speed of the camera.
Page 7

10/11
2.3.4 Zoom
Use the Zoom In/Out buttons to control the camera zooming
2.3.5 Snapshot
Press “Snapshot” button to take instant photo. When snapshot is taken, choose a path to save the photo.
2.3.6 Video Recording
Press the “Record” button to record video footage. Press the “record” button again to stop
recording. You can change the record saving path from “Settings”.
Note:This camera does not support SD card, all videos can only be stored inside computer.
2.3.7 Audio
Press the audio button to hear the sound coming from camera. (This requires additional speaker
to be connected to the camera)
2.3.8 Talk
Press the talk button to talk to the camera end. (This requires additional microphone to be
connected to the camera)
Page 8

12/13
2.3.9 Full Screen
Press the button to view full screen.
2.4 Settings
2.4.1 Status
You can change the camera name in the“Description” field. Other device information
cannot be edited.
2.4.2 Setup
2.4.2.1 Users Permission
You can set permission for different users. “Administrator” has access to all Video operation,
and limited access to setting operation (cannot change “admin” user name and password,
cannot set other user permission). “Operator” has access to all Video operation. “Visitor” can
only view without any operation.
2.4.2.2 Date&Time
Set the date and time of the camera. You can choose to sync date and time with computer
or with server.
2.4.2.3 Audio Settings
You can choose between ”External Headset” and “Built-in Headset”. If external headset is selected,
additional equipment is required to connect with the camera. You can also change microphone
and speaker volume here.
2.4.3 Network Settings
2.4.3.1 IP
In this page, you can select different IP types for camera per your needs.
Static Address: to avoid IP conflicts in complex network environment
Dynamic Address: to enable the camera to get an IP address from router automatically
PPPoE: If using a DSL Internet, please select the PPPoE mode
2.4.3.2 DDNS Settings
This feature is used for port forwarding that enables you to view camera via Internet or
external network.
1) Register a private DDNS account from assigned provider. Since there is no built-in DDNS
account for the camera, please go to the third party DDNS website (such as www.dyndns.org)
to apply a new DDNS account.
2) Go to your router’s configuration page -> port forwarding -> input your camera’s IP address
and the HTTP port number.
Page 9

14/15
Once DDNS connection and port forwarding is finished, you will be able to view the camera
remotely through the URL http://yourdomain.Dyndns.org:port.
2.4.3.3 P2P Settings
GUID: The code shown here is the camera’s GUID code. With this code, you can add and
view camera remotely from internet or external network by simply entering this code when
you do “Add Camera” on smart phone app or on HooToo IPCamClient software in another
Windows PC.
Username and Password is used to sign in P2P software such as IPCamClient from Windows PC
or MyCam Pro from your phone.
Default Username: admin
Default Password: 000000
2.4.3.4 FTP Settings
FTP server is used to upload camera snapshot captured by motion detection to your assigned
FTP address. Test after all FTP parameters filled in.
2.4.3.5 E-mail Settings
If the camera is triggered by motion detection, you can get an email sent to your specified
email address. Please test the email setting to make sure it works.
• Sender: the host of the Sender Email account
• Sender Email: your email account used for send out alerts
• Receiver: Your email account to receive alerts
• SMTP server: Please refer to the email service provider website or Google it
Here is an example of Gmail setting for your reference:
Sender: Lucas
Sender Email:lucas123@gmail.com
Receiver1:rose@gmail.com
Receiver2:judice@hotmail.com
SMTP Server: smtp.gmail.com
SMTP Port: 465
SMTP Username:lucas123@gmail.com
SMTP Password: ********
Note:
• If the email you set failed to test, please try to use some popular email servers, like Gmail or hotmail
• Please remember to enable motion detection to get email alert
2.4.4 Video info
You can choose between “Main stream” and “Sub Stream”.
• Main Stream setting plays video at maximum resolution of 1280x960, but if your connection
bandwidth is limited, you may experience some delay.
• Sub Stream play video at lower resolution, but it comes with much less delay than Main Stream
option. You can choose video resolution from 1280*960,640*480,320*240. Resolution 640*480 is
recommended.
Note:
Because of H.264 compression, Main Stream should be your default setting in normal
circumstances. Only change to Sub Stream when you are experiencing significant delay.
Page 10

16/17
2.4.5 Motion Detection
To activate motion detection:
1) Set “Motion detection” status to ON
2) Select detection area on the screen by dragging your mouse
Note: You can select up to 3 detection areas
You can select sensitivity level. Higher sensitivity means smaller movement is required to
trigger the alarm.
Select Alarm Duration. This is how long the camera will record after alarm is triggered.
Video recording will also be saved in the same length.
3) Make the “Enable” and “Time1” ticked, then you can select the time to activate motion detection
4) Tick ”Schedule”, and select the time you wish to set the motion detection on.
5) Once finished all settings, click “Save” to save your settings.
Note:Sensor can only be triggered by movements within the set motion detection area
2.4.6 Local Settings
You can set the length of each video recording and the saving path.
2.4.7 System
2.4.7.1 Log
You can check all system log here: login time, IP address and when was the system updated.
2.4.7.2 System
You can reset the camera and restore to factory setting. Also updating device UI and
firmware can be done here.
Page 11

18/19
3. Remote Viewing on Windows PC
When you are out for travel or business, you can view your camera via Internet remotely. To
do so, please follow the following tips:
1) Go to www.hootoo.com, download the “IPCamClient” software and install it on a windows PC.
2) Open it, click “Add”
3) Enter the UUID code of your camera manually, and fill in other blanks, click “Next” then “Finish”
4) Select your camera, click “Play”, and then you can view the live video.
Notes:
• The camera’s UUID is essential for remote viewing on both smartphone and PC. Please make
sure you remember or have a record of the UUID with you when planning to access the
camera remotely
• Your camera needs to be connected to an internet enabled network
4. Specification
General
HooToo HT-IP009HDP Outdoor IP Network Camera
Device Type 1.3 Megapixel CMOS sensor
Size 1/3
Day and Night YES
Min Illumination 0.1Lux@F1.2(IR ON)
Infrared sensitivity Support
Filter IR-CUT
IR-led YES
LENS
Lens 3.7-14.8mm
Focus Fixed Lens
Aperture Fixed Aperture
Video
Compression H.264
Picture Resolution Main Flow: 1280*960@30fps
Minor Flow: 640*480@30fps
Flow Type Dual Stream encoding
Bit Rate 128-8192kbps
Bit Rate Type CBR/VBR
S/N Ratio >50DB
Image enhancement Auto White Balance, Backlight compensation, Brightness,
Contrast, Saturation adjusted
Subtitles input Support channel name, date/time
Flip Configuration Up/down, Left/right
5. Warranty and Support
5.1 HooToo Warranty
This HooToo IP Camera is covered with 12 months limited product warranty from date of its
original purchase. If it becomes defective during its warranty period, please contact HooToo
or your seller for warranty cover. The following are not covered by our warranty:
• 2nd hand purchase or purchase from a non-authorized seller/distributor
• Damages resulted from abuse, fire, poison and moisture
• Damages resulted from natural disaster
• Product been dismantled
Notes:
• Successful product registration at www.hootoo.com/productregistration will add an additional 6 month
of warranty cover, making a total of 18 months warranty cover from the date of original purchase.
• Please do not return the product without contacting HooToo first
• We can only provide warranty cover for products sold by HooToo authorized distributor
5.2 Contact
For any inquiries or comment concerning our products, please contact us via below methods.
If you have an order number, please include it as reference. We will try to respond to your inquiry
as fast as possible.
Page 12

HT-IP009HDP
EUROPE
E-mail:
support.uk@hootoo.com (UK)
support.de@hootoo.com (DE)
support.fr@hootoo.com (FR)
support.es@hootoo.com (SP)
support.it@hootoo.com (IT)
EU Importer : ZBT International Trading GmbH,
Lederstr 21a, 22525 Hamburg, Deutschland
NORTH AMERICA
E-mail : support.ca@hootoo.com(CA)
support@hootoo.com (US)
Tel : 1-888-456-8468 (Mon-Fri: 9:00-17:00 PST)
Address : 2228 Junction Ave, San Jose, CA 95131
ASIA PACIFIC
E-mail : support.jp@hootoo.com (JP)
www.hootoo.com
 Loading...