

Honywell HC-14 User Manual
Instruction Manual
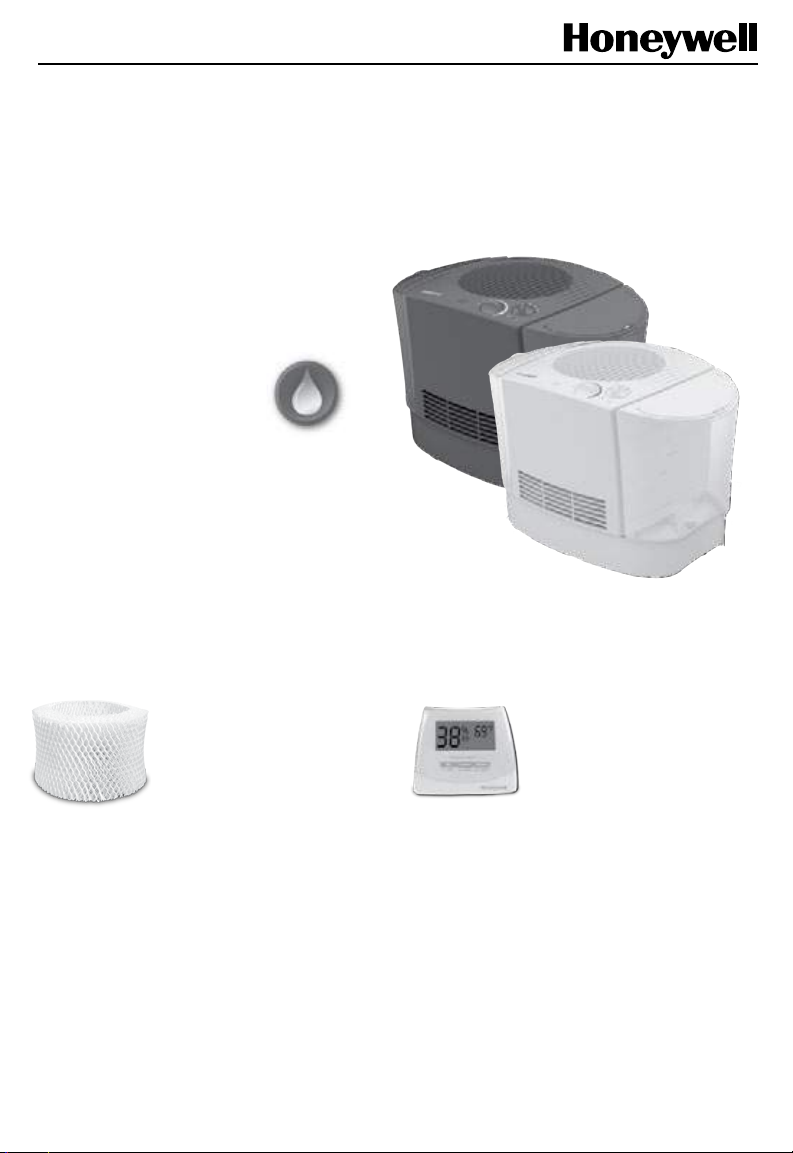
HONEYWELL TOP FILL
COOL MOISTURE HUMIDIFIER
MODEL HEV680 SERIES
REPLACEMENT FILTER: HONEYWELL HC-14 SERIES FILTER E
GETTING TO KNOW
YOUR COOL MOISTURE
EVAPORATIVE HUMIDIFIER
Invisible moisture
• Evaporative humidification
means you will NOT see
the moisture output.
• With evaporative humidification, a fan pulls
dry air from the room through the saturated
wicking filter. Moisture from the wicking
filter evaporates and is pushed into the
room with the help of the fan.
• Evaporative humidification adjusts moisture
output to the amount of moisture the air can hold. The drier (less humid) the air in the room,
the more moisture the humidifier will add to the air. An evaporative humidifier cannot add
more moisture to the room than the air can hold. The amount of moisture the air can hold
depends on many factors including relative humidity level, temperature and size of room.
Filter
• A wicking filter is required for this
unit to operate (one included)
• The wicking filter will help to capture minerals
from your water and will help to prevent white
dust (calcium deposits from hard water)
• If you have hard water, you will need to
replace your filter more frequently
• See “Caring for your Filter” section for tips
on prolonging the life of your wicking filter
Visit www.honeywellcomfort.com (in US) or www.honeywellcomfort.ca (in Canada)
Call 800-477-0457 for questions and information about this humidifier
Humidity Level
• The ideal indoor humidity level is 40-60%
• Use a Honeywell humidity monitor
(HHM10 or H10C) to check your indoor
humidity level (not included)

SAFETY
INSTRUCTIONS
READ AND SAVE THESE SAFETY
INSTRUCTIONS BEFORE USING
THIS HUMIDIFIER
When using electrical appliances, basic
precautions should always be followed to
reduce the risk of fire, electrical shock and
injury to persons, including the following:
1. The humidifier should always be placed on a
firm, flat, waterproof surface at least four feet
(1.2 m) away from bedside, twelve inches
(30 cm) from the wall, and out of reach of
patients, children and pets.
2. Be sure the humidifier is in a stable position
and the power cord is away from heated
surfaces and out of the way to prevent the
humidifier from being tipped over.
3. Before using the humidifier extend the cord
and inspect for any signs of damage. Do not
use the unit if the cord has been damaged.
4. The humidifier has a polarized plug (one blade
is wider than the other) as a safety feature.
This plug will fit into a polarized outlet only
one way. If the plug does not fit fully into the
outlet, reverse the plug. If it still does not fit,
contact a qualified electrician. Do not attempt
to defeat this safety feature.
5. CAUTION: To avoid fire or shock hazard,
plug the humidifier directly into a 120V AC
electrical outlet. To avoid risk of fire, shock or
personal injury do not use an extension cord.
Sh
6.
ut off and unplug humidifier before moving.
The humidifier should always be unplugged
and emptied when not in operation or while
being cleaned. Do not move or tilt humidifier
while it is in operation. Plug and unplug
humidifier with dry hands. Never pull by cord.
7.
8. Do not add any medications, inhalants,
9. Do n
10. Do not block intake or output vents.
11. Do not operate the humidifier without
12. Hu
13.
14. Do not attempt to repair or adjust any
15. For residential use only.
SAVE THESE INSTRUCTIONS
moving or lifting the full Water Tank,
When
use two hands; one hand on the Tank
Handle and the other on the bottom of
the Tank.
scented products or essential oils into
Base, Water Reservoir or Water Tank.
ot cover or insert objects into any
openings on the humidifier.
water. Turn off and unplug unit when Tank
is empty.
midifier requires regular cleaning. Refer
to, and follow, cleaning instructions.
Do not operate outdoors; this appliance is
intended for indoor use.
electrical or mechanical functions on
this humidifier. Doing so will void your
warranty.
2
HEV680 Series HUMIDIFIER COMPONENTS
How Evaporative Humidification Works:
A Wicking Filter inside the humidifier absorbs water from the Reservoir. A fan pulls dry air from
the room into the humidifier where it passes through the saturated Wicking Filter. The Filter
captures minerals and other impurities from the water, before the moisture is evaporated back
into the dry room with the help of the fan. The amount of moisture output depends on many
factors, including the current room humidity and temperature. As the humidity level in the
room increases, the moisture output decreases, which prevents over humidification.
Motor
Housing
Tank Cover
Tank Handle
Water
Tank
Plunger
Housing
Wicking
Filter
Plunger
Water
Reservoir
SETTING UP YOUR HUMIDIFIER
Float
Intake
Grill
Base
Humidity
Level Knob
Power/Output
Knob
Tank Cover
Water
Tank
Refill
Indicator
Humidity
Reached
Indicator
1. Remove packaging
Step 2 Step 1
material. Keep this
Instruction Manual
for future reference.
2. Remove twist tie and
extend power cord.
3. Place the humidifier
on a firm, level, water resistant surface at least 12" (30 cm) from any walls.
Intake Grill on base of unit.
Do not
place on surfaces that can be damaged by water.
Step 3
Do not
block
3
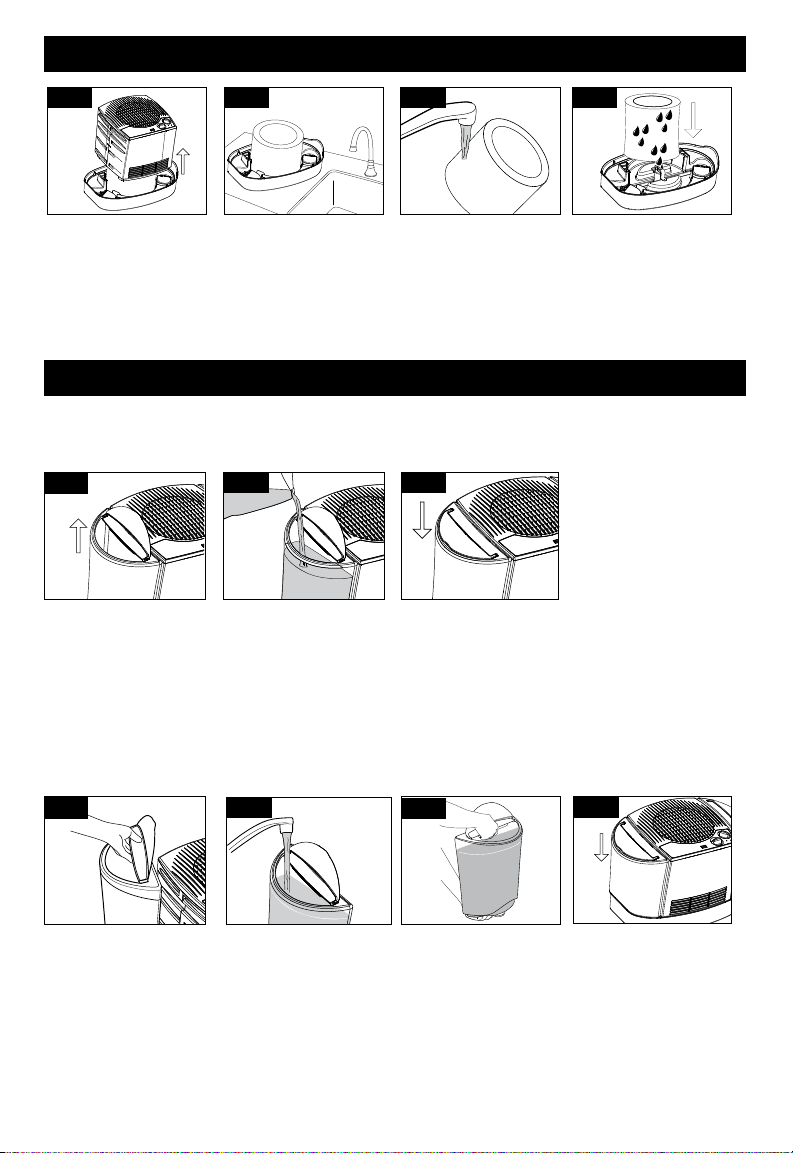
PREPARING THE WICKING FILTER
Step 1
Step 3 Step 2
Step 4
$
1. Remove Water Tanks and lay aside. Grip housing and lift up to expose Wicking Filter.
2. Carry Wicking Filter and Base to sink or tub.
3. Remove Filter from Base and run under cool water until saturated.
4. Carefully place wet Filter back in base; do not squeeze out excess water.
FILLING/REFILLING WATER TANKS
The Tanks can be filled in two ways.
To fill without removing Water Tanks:
Step 1
Step 2
Step 3
$
$
1. Flip Tank Cover open.
2. Pour cool tap water into Water Tank through the Tank Cover opening.
Do not use warm or hot water.
3. Close Tank Cover to keep objects and debris out of water.
Repeat for second Water Tank.
$
To fill at the sink or tub by removing Water Tanks:
Step 1
Step 2
Step 3
$
1. Flip Tank Cover open. Grasp Tank Handle and lift Water Tank to remove from Base. Carry
Tank to sink or tub. NOTE: Do not use the Tank Cover to carry Water Tank.
2. Fill Tank through the Tank Cover opening. When filling, allow enough space at the top to
minimize splashing when carrying. Use cool tap water; Do not use warm or hot water.
NOTE: Do not attempt to unscrew Plunger Housing from underside of Tank.
This is not meant to be removed.
4
Step 4
$
 Loading...