


HP DreamScreen
User Guide
Revision 1.0

Copyright © 2009 Hewlett-Packard Development Company, L.P.
The information in this document is subject to change without notice.
Conventions
Notes, Cautions, and Warnings
Throughout this guide, blocks of text may be accompanied by an icon. These
blocks are notes, cautions, and warnings, and they are used as follows:
WARNING: Indicates that failure to follow directions could
result in bodily harm or loss of life.
CAUTION: Indicates that failure to follow directions could
result in damage to equipment or loss of information.
NOTE: Indicates additional information.

Table of Contents
Conventions.............................................................................................................. ii
What’s in the Box ...................................................................................................... v
Getting Started......................................................................................................... 1
Wall Mounting ................................................................................................... 3
Remote Control......................................................................................................... 4
Navigating the Keyboard Utility ................................................................................. 6
HP DreamScreen ...................................................................................................... 7
Key Features ............................................................................................................ 9
Initial Setup............................................................................................................ 10
Initial configuration from factory default settings.................................................... 10
Restoring factory default settings ......................................................................... 10
Viewing Tutorial Videos ..................................................................................... 11
Photo Slide Show and Browse.................................................................................. 12
Slide show modes ............................................................................................. 12
Browse mode ................................................................................................... 12
Thumbnail mode ............................................................................................... 13
Managing Photos ................................................................................................... 14
Using a PC as an External Media Source................................................................... 16
Menu Options ........................................................................................................ 18
Setup............................................................................................................... 18
Network Setup - wired....................................................................................... 19
Network Setup - wireless.................................................................................... 21
Manual and advanced settings for wireless connection.......................................... 22
Calendar ......................................................................................................... 24
Clock .............................................................................................................. 25
Weather .......................................................................................................... 26
Video .............................................................................................................. 27
Photo............................................................................................................... 28
Music .............................................................................................................. 30
Facebook......................................................................................................... 32
Snapfish .......................................................................................................... 34
Pandora........................................................................................................... 36
HP Smart Radio ................................................................................................ 37
HP DreamScreen PC Software.................................................................................. 38
Installing HP DreamScreen PC Software..................................................................... 38
Running HP DreamScreen PC Software...................................................................... 39
Drag and Drop file transfers ............................................................................... 40
HP DreamScreen PC Software buttons ................................................................. 40
Troubleshooting...................................................................................................... 42
Specifications......................................................................................................... 46
Frequently Asked Questions ..................................................................................... 50
HP DreamScreen User Guide iii

Cleaning and Care Tips .......................................................................................... 51
Cleaning the Screen.......................................................................................... 51
Cleaning the HP DreamScreen and Backing......................................................... 51
Maintenance Guidelines .................................................................................... 51
Regulatory and Safety Information ............................................................................ 52
Materials disposal............................................................................................. 52
Perchlorate Material—special handling may apply................................................ 52
Federal Communication Commission Interference Statement................................... 53
iv HP DreamScreen User Guide

What’s in the Box
Qty Item Image
1 HP DreamScreen 100 or
HP DreamScreen 130
1Stand
1 Power Adapter
(100-240VAC, 12VDC, 2A, 24W)
1 Remote Control and Lithium Button
Battery
1 Cleaning Cloth
Option Back
+
1 CD containing HP DreamScreen PC
Software, User Guide, How-to
Videos, and Demonstration Video
1 Documentation
War ran ty
User Guide on CD
Quick Setup Guide
1 USB cable with A and mini-USB
connectors
HP DreamScreen User Guide v

vi HP DreamScreen User Guide
Getting Started
WARNING: When using this device, basic safety precautions should
always be followed to reduce the risk of fire, electric shock, and injury to
persons, including the following:
Do not use this product near water, for example, near a bathtub,
wash bowl, kitchen sink, or laundry tub, in a wet basement, or near
a swimming pool.
Avoid using this product during an electrical storm. There may be a
remote risk of electric shock from lightning.
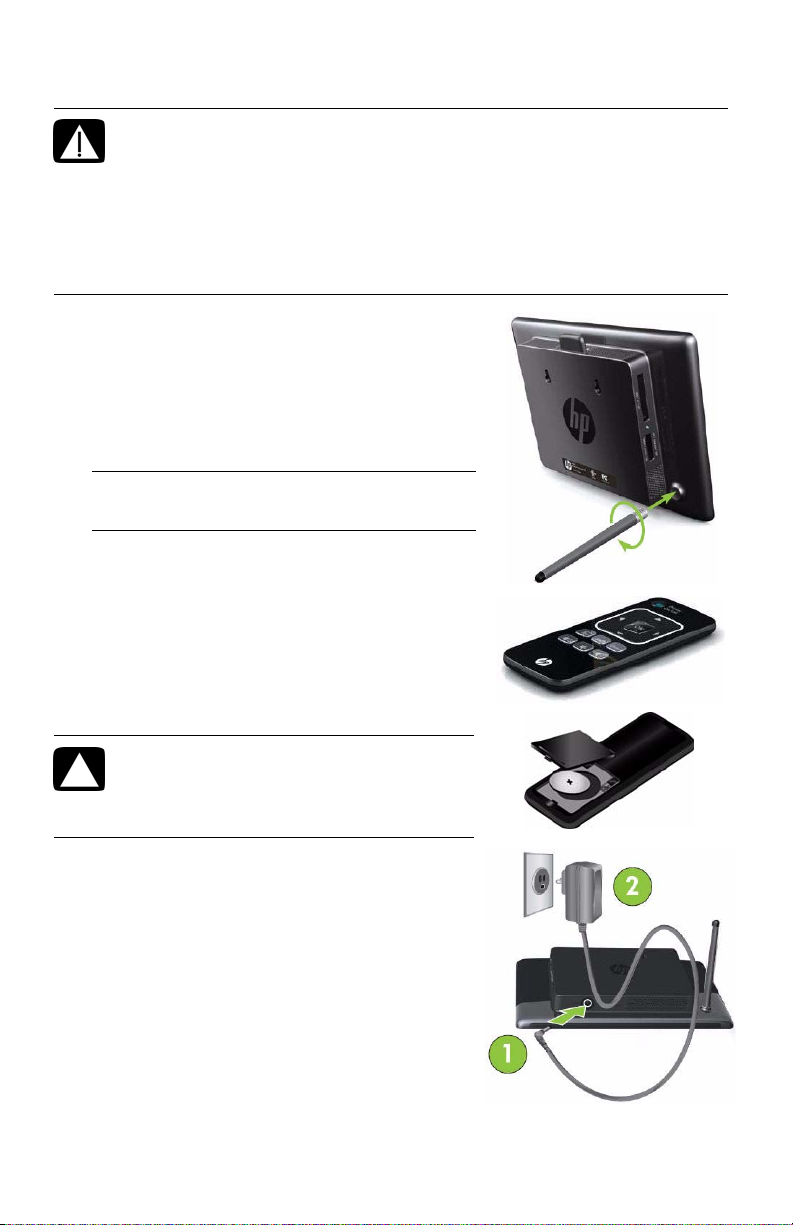
1 Attach the stand to the rear of the HP DreamScreen
100 or HP DreamScreen 130 by screwing it into the
threaded hole in the back of the unit. When the HP
DreamScreen is in the horizontal position, the
threaded hole is at the lower right as you face the
rear of the unit.
NOTE: Screw in the stand by hand until it fits
snugly, but do not overtighten it.
2 Install the battery into the remote control with the
positive (+) side up.
Caution: Only replace the battery with
the supplied battery type.
Ensure the plus sign (+) faces up when
you install a new battery.
3 Connect the power cord into the DC input of the HP
DreamScreen (1) and then plug the adapter into an
AC power outlet (2).
HP DreamScreen User Guide 1
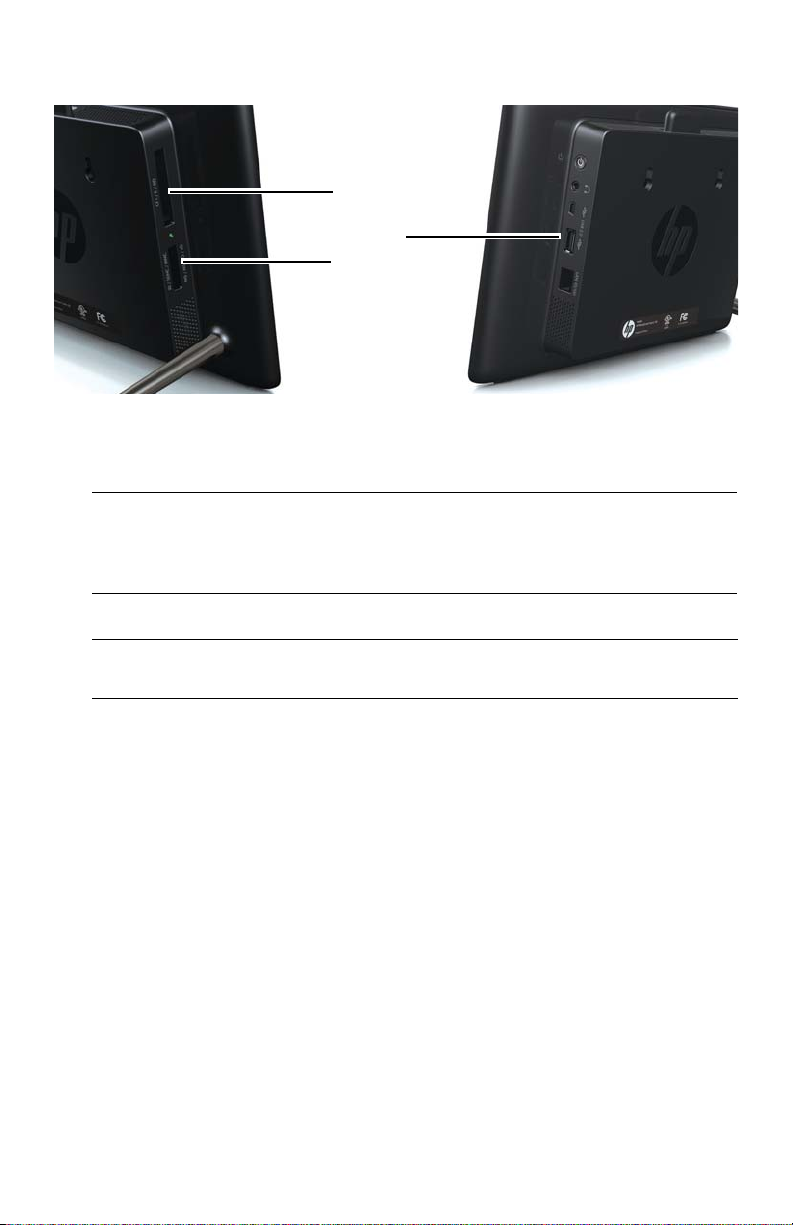
4 Insert your memory card or USB storage device (external memory) containing desired
photos, music, and/or video into the appropriate card slot or USB port as illustrated.
A
C
B
(A) is for Compact Flash (CF) types I, II, and MD.
(B) is for Secure Digital (SD) types SD, SDHC, MS, MS-Pro, MMC, and xD.
(C) is for USB flash drives
NOTE: Memory cards and USB flash drives must be oriented correctly. Ensure the label
on the card is facing toward the rear of the HP DreamScreen when you insert the card
into a slot. A USB device can only be plugged in when oriented correctly. Do not force
a memory card into a slot or a USB flash drive into a connector.
A dialog box prompting you to select an application appears.
NOTE: The HP DreamScreen must be at the main menu for the dialog box to start when
an external source is connected.
5 Use
or to select the Video, Photo or Music application. Then press OK.
2 HP DreamScreen User Guide

Wall Mounting
To prepare the HP DreamScreen 100 or HP
DreamScreen 130 for wall mounting, unscrew
the stand.
Holes for wall mounting are provided on the rear
of the HP DreamScreen.
The distance between the mounting holes (A)
is 78.7 mm (3.098 in).
The mounting hole diameter is 8.5 mm (0.33 in).
The width of the notch (B) at the top of each mounting hole is 5.1 mm (0.20 in).
Recommended Screw Size:
z Standard: #8 pan-head wood screws, or pan-head tapping screws used with
drywall anchors. Minimum screw length 25 mm (1in).
z Metric: M4 pan-head wood screws, or pan-head tapping screws used with
drywall anchors. Minimum screw length 25 mm (1in).
NOTES:
The HP DreamScreen can only be wall mounted horizontally.
Mounting hole placement and size are the same for the HP DreamScreen 100 and
the HP DreamScreen 130.
HP does not supply wall mounting screws for the HP DreamScreen.
HP DreamScreen User Guide 3
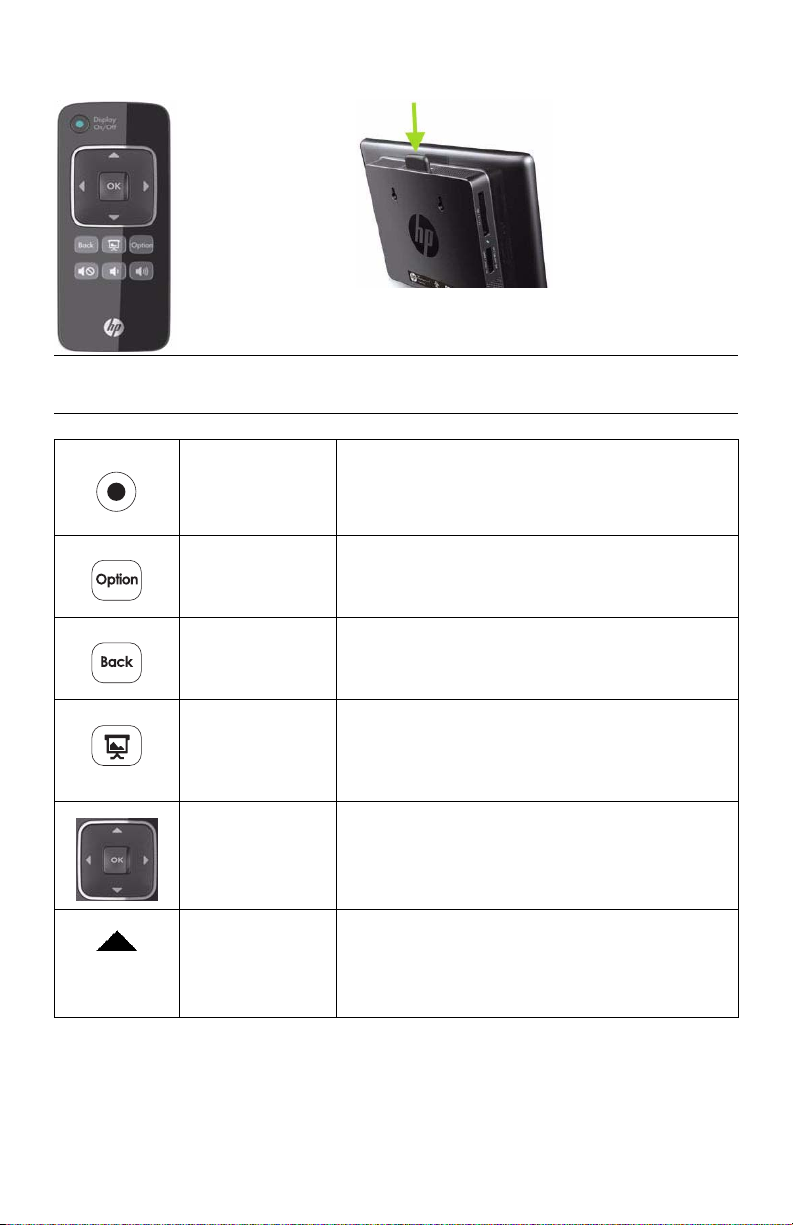
Remote Control
You can place the remote control in a storage bay in the
back of the HP DreamScreen for safekeeping.
NOTE: The sensor for the remote control infrared (IR) beam is at the top center edge of the
screen when the HP DreamScreen is in the horizontal position.
Display On/Off On button: Alternately turns display on or off.
Note: The On/Off button on the HP DreamScreen
glows white when on and red when off.
Option Moves down to several alternate submenu functions.
Click the Option button while in Thumbnail mode for
more choices when working with photos.
Back Moves back up one level at a time from submenus.
Press and hold to access the main menu.
Slide Show Press to start a slide show from internal memory from
Cursor Pad The cursor pad consists of the navigation controls
Up Up Arrow on the cursor pad: Press to move up in
4 HP DreamScreen User Guide
the home (main menu icon) screen.
In thumbnail mode, press to launch a slide show
starting from the selected photo.
(
, , , ), and the OK button.
thumbnail mode.
Press to move left in browse mode.
Press to move up or change items in a submenu list.

Left Left Arrow on the cursor pad: Press to move left in
menu, thumbnail, or browse, mode.
Move left or change items in a submenu list.
Moves selection back while playing music.
OK Activate a highlighted menu item or highlighted
Right Right Arrow on the cursor pad: Press to move right in
Down Down Arrow on the cursor pad: Press to move down in
Volume Up Press to incrementally increase the speaker volume.
Volume Down Press to incrementally decrease the speaker volume.
Mute Press to silence the speaker. Press again to reactivate
submenu tab or button.
Activate a highlighted thumbnail to view the photo at
maximum size.
Plays and pauses music and videos.
Similar to an Enter key when a button is highlighted.
menu, thumbnail, or browse mode.
Move right or change items in a submenu list.
Moves selection forward while playing music.
thumbnail mode.
Press to move right in browse mode.
Move down or change items in a submenu list.
Press and hold until the volume begins to get louder,
and release when the volume is the desired level.
Press and hold until the volume begins to get softer,
and release when the volume is the desired level.
the speaker. The previously set volume level is
retained.
HP DreamScreen User Guide 5
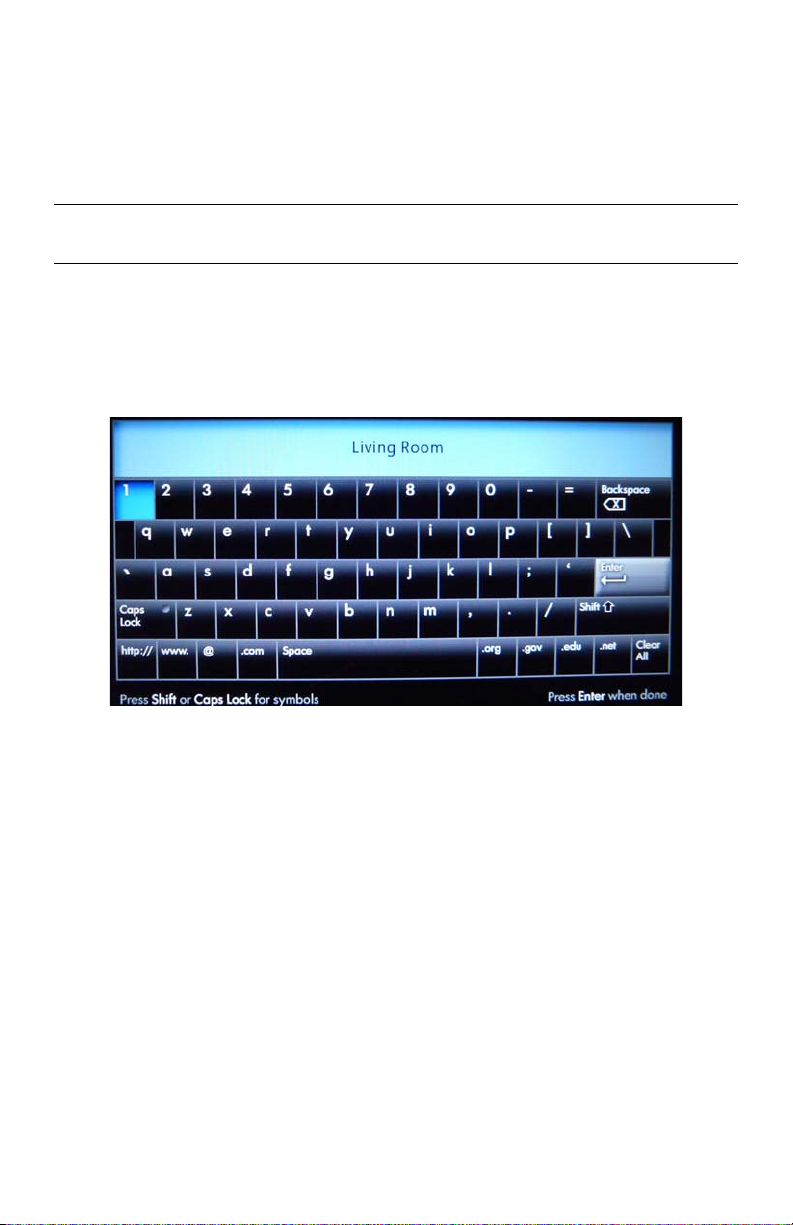
Navigating the Keyboard Utility
When you set up your HP DreamScreen, you occasionally will need to enter data into a data
field. This is required when you set up a wireless network configuration, a weather reporting
location, or a HP DreamScreen configuration to access user accounts on Internet sites (such
as Snapfish and Facebook). The HP DreamScreen has a keyboard utility that appears when
you need to enter such information into data fields.
NOTE: This section describes basic keyboard utility navigation. Detailed steps for performing
the various configurations that use the keyboard utility are covered later in this document.
1 Select your first data field and press OK. to select the keyboard.
2 Use the navigation controls to select the first character you want to enter or “type” into
the data field. Then press OK.
Continue until you have spelled out the name or word that you are entering into the data
field.
3 Use the arrow buttons to select Enter on the keyboard. Then press OK.
4 Press
6 HP DreamScreen User Guide
or to move among any other data fields and the Continue and Back buttons.
Select Continue and press OK when you have completed entering data in all required
fields.

HP DreamScreen
E
A
B
C
D
Left & Right Side Views
A CF Card Slot (insert card with label facing rear of HP DreamScreen.)
Cards supported: CF I, II, and MD
B Memory Card Activity Indicator (On when a memory card is active)
C SD Card Slot (insert card with label facing rear of HP DreamScreen.)
Cards supported: SD, SDHC, MS, MS-Pro, MMC, and xD
F
G
H
I
D Stand
E On Button & LED (toggles display on and off.)
White = On, Red = Off
To reset the HP DreamScreen, press and hold this button until the display turns off
(approximately six seconds). Then wait for the HP DreamScreen to restart.
F Audio out jack (for headphones)
G Mini USB port - to connect the HP DreamScreen to a PC, making the PC an external source
for photos, music, and videos
H USB 2.0 port - to connect a USB flash drive to the HP DreamScreen, making the flash drive
an external source for photos, music, and videos
I LAN/ETHERNET port - to connect to the Internet when a wireless connection is not
available.
HP DreamScreen User Guide 7

A
B
C
Option Back
D
E
F
G
H
I
Front View
NOTE: Buttons are touch sensitive; they appear when tapped and stay on for 10 seconds.
A Remote
Sensor
B
The receiver for the IR beam of the remote control (not visible). Point the remote
control at this location while pressing the remote control buttons.
Up Arrow: Press to move up in thumbnail mode.
Press to move left in browse mode.
Press to move up or change items in a submenu list.
C
Down Arrow: Press to move down in thumbnail mode.
Press to move right in browse mode.
Move down or change items in a submenu list.
D OK Activate a highlighted menu item or highlighted submenu tab or button.
Activate a highlighted thumbnail to view the photo at maximum size.
Plays and pauses music and videos.
Similar to an Enter key when a button is highlighted.
E
Right Arrow: Press to move right in menu, thumbnail, or browse mode.
Move right or change items in a submenu list.
Moves selection forward while playing music.
F
Left Arrow: Press to move left in menu, thumbnail, or browse, mode.
Move left or change items in a submenu list.
Moves selection back while playing music.
G Back Moves back up one level at a time from submenus. Press and hold to access the
main menu.
H Option Moves down to several alternate submenu functions. Click the Option button
while in Thumbnail mode for more choices when working with photos.
I
Volume Control. Press on the front panel followed by
the volume. Press on the front panel followed by
or to decrease the
or to increase
volume.
8 HP DreamScreen User Guide

Key Features
External Memory
Feature
Photo slide show with music XX
Photo slide show without music XX
(Cards and or Flash Drives) Internal Memory
Photo auto-rotation with
Screen orientation
Add photos/videos/audio
files to memory
Delete photos/videos/audio
files from memory
Playback music/audio files XX
Playback video clips XX
View Photo thumbnails XX
Browse Photos/Images XX
XX
X
X
HP DreamScreen User Guide 9

Initial Setup
NOTE: The following instructions are shown using the remote control unit. Most of these
functions can also be conducted using the control keys located on the bottom right side of the
HP DreamScreen (when orientated in the horizontal position). The keys are labeled with
similar icon/text.
Initial configuration from factory default settings
The first time you turn your HP DreamScreen on, it will be in factory default mode.
A demonstration video with sound will automatically play.
1 Watch and enjoy the video. A welcome screen with a Continue button appears.
Or
Press OK or Back to stop the demonstration video. A welcome screen appears.
2 Press OK to continue. A screen with a guide for using the remote control unit appears.
3 Press OK again. The home (main menu icon) screen appears.
Your HP DreamScreen is ready to show videos, show photos, and play music.
NOTE: There are other setup tasks that you should do to enable other features. Many
features (such as Weather, Facebook, Snapfish, HP Smart Radio, and Pandora) require
a network connection. To configure the additional features, see the “Setup” section and
the “Network Setup - wired” and “Network Setup - wireless” subsections, in this
document as well as the other menu item sections that follow.
Restoring factory default settings
Note: This does not remove any personal data from your HP DreamScreen.
1 Use or to select Setup from the main menu.
2 Press OK.
3 Press
4 Press OK to open the System Information page.
5 Press
6 Press OK. A dialog box appears with a warning that continuing will erase all settings.
7 Select Yes and press OK to continue setting factory defaults, or Select No and press
8 Reconfigure your network and any other settings in Setup (see “Setup”, “Network Setup
10 HP DreamScreen User Guide
to select Info.
and then to select Factory Default.
OK to quit changing settings to factory defaults. If you choose to continue, the HP
DreamScreen will restart.
CAUTION: It takes several minutes to restore the HP DreamScreen to the
factory default settings. Do not unplug or attempt to stop the HP
DreamScreen until after it begins to play the introductory video.
- wired”, and “Network Setup - wireless” under “Menu Options.”

Viewing Tutorial Videos
The HP DreamScreen comes with a series of preinstalled tutorial videos. These include:
Basic Setup
Load Photos and Music Videos
Connect to Network
Internet Services
PC Connection Setup
Copying Content from your PC Over a Home Network
Streaming Music and Photos
To view the tutorial videos (as well as any other video on the HP DreamScreen):
1 Select Video from the Main Menu and press OK.
2 Select the All Videos tab and press
3 Use the navigation controls to select the video of your choice and press OK.
The selected video plays.
Note: You can also view the setup tutorial videos at any time on a PC using the CD
provided with your HP DreamScreen.
.
HP DreamScreen User Guide 11

Photo Slide Show and Browse
Slide show modes
There are two slide show modes, one with background music and the other without.
Slide show without music: Simply start a slide show from an internal or external memory
source as described below.
Slide show with music:
a Start a selection of music from a list of MP3 files or an album stored in internal
memory, an external memory card, USB flash drive, a connected PC with Windows
®
Media
Player installed (and configured for media sharing), Pandora, or HP Smart
Radio. For details on playing music, see “Music”, “Pandora”, and “HP Smart
Radio” in the “Menu Options” section of this document.
b Once the music is playing, press and hold Back to return to the main menu.
c Start a slide show from internal memory of from Thumbnail mode as described
below.
Note: For music to continue playing, you must set Playback Sequence in Music Options to
Repeat or Random (see “Music” in the “Menu Options” section).
Slide show from internal memory:
To view a slide show of photos stored in internal memory:
1 Press Back.
2 Press the Slide Show button ( ) on the remote control. The slide show will start
momentarily.
Slide show from Thumbnail mode:
1 From the menu, select Photo. Then press OK.
2 Highlight the tab labeled for the source of the photos you want to browse.
Depending on whether you have any other inputs connected, such as a PC, memory
cards, or a USB flash drive, different tabs will appear. The default tab All Photos
represents the photos stored in the internal memory.
3 Press OK. The thumbnail list of photos appears.
4 Use the navigation controls
show.
5 Press . The slide show will start momentarily.
6 Press Back to stop the slide show.
7 Press and hold Back to return to the main menu.
to select the first photo from which you want to start the slide
Browse mode
1 From the menu, select Photo. Then press OK.
2 Highlight the tab labeled for the source of the photos you want to browse.
12 HP DreamScreen User Guide

Depending on whether you have any other inputs connected, such as a PC, memory
cards, or a USB flash drive, different tabs will appear. The default tab All Photos
represents the photos stored in the internal memory.
3 Press OK. The thumbnail list of photos appears.
4 Use the navigation controls
5 Press OK. The
move you to the left in the photo browser.
6 Press and hold Back to return to the main menu.
and move you to the right in the photo browser. The and
to select the first photo you wish to view in full size.
Thumbnail mode
1 From the menu, select Photo. Then press OK.
2 Highlight the tab labeled for the source of the photos you want to browse.
Depending on whether you have any other inputs connected, such as a PC, memory
cards, or a USB flash drive, different tabs will appear. The default tab All Photos
represents the photos stored in the internal memory.
3 Press OK. The thumbnail list of photos appears.
4 Press and hold Back to return to the main menu.
HP DreamScreen User Guide 13

Managing Photos
Rotate Photo:
If desired, photos that are stored in internal memory can be rotated 90 degrees to the right.
1 Select Photo in the main menu and press OK.
2 Select the All Photos tab and press OK.
3 Press
4 Use the navigation controls to select the photo that you want to rotate.
5 Press Option and then use
Auto Rotation:
During a slide show or while browsing, photos will rotate automatically to match the
orientation of the HP DreamScreen.
Copy Photos onto Internal Memory:
You can copy photos from an external memory card, USB flash drive, or a PC. The photos
can be copied to the internal memory of the HP DreamScreen.
1 Select Photo in the main menu and press OK.
2 Select the tab for the external source you are using and press OK.
3 Press
4 Use the navigation controls to select the photo that you want to copy.
5 Press Option and then use
.
or to select Rotate and press OK.
The photo will be rotated 90 degrees clockwise. To rotate the photo another 90
degrees, repeat step 5.
and press OK.
or to select Copy and press OK to copy the selected
photo
Or
Press Option and then use
photos from the external source.
or to select Copy ALL and press OK to copy all the
Delete Photos from Internal memory:
1 Select Photo in the main menu and press OK.
2 Select the All Photos tab and press OK.
3 Press
4 Use the navigation controls to select the photo that you want to delete.
5 Press Option and then use
14 HP DreamScreen User Guide
and press OK.
or to select Delete and press OK to delete the
selected photo.
Or
Press Option and then use
photos in the internal memory of the HP DreamScreen.
or to select Delete All and press OK to delete all the

NOTES:
HP DreamScreen only allows copies onto internal memory from an external memory
card, or a USB flash drive.
HP DreamScreen only allows deletion from internal memory. It will not delete photos
from an external memory card, a USB storage device, or a PC.
If your HP DreamScreen and your PC are connected to When you are at your PC, you
can copy photos if you are running HP DreamScreen Software.
HP DreamScreen User Guide 15

Using a PC as an External Media Source
You can use a PC as an external source for photos, music, and videos. The media can be
copied from the PC while the HP DreamScreen is at the main menu.
1 Connect the power to the HP DreamScreen to turn it On. Then wait for the HP
DreamScreen to go into the main menu.
2 Connect the small (mini) end of the USB cable to the mini USB socket on the HP
DreamScreen.
3 Connect the large (A connector) end of the USB cable to a USB socket on your PC. See
the following illustration.
The HP DreamScreen stops responding to the remote control and the buttons on the
bezel and displays the following message box:
Screen is Connected to PC
Unplug the USB cable to start using the Screen again
The PC will detect the HP DreamScreen and install it as a USB disk device with the
following folders:
mymusic
myphoto
myvideo
4 Open a Windows Explorer session and open the USB disk device to the media folder to
which you want to copy.
16 HP DreamScreen User Guide

5 Open an additional Windows Explorer session and go to a folder on your PC where
you store music, photos, or videos.
6 Double-click the appropriate media folder in the Windows Explorer session for the HP
DreamScreen.
7 Highlight the photos in the PC Windows Explorer session that you wish to copy to the HP
DreamScreen.
8 Drag the media file(s) from the PC Windows Explorer session into the HP DreamScreen
Windows Explorer session. See the following illustration.
Note: Drag photos from your PC into the myphoto folder in the HP DreamScreen. Drag
music files from your PC into the mymusic folder in the HP DreamScreen, and drag video
files from your PC into the myvideo folder in the HP DreamScreen.
9 Disconnect the USB cable when you are finished. The HP DreamScreen takes a moment
to reorganize the files that are stored on it and then becomes active again.
HP DreamScreen User Guide 17

Menu Options
To select menu options, press or on the remote control or on the HP DreamScreen. Press
OK when you are on the desired menu option.
The menu options, from left to right are as follows:
Setup
Calendar
Clock
Weather (internet connection is required)
Video
Photo
Music
Facebook (Internet connection is required)
Snapfish (Internet connection is required)
Pandora (Internet connection is required)
HP Smart Radio (Internet connection is required)
Setup
Select the Setup icon in the main menu and press OK.
General Tab
Press or to navigate among and select the following:
Device Name
If you have more than one HP DreamScreen, you should give each one a unique name so
they can all be connected to your network and work with your HP DreamScreen PC Software
(see “Installing HP DreamScreen PC Software” and “Running HP DreamScreen PC
Software”).
1 Press OK to go to a keyboard screen.
You use the navigation controls in the keyboard utility to enter the desired device name
as described in the following steps:
2 Use the Arrow buttons to navigate and select characters. Then press OK to enter the
characters.
Continue until you have spelled out the new device name.
3 Select Enter and press OK on the remote to save the name.
18 HP DreamScreen User Guide

Time Zone
1 Press OK to view a Time Zone Selection map.
2 Press
3 Press
4 Press OK once you have selected the time zone.
or to scroll to the desired time zone.
or to select a city in a time zone (optional).
Or
Press Back to leave the map without making changes
24-Hour Time
Press or to toggle between On (24-hour time) or Off (12-hour time).
Time
1 Press OK to go to the Time Setting page.
2 Press
3 Press
4 Press OK to save your time settings.
or to move among the hour, minute, second, and AM/PM settings.
or to increment or decrement the selected hour, minute, second, or AM/PM
settings.
Or
Press Back to exit the Time Setting page without saving the settings.
Date
1 Press OK to go to the Date Setting page.
2 Press
3 Press
4 Press OK to save your date settings.
or to move among the month, day, and year settings.
or to increment or decrement the selected month, day, or year settings.
Or
Press Back to exit the Date Setting page without saving the settings.
US Daylight Saving Time
Press or to toggle between On or Off.
Network Setup - wired
1 Press OK to examine or change your network configuration settings.
NOTE: If you only want to examine the network settings, press OK after viewing them to
exit without changing the configuration.
2 Select Change and press OK.
3 Select Wired and press OK.
4 Select Continue and press OK.
5 Select Set Automatically and press OK.
6 Select Continue and press OK. The connection will complete automatically.
HP DreamScreen User Guide 19

Manual and advanced settings for wired Ethernet
NOTE: This procedure is rarely necessary.
Some cases may require manual settings of the IP address, network mask, default gateway,
domain name server (DNS), and proxy servers.
1 Select Set Manually, Set IP and press OK.
2 Select Set IP and press OK. The Network Settings page appears.
3 Select Static and press OK to enable editing of the network parameters.
4 Use the navigation controls to select the field(s) you want to change for IP, Mask,
Gateway, or DNS.
5 Press OK. You will be placed into the number keyboard strip at the bottom of the page.
6 Use
7 Repeat step 4 if necessary to enter up to three digits in the field.
8 Use
9 Repeat steps 2 through 6 as necessary to edit the required fields.
10 Select Set Manually, Set Proxy and press OK, if you need to configure the proxy
11 Select Proxy On and press OK. A keyboard screen appears.
12 Use the navigation controls to select the first character or shortcut string to enter for the
or to select the first number to enter into the selected field. Then press OK.
or to select Enter. Then press OK.
settings.
proxy server URL. Press OK.
Note:
You can use an IP address for the proxy server, if you need to.
13 Continue until you have entered the entire URL of the proxy server.
14 Select Enter and press OK.
15 Select the Port field and press OK. A keyboard screen appears.
Note: The port number is usually filled in by default.
16 Use the navigation controls to select the first digit of the port number for the proxy
server. Then press OK.
17 Continue until you have entered the entire port number into the field.
18 Select Enter and press OK.
19 Select the ID field and press OK. A keyboard screen appears.
20 Use the navigation controls to select the first character of the ID name for the proxy
server. Then press OK.
21 Continue until you have entered the entire ID name into the field.
22 Select Enter and press OK.
23 Select the Password field and press OK. A keyboard screen appears.
24 Use the navigation controls to select the first character of the Password for the proxy
server. Then press OK.
25 Continue until you have entered the entire password into the field.
20 HP DreamScreen User Guide

26 Select Enter and press OK.
27 Select Continue and press OK.
Network Setup - wireless
1 Press OK to examine or change your network configuration settings.
NOTE: If you only want to examine the network settings, press OK after viewing them to
exit without changing any configuration.
2 Select Change and press OK.
3 Select Wireless and press OK.
4 Select Continue and press OK.
5 Press
6 If you are starting at the Set your WIFI Network page, Select the Network Name field
7 Use the navigation controls to select the first character of the network name. Then press
8 Use the arrow buttons to select Enter on the keyboard. Then press OK.
9 Press
10 Press
11 Press
to select the network name of the wireless router to which you want to connect.
Then press OK. Then select Continue and press OK. The password entry keyboard
appears.
Or
If the name of your chosen network is not shown because broadcast SSID is disabled,
select Set Network Manually and press OK. Then use
and press OK. The Set your WIFI Network page appears.
NOTE: If the wireless router is using any security, you will need to know some of the
following information:
Network name (also known as the server set identifier, or SSID). This is displayed if
the wireless router has broadcasting of the SSID enabled. It is case sensitive
Security - the security type used by the router. The choices are: None, WEP (OPEN),
WEP (SHARED), WPA-PSK (TKIP), WPA-PSK (AES), WPA2-PSK (TKIP), and WPA2PSK (AES)
Password - The password for WEP and WPA security types is a key that is
generated by a passphrase that is entered when the router is configured. The key is
what you need to enter in the password field.
and press OK to select the keyboard. Otherwise, go to step 9.
OK.
Continue until you have spelled out the new network name.
or to select Continue
to select the Security field.
or to select the desired security option from those listed in the Security field.
to select the Password field. Then press OK to select the keyboard.
NOTE: If the security option used by the wireless router is None, the password should
be left blank.
12 Use the navigation controls to select the first character of the password. Then press OK.
HP DreamScreen User Guide 21

Continue until you have spelled out the password.
13 Use the navigation controls to select Enter on the keyboard. Then press OK.
14 Press
or to move among the network fields and the Continue and Back buttons.
Click Continue when you have completed your network configuration.
The HP DreamScreen successfully connects in a few seconds if the network is configured
properly.
Manual and advanced settings for wireless connection
NOTE: This procedure is rarely necessary.
Some cases may require manual settings of the IP address, network mask, default gateway,
domain name server (DNS), and proxy servers.
1 Select Set IP and press OK. The Network Settings page appears.
2 Select Static and press OK to enable editing of the network parameters.
3 Use the navigation controls to select the field(s) you want to change for IP, Mask,
Gateway, or DNS.
4 Press OK. You will be placed into the number keyboard strip at the bottom of the page.
5 Use
6 Repeat step 4 if necessary to enter up to three digits in the field.
7 Use
8 Repeat steps 2 through 6 as necessary to edit the required fields.
9 Select Set Proxy and press OK, if you need to configure the proxy settings.
10 Select Proxy On and press OK. A keyboard screen appears.
11 Use the navigation controls to select the first character or shortcut string to enter for the
or to select the first number to enter into the selected field. Then press OK.
or to select Enter. Then press OK.
proxy server URL. Press OK.
Note: You can use an IP address for the proxy server, if you need to.
12 Continue until you have entered the entire URL of the proxy server.
13 Select Enter and press OK.
14 Select the Port field and press OK. A keyboard screen appears.
Note: The port number is usually filled in by default.
15 Use the navigation controls to select the first digit of the port number for the proxy
server. Then press OK.
16 Continue until you have entered the entire port number into the field.
17 Select Enter and press OK.
18 Select the ID field and press OK. A keyboard screen appears.
19 Use the navigation controls to select the first character of the ID name for the proxy
server. Then press OK.
20 Continue until you have entered the entire ID name into the field.
22 HP DreamScreen User Guide

21 Select Enter and press OK.
22 Select the Password field and press OK. A keyboard screen appears.
23 Use the navigation controls to select the first character of the Password for the proxy
server. Then press OK.
24 Continue until you have entered the entire password into the field.
25 Select Enter and press OK.
26 Select Continue and press OK.
Brightness
Press to increase the brightness setting, or press the to decrease the brightness
setting.
NOTE: The brightness settings range from 0 to 10. The default setting is 8.
Display Time On (Auto)
The HP DreamScreen display is turned on automatically at a preset time when Power
Management: Display Schedule On is enabled.
1 Press OK. The Time Setting page appears.
2 Press
3 Press
4 Press
5 Press OK to save your Power Management: Display Schedule On time settings.
to enable and press the to disable Power Management: Display Schedule
On.
or to move among the hour, minute, and AM/PM settings.
or to increment or decrement the selected hour, minute, or AM/PM settings.
Or
Press Back to exit the Time Setting page without saving the settings.
Display Time Off (Auto)
The HP DreamScreen display is turned off automatically at a preset time when Power
Management: Display Schedule Off is enabled. This feature is used to automatically conserve
power.
1 Press OK. The Time Setting page appears.
2 Press
3 Press
4 Press
5 Press OK to save your Power Management: Display Schedule Off time settings.
to enable and press to disable Power Management: Display Schedule Off.
or to move among the hour, minute, and AM/PM settings.
or to increment or decrement the selected hour, minute, or AM/PM settings.
Or
Press Back to exit the Time Setting page without saving the settings.
Synchronize Clock With Internet Clock
Press or to toggle On or Off.
Screen Saver
HP DreamScreen User Guide 23

Screen Saver lets you set the amount of time that the HP DreamScreen must be idle
before the screen saver starts.
Press
or to select the Screen Saver Wait time. The available selections are: Off, 5
Mins, 10 Mins, 15 Mins, 30 Mins, 60 Mins, 90 Mins, and 120 Mins.
Screen Saver Options
Press or to toggle among Disabled, Slide Show, Clock, Screen Off, or Demo
Video.
Automatic Software Update
Press or to toggle On or Off.
NOTE: When Automatic Software Update is turned on and the HP DreamScreen is
connected to the internet, you will be prompted to update your software when software
updates are available. It is recommended that you accept updates when prompted.
Never turn off power to the HP DreamScreen during a software update. Wait until the
software update completes and the HP DreamScreen restarts.
Info Tab
1 Select the Info tab and press OK to open the System Information page.
You can view the serial number, product name and model, used memory space, free
memory space, copyright notices, and current software version.
2 Optionally, press
and Diagnostics.
3 Press OK. Then follow the instructions on the page that is displayed.
. Then press or to select from Software Update, Reset Settings,
Calendar
The Calendar allows you to view the current month or move forward or backward from month
to month.
1 Select the Calendar icon in the main menu and press OK. A calendar page appears.
2 Use the navigation keys to move forward or backward from month to month.
24 HP DreamScreen User Guide

Clock
NOTE: The Clock menu is for configuring display modes, style and alarm settings. To set the
clock, see the submenu items for time configuration under “Setup”.
1 Select the Clock icon in the main menu and press OK. A clock displaying the current
time appears.
2 Press Option. A Clock Settings dialog appears.
3 Use
4 Select the OK button and press OK when you are finished configuring the clock.
5 Press Back to return to the main menu.
or to select any of the following items:
View - Press or to select one of the following display options: Single Clock,
Dual Clock, Clock with Calendar, or Clock with Photo.
Style - Press or to select Analog or Digital.
Alarm - Select Setup. You can set up to three alarms, all of which are set in the
same manner.
z Use or to select the desired alarm to set and press OK.
z Use or to select among ON/OFF, Hour, Minute, Frequency, or Alarm
Sound.
z Press or to change the selected alarm setting.
z Select the OK button and press OK.
z Press Back to return to the Clock Settings dialog.
2nd Clock Timezone - Press or to select among the time zone settings relative
to GMT.
2nd Clock Nearby city - Press or to select a city associated with the selected
time zone.
HP DreamScreen User Guide 25

Weather
You must have an Internet connection for Weather to work.
1 Select the Weather icon in the main menu and press OK. The current day’s weather
and the forecast for the next four days’ weather for the configured location appears.
To change the location for the weather forecast:
2 Press Option. A Weather Settings dialog appears.
3 Select Country and press OK. A keyboard page appears.
a Use the navigation controls to select the first character of the desired country. Then
press OK.
b Continue until you have spelled out the name of the country.
c Use the arrow buttons to select Enter on the keyboard. Then press OK.
And/Or
Select City or Zip Code and press OK. A keyboard page appears.
d Use the navigation controls to select the first character of the desired city or the Zip
code. Then press OK.
e Continue until you have spelled out the name of the city or the five digit Zip code.
Use the arrow buttons to select Enter on the keyboard. Then press OK.
Or
Navigate to Select City, and press the
4 Optionally, select Temperature Format, and press the
Fahrenheit(°F) or Celsius(°C).
5 Select OK at the bottom of the dialog. Then press OK.
or to scroll through a list of cities.
or to toggle between
26 HP DreamScreen User Guide

Video
1 Select the Video icon in the main menu and press OK.
2 Press
or to select among the Dates, Folders, All Videos, (and if present)
memory cards, and/or USB tabs.
A thumbnail list of videos appears after a few seconds.
NOTE: To install videos from your PC, use the mini USB cable.
3 Press
4 Use
5 Press OK. The selected video will start.
6 To pause the video, press OK.
7 Press and hold the Back button to return to the main menu.
to move into the thumbnail list.
or to select the video you wish to play.
Or
To stop the video and go back into the thumbnail list, press, Back.
Video Submenus
Press Option while a video in the thumbnail list is selected. Press the or to select
the following submenu items:
Copy - Select Copy and press OK to copy the selected video from an external
source (memory cards, or USB) to the internal memory of the HP DreamScreen. You
cannot copy videos to an external source.
Copy All - Select Copy All and press OK to copy all videos from an external
source (memory cards, or USB) to the internal memory of the HP DreamScreen. You
cannot copy videos to an external source.
Delete - Select Delete and press OK to delete the selected video from the internal
memory of the HP DreamScreen. You cannot delete videos from an external source.
Delete All - Select Delete All and press OK to delete all videos from the internal
memory of the HP DreamScreen. You cannot delete videos from an external source.
Video Settings - Select Video Settings and press OK to launch the Video Setting
dialog, which sets the repeat and shuffle behavior of how the videos are displayed.
Use the or to select Play Once, Random, or Repeat.
When you have selected your option, select the OK button and press OK.
HP DreamScreen User Guide 27

Photo
1 Select the Photo icon in the main menu and press OK.
Press
or to select among the Dates, Folders, All Videos, (and if present) PC,
memory cards, and/or USB tabs.
2 Press OK. A thumbnail list of photos appears.
3 Press
4 Use the navigation controls to select the first photo you wish to browse or from which
5 Press OK to browse. The
6 Press Back to stop browsing or stop a slide show.
7 Press Back two more times to return to the main menu.
Photo Submenus
to select the first photo in the thumbnail list.
you wish to start a slide show.
and move you to the right in the photo browser. The
and the
Or
Press to start the slide show.
Press Option while a photo in the thumbnail list is selected. Press the or the to
select the following submenu items:
move you to the left in the photo browser.
Slideshow - Select Slideshow and press OK to start a slide show.
Rotate - Select Rotate and press OK to rotate the selected photo. This only works
on photos stored in the internal memory of the HP DreamScreen. You cannot rotate
photos stored on an external source.
Copy - Select Copy and press OK to copy the selected photo from an external
source (memory card, or USB) to the internal memory of the HP DreamScreen. You
cannot copy photos to an external source.
Copy All - Select Copy All and press OK to copy all photos from an external
source (memory card, or USB) to the internal memory of the HP DreamScreen. You
cannot copy photos to an external source.
Delete - Select Delete and press OK to delete the selected photo from the internal
memory of the HP DreamScreen. You cannot delete photos from an external source.
Delete All - Select Delete All and press OK to delete all photos from the internal
memory of the HP DreamScreen. You cannot delete photos from an external source.
28 HP DreamScreen User Guide

Photo Options - Select Photo Options and press OK to launch the Photo Options
dialog, which sets the behavior of how the photos and thumbnails are displayed.
Note: The Photo Options dialog can also be launched from the opening page of the
Photo application by pressing Option.
The options are:
z Slideshow Timing - Press the or to change the time for each photo in a
slide show to be displayed. The intervals are: 3 sec, 5 sec, 8 sec, 10 sec, 30
sec, 5 min, 10 min, 30 min, 1 hour, 12 hour, and 24 hour.
z Slideshow Transition - Press the or to change the style of transition from
one photo to the next. The transition options are: Random, Wipe Left, Wipe
Right, Wipe Up, Wipe Down, Split horizontal in, Split horizontal out, Split
vertical in, Split Vertical out, Left blinds, Right blinds, Up blinds, Down blinds,
Insert Mode, Plus Mode, and Dissolve.
z Display Mode - Press the or to choose between Fit to screen, or Original.
z Slideshow Sequence - Use the or to select Play Once, Random, or
Repeat.
z Stream Photos From PC - Use the or to select the PC on your network that
you want to use as a source for streaming photos. See the “Streaming photos”
section that follows.
z When you have made your selections, select the OK button and press OK.
Streaming photos
Note: To stream photos from a PC, you must configure at least one photo library configured
in Windows Media Player (version 11 or greater).
1 Select Photo from the main menu and press OK. The Photos on Screen page appears.
2 Press Option. The Photo Options dialog (in the foregoing description) appears.
3 Configure the Photo Options, select the OK button and press OK. The HP DreamScreen
returns to the Photos on Screen page.
4 Use
or to select the PC tab and press OK.
5 A list of folders that reside on the PC appears.
6 Use the navigation controls to select a photo folder and press OK. You may need to
repeat this step on one or more subfolders before any photo thumbnails appear.
7 Select a thumbnail and press to start a slide show of photos from the PC.
Or
Select a thumbnail and press OK. to browse photos from the PC.
8 Press Back to stop browsing or stop a slide show.
9 Press and hold Back to return to the main menu.
HP DreamScreen User Guide 29

Music
1 Select the Music icon in the main menu and press OK.
or to select among the Album, Artist, Genre, Song, (and if present) PC,
Press
memory card, and/or USB tabs.
2 Press OK.
For Albums, Artists, Genres, and Songs
A list of group icons (e.g., album titles, artist names, or music classified by genre)
appears.
1 Select a group from the list and press OK. A list of music selections appears, with the
first song highlighted.
2 Press OK to play the highlighted song. Music will continue to play selections from the
list.
Or
Press Option to launch a submenu of options.
Copy - Disabled for Albums, Artists, or Genres.
Copy All - Disabled for Albums, Artists, or Genres.
Delete - Select Delete and press OK to delete the selected music from the internal
memory of the HP DreamScreen. You cannot delete music from an external source.
Delete All - Select Delete All and press OK to delete all music from the internal
memory of the HP DreamScreen. You cannot delete music from an external source.
Music Options - Select Music Options and press OK to launch the Music Settings
dialog, which sets the behavior of how the music and thumbnails are displayed.
The options are:
z Playback Sequence - Use or to select Play Once, Random, or Repeat.
z Stream Music From PC - Use the or to select the PC on your network that
you want to use as a source for streaming music.
z When you have made your selections, select the OK button and click OK.
3 Use
4 Press OK to play the song. Pressing OK alternately pauses and continues the music.
5 Press Back to return to the list of songs.
6 Press Back three more times to return to the main menu.
and to select the first song you wish to play.
For PC, memory card, compact flash, or USB
A list of music selections appears, with the first song highlighted.
1 Use
30 HP DreamScreen User Guide
and to select the first song you wish to play.

2 Press OK to play the song. Pressing OK alternately pauses and continues the music.
Or
Press Option to launch a submenu of options.
Copy - Select Copy and press OK to copy the selected music from an external
source (memory card, or USB) to the internal memory of the HP DreamScreen. You
cannot copy music to an external source.
Copy All - Select Copy All and press OK to copy all music from an external source
(memory card, or USB) to the internal memory of the HP DreamScreen. You cannot
copy music to an external source.
Delete - Select Delete and press OK to delete the selected music from the internal
memory of the HP DreamScreen. You cannot delete music from an external source.
Delete All - Select Delete All and press OK to delete all music from the internal
memory of the HP DreamScreen. You cannot delete music from an external source.
Music Options - Select Music Options and press OK to launch the Music Setting
dialog, which sets the behavior of how the music and thumbnails are displayed.
Note: The Music Options dialog can also be launched from the opening page of the
Music application by pressing Option.
The options are:
z Playback Sequence - Use or to select Play Once, Random, or Repeat.
z Stream Music From PC - Use the or to select the PC on your network that
you want to use as a source for streaming music. See the “Streaming Music”
section that follows.
z When you have made your selections, select the OK button and press OK.
Streaming Music
Note: To stream music from a PC, you must configure at least one music library configured in
Windows Media Player (version 11 or greater).
1 Select Music from the main menu and press OK. The Music from your PC page
appears.
2 Press Option. The Music Options dialog (in the foregoing description) appears.
3 Configure the Music options, select the OK button and press OK. The HP DreamScreen
returns to the Music from your PC page.
4 Use
or to select the PC tab and press OK.
5 A list of folders that reside on the PC appears.
6 Use the navigation controls to select a music folder and press OK. You may need to
repeat this step on one or more subfolders before any music selections appear.
7 Select a song and press OK to listen to music.
8 Press OK again to pause the music.
9 Press Back to move up one level.
10 Press and hold Back to return to the main menu.
HP DreamScreen User Guide 31

Facebook requires an Internet connection and an account that is already set up.
NOTE: You must configure the HP DreamScreen to view friends, photos, and events on your
Facebook account before you can use your HP DreamScreen to use Facebook. The first time
you start Facebook, an introductory screen appears. The introductory screen gives you the
choice to configure the HP DreamScreen to view friends, photos, and events from an existing
Facebook account or to go to a PC and create a Facebook account.
Configuring your HP DreamScreen to use your Facebook account
1 Select the Facebook icon in the main menu and press OK.
2 Press Option to start the Facebook Account dialog.
3 Select Email. A keyboard page appears.
NOTES:
The bottom row of the keyboard has some preconfigured shortcut keys such as:
http://, www., .com, .org, .gov, .edu, and .net to make it easier to key in a URL.
Select Caps Lock and press OK to reveal upper case letters and several
additional characters. Select Caps Lock and press OK again to return to the
standard keyboard setting.
4 Use the navigation controls to select the first character of the email address that you use
for your Facebook account. Then press OK.
Continue until you have spelled out the entire email address.
5 Use the navigation controls to select Enter on the keyboard. The Facebook Account
dialog appears.
6 Select Password. A keyboard screen appears.
7 Use the arrow buttons to select the first character of your Facebook password. Then
press OK.
Continue until you have spelled out the entire password.
8 Use the navigation controls to select Enter on the keyboard. Then press OK.
9 Select the Save Password checkbox and click OK to avoid having to enter the
password every time you start Facebook.
10 Select OK and press OK. A Facebook list of friends appears.
11 Press Back to return to the main menu.
Viewing friends in your Facebook account
32 HP DreamScreen User Guide

1 Select the Facebook icon in the main menu and press OK. The Status Updates tab is
highlighted by default. Any friends who have included you in their list of contacts will
appear if they have posted any public comments.
2 Use
3 Press Back to go back to the tabs at the top of the Facebook page.
4 Press Back again to return to the main menu.
and to scroll your Facebook status updates down or up one page at a time.
Viewing photos in your Facebook account
1 Select the Facebook icon in the main menu and press OK.
2 Press
3 Press
4 Use the navigation controls to select a friend whose photos you want to view. Then press
5 Use the navigation controls to select an album. Then press OK.
6 Press OK to browse the photos in the album.
7 Press Back to go up to the album view.
8 Press Back to go up to your friends’ thumbnail list.
9 Press Back two more times to get to the main menu.
to select the Photos tab. Then press OK. A thumbnail list of your friends’
profile photos (starting with you) appears. An icon appears when no profile exists for a
friend.
to get into the thumbnail list.
OK.
NOTE: if a selected friend has not posted a photo album, a message indicating there is
no album appears.
Or
Press to start a slide show of the selected album.
Viewing your events in your Facebook account
1 Select the Facebook icon in the main menu and press OK.
2 Press
3 Use
to select the Events tab. Then press OK. Any events you have entered appear.
and to scroll through the events in the list.
Or
Press Back until you return to the main menu.
HP DreamScreen User Guide 33

Snapfish
Snapfish requires an Internet connection and a Snapfish account that is already set up on
your PC.
NOTE: You must configure the HP DreamScreen to play from your Snapfish account before
you can view Snapfish photos or slide shows on your HP DreamScreen. The first time you start
Snapfish, an introductory screen appears. The introductory screen gives you the choice to
configure the HP DreamScreen to play from an existing Snapfish account or to go to a PC
and create a Snapfish account.
Configuring your HP DreamScreen to use your Snapfish account
1 Select the Snapfish icon in the main menu and press OK. The Snapfish page appears
with the Albums highlighted.
2 Press Option. A Snapfish Account dialog box appears.
3 Select Email and press OK. A keyboard page appears.
NOTES:
The bottom row of the keyboard has some preconfigured shortcut keys such as:
http://, www., .com, .org, .gov, .edu, and .net to make it easier to key in a URL.
Select Caps Lock and press OK to reveal upper case letters and several
additional characters. Select Caps Lock and press OK again to return to the
standard keyboard setting.
4 Use the navigation controls to select the first character of the email address that you use
for your Snapfish account. Then press OK.
Continue until you have spelled out the entire email address.
5 Use the arrow buttons to select Enter on the keyboard. The Snapfish Account dialog
box appears.
6 Select Password. A keyboard screen appears.
7 Use the navigation controls to select the first character of your Snapfish password. Then
press OK.
Continue until you have spelled out the entire password.
8 Use the navigation controls to select Enter on the keyboard. Then press OK. The
Snapfish Account dialog box appears.
9 Select the Save Password checkbox and click OK to avoid having to enter the
password every time you start Snapfish.
10 Select the OK button and press OK.
34 HP DreamScreen User Guide

Using your Snapfish account
1 Select the Snapfish icon in the main menu and press OK. A thumbnail list of albums
appears.
2 Press
3 Press OK to select the album. The first photo in the album will be selected.
4 Press OK to browse. The
5 Press Back to stop browsing or stop a slide show.
6 Press Back two more times to return to the main menu.
to get into the album thumbnail list. The first album will be highlighted.
Use the navigation controls to select a different album as desired.
NOTE: You can start a slide show from the selected album by pressing at this
point, or you can continue to the next step for additional options.
Use the navigation controls to select the first photo you wish to browse or from which
you wish to start a slide show.
and move you to the right in the photo browser. The
move you to the left in the photo browser.
and
Or
Press to start the slide show.
HP DreamScreen User Guide 35

Pandora
Pandora requires an Internet connection and a Pandora account that is already set up on
your PC.
NOTE: You must configure the HP DreamScreen to play music from your Pandora account
before you can listen to Pandora. The first time you start Pandora, an introductory screen
appears. The introductory screen gives you the choice to configure the HP DreamScreen to
play from an existing Pandora account or to go to a PC and create a Pandora account.
Configuring your HP DreamScreen to use your Pandora account
If you do not have a Pandora account or you do not have media sharing enabled on your PC,
the HP DreamScreen will prompt you to set up a Pandora account when you start Pandora.
1 Set up a Pandora account from your PC as you normally would.
2 Ensure that your PC and your HP DreamScreen on the same local area network.
3 Set up file sharing. When you install HP DreamScreen PC Software and configure it to
share with your HP DreamScreen, that should take care of this. See “Installing HP
DreamScreen PC Software.”
4 When you run Pandora from the main menu on the HP DreamScreen, the HP
DreamScreen detects the Pandora setup from your PC and displays stations that are
configured for that account.
5 Use
or to select a station and press OK.
When you select a station, the HP DreamScreen runs Pandora from the PC and streams
the music from the PC
Using your Pandora account
1 Select the Pandora icon in the main menu and press OK. A list of stations appears.
2 Press
3 Press OK to play music from the selected station. Music will start to play from the
4 Press OK to stop playing music.
5 Press and hold Back to return to the main menu.
36 HP DreamScreen User Guide
to get into the station list. The first station will be highlighted.
or to select a different station as desired.
Use
selected station.
NOTE: You c a n use
start playing music from the newly selected station.
or to select a different station at any time. Then press OK to

HP Smart Radio
HP Smart Radio requires an Internet connection.
NOTE: You must configure stations on HP Smart Radio before you can listen to listen to HP
Smart Radio.
1 Select the HP Smart Radio icon in the main menu and press OK. The HP Smart Radio
page appears.
2 Press Option. The Search for Stations dialog box appears.
3 Use
4 Use
5 Use
6 Use
7 Use
8 Use
9 Use
10 Use
11 Use
or to select Location and press OK.
Or
Use
or to select Genre and press OK.
to select the First Char of Location / Genre (depending on your choice in
the previous step) selector.
or to select the first character of the location / genre.
to select the Location / Genre selector.
or to scroll the items in the selector.
to go to the Sort By options.
or to select Popularity and press OK to sort stations by popularity.
Or
Use
or to select Name and press OK to sort stations by name.
to select the OK button on the screen. Then press OK on the remote.
A list of stations loads and appears after a brief amount of time.
and to select a station in the list. Press OK to add a selected station to your
permanent play list.
NOTE: When you add a station to your play list, it begins to play and continues
playing until you add another station.
12 Repeat the previous step to add any other stations to your play list.
13 Press Back to view your HP Smart Radio play list.
14 Use
and to select a new station in the play list, and press OK to start playing.
Or
You can remove a station. Use
Option. Select Yes and press OK in the Remove Selected Stations dialog to remove
the station.
and to select a station in the play list, and press
HP DreamScreen User Guide 37

HP DreamScreen PC Software
The CD that comes with your HP DreamScreen has PC software that can enhance the ease of
HP DreamScreen configuration and installation of photos, videos, and music files. The PC
software allows you to:
Upload photos, videos, and music from your PC to your HP DreamScreen.
Manage multiple HP DreamScreens on your home network.
Use your PC to set up your HP DreamScreen(s) to view your accounts on Snapfish,
Pandora, and Facebook.
Installing HP DreamScreen PC Software
Note: HP DreamScreen PC Software is supported on Windows
®
Vista
32 and 64-bit operating systems.
1 Turn on the HP DreamScreen and connect it to your network.
2 Insert the HP DreamScreen CDROM into the optical disc drive of your PC.
The HP DreamScreen PC Software will start automatically. A list of options appears.
Note: If the HP DreamScreen PC Software does not start automatically, open the HP
DreamScreen CDROM in Windows Explorer, and double-click the autorun.exe file.
3 Click on the option to install the HP DreamScreen PC Software. An Install Shield Wizard
dialog box appears.
Note: If the HP DreamScreen PC Software is already installed, a dialog box will either
appear and inform you if the currently installed PC software is the newest available, or it
will ask you if you want to update to a newer version of HP DreamScreen PC Software.
4 Click Next to continue with the installation.
The End User License Agreement appears in a dialog box.
5 Scroll through the End User License Agreement to read it.
6 Select the button to accept the terms of the End User License Agreement.
Note: You must accept the terms of the End User License Agreement to complete the
installation of the HP DreamScreen PC Software.
If you select the button to decline the End User License Agreement, cancellation of the HP
DreamScreen PC Software installation is the only available option.
®
XP 32-bit and Windows
7 Click Install.
8 Continue following the prompts and by clicking Next whenever it appears in a
subsequent dialog box.
After a few steps, a Media Sharing dialog box appears with an icon representing each
HP DreamScreen on your network.
38 HP DreamScreen User Guide

9 Left click the icon of the HP DreamScreen that you want to configure to share media files
stored on your PC. This also enables media sharing with Windows Media Player.
Note: To select more than one HP DreamScreen to configure to share files with your PC,
hold down the Ctrl key while you left click the additional icons.
10 Click OK in the Media Sharing dialog box. The final Install Shield Wizard dialog box
appears.
11 Click Finish to complete the PC software installation and setup.
NOTE: From time to time you may be prompted to update your HP DreamScreen PC
Software when software updates are available. It is recommended that you accept
updates when prompted.
Running HP DreamScreen PC Software
1 Turn on the HP DreamScreen and connect it to your network.
2 Go to the HP DreamScreen main menu.
3 Double-click the HP PC Utility icon on the PC desktop. The HP DreamScreen PC Software
main window appears.
4 Click the name of the HP DreamScreen from the list at the top of the HP DreamScreen PC
Software window.
HP DreamScreen PC Software displays an active Drag and Drop folder icon for
transferring files from the PC to the HP DreamScreen. The following message is
displayed on the HP DreamScreen:
Screen is ready to receive files from PC
The HP DreamScreen does not allow direct user input at this time.
Note: If the HP DreamScreen list at the top of the HP DreamScreen PC Software utility
window is empty, click the Find Screen(s) button in the lower right corner of the
window.
HP DreamScreen User Guide 39

Drag and Drop file transfers
1 Open Windows Explorer and navigate to a folder containing picture or music files.
2 Click a music or picture file in Windows Explorer. Continue to press the left mouse
button while dragging the selected file over the folder displayed in the HP DreamScreen
PC Software utility window.
The file is transferred to the HP DreamScreen.
Note: You can also drag a folder containing multiple files (even mixed media types)
into the file folder displayed in the PC Utility window.
3 Click Finished when you have finished using HP DreamScreen PC Software and want
to use the HP DreamScreen normally.
HP DreamScreen PC Software buttons
Finished
Click Finished when you have finished using HP DreamScreen PC Software and want
to use the HP DreamScreen normally.
Find Screen(s)
Click Find Screen(s) in the HP DreamScreen PC Software utility window to find an HP
DreamScreen that does not appear in the list at the top of the window.
Options
Click Options in the HP DreamScreen PC Software utility window. The Options page
appears with the following buttons:
Online Services
1 Click Online services to use your PC to configure the HP DreamScreen to access your
existing Facebook and, Snapfish accounts. An account settings page appears.
2 Enter the user email account name and password for your Facebook and/or Snapfish
account.
3 Click Send to Screen to send the online services account information to the HP
DreamScreen and return to the Options page.
Or
Click Back to return to the Options page without transferring online account information.
4 Click Back to return to the HP DreamScreen PC Software main window.
5 Click Finished when you have finished using HP DreamScreen PC Software and want
to use the HP DreamScreen normally.
Delete All
1 Click Delete All to delete all the media files on the HP DreamScreen. A pop up
window appears and asks you to confirm that you want to delete all music, photo, video
files that are currently on the HP DreamScreen.
40 HP DreamScreen User Guide

2 Click OK to confirm that you want to delete all the media files from the HP
DreamScreen.
Or
Click Cancel to avoid deleting any files from the HP DreamScreen.
Repair Now
1 Click Repair Now to restart the network services on your PC. A Summary window
appears followed by a Components Wizard pop-up window.
2 Wait for the Wizard to complete.
3 Click Next on the Summary window. The Options window appears.
Check Now
1 Click Check Now to find out if your HP DreamScreen PC Software is current. An HP
DreamScreen PC Updater dialog appears.
2 Click the red X in the upper right corner of the dialog box if the updater indicates your
HP DreamScreen PC Software version is new.
Or
If your HP DreamScreen PC Software needs to be updated, continue following the
prompts and by clicking Next whenever it appears in a subsequent dialog box.
Help
Click Help if you need help running HP DreamScreen PC Software. An online help
session starts.
Back
Click Back to return to the HP DreamScreen PC Software main window.
HP DreamScreen User Guide 41

Troubleshooting
Remote control does not work or works erratically
The most likely cause of this is a weak battery. Replace the battery.
Cannot establish a wireless connection
Incorrectly setting the following parameters can cause this problem:
SSID - This is the network name (also known as the server set identifier, or SSID). Check
for correct spelling. The SSID is case sensitive. If the router is set to broadcast the SSID,
it will be scanned automatically during setup for the wireless network, but it might not be
broadcast for security reasons.
Security - The security type used by the router. The choices are: None, WEP (OPEN),
WEP (SHARED), WPA-PSK (TKIP), WPA-PSK (AES), WPA2-PSK (TKIP), and WPA2-PSK
(AES). You need to match the security type during your wireless network setup with the
security type used in your router configuration for wireless connections.
Password - The password for WEP and WPA security types is a key that is generated by
a passphrase that is entered when the router is configured. The key is what you need to
enter in the password field.
MAC address - This is the Media Access Control (MAC) address, an address that is
unique to every network card. If your router is configured to connect explicitly to wireless
cards on a list, you must add the MAC address of HP DreamScreen to the list on your
router. Once you make a wireless connection, you should be able to view the MAC
addresses of all devices connected to your router. The MAC address of the HP
DreamScreen wireless network card is displayed by default when you select Setup from
the main menu and then, Network Setup. Then click OK.
To adjust your router’s configuration, see the configuration instructions that came with your
router.
Correcting network streaming problems
If the HP DreamSereen is connected to your home network, but it still cannot stream content
from your computer, try the following solutions:
1 Finding the IP addresses of the HP DreamScreen and the computer
Follow the instructions below to find the IP address of your HP DreamScreen:
a Make sure the HP DreamScreen is connected to the network and can access the
Internet.
b Use the navigation controls to select Setup, and press OK. The Settings menu
opens.
c Press
d Find the IP address of the computer that you are using as a media server. From a
42 HP DreamScreen User Guide
or to select Network, and then press OK. The Network Summary
screen opens. You can see the IP information of your HP DreamScreen.
command line, enter ipconfig -all
Both the computer and HP DreamScreen must have the same Gateway address. If
not, this is probably the problem. Change the gateway address to the same
address for all devices that you want to share on the network.

e From your computer, open the cmd window again and type ping 192.168.xx.xx
(the IP address of the HP DreamScreen that was found from the HP DreamScreen
Network Summary screen).
If the HP DreamScreen sends a reply from 192.168.xx.xx then your computer and
your HP DreamScreen are able to send packet information across the network.
Continue using these steps to find and correct the problem.
If the message “Request timed out” appears, there is still a basic networking
problem between your computer and your HP DreamScreen.
2 Ensure you have enabled Media Sharing
Use the instructions in Starting or stopping media sharing with Windows Media Player
11 to check if you enabled media sharing on your computer. In many cases, even
though you enabled sharing, Windows Media Player 11 asks to re-enable media
sharing.
If media sharing is enabled and the HP DreamScreen is listed among the devices that
WMP11 can stream to, then: stop sharing and then restart sharing. This restart is usually
good enough to make sure the WMP11 server can be seen by the HP DreamScreen.
If you enabled media sharing, make sure the HP DreamScreen is among the devices
allowed to receive content.
3 Ensure a firewall is not blocking the stream
Windows Media Player 11 ensures that Windows firewall allows media streaming;
however it is not unusual for a computer to have more than one firewall software
installed and enabled. If you cannot stream any content and WMP11 is configured
correctly, temporarily disable all firewalls (except Microsoft
®
Windows firewall). If that
fixes the problem, configure the firewall settings so that WMP11 is considered a trusted
application and the HP DreamScreen is part of your trusted network. For additional
help, see the Microsoft FAQs on Firewall settings for WMP11.
4 Ensure the computer is using a private Network (Vista)
If your computer is not using Windows Vista, skip this step.
If your computer is running Microsoft Vista, make sure it is using a private and not a
public network. Vista does not allow any media streaming in a public network. To check
your settings, follow these steps at your computer:
a Click Start, and select Network.
b Click the Network and Sharing Center tab.
c If your network is Public, click Customize.
d In the Customize screen, change your network to Private.
5 Disabling unused LAN connections
If your PC has or ever had more than one LAN card, the media server may have
selected to stream on the port of the network card connection that is not connected to the
HP DreamScreen. To check if there are multiple LAN connections on a computer with
Windows access the Network connections window using the following steps at your
computer:
a Click Start, Connect to, and then click Show all connections.
b Check your connections under LAN or High-speed Internet.
HP DreamScreen User Guide 43

If there are more than one active Local Area Connection, right-click on a connection
that the HP DreamScreen does not use and select Disable.
The HP DreamScreen should be able to find and stream shared music and photos
through Windows Media Player.
Finding network settings of your HP DreamScreen
To find the network settings of your HP DreamScreen, follow these steps:
1 Go to main menu of your HP DreamScreen.
2 Select Setup and press OK.
3 Select Network and press OK. Your home network information is displayed.
Finding the network settings of your computer
You can find the network settings of a computer by following these simple steps:
1 Click Start on the taskbar, and then select Run.
2 On the Run window, type cmd, and then press the Enter key. A new command window
should appear.
3 When the new command window appears, type ipconfig -all, and then press the
Enter key. The network information for your computer displays.
Finding the network settings of your router or access point
The procedure to find the settings of your router, such as the SSID and wireless keys, varies
and depends on the router brand and model. Most routers (or access points) are accessible
using a computer browser, such as Internet Explorer.
To find the network settings of your router or access point using the browser, follow these
steps:
1 Open your browser on your computer.
2 Type the address of your access point, for example http://192.168.1.1
If you do not know the address, follow the directions in Finding the network settings of
your computer.
Note: The address of the Default Gateway is also the address of your router.
3 If needed, enter the administrator user name and password. If you do not remember it,
you can reset the router to the default settings and read your router's user manual for the
default user name and password settings. If you still need help, call the support line of
your router's manufacturer or visit their web site.
The SSID is usually listed in the home page of your router's settings.
Finding your wireless encryption keys depends on the model of router, but most routers
list keys under Wireless or Wireless Security or similar. From the router Web page you
should be able to find all the wireless security information that you will need including:
Whether the SSID is broadcast or not
Whether wireless is enabled or disabled
Type of wireless security
Number of bits used in the keys
44 HP DreamScreen User Guide

Keys
Starting or Stopping Media Sharing with Windows Media Player 11
To check your media sharing configuration using Windows Media Player 11 (WMP11):
1 Click Start, and then click Windows Media Player 11.
2 On the top menu, click Library, and then select Media Sharing.
A Media Sharing dialog box appears. If sharing is configured and allowed for your HP
DreamScreen, an icon with a green circle and a check mark appears. The name of your
HP DreamScreen appears below the icon. A red X appears on the icon if media sharing
is not allowed.
Note: If no icon appears in the Media Sharing dialog, do the following:
a Close the dialog.
b Turn off your HP DreamScreen and then turn it back on.
c Go back to step 2 and continue.
3 Select the icon for your HP DreamScreen, click Allow, and then click Apply to enable
media sharing with your HP DreamScreen. Click OK when you are done.
Note: To stop media sharing, follow this procedure but click Deny in the Media
Sharing dialog.
4 Shut down your PC and your HP DreamScreen.
5 Turn on your HP DreamScreen. Then turn on your PC.
Customer Support
If you are still having problems, visit http://www.hp.com for more details and the latest
information.
You can also contact HP customer support by phone at 1-800-474-6836 (800-HP-Invent).
HP DreamScreen User Guide 45

Specifications
Panel Specification
Size HP DreamScreen 100: 254.5 mm (10.2 in)
HP DreamScreen 130: 337.8 mm (13.3 in)
Aspect ratio HP DreamScreen 100: 16:9
HP DreamScreen 130: 16:10
Resolution HP DreamScreen 100: 800 x 480
HP DreamScreen 130:1280 x 800
Contrast ratio 350:1
Power
External Power Adapter Input: 100-240VAC, 50/60Hz, 0.8A
Output: 12VDC, 2.0A
Audio
Internal speakers Stereo
Connectivity
USB Ports 1 STD USB 2.0 Host
1 STD mini USB 2.0 client
Storage/Media
Internal memory 2GB
Note: Customer usable space is limited to 1.5GB
Memory cards supported:
CF – CompactFlash® Supported
MS – Memory Stick Pro™ Supported
MMC – MultiMedia Card Supported
SD™ – Secure Digital Supported
SDHC™ – High Capacity Supported
xD – xD-Picture Card™ Supported
Memory cards slot 1 SD/SDHC/MS/MS-Pro/MMC/xD
Memory cards slot 2 CF I/II/MD
46 HP DreamScreen User Guide

Media Files Supported:
Video file formats
(AVI, .MPG, .MP4)
MPEG 1, MPEG 2
MP@ML
MPEG 1 Compliant with ISO/IEC11172
Part 2
Max resolution up to 352x240
@30Hz or 352x288 @ 25Hz
Max bit rate up to 1.5Mbps
MPEG 2 Compliant with ISO/
IEC 13818 Part 2
Supports up to Main Profile @
Main Level (720x480 @ 30Hz or
720x576 @ 25Hz)
Max bit rate up to 15Mbps
MPEG 4 ASP@L5 Compliant with ISO/IEC 14496 Part 2
Supports up to Advanced Simple
Profile @ Level 5 (720x480 @
30Hz or 720x576 @ 25Hz)
No support for Resync marker,
Global Motion Compensation,
and Quarter-pel Motion
Compensation
Max bit rate up to 8Mbps
H.264 BP/MP/
HL@L3
Compliant with ITU-T H.264
Supports Simple, Baseline, Main,
and High profiles up to Level 3
(720x480 @ 30Hz or 720x576 @
25Hz)
Does not support the following:
Extended Profile: SVSP
switching slices
Extended Profile: data
partitioning
High Profile: 4:2:2 and
4:4:4 YUV pixel formats
High Profile: residual color
transform
High Profile: bit depths other
than 8 bits/pixel
HP DreamScreen User Guide 47

Photo file formats BMP
JPEG (JPEG
Compression)
Compliant with ISO/IEC 10918 Part 1
Supports Baseline Profile up to
4096x4096
Does not support CMYK color
space
PNG Compliant with ISO/IEC 15948
Audio file formats MP3 Compliant with ISO/IEC 11172 Part 3
Supports sampling frequency
32KHz, 44.1KHz, and 48KHz
Supports bit rate up to 320Kbps
for Layer 3
Supports bit rate up to 384Kbps
for Layer 2
Supports 2-channel
PCM/LPCM LPCM:2 channels, sampling frequency
up to 48KHz
PCM:5.1 channels, sampling frequency
up to 192KHz
WMA 9 Supports Microsoft Windows Media
Audio 9 Standard
Supports sampling frequency up to
48KHz
Supports bit rate up to 384Kbps
Supports 2-channel
AAC Compliant with ISO/IEC 14496 Part 3
Supports Low-Complexity profile
Supports sampling frequency up
to 48KHz
Supports bit rate up to 192Kbps
Supports 2-channel
User Interface/Control
Buttons on the front of the
HP DreamScreen
Remote control Infrared, with storage bay on the HP DreamScreen
Vertical Image Switch
Capacitive touch buttons
48 HP DreamScreen User Guide

Auto image rotate with
HP DreamScreen
orientation
PC software
Yes, but only during slide show or photo browsing
HP DreamScreen PC
Software utility
Supported operating systems
Microsoft Windows XP 32-bit (SP2 or later required for Media
Player 11 functionality)
Microsoft Windows Vista 32 and 64-bit
HP DreamScreen User Guide 49

Frequently Asked Questions
Question Answer
How far away can I use the
remote control?
Why can’t I display some of my
Photos?
Why can’t I play some of my
music tracks?
Why can’t I play some of my
video clips?
Can I delete photos from
external memory cards, flash
drives, or connected PC?
Can I delete photos from
internal memory?
How can I switch to the internal
memory?
I have lost or damaged my
remote and/or power adapter.
Can I order replacements?
How can I find the latest
information/FAQs about my
HP DreamScreen?
Up to 2.44m (8 ft.)
Some photo/image file formats or resolutions are not
supported. Please refer to the specifications.
JPEG support up to 4K x 4K resolution, TIFF (4K x4K if JPEG
content), PNG (1K x 1K), BMP (1K x 1K)
Some music file formats are not supported. Please refer to
the specifications.
Some video file formats are not supported. Please refer to the
specifications.
No. You cannot use the HP DreamScreen to delete photos,
videos, or music from any external source.
Yes. You can delete photos, videos, and music from internal
memory.
Remove all external memory cards and USB flash drives. The
HP DreamScreen will automatically switch to internal
memory.
Yes. Visit http://www.hp.com for more details.
Visit http://www.hp.com for more details and the latest
information.
How can I get customer
support from a live person over
the phone?
50 HP DreamScreen User Guide
The HP customer support phone number is:
1-800-474-6836 (800-HP-Invent)

Cleaning and Care Tips
Please power off the HP DreamScreen before cleaning.
DO NOT spray or pour liquid cleaning agents directly on the screen or bezel.
DO NOT use ammonia, alcohol, or abrasive detergent cleaning agents.
Cleaning the Screen
1 Wipe screen with a clean, soft, lint-free cloth to remove dust and loose particles.
2 If further cleaning is required, apply an appropriate cleaning agent (approved for LCD
displays) to a clean, soft, lint-free cloth and wipe the screen.
NOTE: Do not apply too much pressure on the screen to avoid damaging it.
Cleaning the HP DreamScreen and Backing
1 Use a clean, soft, lint-free cloth to remove dust and loose particles.
2 If desired, apply an appropriate cleaning agent to a clean, soft, lint-free cloth and wipe
the appropriate surfaces.
Maintenance Guidelines
To enhance the performance and extend the life of the HP DreamScreen:
Do not open the HP DreamScreen or attempt to service this product yourself. If the HP
DreamScreen is not operating properly or has been dropped or damaged, contact your
Hewlett-Packard authorized dealer, reseller, or service provider.
Adjust only those controls that are described in the operating instructions.
Keep the HP DreamScreen in a well-ventilated area, away from excessive light, heat, or
moisture.
Slots and openings in the cabinet are provided for ventilation. These openings must not
be blocked or covered.
Never push objects of any kind into cabinet slots or other openings.
Unplug the HP DreamScreen from the power outlet before cleaning. Do not use liquid
cleaners or aerosol cleaners.
Do not drop the HP DreamScreen or place it on an unstable surface.
When removing the stand, you must lay the monitor face down on a soft area to prevent
it from getting scratched, defaced, or broken.
HP DreamScreen User Guide 51

Regulatory and Safety Information
Materials disposal
The HP DreamScreen 130 contains the following material that might require special handling
at end-of-life:
Mercury in the fluorescent lamp in the display LCD.
Disposal of mercury can be regulated because of environmental considerations. For disposal
or recycling information, please contact your local authorities or the Electronic Industries
Alliance (EIA) (http://www.eiae.org).
NOTE: The HP DreamScreen 100 does not contain mercury, but please ensure that you
dispose of it properly at the end of product life.
Lithium battery for nonvolatile memory.
The HP DreamScreen contains a lithium battery. This battery is designed to last the lifetime of
the product and is not replaceable. When the HP DreamScreen has exceeded its useful life, it
should be taken to an electronic equipment recycling facility. For disposal or recycling
information, please contact your local authorities or the Electronic Industries Alliance (EIA)
(http://www.eiae.org).
WAR NING: Danger of explosion if the remote control battery is
incorrectly replaced.
Replace only with the same or equivalent type recommended by the
manufacturer. Dispose of used batteries according to the
manufacturer’s instructions.
Perchlorate Material—special handling may apply
The remote control’s battery may contain perchlorate and may require special handling when
recycled or disposed of in California.
For more information go to http://www.dtsc.ca.gov/hazardouswaste/perchlorate/.
52 HP DreamScreen User Guide


54 HP DreamScreen User Guide

B
Browse 12
C
Calendar 24
Care
51
Cleaning
Clock
51
25
D
Disposal of materials 52
F
Facebook 32–33
Features
9
Frequently Asked Questions
FAQ
50
G
Getting Started 1
H
HP Smart Radio 37
I
Initial Setup 10–17
Installing PC software
38
K
Keyboard Utility 6
M
Maintenance 51
Managing Photos
Menu
18
Menu Options
Music
30–31
14–15
18–37
N
Navigation
Keyboard Utility
Remote Control
touch sensitive buttons
Network
wired
19–21
6
4–5
Index
21–23
wireless
P
Pandora 36
PC
16
PC Software
PC software, installing
PC Software, running
Photo
Photos, managing
R
Regulatory and Safety Information 52–53
Remote Control
remote control battery
Running PC Software
S
Setup 18–24
24-Hour Time
Automatic Software Update
Brightness
Date
Device Name
General Tab
Info Tab
Network
Power Management
Synchronize Device Clock With Internet
Time
Time Zone
US Daylight Saving Time
Slide Show
Snapfish
Specifications
T
Troubleshooting 42–45
8
U
Update
28–29
19
wired
wireless
Clock
19
12
34–35
38–41
38
39
14–15
1, 4
1
39
19
24
23
18
18
24
19–21
21–23
23
23
19
19
46
HP DreamScreen User Guide 55

PC Utility 41
software
24
software, automatic
V
Video 27
W
Wall Mounting 3
Weather
26
24
56 HP DreamScreen User Guide
 Loading...