

Page 1

T6570, T8570 Series
Digital Fan-Coil Thermostats
FEATURES
• Simple user interface.
• Attractive modern styling ideal for offices or hotels.
• Digital display of ambient temperature, with user
activated temperature display.
• Digital display shows mode icons when cooling or
heating relays operate, or when energy savings mode
is active.
• Push button setpoint adjustment.
• Switches allow manual control of system operation
and fan speed.
• Energy savings mode - external energy savings input
from time switch, occupancy sensors or hotel cardkey
overrides comfort setpoint with setback heating or
cooling setpoint.
• Energy savings input configurable, normally open or
normally closed.
• Proportional plus integral (P+I) control algorithm for
precision temperature regulation.
• Mounts directly onto wall or standard junction box or
vertical junction box with optional adapter plate.
• Installer setup mode allows changes of operating
APPLICATION
T6570 Series Digital Fan-Coil thermostats provide line voltage
on/off control for fans, valves, compressors or auxiliary
electric heaters in fan-coil and small air-conditioner
applications.
T8570 Series provides low voltage control of these functions.
Models are available for control of single stage air-conditioner
and various fan-coil units
–2-pipe.
– 2-pipe with manual heat/cool changeover.
– 4-pipe with manual heat/cool changeover.
– 4-pipe with automatic heat/cool changeover.
All models are suitable for multiple applications. Changes in
output wiring and external links between wiring terminals can
configure the thermostat for the appropriate application.
The fan can also be controlled from the thermostat. In some
cases it is wired to run continuously and can be switched off
with the On/Off switch. Other models can be installed with fan
running continuously or cycling with the thermostat.
Compressors and auxiliary electric heaters can be controlled
using a relay or contactor controlled by the thermostat.
parameters.
• Selectable °C or °F display.
• Adjustable deadband (some models) for heat and cool
control.
• Selectable energy savings setup cooling and setback
heating setpoints.
• Adjustable maximum heating and minimum cooling
setpoint limits.
• Adjustable minimum relay off-times (heating or
cooling) for compressor short-cycle protection.
• EEPROM permanently retains user settings during
power loss (no batteries required).
• Capability to display temperature sensor failure for
easier troubleshooting.
• Optional remote sensor (T8575D only).
Application......................................................................... 1
Features ............................................................................ 1
Specifications .................................................................... 2
Ordering Information ......................................................... 2
Installation ......................................................................... 3
Operation........................................................................... 4
Operating Modes............................................................... 5
Wiring ................................................................................ 6
PRODUCT DATA
Contents
95C-10897-6
Page 2
T6570, T8570 SERIES DIGITAL FAN-COIL THERMOSTATS
SPECIFICATIONS
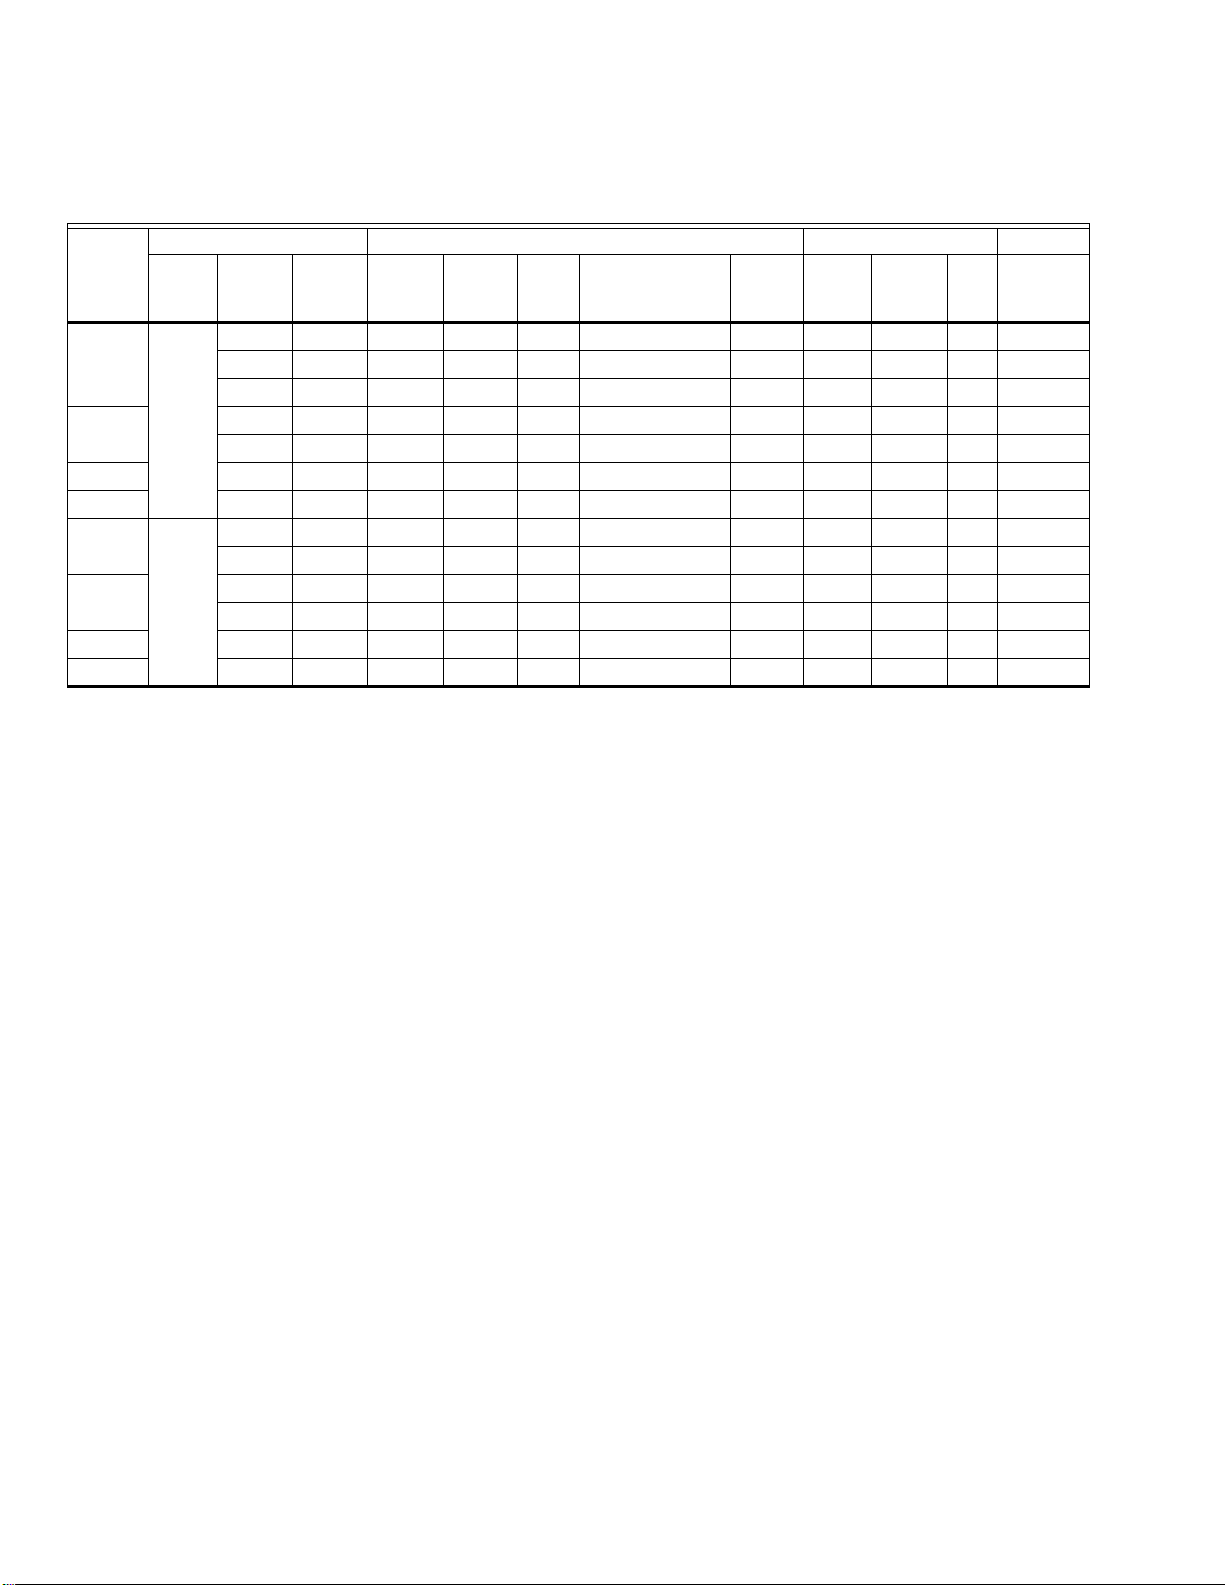
Table 1.
Applications Features Switches Control
2-Pipe
Models
Vol tag e
Fan Coil
T6574B •
120V,
208~
T6575B
277V,
50 -
4-Pipe
2
1
•
3
•
Fan Coil
Relays
• 2 • • • • Fig. 9
• 2 • • • • Fig. 10, 13
T6575C 60 Hz • 2 • • • • Fig. 11, 13
T6575D • 2 • • • • • Fig. 12, 13
Number
T8574B •
24V,
T8575B
50 -
60 Hz
2
1
•
• 2 • • • • Fig. 17
• 2 • • • • Fig. 18
T8575C • 2 • • • • Fig. 19
T8575D • 2 • • • •
1
Heating application
2
Cooling application
3
2-pipe system with external aquastat.
4
optional accessory.
of
Energy
Savings
Input
Fan
On/
Auto
Changeover
Deadband Adjust
Auto
Remote
Sensor
On/Off
(SPST)
3-Speed
Fan
(SP3T)
Heat/
Cool
Wiring
Diagram
1 • • • • Fig. 6
1 • • • • Fig. 7
1 • • • Fig. 8
1 • • • • Fig. 15
1 • • • • Fig. 16
4
• • Fig. 20
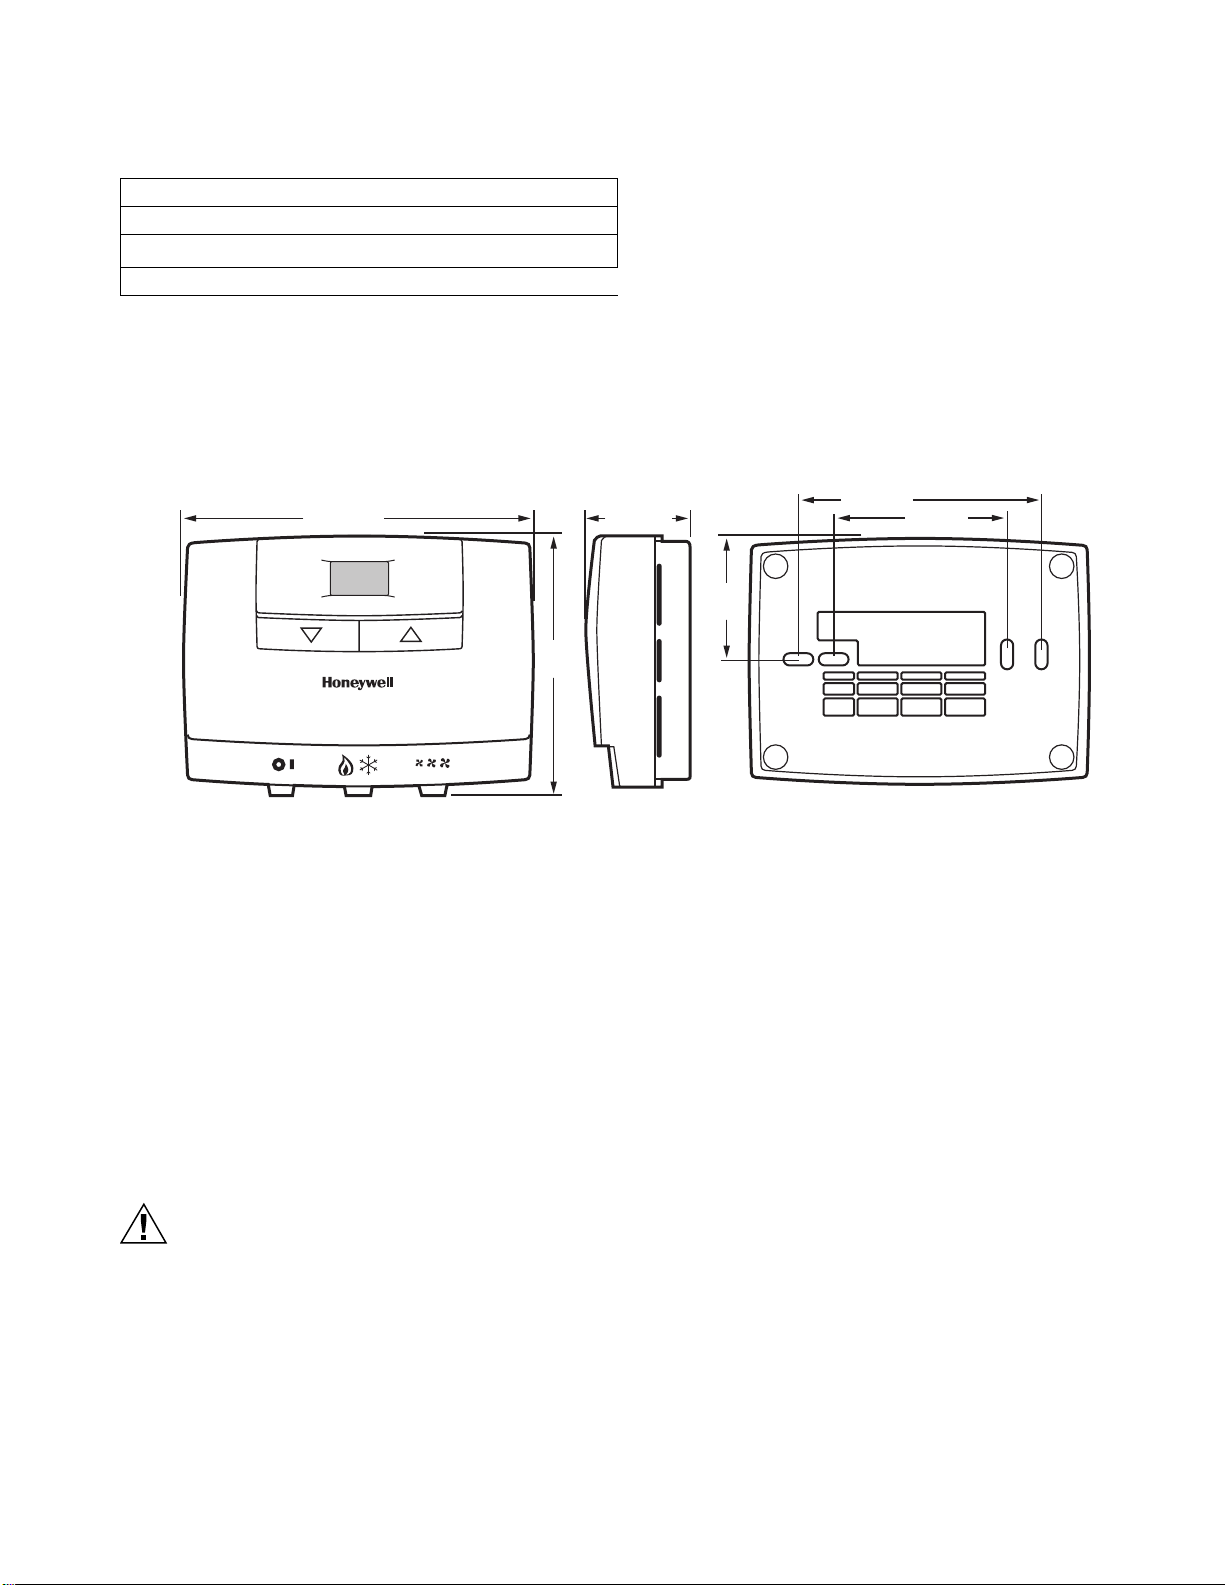
Setpoint Range: 10°C to 30°C (50°F to 90°F). Enclosure: (cover, base, and wallplate) Plastic.
Supply Voltages: 24 (NEMA - rated transformer), 120, 230, Control Performance: On/Off control with P+I algorithm
277 Vac (±10%), 50/60 Hz. (depending on model select ed) gives typical control to 0.75°C (1.5°F) at 22°C (72°F) and
0.5 A. 50% duty cycle.
Ambient Ratings: Junction Box Mounting: Direct mounting on single gang
Temperature: NEMA 2" x 4" surface mount electrical box, or on 4" x 4"
Operating Range: 5°C to 45°C (41°F to 113°F). box with optional 272878 adapter plate.
Shipping and Storage Range: -20°C to 55°C (-4°F to
131°F). Wiring: 11 terminals; screw-in terminals capable of accepting
Humidity Range: 5 to 95% RH, non-condensing at 26°C up to 2 x 18 AWG, 1 x 14 AWG, or 1.5 mm2 wires. Some
(79°F). terminals pre-fitted with color-coded flyleads.
Thermostat Output: 1spdt or 2 spst relay outputs (depending
on model).
ORDERING INFORMATION
When purchasing replacement and modernization products from your TRADELINE® wholesaler or distributor, refer to the
TRADELINE® Catalog or price sheets for complete ordering number.
If you have additional questions, need further information, or would like to comment on our products or services, please write or
phone:
1. Your local Honeywell Automation and Control Products Sales Office (check white pages of your phone directory).
2. Honeywell Customer Care
1885 Douglas Drive North
Minneapolis, Minnesota 55422-4386
In Canada–Honeywell Limited/Honeywell Limitée, 35 Dynamic Drive, Scarborough, Ontario M1V 4Z9.
International Sales and Service Offices in all principal cities of the world. Manufacturing in Australia, Canada, Finland, France,
Germany, Japan, Mexico, Netherlands, Spain, Taiwan, United Kingdom, U.S.A.
95C-10897–6 2
Page 3
T6570, T8570 SERIES DIGITAL FAN-COIL THERMOSTATS
Table 2. Electrical Rating
50-60 Hz 24V 120V 208V 230V 277V
Amps (Resistive) 3.8 3.8 3.8 3.8 3.8
Full Load Inductive 3.0
3.0
1
3.0 3.0 3.0
Pilot Duty 100 VA
1
Equivalent to NEMA 1/8 horsepower rating; allowable load
must be determined by adding nameplate full load and locked
rotor rating of all loads.
Minimum Operational Life (at maximum load): Thermostat
contacts (at 120 Vac): 100,000 cycles
Manual Switches: 10,000 operations.
4-3/16 (122)
3-11/16
(94)
Energy Savings Input: 24 Vdc dry contact, maximum resis-
tance of 1000 ohms. Note 'Caution', page 3.
Protection Class: IP30.
Approvals: CSA Certified C/US LR158158 for Canada and
the U.S.A. Meets CE requirements.
Accessories: Adapter plate for mounting on single- or double-
gang NEMA-standard vertical switch box:
272878 - line voltage models, 24V 2000 series
272881 - 24 V models, 1000 series
T8109 - remote temperature sensor for
T8575D W6380 - fan switching center for T8574/T8575
products
1-7/16 (37)
1-1/2
(38)
3-5/16 (84)
2-3/8 (60)
Fig. 1. Nominal dimensions in inches (mm)
INSTALLATION
When Installing this Product...
1. Read these instructions carefully. Failure to follow them
could damage the product or cause a hazardous condition.
2. Check the ratings given in the instructions and on the
product to make sure the product is suitable for your
application.
3. Installer must be a trained, experienced service techni-
cian.
4. After installation is complete, check out product opera-
tion as provided in these instructions.
CAUTION
Electrical Shock or Equipment Damage Hazard.
Can shock individuals or short equipment circuitry.
Disconnect power supply before installation.
M12081A
IMPORTANT
T6570 Series are line voltage powered devices.
All wiring must comply with national and local electrical codes, ordinances and regulations.
Provide disconnect means and overload protection as required.
T8570 Series thermostats must be powered by an
Approved 24 Vac, Class 2 transformer (such as a
W6380 Relay Control Center).
Location
The T6570, T8570 series thermostats are the temperature
control element in a fan-coil or air-conditioning system. They
must be located about 1.5m (5 ft.) above the floor in a position
with good air circulation to sense room temperature.
The optional T8109 sensor can be used to sense temperature
in return air ductwork, instead of at the thermostat
IMPORTANT
Do not mount device where it can be affected by:
1. Drafts or dead spots behind doors or in corners.
2. Hot or cold air from ducts.
3. Radiant heat from the sun or appliances.
4. Unheated (uncooled) areas such as an outside wall
behind the thermostat.
5. Concealed pipes or chimneys.
3 95C-10897–6
Page 4
T6570, T8570 SERIES DIGITAL FAN-COIL THERMOSTATS
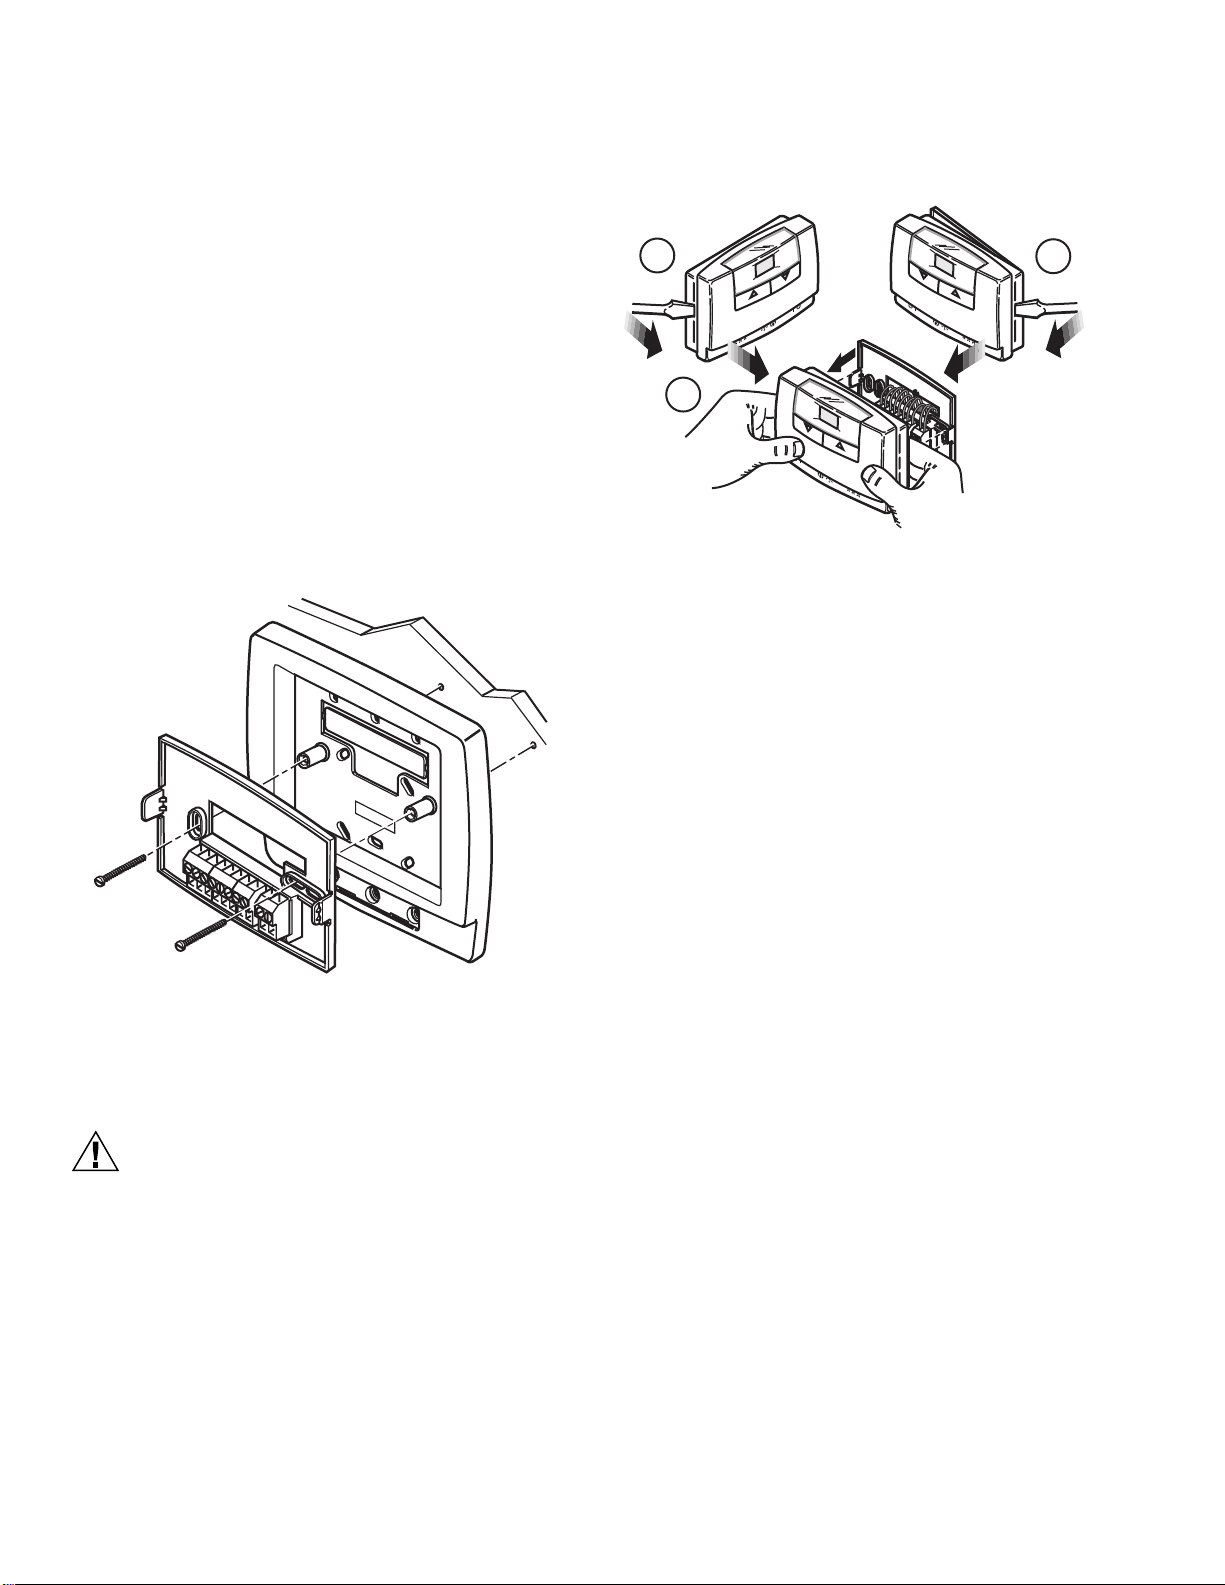
Mounting
Any T6570, T8570 series thermostat can be mounted directly
on the wall on a 65x65mm junction box, or a 2"x4" horizontal
junction box. An optional adapter plate is available for
mounting on a 4"x4" or vertical junction box. (See Fig. 2)
Mounting screws are supplied for alternatives.
1. Feed leadwires through wiring access hole of wallplate
and adaptor plate (if used).
2. Attach supply wires using wire nuts (not provided), or
screw terminals, as appropriate.
3. Locate wallplate in the horizontal mounting position. See
Fig. 2 if using the vertical junction box adapter plate.
4. Push leadwires into electrical junction box and attach
wallplate to box using machine screws provided in the
appropriate mounting holes.
5. Attach thermostat to wallplate:
a. Locate the two center side holes on the back of the
thermostat.
b. Align the holes with the two wallplate side tabs.
c. Press down firmly to snap thermostat into place.
3. Use both hands to pull the thermostat straight away from
the wallplate.
1
2
3
M15396
Fig. 3. Removing the thermostat
Thoroughly check wiring to the wallplate before finally
mounting the thermostat on the wall.
OPERATION
40007507-001
M17505
Fig. 2. Mounting the vertical junction box adapter plate
M17505 Optional adapter plate.
Removing the thermostat
CAUTION
Equipment Damage Hazard.
Improper removal can damage the thermostat.
Carefully follow the thermostat removal directions.
If it is necessary to remove the thermostat from the wallplate
(see Fig. 3):
1. Use a screwdriver to pry thermostat left side away from
the base.
2. Use the screwdriver to pry thermostat's right side away
from the wallplate.
Control
PROPORTIONAL + INTEGRAL (P+I) CONTROL
Like a mechanical thermostat, the T6570, T8570 Series have
On/Off control output. However, this output is regulated by a
P+I algorithm, enabling the thermostat to control closer to
setpoint than conventional thermostats. This results in
performance where the space temperature is maintained within
0.75°C (1.5°F) of the setpoint regardless of fan speed.
P+I action minimizes the difference between the temperature
setpoint and the effective control point by adjusting the output
on-time until the control point matches the setpoint. The ontime is based on a fixed cycle rate of 4 cycles/hour for cooling
(8 cycles/hour for heating), and the proportional band is 1.6°C
(2.9°F).
NOTE: Integral action corrects the temperature control errors
of proportional-only control, but it is slower to react to
large temperature or setpoint changes.
These thermostats also feature optional built-in time
delays for equipment protection which can inhibit
rapid response to large setpoint changes if active.
SINGLE-STAGE COOLING OR HEATING CONTROL (SEE FIG. 4)
In cooling mode the user setpoint will be positioned at the
bottom of the Proportional Band, so the setpoint will effectively
be the temperature where the cooling switches off. In heating
mode the user setpoint will be positioned at the top of the
Proportional Band, and this will be the temperature where the
heating switches off.
NOTE: This also applies to models with manual heat/cool
changeover.
95C-10897–6 4
Page 5

SINGLE STAGE COOLING
C
23.0
22.5
22.0
21.5
21.0
20.5
20.0
SINGLE STAGE HEATING
C
23.0
22.5
22.0
21.5
21.0
20.5
20.0
PROPORTIONAL
BAND
USER
1
SETPOINT
USER
1
SETPOINT
PROPORTIONAL
BAND
1 USER SETPOINT CHANGED
TO 21.5 C (71 F) FROM
23 C (73 F) OR 20 C (68 F).
M17477
Fig. 4. Single stage control.
AUTOMATIC CHANGEOVER WITH ZERO ENERGY DEADBAND
(SEE FIG. 5)
This type of control is available on auto-changeover models
only. The user setpoint centers on the Zero Energy Deadband.
The cooling switch-off-point is positioned at the bottom end of
the cooling proportional band. Likewise, the heating switch-off
point is positioned at the top end of the heating proportional
band.
Zero Energy Deadband width is selectable in the Installer
Setup mode.
EXAMPLE: Using a deadband of 2°C (4°F) and a user setpoint
of 22°C (72°F), the effective heating setpoint is 21°C (70°F)
and the effective cooling setpoint is 23°C (74°F). A change to
the user setpoint causes both heating and cooling setpoints to
change in parallel. This change is restricted to the minimum
cooling setpoint or maximum heating setpoint limits set within
the Installer Setup mode.
C
25.5
25.0
24.5
24.0
23.5
23.0
22.5
22.0
21.5
21.0
20.5
20.0
1
COOLING
PROPORTIONAL
BAND
DEADBAND
HEATING
PROPORTIONAL
BAND
USER SETPOINT CHANGED FROM
1
22 C (72 F) TO 23.5 C (74 F).
USER
SETPOINT
M17478
T6570, T8570 SERIES DIGITAL FAN-COIL THERMOSTATS
OFF MODE
When the system switch is set to Off, power is removed from
the thermostat electronics and output terminals, and the
display will go blank. The thermostat will reboot when power is
restored with the On/Off switch.
NOTE: This On/Off switch is a functional switch and should
not be used as an isolating switch.
STARTUP
On first powering up, or after the On/Off switch has been set to
On, the thermostat undergoes a startup and self-checking
sequence: First, all LCD display segments are illuminated to
check the display. Next a number appears to indicate the
software version. The final check is a check of the sensor. On
completion of the startup sequence, after approximately 2
seconds, the thermostat will resume normal control in either
Comfort or Economy mode. On initial power on, the
temperature setpoint defaults are as shown in the following
table. The current setpoint is stored in EEPROM, and if the
thermostat is switched off, then on again, it will resume control
at the last known setpoint.
Table 3. Power Up Default Setpoints
Power Up Default Setpoints
1 relay or heat cool changeover
models
2 relay + cool
sequence models
°C Scale °F Scale °C Scale °F Scale
Setpoint
22 73 22 73
Default
Cooling OFF
– – 23 75
point
Heating OFF
– – 21 71
point
COMFORT MODE
This is the normal operating mode where the thermostat
controls to the setpoint selected by the user. On initial power
up, the user setpoint will return to the last known or default
value. Control action will be determined by either the default
settings or the installer-set parameters. (See page 6)
ENERGY SAVINGS MODE
Energy Savings mode is activated by a dry contact closure on
the special Energy Management System (EMS) input from an
occupancy detector, window contact, etc. If the signal via input
terminals 10 and 11 is calling for Energy Savings mode, then
the thermostat will control to user/installer defined setback
setpoints for increased energy savings. The display will show a
$ symbol to indicate the Energy Savings mode is active.
Fig. 5. Sequence control with deadband.
OPERATING MODES
The thermostat has two main operating modes: Comfort and
Energy Savings. It also has an OFF mode selected by the On/
Off switch.
5 95C-10897–6
For example, if the user setpoint is 21°C (70°F) and the Energy
Savings mode setpoint for cooling (unoccupied cooling
setpoint) has been set to 28°C (82°F), then the thermostat
controls to 28°C (82°F) when the input signal activates the
economy mode. There is no user override as long as the EMS
signal is present. The default Energy Savings mode setpoints
are shown in table 4.
The Energy Savings mode input can be configured within the
installer setup mode to be activated by either a short-circuit
(default) or open-circuit signal.
Page 6
T6570, T8570 SERIES DIGITAL FAN-COIL THERMOSTATS
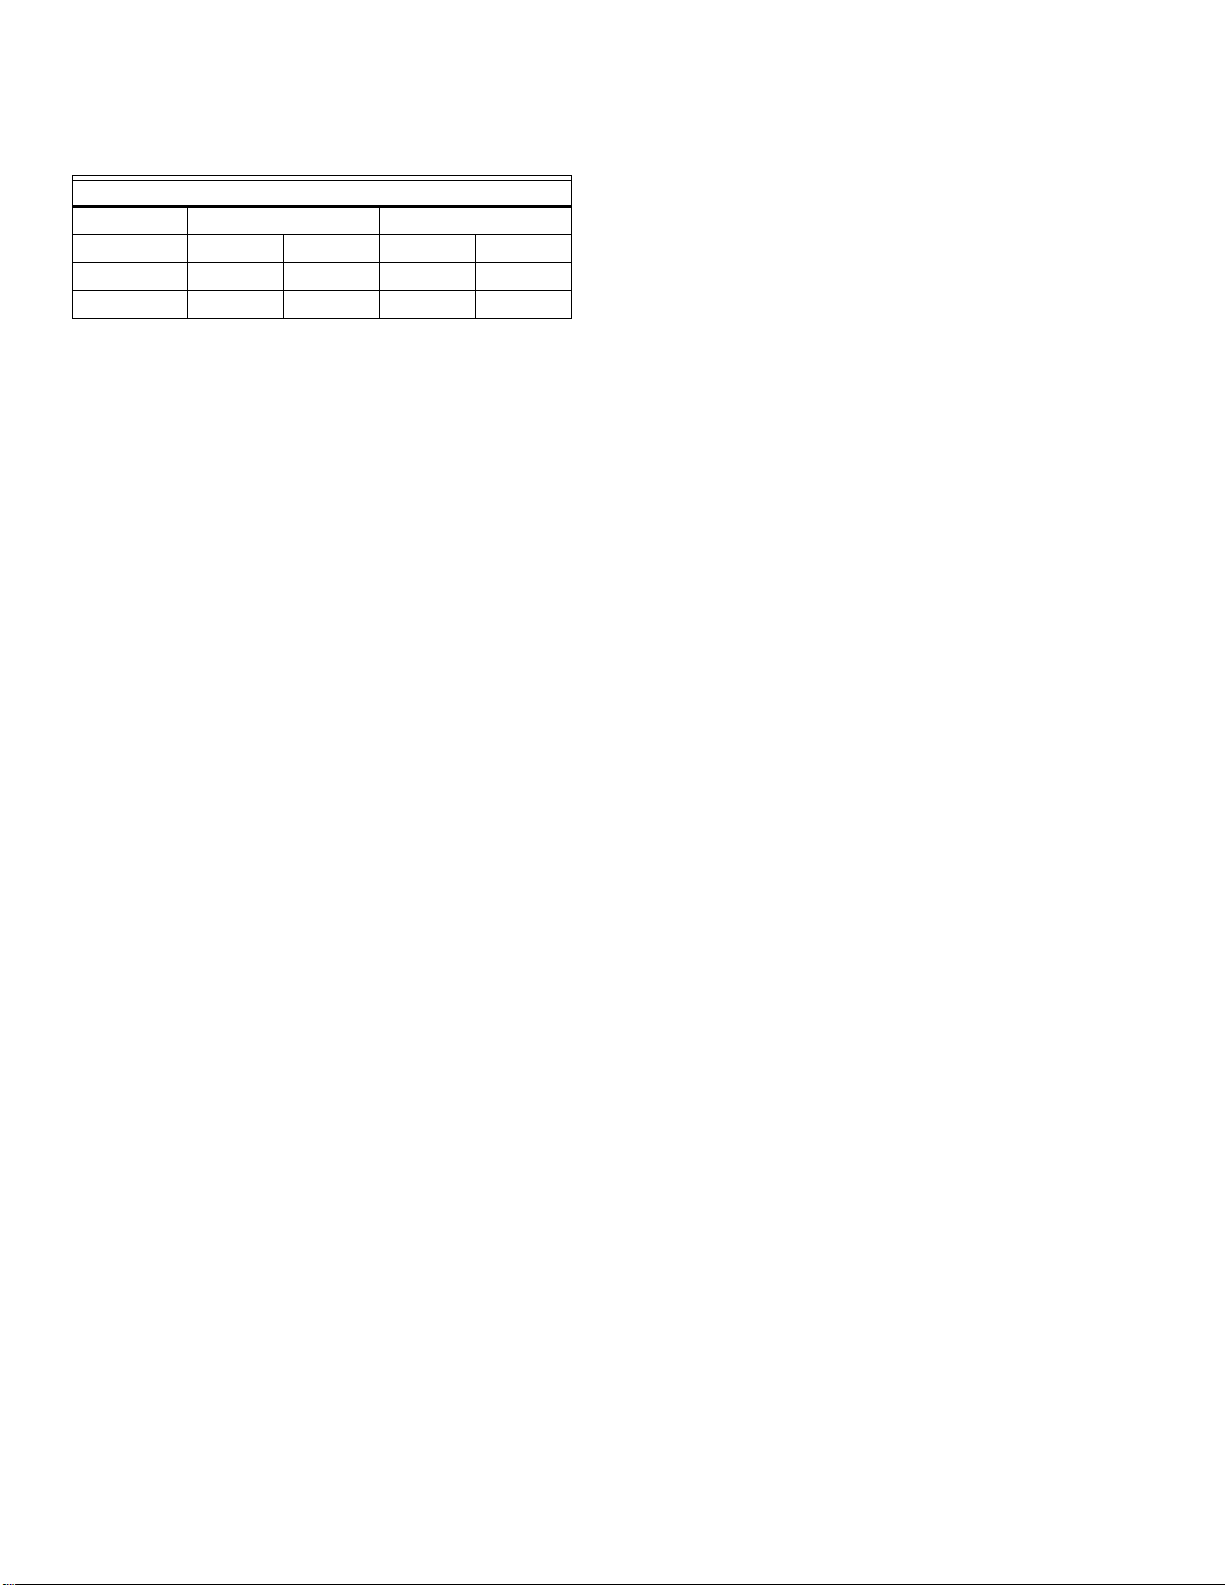
Table 4. Energy Saving Mode Default Settings
Energy Savings Mode – Setpoints
Heating Setpoint Cooling Setpoint
Description Default Range Default Range
°C Scale 18°C 10-18°C 25°C 25-30°C
°F Scale 65°F 50-65°F 77°F 77-90°F
Additional Switches
FAN SPEED SWITCH (SP3T LINE VOLTAGE)
Where supplied, the fan switch allows the selection of three
different settings: low, medium, or high.
NOTE: The installer should select Constant Fan mode if the
fan motor is a type that does not start reliably at low
speed.
SYSTEM HEAT/COOL SWITCH (SPST LOW VOLTAGE)
Where supplied, this switch signals the microprocessor to
operate the relays in either heating or cooling mode: In heating
mode, the cooling relay is disabled. In cooling mode, the
heating relay is disabled.
User Programming Modes
TEMPERATURE (COMFORT) SETPOINT
The temperature setpoint can be adjusted between 10°C and
30°C in steps of 0.5°C by using the [UP] and [DOWN] keys. If
°F is set within the installer setup mode (see later), the range
will be 50°F to 90°F, adjustable in 1°F steps.
DISPLAY
The measured room temperature is normally displayed (unless
rt = 0 in the installer setup mode), and the first press of the
[UP] or [DOWN] keys will switch to display the user setpoint. If
no key is pressed for 5 seconds, the display will return to
showing the room temperature.
When the cooling relay is closed, this will be indicated by a
(snowflake) symbol, whereas closure of the heating relay will
be indicated by a (flame) symbol.
If there is a wiring problem or the room temperature is less
than 5°C (40°F) or over 38°C (100°F) the display will return a
SF (Sensor Failure) warning. If this warning is not due to a
wiring problem it will disappear once the remote sensor or
thermostat comes within the 4.5 to 37.8°C (40 to 100°F) range.
If the SF warning is due to a faulty remote sensor connection
the thermostat will not transfer measurement to the internal
sensor. To resolve the faulty connection the thermostat must
be powered down, the remote sensor connection must be
removed or fixed and then the thermostat must be re-powered.
Installer Setup Mode
The thermostat allows many of its operating parameters to be
adjusted via an Installer Setup Mode. Each operating
parameter has a two-letter identifier code, which is shown on
the display during the Installer Setup Mode programming
sequence. A description of these is shown in Table 5.
PROGRAMMING PARAMETERS
The installer setup mode is accessed by reducing the setpoint
to 10°C (50°F), waiting 3 seconds or until the room
temperature is displayed, and then pressing the [UP] and
[DOWN] keys simultaneously for 3 seconds.
If the installer setup has previously been entered and the
Minimum Cooling Setpoint increased above 10°C (50°F), the
installer setup mode is accessed by reducing the setpoint to
the new value before pressing the two buttons.
The first parameter identifier will be displayed at this point and
the parameter value can be changed by pressing the [UP] key.
The first press displays the default value and any subsequent
press alters the value. The values will wrap around.
To select the parameter value and move to the next parameter,
press [DOWN]. After the final parameter is selected, a further
press of the [DOWN] key will exit from the programming mode.
PARAMETER VALUES
Each parameter has a default value that is used when the
thermostat is first powered up. This value can be changed from
within the Installer Setup Mode, and once changed, it will be
stored in the EEPROM so it is not lost in the event of power
interruption.
If the user wishes to restore the parameters to the default
values, this can be done by changing the temperature scale tS
from °C to °F (or °F to °C) and back again.
PROGRAMMING EXAMPLE
To enter the installer setup mode:
1. Press to change the temperature setpoint to 10°C
(50°F).
2. Wait 3 seconds, or until the room temperature is dis-
played.
3. Press and hold together until [tS] is displayed.
4. Press once to show the default Temperature Scale
value. Continue to show all possible values of this
parameter in sequence.
5. When the desired value is displayed, it is selected by
pressing once. This will also move to the next parameter,
whose identifier will now be displayed.
6. Continue to use to move from one parameter to the next,
and to alter the parameter value.
7. When the last parameter [rt] has been selected, a final
press of will return the display to its normal operating
mode.
95C-10897–6 6
Page 7

T6570, T8570 SERIES DIGITAL FAN-COIL THERMOSTATS
Table 5. Thermostat Parameter Options
°C Scale °F Scale
Parameter ID Description
Temperature Scale tS Allows selection of either °C or °F scale Yes – No –
Dead Band db Setting deadband (Zero Energy Band) 2 2, 3, 4 4 3, 4, 5
Heat or Cool
Operating Mode
Unoccupied Cooling
Setpoint
Unoccupied Heating
Setpoint
Minimum Cooling
Off Time
Minimum Heating
Off Time
Minimum Cooling
Setpoint (Low Limit)
Maximum Heating
Setpoint (High Limit)
Energy Savings
Configuration
Display of Room
Temperature
OP Setting operating mode on single relay,
non-changeover models, to either Heat
or Cool
uC Program unoccupied cooling setpoint
for energy savings.
uH Program unoccupied heating setpoint
for energy savings
CO Setting cooling off-time for short cycle
prevention.
HO Setting heating off-time for short cycle
prevention.
CL Sets the minimum allowable cooling
setpoint.
HL Sets the maximum allowable heating
setpoint.
ES Activate energy savings mode by a
choice of either contact closure or
contact opening.
rt Allows installer to restrict temperature
display to set point only. With this
parameter, the unit will only display the
set point temperature. Useful where
setpoint limits (HL and CL) will affect
control performance and Room
Temperature display will disagree with
user setpoint.
Default Values Default Values
0 0: cool
1: heat
25 25 to 30 77 77 to 90
18 10 to 18 65 50 to 65
0 0, 3, 4, 5 0 0, 3, 4, 5
0 0, 3, 4, 5 0 0, 3, 4, 5
10 10 to 30 50 50 to 90
30 10 to 30 90 50 to 90
1 1: normally open
0: normally closed
1 1: room temp.
0: setpoint only
0 0: cool
1: heat
1 1: normally open
0: normally closed
1 1: room temp.
0: setpoint only
WIRING
Table 6. Leadwire Color Code (if fitted)
Terminal Color Use
1 Black (BK) L1 (Hot)
2 White (WH) L2 (N)
3 Orange (OR) Heat
4 Yellow (YL) Cool
5 Gray (GY) Damper
6 Violet (VI) Fan Common
7 Red (RD) Fan Low
8 Blue (BU) Fan Medium
9 Brown (BN) Fan High
10 – Energy Mgt.
11 –
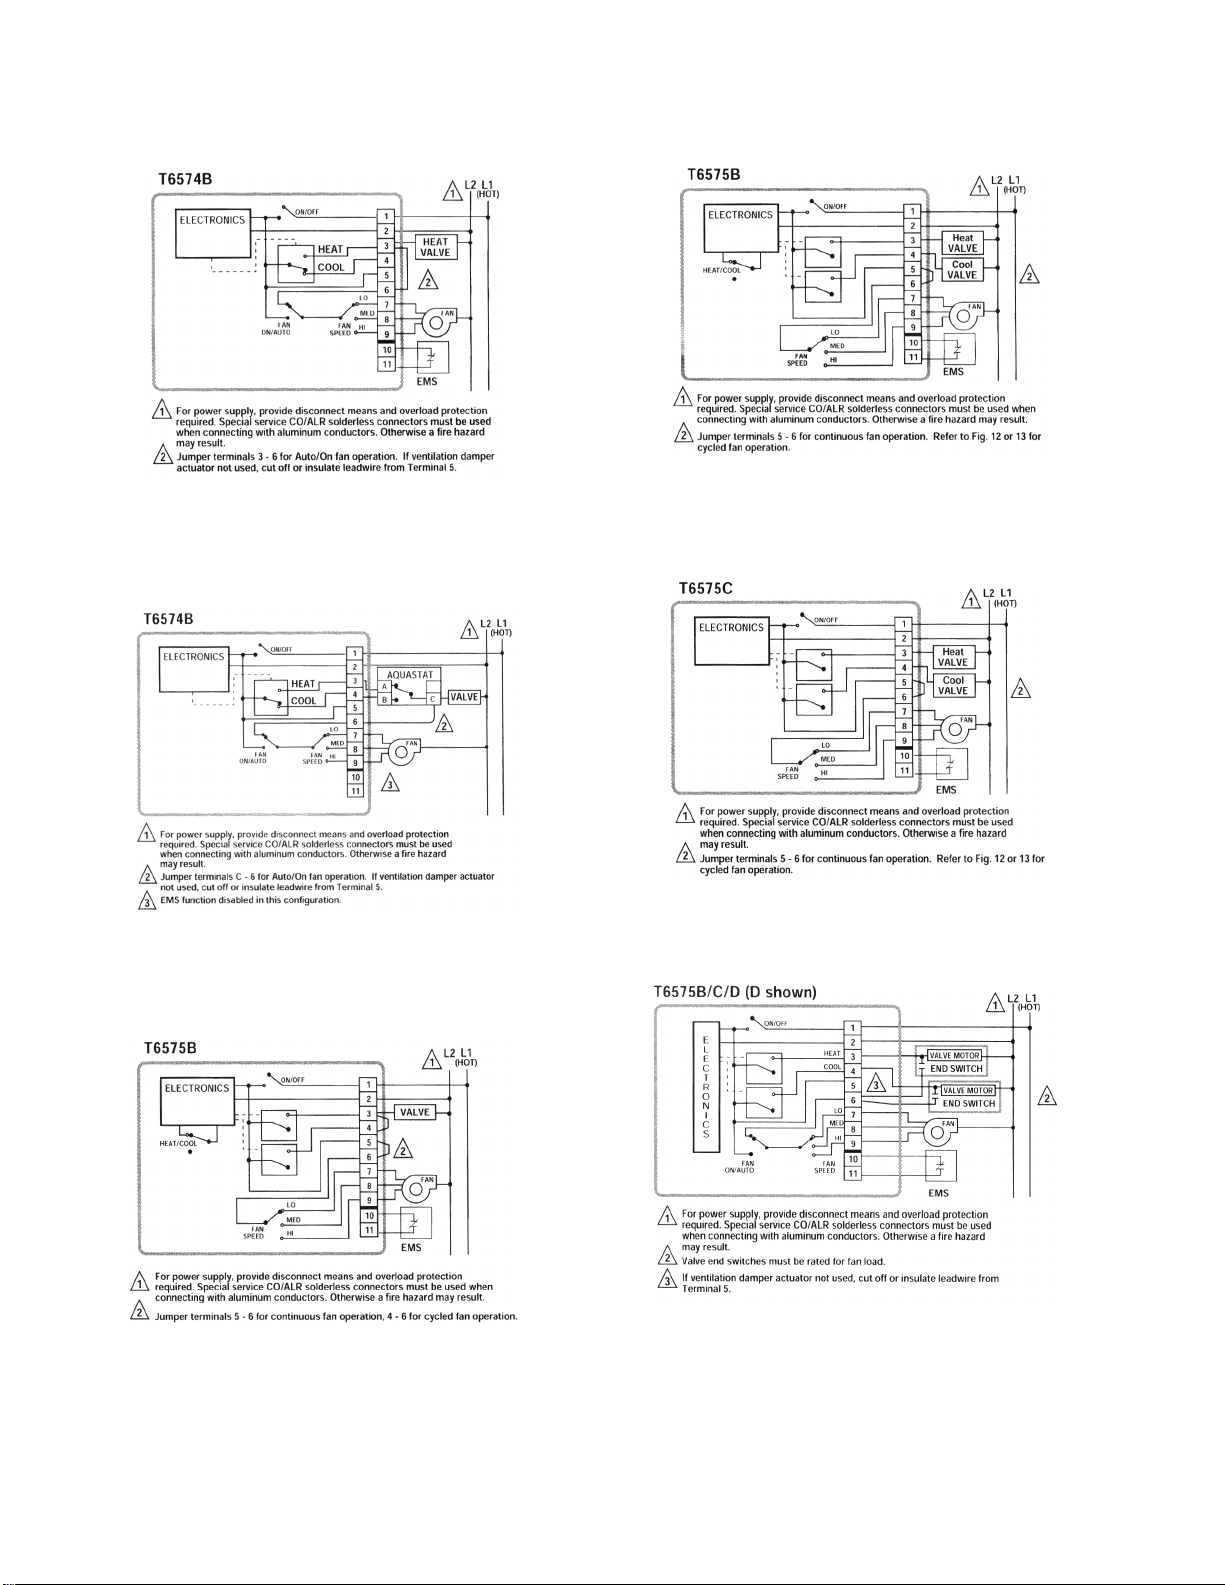
Fig. 6. Wiring 2-pipe cool-only thermostat with fan On/Auto
switch.
System
7 95C-10897–6
Page 8
T6570, T8570 SERIES DIGITAL FAN-COIL THERMOSTATS
Fig. 7. Wiring 2-pipe heat-only thermostat with fan On/Auto
switch.
Fig. 10. Wiring 4-pipe, heat/cool with manual heat/cool
changeover switch, continuous fan.
Fig. 8. Wiring 2-pipe seasonal heat/cool changeover with
external aquastat, fan On/Auto switch.
Fig. 9. Wiring 2-pipe heat/cool with manual heat/cool
changeover switch, continuous fan or cycled fan.
Fig. 11. Wiring 4-pipe, auto heat/cool changeover.
Fig. 12. Wiring 4-pipe, auto heat/cool changeover, with fan
On/Auto switch.
95C-10897–6 8
Page 9

Fig. 13. Wiring 4-pipe, heat/cool with manual heat/cool
changeover switch, cycled fan, using external relay.
Fan-Relay Control Center
T8570 thermostats are typically used with load relays to switch
line voltage loads. Honeywell offers a convenient fan-relay
center, the W6380, that provides 24 Vac power, three
interlocked fan relays, and wiring center terminations for valve,
relay and contactor loads. The W6380 schematic can be found
in Fig. 14.
T6570, T8570 SERIES DIGITAL FAN-COIL THERMOSTATS
Fig. 16. Wiring 2-pipe 24V heat thermostat with fan On/
Auto switch.
Fig. 14. W6380 wiring diagram.
Fig. 15. Wiring 2-pipe, 24V cool-only thermostat with fan
On/Auto switch.
Fig. 17. Wiring 2-pipe heat/cool with manual heat/cool
changeover switch, continuous or cycled fan.
Fig. 18. Wiring 4-pipe 24V heat/cool with manual heat/cool
changeover switch, continuous fan.
9 95C-10897–6
Page 10

T6570, T8570 SERIES DIGITAL FAN-COIL THERMOSTATS
Fig. 19. Wiring 4-pipe 24V auto heat/cool changeover with
continuous fan.
T8575D will find the new sensor source and use this for
control. To extend the sensor cable, up to a maximum of 70
feet (20m), use only shielded cable. For example, Beldfoil® 18
AWG cable is a suitable cable. The sensor connections are
polarity sensitive, so be sure to connect the shielded wire to
the sensor blue wire, as shown in Fig. 21 below.
Fig. 21. Wiring optional remote sensor for the T8575D
model.
Fig. 20. Wiring 4-pipe 24V auto heat/cool changeover
thermostat with fan On/Auto switch.
Wiring Remote Sensor
The T8109 is a optional remote sensor that can be used as an
alternative to the internal sensor of the T8575D. The T8109
remote sensor plugs into the J2 header in the back of the
thermostat. On power-up the T8575D will look for a T8109 and
if there is one connected it will use this control. If it does not
find a T8109 connected it will use the internal sensor. To
change the sensor source, turn off the thermostat power and
disconnect the current sensor source. Then connect the new
sensor source and re-power the thermostat. On powerup the
CAUTION
Equipment Damage Hazard.
Operation at low temperatures can cause fan coil
damage.
This thermostat is not a safety device. Do not use it
where the space temperature is outside of the device
operating range.
A display of SF indicates a space temperature outside
of the thermostat operating range (5°C to 45°C).
With SF displayed, the thermostat ceases to
operate.
CAUTION
Equipment Damage Hazard.
Improper operation can cause compressor
damage.
Do not operate cooling if outdoor temperature is below
50ºF (10°C). Refer to manufacturer recommendations.
To avoid compressor damage, allow the compressor to
remain off for five minutes before restarting.
95C-10897–6 10
Page 11

T6570, T8570 SERIES DIGITAL FAN-COIL THERMOSTATS
95C-10897–6 11
Page 12

T6570, T8570 SERIES DIGITAL FAN-COIL THERMOSTATS
Automation and Control Solutions
Honeywell International Inc. Honeywell Limited-Honeywell Limitée
1985 Douglas Drive North 35 Dynamic Drive
Golden Valley, MN 55422 Scarborough, Ontario M1V 4Z9
customer.honeywell.com
® U.S. Registered Trademark
© 2005 Honeywell International Inc.
95C-10897–6 M.A. Rev. 09-05
 Loading...