

RP2/RP4
Mobile Printers
*
* For China, models RP2B-C, RP2D-C, RP4B, RP4D-C
*For Thailand models RP2B, RP2D-T, RP4B, RP4D-T
*For India models RP2B, RP2D, RP4B-I, RP4D-I
User Guide

Disclaimer
Honeywell International Inc. (“HII”) reserves the right to make changes in specifications and other information contained in
this document without prior notice, and the reader should in all cases consult HII to determine whether any such changes
have been made. The information in this publication does not represent a commitment on the part of HII.
HII shall not be liable for technical or editorial errors or omissions contained herein; nor for incidental or consequential
damages resulting from the furnishing, performance, or use of this material. HII disclaims all responsibility for the
selection and use of software and/or hardware to achieve intended results.
This document contains proprietary information that is protected by copyright. All rights are reserved. No part of this
document may be photocopied, reproduced, or translated into another language without the prior written consent of HII.
Copyright 2017-2020 Honeywell International Inc. All rights reserved.
Web Address:
www.honeywellaidc.com.
Trademarks
Microsoft Windows 7, Windows 8, Windows Mobile, and Windows CE are trademarks or registered trademarks of Microsoft
Corporation.
Wavelink Avalanche is a registered trademark of Wavelink Corporation.
The Bluetooth word mark and logos are owned by Bluetooth SIG, Inc.
Android is a trademark of Google Inc.
Other product names or marks mentioned in this document may be trademarks or registered trademarks of other
companies and are the property of their respective owners.
Patent
For patent information, refer to www.hsmpats.com.
Firmware (Software) Agreement
The enclosed firmware (software) resident in the printer is owned by Licensor or its suppliers and is licensed for used only
on a single printer in the user’s trade or business. The user agrees not to, and not to authorize or permit any other person or
party to, duplicate or copy the firmware or the information contained in the non-volatile or programmable memory. The
firmware (software) is protected by applicable copyright laws and Licensor retains all rights not expressly granted. In no
event will Licensor or its suppliers be liable for any damages or loss, including direct, incidental, economic, special or
consequential damages, arising out of the use or inability to use the firmware (software).

TABLE OF CONTENTS
Customer Support ....................................................................................................................... vii
Technical Assistance ............................................................................................................ vii
Product Service and Repair ............................................................................................... vii
Limited Warranty ................................................................................................................... vii
Chapter 1 - Get Started ....................................................................................1
Introduction...................................................................................................................................... 1
Unpack Your Device.......................................................................................................................1
About the Battery ........................................................................................................................... 2
Charge the Battery......................................................................................................................... 2
Download Required Software.................................................................................................... 3
Default USB Connection.......................................................................................................4
Configure Printer............................................................................................................................ 4
Safety Precautions for Lithium Batteries .............................................................................5
Proper Disposal of the Battery ...........................................................................................6
Important Safety Instructions................................................................................................... 6
Chapter 2 - Load the Media............................................................................. 7
Load Labels or Paper.................................................................................................................... 7
External Media.......................................................................................................................... 9
Configure the Media .................................................................................................................. 10
Media Types and Settings................................................................................................. 11
Chapter 3 - Program the Interface ............................................................. 13
USB Connection .......................................................................................................................... 13
RP2/RP4 User Guide iii

Default USB Connection ....................................................................................................14
USB Settings ...........................................................................................................................14
Configure Printer ............................................................................................................14
Bluetooth Connection................................................................................................................17
Bluetooth Settings................................................................................................................17
Tap and Pair.............................................................................................................................18
Wireless LAN Connection.........................................................................................................18
Static IP/DHCP.......................................................................................................................19
Dynamic IP Address (DHCP)...................................................................................... 19
Static IP Address .............................................................................................................19
Infrastructure/Ad-hoc ..................................................................................................19
Wireless LAN Security .........................................................................................................20
WEP 64 and 128 Bit.......................................................................................................20
WPA2-PSK with CCMP..................................................................................................20
WPA2-PSK with TKIP.....................................................................................................21
WPA2-Enterprise ............................................................................................................21
WPA-PSK with TKIP........................................................................................................21
Chapter 4 - Printer Display and Buttons ................................................... 23
Front Panel .....................................................................................................................................23
On/Off Button .......................................................................................................................23
Media Button .........................................................................................................................23
LED Display .............................................................................................................................24
Audible Indicators.................................................................................................................24
Set Sleep and Power Down Timer..........................................................................................25
Real-Time Clock (RTC)...............................................................................................................25
Set the Date and Time .........................................................................................................25
Chapter 5 - Calibration.................................................................................. 27
Calibrate the Media.....................................................................................................................27
Quick Media Calibration.....................................................................................................27
Manual Media Calibration.................................................................................................28
iv RP2/RP4 User Guide

Gap Type Labels ..............................................................................................................28
Black Mark Labels ..........................................................................................................29
Chapter 6 - Configuration Files....................................................................31
Print Configuration Label.........................................................................................................31
Save and Load Configuration Files.......................................................................................31
Save a Configuration File ...................................................................................................31
Load a Configuration File...................................................................................................31
Chapter 7 - Maintenance...............................................................................33
Battery Charge Information.....................................................................................................33
Health Status ..........................................................................................................................33
Gas Gauge ................................................................................................................................34
Change the Battery .....................................................................................................................34
Cleaning Intervals........................................................................................................................35
Maintenance Schedule..............................................................................................................35
Clean the Printhead..............................................................................................................36
Standard RP4 Models ...................................................................................................36
Linerless Models .............................................................................................................36
Firmware Update..........................................................................................................................37
Chapter 8 - Troubleshooting.........................................................................39
Chapter 9 - Product Specifications .............................................................41
RP2 Printer Specifications .......................................................................................................41
RP4 Printer Specifications .......................................................................................................42
Required Safety Labels..............................................................................................................45
RP2Printer................................................................................................................................45
RP4Printer................................................................................................................................45
Fonts..................................................................................................................................................45
Bar Code Symbologies...............................................................................................................46
Graphics...........................................................................................................................................46
Software and Firmware..............................................................................................................46
RP2/RP4 User Guide v

Control Language Compatibility ....................................................................................46
Device Management Support and Compatibility.....................................................46
Network Compatibility.........................................................................................................46
O/S Support ............................................................................................................................46
Label Design Software Compatibility ...........................................................................46
ERP Systems ...........................................................................................................................47
Software Development Kit .................................................................................................47
Chapter 10 - Accessories .............................................................................. 49
Belt Clip............................................................................................................................................49
Shoulder Strap/Hand Strap (RP4 Printer Only).............................................................. 49
Belt Loop .........................................................................................................................................50
Soft Case .........................................................................................................................................50
USB On-the-Go ............................................................................................................................51
Chapter A - Printer Language Emulation.................................................. 53
Chapter B - Print Demo.................................................................................. 55
NETira CT Printer Demo............................................................................................................ 55
vi RP2/RP4 User Guide

Customer Support
Technical Assistance
To search our knowledge base for a solution or to log in to the Technical Support
portal and report a problem, go to www.hsmcontactsupport.com.
For our latest contact information, see www.honeywellaidc.com/locations.
Product Service and Repair
Honeywell International Inc. provides service for all of its products through service
centers throughout the world. To obtain warranty or non-warranty service, return
your product to Honeywell (postage paid) with a copy of the dated purchase
record. To learn more, go to www.honeywellaidc.com and select Service & Repair at
the bottom of the page.
Limited Warranty
For warranty information, go to www.honeywellaidc.com and click Resources >
Product Warranty.
RP2/RP4 User Guide vii

viii RP2/RP4 User Guide

CHAPTER
GET STARTED
1
Introduction
The RP Series printer family blends the rugged durability with state-of-the-art
electronics and user-friendly features to redefine the standard in portable thermal
printers. The printer’s USB, WiFi LAN, or Bluetooth® technology offers an easy
interface to any host system.
To print labels or receipts, refer to the instructions included with the software you
use to create the labels.
A Windows® printer driver can be found on our website, www.honeywellaidc.com.
Unpack Your Device
After you open the shipping carton containing the product, take the following
steps:
• Check for damage during shipment. Report damage immediately to the carrier
who delivered the carton.
• Make sure the items in the carton match your order.
• Save the shipping container for later storage or shipping.
In order to print from your printer, the following items are required. If you do not
have these items, contact your customer-support or sales representative for advice
on where to purchase the items or where the required software can be downloaded.
• Power Supply (sold separately)
The appropriate power supply for your region is required and is not included as
part of the printer purchase. If you do not have an applicable power supply for
your printer, you will need to order one.
• Connection Cable
You will need a standard Mini B to USB A cable if you are connecting your printer
via USB.
• Print Media
Honeywell offers a full line of applicable printing labels, receipt media, and
supplies.
RP2/RP4 User Guide 1
About the Battery
Power is supplied to the printer by a rechargeable lithium ion battery. Batteries are
shipped only partially charged. The battery should be charged for a minimum of 4
hours before initial use to ensure optimal performance.
Warning: The maximum operating temperature of the printer is 122ºF
(50°C), however the maximum operating temperature for
charging when used with a Honeywell power supply is limited
to 104ºF (40°C). Charge the printer in a location that meets this
temperature requirement.
See Battery Charge Information on page 33 for further information about the battery.
Charge the Battery
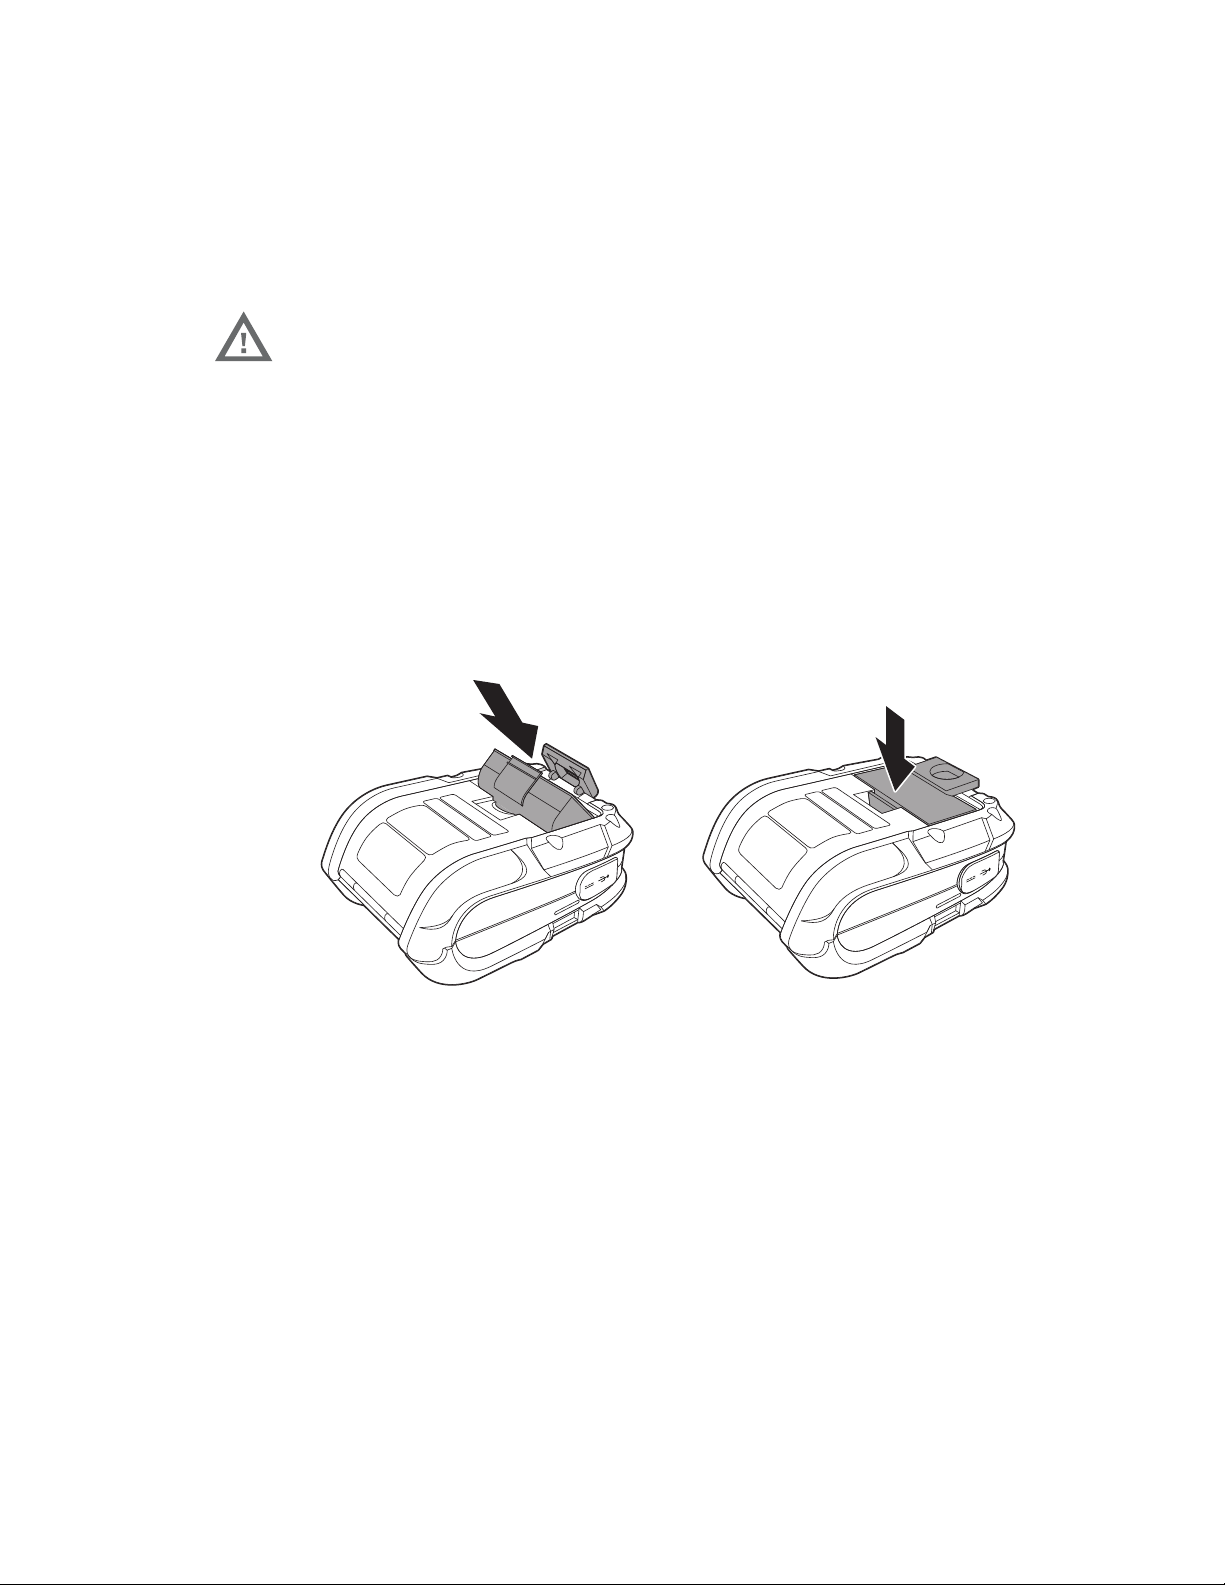
1. Install the battery in the printer. Align the release tab with the same side as the
charge contacts and lock the battery into position. The latch clicks into place
when properly seated.
2. Connect the power supply to printer’s power jack.
2 RP2/RP4 User Guide
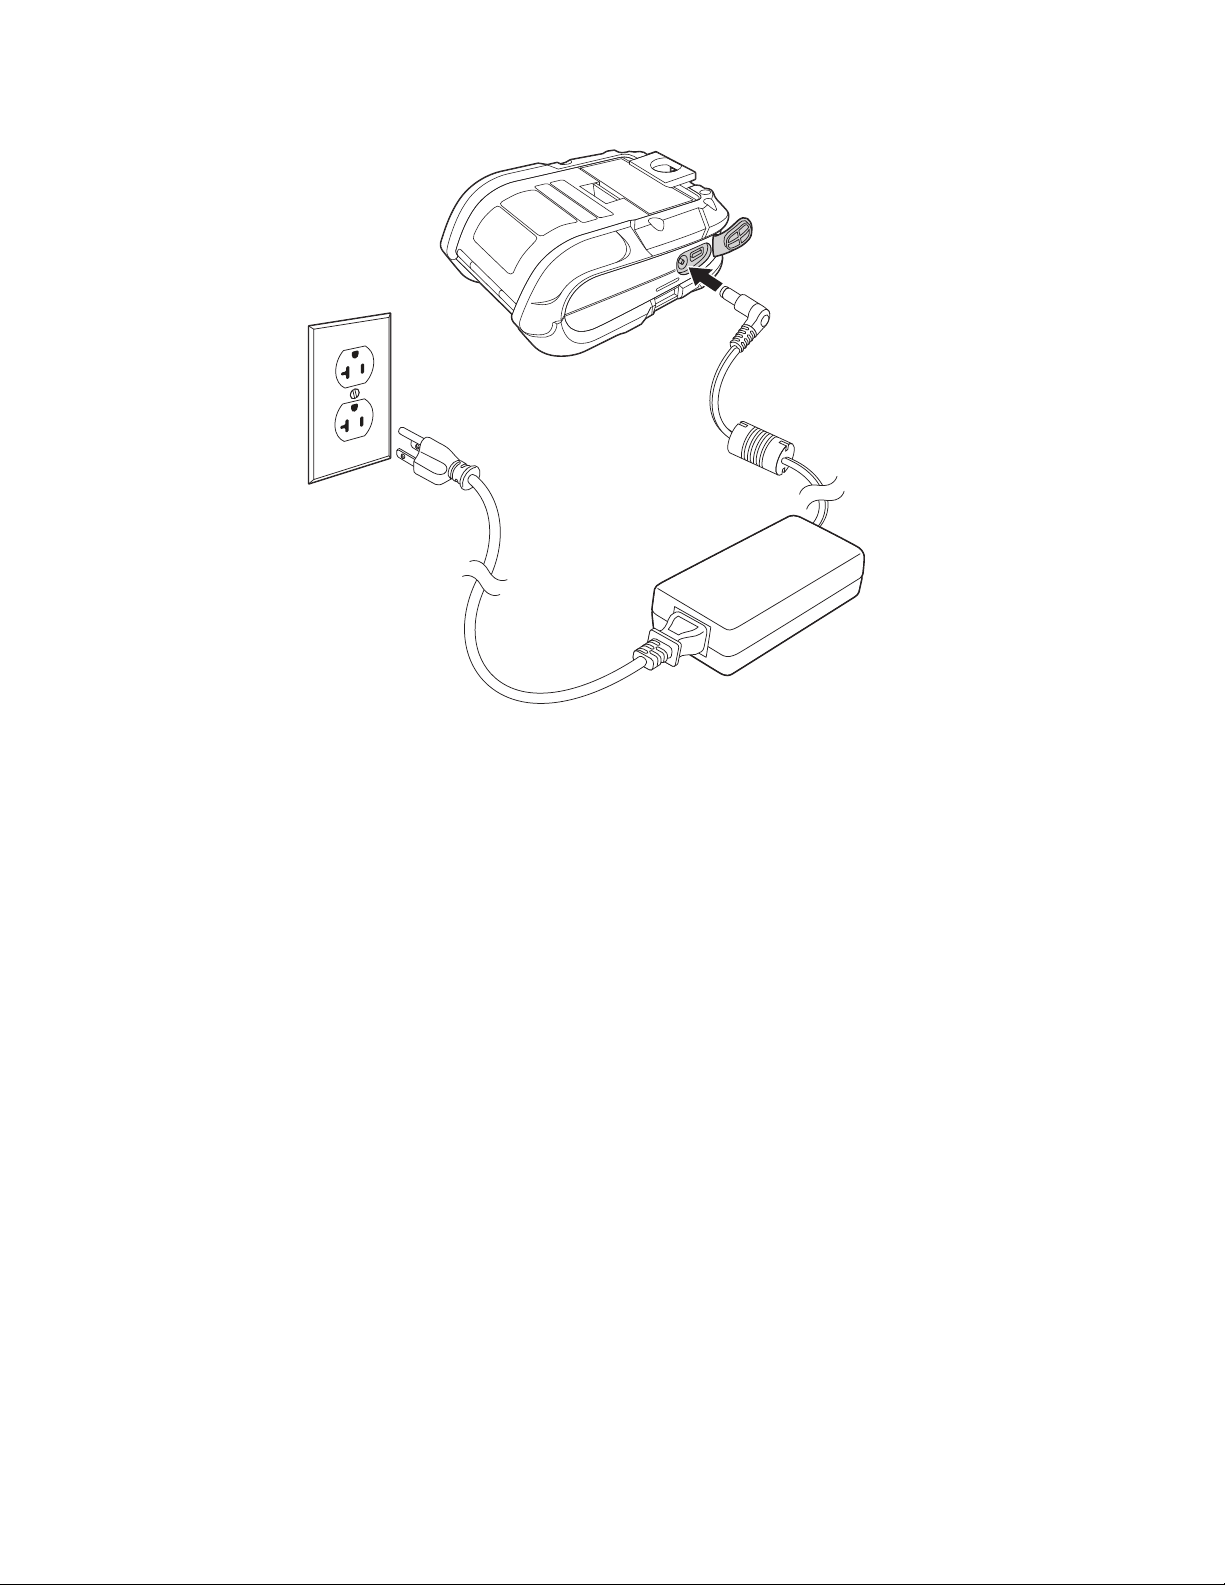
3. Connect the AC power cord to the power supply and plug into an outlet.
Note: Operating the printer while it is connected to the AC power supply can shorten the life
of the battery and is not recommended.
Download Required Software
1. Create a new folder on your local computer named Drivers.
2. Go to the Technical Support Downloads Portal at https://
hsmftp.honeywell.com.
3. Go to:
Software
- Printers
- Mobile - Portable
- RP2 RP3 RP4
- Utility
to download the NETira® CT Printer Configuration Utility.
4. When prompted, click on Open Honeywell Software Downloader.
5. Once the file has been downloaded, extract it to your Drivers folder.
RP2/RP4 User Guide 3

6. Go to:
Software
- Printers
- Mobile - Portable
- RP2 RP3 RP4
- Drivers
- Printer
to download the Windows Printer Drivers (for DPL Input Mode).
7. When prompted, click on Open Honeywell Software Downloader.
8. Once the file has been downloaded, extract it to your Drivers folder.
9. Open the Drivers folder and double-click each of the setup.exe files. Follow the
prompts to install each piece of software.
Default USB Connection
The default USB class is CDC Composite. On some systems (e.g., handheld
devices), you will have to change this USB class in order to connect. See USB
Connection on page 13 for further information.
1. Connect the USB cable to the printer and to the USB port on the host system.
2. Power up your printer.
3. Your host computer should recognize the printer and begin adding the device
driver. If the setup operation does not start, locate the Devices and Printers
section in the Control Panel and select Add a Printer.
4. Select the appropriate RP printer model and follow the prompts to finish
installation.
Configure Printer
1. Turn the printer on and connect it to the computer using the USB cable.
2. Open the NETira
™
CT Printer Configuration Utility Tool.
4 RP2/RP4 User Guide
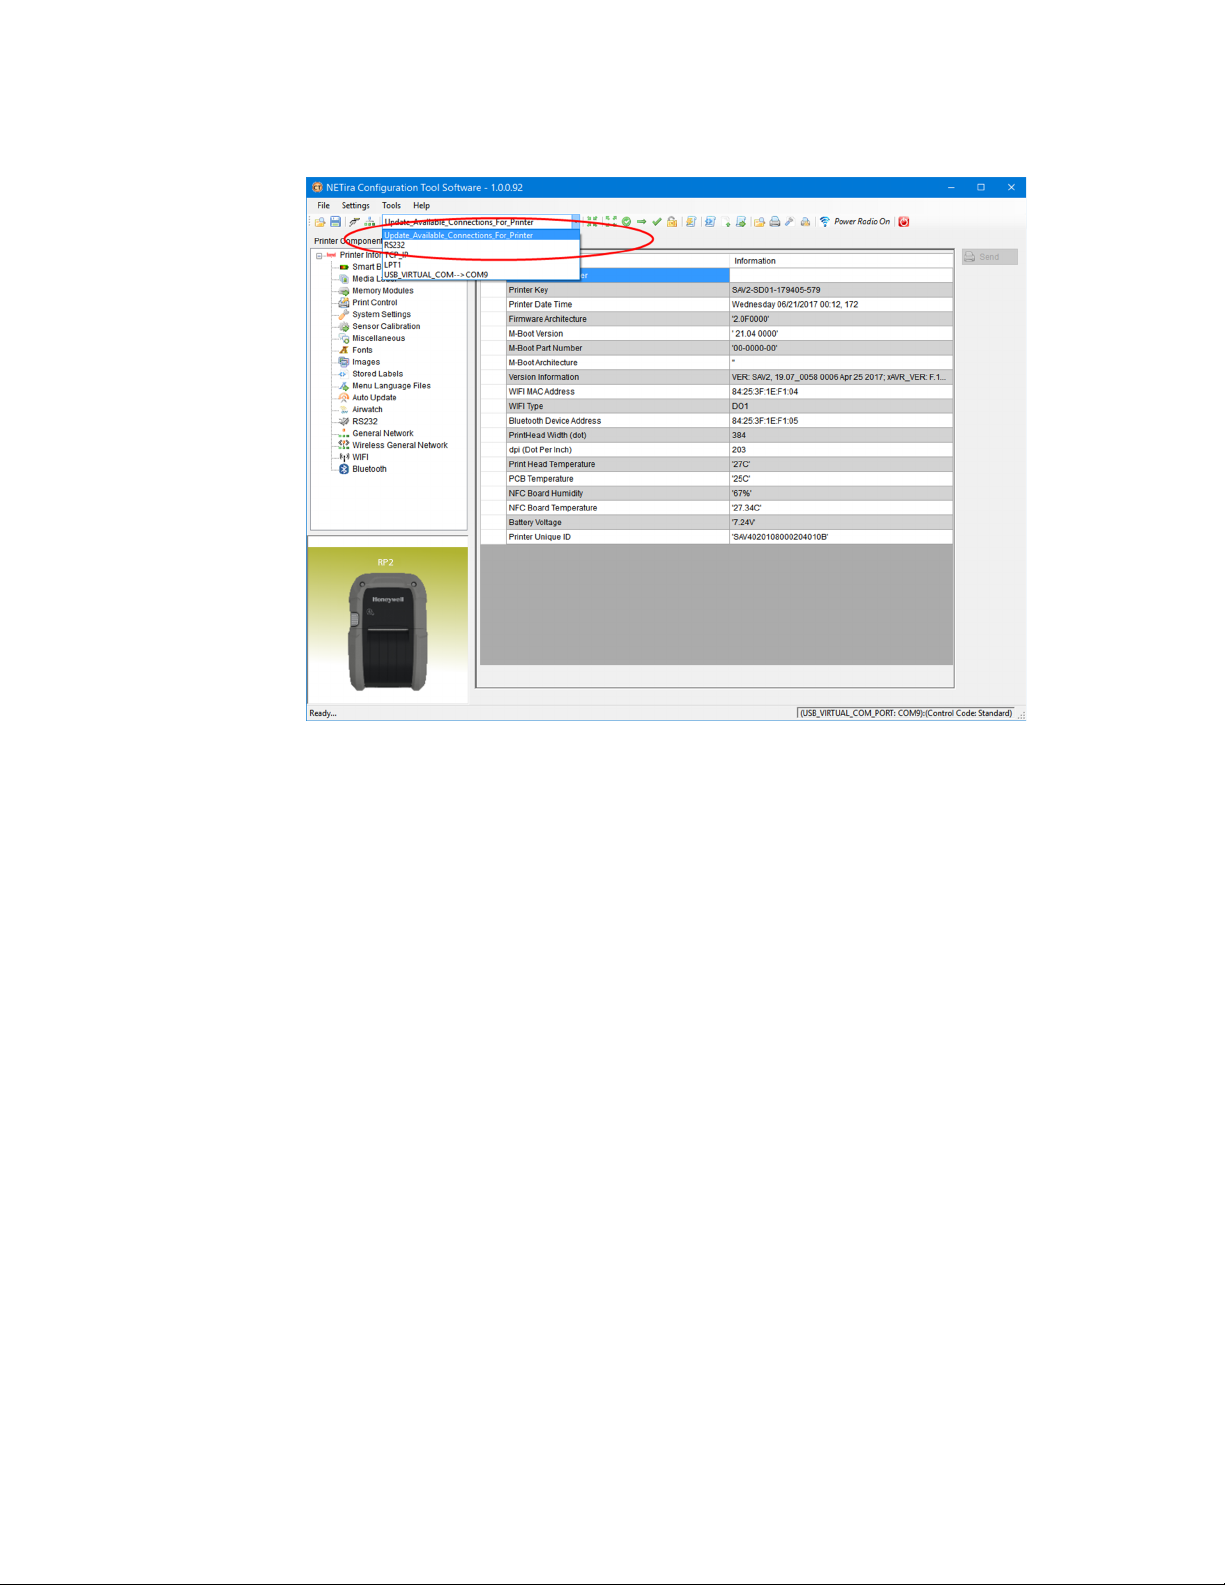
3. Query the printer by clicking Tools - Update Available Connections For
Printer. This will look for the USB Virtual COM Port.
4. Once this is completed, reopen the dropdown menu and select the USB Virtual
COM port.
Note: Make sure this port is not in use by the printer driver when you add it to the host
system.
5. Select Tools - Query Printer Configuration (or press CTRL-q) to display the
printer’s configuration.
See Program the Interface beginning on page 13 for detailed information about
changing your printer’s settings.
Safety Precautions for Lithium Batteries
• Do not place batteries in fire or heat the batteries.
• Do not store batteries near fire or other high temperature locations.
• Do not store or carry batteries together with metal objects.
• Do not expose batteries to water or allow the batteries to get wet.
• Do not connect (short) the positive and negative terminals, of the batteries, to
each other with any metal object.
• Do not pierce, strike or step on batteries or subject batteries to strong impacts or
shocks.
• Do not disassemble or modify batteries.
RP2/RP4 User Guide 5

Caution: There is a danger of explosion if the batteries are incorrectly
replaced. Replace the batteries with only the same or
equivalent type recommended by the manufacturer. Dispose of
used batteries according to the recycle program for batteries as
directed by the governing agency for the country where the
batteries are to be discarded.
Proper Disposal of the Battery
When the battery has reached the end of its useful life, the battery
should be disposed of by a qualified recycler or hazardous materials
handler. Do not incinerate the battery or dispose of the battery with
general waste materials. You may send the battery to us. (postage
paid). The shipper is responsible for complying with all federal, state,
and local laws and regulations related to the packing, labeling, man-
ifesting, and shipping of spent batteries. Contact the Product Service Department
(Customer Support) for recycling or disposal information. Since you may find that
your cost of returning the batteries significant, it may be more cost effective to
locate a local recycle/disposal company.
The printer is also designed with external-charging capabilities (optional) using
Honeywell-approved charging accessories. For more information on available
optional charging accessories, or a guide to using the multi-bay charging accessory, go to www.honeywellaidc.com.
Important Safety Instructions
This printer has been designed to provide many years of safe, reliable performance.
As with all types of electrical equipment, however, there are a few basic precautions
you should take to avoid hurting yourself or damaging the equipment:
• Read the installation and operating instructions.
• Read and follow all warning instruction labels on the printer.
• Make sure all openings on the printer remain unblocked. Never insert anything
into the openings or ventilation slots.
• Do not place the printer near a heat source.
• Do not use your printer near water or spill liquid into it.
• Be certain that your power source matches a listed voltage rating for the printer
(if unsure, check with your dealer or local utility company).
• Do not place the power cord where it can be stepped on and, if the power cord
becomes damaged, immediately replace it.
If service is required, use only qualified trained technicians to repair your printer.
See Customer Support.
6 RP2/RP4 User Guide
CHAPTER
LOAD THE MEDIA
2
Load Labels or Paper
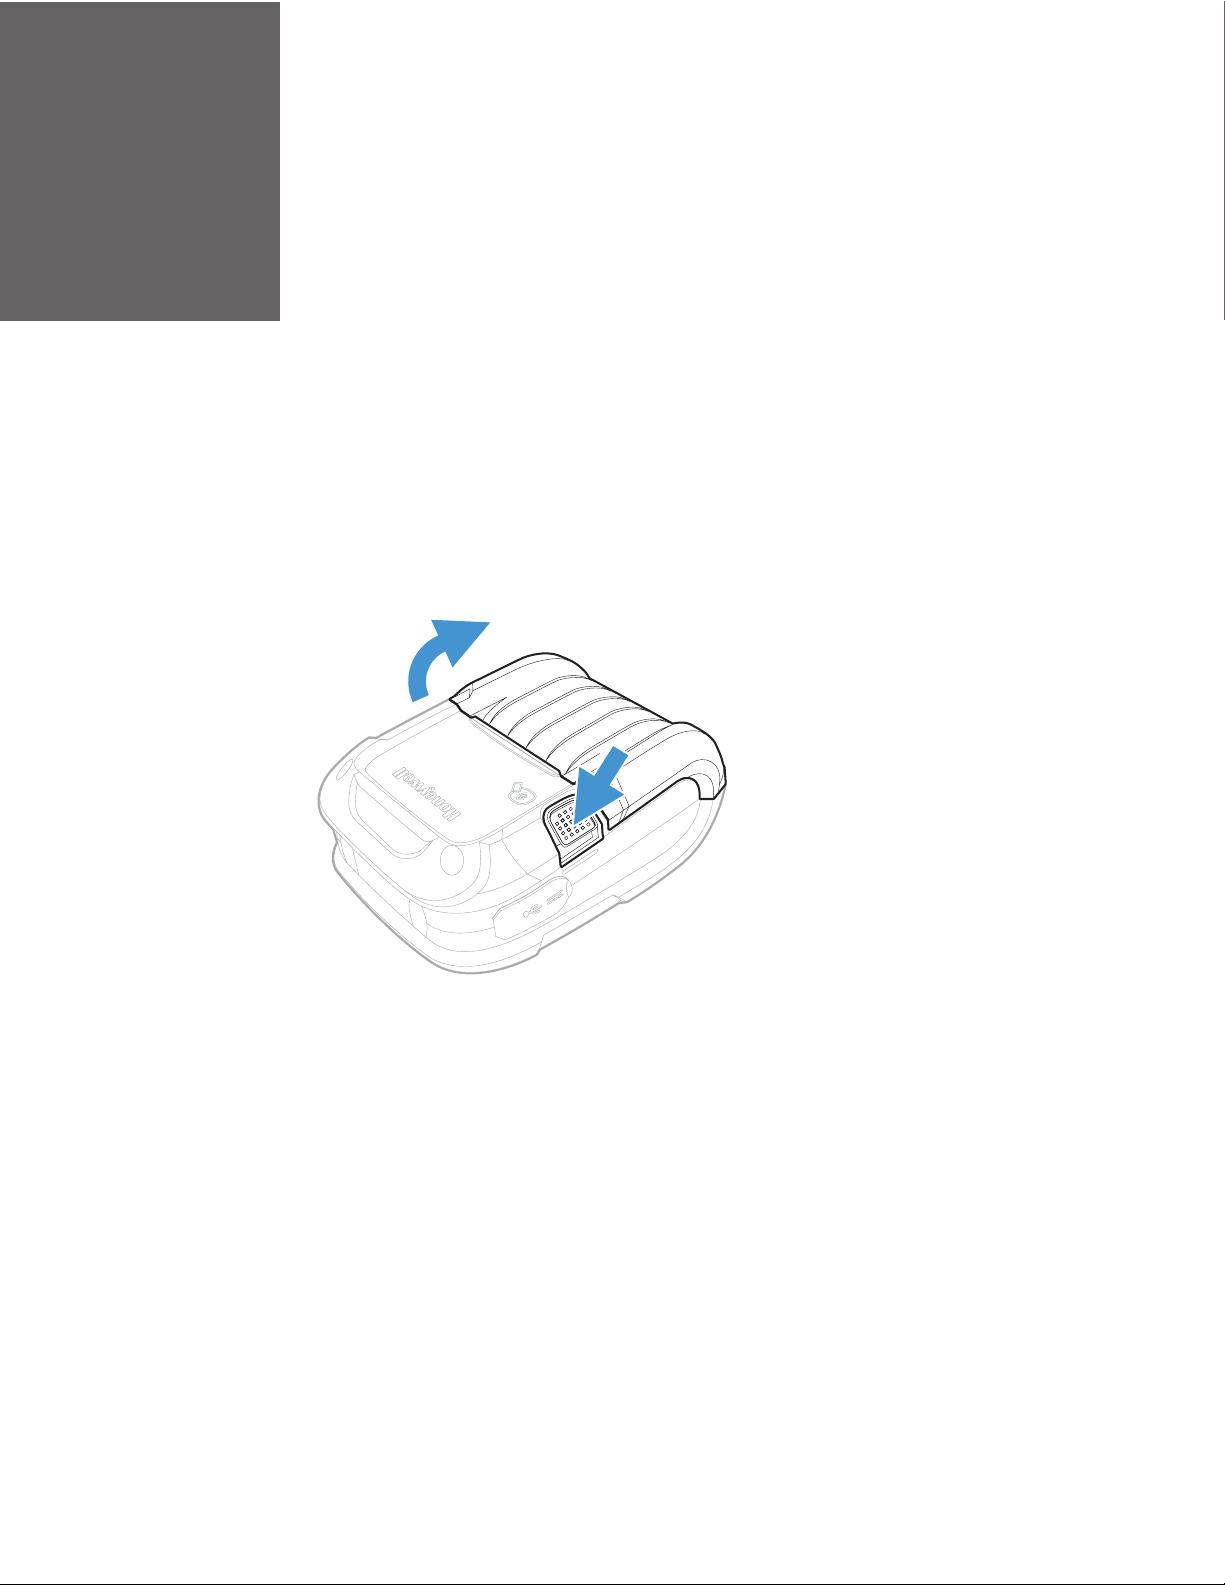
Load labels or paper into the printer as follows:
1. Press down on the latch lock and lift up the printer’s cover.
RP2/RP4 User Guide 7
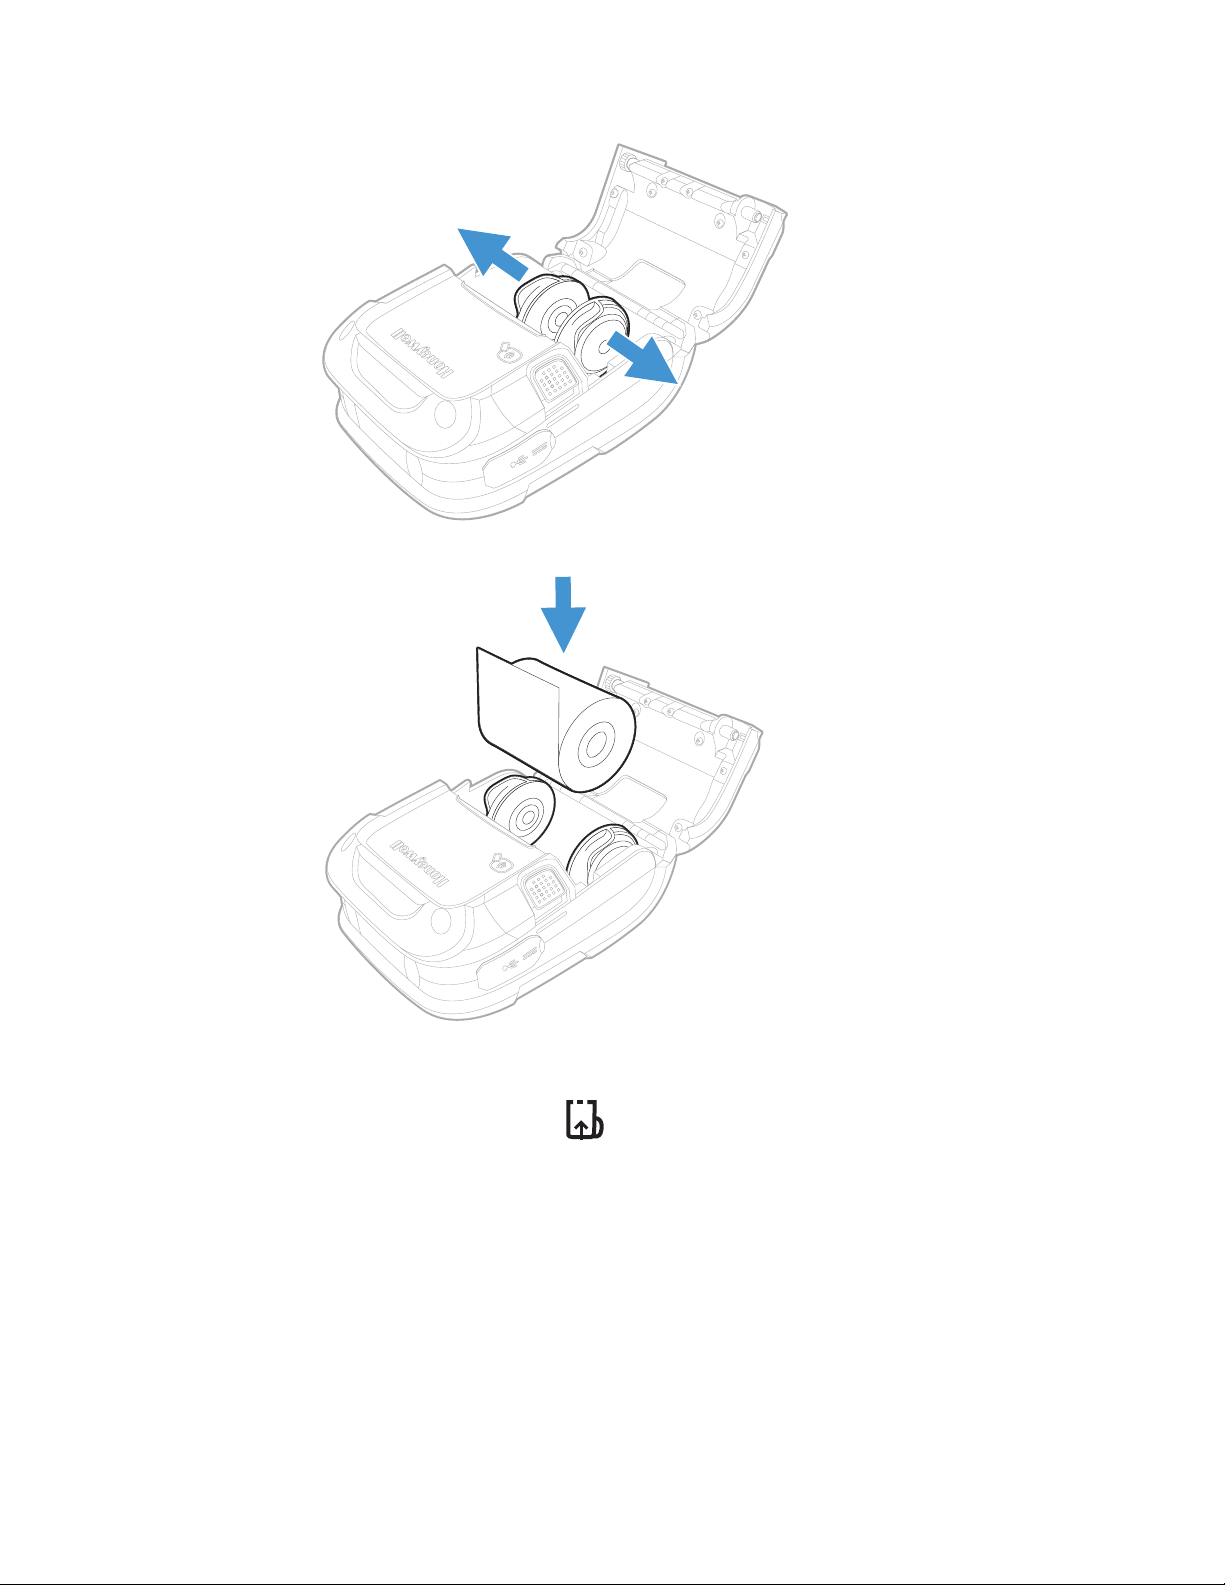
2. Slide and hold open the supply hubs.
3. Orient the paper as shown and insert into the printer.
4. Allow the supply hubs to retract onto the paper roll and press the cover down
until it latches.
5. Press the media button 2 or 3 times to normalize tracking. Each button
press advances the paper to the start of the next label.
8 RP2/RP4 User Guide
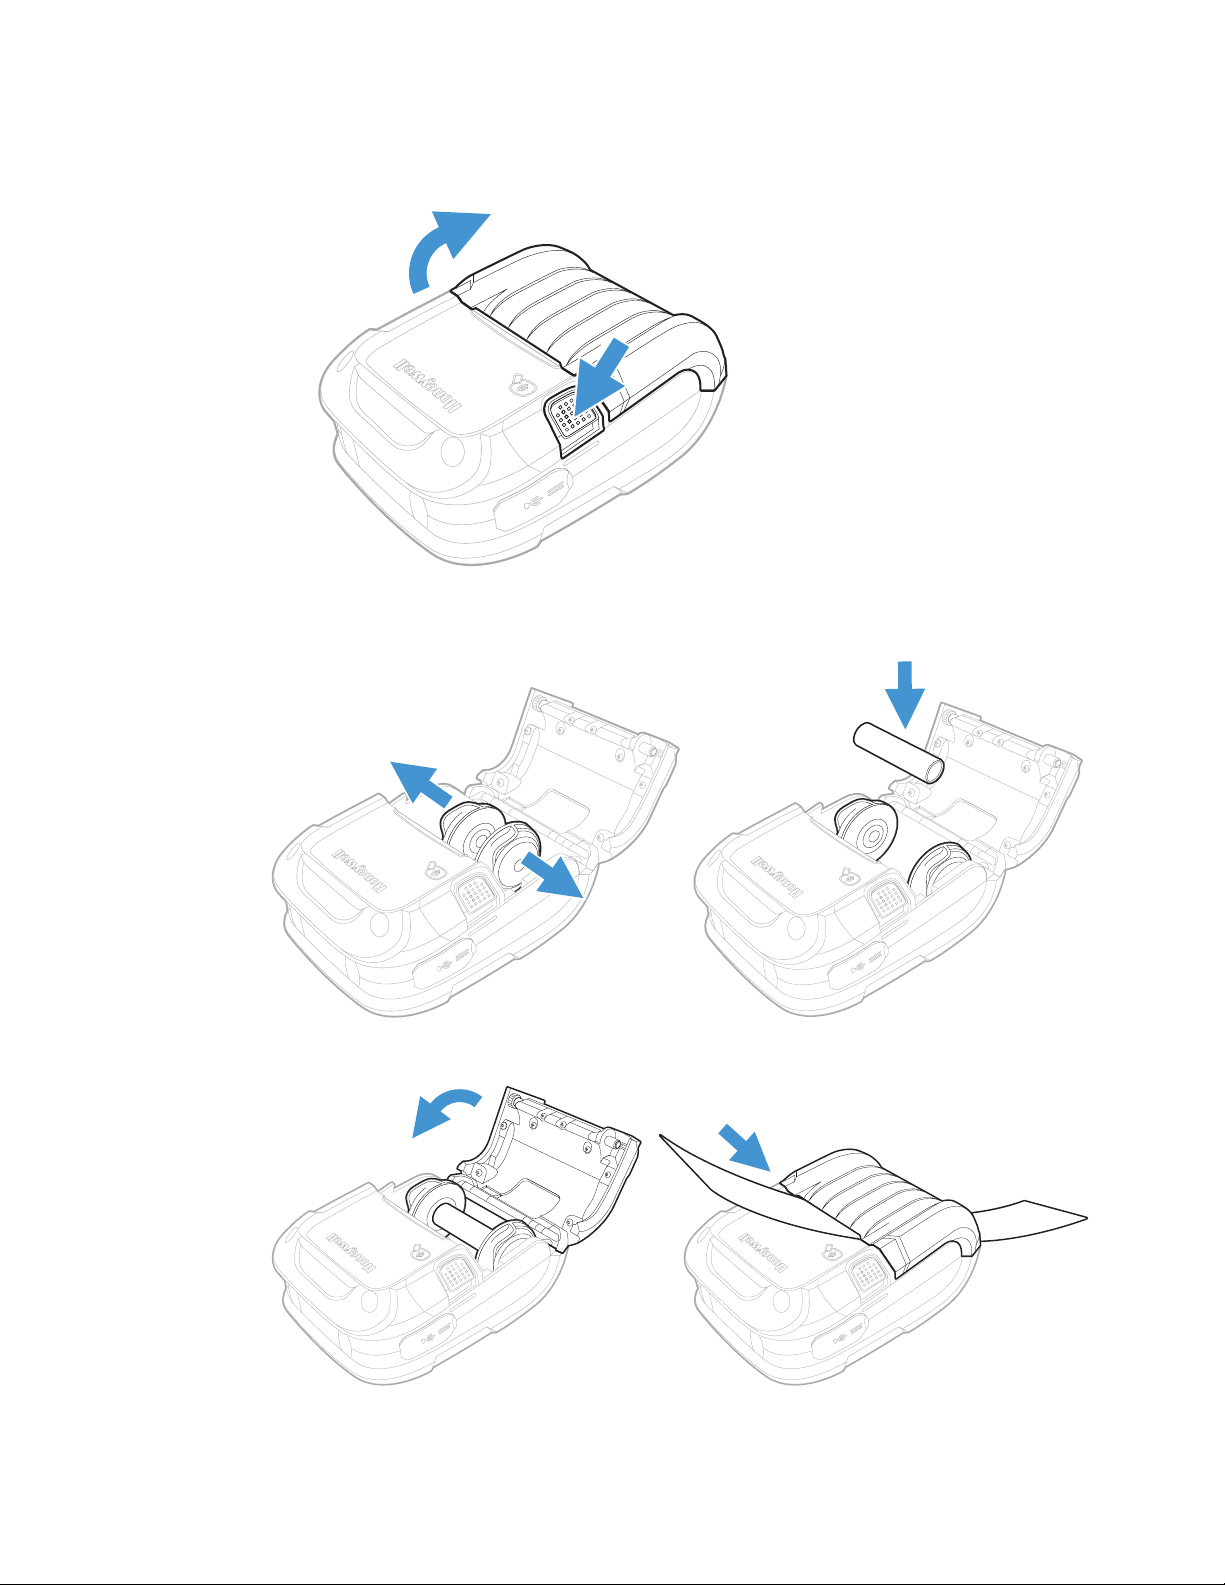
External Media
1. Press down on the latch lock and lift up the printer’s cover.
2. Open the external media door located under the supply hubs.
3. Slide and hold open the supply hubs and install the media spacer.
4. Insert the media through the external media door and through the printer.
RP2/RP4 User Guide 9
5. Press the media button 2 or 3 times to normalize tracking. Each button
press advances the paper to the start of the next label.
Configure the Media
Note: If you haven’t downloaded the drivers and software, you must do so now. See
Download Required Software.
Most applications use the printer’s default media setting of Gap, for gap labels.
However, if reflective (black mark), or continuous media is used, you must change
the printer’s settings.
1. Turn the printer on. If you are using a USB interface, connect the USB cable to
the computer.
2. Open the NETira CT Printer Configuration Utility Tool and click on Tools -
Query Printer Configuration (or press CTRL-q) to query the printer.
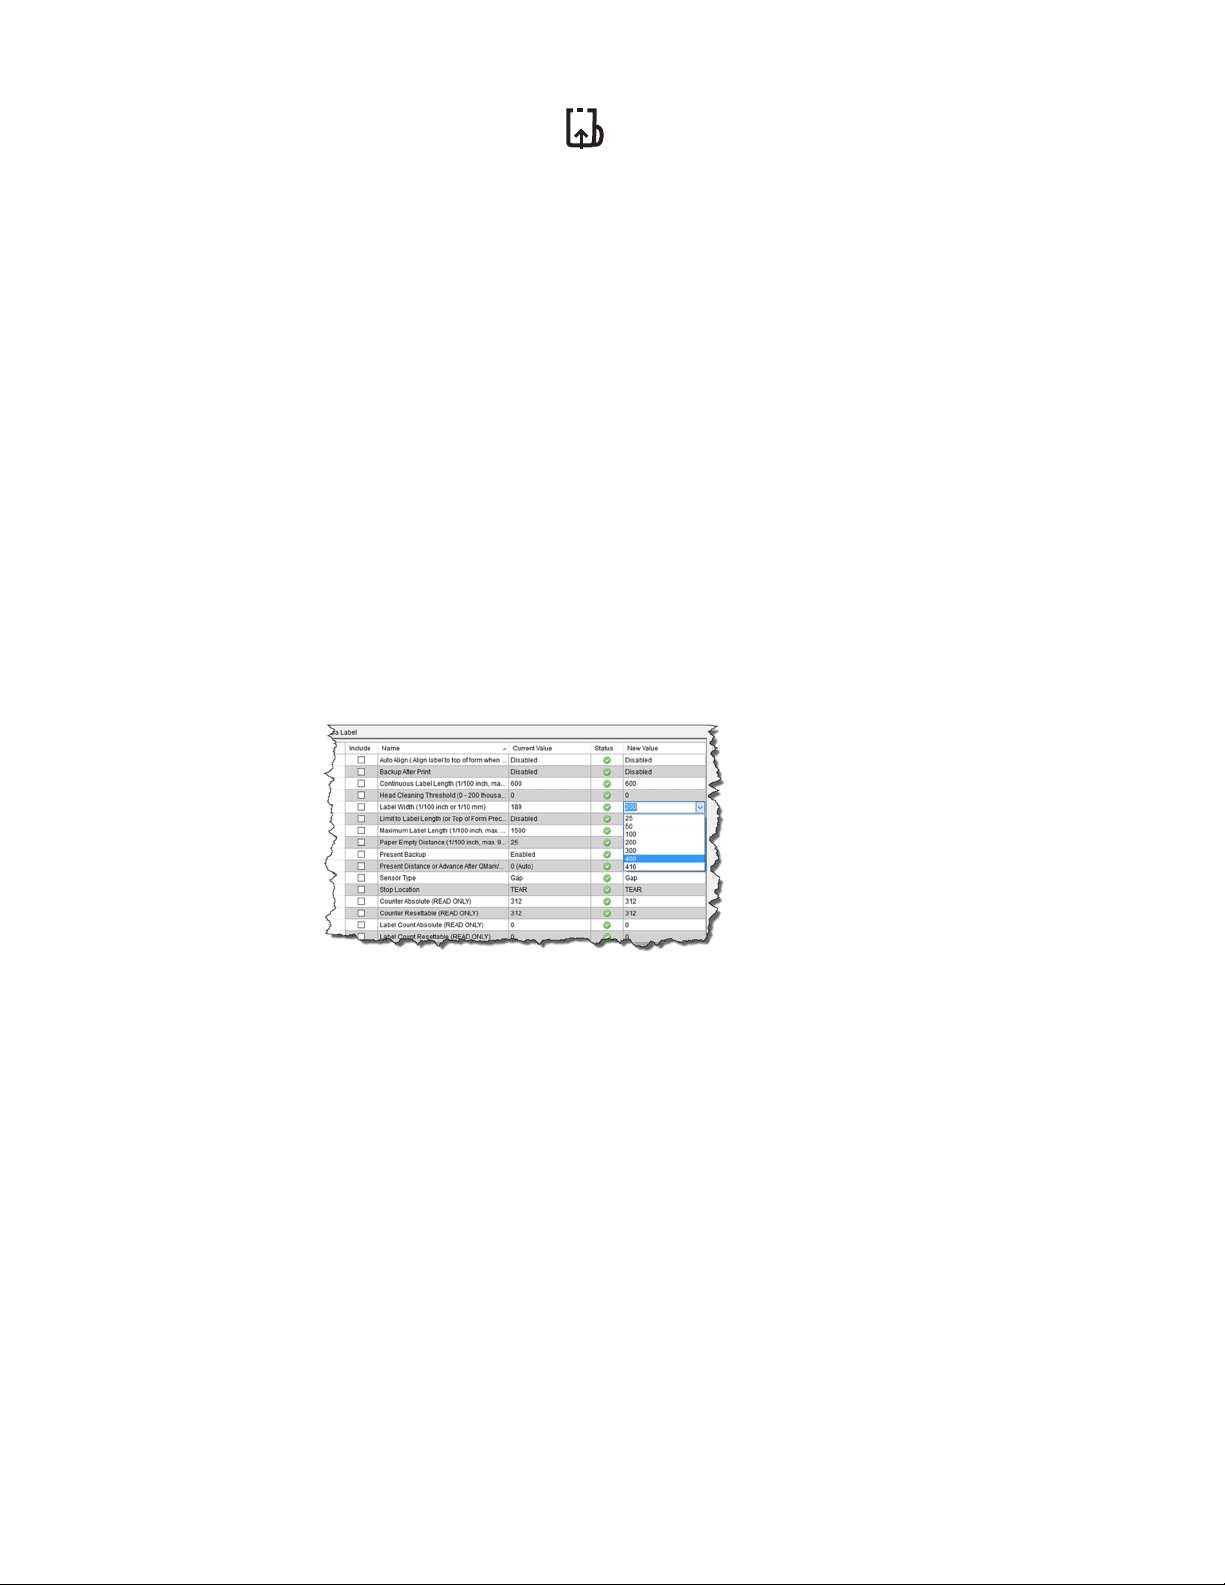
3. Under Printer Information, select Media Label.
4. Click in the entries under the New Value column to update the settings for your
media type. Each setting will have a dropdown list from which you can choose a
new value.
10 RP2/RP4 User Guide
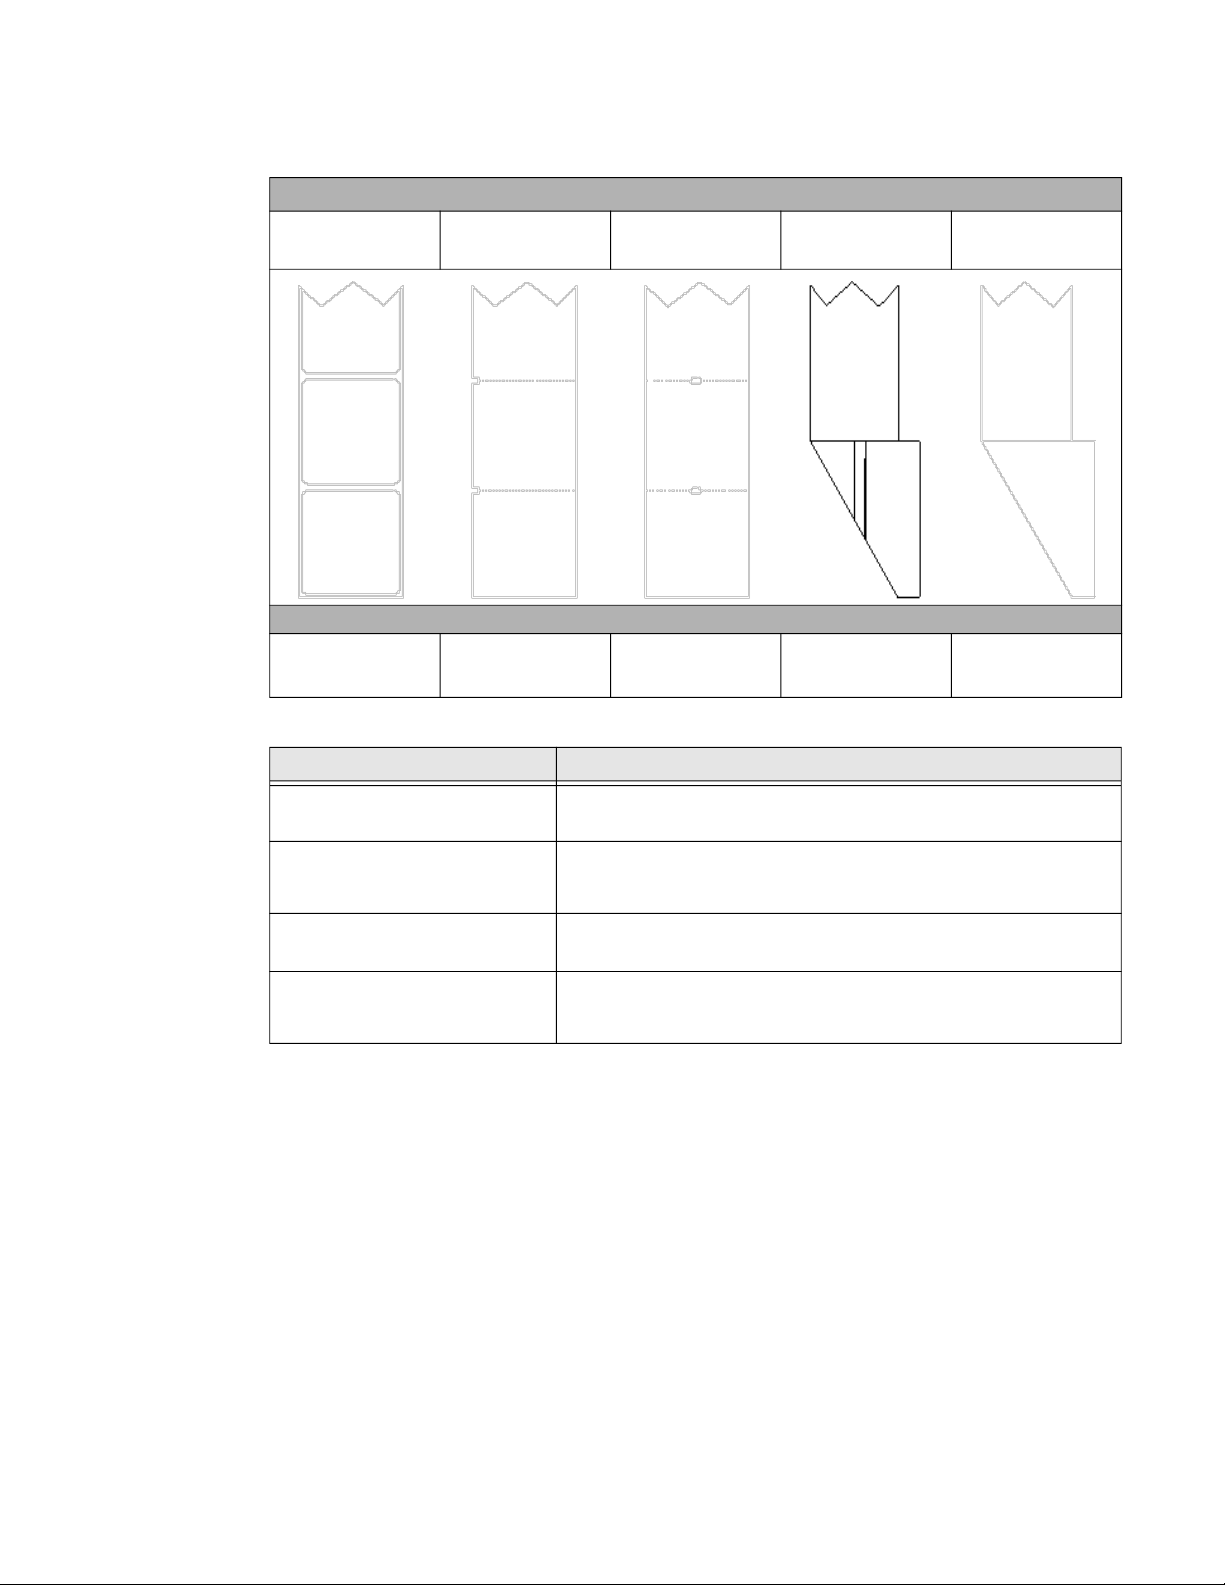
Media Types and Settings
Media Type
Gap Label Notch Edge Notch Center
Sensor Type
Gap Not Supported Gap
Reflective
(Black Mark)
Black Mark (Top
or Bottom)
Continuous
Continuous
Label Length
(set value)
Setting Description
Continuous Label Length
(1/100 inch)
Label Width (1/100 inch)
Maximum Label Length
(1/100 inch)
Sensor Type
Distance the printer will advance after pressing the Media Feed
button. Distance is measured in 1/100 inch, so 1000 = 10 inches.
200 = 2 inch media
300 = 3 inch media
400 = 4 inch media
Distance must be greater than the length of your media. Distance is
measured in 1/100 inch, so 1000 = 10 inches.
Gap = labels with gap
Continuous = media with no gap
Reflective = labels with Q-mark or bla
ck mark
5. After updating the New Value column, click the Send button to send this
change to the printer.
6. Allow 30 seconds for the printer to reset.
If you have issues with media registration after sending these settings to the
printer, refer to Calibrate the Media on page 27.
RP2/RP4 User Guide 11

12 RP2/RP4 User Guide
 Loading...