

Page 1
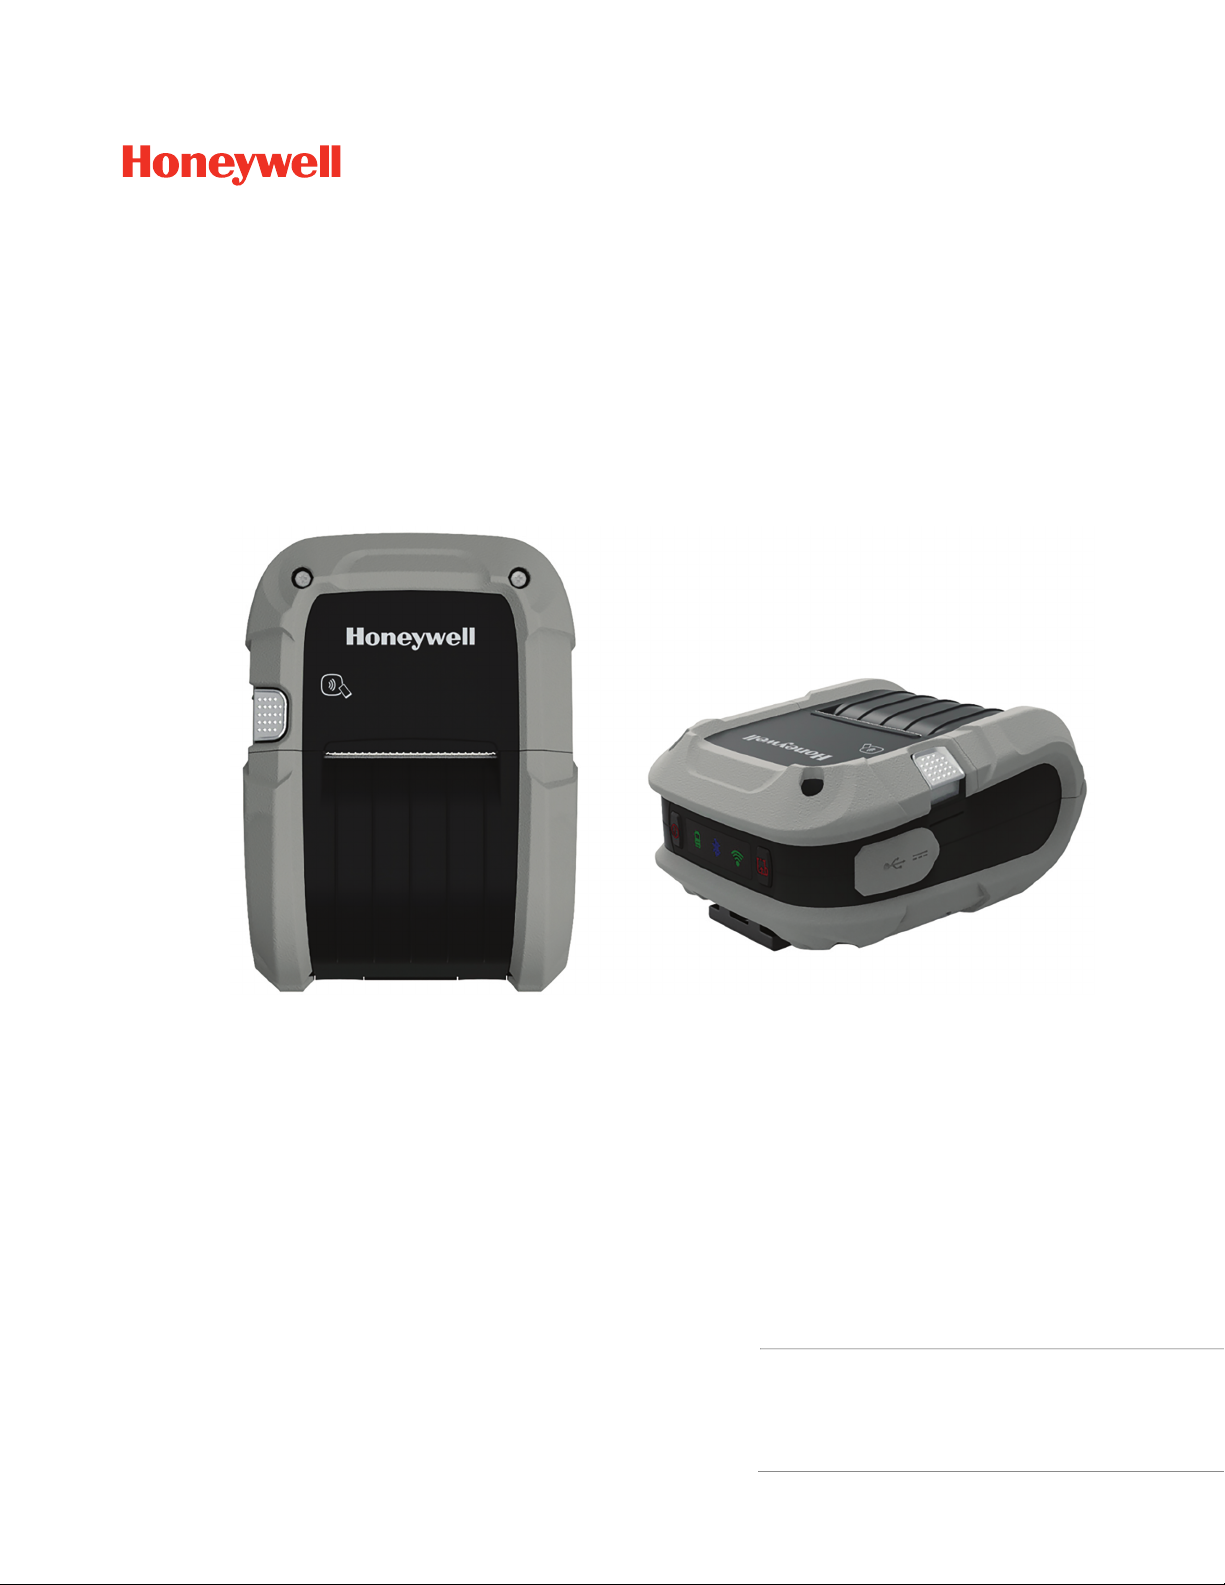
RP2/RP4
Mobile Printers
*
* For China, models RP2B-C, RP2D-C, RP4B, RP4D-C
*For Thailand models RP2B, RP2D-T, RP4B, RP4D-T
*For India models RP2B, RP2D, RP4B-I, RP4D-I
User Guide
Page 2

Disclaimer
Honeywell International Inc. (“HII”) reserves the right to make changes in specifications and other information contained in
this document without prior notice, and the reader should in all cases consult HII to determine whether any such changes
have been made. The information in this publication does not represent a commitment on the part of HII.
HII shall not be liable for technical or editorial errors or omissions contained herein; nor for incidental or consequential
damages resulting from the furnishing, performance, or use of this material. HII disclaims all responsibility for the
selection and use of software and/or hardware to achieve intended results.
This document contains proprietary information that is protected by copyright. All rights are reserved. No part of this
document may be photocopied, reproduced, or translated into another language without the prior written consent of HII.
Copyright 2017-2020 Honeywell International Inc. All rights reserved.
Web Address:
www.honeywellaidc.com.
Trademarks
Microsoft Windows 7, Windows 8, Windows Mobile, and Windows CE are trademarks or registered trademarks of Microsoft
Corporation.
Wavelink Avalanche is a registered trademark of Wavelink Corporation.
The Bluetooth word mark and logos are owned by Bluetooth SIG, Inc.
Android is a trademark of Google Inc.
Other product names or marks mentioned in this document may be trademarks or registered trademarks of other
companies and are the property of their respective owners.
Patent
For patent information, refer to www.hsmpats.com.
Firmware (Software) Agreement
The enclosed firmware (software) resident in the printer is owned by Licensor or its suppliers and is licensed for used only
on a single printer in the user’s trade or business. The user agrees not to, and not to authorize or permit any other person or
party to, duplicate or copy the firmware or the information contained in the non-volatile or programmable memory. The
firmware (software) is protected by applicable copyright laws and Licensor retains all rights not expressly granted. In no
event will Licensor or its suppliers be liable for any damages or loss, including direct, incidental, economic, special or
consequential damages, arising out of the use or inability to use the firmware (software).
Page 3

TABLE OF CONTENTS
Customer Support ....................................................................................................................... vii
Technical Assistance ............................................................................................................ vii
Product Service and Repair ............................................................................................... vii
Limited Warranty ................................................................................................................... vii
Chapter 1 - Get Started ....................................................................................1
Introduction...................................................................................................................................... 1
Unpack Your Device.......................................................................................................................1
About the Battery ........................................................................................................................... 2
Charge the Battery......................................................................................................................... 2
Download Required Software.................................................................................................... 3
Default USB Connection.......................................................................................................4
Configure Printer............................................................................................................................ 4
Safety Precautions for Lithium Batteries .............................................................................5
Proper Disposal of the Battery ...........................................................................................6
Important Safety Instructions................................................................................................... 6
Chapter 2 - Load the Media............................................................................. 7
Load Labels or Paper.................................................................................................................... 7
External Media.......................................................................................................................... 9
Configure the Media .................................................................................................................. 10
Media Types and Settings................................................................................................. 11
Chapter 3 - Program the Interface ............................................................. 13
USB Connection .......................................................................................................................... 13
RP2/RP4 User Guide iii
Page 4

Default USB Connection ....................................................................................................14
USB Settings ...........................................................................................................................14
Configure Printer ............................................................................................................14
Bluetooth Connection................................................................................................................17
Bluetooth Settings................................................................................................................17
Tap and Pair.............................................................................................................................18
Wireless LAN Connection.........................................................................................................18
Static IP/DHCP.......................................................................................................................19
Dynamic IP Address (DHCP)...................................................................................... 19
Static IP Address .............................................................................................................19
Infrastructure/Ad-hoc ..................................................................................................19
Wireless LAN Security .........................................................................................................20
WEP 64 and 128 Bit.......................................................................................................20
WPA2-PSK with CCMP..................................................................................................20
WPA2-PSK with TKIP.....................................................................................................21
WPA2-Enterprise ............................................................................................................21
WPA-PSK with TKIP........................................................................................................21
Chapter 4 - Printer Display and Buttons ................................................... 23
Front Panel .....................................................................................................................................23
On/Off Button .......................................................................................................................23
Media Button .........................................................................................................................23
LED Display .............................................................................................................................24
Audible Indicators.................................................................................................................24
Set Sleep and Power Down Timer..........................................................................................25
Real-Time Clock (RTC)...............................................................................................................25
Set the Date and Time .........................................................................................................25
Chapter 5 - Calibration.................................................................................. 27
Calibrate the Media.....................................................................................................................27
Quick Media Calibration.....................................................................................................27
Manual Media Calibration.................................................................................................28
iv RP2/RP4 User Guide
Page 5

Gap Type Labels ..............................................................................................................28
Black Mark Labels ..........................................................................................................29
Chapter 6 - Configuration Files....................................................................31
Print Configuration Label.........................................................................................................31
Save and Load Configuration Files.......................................................................................31
Save a Configuration File ...................................................................................................31
Load a Configuration File...................................................................................................31
Chapter 7 - Maintenance...............................................................................33
Battery Charge Information.....................................................................................................33
Health Status ..........................................................................................................................33
Gas Gauge ................................................................................................................................34
Change the Battery .....................................................................................................................34
Cleaning Intervals........................................................................................................................35
Maintenance Schedule..............................................................................................................35
Clean the Printhead..............................................................................................................36
Standard RP4 Models ...................................................................................................36
Linerless Models .............................................................................................................36
Firmware Update..........................................................................................................................37
Chapter 8 - Troubleshooting.........................................................................39
Chapter 9 - Product Specifications .............................................................41
RP2 Printer Specifications .......................................................................................................41
RP4 Printer Specifications .......................................................................................................42
Required Safety Labels..............................................................................................................45
RP2Printer................................................................................................................................45
RP4Printer................................................................................................................................45
Fonts..................................................................................................................................................45
Bar Code Symbologies...............................................................................................................46
Graphics...........................................................................................................................................46
Software and Firmware..............................................................................................................46
RP2/RP4 User Guide v
Page 6

Control Language Compatibility ....................................................................................46
Device Management Support and Compatibility.....................................................46
Network Compatibility.........................................................................................................46
O/S Support ............................................................................................................................46
Label Design Software Compatibility ...........................................................................46
ERP Systems ...........................................................................................................................47
Software Development Kit .................................................................................................47
Chapter 10 - Accessories .............................................................................. 49
Belt Clip............................................................................................................................................49
Shoulder Strap/Hand Strap (RP4 Printer Only).............................................................. 49
Belt Loop .........................................................................................................................................50
Soft Case .........................................................................................................................................50
USB On-the-Go ............................................................................................................................51
Chapter A - Printer Language Emulation.................................................. 53
Chapter B - Print Demo.................................................................................. 55
NETira CT Printer Demo............................................................................................................ 55
vi RP2/RP4 User Guide
Page 7

Customer Support
Technical Assistance
To search our knowledge base for a solution or to log in to the Technical Support
portal and report a problem, go to www.hsmcontactsupport.com.
For our latest contact information, see www.honeywellaidc.com/locations.
Product Service and Repair
Honeywell International Inc. provides service for all of its products through service
centers throughout the world. To obtain warranty or non-warranty service, return
your product to Honeywell (postage paid) with a copy of the dated purchase
record. To learn more, go to www.honeywellaidc.com and select Service & Repair at
the bottom of the page.
Limited Warranty
For warranty information, go to www.honeywellaidc.com and click Resources >
Product Warranty.
RP2/RP4 User Guide vii
Page 8

viii RP2/RP4 User Guide
Page 9

CHAPTER
GET STARTED
1
Introduction
The RP Series printer family blends the rugged durability with state-of-the-art
electronics and user-friendly features to redefine the standard in portable thermal
printers. The printer’s USB, WiFi LAN, or Bluetooth® technology offers an easy
interface to any host system.
To print labels or receipts, refer to the instructions included with the software you
use to create the labels.
A Windows® printer driver can be found on our website, www.honeywellaidc.com.
Unpack Your Device
After you open the shipping carton containing the product, take the following
steps:
• Check for damage during shipment. Report damage immediately to the carrier
who delivered the carton.
• Make sure the items in the carton match your order.
• Save the shipping container for later storage or shipping.
In order to print from your printer, the following items are required. If you do not
have these items, contact your customer-support or sales representative for advice
on where to purchase the items or where the required software can be downloaded.
• Power Supply (sold separately)
The appropriate power supply for your region is required and is not included as
part of the printer purchase. If you do not have an applicable power supply for
your printer, you will need to order one.
• Connection Cable
You will need a standard Mini B to USB A cable if you are connecting your printer
via USB.
• Print Media
Honeywell offers a full line of applicable printing labels, receipt media, and
supplies.
RP2/RP4 User Guide 1
Page 10
About the Battery
Power is supplied to the printer by a rechargeable lithium ion battery. Batteries are
shipped only partially charged. The battery should be charged for a minimum of 4
hours before initial use to ensure optimal performance.
Warning: The maximum operating temperature of the printer is 122ºF
(50°C), however the maximum operating temperature for
charging when used with a Honeywell power supply is limited
to 104ºF (40°C). Charge the printer in a location that meets this
temperature requirement.
See Battery Charge Information on page 33 for further information about the battery.
Charge the Battery
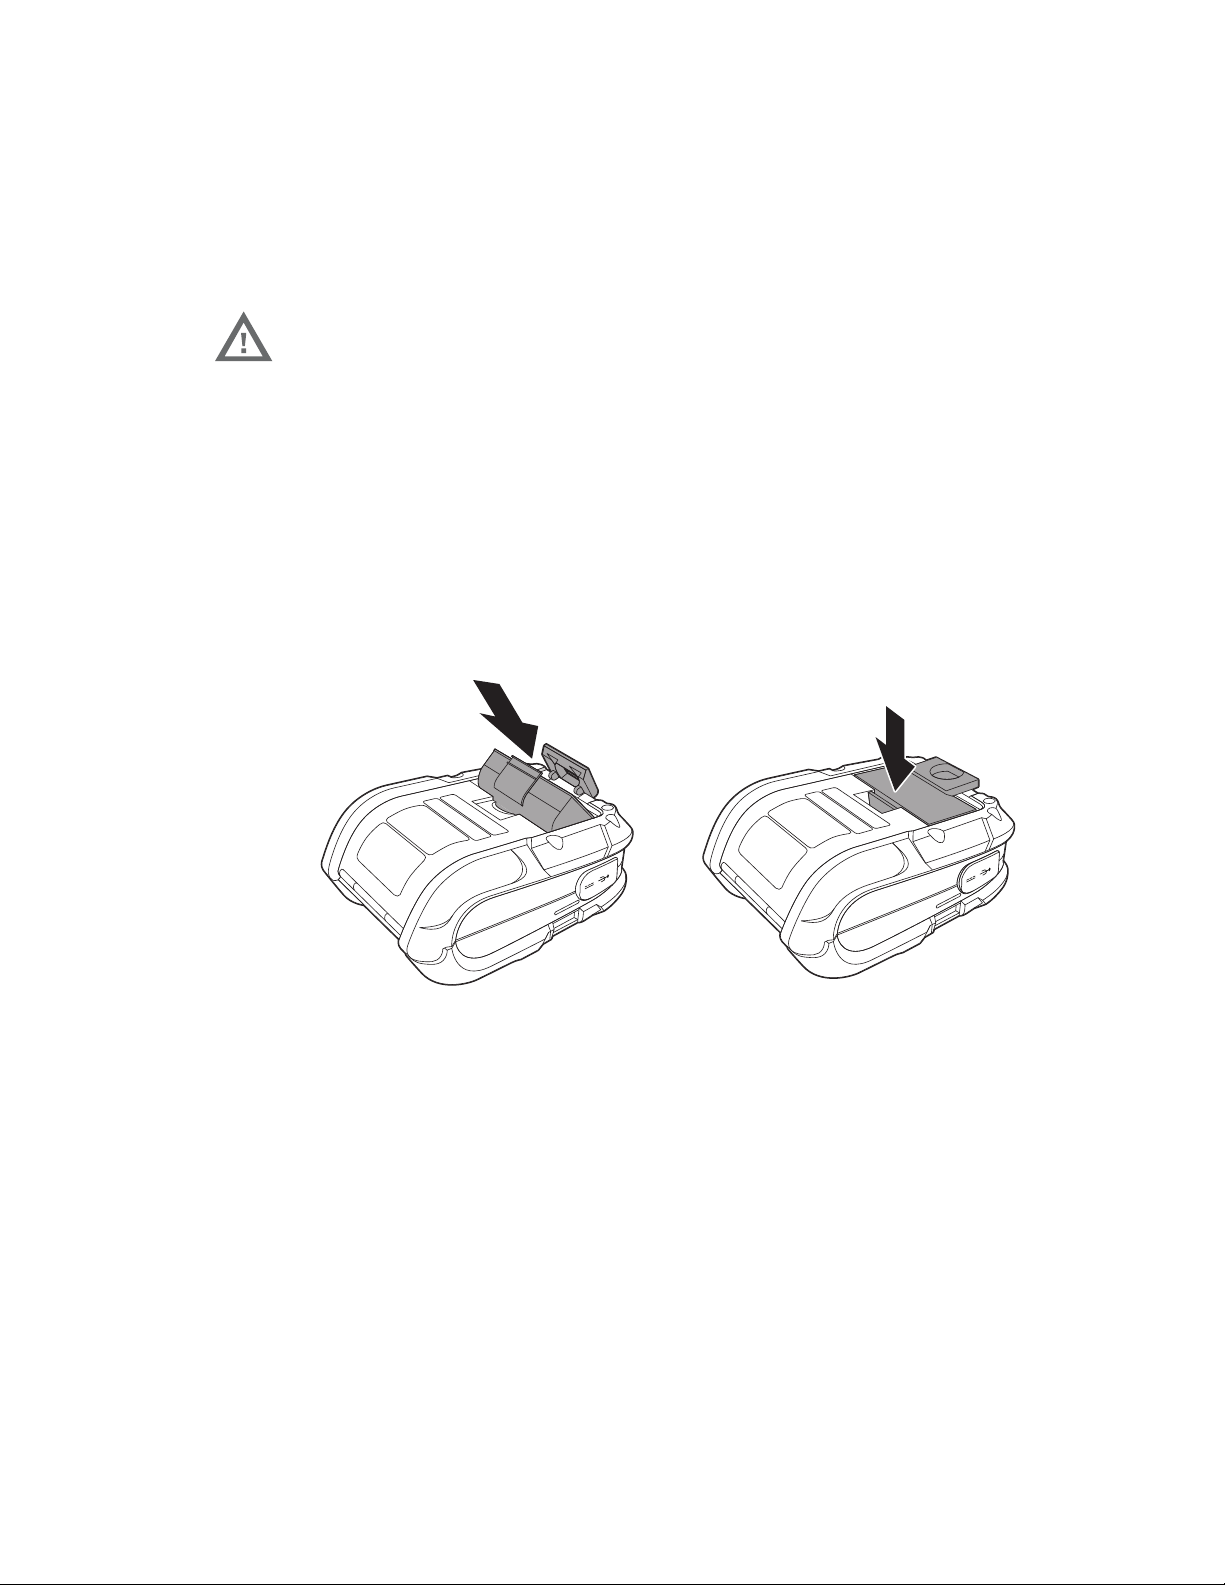
1. Install the battery in the printer. Align the release tab with the same side as the
charge contacts and lock the battery into position. The latch clicks into place
when properly seated.
2. Connect the power supply to printer’s power jack.
2 RP2/RP4 User Guide
Page 11
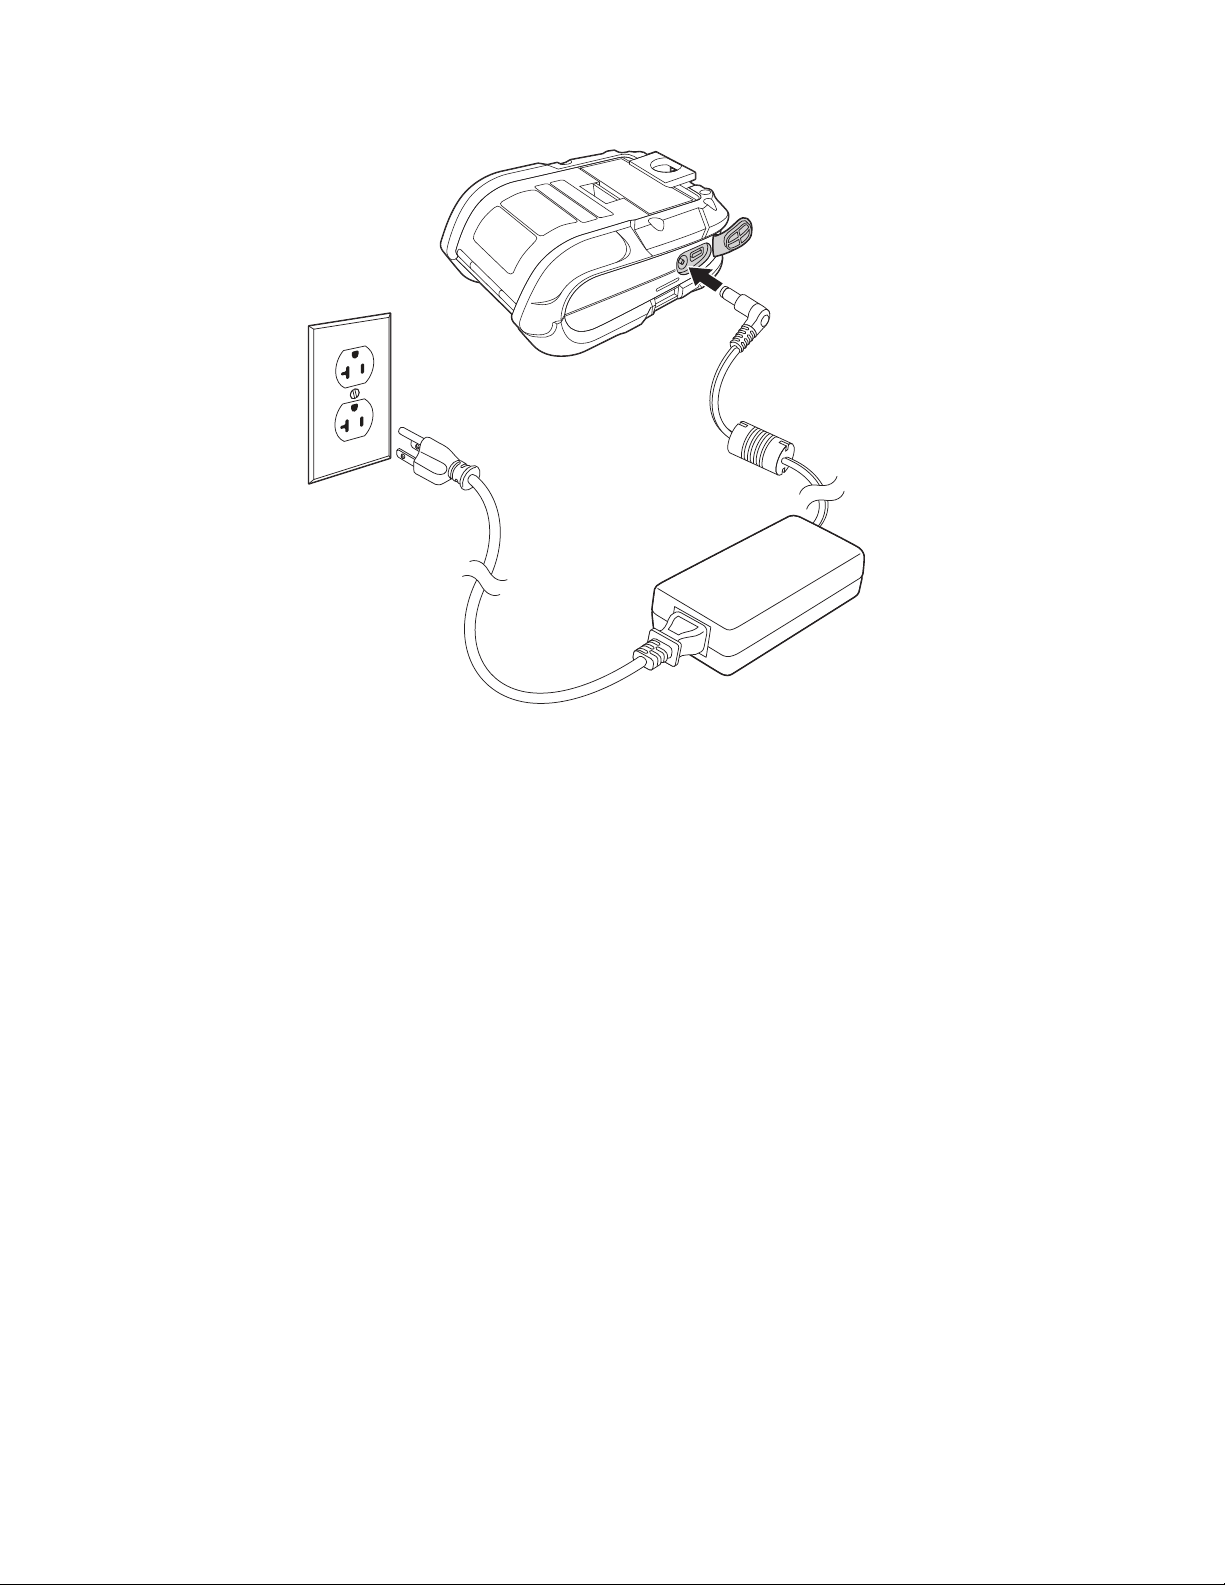
3. Connect the AC power cord to the power supply and plug into an outlet.
Note: Operating the printer while it is connected to the AC power supply can shorten the life
of the battery and is not recommended.
Download Required Software
1. Create a new folder on your local computer named Drivers.
2. Go to the Technical Support Downloads Portal at https://
hsmftp.honeywell.com.
3. Go to:
Software
- Printers
- Mobile - Portable
- RP2 RP3 RP4
- Utility
to download the NETira® CT Printer Configuration Utility.
4. When prompted, click on Open Honeywell Software Downloader.
5. Once the file has been downloaded, extract it to your Drivers folder.
RP2/RP4 User Guide 3
Page 12

6. Go to:
Software
- Printers
- Mobile - Portable
- RP2 RP3 RP4
- Drivers
- Printer
to download the Windows Printer Drivers (for DPL Input Mode).
7. When prompted, click on Open Honeywell Software Downloader.
8. Once the file has been downloaded, extract it to your Drivers folder.
9. Open the Drivers folder and double-click each of the setup.exe files. Follow the
prompts to install each piece of software.
Default USB Connection
The default USB class is CDC Composite. On some systems (e.g., handheld
devices), you will have to change this USB class in order to connect. See USB
Connection on page 13 for further information.
1. Connect the USB cable to the printer and to the USB port on the host system.
2. Power up your printer.
3. Your host computer should recognize the printer and begin adding the device
driver. If the setup operation does not start, locate the Devices and Printers
section in the Control Panel and select Add a Printer.
4. Select the appropriate RP printer model and follow the prompts to finish
installation.
Configure Printer
1. Turn the printer on and connect it to the computer using the USB cable.
2. Open the NETira
™
CT Printer Configuration Utility Tool.
4 RP2/RP4 User Guide
Page 13
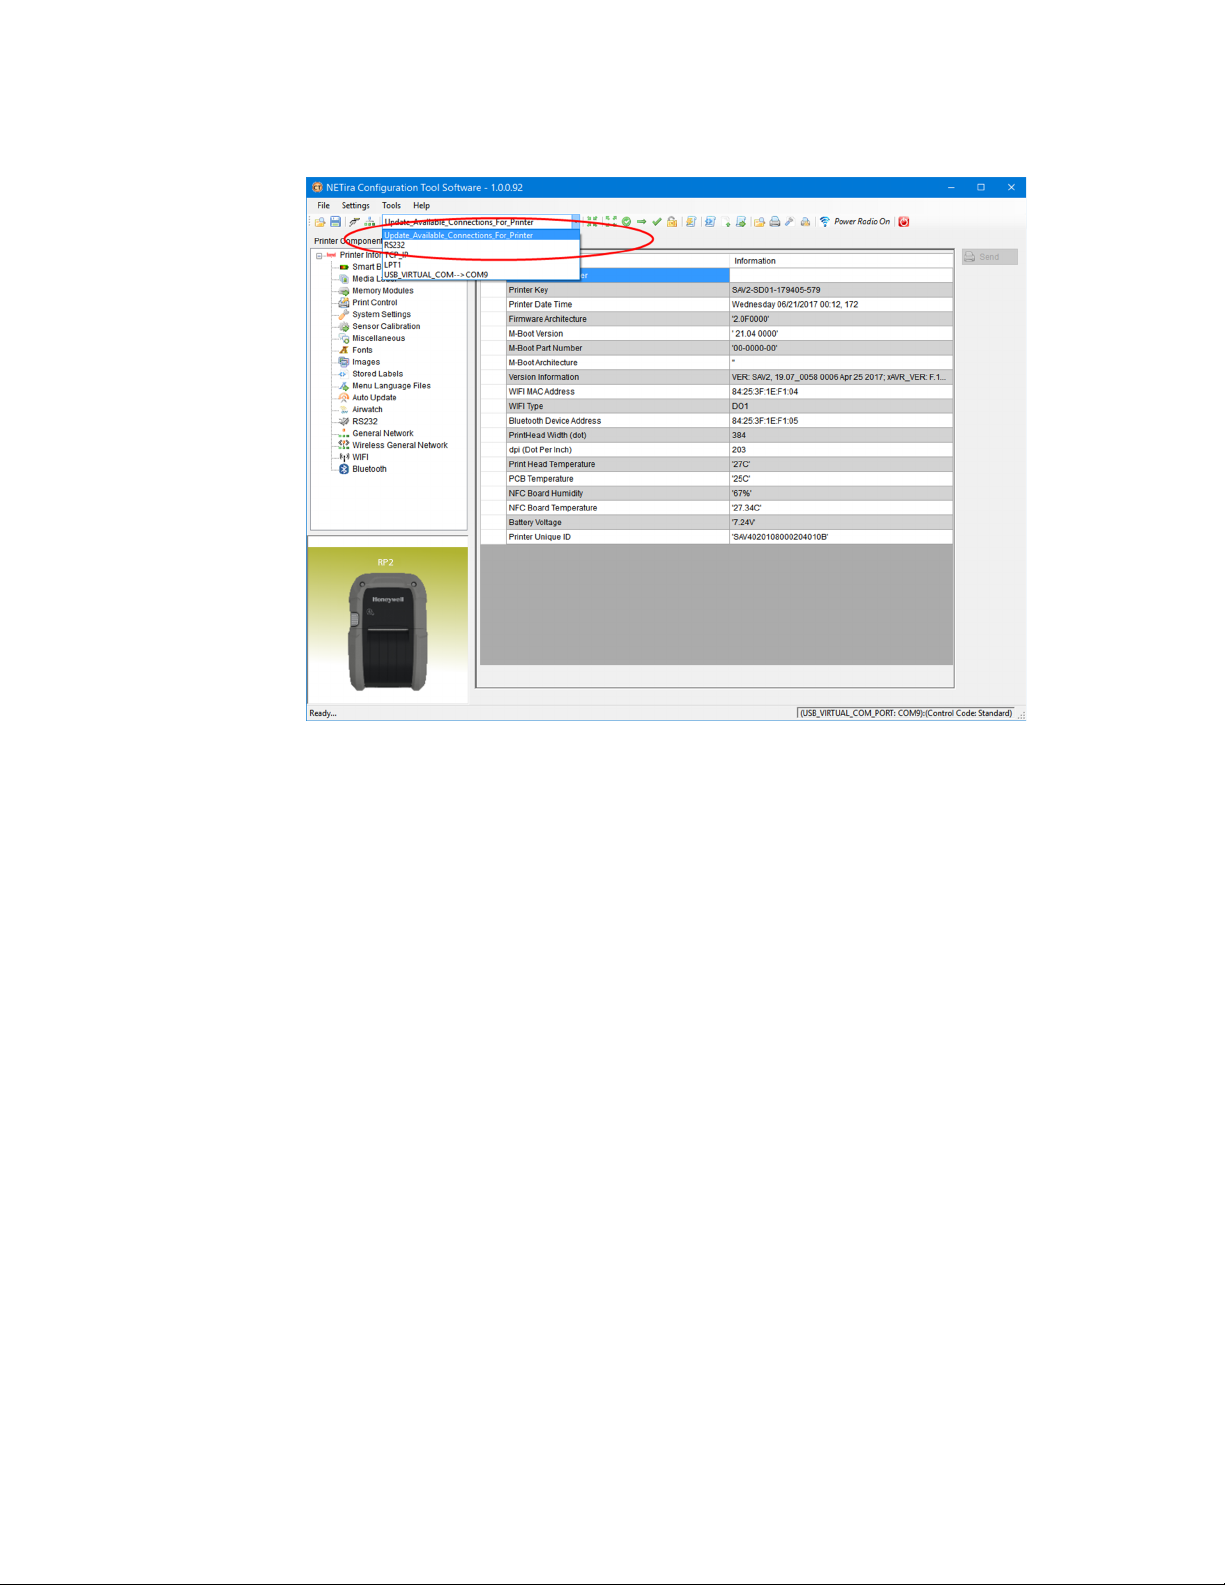
3. Query the printer by clicking Tools - Update Available Connections For
Printer. This will look for the USB Virtual COM Port.
4. Once this is completed, reopen the dropdown menu and select the USB Virtual
COM port.
Note: Make sure this port is not in use by the printer driver when you add it to the host
system.
5. Select Tools - Query Printer Configuration (or press CTRL-q) to display the
printer’s configuration.
See Program the Interface beginning on page 13 for detailed information about
changing your printer’s settings.
Safety Precautions for Lithium Batteries
• Do not place batteries in fire or heat the batteries.
• Do not store batteries near fire or other high temperature locations.
• Do not store or carry batteries together with metal objects.
• Do not expose batteries to water or allow the batteries to get wet.
• Do not connect (short) the positive and negative terminals, of the batteries, to
each other with any metal object.
• Do not pierce, strike or step on batteries or subject batteries to strong impacts or
shocks.
• Do not disassemble or modify batteries.
RP2/RP4 User Guide 5
Page 14

Caution: There is a danger of explosion if the batteries are incorrectly
replaced. Replace the batteries with only the same or
equivalent type recommended by the manufacturer. Dispose of
used batteries according to the recycle program for batteries as
directed by the governing agency for the country where the
batteries are to be discarded.
Proper Disposal of the Battery
When the battery has reached the end of its useful life, the battery
should be disposed of by a qualified recycler or hazardous materials
handler. Do not incinerate the battery or dispose of the battery with
general waste materials. You may send the battery to us. (postage
paid). The shipper is responsible for complying with all federal, state,
and local laws and regulations related to the packing, labeling, man-
ifesting, and shipping of spent batteries. Contact the Product Service Department
(Customer Support) for recycling or disposal information. Since you may find that
your cost of returning the batteries significant, it may be more cost effective to
locate a local recycle/disposal company.
The printer is also designed with external-charging capabilities (optional) using
Honeywell-approved charging accessories. For more information on available
optional charging accessories, or a guide to using the multi-bay charging accessory, go to www.honeywellaidc.com.
Important Safety Instructions
This printer has been designed to provide many years of safe, reliable performance.
As with all types of electrical equipment, however, there are a few basic precautions
you should take to avoid hurting yourself or damaging the equipment:
• Read the installation and operating instructions.
• Read and follow all warning instruction labels on the printer.
• Make sure all openings on the printer remain unblocked. Never insert anything
into the openings or ventilation slots.
• Do not place the printer near a heat source.
• Do not use your printer near water or spill liquid into it.
• Be certain that your power source matches a listed voltage rating for the printer
(if unsure, check with your dealer or local utility company).
• Do not place the power cord where it can be stepped on and, if the power cord
becomes damaged, immediately replace it.
If service is required, use only qualified trained technicians to repair your printer.
See Customer Support.
6 RP2/RP4 User Guide
Page 15
CHAPTER
LOAD THE MEDIA
2
Load Labels or Paper
Load labels or paper into the printer as follows:
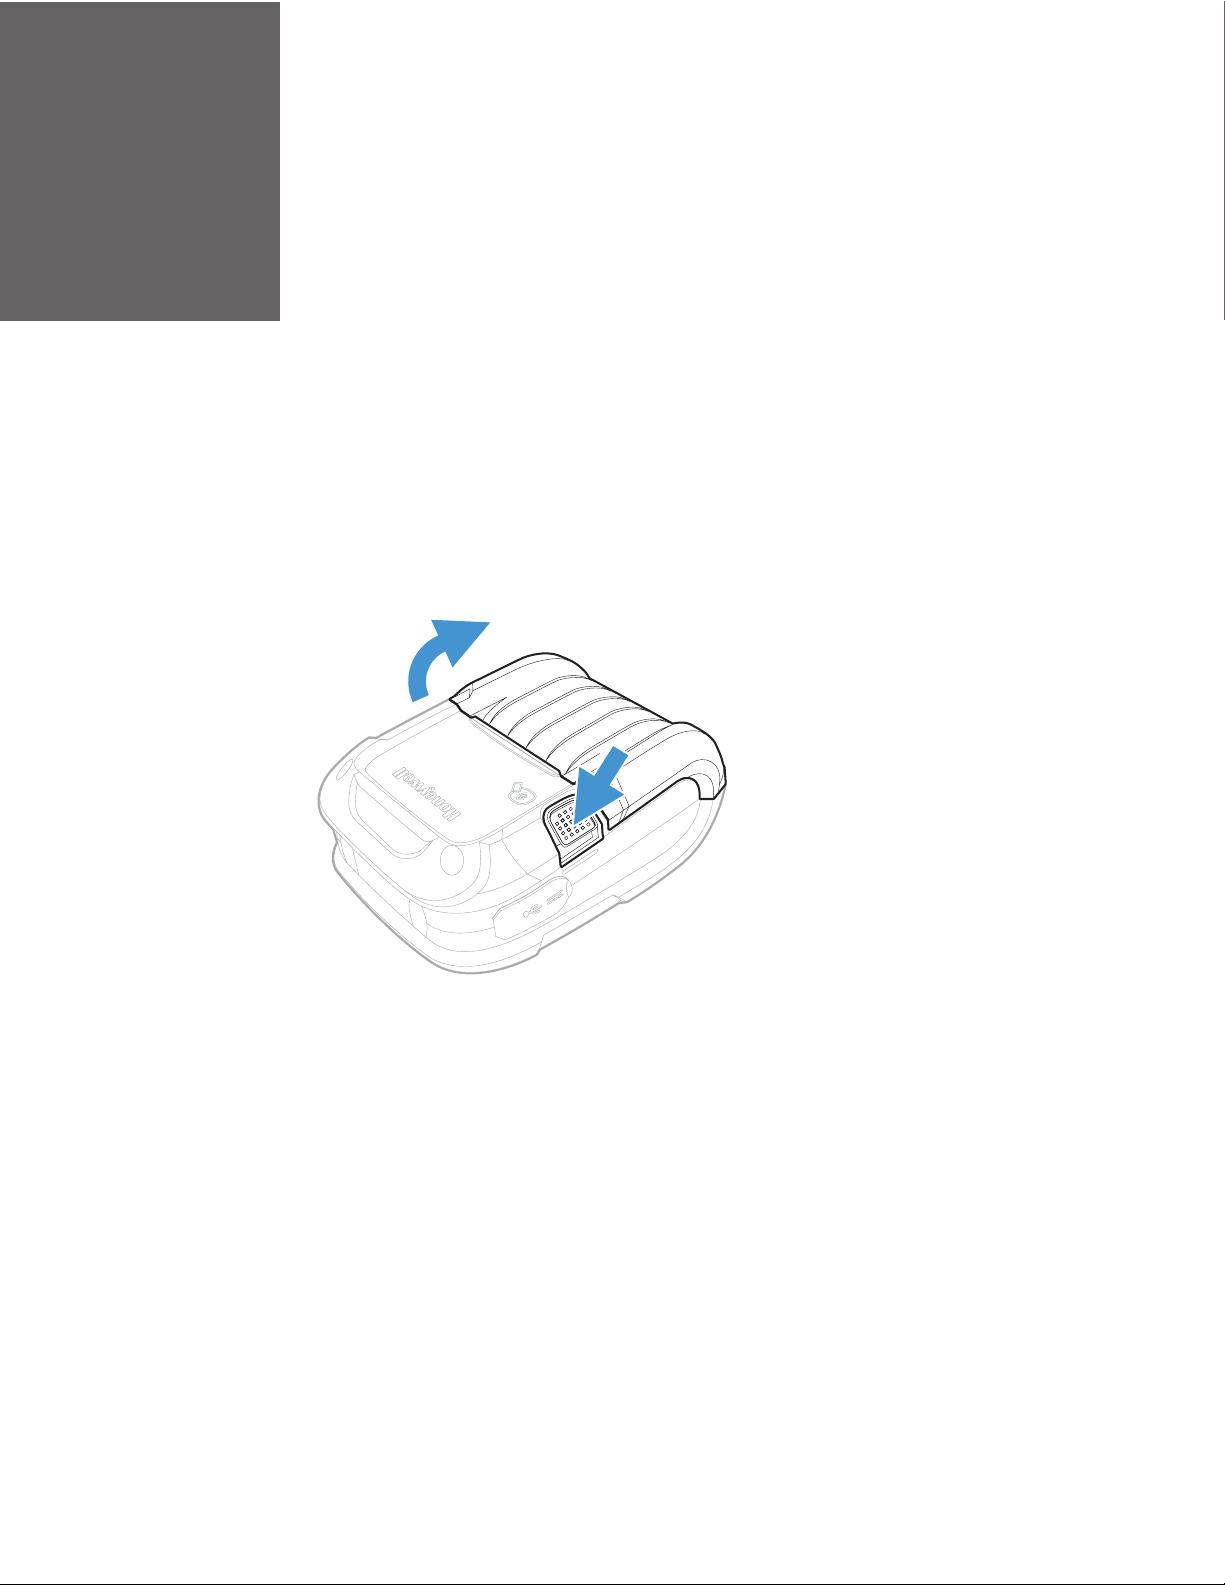
1. Press down on the latch lock and lift up the printer’s cover.
RP2/RP4 User Guide 7
Page 16
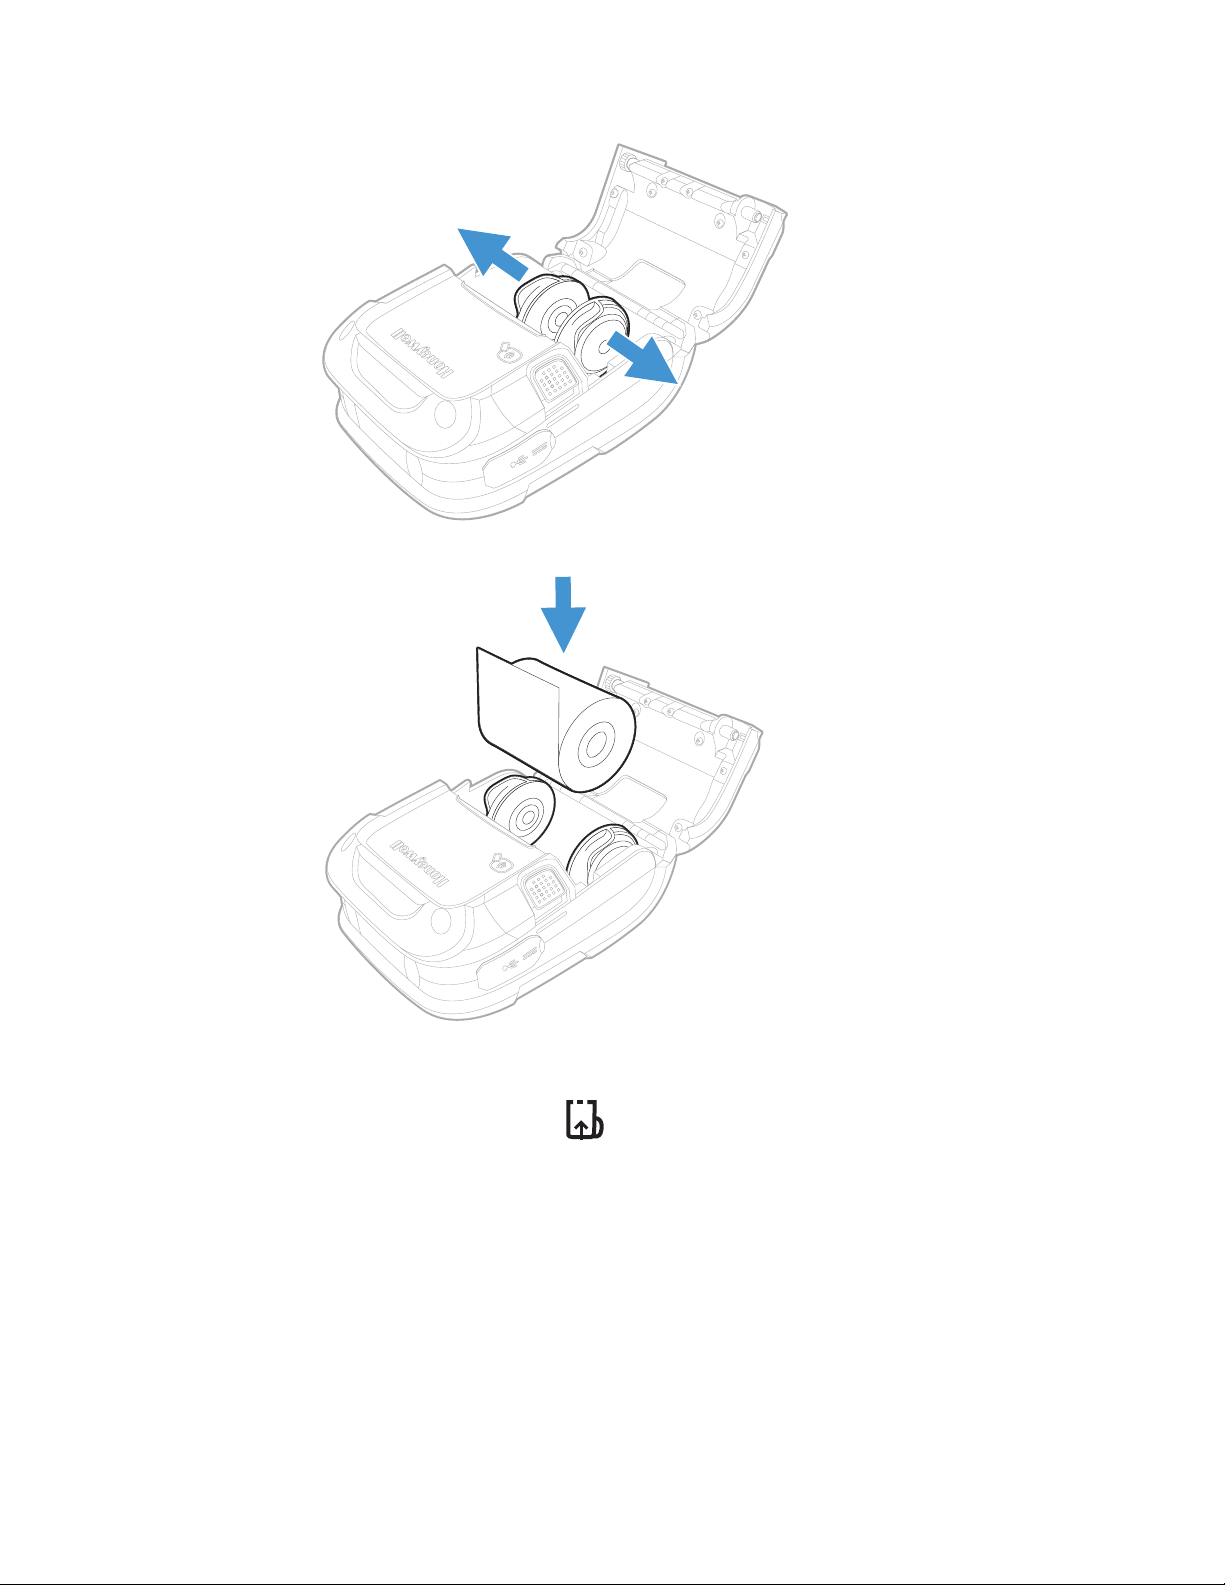
2. Slide and hold open the supply hubs.
3. Orient the paper as shown and insert into the printer.
4. Allow the supply hubs to retract onto the paper roll and press the cover down
until it latches.
5. Press the media button 2 or 3 times to normalize tracking. Each button
press advances the paper to the start of the next label.
8 RP2/RP4 User Guide
Page 17
External Media
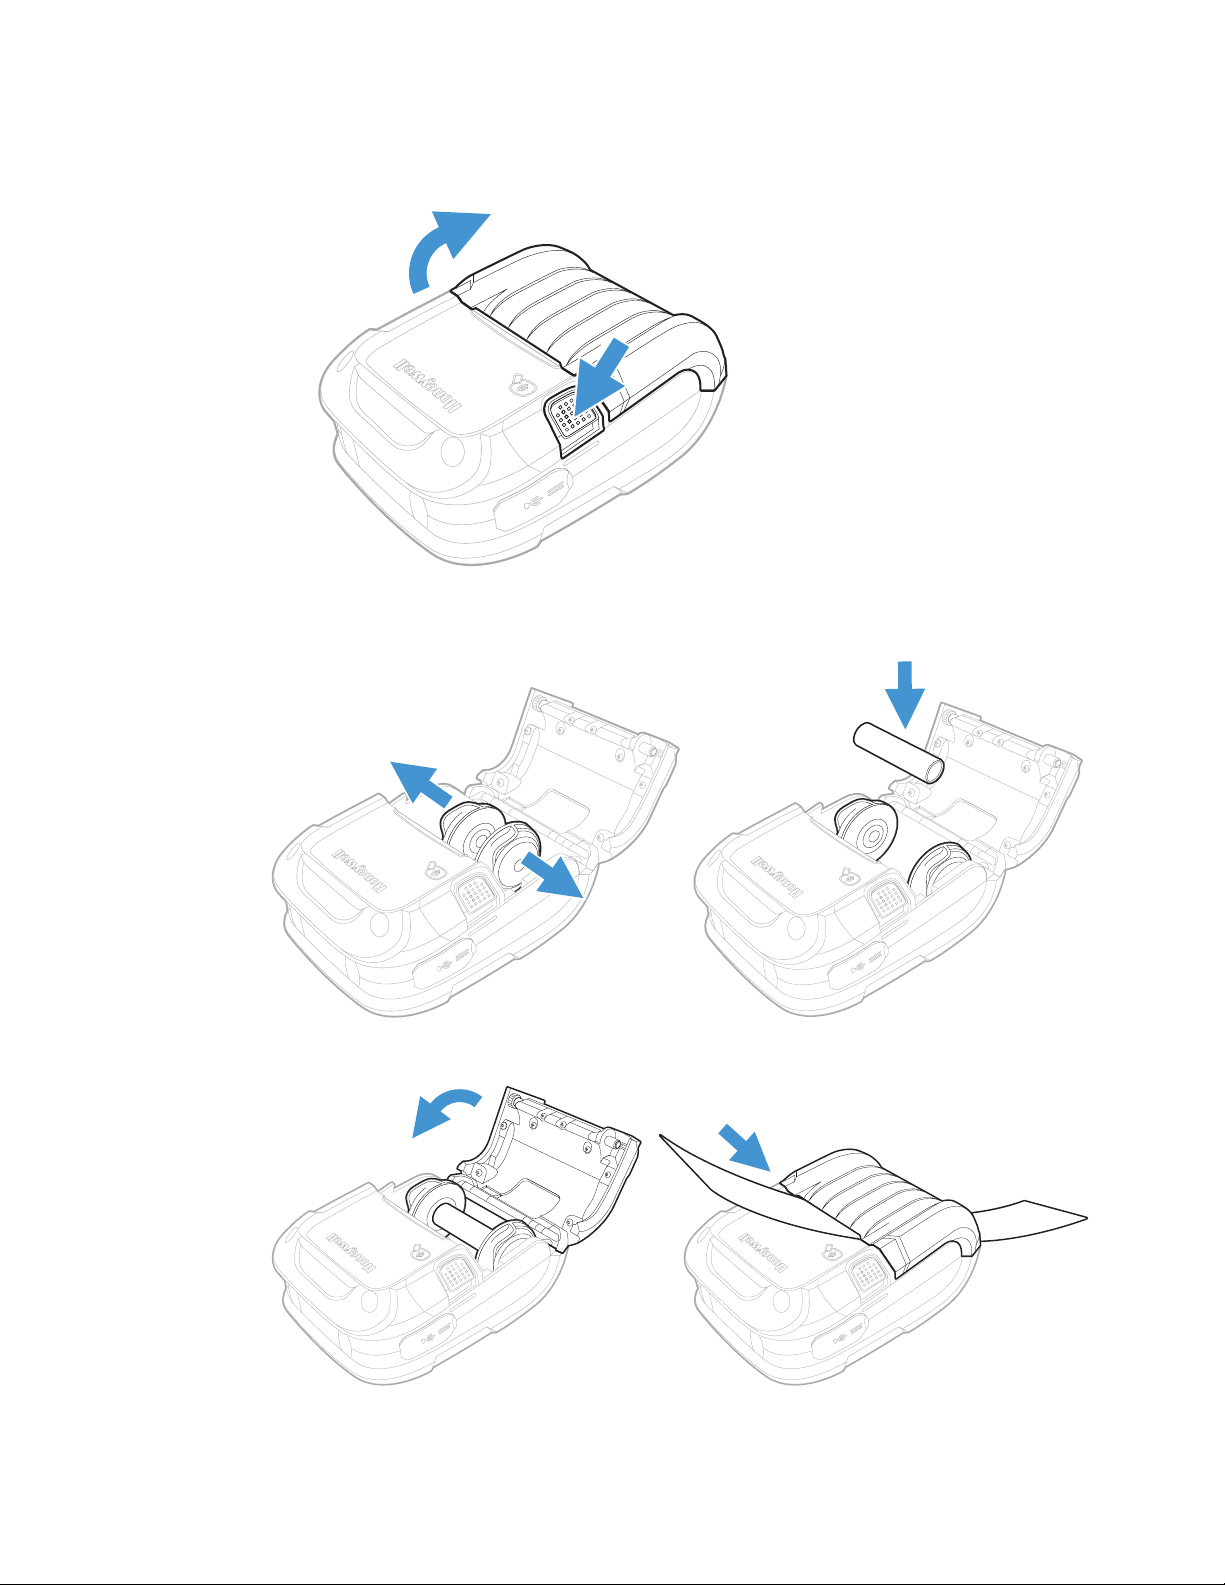
1. Press down on the latch lock and lift up the printer’s cover.
2. Open the external media door located under the supply hubs.
3. Slide and hold open the supply hubs and install the media spacer.
4. Insert the media through the external media door and through the printer.
RP2/RP4 User Guide 9
Page 18
5. Press the media button 2 or 3 times to normalize tracking. Each button
press advances the paper to the start of the next label.
Configure the Media
Note: If you haven’t downloaded the drivers and software, you must do so now. See
Download Required Software.
Most applications use the printer’s default media setting of Gap, for gap labels.
However, if reflective (black mark), or continuous media is used, you must change
the printer’s settings.
1. Turn the printer on. If you are using a USB interface, connect the USB cable to
the computer.
2. Open the NETira CT Printer Configuration Utility Tool and click on Tools -
Query Printer Configuration (or press CTRL-q) to query the printer.
3. Under Printer Information, select Media Label.
4. Click in the entries under the New Value column to update the settings for your
media type. Each setting will have a dropdown list from which you can choose a
new value.
10 RP2/RP4 User Guide
Page 19
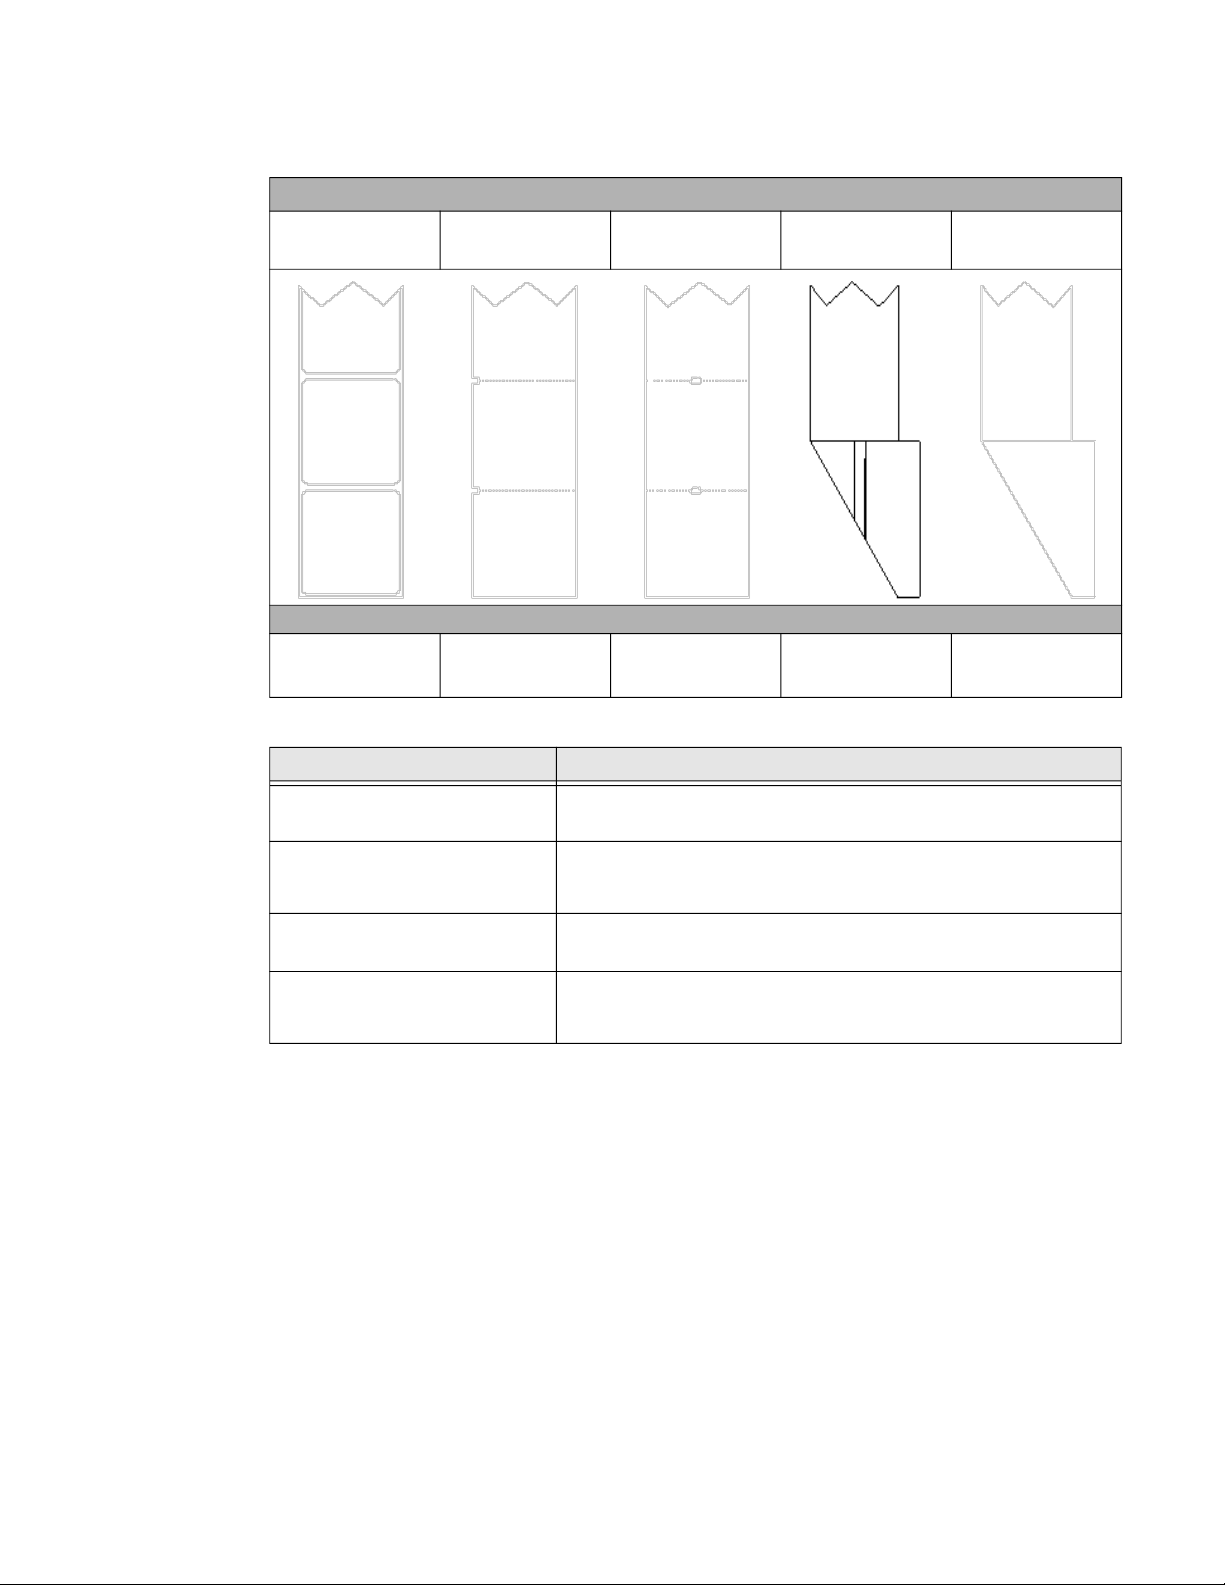
Media Types and Settings
Media Type
Gap Label Notch Edge Notch Center
Sensor Type
Gap Not Supported Gap
Reflective
(Black Mark)
Black Mark (Top
or Bottom)
Continuous
Continuous
Label Length
(set value)
Setting Description
Continuous Label Length
(1/100 inch)
Label Width (1/100 inch)
Maximum Label Length
(1/100 inch)
Sensor Type
Distance the printer will advance after pressing the Media Feed
button. Distance is measured in 1/100 inch, so 1000 = 10 inches.
200 = 2 inch media
300 = 3 inch media
400 = 4 inch media
Distance must be greater than the length of your media. Distance is
measured in 1/100 inch, so 1000 = 10 inches.
Gap = labels with gap
Continuous = media with no gap
Reflective = labels with Q-mark or bla
ck mark
5. After updating the New Value column, click the Send button to send this
change to the printer.
6. Allow 30 seconds for the printer to reset.
If you have issues with media registration after sending these settings to the
printer, refer to Calibrate the Media on page 27.
RP2/RP4 User Guide 11
Page 20

12 RP2/RP4 User Guide
Page 21

CHAPTER
3
PROGRAM THE INTERFACE
You can communicate with the host via USB Connection, Wireless LAN
Connection, or Bluetooth Connection. The printer automatically connects to the
first available port that provides valid data. To change that connection once it is
established, power the printer off and back on again. Use the appropriate instructions that follow for your interface.
Note: Power off the printer before connecting a power or an interface cable.
Note: If you haven’t downloaded the drivers and software, you must do so now. See
Download Required Software.
USB Connection
Note: You will need a standard Mini B to USB A cable if you are connecting your printer via
USB.
The USB Interface is supported in Windows 7.0 and greater. An Internet connection
may be required. You may also need administrative access rights to your host computer for completing this installation. If you do not, you will need to log off and log
in under a profile that has administrative rights for your host computer.
USB Port
Charging Port
RP2/RP4 User Guide 13
Page 22

Default USB Connection
The default USB class is CDC Composite. On some systems (e.g., handheld
devices), you will have to change this USB class in order to connect. See USB
Connection for further information.
1. Connect the USB cable to the printer and to the USB port on the host system.
2. Power up your printer.
3. Your host computer should recognize the printer and begin adding the device
driver. If the setup operation does not start, locate the Devices and Printers
section in the Control Panel and select Add a Printer.
4. Select the printer model.
Once completed, you should see the available printer on your host PC. You can
adjust the printer’s USB settings using the instructions that follow.
USB Settings
The type (or class) of USB connection for the host must be determined. The following USB connections are supported:
• CDC (Communication Device Class)
• Printer Class (Typical Windows® Printer)
• Composite (CDC/Printer Class)
Whenever possible, you should use the default setting, Composite (CDC/Printer
Class), as it gives the most flexibility. However, on some systems (e.g., handheld
devices), CDC or Printer Class should be selected since handheld devices have limited support.
Configure Printer
1. Turn the printer on and connect it to the computer using the USB cable.
2. Open the NETira
™
CT Printer Configuration Utility Tool.
14 RP2/RP4 User Guide
Page 23

3. Query the printer by clicking Tools - Update Available Connections For
Printer. This will look for the USB Virtual COM Port.
4. Once this is completed, reopen the dropdown menu and select the USB Virtual
COM port.
5. Select Tools - Query Printer Configuration (or press CTRL-q) to display the
printer’s configuration.
6. Under Printer Information, select Miscellaneous.
RP2/RP4 User Guide 15
Page 24

DPL Input Mode
7. Change (or confirm) the USB Mode parameter setting. Click on the dropdown
arrow to display the list of possible settings.
8. Click the Send button to send this change to the printer.
1. Open the NETira CT Printer Configuration Utility Tool and click on Tools -
Query Printer Configuration (or press CTRL-q) to query the printer.
2. Go to Tools - Set Input Mode.
3. Select the desired printer language from the dropdown. Click Set and Done.
4. Click the Send button to send this change to the printer.
Allow 30 seconds for the printer to reset.
Note: The NETira CT Configuration Utility can only communicate with the printer using the
DPL printer language input mode. Once the printer has been set to use an input
mode other than DPL, the printer’s input mode must be changed back to Auto or DPL
when you need to communicate with NETira CT.
16 RP2/RP4 User Guide
Page 25

Bluetooth Connection
Follow your host PC or device instructions for pairing a new Bluetooth device. You
should see the printer as an available printer from your host. The default pass code
is 0000. Once connected and the connection is established, adjust the printer’s
Bluetooth settings.
Bluetooth Settings
The printer is configured with default factory settings. To determine your printer's
configuration, print a configuration label (see Print Configuration Label).
1. Open the NETira CT Printer Configuration Utility Tool and click on Tools -
Query Printer Configuration (or press CTRL-q) to query the printer.
2. Under Printer Information, select Bluetooth.
3. Change (or confirm) the following Bluetooth parameter settings:
• Bondable: Yes
• Connectable: Yes
• Discoverable: Yes
• PassKey: Default 0000 (must match entry used on host computer)
4. After updating the New Value column, click the Send button to send this
change to the printer.
5. Allow 30 seconds for the printer to reset.
RP2/RP4 User Guide 17
Page 26

Tap and Pair
You can pair your Android™ phone with an RP2 or RP4 printer by touching the
devices together.
1. Place the Android phone on the printer.
2. The phone recognizes the printer and prompts you to pair.
3. Verify the pairing of the printer in your phone’s Bluetooth settings.
You can go to the Google Play Store and download the Honeywell Android NFC app
to your phone, or use a printing application to send prints to the RP2 or RP4
printer.
Wireless LAN Connection
The printer makes IP requests at power-up, so before making a network connection
to the printer consider how your IP address needs to be assigned. The IP address of
the printer can be configured in one of two ways: use a static IP address or use IP
discovery (DHCP, BootP or RARP).
1. Turn the printer on and connect it to the computer using the USB cable.
™
2. Open the NETira
3. Query the printer by clicking Tools - Update Available Connections For
Printer. This will look for the USB Virtual COM Port.
CT Printer Configuration Utility Tool.
18 RP2/RP4 User Guide
Page 27

4. Once this is completed, reopen the dropdown menu and select the USB Virtual
COM port.
5. Select Tools - Query Printer Configuration (or press CTRL-q) to display the
printer’s configuration.
Static IP/DHCP
The printer can be configured to use a static IP or a dynamic IP obtained from a
DHCP server.
Dynamic IP Address (DHCP)
1. Open the NETira CT Printer Configuration Utility Tool and click on Tools Query Printer Configuration (or press CTRL-q) if you haven’t already done so.
2. Under Printer Information, click on Wireless General Network.
3. Set the IP address method to DHCP.
4. Set the DHCP parameters required for your network by clicking on those
options in the New Value column.
5. Click the Send button to send these changes to the printer.
6. Allow 30 seconds for the printer to reset.
Values obtained from the DHCP server are shown under Active IP address, Active
Subnet Mask, and Active Gateway.
Static IP Address
1. Open the NETira CT Printer Configuration Utility Tool and click on Tools Query Printer Configuration (or press CTRL-q) to query the printer.
2. Under Printer Information, click on Wireless General Network.
3. Change (or confirm) the following parameter settings:
• IP address method: Static
• Static IP address: Set for your network IP range
• Static Subnet mask: Set for your network subnet mask
4. After updating the New Value column, click the Send button to send this
change to the printer.
5. Allow 30 seconds for the printer to reset.
Infrastructure/Ad-hoc
1. Open the NETira CT Printer Configuration Utility Tool and click on Tools Query Printer Configuration (or press CTRL-q) to query the printer.
2. Under Printer Information, click on WIFI.
RP2/RP4 User Guide 19
Page 28

3. Change (or confirm) the following parameter settings:
• ESSID: Type the name of your access point (Default = Honeywell)
• Network Type: Infrastructure or Ad-hoc
4. After updating the New Value column, click the Send button to send this
change to the printer.
5. Allow 30 seconds for the printer to reset.
Note: To validate a successful Wireless LAN connection, the IP address obtained from the
access point is shown on the printer’s LED display.
Wireless LAN Security
The printer can be configured to use several wireless LAN security protocols.
WEP 64 and 128 Bit
1. Open the NETira CT Printer Configuration Utility Tool and click on Tools Query Printer Configuration (or press CTRL-q) to query the printer.
2. Under Printer Information, click on WIFI.
3. Click on Static WEP.
4. Change (or confirm) the following parameter settings:
• WEP Selected Key: Select the key number to use
• WEP AP authentication: If users share 40 bit, use 64 bit encryption.
If users share 128 bit, use 128 bit encryption.
• WEP Data Encryption: Enable WEP Data Encryption
• WEP Key #1-4: Enter the WEP keys used by your access point
5. After updating the New Value column, click the Send button to send this
change to the printer.
6. Allow 30 seconds for the printer to reset.
WPA2-PSK with CCMP
1. Open the NETira CT Printer Configuration Utility Tool and click on Tools Query Printer Configuration (or press CTRL-q) to query the printer.
2. Under Printer Information, click on WIFI.
3. Click on WPA/WPA2.
4. Change (or confirm) the following parameter settings:
• Group Cipher: CCMP
• Network Authentication Type: WPA2-PSK
5. Type the pass phrase under WPA_PSK_TKIP/WPA2_PSK settings.
20 RP2/RP4 User Guide
Page 29

6. After updating the New Value column, click the Send button to send this
change to the printer.
7. Allow 30 seconds for the printer to reset.
WPA2-PSK with TKIP
1. Open the NETira CT Printer Configuration Utility Tool and click on Tools Query Printer Configuration (or press CTRL-q) to query the printer.
2. Under Printer Information, click on WIFI.
3. Click on WPA/WPA2.
4. Change (or confirm) the following parameter settings:
• Group Cipher: TKIP
• Network Authentication Type: WPA2-PSK
5. Type the pass phrase under WPA_PSK_TKIP/WPA2_PSK settings.
6. After updating the New Value column, click the Send button to send this
change to the printer.
7. Allow 30 seconds for the printer to reset.
WPA2-Enterprise
1. Open the NETira CT Printer Configuration Utility Tool and click on Tools Query Printer Configuration (or press CTRL-q) to query the printer.
2. Under Printer Information, click on WIFI.
3. Click on WPA/WPA2.
4. Change (or confirm) the following parameter settings:
• Network Authentication Type: WPA2-Enterprise
• Phase 2 Method: EAP-MSCHAPv2
• EAP Type: EAP-PEAP
5. Type the user name and password under WPA/WPA2 Enterprise.
6. After updating the New Value column, click the Send button to send this
change to the printer.
7. Allow 30 seconds for the printer to reset.
WPA-PSK with TKIP
(EAP type can be variable. Other supported types are EAP-LEAP, EAP-TTLS,
EAP-PEAP, and EAP-FAST.)
1. Open the NETira CT Printer Configuration Utility Tool and click on Tools -
Query Printer Configuration (or press CTRL-q) to query the printer.
2. Under Printer Information, click on WIFI.
RP2/RP4 User Guide 21
Page 30

3. Click on WPA/WPA2.
4. Change (or confirm) the following parameter settings:
• Group Cipher: TKIP
• Network Authentication Type: WPA-PSK_TKIP
5. Type the pass phrase under WPA_PSK_TKIP/WPA2_PSK settings.
6. After updating the New Value column, click the Send button to send this
change to the printer.
7. Allow 30 seconds for the printer to reset.
22 RP2/RP4 User Guide
Page 31

CHAPTER
4
Front Panel
PRINTER DISPLAY AND BUTTONS
On/Off
Button
The front panel has an LED display and 2 buttons.
On/Off Button
Button Press Result
Any length press when printer is off Turn printer on
Short press (less than 5 seconds) Enter or exit sleep mode
Medium press (5 - 10 seconds) Print configuration label (see Print Configuration Label)
Long press (more than 10 seconds) Turn printer off
Battery
Charge
Level
Bluetooth
Indicator
Media
Button
WiFi
Signal
Media Button
The media button advances the paper through the printer. When there is no paper
in the printer, the button blinks red.
RP2/RP4 User Guide 23
Page 32

LED Display
Button Press Result
Short press Feeds label or paper length approximately 1 in. (2.54cm)
when configured for continuous media. Feeds media to
align with the next label when configured for gap or black
mark media.
Press and hold for 3 to 4 seconds
(when configured for continuous form
receipt paper)
Media feeds continuously to the maximum label length
If all the LEDs are red and blinking, it indicates it is too warm or cold for the printer
to print. See Product Specifications beginning on page 41 for more information.
Icon Indication
Solid green = Printer is on
Short green flash = Printer is asleep
On/Off
Battery charge level
Bluetooth indicator
WiFi signal
Blinking red = Charger input voltage is too low or too high
When not charging:
Off = Battery is midway to fully charged
Solid orange = Battery charge is 10-30%
Blinking red = Battery charge is 10% or less
When charging:
Solid green = Battery charge is 90% or more
Solid red = Battery charge is less than 90%
Off = Bluetooth radio is off, disabled, not associated with a mobile
device, or printer is off
Blinking = Data transmission
Solid blue = Bluetooth is enabled and connected
Off = WiFi radio is off, disabled, not associated with a mobile device or
network, or printer is off
White = WiFi is enabled and connected
Audible Indicators
Beeps Indication
1 long beep Power supply disconnected
2 short beeps every 5 seconds No media
2 long beeps Power supply connected
3 short beeps Battery charge is low
5 short beeps Printer door open
24 RP2/RP4 User Guide
Page 33

Set Sleep and Power Down Timer
The RP Series printer display enters sleep mode after 1 minute of inactivity. Press
any button to wake. The printer shuts down after 120 minutes of inactivity unless it
is charging. The sleep and shutdown periods can be adjusted or disabled.
1. Turn the printer on and connect it to the computer using the USB cable.
™
2. Open the NETira
3. Go to System Settings, then Printer Sleep Timeout to adjust the sleep
settings, or Printer Power Down Timeout to adjust the shutdown settings.
CT Printer Configuration Utility Tool.
Real-Time Clock (RTC)
The Real-Time Clock (RTC) is powered from a rechargeable coin cell. Once the RTC
is set, and as long as the main battery is in place and has a reasonable charge, the
RTC will continue to keep time. If the main battery is pulled, the time setting is
retained for 6 months. After 6 months the time will be lost and will need to be reset
once power is restored.
Set the Date and Time
1. Open the NETira CT Printer Configuration Utility Tool and click on Tools Query Printer Configuration (or press CTRL-q) to query the printer.
2. Select Printer Information.
3. View the current RTC date and time stamp in the Printer Date Time section.
To change the date and time:
1. Select Printer Diagnostics.
2. Select Set Date.
3. Set the date and time fields and click OK.
RP2/RP4 User Guide 25
Page 34

26 RP2/RP4 User Guide
Page 35

CHAPTER
CALIBRATION
5
Calibrate the Media
The printer is factory-calibrated for operation with most media types (both gap and
reflective). Try your media without performing any calibration adjustments first to
determine if the factory settings are compatible. Only perform the calibration
adjustments if you are experiencing media-registration issues.
Note: The battery should be charged to 50% or more before starting media calibration.
The Quick Media Calibration should be performed first. If it fails to detect the start
of each label properly, proceed to Manual Media Calibration. Install media in the
printer before calibrating it.
Note: Once you have calibrated the printer, you can save this configuration and share it with
other users or printers. See Configuration Files beginning on page 31.
Quick Media Calibration
1. Turn the printer on. If using a USB interface, connect it to the computer using
the USB cable.
2. Open the NETira CT Printer Configuration Utility Tool and click on Tools -
Query Printer Configuration (or press CTRL-q) to query the printer.
3. In the Printer Information column, click on Sensor Calibration.
RP2/RP4 User Guide 27
Page 36

4. Click the Quick Media button.
5. The printer feeds media while the sensor is calibrated. If the calibration is not
successful, repeat the procedure or use Manual Media Calibration.
Manual Media Calibration
Manual media calibration is used when the Quick Media Calibration has failed to
detect the start of each label. This procedure performs a complete recalibration of
the sensors and will optimize the printer to your media. In some instances, you may
need to perform a Quick Media Calibration after the manual media calibration to
further optimize the printer’s sensor.
Sensor calibration is needed to set either the black mark or the gap value of the
media sensor on the printer.
Gap Type Labels
1. Open the NETira CT Printer Configuration Utility Tool and click on Tools Query Printer Configuration (or press CTRL-q) to query the printer.
2. In the Printer Information column, click on Sensor Calibration.
28 RP2/RP4 User Guide
Page 37

3. Click the Manual Media button.
4. When prompted for the media type, select Interlabel/Gap and click OK.
5. Load Stock
6. Load Special Backing Media
7. Remove Stock
If the calibration is not successful, repeat the procedure.
Black Mark Labels
Note: A special media with black marks is necessary to perform this calibration.
1. Open the NETira
2. In the Printer Information column, click on Sensor Calibration.
a. Place the face of the media over the printer’s sensor and close the door.
b. Click OK.
a. Peel the labels off the backing and place the backing over the printer’s sen-
sor.
b. Close the door and click OK.
a. Remove all media from the printer and close the door.
b. Click OK.
™
CT Printer Configuration Utility Tool.
RP2/RP4 User Guide 29
Page 38

3. Click the Manual Media button.
4. When prompted for the media type, select Black Mark and click OK.
5. Load the media and click OK.
If the calibration is not successful, repeat the procedure.
30 RP2/RP4 User Guide
Page 39

CHAPTER
CONFIGURATION FILES
6
Print Configuration Label
A configuration label provides the firmware version, memory allocations, enabled
options, communications settings and label-counter data for the printer. To print
the configuration label, press and hold the power button for 5 to 10 seconds
and then release.
Save and Load Configuration Files
Once you have configured the printer, you can save the configuration and share it
with other users or printers.
Save a Configuration File
1. Turn the printer on. If you are using a USB interface, connect the USB cable to
the computer.
2. Open the NETira CT Printer Configuration Utility Tool and click on Tools -
Query Printer Configuration (or press CTRL-q) to query the printer.
3. The current settings (either as-is or with changes you add) can now be saved to
a file. Select File - Save As.
4. Select a location and name for this configuration file. The file extension is .cfg.
Load a Configuration File
1. Turn the printer on. If you are using a USB interface, connect the USB cable to
the computer.
2. Open the NETira CT Printer Configuration Utility Tool and click on Tools -
Query Printer Configuration (or press CTRL-q) to query the printer.
3. Select File - Open.
RP2/RP4 User Guide 31
Page 40

4. Select the .cfg file you want to load.
Note: Check the Include Sensor Calibration Data on Open checkbox to import sensor data
with the configuration. Sensor data is printer-specific and should only be imported to
the same printer from which it came.
32 RP2/RP4 User Guide
Page 41

CHAPTER
TEST
MAINTENANCE
7
Battery Charge Information
Once the battery is at a low charge level, the printer stops printing and queues
print jobs. The battery should be replaced at this time so the printer can print the
queued jobs. If the battery is not replaced before the supercap is drained, all
queued jobs will be lost.
The battery has a test button on it so you can determine how much charge is left.
Health Status
Press the test button once quickly. The Test indicator (circled in green) lights up to
show the health status of the battery.
LED Color Cycle Count
Green 1 - 400
Amber 400 - 500
Red 500 - 999
RP2/RP4 User Guide 33
Page 42

Gas Gauge
Press the test button and hold for longer than 5 seconds. The 4 gas gauge lights
appear in green to show the amount of charge left in the battery.
0 - 9% 10 - 39% 40 - 79% 80 - 100%
Change the Battery
1. Remove the old battery from the printer and reinstall the new battery in the
printer.
Note: The printer can run for 20 - 120 seconds without a battery and not lose connectivity
or need a restart.
34 RP2/RP4 User Guide
Page 43

2. Connect the power supply to printer’s power jack then connect the AC power
cord to the power supply. Plug into an outlet.
Warning: Do not operate the printer while it is connected to the AC power
supply.
Cleaning Intervals
Proper cleaning is critical. To maintain peak performance of the printer, Honeywell
offers a complete line of cleaning products, including pens, cards, films and swabs.
The following table outlines the recommended maintenance schedule for the various printer parts.
Maintenance Schedule
RP2/RP4 User Guide 35
Page 44

Clean the Printhead
Area
Printhead Cleaning card or cotton
Platen roller Cotton swab
Peel off roller Cleaning pens Cleaning pens After 3-5 rolls of media
Lid roller Cotton swab
Media sensor Compressed air Compressed air Monthly
Interior Compressed air Compressed air As needed
If print quality declines (symptoms include non-compliant bar codes, print dropouts and streaks), the typical cause is debris buildup on the printhead. When the
buildup is not removed it may lead to reduced service life or printhead failure.
Streaks in printed labels usually indicate a dirty or faulty printhead.
Standard RP4 Models
Method
(Standard Models)
swab with isopropyl
alcohol
with isopropyl alcohol
with isopropyl alcohol
Method
(Linerless Models)
Cleaning pens After 3-5 rolls of media
Cleaning pens After 3-5 rolls of media
Cleaning pens After 3-5 rolls of media
Interval
Clean the printhead using a cleaning card:
1. Open the printer and remove all media.
2. Open the fan fold door in the bottom of the printer.
3. Insert the cleaning card through the door and close the printer cover.
4. Press the Media Feed button several times to feed the cleaning card through
5. Reload media and close the printer.
6. Press the Media Feed button to feed the media through.
Linerless Models
Cleaning pens are used on linerless-model printers or any printer with adhesive
buildup. They are used to clean components that are exposed directly to adhesive.
Step 1. Rub this pen along the sticky component to break down the adhesive
Step 2. Rub this pen along the component to remove the buildup.
the printer. Repeat if necessary.
buildup.
36 RP2/RP4 User Guide
Page 45

The pen cap has a plastic scraper that can be used to remove large amounts of
adhesive buildup.
Caution: Do not use on the platen roller or sensors.
Firmware Update
When program updates and/or new features are added, they can be downloaded to
the printer.
1. Identify the new version for your printer model from www.honeywellaidc.com
and download it to your computer.
2. Turn the printer on and connect it to the computer using the USB cable.
3. Open the NETira CT Printer Configuration Utility Tool.
Note: NETira CT must be version 1.0.0.92 or higher.
4. Query the printer by clicking Tools - Update Available Connections For
Printer. This will look for the USB Virtual COM Port.
5. Once this is completed, reopen the dropdown menu and select the USB Virtual
COM port.
6. Select Tools - Query Printer Configuration (or press CTRL-q) to display the
printer’s configuration.
RP2/RP4 User Guide 37
Page 46

7. Select Tools - Update Printer via File Streaming Method.
8. Click OK to continue.
9. Click on the button for Application Mode.
10. Click on the checkboxes for Boot M and for Firmware and browse to the
locations of these files.
11. Click the Send button to start the download.
The Bluetooth, WiFi, and Media Feed buttons on the printer flash slowly, then
quickly. Once the buttons stop flashing and the power light is solid green, the
printer is ready for normal operation.
38 RP2/RP4 User Guide
Page 47

CHAPTER
8
TROUBLESHOOTING
Once you have corrected any of the following problems, press the media button
to clear the alarm.
Print quality is bad
• Clean the printhead (see Clean the Printhead on page 36).
• The temperature setting may be incorrect for the media being used. Use the
NETira CT Printer Configuration Utility or software commands to adjust the heat
setting and print speed.
• The printhead may be faulty. Call for service (see Product Service and Repair).
Printer indicates it is out of media, even though it is not
• The printer sensor may have accumulated paper dust. Clean the sensor with
compressed air.
Printer doesn’t print or prints several labels at once
• The labels are incorrectly loaded. See Load the Media.
• The media is not calibrated. See Calibration.
• The media sensor or sensor circuitry may be defective. Call for service (see
Product Service and Repair).
Printer skips every other label or occasionally skips labels
• The label is formatted too close to the top edge of the label. Leave white space
equal to 8-dot rows, about .02 inch (.5mm) at the top of the label.
• The media is not calibrated. See Calibration.
• The media sensor or media-sensor circuitry may be defective. Call for service
(see Product Service and Repair).
Unable to print rotations
• The characters are formatted outside the dimensions of the label. Check that the
row and column values provide enough room for the height of the image being
printed.
RP2/RP4 User Guide 39
Page 48

Printing is light on the right side of the label
• The printer’s cover is not latched down. Latch it.
• The printhead is not properly aligned. Call for service (see Product Service and
Repair).
Printer fails to power on
• The battery may need to be charged. Charge the battery (see Charge the
Battery).
Label advances 8 inches before a fault indication
• The media may not be properly loaded. See Load the Media. When loading
media, make sure the supply hubs are against the media and that gaps or marks
in the labels are in line with the media sensor.
• The media sensor or media-sensor circuitry may be defective. Call for service
(see Product Service and Repair).
Labels move excessively from side to side during printing
• The media may not be properly loaded. See Load the Media. When loading
media, make sure the supply hubs are against the media and that gaps or marks
in the labels are in line with the media sensor.
40 RP2/RP4 User Guide
Page 49

CHAPTER
PRODUCT SPECIFICATIONS
9
RP2 Printer Specifications
RP2
Parameter Specification
Mechanical
Height 3 in. (77mm)
Length 6.3 in. (160mm)
Width 4.6 in. (116mm)
Weight (printer and battery only) 1.58 lbs. (0.72kg)
User Interface
Buttons 2
Electrical
DC Input
Smart Battery External DC Jack and
External Charge Contacts 9.5-14V, built-in spike and surge protection
Battery
Lithium Ion 8.4V
2600 mAHr minimum
Endurance Prints more than 320 4”x6” (102 x 152 mm) labels
when operating 16 continuous hours
Expected Charge Time 4-6 hours
Communication
USB Interface 2.0 (full speed)
Bluetooth Interface Versions 4.0 LE (for BT only configuration)/4.1 LE (for BT+Wi-
Fi dual model configuration), Class 2, Serial-port
profile iOS certified
Wireless LAN
Network Standard IEEE 802.11 a/b/g/n/ac with Dual Radio
Wireless Access Modes Infrastructure and ad-hoc
RP2/RP4 User Guide 41
Page 50

RP2
Parameter (Continued) Specification
Security Protocols WEP (64/128), WPA (TKIP/RC4), WPA2 (CCMP/
AES)
Authentication LEAP, EAP-PEAP, EAP-FAST, EAP-TTLS, EAP-LEAP
Network Support DHCP, TCP, UDP, DNS, BOOTP
Print Technology
Print Head Direct thermal, 203 DPI
Print Width 2.8 in. (71.1mm)
Print Speed 4 in. (102mm) per second
Memory
Installed Memory 64 MB RAM/2 GB Flash
Media
Media Roll Width 1 - 2.25 in. (25- 57mm)
Maximum Print Width 1.89 in. (48mm)
Maximum Roll Capacity 2.25 in. (58mm) outside diameter
Core Sizes 0.4 in. (10.16mm), 0.75 in. (19mm), or 1 in.
(25.4mm) inside diameter
Media Thickness 2 - 6.3 mil (.05 - .16mm)
Environmental
Temperature Ranges:
Operating -4F to + 131F (-20C to 55C)
Storage -22F to + 149F (-30C to 65C)
Charging 32F to + 104F (0C to 40C)
Humidity Up to 10-90% non-condensing
Mechanical Drop Operational after 50 drops from 6.6 feet
ESD Sensitivity 15 kV direct air
IP Rating IP54 dust and water
RP4 Printer Specifications
RP4
Parameter Specification
Mechanical
Height 3 in. (77mm)
Length 7.36 in. (187mm)
Width 6.46 in. (164mm)
(2m) to concrete
8 kV contact
42 RP2/RP4 User Guide
Page 51

RP4
Parameter (Continued) Specification
Weight (printer and battery) 2.25 lbs. (1.02kg)
Weight (printer only) 1.72 lbs. (0.78kg)
User Interface
Buttons 2
Electrical
DC Input
Smart Battery External DC Jack and
External Charge Contacts 9.5-14V, built-in spike and surge protection
Battery
Lithium Ion 8.4V
4900 mAHr minimum
Endurance Prints more than 960 4”x6” (102 x 152 mm) labels
when operating 8 continuous hours
Expected Charge Time 4-6 hours
Communication
USB Interface 2.0 (full speed)
Bluetooth Interface Versions 4.0 LE (for BT only configuration)/4.1 LE (for BT+Wi-
Fi dual model configuration), Class 2, Serial-port
profile iOS certified
Wireless LAN
Network Standard IEEE 802.11 a/b/g/n/ac with Dual Radio
Wireless Access Modes Infrastructure and ad-hoc
Security Protocols WEP (64/128), WPA (TKIP/RC4), WPA2 (CCMP/
AES)
Authentication LEAP, EAP-PEAP, EAP-FAST, EAP-TTLS, EAP-LEAP
Network Support DHCP, TCP, UDP, DNS, BOOTP
Print Technology
Print Head Direct thermal, 203 DPI
Print Width 4.1 in. (104.8mm)
Print Speed Up to 5 in. (127mm) per second in draft mode
Memory
Installed Memory 64 MB RAM/2 GB Flash
Media
Media Roll Width 2 - 4.4 in. (51 - 111mm)
Maximum Print Width 4.1 in. (104mm)
Maximum Roll Capacity 2.25 in. (58mm) outside diameter
Core Sizes 0.4 in. (10.16mm), 0.75 in. (19mm), or 1 in.
(25.4mm) inside diameter
Media Thickness 2 - 6.3 mil (.05 - .16mm)
RP2/RP4 User Guide 43
Page 52

RP4
Parameter (Continued) Specification
Environmental
Temperature Ranges:
Operating -4F to + 122F (-20C to 50C)
Storage -22F to + 149F (-30C to 65C)
Charging 32F to + 104F (0C to 40C)
Humidity Up to 10-90% non-condensing
Mechanical Drop Operational after 50 drops from 6.6 feet
ESD Sensitivity 15 kV direct air
IP Rating IP54 dust and water
Required Safety Labels
(2m) to concrete
8 kV contact
44 RP2/RP4 User Guide
Page 53

RP2Printer
WiFi MAC
Address
Compliance
Label
locations
RP4Printer
Bluetooth
Address
WiFi MAC
Address
Compliance
Label location
Fonts
10 alphanumeric fonts from 2.5 to 23 point, including OCR-A and OCR-B.
Bar Code Symbologies
Linear: Codabar, Code 3 of 9, Code 93, Code 128, EAN-8, EAN13, Interleaved 2 of 5,
HIBC, Plessey, MSI, UCC/EAN-128, UPC-A, UPC-E, UPC 2 and 5-digit addendums,
Postnet, Telepen, MaxiCode, FIM, USD-8.
Bluetooth
Address
Compliance
Label location
RP2/RP4 User Guide 45
Page 54

2D Symbologies: PDF417, Aztec, QR Code, GS1, Data Matrix, TCIF Linked Code 39,
MicroPDF417
Graphics
Graphics, including transient “print once” graphics, and logos are stored in flash
memory.
Software and Firmware
NERira Configuration Tool for complete printer setup.
Control Language Compatibility
Line Printer Mode, Easy Print, DPL, ZPL II®, CPCL, IPL™, XML (limited)
Device Management Support and Compatibility
NETira
NETira MD: mobile device management utility for smart mobile devices
AirWatch® Mobile
Wavelink® Avalanche MC
Soti Mobilink
Network Compatibility
TCP/IP-based networks, AS/400 (LPD)-based networks
O/S Support
Microsoft® Windows® XP, Vista, 7, 8, and 10
Label Design Software Compatibility
BarTender®, Niceware/NiceLabel
ERP Systems
SAP®, Oracle®
46 RP2/RP4 User Guide
Page 55

Software Development Kit
Android™ 4.0 and above
Apple iOS 5,6, and 7
Microsoft® Windows desktop up to Windows® 8, Windows® 8 Store, Windows®
Mobile and Windows® CE
C++, C Sharp, Java™, ActiveX Control
RP2/RP4 User Guide 47
Page 56

48 RP2/RP4 User Guide
Page 57

CHAPTER
10
Belt Clip
ACCESSORIES
The belt clip is included with your printer. The nub attachment allows the printer to
swivel for comfort when you are bending over or getting in and out of vehicles.
Shoulder Strap/Hand Strap (RP4 Printer Only)
Each hand or shoulder strap incorporates heavy-duty clasps for an easy and
secure attachment, however, these are not OSHA-approved safety straps.
Both the hand strap and shoulder strap have a limited breakaway strength. If the
strap is caught or wrapped and pulled beyond normal use the strap will come off
the attachment points. Do not use the straps for mounting, hanging or as the
means for a permanent installation of the printer. If the latch appears damaged
(white stress marks in the plastic) discontinue use and replace.
RP2/RP4 User Guide 49
Page 58

Belt Loop
Soft Case
The Velcro® loop fastens comfortably and securely around your belt and keeps the
printer secure. The nub attachment allows the printer to swivel for comfort when
you are bending over or getting in and out of vehicles.
Proper use of this case will allow the printer to be used in harsh, dusty, or rainy
environments. This case will protect your product against particles as small as
dust, and water from any direction. This case can be used in conjunction with the
hand/shoulder straps as well the belt-loop and belt-clip accessories.
The soft case is not designed for extensive prolonged use in the rain. Do not allow
water to enter the case when changing media.
Caution: Excessive water inside the printer, even if a soft case is used,
may violate your warranty.
1. Slide the printer into the case, then close the case using the 2 side zippers and
Velcro® closure.
2. Fold back the paper exit flap for each print job. The paper exit flap can also be
rolled up out of the way and secured using the Velcro® strip. Doing so decreases
the effectiveness of the case for water protection.
50 RP2/RP4 User Guide
Page 59

Never attempt to charge when the printer case or printer is wet since a short circuit
could occur. Remove the printer from the case, allow to completely dry, and then
charge. In the event water is believed to have entered the printer, remove the battery and allow the unit to dry for several days before installing the battery or
charging.
USB On-the-Go
The RP2 or RP4 printer can act as a host so another device such as a bar code
reader, USB flash drive, or keyboard can be added. Contact your Sales Representative for a USB On-the-Go cable.
RP2/RP4 User Guide 51
Page 60

52 RP2/RP4 User Guide
Page 61

APPENDIX
PRINTER LANGUAGE EMULATION
A
The RP2, RP3, and RP4 printers support several printer languages, such as CPCL,
ZPL, and DPL. The printers default to auto input mode that detects the type of
script, then switches to the desired printing language. The following instructions
guide you through manually changing the printer language.
Note: You should only select up to 2 printer languages. You may experience unintended
results if you select more than 2.
1. Open the NETira CT Printer Configuration Utility Tool and click on Tools Query Printer Configuration (or press CTRL-q) to query the printer.
2. Go to Tools - Set Input Mode.
3. Select the desired printer language from the dropdown. Click Set and Done.
4. Click the Send button to send this change to the printer.
Allow 30 seconds for the printer to reset.
Note: The NETira CT Configuration Utility can only communicate with the printer using the
DPL printer language input mode. Once the printer has been set to use an input
mode other than DPL, the printer’s input mode must be changed back to Auto or DPL
when you need to communicate with the NETira CT.
RP2/RP4 User Guide 53
Page 62

54 RP2/RP4 User Guide
Page 63

APPENDIX
PRINT DEMO
B
You can send demo label formats to the printer either using Netira CT.
NETira CT Printer Demo
1. Open the NETira CT Printer Configuration Utility Tool and click on Tools Query Printer Configuration (or press CTRL-q) to query the printer.
2. Go to Tools - Printer Demo.
3. Browse to the folder containing the print files. Highlight the files to be printed
and click Add.
4. Click Print to send the files to the printer.
RP2/RP4 User Guide 55
Page 64

56 RP2/RP4 User Guide
Page 65

Honeywell
9680 Old Bailes Road
Fort Mill, SC 29707
www.honeywellaidc.com
™
RP234-EN-UG Rev D
03/20
 Loading...