

Page 1
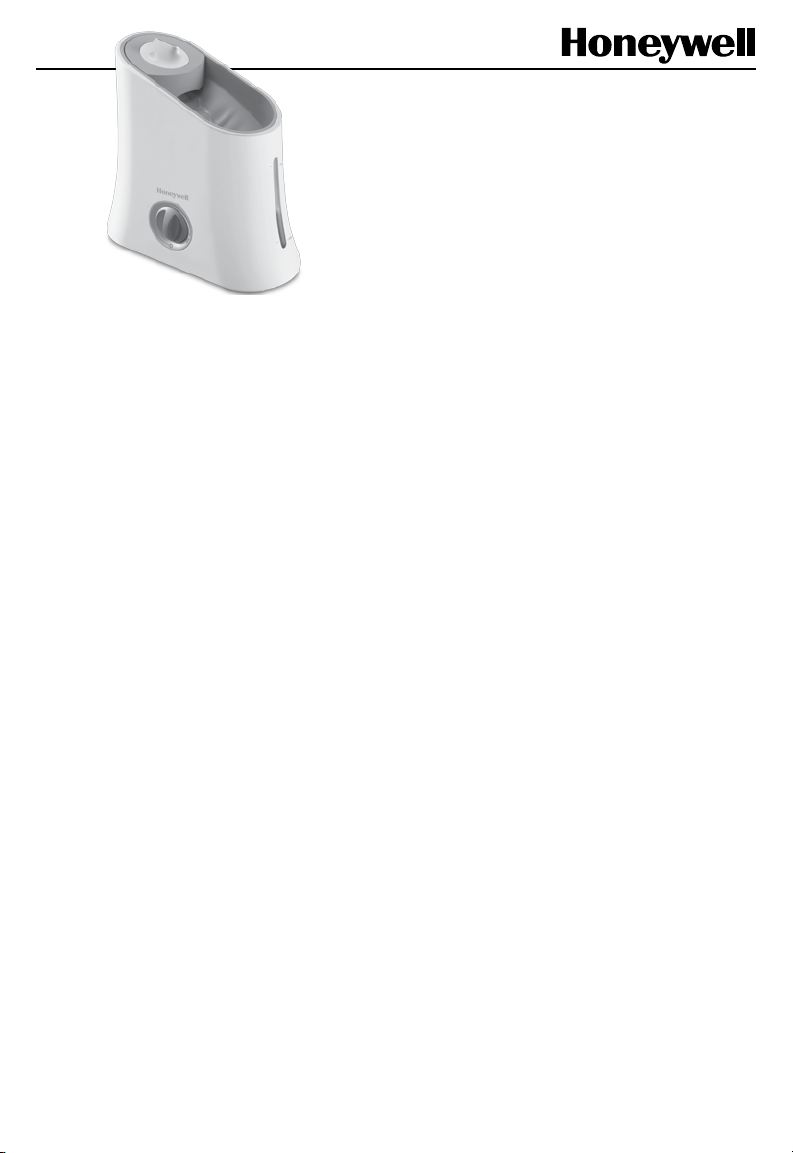
HONEYWELL
TOP FILL ULTRASONIC
HUMIDIFIER
MODEL HUT-220 Series
IMPORTANT SAFETY
INSTRUCTIONS
READ AND SAVE THESE SAFETY
INSTRUCTIONS BEFORE USING
THIS HUMIDIFIER
When using electrical appliances, basic precautions should always be followed to reduce
the risk of fire, electric shock, and injury to
persons, including the following
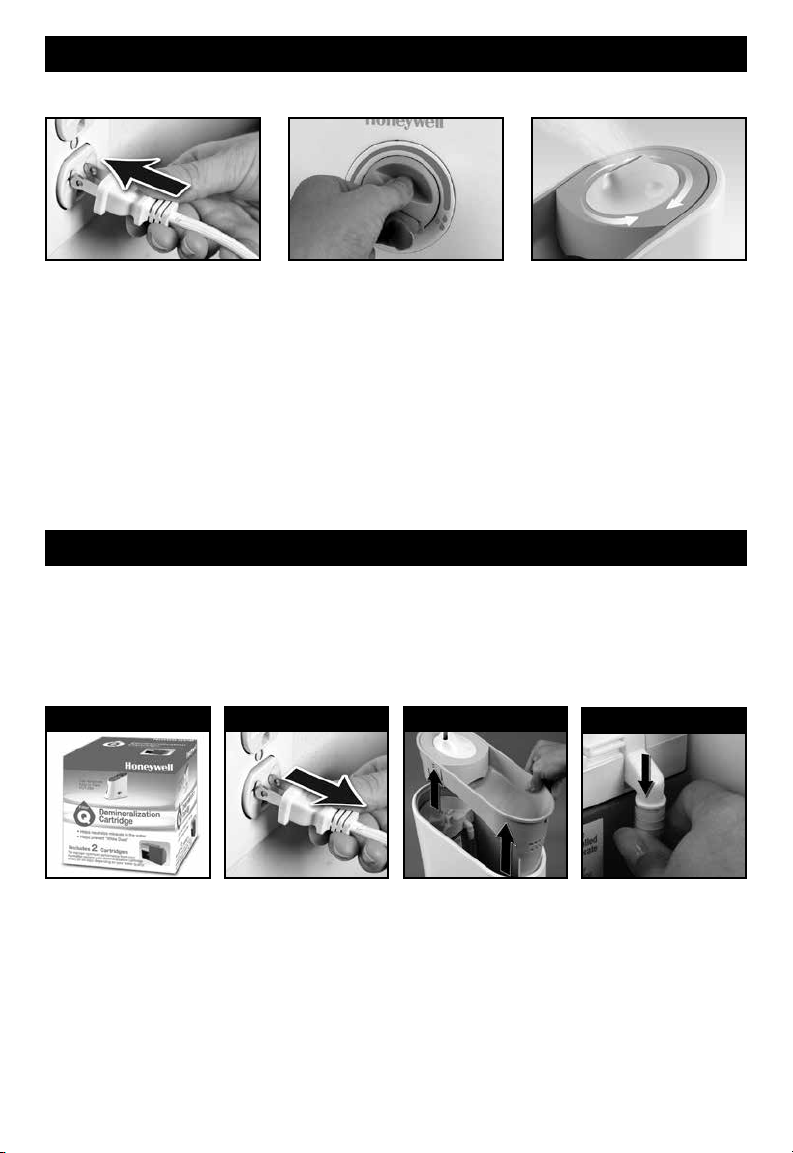
1. Always place this humidifier on a firm, flat and
level surface. This humidifier may not work
properly on an uneven surface.
2. Place this humidifier in an area where it is not
accessible to children.
3. Do not place the humidifier near any heat
sources such as stoves, radiators, and heaters.
4. Do not use the humidifier outdoors.
5. Before using the humidifier, check the power
cord for any signs of damage. If the cord is
found to be damaged, DO NOT USE and return
the humidifier to the manufacturer under the
warranty agreement for repair.
6. This appliance has a polarized plug (one blade
is wider than the other). To reduce the risk of
shock, this plug is intended to fit only one way
in a polarized outlet. If the plug does not fit
securely in the outlet, reverse the plug. If it still
does not fit, contact a qualified electrician.
DO NOT attempt to defeat this safety feature.
7. To disconnect the humidifier, first turn controls
to the OFF position, then grip the plug and pull
it from the wall outlet. Never pull by the cord.
8. A loose fit between the AC outlet (receptacle)
and plug may cause overheating and a
distortion of the plug. Contact a qualified
electrician to replace loose or worn outlet.
9. The humidifier should always be unplugged
and emptied when not in operation or while
being serviced or cleaned.
10. Never tilt or attempt to move the humidifier
while it is operating or filled with water.
UNPLUG the humidifier before moving.
11. This humidifier requires regular cleaning. Refer
to the CLEANING instructions provided. Never
clean the humidifier in any manner other than
as instructed in this manual.
12. Do not direct moisture flow directly at
individuals, walls or furniture.
13. When a humidifier is used in a closed room
or small rooms, check periodically for proper
ventilation, as excessive humidity can cause
condensation stains on walls.
14. Turn the humidifier OFF if you notice
moisture on the inside of your windows. For
proper humidity reading use a hygrometer,
which is available in many hardware and
department stores, or by ordering one from the
manufacturer.
15. This product is intended for residential
use only.
The Honeywell Trademark is used by Kaz USA, Inc. under license from Honeywell International Inc.
Honeywell International Inc. makes no representation or warranties with respect to this product.
Page 2
Honeywell
Ultrasonic Humidifier
Model HUT-220 Series
Kaz USA, Inc.
250 Turnpike Road
Southborough, MA 01772
1-800-477-0457
This device complies with Part 18 of the FCC rules.
Warning: Changes or modifications to this unit not expressly approved
by the party responsible for compliance could void the user’s authority
to operate the equipment.
This equipment has been tested and found to comply with the limits for
Consumer ISM equipment, pursuant to Part 18 of the FCC rules. These
limits are designed to provide reasonable protection against harmful
interference in a residential installation. This equipment generates, uses
and can radiate radio frequency energy, and if not installed and used in
accordance with the instructions, may cause harmful interference with
radio communications. However, there is no guarantee that interference
will not occur in a particular installation. If this equipment does cause
harmful interference to radio or television reception, which can be determined by turning the equipment off and on, the user is encouraged to
try to correct the interference by one or more of the following measures:
• Reorientorrelocatethereceivingantenna.
• Increasetheseparationbetweenequipmentandreceiver.
• Connecttheequipmentintoanoutletonacircuitdifferentfrom
that to which the receiver is connected.
• ConsultthedealeroranexperiencedradioTVtechnicianforhelp.
2
Page 3
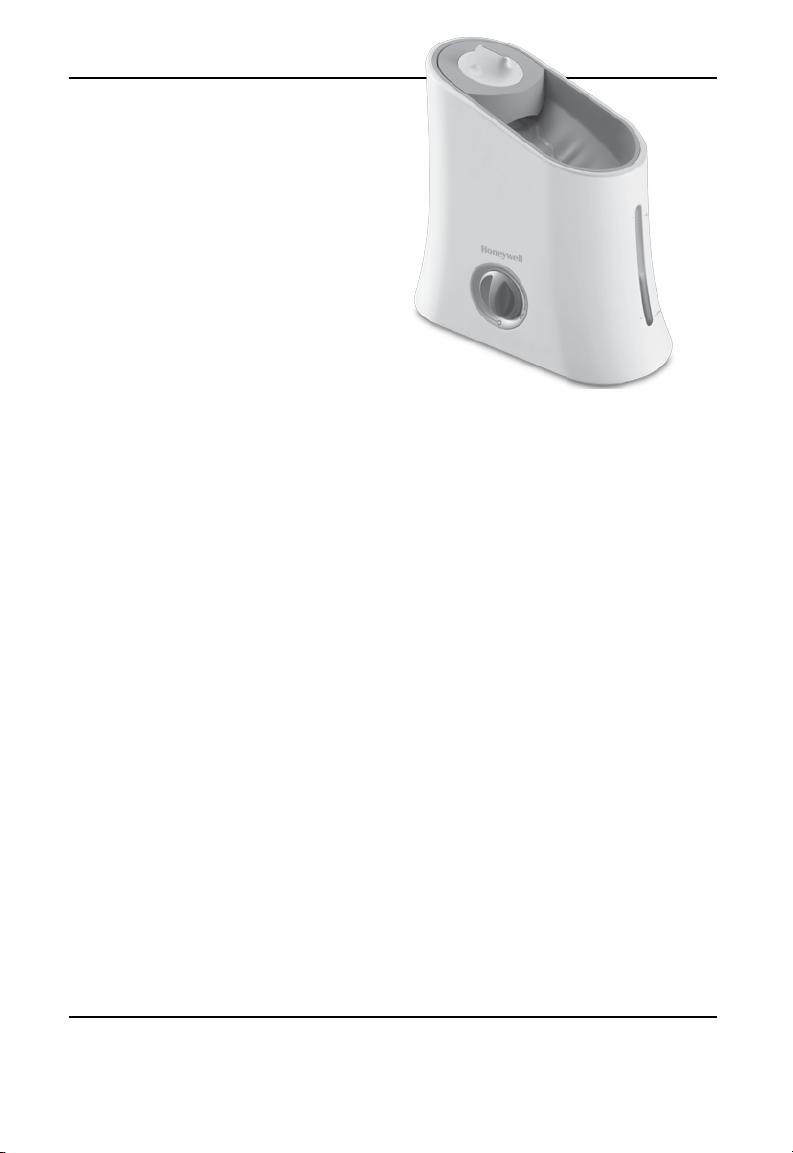
INTRODUCTION
How it Works:
The Easy to Care Ultrasonic Humidifier is designed to silently provide visible cool moisture.
Water is pumped from the water reservoir through the demineralization cartridge which helps
capture minerals in the water. Demineralized water flows into the misting tray where it is
turned into a fine visible mist through the action of ultrasonic sound waves. The mist is then
propelled into the air by a small fan providing relief from dry air.
The unique top fill design makes filling as easy as watering a plant. This unit is also equipped
with a water circulating feature which indicates when refilling is needed.
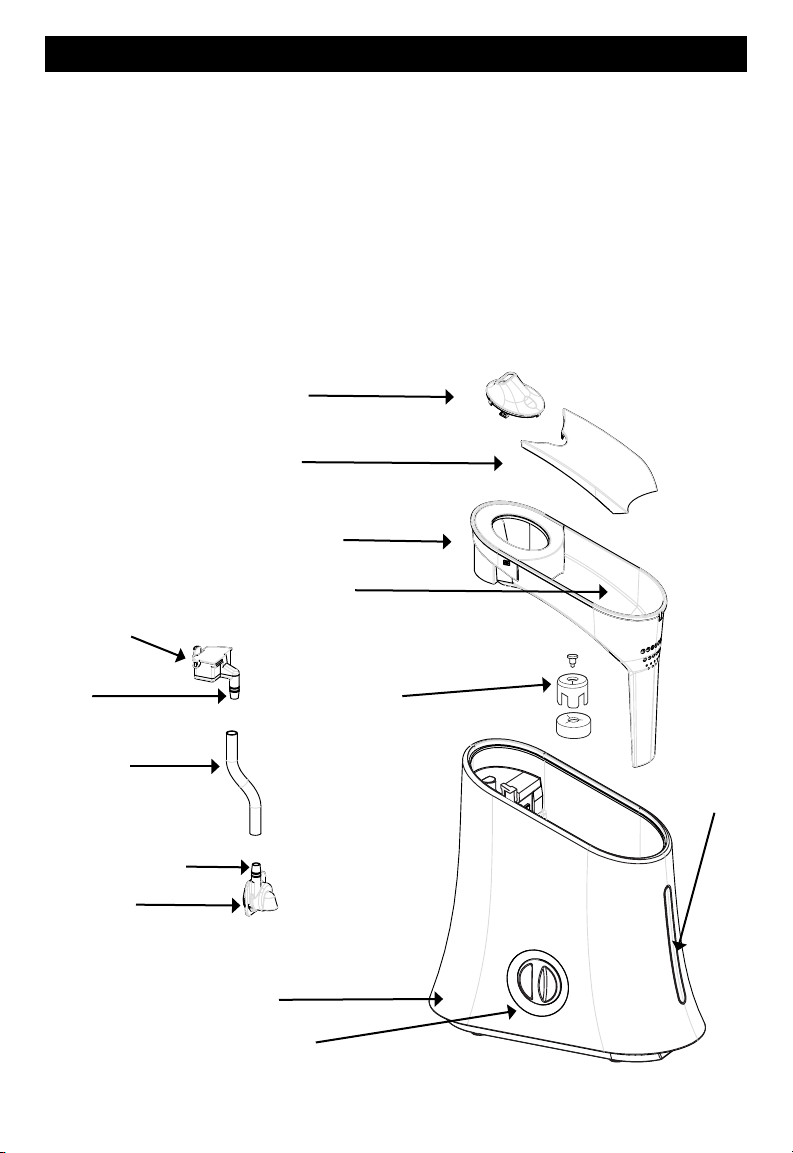
Your humidifier is made up of these parts:
Mist Nozzle
Protective
Clear Cover
Top Housing / Tray
Fill Funnel
Demineralization
Cartridge
Cartridge
Inlet
Water Hose
Pump Outlet
Water Pump
Auto Shut Off
float switch
Water Window
Main Housing
Power/Output Control
3
Page 4
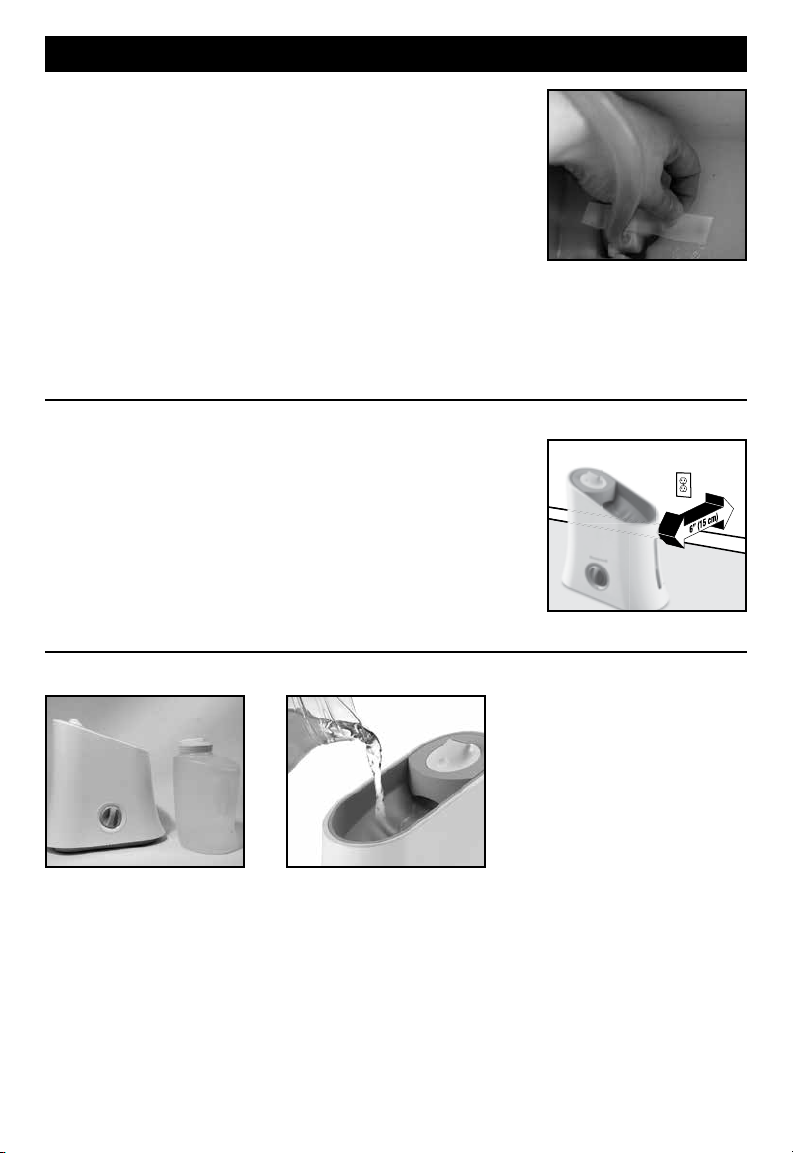
SETTING UP YOUR HUMIDIFIER
Remove from box
Remove packaging material. Remove and set aside instruction
manual. Recycle box and packaging materials or save box for end
of season storage.
To prevent water pump from shifting during transportation
it has been taped to the inside of your humidifier. Remove
top housing and locate the water pump in the bottom of the main
housing. Remove shipping tape located on water pump and place
water pump back in slot.
Make sure it is securely in place and hose is not bent or
crimped or unit will not operate.
Placement
Select a firm, level location at least 6” (15cm) from any
walls for proper airflow. Place the humidifier on a waterresistant surface, as water can damage furniture and some
flooring.
Kaz will not accept responsibility for property damage
caused by water spillage.
Figure 1
Filling
Fill pitcher or jug with up to
1 gallon of cool water.
Note: You can fill this
humidifier with as much as
1 gallon of water or as little
as a cup of water.
4
Indications that your humidifier
needs to be refilled are:
- The humidifier has stopped
producing mist
- Water has stopped circulating
over the top housing
Pour water into the fill funnel
area located on the top of
the unit.
Note: Water can be added
up to, but not exceed the
Full line.
Page 5
OPERATING: HUT-220 Series
Power
With the power switch in the OFF
position, plug the filled humidifier into a polarized 120V outlet.
DO NOT FORCE THE POLARIZED
PLUG INTO THE OUTLET; It will
only fit one way.
DO NOT plug in humidifier with
wet hands to avoid electric shock.
Output
Variable mist control allows you
to customize your humidifier
output. Turn the mist control
knob to the highest setting for
fast moisture and lower setting
for moisture maintenance.
NOTE: DO NOT OPERATE WITH TOP COVER REMOVED.
Doing so could result in water spilling from humidifier.
Mist Direction
Direct moisture away from
walls, furniture and bedding.
Failure to do so could result in
wetting of these items.
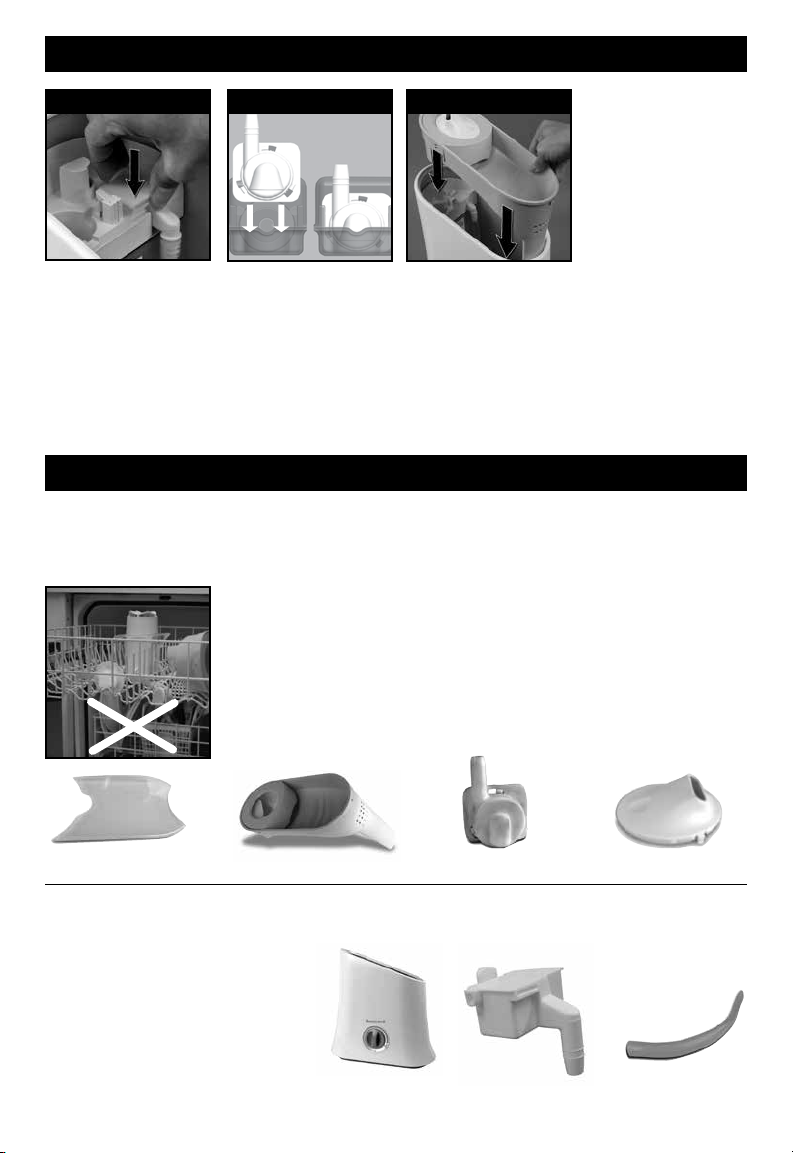
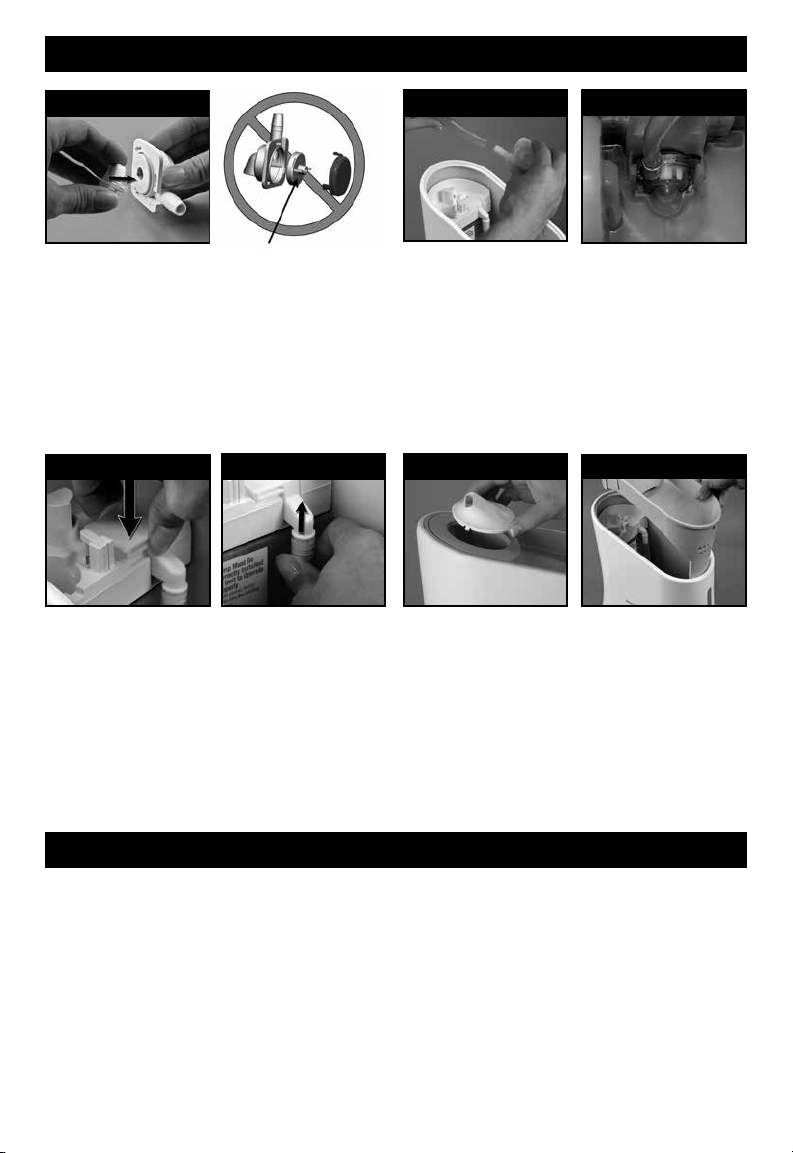
REPLACING DEMINERALIZATION CARTRIDGE
The demineralization cartridge should be changed every 20-30 fillings depending on your water quality.
Keep in mind, depending on your water quality, you may need to change your demineralization cartridge
more frequently. Indications that you should change your cartridge are white colored particles/dust
settling around the base of your humidifier.
For areas of extreme hard water it is recommended that you use distilled water in your humidifier.
STEP 1 STEP 2 STEP 3
Replacement Demineralization Cartridge
HDC-200 or Cartridge
Q.
With dry hands unplug
humidifier and carry to
kitchen or bathroom.
Remove top housing
and set aside.
STEP 4
Remove water hose
from demineralization
cartridge by gently
pulling and twisting.
Remove old demineralization cartridge and
discard.
5
Page 6
REPLACING DEMINERALIZATION CARTRIDGE (Continued)
STEP 5 STEP 6
Replace with new demineralization cartridge
by gently pressing into
place. You will hear a
click when it is fully
seated. Reattach water
hose making sure it is
pushed on all the way
and there are no kinks.
Make sure water pump
is securely in place.
STEP 7
Replace top housing.
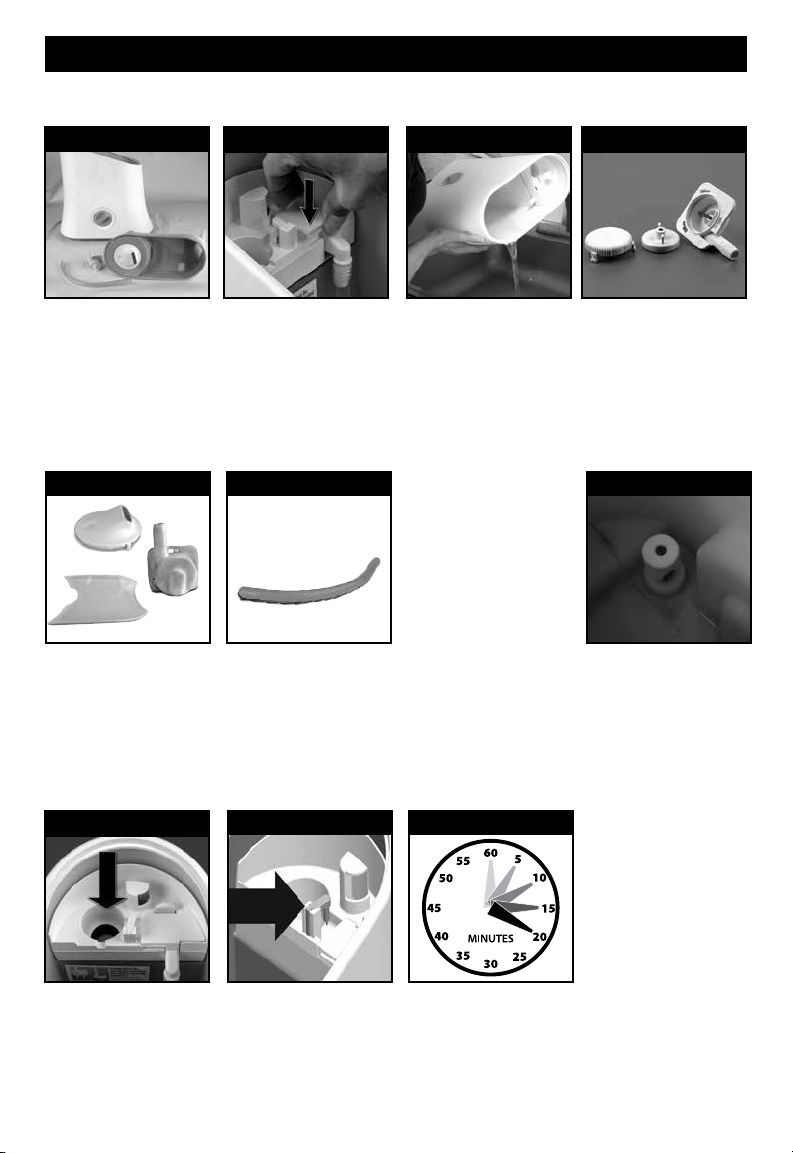
CLEANING: HUT-220 Series
NOTE: It is recommended that all maintenance be done in the kitchen or bathroom on a water
resistant surface.
Weekly Cleaning: To properly clean your humidifier we recommend the process of scale
removal and disinfecting.
DISHWASHER SAFE:
safe for residential dishwashers operating at temperatures below 70°C/158°F.
It is recommended that you run the dishwasher on the light duty or normal cycle.
Do not wash humidifier parts with soiled articles/dishes.
DO NOT USE DETERGENTS. If you use your dishwasher to clean the following
parts you will not need to follow the disinfecting and scaling procedure.
Please Note: Do not place parts on lower rack of dishwasher.
Using the lower rack could cause damage to the humidifier parts and
dishwasher.
The following parts are TOP RACK dishwasher
Protective Clear Cover Top housing Mist Nozzle
Water Pump
THE MAIN HOUSING, DEMINERALIZATION CARTRIDGE AND WATER HOSE
ARE NOT DISHWASHER SAFE.
Placing these parts in the dishwasher
will damage your humidifier and
render it unable to operate properly.
6
Main Housing
Demineralization Cartridge
Water Hose
Page 7
CLEANING: HUT-220 Series (continued)
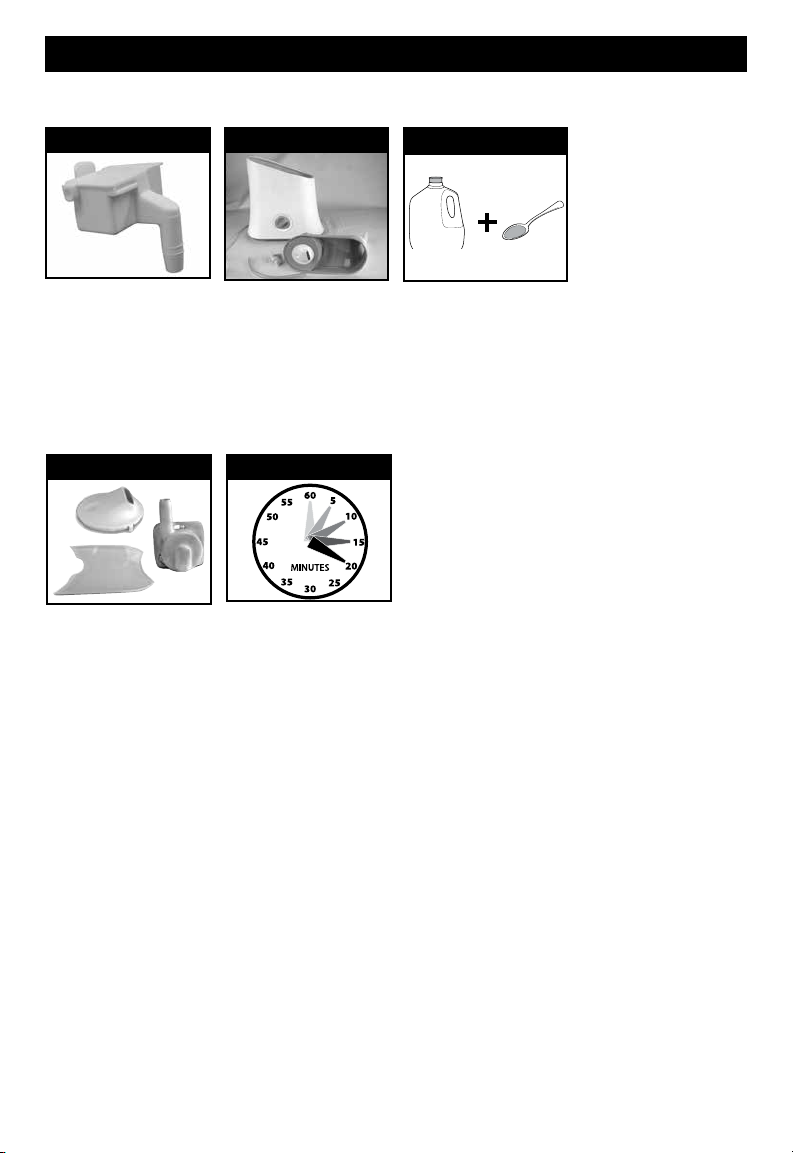
Scale Removal directions:
STEP 1
Remove top housing,
clear protective cover,
water pump and water
hose and set aside.
STEP 5
Place pump components,
mist nozzle, and
protective clear cover
inside main housing
in the vinegar solution
to soak or follow the
dishwasher option.
STEP 2 STEP 3
Remove demineralization cartridge and set
aside. DO NOT WASH
OR SOAK IN VINEGAR.
STEP 6
Wash hose with soap and
warm water. Rinse hose
thoroughly until all soap
residue is removed.
Fill water reservoir of
main housing with 1
cup of vinegar.
For tough stains, soak
the hose in a bowl
of white household
vinegar for 30 minutes
and rinse with warm
water while flexing and
crushing the soft hose
to loosen any debris.
Clean and wipe dry
with a hand cloth.
STEP 4
Disassemble Water
Pump by gently
turning the back cover
counter-clockwise to
unlock. Remove back
cover and impeller disk
inside.
STEP 7
Gentle wipe area around
“auto shut off float” to
ensure any minerals are
removed from this area.
STEP 8
Gently wipe top housing
and nebulizer with
undiluted vinegar.
Note: You can place
the top housing in
the dishwasher if you
choose.
STEP 9 STEP 10
Be sure to keep water
level sensor clean. Gently wipe with a soft cloth
and undiluted vinegar.
Soak for 20 minutes.
Rinse base and parts
not put in dishwasher
until vinegar smell is
gone.
Note: For best cleaning
results hose should be
soaked in the base and
then rinsed with clean,
cool water until the smell
of vinegar is gone.
With your unit un-assembled, proceed to the
disinfecting instructions.
7
Page 8
CLEANING: HUT-220 Series (continued)
Disinfecting directions: Disinfect following scale removal
STEP 1
DO NOT DISINFECT
demineralization
cartridge.
STEP 4
Soak water pump
components, mist nozzle
and clear protective
cover in water reservoir
of the main housing if
these parts were not
cleaned on the top rack
of dishwasher.
STEP 2
1
Set aside top housing,
clear protective cover,
water pump and water
hose.
Add 1 TB of bleach to 1
gallon water. Add ½ to
¾ gallon of water/bleach
solution to water reservoir
of the main housing.
STEP 5
Wipe top cover with remaining
water bleach solution if these
parts were not placed in
dishwasher. Place hose in bleach
solution. Soak for 15-20 minutes.
Thoroughly rinse base and any
parts not placed in dishwasher
until the smell of bleach is gone.
l
g
a
STEP 3
NOTE: USING MORE
THAN 1 TB OF BLEACH
PER GALLON OF
WATER WILL RESULT
IN DAMAGE TO YOUR
HUMIDIFIER.
Note: For best cleaning results hose should be soaked in the base and then rinsed with clean,
cool water until the smell of bleach is gone.
8
Page 9
RE-ASSEMBLING: HUT-220 Series
STEP 1 STEP 2
Reassemble pump by
inserting impeller disk
with blades facing front
housing onto front hous
ing shaft. Replace back
cover and turn clock
wise to lock in place.
STEP 4 STEP 6
Insert demineralization
cartridge into slot and
gently press into place.
Do Not Re-Assemble
Pump with impeller disk
blades facing towards
back cover. Incorrect
assembly will not allow
you to attach rear cover.
-
STEP 5
Attach water hose
opening to demineralization cartridge by gently
inserting cartridge outlet
into water hose opening.
Insert pump outlet into
hose and gently press
all the way on until it
cannot go any further.
Replace mist nozzle by
gently snapping into
place.
STEP 3
Insert water pump/
hose assembly into slot
in base.
Note: please be sure
pump is fully seated
and there are no kinks
in the hose.
STEP 7
Replace top housing and
protective clear cover.
Note: Please be careful of clothing, rugs and other non bleach resistant materials when
disinfecting. Spilling bleach on clothing, rugs and certain surfaces may cause damage.
END-OF-SEASON CARE AND STORAGE
Follow the CLEANING instructions when the humidifier will not be used for at least one week or more, or
at the end of the season.
At the end of the season, remove demineralization cartridge and allow to dry properly.
Note: If demineralization cartridge has been used you should replace it with a new cartridge.
Dry the humidifier completely before storing. DO NOT store with water inside the main housing water
reservoir or water tube.
Pack unit in original carton and store in a cool, dry location.
Install new demineralization cartridge before next use.
9
Page 10

CONSUMER RELATIONS
Mail questions or comments to:
Kaz USA, Inc.
Consumer Relations Dept.
250 Turnpike Road, Southborough, MA 01772
Please be sure to specify model number.
Call us toll-free at: 1-800-477-0457
E-mail: consumerrelations@kaz.com
Or visit our website at: www.kaz.com
TO ORDER REPLACEMENT PARTS
HUT-220-Tray
HUT-220-Tray Cover
HUT-220-Mist Nozzle
HUT-220-Pump
HUT-220-Hose
HUT-220-Blank
HUT-220B-Tray
HUT-220B-Mist Nozzle
ELECTRICAL RATINGS
The Honeywell HUT-200 Series models are rated at 120V, 60 Hz.
NOTE: IF YOU EXPERIENCE A PROBLEM, PLEASE CONTACT CONSUMER RELATIONS FIRST
OR SEE YOUR WARRANTY. DO NOT RETURN THE HUMIDIFIER TO THE ORIGINAL PLACE
OF PURCHASE. DO NOT ATTEMPT TO OPEN THE MOTOR HOUSING OR TAMPER WITH
INTERLOCK SWITCH YOURSELF, DOING SO MAY VOID YOUR WARRANTY AND CAUSE
DAMAGE TO THE PRODUCT OR PERSONAL INJURY.
FREQUENTLY ASKED QUESTIONS
Cleaning
Question Answer
How do I clean inside the water pump? You can clean the inside of the pump by turning
What parts are dishwasher safe? The water hose, water pump, top housing,and
How do I assemble my humidifier after cleaning? See page 9 of your owners manual.
Can I use dish soap to clean my humidifier?
Can I add water treatments to this humidifier?
10
the cover counter-clockwise. Remove the cover
and you can clean the housing and disk.
protective clear cover are all top rack dishwasher
safe
It is not recommended that you use dish soap to
clean your humidifier as it is very hard to remove
all the soap and this could cause damage to your
humidifier. The only part that we recommend
cleaning with soap is the water hose and this part
should be rinsed until all soap residue is removed.
You should only add water treatments to your
humidifier that are specifically made for ultra
sonic humidifiers such as the ProtecTM Cleaning
Cartridge, model PC-1 or PC-2. Using water treat
ments that are not recommended for ultrasonic
humidifiers could damage your humidifier. If you
are concerned about hard water it is recommended
you use distilled water in your humidifier.
-
-
Page 11

FREQUENTLY ASKED QUESTIONS (Continued)
Operation
Question Answer
What setting should I put my humidifier on? You should run your humidifier on the highest
I ran my humidifier overnight in a very dry
room and the humidity barely changed but my
water level decreased quite a bit
Can I run my humidifier without a
demineralization cartridge?
How often should I change my
demineralization catridge?
How do I know my humidifier is operating
properly?
The water window is illuminated but I do not
see any mist coming out of the mist nozzle.
There is no water running through the water
flow area on the top housing.
How much water does my humidifier hold? Your humidifier can hold up to 1.0 Gallon of water. It
setting if your room is very dry. Once you are at a
more comfortable humidity you can turn your output
setting to a lower setting.
It may take a few days for your humidity to increase.
Wood, rugs and other objects in your room will
absorb moisture before you can feel the effects,
if it is extremely dry.
Yes but it is recommended that you use a demineralization cartridge to help reduce white dust. If you
choose to not use a demineralization cartridge you
will need to replace the demineralization cartridge
in your unit with HUT-200-BLANK for it to operate.
It is recommended that you use distilled water if you
choose not to use a demineralization cartridge.
In general the demineralization cartridge will last
20-30 fillings depending on water quality and
usage. White dust on surrounding surfaces could
indicate that your demineralization cartridge needs
to be replaced.
You will see visible mist coming from your
humidifier. Also, water will flow down the top
housing and you will notice a decrease in the
water level after 8 hrs of use.
Make sure unit has water.
See Troubleshooting Guide for more.
First check to make sure there is water in your
humidifier. If yes, check your water pump to make
sure it is properly seated in the holding area. Check
to make sure the water hose is firmly attached to
both the water pump and demineralization cartridge. Last, check to ensure that the float switch
moves freely and is not obstructed. Next, make
sure there is nothing obstructing the water flow
area on the top cover or water hose. If these steps
do not help, please please see our Troubleshooting
Guide or contact our customer service department
at 1-800-477-0457.
can be filled to the Full line.
How long will my humidifier run when full? Your humidifier will run up to 22 hrs on high and 46
hrs on low.
11
Page 12

TROUBLESHOOTING
1. Water is not flowing
a. Check to be sure there is water in the tank and it is covering the pump.
b. Check hose to be sure there are no kinks. Hose should be pushed fully onto both the
demineralization cartridge and pump.
c. Make sure pump is fully seated properly in bottom of tank.
d. Turn unit off, then back on to help clear any air in the system.
e. If water still is not flowing, remove pump, disassemble and make sure pump
wheel can spin freely and there is nothing blocking pump inlet or demineralization
cartridge inlet.
2. Unit flows water but does not produce mist
a. Make sure control is rotated fully clockwise.
b. Remove mist nozzle and check to see if there is water inside the nebulizer cham-
ber which is the pocket located next to the demineralization cartridge. If there is
no water in the nebulizer chamber, you may need to replace your demineralization
cartridge.
c. If there is water in the nebulizer chamber and steps 2a and 2b have been followed,
you may need to call our toll free number for further instructions.
3. Pump makes a swishing sound
a. The pump may have sucked in air. Be sure there is enough water in the tank to cover
the pump.
b. After filling, turn the unit off for a few seconds, then turn it back on to clear the
system of air.
4. Pump makes a whirring sound
a. The pump may not be properly seated. Be sure to push pump fully into tank. After
seating the pump properly, turn the unit off for a few seconds, then turn it back on.
12
Page 13

2 YEAR LIMITED WARRANTY
You should first read all instructions before
attempting to use this product.
A. This 2 year limited warranty applies to
repair or replacement of product found to
be defective in material or workmanship.
This warranty does not apply to damage
resulting from commercial, abusive,
unreasonable use or supplemental damage.
It also does not apply to the filter or Protec™
Cartridge. Defects that are the result of
normal wear and tear will not be considered
manufacturing defects under this warranty.
KAZ USA, INC. IS NOT LIABLE FOR
INCIDENTAL OR CONSEQUENTIAL
DAMAGES OF ANY NATURE. ANY IMPLIED
WARRANTY OF MERCHANTABILITY OR
FITNESS FOR A PARTICULAR PURPOSE ON
THIS PRODUCT IS LIMITED IN DURATION
TO THE DURATION OF THIS WARRANTY.
Some jurisdictions do not allow the exclusion
or limitation of incidental or consequential
damages or limitations on how long an
implied warranty lasts, so the above
limitations or exclusions may not apply to
you. This warranty gives you specific legal
rights, and you also may have other rights
which vary from jurisdiction to jurisdiction.
This warranty applies only to the original
purchaser of this product from the original
date of purchase.
B. At its option, Kaz USA, Inc. will repair or
replace this product if it is found to be
defective in material or workmanship.
C. This warranty does not cover damage
resulting from any unauthorized attempts
to repair or from any use not in accordance
with the instruction manual.
D. Return defective product to Kaz USA, Inc.
with a brief description of the problem.
Include proof of purchase and a $10
US/$15.50 CAN check or money order
for handling, return packing and shipping
charges. Please include your name, address
and a daytime phone number.
You must prepay shipping charges.
We suggest having tracking or delivery
confirmation. Send to:
In U.S.A.:
Kaz USA, Inc.
Attn: Returns Department
4755 Southpoint Drive
Memphis, TN 38118
USA
In Canada:
Kaz Canada, Inc.
Attn: Returns Department
510 Bronte Street South
Milton, ON L9T 2X6
Canada
Please go to www.kaz.com and register
your product under the Customer Care Center and receive product information updates
and new promotional offers.
©2012
Kaz USA, Inc
. All Rights Reserved.
P/N: 31IM200B190
13
Page 14

HUMIDIFICATEUR À
ULTRASONS HONEYWELL
REMPLI PAR LE HAUT
MODÈLE DE LA SÉRIE HUT-220
IMPORTANTES INSTRUCTIONS DE SÉCURITÉ
LIRE CES INSTRUCTIONS DE
SÉCURITÉ AVANT D’UTILISER
L’HUMIDIFICATEUR
L’utilisation d’appareils électriques nécessite
des précautions élémentaires afin de réduire
les risques d’incendie, de choc électrique
ou de blessures. Parmi les précautions à
observer, on compte les suivantes:
1. Il convient de toujours placer l’humidificateur
sur une surface ferme, dégagée et bien
horizontale, puisqu’il pourrait ne pas fonctionner
adéquatement sur une surface inégale.
2. Placer l’humidificateur hors de la portée des
enfants.
3. Ne pas placer l’appareil près de sources de
chaleur telles que poêles, radiateurs ou appareils
de chauffage.
4. Éviter d’utiliser l’humidificateur en plein air.
5. Avant d’utiliser l’humidificateur, vérifier que le
cordon d’alimentation n’est pas endommagé. Si
le cordon est endommagé, NE PAS UTILISER
L’APPAREIL, mais plutôt le retourner au fabricant
pour une réparation selon les termes de la
garantie.
6. Ce produit est équipé d’une fiche polarisée (fiche
dont l’une des lames est plus large que l’autre).
Afin de réduire les risques de choc électrique,
cette fiche ne peut êtreinsérée que d’une seule
manière dans la prise de courant polarisée. Si la
fiche nes’insère pas complètement dans la prise,
tourner la fiche. Si la fiche ne s’insère toujours
pas dans la prise, contacter un électricien.
La marque de commerce Honeywell est utilisée par Kaz USA , Inc. avec l’autorisation de Honeywell International Inc.
14
Honeywell International Inc. ne fait aucune assertion et n’offre aucune garantie en ce qui concerne ce produit.
ÉVITER de contourner le dispositif de sécurité que
constitue la fiche polarisée.
7. Pour débrancher l’appareil, régler le bouton de
contrôle à la position OFF, puis enlever la fiche
de la prise de courant. Ne jamais débrancher
l’appareil en tirant sur le cordon d’alimentation.
8. Une mauvaise connexion entre la sortie de
courant alternatif et la fiche peut provoquer un
échauffement excessif et une déformation de
la fiche. Demander à un électricien qualifié de
remplacer les prises de courant lâches ou usées.
9. Toujours débrancher et vider l’appareil quand
celui-ci ne sert pas ou durant son entretien ou
son nettoyage.
10. Éviter d’incliner ou de déplacer l’humidificateur
quand il fonctionne ou qu’il est rempli d’eau.
DÉBRANCHER l’appareil avant de le bouger.
11. Cet humidificateur nécessite un nettoyage
régulier. Consulter les instructions de NETTOYAGE
ci-jointes. Ne jamais nettoyer l’appareil d’une
autre manière que celle prescrite dans le présent
guide.
12. Éviter de diriger le flux de vapeur directement
vers des personnes, un mur ou un meuble.
13. Lorsqu’un humidificateur est utilisé dans une
pièce fermée ou une petite pièce, il convient
de vérifier périodiquement si la ventilation est
adéquate, puisqu’un taux d’humidité trop élevé
peut causer des taches de condensation sur les
murs.
14. Couper le fonctionnement de l’humidificateur si
de l’humidité se forme à l’intérieur des fenêtres.
Afin d’obtenir des relevés précis du degré
d’humidité, utiliser un hygromètre. Ils sont vendus
en quincaillerie et dans les grands magasins et
peuvent être commandés du fabricant.
15. Cet appareil est uniquement destiné à
l’utilisation résidentielle.
Page 15

Humidificateur à
ultrasons Honeywell
Modèle de la série HUT-220
Kaz USA, Inc.
250 Turnpike Road
Southborough, MA 01772,
ÉTATS-UNIS
1-800-477-0457
Cet appareil est conforme à la partie 18 du règlement de la
Commission fédérale des communications des États-Unis (FCC).
Avertissement: Tous changements ou toutes modifications apportés,
quels qu’ils soient, n’étant pas expressément approuvés par le parti
responsable de la conformité risquent, pour l’utilisateur, d’annuler son
droit d’employer l’appareil.
Cet appareil a été soumis aux tests d’usage et déclaré conforme aux
limites établies pour appareils générateurs de fréquences ISM, selon la
partie 18 du règlement de la FCC. Ces limites ont pour but de
procurer une protection raisonnable contre le brouillage préjudiciable
dans un immeuble d’habitation. L’appareil produit, utilise et peut émettre
des fréquences radioélectriques; s’il n’est pas posé et employé selon
les instructions, il peut causer des parasites nuisant aux radiocommunications. Rien ne garantit que le brouillage ne se produira pas
dans certains immeubles. Si l’appareil cause des parasites nuisibles
à la réception des radiocommunications ou des signaux de télévision
– ce qui peut être établi en le mettant hors tension puis sous tension
– l’utilisateur peut essayer de rectifier la situation en adoptant une ou
plusieurs des mesures suivantes:
• modierl’orientationoulapositiondel’antenneréceptrice ;
• augmenterl’écartentrel’appareiletlerécepteur;
• brancherl’appareilsuruncircuitautrequeceluisurlequelest
connecté le récepteur; ou enfin
• consulterledétaillantoubienunspécialisteenradioettélévision
expérimenté.
15
Page 16

INTRODUCTION
Principe du fonctionnement
Très facile à entretenir, cet humidificateur à ultrasons est conçu pour diffuser silencieusement
de la vapeur froide et visible. L’eau pompée du réservoir passe à travers la cartouche de
déminéralisation, ce qui aide à capter les minéraux en suspension dans l’eau. L’eau purifiée
coule dans le plateau de brumisation où elle est pulvérisée par des oscillations ultrasoniques
puis dispersée dans l’air par un petit ventilateur, réhydratant ainsi l’air ambiant trop sec.
Grâce à son unique orifice de remplissage au haut, il est aussi facile à remplir qu’il serait
d’arroser des plantes. Il présente aussi une fonction d’écoulement d’eau qui avertit quand le
remplissage est nécessaire.
L’humidificateur se compose des pièces suivantes:
Buse de
diffusion
Couvercle
transparent
du plateau
Cartouche de
déminéralisation
Entrée
de la
cartouche
Tuyau à eau
Sortie de la
pompe
Pompe à eau
Haut du boîtier/
plateau
Boîtier principal
Alimentation/
commande de débit
Entonnoir de
remplissage
Interrupteur à
flotteur d’arrêt
automatique
Indicateur de
niveau d’eau
16
Page 17

MONTAGE ET MISE EN PLACE DE L’HUMIDIFICATEUR
Sortir l’appareil de sa boîte d’emballage
Retirer les matériaux d’emballage. Réserver le mode d’emploi.
Recycler l’emballage et les divers matériaux ou préférablement
les garder pour le rangement hors saison.
Afin qu’elle ne bouge pas durant l’expédition, la pompe a été
fixée à l’intérieur de l’humidificateur avec du ruban. Enlever
le haut du boîtier et repérer la pompe au fond du boîtier principal.
Retirer le ruban qui immobilise la pompe à eau puis placer celle-ci
dans la fente prévue à cet effet.
Veiller à ce que la pompe soit solidement adaptée et que
le tuyau ne soit ni cintré ni gaufré, ce qui empêcherait
l’appareil de fonctionner.
Mise en place
Choisir un endroit plat, rigide et d’aplomb, à au moins 6 po
(15 cm) des murs pour ne pas entraver la circulation de l’air.
Poser l’humidificateur sur une surface insensible à l’eau car
l’eau peut abîmer les meubles et certains planchers.
Kaz n’assume aucune responsabilité pour les dommages
matériels que cause l’eau.
Figure 1
Remplissage
Remplir un pichet ou une
cruche d’eau froide – jusqu’à
1 gallon US ou 3,75 litres.
Remarque: Il est possible
de verser un maximum de
3,75 litres ou un minimum
de 250 mL d’eau dans
l’humidificateur.
Signes que l’humidificateur a
besoin d’être rempli:
- L’humidificateur a cessé de
produire de la vapeur
- L’eau a cessé de circuler sur
haut du boîtier
Verser l’eau dans l’entonnoir
de remplissage situé au haut
de l’appareil.
Remarque : Le niveau
de l’eau peut atteindre le
repère «plein» (full) mais
pas le dépasser.
17
Page 18

MODE D’EMPLOI DE LA SÉRIE HUT-220
Alimentation
L’interrupteur étant à l’ARRÊT,
brancher l’humidificateur rempli
d’eau sur une prise de courant
polarisée de 120 volts. NE PAS
FORCER LA FICHE POLARISÉE,
elle n’enfonce que dans un sens.
NE PAS brancher l’appareil les
mains mouillées, afin d’éviter tout
risque de choc électrique.
Débit
Le variateur de débit permet de
personnaliser le fonctionnement.
Tourner le bouton du variateur
de débit au réglage le plus haut
pour vite réhydrater l’air ou
bien au réglage le plus bas pour
maintenir l’humidité ambiante.
REMARQUE: NE PAS FAIRE FONCTIONNER CET APPAREIL SANS
SON COUVERCLE, sous peine d’éclaboussures d’eau.
Orientation
Éloigner le débit de vapeur des
murs, des meubles et de la
literie, la nébulisation risquerait
de les imbiber d’eau.
REMPLACEMENT DE LA CARTOUCHE DE DÉMINÉRALISATION
La cartouche de déminéralisation devrait être changée tous les 20 à 30 remplissages et parfois plus souvent – tout
dépend de la qualité de l’eau de la région. Lorsque des poussières ou des particules blanches se déposent à la base
de l’humidificateur, c’est un signe que la cartouche de déminéralisation doit immanquablement être changée.
Dans les régions où l’eau est très dure ou calcaire (contenant beaucoup de calcium), il est vivement recommandé
d’employer de l’eau distillée dans l’humidificateur.
ÉTAPE 1 ÉTAPE 2 ÉTAPE 3
Cartouche de déminéralisation HDC-200
ou cartouche Q.
18
Débrancher
l’humidificateur (avec
les mains sèches) et le
porter dans la cuisine
ou la salle de bains.
Retirer le haut du
boîtier de l’appareil et le
mettre de côté.
ÉTAPE 4
Détacher le tuyau à
eau de la cartouche de
déminéralisation usée
en le tirant et en le
tournant délicatement.
Retirer la cartouche de
déminéralisation usée
et la jeter.
Page 19

REMPLACEMENT DE LA CARTOUCHE DE DÉMINÉRALISATION (suite)
ÉTAPE 5 ÉTAPE 6
Placer une cartouche de
déminéralisation neuve en
la pressant délicatement.
Un déclic signale sa bonne
installation. Rattacher le
tuyau à eau en le poussant
à fond et en veillant à ce
qu’il ne plisse pas.
S’assurer que la pompe
soit solidement
positionnée.
ÉTAPE 7
Replacer le haut du
boîtier.
ENTRETIEN DES APPAREILS DE LA SÉRIE HUT-220
REMARQUE: Il est recommandé d’effectuer l’entretien de l’humidificateur dans la cuisine ou
dans la salle de bains, sur une surface insensible à l’eau.
Entretien hebdomadaire: Pour nettoyer l’humidificateur comme il le faut, nous conseillons de
procéder au détartrage en premier puis à la désinfection.
Pièces résistantes au lave-vaisselle: Les pièces suivantes vont
dans le PANIER SUPÉRIEUR des lave-vaisselle ménagers dont les températures ne dépassent pas 70 °C/158 °F. Utiliser de préférence le cycle délicat
ou normal. Ne pas laver les pièces avec de la vaisselle souillée.
NE PAS EMPLOYER DE DÉTERGENT. Lorsque les pièces suivantes sont lavées
en machine, la désinfection et le détartrage sont inutiles.
Noter qu’il ne faut pas mettre les pièces dans le panier inférieur du
lave-vaisselle, sous peine d’abîmer non seulement les pièces de
l’humidificateur, mais aussi le lave-vaisselle.
Couvercle transparent
Haut du boîtier
Pompe à eau
Buse de diffusion
LE BOÎTIER PRINCIPAL, LA CARTOUCHE DE DÉMINÉRALISATION ET
TUYAU À EAU NE
RÉSISTENT PAS AU
LAVE-VAISSELLE.
Les passer au lave-vaisselle
endommagera l’humidificateur
et l’empêchera de fonctionner
convenablement.
Boîtier principal
Cartouche de
déminéralisation
Tuyau à eau
19
Page 20

ENTRETIEN DES APPAREILS DE LA SÉRIE HUT-220 (suite)
Directives de détartrage
ÉTAPE 1
ÉTAPE 2
ÉTAPE 3
ÉTAPE 4
Retirer le couvercle
transparent, le haut du
boîtier, la pompe et le
tuyau à eau; les mettre
de côté.
ÉTAPE 5
Placeréléments de
la pompe, la buse de
diffusion et le couvercle
dans le boîtier principal
pour les faire tremper dans
le vinaigre ou bien les
passer au lave-vaisselle.
ÉTAPE 8
Essuyer délicatement
le haut du boîtier et le
nébuliseur avec un linge
imbibé de vinaigre non
dilué. Remarque: Le
haut du boîtier peut
être mis au lave-vais-
20
selle, si désiré.
Sortir la cartouche de
déminéralisation et
la mettre de côté. NE
PAS LA LAVER OU LA
TREMPER DANS LE
VINAIGRE.
ÉTAPE 6
Laver le tuyau à l’eau
chaude savon neuse.
Bien le rincer pour
éliminer toute trace de
savon.
ÉTAPE 9
Soyez sur de garder
le niveau d’eau propre
capteur. Essuyez
doucement avec un
chiffon doux et vinaigre
non dilue.
Vider le boîtier principal
en vidangeant l’eau
par le bord arrière
supérieur. Verser
alors 1 tasse (500 mL)
de vinaigre dans le
réservoir.
Pour éliminer les taches
tenaces, tremper
pendant 30 minutes le
tuyau dans du vinaigre
blanc puis le rincer à
l’eau tiède en le courbant et le pressant pour
déloger tous débris. Le
rincer abondamment
et l’assécher avec un
chiffon.
ÉTAPE 10
Laisser tremper pendant 20
minutes. Rincer le réservoir du
boîtier principal et les pièces
n’ayant pas été mises au
lave-vaisselle jusqu’à ce que
l’odeur de vinaigre ait disparu.
Démonter la pompe
à eau en tournant
délicatement le
couvercle arrière en
sens antihoraire afin
de le débloquer. Retirer
le couvercle arrière et
la roue à ailettes.
ÉTAPE 7
Essuyer délicatement
la surface autour de
l’interrupteur à flotteur pour
assurer l’absence de tartre.
Remarque : Pour
obtenir les résultats optimaux, le
tuyau devrait tremper dans le boîtier
puis être rincé à
l’eau claire jusqu’à
ce qu’il n’y ait plus
trace d’odeur de
vinaigre.
L’appareil étant
démonté, procéder
à la désinfection.
Page 21

ENTRETIEN DES APPAREILS DE LA SÉRIE HUT-220 (suite)
Directives de désinfection: désinfection après le détartrage
ÉTAPE 1
NE PAS DÉSINFECTER
la cartouche de
déminéralisation.
ÉTAPE 4
Faire tremper les
éléments de la pompe,
la buse de diffusion et
le couvercle transparent
dans le réservoir s’ils
n’ont pas été lavés dans
le panier supérieur du
lave-vaisselle.
ÉTAPE 2
1
g
a
Mettre le haut du
boîtier, le couvercle
transparent, la pompe
et le tuyau à eau de
côté.
Ajouter 1 c. à table (15 mL)
d’eau de Javel à 1 gallon
US (3,75 L) d’eau. Verser
entre la moitié et les trois
quarts de l’eau javellisée
dans le réservoir du boîtier
principal.
ÉTAPE 5
Essuyer le couvercle transparent
avec la solution javellisée restante
s’il n’a pas été nettoyé au lavevaisselle. Placer le tuyau dans la
solution javellisée. Faire tremper
les pièces de 15 à 20 minutes.
Rincer à fond le réservoir du
boîtier principal et toutes les
pièces non lavées au lavevaisselle jusqu’à ce que l’odeur
d’eau de Javel ait disparu.
ÉTAPE 3
l
REMARQUE: DILUER
PLUS DE 15 ML
D’EAU DE JAVEL
DANS 3,75 LITRES
D’EAU ABÎME
L’HUMIDIFICATEUR.
Remarque: Pour obtenir les résultats optimaux, le tuyau devrait tremper dans le boîtier puis
être rincé à l’eau claire jusqu’à ce que l’odeur d’eau de Javel ait disparu.
21
Page 22

REMONTAGE DES APPAREILS DE LA SÉRIE HUT-220
ÉTAPE 1 ÉTAPE 2
Remonter la pompe en
insérant la roue – les
ailettes orientées vers
l’avant du boîtier – sur
l’arbre avant du boîtier.
Replacer le couvercle
arrière et le tourner en
sens horaire pour le
bloquer.
ÉTAPE 4 ÉTAPE 6
Placer la cartouche de
déminéralisation
dans la fente et
l’enfoncer doucement
en place.
Remarque : Protéger vêtements, tapis et autres matériaux non résistants à l’eau de Javel
durant la désinfection. Les éclaboussures de solution javellisée risquent de décolorer et
d’abîmer les textiles, les tapis et certaines autres surfaces.
No monte la bomba con
las aspas del disco im
pulsor apuntando hacia
la cubierta posterior.
Montar incorrectamente
no le permitirá colocar la
cubierta posterior.
ÉTAPE 5
Fixer le bout du tuyau à
eau à la cartouche de
déminéralisation en
insérant soigneusement
la sortie de la cartouche
dans le tuyau.
Enfoncer l’orifice de
sortie de la pompe dans
le tuyau et le pousser
délicatement jusqu’à
ce qu’il ne puisse pas
pénétrer plus loin.
Replacer la buse de
diffusion en l’adaptant
délicatement par
pression.
ÉTAPE 3
Introduire l’ensemble
pompe et tuyau dans la
fente du fond.
Remarque: Veiller à ce
que la pompe soit bien
adaptée et que le tuyau
ne fasse pas de plis.
ÉTAPE 7
Remettre le haut du
boîtier et le couvercle
transparent.
ENTRETIEN ET RANGEMENT DE FIN DE SAISON
À la fin de la saison d’utilisation, ou bien quand l’humidificateur ne doit pas servir pendant une semaine
ou plus, observer les instructions d’ENTRETIEN préconisées.
À la fin de la saison d’utilisation, retirer la cartouche de déminéralisation et la laisser sécher proprement.
Remarque : Si la cartouche de déminéralisation a fait son temps de service, elle devrait être
remplacée par une cartouche neuve.
Laisser totalement sécher l’humidificateur avant de le ranger. Veiller à ce que le réservoir du boîtier
principal et le tube à eau soient TOTALEMENT secs.
Remettre l’humidificateur dans sa boîte d’emballage et ranger celle-ci dans un endroit frais et sec.
Installer une cartouche de déminéralisation neuve avant de recommencer à utiliser l’humidificateur.
22
Page 23

SERVICE À LA CLIENTÈLE
Adresser questions et commentaires à :
Kaz USA, Inc.
Consumer Relations Dept.
250 Turnpike Road
Southborough, MA 01772
USA
Prière de spécifier le numéro de modèle.
Composez sans frais : 1-800-477-0457
Courriel : consumerrelations@kaz.com
ou visitez notre site Web, à l’adresse :
www.kaz.com
COMMANDE DE PIÈCES DE RECHANGE
HUT-220-Haut du boîtier
HUT-220-Couvercle du haut du boîtier
HUT-220-Buse de diffusion
HUT-220-Pompe
HUT-220 -Tuyau
HUT-220-BLANK Cartouche d’appoint
HUT-220B-Haut du boîtier
HUT-220B-Buse de diffusion
CARACTÉRISTIQUES ÉLECTRIQUES
Les modèles Honeywell de la série HCM-350 ont les caractéristiques assignées suivantes: 120 V, 60 Hz.
REMARQUE : EN CAS DE PROBLÈME, COMMUNIQUER AVEC LE SERVICE À LA CLIENTÈLE
OU CONSULTER LA GARANTIE. NE PAS RETOURNER L’HUMIDIFICATEUR AU LIEU
D’ACHAT. NE PAS ESSAYER D’OUVRIR SOI-MÊME LE CARTER DU MOTEUR OU D’ALTÉRER
L’INTERRUPTEUR DE VERROUILLAGE, SOUS PEINE D’ANNULATION DE LA GARANTIE ET
DE PROVOQUER L’ENDOMMAGEMENT DE L’APPAREIL OU DES BLESSURES CORPORELLES.
FOIRE AUX QUESTIONS
Entretien
Questions Réponses
Comment puis-je nettoyer l’intérieur de la
pompe?
Quelles sont les pièces qui peuvent passer au
lave-vaisselle?
Comment puis-je remonter mon humidificateur à
la fin de l’entretien?
Puis-je me servir de détergent liquide pour
vaisselle pour nettoyer mon humidificateur ?
Puis-je ajouter des produits de traitement de
l’eau à cet humidificateur?
Pour ceci, tournez le couvercle dans le sens antihoraire. Retirez alors le couvercle afin de nettoyer
le boîtier et le disque.
Le tuyau à eau, la pompe, le haut du boîtier et le
couvercle transparent peuvent être lavés dans le
panier supérieur du lave-vaisselle.
Consultez la page 22 du guide d’utilisation.
Nous le déconseillons parce que les traces de détergent
étant très difficiles à éliminer, elles pourraient causer
l’endommagement de votre humidificateur. Le seul élément que
nous conseillons de laver au savon est le tuyau à eau – il devrait
alors être rincé jusqu’à ce qu’il n’y ait plus trace de savon.
N’ajoutez que des produits de traitement de l’eau spécialement conçus pour les humidificateurs à ultrasons, la
cartouche nettoyante Protec
exemple. Des produits non conseillés pour les humidificateurs
à ultrasons pourraient abîmer l’appareil. Si vous vous souciez
des conséquences de l’eau dure, employez de l’eau distillée
dans l’humidificateur.
MC
, modèle PC-1 ou PC-2, par
23
Page 24

FOIRE AUX QUESTIONS (suite)
Fonctionnement
Questions Réponses
Quel est le réglage le plus approprié pour mon
humidificateur?
L’air étant très sec, j’ai laissé fonctionner
mon humidificateur toute la nuit – le taux
d’humidité ambiant a à peine changé bien que
le niveau de l’eau ait considérablement baissé.
Puis-je employer mon humidificateur sans
cartouche de déminéralisation?
Tous les combien dois-je changer la cartouche
de déminéralisation?
Comment puis-je savoir si mon humidificateur
fonctionne convenablement?
L’indicateur de niveau luit mais je ne vois pas
de vapeur se dégager de la buse.
Il ne coule pas d’eau là où elle devrait couler
dans le haut du boîtier.
Quelle est la capacité du réservoir? Sa capacité est de 1 gal US, soit 3,75 litres d’eau.
Faites fonctionner votre humidificateur au réglage
le plus haut si l’air et très sec. Une fois le taux
d’humidité équilibré, mettez-le à un réglage plus bas.
Plusieurs jours peuvent être requis pour que le taux
d’humidité augmente. Les boiseries, tapis et autres
objets absorberont de l’humidité avant que ressentiez les bienfaits, si l’air était extrêmement sec.
Oui, mais nous recommandons d’employer une
cartouche de déminéralisation pour réduire la
poussière blanche. Si vous décidez de ne pas
utiliser de cartouche de déminéralisation, vous
devez la remplacer par une cartouche d’appoint
HUT-200-BLANK afin que votre appareil fonctionne
tel que préconisé. En ce cas, nous vous conseillons
également de vous servir d’eau distillée.
D’une façon générale, une cartouche de déminéralisation dure de 20 à 30 remplissages, selon la
qualité de l’eau et la fréquence d’utilisation. De la
poussière blanche à proximité de l’appareil signale
que la cartouche a besoin d’être remplacée.
Vous voyez le débit de vapeur qui se dégage de
l’appareil. De plus, l’eau coule dans le haut du
boîtier et vous devriez constater que le niveau de
l’eau a baissé après 8 heures d’utilisation.
Assurez-vous qu’il y ait de l’eau dans le réservoir.
Consultez aussi le guide de dépannage.
Commencez par vous assurer qu’il y a de l’eau dans
le réservoir. Si oui, assurez-vous que la pompe est
solidement adaptée. Ceci fait, vérifiez que le tuyau
est fermement fixé à la pompe et à la cartouche de
déminéralisation. Pour terminer, assurez-vous que
rien n’obstrue l’écoulement de l’eau sur le couvercle
ou au tuyau. Si le problème persiste, consultez
notre guide de dépannage ou communiquez avec le
service à la clientèle au 1-800-477-0457.
Il peut être rempli jusqu’au repère plein (full).
Combien de temps mon humidificateur peut-il
fonctionner quand son réservoir est plein?
24
Il fonctionnera jusqu’à 22 heures au réglage haut ou
jusqu’à 46 heures au réglage bas.
Page 25

DÉPANNAGE
1. L’eau ne coule pas
a. Assurez-vous qu’il y ait de l’eau dans le réservoir et qu’elle recouvre la pompe.
b. Vérifiez que le tuyau n’ait pas de faux plis. Le tuyau doit également être poussé à
fond sur la cartouche de déminéralisation et sur la pompe.
c. Assurez-vous que la pompe soit impeccablement adaptée au fond du réservoir.
d. Éteignez l’appareil puis rallumez-le pour libérer l’air qui pourrait se trouver dans
le système.
e. Si l’eau ne coule toujours pas, enlevez la pompe, démontez-la puis assurez-vous
que la roue tourne librement et que rien ne bouche l’orifice d’entrée de la pompe ou
l’orifice de la cartouche de déminéralisation.
2. L’eau coule mais ne produit pas de vapeur
a. Assurez-vous que la commande soit tournée à fond en sens horaire.
b. Retirez la buse de diffusion et vérifiez qu’il y ait de l’eau dans la chambre du
nébuliseur, soit la poche située à côté de la cartouche de déminéralisation. S’il n’y
a pas d’eau dans la chambre du nébuliseur, il faut peut-être que vous remplaciez la
cartouche de déminéralisation.
c. S’il y a de l’eau dans la chambre du nébuliseur et que vous avez observé les
directives des paragraphes 2a et 2b, il est peut-être nécessaire que vous appeliez
notre service à la clientèle pour obtenir des instructions complémentaires.
3. La pompe émet un sifflement
a. La pompe peut avoir aspiré de l’air. Assurez-vous qu’il y ait suffisamment d’eau dans
le réservoir pour recouvrir la pompe.
b. Après le remplissage, éteignez l’appareil pendant quelques secondes puis rallumez-
le pour évacuer l’air du système.
4. La pompe fait un bruit de ronflement
a. Elle n’est peut-être pas parfaitement adaptée dans le réservoir. Veillez à ce qu’elle
soit enfoncée à fond. Après avoir rectifié son positionnement, éteignez l’appareil
pendant quelques secondes puis rallumez-le.
25
Page 26

GARANTIE LIMITÉE DE 2 ANS
Prière de lire toutes les instructions
avant de tenter d’utiliser ce produit.
A. Cette garantie limitée de 2 ans s’applique
à la réparation ou au remplacement d’un
produit comportant un vice de matière ou de
main-d’œuvre. Cette garantie ne s’applique
pas aux dégâts découlant d’un usage
commercial, abusif ou déraisonnable, ni aux
dégâts supplémentaires. Elle ne s’applique
pas non plus au filtre ni à la cartouche
ProtecMC. Les défaillances résultant de
l’usure normale ne sont pas considérées
comme des vices de fabrication en vertu de
la présente garantie.
KAZ USA, INC. N’EST NULLEMENT
RESPONSABLE POUR LES DOMMAGES
FORTUITS OU INDIRECTS, QUELS QU’ILS
SOIENT. TOUTE GARANTIE IMPLICITE
DE QUALITÉ MARCHANDE ET DE
CONVENANCE RELATIVE À CE PRODUIT
A LA MÊME DURÉE LIMITE QUE LA
PRÉSENTE GARANTIE.
Dans certaines régions, on ne permet pas
l’exclusion ou la limitation des dommages
fortuits ou indirects, ni les limites de
durée applicables à une garantie implicite;
par conséquent, il est possible que ces
limitations ou exclusions ne s’appliquent pas
dans votre cas. Cette garantie vous confère
des droits précis, reconnus par la loi. Ces
droits diffèrent d’une région à l’autre, et il
est possible que vous en ayez d’autres. Cette
garantie s’applique uniquement à l’acheteur
initial de ce produit, à compter de la date de
l’achat.
B. À sa discrétion, Kaz USA, Inc. réparera ou
remplacera ce produit si l’on constate qu’il
comporte un vice de matière ou de maind’œuvre.
C. Cette garantie ne couvre pas les dommages
découlant des tentatives de réparation
non autorisées ou de toute utilisation non
conforme au présent manuel.
D. Retourner tout produit défectueux à
Kaz USA, Inc., accompagné d’une brève
description du problème. Inclure une preuve
d’achat et un chèque ou un mandat de poste
de 10,00 $ US / 15.50 $ can. pour les frais
de manutention, d’emballage de retour et
d’expédition. Prière d’indiquer nom, adresse
et numéro de téléphone durant la journée.
Les frais de transport doivent être payés
à l’avance. Nous vous suggérons d’utiliser
un système de confirmation et de suivi de
livraison. Faire l’envoi:
Aux États-Unis:
Kaz USA, Inc.
Attn: Returns Department
4755 Southpoint Drive
Memphis, TN 38118
USA
Au Canada:
Kaz Canada, Inc.
Attn: Returns Department
510 Bronte Street South
Milton, ON L9T 2X6
Canada
Veuillez aller au www.kaz.com pour faire
enregistrer votre produit sous « SUPPORT
» puis « Register Product » et recevoir des
renseignements quant aux réactualisations
et aux nouvelles offres promotionnelles.
26
©2012
Kaz USA, Inc.
Tous droits réservés.
P/N: 31IM200B190
Page 27

HONEYWELL HUMIDIFICADOR
ULTRASÓNICO DE LLENADO
POR ARRIBA
MODELO Series HUT-220
INSTRUCCIONES
IMPORTANTES DE
SEGURIDAD
LEA Y GUARDE ESTAS INSTRUCCIONES DE SEGURIDAD ANTES DE
USAR ESTE HUMIDIFICADOR
Siempre se deben tomar las precauciones
básicas cuando se usen artefactos eléctricos
para reducir el riesgo de incendio, choque
eléctrico y lesiones personales, incluyendo lo
siguiente:
1. Siempre coloque este humidificador sobre una
superficie firme, plana y nivelada.
Es posible que este humidificador no funcione
debidamente sobre una superficie desnivelada.
2. Coloque este humidificador en un lugar fuera del
alcance de los niños.
3. No coloque el humidificador cerca de ninguna
fuente térmica como estufas, radiadores y
calentadores.
4. No use el humidificador al aire libre.
5. Antes de usar el humidificador, verifique que el
cordón eléctrico no tenga señales de avería. Si
considera que el cordón está estropeado,
NO LO USE y devuelva el humidificador al
fabricante conforme al acuerdo de garantía para
su reparación.
6. Este artefacto tiene un enchufe polarizado (una
punta es más ancha que la otra). Para reducir el
riesgo de choque, este enchufe ha sido diseñado
para que encaje de una forma solamente en
un tomacorriente polarizado. Si el enchufe no
encaja completamente en el tomacorriente,
inviértalo. Si aún no encaja, comuníquese con
un electricista competente. NO trate de ir en
contra de esta característica de seguridad.
Kaz USA, Inc. utiliza la marca de comercio Honeywell con autorización de Honeywell International Inc.
Honeywell International Inc. no hace ninguna declaración o garantía con respecto a este producto.
7. Para desconectar el humidificador, primero
coloque los controles en la posición apagada
(OFF), luego sujete el enchufe y sáquelo del
tomacorriente. Nunca tire del cordón.
8. Una conexión floja entre la toma de corriente
alterna (tomacorriente o receptáculo) y el
enchufe puede hacer que el enchufe se
recaliente y se deforme. Comuníquese con
un electricista competente para cambiar un
tomacorriente flojo o gastado.
9. Se debe desenchufar y vaciar el humidificador
siempre que no esté funcionando o durante su
reparación o limpieza.
10. Nunca incline ni trate de mover el humidificador
mientras esté funcionando o esté lleno de agua.
DESENCHÚFELO antes de moverlo.
11. El humidificador se debe limpiar con
regularidad. Consulte las instrucciones
de LIMPIEZA provistas. Nunca limpie el
humidificador de ninguna otra manera que no
sea conforme con las instrucciones de este
manual.
12. Nunca oriente el vapor directamente hacia
personas, paredes o muebles.
13. Si usa el humidificador en una habitación
cerrada o en una habitación pequeña, debe
comprobar periódicamente que haya la
adecuada aireación ya que un nivel de humedad
demasiado elevado provocará manchas de
condensación en las paredes.
14. Apague el humidificador si se forma
condensación en el interior de las ventanas.
Para obtener el nivel de humedad exacto, use
un higrómetro que puede conseguir en una
ferretería o en un gran almacén. También puede
hacer un pedido al fabricante.
15. Este producto está fabricado solo para
uso residencial.
27
Page 28

Honeywell
Humidificador Ultrasónico
Modelo de la Serie HUT-220
Kaz USA, Inc.
250 Turnpike Road
Southborough, MA 01772
1-800-477-0457
Este dispositivo cumple con la Parte 18 de las reglas de la FCC.
Advertencia: Cambios o modificaciones hechos a esta unidad que
no hayan sido expresamente aprobados por la parte responsable del
cumplimiento pueden anular la autoridad del usuario para utilizar el
equipo.
Este equipo ha sido probado y cumple con los límites correspondientes
a un equipo ISM, según la Parte 18 de las Normas FCC (la Comisión
Federal de Comunicaciones de EE. UU.). Estos límites están diseñados
para proporcionar protección razonable contra interferencias perjudiciales en una instalación residencial. Este equipo genera, utiliza y puede
emitir energía de frecuencias de radio y, si no es instalado y usado de
acuerdo a las instrucciones, puede causar interferencias perjudiciales
en las comunicaciones de radio. Sin embargo, no hay garantía de que
no ocurrirán las interferencias en una instalación determinada. Si este
equipo causa interferencias perjudiciales en la recepción de radio o
televisión, que se pueden identificar encendiendo y apagando el equipo,
recomendamos al usuario que intente solucionar las interferencias tomando una o más de las siguientes medidas:
• Cambiarlaorientaciónoposicióndelaantenareceptora.
• Aumentarlaseparaciónentreelequipoyelreceptor.
• Conectarelequipoauntomacorrientedeuncircuitodiferentedel
que está conectado el receptor.
• Consultaralproveedoroauntécnicoderadio/TVconexperiencia
para recibir ayuda.
28
Page 29

INTRODUCCIÓN
Cómo Funciona:
El humidificador Ultrasónico de Cuidado Fácil está diseñado para proveer silenciosamente vapor
frío visible. El agua se bombea desde el depósito de agua a través del cartucho de desmineralización el cual ayuda a capturar los minerales en el agua. El agua desmineralizada fluye dentro
de la bandeja evaporadora donde es convertida en una vapor fino visible a través de ondas
de sonido ultrasónico. Entonces el vapor es empujado hacia el aire por un pequeño ventilador
brindando alivio por resequedad en el aire.
El diseño único de llenado por arriba hace que sea tan fácil como vertir agua a una planta.
Esta unidad también cuenta con un aditamento de circulación de agua que indica cuando
necesita rellenarse.
Su humidificador consta de las siguientes partes:
Boquilla de
Vapor
Cubierta
Transparente
Protectora de
Bandeja
Cubierta Superior/
Bandeja
Cartucho de
desmineralización
Entrada del
Cartucho
Manguera
de Agua
Salida de la
Bomba
Bomba de
Agua
Embudo de
Llenado
Interruptor
de Flotador
con Apagado
Automático
Ventana de
Agua
Cubierta
Principal
Encendido/Control
29
Page 30

INSTALAR SU HUMIDIFICADOR
Saque de la caja
Retire el material de empaque. Retire y coloque a un lado el
manual de instrucciones. Recicle la caja y el material de empaque
o guarde la caja para almacenar al final de la temporada.
Para prevenir que la bomba de agua se mueva al transportarlo se ha pegado al interior de su humidificador. Retire la
cubierta superior y localice la bomda de agua en el fondo de la
cubierta principal. Retire la cinta para transporte de la bomba de
agua y ponga la bomba de agua en la ranura.
Asegúrese que esté segura en su lugar y que la manguera no
este doblada o presionada o que la unidad esté funcionando.
Colocación
Seleccione una ubicación firme y nivelada retirada por
lo menos 15 cm (6”) de cualquier pared para un flujo de
aire apropiado. Coloque el humidificador en una superficie
resistente al agua, ya que el agua puede dañar algunos
muebles o pisos.
Kaz no aceptará responsabilidad alguna por daños causados por derramamiento de agua.
Figura 1
Llenado
Llene una jarra con 1 galón
de agua fresca.
Nota: Puede llenar su
humidificador hasta un
máximo de 1 galón o un
mínimo de 1 taza de agua.
30
Indicadores de que el humidificador necesita ser rellenado:
- El humidificador ha dejado de
producir vapor
- El agua ha dejado de circular
sobre la cubierta superior
Vierta agua en el embudo de
llenado localizado en la parte
superior de la unidad.
Nota: Puede llenar con
agua hasta la Línea de
Lleno, pero no la sobrepase.
Page 31

OPERACIÓN: Series HUT-220
Encendido
Con el botón de encendido en
posición APAGADO, conecte el
humidificador lleno a un tomacor
riente polarizado de 120V~.
NO FORCE EL ENCHUFE POL AR
IZADO EN EL TOMACORRIENTE;
entra en una sola posición.
NO conecte el humidificador con
las manos mojadas para evitar
descarga eléctrica.
Salida
El control variable de vapor
permite personalizar la salida del
humidificador. Gire la perilla de
-
control de vapor al ajuste más
alto para mayor humedad y al
-
ajuste más bajo para consevar la
humedad.
NOTA: NO OPERE LA UNIDAD SIN LA CUBIERTA SUPERIOR.
Hacerlo pudiera resultar en derramamiento de agua del
humidificador.
Dirección del Vapor
Direccione el vapor lejos de
paredes, muebles o camas.
El no hacer esto, puede mojar
estos objetos.
REEMPLAZAR EL CARTUCHO DE DESMINERALIZACIÓN
El cartucho de desmineralización se debe cambiar cada 20-30 llenadas dependiendo de la calidad del agua. Tenga
en cuenta, dependiendo de la calidad del agua, pueda necesitar cambiar el cartucho de desmineralización con
mayor frecuencia. Un indicador de que necesita cambiar el cartucho son partículas blancas/polvo alrededor de la
base del humidificador.
Para áreas con agua extremadamente dura se recomienda que utilice agua destilada en el humidificador.
PASO 1 PASO 2 PASO 3
Reemplazo del Cartucho de Desmineralización HDC-200
ó Cartucho Q.
Con las manos secas
desconecte el humidificador y llévelo al baño
o cocina.
Retire la cubierta superior y colóquela
a un lado.
PASO 4
Retire la manguera
de agua del cartucho
de desmineralización
estirándola y girándola
gentilmente.
Saque el cartucho de
desmineralización viejo
y deséchelo.
31
Page 32

REEMPLAZO EL CARTUCHO DE DESMINERALIZACION (Continuación)
PASO 5 PASO 6
Cambie por el cartucho
nuevo presionando suave
en su lugar. Escuchará
un click cuando esté bien
colocado. Vuelva a colocar
la manguera asegurando
que llegue hasta el final y
sin dobleces.
Revise que la bomba
de agua esté bien
colocada.
PASO 7
Vuelva a colocar la
cubierta superior
LIMPIEZA: Series HUT-220
NOTA: Se recomienda que todos los mantenimientos sean realizados en la cocina o baño sobre
una superficie resistente al agua.
Limpieza Semanal: Para limpiar adecuadamente su humidificador recomendamos el proceso de
eliminación de sarro y desinfección de la unidad
Seguro para Lavavajillas: Las siguientes partes son seguras para
la CANASTILLA SUPERIOR del lavavajillas, para lavavajillas de uso residencial
operando a temperaturas menores a los 70°C/158°F. Es recomendable que
opere su lavavajillas en el ciclo suave o normal. No lave las partes del humidificador con artículos/platos sucios. NO UTILICE DETERGENTES. Si utiliza su
lavavajillas para lavar las siguientes partes necesitará seguir el procedimiento
de eliminación de sarro y desinfección.Por favor Note: No coloque las partes
en la canastilla inferior del lavavajillas. El hacerlo puede causar daño en
las partes del humidificador y en el lavavajillas.
Cubierta Protectora Cuberta superior
Transparente
Bomba de Agua
Boquilla de vapor
LA CUBIERTA PRINCIPAL, EL CARTUCHO DE DESMINERALIZACIÓN Y MANGUERA
DE AGUA NO SON SEGUROS
PARA EL LAVAVAJILLAS.
Colocar estas partes en el
lavavajillas dañará el
humidificador
y no funcionará
correctamente.
32
Cubierta Principal
Cartucho de
Desmineralización
Manguera de
agua
Page 33

LIMPIEZA: Series HUT-220 (continuación)
Instrucciones para eliminar el sarro:
PASO 1
Retire la cubierta
superior, la cubierta
protectora transparente,
la bomba de agua y la
manguera y colóquelas
a un lado.
PASO 5
Coloque partes de la
bomba, la boquilla de vapor
y la cubierta transparente
protectora dentro de la
cubierta principal para
remojar en la solución de
vinagre o siga la opción del
lavavajillas.
PASO 8
Gentilmente limpie la
cubierta superior y el
nebulizador con vinagre
sin diluir.
Nota: Si desea puede
poner la cubierta
superior en el
lavavajillas.
PASO 2 PASO 3
Retire el cartucho de
desmineralización y
colóquelo a un lado. NO
LAVE O SUMERJA EN
VINAGRE.
PASO 6
Lave la manguera con
jabón y agua tibia.
Enjuague a fondo la
manguera hasta que se
quite todo el residuo de
jabón.
PASO 9
Asegurese de mantener
el sensor del nivel de
agua limpio. Limpie
suavemente con harapo
suave y vinagre puro.
Vacíe la cubierta prin
cipal, tirando el agua
por atrás de la cubierta.
Llene el depósito de
agua con 1 taza de
vinagre.
Para manchas
difíciles, sumerja la
manguera en un tazón
con vinagre blanco
durante 30 minutos
y enjuague con agua
tibia mientras dobla
y aplasta la suave
manguera para aflojar
cualquier residuo.
Limpie y seque con un
paño.
PASO 10
Sumerja por 20 minutos.
Enjuague el depósito de agua
de la cubierta principal y las
partes que no se pusieron en
el lavavajillas hasta que el
olor a vinagre desaparezca.
-
PASO 4
Desmonte la Bomba de
Agua girando con cuidado
la cubierta posterior hacia
la izquierda para abrir.
Quite la cubierta posterior
y el disco impulsor del
interior.
PASO 7
Limpie con cuidado el área
alrededor del “flotador con
apagado automático” para
asegurar que cualquier
mineral sea eliminado de
esta zona.
Nota: Para mejores
resultados en la
limpieza la manguera
debe remojarse en
la base y después
enjuagada con agua
limpia y fresca hasta
que el olor a vinagre
desaparezca.
Con la unidad desarmada, proceda con
las intrucciones de
desinfección.
33
Page 34

LIMPIEZA: Series HUT-220 (continuación)
Instrucciones para desinfectar: Desinfectar despues de retirar el sarro
PASO 1
NO DESINFECTE el
cartucho de desmineralización.
PASO 4
Sumerja Partes de la
Bomba de agua, la
boquilla de vapor y la
cubierta protectora
transparente en el
depósito de agua de
la cubierta principal si
éstas partes no fueron
lavadas en la canastilla
superior del lavavajillas.
PASO 2
1
l
g
a
Deje a un lado la
cubierta superior, la
cubierta transparente
protectora, la bomba de
agua y la manguera del
agua.
Agregue 1 CUCH de cloro a
1 galón de agua. Agregue ½
ó ¾ de galón de la solución
de agua/cloro en el depósito
de agua de la cubierta
principal.
PASO 5
Limpie la cubierta superior con el
sobrante de la solución de agua
con cloro si ésta parte no fue
puesta en el lavavajillas. Coloque
la manguera en la solución
de cloro. Sumerja por 15 ó 20
minutos.
Enjuague perfectamente bien la
base y cualquier otra parte no
puesta en el lavavajillas hasta que
el olor del cloro desaparezca.
PASO 3
NOTA: USAR MÁS DE
1 CUCH. DE CLORO
POR GALÓN DE AGUA
PROVOCARÁ DAÑO EN
EL HUMIDIFICADOR.
Nota: Para mejores resultados en la limpieza la manguera debe remojarse en la base y
después enjuagarse con agua limpia y fresca hasta que el olor a cloro desaparezca.
34
Page 35

REARMADO: Series HUT-220
PASO 1
Vuelva a armar la
bomba insertando el
disco impulsor con las
aspas apuntando hacia
el frente de la carcasa
sobre el eje delantero
de la carcasa. Vuelva
a colocar la cubierta
posterior y gire hacia la
derecha para asegurar
en su lugar.
PASO 4 PASO 6
Inserte el cartucho de
desmineralización en la
ranura y presione gentilmente para colocarlo en
su lugar.
Nota: Cuando desinfecte tenga cuidado con la ropa, alfombras y otros materiales no resistentes
al cloro. Derramar cloro sobre ropa, alfombras y ciertas superficies, puede causar daños.
No monte la bomba con
las aspas del disco im
pulsor apuntando hacia
la cubierta posterior.
Montar incorrectamente
no le permitirá colocar la
cubierta posterior.
PASO 5
Conecte la mangera
de agua al cartucho
de desmineralización
insertando gentilmente la salida del
cartucho en la abertura de la manguera
de agua.
-
PASO 2 PASO 3
Inserte la manguera en
la salida de la bomba
y presione gentilmente
hasta que ya no avance
más.
Coloque de nuevo la
boquilla de vapor inser
tándola gentilmente en
su lugar.
-
Inserte el montaje
de bomba de agua/
manguera en la ranura
de la base.
Nota: asegúrese que
la bomba esté bien
colocada y la manguera
no tenga dobleces.
PASO 7
Vuelva a colocar la
cubierta superior y la
cubierta protectora
transparente.
CUIDADO Y ALMACENAJE POR FIN DE TEMPORADA
Siga las instrucciones de LIMPIEZA cuando el humidificador no se vaya a usar en por lo menos una
semana o más, o por fin de temporada.
Al final de la temporada, retire el cartucho de desmineralización y permita que se seque bien.
Nota: Si el cartucho de desmineralización se ha usado por completo cámbielo por uno nuevo.
Seque el humidificador completamente antes de almacenar. NO almacene con agua en el depósito de
agua de la cubierta principal o en el tubo de agua.
Empaque la unidad en la caja original y almacene en un área seca y fresca.
Instale un nuevo cartucho de desmineralización antes de volver a usar.
35
Page 36

SERVICIO AL CONSUMIDOR
Envíe sus preguntas o comentarios a:
Kaz USA, Inc.
Consumer Relations Dept.
250 Turnpike Road
Southborough, MA 01772 USA
Por favor especifique el número del
modelo.
Llámenos al número de teléfono de llamada
gratis de larga distancia: 1-800-477-0457
e-mail: consumerrelations@kaz.com
O visítenos en nuestro sitio web: www.kaz.com
ORDENAR PARTES DE REMPLAZO
HUT-220-Charola
HUT-220-Cubierta de Charola
HUT-220-Boquilla de Vapor
HUT-220-Bomba
HUT-220-Manguera
HUT-220-Cartucho Vacío
HUT-220B-Charola
HUT-220B-Boquilla de Vapor
POTENCIA NOMINAL
Los Modelos de las Series HCM-350 de Honeywell son clasificados en 120 V~, 60 Hz.
NOTA: SI USTED EXPERIMENTA ALGÚN PROBLEMA, POR FAVOR CONTACTE PRIMERO AL
SERVICIO AL CONSUMIDOR O VEA SU GARANTÍA. NO REGRESE EL HUMIDIFICADOR AL
LUGAR ORIGINAL DE COMPRA. NO INTENTE ABRIR EL COMPARTIMIENTO DEL MOTOR O
FORZAR EL INTERRUPTOR DE ARRANQUE USTED MISMO, EL HACERLO PUEDE ANULAR
SU GARANTÍA Y CAUSAR DAÑO AL PRODUCTO O LESIONES CORPORALES.
PREGUNTAS FRECUENTES
Limpieza
Pregunta Respuesta
¿Cómo limpio el interior de la bomba de agua? Puede limpiar el interior de la bomba girando
¿Qué partes son seguras para el lavavajillas? La manguera de agua, la bomba de agua, la cubi-
¿Cómo ensamblo mi humidificador después de
limpiarlo?
¿Puedo utilizar jabón para lavar platos para
limpiar mi humidificador?
¿Puedo agregar tratamientos de agua a este
humidificador?
36
la cubierta hacia la izquierda. Retire la cubierta
para limpiarla junto con el disco.
erta superior, la cubierta protectora transparente
y la manguera de agua son todas seguras para la
canastilla superior del lavavajillas.
Consulte la página 35 de su manual de usuario.
No es recomendable que utilice jabón para platos para
limpiar su humidificador ya que es muy difícil remover
todo el jabón y esto puede causar daño en su humidi-
ficador.
La única parte que recomendamos limpiar con jabón
es la manguera de agua y esta parte debe ser enjuagada
hasta que todo el residuo de jabón desaparezca.
Sólo debe agregar a su humidificador los tratamientos de
agua que son fabricados especialmente para Humidificador Ultrasónico tales como el Cartucho de Limpieza
ProtectMR, modelo PC-1 ó PC-2. Utlizar tratamientos de
agua que no son recomendados para Humidificador
Ultrasónico puede dañar su humidificador. Si le preocupa
la dureza del agua le recomendamos que utilice agua
destilada en su humidificador.
Page 37

PREGUNTAS FRECUENTES (Continuación)
Operación
Pregunta Respuesta
¿En qué ajuste puedo colocar mi humidifica-
dor?
Utilicé mi humidificador toda la noche en una
habitación muy seca y la humedad casi no
cambió pero el nivel del agua disminuyó.
¿Puedo operar mi humidificador sin el cartucho de desmineralización?
¿Qué tan frecuente debo cambiar mi cartucho
de desmineralización?
Usted debe operar su humidificador en el ajuste
más alto si su habitación está muy seca. Una vez
que tenga una humedad más cómoda puede ajustar
el nivel de salida en el ajuste más bajo.
Puede tardar varios días en aumentar el nivel de
humedad. Si está extremadamente seco, la madera,
alfombras y otros objetos en su habitación pueden
absorber la humedad antes que pueda sentir los
efectos.
Si, pero es recomendable que utilice el cartucho de
desmineralización para ayudar a reducir el polvo
blanco. Si escoge no utilizar el cartucho de desmineralización necesitará sustituirlo con el HUT-200CARTUCHO VACÍO para que pueda funcionar. Es
recomendable que utilice agua destilada si escoge
no utilizar un cartucho de desmineralización.
En general el cartucho de desmineralización puede
durar de 20-30 llenadas.
¿Cómo se que mi humidificador está operando
correctamente?
La ventana del agua está iluminada pero no
veo vapor saliendo de la boquilla de vapor.
No hay agua circulando en el área de circulación de agua en la cubierta superior.
¿Cuánta agua cabe en mi humidificador? Su humidificador puede contener hasta 1.0 Galón
¿Cuánto tiempo funcionará mi humidificador
cuando esté lleno?
Usted notará vapor visible saliendo de su humidificador. También, el agua caerá de la cubierta
superior y el nivel de agua disminuirá después de 8
horas de uso.
Asegúrese que la unidad tenga agua. Consulte
la Guía de Solución de Problemas para mayor
información.
Primero revise para asegurarse que su humidificador tenga agua. Si es así, revise su bomba de agua
para asegurarse que esté colocada correctamente
en el área de soporte. Luego revise para asegurarse que la manguera de agua esté conectada
firmemente a la bomba de agua y al cartucho de
desmineralización. Por último, asegúrese que nada
obstruya el área de flujo del agua en la cubierta
superior o en la manguera del agua. Si estos pasos
no son de ayuda, por favor consulte nuestra Guía de
Solución de Problemas o contacte nuestro departamento de servicio al consumidor al
1-800-477-0457.
de agua. Puede llenarse hasta la Línea de Lleno.
Su humidificador puede operar hasta 22 horas en
alta y 46 horas en baja.
37
Page 38

SOLUCIÓN DE PROBLEMAS
1. No está fluyendo el agua
a. Revise para asegurarse que el tanque tenga agua y que esta cubra la bomba.
b. Revise la manguera y asegúrese que no esté torcida. La manguera debe conectarse
completamente al cartucho de desmineralización y a la bomba.
c. Asegúrese que la bomba esté colocada correctamente en el fondo del tanque.
d. Apague la unidad y después vuélvala a encender para ayudar a eliminar algún aire
en el sistema
e. Si todavía no circula el agua, saque la bomba, desármela y asegúrese que la rueda
de la bomba gire libremente y que las entradas de la bomba o del cartucho de des-
mineralización no tengan obstrucciones.
2. La unidad circula el agua pero no produce vapor
a. Asegúrese que el control esté completamente hacia la derecha.
b. Quite la boquilla de vapor y revise para ver si no hay agua en el interior del com-
partimiento del nebulizador el cual es el bolsillo ubicado a un lado del cartucho de
desmineralización. Si no hay agua en el compartimiento del nebulizador, puede
necesitar reemplazar su cartucho de desmineralización.
c. Si el compartimiento del nebulizador tiene agua y ya siguió los pasos 2a y 2b, puede
necesitar llamarnos por teléfono para más instrucciones.
3. La bomba hace un sonido siseante
a. La bomba puede haber succionado aire. Asegúrese que haya suficiente agua en el
tanque para que cubra la bomba.
b. Después de llenar, apague la unidad por unos segundos, después enciéndala de
nuevo para eliminar el aire en el sistema.
4. La bomba tiene un zumbido
a. La bomba puede no estar colocada correctamente. Asegúrese de empujar la bomba
hasta el fondo del tanque. Después de colocar la bomba correctamente, apague la
unidad por unos segundos, después enciéndala de nuevo.
38
Page 39

GARANTÍA LIMITADA DE 2 AÑOS
Por favor, lea todas las instrucciones antes
de usar este producto.
A. La presente garantía limitada cubre la
reparación o sustitución de todo producto
con un defecto de fábrica o de mano de
obra por un período de 2 años. Esta garantía
excluye los daños ocasionados por el uso
comercial, abusivo o desrazonable y los
daños adicionales. Tampoco se aplica al filtro
ni al cartucho antimicrobiano ProtecMC. Los
fallos resultantes del desgaste normal no se
consideran defectos de fábrica en virtud de
la presente garantía.
KAZ USA, INC. QUEDA EXENTA DE
TODA RESPONSABILIDAD POR LOS
DAÑOS FORTUITOS O INDIRECTOS
DE CUALQUIER CLASE. CUALQUIER
GARANTÍA IMPLÍCITA DE CALIDAD
COMERCIAL O DE CONVENIENCIA
RELACIONADA CON ESTE PRODUCTO,
TENDRÁ LA MISMA VIGENCIA QUE LA
PRESENTE GARANTÍA.
En ciertos lugares, no se permite la exclusión
o limitación de daños fortuitos o indirectos,
ni los límites de duración aplicables a una
garantía implícita. Por consiguiente, es
posible que estas limitaciones o exclusiones
no se apliquen en su caso. Esta garantía
le otorga derechos legales específicos y
usted puede que tenga otros, que varían de
un lugar a otro. La presente garantía sólo
es válida para el comprador original del
producto a partir de la fecha de compra.
B. A su juicio, Kaz USA, Inc. reparará o
reemplazará este producto si se considera
que sus materiales o su mano de obra son
defectuosos dentro del período de garantía.
C. Esta garantía no cubre daños ocasionados
por tentativas no autorizadas de reparar
el producto o del uso del mismo en
contravención de las indicaciones que
aparecen en el manual de instrucciones.
D. Devuelva el producto defectuoso, con flete
pagado y prueba de compra, junto con
cheque o giro postal por $10.00 US/$15.50
CAN para cubrir gastos de administración,
empaque de regreso y envío. Por favor
incluya su nombre, dirección y un número de
teléfono para comunicarse durante el día.
Los gastos de envío deben pagarse por
adelentado. Le sugerimos que pida confir-
mación del seguimiento o de la entrega. Mande
el envío a:
En los Estados Unidos:
Kaz USA, Inc.
Attn: Returns Department
4755 Southpoint Drive
Memphis, TN 38118
USA
En Canada:
Kaz Canada, Inc.
Attn: Returns Department
510 Bronte Street South
Milton, ON L9T 2X6
Canada
Por favor visite www.kaz.com y registre su producto en el Centro de Atención al Cliente y reciba
información y actualizaciones de su productos y
nuevas ofertas promocionales.
©2012
Kaz USA, Inc.
Todos los derechos reservados
P/N: 31IM0220190
39
Page 40

40
 Loading...