Honeywell Enterprise Browser User Manual

Enterprise Browser

for Honeywell Mobile Devices powered by Windows™

User Guide

Disclaimer

Honeywell International Inc. (“HII”) reserves the right to make changes in specifications and other information contained in this document without prior notice, and the reader should in all cases consult HII to determine whether any such changes have been made. The information in this publication does not represent a commitment on the part of HII.

HII shall not be liable for technical or editorial errors or omissions contained herein; nor for incidental or consequential damages resulting from the furnishing, performance, or use of this material.

This document contains proprietary information that is protected by copyright. All rights are reserved. No part of this document may be photocopied, reproduced, or translated into another language without the prior written consent of HII.

©2020 Honeywell International Inc. All rights reserved.

Other product names or marks mentioned in this document may be trademarks or registered trademarks of other companies and are the property of their respective owners.

Web Address: www.honeywellaidc.com

Patents

For patent information, refer to www.honeywellaidc.com\patents

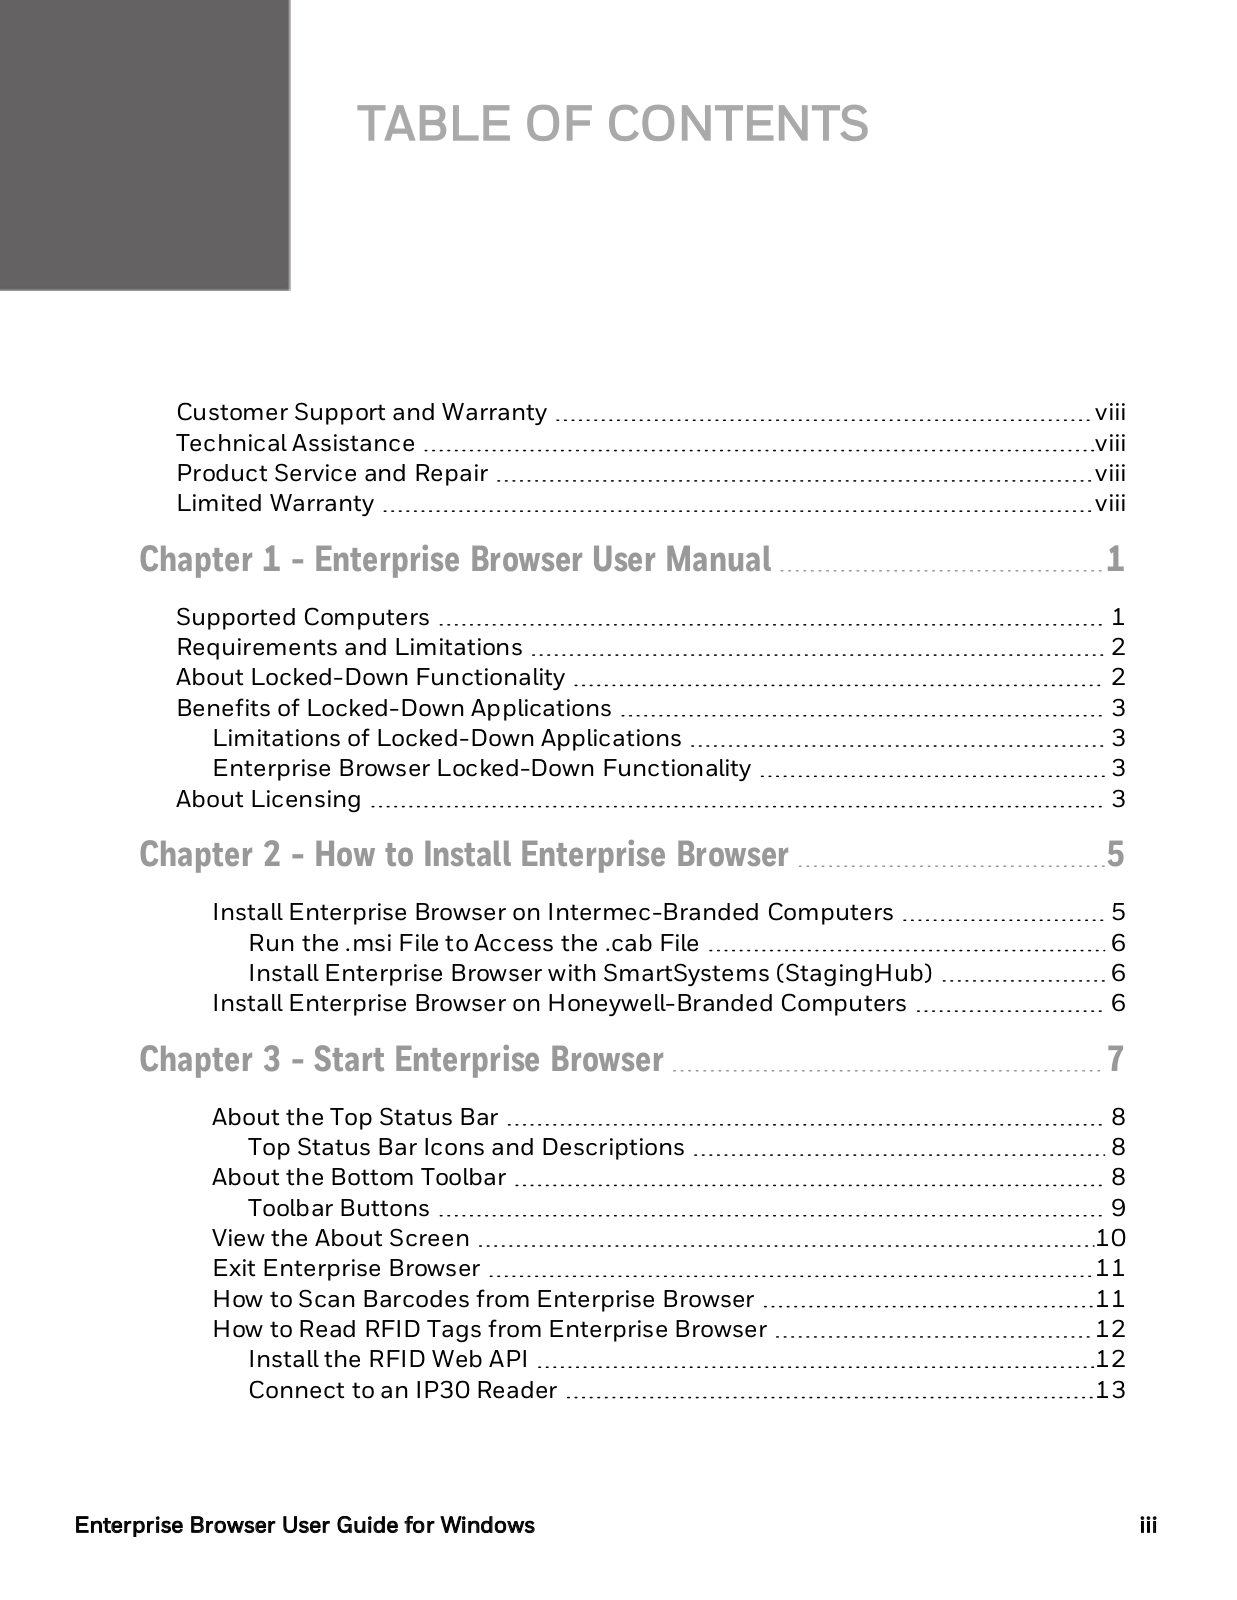
TABLE OF CONTENTS

Customer Support and Warranty

viii

TechnicalAssistance

viii

Product Service and Repair

viii

Limited Warranty

viii

Chapter 1 - Enterprise Browser User Manual

1

Supported Computers

1

Requirements and Limitations

2

About Locked-Down Functionality

2

Benefits of Locked-Down Applications

3

Limitations of Locked-Down Applications

3

Enterprise Browser Locked-Down Functionality

3

About Licensing

3

Chapter 2 - How to Install Enterprise Browser

5

InstallEnterprise Browser on Intermec-Branded Computers

5

Run the .msi File to Access the .cab File

6

InstallEnterprise Browser with SmartSystems (StagingHub)

6

InstallEnterprise Browser on Honeywell-Branded Computers

6

Chapter 3 - Start Enterprise Browser

7

About the Top Status Bar

8

Top Status Bar Icons and Descriptions

8

About the Bottom Toolbar

8

Toolbar Buttons

9

View the About Screen

10

Exit Enterprise Browser

11

How to Scan Barcodes from Enterprise Browser

11

How to Read RFID Tags from Enterprise Browser

12

Installthe RFID Web API

12

Connect to an IP30 Reader

13

Enterprise Browser User Guide for Windows

iii

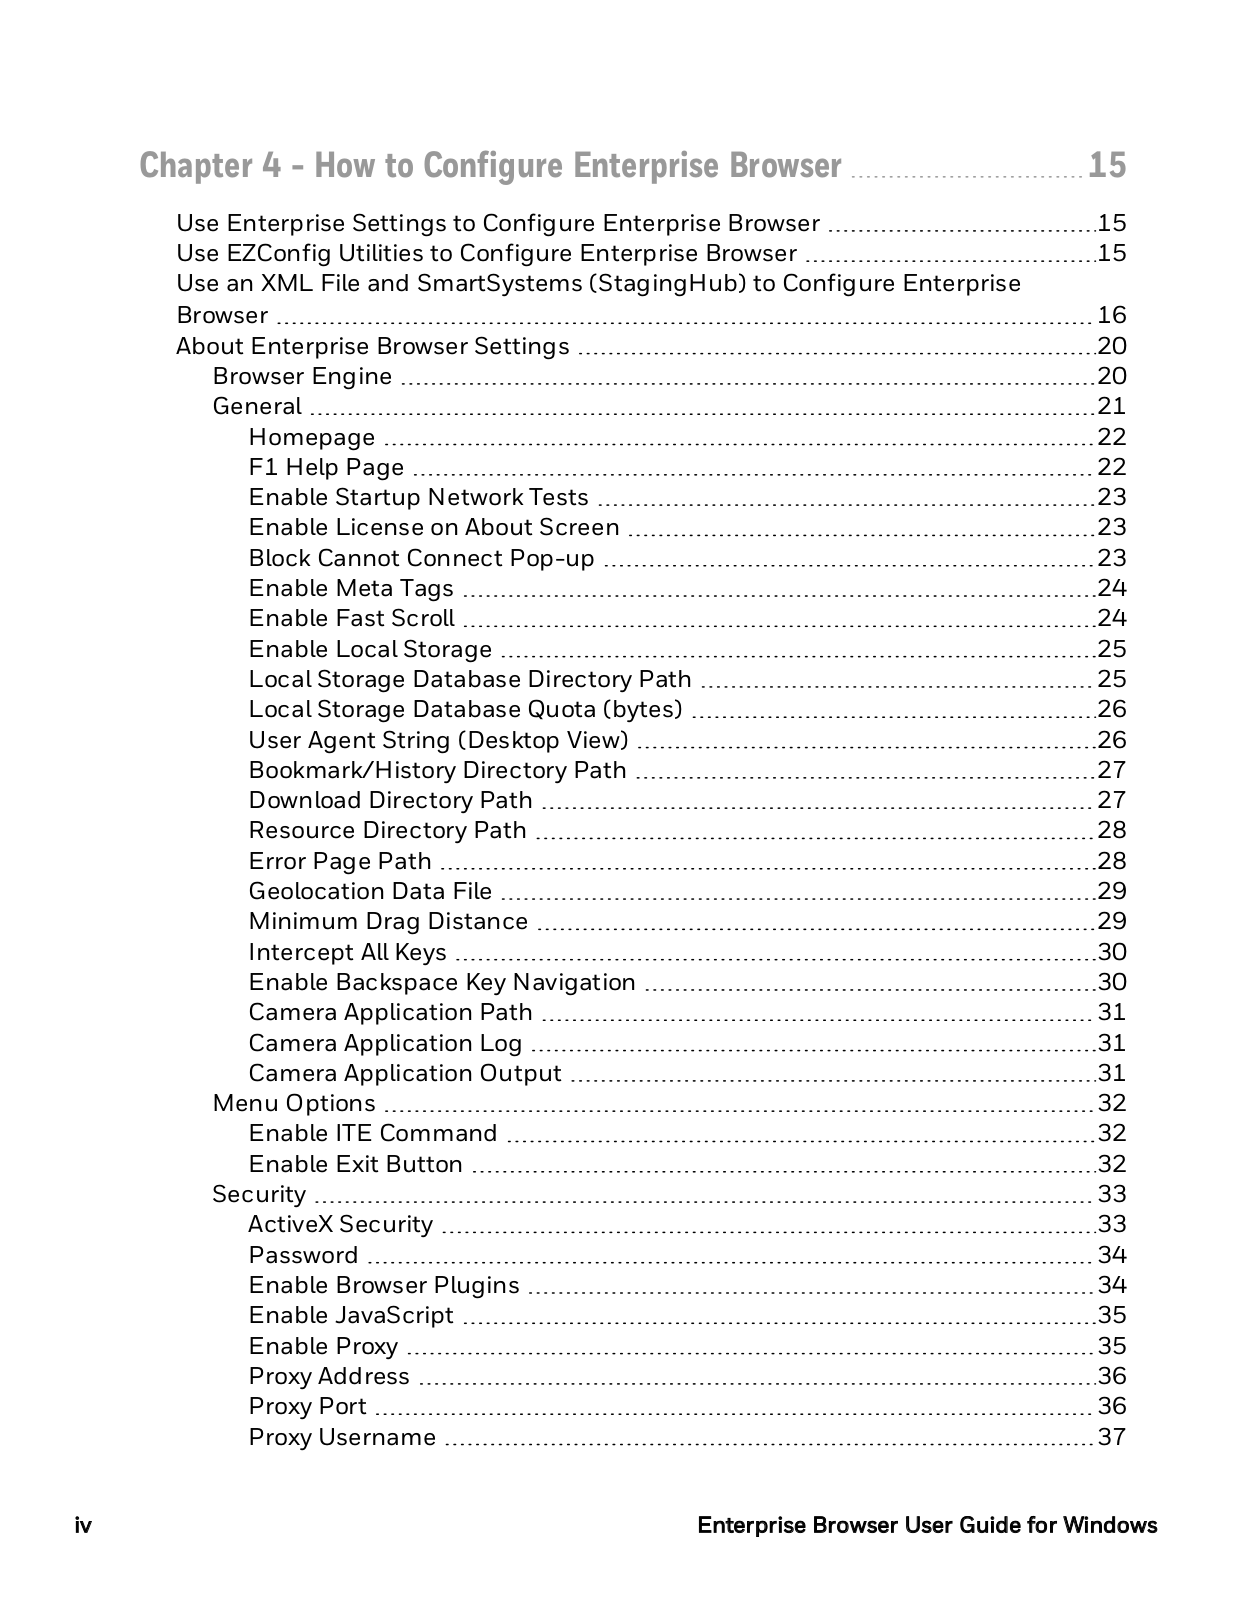
Chapter 4 - How to Configure Enterprise Browser

15

Use Enterprise Settings to Configure Enterprise Browser

15

Use EZConfig Utilities to Configure Enterprise Browser

15

Use an XML File and SmartSystems (StagingHub) to Configure Enterprise


Browser

16

About Enterprise Browser Settings

20

Browser Engine

20

General

21

Homepage

22

F1 Help Page

22

Enable Startup Network Tests

23

Enable License on About Screen

23

Block Cannot Connect Pop-up

23

Enable Meta Tags

24

Enable Fast Scroll

24

Enable LocalStorage

25

LocalStorage Database Directory Path

25

LocalStorage Database Quota (bytes)

26

User Agent String (Desktop View)

26

Bookmark/History Directory Path

27

Download Directory Path

27

Resource Directory Path

28

Error Page Path

28

Geolocation Data File

29

Minimum Drag Distance

29

Intercept AllKeys

30

Enable Backspace Key Navigation

30

Camera Application Path

31

Camera Application Log

31

Camera Application Output

31

Menu Options

32

Enable ITE Command

32

Enable Exit Button

32

Security

33

ActiveX Security

33

Password

34

Enable Browser Plugins

34

Enable JavaScript

35

Enable Proxy

35

Proxy Address

36

Proxy Port

36

Proxy Username

37

iv

Enterprise Browser User Guide for Windows

Honeywell Enterprise Browser User Manual

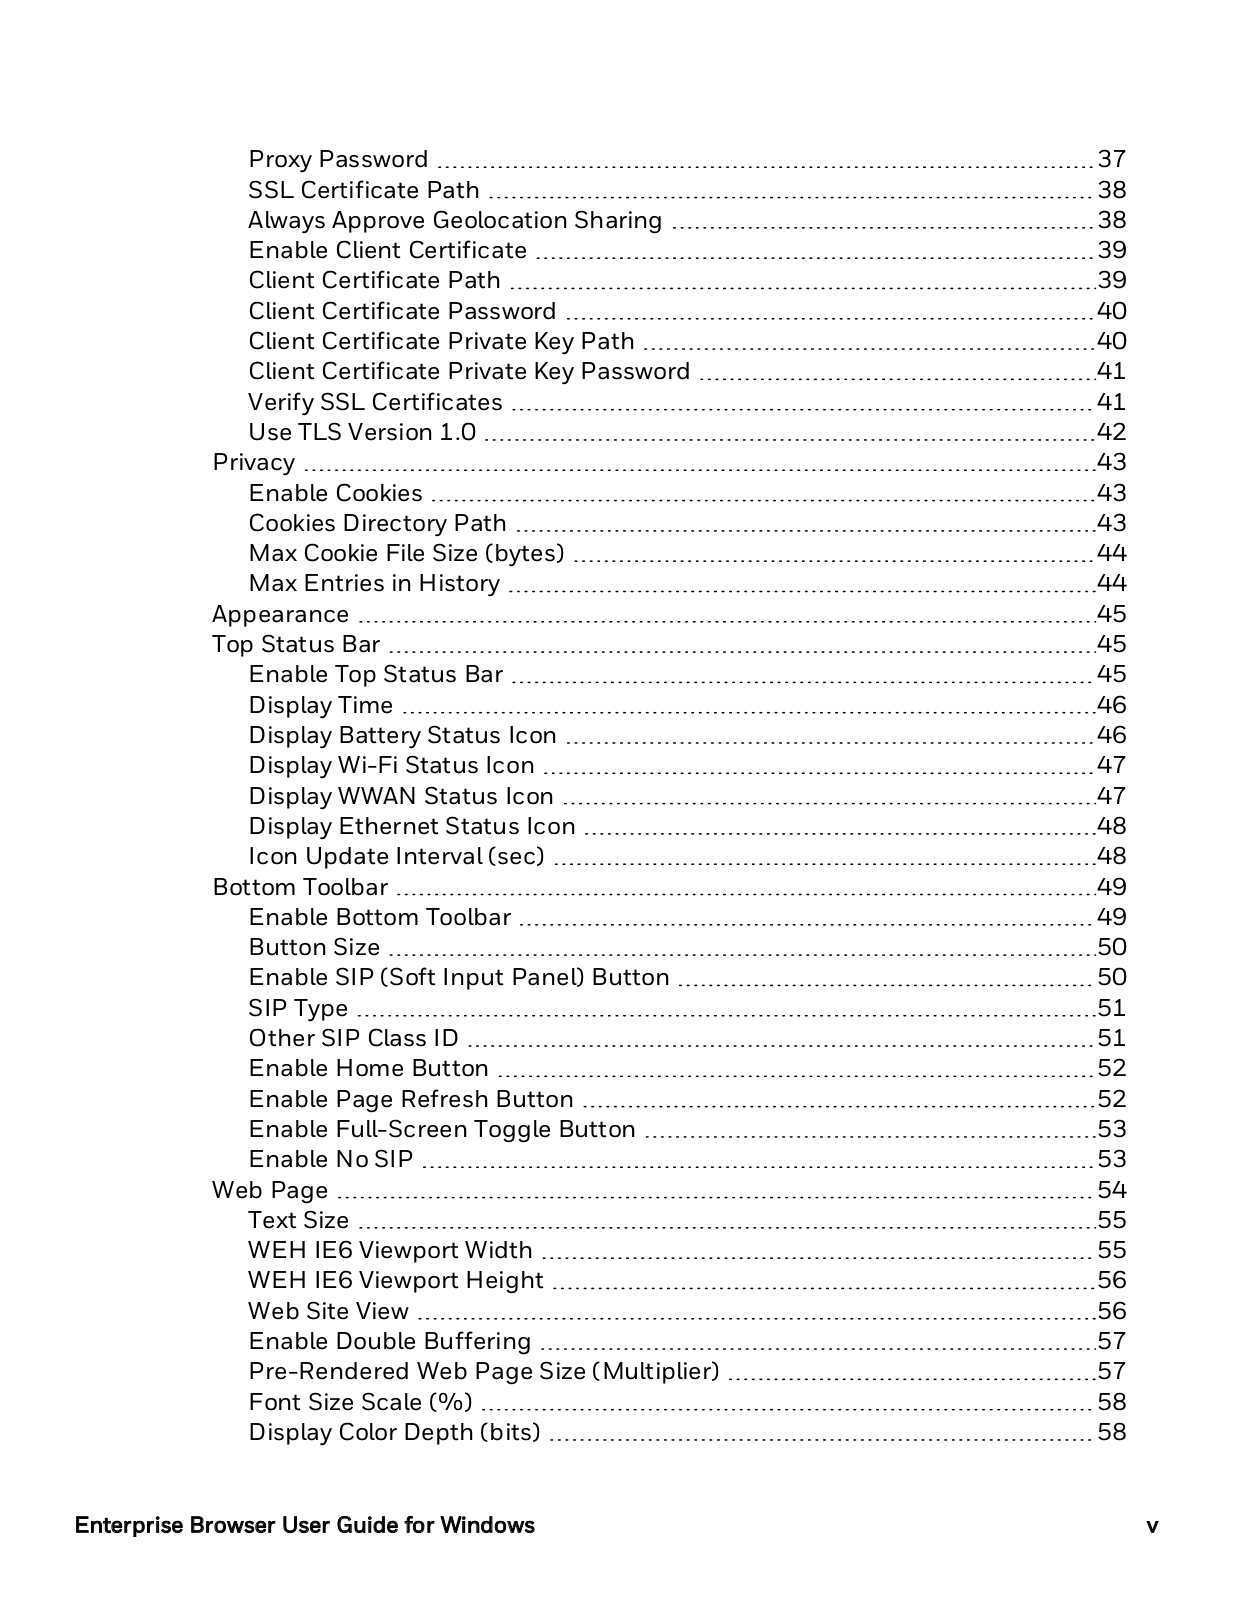
Proxy Password

37

SSL Certificate Path

38

Always Approve Geolocation Sharing

38

Enable Client Certificate

39

Client Certificate Path

39

Client Certificate Password

40

Client Certificate Private Key Path

40

Client Certificate Private Key Password

41

Verify SSL Certificates

41

Use TLS Version 1.0

42

Privacy

43

Enable Cookies

43

Cookies Directory Path

43

Max Cookie File Size (bytes)

44

Max Entries in History

44

Appearance

45

Top Status Bar

45

Enable Top Status Bar

45

Display Time

46

Display Battery Status Icon

46

Display Wi-Fi Status Icon

47

Display WWAN Status Icon

47

Display Ethernet Status Icon

48

Icon Update Interval(sec)

48

Bottom Toolbar

49

Enable Bottom Toolbar

49

Button Size

50

Enable SIP (Soft Input Panel) Button

50

SIP Type

51

Other SIP Class ID

51

Enable Home Button

52

Enable Page Refresh Button

52

Enable Full-Screen Toggle Button

53

Enable No SIP

53

Web Page

54

Text Size

55

WEH IE6 Viewport Width

55

WEH IE6 Viewport Height

56

Web Site View

56

Enable Double Buffering

57

Pre-Rendered Web Page Size (Multiplier)

57

Font Size Scale (%)

58

Display Color Depth (bits)

58

Enterprise Browser User Guide for Windows

v

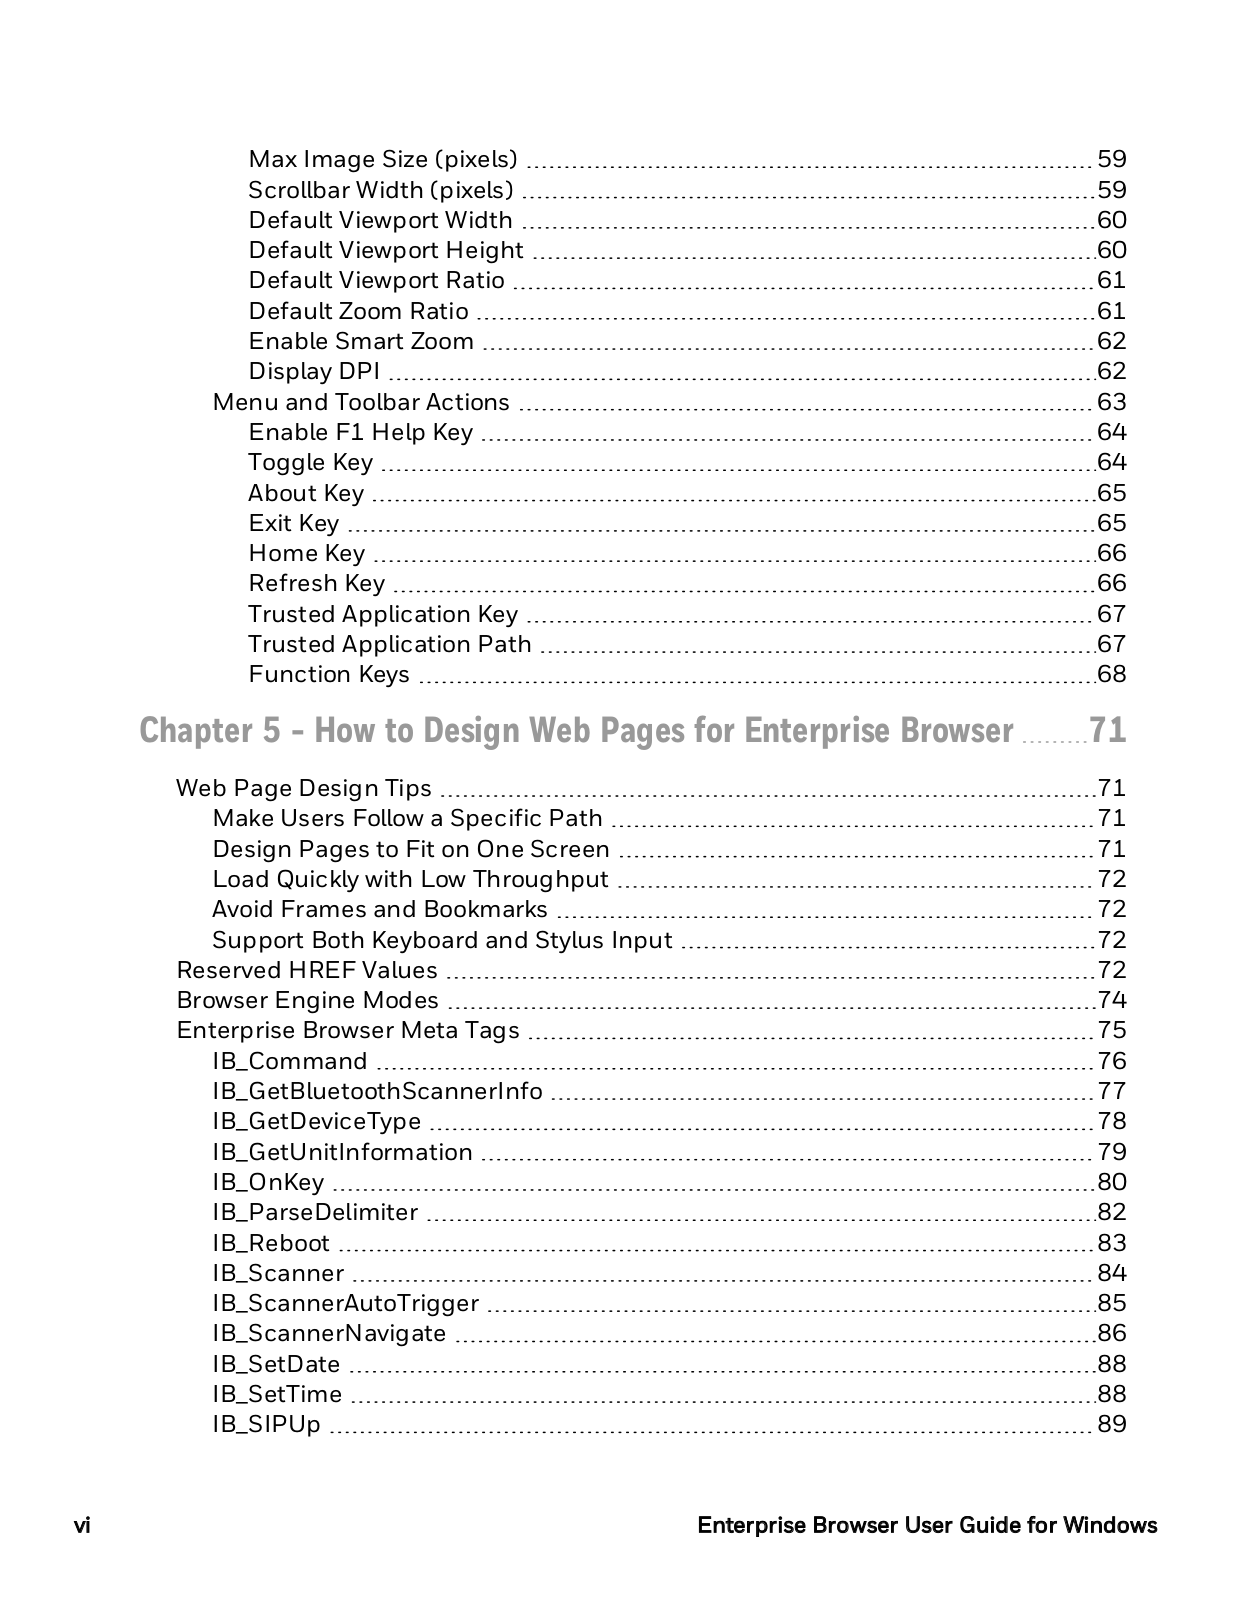
Max Image Size (pixels)

59

Scrollbar Width (pixels)

59

Default Viewport Width

60

Default Viewport Height

60

Default Viewport Ratio

61

Default Zoom Ratio

61

Enable Smart Zoom

62

Display DPI

62

Menu and Toolbar Actions

63

Enable F1 Help Key

64

Toggle Key

64

About Key

65

Exit Key

65

Home Key

66

Refresh Key

66

Trusted Application Key

67

Trusted Application Path

67

Function Keys

68

Chapter 5 - How to Design Web Pages for Enterprise Browser

71

Web Page Design Tips

71

Make Users Follow a Specific Path

71

Design Pages to Fit on One Screen

71

Load Quickly with Low Throughput

72

Avoid Frames and Bookmarks

72

Support Both Keyboard and Stylus Input

72

Reserved HREF Values

72

Browser Engine Modes

74

Enterprise Browser Meta Tags

75

IB_Command

76

IB_GetBluetoothScannerInfo

77

IB_GetDeviceType

78

IB_GetUnitInformation

79

IB_OnKey

80

IB_ParseDelimiter

82

IB_Reboot

83

IB_Scanner

84

IB_ScannerAutoTrigger

85

IB_ScannerNavigate

86

IB_SetDate

88

IB_SetTime

88

IB_SIPUp

89

vi

Enterprise Browser User Guide for Windows

IB_TextSize

90

IB_UpdateSettings

90

Symbology ControlTags

91

Symbology Configuration Tags

92

Enterprise Browser Custom Edit Control

96

ITCAXEdit Properties

98

ALIGNMENT

98

BORDER

100

ENABLESCANNER

101

ENABLESIP

102

FONTBOLD

104

FONTFIXEDPITCH

105

FONTITALIC

106

FONTNAME

108

FONTSIZE

109

FONTUNDERLINE

110

MAXLENGTH

112

PASSWORD

113

SETFOCUS

114

VALUE

115

WANTRETURN

116

ITCAXEdit Events

117

OnChange

118

OnClick

118

OnFocus

119

OnKeyDown

120

OnKeyPress

121

OnKeyUp

122

OnLostFocus

122

HTML5 Key Mapping

123

Chapter 6 - Troubleshoot Enterprise Browser

127

Problems and Possible Solutions

128

Connectivity Messages

131

License Errors

132

Enterprise Browser User Guide for Windows

vii

Customer Support and Warranty

Technical Assistance

To search our knowledge base for a solution or to log in to the Technical Support portal and report a problem, go to www.hsmcontactsupport.com.

For our latest contact information, see www.honeywellaidc.com/locations.

Product Service and Repair

Honeywell International Inc. provides service for all of its products through service centers throughout the world. To obtain warranty or non-warranty service, return your product to Honeywell (postage paid) with a copy of the dated purchase record. To learn more, go to www.honeywellaidc.com and select Service & Repair at the bottom of the page.

Limited Warranty

For warranty information, go to www.honeywellaidc.com and click Resources > Product Warranty.

viii

Enterprise Browser User Guide for Windows

CHAPTER

ENTERPRISE BROWSER USER

1

MANUAL

Enterprise Browser is a locked-down enterprise Web client application designed for Honeywell computers and compatible with either Microsoft® Internet Explorer® or HTML5 web browser engines. You can configure Enterprise Browser for your specific application requirements and use the included sample files to design your own web pages.

Before you install Enterprise Browser, make sure you understand the requirements and limitations and locked-down functionality.

This version of the user manual includes support for the RT10W Tablet.

Supported Computers

Enterprise Browser is supported on many different Intermec-branded and Honeywellbranded computers. Some operating systems support only the Internet Explorer 6 (IE6) or Pocket Internet Explorer (PIE) version of Enterprise Browser. For more information, see "Browser Engine Modes" on page 74

Microsoft Windows CE 6.0 (IE6 and HTML5):

CV41

Microsoft Windows Mobile 6.1 (PIE and IE6):

CN50

Microsoft Windows Embedded Handheld 6.5 (PIE, IE6, and HTML5):

CK3R

CK3X

CK70

CK71

CN50

CN51

CN70

CN70e

D70e

Microsoft Windows XP, Windows 7, and Windows Embedded Standard 7 (Internet Explorer 8 only):

Enterprise Browser User Guide for Windows

1

CV61

Thor™ VM3

Microsoft Windows Embedded Compact 7:

Thor™ CV31

Thor™ VM3

Microsoft Windows 10:

RT10W Tablet

Thor™ VM3

For more information about each computer, see the computer user manual available from the Honeywell Scanning & Mobility website at www.honeywellaidc.com.

Requirements and Limitations

Enterprise Browser:

Requires about 11 MB of space for the Enterprise Browser .cab file.

May be configured with Enterprise Settings, EZConfig Utilities, or an XML file.

Permits only limited, locked-down functionality, but does not lock down other applications.

Does not support screen rotation and disables buttons that rotate the screen.

D70e models only: Although screen rotation is not supported while Enterprise Browser is running, You can configure your D70e computer display for landscape mode before you start Enterprise Browser.

Does not save the registry to storage media.

May exit locked-down mode if the Connection Manager does not connect the computer to the network properly.

Has some of the same capabilities as Internet Explorer and the HTML5 Browser, but you may experience different behavior in certain situations. Report any functionality discrepancies to Intermec by Honeywell.

For RT10W Tablet: Enterprise Browser supports resolutions (1920x1200 with 150% Scale and layout, 1024x768 with 100% Scale and layout) in both Landscape and Portrait mode. It also supports screen rotation for these resolutions.

About Locked-Down Functionality

A locked-down application deliberately limits functionality. For example, users cannot exit the program, type URLs, or use the Back button. In Enterprise Browser, users cannot access the normal Navigation bar, Command bar, and Start Menu. The web page navigation defines what users can do. Users can still use the on-screen keyboard,

2

Enterprise Browser User Guide for Windows

but Enterprise Browser prevents the keyboard from automatically appearing when the focus moves to a text box.

Benefits of Locked-Down Applications

Locked-down applications can prevent users from getting ”lost” in other parts of the system or changing system settings, and help ensure that users stay as focused and productive as possible. An administrator can modify system settings or exit the Enterprise Browser application as necessary using a password.

Limitations of Locked-Down Applications

No application can be completely locked down on a Windows CE-based computer. Windows CE platforms are multi-tasking environments where any number of applications can be active simultaneously. In addition, Windows CE provides numerous services and utilities that launch and remain active after a warm or cold boot. These services and utilities may open pop-up menus or windows on top of an active application, including Enterprise Browser. For example, Microsoft’s Connection Manager Application may display Network Status messages. Locked-down applications do not control these pop-up menus or windows.

Enterprise Browser Locked-Down Functionality

Enterprise Browser has different compatibility modes depending on the operating system and the computer model.

Enterprise Browser also suppresses keys that may interfere with the locked-down feature. All suppressed keys and key combinations remain suppressed until the computer is warm or cold booted. Enterprise Browser suppresses these keys:

All application keys and keys mapped as application keys

The ”send” and ”end” keys that launch the phone dialer

The volume up and volume down keys

All keys that call the Windows Device Lock

Key combinations that start Windsows Task Manager (Alt + Tab and Alt + Ctrl + Delete)

About Licensing

Enterprise Browser requires a runtime license to unlock its features beyond the 60-day free trial. License information is displayed on the About screen. Without a license, Enterprise Browser runs in demonstration mode:

For the first 30 days, a demonstration warning popup message appears when Enterprise Browser runs.

Enterprise Browser User Guide for Windows

3

From the 31st to 60th day, a demonstration warning popup message appears once a day.

After the 60th day, a license error popup message appears periodically throughout the day.

The runtime license is installed at the factory for CV41, CK71, RT10W Tablet, and VM3 computers with the optional Client Pack configuration. You can also purchase a standalone license or Client Pack runtime license through normal sales channels.

Use SmartSystems (StagingHub) Console (Intermec-branded computers only) or Intermec License Manager to install the license. Both applications are available at no charge from Intermec by Honeywell. If the licensing application is connected to your mobile computer, Enterprise Browser can automatically check out a license.

To use SmartSystems (StagingHub) Console or Intermec License Manager, SmartSystems (StagingHub) Reference Client v3.30 or later must be installed on the mobile computer. To find the version of the SmartSystems (StagingHub) Reference Client on your computer, start Enterprise Settings and go to Device Settings > System Component Versions > SSRef Client.

For more information on licensing, see the PDF document, Activating Licensed Intermec Software.

To install a license on the D70e, copy the license XML file to the \Honeywell\LMConfigDir folder. For help, see the D70e User's Guide.

4

Enterprise Browser User Guide for Windows

CHAPTER

2

HOW TO INSTALL ENTERPRISE BROWSER

To install Enterprise Browser, you need to copy a .cab file to the appropriate location on your mobile computer. Make sure that your mobile computer has at least 11 MB of space. The installation method you use depends on the mobile computer:

Intermec-branded mobile computers

Honeywell-branded mobile computers

You can also use Device Management software, such as Remote Mastermind (ReM) or SmartSystems (StagingHub) to install Enterprise Browser on your mobile computer. For help, see the documentation that ships with the software.

Install Enterprise Browser on Intermec-Branded Computers

If you are re-installing Enterprise Browser on a CV41 computer, delete the existing Enterprise Browser .cab file from \System\Intermec and cold boot the computer.

1.On your PC, go to www.honeywellaidc.com

2.Click the Downloads tab.

3.Click the link to download the appropriate version of Enterprise Browser for your mobile computer.

4.On the Downloads Login page, login or create a new account.

5.Follow the instructions to download the Enterprise Browser .cab or .msi file to your PC.

If the Enterprise Browser download is only available as a .msi file, you need to run the

.msi file to access the .cab file or use SmartSystems (StagingHub) to install Enterprise Browser.

6.Copy the .cab file to the \Flash File Store (or \System\Intermec for the CV41) folder on your mobile computer.

7.On your mobile computer, tap Start > File Explorer > Flash File Store or System (CV41).

8.Tap the .cab file. Enterprise Browser is installed on your mobile computer.

Enterprise Browser User Guide for Windows

5

Run the .msi File to Access the .cab File

If the Enterprise Browser download is only available as an .msi file, you need to run the

.msi file to access the .cab file. You can also use SmartSystems (StagingHub) to install Enterprise Browser.

1.Double-click the .msi file.

2.When the Security Warning dialog box appears, click Run.

3.Follow the steps to extract the Enterprise Browser files to your PC. The .cab file is copied to:

C:\Program Files\Intermec\SmartSystem\SS_Lib\Software\IB_XXXX_x.x.x.x where XXXX is the operating system and x.x.x.x is the version number.

Install Enterprise Browser with SmartSystems (StagingHub)

1.On your PC, go to https://hsmftp.honeywell.com and select Software > Software and Tools > Emulators, Browsers, and Tools > Enterprise Browser.

2.Select the Enterprise Browser.msi install file for your computer. You need to log in to download the software.

3.Follow the instructions to download the file to your PC.

4.Browse to the file and click the file to install it.

5.Open SmartSystems (StagingHub).

6.From the SmartSystems (StagingHub) console, click and drag the Enterprise Browser bundle from the Software Vault folder to your computer.

7.When you are prompted to perform the installation, click Yes.

8.After the installation is finished, restart the computer.

Install Enterprise Browser on Honeywell-Branded Computers

Software downloads can be accessed through the Technical Support Downloads Portal.

1.Go to https://hsmftp.honeywell.com.

2.Create an account if you have not already created one. You must login to download the software.

3.Install the Honeywell Download Manager tool on your workstation (e.g., laptop or desktop computer) prior to trying to download any files.

4.Locate the application or upgrade you want to download in the Software directory tree.

5.Select Download. Follow the prompts to download the file.

6

Enterprise Browser User Guide for Windows

3

START ENTERPRISE BROWSER

CHAPTER


After you install Enterprise Browser and the appropriate license, you are ready to run the application.

You must connect your mobile computer to a wireless network before you can use Enterprise Browser. Honeywell recommends using 802.11 security for network communications. For help, see your computer user manual.

Tap the Enterprise Browser icon on the Start screen.

Or,

Tap Start > Enterprise Browser.

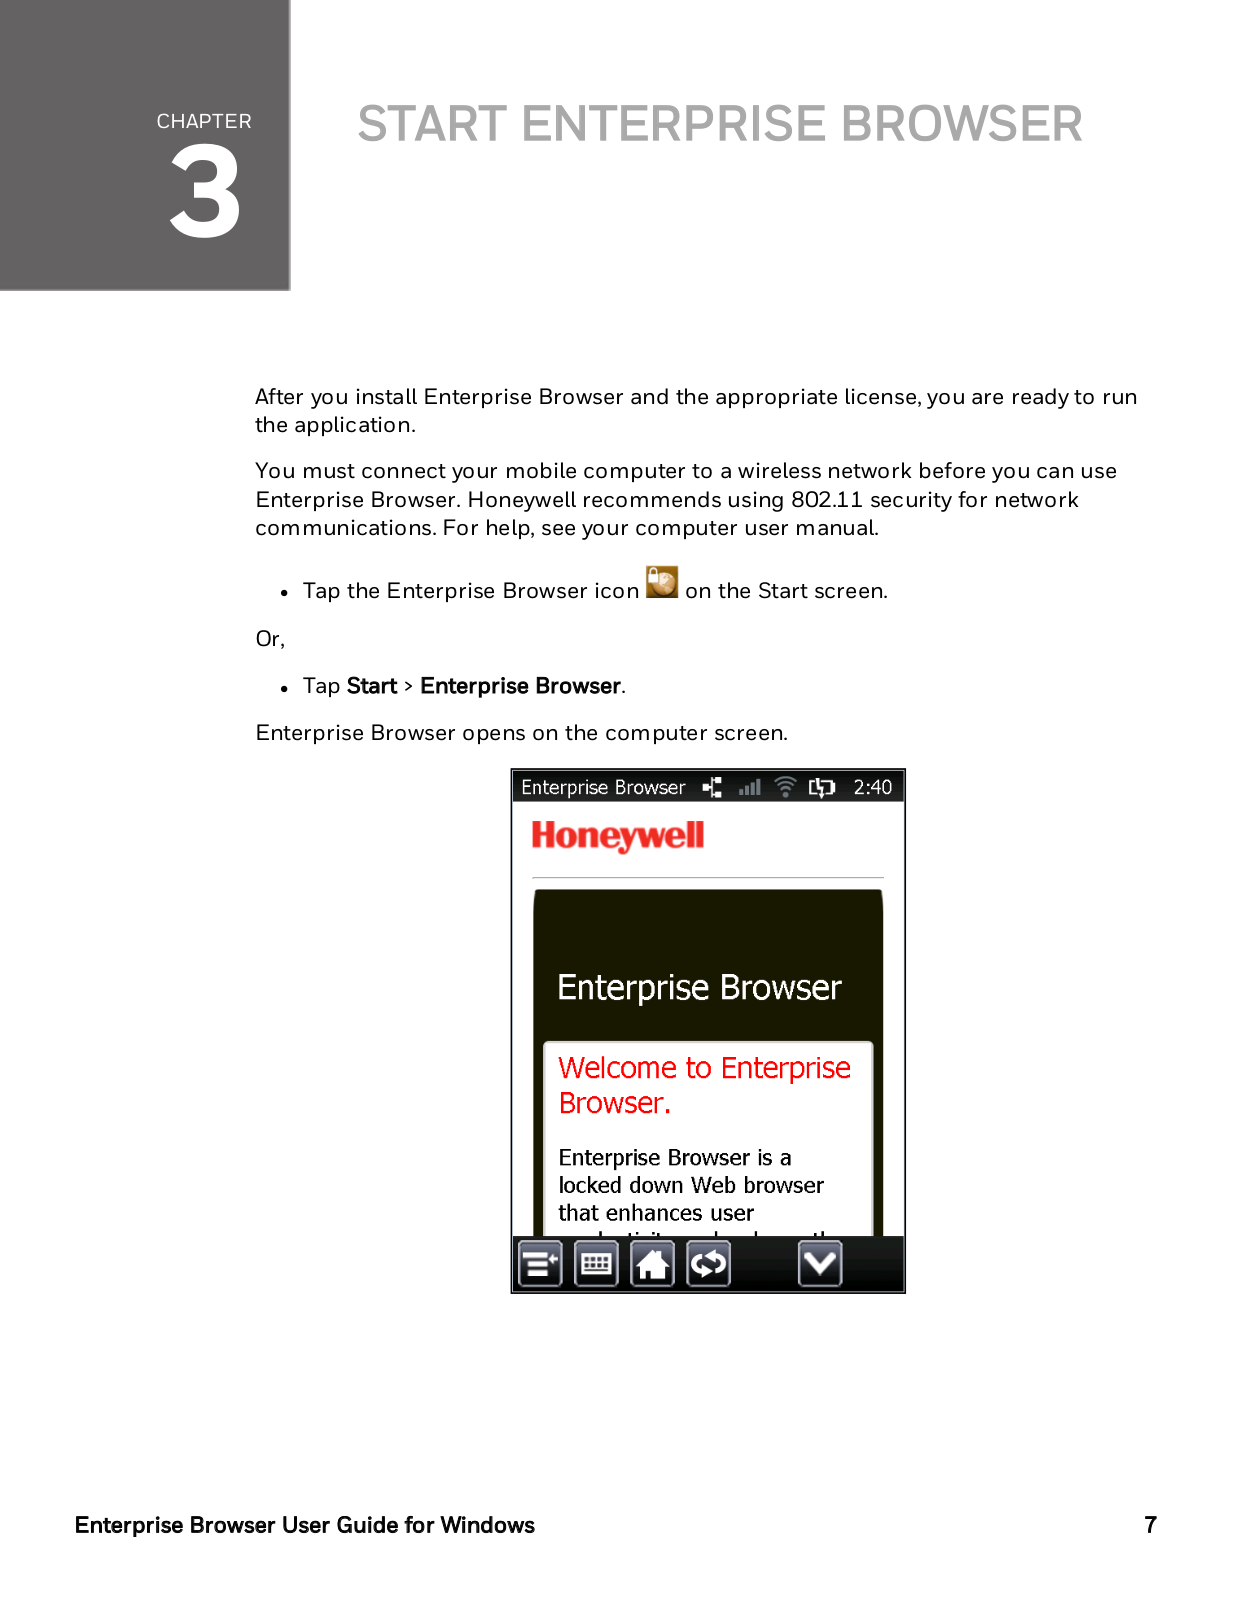
Enterprise Browser opens on the computer screen.

Enterprise Browser User Guide for Windows

7

About the Top Status Bar

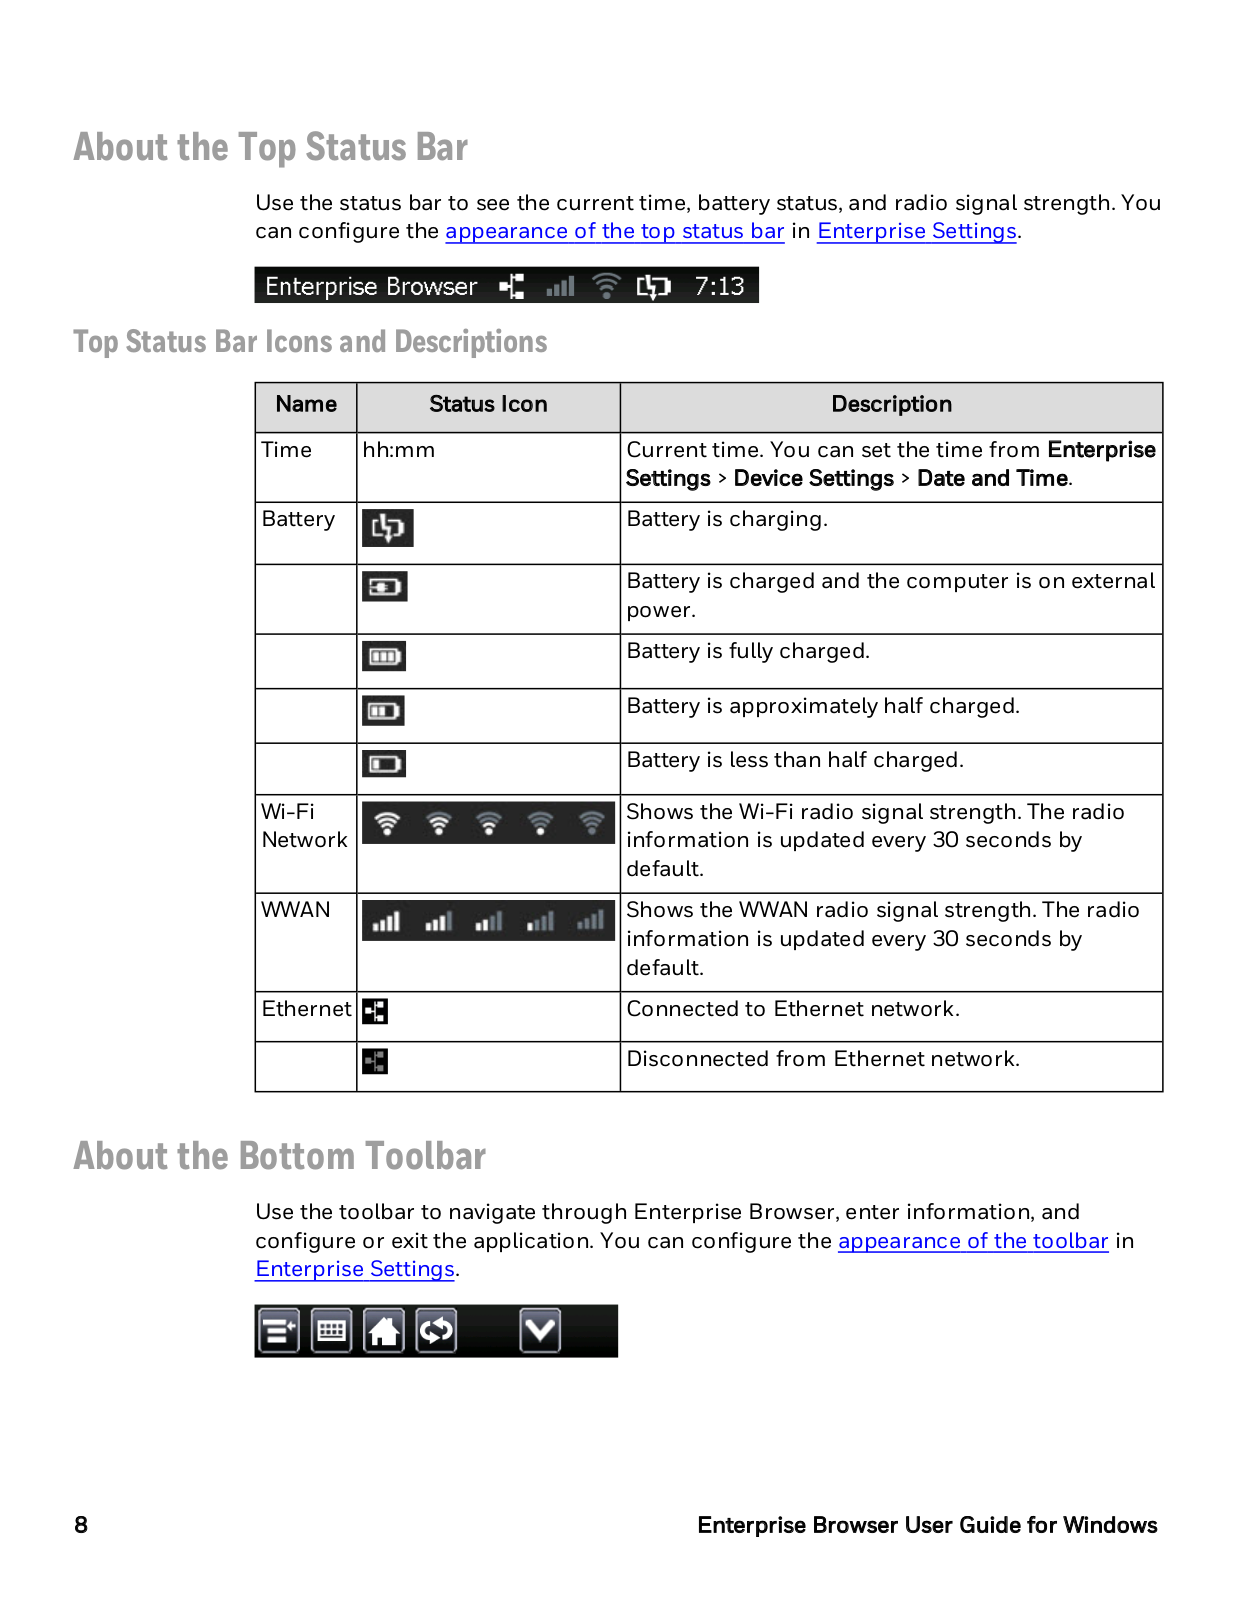
Use the status bar to see the current time, battery status, and radio signal strength. You can configure the appearance of the top status bar in Enterprise Settings.

Top Status Bar Icons and Descriptions

Name

Status Icon

Description


Time

hh:mm

Current time. You can set the time from Enterprise


Settings > Device Settings > Date and Time.


Battery


Battery is charging.


Battery is charged and the computer is on external


power.


Battery is fully charged.


Battery is approximately half charged.


Battery is less than half charged.


Wi-Fi


Shows the Wi-Fi radio signal strength. The radio

Network


information is updated every 30 seconds by


default.


WWAN


Shows the WWAN radio signal strength. The radio


information is updated every 30 seconds by


default.


Ethernet


Connected to Ethernet network.


Disconnected from Ethernet network.


About the Bottom Toolbar

Use the toolbar to navigate through Enterprise Browser, enter information, and configure or exit the application. You can configure the appearance of the toolbar in Enterprise Settings.

8

Enterprise Browser User Guide for Windows

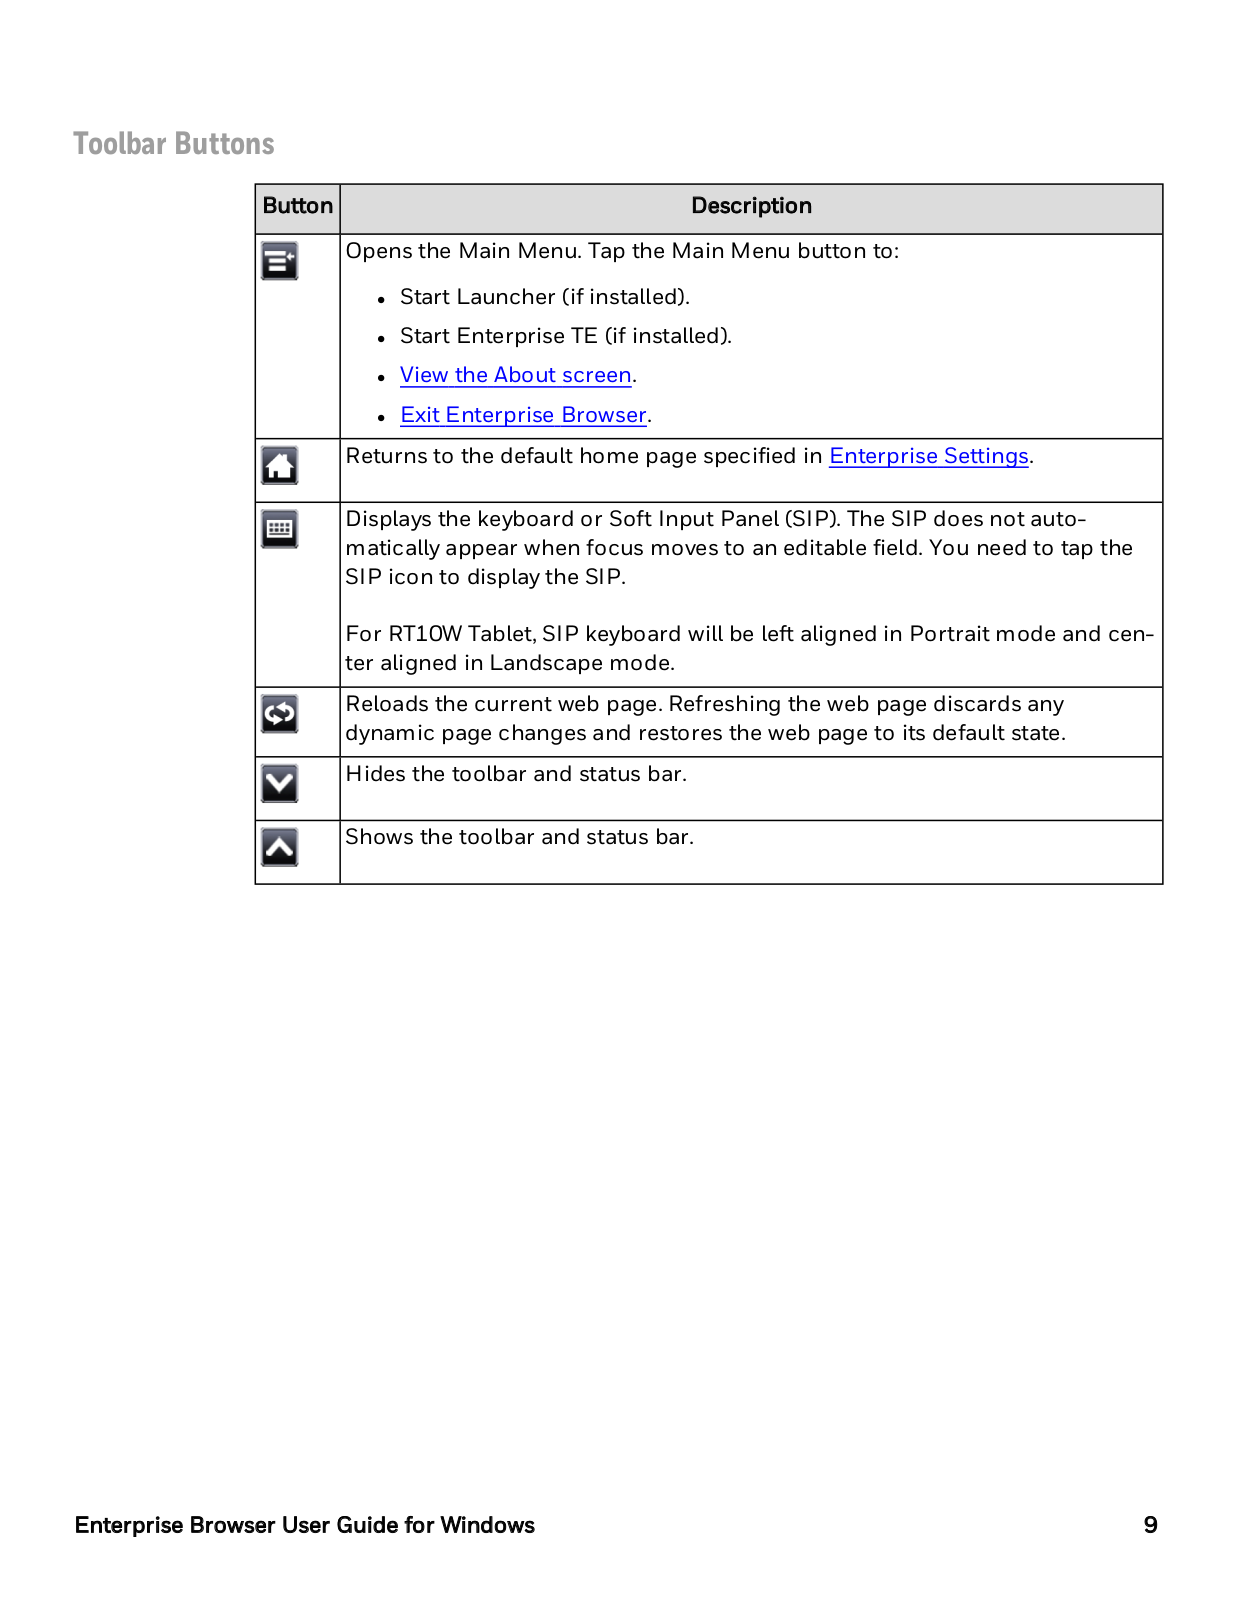
Toolbar Buttons

Button

Description

Opens the Main Menu. Tap the Main Menu button to:

Start Launcher (if installed).

Start Enterprise TE (if installed).

View the About screen.

Exit Enterprise Browser.

Returns to the default home page specified in Enterprise Settings.

Displays the keyboard or Soft Input Panel (SIP). The SIP does not automatically appear when focus moves to an editable field. You need to tap the SIP icon to display the SIP.

For RT10W Tablet, SIP keyboard will be left aligned in Portrait mode and center aligned in Landscape mode.

Reloads the current web page. Refreshing the web page discards any dynamic page changes and restores the web page to its default state.

Hides the toolbar and status bar.

Shows the toolbar and status bar.

Enterprise Browser User Guide for Windows

9

View the About Screen

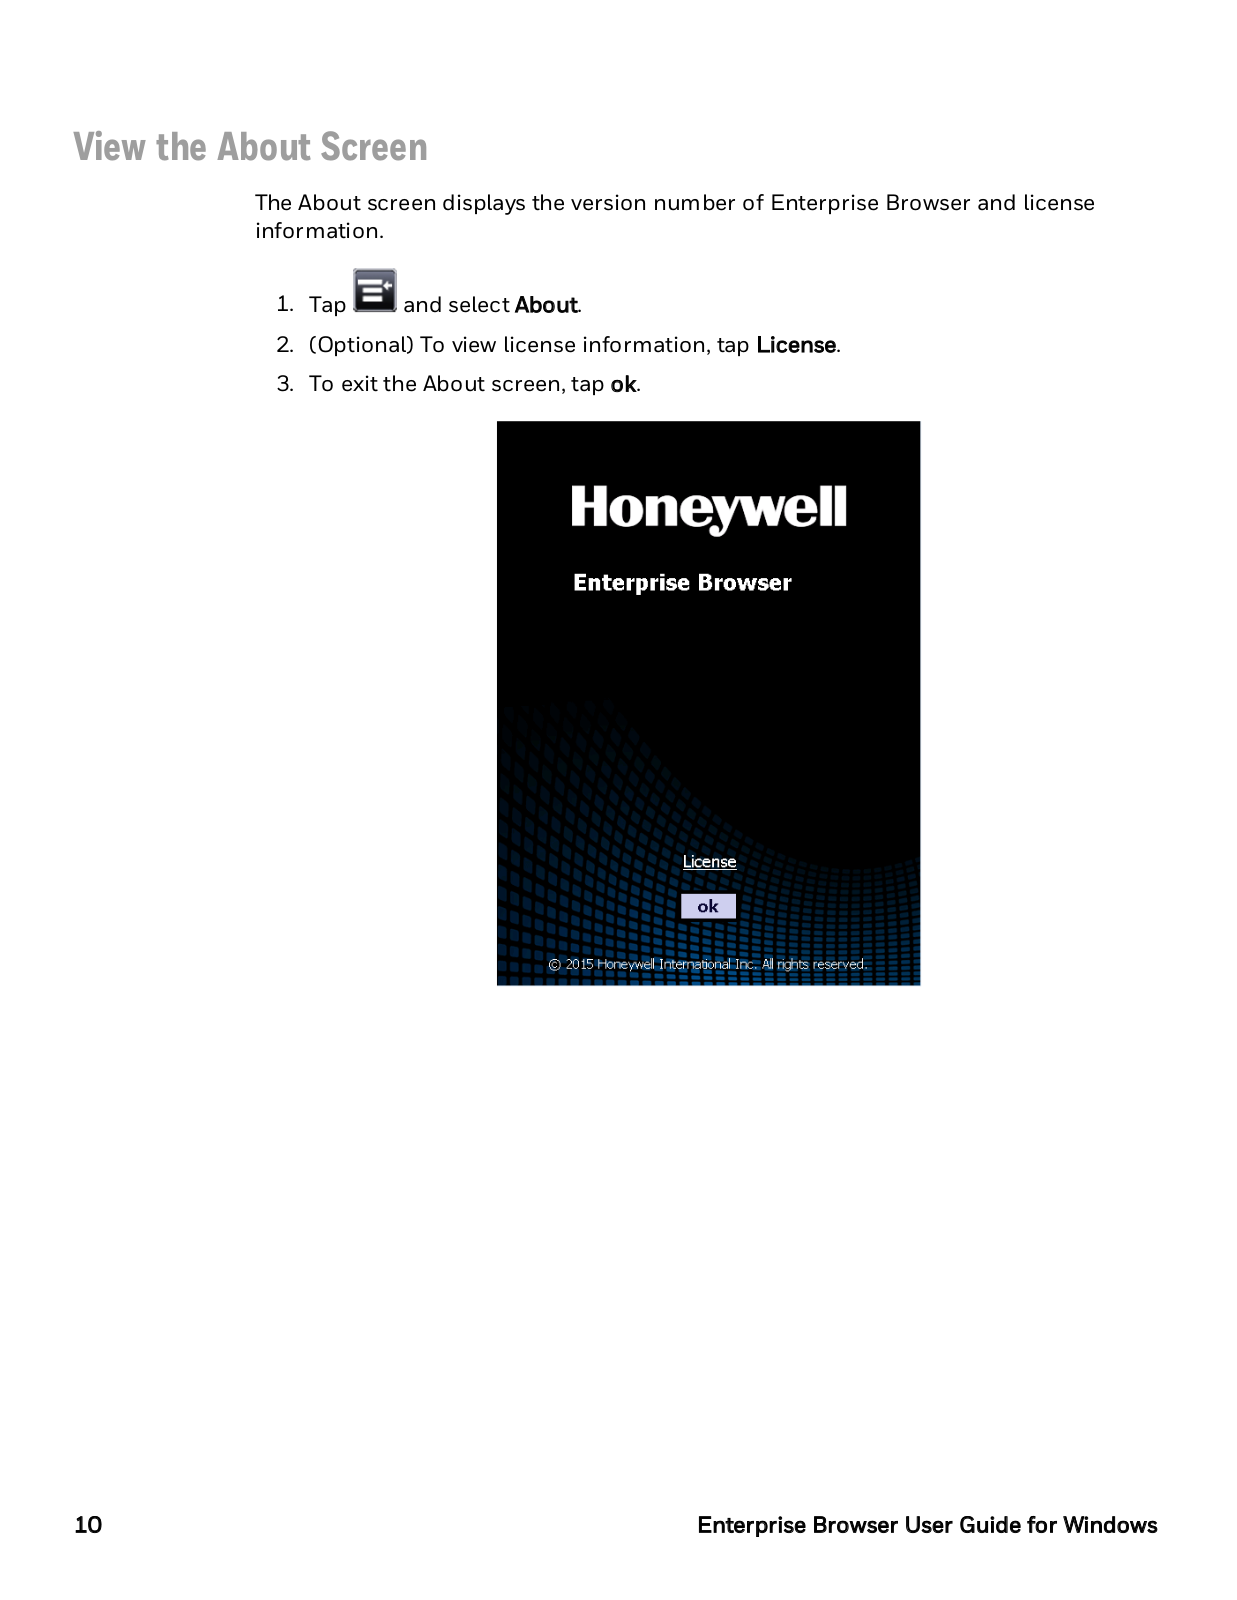
The About screen displays the version number of Enterprise Browser and license information.

1.Tap and select About.

2.(Optional) To view license information, tap License.

3.To exit the About screen, tap ok.

10

Enterprise Browser User Guide for Windows

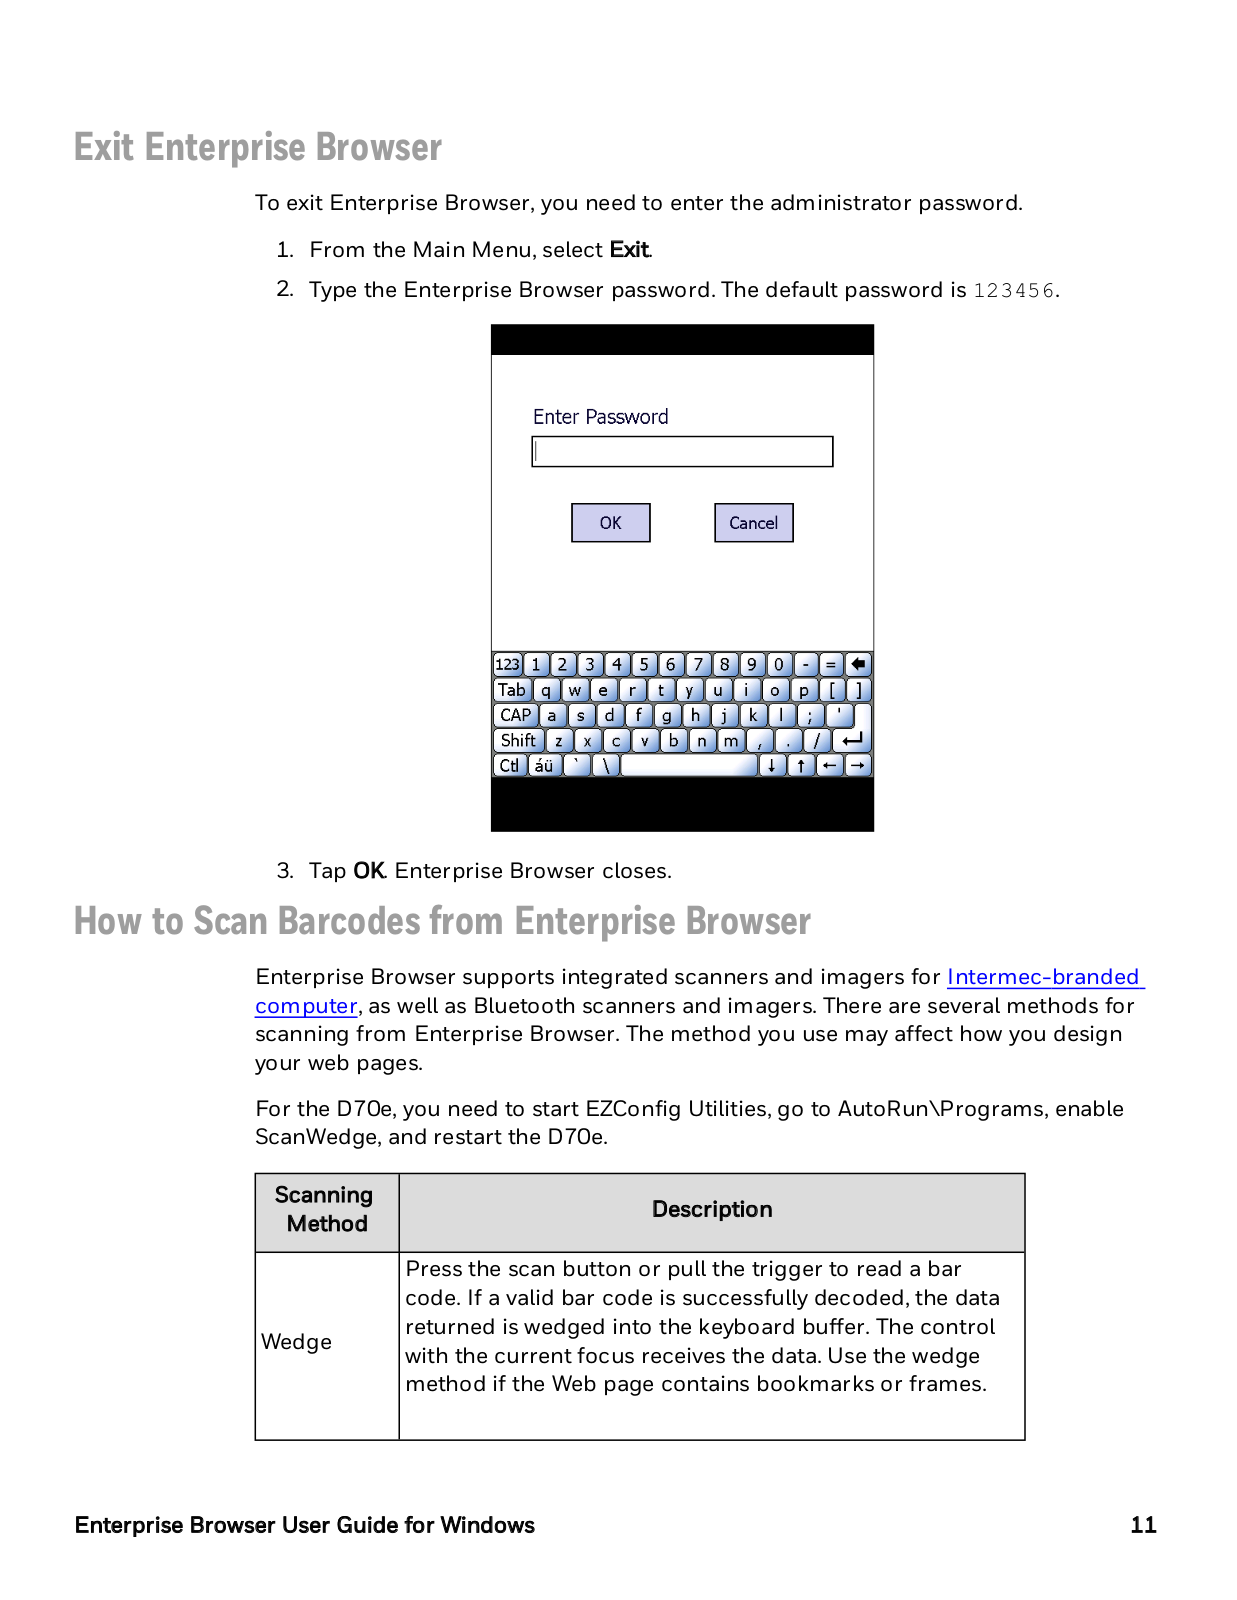
Exit Enterprise Browser

To exit Enterprise Browser, you need to enter the administrator password.

1.From the Main Menu, select Exit.

2.Type the Enterprise Browser password. The default password is 123456.

3. Tap OK. Enterprise Browser closes.

How to Scan Barcodes from Enterprise Browser

Enterprise Browser supports integrated scanners and imagers for Intermec-branded computer, as well as Bluetooth scanners and imagers. There are several methods for scanning from Enterprise Browser. The method you use may affect how you design your web pages.

For the D70e, you need to start EZConfig Utilities, go to AutoRun\Programs, enable ScanWedge, and restart the D70e.

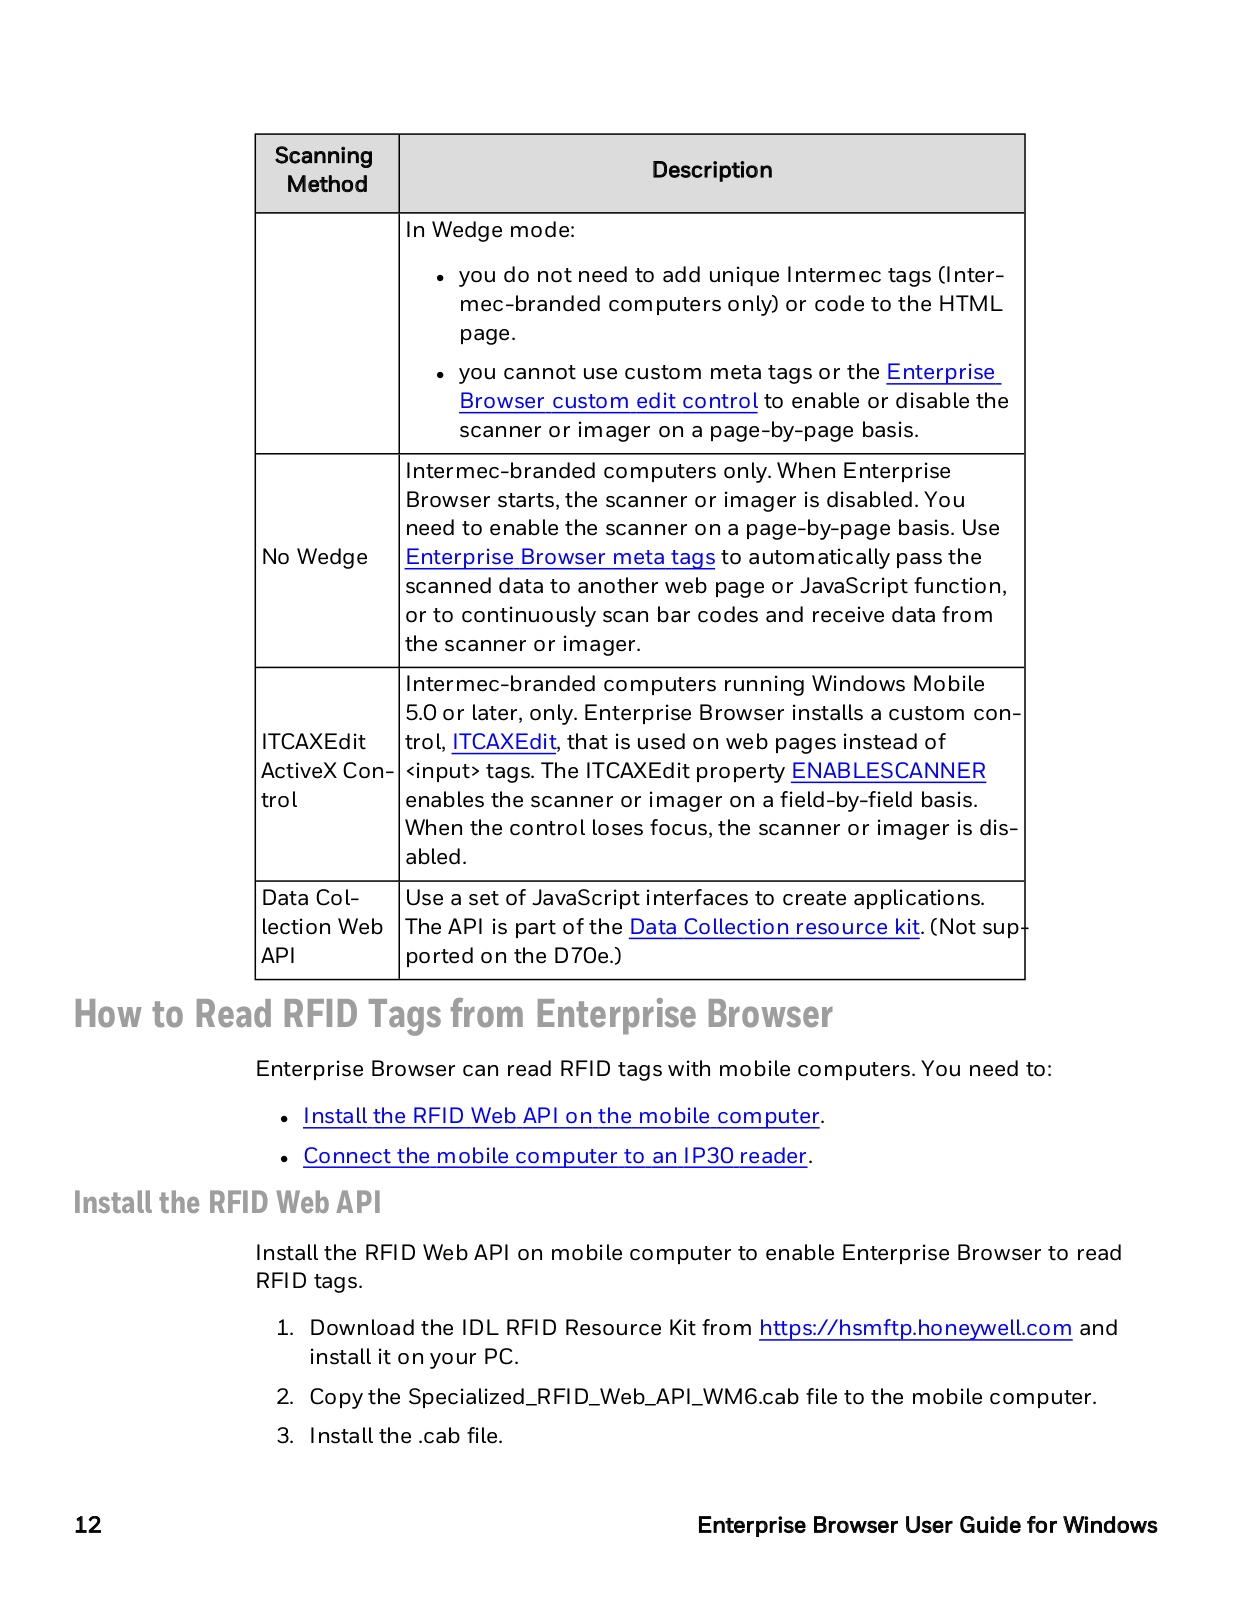
Scanning

Description

Method

Press the scan button or pull the trigger to read a bar code. If a valid bar code is successfully decoded, the data

Wedge

returned is wedged into the keyboard buffer. The control with the current focus receives the data. Use the wedge method if the Web page contains bookmarks or frames.

Enterprise Browser User Guide for Windows

11

Scanning

Description


Method


In Wedge mode:


you do not need to add unique Intermec tags (Inter-


mec-branded computers only) or code to the HTML


page.


you cannot use custom meta tags or the Enterprise


Browser custom edit control to enable or disable the


scanner or imager on a page-by-page basis.


Intermec-branded computers only. When Enterprise


Browser starts, the scanner or imager is disabled. You


need to enable the scanner on a page-by-page basis. Use


No Wedge

Enterprise Browser meta tags to automatically pass the


scanned data to another web page or JavaScript function,


or to continuously scan bar codes and receive data from


the scanner or imager.


Intermec-branded computers running Windows Mobile


5.0 or later, only. Enterprise Browser installs a custom con-


ITCAXEdit

trol, ITCAXEdit, that is used on web pages instead of


ActiveX Con-

<input> tags. The ITCAXEdit property ENABLESCANNER


trol

enables the scanner or imager on a field-by-field basis.


When the control loses focus, the scanner or imager is dis-


abled.


Data Col-

Use a set of JavaScript interfaces to create applications.


lection Web

The API is part of the Data Collection resource kit. (Not sup-

API

ported on the D70e.)


How to Read RFID Tags from Enterprise Browser

Enterprise Browser can read RFID tags with mobile computers. You need to:

Install the RFID Web API on the mobile computer.

Connect the mobile computer to an IP30 reader.

Install the RFID Web API

Install the RFID Web API on mobile computer to enable Enterprise Browser to read RFID tags.

1.Download the IDL RFID Resource Kit from https://hsmftp.honeywell.com and install it on your PC.

2.Copy the Specialized_RFID_Web_API_WM6.cab file to the mobile computer.

3.Install the .cab file.

12

Enterprise Browser User Guide for Windows

See Also

How to Read RFID Tags from Enterprise Browser

Connect to an IP30 Reader

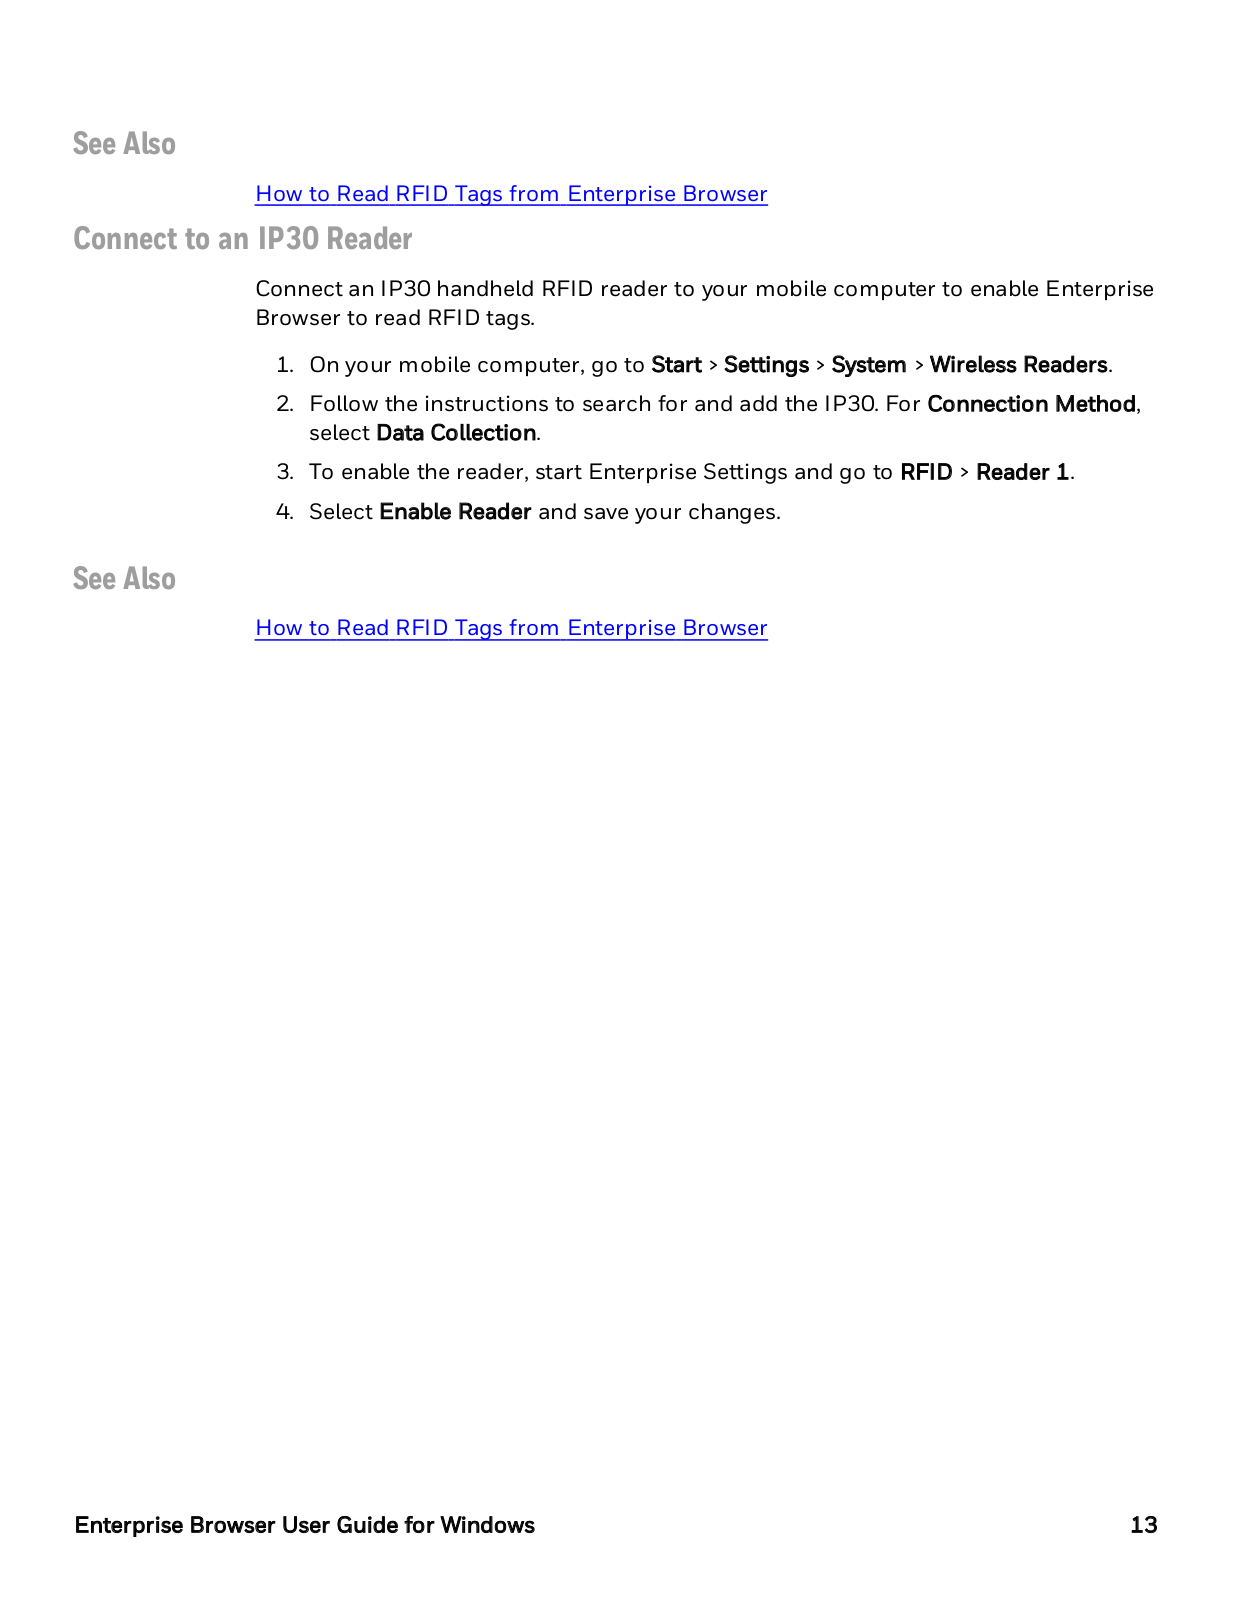
Connect an IP30 handheld RFID reader to your mobile computer to enable Enterprise Browser to read RFID tags.

1.On your mobile computer, go to Start > Settings > System > Wireless Readers.

2.Follow the instructions to search for and add the IP30. For Connection Method, select Data Collection.

3.To enable the reader, start Enterprise Settings and go to RFID > Reader 1.

4.Select Enable Reader and save your changes.

See Also

How to Read RFID Tags from Enterprise Browser

Enterprise Browser User Guide for Windows

13

14

Enterprise Browser User Guide for Windows

CHAPTER

4

HOW TO CONFIGURE

ENTERPRISE BROWSER

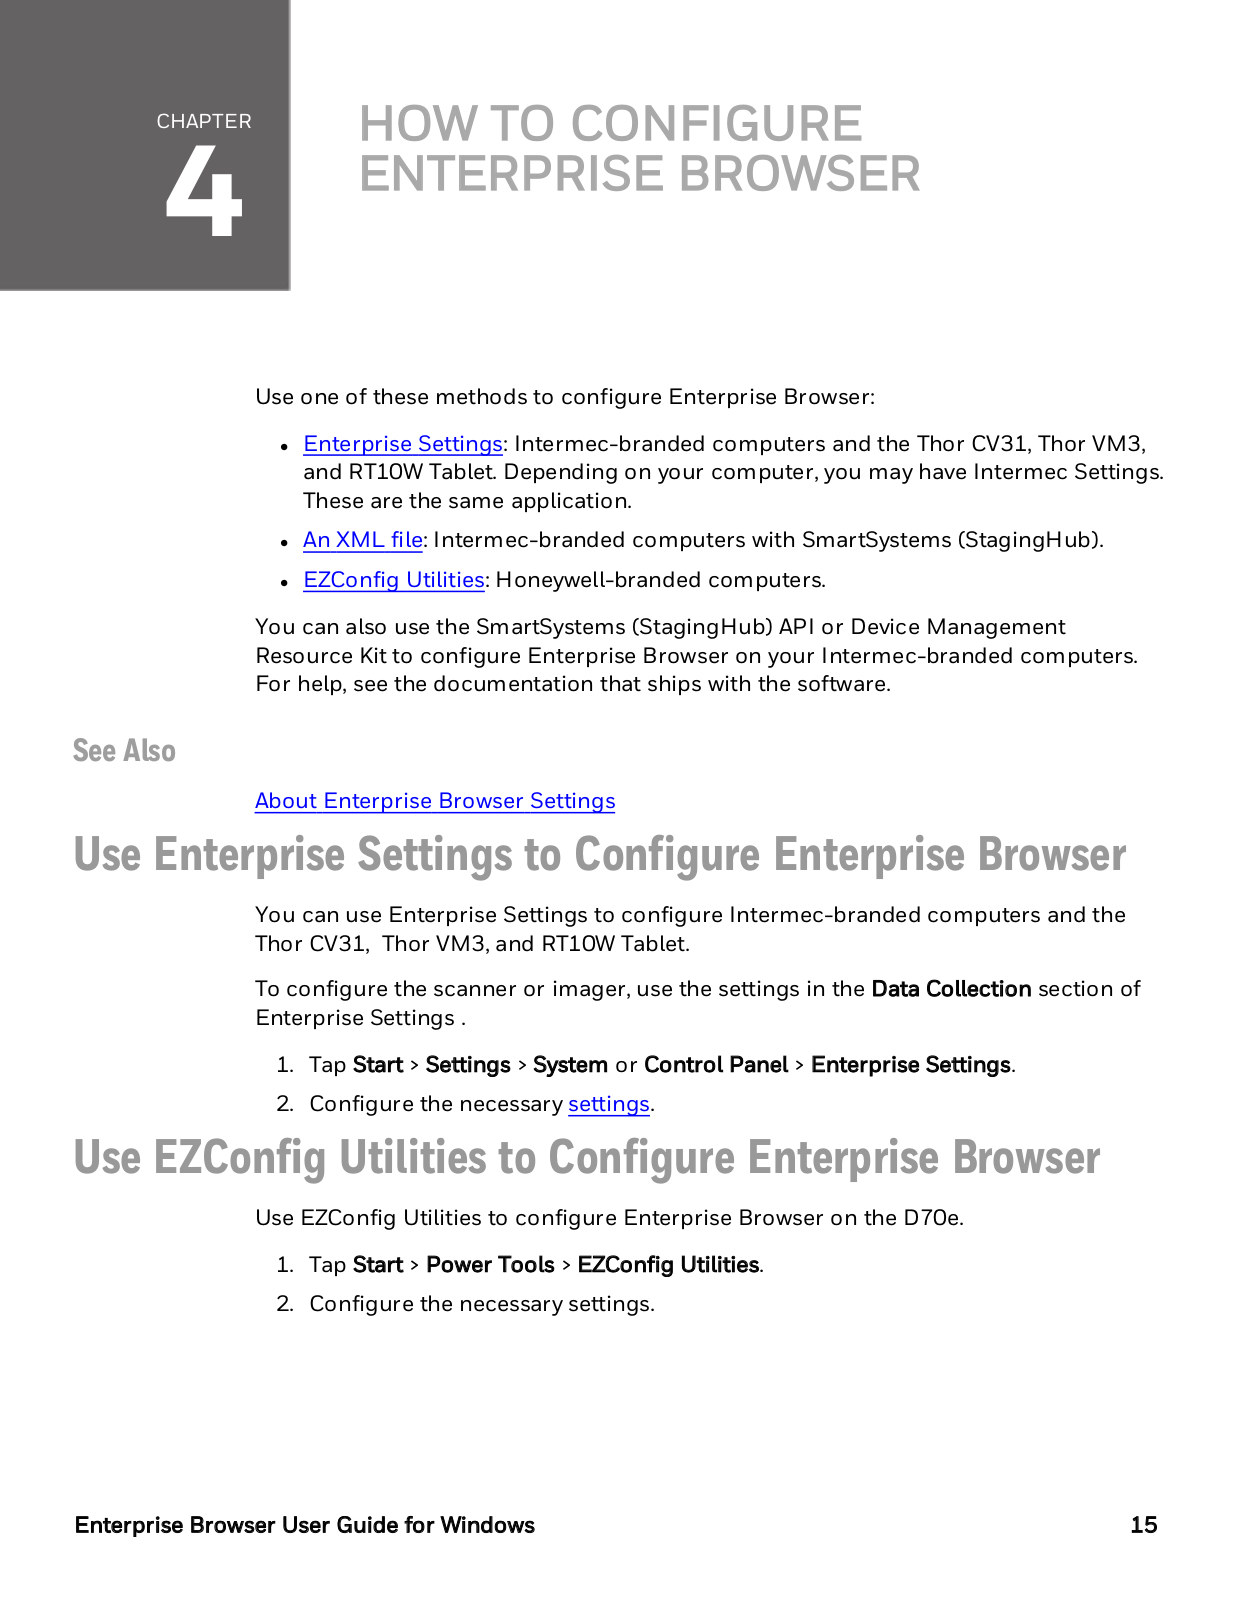
Use one of these methods to configure Enterprise Browser:

Enterprise Settings: Intermec-branded computers and the Thor CV31, Thor VM3, and RT10W Tablet. Depending on your computer, you may have Intermec Settings. These are the same application.

An XML file: Intermec-branded computers with SmartSystems (StagingHub).

EZConfig Utilities: Honeywell-branded computers.

You can also use the SmartSystems (StagingHub) API or Device Management Resource Kit to configure Enterprise Browser on your Intermec-branded computers. For help, see the documentation that ships with the software.

See Also

About Enterprise Browser Settings

Use Enterprise Settings to Configure Enterprise Browser

You can use Enterprise Settings to configure Intermec-branded computers and the Thor CV31, Thor VM3, and RT10W Tablet.

To configure the scanner or imager, use the settings in the Data Collection section of Enterprise Settings .

1.Tap Start > Settings > System or Control Panel > Enterprise Settings.

2.Configure the necessary settings.

Use EZConfig Utilities to Configure Enterprise Browser

Use EZConfig Utilities to configure Enterprise Browser on the D70e.

1.Tap Start > Power Tools > EZConfig Utilities.

2.Configure the necessary settings.

Enterprise Browser User Guide for Windows

15

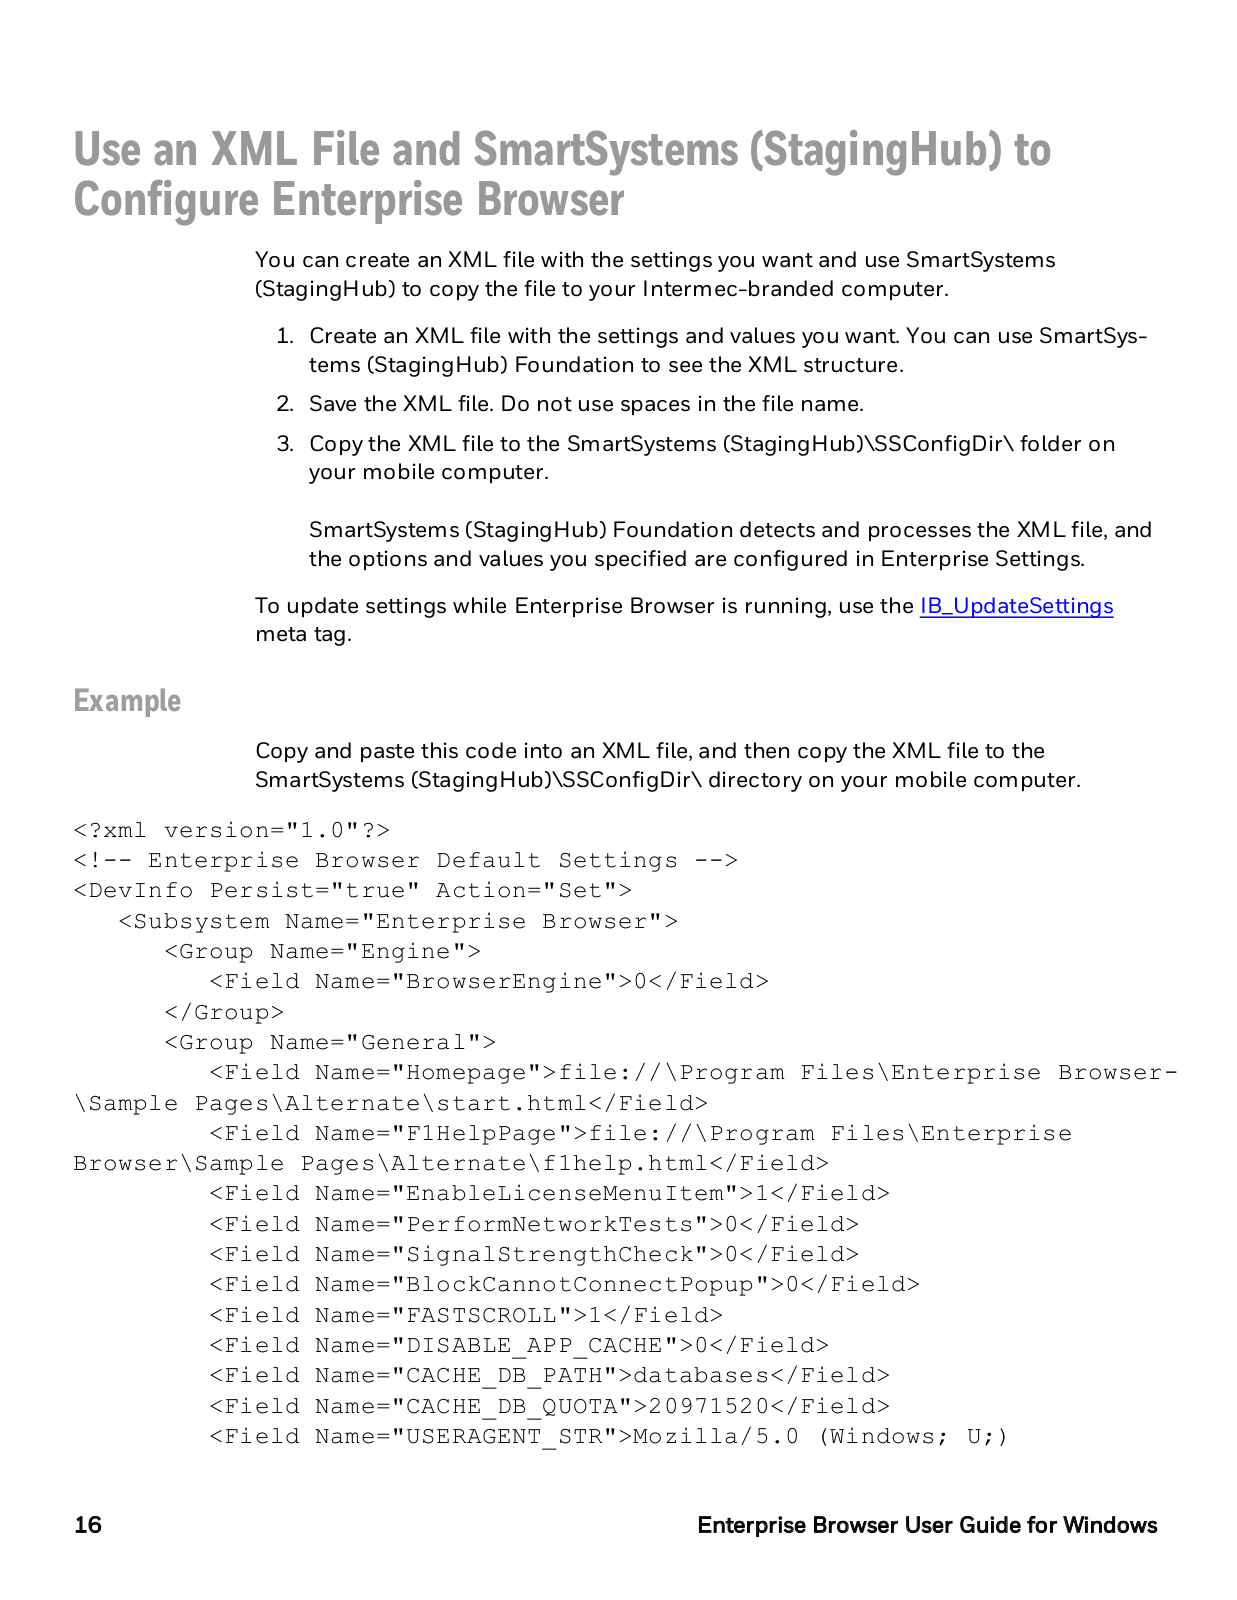
Use an XML File and SmartSystems (StagingHub) to Configure Enterprise Browser

You can create an XML file with the settings you want and use SmartSystems (StagingHub) to copy the file to your Intermec-branded computer.

1.Create an XML file with the settings and values you want. You can use SmartSystems (StagingHub) Foundation to see the XML structure.

2.Save the XML file. Do not use spaces in the file name.

3.Copy the XML file to the SmartSystems (StagingHub)\SSConfigDir\ folder on your mobile computer.

SmartSystems (StagingHub) Foundation detects and processes the XML file, and the options and values you specified are configured in Enterprise Settings.

To update settings while Enterprise Browser is running, use the IB_UpdateSettings meta tag.

Example

Copy and paste this code into an XML file, and then copy the XML file to the

SmartSystems (StagingHub)\SSConfigDir\ directory on your mobile computer.

<?xml version="1.0"?>

<!-- Enterprise

Browser Default Settings -->

<DevInfo Persist="true" Action="Set">

<Subsystem Name="Enterprise Browser">

<Group Name="Engine">

<Field

Name="BrowserEngine">0</Field>

</Group>


<Group Name="General">

<Field

Name="Homepage">file://\Program Files\Enterprise Browser-

\Sample Pages\Alternate\start.html</Field>

<Field

Name="F1HelpPage">file://\Program Files\Enterprise

Browser\Sample Pages\Alternate\f1help.html</Field>

<Field

Name="EnableLicenseMenuItem">1</Field>

<Field

Name="PerformNetworkTests">0</Field>

<Field

Name="SignalStrengthCheck">0</Field>

<Field

Name="BlockCannotConnectPopup">0</Field>

<Field

Name="FASTSCROLL">1</Field>

<Field

Name="DISABLE_APP_CACHE">0</Field>

<Field

Name="CACHE_DB_PATH">databases</Field>

<Field

Name="CACHE_DB_QUOTA">20971520</Field>

<Field

Name="USERAGENT_STR">Mozilla/5.0 (Windows; U;)

16

Enterprise Browser User Guide for Windows

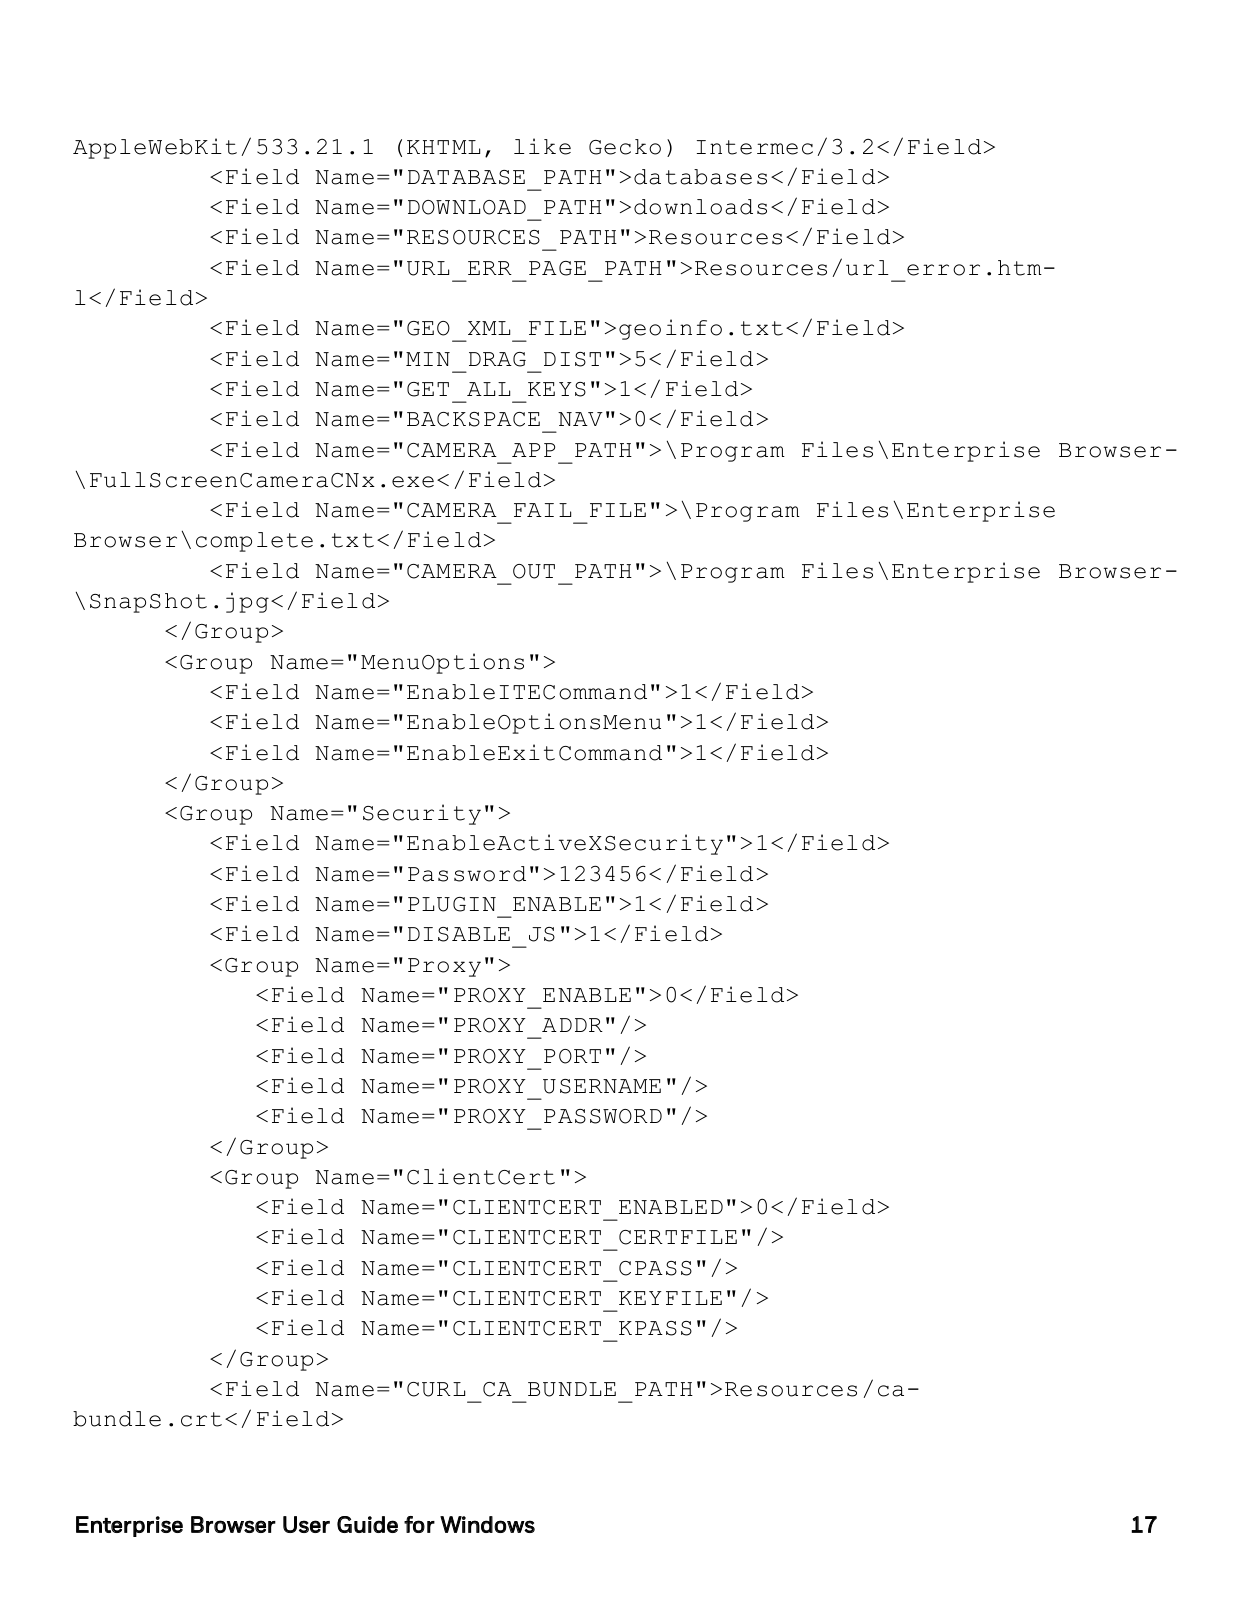
AppleWebKit/533.21.1 (KHTML, like Gecko) Intermec/3.2</Field> <Field Name="DATABASE_PATH">databases</Field>

<Field Name="DOWNLOAD_PATH">downloads</Field>

<Field Name="RESOURCES_PATH">Resources</Field>

<Field Name="URL_ERR_PAGE_PATH">Resources/url_error.htm-

l</Field>

<Field Name="GEO_XML_FILE">geoinfo.txt</Field>

<Field Name="MIN_DRAG_DIST">5</Field>

<Field Name="GET_ALL_KEYS">1</Field>

<Field Name="BACKSPACE_NAV">0</Field>

<Field Name="CAMERA_APP_PATH">\Program Files\Enterprise Browser- \FullScreenCameraCNx.exe</Field>

<Field Name="CAMERA_FAIL_FILE">\Program Files\Enterprise

Browser\complete.txt</Field>

<Field Name="CAMERA_OUT_PATH">\Program Files\Enterprise Browser- \SnapShot.jpg</Field>

</Group>

<Group Name="MenuOptions">

<Field Name="EnableITECommand">1</Field>

<Field Name="EnableOptionsMenu">1</Field>

<Field Name="EnableExitCommand">1</Field> </Group>

<Group Name="Security">

<Field Name="EnableActiveXSecurity">1</Field>

<Field Name="Password">123456</Field>

<Field Name="PLUGIN_ENABLE">1</Field>

<Field Name="DISABLE_JS">1</Field>

<Group Name="Proxy">

<Field Name="PROXY_ENABLE">0</Field>

<Field Name="PROXY_ADDR"/>

<Field Name="PROXY_PORT"/>

<Field Name="PROXY_USERNAME"/>

<Field Name="PROXY_PASSWORD"/>

</Group>

<Group Name="ClientCert">

<Field Name="CLIENTCERT_ENABLED">0</Field>

<Field Name="CLIENTCERT_CERTFILE"/>

<Field Name="CLIENTCERT_CPASS"/>

<Field Name="CLIENTCERT_KEYFILE"/>

<Field Name="CLIENTCERT_KPASS"/> </Group>

<Field Name="CURL_CA_BUNDLE_PATH">Resources/cabundle.crt</Field>

Enterprise Browser User Guide for Windows

17

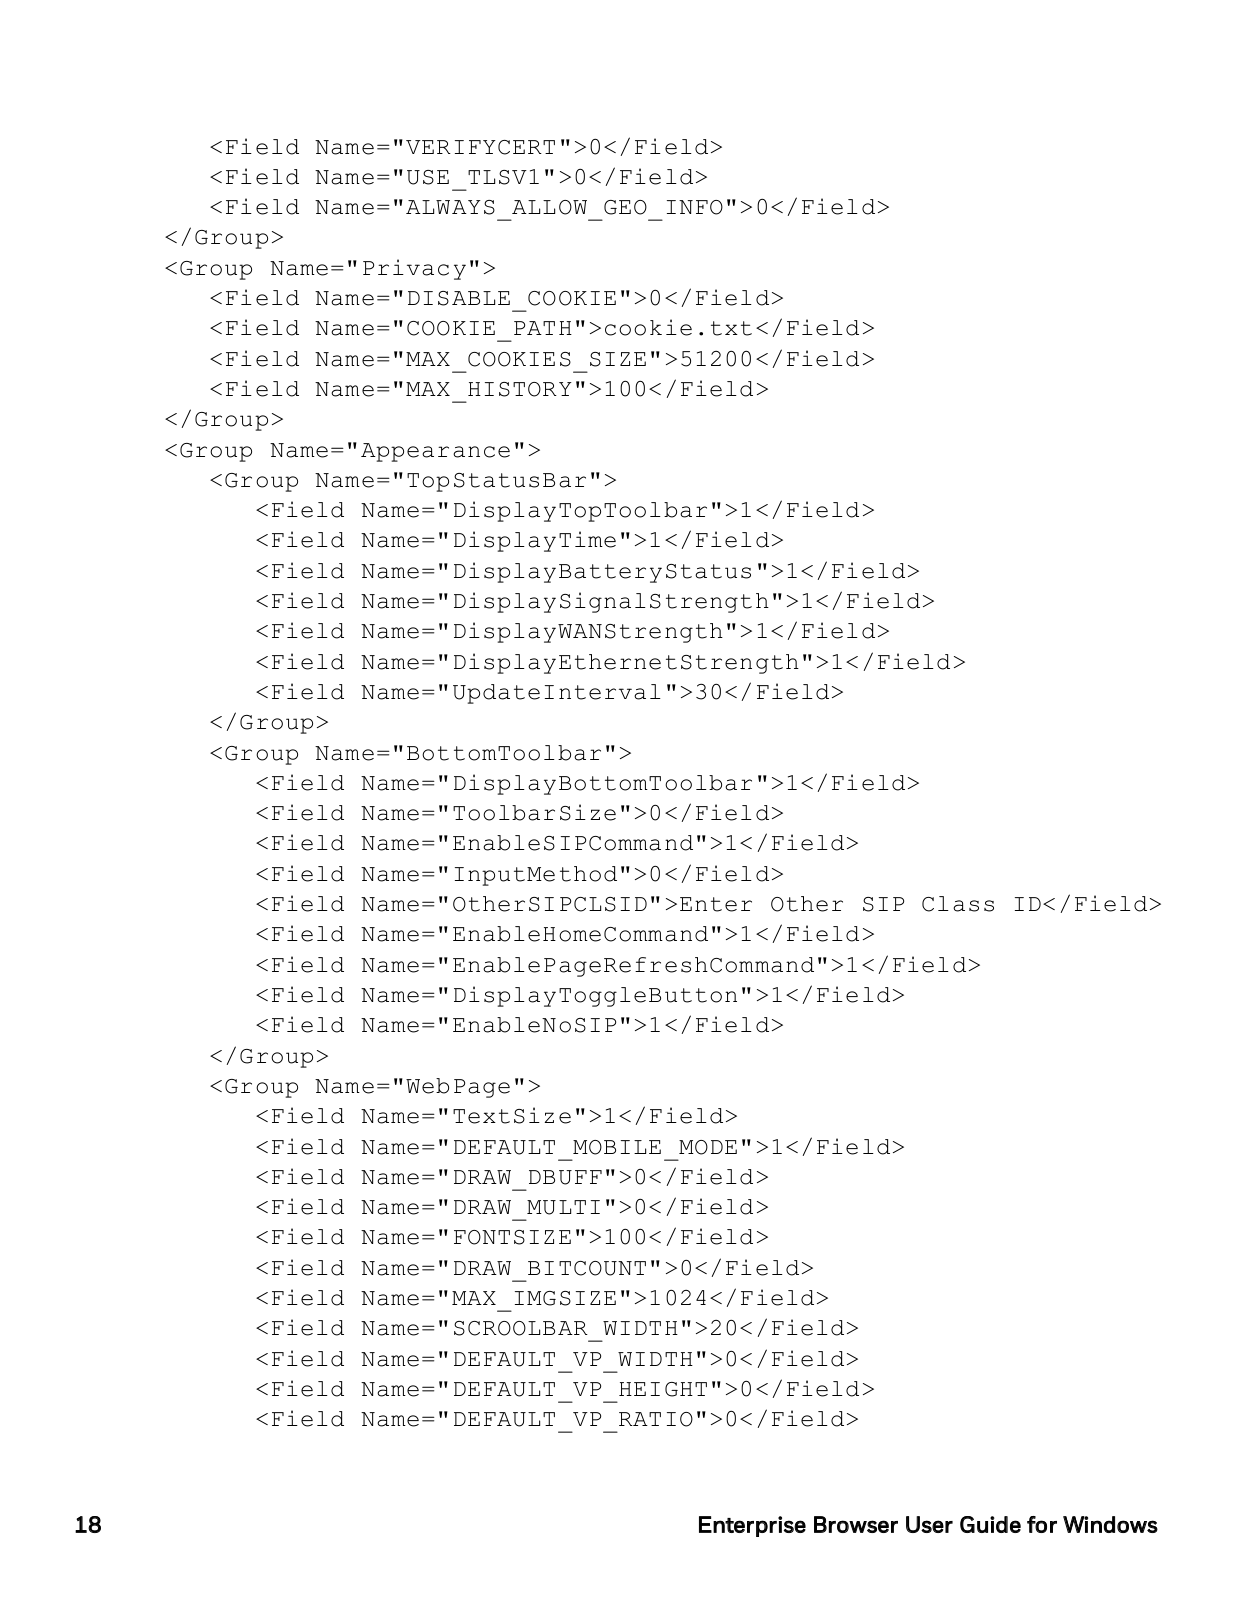
<Field Name="VERIFYCERT">0</Field>

<Field Name="USE_TLSV1">0</Field>

<Field Name="ALWAYS_ALLOW_GEO_INFO">0</Field> </Group>

<Group Name="Privacy">

<Field Name="DISABLE_COOKIE">0</Field>

<Field Name="COOKIE_PATH">cookie.txt</Field>

<Field Name="MAX_COOKIES_SIZE">51200</Field>

<Field Name="MAX_HISTORY">100</Field>

</Group>

<Group Name="Appearance">

<Group Name="TopStatusBar">

<Field Name="DisplayTopToolbar">1</Field>

<Field Name="DisplayTime">1</Field>

<Field Name="DisplayBatteryStatus">1</Field>

<Field Name="DisplaySignalStrength">1</Field>

<Field Name="DisplayWANStrength">1</Field>

<Field Name="DisplayEthernetStrength">1</Field>

<Field Name="UpdateInterval">30</Field>

</Group>

<Group Name="BottomToolbar">

<Field Name="DisplayBottomToolbar">1</Field>

<Field Name="ToolbarSize">0</Field>

<Field Name="EnableSIPCommand">1</Field>

<Field Name="InputMethod">0</Field>

<Field Name="OtherSIPCLSID">Enter Other SIP Class ID</Field>

<Field Name="EnableHomeCommand">1</Field>

<Field Name="EnablePageRefreshCommand">1</Field>

<Field Name="DisplayToggleButton">1</Field>

<Field Name="EnableNoSIP">1</Field>

</Group>

<Group Name="WebPage">

<Field Name="TextSize">1</Field>

<Field Name="DEFAULT_MOBILE_MODE">1</Field>

<Field Name="DRAW_DBUFF">0</Field>

<Field Name="DRAW_MULTI">0</Field>

<Field Name="FONTSIZE">100</Field>

<Field Name="DRAW_BITCOUNT">0</Field>

<Field Name="MAX_IMGSIZE">1024</Field>

<Field Name="SCROOLBAR_WIDTH">20</Field>

<Field Name="DEFAULT_VP_WIDTH">0</Field>

<Field Name="DEFAULT_VP_HEIGHT">0</Field>

<Field Name="DEFAULT_VP_RATIO">0</Field>

18

Enterprise Browser User Guide for Windows

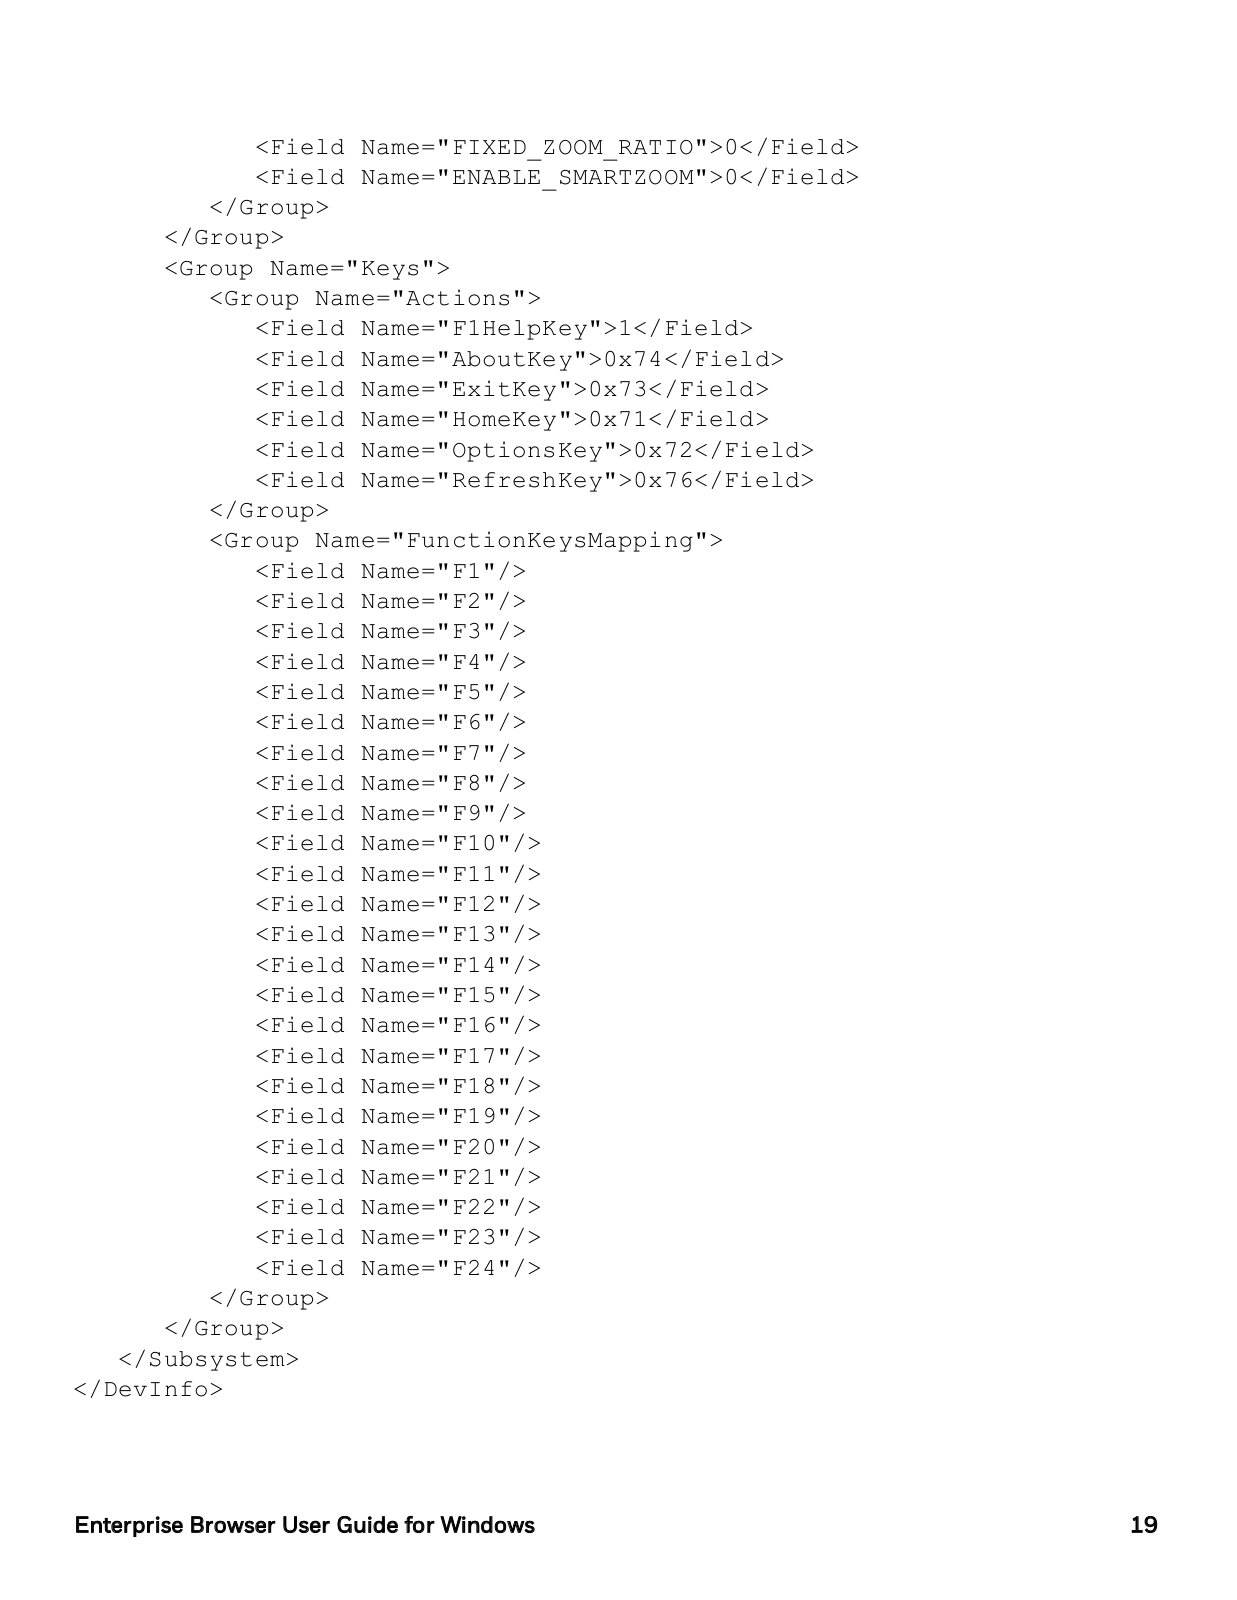
<Field Name="FIXED_ZOOM_RATIO">0</Field>

<Field Name="ENABLE_SMARTZOOM">0</Field>

</Group>

</Group>

<Group Name="Keys">

<Group Name="Actions">

<Field Name="F1HelpKey">1</Field>

<Field Name="AboutKey">0x74</Field>

<Field Name="ExitKey">0x73</Field>

<Field Name="HomeKey">0x71</Field>

<Field Name="OptionsKey">0x72</Field>

<Field Name="RefreshKey">0x76</Field>

</Group>

<Group Name="FunctionKeysMapping">

<Field Name="F1"/>

<Field Name="F2"/>

<Field Name="F3"/>

<Field Name="F4"/>

<Field Name="F5"/>

<Field Name="F6"/>

<Field Name="F7"/>

<Field Name="F8"/>

<Field Name="F9"/>

<Field Name="F10"/>

<Field Name="F11"/>

<Field Name="F12"/>

<Field Name="F13"/>

<Field Name="F14"/>

<Field Name="F15"/>

<Field Name="F16"/>

<Field Name="F17"/>

<Field Name="F18"/>

<Field Name="F19"/>

<Field Name="F20"/>

<Field Name="F21"/>

<Field Name="F22"/>

<Field Name="F23"/>

<Field Name="F24"/> </Group>

</Group>

</Subsystem>

</DevInfo>

Enterprise Browser User Guide for Windows

19

See Also

About Enterprise Browser Settings

About Enterprise Browser Settings

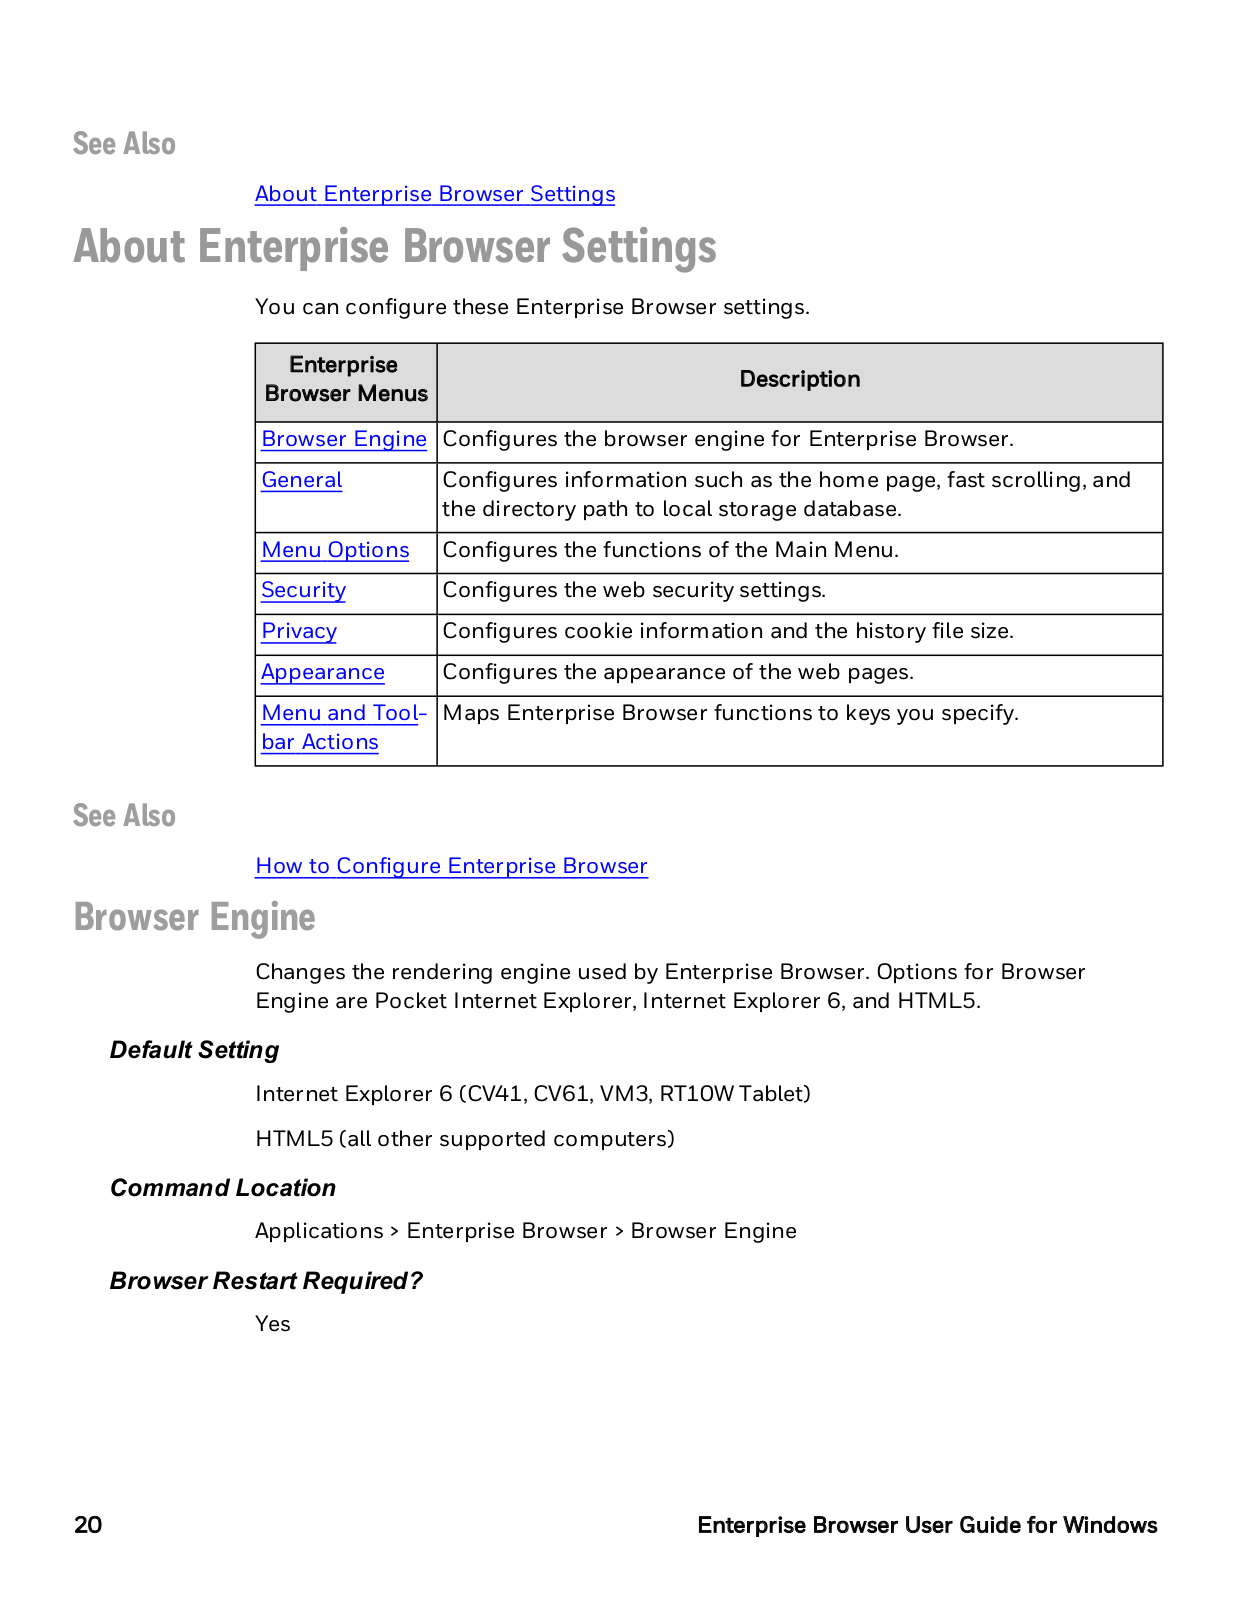
You can configure these Enterprise Browser settings.

Enterprise

Description

Browser Menus

Browser Engine Configures the browser engine for Enterprise Browser.

General

Configures information such as the home page, fast scrolling, and


the directory path to local storage database.


Menu Options

Configures the functions of the Main Menu.


Security

Configures the web security settings.


Privacy

Configures cookie information and the history file size.


Appearance

Configures the appearance of the web pages.

Menu and Tool- Maps Enterprise Browser functions to keys you specify. bar Actions

See Also

How to Configure Enterprise Browser

Browser Engine

Changes the rendering engine used by Enterprise Browser. Options for Browser Engine are Pocket Internet Explorer, Internet Explorer 6, and HTML5.

Default Setting

Internet Explorer 6 (CV41, CV61, VM3, RT10W Tablet)

HTML5 (all other supported computers)

Command Location

Applications > Enterprise Browser > Browser Engine

Browser Restart Required?

Yes

20

Enterprise Browser User Guide for Windows

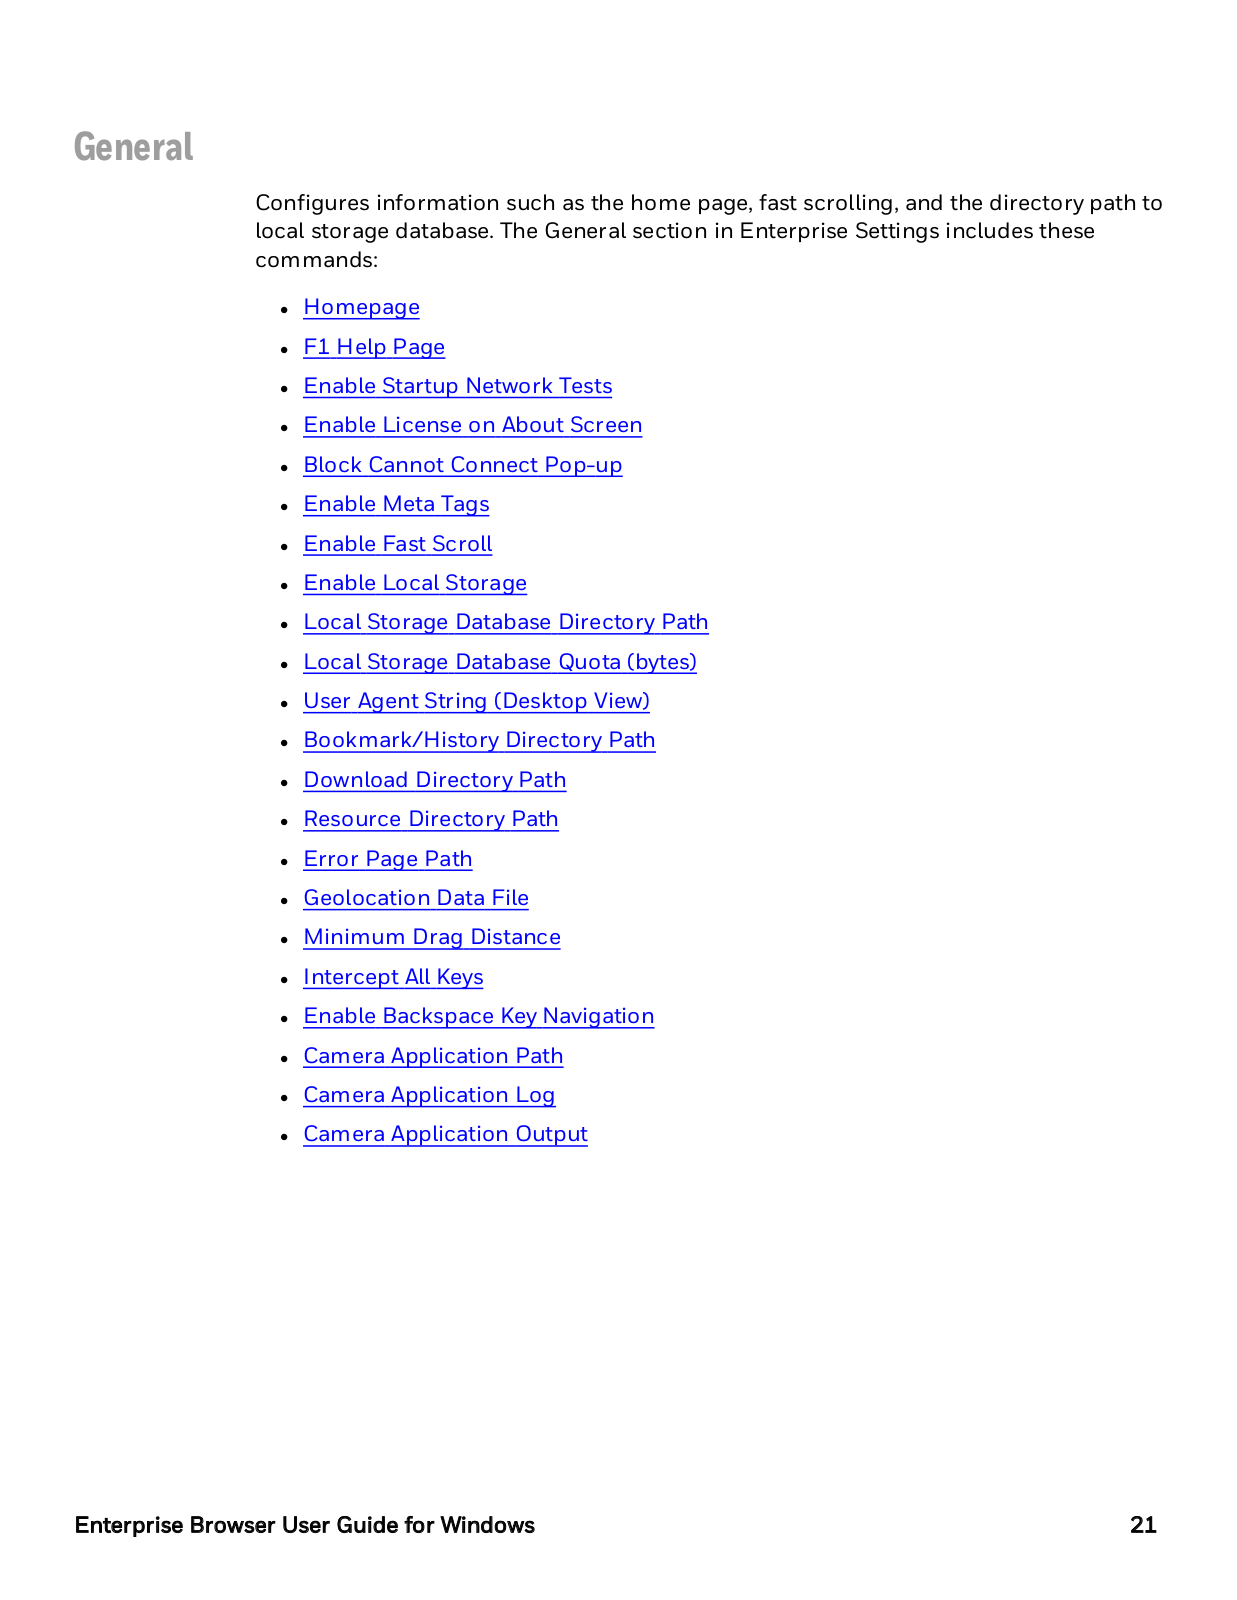
General

Configures information such as the home page, fast scrolling, and the directory path to local storage database. The General section in Enterprise Settings includes these commands:

Homepage

F1 Help Page

Enable Startup Network Tests

Enable License on About Screen

Block Cannot Connect Pop-up

Enable Meta Tags

Enable Fast Scroll

Enable Local Storage

Local Storage Database Directory Path

Local Storage Database Quota (bytes)

User Agent String (Desktop View)

Bookmark/History Directory Path

Download Directory Path

Resource Directory Path

Error Page Path

Geolocation Data File

Minimum Drag Distance

Intercept All Keys

Enable Backspace Key Navigation

Camera Application Path

Camera Application Log

Camera Application Output

Enterprise Browser User Guide for Windows

21

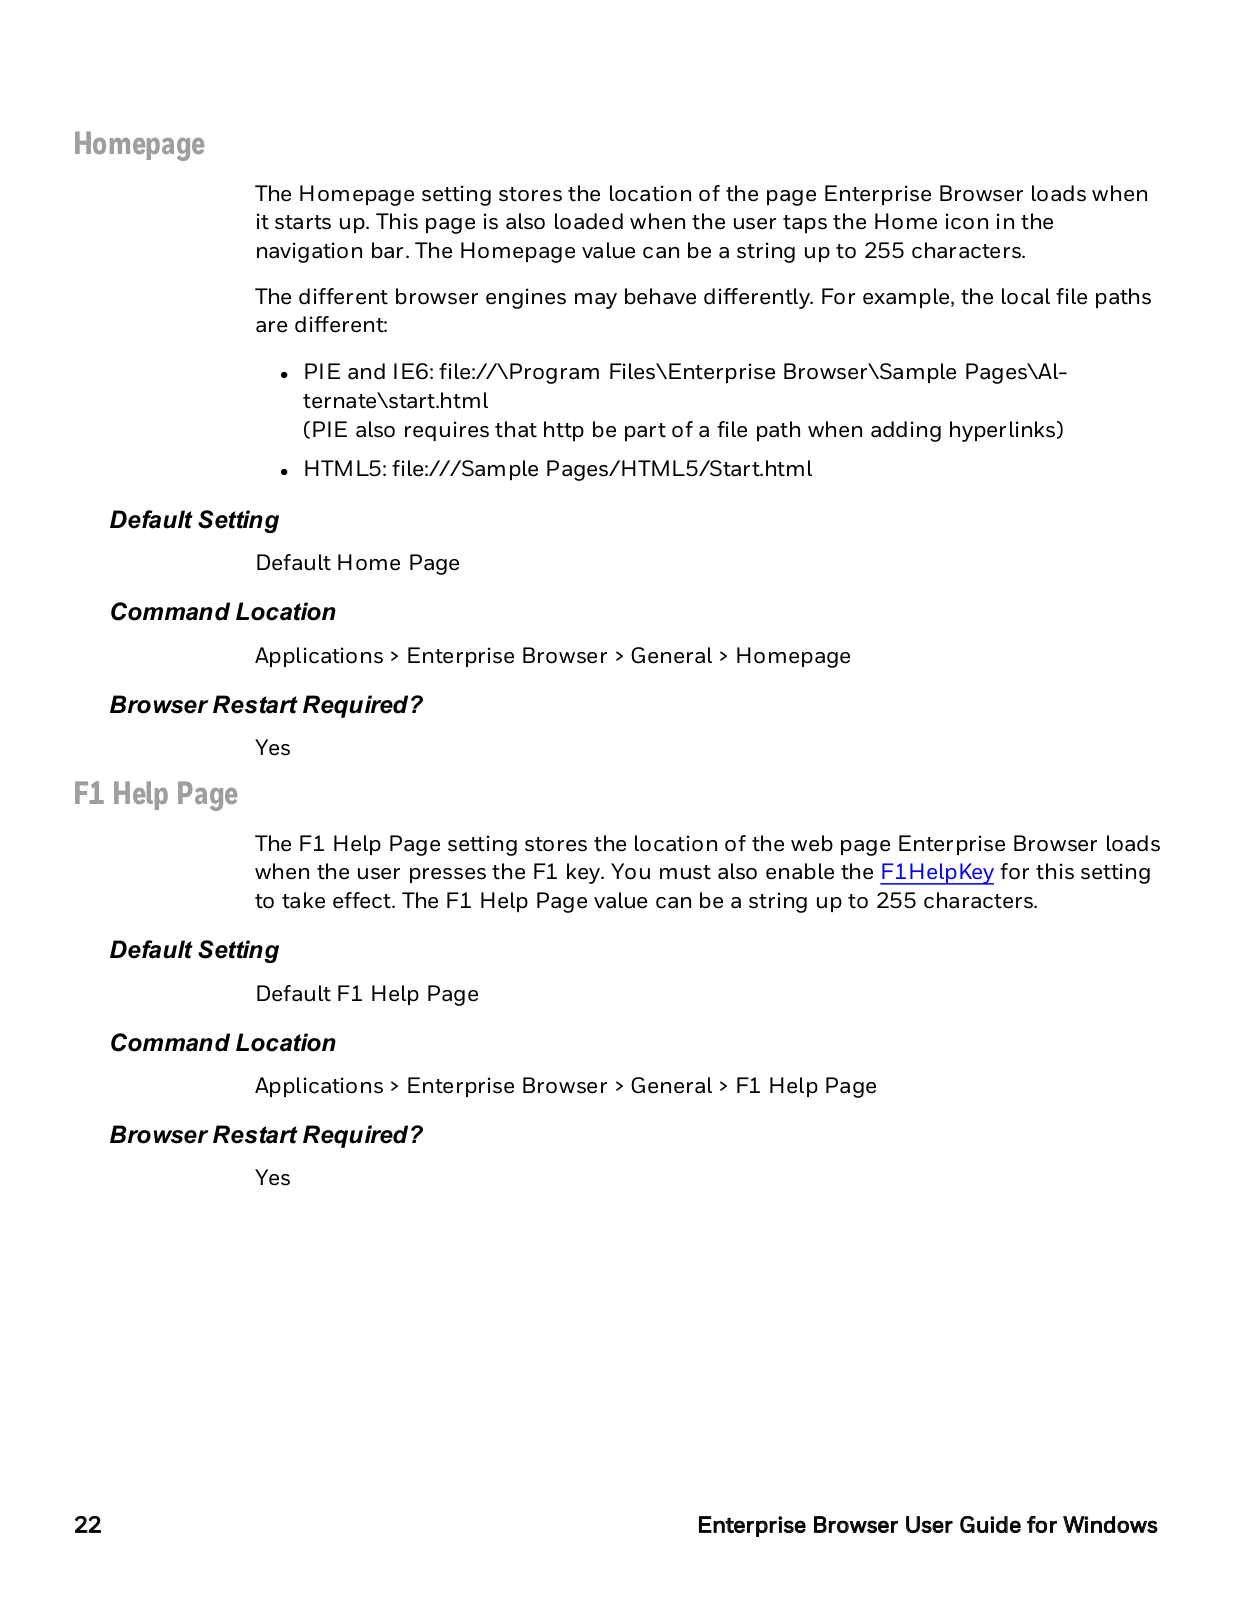
Homepage

The Homepage setting stores the location of the page Enterprise Browser loads when it starts up. This page is also loaded when the user taps the Home icon in the navigation bar. The Homepage value can be a string up to 255 characters.

The different browser engines may behave differently. For example, the local file paths are different:

PIE and IE6: file://\Program Files\Enterprise Browser\Sample Pages\Alternate\start.html

(PIE also requires that http be part of a file path when adding hyperlinks)

HTML5: file:///Sample Pages/HTML5/Start.html

Default Setting

Default Home Page

Command Location

Applications > Enterprise Browser > General > Homepage

Browser Restart Required?

Yes

F1 Help Page

The F1 Help Page setting stores the location of the web page Enterprise Browser loads when the user presses the F1 key. You must also enable the F1HelpKey for this setting to take effect. The F1 Help Page value can be a string up to 255 characters.

Default Setting

Default F1 Help Page

Command Location

Applications > Enterprise Browser > General > F1 Help Page

Browser Restart Required?

Yes

22

Enterprise Browser User Guide for Windows

Loading...
+ 113 hidden pages