

Page 1
ScanPal EDA71
Enterprise Tablet
powered by Android™
User Guide
Page 2

Disclaimer
Honeywell International Inc. (“HII”) reserves the right to make changes in specifications and other information contained in
this document without prior notice, and the reader should in all cases consult HII to determine whether any such changes
have been made. The information in this publication does not represent a commitment on the part of HII.
HII shall not be liable for technical or editorial errors or omissions contained herein; nor for incidental or consequential
damages resulting from the furnishing, performance, or use of this material. HII disclaims all responsibility for the selection and use of software and/or hardware to achieve intended results.
This document contains proprietary information that is protected by copyright. All rights are reserved. No part of this document may be photocopied, reproduced, or translated into another language without the prior written consent of HII.
Copyright 2016-2019 Honeywell International Inc. All rights reserved.
Web Address:
www.honeywellaidc.com
Trademarks
Google and Android are trademarks of Google LLC.
Bluetooth trademarks are owned by Bluetooth SIG, Inc., U.S.A. and licensed to Honeywell.
microSD is a registered trademark of SD-3C, LLC.
Qualcomm and Snapdragon are registered trademarks or trademarks of Qualcomm Incorporated in the United States
and/or other countries.
Other product names or marks mentioned in this document may be trademarks or registered trademarks of other compa-
nies and are the property of their respective owners.
Patents
For patent information, refer to www.hsmpats.com.
Page 3

TABLE OF CONTENTS
Customer Support ........................................................................................................................ ix
Technical Assistance ............................................................................................................. ix
Product Service and Repair ................................................................................................ ix
Limited Warranty .................................................................................................................... ix
Chapter 1 - Tablet Features............................................................................. 1
Features of ScanPal EDA71 Enterprise Tablet................................................................... 1
About EDA71-1 Tablet ........................................................................................................... 1
About the Battery ........................................................................................................................... 3
Charge the Battery Before Use........................................................................................... 4
Replace the Battery................................................................................................................. 4
About the Battery Status....................................................................................................... 6
About the Battery Status LED Setting............................................................................. 6
Check the Battery Level and Usage ................................................................................. 7
About Battery Life and Conservation .............................................................................. 8
Battery Recommendations and Safety Protections................................................... 8
Enable Airplane Mode ........................................................................................................... 9
Power on the Computer............................................................................................................... 9
Unlock the Screen .......................................................................................................................... 9
Change the Screen Lock to Protect the Computer........................................................ 10
Select a Touch Screen Profile to Optimize Performance............................................. 10
Configure the Screen Backlight ............................................................................................ 11
About the Scan Status LED..................................................................................................... 11
About Audio Features ................................................................................................................ 11
Adjust Speaker Volume ...................................................................................................... 12
EDA71 User Guide iii
Page 4

Enable Vibrate Mode............................................................................................................12
Audio Settings ........................................................................................................................12
Insert a microSIM or a microSD Card.................................................................................. 13
How to Transfer Files..................................................................................................................14
Configure USB Connection and Transfer Files .........................................................15
Accessories for the Tablet......................................................................................................... 15
Chapter 2 - User Interface and Applications ............................................ 17
About the User Interface...........................................................................................................17
Navigation and Function Buttons.................................................................................. 18
About Status Bar Icons .......................................................................................................18
Remap a Button or Key........................................................................................................19
Restore Default Button Action .........................................................................................19
View and Manage Notifications ......................................................................................20
Open Quick Settings ............................................................................................................20
Customize the Home Screen ............................................................................................20
Customize the Favorites Tray ........................................................................................... 21
Use Google™ Search.............................................................................................................21
About Screen Gestures .......................................................................................................22
Set the Time Zone..................................................................................................................22
About Honeywell Applications................................................................................................ 23
Applications You Can Download to the Mobile Computer..........................................24
About Honeywell Enterprise Browser............................................................................ 24
About Honeywell Launcher...............................................................................................24
Unlock Developer Options .......................................................................................................25
Chapter 3 - Scan Function............................................................................ 27
Scan Function ............................................................................................................................... 27
About Provisioning Mode...................................................................................................27
Scan a Bar Code with the Scan Demo........................................................................... 27
About the Scan Wedge Feature .......................................................................................28
Change the Scanner Settings.................................................................................................28
Change the Bluetooth Scanner Settings ..................................................................... 28
iv EDA71 User Guide
Page 5

Restore Default Scan Settings .........................................................................................29
Default Scan Settings ..........................................................................................................29
Symbology Settings..............................................................................................................31
Decode Settings.....................................................................................................................31
Imager Settings......................................................................................................................32
Trigger Settings ......................................................................................................................32
Notification Settings ............................................................................................................33
Add a Scan Setting Profile..................................................................................................33
Delete a Scan Setting Profile ............................................................................................34
About the Optional Digital Scan Button .............................................................................34
Enable and Configure the Digital Scan Button .........................................................34
Scan Bar Codes.............................................................................................................................35
About the Scan Engine........................................................................................................36
About Scanning Configuration Bar Codes ..................................................................36
Use the Scan Demo App............................................................................................................36
Change the Scan Demo Symbology Settings ............................................................37
Use the Imager as a Flashlight ........................................................................................37
Chapter 4 - Use the Phone.............................................................................39
About the Phone...........................................................................................................................39
Add or Switch Between Network Carriers ...........................................................................40
About the microSIM Card Slot..........................................................................................40
Activate the Phone ................................................................................................................40
Make a Phone Call .......................................................................................................................41
Answer the Phone ........................................................................................................................41
Switch Apps During a Phone Call....................................................................................42
Make an Emergency Phone Call ............................................................................................42
Configure Phone Settings ........................................................................................................42
Chapter 5 - Use the Camera ..........................................................................43
About the Color Camera ............................................................................................................43
How to Zoom............................................................................................................................43
Take a Photo...................................................................................................................................44
EDA71 User Guide v
Page 6

Change Camera Settings..........................................................................................................44
Record a Video ..............................................................................................................................45
Change Video Settings ..............................................................................................................45
Use the Camera as a Flashlight .............................................................................................45
Chapter 6 - Configure the Tablet ................................................................ 47
How to Configure the Tablet....................................................................................................47
Start the Settings App .........................................................................................................47
About the Structure of the Settings App ......................................................................47
About Network Communications ..........................................................................................54
Connect to a Wi-Fi Network ..............................................................................................54
Connect to an Ethernet Network.....................................................................................56
How to Connect to Virtual Private Networks .............................................................. 57
About Wireless Security.............................................................................................................58
About Certificates .................................................................................................................58
About Bluetooth Communications.......................................................................................59
Connect a Bluetooth Device .............................................................................................60
Rename the Computer and View File History ............................................................ 60
Rename, Share, or Unpair a Paired Device..................................................................61
About the Scanner Edge App............................................................................................61
About Serial and USB Communications.............................................................................62
USB Troubleshooting........................................................................................................... 62
How to Share Your Mobile Data Connection ....................................................................63
Share the Data Connection Through USB or Bluetooth........................................63
About Near Field Communication (NFC) ...........................................................................63
Developer Information............................................................................................................... 64
About Provisioning Mode .........................................................................................................65
Enable or Disable Provisioning Mode...........................................................................65
Chapter 7 - Mange and Maintain the Tablet............................................. 67
About Software Updates ........................................................................................................... 67
About Transferring Files via USB Connection ...........................................................67
Install Software Updates with AutoInstall .........................................................................68
vi EDA71 User Guide
Page 7

Optional microSD Card Method ......................................................................................68
About the Honeywell Upgrader ..............................................................................................69
How to View the Installed OTA Version .........................................................................69
Install OTA Updates..............................................................................................................70
Reboot (Restart) the Computer..............................................................................................71
About Enterprise Data Reset ...................................................................................................71
Before You Begin....................................................................................................................71
Enterprise Data Reset the Computer.............................................................................72
About Full Factory Reset ...........................................................................................................72
Before You Begin....................................................................................................................72
Full Factory Reset the Computer.....................................................................................73
Clean the Tablet ............................................................................................................................73
Appendix A - Specifications ..........................................................................75
Computer Agency Information ...............................................................................................75
Label Locations......................................................................................................................75
Physical and Environmental Specifications .....................................................................75
Bar Code Symbologies Supported ........................................................................................76
N6703 Imager Engine Reading Distances..................................................................77
N6703 Imager Engine Field of View/Resolution ......................................................77
EDA71 User Guide vii
Page 8

viii EDA71 User Guide
Page 9

Customer Support
Technical Assistance
To search our knowledge base for a solution or to log in to the Technical Support
portal and report a problem, go to www.hsmcontactsupport.com.
For our latest contact information, see www.honeywellaidc.com/locations.
Product Service and Repair
Honeywell International Inc. provides service for all of its products through service
centers throughout the world. To obtain warranty or non-warranty service, return
your product to Honeywell (postage paid) with a copy of the dated purchase
record. To learn more, go to www.honeywellaidc.com and select Service & Repair at
the bottom of the page.
Note: The following paragraph is used only in Mobility User Guides:
For ongoing and future product quality improvement initiatives, the tablet comes
equipped with an embedded device lifetime counter function. Honeywell may use
the lifetime counter data for future statistical reliability analysis as well as ongoing
quality, repair and service purposes.
Limited Warranty
For warranty information, go to www.honeywellaidc.com and click Get Resources >
Product Warranty.
EDA71 User Guide ix
Page 10

x EDA71 User Guide
Page 11

CHAPTER
1
TABLET FEATURES
This chapter introduces the ScanPal EDA71 Enterprise tablet. Use this chapter to
learn about the basic computer features, functions, and accessories.
Features of ScanPal EDA71 Enterprise Tablet
ScanPal EDA71-0 and EDA71-1 (hereinafter called “EDA71” or “tablet”) with
Android operating system will be introduced in this chapter. Users can learn
something about the main features, functions and accessories of the tablet from
this chapter.
About EDA71-1 Tablet
Honeywell EDA71-1 Enterprise Tablet is a smart phone for enterprise users,
delivering stable and secure enterprise data management and wireless
communications through Android operating system. The main features of ScanPal
EDA71-1 are: large-screen display, high-capacity battery, barcode imaging and
extreme robustness.
• Android™ OS.
• 2 GB dynamic RAM and 32GB flash memory / 4 GB dynamic RAM and 64GB
flash memory.
• Large display with sensitive multi-touch screen.
• High-performance area imaging features with an ergonomic scan trigger.
• LTE/UMTS/CDMA/GSM wireless WAN communications ensure high-speed
data transmission and high-fidelity sound support for all network
technologies.
• IEEE 802.11a/b/g/n/ac.
•Bluetooth 4.2.
• Near-field communication (NFC) technology for short-range wireless data
transmission.
EDA71 User Guide 1
Page 12
• High value-added software components support professional imaging and
Optical Character Recognition (OCR) features.
• IP64 Ingress Protection.
• Reliable Micro SD slot that supports up to 128GB expansion.
• Integrated GPS receiver.
• 13 mega pixel color camera.
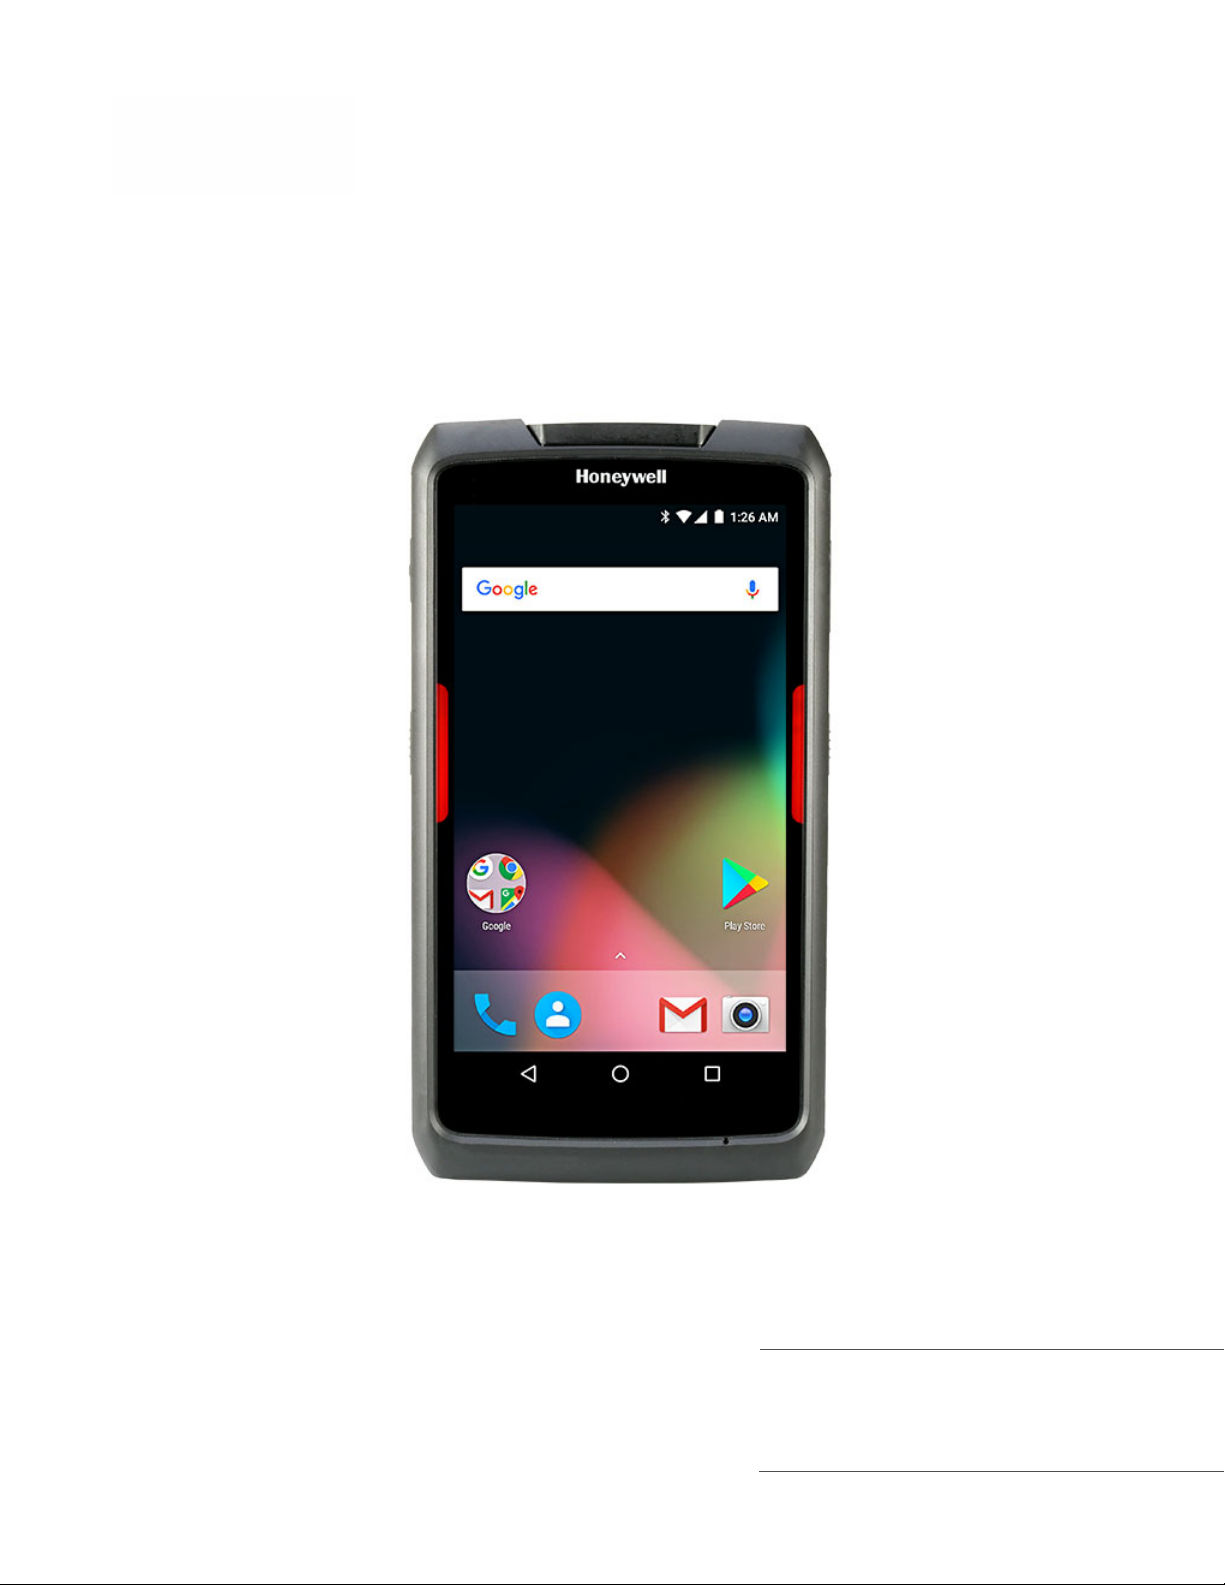
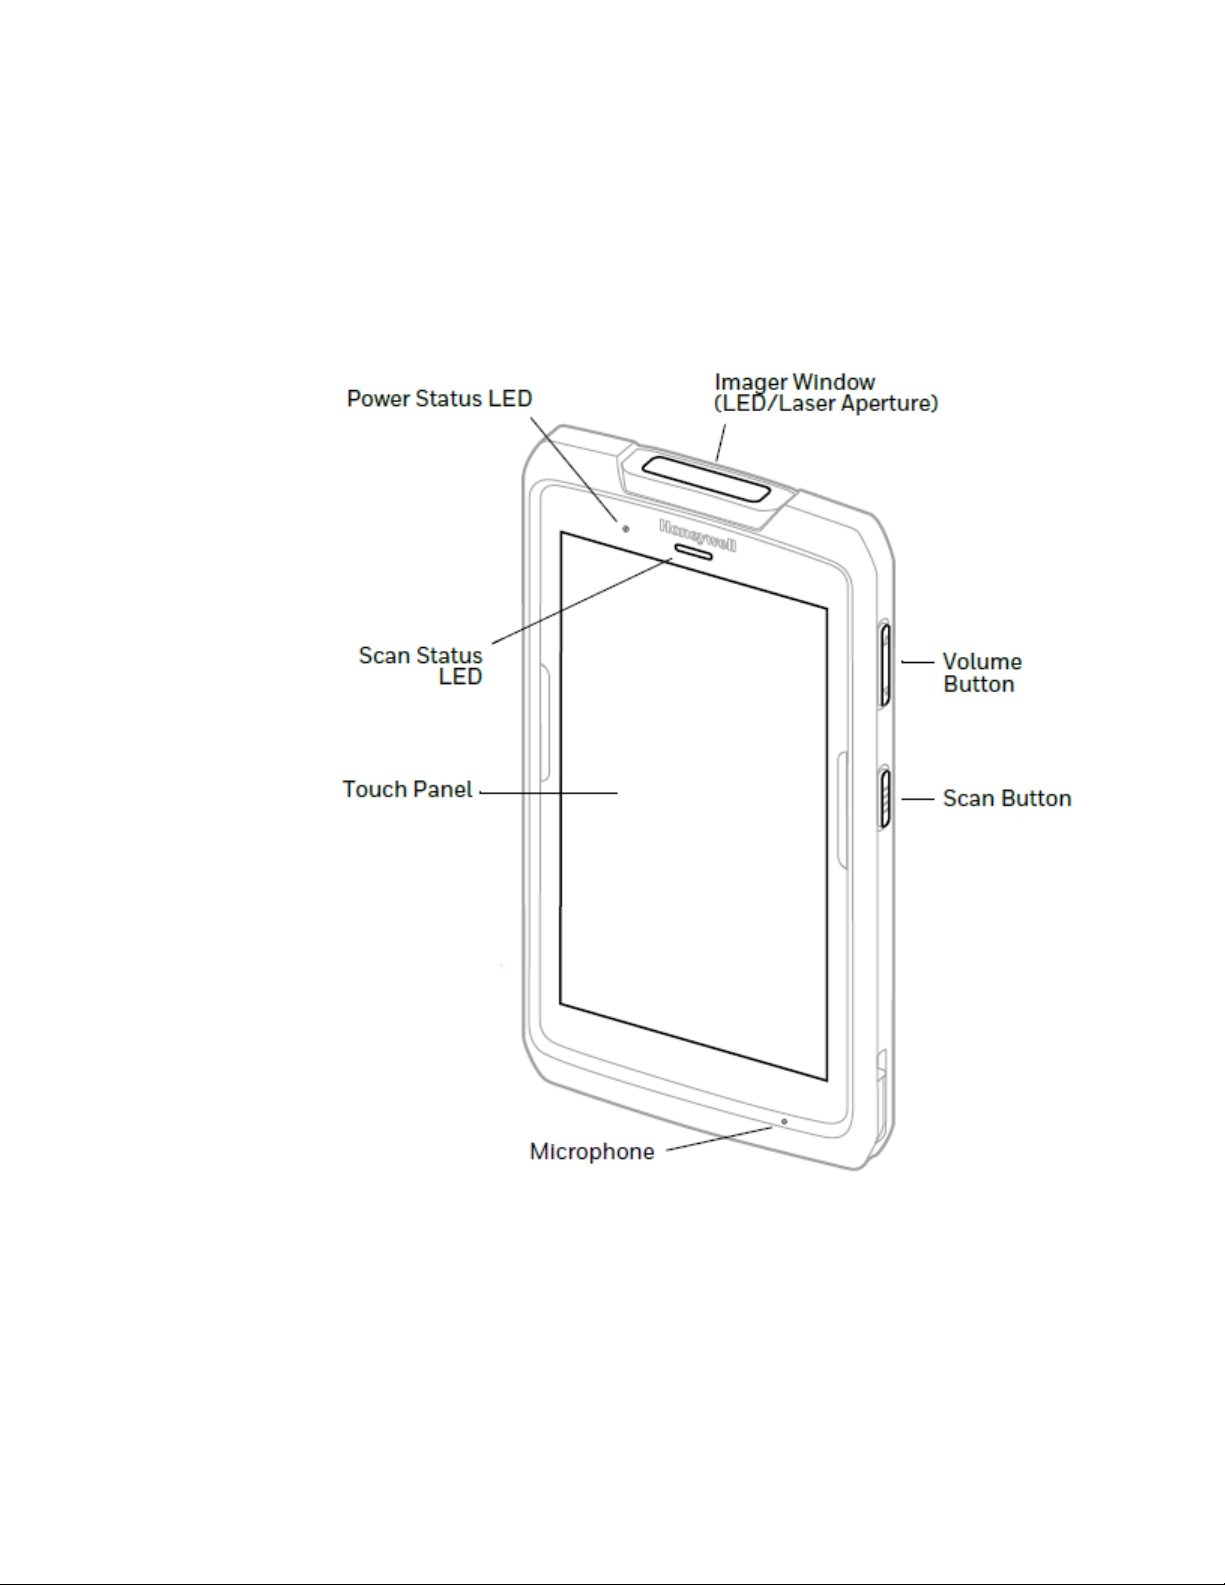
Front View
2 EDA71 User Guide
Page 13
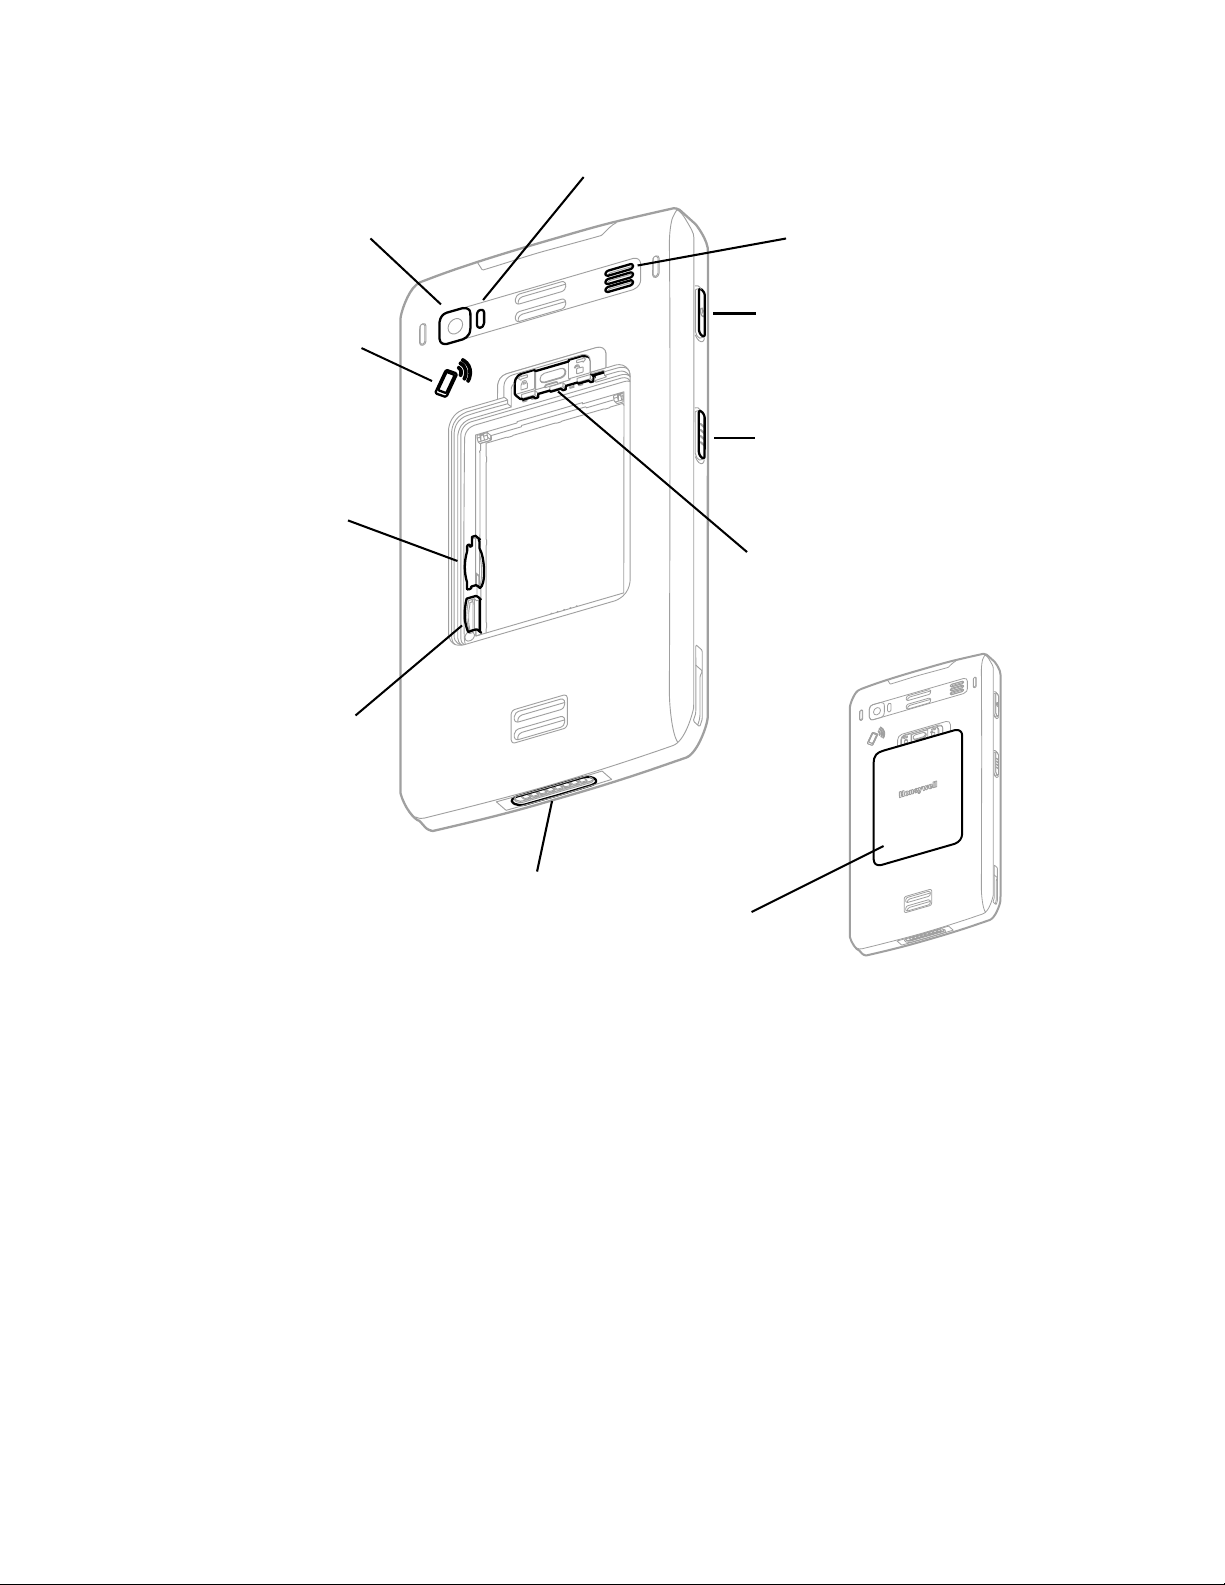
Back View
Camera Flash/Flashlight
Speaker
Power Button
Scan Button
Battery Door Latch
Battery Door
I/O Connector
microSD
Card Slot
SIM Card
Cover/Slot
NFC
Antenna
Location
Camera
Lens
About the Battery
EDA71 uses 3.8V rechargeable lithium ion battery as its main power supply. The
battery capacity is 15.2 watt/hour. Battery life is influenced by many factors, such
as: screen brightness, the length of time before the screen automatically go to
sleep, input configurations, extreme temperature and using behaviors, etc.
Note: Honeywell suggests you to keep the battery charged to avoid data loss. Change
battery only after switching off the device as per normal. Switch on the device after
completing change of battery.
If you need to buy a replaceable battery, please contact regional resellers.
Honeywell recommends using only a Honeywell lithium battery; any damage
caused by use of non-Honeywell battery is not covered by warranty.
EDA71 User Guide 3
Page 14

Warning: Improper use of the battery in this device can cause fire or
chemical burns. Please do not disassemble the battery or heat
it to 100°C (212°F) and above, or incinerate the battery. Make
sure waste batteries are properly disposed. Keep out of reach
of children.
Warning: Do not store the battery without using for a long period of time.
If storing the battery for over 3 months, please make sure to
check the remaining battery power capacity is at least 30%
every 3 months.
Charge the Battery Before Use
Before using EDA71, you need to make sure the battery (model number: BATEDA50) is fully charged. You can charge the battery before or after installing it to
EDA71. It will take about 5 hours for the battery to be fully charged using original
charger, quad bay charger, single cradle charger.
Note: Honeywell recommends recommend using Honeywell’s original charger; any
damage caused by use of non-Honeywell charger is not covered by warranty.
Warning: Ensure all components are dry prior to mating the computers
and batteries with peripheral devices. Mating wet components
may cause damage not covered by the warranty.
Note: Using the computer while charging the battery increases the time required to reach
a full charge.
Replace the Battery
If your battery power is low, you need to either charge the battery in the computer,
or replace it with a charged battery.
To recharge the battery:
1. Save all files and close any open applications.
2. Press and hold the Power button until the options menu appears:
3. Tap Battery Swap. Follow the on-screen instructions to place the unit in battery
swap mode.
Once the tablet is powered off:
4 EDA71 User Guide
Page 15
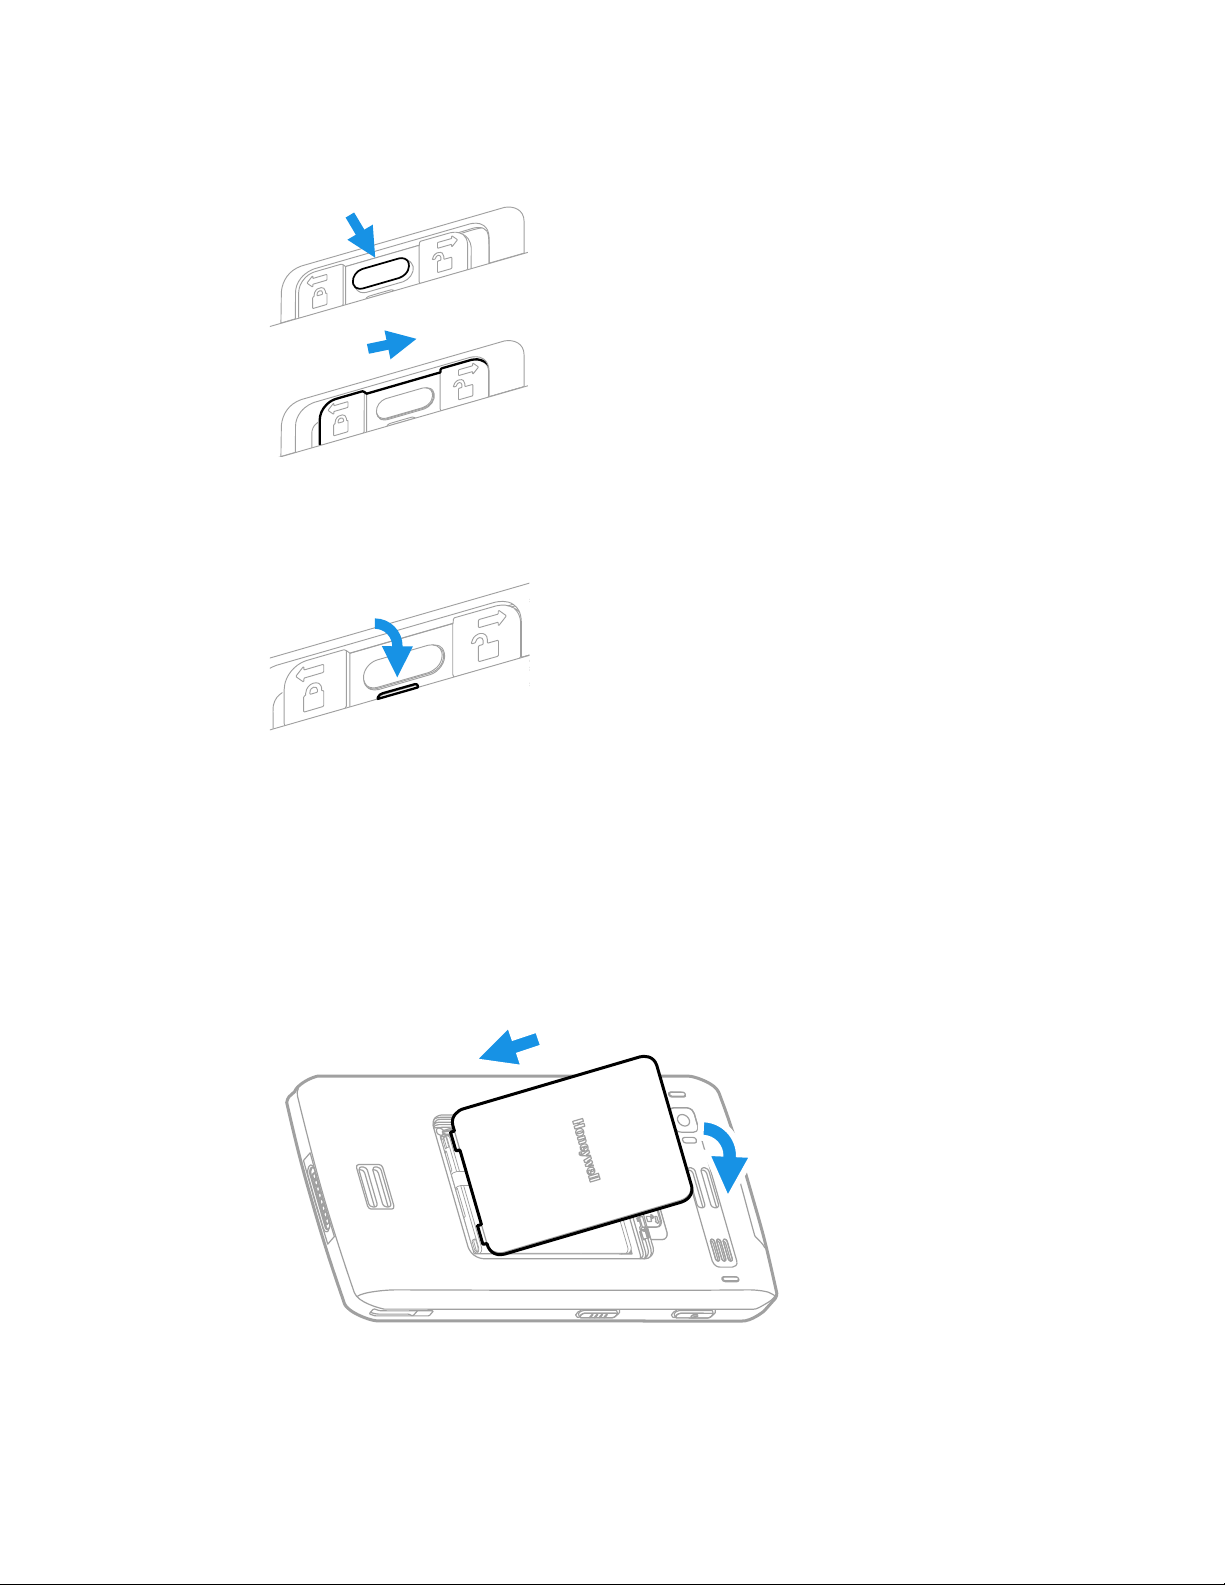
1. Press down the battery cover safety button to move the lock to the unlock
position.
2. Open the battery cover with the battery cover buckle handle
3. Insert the battery (insert the non-connector side first, then press the battery
down to establish a connection between the battery and the phone).
4. Press down the battery cover.
5. Press down the battery cover safety button to move the battery cover safety
lock to the lock position.
EDA71 User Guide 5
Page 16
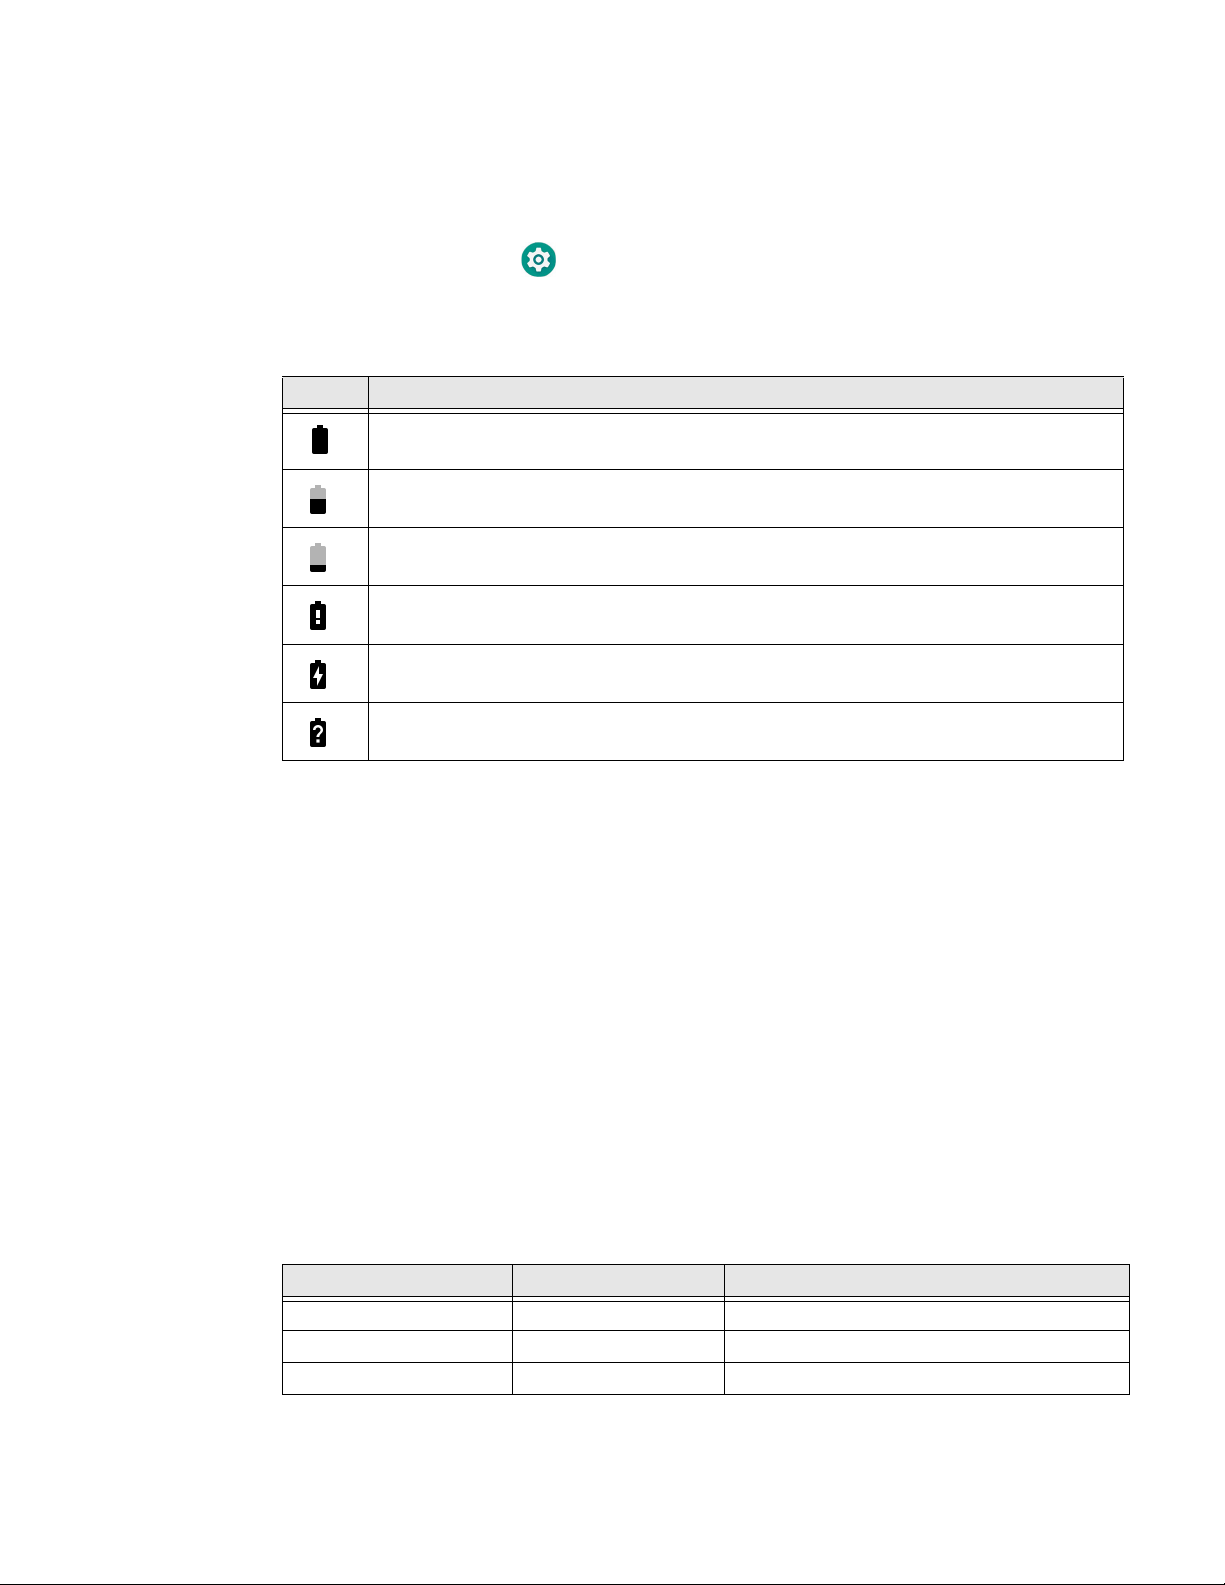
About the Battery Status
Use the battery icon in the Status bar at the top of the screen to see the charge
level of your battery. If you want more detailed information on your battery, such as
usage time, charge remaining on the battery, or battery health information,
open the Settings app and tap either Battery Honeywell Settings or Battery
Optimizer.
Battery Status Icons
Icon Status
The battery charge is at 100%.
The battery charge is at 50%.
The battery charge is low. You need to charge or replace the battery soon.
The battery is critically low. You need to replace the battery now or connect the computer to
a charging accessory.
The computer is connected to external power and the battery is charging.
There is a battery error. Install another battery. If the problem persists, contact Honeywell
technical Support.
The Battery status LED appears in the upper right corner of the touch screen. The
LED color and behavior (e.g., steady on, blinking, off) indicates the charging status
of the battery. To view status descriptions and to learn how to modify the Battery
LED behavior, see About the Battery Status LED Setting on page 6.
About the Battery Status LED Setting
You can change the behavior of the Battery status LED if the out-of-box behavior
for a charging battery (blinking green) is not acceptable to your environment.
You can choose one of three options:
• Honeywell Battery LED (factory default, out-of-box configuration)
• Default Battery LED (optional Android OS configuration)
• No Battery LED
Honeywell Battery LED Behavior (Factory Default/Out-of-Box Configuration)
Connected to Power LED State Description
No Blinking amber Battery level is below 15%
No Off Battery level is more than 15%
Yes Steady amber Battery level is between 0% and 60%
6 EDA71 User Guide
Page 17

Connected to Power LED State Description
Yes Blinking green Battery level is between 60% and 95%
Yes Steady green Battery level is above 95%
Either Blinking red Battery error
Default Battery LED Behavior (Optional Android OS Configuration )
Connected to Power LED State Description
No Blinking red Battery level is below 15%
No Off Battery level is 15% or more
Yes Steady red Battery level is below 15%
Yes Steady amber Battery level is between 15% and 90%
Yes Steady green Battery level is 90% or more
No Blinking red Battery level is below 15%
Select the No battery LED setting if you want to use the LED as a notification LED
for applications or device management solutions. For more information on how to
use the LED as a notification LED, see http://developer.android.com/guide/
topics/ui/notifiers/notifications.html.
Change the Battery LED Status Behavior
To change the battery status LED behavior:
1. Swipe up from the bottom of the Home screen to access all apps.
2. Tap Settings > Honeywell Settings > Battery LED.
3. Choose one of the options:
• Default Battery LED (optional Android OS configuration)
• Honeywell Battery LED (factory default/out-of-box configuration)
• No Battery LED
Check the Battery Level and Usage
In addition to the Battery status icon and LED, you can monitor the battery status
from the Settings app.
1. Swipe up from the bottom of the Home screen to access all apps.
2. Tap Settings > Battery.
The current percentage of battery power remaining and the amount of usage time
left on the battery appear on the screen. A list shows the battery usage for
individual apps and services. For usage details, select one of the apps or services in
the list. You can also access the Battery saver feature from the battery screen.
EDA71 User Guide 7
Page 18

About Battery Life and Conservation
If you store the battery outside of the computer for long periods of time, the battery
slowly discharges. To maintain battery performance, storing the battery in a
charger is recommended. Use the reference table below to learn about how to
conserve battery power.
When You Want to: Do this to Save Battery Power:
Use the computer and
the low battery status
icon appears or the
battery light turns on.
Stop using the
computer for
5 minutes or more.
Store the computer for
more than a day.
Store the battery
outside of the
computer.
Do one of the following:
• Connect the computer to a charging accessory.
• Replace the Battery (see page 4).
Make sure that the low battery status icon is not on the screen and that
the battery status LED is not on. Press and release the Power button to
put the computer to sleep.
• If you are storing the computer for a few days (e.g., over the weekend),
install a fully charged battery or connect the computer to a power
source.
• If you are storing the computer for a longer period of time, remove and
charge the battery. When the battery is done charging, store both the
battery and the computer in a cool location.
• If you store the battery for several months, recharge the battery
periodically to keep it at peak performance.
Store the batteries in a charger.
Battery Recommendations and Safety Protections
Caution: Improper battery replacement or incompatible device usage may
result in risk of burns, fire, explosion, or other hazard. Dispose of
lithium-ion batteries according to local regulations. Risk of fire and
burns if improperly handled. Do not open, crush, heat above 50°C
(122°F), or incinerate.
• Fully charge the battery before using it. The battery is only partly charged when
get packed.
• Refer to the chapter "charging" to get the right process for battery charging.
Using the battery for other devices may cause damages on the device or the
battery.
• Avoid battery or tablet drops. If you suspect that a battery or tablet fails, send it
to Honeywell service center for verification.
• This battery can only replace another BAT-EDA71-X battery. These batteries
have been tested and meet the appropriate safety standards. If you need to
replace the battery, please contact Honeywell service representatives or the
resellers.
8 EDA71 User Guide
Page 19

• There are security risks in waste batteries. Before cleaning up the battery, stick
the poles with insulation tape.
• Do not modify the battery or attempt to insert foreign objects into the battery.
• Do not solder directly to the battery poles.
• Do not short connect the battery and put the battery away from metal objects.
• Do not drop or mechanically shock or extrude the battery.
• Do not disassemble or open the battery. Do not crush, bend or deform the
battery; Do not puncture, shred or burn the battery.
• Do not immerse the battery in water.
Enable Airplane Mode
If you do not need to connect to any wireless networks, you can enable Airplane
mode to turn Off the radios and save battery power.
1. Swipe up from the bottom of the Home screen to access all apps.
2. Tap Settings > Wireless & Networks.
3. Tap the toggle button next to Airplane mode. An airplane icon appears in the
status bar to indicate Airplane mode is turned On.
Power on the Computer
After you have fully charged and installed a battery, power on the computer for the
first time:
•Press and hold the Power button for approximately 3 seconds, and then release
the button.
Unlock the Screen
The screen lock automatically activates every time the computer is turned On or
when the computer wakes from sleep mode.
• Swipe up from the lock icon at the bottom of the screen.
The level of security provided depends on the type of lock set (e.g., Swipe, Pattern,
PIN, or Password). The default setting, Swipe, provides no protection against unauthorized access to your computer.
EDA71 User Guide 9
Page 20

Change the Screen Lock to Protect the Computer
After you start using the computer, you should change the screen lock to prevent
unauthorized persons from accessing the computer after the screen lock activates
unless they input the correct password, pin, or pattern.
The recommended setting for the Screen lock is to enable a Password lock. Use a
strong password value (e.g., include numbers, characters, special characters, and
mix character case).
1. Swipe up from the bottom of the Home screen to access all apps.
2. Tap Settings > Security & location > Screen lock.
3. Choose one of the following options:
•None
• Swipe
• Pattern
•PIN
•Password
4. Follow the on-screen prompts to complete the setup.
Exit the Settings app.
Select a Touch Screen Profile to Optimize Performance
Optimize screen interactions by selecting a touch screen profile designed
specifically for your use case. For example, if you wear gloves, set the touch screen
profile to Glove use enhanced for the best touch screen response.
Note: Maximum glove thickness of 2 mm (0.08 inches) for touch screen response.
1. Swipe up from the bottom of the Home screen to access all apps.
2. Tap Settings > Honeywell Settings.
3. Choose one of the following option:
• Glove enhanced mode
4. Exit the Settings app.
10 EDA71 User Guide
Page 21
Configure the Screen Backlight
The display has an ambient light sensor that automatically adjusts the backlight
intensity to conserve power and ensure the display is readable. You can also
manually set the backlight intensity if you do not want to use the automated
adaptive brightness feature.
1. Swipe up from the bottom of the Home screen to access all apps.
2. Tap Settings > Display.
3. Choose one of the following options:
• To have the computer automatically adjust the brightness for your work
environment, turn On the Adaptive brightness setting. You can tap
Adaptive brightness to toggle the feature On or Off.
4. To set the brightness level manually, verify the Adaptive brightness feature is
turned Off, and tap Brightness level. Adjust the slider to set the brightness
level.
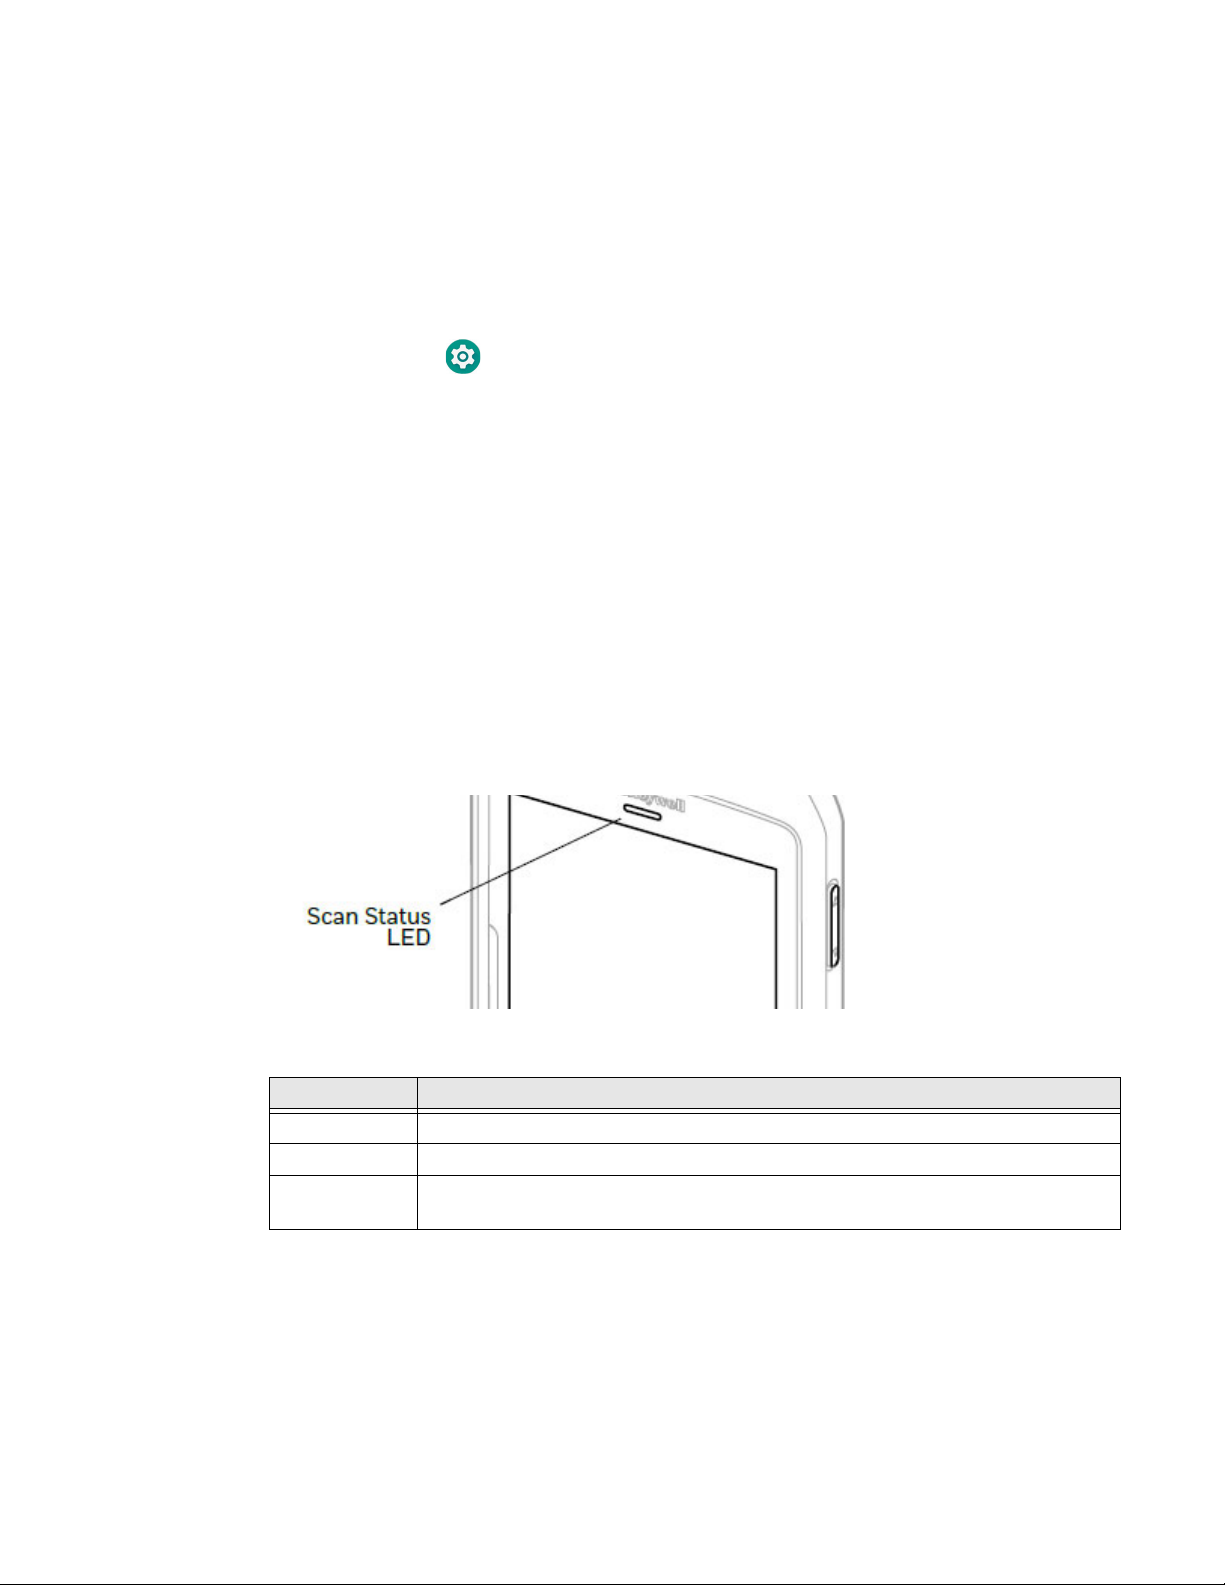
About the Scan Status LED
The Scan Status LED indicates the read status of the imager when scanning a bar
code.
Scan Status LED Descriptions
LED Color Description
Green Good read of a bar code.
Blinking green The data collection engine is processing or starting up.
Red Failure to scan bar code.
Check to make sure you have the correct symbology enabled.
About Audio Features
EDA71 is equipped with a speaker, receiver, and software utilities for volume
setting.
Adjusting the ringtone volume for calls and messages with the volume key on the
side of the tablet, you can quickly adjust the ringtone volume.
EDA71 User Guide 11
Page 22

Adjust Speaker Volume
Use the volume buttons on the side of the tablet to adjust the volume of ringtones,
media, notifications, and alarms.
1. To change the volume on the active speaker, do one of the following:
•Press the Volume Up button.
•Press the Volume Down button.
• Press any Volume button and drag the on-screen slider to the left to lower
the volume or to the right to raise the volume.
2. (Optional) Tap the down arrow to expand the options.
Use the stylus or the volume buttons to adjust each volume type.
• Use the slider for notifications and rings.
• Use the slider for media (e.g., music, videos).
• Use the slider for alarms.
Enable Vibrate Mode
You can use the Volume down button to quickly enable Vibrate mode so the computer vibrates instead of emitting sound for notifications and rings. If you still want
to hear alarms, turn On the Alarms Only feature.
1. Press the Volume down button until the computer vibrates.
2. To turn On the Alarms Only feature, press the Volume down button again with
the volume slider open. The status bar at the top of the screen indicates the
active mode:
• When Vibrate mode is active, appears.
• When Alarms Only mode is active, the Do Not Disturb icon appears.
Audio Settings
This section describes the audio settings you an configure in the Settings app.
To change audio settings, select the Settings app and tap Sound.
Note: Sound settings are model dependent. Some settings may not be available for your
model type.
12 EDA71 User Guide
Page 23

Sound Settings
Setting Description
Media Volume Use the sliders to set the volume for media (e.g., music, videos, and
Alarm Volume
Ring Volume
Also Vibrate for calls Select to enable vibrate mode when the phone is ringing.
Do not disturb Select to set which notifications to let through when you have Do
Phone ringtone Select a default ringtone.
Default notification
ringtone
Default alarm ringtone Select a alarm sound.
Emergency
broadcasts
Other sounds
Dial pad tones Enable or disable an audio sounds when you use the phone dial pad.
Screen locking sounds Enable or disable an audio tone when the screen is locked.
Charging sounds Enable or disable an audio tone when the computer is charging.
Touch sounds Enable or disable audio sounds when you use the touch screen.
Vibrate on tap Enable or disable vibrate mode when you touch the screen.
games), alarms, and rings (notifications and ringtones).
Not Disturb turned On and when you want to be left alone.
Select a notification sound.
Select to configure Emergency alert settings.
Turn alerts On or Off, specify tone, vibrate or text-to-speech.
Insert a microSIM or a microSD Card
Only EDA71-1 (WWAN) models support SIM card use for cellular phone features.
SIM slot feature on EDA71-0 (WLAN) models is limited to UICC card use for NFC
Secure Element NFC link encryption only.
Note: Format the memory card before initial use.
Caution: Always power off the computer before attempting to install or
remove a card.
1. Save your files and close any open applications.
2. Press and hold the Power button until the options menu appears.
3. Tap Power Off.
4. Press down the battery cover safety button to move the lock to the unlock
position at right.
5. Open the battery cover with the battery cover buckle handle.
6. Open the battery connector side, then pull out the battery.
7. Open the micro card’s silicone cover
8. Open the card cover and insert the card.
EDA71 User Guide 13
Page 24
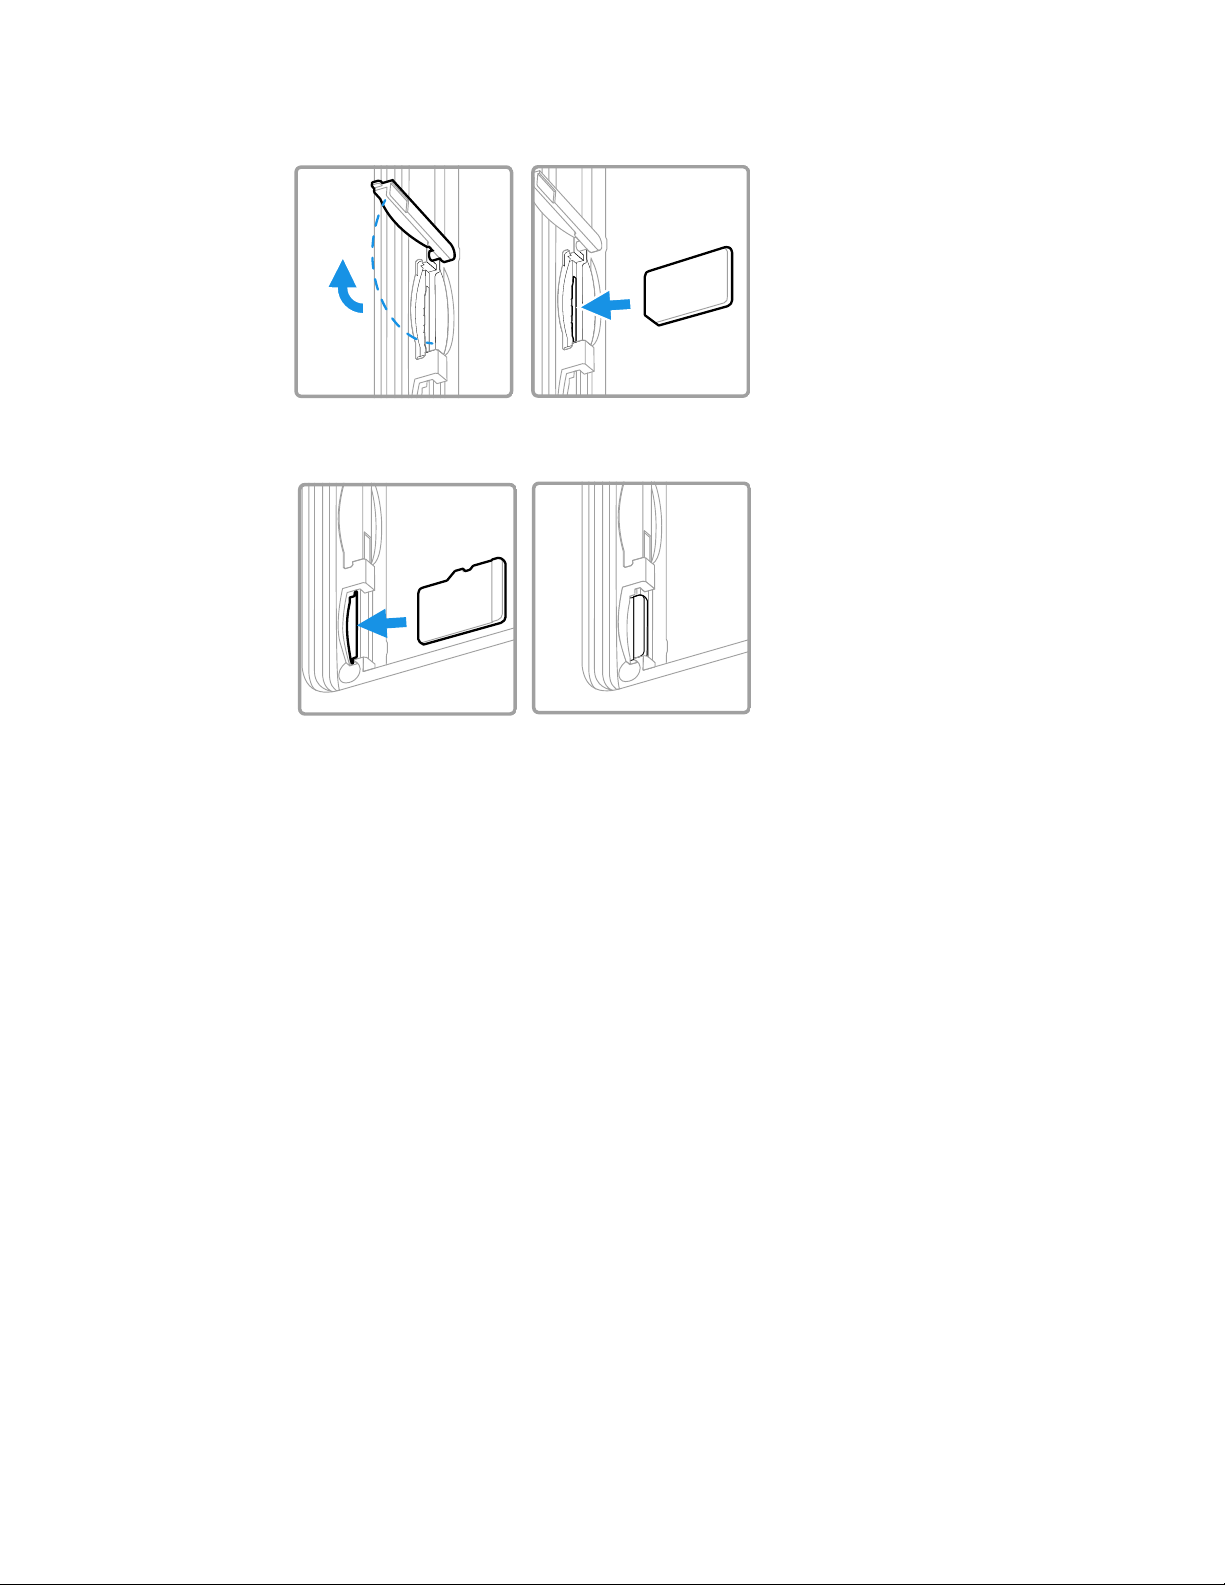
microSIM
microSD
9. Close the card cover and silicone cover.
10. Insert the battery (first insert one end before pressing the other end in order for
the battery to be connected to the device).
11. Press to lock the battery cover.
12. Press down the battery cover and slide the battery cover handle to lock it.
13. Turn on the device.
How to Transfer Files
To transfer files you need to physically connect the tablet to your workstation (e.g.,
laptop or desktop computer) through a USB connection. When the tabletis connected and USB is configured for file or photo transfer, use a file browser (e.g., File
Explorer or Windows Explorer) on your workstation to transfer files between the two
computers. If you are transferring files to and from a Mac, use the Android File
Transfer application (available from www.android.com/filetransfer).
Note: File transfer through a USB connection is disabled by default. You need to configure
the USB connection for transferring files or photos.
14 EDA71 User Guide
Page 25

Configure USB Connection and Transfer Files
The EDA71 supports Hi-Speed USB communications (USB2.0) with maxium data
transfer rate of 480 Mbps.
1. Connect your tablet to your workstation.
2. On the tablet, swipe down from the top of the screen to see the notifications.
3. Tap the Android System USB charging notification twice to open the options
menu.
4. Select either Transfer files or Transfer photos (PTP).
5. Open the file browser on your workstation.
6. Browse to the EDA71. You can now copy, delete, or move files between the
EDA71 and your workstation.
Accessories for the Tablet
The EDA71 ships with a partially discharged battery. All other accessories are
ordered and shipped separately.
For more information about accessories, see the ScanPal EDA70/EDA71 Series
Tablet Accessories Guide at www.honeywellaidc.com.
EDA71 User Guide 15
Page 26

16 EDA71 User Guide
Page 27
CHAPTER
2
USER INTERFACE AND APPLICATIONS
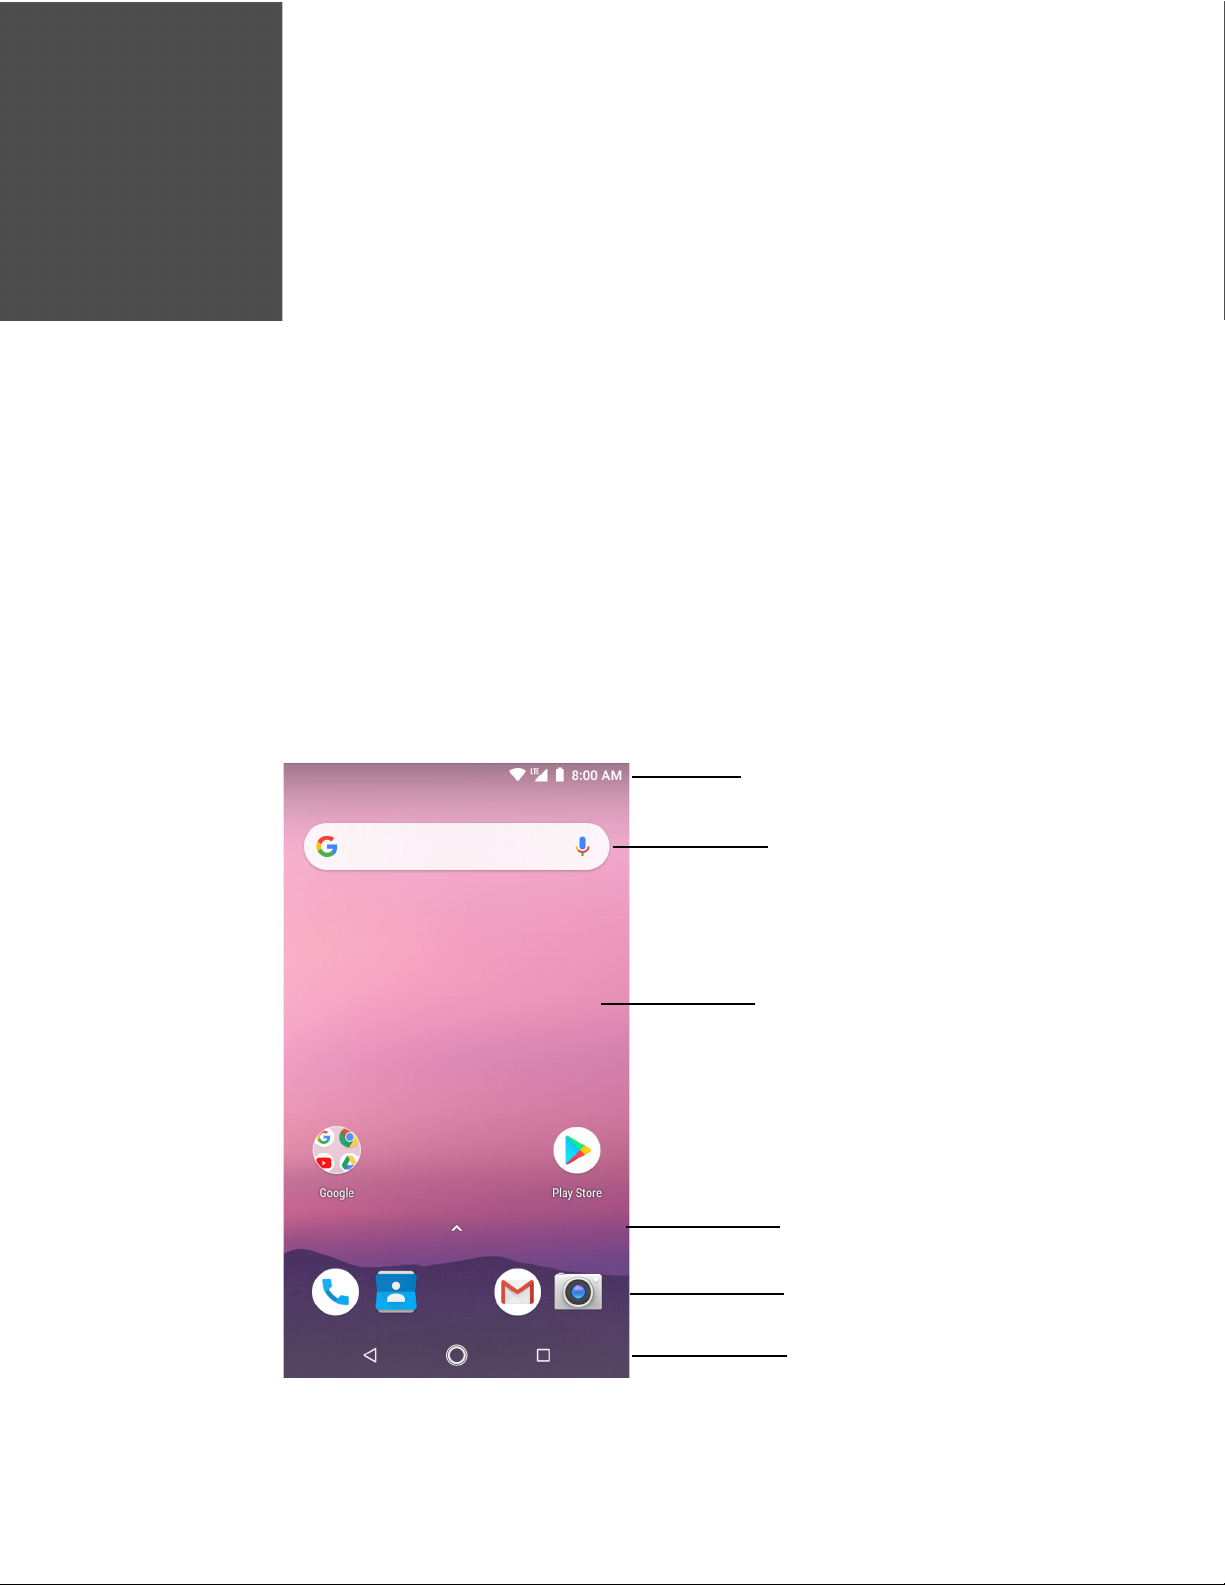
Notification/Status Bar
Search Bar
Home Screen Panel
Swipe up to access all apps
Favorites Tray
Navigation Buttons
Use this chapter to learn about the user interface and how to interact with the
screen. You can also use this chapter to learn about the Honeywell applications on
the tablet.
About the User Interface
The Android 8.1 operating system provides a touch-friendly and easy- to-navigate
user interface. When you turn On the tablet, the Home screen is the first screen
that appears after language provisioning and the startup Wizard is complete.
EDA71 User Guide 17
Page 28

Home Screen Features
Item Description
Notifications Panel/
Status Bar
Common Applications The applications on this bar will be displayed on the main interface.
Search Bar Search the Internet or the computer using Google™.
Home Screen Panel You can create more than one custom Home screen panel. Swipe left or
Favorites Tray App icons in the customizable tray are visible on all Home screen panels.
Status icons to the left tell you when an app has sent notifications, such
as an arriving message. System icons to the right display the current
wireless and network connection state and battery level.
Touch the microphone icon in the search box to initiate a voice search or
command.
right on the Home to switch between your custom panels.
Navigation and Function Buttons
Your tablet has virtual buttons on the front panel below the common
applications in the main interface and hardware buttons located on the sides for
easy and quick feature access when using the tablet.
Navigation and Function Buttons
Button Description
Back Return to previous screen.
Home Return to the Home screen.
Recent Apps View and switch between recently used apps.
Volume Raise or lower the volume of the active speaker.
Scan Press the right or left scan button to trigger the
Power Turn on, turn off, and lock screen on the tablet.
About Status Bar Icons
Status and notification icons show you the current status of your network, the
battery, notifications, and sounds. Use the table below to understand some of the
most common icons.
For button location on tablet, see Features of
ScanPal EDA71 Enterprise Tablet on page 1.
scanner.
18 EDA71 User Guide
Page 29

Status and Notification Icons
Icon Description Icon Description
Pending alarm and Alarm is set Vibrate mode is turned On
New text message or
multimedia message
Error with text or multimedia
message delivery
New email SD card is full
Computer is connected to a PC
with a SUSB cable
Synchronizing data Fi-Fi network is connected but no
Error with sync or sign-in Phone connected with full amount
Computer is connected with
Ethernet
Remap a Button or Key
You can change the default function of the physical buttons and keys.
1. Swipe up from the bottom of the Home screen to access all apps.
2. Tap Settings > Honeywell Settings > Key Remap.
Airplane mode is turned On
Bluetooth is turned On
Wi-Fi network is connected with full
signal strength
signal strength
of bars
Phone connected with full amount
of bars but no internet connection
3. Tap the plus sign (+).
4. Press the button or key you want to remap.
5. Tap OK.
6. Tap Keys or Applications to view the available functions.
7. Select the function you want assigned to the button. The function you selected
now appears next to the button or key name.
Restore Default Button Action
To restore the default button action:
1. Swipe up from the bottom of the Home screen to access all apps.
2. Tap Settings > Honeywell Settings > Key Remap.
3. Tap the clean icon .
4. Choose the remapped button(s) you want restored to the default setting(s).
EDA71 User Guide 19
Page 30

• Tap the check box next to the button.
OR
•Tap All Select to choose all the buttons.
5. Tap Delete.
View and Manage Notifications
You can view recent events on the computer, manage system notifications, change
a setting or quickly respond to an app notification by opening the notifications
panel.
When a notification icon appears in the status bar at the top of the screen:
1. Swipe down from the top of the screen to open the notifications panel.
2. Respond to the notification. You can take one of the following actions:
• Tap the notification to open the associated app.
• Tap a quick-reply or action command (e.g., Reply, Archive), if available.
• Swipe the notification sideways, off the screen t dismiss it. Note that some
notifications cannot be dismissed.
• Slide the notification left or right to reveal the Settings icon . Choose
between Show notifications silently, Don’t silence, or More settings.
To close the notification panel, swipe up from the bottom of the screen, or tap the
Back or Home buttons.
Open Quick Settings
Use the Quick Settings screen for easy access to common settings. Tap an icon to
toggle the feature On/Off or to open additional settings.
• To open Quick Settings, swipe down twice from the status bar at the top of
the screen.
• To close Quick Settings, tap the top of the screen, Back or Home buttons.
Customize the Home Screen
You can add application icons to any Home screen for easier access.
1. Swipe up from the bottom of the Home screen to access all apps.
2. Tap and hold the app you want to add. The computer vibrates, and then
switches to a smaller view of the Home screen panels.
20 EDA71 User Guide
Page 31

3. Drag and drop the app icon into place.
• If you want to add another home screen, drag the icon to the right edge of the
screen before releasing the icon.
• If you want to create a folder, drag and drop the icon on top of another icon.
To add a Widget or customize the look of the Home screen:
1. Tap and hold an empty section of the screen.
2. Select either Wallpapers, Widgets, or Home Settings.
Customize the Favorites Tray
Modify the Favorites tray to contain the apps you use the most.
1. Tap and hold the app icon you want to replace on the Favorites tray.
2. Drag and drop the app on “X Remove” at the top of the screen.
3. Swipe up from the bottom of the screen to access all apps.
4. Tap and hold the icon of the app you want to add.
5. Drag and drop the icon into position on the Favorites tray.
Use Google™ Search
Use the Google Search field at the top of the Home screen to help you find
anything you need on the computer or on the web.
1. At the top of any Home screen, tap inside the Google Search box and begin to
type your search term.
As you type, suggestions from Google web search appear below the Search box,
and results from the computer (such as apps or contacts) appear below the web
search results.
2. Tap a suggestion to search for it immediately, or touch the arrow to add the
term to the search field without starting to search.
EDA71 User Guide 21
Page 32

About Screen Gestures
Use your fingers or the stylus to manipulate icons, buttons, menus, the on-screen
keyboard, and other items on the screen.
•Tap
Tap to select something, toggle a setting On or Off, or activate a field for text
entry. An on-screen keyboard automatically appears for text entry.
• Tap and hold
Tap and hold an item but do not lift your finger or stylus until an action occurs.
•Drag and drop
Tap and hold an item, and then slide your stylus or finger across the screen
until you reach the target position. Lift your finger or stylus off the screen to
drop the item in place.
• Swipe
Quickly move your finger across the screen, without pausing when you first
touch. For example, you can swipe a Home screen left or right to view the other
Home screens.
•Slide
Slowly move your finger across the screen, without pausing when you first
touch. For example, you can slide a notification to the left until the Settings
gear is revealed.
•Double-tap
Tap quickly twice on a web page, map, or other screen to zoom in. Double-tap
again to zoom out.
•Pinch
In some apps, you can zoom in and out by placing two fingers on the screen at
once and pinching them together (to zoom out) or spreading them apart (to
zoom in)
Set the Time Zone
The computer gets the current date and time from its network connection. If
preferred, you can change this behavior and manually set the time zone for your
location.
1. Swipe up from the bottom of the Home screen to access all apps.
2. Tap Settings > System > Date & time.
3. Tap Automatic time zone to turn off the feature.
4. Tap Select time zone and choose the time zone for your location.
22 EDA71 User Guide
Page 33

About Honeywell Applications
Honeywell applications help you troubleshoot and connect your tablet to other
devices and networks. Some of the applications in this table are located in the
Power Tools app. To learn more about Honeywell Power Tools, go to
www.honeywellaidc.com to download the Dolphin Power Tools User Guide.
Honeywell Applications Available on the Computer
Icon Application Description
AutoInstall Settings Enable the AutoInstall feature, to automatically install
*.zip or *.apk files containing applications saved in the
Internal shared storage\honeywell\autoinstall folder and
IPSM storage will not be installed.
Carrier Select The SIM Selection app only appears on EDA71-1 models.
Use the app to quickly change your network carrier.
Demos Honeywell Demo apps demonstrate the basic capabilities of
the computer and are not intended as functional business
solutions. The demos included, demonstrate scanning,
signature capture, NFC functionality, and printing via
Bluetooth technology.
Information on how to create custom applications for your
Honeywell tablet can be found in the Honeywell
Software Development Kit (SDK) for Android, available from
the Technical Support Downloads Portal.
HUpgrader Use the HUpgrader app to view the current OTA version on
the computer, check for updates, or initiate an OTA upgrade
from storage.
SIM Selection The SIM Selection app only appears on EDA71-1 models
Power Tools
BattMon BattMon provides information on the charge status and
Configure Autorun Configure Autorun provides the ability to set applications to
Diagnostic Information Diagnostic Information provides access to system statistics,
EZConfig EZConfig supports advanced customization and
Wireless Tether Use to enable range tracking and customize out-of-range
equipped with dual SIM slots. Use the app to configure and
switch between two SIM cards installed in the computer.
health of the battery, and provides access to activate battery
status notifications and battery charging history logs.
automatically run after a reboot.
notifications and version information about the computer.
configuration of the hand held computer. EZConfig includes
a standard XML editor and configuration bar code scanner
feature.
alerts for Bluetooth devices paired and tethered to your hand
held computer.
EDA71 User Guide 23
Page 34

Icon Application Description
IPConfig Use IPConfig to view network adapter information.
Ping use Ping to verify communication links or to make sure a
specific IP address is working.
Route Use Route to view and edit the rules that govern how packets
destined for various subnets are routed.
Applications You Can Download to the Mobile Computer
You can download Honeywell applications to extend the capabilities of the
computer. You may need to purchase a license to run some applications. To learn
more about the applications described in this section and other Honeywell
software solutions, go to www.honeywellaidc.com > Browse Products > Software.
About Honeywell Enterprise Browser
Enterprise Browser for Microsoft® Internet Explorer® is a locked-down enterprise
Web client application designed for Honeywell computers. It provides a controlled
Web application environment that helps enterprises increase productivity and
reduce IT management expenses. You can configure Enterprise Browser for your
specific application requirements and design custom web applications that run
through the Enterprise Browser to provide your users with an easy-to-use yet controlled experience.
If Enterprise Browser is not included on your computer model, you can download a
trial version for evaluation. After the evaluation period expires, you need to
purchase a license. For more information about Enterprise Browser, visit
www.honeywellaidc.com.
About Honeywell Launcher
Launcher is a configurable locked-down menu program designed for Honeywell
computers that prevents end-users from accessing the start menu and other nonauthorized applications. Use Launcher to provide a platform where your tablet
users are limited to running only company-approved applications and prevent
them from initiating unauthorized configuration changes. You can also use Honeywell Launcher together with Honeywell Enterprise Browser to create a single-purpose device configuration.
If Launcher is not included on your computer model, you can download a trial version of the software for evaluation. After the evaluation period expires, you need to
purchase a license. For more information about Launcher, visit
www.honeywellaidc.com.
24 EDA71 User Guide
Page 35

Unlock Developer Options
Developer options only appear in the Settings app if you unlock the feature. If you
are a developer working with the computer, you can easily unlock the additional
settings to use for testing and debugging applications under development for the
computer.
1. Swipe up from the bottom of the Home screen to access all apps.
2. Tap Settings > System > About phone.
3. Tap Build number seven times. A message appears informing you that you are
now a developer.
4. Tap Developer options under Settings > System.
EDA71 User Guide 25
Page 36

26 EDA71 User Guide
Page 37

CHAPTER
3
SCAN FUNCTION
This chapter describes how to scan barcodes and set scan functions.
Scan Function
Integrated scanner enables reading for 1D and 2D barcode, composite code and
postcode. It supports comprehensive, highly flexible scanning in real applications.
Imaging Engine can capture black and white images, such as signatures and damaged inventory lists.
About Provisioning Mode
After completing the out-of-box set up process, Provisioning Mode is automatically turned off. Scanning a bar code to install applications, certificates, configuration files, and licenses on the tablet is restricted unless you enable Provisioning
mode in the Settings app.
Scan a Bar Code with the Scan Demo
For optimum performance, avoid reflections by scanning the bar code at a slight
angle.
1. Swipe up on the screen to access all apps.
2. Select Demos > Scan Demo. Point the tablet at the bar code
3. Touch Scan on the screen or press and hold any Scan button.
4. Center the aiming beam over the bar code. The decode results appear on the
screen.
EDA71 User Guide 27
Page 38

About the Scan Wedge Feature
The scan wedge feature sends scanned bar code data to an active application as
Android keypad input. To scan a bar code as keyboard input, open an application
that accepts text input and then scan a bar code. You can use applications that are
coded to use the scanner or applications that receive data through the scan wedge
feature. If an application claims the scanner through the BarcodeReader API, the
scan wedge feature is temporarily disabled.
You can find information on how to create custom applications for the computer in
the Software Development Kit (SDK) available for download from the Technical Sup-
port Downloads Portal at https://hsmftp.honeywell.com. Once you create an
account and enter the portal, navigate to Software > Software and Tools > Devel-
oper Library > SDKs for Android.
Change the Scanner Settings
Changes you make to the Default profile apply to all applications with no profile
assigned.
1. Swipe up from the bottom of the Home screen to access all apps.
2. Tap Settings > Honeywell Settings > Scanning.
3. Tap Internal Scanner > Default Profile.
4. Select from the following:
• Data Processing Settings,
• Symbology Settings,
• Decode Settings,
• Imager Settings,
• Trigger Settings, or
• Notification Settings.
Modify the settings to meet your application needs.
To learn more about Scanner settings, see
Change the Bluetooth Scanner Settings
When the Bluetooth scanner is paired, changes can be made to the Default profile
for the scanner.
1. Swipe up from the bottom of the Home screen to access all apps.
2. Tap Settings > Honeywell Settings > Scanning.
3. Tap Bluetooth Scanner > Default Profile > Data Processing Settings.
Modify the settings to meet your application needs.
28 EDA71 User Guide
Page 39

Restore Default Scan Settings
Substring Replacement Character Code
\r 13
\n 10
\t 9
\\ ‘\’
You can easily discard all changes you made to the Default profile and restore the
default values.
Note: When you choose the Restore all defaults option from any of the settings screens in
a profile, all the settings in that profile return to their default values.
1. Open the Default profile.
2. Tap in the upper right corner of any of the scan settings screens for the
profile.
Tap Restore all defaults.
Default Scan Settings
Use the following sections to understand the scan settings available for scanner
profiles. To learn how to create a new profile, see page 33.
Data Processing Settings
Use the Data Processing Settings to specify how bar code data is processed by the
computer.
Data Processing Settings
Setting Description Default
Wedge Enable or Disable the scan wedge feature Enabled
Charset Select the character set to use when interpreting the bar
code data into a string.
Prefix Defines the string added before the decoded bar code
data.
Substitutions occur within the Prefix string values.
ISO-8859-1
None
EDA71 User Guide 29
Page 40

Setting Description Default
Substring Replacement Character Code
\r 13
\n 10
\t 9
\\ ‘\’
Suffix Defines the string added after the decoded bar code data.
Substitutions occur within the Suffix string values.
Wedge as Keys List of character values to wedge as keys, represented as a
comma-separated list of decimal values.
Data Editing Plugin Specify a Total Freedom data editing plug-in and edit
plug-in settings.
Symbology Prefix Specify a symbology identifier prefix to the bar code data.
Options include:
•None
•Honeywell
•AIM
Launch Browser Enable or disable URL bar code handling.
If a bar code starts with http:// or https://, the browser
opens using the bar code data as a URL.
None
9,10
None
None
Enable
Corresponds to BarcodeReader property:
PROPERTY_DATA_PROCESSOR_LAUNCH-BROWSER
Scan to Intent Enable or disable special handling of scan-to-intent bar
codes.
Applies to bar codes in one of the following formats:
‘//’ ACTION
‘//’ ACTION '$' extra-data
Where: ACTION and extra-data are any string of
characters.
Launches an application listening for the intent.
Intent action:
“com.honeywell.scantointent.intent.action.” + ACTION
Intent extra:
“com.honeywell.scantointent.intent.extra.DATA” contains
the remainder of the bar code data after the first ‘$’
character.
Corresponds to BarcodeReader property:
PROPERTY_DATA_PROCESSOR_SCAN_TO_INTENT
Launch EZ Config Enable or disable special handling of EZConfig bar codes.
Applies to EZConfig bar codes that are encoded with the
Aztec symbology and contain specific header data.
Enabled
Enabled
30 EDA71 User Guide
Corresponds to BarcodeReader property:
PROPERTY_DATA_PROCESSOR_LAUNCH_EZ_CONFIG
Page 41

Symbology Settings
Use the Symbology Settings to enable or disable bar code symbologies for the
selected scan setting profile.
• Tap the check box next to a symbology name to enable (check mark) or disable
(no check mark) decoding for that symbology.
Tap the symbology name to view and modify additional configuration parameters
for the symbology selected.
To view a list of default settings for supported symbologies, see page 96.
Decode Settings
Adjust the Decode Settings when scanning bar codes that are densely packed or
poor quality.
Decode Settings
Setting Description Default
Center Decode When enabled, the imager scans and decodes a bar code only if
Disabled
part of the bar code is at the center of the aimer window. This is
useful in situations where several bar codes may be very close
together in the imager field-of-view.
• Tap the check box to toggle the feature On or Off.
•Select Center Decode to adjust the Window dimensions.
Honeywell recommends leaving the settings at 50 (default) to
define the “center” area for the bar code.
Configurable parameters:
•Window top
• Window bottom
•Window left
• Window Right
Decode Security
Poor Quality 1D
Reading
Video Mode Use this setting to specify whether normal or inverse decoding
Enable this setting when scanning damaged or badly printed 1D bar codes to improve bar code read success.
for linear symbologies is enabled during the execution of
Decode. By default normal video is enabled. Options include:
•Normal
•Inverse
• Normal and Inverse
Disabled
Normal
EDA71 User Guide 31
Page 42

Setting Description Default
DPM Mode use this setting when scanning Direct Part Marking (DPM) bar
codes that are etched or imprinted directly into the surfaces of
the materials including metal and plastic.
Options include:
• No DPM optimization
• Dotpeen DPM decoding
• Reflective DPM decoding
Region of
Interest
Set the ROI for decoding. Options include:
•Disable
ROI is disabled and the entire original image is sent to
the decoder.
•Standard
Use the aimer position to weight activity. Activity
calculated on the row and the column in the middle of
each cell. The ROI window may not include the aimer.
• Standard, aimer centered
Activity calculated on the row and the column in the
middle of each cell. The ROI window will always include
the aimer.
• DPM, aimer centered
Activity calculated on 4 rows and 2 columns in each cell.
The ROI window will always include the aimer.
• Kiosk/presentation application
Ignore aimer position, no weight activity. Activity
calculated on the row and the column in the middle of
each cell. The ROI window may not include the aimer.
No DPM
optimization
Disabled
Imager Settings
You should not need to modify the Imager Settings. The Override Recommended
Values setting is disabled by default. The recommended Imager Settings are
designed to work in a wide range of environments and should only be modified if
you have an advanced understanding of imagers.
Trigger Settings
Use the Trigger Settings to configure how the scan buttons work.
Trigger Settings
Setting Description Default
Enable Scan
Trigger
Scan delay Set the minimum amount of time in seconds before the scanner
Enable or Disable activating the imager by pressing the side scan
buttons or the virtual Scan button in the Scan Demo app.
can read another bar code.
Enabled
0
32 EDA71 User Guide
Page 43

Setting Description Default
Decode Timeout Set the number of seconds before the scanner automatically turns
Trigger Scan
Mode
Same symbol
timeout
Notification Settings
Use the Notification Settings to configure how your computer responds when you
scan a bar code.
Notification Settings
off if the scan button is pressed and nothing has successfully
decoded.
Set read behavior on scan button press. Options available:
• One Shot
• Continuous
• Read on release
• Read on second trigger press
Set the minimum buffer time in seconds before the scanner reads
the same bar code. This can be adjusted to prevent inadvertent
scans of the same bar code if the code is left in the scan field
longer than the Decode Timeout limit. The default same symbol
timeout is 1000 seconds.
20
One
Shot
Disabled
Setting Description Default
Good Read Notification Enables or disables a good read notification. The
Bad Read Notification Enables or disables notification of a failed scan. The
Vibrate On Notification Enables or disables whether the computer vibrates when
Add a Scan Setting Profile
To create a scan setting profile for a custom app on the computer:
1. Swipe up from the bottom of the Home screen to access all apps.
2. Tap Settings > Honeywell Settings > Scanning > Internal Scanner.
3. Tap in the upper right corner of the app screen.
4. Take one of the following actions:
• Tap the profile name field, and then add a new name.
Enabled
notification consists of a green blink of the Scan Status
LED, a short beep, and an optional short vibration.
Disabled
notification consists of a red blink of the Scan Status LED,
an error beep, and an optional short vibration.
Disabled
there is a good or bad read.
OR
•Tap the select an application option, and then choose an app from the list.
The new profile appears on the Internal Scanner profile list. You can now select and
modify the scan settings for the new profile.
EDA71 User Guide 33
Page 44

Delete a Scan Setting Profile
1. Swipe up from the bottom of the Home screen to access all apps.
2. Tap Settings > Honeywell Settings > Scanning > Internal Scanner.
3. Tap and hold the profile you want to delete.
Select Delete, then select OK.
About the Optional Digital Scan Button
By default, the imager is enabled for scanning with the left, middle and right scan
buttons configured to trigger the imager. If your application environment requires
use of an on-screen scan button, enable the Digital Scan Button feature in the
Settings app. Once enabled, you can then modify the appearance of the on-screen
Scan button and select the apps the button appears in.
Enable and Configure the Digital Scan Button
1. Swipe up from the bottom of the Home screen to access all apps.
2. Tap Settings > Honeywell Settings > Digital Scan Button.
3. Tap Enable Digital Scan Button to turn the feature on. A preview of the button
appears at the bottom of the screen.
4. Configure the button appearance. As you adjust the settings, the preview
button updates.
•Tap Select Button Size, and then choose Small, Medium or Large.
•Tap Select Button Color and then choose from seven color options. Default
color is black. Tap a dot to select the color, and then select OK to confirm.
• Use the slider under Transparency Level to adjust how transparent the
button appears on the application screen.
5. Drag the preview button to the location where you want it to appear on the
screen. Once you have positioned the button, tap the Set Button Location
toggle button to lock it into position.
6. Tap Choose Application.
7. Check the box next to all the applications where you want the digital scan
button to be available.
8. Select OK.
9. Tap Back to return to the Settings screen.
The digital scan button appears on the screen when you open any of the apps
you selected during the button setup. Tap and hold the button to activate the
imager and scan a bar code.
34 EDA71 User Guide
Page 45

Scan Bar Codes
By default, the computer imager is enabled for scanning. It supports
omni-directional (360°) bar code scanning and an aiming beam is provided to help
assist with targeting bar codes.
Before you start scanning bar codes, go into Settings > Honeywell Settings >
Scanning > Internal Scanner and modify the scan profile to enable only the bar
code symbologies that you need. By reducing the active symbology list, you can
increase scan speed.
1. Point the scanner window at the bar code. For optimum performance, avoid
reflections by scanning the bar code at a slight angle.
2. Press and hold any Scan button.
3. Center the aiming beam over the bar code. Make sure the entire bar code is
inside of the illumination frame.
4. Release the Scan button when the computer beeps, and the Scan Status LED
briefly turns on. The bar code information is entered into the application in use.
Note: Not all bar code symbologies are enabled by default. If a bar code does not scan, the
correct symbology may not be enabled.
EDA71 User Guide 35
Page 46

About the Scan Engine
EDA71 comes equipped with the Honeywell N6703SR scan engine.
The N6703 series integrates Honeywell’s Adaptus 6.0 technology for unparalleled
1D and 2D performance.
Items Performance
Sensor Proprietary CMOS sensor with global shutter and 1280 x 800 pixel resolution.
Illumination White LED (exempt risk group)
Aiming 650 nm high-visibility red laser (class 2 laser safety)
Typical frame rate 60 frames per second (max)
Motion Tolerance Up to 600 cm (236in) per second in total darkness with 100% UPC at 10 cm
Field of view Horizontal Field Angle: 48°
Scan Angles Tile: 360°
Symbol Contrast 20% minimum reflectance
(4in) distance
Vertical Field Angle: 31°
Pitch: ± 60°
Skew: ± 60°
About Scanning Configuration Bar Codes
After completing the out-of-box set up process, Provisioning mode is
automatically turned Off. Scanning a bar code to install applications, certificates,
configuration files, and licenses on the computer is restricted unless you enable
Provisioning mode in the Settings app.
To learn more About Provisioning Mode see page 85.
Use the Scan Demo App
Use the Scan Demo app to read bar codes or test your symbology decode settings.
1. Swipe up from the bottom of the Home screen to access all apps.
2. Tap Demos.
3. Swipe left or right on the screen until Scan Demo appears under the turntable.
Tap the center of the box image to open the app.
4. Point the scanner window at the bar code.
5. Press and hold any Scan button or tap and hold the on-screen Scan button.
6. Center the aiming beam over the bar code. Make sure the entire bar code is
inside of the illumination frame.
7. Release the Scan button when the computer beeps, and the Scan Status LED
briefly turns On. Bar code information appears on the screen.
Note: In the Scan Demo app, not all bar code symbologies are enabled by default. If a bar
code does not scan, the correct symbology may not be enabled.
36 EDA71 User Guide
Page 47

Change the Scan Demo Symbology Settings
1. In the Scan Demo app, tap in the upper right corner of the screen.
2. Select Symbology Settings.
3. Modify the symbology parameters.
• Tap the check box next to a symbology name to enable (check mark) or
disable (no check mark) decoding for that symbology.
• Tap the symbology name to view and modify additional configuration
parameters for the symbology selected.
4. Tap Back to return to the Scan Demo app.
Use the Imager as a Flashlight
To use the imager as a flashlight.
1. Open Quick Settings (see page 38).
2. Tap the Flashlight icon to turn the flashlight on.
3. Select the icon again to turn the flashlight off.
EDA71 User Guide 37
Page 48

38 EDA71 User Guide
Page 49

CHAPTER
4
USE THE PHONE
You can use the phone feature to make and receive phone calls as well as transmit
data through wireless wide-area networks (WWANs).
Note: Phone features are only supported on EDA71 WWAN models (EDA71-1).
About the Phone
Phone features on the computer include a speaker and a microphone. You can also
use a Bluetooth headset or hands-free kit.
On EDA71 WWAN models the phone feature is enabled by default and supports all
cellular radio access technologies (2G, 3G, etc.) for voice and data connections
around the globe. These features are certified by PTCRB, GCF, and all major US
carriers.
After you turn on the phone and activate service with your wireless carrier, you can
customize the phone features and network settings in the Wireless & Networks
section of the Settings app.
Both WWAN radios support Network Information and Time Zone (NITZ) messages to
automatically set the system time.
EDA71 User Guide 39
Page 50

Add or Switch Between Network Carriers
The SDR radio and Sim card slot in the EDA71-1 WWAN model make it easy for you
to add carriers and switch between them as needed.
Use the Carrier Selection app to quickly change your WWAN radio network carrier.
1. Swipe up from the bottom of the Home screen to access all apps.
2. Tap Carrier Selection .
3. Select a carrier from the list, and then tap Apply Settings.
• If the update is successful, the Carrier Selection screen appears and displays
the updated carrier information.
• If the update is unsuccessful, a message appears. Tap OK to return to the
Carrier Selection screen.
About the microSIM Card Slot
EDA71-1 WWAN tablets (model EDA71) come equipped with one microSIM and
card slot to support cellular phone features.
For more information on how to insert a microSIM card into the tablet, see Insert a
microSIM or a microSD Card on page 13.
Activate the Phone
You use a SIM card to activate the phone on your EDA71 WWAN tablet EDA71-1.
You can purchase the micro SIM card from your network provider. EDA71-1 WWAN
models includes one microSIM card slot and one microSD card slot for multiple
network provider flexibility.
1. Select a network carrier. To learn how, see Add or Switch Between Network
Carriers on page 40.
2. Activate and configure the SIM slot you are installing the card in.
3. Press and hold the Power button until the options menu appears.
4. Tap Power Off and then OK to verify.
40 EDA71 User Guide
Page 51

Make a Phone Call
Once the phone is activated, you can make a phone call.
1. Tap in the favorites tray or press the Phone key to open the phone app.
2. Use one of the methods below to enter the telephone number you want to call.
• Press the number keys on the keypad.
• Tap and use the on-screen dialer.
• Select a person on your saved contact list .
• Select a favorite on your speed dial list .
Answer the Phone
When you receive a phone call, the Incoming Call screen opens. If the caller telephone number is available, it appears on the screen. Depending on your calling
plan, you may also see a Caller ID information. All incoming calls are recorded in
the Call log. If you miss a call, you receive a notification.
1. On the Incoming Call screen, tap and hold the white call icon.
2. Three icons appear:
• To answer the call, drag the white call icon to .
You can also press the Phone key on the keypad to answer the call.
• To send the caller directly to voice mail, drag the icon to .
• To send a text message back to the caller instead of answering, drag the icon
to .
EDA71 User Guide 41
Page 52

Switch Apps During a Phone Call
You can multi-task while a phone call is in progress. For example, you can use the
Calendar app to check your schedule during a call.
Note: Depending on your WWAN connection and carrier, apps that need a data connection
may be unable to access online data while the phone call is in progress. If
simultaneous phone calls and data connections are not possible due to provider
limitations, voice calls receive priority. Check with your provider for more information.
1. During a phone call the screen goes dark. Take the phone away from your ear to
wake the screen. Tap the Home button.
2. Select another app (e.g., Calendar, Contacts). The phone icon appears in the
status bar at the top of the screen while the call is connected.
3. To return to the call screen, swipe down from the top of the screen and select
ongoing call notification or select Hang up if you want to end the call.
Make an Emergency Phone Call
You can use the phone to make an emergency phone call even if the SIM card is
missing from your phone. The phone shows no service but the call still goes
through if you dial certain emergency numbers (e.g., 112, 911, 000, 08, 118, 119,
and 999).
Configure Phone Settings
You can customize settings for the phone, including the ringtone, voicemail
options, keypad tones, Internet call settings, and other options.
1. Open the phone app .
2. Tap next to the microphone icon at the top of the screen.
3. Select Settings. The Call settings menu appears.
4. Change phone settings as necessary.
Note: Available settings vary depending on your cellular carrier and phone plan.
42 EDA71 User Guide
Page 53

CHAPTER
5
USE THE CAMERA
Use this chapter to learn how to take pictures and record videos with the color
camera.
About the Color Camera
The EDA71 comes equipped with a 13-megapixel color camera, 4K video with
image stabilization, and advanced software features for enhanced exposure
control for taking pictures and videos. The camera lens and flash are located on the
back of the computer.
Use the Photos app to view photos and videos stored on the EDA71.
By default the photos and videos captured with the Camera app are saved on the
computer under Internal shared storage\DCIM\Camera.
How to Zoom
The camera zoom is controlled using a pinching motion on the touch screen. Place
two fingers on the screen at the same time, and then:
• spread them apart to zoom in (enlarge and object).
• pinch them together to zoom out.
EDA71 User Guide 43
Page 54

Take a Photo
Color FiltersScene Modes HDR Mode Advanced
Settings
1. Tap the Snapdragon™ Camera icon in the favorites tray on the Home
screen.
2. Using the screen as a viewfinder, move the computer until you see the image
you want to capture. The camera lens is located on the back of the computer.
3. The camera automatically adjusts the focus but you can tap the screen to
modify the focal point. By default, the camera senses the lighting in the
environment and turns the flash on, if needed.
4. Tap to take a photo.
• To view the picture, tap the preview near the bottom of the screen.
• To return to the Camera app, tap the Back navigation button.
Change Camera Settings
You can change the camera settings for best results when taking pictures. The
camera settings are adjustable from within the Snapdragon™ Camera app.
1. Open the Snapdragon Camera app .
2. At the top of the screen, select any of the following to adjust the settings.
• Scene Modes
Use preset setting profiles for best picture quality. Options include:
Automatic, High Dynamic Range (HDR), OptiZoom, Portrait, Landscape,
Sports
• Color Filters
Stylize your pictures by applying a filter. Options include: None, Mono, Sepia,
Negative, Solarize, Posterize, Aqua, Emboss, Sketch, Neon
• HDR Mode
Tap to quickly toggle HDR mode On or Off. When enabled, the computer
automatically captures multiple photos and combines them into one photo
creating the best quality image possible.
• Advanced Settings
Manually set advanced features. Options include: Flash, GPS location,
Picture size, Picture quality, Countdown timer, Storage, Continuous shot,
Face detection, ISO, Exposure, White balance, Chroma flash, Readeye
reduction, and Shutter sound.
44 EDA71 User Guide
Page 55

Record a Video
Color Filters Sound/
Microphone
Advanced
Settings
This section explains how to record video with the camera in the computer.
1. Tap the Snapdragon Camera icon in the favorites tray.
2. Tap mode selection in the bottom right corner of the app.
3. Tap to select video.
4. Tap to begin recording video. To zoom in or out, pinch or spread your fingers
apart.
5. When you are done recording, tap .
Change Video Settings
You can change the video settings for best results when recording video.
1. Open the Snapdragon Camera app .
2. Tap to select video.
3. At the top of the screen, select any of the following to adjust the settings.
• Color Filter
Stylize your video by applying a filter. Options include: None, Mono, Sepia,
Negative, Solarize, Posterize, Aqua, Emboss, Sketch, Neon.
• Sound/Microphone
Tap to quickly toggle sound recording On or Off.
• Advanced Settings
Manually set advanced features. Options include: Flash, Video quality, Video
duration, GPS location, Storage, White balance and Image stabilization.
Use the Camera as a Flashlight
To use the camera as a flashlight, open quick settings and tap the Flashlight icon
to turn the flashlight on. Select the icon again to turn the flashlight off.
EDA71 User Guide 45
Page 56

46 EDA71 User Guide
Page 57

CHAPTER
6
CONFIGURE THE TABLET
Use this chapter to learn about the available methods for configuring your tablet.
You can also use this chapter to learn how to configure network communications
and wireless security.
How to Configure the Tablet
You can configure many parameters on the computer such as the bar code
symbologies the integrated scanner decodes, or the network settings. The values
you set for these parameters determine how the computer operates.
You configure the computer using the Settings app.
Start the Settings App
The Settings app is available from the all apps menu and the notification panel.
• Swipe up from the bottom of the Home screen to access all apps, and then tap
Settings .
OR
• Swipe down from the top of the Home screen, and then select in the status
bar.
Note: To view a simplified settings menu without descriptions, swipe right from the left
edge of the Settings screen.
About the Structure of the Settings App
Use this section to learn about the structure of the Settings app so you can find
parameters quickly.
Note: The Settings app varies by computer model and OS version. You computer may not
include all the features outlined in this section.
EDA71 User Guide 47
Page 58

When you open the Setting app, suggestions appear at the top of the list.
• Tap or to expand or collapse the suggestion list.
• Tap a suggestion to open the settings screen or app relevant to the suggestion.
• Tap the , and then Remove to dismiss the suggestion.
Network & Internet
Setting Description
Wi-Fi • Turn WLAN radio On or Off.
• Lists available Wi-Fi networks in range and the connection status when
the radio is turned On.
• Add a network Wi-Fi connection.
Mobile Network
(EDA71-1 WWAN
Models only)
Data usage • Manage mobile/cellular data usage.
Hotspot &
tethering
Ethernet • Turn Ethernet connection on and off.
Mobile plan Provides information on your cell phone plan.
VPN Set the password parameters for a Virtual Private Network (VPN) connection.
Airplane Mode Turn Airplane mode On or Off.
Modify mobile network settings, including enabling data access and roaming
over mobile networks, selecting access points and network operations, or
selecting only 2G networks 9to save battery life).
• Turn Mobile data On or Off
• Turn Roaming On or Off
• View Data use information
• Access advanced options, including:
• 4G LTE Mode on/Off setting
• Preferred network settings
• CDMA roaming settings and subscription settings (i.e. RUIM/SIM, NV)
• Access point name and selection
• Network selection settings
• View mobile or Wi-Fi data use statistics for the current data use cycle.
• Turn the Data saver feature On or Off.
• Turn network restrictions for metered WLAN networks On or Off.
• Enable or disable USB tethering or Bluetooth tethering for sharing mobile
data connections.
• Enable or Disable using the computer as a portable Wi-Fi hotspot.
• Configure Wi-Fi hotspot.
• Configure Ethernet connections and set up proxy settings when the
Ethernet setting is turned On.
48 EDA71 User Guide
Page 59

Connected Devices
Setting Description
Bluetooth • Turn the Bluetooth radio On or Off
• Lists Bluetooth enabled devices in range when the radio is turned On
• Connect to a Bluetooth Device
• View and rename the computer
• View the computer Bluetooth address
• View received files
Cast Set up a Cast connection.
Cast (project) audio and screen content to a secondary device such as a
television.
NFC Turn Near Field Communication (NFC) On or Off.
When the NFC radio is enabled, data exchanges are allowed when the
computer touches another NCFC enabled device.
Android Beam Turn the Android Beam feature On or Off.
When NFC is enabled, this feature is accessible. You can beam app content to
another NFC capable device by holding the devices close together. The app
determines what content is transmitted to the other device.
Printing Set up a printer connection with the EDA71. Connection options include cloud
print services, Wi-Fi printing via a router, or printing via NFC.
USB Configure USB communication.
Chromebook Set up connection from the EDA71 to a Chromebook.
Apps & Notifications
Setting Description
App Info View a list of all apps installed on the computer and system services running.
Notifications • Manage notifications (i.e., turn notifications On/Off)
• Set rules for notifications on the screen lock
• Turn notification dots On/Off
• Turn LED blink notification On/Off
• Set the default sound for all notifications.
App permissions View and manage individual app permissions.
Advanced
Default apps View and manage default app use.
Emergency
Alerts
special app
access
Manage Emergency alert notifications.
Manage apps with special unrestricted access.
EDA71 User Guide 49
Page 60

Battery
Setting Description
Battery View current battery charge or charging status.
Battery saver turn the Battery saver feature On or Off and set when the feature
automatically activates.
• Never
• When the battery charge is at 5%
• When the batter charge is at 15%
Battery percentage Set to show or do not show battery percentage in status bar.
Adaptive
brightness
Sleep Set the inactivity time limit before the unit automatically turns off the screen
Ambient display Set how the screen in sleep mode responds when new notifications are
App battery usage
data
Display
Turn the Adaptive brightness feature On or Off.
to save battery power (seconds or minutes)
received (i.e., wake or do not wake)
View battery usage data
Setting Description
Brightness level Set the Brightness level manually if Adaptive brightness feature is turned
Off.
Night light Activate the Night light feature to adjust the screen to tint to a light amber
for easier viewing and reading in dim light or for the hours you use the device
before going to sleep.
Set the features to stay on or define a schedule to automatically turn the
feature On/Off. You can manually adjust the intensity of the amber hue
once the feature is activated.
Adaptive brightness Set how the screen in sleep mode responds when new notifications are
received (i.e., wake or do not wake)
Wallpaper Set the wallpaper.
Advanced
Sleep Set the inactivity time limit before the unit automatically turns off the screen
to save battery power (seconds or minutes)
Keypad
backlight
Auto-rotate
screen
Font size Set the default on-screen text size.
Display size Set the default size of items on your screen.
Ambient display Set how the screen in sleep mode responds when new notifications are
Set the inactivity time limit before the unit automatically turns off the screen
to save battery power (seconds or minutes)
Set the screen to switch from portrait to landscape when the unit is rotated.
When Off, the screen does not automatically rotate.
received (i.e., wake or do not wake)
Sound
In the Settings app, select Sound to modify the audio settings.
50 EDA71 User Guide
Page 61

Storage
In the Settings app, select Storage to view statistics on available and used storage
space on the device and on any portable storage cards installed.
Security & Location
In the Settings app, select Security & Location to view the latest Security scan
results, security updates, and phone encryption status. You can also access
additional settings related to device security.
Setting Description
Screen Lock Activate and configure a screen lock (i.e., None, Swipe, Pattern, Pin, and
Password)
Lock screen
preferences
Smart Lock Define safe conditions or locations where your phone will stay unlocked
Location • Turn location services (Google and GPS satellite data) On or Off.
Show passwords Enable or disable showing characters briefly as you type.
Device admin apps Manage administrator privileges.
SIM card lock Set up SIM card lock or edit an existing lock.
Encryption &
credentials
Trusted agents View and enable/disable trusted agent apps (like Smart Lock by Google)
Screen pinning Enable or disable the screen pinning feature. When enabled, you can pin
Apps with usage
access
Configure the following lock screen parameters:
• Select notifications you want shown on the lock screen.
• Enable or disable adding users from the lock screen.
• Customize the lock screen message.
(i.e., On-body, Trusted places, Trusted devices, and Voice match)
• View and manage app-level location service permissions.
• Set location mode accuracy and view location request history.
• Turn Wi-Fi and/or Bluetooth scanning On or Off. When enabled,
system apps and services are allowed to detect W-Fi networks or
Bluetooth devices at any time to improve location services.
View encryption status and manage trusted credentials (i.e., view, install,
clear, and edit)
on the device. Trusted agents by pass security based on set parameters.
the device screen to a recently used app where it stays until you unpin the
app via the security method chosen.
View and manage apps with usage permission.
Users & Accounts
In the Settings app, select Users & Accounts to access the settings below.
Setting Description
Users • Modify the owner profile name and add profiles for other people who
use the computer.
• Activate a different user profile.
Add account Select to add and manage Corporate or Email account on the computer.
EDA71 User Guide 51
Page 62

Setting Description
Emergency
Information
Automatically sync
data
Add users from lock
screen
Enter emergency information for the active user profile. The information
you enter may be used by first responders in an emergency. Anyone can
read the information from the emergency dialer without unlocking the
computer.
Turn auto-sync On or Off for accounts. Turning the feature On allows
apps to refresh data automatically.
Enable or disable allowing users to be added from the lock screen.
Honeywell Settings
In the Settings app, select Honeywell Settings to access the settings below.
Setting Description
Battery LED Configures the battery LED behavior. To learn more see, Change the
Battery Status LED Behavior,page 14
Battery Monitor View the battery charge status and battery information such as overall
battery health, internal temperature, and serial number.
Battery Optimizer View battery status and app usage information.
Create and enable or disable a battery optimization profile that
implements a group of settings to conserve power.
Options include:
•None
When selected, no battery optimization profile is active.
• Energy Saver
This pre-defined profile implements UI settings that optimize
battery conservation.
• Cold Storage
This pre-defined profile implements UI settings that optimize
battery conservation in cold storage environments.
• Add a Custom Profile
tap to create a custom battery profile that balances your application
needs with energy saving settings. You can turn location services
On or Off, configure sound and vibration options, modify brightness
and timeout display options, turn UI transition animations On or Off,
and background services On or Off.
Digital Scan Button Enable and configure the optional digital scan button. To learn more,
see Enable and Configure the Digital Scan Button, page 52.
HXLogger The HXLogger is an advanced diagnostic log service that provides a
basic log service, plug-ins for modified log services, and a log manager.
•Tap HXLogger to turn the basic log service On or Off.
When enabled, the service records app and system diagnostic
troubleshooting information into four basic log files: main log file,
radio log, event log, and kernel log.
•Tap PlugIn to view and enable additional log services and custom
plugins
•Tap Manager to change the default log path, delete logs, or upload
logs for technical support troubleshooting.
52 EDA71 User Guide
Page 63

Setting Description
Key Remap Change (remap) a button or key function. To learn more, see Remap a
Button or Key on page 37.
Key WakeUp Set the buttons you want to use to wake the computer from sleep mode.
Options include: PTT (push-to-talk), Left Scan, Middle Scan, Right Scan,
Volume Up, Volume Down. By default the Left, Middle and Right Scan
buttons are enabled for wake up.
Provisioning Mode Enable or disable unrestricted installation of applications, certificates,
configuration files, and licenses. Provisioning mode is turned Off by
default. To learn more About Provisioning Mode, see page 65.
Scanning Configure the computer imager. To learn more, see Change the Scanner
Settings on page 46.
Smart sensors Configures the integrated motion detection sensors for advanced power
management. Options include: Keep awake on motion, Wake on motion,
Face down suspend.
Web Applications Enables access for the Honeywell Mobility SDK for Web apps and lets
you set a port.
Accessibility
In the Settings app, select Accessibility to access screen readers, display settings,
interaction controls, and audio & on-screen text features to improve accessibility
levels.
Setting Description
Text-to-speech output
(TTS)
Display Configure display features that may aid visual accessibility levels.
Interaction Controls Set interaction controls that may aid physical accessibility levels.
Audio & on-screen text Turn Mono audio On/Off and Captions On/Off
High contrast text Turn High contract text On/Off
Select and configure the preferred TTS engine, set language, speech
rate and pitch of synthesized voice.
• Adjust font size
• Display size
• Turn the Magnification feature On/Off
• Set Color correction
• Turn Color inversion On/Off
• Turn Large mouse pointer On/Off
• Configure Switch Access
• You can use a switch or keyboard to control your device
• Set the Click after pointer stops moving delay
• Turn the Power button ends call feature On/Off
• Turn Auto-rotate screen On/Off
• Adjust the Touch & hold delay
Google
In the Settings app, select Google to set up and manage your Google accounts and
services.
EDA71 User Guide 53
Page 64

System
Setting Description
Language & input • Set the Device Language
• Set and mange the Virtual and Physical keyboard input methods
• Configure auto-typing features such as capitalization, punctuation,
spell check, and the personal directory
• Set text-to-speech output
• Adjust the pointer speed
Date & time Configure all date and time settings
Backup Turn the Google Drive backup feature On or Off.
When enabled, phone data (e.g., apps, apps data, call history, contacts,
device settings, SMS, Wi-Fi passwords and permissions) is
automatically backed up to the Google Drive.
Developer options Enable developer-specific options such as USB debugging and SD card
protection.
This option only appears under System settings if you enable to feature.
To learn more, see Unlock Developer Options on page 43.
Reset options Select from the following reset options:
• Reset Wi-Fi, Mobile & Bluetooth
• Reset app preference
• Erase all data (factory reset)
To learn more, see Full Factory Reset the Computer on page 93
About phone View device specific information including the model number, phone
number, operating system version, software patch version, radio
versions, build number, and legal information.
About Network Communications
You can easily add the tablet to your wireless or wired data collection network.
Connect the EDA71 your computer using:
• 802.11 a/b/g/n/ac radio communications.
• Bluetooth communications.
• USB and serial communications.
Connect to a Wi-Fi Network
The computer contains an 802.11 a/b/g/n/ac radio to transfer data using wireless
communications. Before you connect to a Wi-Fi network, you need to know about
your network security protocol and its required credentials.
54 EDA71 User Guide
Page 65

By default, the 802.11 radio is disabled.
1. Swipe up from the bottom of the Home screen to access all apps.
2. Tap Settings > Network & Internet > Wi-Fi.
3. Tap Off to toggle Wi-Fi radio On . A list of discovered networks appears.
4. On the list, tap a network name to initiate a connection.
To add a network if it does not appear on the list:
a. Navigate to the end of the discovered network list, and then tap
Add network.
b. Type the Wi-Fi network name (SSID).
c. Choose a security protocol and add any required information.
d. Tap Save.
5. Enter any required information if the network is secured (e.g., password, key or
certificate name).
6. Tap Connect.
Once you connect to a saved Wi-Fi network:
• Tap the network name on the list to view details (e.g., status, signal strength,
speed, frequency, security type). Select to close details screen.
• The computer automatically connects to the same network when the network is
in range and the WLAN radio is turned On.
• To remove a network from your saved list, tap and hold the network name and
select Forget network. You can do this for networks you no longer use.
• To modify a network from your saved list, tap and hold the network name and
select Modify network. You can do this if you changed your network password.
• To view a list of only your saved networks, tap , and then select Saved
networks.
Configure Proxy Settings for a Wi-Fi Network
If you need to connect to network resources through a proxy server, you can
configure settings for the proxy server for each Wi-Fi network you add. By default,
the Wi-Fi networks you add are not configured to connect through a proxy server.
Note: Proxy settings apply only to the Wi-Fi network you modify. You must change proxy
settings for each network requiring a proxy server.
1. Swipe up from the bottom of the Home screen to access all apps.
2. Tap Settings > Network & Internet > Wi-Fi. The list of available Wi-Fi
networks appears.
EDA71 User Guide 55
Page 66

3. Tap and hold the name of a connected network, and then tap Modify network.
4. Tap Advanced options.
5. Under Proxy, tap None to open menu, and then select Manual.
6. Enter the proxy settings for the network.
7. Tap Save.
Disable Wi-Fi Notifications and Set WLAN Radio Sleep Parameter
By default, when Wi-Fi is enabled, you receive notifications in the Status bar when
the computer discovers a wireless network. You can disable these notifications.
1. Swipe up from the bottom of the Home screen to access all apps.
2. Tap Settings > Networks & Internet > Wi-Fi. Verify the WLAN radio is
turned On.
3. Navigate to the bottom of the discovered network list.
4. Select Wi-Fi preferences.
5. Tap Open network notification to toggle the setting On or Off.
Connect to an Ethernet Network
To connect the computer to an Ethernet network, you need a EDA71 Ethernet
Home Base or a EDA71 Net Base.
1. Make sure the base is connected to your Ethernet network.
2. Place the computer in the base.
3. Swipe up from the bottom of the Home screen to access all apps.
4. Tap Settings > Network & Internet > Ethernet. The Ethernet setting is
turned On by default.
5. Tap Ethernet.
The Ethernet connection screen shows the current Ethernet connection. By
default, the computer assumes a DHCP connection, and that your network has
assigned an IP address automatically. If DHCP is working, the Ethernet base
should indicate that communication with the network is occurring.
6. (Optional) To assign a static IP address.
a. Tap DHCP and then select Static from the list.
b. Enter the required network information, and then tap Apply.
7. Tap Save.
56 EDA71 User Guide
Page 67

How to Connect to Virtual Private Networks
The computer supports connecting to virtual private networks (VPN). This section
describes how to add and connect to VPNs. To configure VPN access, you must
obtain details from your network administrator. You can view and change VPN
settings in the Settings app.
Note: Before you can add or connect to a VPN network, you must enable a screen lock
method.
Add a VPN
Before you can connect to a VPN, you must create a VPN profile.
1. Swipe up from the bottom of the Home screen to access all apps.
2. Tap Settings > Network & Internet > VPN.
3. Tap to add a VPN new profile.
4. Enter the required information for the VPN connection. If needed, swipe up on
the screen to access all the required information fields.
5. Tap Save. The VPN name appears in the VPN list.
Connect to a VPN
Once a VPN profile is created, you can connect to the VPN at any time.
1. Swipe up from the bottom of the Home screen to access all apps.
2. Tap Settings > Network & Internet > VPN.
3. Tap the name of the VPN in the list.
4. Enter any necessary credentials when prompted.
5. Tap Connect. A appears in the status bar and a notification is received.
To disconnect from the VPN, tap the notification.
Edit VPN Information
Editing an existing VPN profile can be done from the VPN screen.
1. Swipe up from the bottom of the Home screen to access all apps.
2. Tap Settings > Network & Internet > VPN.
3. Tap and hold the name of the VPN in the list.
4. Tap to the right of the VPN profile you want to edit.
5. Edit the VPN settings as necessary.
EDA71 User Guide 57
Page 68

6. When you are done, tap Save.
About Wireless Security
The computer provides these security solutions for your wireless network:
• Wi-Fi Protected Access 2 (WPA2™)
• Wi-Fi Protected Access (WPA)
•802.1x
Honeywell recommends WPA2 security with PSK (Personal) or 802.1x (Enterprise)
key management.
Before you set security, you need to enable the radio, set the date, and set the SSID
on your computer. To use 802.1x security, you need to load a root certificate on
your computer. To use transport layer security (TLS) with 802.1x security, you also
need to load a user certificate.
Use the Settings app to access and configure all wireless security settings.
About Certificates
You can use digital certificates to identify the computer for network access or
authentication to servers. To use a certificate to identify your device, you must
install it in the trusted credential storage on the computer.
Android supports DER-encoded X.509 certificates saved in files with a .crt or .cer
file extension. To install a valid certificate with a .der or other extension, you must
change the extension to .crt or .cer to install it.
Android also supports X.509 certificates saved in PKCS#12 key store files with a
.p12 or .pfx extension. To install a valid key store file with another extension, you
must change the extension to .p12 or .pfx to install it. When you install a certificate
from a PKCS#12 key store, Android also installs any accompanying private key or
certificate authority certificates.
Load a Certificate
To use a certificate, you must install it in the trusted credential storage on the
computer.
Note: Apps such as email and browsers that support certificates allow you to install
certificates directly from within the app. For more information, see the help that
comes with the app.
1. Copy the certificate or key store from your PC to the mobile computer.
2. Swipe up from the bottom of the Home screen to access all apps.
3. Tap Settings > Security & location > Encryption & credentials.
58 EDA71 User Guide
Page 69

4. Tap Install from storage. Navigate to the location where you saved the
certificate or key store.
5. Tap the certificate or key store to install it. If prompted, enter the key store
password and tap OK.
6. Select VPN and apps or Wi-Fi.
7. Enter a name for the certificate and tap OK.
Disable or Remove Certificates
If a user or system certificate is compromised, or your organization chooses not to
trust it, you can disable or remove the certificate.
1. Swipe up from the bottom of the Home screen to access all apps.
2. Tap Settings > Security & location > Encryption & credentials.
3. Select Trusted credentials.
The trusted credentials screen has two tabs:
• System shows Certificate Authorities (CA) certificates permanently installed
on the computer. They can only be disabled.
• User shows CA certificates you have installed yourself. You can remove these
certificates.
4. Tap the name of the certificate to you want to disable or remove. The Security
certificate screen appears.
5. Scroll to the bottom of the screen and tap Disable (for System certificates) or
Remove (for User certificates).
6. Tap OK.
Note: You can enable a disabled System certificate but if you remove a User certificate, you
must install it again to enable it.
About Bluetooth Communications
Your tablet is equipped to communicate with other devices using Bluetooth
technology. The Bluetooth radio must be turned On to discover, pair and connect to
other Bluetooth devices. System bar icons indicate Bluetooth radio status.
EDA71 User Guide 59
Page 70

Connect a Bluetooth Device
To connect to a Bluetooth device, you must turn On the Bluetooth radio and then
select the device from a list of discovered devices.
1. Swipe up from the bottom of the Home screen to access all apps.
2. Tap Settings > Connected devices > Bluetooth.
3. If necessary, tap Off to toggle the Bluetooth radio On . A list of available
Bluetooth devices appears.
4. Tap Pair a new device.
A list of available Bluetooth devices in range appears.
5. Select a device on the list to initiate a pairing request.
6. When the pairing request message appears:
• Verify the pairing PIN is the same on both device, and then tap Pair.
OR
• If the pairing request requires a PIN, enter the PIN, and then tap Pair.
When the device is successfully paired with the computer, the device name
appears under Paired devices.
7. (Optional) Once paired to a device, you can connect manually to the device. Tap
the device under Paired devices. The word “Connected” appears under the
paired device name.
The status icon changes from to .
• To disconnect a paired device, tap the name of the paired device and then tap OK
when the “Disconnect?” screen appears.
Rename the Computer and View File History
You can change the name of the computer to make it easier to identify when
pairing with other Bluetooth enabled devices and view statistics about received
files.
1. Swipe up from the bottom of the Home screen to access all apps.
2. Tap Settings > Connected devices > Bluetooth.
3. Tap Device Name. Type the new name and then select Rename.
60 EDA71 User Guide
Page 71

Rename, Share, or Unpair a Paired Device
You can rename a paired device to make it easier to identify on the list or unpair the
device to remove it from the paired list.
1. Swipe up from the bottom of the Home screen to access all apps.
2. Tap Settings > Connected devices > Bluetooth.
3. Tap next to the paired device.
4. Take one of the following actions:
• To rename the device, type the new name, and then tap OK.
•To allow Internet connection sharing or Contact Sharing, tap the check box
next to the setting.
• To unpair the device, tap Forget.
About the Scanner Edge App
Your tablet is equipped to communicate with scanners using Bluetooth technology
through the Scanner Edge app. The Bluetooth radio must be turned on. System bar
icons indicate Bluetooth radio status.
To turn on the Bluetooth radio:
1. Swipe up from the bottom of the Home screen to access all apps.
2. Tap Settings > Connected devices > Bluetooth.
3. If necessary, tap Off to toggle the Bluetooth radio On .
Connect a Bluetooth Scanner
To connect to a Bluetooth scanner, the Bluetooth radio must be turned on and then
scan a pairing bar code with the Bluetooth scanner.
1. Swipe up from the bottom of the Home screen to access all apps.
2. Tap Scanner Edge .
3. Tap the menu icon and then tap Pair BT Scanner.
4. For Honeywell branded scanners tap Honeywell or for Intermec branded
scanners tap Intermec.
5. Scan the Scan to connect barcode displayed on screen.
EDA71 User Guide 61
Page 72

When the scanner is successfully paired with the computer, the scanner name
appears under Connected Device.
Unpair a Paired Scanner
You can unpair the scanner to remove it from the Connected Device list.
1. Swipe up from the bottom of the Home screen to access all apps.
2. Tap Scanner Edge .
3. Tap the menu icon and then tap Disconnect BT Scanner.
4. Tap Honeywell or Intermec.
•Scan the Scan to disconnect barcode displayed on screen.
About Serial and USB Communications
You can use these Dolphin CX80 series accessories to transmit data to and receive
data from another device through serial or USB communications:
•Vehicle dock
•Home Base
• Ethernet Home Base
• USB snap-on adapter
USB Troubleshooting
• If you have a problem with your workstation computer recognizing the USB
device, try downloading and installing the Honeywell-aidc-usb-driver. The
62 EDA71 User Guide
Page 73

driver is part of the Honeywell_Mobility SDK_Android software.zip file. To learn
where to get the software, see Developer Information on page 64.
• Check to make sure you have enabled the USB for file transfer. To learn more, see
Configure USB Connection and Transfer Files on page 34
How to Share Your Mobile Data Connection
You can share the mobile data connection through USB tethering or Bluetooth
tethering. You can also use the computer as a Wi-Fi hotspot to share the connection with other devices.
Share the Data Connection Through USB or Bluetooth
You can share your data connection with another device through tethering. After
you connect the tablet to another device through a USB connection, you can share
the tablet’s data connection through USB tethering. Or, if the device is Bluetoothcapable, you can configure the tablet to share the data connection with the device
through Bluetooth tethering.
1. Prepare the devices.
• For USB - Connect the tablet to another device through an EDA71 accessory
and USB communication cable. Make sure your USB connection is set to File
Transfer instead of Charging.
• For Bluetooth - Pair your EDA71 with another Bluetooth enabled device.
Make sure the other device is set to use a network connection by Bluetooth.
2. Swipe up from the bottom of the Home screen to access all apps.
3. Tap Settings > Network & tethering > Hotspot & tethering.
4. Select the type of tether to initiate:
•Tap USB tethering.
•Tap Bluetooth tethering.
The devices is now sharing the computer data connection.
Note: To stop sharing the connection, disconnect the USB cable, or tap USB tethering or
Bluetooth tethering again to turn Off the feature.
About Near Field Communication (NFC)
NFC technology provides the ability for short-range, wireless data transfer
between the EDA71 and NFC tags or other NFC enabled devices placed in close
proximity to the back of the computer. All EDA71 mobile computers support the
following modes of operation:
EDA71 User Guide 63
Page 74

• NFC tag reader/writer mode: The computer reads and/or writes digital
information from or to an NFC tag.
• Peer-to-Peer (P2P) mode: The tablet uses Android Beam and/or Bluetooth
technology to transfer screen content (e.g., a picture, contact information, Web
page url, or file) between NFC enabled devices.
• NFC card emulation mode: The tablet emulates an NFC card (smart card) that
an external card reader can access. You can download and install apps for card
emulation mode from the Google Play Store. Some examples include digital
wallets (e-wallets) offered by your bank or credit card company and Google Pay.
The app you install determines the type of emulation mode used: Card Emulation with a Secure Element or Host-based Card Emulation. Secure element use
is common for financial transactions that require a high level of security in
order to provide a secure memory and execution environment for running custom smart card applets and storing your personal information (e.g., account
information and credentials).
Note: When using a Universal Integrated Circuit (UICC) card for NFC Secure Element NFC
link encryption, install the card in SIM slot 1.
Developer Information
To download the Honeywell Mobility SDK for Android and EZConfig for Mobility:
1. Go to www.honeywellaidc.com.
2. Select Get Resources > Software.
3. Click on the Technical Support Downloads Portal link,
https://hsmftp.honeywell.com.
4. Create an account if you have not already created one. You must login to
download the software.
5. Install the Honeywell Download Manager tool on your workstation (e.g., laptop
or desktop computer) prior to trying to download any files.
6. Navigate to the software:
• Honeywell Mobility SDK for Android
Click on Software > Software and Tools > Developer Library > SDKs for
Android.
• EZConfig for Mobility
Click on Software > Software and Tools > EZConfig for Mobility.
7. Select Download next to the software zip file.
64 EDA71 User Guide
Page 75

About Provisioning Mode
Once you complete the out-of-box initial setup process, Provisioning mode is
automatically turned Off to improve device security against unwanted
modifications to the system.
When Provisioning mode is turned Off (disabled):
• Configuration bar codes do not scan and process.
• \honeywell\autoinstall folders are inaccessible.
Note: To learn more about network and security for Honeywell mobile computers with
Android operating systems, go to www.honeywellaidc.com.
Enable or Disable Provisioning Mode
1. Swipe up from the bottom of the Home screen to access all apps.
2. Tap Settings > Honeywell Settings > Provisioning mode .
3. Tap the button to toggle the provisioning On or Off.
EDA71 User Guide 65
Page 76

66 EDA71 User Guide
Page 77

CHAPTER
7
MANGE AND MAINTAIN THE TABLET
Use this chapter to understand how to upgrade software, reset, and maintain the
tablet.
About Software Updates
Honeywell provides patches and security updates for existing software products at
no additional charge. Software upgrades (from one major version to another) may
involve additional charges. Some licensed software that Honeywell distributes
requires user registration and log in before the software can be downloaded.
Support for Honeywell Safety and Productivity Solutions products is available
online through the Technical Support Portal.
Software downloads can be accessed through the Technical Support Downloads
Portal.
1. Go to www.honeywellaidc.com.
2. Select Get Resources > Software.
3. Click on the Technical Support Downloads Portal link,
https://hsmftp.honeywell.com.
4. Create an account if you have not already created one. You must login to
download the software.
5. Install the Honeywell Download Manager tool on your workstation (e.g., laptop
or desktop computer) prior to trying to download any files.
6. Locate the app or upgrade you want to download in the Software directory tree.
7. Select Download. Follow the prompts to download the file.
About Transferring Files via USB Connection
If you plan on using a USB connection to transfer the upgrade files to the mobile
computer, make sure you set the USB connection to allow file transfers. To learn
more, see Configure USB Connection and Transfer Files on page 34.
EDA71 User Guide 67
Page 78

Install Software Updates with AutoInstall
Important: The EDA71 must have power for the entire length of the upgrade process or it could
become unstable. Do not attempt to remove the battery during the process.
1. Swipe up from the bottom of the Home screen to access all apps.
2. Tap Settings > Provisioning mode under Honeywell Settings.
3. Tap the toggle button to turn Provisioning mode On.
4. Save the upgrade file (*.zip or *.apk) to the following folder on the EDA71 tablet:
• Internal shared storage\honeywell\autoinstall
Software upgrades saved to this folder for installation, do not persist when a
Full factory reset or Enterprise data reset is performed.
5. Swipe up from the bottom of the Home screen to access all apps.
6. Tap AutoInstall Settings and verify Autoinstall is enabled .
7. Tap Packages Update from the AutoInstall Settings screen.
The tablet automatically initiates a reboot and installs the
software upgrade. The system update screen appears during the upgrade
process. When the update is finished, the lock screen appears.
8. Once installation is complete, turn Provisioning mode Off.
Note: Some updates do not require the computer to reboot before installation.
Optional microSD Card Method
The EDA71 comes equipped with a microSD card socket. You can install an
upgrade from a microSD card you insert in the computer.
Important: The EDA71 must have power for the entire length of the upgrade process or it could
become unstable. Do not attempt to remove the battery during the process.
1. On the EDA71, swipe up from the bottom of the Home screen to access all apps.
2. Tap Settings > Provisioning mode under Honeywell Settings.
3. Tap the toggle button to turn Provisioning mode On.
4. Tap AutoInstall Settings . Verify AutoInstall is enabled .
5. Press and hold the Power button, and then tap Power off.
6. On your workstation (e.g., laptop, desktop computer), format the microSD card
and create a \honeywell\autoinstall folder on the root of the card.
7. Save the upgrade file in the autoinstall folder.
8. Install the microSD card in the EDA71, and then press the Power button.
68 EDA71 User Guide
Page 79

The computer automatically runs the upgrade found in the autoinstall folder on
the card. The system update screen appears during the upgrade process. When
the upgrade is finished, the lock screen appears.
9. Once installation is complete, turn Provisioning mode Off.
About the Honeywell Upgrader
Use the Honeywell Upgrader app (HUpgrader) to check for and install OTA updates
or view the current OTA version installed on the computer.
How to View the Installed OTA Version
1. Swipe up from the bottom of the Home screen to access all apps.
2. Tap HUpgrader to open the Honeywell Updater app. The OTA version
number installed on the computer appears on the screen.
EDA71 User Guide 69
Page 80

Install OTA Updates
To use the HUpgrader to install an OTA update file downloaded from the Technical
Support Downloads Portal:
1. Swipe up from the bottom of the Home screen to access all apps.
2. Tap Settings > Provisioning mode under Honeywell Settings.
3. Tap the toggle button to turn Provisioning mode On.
4. Save the OTA file (*.zip) in the following folder on the EDA71 computer:
• Internal shared storage\Download
5. Tap HUpgrader to open the Honeywell Updater app.
6. Tap in the upper right corner, and then tap Select OTA from storage.
7. Select the storage location (i.e., Internal Storage) where you saved the file.
8. Tap the OTA update file. The computer examines the file, and then starts the
installation.
9. Once the installation is complete (100%), select OK when prompted to Reboot
the computer. The computer reboots and finishes the update.
70 EDA71 User Guide
Page 81

Reboot (Restart) the Computer
You may need to reboot the computer to correct conditions where an application
stops responding to the system.
1. Save your files and close any open applications.
2. Press and hold the Power button until the options screen appears.
3. Tap Reboot.
4. Tap OK to confirm Reboot. The computer reboots.
If the touch panel display is unresponsive:
•Press and hold the Power button for approximately 8 seconds until the
computer reboots.
About Enterprise Data Reset
You can perform an Enterprise data reset if a Reboot did not improve the condition
and all other troubleshooting methods have not resolved the issue. This method
provides a clean configuration for troubleshooting by erasing all data from the
Internal shared storage location on the computer. Data is not erased from the
IPSM Card location.
Caution: An Enterprise data reset results in data loss, only perform this
Note: This method of recovery may not be available if your system administrator has set
policies to prevent the reset use.
Before You Begin
• If you recently reset your Google Account password, wait 24 hours before
performing a Enterprise data reset.
• Make sure you have your screen lock password, PIN or pattern if you activated
one. You will need this to reset the computer.
• If you have a Google Account, back up your data and settings to your Google
Account so you can restore them if needed.
• Connect the computer to an external power source or make sure you have a full
battery charge.
• Make sure you have an Internet connection.
procedure if all other recovery methods have failed. All personal
content is erased including, but not limited to emails, pictures,
contacts, Google account information, system settings and app
settings.
EDA71 User Guide 71
Page 82

Enterprise Data Reset the Computer
1. Swipe up from the bottom of the Home screen to access all apps.
2. Select Settings > Backup & reset.
3. Tap Reset Phone.
4. If prompted, type your screen lock security pattern, PIN, or password and tap
next ( ).
5. Tap Erase Everything. A message appears informing you an Enterprise data
reset is being performed.
About Full Factory Reset
A Full Factory Reset should only be performed if you have exhausted all other
troubleshooting options. This method reverts the computer back to the factory
state by erasing all data in Internal shared storage and the IPSM Card storage
locations on the computer.
Caution: A Full factory reset results in data loss. Perform this procedure
only if all other recovery methods have failed and have no other
option. All personal content is erased including, but not limited to
emails, pictures, contacts, Google account information, system
settings and app settings.
Note: This method of recovery may not be available if your system administrator has set
policies to prevent the reset use.
Before You Begin
• If you added a Google Account to the 71 Series computer, make sure you have
your Google username and password associated with the computer. If you do
not have the username and password, you will not be able to use the computer
after the reset. This is a security measure that prevents unauthorized users from
using the device if they try a Full factory reset.
• If you did not add a Google Account to the computer, the extra security level is
not enabled and you will not need a Google username and password.
• If you recently reset your Google Account password, wait 24 hours before
performing a Full factory reset.
• Connect the computer to an external power source or make sure you have a full
battery charge.
• Make sure you have an Internet connection.
72 EDA71 User Guide
Page 83

Full Factory Reset the Computer
1. Swipe up from the bottom of the Home screen to access all apps.
2. Select Settings > Backup & reset.
3. Tap Full factory reset.
4. Tap Reset Phone.
5. If prompted, type your screen lock security pattern, PIN, or password and tap
next ( ).
6. Tap Erase Everything. A message appears informing you an Full factory reset
is being performed.
Clean the Tablet
To keep the tablet in good working order, you may need to clean the scanner
window, color camera window, and the touch screen. Clean the windows and the
touch screen as often as needed for the environment in which you are using the
tablet. The tablet withstands application of the following cleaning agents when
applied to a clean soft cloth and removed immediately with a dry soft cloth:
• Acetic acid, 10% in water
• Ethyl alcohol, 10% in water
• Mild soap solutions
Note: Always leave the battery installed when you clean the computer.
1. Press the Power button to suspend the computer.
2. Dip a clean cloth towel in the cleaning agent and wring out the excess.
3. Wipe off the scanner window, camera lens, and flash area. Do not allow any
abrasive material to touch these surfaces.
4. Wipe dry.
5. Let the computer completely air dry before using again.
EDA71 User Guide 73
Page 84

74 EDA71 User Guide
Page 85

APPENDIX
A
SPECIFICATIONS
Computer Agency Information
EDA71 tablets meet or exceed the requirements of all applicable standards
organizations for safe operation. The best way to ensure safe operation is to use
the tablet according to the agency guidelines on the product regulatory sheet,
quick start guide and in this user guide. Read all guidelines before using your
tablet.
Product documentation is available for download from www.honeywellaidc.com.
Public certificates are available for download from
www.honeywellaidc.com/compliance.
Label Locations
Labels inside the battery compartment contain information about the tablet
including, compliance information, model number, serial number, IMEI number
(EDA71-1 models only) and MAC address. Laser safety labeling is located on the
back of the tablet.
Physical and Environmental Specifications
1. Go to www.honeywellaidc.com.
2. Type EDA71 in the Search box and then press Enter.
3. Select the Products tab.
4. Click the red arrow under the EDA71 Tablet description.
5. Select one of the following:
• Specifications
View System Architecture, Wireless Connectivity, Mechanical, and
Environmental specifications.
• Documents
EDA71 User Guide 75
Download the Data Sheet, Accessory Guide, Quick Start Guide, User Guide,
Regulatory Information, Battery Information and other product
documentation.
Page 86

Bar Code Symbologies Supported
The computer supports the following bar code symbologies:
1D Symbologies 2D Symbologies Postal Codes
Default Default Default
Codabar Enabled Aztec Code Enabled Australian Post Disabled
Code 39 Enabled Codablock A Disabled British Post Disabled
Code 32 Disabled Codablock F Disabled Canadian Post Disabled
Code 11 Disabled DataMatrix Enabled China Post Disabled
Code 93 Disabled DotCode Disabled InfoMail Disabled
Code 128 Enabled Grid Matrix Disabled Japanese Post Disabled
Composite Disabled HanXin Disabled Korean Post Disabled
EAN-8 Enabled Maxicode Disabled Netherlands (KIX) Post Disabled
EAN-13 Enabled PDF 417 Enabled 2D Postal Settings Disabled
GS1-128 Enabled QR Code Disabled Planet Code Disabled
GS1 DataBar Disabled TLC 39 Disabled Postnet Disabled
IATA 2 of 5 Disabled OCR-A Disabled
Standard 2 of 5 Disabled OCR-B Disabled
Interleaved 2 of 5 Enabled
ISBT 128 Disabled
Matrix 2 of 5 Disabled
MSI Disabled
Telepen Disabled
Trioptic Code Disabled
UPC-A Enabled
UPC-E Enabled
UPC-E1 Enabled
Note: To learn about changing the symbology settings, see Change the Scanner Settings on
page 46.
76 EDA71 User Guide
Page 87

N6703 Imager Engine Reading Distances
The depth of field measurements were taken using these parameters:
• Distances are measured from the front of the engine.
• +23 °C (+73 °F), 0 lux
• Photographic quality codes
Note: Time to Read and Depth of Field are impacted if the bar code symbol is at the edge of
the image.
Symbology Near Distance Far Distance
5 mil Code 39 mm 79 270
in 3.11 10.63
10 mil Code 39 mm 40 450
in 1.34 17.72
20 mil Code 39 mm 44 674
in 1.50 26.53
13 mil 100% UPC-A mm 44 515
in 1.50 20.27
15 mil Code 128 mm 42 572
in 1.42 22.52
10 mil Data Matrix mm 83 236
in 3.27 9.29
5 mil PDF417 mm 119 177
in 4.68 6.97
6.7 mil PDF417 mm 96 236
in 3.78 9.29
6.7 mil QR mm 123 147
in 4.84 5.79
15 mil QR mm 39 390
in 1.3 15.35
N6703 Imager Engine Field of View/Resolution
DPI can be calculated based on the following formula:
Focus
Hoorizontal Field Angle (degrees) 48
Vertical Field Angle (degrees) 31
Horizontal DPI = 832 pixels/width of horizontal field of view (inches) Vertical DPI =
640 pixels/width of vertical field of view (inches)
EDA71 User Guide 77
Page 88

78 EDA71 User Guide
Page 89

Page 90

™
Honeywell
9680 Old Bailes Road
Fort Mill, SC 29707
www.honeywellaidc.com
EDA71-A-EN-UG-01 Rev A
08/19
 Loading...