

Page 1
P1
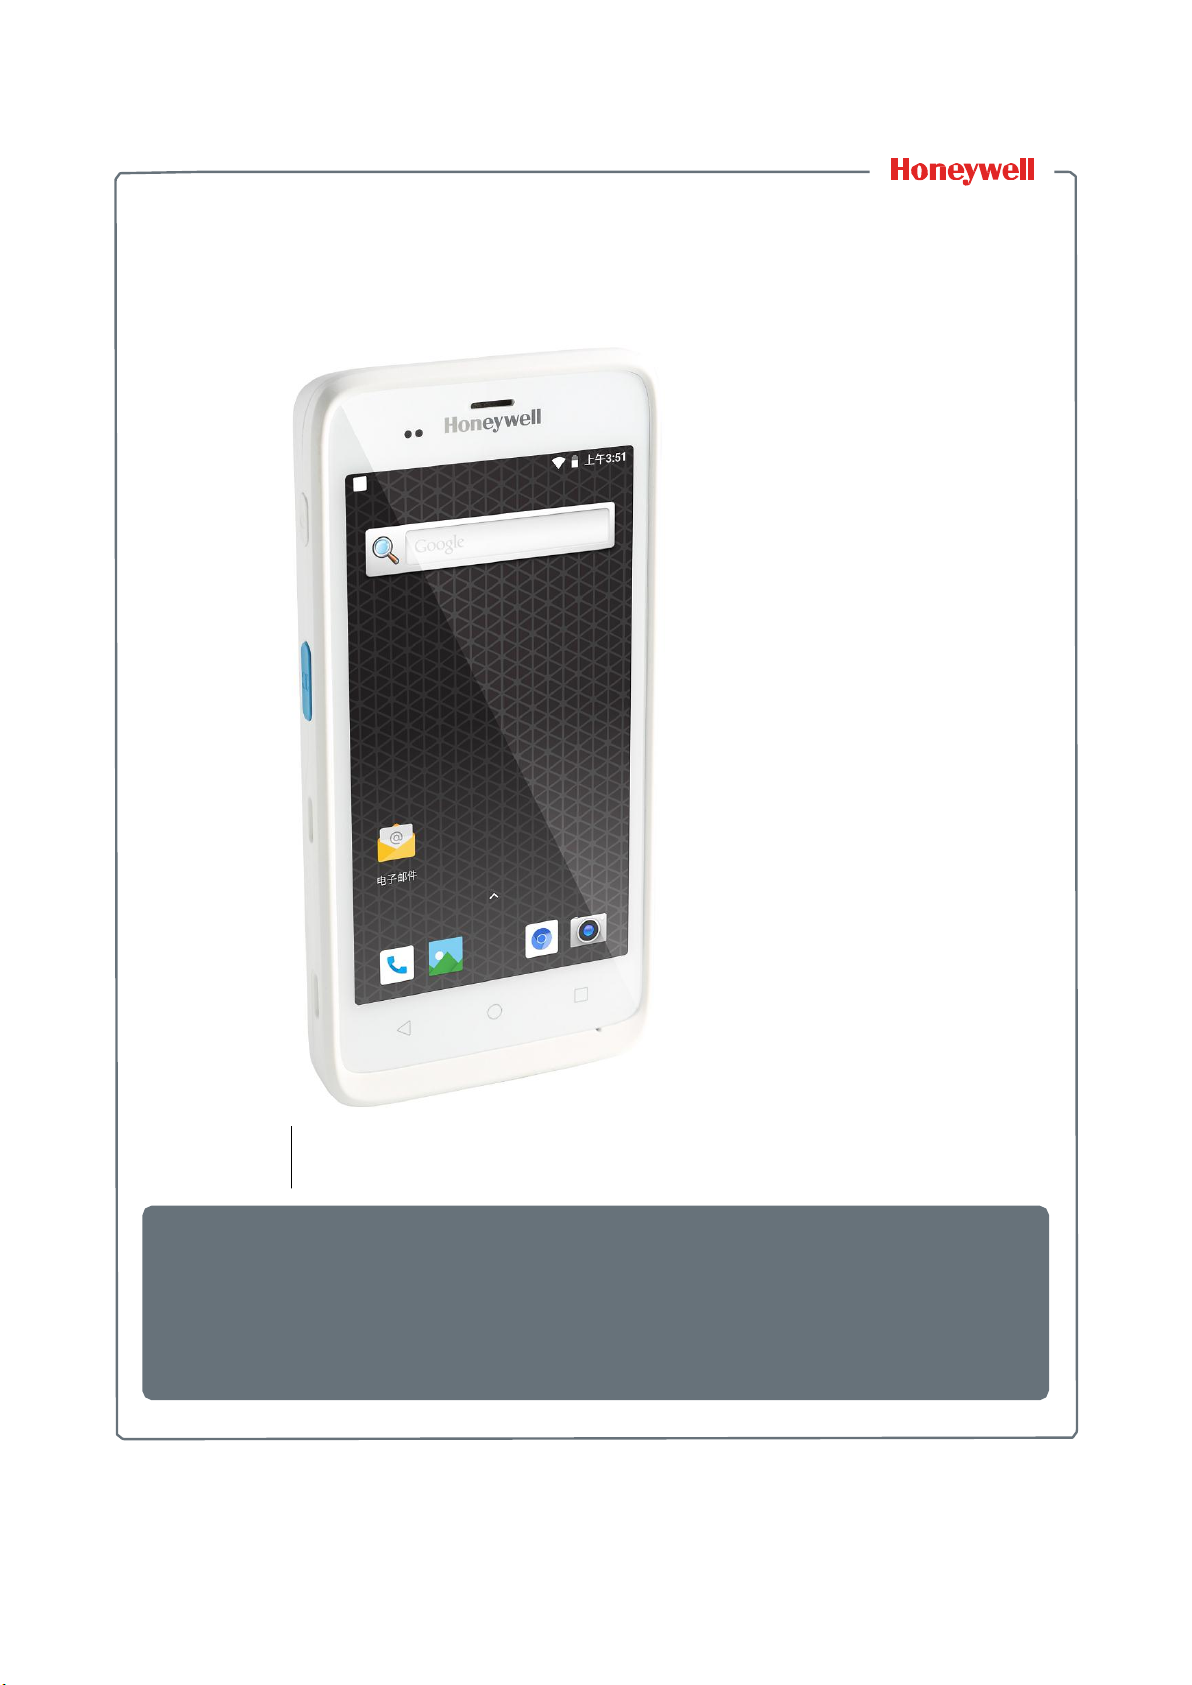
ScanPal EDA51 (Model: EDA51-1)
Enterprise Tablet
with Android™ 8.1 Operating System
Page 2

P2
免责声明
霍尼韦尔公司(简称 HII)有权对本手册的规格和其他信息作出更改,并不另行通知。任何情况下,用户
应向 HII 确认是否进行了任何更改。本刊物内容并不代表 HII 方的承诺。
Disclaimer
Honeywell International Inc. (abbr. HII) reserves the rights to modify the specifications and other information
mentioned in this User Guide without prior notification. In any case, users should confirm with HII whether any
changes were made. This publication does not represent any commitments of HII.
HII 不会对此手册的技术或编辑错误或遗漏承担责任;也不会对因提供、执行或使用此材料所造成的意外
或间接损害承担责任。HII 对为达到产品预期效果而选择或使用的软件或硬件不承担责任。
HII is not responsible for any technical or editing errors or omissions contained in this manual, nor for any
incidents or indirect damages caused by providing, implementing or using this material. HII is not responsible for
the softwares or hardwares selected or used in order to achieve the desired results.
此文档包含受版权保护的专有信息。保留所有权利。未经 HII 提前书面许可,不可复印、复制此文档、或
将其翻译为其他语言。
The proprietary information contained in this article is protected by copyright. All rights reserved. Without prior
written consent from HII, any form of photocopy, copy or translation into other languages is not allowed.
商标权
Trademark Rights
Android、Google 及其他标记为 Google 公司的商标。
Android, Google and other marks are trademarks of Google Inc.
此手册所提及的其他产品名称可能是其他各相应公司的商标或注册商标,其所有权归这些公司所拥有。
Other product names mentioned in this manual may be trademarks or registered trademarks of their respective
companies, which are owned by these companies.
专利权
Patents
专利权信息,请参考网址:www.hsmpats.com.
For information on patents, please refer to www.hsmpats.com.
Copyright © 2016 Honeywell International Inc. All rights reserved.
Page 3

P3
目录
Content
Page 4

P6
技术支持
Technical Support
如果您需要安装或故障排除,请通过以下途径联系我们:
知识库:www.hsmknowledgebase.com
If you need installation or troubleshooting help, please contact us via:
Knowledge base: www.hsmknowledgebase.com
霍尼韦尔知识库提供上千种即可解决方案,如果知识库不能帮助您解决问题,则可登录霍尼韦尔技术支
持网站提交您的问题或询问问题。
Honeywell knowledge base provides thousands of turnkey solutions. If the knowledge base can't help you solve
your problems, you can submit your questions or ask question on Honeywell technical support website.
技术支持网站:www.hsmsupportportal.com
登录霍尼韦尔技术支持网站搜寻知识库,提交您的困难或问题,请求回电服务,或提供反馈。填写表格
时,请提供尽量详细的信息。您也可以上传附件进行说明。
Technical support website: www.hsmsupportportal.com
Login Honeywell technical support website to search for knowledge base, submit your difficulties or questions,
ask for call-back services or provide feedbacks. Please provide more detailed information when filling the forms.
You can also upload attachments for explanation.
联系电话:www.honeywellaidc.com/locations
最新联系信息,请访问我们的网站。
Contacts: www.honeywellaidc.com/locations
For the latest contacts, please visit our website.
产品服务与维修
霍尼韦尔国际公司通过服务中心为公司所有产品向全世界提供服务。服务中心站点信息请访问:
www.honeywellaidc.com,选择中文语言(Chinese),然后选择支持 >联系支持 > 服务与维修。用户在把
产品寄到维修中心之前,请联系服务中心并拿到 RMA(Return Material Authorization)号码。
Product Service and Maintenance
Honeywell International Inc. provide services for all of its products all over the world via its service centers. For
information about the site of service centers, please visit www.honeywellaidc.com and select English as preferred
language, then select Support > Contact Support > Service and Maintenance. Please contact our service center to
get RMA (Return Material Authorization) numbers before sending the products for maintenance.
要获得霍尼韦尔保修期内或保修期外服务,请将产品随同购买日期记录一起寄回(邮费自付)霍尼韦尔维
修服务中心。
To get Honeywell service during warranty or out of warranty, please send the product together with the purchase
date records to Honeywell service center (postage paid).
有限质量保证
质保信息,请访问 www.honeywellaidc.com,选择中文语言(Chinese)并点击资源>保修期。
Limited Warranty
For information about the warranty, please visit www.honeywellaidc.com and select Chinese as preferred
language, tap Resources > Warranty.
Page 5

信息反馈
您的反馈对我们提高文档质量来说十分重要。请直接联系技术交流部门提交你们对手册的反馈:
Feedback
Your feedback is very important for us to improve the quality of documentation. Please contact technical
communication departments to submit your feedback on the User Guide:
Page 6

P7
第 1 章– ScanPal 系列 EDA51-X 无线终端产品特点
Chapter I - Features of ScanPal EDA51-X Enterprise Tablet
1 ScanPal 系列 EDA51-X 无线信息终端产品特点
1 - Features of ScanPal EDA51-X Enterprise Tablet
本章介绍操作系统为 Android 8.1 的 ScanPal 系列 EDA51-X(X 指 0,1,下同)无线信息终端,以下简称
EDA51-X 或者无线终端。用户可以从本章节了解此无线终端的基本特点、功能和其配件信息。
ScanPal EDA51-X (X refers to 0 and 1, as in all other cases below) (hereinafter called “EDA51-X” or “terminal”)
with Android 8.1 operating system will be introduced in this chapter. Users can learn something about the main
features, functions and accessories of this terminal from this chanpter.
Page 7

FCC Statement
15.19 Labeling requirements.
This device complies with part 15 of the FCC Rules. Operation is subject to the following two conditions: (1)
This device may not cause harmful interference, and (2) this device must accept any interference received,
including interference that may cause undesired operation.
15.21 Information to user.
Any Changes or modifications not expressly approved by the party responsible for compliance could void the
user's authority to operate the equipment.
15.105 Information to user.
This equipment has been tested and found to comply with the limits for a Class B digital device, pursuant to
Part 15 of the FCC Rules. These limits are designed to provide reasonable protection against harmful
interference in a residential installation. This equipment generates uses and can radiate radio frequency
energy and, if not installed and used in accordance with the instructions, may cause harmful interference to
radio communications. However, there is no guarantee that interference will not occur in a particular
installation. If this equipment does cause harmful interference to radio or television reception, which can be
determined by turning the equipment off and on, the user is encouraged to try to correct the interference by
one or more of the following measures:
-- Reorient or relocate the receiving antenna.
-- Increase the separation between the equipment and receiver.
-- Connect the equipment into an outlet on a circuit different from that to which the receiver is connected.
-- Consult the dealer or an experienced radio/TV technician for help.
Specific Absorption Rate (SAR) information:
This product meets the government's requirements for exposure to radio waves. The guidelines are based on
standards that were developed by independent scientific organizations through periodic and thorough
evaluation of scientific studies. The standards include a substantial safety margin designed to assure the
safety of all persons regardless of age or health.
FCC RF Exposure Information and Statement The SAR limit of USA (FCC) is 1.6 W/kg averaged over one
gram of tissue. This device was tested for typical body-worn operations with the back of the handset kept
10mm from the body. To maintain compliance with FCC RF exposure requirements, use accessories that
maintain a 10mm separation distance between the user's body and the back of the handset. The use of belt
clips, holsters and similar accessories should not contain metallic components in its assembly. The use of
accessories that do not satisfy these requirements may not comply with FCC RF exposure requirements, and
should be avoided.
Body-worn Operation
This device was tested for typical body-worn operations. To comply with RF exposure requirements, a
minimum separation distance of 10mm for body worn must be maintained between the user’s body, including
the antenna. Third-party belt-clips, holsters, and similar accessories used by this device should not contain
any metallic components. Body-worn accessories that do not meet these requirements may not comply with
RF exposure requirements and should be avoided. Use only the supplied or an approved antenna.
Page 8

P8
第 1 章– ScanPal 系列 EDA70-X 无线信息终端产品特点
Chapter I - Features of ScanPal EDA51-X Enterprise Tablet
EDA51-X 无线终端简介
About EDA51-X Terminal
霍尼韦尔 EDA51-X 终端机面向企业用户的平板电脑智能手机,通过 Android 操作系统提供稳定安全的企
业数据管理及无线通讯。EDA51-X 的主要特点有:大屏幕显示、高容量电池、条形码成像及超强耐受
性。
Honeywell EDA51-X Enterprise Tablet is a smart phone for enterprise users, delivering stable and secure
enterprise data management and wireless communications through Android operating system. The main features
of ScanPal EDA51-X are: large-screen display, high-capacity battery, barcode imaging and extreme robustness.
• Android 8.1 操作系统。
• 2 GB 动态随机存储器配置 16 GB 闪速存储器,同时提供 3GB 动态随机存储器配置 32GB 闪速存储器。
• 大屏幕显示,灵敏的多触摸点屏幕显示。
• 高性能二维成像仪配置,具有根据人体工程学设计的扫描触发键。
• LTE/UMTS/GSM 无线广域网通信,保证所有网络技术的高速度数据传输及高保真声音支持。
• IEEE 802.11a/b/g/n/ac。
• 蓝牙 4.2。
• 短距离无线数据传送采用近场通讯(NFC)技术。
• 高附加值的软件组件支持专业成像及光学字符识别(OCR)功能。
• IP64 防护等级。
• 可靠的 Micro SD 插槽,最大可支持 128GB。
• 集成化 GPS 接收机。
• 13 百万像素彩色摄像头。
• Android™ 8.1 OS.
• 2 GB dynamic RAM and 16GB flash memory / 3 GB dynamic RAM and 32GB flash memory.
• Large display with sensitive multi-touch screen.
• High-performance area imaging features with an ergonomic scan trigger.
• LTE/UMTS/GSM wireless WAN communications ensure high-speed data transmission and high-fidelity
sound support for all network technologies.
• IEEE 802.11a/b/g/n/ac.
• Bluetooth 4.2.
• Near-field communication (NFC) technology for short-range wireless data transmission.
• High value-added software components support professional imaging and optical character recognition (OCR)
features.
• IP64 Ingress Protection.
• Reliable Micro SD slot that supports up to 128GB expansion.
• Integrated GPS receiver.
• 13 mega pixels color camera.
Page 9
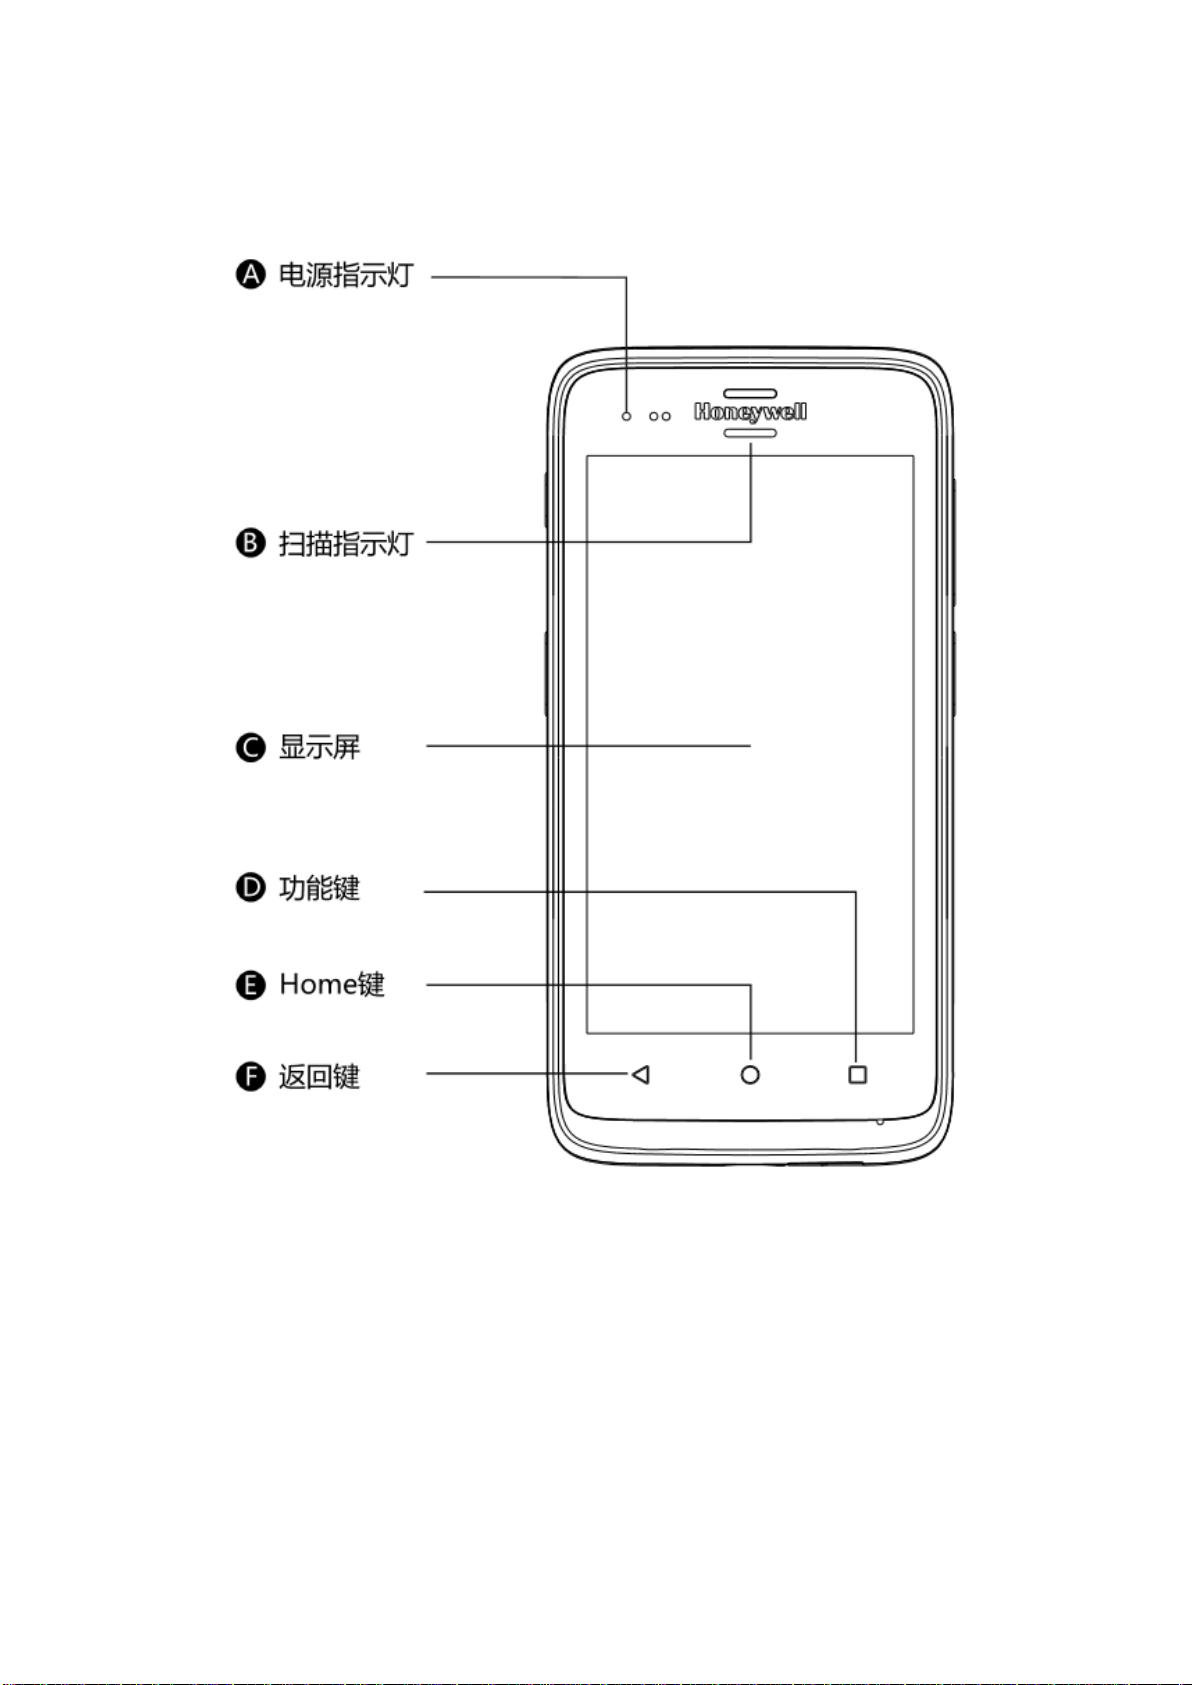
P9
Power Indicator
Scan Indicator
Display
Function Key
Home Key
Return Key
ScanPal 终端机前面板图
EDA51-X front view
Page 10
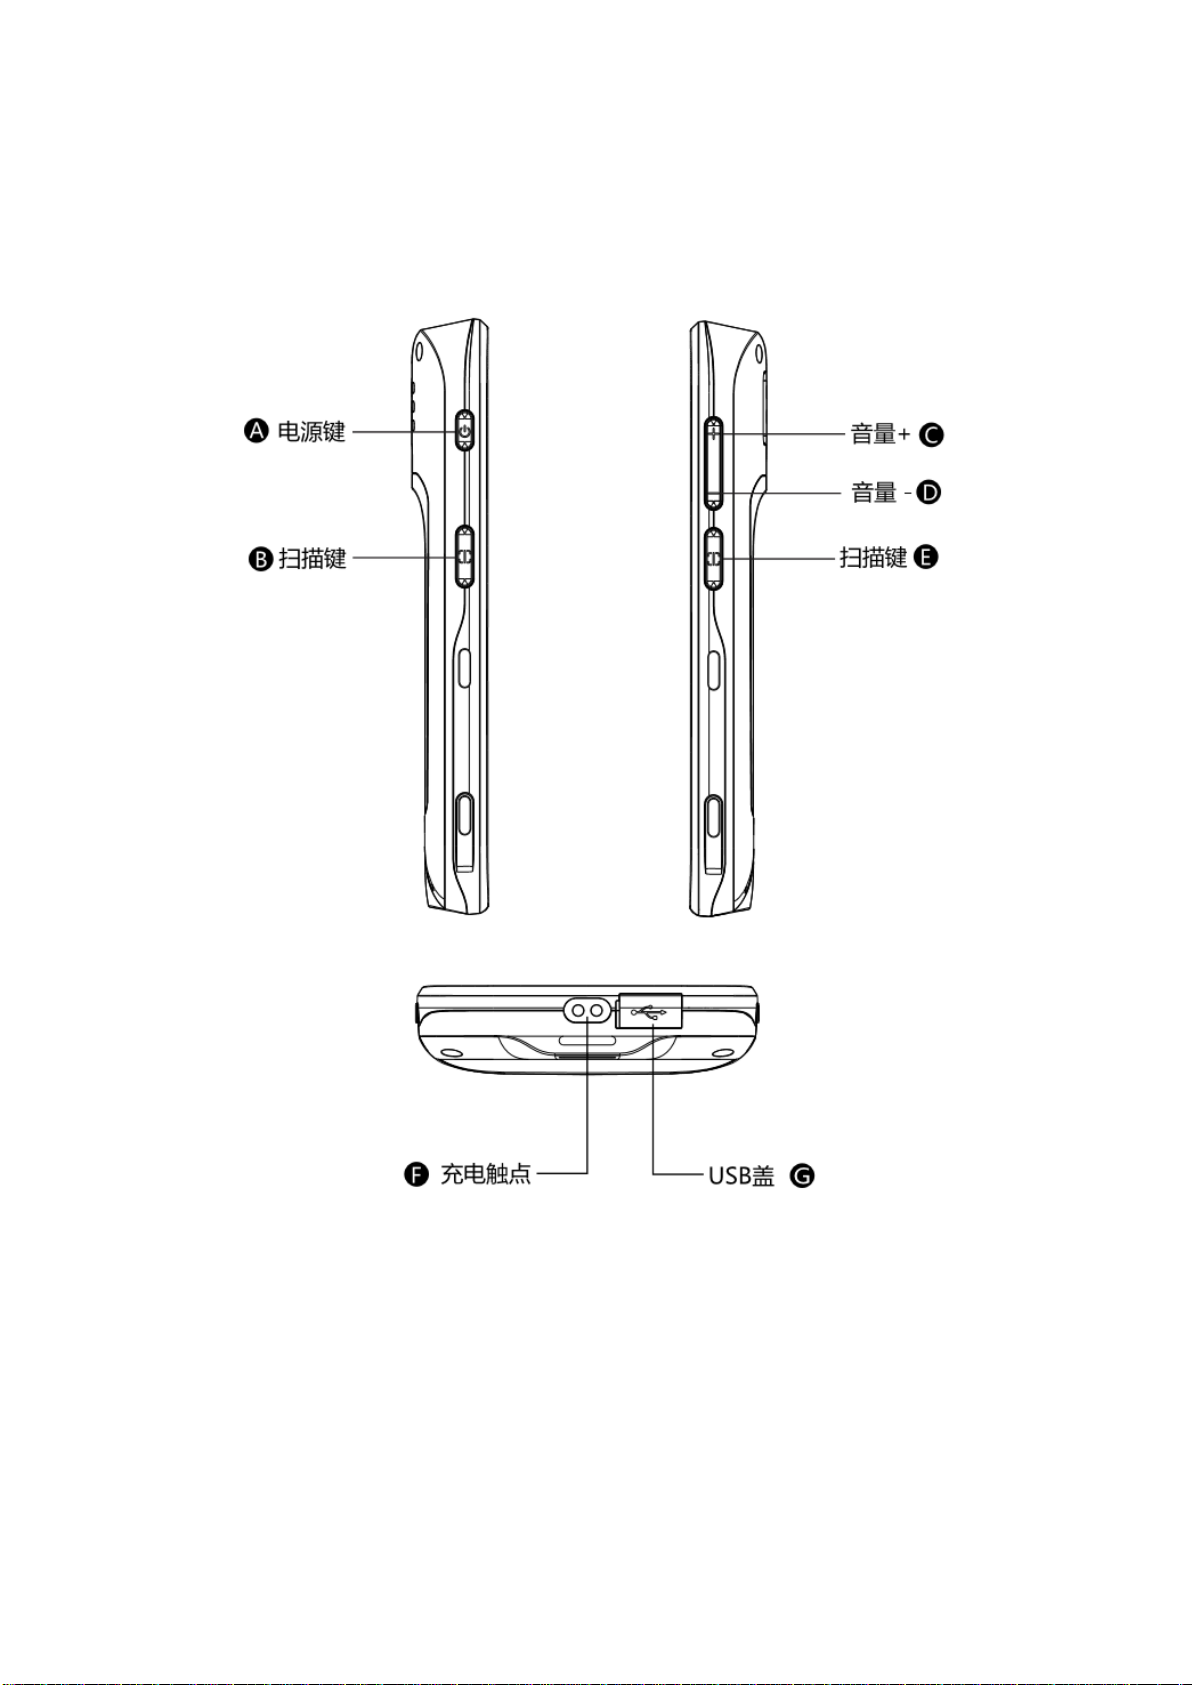
P10
Power Button
Scan Button
Volume Up
Volume Down
Scan Button
Charging Contact
USB Cover
ScanPal 终端机侧面及底部图
EDA51-X side and bottom views
Page 11
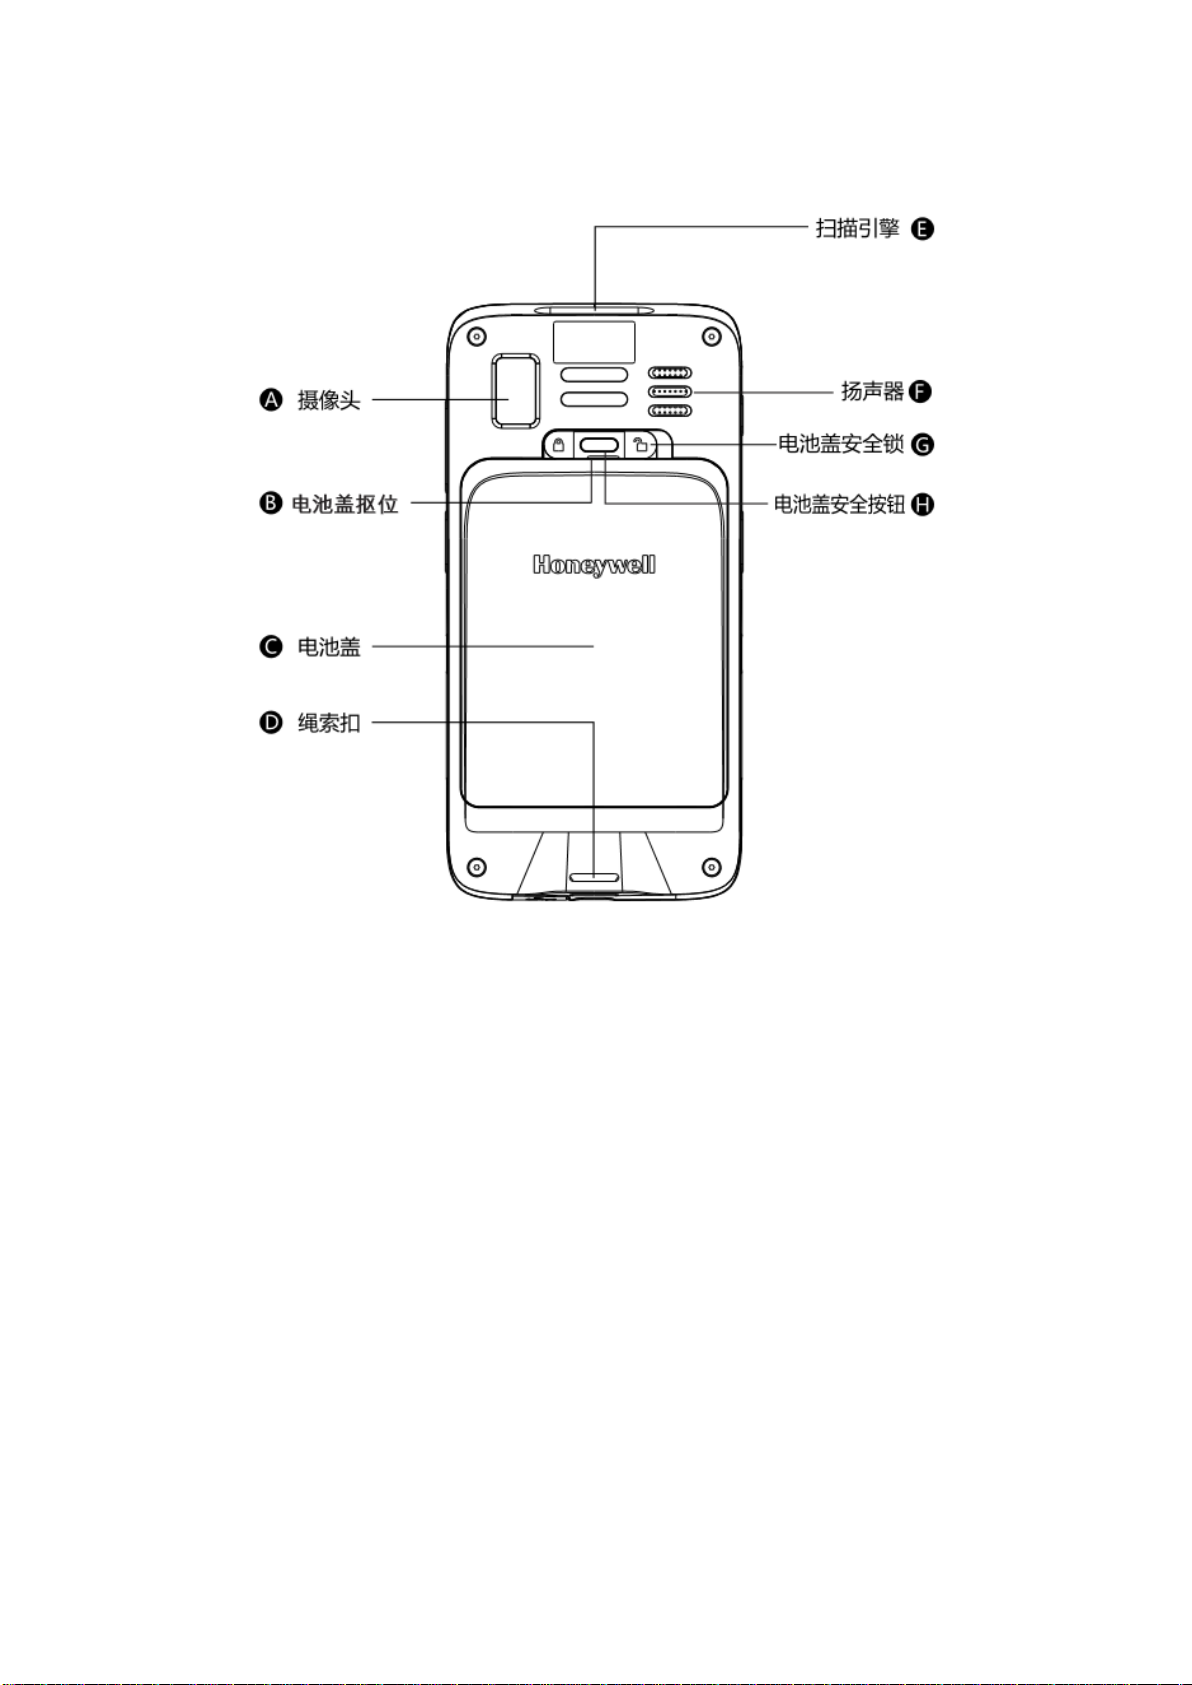
P11
Camera
Battery Cover Buckle Handle
Battery Cover
String Buckle
Scan Engine
Speaker
Battery Cover Safety Lock
Battery Cover Safety Button
ScanPal 终端机后面板图
EDA51-X rear view
Page 12

P12
电池
Battery
EDA51-X使用 3.8V 可充电锂电池作为主要供电电源。电池容量为15.2 瓦特/小时。诸多因素决定电池使
用时间,例如:屏幕显示亮度、屏幕自动进入休眠时间、输入装置、极端气温和用户使用等因素。
EDA51-X uses 3.8V rechargeable lithium ion battery as its main power supply. The battery capacity is 15.2
watt/hour. Battery life is influenced by many factors, such as: screen brightness, the length of time before the
screen automatically go to sleep, input configurations, extreme temperature and using behaviors, etc.
霍尼韦尔建议保证电池一直处于有电状态,以防数据丢失。更换电池时,请正常关机后操作,更换完毕再
开机启动。
Honeywell suggests you to keep the battery charged to avoid data loss. Change battery only after switching off the
device as per normal. Switch on the device after completing change of battery.
若需更换电池产品,请联系当地经销商。
If you need to buy a replaceable battery, please contact regional resellers.
警告:此设备中的电池若使用不当,可引起火灾或化学烧伤。请勿拆开电池或将其加热到 100°C (212 °F) 以
上,或焚烧电池。合理处理废弃电池。置于儿童不易接触到的地方。
Warning: Improper use of the battery of this device can cause a fire or chemical burns. Please don't disassemble
the battery or heat it to 100 °C (212 °F) and above, or incinerate the battery. Make sure waste batteries are
properly disposed. Keep out of reach of the children.
我们推荐用户使用霍尼韦尔锂电池。使用非霍尼韦尔电池所造成的损害不包含在霍尼韦尔保修范围之
内。
We would recommend using only Honeywell‟s lithium battery; any damage caused by use of non-Honeywell
battery is not covered by warranty.
充电
使用 EDA51-X 无线终端之前,需确定电池(电池型号:BAT-EDA50)已充满电。可在将电池安装于
EDA51-X 无线终端之前或之后进行充电。使用原装充电器,或者座充,四联充,将电池完全充满电需要
大约 5 个小时。
Charging
Before using EDA51-X, you need to make sure the battery (model number BAT-EDA50K) is fully charged. You
can charge the battery before or after installing it to EDA51-X. It will take about 5 hours for the battery to be fully
charged using original quad charger (cradle charger or otherwise).
我们推荐用户使用霍尼韦尔原配充电设备。使用非霍尼韦尔原配充电设备所造成的损害不包含在霍尼韦
尔保修范围之内。
We would recommend using Honeywell‟s original charger; any damage caused by use of non-Honeywell charger
is not covered by warranty
Page 13
P13
更换电池
电池电量低时,可以对无线终端内的电池进行充电,或者更换为电量满的电池。
Replacing batteries
When the battery power is low, you can charge it together with the terminal, or replace it with a fully-charged
battery.
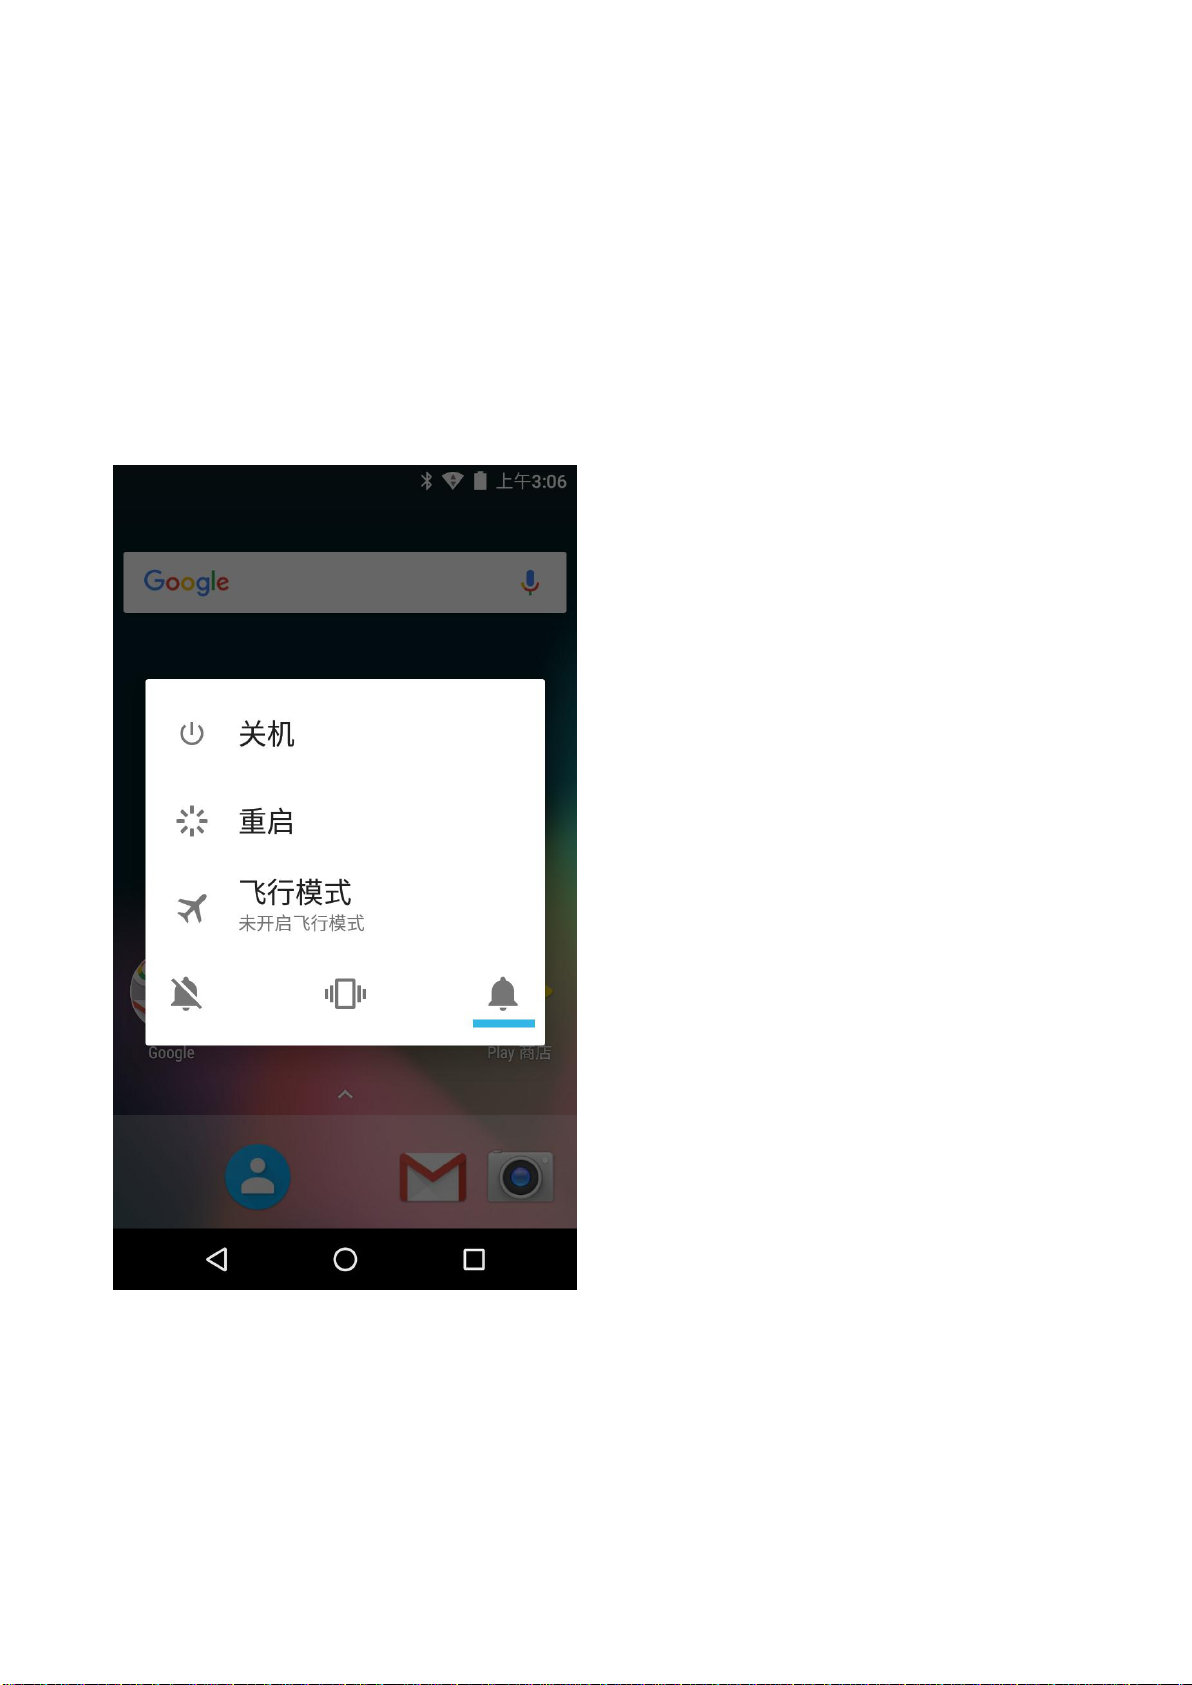
1. 保存好文件,并关闭所有运行应用程序。
2. 长时间按下电源键。出现如下界面:
1. Save all the files and close all running Apps.
2. Long press the power button. Until the follow interface pop up:
3. 点击关机。
3. Tap Turn off.
4. EDA51-X 无线终端会直接关机。
4. EDA51-X will turn off directly.
Page 14
P14
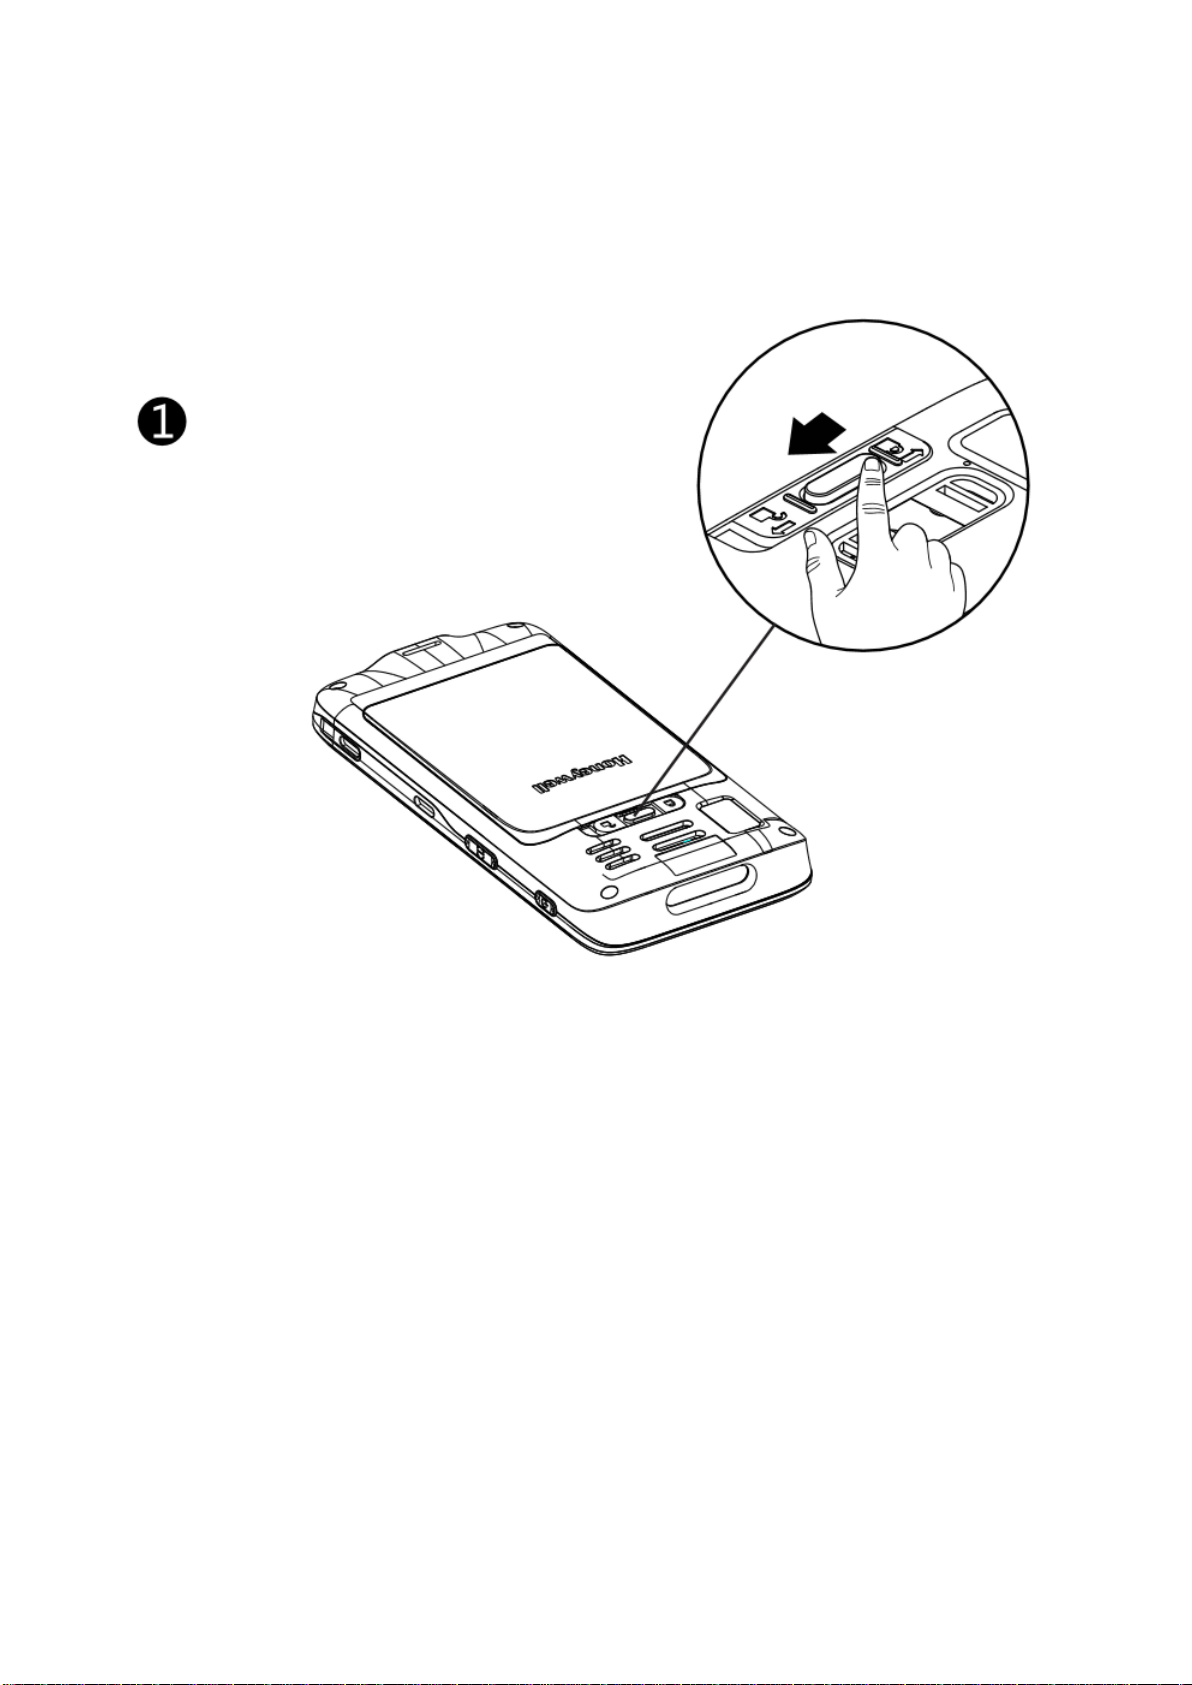
关机后,手动进行如下操作:
After it's turned off, do as the following instructions manually:
1. 按下电池盖安全按钮,将电池盖安全锁移动到右侧解锁位置。
1. Press down the battery cover safety button to move the lock to the unlock position at right;
2. 从电池盖扣柄处,将电池盖抠开
2. Open the battery cover with the battery cover buckle handle;
Page 15
Page 16
P15
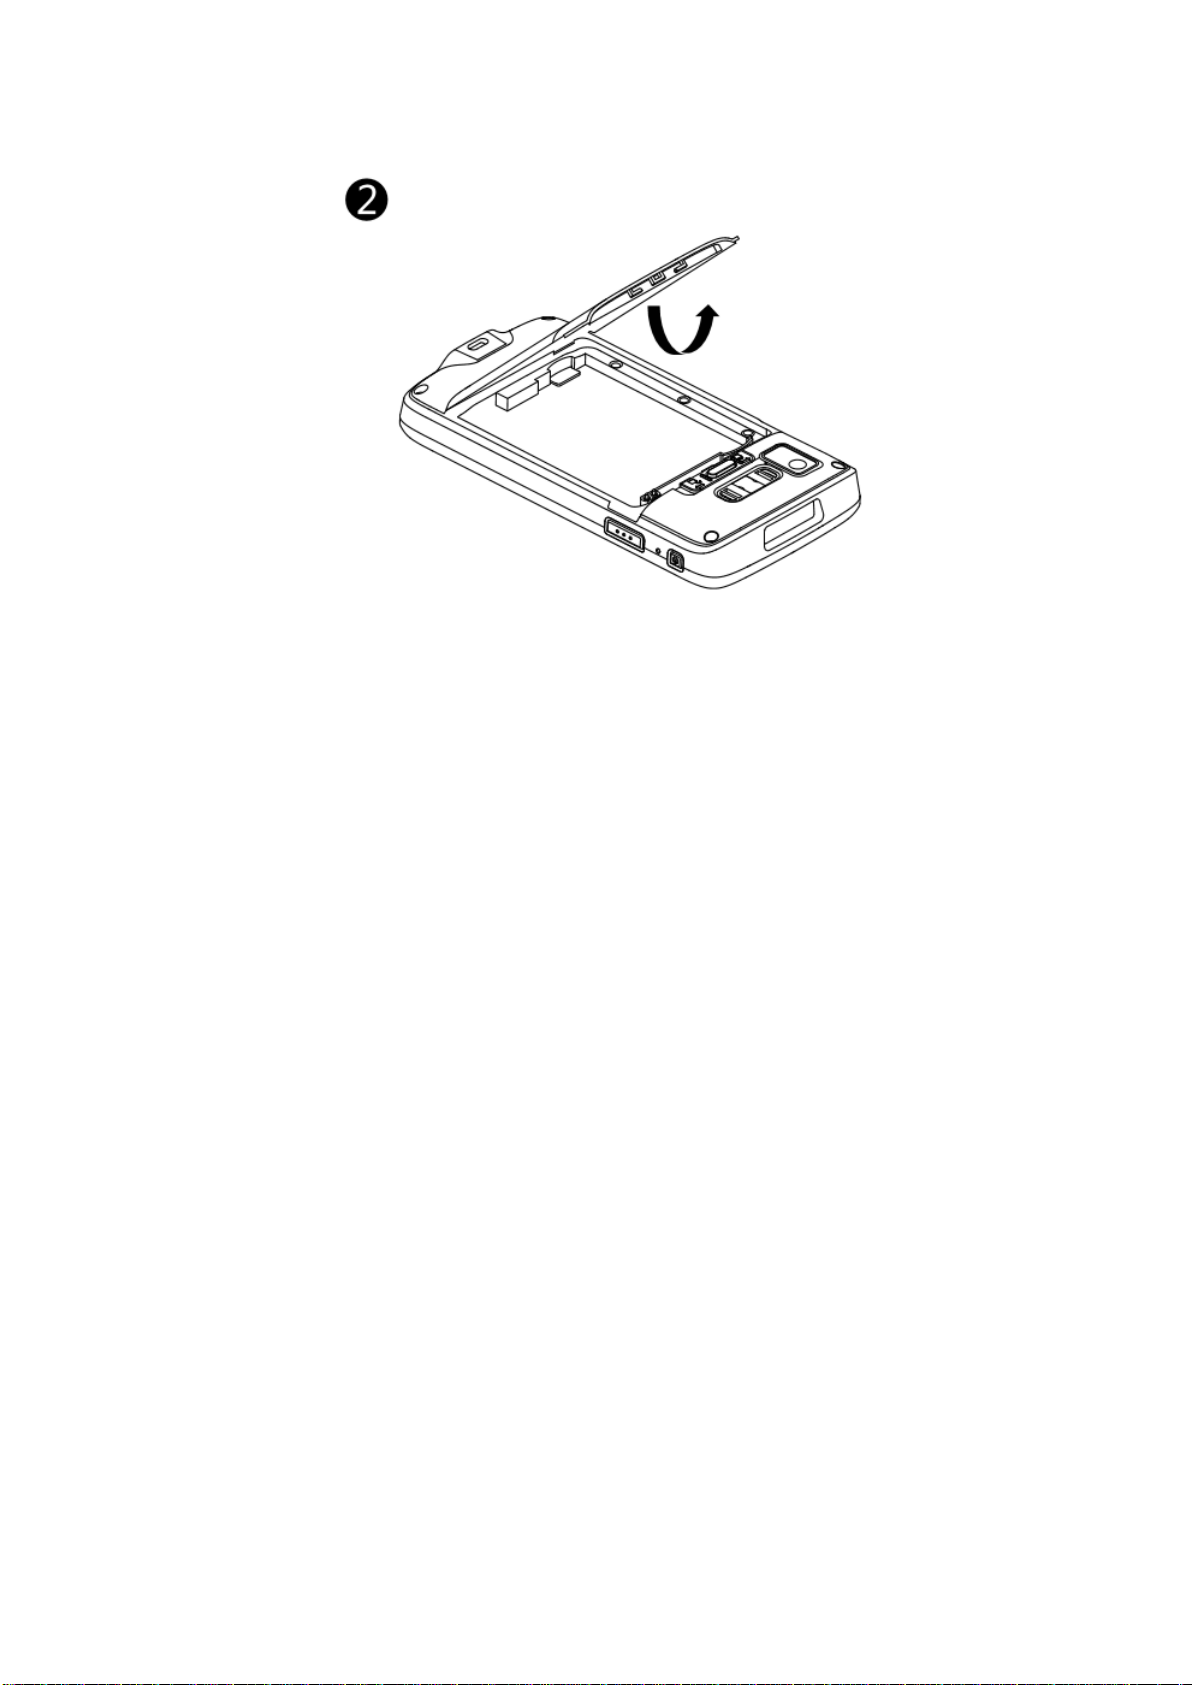
3. 插入电池(先插入电池非连接器一侧,再扣下电池,使得电池与手机建立连接)。扣下电池盖
3. Insert the battery (Insert the non-connector side first, then press the battery down to establish connection
between the battery and the phone);
4. 扣下电池盖
4. Press down the battery cover;
Page 17

P16
图标
状态
电池电量为 100%
电池电量为 50%
电池电量极低。需要立即更换电池。
无线终端正在与外部电源相连,处于电池充电状态。
电池故障。请更换电池。若故障仍存在,请与霍尼韦尔技术支持联系。
Icon
Status
Battery power is 100% full
5. 按下电池盖安全按钮,将电池盖安全锁移动到左侧锁定位置。
5. Press down the battery cover safety button to move the battery cover safety lock to the lock position at
left.
电池状态图标
从状态栏的电池图标可以了解电池的电量状况。以下表格仅包含其中几种图标。若想了解电池使用时间及
剩余电量等详细信息,请前往设置>电池。
Battery icon
Battery icon on the status bar shows the power status of the battery. The following table only contains several of
the icons. For detailed information about battery life and power remained, please go to Settings > Battery.
电池状态图标
Battery icon
Page 18

Battery power is 50% full
Battery power is too low. Replacing the battery right now.
The terminal has been connected to external power supply for charging.
Battery failure occurs. Please replace the battery. If the failure still exists,
please contact Honeywell technical support.
Page 19

P17
连接到电源
指示灯状态
描述
否
闪烁 琥珀色(橙色)
电池电量小于 15%
否 关 池电量高于 15%
是
稳定琥珀色(橙色)
电池电量处于 0%到 60%之间
是
闪烁绿色
电池电量处于 60%到 95%之间
是
稳定绿色
电池电量高于 95%
是/否
闪烁红色
电池故障
Connect to power supply
Indicator status
Description
No
Flashing amber (Orange)
Battery power is less than 15% full
No
No light
Battery power is higher than 15% full
Yes
Stable amber (Orange)
Battery power is between 0% to 60% full
Yes
Flashing green
Battery power is between 60% to 95% full
Yes
Stable green
Battery power is higher than 95% full
Yes/no
Flashing red
Battery failure
无线终端左上角的电源指示灯表示电池充电状态。也可以使用此指示灯作为系统消息指示灯。具体设置
方法可以参考 http://developer.android.com/guide/topics/ui/notifiers/notifications.html.
Power indicator on the upper left corner of the terminal shows the battery charging status. It can also be used as
system message indicator. For detailed setting methods, please refer to
http://developer.android.com/guide/topics/ui/notifiers/notifications.html.
出厂电源状态指示灯描述
Default power indicator description
Page 20

P18
连接到电源
指示灯状态
描述
否
红色闪烁
电池电量小于 15%
否
关
电池电量大于等于 15%
是
稳定红色
电池电量小于 15%
是
稳定琥珀色
电池电量处于 15%到 90%之间
是
稳定绿色
电池电量大于 90%
Connect to
power supply
Indicator status
Description
No
Flashing red
Battery power is less than 15% full
No
No light
Battery power is 15% or more
Yes
Stable red
Battery power is less than 15% full
Yes
Stable amber
Battery power is between 15% to 90% full
Yes
Stable green
Battery power is over 90% full
更改电源状态指示灯指示意义
Changing power indicators
若电池充电时默认指示灯(显示闪烁绿色)不合适您所处的环境,可以更改指示灯指示意义。
If the default indicators for battery charging (flashing green) are inappropriate for your environment, you can
change the indicator.
除了更改出厂电源状态指示灯意义之外,您还可以选择:
In addition to changing the default power indicator, you can also select:
• 默认电源指示灯(Default Battery LED)
• 无电源指示灯(No Battery LED)
• Default Battery LED
• No Battery LED
若想让状态指示灯亮起为稳定的琥珀色,而在充电时为稳定的绿色,则 需进行 Default Battery LED 设
置。若想将指示灯作为通知消息(应用或者设备管理解决方案通知)指示灯,则需选择 No Battery LED 设
置。
If you prefer the indicator to be solid amber and to change to solid green when in charging, you need to perform
Default Battery LED settings. If you prefer the indicator as message notification (application or device
management solution notification) indicator, you need to select No Battery LED settings.
默认电源指示灯意义
Default power indicator meanings
1. 点击 设置> Honeywell Battery LED
2. 选择如下选项:
• Default Battery LED
• HSM Battery LED(出厂设置)
• No Battery LED
Page 21

1. Tap Settings> Honeywell Battery LED
2. Select from the following options:
• Default Battery LED
• HSM Battery LED (Factory settings)
• No Battery LED
Page 22

P19
有如下需要之时:
省电策略:
使用无线终端而屏幕显示电量
低图标,或电量指示灯亮起
长时间按下电源键,选择关机。无线终端关闭后,取出电池并替换为充满
电的电池。
停止使用无线终端 5 分钟或 5
分钟以上
确定显示屏上不再显示低电量图标,并且电源指示灯没有亮起。点击电
源键挂起无线终端。
将无线终端存放一天以上
• 若需要将无线终端存放几天(例如一个周末),则安装一个充满电的电
池或将无线终端连接到电源。
• 若存放时间还要长,则将电池移出并充电。电池充电完成后,将电池和
无线终端都放于阴凉的地方。
• 若要将电池存放几个月,则要定期为电池充电,以保证电池运行优
异。
将电池取出无线终端存放时
将电池放入充电器中存放。
If you have the following needs:
Power saving plan:
Low power icon shows on the screen or the
power indicator lights on when the
terminal is in use
Long press the power button and choose Turn Off. And the replace
the battery with fully charged one.
The terminal will not be in use for 5 mins
or more
Make sure no low power icon displayed and the power indicator
doesn't light on. Switch to sleep mode by pressing the Power
button.
The terminal will be stored for more than
one day
• If you need to store this terminal for several days (like a
weekend), you need to install a fully charged battery or
connect the terminal to the power supply.
查看剩余电量
Checking the remaining battery capacity
除了电量状态图标及电源状态指示灯外,您还可以从设置中查询电量信息。
Except for the battery icon and power indicator, you can also get the battery capacity information from Settings.
1. 点击 设置。
2. 点击 电池。当前电池电量剩余百分比及剩余使用时间会显示在显示屏上。列表上会显示每个应用及服
务所消耗的电量。使用情况详情,请点击列表中对应的应用或服务。
1. Tap Settings
2. Tap Battery. The current percentage of remaining battery capacity and the remaining time will be displayed.
The list will present the power consumed by each application and service. For detailed usage information, please
tap the respective applications and services in the list.
电池寿命及维护
若将电池长时间放置于无线终端之外,电池会慢慢放电。霍尼韦尔技术支持建议您将电池存放于充电器
中来保持电池性能。
Battery life and maintenance
The battery will discharge slowly if it's placed outside of the terminal. Honeywell technical support recommends
you store battery in a charger to maintain battery performance.
电池维护技巧
Tips for battery maintenance
Page 23

• If you need to store it for a longer time, remove the battery and
charge it. Put the terminal and the battery in a shady and cool
place after the battery is fully charged.
• If the battery is to be stored for several months, regular
charging is needed for excellent battery performance.
Store the battery outside the terminal
Put the battery in the charger.
Page 24

P20
电池维护建议及安全保护措施
Battery maintenance recommendations and safety protection measures
• 使用之前要充满电,电池装箱时只充有一部分电量。
• 参考“充电”章节查询正确充电方法。若将此电池用于其它设备,可能导致设备或电池损坏。
• 防止摔落电池或无线终端。若怀疑电池或无线终端出现故障,则将其邮寄至霍尼韦尔客服中心检查。
• 此电池仅可替换为另一同型号电池。这些电池已经经过测试,符合相应安全标准。需更换电池时请联系
霍尼韦尔客服代表或经销商。
• 废弃电池存在安全隐患。清理电池之前,用绝缘带贴住电池极点。
• 请勿擅自改装电池或试图将异物插入电池。
• 不要直接焊接到电池极点。
• 不要短接电池,并将电池远离金属物品。
• 请勿摔落电池或对其进行机械冲击或挤压。
• 请勿拆卸或打开电池,请勿压碎、弯折或使电池变形;请勿刺穿、撕碎或灼烧电池。
• 请勿将电池浸入水中。
• Fully charge the battery before using it. The battery is only partly charged when get packed.
• Refer to the chapter "charging" to get the right process for battery charging. Using the battery for other
devices may cause damages on the device or the battery.
• Avoid battery or terminal drops. If you suspect that a battery or terminal fails, send it to Honeywell service
center for verification.
• This battery can only replace another BAT-EDA51-X battery. These batteries have been tested and meet the
appropriate safety standards. If you need to replace the battery, please contact Honeywell service representatives
or the resellers.
• There are security risks in waste batteries. Before cleaning up the battery, stick the poles with insulation tape.
• Do not modify the battery or attempt to insert foreign objects into the battery.
• Do not solder directly to the battery poles.
• Do not short connect the battery and put the battery away from metal objects.
• Do not drop or mechanically shock or extrude the battery.
• Do not disassemble or open the battery. Do not crush, bend or deform the battery; Do not puncture, shred or
burn the battery.
• Do not immerse the battery in water.
Page 25

P21
启动飞行模式
Enabling Airplane mode
若您无需连接到任何无线网络,可开启飞行模式,以关闭所有无线接收来节省电源。
If you don't need to connect to any wireless network, you can enable the airplane mode to turn off all wireless
receivers to save power.
1. 点击 设置。
2. 在 无线和网络,点击更多。
3.打开 飞行模式 开关控件启动飞行模式。
1. Tap Settings.
2. Tap More under Wireless & Networks.
3. Open Switch control of Airplane Mode to enable airplane mode.
Page 26

P22
开机
Switch on
电池充完电并装入 EDA51-X 后,首次开机 EDA51-X:
After the battery is fully charged and installed into EDA51-X, switch on it for the first time:
按下并放开电源键。
注意:完成安装向导后,欢迎界面不再出现。每次开机后,出现的界面为锁定屏幕界面。
Press down and then release the power button.
Please note: after complete the installation instructions, the welcome interface will not appear again. The interface
appears as locked screen interface after each time you switch on the terminal.
解锁屏幕
Unlocking the screen
每次开机 EDA51-X 后,都需要先解锁屏幕。
Every time you switch on the EDA51-X, you need to unlock the screen.
• 将锁形图标滑向屏幕任一边缘来解锁屏幕。
• 开始使用 EDA51-X 后,建议设置密码来保护无线终端。
• Slide the lock icon to any edge of the screen to unlock it.
• After the EDA51-X is deployed, we suggest you to set password to protect your terminal.
点击点击 设置>安全>屏幕锁定方式。
选项有 滑动,图案,PIN 码,密码
Tap Settings>Security>Screen lock mode.
Available options: Slide, Pattern, PIN and Password
Page 27

Page 28
P23
指示灯颜色
意义
绿色
条形码阅读读取正常
红色
条形码阅读读取失败
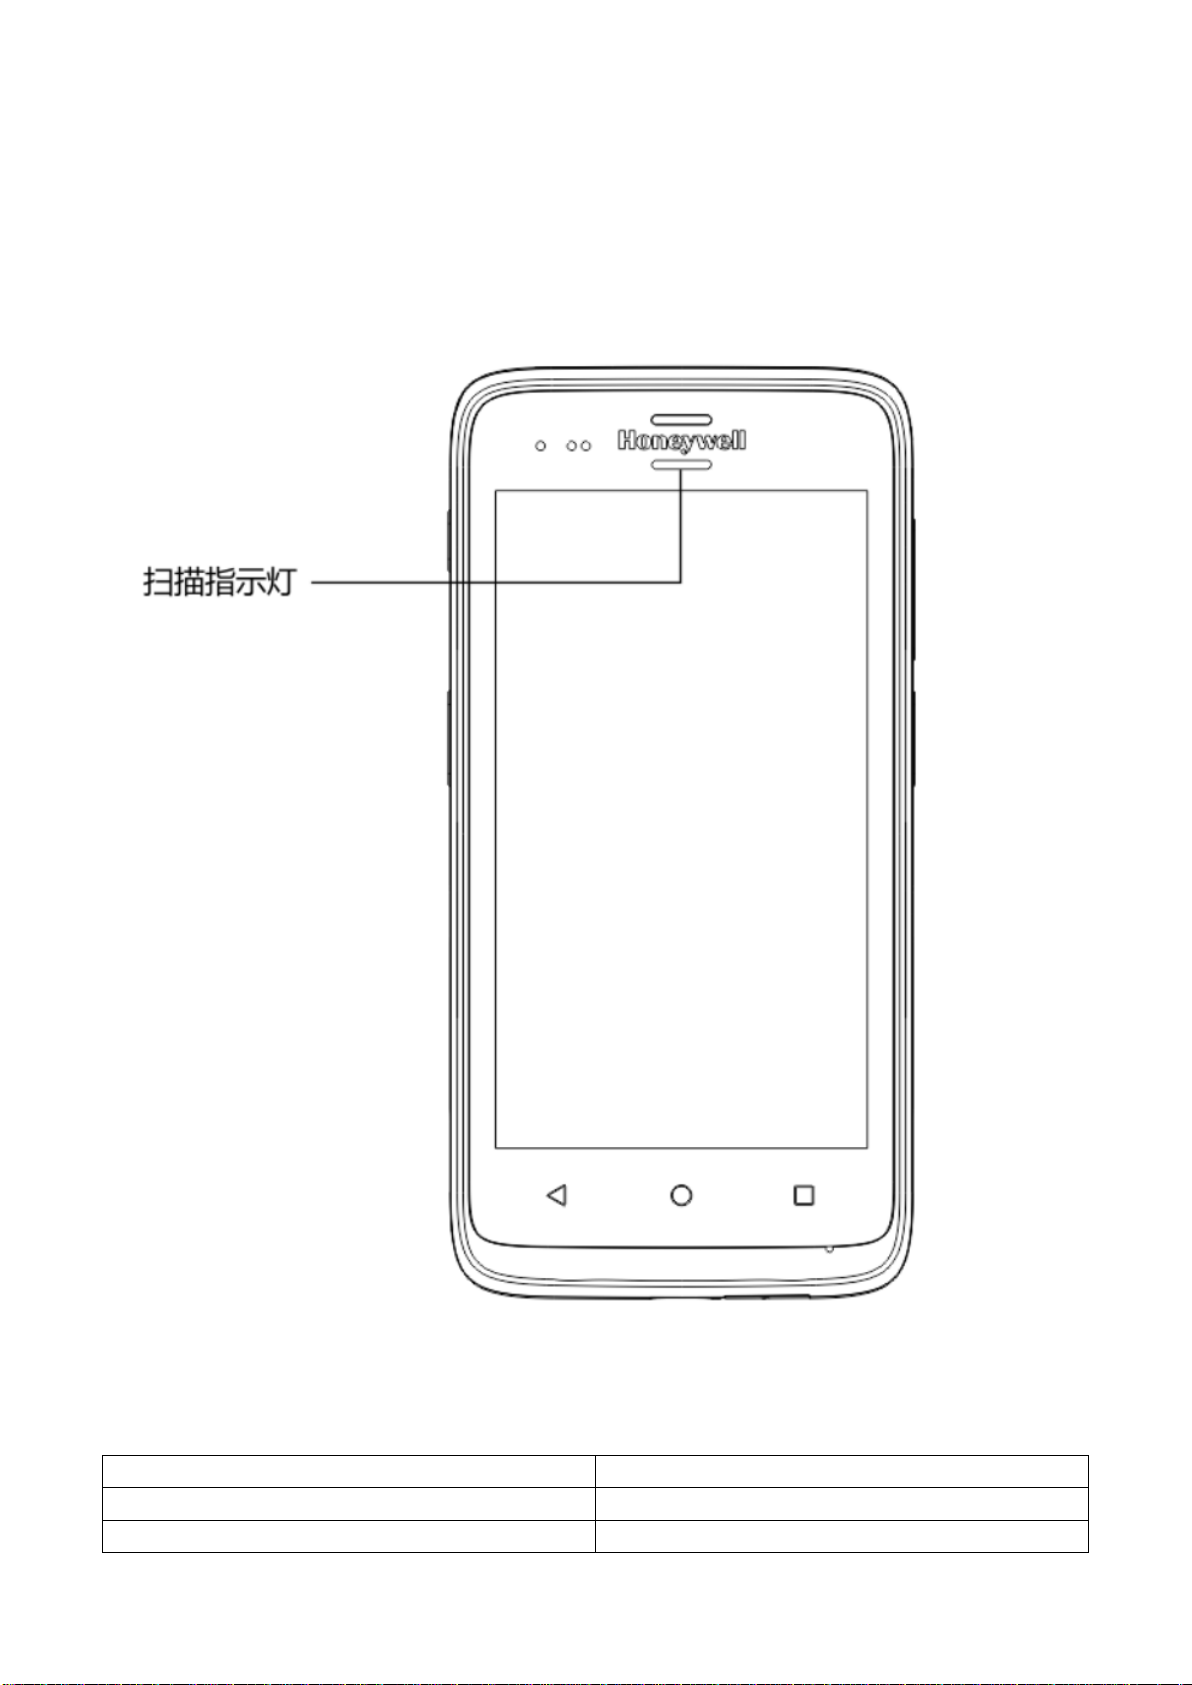
扫描指示灯
Scanning Indicator
扫描指示灯指示扫描仪的状态。条形码扫描方法,请参考“
The scanning indicator indicates the status of the scanner. For barcode scanning method, please refer to the
chapter "Scanning barcodes".
扫描条形码
”章节。
Scanning Indicator
扫描指示灯定义
Scanning indicator definition
Page 29

Light of the indicator
Meanings
Green
Good read for the barcodes
Red
Barcodes reading failed
Page 30

P24
设置屏幕背光灯
Setting screen backlight
产品屏幕装有背景光传感器,可自动调整背景光强度,以节省电源并保证屏幕显示可读性。您可根据所
处环境需要设置背光灯强度。
The terminal's screen is equipped with background light sensor which can automatically adjust backlight intensity
to save power and ensure the display readability. You may set the backlight intensity based on the environment.
1. 点击 设置。
2. 点击 显示>亮度。
3. 点击 自动调节亮度 来自动调整背景光强度,或直接滑动调整条来设置背景光强度。
1. Tap Settings.
2. Tap Display>Brightness level
3. Tap Adaptive brightness to automatically adjust the backlight intensity, or slide adjustment bar to set the
backlight intensity.
音频功能
EDA51-X 装配有扬声器、受话器及设置音量的软件工具。
Audio features
EDA51-X is equipped with speaker, receiver and software utilities for volume setting.
调整铃声及信息音量
使用无线终端一侧的音量键,可迅速调整铃声及信息音量。
Adjusting the ringtone volume for calls and messages
With the volume key on the side of the terminal, you can quickly adjust the ringtone volume.
注意:音量键仅可调整铃声及信息音量。调整其他声音的音量,打开 设置>声音。
Note: Volume key can only adjust ringtone volume for calls and messages. To adjust volumes of other sound, open
Settings >Sound.
Page 31

P25
1. 按下无线终端右侧的按钮(∆或)。音量调整条显示在屏幕上。
2. 按音量键或滑动音量条来调整音量。
3. 长按音量键,或者音量条拉到最左边,将会启动振动模式。
1. Press the key on the right side of the terminal (∆ or). Volume bar will show on the screen.
2. Adjust the volume by pressing volume key or slide volume bar.
3. Hold down the volume down () button or pull the volume indicator to the extreme left to activate vibration
mode.
Page 32

P26
启动振动模式
办公环境下,您可以将无线终端调整为振动模式,并静音扬声器,有两种方式可以设定。
Enabling vibration mode
You can set the terminal to vibration/silence mode in the office.
方法 1,长按音量键,或者音量条拉到最左边,将会启动振动模式。
Method 1: Hold down the volume down () button or pull the volume indicator to the extreme left to activate
vibration mode.
方法 2,
Method 2:
1. 长时间按下电源键。电源选项显示在屏幕上:
1. Long press the power button. Power options will be displayed on the screen:
2. 点击 启动振动模式。
2. Tap Enabling vibration mode.
Page 33
P27
设置
描述
媒体音量
使用音量调节条来设置以下音量:
音乐、视频、游戏及其他媒体。
闹钟音量
使用音量调节条来设置以下音量:
闹铃及警报音
通知音量
使用音量调节条来设置以下音量:
铃声及信息提示音。也可使用手机一侧音量键进行调整。
勿扰
可调整勿扰规则
默认通知铃声
选取通知铃声
默认闹钟铃声
选取闹钟铃声
紧急广播
设置小区广播
其他提示音
设置是否开启拨号键盘提示音,屏幕锁定提示音,充电提示音,
触摸提示音,点按时振动。
投射
将设备屏幕投射到特定设备上
Settings
Description
Media Volume
Use the volume adjustment bar to set the volume for:
Music, videos, games and other medias.
Alarm Volume
Use the volume adjustment bar to set the volume for:
Alarm and alert tones
Ring Volume
Use the volume adjustment bar to set the volume for:
Ringtones for calls and message notifications. They can also
be adjusted by the volume key on the side of the phone.
Do not disturb
Could adjust do not disturb rules
Default notification
ringtone
Select notifications tones
Default alarm ringtone
Select alarm ringtone
音频设置
Audio settings
此章节描述设置应用中的音频和声音设置。更改音频设置,设置>声音。
This chapter will describe about audio and sound settings. To change audio setting, go to Settings > Sound.
音频和声音设置
Audio and sound settings
Page 34

Emergency broadcasts
Set community broadcasts
Other sounds
Set whether to turn on dial pad touch tones, lock screen tone,
charging tone, touch tones, and touch vibration.
Cast
Cast the device screen onto a specific device
Page 35

P28
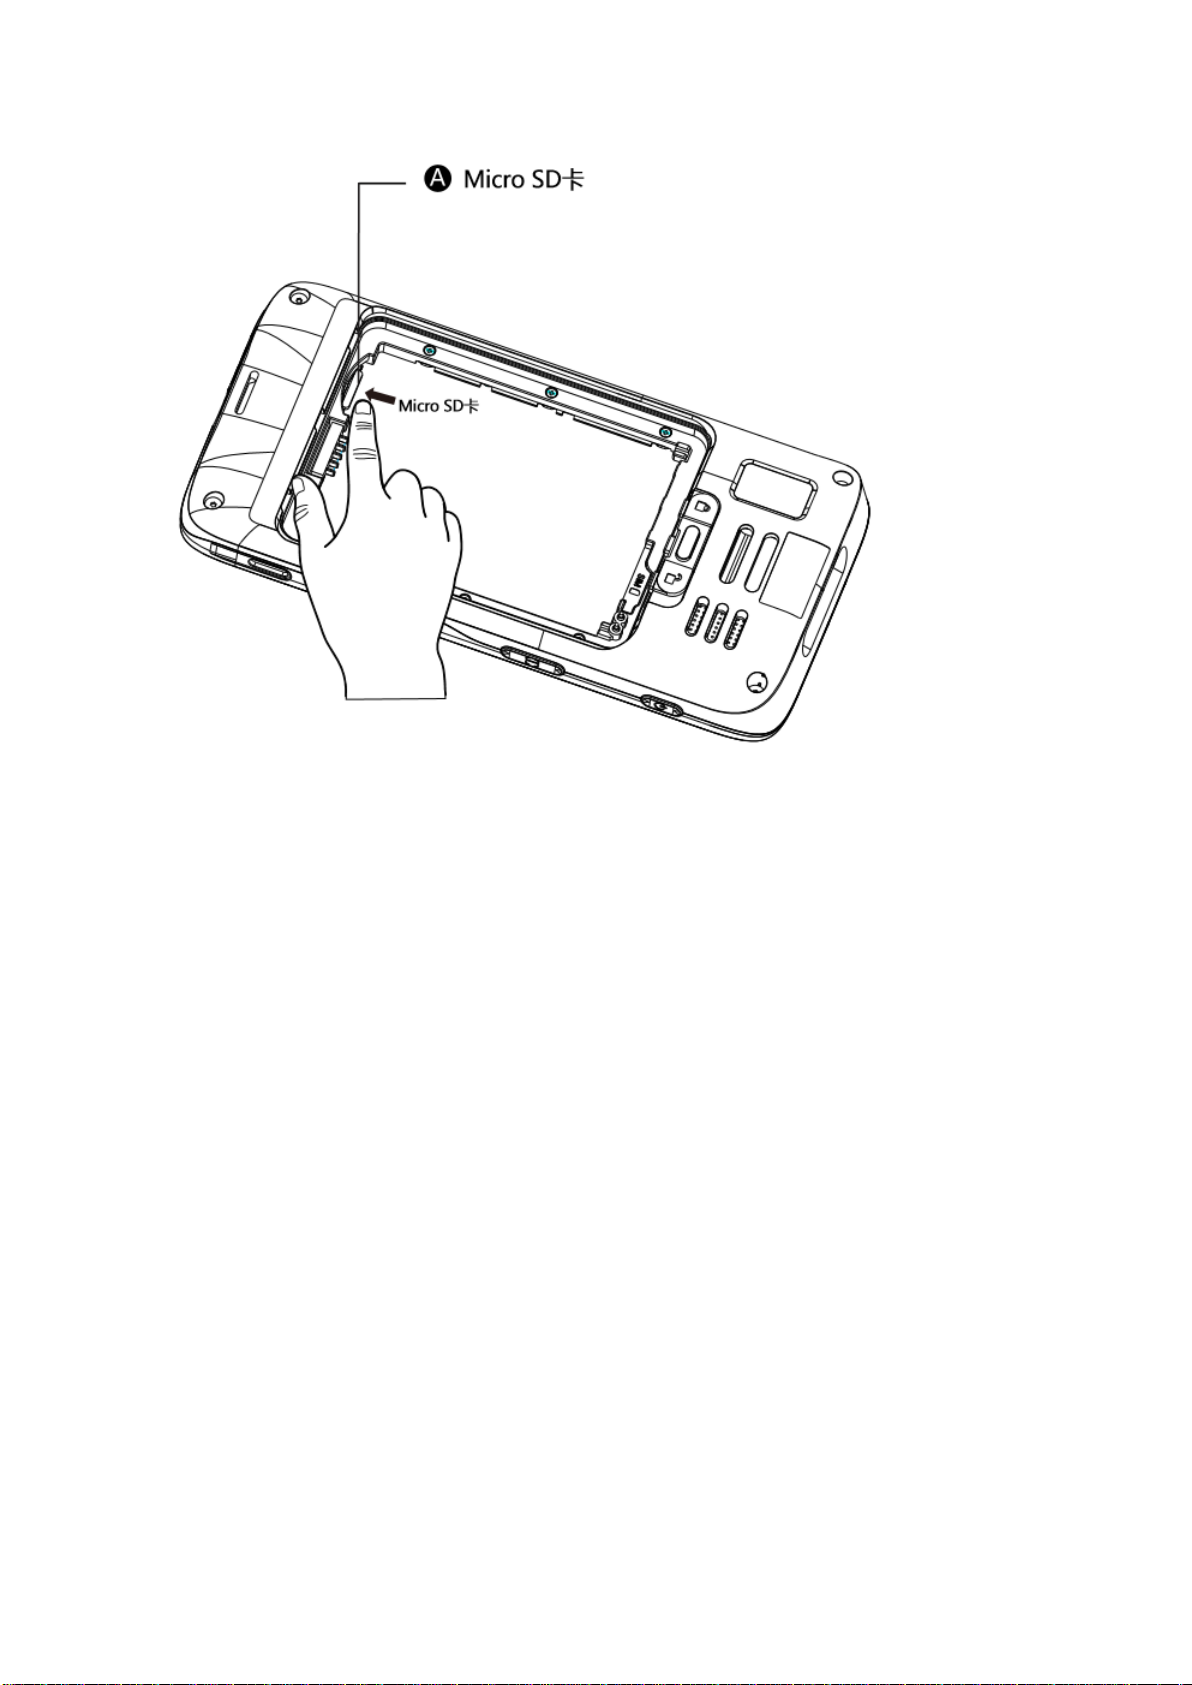
插入 SD 卡
Inserting SD card
您可使用 SD 内存卡来扩充内存或安装软件。霍尼韦尔推荐配合使用 Single Level Cell (SLC)技术等级 SD
内存卡或 SDHC 内存卡以达到最佳性能及耐久性。
You can use a SD card to expand the memory or to install softwares. Honeywell recommend the using of Single
Level Cell (SLC) graded SD memory card or SDHC memory card in order to achieve optimum performance and
durability.
注意:首次使用之前先将内存卡格式化。
Note: format the memory card when you use it for the first time.
1. 关闭无线终端。
2. 按下电池盖安全按钮,将电池盖安全锁移动到右侧解锁位置。
3. 从电池盖扣柄处,将电池盖抠开。
4. 拔出电池(先掀开电池连接器后侧,再拉出电池)。
5. 将 Micro SD 卡硅胶盖掀开;
6. 将 Micro SD 卡盖掀开并放入卡片;
7. 插入电池(先插入电池连接器一侧,再扣下电池,使得电池与终机建立连接;
8. 扣下电池盖
9. 按下电池盖按钮,将电池盖安全锁移动到左侧锁定位置;
10. 开机
1. Turn off the terminal.
2. Press down the battery cover safety button to move the lock to the unlock position at right;
3. Open the battery cover with the battery cover buckle handle;
4. Pull out the battery (First open the battery connector side, then pull out the battery)
5. Open the Micro SD card‟s silicone cover;
6. Open the Micro SD card cover and insert the card;
7. Insert the battery (first insert one end before pressing the other end in order for it to be connected to the
device);
8. Press to lock the battery cover
9. Press down the battery cover and slide the battery cover buckle handle to lock it.
10. Switch on the device
Page 36
Micro SD Card
Page 37

P29
文件传输
File transfer
使用 USB CUP 可以连接电脑和无线终端进行传输文件。用 USB CUP 将无线终端和电脑相连,就可以浏
览无线终端的文件,或者将文件移动到电脑上或将电脑中的文件传输至无线终端。如果您从 Mac 电脑上
进行文件传输,则使用 Android 文件传输应用(可以在如下网站下载到:www.android.com/filetransfer)
Files can be transferred between the terminal and a computer by using a USB adapter or standard USB cable. By
connecting the terminal to a computer with a USB cable, you can view the files in the terminal, or transfer the
files to the computer, or transfer files from the computer to the terminal. If you transfer files with a Mac computer,
you need to use Android File Transfer app (it can be download via www.android.com/filetransfer)
无线终端默认使用充电模式,可以选择使用 MTP(媒体传输协议)或 PTP(图片传输协议)进行连接。
若主要传输摄像机图片,则可以使用 PTP(图片传输协议)进行连接设置。若 Windows 系统电脑不支持
MTP,则可使用 PTP 传输。
The terminal will connect with charging port as default and support MTP (Media Transfer Protocol) or PTP
(Picture Transfer Protocol). If you mainly transfer camera photos, you can use PTP connection settings. If the
computer with Windows system doesn't support MTP, you can use PTP transmission.
注意:EDA51-X 支持高速 USB 通信(USB2.0),最大数据传输速度为 480 Mbps。
Note: EDA51-X supports high-speed USB communication (USB2.0), with maximum data transfer rate at 480
Mbps.
1. 将 EDA51-X 通过 USB CUP 连接至电脑。
2. 在 EDA51-X 屏幕上,选择媒体设备(MTP)或相机(PTP),EDA51-X 会将您的选择设为默认选择。
3. 从电脑上浏览 EDA51-X 文件。您可进行复制、删除或将文件在 EDA51-X 与电脑之间进行转存。
1. Connect EDA51-X to the computer.
2. Select Media device (MTP) or Camera (PTP) on the EDA51-X screen. EDA51-X will set your selection as
default selection.
3. View the files stored in EDA51-X. You can copy, delete or transfer the files between EDA51-X and the
computer.
如何在 EDA51-X 上浏览文件
用户可以使用文件管理来浏览 EDA51-X 和内存卡上的文件。
How to view files on EDA51-X
Users can view the files in EDA51-X and its memory card through File Explorer.
注意:因系统权限问题,某些文件不能被打开。可以根据需要,选择相应的应用来打开文件。
Note: Due to system permission issues, some files cannot be opened. Based on your needs, you can select
respective apps to open the file.
1. 轻触或者上拉 >文件管理器 。
2. 轻触文件夹名或文件名来打开文件。
1. Tap or pull upward >File manager .
2. Tap the folder name or file name to open the file.
Page 38

P30
EDA51-X 配件
EDA51-X Accessories
EDA51-X 无线终端配有原装电池。其他所有配件都需要单独订购及寄送。若您有需要,请联系当地销售代
表。
EDA51-X terminal is equipped with original battery. All other accessories require separate order and shipment. If
necessary, please contact your local sales representatives.
EDA51-X 附件及描述请参考 EDA70 附件列表
For EDA 51-X accessories and description, please refer to the list of EDA 70 accessories
Page 39

P31
第 2 章– 用户界面及应用
Chapter II - User interface and application
2 用户界面及应用
2 - User interface and applications
本章节介绍 Android 系统用户界面,及如何与屏幕进行交互。用户还可以通过此章节了解无线终端上霍尼
韦尔各种应用。
This chapter introduces the Android system user interface, and how to interact with the screen. Users can also
learn about a variety of Honeywell applications on the terminal through this chapter.
Page 40
P32
名称
描述
状态栏
左侧状态栏显示应用发送的系统消息,例如信息到达通知。右侧状态栏显示
当前无线和网络连接状况及电量剩余情况。
状态栏
快速搜索框
常用应用栏
上拉或者轻击进入全部
应用列表
用户界面
Android7.1 操作系统用户界面为用户提供了完美的触屏体验及便捷的导航体验。
User interface
Android 8.1 operating system user interface provides users with a perfect touch and easy navigation experience.
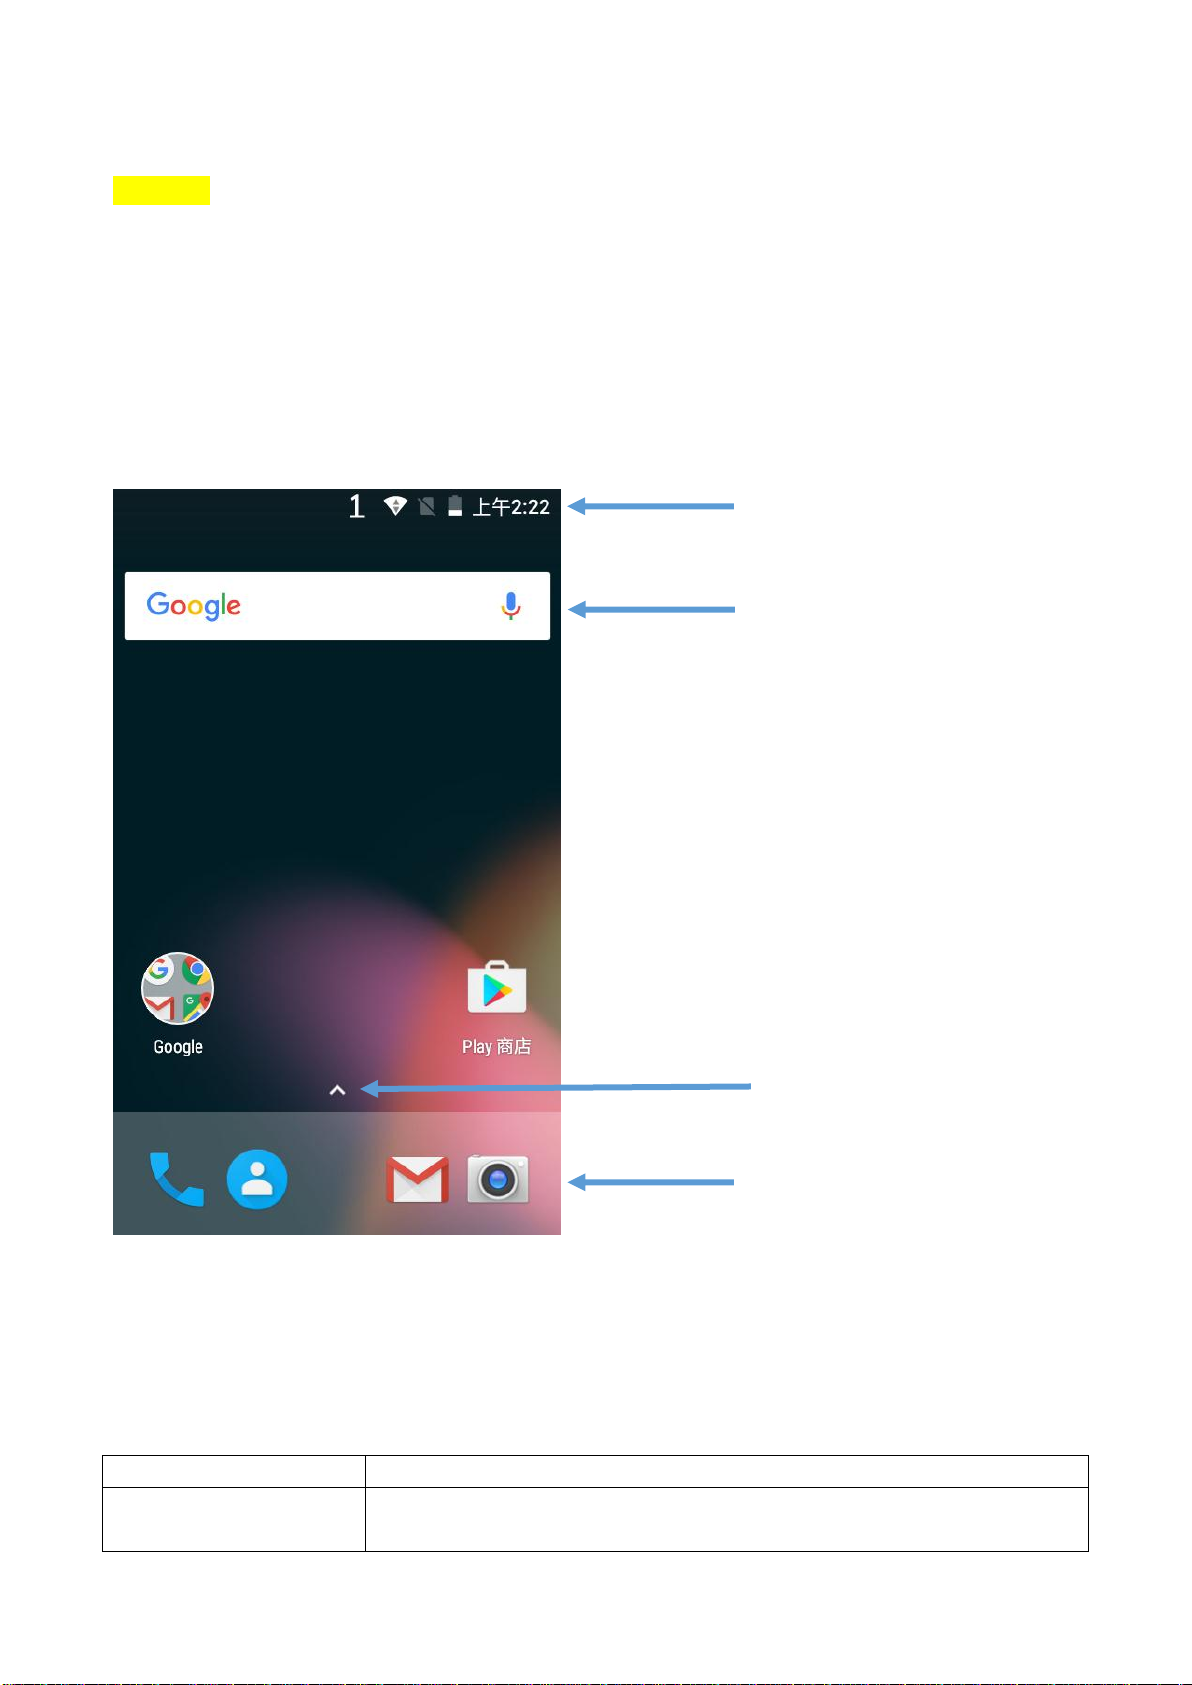
主界面
The main interface
开启无线终端并设置好语言后,屏幕首先显示主界面。
After switch on the terminal and setting up your preferred language, the main interface will be displayed on the
screen first.
Status bar
Quick Search box
Pull up or tap to show all applications
Common applications
主界面描述
The main interface description
Page 41

常用应用
此栏的应用会一直显示在主界面上。
搜索框
使用 Google 搜索在网络或终端机上进行搜索
Name
Description
Status bar
The left side of the status bar displays system messages sent by
the application, such as information notifications. The right of
the status bar displays the current wireless and network
connection status and remaining battery power.
Common
applications
The applications on this bar will be displayed on the main
interface.
Search bar
Use Google Search to search on the web or the terminal.
Page 42

P33
按键
描述
功能
返回
返回前一界面
功能键
进入近期任务
Home 键
返回主界面
音量
调高或调低扬声器的音量
扫描键
按住可进行扫描
电源键
可以开机、关机、锁屏
Keys
Description
Functions
Return
Return to the previous screen
Function Key
Show the applications that have been
visited recently
Home Key
Return to the main interface
Volume
Increase or decrease the speaker volume
Scan Button
Press and hold to scan graphics
Power button
Turn on, turn off, lock the screen
导航及功能键
在 EDA51-X 无线终端主界面的常用应用下方有导航键及功能键;无线终端两侧有其他功能性按键。
Navigation and function keys
There are navigation and function keys below the common applications in the main interface of EDA51-X; other
function keys are on the two sides of the terminal.
导航及功能键
Navigation and function keys
状态栏图标
状态和通知图标显示当前网络、电量、通知及声音设置。详细状态栏图标请参见如下表格:
Status bar icons
Status and notification icons display the current network connections, power, notifications and sound settings.
Please refer the following table for detailed status bar icons:
状态及通知图标:
Page 43

Status and notification icons:
图标
描述
图标
描述
未完成日历事件
声音已关闭
未报时闹钟;已设置闹
钟
振动模式已开启
Icons
Description
Icons
Description
Incomplete calendar events
Sound is disabled
Not ringing alarm clock;
alarm clock set
Vibration mode has been
enabled
Page 44

P34
新文本信息或多媒体信
息
电池电量为 100%
文本信息或多媒体信息
传输失败
使用外部电源充电过程
中
新邮件
已开启飞行模式
无线终端通过 USB 线
连接在了电脑上
EDA51-X 和某蓝牙 设
备正在同步
已开启 ABD(USB 故障
排除开启)
蓝牙已开启
数据同步中
Wi-Fi 信号充足
同步或账号登录失败
Wi-Fi 已连接但无信号
存储卡内存已满
已连接网络
New text messages or
multimedia information
Battery power is 100% full
Text messages or multimedia
information transmission
failed
Being in charge with external
power supply
New mails
Airplane mode is enabled
The terminal is connected to
the computer via USB cable
EDA51-X is syncing with a
Bluetooth-enabled device
ABD has been enabled (USB
troubleshooting has been
enabled)
EDA51-X is syncing with a
Bluetooth-enabled device
Data Sync
Wi-Fi signal is adequate
Sync or account logon failed
Wi-Fi is connected, but with no
signal
Memory card is full
Network connected
按键映射 KeyRemap
KeyRemap
用户可以更改左扫描键、右扫描键的默认功能。
Users can change the default functions of the left and right scanning buttons.
1. 点击设置>按键映射。
2. 轻触想要重新定义的按键。
3. 点击 KEYS 或 APPS 来浏览可选功能。
4. 为按键选择需定义的功能。选择的新功能会显示在按键名字下面。
1. Tap Settings > Key Remap.
Page 45

2. Touch the keys you want to redefine.
3. Tap KEYS or APPs to view options.
4. Select the required functions for the key. The new functions selected will be displayed under the name of the
key.
Page 46

P35
浏览系统消息
用户可以在通知页面查看 EDA51-X 的系统消息。
Viewing system messages
Users can view EDA51-X's system messages in the notification page.
• 打开通知页面,从屏幕顶部向下轻扫。
• 关闭通知页面,从屏幕底端向上轻扫,或点击返回键或 Home 键。
• Open the notification page: swipe down from the top of the screen.
• Close the notification page: swipe up from the bottom of the screen or tap Return key or Home key.
管理系统消息
应用发给 EDA51-X 系统消息的时候,用户能很快对其进行处理。
Managing system messages
When the applications send system messages to EDA51-X, users can manage them quickly.
1. 系统消息图标出现时,从屏幕向下轻扫。
2. 要对系统消息进行处理,则轻触此消息。相关应用就会打开以便用户进行处理。
• 将系统消息向一侧轻扫,可清除此条消息。
• 将消息向左滑动,可对此消息进行设置。
1. When the system message icon appears, swipe down the screen.
2. To manage the system message, touch it. The respective application will be opened for users to manage it.
• Swipe the system message to the side to clear it.
• Slide the message to the left to set it.
Page 47

P36
第 2 章– 用户界面及应用
Chapter II - User interface and application
主界面个性化设置
你可以将应用图标添加到任一主界面,以便更快捷打开这些应用。
Personalizing the main interface
You can add application icons to either one of the main interface to open these applications more quickly.
1. 点击或者上拉 。显示所有应用。
1. Tap or pull upward . To display All applications.
2. 将应用图标移动到主界面:长按要添加到主界面的图标,然后滑动手指将图标放置于任一主界面。
2. To move the application icon to the main interface: long press the icons to be added to the main interface,
then slide your finger to place it on either one of the main interface.
将小部件图标移动到主界面:长按桌面->小部件->长按小部件图标,然后滑动手指将控件图标放置于任
一主界面。
To move the application icon to the main interface: long press the desktop- > widget- >long press the widget icon,
then slide your finger to place the control icon on either one of the main interface.
3. 将应用或者小部件从主界面上移除:长按此图标并滑向界面上方的 X 删除。
3. To remove the applications or widgets from the main interface: long press the icons and slide to X Delete on
the top of the interface.
4. 长按桌面空白区域,显示菜单项“壁纸”“小部件”“设置”。
4. Long press the blank area on the desktop, and display menu WALLPAPERS, WIDGETS and SETTINGS.
自定义常用应用
用户可以应用添加在常用应用栏中,以便更快键打开这些应用。
Customizing common applications
Users can add applications to the common application bar to open these applications more quickly.
1. 点击或者上拉 。显示所有应用。
2.移除常用应用栏中的应用图标:长按常用应用栏中的图标并滑向屏幕顶端 X 删除。
3.添加应用图标到常用应用栏中:长按要添加的应用,然后滑动手指将图标放置于常用应用栏中。
1. Tap or pull upward . To display All applications.
2. Long press the icons in the common application bar and slide it to the X Delete on the top of the interface.
3. To add application icon to the common application bar: long press the application to be added to the main
interface, then slide your finger to place it in common applications.
Using GoogleTM
使用界面上方的 Google 搜索引擎,可以帮助用户查找在终端机或互联网上的任何信息。
Use Google search engine at the top of the interface to help users find any information on the terminal or the
internet.
1. 在任一主界面,轻触 Google 搜索栏,输入搜索条目。终端机上的搜索结果(比如说应用及联系人)
Page 48

也会相应出现在网络搜索结果下面。
2. 轻触一条搜索提示目立即开始搜索,或者仅轻触其箭头将其输入搜索框,而不立即进行搜索。
1. In any of the main screens, tap Google search box and enter search object. The search results on the terminal
(such as applications and contacts) will also appear on the network search result.
2. Tap a search prompt to start the search now, or simply tap the arrow to enter it into the search box without
searching immediately.
Page 49

P37
屏幕操作手势
Touch screen gestures
使用手指可以操作应用、菜单、屏幕键盘及界面上的其他功能。
Use your finger can operate applications, menus, on-screen keyboard and other functions on the interface.
• 轻触某功能或应用将其选中或启动。
• 输入名字或密码等内容时,轻触需要输入的地方,出现屏幕键盘以进行输入。
• Tap a function or application to select or start it.
• To enter a name or password, touch the place to enter and on-screen keyboard will appear for input.
其他操作手势包括:
Other touch screen gestures include:
• 长按:按下某图标并保持,直到系统有响应。
• 拖移:长按某图标,然后将手指在屏幕上移动到目标位置。例如:利用拖移方法,您可以在主界面上重
新排列某些快捷方式。
• 轻扫或滑动:快速将手指在屏幕上进行移动,手指按下后不要停止。例如,用户可以向左或向右轻扫主
屏幕来查看其它主屏幕。
• 双击:在地图或其他界面上连续快速点击两次可放大观看。再次双击可返回原尺寸。
• 捏合:某些应用中,可将两手指放在屏幕上捏合对物体进行缩小操作,或展开两个手指对物体进行放大
操作。
• Long press: press an icon and hold until the system reacts.
• Drag: Press an icon, and then move your finger across the screen to the destination. For example: With
dragging method, you can rearrange some shortcuts on the main interface.
• Swipe or slide: Quickly move your finger on the screen and keep your finger touching on the screen. For
example, users can swipe the home screen to the left or right to view other home screens.
• Double-click: tap twice rapidly in a row on the map or other interface to enlarge it. Double-click again to
return to the original size.
• Kneading: In some applications, subjects can be zoomed out by kneading two fingers on the screen, or zoom
in by expanding two fingers.
设置时区
EDA51-X 可自动根据网络同步时间和日期。用户可手动为所处区域设置时区。
Setting timezones
EDA51-X can automatically sync the time and date according to the network. Users can also set timezones for
their regions manually.
1. 打开设置。
2. 点击日期和时间。
3. 关闭自动确定日期和时间勾选。
4. 点击选择时区并点击您所处区域的时区。
1. Open Settings.
2. Tap Date & Time.
3. Uncheck Automatic date & time.
4. Tap Selecting Timezones and tap the timezone for your region.
Page 50
P38
图标
Icons
应用 Applications
描述 Descriptions
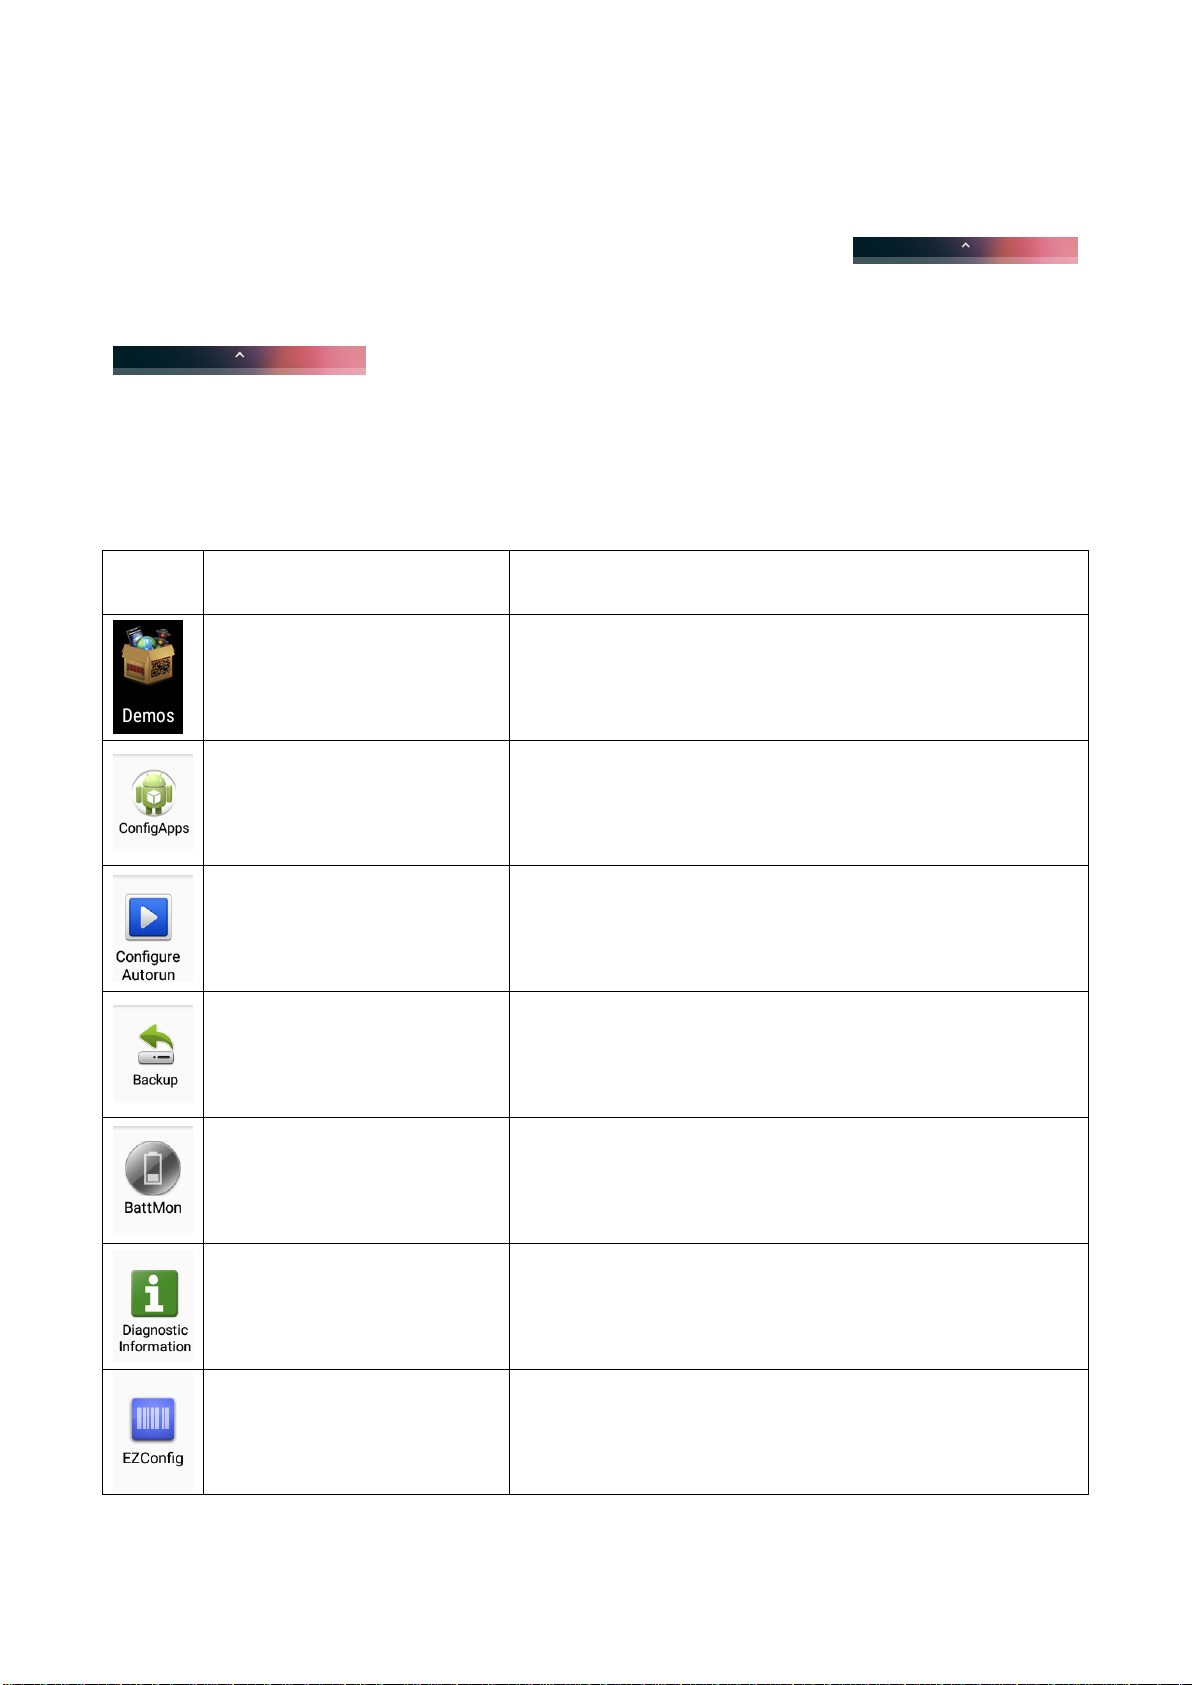
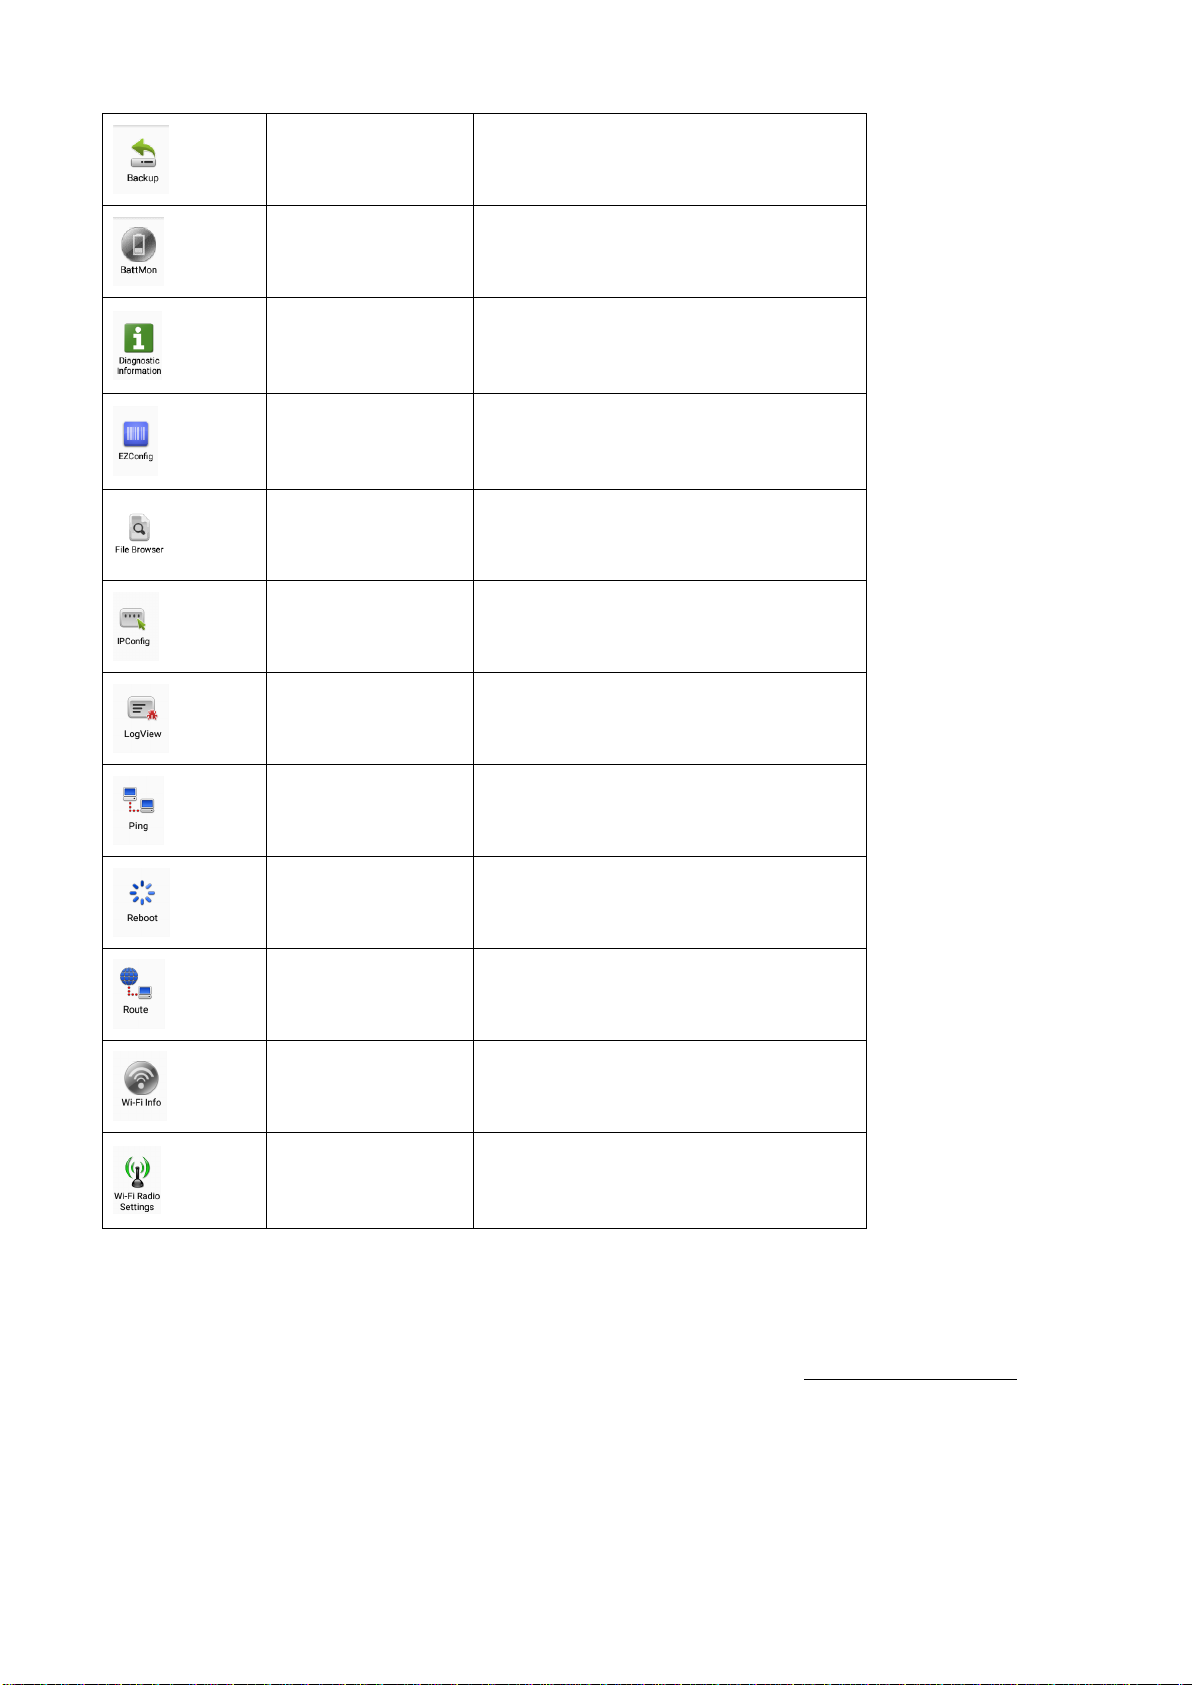
Demos
包括 Scan Demo,NFC Demo 等,可以进行扫描等功能的测
试和使用 Scan Demo, NFC
Demo and more included, allows testing and using functions like
scanning.
ConfigApps
提供禁用/使能和卸载应用的方法
Prohibit/use and uninstallation of applications
Configure Autorun
配置需要在开机时自动启动的应用
Autorun application when the device is being activated
Backup
备份和恢复用户数据和用户设置
Backup and restore user data and Settings
BattMon
监控电池充电状态
Monitors battery-charging status
Diagnostic Information
查看设备信息,Honeywell 应用,射频信息,电池信息,内
存信息,扫描头信息
Check equipment information, Honeywell applications, radio
frequency information, RAM and scanner
EZConfig
通过条形码和配置文件配置设备和应用
Configure equipment and applications through barcode and
configuration documents
霍尼韦尔应用软件
Honeywell applications
霍尼韦尔帮助用户排除故障并将无线终端连接至其他设备及网络上。点击或上拉
可显示以下表格中的应用。详情请点击:www.honeywellaidc.com.
Honeywell helps users troubleshoot and connect the terminals to other devices and networks. Tap or pull upward
to show the applications below. For more details, please visit:
www.honeywellaidc.com.
EDA51-X 上的可用霍尼韦尔应用软件
Honeywell software applications available on EDA51-X
Page 51
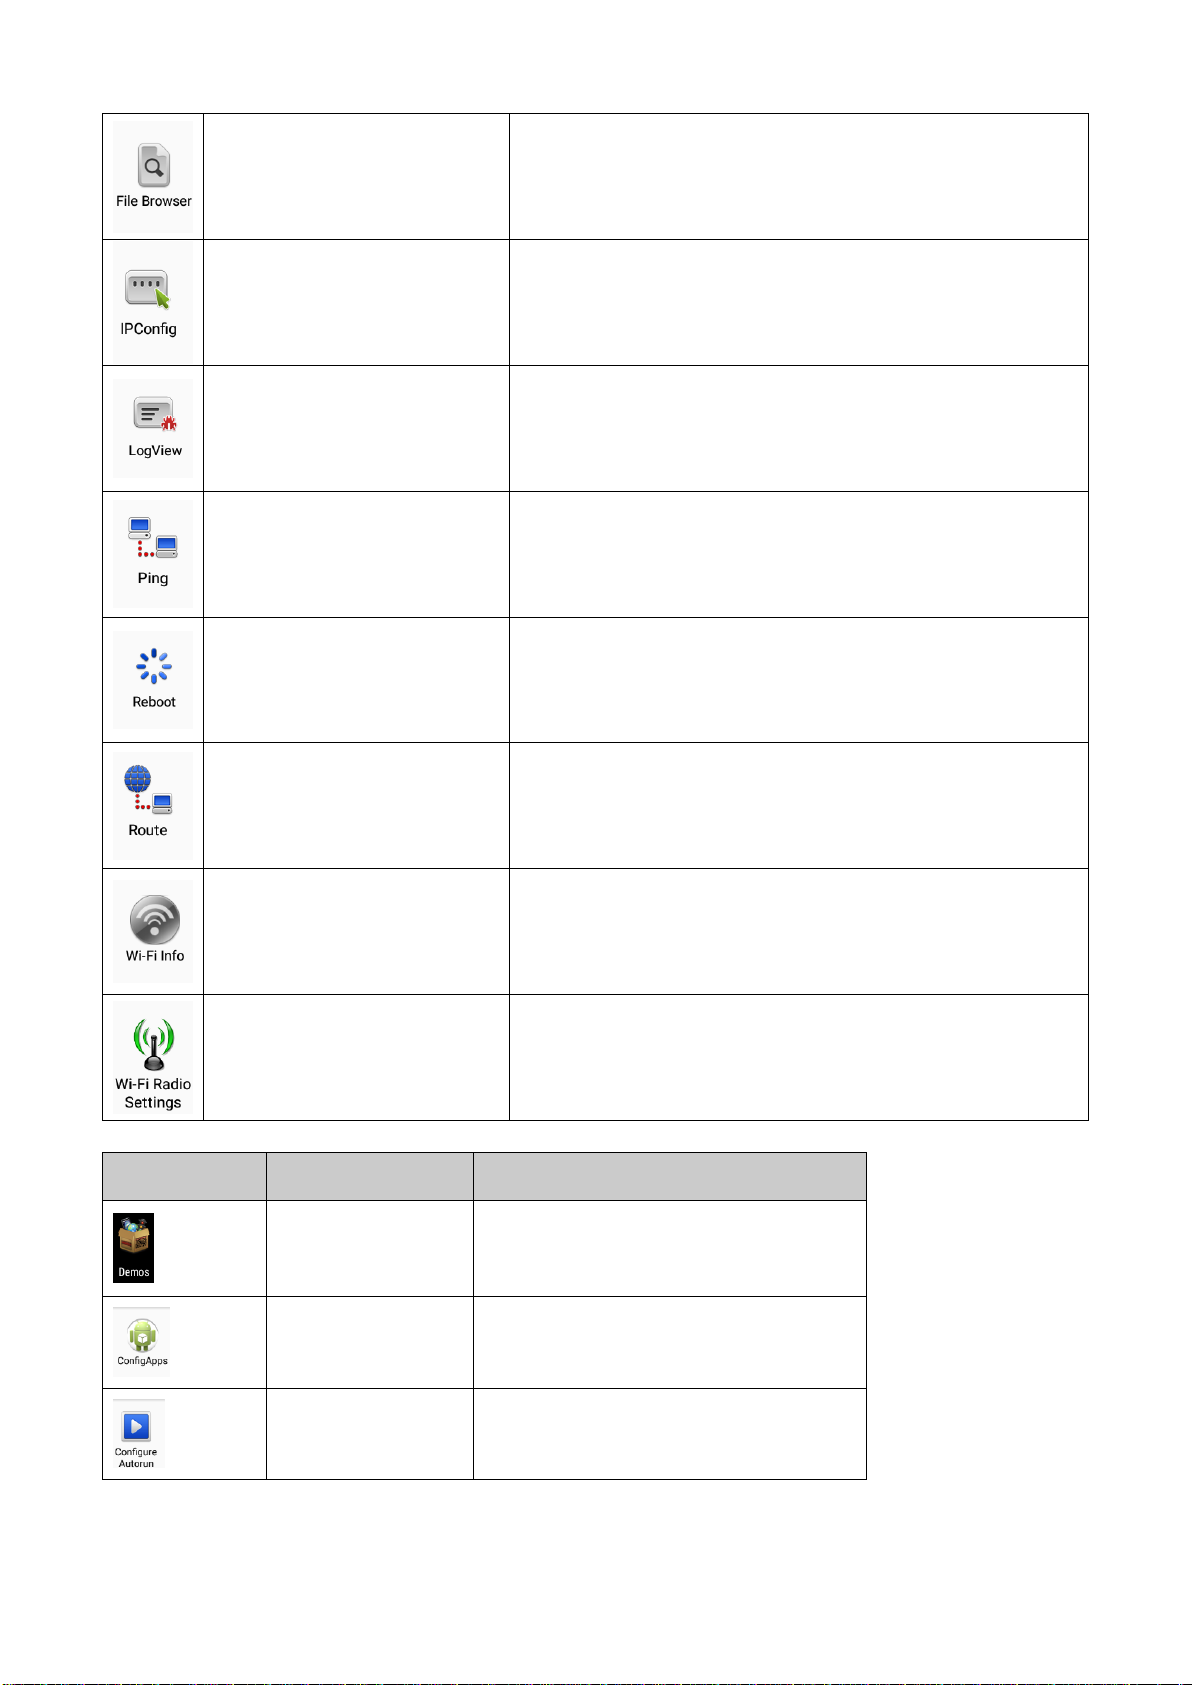
File Browser
查看设备中存储的文件
IPConfig
应该查看和设置ip地址
LogView
查看 Log 信息
Ping
网络诊断工具,测试网络是否连通
Reboot
可以重启设备
Route
查看路由信息
Wi-Fi info
查看Wi-Fi信息
Wi-Fi Radio Settings
主要是设置wifi低功耗和wifi漫游切换的阀值
Icons
Applications
Descriptions
Demos
Scan Demo, NFC Demo and more
included, allows testing and using functions
like Scan Demo and NFC.
ConfigApps
Prohibit/use and uninstallation of
applications
Configure Autorun
Autorun application when the device is
being activated
Page 52
Backup
Backup and restore user data and settings
BattMon
Monitors battery-charging status
Diagnostic
Information
Check equipment information, Honeywell
applications, radio frequency information,
RAM and scanner
EZConfig
Configure equipment and applications
through barcode and configuration
documents
File Browser
View files stored in the device
IPConfig
View and set IP address
LogView
View log information
Ping
Network diagnostic tool to test whether the
network is connected
Reboot
Used to restart the device
Route
View routing information
Wi-Fi info
View Wi-Fi information
Wi-Fi Radio Settings
It‟s mainly to set Wi-Fi low power
dissipation and Wi-Fi roaming switch
threshold
下载企业应用锁
Download Enterprise Application Lock (Applock)
Honeywell 企业应用锁(Applock)是一个 android app,您可以配置哪些 app 可以被允许启动或者哪些
app 被禁止启动。Applock 的用户手册和安装程序可以通过以下网站下载:www.honeywellaidc.com
Honeywell Applock is an Android application which allows you to configure the apps that may or may not be
allowed. The User Guide and installation procedure for Applock may be downloaded via:
www.honeywellaidc.com
解锁开发者选项
如果您是 EDA51-X 的研发人员,您可以轻松的解锁开发者选项。开发者选项可让您在 EDA51-X 研
Page 53

发过程中进行测试及排除故障。解锁开发者选项后,系统菜单中会出现开发者选项连接。
Unlocking developer options
If you are a developer for EDA51-X, you can easily unlock developer options. Developer options can help you
test and troubleshoot during the process of developing EDA51-X. After Developer options is unlocked, the system
menu will present developer option connections.
1. 点击设置。
2. 点击关于手机。
3. 点击 版本号 7 次,之后会出现“您现在处于开发者模式!”的提示信息。
1. Tap Settings.
2. Tap About phone.
3. Click the Build number 7 times and notification as "You are now in developer mode" will appear.
Non-GMS
EDA51-X 加入了 Google 的 Non-GMS 包。
应用包括:Maps,Voice Search,Drive,Photos,Chrome,Hangouts,Gmail,Google,Play Store,Play Music,
Play Movies & TV,YouTube.
EDA51-X joined in Non-GM packages of Google.
The App includes Maps, Voice Search, Drive, Photos, Chrome, Hangouts, Gmail, Google, Play store, Play Music,
Play Movies & TV, YouTube.
Page 54

P40
3 扫描功能
3 - Scan Function
本章节介绍条形码扫描方法及扫描功能设置。
This chapter describes how to scan barcodes and set scan functions.
Page 55

P41
处理步骤
关联扫描设置
解码条形码
符号设置
将条形码分析为 ISO8859-1
符号设置
检测到特殊条形码并执行特定动
作,而不是执行常规动作。
数据处理设置
启动浏览器
扫描到 Intent
启动 EZConfig
转换为已选字符组
数据处理设置
字符集
Processing steps
Respective scan settings
Decode barcodes
Symbology settings
Parsing the barcodes as
ISO8859-1
Symbology settings
Special barcodes detected
activate special actions, rather
than performing the normal
operations.
Data processing settings
Start your browser
Scan to Intent
EZConfig enabled
Converted to the selected
character set
Data processing settings
Character set
扫描功能
扫描仪可读取 1D 及 2D 条形码、复合码及邮政编码。同时支持在真实应用场合全方位、高灵活性扫
描。图像引擎同时可以捕获黑白影像,例如签名及受损的存货清单。
Scan Function
Integrated scanner enables reading for 1D and 2D barcode, composite code and postcode. It supports
comprehensive, highly flexible scanning in real applications. Imaging Engine can capture black and white images,
such as signatures and damaged inventory lists.
如何将数据作为 Android 键盘输入进行发送
How to transfer data via Android keyboard input
Scan wedge 功能将扫描条形码数据作为 Android 键盘输入发送到一主动应用程序。扫描 wedging 功能
在 EDA51-X 无线终端上默认为使能状态。用 户可以使用通过扫描仪或应用来接收 scan wedge 功能的
应用。若某应用通过 Barcode Reader API 获取扫描功能,则扫描 wedge 功能将被暂时禁用。
Scan wedge feature enables transferring scanned barcode data to active applications via Android keyboard input.
Scan wedge function is enabled by default on EDA51-X. Users can use applications that can accept scan wedge
function through scanners or applications. If an application obtains scan function through Barcode Reader API,
the scan wedge function will be temporarily disabled.
用户可以在 Software Development Kit (SDK)中建立 EDA51-X 自 定 义 应用,SDK 下 载 地 址为:
www.honeywellaidc.com。
Users can build customized applications in Software Development Kit (SDK) for EDA51-X. Please download
SDK at: www.honeywellaidc.com.
扫描数据处理与设置
Processing and settings for scanned data
Page 56
P42
• 前缀
前缀
• 符号前缀
数据处理设置
符号前缀
• 条形码数据
后缀
• 后缀
• Prefix
• Sign prefix
• Barcode data
• Suffix
Data processing settings
Prefix
Sign prefix
Suffix
激活 Total Freedom 插件
数据处理设置
数据编辑插件
将最后数据以 Android Key
Events 形式注入
数据处理设置
wedge
Activate Total Freedom plug-in
Data processing settings
Data editing plug in
Input the final data as Android Key
Events
Data processing settings
wedge
子字符串
替换字符代码
以 KeyEvent 形式 wedge
\r
13
No
\n
10
Yes
\t
9
Yes
\\
„\‟
No
Substring
Replacement character code
Wedge in form of KeyEvent
\r
13
No
\n
10
Yes
\t
9
Yes
\\
„\‟
No
添加前缀与后缀,数据字符串组成顺序如下:
Add a prefix and suffix to make the data string in the following order:
分析前缀及后缀字符串的替换
Parsing the replacement for prefix and suffix string
前缀和后缀字符串值内会出现替换。
Prefix and suffix will be replaced within the string value.
前缀和后缀分析
Prefix and suffix parsing
更改扫描设置
对默认文件所做的更改适用于所有无文件的应用。
Changing scan settings
Page 57

Changes made to the default file apply for all non-document applications.
1. 点击设置。
2. 点击扫描设置。
3. 点击 Internal Scanner。
4. 点击 Default Profile。
5. 选择 Data Processing 设置, Symbology 设置, Decode Settings, Imager Settings, Trigger Settings 或者
Notification Settings.
6. 修改设置以满足应用程序需求。
1. Tap Settings.
2. Tap Scan Settings.
3. Tap Internal Scanner
4. Tap Default profile.
5. Select Data Processing Settings, Symbology Settings, Decode Settings, Imager Settings, Trigger Settings or
Notification Settings.
6. Modify the setting to meet application needs.
Page 58

P43
设置
描述
默认
Wedge
发送数据到应用程序的时候开启
或 者 关 闭 发 送 条 码 数 据 作 为
android 事件
开启
字符集
解释条码为字符时选择使用的字
符集,可选的包括:
• ISO-8859-1
• US-ASCII
• UTF-16
• UTF-16BE
• UTF-16LE
• UTF-8
对应相关 BarCodeReader 属性:
PROPERTY_DATA_PROCESSOR
_CHARSET
ISO-8859-1
恢复默认扫描设置
用户可轻松取消对默认文件夹做的所有更改并恢复出厂默认值。
Restoring default scan settings
Users can easily cancel all the changes made to default folder and restore the factory defaults.
注意:恢复某种设置的默认出厂值时,此文件夹中所有的设置都会恢复出厂默认值。
Note: Restore factory defaults for a certain setting, all the settings under this folder will be restored to factory
defaults.
1. 点击任一扫描设置界面右上角的 图标。
2. 点击 Restore all defaults。
1. Tap the icon on the upright of any Scan Settings interface.
2. Tap Restore all defaults.
扫描仪默认设置
Scanner default settings
根据如下表格了解 Data Processing Settings、Symbology Settings、 Decode Settings、 Imager Settings、Trigger
Settings 及 Notification Settings。
Study the following table to learn about Data Processing Settings, Symbology Settings, Decode Settings, Imager
Settings, Trigger Settings and Notification Settings.
数据处理设置
使用数据处理设置来设置 EDA51-X 处理条形码数据的方式。
Data processing settings
Use data processing settings to set the barcode data processing patterns for EDA51-X.
数据处理设置
Data processing settings
Page 59

Settings
Description
Default
Wedge
Enable or disable the transferring of barcode data as Android Events
when sending data to the application.
Enabled
Character set
Explain the selected character set when the barcode is a character,
options including:
• ISO-8859-1
• US-ASCII
• UTF-16
• UTF-16BE
• UTF-16LE
• UTF-8
The related BarCodeReader attributes:
PROPERTY_DATA_PROCESSOR_CHARSET
ISO-8859-1
Page 60

P44
前缀
在解码条码之前定义添加的字符
无
后缀
在解码条码之后定义添加的字符
无
数据编辑插件
指定一种免费的数据编辑插件
无
字符前缀
指定一种字符前缀去解码条码数据
• None
• Honeywell
• AIM
无
启动浏览器
开启或者关闭 URL 条码,如果条码以 http://或者 https://,
浏览器将会到开相应 URL
对应相关 BarCodeReader 属性:
PROPERTY_DATA_PROCESSOR_LAUNCHBROWSER
开启
扫描 Intent
开启或者关闭指定的目标扫描处理。将条码应用为以下格
式
„//‟ ACTION
„//‟ intent-suffix „$‟ extra-data
Where:
额外的操作和数据包括以下字符,来启动 Intent 或者相应
应用
Intent action:
“com.honeywell.scantointent.intent.action.” +ACTION
Intent extra
“com.honeywell.scantointent.intent.extra.DATA” contains the
remainder of the bar code data after the first „$‟ character.
对应相关 BarCodeReader 属性:
PROPERTY_DATA_PROCESSOR_SCAN_TO_INTE
N T
开启
Prefix
Define the character to be added in front of the decoding barcodes
No
Suffix
Define the character to be added at the end of the decoding barcodes
No
Data editing
plugin
Specify a free plug-in for data editing
No
Character
prefix
Specify a character prefix to decode the barcode data
• None
• Honeywell
• AIM
No
Start your
To open or close URL barcode, if the barcode start with http:// or
Enabled
Page 61

browser
https://, the browser will open the respective URL
The related BarCodeReader attributes:
PROPERTY_DATA_PROCESSOR_LAUNCH- BROWSER
Scan Intent
Enable or disable scan processing for specified targets. Apply the
barcode as the following format
„//‟ ACTION
„//‟ intent-suffix „$‟ extra-data
Where:
Additional operations and data include the following characters, to
enable Intent or respective applications
Intent action:
“com.honeywell.scantointent.intent.action.”+ ACTION
Intent extra
“com.honeywell.scantointent.intent.extra.DATA” contains the
remainder of the bar code data after the first „$‟ character.
The related BarCodeReader attributes:
PROPERTY_DATA_PROCESSOR_SCAN_TO_INTE N T
Enabled
Page 62

P45
启动 EZ Config
开启或者关闭指定 EZConfig 操
作到条码。采用 Aztec 符号编码
并且包含指定的头数据。
对应相关 BarCodeReader 属性:
PROPERTY_DATA_PROCESSOR
_LAUNCH_EZ_CONFIG
开启
Start EZ
Config
Enable or disable specifying EZ Config operations to barcode. Adopt
Aztec code and include specified header data.
The related BarCodeReader attributes:
PROPERTY_DATA_PROCESSOR_LAUNCH_EZ_ CONFIG
Enabled
Page 63

P46
设置
默认
Code 128
开启
GS1-128
开启
Code 39
开启
Datamatrix
开启
UPC-A
开启
UPC-E
关闭
EAN-8
关闭
EAN-13
开启
Aztec
开启
China Post
关闭
Codabar
开启
Codablock A
关闭
Codablock F
关闭
Code 11
关闭
Code 93
关闭
Settings
Default
Code 128
Enabled
GS1-128
Enabled
Code 39
Enabled
Datamatrix
Enabled
UPC-A
Enabled
UPC-E
Disabled
EAN-8
Disabled
EAN-13
Enabled
Aztec
Enabled
China Post
Disabled
Codabar
Enabled
符号设置
使用符号设置启用或禁用条形码识读码制。点击某个符号来浏览并修改符号配置参数。
Symbology settings
Enable or disable a barcode symbology with Symbology Settings. Tap on a symbol to view and modify the
configuration parameters of the symbol.
符号设置
Symbology settings
Page 64

Codablock A
Disabled
Codablock F
Disabled
Code 11
Disabled
Code 93
Disabled
Page 65

P47
Composite
关闭
Han Xin
关闭
IATA 2 of 5
关闭
Interleaved 2 of 5
开启
Korean Post
关闭
Matrix 2 of 5
关闭
Maxicode
关闭
Micro PDF 417
关闭
MSI
关闭
PDF 417
关闭
QR Code
开启
RSS (GS1)
关闭
Standard 2 of 5
关闭
Telepen
关闭
TLC 39
关闭
Trioptic
关闭
2D Postal Settings
关闭
OCR
关闭
Composite
Disabled
Han Xin
Disabled
IATA 2 of 5
Disabled
Interleaved 2 of 5
Enabled
Korean Post
Disabled
Matrix 2 of 5
Disabled
Maxicode
Disabled
Micro PDF 417
Disabled
MSI
Disabled
PDF 417
Disabled
QR Code
Enabled
RSS (GS1)
Disabled
Standard 2 of 5
Disabled
Telepen
Disabled
TLC 39
Disabled
Page 66

Trioptic
Disabled
2D Postal Settings
Disabled
OCR
Disabled
Page 67

P48
设置
描述
默认
解码超时
如果扫描触发被按住并且没有成功解码的话,扫描
在 20 秒后自动关闭
20
Settings
Description
Default
Decoding timeout
If the scan trigger is held down but decoding is not
successfully performed, Scanning will automatically
shut down after 20 seconds
20
图像设置
用户应该无需更改图像色绘制。覆盖推荐值设置默认为关闭。推荐图像设置可应用于诸多环境,只有用户
对图像有比较深入的了解时才可以进行更改。
Image settings
There should be no need for users to change image color rendering. Covering the recommended value is
disabled by default. Recommended image settings can be applied in many environments; only the users who have
more in-depth understanding on the image can change the settings.
触发设置
触发设置可设置扫描键使用方式。
Trigger settings
Trigger settings can set up the using patterns for scan key.
触发设置
Trigger settings
Page 68

P49
设置
描述
默认
Good Read Notification
开启或关闭成功读取通知。通知
包括绿色提示灯,短的提示音和
可选的较短的震动
开启
Bad Read Notification
开启或关闭失败读取通知。通知
包括红色提示灯,错误提示音和
可选的较短的震动
关闭
Vibrate Enabled
不管读取成功或者失败,开启或
关闭手机震动
关闭
Settings
Description
Default
Good Read
Notification
Enable or disable Good Read Notification.
Notification includes green indicator, short
beep and optional short vibration
Enabled
Bad Read
Notification
Enable or disable Fail to Read notification.
Notification includes red indicator, failure
beep and optional short vibration
Disabled
Vibrate Enabled
Regardless of succeeding or failing to read,
turn on or off the phone vibrations
Disabled
通知设置
可在通知设置中设置 EDA51-X 在扫描条形码时的响应方式。
Notification settings
You can set up the responses during scanning process for EDA51-X in the notification settings.
通知设置
Notification settings
Page 69

P50
扫描引擎
扫描条形码
扫描引擎会发出扫描光束,以便准确瞄准条形码。同时支持全方位 360°扫描,以便更便捷的扫描条形
码。
Scanning barcodes
Scan engine will emit scanning beams for accurate barcode aiming. It will also support a full range of 360°
scanning, which will make barcode scanning more convenient.
注意:开始扫描条形码之前,在设置里仅启用所需条形码字符。
Note: Before scanning a barcode, you only need to enable the desired barcode symbology in the settings.
1. 点击或者上拉 >Demos>ScanDemo。
2. 将扫描窗口对准条形码并将无线终端拿稳,放在离条码标签几英寸的距离。
3. 点击其中一个扫描按键或在界面上点击 Scan。确保整个条形码处于扫描光照范围之内。
1. Tap or pull upward >Demos>ScanDemo.
2. Align the scanning window with the barcode and stably place the terminal a few inches away from the
barcode.
3. Press one of the scan keys or tap Scan on the interface. Make sure the entire barcode is within the scanning
beam range.
扫描引擎
Scan Engine
扫描成功时,会听到一声“哔”声,且 Good Read LED 立即开启。
When the scanning is successfully completed, you will hear a "beep" sound, and the Good Read LED will open
immediately.
Page 70

P51
第 5 章– 使用照相机
Chapter V - Using Camera
5 使用照相机
5. Using Camera
本章介绍如何使用彩色照相机的功能拍摄照片和视频功能。
This chapter describes how to use a color camera to take photos and videos.
Page 71
P52
彩色照相机
Color camera
EDA51-X 无线终端装有 500 万像素的彩色相机,可用于拍摄照片和视频图像。摄像头和闪光灯位于无
线终端的背部。点击 照片 应用可查看无线终端上存储的照片和视频。
EDA51-X is equipped with 13 megapixels color camera which can be used to take photos and videos. The camera
and flash light are located on the back of the terminal. Tap Photo Gallery app to view all the photos and
videos stored on the terminal.
调整相机和视频设置
在相机应用中可调整相机和视频的设置。
Adjusting camera and video settings
Adjust the camera and video settings in the Camera apps.
变焦
焦距调节通过手指在屏幕上的缩放动作来控制。将两根手指同时放在屏幕上,然后:
Zooming
Focus adjustment is realized by zooming actions of the fingers on the screen. Place two fingers on the screen at
the same time, then:
• 向相反方向分开两手指来放大图像(放大对象)。
• 向相反方向收拢两手指来缩小图像。
• Separate the two fingers in opposite directions to zoom in the images (enlarge objects).
• Fold the two fingers in opposite directions to zoom out the images
更改相机设置
为了在拍摄照片时获得最好的效果,用户可事先更改相机设置。
Changing camera settings
In order to obtain the best results when taking photos, users can change the camera settings beforehand.
1. 点击应用,再点击相机 。
2. 点击右上角闪光灯图标查看相机选项。
3. 点击 HDR 或其中任意图标更改相机基本设置。
• 当 HDR 启用时,无线终端会自动捕获多张照片并将他们合成一张照片以达到可能的最好的图像质
量。
• 启用或关闭不同选项如取景模式、存储位置和图片大小。
1. Tap All Applications and then tap Camera .
2. Tap the Setting icon on the top right to view Camera Options.
3. Tap HDR or any icons to change the basic settings of the camera.
• When HDR is enabled, the terminal will automatically capture multiple photos and composite them into one
to achieve the best possible image quality.
• Enable or disable various options, like viewfinder mode, storage location and image size.
拍摄照片
Page 72

Taking photos
1. 点击应用,再点击相机 。
1. Tap All Applications and then tap Camera .
Page 73
P53
2. 将屏幕当做取景器,移动无线终端直到看到想捕获的画面。
3. 轻触屏幕来对焦。默认情况下,照相机会自动感应环境光线,如需要会开启闪光灯。
4. 按下拍照键 拍摄照片。
2. Take the screen as a viewfinder and move the terminal until you get the images you want to capture.
3. Tap the screen to focus. By default, the camera automatically senses the ambient light, and the flashlight will
be opened if necessary.
4. Press the camera key to take photos
拍摄视频
本节介绍如何用无线终端的相机功能拍摄视频。
Shooting videos
This section describes how to use the camera function to shoot videos.
1. 点击应用,再点击相机 。
2. 点击右下角相机拍摄选项 。
3. 点击 选择视频。
4. 点击 开始视频拍摄。要调整焦距,可以用两手指在屏幕上进行捏合操作;要抓拍照片,可以在视
频拍摄过程中点击屏幕进行即时抓拍。
5. 要结束视频拍摄,点击 。
1. Tap All Applications and then tap Camera .
2. Tap Camera Shooting Options on the bottom right .
3. Tap to choose videos
4. Tap to start video shooting. To adjust the focus, you can knead two fingers on the screen; to capture
images, you can tap on the screen for instant capturing during video shooting process.
5. To stop video shooting, tap .
更改视频设置
Changing video settings
为了在拍摄视频时获得最好的效果,用户可事先更改相机设置。
In order to obtain the best results when shooting videos, users can change the camera settings beforehand.
1. 点击应用,再点击相机 。
2. 点击 。
3. 点击右上角设置或者向右滑动查看视频选项。
4. 点击屏幕其他任意位置来开启或关闭相关选项。
Page 74

1. Tap All Applications and then tap Camera .
2. Tap .
3. Tap settings on the top right corner or slide to the right to view Video Options.
4. Tap any other positions of the screen to enable or disable Camera Options.
Page 75

P54
第 7 章– 配置无线终端
Chapter VII - Configuring Terminal
7 配置无线终端
7 - Configuring Terminal
本章节介绍如何配置 EDA51-X 无线终端。用户还可了解到如何配置网络通讯和无线安全。
This Chapter deals with configuration of EDA51-X. The user can also learn how to configure network
communication and wireless security.
Page 76

P55
配置无线终端
用户可以配置无线终端上的很多参数,例如解码的条码符号或网络设置。用户设定的这些参数值决定着
无线终端如何工作。
Terminal configurations
Users can configure many parameters for the terminal, such as barcode symbologies to be decoded or network
settings. These parameters set by the user decide how the terminal works.
用户在应用设置中配置无线终端。
Users can configure the terminal in Application Settings.
开始应用设置
Setting launch applications
应用设置在应用菜单中。
Set the applications using the application menu.
点击设置。
Tap Setting.
应用设置的结构
本节介绍应用设置结构,以方便用户快速找到相关参数项。
Structure of the Application Settings
The section describes the structure of Application Settings to make it easier for users to quickly locate respective
specifications.
Page 77

P56
设置
说明
WLAN
开启或关闭 Wi-Fi 无线电。当 Wi-Fi 开启 时,点击该栏查看可用的 Wi-Fi
网络。
蓝牙
开启或关闭蓝牙无线电。当蓝牙开启时,点击该栏查看范围内的蓝牙设备。
流量使用情况
显示当前流量使用情况,包括 WLAN 和 移动网络
(当 sim 卡插入后 移动网络 才显示)
更多
飞行模式:开启或关闭飞行模式。
WLAN 通话:开启后通过 WI-FI 网络通话
NFC:开启 NFC 时,允许手机在接触 NFC 标签的时候读取 NFC 标签信
息。
Android Beam:在 NFC 开启时,只要将两设备靠近,该功能可以使用户直
接发送无线终端上的应用程序内容到另一个 NFC 支持的设备上。
VPN:设置访问虚拟专用网络的密码。
重置网络设置:重置所有网络设置。
Settings
Introductions
Wi-Fi
To enable or disable Wi-Fi radios. When Wi-Fi is enabled,
available Wi-Fi networks can be viewed by taping this bar.
Bluetooth
To enable or disable Bluetooth radios. When Bluetooth connection
is enabled, Bluetooth-enabled devices within the range can be
viewed by tapping this bar.
Data usage
Displays the current usage of flow rate, including Wi-Fi and
Cellular data. (Cellular data will displayed after sim card is
inserted).
More...
Airplane mode: to enable or disable Airplane mode.
Wi-Fi Calling: to telephone through Wi-Fi network after it is being
enabled.
NFC: enabling NFC allows NFC tag information to be read when
the terminal touches NFC tag.
Android Beam: when NFC is enabled, this function allows users to
send the application contents from the terminal directly to another
NFC-supported device when the two get closer.
Tethering & Portable Hotspot: a handheld device can be used as a
建议
通过智能预判用户的需求自动推荐快捷入口
Suggestions
Automatically recommend quick access through intelligent pre-judgment of user‟s needs.
无线和网络
Wireless & networks
Page 78

wireless router to radiate the wireless network, and then other
WLAN-enabled device can receive it.
VPN: Set a password for accessing the virtual private network.
Network setting reset: reset all network setting.
Page 79

P57
设置
说明
声音
设置电话和提醒的声音,包括音调和音量。
显示
设置亮度、墙纸、休眠时间、字体大小和屏幕自动旋转。
通知
设置应用是否允许发送通知
存储
显示存储剩余空间。
电池
显示电池使用数据和当前电池状态。
应用
显示已下载和运行中的应用。
内存
显示内存使用量
用户
添加切换用户
Settings
Introductions
Sound
Set sound for calls and notifications, including the tone and
volume.
Display
Set screen brightness, wallpaper, screen timeout, font size and
screen rotation.
Notifications
Set whether the app allows notifications to be sent
Storage
Shows the remaining memory space.
Battery
Shows battery usage data and the current battery status.
Apps
Shows applications downloaded and on the run.
Memory
Display memory usage
Users
Add toggle user
设置
说明
位置信息
打开和关闭位置信息(Google)。
安全
设置锁屏和管理员权限,应用安装和数据存储安全。
帐户
设置电子邮箱账户。
Google
Google 的相关服务
语言和输入法
选择当前语言和默认键盘。设置自动输入功能,如:大写和标点。设置外接鼠
标或触摸屏的光标速度。
备份和重置
恢复出厂设置。
Settings
Introductions
Location
To enable or disable location information (Google).
设备
Device
个人
Personal
Page 80

Security
Set screen lock and administrator privileges, including application
installation and data storage security.
Accounts
Set up an e-mail account.
Google
Related services of Google
Language & input
Select the current language and the default keyboard. Set
automatic input function, such as: capitalization and punctuation.
Set the cursor speed for external mouse or touch screen.
Backup & reset
Factory Data Reset.
Page 81
P58
设置
Settings
说明
Introductions
按键映射
Key Remap
重新定义左扫描键,右扫描键,中扫描键,以及 P1,P2 键。更多帮助,参
见按键映射。
Redefines left scan button, right scan button, middle scan button and P1, P2
buttons. For more information please refer to Mapping Button.
Honeywell Battery LED
配置电池 LED 亮灯模式。
Configuring battery LED lighting modes.
扫描设备
Scan Settings
配置 EDA50K-X 成像器。更多帮助,参见更改扫描设置。
Configure ScanPal EDA50K-X imager. For more help, please refer to changing
scan Settings.
日志
Logger
启动 android logcat 和 linux kernel 的日志服务,为了能方便抓取设备运行
中的问题
Activates Android Logcat and Linux Kernel log services to facilitate identification
of problems during the device‟s operation
Smart sensors
通过集成到设备中的 sensor 更好进行电源管理
Integrated sensor allows better power management
设置
说明
日期和时间
配置所有日期和时间的设置。
定时开关机
设置定时开关机
无障碍
设置辅助功能级别,例如:大号字体和文字转语音输出。
打印
配置打印选项。
关于手机
显示无线终端系统的信息。
Settings
Introductions
Date & Time
Configure all time and date settings.
Scheduled Power On and Off
Set scheduled power on and off
Accessibility
Set auxiliary function level, for example: large font and
text-to-speech output.
Printing
Configure printing options.
About phone
Shows information about the terminal system.
Honeywell 设置
Honeywell Setting
系统
System
Page 82

P59
网络通讯
用户可以将无线终端连接到其无线和有线网络中。用户可通过以下方法连接无线终端:
Network communication
Users can connect the terminal to wireless and wired networks. Users can get the terminal connected via the
following ways:
• 802.11 无线电
• 蓝牙
• USB
• 802.11 radios
• Bluetooth
• USB
连接到 Wi-Fi 网络
Connecting to Wi-Fi networks
使用无线通讯,GEDA51-X 通过 802.11 无线电来传输数据。用户在连接到 Wi-Fi 网络前,需要了解网
络的安全协议和其要求的证书。通常情况下,802.11 无线电默认是关闭的。
When communicating through wireless networks, EDA51-X transfer data through 802.11 radios. Before
connecting to a Wi-Fi network, users need to know the Security Protocol of the network and the certificates it
required. Usually, 802.11 radio is disabled by default.
1. 进入 设置>WLAN。
2. 当 WLAN 开关变为蓝色,显示搜索到的网络列表。
1. Enter Settings > WLAN.
2. When the WLAN switch turns blue, tapping the WLAN bar will display the detected network list.
Page 83

P60
3. 要通过 WI-FI 保护接入(WPS)快速连接到一个网络时,点击 >刷新。要搜索不在列表中的网络,滑
动到列表的末尾,点击添加网络并输入网络名称。
4. 点击某个网络名称以查看其详细信息。
3. To quickly connect to a network via Wi-Fi Protected Access (WPS), tap > Refresh. To search the
network outside of the list, slide to the end of the list and tap Add network and enter the network name.
4. Tap on a network name to view its details.
如果该网络是安全的,会弹出一个列表要求填入所需信息(例如:证书名称,密码或者其他凭证)。要连
接到某个安全网络,输入所需信息,然后点击连接。
If the network is secure, a form will pop up asking you to fill in the necessary information (for example:
certificate name, password or other credentials). To connect to a secure network, enter the required information,
and then tap Connect.
• 要离开已连接的网络,点击忘记。例如:用户可以选择忘记一个不再使用的网络。
• 要关闭网络信息屏,点击取消。
• To leave the network that has been connected, tap Forget. For example, users can choose to forget a network
that they won't use again.
• To close the network information screen, tap Cancel.
配置 Wi-Fi 网络的代理服务设置
Configuring Wi-Fi network proxy servers
如果用户需要通过代理服务器连接到网络资源,则需要对每个添加的 WiFi 网络配置代理服务器。默认
情况下,用户添加的 Wi-Fi 网络都未进行代理服务器的设置。
If users need to connect to network resources through a proxy server, they need to configure a proxy server for
each Wi-Fi network added. By default, none of the Wi-Fi networks added by users has done proxy server settings.
Page 84

P61
注意:代理服务器设置只适用于用户修改过的 Wi-Fi 网络。用户必须为每个要求用代理服务器的网络设置
其代理服务器。
Note: Proxy server settings only apply to the Wi-Fi networks that users modified. Users have to set proxy servers
for each network that requires the using of proxy server.
1. 进入应用设置页面,点击 Wi-Fi,显示可用的 Wi-Fi 网络。
2. 长按网络名称,然后点击连接到网络,将弹出网络设置列表。
3. 在网络设置列表底部选择显示高级选项。
4. 如果该网络没有代理服务器设置,则在代理服务器设置列表中点击无,然后再点击手动。
5. 输入该网络的代理服务器设置。
6. 点击保存。
1. Enter Application Settings screen, tap Wi-Fi to show available Wi-Fi networks.
2. Long press the network name, then tap Connect the Network, then a network setting list will pop up.
3. Choose Show Advanced Options at the bottom of the network setting list.
4. If the network does not have proxy server settings, tap None on the proxy server setting list, and then tap
Manual Settings.
5. Enter the network proxy server settings.
6. Tap Save.
关闭 Wi-Fi 通知
Wi-Fi 在默认情况下是启用的,当无线终端搜索到无线网络,用户会在状态栏收到通知。用户可以关闭这
些通知。
Disable Wi-Fi notifications
Wi-Fi is enabled by default. Users will receive notifications in the Status Bar when the terminal finds wireless
networks. Users can disable these notifications.
1. 进入应用设置界面。
2. 点击 WI-FI 栏。
3. 点击右上角设置图标
4. 将网络通知复选框取消以关闭通知。
1. Enter Application Settings screen.
2. Tap Wi-Fi bar.
3. Tap the Settings icon on the top right.
4. Uncheck the Network notification to disable Wi-Fi Notifications.
Page 85

P62
连接到虚拟专用网络
Connecting to a virtual private network
无线终端支持连接到虚拟专用网络(VPN)。本节介绍如何添加和连接到 VPN。要配置 VPN,用户须先
咨询网络管理员。用户可以在应用设置里 面查看和更改 VPN 设置。
The terminal supports connection to virtual private networks (VPNs). This section describes how to add and
connect to VPNs. To configure a VPN, users must consult your network administrator. Users can view and change
VPN settings in the Application Settings.
注意:用户在访问 VPN 前,需要先设置锁屏密码。
Note: Before accessing VPN, users need to set a lock screen password.
添加 VPN
Add VPN
用户在连接到 VPN 前,须先添加 VPN 相关信息。
Before connecting to a VPN, users must first add the relevant information of the VPN.
1. 进入应用设置界面。
2. 在无线和网络栏点击更多。
3. 点击 VPN。
4. 点击添加 VPN 加号。
5. 输入 VPN 信息。
6. 点击保存,VPN 名称显示在列表中。
1. Enter Application Settings screen.
2. Tap More under Wireless and Networks.
3. Tap VPN.
4. Tap VPN +.
5. Input the VPN information.
6. Tap Save, and VPN name will be displayed in the list.
连接到 VPN
Connect to VPN
1. 进入应用设置界面。
2. 在无线和网络栏点击更多。
3. 点击 VPN。
4. 在列表中点击 VPN 名称,根据提示输入证书信息。
5. 点击连接。无线终端连接到 VPN,并显示状态图标和通知。
1. Enter Application Settings screen.
2. Tap More under Wireless and Network.
3. Tap VPN.
4. Tap the VPN name in the list, and enter the certificate information based on the tips.
5. Tap Connect. The terminal gets connected to the VPN, and the status icons and notification will be
displayed.
要断开与 VPN 的连接,点击通知。
Page 86

To disconnect from the VPN, tap the notification.
编辑 VPN 信息
1. 进入应用设置界面。
2. 在无线和网络栏点击更多。
3. 点击 VPN。
4. 长按要编辑的 VPN 名,然后从列表中选择编辑网络。
5. 根据需要编辑 VPN 信息。
Edit VPN information
1. Enter Application Settings screen.
2. Tap More under Wireless and Network.
3. Tap VPN.
4. Long press the name of the VPN to be edited and select Editing Networks from the list.
5. Edit VPN information based on your needs.
Page 87

P63
6. 编辑完成后点击保存。
6. Tap Save after editing.
无线安全
Wireless Security
无线终端为用户的无线网络提供以下安全方案。
The terminal provides the following security solutions for users' wireless network.
• WPA2™
• WPA
• 802.1x
• LEAP
• WEP
用户在设置安全方案前,须先启用无线电,在无线终端上设置日期和 SSID。要使用 802.1x 方案,用户
须先下载一个根证书到无线终端上。要和 802.1x 一起使用传输层安全协议(TLS),用户也要先下载一
个用户证书。
Before setting up security program, you must first enable the radio and set the date and SSID on the terminal. To
use 802.1x program, users must download a root certificate to the terminal. To use Transport Layer Security
protocol (TLS) together with 802.1x , users also need to download a user certificate first.
在应用设置页面中查看和配置所有的无线安全设置。
View and configure all of the wireless security settings in the Application Settings screen.
证书
Certificates
用户可以使用数字证书来鉴定无线终端的网络访问或服务器验证。要使用证书来鉴定设备,用户须先将
设备安装在无线终端上受信任的证书存储中。
Users can use digital certificates to identify the terminal's network access or server validation. To identify the
device with certificates, users must first install the device to the trusted certification store on the terminal.
安卓支持 DER 编码的 X.509 证书,该证书保存在以.crt 或.cer 为扩展名的文档中。安装 der 格式的有
效证书。安卓还支持 X.509 证书,该证书 保存在以 p12 或 .pfx 为扩展名的 PKCS#12 密匙存储文件中。
如果要安 装一个有效的以其他扩展名结尾的密匙存储文件,用户须先将扩展名改 成.p12 或.pfx。当用户
从 PKCS#12 密匙存储文件中安装了一个证书,安卓还安装其附带的私人密匙证书或权限证书。
ndroid supports DER encoded X.509 certificate stored in the documents with .crt or .cer extension. Install a valid
DER-format certificate. Android also supports X.509 certificate stored in PKCS # 12 key store file with p12
or .pfx extension. To install a valid key storage file with other extensions at the end, users must change the
extension to .p12 or .pfx first. If users installed a certificate from the PKCS # 12 key store file, Android will also
install the private key certificate or a certificate authority that came with it.
下载证书
Download certificates
要使用证书,用户须先将证书安装在无线终端上受信任的证书存储中。
To use the certificate, users must first install the certificate to the trusted certification store on the terminal.
Page 88

注意:一些支持证书的应用,如邮箱和浏览器等,允许用户从应用中直接安装证书。更多信息,参考应用
中的帮助文档。
Note: Some applications that support certificates, such as email and browsers, allow users to install the certificate
directly from the application. For more information, please refer to the Help Documentation in the application.
1. 将证书或密匙存储器从电脑中拷贝到 SD 卡中。
2. 将 SD 卡装入电脑,开启电脑。
3. 进入应用设置,点击安全>从 SD 卡安装。
1. Copy the certificate or key storage from computer to the SD card.
2. Install the SD card in the terminal and turn on the terminal.
3. Enter Application Settings, tap Safety > Install From SD Card.
Page 89

P64
4. 点击证书或密匙存储器名称安装。根据提示输入密匙存储器密码,然后点击确定。
5. 输入证书名称,点击确定。
4. Tap the name of the certificate or key storage to install. Following the tips to enter the password of the key
storage, then tap OK.
5. Enter the certificate name and tap OK.
禁用或删除证书
如果证书是被盗用的或者用户选择的组织不信任该证书,用户可将其禁用或删除。
Disable or delete certificates
If the certificate is a stolen one or the organization selected by the user does not trust the certificate, the user can
disable or delete the certificate.
1. 进入应用设置,点击安全 > 受信任的凭据。受信任的证书屏有两个标签:
• 系统标签显示 ROM 中已经安装的 CA 证书。
• 用户标签显示用户自己已安装的 CA 证书。
1. Enter Application Settings, tap Safety > Trusted Credentials. There are two tabs in the Trusted Certificate
screen:
• System tab displays CA certificates installed in ROM.
• User tab displays CA certificates installed by users.
2. 点击证书名称将其禁用或删除,弹出证书详情屏幕。
3. 向下滑动屏幕到最屏幕底部,点击禁用(系统证书)或删除(用户证书)。
2. Tap the certificate name to disable or delete it, and the certificate details screen will pop up.
3. Slide the screen down to the bottom, tap Disable (system certificates) or delete (user certificates).
如有需要,用户可在此启用已被禁用的系统证书。如果是已被删除的用户证书,则须重新安装才能再次启
用。
If necessary, users can enable the disabled system certificate here. For deleted user certificates, users must reinstall
it to enable it again.
4. 点击确定。
4. Tap OK.
Page 90

P65
蓝牙通讯
Bluetooth communication
EDA51-X 支持蓝牙通讯,允许用户和其他蓝牙设备连接。
EDA51-X supports Bluetooth communication, allowing users to get connected with other Bluetooth-enabled
devices.
搜索和连接其他蓝牙设备前,用户须先开启蓝牙无线电。默认情况下,蓝牙无线电是关闭的。
Before searching for and connecting to other Bluetooth-enabled devices, users must enable the Bluetooth radio.
By default, Bluetooth radio is disabled.
蓝牙无线电可通过系统重置恢复到其当前的状态。如果用户重置过系统数据,必须重新建立配对设备。蓝
牙状态显示在系统图标栏上。
Bluetooth radio can be restored to its current state by system resetting. If users have reset the system data, they
must re-establish the paired devices. Bluetooth status is displayed on the System Icon bar.
连接蓝牙设备
要连接到一个蓝牙设备,用户须先开启蓝牙然后从已搜索到的设备列表中选择一个设备。
Pairing with a Bluetooth-enabled device
To connect to a Bluetooth-enabled device, users should enable Bluetooth radio first and then choose the device
from the detected device list.
1. 进入应用设置。
2. 点击蓝牙,如果蓝牙开关未打开,滑动开关将其打开。
3. 蓝牙开启后,显示可用的蓝牙设备列表。
1. Enter Application Settings screen.
2. Tap Bluetooth. If Bluetooth switch is off, slide it on.
3. It will display available Bluetooth-enabled device list after Bluetooth switched on.
Page 91

P66
4. (可选)如果用户想连接的设备不在列表中,先检查该设备是否开启了蓝牙功能并处于可被搜索状态,
然后点击搜索设备。
4. (Optional) If the desired device is not listed, please check if the Bluetooth of that device has been enabled
and is detectable, and then tap Scan Device.
5. 在列表中点击某个设备将其选中。显示配对对话框后,输入设备 PIN 码,点击确定。当设备和无线终
端已成功配对,该设备名称将出现在顶部的配对设备列表中。
5. Select the device to pair with. After Pairing Dialog Box is displayed, enter the device PIN code, and tap OK.
When the device and the terminal s have been successfully paired, the device name will appear in the list of paired
devices at the top.
6. 要与已配对设备断开连接,点击设备名旁的快速设置图标,然后点击取消
6. To disconnect with the paired device, tap the Quick Setting icon beside the device name, and then tap Cancel
Pairing.
Page 92

P67
配置蓝牙设置
用户可在应用设置中配置蓝牙设置。
Configuring Bluetooth settings
Users can configure for Bluetooth in Application Settings.
1. 进入应用设置界面,点击蓝牙。
2. 点击菜单图标 ,从菜单中选择一个设置:
1. Enter Application Settings screen, and tap Bluetooth.
2. Tap Menu icon to select one for setting:
• 刷新
• 点击重命名手机更改无线终端设备名称。输入新名称,然后点击重命名。
• 点击显示接收到的文件在接收到的文件中查看数据。
• Refresh.
• Tap Rename phone to change the name of the terminal. Enter a new name and then tap Rename.
• Tap Show received files to view data in the received files.
搜索 EDA51-X 无线终端
在默认情况下,蓝牙打开后,设备可被搜索到的。
Searching for EDA51-X
By default, the device can be searched during Bluetooth is turned on.
重命名或断开已配对设备
用户可在应用设置中重命名或断开已经配对的蓝牙设备。
Renaming or disconnecting a paired device
Users can rename or disconnect a paired Bluetooth-enabled device in the Application Settings.
1. 进入应用设置界面,点击蓝牙。
2. 点击已配对列表中的设置图标。
3. 要重命名设备,点击重命名,输入新名称,点击确定。
要断开与该设备的连接,点击取消保存。
1. Enter Application Settings screen, and tap Bluetooth.
2. Tap Settings icon in the Paired List.
3. To rename the device, tap Rename, enter a new name and click OK.
To disconnect with this device, tap Cancel save.
Page 93

P68
USB 通讯
通过 USB 通讯,用户可使用下列配件将数据传输到其他设备或从其他设备接收数据。
Communication via USB
By communication via USB, users can transfer data to other devices or receive data from other devices with the
following accessories.
• USB CUP 线
关于配件的更多信息,联系当地经销商。
• USB CUP cable
For more information about accessories, please contact local resellers.
近场通讯
Near Field Communication (NFC)
NFC 技术提供 EDA51-X 与 NFC tags,或与同样具有 NFC 近场通讯的设备间,短距离的无线数据传
输。
NFC technology provides short-range wireless data transmission between EDA51-X with NFC tags or other
NFC-enabled devices near its back.
具备 NFC 功能的 EDA51-X 机型支持以下操作模式:
NFC-enabled EDA51-X models support the following operations:
NFC tag 读/写模式:无线终端从 NFC tag 读取信息或往 NFC tag 写入信息。
NFC tag read / write mode: The terminal reads digital information from the NFC tag or writes information into
NFC tag.
注意:睡眠模式(挂起模式)和锁屏状态下会暂时关闭 NFC 无线电。
Note: When in sleep mode (suspend mode) and lock-screen state, NFC radio will be temporarily disabled.
Page 94

P69
第 7 章– 管理和维护
Chapter VII - Management and Maintenance
7 管理和维护
7- Management and Maintenance
本章介绍如何升级软件、重置无线终端以及维护 EDA51-X 。
This Chapter deals with software upgrade, resetting terminal and maintenance of EDA51-X.
Page 95

P70
升级系统软件
Upgrading system software
EDA51-X 系统软件的升级需通过从技术支持网站上下载“.zip”文件完成。网站地址:
The other system softwares of EDA51-X can be upgraded by downloading ".zip" files from the Technical Support
Website. Website:
AutoInstall 应用升级
Upgrading AutoInstall application
1. 将升级文件“ EDA50K_OTA_xxxxx_Update.zip”文件拷贝到以下 EDA51-X 系统文件夹中:
• 文件管理\外置存储卡\honeywell\autoinstall
• IPSM\honeywell\autoinstall
1. Copy the upgrade file "EDA50K_OTA_xxxxx_Update.zip" to the following EDA51-X's system folder:
• File Explorer\External Memory Card\Honeywell\Autoinstall
• IPSM\Honeywell\Autoinstall
2. 点击所有应用 > AutoInstall Settings。
3. 选择 Packages upgrade,EDA51-X 将自动重启并安装升级文件。
2. Tap All Applications > AutoInstall Settings.
3. Choose Packages update, and EDA51-X will restart and install the upgrade file.
Recovery 菜单手动升级
Manually upgrading Recovery Menu
1. 将“ EDA50K_OTA_xxxxx_Update.zip”文件拷贝到 T 卡的根目录。
2. 关机状态下,同时按住“电源键” + “音量+”约 15 秒左右手机进入 Recovery 菜单。
3. 按住“音量–”,选中“Apply update from sdcard”。按“电源键”,然后选中刚才拷贝的 zip 文件,按住“电
源键”。
4. 升级成功后会自动跳到 Reboot System Now 菜单,按下“电源键”重启无线终端。
1. Copy the file " EDA50K_OTA_xxxxx_Update.zip " to the root directory of the T card.
2. Turn off the terminal, press and hold the "Power button" + "Volume+" key for about 15s, then the phone
will enter Recovery Menu.
3. Press "Volume-", and select "Apply update from SD card". Press "Power button", select the zip file just
copied, then press and hold the "Power button".
4. After the upgrading is completed, it will automatically move to Reboot System Now Menu. Please press the
"Power button" to restart the terminal.
Page 96

P71
重启无线终端
Restarting the Terminal
若无线终端或某个应用程序锁死或按电源键无响应,则需要重启无线终端。
If the terminal or an application is locked or doesn't respond when pressing the power button, you need to restart
the terminal.
重启时无线终端使用闪存中当前保存的配置。尝试以下方法重启无线终端:
When restarting, the terminal will use the current configuration saved in the flash memory. Try the following ways
to restart the terminal:
• 重启系统:重启无线终端操作系统
• 硬件重启:若按电源键无响应,则需要长按电源键(13s),终端将会强制关机,并重启系统
• 恢复出厂设置:完全清除无线终端中的数据,包括所有应用和数据文件,但不包括内置文件或可移动存
储设备中的数据。
• Restarting the system: Restarts the terminal‟s operating system
• Restarting hardware: If there is no response after pressing the power button, hold it down for 13 seconds
to force restart of the device
• Restore default settings: Clears all data in the terminal including all applications, data and files except
built-in files or data in the movable storage device
重启系统
当某个应用程序无响应时,可能需要重启系统解决该问题。
Restarting the system
When an application is not responding, you may need to restart the terminal to resolve the issue.
1. 保存文件并关闭已打开的应用。
2. 按住“电源键”直到显示如下界面:
1. Save the file and close open applications.
2. Press and hold "Power button" until the following interface displayed:
Page 97
3. 点击 关机, EDA51-X 关机。
4. 按“电源键”重启 EDA51-X 。
3. Tap Power off to switch off EDA51-X.
4. Press down "Power button" to restart EDA51-X.
Page 98

P72
恢复出厂设置
Restore factory settings
若无线终端出现类似锁死的情况,可尝试冷启动。若重置无效,采取恢复出厂设置的方式,重启机器使
其正常工作再进行故障排除。
If the terminal appears to be locked, try a cold boot. If resetting is invalid, try to restore factory settings, restart the
terminal to make it work again and do troubleshooting later.
警告:此操作将清除无线终端中的所有用户数据,包括所有应用和数据,但不包括闪存或外接存储设备
中的数据。
Warning: This action will clear all data in the terminal, including all applications and data, but excluding data
stored in flash memory or external storage device.
1. 点击 设置。
2. 点击 备份和重置。
3. 点击 恢复出厂设置。
4. 点击 恢复手机出厂设置。
5. EDA51-X 将重启并自动清除用户数据。
1. Tap Settings.
2. Tap Backup & Reset.
3. Tap Factory Data Reset.
4. Tap Reset Phone.
5. EDA51-X will restart and automatically clear user data.
Page 99
Cleaning the terminal
In order to ensure the terminal in good working condition, you need to clean the scan window, camera and touch
screen. Based on the environmental conditions where the terminal is being used, clean these parts at regular
intervals. Use a clean, soft cloth which dampened with the following solvents for the cleaning, and quickly wipe it
with another piece of clean, soft cloth.
• Acetic acid (10% soluble in water)
• Ethanol (10% soluble in water)
• Neutral soap solution
Warnings: this product includes non user-serviceable parts inside. Disassembling the product may prevent
warranty and cause internal damages to the product.
Note: We advise you not to open the battery cover or remove the battery, so as to avoid the liquid flowing into the
internal part of the terminal from the SIM card and SD card interface.
1. Press the power button to enter standby mode.
2. Dip a clean cloth in detergent, then wrung out excessive water.
3. Wipe the scanning window, camera and flash area, avoiding touching these areas with hard objects or
abrasive materials.
4. Dry the cleaned area.
5. Make sure the terminal is fully dry before using it again.
Page 100

P73
长
214mm
宽
118 mm
厚
21 mm
重量(含电池)
550 g(含电池)
滚筒和跌落标准
滚筒标准
0.5m 滚筒 200 次
跌落标准
1.2 米水泥地面多次跌落
功率和电气参数
电池
可充电锂电池
充电量
5 V,1.2 A
温度和湿度参数
工作温度
-10 °C ~ 50 °C(14 °F ~ 122 °F)
储存温度
-20 °C ~ 60 °C (-4 °F ~ 140 °F )
Length
214mm
Width
118 mm
Thickness
21 mm
Weight (with battery)
500 g (with battery)
Tumble
200 tumbles within 0.5m
Drop
Multiple drops form 1.2 m to concrete at room temperature
Battery
Rechargeable Li-ion battery
Charging power
5 V, 1.2 A
8 参数
8. Specifications
物理和环境参数
Mechanical and environmental specifications
本章节提供 EDA51-X 的物理和环境参数。
This Chapter provids the mechanical and environment specifications of EDA51-X
产品外形尺寸
Product dimensions
Tumble and drop standards
Power and electrical specifications
Temperature and humidity specifications
 Loading...