

Open the Package
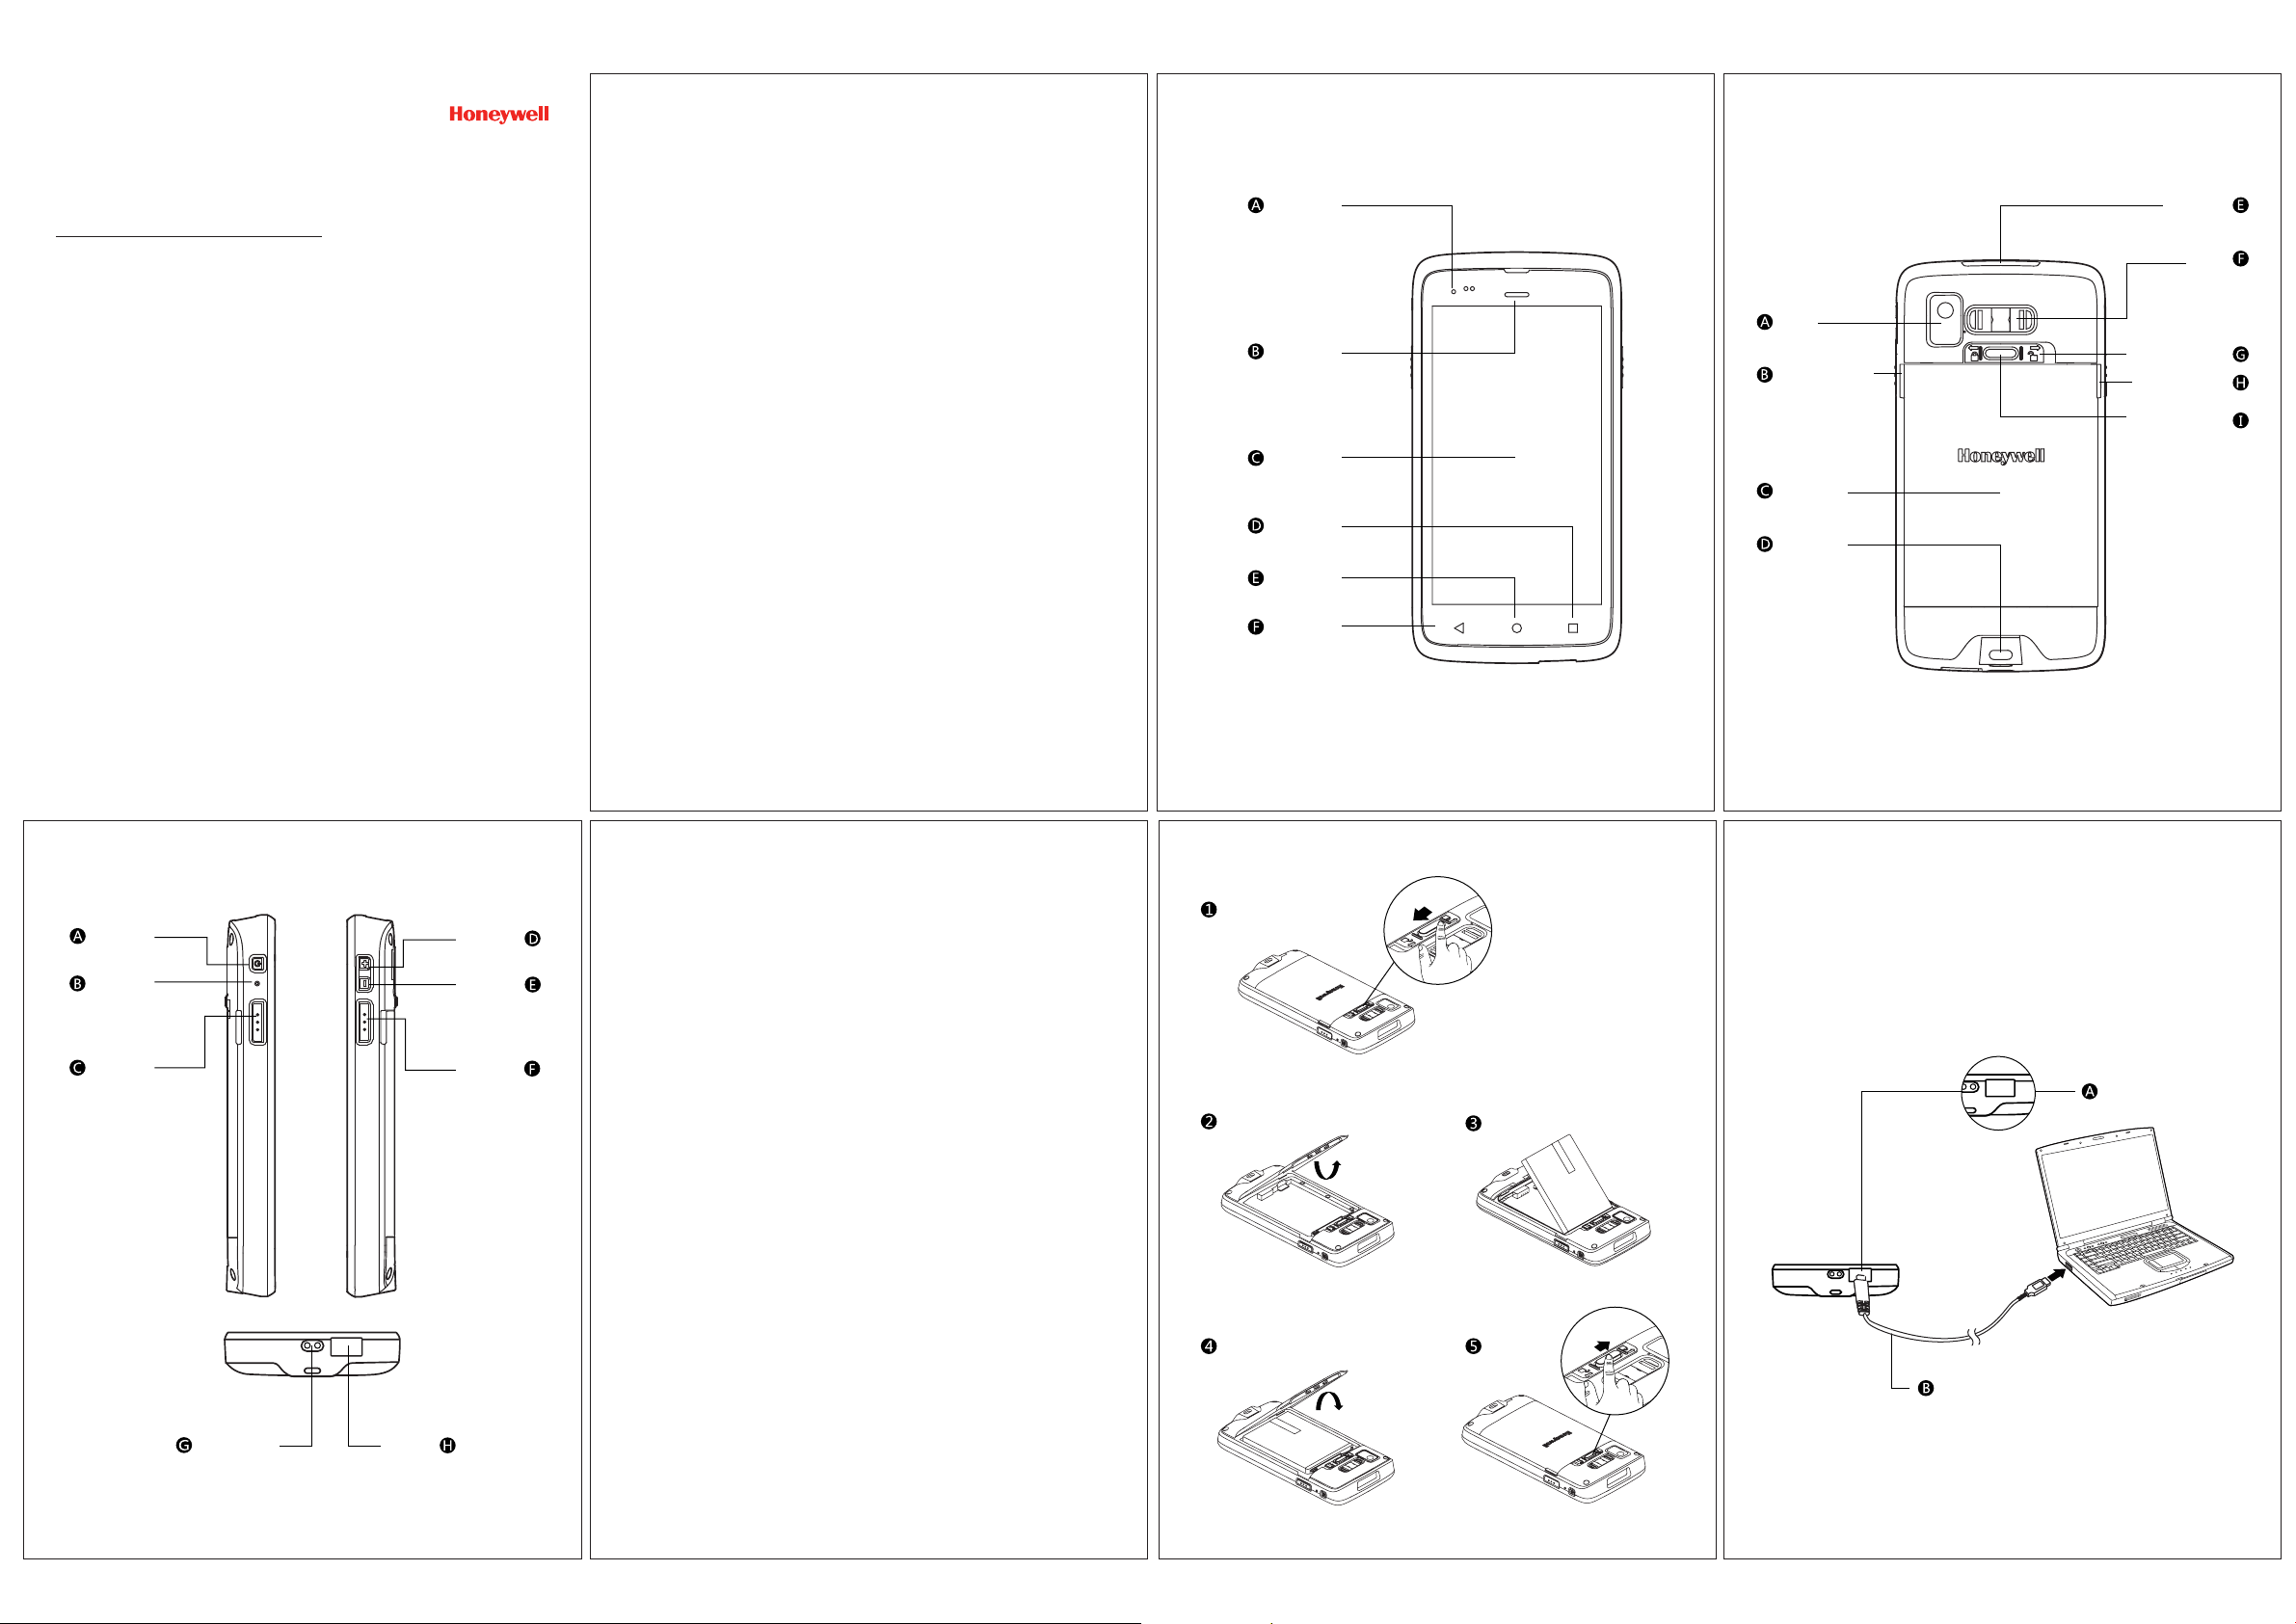
Front Panel
Rear Panel
Enterprise Hybrid Device (EHD)
EDA50-111
EDA50-011
Quick Start Guide
ScanPalTM Series
Please check if the following items included in the package:
TM
ScanPal
·
Main battery (3.8V, lithium ion battery);
·
10-watt power adapter;
·
Replaceable adapter plug;
·
USB charging cable;
·
Quick Start Guide
·
Enterprise Hybrid Device ;
Remarks:
If you ordered accessories for the terminal, please make sure they are
also included in the package; be sure to keep the original packages for
TM
ScanPal
EDA50 to be returned for repairing when necessary.
Note:
End users should not arbitrarily replace the operating system with other
operating systems. To update operating system installed on your device,
you need to get license from the OS vendors.
Power Indicator
Scan Indicator
Display
Function Key
Home Key
Return Key
Camera
Battery Cover Buckle
Handle
Battery Cover
String Buckle
Scan Engine
Speaker
Battery Cover Safety
Lock
Battery Cover Buckle
Battery Cover Safety
Button
Left Side View
Power Button
Reset Button
Scan Button
The Bottom
EDA50-SC-QS Rev B
22/10
Right Side View
Volume Up
Volume Down
Scan Button
EDA50-111/EDA50-011 belongs to ScanPal
TM
Series
Install the Main Battery
Replace the battery with wrong models may cause explosion. Please
make sure to use the battery in accordance with local regulations.
Please recycle the battery when possible.
Do not dispose it as household waste
Please ensure all kits are dry when connect the mobile device or battery
to external devices.
Damages caused by connecting wet kits are not covered by the
warranty.
TM
ScanPal
Please follow the steps below to install the battery.
1. Press down the battery cover safety button to move the battery cover
2. Open the battery cover with the battery cover buckle handle ;
3. Insert the battery (Insert the non-connector side first, then press the
4. Press down the battery cover (Insert the non-connector side first,
5. Press down the battery cover safety button to move the battery cover
EDA50 comes with a battery in a separate package.
safety lock to the unlock position at right;
battery down to establish connection between the battery and the
phone)
then press the battery cover down)
safety lock to the lock position at left
Charging / Sync
Synchronous Communication
Open the USB cover at the bottom of ScanPal
Connect ScanPal
TM
EDA50 to the computer with USB charging cable
USB charging cable
TM
EDA50
USB Cover
Charging Contact
USB Cover
Remarks:
Refer to the illustrated installation steps on the following page.
Charging / Sync
Suspend / Wake Up the Terminal
Install memory card
Install SIM Card
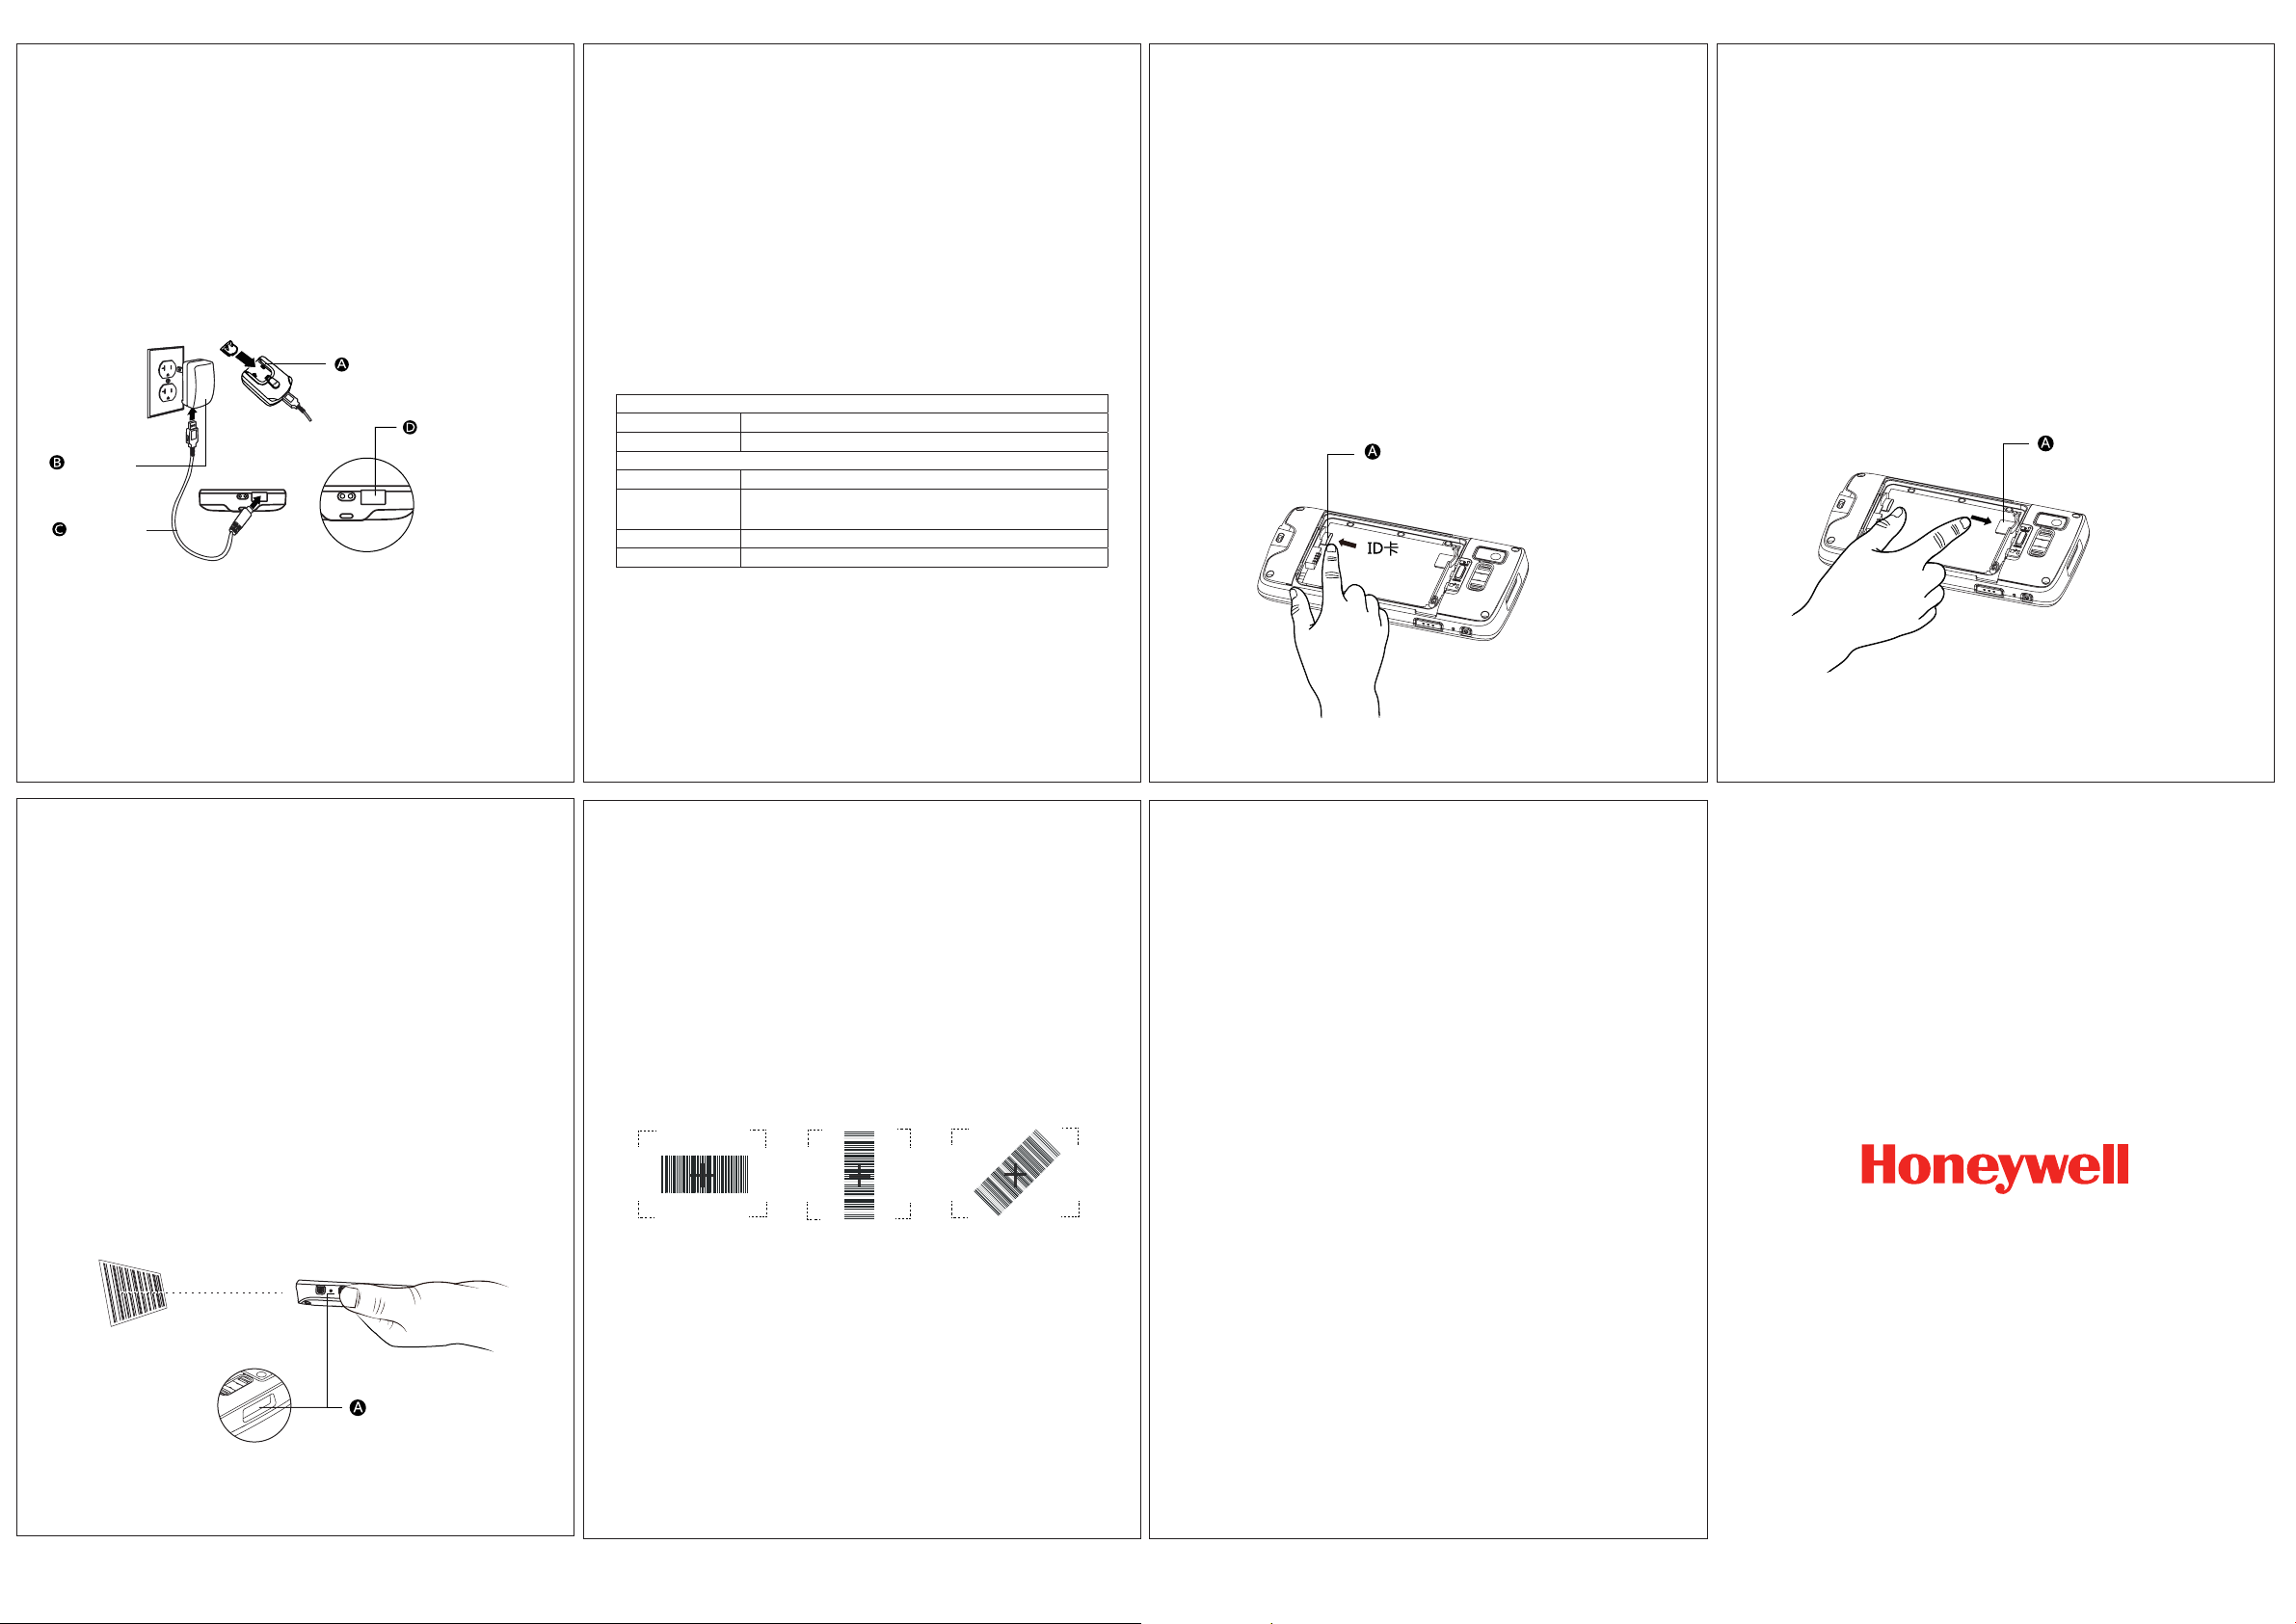
Charging
1. Open the USB cover at the bottom of ScanPal
2. Connect ScanPal
TM
EDA50 to the power adapter with USB charging cable;
3. Make sure the replaceable adapter plug plugged into the power adapter;
4. Connect the power adapter to the wall plug and start charging for ScanPal
TM
EDA50;
TM
EDA50.
Get ScanPal
TM
EDA50 charged for at least 4 hours before using it, subject to
your battery models.
Using the terminal while charging will significantly extend the time required
for fully charged.
Replaceable adapter plug
USB Cover
Power adapter
USB charging
cable
Remarks:
It's recommended to use Honeywell's peripherals, batteries, USB charging cables
and power adapters.
Damages caused by using non-Honeywell peripherals, batteries, USB charging
cables or power adapters are not covered by the warranty.
Warnings:
Please make sure all kits are dry when use the terminal and battery with other
accessories.
Damages caused by using wet kits may not be covered by the warranty.
Suspend / Wake Up the Terminal
Press the power button and then release (less than 2 seconds)
To wake up the device from sleep mode, press the power button and
then release (less than 2 seconds)
Reboot
When something is wrong with the OS, press the reset button and then
release to restart ScanPal
TM
ScanPal
EDA50 Power Indicator
TM
EDA50
The status of power indicators in non-charging and charging process
are illustrated as below:
Non- charging process
Off Battery power is normal
Flashing orange Battery power is low
Charging process
Constant green Charging complete
Flashing green During charging process, and the charging is about to be
completed
Orange During charging process, and the battery power is still low
Flashing red Battery is abnormal
1. Power off;
2. Press down the battery cover safety button to move the lock to the unlock
position at right;
3. Open the battery cover with the battery cover buckle handle ;
4. Pull out the battery (First open the battery connector side, then pull out the
battery)
5. Insert the MicroSD card to SD card slot until it clicks;
6. Insert the battery (Insert the non-connector side first, then press the battery
down to establish connection between the battery and the phone);
7. Press down the battery cover (Insert the non-connector side first, then press
the battery cover down);
8. Press down the battery cover safety button to move the battery cover safety
lock to the lock position at left;
9. Power on
ID Card
1. Power off;
2. Press down the battery cover safety button to move the lock to the unlock
position at right;
3. Open the battery cover with the battery cover buckle handle ;
4. Pull out the battery (First open the battery connector side, then pull out the
battery)
5. Insert the SIM card to SIM card slot until it clicks;
6. Insert the battery (Insert the non-connector side first, then press the battery
down to establish connection between the battery and the phone);
7. Press down the battery cover (Insert the non-connector side first, then press
the battery cover down);
8. Press down the battery cover safety button to move the battery cover safety
lock to the lock position at left;
9. Power on
SIM Card
Note: only EDA50-111 delivers this feature
Use Scan Engine
Align the aiming beam with the barcodes, and adjust the angle between the
beam and the barcodes to get the best results.
The recommended range from the terminal to the barcodes is 4" to 10" (10cm
to 25cm)
1. Click the demo application on the interface, and then select Scan demo
program;
2. Click Scan on the screen or press the Scan Button;
3. Align ScanPal
4. Adjust the aiming beam: in order to obtain the best performance, avoid
scanning in a slight angle and slowly move the beam on the barcodes by
scanning the reflection of the barcodes;
5. The terminal will beep when the barcodes are successfully decoded, which
means the information included in the barcode has been obtained by the
terminal
TM
EDA50 with the barcodes;
Scan Engine
Aiming Beam
The aiming beam gets narrower when the terminal gets closer to the
barcodes, while it gets wider when the terminal gets farther from the
barcodes.
The smaller the barcodes, the closer the aiming beams should get to the barcodes
The bigger the barcodes, the father the aiming beams should get to the barcodes
Beam positions when scan 2D images
Technical Support
For information about technical support, after-sales service and maintenance, please
visit www.honeywellaidc.com .
User Documents
For the local version of this article, please visit www.honeywellaidc.com .
Patents
For information on patents, please refer to www.honeywellaidc.com/patents.
Warranty
Please log into www.honeywellaidc.com/warranty_information for warranty information
on your product.
Disclaimer
Honeywell International Inc. reserves the rights to modify the specifications and other
information mentioned above without prior notification.
Readers should consult Honeywell International Inc. to make sure if any changes made
any time they read this article.
The information in this article does not represent any commitments of Honeywell
International Inc.
Honeywell International Inc. is not responsible for direct or indirect loss caused by any
technical or editing errors or omissions contained in this article.
The proprietary information contained in this article is protected by copyright.
All rights reserved.
Without prior written consent from Honeywell International Inc., any form of photocopy,
copy or translation into other languages for any part of this article is not allowed.
All Rights Reserved by Honeywell International Inc.
Website: www.honeywellaidc.com
 Loading...