

Page 1

Captuvo™ SL42(H)
Enterprise Sled for Apple® iPhone® 7, iPhone® 6, and
iPhone® 6s
Quick Start Guide
CAP42-76S-EN-QS-01 Rev A
10/17
Page 2

Getting Started
The Captuvo SL42(H) Enterprise Sled (Agency Model: SL-ES-G)
used with the Apple iPhone
an integrated imager for scanning all types of bar codes.
Note: Honeywell is not an authorized Apple repair center. Please
return only your sled to us for repair. Honeywell is not liable
for any non-Honeywell product shipped to our repair
center.
Note: Refer to your Apple iPhone documentation for important
product and safety information.
®
7, iPhone 6, and iPhone 6s include
User Documentation
To download the sled documentation, visit
www.honeywellaidc.com.
Application Software
You can create custom applications for your Captuvo SL42(H)
sled. Refer to www.honeywellaidc.com/Captuvo/developer-
resources.html for more information.
1
Page 3
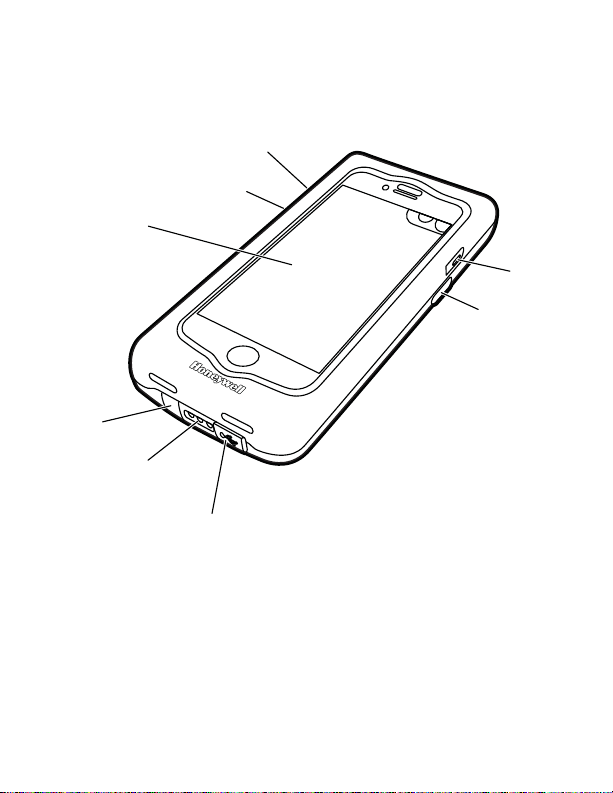
Front View
Power
button
Scan button
USB cover
Charging
pads
DC cover
Screen
protector
Scan button
Volume button
2
Page 4
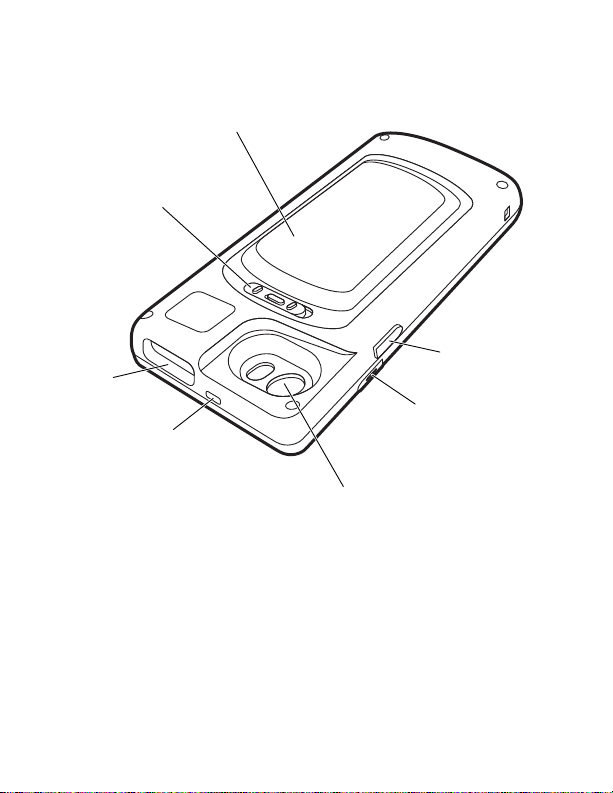
Back View
Scan button
Power button
Rear camera
opening
LED indicator
Scanner
Battery door
lock
Battery door
3
Page 5
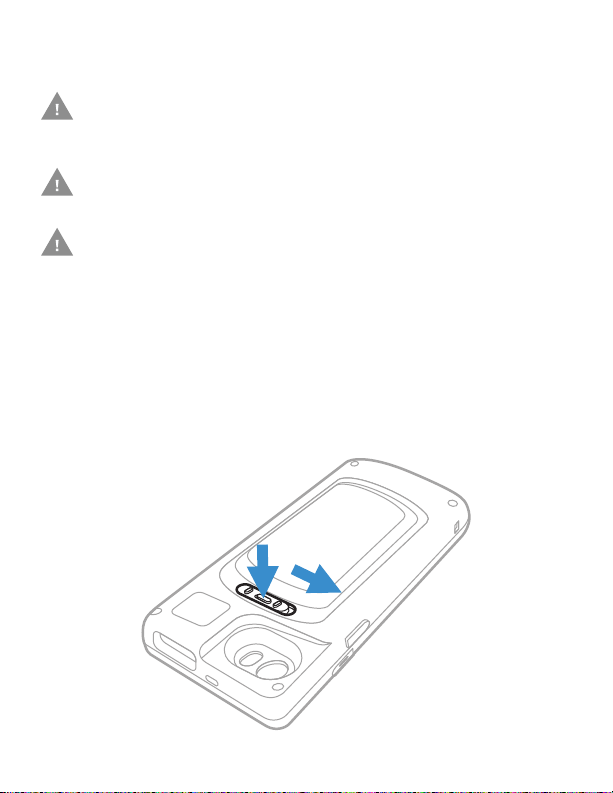
Insert the Battery
Ensure all components are dry prior to mating sleds/
batteries with peripheral devices. Mating wet
components may cause damage not covered by the
warranty.
We recommend use of Honeywell Li-Ion battery
packs. Use of any non-Honeywell battery may result
in damage not covered by the warranty.
There is a danger of explosion if the batteries are
incorrectly replaced. Replace the batteries with only
the same or equivalent type recommended by the
manufacturer. Dispose of used batteries according to
the recycle program for batteries as directed by the
governing agency for the country where the
batteries are to be discarded.
To install the battery:
1. Open the battery door by pushing the button and sliding
the lock to the unlock position.
4
Page 6

2. Remove the battery door.
3. Insert the battery.
5
Page 7

4. Put the battery door back on, close it, and slide the lock to
the lock position.
Battery Life
Battery Type Time
Standard Up to 10 hours
Extended Up to 14 hours
6
Page 8

Install/Remove the Apple iPhone in the Sled
Warning: To protect your hands from injury, wear
1. Loosen the 4 screws (TORX T6) on the back of the unit.
protective gloves when opening the Sled
housing.
7
Page 9

2. Using a plastic pry tool, insert the tool into the seam on the
top of the device and pry open the housing.
3. Continue around the top and down the side of the ho
using
with the pry tool, releasing the clips.
4. Once one side of the housing is open, pull the housing apart
with your hands. You will need to use some force.
5. Place the iPhone into the sled and press the top and bottom
housings together. Press strongly around the housing
edges to clip the top and bottom together.
6. Tighten the four screws (torque: 2kgf.cm/1.73lbf.in). Do not
over tighten the screws.
8
Page 10

Charge Using Wall Adapter
Note: If you use the wall adapter, both the sled and the iPhone
charge simultaneously.
9
Page 11

Transfer Data Using a USB Cable
You can transfer data when the iPhone is in the sled and connected to a PC/laptop using a standard micro USB to USB
cable. The sled and phone do not charge via USB.
10
Page 12

LED Indicators
Sled connected to an external power source.
Color Indication
Solid Green Sled is charging, battery is more than
95% charged.
Solid Amber Sled is charging, battery is 0% to 60%
charged.
Blinking Red Battery error.
Sled not connected to an external power source.
Color Indication
Solid Green Battery is 81-100% charged.
Blinking Green Battery is 21-80% charged.
Solid Red Battery is 0-20% charged
Blinking Red Battery error.
Note: If you change the default factory setting using the Captuvo
SDK, the LED behavior is the same as the factory default
behavior, except for a sled that is charging while connected
to an external power source and between 60-90%
charged. In this case, the LED pulses green.
11
Page 13

Honeywell Price Check Method
1. Download the Honeywell Price Check application from the
Apple App StoreSM.
2. Scan a bar code.
Note: This application is for demonstration purposes only and
does not process any data.
12
Page 14

Healthcare Housing Cleaning Directions
The following cleaning solutions have been tested to assure safe
cleaning of your sled’s disinfectant-ready housing. They are the
only solutions approved for use with this sled.
®
•409
Blue
• Isopropyl Alcohol Wipes (70%)
®
•Sani-Cloth
•Sani-Cloth
•Sani-Cloth
•Super Sani-Cloth
Bleach Wipes
®
HB
®
Plus
®
•Sani-Cloth® AF3
®
• Virex
•Windex
256
®
Blue
Damage caused by the use of cleaners other than
those listed above may not be covered by the
warranty.
Operating Temperature
The maximum operating temperature range for the sled is 0°C
to 35°C (32°F to 95°F).
13
Page 15

Support
To search our knowledge base for a solution or to log into the
Technical Support portal and report a problem, go to
www.hsmcontactsupport.com.
User Documentation
For the user guide and other documentation, go to
www.honeywellaidc.com.
Limited Warranty
For warranty information, go to www.honeywellaidc.com and
click Get Resources > Product Warranty.
Patents
For patent information, see www.hsmpats.com.
Trademarks
Apple and iPhone are trademarks of Apple Inc., registered in the
U.S. and other countries. App Store is a service mark of Apple
Inc.
“Made for iPhone” means that an electronic accessory has been
designed to connect specifically to an iPhone and has been certified by the developer to meet Apple performance standards.
Apple is not responsible for the operation of this device or its
compliance with safety and regulatory standards. Please note
that the use of this accessory with an iPhone may affect wireless
performance.
14
Page 16

Disclaimer
Honeywell International Inc. (“HII”) reserves the right to make
changes in specifications and other information contained in
this document without prior notice, and the reader should in all
cases consult HII to determine whether any such changes have
been made. The information in this publication does not represent a commitment on the part of HII.
HII shall not be liable for technical or editorial errors or omissions contained herein; nor for incidental or consequential
damages resulting from the furnishing, performance, or use of
this material. HII disclaims all responsibility for the selection
and use of software and/or hardware to achieve intended
results.
This document contains proprietary information that is protected by copyright. All rights are reserved. No part of this document may be photocopied, reproduced, or translated into
another language without the prior written consent of HII.
Copyright 2017 Honeywell International Inc. All rights
reserved.
15
 Loading...