

Page 1

Leitor Fixo RFID
Honeywell IF1
A série de leitores RFID fixos oferece boa relação
custo/benefício e opções flexíveis, projetadas para
aplicações que exigem durabilidade e confiabilidade.
Aprenda como instalar, configurar e utilizar esse leitor
fixo.
www.bztech.com.br
Page 2

IF1
Fixed RFID Reader Series
1026FF01, 1026FF02F9, 1026FF03F9
User Manual
Page 3

ii IF1 Fixed RFID Reader Series User Manual
Disclaimer
Honeywell International Inc. (“HII ”) reserves the right to make changes in specifications and
other information contained in th is document wit hout prior notice , and the r eader should in a ll
cases consult HII to determine whether any such changes have been made. The information
in this publication does not represent a commitment on the part of HII.
HII shall not be liable for technical or editorial errors or omissions contained herein; nor for
incidental or consequential damages resulting from t he furnishing, performance, or use of
this material. HII disclaims all responsibility for the selection and use of software and/or
hardware to achieve intended results.
This document contains proprietary information that is protected by copyright. All rights are
reserved. No part of this document may be photocopied, reproduced, or translated into
another language without the prior written consent of HII.
Patents
For patent information, please refer to www.hsmpats.com.
© 2014 Honeywell Int ernational Inc. All rights reserved.
Page 4

IF1 Fixed RFID Reader Series User Manual iii
Contents
Before You Begin. . . . . . . . . . . . . . . . . . . . . . . . . . . . . . . . . . . . . . . . . . . . . . . . . . . vii
Safety Information . . . . . . . . . . . . . . . . . . . . . . . . . . . . . . . . . . . . . . . . . . . vii
Global Services and Support . . . . . . . . . . . . . . . . . . . . . . . . . . . . . . . . . . . vii
Warranty Information. . . . . . . . . . . . . . . . . . . . . . . . . . . . . . . . . . . vii
Web Support . . . . . . . . . . . . . . . . . . . . . . . . . . . . . . . . . . . . . . . . . vii
Send Feedback . . . . . . . . . . . . . . . . . . . . . . . . . . . . . . . . . . . . . . . viii
Telephone Support . . . . . . . . . . . . . . . . . . . . . . . . . . . . . . . . . . . . viii
Who Should Read This Manual . . . . . . . . . . . . . . . . . . . . . . . . . . . . . . . . . viii
Related Documents . . . . . . . . . . . . . . . . . . . . . . . . . . . . . . . . . . . . . . . . . . viii
1
About the RFID Reader. . . . . . . . . . . . . . . . . . . . . . . . . . . . . . . . . . . . . . . . 1
About the RFID Reader. . . . . . . . . . . . . . . . . . . . . . . . . . . . . . . . . . . . . . . . . . . . . . . 2
About the RFID Reader Ports . . . . . . . . . . . . . . . . . . . . . . . . . . . . . . . . . . . . . . . . . . 3
About the LED Indicators . . . . . . . . . . . . . . . . . . . . . . . . . . . . . . . . . . . . . . . . . . . . . 4
IF1 Accessories. . . . . . . . . . . . . . . . . . . . . . . . . . . . . . . . . . . . . . . . . . . . . . . . . . . . . 5
About the Mounting Kit Options . . . . . . . . . . . . . . . . . . . . . . . . . . . . . . . . . . . . . . . . 6
Install the Wall Mounting Kit. . . . . . . . . . . . . . . . . . . . . . . . . . . . . . . . . . . . . 6
How to Communicate with the IF1 . . . . . . . . . . . . . . . . . . . . . . . . . . . . . . . . . . . . . . 8
Assign an IP Address. . . . . . . . . . . . . . . . . . . . . . . . . . . . . . . . . . . . . . . . . . 8
Log In to the Web Browser Interface . . . . . . . . . . . . . . . . . . . . . . . . . . . . . 12
Set the Date and Time . . . . . . . . . . . . . . . . . . . . . . . . . . . . . . . . . . . . . . . . . . . . . . 13
2
Configure the Reader. . . . . . . . . . . . . . . . . . . . . . . . . . . . . . . . . . . . . . . . . 15
Configure Ethernet Settings . . . . . . . . . . . . . . . . . . . . . . . . . . . . . . . . . . . . . . . . . . 16
Ethernet Settings . . . . . . . . . . . . . . . . . . . . . . . . . . . . . . . . . . . . . . . . . . . . 17
Configure Common Network Settings . . . . . . . . . . . . . . . . . . . . . . . . . . . . 18
Common Network Settings. . . . . . . . . . . . . . . . . . . . . . . . . . . . . . . . . . . . . 18
About the Device Configuration Web Service . . . . . . . . . . . . . . . . . . . . . . . . . . . . . 19
Configure the Device Configuration Web Service . . . . . . . . . . . . . . . . . . . 20
Download the Device Configuration WSDL Document . . . . . . . . . . . . . . . 21
Configure Services . . . . . . . . . . . . . . . . . . . . . . . . . . . . . . . . . . . . . . . . . . . . . . . . . 22
Services Settings . . . . . . . . . . . . . . . . . . . . . . . . . . . . . . . . . . . . . . . . . . . . 22
About RFID Services. . . . . . . . . . . . . . . . . . . . . . . . . . . . . . . . . . . . . . . . . . . . . . . . 23
Contents
Page 5

iv IF1 Fixed RFID Reader Series User Manual
Configure the BRI Server Settings. . . . . . . . . . . . . . . . . . . . . . . . . . . . . . . 24
BRI Server Settings. . . . . . . . . . . . . . . . . . . . . . . . . . . . . . . . . . . . 24
View the BRI Server Log . . . . . . . . . . . . . . . . . . . . . . . . . . . . . . . . . . . . . . 25
BRI Server Event Settings. . . . . . . . . . . . . . . . . . . . . . . . . . . . . . . 25
Configure the BRI Attribute Settings . . . . . . . . . . . . . . . . . . . . . . . . . . . . . 26
BRI Attribute Settings . . . . . . . . . . . . . . . . . . . . . . . . . . . . . . . . . . 26
Configure LLRP Settings . . . . . . . . . . . . . . . . . . . . . . . . . . . . . . . . . . . . . . 29
LLRP Settings . . . . . . . . . . . . . . . . . . . . . . . . . . . . . . . . . . . . . . . . 31
Configure Security. . . . . . . . . . . . . . . . . . . . . . . . . . . . . . . . . . . . . . . . . . . . . . . . . . 31
Change User Credentials. . . . . . . . . . . . . . . . . . . . . . . . . . . . . . . . . . . . . . 32
User Credential Settings . . . . . . . . . . . . . . . . . . . . . . . . . . . . . . . . 32
Configure the RADIUS Server . . . . . . . . . . . . . . . . . . . . . . . . . . . . . . . . . . 33
RADIUS Server Settings . . . . . . . . . . . . . . . . . . . . . . . . . . . . . . . . 33
Disable Serial Port Access. . . . . . . . . . . . . . . . . . . . . . . . . . . . . . . . . . . . . 34
About Certificates . . . . . . . . . . . . . . . . . . . . . . . . . . . . . . . . . . . . . . . . . . . . . . . . . . 34
Import a Certificate. . . . . . . . . . . . . . . . . . . . . . . . . . . . . . . . . . . . . . . . . . . 35
View Certificates . . . . . . . . . . . . . . . . . . . . . . . . . . . . . . . . . . . . . . . . . . . . 35
3
Develop and Install RFID Applications . . . . . . . . . . . . . . . . . . . . . 37
About RFID Applications . . . . . . . . . . . . . . . . . . . . . . . . . . . . . . . . . . . . . . . . . . . . . 38
About the RFID Resource Kit . . . . . . . . . . . . . . . . . . . . . . . . . . . . . . . . . . . . . . . . . 38
About .NET Support . . . . . . . . . . . . . . . . . . . . . . . . . . . . . . . . . . . . . . . . . . . . . . . . 38
About Java Support. . . . . . . . . . . . . . . . . . . . . . . . . . . . . . . . . . . . . . . . . . . . . . . . . 38
How to Execute Java Applications . . . . . . . . . . . . . . . . . . . . . . . . . . . . . . . 39
How to Execute .JAR Files. . . . . . . . . . . . . . . . . . . . . . . . . . . . . . . . . . . . . 39
How to Enable the Java Just-In-Time Compiler . . . . . . . . . . . . . . . . . . . . . 39
How to Specify the Class Path for the Java Virtual Machine . . . . . . . . . . . 40
About Java Support for Microsoft SQL Server and Sybase . . . . . . . . . . . . 40
Create an Installation Package . . . . . . . . . . . . . . . . . . . . . . . . . . . . . . . . . . . . . . . . 40
Create a Configuration File . . . . . . . . . . . . . . . . . . . . . . . . . . . . . . . . . . . . 40
Configuration File Example . . . . . . . . . . . . . . . . . . . . . . . . . . . . . . 41
Archive the Installation Files. . . . . . . . . . . . . . . . . . . . . . . . . . . . . . . . . . . . 41
How Install RFID Applications. . . . . . . . . . . . . . . . . . . . . . . . . . . . . . . . . . . . . . . . . 41
Install Applications On to the Reader. . . . . . . . . . . . . . . . . . . . . . . . . . . . . 42
How to Manage Applications. . . . . . . . . . . . . . . . . . . . . . . . . . . . . . . . . . . . . . . . . . 42
Start an Application . . . . . . . . . . . . . . . . . . . . . . . . . . . . . . . . . . . . . . . . . . 42
Stop an Application . . . . . . . . . . . . . . . . . . . . . . . . . . . . . . . . . . . . . . . . . . 43
Uninstall an Application . . . . . . . . . . . . . . . . . . . . . . . . . . . . . . . . . . . . . . . 43
Contents
Page 6

IF1 Fixed RFID Reader Series User Manual v
Auto-Start an Application at Boot Time. . . . . . . . . . . . . . . . . . . . . . . . . . . . . . . . . . 43
Auto-Start an Application with the Web Browser . . . . . . . . . . . . . . . . . . . . 43
Auto-Start an Application with the Configuration File. . . . . . . . . . . . . . . . . 44
About Edgeware Applications . . . . . . . . . . . . . . . . . . . . . . . . . . . . . . . . . . . . . . . . . 44
Install or Upgrade Edgeware Applications . . . . . . . . . . . . . . . . . . . . . . . . . 45
About the Developer Tools . . . . . . . . . . . . . . . . . . . . . . . . . . . . . . . . . . . . . . . . . . . 45
Read RFID Tags Through the Demo Application . . . . . . . . . . . . . . . . . . . . 46
Send BRI Commands. . . . . . . . . . . . . . . . . . . . . . . . . . . . . . . . . . . . . . . . . 46
Run BRI Scripts . . . . . . . . . . . . . . . . . . . . . . . . . . . . . . . . . . . . . . . . . . . . . 47
4
Troubleshoot and Maintain the Reader. . . . . . . . . . . . . . . . . . . . . 49
Upgrade Firmware. . . . . . . . . . . . . . . . . . . . . . . . . . . . . . . . . . . . . . . . . . . . . . . . . . 50
View the System Log. . . . . . . . . . . . . . . . . . . . . . . . . . . . . . . . . . . . . . . . . . . . . . . . 51
Restore Default Settings . . . . . . . . . . . . . . . . . . . . . . . . . . . . . . . . . . . . . . . . . . . . . 51
Reboot the Reader . . . . . . . . . . . . . . . . . . . . . . . . . . . . . . . . . . . . . . . . . . . . . . . . . 52
View Device Inf ormation . . . . . . . . . . . . . . . . . . . . . . . . . . . . . . . . . . . . . . . . . . . . . 53
Call Product Support. . . . . . . . . . . . . . . . . . . . . . . . . . . . . . . . . . . . . . . . . . . . . . . . 53
Troubleshoot the Reader. . . . . . . . . . . . . . . . . . . . . . . . . . . . . . . . . . . . . . . . . . . . . 54
Problems While Working with RFID . . . . . . . . . . . . . . . . . . . . . . . . . . . . . . 54
Problems with Connectivity . . . . . . . . . . . . . . . . . . . . . . . . . . . . . . . . . . . . 55
5
About the GPIO Ports. . . . . . . . . . . . . . . . . . . . . . . . . . . . . . . . . . . . . . . . . 57
About the GPIO Interfaces . . . . . . . . . . . . . . . . . . . . . . . . . . . . . . . . . . . . . . . . . . . 58
How to Use the Input Interfaces . . . . . . . . . . . . . . . . . . . . . . . . . . . . . . . . . . . . . . . 58
Powered Input Example . . . . . . . . . . . . . . . . . . . . . . . . . . . . . . . . . . . . . . . 59
Isolated Input Interface Example . . . . . . . . . . . . . . . . . . . . . . . . . . . . . . . . 59
Open Collector Input Interface Example . . . . . . . . . . . . . . . . . . . . . . . . . . 60
How to Use the Output Interfaces . . . . . . . . . . . . . . . . . . . . . . . . . . . . . . . . . . . . . . 61
How to Switch the High Side with Reader Power. . . . . . . . . . . . . . . . . . . . 62
How to Switch the Low Side with Reader Power . . . . . . . . . . . . . . . . . . . . 62
How to Switch the High Side with External Power . . . . . . . . . . . . . . . . . . . 63
Drive a DC Relay to Control an AC Load. . . . . . . . . . . . . . . . . . . . . . . . . . 64
How to Use the Power Interface . . . . . . . . . . . . . . . . . . . . . . . . . . . . . . . . . . . . . . . 65
Contents
Page 7

vi IF1 Fixed RFID Reader Series User Manual
A
Specifications. . . . . . . . . . . . . . . . . . . . . . . . . . . . . . . . . . . . . . . . . . . . . . . . . 67
IF1 Specifications . . . . . . . . . . . . . . . . . . . . . . . . . . . . . . . . . . . . . . . . . . . . . . . . . . 68
IF1L Enhanced Specifications. . . . . . . . . . . . . . . . . . . . . . . . . . . . . . . . . . . . . . . . . 69
Optional Integrated Antenna Specifications . . . . . . . . . . . . . . . . . . . . . . . . . . . . . . 70
Port Pin Assignments . . . . . . . . . . . . . . . . . . . . . . . . . . . . . . . . . . . . . . . . . . . . . . . 71
GPIO Port. . . . . . . . . . . . . . . . . . . . . . . . . . . . . . . . . . . . . . . . . . . . . . . . . . 71
Ethernet Port . . . . . . . . . . . . . . . . . . . . . . . . . . . . . . . . . . . . . . . . . . . . . . . 72
Contents
Page 8

Before You Begin
IF1 Fixed RFID Reader Series User Manual vii
Before You Begin
This section provides you with safety information, technical support
information, and sources for additional product information.
Safety Information
Your safety is extremely important. Read and follow all warnings and
cautions in this document before handling and operating Intermec
equipment. You can be seriously injured, and equipment and data can
be damaged if you do not follow the safety warnings and cautions.
Global Services and Support
Warranty Information
To understand the warranty for your Intermec product, visit the Intermec
website at www.intermec.com and click Support > Returns and
Repairs > Warranty.
Disclaimer of warranties: The sample code included in this document is
presented for reference only. The code does not necessarily represen t
complete, tested progr ams. The code is provided “as is with all f aults.” All
warranties are expressly disclaimed, including the implied warranties of
merchantability and fitness for a particular purpose.
Web Support
Visit the Intermec website at www.intermec.com to download our
current manuals (in PDF).
Visit the Intermec technical knowledge base (Knowledge Central) at
www.intermec.com and click Support > Knowledge Central to revie w
technical information or to request technical support for your Intermec
product.
A caution alerts you to an operating procedure, practice, condition,
or statement that mu st be strictly observed to prevent equipment
damage or destruction, or corruption or loss of data.
Note: Notes either provide extra information about a topic or contain
special instructions for handling a particular condition or set of
circumstances.
Page 9

Before You Begin
viii IF1 Fixed RFID Reader Series User Manual
Send Feedback
Your feedback is crucial to the continual improvement of our
documentation. To provide feedback about this manual, please contact
the Technical Communications department.
Telephone Support
In the U.S.A. and Canada, call 1-800-755-5505.
Outside the U.S.A. and Canada, contact your local Intermec
representative . To search for your local represe ntative , from the Intermec
website, click About Us > Contact Us.
Who Should Read This Manual
This document is for the person who is responsible for installing,
configuring, and maintaining the IF1.
This document provides you with inf ormation about the features of the
IF1, and how to install, configure, operate, maintain, and troubleshoot it.
Before you work with the IF1, you should be familiar with your network
and general networking terms, such as IP address.
Related Documents
The Intermec website at www.intermec.com contains our documents
(as .pdf files) that you can download for free.
To download documents
1 Visit the Intermec website at www.intermec.com.
2 Click the Products tab.
3 Using the Products menu, navigate to your product page. For
example, to find the IF1 product page, click RFID > Fix ed Reader s >
IF1.
4 Click the Manuals tab.
If your product does not have its own pr oduct page, click Support >
Manuals. Use the Product Category, Product Family, and Product
fields to find your documentation.
Page 10

1
1
About the RFID Reader
This chapter introduces the IF1 Fixed Mount RFID Reader Series,
and includes descriptions of the reader features and basic
operation.
Page 11
Chapter 1 — About the RFID Reader
2 IF1 Fixed RFID Reader Series User Manual
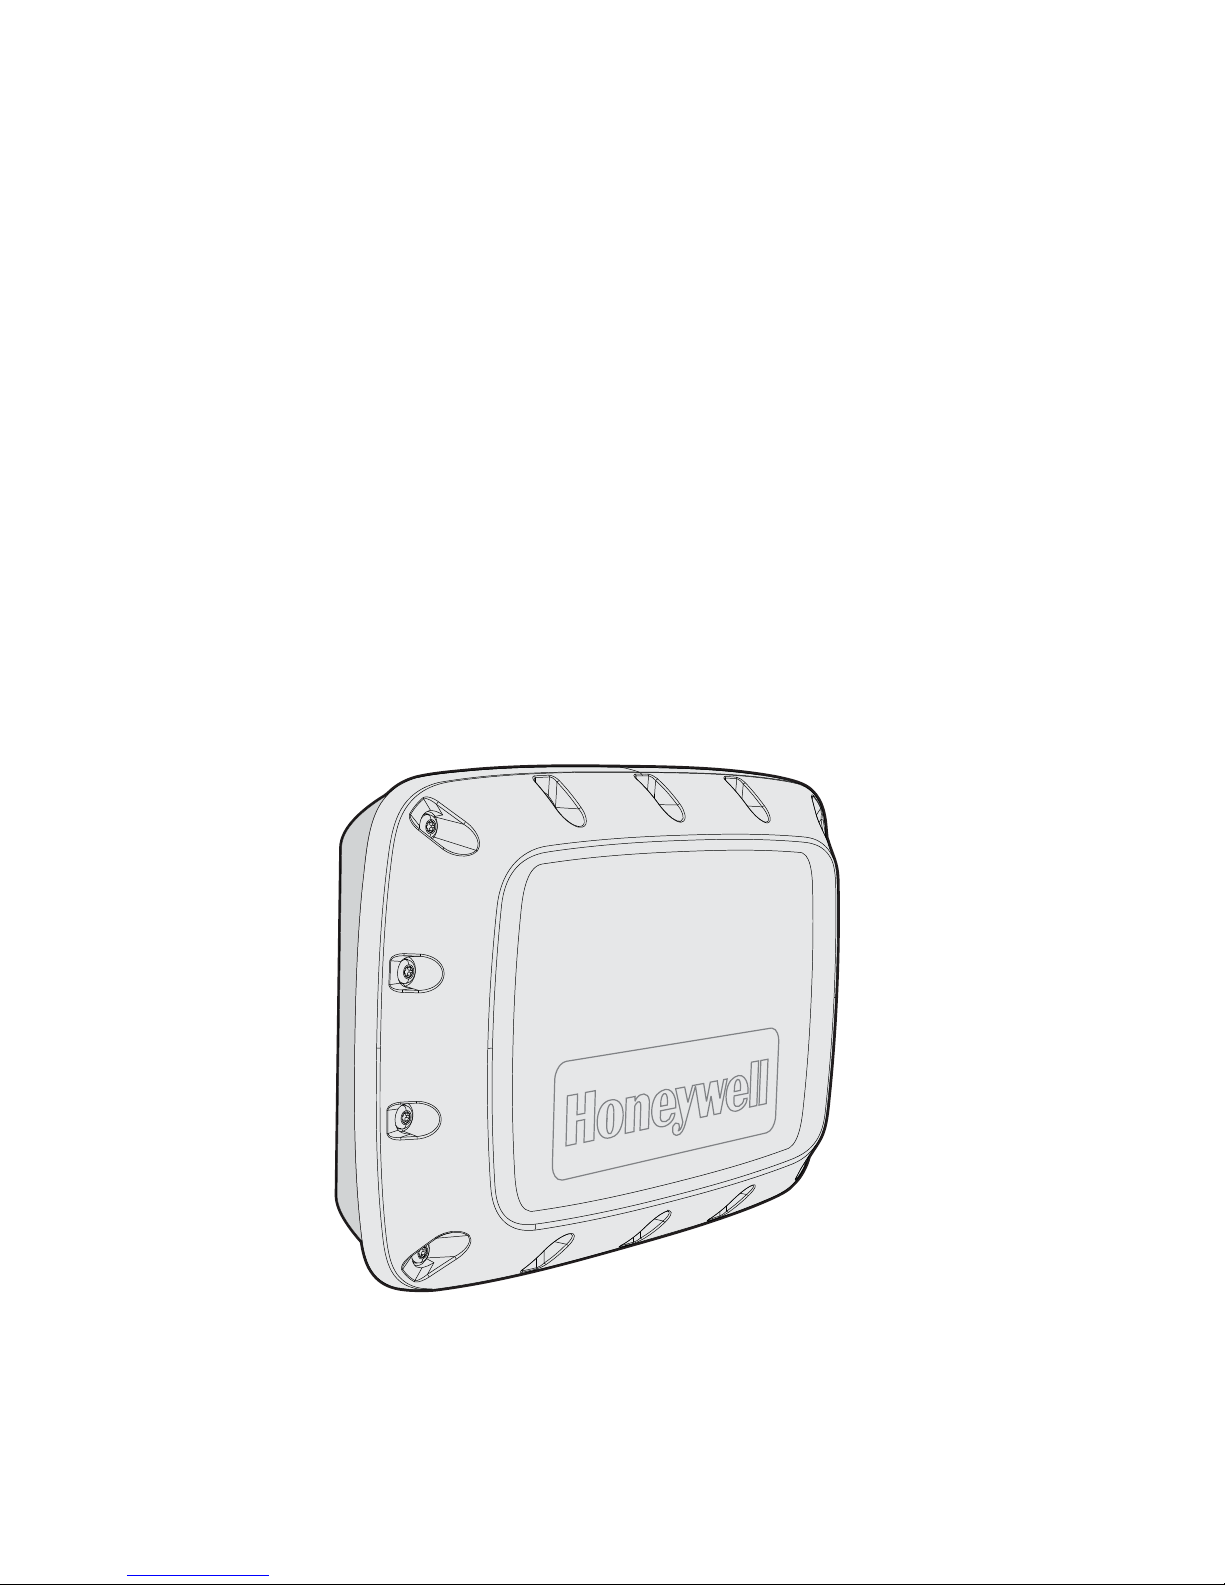
About the RFID Reader
The IF1 Fixed RFID Reader is an RFID reader with integrated antenna
that provides connectivity between tag data and an enterprise system.
Features of the RFID reader include:
• integrated high -gain linear or two-antenna port options.
• 64 MB of storage space for your RFID applications.
• a web browser interface for easy configuration.
• options for a second external antenna connection.
• support for EPCglobal Gen-2 tag types.
• IP66 seal rating for outdoor installations.
• support for Power Over Ethernet.
• VESA mount compatibility.
• USB and sealed Power Over Ethernet ports.
• optional GPIO por t.
IF1 Fixed RFID Reader
Page 12
Chapter 1 — About the RFID Reader
IF1 Fixed RFID Reader Series User Manual 3
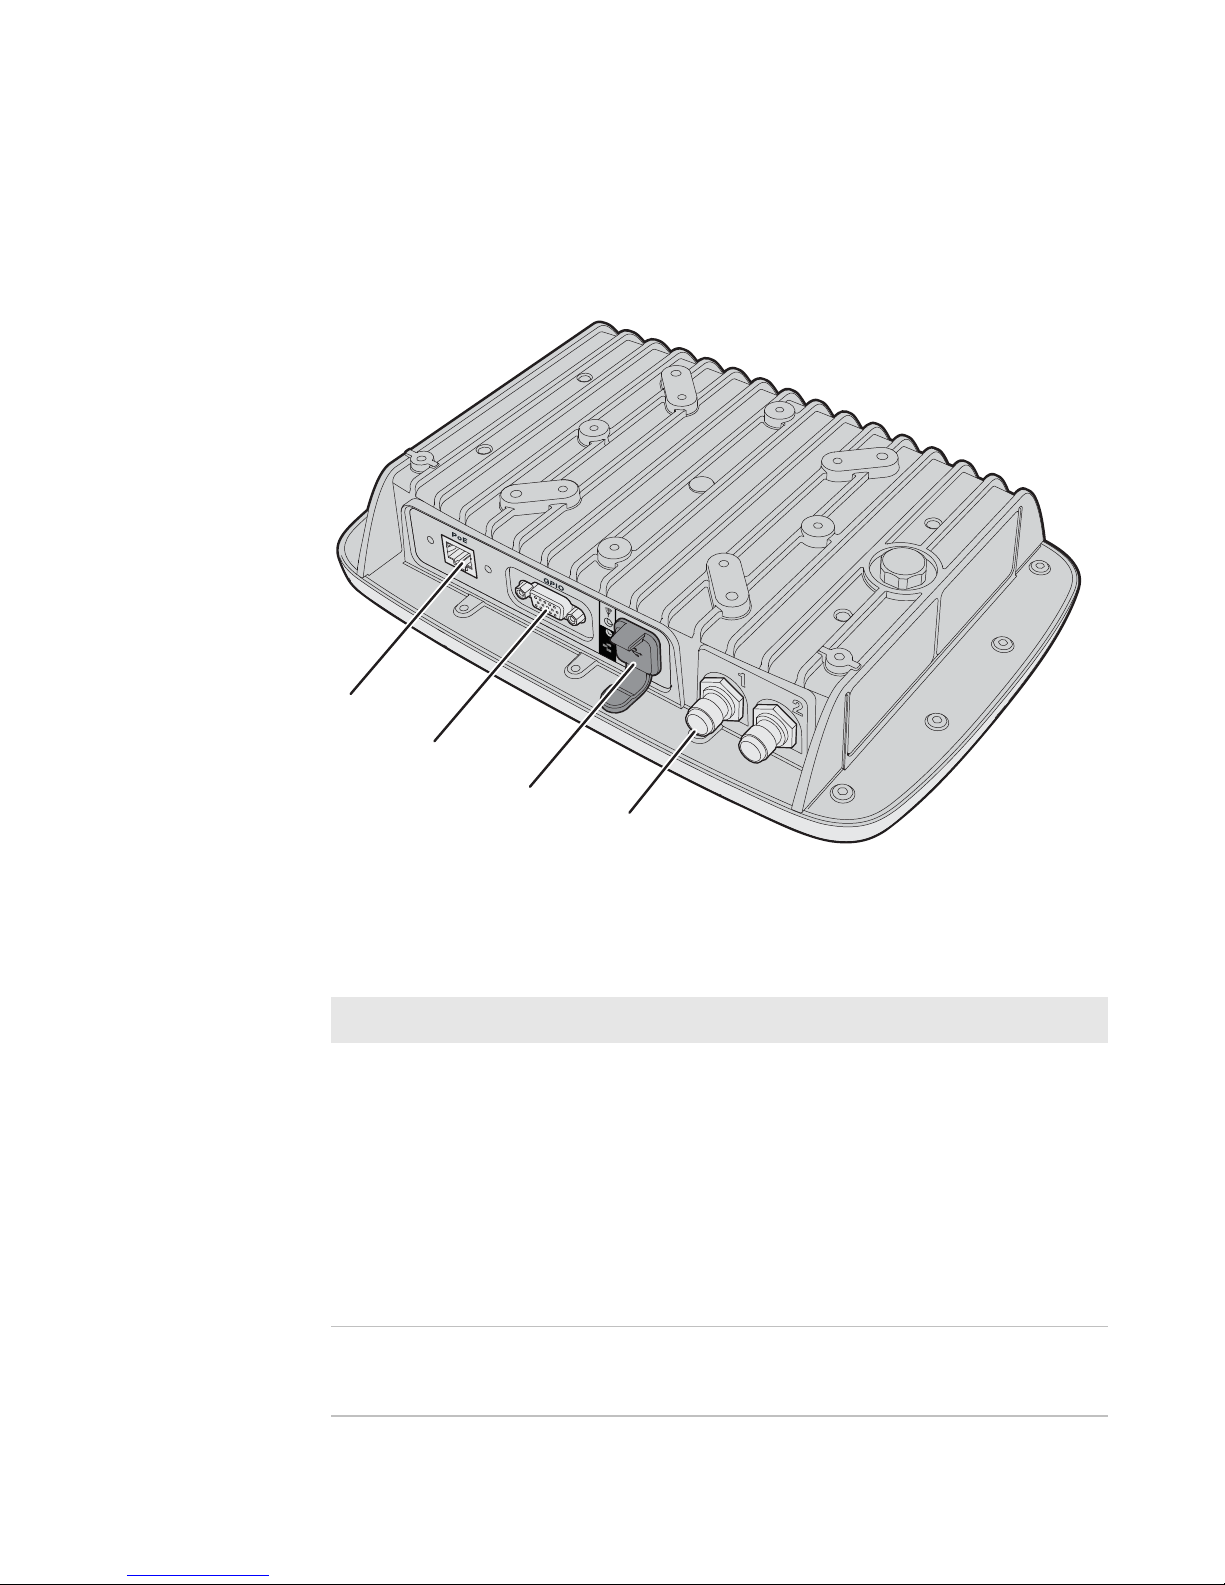
About the RFID Reader Ports
Depending on your configuration, the ports that are available on the IF1
may be different.
IF1 Fixed RFID Reader Ports
Reader Port Descriptions
Callout Port Description
1 Ethernet 10Base/100Base-T port that connects the
reader to your Ethernet network. The
reader auto-negotiates with the server to
set the best data rate. This port uses MDI/
MDI-X auto-switching so you can connect
either a standard Ethernet cable or a
crossover cable.
The port also supports Power Over
Ethernet (POE). To power the reader, you
need an 802.3af-compliant power supply.
2GPIO
(Optional)
General purpose input/output (GPIO) port
that connects the reader to industrial
controls such as relays or indicators.
1
2
3
4
Page 13
Chapter 1 — About the RFID Reader
4 IF1 Fixed RFID Reader Series User Manual
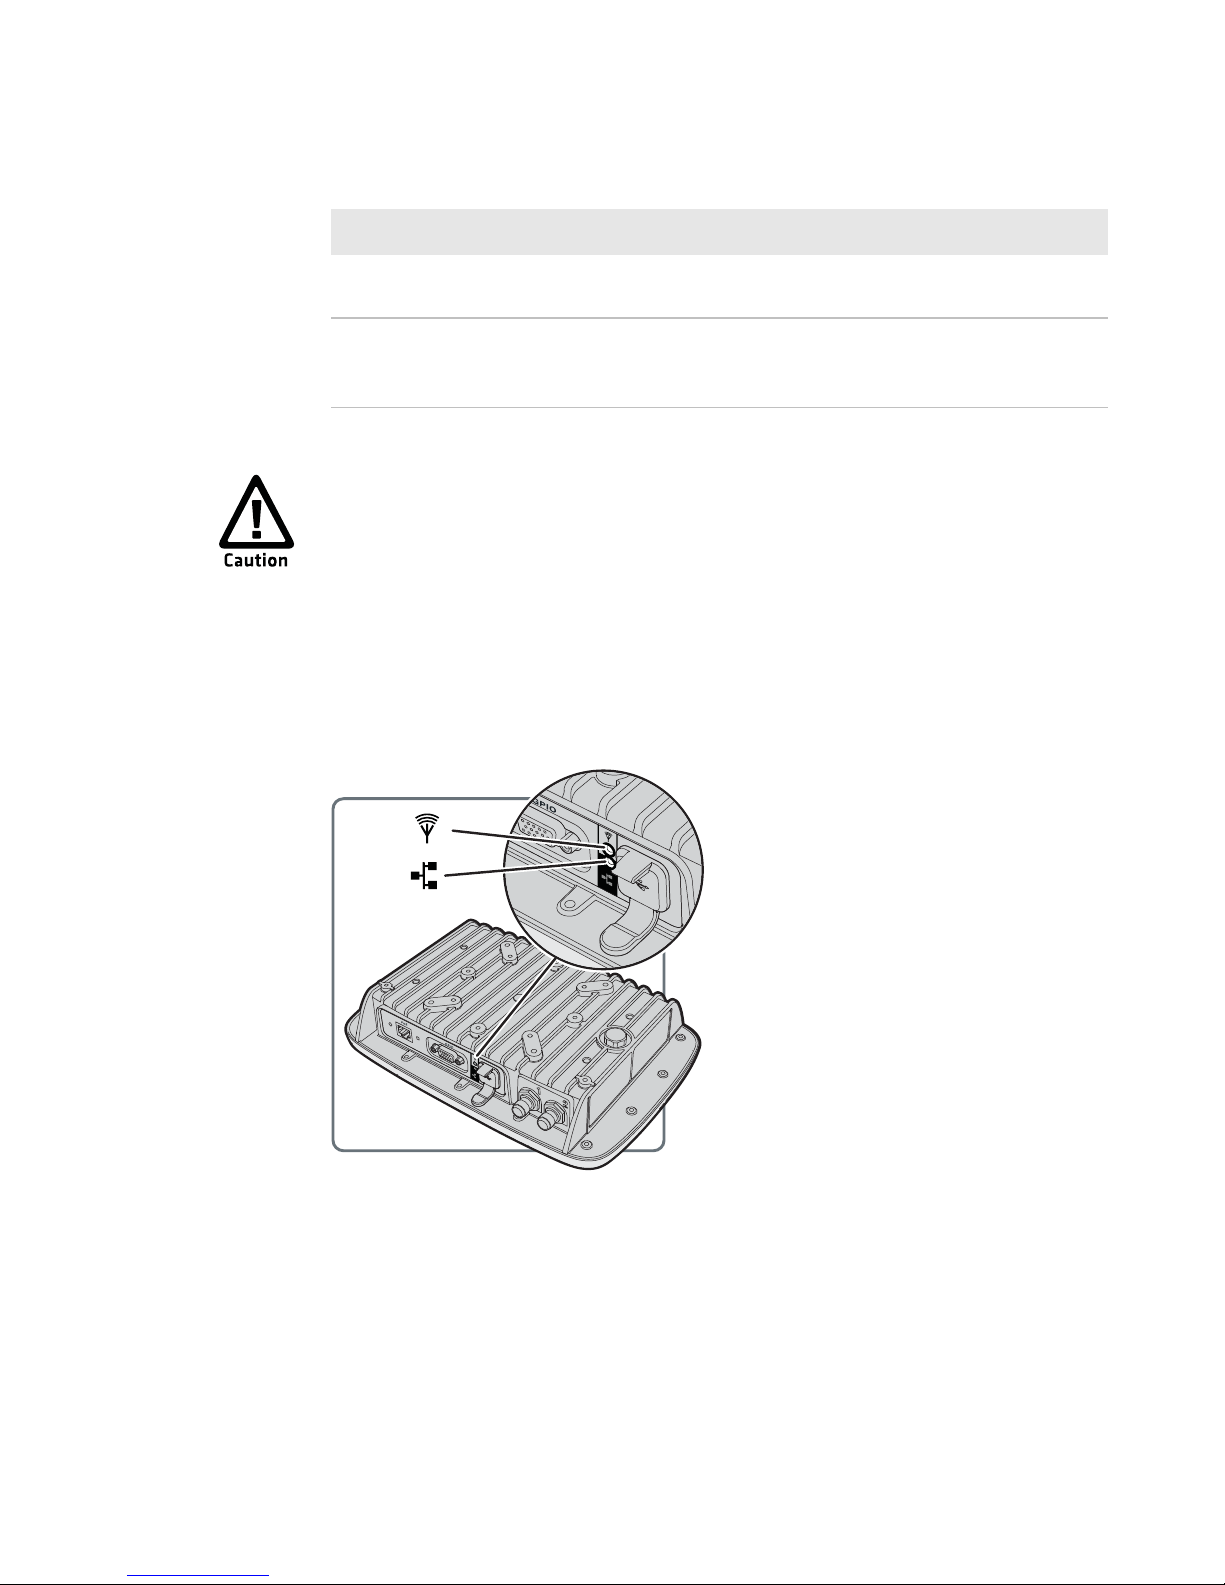
About the LED Indicators
The LED indicators on the reader light up to indicate the status of the
reader during operation.
IF1 LED Indicators
3 USB Connects the reader to a desktop PC for
configuration.
4 Antenna Connects an external antenna to your
reader. The antenna port uses Reverse
TNC connectors.
Reader Port Descriptions (continued)
Callout Port Description
Professional Insta llation Required: Government regulatory
agencies require this RFID rea der use o n ly appro v ed an tennas and
cables. Therefore, this reader uses a custom antenna connector.
Do not use antennas not approved for use with this reader.
Page 14

Chapter 1 — About the RFID Reader
IF1 Fixed RFID Reader Series User Manual 5
IF1 Accessories
You can use these accessories (sold and ordered separately) with the
IF1. To order accessories, contact your local sales representative.
LED Indicators
Icon Name Color Description
RFID
antenna
Solid green RF field is active
Blinking green A tag is being interrogated.
Blinking red The reader cannot output the requested RF po wer
lev el, or an RF fault is detected.
Off The reader is not powered.
Ethernet Solid green The reader is powered, an Ethernet link is
established, and the host is connected.
Flickering green Packets of information are being sent through the
Ethernet port.
Blinking green
and orange
An Ethernet link is established, but ther e is no
host connection.
Blinking red The reader is powered, but an Ethernet link is not
established.
Off The reader is not powered.
IF1 Accessories
Accessory Description
Wall Mounting Kit The wall mounting kit allows you to mount the IF1
to a flat surface.
Ethernet Connector
Kit
The Ethernet Connector Kit provides a secure
connection from your Ethernet cable to the IF1
and is required if you need to maintain the IP66
rating of the IF1.
GPIO Cable 15-pin GPIO cable to connect Ge neral Purpose
Input/Output control lines to external devices.
Page 15

Chapter 1 — About the RFID Reader
6 IF1 Fixed RFID Reader Series User Manual
About the Mounting Kit Options
You can install the reader with a wall mounting kit (P/ N 219-028-001) or
a VESA mounting kit. Contact your local sales representative for more
information.
Install the Wall Mounting Kit
To maintain the IP66 rating of the IF1, you must mount the IF1 correctly.
1 Choose a mounting location.
2 Connect an earth ground cable to the IF1.
3 Secure the wall mount to the IF1 with the washers and screws
provided.
(x4)
Page 16

Chapter 1 — About the RFID Reader
IF1 Fixed RFID Reader Series User Manual 7
4 Secure three screws (not provided) to the wall, and place the
mounting bracket on to the screws.
5 Secure three screws (not provided) to the bottom of the wall
mounting bracket.
(x3)
Page 17

Chapter 1 — About the RFID Reader
8 IF1 Fixed RFID Reader Series User Manual
How to Communicate with the IF1
By default, the reader is configured to be a DHCP client and accepts
offers from any DHCP server. Therefore , the reader works out of the box
if you connect it to your network and use a DHCP server to assign it an
IP address.
If you are not using a DHCP server t o assign an IP address , y ou need to
use a serial communications pr ogram such as HyperTerminal or Tera
Term to assign a static IP address.
After the reader has been assigned an IP address, connect it to your
network, and then complete the configuration by using the web browser
interface.
Assign an IP Address
You need to assign an IP address to the reader before you can connect
the reader to y ou r net work to use the web bro wser int er face to complete
the configuration.
1 Download the USB drivers for the reader from www.intermec.com.
2 Extract the installation files that you downloaded.
3 Connect a USB cable from your reader to your desktop PC.
Page 18

Chapter 1 — About the RFID Reader
IF1 Fixed RFID Reader Series User Manual 9
4 When the USB Driver Installation Wizard appears , select Browse m y
computer for driver software.
5 In Search for driver software in thi s lo catio n, clic k Browse, select
the folder where you extracted the reader installation files, and click
OK.
6 Click the Windows icon > Control Panel > Device Manager and
see which COM port the reader was assigned.
7 Click Next to install the drivers.
8 When the installation is finished, click Close.
Page 19

Chapter 1 — About the RFID Reader
10 IF1 Fixed RFID Reader Series User Manual
9 Open a serial communications program to connect to the reader.
10 Type config and press Enter, and then type config again in the
Password field and press Enter.
Page 20

Chapter 1 — About the RFID Reader
IF1 Fixed RFID Reader Series User Manual 11
11 By default, DHCP is enabled and the IP address to configure the
reader appears. Use the IP address to configure the reader through
the web browser interface.
If you are not using DHCP, press D. DHCP is disabled and the
Ethernet Configuration Options screen appears.
12 To set the IP address, pr ess 1, type in the IP address, and press
Enter.
13 To set the subnet mask, press 2, type in the subnet mask, and press
Enter.
14 To set the IP router, press 3, t ype in th e IP add re ss, and press Enter.
15 (Optional) To change the Ethernet link speed, press L, and choose
the link speed.
16 Press Q to close the Initial Configuration screen.
17 Remove the USB cable from the reader. The reader is ready to be
configured and connected to your network.
Page 21

Chapter 1 — About the RFID Reader
12 IF1 Fixed RFID Reader Series User Manual
Log In to the Web Browser Interface
After the reader is assigned an IP add ress , y o u can configu re the r eader
through the web browser interface. Before you log in, make sure an IP
address has been assigned to the r eader , and t he reader is connected to
your network.
1 Start a web browser.
2 In the browser address field, enter the IP address, and press Enter.
3 (Optional) For a secure session, click A secure session is
available.
4 Enter your Username and Password. The default user name is
intermec and the default password is intermec.
5 Click Non-Secure Login, or Secure Login. The Ethernet screen
appears and you are logged in to the web browser interface .
Page 22

Chapter 1 — About the RFID Reader
IF1 Fixed RFID Reader Series User Manual 13
Set the Date and Time
Set the date and time through the web browser interface.
1 From the Main Screen of the web browser interface, click the date
and time in the upper right corner.
3
2 Select your time zone from the drop-down list, and then click
Activate Changes.
3 Enter the current year, mo nth, and day in the entry fields.
4 Enter the current hour, minutes, and seconds in the entry fields.
5 Click Activate Changes. The new time and date are set.
Page 23

Chapter 1 — About the RFID Reader
14 IF1 Fixed RFID Reader Series User Manual
Page 24

15
2
Configure the Reader
This chapter describes how to configure the reader.
Page 25

Chapter 2 — Configure the Reader
16 IF1 Fixed RFID Reader Series User Manual
Configure Ethernet Settings
To use the reader, you need to configure Ethernet settings such as your
IP address and subnet mask.
1 Log in to the web browser interface and click Network
Configuration or Ethernet.
2 Configure the settings.
3 When you are finished, click Activate Changes to save your
changes.
Note: If DHCP is enabled, you may not need to configure Ethernet
settings. For more information, contact your network administrator.
Page 26

Chapter 2 — Configure the Reader
IF1 Fixed RFID Reader Series User Manual 17
Ethernet Settings
You can configure these Ethernet settings for your reader to
communicate with your network.
Ethernet Settings
Setting Description
Enable DHCP Select this field if you want the reader to get its IP address from a
DHCP server.
If this field is not selected, you need to specify the IP address,
subnet mask, and IP router for your network.
IP Address The IP address of the reader. The IP address has the form x.x.x.x,
were x is a number from 0 to 255. The default MAC address is on
the label on the side of the reader.
If DHCP is enabled, the currently assigned IP address appears in
this field.
If DHCP is disabled, specify the IP address in the entry field.
Subnet Mask The subnet mask for this network. The subnet mask has the form
x.x.x.x, where x is a number from 0 to 255.
If DHCP is enabled, the currently assigned subnet mask appears
in this field.
If DHCP is disabled, specify the subnet mask in the entry field.
Router Default The IP address of the router. The IP address has th e form x.x.x.x,
were x is a number from 0 to 255.
If DHCP is enabled, the currently assigned router address
appears in this field.
If DHCP is disabled, specify the router address in the entry field.
Link Local IP Address The IP address of the reader is only routable on the local IP
subnet. The reader auto-negotiates with other devices on its
Ethernet segmen t to ob ta in a uniq ue add ress, so no user
configuration of the Link Local IP Address is necessary. The
reader always has a Link Local IP Address, even if another
address is assigned through DHCP or statically via userconfiguration.
IPv6 Autoconfigure Enables IPv6 automatic configuration.
Auto-configuration is enabled by default. If you disable
auto-configuration, you need to specify an IPv6 address, subnet
mask, and router.
IPv6 Address 128-bit IPv6 address for the reader.
Page 27

Chapter 2 — Configure the Reader
18 IF1 Fixed RFID Reader Series User Manual
Configure Common Network Settings
You can configure the common network setting s th at apply t o t h e read er
network interface.
1 Log in to the web browser interface and click Network
Configuration > Common.
2 Configure the settings.
3 Click Activate Changes to save your changes.
Common Network Settings
You can configure these common network settings that apply to the
reader network interface.
IPv6 Router 128-bit address for the IPv6 router.
Ethernet Settings (continued)
Setting Description
Common Network Settings
Setting Description
Hostname Name for this reader. The default is “IF1<serial number of the
reader>”.
The hostname can be either a simple hostname, or a qualified
domain name (FQDN). If this reader obtains its IP address via
DHCP, this parameter is sent to the DHCP server . If the server
supports it, this field is used for dynamic DNS updates.
Page 28

Chapter 2 — Configure the Reader
IF1 Fixed RFID Reader Series User Manual 19
About the Device Configuration Web
Service
The Device Configuration web service provides a way to
programmatically configure the reader over your network. This SO APbased service provides a configuration API that allows you to specify a
variety of network, RFID, and system settings.
For more information on the Device Configuration web service, see the
Device Configuration Web Service Command Reference Manual.
DNS Server 1 IP address of a domain name server that th e reader uses to
resolve DNS names.
DNS Server 2 IP address of a second domain name server that the reader uses
to resolve DNS names .
DNS Suffix 1 Primary DNS suffix to be appended to unqualified names.
DNS Suffix 2 Secondary DNS suffix to be appended to unqualified names.
SNTP Server Name 1 DNS name or IP address of an SNTP or NTP server.
SNTP Server Name 2 DNS name or IP address of a second SNTP or NTP server.
Time Zone Time zone for this reader. Choose the time zone from the drop-
down list. Default is GMT.
SYSLOG Destination Domain name or IP address of the SYSLOG server.
Common Network Settings (continued)
Setting Description
Page 29

Chapter 2 — Configure the Reader
20 IF1 Fixed RFID Reader Series User Manual
Configure the Device Configuration Web Service
Enable the device configuration web service to specify a v ariety of
network, RFID, and system settings.
1 Log in to the web browser interface and click Network
Configuration > Device Management.
By default, Device Configuration web services are enabled for ei ther
secure or insecure connections.
2 To disable web services over a secure connection, clear the Enable
Device Web Services (Secure) check box, and then click Activate
Changes.
To disable web services over an inse cure connection, clear the
Enable Device Web Services (Insecure) check box, and then click
Activate Changes.
Page 30

Chapter 2 — Configure the Reader
IF1 Fixed RFID Reader Series User Manual 21
Download the Device Configuration WSDL Document
Download the device configuration web service description language
(WSDL) document to help you configure your system settings.
1 Log in to the web browser interface and click Network
Configuration > Device Management.
2 Click DeviceConfiguration.wsdl. The document opens in the
browser window.
Page 31

Chapter 2 — Configure the Reader
22 IF1 Fixed RFID Reader Series User Manual
Configure Services
Configure the wa y users (such as develope rs) can access and configure
the reader.
1 Log in to the web browser interface and click Network
Configuration > Services.
2 Enable or disable the services by selecting or clearing the check
boxes, or by selecting options from the drop-down list.
3 Click Activate Changes to save your changes.
Services Settings
Services settings control the way users a ccess the reader.
Services Settings
Service Description
Enable Web Server
(Insecure)
Enables access to the web browser interface. An insecure
connection only allows users to log in to web browser interface
from HTTPS through port 80.
Enable Web Server
(Secure)
Enables access to the web browser interface. An insecure
connection only allows users to log in to web browser interface
from HTTPS through port 443.
Enable SSH Server Enables Secure Shell (SSH) access to the Linux system console
using the same login and password as the web browser interface
(default is
intermec). SSH access is disabled by def ault.
Enable FTP Server Enables access to the reader through its FTP server.
Page 32

Chapter 2 — Configure the Reader
IF1 Fixed RFID Reader Series User Manual 23
About RFID Services
The RFID services set the protocol your application uses to
communicate with the RFID module . There are two RFID services
available:
• BRI (Basic Reader Interface): Intermec proprietary protocol for
controlling the reader. For information about the BRI, see Basic
Reader Interface Programmer Reference Manual.
• LLRP (Low-Level Reader Protocol): EPCglobal standar d for network
interfaces between the RFID reader and its controlling software. The
IF1 supports version 1.0.1 of the EPCglobal LLRP. For inf ormation on
LLRP, see go to http://www.epcglobalinc.org/standards/llrp. An
open source LLRP Toolkit can be downloaded at http://
sourceforge.net/projects/llrp-toolkit.
Enable Telnet Server Enables access to the Linux system console via standard Telnet,
using the same login and password as the web browser interface.
The default login and pass word is intermec. The Telnet server is
disabled by default.
Enable CIFS/SMB
Service
Enables the Common Internet File System service, which creates
a file sharing connection from a Windows PC to the /home/
developer directory on the IF61. CIFS/SMB is disabled by default.
When you enable the CIFS/SMB service, entry fields for a
username and password appear. Enter these settings and then
click Activate Changes.
Enable Bonjour Service
Advertisement
Enables the reader to advertise services and be discovered by
Bonjour zero-configuration networking. Bonjour is enabled by
default.
To prevent erro rs when using Bonjour, make sure the reader
hostname does not include spaces.
Enable UPnP Discovery Enables the reader to be discovered by Universal Plug and Play
protocols. UPnP is enable d by default.
Services Settings (continued)
Service Description
Page 33

Chapter 2 — Configure the Reader
24 IF1 Fixed RFID Reader Series User Manual
Configure the BRI Server Settings
Configure the BRI Server to handle communications between you
application and the RFID module.
1 Log in to the web browser interface and click RFID Services > BRI >
BRI Server.
2 Configure the BRI Server settings.
3 Click Activate Changes to save your changes.
BRI Server Settings
BRI Server settings handle communications between your application
and the RFID module.
BRI Server Settings
Setting Description
Enable External BRI
Connections
Enables external TCP connections to the BRI server. If this is not
enabled, BRI applications will not be able to connect to the reader .
BRI TCP Port Specifies the TCP port used for incoming connections to the BRI
server. This port must be unique for all TCP services running on
the reader. Valid range is 2189 to 65535. Default is 2189.
Enable Logging Enables logging of BRI server events.
Enable BRI on serial
port
Enables sending BRI commands through the serial port.
Serial Baud Rate Specifies the serial baud rate the reader uses to communicate.
Page 34

Chapter 2 — Configure the Reader
IF1 Fixed RFID Reader Series User Manual 25
View the BRI Server Log
If you enable logging, you can see a list of BRI server events, and sa ve
the logfile as a .txt file.
1 Log in to the web browser inter face and enable logging.
2 Click RFID Services > BRI > BRI Log.
3 To save the log file, click Export log to te xt file and then choose File
> Save As. Follow the prompts to save the log file to your desktop
PC.
BRI Server Event Settings
You can view BRI Server Events when you enable logging.
BRI Server Events
Event Name Description
Time/Date Time and date of the event.
Connection Session ID of the client communicating with the BRI
server.
Type Message type of the e ve nt, genera lly indicating which
system sent the message:
1 = Command received by BRI server
2 = Response sent by BRI server
3 = BRI server connection message
Message Text of the message, including responses.
Page 35

Chapter 2 — Configure the Reader
26 IF1 Fixed RFID Reader Series User Manual
Configure the BRI Attribute Settings
Configure the BRI Attribute settings to control how the reader operates
and reads tags.
1 Log in to the web browser interface and click RFID Services > BRI >
BRI Attributes.
2 Configure the BRI Attribute settings.
3 Click Activate Changes to save your changes.
BRI Attribute Settings
BRI Attribute settings control how the reader operates an d reads tags.
For more information, see the Basic Reader Interface Programmer
Reference Manual.
BRI Attribute Settings Descriptions
Setting Description
Tag Type Select the tag types you want the RFID reader to read:
• EPC Class 1 Gen 2 (default)
• Phillips v1.19
• ISO6B/G1
• ISO6B/G2
This setting is equivalent to the TAGTYPE BRI attribute.
Page 36

Chapter 2 — Configure the Reader
IF1 Fixed RFID Reader Series User Manual 27
Read Tries The maximum number of times the read algorithm is executed
before a response is re turned to a Read command. Valid rang e is 1
to 254. Default is 3.
In practice, this is the number of times an identified tag is read until
the Read is successful.
This setting is equivalent to the RDTRIES BRI attribute.
Write Tries The maximum number of times the read algorithm is executed
before a response is retu rned to a Write command. Valid range is 1
to 254. Default is 5.
In practice, this is the number of times an identified tag is read until
the Write is successful.
This setting is equivalent to the WRTIES BRI attribute.
Lock Tries The maximum number of times the lock algorithm is executed
before a respon se is returned to a Loc k command. Valid range is 1
to 254. Default is 3.
This setting is equivalent to the LOCKTRIES BRI attribute.
Field Separator The character used for separating fields in tag data. Choose from
space ( ), comma (,), colon (:), semicolon (;), tab, caret (^), or tilde
(~). Default is space ( ).
This setting is equivalent to the FIELDSEP BRI attribute.
ID Report Enables tag ID reporting after a Read, Write, or Lock command is
executed:
• For ISO tags, the tag identifier corresponds to TAGID.
• For EPC tags, the identifier corresponds to EPCID.
Default is enabled.
This setting is equivalent to the IDREPORT BRI attribute.
No Tag Report Enables a NO TAG m essage, which is sent when no tags ar e found
during execution of a Read, Write, or Lock command. Default is
disabled.
This setting is equivalent to the NOTAGRPT BRI attribute.
Report Timeout The timeout (in ms) for delays in tag reporting when the RFID
reader is in continuous read mode. Valid range is 0 to 65534.
Default is 0.
This setting is equivalent to the RPTTIMEOUT BRI attribute.
Timeout Configuration
Mode
Establishes whether to use the Timeout or Tries attributes. Default
is off.
This setting is equivalent to the TIMEOUTMODE BRI attribute.
BRI Attribute Settings Descriptions (continued)
Setting Description
Page 37

Chapter 2 — Configure the Reader
28 IF1 Fixed RFID Reader Series User Manual
Select Tries (Not supported by EPCglobal Class 1 Gen 2 tags) The number of
times a group select is attempted. A group select is the command
that starts the identity process. Valid range is 1 to 254. Default is 1.
This setting is equivalent to the SELTRIES BRI attribute.
Unselect Tries (Not supported by EPCglobal Class 1 Gen 2 tags) The number of
times a group unselect is attempted. Valid range is 1 to 254.
Default is 1.
This setting is equivalent to the UNSELTRIES BRI attribute.
Session The command session parameter to a corresponding EPCglobal
Class 1 Gen 2 air protocol command. Valid range is 0 to 3. Default
is 3.
This setting is equivalent to the SESSION BRI attribute.
Initial Q (EPCglobal Class 1 Gen 2 tags only) The initial Q parameter value
used by the Query command. Valid range is 1 to 254. Default is 4.
If you know there is only one tag in the field, set this attribute to 0
for best performance.
This setting is equivalent to the IN ITIALQ BRI attribute.
Initialization Tries The maximum number of times the reader attempts to initialize a
tag. Valid range is 1 to 254. Default is 1.
This setting is equivalent to the IN ITTRIES BRI attribute.
Schedule Option Determines how antennas are switched durin g th e inventor y
process:
• 0 - Legacy BRI operations
• 1 - Simplified BRI operations
• 2 - Simplified BRI operations with EPCC1G2 A/B toggling.
Default is 0.
This setting is equivalent to the SCHEDULEOPT BRI attribute.
ID Tries The maximum number of times the reader ex ecutes the identify
algorithm before a response is returned to a Read or Write
command. Valid range is 1 to 254. Default is 1.
In practice, this is the number of times a tag ID attempt is made for
the antenna.
This setting is equivalent to the IDTRIES BRI attribute.
Antenna Tries The number of times the antenna is used for a Read an d Write
command. Valid range is 1 to 254. Default is 1.
This setting is equivalent to the ANTTRIES BRI attribute.
BRI Attribute Settings Descriptions (continued)
Setting Description
Page 38

Chapter 2 — Configure the Reader
IF1 Fixed RFID Reader Series User Manual 29
EPCC1G2 Advance
Medium Access Mode
Dense Reader Mode settings used with EPCC1G2 parameters.
This setting is equivalent to EPCC1G2PARAMETERS BRI
attribute.
Dense Reader Mode Allows the reader to hop between channels within a certain
frequency spectrum to prevent other readers in the area from
interfering with one another. Default is enabled.
This setting is equivalent to the DENSEREADERMODE or DRM
BRI attribute.
Field Strength dB 1-4 The RF power level (in dBm). Valid range is 1 to 30. Default is 30.
Use this setting to attenuate the antenna field strength. In some
situations, full output power can cause unnecessary interference.
For example, if the tag is close to the antenna, full output power
might overload the tag and cause unreliable behavior.
This setting is equivalent to the FIELDSTRENGTH BRI attribute.
Antenna Sequence 1-8 The antenna sequence to be used during READ and WRITE
commands.
This setting is valid for two antennas only, and is equivalent to the
ANTS BRI attribute.
BRI Attribute Settings Descriptions (continued)
Setting Description
Page 39

Chapter 2 — Configure the Reader
30 IF1 Fixed RFID Reader Series User Manual
Configure LLRP Settings
Configure the LLRP settings to establish an interface method between
the reader and a client. For more information on LLRP, see http://
www.epcglobalinc.org/standards/llrp.
1 Log in to the web browser interf ace and clic k RFID Services > LLRP.
2 Configure the LLRP settings.
3 Click Activate Changes to save your changes.
Page 40

Chapter 2 — Configure the Reader
IF1 Fixed RFID Reader Series User Manual 31
LLRP Settings
LLRP settings establish an interface method between the reader and a
client.
Configure Security
To make sure the reader is secure, change your security settings when
you set up your reader. You can secure the reader by:
• changing user credentials.
• enabling a RADIUS server.
• enabling or disabling serial configuration.
LLRP Settings
Setting Description
Secure Server Enable Allows connections to the secure LLRP server on port 5085.
Unsecure Server Enable Allows connections to the unsecure LLRP sever on port 5084.
Download Intermec
Extensions Definition
Downloads an XML file that describes Intermec by Honewell-
specific extensions for the LLRP protocol.
Reader Initiated
Connections
For reader-initiated TCP/IP connections to a remote LLRP client.
• Client address - The IP address of the remote LLRP client.
• TCP port - Port number for the TCP/I P socket connection.
• Enable security (TLS) - Select this option to enable Transport
Layer Security for this TCP/IP connection.
Page 41

Chapter 2 — Configure the Reader
32 IF1 Fixed RFID Reader Series User Manual
Change User Credentials
If you are not using a password server to authorize user logins to the
reader, change the default user name and password.
1 Log in to the web browser interface and click Security > P ass wor ds.
2 Configure the User Credential settings.
3 Click Activate Changes to save your changes.
User Credential Settings
User Credential settings control the user name and password y ou use to
log in to the reader.
User Credential Settings
Setting Description
Username The user name to log in to the read er . The user name can be from
1 to 32 characters long. You must always specify a user name.
Default is
intermec.
Password The password to log in to the reader. This password gives you
both read and write access to the reader configuration. The
password can be fr om 8 to 32 characters long. You must always
specify a password. Default is
intermec.
Read-only password The password to log in to the reader. This password gives a user
read-only access. The user can view the configuration of the
reader and e xecut e diagnostics , but ca nnot perf orm any tasks that
affect the reader operation. Default is read only.
The read-only password cannot be deleted. To disable read-only
access, you need to enable the RADIUS server.
Page 42

Chapter 2 — Configure the Reader
IF1 Fixed RFID Reader Series User Manual 33
Configure the RADIUS Server
If you are using a password server to manage users who log in to the
reader, you need to enable and configure the RADIUS server.
1 Log in to the web browser interface and click Security > P ass wor ds.
2 Select Enable RADIUS.
3 Configure the RADIUS server settings.
4 Click Activate Changes to save your changes.
RADIUS Server Settings
You can configure RADIUS Server settings to manage how users log in
to the reader.
RADIUS Server Settings
Setting Description
Enable RADIUS Enables RADIUS authentication for the reader.
Primary RADIUS Server IP address or DNS name of the RADIUS server. If this is left
blank, the RADIUS client does not use this entry.
Secret Secret key for the RADIUS server.
Port Port number of the primary RADIUS server. Default is 1812.
Secondary RADIUS
Server
IP address or DNS name of the RADIUS server to use if there is
no response from the primary RADIUS server.
Secret Secret key for the secondary RADIUS server.
Port Port number of the secondary RADIUS server. Default is 1812.
Page 43

Chapter 2 — Configure the Reader
34 IF1 Fixed RFID Reader Series User Manual
Disable Serial Port Access
To enhance security, or allow an external application to communicate
with the serial port, disable serial port access to the reader.
1 Log in to the web browser interface and click Security > P ass wor ds.
2 Clear the Enable Serial Configuration check box.
3 Click Activate Changes to save your changes.
About Certificates
The default server certificate on the reader (ValidforHTTPSOnly)
provides support for secure network applications, such as the secure
web browser inte rface a nd secure LLRP client connections . You can also
use a third-party CA to issue unique client certificates and a root
certificate.
Page 44

Chapter 2 — Configure the Reader
IF1 Fixed RFID Reader Series User Manual 35
Import a Certificate
To enhance security, import a certificate to the reader.
1 Log in to the web browser interface and click Security > Import
Certificate.
2 Select the type of certificate.
3 Click Browse a nd select the certificate.
4 If you selected a server certificate to import, enter the passphrase f or
the certificate.
5 Click Import Certificate. The certificate is imported.
View Certificates
Use the web browser interface to view the certificates loaded on to the
reader.
• Log in to the web browser interface and click Security > Certificate
Details. The Certificate Details screen appears.
Page 45

Chapter 2 — Configure the Reader
36 IF1 Fixed RFID Reader Series User Manual
Page 46

37
3
Develop and Install RFID
Applications
Use this chapter to help you develop and install applications on
your IF1.
Page 47

Chapter 3 — Develop and Install RFID Applications
38 IF1 Fixed RFID Reader User Manual
About RFID Applications
RFID applications that you develop communicate through one of two
RFID services:
• BRI (Basic Reader Interface): Intermec proprietary protocol for
controlling the reader. For more information, see the Basic Reader
Interface Programmer Reference Manual.
• LLRP (Low-Level Reader Protocol): EPCglobal standar d for network
interfaces between the RFID reader and its controlling software. The
IF1 suppor ts version 1.0.1 of th e EPCg lob a l LLRP version 1.1. For
more information on LLRP, see http://www.epcglobalinc.org/
standards/llrp.
About the RFID Resource Kit
To create an application, use the RFID Resource Kit. The Intermec by
Honeywell Developer Library RFID Resource Kit includes Java and C#
tools you can use to develop applications that enable control of the
reader and data managem ent.
The resource kit is available as part of the Intermec by Honeywell
Dev elope r L ibrary (IDL). To learn more about the RFID Resource Kit, go
to www.intermec.com and select Products > Applications and
Software > Developer Library > Developer Resource Kits.
About .NET Support
The reader supports applications based on .NET Framework 1.0, 1.1,
and 2.0. The reader uses Mono open source so ftware to pr ovide suppo rt
for .NET applications deployed on the Linux operating system of the
reader.
About Java Support
The reader comes with a JDBC driver y ou can use to create applicat ions
that writes data directly from the reader to a remote database.
Page 48

Chapter 3 — Develop and Install RFID Applications
IF1 Fixed RFID Reader User Manual 39
For more sophisticat ed J a va development, the reader supports the open
standard OSGi service-oriented architecture. This architecture allows
system administrators to install, uninstall, enable, and disable system
services (also known as bundles) without having to reboot the reader
each time. To use OSGi effectively, you need an OSGi server. For more
information, go to www.osgi.org.
How to Execute Java Applications
To execute a Java application on the reader, use this command:
$JAVA_HOME/bin/java myJAVAClass
How to Execute .JAR Files
To execute .jar files, use this command:
$JAVA_HOME/bin/java myApplication.jar
When you create a .jar file , you need to include manifest files:
• The manifest need s to include an attribute called “Main-Class” to
specify the application’s entry point (for example, Main-Class:
MyJavaClass).
• If the executable .jar needs to reference other .jar files, specify the
files in the manifest file using the “Class-Path” attribute.
How to Enable the Java Just-In-Time Compiler
To enable the Java just-in-time (JIT) compiler for maximum performance,
use this command:
$JAVA_HOME/bin/java -jit java -jar MyJar.jar
where:
$JAVA_HOME is an environment variable that indicates the Java
runtime installation path (/usr/java). Alwa ys use this variable f or simplicity
and to make sure that the correct runtime files are used.
$JAVA is the name of the Java runtime executable installed in the
reader.
Page 49

Chapter 3 — Develop and Install RFID Applications
40 IF1 Fixed RFID Reader User Manual
How to Specify the Class Path for the Java Virtual
Machine
If your application references third party Jav a libraries, such as the
components from the Intermec by Honeywell RFID Resource Kit, you
must include the
-cp option to specify the class path for the JVM to find
the Ja v a clas ses . Mak e sure to includ e the current path so classes in the
current directory can be found as shown in this example:
$JAVA_HOME/bin/java -cp .:./BasicRFID.jar
MyClass
About Java Support for Microsoft SQL Server and
Sybase
The reader jTDS driver (version 1.2) provides JDBC capabilities to Java
applications running on th e re ad er. You need to include the location of
the JDBC drivers in the class path with the environmental variable
$JDBC_HOME. The JDBC drivers support JDBC 1.0 and:
• Microsoft SQL Server versions 6.5, 7, 2000, and 2005.
• Sybase versions 10,1 1, 12, and 15.
For more information, go to http://jtds.sourceforge.net.
Create an Installation Package
Before you can install your RFID application, you must cr eate an
installation package.
1 Create a configuration file.
2 Archive the installation files.
Create a Configuration File
When you create an application for the reader, you need to include a
configuration file in the root directory of the archive so that the
application can run on the reader.
1 Open a text edit or and type this syntax:
AUTOSTART=true|false
RUNAFTERINSTALL=true|false
CMDLINE=<Command line to start the
application>
Page 50

Chapter 3 — Develop and Install RFID Applications
IF1 Fixed RFID Reader User Manual 41
where:
AUTOSTART specifies whether the application automatically starts
when the reader boots.
RUNAFTERINSTALL specifies whether the application starts
immediately after installation.
CMDLINE specifies the application name and optional parameters it
accepts. Specify command line parameters as if the application is
being executed from inside the directory containing the application.
2 Save the configuration file with the name userapp.conf.
Configuration File Example
This example auto-starts an application when the reader boots and runs
an application named testapp.exe:
AUTOSTART=true
RUNAFTERINSTALL=false
CMDLINE=./testapp.exe
Archive the Installation Files
To install an RFID application on the reader, you need to package the
configuration file and application.
1 Create a configuration file named userapp.conf.
2 Pac kage the userapp.conf file and y our application into one of these
formats: .zip, .tar/bz2, or .tar/gz file. Your application can now be
installed on the reader.
How Install RFID Applications
There are two ways to install your RFID application:
• Run the application on a remote server through TCP port 2189. All
processing is performed by the server.
• Run the application locally on the reader. The application resides on
the reader, and much of the processing occurs on the reader.
Note: The reader ex ecutes ap plications from their installation directories,
so the userapp.conf file does not need to include path information.
Page 51

Chapter 3 — Develop and Install RFID Applications
42 IF1 Fixed RFID Reader User Manual
Install your application on the reader to improve system scalability by
minimizing network traffic, so reader can handle processing tasks such
as data filtering.
Install Applications On to the Reader
The reader provides up to 64 MB of storage for your applications. Use
the web browser interface to install applications on reader.
1 Log in to the web browser interface and click Edgeware
Applications > Install User Application.
2 Click Browse and follow the prompts to navigate to the location of
the application file.
3 Click Upload. The application is uploaded to the reader , placed in t he
/home/developer/edgeware/userapp0 directory, and the application
name appears in the Edgeware Applications list.
Page 52

Chapter 3 — Develop and Install RFID Applications
IF1 Fixed RFID Reader User Manual 43
How to Manage Applications
To maximize resources, you can start, stop, or uninstall applications on
the reader.
Start an Application
By default, an applicatio n is stopped. You can start the application from
the web browser interface.
1 Log in to the web browser interface and click Edgeware
Applications > Application Control. The Application Control
screen appears.
2 Click to start an application.
Stop an Application
Stop an application from running to reduce the a mount o f r esources tha t
the reader is using.
1 Log in to the web browser interface and click Edgeware
Applications > Application Control. The Application Control
screen appears.
2 Click to stop an application.
Uninstall an Application
Uninstall an application that you are not using to free up storage space
on the reader.
1 Log in to the web browser interface and click Edgeware
Applications > Application Control. The Application Control
screen appears.
2 Click to uninstall an application.
Auto-Start an Application at Boot Time
There are two ways to configure your application to auto-start when the
reader boots:
• Through the web browser.
• Through the configuration file you deliver with the application.
Page 53

Chapter 3 — Develop and Install RFID Applications
44 IF1 Fixed RFID Reader User Manual
Auto-Start an Application with the Web Browser
After an application is installed, you can easily configure the application
to auto-start through the web browser interface.
1 Log in to the web browser interface and click Edgeware
Applications > Application Control. The Application Control
screen appears.
2 Select the Auto-Start check box and then click Activate Changes.
Auto-Start an Application with the Configuration File
When you pac kage an application f or installati on on the reader , y ou need
to include a configuration file. You can specify Auto-Start in the
configuration file.
1 With a text editor , open the userapp.conf configur ation file pac kaged
with your application.
2 In the command syntax, make sure AUTOSTART=true.
3 Save the userapp.conf file.
4 Repackage the updated configuration file with your application.
5 Upload the application to the reader through the web browser
interface.
About Edgeware Applications
Edgeware applications are supplied by Honeywell and its partner
developers, and provide immediate functionality for your RFID system.
Edgeware Applications
Name Description
Dev eloper Tools Used for basic testing of your RFID system. You
can read RFID tags, send BRI commands, and
run BRI scripts through these tools.
SAP Device
Controller
Communicates with the SAP backend module on
your server.
Application Level
Events Engine
The ALE Engine lets the reader communicate
with your ALE application.
ALE Store and
Forward
Reads tags, saves tag data, and forwards the
data to a folder on a host OC or to a TCP/IP
socket.
Page 54

Chapter 3 — Develop and Install RFID Applications
IF1 Fixed RFID Reader User Manual 45
Install or Upgrade Edgeware Applications
Some Edgeware applications, such as the SAP Device Controller or the
Application Level Events Engine (ALE), are not installed on your reader.
You can easily download, install, or upgr ade y our Edge w are applications
through the web browser interface.
1 Log in to the web browser interface and click Edgeware
Applications > Install Edgeware.
2 Click Browse to browse to the location of the firmware file, and then
double-click the file.
3 Click Install. The Edgeware applica tion is installed on the reader.
When the installation is complete, the reader reboots.
About the Developer Tools
Developer Tools are used f or basic testing of your RFID system. You can:
• read RFID tags through the demo application.
• send BRI commands.
• run BRI scripts.
Page 55

Chapter 3 — Develop and Install RFID Applications
46 IF1 Fixed RFID Reader User Manual
Read RFID Tags Through the Demo Application
Use the demo application to v erify that your reader can re ad RFID tags.
1 Log in to the web browser interface and click Edgeware
Applications > Application Control. The Application Control
screen appears.
2 If the Developer Tools are not enabled, click .
3 Click Developer Tools > Reader Demo.
4 Place a tag near the antenna and then click Start.
Send BRI Commands
Use the Developer Tools to easily send BRI commands through the web
browser interface.
1 Log in to the web browser interface and click Edgeware
Applications > Application Control. The Application Control
screen appears.
2 If the Developer Tools are not enabled, click .
Page 56

Chapter 3 — Develop and Install RFID Applications
IF1 Fixed RFID Reader User Manual 47
3 Click Developer Tools > BRI Commands.
4 Enter a BRI command in the Command field and th en clic k Run. The
command is executed and a value ret urns onscreen.
Run BRI Scripts
Run a BRI script to send multiple BRI commands to the reader.
1 Log in to the web browser interface and click Edgeware
Applications > Application Control.
2 If the Developer Tools are not enabled, click .
3 Click Developer Tools > BRI Commands.
4 Click Browse and browse to the location of the BRI script.
Page 57

Chapter 3 — Develop and Install RFID Applications
48 IF1 Fixed RFID Reader User Manual
5 Double-click the BRI script file.
6 Click Load. The script is loaded and run, and values are returned
onscreen.
Page 58

49
4
Troubleshoot and Maintain the
Reader
Use this chapter to find answers to any problems you may
encounter while using the reader. You will also find information on
routine maintenance.
Page 59

Chapter 4 — Troubleshoot and Maintain the Reader
50 IF1 Fixed RFID Reader User Manual
Upgrade Firmware
Easily upgrade the firmware on the reader by through the w eb browser
interface.
1 Download the reader fi rmware file from www.intermec.com.
2 Double-click the f ile you do wnloaded f ollo w the prompts to extr act the
file to your PC.
3 Log in to the web browser interface and click Maintenance >
Firmware.
4 Click Browse to browse to the location of the firmware file, and then
double-click the file.
5 Click Upgrade IF1 RFID Reader. The upgrade process begins and
the firmware is transferred to the IF1.
During the upgrade, t he w eb b rowser interface screen does not auto-
refresh. Click Refresh in the web browser to check the progress of
the upgrade. When the login screen appears, the upgrade is
complete.
Make sure the reader is connected to a reliable power source
before you upgrade the firmware. Do not cycle power to the reader
during the upgrade. If power is lost during the upgrade, the reader
may require factory repair.
Page 60

Chapter 4 — Troubleshoot and Maintain the Reader
IF1 Fixed RFID Reader User Manual 51
View the System Log
The system log shows events logged by the reader. You may need this
information to troubl eshoot the reader or when y ou call Product Support.
1 Log in to the web browser interface and click Maintenance >
System Log.
2 (Optional) Click Export log to text file and follow the prompts to
save the log file to your desktop PC.
Restore Default Settings
If you have problems with the reader, use the web browser interface to
restore the default settings.
1 Log in to the web browser interface and click Maintenance >
Configuration.
Page 61

Chapter 4 — Troubleshoot and Maintain the Reader
52 IF1 Fixed RFID Reader User Manual
2 Click Restore Defaults, and then click OK. The reader reboots and
restores the default configuration.
Reboot the Reader
If the reader or an application loc ks up , or if the re ader does not respond,
you may need to restart the reader.
1 Log in to the web browser interface and click Maintenance >
Reboot.
2 Click Reboot, and follow the prompts to reboot the reader. The
reader reboots and restores the default configuration.
Page 62

Chapter 4 — Troubleshoot and Maintain the Reader
IF1 Fixed RFID Reader User Manual 53
View Device Information
View the device information page to see the installed software versions,
serial numbers, and other reader-specific information.
• Log in to the web browser interface and click About.
Call Product Support
If you are having trouble using y our reader, you can:
• use the troubleshooting tables in this manual to find your problem
and possible solutions.
• visit the Intermec by Honeywell knowledge base , Kno wledge Cent ral
at intermec.custhelp.com.
If you still need help, call Product Support at:
1-800-755-5505
Before you call Product Support, have this information ready:
• Configuration Number (CN) and serial number (SN)
• Device software version
• RFID module firmware version
You can access this information from the Device Information screen of
the reader web page.
Page 63

Chapter 4 — Troubleshoot and Maintain the Reader
54 IF1 Fixed RFID Reader User Manual
Troubleshoot the Reader
This section includes lists of problems and possible solutions.
Problems While Working with RFID
You can solve many problems you may encounter when working with
your RFID system by carefully checking the RFID settings and changing
them accordingly.
RFID Problems and Solutions
Problem Solution
The reader is unable to read
RFID tags, or seems to read
tags slowly or inconsistently.
Check these conditions:
• Your RFID antennas must be connected correctly
to the reader and mounted in optimum locations.
Make sure all antenna conne ctions are tight and
that the cables are in good condition. For help,
contact your RFID system consultant.
• Make sure y ou selected the correct tag types for
your application.
The reader does not
respond to your RFID
application.
• Your application may not be communicating wi th
the reader BRI server.
• You may need to change BRI server settings to
communicate with your application. F or e xamp le, if
your application is running on a desktop PC, you
need to enable external BRI connections to the
reader.
Page 64

Chapter 4 — Troubleshoot and Maintain the Reader
IF1 Fixed RFID Reader User Manual 55
Problems with Connectivity
When you troub lesho ot problems with connectivity, make sure you kno w
your:
• TCP/IP settings.
• COM port se ttin g s for serial connections.
You should also make sure all physical network connectors and cables
are in good working order.
Connectivity Problems and Solutions
Problem Solution
You cannot connect to the
reader through the USB port
• Make sure you downloaded the reader USB drivers.
• Verify that your serial connection is configured to
115200, N, 8, 1, no flow contr ol.
You cannot connect to the
reader using a web browser.
• Verify that you have the correct IP address for the
reader.
• If you access the Internet through a proxy server, make
sure you add the IP address of the reader to the
Exceptions list.
You cannot load a security
certificate.
You must use a secure web browser connection to load
certificates.
You assigned a static IP
address to the reader but
cannot connect the reader over
your network.
Make sure that DHCP is disabl ed and that your TCP/IP
parameters are set correctly.
Page 65

Chapter 4 — Troubleshoot and Maintain the Reader
56 IF1 Fixed RFID Reader User Manual
Page 66

57
5
About the GPIO Ports
Use this chapter to learn about the GPIO ports.
Page 67

Chapter 5 — About the GPIO Ports
58 IF1 Fixed RFID Reader User Manual
About the GPIO Interfaces
The reader has two general p urpose input and output (GPIO) interfaces.
You connect external controls such as motion sensor s or indicator lamps
to the GPIO interfaces, which can then trigger reader operations.
Each interface is electrically isolated from the rea der and designed for
low voltage DC loads. The reader can also supply 5 VDC at 0.30 A to
external devices.
How the inputs and outputs are used depends on the RFID application
software being used in the system. You need to coordinate input and
output control wiring with the software developer.
How to Use the Input Interfaces
Each of the two inputs is compatible with input signa ls of 4.5 to 28 VDC.
Both the high and low signal contacts are exposed and isolated to
1500 V. Input impedance is 1.8 K ohms minimum.
In a typical application, the reader senses input from an external control
like a switch and then starts a tag read operation.
There are three basic ways to connect input controls to the reader input
interfaces:
• Supply the input interface with power from the reader.
• Isolate the reader from the input power source.
• Use an open collector solid state drive from a remote device to
control the inputs.
GPIO Input Signals
Signal Description Min. Typical Max.
V
in
(High) High input voltage 4.5 V 24 V 28 V
V
in
(Low) Low input voltage -1 V 0 V .8 V
Page 68

Chapter 5 — About the GPIO Ports
IF1 Fixed RFID Reader User Manual 59
Powered Input Example
The reader powered input the simplest way to connect a control to a
reader input interface. If the ext ernal control device is a switch, you can
connect one side of the switch to a reader +Input pin and the other side
of the switch to one of the +5 VDC sources.
Reader Powered Input
Isolated Input Interface Example
Isolate the input interface to minimize noise induced by distance or
grounding characteristics. The isolated input avoids induced noise by
referencing a remote input to chassis return of the reader.
Isolated Input Interface
External
input
switch
+Input
+5 V
Ground
- Input
+
-
External
input
switch
10 to 28 VDC
Twisted
pair
-Input
+Input
Page 69

Chapter 5 — About the GPIO Ports
60 IF1 Fixed RFID Reader User Manual
Open Collector Input Interface Example
The input can be connected to an open collector int erface of an external
device. This open collector input interface typically implies that the
grounds are tied together for the two systems. The common groun d can
be a source of input noise, so you should follow good grounding
practices for both the reader and the input device.
In this situation, the reader provides power to the pull-up resistor for the
open collector. Connect the +Input pin to the +5 VDC source.
Open Collector Input Interface
+Input
+5 V
Ground
- Input
Page 70

Chapter 5 — About the GPIO Ports
IF1 Fixed RFID Reader User Manual 61
How to Use the Output Interfaces
Each reader output interface is optically isolated from the reader,
polarized, and rated for 5 to 30 VDC at 0.4 A.
Because the outputs are optically isolated, each one can be configured
to switch the high side or the lo w side of the load. You can power the load
directly from the reader or from an external power supply.
In a typical application, the outputs control indicator lamps that signal
good reads or errors. The basic metho ds f or connecting e xt ernal devices
to the GPIO outputs include:
• switching the high side, with the load powered by the reader.
• switching the low side, with the load powered by the reader.
• switching the high side, with the load powered externally.
• driving a DC relay that controls an AC load.
These methods are shown in the next examples.
GPIO Output Specifications
Signal Description Min. Typical Max.
Leakage
current (High)
Switch output, high leakage
current
0 mA 1 mA 10 mA
V
sat
(Low) Switch output on, saturation
voltage with 0.25 A load
0 V 1 V 1.5 V
Page 71

Chapter 5 — About the GPIO Ports
62 IF1 Fixed RFID Reader User Manual
How to Switch the High Side with Reader Power
In this example, an external indicator lamp (0.25 A maximum current) is
connected to the -Output and Ground pins, and the corresponding
+Output pin is connected to the +12 VDC source.
Switching the High Side
How to Switch the Low Side with Reader Power
For low side switching applications, the lamp power is routed to all the
lamps in common and the low side of the load is rou ted to the switch.
Connect the external indicator lamp to the +Output and +12 VDC pins,
and short the corresponding -Output pin to ground.
Switching the Low Side of the Output Load
External
indicator lamp
0.25 A maximum
+Output
+12 V
Ground
- Output
External
indicator lamp
0.25 A maximum
Ground
- Output
+Output
+12 V
Page 72

Chapter 5 — About the GPIO Ports
IF1 Fixed RFID Reader User Manual 63
How to Switch the High Side with External Power
To use external power (5 to 48 VDC) to s witch t he high side , connect the
Ground pin to the ground system of the external power supply, and
connect the positive side of th e external supply to the +Output pin. The
external indicator lamp is connected to the corresponding
-Output and Ground pins.
Switching the High Side with External Power
External
indicator
lamp
External
power
5-48 VDC
+
-
Ground
+Output
- Output
Page 73

Chapter 5 — About the GPIO Ports
64 IF1 Fixed RFID Reader User Manual
Drive a DC Relay to Control an AC Load
While the reader outputs are designed to switch DC loads, they can also
drive relays that control AC loads.
Driving a DC Relay: The external relay provides dry contacts to the AC
motor.
AC motor
120-230
VAC
External
relay
+ Output
+ 12 V
Ground
- Output
Note: In many installations , the rela y and A C wiring m ust be placed in an
enclosure that meets local fire code regulations.
Page 74

Chapter 5 — About the GPIO Ports
IF1 Fixed RFID Reader User Manual 65
How to Use the Power Interface
The reader GPIO interface provides 5 VDC at 0.30 A for powering
external inputs and loads , eliminating the need f or a n ext ernal DC supply
and simplifying the system installation.
The GPIO interface power has an internal thermal fuse that trips if the
load exceeds 0.5 A. The fuse is self-recovering after the excessive load
is removed.
The total load on the GPIO interface power must stay within the 0.5 A
limit. When you design a system that uses the GPIO interface power,
make sure to complete a power budget assessment to ensure that the
supply is adequate for the syste m.
If your system needs more than +12 VDC at 0.5 A, you can connect an
external power supply to the +12 V and Ground pins. The external
supply powers the e xte rnal loads, and that po wer is a v ailab le at all +12 V
pins on the GPIO port.
Page 75

Chapter 5 — About the GPIO Ports
66 IF1 Fixed RFID Reader User Manual
Page 76

67
A
Specifications
This appendix contains specifications and the port pin assignments
for the IF1.
Page 77

Appendix A — Specifications
68 IF1 Fixed RFID Reader Series User Manual
IF1 Specifications
* Specifications listed may be different due to individual country
regulations.
IF1 Specifications
Dimensions 26.5 cm x 18.6 cm x 5.85 cm
(10.2 in x 7.3 in x 2.3 in)
Weight 1.6 kg (3.5 lb)
Integrated antenna 7.5 dBi integrated anten n a
depending on option
External antenna ports Up to 2 external RP-TNC antenna
ports depending on option
Optional GPIO ports 2 inputs, 2 outputs
Memory 64 Mb
Air interface protocol
• EPCglobal UHF Class 1 Gen2
• ISO 18000-6C
Receive power -82 dBm at 1 W
Transmit power* 30 dBm
DC electrical rating 55 V, 0.3 A
Power consumption 10 W maximum
Power source 802.3 af Power Over Ethernet
Operating temperature -20 °C to 65 °C (-13 °F to 149 °F)
Storage temperature -30 °C to 75 °C (-22 °F to 167 °F)
Humidity 10% to 90% (Non-condensing)
Environmental protection rating IP66 with Ethernet cable housing.
Operating system Linux
Application interface
• Basic Reader Interface (BRI),
• Low-Level Reader Protocol
(LLRP)
Application support .Net, Java
Page 78

Appendix A — Specifications
IF1 Fixed RFID Reader Series User Manual 69
IF1L Enhanced Specifications
* Specifications listed may be different due to individual country
regulations.
IF1L Enhanced Specifications
Dimensions 26.5 cm x 18.6 cm x 7.5 cm
Weight 1.6 kg (3.5 lb)
Integrated antenna Internal linear polarized
External antenna ports 1 external RP-TNC antenna port
GPIO ports 2 inputs, 2 outputs
Memory 64 Mb
Air interface protocol
• EPCglobal UHF Class 1 Gen2
• ISO 18000-6C
Receive power -82 dBm at 1 W
Transmit power* 30 dBm
DC electrical rating 55 V, 0.3 A
Power consumption 10 W maximum
Power source 802.3af Power Over Ethernet
Operating temperature -25 °C to 65 °C (-13 °F to 149 °F)
Storage temperature -30 °C to 75 °C (-22 °F to 167 °F)
Humidity 10% to 90% (Non-condensing)
Environmental protection rating IP66 with Ethernet cable housing
Operating system Linux
Application interface
• Basic Reader Interface (BRI),
• Low-Level Reader Protocol
(LLRP)
Application support .Net, Java
Page 79

Appendix A — Specifications
70 IF1 Fixed RFID Reader Series User Manual
Optional Integrated Antenna
Specifications
Integrated Antenna Specifi cations
Antenna type (Gain) Linear polarized (7.5 dBi)
RF connector port RP-TNC connector
Air interface protocol
• ISO 18000-6C
• ARTEFACT PA
• SINIAV G0
Page 80

Appendix A — Specifications
IF1 Fixed RFID Reader Series User Manual 71
Port Pin Assignments
Use this section to understand the port pin assignments for the ports
located on the reader.
GPIO Port
The GPIO port allows GPIO communications with your reader. The
GPIO port is standard with two-antenna port options of the reader, and
optional with the integrated antenna options of the reader.
GPIO Port Pin Assignments
Pin Function Description
1 +5 VDC +/-10% Non-isolated wetting supply, 300 mA max
2 HOST_RX1 Non-isolated host RS232 (output from IF1)
3 HOST_TX1 Non-isolated host RS232 (input from IF1)
4NC
5 GND Non-isolated signal ground
6NC
7NC
8NC
9 ISO_V- Isolated common return for GPIO input and
outputs
10 ISO_V- Isolated common return for GPIO input and
outputs
11 GP output 0+ Isolated GP output (open co llector, 30 V max,
40 mA maximum continuous)
12 GP output 1+ Isolated GP output (open co llector, 30 V max,
40 mA maximum continuous)
13 GP input 0+ Isolated GP input (28 VDC maximum,
V
in low
= 0.8 V max, V
in high
= 4.5 V max
1
11
10
5
15
6
Page 81

Appendix A — Specifications
72 IF1 Fixed RFID Reader Series User Manual
Ethernet Port
The Ethernet port allows Ethernet communications and Power-OverEthernet. Use the illustration to understand the port pin assignments.
14 GP input 1+ Isolated GP input (28 VDC maximum,
V
in low
= 0.8 V max V
in high
= 4.5 V max
15 ISO_V+ Isolated external power for GP out pullups
(28 VDC max)
GPIO Port Pin Assignments (continued)
Pin Function Description
Ethernet Port Pin Assignments
Pin Description
1 Ether net TX+/Spare POE return
2 Ethernet TX-/Spare POE return
3 Ethernet RX+/Spare POE 48 VDC
4 POE 48 VDC
5 POE 48 VDC
6 Ethernet RX-/Spare POE 48 VDC
7 POE return
8 POE return
Pin 1
Page 82

Page 83

Honeywell Scanning & Mobility
9680 Old Bailes Road
Fort Mill, SC 29707
www.honeywellaidc.com
IF1 Fixed RFID Reader Series User Manual
*935-079-001*
P/N 935-079-001
 Loading...